The Odoo 19 Point of Sale (POS) system offers powerful customization capabilities that allow businesses to adapt the POS interface to their specific operational needs. One of the most effective ways to extend POS functionality is by adding custom POS screens.
Custom screens in Odoo 19 POS make it possible to display tailored business data, collect additional inputs from users, and integrate third-party services directly into the POS workflow. This flexibility is especially valuable for businesses with unique sales processes, advanced reporting needs, or external system integrations.
In this step-by-step guide, you will learn how to create a custom screen in Odoo 19 POS, along with a custom POS button to launch it seamlessly from the interface. The guide covers all essential components, including:
- Defining XML templates for the POS UI
- Implementing JavaScript components using the modern POS framework
- Updating the Odoo module manifest for proper asset loading
Module Structure
Before moving into the technical implementation, it’s important to understand how our custom Point of Sale (POS) module is structured. A clean and well-planned directory layout plays a vital role in ensuring smooth module loading, easier maintenance, and better scalability within Odoo 19.
In this section, we’ll walk through the directory organization of our custom POS module. This structure forms the foundation for adding new POS screens and guarantees that all JavaScript assets, XML templates, and Python files are correctly recognized by the Odoo framework.
Below is the complete directory structure used for implementing a custom screen in the Odoo 19 POS environment:
custom_pos_screen/
+-- static/
¦   +-- src/
¦       +-- js/
¦       ¦   +-- custom_button.js
¦       ¦   +-- custom_screen.js
¦       +-- xml/
¦           +-- custom_button.xml
¦           +-- custom_screen.xml
+-- __init__.py
+-- __manifest__.py
Implementation Steps
1. Creating the Custom Screen Template:
The XML template below defines the structure and visual layout of the custom POS screen, following Odoo 19 POS UI standards for clarity and responsiveness.
<?xml version="1.0" encoding="UTF-8"?>
<templates id="template" xml:space="preserve">
<t t-name="custom_pos_screen.CustomScreen">
<div class="screen h-100 bg-100">
<div>
<button class="new-order btn btn-primary btn-lg lh-lg my-2"
t-on-click="() => this.closeCustomScreen()">
BACK
</button>
</div>
<div class="content">
<div class="custom-message screen-full-width d-flex w-100 h-100">
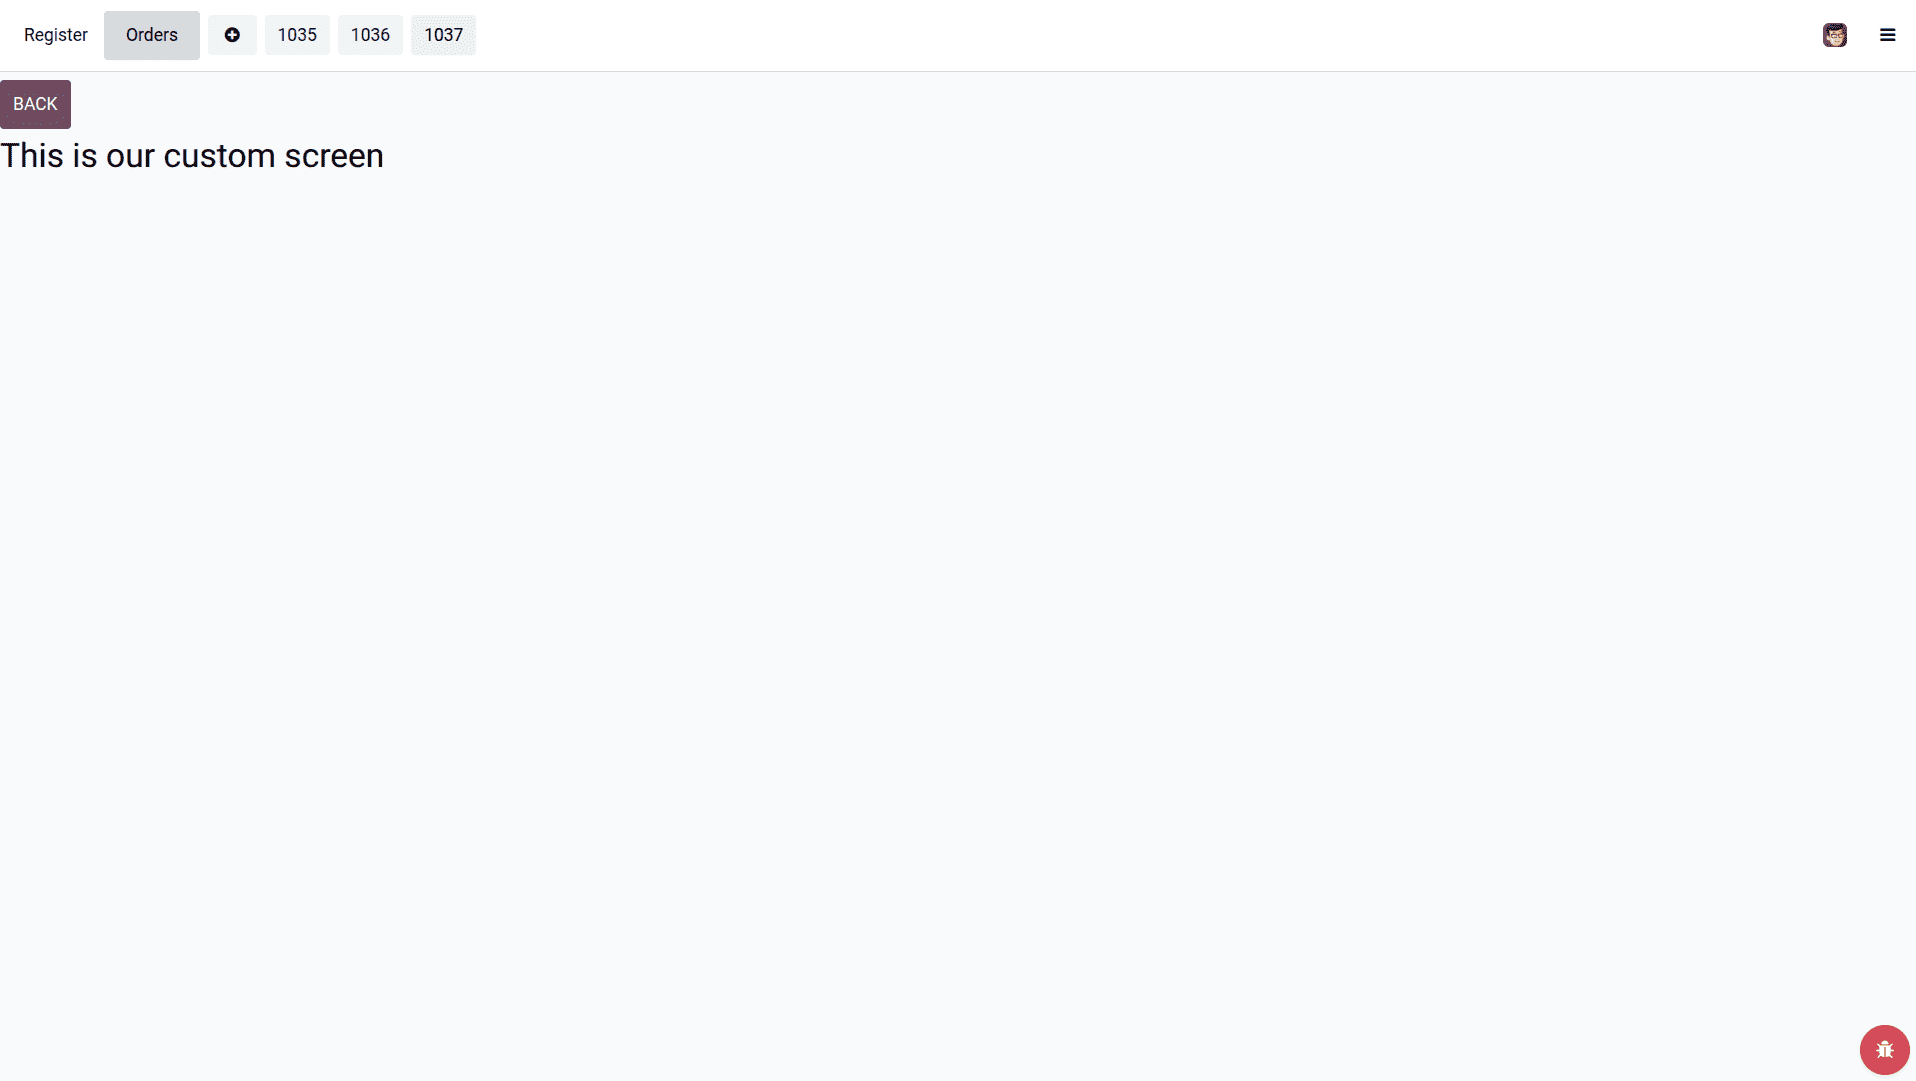
<h1>This is our custom screen</h1>
</div>
</div>
</div>
</t>
</templates>
This OWL-based QWeb template registers a new POS screen, defines a full-height layout using standard POS CSS classes, and binds the back button to a JavaScript handler (closeCustomScreen) for controlled screen navigation within the Odoo 19 POS frontend.
2. Creating the JavaScript Component
As a next step, we need a JavaScript component to handle the logic of the screen:
import { Component } from "@odoo/owl";
import { registry } from "@web/core/registry";
import { usePos } from "@point_of_sale/app/hooks/pos_hook";
export class CustomScreen extends Component {
   static template = "custom_pos_screen.CustomScreen";
   setup() {
       this.pos = usePos();
   }
   closeCustomScreen() {
       const order = this.pos.addNewOrder();
       this.pos.navigate("ProductScreen", {
           orderUuid: order.uuid,
       });
   }
}
registry.category("pos_pages").add("CustomScreen", {
   name: "CustomScreen",
   component: CustomScreen,
   route: `/pos/ui/${odoo.pos_config_id}/customscreen`,
   params: {},
});
The following JavaScript implementation demonstrates how a custom POS screen is created, connected to its XML template, and registered within the Odoo 19 POS frontend routing system using OWL components.
- The CustomScreen class is implemented as an OWL component, which is the standard UI framework used in the Odoo 19 Point of Sale frontend.
- The XML template custom_pos_screen.CustomScreen is linked to the component using the static template property, ensuring the UI is rendered correctly.
- The setup() method initializes the component and retrieves the active POS environment using the usePos() hook.
- The closeCustomScreen() method manages screen navigation by creating a new POS order and redirecting the interface back to the default product screen.
- The screen is registered under the pos_pages registry, which is responsible for managing navigable POS pages in Odoo 19.
- A custom route is defined to uniquely identify and access the screen within the POS UI routing system.
- Registering the component in the registry ensures the screen is properly loaded and available during POS runtime.
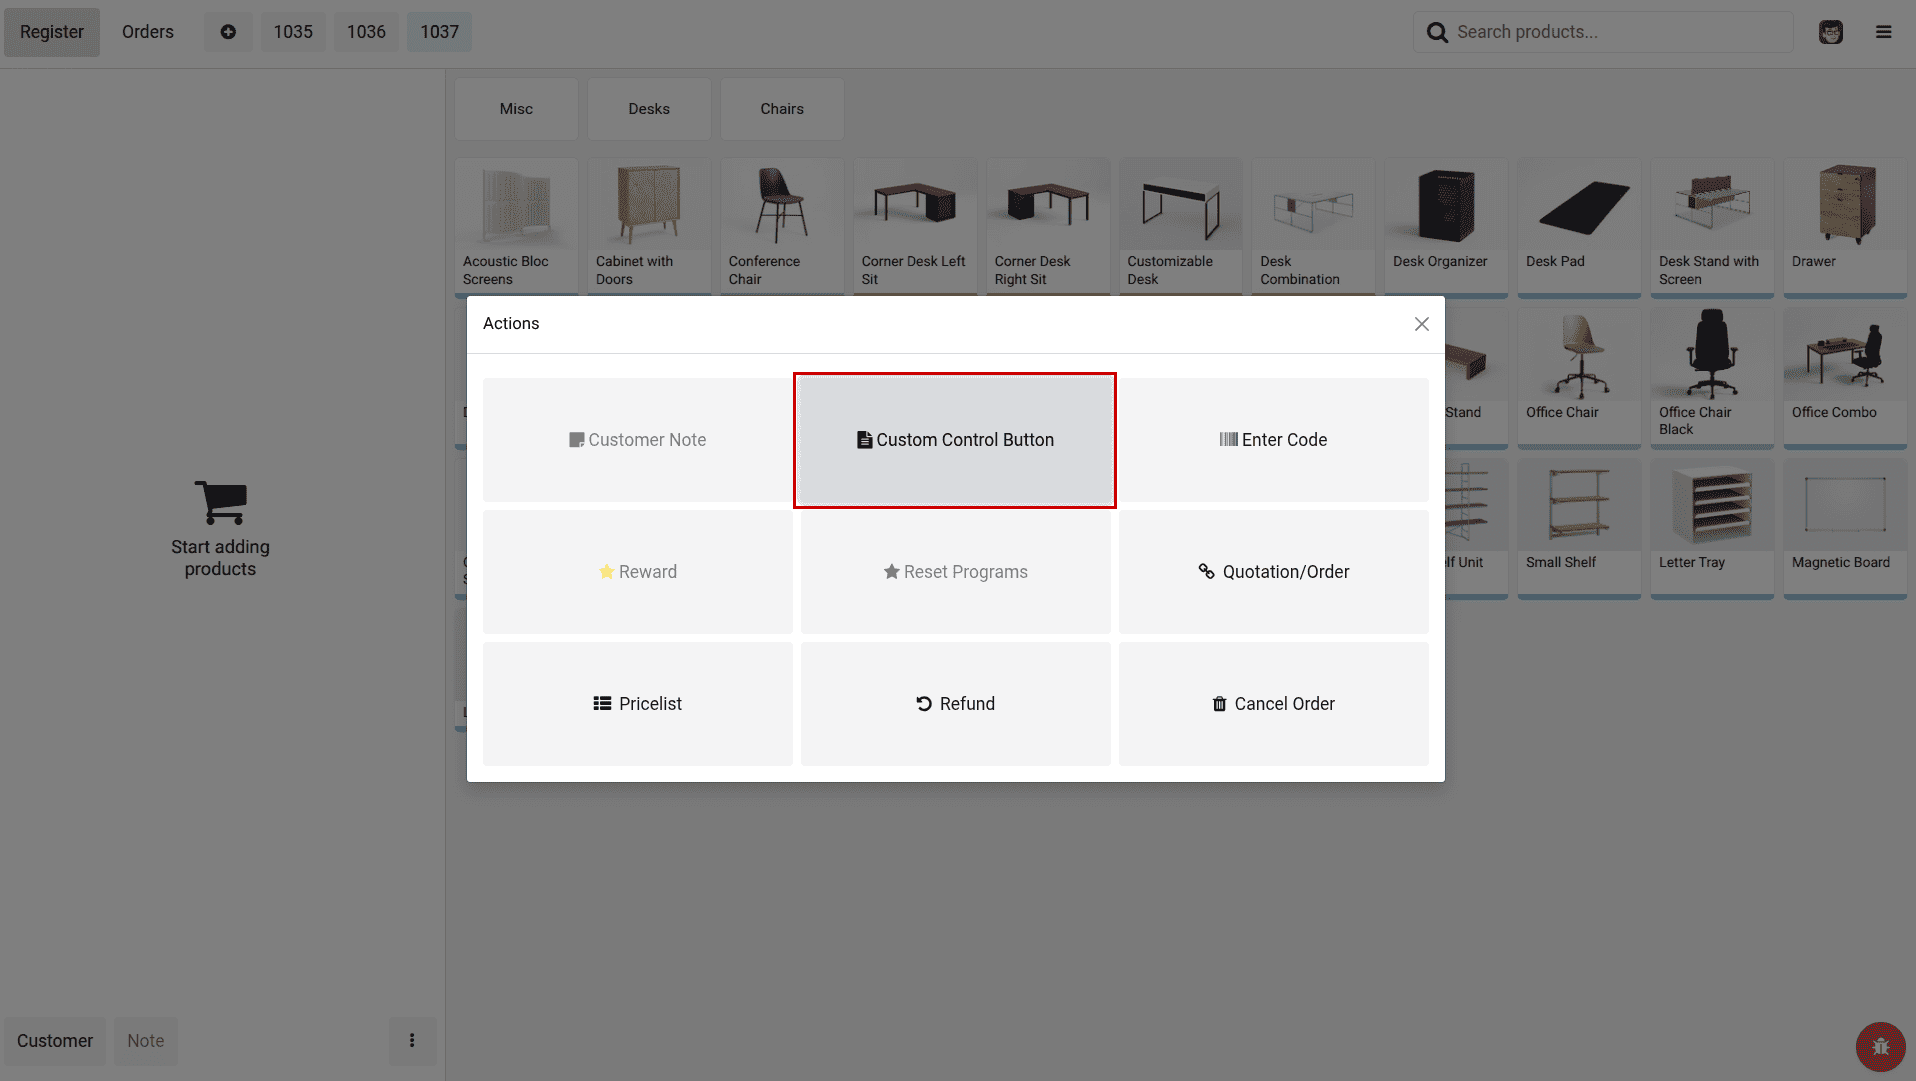
3. Adding a custom button for navigating the custom screen
To make the custom screen available to users, we add a control button in the POS interface that triggers navigation to the newly created screen.
Button template (custom_button.xml):
<?xml version="1.0" encoding="UTF-8"?>
<templates id="template" xml:space="preserve">
   <t t-name="pos_sale.ControlButtons"
      t-inherit="point_of_sale.ControlButtons" t-inherit-mode="extension">
       <xpath expr="//t[@t-if='props.showRemainingButtons']/div/NoteButton"
              position="after">
           <button t-att-class="buttonClass"
                   t-on-click="onClick">
               <i class="fa fa-file-text me-1"/>Custom Control Button</button>
       </xpath>
   </t>
</templates>
Button JavaScript (custom_button.js):
import { patch } from "@web/core/utils/patch";
import { ControlButtons } from "@point_of_sale/app/screens/product_screen/control_buttons/control_buttons";
import { usePos } from "@point_of_sale/app/hooks/pos_hook";
import {CustomScreen} from "./custom_screen";
import { useService } from "@web/core/utils/hooks";
patch(ControlButtons.prototype, {
   setup() {
       super.setup();
       this.pos = usePos();
       this.dialog = useService("dialog");
   },
   onClick() {
       this.pos.navigate("CustomScreen");
   },
});
This Code:
- The XML template extends the default POS ControlButtons template using t-inherit to add a new control button without modifying core files.
- An XPath expression is used to insert the custom button at a specific position within the Product Screen control panel.
- The button uses standard POS styling and binds the click event to a JavaScript handler through t-on-click.
- The JavaScript patch utility extends the existing ControlButtons component behavior in a safe and modular way.
- The usePos() hook is used to access the active POS instance and its navigation methods.
- The setup() method initializes required POS services when the control buttons component is loaded.
- The onClick() method triggers navigation to the custom POS screen when the button is pressed.
- This approach ensures seamless integration of the custom screen into the Odoo 19 POS interface.
4. Module manifest configuration
{
   'name': 'Custom Pos Screen',
   'version': "19.0.1.0.0",
   'summary': 'Adds custom button and screen to POS',
   'description': '''
   This module adds a custom button to POS that opens a custom screen.
   ''',
   'category': 'Point of Sale',
   'author': 'Cybrosys Techno Solutions',
   'company': 'Cybrosys Techno Solutions',
   'maintainer': 'Cybrosys Techno Solutions',
   'website': 'https://www.cybrosys.com',
   'depends': ['base', 'mail'],
   'data': [
   ],
   'assets': {
       'point_of_sale._assets_pos': [
           'custom_pos_screen/static/src/js/custom_button.js',
           'custom_pos_screen/static/src/js/custom_screen.js',
           'custom_pos_screen/static/src/xml/custom_button.xml',
           'custom_pos_screen/static/src/xml/custom_screen.xml',
       ],
   },
   'license': 'LGPL-3',
   'installable': True,
   'application': False,
   'auto_install': False,
}
The manifest:
- Declares dependencies on the POS module
- Bundles all our assets in the POS interface
- Makes our files available in the correct loading order
After completing the implementation of the custom POS screen module, the following changes will be visible in the Odoo 19 Point of Sale interface:
When the custom control button is clicked, the POS navigates to the newly created custom screen, as shown below.
Custom screens in Odoo 19 Point of Sale provide a powerful way to extend POS functionality and tailor the interface to specific business needs. By combining OWL components, QWeb templates, and POS routing, developers can add new screens and workflows without modifying core code.
This tutorial demonstrated how to create a custom POS screen, add a control button, and configure assets correctly within a custom module. With this approach, businesses can implement custom data entry, integrations, and POS workflows while maintaining upgrade compatibility.
Odoo 19 POS customization enables flexible, scalable solutions for modern retail and hospitality operations.
To read more about How to Create a Custom Screen in POS in Odoo 18, refer to our blog How to Create a Custom Screen in POS in Odoo 18.