The contact list increases depending on the size of an organization, and a contact book is essential for smooth business operations. Most companies face difficulty managing many contacts, and ERP software avoids all your troubles within less time. All contacts are accessed quickly through a separate contact management system. The interaction with clients and service providers is rapidly maintained using good contact management. You can create and maintain contacts with the Odoo 15 Contacts module, which is necessary for contact management.
This blog ensures you how to create a new contact in the Odoo 15 Contacts module.
Odoo 15 Contacts module manages the contact data in meetings, transactions, and business information. You can configure the Localization, Contact Tags, titles and more aspects with the Configuration feature of the Odoo 15 Contacts dashboard. Users can manage Sales, Purchases, Addresses, and Accounting when creating a new contact.
Contacts
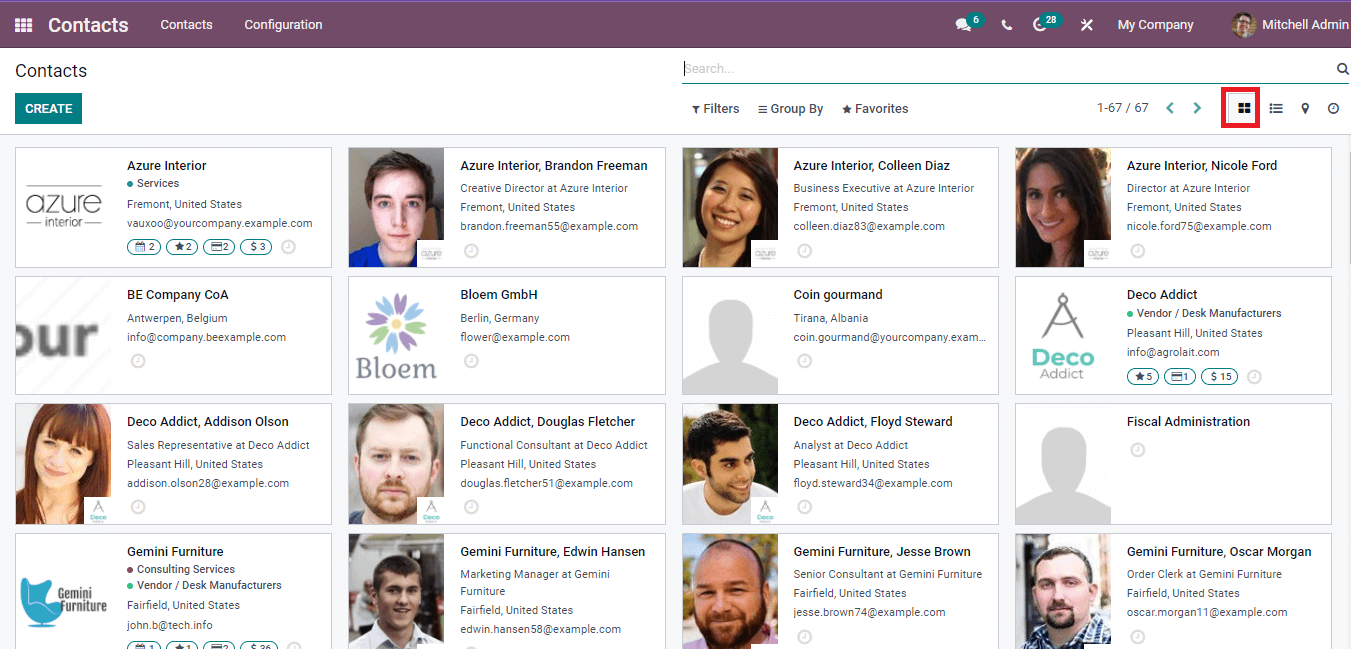
Select the Contacts tab in the Odoo contact window, and we can view the information of all existing contacts. The Kanban view of the window shows the name, location, email id and image of specific individuals, as shown in the screenshot below.
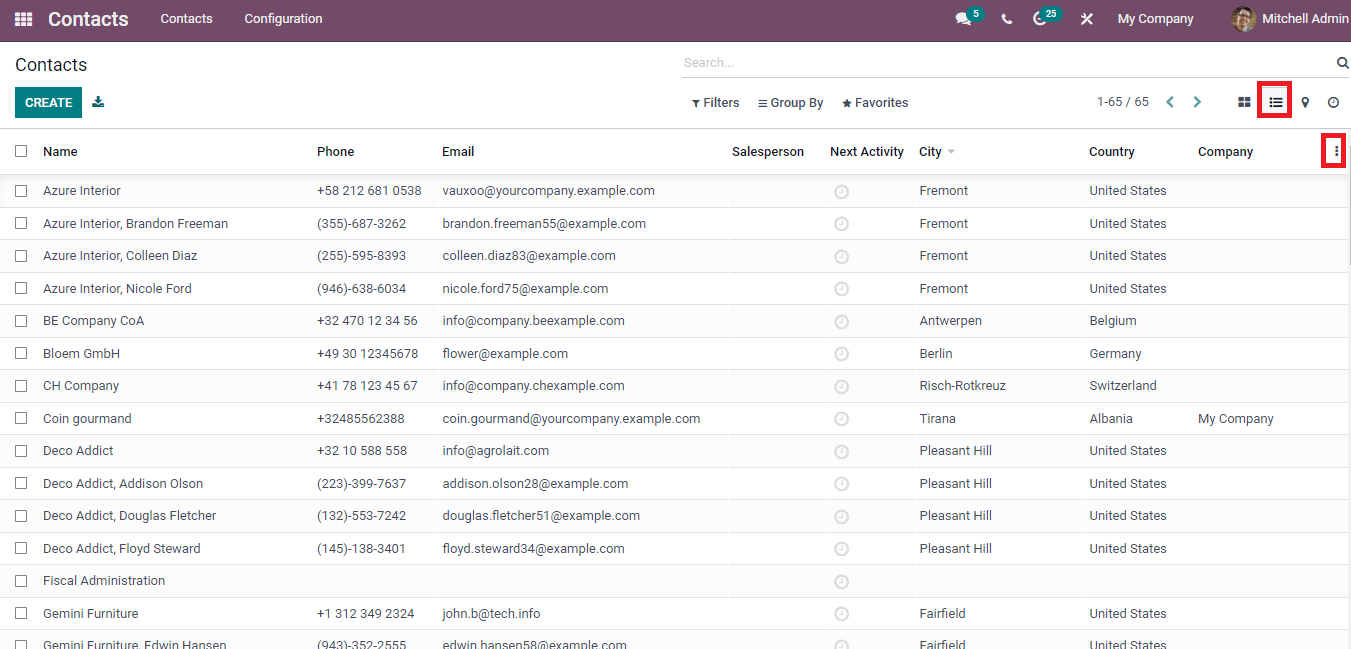
In the List view, we can see the details, including Name, Email, Next activity, Country, Phone, and City. You can add more custom fields to the list by selecting the Add Custom Field from the three-dot button at the right end, as depicted in the screenshot below.
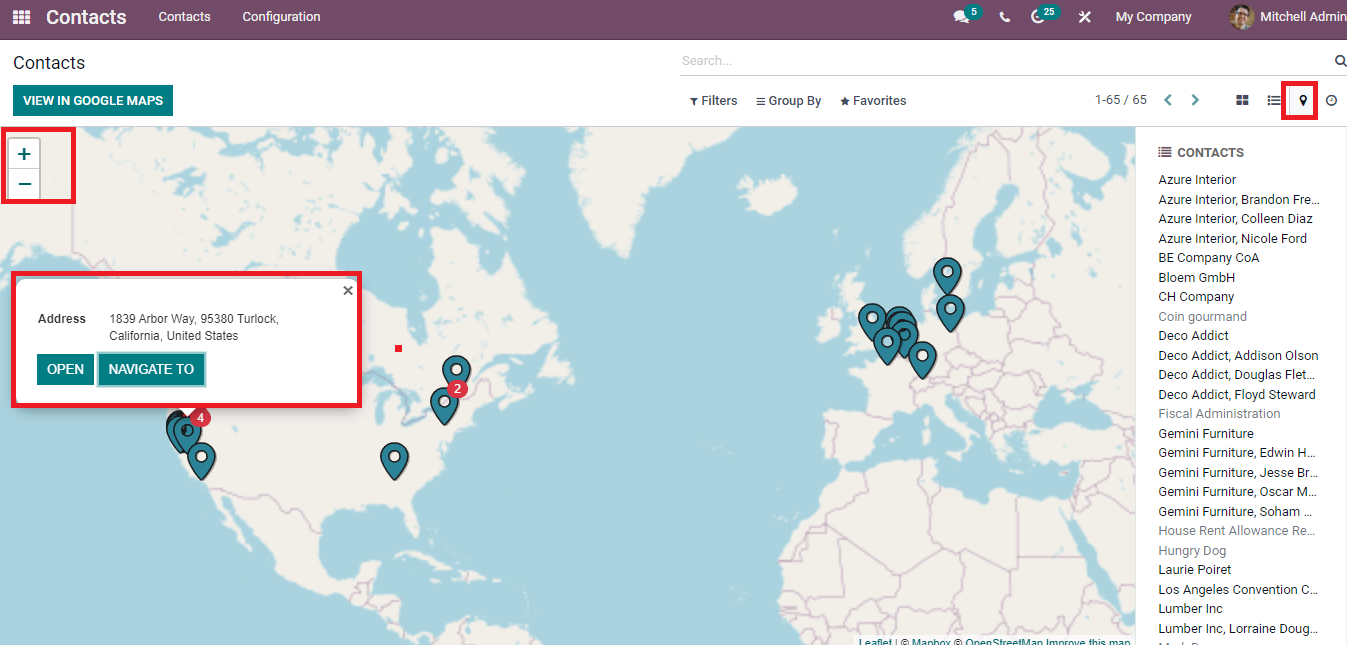
The Map view of the Contacts window shows the location of most contacts in the list. + icon at the left end assists Zoom in the place, and -icon helps to Zoom out the site of a specific contact. We can see a particular person's name and address by clicking on the location icon inside the map. The Open icon directs you to the Contacts page and Navigate To option to view the address in google maps. A list of the existing contacts is visible on the map window's right side.
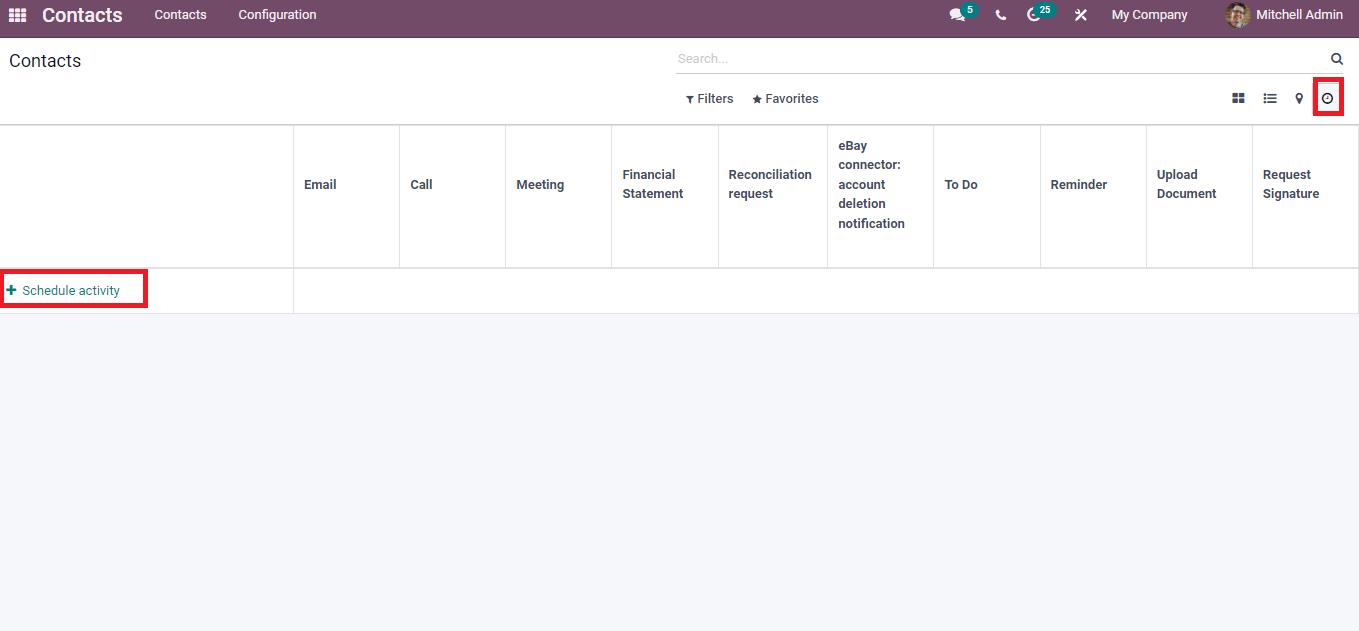
Users can schedule an activity with the Activity view of the Contacts window. Here, click on the Schedule Activity icon and create a new activity. It is easy to schedule the activity as Email, Reminder, Call, To Do, Meeting, and more
How to create a New Contact?
We can store the data of a new company employee by creating a contact in the Odoo 15 Contacts module. Select the Create icon in the Contacts window, and a new window opens before you. A new contact can be created as a company or individual. First, let's look at how to create a contact for individuals. For example, new contact of an individual named 'Mary Franz' shows here. Enable the Individual option and enter the name/company. After selecting your company, the address is entered automatically inside the Contact option. Contact is an Address type that contains the invoice/delivery address used in sales orders. Authorized users can see the private address. You can enter the Tax identification number in the VAT option and use it in some legal statements. A specific code relating to personal identification numbers for tax authorities is Citizen Identification, as shown in the screenshot below.
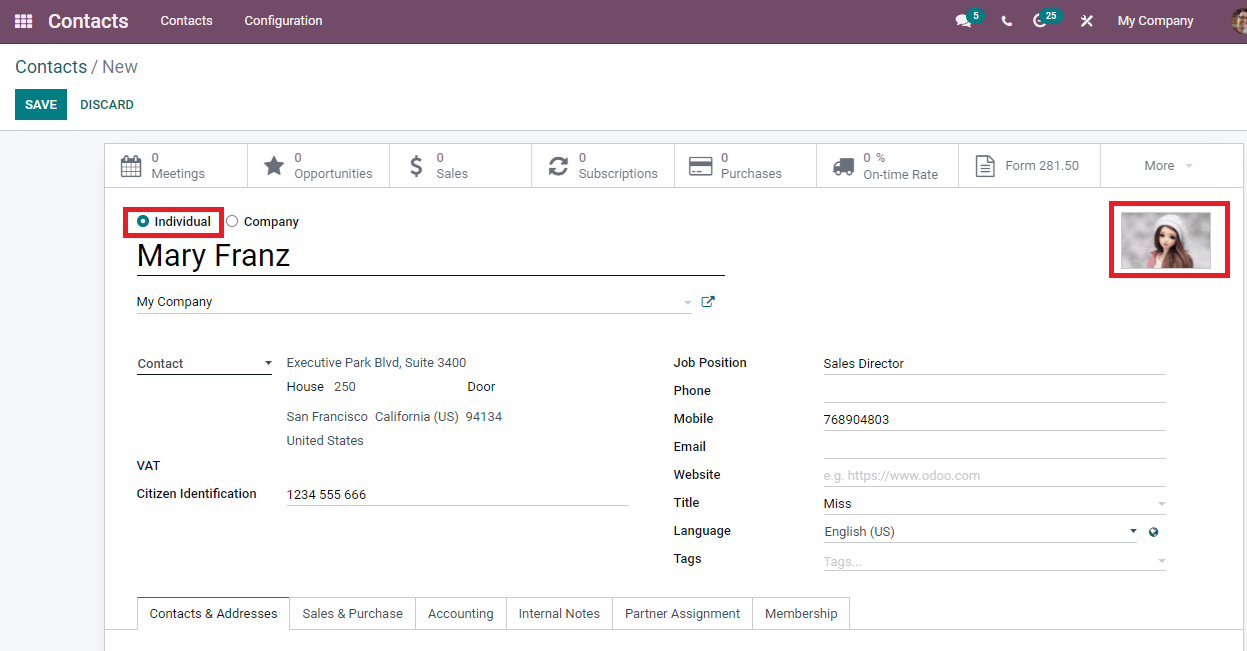
Add the job position, mobile number, website, and email of the person. Choose the language from the dropdown menu. After selecting it, all documents and details sent to the contact are viewable in this language. You can add the individual's image on the right top of the Contacts window.
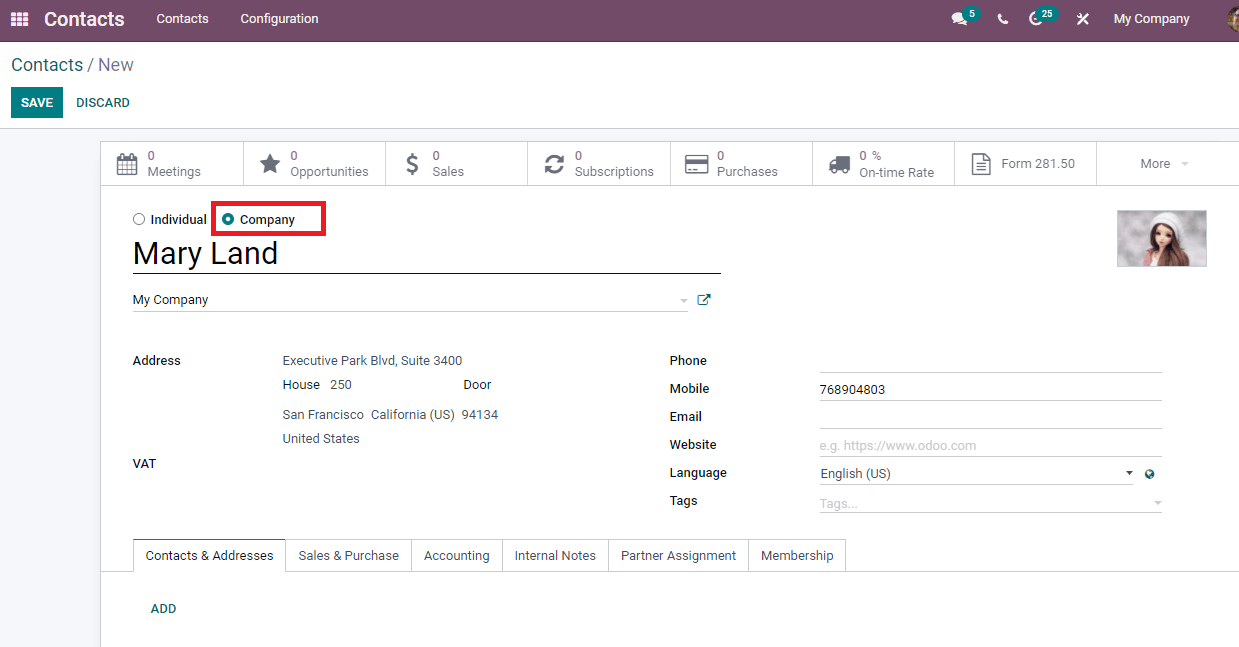
By enabling the Company option, the Contact title changes into the Address option assisting in adding the company location. Citizen identification number and job position is absent in the window. All other options are the same as the Individual data related windows, as displayed on the screenshot below.
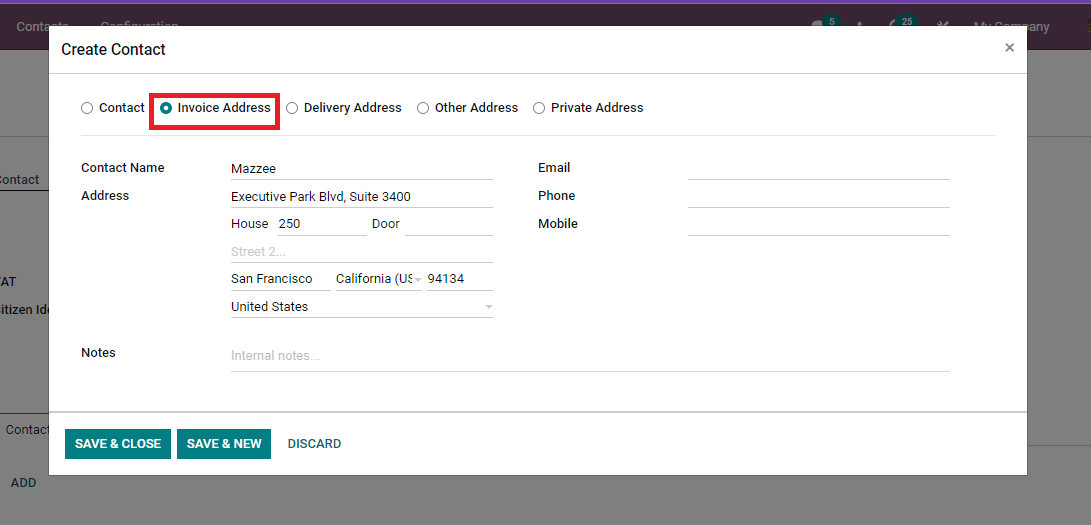
Now, let's look at the primary tabs at the end of the Contacts window. You can add Addresses by clicking on Add icon inside the Contacts/Addresses tab. In the new window, we can create contact as per Invoice Address, Private Address, Delivery Address, Contact and Other Address. By enabling contact, address type of invoice and sales are available in Sales order. Enter the Contact Name, Email, Job position, Title, and add a message inside the Notes section as shown in the screenshot below.

You can apply Address, Contact Name, Mobile, Email and Notes after enabling the Invoice Address.
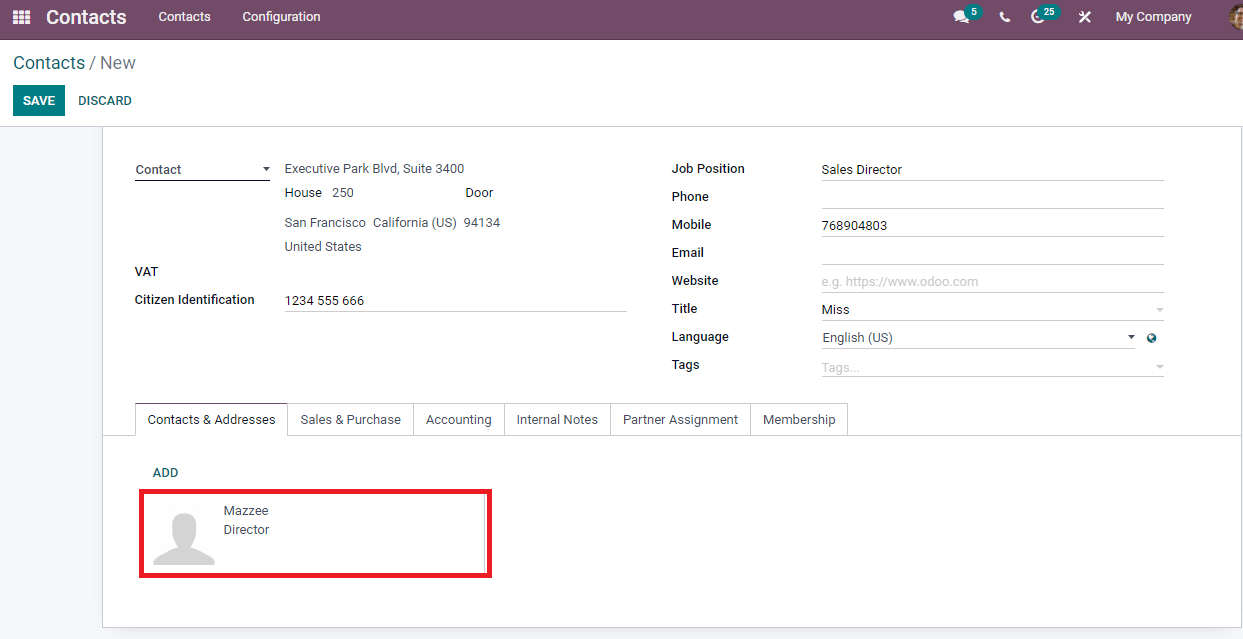
All these options are viewable when activating the Delivery Address, Other Address and Private Address in the Create Contact window. Later, click on the Save & Close icon, and the created contact is visible inside the Contacts & Address tab
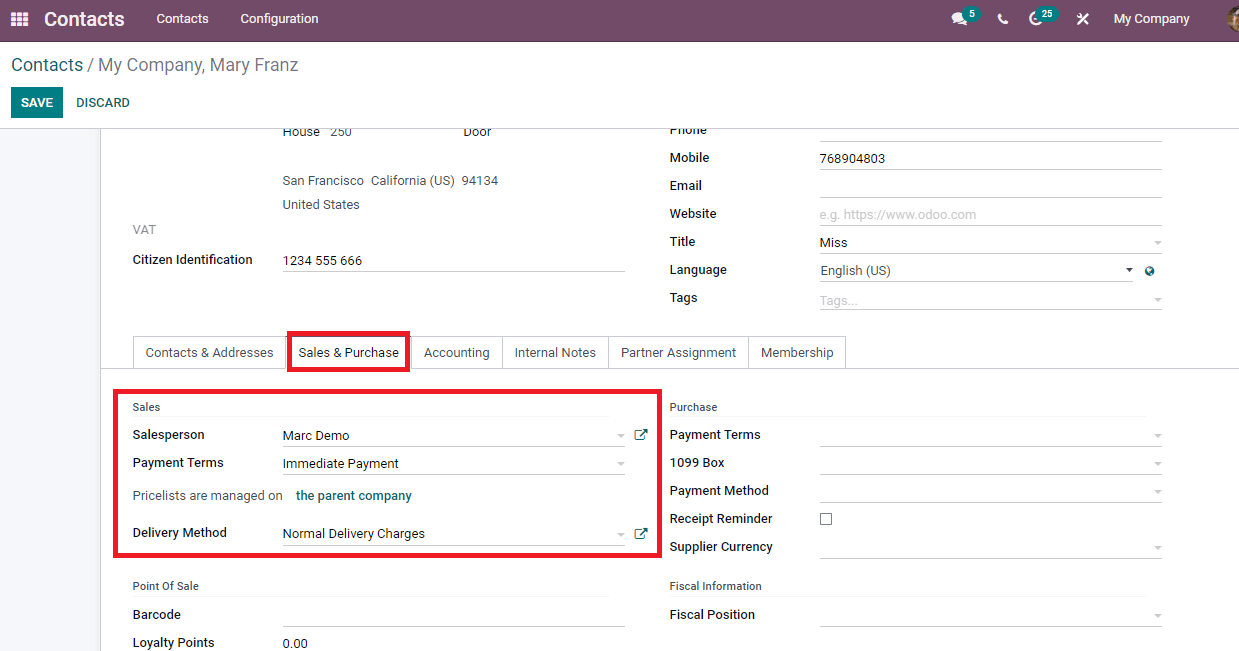
We can manage the Sales and Purchase of an individual inside the Sales & Purchase tab. Here, you can see various titles such as Purchase, Misc, Point of Sale and Sales. Inside the Sales section, you can add the name of the Salesperson and internal user in charge of Contact (Mary Franz). Values set for Payment Terms are company-specific, and it is used instead of the default in customer invoices and sales orders. We can apply the Payment Teams as immediate payment, two months, 15 days, and more. The Parent company manages the price list of individuals, and you can check the company details by selecting the Parent company option. Users can set the Delivery method used in Sales orders as Free delivery charges, Normal delivery charges and more aspects as depicted in the screenshot below.
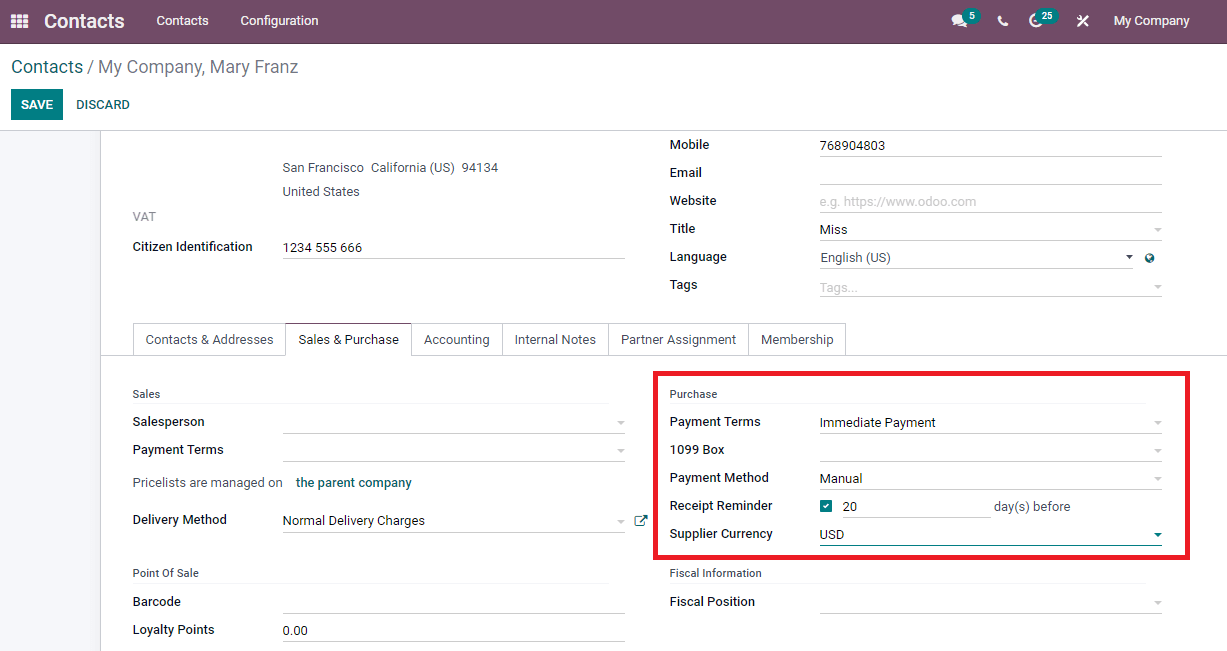
Below the Purchase title, you can see Payment Terms used for vendor bills and purchase orders. We can set Payment Terms as per specific duration, such as the month-end, 20 days, and more. The journal items of specific vendors summed in the report box are the 1099 Box option, and you can choose rents, other income/more aspects from the dropdown menu. Choose your Payment method that filters vendor bills to register mass payments. It is primarily used in check runs and developing bank files. You can set it as credit transfer, manual, and checks. A space to enter the date opens before you after activating the Receipt Reminder option to automatically send a confirmation email to the vendor before the accurate receipt date. The reminder ensures the vendor confirms the original date. Set your Supplier currency used for the purchase from a recent partner.
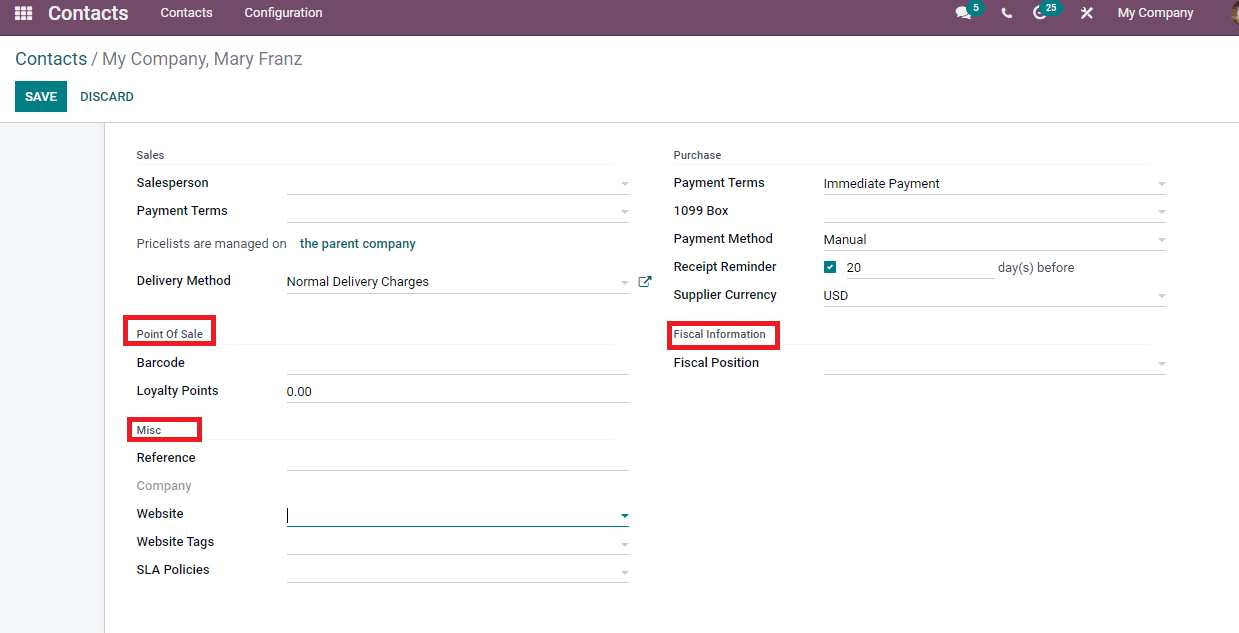
Add the Barcode to identify contact and Loyalty Points as won by the user for a program inside the Point of Sale section. Later, enter the Fiscal position that determines accounts and taxes used for contact below the Fiscal Information. Add the Reference, Website Tags, SLA Policies and Website inside the Misc Section as displayed in the screenshot below.
Now, let's look at the Accounting tab, and all accounts are managed inside the Parent company. After clicking on the Parent company icon, you will direct to the company page of a specific individual, as shown in the screenshot below.
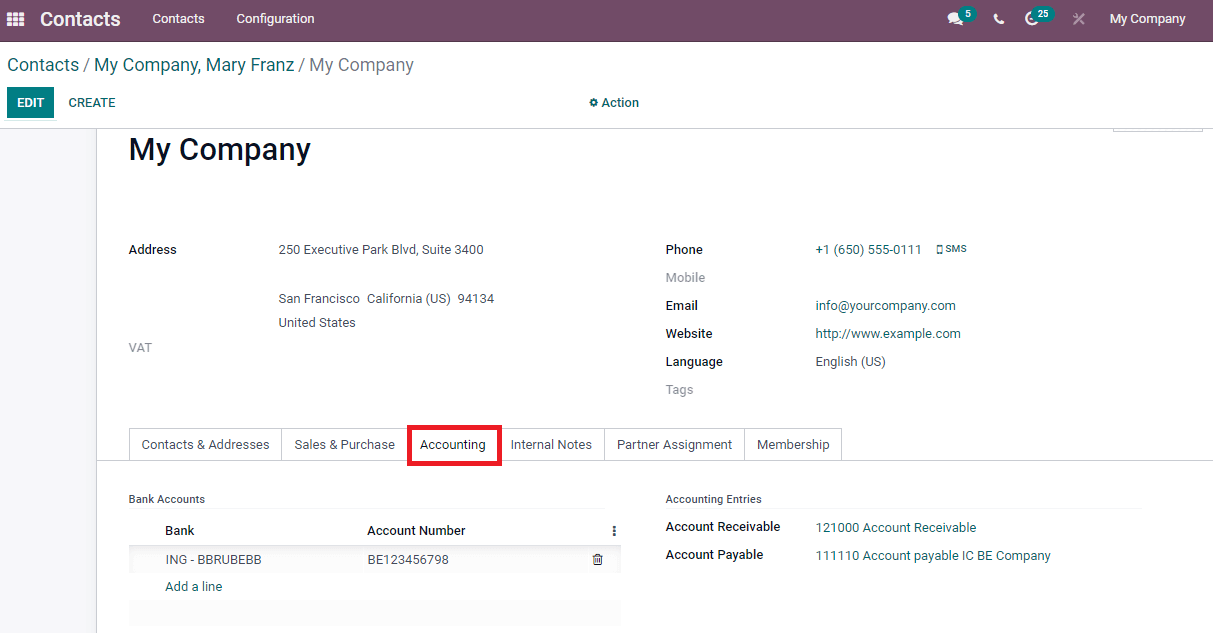
Here, you can set the Bank Accounts and Accounting Entries inside the Accounting tab of the company window. Enter the Bank and Account number by clicking on Add a line option. The receivable Account for the current partner is entered in Account Receivable, and the payable Account is Account Payable add below the Accounting Entries. Later, click on the Save icon to store the personal accounts information.
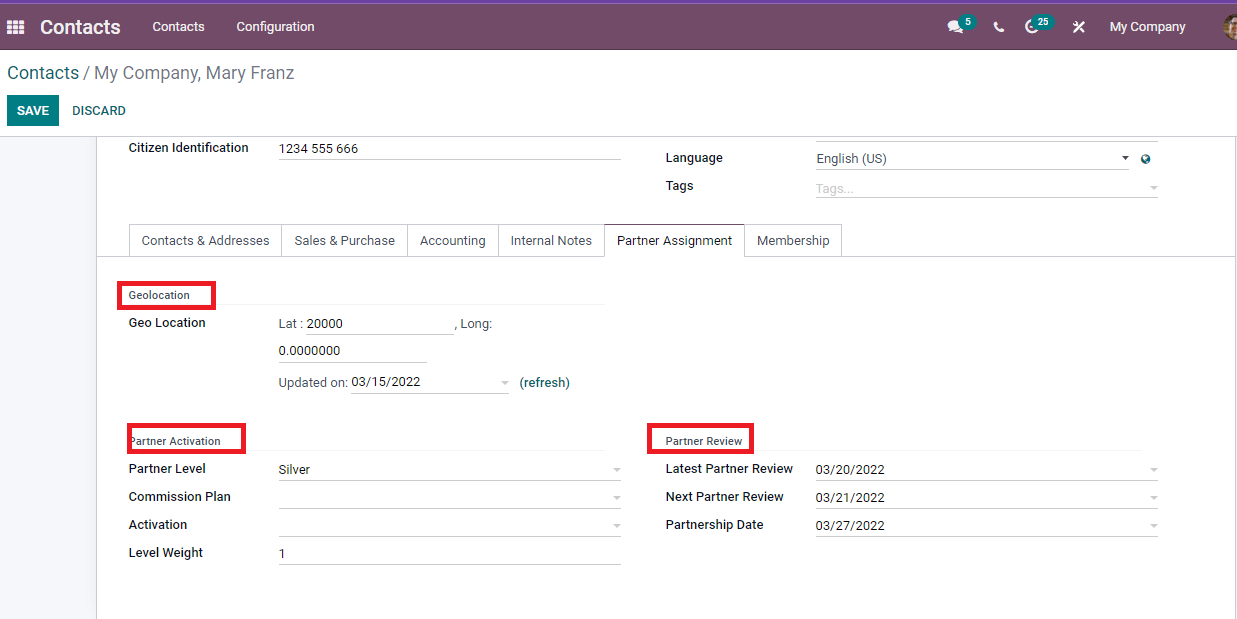
Go back to the Contacts window, and the user can add notes inside the Internal Notes tab. The Partner Assignment tab contains several options, including Geolocation, Partner Review, and Partner Activation. You can add the Geo Location with an updated date. Inside the Partner activation, enter Partner level, Activation, and Commission plan. Level weight is a numerical value higher than 0 that decides the partner's agreement for an opportunity. We can add the Partnership, Next, and Latest Partner Review dates inside the Partner Review section, as shown in the screenshot below.
Below the Membership tab, you can choose as a Free or Associate member is the person in which the individual wants associate membership. The Current Membership status shows the state of membership, and it is in various categories.
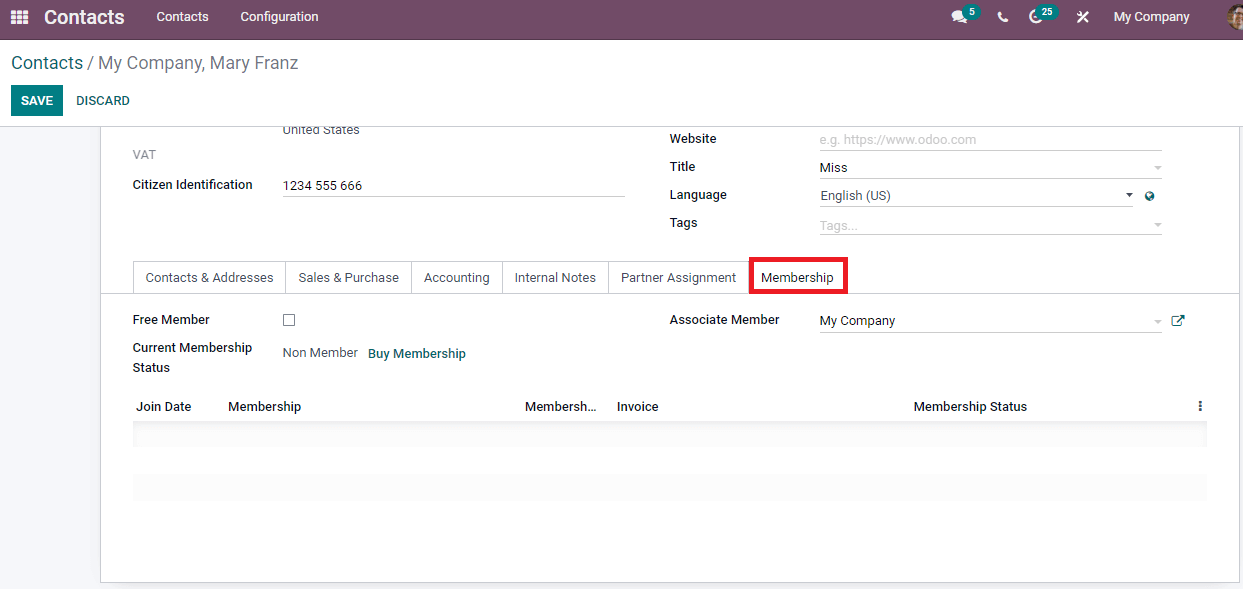
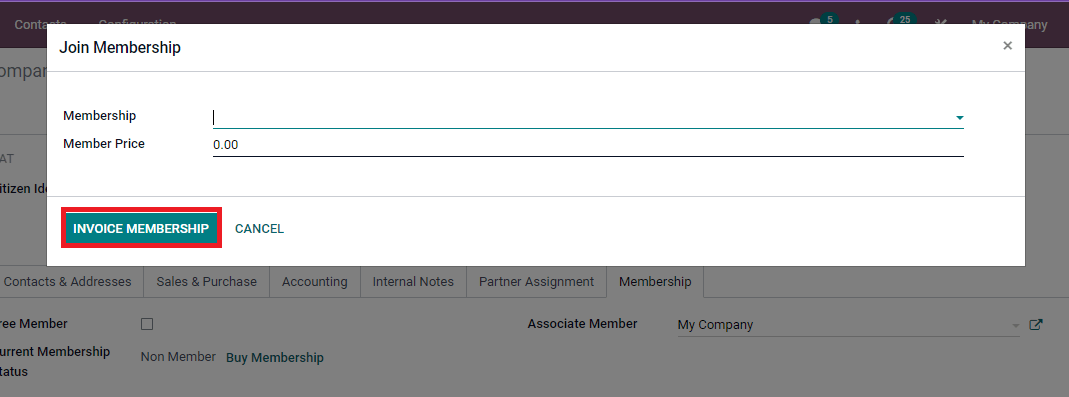
A non-member did not apply for any membership, and a Canceled member is one who cancelled the membership. The date expired for a member is known as an Old member, and one who applied for membership/invoice will be created as a Waiting member. Those who paid the membership are Paying members, and a member whose invoice was created is an Invoiced member. It is possible to join an individual's membership by clicking on the Buy Membership icon. In the new window, add the membership and member price. Later, select the Invoice Membership icon to start your membership.
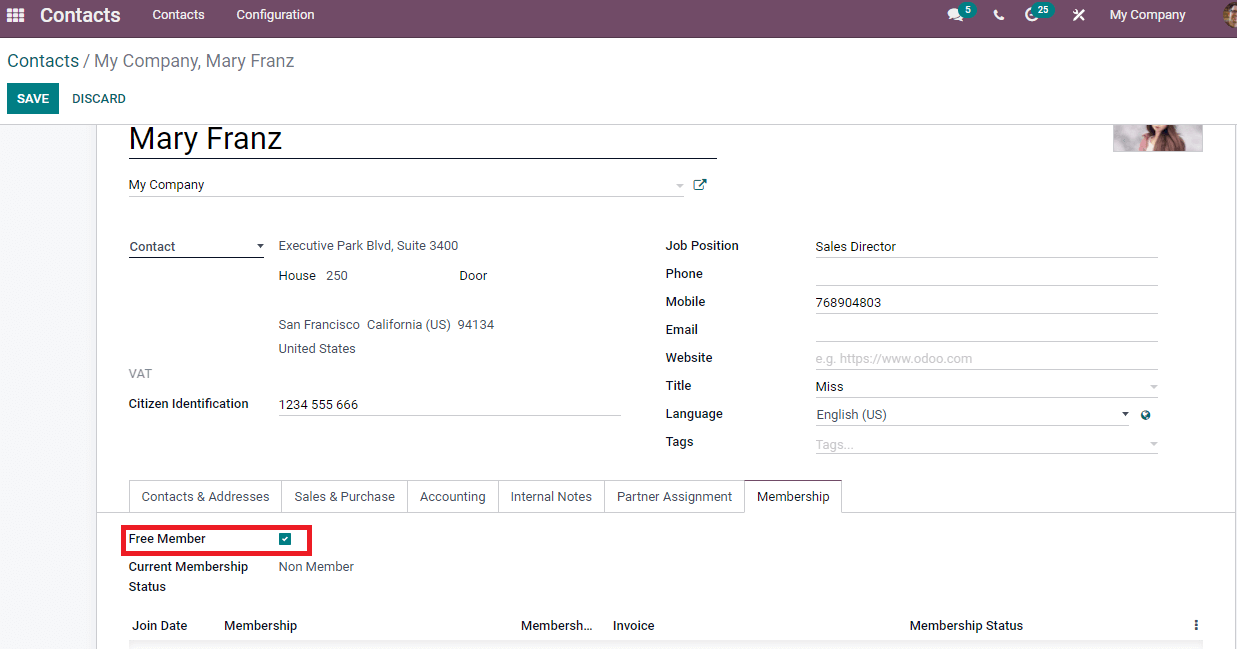
You can see the Current Membership status as Non-member after enabling the Free member option in the Membership tab.
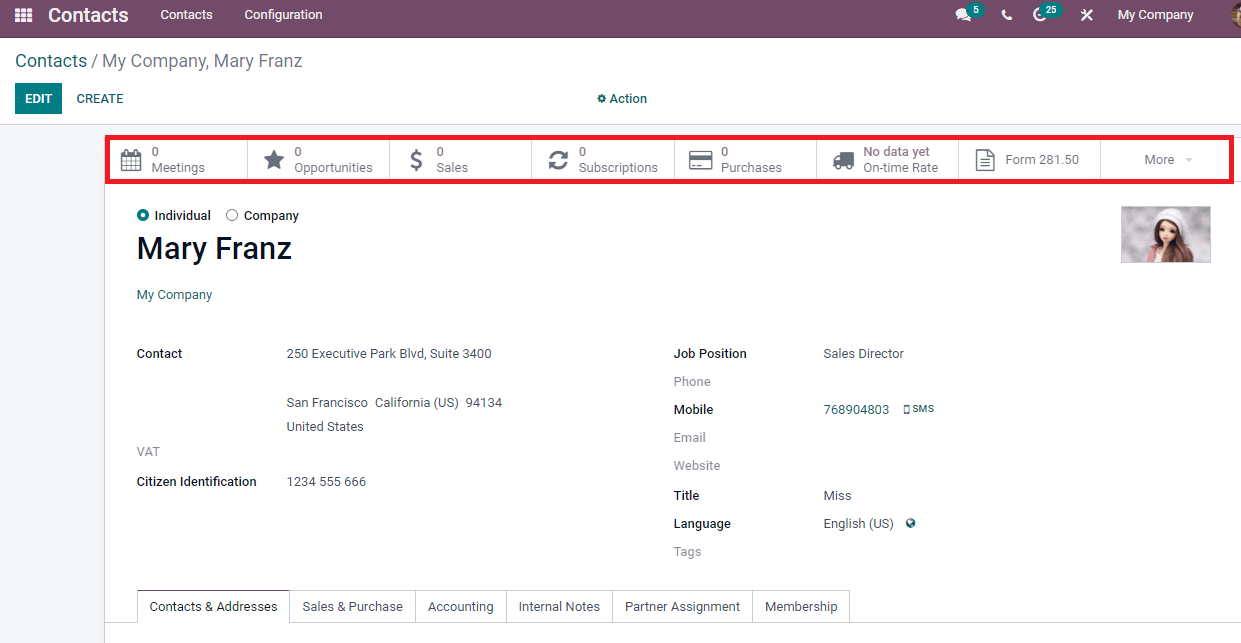
After entering all the details regarding the individual, click on the Save button to store the data information. We can see several smart tabs below the Save icon, such as Meetings, Purchases, Opportunities, Sales and more that make information more lucrative in the Contacts window as portrayed below.
We discuss creating a new Contact in the Odoo 15 Contacts module here. Users can track all contact management using the Odoo 15 Contacts module. It is easy to manage the address, membership, accounting, sales, and purchases of a specific individual/company using the Odoo 15 Contacts module.