Odoo, a comprehensive suite of business management software, offers robust reporting capabilities that are crucial for generating various documents, from invoices and sales orders to custom analytical reports. Reporting actions in Odoo allow users to print these documents directly from the system, providing a seamless and efficient way to manage business operations.
This blog will guide you through the process of creating and utilizing reporting actions in Odoo 19, ensuring you can generate professional and customized reports for your specific needs.
Understanding Report Actions in Odoo
In Odoo, a report action is essentially a server action that triggers the generation of a document. These documents can be in various formats, most commonly PDF, but also HTML or even XLSX (with additional modules). They are typically based on QWeb templates, Odoo's templating engine, which allows for dynamic content generation and flexible design.
Common use cases for reporting actions include:
- Invoices and Sales Orders: Generating printable versions for customers.
- Purchase Orders: Creating official documents for suppliers.
- Delivery Slips: Printing packing information for shipments.
- Custom Reports: Developing unique reports for internal analysis or specific business processes.
Step-by-Step Guide to Creating a Report Action
Let's walk through the process of creating a simple PDF report for a custom Odoo model. For this example, let's assume you have a custom module named my_module and a model my_module.order for which you want to generate a report.
from odoo import models, fields, api
class MyModuleOrder(models.Model):
   _name = 'my_module.order'
   _description = 'My Custom Order'
   name = fields.Char(string='Order Reference', required=True, copy=False, readonly=True, default='New')
   customer_id = fields.Many2one('res.partner', string='Customer', required=True)
   order_date = fields.Date(string='Order Date', default=fields.Date.context_today)
   order_line_ids = fields.One2many('my_module.order.line', 'order_id', string='Order Lines')
   total_amount = fields.Monetary(string='Total Amount', compute='_compute_total_amount', store=True, currency_field='currency_id')
   currency_id = fields.Many2one('res.currency', string='Currency', default=lambda self: self.env.company.currency_id)
   @api.depends('order_line_ids.price_subtotal')
   def _compute_total_amount(self):
       for order in self:
           order.total_amount = sum(order.order_line_ids.mapped('price_subtotal'))
   @api.model_create_multi
   def create(self, vals_list):
       for vals in vals_list:
           if vals.get('name', 'New') == 'New':
               vals['name'] = self.env['ir.sequence'].next_by_code('my_module.order') or 'New'
       return super(MyModuleOrder, self).create(vals_list)
class MyModuleOrderLine(models.Model):
   _name = 'my_module.order.line'
   _description = 'Order Line'
   order_id = fields.Many2one('my_module.order', string='Order', required=True, ondelete='cascade')
   product_id = fields.Many2one('product.product', string='Product', required=True)
   quantity = fields.Float(string='Quantity', default=1.0)
   price_unit = fields.Monetary(string='Unit Price')
   currency_id = fields.Many2one(related='order_id.currency_id', depends=['order_id.currency_id'], store=True, string='Currency')
   price_subtotal = fields.Monetary(string='Subtotal', compute='_compute_price_subtotal', store=True)
   @api.depends('quantity', 'price_unit')
   def _compute_price_subtotal(self):
       for line in self:
           line.price_subtotal = line.quantity * line.price_unit
1. Define the Report Action in XML
The first step is to define the report action in an XML file within your Odoo module (e.g., my_module/reports/report_order.xml). This XML record registers your report with Odoo.
<?xml version="1.0" encoding="utf-8"?>
<odoo>
   <data>
       <record id="action_report_my_order" model="ir.actions.report">
           <field name="name">My Custom Order Report</field>
           <field name="model">my_module.order</field>
           <field name="report_type">qweb-pdf</field>
           <field name="report_name">my_module.report_my_order_document</field>
           <field name="report_file">my_module.report_my_order_document</field>
           <field name="print_report_name">(object.name or '').replace('/', '')</field>
           <field name="binding_model_id" ref="model_my_module_order"/>
           <field name="binding_type">report</field>
       </record>
   </data>
</odoo>
Let's break down the key attributes:
- id: A unique external identifier for your report action.
- model: The Odoo model on which this report will be available. When you print this report, it will be based on records of this model.
- name: The human-readable name that will appear in the "Print" menu.
- report_type: Specifies the output format. Common values are qweb-pdf for PDF, qweb-html for HTML.
- report_name: The full QWeb template name that Odoo will use to render the report. This typically follows the pattern module_name.template_id.
- report_file: The base name for the report file. Odoo will use this to generate the filename.
- print_report_name: An optional Python expression to dynamically generate the filename when the report is printed. Here, it uses the name field of the my_module.order object and replaces slashes for a cleaner filename.
Eg. if your order is "ORD/001", this code saves the PDF as "ORD001.pdf"
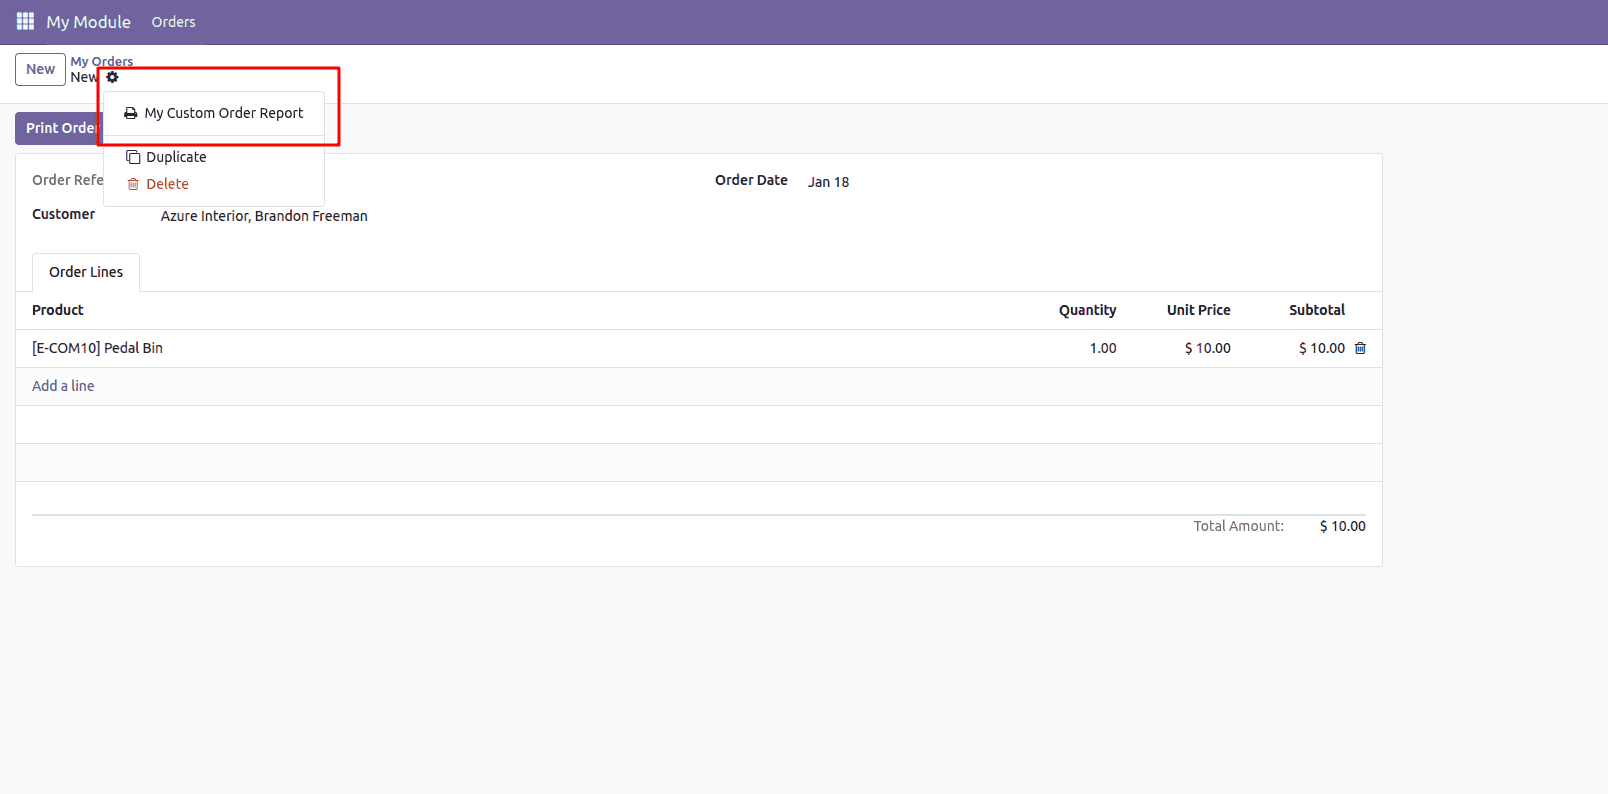
- binding_model_id: By linking this to your model using `ref="model_my_module_order"`, Odoo automatically adds this report to the "Print" menu in the action bar. You don't need a separate button anymore. So for creating a ref takes your models technical name (eg. my.module.order) from _name and replace the dots with underscore and add model_ as prefix.
- <field name="binding_type" style="">report</field>: Actions can also be "actions" (server actions), so this clarifies that it should appear in the printing section of the menu.
2. Create the Report Template (QWeb)
Next, you need to design the actual layout and content of your report using QWeb. Create another XML file (e.g., my_module/reports/report_order_templates.xml) for your QWeb template.
<?xml version="1.0" encoding="utf-8"?>
<odoo>
<data>
<template id="report_my_order_document">
<t t-call="web.html_container">
<t t-foreach="docs" t-as="o">
<t t-call="web.external_layout">
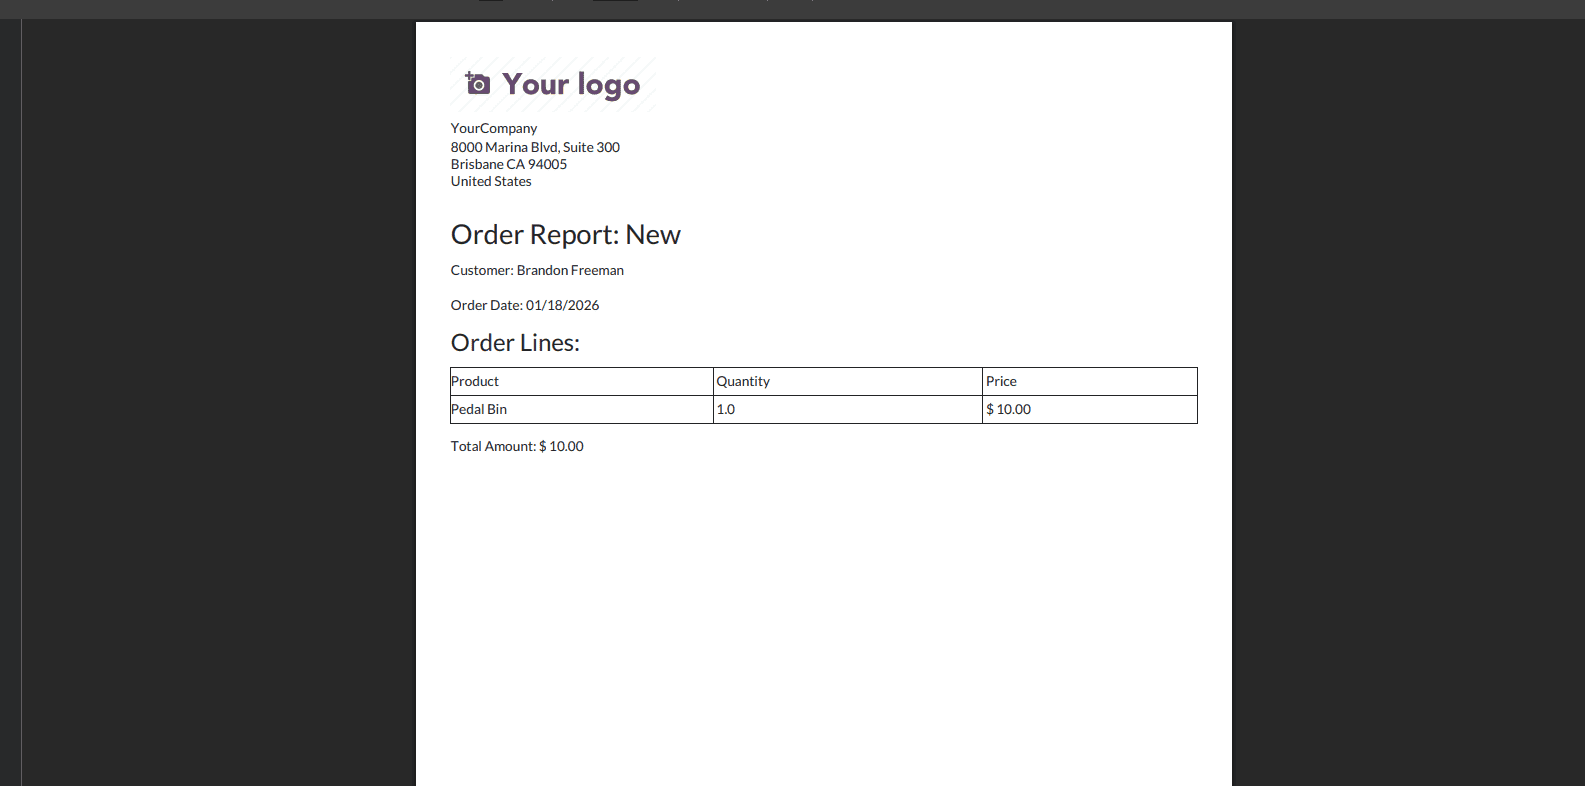
<div class="page">
<h2>Order Report: <span t-field="o.name"/></h2>
<p>Customer: <span t-field="o.customer_id.name"/></p>
<p>Order Date: <span t-field="o.order_date"/></p>
<h3>Order Lines:</h3>
<table class="table table-sm">
<thead>
<tr>
<th>Product</th>
<th>Quantity</th>
<th>Price</th>
</tr>
</thead>
<tbody>
<tr t-foreach="o.order_line_ids" t-as="line">
<td><span t-field="line.product_id.name"/></td>
<td><span t-field="line.quantity"/></td>
<td><span t-field="line.price_unit"/></td>
</tr>
</tbody>
</table>
<p>Total Amount: <span t-field="o.total_amount"/></p>
</div>
</t>
</t>
</t>
</template>
</data>
</odoo>
Key elements in the QWeb template:
- <template id="report_my_order_document">: This id must match the name attribute in your <report> action (after the module name, e.g., report_my_order_document).
- <t t-call="web.html_container">: This is the main container for all Odoo reports, providing basic HTML structure.
- <t t-foreach="docs" t-as="o">: The docs variable contains the record(s) for which the report is being generated. t-foreach iterates through them, and t-as="o" assigns each record to the variable o.
- <t t-call="web.external_layout">: This is a crucial call that includes Odoo's standard header and footer for reports, ensuring a consistent look and feel. You can also use web.internal_layout for a simpler layout.
- <div class="page">: Defines the content area of your report page.
- <span t-field="o.name"/>: This is how you display field values from your Odoo record (o). Odoo automatically formats the output based on the field type.
- HTML Structure: You can use standard HTML tags (<h2>, <p>, <table>, etc.) and Bootstrap classes (table, table-sm) for styling.
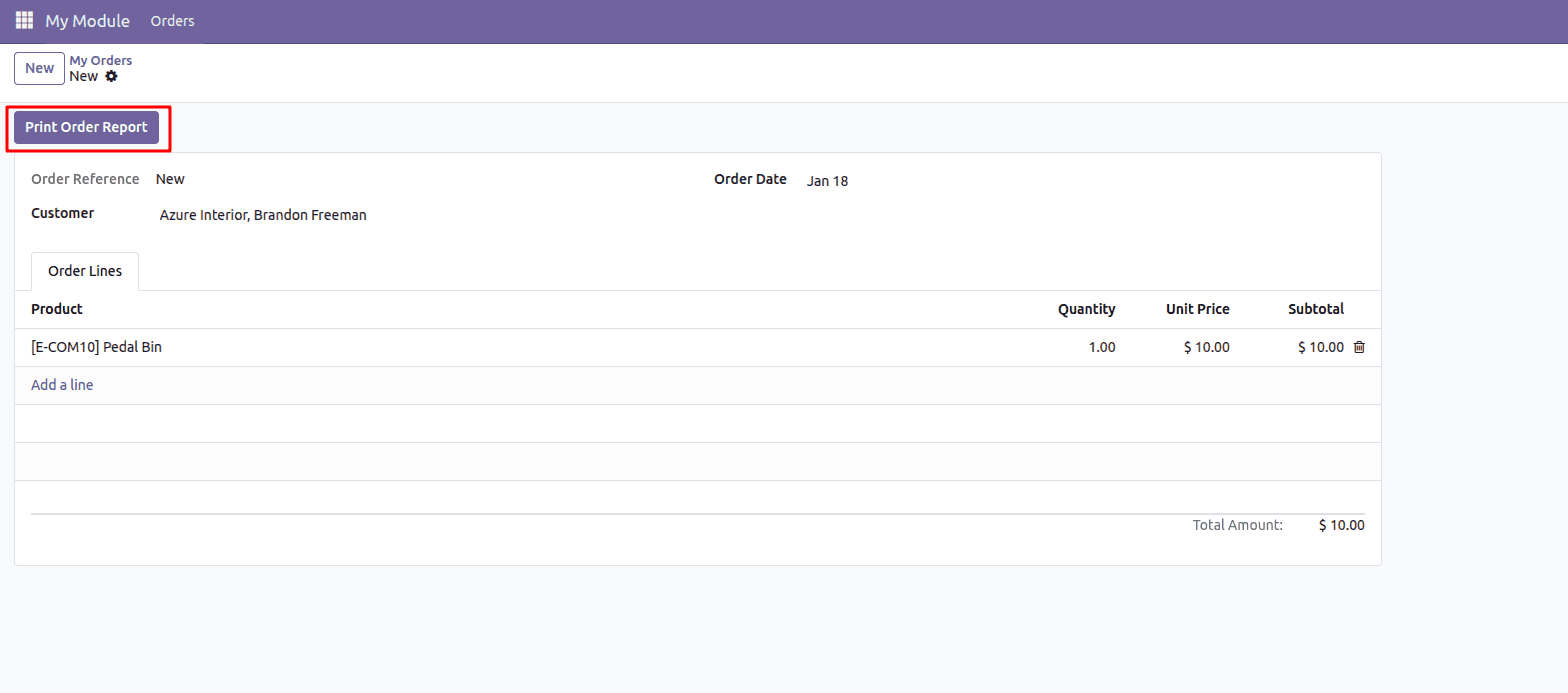
3. Integrate the Report Action
To make your report accessible to users, you typically add it as a button on the form view of your model.
In your model's view XML file (e.g., my_module/views/order_views.xml), add a button that triggers the report action:
```xml
<header>
    <button name="%(my_module.action_report_my_order)d"
            string="Print Order Report"
            type="action"
            class="oe_highlight"/>
</header>
```
- <button name="%(action_report_my_order)d" ... />: The name attribute uses the %(action_report_my_order)d syntax to reference the id of your report action defined earlier. The d suffix tells Odoo to resolve this as a database ID.
4. Add to __manifest__.py
Remember to add this XML file to your module's __manifest__.py file under the data key:
   'data': [
       'security/ir.model.access.csv',
       # LOAD REPORTS FIRST
       'reports/report_order_templates.xml',
       'reports/report_order.xml',
       # THEN LOAD VIEWS
       'views/order_views.xml',
   ],
So when the user print the order this pdf report will generate and downloaded.
Using Reporting Actions
Once you have defined and integrated your reporting action, users can access and generate reports in a few ways:
- From a Form View (Print Button): As demonstrated above, a dedicated "Print" button on a record's form view is the most common way to generate a report for that specific record.
- From a List View (Action Menu): For reports that can be generated for multiple records, you can select several records in a list view and then choose the report from the "Action" menu. Odoo will then generate a single PDF containing all selected records.
- From a Menu Item (Advanced): In some cases, you might want to create a dedicated menu item that directly triggers a report, perhaps for a summary report that doesn't relate to a specific record. This involves creating an ir.actions.report record and linking it to an ir.ui.menu.
When a user clicks the "Print" button or selects the report from the "Action" menu, Odoo will:
- Fetch the relevant record(s) based on the model defined in the report action.
- Render the QWeb template (name attribute) using the fetched data.
- Convert the rendered HTML into the specified report_type (e.g., PDF).
- Download the generated file to the user's browser.
Reporting actions are a fundamental part of Odoo's architecture, enabling businesses to generate a wide array of documents with ease. By understanding how to define report actions in XML, design QWeb templates, and integrate them into your Odoo interface, you gain the flexibility to create powerful and customized reports that cater to your unique business requirements in Odoo 19. This capability empowers users to access critical information in a printable format, streamlining operations and enhancing overall efficiency.
To read more about How to Create and Use Client Actions in Odoo 19, refer to our blog How to Create and Use Client Actions in Odoo 19.