Every industry requires a systematic approach to project profitability management. An organisation can reduce the stress and cost of planning by developing a thorough strategy for every phase of the project before it starts. The operational clarity of your firm will be improved by organising and monitoring a variety of operations within a project.
If you can view a project's costs, income, profitability, tasks, time, and staff in one location, it will run more smoothly. Knowing where you stand and being able to change direction as needed helps you make smarter business decisions.
Odoo 18 simplifies the process of determining a project's profitability. Regardless of a project's size or complexity, profitability is essential. It will help you decide whether to move forward with the project or not. The project's profitability can be ascertained following the creation of project invoices. Depending on the ordered amount, milestones reached, or the timesheets of the assigned workers, invoices may be generated. By deducting the whole amount spent on the project from the total amount invoiced, profitability is calculated.
Let's now examine how the Odoo 18 Project module can be utilised for project updates and profitability.
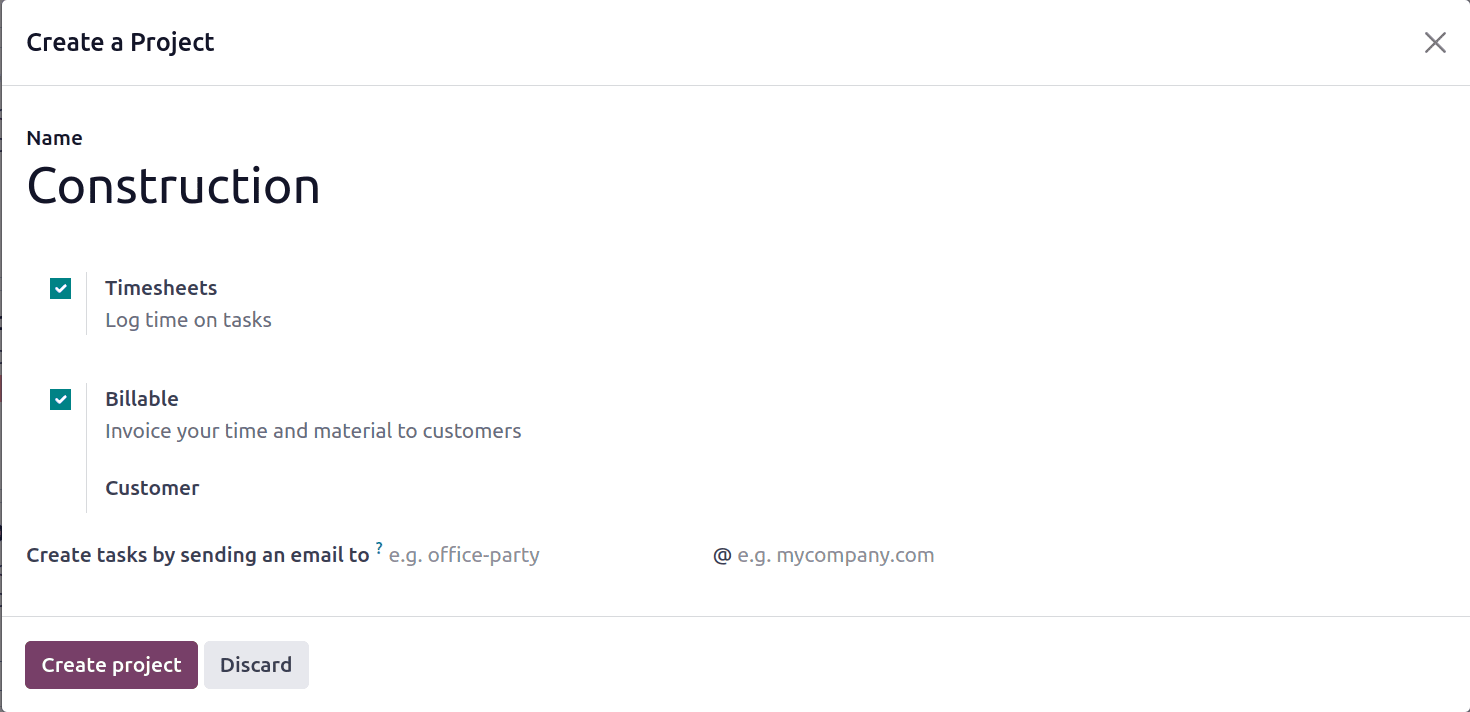
First, let's make a new project. A new wizard will appear and ask you to input the name of the project. A number of checkboxes are displayed. If the work and time need to be invoiced, check the Billable box. You can include an employee's timesheet in a project if you enable timesheets. Planning is made possible in a project by using resource planning.
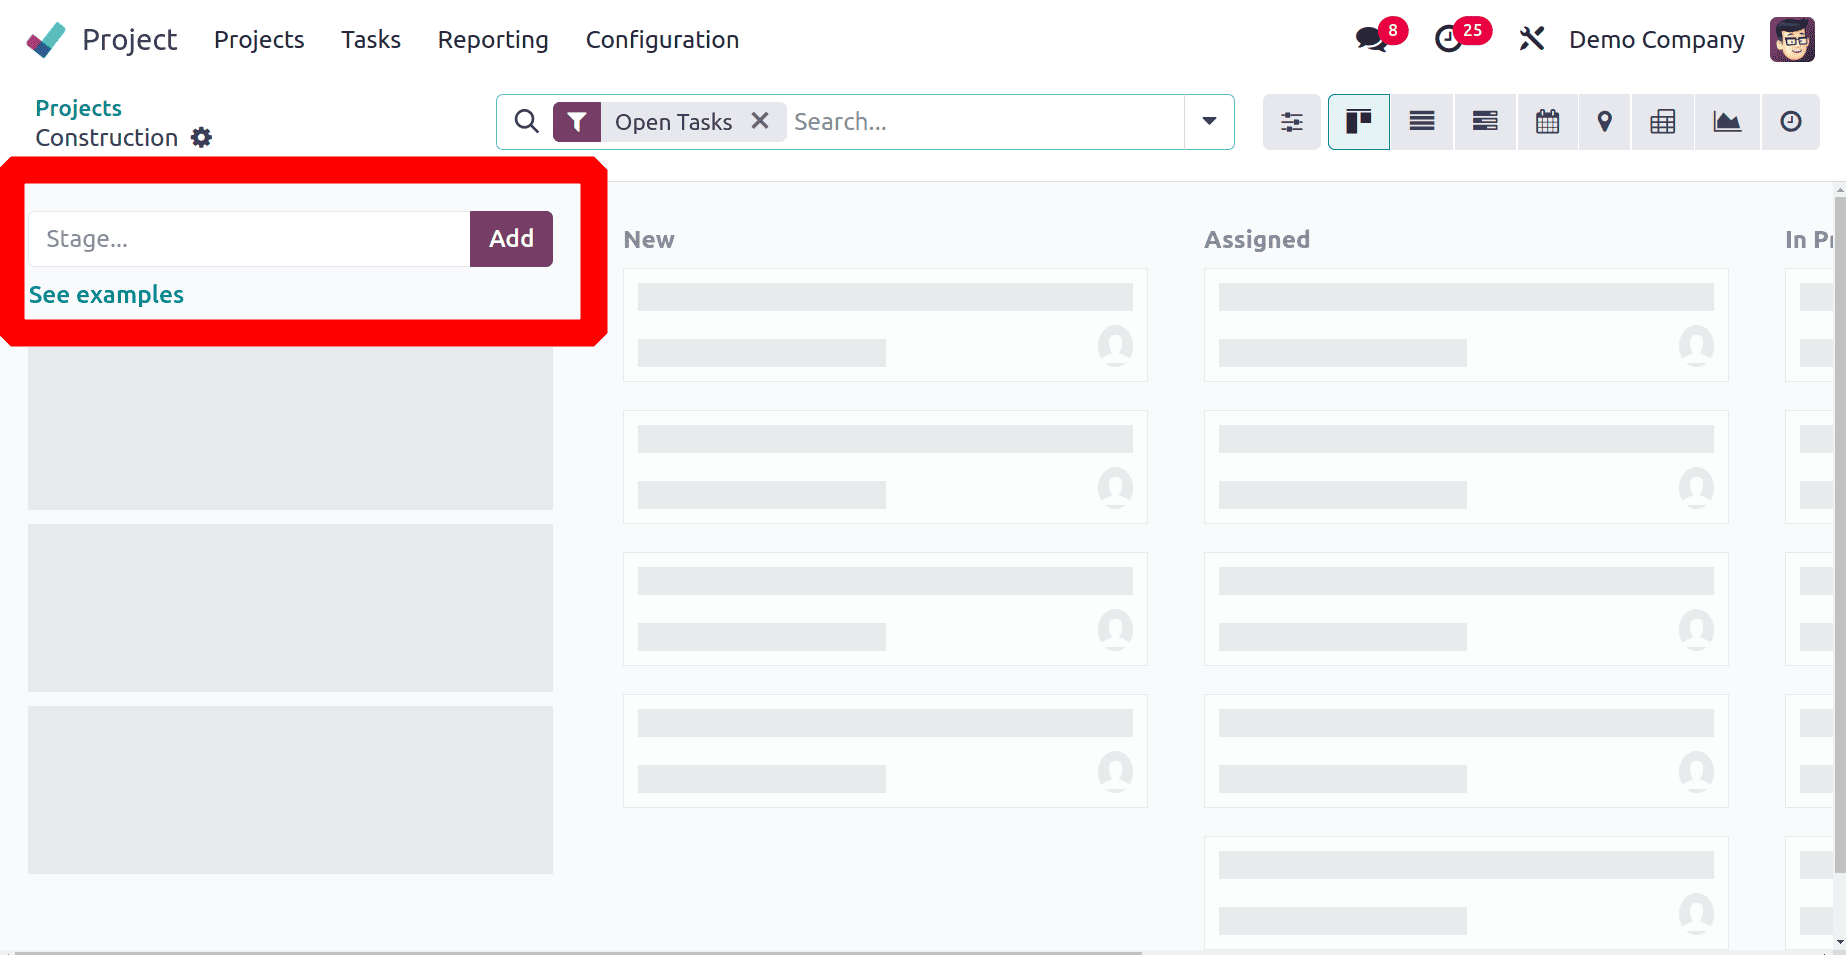
This opens a new page where you may create the task phases for the project. A variety of stage names should be used. Additional stages can be added to the given name by using the ADD button.
Every level requires the creation of a task. Odoo 18 allows you to create multiple tasks for each phase. It is also possible to assign certain duties to a resource. After creating a task and allocating resources to it, click "add."
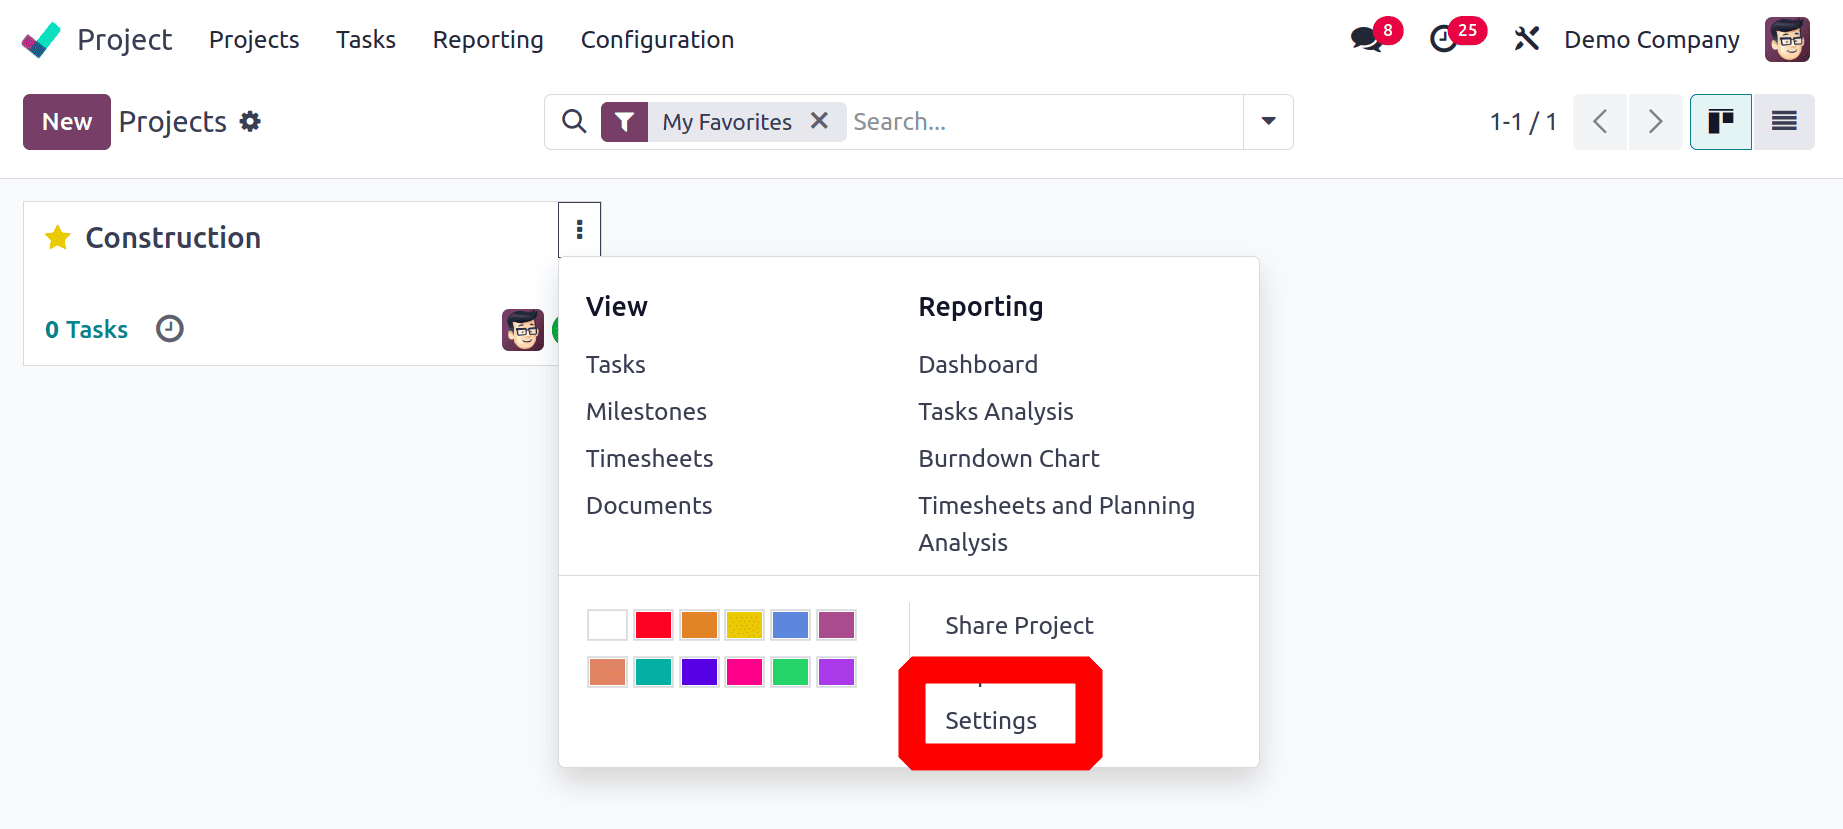
An overview button must be activated in order to analyse the project's profitability. Select the setting option by clicking the three dots in the project's upper right corner.
Enter the project name, tasks, customer, tags, project manager, scheduled date, and company in the new project creation box. An analysis account with the same name as the project is created when you begin a new project in this module. The project's costs and profits will be included in this analytical assessment.
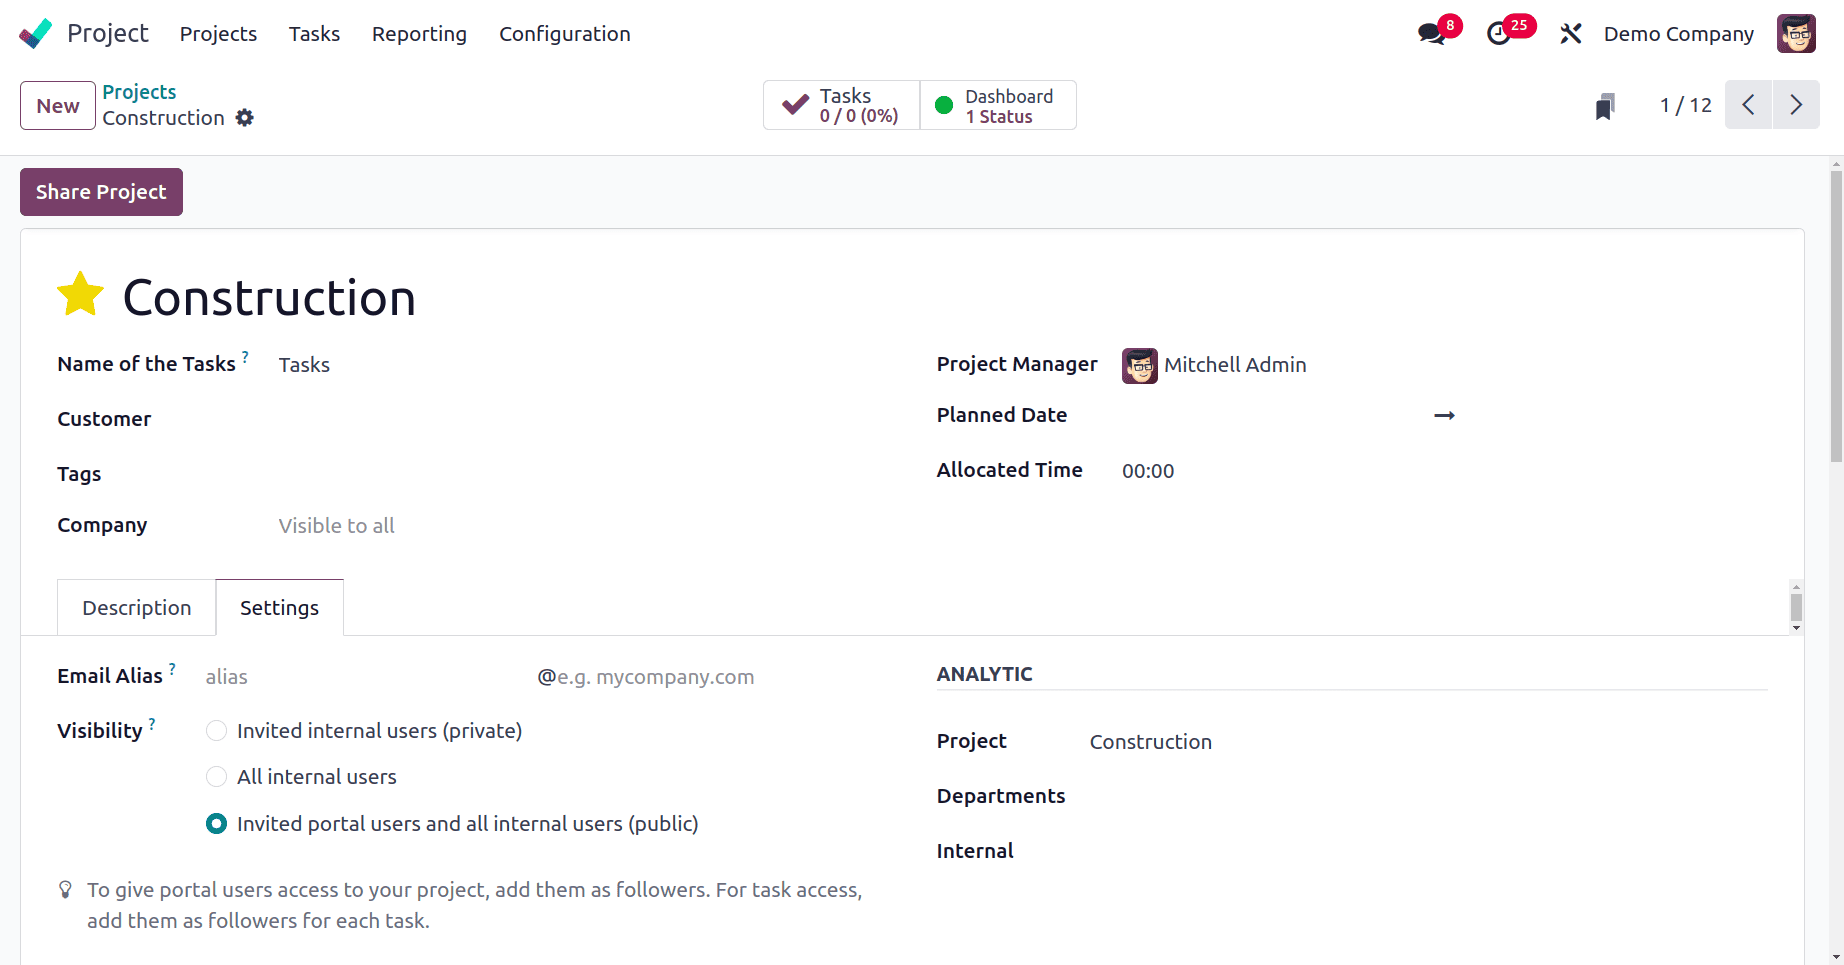
You can bill for the time and materials spent on the project by selecting the Billable option in the Settings tab.

You can easily ascertain if the project is lucrative or not by using the documented expenses and revenue to help you estimate profitability.
In order to attach timesheets to the order and generate invoices, you can create a sales order for a newly established project in the project window. Set the Invoicing Policy to Fixed Price/Prepaid, Milestones, Timesheets, or based on delivered amount as necessary before creating a sales order using the project as a service product.
In order to attach timesheets to the order and generate invoices, you can create a sales order for a newly established project in the project window. Set the Invoicing Policy to Fixed Price/Prepaid, Milestones, Timesheets, or based on delivered amount as necessary before creating a sales order using the project as a service product.
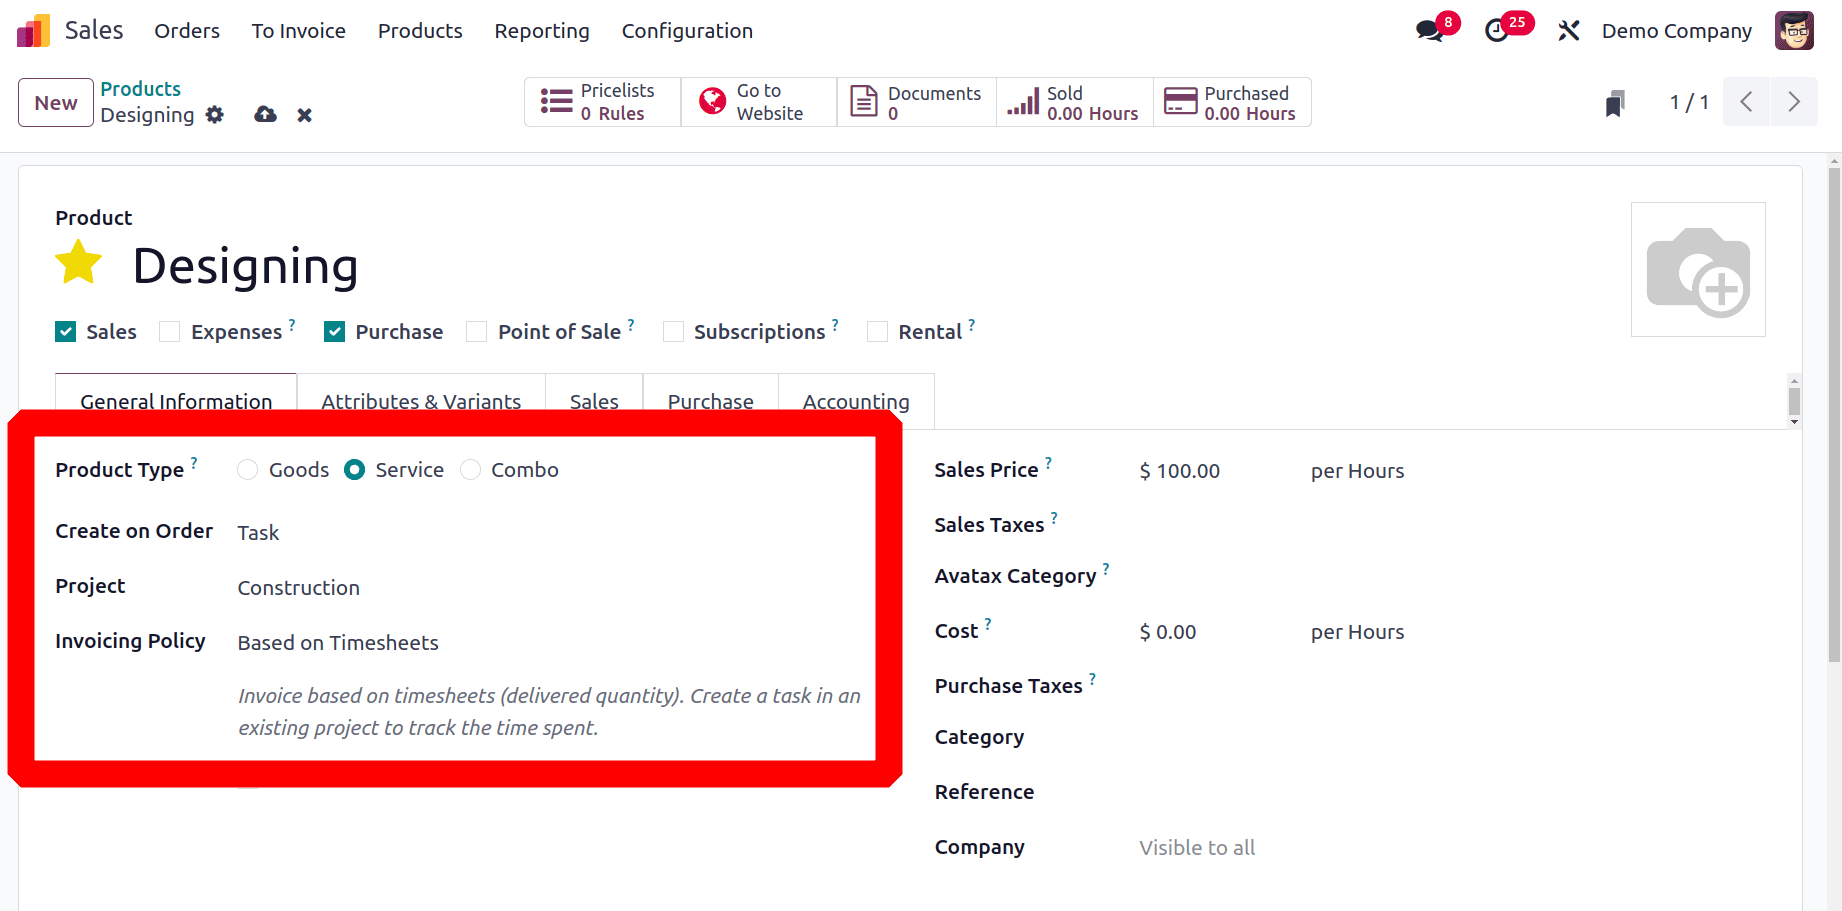
Here, the service product is named ‘Designing’. The product type is Service, and the Invoicing policy is based on Timesheet. By adding this product to the sale order, which will create a new task in the created project named Construction.
The project's customer, together with the invoice address, delivery address, quotation template, referrer, order date, pricelist, and terms of payment, should all be mentioned in the new sales order that is created from the sales module. It is possible to add the service product to the Order Lines. Once the Sales Order has been established, make your choices by clicking the Confirm button.
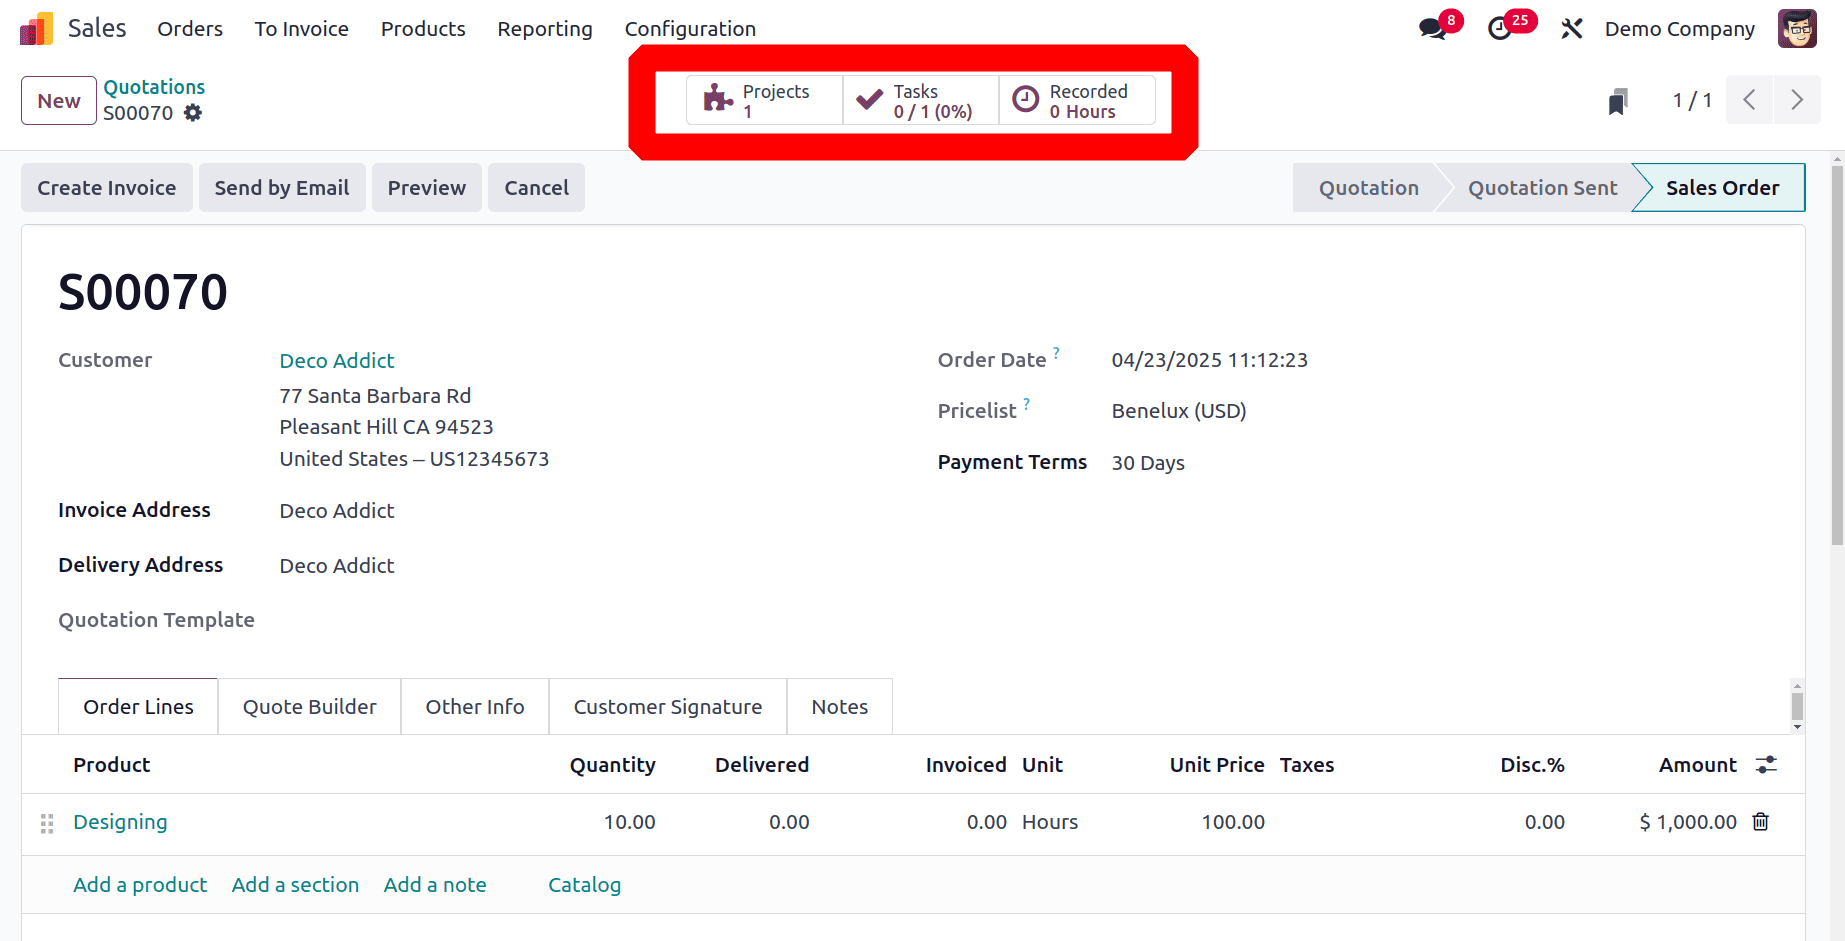
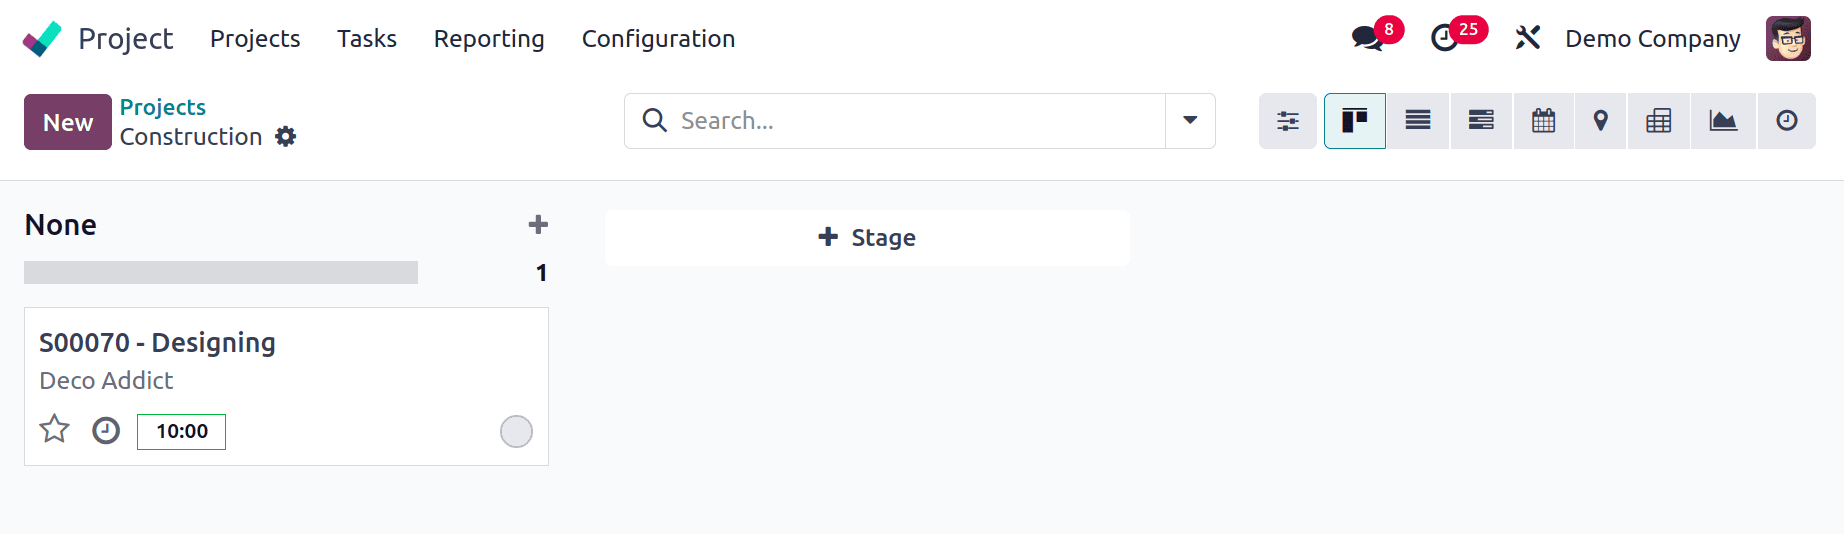
By referencing the Project in the product, which will generate a Task as creating an Order is given, the sophisticated Odoo feature enables the creation of a link between the construct quotation and the sales module. By doing this, a task with the sales order data is created within the project in question, as seen below.
As can be seen below, the generated task contains the project specifics, including the project name, customer, and sale order item. Then the Allocated Time is visible. This shows the number of hours initially expected for the work, the task's progress as a percentage, and the amount of time the employee spent on the task.
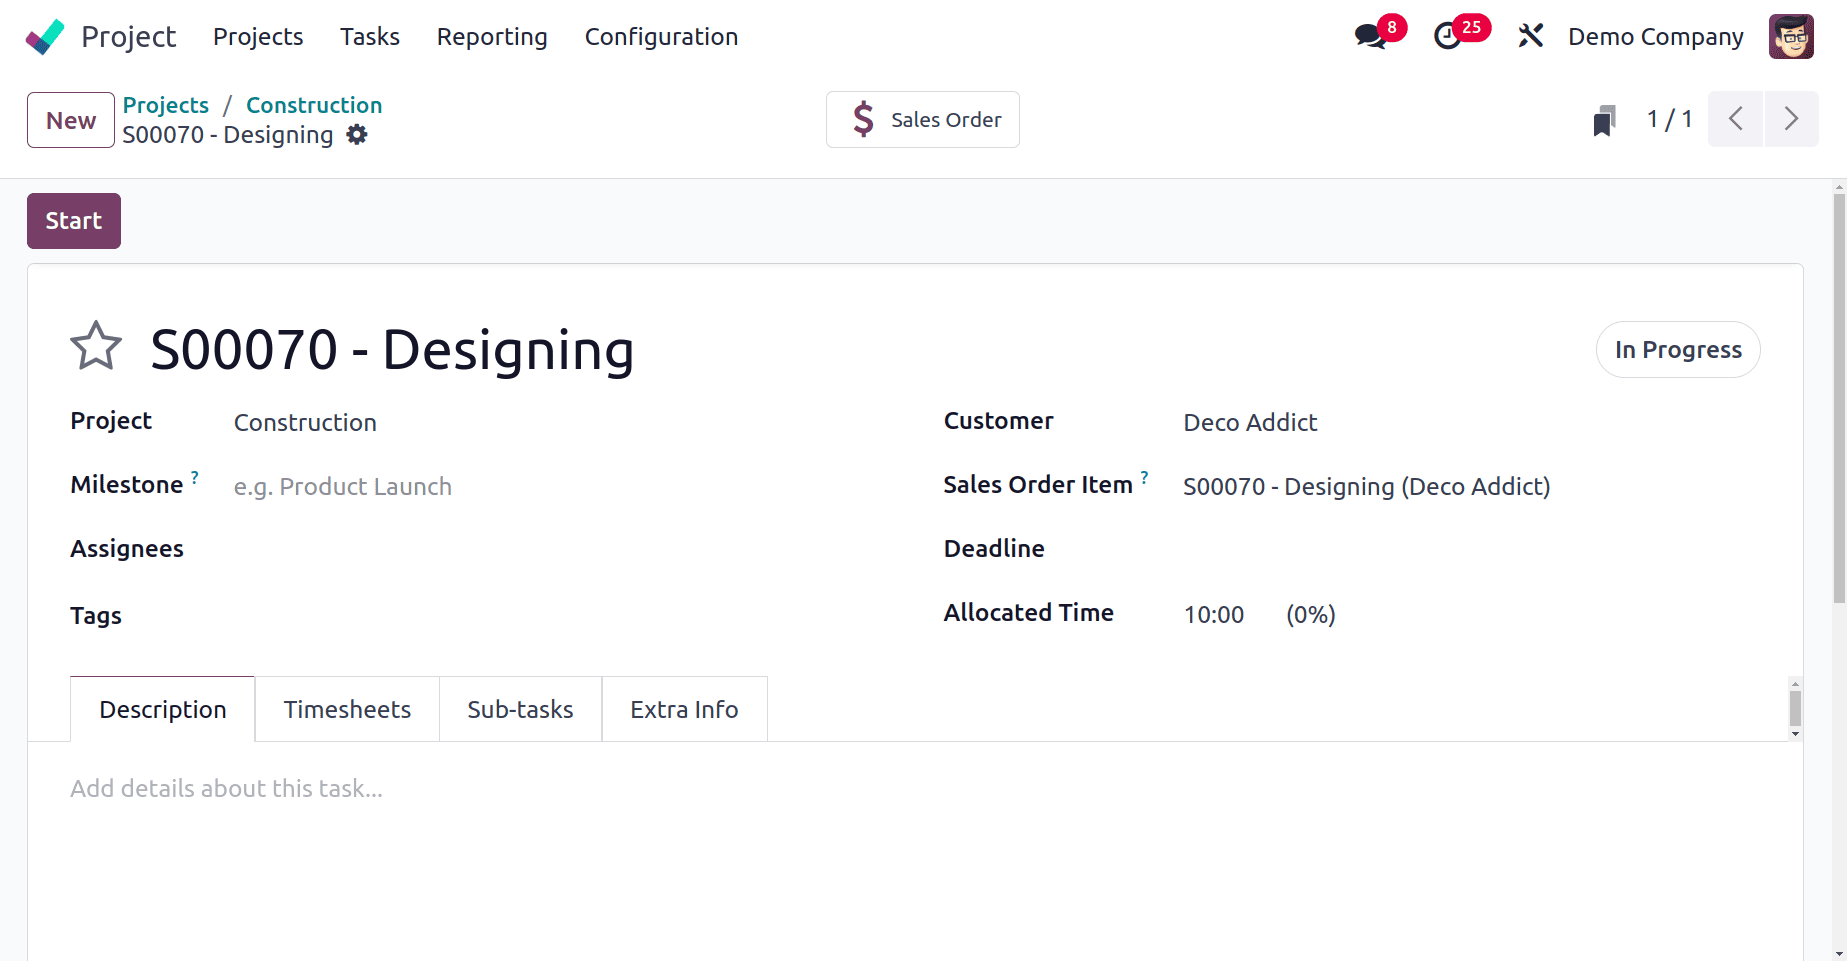
The Description tab allows you to add a description of the work that has been done.
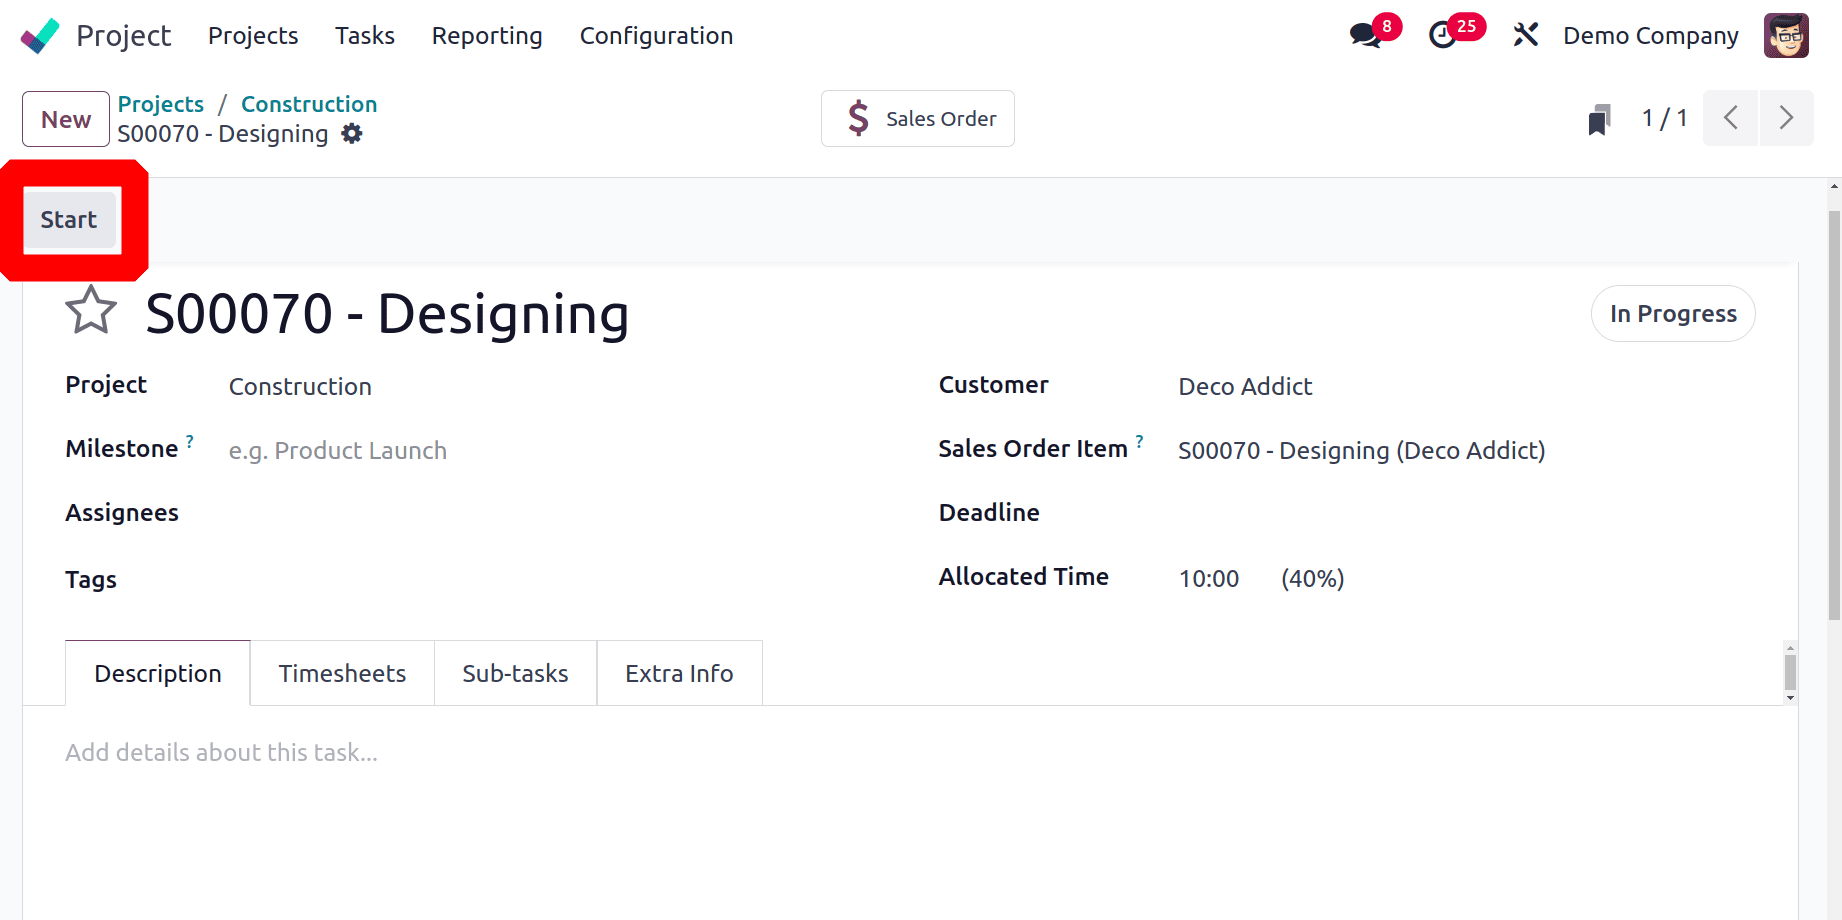
After the job starts, you can select the START button. This enables you to estimate the duration of the task. After choosing the START button, the timer that appears can be quickly paused using the PAUSE button. The timer can also be stopped by pressing the end button. Once the work is complete, you can use the pop-up box to describe the task and see how much time was spent on it.
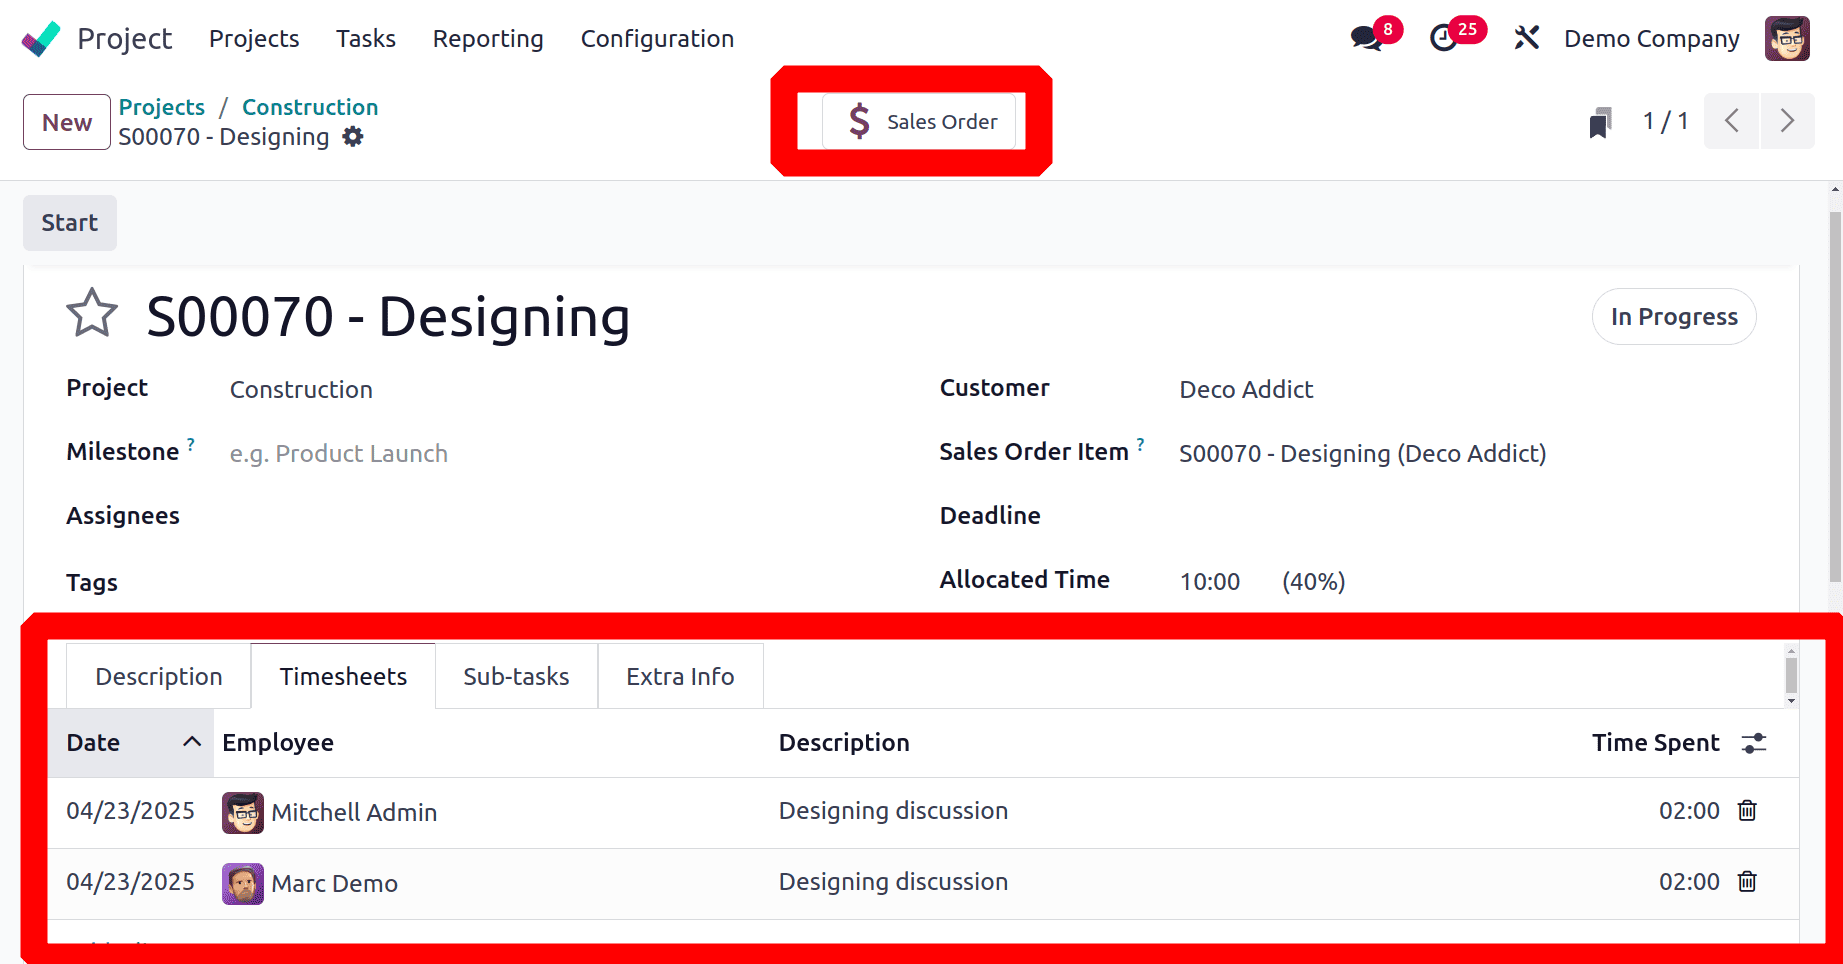
The next step after tracking time is to make an invoice for the project. To do this, the user can click the sales smart button in the project and verify the order, as illustrated above.
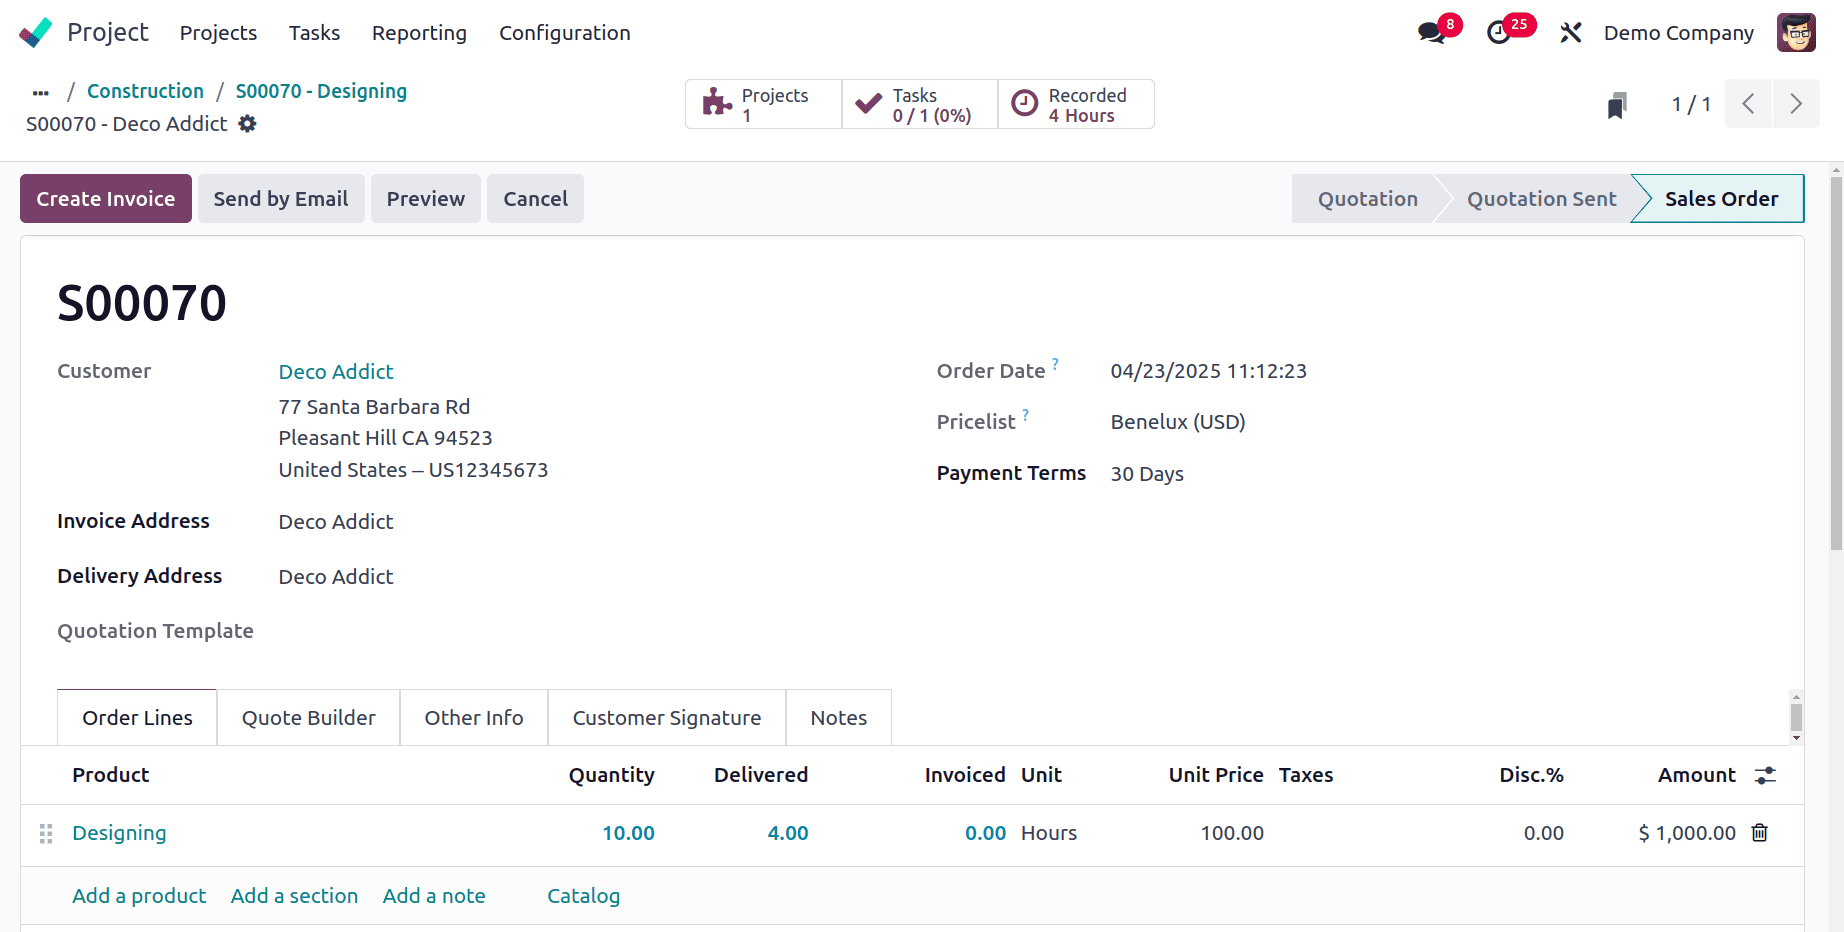
The sales order is available right now. The order line displays the total allotted time and delivered time. In this case, the delivery time is just four hours. Because the invoicing policy is set to "Based on Timesheet," the invoice will only be generated for the provided time. To add an invoice, click the "Create Invoice" button.
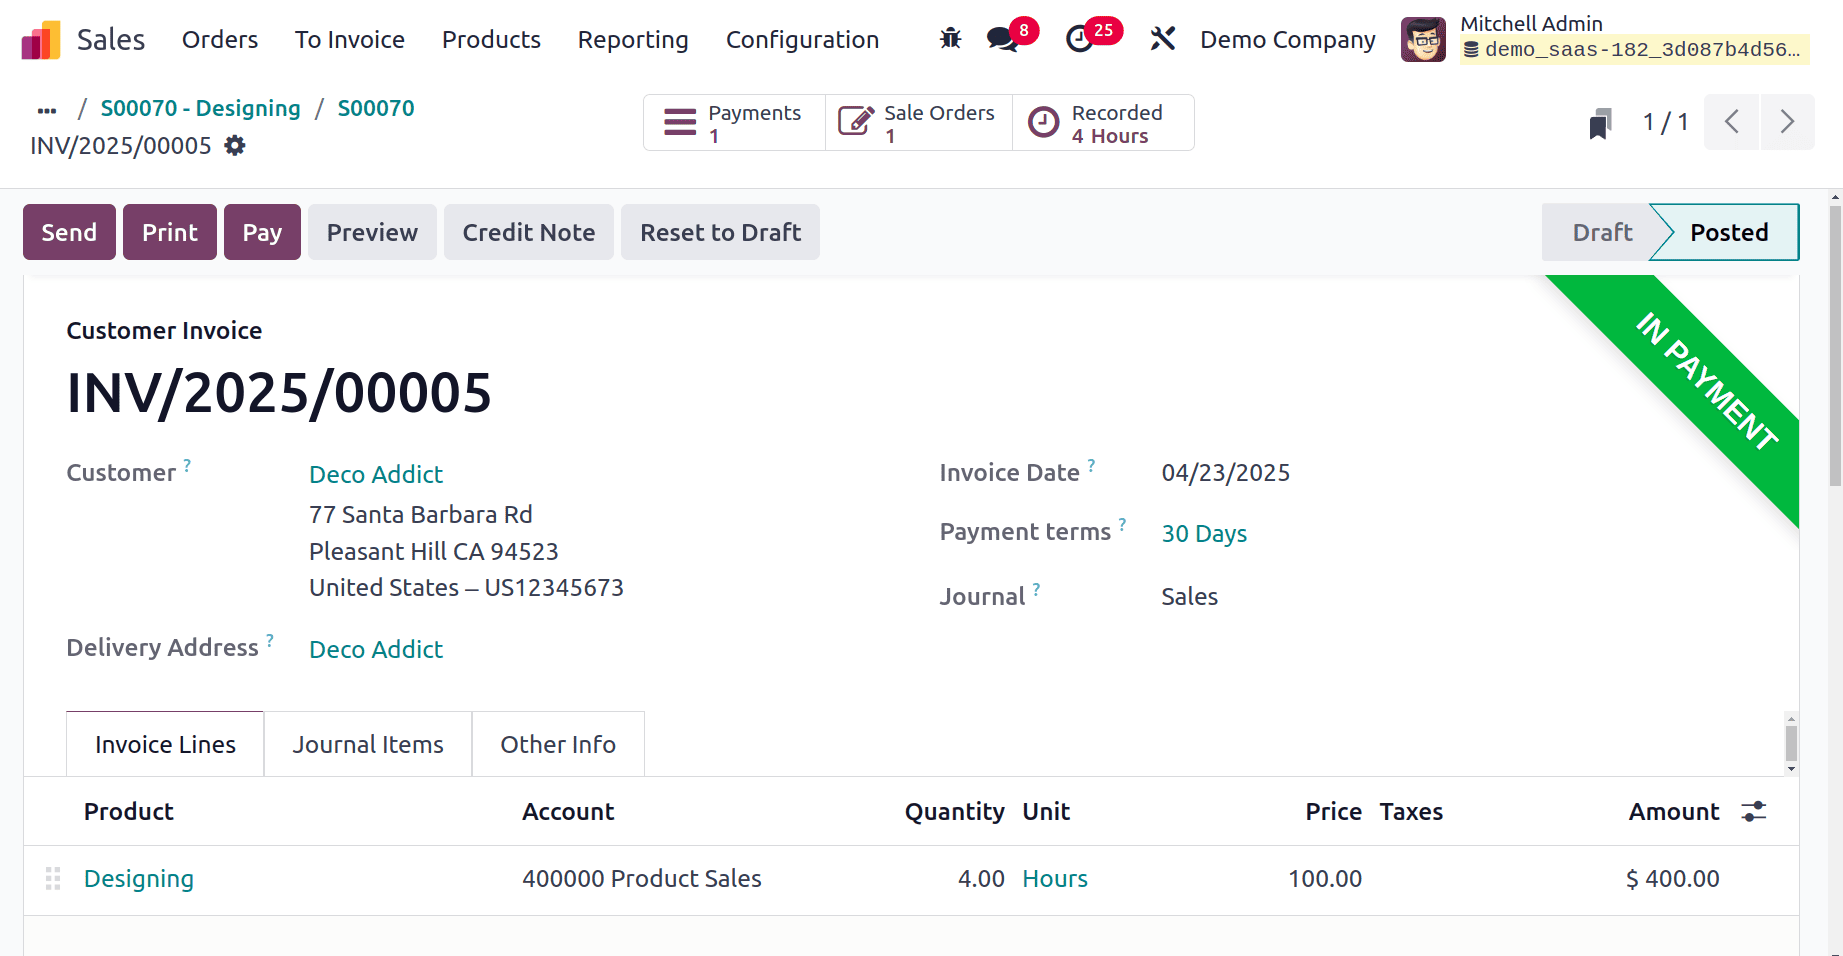
Below is the invoice for the following product. Once the invoice has been verified, register the payment by selecting the Register Payment option.
Once the project is complete, view the project dashboard in the Project module to determine its profitability.
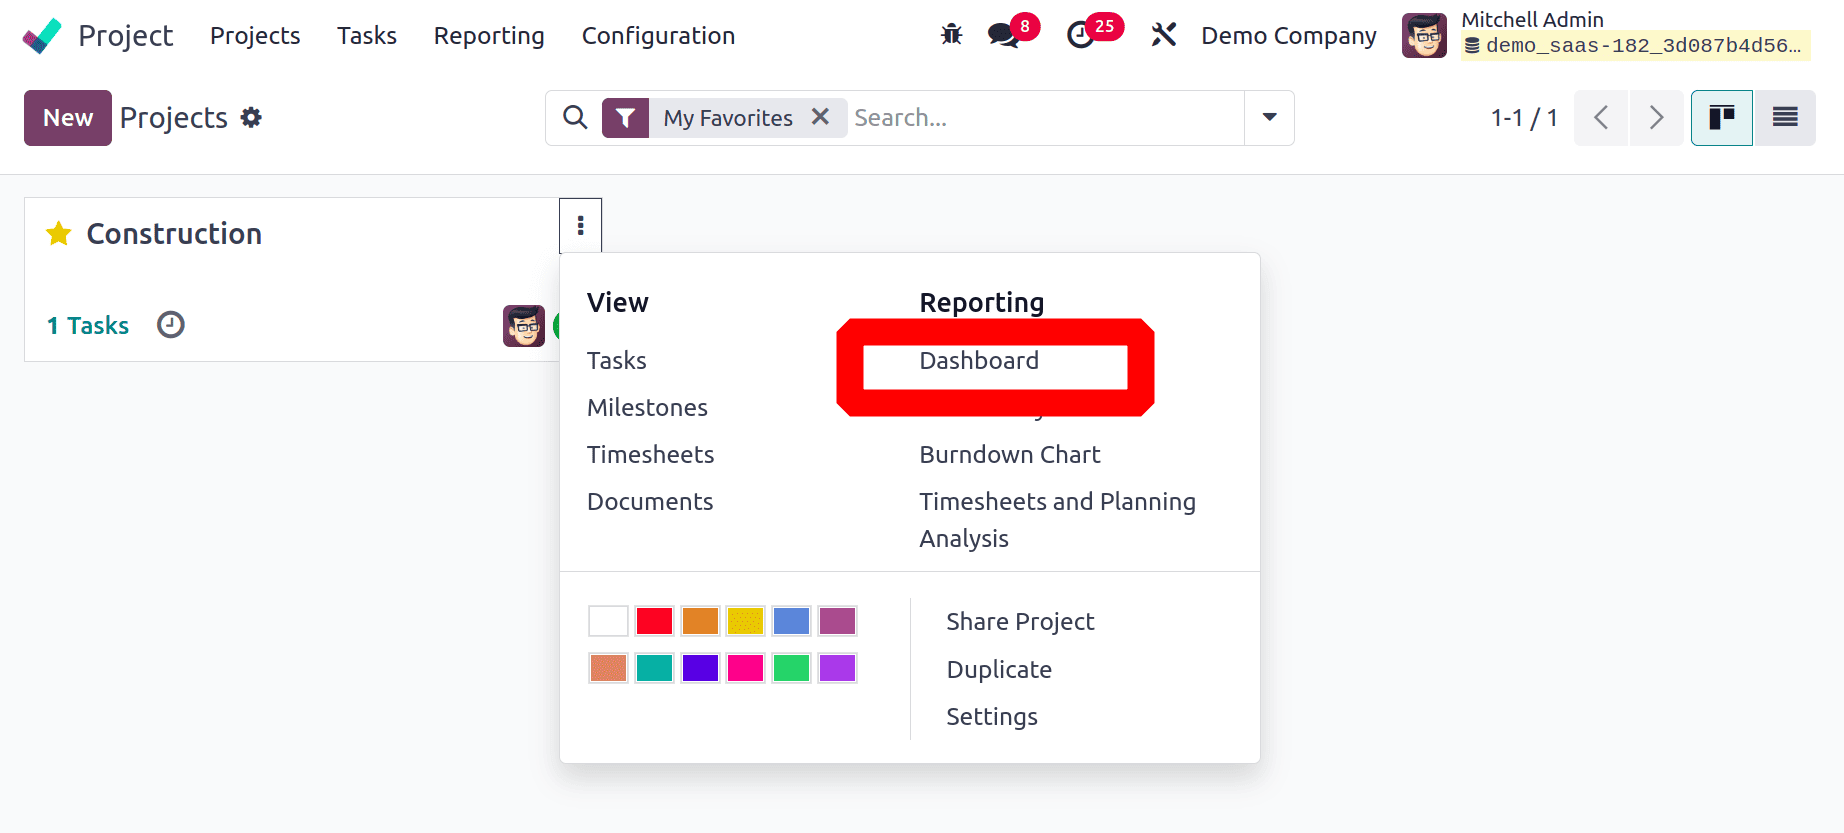
All of the module's defined projects are shown in the Kanban view of the project dashboard. Each project tab's three vertical dots in the top right corner will show options for analysing and reporting on different project processes. The Project Updates option can be used to review the profitability.
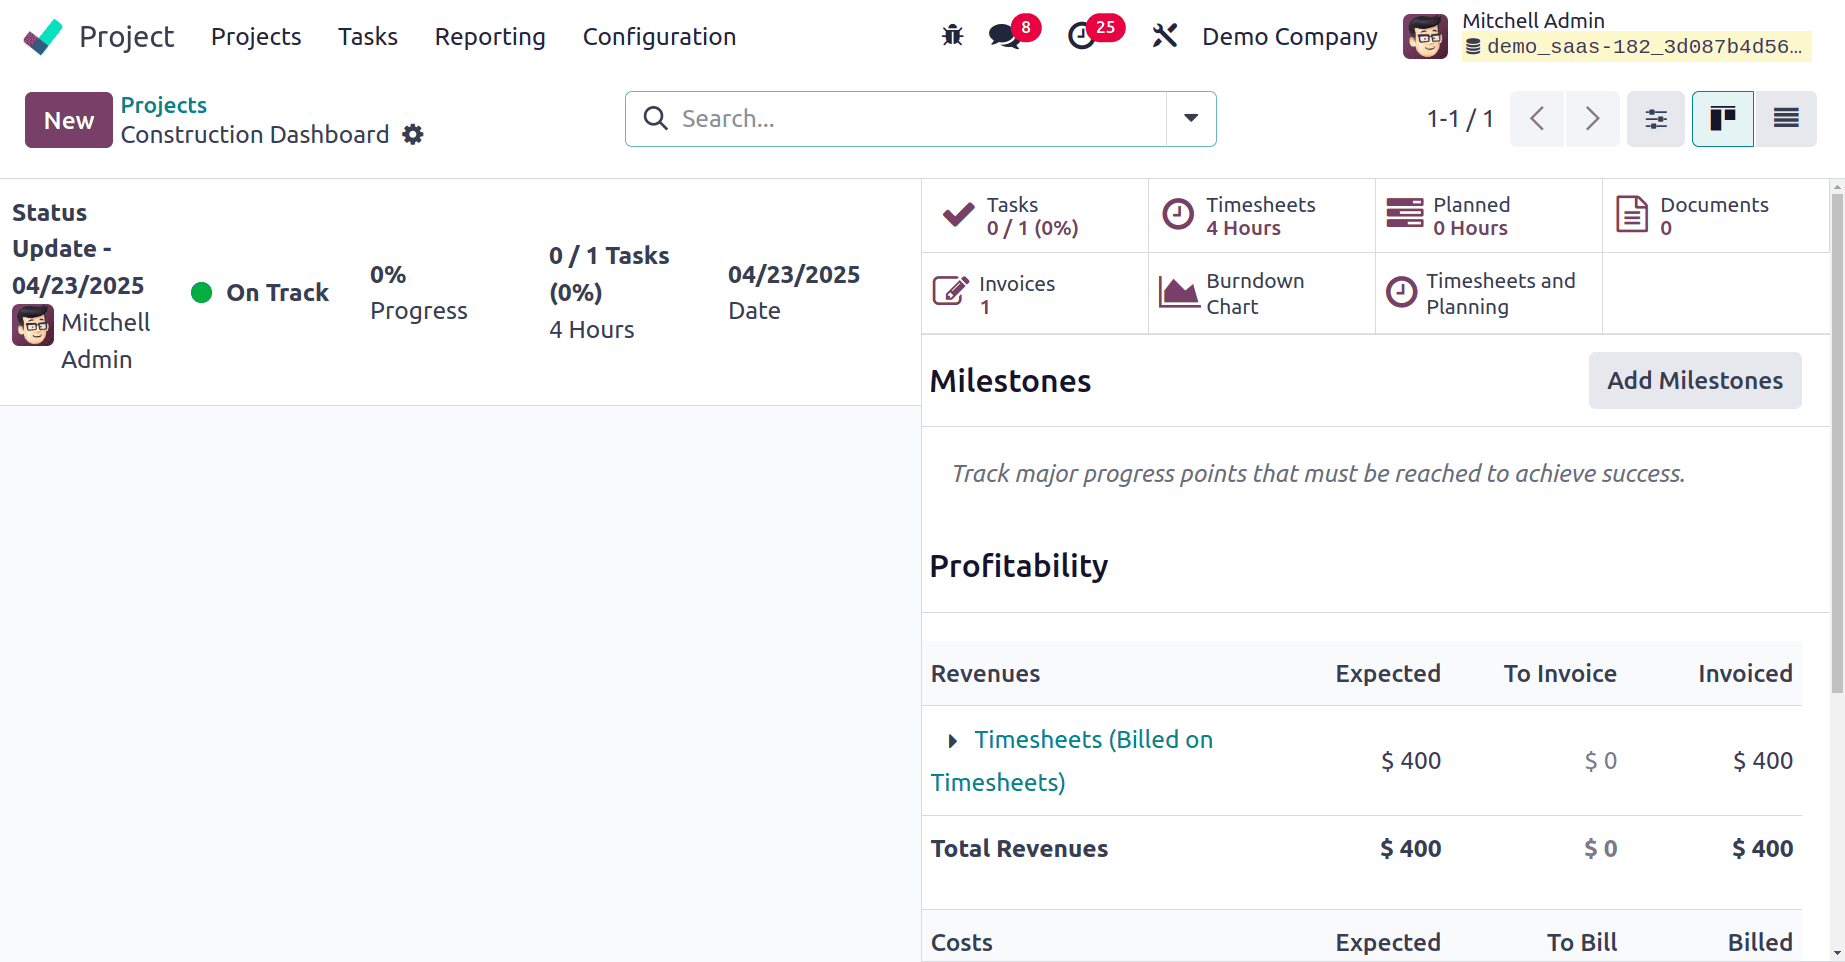
Project progress data is shown on one side of the screen, as seen in the image above. Using the smart buttons on the right side of the screen, you can keep an eye on and manage the following: Tasks, Timesheets, Planned Hours, Documents, Invoices, Burndown Chart, Timesheets & Planning.
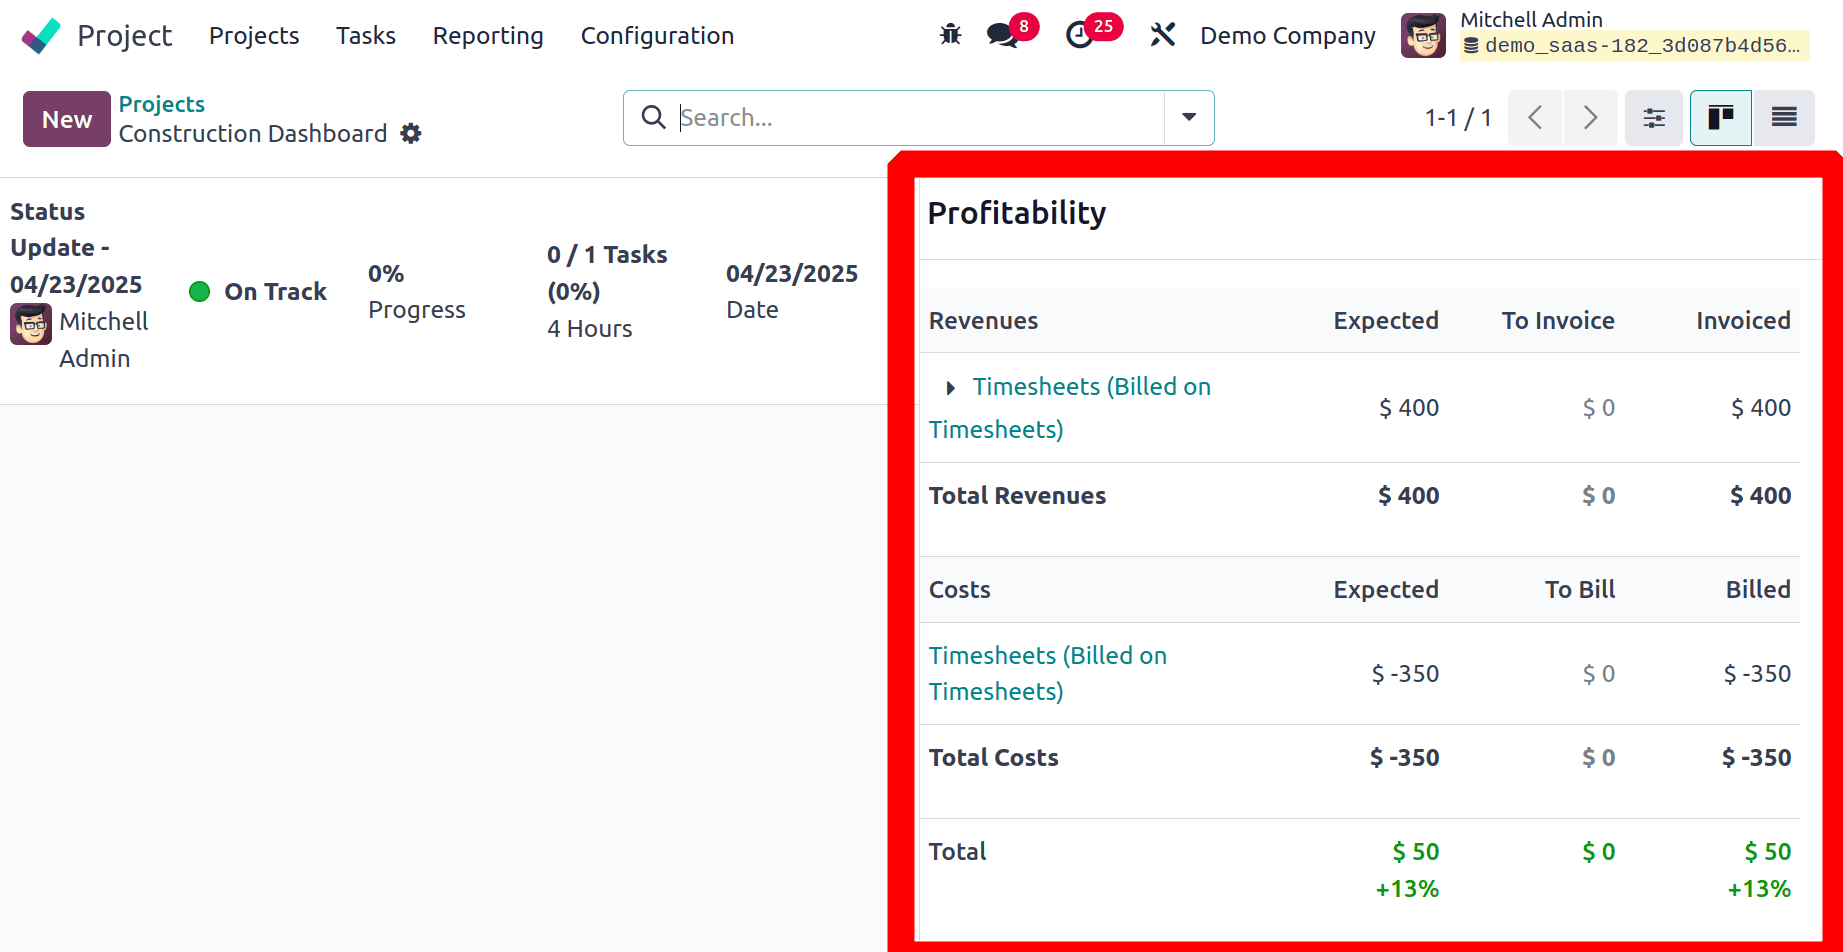
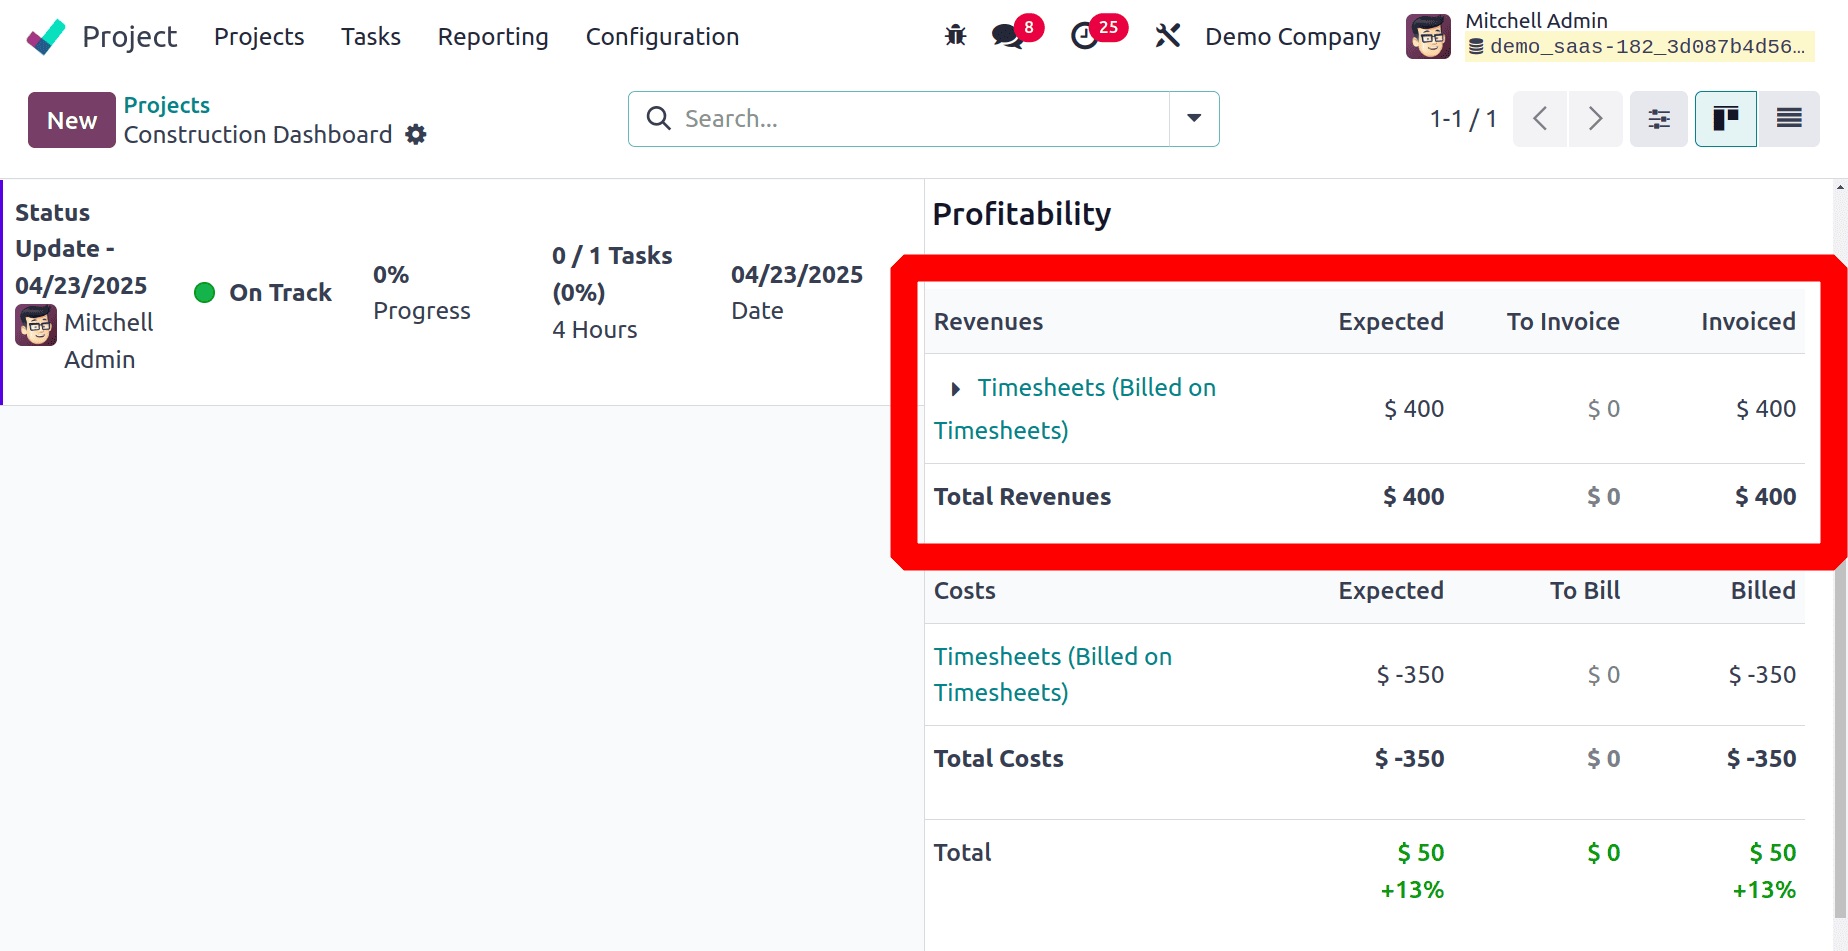
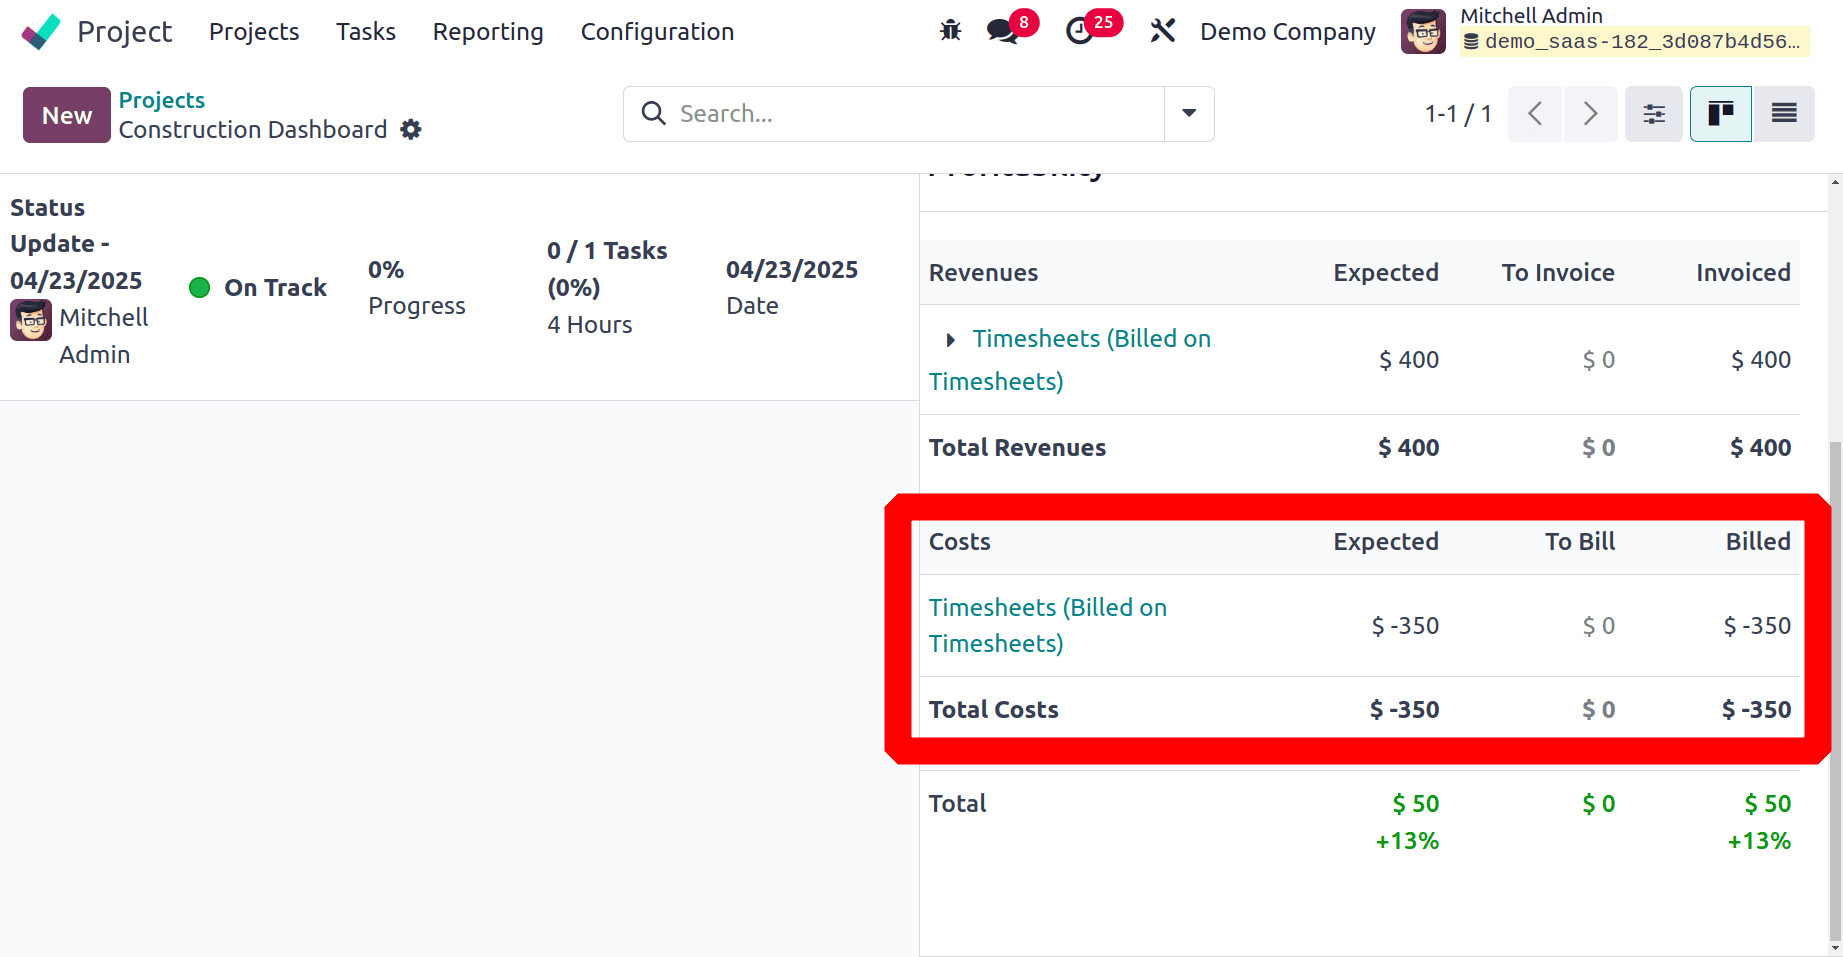
The expected profitability based on the budget and expenditure amount is shown in the Profitability option. The amount of money spent on the project is mentioned. This data is used to calculate the project's current cost as well as the margin, costs, and revenue.
Here, the Revenue shows the total amount invoiced to the customer. Previously confirmed and paid an invoice of $400, which shows as the Revenue
And the next one is Cost, which means the expense of the company. Here, two employees added a timesheet for the task. Both the employee's timesheet cost is taken as the cost here. Which is an expense for the company, that's why it shows asa negative value
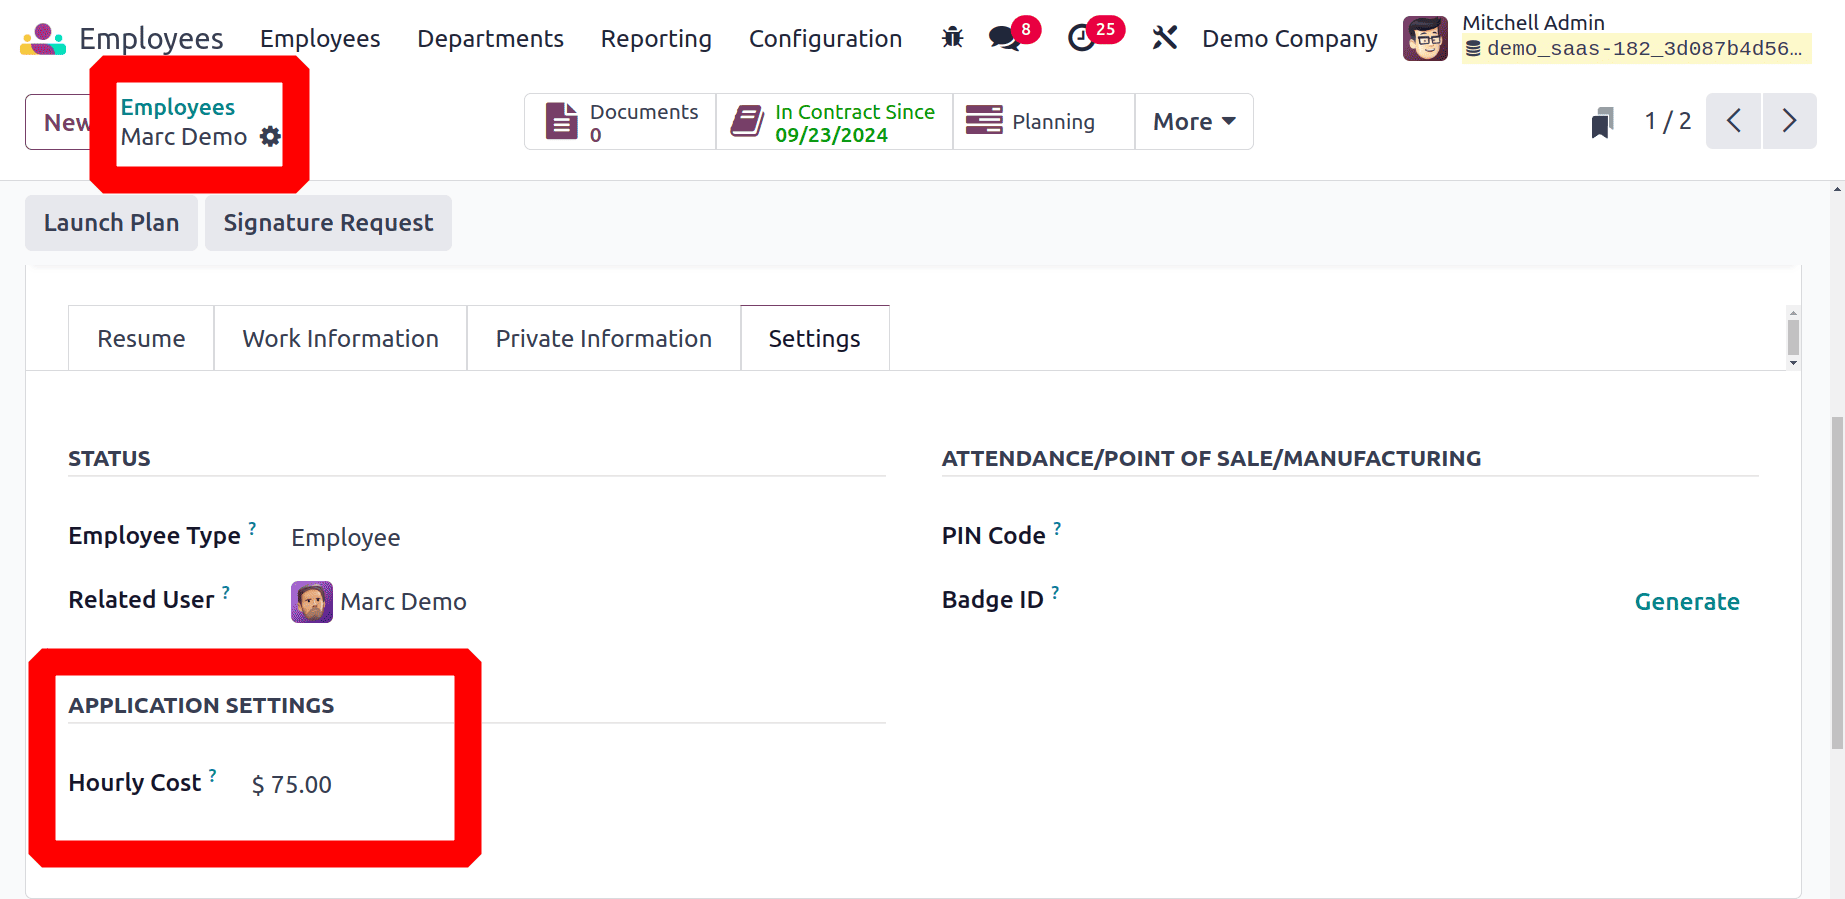
The employee cost is added to the employee form. So, go to the Employee module to check it. From the Setting tab of the employee, the hourly cost can be viewed. Here, the Hourly cost of the employee Marc Demo is $75.
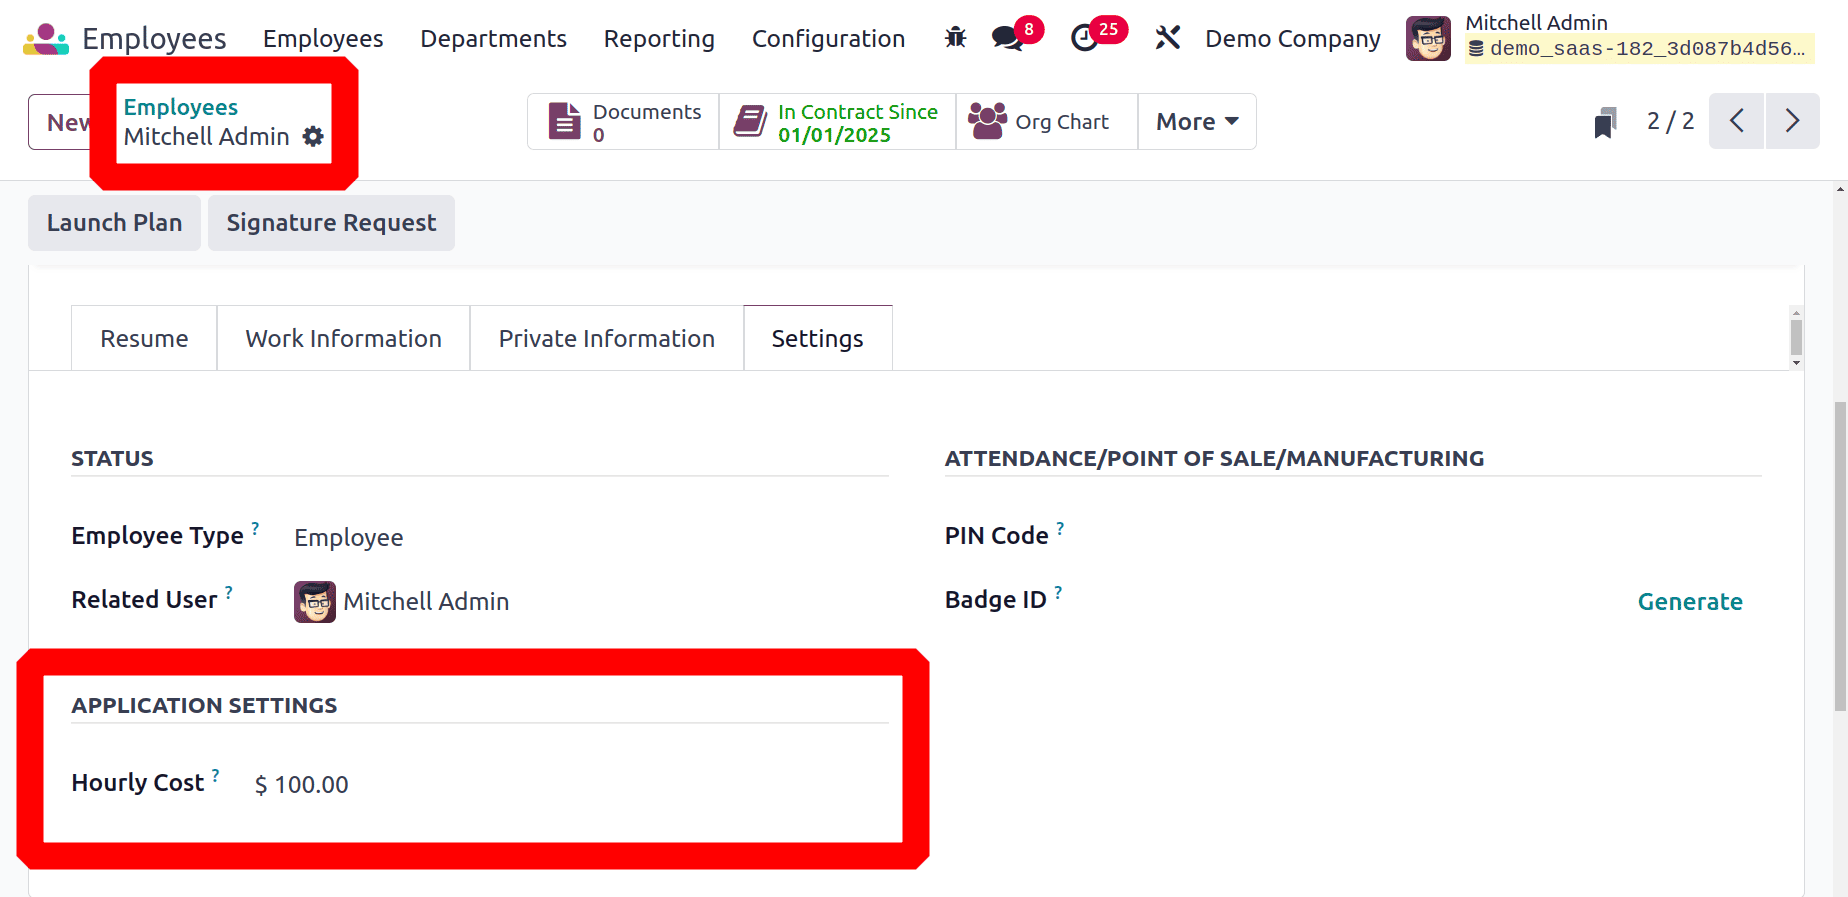
The hourly cost of the employee Mitchell Admin is set as $100. So both employees added a 2-hour timesheet. Which means (2*75 + 2*100= 350).
So the Profitability of a project is calculated by subtracting the Total Cost from the Total Revenue. Here, the Revenue is $400 and the cost is $350. So the total is (400-350=50).
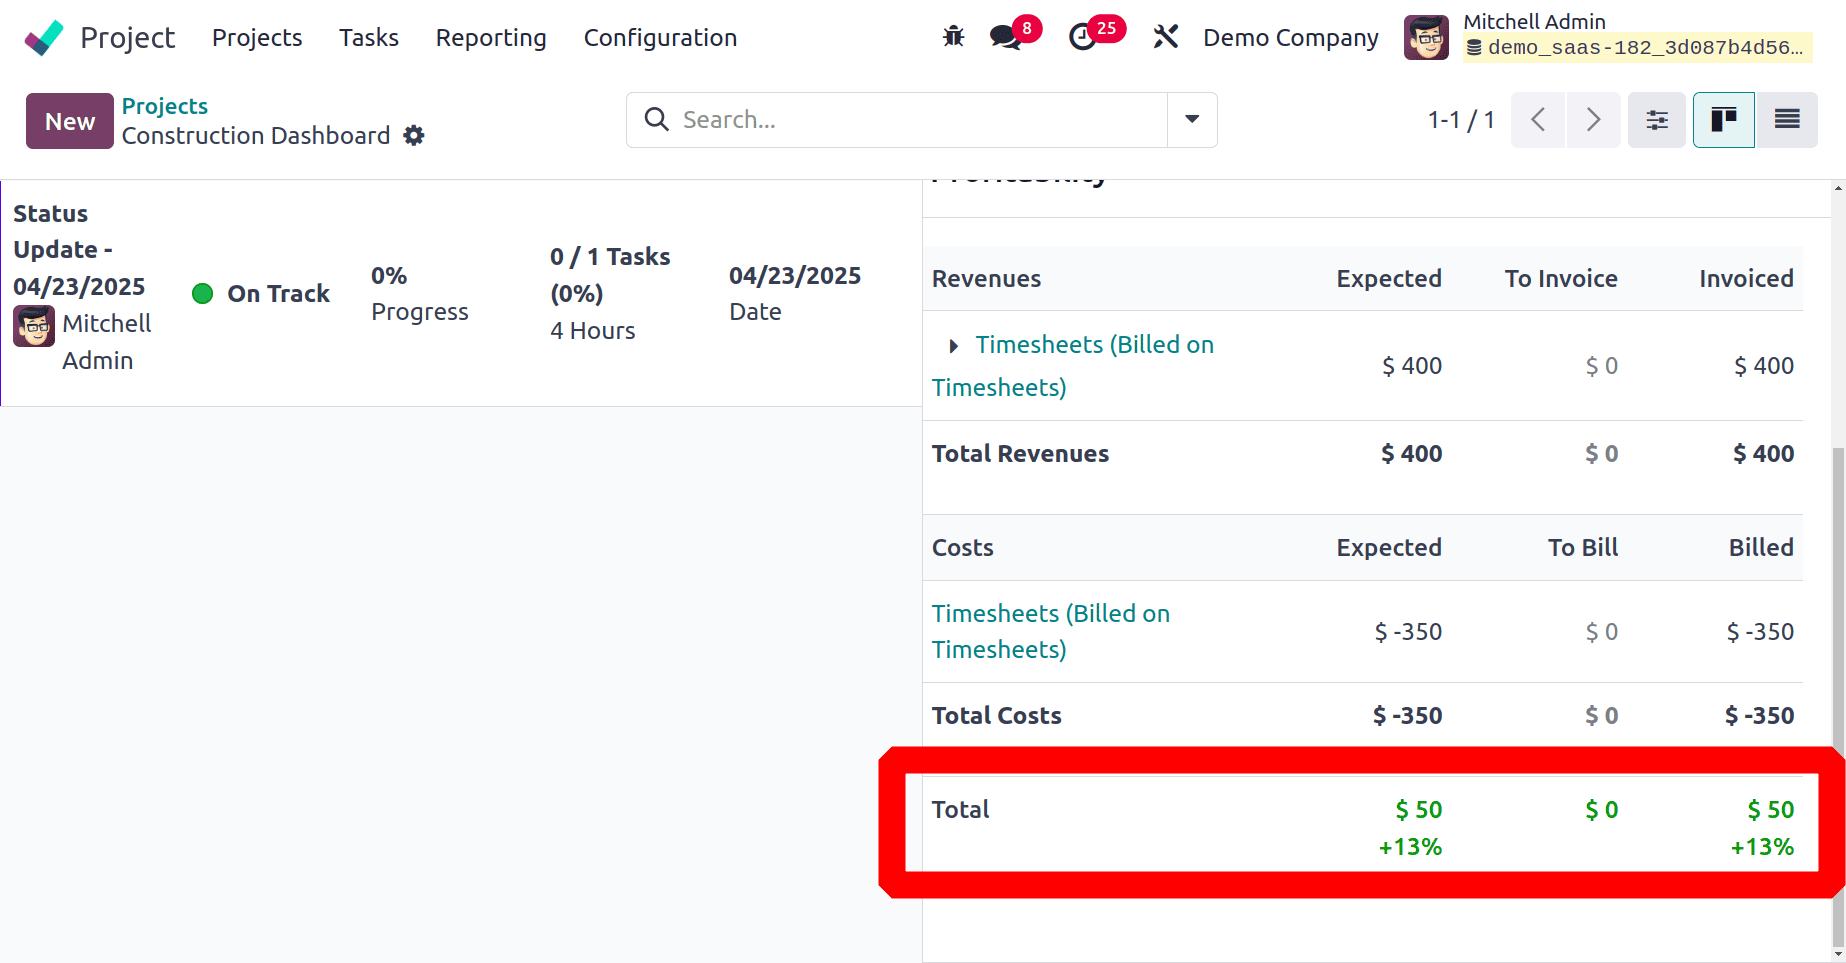
We have a Revenue and Costs section under Profitability. Here are the analytical account's expenses and earnings. Subtract the project's costs and expenses from its revenue to find the project margin. Project success is shown by positive margins, whilst project failure is indicated by negative margins.
The Odoo Project module assists you in determining a project's gain or loss by accurately recording the project's facts. Thus, the Odoo 18 Project module handles project changes and profitability in this manner.
To read more about How to Create a Project in Odoo 18, refer to our blog How to Create a Project in Odoo 18.