Managing field operations with precision and flexibility is crucial for businesses that deal with on-site tasks such as installations, repairs, inspections, and product deliveries. Odoo 18 offers a powerful and integrated solution through its Field Service module, enabling companies to plan, execute, and monitor every aspect of their fieldwork efficiently.
Odoo Field Service is more than just a task scheduler; it's a comprehensive suite of tools that supports the entire lifecycle of onsite operations. Whether your business involves technical maintenance, customer-site repairs, or construction services, Odoo Field Service ensures streamlined coordination between back-office planning and field execution. From job assignment and route optimization to time tracking, invoicing, and reporting, the module is designed to make your field services smarter and more customer-centric.
One of the most practical features in Odoo 18 is the ability to initiate onsite interventions directly from a project. This integration empowers your sales and service teams to deliver a seamless customer experience by linking project workflows with field service operations. Before any fieldwork begins, clients can receive and approve quotes, ensuring transparency and authorization at every step. Once approved, the onsite intervention can be managed and tracked under the corresponding project, offering a unified and organized approach to service delivery.
In this blog, we’ll walk you through how to plan an on-site intervention based on a project in Odoo 18, detailing the configuration, workflow, and best practices to help your team maximize productivity and deliver exceptional service.
Step 1: Creating a Project for Onsite Intervention
To begin planning an on-site intervention in Odoo 18, the first step is to create a new project that will serve as the foundation for organizing all related tasks and field activities. Let’s consider an example project titled ‘Office Renovation’.
To create a project in Odoo 18:
1. Navigate to the Project module from the main dashboard.
2. Click the ‘New’ button to open the project creation wizard.
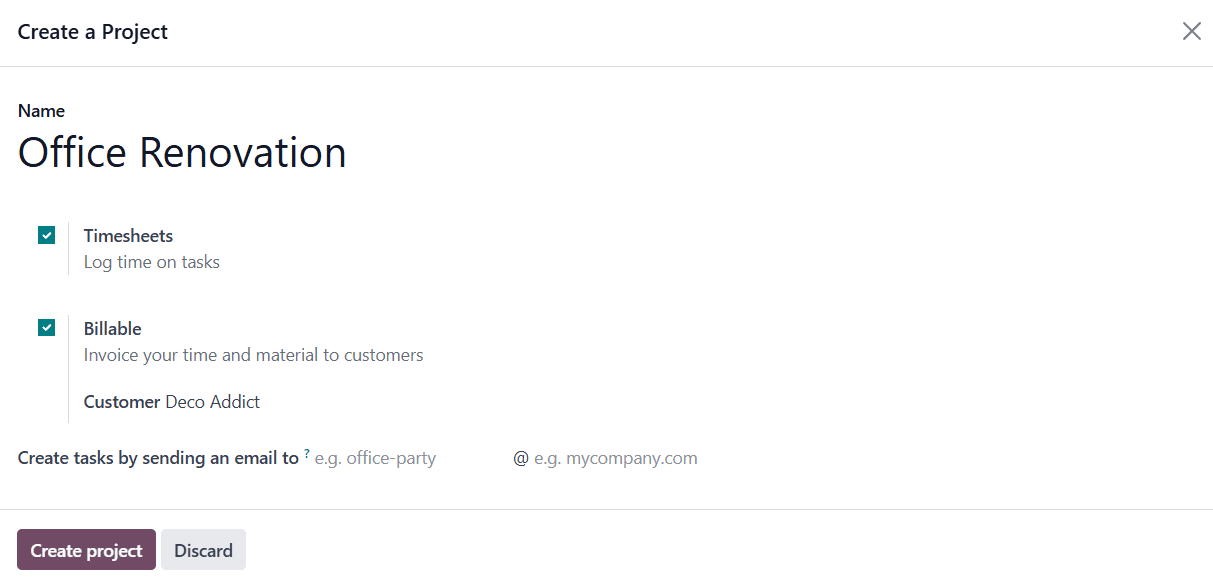
In the creation form, enter the project name, for instance, Office Renovation. Odoo provides a range of configuration options during this setup phase to tailor the project according to your operational needs:
* Billable: Enable this option if you intend to invoice the client for time and materials used during the intervention. This is particularly useful for service-based businesses that charge per hour or based on consumption.
* Timesheets: If tracking employee work hours is important, enable the Timesheets option. This will allow assigned workers to log their hours, which can later be used for productivity analysis or billing.

In addition to these, you can also:
* Specify the Customer linked to the project.
* Assign a Project Manager who will oversee the operations.
* Set the Planned Date and Allocated Hours to define the project timeline.
* Use Tags to categorize tasks for easy tracking and filtering later.
Once all necessary information is filled in, save the project. You are now ready to proceed with customizing tasks and linking them to onsite interventions.
Step 2: Enabling Field Service Integration for the Project
To link your project with onsite operations, Odoo 18 allows seamless integration between the Project and Field Service modules. This is done by enabling the Field Service feature within your project settings.
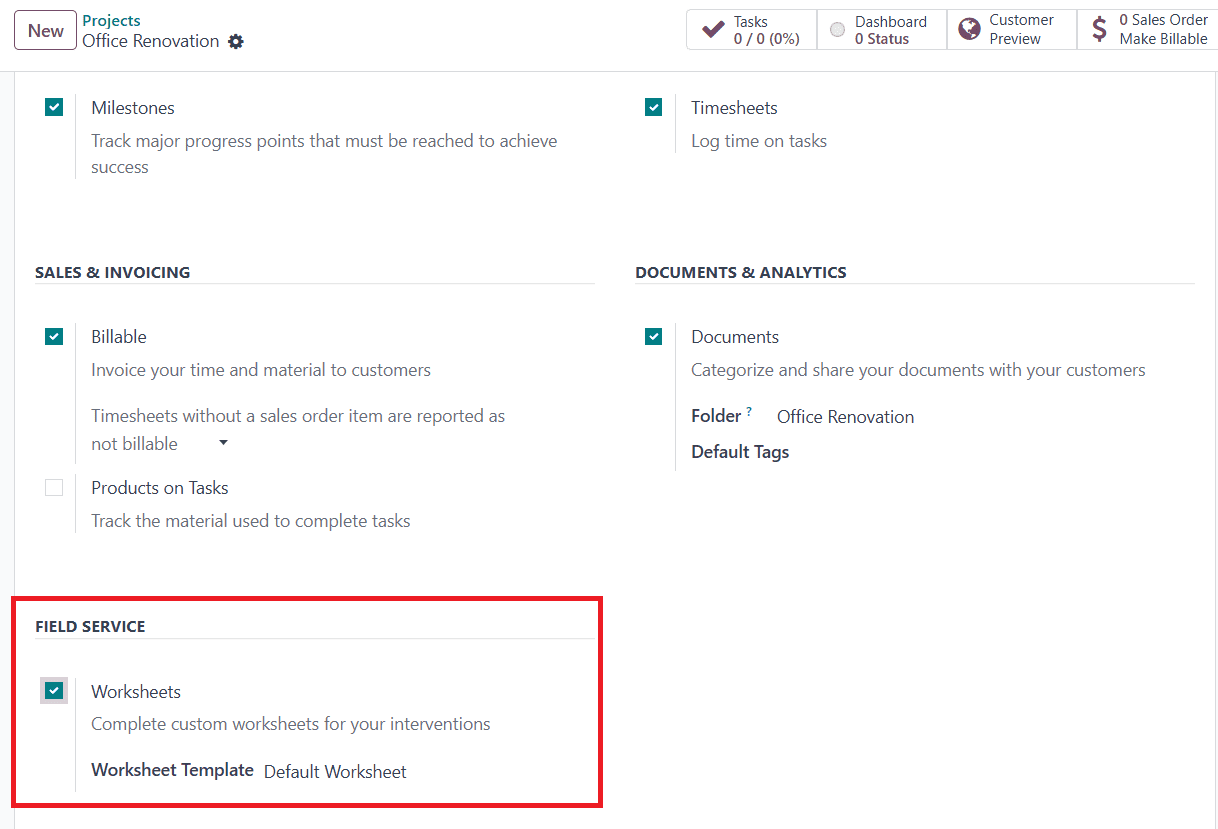
By enabling this option, the tasks under this project will also appear in the Field Service module, allowing you to manage and execute field operations directly from there. Here, you can enable the Worksheets option if you want to associate a worksheet template with your tasks. Worksheets are helpful for creating structured reports (e.g., inspection results, maintenance checklists, or completion notes) that can be submitted for client approval after the intervention. If applicable, you can choose a predefined worksheet template from the dropdown. This ensures that field workers follow a consistent reporting format when completing tasks onsite.
Step 3: Creating a Task in the Field Service Module
Once the Field Service feature is enabled for your project, it's time to create and manage your actual field tasks.
To create a new task:
1. Go to the Field Service module from the Odoo 18 dashboard.
2. Navigate to the My Tasks menu.
3. Click New to open the task creation form.
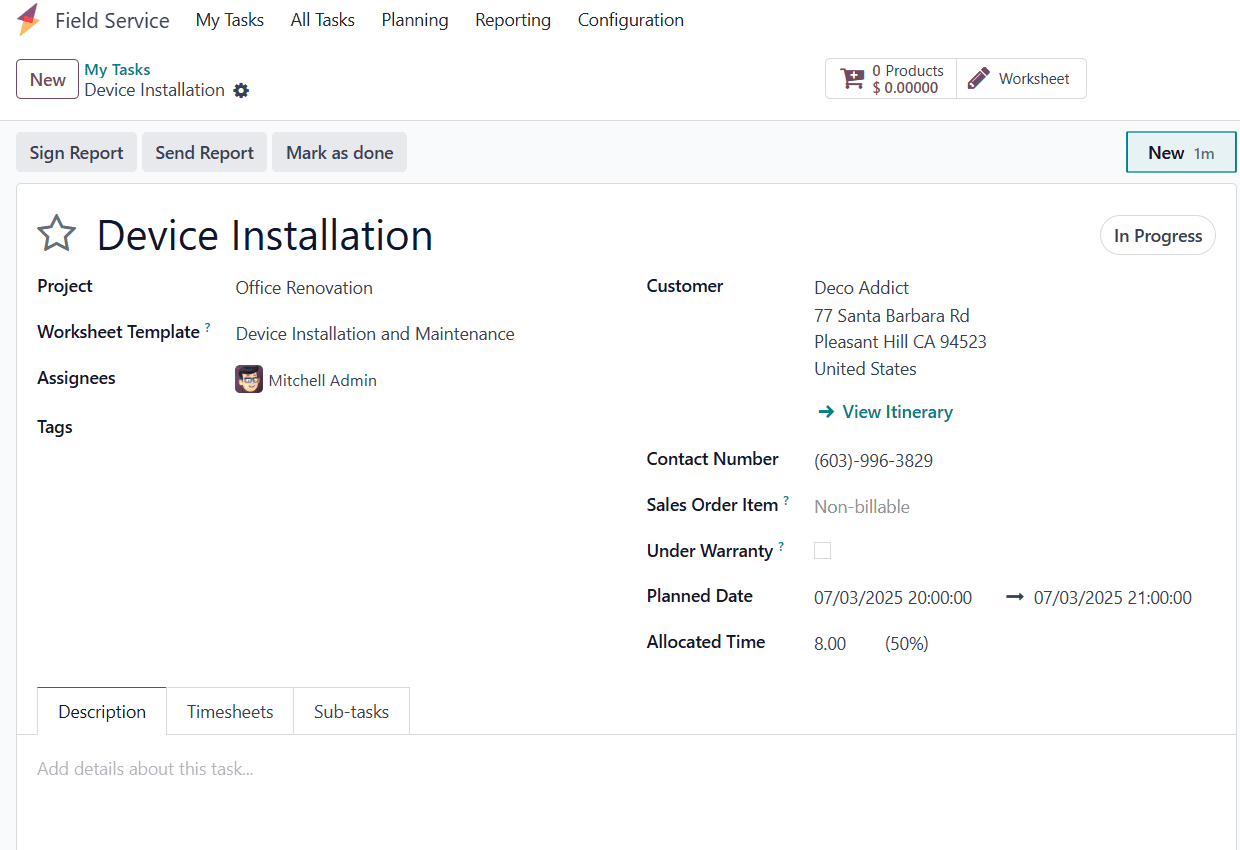
Task Configuration Details:
* Task Title: Enter a clear and descriptive name for the task
* Project: Select the relevant project (e.g., Office Renovation) from the drop-down menu to associate the task with the overall project workflow.
* Worksheet Template: Choose a suitable Worksheet Template if the activity requires formal documentation such as inspection checklists or completion reports. This will later be used to generate client-approvable worksheets.
* Assignees: Assign the task to one or more employees who will carry out the on-site work.
* Tags: Add relevant tags to categorize and quickly identify the task.
* Customer: Specify the customer for whom the task is being performed.
* Sales Order Item: If the task is linked to a sales order and needs to be billed, select the corresponding sales order line from the Sales Order Item field.
* Allocated Hours: Define the total number of hours expected to complete the task.
* Planned Date: Set the planned date or timeframe for when the onsite intervention is scheduled to take place.
Task Description:
Under the Description tab, you can provide additional details or specific instructions for the field worker. This may include safety notes, material checklists, or procedural guidelines.

Timesheet:
Odoo 18 provides robust tools to track and monitor task progress in real time. Within the task form view, navigate to the Timesheet tab to log the actual work done. Click Add a Line to manually enter timesheet entries. Specify the Date, Employee, a short Description of the work performed, and the number of Hours Spent.
In the task’s form view, you’ll also notice Smart Buttons at the top. These provide quick access to related information such as:
* Worksheets: View or complete the worksheet associated with this task.
* Products: Track any materials or items used during the service.
These tools help ensure that everything related to the field task, from timing and materials to documentation and billing, is easily accessible and centrally managed.
Step 4: Completing the Task, Generating Reports, and Invoicing
Once the onsite work is completed, it's time to close the task, send the necessary reports to the client, and proceed with invoicing and payment processing, all seamlessly managed from within Odoo 18.
Marking the Task as Done:
After the field service task is finished:
1. Open the task in the Field Service module.
2. Click the Mark as Done button.
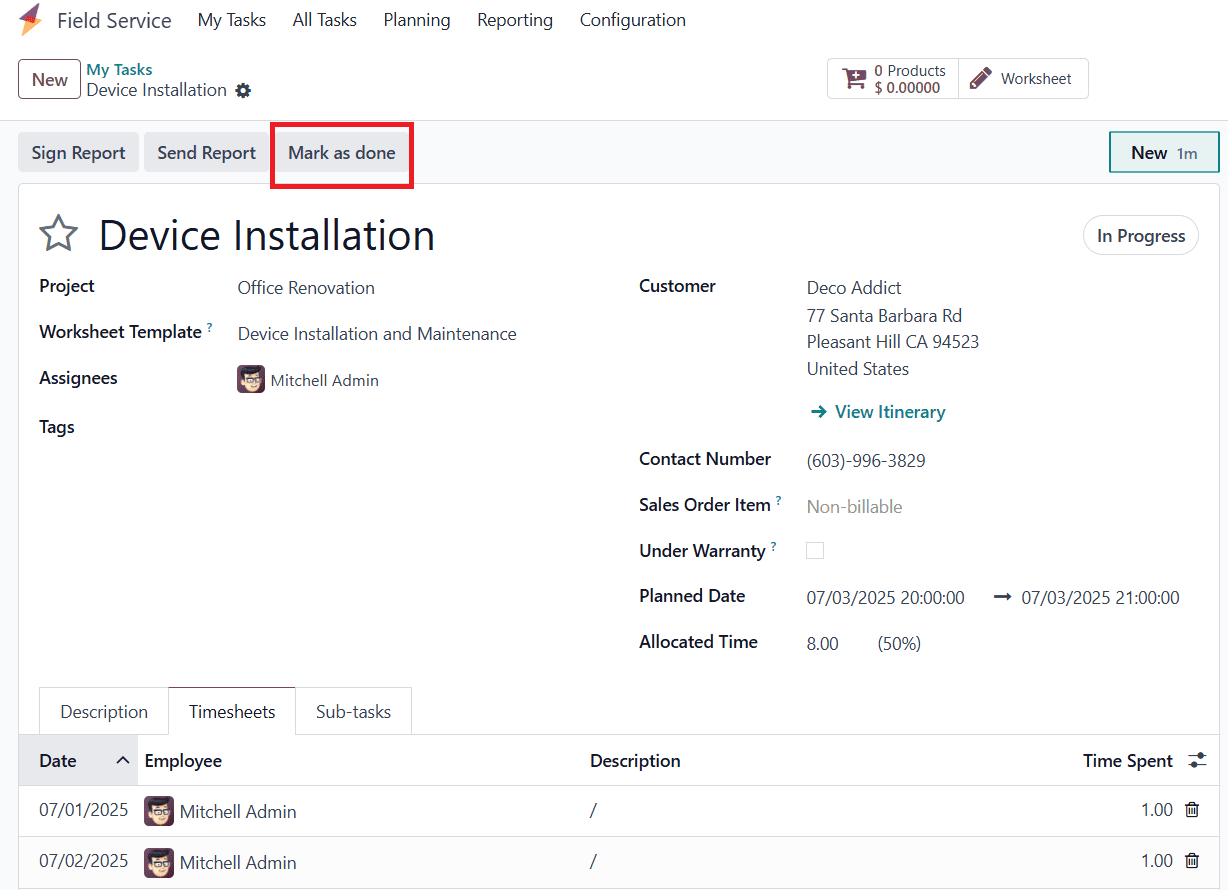
This action confirms that the field operation is complete and automatically triggers the next set of options, including creating an invoice.
Sending the Service Report:
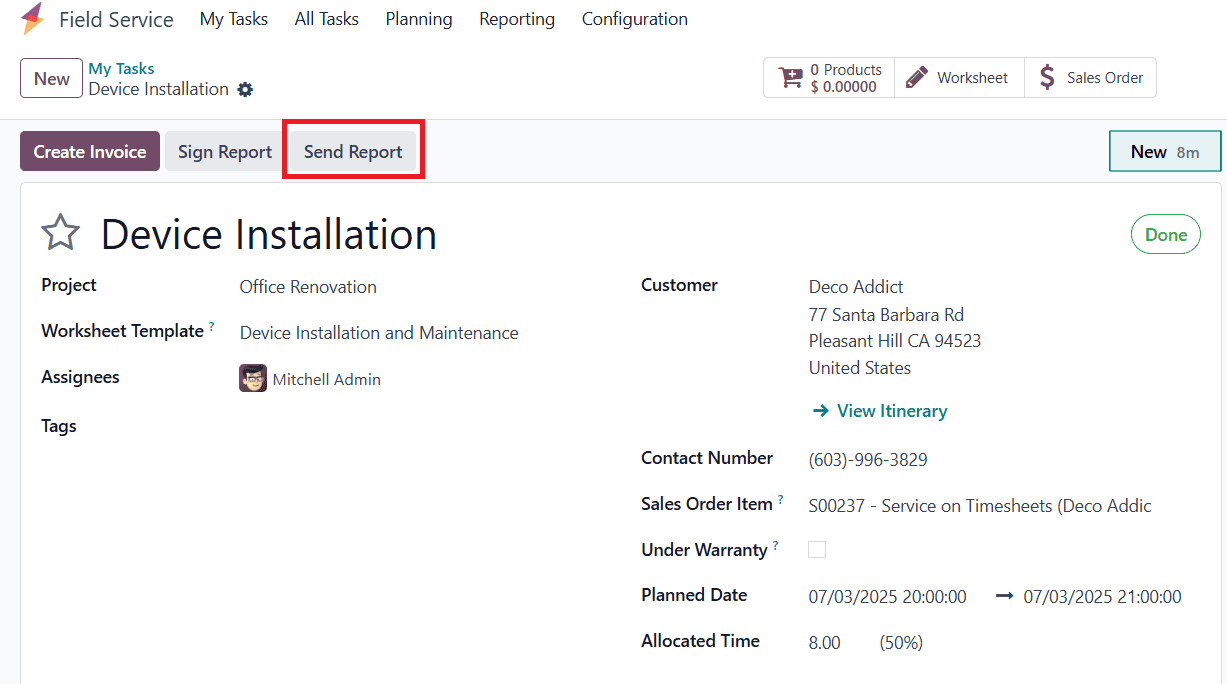
Odoo 18 allows you to send a detailed worksheet report to the client:
* Click the Send Report button available on the task form.
* A pre-filled email form will open, attaching the auto-generated worksheet (based on the selected template).
* You can review the report, add extra notes or attachments, and press Send to deliver it directly to the customer.
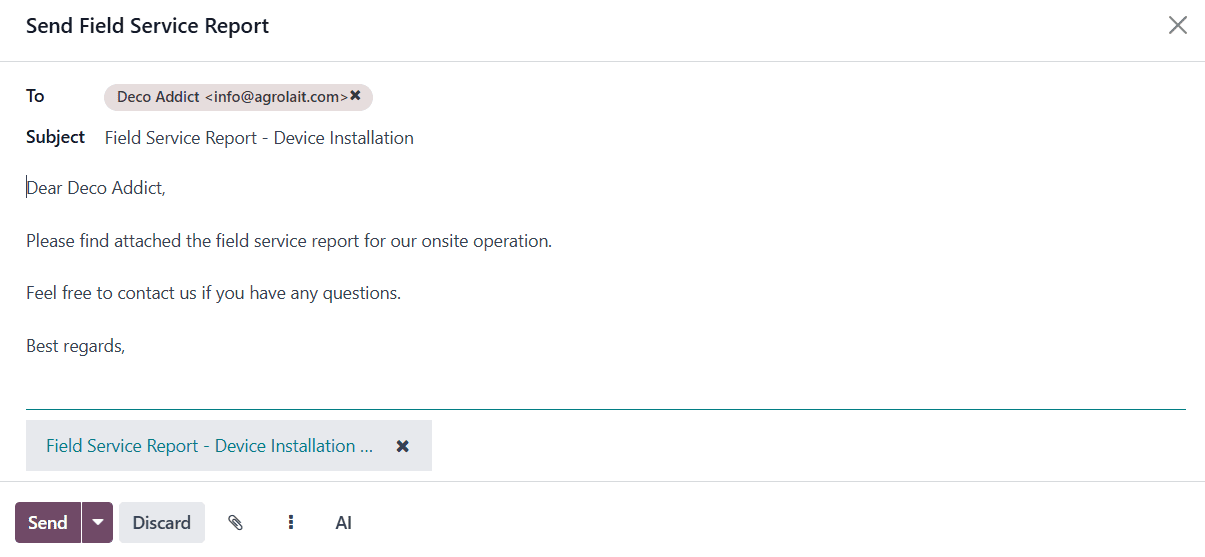
This keeps the client informed and provides a professional summary of the work performed.
Getting the Report Signed:
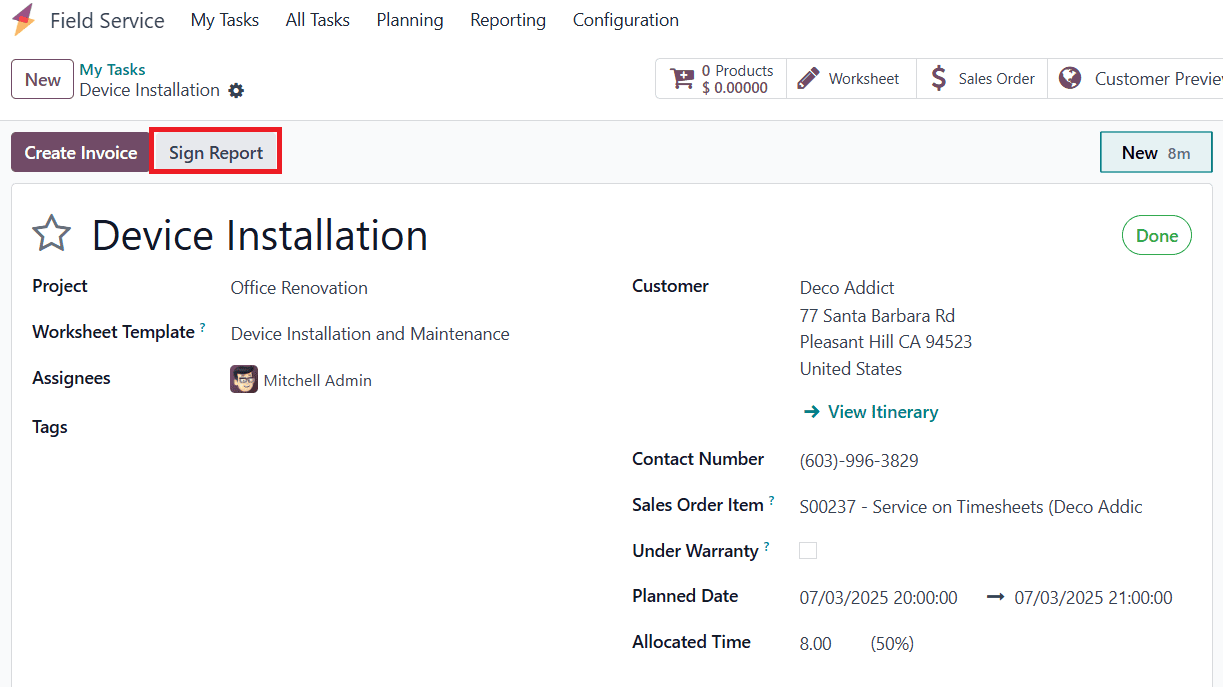
To further streamline the process and add a layer of client approval:
* Click the Sign Report button.
* This opens the report in the Customer Portal, where the client can digitally sign the document.

Once signed, this confirmation acts as authorization for billing and records approval of the completed work.
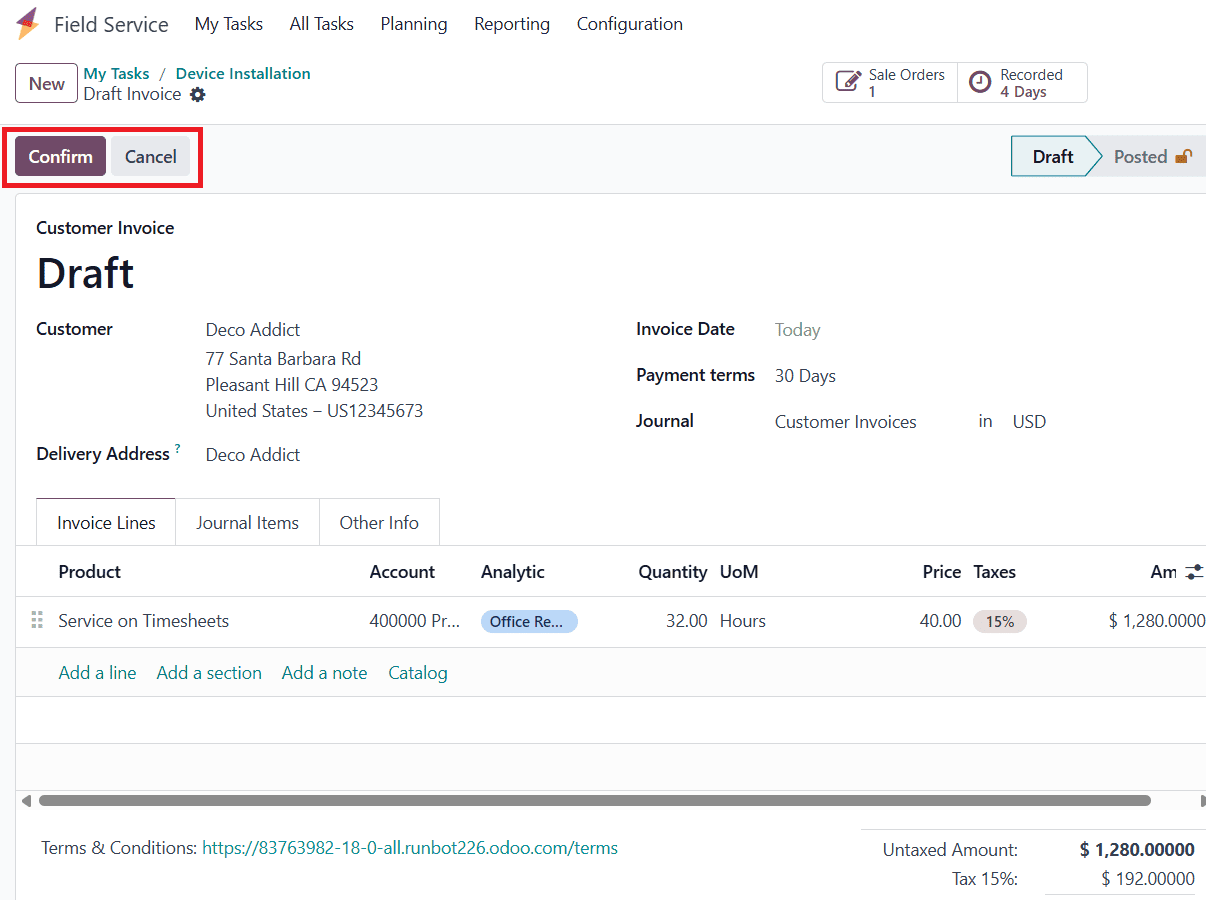
Creating the Invoice:
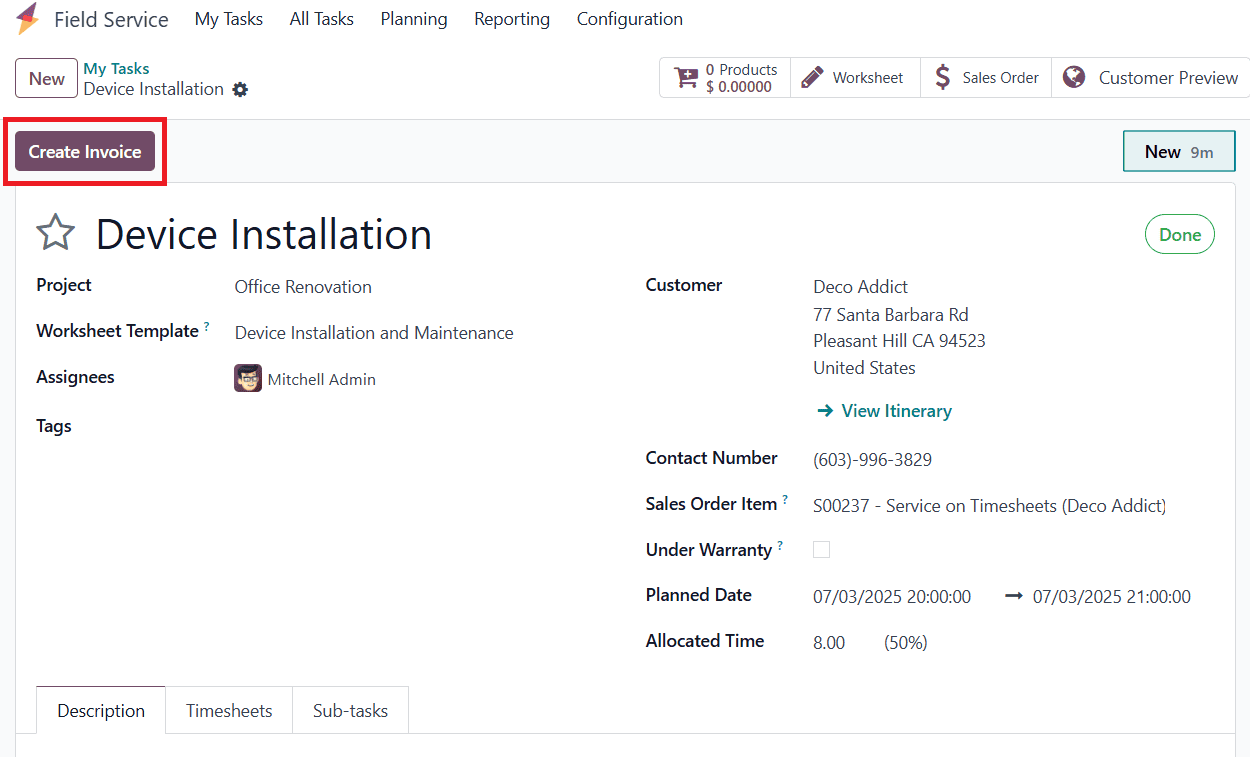
Once the task is marked as done:
* A Create Invoice button will appear.
* Click this to generate an invoice based on the timesheets and materials used (as per the linked Sales Order).
* Review the draft invoice, confirm it, and proceed with the payment process.
This ensures a smooth handover from service delivery to billing, eliminating the need for separate manual steps.
With these steps, Odoo 18 provides a complete workflow for planning and executing onsite interventions based on projects. From project creation and task assignment to timesheet tracking, client reporting, and billing, the Field Service module ensures that every aspect of field operations is managed efficiently and transparently. Businesses can deliver better service, maintain accountability, and enhance customer satisfaction while keeping everything centralized in one powerful platform.
To read more about How to Create a Project in Odoo 18, refer to our blog How to Create a Project in Odoo 18.