There are different types of action in Odoo. These actions help in controlling the view or act as a system to control the user action. The different types of actions in Odoo are
1. Server Actions
2. Client Actions
3. Window Actions
4. URL Actions
5. Report Actions
6. Automated Actions
For understanding more about Actions, you can refer to blog types of action in odoo.
In this blog, we are gonna discuss Client Action in Odoo.
Client actions are basically menu-items defined in XML and the corresponding actions are handled in a widget. In this example, we can discuss how we can add a menu under the orders menu in sales? and further on clicking the menu, fetching the sales orders, and displaying it.
Firstly creating a menu in the XML file in the views directory(views/views.xml).
<record id="action_sale_demo" model="ir.actions.client">
       <field name="name">Sale Custom</field>
       <field name="tag">sale_cust</field>
       <field name="target">new</field>
</record>
   <menuitem id="menu_sale_demo"  action="action_sale_demo"
     name="Sale Custom" parent="sale.sale_order_menu"/>
Here I am creating a record in ir.actions.client model with name as Sale Custom(We can give any name as we want). Furthermore, On the tag field, I had given the tag as sale_cust, which is the tag used in the widget to load the action or on clicking the menu, this tag will help in loading or calling the action defined in the widget(JS file).
The target field will help in adjusting the view size(Client Action) i.e. open as a pop-up, or as a full screen, or any other action. Here I had given it as new So that the client action will be open as a pop-up. So this action will be defined in the menu created. We can see the record id=action_sale_demo is called the action on the menu item.
Now let's define the widget(static/src/js).
odoo.define('client_act.sale_cust', function (require) {
   'use strict';
   var AbstractAction = require('web.AbstractAction');
   var core = require('web.core');
   var rpc = require('web.rpc');
   var QWeb = core.qweb;
   var SaleCustom = AbstractAction.extend({
   template: 'SaleCust',
       events: {
       },
       init: function(parent, action) {
           this._super(parent, action);
       },
       start: function() {
           var self = this;
           alert("Hello")
           self.load_data();
       },
       load_data: function () {
           var self = this;
                   var self = this;
                   self._rpc({
                       model: 'sale.custom',
                       method: 'get_sale_order',
                       args: [],
                   }).then(function(datas) {
                   console.log("dataaaaaa", datas)
                       self.$('.table_view').html(QWeb.render('SaleTable', {
                                  report_lines : datas,
                       }));
                   });
           },
   });
   core.action_registry.add("sale_cust", SaleCustom);
   return SaleCustom;
});
So here we are extending the Abstract Action class to create the widget. Here I have defined a template('SaleCust') that will be rendered when this action is performed.
On the start function, we are calling the load data function, and on the load data it will use the RPC function to get the data from the python function and the returned value is passed to the template ('SaleTable'), which will be added to the tavle_view class of the main Template (SaleCust).
Now we have to define the qweb template and also the python function file which the RPC is calling. So first I am creating the python file(models/filename.py).
from odoo import models, fields, api
class SaleCustom(models.Model):
   _name = 'sale.custom'
   @api.model
   def get_sale_order(self):
       ret_list = []
       req = (
                   "SELECT sale_order.name, rp.name AS customer, sale_order.amount_total, sale_order.state "
                   "FROM sale_order "
                   "Join res_partner rp ON (sale_order.partner_id=rp.id)")
       self.env.cr.execute(req)
       for rec in self.env.cr.dictfetchall():
           ret_list.append(rec)
       return ret_list
Here I am creating a new model(sale.custom)[need to give the security to the model], and I am defining the function, which executes a simple query and each row is appended to a list, which is the final list that is returned.
Therefore, this list will be available in the RPC call, and the data is passed to the qweb template
Let's define the template(In static/src/xml).
<templates>
   <t t-name="SaleCust">
       <div>
           <div>
               <h3>
                   Sale Custom
               </h3>
           </div>
           <div>
               <div class="filter_view_tb"></div>
           </div>
           <br></br>
           <div>
               <div class="table_view"></div>
           </div>
       </div>
   </t>
   <t t-name="SaleTable">
       <div>
           <div class="table_main_view">
               <table cellspacing="0" width="100%">
                   <thead>
                       <tr>
                           <th>Number</th>
                           <th>Customer</th>
                           <th>Amount Total</th>
                           <th>Status</th>
                       </tr>
                   </thead>
                   <tbody>
                       <t t-foreach="report_lines" t-as="data">
                           <tr style="border: 1px solid black;">
                               <td style="border: 0px solid black;">
                                       <t t-esc="data['name']"/>
                               </td>
                               <td>
                                   <t t-esc="data['customer']"/>
                               </td>
                               <td>
                                   <t t-esc="data['amount_total']"/>
                               </td>
                               <td>
                                   <t t-esc="data['state']"/>
                               </td>
                           </tr>
                       </t>
                   </tbody>
               </table>
           </div>
       </div>
   </t>
</templates>
This is the qweb template, in which the data is passed. This is how a client action can be defined; you can look at the resultant screenshots of the configuration down below.
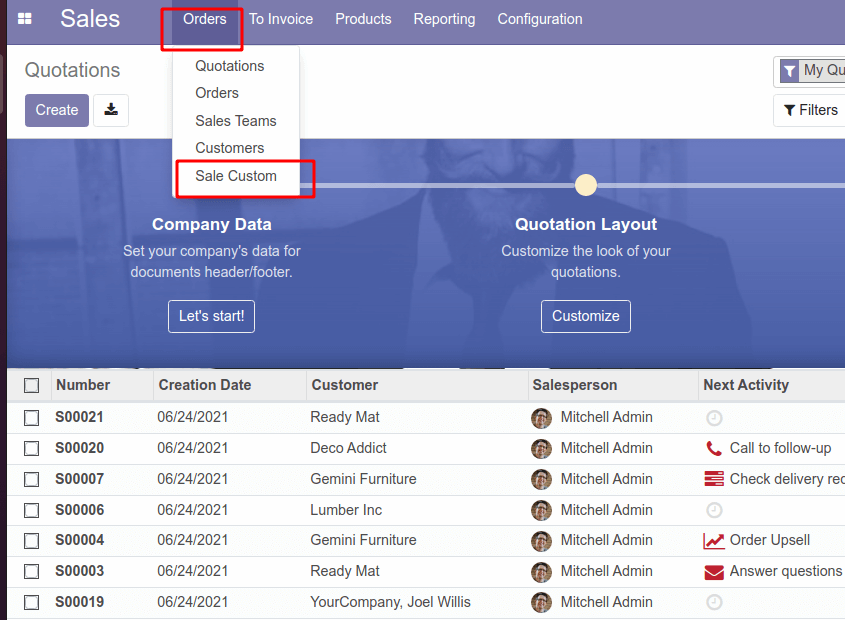
IMG:1- New menu created under the orders menu in sale
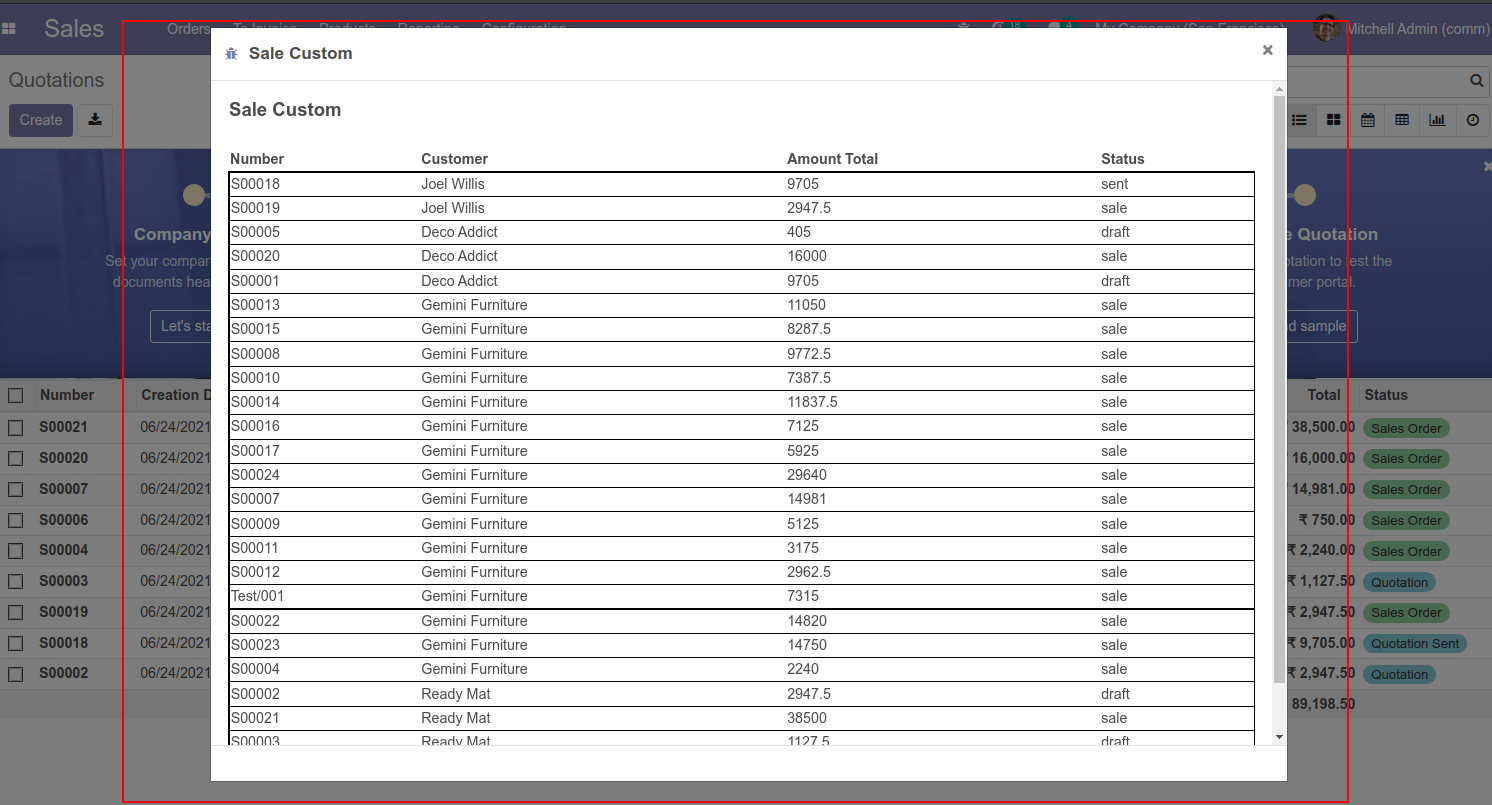
IMG 2:- On clicking the menu, the template will be loaded by adding the corresponding value.
This view can be open in the current window in full-screen mode by giving target as current
<field name="target">current</field>
We can also define extra filters on this view and manage the corresponding data by applying the changes on the query defined, based on the filter data passed to the query.