Field service management comprises sending out employees or independent contractors to install, maintain, or repair machinery, systems, or assets outside the company's territory. The professionals who provide clients with skilled, specialized, or unique services are tracked by field service managers who also coordinate their efforts.
Data from mobile devices, IoT, business asset management systems, and other remote sources are integrated via field service management solutions. It also improves first-time fixing rates, motivates field service professionals, lowers expenses, and boosts customer happiness. This assists businesses in managing resources efficiently. These technologies aid technicians in remaining safe, and compliant, troubleshooting, and successfully completing job duties by offering remote support and mobile capabilities. Utilizing data and insights, businesses may cut expenses and guarantee prompt reactions to worries or unforeseen delays.
A complete platform for organizing and tracking different site activities and services, such as repair, installation, building, and product delivery, is called Odoo field service management. It has a number of features, including service creation and organization, task assignment, time tracking, original worksheet creation, effective stock management, quotation generation, service bill creation, and electronic signing. By streamlining task scheduling and completion, the Odoo field service module ensures effective and efficient handling of numerous duties.
Odoo 16 Field Service platform provides various task management facilities that include controlling and optimizing workloads in manufacturing or production processes known as scheduling. It organizes work processes, allots resources, arranges human resources, and makes material acquisitions. In Odoo 16 Field Services, task scheduling entails developing, allocating, administering, and correcting particular tasks or services requested by customers, such as provider services, installations, and repairs. This process is only performed after a new task has been created and is visible in the "My Tasks" section.
We can check out the process of creating a new task for a project and managing it through the Field Service application within this blog section.
Configuration of Projects
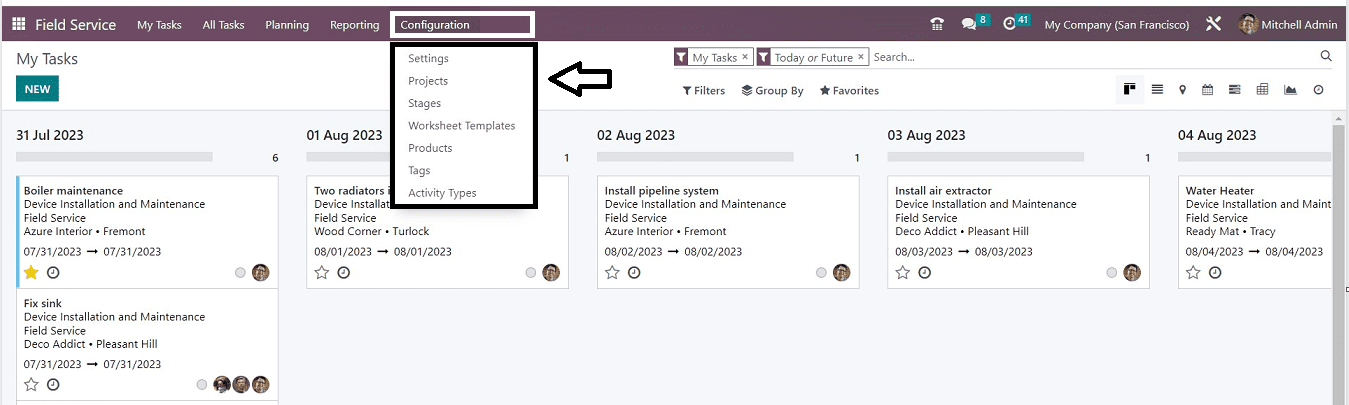
First of all, we can create a new project to create a Field Service Task of that project type. Odoo gave us the facility to create customized projects as per the organizational requirements. This can be done by using the “Projects” option available in the “Configuration” menu of the Odoo 16 Field Service Module.
Opening the “Project” option will lead you to the Projects Dashboard window. You can access information about the project Name, Worksheet Template, Company, Start Date, End Date, Allotted Hours, Project Manager, and Stage. Click the "NEW" button since we are going to start a new project here.
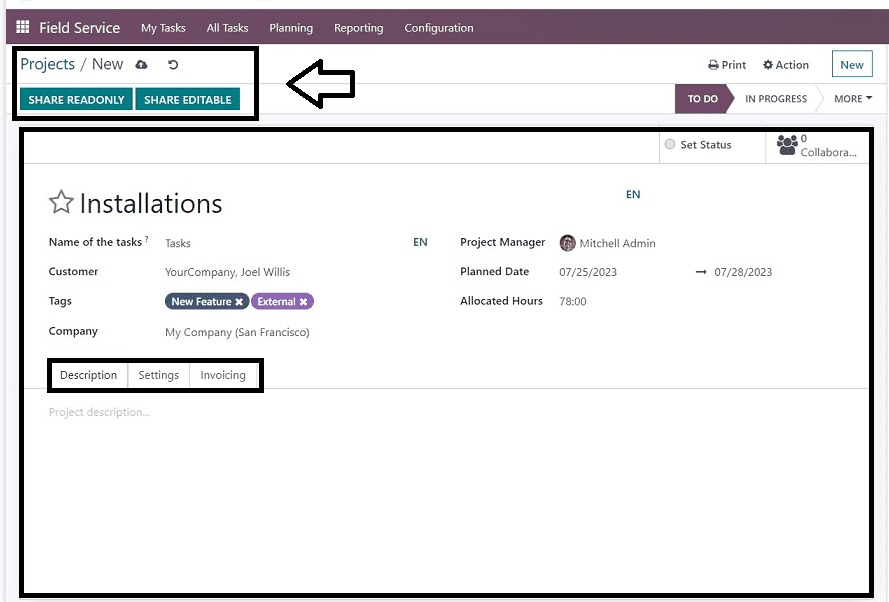
You can type the project type name on the empty field, so here I am giving it as “Installations.” you have to fill in the “Customer” details, “Tags,” and “Company” fields according to your data. Also, mention the “Project Manager” in the respective field. You can give the “Planned date” by selecting the required date from the calendar dropdown section. Additionally, enter the “Allocated Hours” as per the task requirements.
This form contains three tab sections named “Descriptions,” “Settings,” and “Invoicing.”
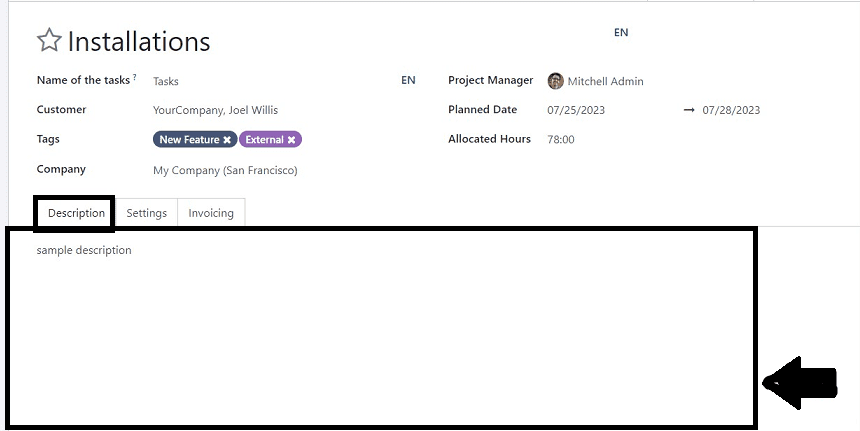
Description Tab
You can give any Descriptions or Notes regarding the particular project in the “Description” tab area.
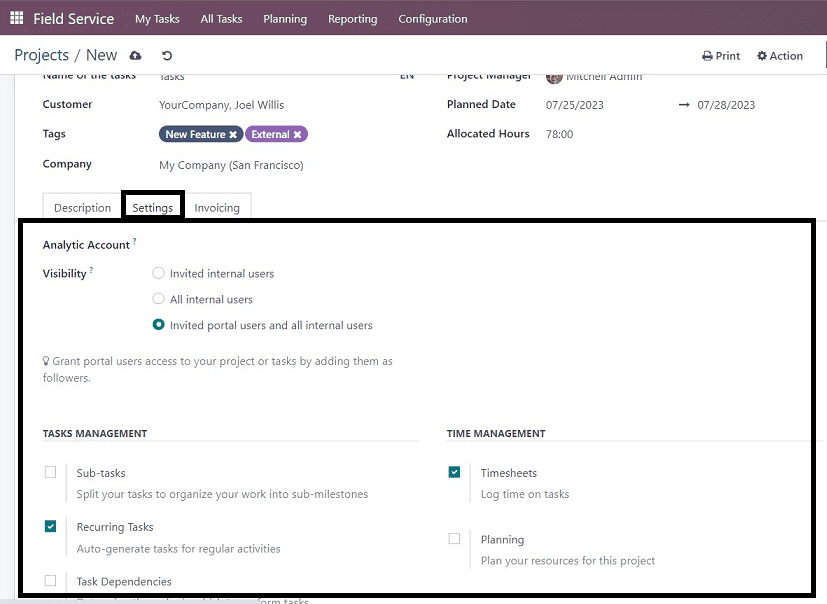
Settings Tab
You may link the tasks and timesheets for this project by adding an “Analytic Account” in the relevant area on the “Settings” tab. This will let you keep tabs on the project's expenses and income. In the relevant box, you can decide on the project's "Visibility" setting from Invited Internal Users, All Internal Users, or Invited Portal Users and All Internal Users. This selection will determine who has access to the project and the responsibilities associated with it. To divide the tasks into smaller milestones, turn on the “Sub-tasks” option in the “TASK MANAGEMENT” session. You may select the “Recurring Tasks” option to enable automated task scheduling at certain periods.
You can define the sequence of each task's execution by turning on the “Task Dependencies.” You can track significant advancements that need to be made in order to succeed using the “Milestone” option. The "Timesheets" option needs to be turned on to monitor how much time is spent on tasks and record it in a timesheet. To schedule your resources for this project, turn on the “Planning” option.
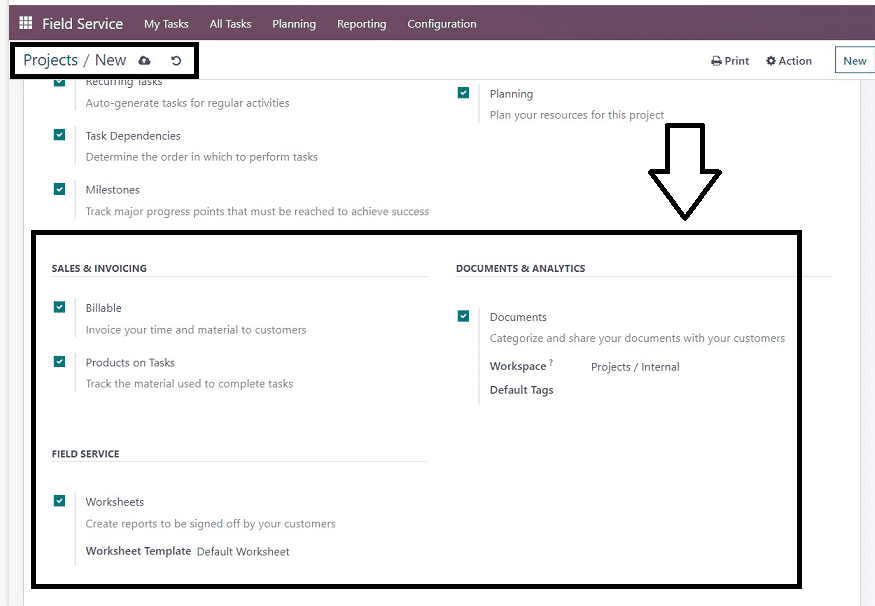
You can bill the relevant client for your time and materials if you enable the “Billable” option. After selecting the “Products on Tasks” option, it is feasible to keep track of the supplies required to complete the activities. Using the “Documents” option will allow you to organize and share your documents with the relevant customer. To produce worksheet reports of the tasks that need to be approved by the relevant client, activate the “Worksheets” option under the “FIELD SERVICE” session.
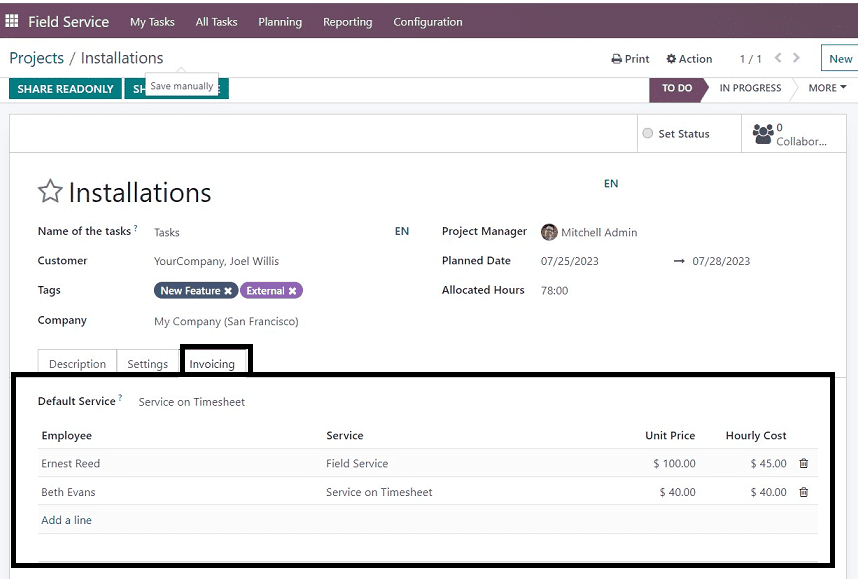
Invoicing Tab
For the invoicing procedure, you can customize the Default Service under the Invoicing tab. This designates the service that will automatically be used for billing for the time spent on a job. Choosing a particular sales order item may be changed on each job separately. The Employee, Service, Unit Price, and Hourly Cost may all be added by using the “Add a Line” button.
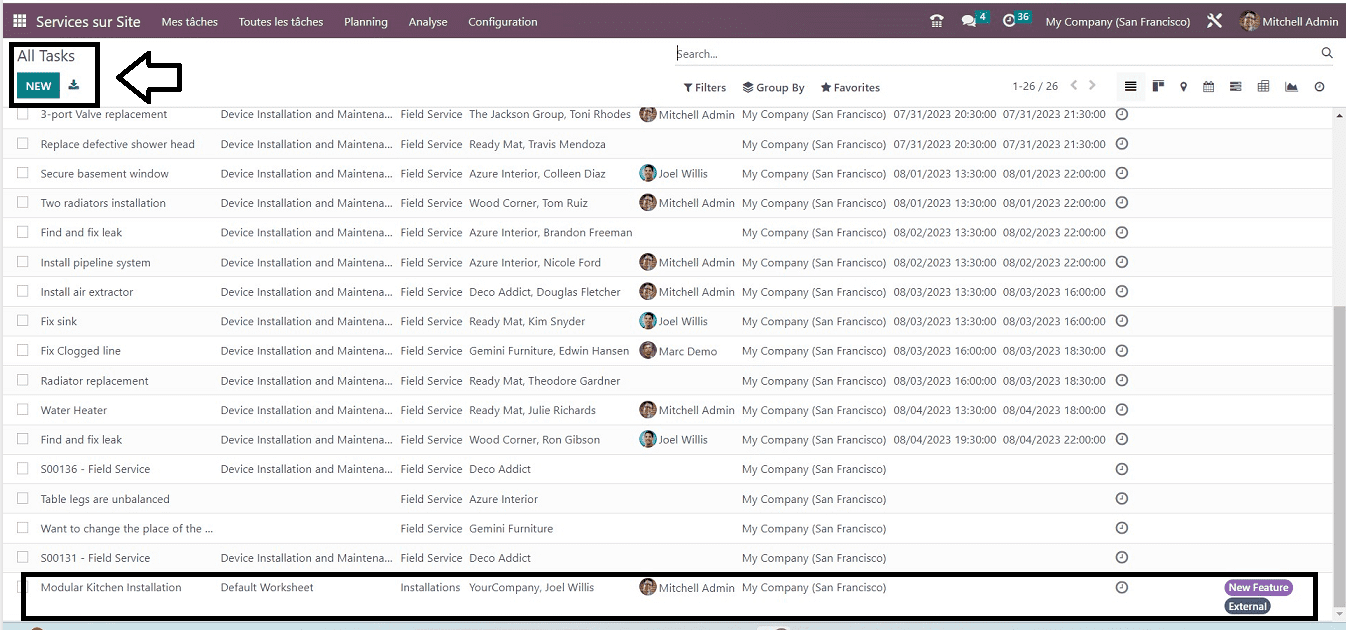
Then save your project data after completing the process and come back to the project's dashboard. Now, our new project has been added to the projects database inside the Field Service Module. Then we can create a new Field Service Task for this project by entering it into the “My Tasks” menu.
As the picture below demonstrates, we are transferred to the application's home page as well as the “My Tasks” menu of the Field Service Module from the Odoo 16 Platform.
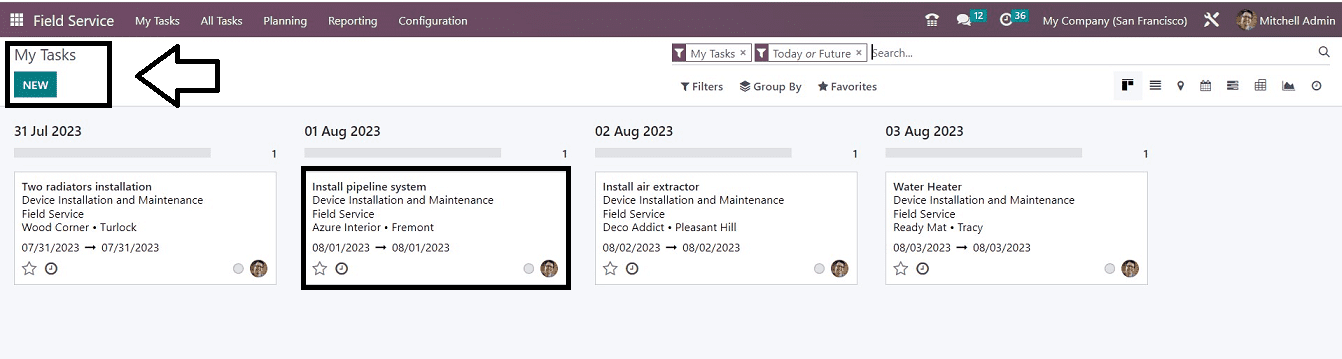
The Kanban view gives us a quick overview of assigned activities, client information, and dates by displaying tasks and services depending on the date. A task details form is displayed when a task is clicked. The "New" task button, which can be found in the top left corner, enables us to add or create new tasks.
A form will appear when you click the "NEW" button, as seen below. So, we can talk about each field in the form, how to fill it out, and the purpose that it does.
In the provided blank area, you can provide the task's name and select the “Project.” Here, we are going to select the newly created project name. If we select the project name, then the “Worksheet Template,” “Milestone,” “Assignees,” Customer,” and “Phone” fields will be auto-filled as per the project settings.
The “Tag” field can be used to add the task's appropriate Tags. You can choose a “Sales Order” to which you wish to bill this specific work by entering its sales order item number in the field. According to the service or task type, you can add any required tools or products to the same page. using the “+Add a Property” link.
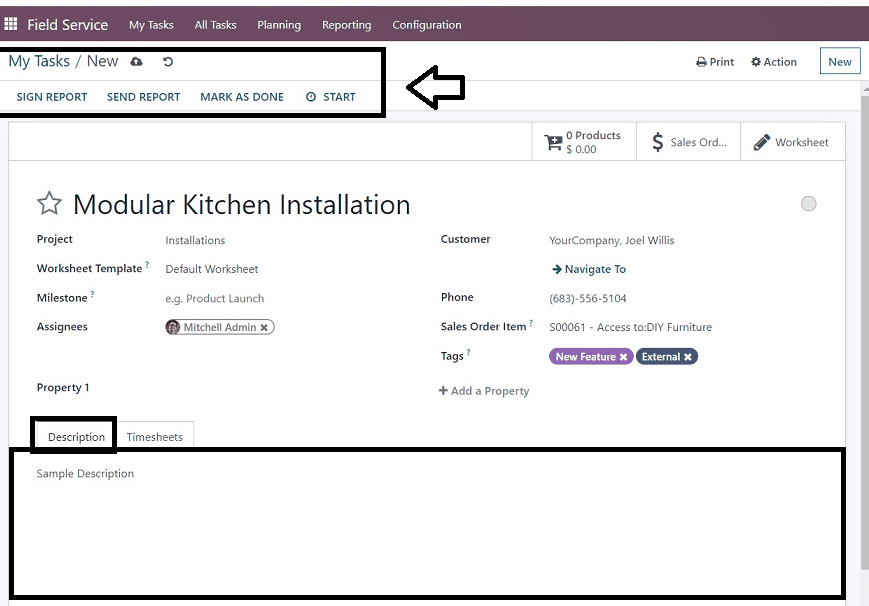
Description Tab: You can add any notes or descriptions regarding the project within the “Description” tab, You can edit any important notes or descriptions related to the given task in this field. Putting a “/” will help you to organize the information in Bulleted Lists, Numbered Lists, Checklists, Templates, Separators, etc., by selecting from the displayed scroll popup window, as shown in the screenshot above.
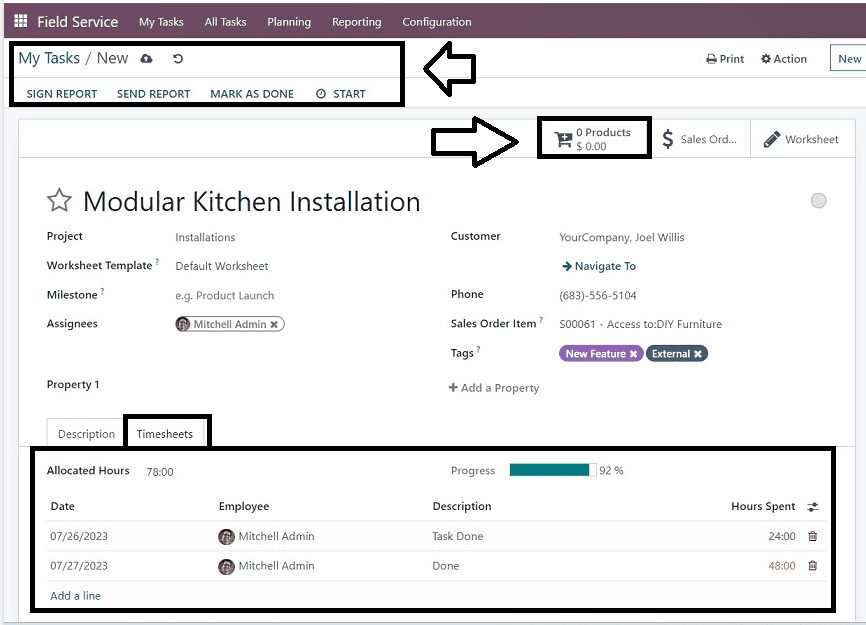
Timesheets Tab: The "Allocated Hours" option allows you to enter the amount of time needed to do the specific assignment.
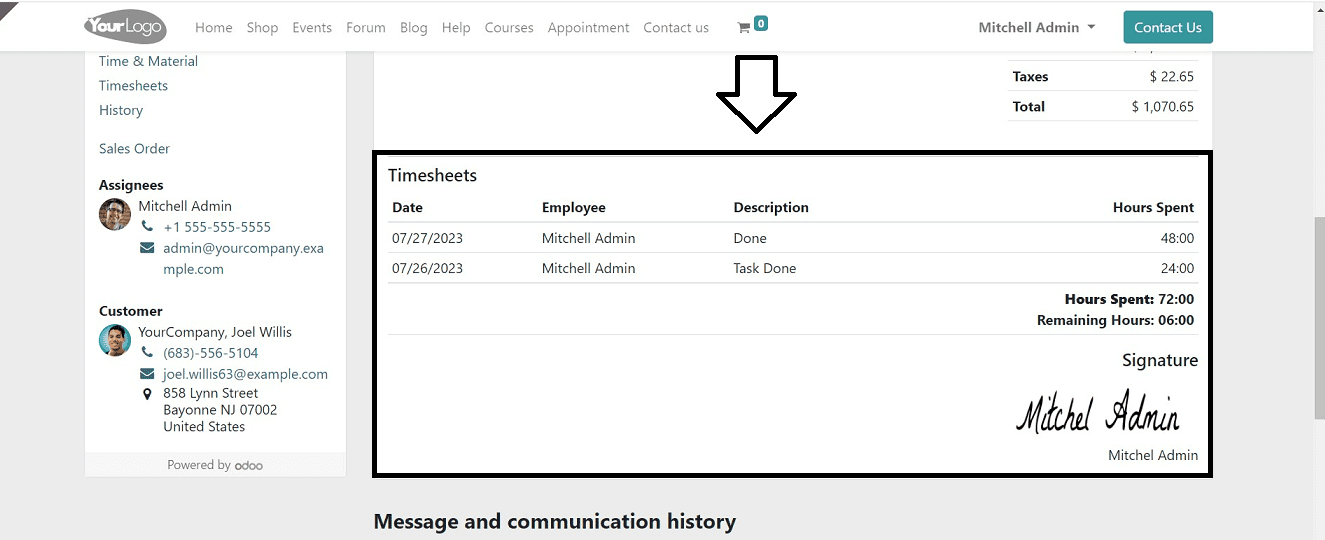
By selecting the “Add a line” option provided according to the number of individuals allocated for the assignment, as shown in the screenshot below, you can add the “Date” the task was executed, the names of the assigned “Employees,” “Description,” and the “Hours Spent” to do that specific activity or task. You can add the timesheet data inside the “Timesheets” tab by clicking on the “Add a line” link.
Adding Extra Products
Using the “Products” smart button included in the Task Configuration Form, we may add extra Tools, Products, or any Components of any devices that are necessary while carrying out a Task, Servicing, or Installation procedure.
A "Products" window, as seen below, will be opened by clicking the "Products" smart button.
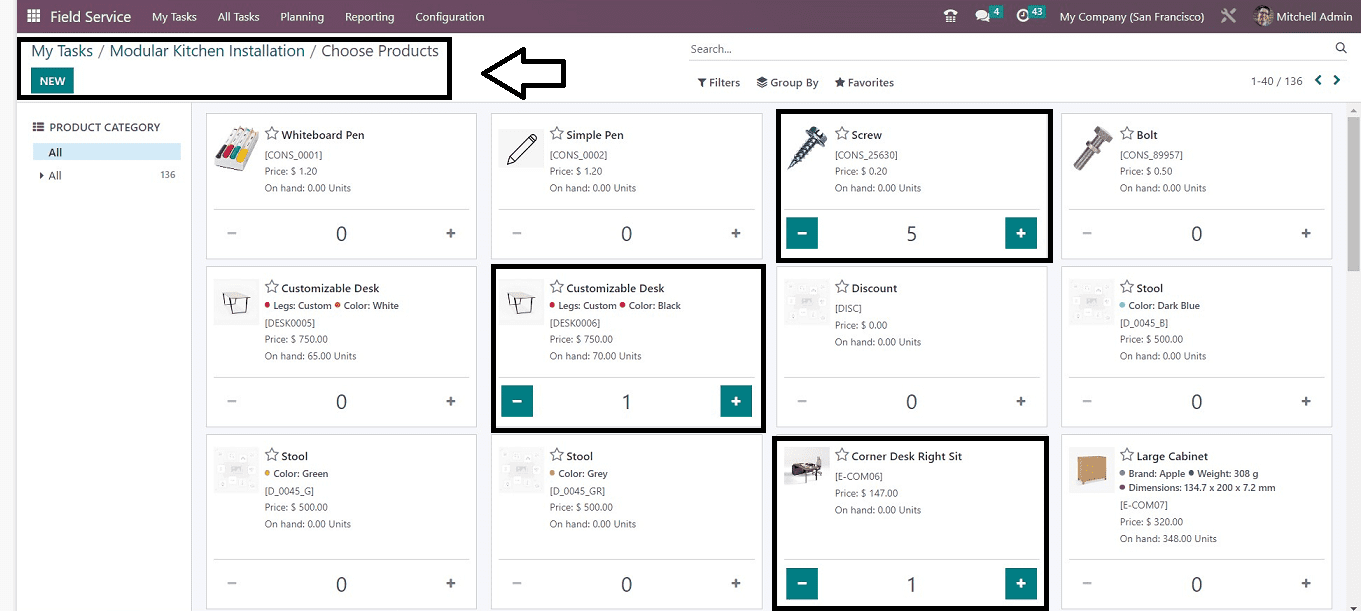
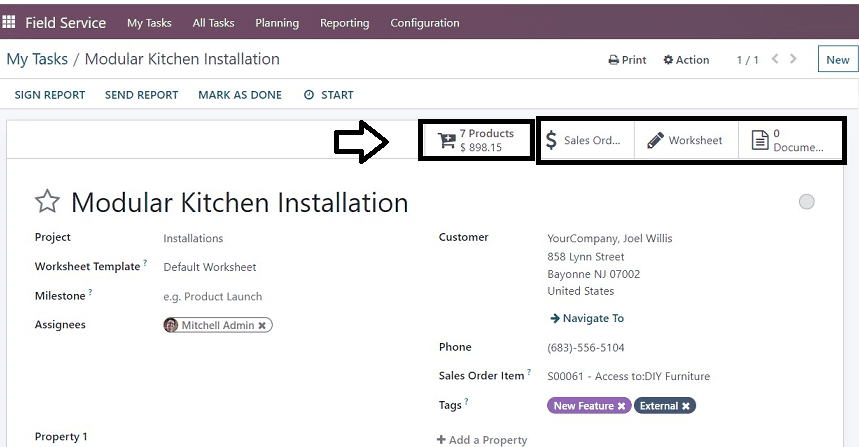
You can see the Kanban dashboard arrangement of various products available in the company warehouse from this window. Choose whatever items you want the field service invoice to include. Here, I have added some random products for a sample demonstration. Then come back to the task Configuration form, where you can see the products that are added to the task, and you can see the billing amount from the “Product” smart button itself.
Timesheet Billing
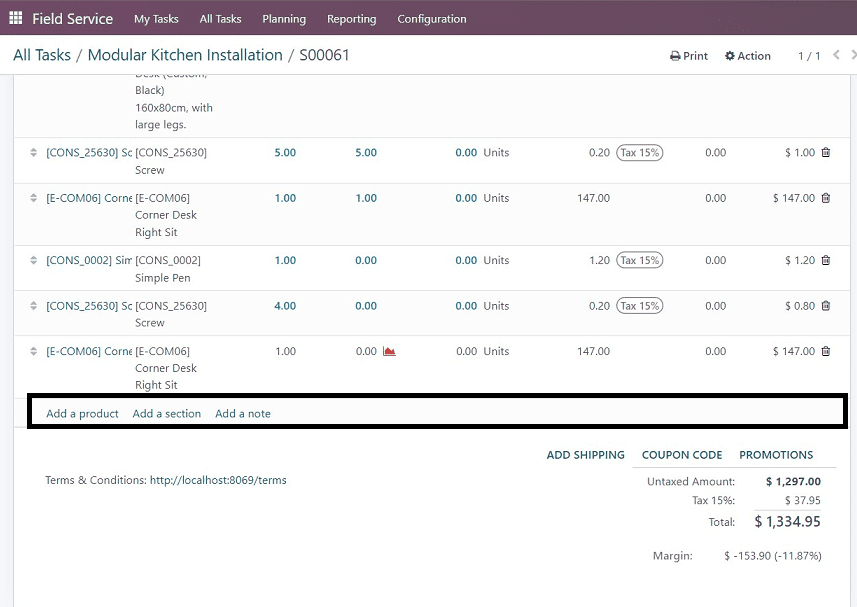
You can see the invoicing and billing details from the “Sales Order” smart button. Clicking on it will open a new form section where you can see the detailed billing of each product, taxes, and the total amount by scrolling down the screen as shown below.
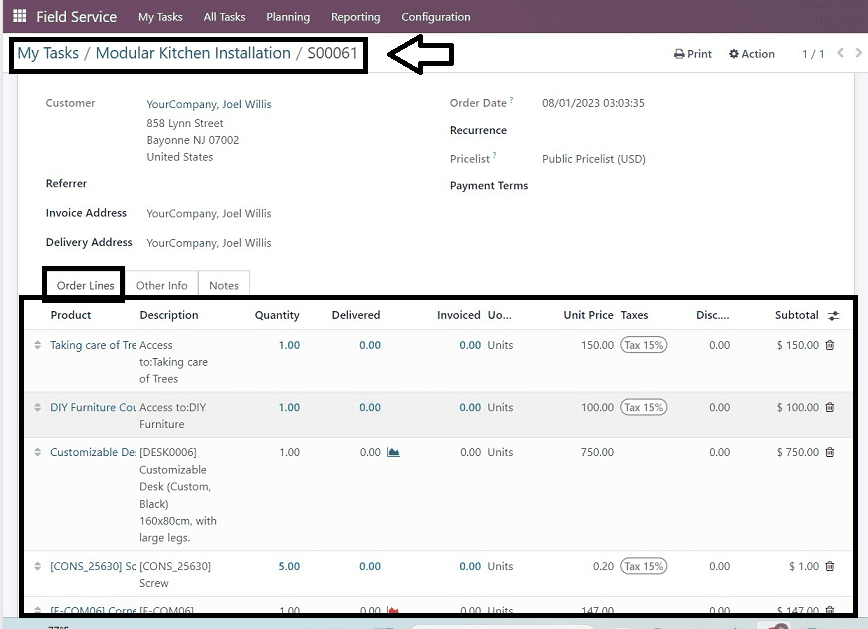
You can add any products using the “Add a line” option available on the “Order Lines” tab of the billing form.
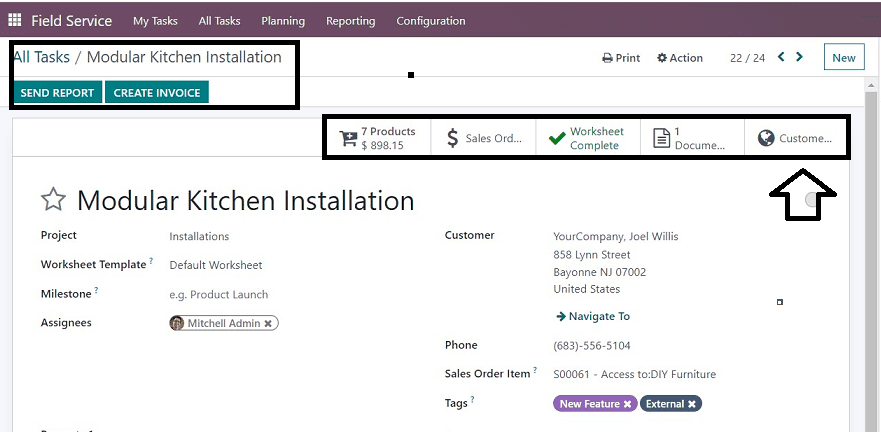
You will get the exclusive details of the invoicing and billing details of the task in a document format by opening the “Documents” smart button, as shown below.
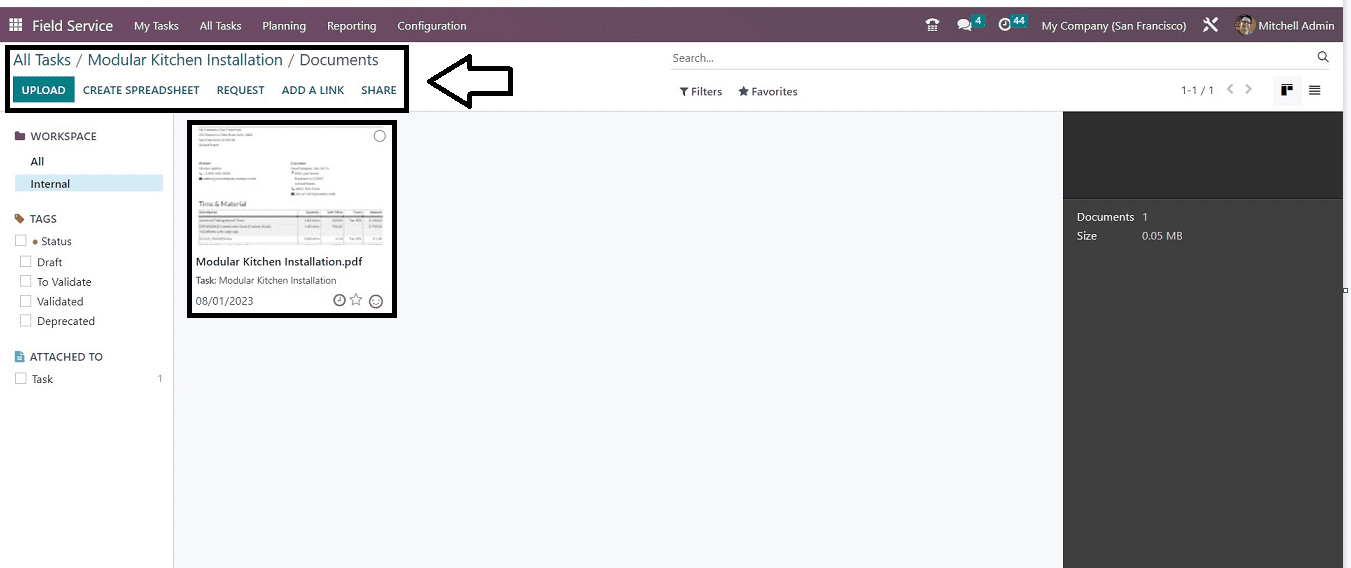
You can download the document, share it, and create spreadsheets using this “Documents'' window. After editing all the required task details, save your data using the Save icon available at the top of the form. The employee can gather customer signatures for their work report from the displayed digital submission web page online. An interactive page for manual sign-up is opened by clicking the "SIGN REPORT'' button. The “SEND REPORT'' button can be used to send work reports to customers. The task will be marked as finished when the "MARK AS DONE" button is clicked. Then you can move to the invoicing and billing procedures.
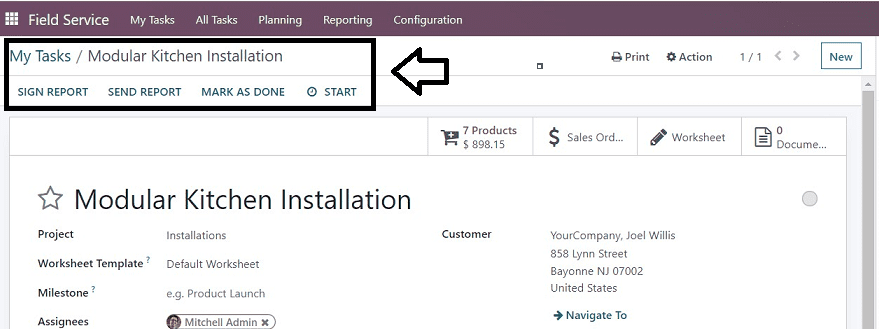
The "START" button associated with the timer option can be used to begin the timer when a task is initiated. The "MARK AS DONE" button must be pressed in order for the job to be marked as completed. Here I have marked the task as “MARK AS DONE.”
Adding Worksheets
The Odoo 16 Field Service Module offers extensive management and monitoring of staff timesheets. Employee worksheet information may be managed and updated directly from the Task Configuration Form. The "Worksheet" smart button can be used to complete this work. Pressing on the “Worksheet” button will open the Worksheet configuration form, as shown below.

In our Field Services Worksheets section, we can see a sample worksheet template, as shown in the above screenshot. You can edit any comments in the Worksheet “Comments” line and save the details. We can custom-edit new worksheets using the “Worksheet Templates” option available in the “Configuration” menu.
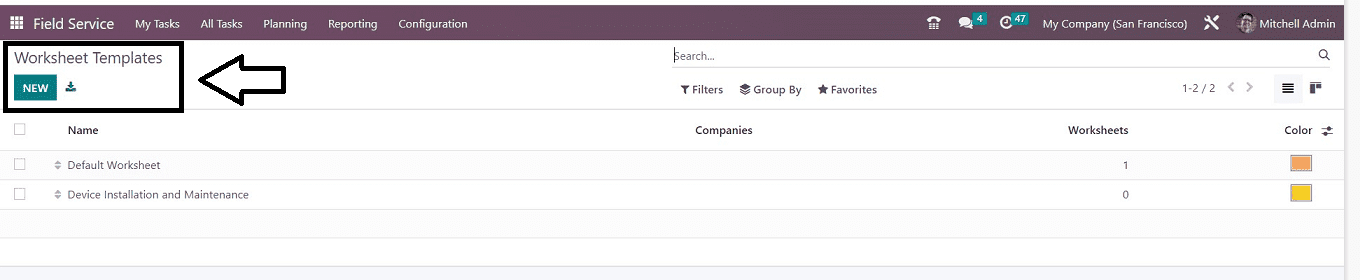
You can create a customized worksheet using the “NEW” button available on the ‘Worksheet Template” dashboard. Completing the worksheet will be saved and displayed in the “Worksheet” smart button, as shown below.
Signing Reports and Customer Preview
After completing the task, the admins can check the task Reports, Worksheets, and Timesheets using the “Customer Preview” smart button. Clicking on that button will open the user interface website, as shown below.
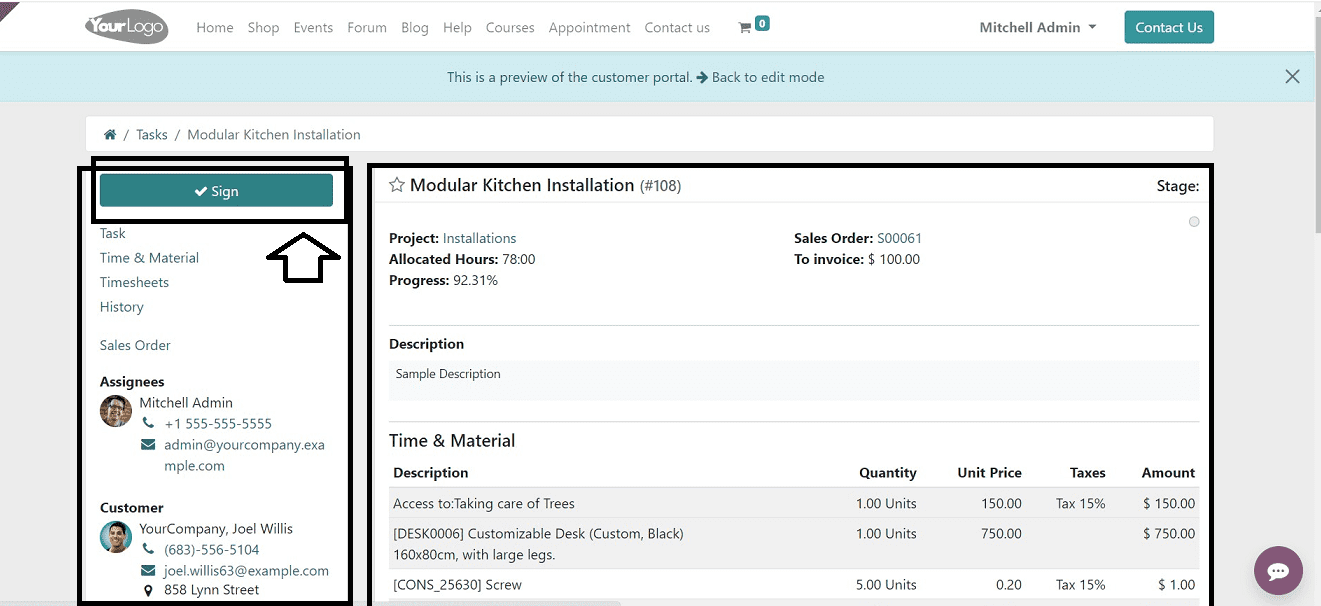
After ensuring the task details include invoicing and billing, you can sign the report using the “SIGN” button available on the left side of the page. You can also check the “Time & Material,” “Timesheets,” “Task,” “Sales orders,” and every other task-related information from this website window. Clicking the ‘SIGN” button will open a signing field where you can Draw your sign, Upload it from your device or Select a desired sign from the Odoo Suggested designs.
After verifying and completing the signing report procedure, then you can invoice the task. To perform this task, click on the “CREATE INVOICE” button.
Creating Invoice
After completing the task, you will see the “CREATE INVOICE” button under the task title area of the configuration form.
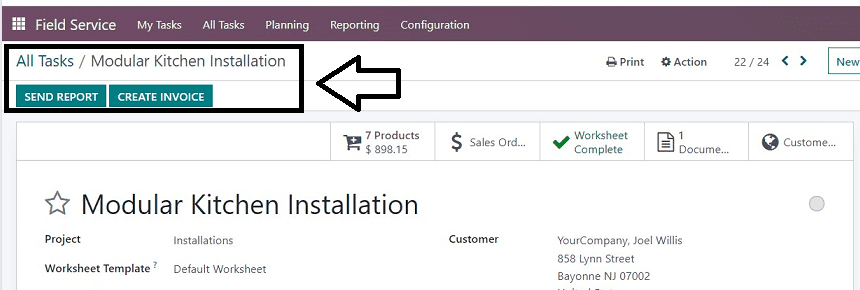
You can create the invoices and send them to the customers using this button. To know more about these procedures, refer to our blog. How to Assign A Task in Odoo 16 Field Services
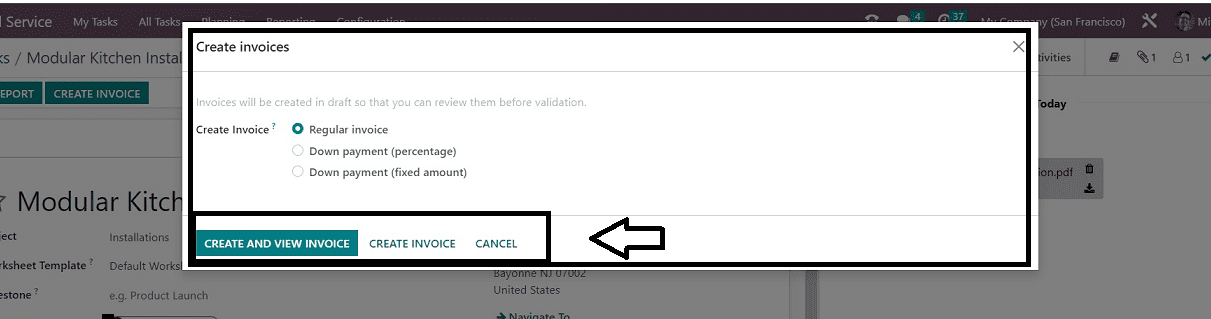
Pressing the “CREATE INVOICE” button will open a small dialogue box pop-up, as shown below, where you can select the invoice type from the “Create Invoice” options and click on the “CREATE AND VIEW INVOICE” button to create and get an instant preview of the invoice. or you can just use the “CREATE INVOICE” button as depicted below.
You will reach the invoice window from where you are able to send, Print, Make Payments, Add to Credit Notes, etc., using the many buttons available on the page like “SEND & PRINT,” “REGISTER PAYMENT,” “PREVIEW,” “ADD CREDIT NOTE,” etc.

Click "CREATE PAYMENT" to start payment. You will receive a small popup window where you can edit the payment “Journal,” “Payment Method,” “Amount,” “Payment Date,” and “Memo,” as illustrated in the screenshot below.
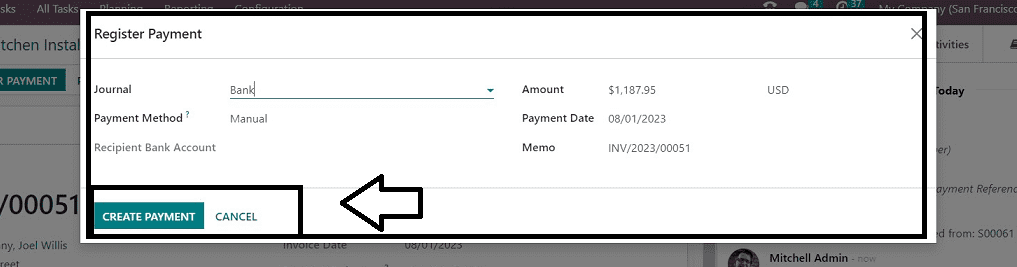
Make your payments using the “CREATE PAYMENT” button after editing the required details. Your payment will be processed, and you can see a green ribbon inside the task configuration form that indicates “PAID.”
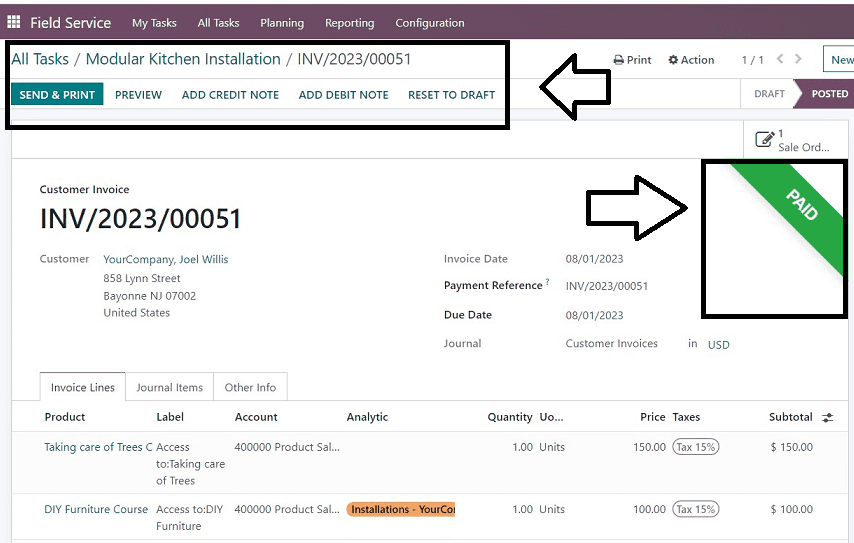
Now our task is completed, and the bills are paid, now you can send and print the invoice details if required using the “SEND & PRINT” button.
Expense Reinvoicing
The expense reinvoicing tool in the Odoo 16 Field Service Module enables the employees to add additional staff costs that are necessary to complete a task, include unexpected expenditures on the client invoice, and then collect payment from the customer. The Odoo Expenses Module and the Field Service Module are integrated. We could carry out this action as a result of this integration. Let's examine the process involved in this now. Assuming you performed the Field Service Task as an employee and incurred some additional costs, you may request reimbursement by submitting an expense report using the Expense Module.
To do the Expense Reinvoicing procedure, go to the Odoo 16 Expense Module.
Open the Expense Application. You will land on the “My Expense” dashboard of the Module, which is also the Homepage of the Module. You can see the various expense records that have been created inside the Expense Module.
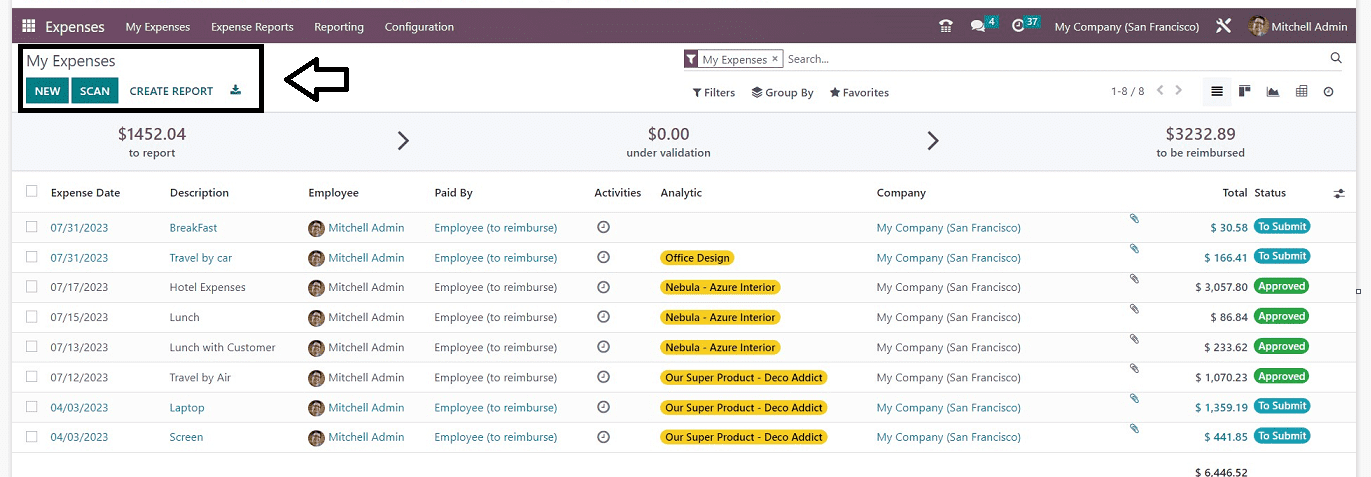
Create your new Expense Request by pressing the “NEW” button. From the displayed window, you can make an expense request.
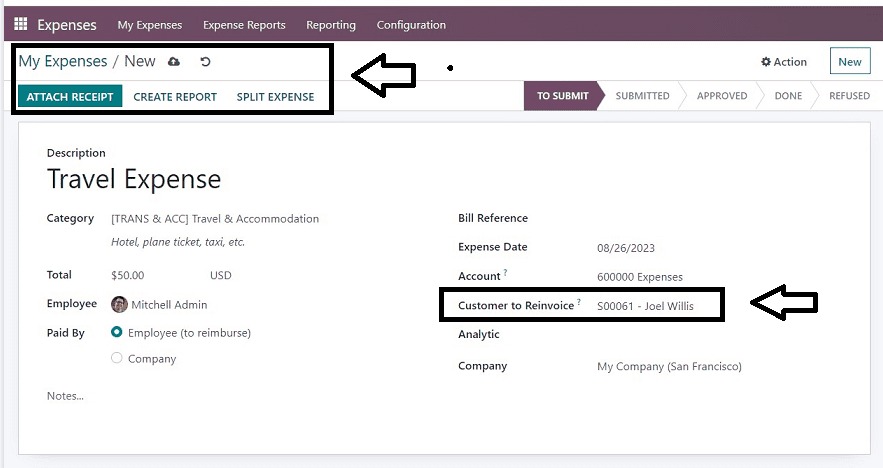
You have to give the name of the expense in the ”Description” field and select an appropriate “Category” as per the nature of your expense. The expense amount can be added in the “Total” field. You can mention your name in the “Employee” field, and the "Paid By" option can be set to "Employee," in which case it would be reimbursed for you; but, if you choose "Company," it will be treated as a business cost, and it will go to the company side. You can give any reference documents or bills in the “Bill Reference” area. Mention the “Expense Date” and “Account.”
Customer to Re Invoice: This is the main function for processing expense rebilling. You must choose the precise Customer invoice number that is displayed in the "Sales Order Item" invoice form on our Field Service Task Configuration form. As a result, when I clicked the "Customer to Re Invoice" section, I chose the invoice number from the list of options that was given in a pop-up window. By doing this, this extra expense will be billed inside that particular customer invoice. You can give any “Analytic” account and, finally, the “Company” name.
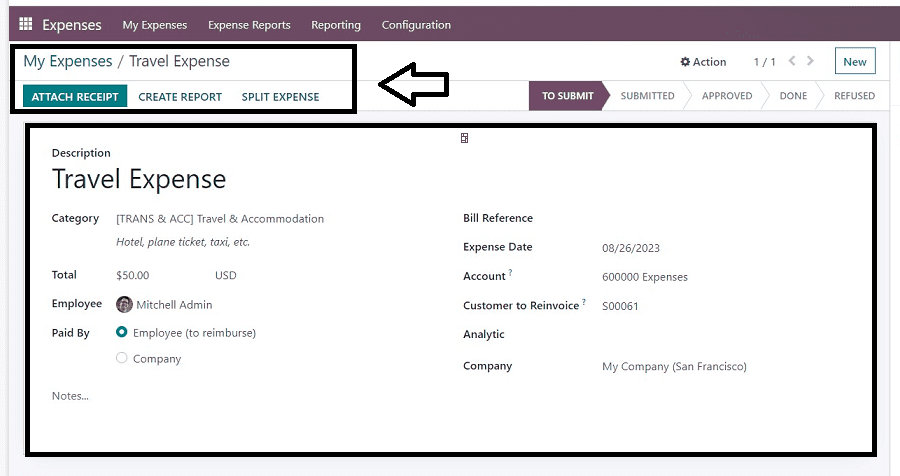
After saving the expense details, you can attach any receipts or documents regarding the expense using the “ATTACH RECEIPT” button. The “CREATE REPORT” button will help you to create the expense report. You will receive an “Expense” tab inside the configuration form after creating the report. So you can enter the expenses one by one using the “Add a line” link available inside the “Expenses” tab, as shown below.
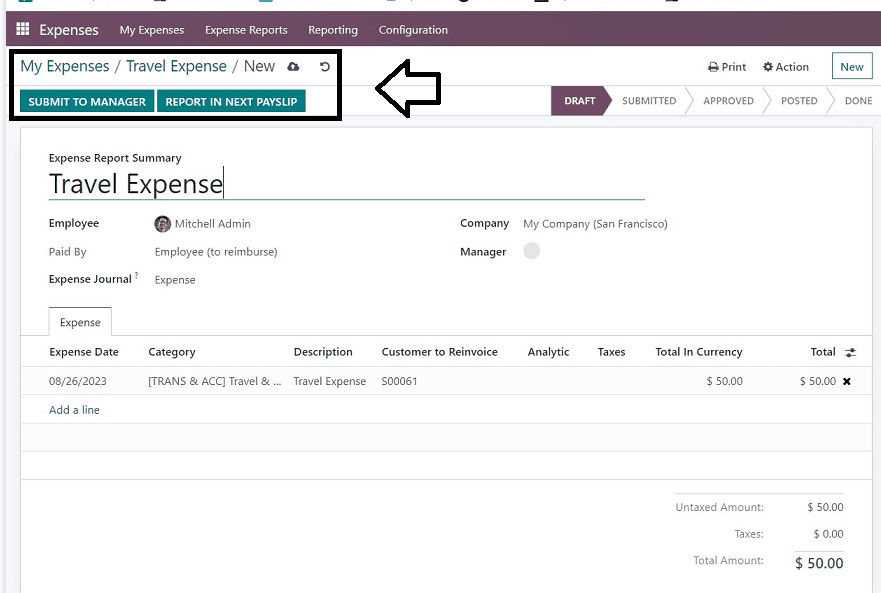
After adding the expenses, you can press the “SUBMIT TO MANAGER” button to submit the report. The manager can approve your reimbursements by checking the report data. You will see the various stages of the expense report from the various status buttons provided on the form that includes, “DRAFT,” “SUBMITTED,” “APPROVED,” “POSTED,” and ‘DONE.”
Once the manager approves your expense request, then you can see the status as “DONE,” as shown in the screenshot below.
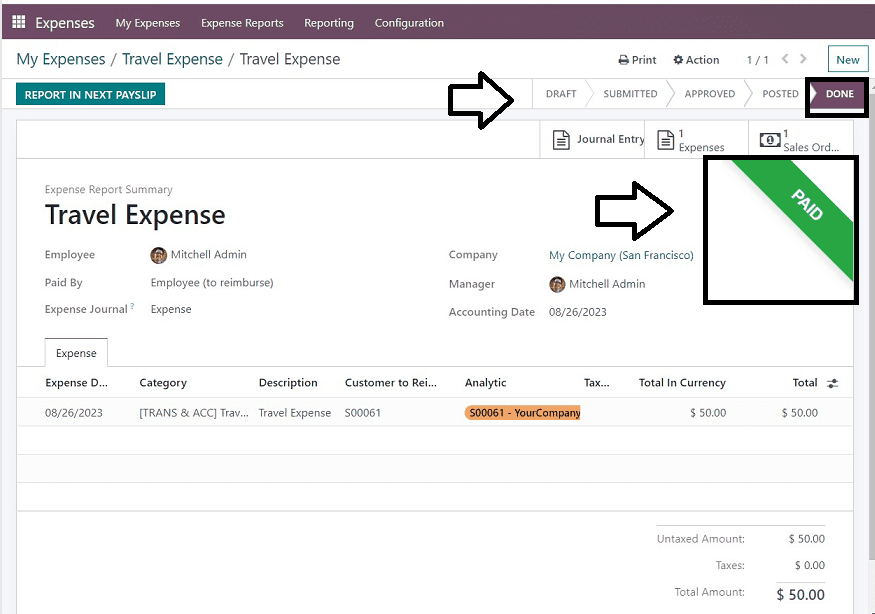
You can also see a green ribbon that appears to indicate the Expense Approval as “PAID.” Now, this expense will be added to the particular customer’s Service Invoice. So it will be billed with their other invoice bills, and you can receive the reimbursements from there.
To check this, come back to the Odoo 16 Field Service Module and open the task that we created earlier.
Open the task configuration form and open the “Service Invoice” smart button. Here, you can see the Expense Reinvoice amount has been successfully added to the customer service bill, as shown below.
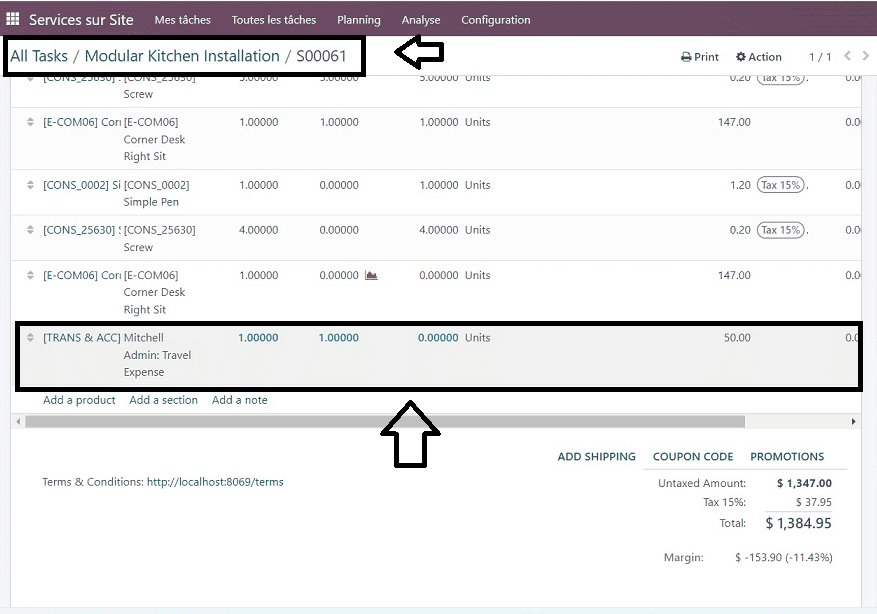
The employee can also receive their expense reimbursements for that specific work once the client has paid the invoice bill.
The process of managing a field service task, which includes timesheet billing, adding additional products, re-invoicing expenses, and adding worksheets, has been covered in detail in this blog session. The Odoo field service module provides effective and efficient handling of various tasks by optimizing task scheduling and accomplishment.
To read more about the features of Odoo 16 field service app, refer to our blog What Are the Features of Odoo 16 Field Service App