Odoo is an all-encompassing business management tool that provides a variety of apps for various business tasks, including accounting. We will examine the features and capabilities of the Accounting module for Odoo in this blog, concentrating on vendor bills and payment administration. The documentation your suppliers produce for the items or services rendered to your business are vendor bills or supplier invoices.
The accounting module of Odoo offers complete solutions for handling payments and vendor invoices. The platform provides a variety of features that speed up procedures, increase accuracy, and aid in effective financial administration, from bill production to payment reconciliation. Its powers are further enhanced by its interaction with other Odoo applications, making it a useful tool for companies of all sizes.
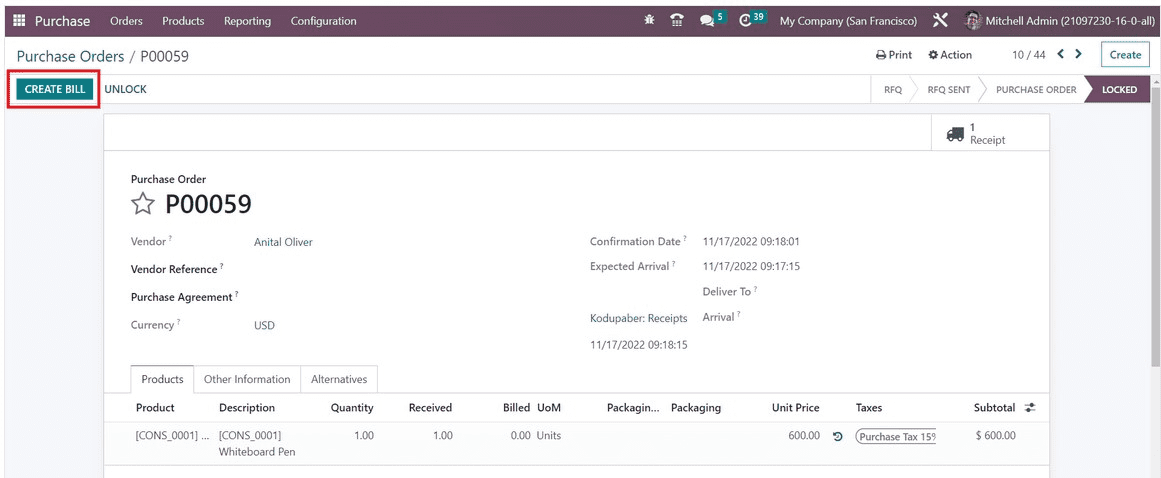
In the Odoo Accounting module, you may create vendor bills while making purchases from a vendor. These invoices reflect the payment that is due to the specific seller. A vendor bill will detail all financial information regarding the purchases made by your business from a vendor.
The option to automatically generate the matching vendor bill will appear once you have confirmed a purchase order, as seen in the figure below.
The management vendor invoices were already covered in the Purchase module. These automatically produced vendor invoices will also be documented in the Accounting module. The Accounting module's Bills option is under the Vendor menu. Bills that have already been generated can be seen here, as illustrated in the image below.
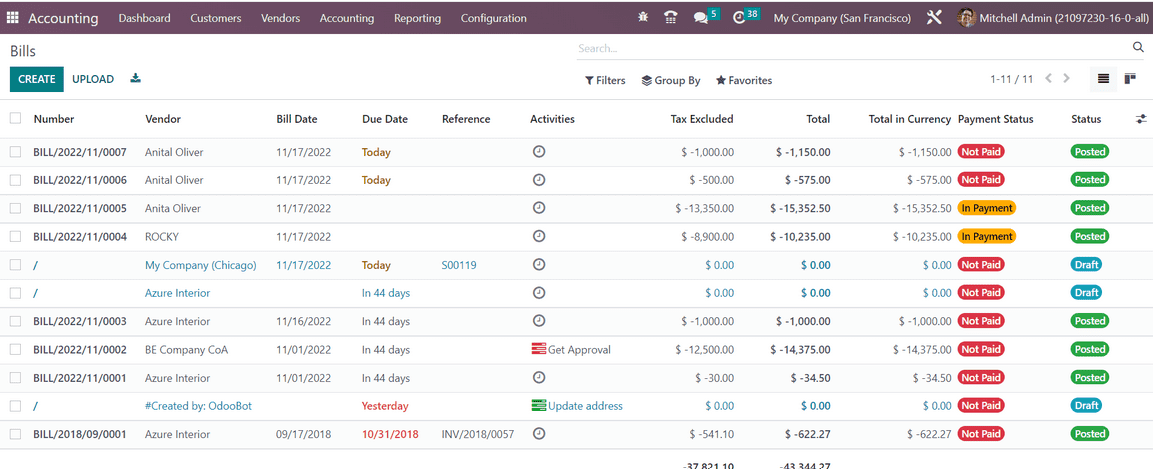
The user can choose between the Kanban and List views on this platform. The list view preview includes the number, Vendor, Bill Date, Due Date, Reference, Activities, Tax Included, Total, Total in Currency, Payment Status, and Status of each vendor bill.
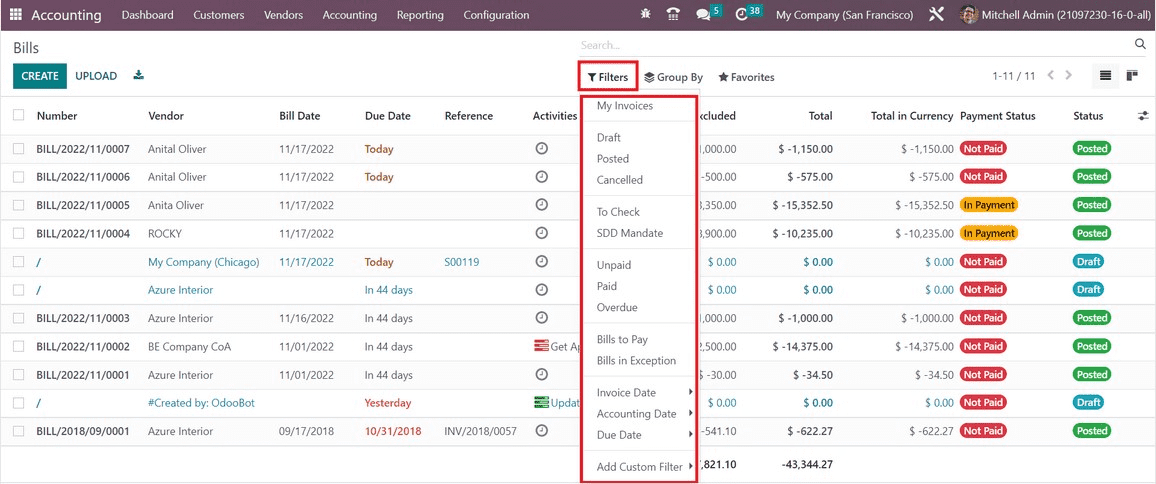
The criteria for the available vendor bills include My Invoices, Draught, Posted, Canceled, To Check, SDD Mandates, Unpaid, Paid, Overdue, Bills to Pay, Bills in Exception, Invoice Date, Accounting Date, and Due Date. The Add Custom Filter option can be used to add more filters.
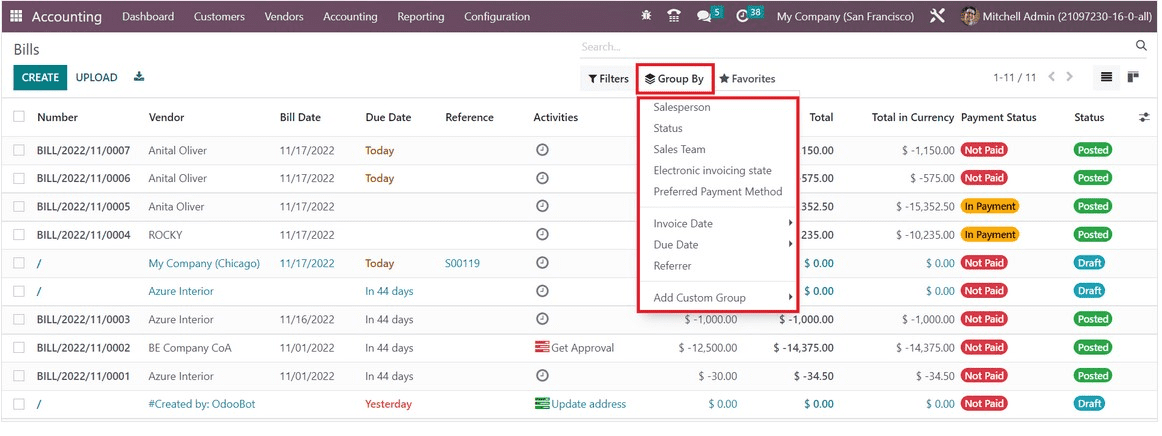
Salesperson, Status, Sales Team, Electronic Invoicing State, Preferred Payment Method, Invoice Date, Due Date, and Referrer are the default Group By options that are available. Click the Add Custom Group button to add a custom group by choice.
You can upload a copy of the vendor invoice using the Upload button. The Create button can be used to create vendor invoices manually. The relevant bill information is mentioned in a new window that displays on the screen.
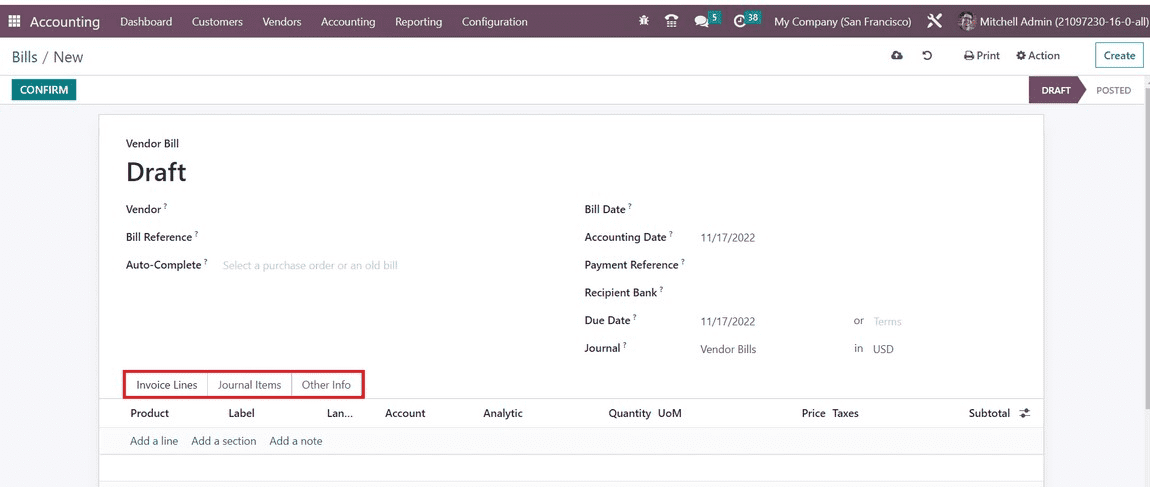
Put the vendor's ID in the Vendor field and a bill reference in the Bill Reference field. By entering a previous bill or purchase order associated with this bill in the Auto-Complete area, you can have the remaining fields of the bill autocomplete. The Bill Date field can be used to specify the date that the bill was generated. The Accounting Date displays the date that the system updated with regard to this bill's accounting data. You can enter the Payment Reference, Recipient Bank, Bill Due Date, and Journal information in the corresponding fields.
The invoice's Invoice Line, Journal Items, and Other Info tabs are identical. After filling out all required fields, click the Confirm button to approve the bill. Once you confirm the bill, its status will change from Draught to Posted.
The Accounting Dashboard also lets you control vendor invoices.
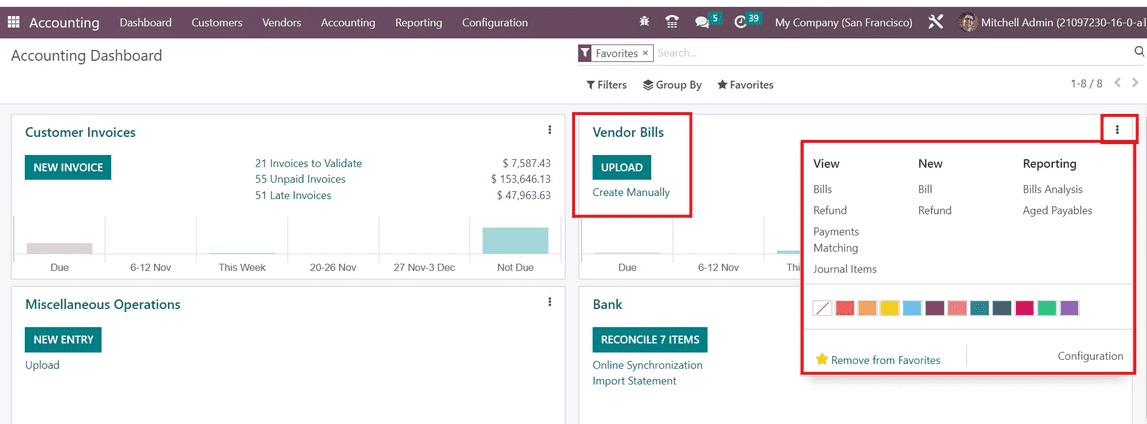
The Upload button allows you to upload a vendor bill, while the Construct Manually button allows you to construct a new bill manually. Bills, refunds, and journal items can all be created and viewed using the available choices. Using the Payment Matching feature, you can match payments and invoices with the related bank statements.
As we previously explained, refunds can be generated directly from the Accounting Dashboard. You will receive a separate platform under the Vendors menu to create refunds. The creation of consumer credit notes was already covered. You can also create vendor credit notes using the same methodology. You will see the Add Credit Note option on a bill, as seen in the image below.
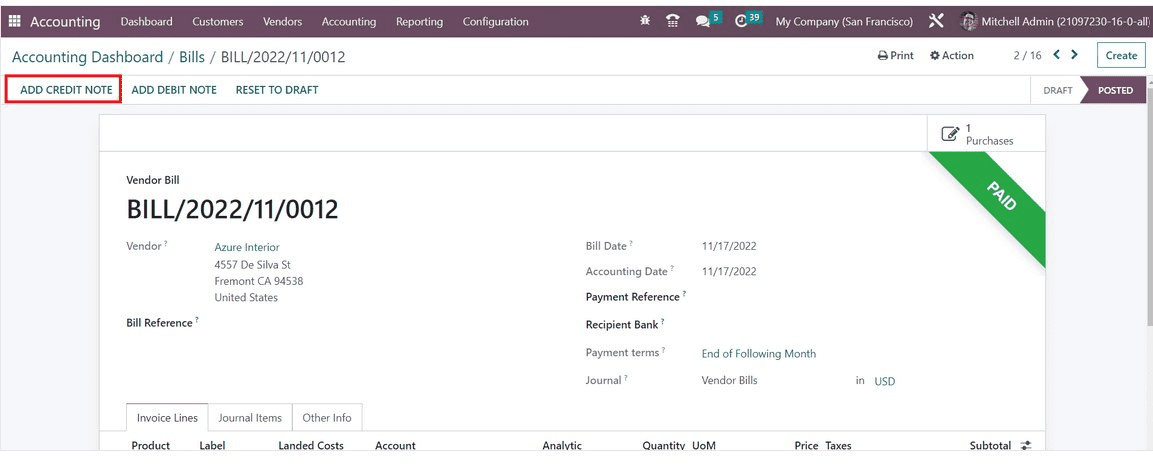
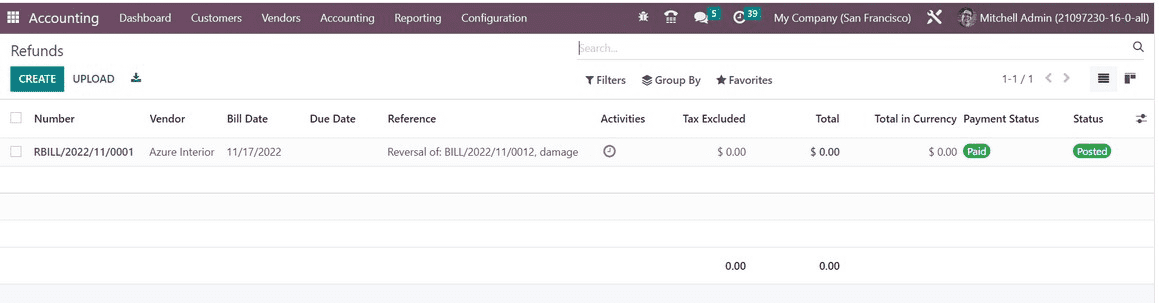
This button will initiate a vendor credit note. The Vendor's menu's Refunds platform will list these vendor credit notes.
Next to refunds, under the Vendors menu, you have the Payment option, which is a way to track changes in liquidity. You have the option of processing those payments manually or using already-built facilities. The page will be, as shown in the screenshot below.

Here, you will get the list of all payments with the details, such as date, number, journal, payment method, vendor, batch payment, amount, and status, respectively. Now, you can make a new one with the help of the NEW icon, which gives the new page, as shown in the screenshot below.
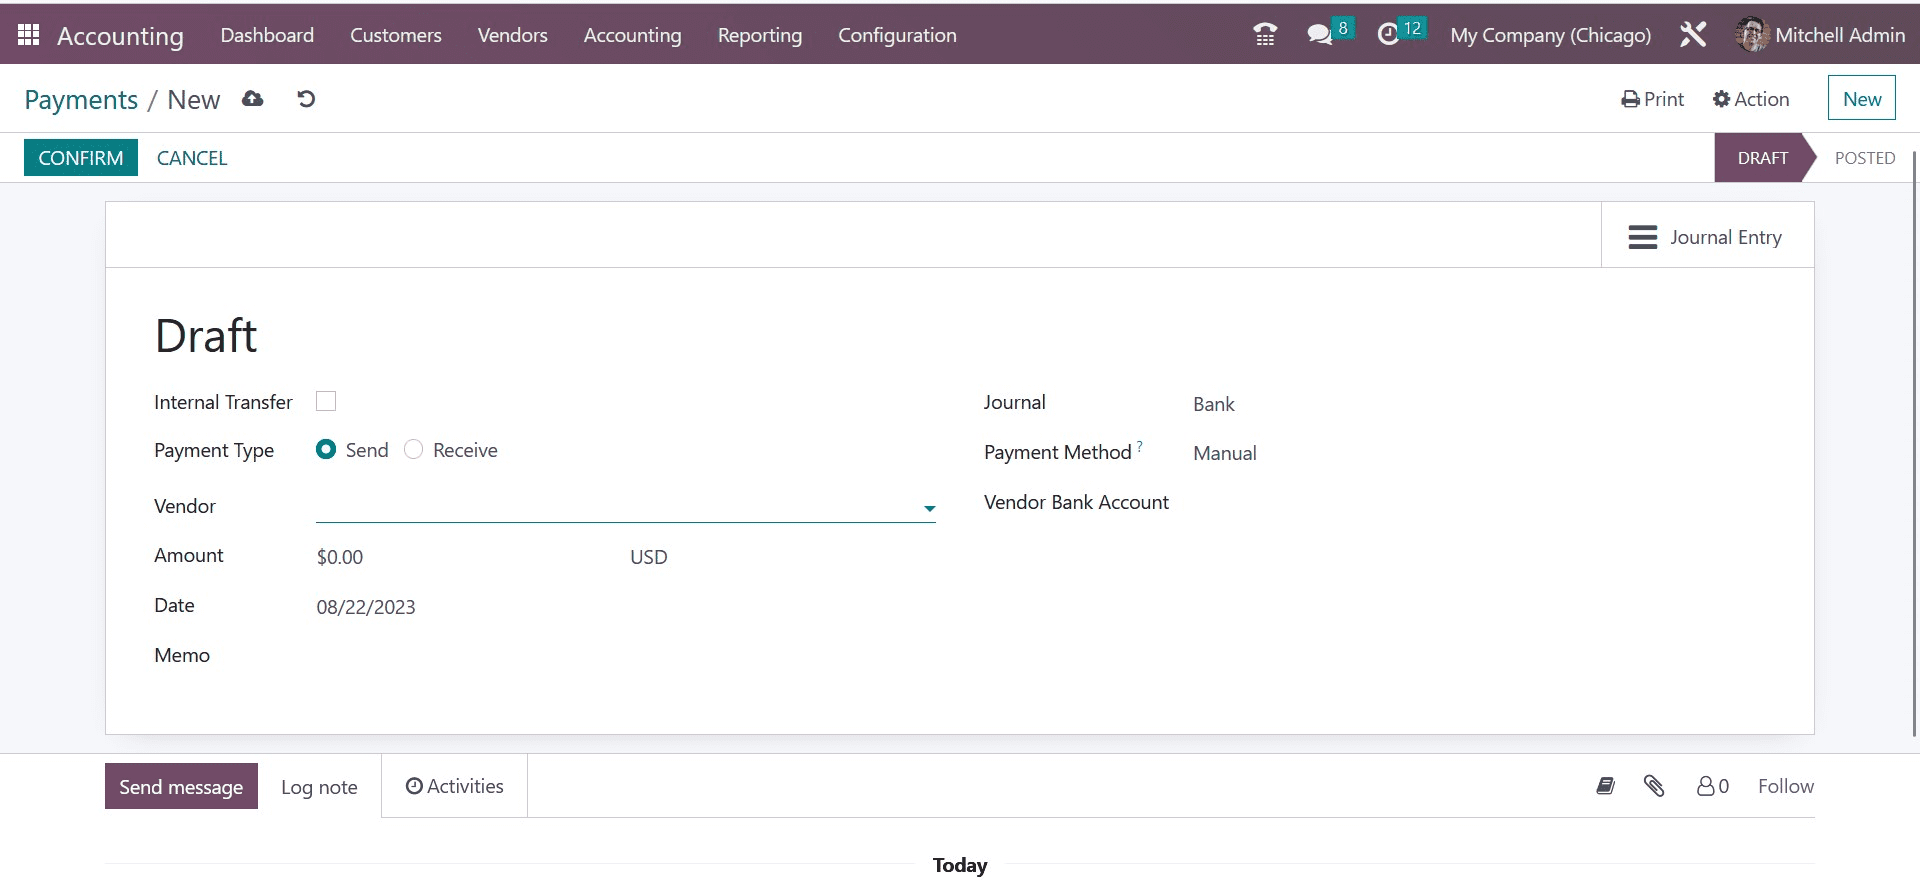
Here, you can provide those required details, and finally, go to the CONFIRM button. Now, next, you have got the option of batch payment, as in the image below under the Vendors menu.
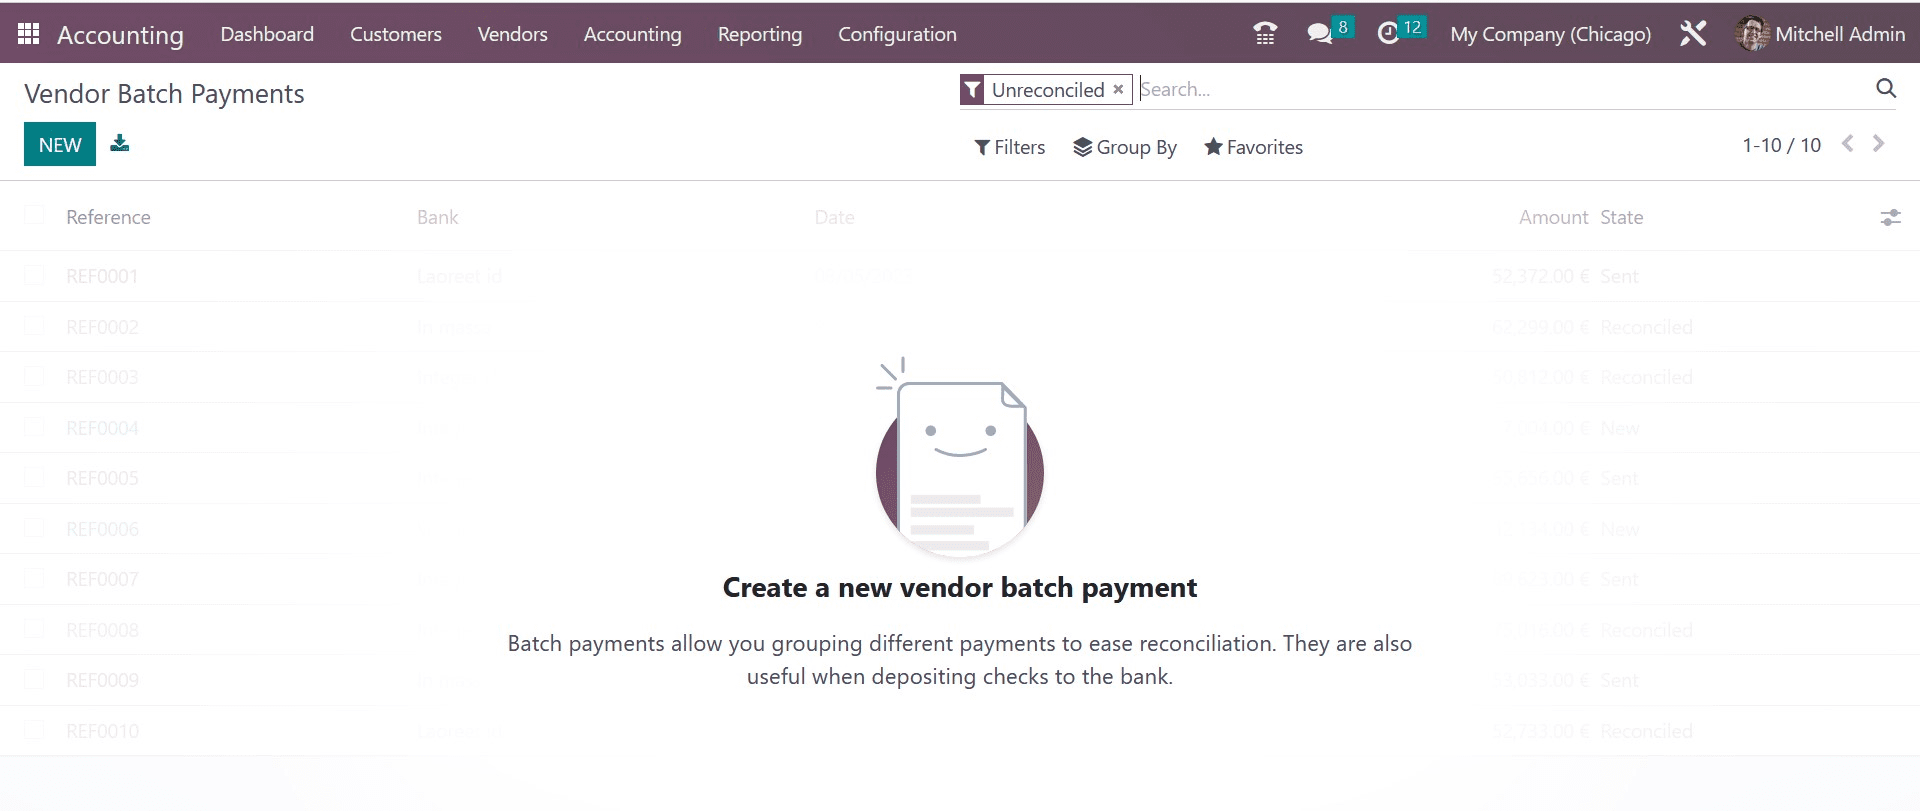
Batch payment arranges various payments into batches to make reconciliation easier.
Additionally, they come in handy when depositing cheques at the bank. In order to make a similar kind, go to the NEW icon.
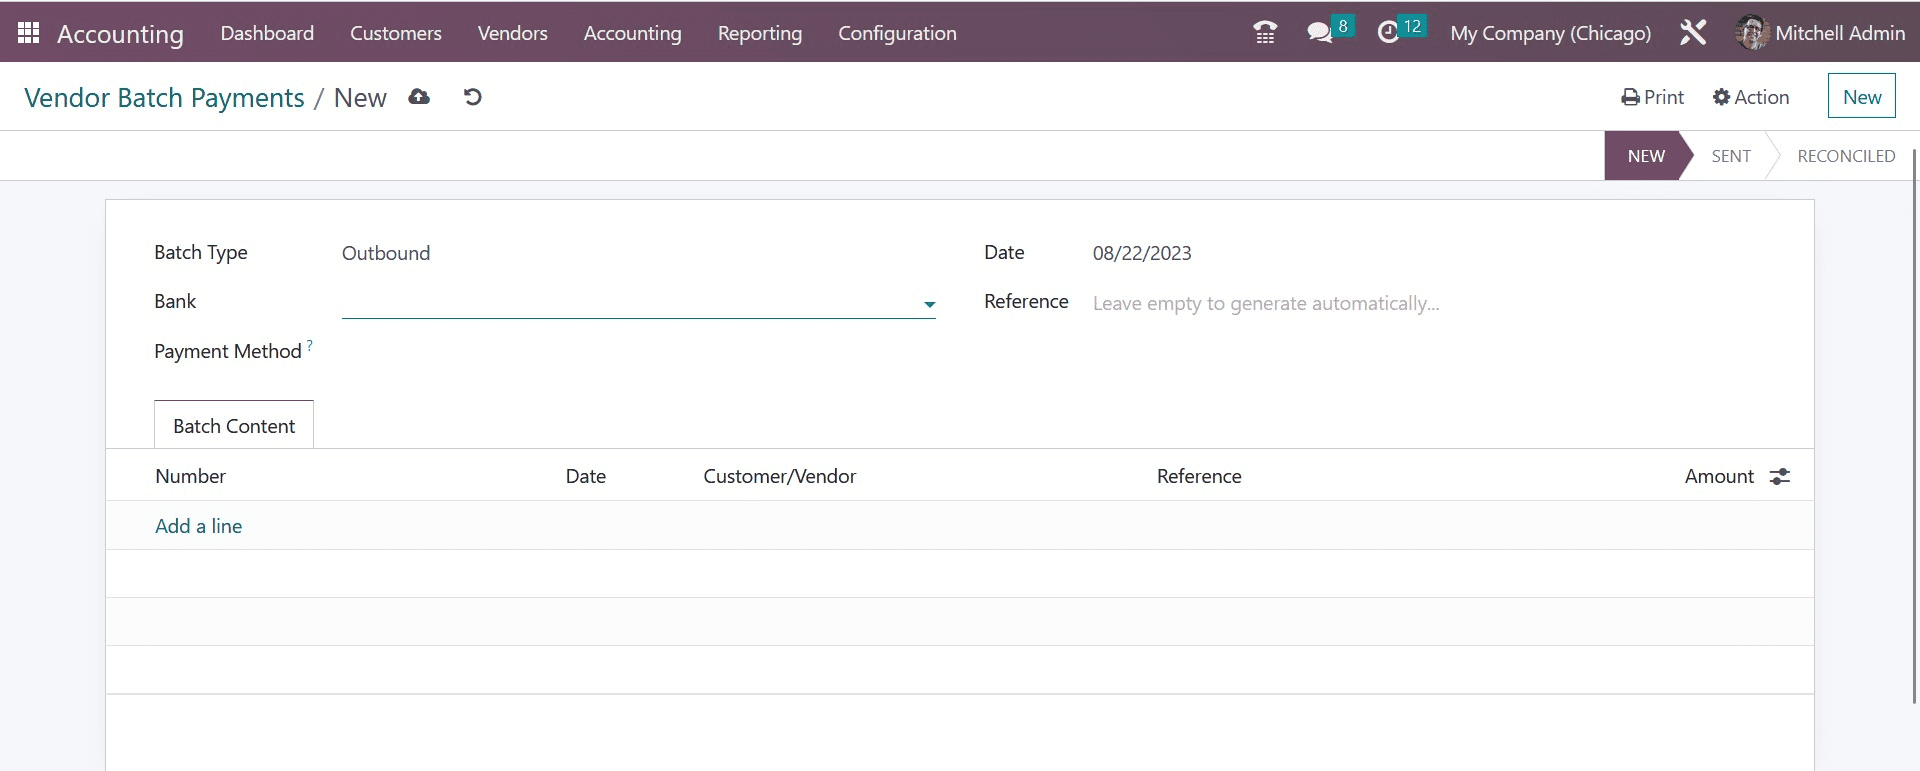
On the new page, you can add the details, such as batch type, name of the bank, and an option to select the payment method, date, and reference, respectively. Under the batch content, using the Add a Line option, you can add the number, date, customer/vendor, reference, and amount. Then, you can save those details.
Now, under the Vendors menu, you have got the employee expense option, and the page will be, as shown in the screenshot below.
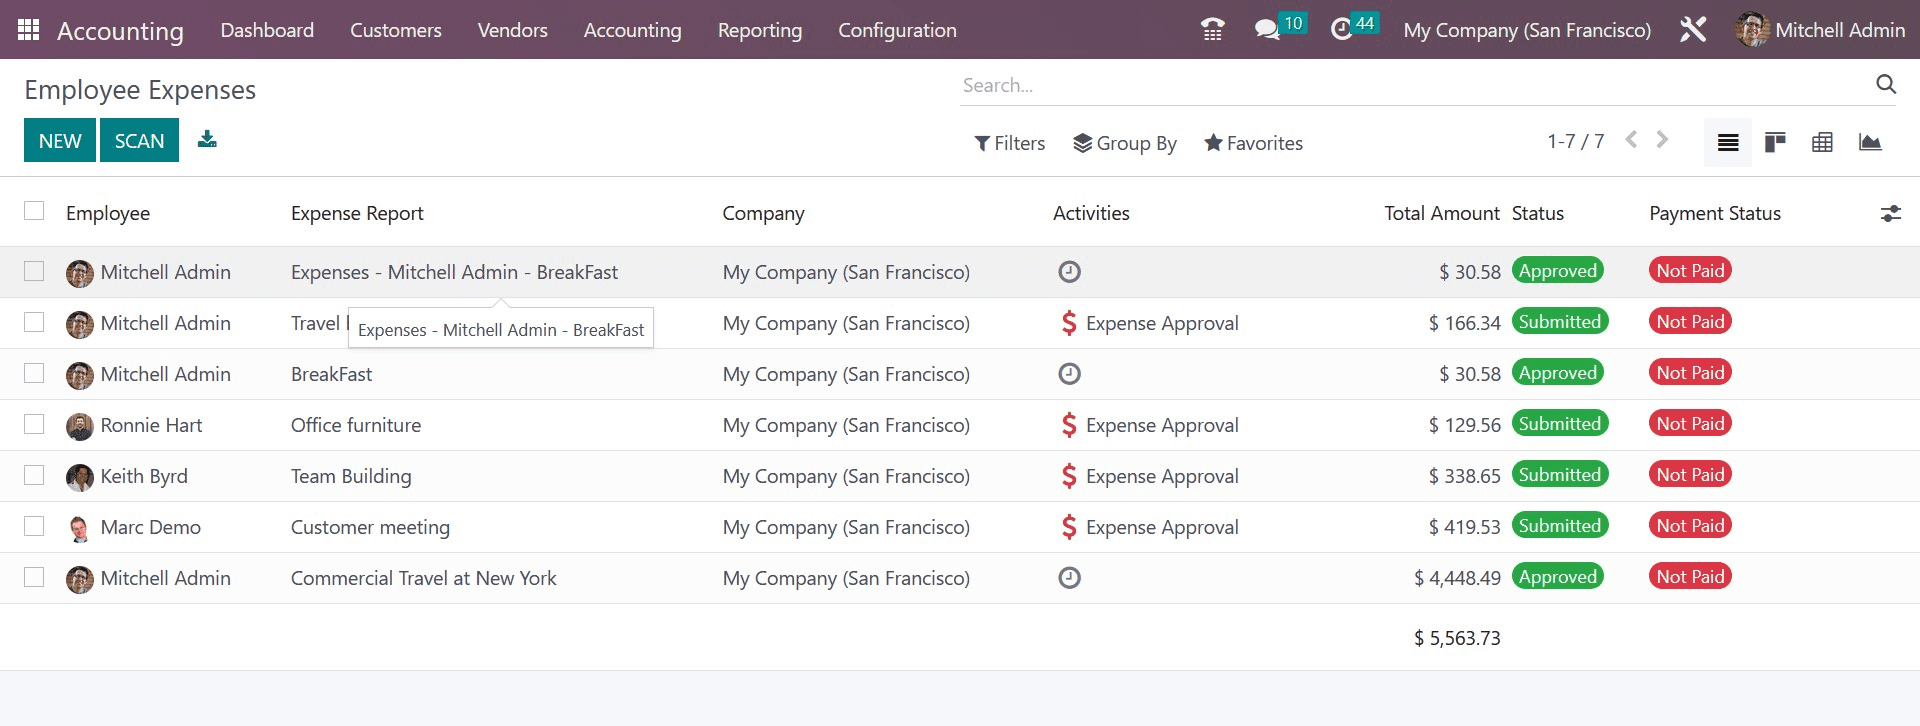
Here, you can have the details, such as employee, expense report, company, activities, total amount, and payment status. You can view the page in Kanban, List, Graphical, and Pivot view accordingly.
Now, the next one is the Product option. This option can be used to have the details regarding the product, which include details, as in the image below.
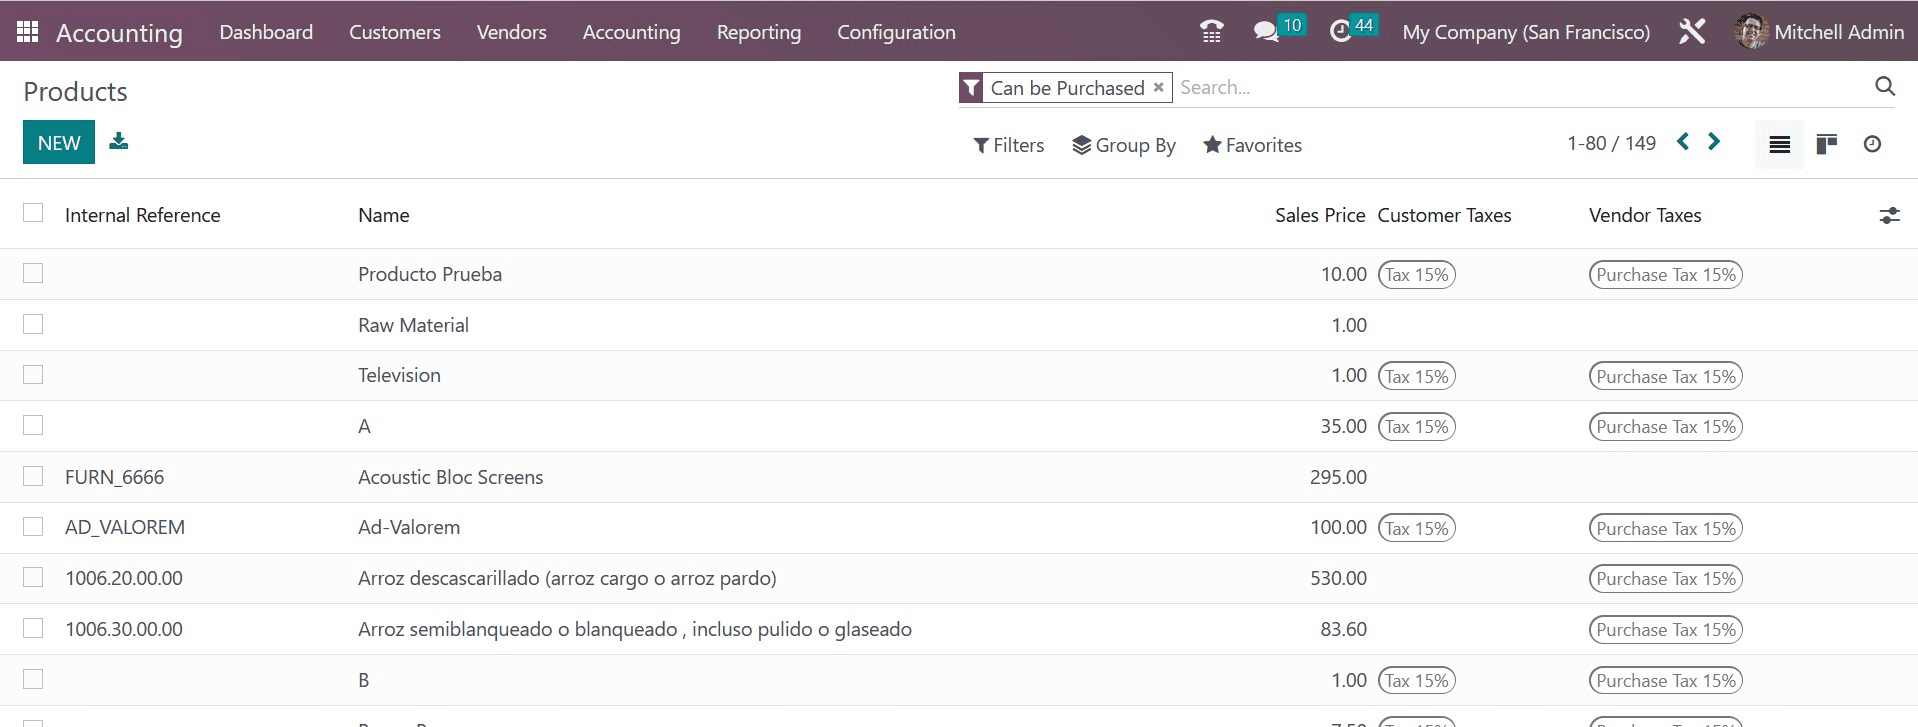
Here, you can have the details, such as internal reference, name, sales piece, customer taxes, and vendor taxes. The NEW icon can be used for the creation of the same. This is all about vendor bills and payment management in Odoo 16 Accounting.
To read more about registering a vendor bill with Odoo 15 accounting, refer to our blog How to Register a Vendor Bill With Odoo 15 Accounting