Efficient reporting is a key part of any business workflow. Odoo 19 provides flexible reporting tools, and triggering reports directly from user actions can greatly improve usability and speed.
In many real scenarios, users need to generate printable documents straight from a form view — such as printing customer or vendor details from the Contacts module with a single click. Instead of navigating through menus, a simple action button can instantly produce a PDF report.
In this tutorial, we will build a custom Print Details button on the res.partner form view that triggers a QWeb PDF report. You’ll learn how to define a report action, design a QWeb template, and connect everything through a server-side method to generate reports seamlessly in Odoo 19.
Step-by-Step Implementation
In this section, we will create a custom module that adds a Print Details button to the Contacts form and triggers a PDF report in Odoo 19.
Step 1: Create the PDF Report Template
The first step in triggering reports from actions in Odoo 19 is designing the PDF layout. Odoo uses QWeb templates to structure report content, which allows full control over how data is displayed in the generated document.
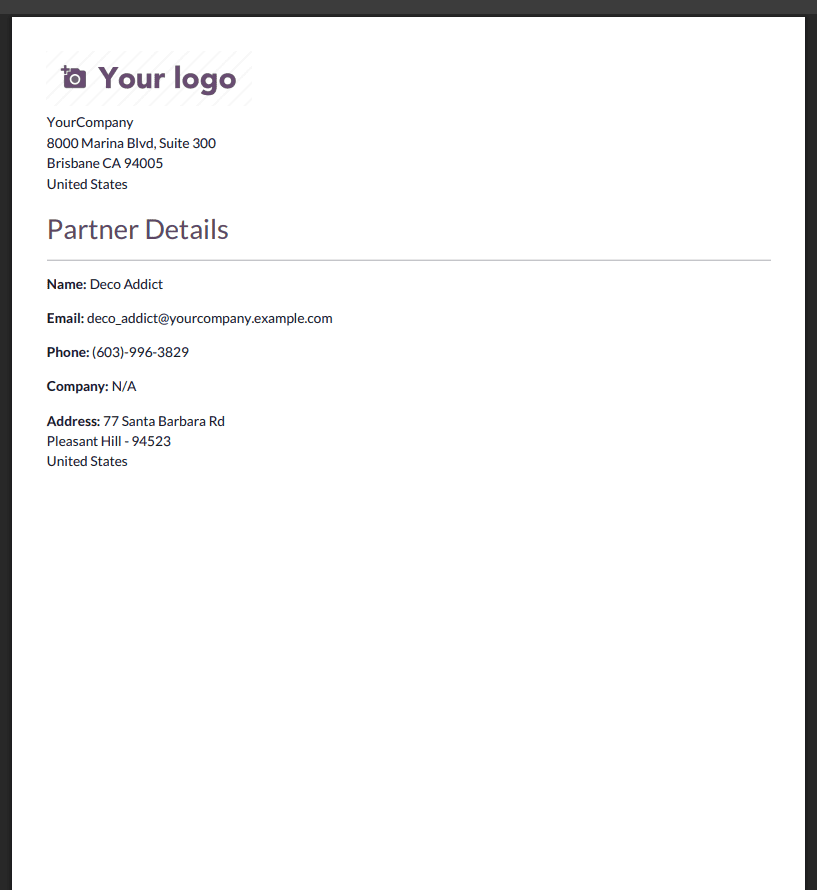
In our case, we will build a simple report template that displays essential partner details such as name, email, phone, and company information. This template will later be linked to a report action and triggered from the Contacts form.
<?xml version="1.0" encoding="UTF-8"?>
<odoo>
   <template id="partner_details_template">
       <t t-call="web.external_layout">
           <main>
           <t t-foreach="docs" t-as="partner">
               <div class="page">
                   <h2>Partner Details</h2>
                   <hr/>
                   <p><strong>Name:</strong> <t t-esc="partner.name"/></p>
                   <p><strong>Email:</strong> <t t-esc="partner.email or 'N/A'"/></p>
                   <p><strong>Phone:</strong> <t t-esc="partner.phone or 'N/A'"/></p>
                   <p><strong>Company:</strong> <t t-esc="partner.company_name or 'N/A'"/></p>
                   <p><strong>Address:</strong>
                       <t t-esc="partner.street or ''"/>
                       <t t-esc="partner.street2 or ''"/><br/>
                       <t t-esc="partner.city or ''"/> -
                       <t t-esc="partner.zip or ''"/><br/>
                       <t t-esc="partner.country_id.name or ''"/>
                   </p>
               </div>
           </t>
           </main>
       </t>
   </template>
</odoo>
Step 2: Create the Report Action
After designing the QWeb template, the next step is to register a report action.
This action tells Odoo which model the report belongs to, which template to use, and how the report should be generated. Once defined, Odoo can trigger this report from Python methods or directly from the user interface.
<?xml version="1.0" encoding="UTF-8"?>
<odoo>
   <record id="action_partner_details_report" model="ir.actions.report">
           <field name="name">Partner Report</field>
           <field name="model">res.partner</field>
           <field name="report_type">qweb-pdf</field>
           <field name="report_name">contact_pdf_report.partner_details_template</field>
           <field name="report_file">contact_pdf_report.partner_details_template</field>
           <field name="binding_model_id" ref="model_res_partner"/>
           <field name="binding_type">report</field>
       </record>
</odoo>
- The name field gives the report a clear title, which appears in the Action menu when printing.
- The model field specifies that this report is linked to the res.partner model, meaning it will use partner records as its data source.
- The report_type is set to qweb-pdf, telling Odoo to generate the report in PDF format using the QWeb template.
- The report_name points to the QWeb template that defines the layout and content of the report.
- The report_file defines the technical reference Odoo uses internally when rendering the PDF.
- The binding_model_id connects the report to the Partner model, which automatically adds the report option to the Action menu
- The binding_type is set to report, indicating that this action is a printable report linked to the model.
Step 3: Create a Python Method and Add a Print Button
Now that the report template and report action are ready, the next step is to trigger the report from the user interface. In Odoo, this is done by creating a server-side Python method on the model and linking it to a button in the form view.
When the user clicks the button, the Python method will execute and return the report action, instantly generating the PDF.
A) Create the Python Method:
from odoo import models
class ResPartner(models.Model):
   _inherit = 'res.partner'
   def print_pdf_report(self):
       self.ensure_one()
       return self.env.ref(
           'contact_pdf_report.action_partner_details_report'
       ).report_action(self)
- The method print_pdf_report() is attached to the res.partner model.
- ensure_one() guarantees the report is generated for a single active record.
- env.ref() locates the report action using its external ID.
- report_action(self) triggers Odoo’s reporting engine to generate and download the PDF.
B) Add the Print Button in Partner Form:
<?xml version="1.0" encoding="UTF-8"?>
<odoo>
   <record id="view_partner_form_print_button" model="ir.ui.view">
       <field name="name">res.partner.form.print.button</field>
       <field name="model">res.partner</field>
       <field name="inherit_id" ref="base.view_partner_form"/>
       <field name="arch" type="xml">
           <xpath expr="//div[@name='button_box']" position="inside">
               <button name="print_pdf_report"
                       string="Print Details"
                       type="object"
                       class="btn-primary"
                       icon="fa-print"/>
           </xpath>
       </field>
   </record>
</odoo>
- The button is injected into the existing partner form using view inheritance.
- type="object" tells Odoo to call the Python method with the same name.
- Clicking the button executes print_pdf_report() and downloads the PDF.
After installing and upgrading the module, open any Contact record in Odoo. You will now see a new Print Details button available on the partner form view. Clicking this button instantly triggers the Python method, which calls the report action and generates a downloadable PDF containing the partner’s details.
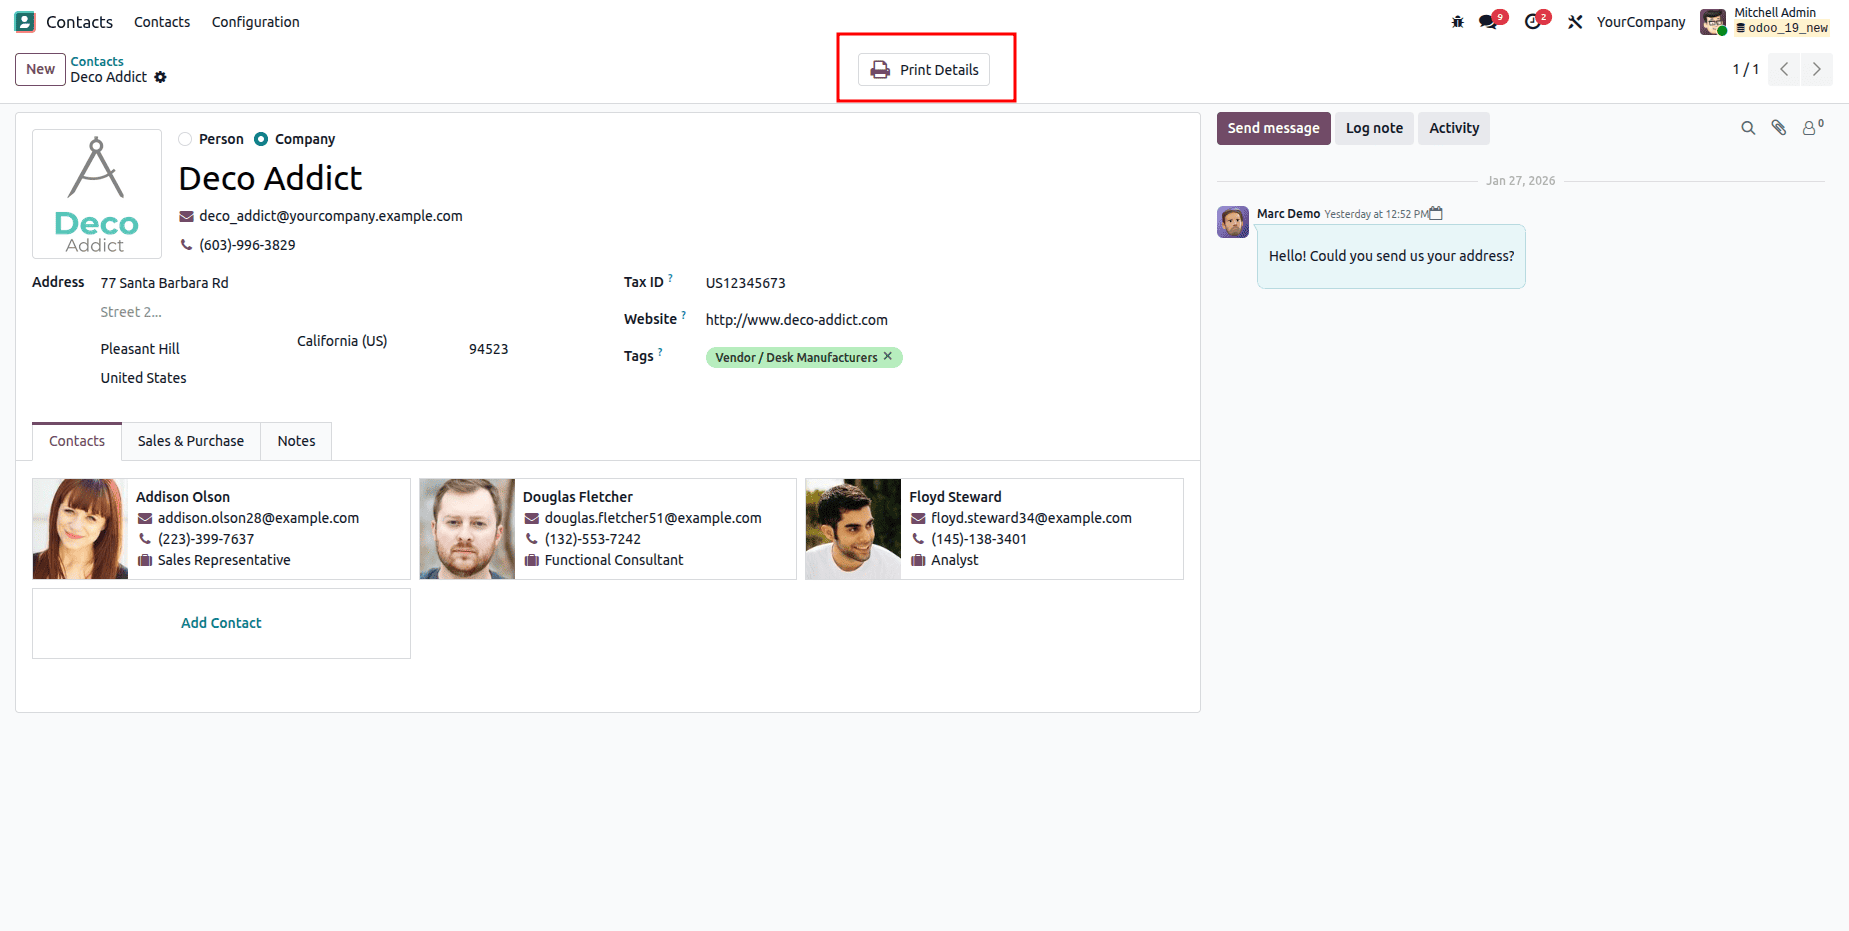
When you press the Print Details button, the PDF report is automatically generated and downloaded, containing the complete details of the selected contact.
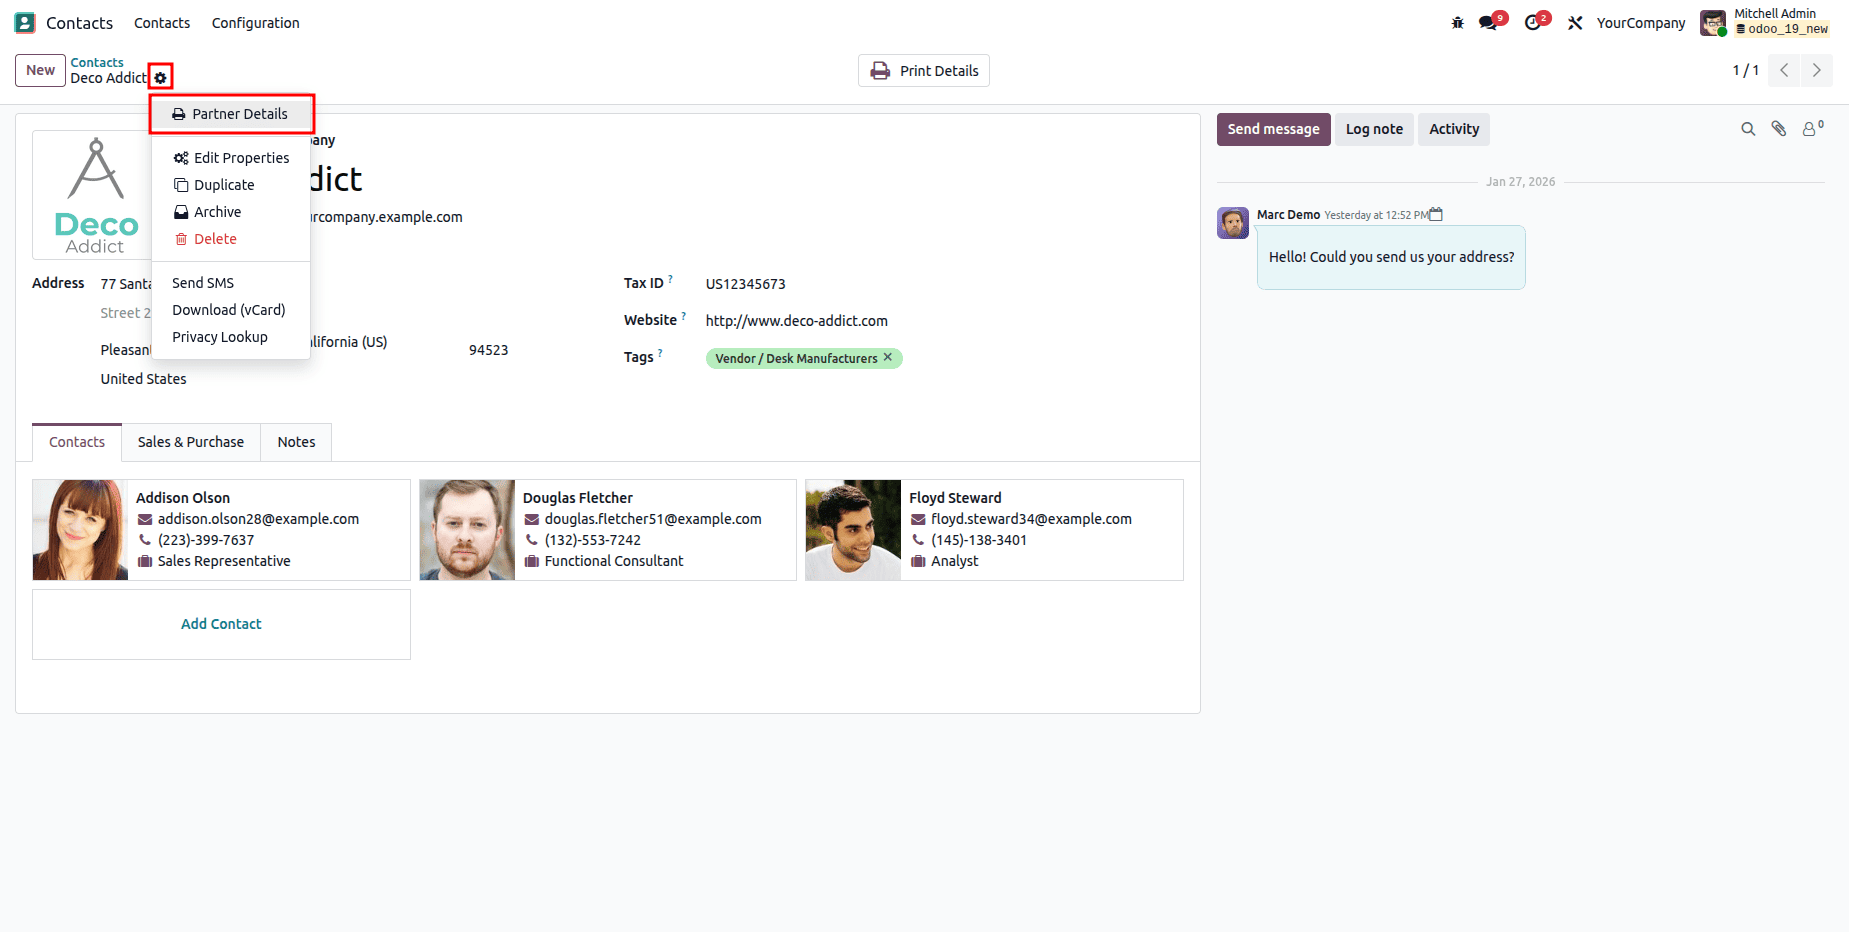
Since we added the binding model and binding type in the report action, Odoo automatically attaches the report to the res.partner model. As a result, a Print Details option also appears inside the Action (Gear Icon) menu on the partner form view, allowing users to generate the same PDF report directly from the gear icon.
Being able to generate reports directly from user actions can make a huge difference in everyday Odoo usage. Instead of navigating through multiple menus, users can simply open a record, click a button, and instantly receive a well-formatted PDF. This small enhancement greatly improves both efficiency and user experience.
In this tutorial, we created a Print Details button in the Contacts form, connected it to a QWeb PDF report, and linked the report to the Action menu through model binding. The result is a clean and practical solution that allows anyone to download partner details in seconds.
This same concept can easily be applied to other areas of Odoo — such as invoices, products, or employee records — making it a flexible technique for building custom reporting features. With this foundation, you can now design your own professional reports that fit perfectly into your business workflow.
To read more about How to Create and Use Reporting Actions in Odoo 19, refer to our blog How to Create and Use Reporting Actions in Odoo 19.