Managing documents effectively is critical for any business striving to maintain streamlined operations and control costs. Odoo 18 introduces a powerful solution with its Documents module, which offers a centralized and secure system for managing a wide range of file types. Once installed from the Odoo Apps menu, the module can be accessed through the Documents icon. The first menu is the ‘Documents’ menu which shows a dashboard of all the existing documents and navigates through various folders and other categories.
Documents Dashboard
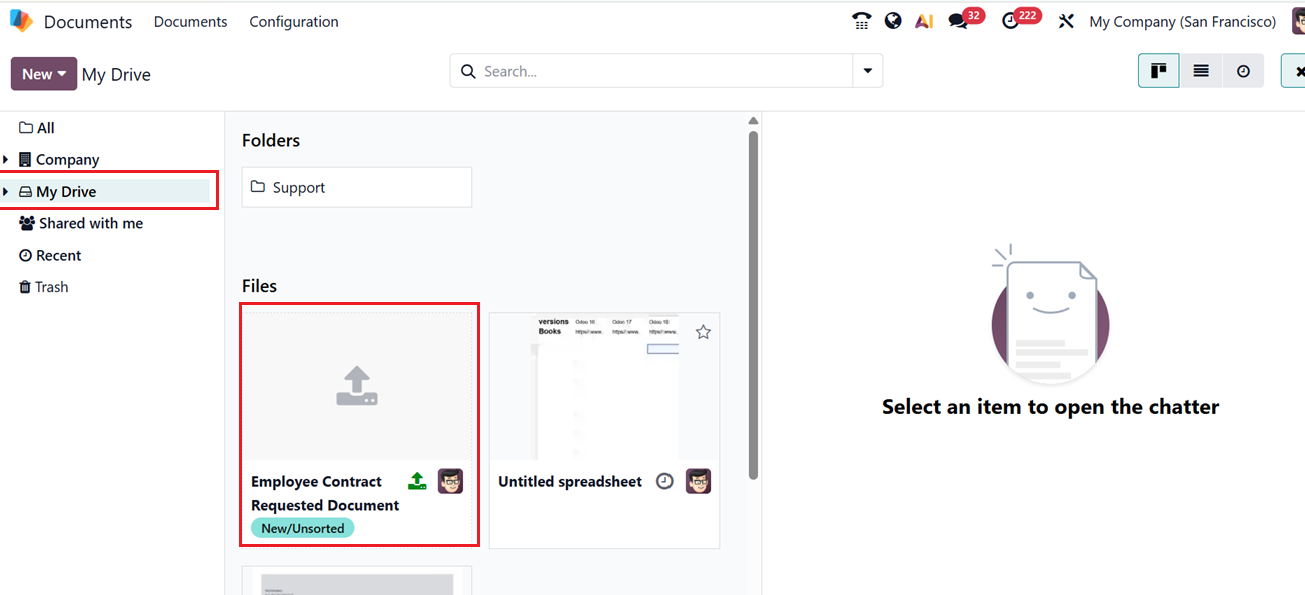
The main dashboard provides an organized overview of previously created and stored files of a company. On the left-side panel, you can see different file spaces arranged into predefined workspaces such as All, Company, My Drive, Share with me, Recent and Trash options. Also, you can see the previously created folders in the ‘Folders’ area with different user specific folder names, as shown in the screenshot below.

The dashboard supports Kanban, List and Timesheet views that provides flexibility to visualize and manage the documents according to various requirements. The advanced search bar in Odoo allows you to quickly locate specific documents by applying different filters and sorting options under the ‘Filters’ and ‘Group By’ menus.You can also utilize the ‘Favorites’ option to save the recent searches. Odoo also helps to create customized filters and grouping options using the ‘Custom Filter’ and ‘Custom Group’ options provided under the Filers and Group by sections respectively. These filtering options help you organize and manage your records efficiently.
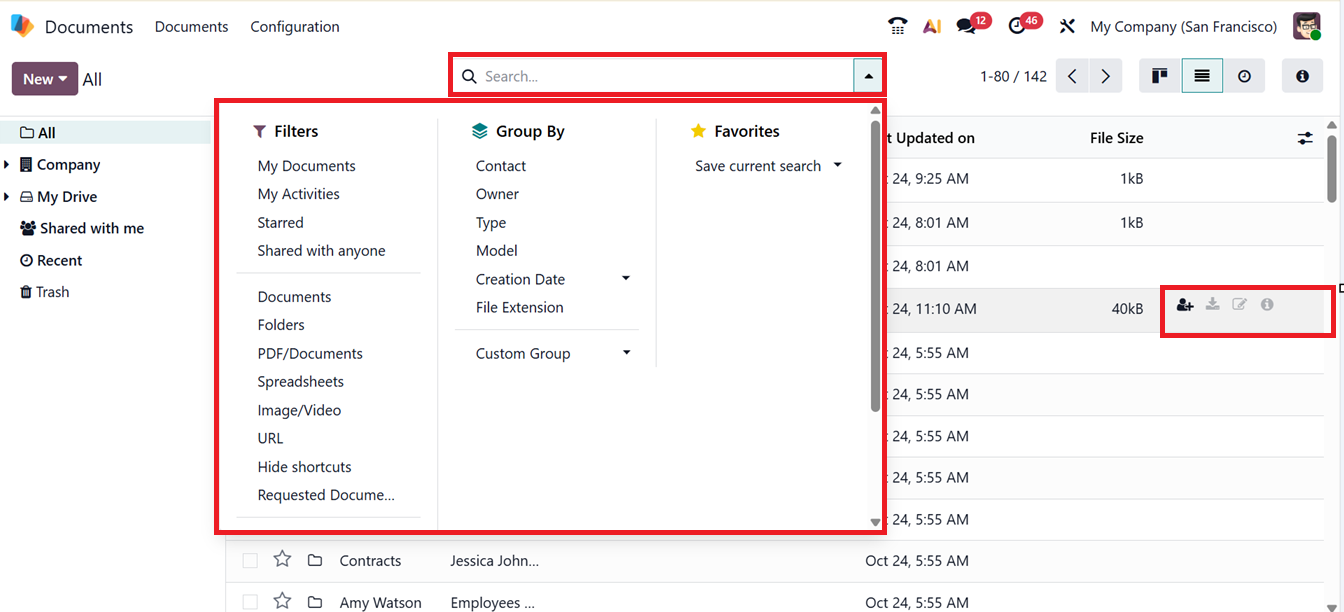
Inside a document column, you can see some icon options including Share, Download, Rename, Details and Go Inside. Using these icons, you can Share a document, Download them into your system storage, Rename the file, Check details including Owner name, Contact Details, Email address, Created Date etc and the Go Inside button can be used to get inside the document.
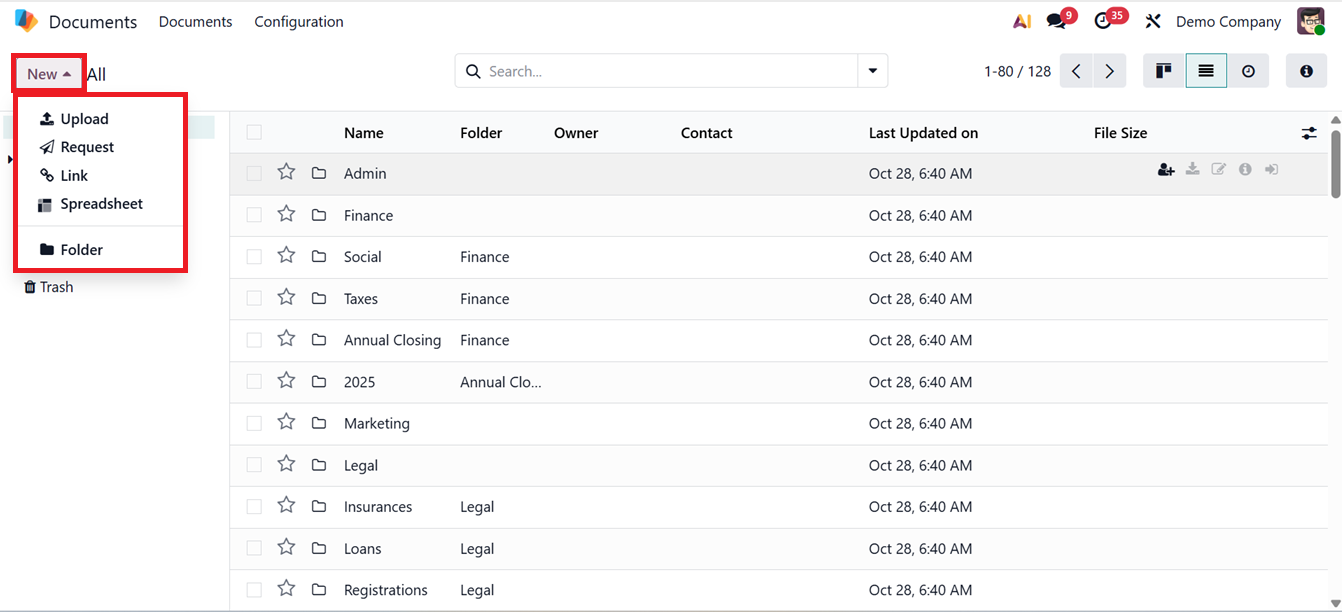
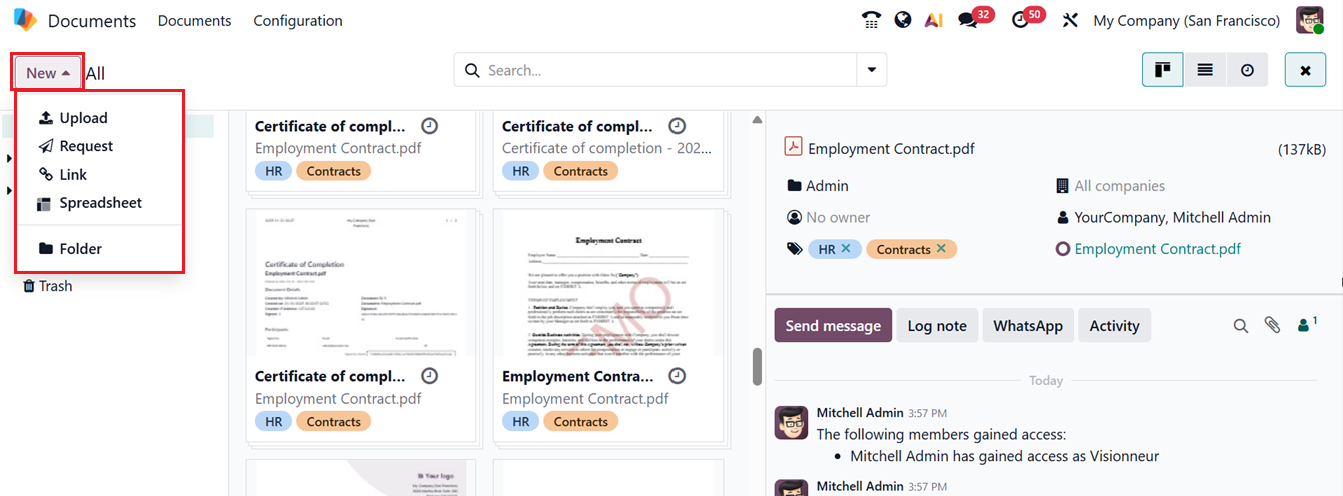
The ‘New’ button at the upper left corner of the window enables you to upload a new document, request a document, add a link, create a spreadsheet with document data, or make new folders by using the Upload, Request, Link, Spreadsheet, and Folder buttons respectively, as shown in the screenshot below.
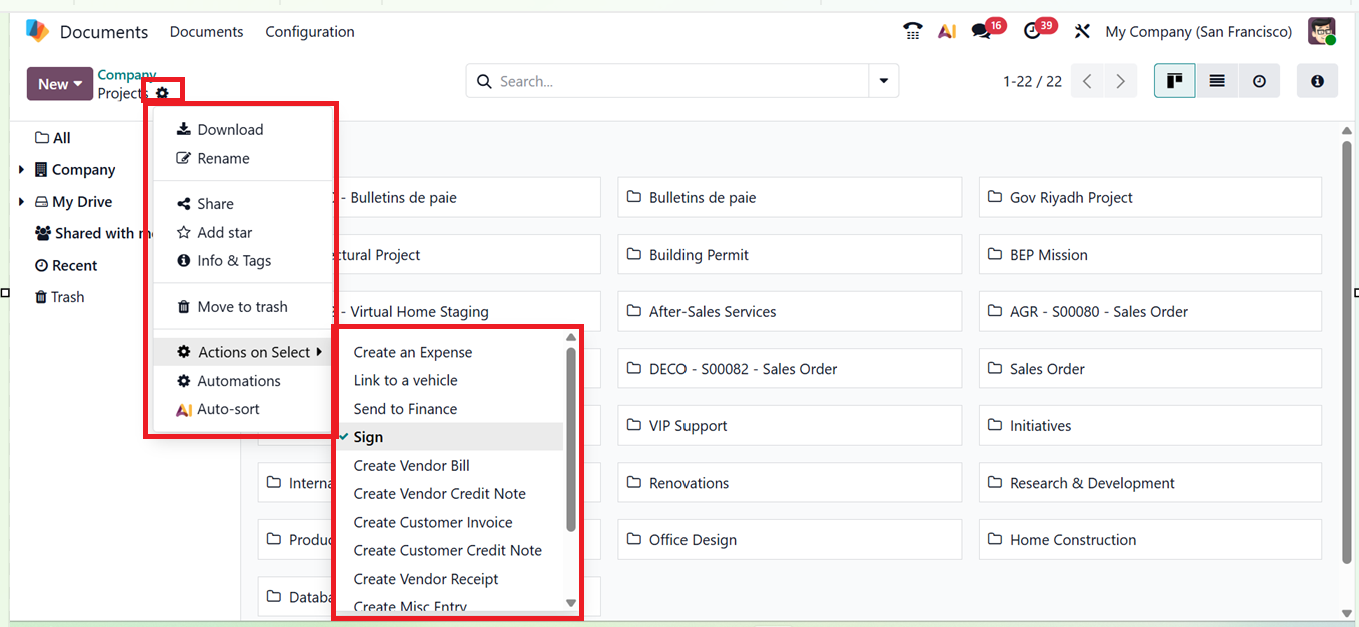
After selecting an appropriate document category, the dashboard will display all the documents stored under that section. From the ‘Action’ menu, you can perform multiple operations such as Download, Rename, Share, Add Star, Info & Tags, Move to Trash, Set Actions on Selection, and apply various Automations through the corresponding options, as shown in the screenshot below.
Selecting the "All" folder category displays every document without classification. You can utilize the ‘Tags’ option within each workspace for easier identification.

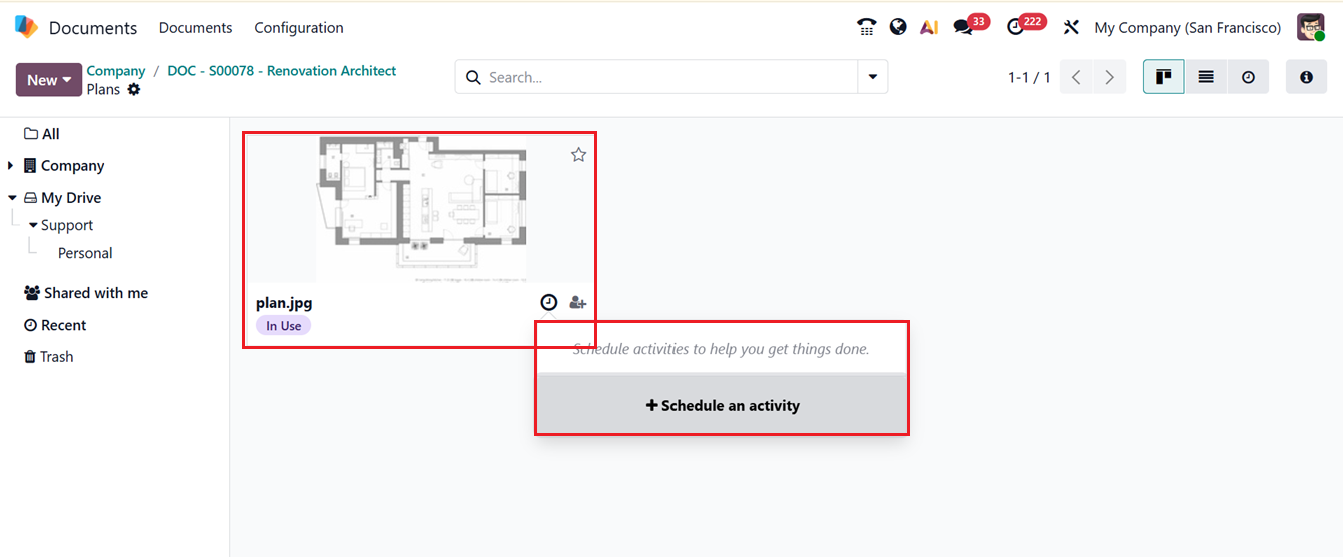
For example, by choosing the ‘Plans’ category, you can view and manage the architectural plan related documents, as shown in the screenshot below.
Clicking on a document will open it in detail, as demonstrated below.
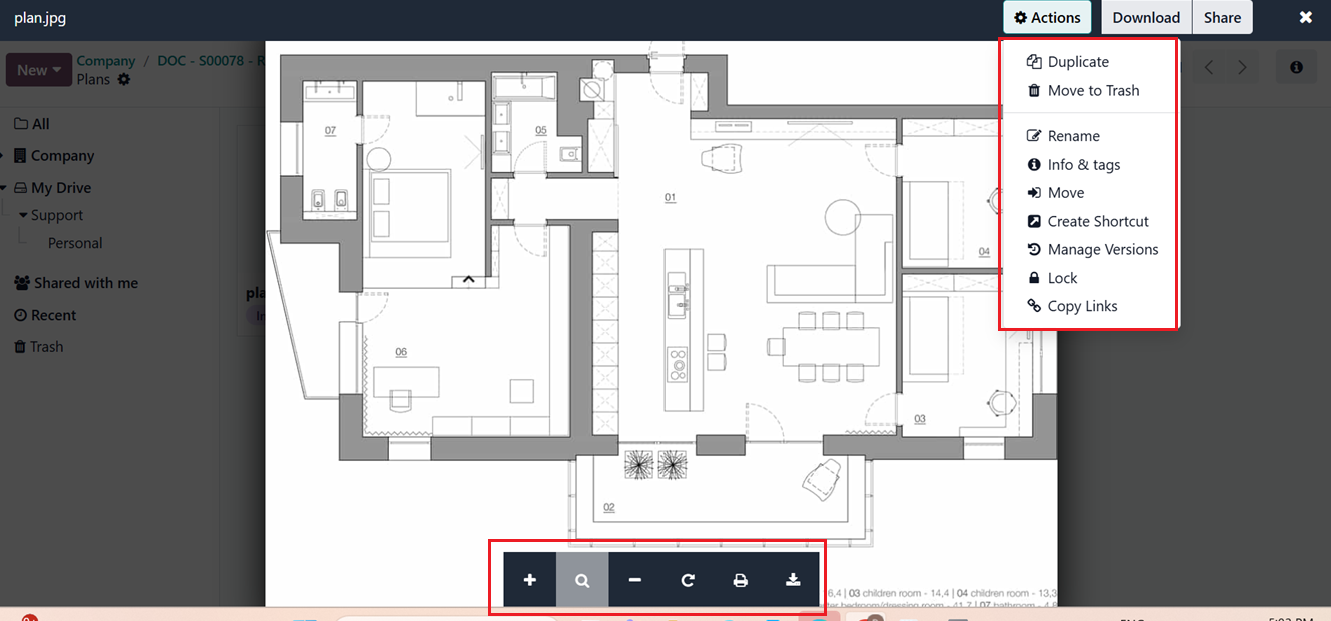
You can zoom in or out using the ‘+’ and ‘-’ icons. Then, utilize the Rotate, Print or Download the document using the relevant icons provided. The ‘Split PDF’ button lets you divide multipage PDF files into separate documents, particularly useful for batch-scanned files.

Clicking on this ‘Split PDF’ button opens an interface where you can choose the files or add files and perform the split, as shown in the screenshot below.
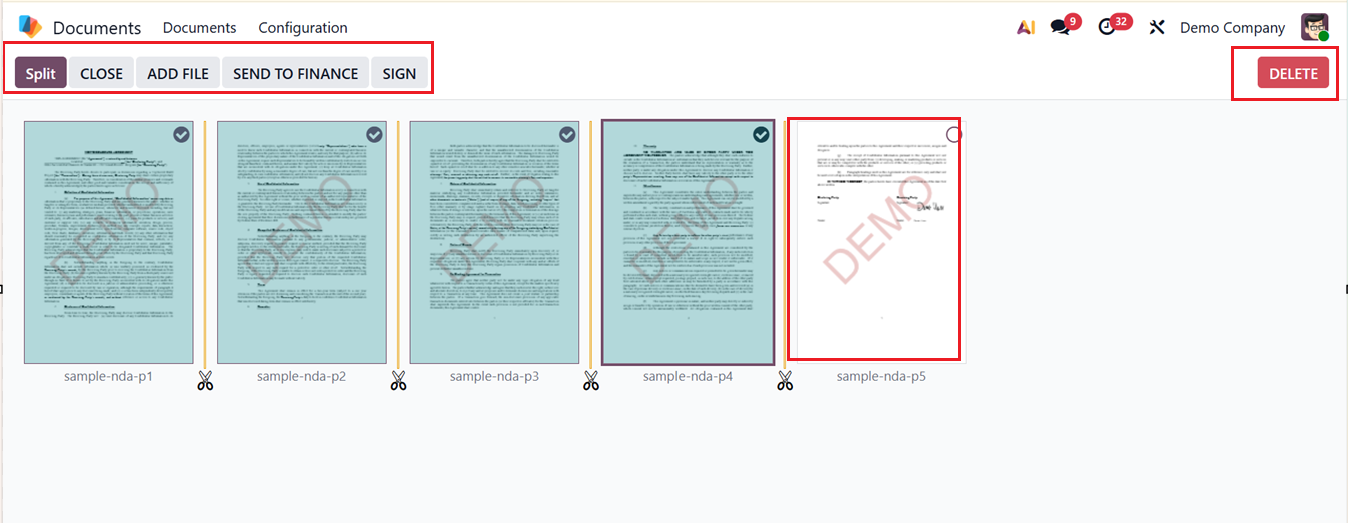
After selecting the required documents, click on the ‘Split’ button. This function will then create separate document entries in the dashboard, as shown below.
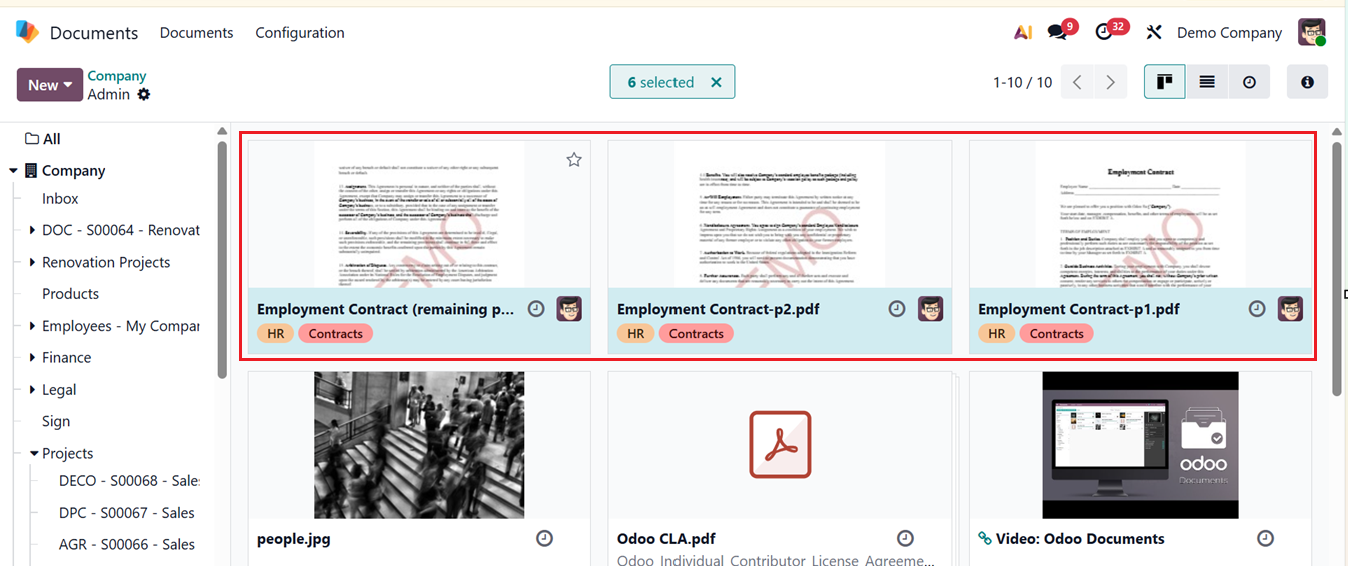
Each document’s ‘Actions’ menu includes icons for performing different tasks such as Select Document, Schedule Activity, and Toggle Favorite, as highlighted below.
The scheduling option is also highlighted in the image. After opening a specific document category, you can directly schedule an activity using the ‘Activity’ icon.
Creating a New Folder
To create new folders, use the ‘Folder’ button in the ‘New’ dropdown. A pop-up window will appear allowing you to specify the folder name, as shown in the screenshot below.

The newly created folder will be displayed in the folder list, and you can add relevant documents to it.

Uploading a Document
You can add new files to the system by clicking on the ‘Upload’ button located at the top left corner of the window.
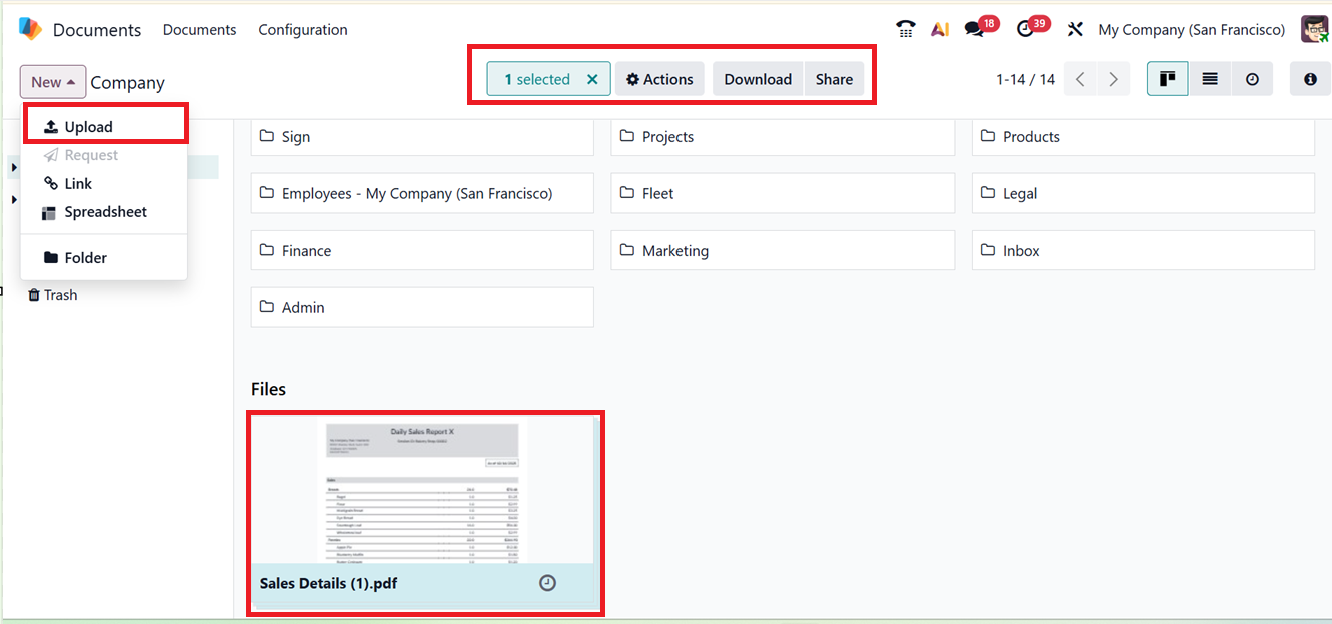
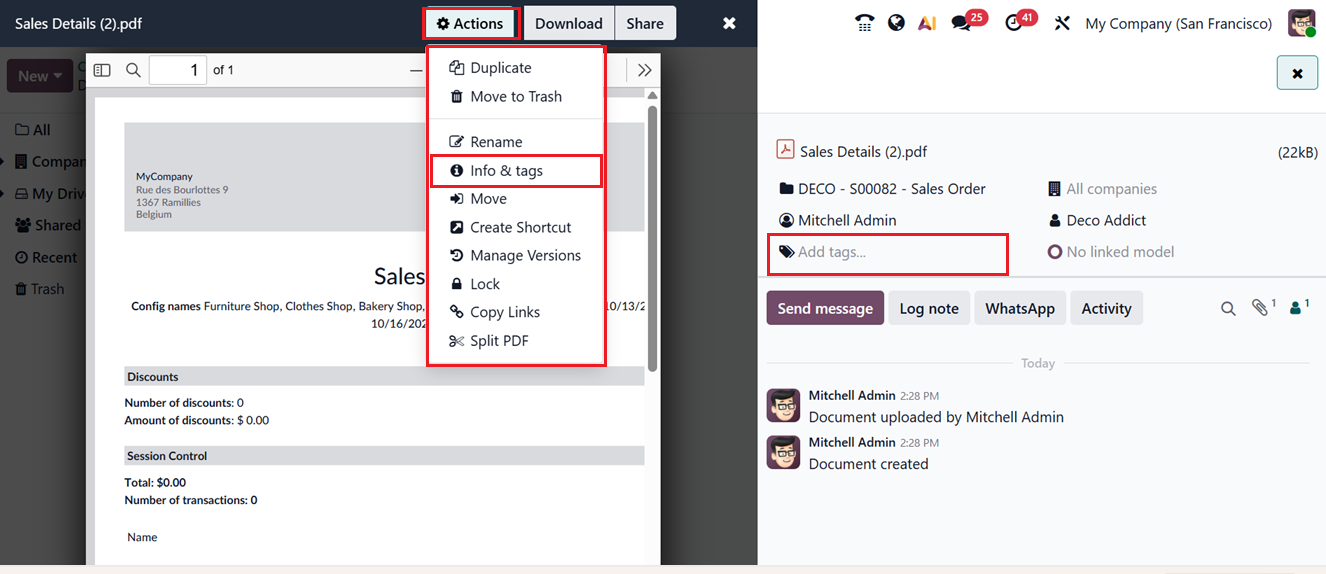
Once the document is uploaded from your device storage, click on the file to see the full document details. The ‘Actions’ menu placed at the top of the window will provide various options including Export, Insert in spreadsheet, Duplicate, Move to Trash, Rename, Info & Tags, Move, Create Shortcut, Manage Versions, Lock, Copy Links and Split PDF, as shown in the screenshot below.

- Export- Exports the selected document to your device.
- Insert in Spreadsheet- Inserts the document’s data into an Odoo Spreadsheet.
- Duplicate- Creates an exact copy of the selected document.
- Move to Trash- Moves the document to the trash folder.
- Rename- Renames the selected document.
- Info & Tags- Opens document info and allows adding or editing tags.
- Move- Moves the document to another folder or workspace.
- Create Shortcut- Creates a shortcut to the document in another location.
- Manage Versions- Manages different versions of the document.
- Lock-Locks the document to prevent edits or deletion.
- Copy Links- Generates shareable links to the document.
- Split PDF- Splits a multi-page PDF into separate pages or files.
After choosing the file you wish to share, click on the ‘Share’ button at the top of the window. The system will display a pop-up window where you can input details for sharing the selected record. A screenshot of this window is displayed below.

To generate a shareable URL, click the ‘Copy Links’ button. You can then add the name or email addresses of recipients in the designated field and assign their access level as either Viewer or Editor. You can also set an expiration date for access using the calendar option, and once all details are entered, click the ‘Done’ button.
The ‘Download’ button enables you to download any document uploaded or saved by another user.
you can view and modify additional document details such as Name, Contact, Owner, Workspace, Tasks, and Tags, as shown in the screenshot below.
To add new tags, click once in the ‘Add tags’ space, and a dropdown menu will appear displaying available tags, as shown in the screenshot above.
The Open Chatter box, located on the right-hand side of the window after opening a document, enables you to plan tasks related to the file, send messages to document followers, and add log notes. Through Odoo’s WhatsApp integration, you can also send WhatsApp messages as needed, as depicted in the screenshot below.
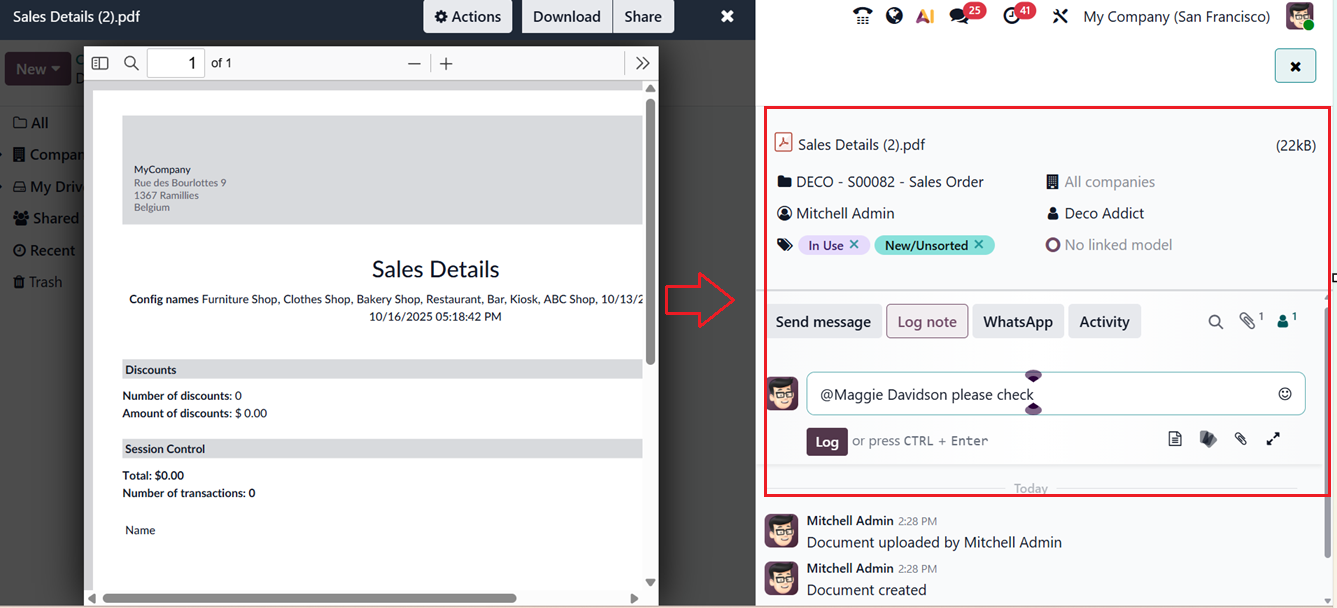
From the Chatterbox area, you can attach files and emojis to your messages. Each workspace can also have automated actions for its documents.
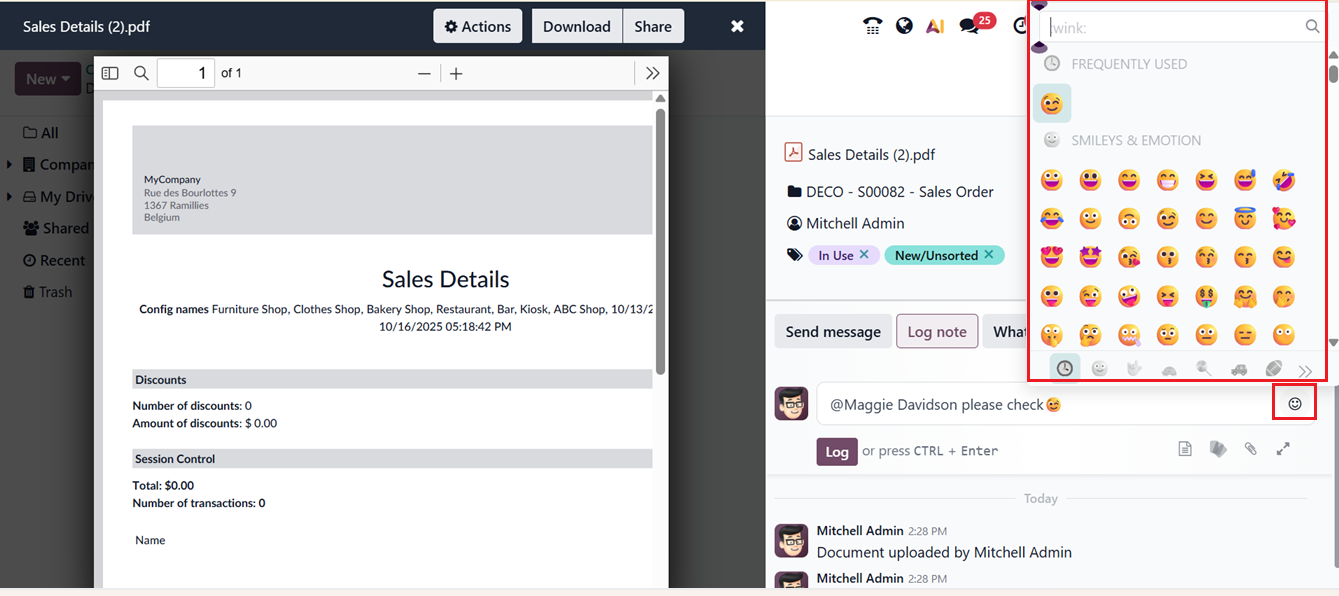
You can send any quick messages using the ‘Send message’ button. Odoo also allows you to insert a Canned response, Add documents, Attach files and Open full mail composer using the small icons provided under the message typing field, as depicted in the screenshot below.
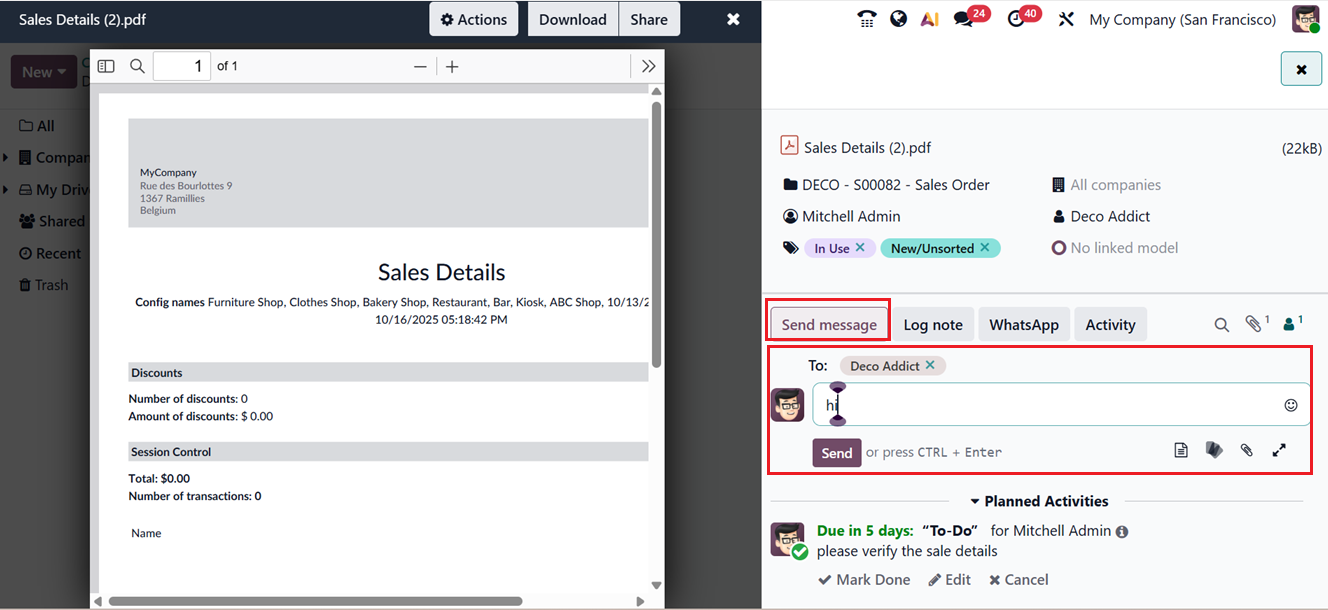
After editing the message, click on the ‘Send’ button. Then, you can schedule and manage several activities using the ‘Activity’ button found on the right side of the window.
Scheduling an Activity
Clicking on the ‘Activity’ button will open a pop-up window, where you can select an activity whether it is an actual job To-Do, Email, Call, Meeting, Do Stuff, UBO Form Request, Inbox, Document or Signature, as shown in the screenshot below.

- To-Do – Schedule a general task or reminder to be completed.
- Email – Schedule an email to be sent or prepare a reminder to follow up by email.
- Call – Plan a phone call or follow-up call related to the document.
- Meeting – Schedule a meeting or appointment connected to the document.
- Do Stuff – Create a custom task or action that doesn’t fit other categories.
- UBO Form Request – Schedule the action of requesting a UBO (Ultimate Beneficial Owner) form.
- Inbox – Schedule an activity that will appear in the user’s activity inbox for attention.
- Document or Signature – Schedule an action requiring document review or a signature request.
Then, you can provide a brief summary of the scheduled task in the ‘Summary’ field , mention the ‘Due Date’ and the ‘Assigned to’ person details along with any relevant notes. Finally, you can save the activity using the ‘Save’ button or mark it as completed using the ‘Mark Done’ button or delete if it is not necessary using the ‘Discard’ buttons respectively.
Depending on the document type, users can perform a range of actions within the Odoo 19 Documents module. These include creating tasks, marking documents as drafts, deprecating, or signing them where applicable.
For example, an Employment Contract document has a ‘Sign’ option, while a Partner Spreadsheet Test document only allows actions like setting a task, marking as draft, or deleting.
After scheduling the activity, it will be shown inside the ‘Planned Activities' chatter area at the right side of the document window, as shown in the screenshot below.

Signing a Document
With the integration of the Odoo Sign module, Odoo provides a "Sign" button within the document window for files requiring signatures. You can click the ‘Sign’ option from the ‘More’ button placed at the top of the document window. This button allows users to sign documents directly in the module, as illustrated in the screenshot below.

By clicking on the "Sign" button, a new window appears featuring tools such as signature field customization and editable document layouts, as shown below.
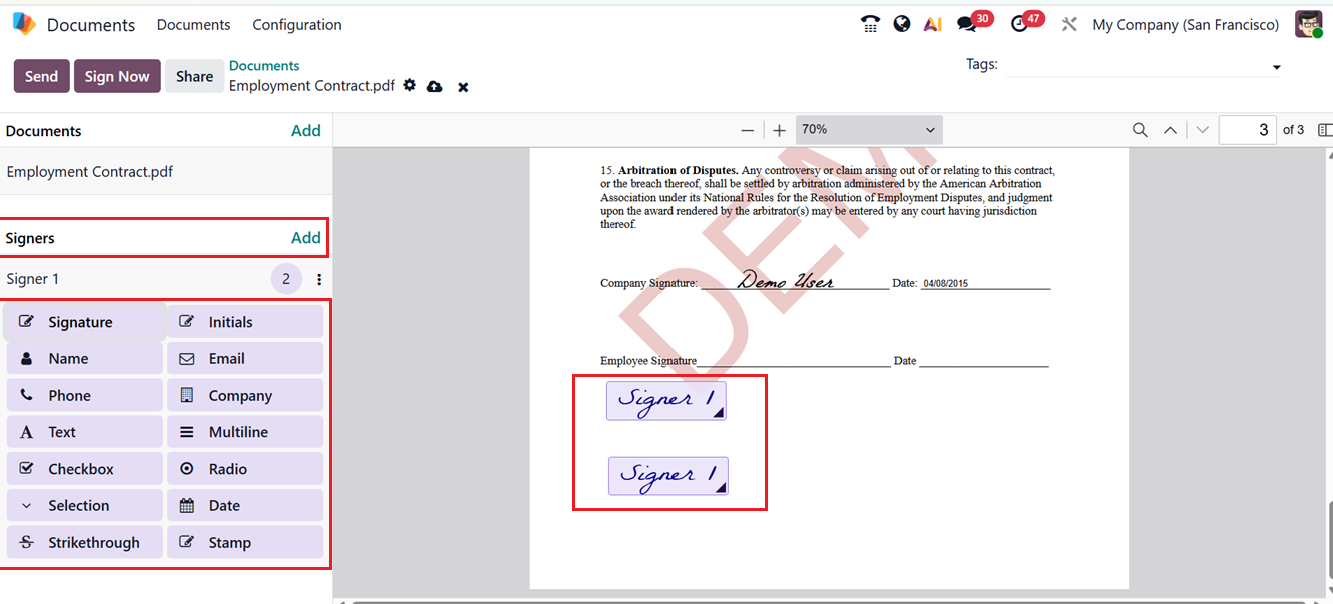
From the ‘Fields’ section, you can drag and drop required signing fields into the document. You can also set the person's name in the signing fields using the ‘Add’ button found near the ‘Signers’ area, as shown in the screenshot below.
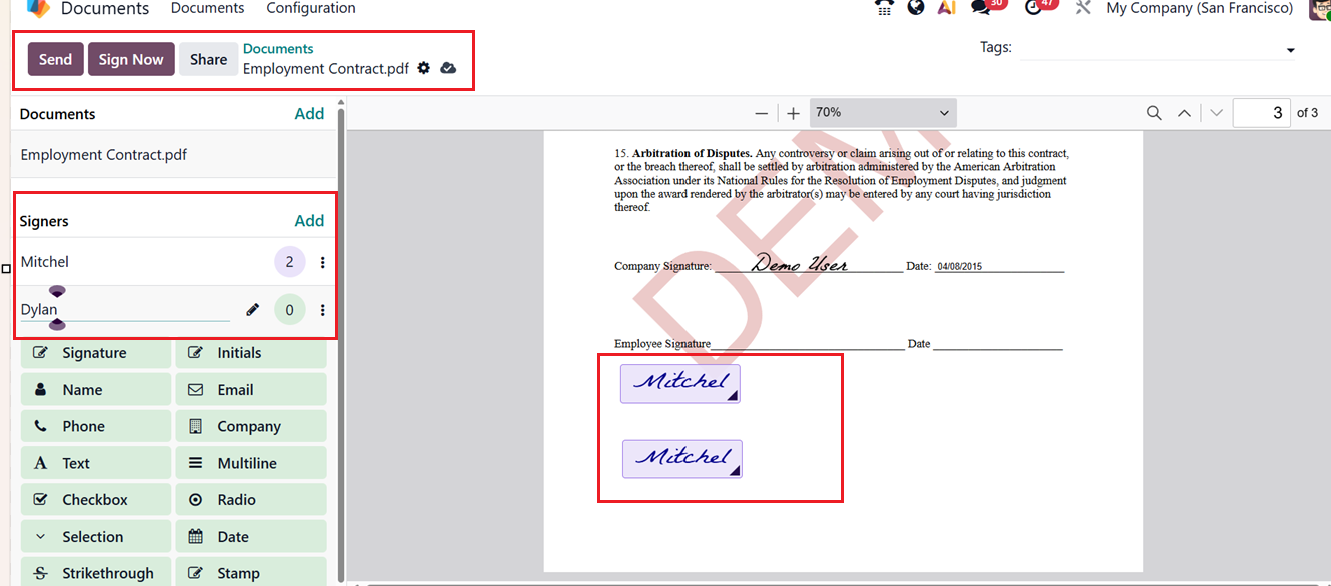
After mentioning the signers and all fields are positioned, click ‘Sign Now’ to initiate the signing process. A signature request pop-up window will then appear, allowing you to edit details such as Employee Name, Subject, File Name, and Contacts in Copy, as illustrated in the screenshot below.
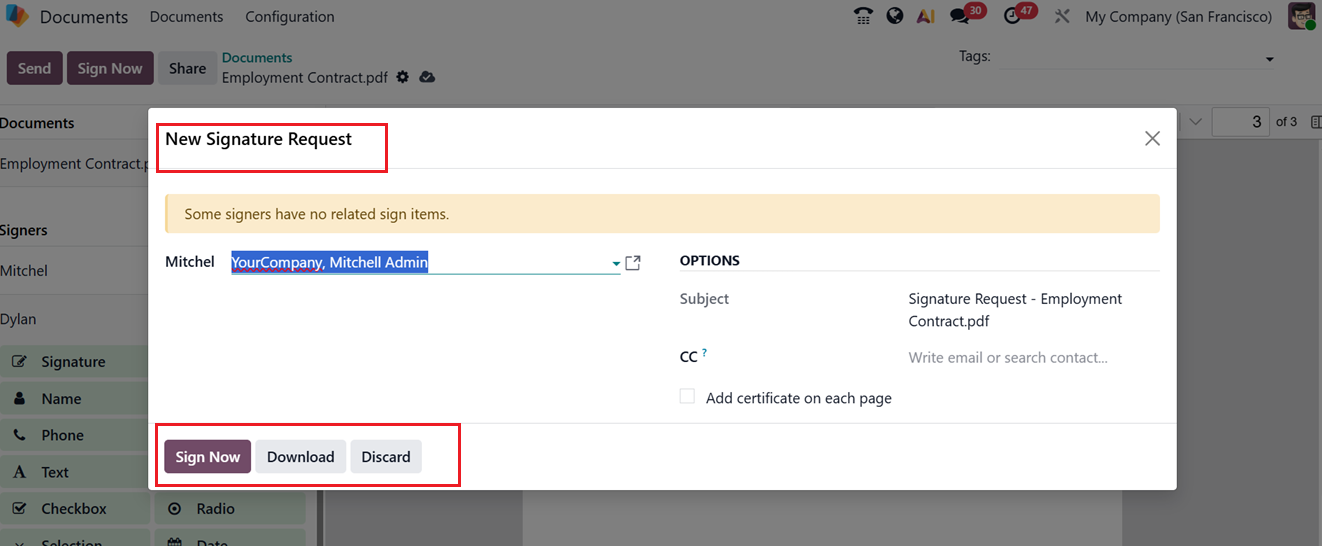
To finalize, press the ‘Sign Now’ button. This will redirect you to the document, where you can click on the signature field to open a signature editor.

Here, you can automatically generate a new signature, draw one manually, or upload a signature file from your device using the Auto, Draw, and Load buttons as illustrated below.
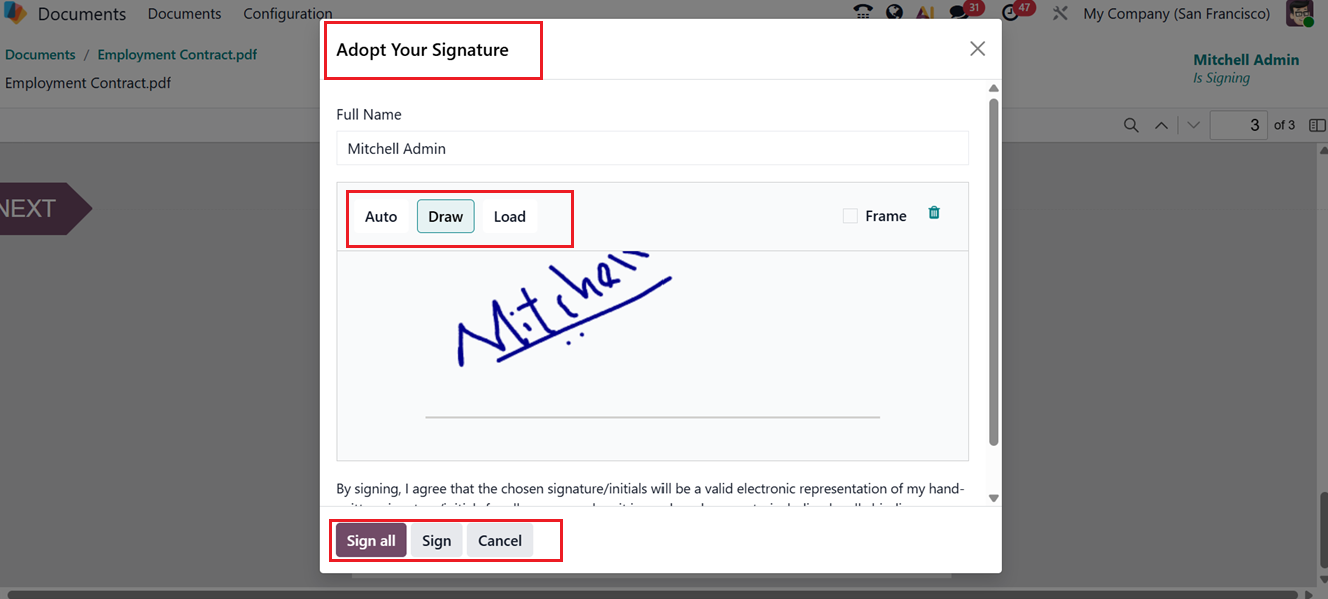
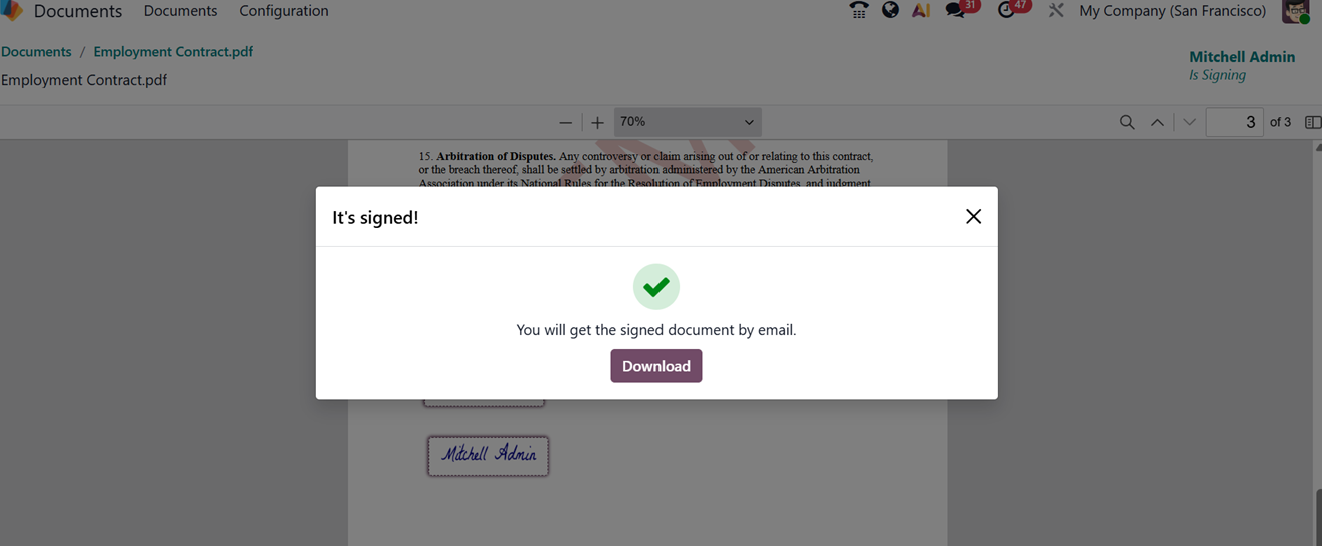
Then, press the ‘Sign All’ button to complete the process. Afterward, you can validate and send the completed document for further processing using the ‘Validate & Send Completed Document’ button.

Once validated, the document can be downloaded using the ‘Download’ button, as depicted in the screenshot below.
If you send a signature request or receive a request, it will be shown under the ‘My Documents’ dashboard. So, the authorized personnel or administrators can reject or sign the document using the ‘Resend’ or ‘Sign’ buttons or modify it by selecting the ‘Edit’ option after opening the document.

The ‘Send to Finance’ buttons in certain document windows can be used to forward the selected document to the finance team for accounting-related processing or approval.
Create Spreadsheet
You can generate spreadsheets by selecting the ‘Spreadsheet’ button under the ‘New’ dropdown menu in the Document module’s main screen.
This option is ideal for compiling related data into a single, analyzable sheet. When you click the ‘Spreadsheet’ option, a new window will appear as shown in the screenshot below.
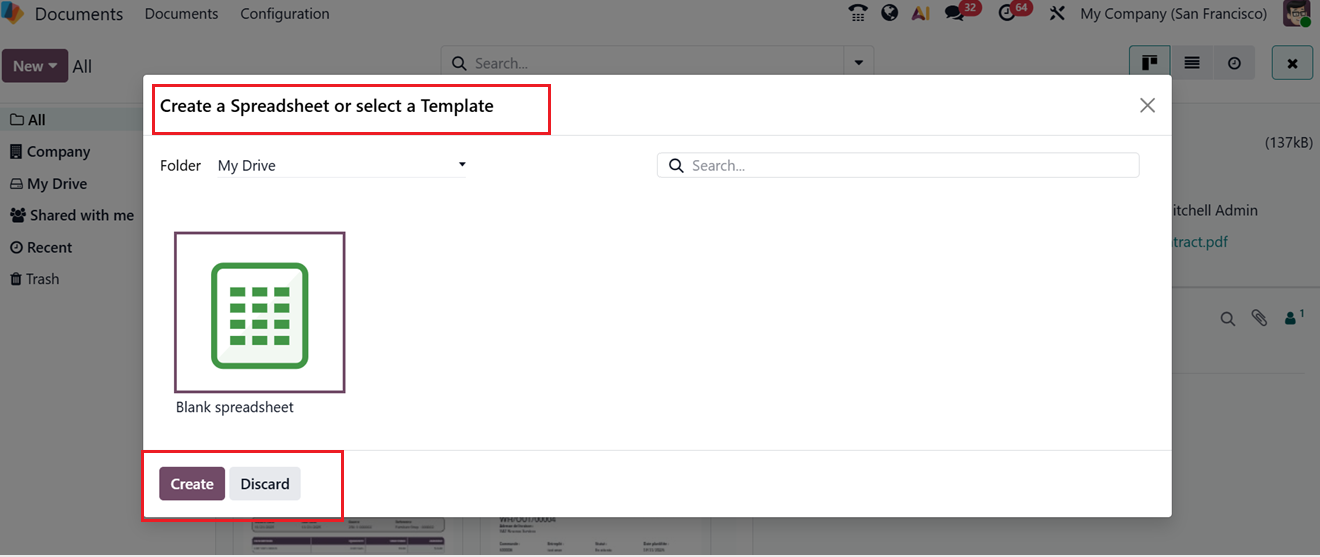
This window includes several spreadsheet templates for various reports or file types. You can choose a suitable model or create a blank spreadsheet by selecting the empty option. Odoo also allows you to search specific spreadsheet documents using the search bar area.
To freshly create a new spreadsheet data, click on the ‘Create’ button at the bottom left of the window after making your selection. Then, you can update the spreadsheet with relevant data and links, as shown in the screenshot below.

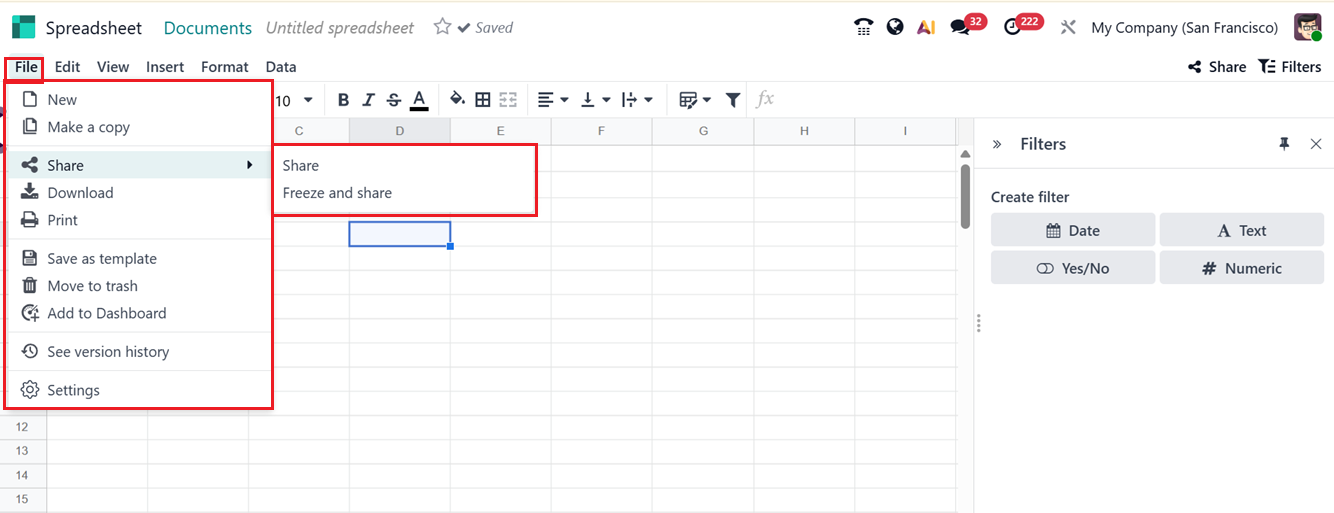
After modifying the spreadsheet using the available tools and functions similar to those found in a standard Microsoft Excel environment, you can share the updated document with other users. To do this, simply click the ‘Share’ button located at the top-right corner of the window, which allows you to grant access and collaborate with team members in real time. You can also utilize the ‘Filters’ option to create filters based on various specifics.
To add new spreadsheet templates into the Template Selection window, you can choose the ‘Save as template’ option from the ‘File’ menu. You can also, create a copy of the template, Share, Download, Print, Move to trash, Add to Dashboard, See version history, Freeze and Share and change file settings using the relevant option provided under the ‘File’ menu, as depicted in the screenshot below.
Requesting a Document
Users can request essential documents from employees or other responsible individuals using the ‘Request’ button under the ‘New’ dropdown. This feature simplifies organization-wide document management and ensures seamless access to critical files.
Clicking on the ‘Request’ opens a pop-up window where you can enter the Document Name, Requested Person, Due Date, Folder, Tags, and any related Message, as depicted in the screenshot below.

After filling in the details, click on the ‘Request’ button. The requested document will then appear on the dashboard.
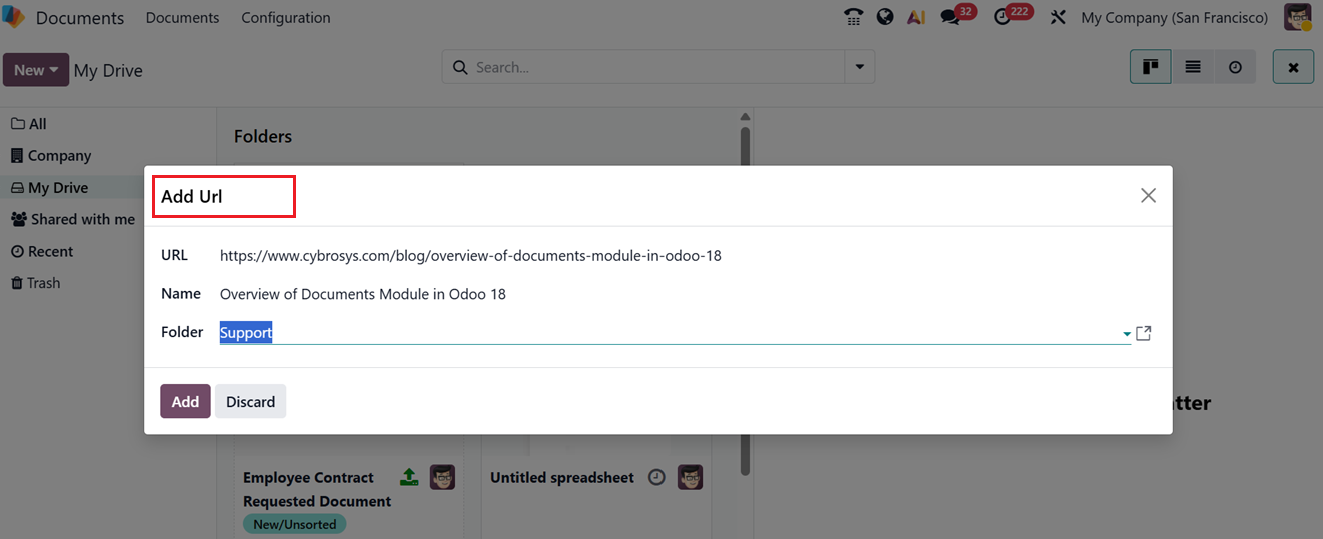
Adding a URL
To link external documents, files, or data, click on the ‘Link’ button from the ‘New’ dropdown. Copy the URL and paste it in the displayed window along with the URL Name and Folder Name, as illustrated below.
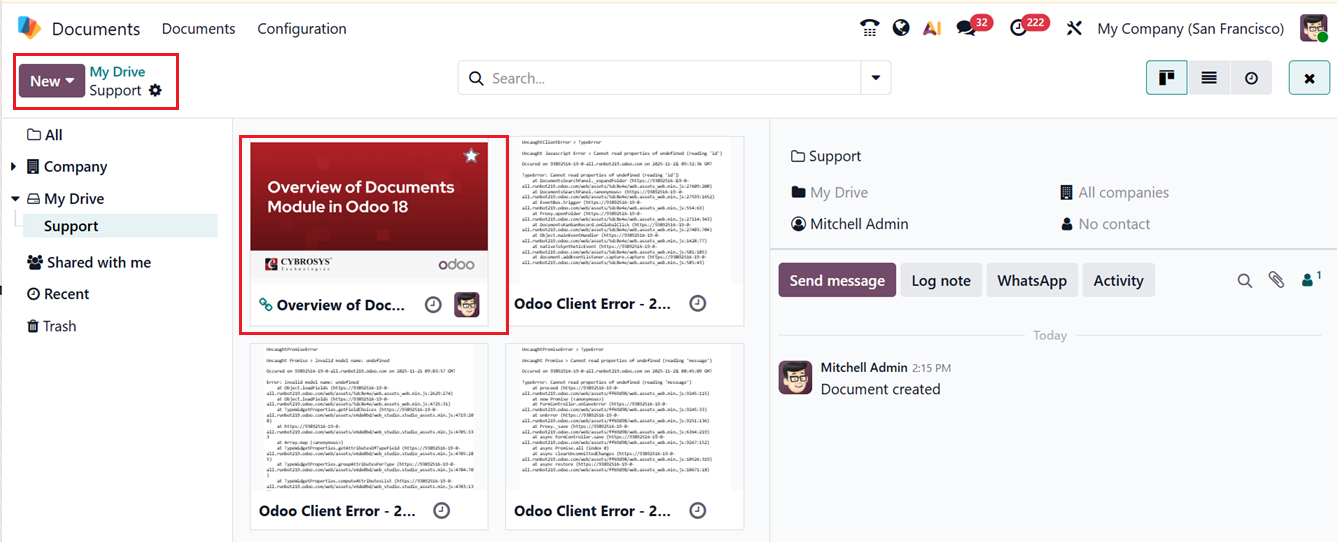
The added URL will then be listed on the document dashboard for quick access, as shown in the screenshot below.
Creating a New Folder
To create a new folder for your requirements, click on the ‘Folder’ option from the ‘New’ button. This will open a new ‘Add Folder’ pop-up window, as shown in the screenshot below.
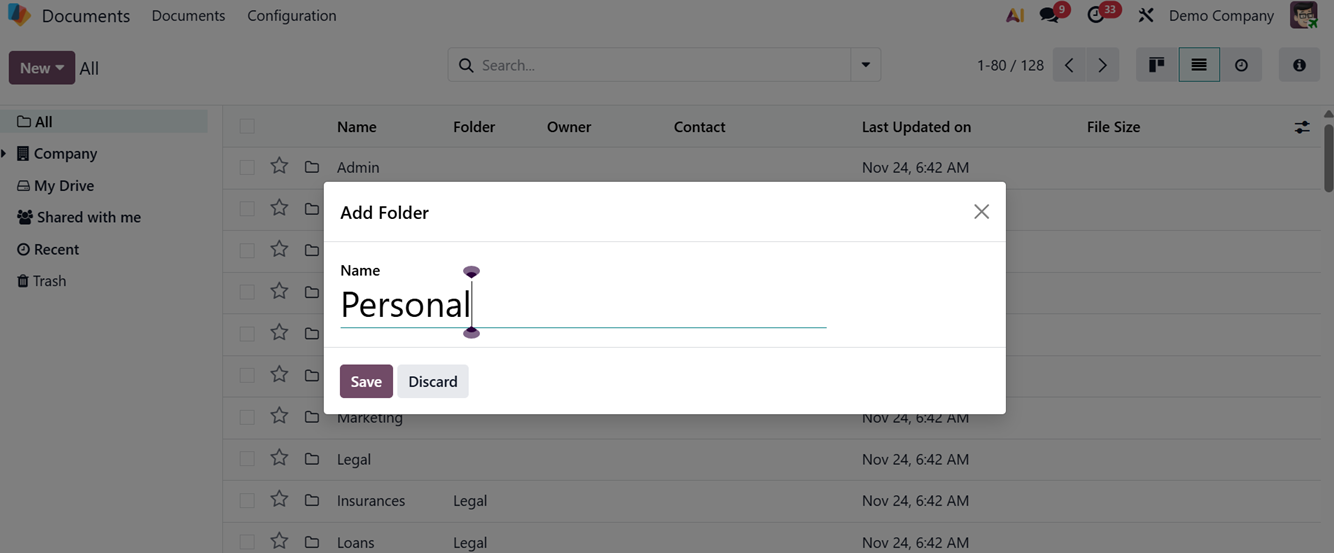
Here, you may specify a folder name and save the file by selecting the Save button. The newly created folder will then appear under the appropriate folder section, allowing you to add documents to it, as illustrated in the screenshot below.

Configuration Menu
Configuration Menu
The Settings menu in the Odoo 19 Documents module provides a wide range of configuration options. To access it, go to Configuration settings within the Document module. You will see two tabs: Trash Management and Files Centralization.


In the ‘Trash Management’ section, you can define deletion delays in days. Enabling this feature displays an alert when a document is moved to Trash, indicating it will be permanently deleted after 30 days. During this period, the document remains visible in Trash via the dashboard.
In the ‘Files Centralization’ section, you can set templates for storing signed documents in specific workspaces. The available centralization options include Default Project Folder, Product, Human Resources, Sign Approvals, Fleet and Accounting. These configurations help centralize documents uploaded by customers along with their purchases.
For instance:
- Human Resources:Centralizes employee documents like contracts and payslips. After enabling, select Workspace, Payroll Workspace, Default Payslip Tags, and Contracts.
- Products: Manages product-related files and supports spreadsheet centralization.
- Sign: Links a sign template to directories.
- Approvals: Automatically saves approval-related documents, including request forms and validated workflows, into the relevant workspace.
- Fleet: Organizes documents related to company vehicles, such as registration papers or maintenance records.
- Accounting: Consolidates accounting files and journals for synchronization.
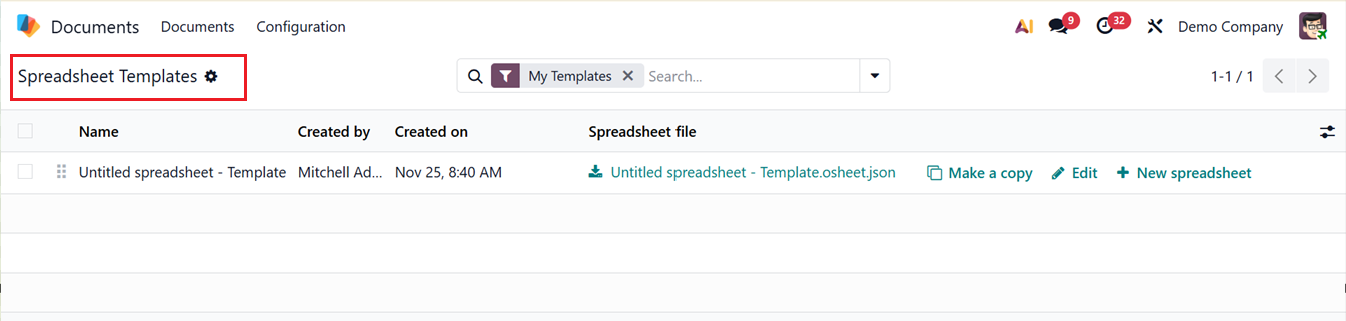
Spreadsheet Templates
The Configuration menu also includes a Spreadsheet Templates section, which helps manage all spreadsheet templates in one place. You can create, modify, or duplicate templates from here.
Tags
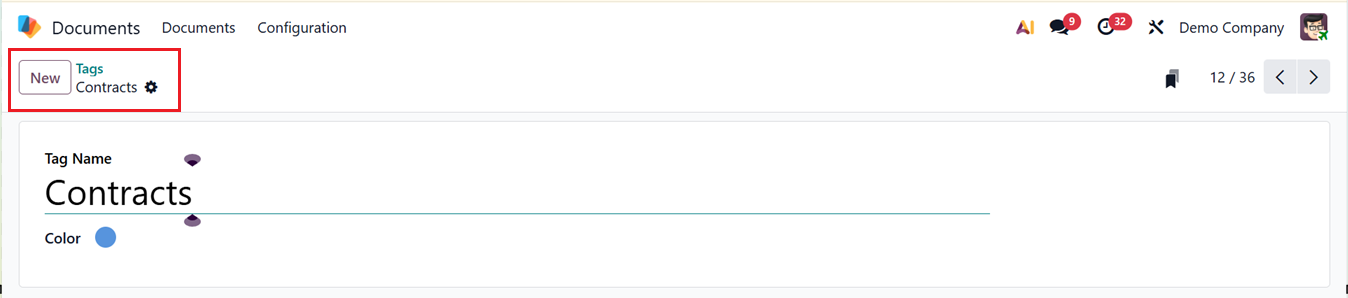
To configure new tags, navigate to the ‘Tags’ option from the ‘Configuration’ menu of the Odoo 18 Document module. The Tags window lists all existing tags, allowing you to view, edit, or create new ones by clicking the ‘New’ button.

When you click ‘New,’ a creation form appears where you can define the Tag Name, Color, and Tooltip (hover text), as shown in the screenshot below.
Activity Types
The Odoo 19 Documents module includes Activity Types that help define actions for document processing, making task management more efficient. You can configure activity types like calls, meetings, emails, and reviews under the ‘Activity Types’ option from the ‘Configuration’ menu. The dashboard displays details such as name, default summary, planned date, and activity type.

To create a new Activity Type, click on the ‘New,’ then choose an ‘Action’ Type (e.g., Call, Email, Meeting, or To-Do) and add a ‘Name’ (e.g., Review Document or Approve Contract). Assign a ‘Default User,’ ‘Default Summary,’ and a ‘Default Note.’ You can then specify the appropriate number of days before the action is executed in the ‘Schedule’ field. This enables you to plan and manage the action’s deadline effectively.
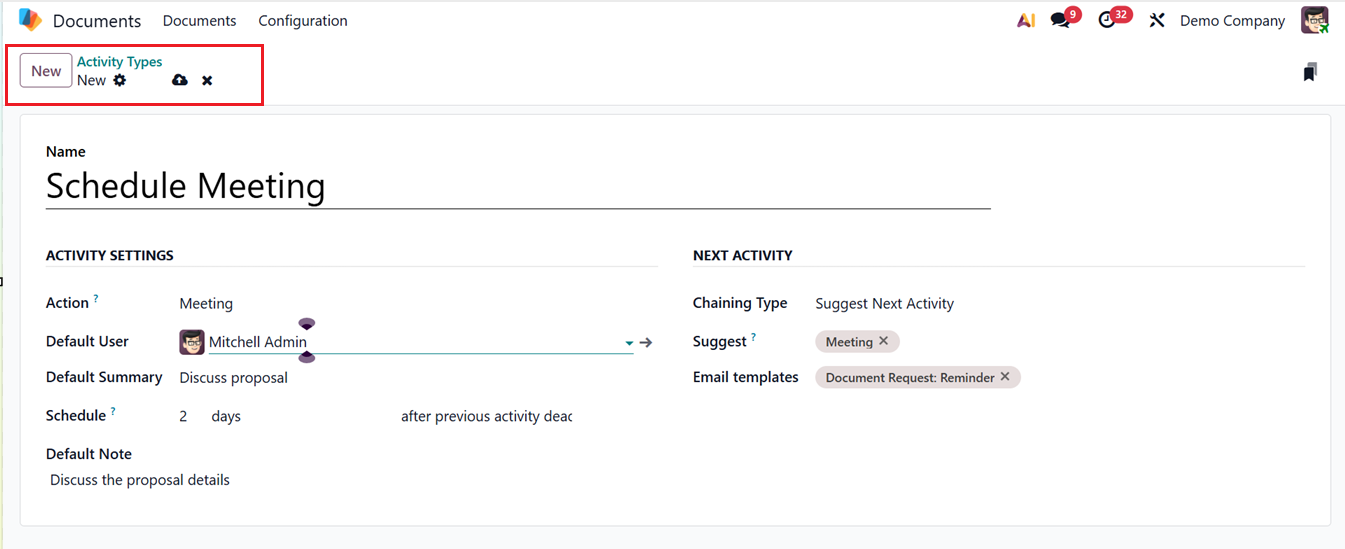
In the ‘NEXT ACTIVITY’ tab, define follow-up steps using the ‘Chaining Type’ option choose the ‘Suggest Next Activity’ to prompt a suggestion or ‘Trigger Next Activity’ to automatically initiate the next task. You can set the suggested activities in the ‘Suggest’ field. Once the current activities are marked as done, this mentioned activity will be suggested. Then, set templates for customer emails in the ‘Email Templates’ area. Finally, click on the Save icon to apply the configuration. These custom Activity Types will then appear in the dropdown list when scheduling new activities.
Activity Plan
An Activity Plan represents a structured sequence of automated tasks that streamline document workflows. It allows scheduling, assigning users, setting deadlines, automating follow-ups, and improving synchronization. The ‘Activity Plan’ dashboard lists available Document Plans with their ‘Steps Count’ in a structured view, as shown below.

To create a new plan, click on the ‘New’ button and fill in the Plan Name, Model, and Company details in the form displayed, as shown in the screenshot below.
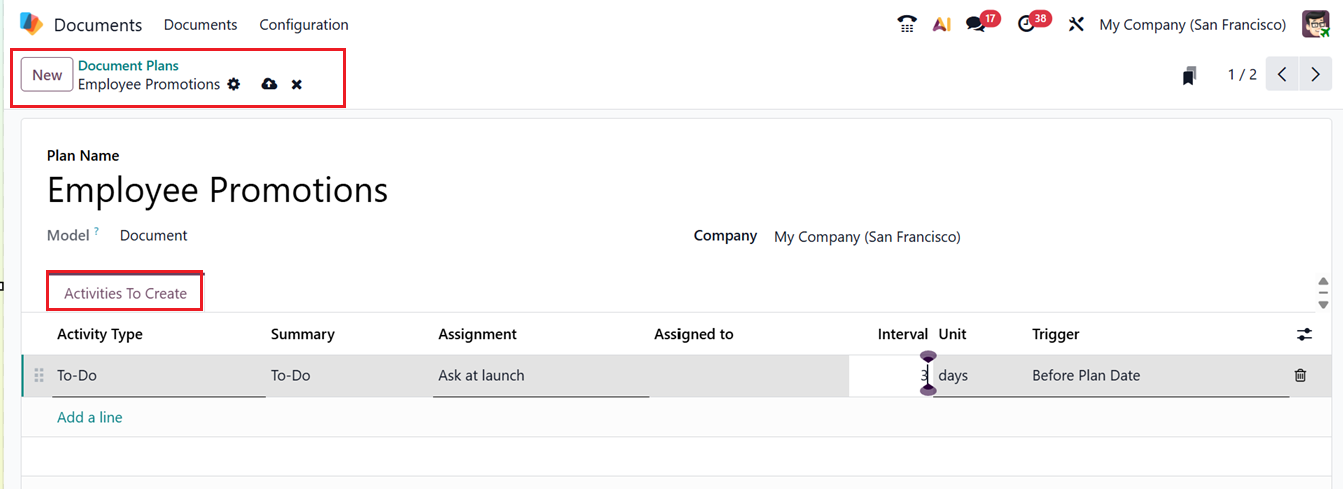
Using the Add a line button within the Activities to Create tab, you can define the specific activities that should be generated as part of the plan in the ‘Activity Type’ field. For each activity, you can enter detailed information such as the Summary of the task, the Assignment type, Assigned To (Responsible user), the Interval before the activity is due, the Unit of time (days, weeks, etc.), and the Trigger that determines when the activity should be created. Once all required activities are configured and the plan is saved, it can be reused across future workflows to ensure consistency and streamline task creation.
By consolidating documents into one digital workspace, reducing paperwork, and enhancing productivity, the Odoo 19 Documents module transforms document management. It promotes accessibility, collaboration, and organized operations across all departments.