Configuration
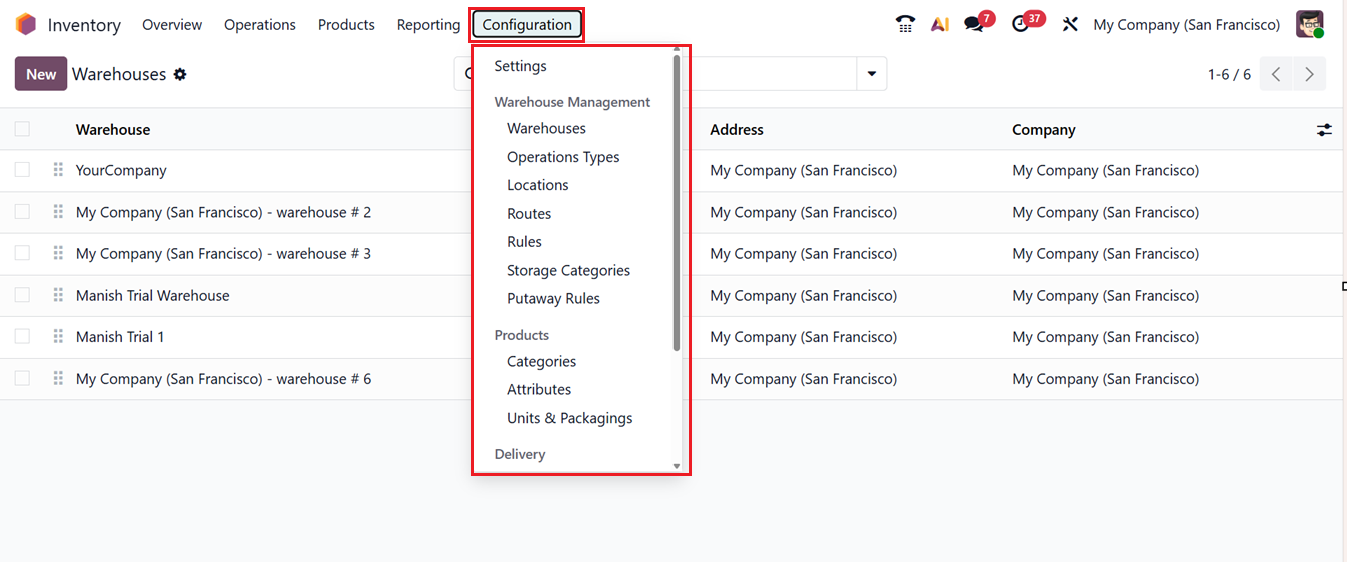
In the ‘Configuration’ menu of the Odoo 19 Inventory Module, you can manage all the general Settings, Warehouses, Products, Delivery and Reporting related features required for better functionality.
Warehouse management is a vital part of inventory operations, ensuring efficient storage, movement, and control of goods. Odoo 19 streamlines this process by offering a structured and flexible system suitable for both single and multi-warehouse setups. The Warehouse Management tab in the Inventory module’s Configuration menu provides key tools such as Warehouses, Operation Types, Locations, Routes, Rules, Storage Categories, and Putaway Rules options to support efficient and transparent warehouse operations.
1.1 Warehouse
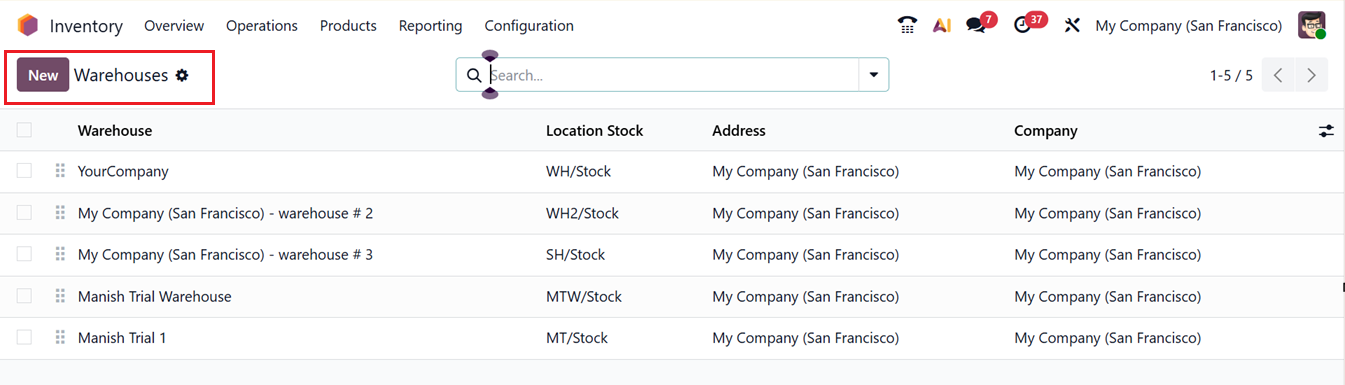
To begin configuring warehouses in the Odoo 19 Inventory module, navigate to the Configuration menu and open the Warehouses sub menu. The displayed list view presents details such as Warehouse Name, Location Stock, Address, and Company information.
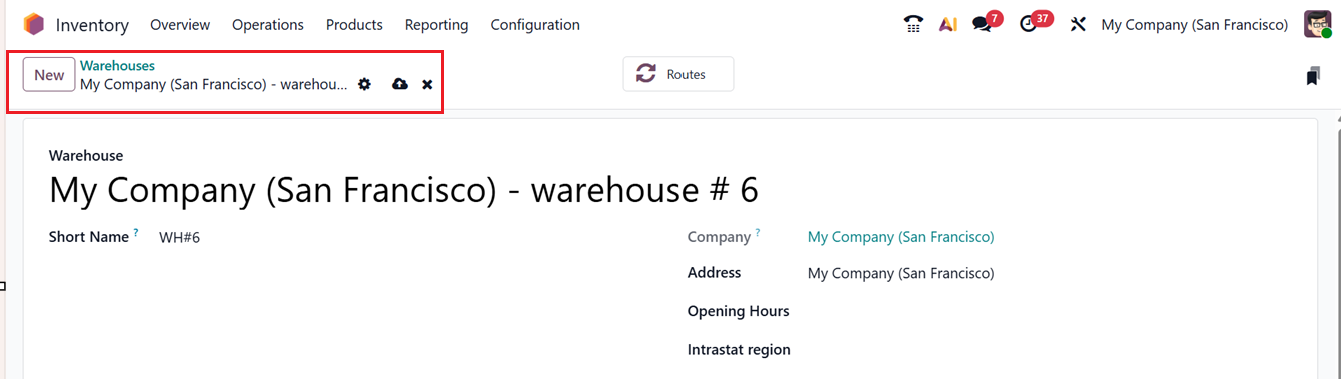
To add a new warehouse, click on the New button and fill in the required details. In the creation window, enter essential information including Warehouse Name, Short Name, Company, Address, Opening Hours, and Intrastat Region. These fields ensure each warehouse is clearly identified and categorized.
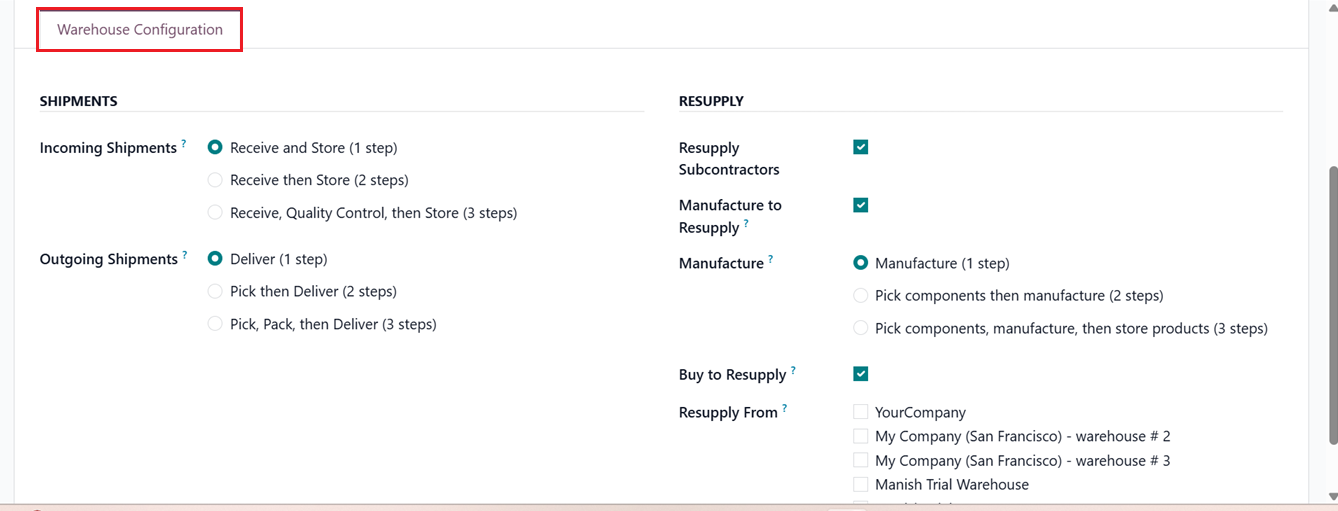
Under the Warehouse Configuration tab section, you’ll find settings related to SHIPMENTS and RESUPPLY operations.
Incoming Shipments: You can define how incoming products are received into the warehouse. The available options are:
- Receive and Store (1 stop): Products are received straight into the stock location.
- Receive then Store (2 steps): A two-step method where items are first received in an input area and then transferred to stock.
- Receive, Quality Control, then Store (3 steps): A three-step process where items undergo quality inspection before being stocked.
Similar configurations are available for Outgoing Shipments, allowing you to choose the most suitable method for dispatch operations based on business needs.
- Deliver (1 step): Products are picked and delivered to the customer in a single action. This is ideal for small warehouses with simple operations where no separate picking or packing control is needed.
- Pick then Deliver (2 steps): Products are first picked from storage and moved to a staging area, then delivered to the customer. This option provides better control over order preparation before shipping.
- Pick, Pack, then Deliver (3 steps): Products are picked, then packed separately, and finally delivered. This method is best for large or high-volume warehouses that need strict control over packing, checks, and shipping accuracy.
The RESUPPLYtab offers enhanced features for managing inter-warehouse and subcontractor resupplies.
- Resupply Subcontractors: Facilitates sending materials from the main warehouse to subcontractors when required.
- Manufacture to Resupply: When activated, this option allows the company to manufacture goods to restock the warehouse.
- Buy to Resupply: Allows Odoo to automatically purchase raw materials when stock levels fall below minimum limits.
- Resupply from Warehouse: Enables restocking items from one warehouse to another, ensuring all locations remain adequately supplied.
Manufacture: Three methods can be used for manufacturing procedures.
- Manufacture: Transfers components directly to the production area for immediate processing.
- Pick Components and then Manufacture: A two-step procedure where items are picked from stock before being moved to production.
- Pick Components, Manufacture, and then Store Products: A three-step method where finished products are stored back in the warehouse after manufacturing.
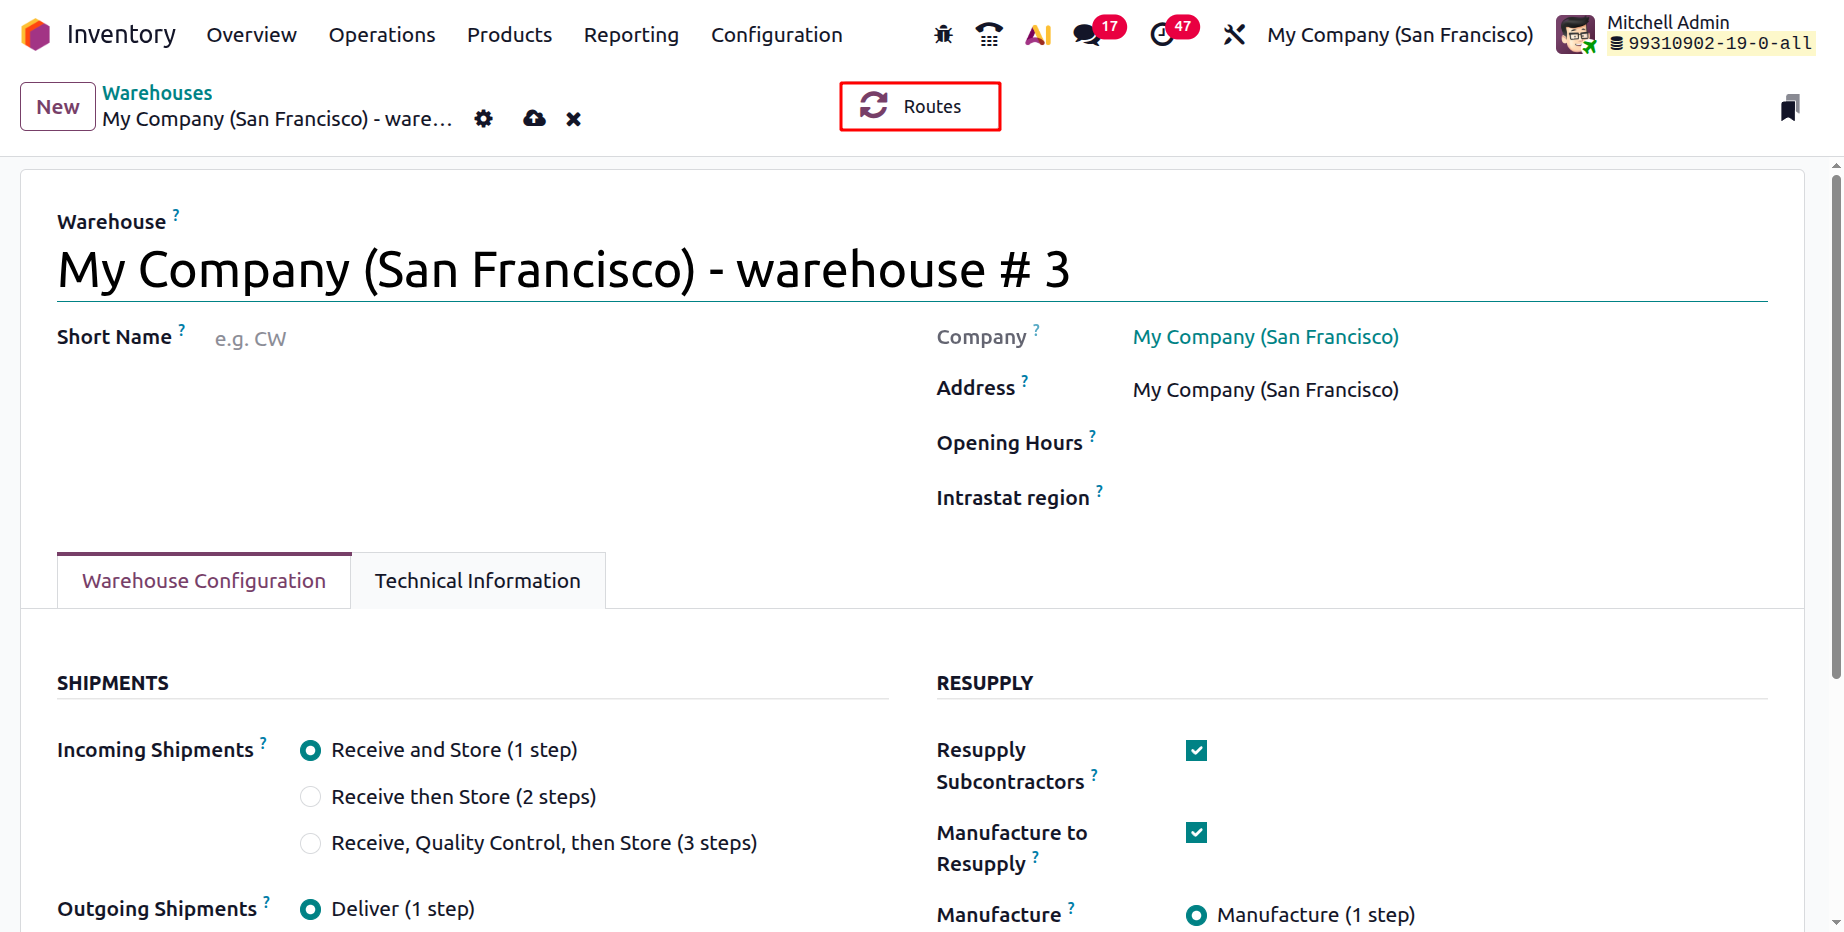
After entering all relevant details, click Save to store the warehouse configuration. The Routes used in warehouse operations can be accessed via the Routes Smart button located at the top right of the warehouse form in a dashboard, as shown above.
1.2 Operation Types
In the Odoo Inventory module, Operation Types define how stock movements are managed in the warehouse by controlling workflows, locations, and operational rules. They tell Odoo what type of stock movement is occurring and how it should be processed, including whether it is a receipt, delivery, internal transfer, dropshipping, or manufacturing operation. Each operation type specifies the source and destination locations, the process flow (one-step, two-step, or three-step), document sequencing, requirements for lots, serial numbers, or packaging, and allowed actions such as reservation, validation, and backorders.
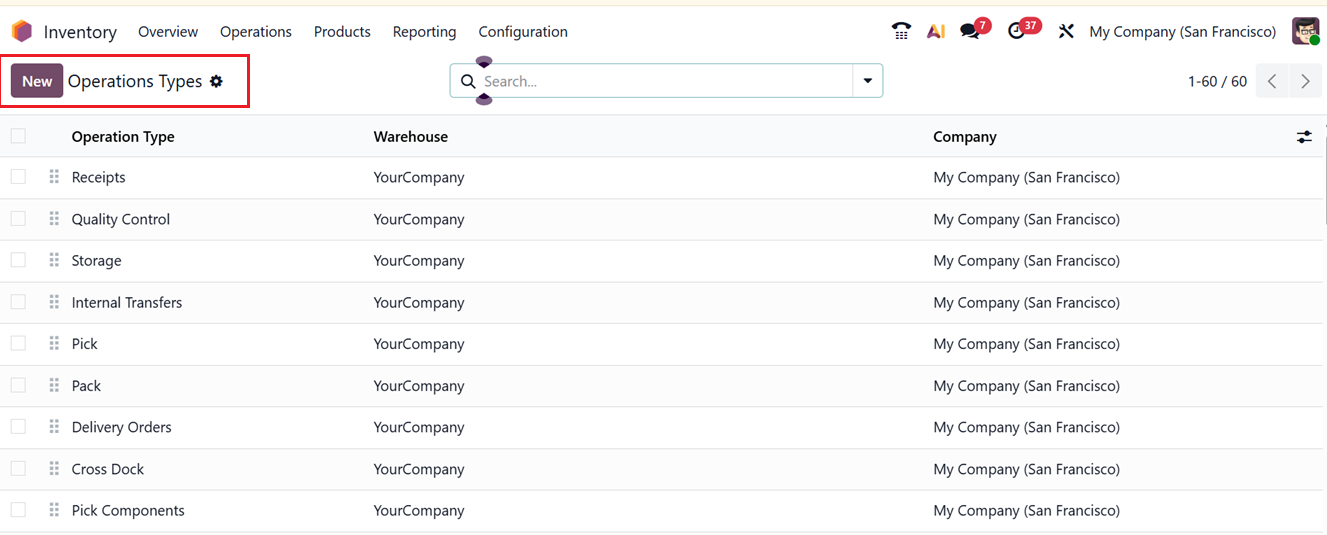
Odoo provides the flexibility to create and customize Operation Types that represent different warehouse activities such as Receipts, Deliveries, Manufacturing Orders, and Internal Transfers. To access this feature, navigate to the Configuration menu and choose the Operation Types option. You will see a list view displaying all predefined operations, as shown in the screenshot below.
To add a new one, click on the New button and in the operation creation form, specify the Type of Operation Name, Reference Prefix, Sequence Prefix, Warehouse, Barcode and Show Reception Report at Validation to automatically show the reception receipt when validating an operation.
The Type of Operations field refers to the category of stock movement that defines the purpose and direction of an inventory operation. It indicates what kind of movement is being performed, which in turn determines the default behavior, locations, and workflow applied to that operation. The main types of operations include;
- Receipts:for stock coming from a vendor to your warehouse.
- Delivery: for stock moving from your warehouse to a customer;
- Internal Transfers: for stock moving between locations within your warehouse.
- Manufacturing: for stock consumed and produced during production.
- Repair: for stocks that need to be repaired after production.
- Dropshipping: for stock shipped directly from a vendor to a customer.
Each type of operation controls key aspects such as the default source and destination locations.
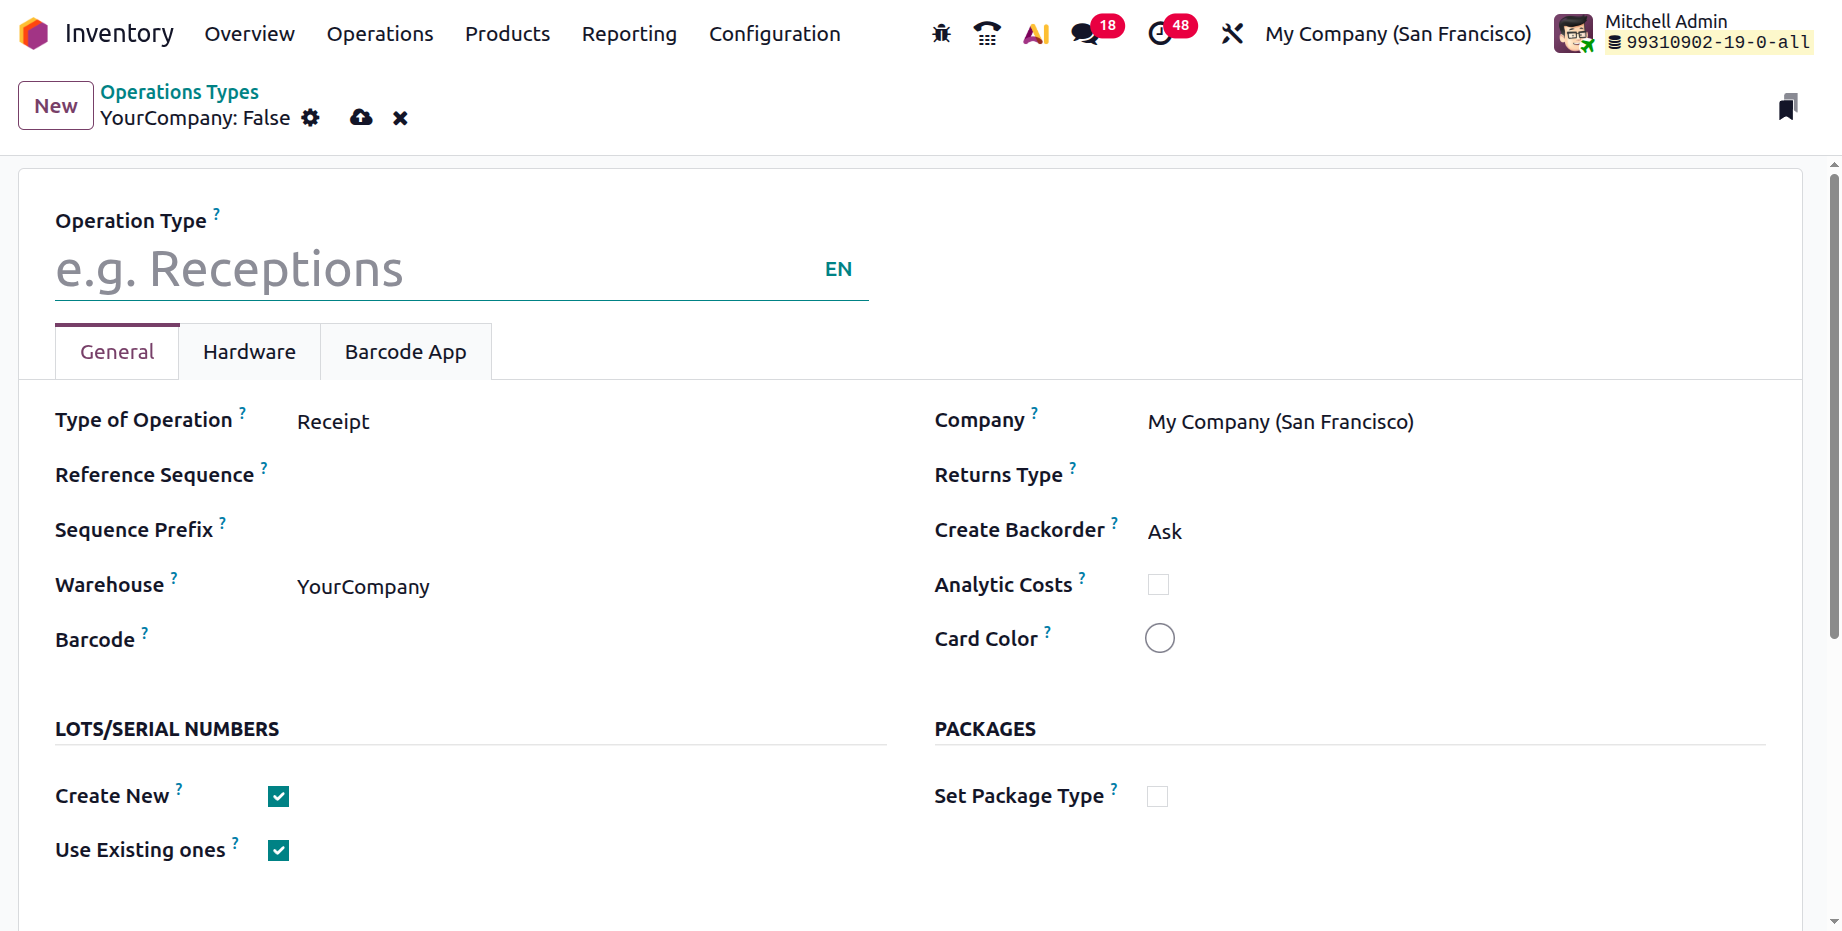
Then, you can see the Company, Returns Type and Create Backorder. The Analytic Costs can be enabled to validate stock pickings to generate analytical entries for the selected project and you can choose a highlight color for the operation cards in the Card Color option
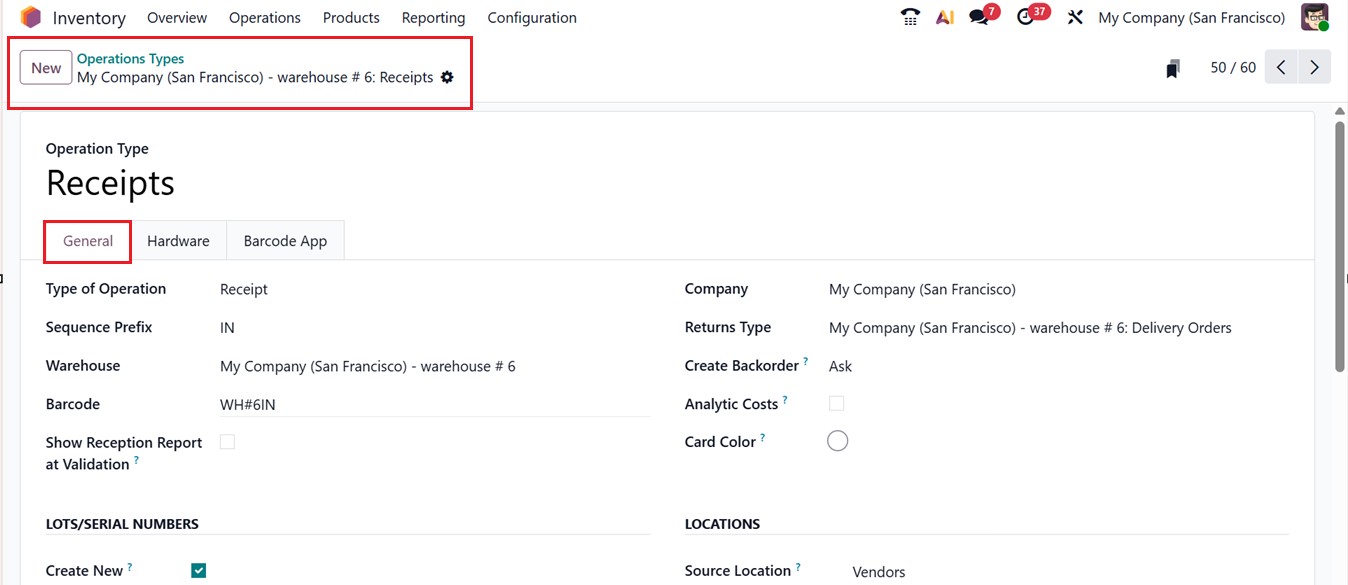
In the Create Backorders, you can choose between:
- Ask: Odoo will prompt whether to create a backorder.
- Always: Automatically creates a backorder for remaining items.
- Never: Cancels unprocessed quantities.
Under the LOCATIONS tab, specify the Default Source Location and Default Destination Location based on the selected operation type. Depending on whether the operation is for internal transfer, delivery, manufacturing, or receipt, some fields will dynamically change to match the selected type.
If the operation involves product returns, you can select the Operation Type for Returns, which helps Odoo automatically fill in relevant product, location, and lot/serial details in detailed operations.
In the LOT/SERIAL NUMBERS tab, you can enable the Create New and Use Existing ones options to allow you to create new Lot/ Serial numbers for the products in an operation and choose from the available Lot/Serial number options respectively.
In the PACKAGES section, you can enable the ‘Set Package Type’ option to assign a package or specific packaging type (such as a box or pallet) to products during ‘Put in Pack’ stock movements. It defines how products are physically packed, enabling grouping items into packages, tracking stock by package, and supporting accurate shipping, labeling, and carrier integration. This feature is mainly used in Pick, Pack, and Deliver workflows to ensure proper packing before delivery and improve warehouse and logistics control.

In the BATCH & WAVE TRANSFERS tab section, you can enable the Dispatch Management feature to display dispatch details in a batch or wave transfer operation form view and in dashboard view. Then, you can provide a location in the ‘To’ field where the dispatch management is occurring. This will open an Automatic Batches option that can be used to automatically put the pickings in batches. Then, set the Maximum lines and Maximum Transfers required to occur the automatic batch picking operation or leave it as 0. Then, enable the Auto-confirm button to automatically verify the batch and wave transfers.
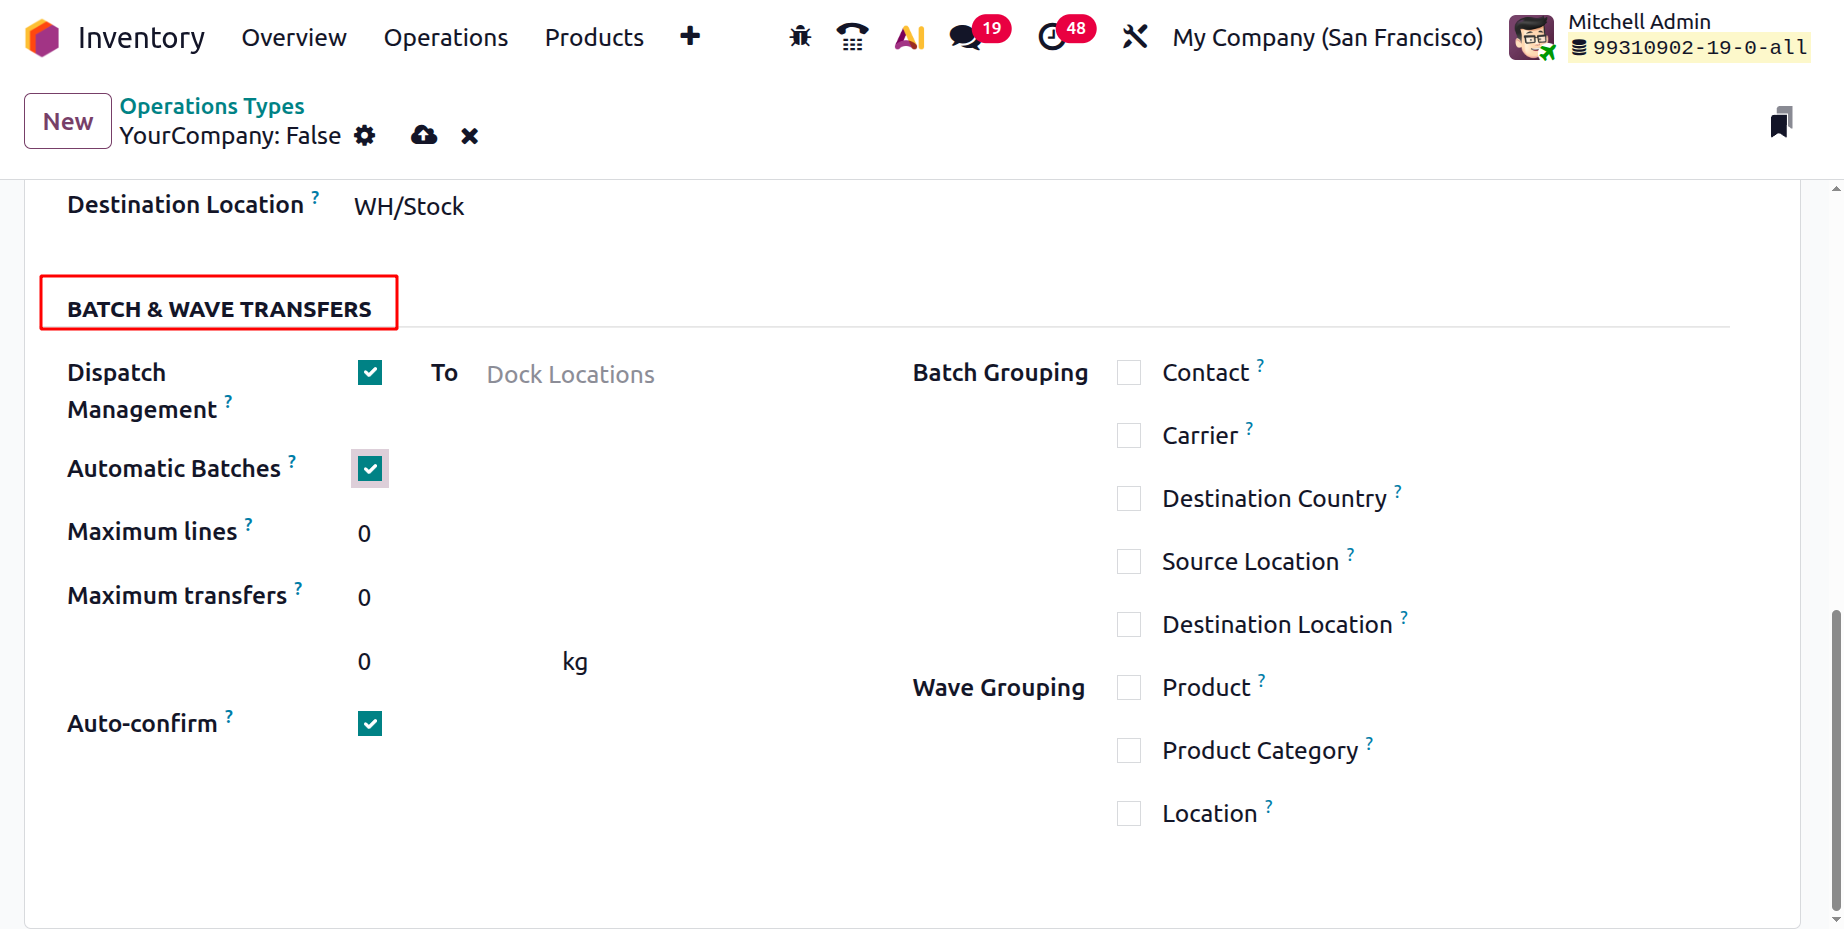
You can also choose the conditions of the Batch Grouping and Wave Grouping options based on the available options including Contact, Carrier, Destination Country, Source Location, Destination Location, Product, Product Category etc. This will automate the batch or wave pickings based on the selected option.
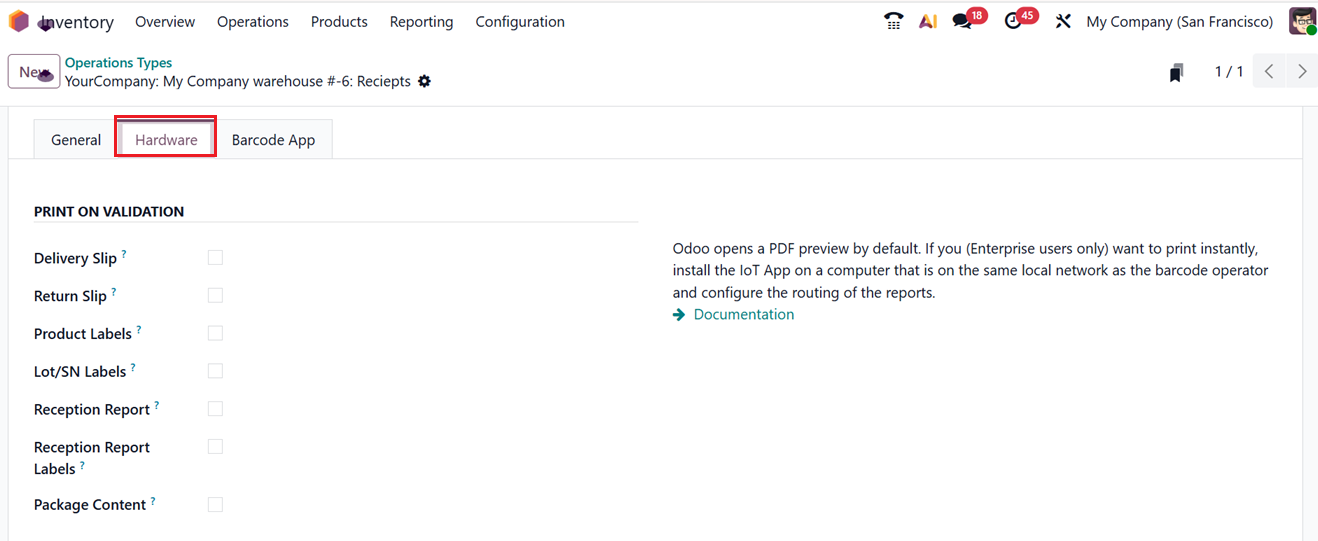
In the ‘Hardware’ tab, you can enable the automatic printing of the labels of a picking when it is validated in Delivery Slip, Return Slip, Product Labels, Lot/SN Labels, Reception Report, Reception Report Labels and Package Contents.

The PRINT ‘PUT IN PACK’ tab can be used to automatically print the Package Labels when the “Put In Pack” button is used. Then, the Connect Scale option can be used to choose the scales that you want to use in this operation type to weigh the created packages.
In the Barcode App tab, you can define how barcode operations behave by configuring the MANDATORY SCAN, FINAL VALIDATION, and OPTIONS settings available in this section.
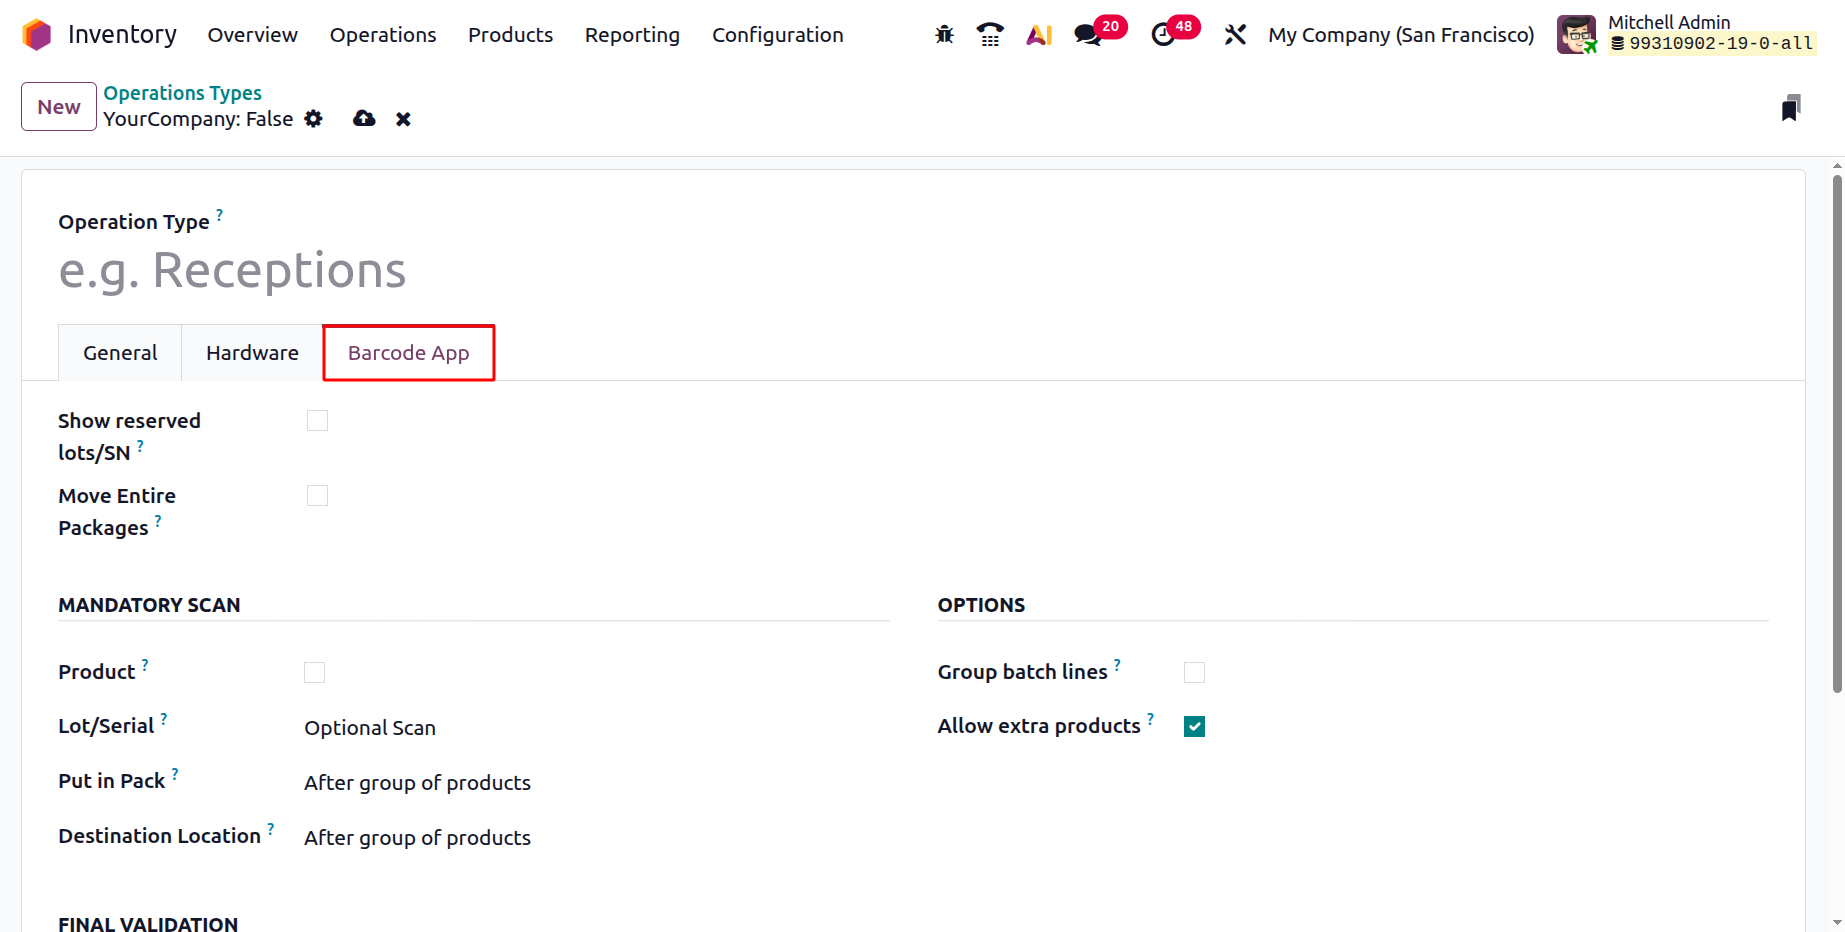
Then, you can activate the ‘Show reserved lots/SN’ option to display reserved LOT/Serial numbers, if not, the picker will pick products with available Lot/SN numbers. If you activate the Move Entire Packages option, the whole package will be displayed inside a Barcode app rather than displaying the contents of the package.
The MANDATORY SCAN configuration determines whether barcode scanning is required during a picking operation. This depends on the selected Destination Location, which can be set to either After each product, After group of products and No. then, you can enable the ‘Product’ option to scan the product before editing product lines. By enabling the Lot/Serial option, you can set whether the Lot/ Serial numbers are Mandatory Scan or Option Scan in the Barcode scanner. When products are placed in packages, tracking can be done either after grouping items together or individually for each product, depending on the selected packing rules provided in the Put in Pack field.
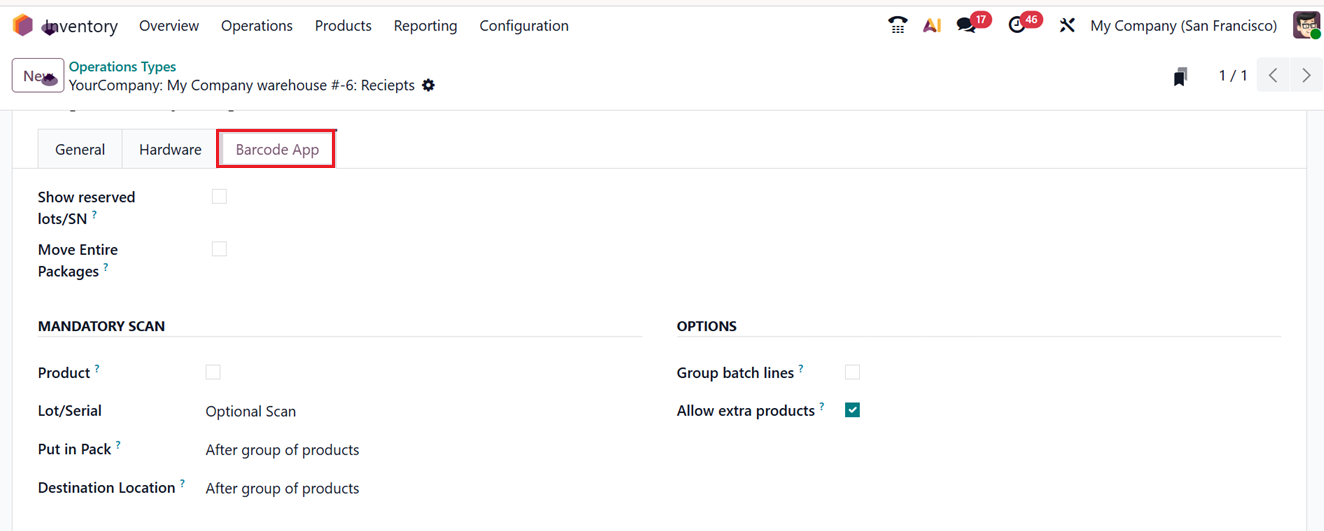

The FINAL VALIDATION settings control how operations are confirmed. When the product column is enabled, users can Allow full picking validation without requiring barcode scans. Additionally, enabling the option to ‘Force all products to be packed’ ensures that every item is properly packed before barcode verification is completed. Choosing the Force a destination for all products will ensure that every product has reached the requested destination.
Within the OPTIONS section, users can activate additional features such as Group batch lines or Allow extra products to be included during operations, offering greater flexibility in inventory handling. Once all changes to the operation type are completed, the settings should be saved and applied to the corresponding inventory operations within the company.
The available configuration options vary based on the selected operation type. For instance, choosing a Receipt operation provides additional settings related to lot creation and lot or serial number tracking. Similarly, selecting a Delivery operation updates the settings tab and introduces delivery-specific configuration options.
1.3 Locations
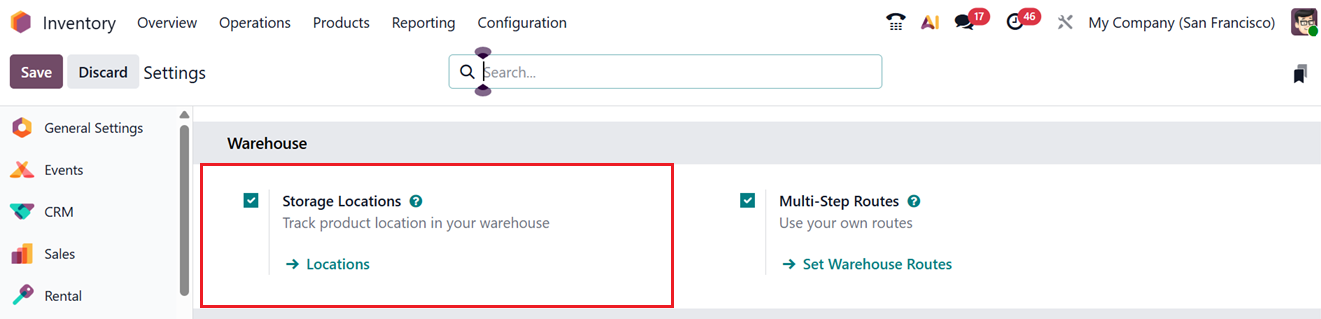
Storage locations play a vital role in tracking products within the warehouse. Odoo allows you to define and manage multiple storage locations under one warehouse, offering precise control over stock movement. To enable this feature, go to the Settings window and activate the Storage Locations feature from the Warehouse tab, as shown in the screenshot below.
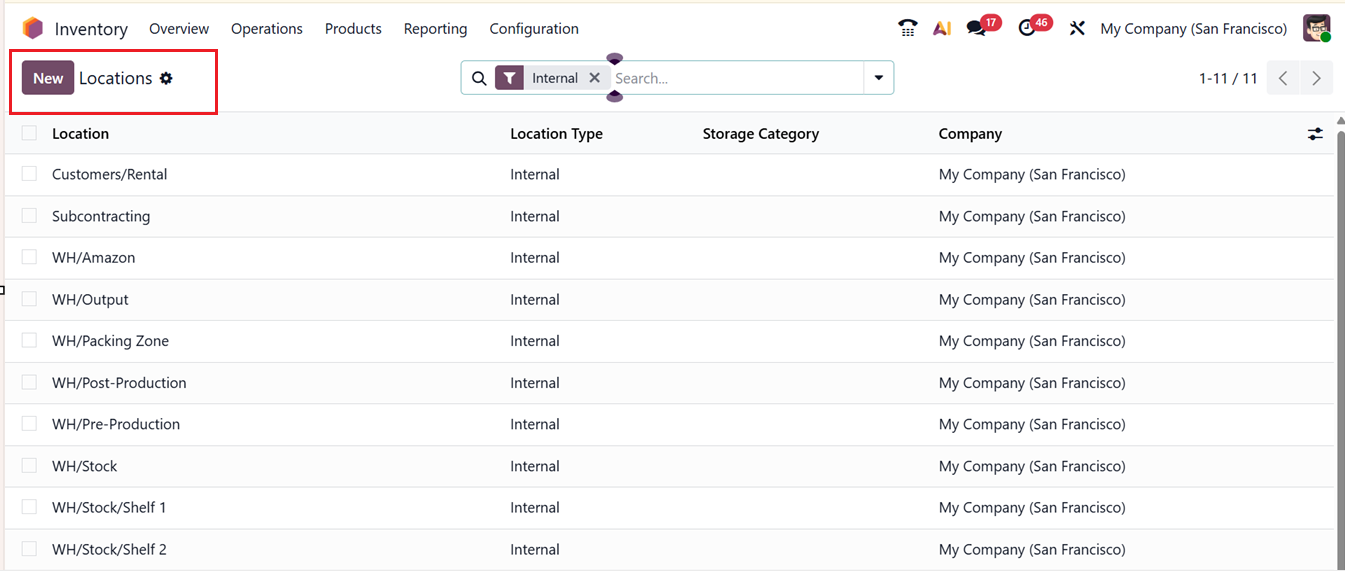
Once enabled, navigate to the Configuration menu and choose the Locations sub menu to view a list of all defined locations. This can also be accessed by opening the ‘Locations’ link provided under the Storage Location settings area. The list view includes details such as Location Name, Location Type, Storage Category, and Company.
Click on the New button to create a new location. In the location form, specify the Location Name and choose its Parent Location from the dropdown. You can configure additional details under the tabs ADDITIONAL INFORMATION, LOGISTICS, and CYCLING COUNTING.
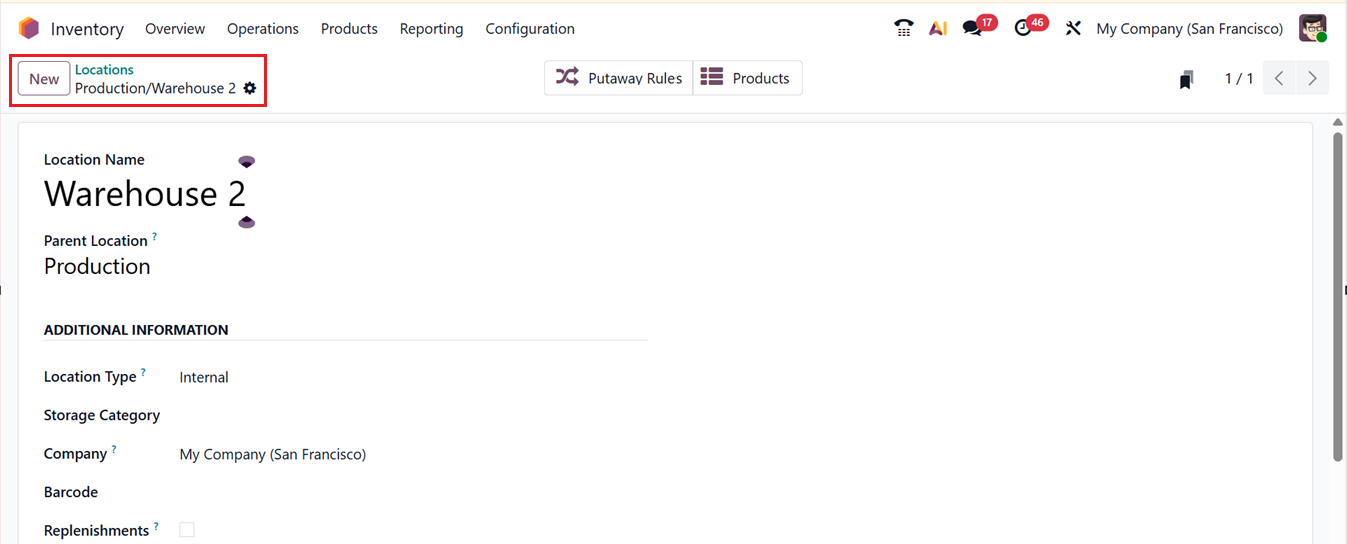

In the ADDITIONAL INFORMATION tab, select a Location Type for the new location from the following options:
- Vendor Location: Represents suppliers’ premises.
- Internal Location: Refers to company-owned warehouses or storage zones.
- Customer Location: Indicates delivery destinations for customers.
- Inventory Loss: Used for adjustments when stock discrepancies occur.
- Production: Used during manufacturing operations.
- Transit: Represents inter-warehouse movements.
- View: A logical or grouping location without physical stock.
You can also assign a Storage Category and link multiple companies if needed. Add a Barcode for scanning purposes and enable Replenish to trigger replenishment suggestions for this location.
Under the CYCLING COUNTING tab, specify the Inventory Frequency in days. Odoo will automatically update the Last Effective Inventory and Next Expected Inventory fields based on your schedule.
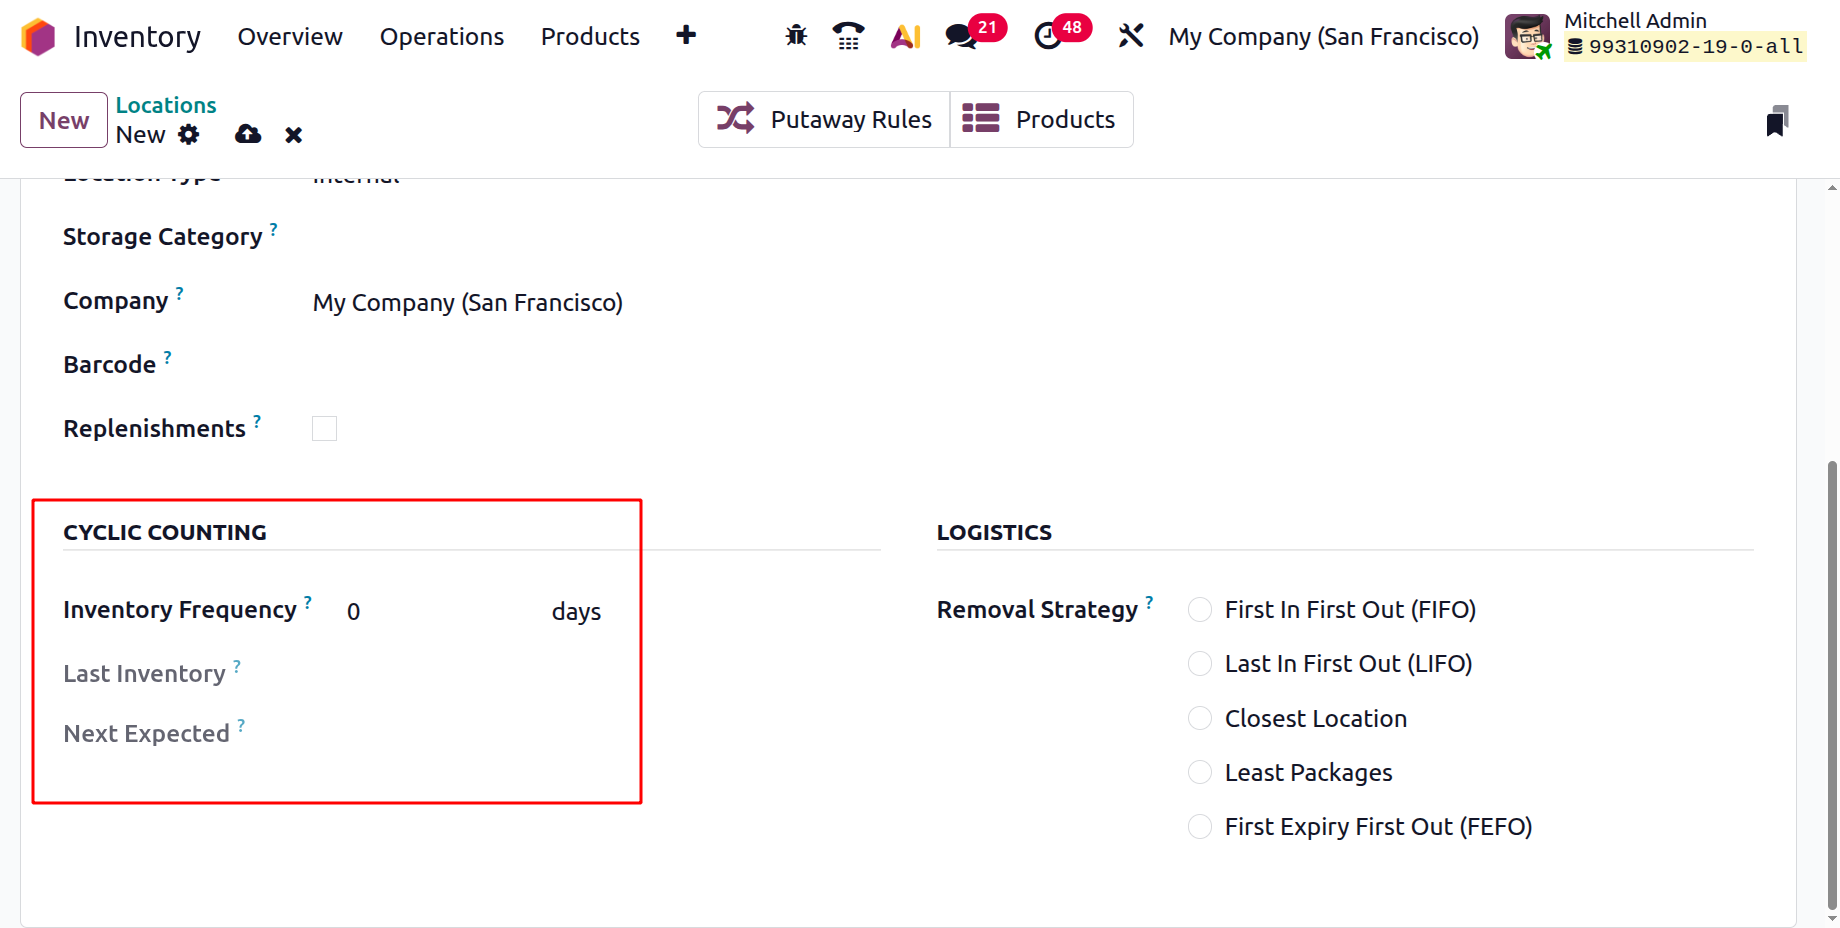
You can also define Removal Strategies that determine how stock is withdrawn in the LOGISTICS tab. Choose from the available options including;
- FIFO (First In, First Out): Items received earliest are dispatched first.
- LIFO (Last In, First Out): Latest received items are shipped first.
- Closest Location: Selects items stored nearest to the destination.
- FEFO (First Expiry, First Out): Prioritizes items with the earliest expiration date.
- Least Packages: Prioritizes items with fewer packages to minimize handling.
After saving the details, the smart buttons for Products and Putaway Rules provide quick access to related operations and data.
1.4 Routes
The Routes feature in Odoo 19 serves as a framework for defining how goods move through different stages of your supply chain. Routes determine the flow of products from suppliers to warehouses, between internal locations, or directly to customers. You can access and configure routes through the Configuration menu by choosing the Routes from the Warehouse Management section of the Inventory module.
The interface presents a list view showing preconfigured routes with details such as Route Name, Company, and Warehouse. From this screen, you can create a new route or modify existing ones to suit your company’s logistics policies.
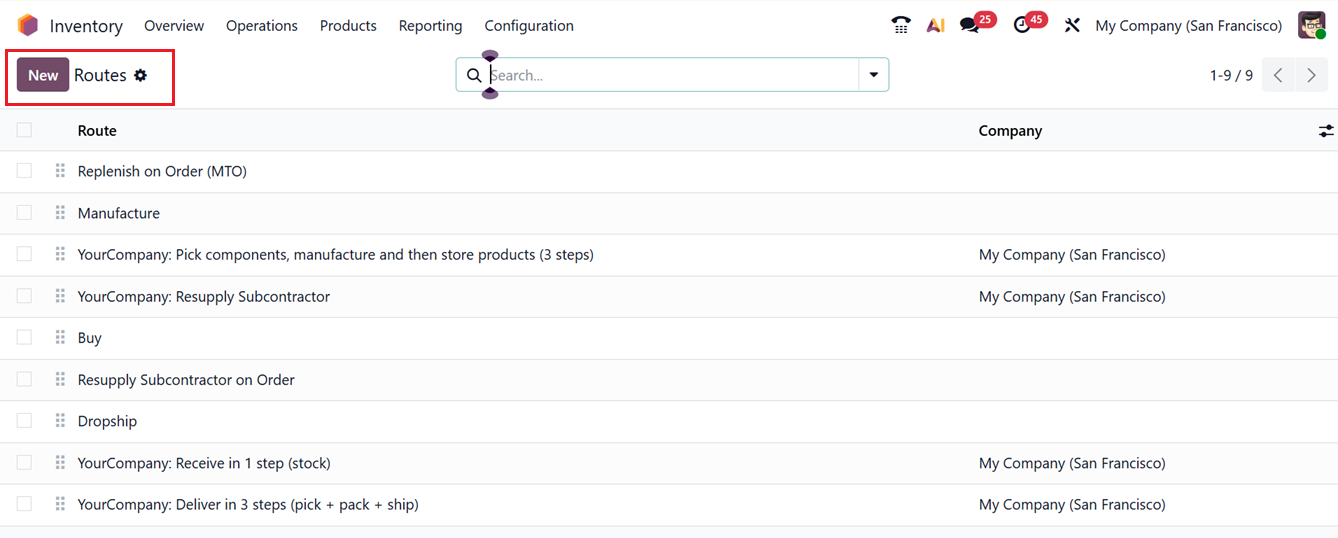
To create a new route, click on the New button and enter the Route Name and, if applicable, specify the Supplied Warehouses, and Company. If all companies of a multi company setup share this route, you can leave the Company field blank.
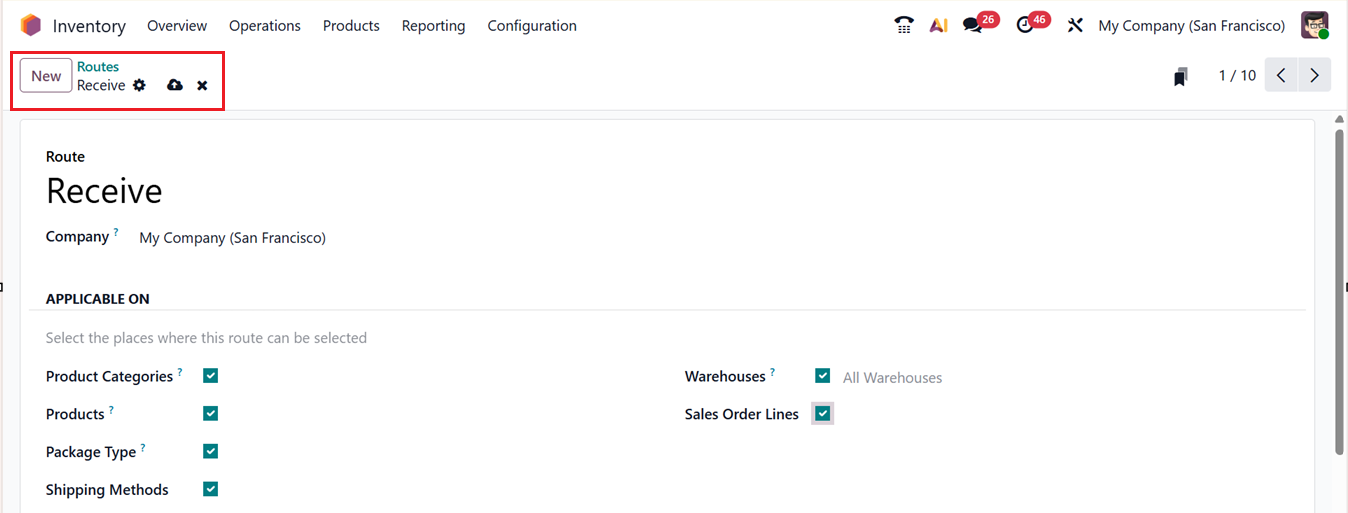

The APPLICABLE ON section allows you to define where the route can be applied. You can select one or multiple options, such as: Product Categories, Products, Package Type, Shipping Methods, Warehouses and Sales Order Lines. This flexibility allows routes to be customized based on how your organization manages inventory movements.
In the RULES tab, click on the Add a line button to create rules that define how the route operates. You can specify the conditions and actions for each rule, such as moving items between specific locations, triggering procurements, or handling manufacturing orders from the ‘Create Rules’ window, as shown in the screenshot below.
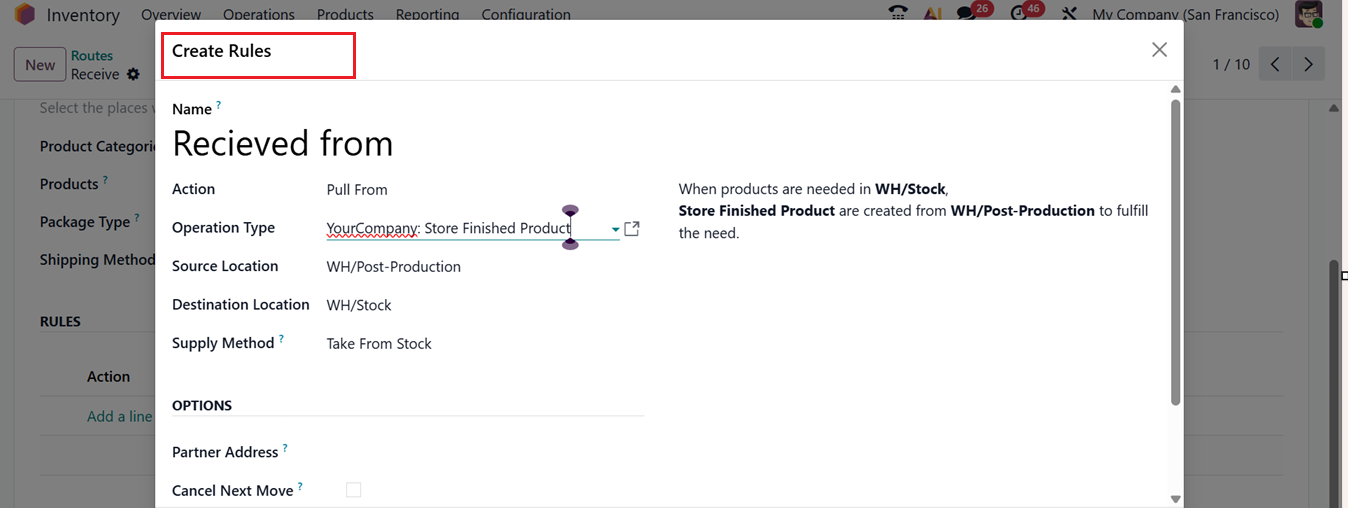

After defining the rules, click Save to apply your configurations. While configuring individual products, you can assign a specific route under the Inventory tab in the product form.
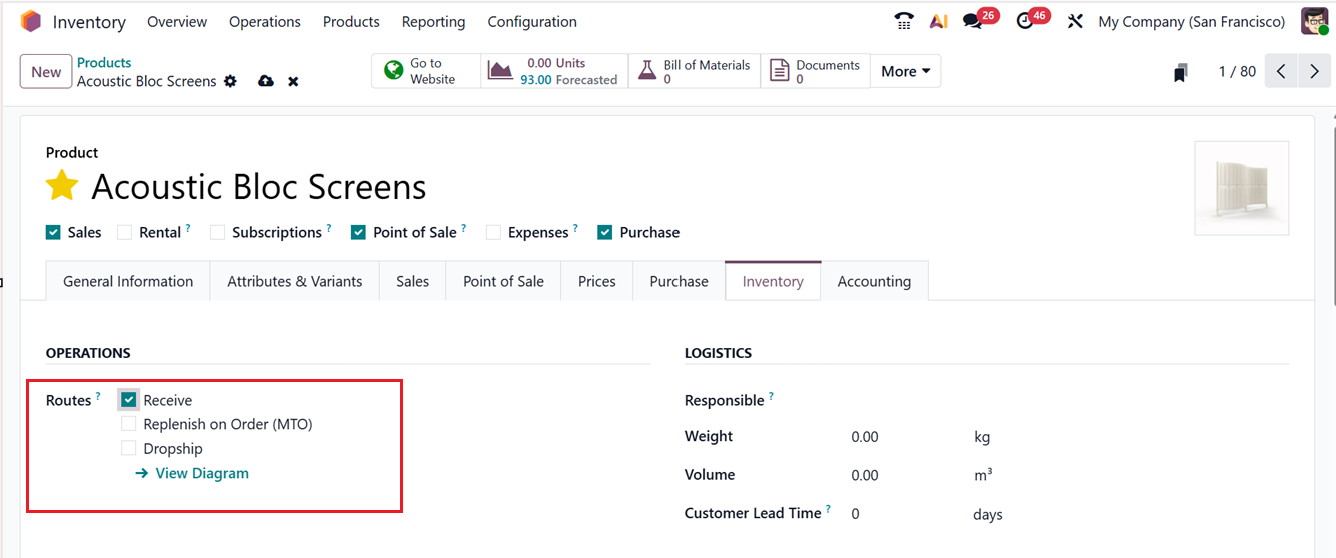
This ensures that the selected route governs how that particular product is managed throughout the supply chain. Now, let’s discuss the configuration process of Warehouse management Rules in detail.
1.5 Rules
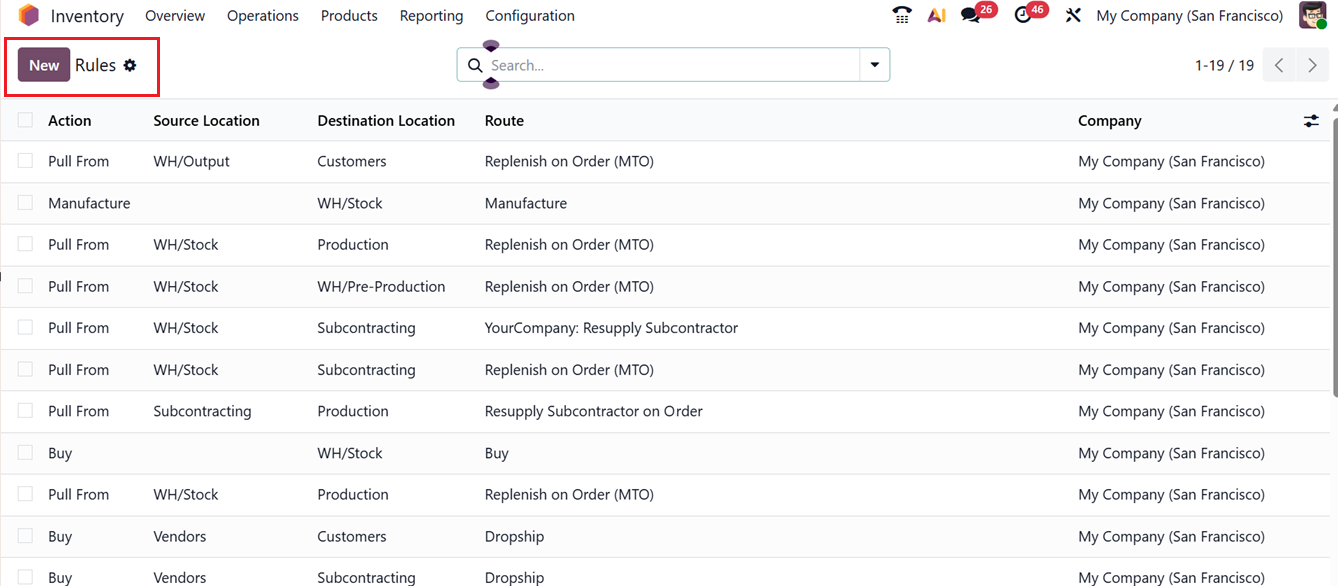
In Odoo 19, Rules govern the behavior of product movements within warehouses and across routes. These rules define how and when goods are pushed, pulled, purchased, or manufactured to meet stock demands. You can access this feature from the Configuration menu by choosing the Rules under the Warehouse Management section.
The list view provides key details for each rule, including Action, Source Location, Destination Location, Route, and Company, as shown in the screenshot below.
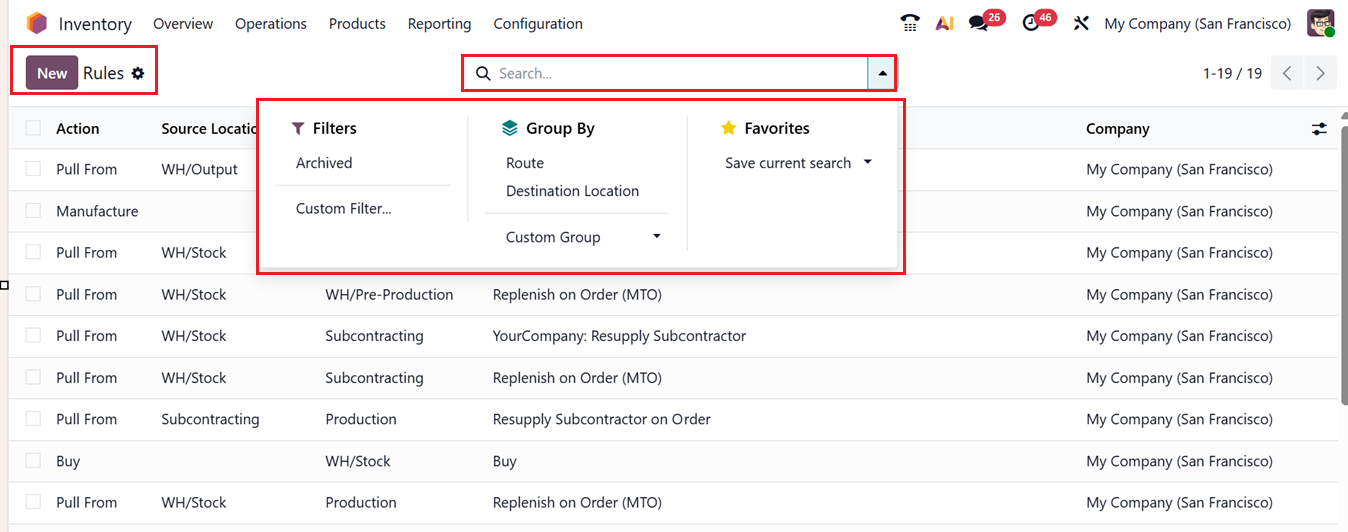
You can filter, group, or search for specific rules using the built-in Filter and Group By tools. This also helps you to create customized filters and groups using the Custom Filter and Custom Group options.
Also, you can create a new rule using the New button. In the new rule form, start by entering a Rule Name and selecting an Action from the drop-down menu. The available actions include:
- Pull From: Used when a product is needed at a destination location . Odoo automatically generates a picking from the source location to satisfy that demand.
- Push To: Moves items to the destination location once they arrive at the source point, often used for multi-step delivery processes.
- Pull & Push: Combines both actions, triggering movement both from and to locations as needed.
- Manufacture: Automatically creates a manufacturing order to meet a production requirement.
- Buy: Generates a purchase quotation when stock is required at the destination location.
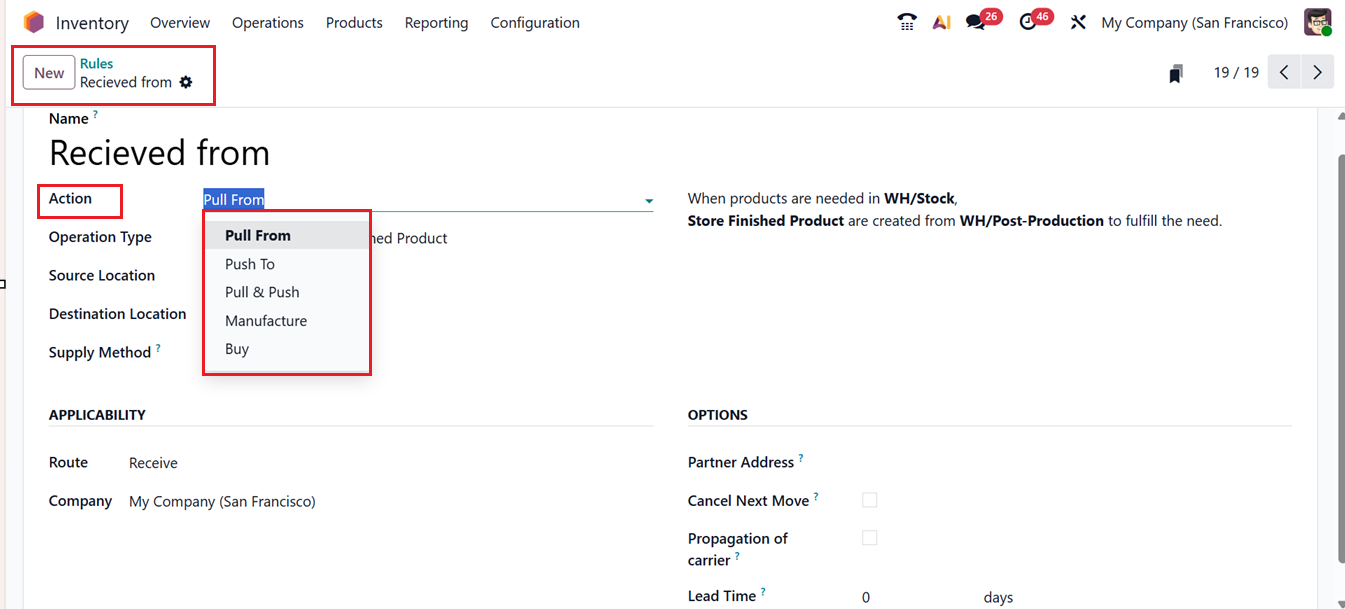
Below the action field, you can specify the Operation Type, Source Location, and Destination Location to define the logistics path.
The APPLICABILITY tab enables you to determine where and how this rule applies. Here, you can define the Route and Company.
The Supply Method option determines how stock will be sourced to fulfill a demand either from existing inventory stock or through a triggered rule or take from stock and if unavailable trigger another rule, as shown in the screenshot below.
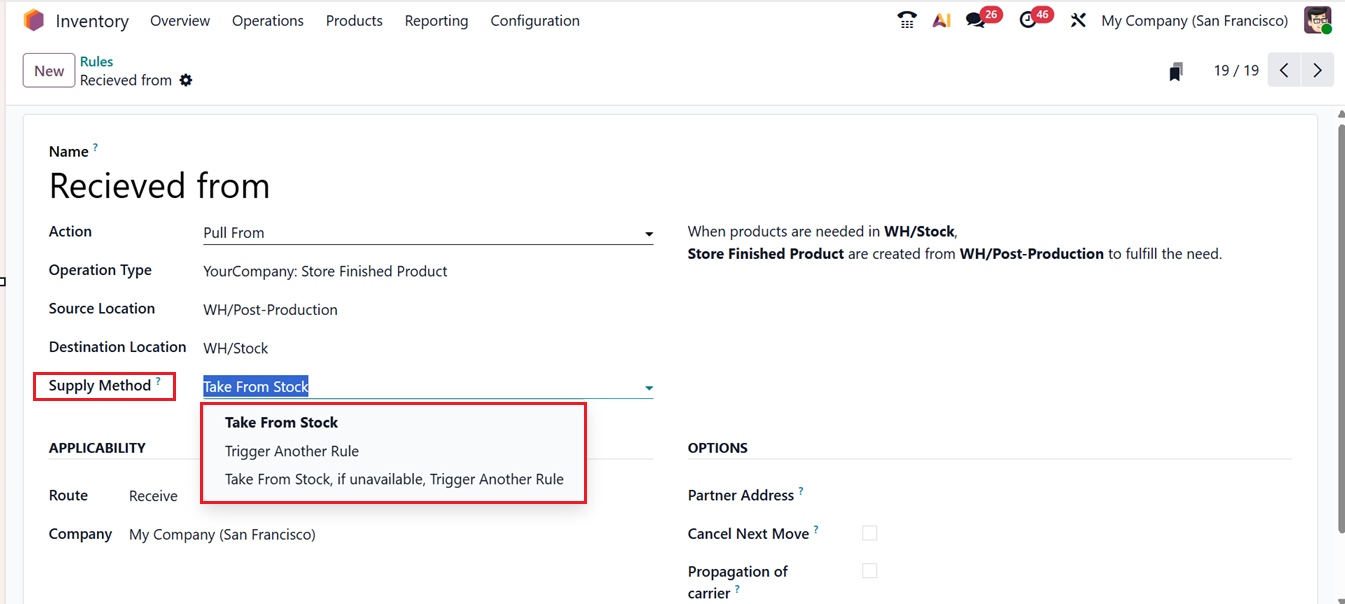
- Take From Stock:The products will be taken from the available stock of the source location.
- Trigger Another Rule: System will find to trigger a stock rule to bring the products in the source location by ignoring the available stock.
- Take From Stock, if unavailable, Trigger Another Rule: The products will be taken from the available stock of the source location. If the stock is unavailable, the system will try another rule to bring the products in the source location.
In the OPTIONS tab, you can mention any Partner Address to specify where the products to be delivered. Additionally, enabling Cancel Next Move ensures that if a move is canceled, all subsequent dependent moves are also canceled. Activating the ‘Propagation of carrier’ allows the assigned carrier to propagate through all related moves. Finally, set an ‘Lead Time’ to compute the expected date of the created transfer based on this lead time. Once all parameters are defined, click Save to store the rule.
1.6 Storage Categories
The Storage Categories feature in Odoo 19 allows users to group multiple storage locations into a single category, improving organization and facilitating intelligent stock placement. Before setting up storage categories, ensure that Storage Locations are enabled from the Settings window by enabling the Storage Locations.

Once enabled, go to the Configuration menu and choose the Storage Categories to view existing categories. The list displays details such as Storage Category Name, Maximum Weight, Allow New Product, and Company.
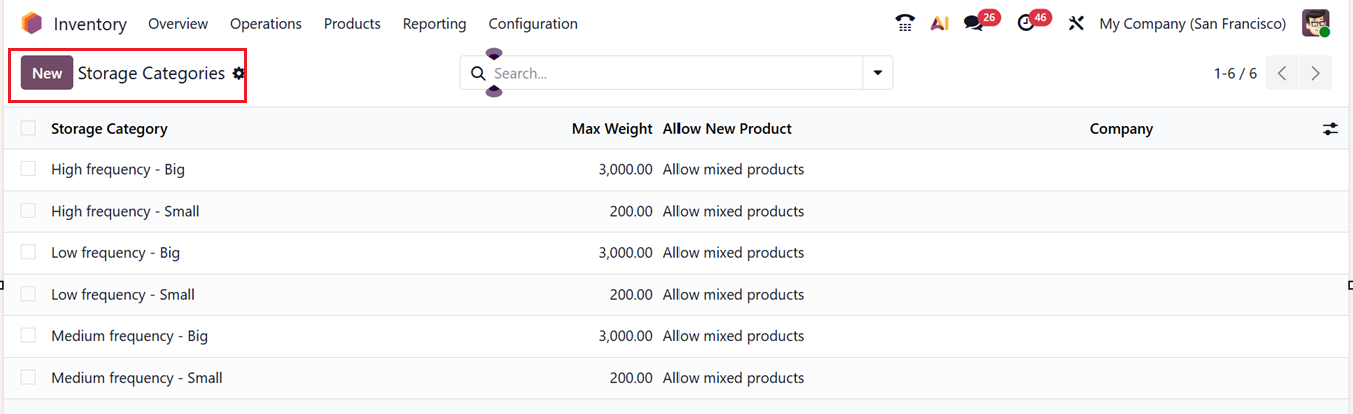
Click on the New button to create a new storage category. In the creation form, provide a Category Name and specify the Maximum Weight that can be stored under this category. In the Allow New Product field, you can define conditions for when new products can be stored here:
- If the location is empty.
- If all products are the same.
- Allow mixed products.
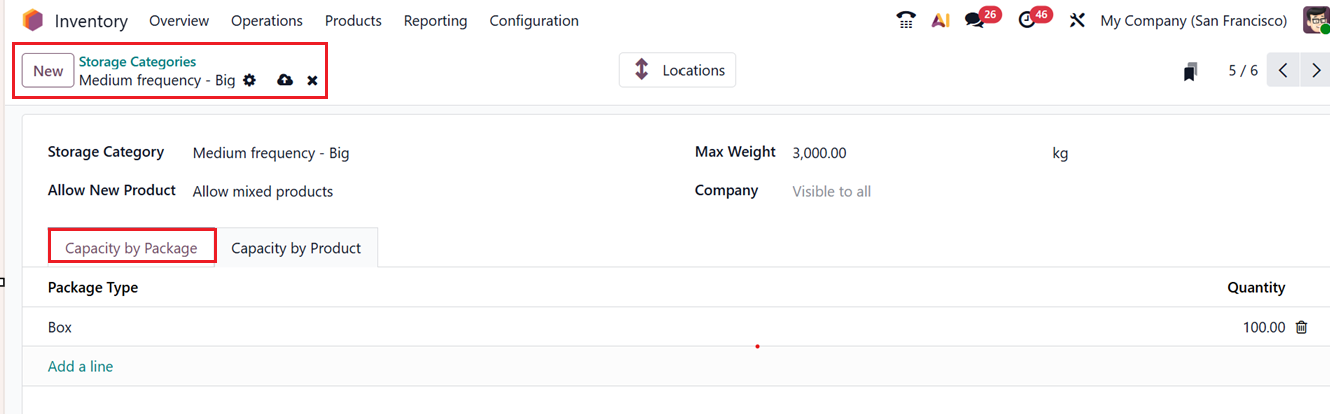
Under the Capacity by Package tab, you can specify the Package Type and Quantity using the Add a line button. Similarly, under the Capacity by Products, you can define the maximum capacity for each product type allowed in this category, as shown in the screenshot below.
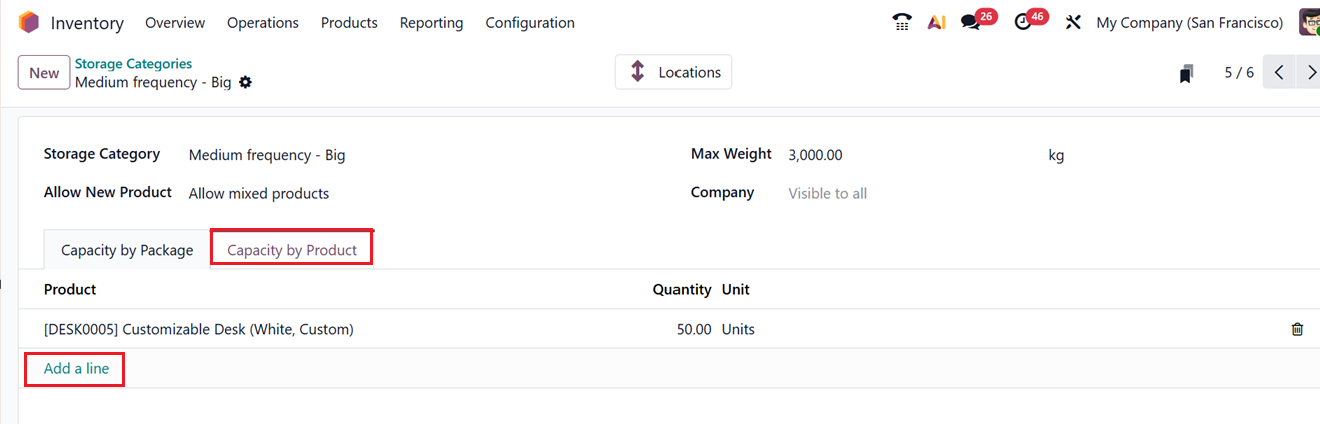
After editing all the details, click on the Save button to finalize the storage category. This will generate a smart button labeled Locations provides quick access to all storage locations assigned under the selected category. This intelligent categorization helps streamline putaway and retrieval processes within the warehouse.
1.7 Putaway Rules
Proper placement of products within a warehouse is essential for efficiency and safety, especially when handling perishable or hazardous goods. The Putaway Rules in Odoo 19 automate this process by directing incoming products to appropriate storage locations. To access this feature, navigate to the Configuration menu and choose the Putaway Rules option.
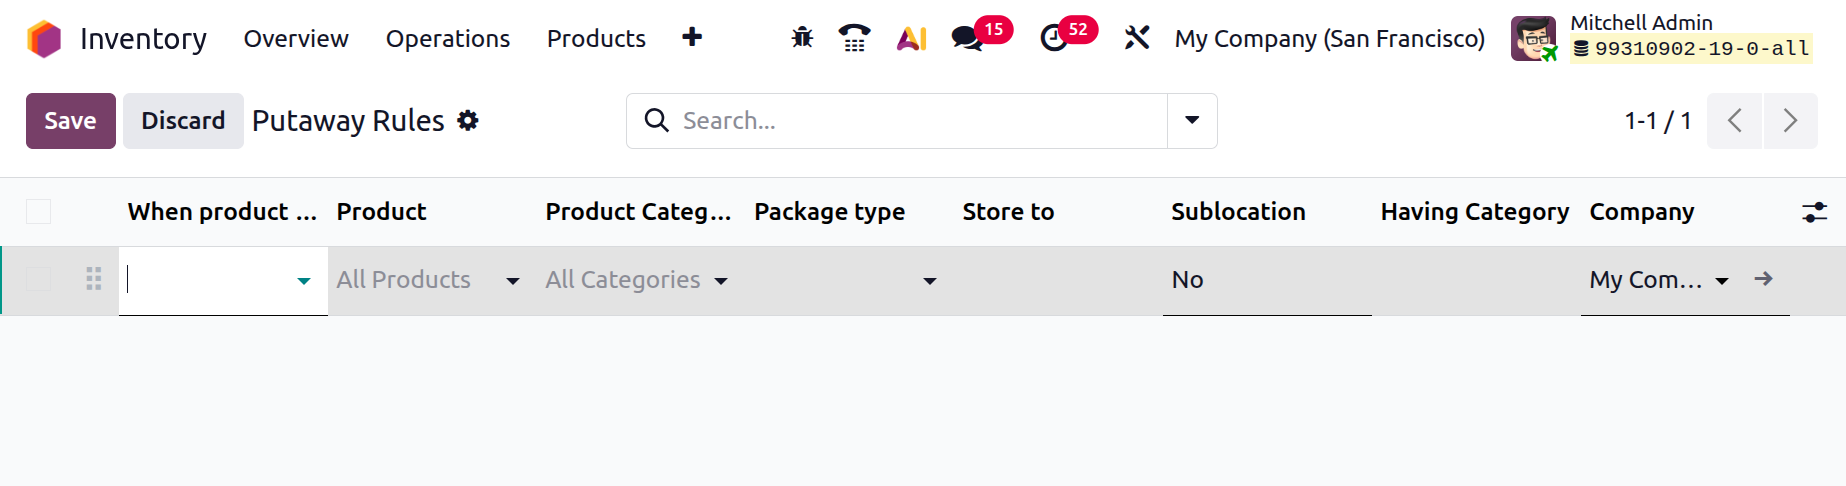
The list view presents all existing rules, displaying details such as When Product Arrives In, Product, Product Category, Package Type, Store To, Sublocation, Having Category, and Company,as shown in the screenshot below.

Then, click on the New button to create a new putaway rule. In the rule configuration form, specify the ‘When Product Arrives In’ location, which is the receiving location where products initially arrive. Then, mention any Product or Product Category to which the rule applies or leave it empty to apply for all categories and products. Then, mention the Package Type.
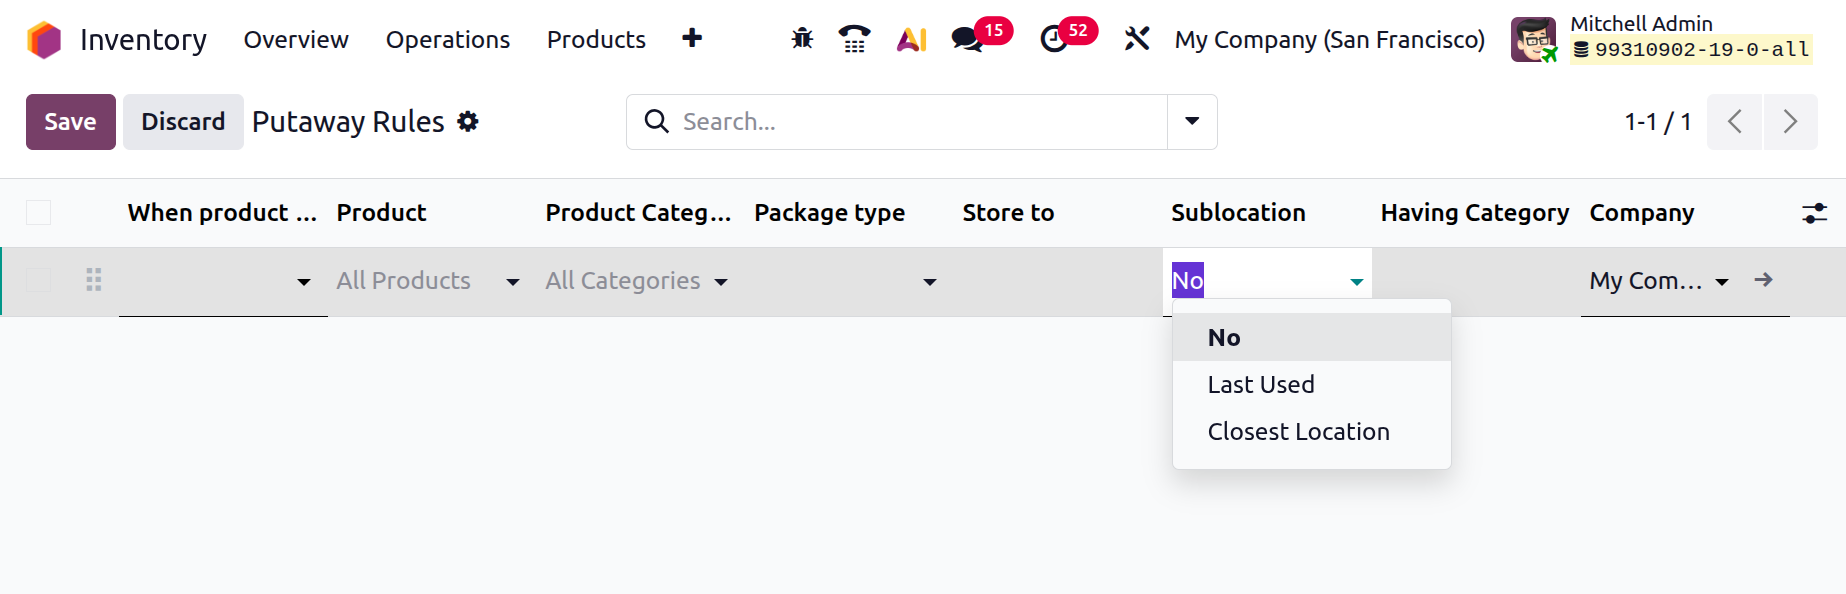
In the ‘Store To’ field, mention the destination location where items will be moved. Under the Sub-location Option, Odoo provides three key choices:
- No (Fixed Location): Always move goods to a predetermined spot.
- Last Used Location: Automatically moves items to the location where similar goods were last stored.
- Closest Location: Sends goods to the nearest available sublocation to reduce handling time.
You can also specify a category for the sublocation under Having Category field and assign the relevant Company. Once all configurations are complete, click on the Save button. From this point onward, any product arriving in the defined receiving location will automatically be redirected to its assigned sublocation based on these rules.
1.8 Categories
An efficient inventory system requires well-organized product classification. Odoo simplifies this through flexible Product Categories, which allow businesses to structure their inventory logically and adapt to evolving product lines or market demands. To access this feature, go to the Configuration menu and choose the Categories option. This will open the list view of the preconfigured categories for better organization.
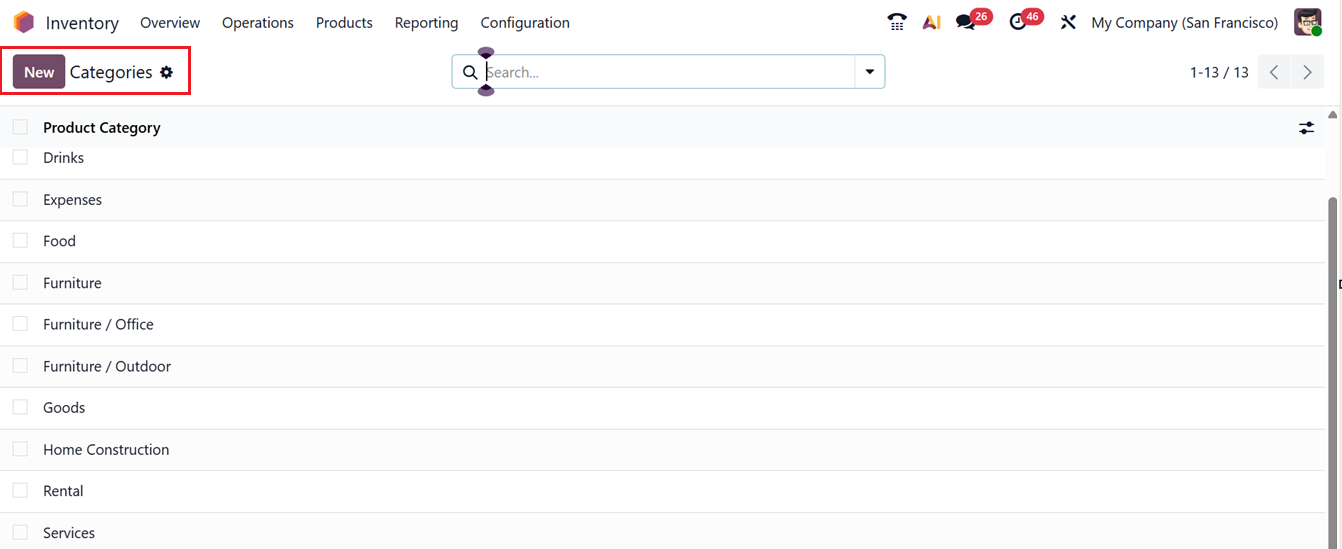
To create a new category, click the New button and enter the Category Name and, if applicable, define its Parent Category to create a hierarchical structure. For instance, a parent category like Clothes may include subcategories such as Dresses, Shirts etc. This structured approach simplifies both navigation and inventory tracking.


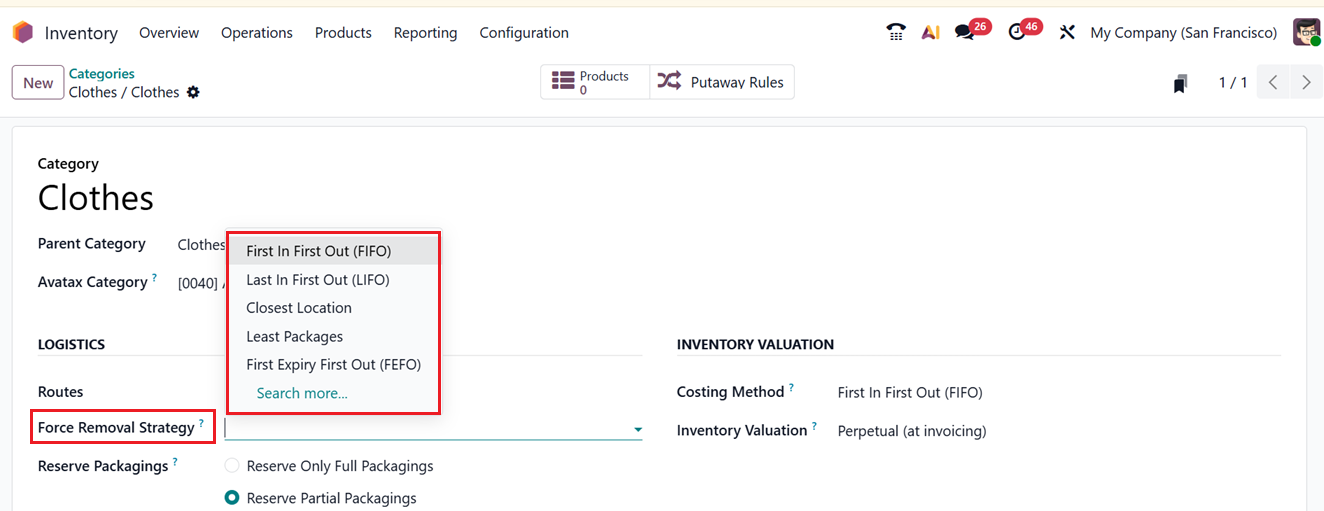
Under the LOGISTICS tab, you can set the Routes of the category and Force Removal Strategy to define how products are picked from the warehouse. Available strategies include:
- FIFO (First In, First Out): Oldest received items are dispatched first, ideal for perishable goods.
- LIFO (Last In, First Out): Most recently received items are removed first.
- FEFO (First Expiry, First Out): Products with the nearest expiration date are prioritized.
- Least Packages: Chooses the smallest available package first to reduce handling.
- Closest Location: Selects the item stored closest to the picking point.
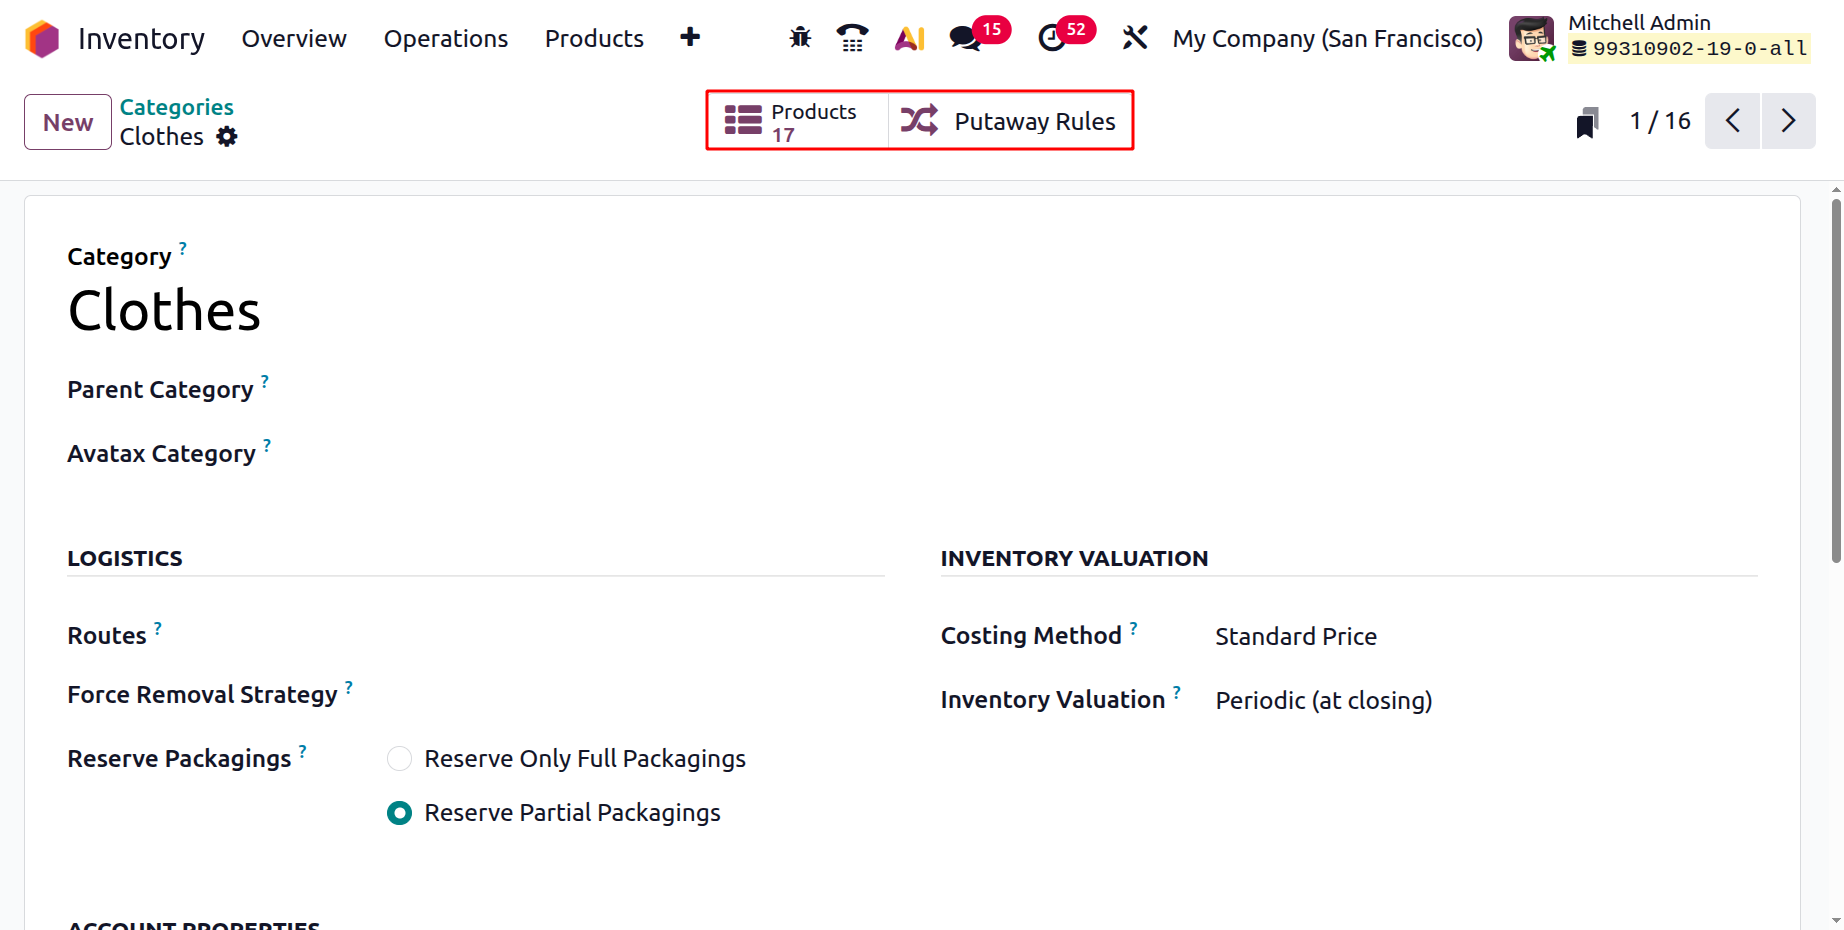
Then you can configure Reserve Packagings to determine whether packages should be reserved in full or partially for deliveries.
In the Category configuration form view, there are two reservation methods are available:
- Reserve Only Full Packagings: Reserves stock only when complete packaging quantities are available.
- Reserve Partial Packagings: Allows partial fulfillment of orders when full packaging quantities aren’t in stock.
For example, if each package contains twelve units and an order requests two packages (14 units), but only twenty-two units are in stock, Odoo will reserve 7 units if using Reserve Only Full Packagings and 12 units if using Reserve Partial Packagings.
Under the ACCOUNT PROPERTIES tab, specify the Income Account (records revenue from sales) and Expense Account (records the cost of goods or purchases). You can also mention the Stock Account and Stock Variation accounts to manage the current value of the product and to store the inventory variation of a specific period in an account. Then, you can see an Price Difference Account field only if the ‘Inventory Valuation’ is set as ‘Perpetual (at invoicing).’ This account will hold the price difference between the standard price and bill price

Next, choose a Costing Method from the INVENTORY VALUATION tab. The options includes;
- Standard Price: Maintains a fixed cost regardless of market fluctuations.
- Average Cost (AVCO): Calculates the running average cost of stock.
- FIFO (First In, First Out): Uses the cost of the earliest acquired items first.
After saving the data, you can see the products which belong to this category from the ‘Products’ smart button and check the ‘Putaway Rules’ smart button to manage the putaway rules.
These comprehensive configuration tools in Odoo empower businesses to adapt their inventory structure, streamline warehouse logistics, and maintain accurate stock control.
1.9 Attributes
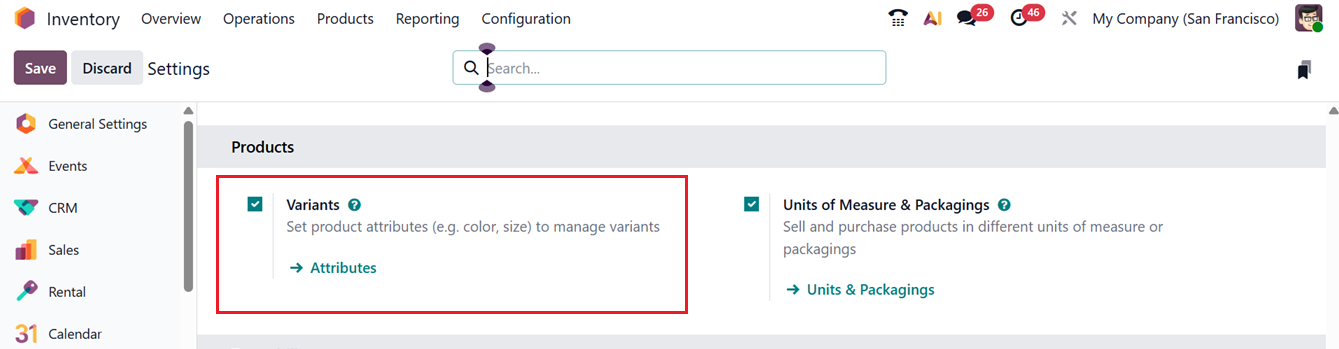
Attributes define the features that differentiate one product variant from another, including aspects like color, size, material, or style. These attributes can be created and maintained within the Odoo 19 Inventory application by going to the Settings window and activating the ‘Variants’ option, as shown in the screenshot below.
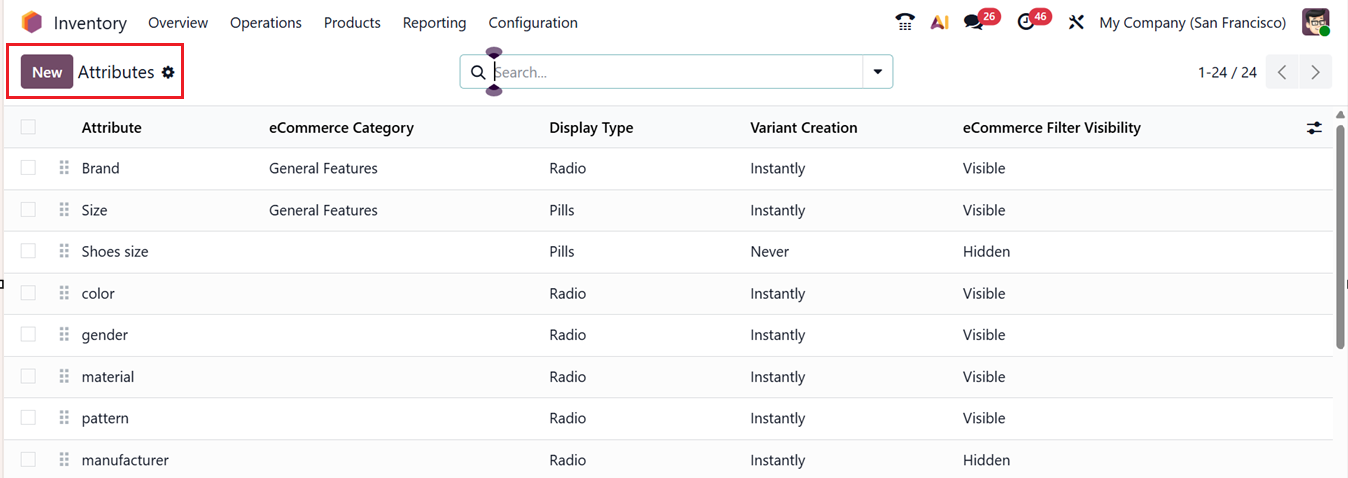
Then, you can click on the Attributes link to access or manage the attributes or go to the ‘Attributes’ sub menu from the Configuration menu. Here, you can see the list view of all the available attributes, as shown in the screenshot below.
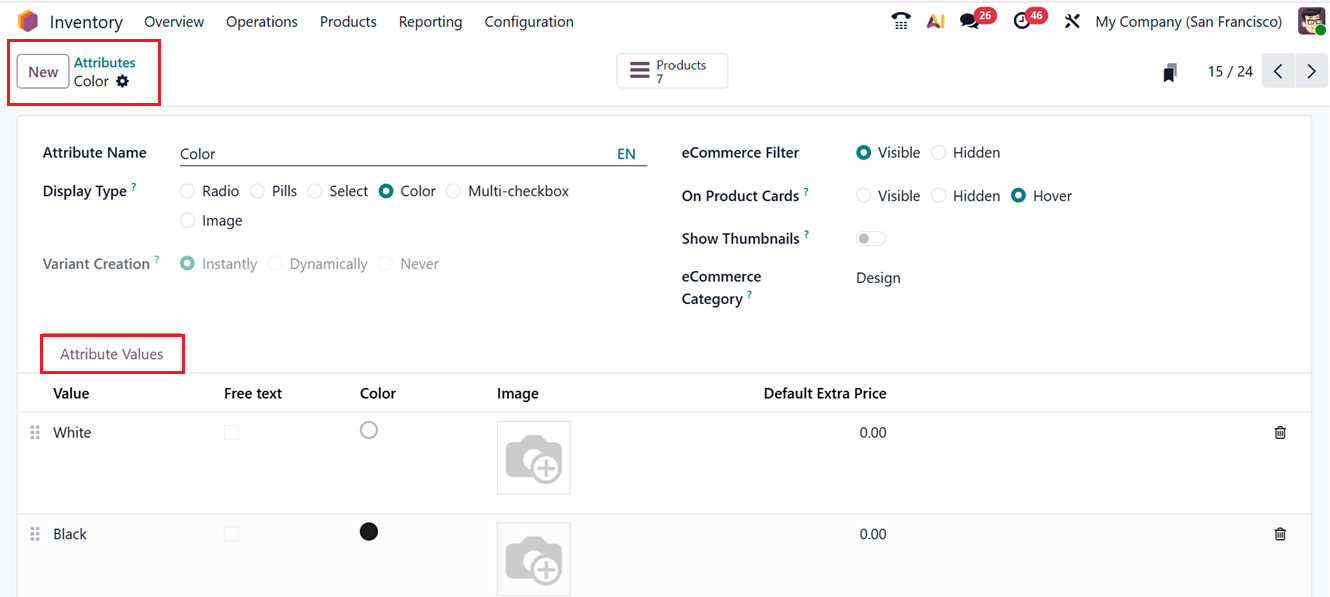
click on the ‘New’ button to create new attributes and edit the required details in the displayed form including the Attribute Name such as Color or Size, and choose a Display Type like Radio buttons, Pills, Dropdown (Select), Color, Multicheckbox, or Image, as shown below.
Next, configure the Variant Creation Mode, which controls how and when product variants are generated in Odoo.
- Selecting Instantly creates all possible variants as soon as the attribute is applied to a product.
- The Dynamic option generates variants only when they are used in transactions, helping reduce unnecessary data.
- Choosing Never disables variant creation entirely, allowing the attribute to be used only for reference purposes.
These settings help balance performance, data management, and flexibility. You can also decide whether the attribute should appear on the online store by enabling the eCommerce Filter option. An eCommerce Category can be assigned to group similar attributes, making product comparison easier for customers.
The On Product Cards option allows you to display and select the instantly created variants directly on your eCommerce product page. You can control their visibility using the Visible, Hidden, and Hover options.
In the Attribute Values tab, enter the relevant color Values, such as White, Black, Red by clicking on the ‘Add a line’ button. Then, you can choose the Free Text box to display the value in an editable text box and choose the color from the color palette provided in the Color. Then, add a picture of the product in this attribute value in the Image field and also, you can specify any Default Extra Value taken for the products with this specific attribute value. Finally, save the attribute.
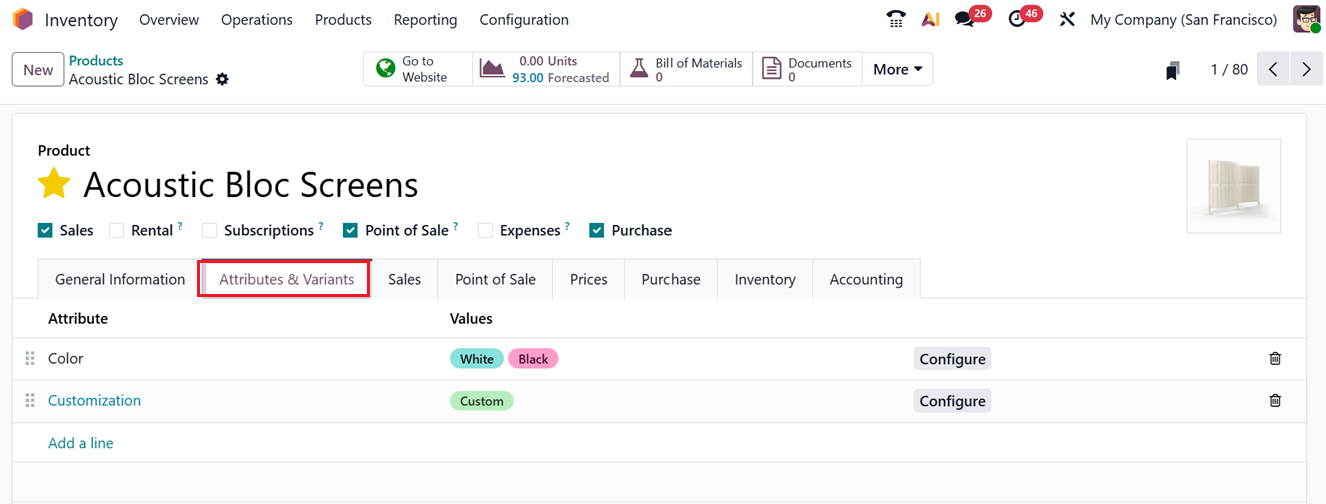
Once created, attributes can be applied to products by opening the product form and going to the Attributes & Values tab. Click Add a line to select the required attributes and their corresponding values, as shown in the screenshot below.
1.10 Unit &Packagings
In Odoo 19 Inventory, the Units & Packagings define how products are measured and packed during inventory operations. Units of Measure control how quantities are tracked and traded, while Packagings specify how products are grouped for storage, transfer, and delivery. Together, they ensure accurate stock management and smoother warehouse operations.
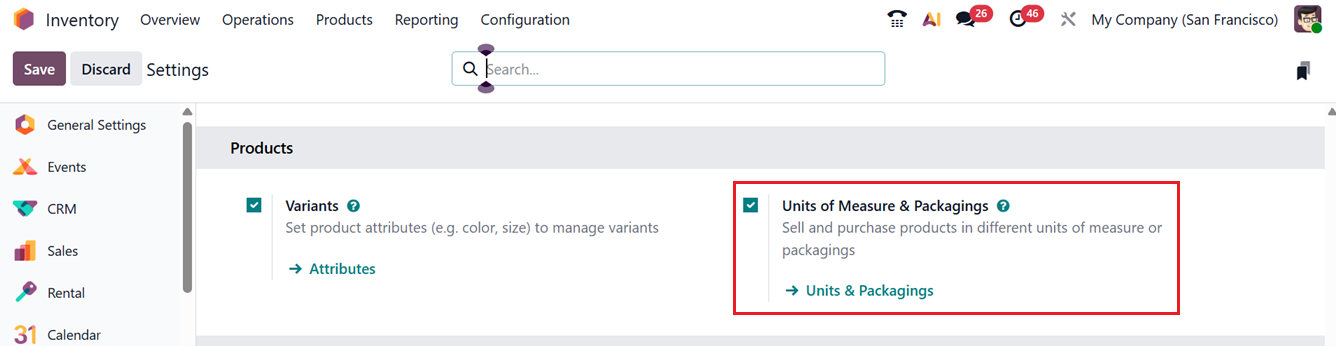
To configure this feature, you must enable the ‘Units of Measures & Packagings’ feature from the Settings window, as shown in the screenshot below.
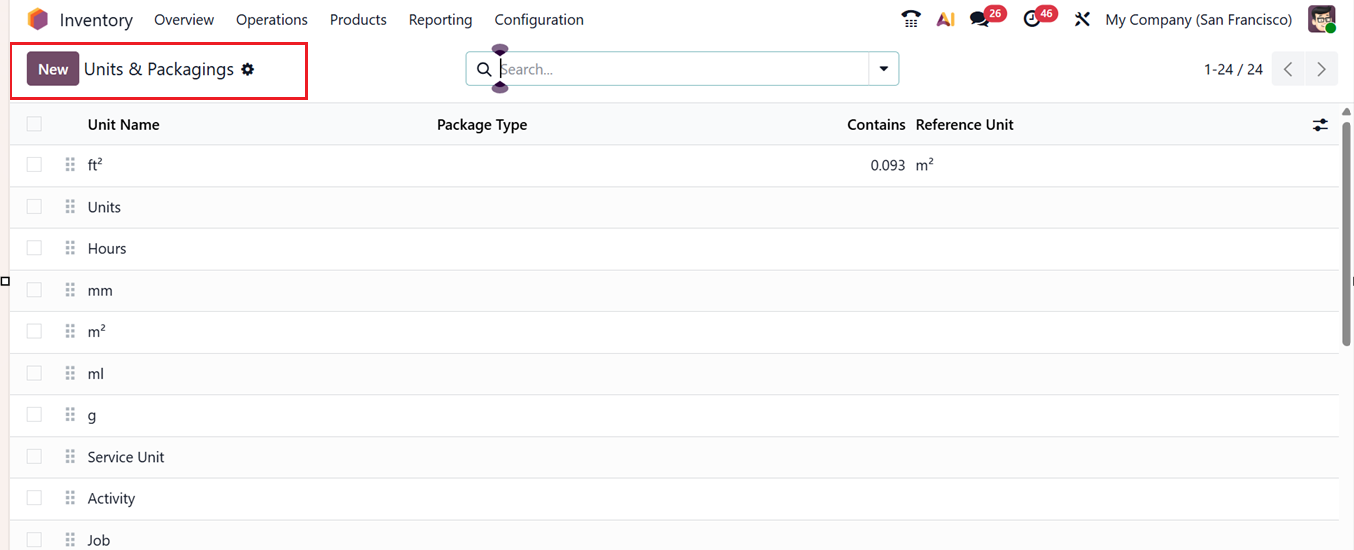
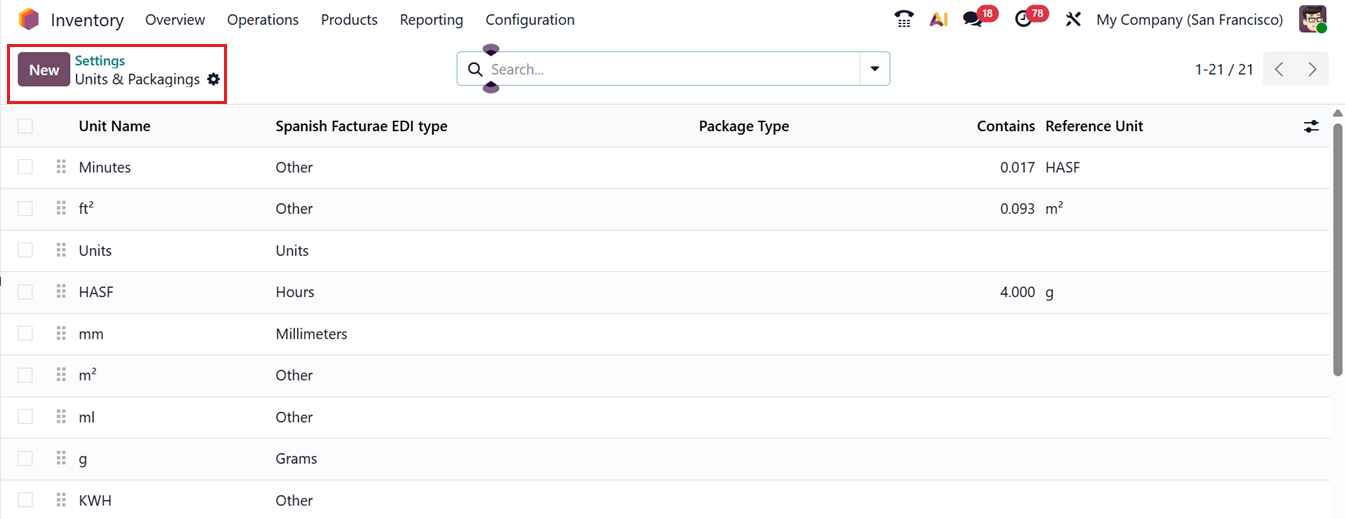
Then, you can click on the Units & Packagings link from the settings interface or choose the Units & Packagings option from the Configuration menu. This will open the dashboard of all the available units with their Unit name, Package Type, Contains and Reference Unit, as shown below.
Then, simply click on the ‘New’ button to create a new Unit/Package. This will open a form view, where you can edit the Unit Name, Quantity and Reference Unit as shown in the screenshot below.
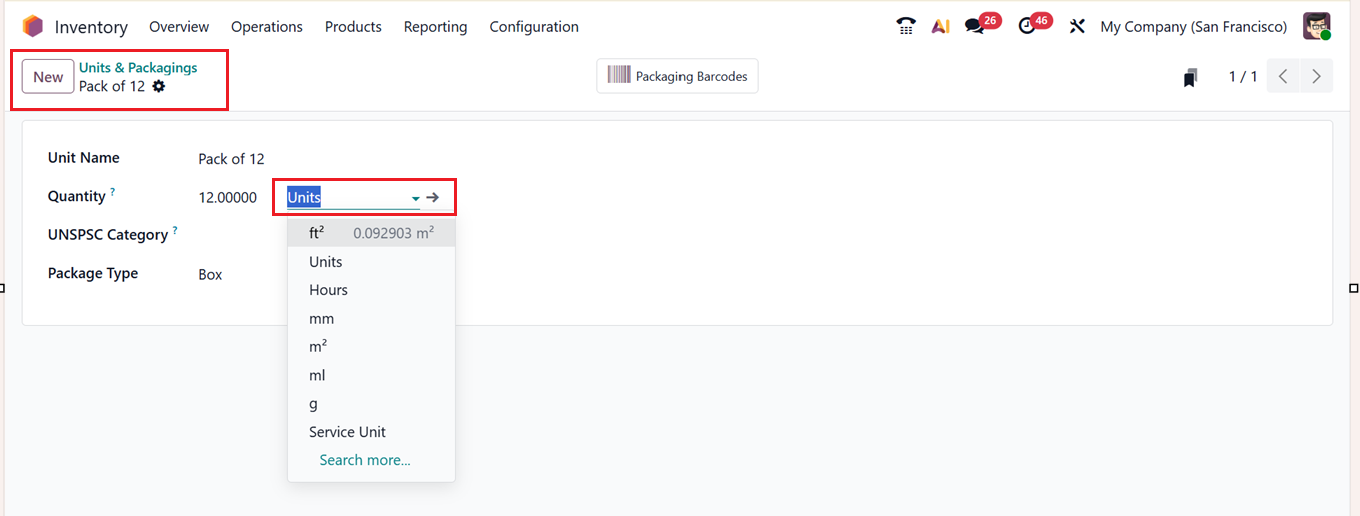
Then provide a UNSPSC Category if available. It is a code related to the creating Unit of Measure. Then, mention the quantity type from the drop down and a Package Type to mention whether it is a Pallet, Box, Cluster Pack, bPost Custom Parcel etc. Finally, save the data to utilize the packaging option while configuring any products or in any other inventory operation.
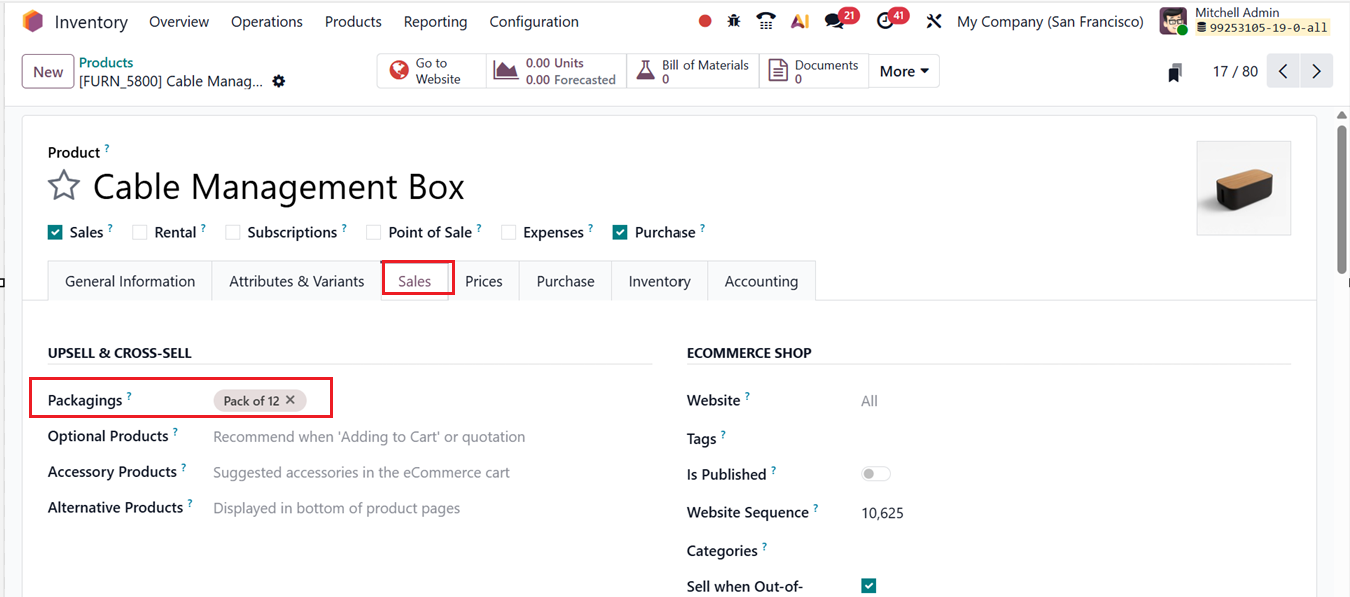
The newly created Units & Packages can be set inside the Packagings field of the Sales tab of a Product configuration form while adding a new product in your inventory, as shown in the screenshot below.
1.11 Delivery Methods
In Odoo 19 Inventory, the ‘Delivery Methods’ control how products are shipped and how shipping costs are calculated. They support fixed or rule-based pricing and carrier integrations, helping automate shipping charges and streamline delivery operations.
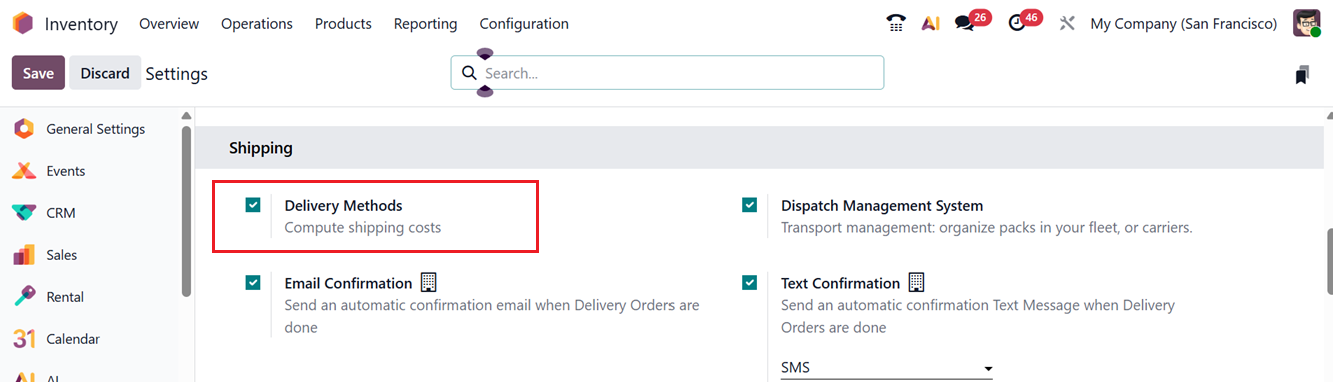
In order to utilize the function, you have to activate the’ Delivery Methods’ feature from the ‘Shipping’ tab of the Settings window, as depicted in the screenshot below.
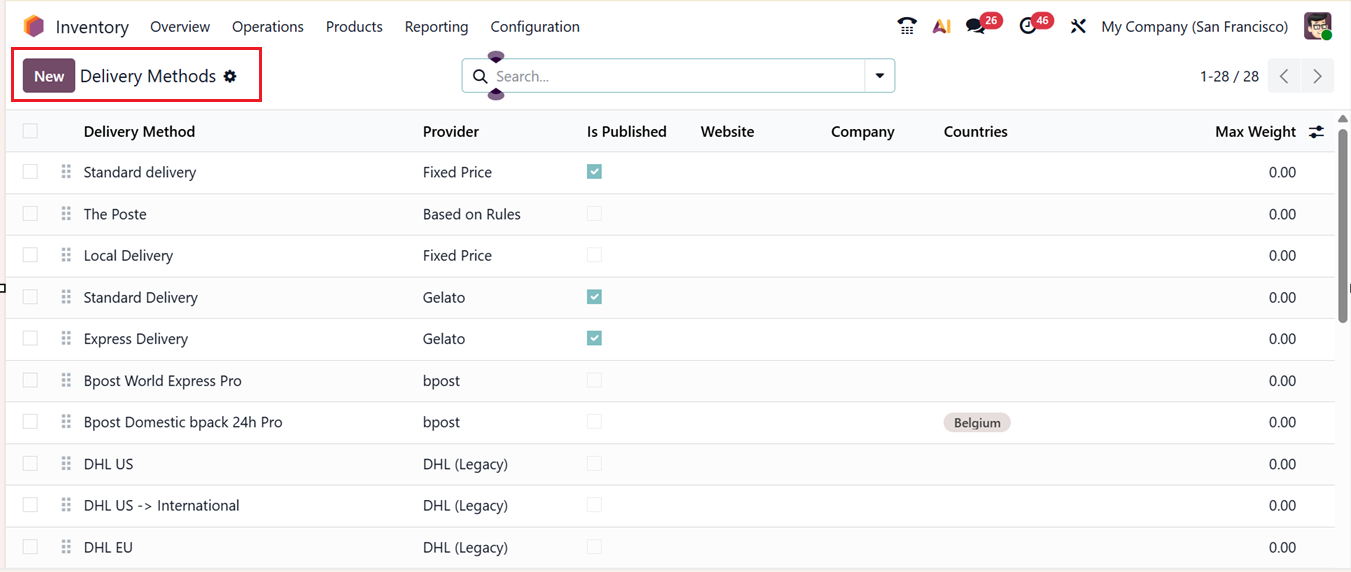
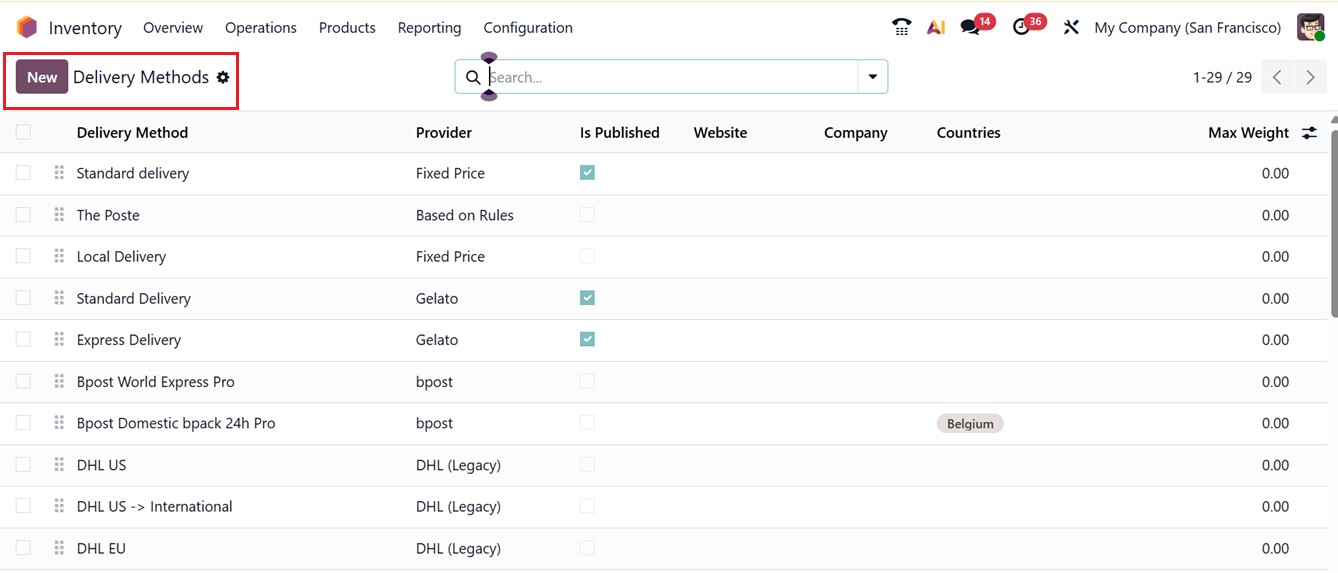
Then, go to the ‘Delivery Methods’ window from the Configuration menu. This will show the list of all the available methods with their respective Delivery Method name, Provider, Is Published, Website, Company, Countries and Maximum weight, as shown in the screenshot below.
Then, click on the ‘New’ button to create a new method and specify the Delivery Method name. Next, enter the below fields including;
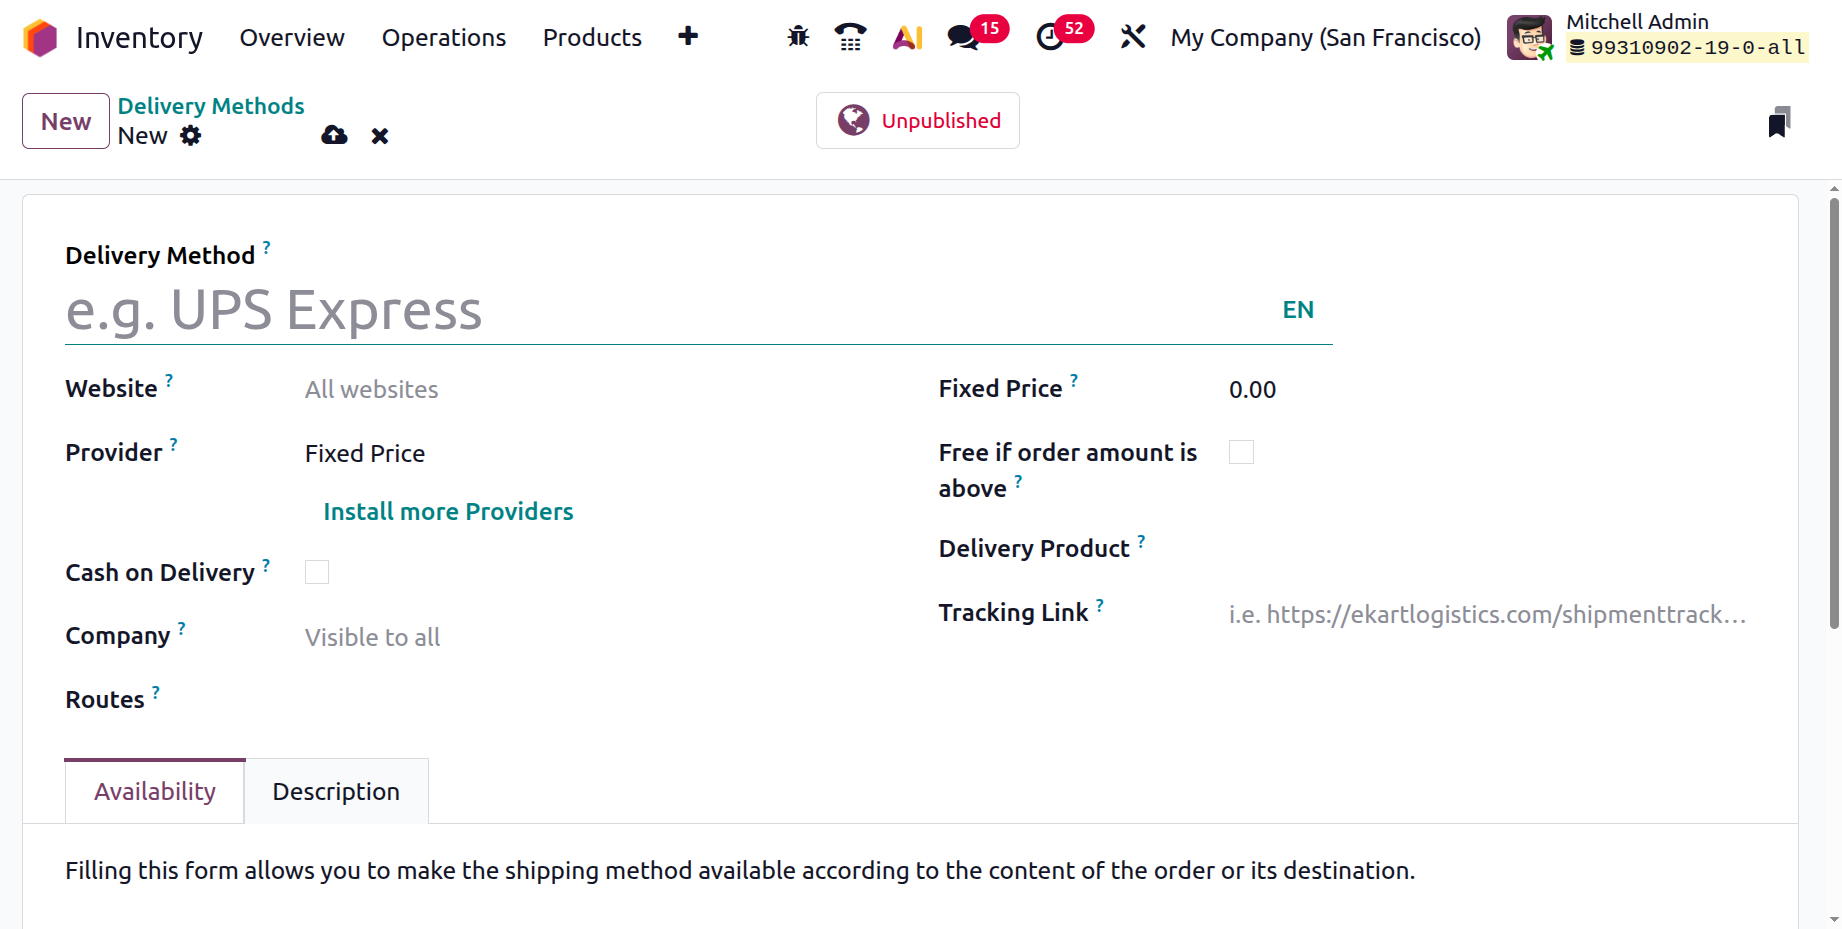
- Website: Choose a specific website for eCommerce use, or leave it empty to apply it to all sites (visible only when eCommerce is enabled).
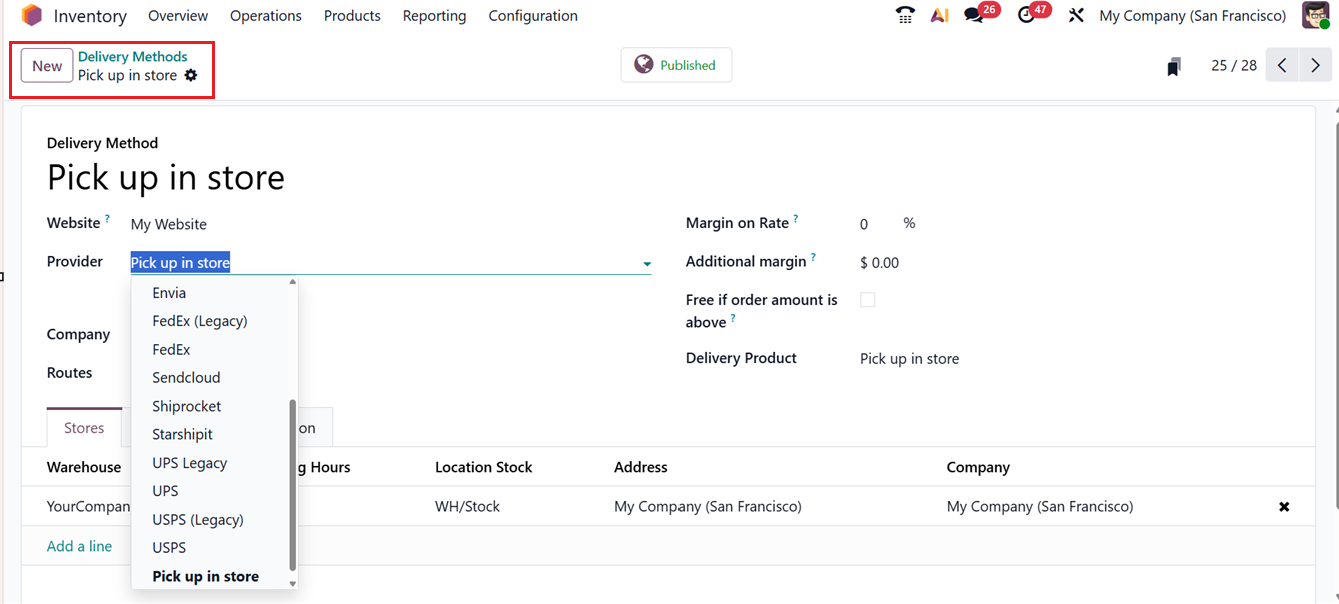
- Provider: Select the shipping service, either a third-party carrier or a custom option from the dropdown after ensuring the integration is installed. Selecting different providers will generate different form fields according to the chosen provider.
- Cash on Delivery: Enable this option to allow customers to pay upon delivery on the website.
- Company: Assign the delivery method to a specific company or leave it blank to make it available to all (shown only in multi-company setups).
- Routes: Define delivery routes like standard or express shipping when multi-step routes are enabled.
- Delivery Product: Choose the service product that represents the shipping charge on the sales order.
- Free if order amount is above: Enable free delivery when the order total exceeds a set amount.
- Margin on Rate: The percentage of the amount that is going to be added on shipping price of this delivery method.
- Additional Margin: The fixed amount that is going to be added in the shipping price.
For example, to configure a flat shipping rate of 300, you would assign a delivery method name, select Fixed Price as the provider, set the fixed amount to 300, and choose a delivery product that represents this charge.
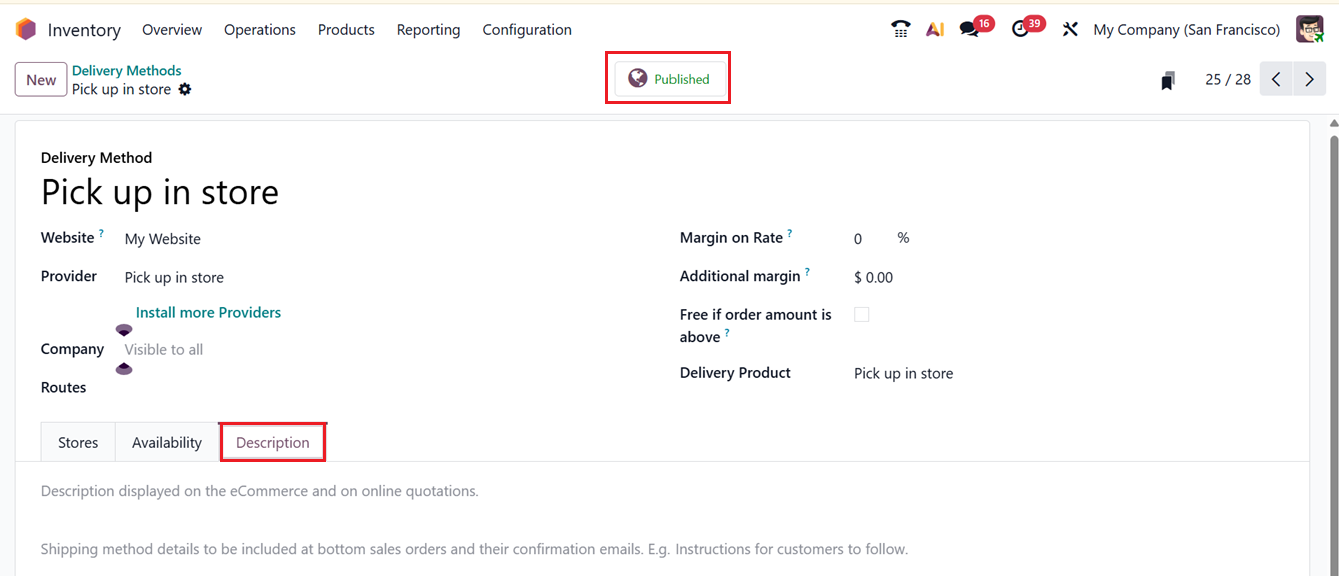
The ‘Stores’ tab can be used to set the Warehouse, Opening Hours, Location Stock, Address and Company details using the ‘Add a line’ button. This ‘Stores’ tab is available only if the Provider is chosen as Pick up in store, if the Provider is Based on rules, another tab named Pricing will be shown as depicted in the screenshot below.
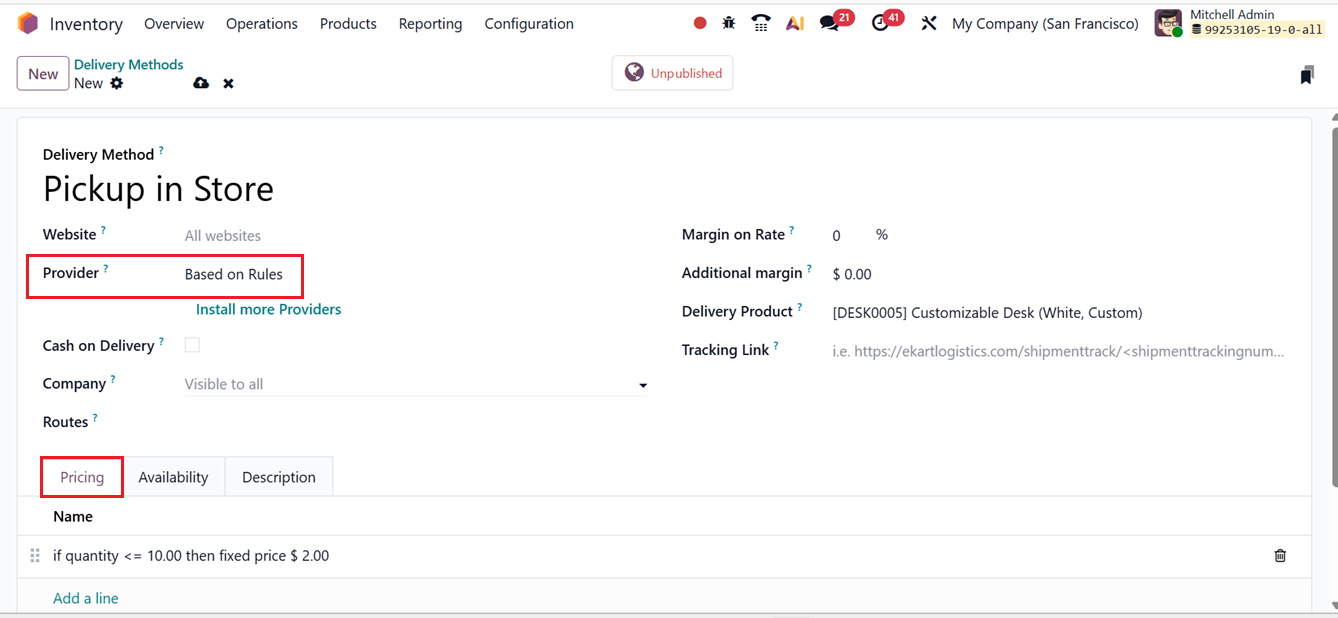
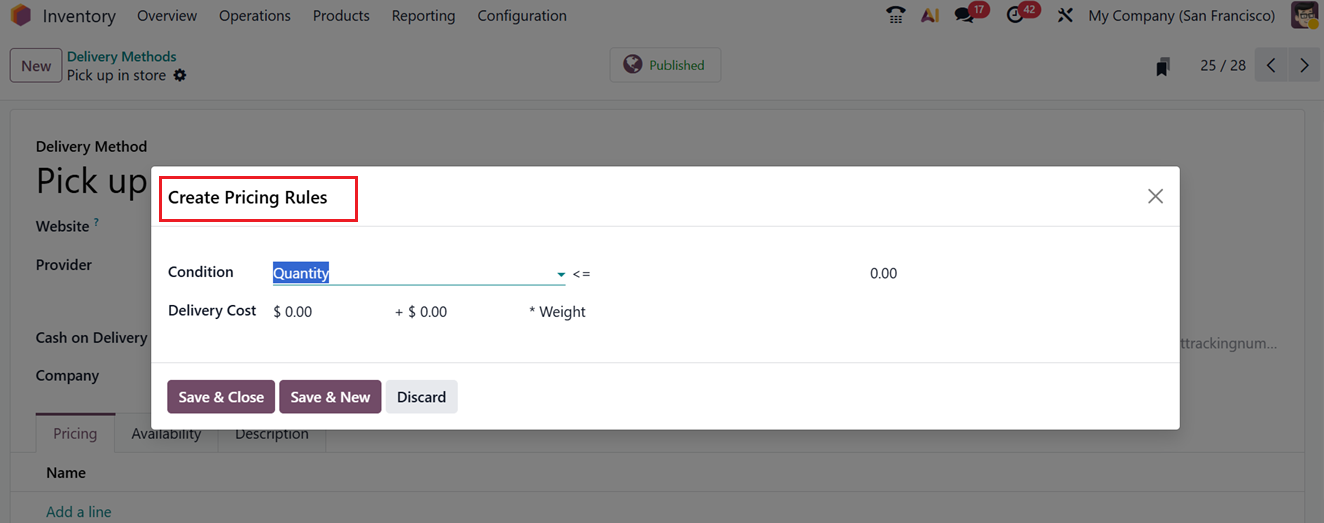
Within the Pricing tab, pricing rules can be defined by specifying a Condition and the corresponding Delivery Cost based on that condition, as shown in the screenshot below .
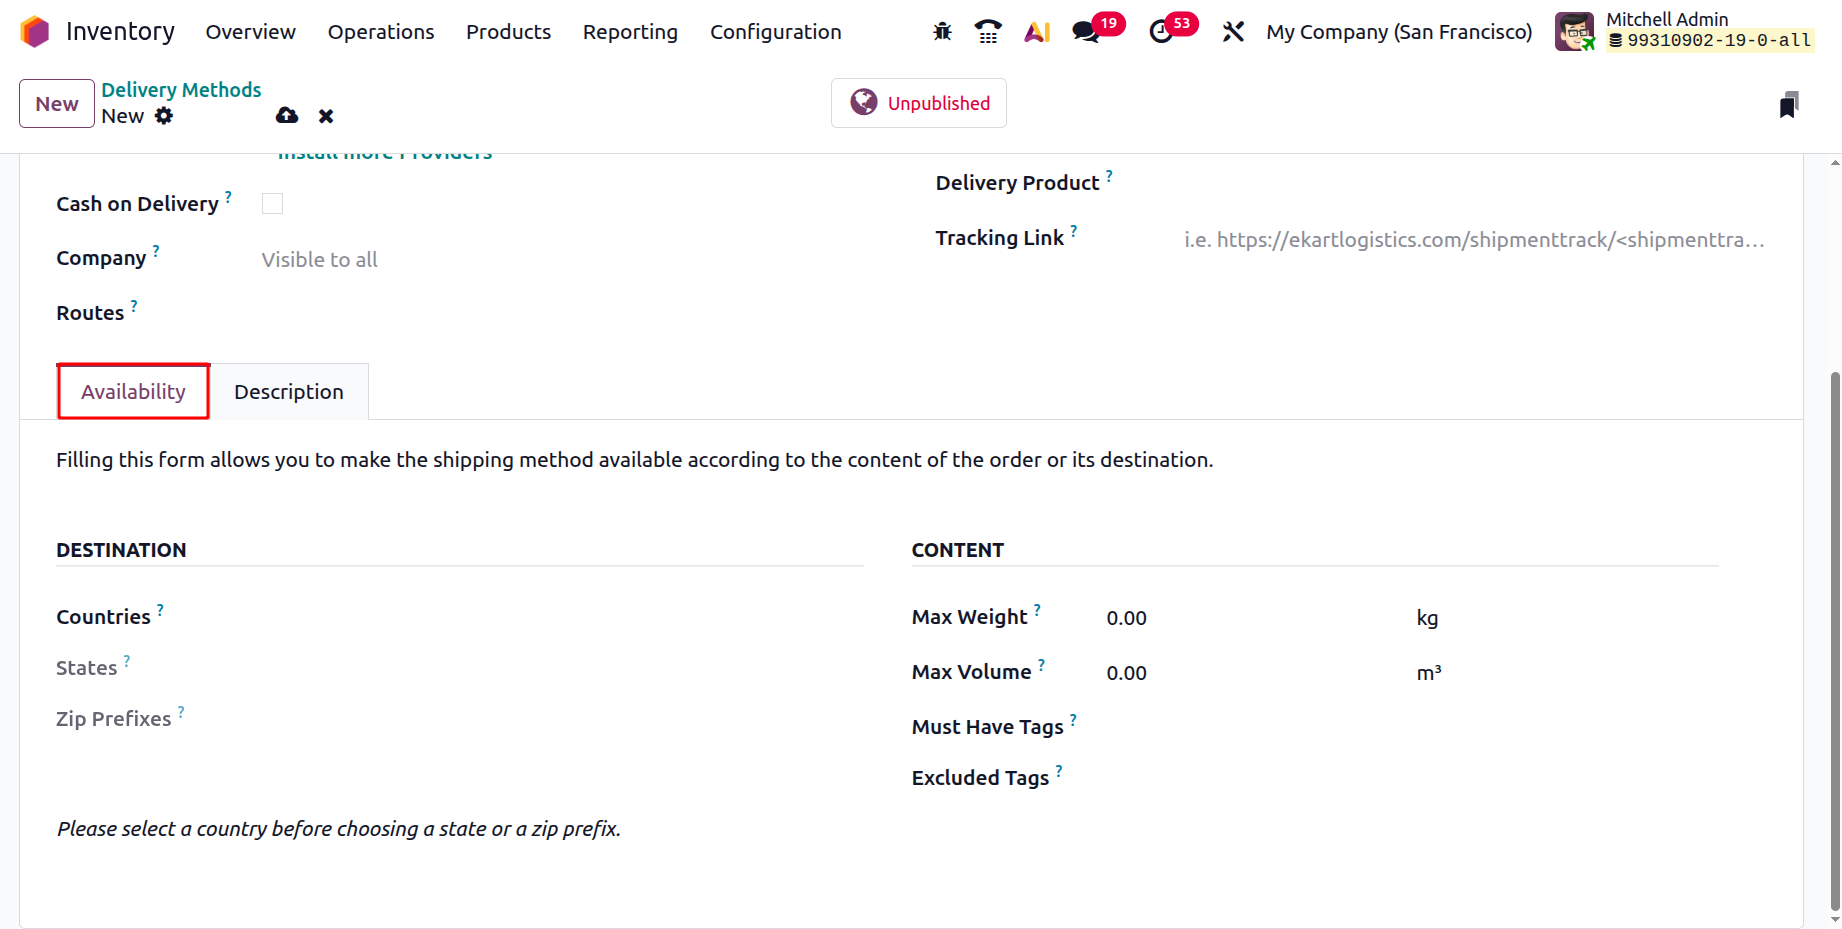
These tab sections may vary for different Providers. Next, the Availability tab is used to control and manage the shipping method available according to the content of the order or its destination.
Inside the DESTINATION area, you can set the Countries, States and Zip Prefixes of the chosen locations in which this particular shipping method is available.
In the CONTENT section, you can set a Max Weight and Max Volume to limit the maximum weight and volume allowed for this delivery method. If an order exceeds these limits, the delivery method will not be available.
The Must Have Tags condition ensures a shipping method is available only if at least one product in the order has the specified tag. Conversely, the Excluded Tags condition prevents a delivery method from being applied if any product in the order carries the specified tag, as shown in the screenshot below.
Finally, you can edit any notes regarding the delivery methods in the ‘Description’ tab and save the details. Using the ‘Published/Unpublished’ smart button, you can publish the delivery methods on the website.
1.12 Package Types
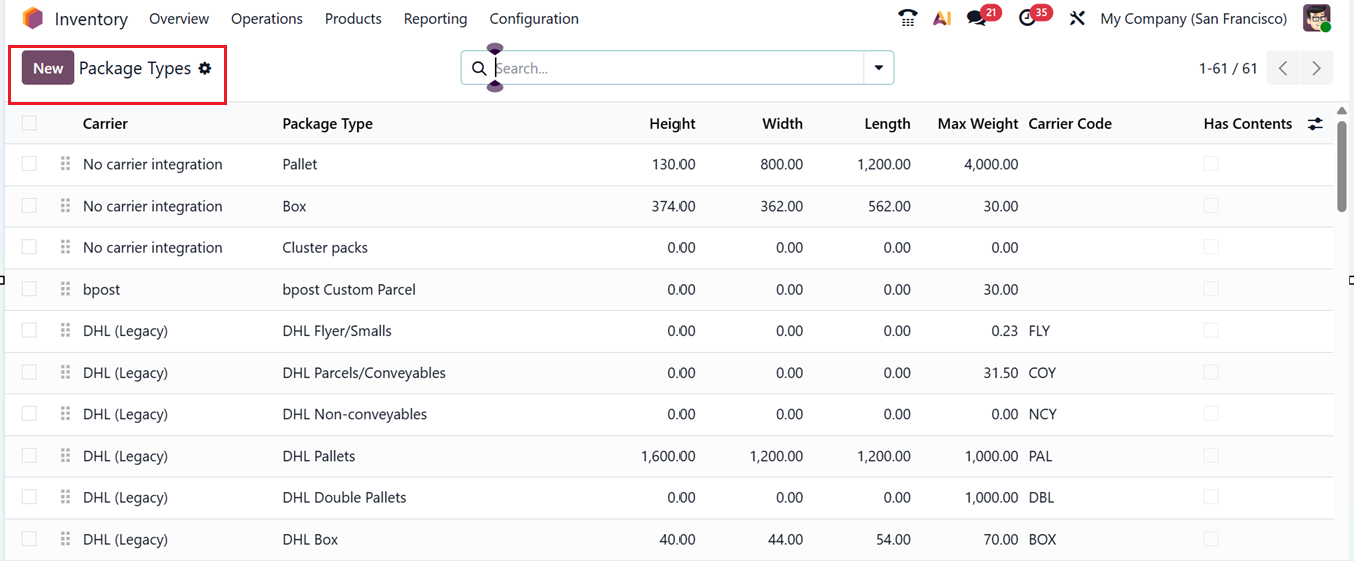
In the Odoo Inventory module, ‘Package Types’ can be created and managed to support different packaging requirements and delivery processes. These are set up from the Configuration menu.
This will show the dashboard of all the available package types with their Carrier name, Package Type, Height, Width, Length, Maximum Weight, Carrier Code and Contents, as shown in the screenshot below.
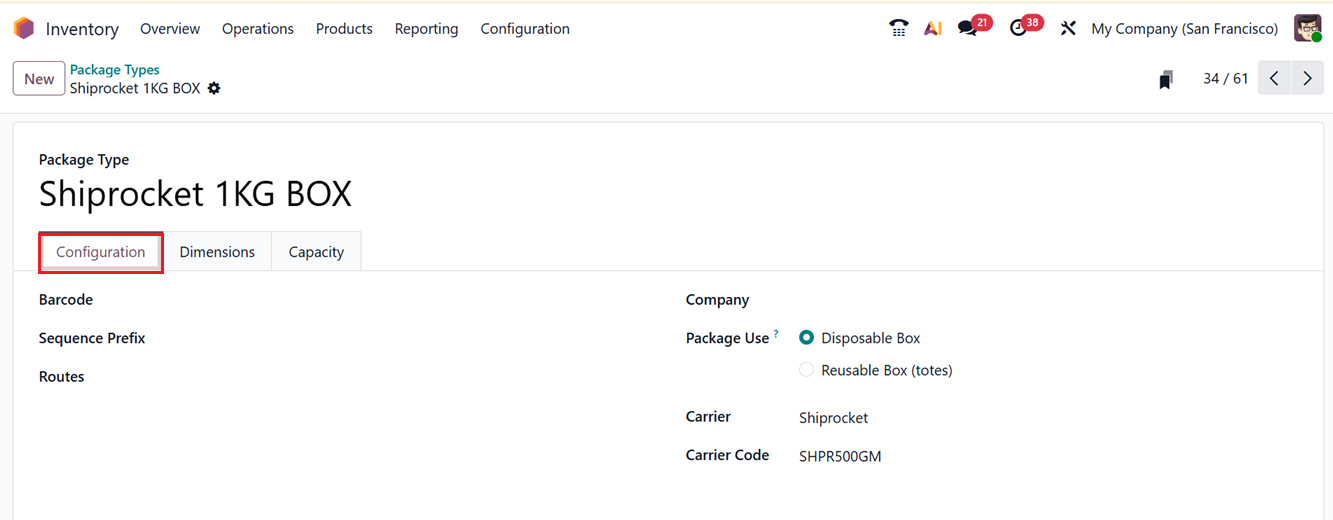
Then, you can create new Package Types using the ‘New’ button and in the displayed form view, specify details such as Barcode, Sequence Prefix, Rotes, Company, Carrier Name and the Carrier Code. In the ‘Package Use’ field, you can choose either Disposable Box or Reusable Box (totes)option.
The Package Use configuration offers two options: Reusable Box and Disposable Box.
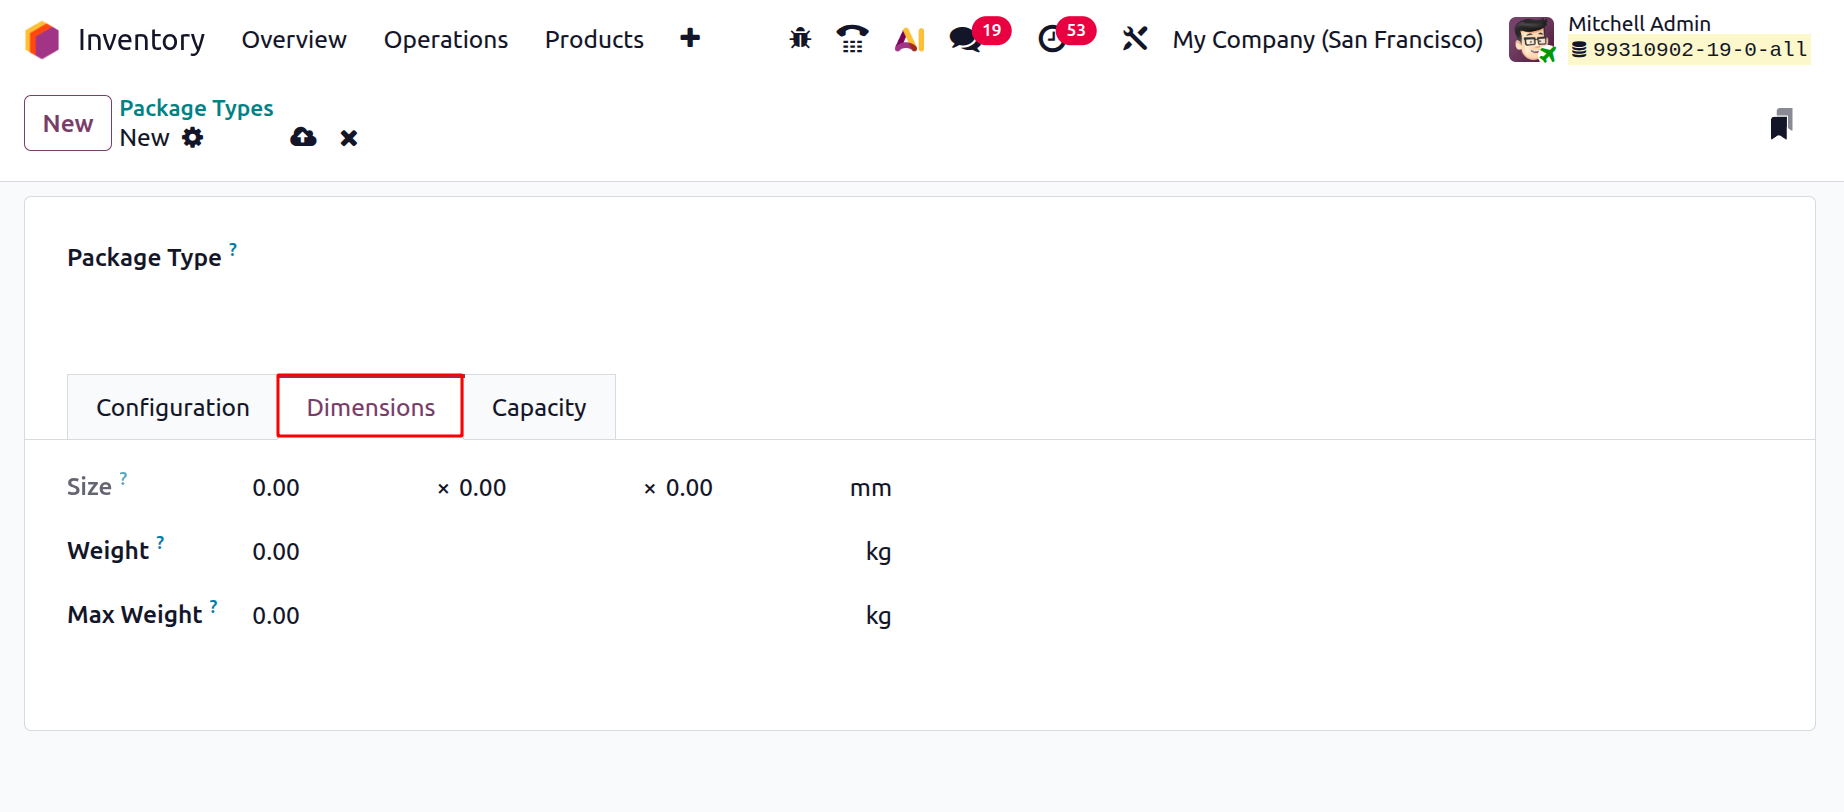
In the Dimensions tab of the form, you can set the package dimensions including the Size, Weight of the package type, and Max Weight shippable in this package type to streamline inventory and logistics operations, as shown in the screenshot below.
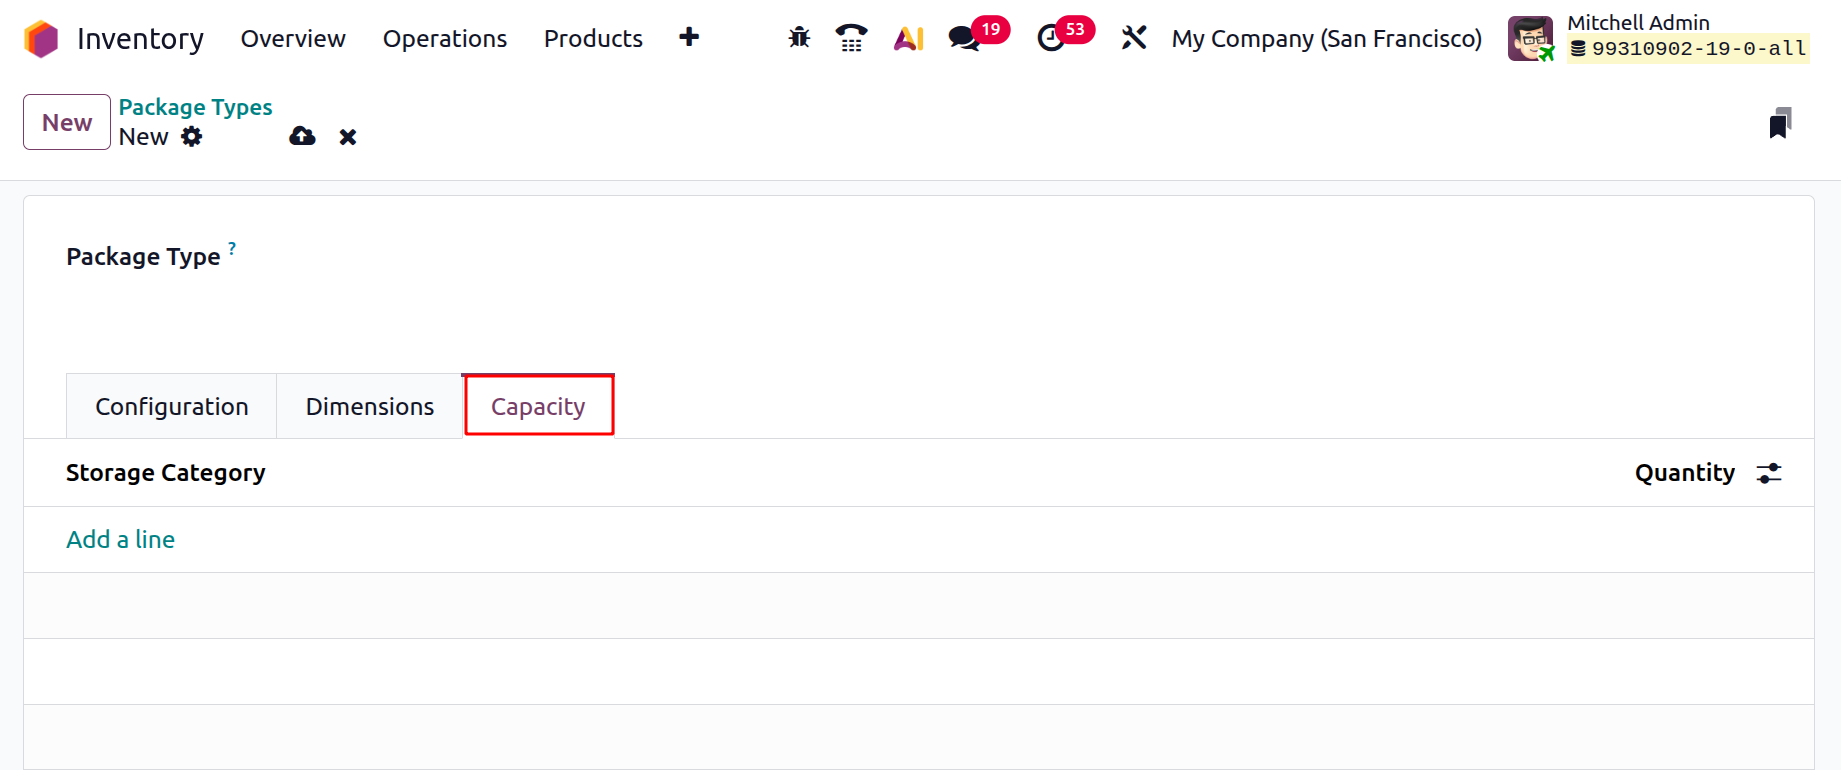
Lastly, the Capacity tab can be used to add the maximum storage capacity of the package type and its quantity such as High frequency Big, Medium, Small boxes, Medium Frequency-Big, Small and Medium boxes, as shown in the screenshot below.
After saving all the details, you can utilize them for future requirements.
1.13 Zip Prefix
In Odoo 19 Inventory, the Zip Prefix setting in delivery methods allows businesses to control shipping options based on the customer’s postal code. By entering the starting digits of a ZIP code, a delivery method is offered only if the customer’s address matches the prefix. This is useful for regional shipping rules, such as local couriers or express delivery in certain areas, ensuring that customers only see delivery options valid for their location.
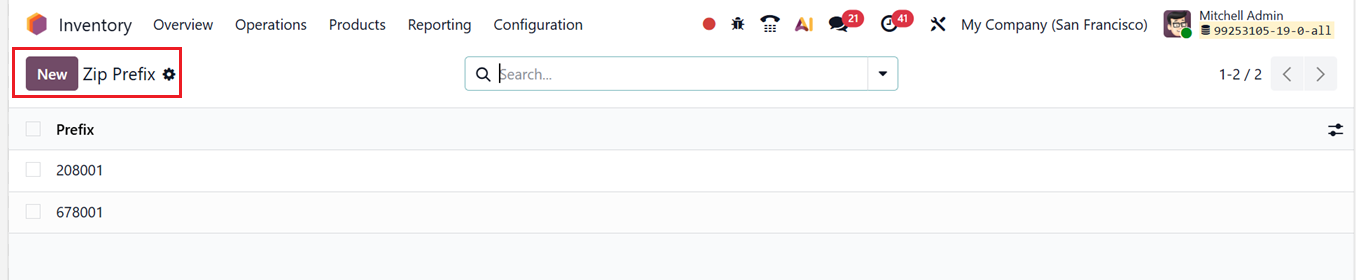
The Zip Prefix window will show the list view of all the available Zip codes that are previously saved in your Inventory, as shown in the screenshot below.
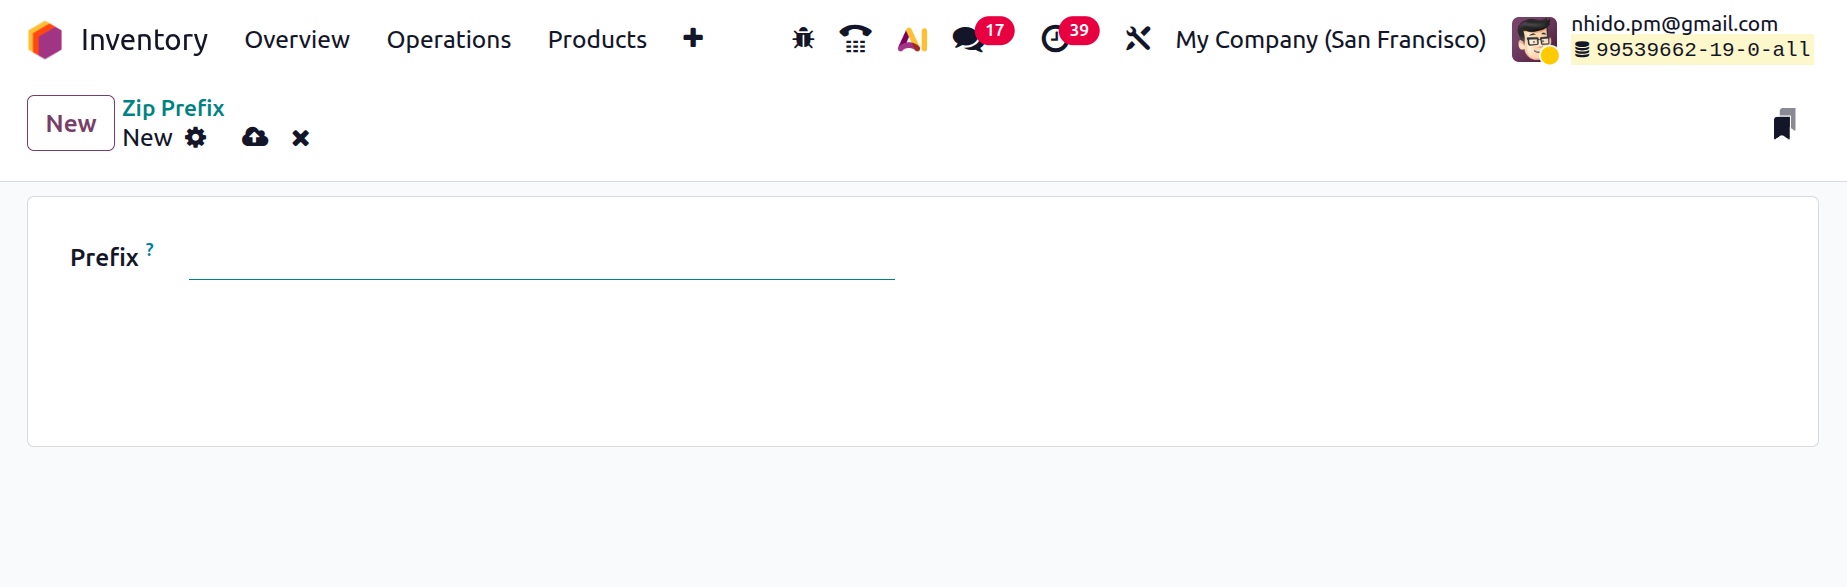
You can simply add new Zip codes or numbers using the ‘New’ button. Then, enter the code in the ‘Prefix’ editing field and save it to manage your shipping methods.
1.14 Reset Links Printers
In Odoo 19 Inventory, Reset Links Printers refers to the option used to clear or reinitialize the connection between Odoo and configured REST link printers. It is typically used when a printer link is not responding, misconfigured, or needs to be reconnected, ensuring that automatic printing functions work correctly during inventory and warehouse operations.
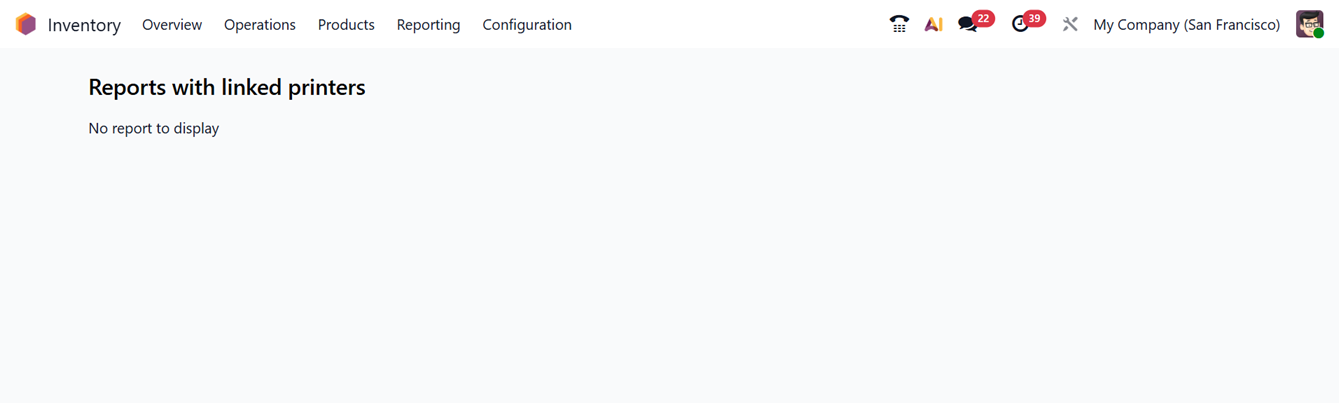
You can view the list of available or already configured printers in the dashboard found under the Reset Links Printers option in the Configuration menu. If no printers are currently linked, the dashboard will appear empty, as illustrated in the screenshot below.
This feature allows documents such as labels, picking slips, and delivery slips to be printed directly from inventory operations, support barcode printing without manual downloads, and help improve warehouse efficiency by reducing manual steps.
1.15 Settings
The ‘Settings’ window from the Odoo 19 Inventory Modules 'Configuration’ menu consists of the options to manage general settings and functions required for smooth inventory operations.
Here, the settings options are arranged in multiple tab sections according to the functionality such as Operations, Barcodes, Shipping, Shipping Connectors, Products, Traceability, Valuation, Warehouse, Advanced Scheduling and Logistics.
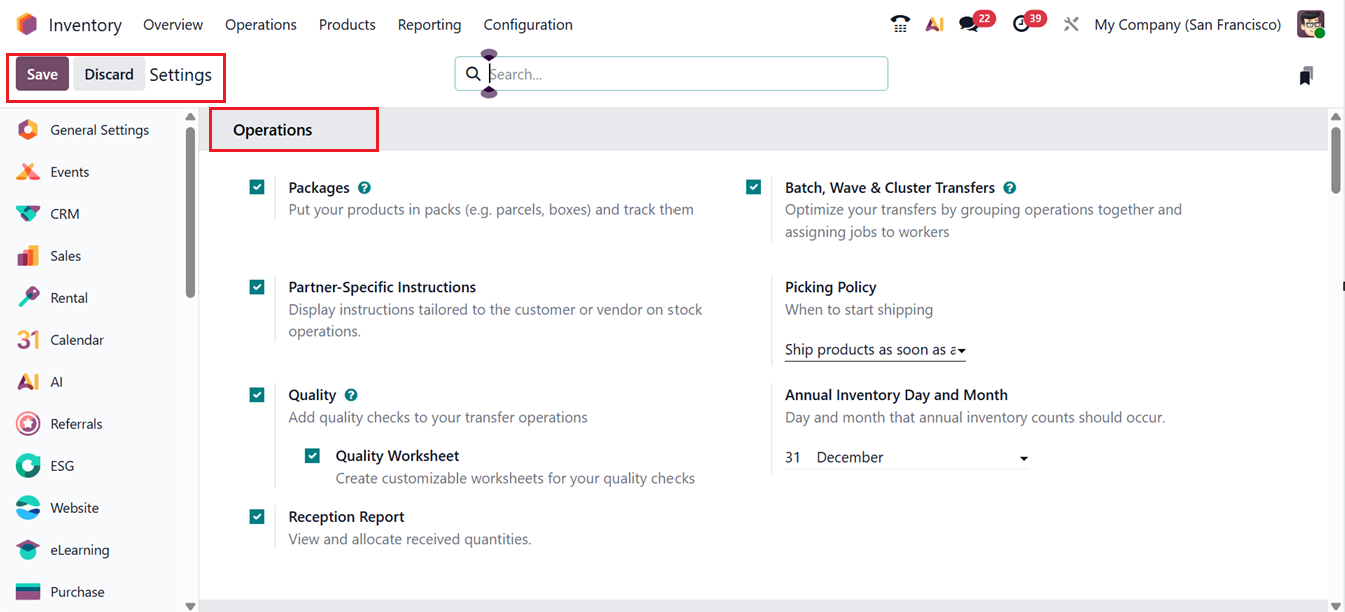
1. Operations Tab
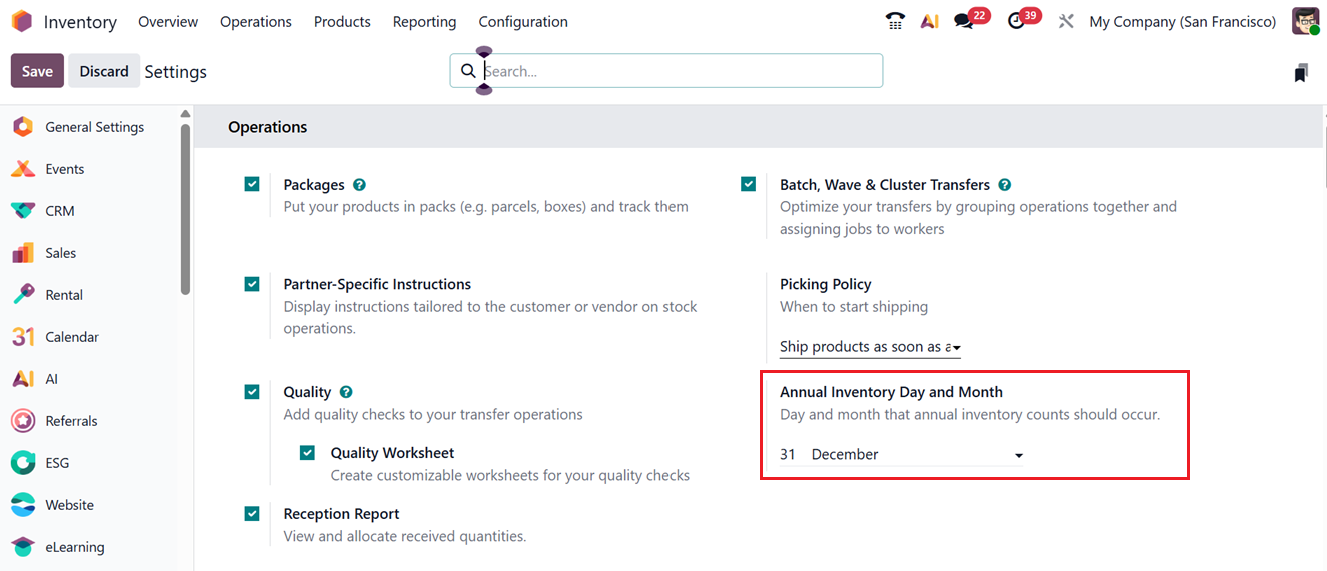
Within the Settings section of the Inventory module, there is an Operations category that includes several important features such as Packages, Partner-Specific Instructions, Quality, Reception Report, Batch, Wave &Cluster Transfers, Picking Policy and Annual Inventory Day and Month. These options help businesses manage inventory processes more efficiently and accurately
The Packages option plays a vital role in protecting products from damage during storage and transportation. Ensuring goods are moved safely is a fundamental responsibility for any business. With Odoo 19, users can configure different packaging methods, including creating delivery packages, assigning multiple packages to a single product, or grouping multiple products into one package. These packaging configurations become accessible in the Inventory module once the Packages option is enabled from the Operations section in the Settings menu. You can check on the detailed Package Type Configuration from the previous section of this book.
The ‘Partner-Specific Instructions’ option will allow you to set customized handling or delivery instructions for specific customers or vendors. These instructions automatically appear during relevant inventory operations, helping warehouse staff follow partner-specific requirements accurately.
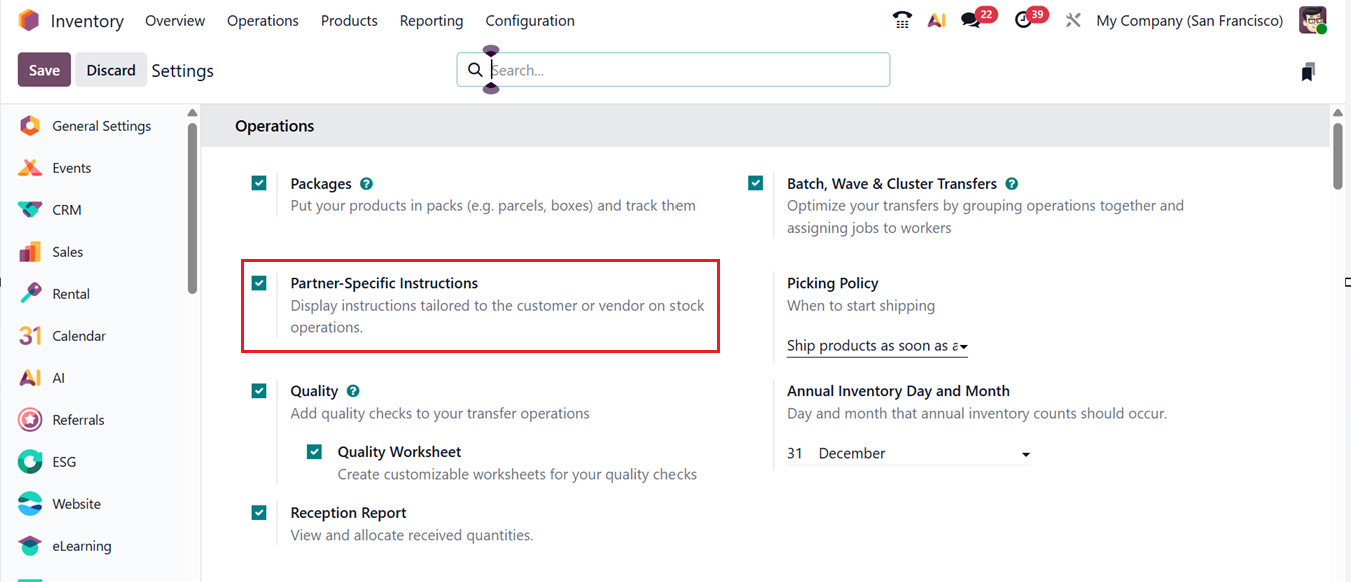
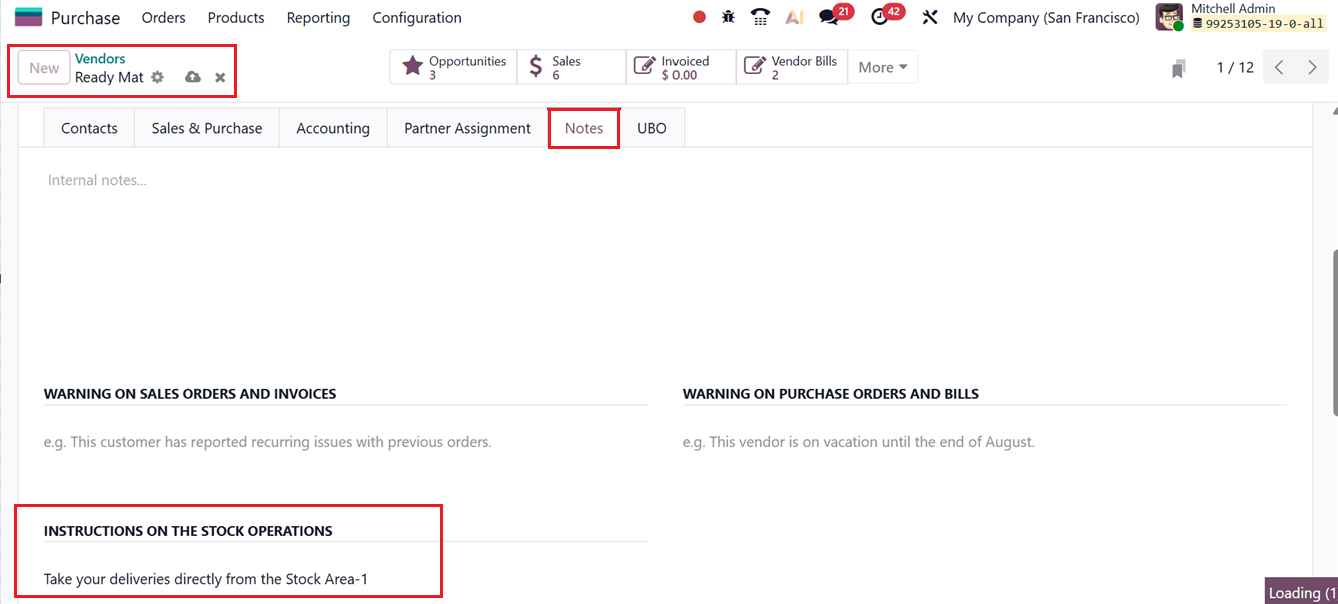
This feature allows you to display instructions tailored to a specific customer or vendor on stock operations. The instructions can be added in the Vendor/Partner’'s Note tab, where the INSTRUCTIONS ON THE STOCK OPERATIONS option is available, as shown in the screenshot below.
The Quality option focuses on quality control processes. Quality checks are manual inspections performed by staff to ensure that goods meet required standards. In Odoo, quality checks can be applied to a single product or multiple products within the same inventory transfer or manufacturing order, helping maintain consistent product quality.
You can activate the ‘Quality Worksheet’ option to create customizable worksheets for your quality checks under the ‘Quality’ settings field, as shown in the screenshot below.

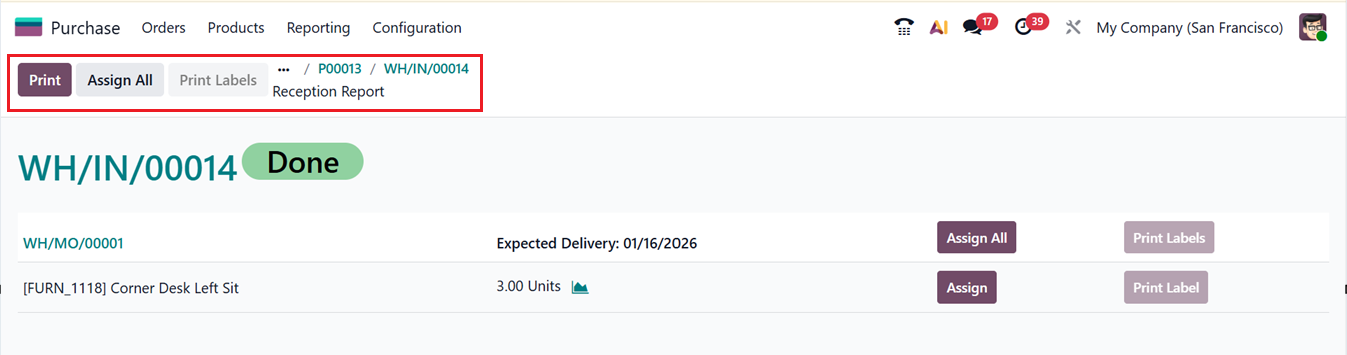
Next is the Reception Report feature, which helps simplify complex receiving processes. Once a receipt is validated, Odoo automatically generates a reception report that summarizes received items. This report helps allocate products to the appropriate orders and enhances overall operational organization and efficiency.
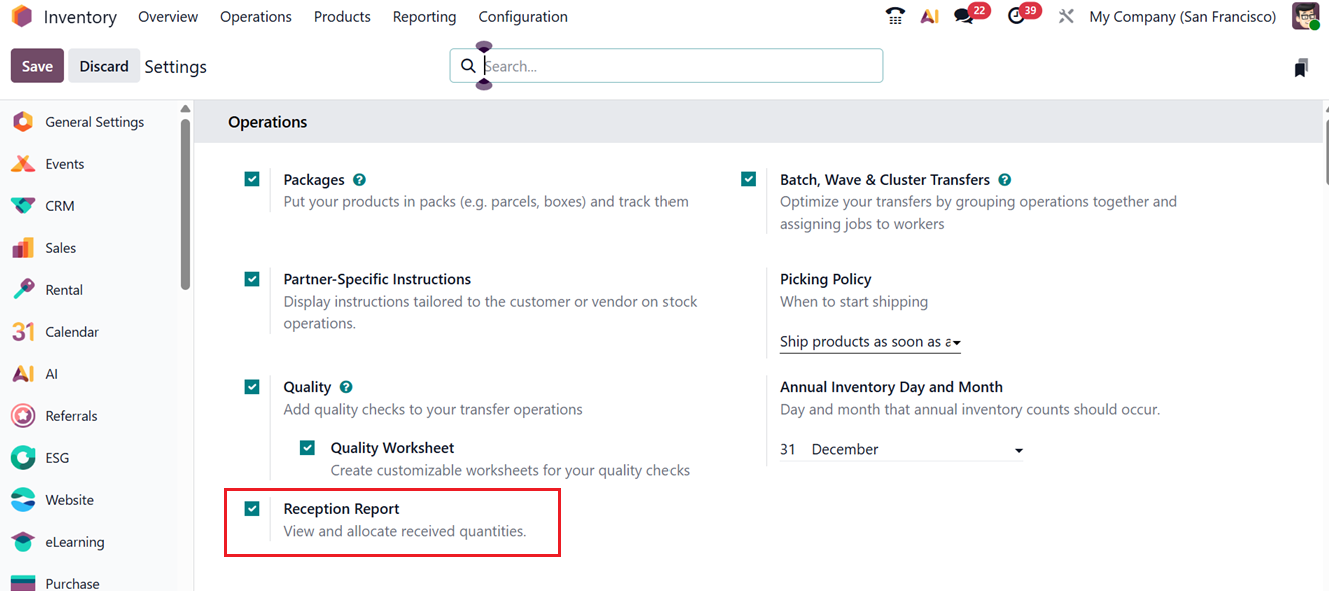
The reception report generated during the purchase receipt process can be viewed directly from the Purchase module, as illustrated in the screenshot below.
Another key configuration under Operations is the Picking Policy. This feature controls how products are shipped based on stock availability. Odoo provides two primary Picking strategies that can be activated from the Settings submenu in the Inventory configuration, as shown below.
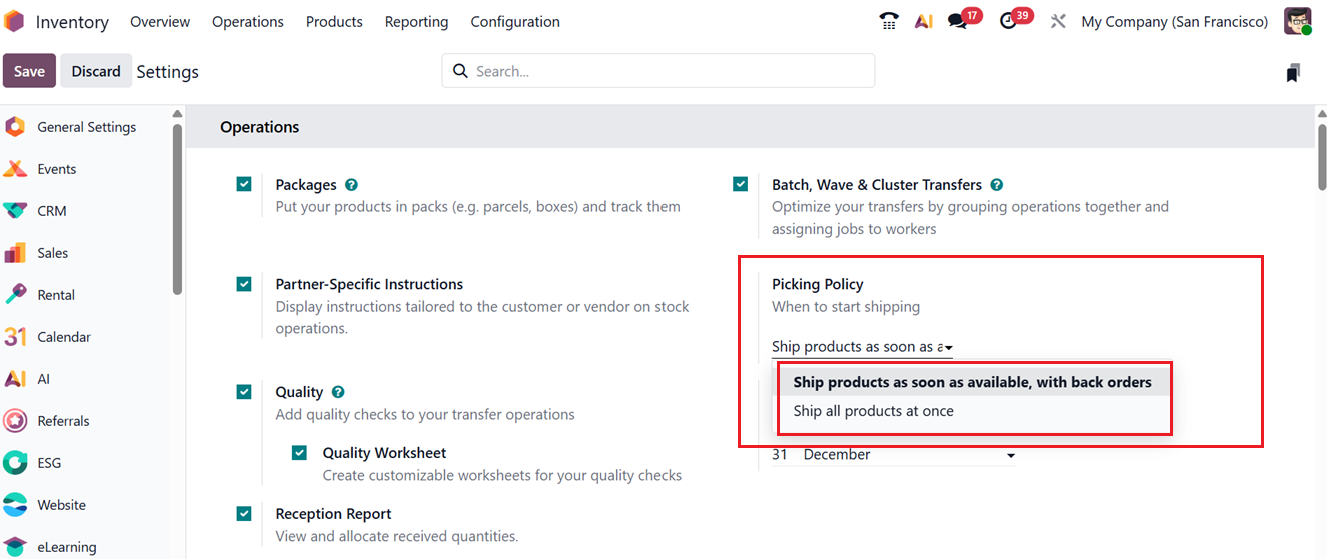
The first option, Ship products as soon as available, with backorders, is useful when customers order quantities that exceed current stock levels. With this policy enabled, available products are shipped immediately, while the remaining items are delivered later through backorders. The second option, Ship all products at once, ensures that shipments are only processed once all ordered items are available in stock. If inventory levels are insufficient, the order remains on hold until stock is replenished.
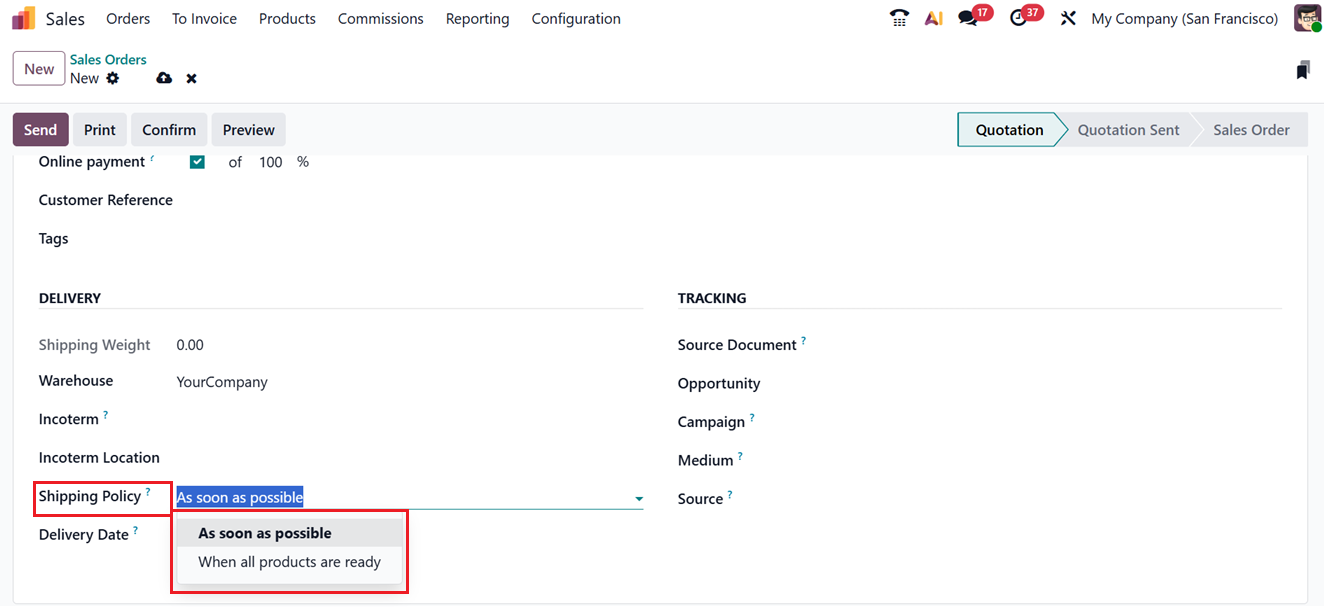
These Shipping Policy can also be selected directly on the sales order form under the Other Info tab, as shown in the screenshot below.
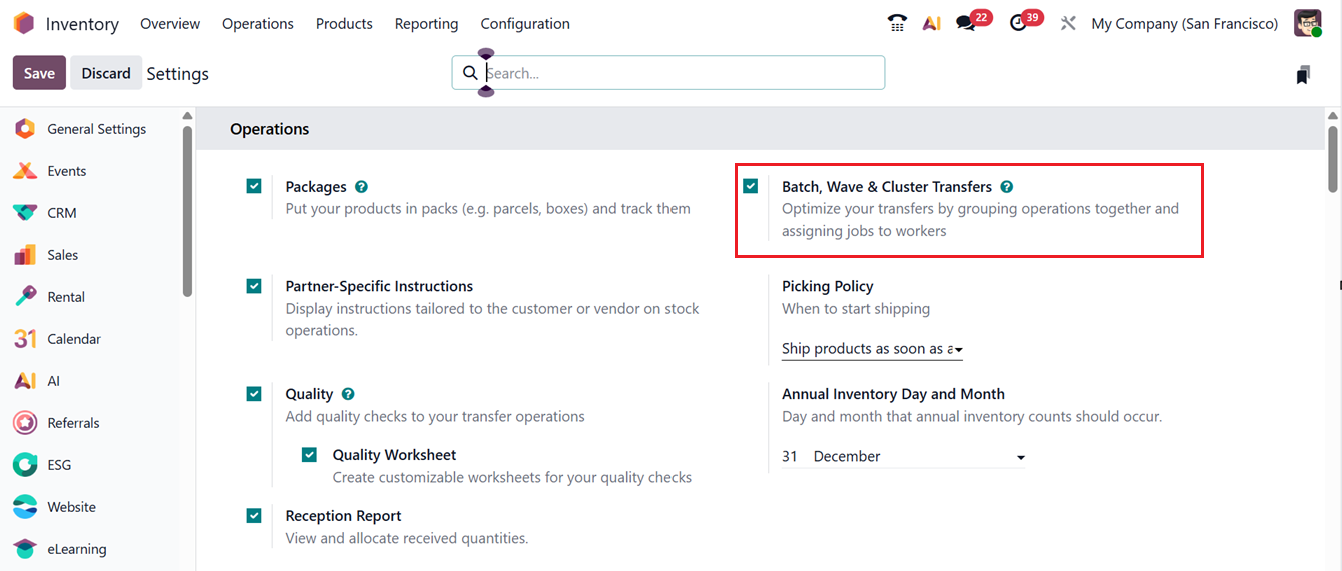
The ‘Batch, Wave & Cluster Transfers’ feature allows you to optimize picking and transfer operations. Batch transfers group multiple pickings together, wave transfers organize pickings based on schedules or priorities, and cluster transfers combine pickings by location. Together, they reduce travel time and improve warehouse productivity.
The Annual Inventory Day and Month setting defines the scheduled date for annual inventory counting. It helps companies plan and perform regular stock audits, ensuring accurate inventory records and compliance with internal or regulatory requirements.
2. Barcode Tab
The Barcode tab section is another major component of the Operations settings. It includes features such as Barcode Scanner and Stock Barcode Database.
Odoo’s Barcode Scanner functionality simplifies inventory management by allowing users to scan products instead of manually searching for them. To use this feature, the Barcode Module must be installed from the Odoo App Store. Once installed, it can be activated from the Inventory Settings menu, as shown in the screenshot below.
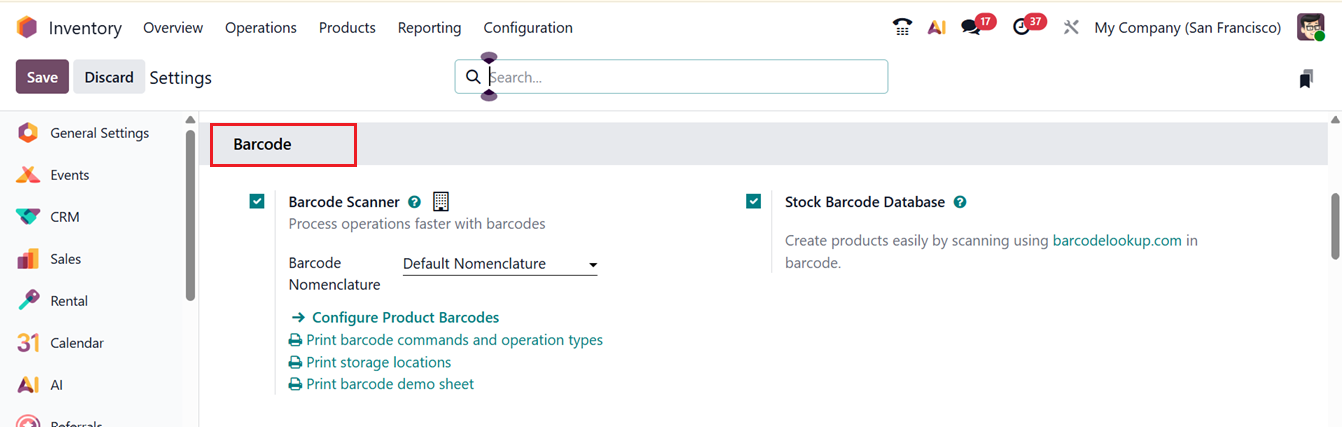
After enabling barcode scanning, you can define barcode generation rules through the Barcode Nomenclature field. Selecting an appropriate nomenclature helps standardize barcode formats. The Configure Product Barcode option then allows users to assign barcodes to individual products.
Odoo displays a list of all products in the database, where barcodes can be entered directly into the product records.

After saving the new barcode, these can be used across inventory operations, making product identification faster and more accurate with barcode scanners. The Barcode Nomenclature feature allows businesses to define custom barcode rules, but configuring it requires enabling Developer Mode in Odoo.
The Stock Barcode Database feature allows products to be created quickly by scanning barcodes and retrieving data from barcodelookup.com. This capability speeds up warehouse workflows by enabling barcode scanning during stock activities such as receipts, deliveries, internal transfers, and inventory adjustments.
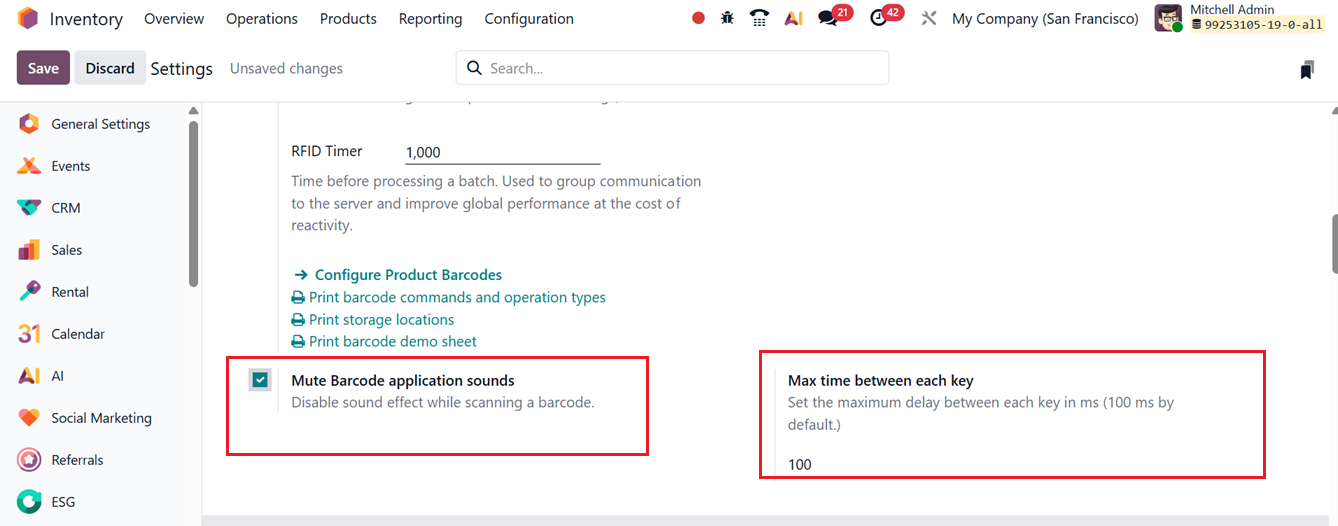
The Mute Barcode Application Sounds option allows you to enable or disable sound effects when scanning barcodes. The Max time between each key option lets you set the maximum delay between keystrokes (in milliseconds), with the default value set to 100 ms, as shown in the screenshot below.
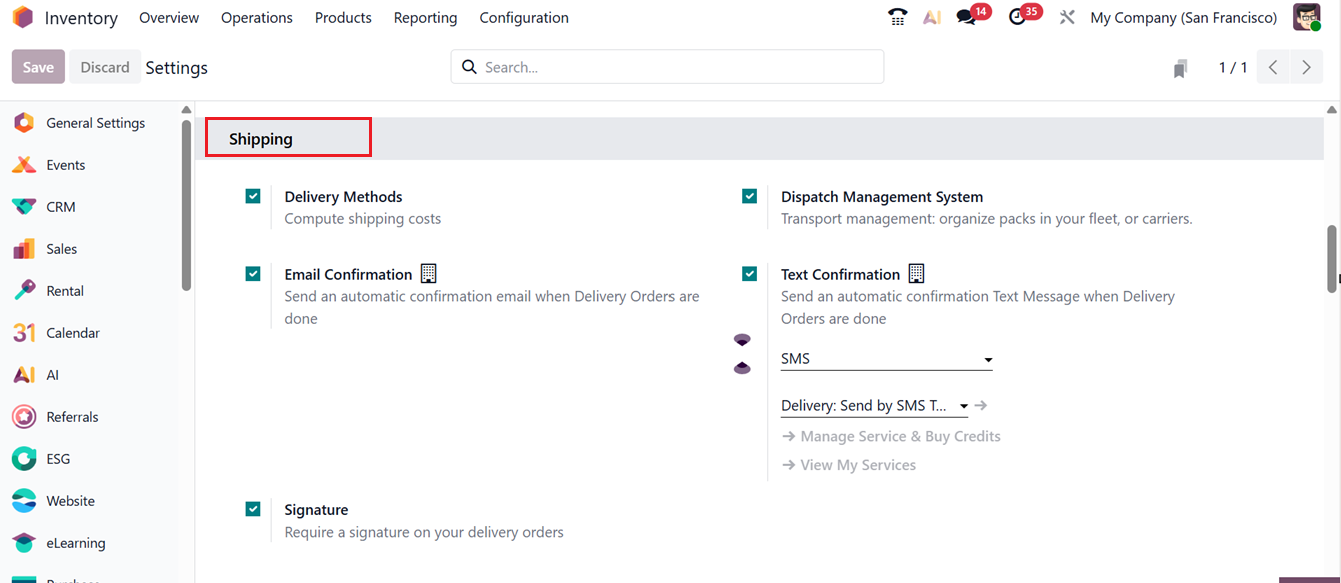
3. Shipping Tab
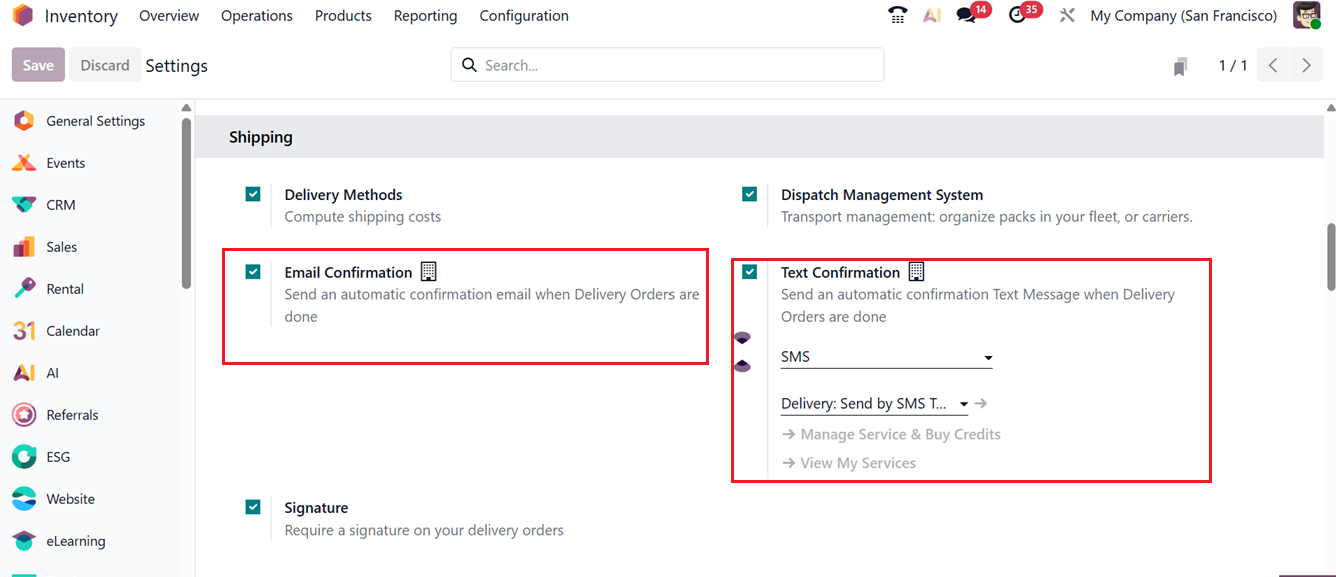
The next section in the settings window is the Shipping tab, which includes several configuration options such as Delivery Methods, Email Configuration, Dispatch Management System, Signature, Text Confirmation SMS Configuration. These settings help manage how products are shipped and how customers are informed throughout the delivery process.
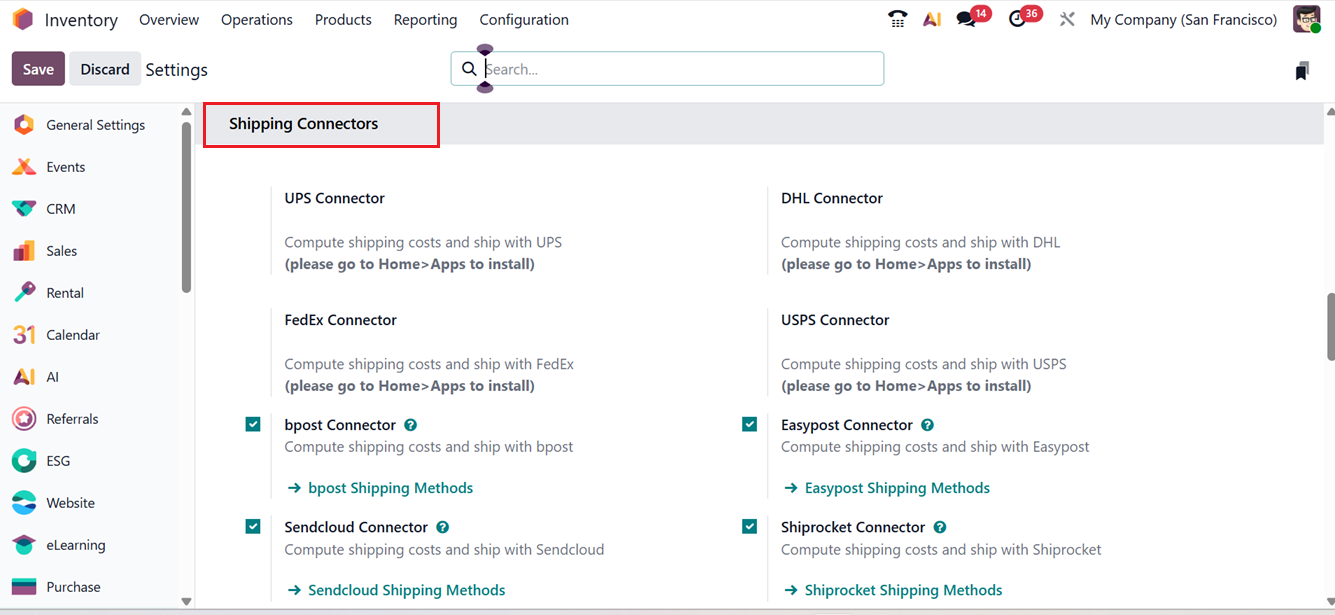
Activating Delivery Methods allows the system to calculate shipping charges automatically. In addition, users can enable built-in shipping connectors to work with third-party logistics providers for deliveries. Odoo supports multiple shipping integrations, including UPS Connector, FedEx Connector, bPost Connector, Sendcloud Connector, DHL Connector, USPS Connector, Easypost Connector etc, enabling seamless carrier-based shipping operations, as depicted in the screenshot below.
New shipping methods can be created by navigating to the Delivery Methods sub menu option available under the Configuration menu. This section displays a list of existing shipping methods along with details such as the delivery method name, shipping provider, publication status, associated website, and company. You can check the detailed Delivery Methods configuration section from the previous section of this book.
Odoo also supports automated customer notifications. Once delivery orders are completed, Email Confirmations and SMS messages can be sent automatically. These options can be enabled by activating the Text Confirmation and Email Confirmations options from the Inventory Settings menu, where you can also define the default SMS template used for delivery confirmations, as highlighted in the screenshot below.
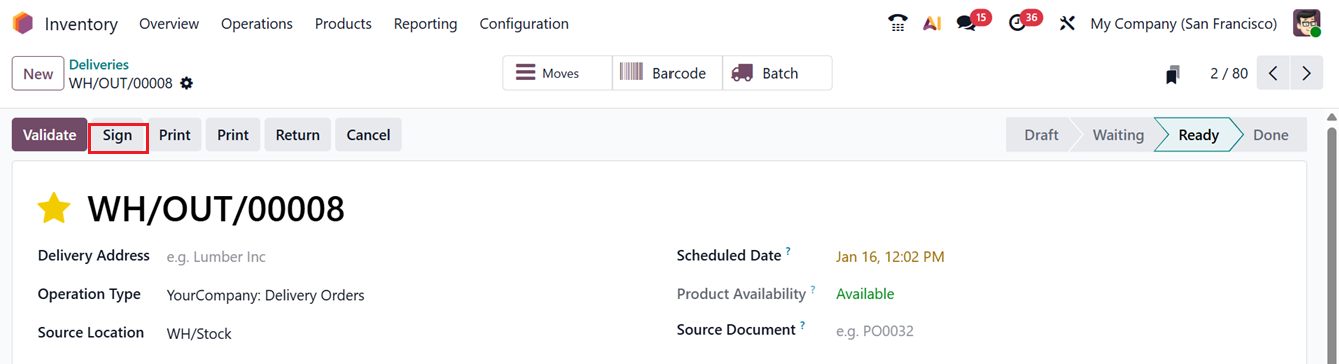
To further enhance delivery validation, Odoo allows customers to provide a signature upon receipt. By enabling the Signature option in the Shipping tab, a Sign button becomes available on validated delivery orders. Customers can use this option to sign digitally and confirm successful delivery, as shown in the screenshot below.
Additionally, the Dispatch Management System helps organize and manage product dispatch across fleets or carriers. This system supports efficient order fulfillment, shipment handling, and stock movement coordination. By ensuring accurate and timely dispatches, Odoo’s dispatch management system reduces manual effort, minimizes delivery errors, and significantly improves overall customer satisfaction.
4. Shipping Connectors Tab
The next feature is Shipping Connectors, which allows Odoo 19 to work with various external delivery services. By connecting Odoo to carrier tracking systems, you can manage the shipping company, shipping costs, and the final delivery location directly from the system.
Shipping connectors are set up from the Settings menu, and Delivery Methods can be configured through the Configuration menu. In the ‘Shipping Connectors’ tab of the settings window, you can activate or deactivate the shipping connector options by enabling or disabling them, as shown in the screenshot below.
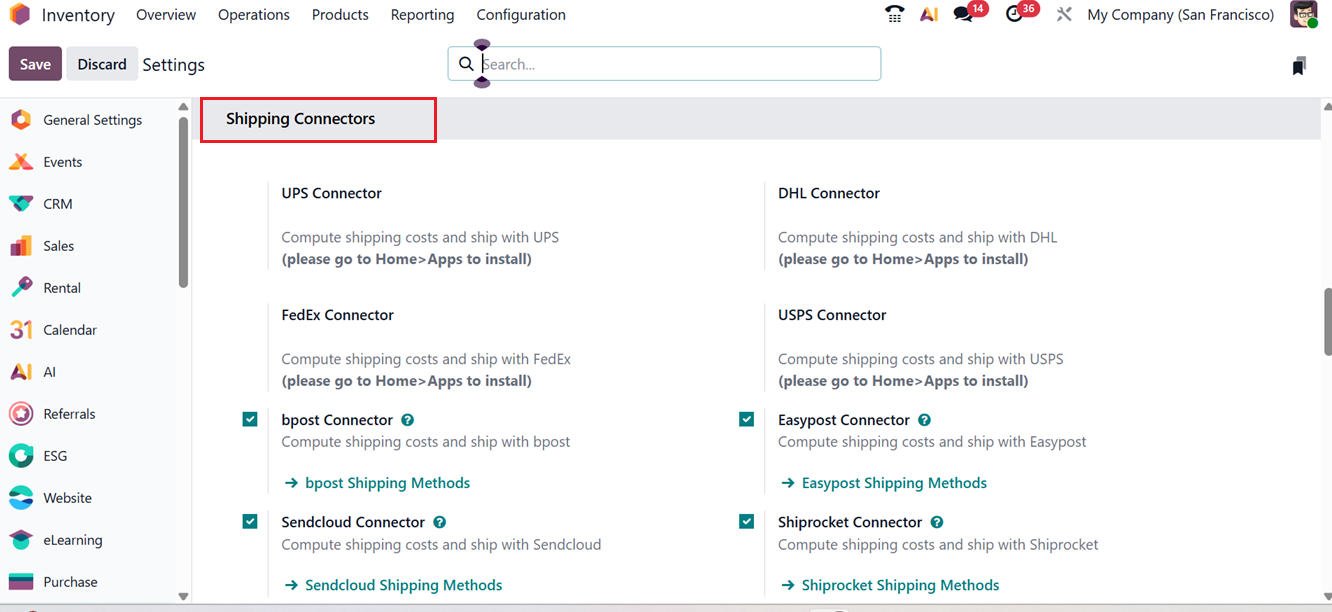
Odoo supports several types of shipping connectors, including;
- UPS: Supports services like Next Day, 2nd Day Air, and Ground with automatic rate calculation.
- FedEx: Handles express, ground, and freight shipping with tracking and label printing.
- bpost: Integrates with Belgium’s national postal service.
- Sendcloud: A European shipping platform connecting multiple carriers for eCommerce.
- Starshipit: Calculates shipping costs and manages shipments via Starshipit.
- DHL: Provides international and domestic shipping with real-time rates and labels.
- USPS: U.S. Postal Service connector for domestic and international deliveries.
- Easypost: Aggregates multiple carriers like UPS, FedEx, USPS, and DHL into a single integration.
- Shiprocket: Helps calculate shipping costs and process shipments through Shiprocket.
These connectors make it easy to automate shipping, get real-time rates, print labels, and track deliveries efficiently within Odoo. Routes for the selected shipping carriers are automatically generated, and most carriers provide multiple delivery options, such as one for local shipping and another for international shipping.
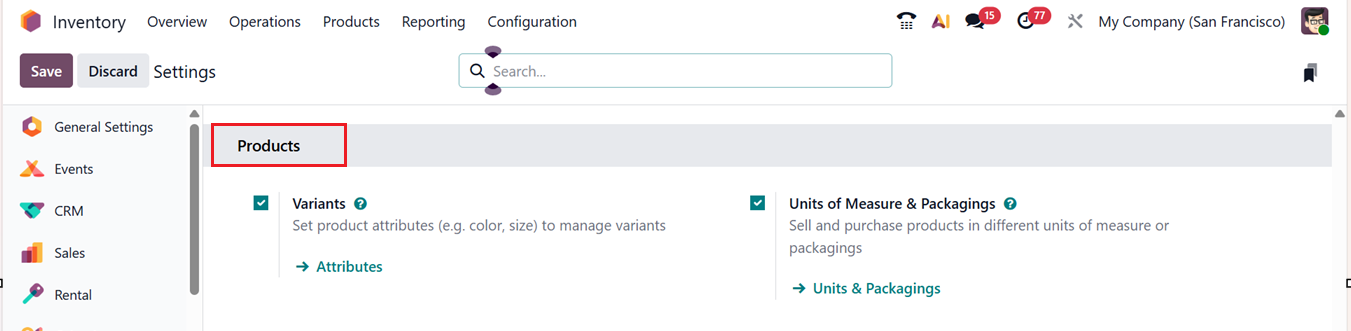
5. Products
The next option in the Settings window is the Products tab, which includes Variants, Units of Measure & Packaging options. Offering different options for products can help boost sales, and Odoo allows you to manage multiple product versions directly from the Inventory module, similar to how it is handled in Sales and Purchase.
After activating the feature from the Settings window, you can explore the Product Variants feature under the Products menu in Inventory, where each variant and its associated values can be viewed, as shown in the screenshot below.
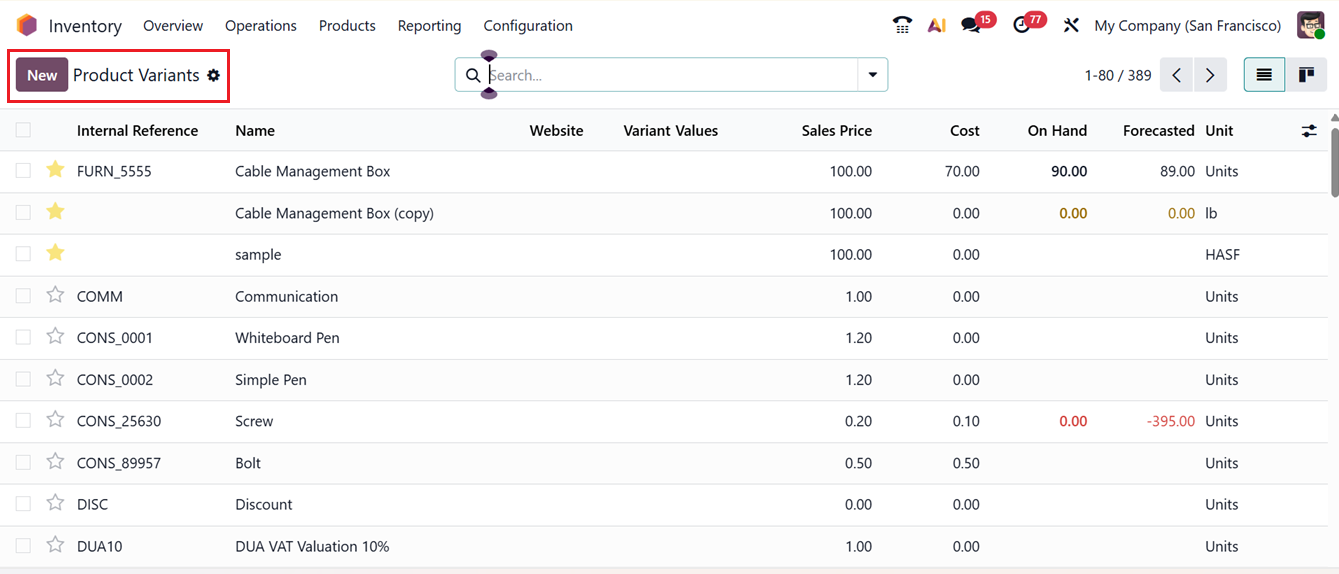
The Variants section displays all variant values for the products. Preconfigured attributes are available in the Attributes window of the the Configuration menu and you can create new ones through this dashboard or through the ‘Attributes’ link provided under the Variants settings field.
Both of the options will lead you to the Attributes dashboard window which contains the name of the Attributes, eCommerce Category, Display Type, Variant Creation, eCommerce Filter Visibility, as shown in the screenshot below.
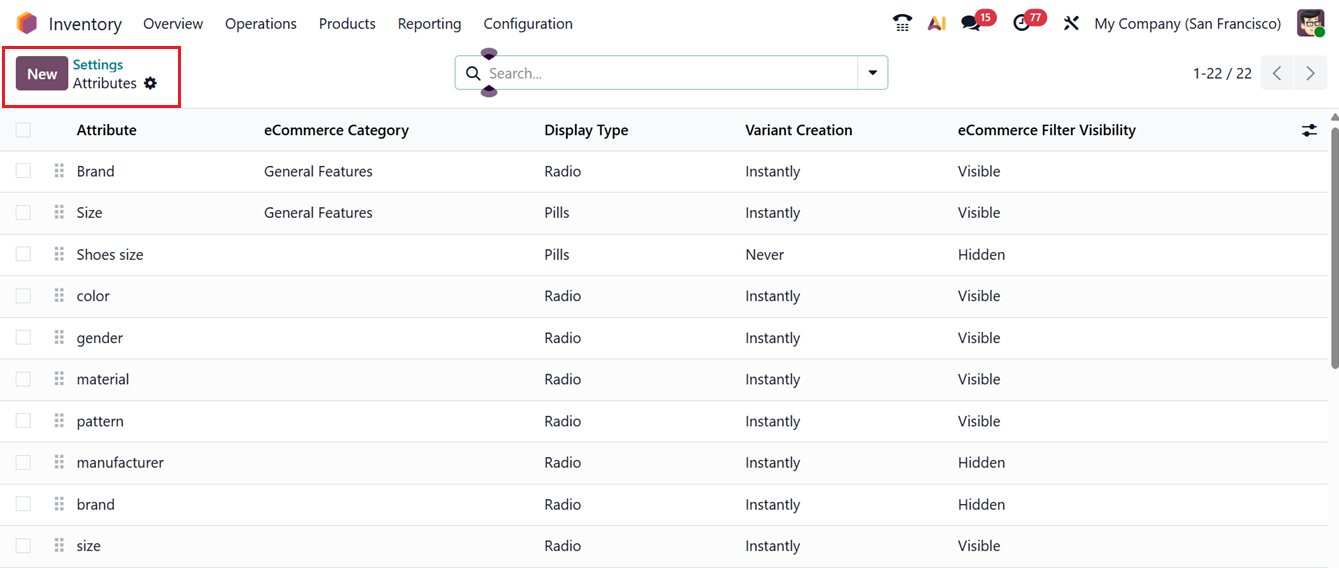
You can create new attributes by opening the New configuration form. We have already discussed the attribute creation process in the Configuration section of this book. So, you can refer for more information.
The next section is Units of Measure & Packaging, which helps classify product units and manage unit conversions. Odoo’s Unit of Measure Category feature allows you to handle sales and purchases in different units or packaging. To manage this, go to the Configuration tab and select the Unit of Measure Category. This view shows all existing units and packaging within the category, including their names, contents, and reference units.
To create a new unit you can utilize the ‘New’ button and edit the specifics that we have discussed in the Configuration section.
6. Traceability Tab
During inventory management, products are often assigned lot numbers or serial numbers to ensure accurate tracking. While configuring products in the Inventory module, you can assign lots or serial numbers so that detailed traceability reports can be generated later without difficulty. This Traceability functionality is supported by the advanced inventory management tools available in Odoo 19, making product tracking more efficient and reliable.
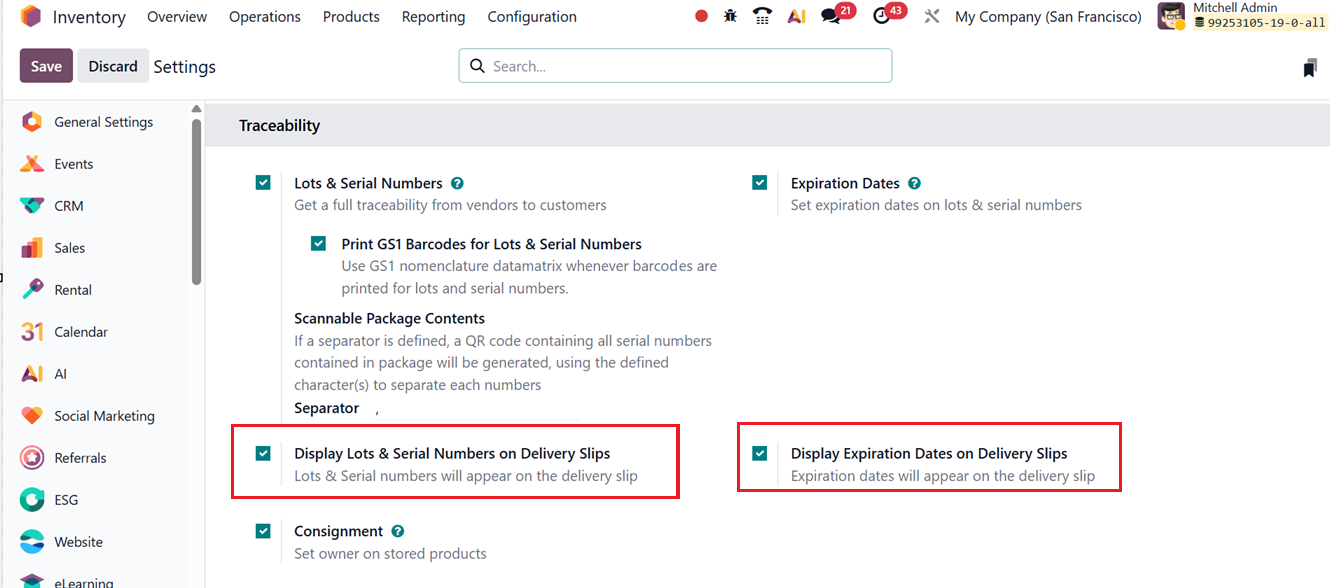
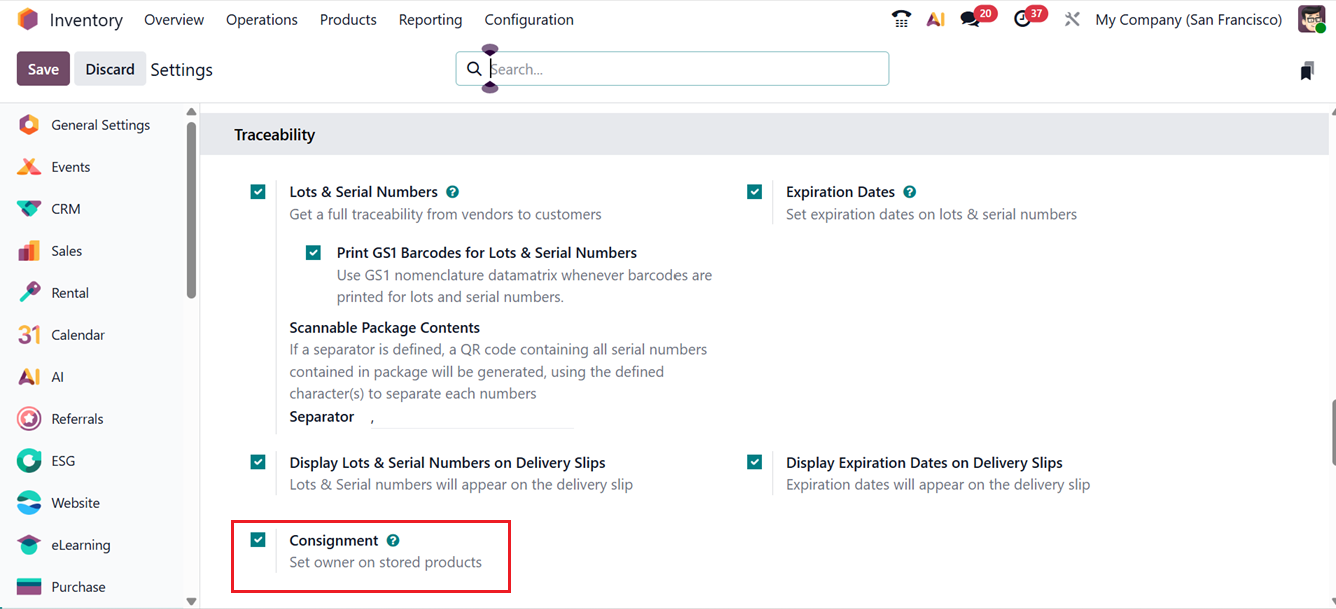
To access all traceability-related features, the Lots & Serial Numbers option must be enabled from the Inventory Settings menu. Then, you can see the options Print GS1 Barcodes for Lots & Serial Numbers, Scannable Package Contents, Display Lots & Serial Numbers on Delivery Slips, Consignment, Expiration Dates and Display Expiration Dates on Delivery Slips, as shown below.
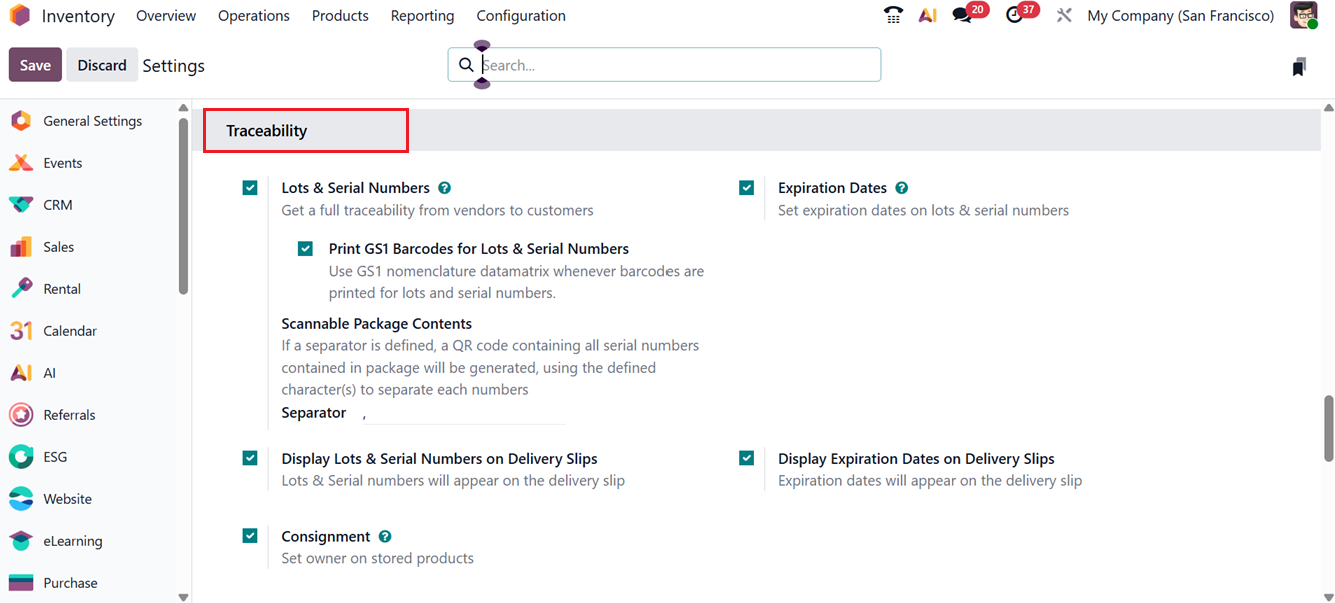
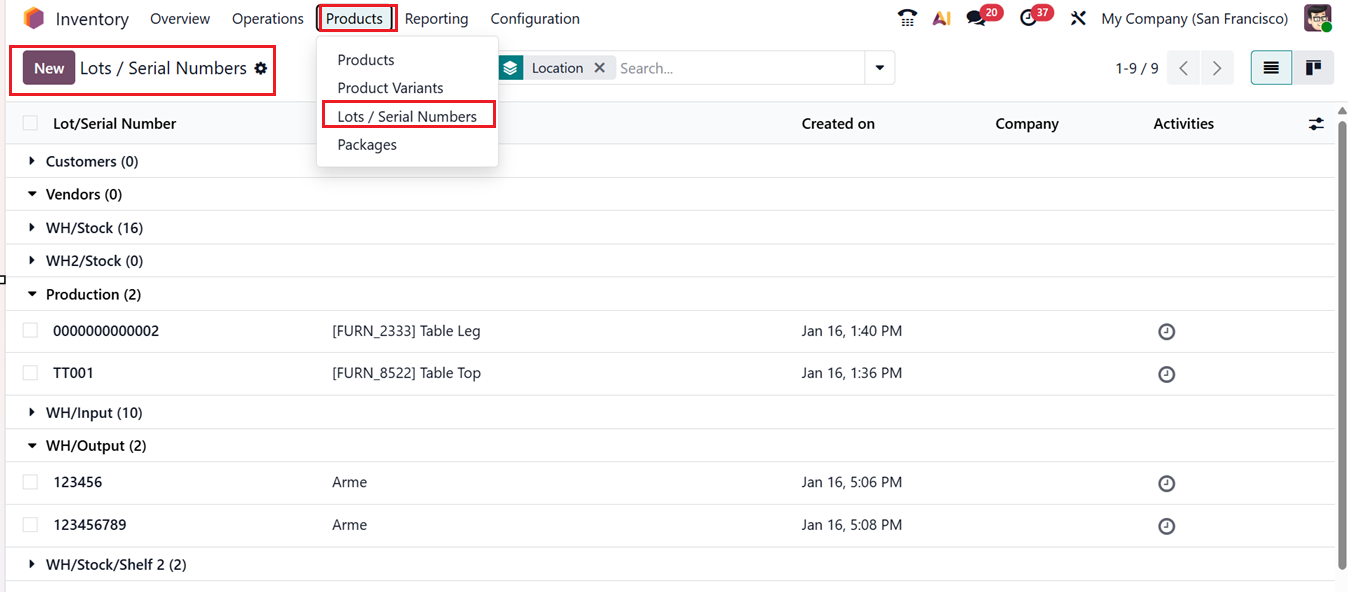
The Lots and Serial Numbers feature appears within the Traceability tab, as shown in the interface. Once this option is activated, the Lots/Serial Numbers menu becomes available under the Products section, allowing users to manage and monitor tracked items effectively.
The detailed Lot/Serial Number configuration function is explained in the Products menu section of this book.
Another important feature under Traceability is Expiration Dates. Assigning expiration dates to consumable or storable products is essential to ensure product safety and compliance. Each product should include an expiration date so customers and businesses know how long the item remains usable. Odoo 19 manages expiration dates using lot and serial number tracking, and this feature can be enabled directly from the Inventory Settings menu.
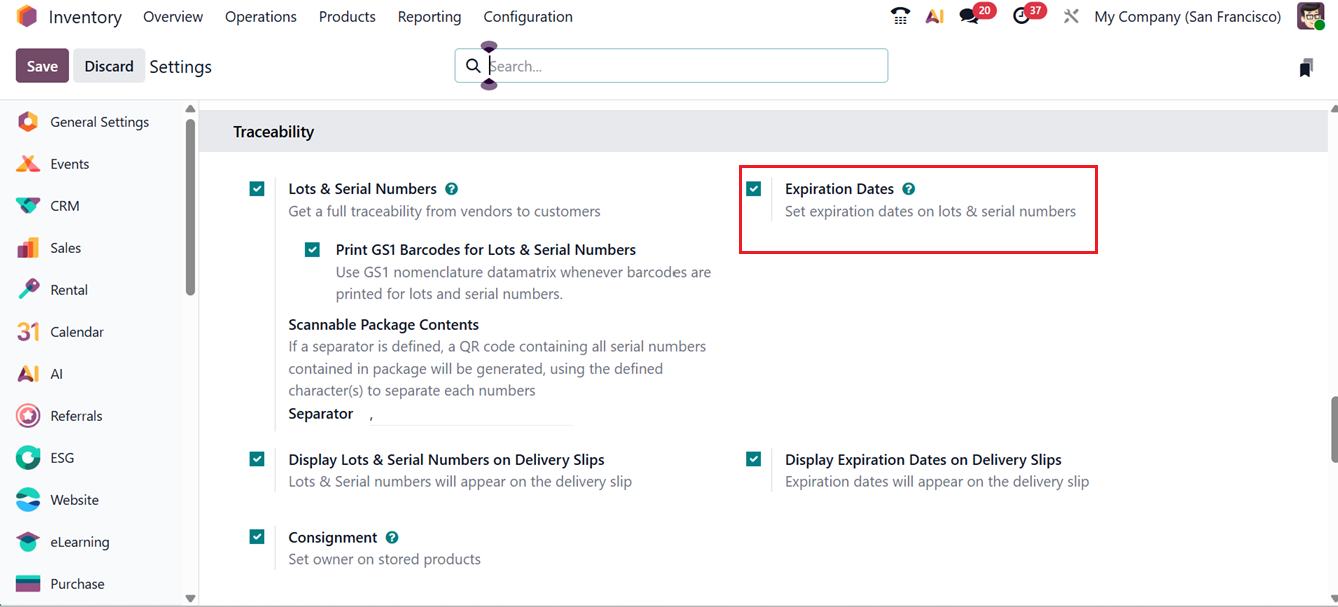
By enabling the Expiration Dates option under the Traceability tab, you will get access to several date-related fields in the TRACEABILITY section of the ‘Inventory’ Tab while configuring a new product.
After enabling the ‘Expiration Dates’ option in the product configuration form, these dates can also be printed on delivery slips by activating the corresponding display option. In the DATES section, fields are available for Expiration Date, Best Before Date, Removal Date, and Alert Date, allowing detailed lifecycle management of products, as shown in the screenshot below.
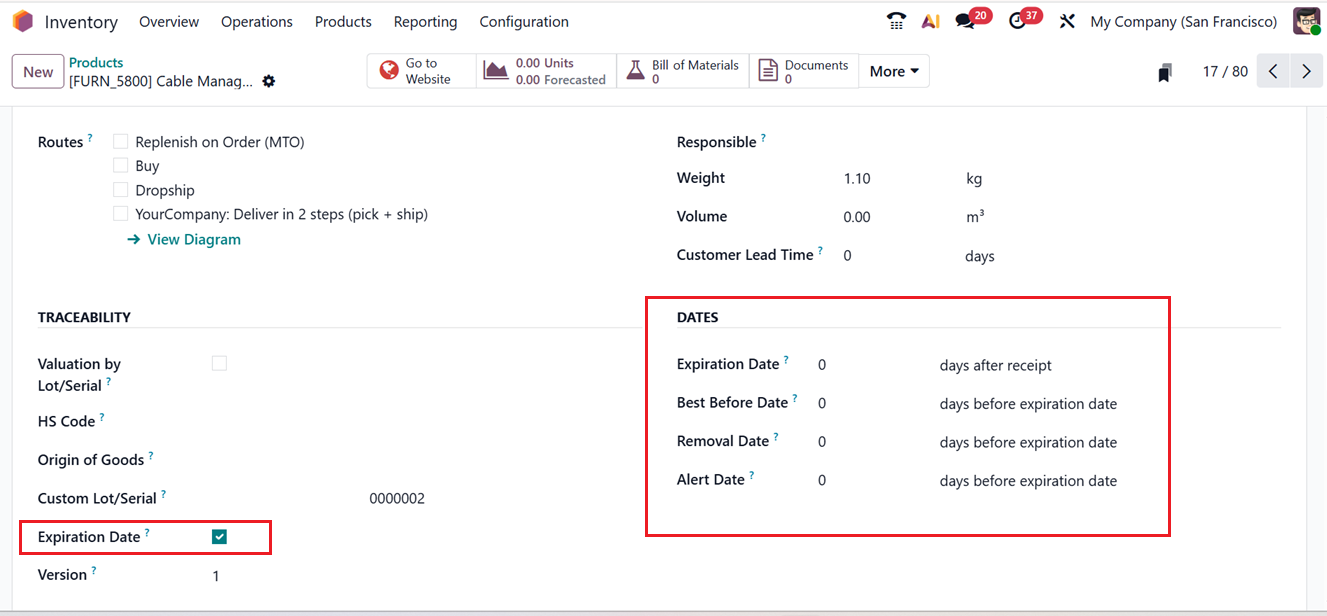
- The Expiration Date indicates the time after which a product may become unsafe or unsuitable for use.
- The Best Before Date refers to the period before expiration during which product quality may begin to decline, even if it is still safe to use.
- The Removal Date specifies when a product should be removed from stock.
- The Alert Date triggers a warning a set number of days before the product reaches its expiration.
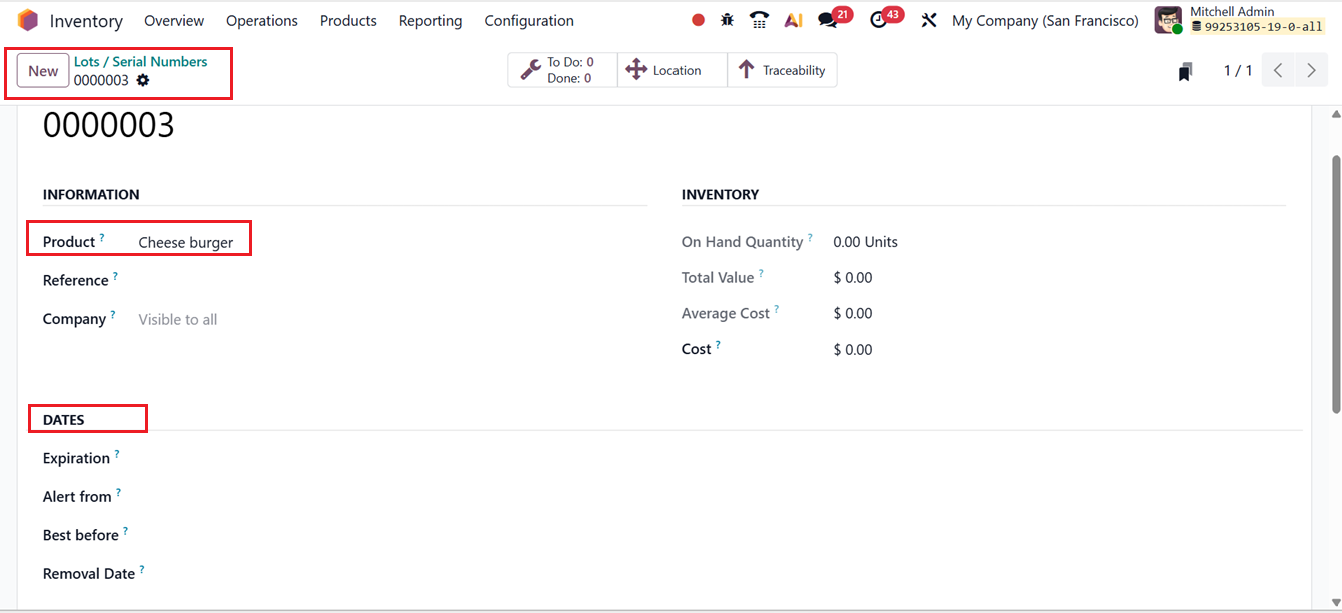
After defining expiration dates for a product, you can also manage them through the Lot/Serial Numbers configuration form. When configuring a lot or serial number, selecting a product with an expiry date in the Product field will display a Dates tab, where you can set expiration dates specific to each lot or serial number, as shown in the screenshot below.
Once the option to Display Lots & Serial Numbers on Delivery Slips and the Display Expiration Dates on Delivery Slips was enabled this Lot/Serial number and Expiration date information automatically appeared on the delivery documents, improving transparency and traceability.
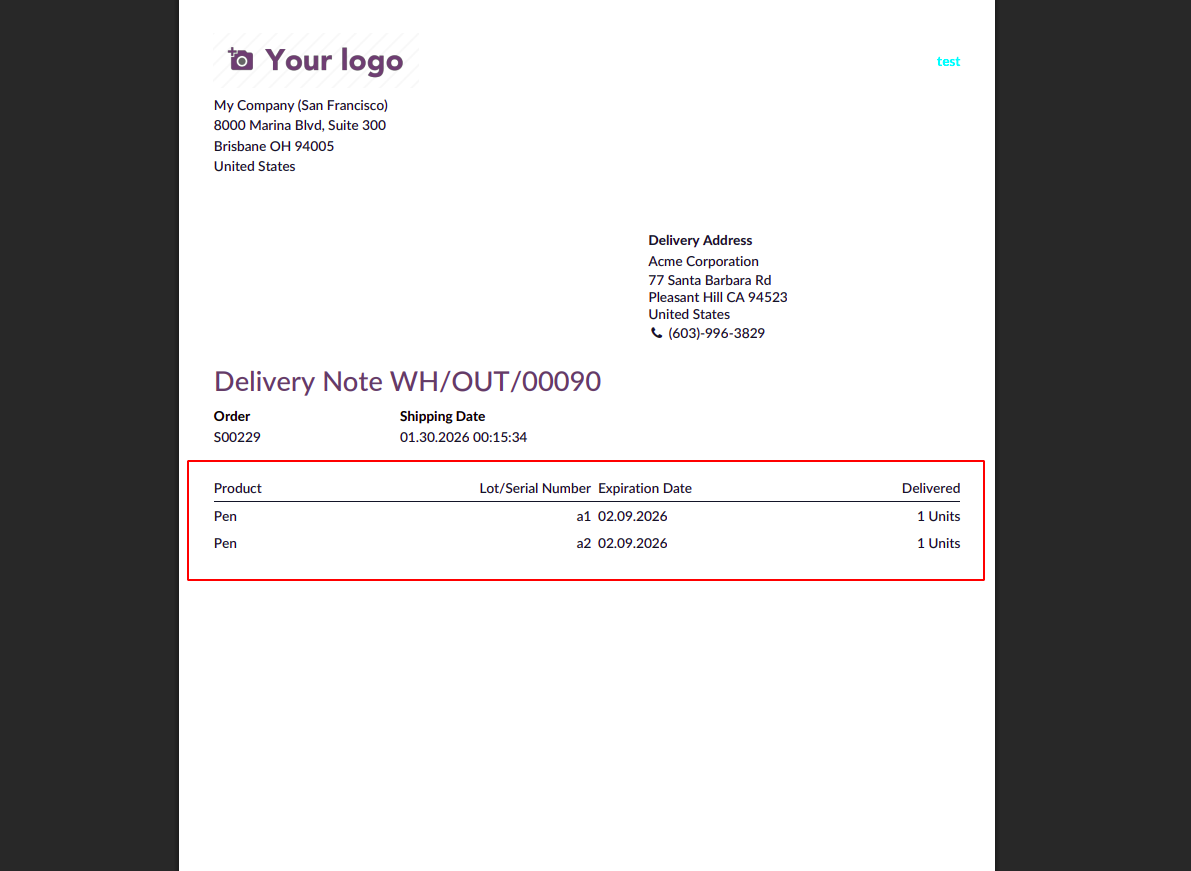
The Delivery Slip shows the Lot/Serial Numbers and Expiration Dates inside the Delivery slip as shown below.
The next feature under the Traceability tab is Consignment. This option allows businesses to define the owner of consigned products stored in their inventory. In a consignment setup, the supplier retains ownership of the goods until they are sold to a customer. This method makes it easier to return unsold items to suppliers and reduces the need for retailers to maintain continuous stock ownership. The Consignment feature can be activated from the Traceability section of the Settings menu.
Once enabled, you can assign an owner to products at the time of receipt. For example, while creating a receipt for consigned stock, the consignee’s name can be entered in the Assign Owner field. Using the Add a line option on the Operations tab, the consigned product and its quantity can be recorded as usual, as shown in the screenshot below.

In this case, Abigail Peterson is assigned as the owner of 5 units of a product. After validating the receipt, the system records that 5 units of the Customizable Desk have been delivered under her ownership.
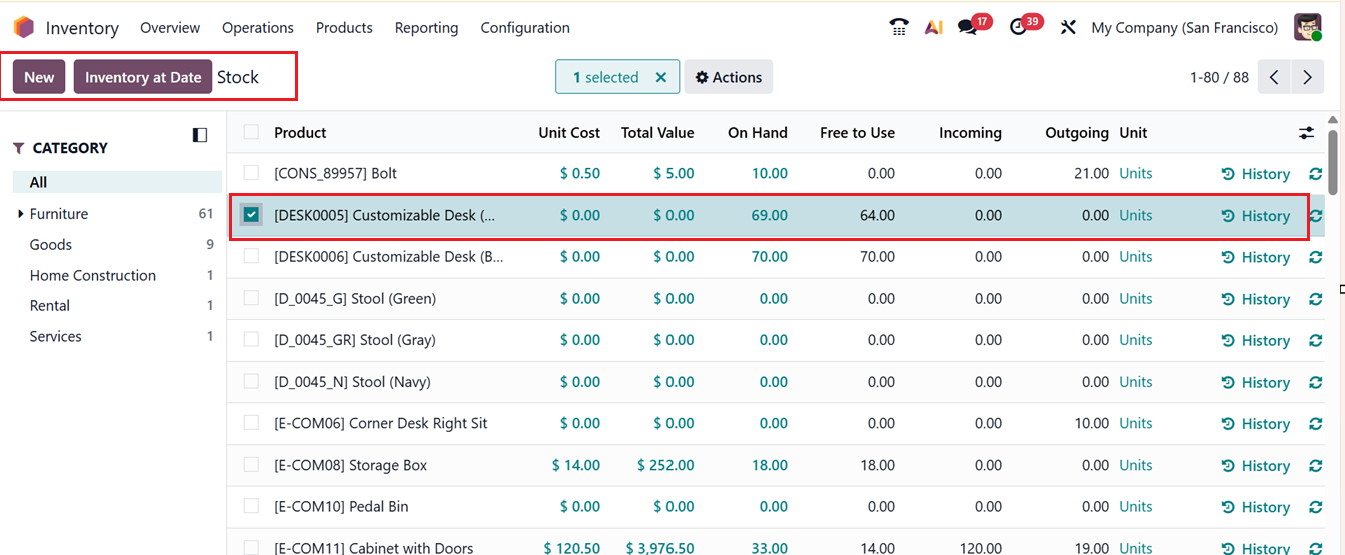
The Stock Report available in the Reporting menu shows that a total of 69 units of the product are currently in stock, as depicted in the screenshot below.
Additionally, detailed insights into stock movement and consignment ownership can be reviewed through the Moves History reporting window, as shown below.
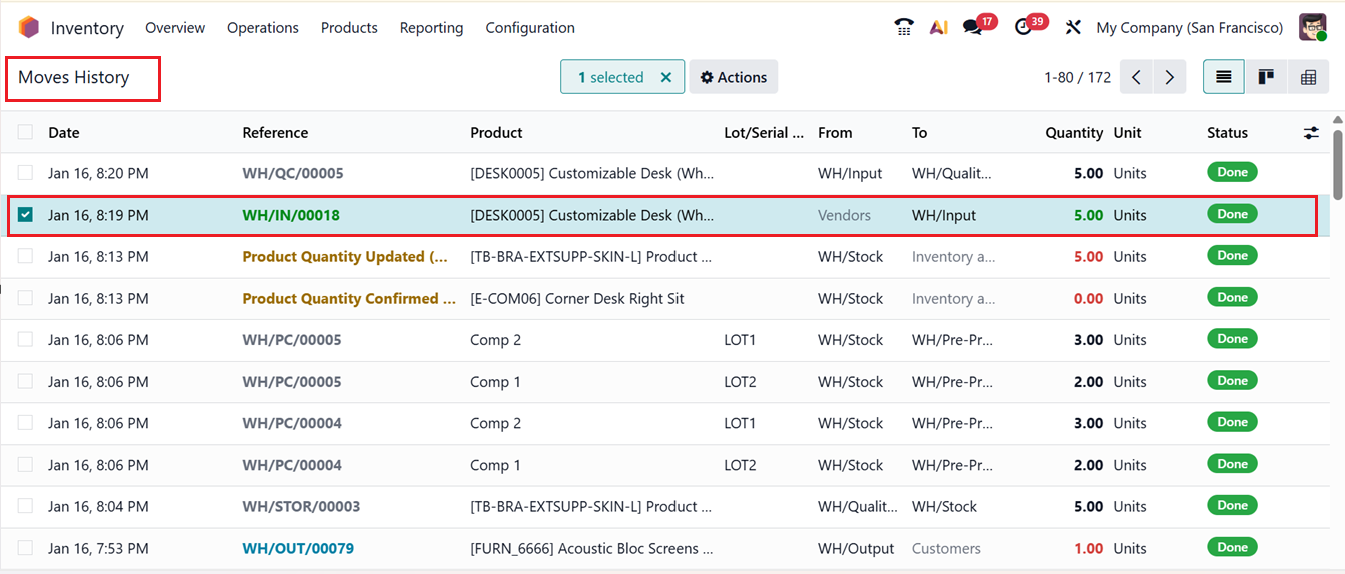
From this data, it is clear that Abigail Peterson is responsible for 5 units of the product. This demonstrates how Odoo 19 effectively manages product ownership and traceability through its consignment functionality.
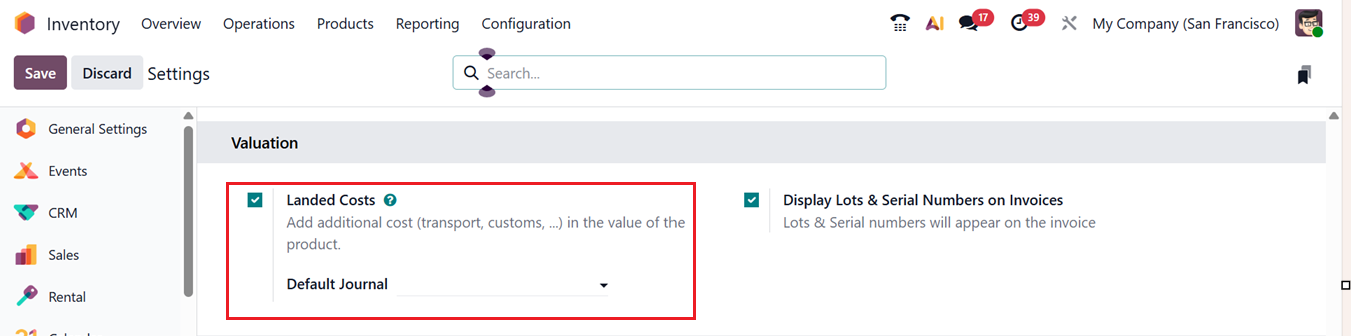
7. Valuation Ta
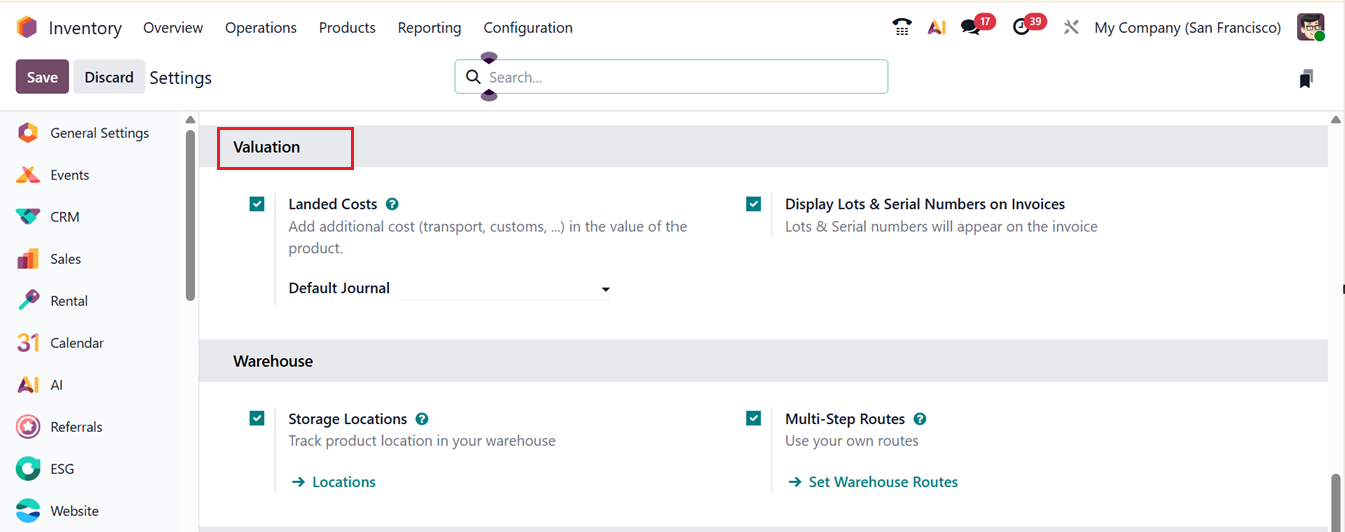
The next option available in the settings window is the Valuation tab. Under this section, you will find options for Landed Costs and Display Lots and Serial Numbers on Invoices, as shown in the screenshot below.
The ‘Landed costs’ refers to the total expense a company incurs when purchasing a product, beyond its base price. These costs may include transportation charges, handling fees, customs duties, insurance, and other related expenses. All such additional charges are combined with the product’s original cost to calculate its actual value, which then helps determine accurate pricing.
The method used to calculate landed costs can vary from one organization to another based on internal policies. In Odoo 19 Inventory, these costs can be calculated and allocated across product quantities to ensure correct valuation.
When the Landed Costs feature is enabled, businesses can apply custom additional charges to products. To understand how this works, you can create and validate a purchase order that includes multiple products from the same category. This helps demonstrate how landed costs are distributed. Landed cost configuration is supported only for products that use AVCO or FIFO costing methods, which must be set in advance, as they are required for landed cost calculations.
8. Warehouse Tab
The next tab available in the settings is Warehouse tab. This tab helps create and manage specific Storage Locations and Multistep Routes.
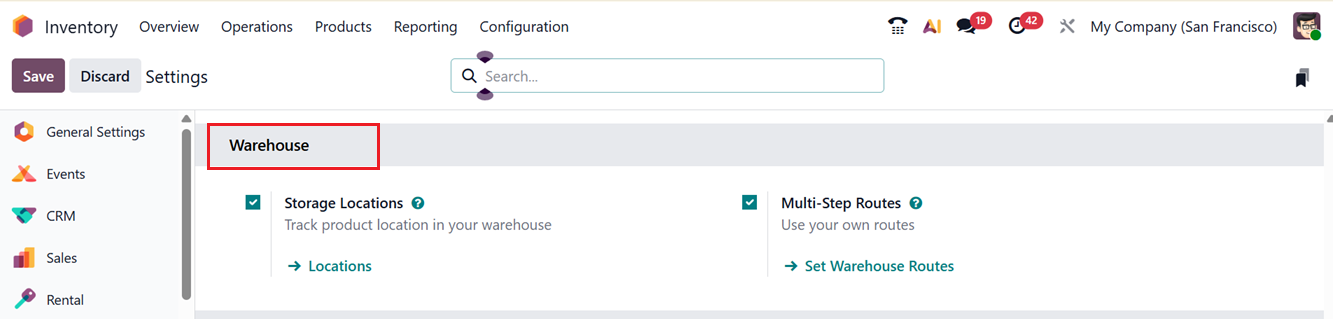
To activate and manage inventory store locations you need to enable the Storage Locations feature by selecting the respective checkbox under the Warehouses settings section, then saving the changes.
Once enabled, the Locations option becomes available in the Configuration menu. You can see the available locations in a list view, as shown below.
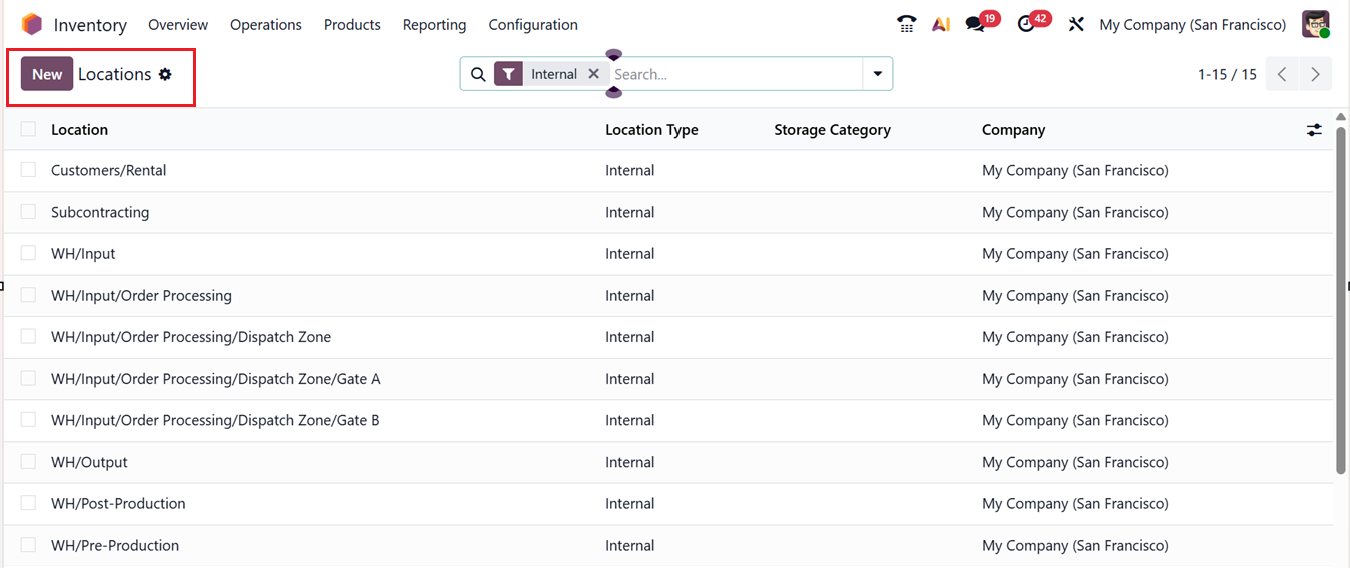
While creating a new location, you must provide a clear Location Name so it can be easily identified, and choose a Parent Location to show where the new location fits within the overall warehouse structure. Locations are displayed in a hierarchical format, making it easier to understand their relationship within the warehouse.
For detailed information about configuring locations, you can check on the Configuration section of this book.
Another important option under the Warehouse tab is Multi-Step Routes. These routes represent the defined paths a product follows as it moves through different stages in the warehouse. Having clear routes makes it easier to monitor, control, and track inventory movements. Without proper routing rules, managing stock flow can become difficult and inefficient. Odoo 19 allows businesses to set specific movement rules based on their internal processes, helping ensure inventory is handled correctly.
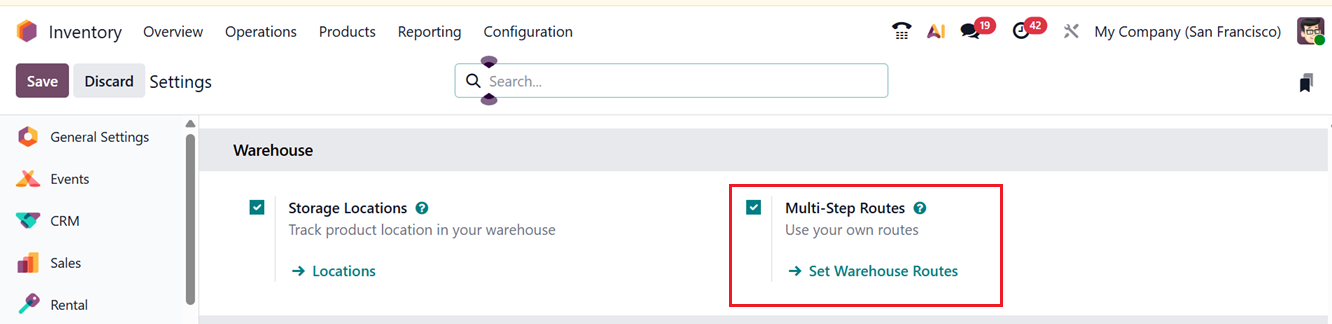
With multi-step routes enabled, users can create and manage detailed transfer rules for products. Before setting up routes, it is important to first configure warehouses and storage locations, as routes depend on these structures. The Multi-Step Routes option must be activated from the Inventory Settings menu, after which users can define custom routes that match their warehouse operations and stock movement requirements.
You can check on the Configuration section of this book to check the detailed section of Warehouse configuration.
9. Advanced Scheduling Tab
The Advanced Scheduling section in Odoo’s Inventory settings helps organize sales and purchase activities in a more efficient way, saving both time and effort. This section offers options for Replenishment Horizon, Days to Purchase and Security Lead Time for Sales, as shown in the screenshot below.
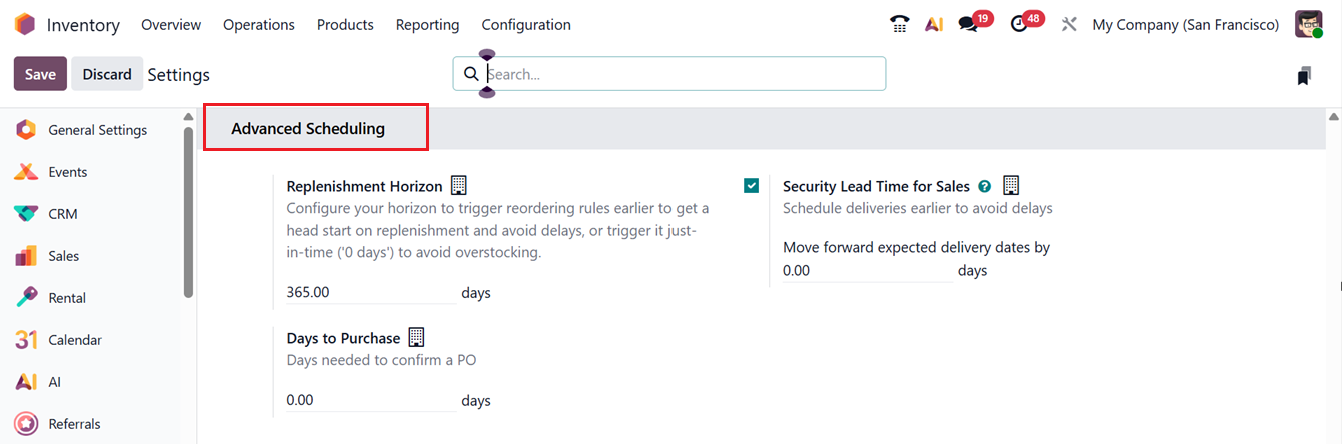
In the Replenishment Horizon area, you can set a time window to activate reordering rules in advance so replenishment can begin early and delays are avoided, or keep it at zero days for just-in-time restocking to prevent excess inventory. The Days to Purchase option can be used to define the number of days required to confirm a purchase order.
For earlier deliveries, the Security Lead Time for Sales setting allows you to move the delivery date forward by specifying the required number of days. Similarly, the Security Lead Time for Purchase option lets you bring forward the purchase order date by a defined number of days.
10. Logistics Tab
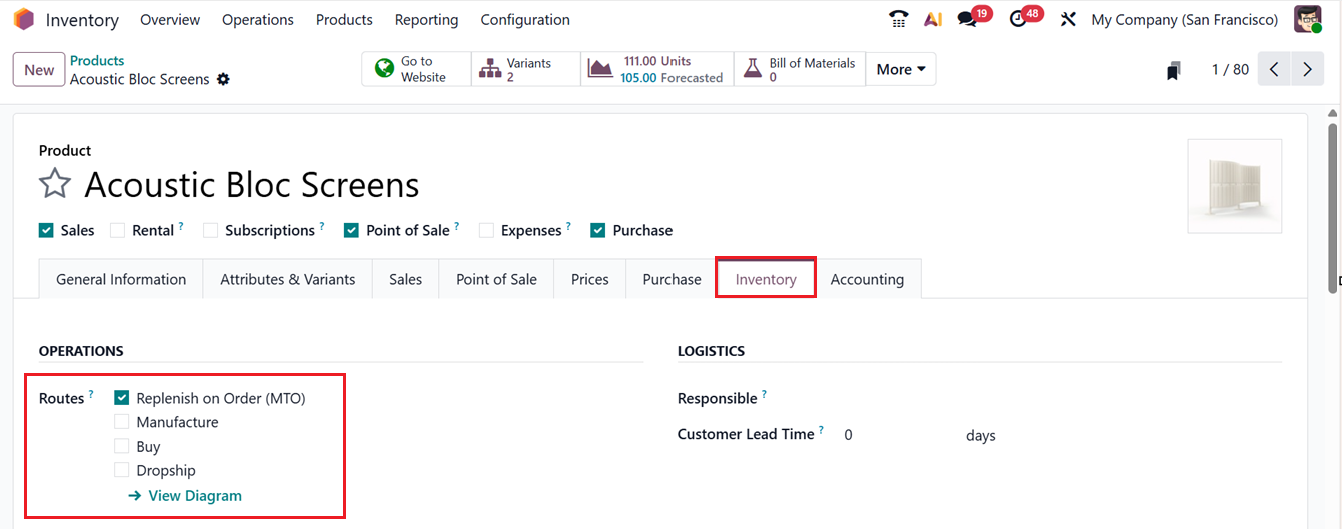
The final tab in the settings is Logistics, as shown in the interface. The key features available here is Dropshipping and Replenishment on Order (MTO), as shown in the screenshot below.
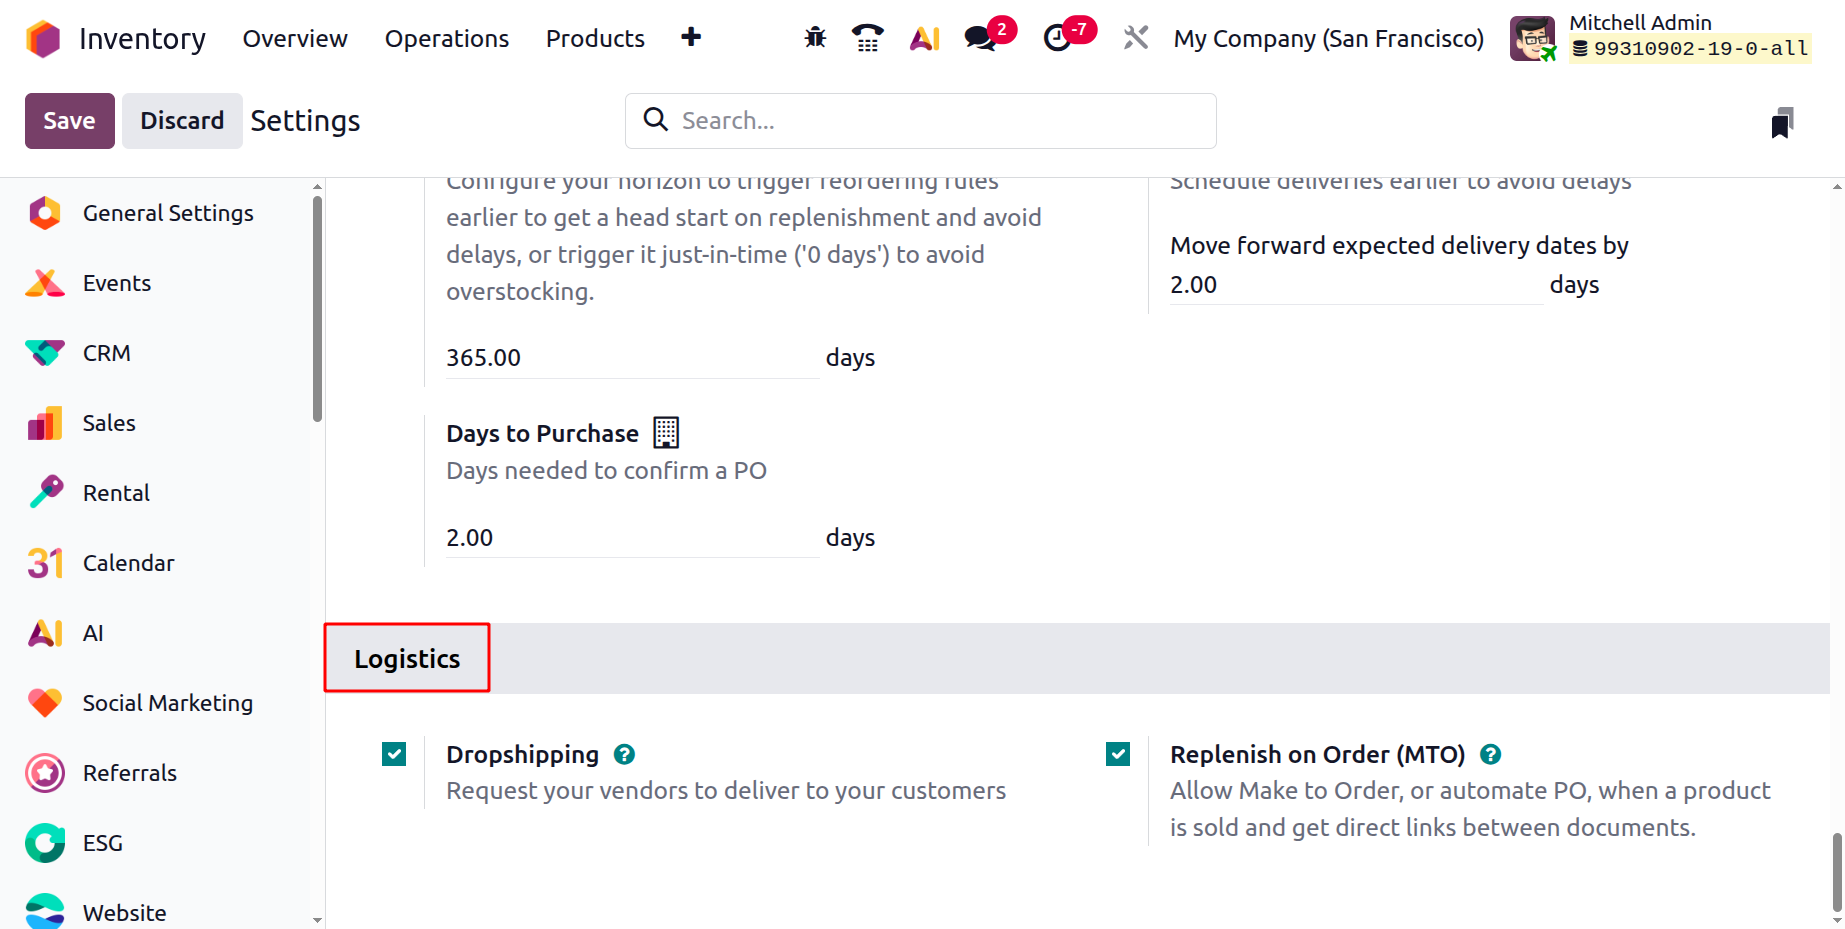
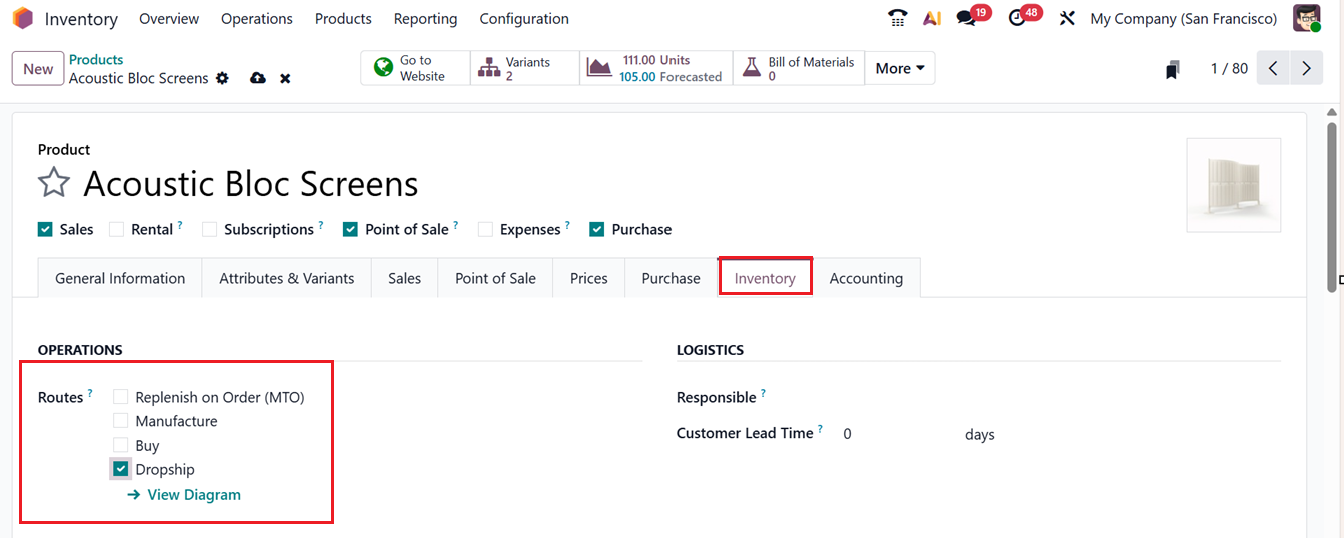
After activating the Dropshipping feature, it lets businesses sell products without keeping them in stock. When this option is enabled, items are shipped directly from the supplier to the customer. Then, you can select the Dropship as a route in a product configuration form, as shown in the screenshot below.
This feature is ideal for suppliers or retailers who do not want to manage physical inventory. With this method, products are shipped directly from the vendor to the customer, eliminating the need for warehouse storage. This approach benefits retailers by reducing storage costs and simplifying logistics, as goods move straight from the supplier or manufacturer to the end customer.
The Replenish on Order (MTO) in Odoo 19 Inventory module is a procurement method that creates a purchase order or manufacturing order as soon as a sales order is confirmed. Products are sourced only when a customer places an order, which helps keep inventory levels low. Each sales order is directly linked to its procurement, improving tracking, accuracy, and timely delivery while lowering holding costs.
MTO works well for customized or non-stock items, as it supports flexible order handling, avoids excess stock, and improves cash flow. To use this feature, enable Replenish on Order (MTO) from the Settings page under the Logistics section.
The MTO feature automatically generates a purchase order when a sales order is confirmed. For example, consider a product named Acoustic Bloc Screens. This product is not stored in inventory, and no Bill of Materials (BoM) is defined, meaning it is neither manufactured nor stocked in advance.
To set this up, open the product form and enable Replenish on Order (MTO) in the Inventory tab of the Product form. After saving the product, it is ready to trigger procurement automatically whenever a customer places an order.