Operations
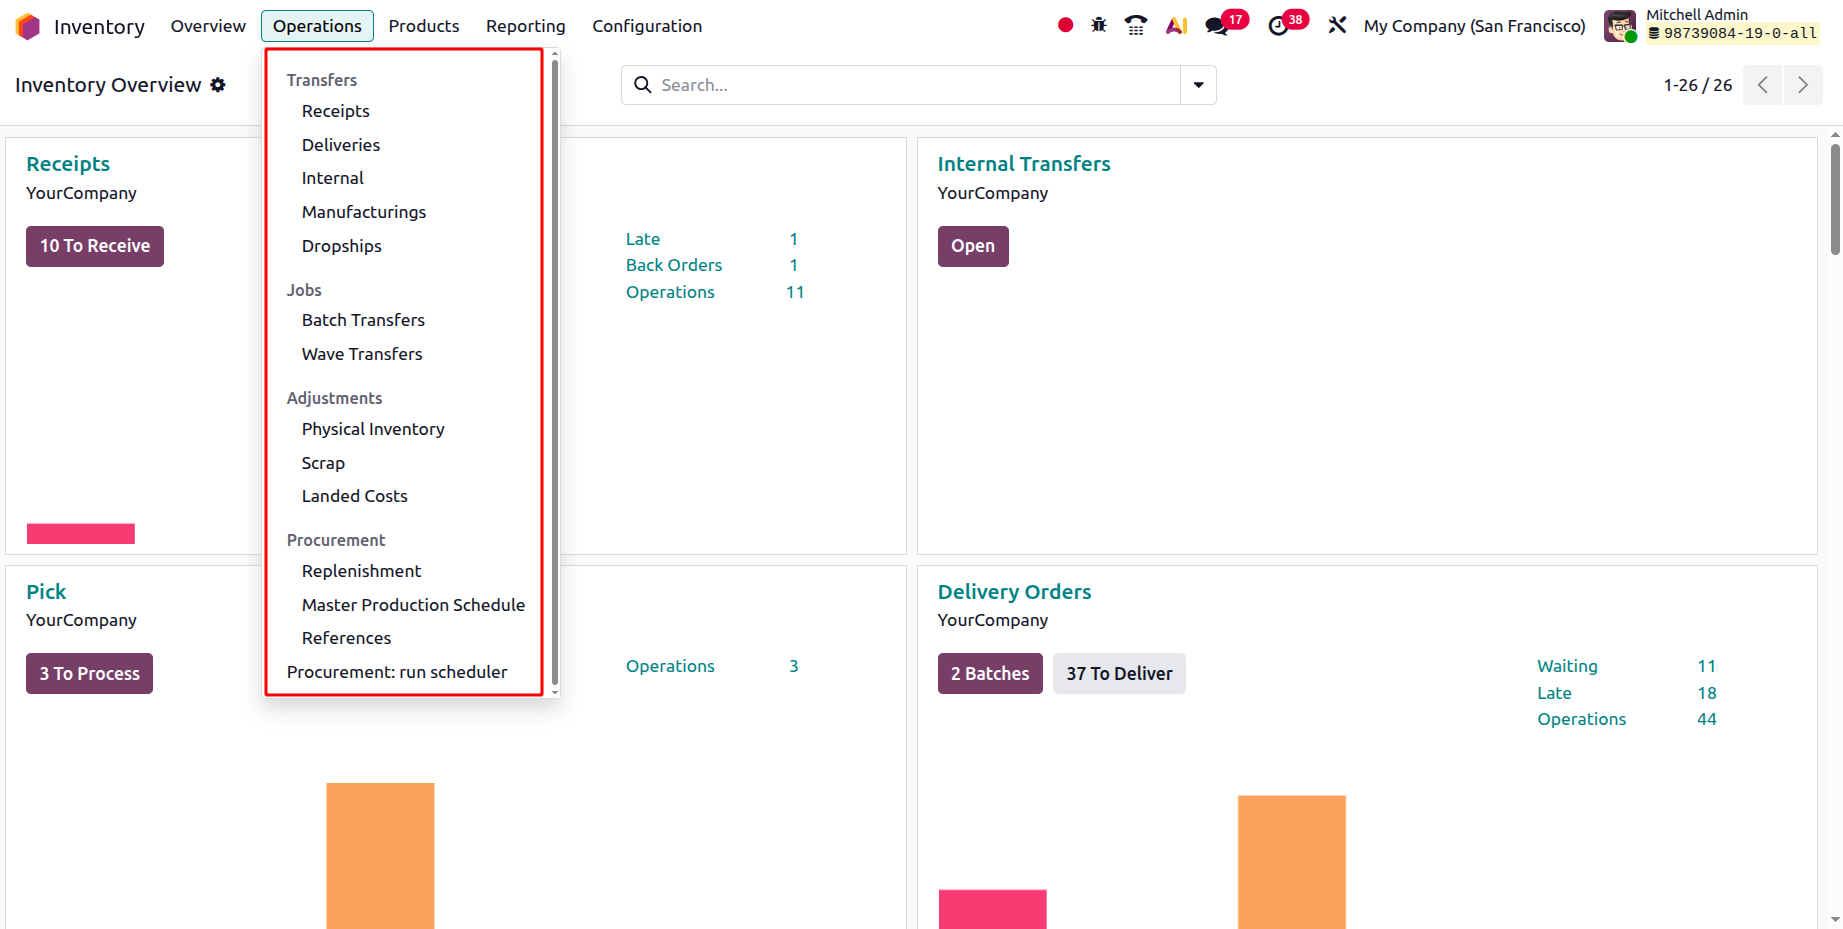
The Operations menu in the Odoo Inventory module provides essential tools for controlling stock movements and warehouse processes effectively. It allows businesses to handle Receipts, Deliveries, Internal, Manufacturing, Dropships, Batch Transfers, Wave Transfers, Physical Inventory, Scrap, Landed Costs, Replenishment, Master Production Schedule, References and Procurement Run Scheduler to ensure smooth logistics and maintain stock accuracy, as shown in the screenshot below.
By utilizing these functions, organizations can streamline warehouse workflows, automate replenishment activities, and track inventory in real time. These capabilities significantly enhance operational efficiency and reduce potential stock management errors. Now, we can discuss them in detail.
Transfers
Organizations with multiple warehouses often face challenges in managing product movement across different locations. In such cases, one warehouse is usually designated as a central hub while others act as distribution points. Odoo 19 streamlines this process through its Transfers feature, enabling smooth inbound, outbound, and internal movements of goods between warehouses and locations. After configuring warehouses and storage locations, users can efficiently manage all product transfers using the Transfers option available under the Operations menu.
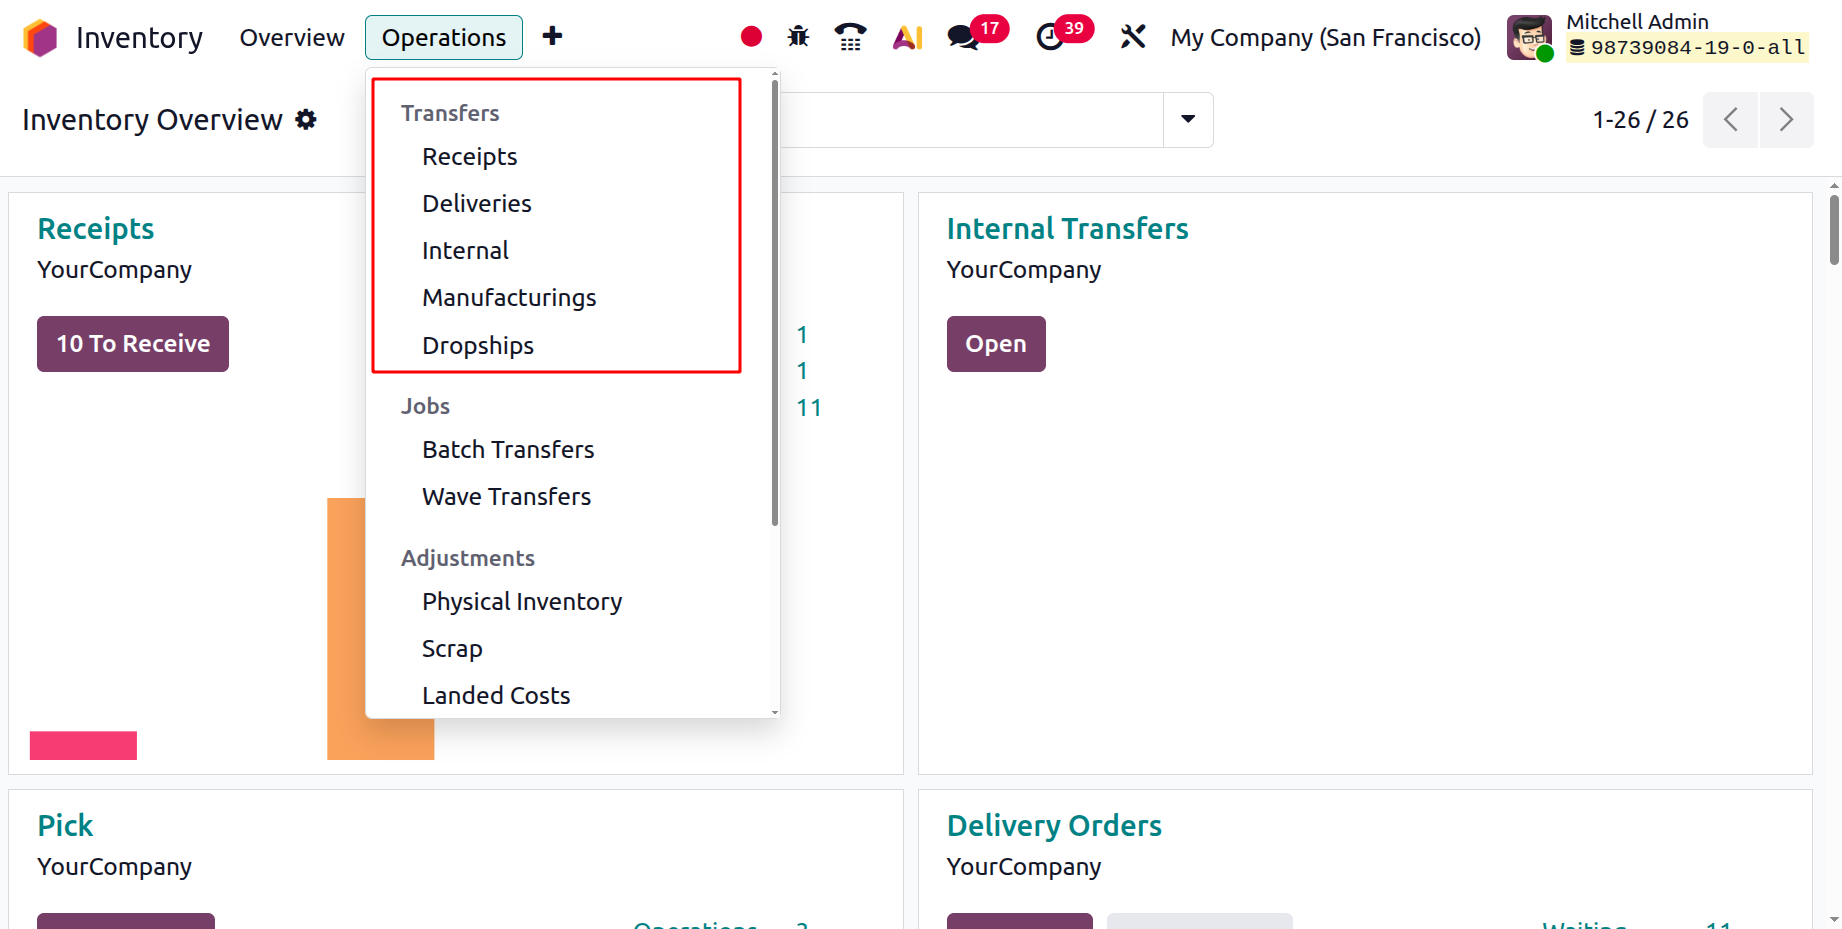
Within the Transfers section, you can view several types of movements such as Receipts, Deliveries, Internal, Manufacturing and Dropship options.
1.1 Receipts
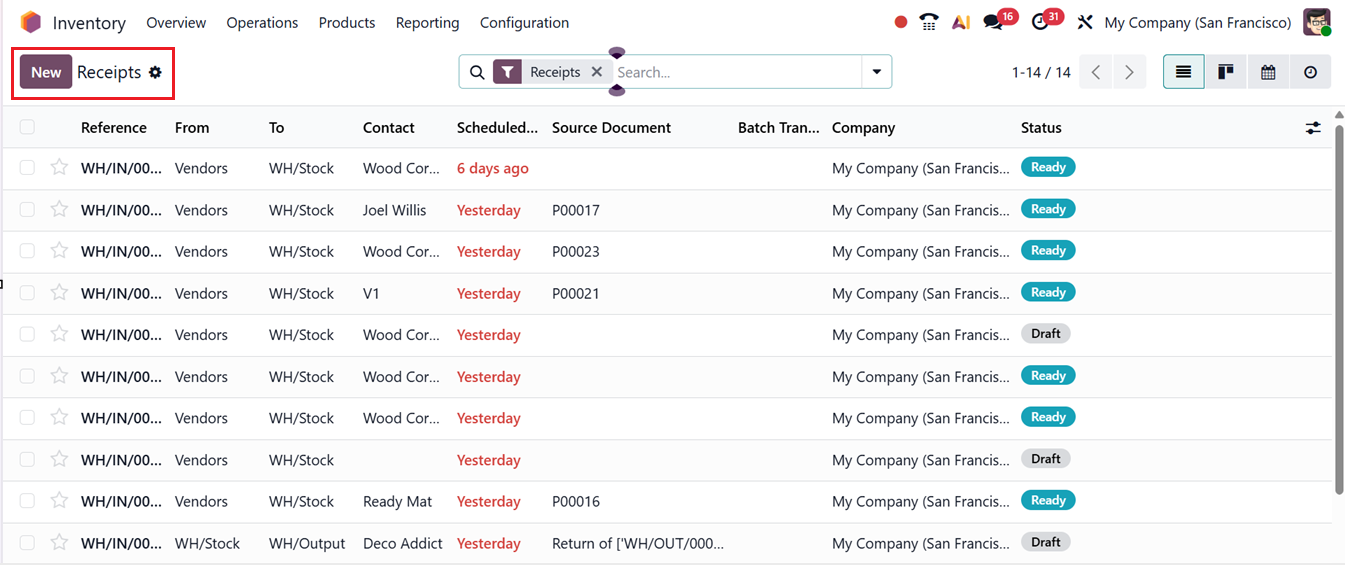
In the ‘Receipts’ window, you can access detailed information for preconfigured transfers, including Reference, From, To, Contact, Scheduled Date, Source Document, Batch Transfer, Company, and Status, as illustrated in the screenshot below.
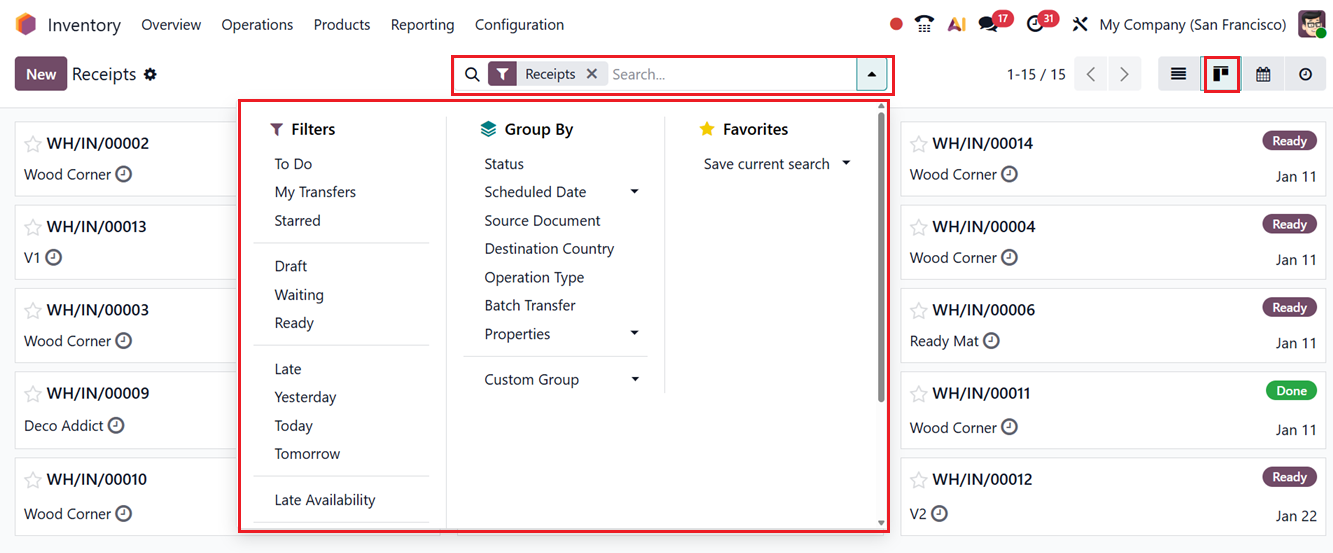
The interface also provides Kanban, Calendar, and Activity views. Sorting activities can be completed easily using the Group By and Filters tools provided in the advanced search bar area. The ‘Favorites’ feature will help you to save recent searches using filter options.
You can also create customized groups and filters using the ‘Custom Group’ and ‘Custom Filter’ options from the relevant sections, as shown in the screenshot below.
To create a new transfer between two locations, click on the New button. This will open a new receipt transfer configuration form. The displayed Receipts transfer form contains several key fields that define how stock moves between locations. When creating a new transfer, the Receive From field is used to add the vendor partner involved in the operation.
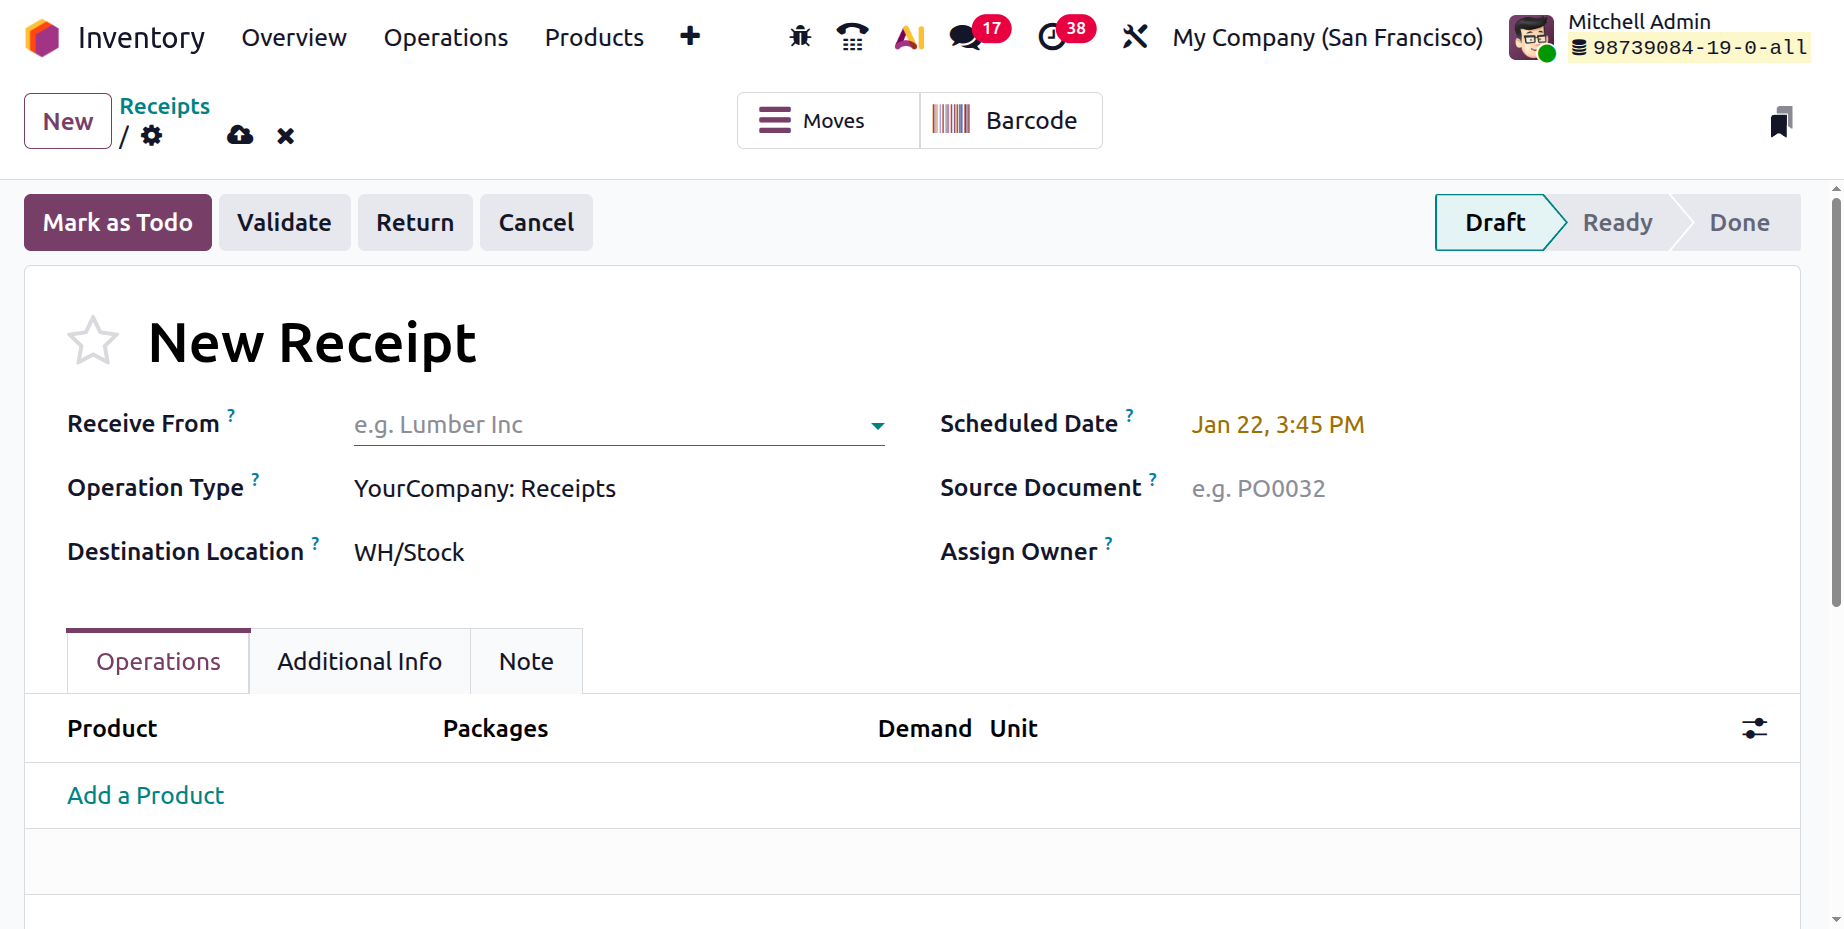
The Operation Type field determines the nature of the transfer and controls the workflow, locations, and validation rules. Once the operation type is selected, the Destination Location field will be automatically suggested but can be adjusted if needed to define where the products are going in this receipt transfer operation.
The Scheduled Date specifies when the stock movement is planned to occur, helping with inventory planning and availability forecasting. Finally, the Source Document field allows users to link the transfer to a related document, such as a purchase order, sales order, or manufacturing order, ensuring traceability and better operational control.
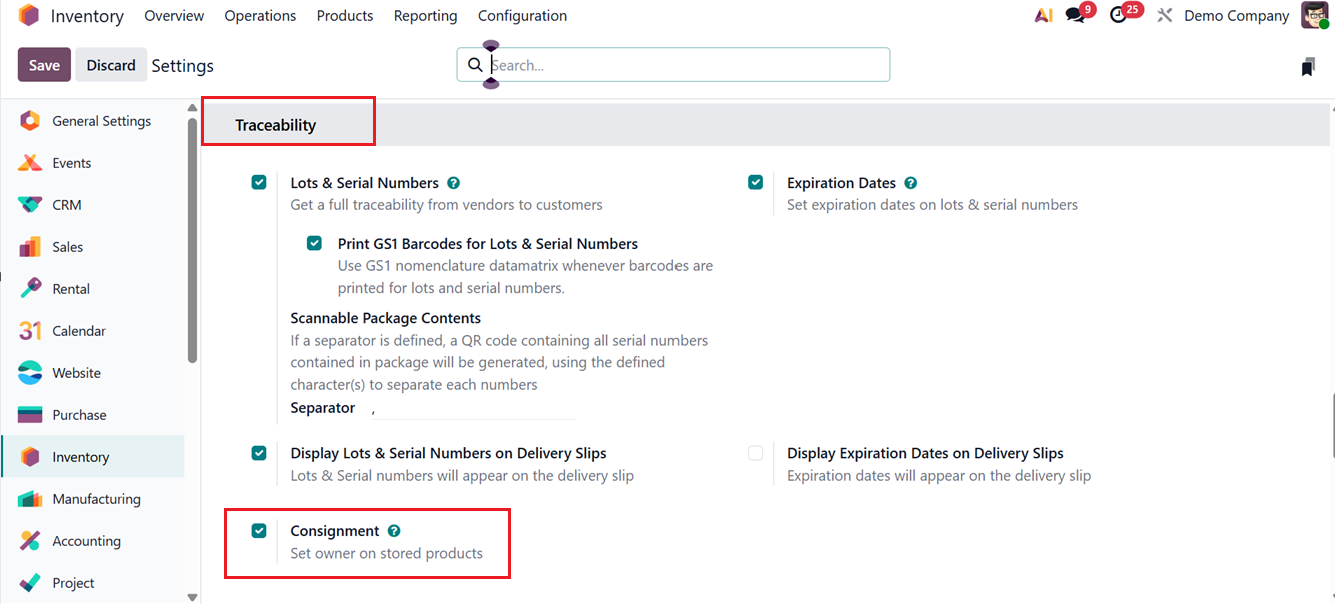
Then, the ‘Assign Owner’ field can be used to assign an owner when validating the transfer. To display this field in an operation type, you need to enable the Consignment option from the ‘Traceability’ tab of the general Settings window, as shown in the screenshot below.
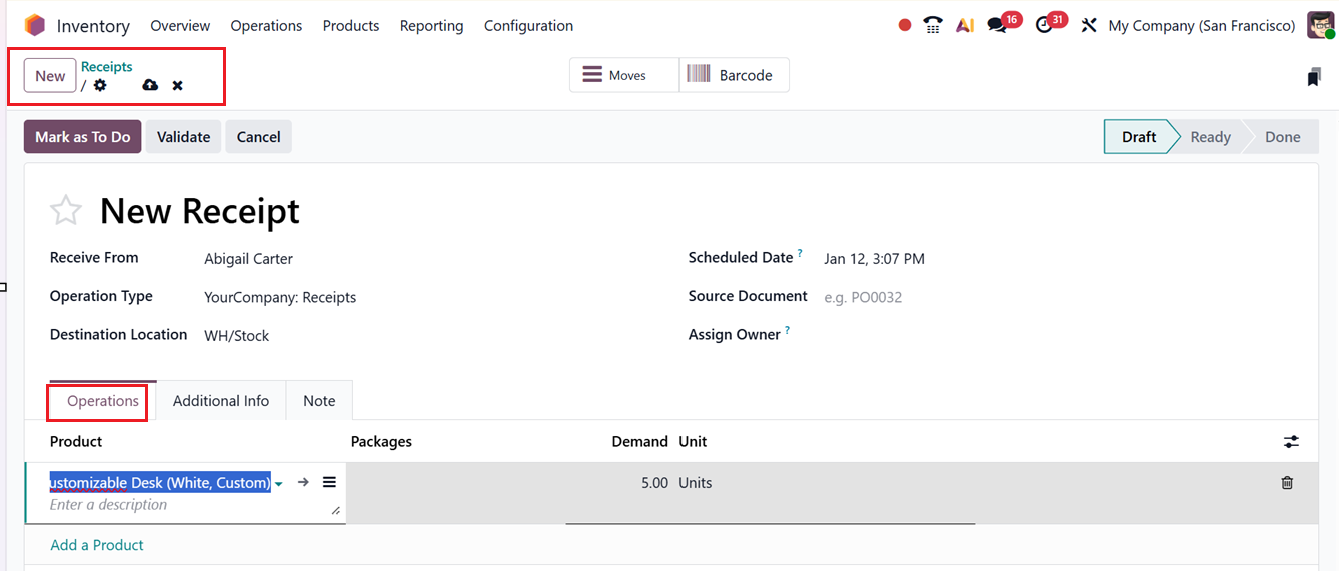
The Add a Line button under the Operations tab lets you include each item involved in the transfer individually, defining Product names, Packages, Demand quantity, and Unit of measure (UoM). The “demand” represents the amount of stock to be transferred, as shown in the screenshot below.
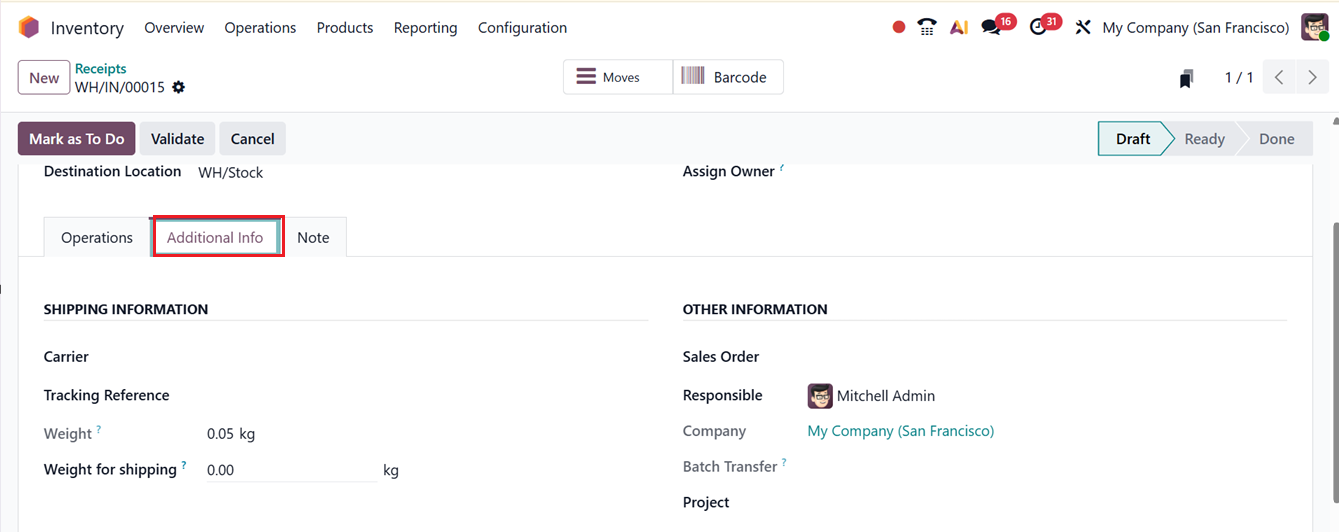
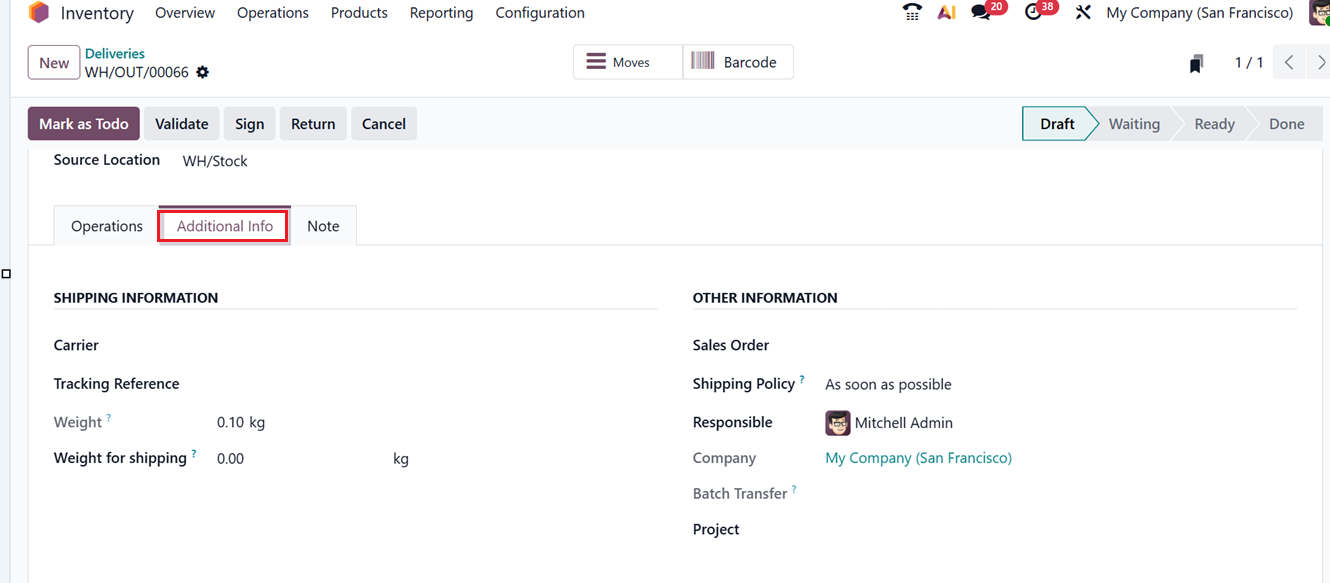
Additional shipping details can be entered in the Additional Info tab, such as Carrier like Standard Delivery, The Poste, The Delivery, Local Delivery, Bpost World Express Pro, DHL US, DHL EU. Then, edit the Tracking Reference number, Weight, and Weight for shipping, which is the total weight of the products and packaging to compute the cost of shipping in the SHIPPING INFORMATION.
The OTHER INFORMATION tab allows you to configure the ‘Sales Order’ related to this transfer and assign a Responsible Employee for managing subsequent tasks. You can also fill in the Project in which the transfer belongs to and Company information, as shown in the screenshot below.
Then, the Internal notes about this transfer should be recorded under the Notes tab and click on the Save icon to store the transfer record.
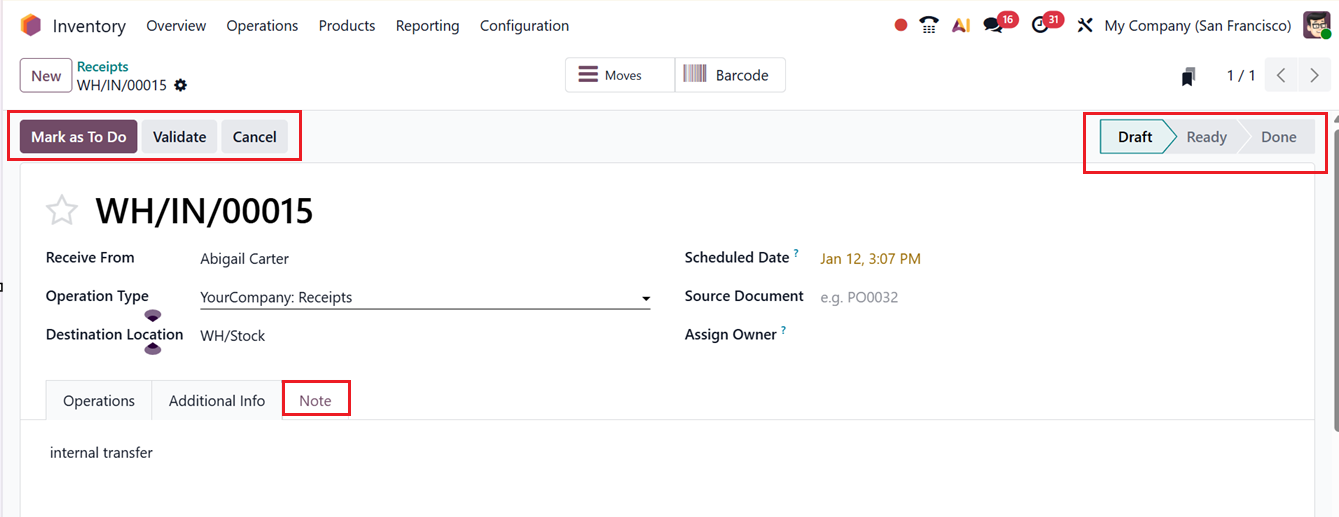
Initially, the transfer appears in the Draft state. When it’s ready for processing, switch it to the Ready state by selecting Mark as To Do or use the Validate button once the operation is complete,as demonstrated below.
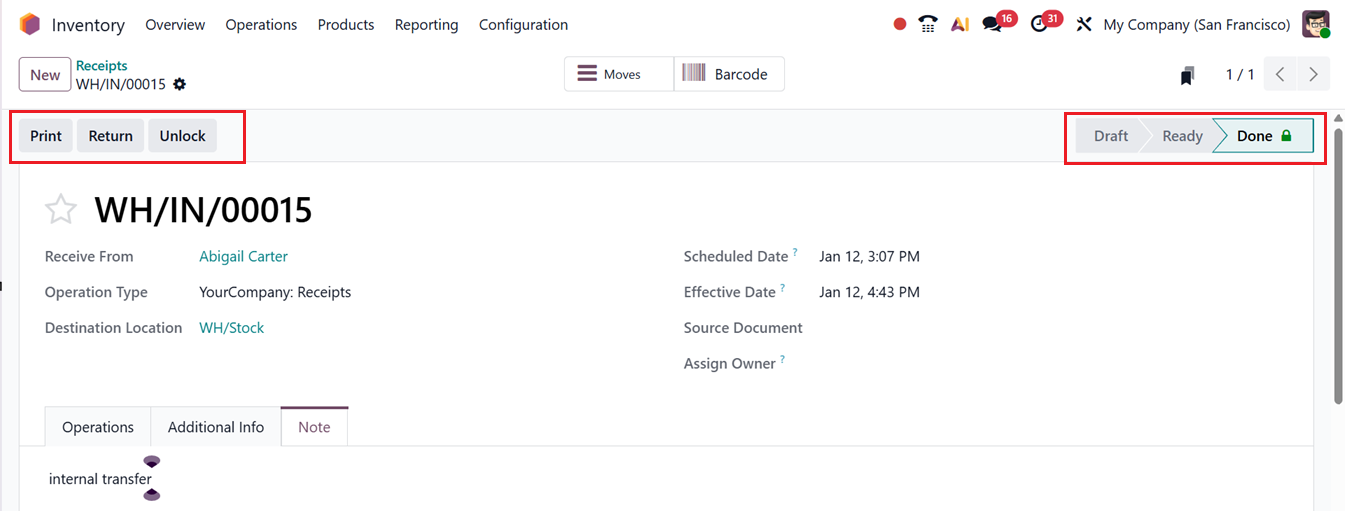
Now, the transfer process is now finalized and you can see the status as ‘Done’ in the pipeline stages area. Then, you can print a Delivery Slip by using the Print button or return items to their previous location via the Return button. The ‘Lock’ and ‘Unlock’ buttons can be used to disable or enable further editing in a confirmed transfer operation form.
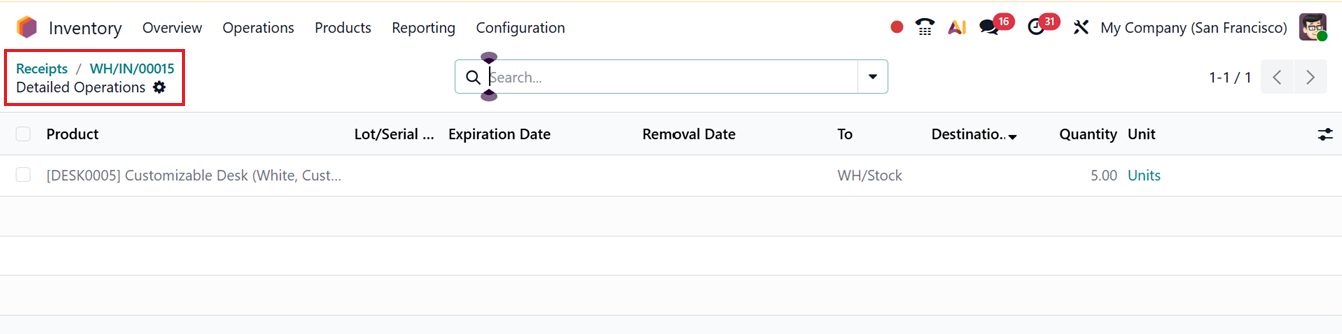
The Moves smart button opens a detailed view of the product movement operations, showing how items are transferred from one location to another within the inventory during the transfer process, as shown in the screenshot below.
The ‘Barcode’ smart button will open the Odoo Barcode interface to manage the internal transfers, Pickings and Returning processes more effectively.
Then, you can also utilize the ‘Action’ menu of the receipts form to Print, Duplicate, Delete, Request Signature, Edit Properties, Unreserve products, Scrap, Split, Quality Alert, Quality Check and Create Repair orders, as shown in the screenshot below.
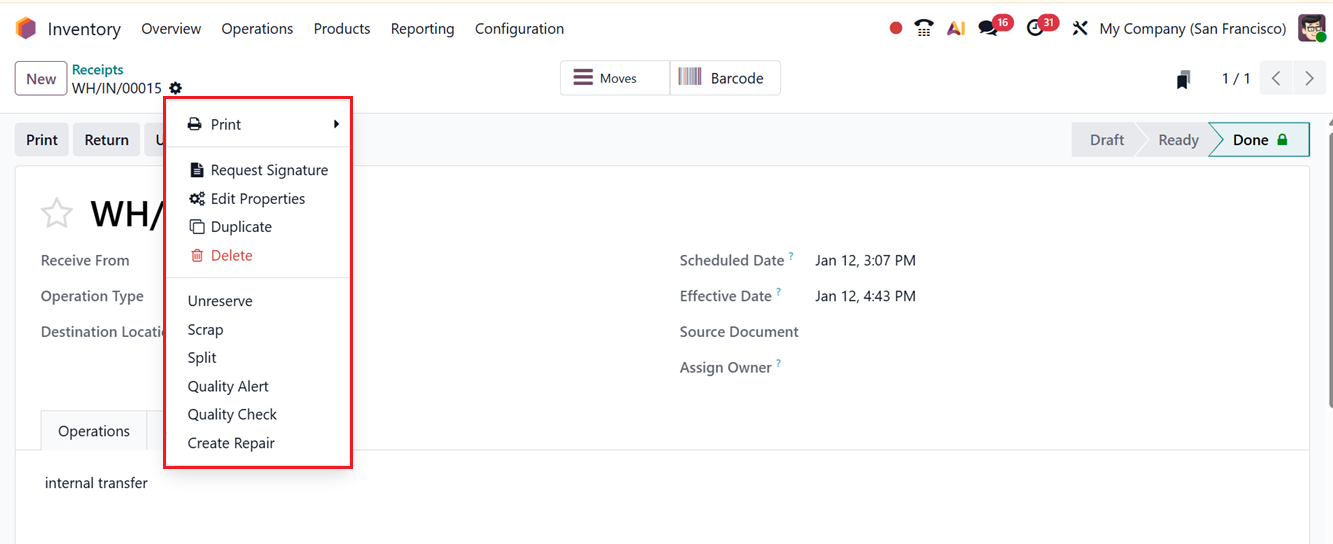
- Print: Generate and print transfer-related documents such as delivery slips, picking lists, or labels.
- Duplicate: Create a copy of an existing transfer to reuse the same details.
- Delete: Remove an unvalidated or unprocessed transfer from the system.
- Request Signature: Collect a digital signature to confirm receipt of goods.
- Unreserve Products: Release reserved stock back to available inventory.
- Scrap: Record damaged or unusable products and remove them from usable stock.
- Split: Divide a transfer into multiple transfers for separate processing or delivery.
- Quality Alert: Report and track product quality issues.
- Quality Check: Perform quality inspections before completing a transfer.
- Create Repair Orders: Generate repair orders for damaged or faulty products directly from the transfer.
- Edit Properties: Allows adding new properties or custom form fields when additional data needs to be captured.
Clicking on the ‘Edit Properties’ option will open a small pop-up in the form, where you can add a Label (field name) and select a Field Type such as whether it is a single Text line field, Multiline Text, Calendar selection, Date, HTML Code, Checkbox, Selection dropdown etc.
Then, define a Default value if any and set a Suffix value. The display of this field in Calendar, Kanban, and Card views can then be adjusted using the Display in Cards visibility option. Lastly, as seen in the screenshot below, turn on or off the AI recommendations.
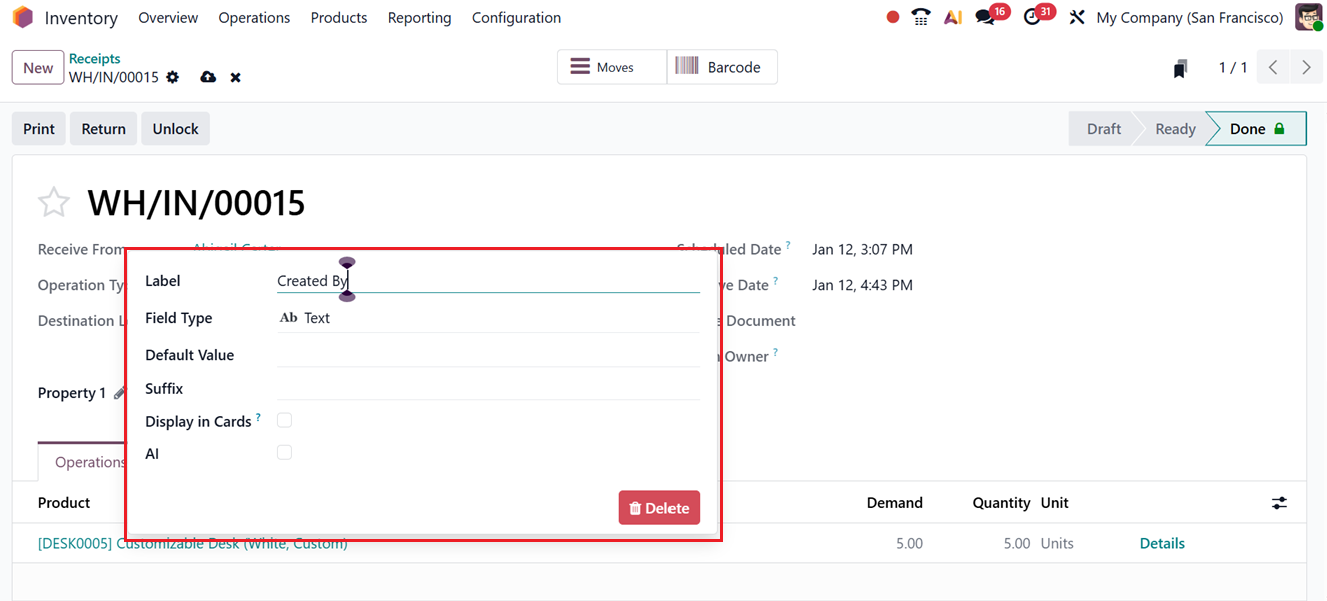
After saving the changes, the newly customized field will appear on the form. The Edit Property option is available in most configuration forms across all the Odoo modules. So, you can use it effectively for customized requirements without any developer support.
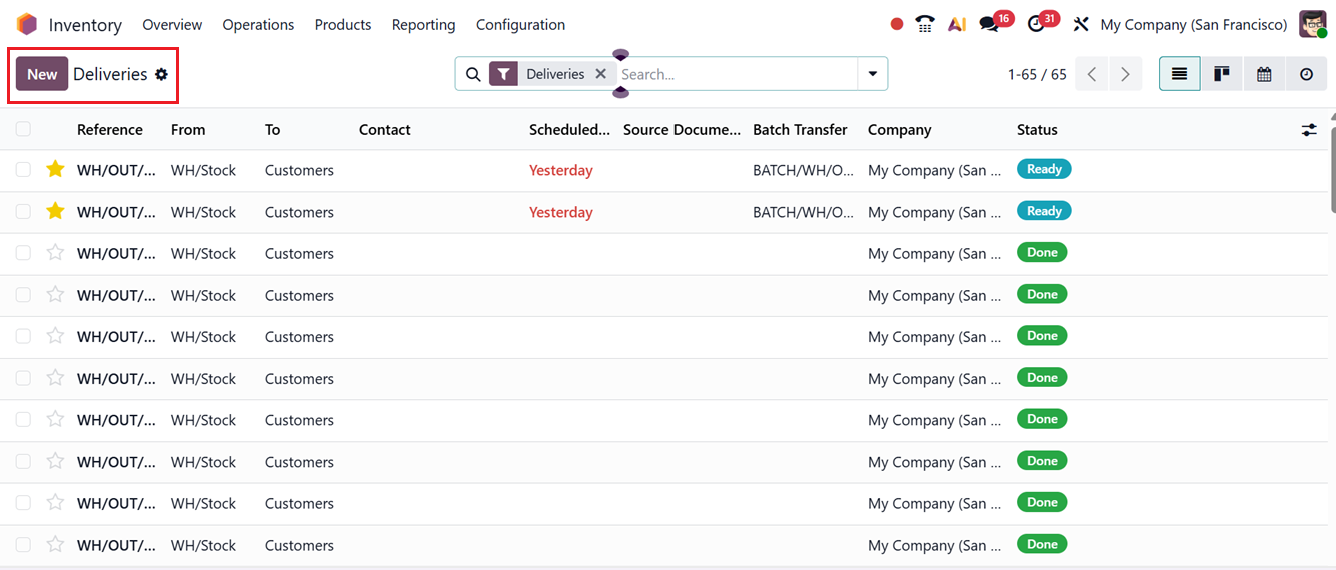
1.2 Deliveries
This function moves stock from the warehouse to customers or other designated locations. It is typically used during sales operations.
The ‘Deliveries’ dashboard window is similar to the ‘Receipt' window with similar dashboard titles and options, as shown in the screenshot below.
From the dashboard, you can create a Delivery operation by clicking the New button, which opens the delivery transfer configuration form. The form fields and processes are almost similar to those discussed earlier.
You can add a Delivery Address, Operation Type, Source Location, Scheduled Date and any Source Location, as shown in the screenshot below.
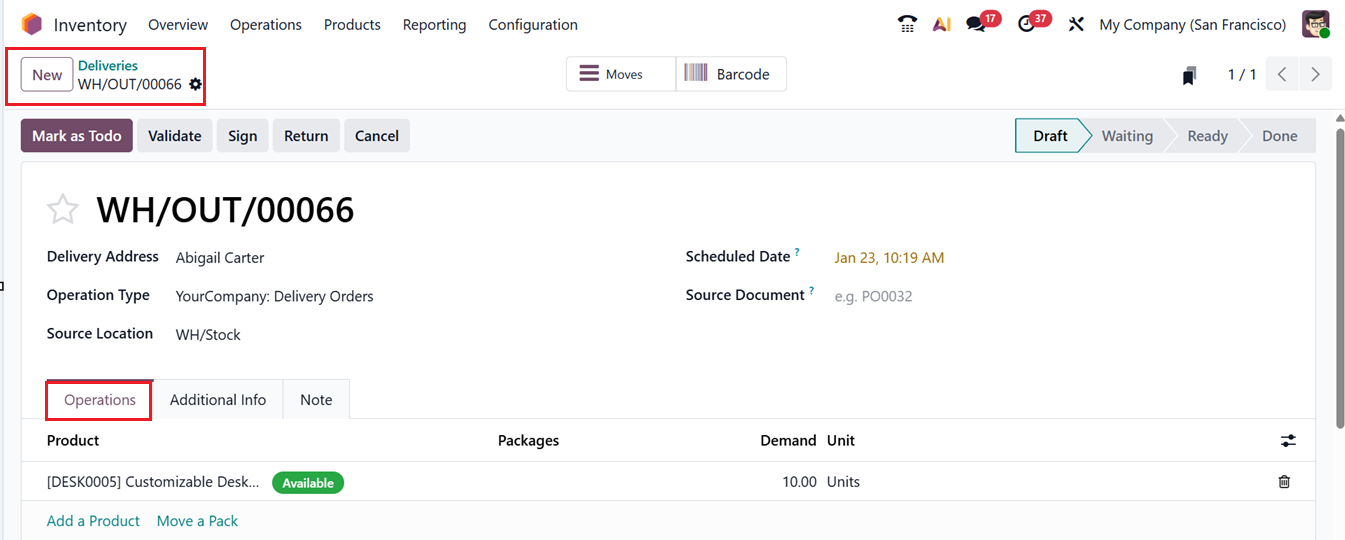
In the ‘Operations’ tab, you can add the Products to be included in this operation and its Packages and Demand Unit as per the requirement with the ‘Add a Product’ button. The ‘Move a Pack’ option can be used to move the packages in packages.
In the ‘Additional Info’ tab, you can mention the Carrier, Tracking Reference, Weight and Weight for shipping as usual. Then, you can mention the Sales Order related to this operation, Responsible person and Project in which this operation belongs to. Here, you can also mention the ‘Shipping Policy’ defines when a delivery order can be shipped based on product availability.
- As soon as possible:Odoo allows partial deliveries: available products can be shipped immediately and a backorder is created for the remaining items.
- When all products are ready: The delivery is blocked until all ordered products are available, ensuring a single, complete shipment with no partial deliveries.
-
After editing all the details, you can highlight the operation to be waiting to do using the ‘Mark as Todo’ button or immediately confirm the operation using the ‘Validate’ button. You can utilize the ‘Sign’ button to get a confirmation signature from the authorised person or department. The ‘Return’ button helps to return the products and the ‘Cancel’ option can be used to cancel the operation.
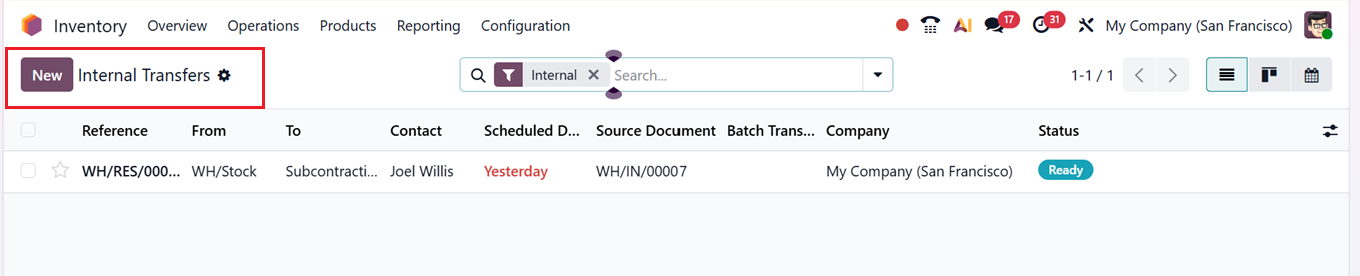
1.3 Internal
This process transfers inventory between areas within the same company, allowing the relocation of goods between warehouses or internal storage zones. External entities are not involved in this operation.
You can see the ‘Internal Transfers’ dashboard with their Reference ID, From, To, Contact, Scheduled Date and other details, as shown in the screenshot below.
The creation of a new Internal Transfer is similar to the Receipt Transfer operations, but some form fields may vary . In the new configuration window, provide a Contact person for this transfer and mention the Operation Type.
Then, mention the Source Location and Destination Location of the product. Then, mention the Scheduled Date of the transfer and add any Source Document regarding the transfer operation or products in the relevant fields, as depicted in the screenshot below.
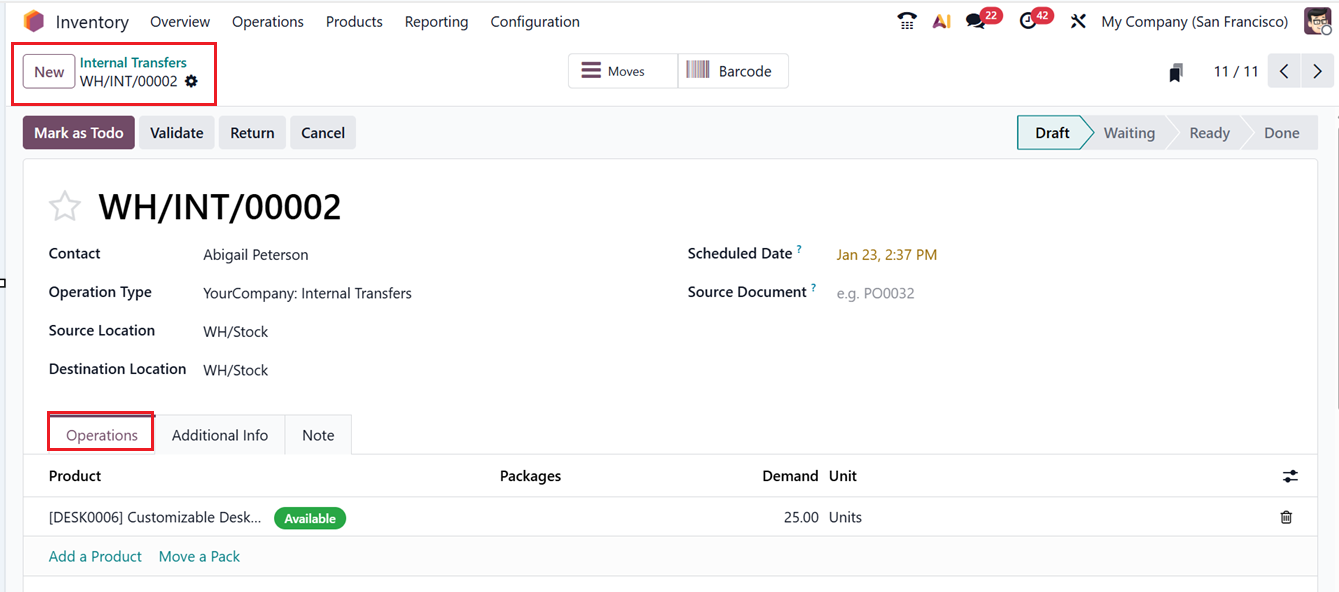
As usual, you can add products to this transfer using the ‘Add a Product’ button available in the Operations Tab and in the Additional Info tab, you can specify the Carrier, Tracking Reference, Weight details, related Sales Order, Responsible person, and Project. You can also set the Shipping Policy, which determines when the delivery can be shipped: As soon as possible allows partial deliveries with backorders for remaining items, while When all products are ready waits until all products are available to ship everything in one complete delivery.
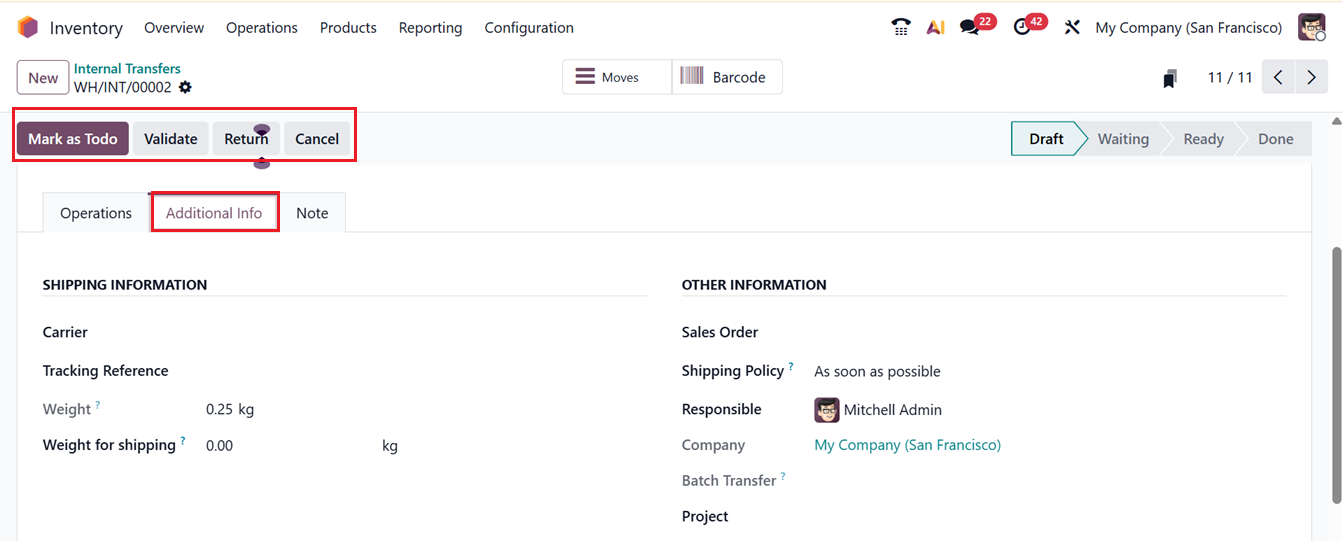
In the ‘Notes’ tab, provide any extra information or notes regarding the transfer and save the details. Then, you can validate the transfer using the Validate button or put the transfer in the waiting list using the Mark as Todo button.
1.4 Manufacturing
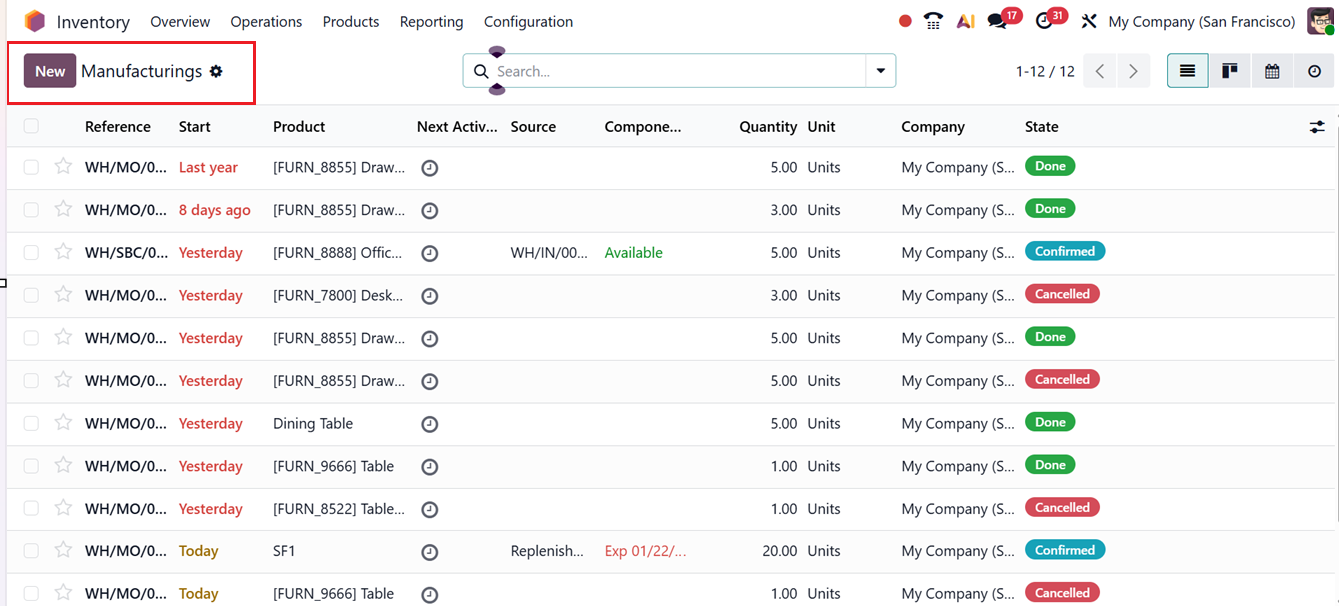
The’Manufacturings’ window of the ‘Operations’ menu manages the transfer of raw materials into production areas and moves finished goods back into inventory upon completion.
The dashboard list view will show the details of the Reference number, Start date, Next activity, Source, Components, Quantity, Unit, Company and current State, as shown in the screenshot below.
In the new Manufacturing Operation creation form, you can edit the product to be manufactured in the Product field and the total quantity to be generated in the Quantity field, as shown in the screenshot below.
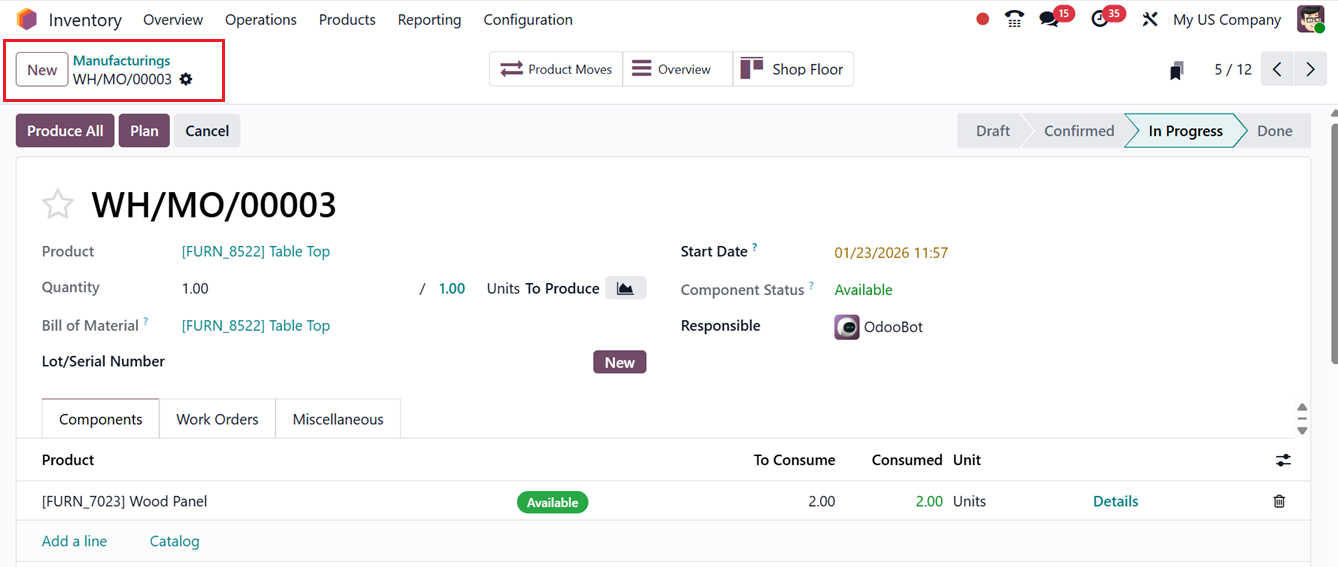
Then, you can also add the Bill of Materials related to the product or you can generate a new bill of materials using the ‘+Generate BOM’ button. You can then provide the Lot/Serial Numbers in the relevant field. Finally, mention the Start Date and Responsible person assigned for this particular product transfer operation.
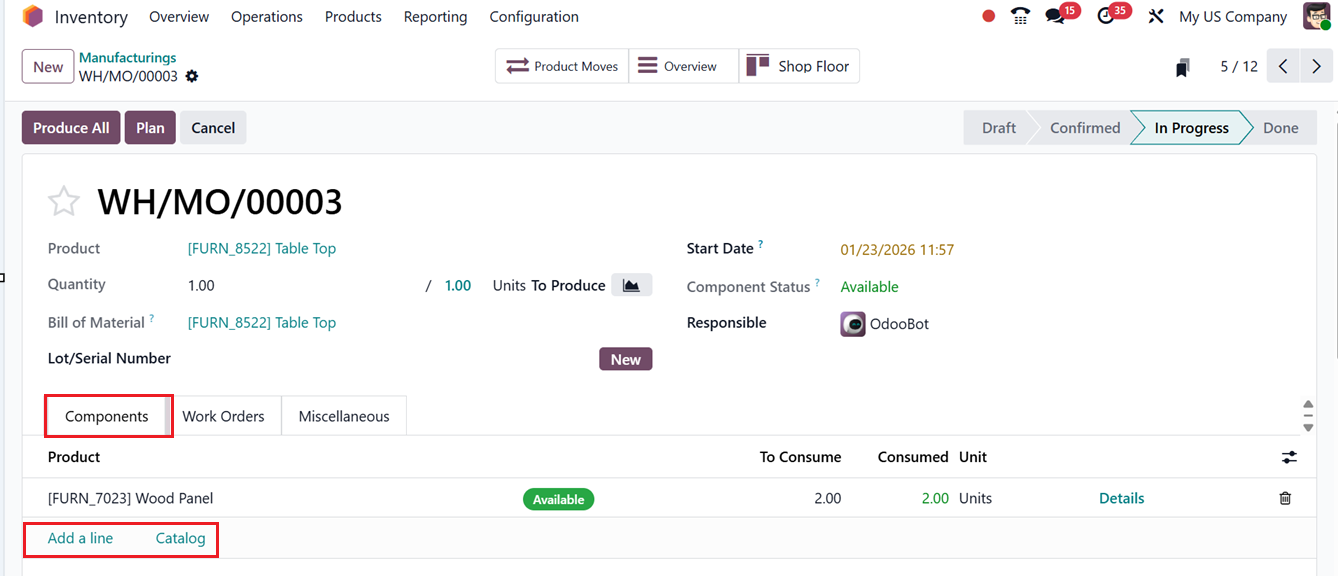
In the Components Tab, edit the components required to build the product using the ‘Add a line’ button or you can choose the products from the catalog using the Catalog button.
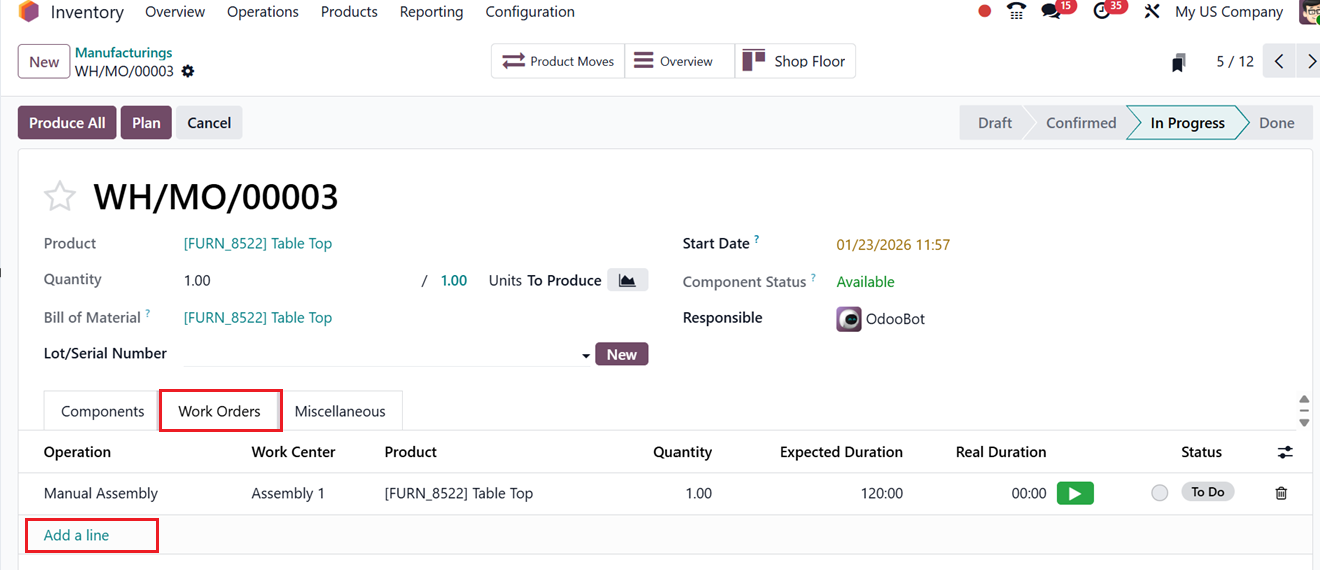
In the ‘Work Orders’ Tab, you can specify the operations included in this order by mentioning the Operation such as, Drilling, Assembly, Welding etc and specify the Work Center, Product, Quantity, Expected Duration, Real Duration and Current Status using the Add a line button, as depicted in the screenshot below.
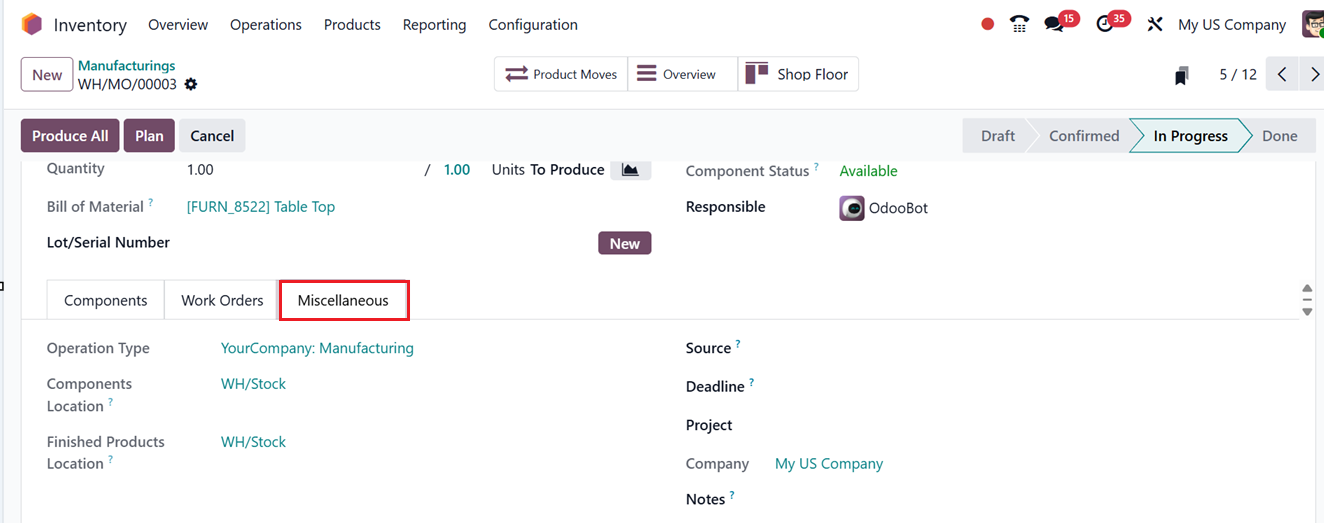
Finally, in the Miscellaneous tab, you can see the Operation Type and Components Location which is where the components are collected. In the Finished Products Location, you can see where the system is going to stock the finished products along with the Company details. Then, you can specify the reference of the document that generated this production order in the Source field and the most relevant Deadline of this manufacturing production. At last, you can mention the Project in which this manufacturing operation is related to and provide any notes or instructions that can be viewed inside the shop floor section of a manufacturing interface in the Notes field.
After saving the data, you can click on the ‘Produce All’ button to immediately start the manufacturing order and produce the product. The ‘Plan’ button will help you to schedule the manufacturing process for another suitable date or time.
The Product Moves button will open the Inventory moves dashboard displaying where the components and parts are collected along with their dates, reference, locations etc. The Overview smart button will show the details of the manufacturing order overview including the Products, Components and Operations included in this process along with the Manufacturing Costs, Real Costs and other details.
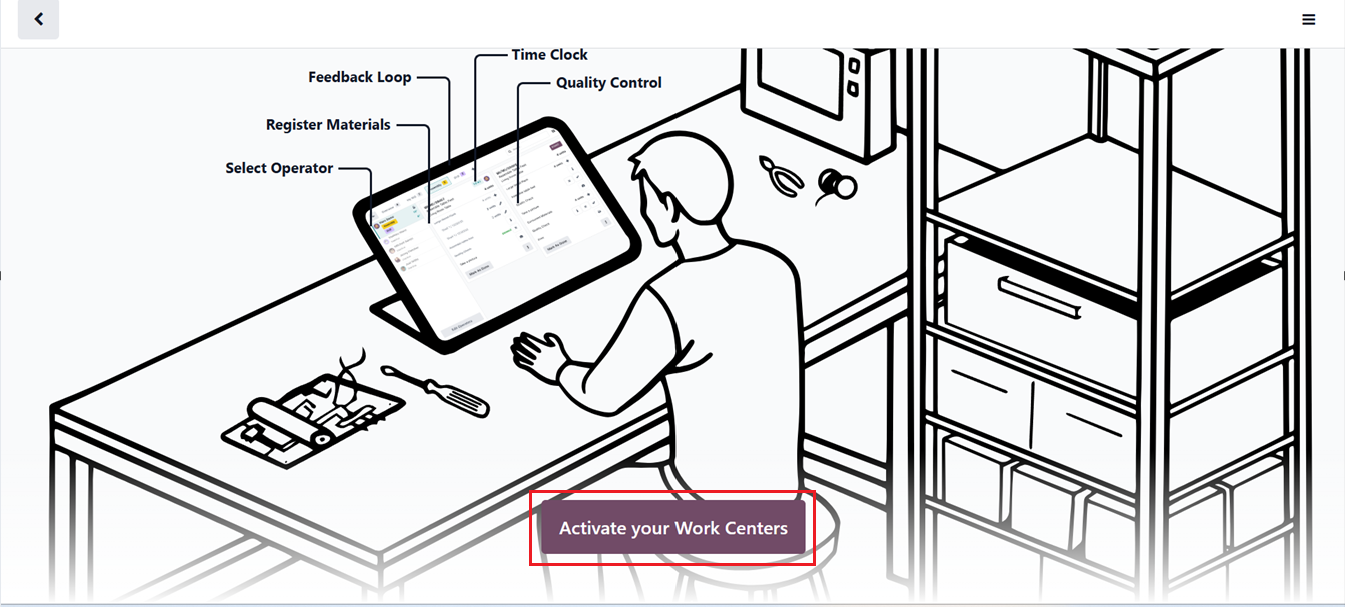
The Shop Floor smart button can be used to manage the manufacturing process. This feature lets you manage and execute manufacturing orders directly from a dedicated, tablet-friendly app, allowing operators to view tasks, track progress, and complete work orders in real time for better visibility and efficiency. After opening the smart button, you need to activate the work centers for this Manufacturing Order using the ‘Activate your Work Centers’ button.
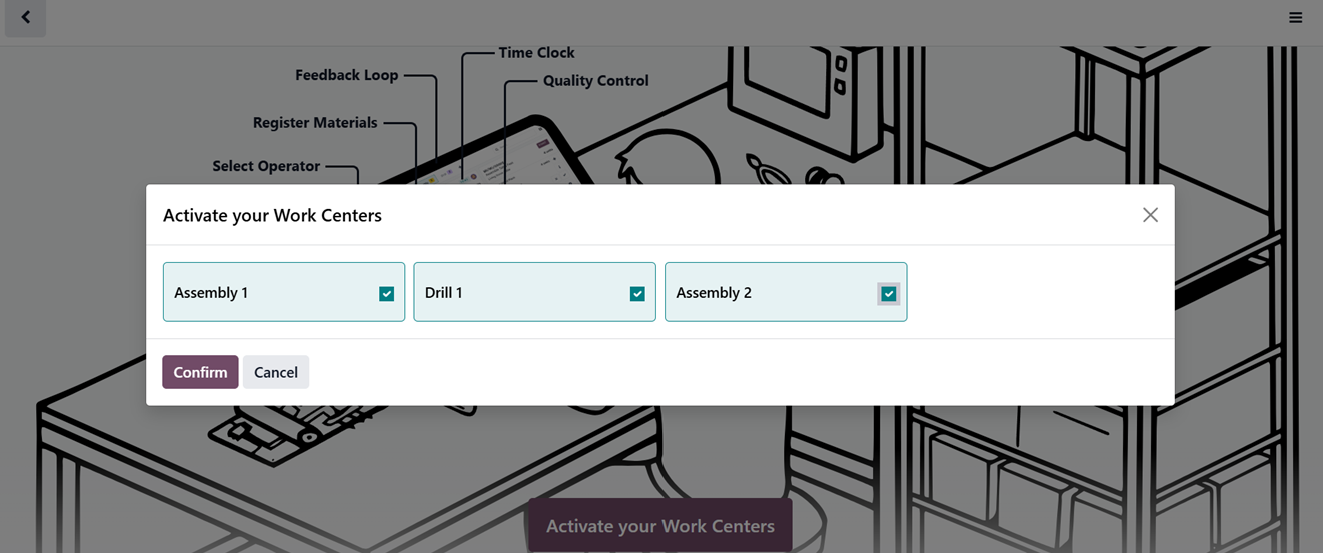
Then, choose the work centers you want to activate and confirm it using the Confirm button.
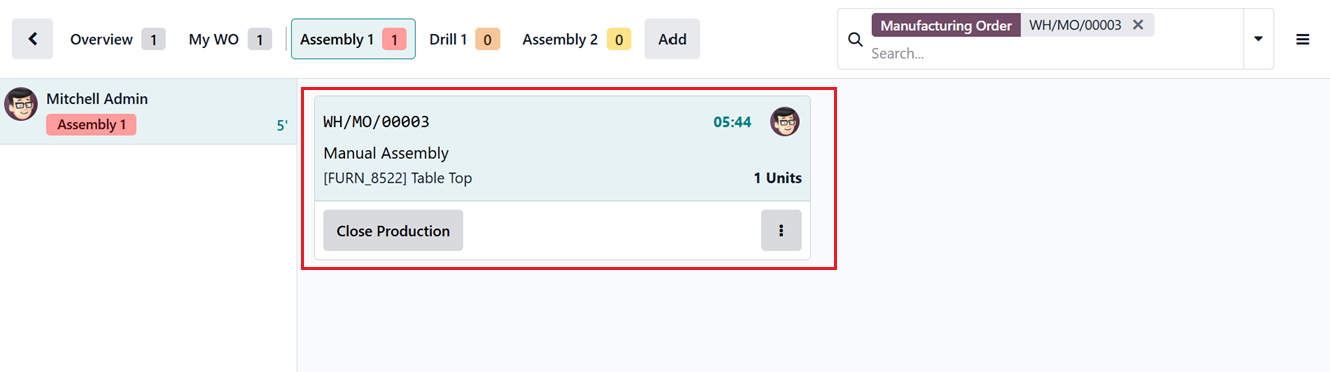
Inside the Shop Floor interface, you can see the Manufacturing overview along with different Work center options and work orders assigned in each work centre from the top of the window.
Here, we have only one work order in the Assembly work centre. So, you can go to the work centre by opening it and start the manufacturing process manually.
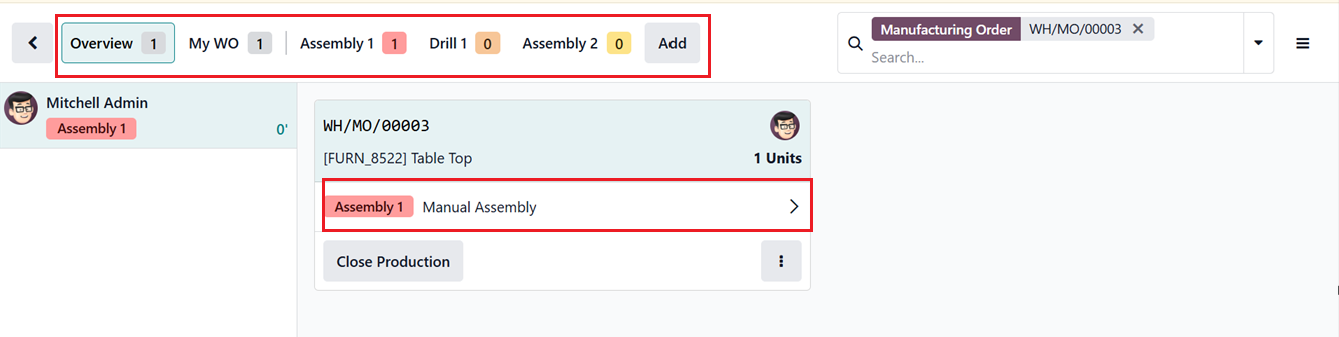
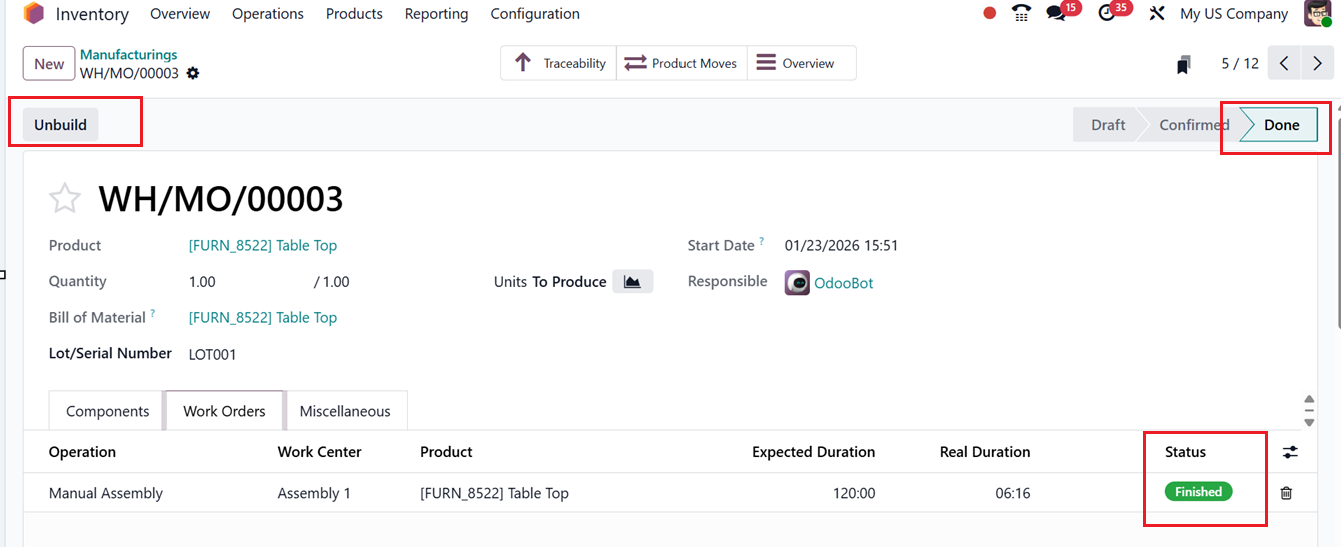
Inside the work center window, you can manage the other manufacturing processes and steps. If necessary, you can also add extra workcenters. After completing the production, you can click on the Close Production button.
After completing the manufacturing order, come back to the manufacturing operation configuration form and the process will seem as finished.
For more detailed information about manufacturing order management, you can check on the Odoo 19 Manufacturing Module.
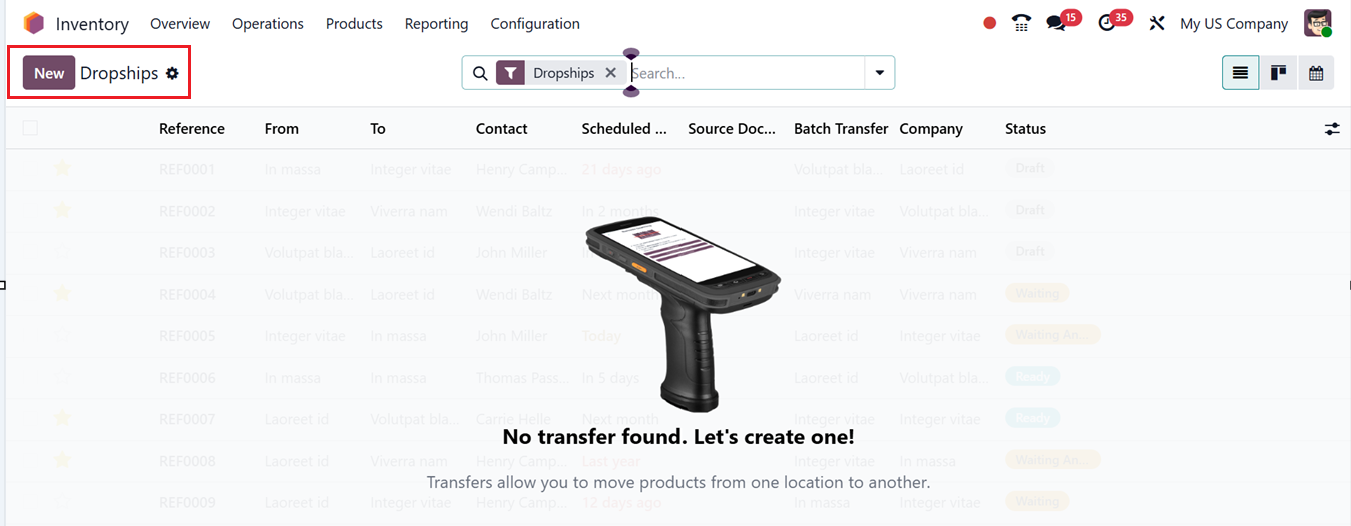
1.5 Dropship
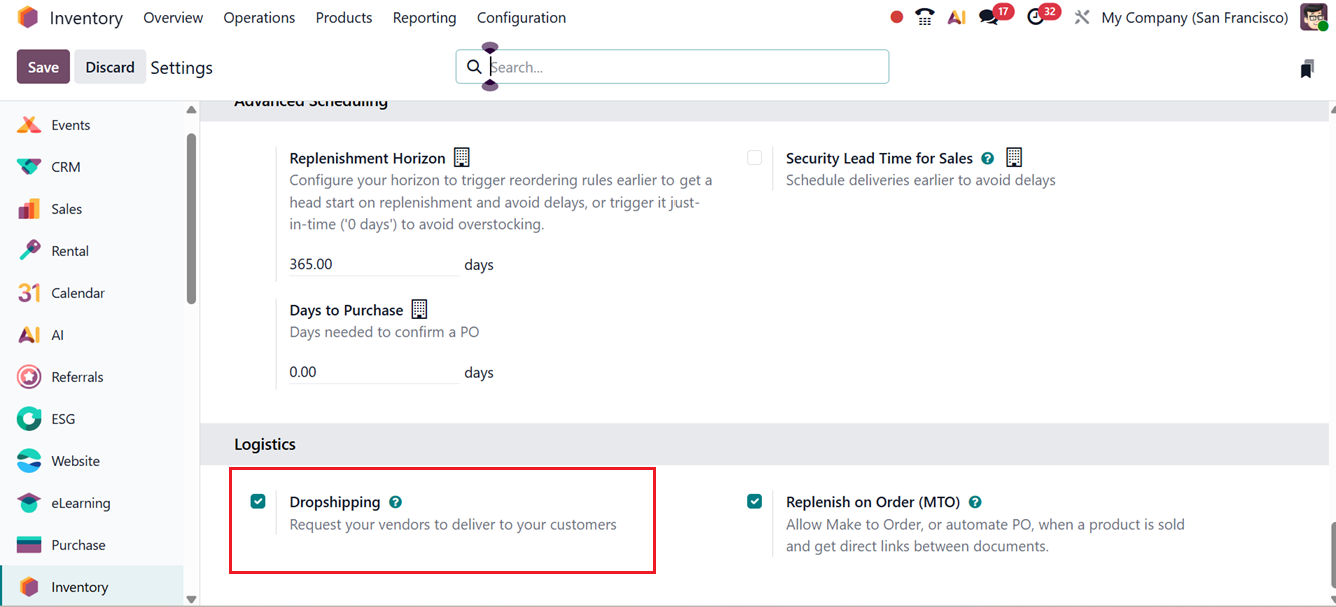
The ‘Dropshipping’ feature enables direct delivery of goods from the supplier to the customer without storing them in the company’s warehouse, meaning the stock is not affected. Before creating any Dropshipping operations, you have to enable the ‘Dropshipping’ feature from the ‘Logistics’ tab of the Settings window, as shown in the screenshot below.
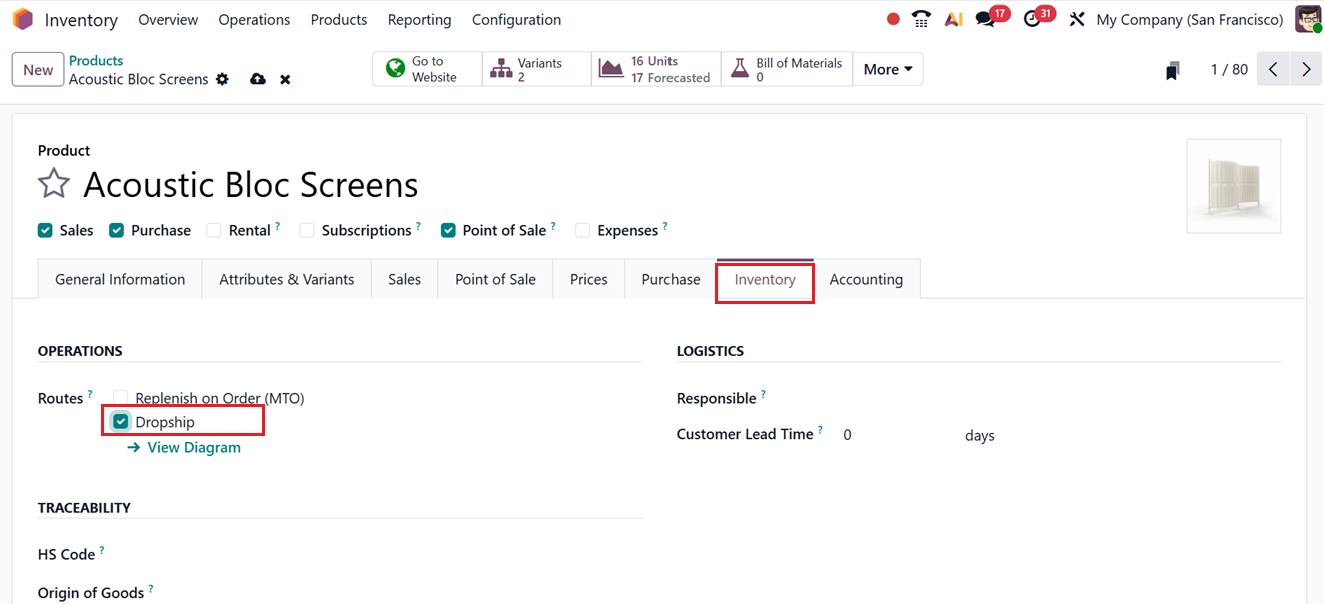
Once the Dropshipping feature is enabled in the settings, an additional ‘Dropship’ option will be displayed in the Inventory Routes tab of the product configuration page, as shown below.
Then, you can create new Dropship orders from the Dropships window from the Operations menu, as shown below.
Then, you can create a new dropship order using the New button and edit the details including the Contact name. Here, Odoo will automatically consider the Operation Type as Dropship. Then, the Source Location and Destination Location will be assigned to Vendors and Customers. Also, you can edit the Scheduled Date for this transfer and add a Source Document regarding the transfer or products, as shown in the screenshot below.
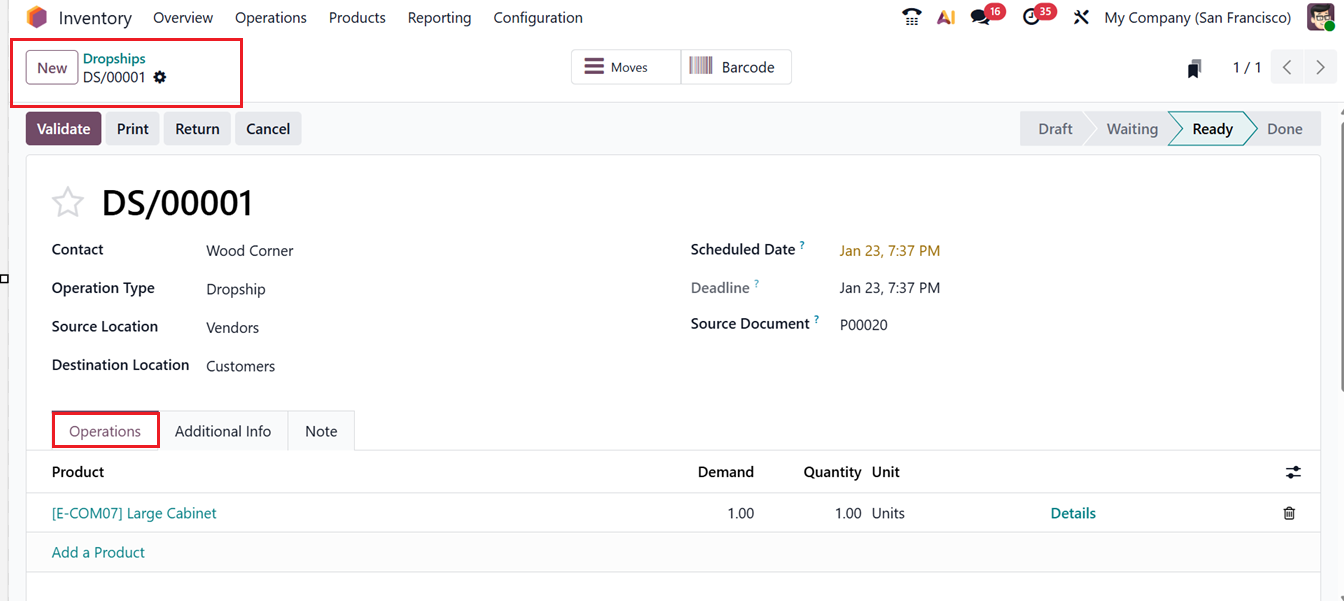
Inside the Operations Tab, add the products that need to be dropshipped and its Demand units using the ‘Add a line’ button as we discussed in the other transfer operations, as depicted in the above screenshot.
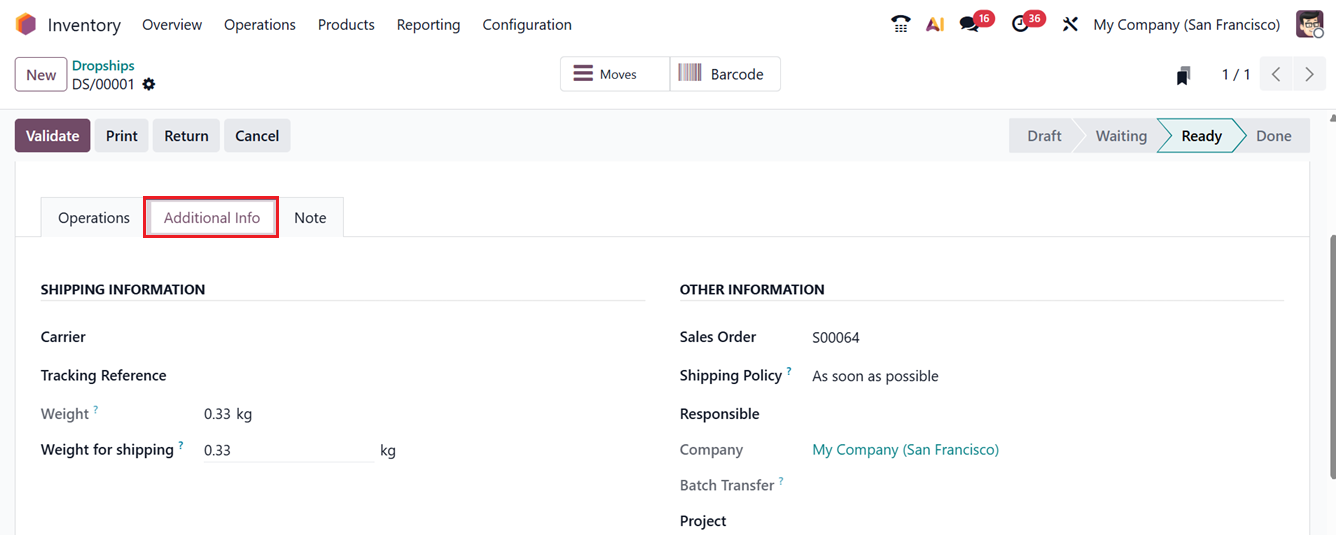
Inside the Additional Info tab, edit the details including Carrier, Tracking Reference, Weight for shipping, Sales Order, Shipping Policy, Responsible person name and Project related to the dropship operation, as shown in the screenshot below.
Inside the Notes tab, edit any instructions or notes regarding the transfer or products and save the details.
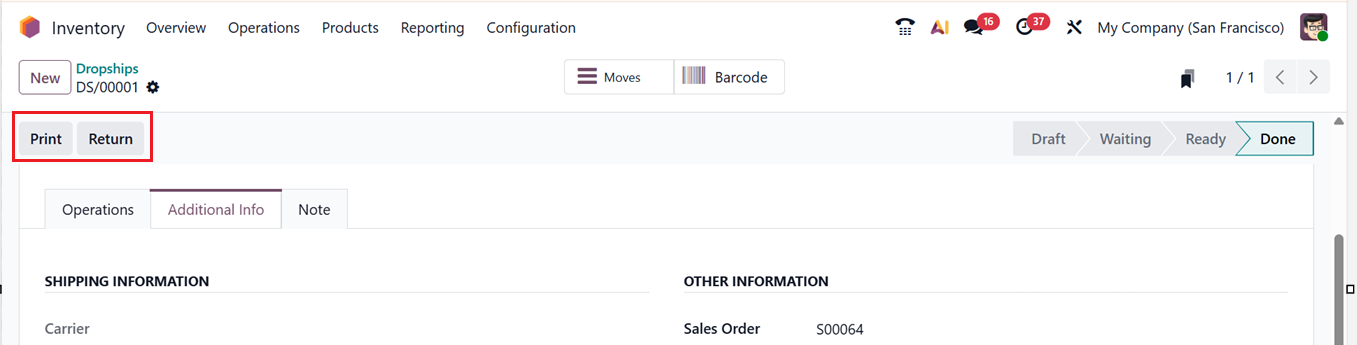
Then, you can validate this dropship ord using the ‘Validate’ button. This will complete the dropship order and you can see the sales order related with this transfer in the Additional info tab. Then, you can print the transfer receipt or return the dropship products using the Print and Return buttons respectively.
1.6 Batch Transfers
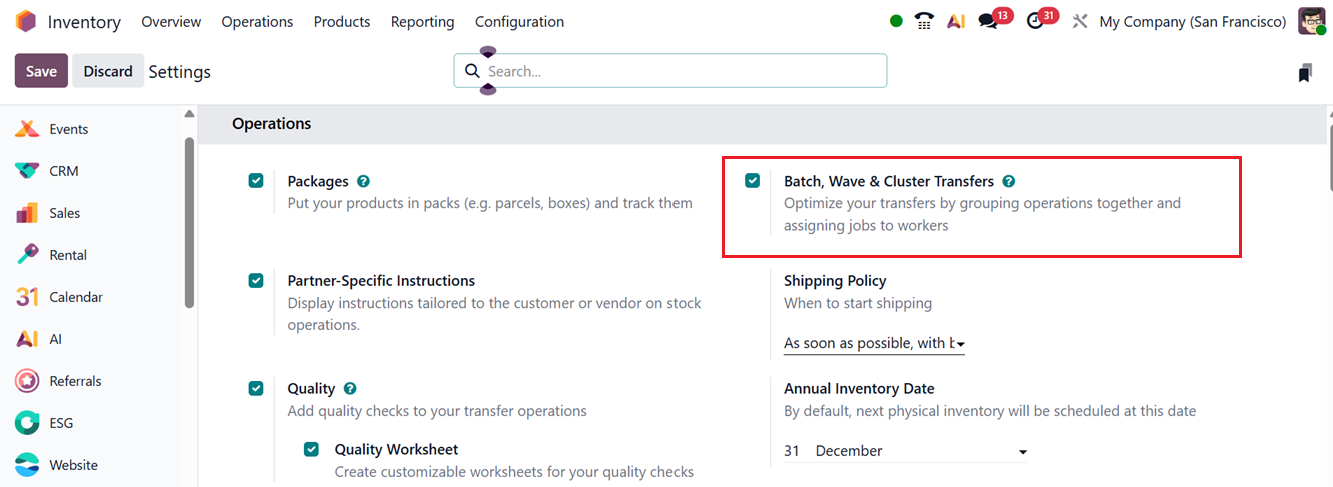
The Batch Transfer feature in Odoo 19 enables users to process several transfers simultaneously, saving both time and effort. All included transfers within a batch are executed together, which reduces complexities when handling large-scale movements. To activate the feature, you can enable the ‘Batch, Wave & Cluster Transfers’ option from the ‘Operations’ tab of the Settings menu in the Inventory module, as shown in the screenshot below. Once activated, click on the Save button to apply changes.

You can then manage Batch Transfers via the Operations menu. This page lists existing batch transfers with fields for Batch Transfer, Description, Scheduled Date, Responsible, Operation Type and Status.
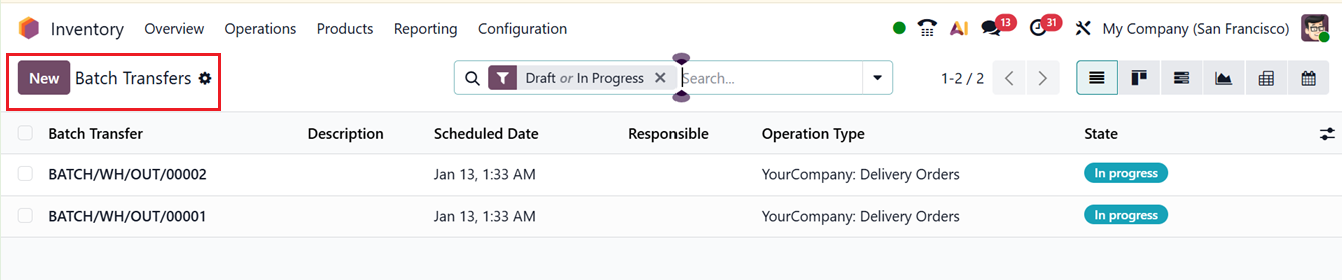
The view can also be switched to Kanban, Gantt, Graph, Pivot and Calendar views. To create a new batch, click on the New button. Assign an employee in the Responsible field, fill in the Operation Type and manually set the Scheduled Date if required. If not manually set, Odoo 19 automatically selects the earliest date from the included transfers. Then, you can add any notes regarding the batch transfers in the ‘Descriptions’ field, as shown in the screenshot below.

When the Dispatch Management System is enabled, you can also specify the Third party provider in the Vehicle, and Vehicle Category fields.
Then, add transfers to the batch one by one using Add a line link provided under the Transfers tab. This will cause a pop-up window to appear, showing eligible transfers of the chosen operation type. Then, select required transfers that share the same Status (Waiting or Ready) by clicking on the Select button to add them to the batch.
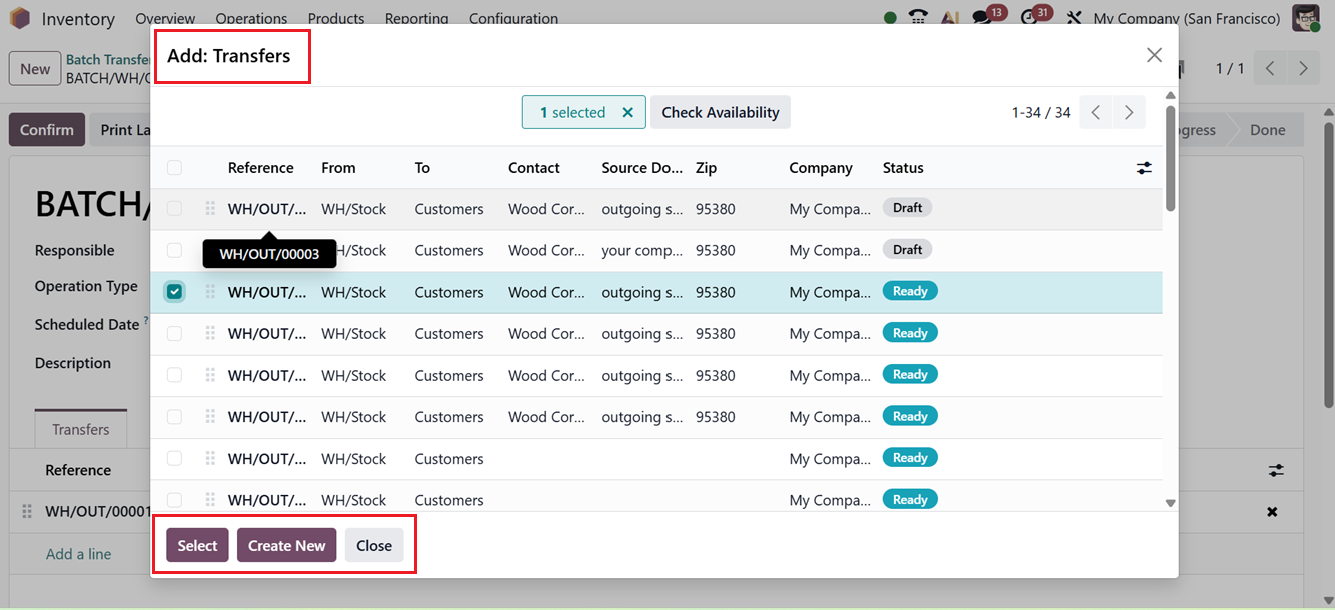
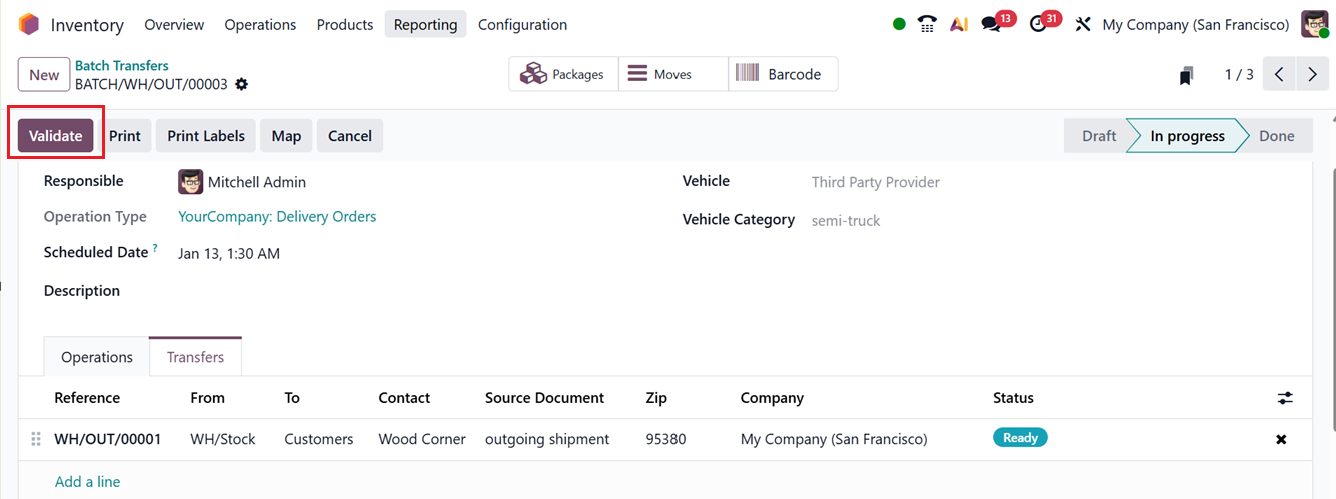
You can also create new batches using the ‘Create New’ button. All the selected transfers will appear in the batch list in the ‘Transfers’ tab. Once availability is verified, click on the Confirm button and then Validate the transfer to finalize the batch transfer.
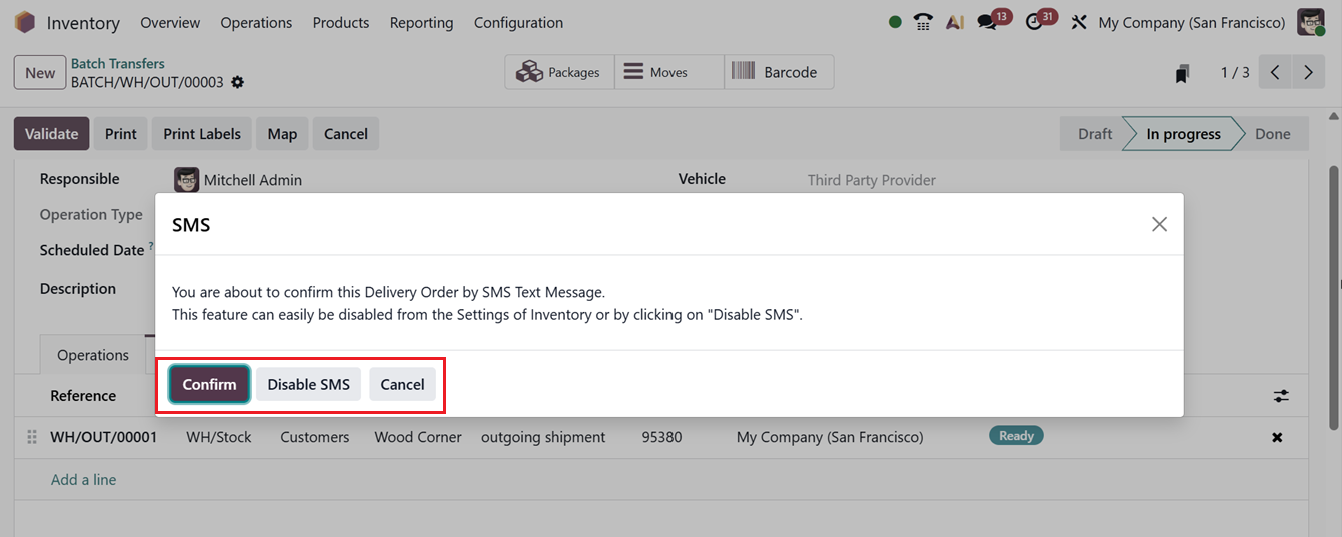
While validating the transfer, you have to confirm the delivery order by SMS notification if the SMS feature is enabled in the Inventory system, as shown below.
Then, you can proceed with the next procedures. You can also create new batches directly from the Transfers menu. To check this facility, select existing transfers with matching operation types and statuses from the dashboard. Then, click on the Action button and choose the ‘Add to batch’ option, as shown in the screenshot below.
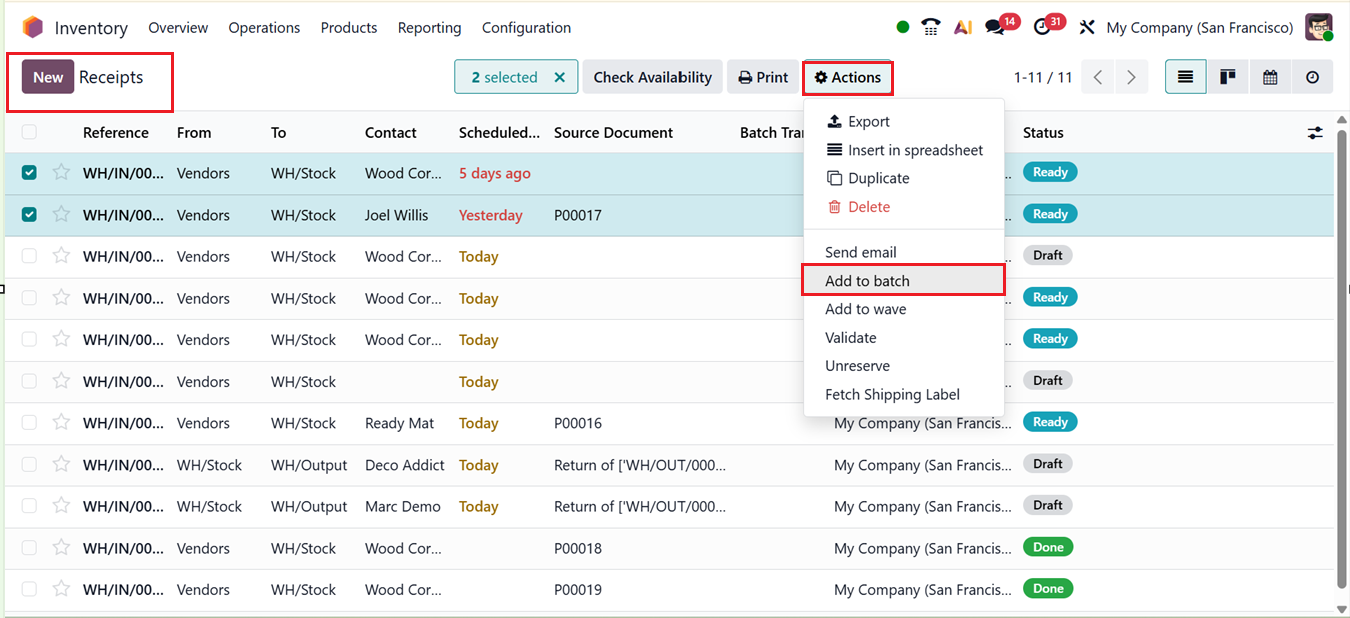
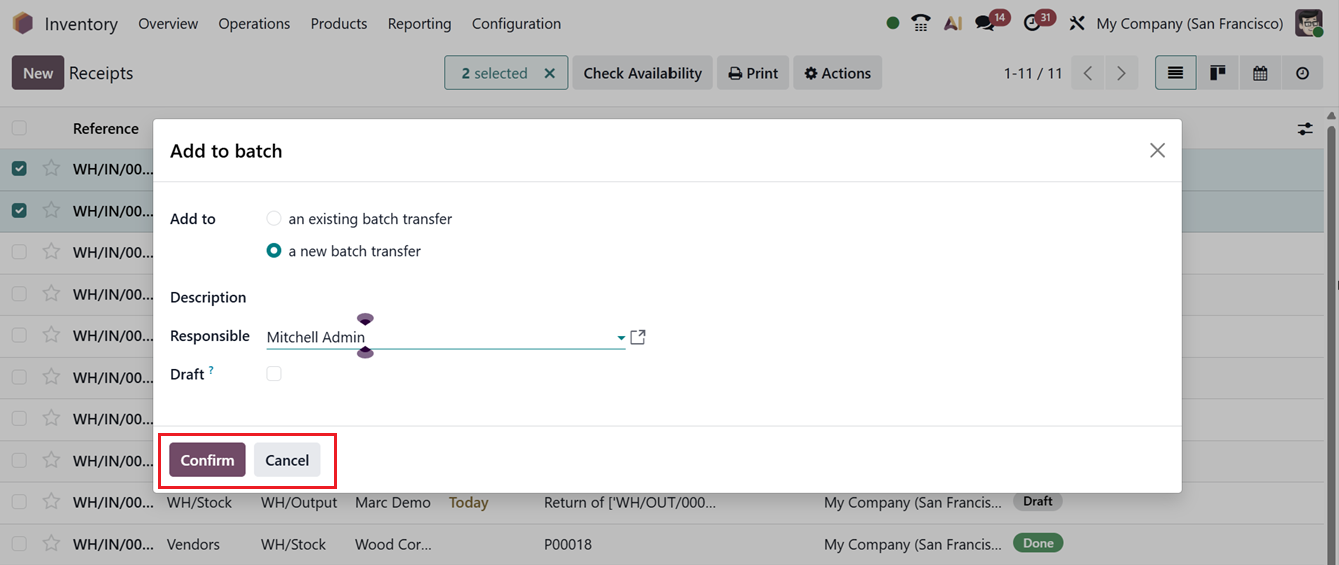
The selected transfers can either be added to an existing batch or form a new one. Enter a Responsible Employee for the new batch and enable the Draft option if you wish to create it in draft mode.
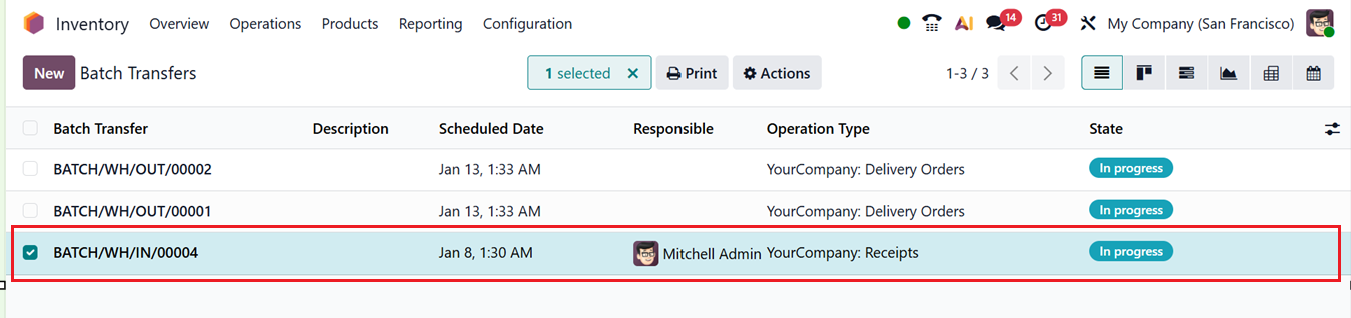
After clicking on the Confirm button, a new batch transfer will appear in the Inventory module, ready for tracking and management in the ‘Batch Transfers’ window, as shown below.
1.7 Wave Transfers
The Wave Transfer feature functions similarly to batch transfers but is more advanced. It enables bulk transfer of multiple products at once, though transfers cannot be removed once added. Ensure that this ‘Batch, Wave & Cluster Transfers’ feature is activated in the Settings menu to use it within the Odoo 19 Inventory module.
Inside the Wave Transfers window, you can see previously configured wave transfers in a dashboard along with their Batch Transfer , Description, Scheduled Date, Responsible person, Operation Type and State, as shown in the screenshot below.

Here, you can see the Prepare Wave button which is used for wave picking. It groups multiple pickings into a single wave so warehouse staff can pick items for several orders in one optimized trip instead of processing orders one by one.
With this method, Odoo organizes the wave by product, location, and quantity, creating a wave transfer that can be assigned to a picker or team. This reduces walking time, improves efficiency, and minimizes errors.
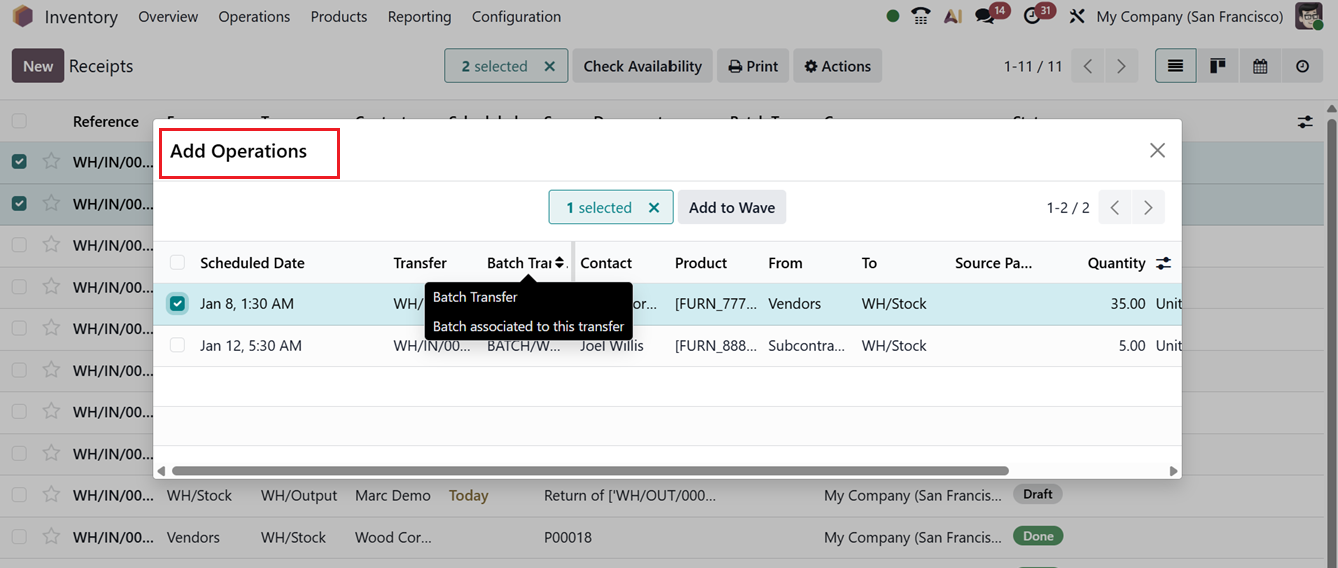
After clicking on the Prepare Wave button, a transfers dashboard window will appear where you can choose and combine required transfers to prepare a Wave transfer, as shown in the screenshot below.
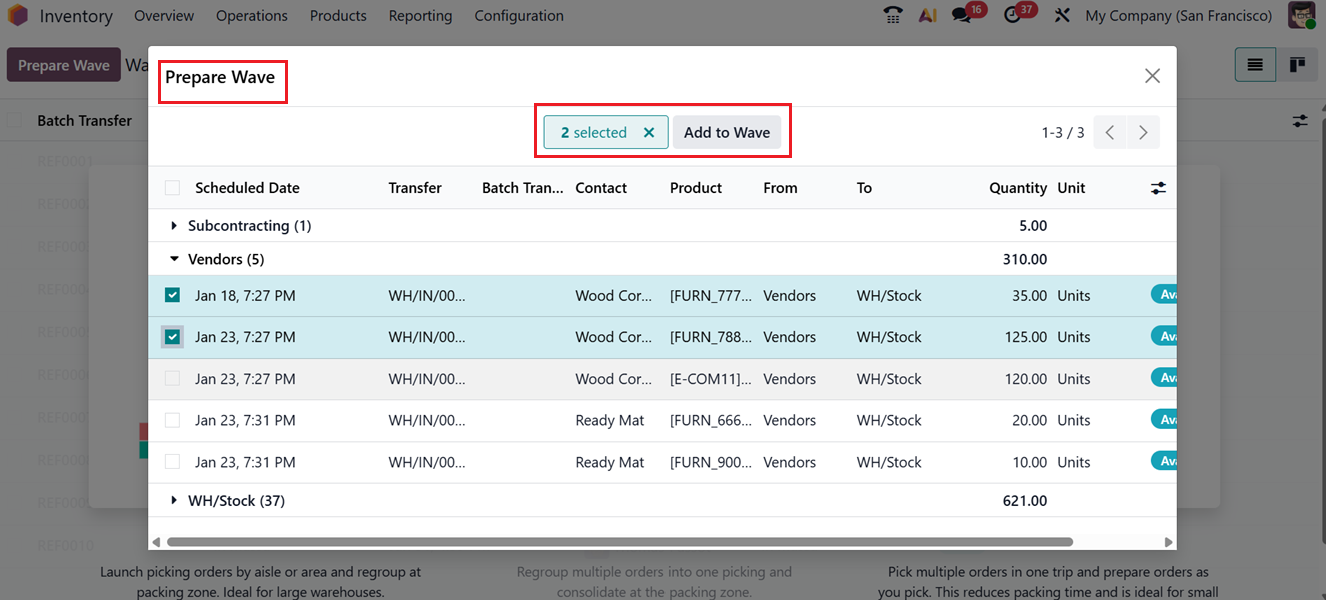
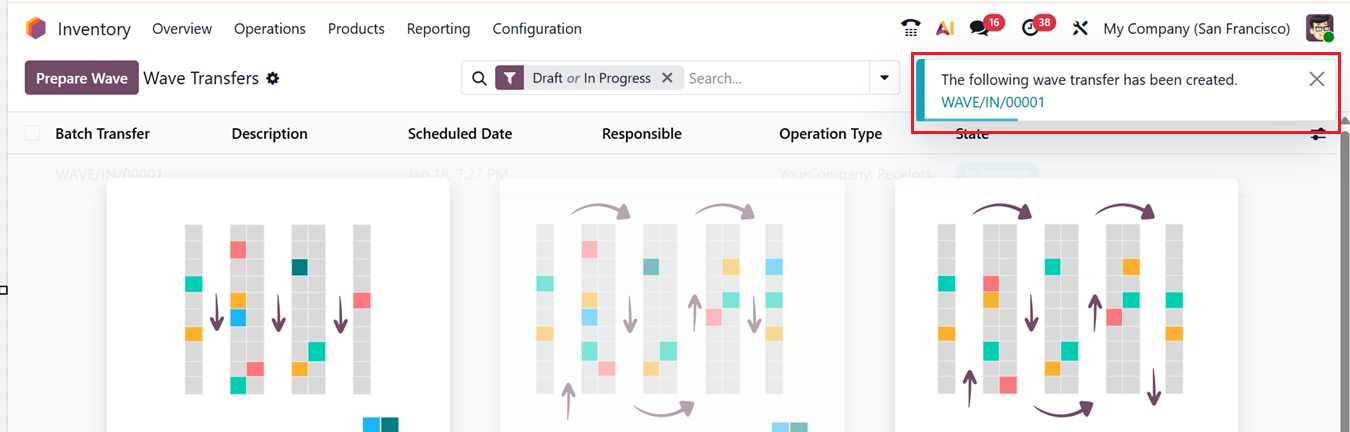
After choosing the transfer lines, click on the Add to Wave button. This action will create a new wave transfer and you can see the notification, as shown in the screenshot below.
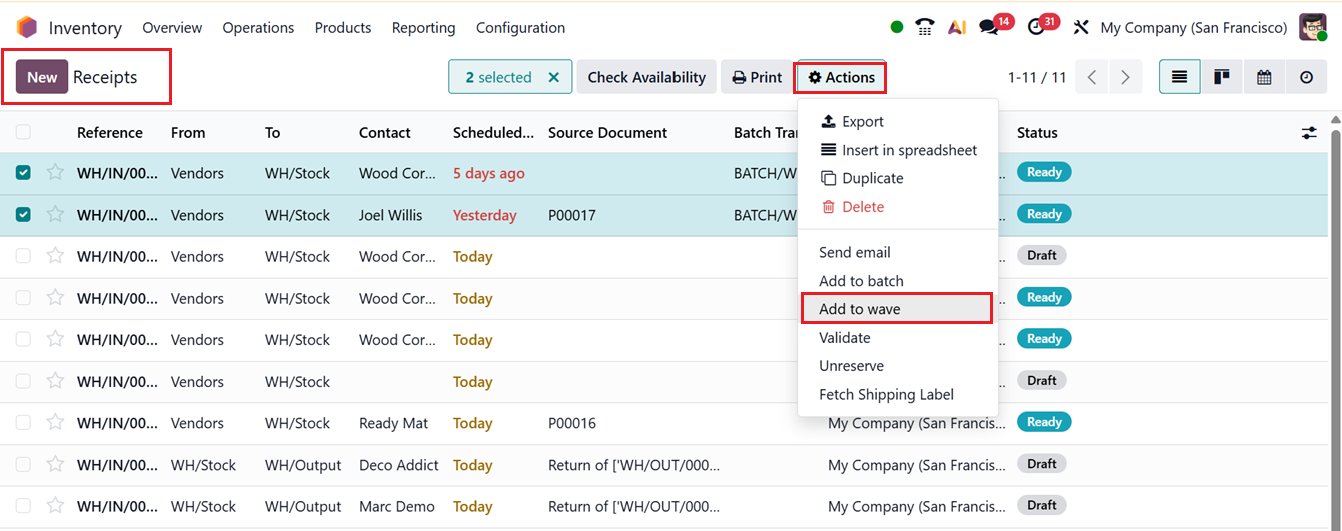
Also, you can go to any Transfers window and select transfers with the same Operation Type and Status. The Action button will appear, allowing you to choose Add to wave.
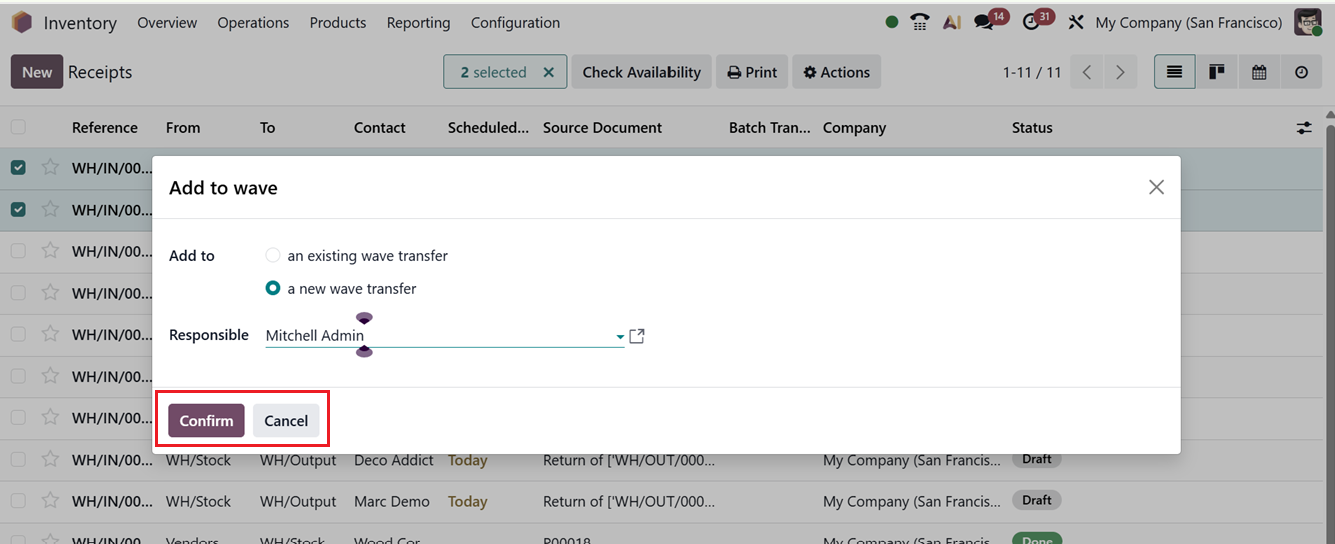
This will open a pop-up window where you can add selected transfers to either ‘an existing wave transfer’ or ‘a new wave transfer.’ Then, assign a Responsible employee and click on the Confirm button, as shown in the screenshot below.
After approval, all selected orders appear for inclusion in the wave. So you can choose the necessary ones and click on the Add to Wave button from the ‘Add Operations’ window, as shown below.
You can view the new wave transfer in the Operations menu under the Wave Transfer section showing details such asBatch Transfer, Description, Scheduled Date, Responsible, Operation Type, and State, as shown in the screenshot below.

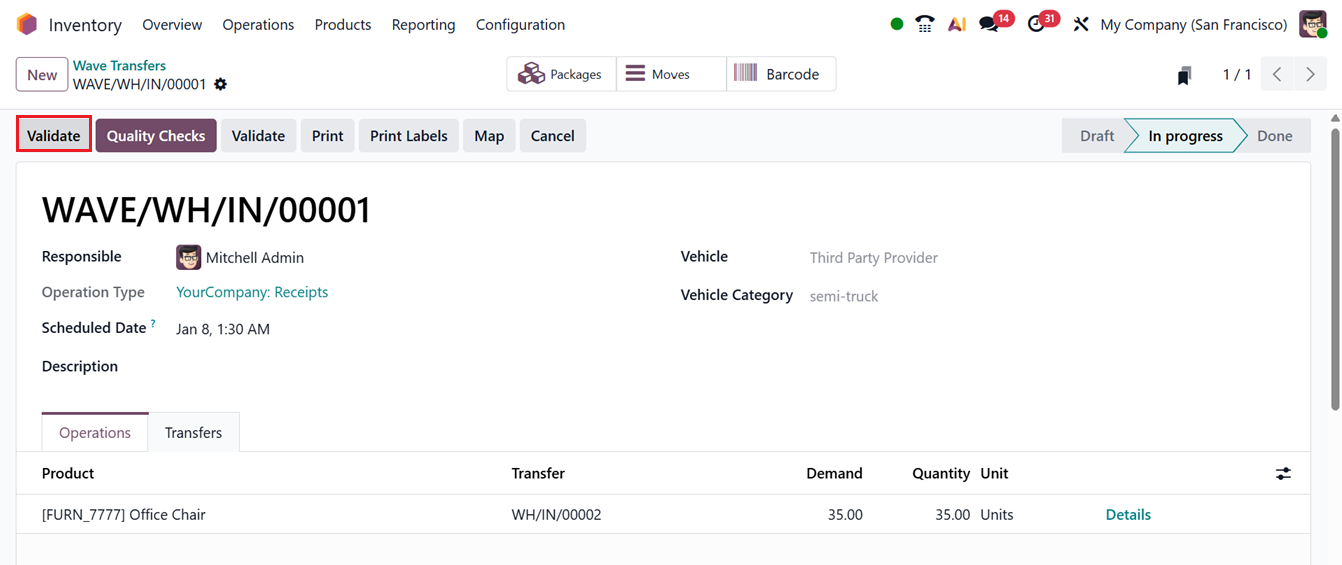
From the Wave Transfers dashboard, open the record and click Validate to complete the transfer.
Additionally, automatic batch and wave transfers can be enabled for an operation type while configuring a new Operation Types.
To activate the wave transfer for an operation type, you can enable the ‘Automatic Batches’ option under the ‘BATCH & WAVE TRANSFERS’ tab, as shown below.
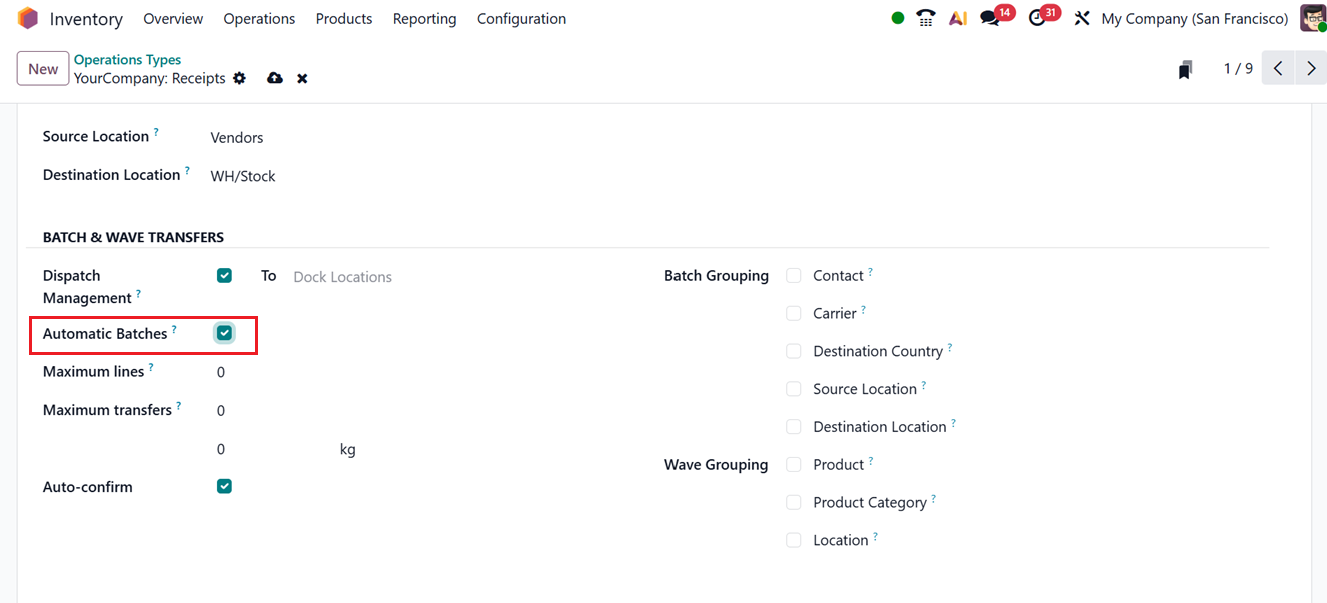
Once the feature is activated, settings such as Maximum Lines, Maximum Transfers, Auto Confirm, Batch Grouping, and Wave Grouping become available. So that, you can edit the required specifics of the transfers according to your requirements.
1.8 Physical Inventory
Depending on current physical stock levels, adjustments may occasionally be required in your company’s inventory records. To maintain accurate stock control, these updates must be reflected within Odoo 19 using the Physical Adjustment platform.
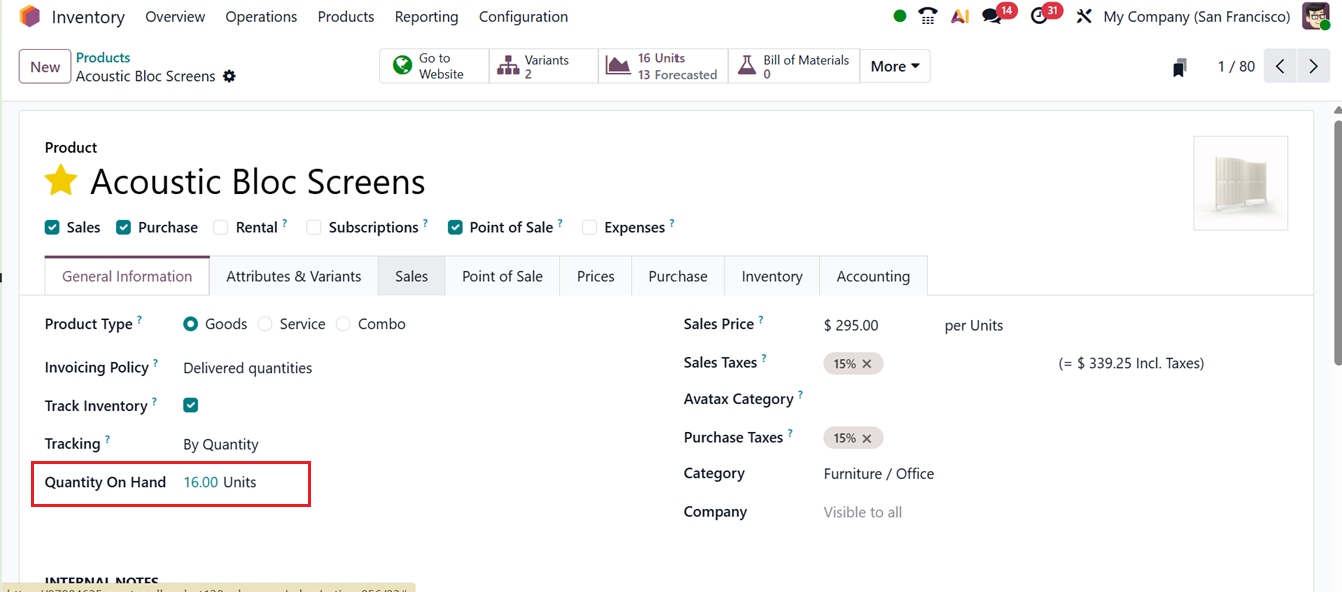
In Odoo 19, the product inventory can be updated directly from the Product configuration window itself. Here, you can see an ‘Quantity On Hand’ button for recording on-hand quantities in company warehouses inside the ‘General Information’ tab section.
In Odoo 19 Inventory Module, Quantity On-Hand details are shown only for tracked products (Products with Lot or Serial numbers). These products require precise tracking of individual units, so Odoo displays on-hand quantities per lot or serial number. Untracked products show only the total available quantity, without detailed on-hand breakdowns.
Then, click on the highlighted field to view Inventoried Quantity details. Then click on the ‘New’ button to adjust or add new stock levels and quantities.

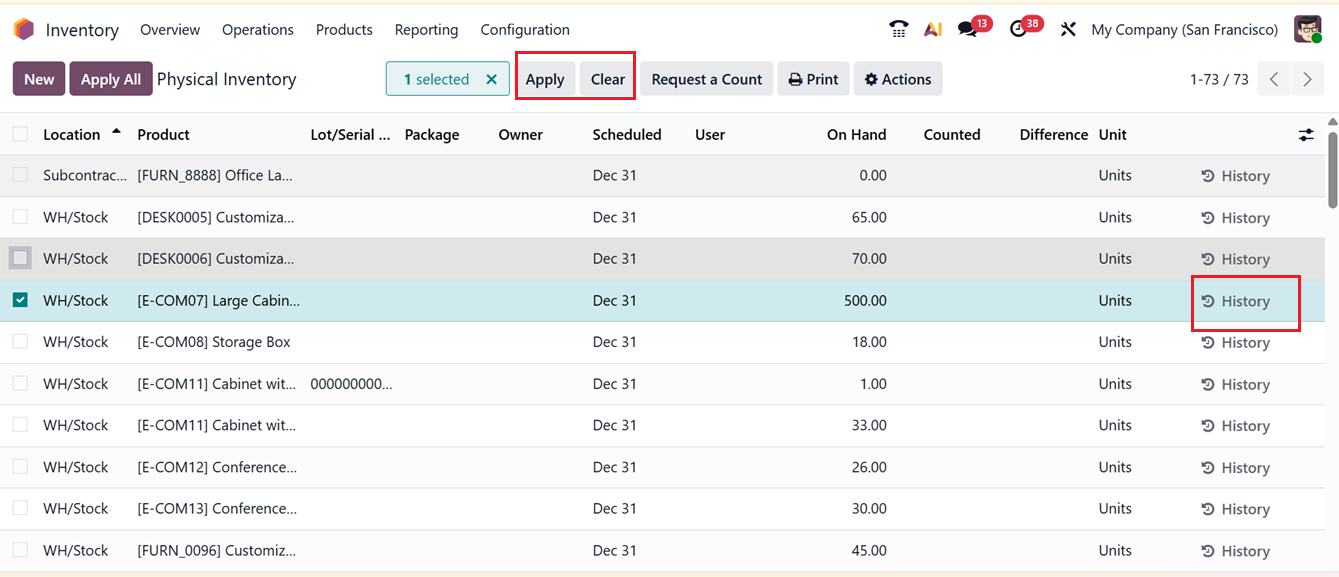
To manage all such revisions collectively, the Physical Inventory platform can be accessed via the Operations menu. This window displays all recorded adjustments and allows bulk updates across multiple products. Here, you can view details such as Location, Product, Lot/Serial Number, Package, Owner, Scheduled Date, User, On Hand, Counted, Difference and Unit.
You can then click on the New button to enter the Counted Quantities for the corresponding lot or serial number. Odoo will automatically calculate and display the difference between on-hand and counted quantities.
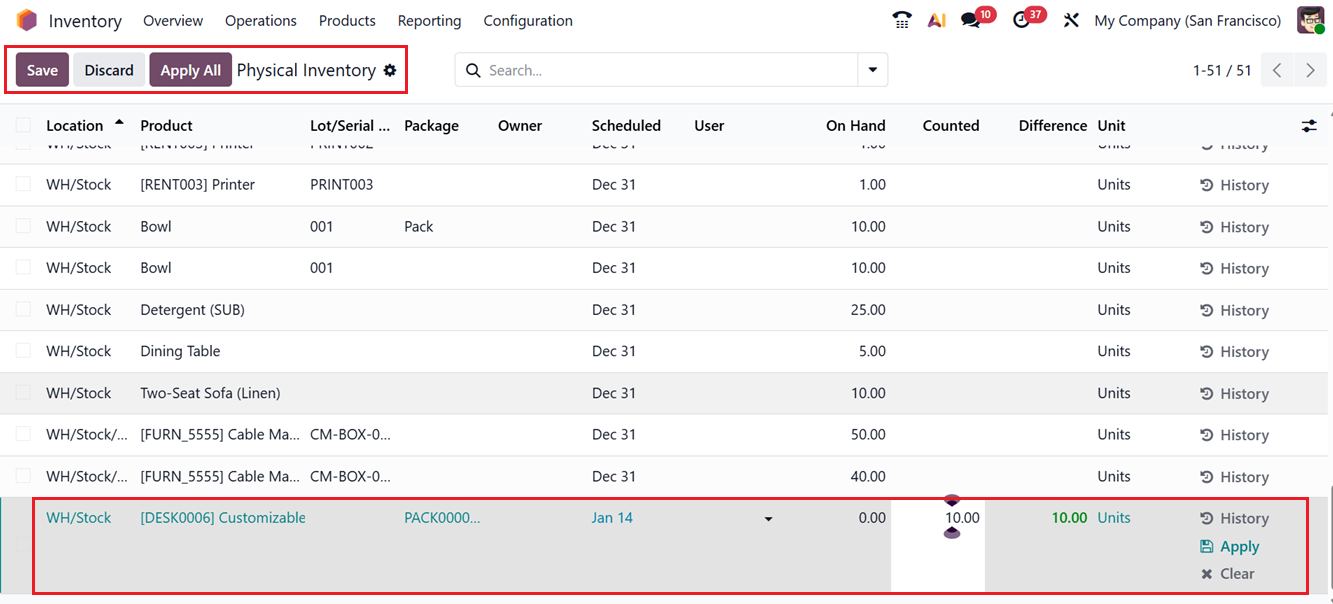
Click Apply to confirm the adjustment, or Clear if no changes are necessary. The History button provides a record of past inventory modifications. Additional buttons enable you to manage multiple adjustments simultaneously Apply to confirm or Clear to cancel.
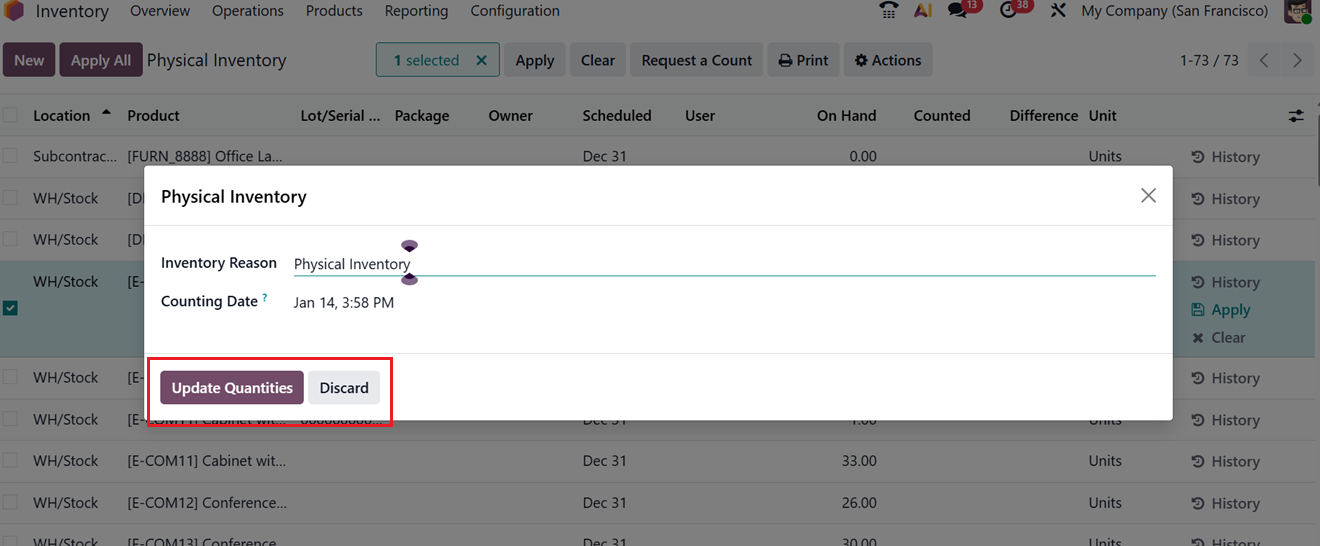
Once the desired updates are made, press Apply again to finalize them. This will open a Physical Inventory updating pop-up window, letting you request inventory counting for selected products. In the pop-up window, specify The Inventory Reason and a Counting Date date for the count and click on the Update Quantities button, as shown in the screenshot below.
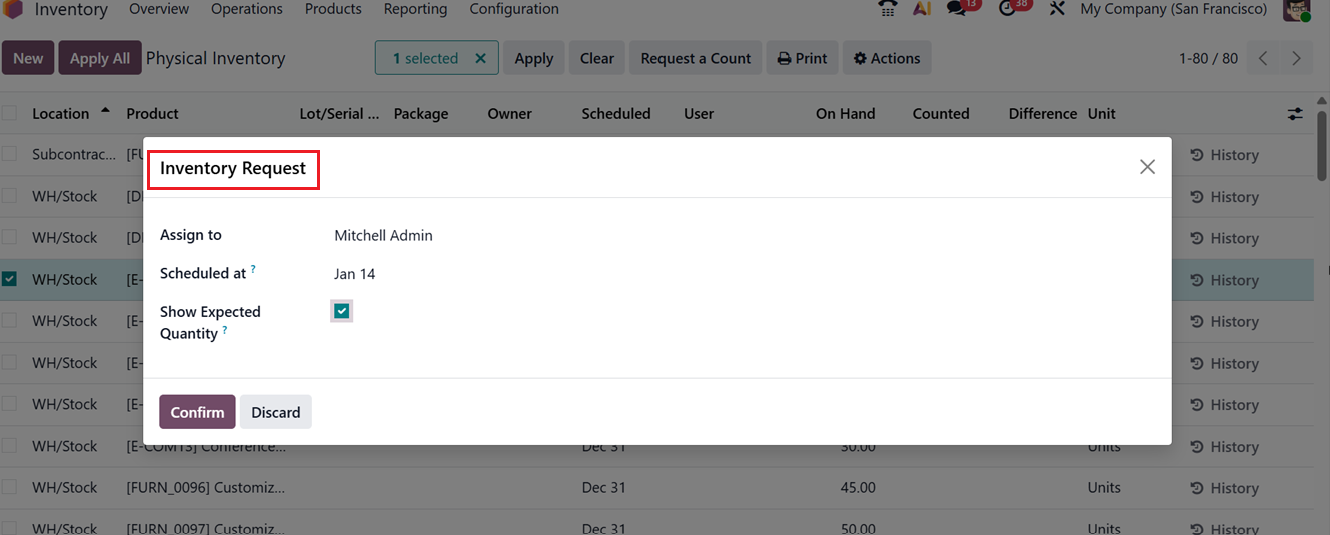
The ‘Request a Count’ button allows you to initiate a count for the selected inventory adjustments. A pop-up window lets you choose a specific person who is responsible for the request in the ‘Assign to’ field. Then, the date for when the inventory should be provided in the Schedule at field. The Show Expected Quantity field can be enabled or disabled to whether or not display this quantity to the users as needed. To proceed, select the Confirm button. In Odoo 19, inventory adjustments are handled using the same approach.
The ‘Actions’ menu from the dashboard can be used to Export the dashboard data, Insert in Spreadsheet, Duplicate, Set to quantity on hand, Set to 0 and Relocate.
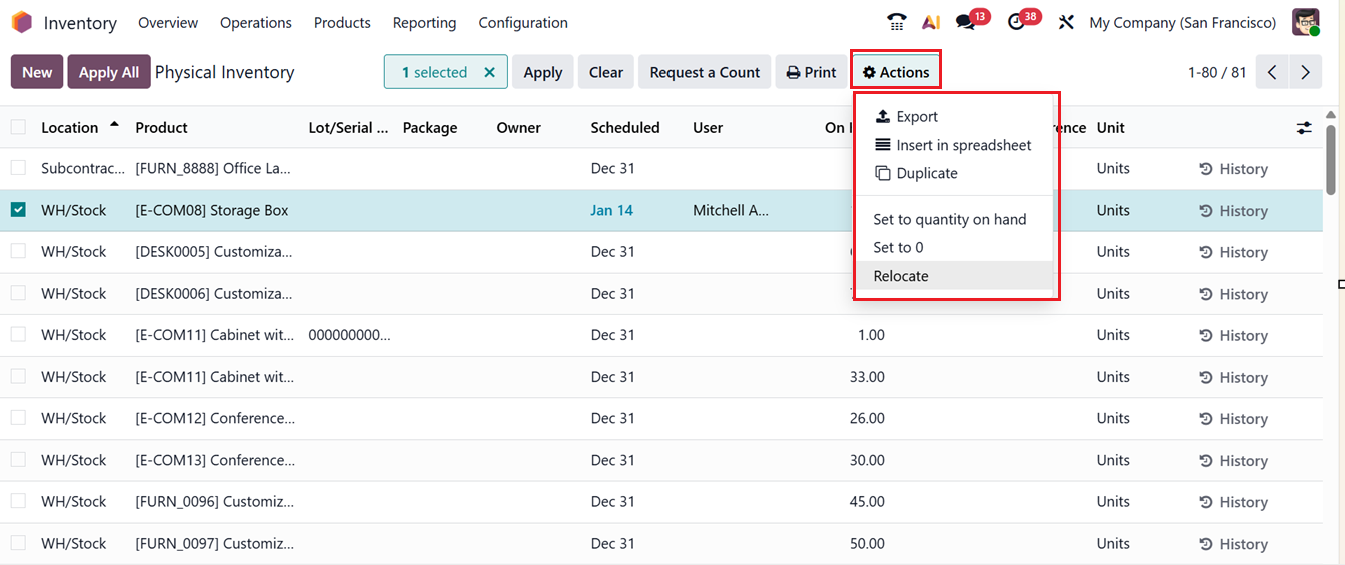
The Relocate option in Odoo 19 simplifies stock movement between locations. You can add destination details and a brief note, then confirm the relocation.

The Set to 0 option will set the selected product quantity to 0 units and the Set to quantity on hand option will set the selected products quantity to the On hand quantities.
For easy and effective inventory management, you can schedule the annual inventory counting period by setting the Annual Inventory Day and Month from Operations tab of the Settings menu, as shown below.
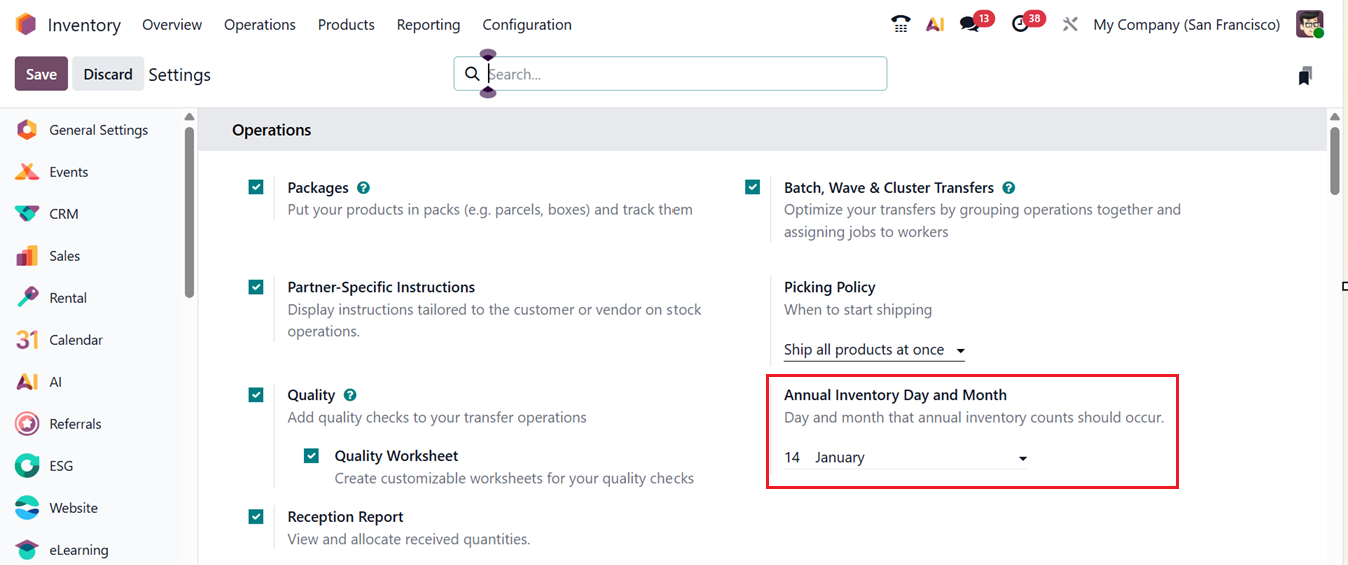
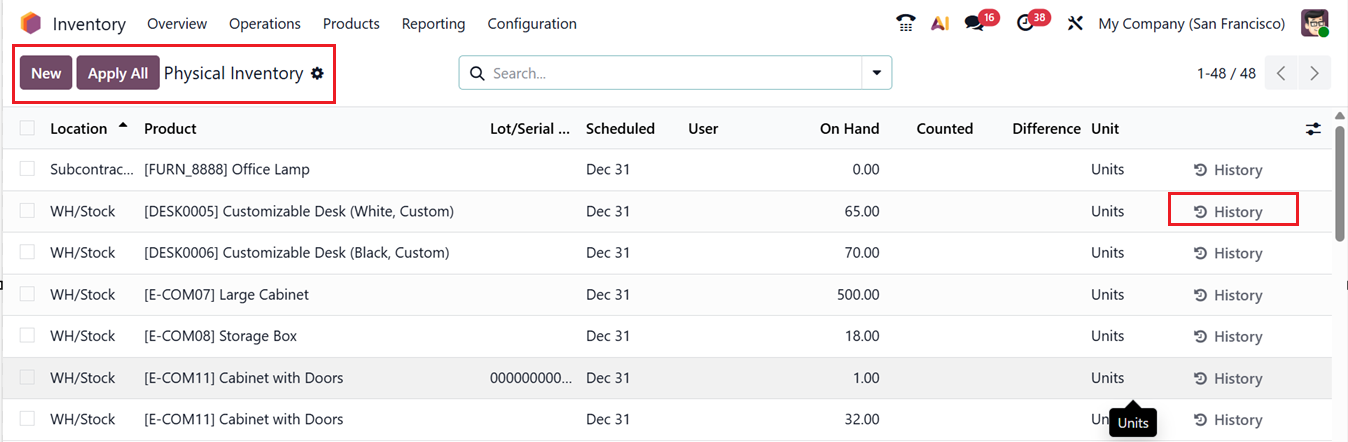
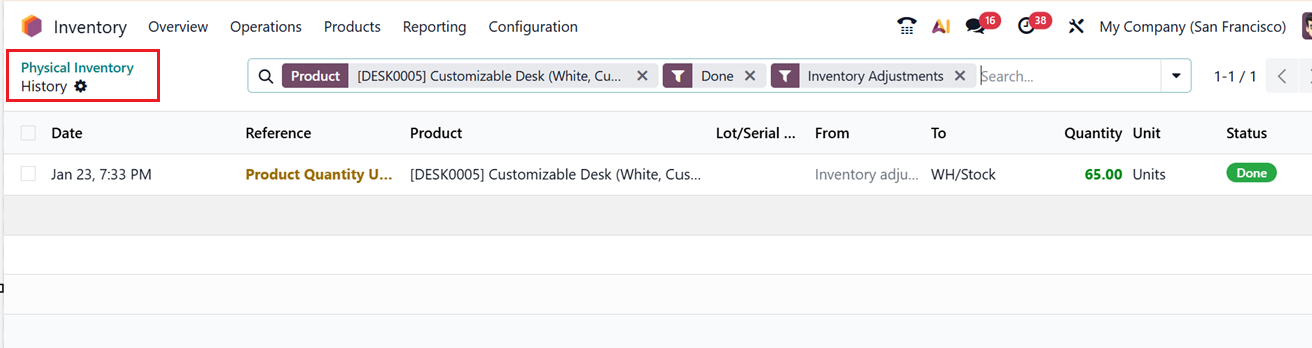
By defining this date, Odoo knows when your annual inventory counting period occurs, helping you plan and organize physical stock checks, ensure accurate stock levels, and align inventory counts with audits or year-end reporting. You can check this annual inventory update history of a product by clicking on the ‘History’ icon from the Physical Inventory dashboard, as shown below.
The History dashboard section will provide the last inventory count date, Reference, Product, Lot/Serial Number, User, On Hand Quantity, From and To Locations, Quantity, Unit and Current Status, as shown below.
1.9 Scrap
Scrap inventory includes defective or unusable products, such as items that are damaged or past expiration. These products cannot be sold and must be removed from stock. Slightly damaged goods may be repurposed for repairs, while reusable materials from scrap can be recycled. Implementing an intelligent scrap management system reduces waste, lowers costs, and benefits the environment.
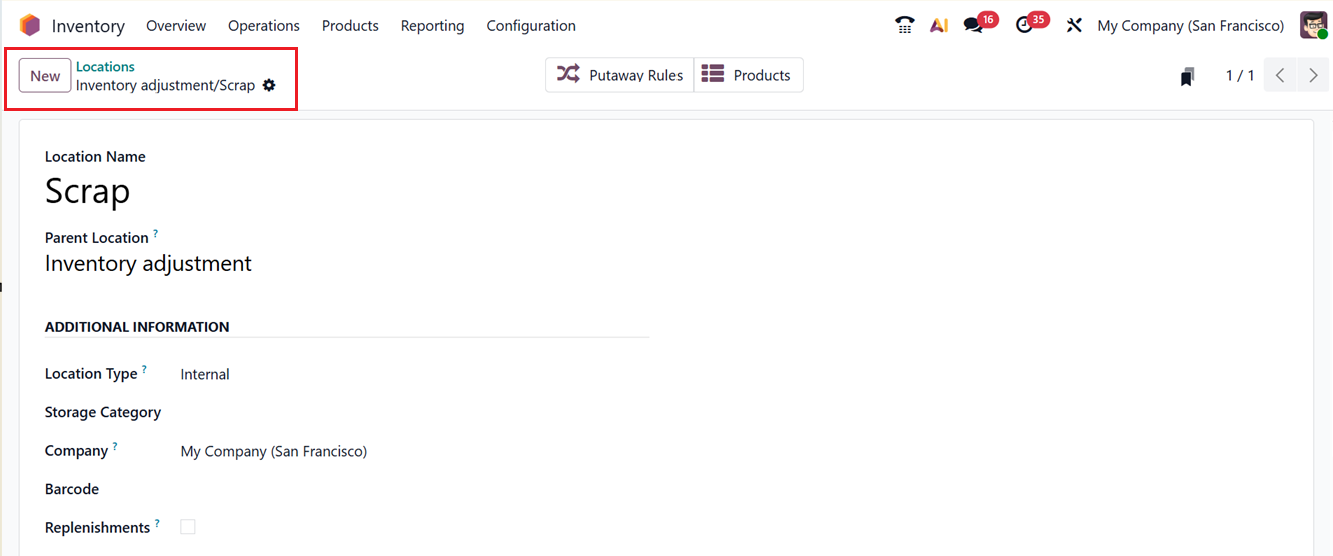
You can select a scrap location from the warehouse’s existing storage locations. Let us see how Odoo 19 simplifies the management of scrap locations in your inventory. The setup and management of storage locations in Odoo Inventory have already been explained, and scrap locations can be configured using the same method. To do this, navigate to the Locations option under the Configuration menu. This will open a new window, as shown below.
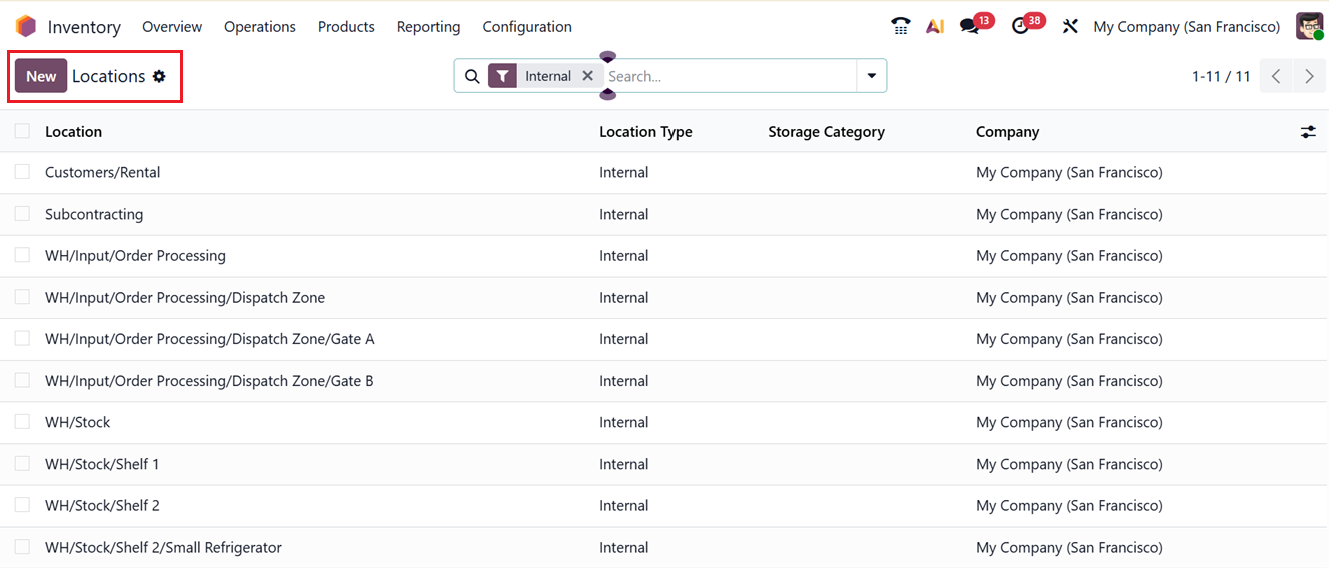
Then, click on the New button to create a new scrap location. Enter a name (for example, “Scrap Location”) in the designated field. The remaining steps are similar to standard location configuration. Multiple scrap locations can be configured this way.
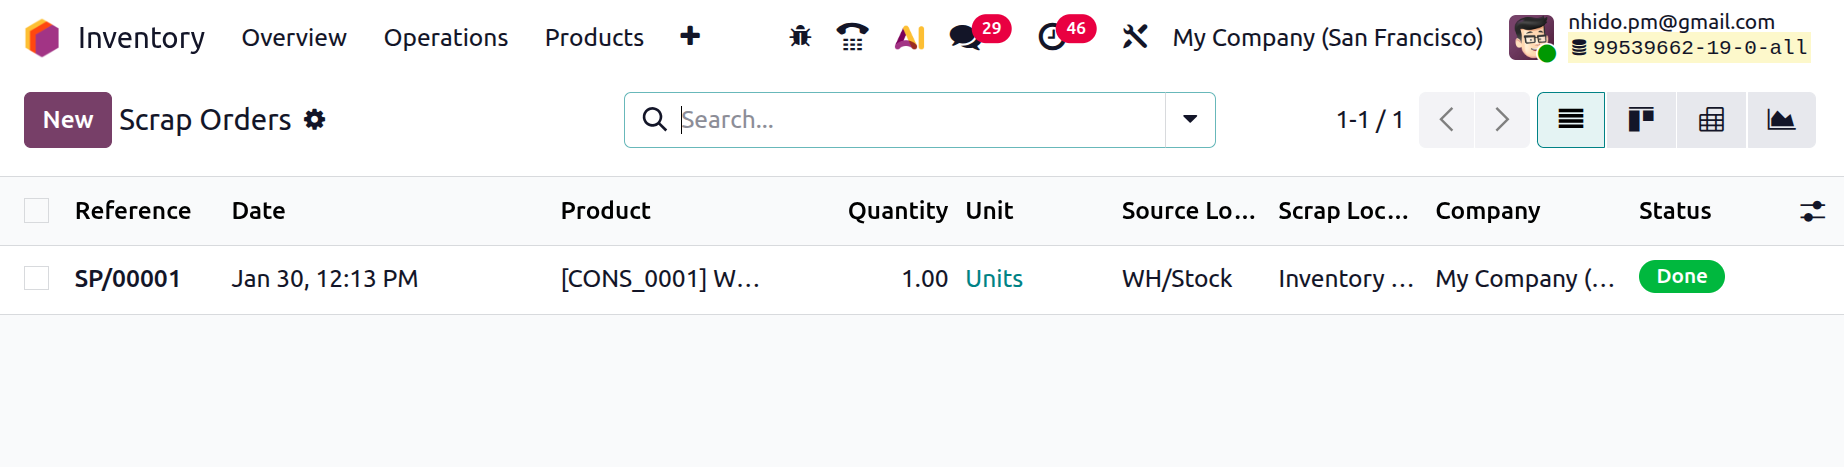
When opening the Scrap option under the Operations tab, fields for Reference, Date, Product Name, Quantity, Unit, Source Location, Scrap Location, Company and current Status can be seen in a dashboard view, as shown below.
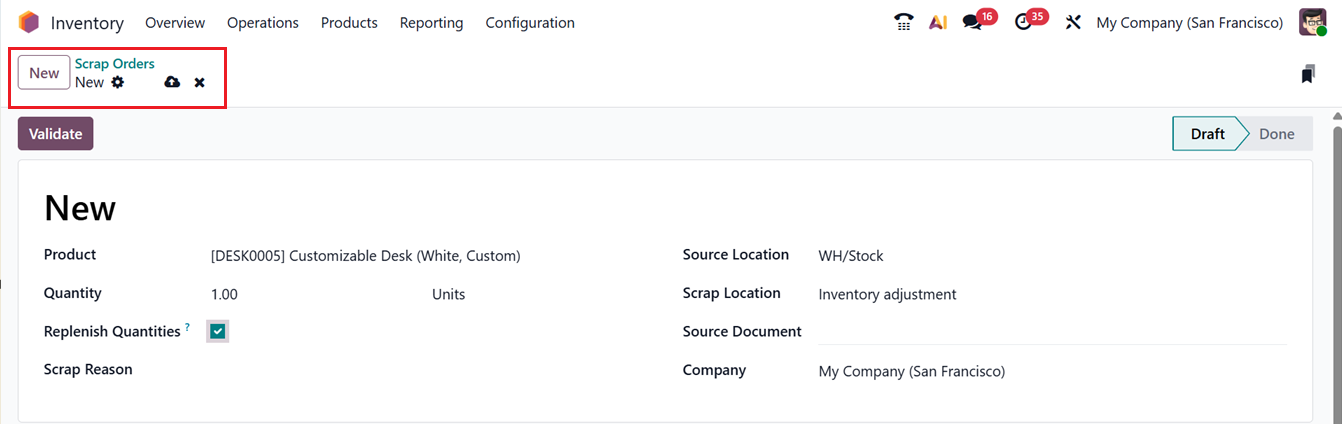
You can click on the ‘New’ button to create a new Scrap order and edit the required fields in the displayed window. When you open the Scrap option from the Operations tab, the form displays fields for the scrap Product name, Quantity and the Scrap Reason explaining why the products are marked as a scrap order. Enabling the Replenish Quantities option will trigger replenishment for this scrap product. If it is only possible if a replenishment rule exists for this scrapped product.
The Source Location is the default warehouse location from which a product is picked during stock operations, while the Scrap Location is where damaged, expired, or unusable products are moved. Scrap items are removed from available stock but kept for tracking, ensuring accurate inventory control.
Then, the Company details will be shown automatically and you can also mention any Source Document validating the scrap reason, as shown in the screenshot below.
If you want to move damaged or expired items, you can choose a destination from the Scrap Location drop-down list. Once you click Validate, the product is transferred to the selected scrap location, and the quantity is deducted from the related delivery orders. You can also sort and organize scrap data using the Filter and Group By tools available on the Inventory platform.
1.10 Landed Costs
The landed cost represents the total additional amount a company must bear for a product at the time of purchase. It encompasses multiple associated charges such as transportation, handling fees, import taxes, customs duties, and other incidental expenditures. These additional amounts are aggregated with the base purchase price of the product to arrive at its total selling cost. Each organization may utilize distinct policies or methods, depending on its internal accounting structure, to determine the landed cost. Within the Odoo 19 Inventory module, users can calculate these costs and allocate them proportionately across individual product quantities to revise their selling prices effectively.
To activate the Landed Costs feature, navigate to the Settings menu and activate the option form the ‘Valuation’ tab, as shown in the screenshot below.

By enabling this feature, users can append custom-defined landed costs to their items. Begin by generating a purchase order that includes products within the same category, then mark the order to observe how the landed cost process functions. Landed costs can only be applied to products that use FIFO (First In, First Out) or AVCO (Average Costing) valuation methods. These requirements must be met before applying landed costs. For this feature, you also need to create a Landed Cost Product.
To check this, create a RFQ order in the Purchase Module. Then, check under the Products section to see the unit price of each purchased product. Once satisfied with the details, select the Confirm Order button to finalize the purchase. Then receive the items by clicking on the Receive. So, the items will be recorded in your inventory system.
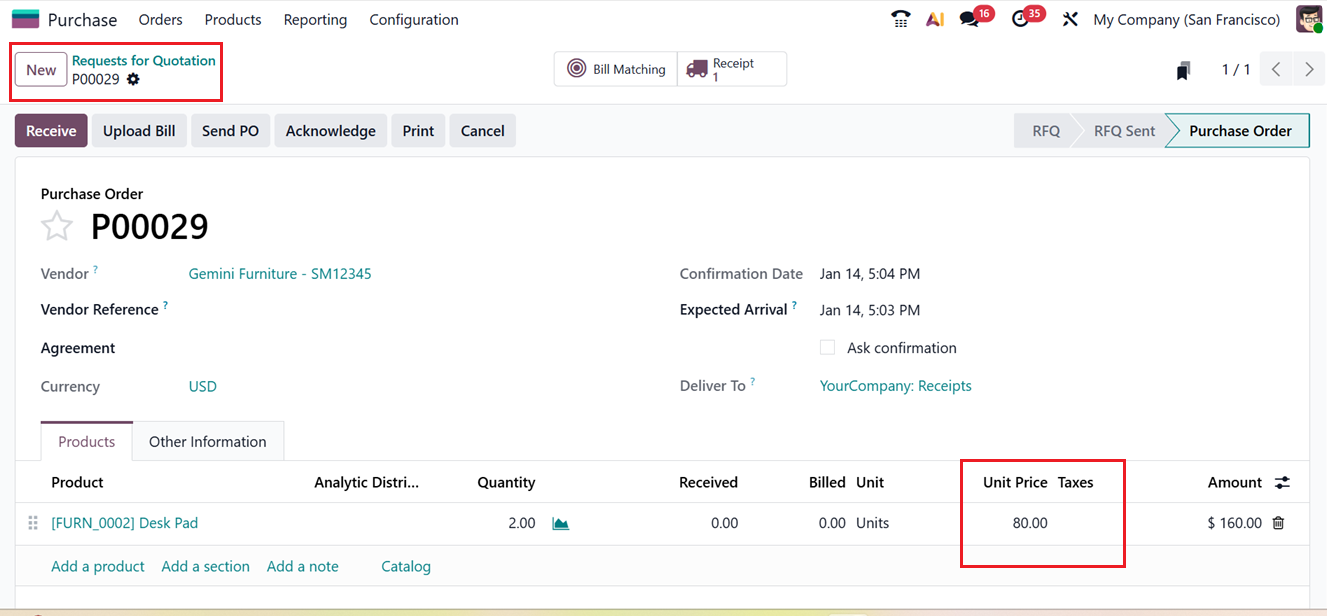
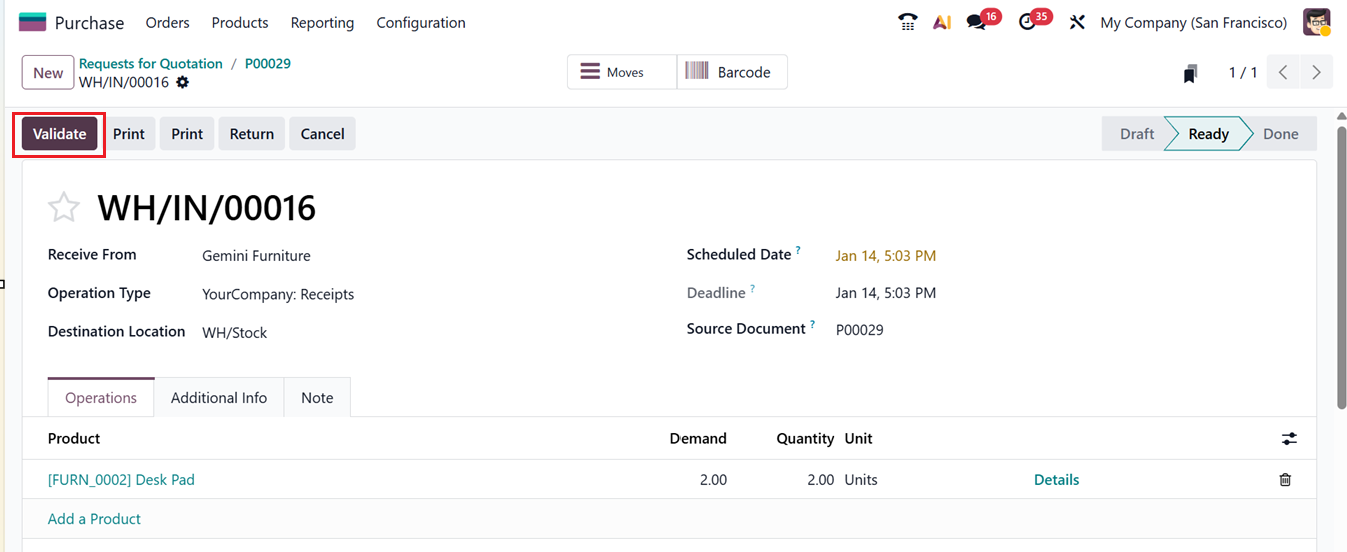
After receiving, you can review the items stored within your warehouse inventory. To validate that the stock transfer was successful, click the Validate button. The received goods are now placed within the designated storage location as noted on the receipt. When these items are sold later, the landed cost can be added to determine the updated selling price.
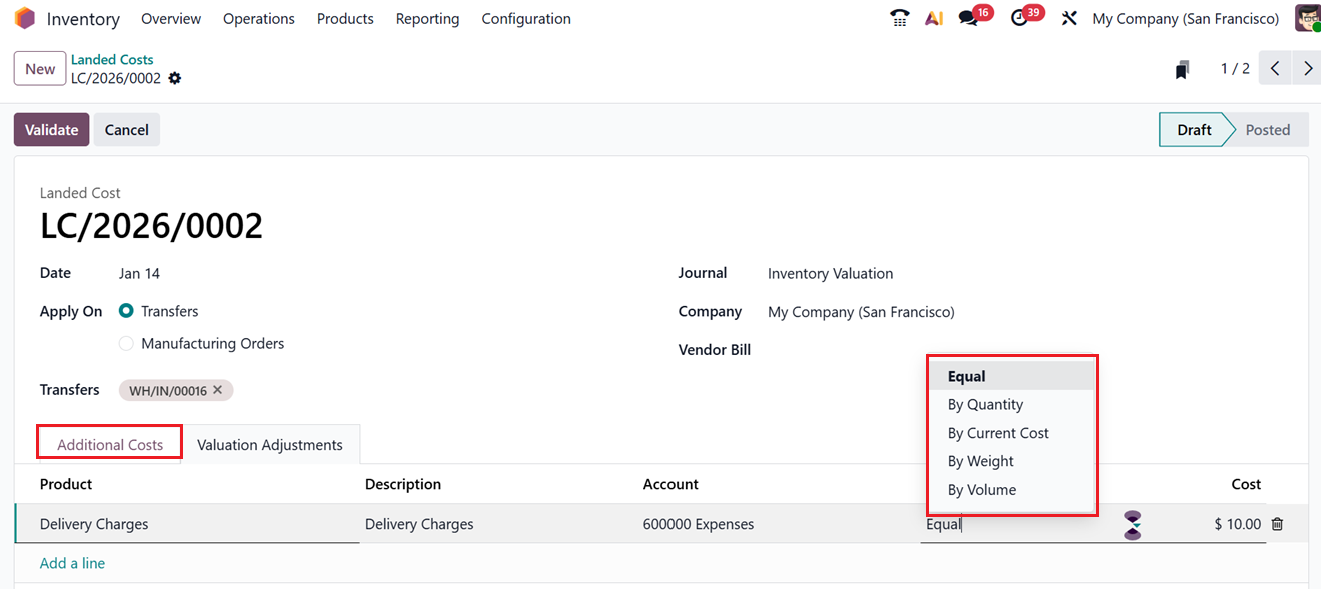
Consider incurring a minimal expense during product transfer for instance, freight or transportation costs. Such transfer-related expenses can be included as an additional charge through the landed cost functionality. In Odoo 19, this process is accomplished within the Inventory module under the Operations menu, where the Landed Costs section is located., as shown in the screenshot below.

From this interface, you can view the list of previously defined landed costs or charges. To add a new one, simply click the New button and enter the creation date in the appropriate field. You may apply the landed cost either to Transfers or Manufacturing Orders.
For this example, since we are applying it to transfers, select Transfers under the Apply On field. Next, specify the Receipt ID from the earlier purchase order. Additionally, fill in fields for the Journal, Company, and Vendor Bill, as shown below.
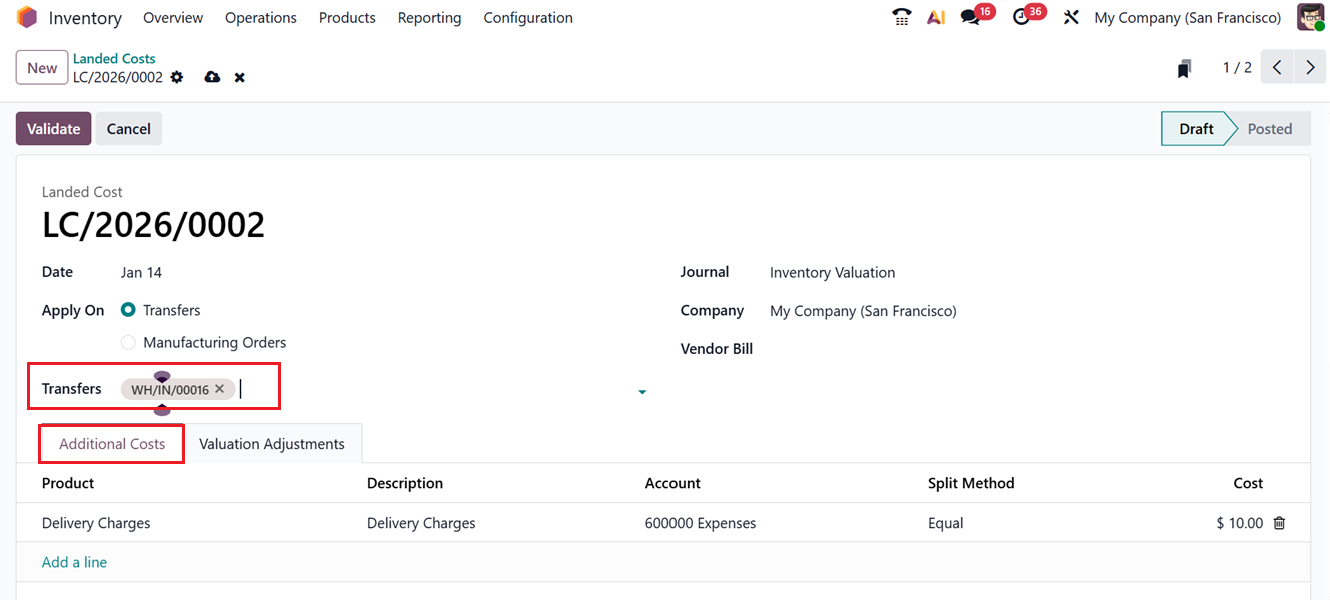
Under the Additional Costs tab, click Add a line button to enter the details of the additional expenses. In this demonstration, Delivery Charges are considered as a separate cost. When defining transportation as an added charge, ensure that it is created as a Service- Product Type as shown in the screenshot below.
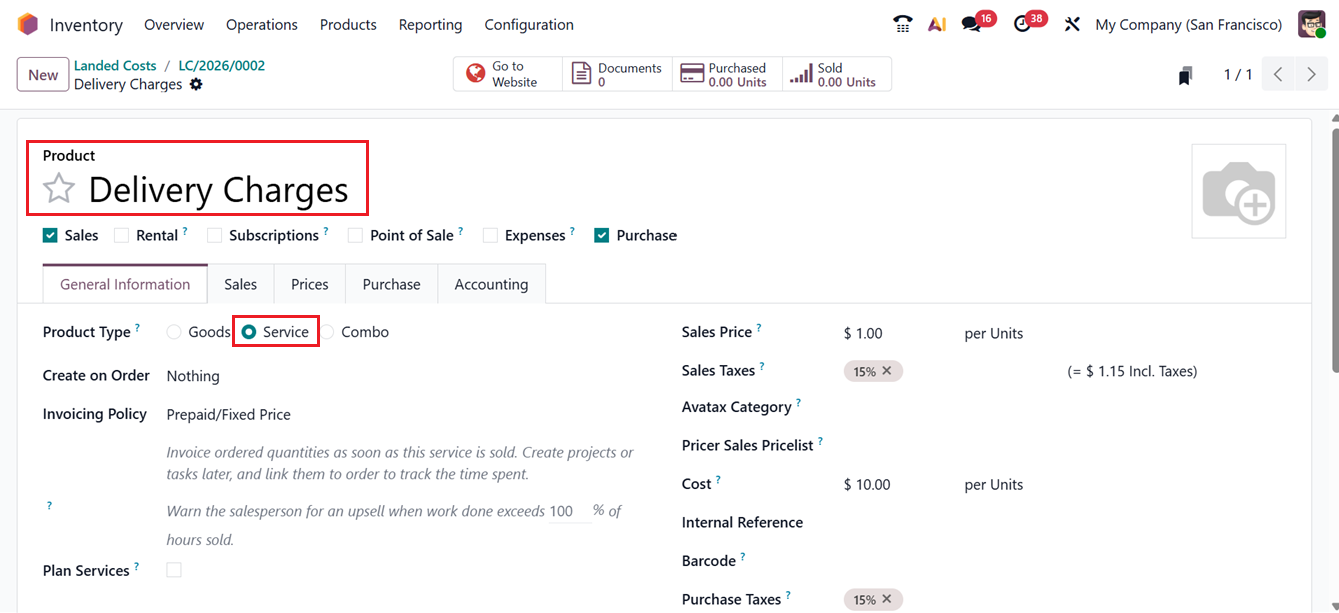
After specifying the Product, Description, and Account information you have to enable the ‘Is a Landed Cost’ option from the Purchase tab of the product form in the ‘VENDOR BILLS’ tab. This will allocate the extra cost on the receipts when receiving a vendor bill. This will display another field, where you can select an appropriate Default Split Method.
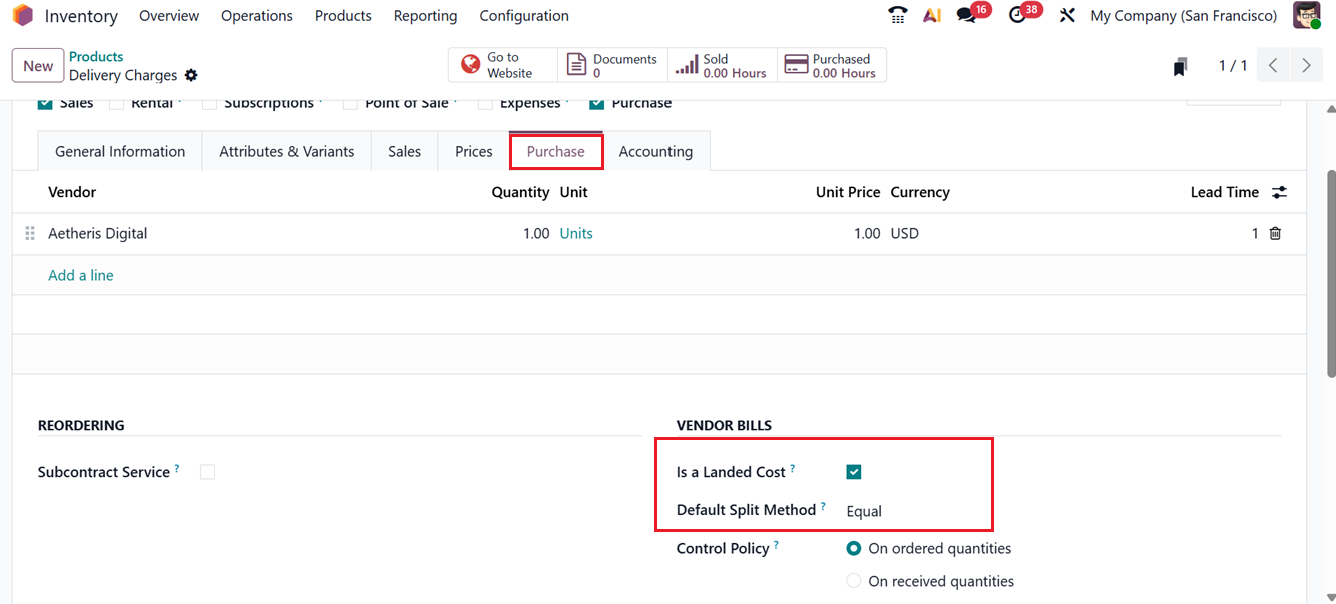
The Default Split Method determines how the landed cost is distributed among the products listed in the corresponding receipt. The division can be based on several options Equal, By Quantity, By Current Cost, By Weight, or By Volume depending on the organization’s pricing policy. For this illustration, the Equal split method is chosen.
Once all the details are reviewed, press on the Validate button to confirm it. Upon validation, the calculated landed cost is automatically incorporated into the product’s final selling price. Implementing this practice allows a company to better evaluate its total costs, resulting in a more precise selling price and potentially improved profit margins.
1.11 Replenishment
Replenishment is one of the most essential processes in inventory management, ensuring that a company maintains an optimal stock level to meet continuous demand. It involves restocking items in accordance with sales trends and supply requirements to prevent both stockouts and overstocking. The Odoo 19 ERP System provides robust tools to assist businesses in automating and managing replenishment activities effectively. Replenishment within Odoo can be handled in two primary ways either through the Product Management window or by using the Replenishment module within the Inventory application.
In the Operations tab of the Odoo 19 Inventory module, users can access the Replenishment Management interface. This advanced platform displays a comprehensive list of preconfigured replenishment orders that have already been set up within the system, as shown in the screenshot below.

An advanced search box is provided at the top of the interface, enabling users to locate specific replenishment orders quickly. Various Filters and Group By options further simplify the process of organizing and retrieving information. These allow sorting of orders based on parameters such as Archived, Manual, Automatic, To Order, Not Snoozed, Location, Product, and Category. On the left-hand panel, users can also find a Custom Filter and aCustom Group feature that enables sorting data by warehouse locations or other desired criteria.
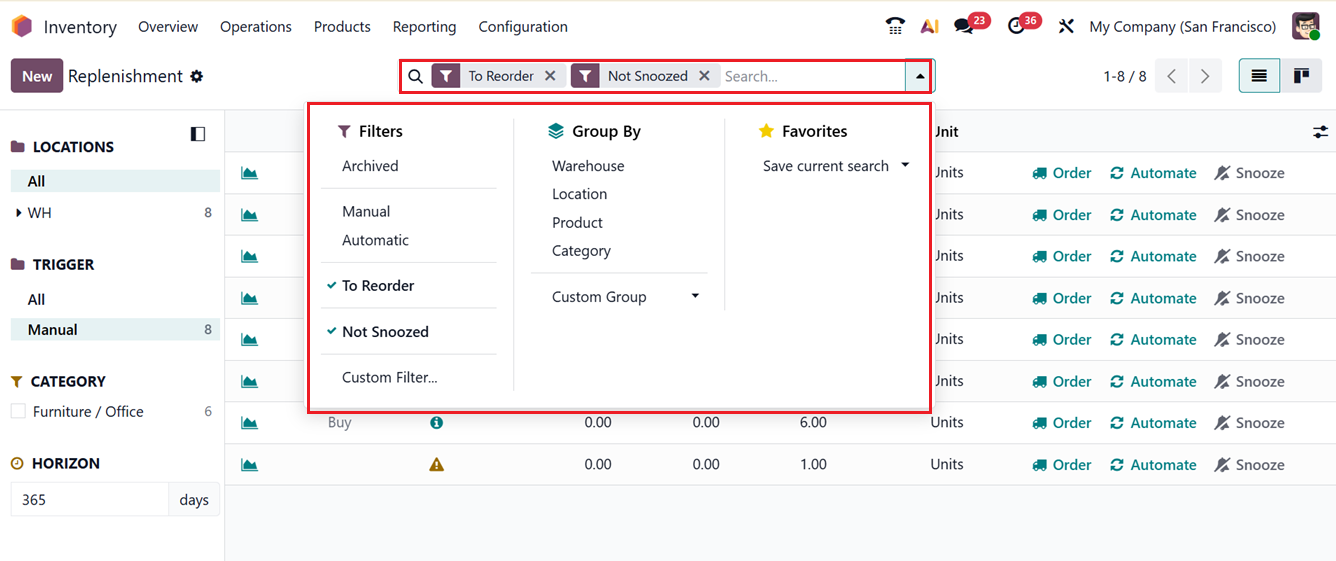
Additionally, the TRIGGER option from the left side panel allows users to distinguish between system-generated replenishment requests and those created manually. Apart from the List view, you can also see the dashboard in Kanban view by utilizing the relevant icon from the top right corner.
In the list view, each replenishment record provides key details such as Product, Location, On Hand, Forecast, Route, Min, Max, To Order and Unit.
Selecting the Order link creates a Request for Quotation (RFQ) for a one-time replenishment of the product. On the other hand, the Automate option sets the system to replenish the product automatically whenever stock falls below the defined minimum threshold.
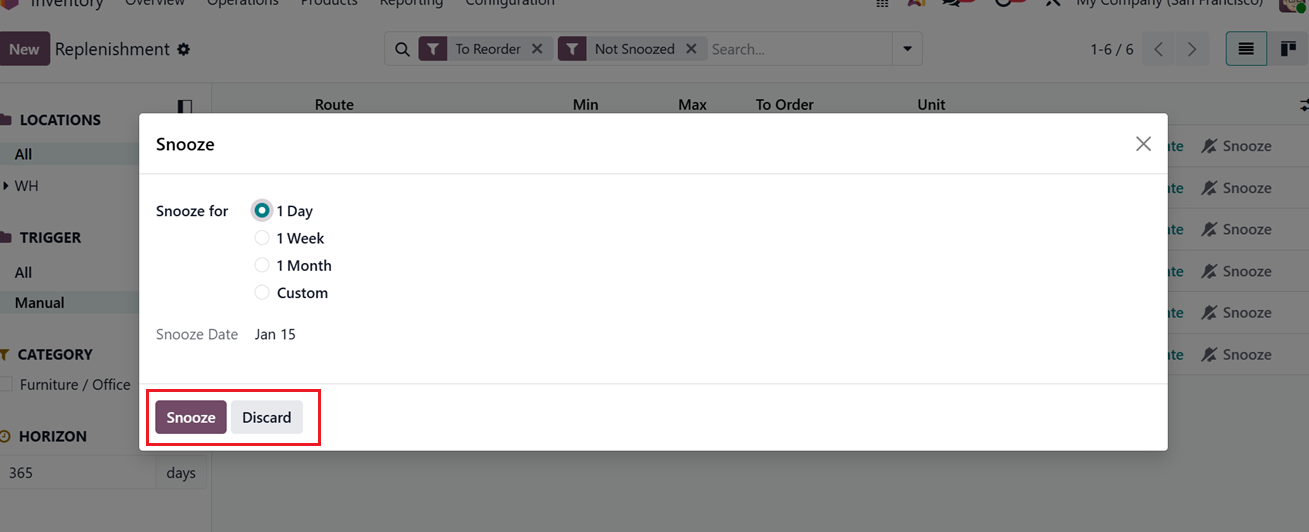
For situations where you want to postpone replenishment temporarily, Odoo offers a Snooze function that allows you to delay the replenishment process for a specific period.
The Snooze feature gives you flexible scheduling choices you can defer replenishment for 1 Day, 1 Week, 1 Month, or any Custom time frame based on operational needs. Additionally, a Snooze Date field is available within the pop-up window, enabling you to specify the exact date on which the replenishment action should resume, as shown in the screenshot below.
To create a new replenishment manually, click on the New button from the Replenishment window. Doing this will open a new entry line where you can define the details of the replenishment.
Once you enter the product name, Odoo automatically fills in relevant fields like Location, On Hand Quantity, and Forecasted Quantity. From the Route dropdown menu, you can select the desired route for product procurement, such as Manufacture, Replenish on Order, Buy, Dropship, or Transferring from another warehouse, a s shown in the screenshot below.
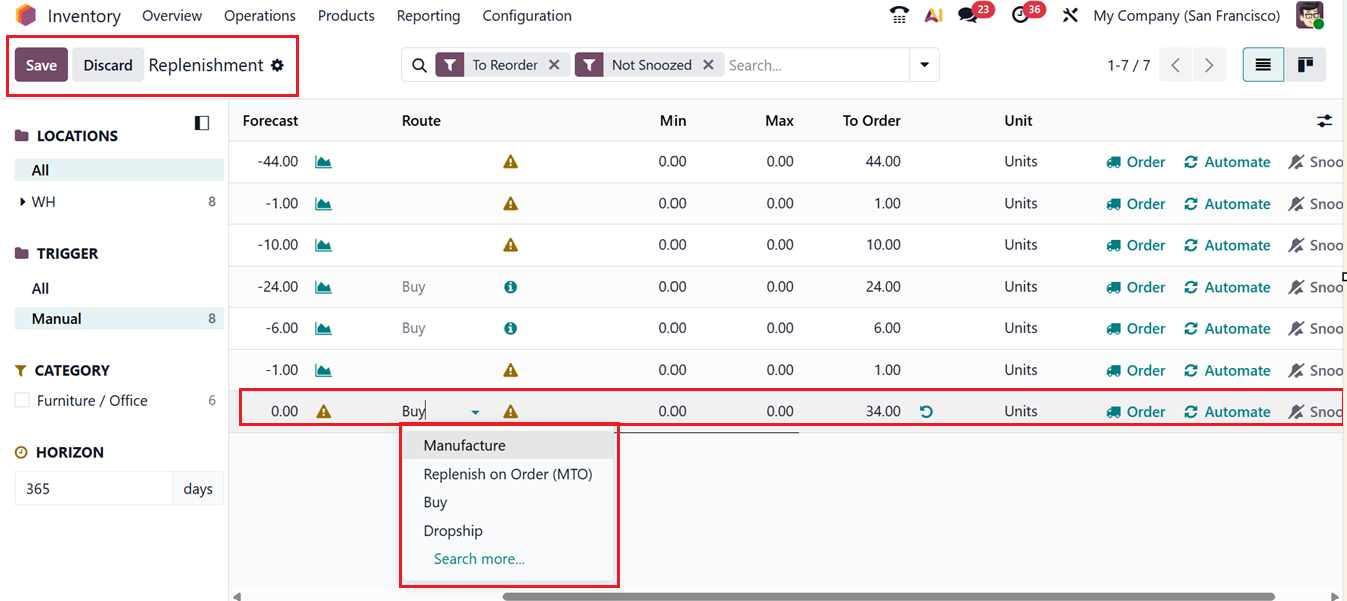
Next, you should specify the Minimum and Maximum stock levels for the product. These values determine when replenishment should be triggered. After entering the quantity ‘To Order', Odoo presents two replenishment options: Order Once and Automatic Orders.
By utilizing this feature, businesses can manage restocking operations strategically, ensuring they maintain ideal inventory levels while optimizing procurement timing and reducing unnecessary holding costs.
1.12 Master Production Schedule
The Master Production Schedule (MPS) in Odoo 19 supports long-term production and inventory planning by allowing users to forecast demand and plan manufacturing or purchasing activities in advance. It enables manual entry of expected demand, analyzes current stock, safety levels, bills of materials, and existing orders, and then suggests replenishment quantities. Users can review these recommendations and generate manufacturing orders or purchase orders directly from the MPS view, maintaining full control over execution. With flexible planning periods and clear visual insights, MPS helps businesses align production with future demand and optimize inventory management.
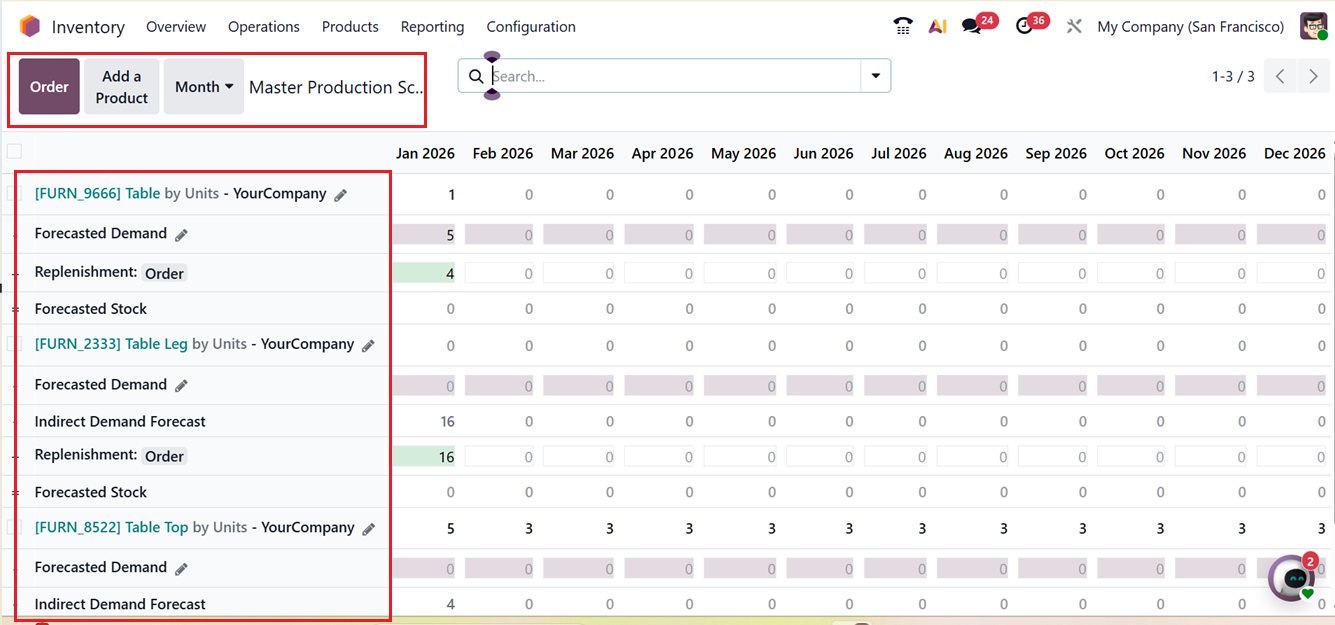
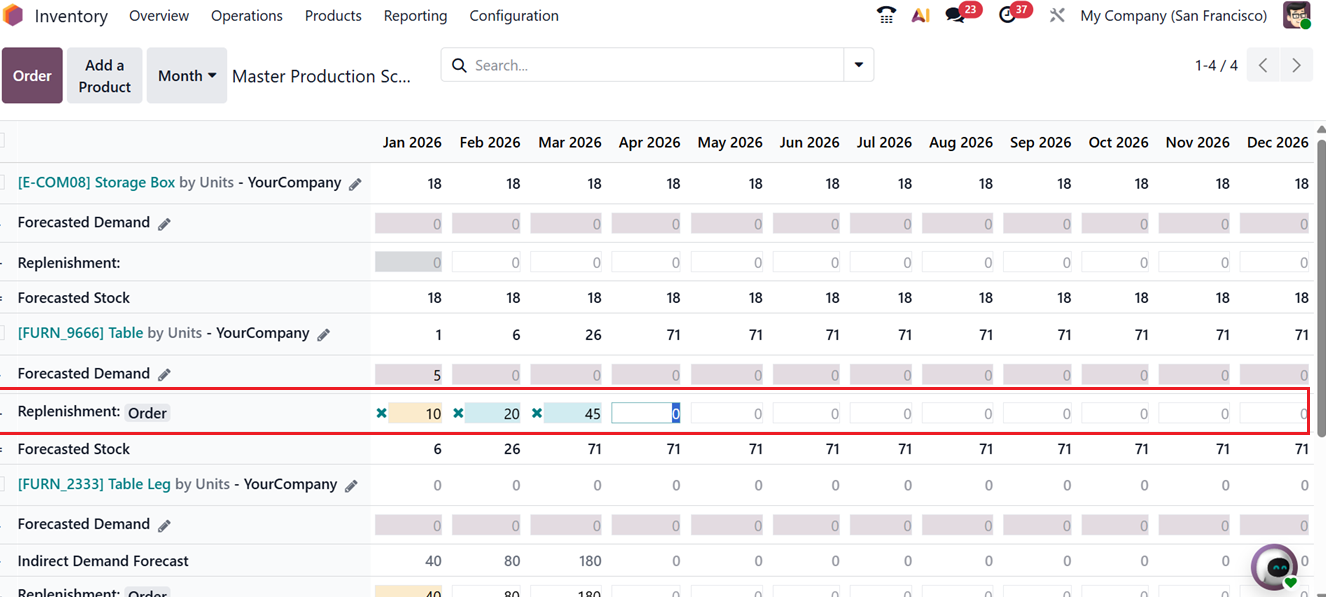
The ‘Master Production Schedule’ option from the ‘Operations' menu will show the dashboard of all the products. The left side of the MPS screen lists all products, with each product displayed across multiple rows. These rows represent the planning data of a single product over all defined time periods.
By default, the view includes the Product name with its internal reference and Company name, Forecasted Demand entered manually for each period, Indirect Demand Forecast, Suggested Replenishment quantities, and Forecasted Stock. Together, these rows follow a simple planning logic where forecasted demand plus replenishment results in the projected stock for the next period, as shown in the screenshot below.
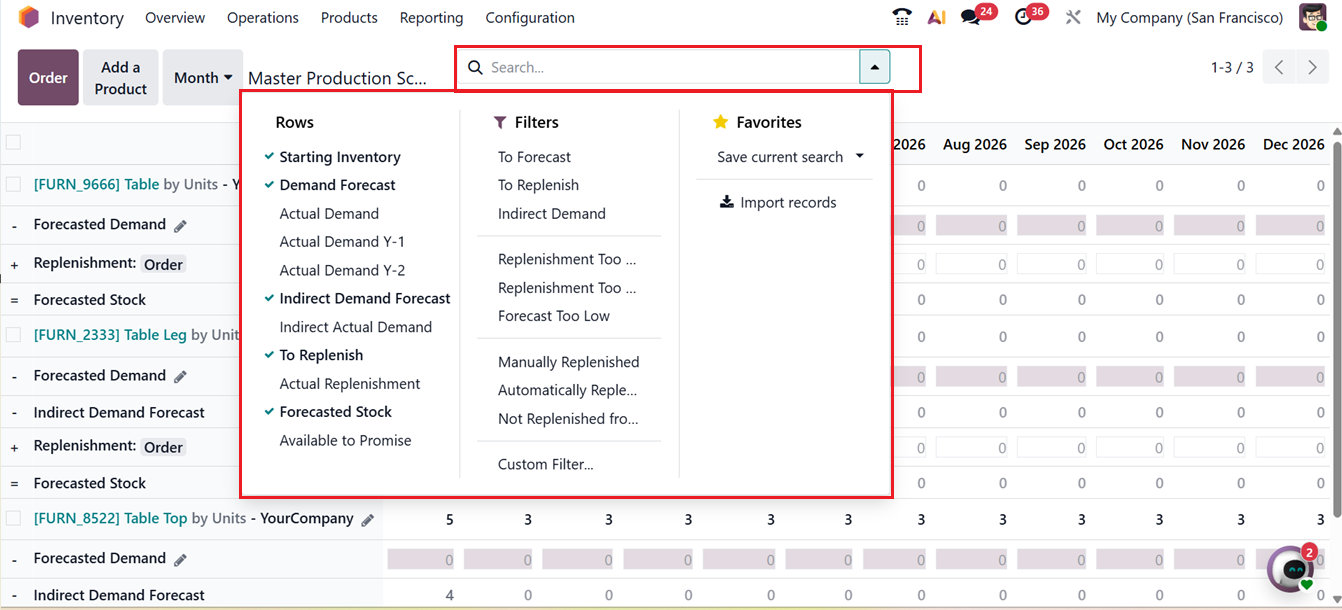
The MPS view can be adjusted to show additional planning data using different Filters options from the advanced search bar. Also, you can create customized filter options using the ‘Custom Filter’ option. Then, you can include more rows such as Actual Demand from confirmed sales orders, Indirect actual Demand, Available-to-Promise quantities, previous year demand for seasonal comparison, or Actual Replenishment based on confirmed purchase and manufacturing orders. This flexibility helps create a more realistic and data-driven production plan.
To the right side of the product list, the dashboard displays columns representing time intervals defined in the configuration settings, such as daily, weekly, or monthly periods. The number of columns depends on the selected planning horizon. The first column always reflects the current period, serving as the immediate focus for planning decisions. Here, it shows on a monthly basis.
Replenishment values in the current period use color indicators to guide actions. These visual cues help planners quickly prioritize decisions.
- Green signals that a new order is required.
- Gray confirms an order is already created.
- Yellow warns that existing orders are insufficient.
- Red indicates excess replenishment that may cause overstock.
Odoo allows replenishment orders to be generated directly from the MPS dashboard. Using the ‘Orders’ button, orders can be created for a single product, for multiple selected products using bulk actions, or globally for all products that fall below safety stock in the current period.
The ‘Add a Product’ button can be used to add new products into the Master Production Schedule dashboard. Clicking on the respective button will open a pop-up window, where you can add the product details including the Product name and enable the Indirect Demand option to not display the product in the ‘To Forecast’ filter. Then, mention the Bill of Materials to import the bill of material components.
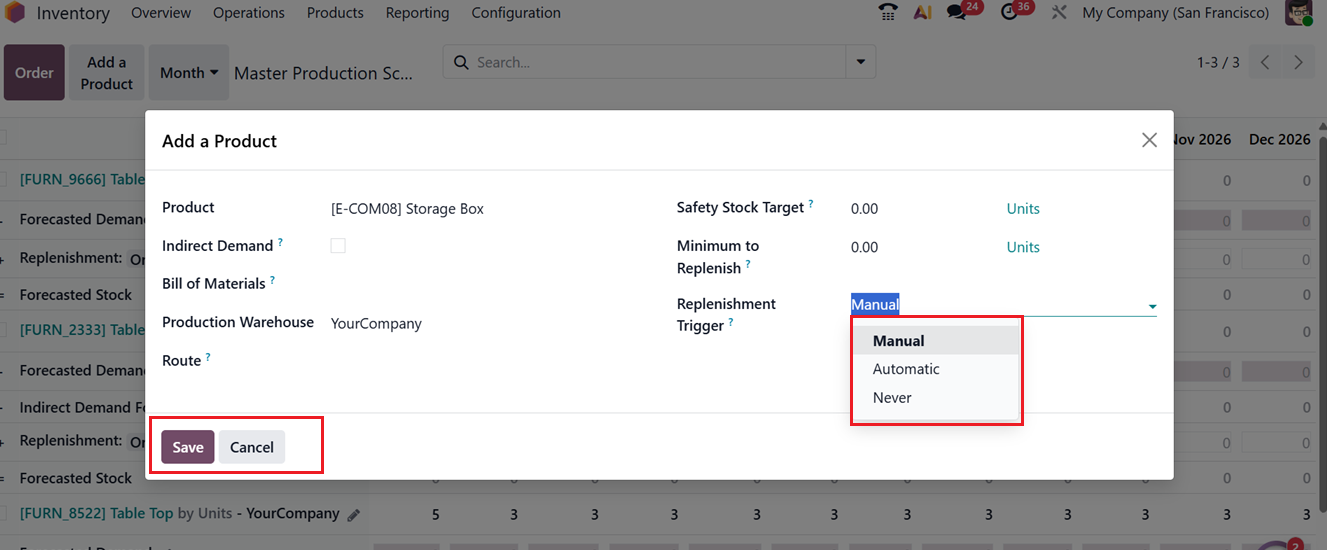
The Production Warehouse specifies where inventory and production planning are applied, and the Route determines the route to replenish your product. The Safety Stock Target defines a minimum free stock level that has to be maintained always. Then, the Minimum to Replenish sets the smallest allowable replenishment quantity, and the Replenishment Trigger controls when the system suggests replenishment based on stock levels and demand using three options including;
- Manual: Product to be replenished manually from MPS.
- Automatic:Product to be replenished by automatically using scheduled actions.
- Never: Product is not replenished from MPS.
After editing all the details, save them to add the product in the Master Production Schedule dashboard.
Using the ‘Order’ icon placed in the ‘Replenishment’ column of each product, you can simply replenish the products by manually entering the quantities, as shown in the screenshot below.
Clicking on the editing icon of the ‘Forecasted Stock’ field will open a ‘Suggest Forecasted Demand’ pop-up where you can set the ‘Period’ and ‘Based on’ condition, as shown in the screenshot below.
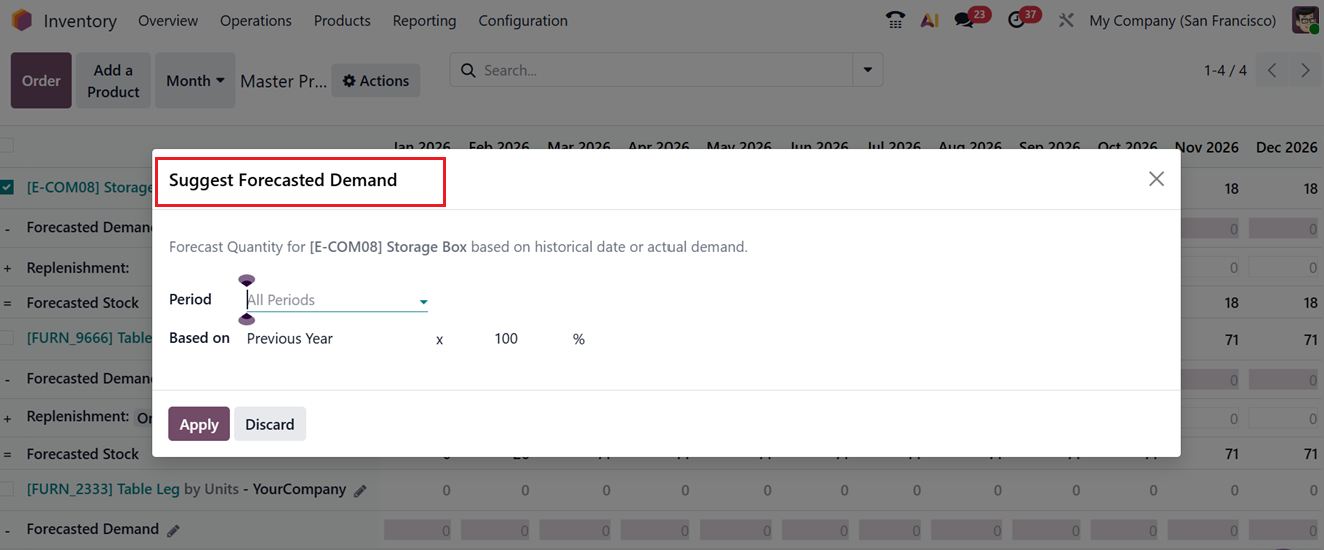
This is the expected quantity of the product that will remain in inventory at the end of each period, calculated on the assumption that all planned replenishments are completed.
Overall, the Master Production Schedule in Odoo 19 serves as a powerful planning tool that combines demand forecasting, replenishment suggestions, and order generation in one centralized view. It helps businesses plan ahead, maintain optimal inventory levels, and coordinate production and purchasing more effectively.
1.13 References
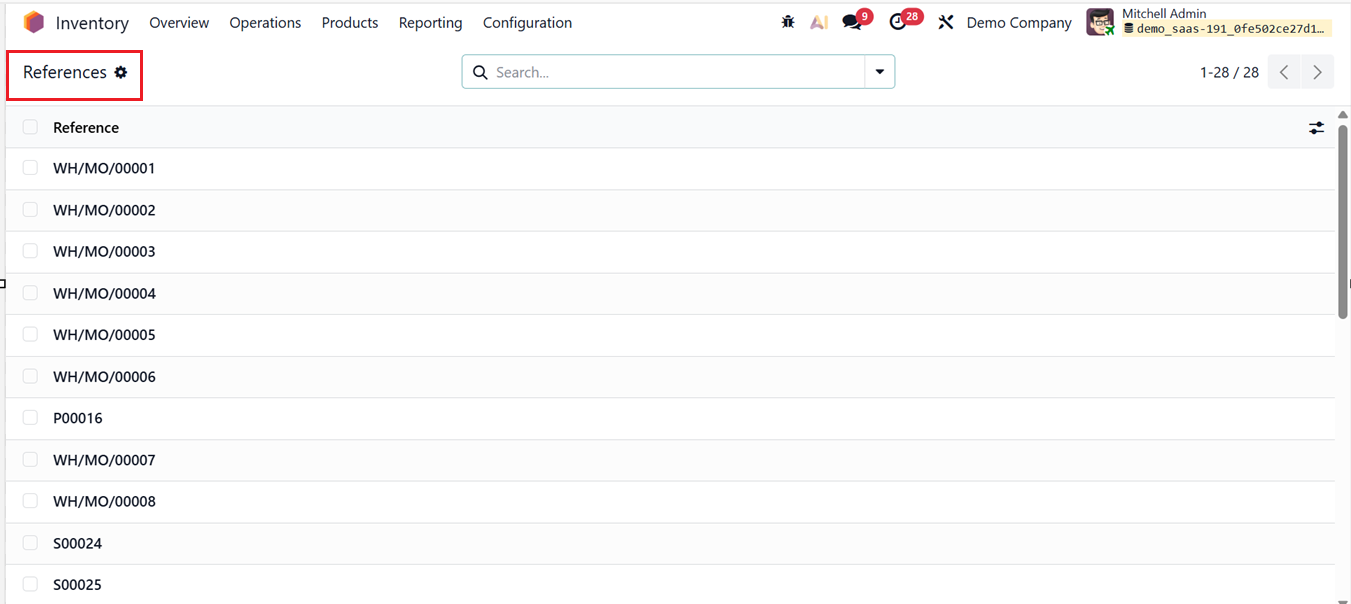
In the Odoo 19 Inventory Module, the References represents the unique identifier or document name assigned to an operation. It is used across different inventory-related documents such as receipts, deliveries, internal transfers, replenishment moves, inventory adjustments, and scrap operations. These references are automatically generated by Odoo using predefined sequences and typically look like codes such as WH/MO/00001 for receipts, WH/OUT/00023 for deliveries, or WH/INT/00010 for internal transfers etc. The reference is important because it allows users to track stock movements across Inventory, Purchase, Sales, and Accounting modules. It is also heavily used for auditing, reporting, and troubleshooting stock issues. Because it is system-generated and tied to sequences, it is generally not recommended to edit the reference manually.
You can see the references available across your Inventory system in a dashboard in the References window of the Operations menu as shown in the screenshot below.
1.14 Procurement: run Scheduler
The Run Scheduler feature in Odoo Inventory is used to trigger the replenishment engine. In simple terms, it tells Odoo to immediately evaluate stock levels and apply replenishment rules. When the scheduler is run, Odoo checks reordering rules (minimum and maximum quantities), routes such as Buy, Manufacture, or Dropship, lead times, and forecasted quantities. Based on this analysis, Odoo automatically creates the necessary documents, such as Requests for Quotation or Purchase Orders, Manufacturing Orders, and Internal Transfers.
In Odoo 19 and other recent versions, the ‘Procurement: run Scheduler’ option is typically found under the Operations menu but the location may vary depending on system configuration and user access rights.
Under normal circumstances, the scheduler runs automatically through a background cron job. However, users may choose to run it manually in specific situations, such as after creating or modifying reordering rules, importing stock quantities, changing routes or lead times, or when immediate replenishment is required without waiting for the scheduled run.
A common point of confusion is the difference between the Replenish button and Run Scheduler. The Replenish button applies to a single product and is used for quick, immediate restocking, while Run Scheduler processes all applicable products across the system and performs a full planning run. Although Reference and Run Scheduler are different concepts, they are connected in practice because documents created by the scheduler are also assigned system-generated references.