Products Menu
Monitoring each detail of a product is essential for maintaining precise and effective inventory management. With the Odoo 19 Inventory Module, users can add new products to the database and efficiently monitor their performance, movement, and availability to optimize operational control. The product configuration process in the Inventory module closely mirrors that of the Sales and Purchase modules. Within the Inventory menu bar, a distinct section labeled Products is available for streamlined product management.
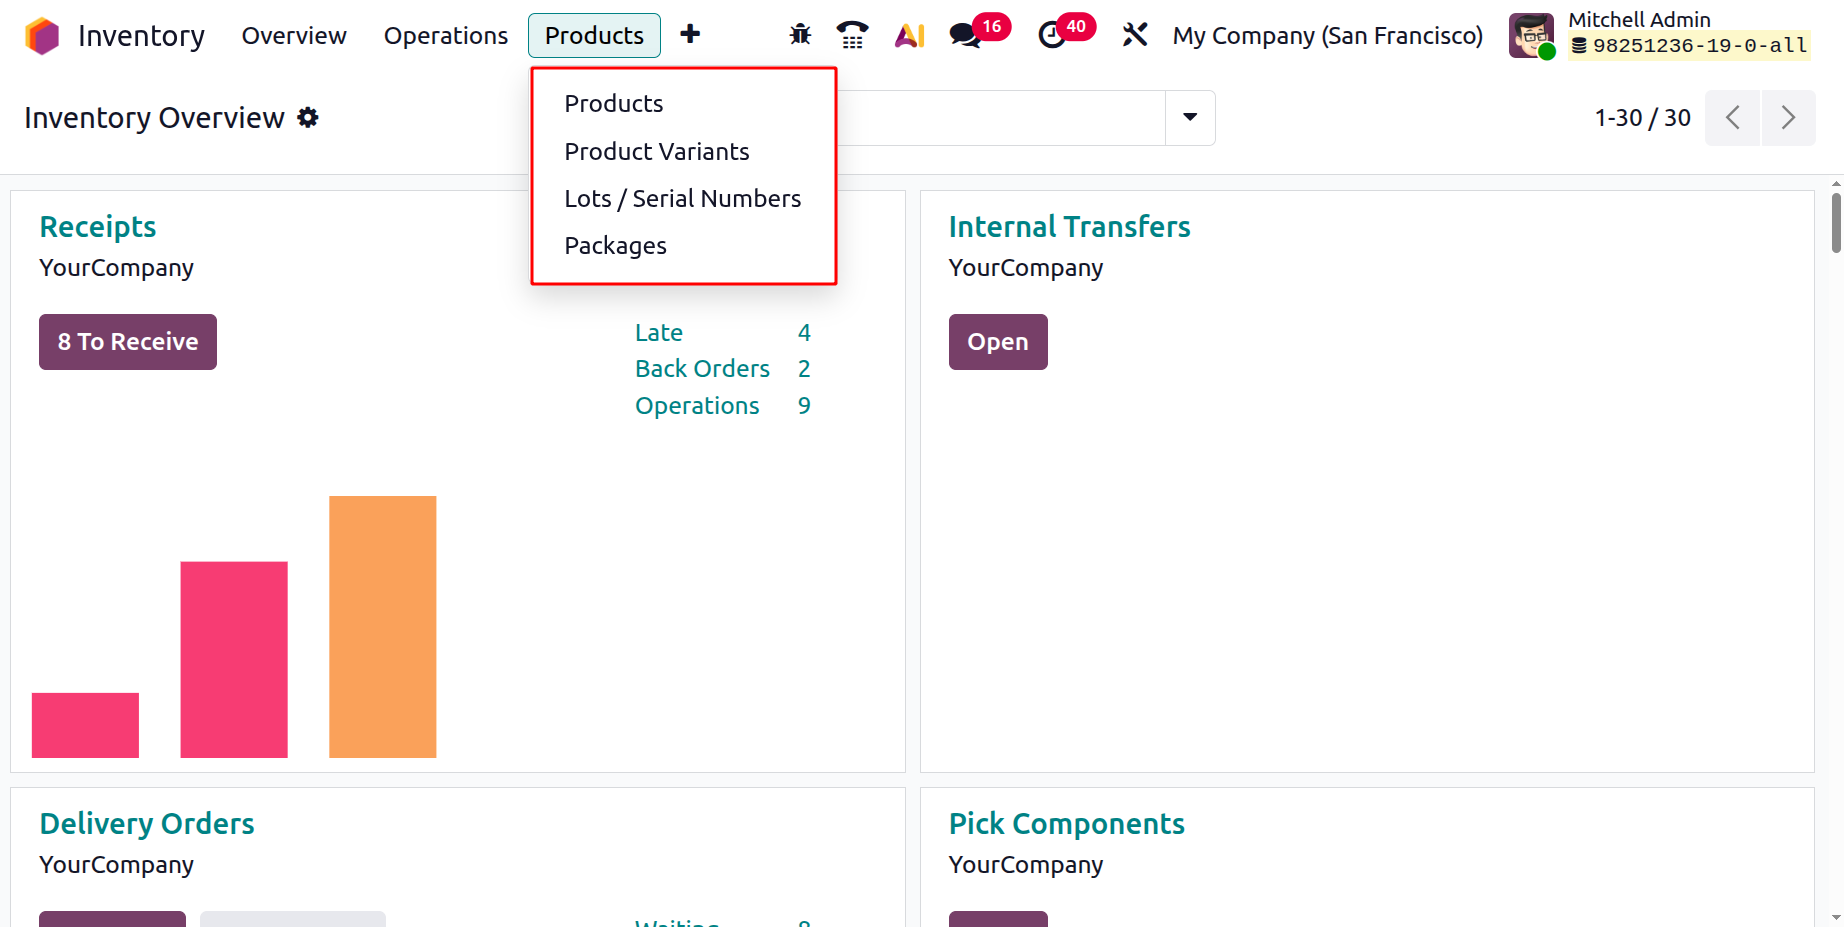
The Products Menu provides access to various sub-options, including Products, Product Variants, Packages, and Lots/Serial Numbers.
1.1 Product
By selecting the Products option, users can view all configured items within the system. The interface displays the products in Kanban view, where each product card presents essential information such as product name, image, price, and quantity available. Products can be easily added to the Favorites list using the star icon, facilitating quicker access to frequently used items.
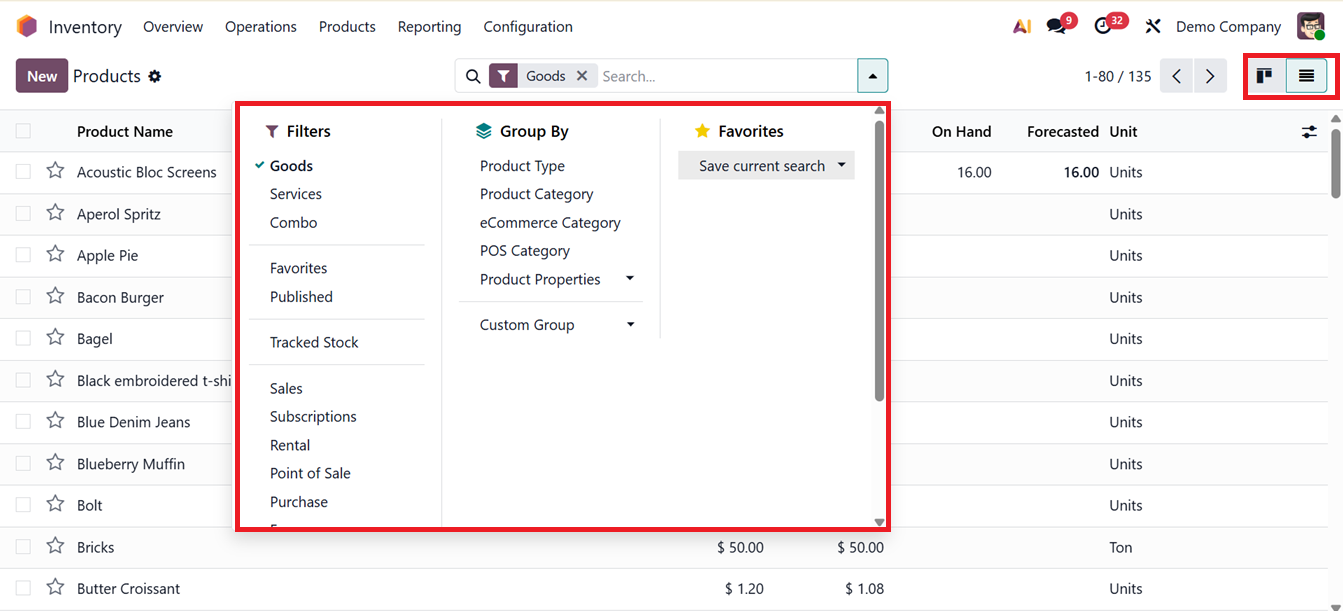
Odoo 19 incorporates advanced data management capabilities, including Filters and Group By options. These tools allow users to efficiently locate, categorize, and analyze product information within the inventory system.
The Filter feature offers both predefined and customizable options, enabling users to sort products by parameters such as Product Type, Sales Availability, POS Compatibility, Rental Status, Purchase Eligibility, Expensed Products, Forecasted Quantities, and Archived Products. Custom filters can also be created to meet specific business needs. Similarly, the Group By function provides default and custom sorting methods, enabling product grouping by Category, POS Category, or Type. The Add Custom Group option allows additional sorting structures to be defined according to operational requirements.
Products can also be viewed in List View, which displays detailed attributes such as Product Name, Internal Reference, Responsible Person, Product Tags, Sales Price, Cost, Quantity on Hand, Forecasted Quantity, and Unit of Measure. Further columns such as Website ID, Barcode, Company, Product Category, and Product Type can be added through the Add Custom Field option for more extensive data visibility.
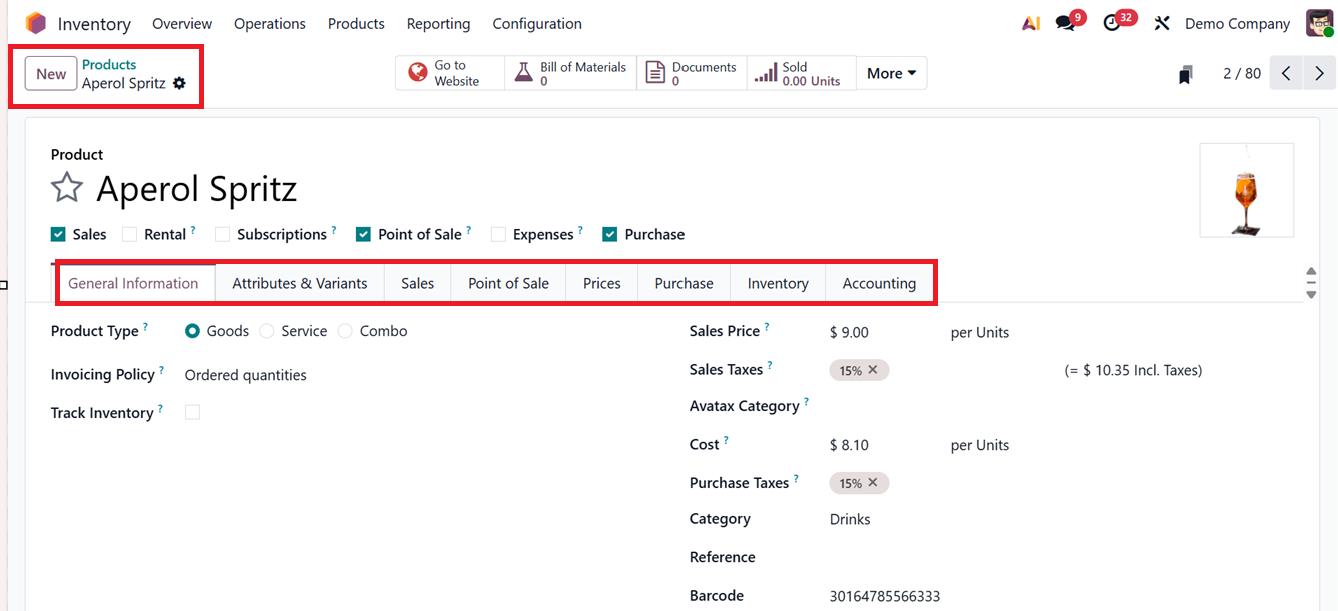
Selecting a specific product from the list opens the Product Detail Window, where users can configure or modify product attributes. Smart buttons provide quick access to related information, such as Extra Prices, On Hand Quantities, Forecasted Stock, Movement History (In & Out), Reordering Rules, and Lots/Serial Numbers, as shown in the screenshot below. These smart buttons may vary according to certain product types.
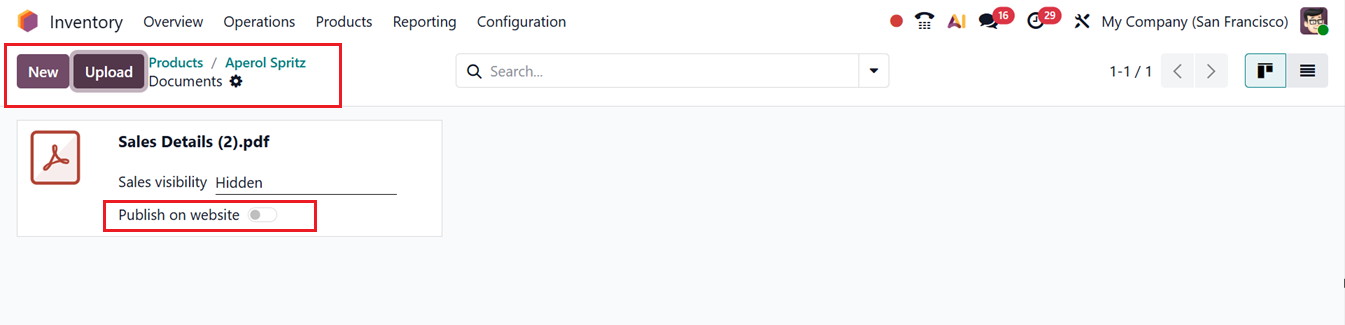
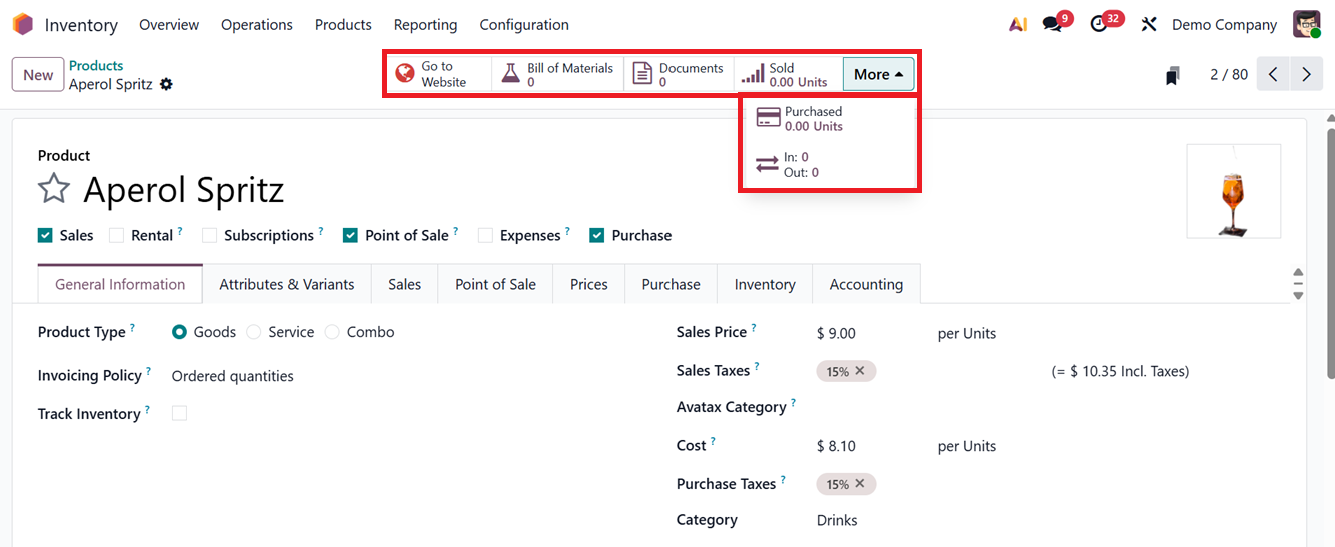
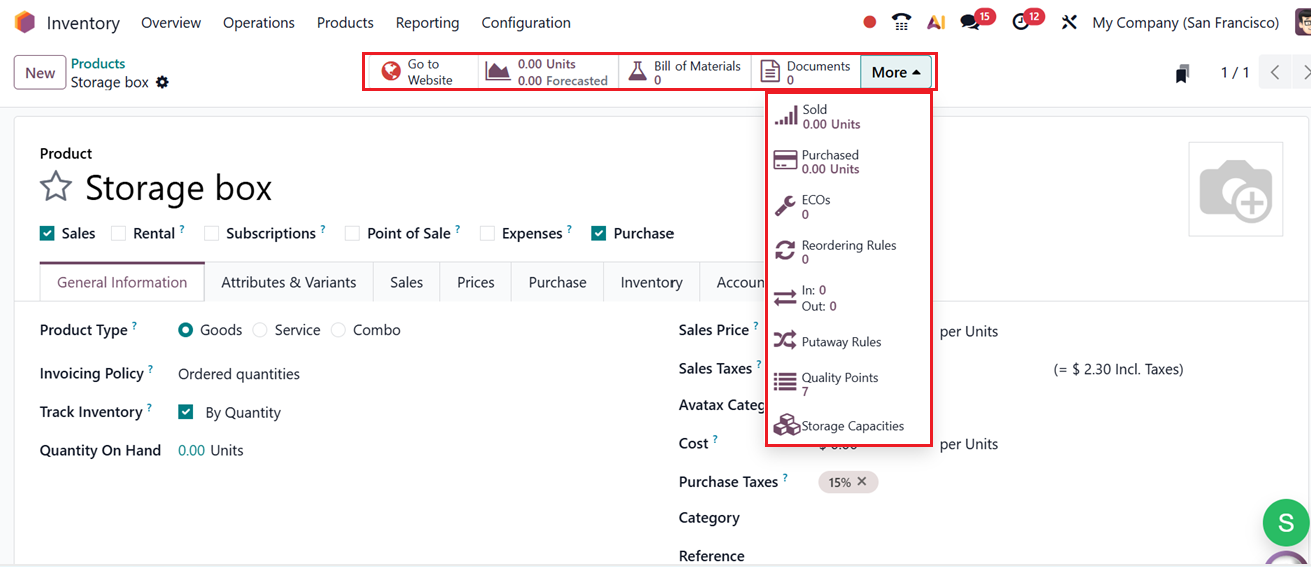
The Documents smart tab within the product record includes options like Sales Visibility which controls the accessibility of documents (e.g., manuals or spec sheets) for internal teams and the ‘Go to Website’ button allows these products and its specifications to be made publicly available on the company’s eCommerce platform.
Then, you can manage the eCommercewebsite interface of the product using the Go to Website smart button and manage bill of materials of the product using the Bill of Materials smart button. Using the Documents option, you can store or manage documents or files related to the product such as warranty, bill, instruction, notes etc and the Sold button will display the sold unit of the products from the total quantity. Finally, the More dropdown inside the product form grants access to check and manage the Purchased Units and In/Out units, as depicted in the screenshot below.
To add a new product, click the New button. This opens the Product Configuration Window, where users can enter details such as Product Name, image, and operational types, including Sales, Prices, Purchase, Inventory, Expenses, Point of Sale, and Rental.
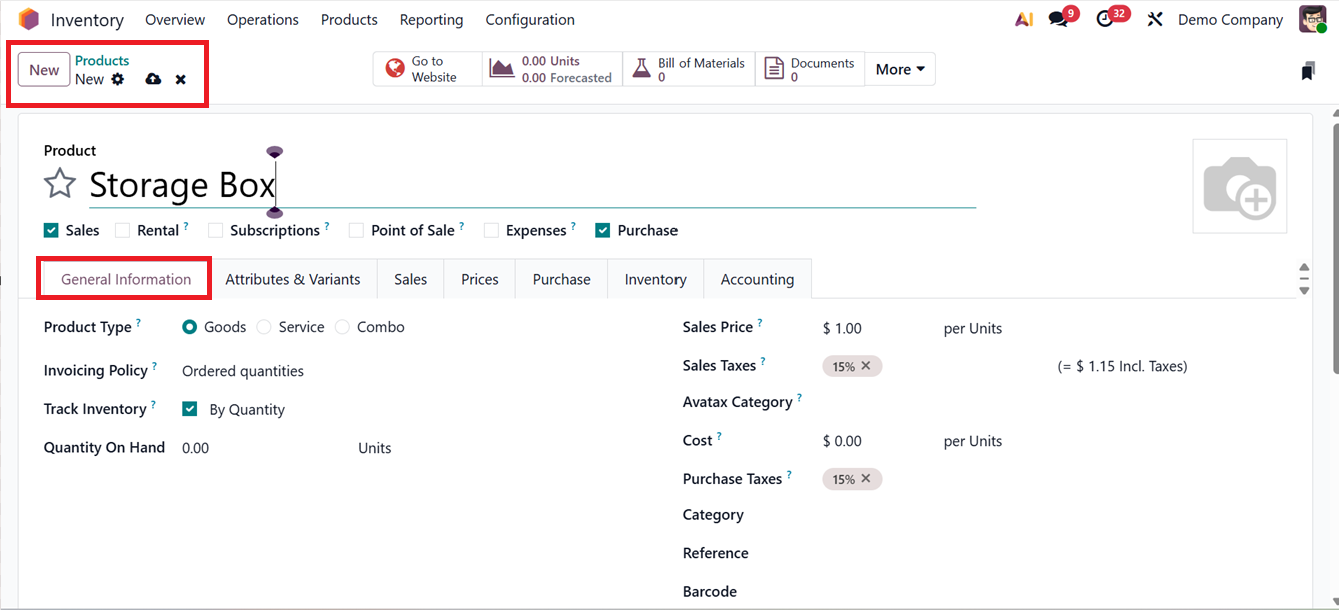
The configuration interface is divided into multiple tabs General Information, Attributes & Variants, Sales, Purchase, Inventory, and Accounting allowing users to define each aspect of a product systematically.
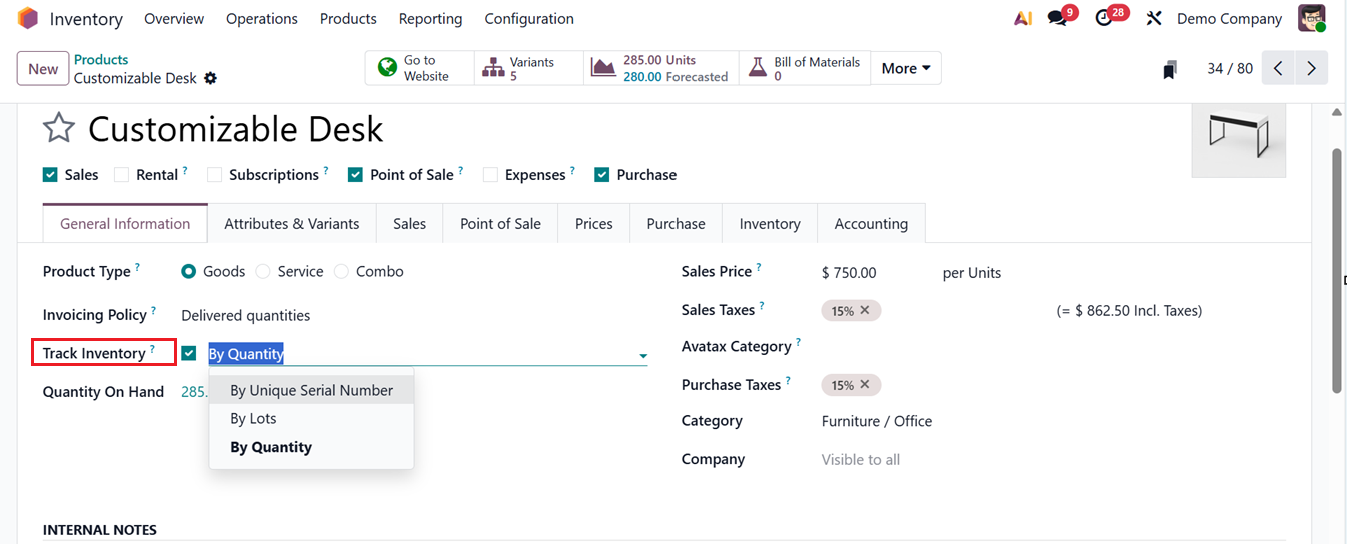
Within General Information, users specify the Product Type (Goods, Services, or Combo) and Invoicing Policy (Ordered Quantities or Delivered Quantities). Additionally, inventory tracking can be set up by Quantity, by Lot, or by Unique Serial Number. Other fields allow users to define Sales Price, Units, Sales Taxes, AvaTax Category, Barcode, Internal Reference, and Company. Notes exclusive to internal use can be documented under Internal Notes.
For Service-type products, alternative invoicing methods such as Prepaid/Fixed, Timesheet-based, Milestone-based, or Delivered Quantity-based billing are available.
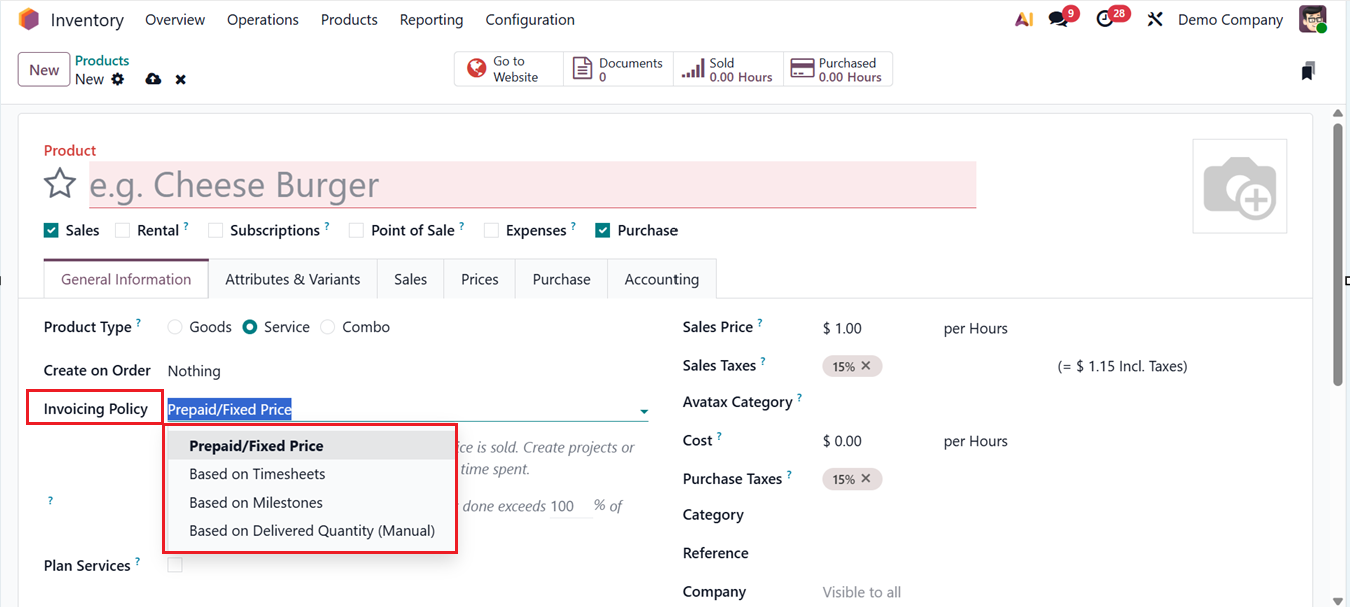
- Prepaid / Fixed: Invoices are generated according to the quantities specified in the order, either in advance or at predefined stages.
- Based on Timesheet: Billing is calculated from the hours or entries recorded in timesheets for specific projects or tasks.
- Based on Milestone: Charges are raised when predefined project milestones are successfully completed.
- Based on Delivered Quantity (Manual): Service fees are calculated based on the actual quantity of services delivered or fulfilled.
Under the Create on Order Field, you can choose the most appropriate option for how the service should be generated. Once the sales order is confirmed, the system can automatically create Nothing, Event Registration, Task, Project &Task and only a Project based on the selected configuration. This setup allows you to efficiently monitor and manage the services being delivered.

When the Plan Services option is enabled, a work shift is automatically scheduled for the specified role at the time the sales order is confirmed. Activating this option also opens a dedicated field where you can add a detailed description of the job or service.
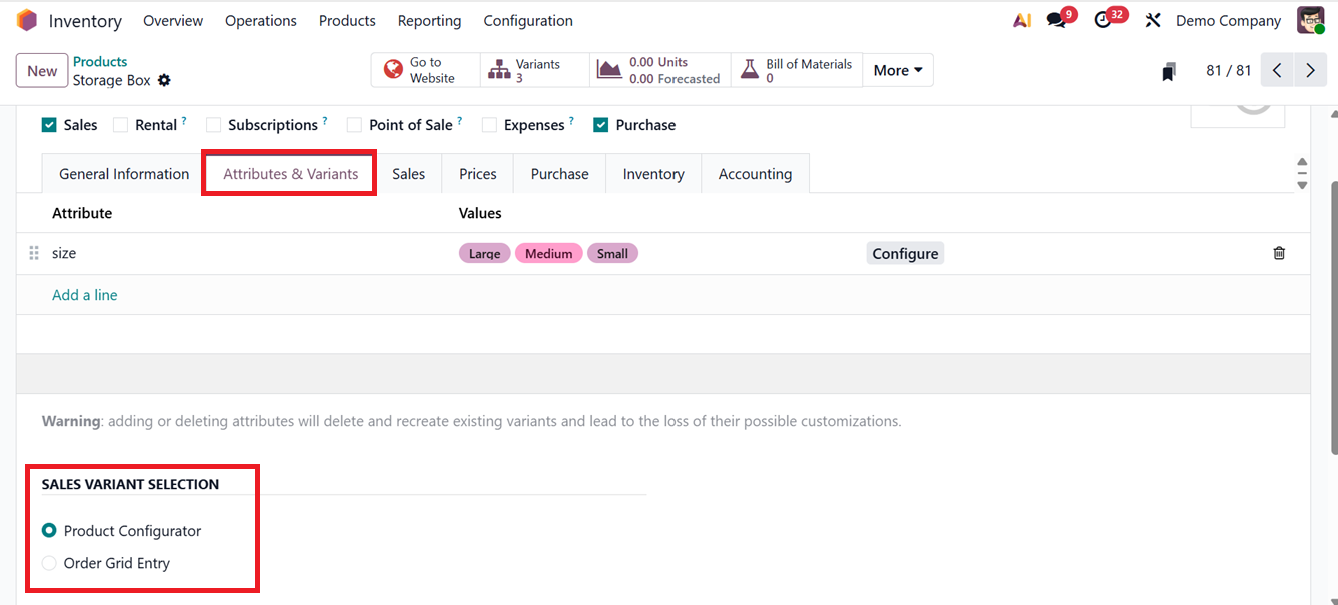
Then the Attributes & Variants Tab enables the creation and management of product variants. Users can add or configure new attributes and variations using the Add a Line or Configure buttons.
In the Sales Tab, users can define UPSELL & CROSS-SELL strategies by linking the Optional Products field to suggest add-on items during the sales process, while Accessory Products highlight complementary items that support or enhance the main product. Alternative Products provide substitute options for customers seeking variations, and Product Packagings define the different packaging formats available for selling or shipping the product.
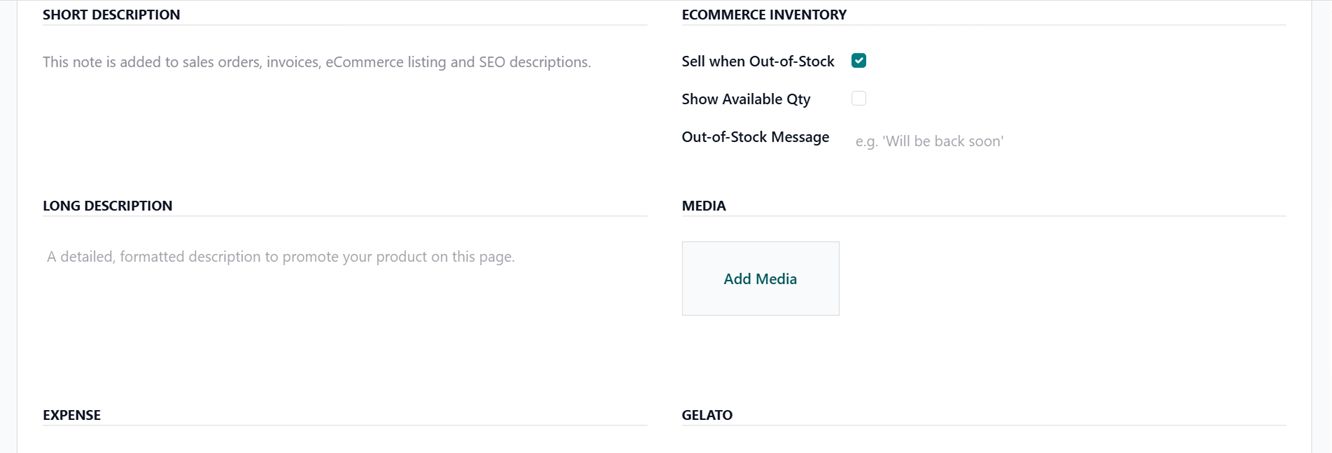
The module also includes key ECOMMERCE SHOP configuration fields. The Website field determines on which site the product is published, and Tags help organize items to improve searchability. The ‘Is Published’ field can be used to publish this product on a website. Then, the Categories can be mentioned to highlight the product within the website’s hierarchy for easier navigation. The Sell When Out of Stock option allows purchases even if inventory is unavailable, while the Ribbon field lets you display visual labels such as “New” or “Best Seller.” Additionally, Show Available Quantity displays live stock levels to customers, and Out-of-Stock Messages provide custom notifications when the product cannot be immediately supplied.
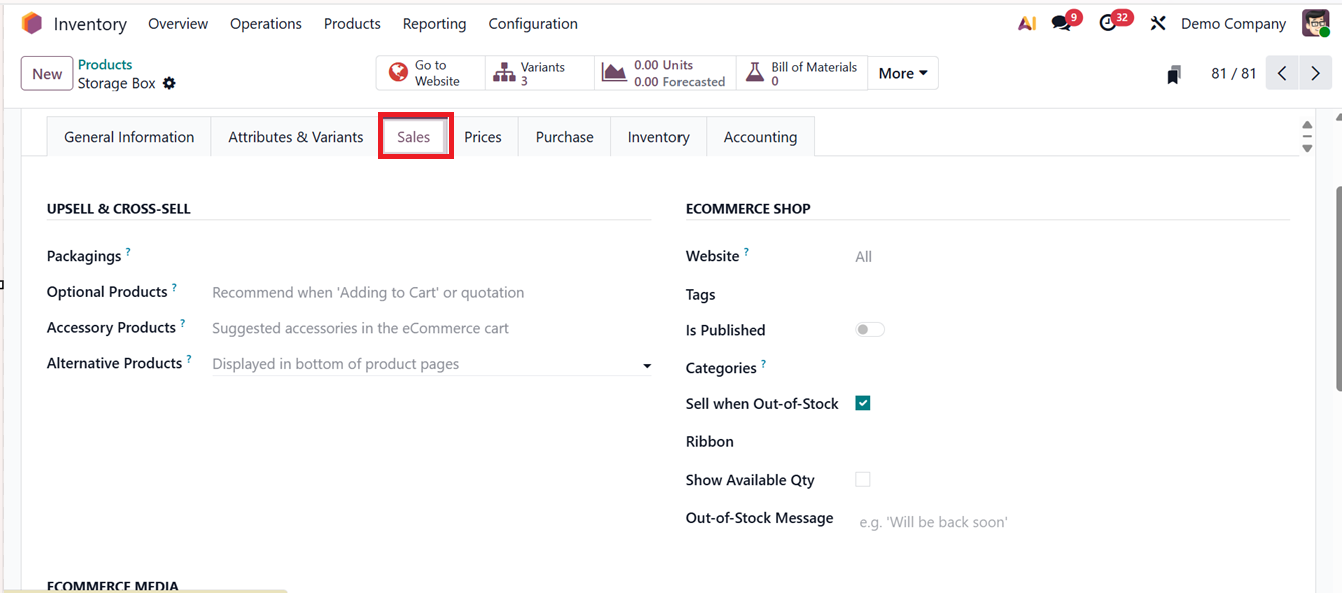
For POS Integration, you can provide a SHORT DESCRIPTION which is then added to sales orders, invoices, ecommerce listing and SEO descriptions. The LONG DESCRIPTION is a detailed formatted note and the MEDIA section can be used to add a picture of the product using the ‘Add Media’ button.
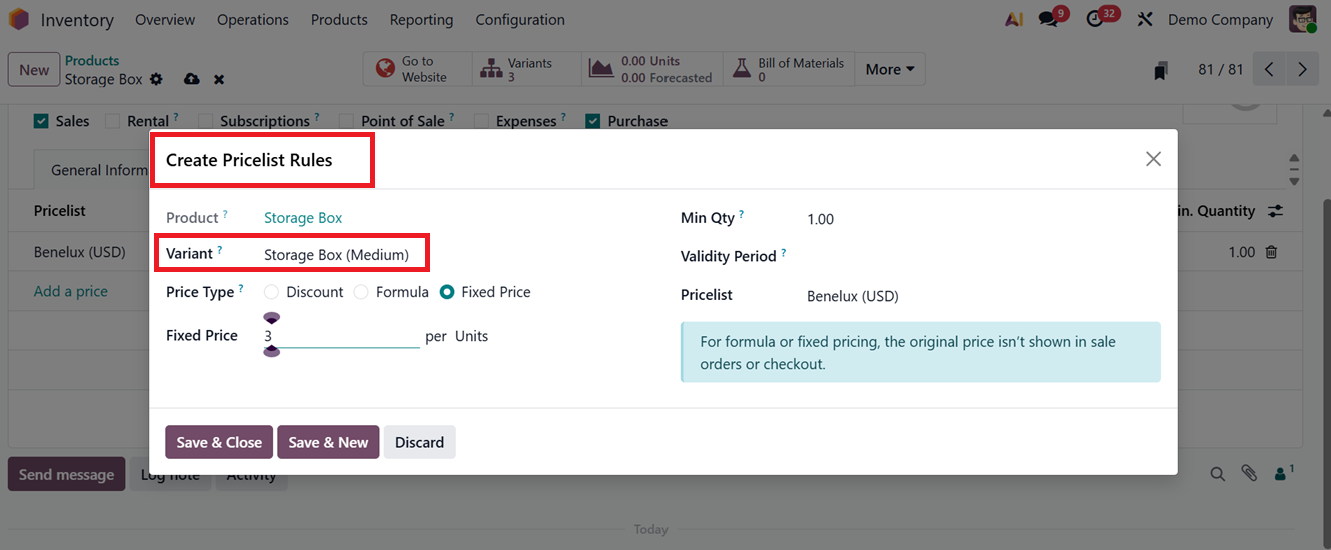
The ‘Prices’ tab can be used to add multiple price lists for different variants of the product using the ‘Add a price’ button.
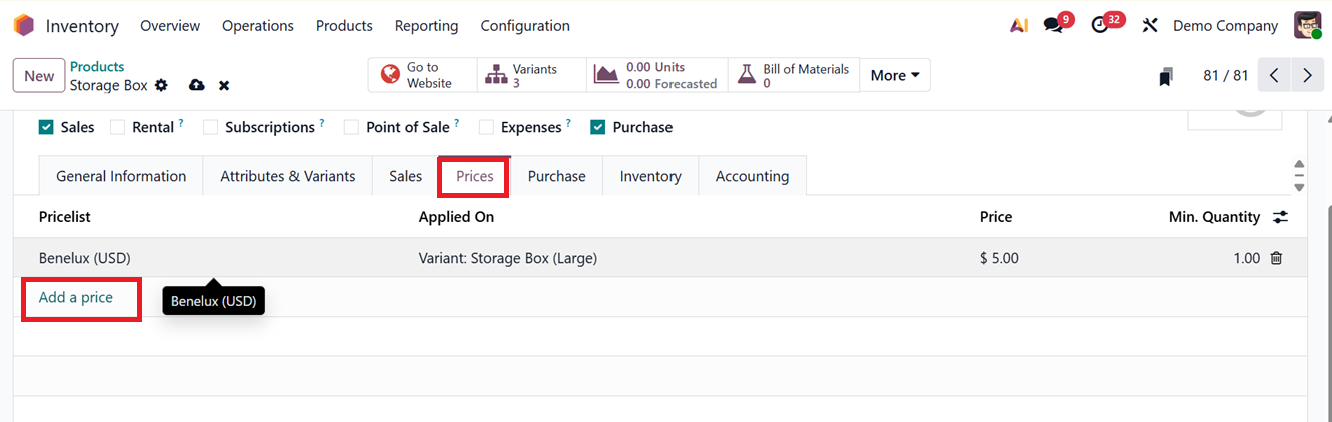
To create different pricelist rules for different product variants, click on the ‘Add a line’ button.
The Purchase Tab allows users to record supplier details, pricing, delivery lead times, and subcontracting options. Odoo supports multiple suppliers for a single product, facilitating vendor comparison for better procurement decisions.

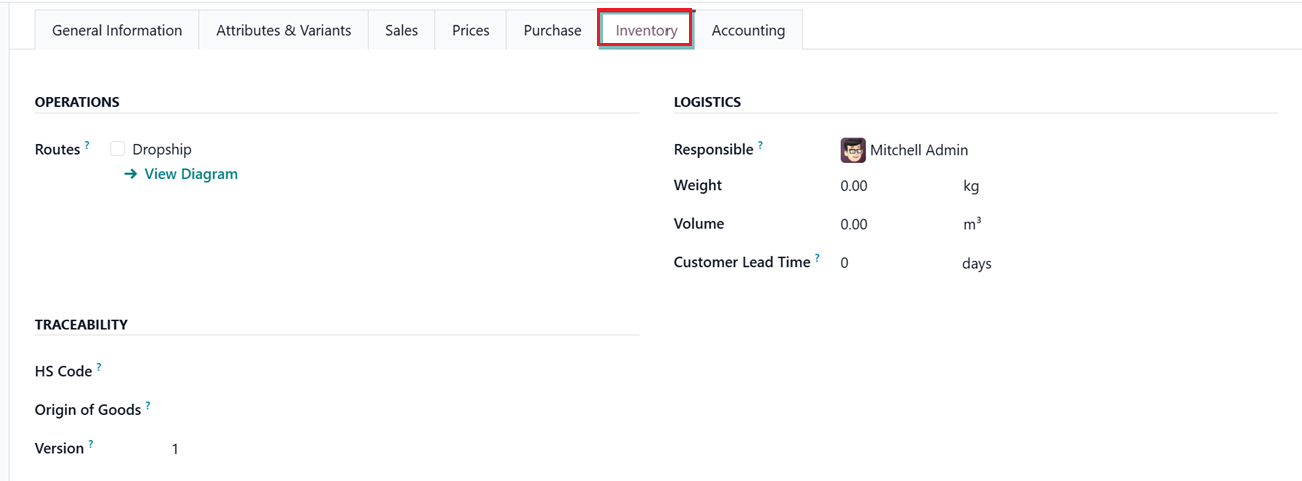
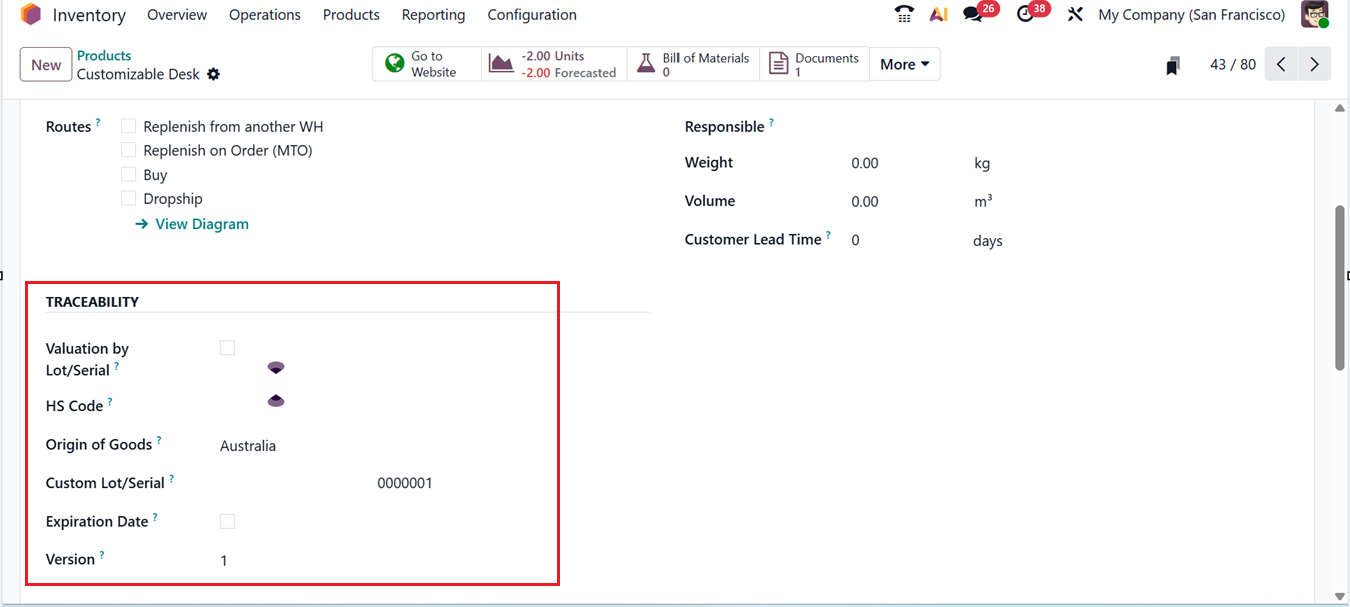
The Inventory tab manages logistical operations, routes, and delivery descriptions. Routes such as Buy, Manufacture, Dropship, Dropship Subcontractor, and Resupply Subcontractor can be configured here. Users can also specify Responsible user name, Weight, Volume and Customer Lead Time in the LOGISTICS section. Then, mention the Origin of Goods, Version and HS Code for compliance and reporting purposes in the ‘TRACEABILITY’ section. The Customer Lead Time field defines the number of days between order confirmation and the delivery date.
Then, you can mention any description for the products for receipts and delivery orders in the DESCRIPTION FOR RECEIPTS and DESCRIPTION FOR DELIVERY ORDERS area, as depicted in the screenshot below.

The Accounting tab is used to define and manage the financial details related to a product. You can specify the Income Account and Expense Account to accurately record cash inflows and outflows.
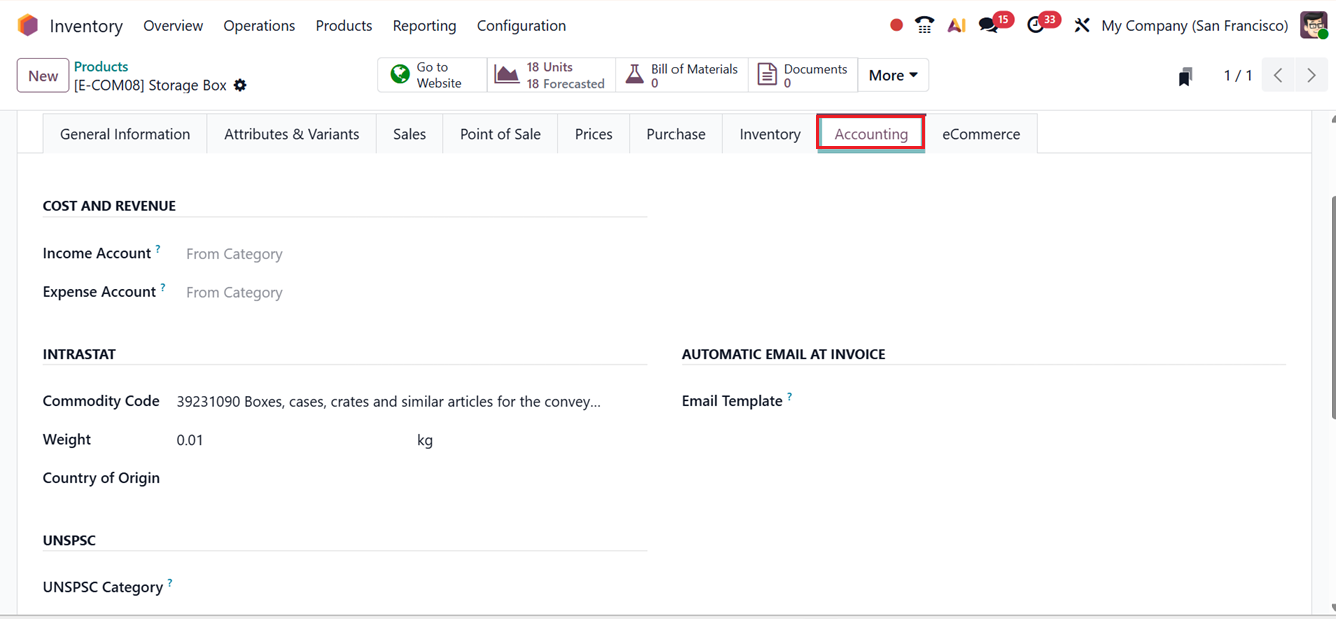
Additionally, you can set up the Commodity Code and Country of Origin in the INTRASTAT section. Then, automatic invoice notifications by selecting an appropriate Email Template in the AUTOMATIC EMAIL AT INVOiCE field, ensuring invoices are sent without manual intervention.
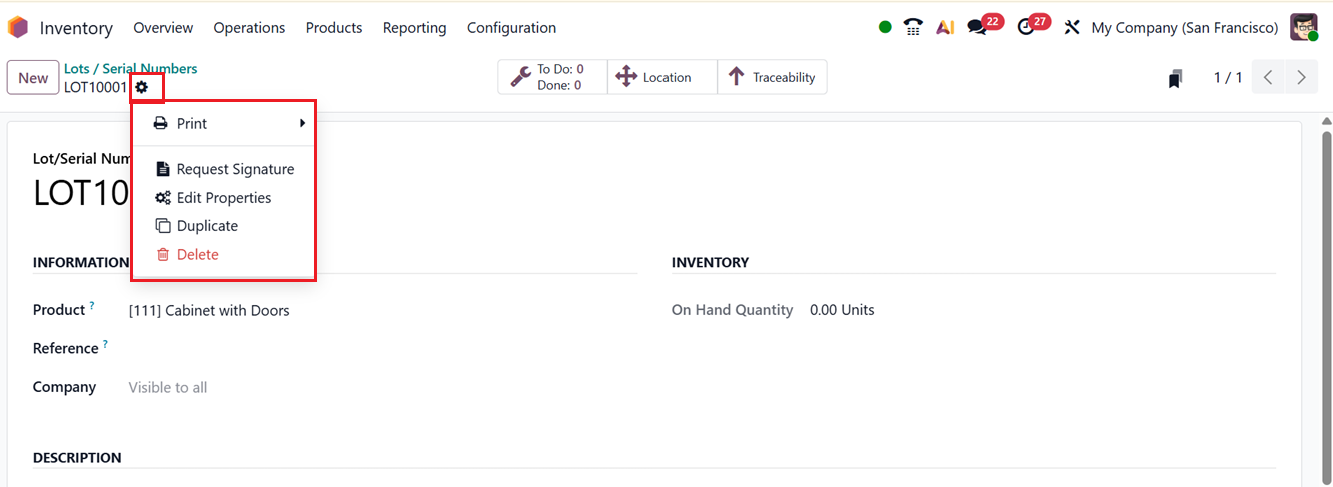
After configuring products, operational actions such as Replenish, Update Quantity, and Print Labels can be executed directly from the product dashboard. The ‘Actions’ menu provides various options including Request Signature, Edit Properties, Duplicate, Archive, Delete, Get Pictures from Barcode Lookup, Print Labels, Pricelist Report and Replenish options, as shown in the screenshot below.
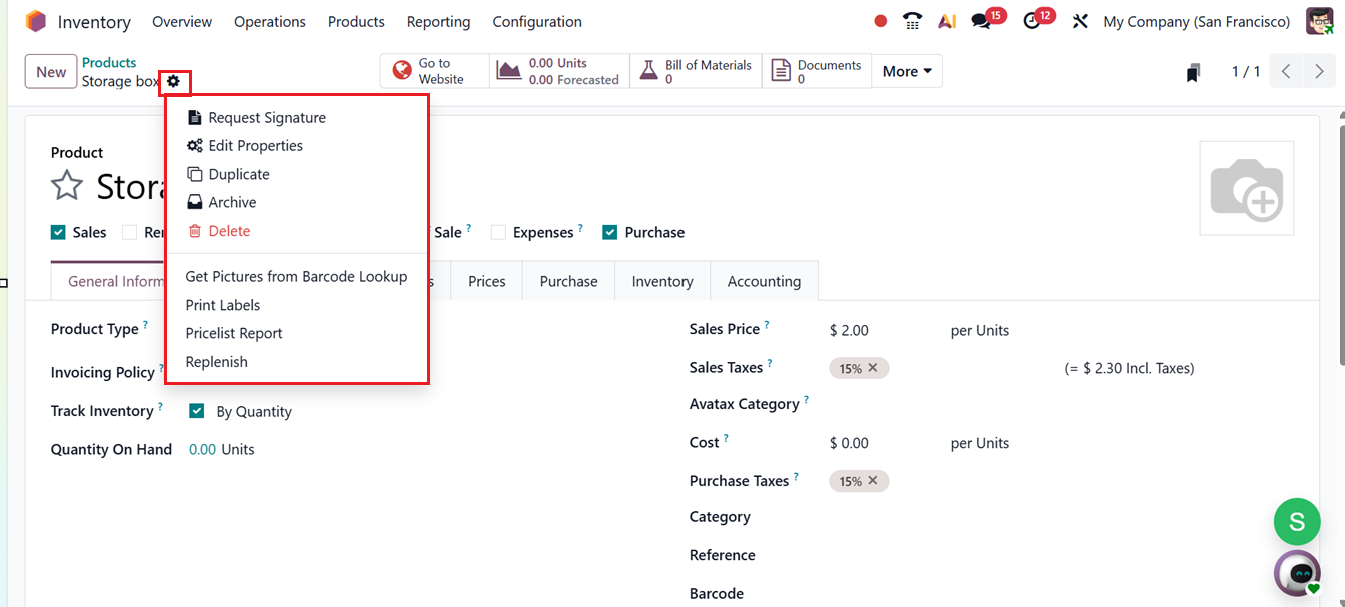
- Request Signature: Collects a digital signature to confirm receipt or approval of stock operations.
- RequestEdit Properties: Modifies additional settings or attributes of a record.
- RequestDuplicate: Creates a copy of an existing record for quick reuse.
- RequestArchive: Hides a record from active use without deleting it.
- RequestDelete: Permanently removes a record from the system.
- RequestGet Pictures from Barcode Lookup: Automatically fetches product images using the barcode.
- RequestPrint Labels: Prints barcode and product labels for inventory tracking.
- RequestPricelist Report: Generates a report showing product prices from pricelists.
- RequestReplenish: Restocks products by creating purchase or production orders.
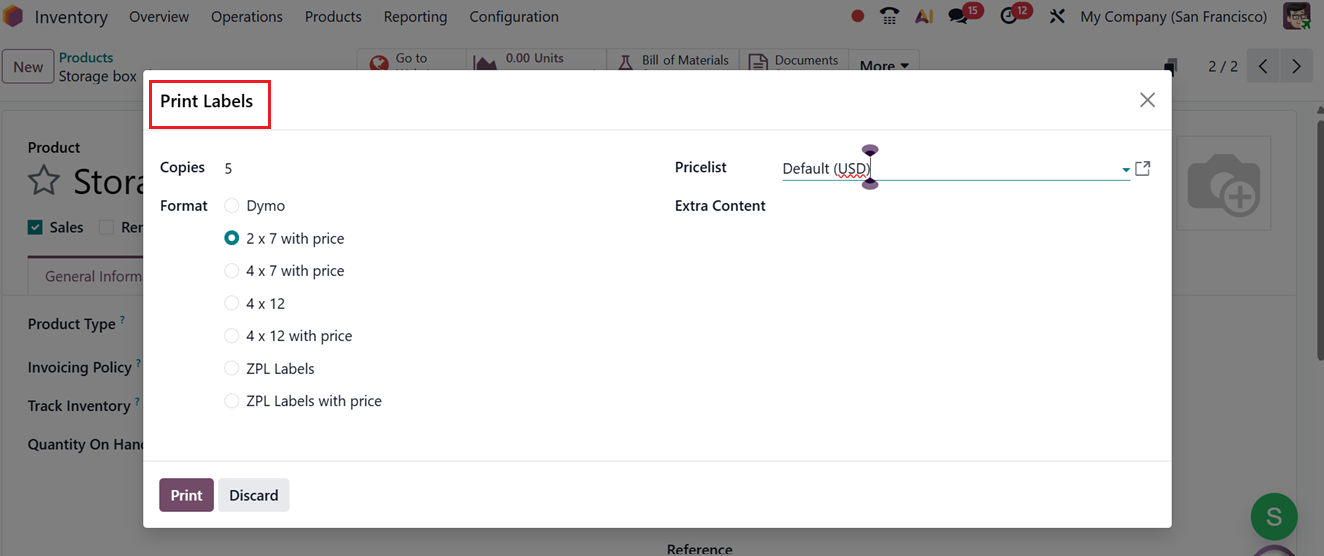
The ‘Print Labels’ option opens a wizard that enables users to set the quantity of Copies, Label Format, Pricelist and Additional Content before generating product labels for packaging or delivery, as shown in the screenshot below.
The smart buttons provided at the top of the page will help you to check the website interface using the Go to Website option, Check Units Forecasted, Bill of Materials, Documents, Sold Units, Purchased Units, Reordering Rules, In/Out, Putaway Rules, Quality Points and Storage Capacities, as shown in the screenshot below.
This completes the explanation of Product Configuration in Odoo 19. In the subsequent section, we will proceed to examine Product Variants and their configuration options within the Inventory Module.
1.2 Product Variants
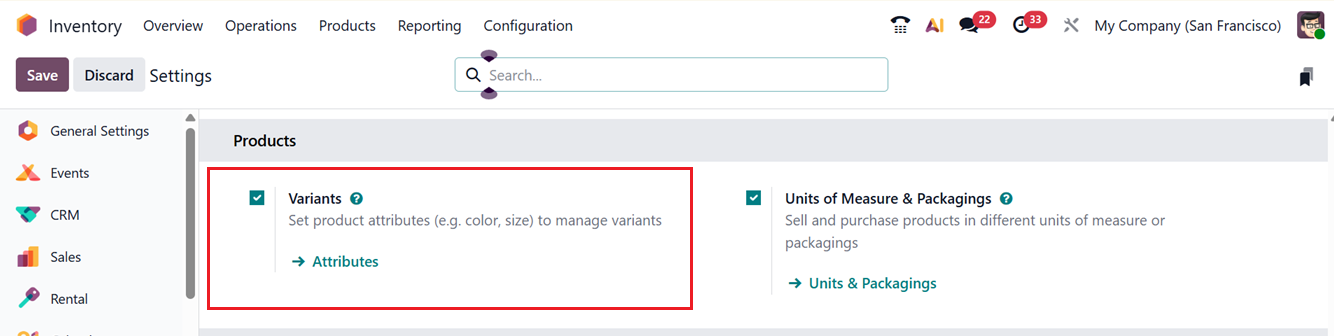
Providing customers with multiple product choices is an effective approach to increasing sales. Odoo 19 enables users to configure numerous product variants within the Inventory module, similar to how it’s done in the Sales and Purchase modules. Begin by ensuring that the Variants feature is activated from the Settings menu of the Inventory module, as illustrated below.
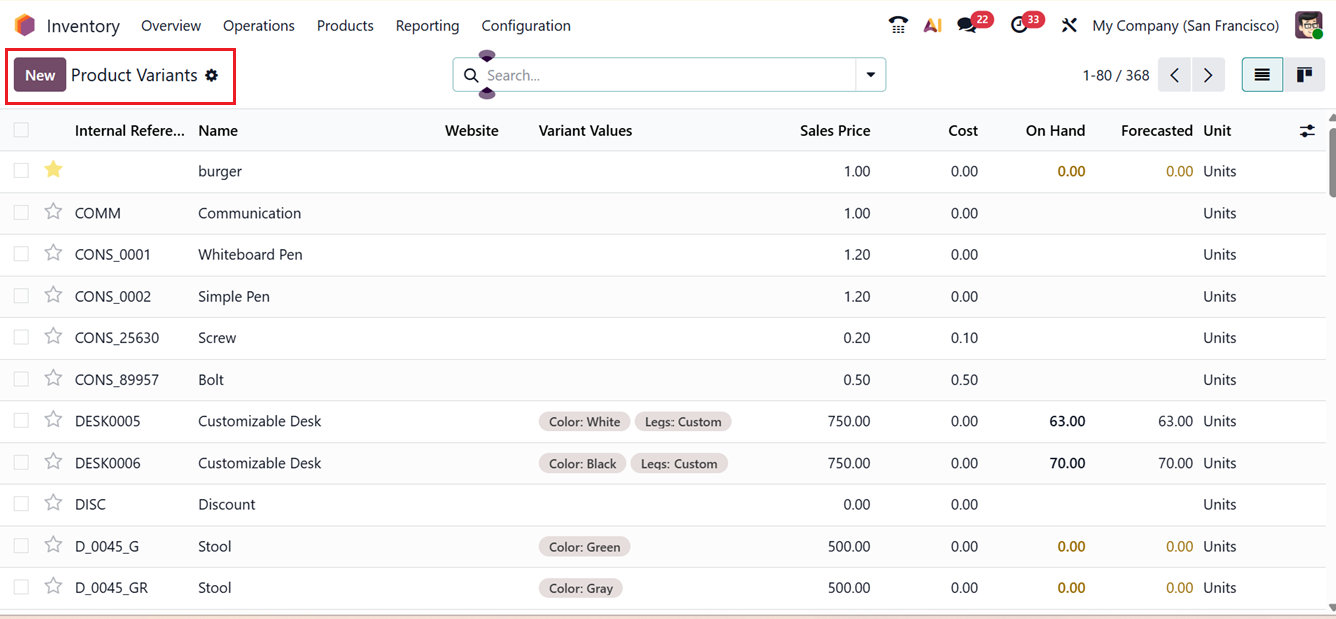
You can access the Product Variants option from the Products menu of the Inventory module. The setup process for product variants remains identical to the configuration discussed in the earlier section.
The following screenshot displays the list of variants that have been defined in the Inventory module. The interface of this window resembles that of the product window, with the only difference being the visibility of the Variant Values related to each product.
When creating a new product, you can list its versions under the ‘Attributes & Variants’ tab. It is necessary to mention both the attributes and values of the variant in this section. Then, the new variant value can be created directly from this page by clicking the ‘Configure’ button, as depicted in the screenshot below.

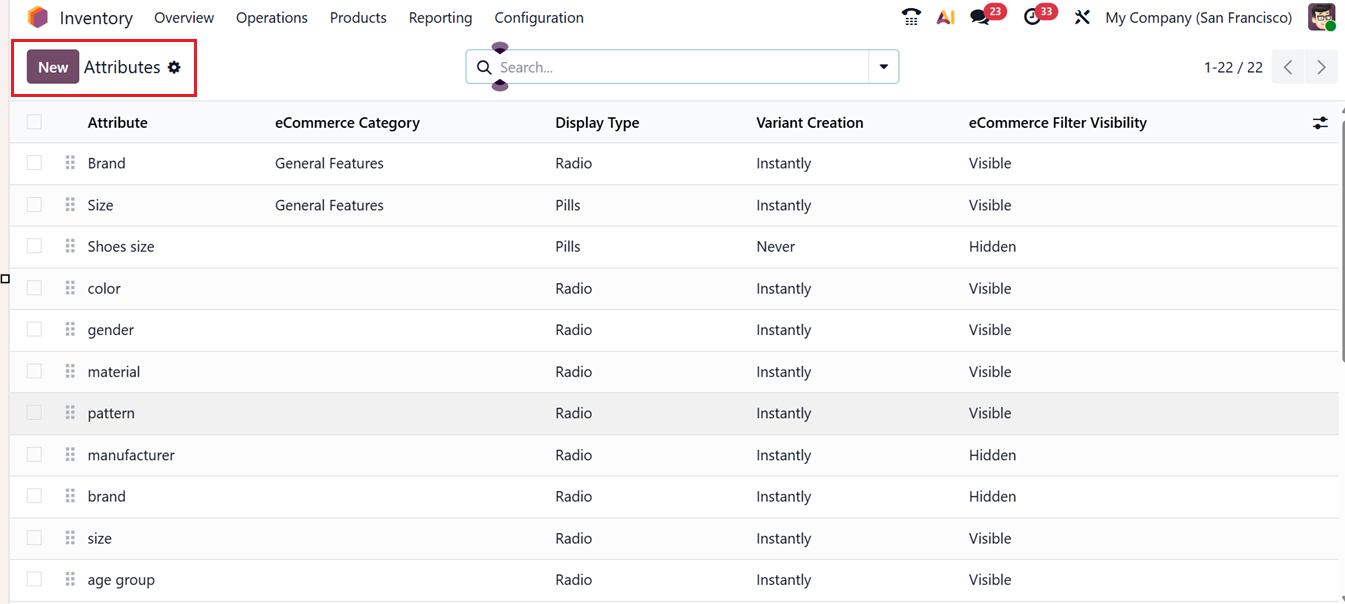
In addition, Odoo provides an alternate platform for defining product attributes and values, which can be accessed through the ‘Configuration’ menu.
By selecting the ‘Attributes’ button from the ‘Configuration’ menu section, Odoo 19 navigates to a page listing all pre-existing attributes. This page displays information such as Attribute name, eCommerce Category, Display Type, Variant Creation mode, and eCommerce Filter Visibility, as shown in the screenshot below.
You can locate specific attributes using the search bar and apply custom Filter and Group By tools for sorting. To introduce a new attribute, click on the ‘New’ button.
In the displayed window, enter the correct title for the attribute in the ‘Attribute Name’ field. To group similar attributes on the same section of the eCommerce comparison page, select the appropriate category in the Category field.
The Display Type for an attribute in the product configurator can be adjusted to Radio, Pills, Select, Color, or Multi-checkbox (optional). The ‘Multi-checkbox’ display type feature in Odoo lets customers choose multiple product variants simultaneously from the order line window.
In the Variant Creation mode, you can select one of the following methods for generating variants:
- Instantly: All possible product variations are created immediately when an attribute and its values are added.
- Dynamically: Variants are created only when the corresponding attributes and values are added to a sales order.
- Never: Variant generation does not occur for the specified attributes.
Once an attribute has been assigned to at least one product, you cannot modify its variant creation mode. The ‘eCommerce Filter’ visibility box allows you to choose whether customers can filter products based on attributes. Selecting Visible enables filtering, while Hidden conceals the filter from the eCommerce page. The ‘On Products Cards’ field can be set as Visible, Hidden or Hover to display the instantly created variants on selection in your shop page.
The ‘Show Thumbnails’ option can be used to enable or disable the product variant images instead of attribute value displays. Finally, the ‘eCommerce Category’ field can be used to set a category to regroup the similar attributes under the same section in an ecommerce comparison page.
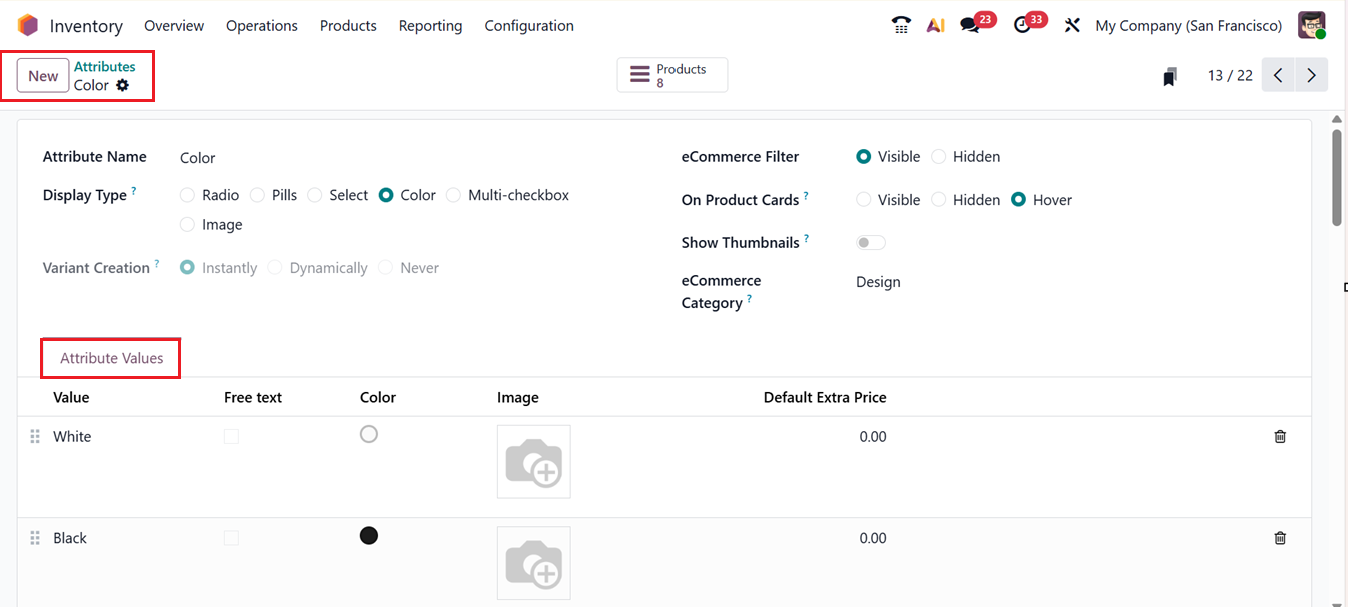
Inside the ‘Attribute Values] tab, you can add individual attribute values by clicking on the Add a line button. Then, edit the Value name and disable or enable the Free Text box to display it as a free text. Another feature in Odoo allows users to add Color and Images to characteristics. This functionality is only available when the Display Type is set to Color, and images can be uploaded from the attribute values tab, as demonstrated in the image below.
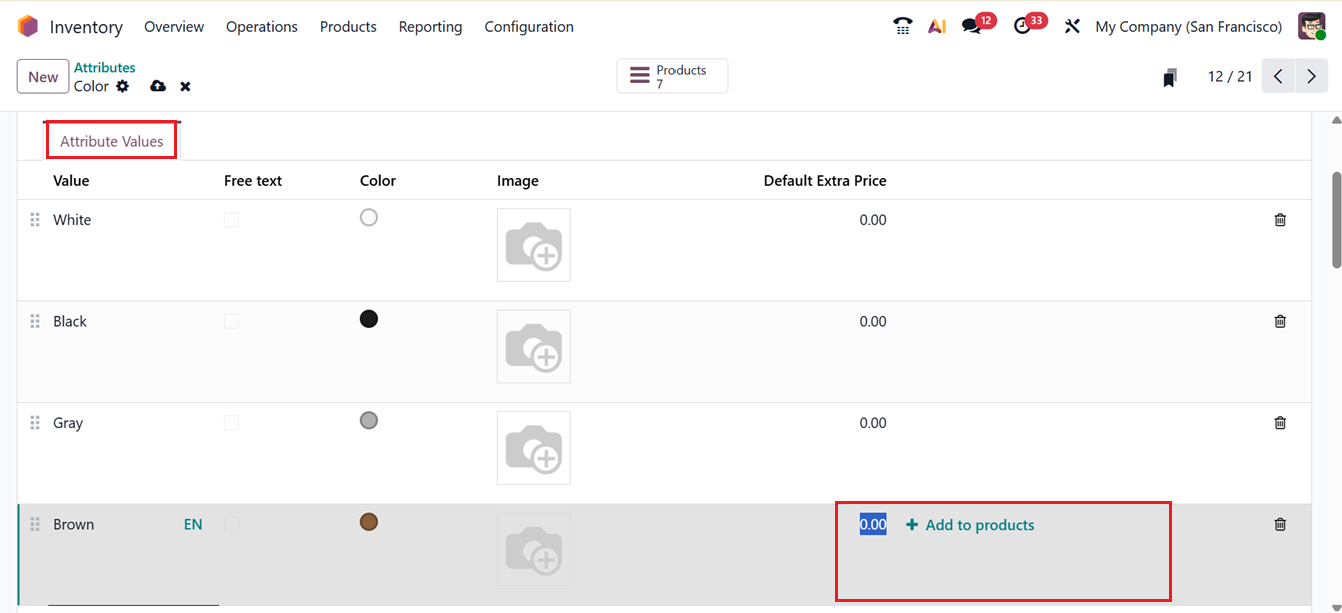
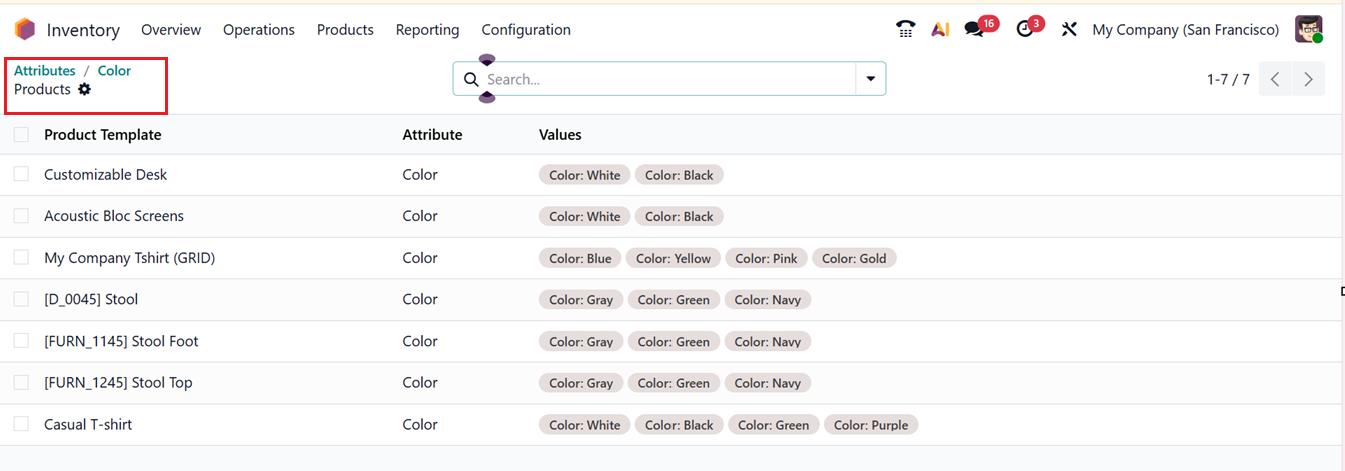
For each attribute value, you can define an additional cost for that particular variant using the Default Extra Price field, which adjusts the sales price. After configuring the attributes, you can use them for your inventory products. Then the Products smart button, as shown in the image, lets you view all products associated with a specific attribute in a list view.
The created attributes can then be applied to products while configuring a new product. Thus, through the Attributes & Variant tab, users can link the generated attributes to their items.
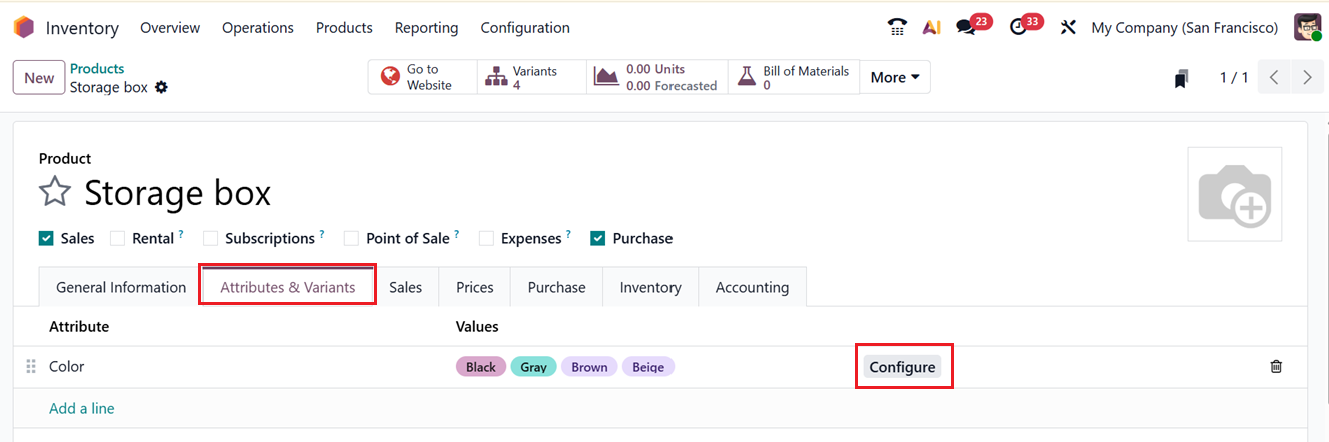
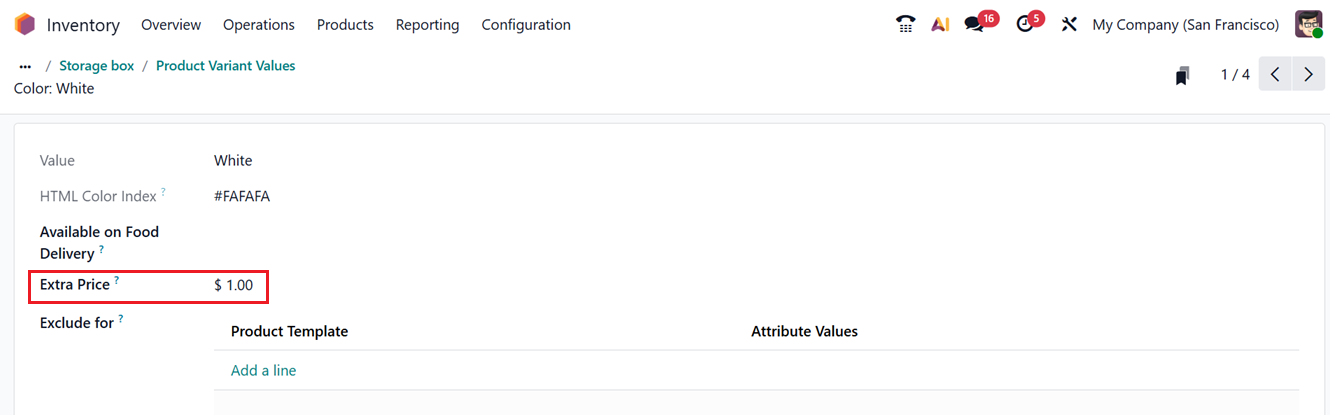
To modify any attribute, click the Configure button on the right-hand side, as displayed in the image above. Upon clicking, a new window will open, showing Value, HTML color index, Image, Available on Food Delivery and Extra Price for every product variation.
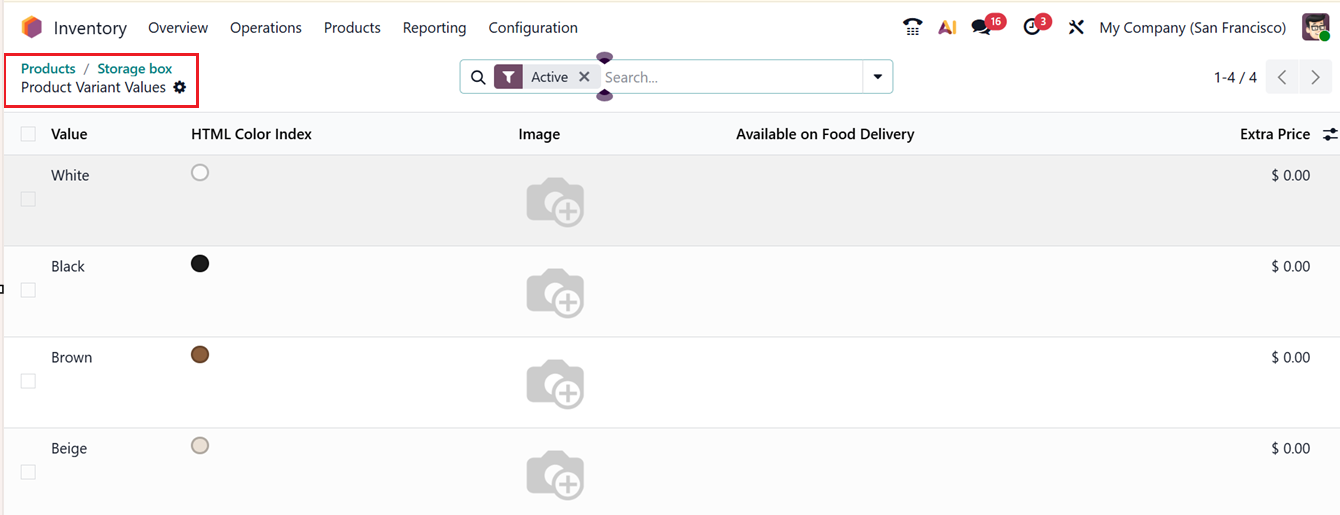
To add an extra price for different attribute values, click the corresponding column to open a new window where you can view the value name and HTML color index. You can then enable or disable whether the value is applicable for food delivery, adjust the extra price for the specific variant, and specify product templates and attribute values in the Exclude for field to prevent this attribute value from being compatible with certain product values or with optional and accessory products, as shown in the screenshot below.
1.3 Lots/Serial Numbers
In Odoo 19 Inventory, the ‘Lots and Serial Numbers’ are used to track products or batches throughout the supply chain. Lots identify groups of identical items, while Serial Numbers uniquely track individual products. This feature ensures product traceability, supports recalls and quality control, tracks stock movements, and helps meet regulatory requirements. Lots and serial numbers are configured at the product level and managed during inventory operations such as receipts, manufacturing, and deliveries.
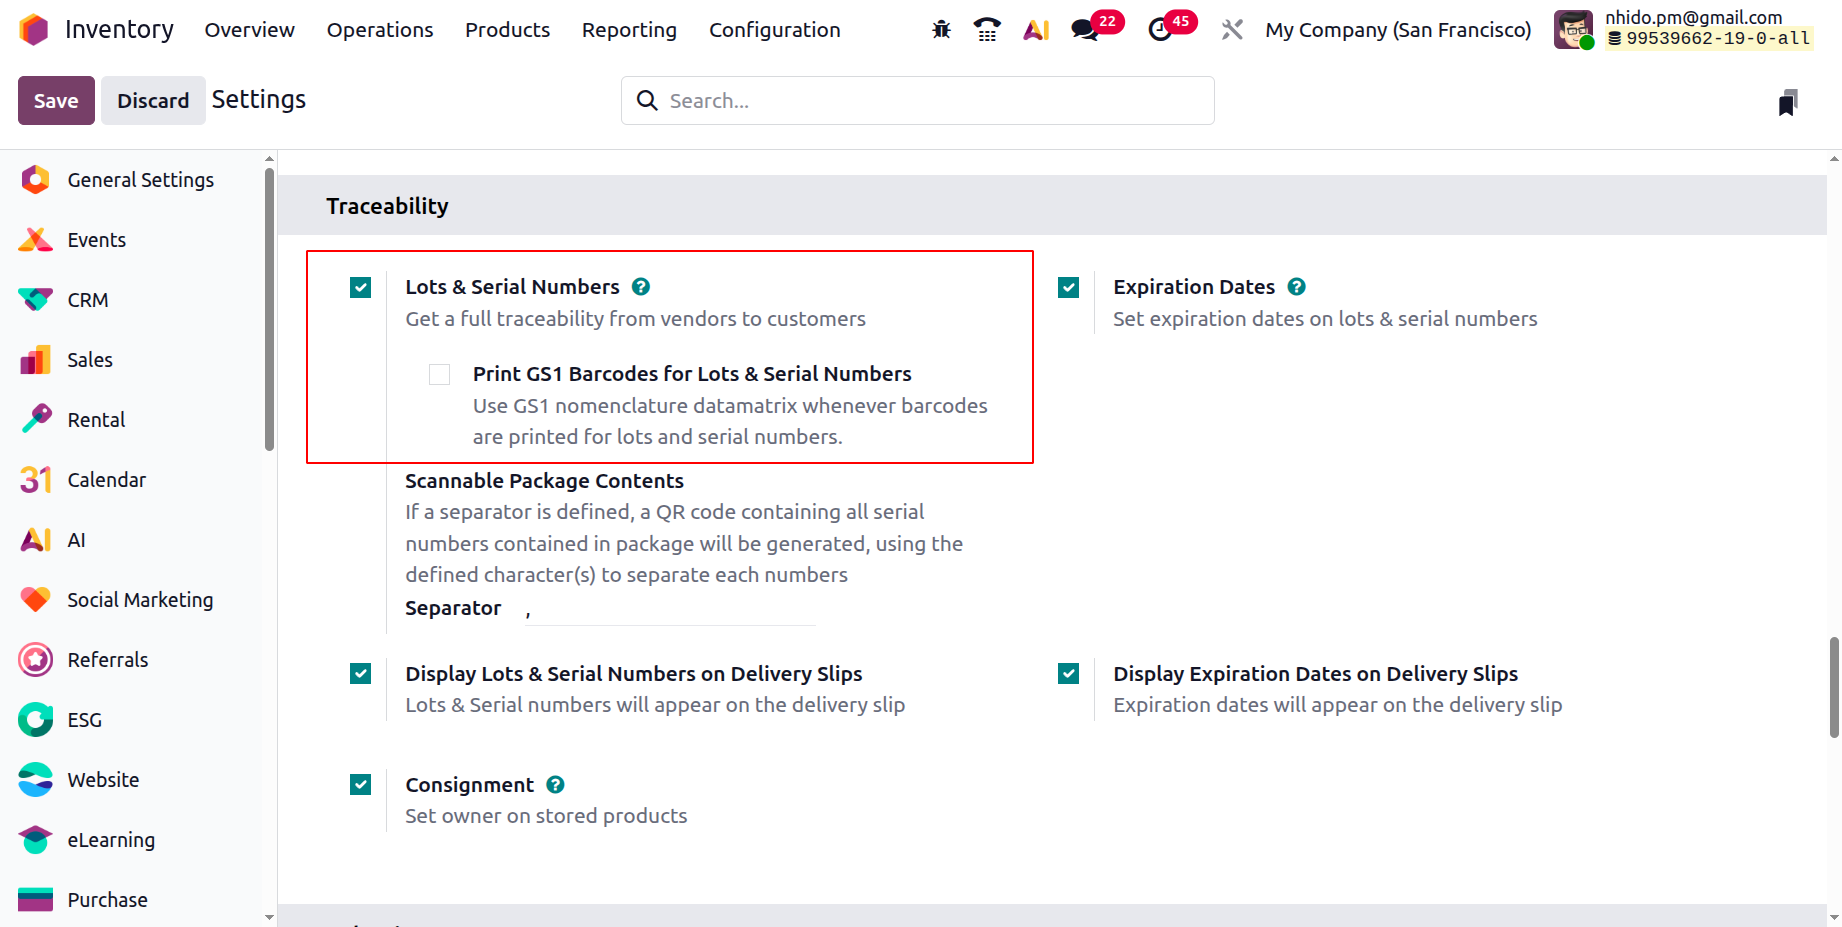
You can enable the ‘Lots/Serial Numbers’ and related options inside the ‘Traceability’ tab of the ‘Settings’ window, as shown in the screenshot below.
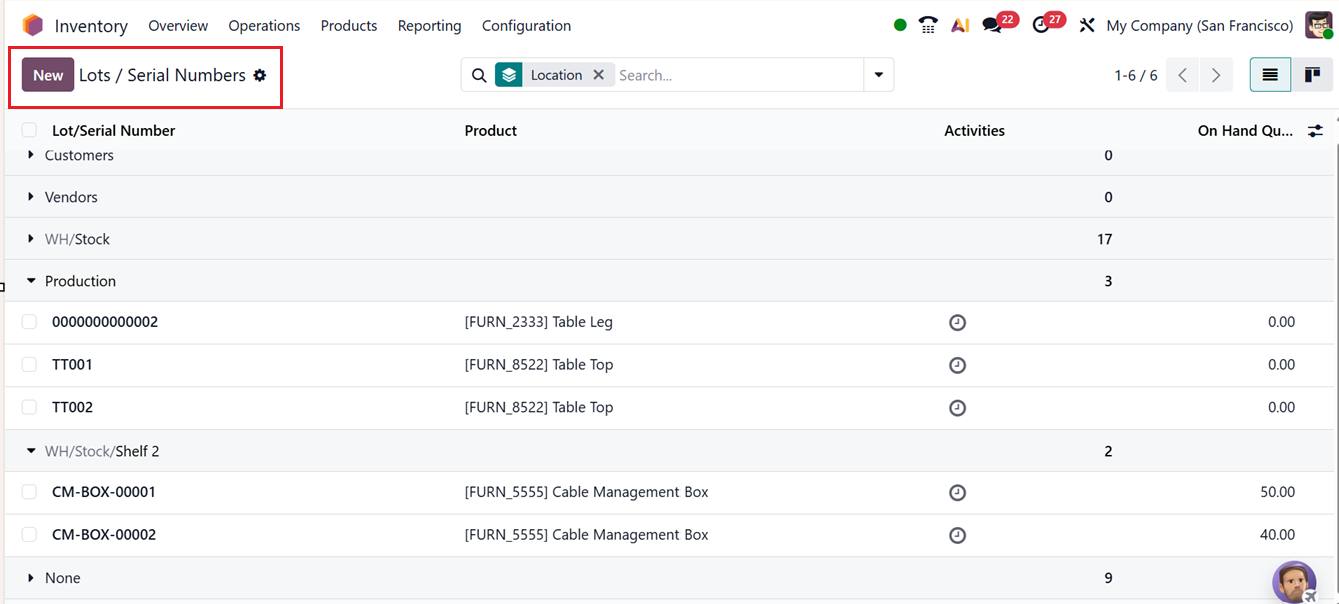
After enabling this option, the Lots/Serial Numbers section will appear under the Products menu. This section displays all previously configured lots and serial numbers, along with their corresponding Lot/Serial Number, Product, Activities and On Hand Quantities details, as shown in the screenshot below.
To add a new serial or lot number, click on the New button. Start by entering a specific Lot/Serial Number in the given field. Fill in the Product that this lot/serial number contains, Internal Reference, and Company fields appropriately in the INFORMATION section. Once a product has been moved, its serial number can no longer be changed.
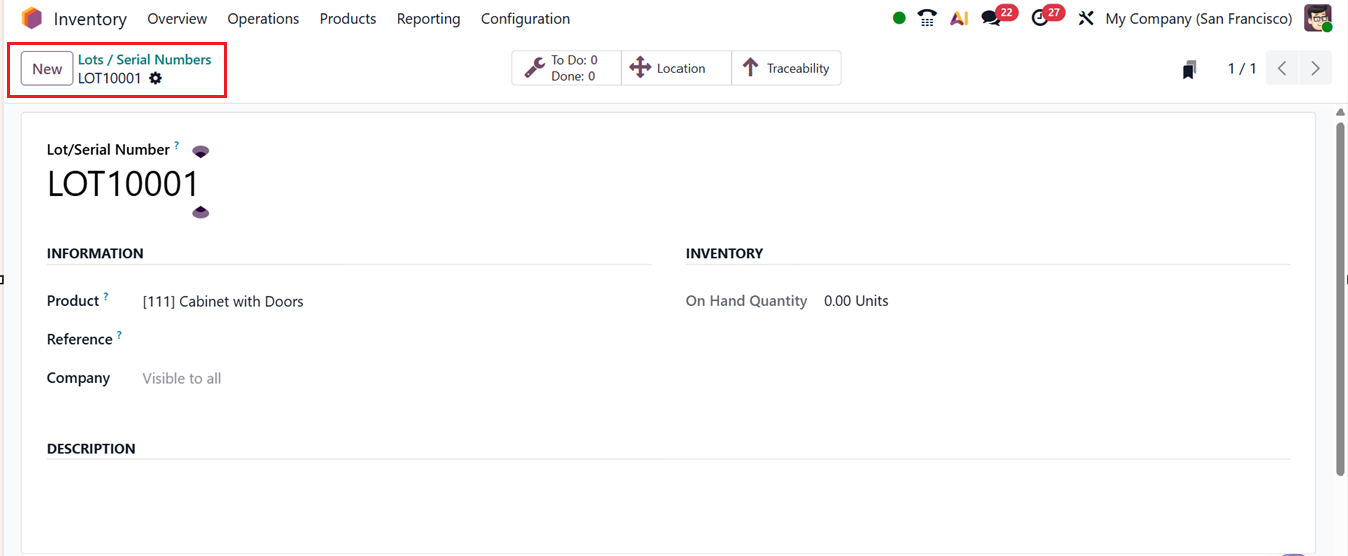
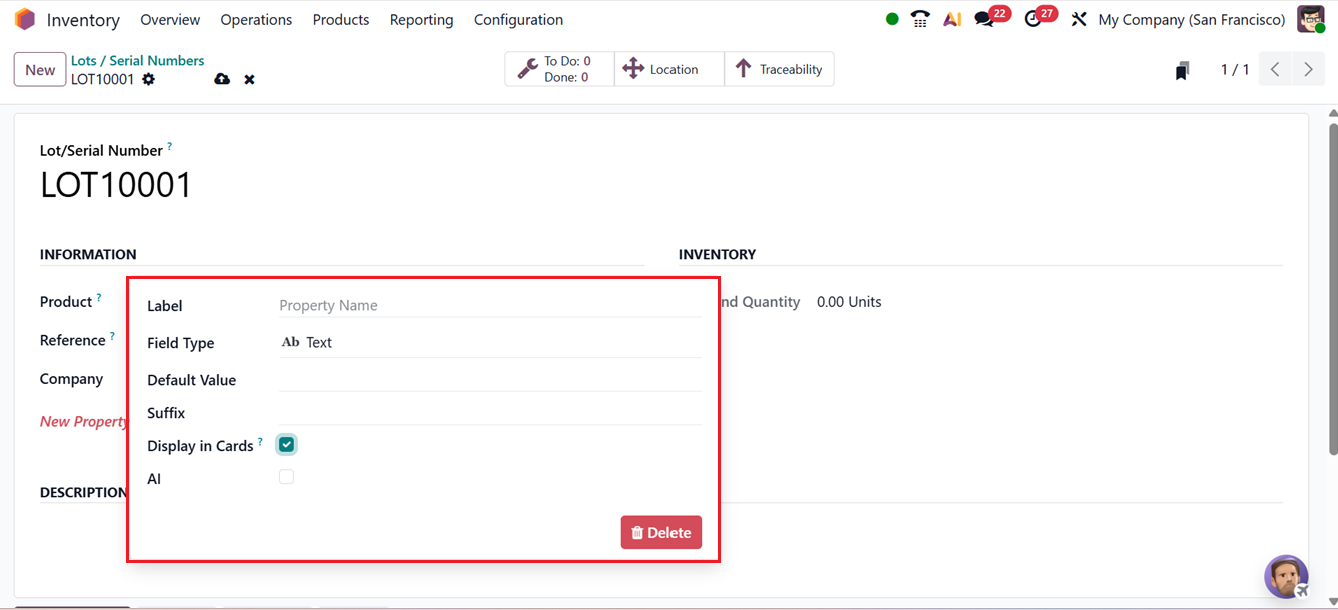
The ‘On Hand Quantity’ will be displayed on the INVENTORY section. Any additional notes regarding the selected lot or serial number can be entered under the DESCRIPTION tab. Then, you can use the ‘Edit Properties’ feature that is now accessible in almost every main configuration form in Odoo through the Action button.
Here, you can see a pop-up box, you can specify the name of the field in the Label field and choose Field Type such as whether it is a field for simple Text, Selection, Date, . Additionally, you can define the default value and choose whether the field should appear in the Calendar, Cards, or Kanban views using the Display Cards option.
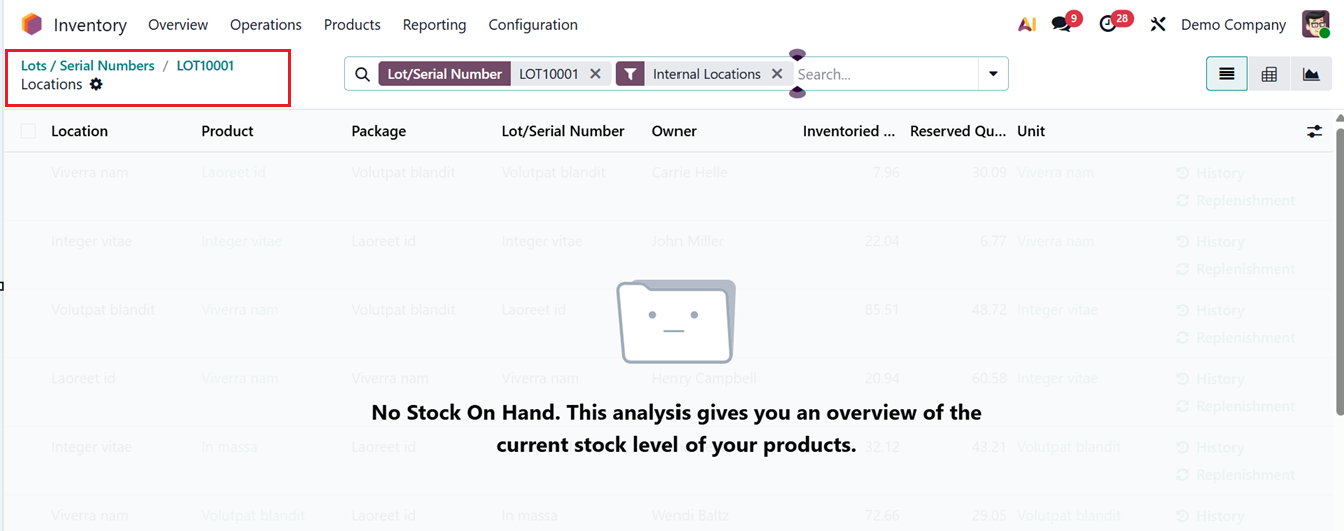
Depending on user actions related to that particular lot or serial number, more smart buttons may appear. When configuring a new lot or serial number, the Location and Traceability smart buttons become visible, as shown below.
By clicking on the Location smart button, you can view the exact physical position of the product. The Location section provides details such as Location, Product, Package, Lot/Serial Number, Owner, On-Hand Quantity, Reserved Quantity, and Unit.
The History button lets you review the product’s movement history, while the Replenishment button allows for product restocking.
Selecting the Traceability smart button displays comprehensive tracking data for the product, including Reference, Product, Date, Lot/Serial, From, To, and Quantity, as shown in the example screenshot below.

Traceability
When defining a new product in the Odoo 19 Inventory module, its traceability type can be set under the Inventory tab. Here, you can enable the ‘Valuation by Lot/Serial’ option to determine whether the valuation will be specified based on the Lot or serial number. Then, provide a ‘HS Code’ which is a standard code for international shipping and goods declaration and the ‘Origin of Goods’ to identify where they originated/Manufactured or Produced.
Then, the Custom Lot/Serial option can be used to save the customized lot/ Serial number sequence of the product. Finally you can mention the Expiration Date of the product and mention the current Version number of the product, as depicted in the screenshot below.
Then, in the ‘General Information’ tab, enable the inventory tracking option in the ‘Track Inventory’ field by choosing any option including By Unique Serial Number, By Lots or By Quantity, as shown below.
Once the product has been received into inventory, a corresponding lot or serial number can be assigned. After confirming a purchase order, you can manage product lots and serial numbers prior to receipt. To demonstrate, let’s create and validate a new receipt order, as shown in the screenshot below.
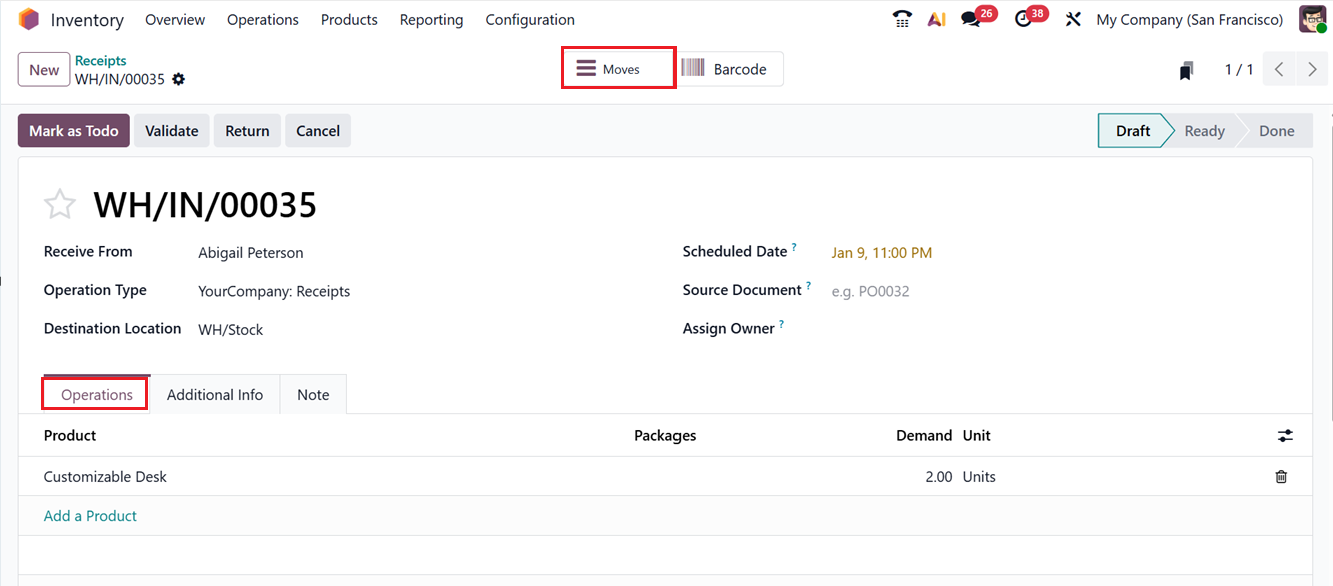
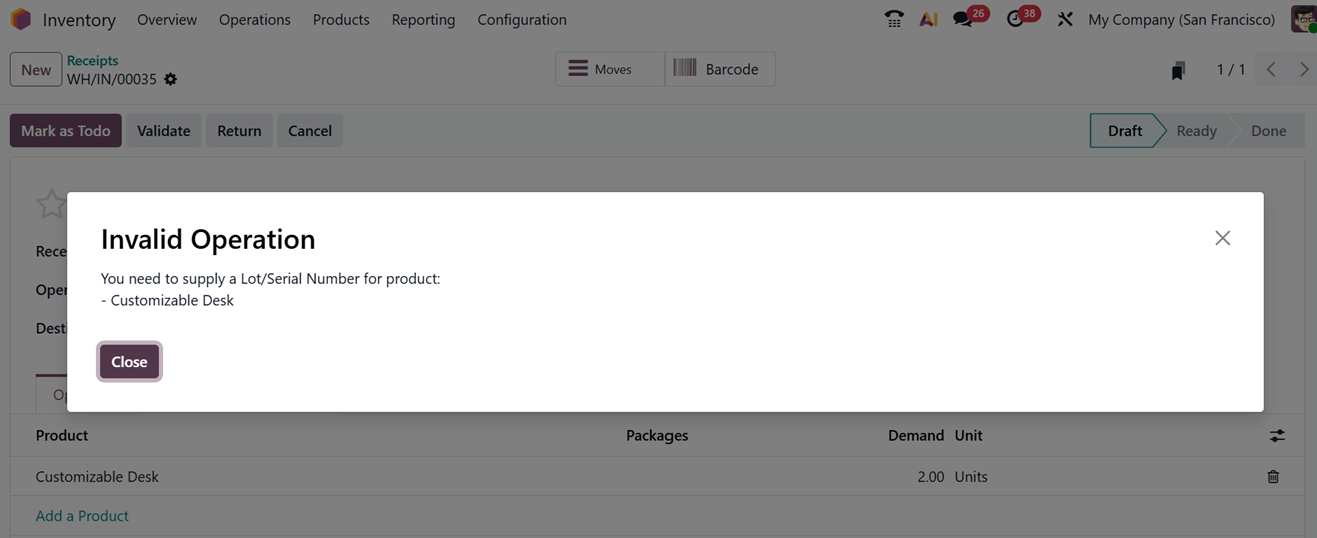
While trying to validate the order, you will get a notification to add aLot/Serial Number.
In the Receipt window, use the ‘Moves’ smart button to edit the Lot/Serial Number.Upon selection,
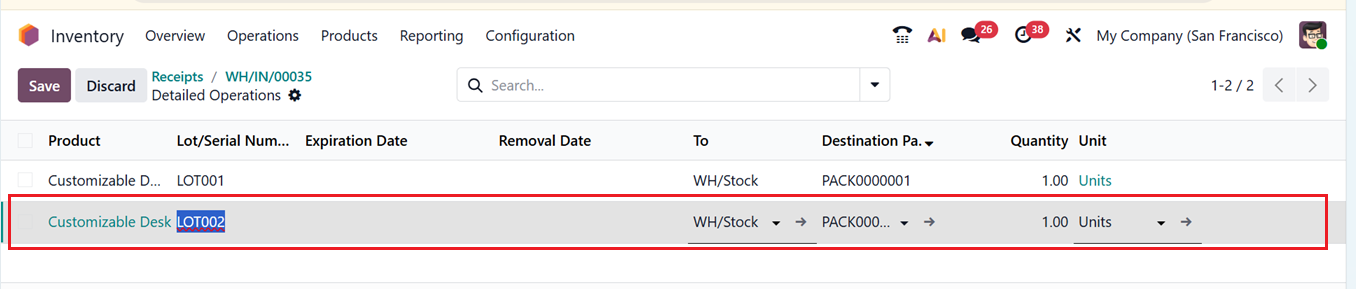
So, clicking on the Add a line button will open a new editing line that will allowing you to input the product’s Lot or Serial number with Destination Package in their respective fields, as shown in the screenshot below.
Within the Odoo Inventory module, Generate Serials/Lots automatically creates a sequence of lot or serial numbers, while Import Serials/Lots allows manual importation from a file or external source.
Click Confirm to finalize the process. The item will now be added to inventory, and the receipt will be confirmed.
The assigned lot or serial number will now appear in the product details window of the newly received item. This can be verified by selecting the smart button shown in the image below.
The newly generated lot or serial number will be displayed here.
You can also display lot and serial number details on delivery slips by enabling the Display Lots & Serial Numbers on Delivery Slips setting under the Traceability tab within the Settings menu.
1.4 Packages
In Odoo 19 Inventory, ‘Packages’ are used to physically group products so they can be stored, moved, and tracked as a single unit. A package represents a real container such as a box, carton, or pallet that may hold multiple products with different quantities or lot/serial numbers. Using packages helps warehouses move items in bulk, track goods more efficiently, simplify logistics and shipping, and monitor the location of entire packages rather than individual products.
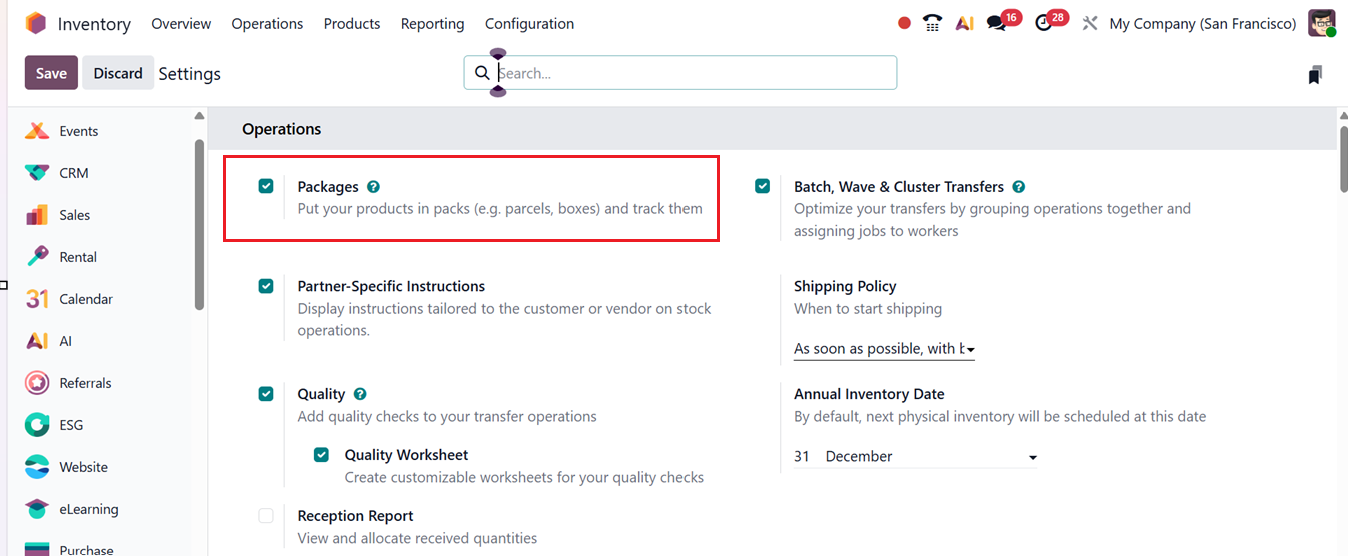
You have to enable this ‘Packages’ feature from the ‘Operations’ tab of the ‘Settings’ window, as shown in the screenshot below.
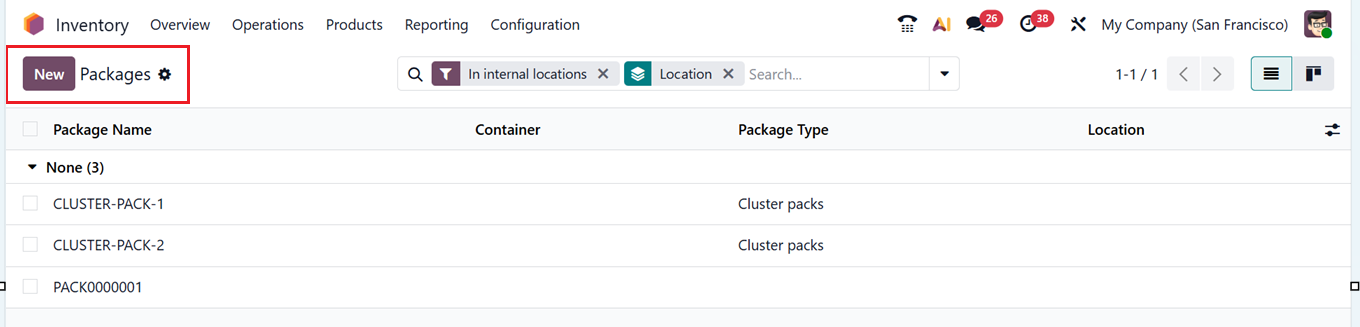
Once the Packages feature is activated from the Settings module, the corresponding option will become available within the Products menu of the Inventory module.
This section presents a list view of the workspace. From the list view, you can examine the Package Name, Container, Package Type and Company information for previously configured packages, as illustrated below.
Then, a new package can be created for multiple products by clicking on the New button. In the displayed window, enter the Package Reference to appear as a unique identifier. Within the Package Type field, you can choose an appropriate category for your packages including Box, Pallet, Cluster Packs, bPost Custom Parcel, DHL Flyer/Smalls, DHL Parcels/Conveyables etc. The configuration of package types will be explained later. You can specify the package’s weight in the Shipping Weight field and input the Company name and the product’s Location in their respective areas. The Pack Date field automatically displays the relevant date of packaging. The ‘Container’ field can be used to mention the container in which this package belongs to, as depicted in the screenshot below.
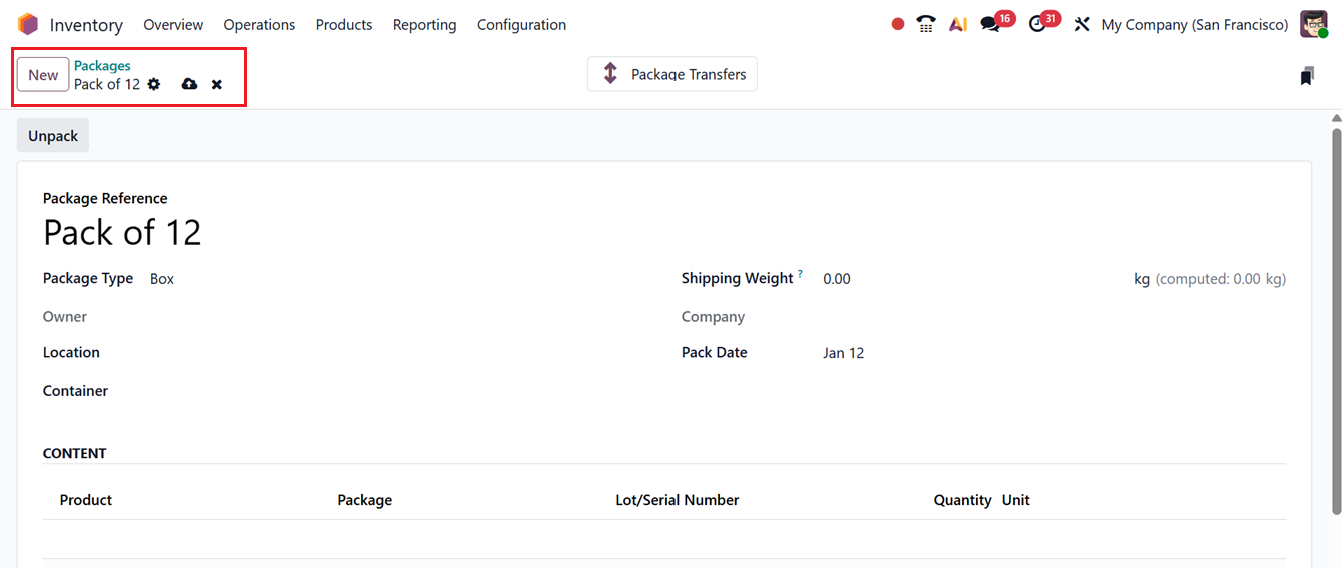
By accessing the CONTENT tab, you can view the products included in this package. The list appears only after the package has been involved in stock movements, displaying details such as Product Name, Package, Lot/Serial Number, Quantity, and Unit.
Once all the required fields are filled, save the Package details for future use. You can check the functionality of these packages when validating delivery orders, several items can be grouped into a single package. Through the smart button available on the corresponding sales order window, you can confirm the delivery order after verifying the sales order. The approved delivery order will appear as shown below.
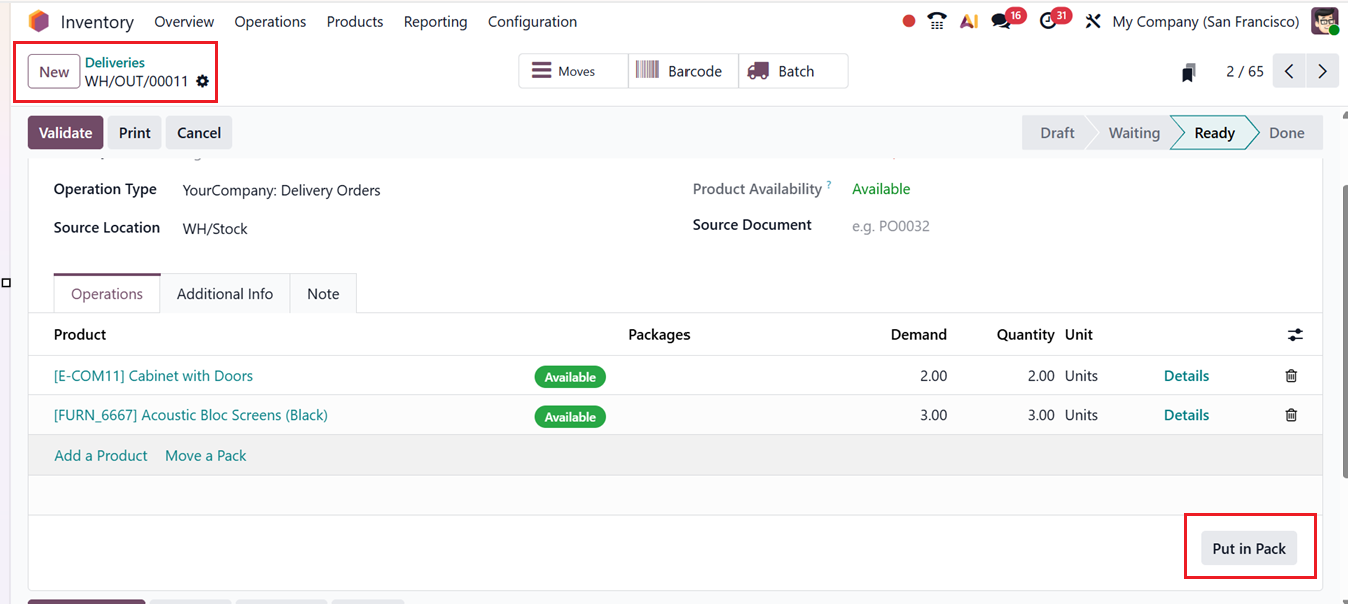
Here, you can see a ‘Put in Pack’ option located within the Operations tab. By clicking this button, you can pack the customer’s ordered products. Immediately after choosing this option, a new 'Packages' smart button appears on the screen, as illustrated below.
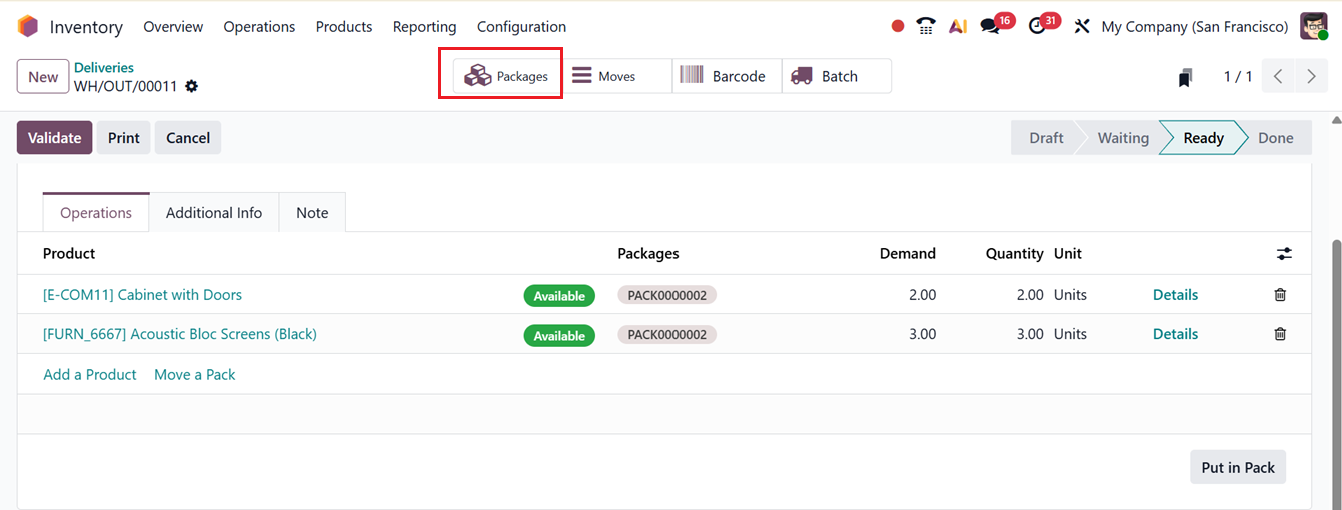
By selecting the Packages button, you can review the detailed information of the package associated with that particular delivery order, as shown below.

As mentioned earlier, all generated packages can also be accessed under the Packages option in the Inventory module.