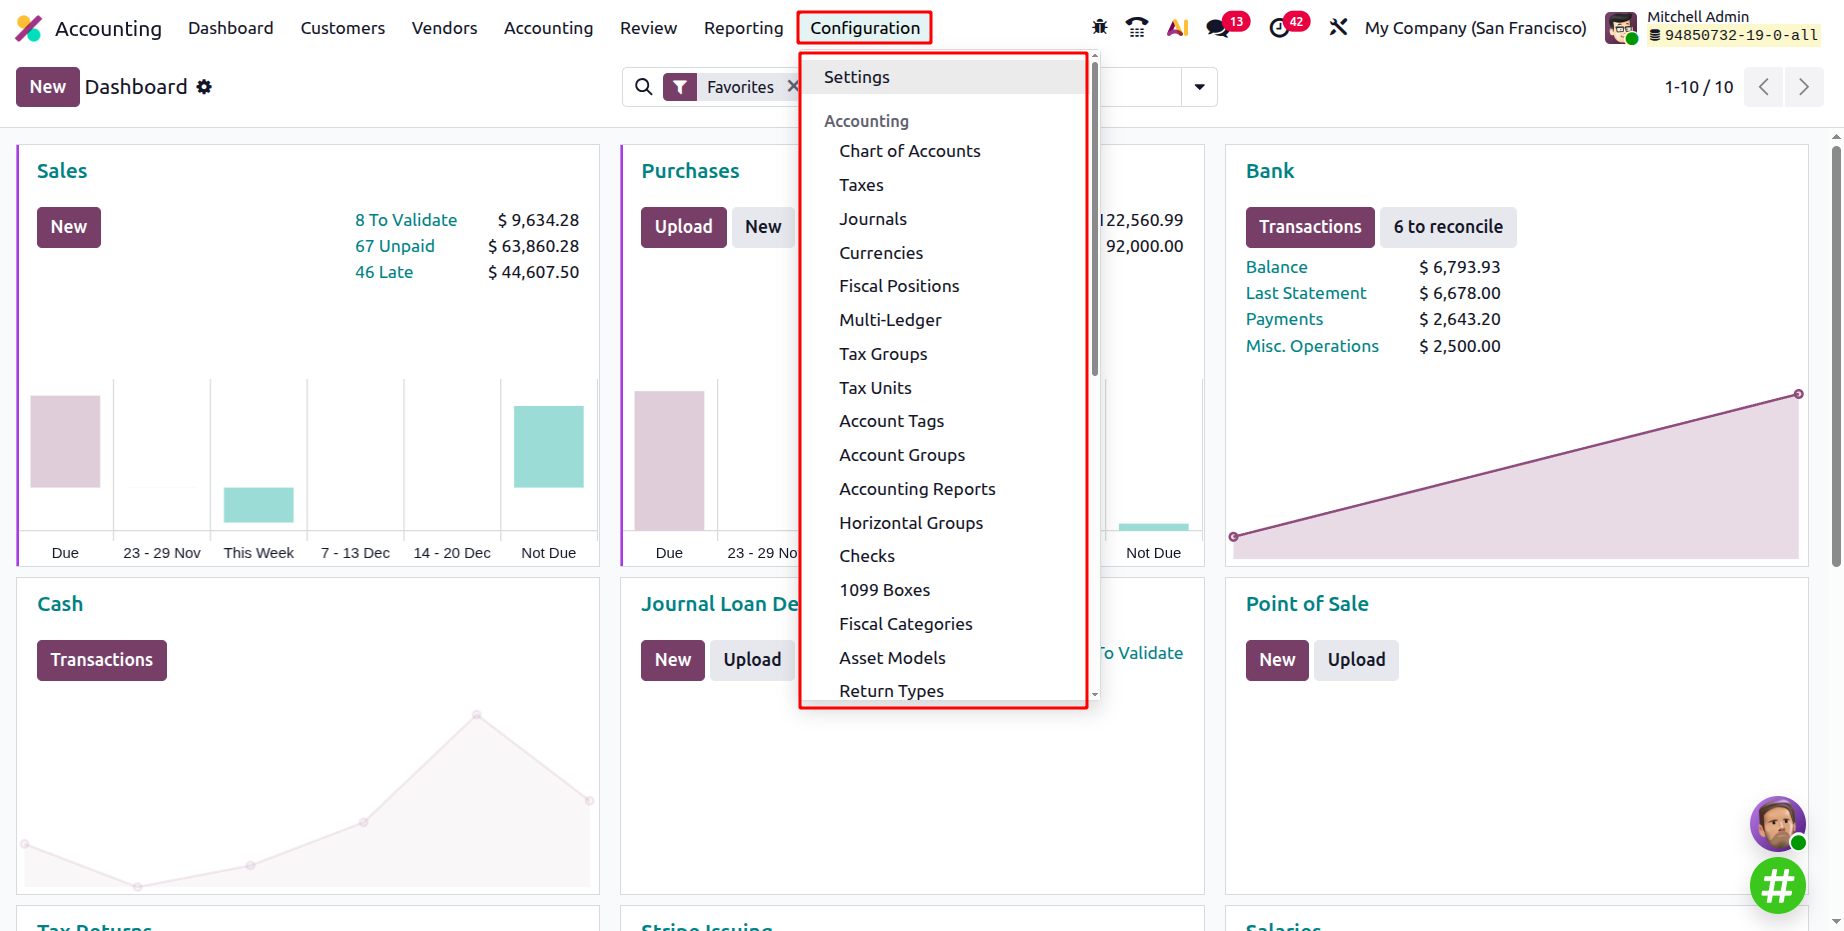
Configuration
The Configuration menu of the Accounting contains Settings, Accounting, Invoicing, Online Payments and Analytic Accounting.
1.1 Chart of Accounts
In Odoo 19 Accounting, the Chart of Accounts is the foundation of your company’s financial structure, a centralized and organized list of accounts used to classify and record every business transaction.
You can access it from Accounting ▸ Configuration ▸ Chart of Accounts.
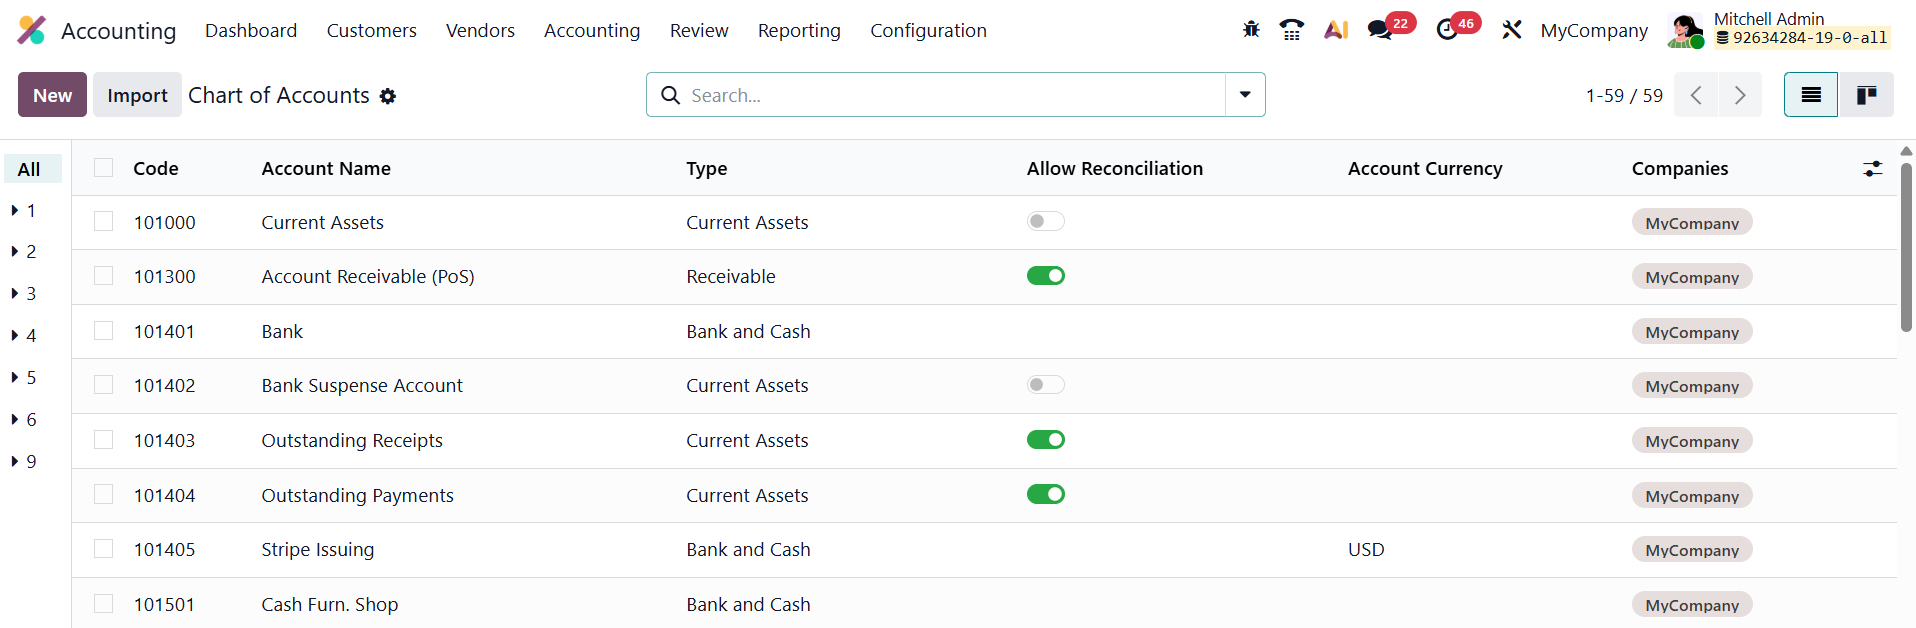
The view appears as an interactive grid displaying each account’s Code, Name, Type, Currency, and Company. The Account Type field is particularly crucial, as it determines how the account behaves in financial reports, which fiscal year closing rules apply, and whether the account supports reconciliation for linking payments and invoices.
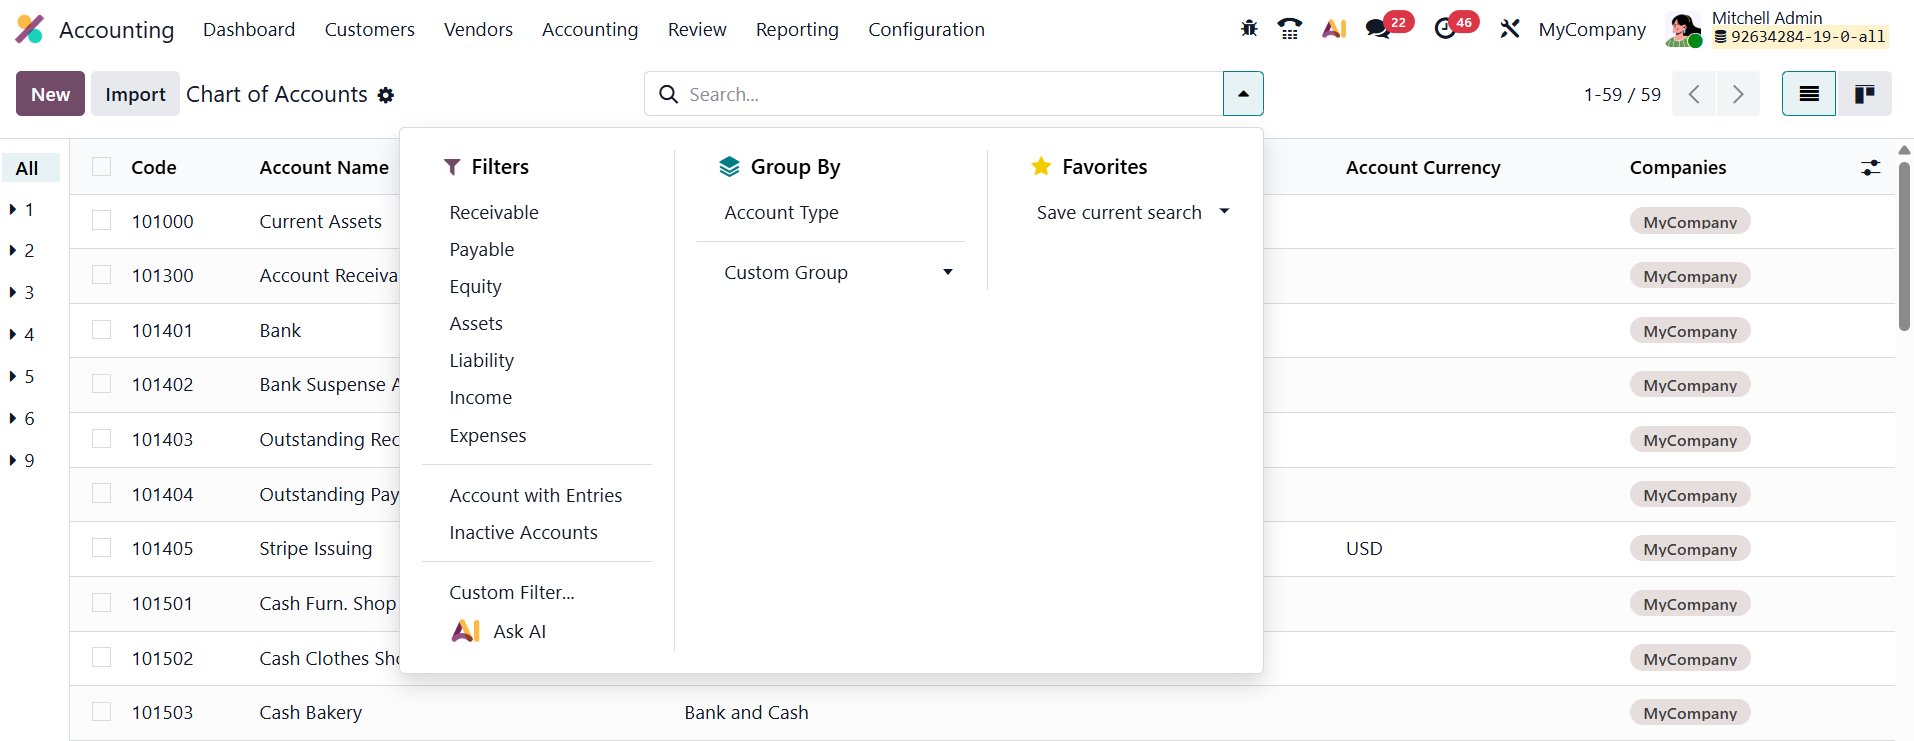
Built-in Filters such as Receivable, Payable, Assets, Liabilities, Income, Expenses, and Equity allow quick sorting, while custom filters and groupings provide deep flexibility for segmenting financial data, eliminating the need for manual spreadsheet exports.
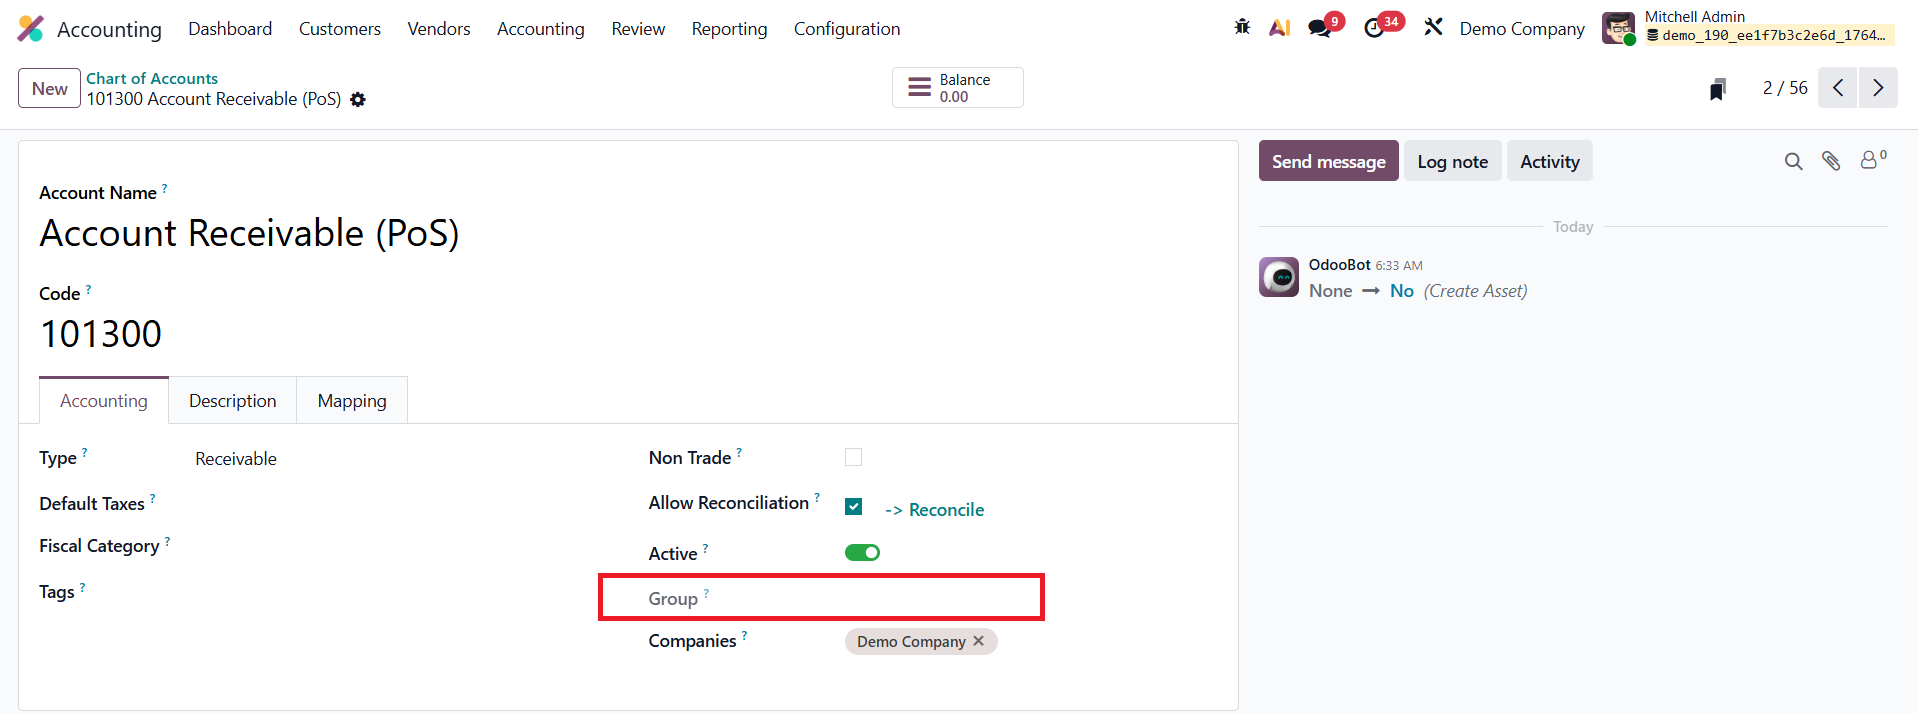
Click New to add a new account.
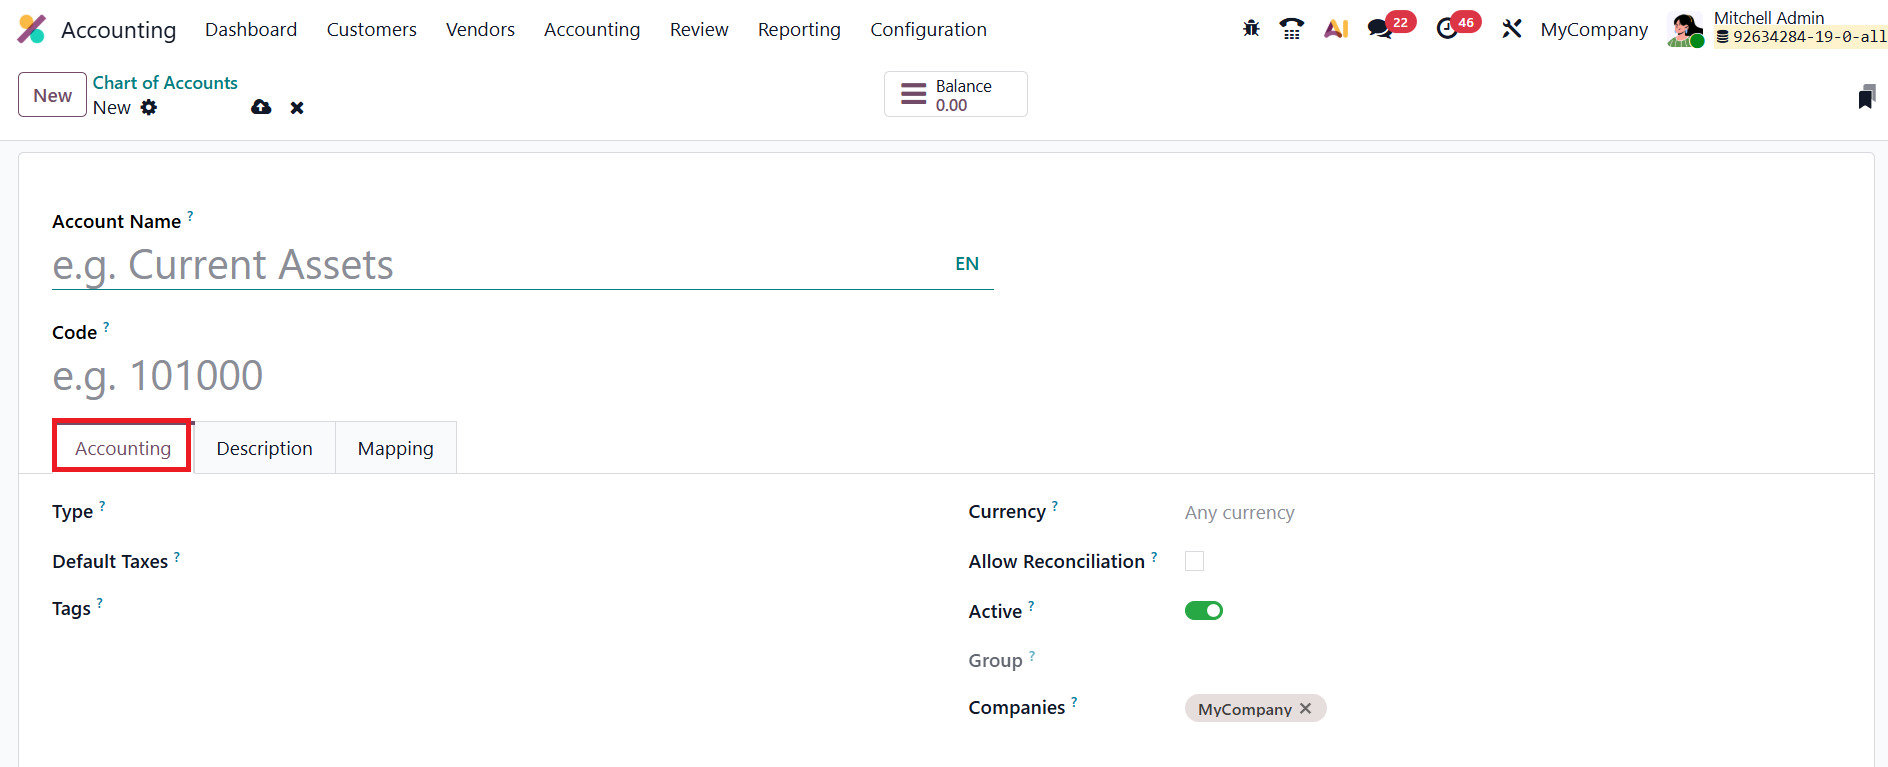
Then fill in the Code, Name, Type, Currency, and Reconciliation fields. Each account includes:
- Account Code – A unique identifier that helps track and reference accounts in reports.
- Account Name – A descriptive label defining the account’s purpose in the company’s finances.
- Account Type – Determines its behavior in balance sheets and income statements.
- Tags – Custom labels that make it easier to categorize accounts and generate analytical reports.
- Default Taxes – Defines the default tax rate automatically applied when the account is used in transactions.
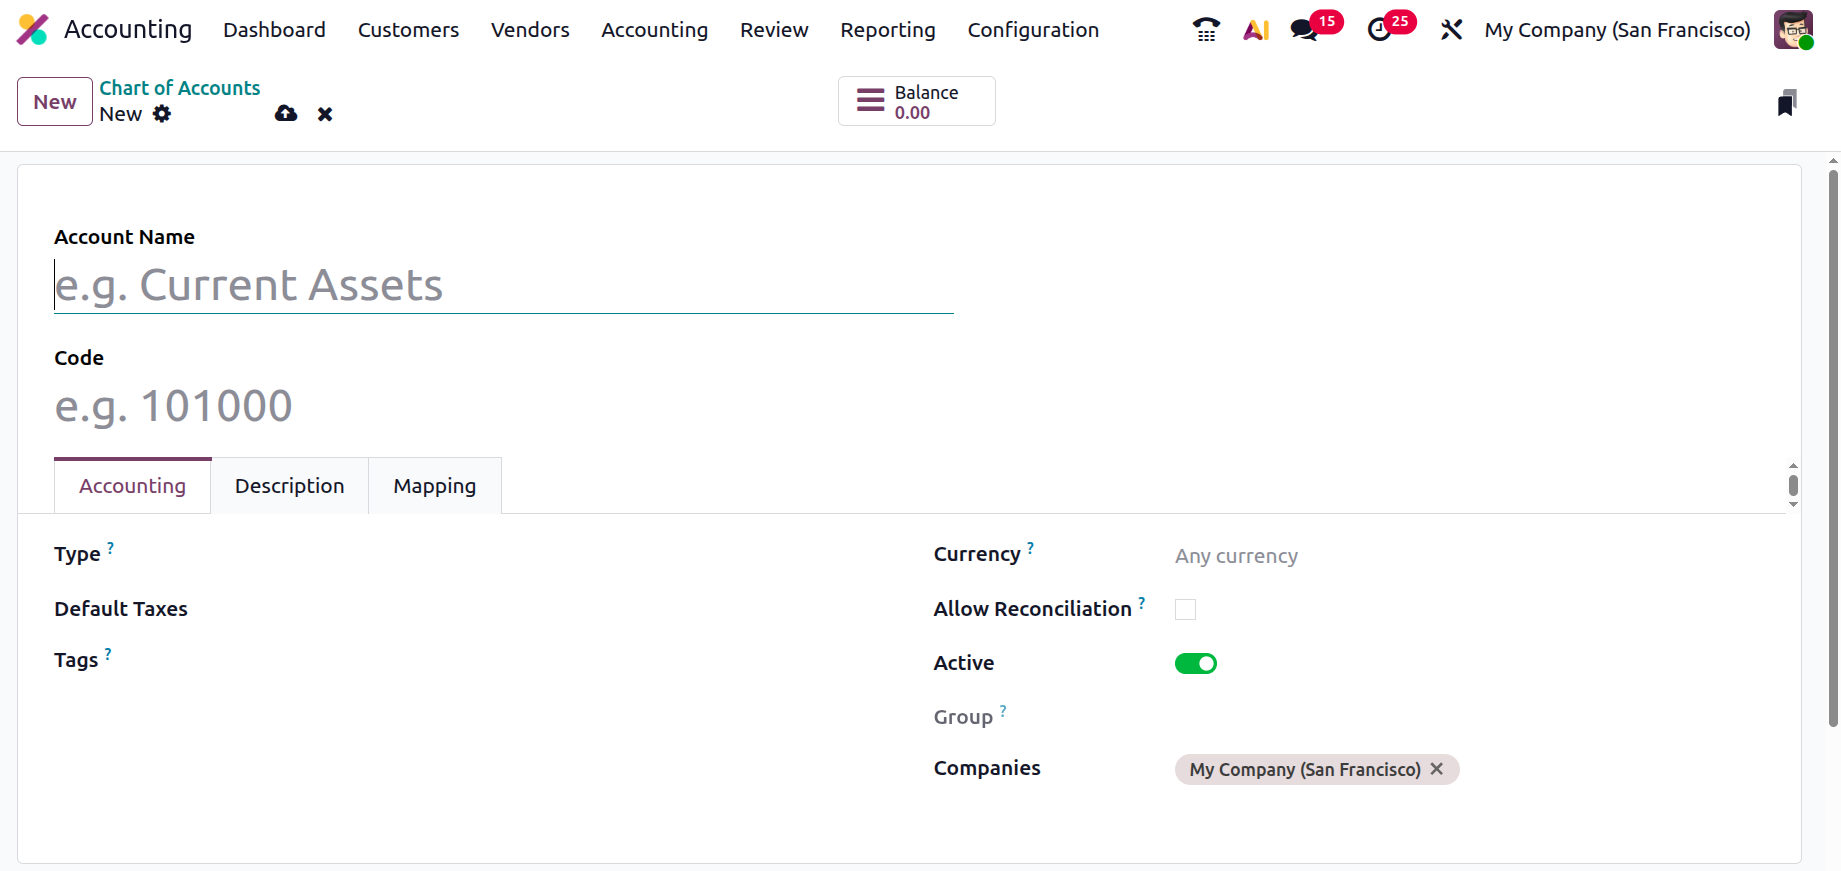
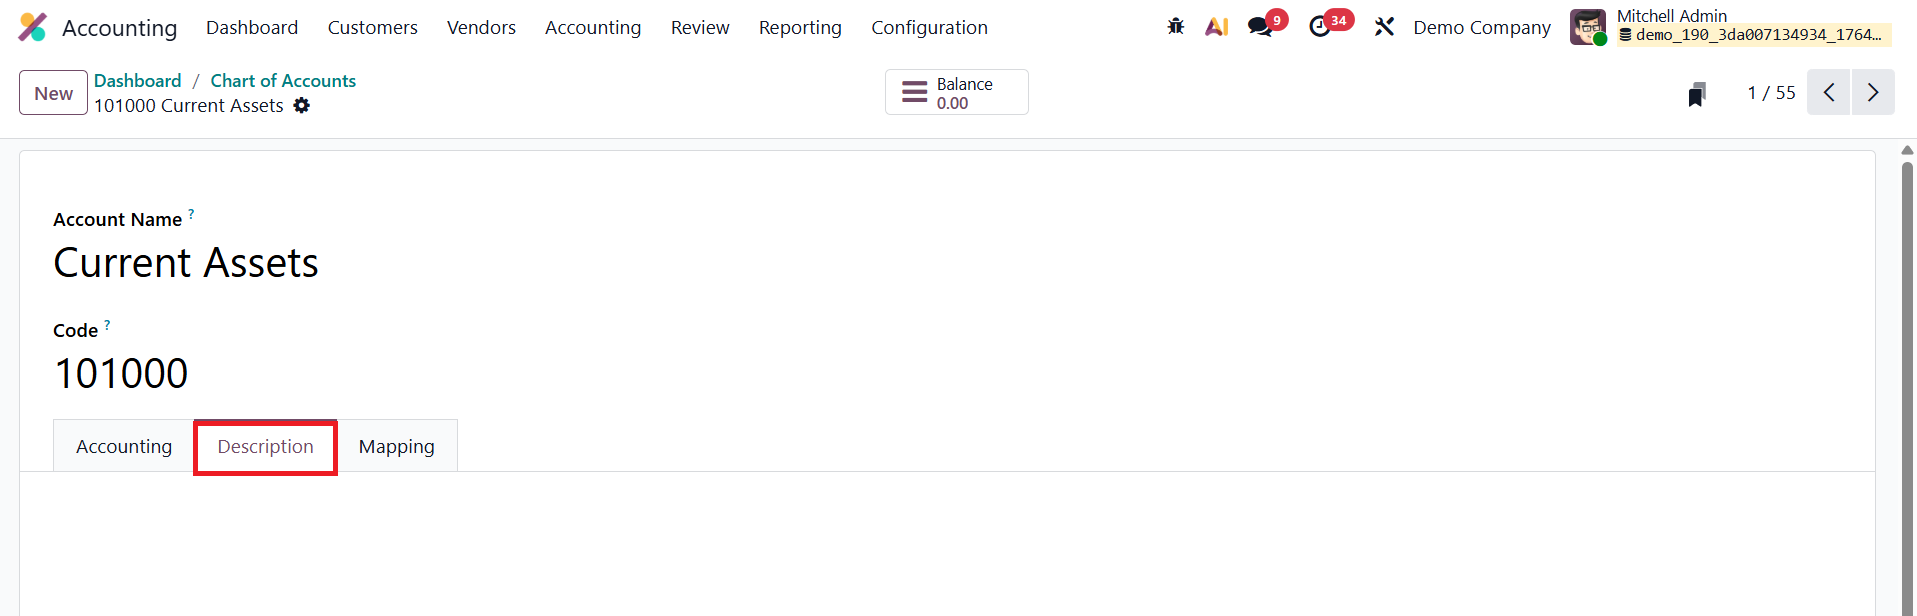
Add description related to the account under the Description tab.
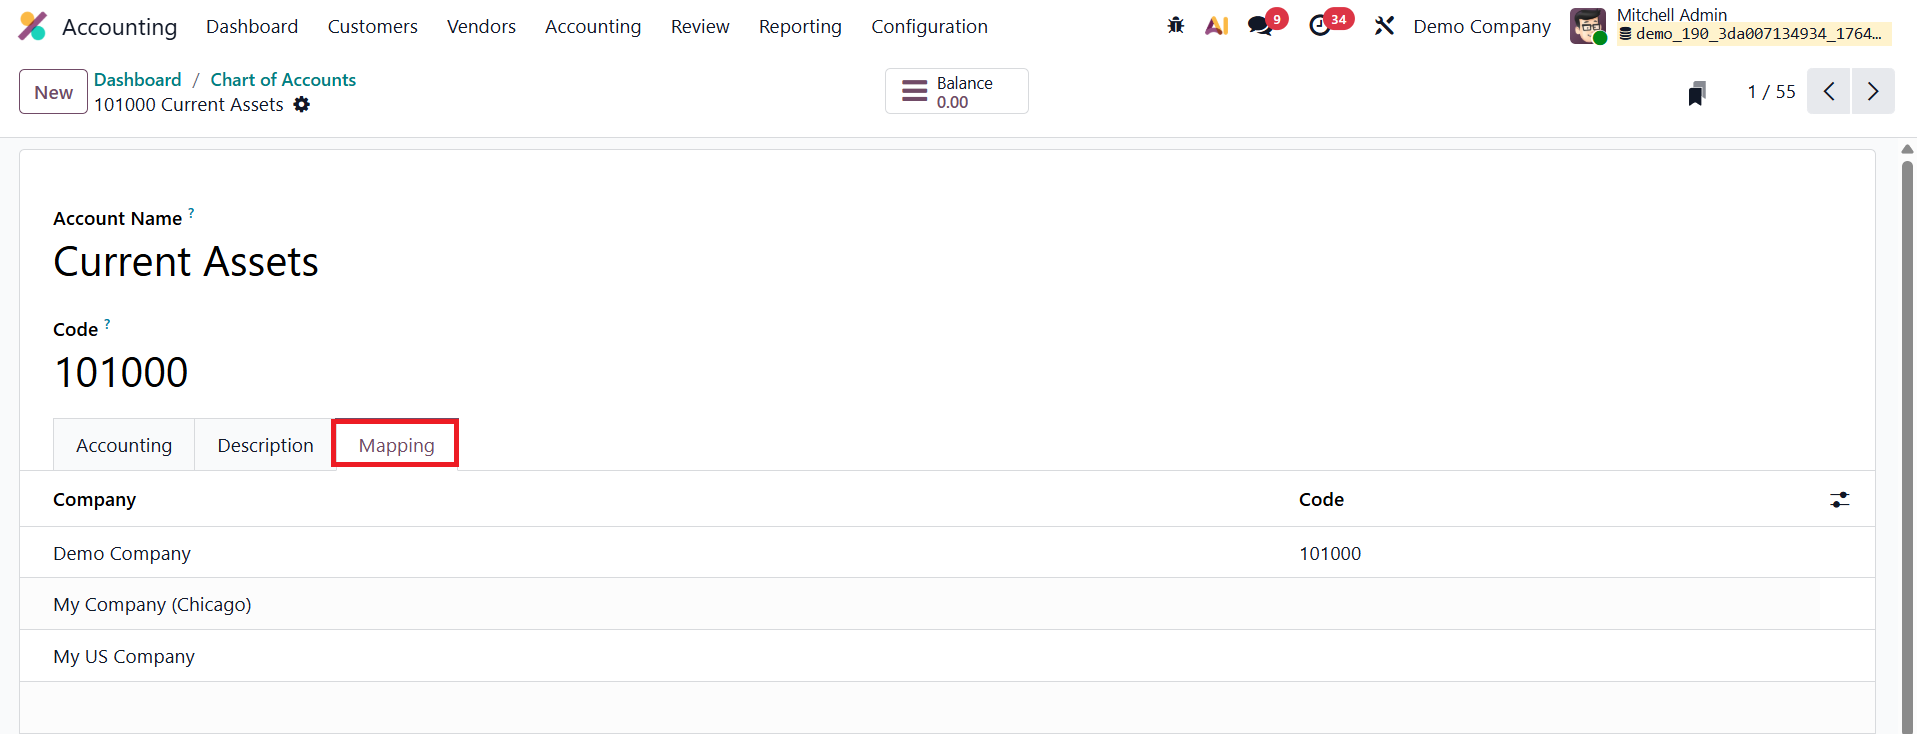
Additionally, the Account Mapping feature lets you align equivalent accounts between companies, ensuring consistency in consolidated financial reporting.
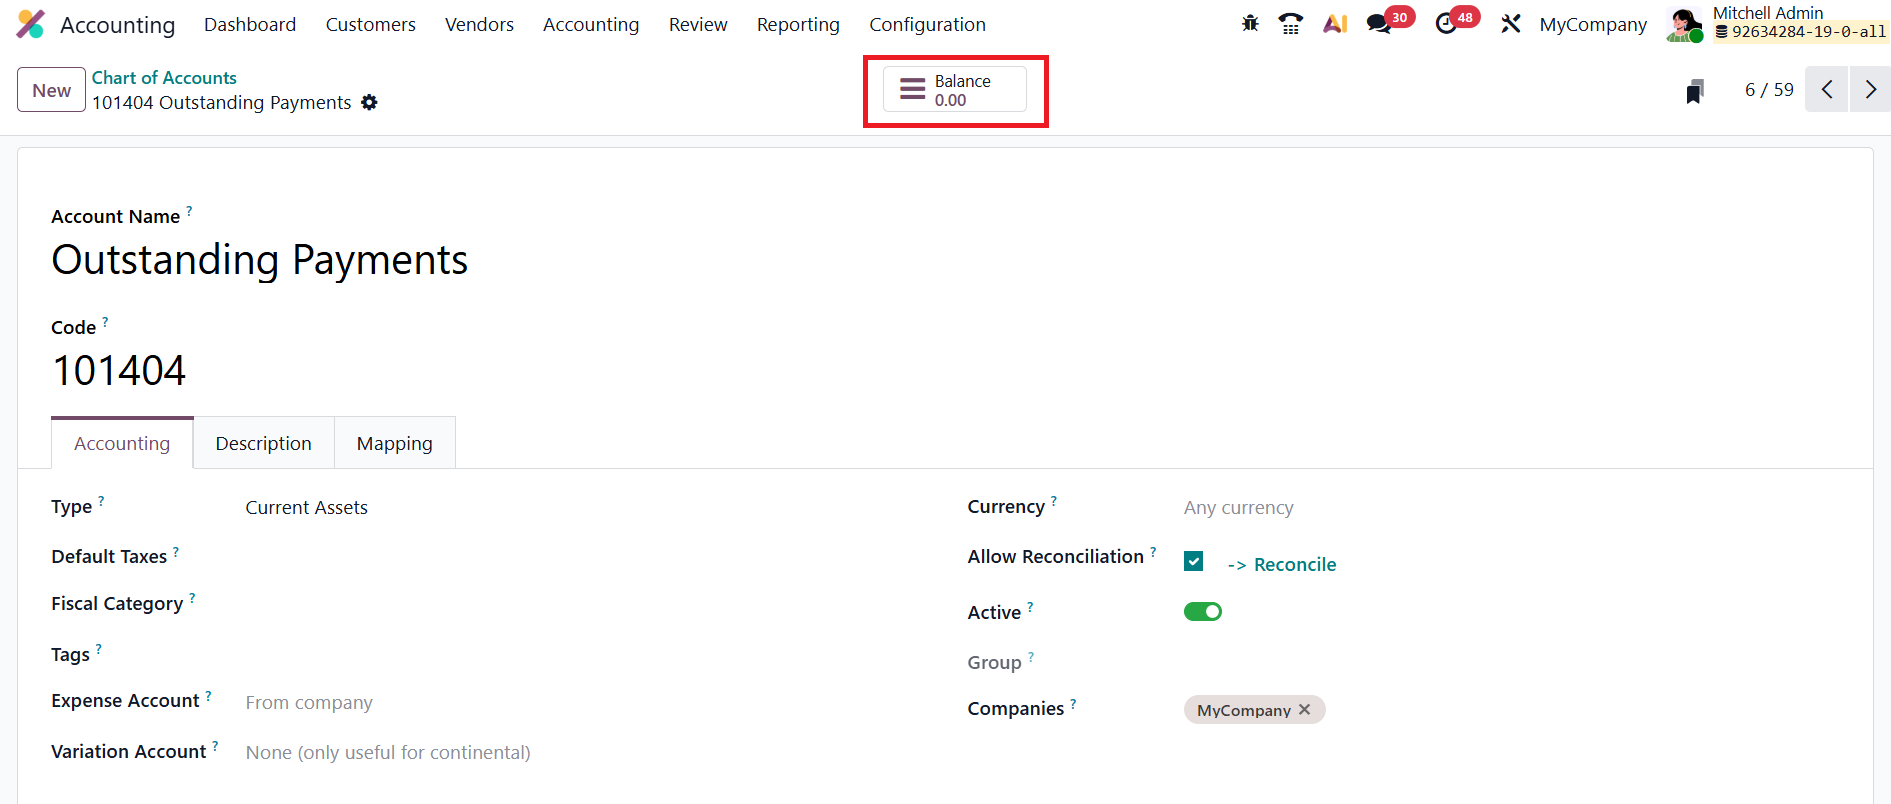
For quick insights, clicking the Balance button displays the account’s current debit, credit, and net balance, giving instant visibility into financial activity without leaving the dashboard.
1.2 Taxes
Tax configuration has always been a sensitive process, one small rounding error can throw your entire ledger off balance and even trigger compliance penalties. Odoo 19 simplifies this complex task by centralizing every tax-related setting in one unified dashboard:
Accounting → Configuration → Taxes.
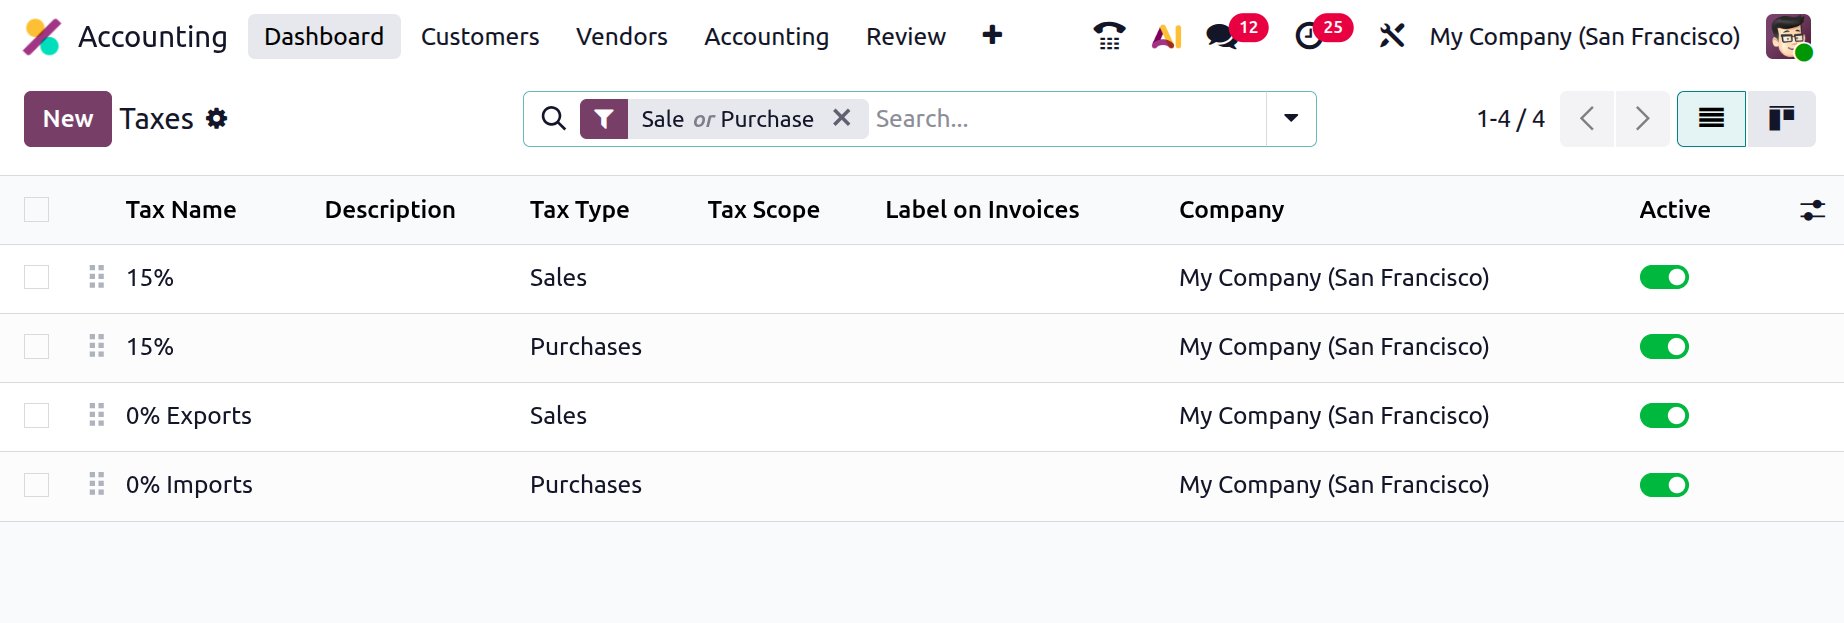
The dashboard in Odoo 19 offers a clean, filterable overview of all existing tax rules. You can instantly filter by Sales, Purchases, Goods, Services, Active and Archived. Each line displays essential details such as Tax Name, Description, Tax Type, Tax Scope, Label on Invoices, and Company, ensuring you can locate and manage tax rules effortlessly.
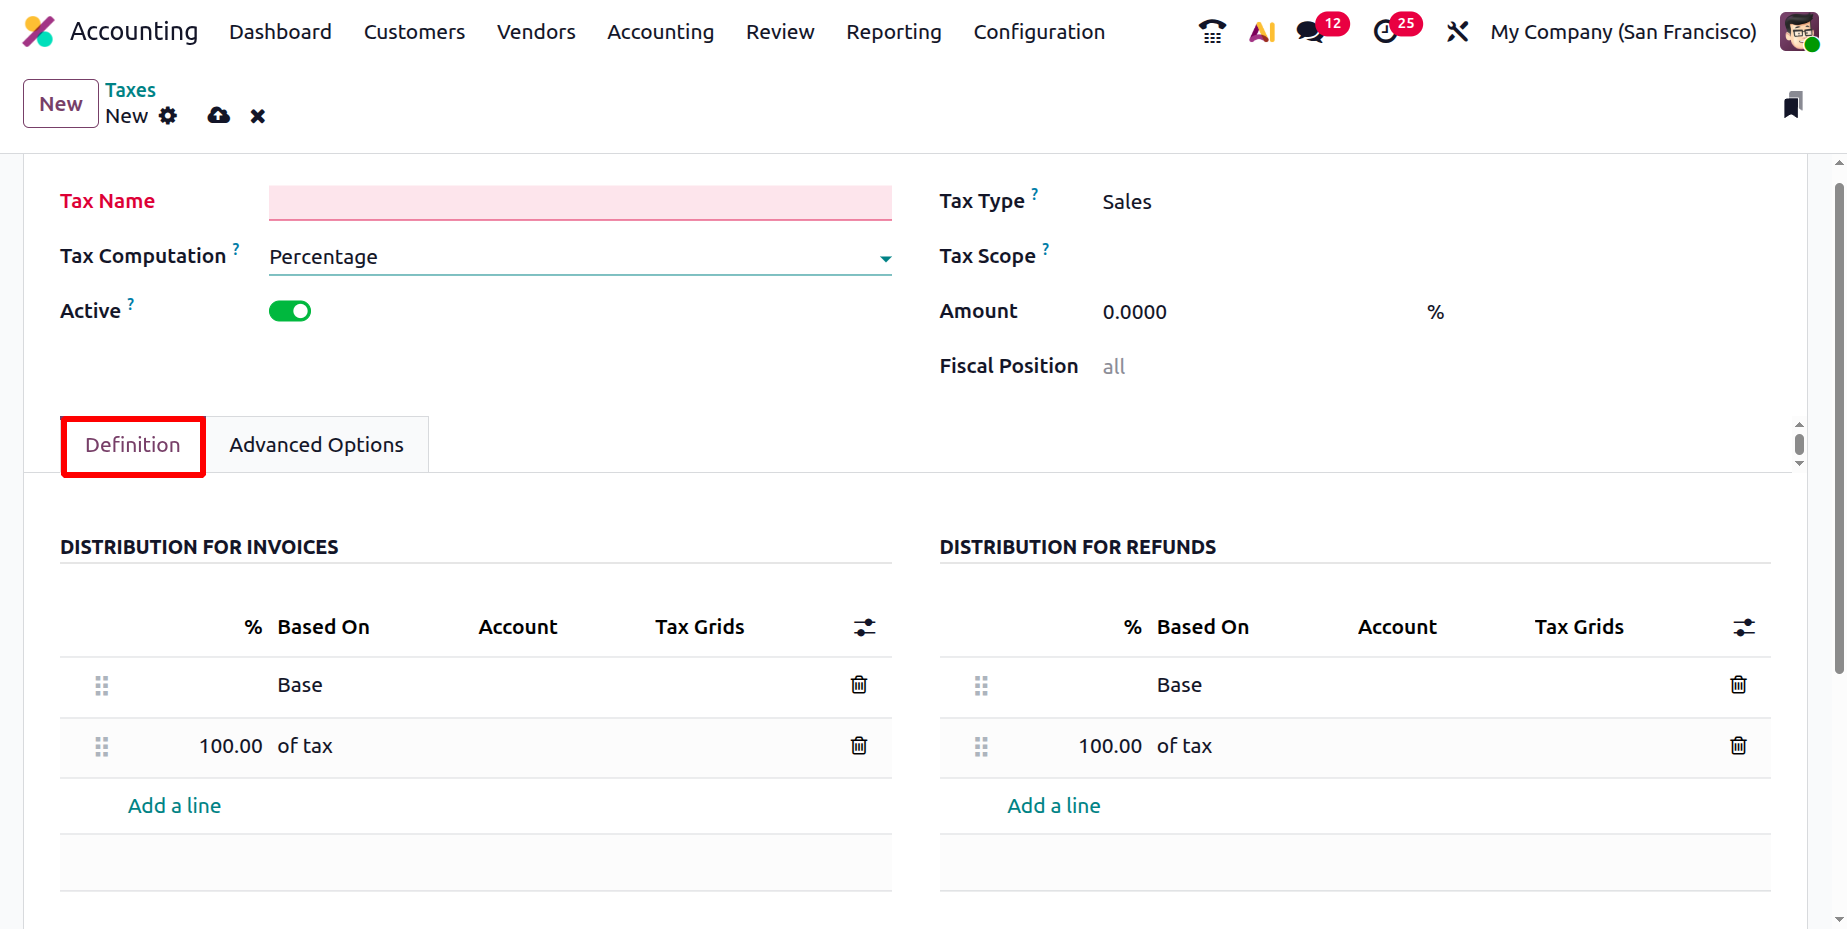
When you click New, a structured form opens, where each field determines how Odoo will calculate and apply tax values across invoices, bills, and reports. Begin by entering a clear and descriptive Tax Name, then specify whether it applies to Sales or Purchases in the Tax Type field. If the rule only targets specific items, restrict it through the Tax Scope field. Outdated rates can be deactivated anytime by unchecking the Active box, without erasing their historical data. The Fiscal Positions field is used to automatically map and replace taxes and accounts in transactions based on specific tax rules or customer locations.
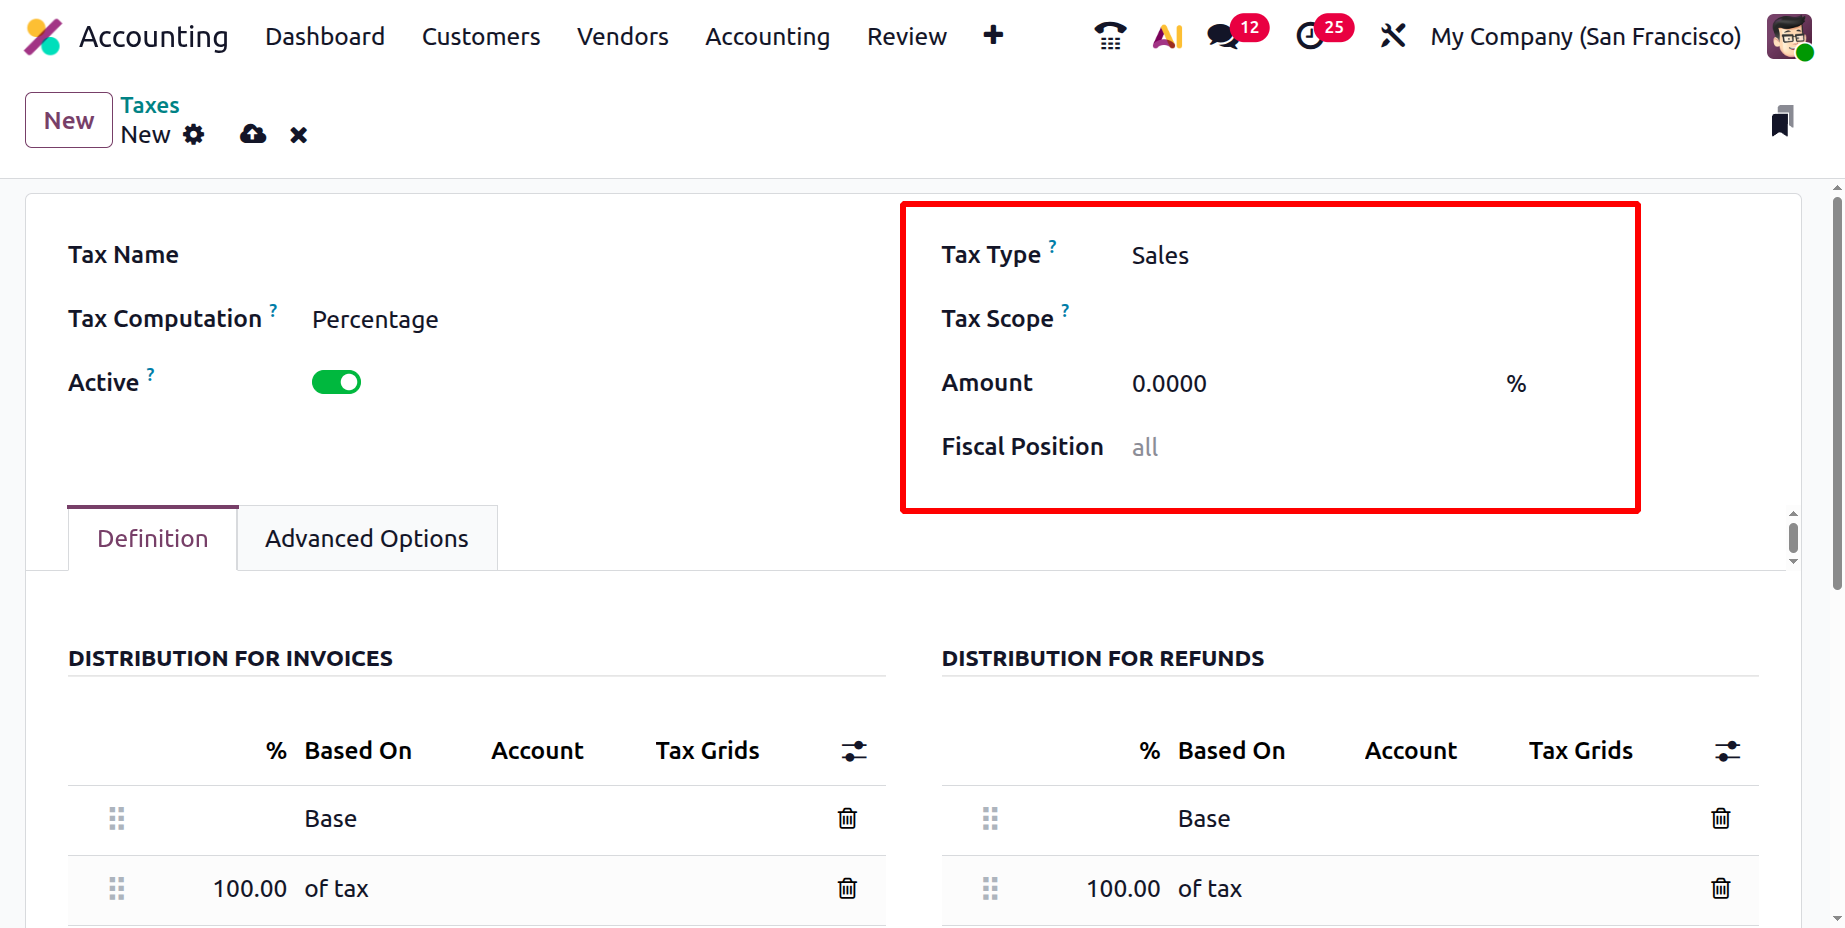
The Tax Computation method dictates how Odoo calculates the tax. Odoo 19 supports five main computation types:
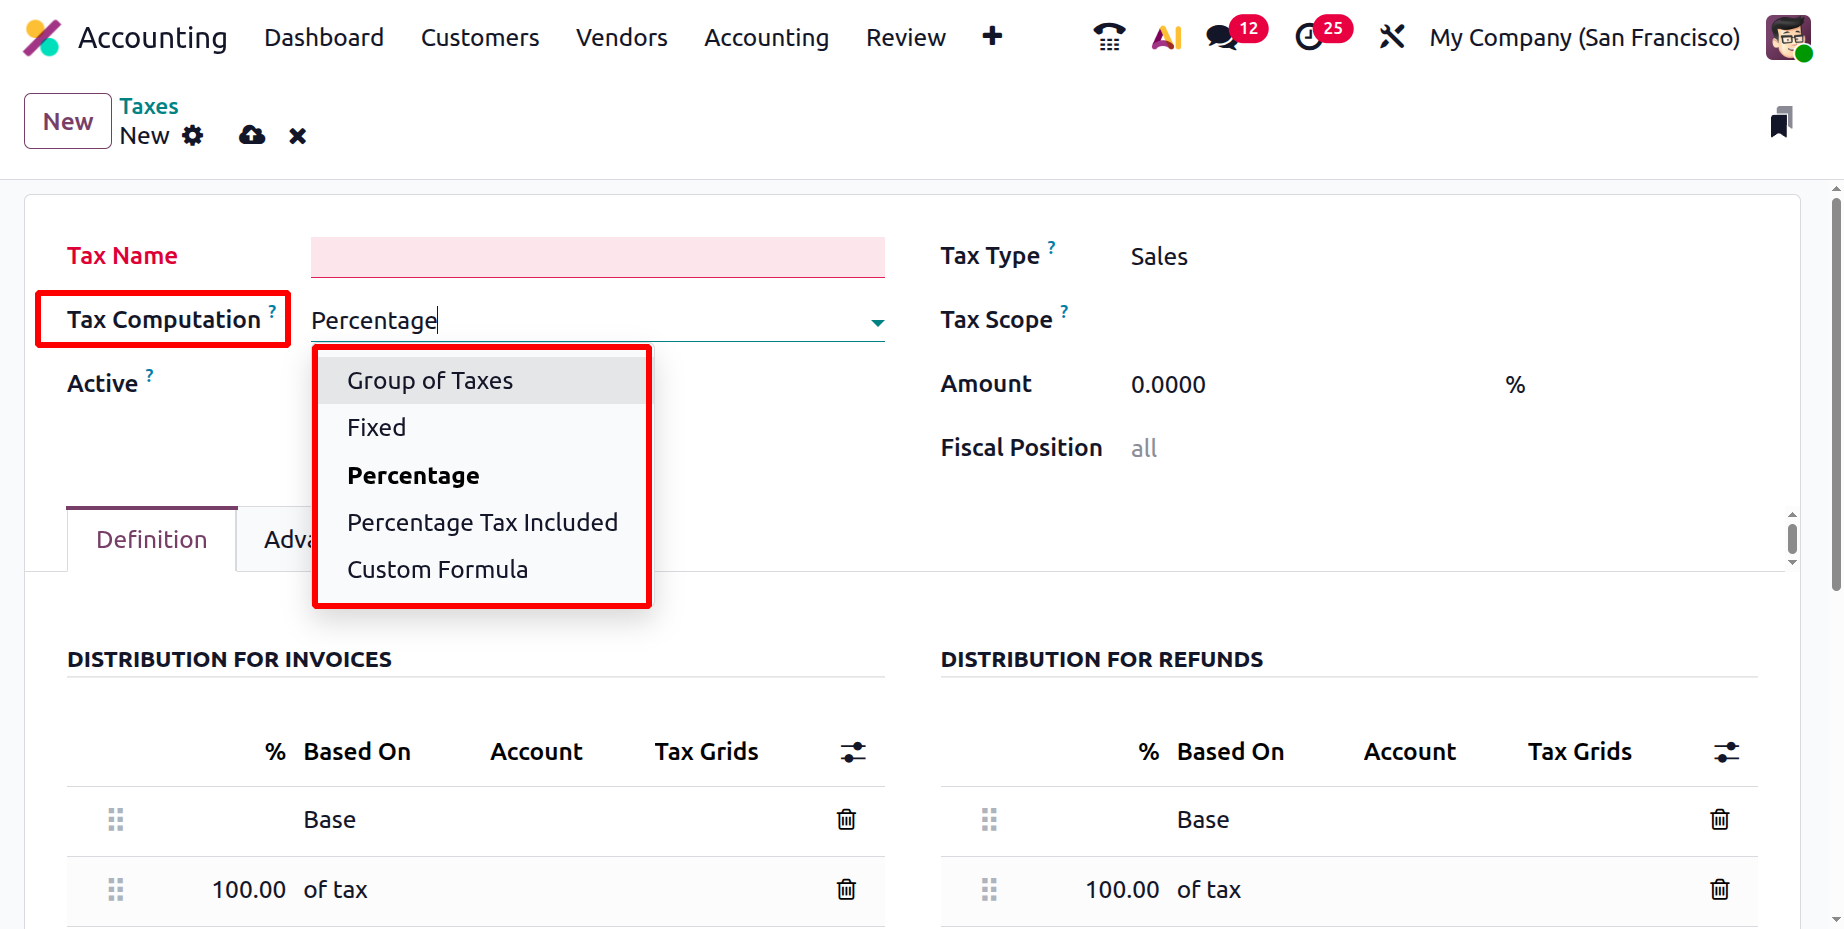
- Fixed – Applies a flat tax amount in the company’s currency, regardless of the transaction value. Ideal for environmental charges or fixed service fees.
- Percentage of Price – Calculates the tax as a percentage of the sales price (the base amount).
- Percentage of Price Tax Included – Uses the total tax-inclusive price as the base and back-calculates the tax portion, perfect for inclusive pricing models.
- Group of Taxes – Combines multiple sub-taxes into a single rule, allowing you to stack federal, state, and local taxes in a specific sequence.
- Custom Formula – Enables custom tax computations with Python scripts, using variables such as price, product, or partner to determine whether and how the tax should apply.
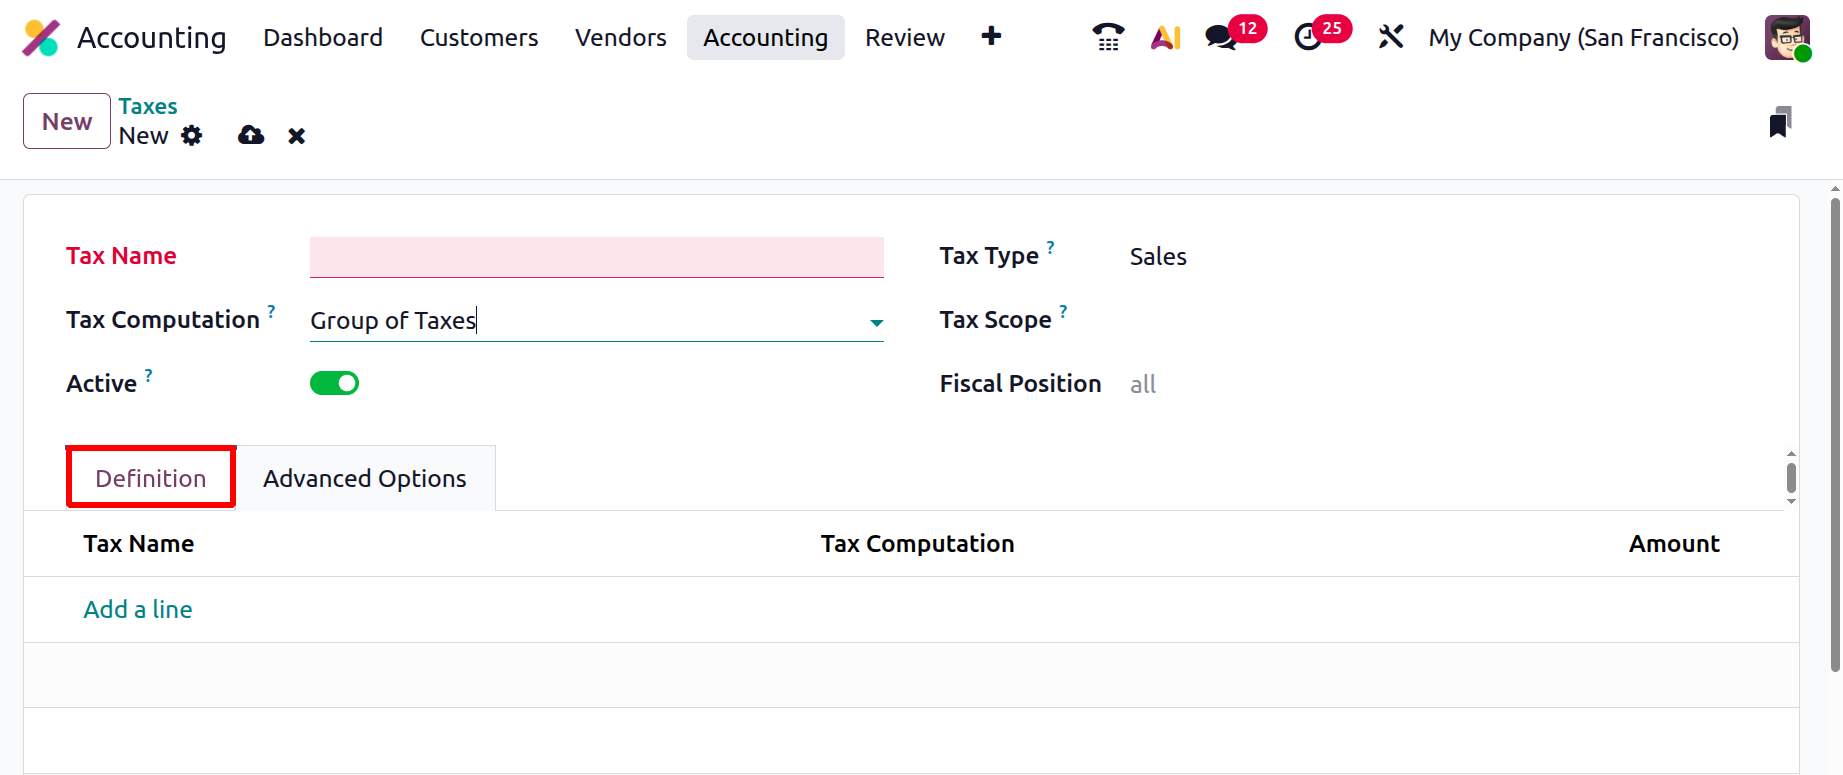
Selecting the Group of Taxes option reveals an additional Definition tab where you can add multiple sub-taxes and define their computation order.
Each tax method includes a Definition tab that determines the computation base, the general ledger accounts for tax postings, and the tax grids (boxes) where Odoo will place the reported values for both invoices and refunds.
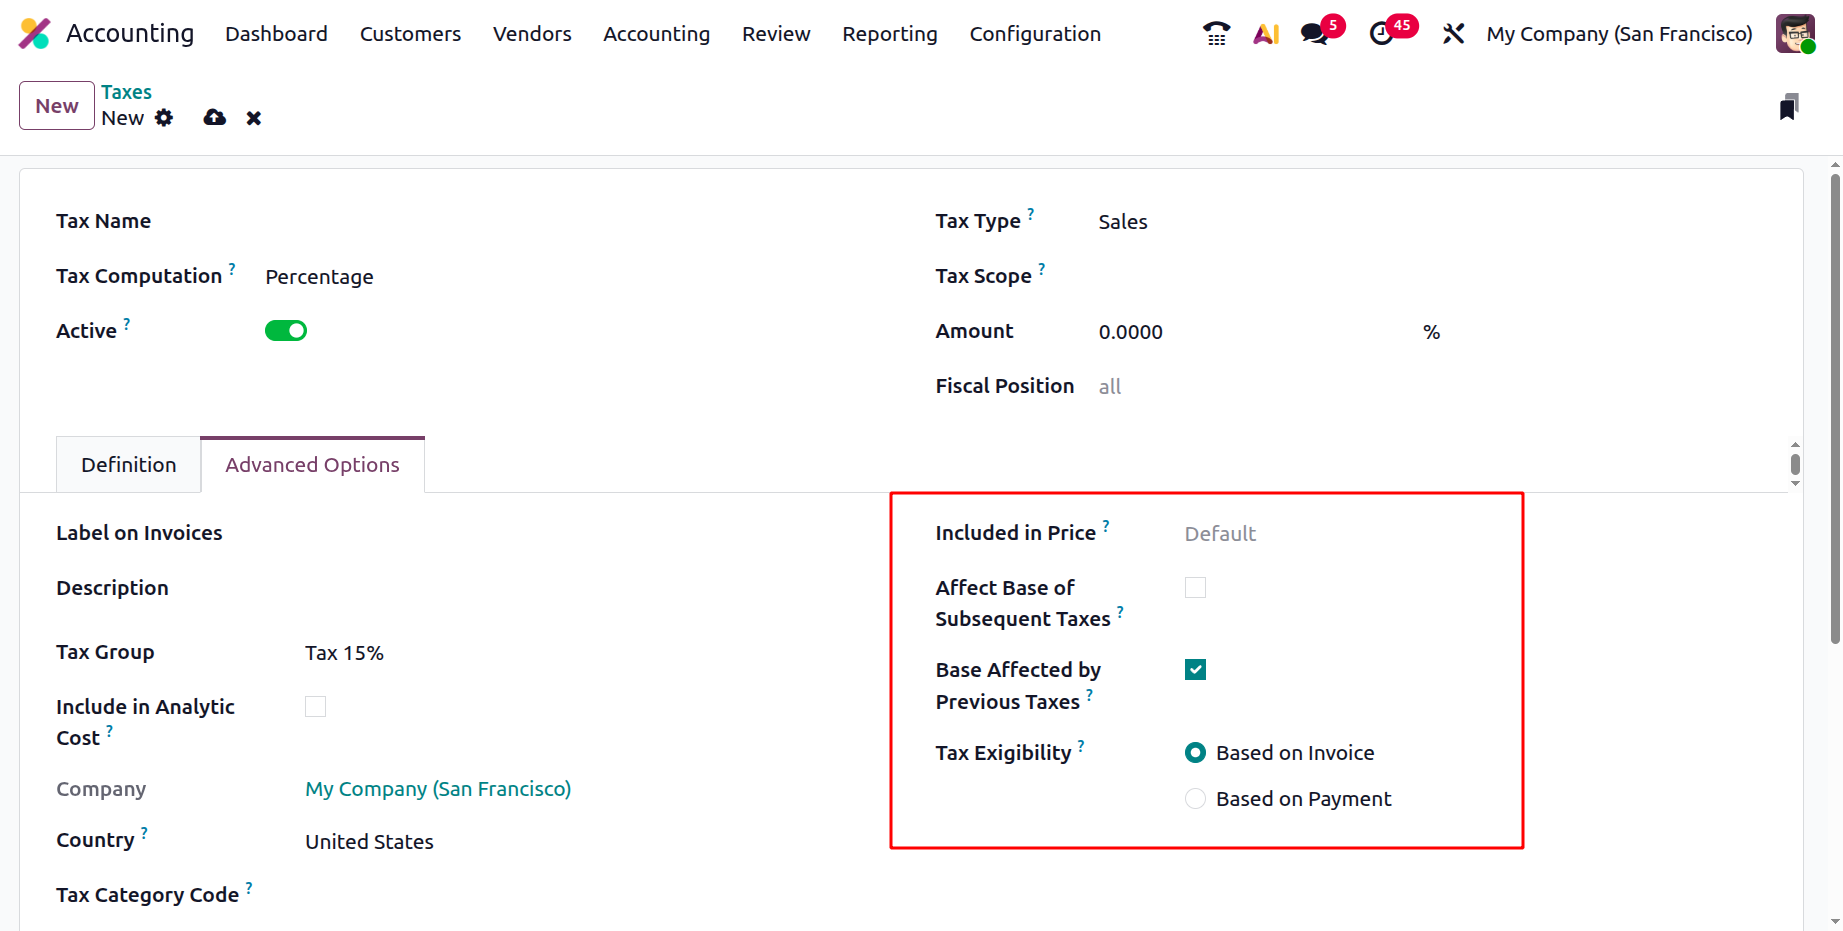
In the Advanced Options tab, the Label on Invoices specifies the short name displayed on invoices, while the Description provides an internal explanation of the tax rule. The Tax Group organizes multiple taxes under a broader category, such as VAT or Service Tax, for easier reporting. Enabling Include in Analytic Cost ensures the tax amount is included in analytic account tracking for detailed cost analysis. The Tax Category Code represents the official classification of the tax used for electronic invoicing purposes, while Legal Notes allow you to include regulatory text on invoices for compliance.
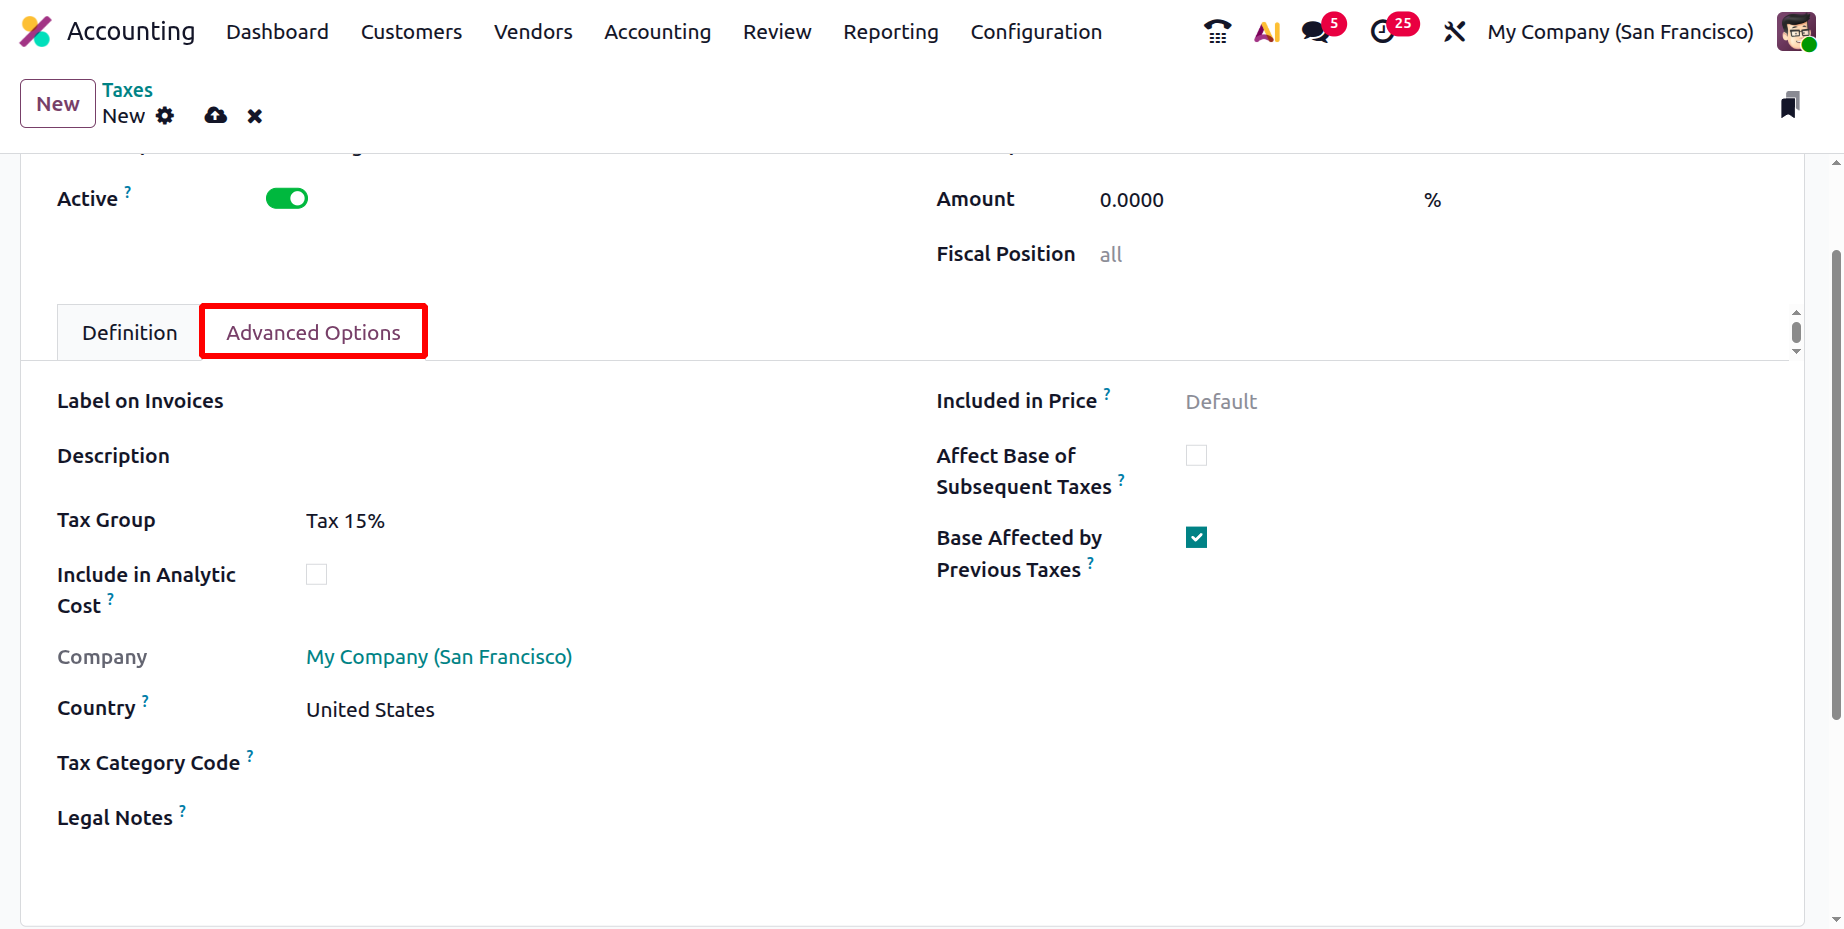
Activating Included in Price means product prices already contain the tax, prompting Odoo to back-calculate it, whereas disabling it makes the tax additive. The Affect Base of Subsequent Taxes and Base Affected by Previous Taxes options control whether taxes influence or are influenced by other taxes in multi-layered structures. Finally, Tax Exigibility determines when the tax is recognized, either Based on Invoice, which records it when the invoice is issued (accrual basis), or Based on Payment, which records it upon actual payment (cash basis).
After confirming the Company and Country, hit Save. From that moment, Odoo 19 automatically applies the correct tax to every invoice, refund, and vendor bill, posting values to the right accounts and filling the corresponding return boxes.
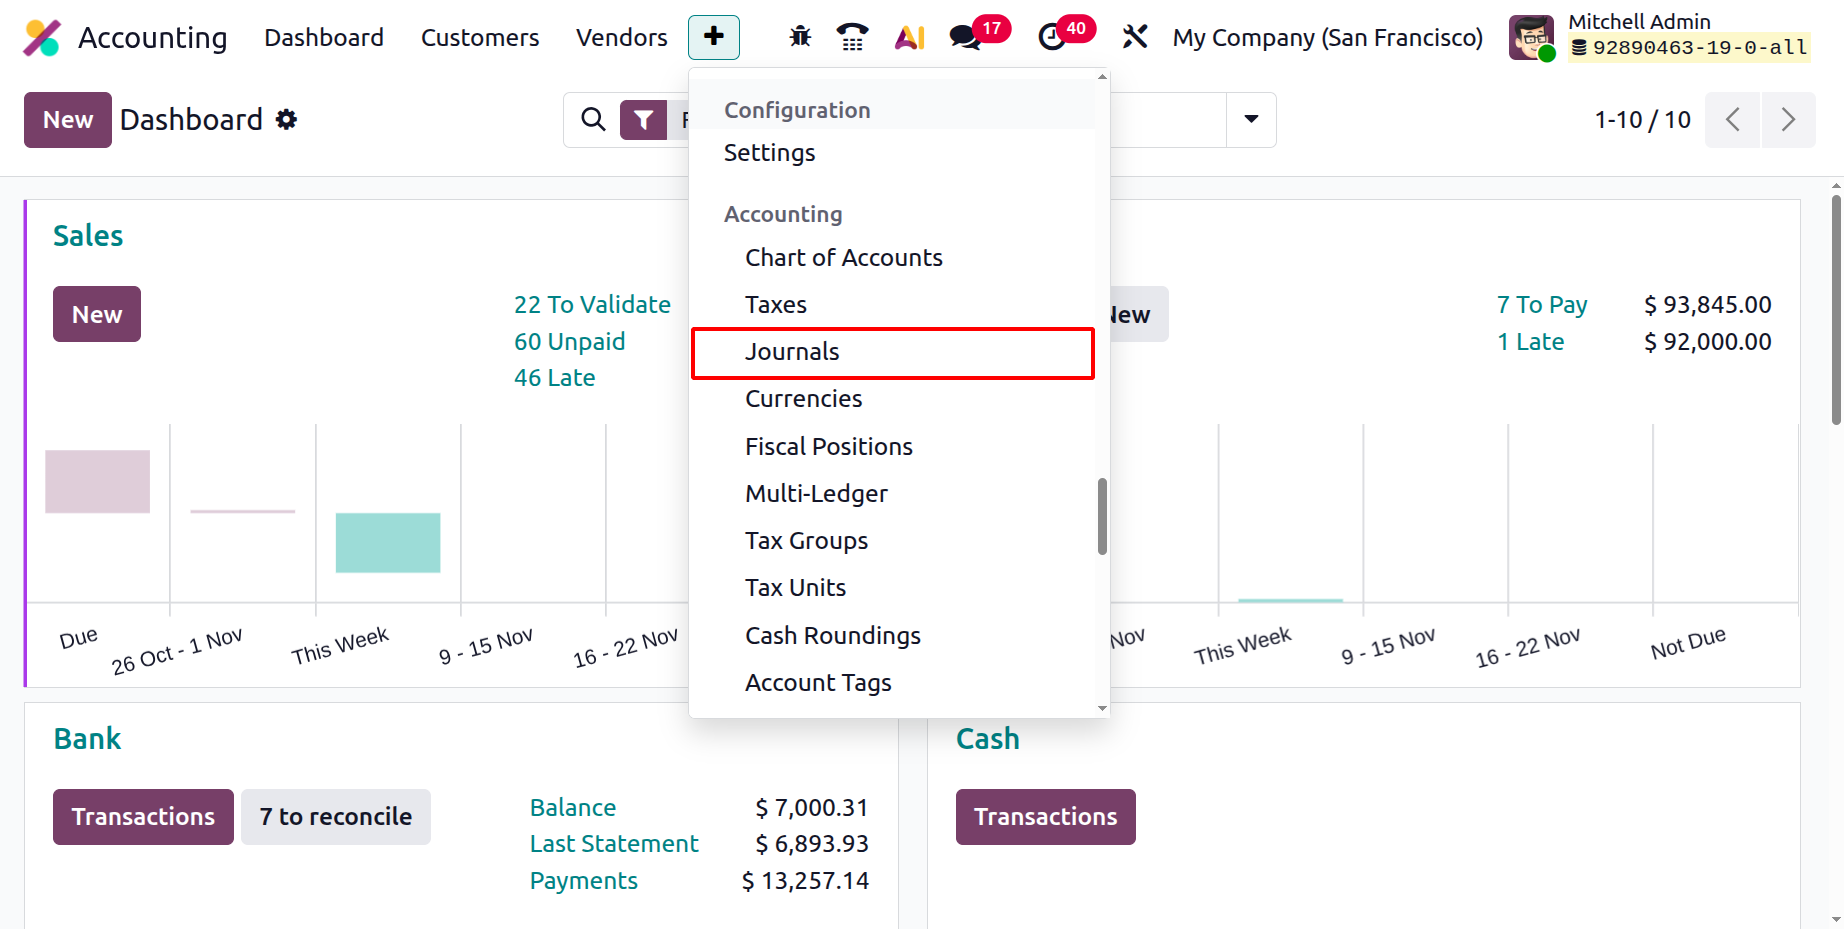
1.3 Journals
In Odoo 19 Accounting, journals play a crucial role in maintaining financial transparency, ensuring compliance, and generating accurate and reliable financial reports. Every transaction recorded in the system passes through a journal, a structured log that categorizes entries by type and date. These journals form the backbone of Odoo’s double-entry accounting system, enabling businesses to efficiently track income, expenses, assets, liabilities, and cash flow.
Odoo 19 continues to support multiple types of journals: Sales Journal, Purchase Journal, Bank Journal, Cash Journal, Credit Card Journal, and Miscellaneous Journal, each designed to handle specific financial operations such as customer invoices, vendor bills, bank reconciliations, and adjustment entries.
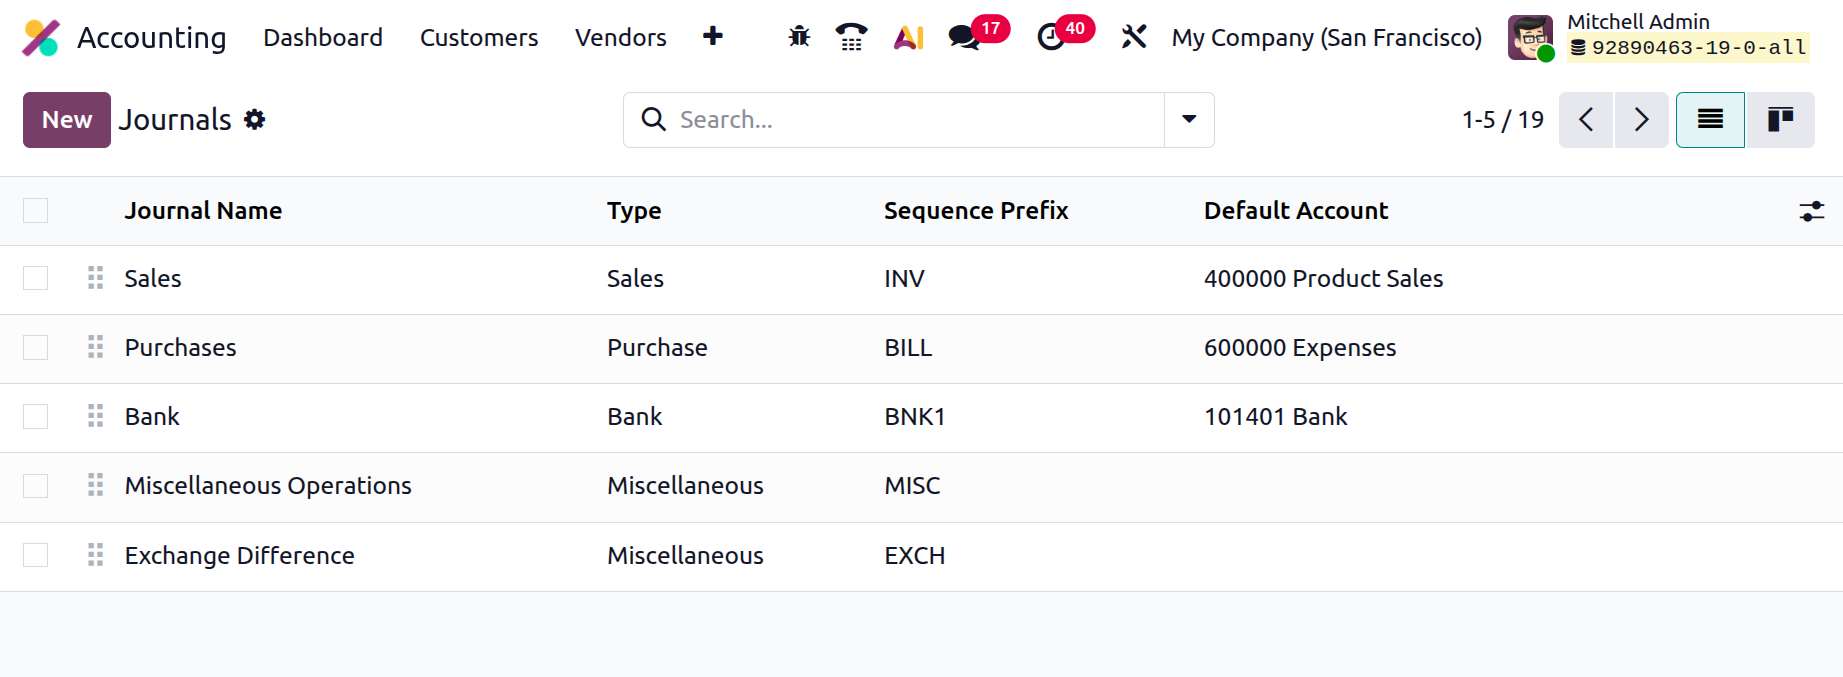
To access and manage journals, go to the Accounting module → Configuration → Journals.
This section displays an overview of all configured journals in your database. The list view provides key details such as Journal Name, Type (Sales, Purchase, etc.), Sequence Prefix, and Default Account, allowing accountants to easily identify and manage each journal.
To create a new journal, click the New button. A configuration form will appear where you can define the journal’s attributes.
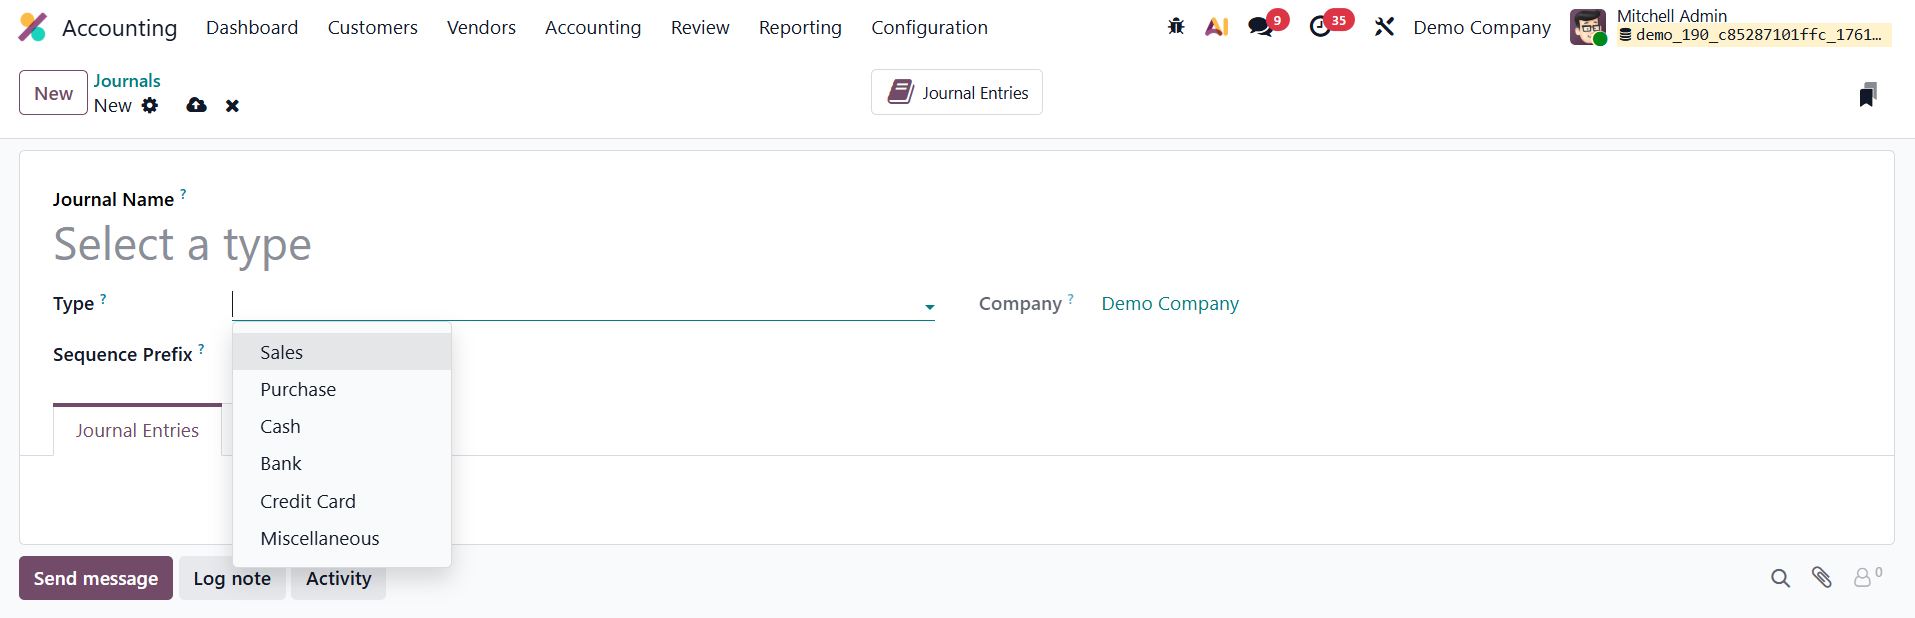
Begin by entering a Journal Name. The Company field will automatically populate based on your current environment, ensuring proper alignment in a multi-company setup. Mention the suitable Sequence Prefix in the given field, which is a short name used for display.
Next, select the Journal Type, which determines how the journal behaves within the system. In Odoo 19, the available journal types include:
- Sales Journal –Records customer invoices and revenue-related transactions.
- Purchase Journal – Used for vendor bills and expense tracking.
- Cash Journal – Handles cash transactions, including petty cash expenses and cash receipts.
- Bank Journal – Used for managing deposits, withdrawals, and bank statement reconciliations.
- Credit Card Journal – Tracks payments and expenditures made through company credit cards.
- Miscellaneous Journal – Used for special accounting entries like adjustments, depreciation, or opening balances.
The journal type you choose influences the subsequent configuration fields, ensuring that each transaction type is recorded and processed correctly in Odoo 19.
Sales Journal
In Odoo 19 Accounting, configuring a Sales Journal is essential for accurately recording and managing all entries related to customer invoices and sales transactions. When creating a new journal and selecting the Sales journal type, Odoo automatically displays configuration options under the Journal Entries and Advanced Settings tabs, allowing for precise customization and control.
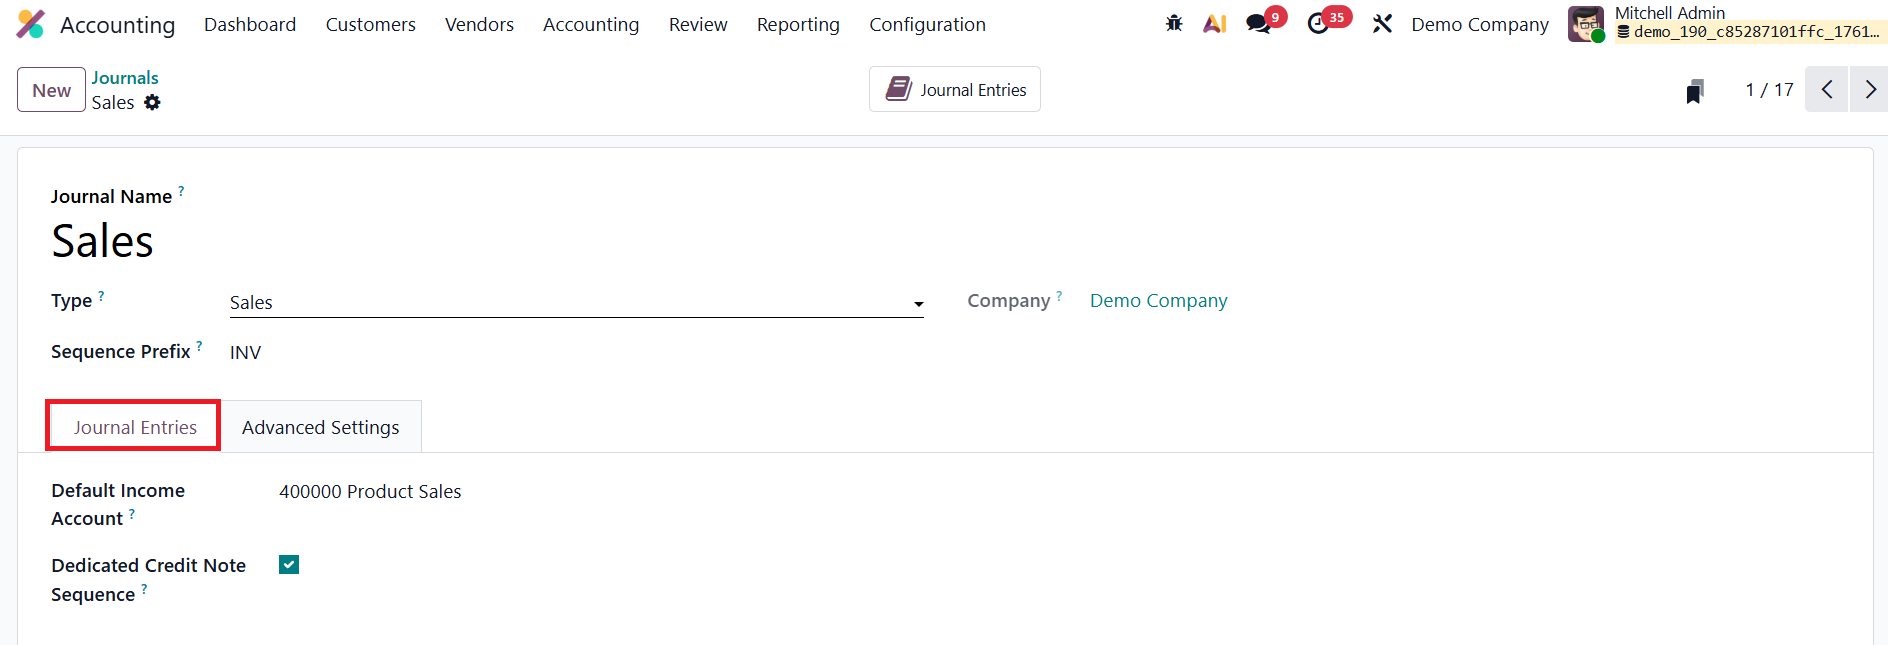
Within this tab, you can define the Default Income Account that will be automatically used for transactions associated with this journal. This helps maintain consistency in revenue recognition. Enable Dedicated Credit Note Sequence to maintain a separate numbering system for credit notes, ensuring they are easily distinguishable from regular invoices.
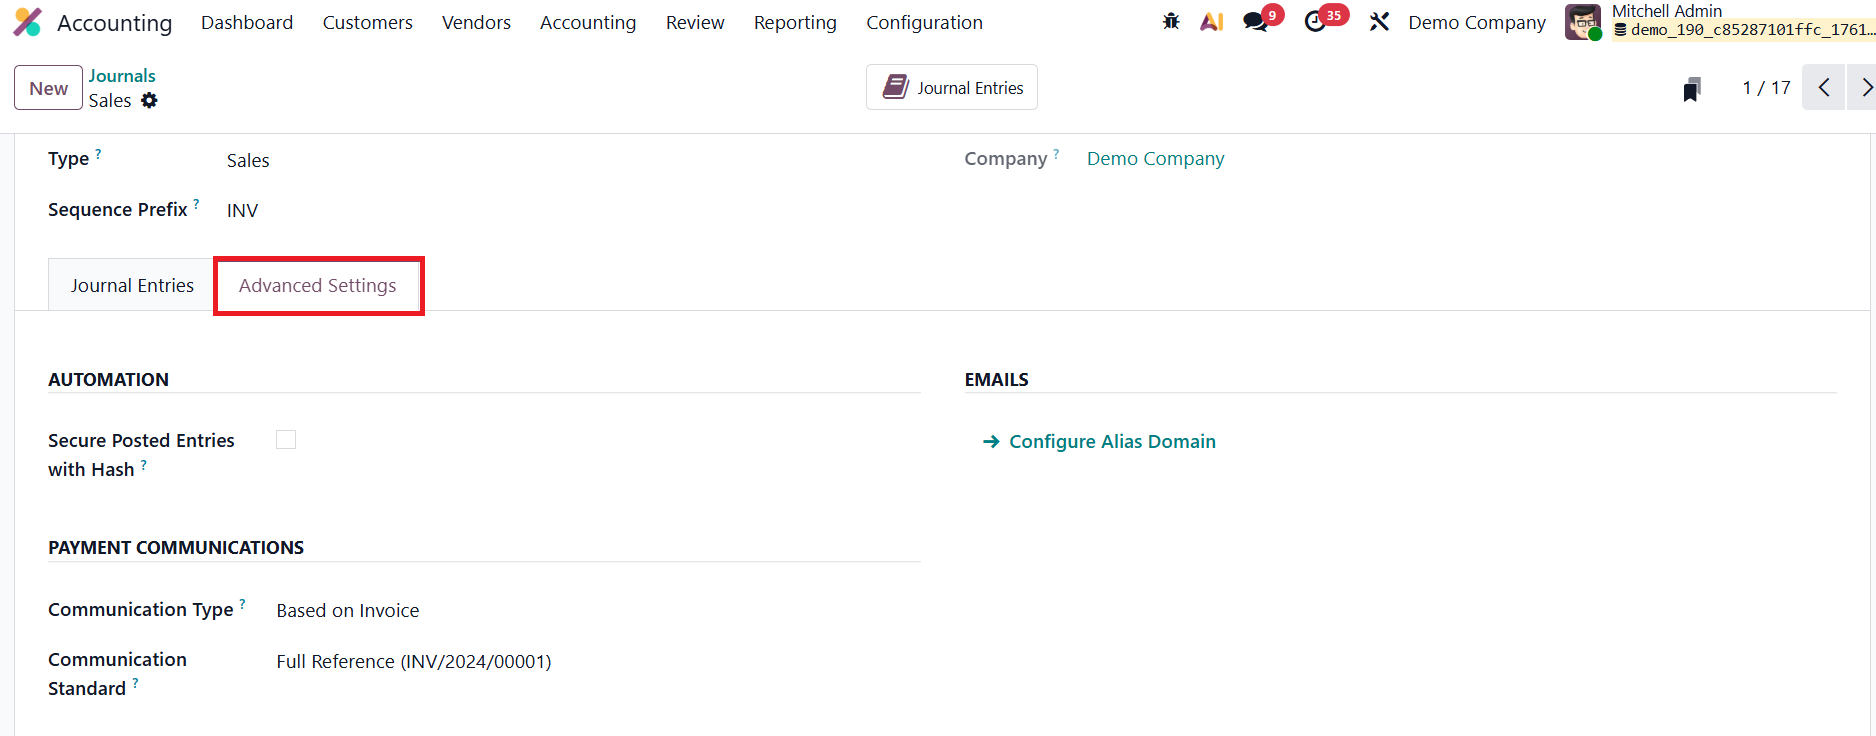
The Advanced Settings tab section provides enhanced configuration for access control and data security. Activating Secure Posted Entries with Hash ensures that once a journal entry is posted, it is locked and cannot be modified, safeguarding financial data integrity and supporting compliance with audit requirements. Under the Communication Type section, you can determine how references appear on customer invoices, either Based on Invoice or Based on Customer, to make it easier for clients to identify which invoice a payment relates to. Additionally, the Communication Standard field lets you define the reference model used for communications, with Odoo’s internal reference set as the default.
For businesses that handle automated billing or invoice generation through email, Odoo 19 enables seamless integration with configured Email Servers, ensuring smooth communication and invoice delivery to customers.
Purchase Journal
In Odoo 19 Accounting, the Purchase Journal is used to manage and record all transactions related to vendor bills, supplier invoices, and company expenses. By selecting Purchase as the Journal Type while creating a new journal, you can tailor its configuration to suit expense-related accounting workflows. Similar to the Sales Journal, two main configuration tabs are available, Journal Entries and Advanced Settings, each offering options designed for better accuracy and control in purchase management.
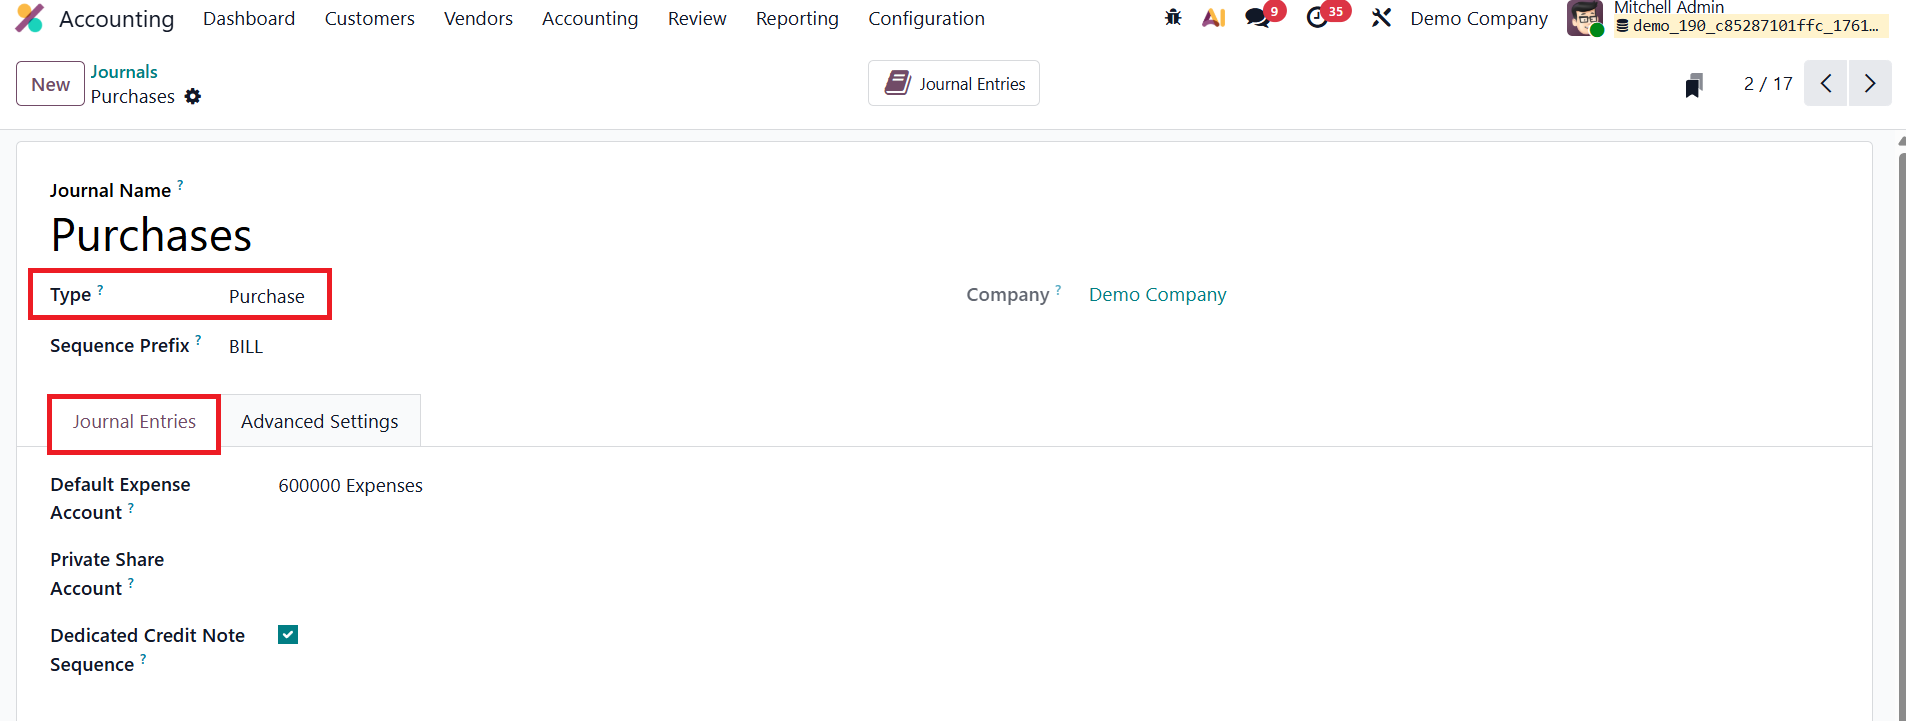
The key configuration field here is the Default Expense Account, which automatically applies to expense transactions recorded through this journal. Mention the Private Share Account, which is the account used to register the private part of mixed expenses. Enable Dedicated Credit Note Sequence to create an independent numbering sequence for credit notes, making them clearly distinguishable from regular invoices.
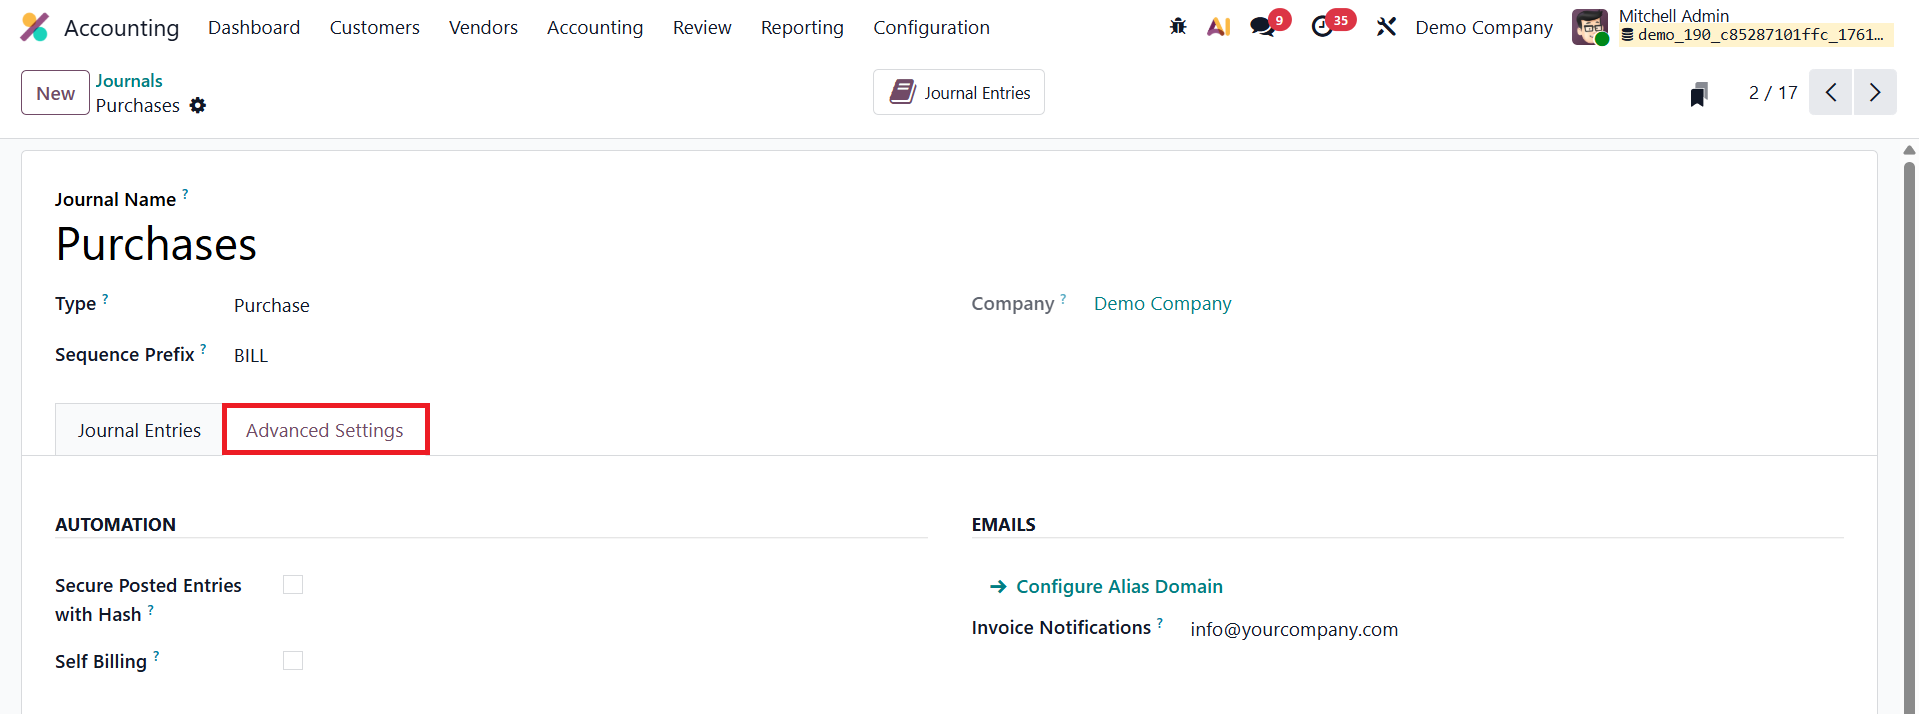
Enabling Secure Posted Entries with Hash in the Advanced Settings tab provides an added layer of protection by locking posted entries and preventing unauthorized modifications. This feature promotes transparency and ensures full compliance with auditing and accounting standards. The Self Billing field allows you to use this journal for self-billing invoices.
Cash Journal
In Odoo 19 Accounting, the Cash Journal is specifically designed to record and manage manual cash transactions such as petty cash expenses, direct cash payments, and collections. Configuring a Cash Journal allows businesses to maintain accurate records of all cash movements while ensuring traceability and control over day-to-day financial operations.
When creating a new journal and selecting Cash as the Journal Type, several dedicated configuration tabs become available for detailed customization, including Journal Entries, Incoming Payments, Outgoing Payments, and Advanced Settings
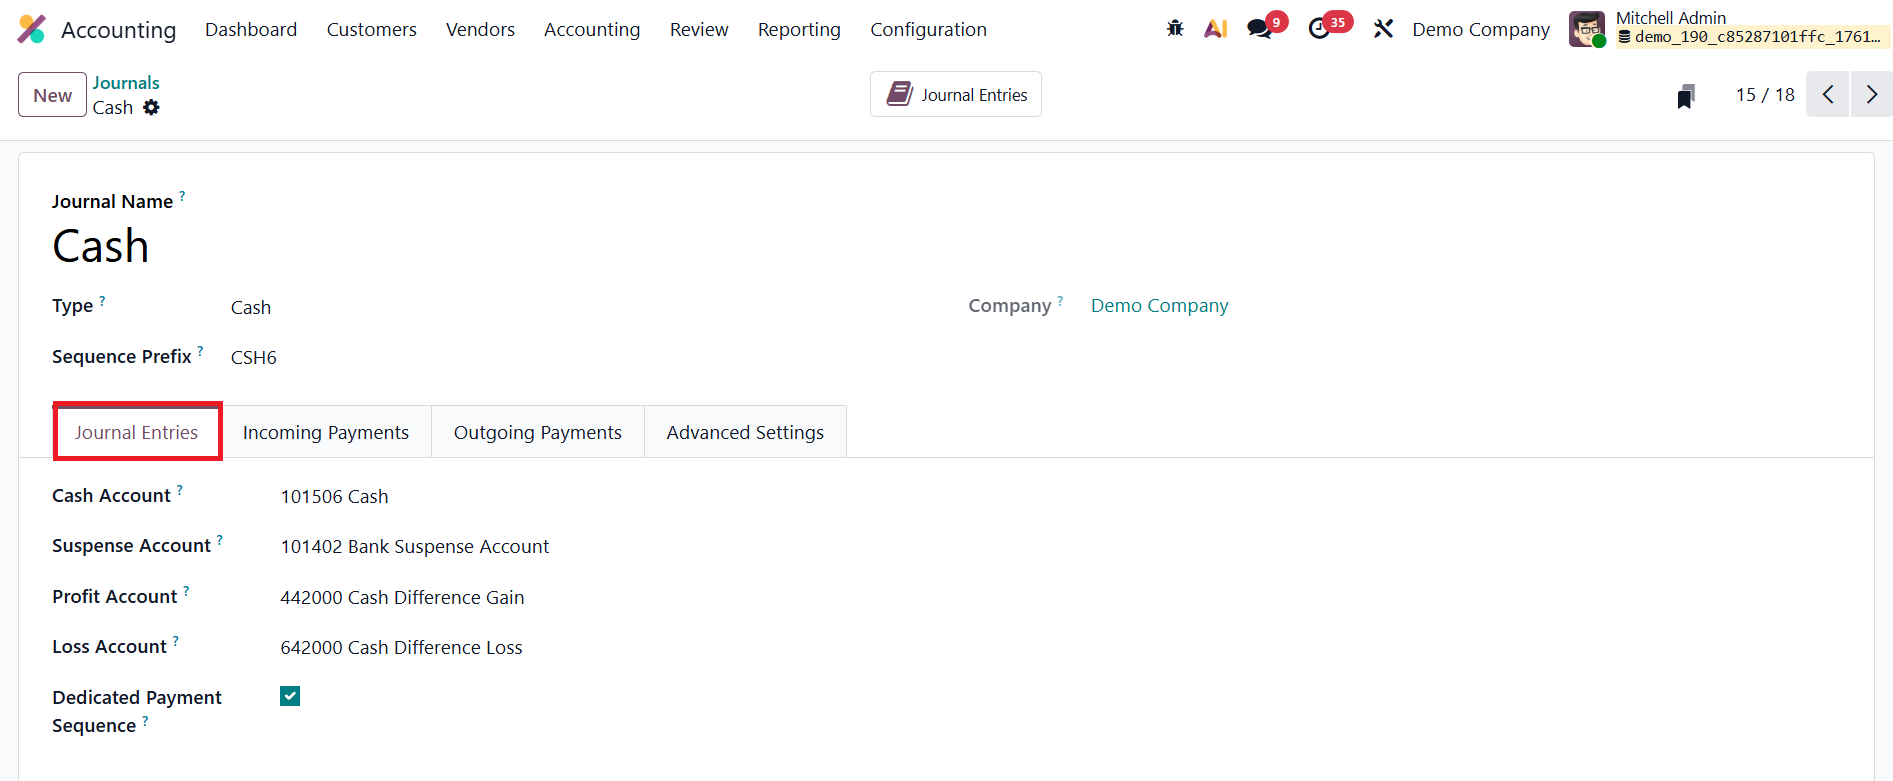
Here, you can assign a Cash Account to track all cash-related entries. Additionally, a Suspense Account can be defined to temporarily hold unallocated amounts until they are reconciled. This is particularly useful when handling discrepancies during cash counting or bank reconciliation.
In cases where the actual cash balance differs from the expected amount, Odoo 19 can automatically post the difference to the defined Profit Account or Loss Account, maintaining accuracy in your financial records. To improve traceability, enable the Dedicated Payment Sequence option to ensure each cash transaction follows its own unique numbering pattern, separate from other journals.
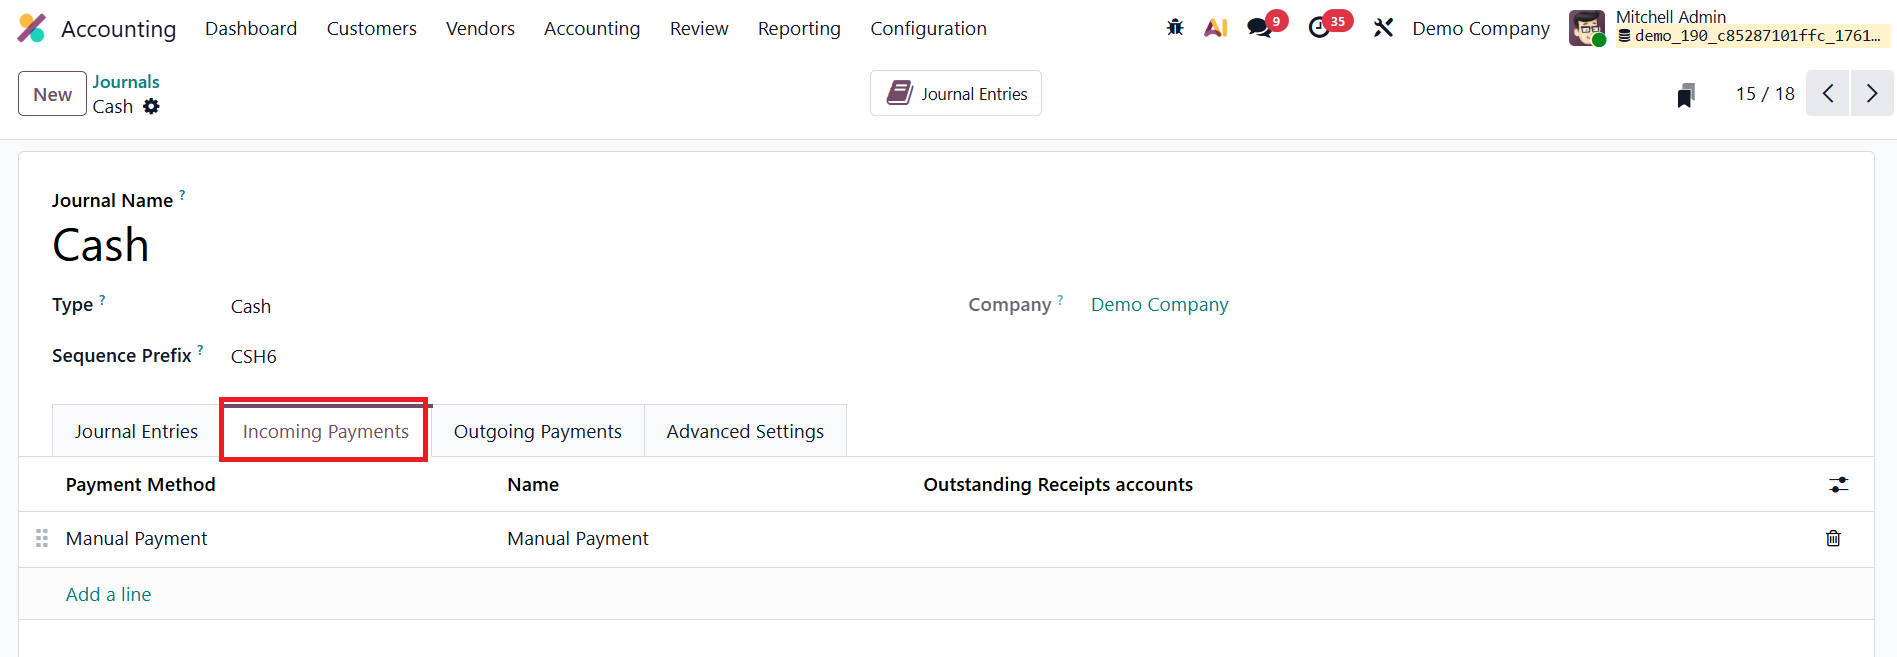
The Incoming Payments tab allows you to configure payment methods and names for receiving cash, such as direct customer payments or over-the-counter collections.
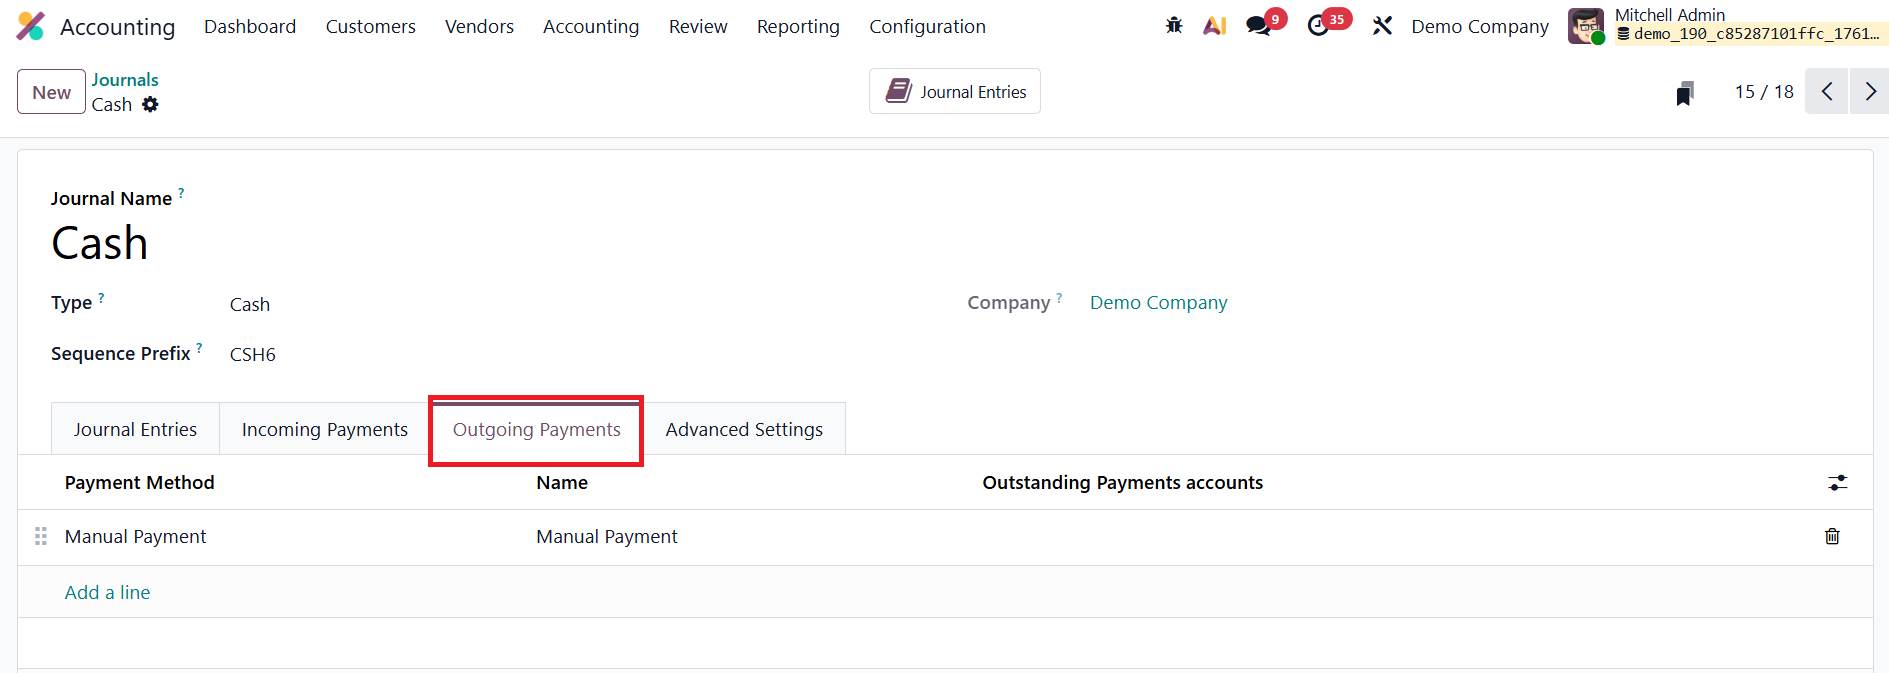
The Outgoing Payments tab lets you define payment methods for cash disbursements, including petty cash expenses or supplier payments. These settings streamline the management of both incoming and outgoing cash flows, ensuring all cash activity is systematically recorded.
In the Advanced Settings section, you can restrict the journal’s usage to specific accounts by setting Allowed Accounts. If left blank, all accounts remain accessible.
Bank
In Odoo 19 Accounting, the Bank Journal is used to manage and record all bank-related financial transactions, including deposits, withdrawals, fund transfers, and bank statement reconciliations. Setting up a Bank Journal ensures accurate mapping between your company’s accounting system and real-world bank operations, supporting precise reconciliation and financial reporting.
When creating a new journal, select Bank as the Journal Type. This will open configuration options tailored specifically for bank transaction management.
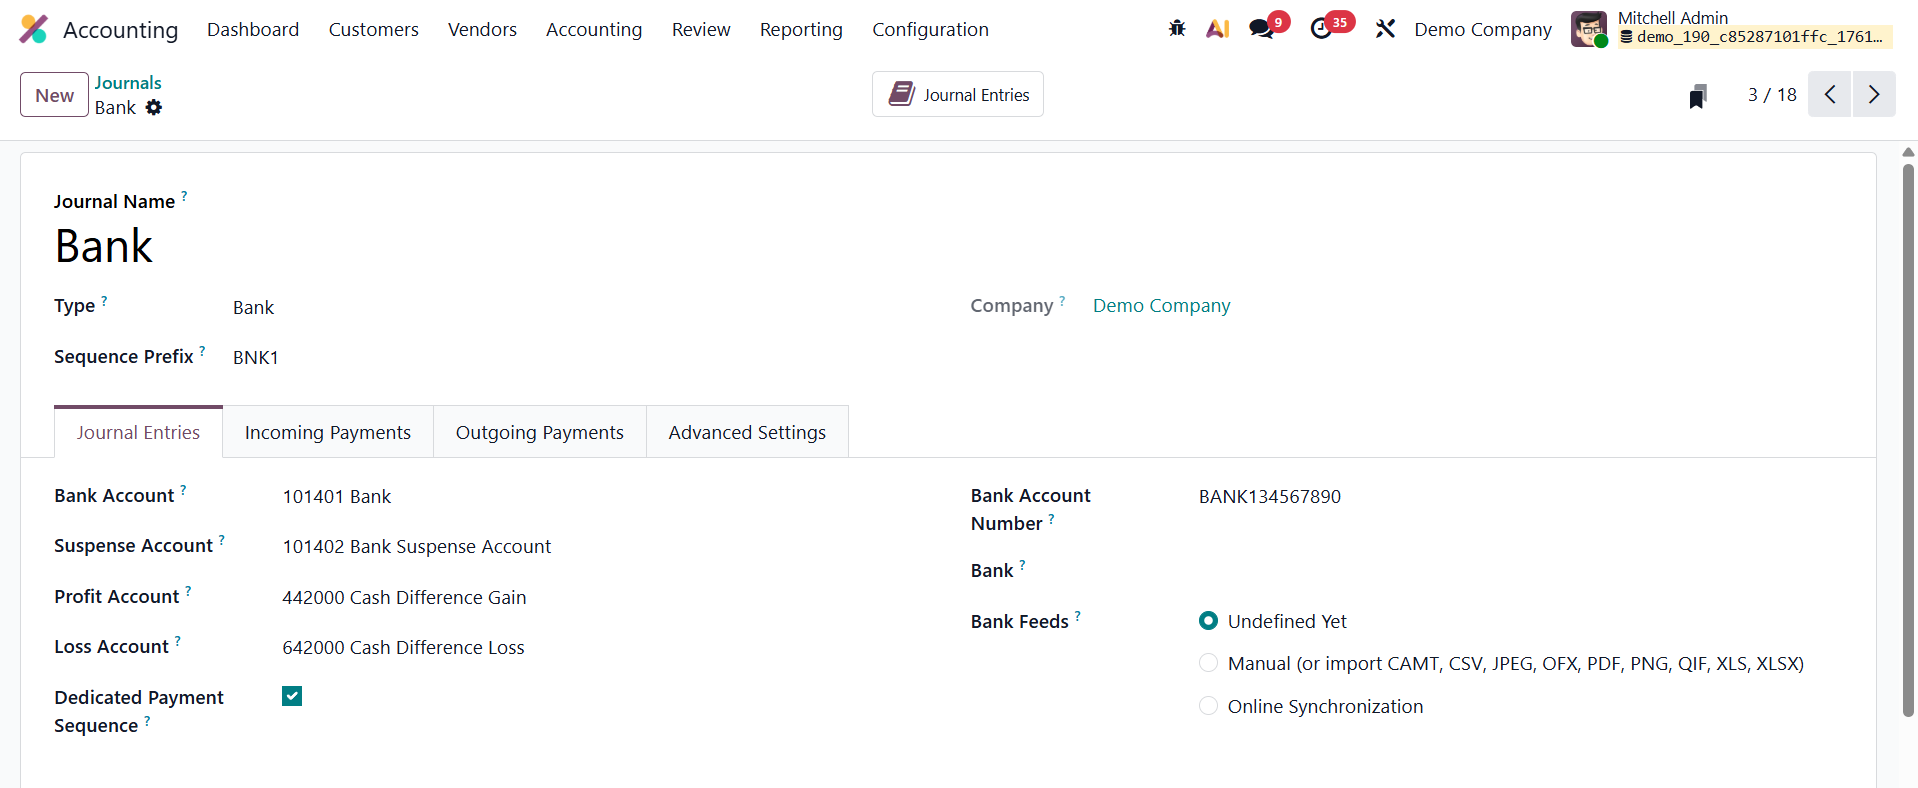
During setup, you’ll need to enter key details such as the Account Number and the linked Bank Account. These fields connect your journal entries directly to the correct financial institution and account, ensuring that all banking activities are properly reflected in your company’s ledgers. Under the Bank Feeds section, you can determine how Odoo 19 should handle bank statements. The platform offers multiple synchronization options:
- Manual Import: Upload bank statements manually in supported formats such as CSV, OFX, or CAMT.
- Online Synchronization: Integrate directly with your bank to automatically fetch statements, depending on your regional and banking partner availability.
- Undefined Yet: Choose this placeholder option if you wish to configure bank feeds at a later stage.
Odoo 19 also includes dedicated tabs for Incoming Payments and Outgoing Payments, allowing for customized payment method management:
- In the Incoming Payments tab, define the payment methods your company uses to receive funds.
- In the Outgoing Payments tab, specify methods for processing payments to vendors, such as bank transfers, checks, or automated payments.
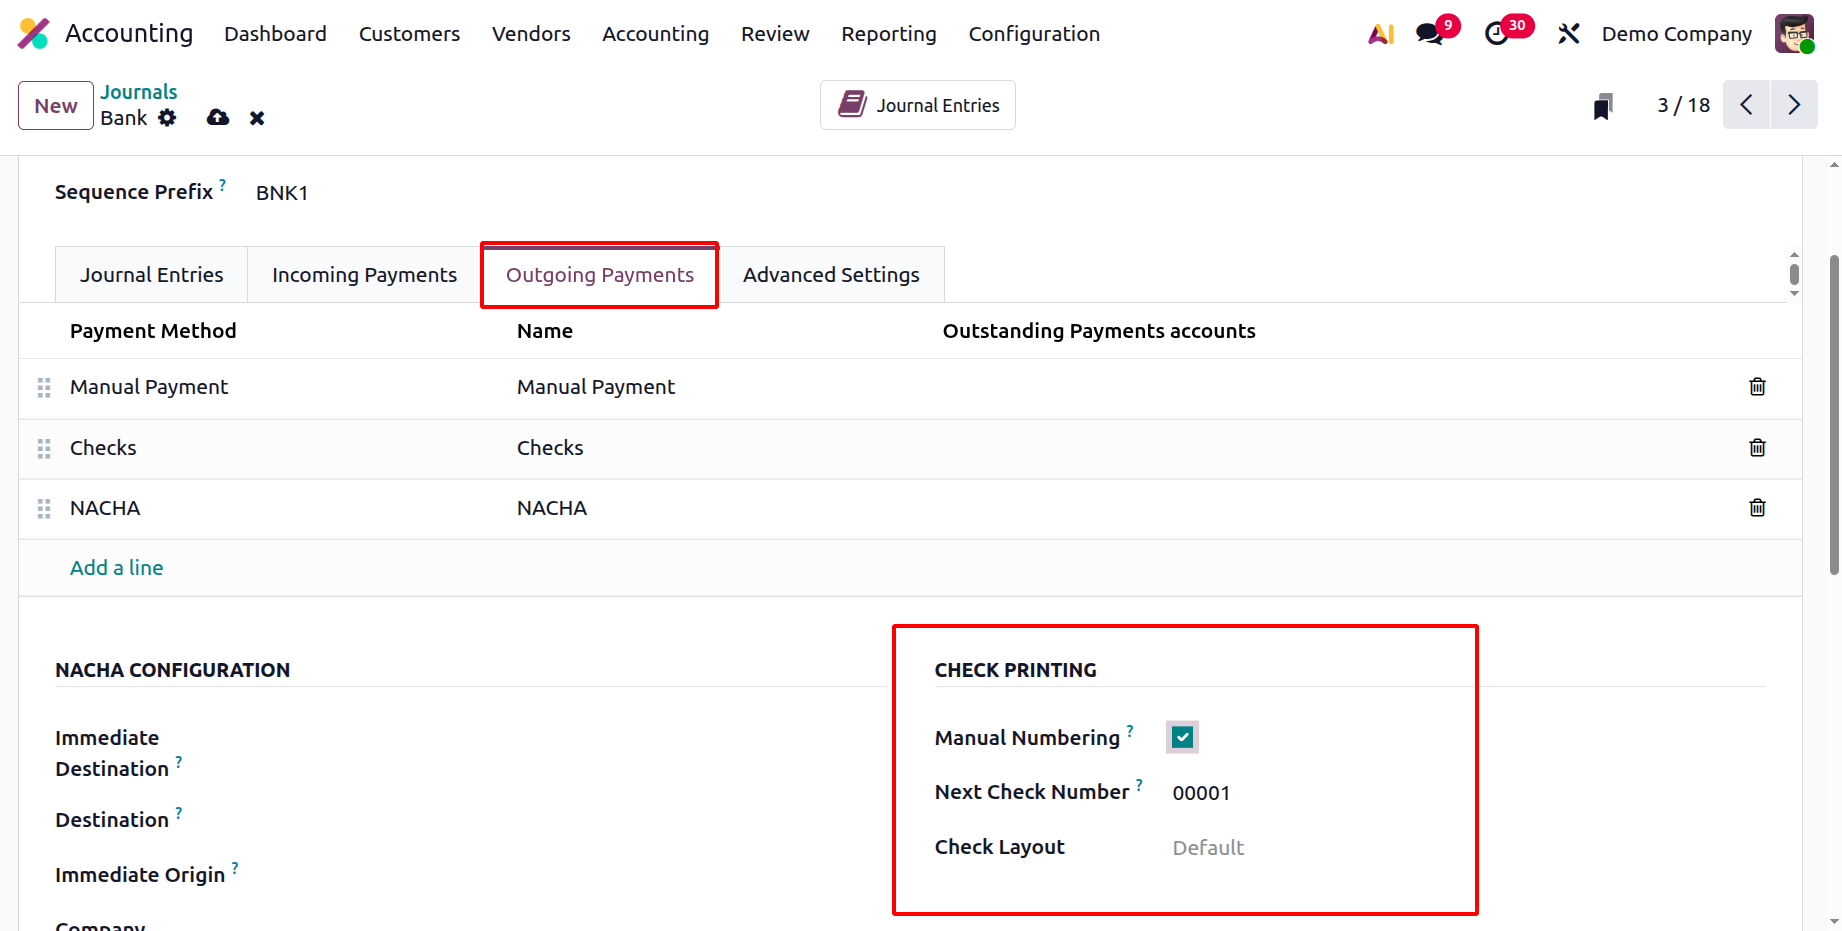
In the Check Printing section, Manual Numbering allows you to enter check numbers manually instead of letting Odoo generate them automatically. When manual numbering is disabled, Odoo uses the Next Check Number field as the starting point and then assigns numbers sequentially each time a check is printed. This ensures consistency and prevents duplicate numbering. The Check Layout option lets you choose the format or style used when printing checks which match commonly used check templates.
In the Bank Journal configuration window under the NACHA Configuration section of Odoo 19, each field helps define how electronic payments are formatted according to NACHA standards. Immediate Destination refers to the routing number of the bank receiving the payment file, while Destination specifies its name.
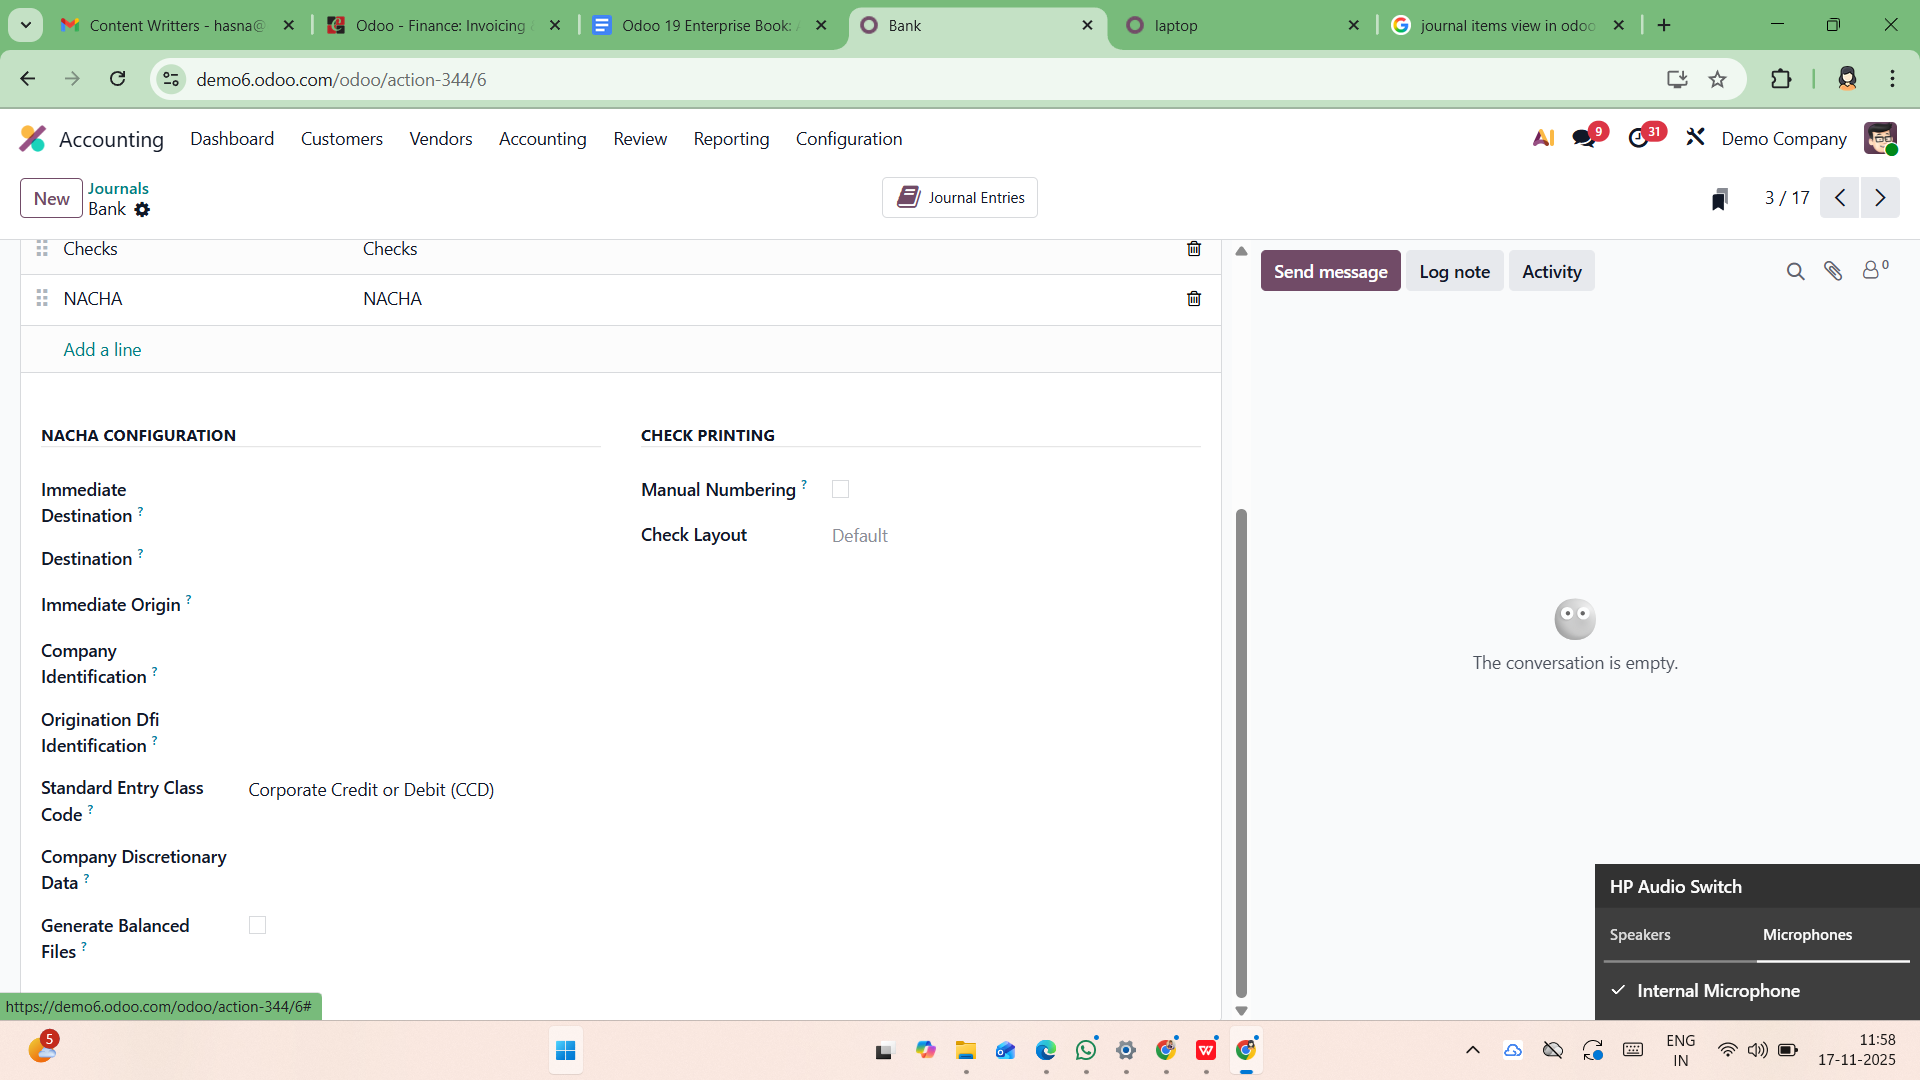
Immediate Origin indicates the routing number of the entity sending the file, usually your company’s bank, whereas Company Identification represents a unique identifier assigned to your company for ACH transactions. The Origination DFI Identification is the routing number of the financial institution responsible for originating the ACH entries. The Standard Entry Class (SEC) Code, determines the type of transactions being processed and ensures that the correct format is applied. The Company Discretionary Data field allows you to include optional internal information or codes for reference within the ACH file. Finally, the Generate Balanced Files option ensures that offsetting entries are automatically added so that total debits and credits in the NACHA file balance correctly as required by some banks.
Depending on the method selected, Odoo dynamically displays additional configuration options, such as payment reference formats or bank file generation settings, ensuring smooth and accurate transaction processing.
Credit Card
In Odoo 19 Accounting, the Credit Card Journal is designed to efficiently manage and record all transactions made through company credit cards, providing greater control and visibility over credit-based expenditures. This journal type helps businesses track employee spending, reconcile credit card statements, and maintain accurate financial records with minimal manual effort.
When creating a new journal, select Credit Card as the Journal Type. This automatically adjusts the configuration options to fit the requirements of credit card transaction management.
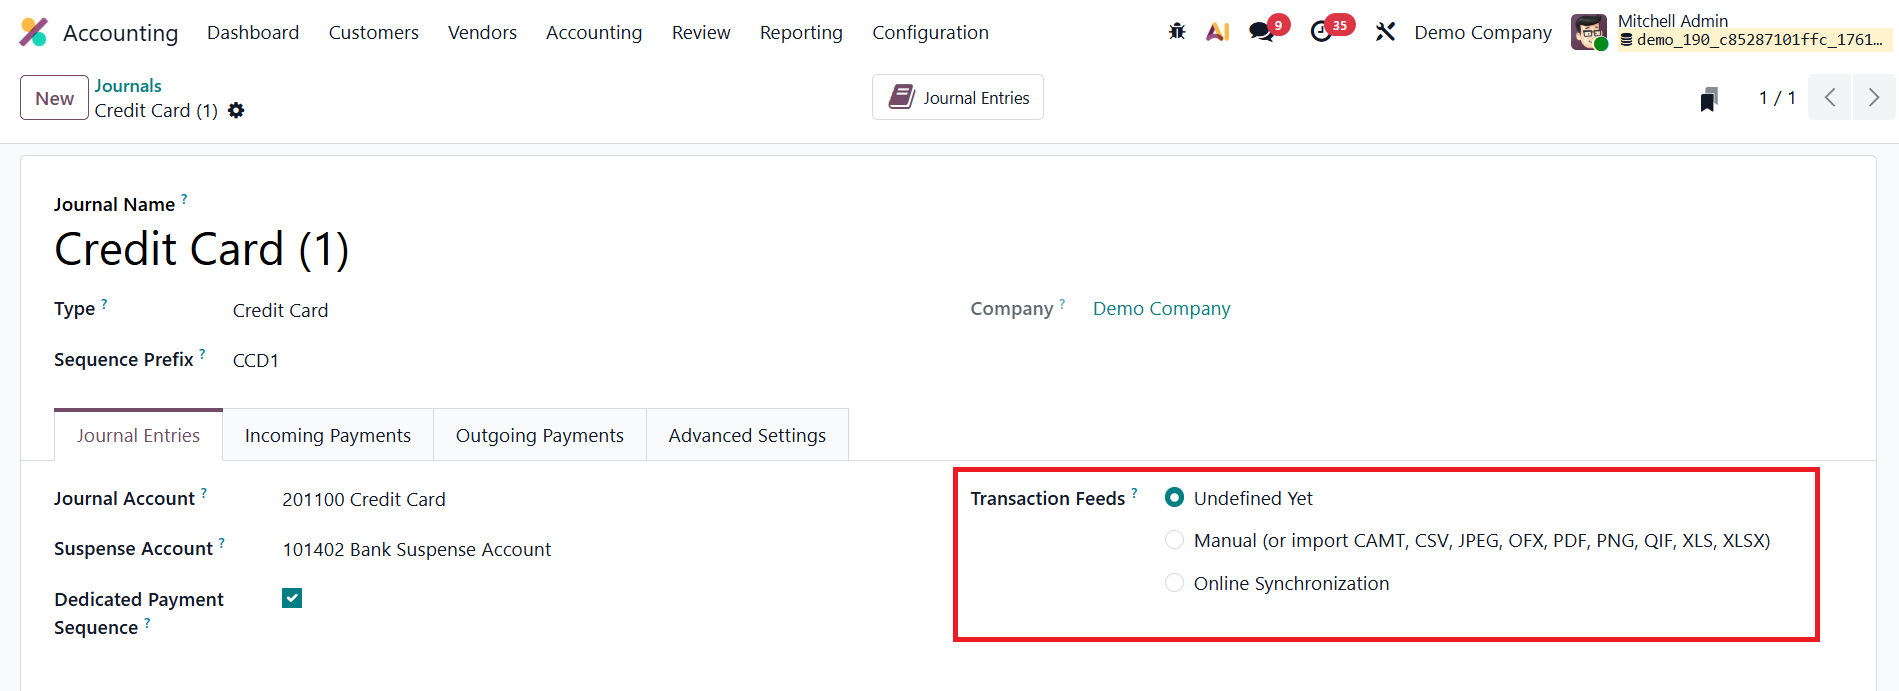
A key feature of this configuration is the Credit Card Setup section, which defines how transaction feeds are handled. Under the Transaction Feeds field, you can choose from several options based on your workflow and integration preferences:
- Undefined Yet – Select this option if you haven’t set up your credit card data import method yet.
- Manual (or Import) – Enables you to manually upload credit card transaction files. Odoo 19 supports multiple formats, including CAMT, CSV, JPEG, OFX, PDF, PNG, QIF, XLS, and XLSX, allowing flexibility in data import from various banking sources.
- Online Synchronization – Allows automatic synchronization of credit card transactions directly from your financial institution, minimizing manual intervention and ensuring real-time updates.
By configuring these options, you can streamline the recording and reconciliation of all credit card activities, ensuring that business expenses are tracked accurately and efficiently.
Miscellaneous
In Odoo 19 Accounting, the Miscellaneous Journal serves as a flexible tool for recording all accounting entries that don’t fall under predefined categories like Sales, Purchases, Bank, Cash, or Credit Card transactions. It is primarily used for adjustments, opening balances, depreciation entries, year-end corrections, and other non-routine financial activities. When creating a new journal, select Miscellaneous as the Journal Type. This enables configuration fields similar to other journals, allowing you to define essential accounting and advanced settings such as the Default Account, and Allowed Accounts.
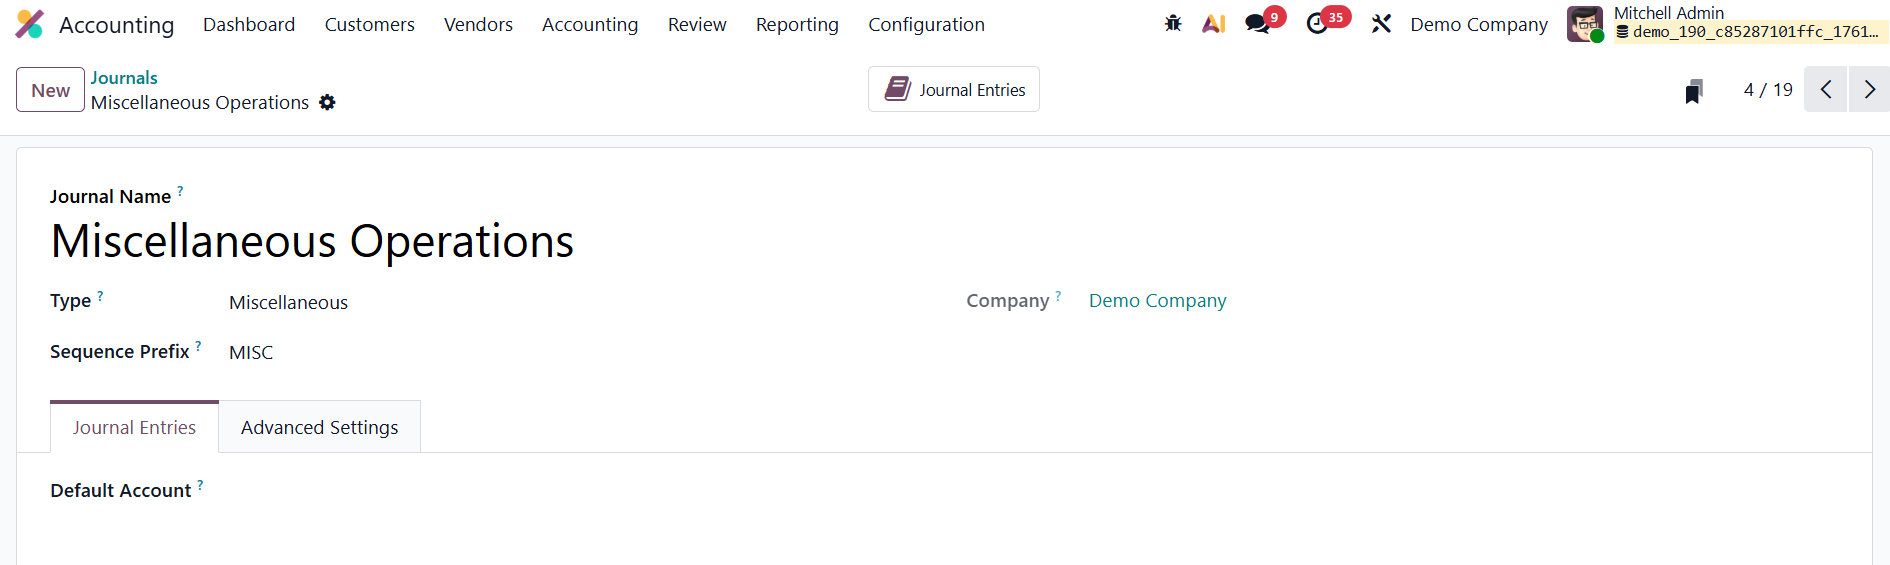
After saving the configuration, Odoo automatically adds the journal to your system, making it accessible for manual or automated entries.
To review transactions recorded in this journal, click the Journal Entries smart button. This provides a detailed list of all entries linked to the Miscellaneous Journal, ensuring clarity, traceability, and easy auditing of exceptional financial movements.
1.4 Currencies
In Odoo 19, managing multiple currencies is more streamlined, enabling businesses to handle international transactions with accuracy and flexibility.
From the Accounting → Configuration → Currencies menu, you can view, edit, and create currencies used across your system.

The currency list provides an at-a-glance summary that includes each currency’s name, symbol, last update date, Unit per USD, and its active/inactive status, helping you maintain full visibility over your financial environment.
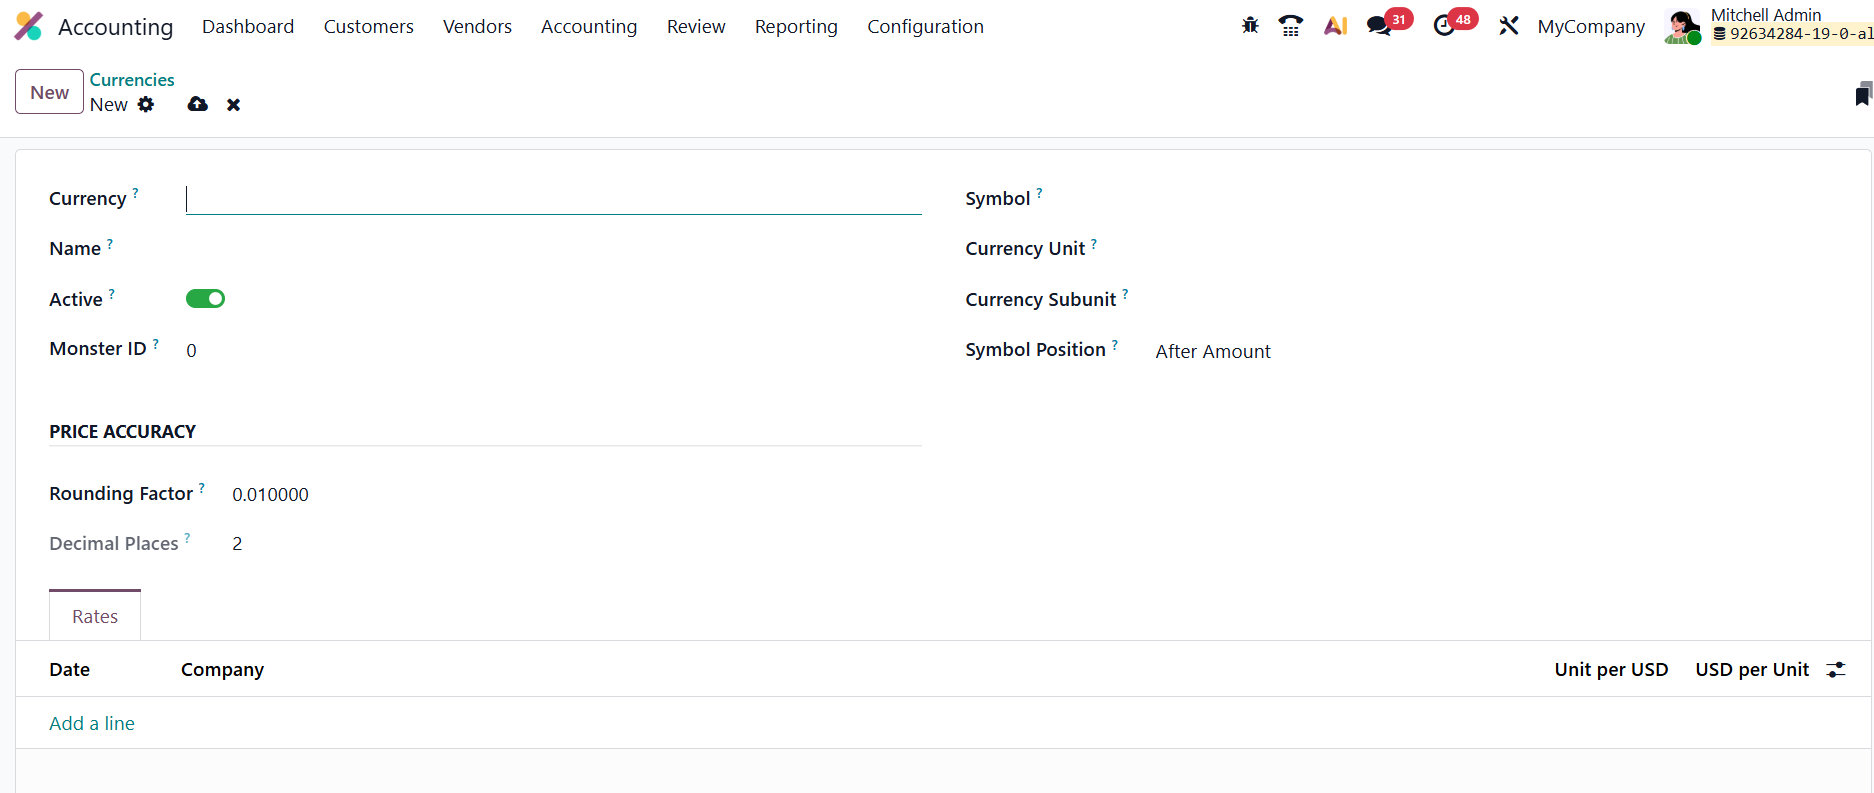
To configure a new currency, click New and fill in details such as the currency code, name, unit, and subunit. Activating the Active toggle makes the currency immediately usable for transactions. The Price Accuracy field lets you set rounding precision, ensuring figures display and calculate correctly down to the desired decimal places.
The Rates tab allows you to specify exchange rates relative to your company’s base currency; simply click Add a Line to enter rate values or update them as needed.
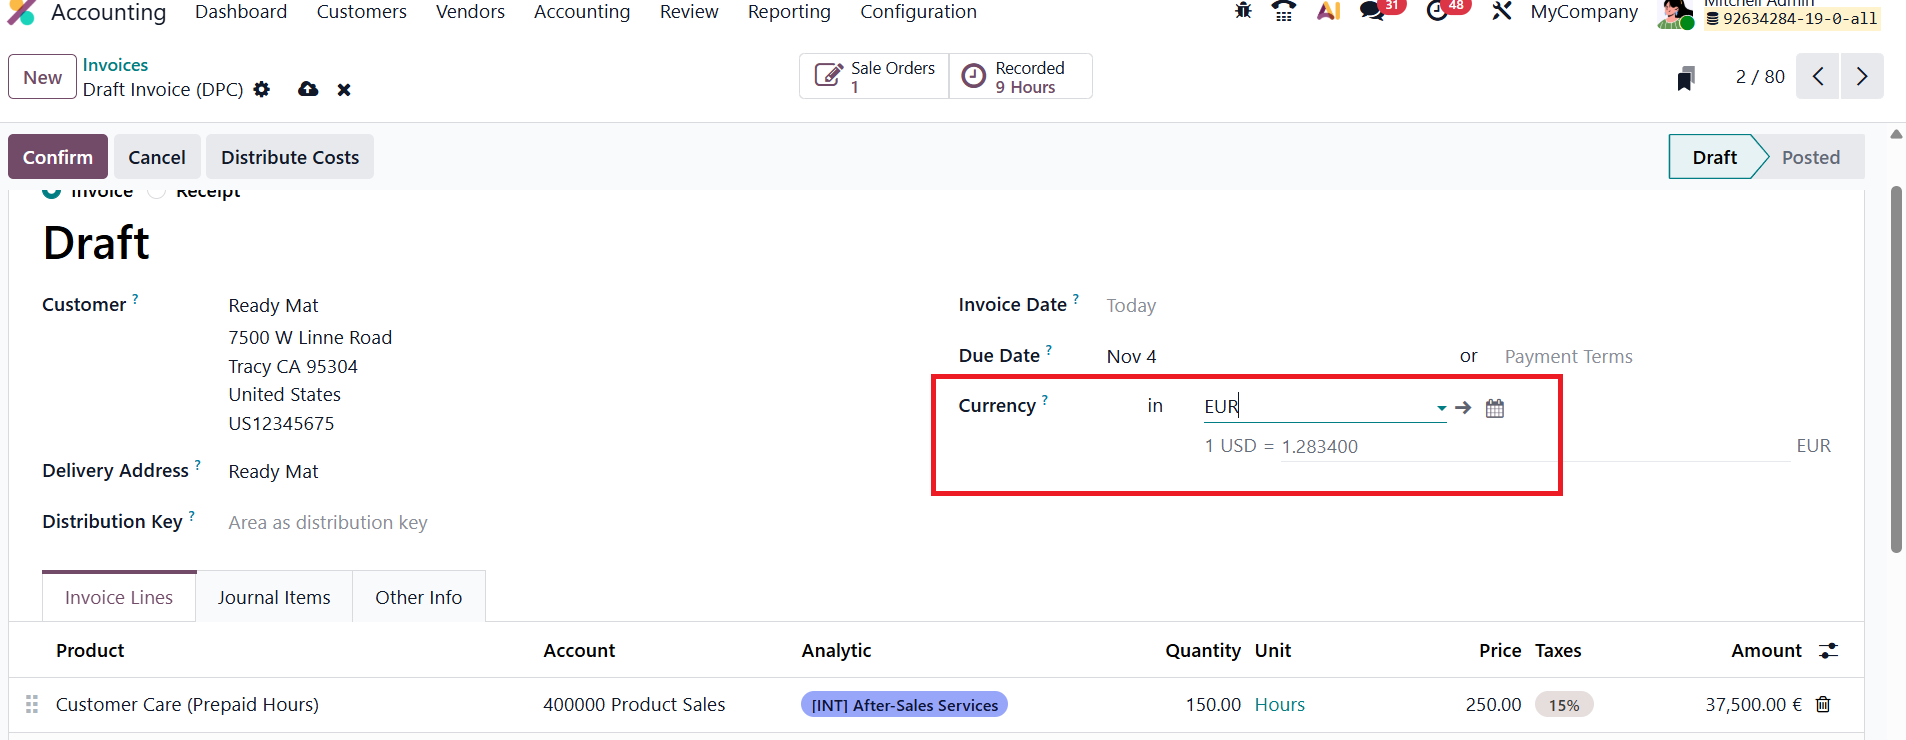
In Odoo 19, exchange rates are automatically synchronized and reflected on all relevant financial documents, including invoices, bills, and payments, ensuring precise conversions across multiple currencies. The calendar icon next to the currency in Odoo 19 allows you to set or adjust the Currency Rate Date. When you click this icon, you can choose a specific date for applying an exchange rate, ensuring that the system uses the correct conversion rate for that particular transaction or accounting entry.
The system fetches up-to-date rates from trusted online sources based on your configuration, eliminating the need for manual updat
1.5 Fiscal Position
In Odoo 19 Accounting, the Fiscal Position feature allows businesses to automatically adjust taxes and accounts when operating across regions or countries with varying tax regulations.
Accessible through Accounting → Configuration → Fiscal Positions, this section lists all existing fiscal positions along with their names and associated companies, making it easy to manage and customize region-specific accounting rules.
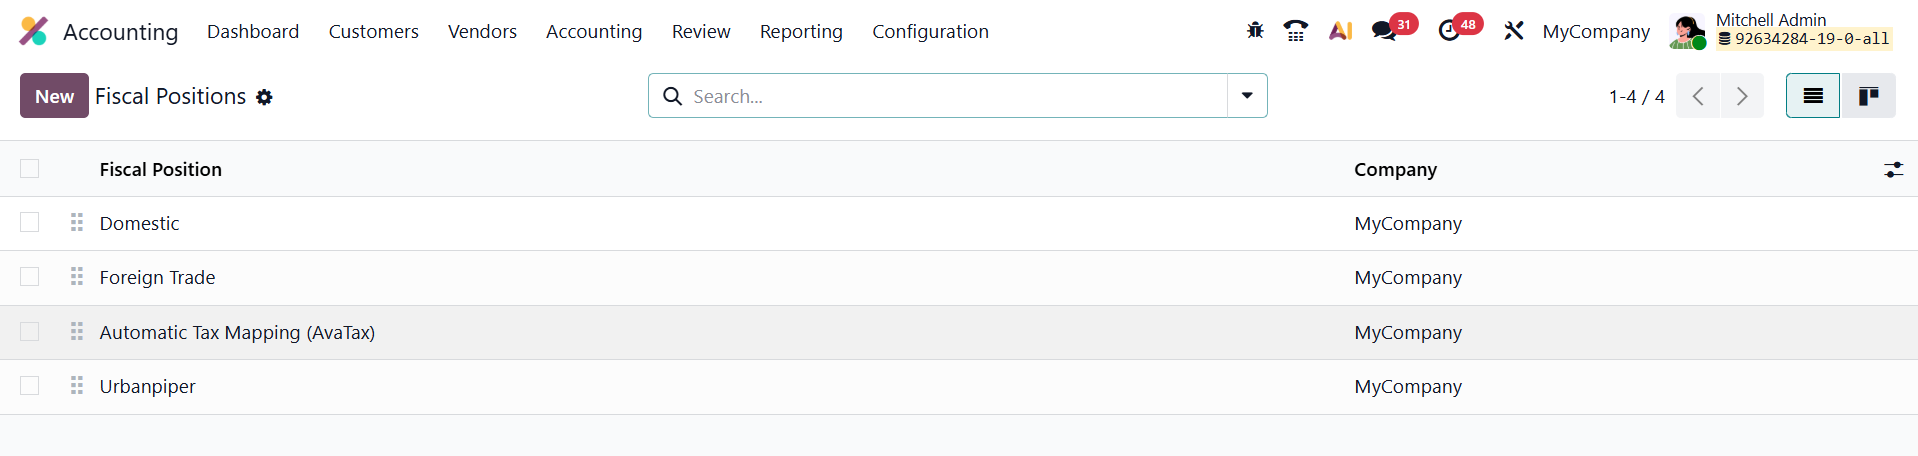
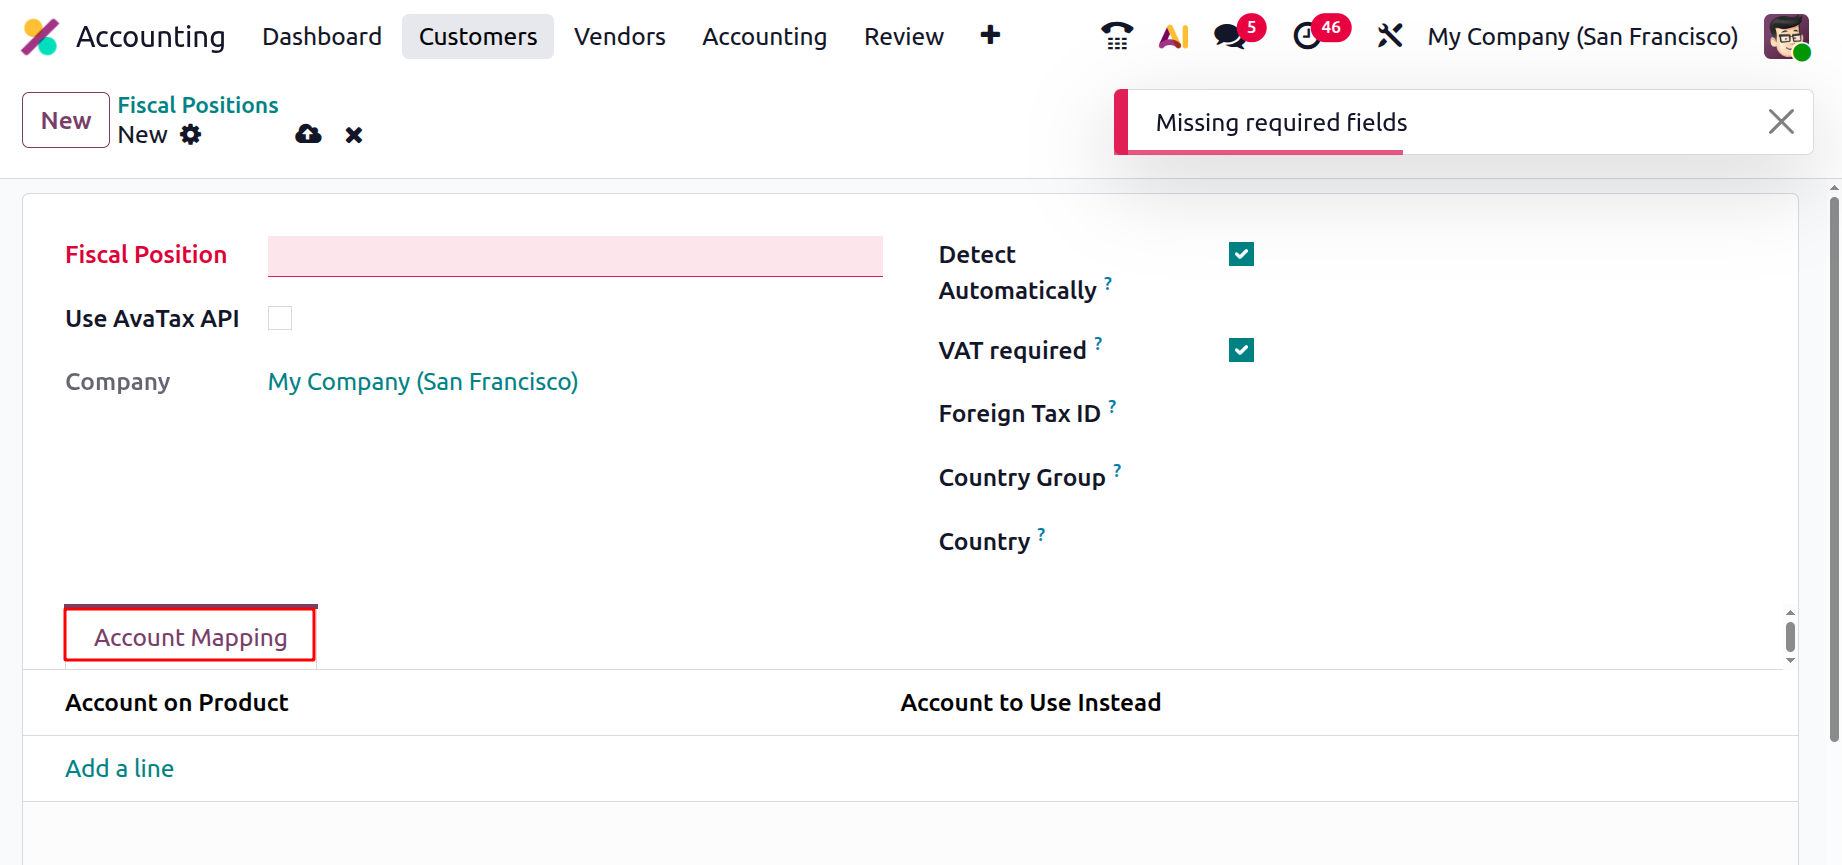
To create a new fiscal position, click New and assign it a clear, descriptive name.
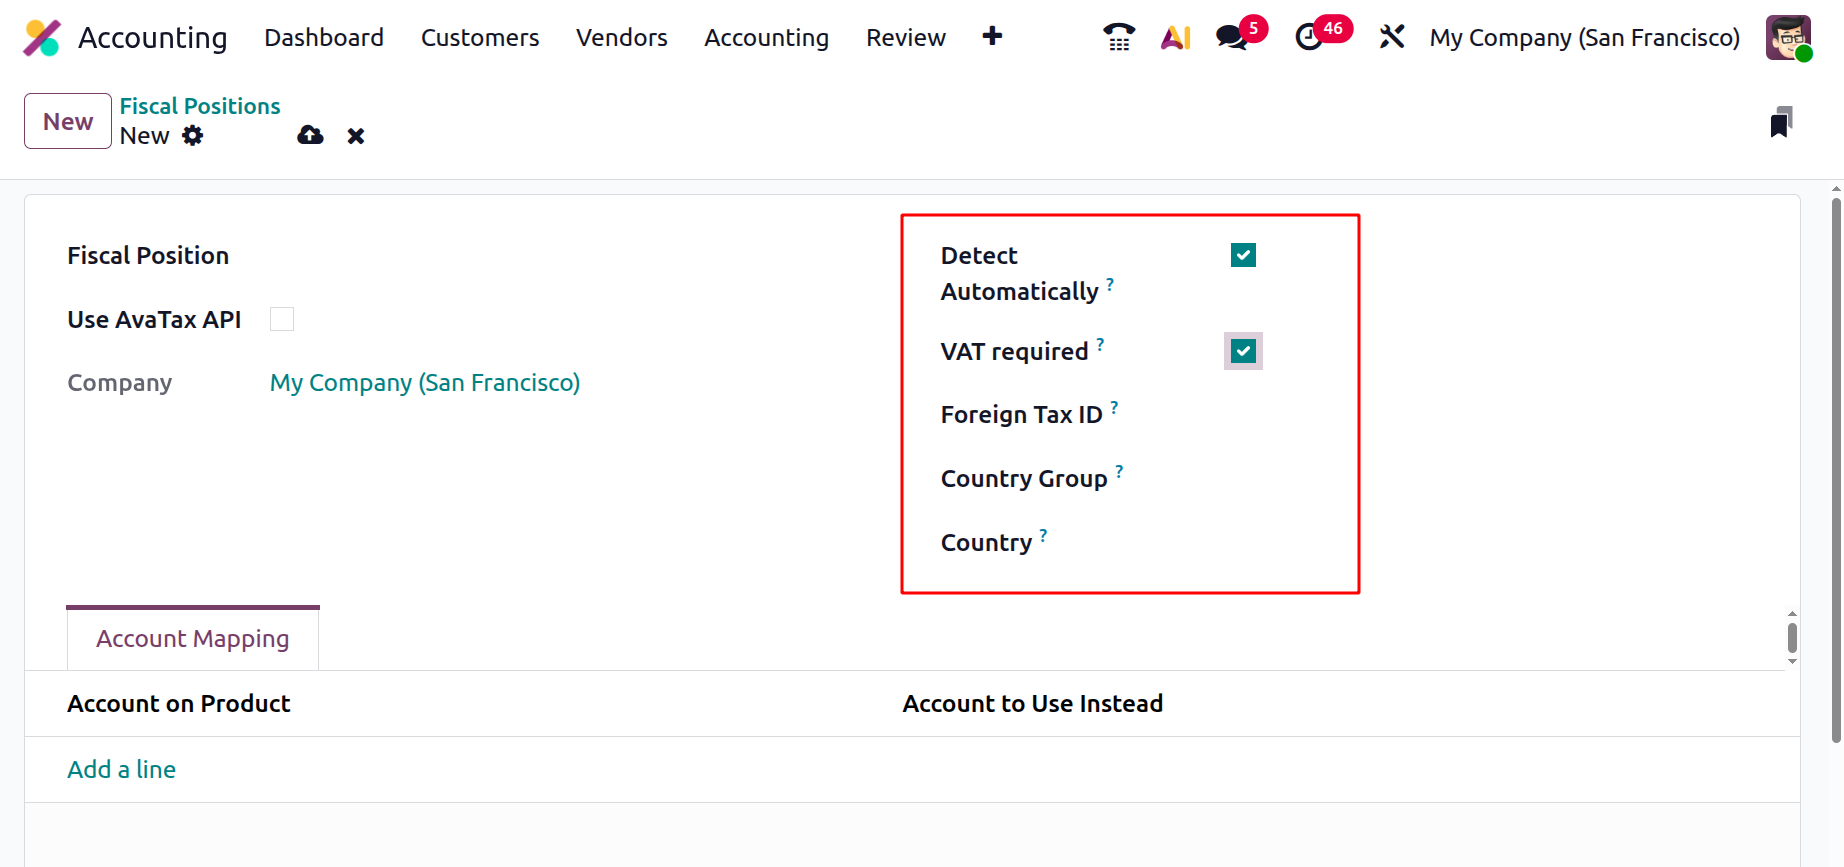
Enabling the Detect Automatically option allows Odoo to apply the fiscal position automatically when a customer’s delivery address matches the specified Country or Country Group. You can also enable VAT Required to ensure that this fiscal position applies only to partners with a valid VAT number. The Foreign Tax ID field can be used to store your company’s tax registration number for that specific jurisdiction.
The Account Mapping tab allows you to replace ledger accounts automatically, ensuring compliance with regional accounting standards.
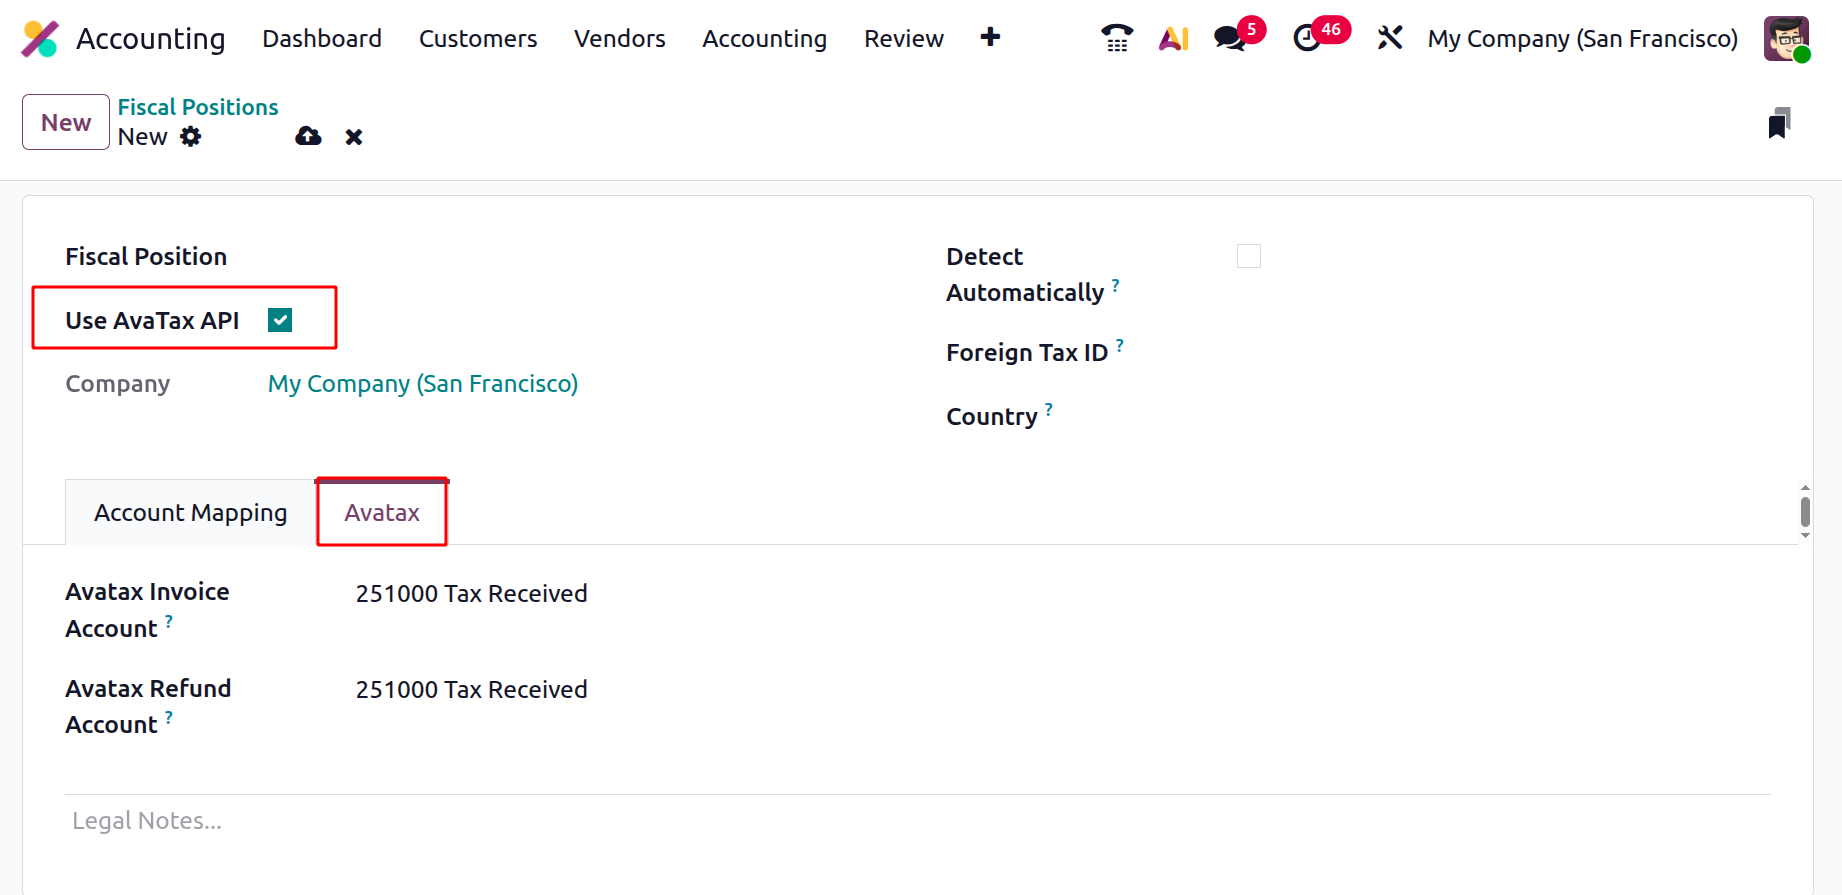
If your company uses AvaTax integration, enabling the Use AvaTax API option reveals an additional AvaTax tab, where you can configure the Avatax Invoice Account, Avatax Refund Account, and add any legal notes required on documents generated under that fiscal position.
This automation ensures that every transaction reflects the correct tax structure, account mapping, and compliance details based on the location of the sale or service.
In Odoo 19, the Fiscal Position can now be added directly within the Taxes configuration.
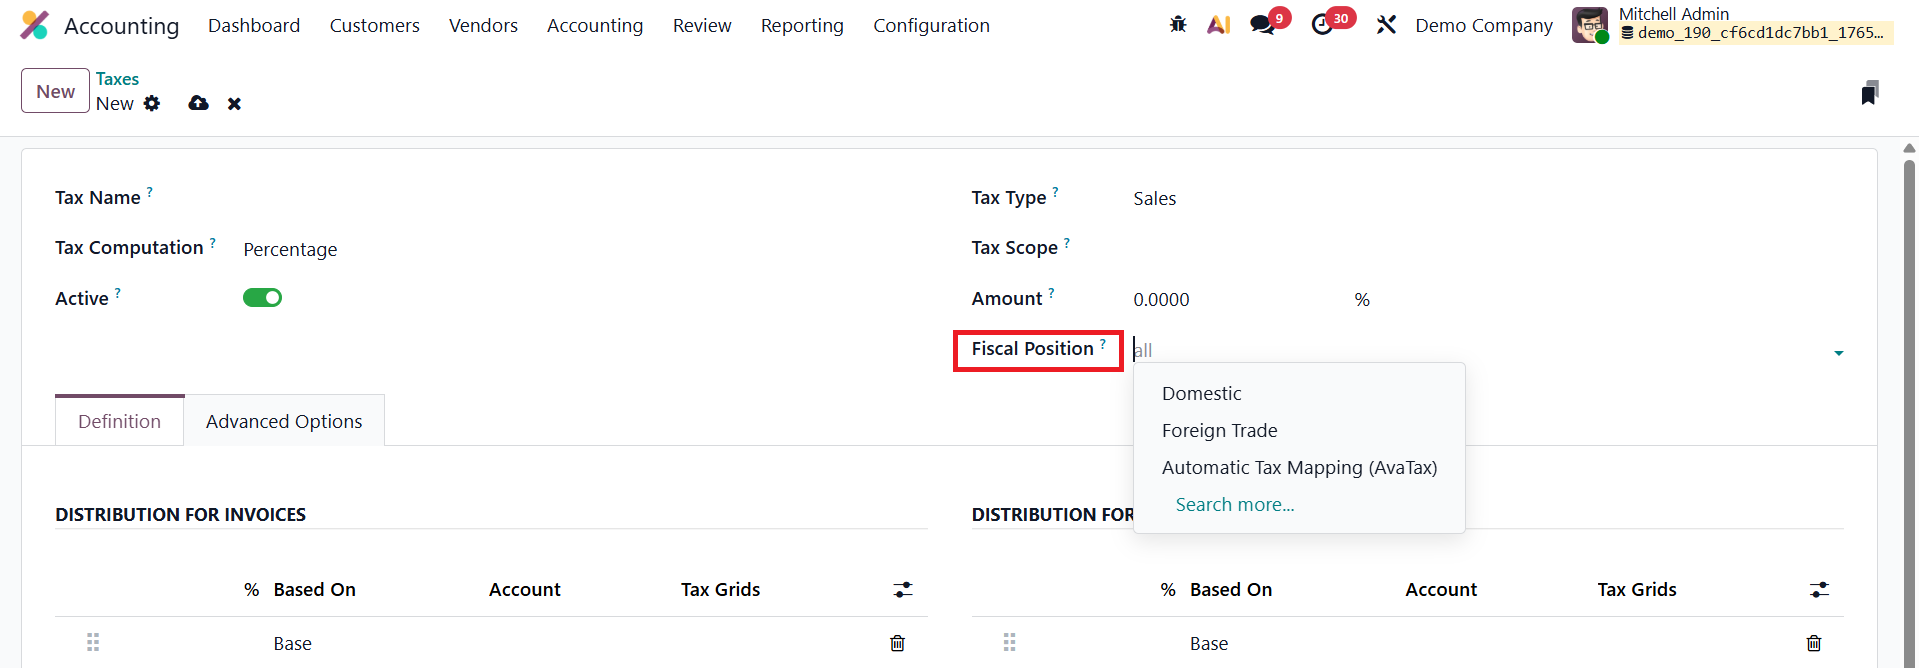
This allows users to define and apply fiscal positions while setting up taxes, simplifying tax mapping and making fiscal adjustments more straightforward.
1.6 Multi-Ledger
In Odoo 19 Accounting, the Multi-Ledger feature provides greater control and transparency for businesses managing multiple subsidiaries or consolidated entities. Each company continues to operate its own standard ledger, recording day-to-day financial transactions without including consolidation adjustments. The consolidation company, on the other hand, maintains a dedicated multi-ledger, which centralizes all adjustment journals from the subsidiaries. This setup ensures that group-level reports reflect accurate consolidation data while keeping each company’s operational accounts separate and clear.
To configure an additional ledger in Odoo 19, go to Accounting ▸ Configuration ▸ Multi-Ledgers and click New.
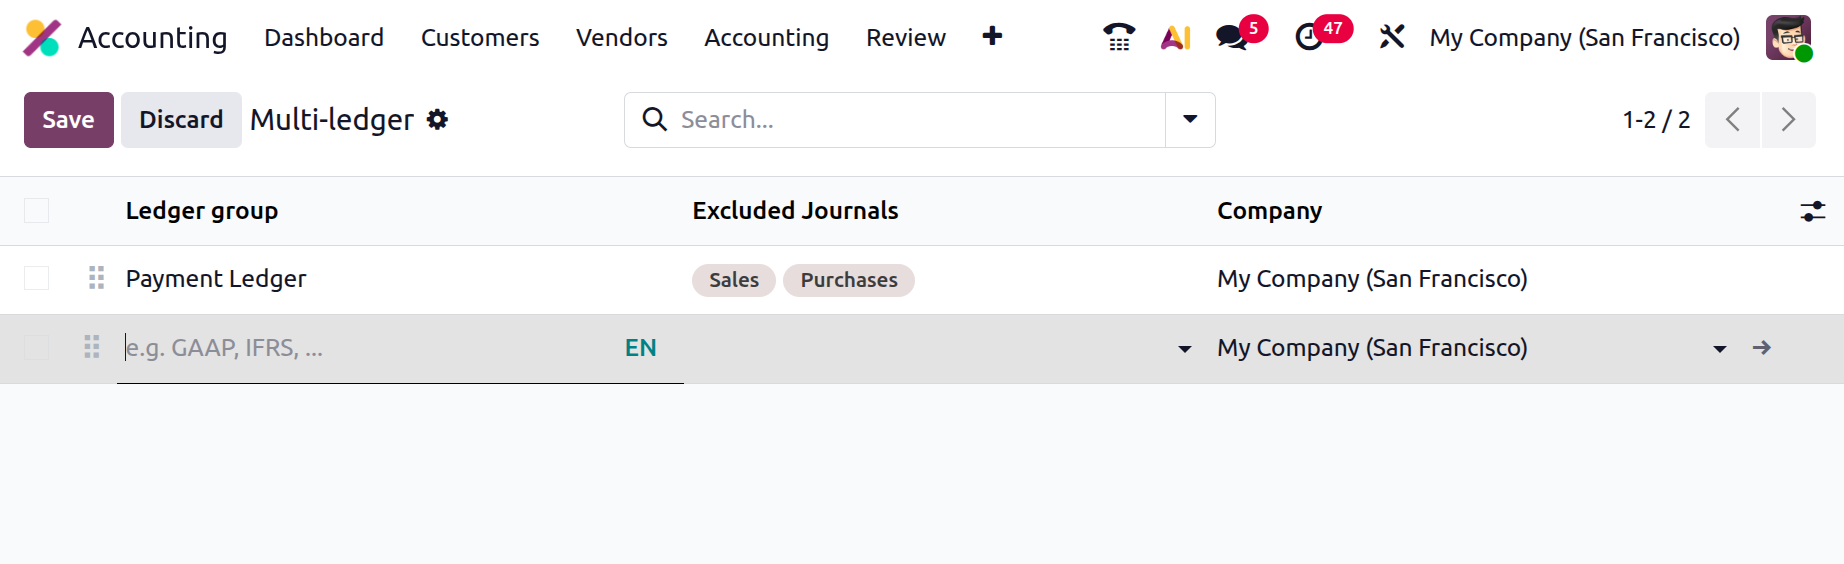
In the setup window, specify a Ledger Name, select the Company, and define which journals should be excluded from this ledger. Once saved, Odoo automatically compiles and tracks all relevant consolidation entries in the multi-ledger, giving finance teams a unified, real-time view of consolidated financial performance.
Once created, the new multi-ledger becomes available directly inside the Reports menu, allowing users to seamlessly switch between ledgers while analyzing financial statements and ensuring better transparency and compliance in reporting.
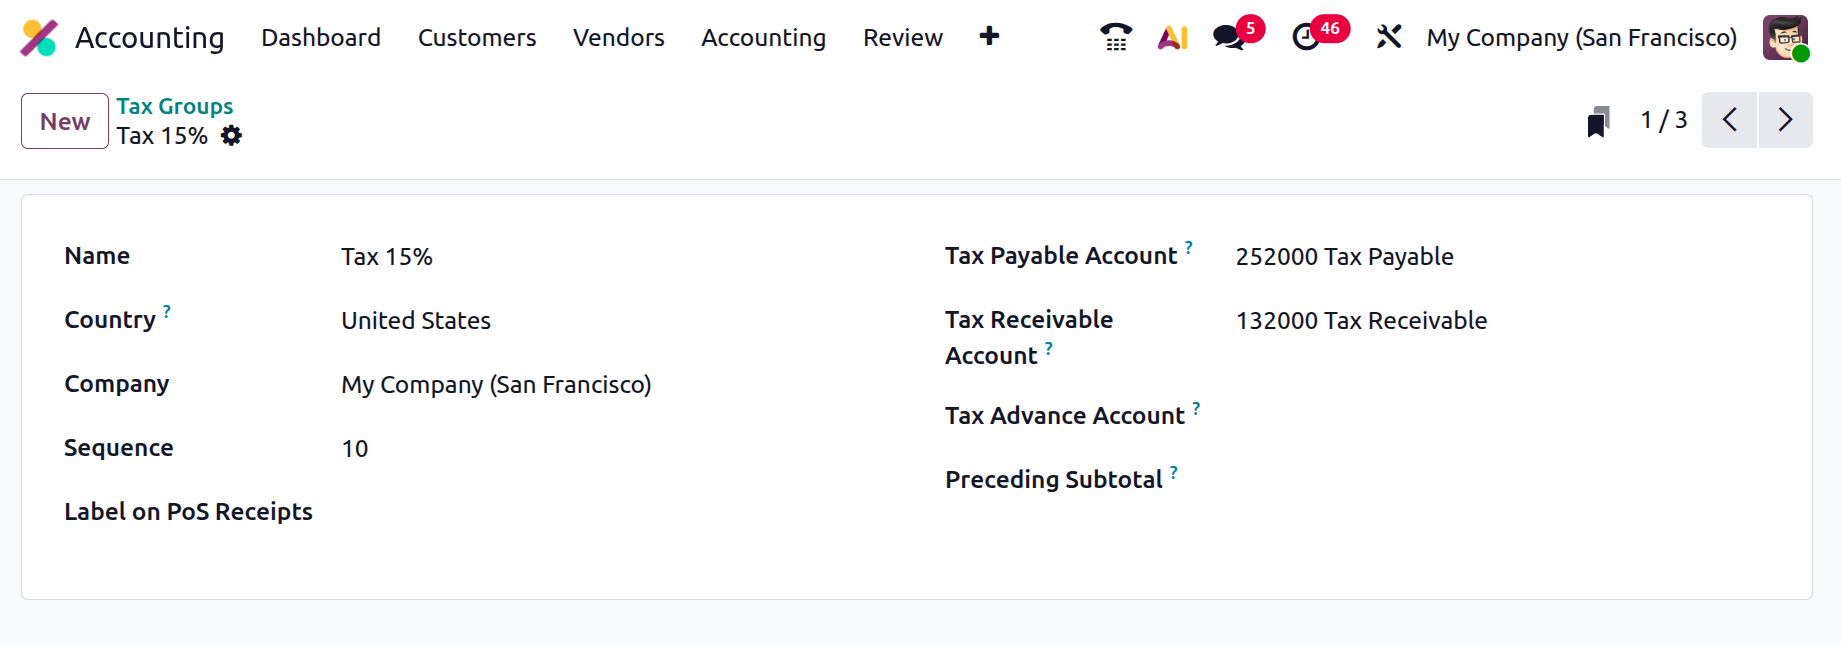
1.7 Tax Groups
In Odoo 19, tax groups help businesses organize and manage different types of taxes based on their operational needs, whether for goods, services, or supplier transactions.
You can configure and view them by navigating to Accounting → Configuration → Tax Groups. This section provides a consolidated overview of all tax groups defined in the system, making it easy to maintain clarity and compliance across various fiscal operations.

Each tax group record includes essential details such as the Name, which identifies the group, and the Country, which specifies the jurisdiction where the tax applies. The Tax Payable Account records the amounts owed to tax authorities, while the Tax Received Account keeps track of taxes collected from customers. For companies that make advance tax payments, the Tax Advance Account is also available to manage these prepayments efficiently. By structuring taxes through tax groups, Odoo 19 ensures consistent reporting, simplifies reconciliation, and enhances the overall transparency of tax-related entries across the accounting system.
When you click the View button in the Tax Group window in Odoo 19, you can access a range of configuration fields that define how the tax group behaves both in accounting and on printed reports. Fields such as Name and Country specify the group’s identity and regional tax applicability, while Company ensures that the configuration is assigned to the correct entity. The Sequence values help determine the order in which the tax should appear in documents. The Label on PoS Receipts defines how the tax name will be displayed to customers during retail transactions, ensuring clarity at the point of sale. The Tax Payable Account, Tax Receivable Account, and Tax Advance Account are crucial accounting fields: they ensure tax collected from customers is posted to the correct liability account, tax paid on purchases is recorded as recoverable, and any tax prepaid or collected in advance is properly tracked. Lastly, the Preceding Subtotal option controls how the tax amount is presented in totals, for example, whether the tax should appear after a specific subtotal line, which helps display multi-layered tax structures accurately on invoices and receipts.
1.8 Tax Unitsr
In Odoo 19, the Tax Unit feature, available under Accounting → Configuration → Tax Units, helps businesses efficiently group and manage their tax reports, particularly when operating across multiple companies or locations. This functionality is invaluable for organizations that must consolidate tax declarations under a single reporting entity. When creating a new Tax Unit, you can define key details that determine how tax reporting will be structured.
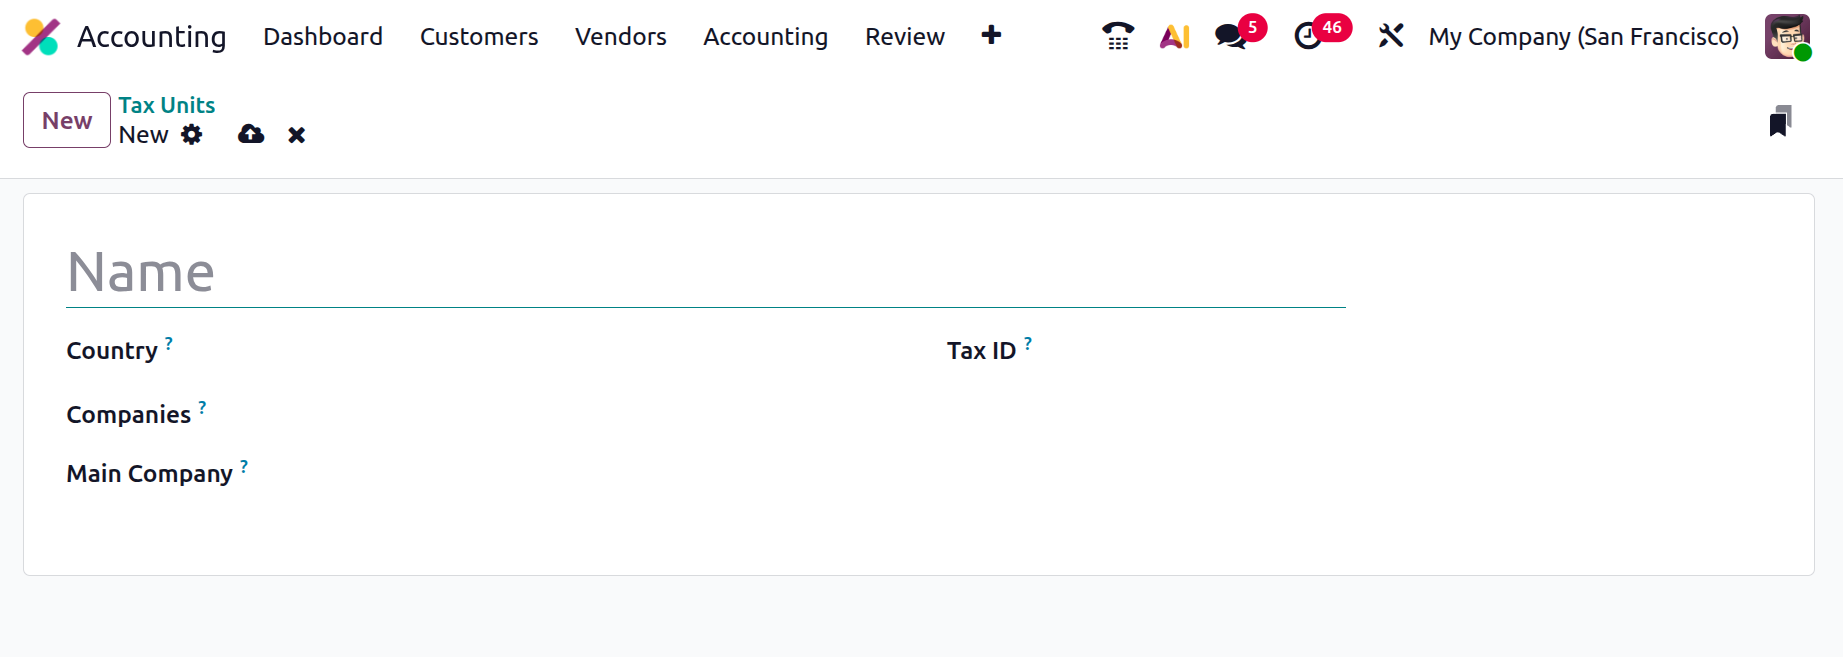
The Title field identifies the tax unit, while the Country field specifies the jurisdiction where the tax applies. You can also list all Companies included in the unit and designate one as the Main Company, which will be responsible for filing and paying taxes on behalf of the group. Additionally, the Tax ID field allows you to assign an identification number for the tax unit, ensuring accuracy and compliance during submissions. By grouping multiple companies under a unified tax unit, Odoo 19 streamlines the preparation, review, and filing of tax reports, reducing redundancy and ensuring that all related transactions are captured under a single, coherent declaration.
1.9 Cash Roundings
In Odoo 19 Accounting, the Cash Rounding feature ensures that invoice totals align with the smallest available currency denomination, making cash transactions simpler and more accurate. This is especially useful in regions where payments are made using physical currency with limited denominations.
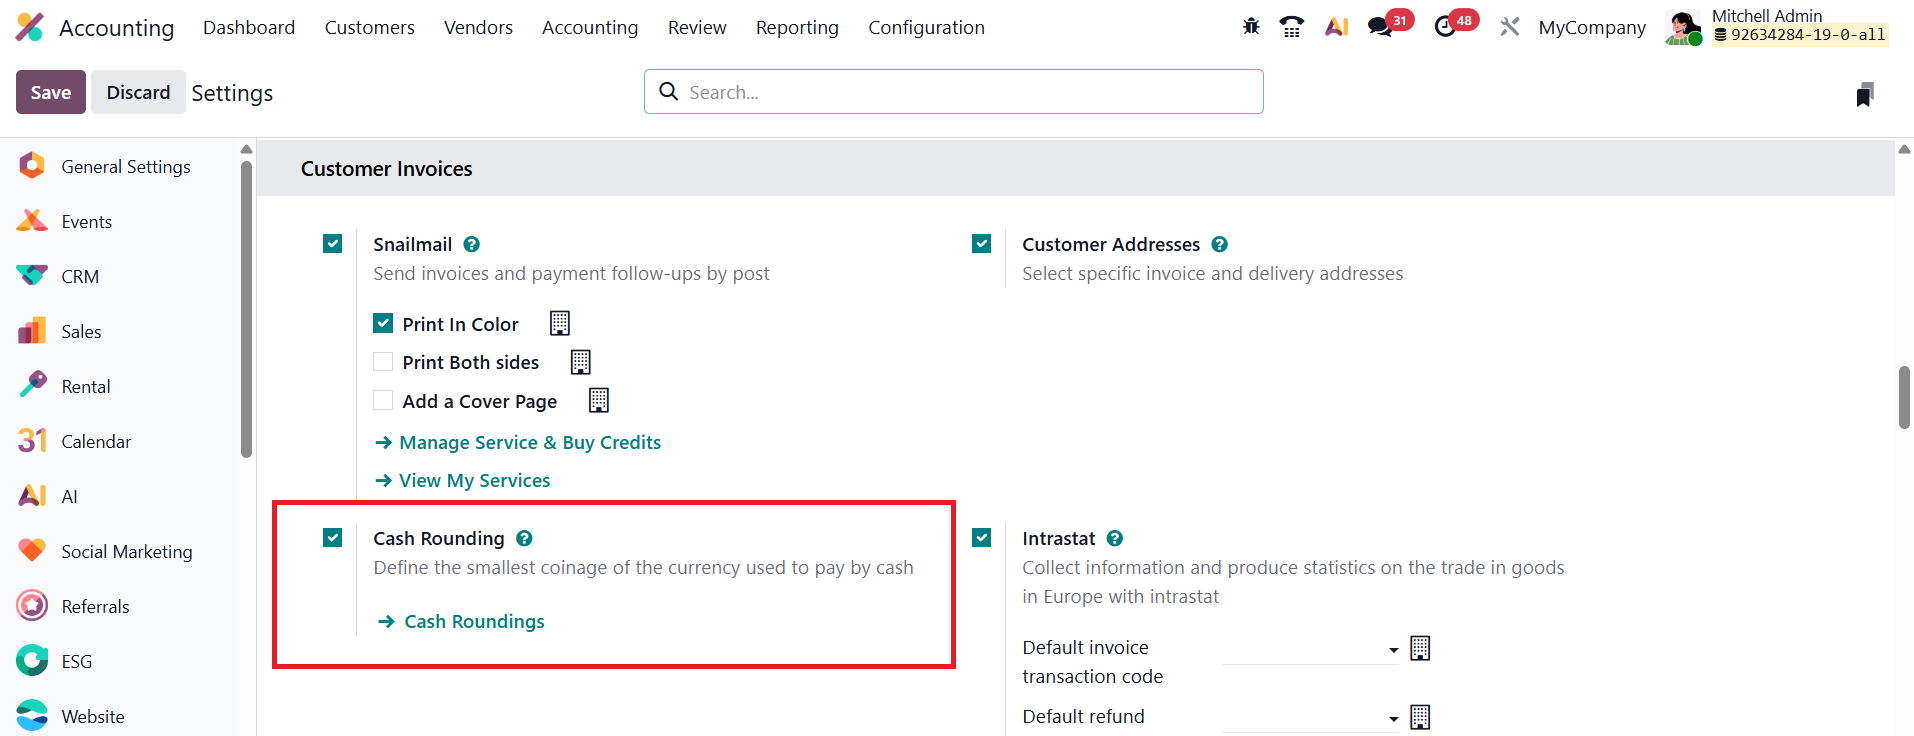
To enable this feature, go to Accounting ▸ Settings and activate the Cash Rounding option under the Customer Invoices section. Once enabled, you can configure rounding rules by navigating to Accounting ▸ Configuration ▸ Cash Rounding.

In the list view, you’ll find all existing rounding configurations. To create a new one, click New.
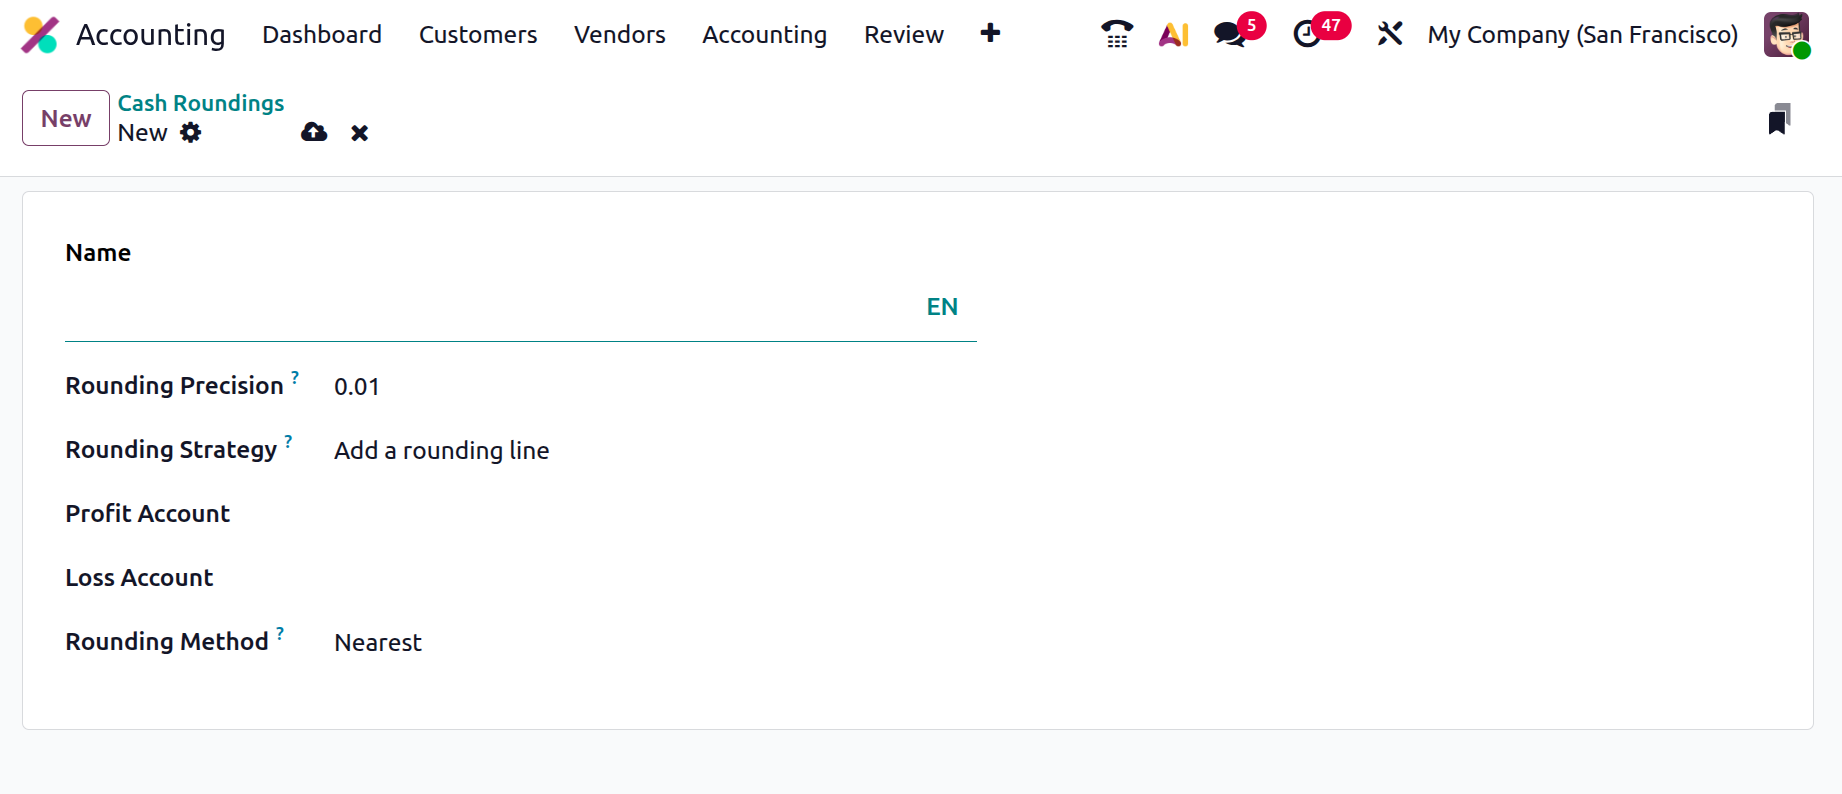
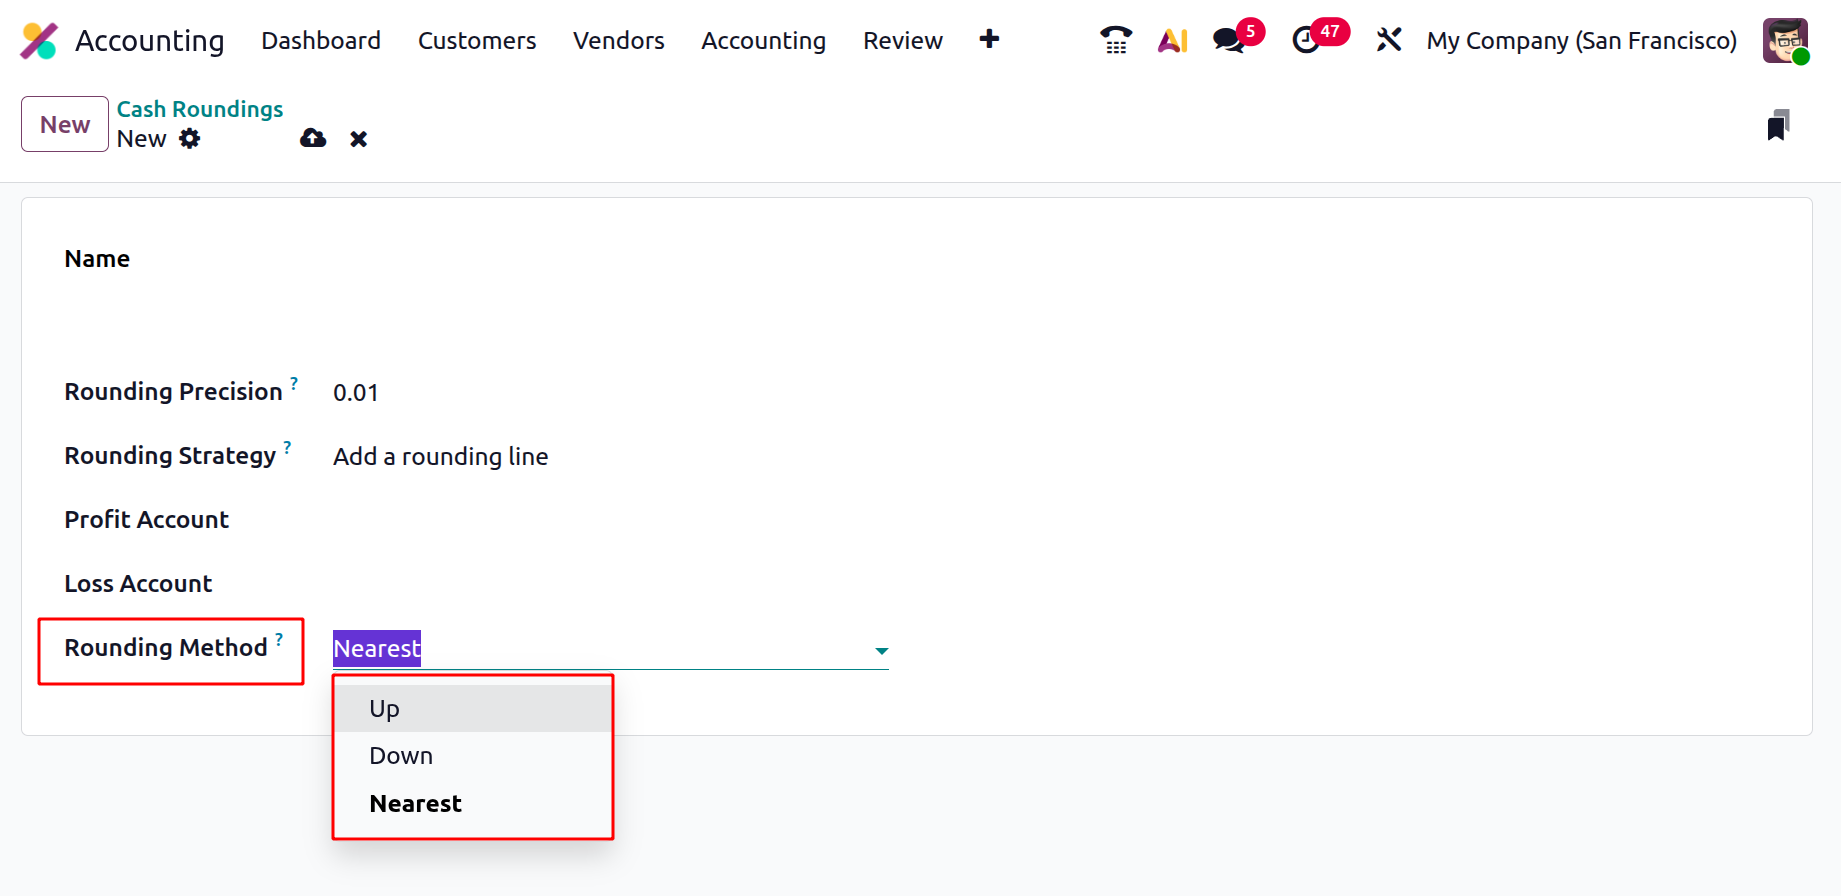
In the setup form, provide a Name for the rounding method and define the Rounding Precision, which represents the smallest denomination to which the amount should be rounded.
Next, choose a Rounding Strategy:
- Add a Rounding Line –Inserts a separate rounding line in the invoice to reflect the adjustment.
- Modify Tax Amount – Adjusts the tax calculation so that the invoice total adheres to the rounding precision.
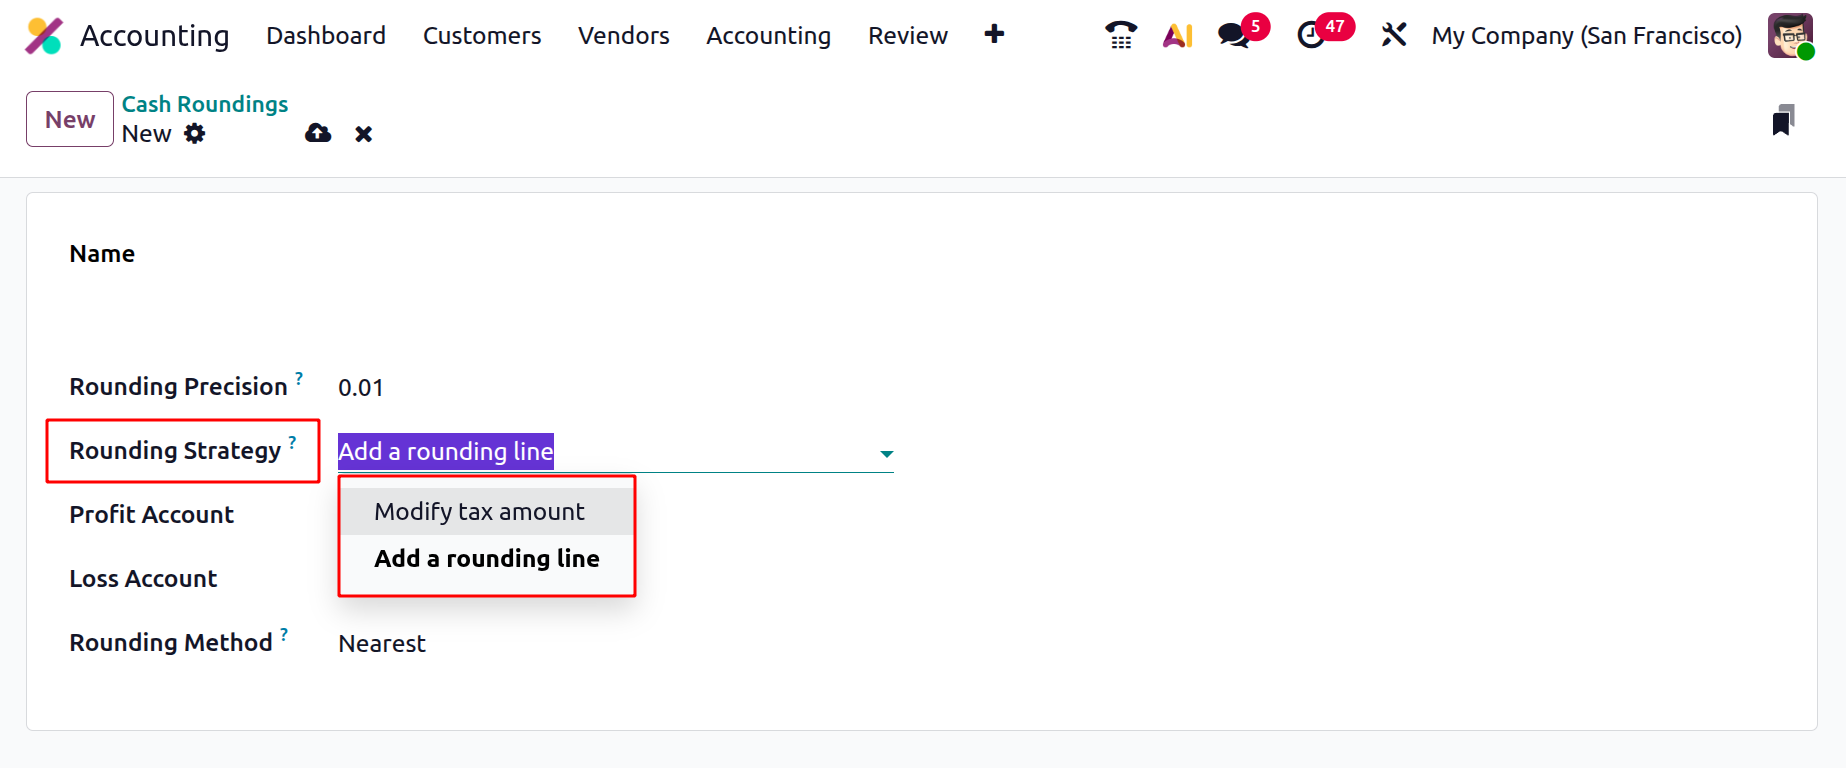
Specify the appropriate Profit and Loss Accounts to record any rounding differences that result from these adjustments.
Odoo 19 supports three rounding methods:
- Up – Always rounds the amount up to the nearest valid denomination.
- Down – Always rounds the amount down to the nearest valid denomination.
- Nearest – Rounds up when the decimal part is 0.5 or greater, and rounds down when it is less than 0.5.
This rounding system also handles fractional values, ensuring that your invoices comply precisely with local currency standards and simplifying the reconciliation of cash payments.
1.10 Account Tags
In Odoo 19 Accounting, you can organize and monitor specific balances, rates, or financial elements efficiently using Account Tags. These tags help categorize and filter accounts, taxes, and products for clearer reporting and easier data analysis.
To create and manage tags, navigate to Accounting ▸ Configuration ▸ Account Tags.
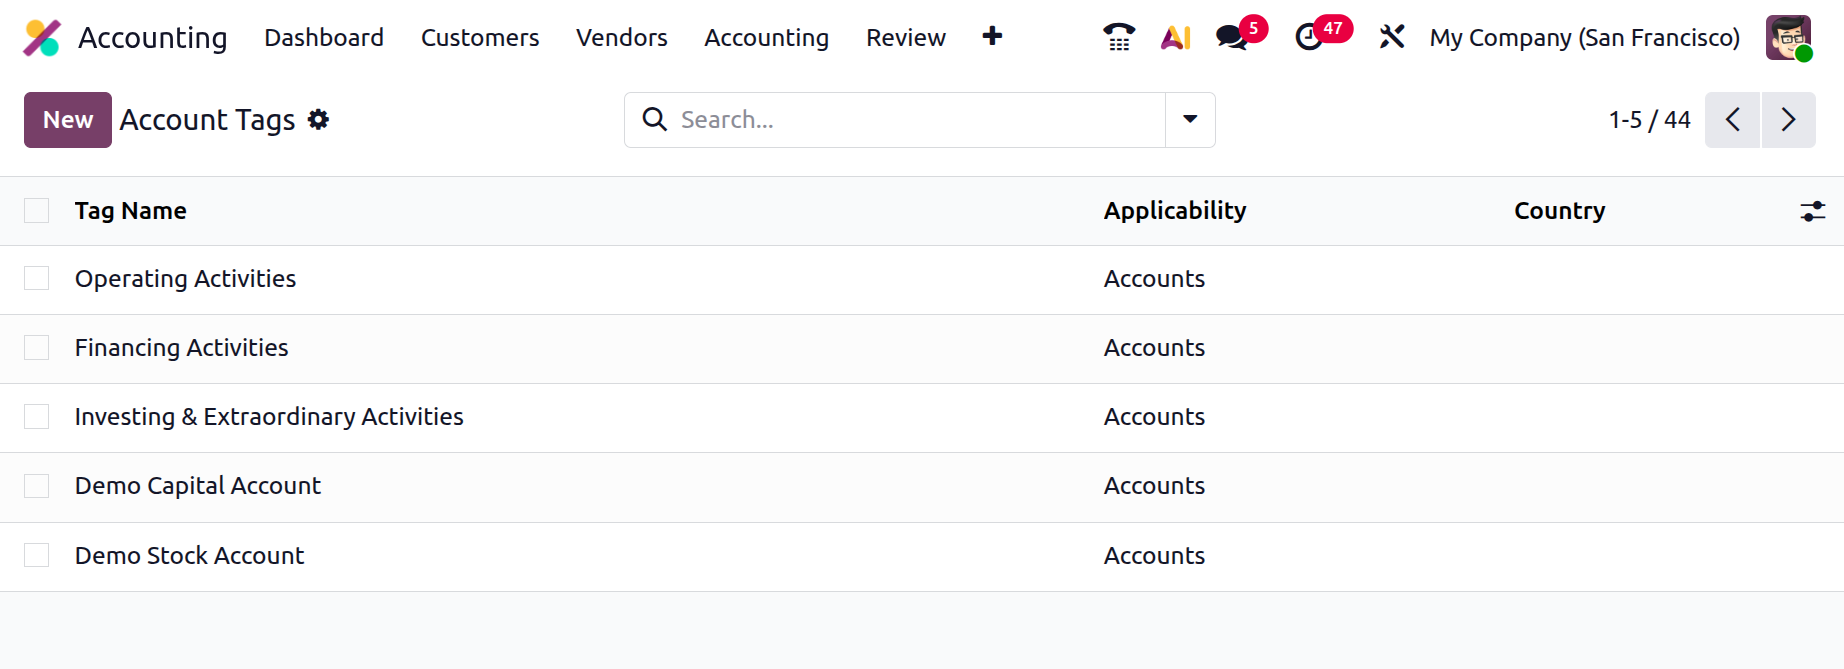
The list view displays all existing tags along with details about their Applicability, indicating where each tag can be used, whether on Accounts, Taxes, or Products.
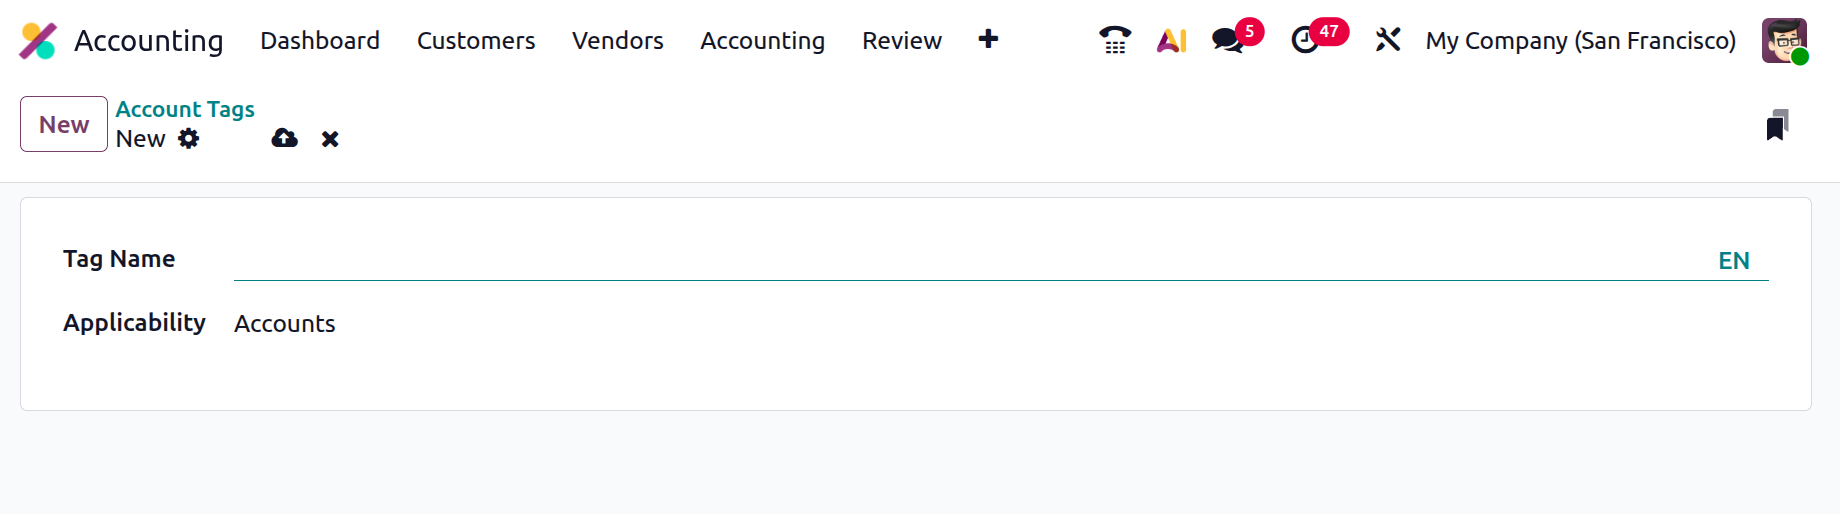
Click New to create a new tag. In the setup form, enter a clear and descriptive Tag Name and define its Applicability based on where you want the tag to be available. If you choose Accounts, the tag can be applied to Chart of Accounts entries to group balances and simplify reporting, such as segmenting income by department or project. When Taxes is selected, the tag can be linked to tax configurations, allowing grouped tax reporting or filtering specific tax amounts in financial statements. If you choose Products, the tag can be assigned to items sold or purchased, enabling enhanced profitability tracking, revenue analysis, or cost segmentation based on product categories. Once saved, the tag becomes selectable within the relevant forms and can be leveraged for reporting, filtering, and automated account mappings, enhancing both accuracy and efficiency in financial management.
1.11 Account Groups
In Odoo 19 Accounting, you can organize multiple ledger accounts under a single parent using Account Groups. This feature helps maintain a structured and clean Chart of Accounts, ensuring that reports such as the Trial Balance and Balance Sheet display automatic roll-ups and subtotals for grouped accounts.
By default, Odoo assigns new accounts to a group based on their account number. For example, an account numbered 131200 will automatically fall under the group starting with 131000. However, you can manually override this assignment by selecting a different Group (or View) on the account form, giving you full control over your account hierarchy.

If the required group doesn’t already exist, you can create one manually. To do so, enable Developer Mode, then navigate to Accounting ▸ Configuration ▸ Account Groups and click New.
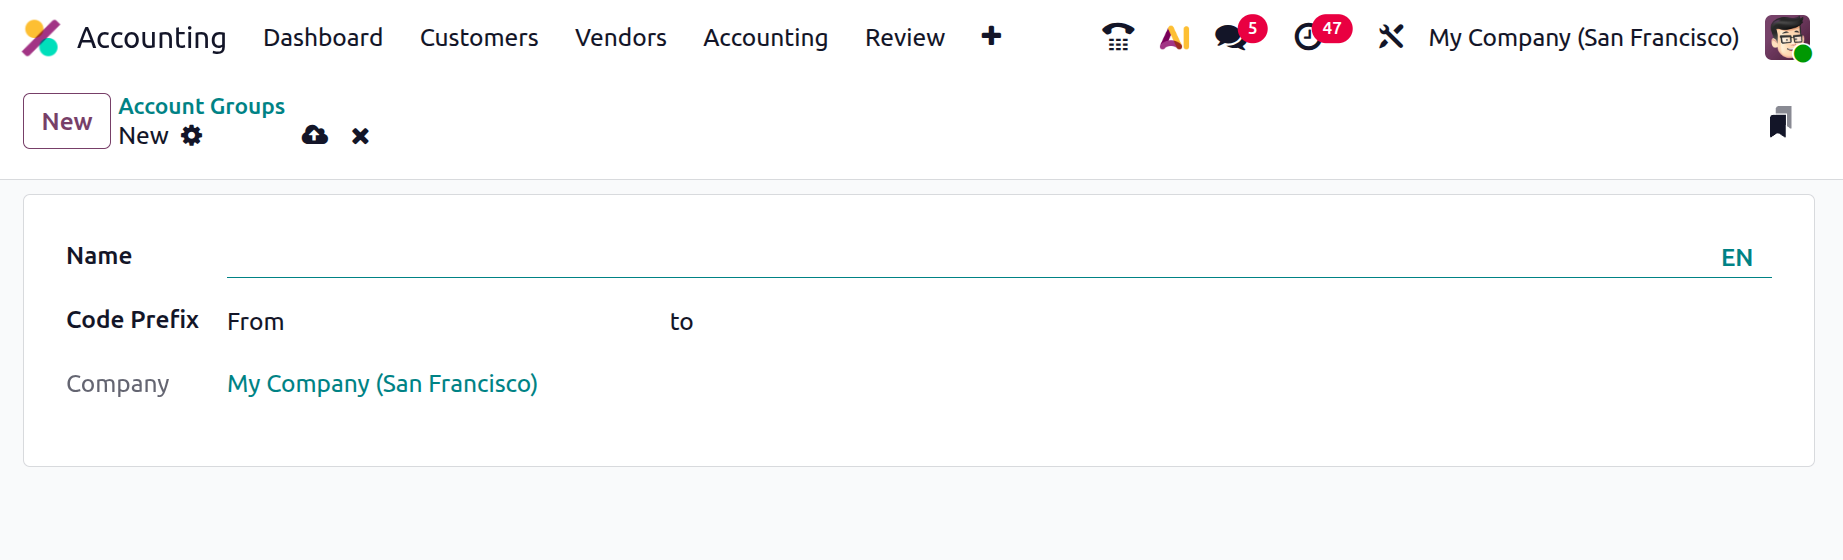
In the creation form, provide a clear Name, define the Code Prefix that determines the range of child accounts (using the same prefix in both From and To fields), and specify the Company if the group is company-specific. Once saved, the new group becomes available for selection in account forms and will automatically aggregate the balances of its child accounts for financial reporting purposes.
Account groups are displayed within the Chart of Accounts in Odoo 19.
1.12 Accounting Reports
In Odoo 19 Accounting, the reporting framework has been enhanced to offer even more flexibility and precision, allowing businesses to generate, customize, and analyze a wide range of financial reports, including Tax Reports, Balance Sheets, Profit and Loss Statements, and Management Reports, with ease. These reports provide real-time insights into financial performance and can be tailored to match specific accounting practices or compliance requirements.
To configure or create new reports, navigate to Accounting › Configuration › Accounting Reports.
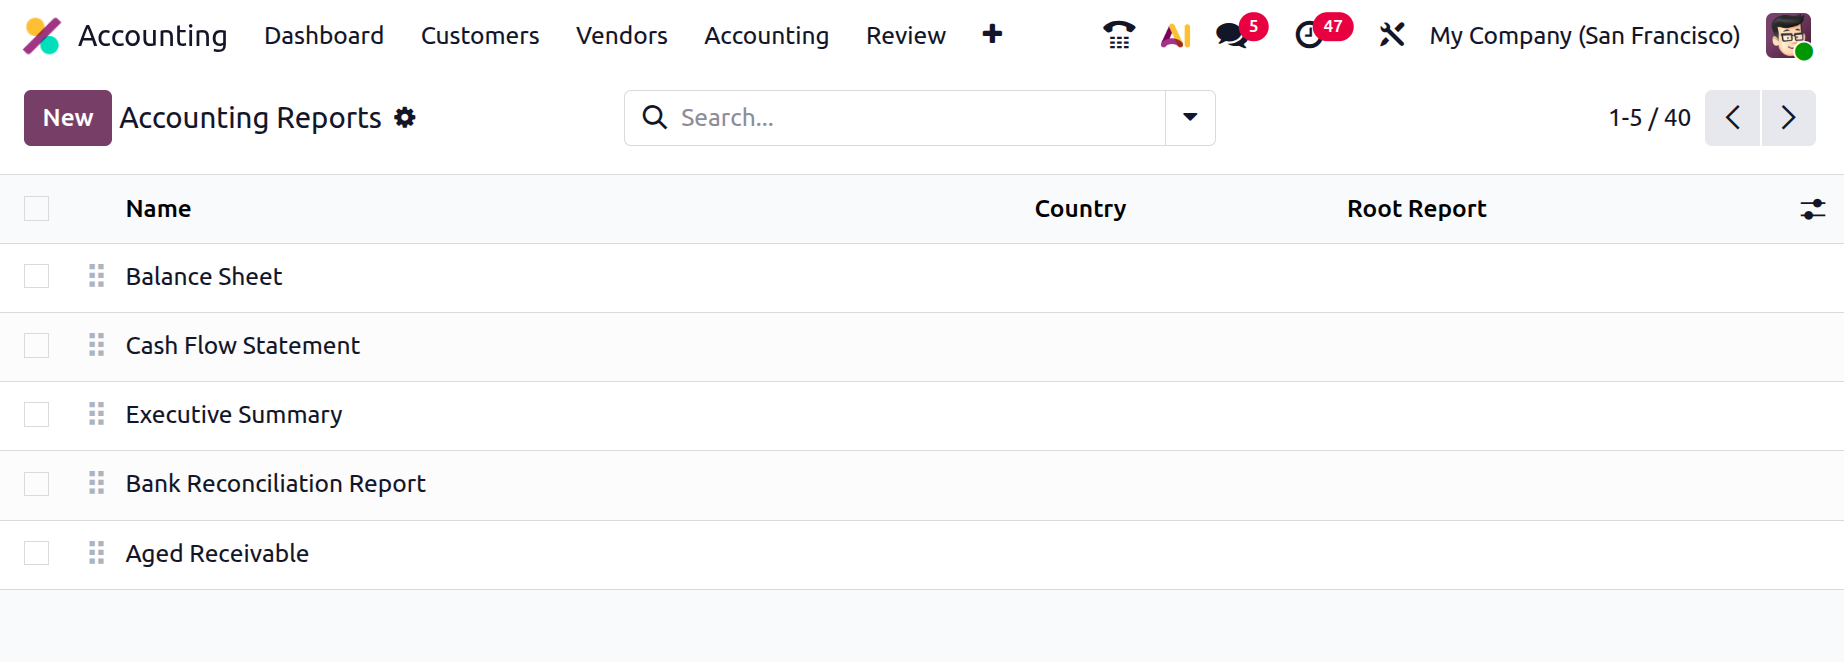
Here, you can either create a new root report or develop a variant of an existing report.
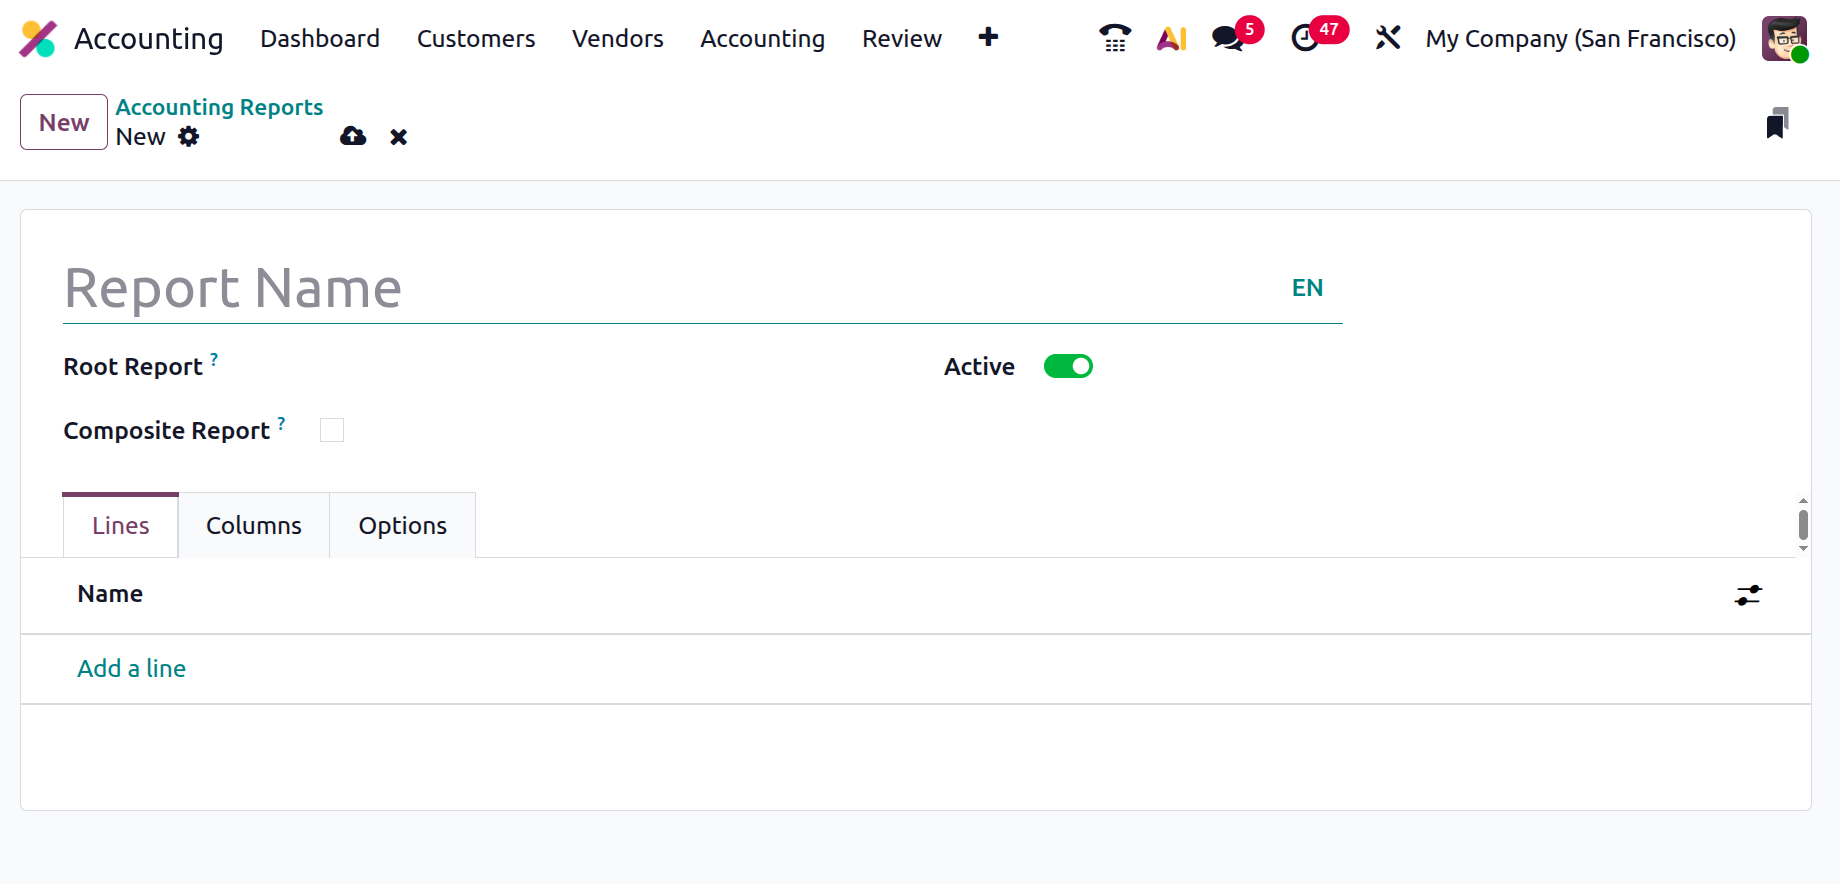
A Root Report serves as a base template, while variants inherit the structure of a root report but can include custom configurations, such as additional columns, formulas, or filters. If a report doesn’t reference another as its root, Odoo automatically considers it a standalone root report. The Composite Report enables the creation of structured reports composed of multiple sections, ensuring smoother navigation and quicker printing.
After creating a report, the next step is to define report lines, which represent individual elements such as revenue, expenses, or liabilities. You can click Add a Line to create new entries or edit existing ones.
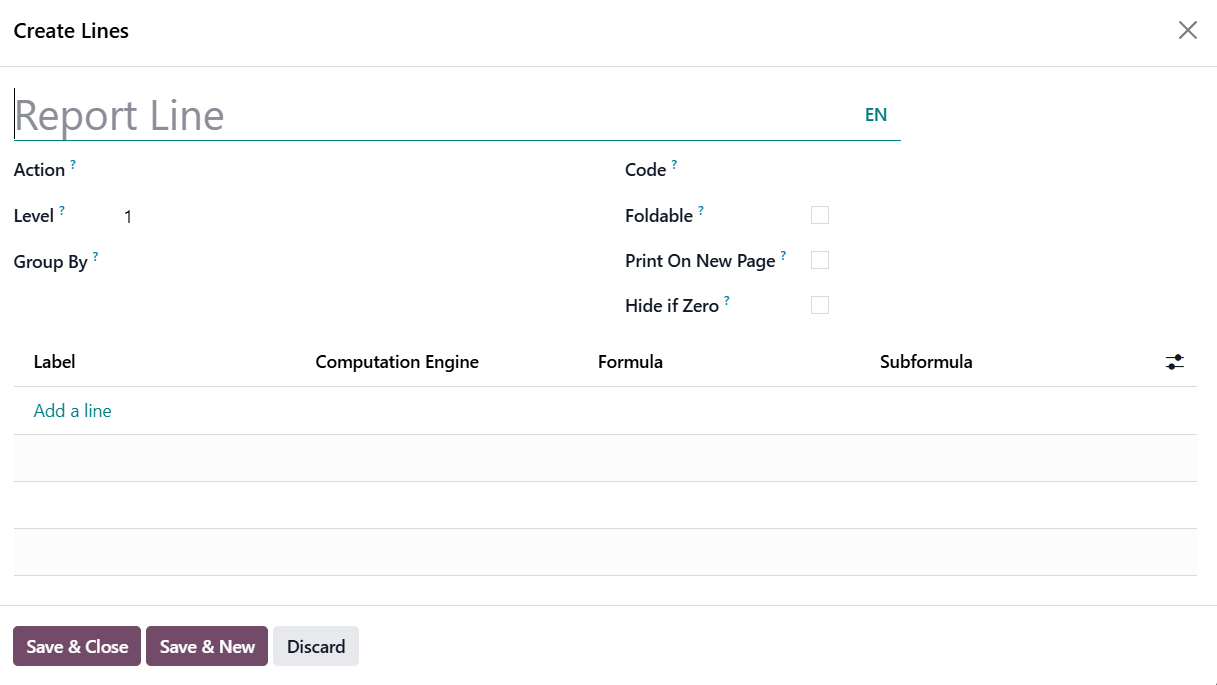
Each line requires a Name and may include an optional Code if it will be referenced in a formula. In Odoo 19, each formula or expression is assigned a unique label, ensuring that it can be distinctly identified and reused across report sections. The Computation Engine field determines how formulas are calculated, allowing Odoo to interpret different mathematical or logical expressions. You can even combine multiple computation engines within the same report line, making it possible to handle complex financial calculations that blend accounting, analytic, or statistical logic. The Formula field defines the actual mathematical expression, referencing the codes and labels assigned to report lines.
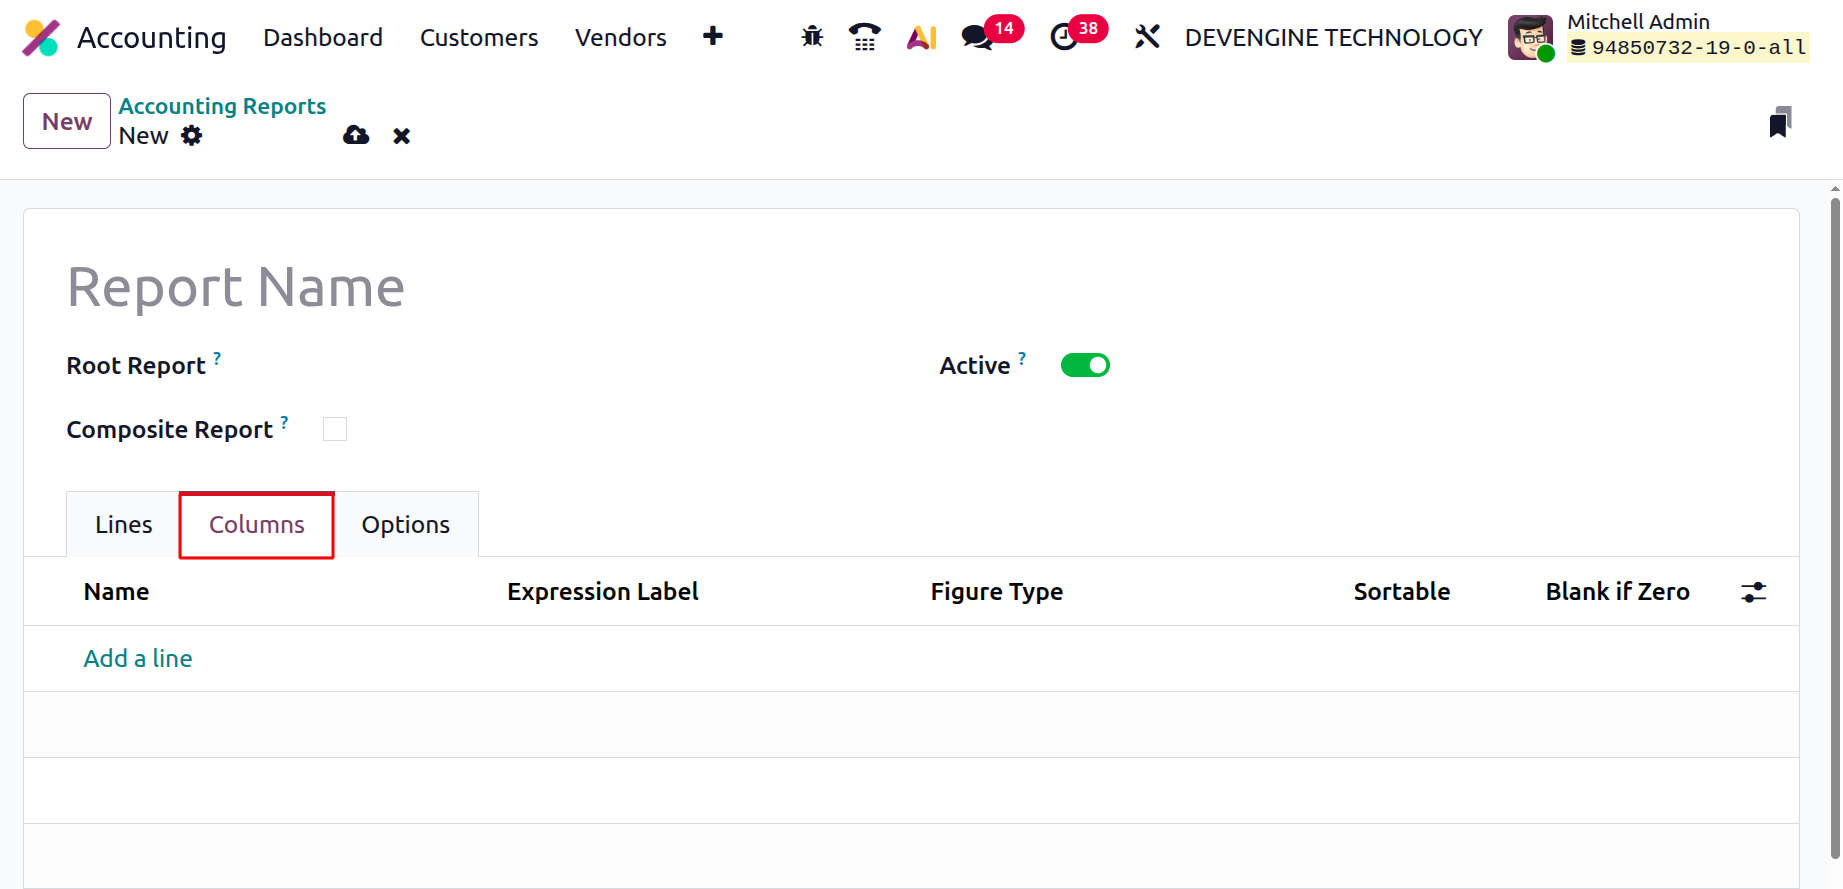
Odoo 19 reports can display data in multiple columns, with each column drawing its values from the expressions defined in the report lines. The Expression Label field links each column to its respective expression. For example, one column might display the current fiscal year’s values, while another shows those from the previous year for comparison. To avoid confusion, each column must have a distinct expression label.
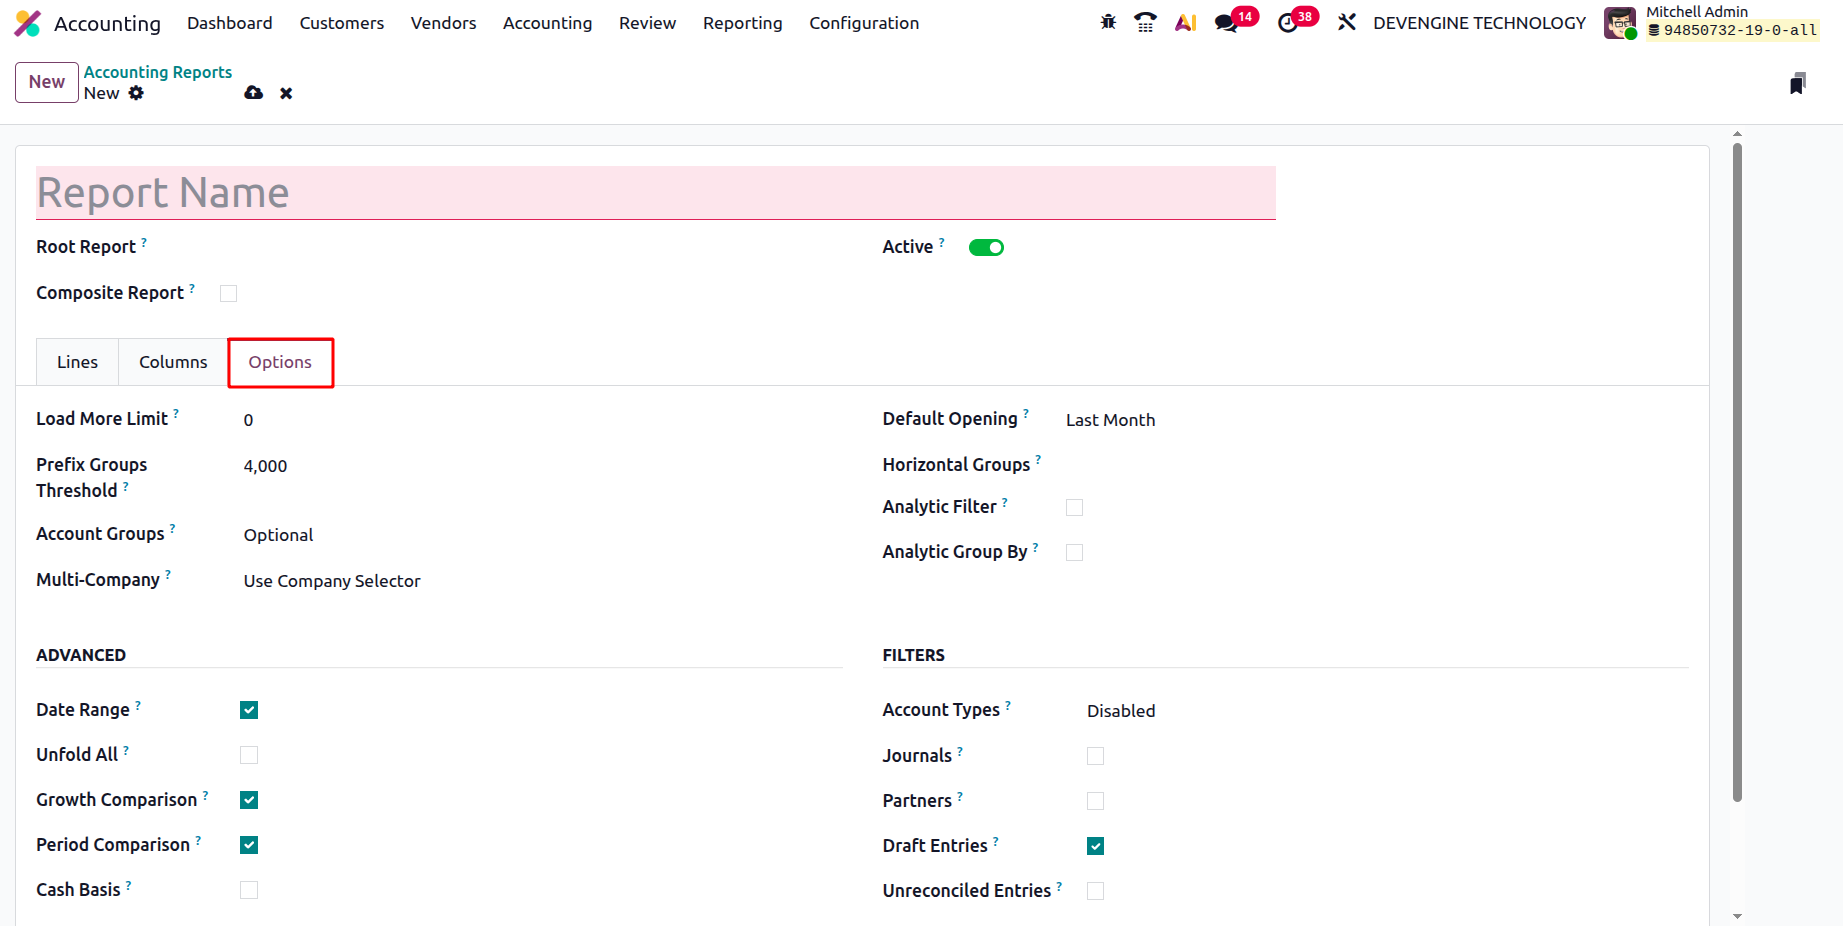
Several advanced parameters allow you to fine-tune how your reports behave and display data. The Load More Limit defines how many records load at once, an essential feature for large reports, improving performance and usability. You can also manage Account Groups, choosing from three visibility modes: Always, Optional, or Enabled by Default, to control how grouped accounts appear within reports.
For multi-company environments, Odoo 19 introduces enhanced filtering options. You can enable the Use Company Selector or Use Tax Unit features to consolidate and compare data across multiple entities, or disable them for single-company reports. The Default Opening field specifies which time frame is loaded by default when a report opens, for example, Last Month, This Quarter, or This Year, ensuring the report initially displays the most relevant financial period. You can add Horizontal Groups to structure data sections visually and activate Analytic Filters or Analytic Group By options to refine data based on analytic accounts or tags.
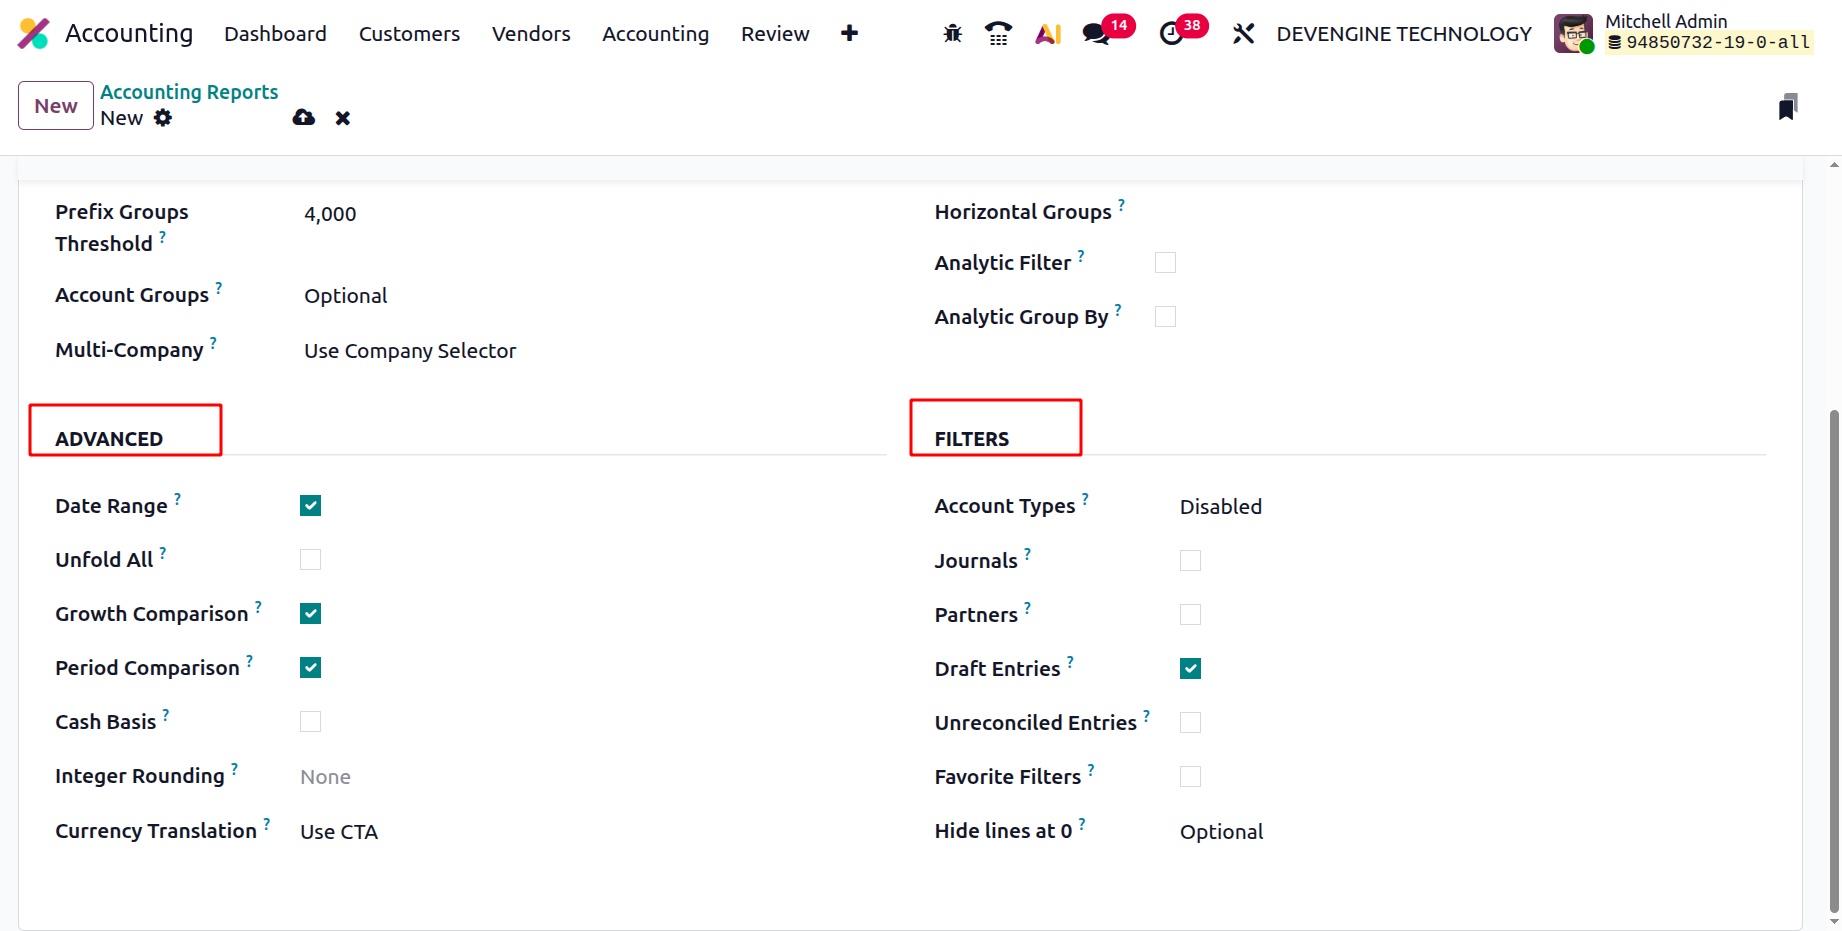
The Advanced options section provides additional tools to tailor report functionality. You can enable the Date Range Filter to specify custom date intervals, use the Unfold All option to automatically expand all lines, and activate Growth Comparison or Period Comparison to view side-by-side data between different reporting periods. For businesses that follow cash-based accounting, enabling Cash Basis Mode ensures that transactions are reported based on actual cash flow rather than invoice dates. The Integer Rounding determines how numerical values are rounded. Setting it to None keeps full decimal precision, ensuring maximum accuracy. The Currency Translation specifies how foreign currency balances are converted. Selecting Use CTA (Cumulative Translation Adjustment) applies a standardized translation adjustment for consolidated foreign entities, maintaining accurate cross-currency reporting.
Lastly, the Filters section enables refined data control through options such as Account Types, Journals, Partners, Draft Entries, and Unreconciled Entries, giving users granular control over the data displayed in the final report. The Favorite Filters lets users save commonly used filter combinations for quick access in future reporting sessions. The Hide Lines at 0, when enabled, hides lines with a balance or amount of zero from the report, keeping the presentation clean and focused.
The Accounting Reports configuration in Odoo 19 offers a comprehensive, modular, and intuitive framework.
1.13 Horizontal Groups
In Odoo 19 Accounting, the Horizontal Group feature continues to enhance financial reporting by allowing users to organize data in a more structured and comparative way. This functionality helps businesses generate customized financial reports such as Balance Sheets or Profit and Loss statements, offering a clearer perspective on specific dimensions of their operations. By grouping data horizontally, users can compare figures side by side, making it easier to interpret trends and performance across different categories.
To access this feature, navigate to the Configuration menu under the Accounting module and select Horizontal Groups from the Accounting section.

The dashboard displays all existing horizontal groups with their names and associated reports. To create a new group, click New, and a configuration form will appear.
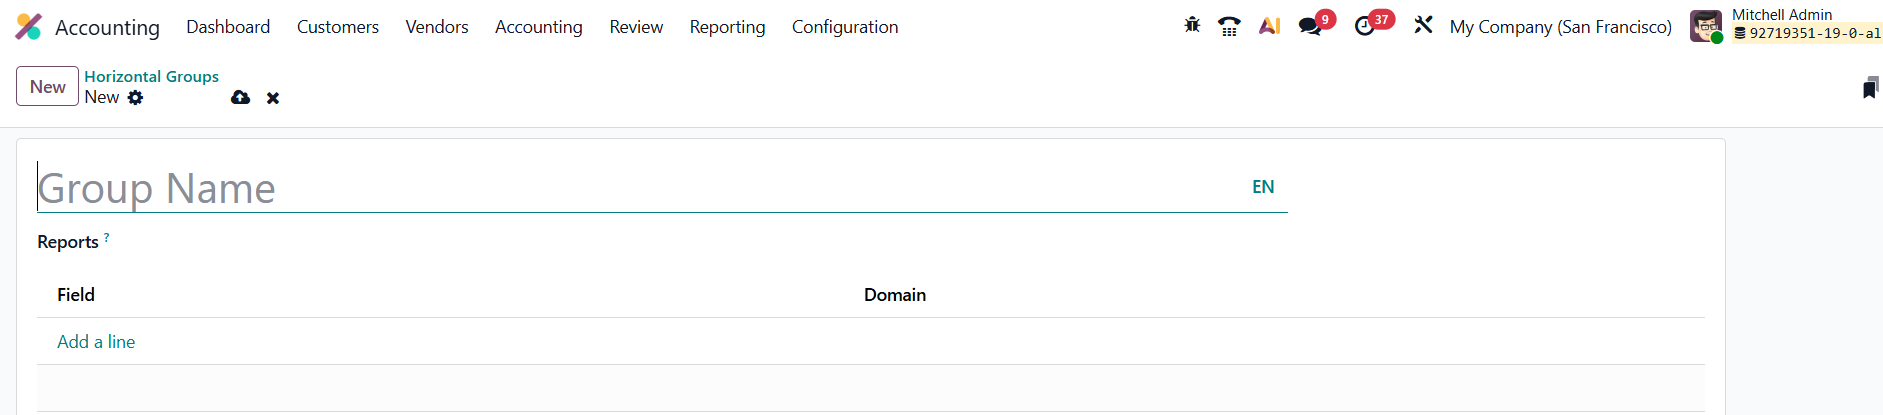
Here, you can enter the Group Name and specify the Reports where this grouping should appear. By clicking Add a Line, you can define the Field Name and Domain to determine how data is filtered and displayed.
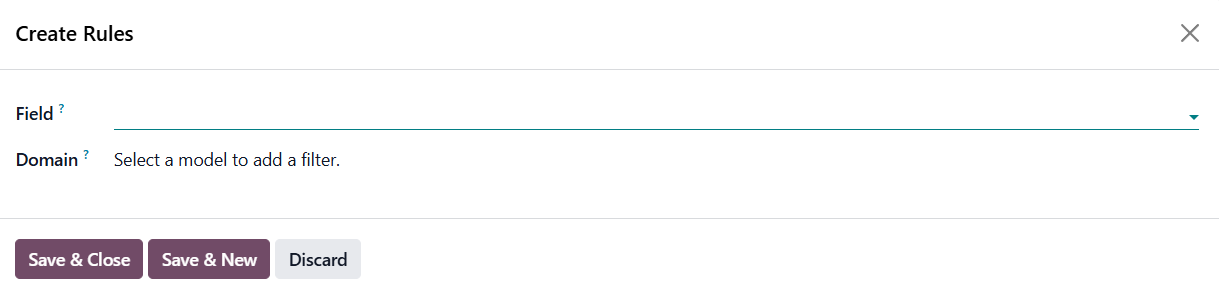
A pop-up window allows further customization; users can set domain rules, choose fields, and refine the scope of the group. Once configured, select Save & Close to finalize the setup. When you navigate to the Reporting menu to generate reports, the Horizontal Group option becomes available, enabling you to select your customized groups and instantly view data categorized according to the parameters you defined.
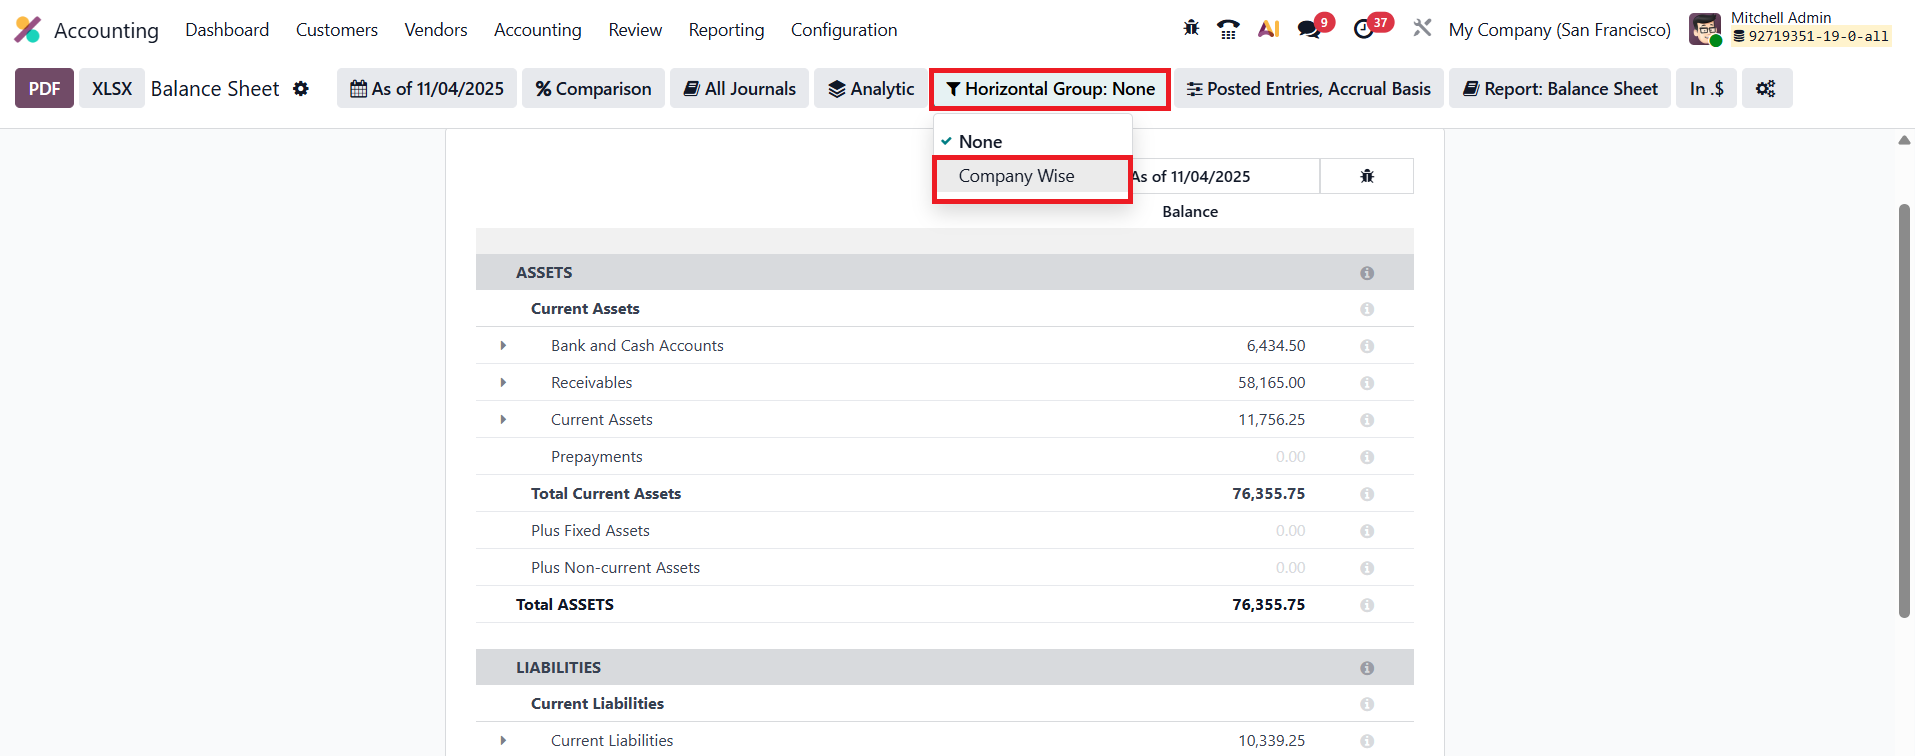
This streamlined approach to reporting helps accountants and managers gain deeper insights into business performance without manual data manipulation.
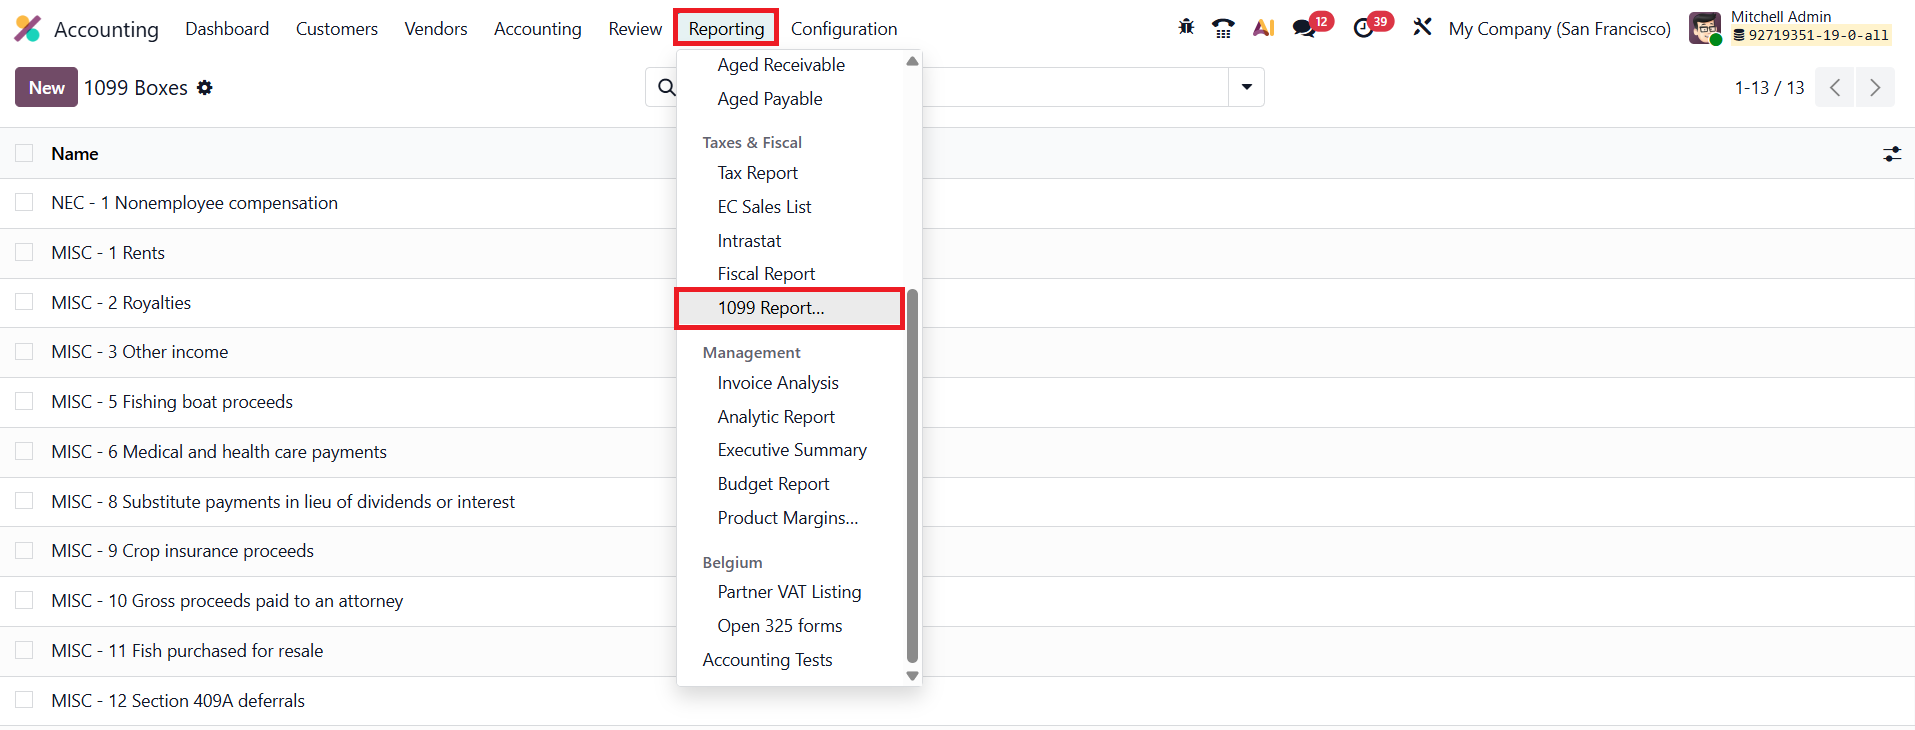
1.14 1099 Boxes
In Odoo 19 Accounting, managing and generating 1099 income statements for U.S.-based contract workers has become more streamlined and compliant with updated electronic filing standards. Businesses are required to issue 1099 forms for independent contractors who have received payments of $600 or more during the fiscal year, and Odoo simplifies this entire process by allowing users to configure, track, and export 1099 data directly from the Accounting module.
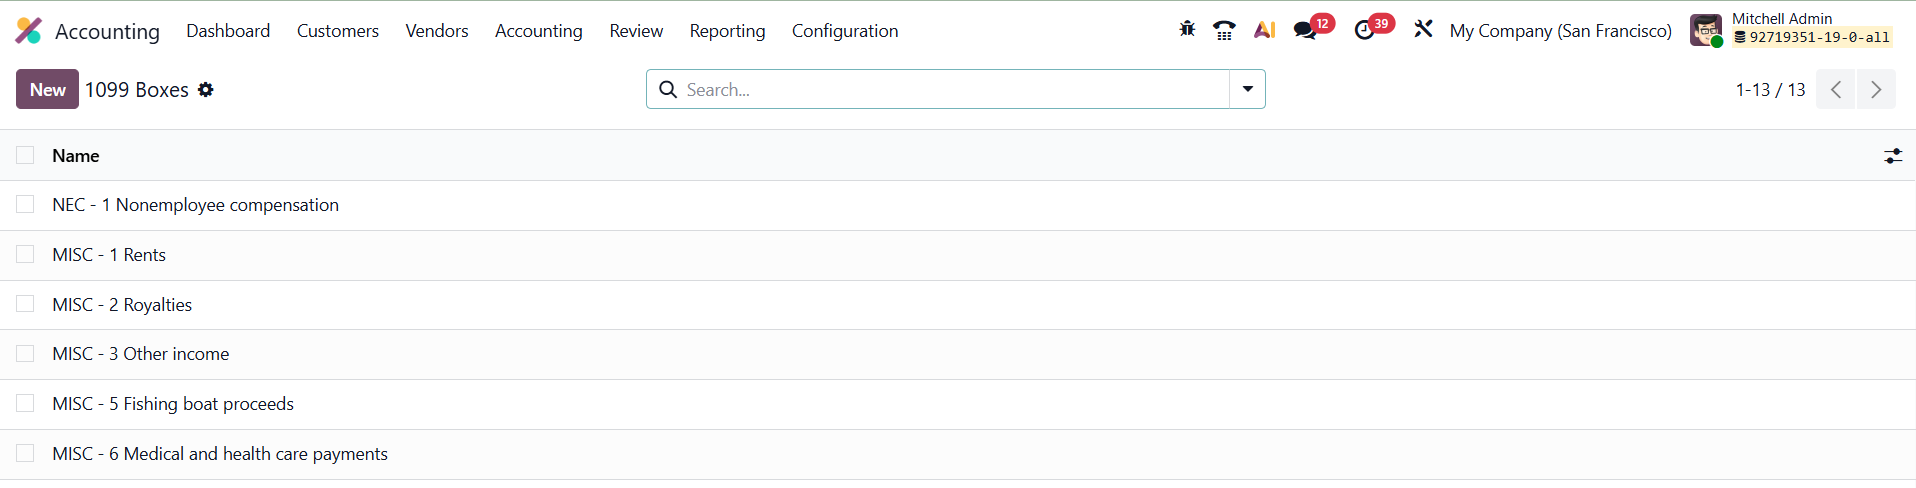
To begin, navigate to Accounting ▸ Configuration ▸ 1099 Boxes. This section lets you create and manage the 1099 boxes, which categorize payments according to IRS requirements (for example, “Nonemployee Compensation” or “Rents”).
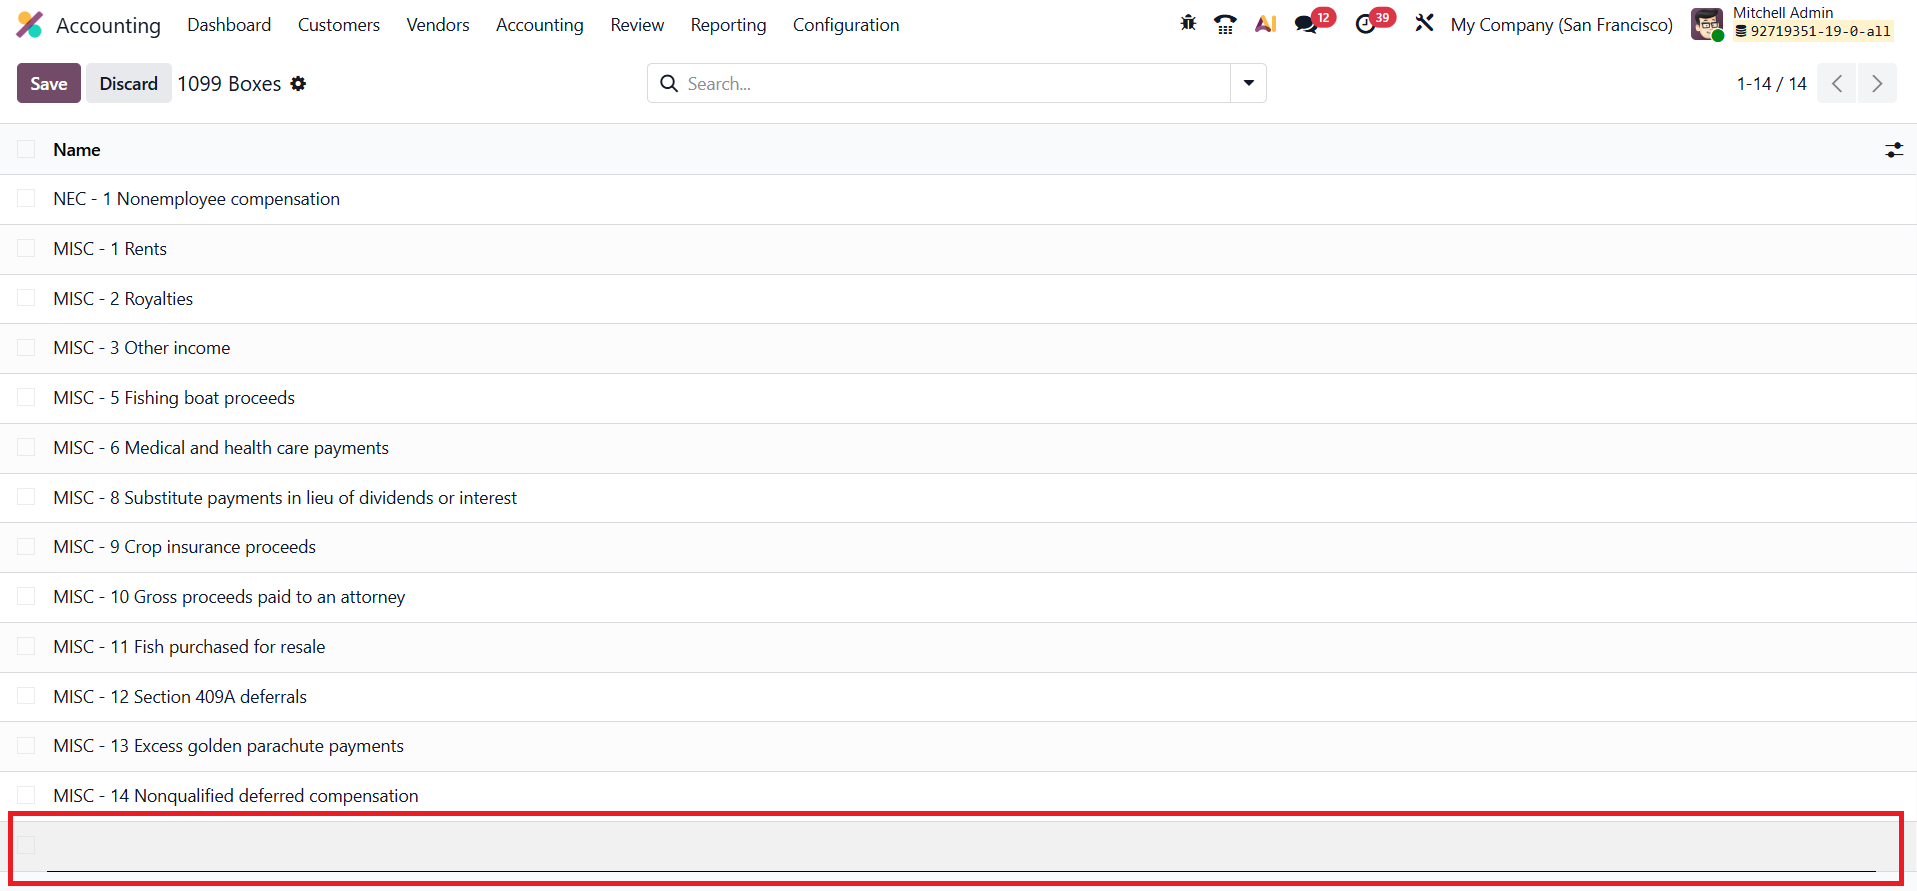
Click New to define a Box Name, add a description. These boxes act as categories that link to vendor payments throughout the fiscal year.
Once the boxes are set up, proceed to Accounting ▸ Reporting ▸ 1099 Reports to generate your yearly 1099 summary.
Specify the Start Date and End Date for the reporting period. Odoo will automatically compile all transactions associated with vendors who are tagged with the relevant 1099 box information.
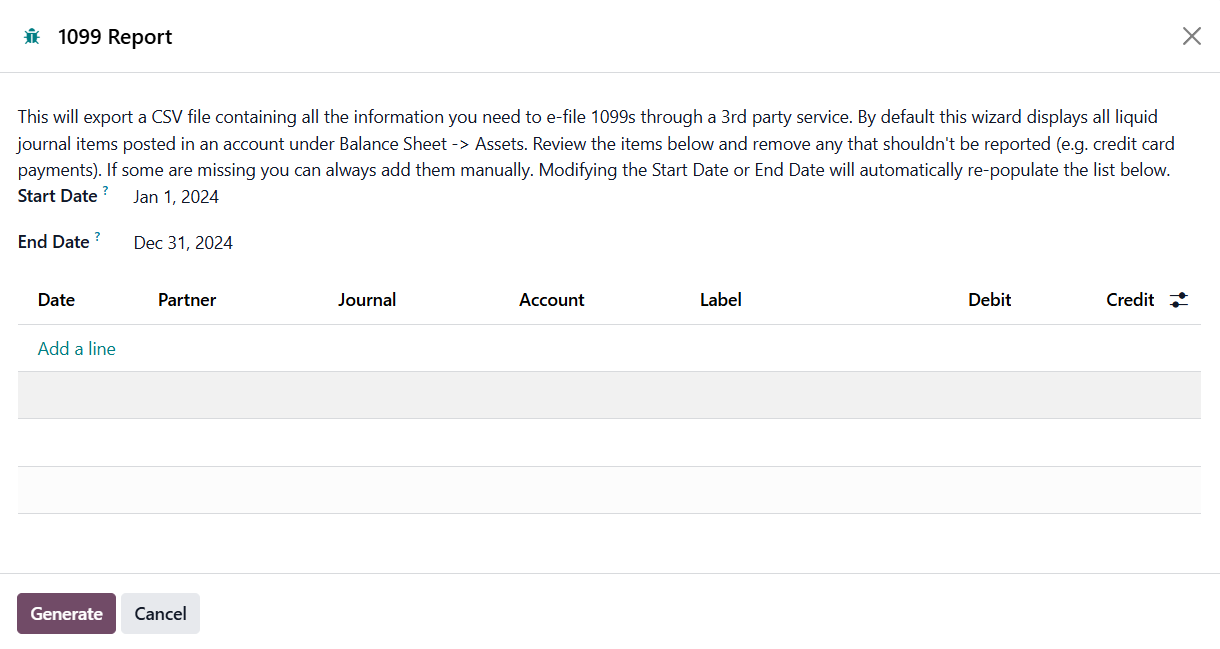
A detailed list of journal entries will appear, showing columns for Date, Partner, Journal, Account, Label, Debit, and Credit. You can review, edit, or manually include any missing entries before finalizing the report.
After verifying the details, click Generate to export the data as a CSV file. This file contains all the necessary information for electronic submission to the IRS or through third-party e-filing providers. By automating categorization and data compilation, Odoo 19 Accounting ensures faster, error-free 1099 report generation and helps maintain accurate tax compliance for businesses working with independent contractors.
1.15 Fiscal Categories
In Odoo 19 Accounting, fiscal categories can now be configured directly under the Configuration menu, providing greater flexibility in managing tax rates and fiscal rules. This enhancement allows businesses to define different rates for accounts within the same category without the need to duplicate fiscal categories.
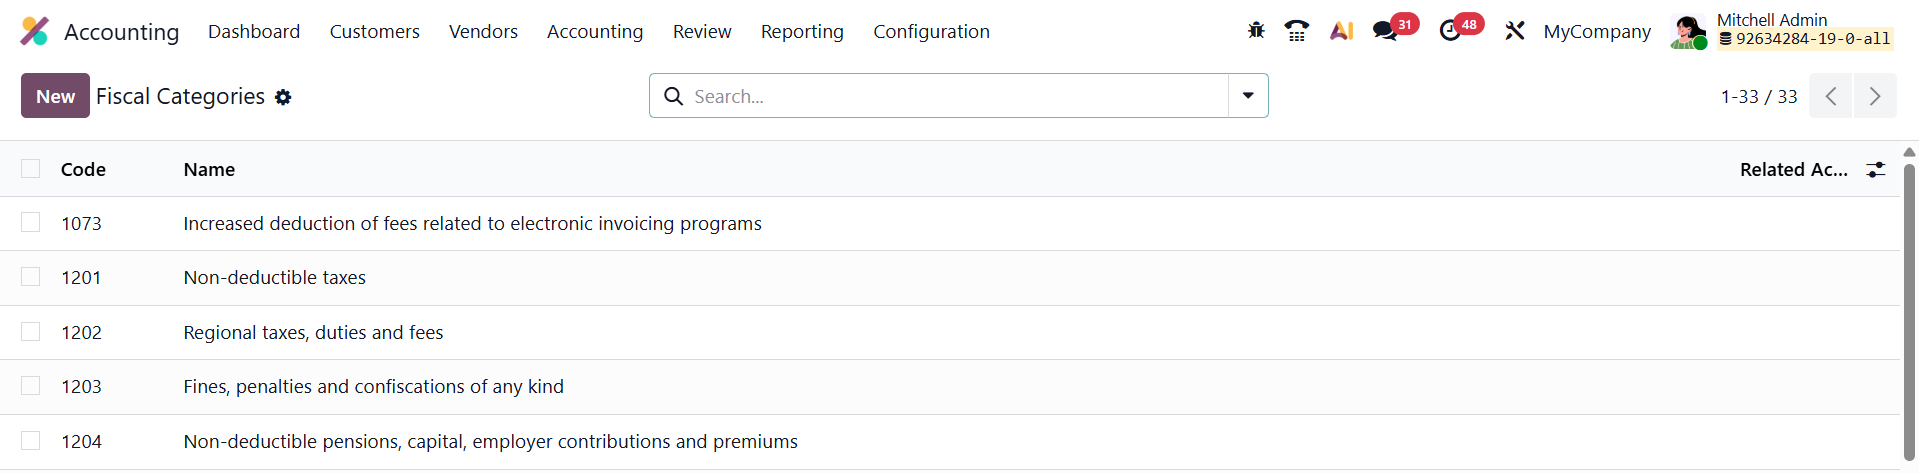
When you open the Fiscal Categories configuration window, you’ll find several key fields that define the structure and applicability of each category.
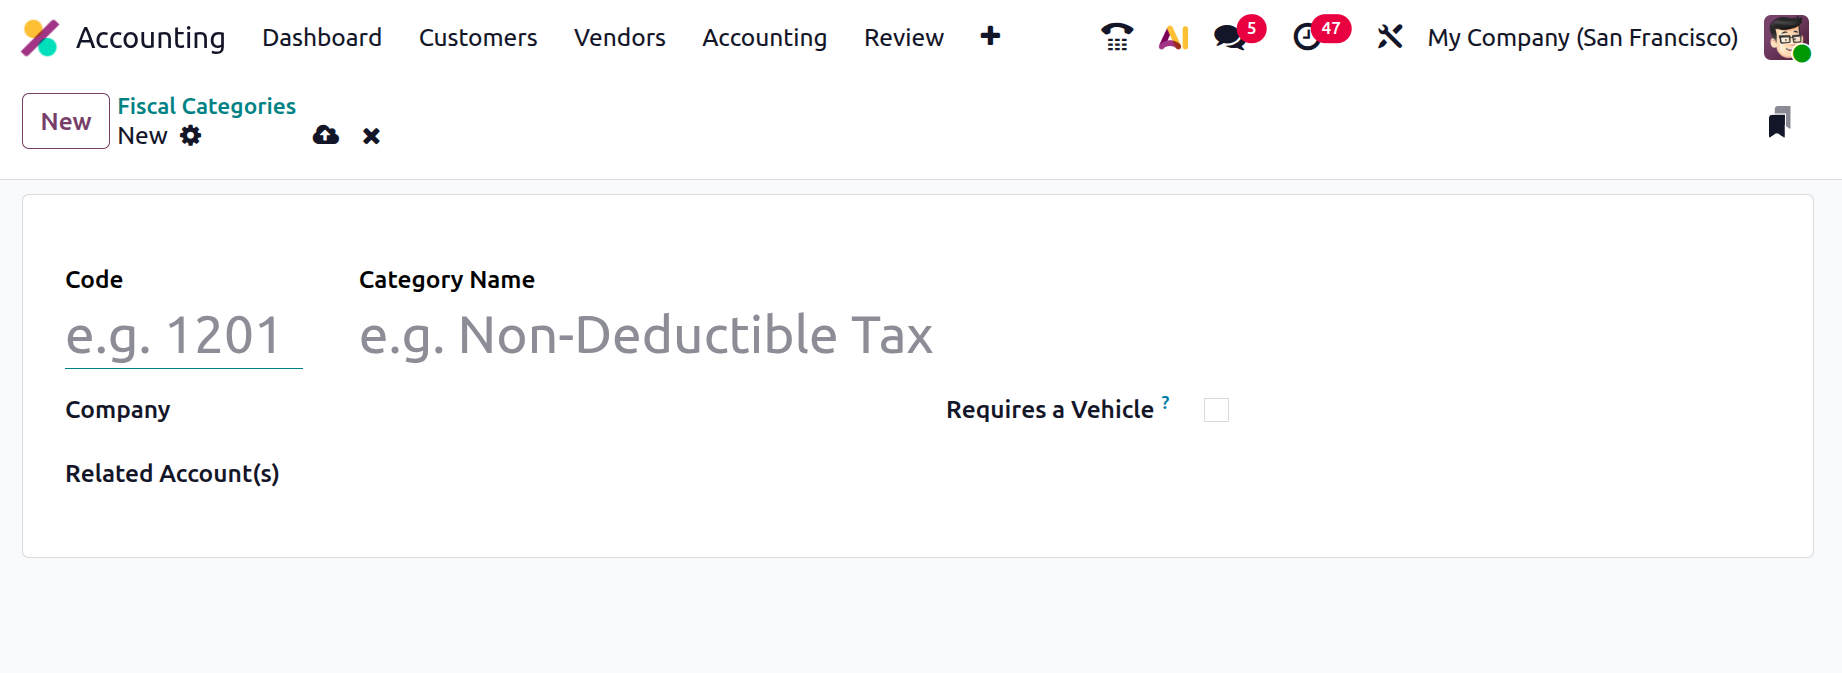
The Code field allows you to assign a unique numerical or alphanumerical identifier (for example, 1201) to the fiscal category, making it easier to reference and organize in reports or configurations. The Category Name field specifies the descriptive title of the category, such as Non-Deductible Tax or Fleet Expenses, clearly indicating its fiscal purpose. The Company field links the category to a specific company in multi-company setups, ensuring that fiscal rules are applied accurately within the relevant entity. In the Related Account(s) field, you can associate one or more ledger accounts that fall under this fiscal category, these accounts will automatically inherit the fiscal behavior and tax treatment defined by the category.
An additional field, Requires a Vehicle, is particularly useful for organizations that manage fleet or transportation-related expenses. When enabled, this option ensures that only expenses linked to a registered vehicle are associated with the category, allowing precise tracking of non-deductible taxes or special rates applicable to company vehicles.
The Fiscal Categories configuration in Odoo 19 provides a streamlined and adaptable framework for handling region-specific or industry-specific tax treatments, ensuring compliance and accuracy in financial reporting.
1.16 Online Synchronization
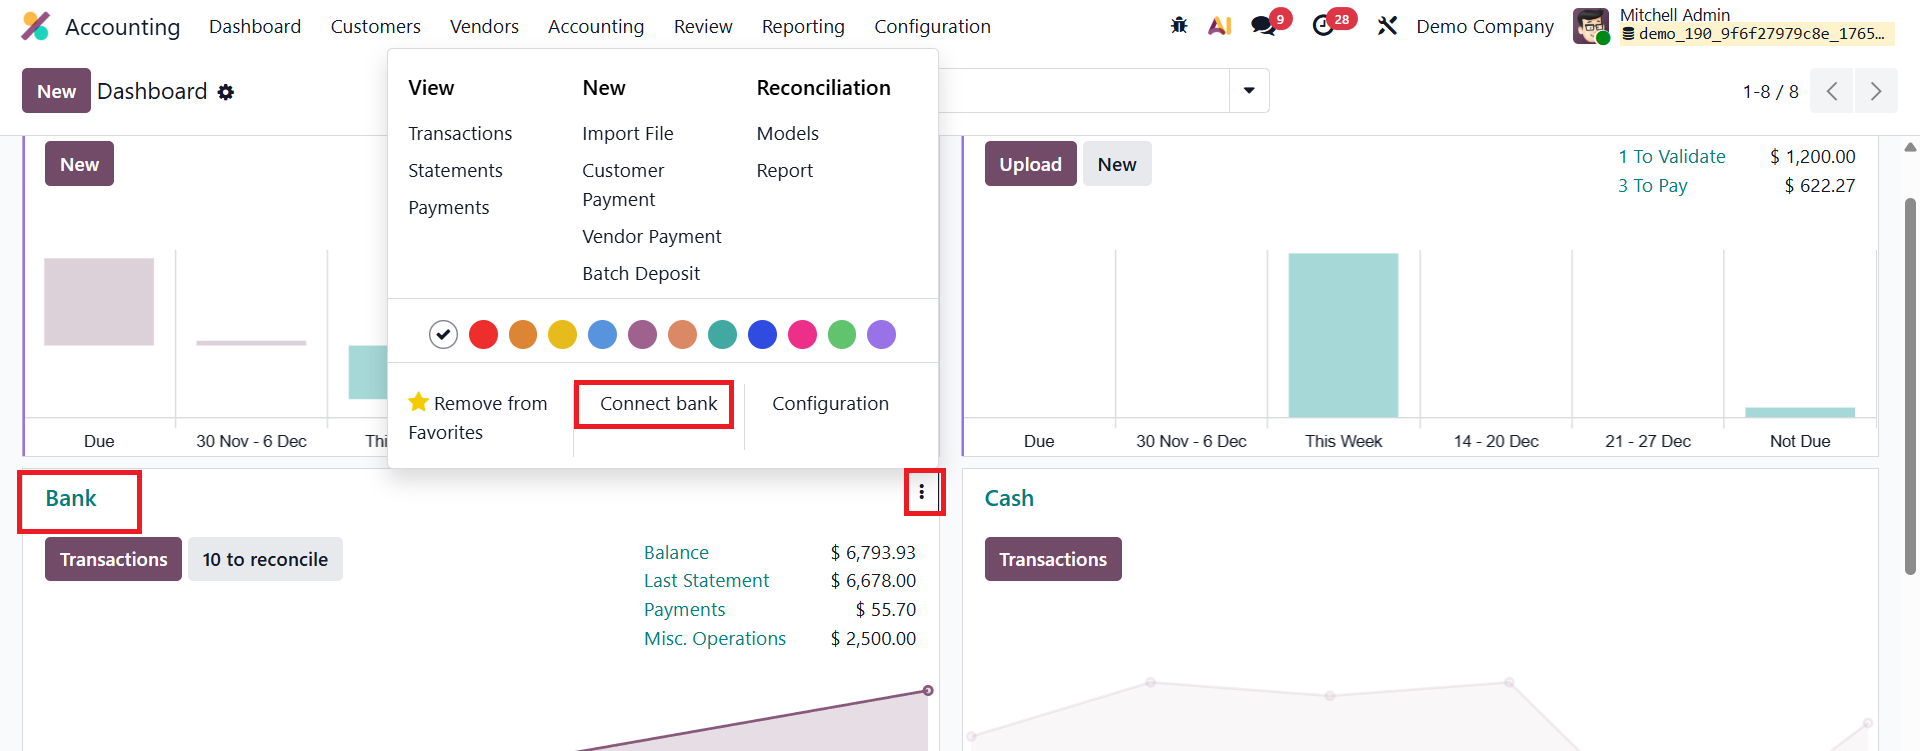
All connected bank accounts can later be managed through the Online Synchronization settings.

Enable Developer Mode, then navigate to Accounting → Configuration → Online Synchronization.
Odoo 19 allows you to directly synchronize your bank accounts to automatically import all bank transactions into the Accounting database. To set up synchronization, go to the Accounting Dashboard, click New, and choose the Bank option. In the Add a Bank Account window, search and select your bank, then click Connect.
Based on the bank institution and country, you may be asked to specify the type of account or select a third-party provider to complete the connection. Once configured, Odoo will regularly import your bank statements automatically.
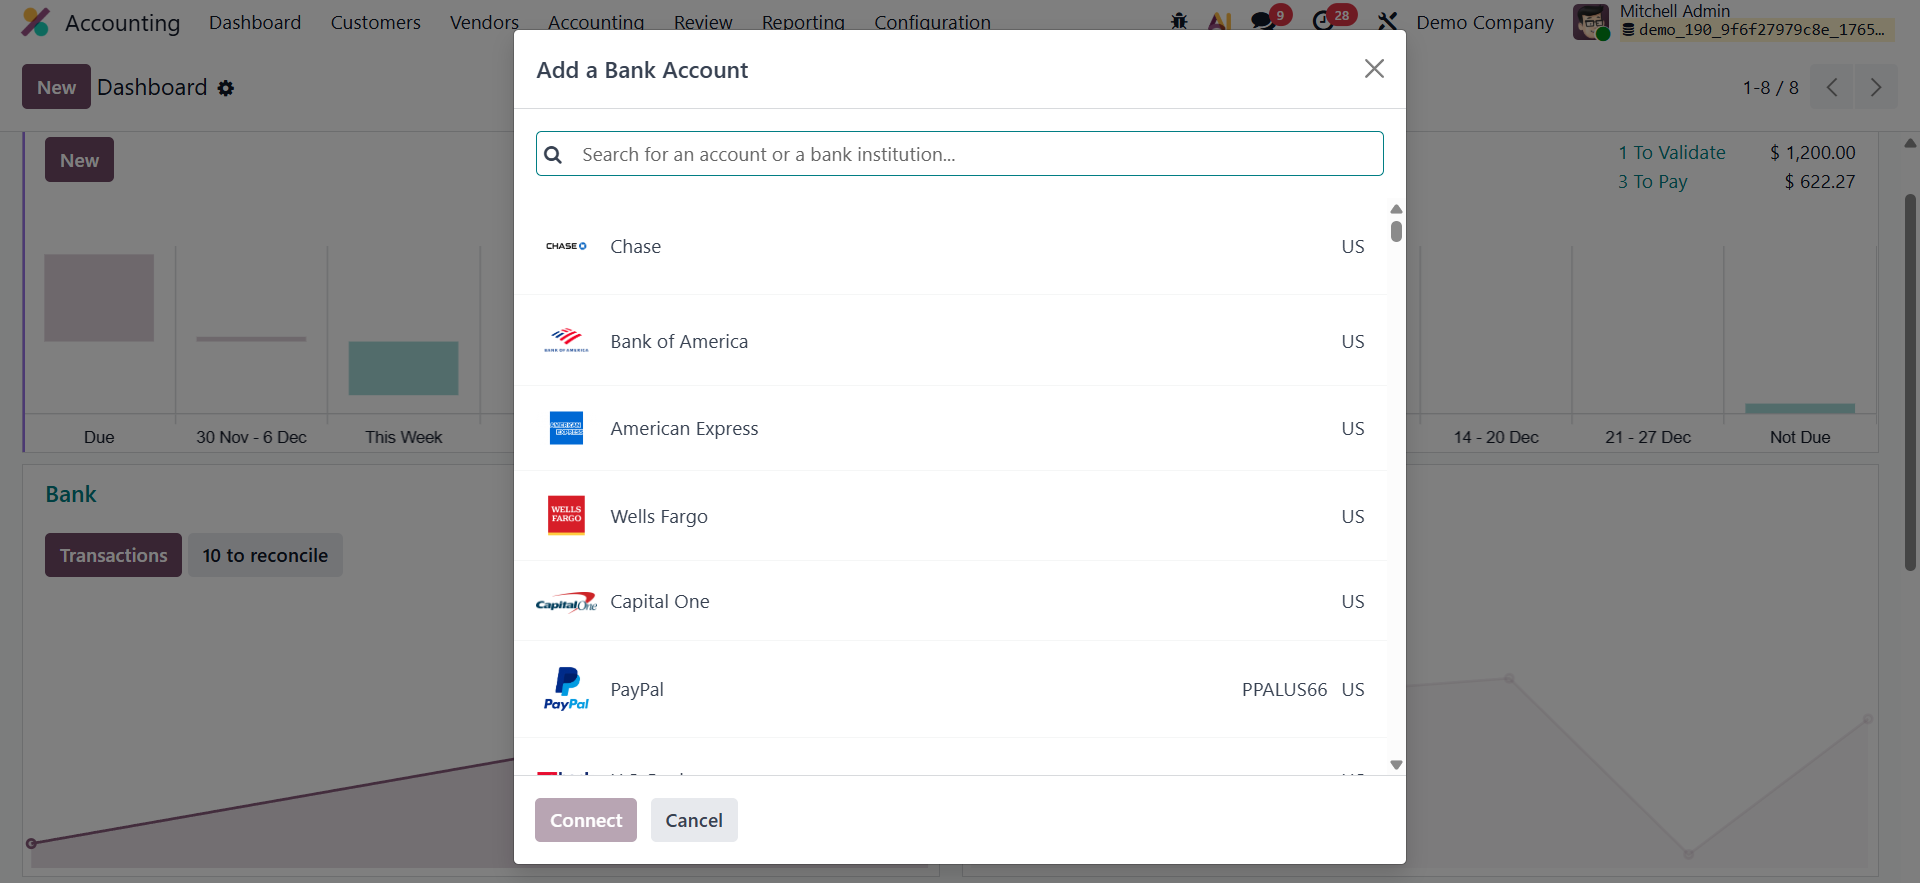
If the required bank is not listed in the Search for an account or a bank institution window, scroll to the bottom and click Add new bank to manually create a bank account.
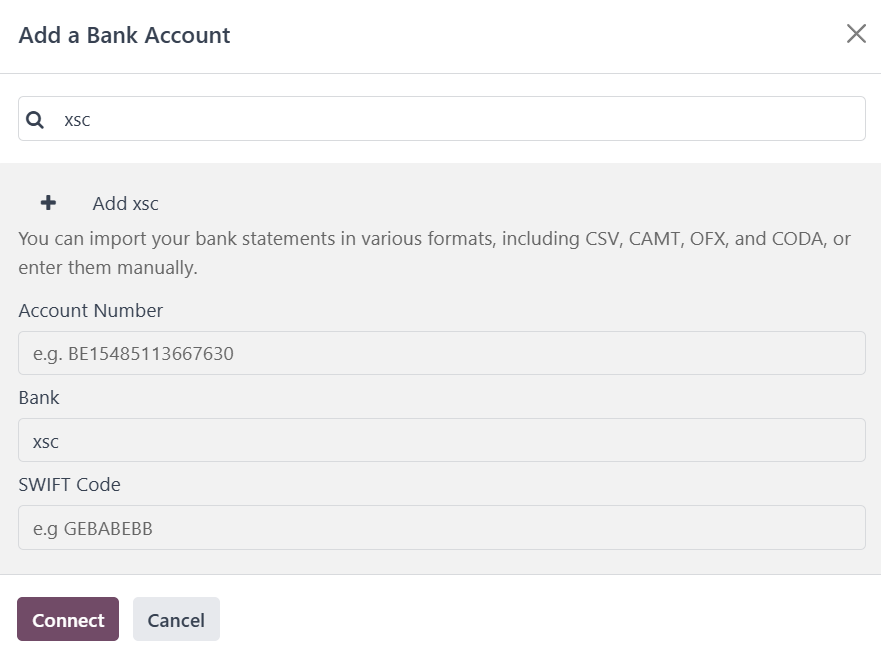
Enter details such as the Account Number, Bank, and SWIFT Code, and then click Connect. This creates a bank journal using the configured account number; however, note that manually added banks are not synchronized and require manual statement imports.
1.17 Payment Terms
In Odoo 19 Accounting, the Payment Terms feature helps businesses define clear rules for when and how customers or vendors must settle their payments. These terms can include specific due dates, installment structures, and even early payment discounts to encourage prompt settlements.
To configure them, navigate to Accounting ▸ Configuration ▸ Payment Terms.
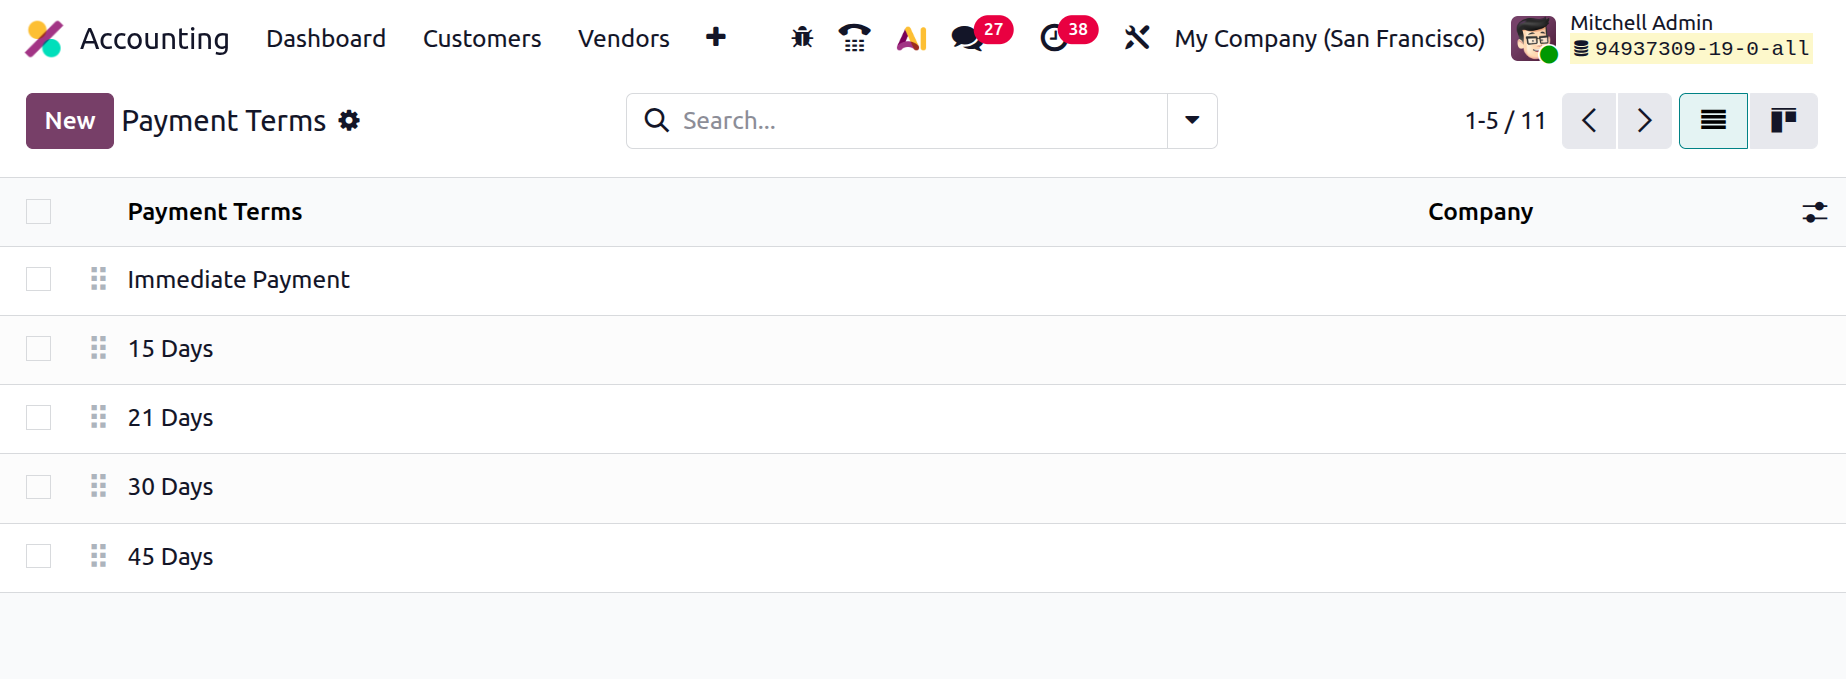
Click the New button to create a new payment term. In the configuration form, begin by selecting the Company (particularly useful if your database manages multiple companies) and provide a clear Name that describes the policy, such as Net 30 or 50/50 Installment Plan. If you wish to offer early payment incentives, enable the Early Discount option, specify the discount percentage, and set the validity period. Odoo 19 will automatically apply this discount on invoices that meet the early payment condition.
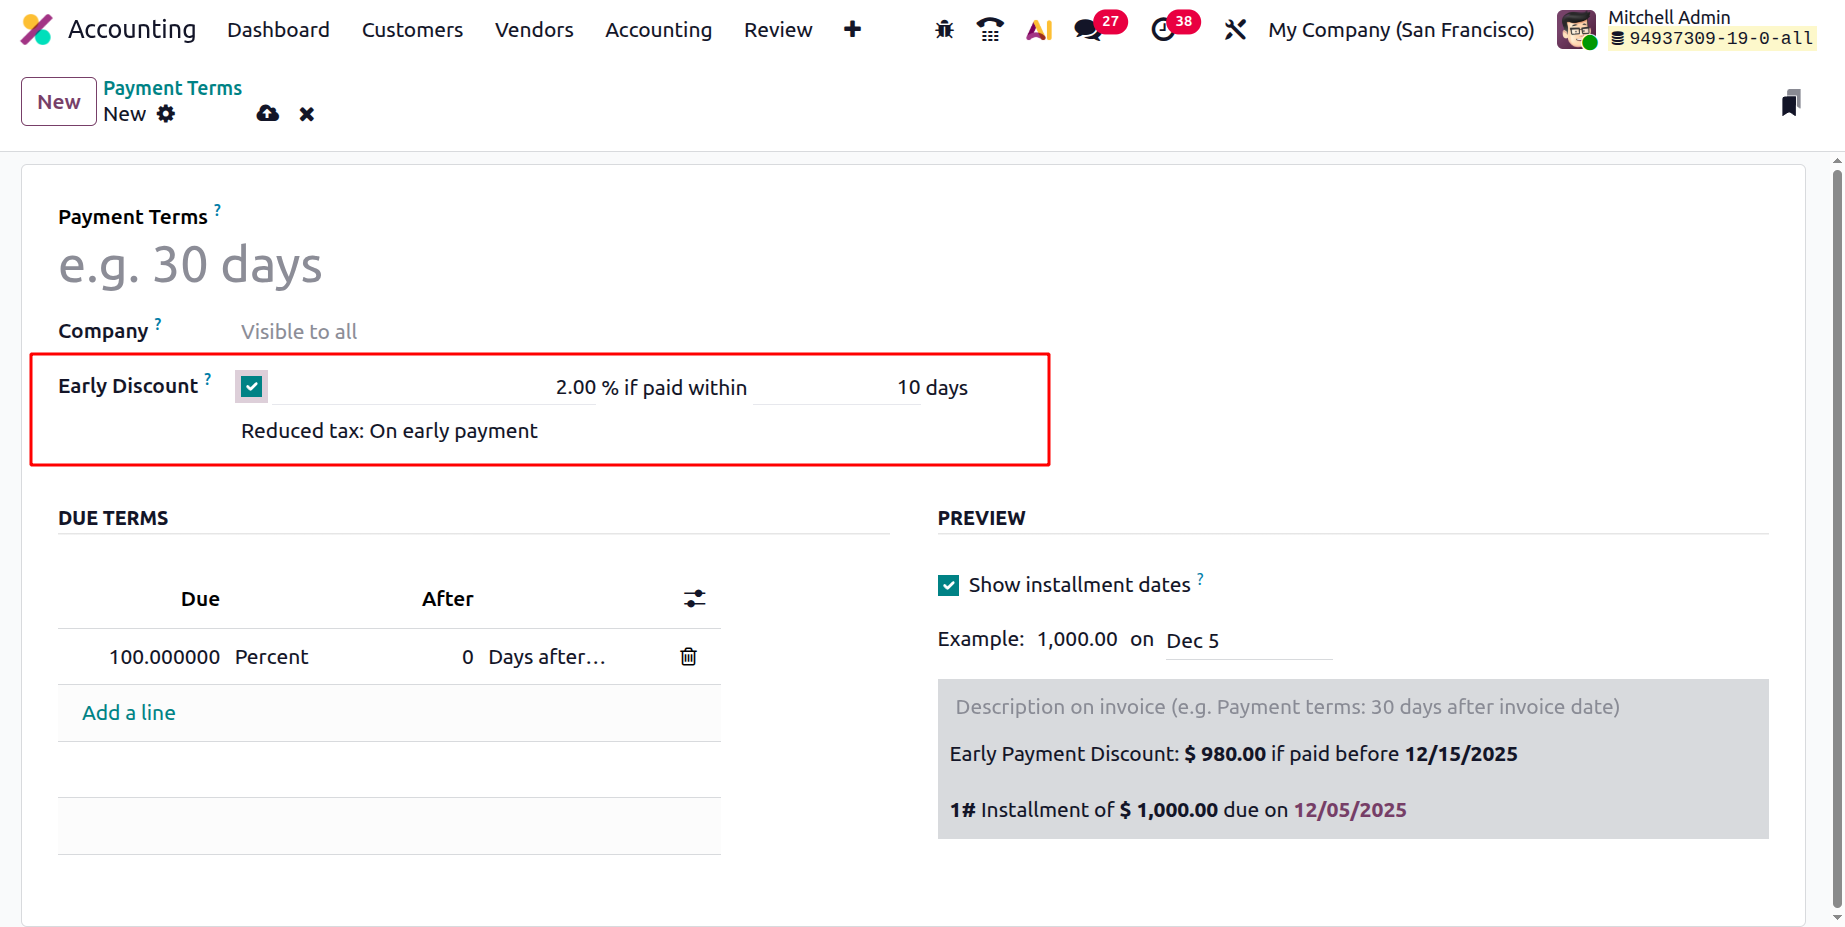
Under the Due Terms section, you can define one or more lines to indicate when each portion of the payment becomes due. For example, a single entry like “100% due 30 days after the invoice date” represents the standard Net 30 arrangement. Alternatively, you can configure multiple lines for installment payments, such as “50% on the invoice date” and “50% after 30 days,” which is ideal for staggered or milestone-based contract
To enhance clarity for your customers or vendors, fill in the Preview Text and enable the Show Installment Dates option. This ensures that all printed or emailed invoices display the exact payment schedule, including specific calendar dates, instead of just relative timeframes.
Once configured, you can assign the relevant Payment Terms in the Sales & Purchase tab of a contact’s form.
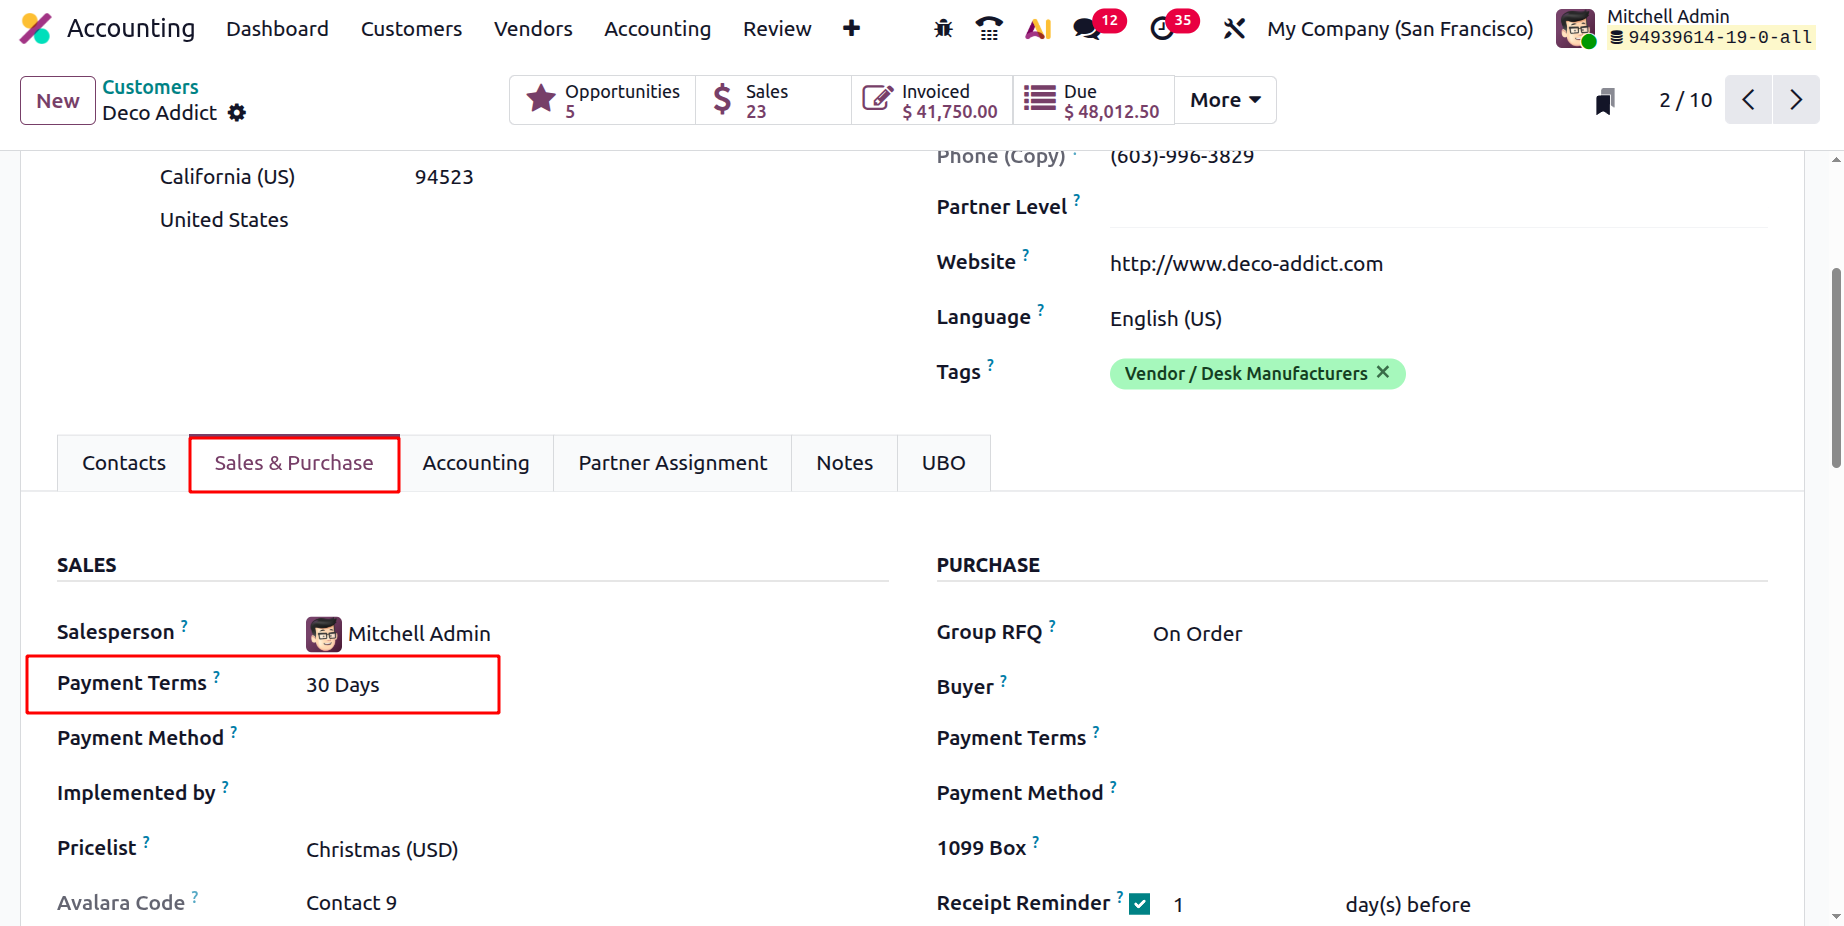
This way, every time you create a sales order, purchase order, or invoice for that partner, Odoo automatically applies the appropriate payment policy.
1.18 Follow-up Levels
In Odoo 19 Accounting, the Customer Follow-Ups feature provides an enhanced and automated way to manage overdue invoices and improve collection efficiency through customizable Follow-Up Levels.
To configure them, navigate to Accounting ▸ Configuration ▸ Follow-Up Levels.
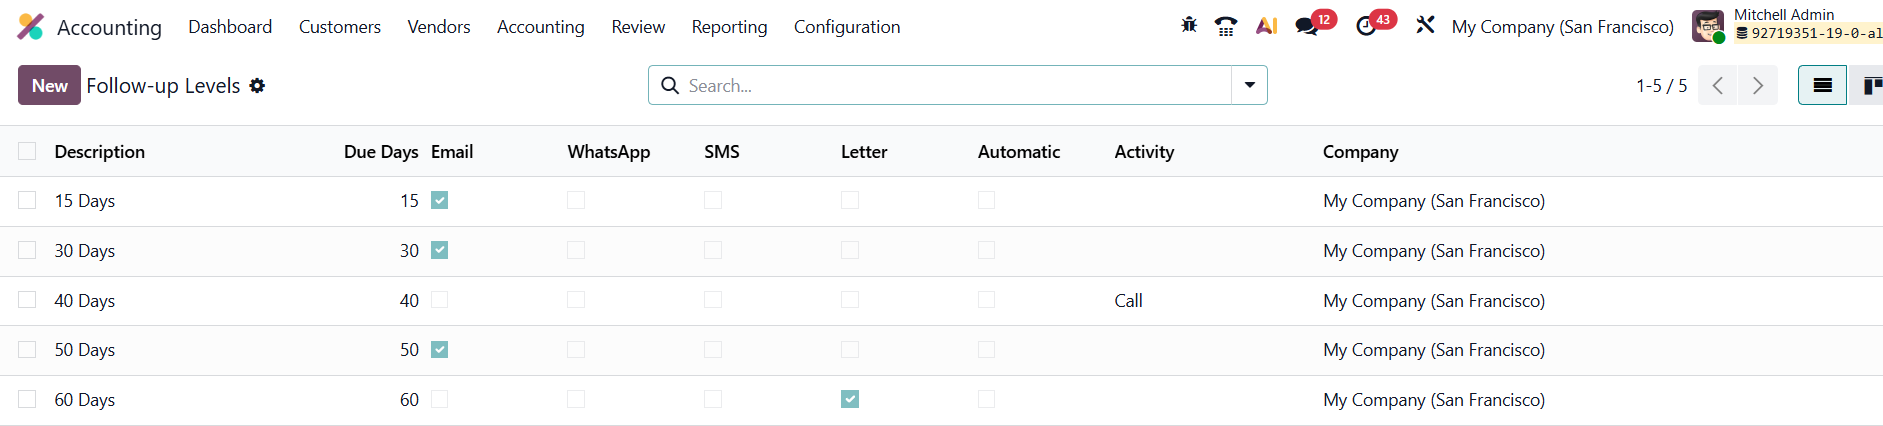
The overview page lists each level’s Description, Company, and Due Days, the number of days after an invoice’s due date when that follow-up action should be triggered (for example, sending a reminder 15 days after the payment is overdue).
Click New to create a new follow-up level.
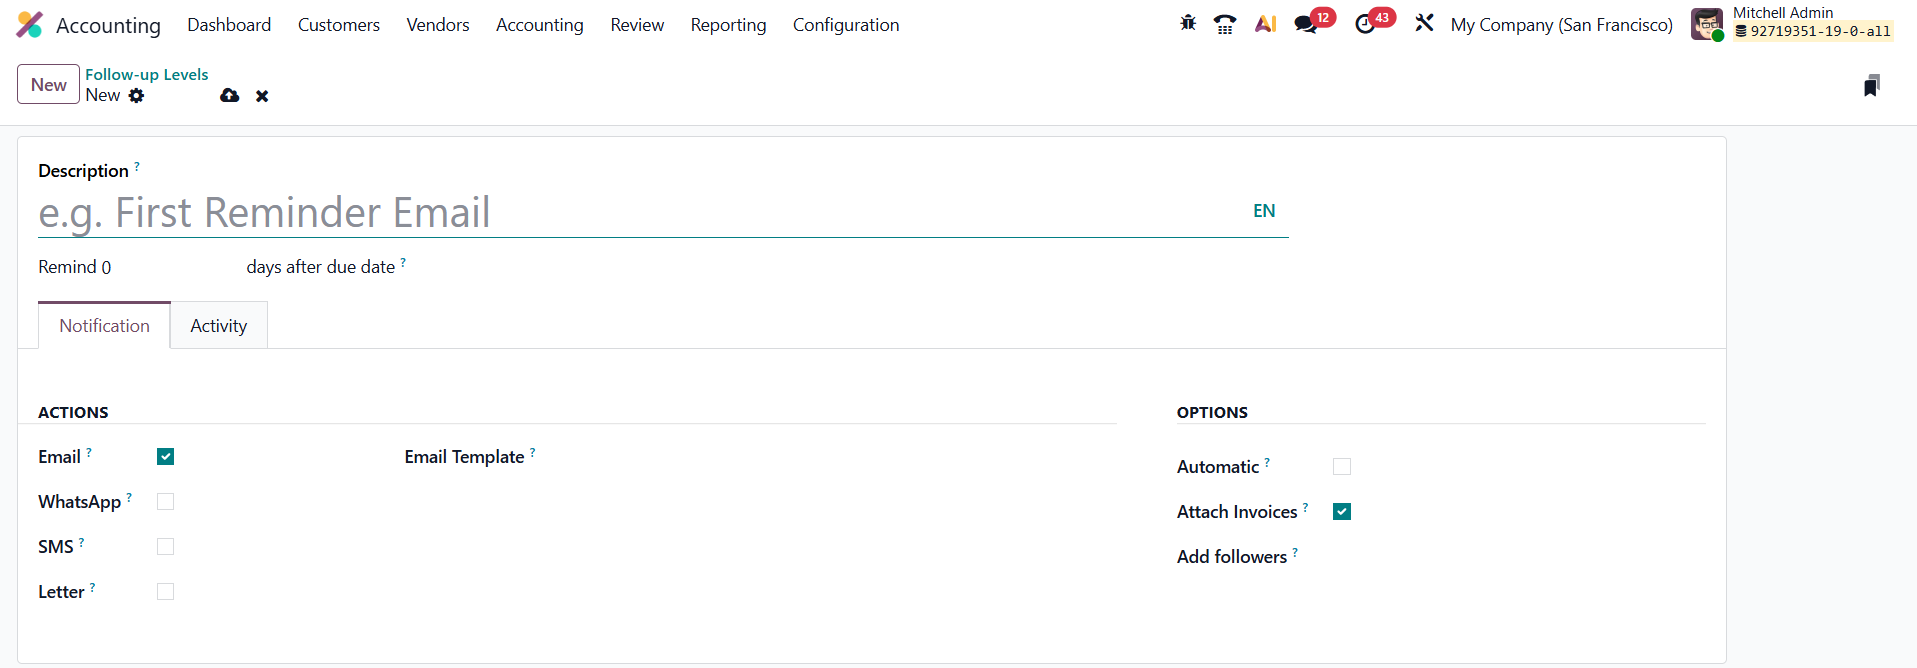
In the form view, you can assign a Description and define the Due Days threshold. Each level represents a stage in your collection strategy, allowing you to escalate reminders as overdue durations increase.
Under the Notifications section, Odoo 19 offers multiple communication channels, Email, WhatsApp, SMS, and Letter, for sending reminders. You can choose which channels to activate, select the relevant templates, and even attach the overdue invoice PDF automatically. The Automatic option ensures that specific reminders are sent without manual intervention, helping you maintain consistent and timely communication with customers. Enable the Attach Invoices, to attach overdue invoices directly to the reminder so that customers can easily review the pending documents. You can also Add Followers to the related customer record to ensure they receive notifications for any replies made to the reminder email, keeping all communication tracked and transparent.
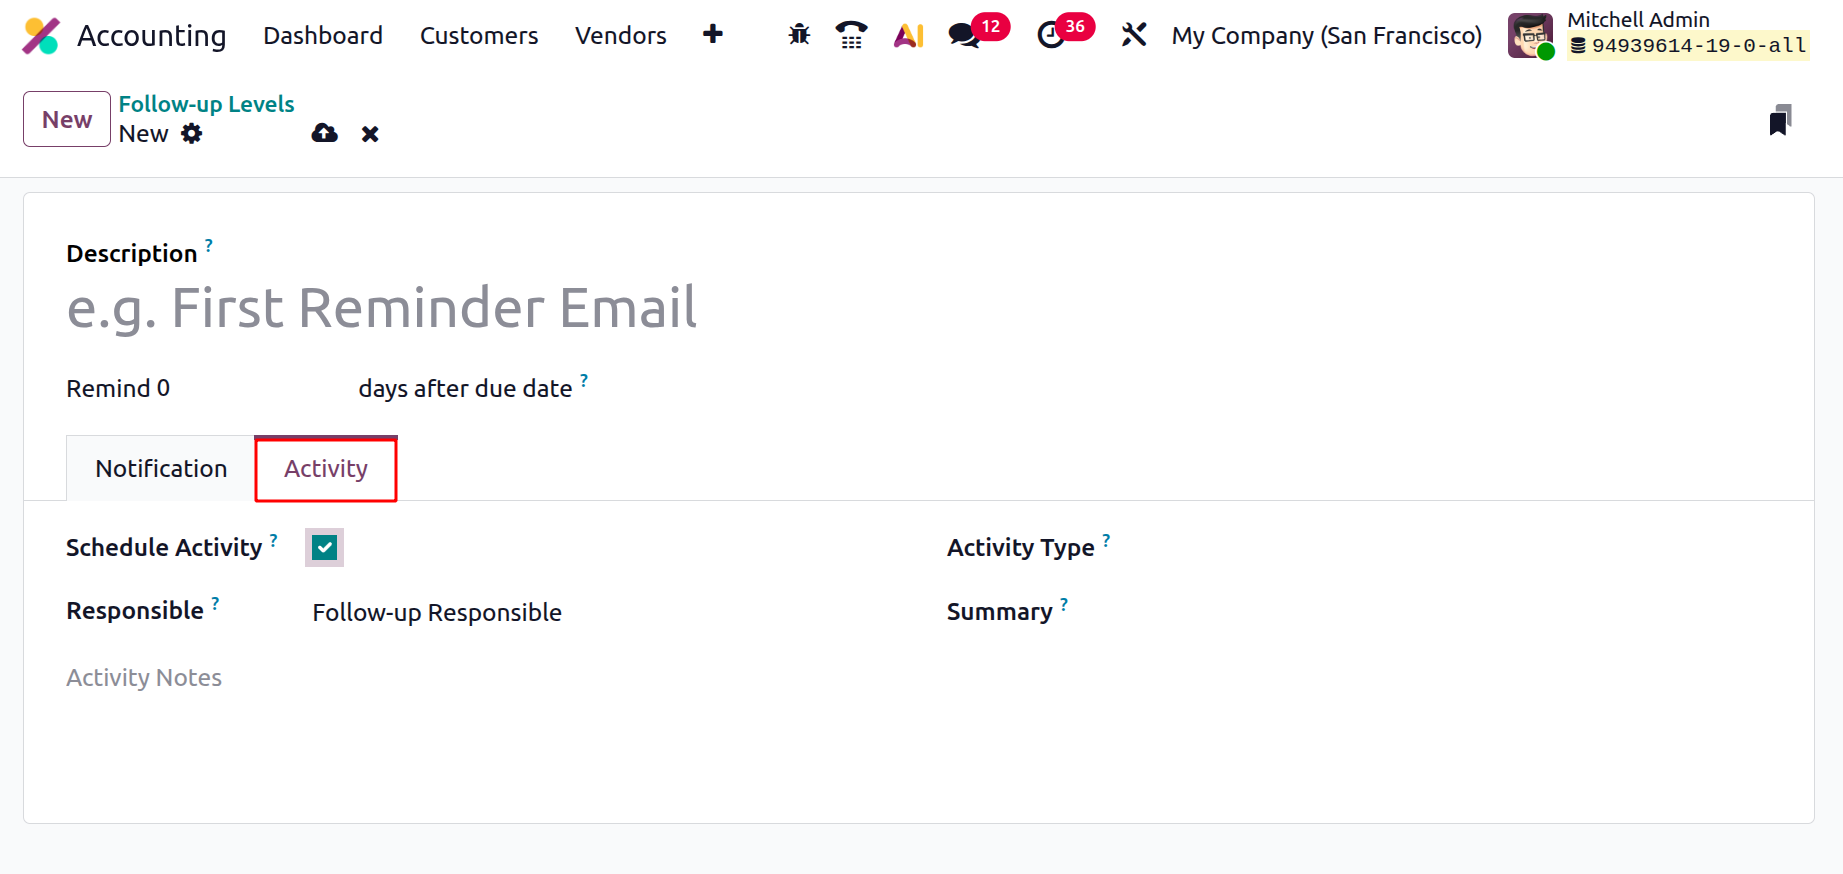
In addition, the Activity tab allows you to set up internal to-do items for your team. Enable Schedule Activity, specify the Responsible Person (such as the Account Manager, Salesperson, or Follow-Up Responsible), and choose an Activity Type like “Call” or “Follow-Up Task.” You can also add a Summary and internal Notes to guide the responsible user’s next steps.
By configuring multiple follow-up levels, businesses can automate a structured and professional collection process. This not only ensures steady cash flow but also helps maintain positive client relationships through timely, courteous, and consistent communication.
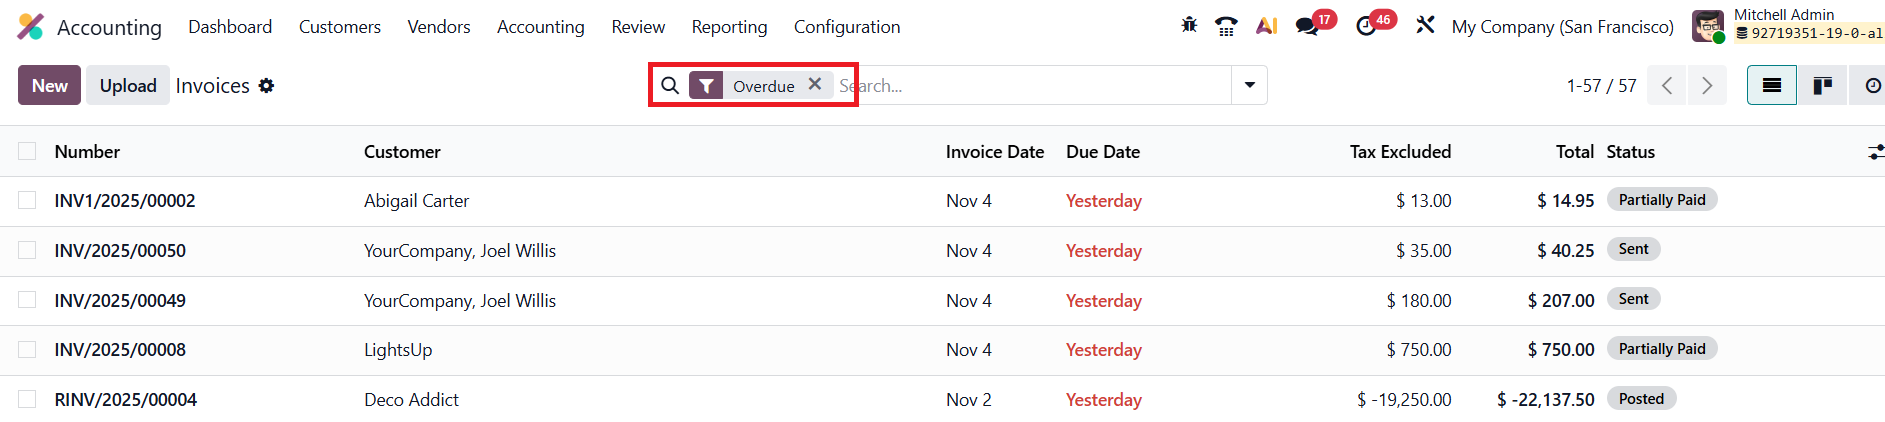
To view all overdue invoices, navigate to Accounting › Customers › Invoices. In the list view, open the search bar and apply the Overdue filter to display only the invoices that are past their due dates.
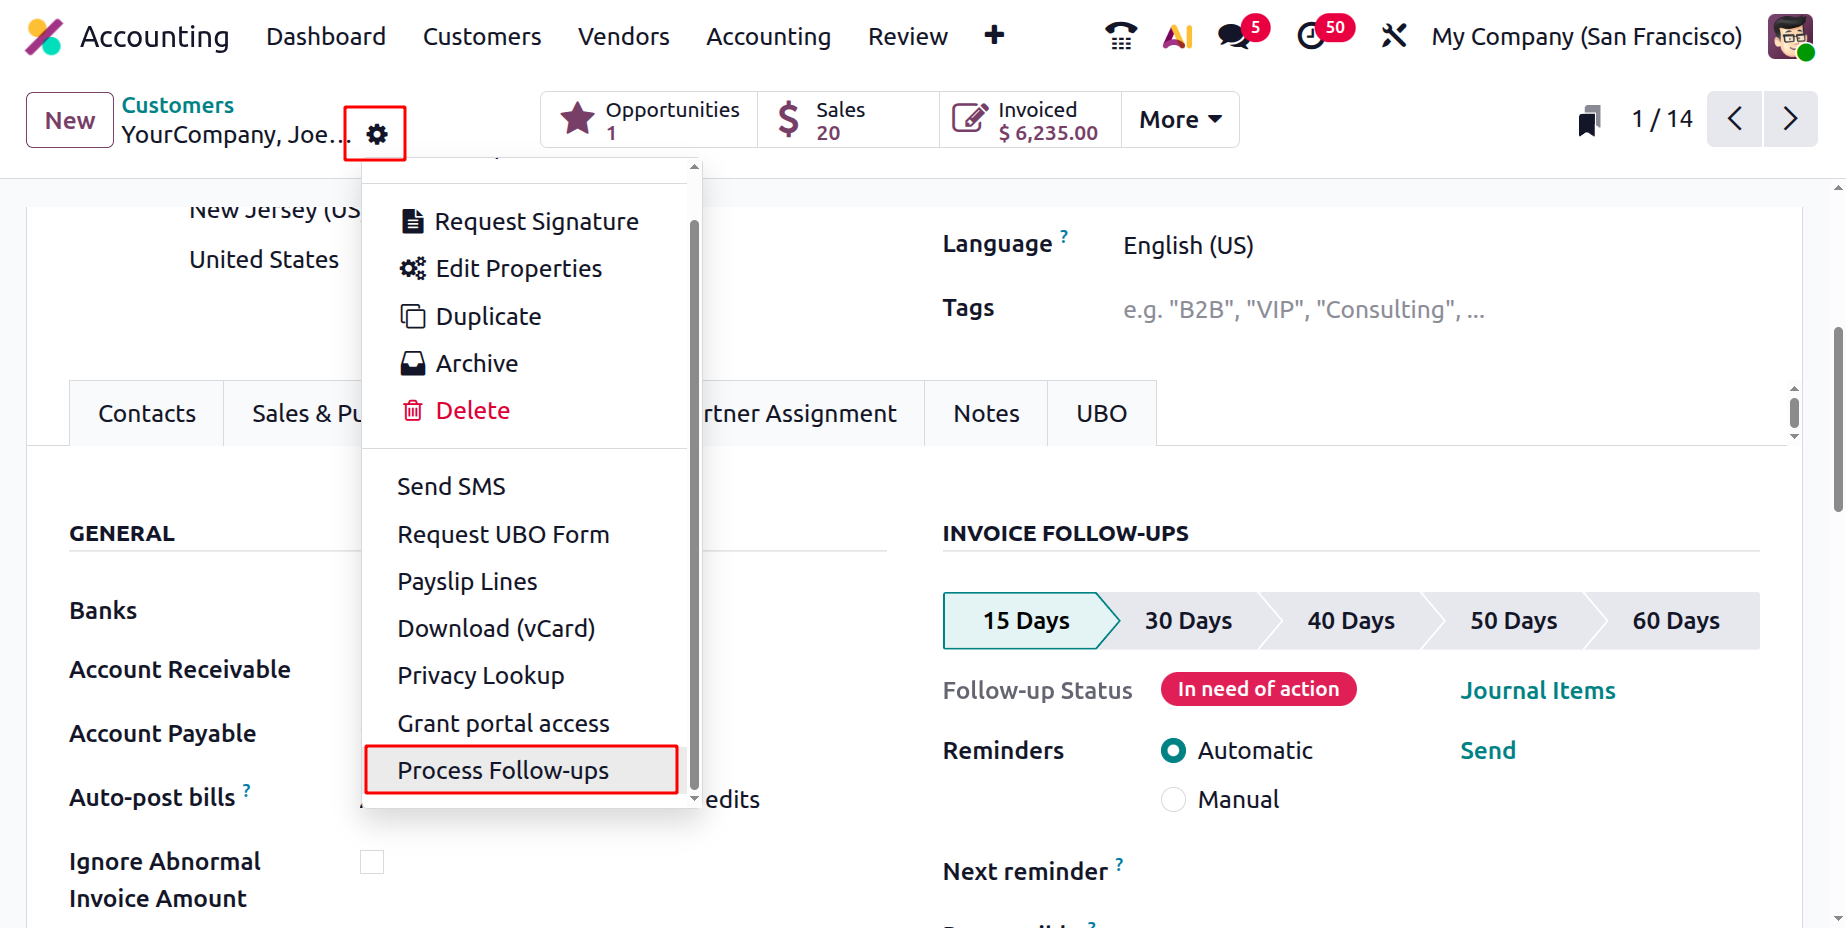
For a comprehensive view of a customer’s invoice follow-up status, go to Accounting › Customers › Customers. Open the customer’s form and navigate to the Accounting tab.
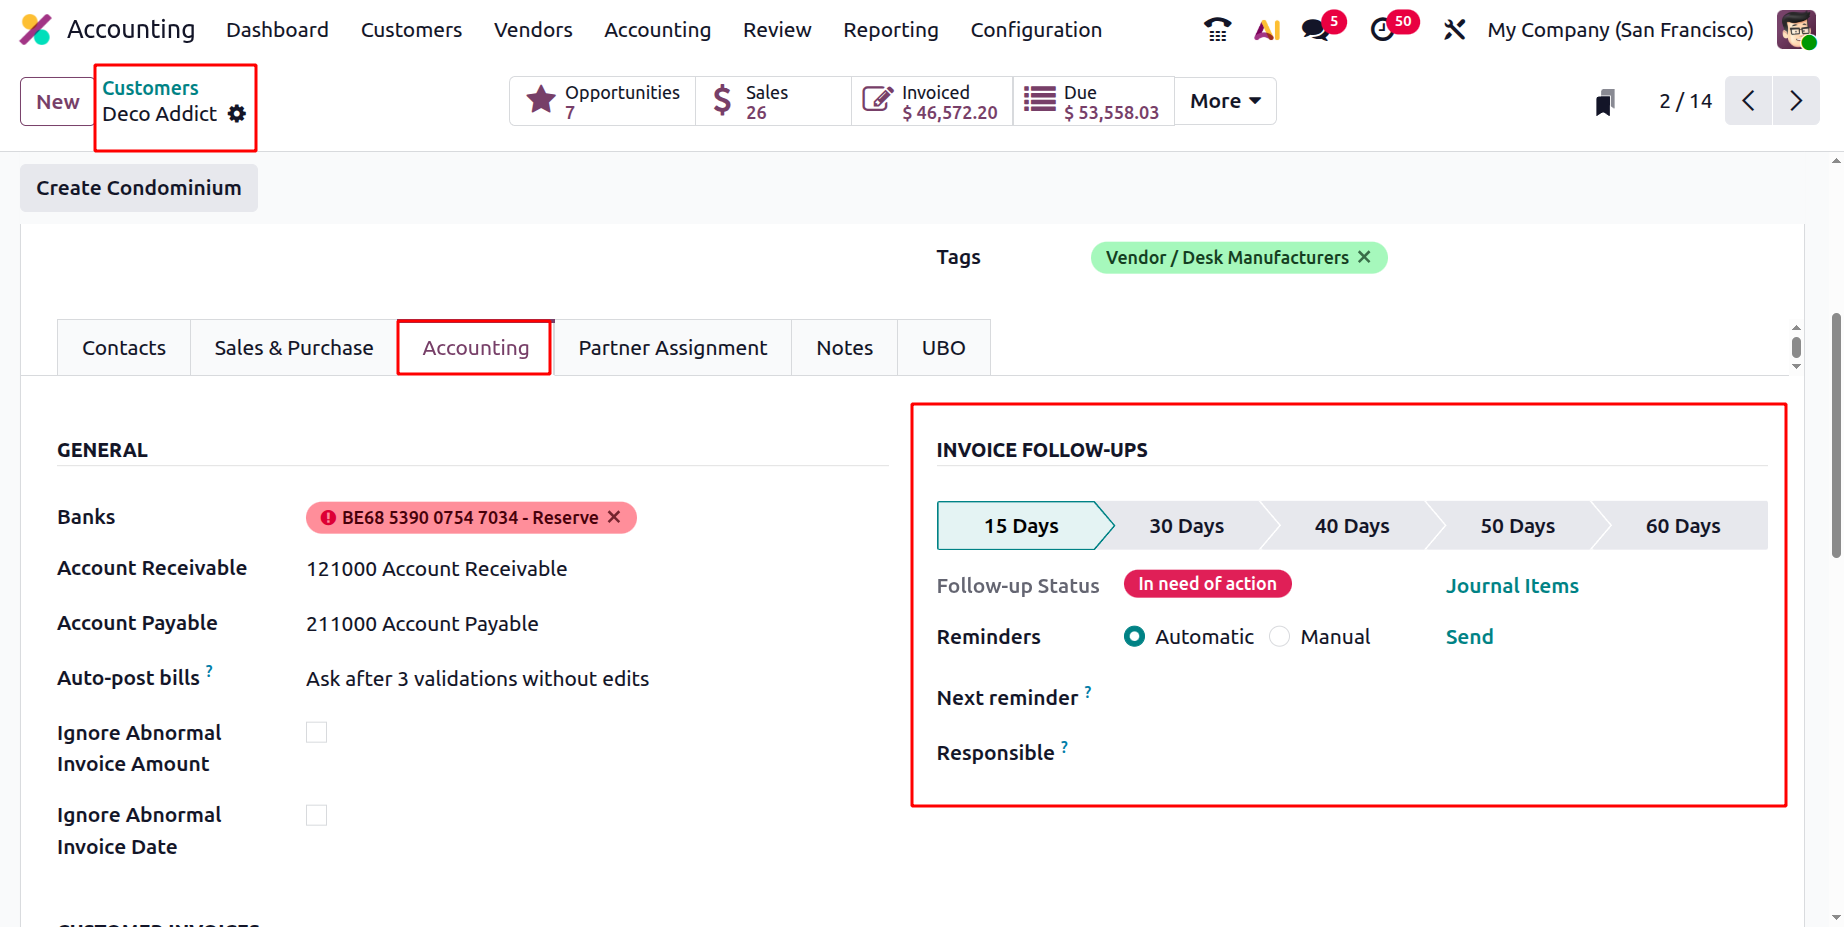
Under the Invoice Follow-ups section, you can click on each level to see its Follow-up Status. If any action is required, click Overdue Invoices to access a detailed list of invoices that are past due. You can also configure additional options within this section:
- Reminders – Choose whether reminders are sent Automatically or Manually.
- Next Reminder – The next scheduled follow-up date is automatically assigned during processing but can be manually adjusted as needed.
- Responsible – Assign the user who will manage the follow-up activities.
To manually send a payment reminder, click Send, then select your preferred actions from the Send and Print window:
- Print
- Email
- WhatsApp
- SMS
- By Post
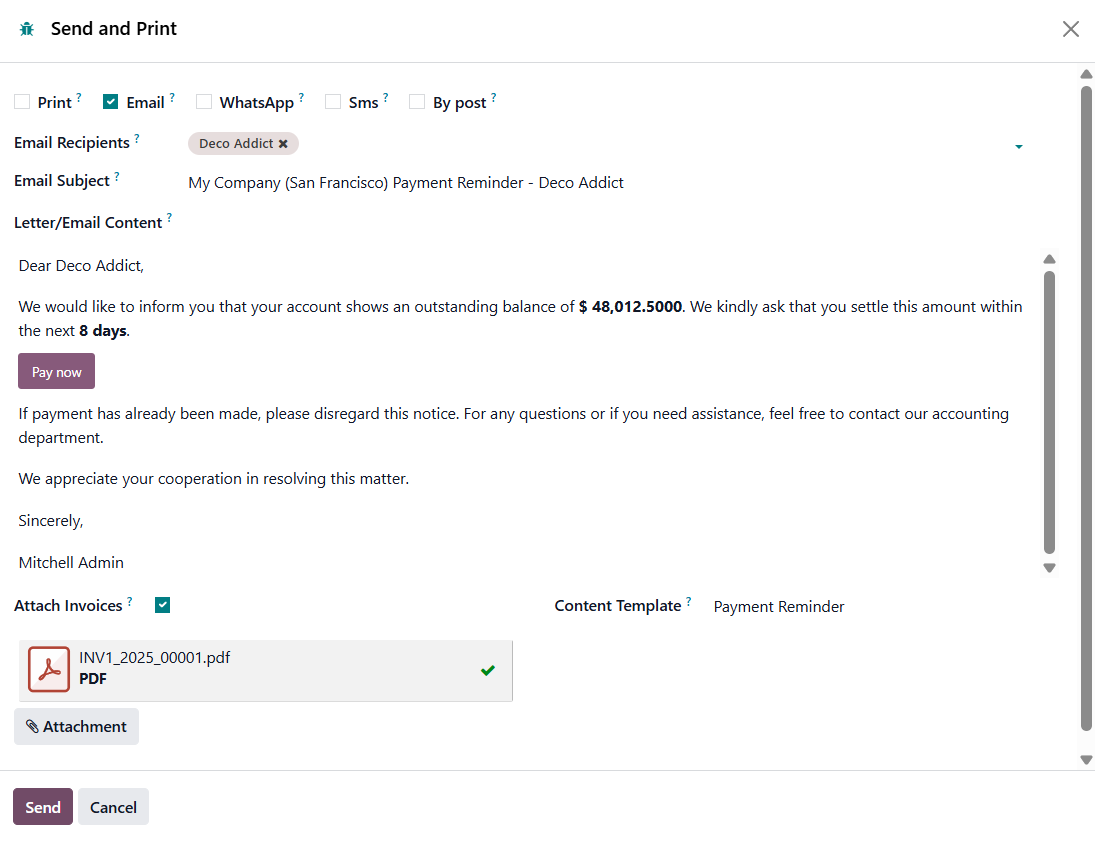
You can enable the Attach Invoices option to include overdue invoices in the reminder. If required, update the Content Template, WhatsApp Template, or Phone Number, then click Send or Send & Print to dispatch the follow-up report.
Once you’ve configured the additional follow-up options, you can easily review which customers have overdue invoices or require further action.
To do this, navigate to Accounting › Customers › Customers. In the Customers kanban view, use the search bar to filter by Overdue Invoices or Requires Follow-up.
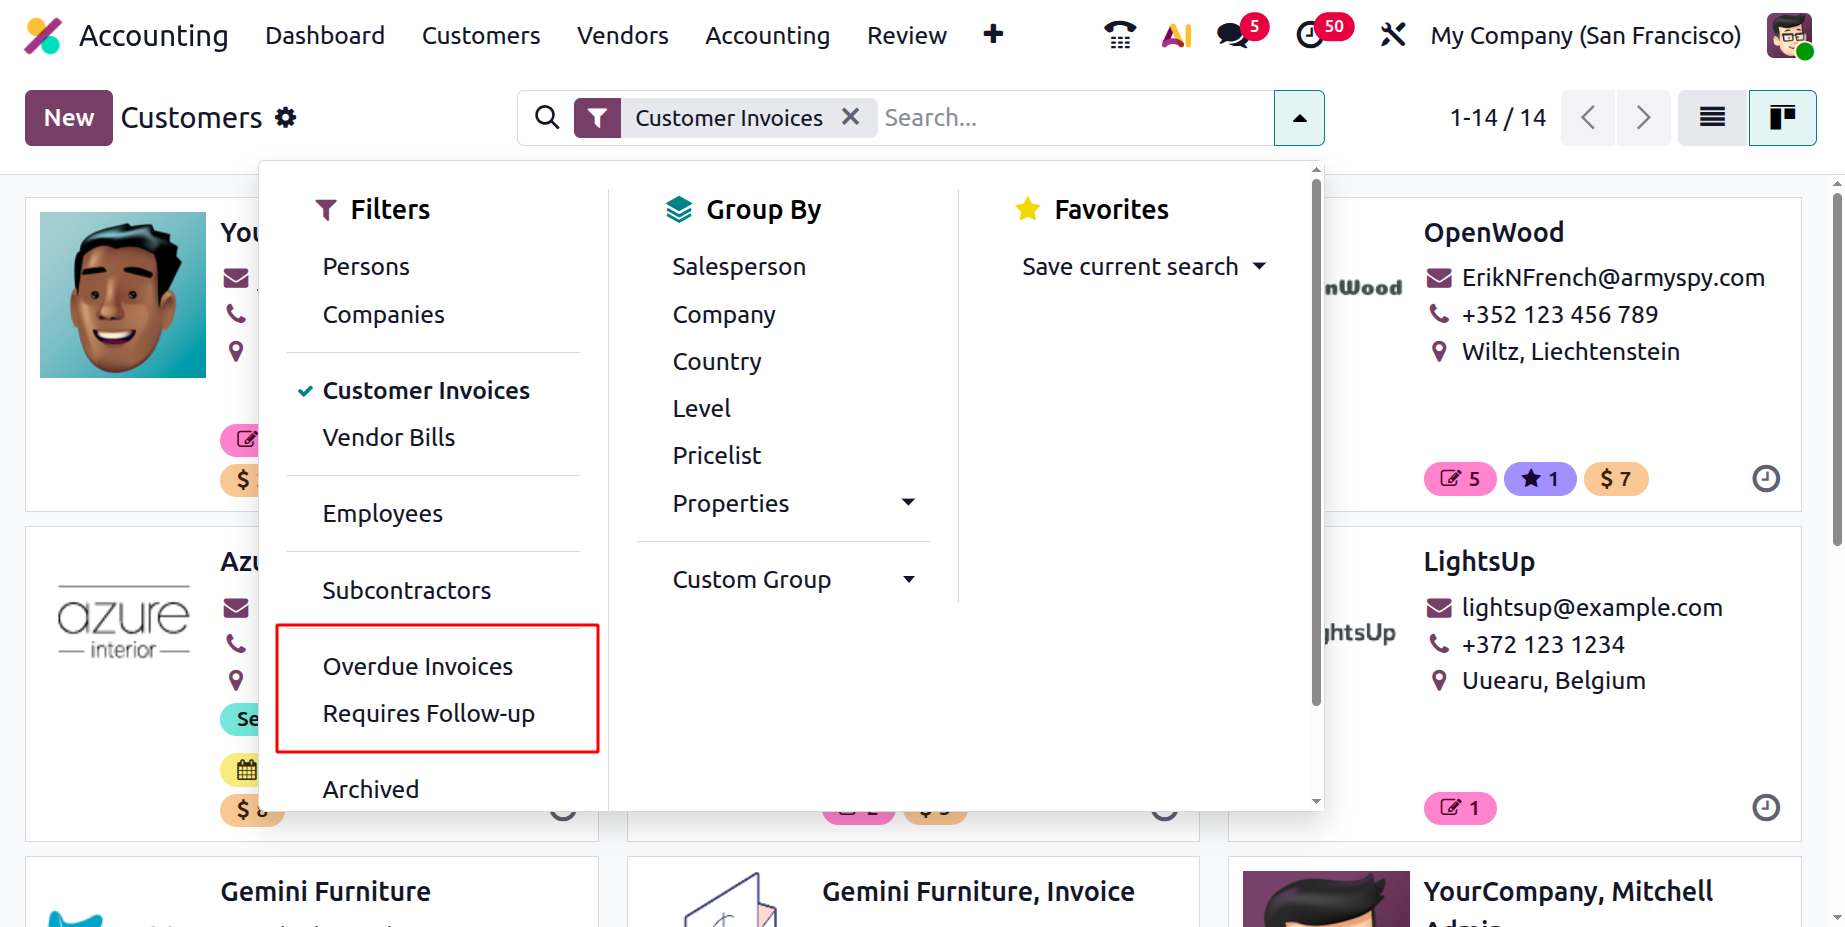
To process follow-ups for customers, select the customer who needs reminder, click the Actions (⚙️) button, and choose Process Follow-ups.
This will generate and send the appropriate follow-up reports to the customer, streamlining your collection process and ensuring timely communication.
1.19 Incoterms
In Odoo 19 Accounting, managing international trade terms is more streamlined through the Incoterms configuration feature, which helps define the precise responsibilities, risks, and costs shared between buyers and sellers in global transactions.
To access this, go to Accounting › Configuration › Incoterms.
This section displays a grid of all configured Incoterms, where each entry includes a Code, the official three-letter abbreviation (e.g., EXW, FOB, DDP), and the corresponding Name, such as Ex Works or Delivered Duty Paid. This setup ensures clarity and standardization in how trade agreements are documented.
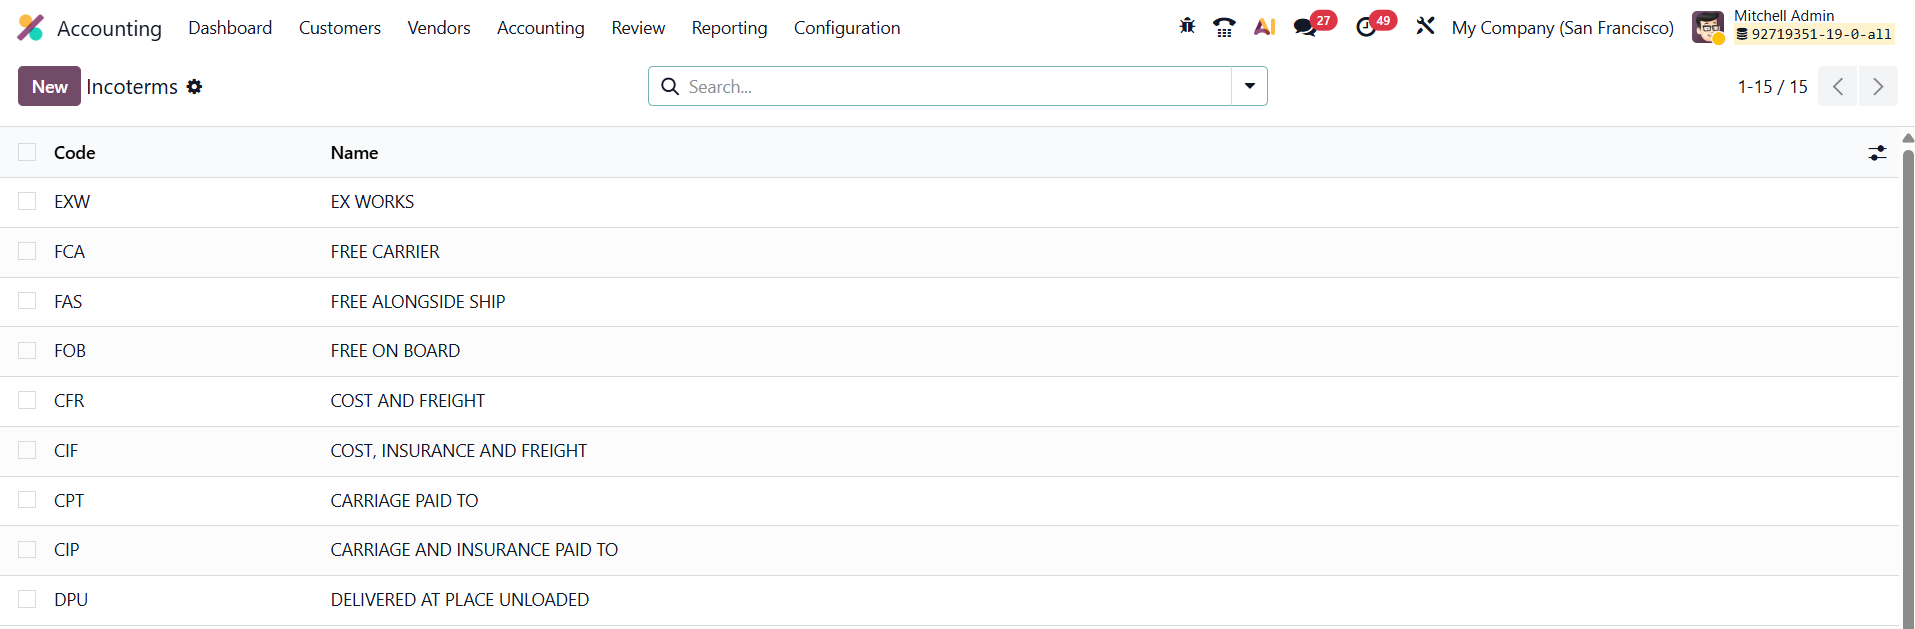
If you need to add a new Incoterm, simply click New. Odoo 19 allows in-line editing directly in the table, making it easy to create or modify terms without opening a separate form. Enter the Code and the Full Name of the Incoterm as it should appear on official business documents, then click Save to make it immediately available across the system.
Once saved, the new Incoterm becomes selectable in various transaction documents, including Sales Orders, Purchase Orders, Delivery Slips, and Customer or Vendor Invoices.
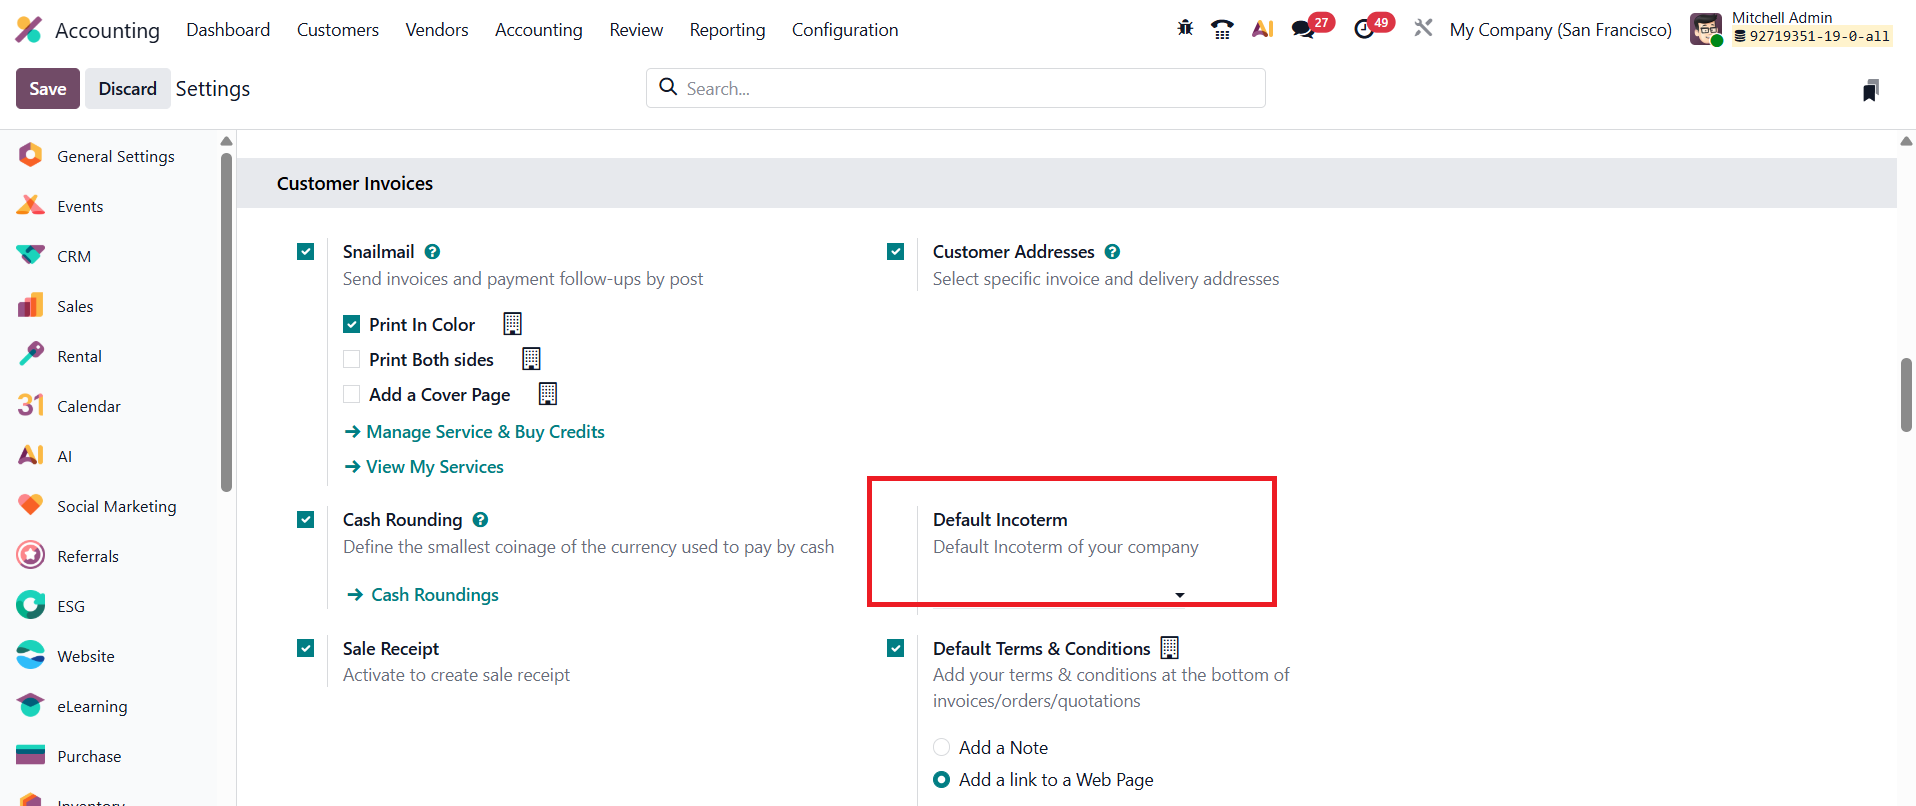
From the Settings menu of the Accounting module, you can set the default incoterm of your company.
This centralized configuration ensures that all business documents remain consistent with international trade standards, reduces manual entry errors, and improves efficiency in cross-border operations.
1.20 Product Categories
In Odoo 19 Accounting, Product Categories play an important role in defining the financial and inventory behavior of products, and the configuration option is available under the Accounting module’s Configuration menu.
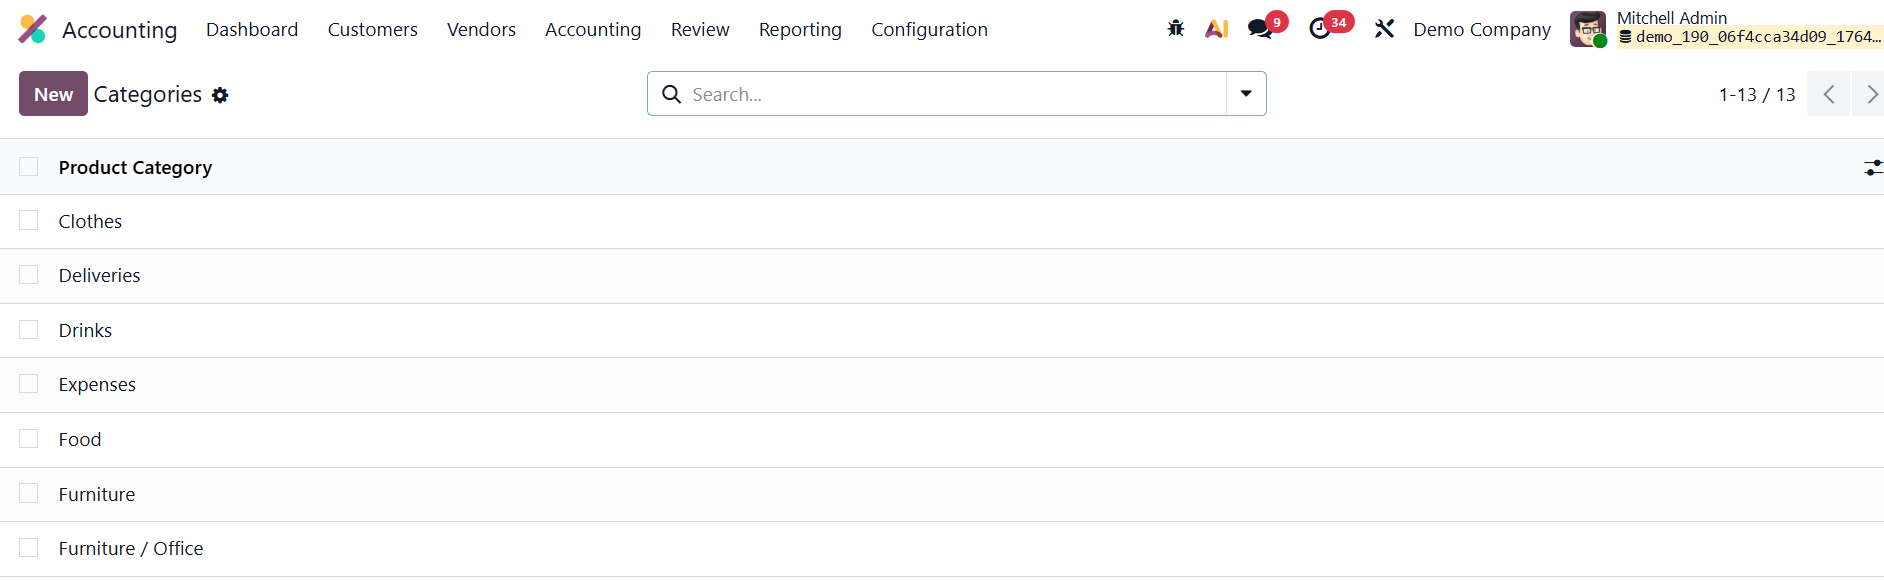
In order to configure a new Product Category, click the New button.

Each category begins with a Category Name and can be placed under a Parent Category to maintain a structured product hierarchy. The Avatax Category field helps integrate with automated tax solutions for appropriate tax mapping during transactions. Under Logistics settings, the Force Removal Strategy determines how products are moved out of stock. First In First Out (FIFO) selects the oldest stock units first, which is ideal for perishable or time-sensitive goods. Last In First Out (LIFO) does the opposite by picking the most recently received products first, useful when newer stock is more accessible or preferred. Closest Location prioritizes items stored nearest to the picking point, helping speed up warehouse operations by reducing travel time. Finally, Least Packages selects products in a way that uses the minimum number of packages or containers, ensuring more efficient handling and reducing unnecessary partial picks.
The Reserve Packagings options, Reserve Only Full Packagings or Reserve Partial Packagings, control how products are reserved in warehouse operations based on packaging units.
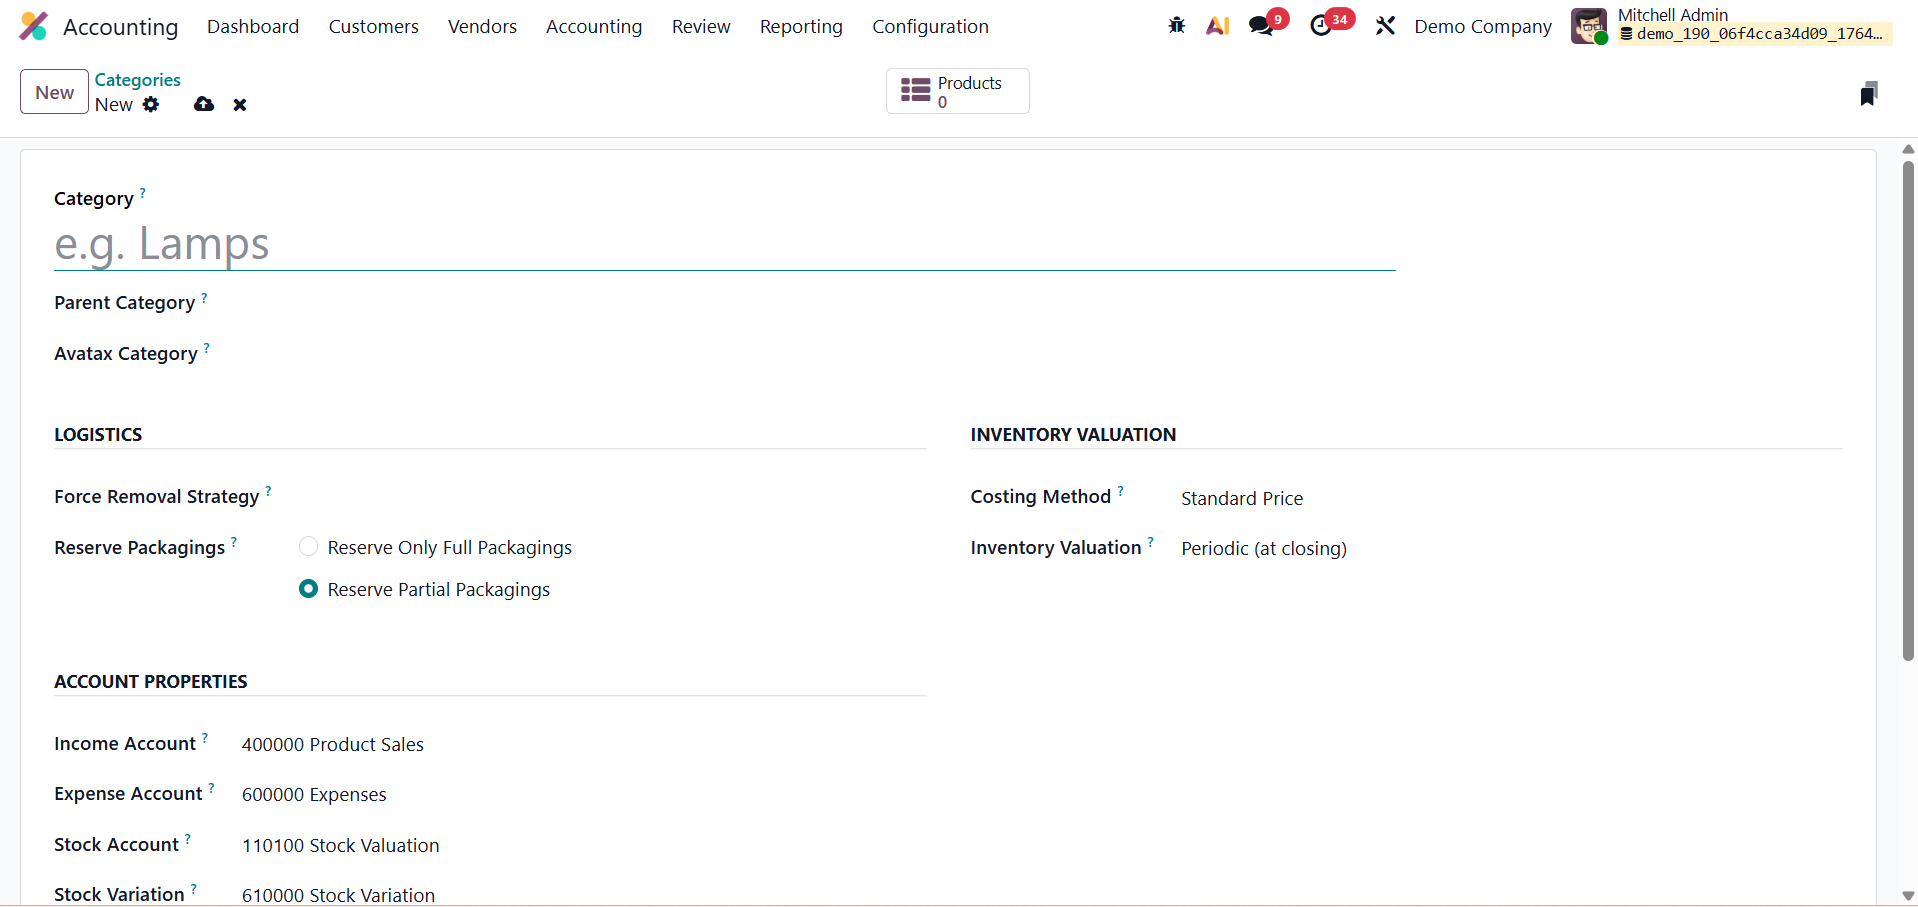
In the Inventory Valuation section, the Costing Method decides how product costs are calculated. Standard Price keeps a fixed cost for the product unless manually adjusted, making it suitable for businesses with stable pricing. First In First Out (FIFO) assigns costs based on the oldest purchased stock first, ensuring accurate valuation when prices change over time. Average Cost (AVCO) continuously recalculates the product’s cost by averaging the value of existing inventory with each new purchase, providing a balanced and realistic cost flow for items with frequent price variations
The Inventory Valuation field allows selection of the valuation mode, like Periodic (at closing) where inventory valuation entries are recorded manually at period-end. With Perpetual (at invoicing) valuation, inventory values and related accounting entries are automatically updated in real time whenever products are bought, sold, or adjusted, ensuring continuous and accurate financial tracking.
The Account Properties section identifies which accounts are used for financial postings: Income Account defines where revenue from product sales is recorded, Expense Account captures cost-related entries for purchased goods, and Stock Account holds inventory value. Finally, Stock Variation is used to record adjustments between purchase costs and actual inventory valuation, ensuring accurate financial tracking of stock movements and value fluctuations.
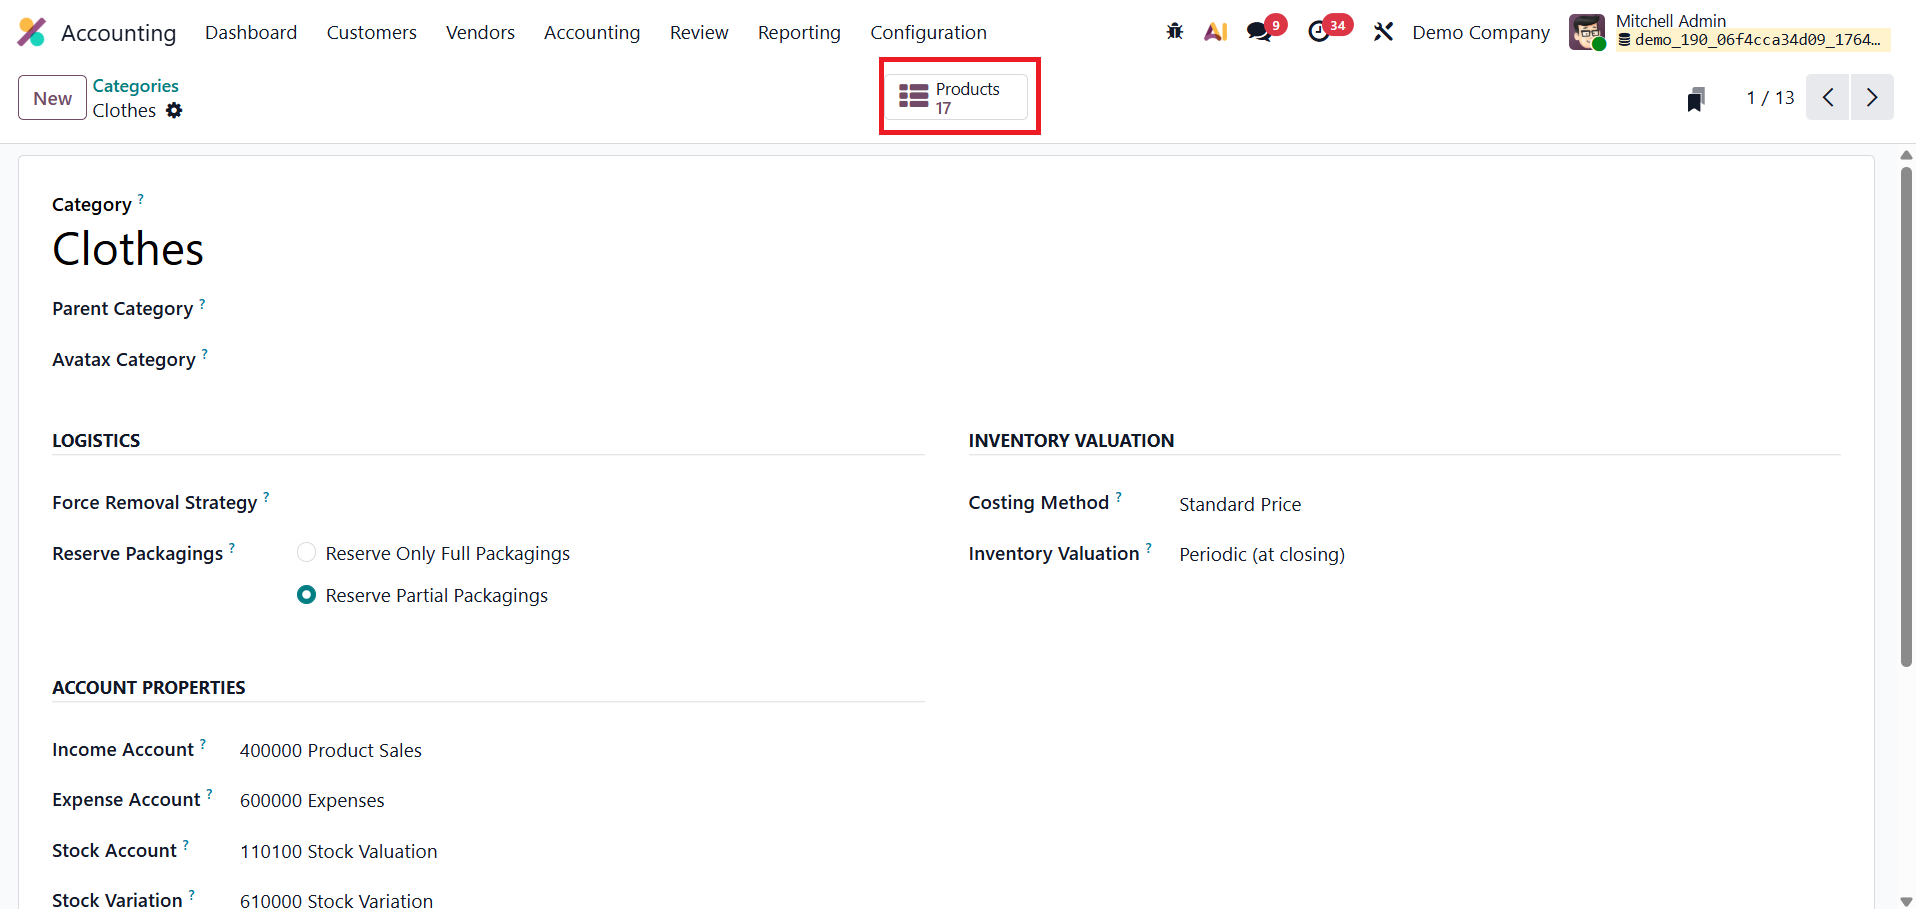
Once you complete the configuration of the Product Category, a smart tab will appear which will show the Products that belong to that particular category.
1.21 Payment Providers
In Odoo 19 Accounting, the Configuration menu provides a comprehensive set of tools to manage every aspect of how your company handles, processes, and monitors payments. The four key components found here, Payment Providers, Payment Methods, Payment Tokens, and Payment Transactions, work together to create a seamless and secure payment ecosystem, from issuing invoices to receiving payments.
Payment Providers form the core of Odoo’s online payment framework.
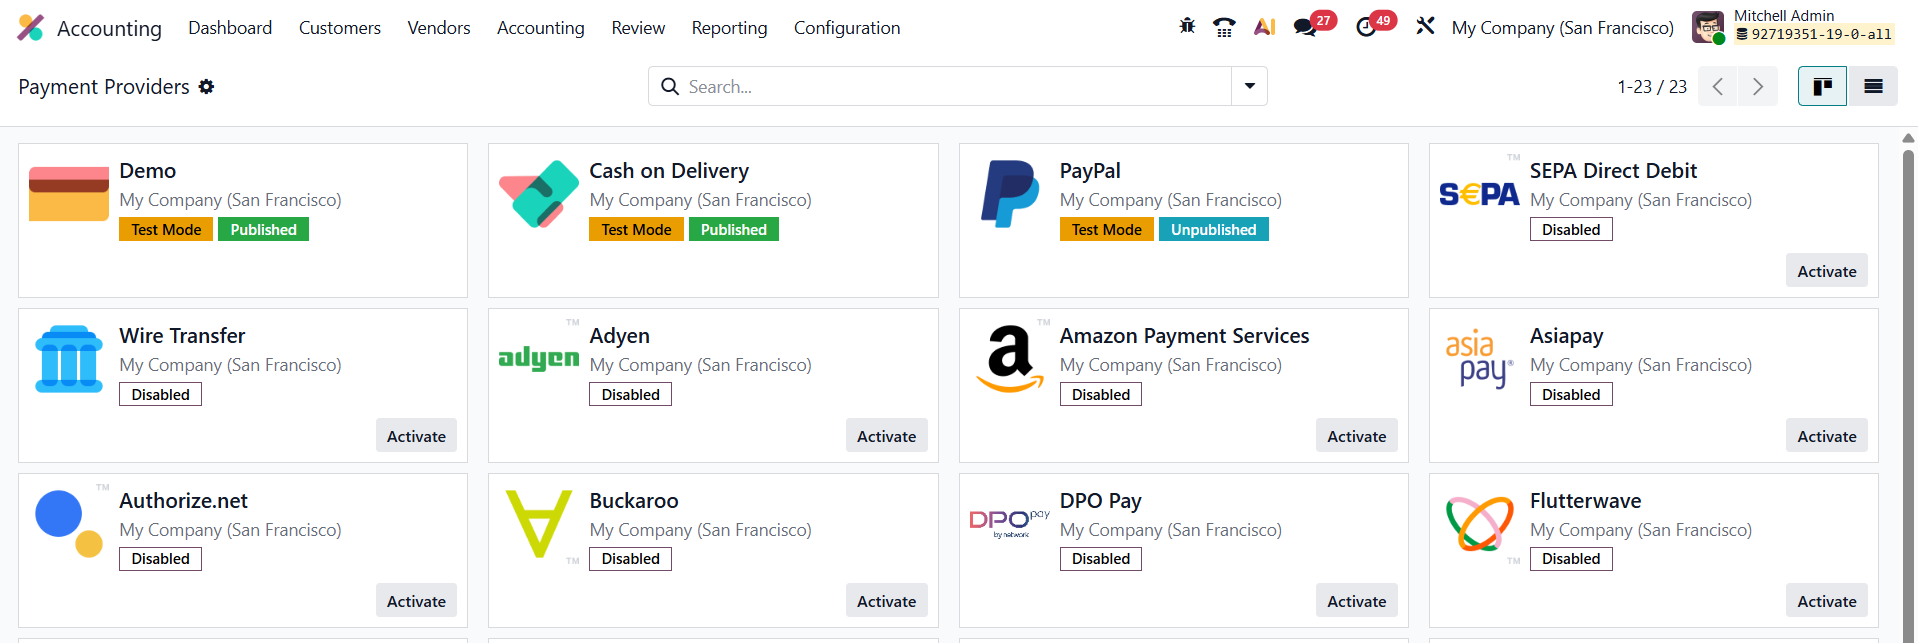
By configuring trusted gateways such as Stripe, PayPal, Adyen, and others, businesses can enable customers to pay invoices or sales orders directly through Odoo’s portal, anytime and anywhere.
To activate a provider, navigate to Accounting › Configuration › Payment Providers, and click Activate beside your chosen provider. From there, you can open the detailed configuration form to customize its settings.
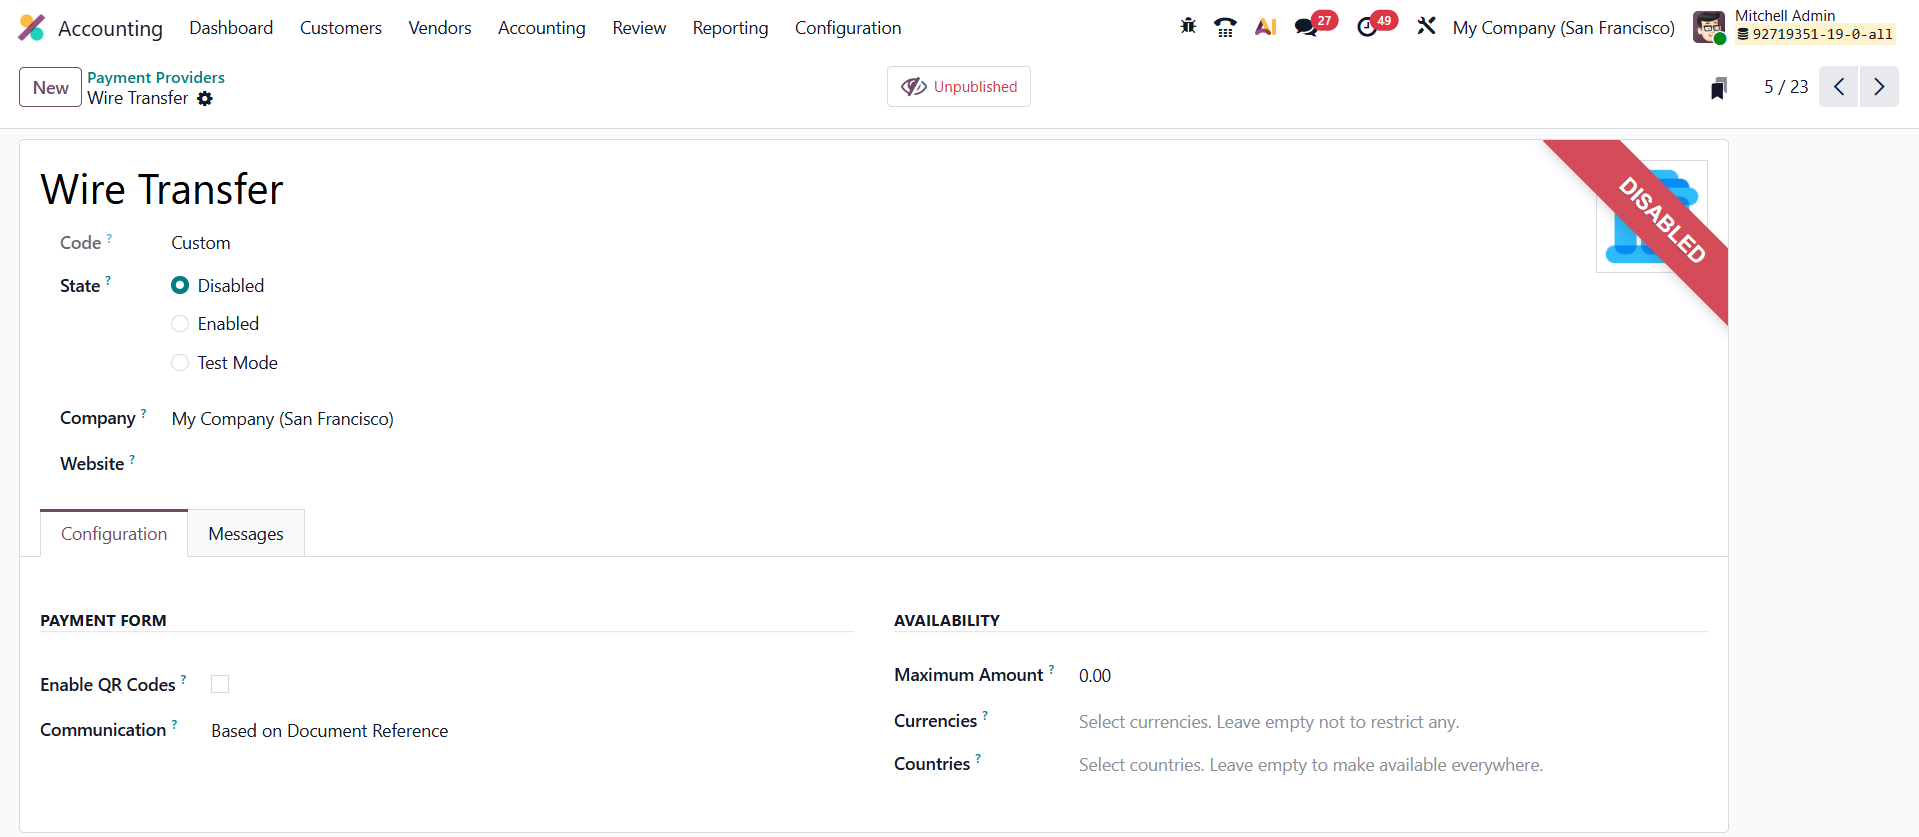
The configuration form starts with the Provider Name and Technical Code. You can set the provider’s operational status as Disabled, Enabled, or Test Mode, the latter being ideal for running test transactions without affecting live data. The Company and Website fields let you control the scope of availability; leaving them blank makes the provider accessible to all companies and websites in your Odoo database.
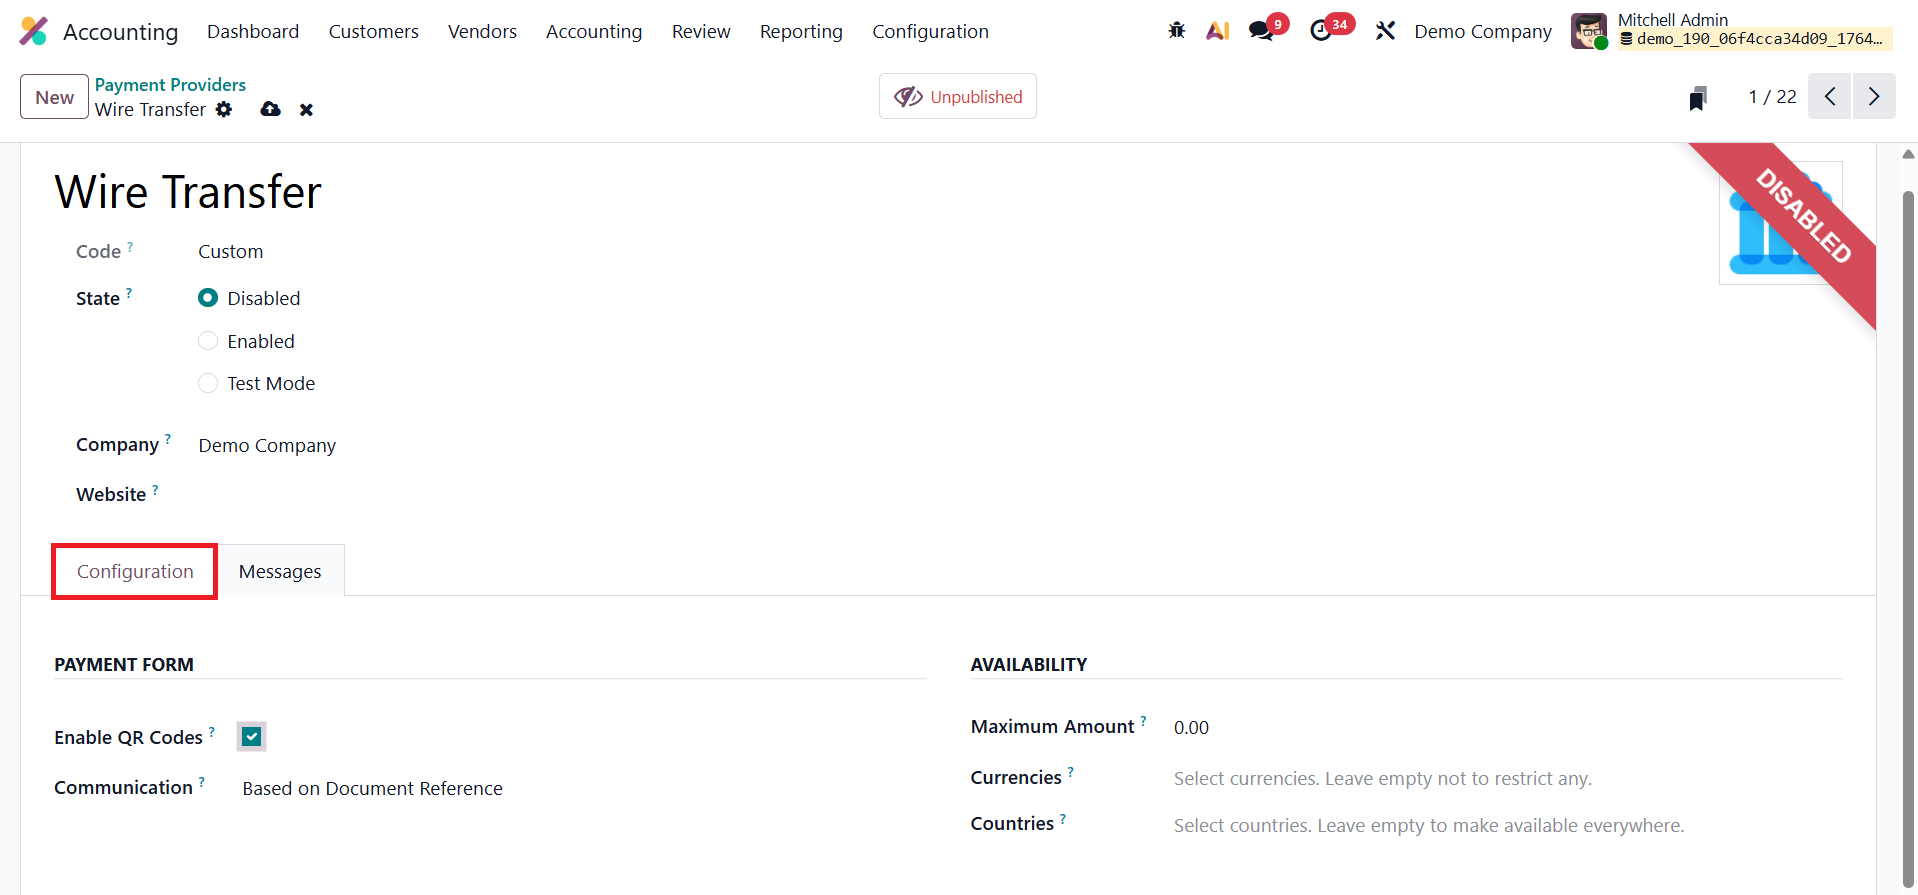
To accept QR code payments, simply enable the QR Codes option. You can also personalize the Communication field, which defines the message displayed to customers when selecting this payment option on sales orders or invoices. The Maximum Amount field allows you to cap payment values per transaction, while the Countries field helps restrict the provider’s availability to specific regions, or keep it global by leaving it empty.
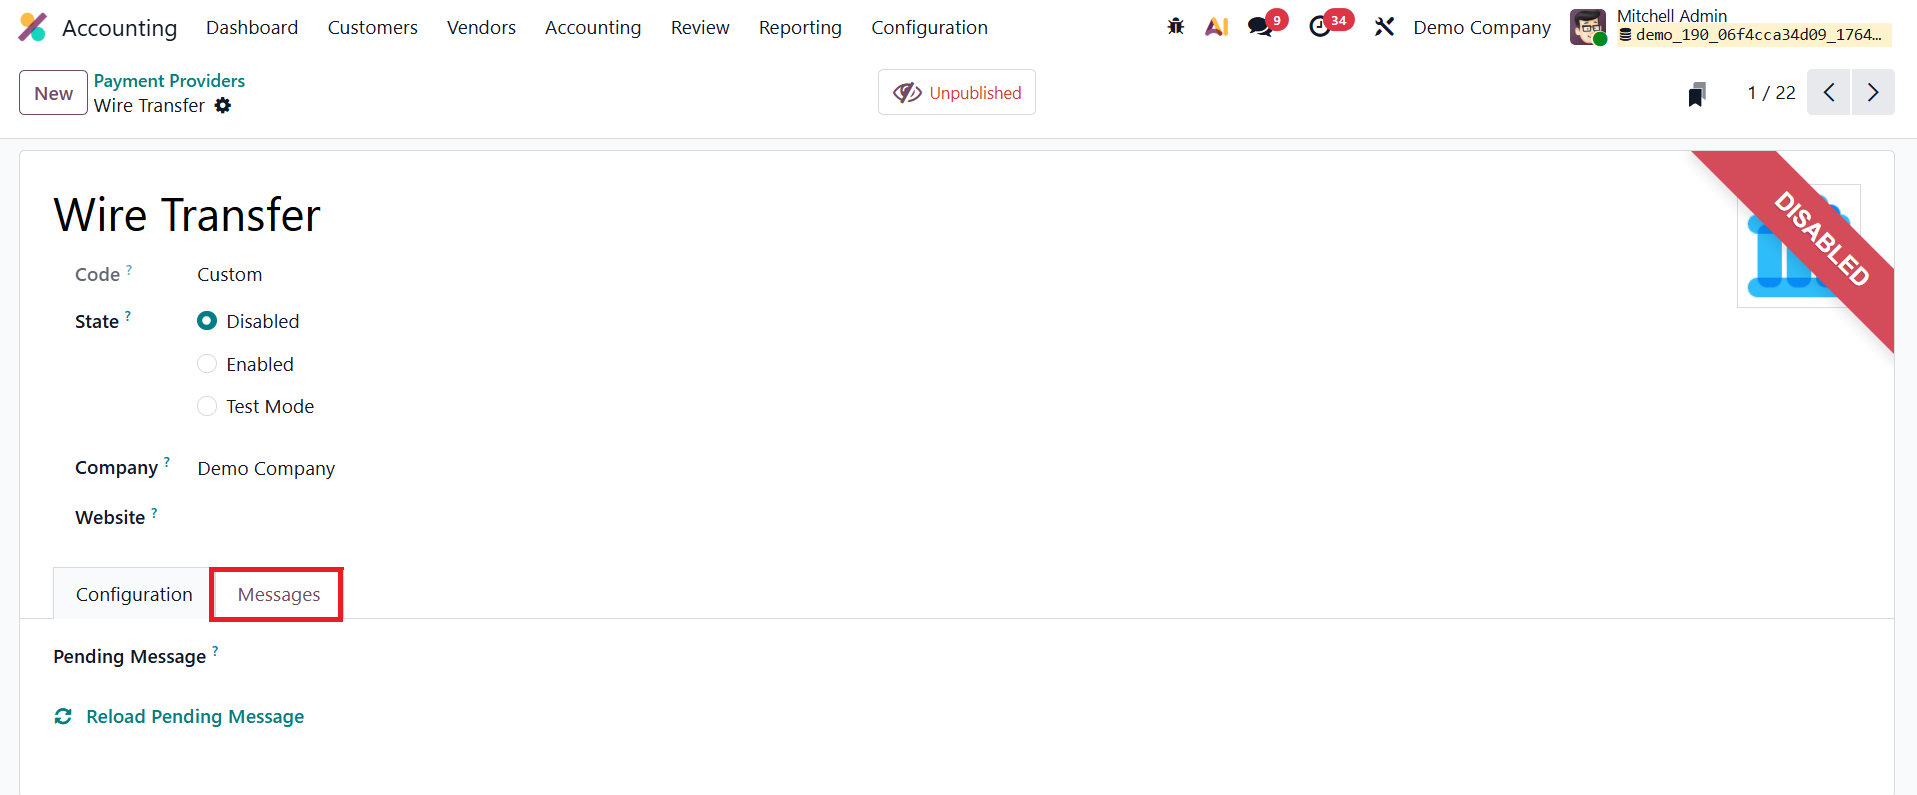
Additionally, Odoo 19 includes a Pending Message section, where you can compose the message displayed to customers if their transaction remains pending, ensuring transparent communication during the payment process. Thanks to built-in API integrations for major payment platforms, Odoo also supports Test Mode, allowing you to safely simulate transactions without needing real credentials. This makes it easy to verify end-to-end payment workflows before enabling them in a live environment.
1.21.1 Payment Methods
In Odoo 19 Accounting, the Payment Methods feature enhances the online checkout experience by allowing businesses to define and display custom payment method icons, such as Visa, MasterCard, PayPal, or other gateways, so customers can instantly recognize their preferred payment options.
You can configure these methods by navigating to Accounting › Configuration › Payment Methods.
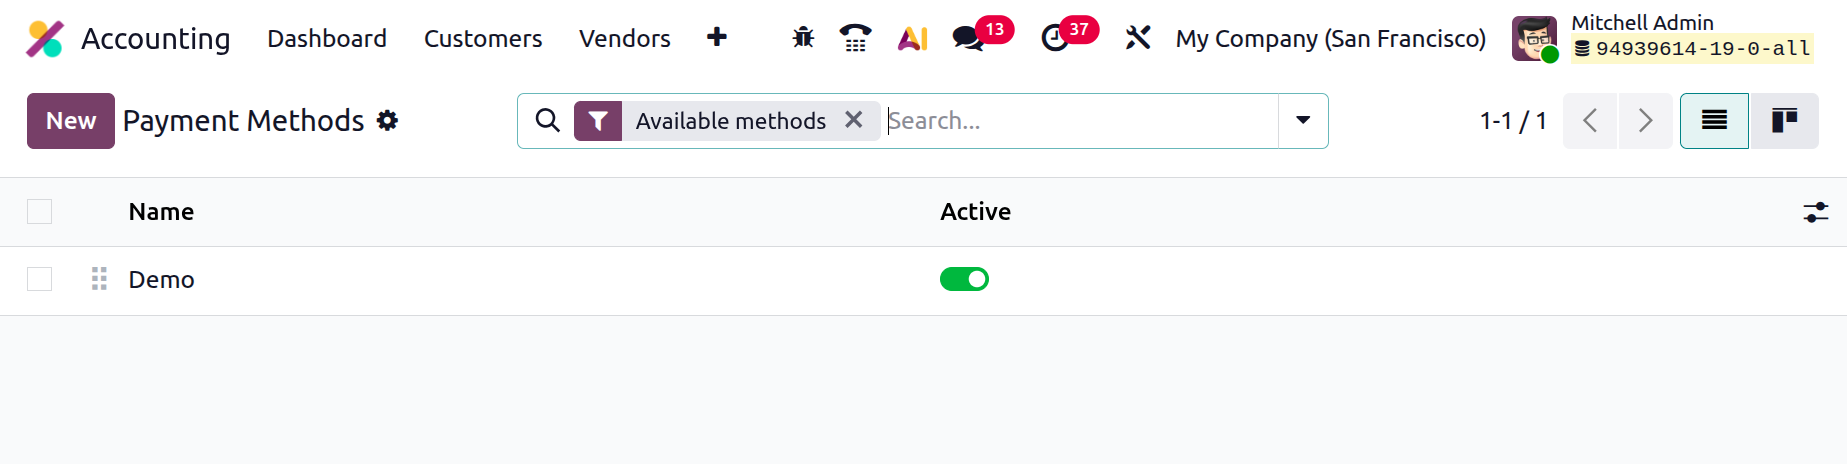
The list view displays all existing payment methods, each representing a visual identifier for available payment gateways. To add a new one, click New, which opens a configuration form where you can define all relevant details.
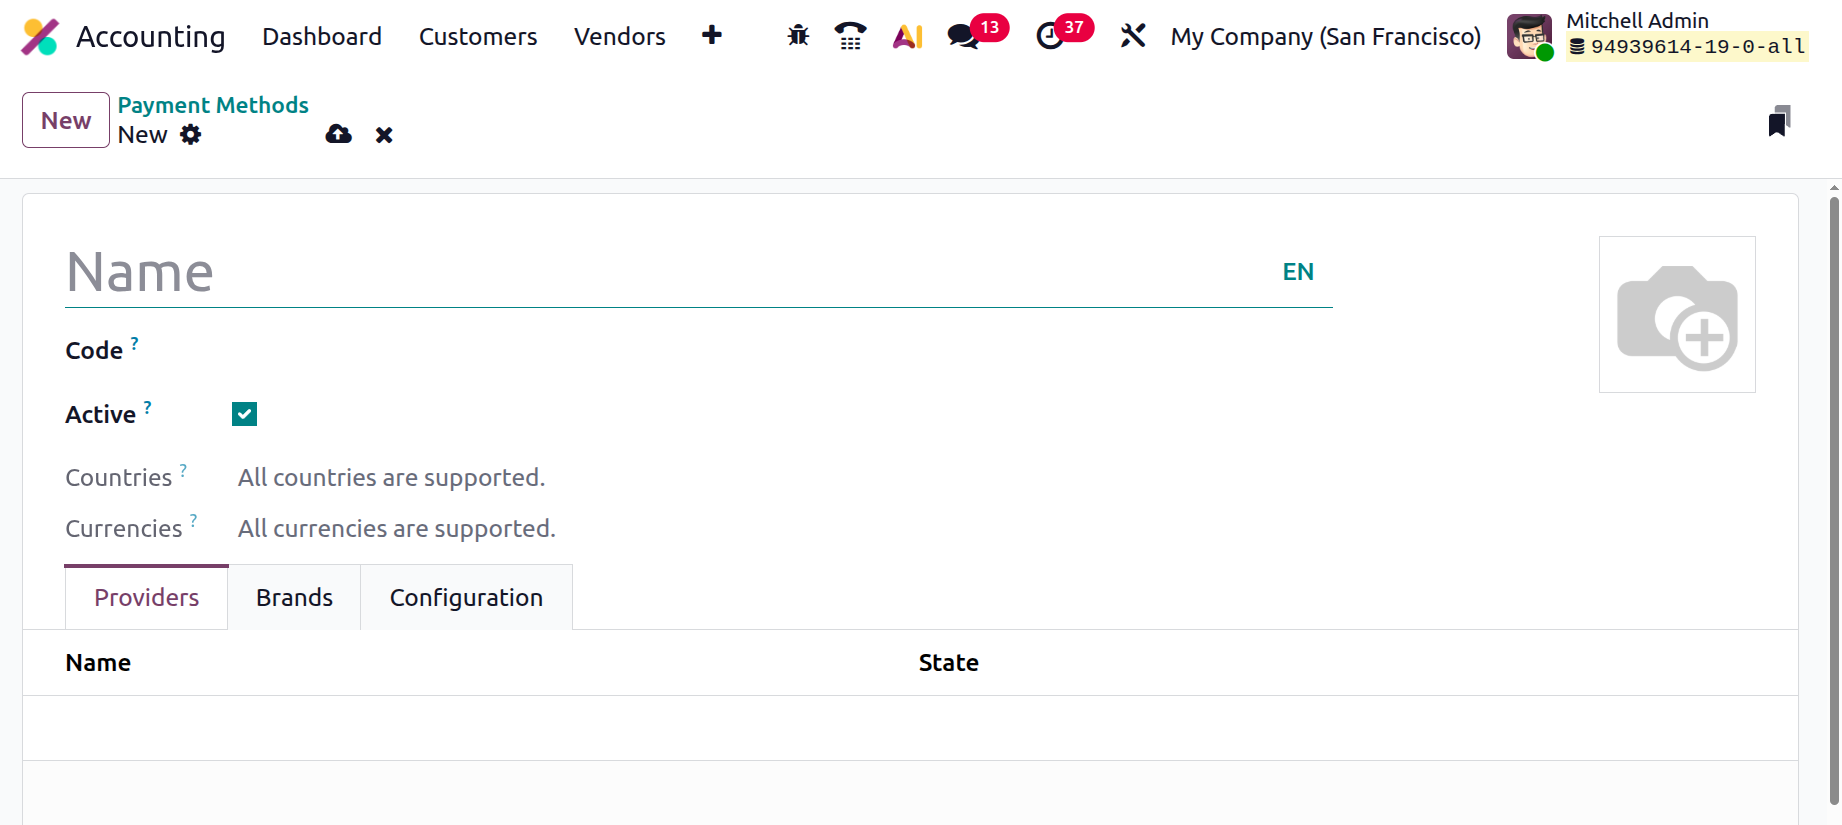
Begin by assigning a clear and descriptive Name to the payment method. Under the Providers list tab, link the method to one or more active Payment Providers already configured in your system. In the Primary Payment Method field, specify the main provider this method represents.
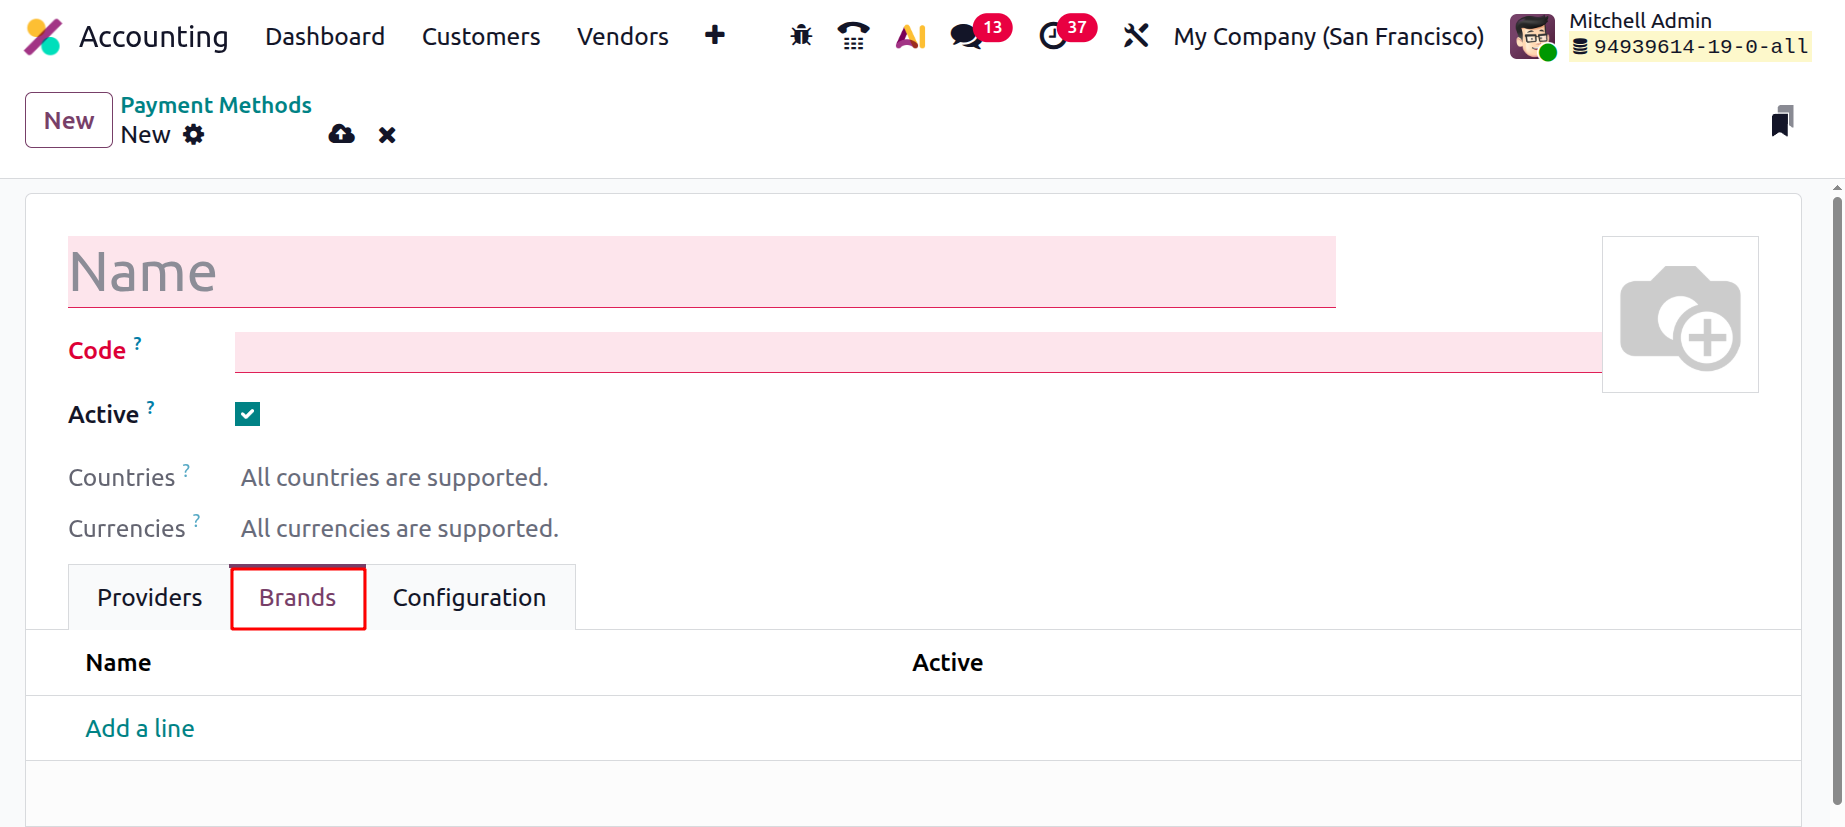
Mention the name of the Brands one by one using the Add a Line button under the respective tab.
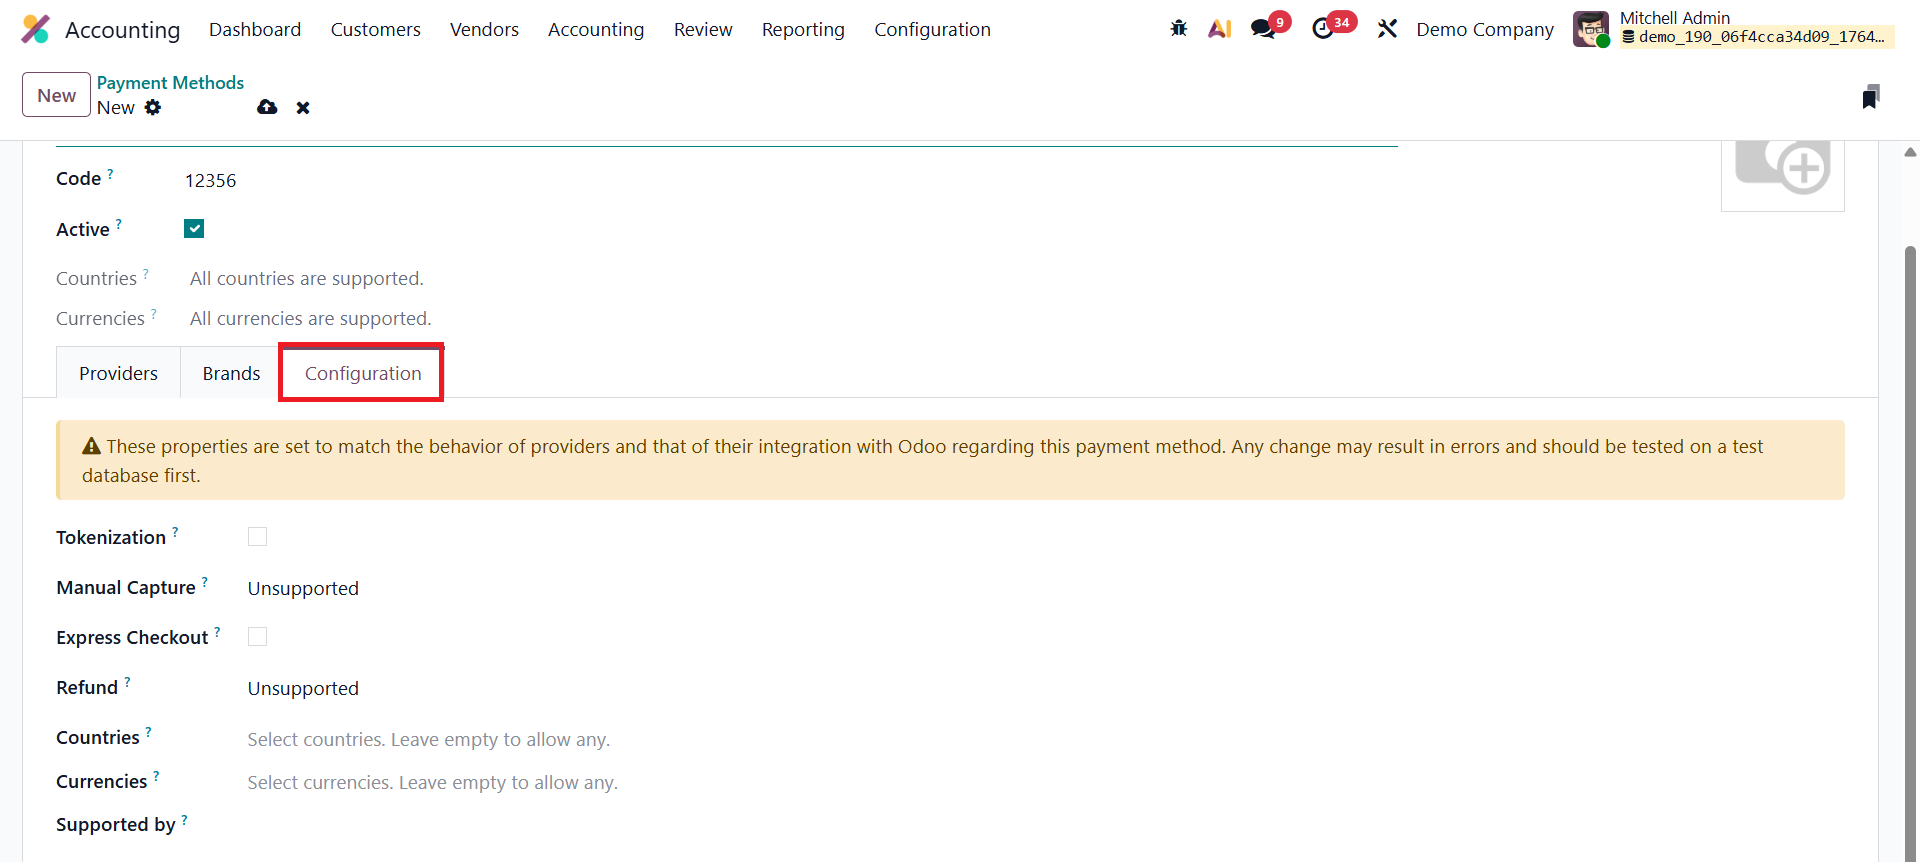
Within the Configuration tab, Odoo 19 introduces refined controls for Tokenization and Express Checkout. Enabling Tokenization allows Odoo to create secure payment tokens as soon as a customer completes a transaction. These tokens, stored safely with the payment provider, let returning customers complete future purchases without re-entering their card details, speeding up checkouts while maintaining compliance with payment security standards.
You can further configure additional options, such as Refund, Countries, Currencies, and Supported By, to ensure that each method functions correctly across regions and payment environments. By setting up multiple payment methods with recognizable icons, Odoo 19 delivers a smoother, more transparent, and professional checkout process, enhancing user trust and improving conversion rates across eCommerce and invoicing platforms.
1.21.2 Payment Tokens
In Odoo 19, the Payment Tokens feature makes repeat purchases and subscription billing much smoother by securely saving customers’ payment details in tokenized form. When a shopper completes a transaction on your Odoo 19 eCommerce site, they begin by selecting one of the active Payment Providers, such as Stripe, PayPal, or Adyen. Once a card-based payment option is selected, Odoo displays a “Save my payment details” checkbox during checkout.
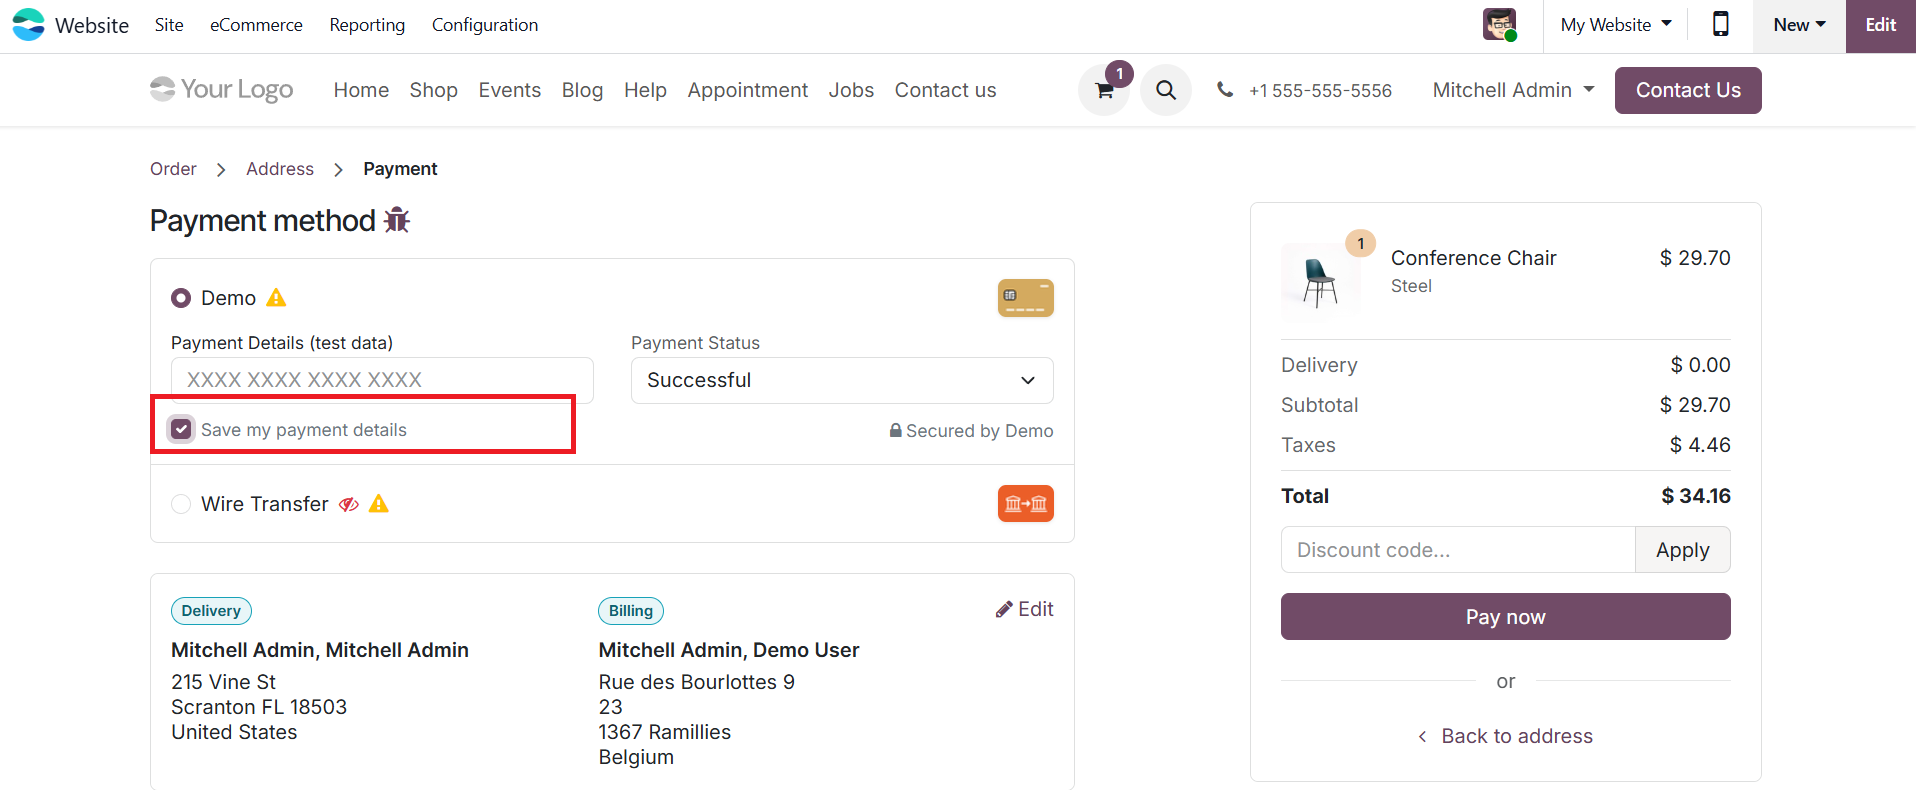
If the customer opts in, the payment provider generates a secure token that represents the card information.
Instead of storing the actual card details, Odoo saves this token in Accounting › Configuration › Payment Tokens.

Each record includes details such as the Company, Customer (Partner), Payment Provider, and the Provider Reference for secure identification and tracking.

During future transactions, Odoo retrieves the saved token, allowing the system to charge the customer’s remembered card automatically with a single click. This eliminates the need for the customer to re-enter card details every time, creating a seamless and efficient checkout process.
The feature is especially beneficial for subscription plans, recurring invoices, and other continuous payment models, significantly reducing checkout friction and improving customer convenience while maintaining full payment security compliance.
1.21.3 Payment Transactions
In Odoo 19, you can easily track and review all online payments processed through your integrated gateways directly from the Accounting module.
Navigate to Accounting › Configuration › Payment Transactions to access the complete transaction log.
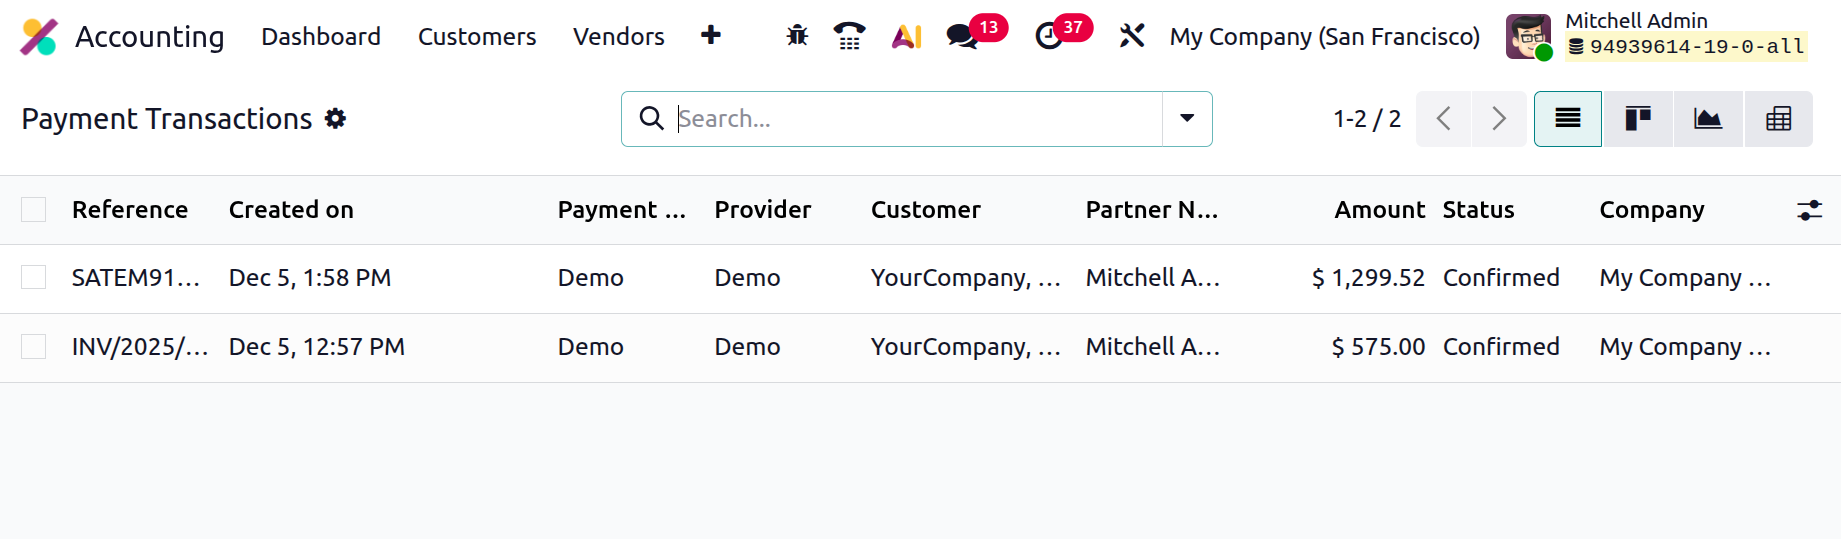
This section provides a comprehensive overview of every payment event recorded in the system, regardless of the provider. Each entry displays essential details, including the Transaction Reference, Creation Date, Payment Method, Provider, Customer (Partner) Name, Amount, Status, and the Company associated with the sale.
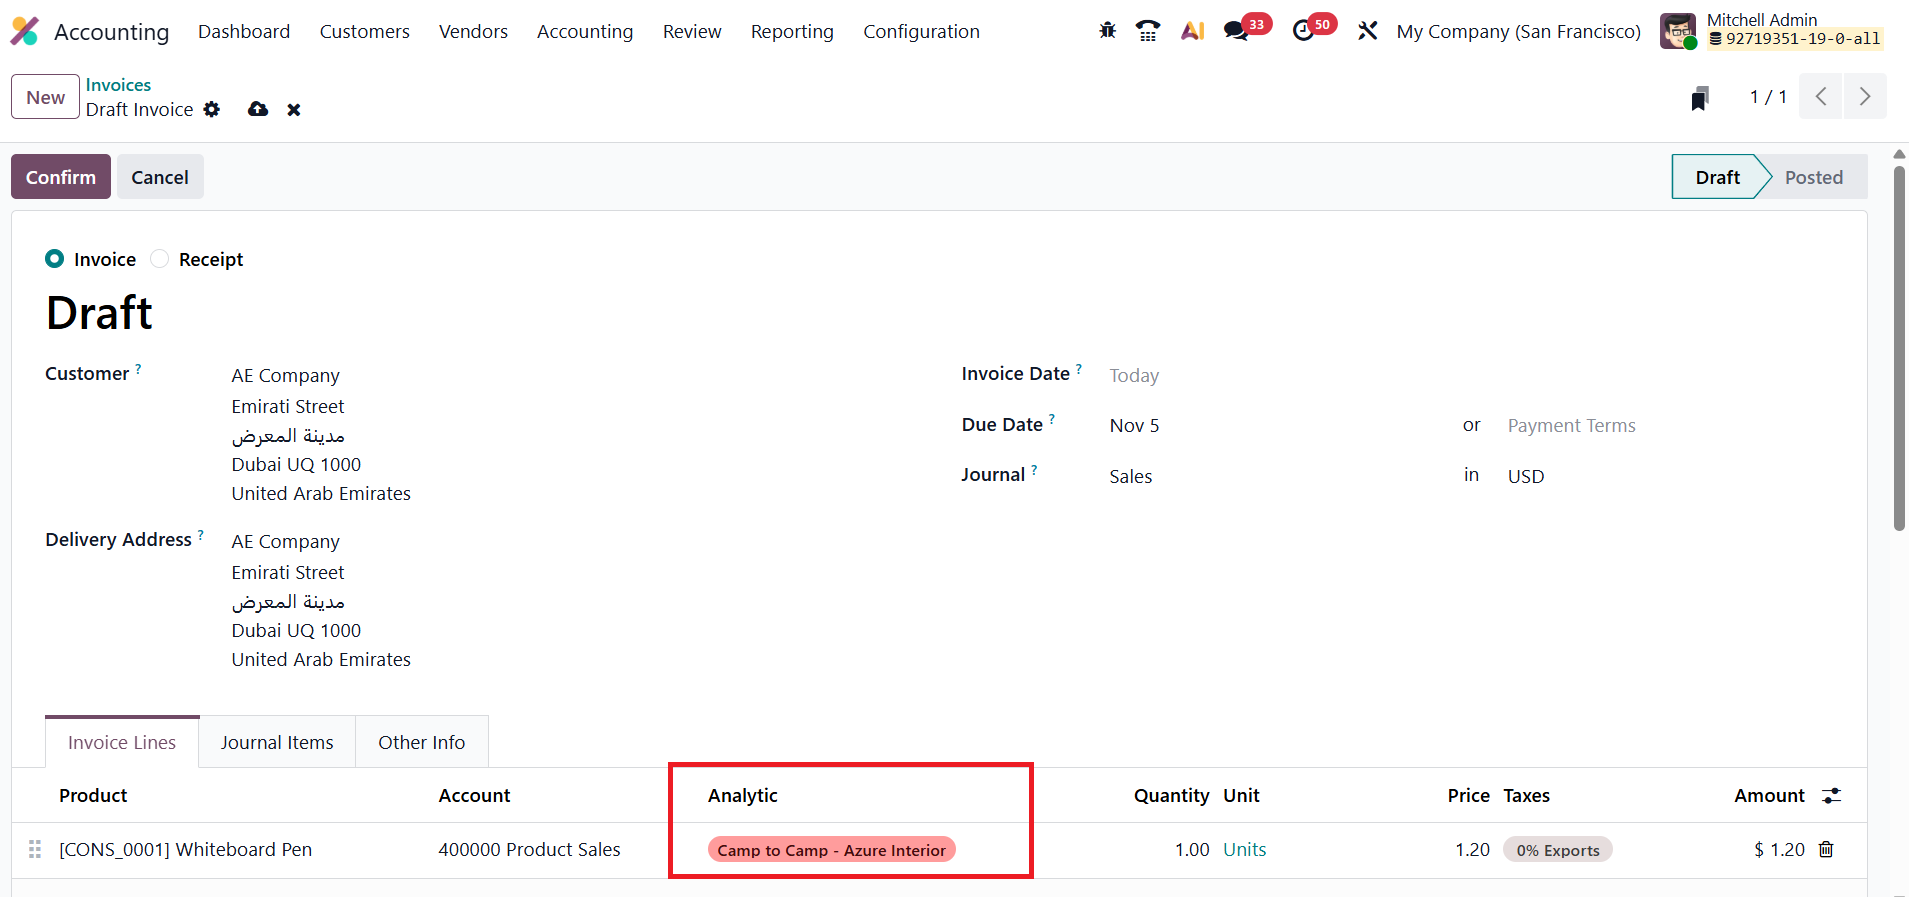
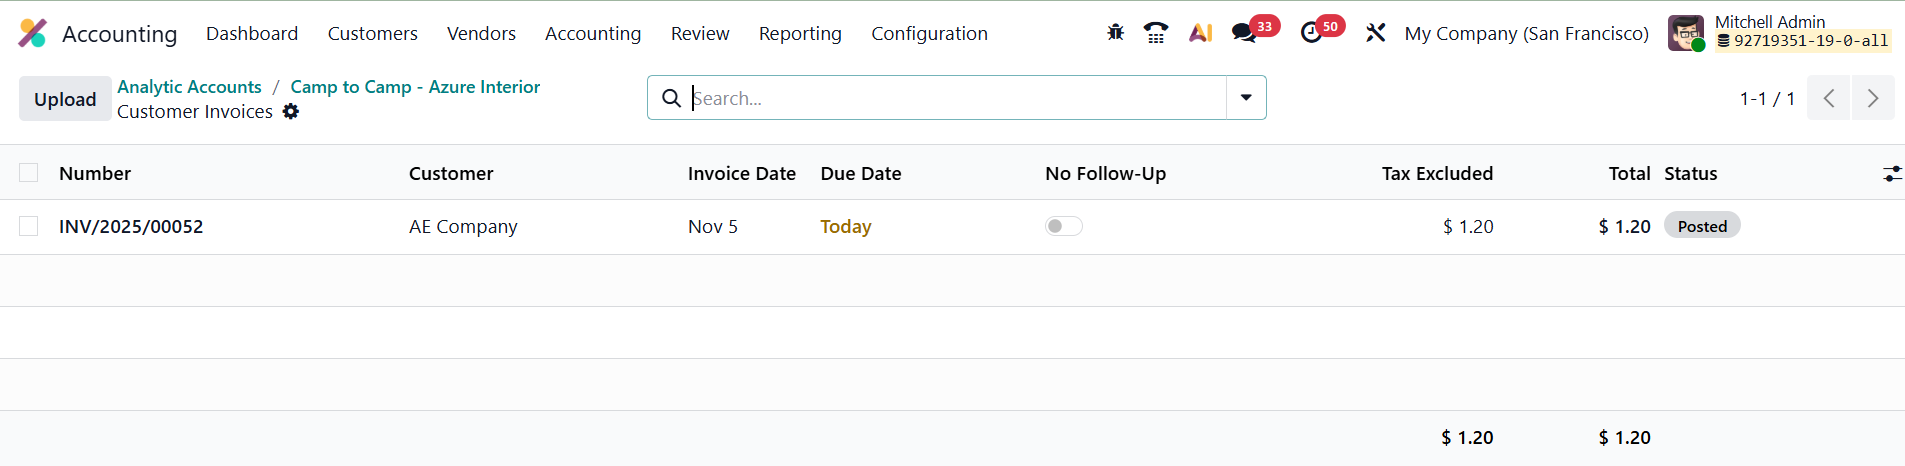
1.22 Analytic Accounts
In Odoo 19, the Analytic Accounting feature continues to be an essential tool for tracking revenues and expenses across projects, departments, or any other custom dimension, without overloading your main chart of accounts.
To begin, enable Analytic Accounting from Accounting › Settings.

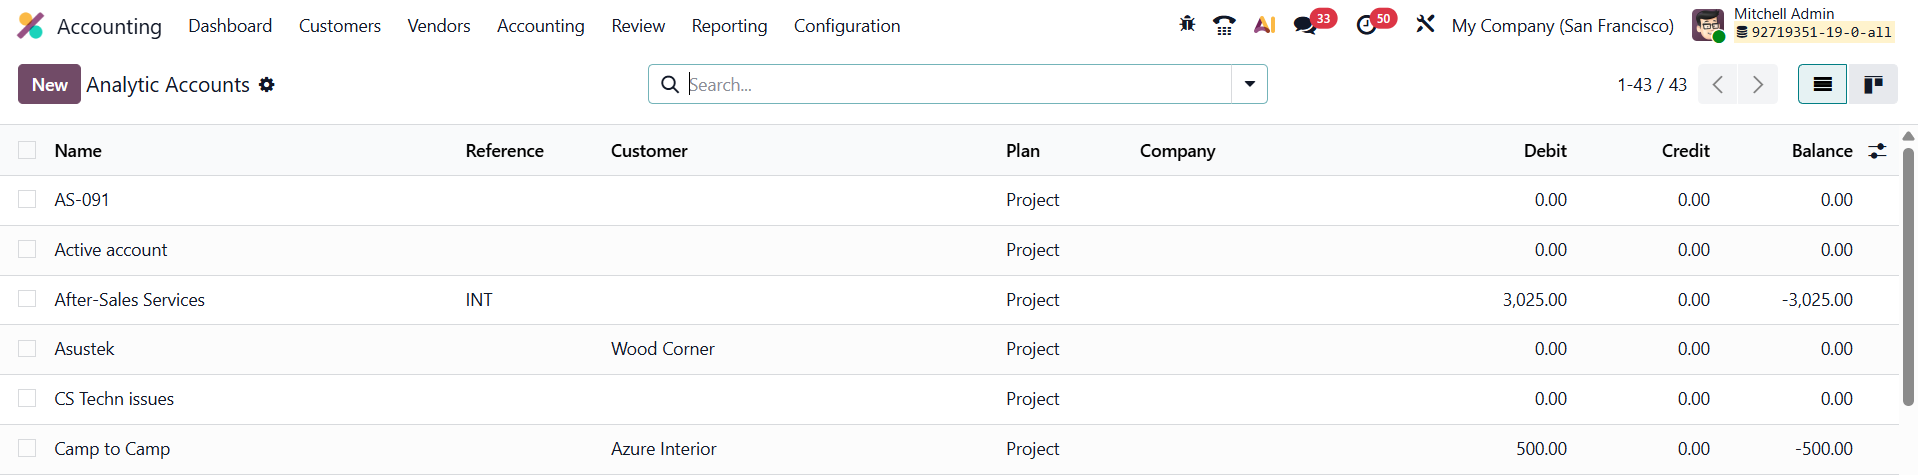
Once activated, the Configuration › Analytic Accounts menu becomes available, displaying all existing accounts with key details such as Name, Reference, Customer, Analytic Plan, Company, Debit, Credit, and Balance.
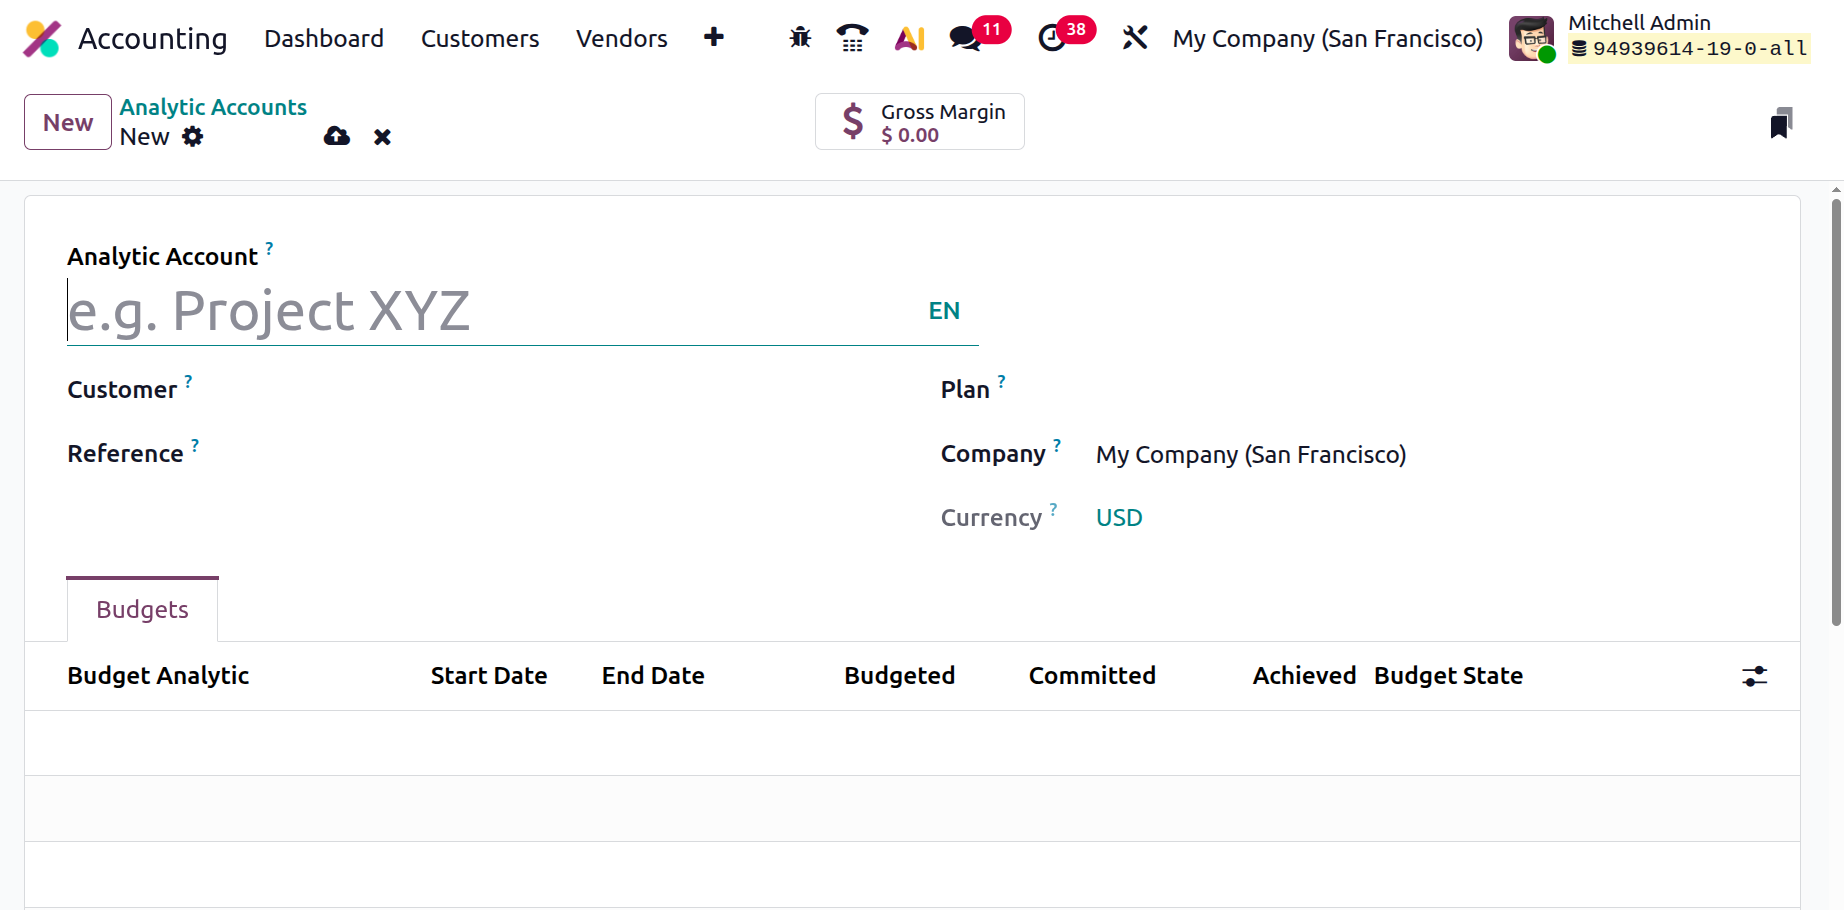
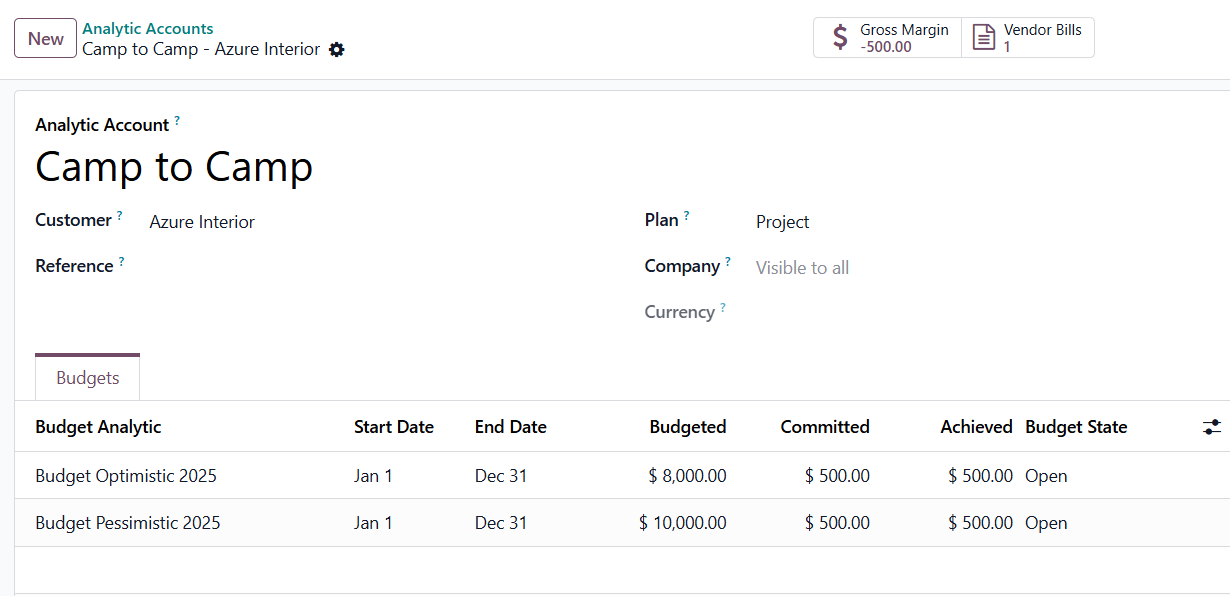
Creating a new analytic account is simple, click New, then provide a descriptive Account Name, optionally link a Customer, assign a Reference, select the Company and Currency, and associate it with an Analytic Plan.
1.22.1 Analytic Plansh
Analytic Plans serve as structured reporting frameworks, helping categorize transactions.
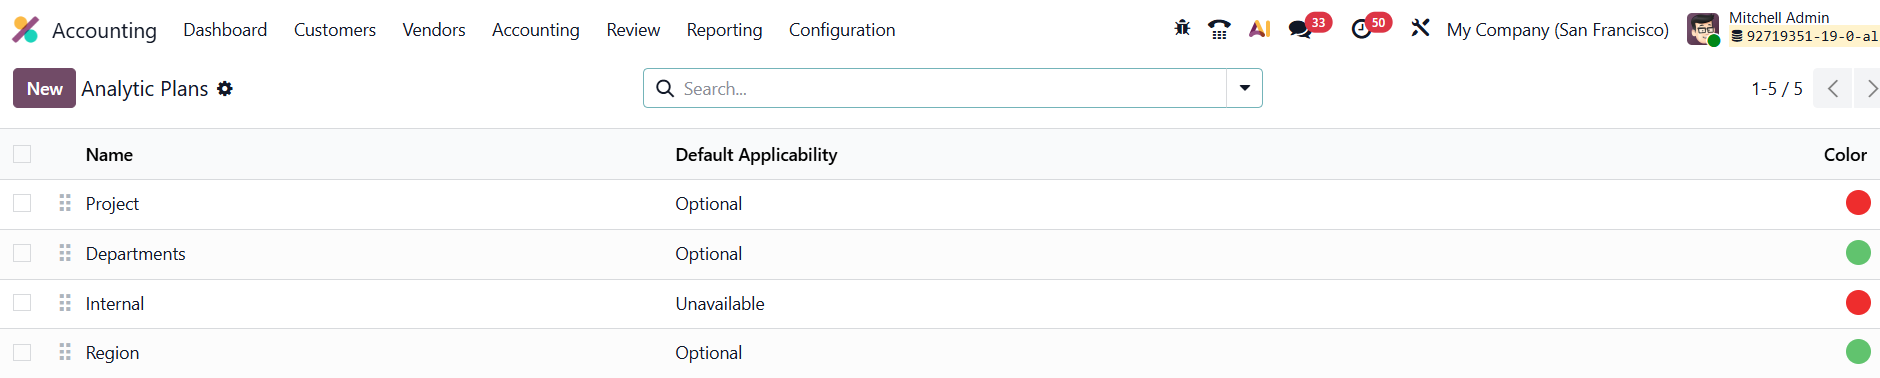
You can configure them under Configuration › Analytic Plans, where you can define the Parent Plan, assign Color Tags, and specify Applicability (for example, Invoices, Vendor Bills, or Expenses) using the Add a Line option.
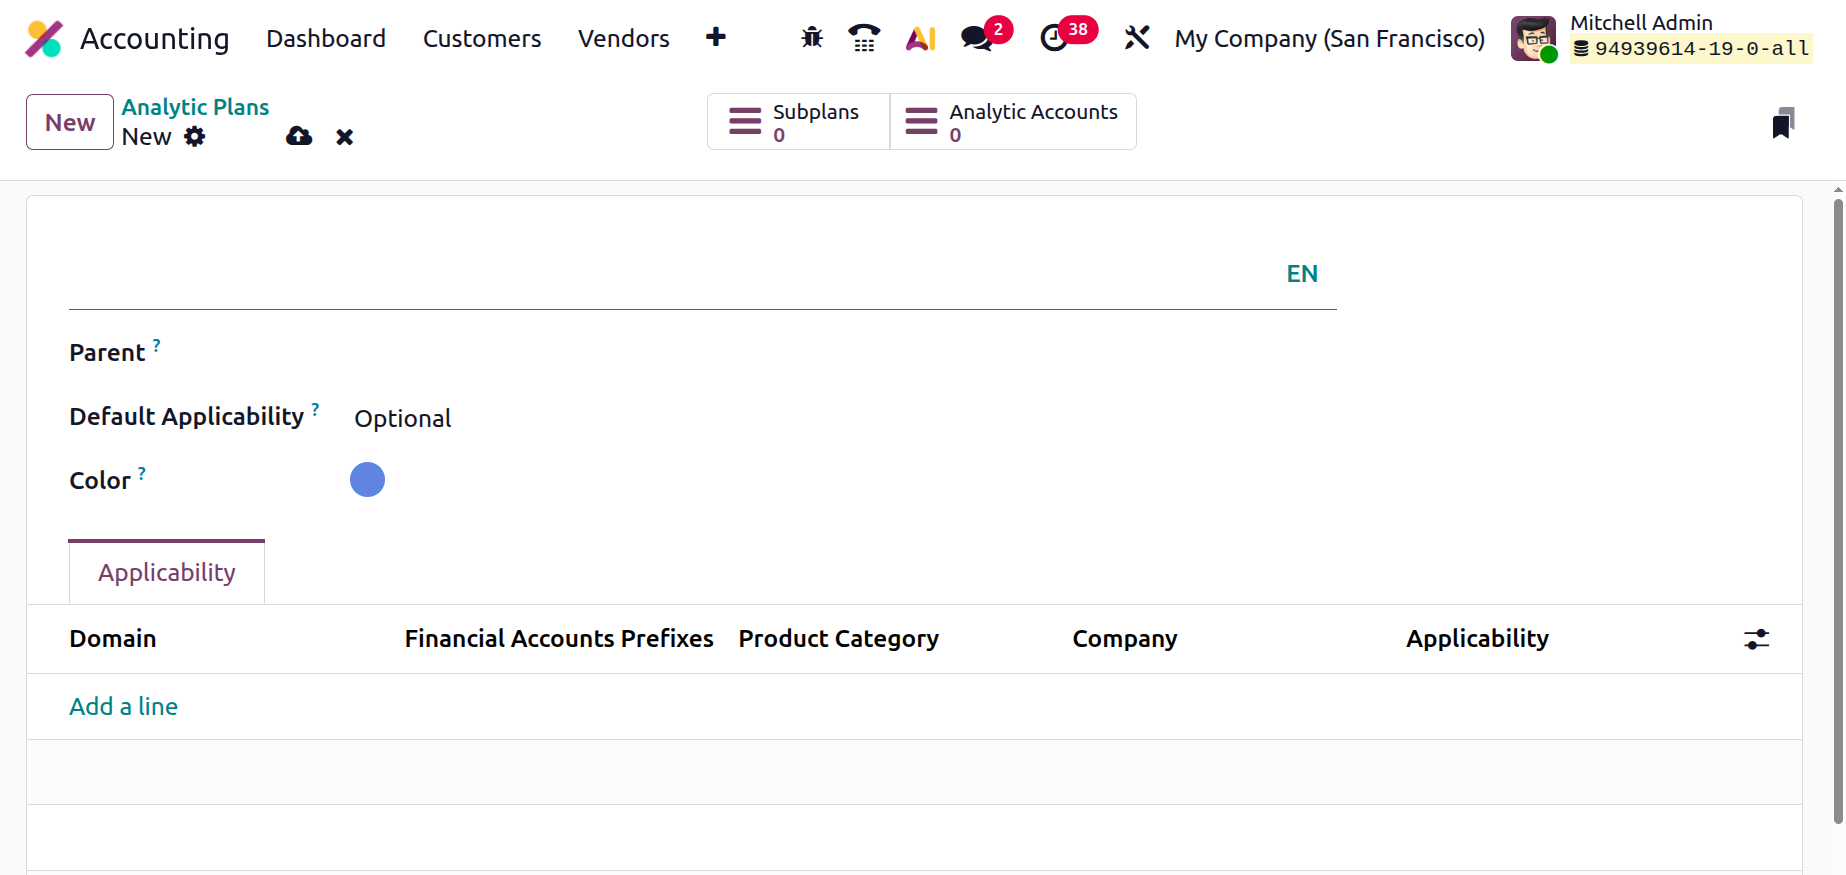
Each line can be customized with Financial Account Prefixes, Product Categories, and usage rules (Required, Optional, or Unavailable).
Back in the analytic account form, you can attach Budget Items to monitor planned vs. actual performance. Once transactions start posting, smart buttons display real-time summaries for gross margin, budget utilization, and account balances.
In daily use, you can assign analytic accounts directly on invoices, bills, expenses, or other financial documents. Upon validation, Odoo 19 automatically records the corresponding analytic entries, ensuring transparent, multidimensional financial insights across your organization.
1.22.2 Analytic Distribution Model
In Odoo 19, the Analytic Distribution Models feature refines how businesses allocate costs and revenues across multiple analytic accounts automatically. Once Analytic Accounting is activated, every journal entry can be configured to distribute its amount according to predefined rules, saving time and ensuring consistency.

To access this feature, navigate to Accounting › Configuration › Analytic Distribution Models. The overview displays each model’s Account Prefix, Partner, Product, Company, and the associated Analytic Distribution, giving you a clear snapshot of how your allocations are organized.
Click New to create a model. In the form, you define the conditions that determine when the model applies, such as a specific Partner or Partner Category, a Product or Product Category, and optionally, a Company if your setup involves multiple entities. The Accounts Prefix identifies which general ledger accounts the rule should affect.
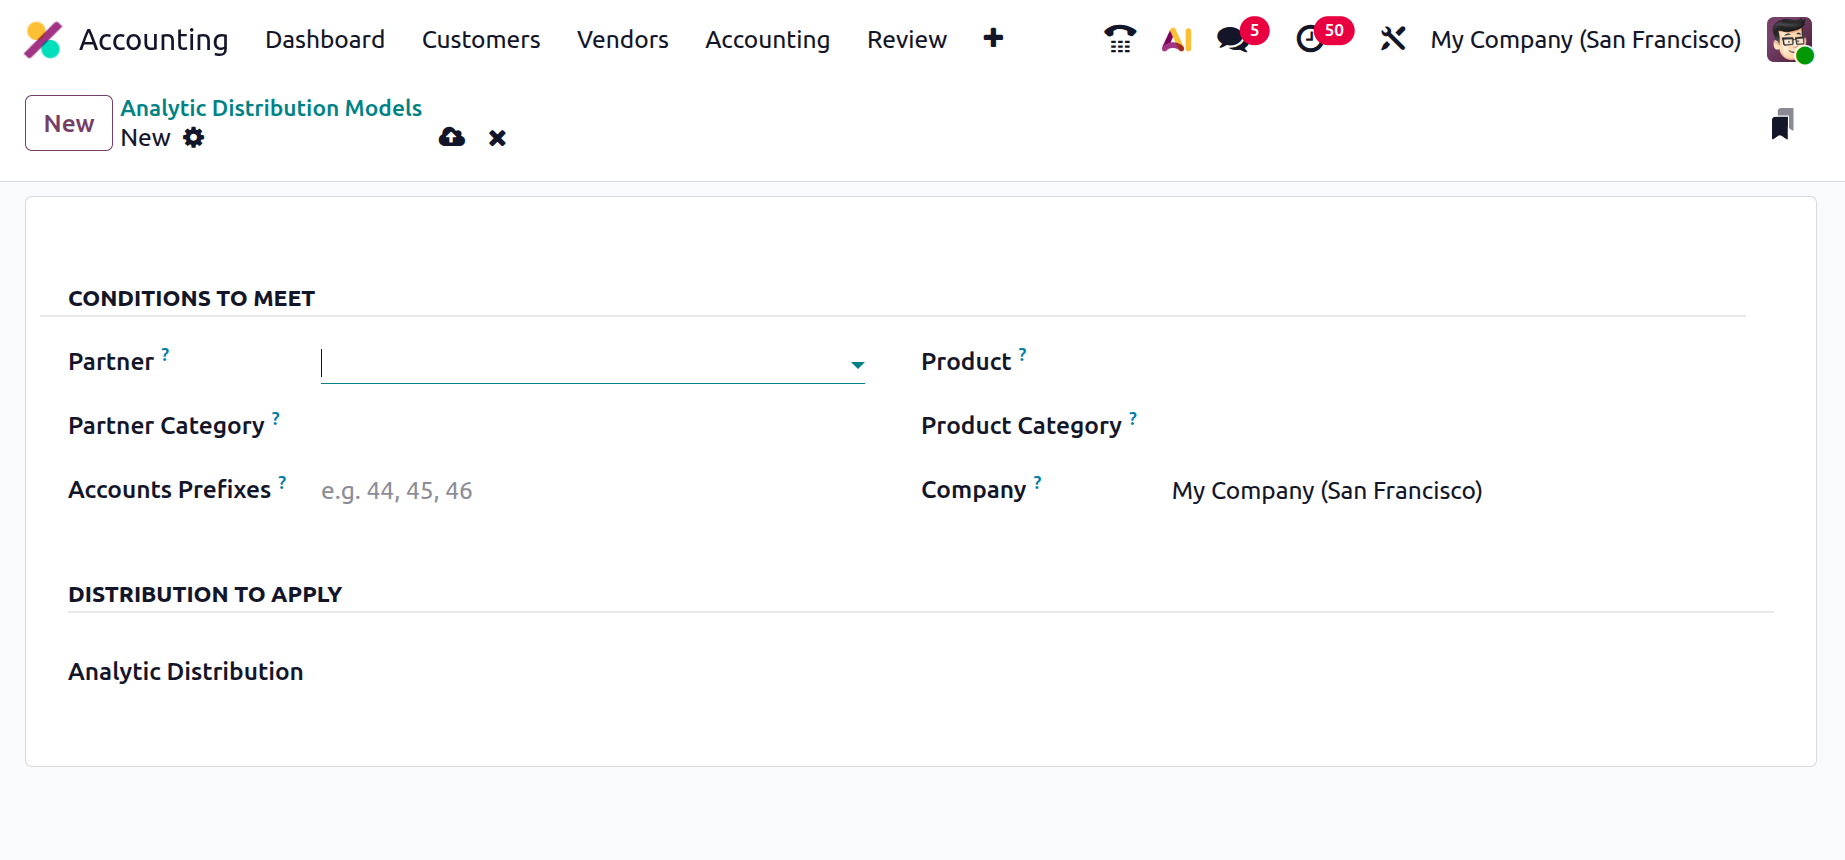
In the Analytic Distribution to Apply section, add one or more Analytic Accounts and assign the corresponding percentage (or fixed value) of the amount that should flow into each. Odoo 19 lets you define multiple distributions per rule, offering greater flexibility for projects that share costs or revenues.
When you later create an invoice, vendor bill, or any journal entry that matches the model’s criteria, Odoo automatically fills in the analytic distribution lines. Once the entry is posted, the amounts are allocated seamlessly to the designated analytic accounts.
This automation not only enforces accurate cost tracking but also ensures compliance with your internal accounting policies, eliminating manual calculations and providing a consistent foundation for performance analysis across departments or projects.