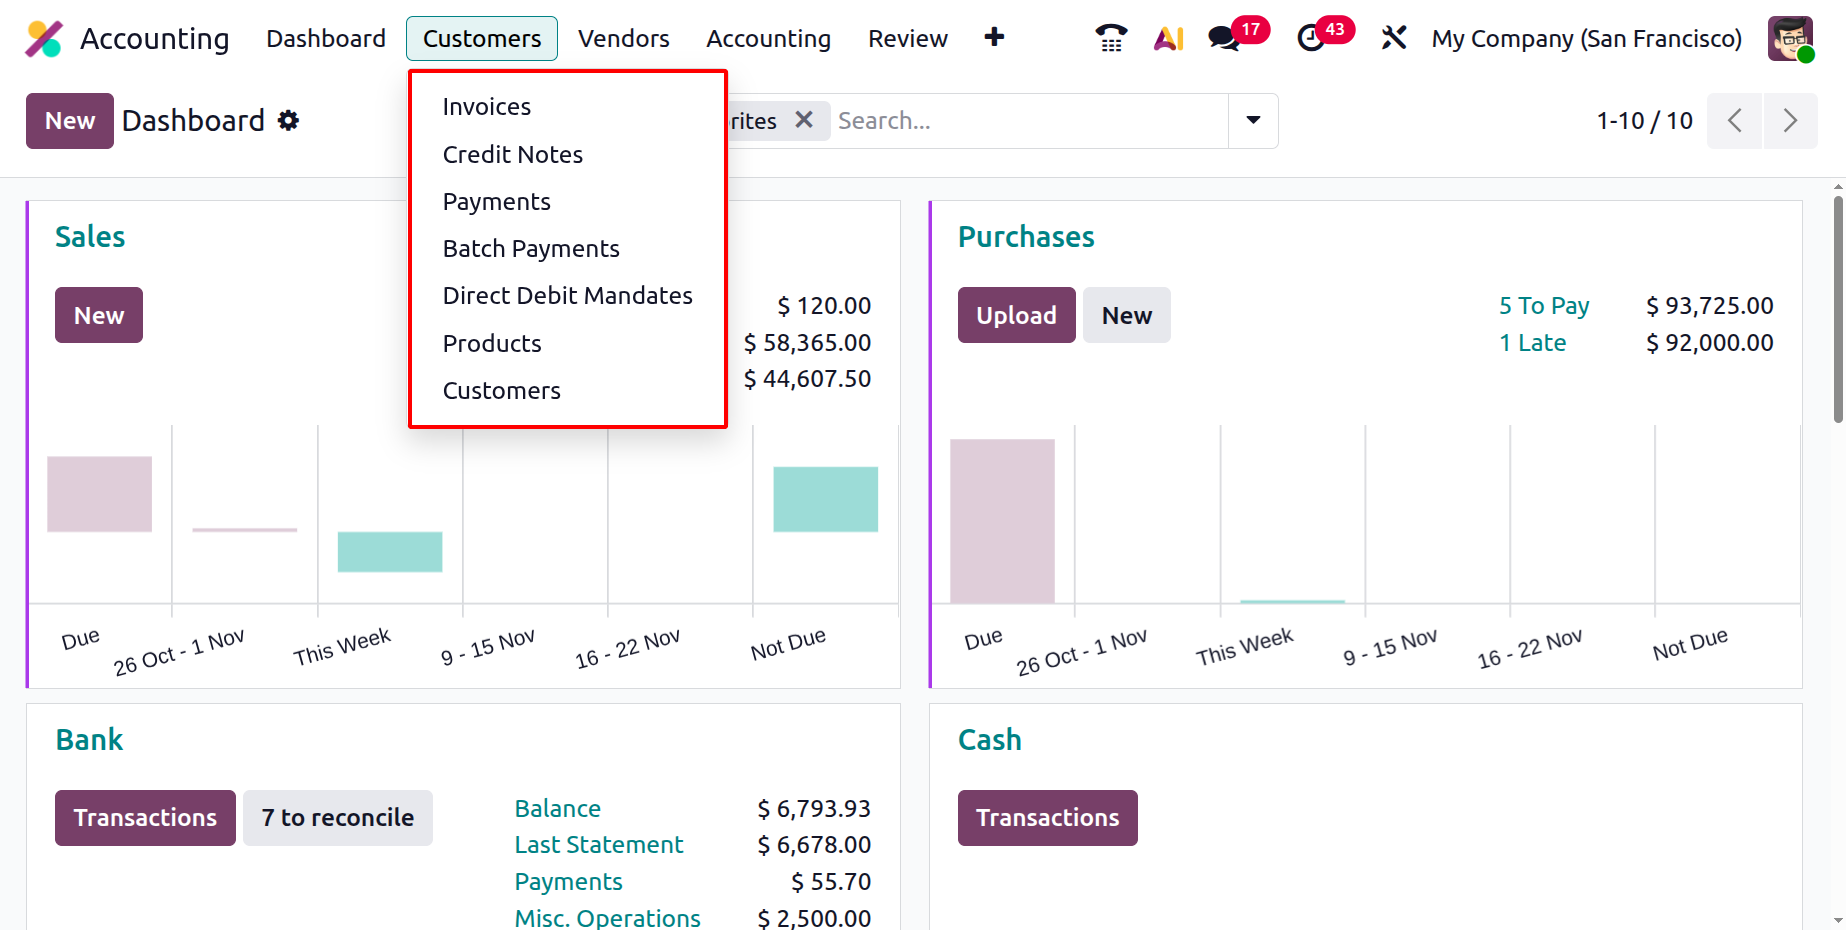
Customers
The Customer menu contains the options like Invoices, Credit Notes, Payments, Batch Payments, Direct Debit Mandates, Products and Customers.
1.1 Customer Invoices
Depending on the nature of business operations and the modules in use, Odoo 19 intelligently creates invoices at the appropriate stages of a transaction. For instance, within the Sales module, once a sales order is confirmed, the system can automatically generate a draft customer invoice, eliminating the need for manual input. This draft can then be reviewed, edited if necessary, and validated before being sent to the customer. Both automatically generated and manually created invoices are seamlessly synchronized and centralized in the Invoices dashboard, accessible under the Customer menu of the Accounting module.
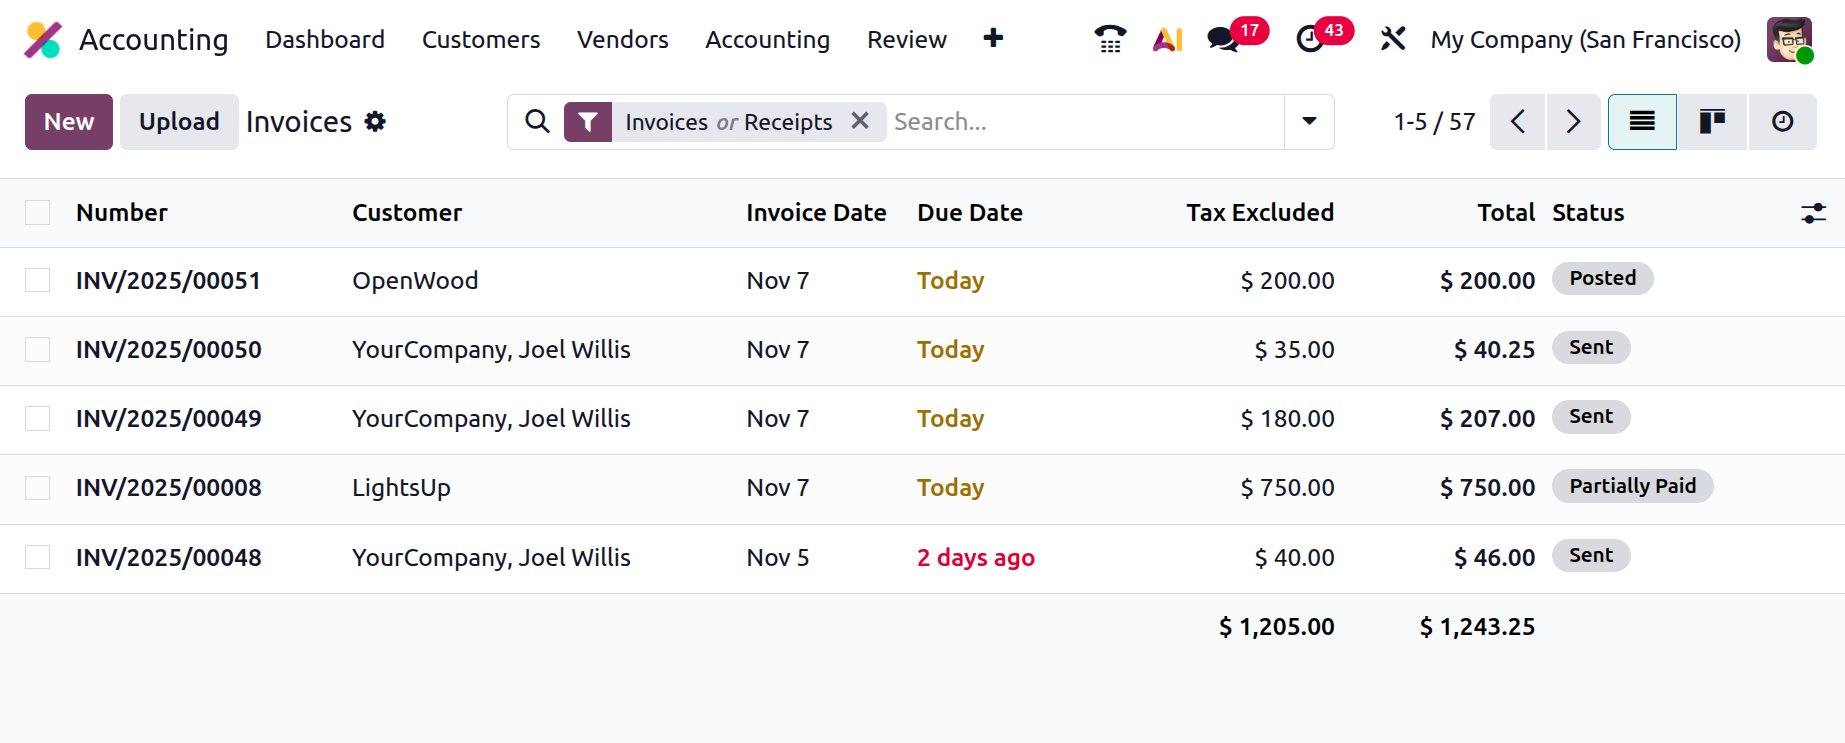
The Invoices dashboard in Odoo 19 provides users with a clear and organized view of all customer invoices in one place. The list view includes essential details such as Invoice Number, Customer Name, Invoice Date, Due Date, Tax Excluded, and Invoice Status. The layout is designed for clarity and convenience, allowing finance teams to monitor invoice progress and status at a glance. Additionally, users can modify column visibility based on their workflow preferences.
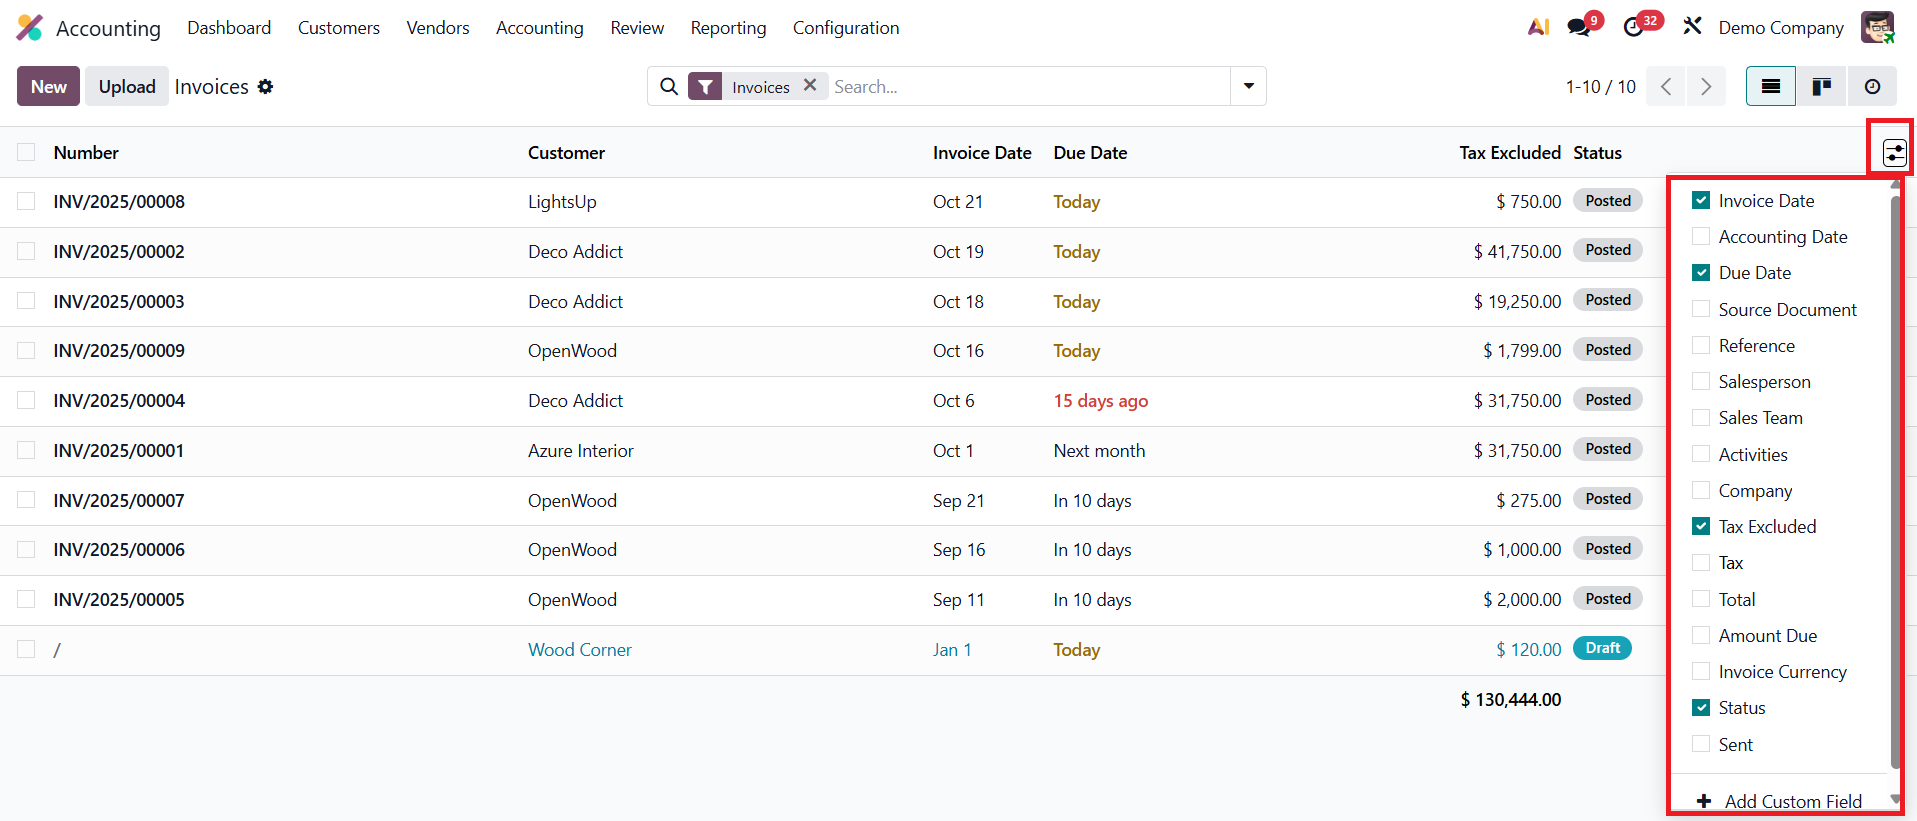
By clicking the small gear icon beside the Status field, users can add or remove various fields, including Accounting Date, Source Document, Activities, Salesperson, Sales Team, Reference, Company, Tax, Total, Amount Due, Currency, and Sent. This flexibility ensures that each user can tailor the interface to match their specific operational needs.
To manage large volumes of invoices efficiently, Odoo 19 introduces enhanced sorting, filtering, and grouping functionalities. The system includes default filters such as My Invoices, Draft, Posted, Canceled, Not Sent, Invoices, Receipts, Credit Notes, To Review, To Pay, In Payment, and Overdue, helping users quickly locate the documents they need.
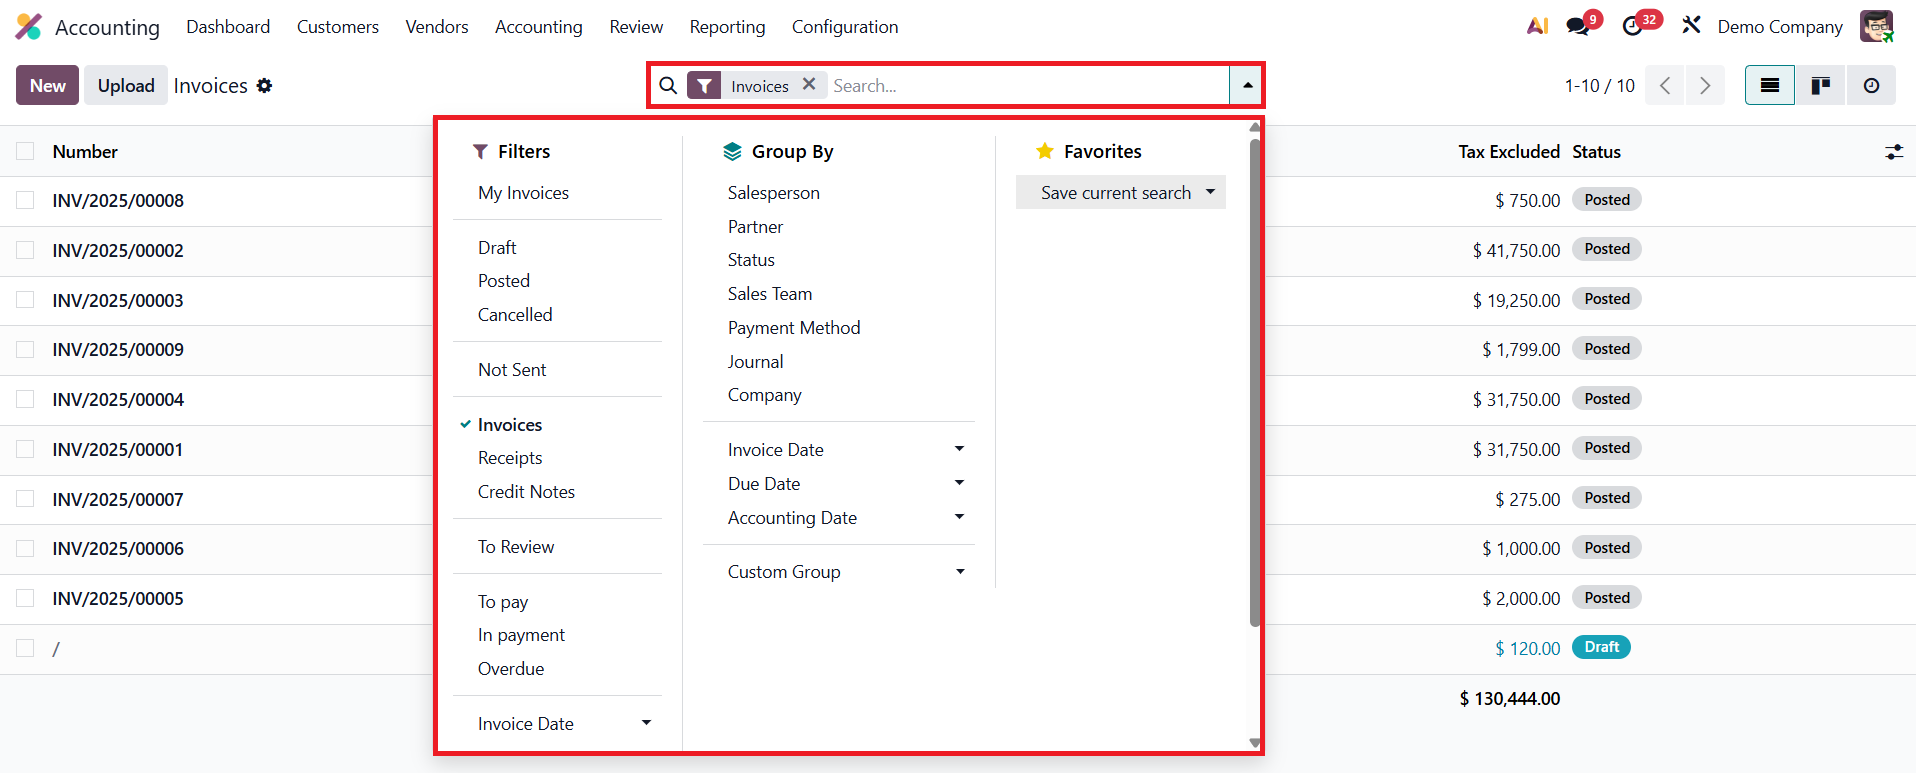
For more specific searches, the Add Custom Filter option allows users to define their own conditions, providing full control over how data is displayed. The Group By feature adds another layer of convenience by letting users organize invoices based on parameters such as Salesperson, Partner, Status, Sales Team, Payment Method, Invoice Date, Company, or Journal. Odoo 19 also allows users to create custom groups for more refined segmentation, ensuring greater visibility and better management of complex invoice sets.
Odoo 19 enhances usability further by offering multiple viewing modes for invoices. The List view provides a structured and data-rich format, ideal for detailed review and analysis, while the Kanban view delivers a more visual and interactive representation of invoices.
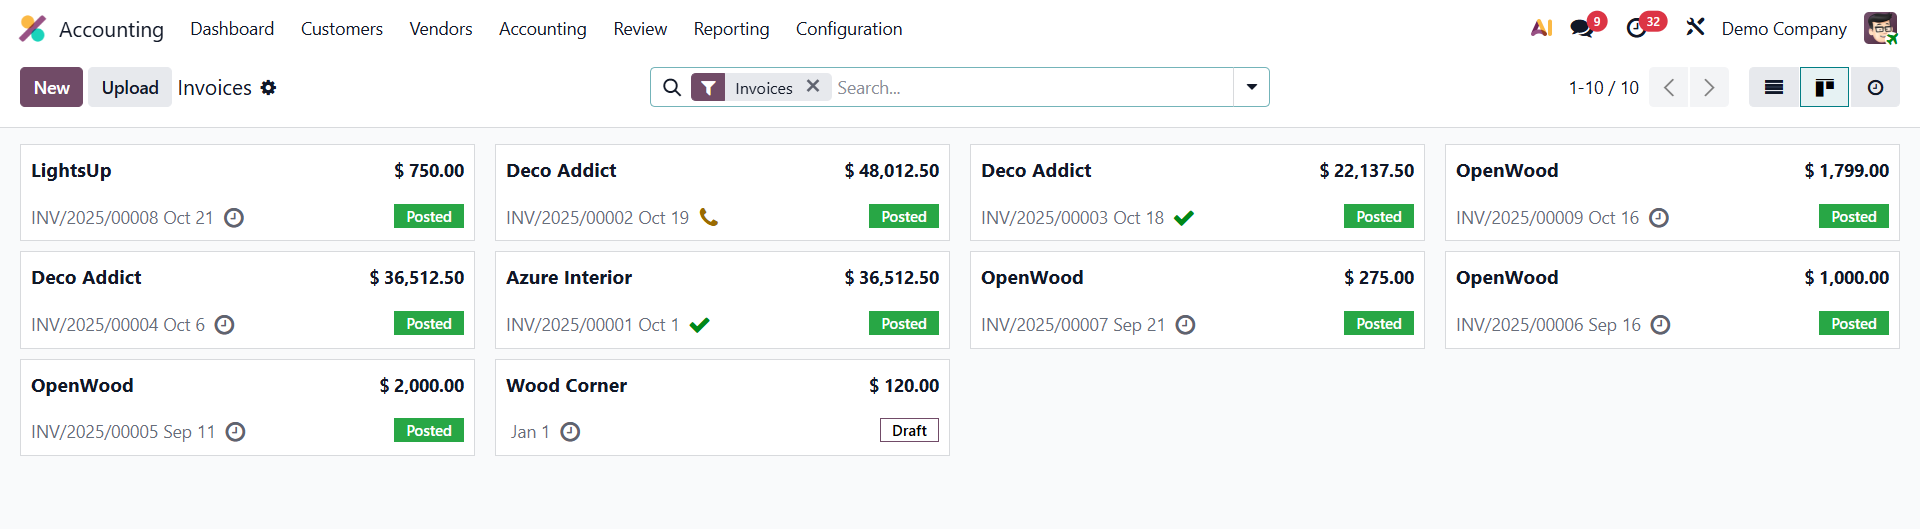
The Kanban layout displays invoices as movable cards categorized by their status, enabling teams to track workflow progress intuitively. From this view, users can either upload existing invoices using the Upload button or create new ones by clicking the New button. Selecting “New” opens an invoice creation form, where users can input customer details, add products or services, specify payment terms, and verify tax and accounting details before finalizing.
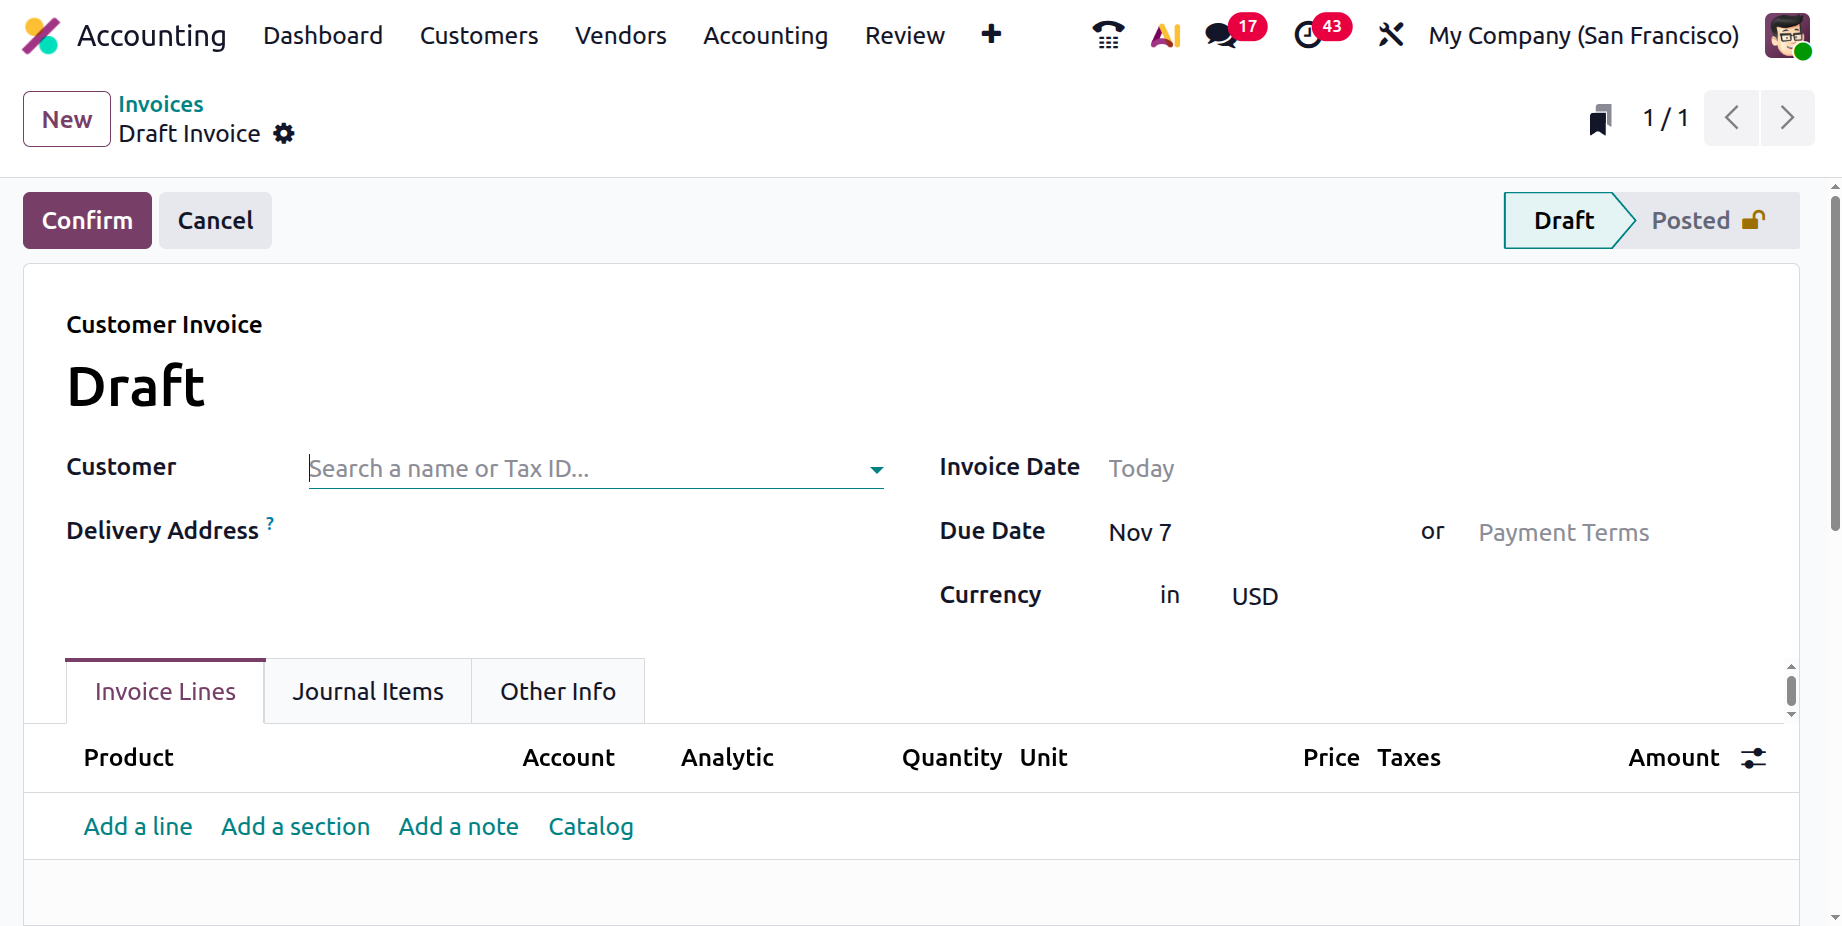
When creating a new invoice, users begin by specifying the Customer Name and Delivery Address, ensuring the document is correctly linked to the intended client. Next, users must enter the Invoice Date, which helps in tracking and reconciling payments later. Based on the customer’s configuration, the Payment Terms may be automatically filled in, for example, 30 Days, Immediate Payment, or End of Month. However, users can also manually set a Due Date if the transaction requires specific terms.
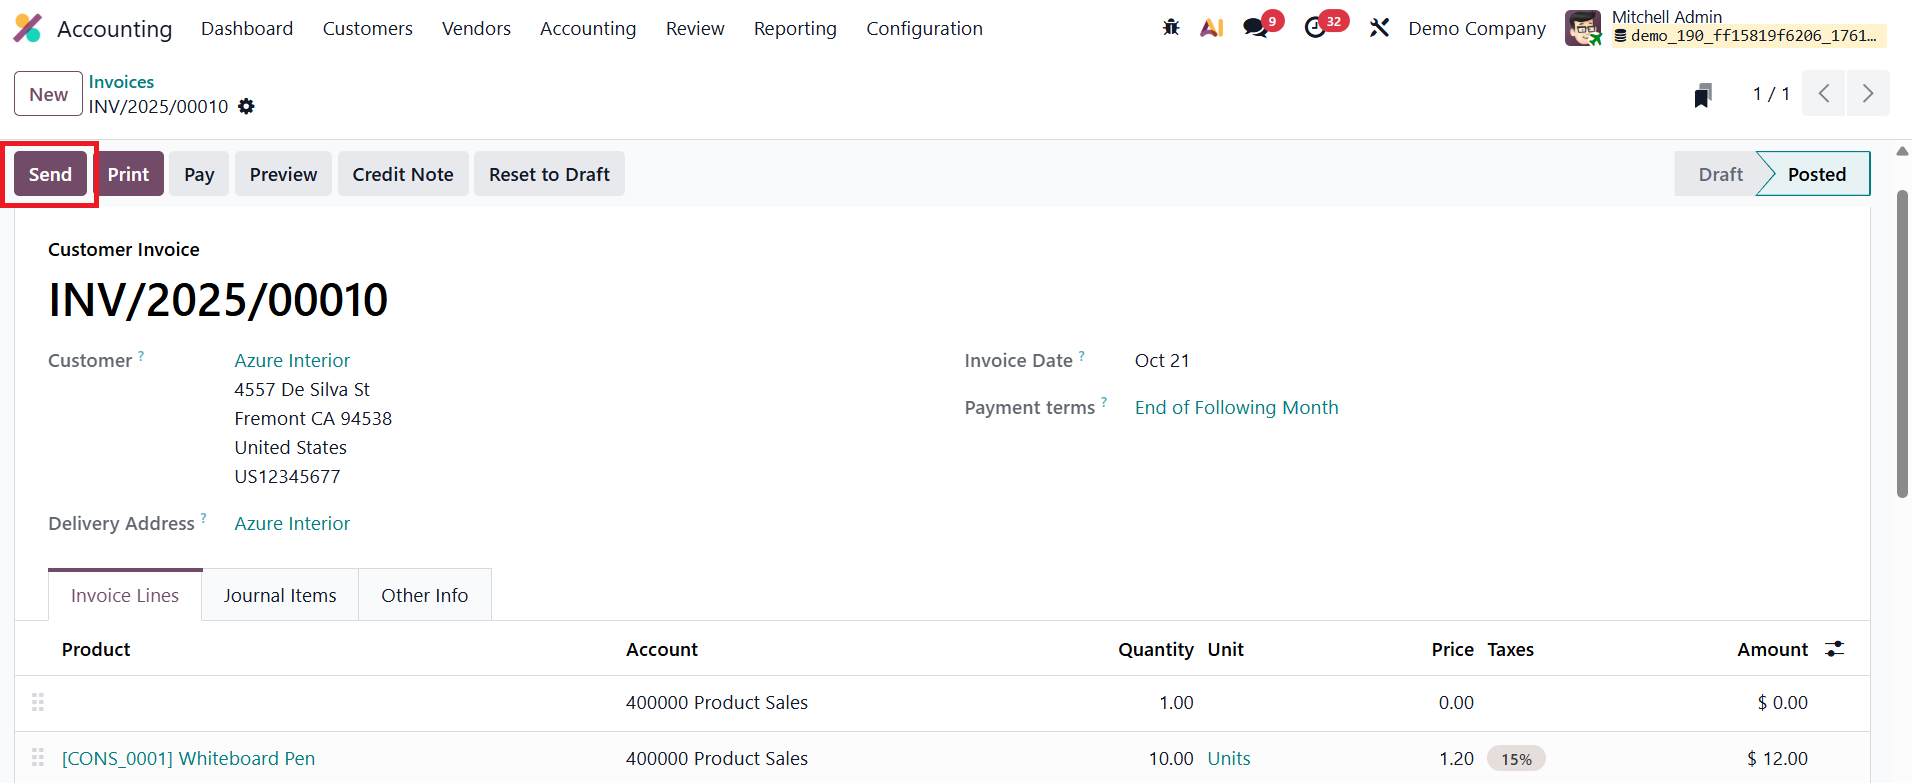
The invoice form in Odoo 19 is organized into three main tabs: Invoice Lines, Journal Items, and Other Info, each designed to handle different aspects of the invoicing process.
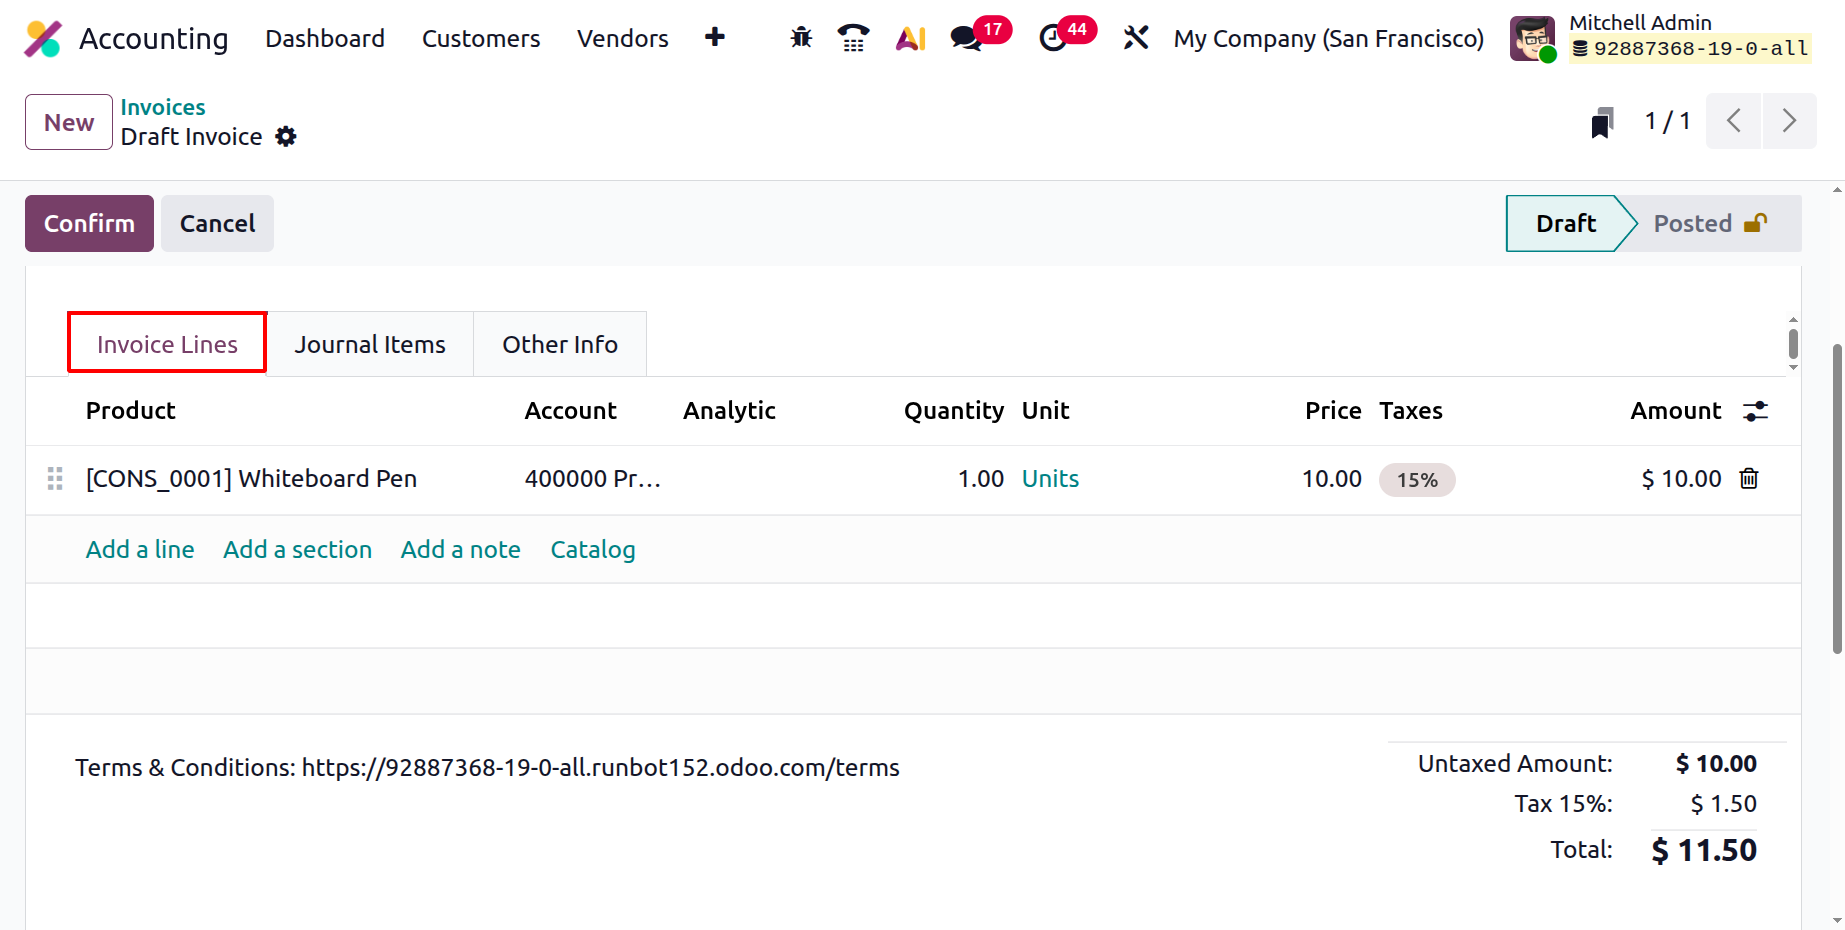
In the Invoice Lines tab, users can add products or services using the Add a Line button. Each line entry includes details such as Product, Account, Quantity, Unit of Measure (UoM), Price, Taxes, and Amount. If the invoice is automatically generated from a Sales Order, these details are pre-filled based on the order lines, reducing manual data entry and ensuring consistency.
For better organization, users can also use Add a Section to insert headings or Add a Note to include additional comments or clarifications within the invoice. The Catalog button in the Invoice Line section is a helpful shortcut that allows users to browse and select products or services directly from the company’s product catalog while drafting or editing an invoice. At the bottom of this section, the Untaxed Amount, Taxes, Total, and Amount Due are automatically calculated and displayed, providing an instant overview of the final amount payable.
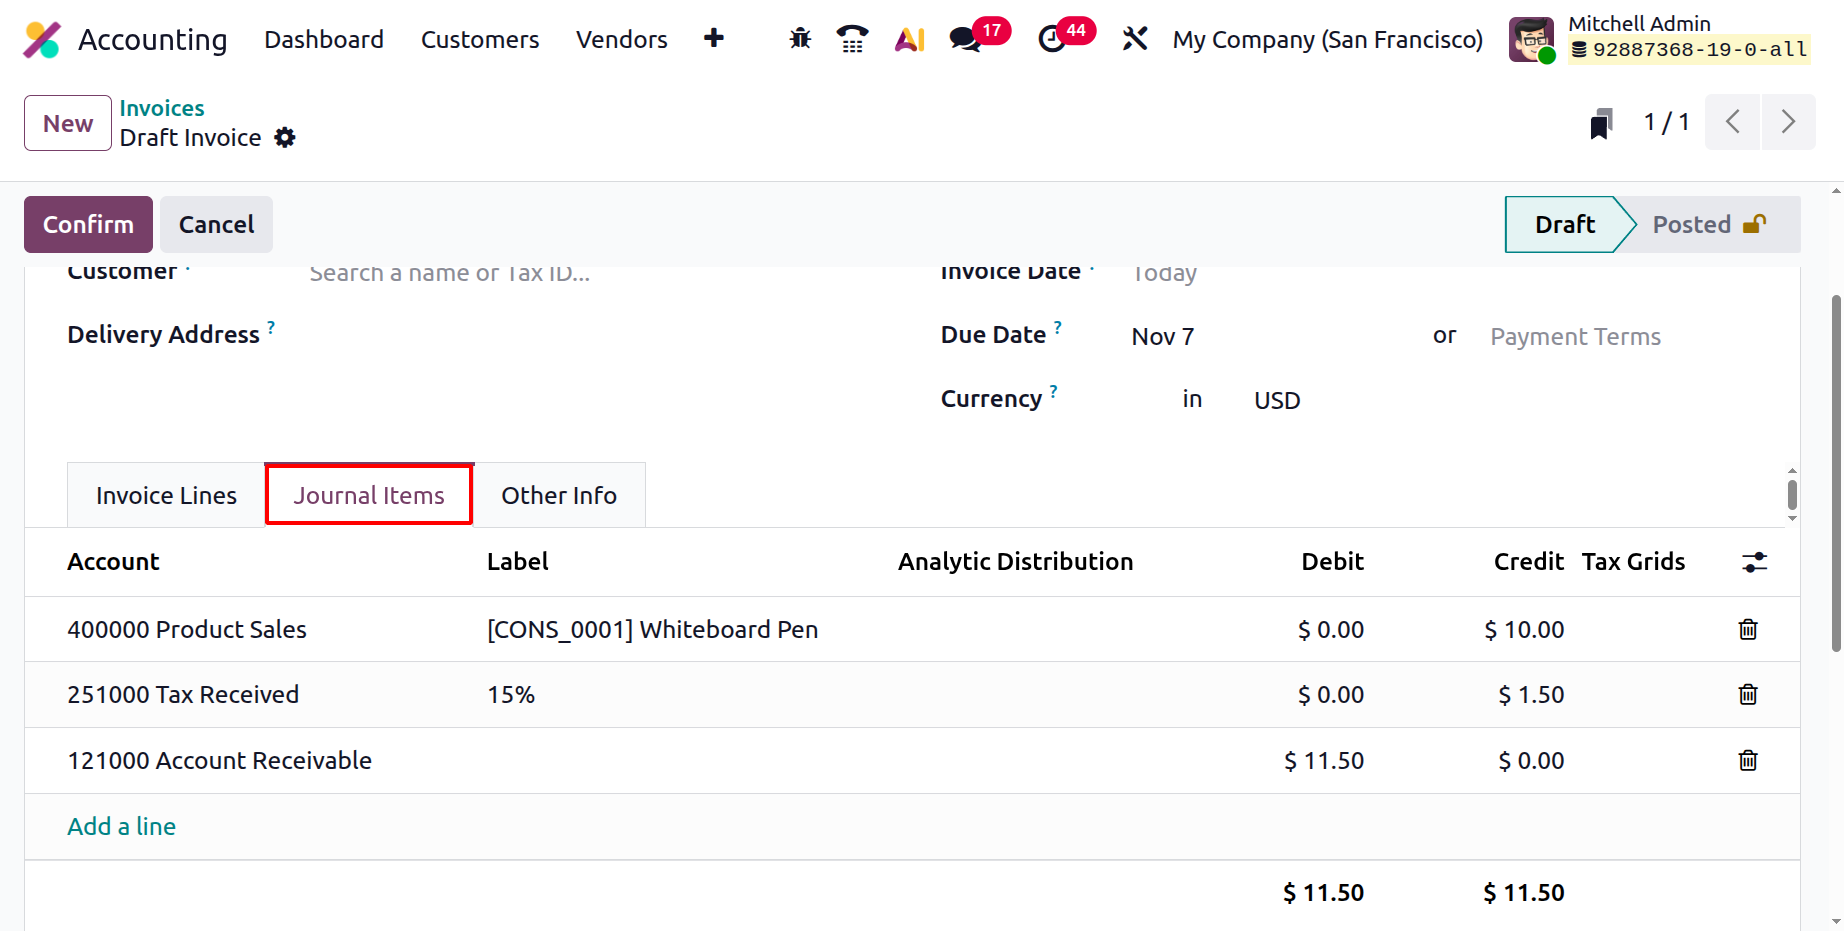
The Journal Items tab presents the underlying accounting entries generated from the invoice. This includes key details such as Account, Label, Debit and Credit Amounts, and Tax Grids. These entries represent how the transaction will affect the company’s financial statements. Users can also add new lines or delete existing ones using the action buttons available in this section.
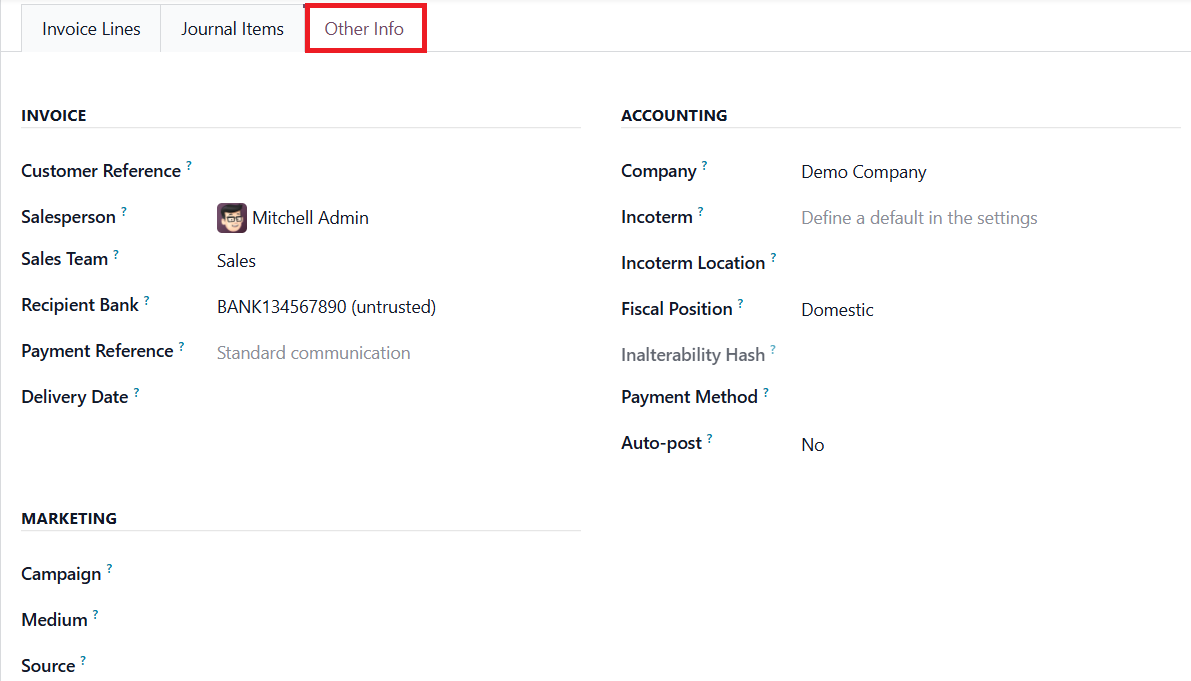
The Other Info tab gathers all supplementary information related to the invoice. Here, users can assign a Salesperson and Sales Team to track who handled the transaction. It also includes fields for Customer Reference and Recipient Bank Account, ensuring that payments are directed to the correct destination. The Payment Reference field allows you to specify a unique reference or identifier that helps the customer recognize the payment related to this invoice. The Delivery Date field records the date on which the products or services included in the invoice were delivered to the customer.
Under the Accounting section of this tab, users can fine-tune additional configurations by setting the Company, Fiscal Position, Incoterms, Incoterm Location, and Payment Method. These fields help ensure that the invoice complies with international trade standards, taxation rules, and company policies.
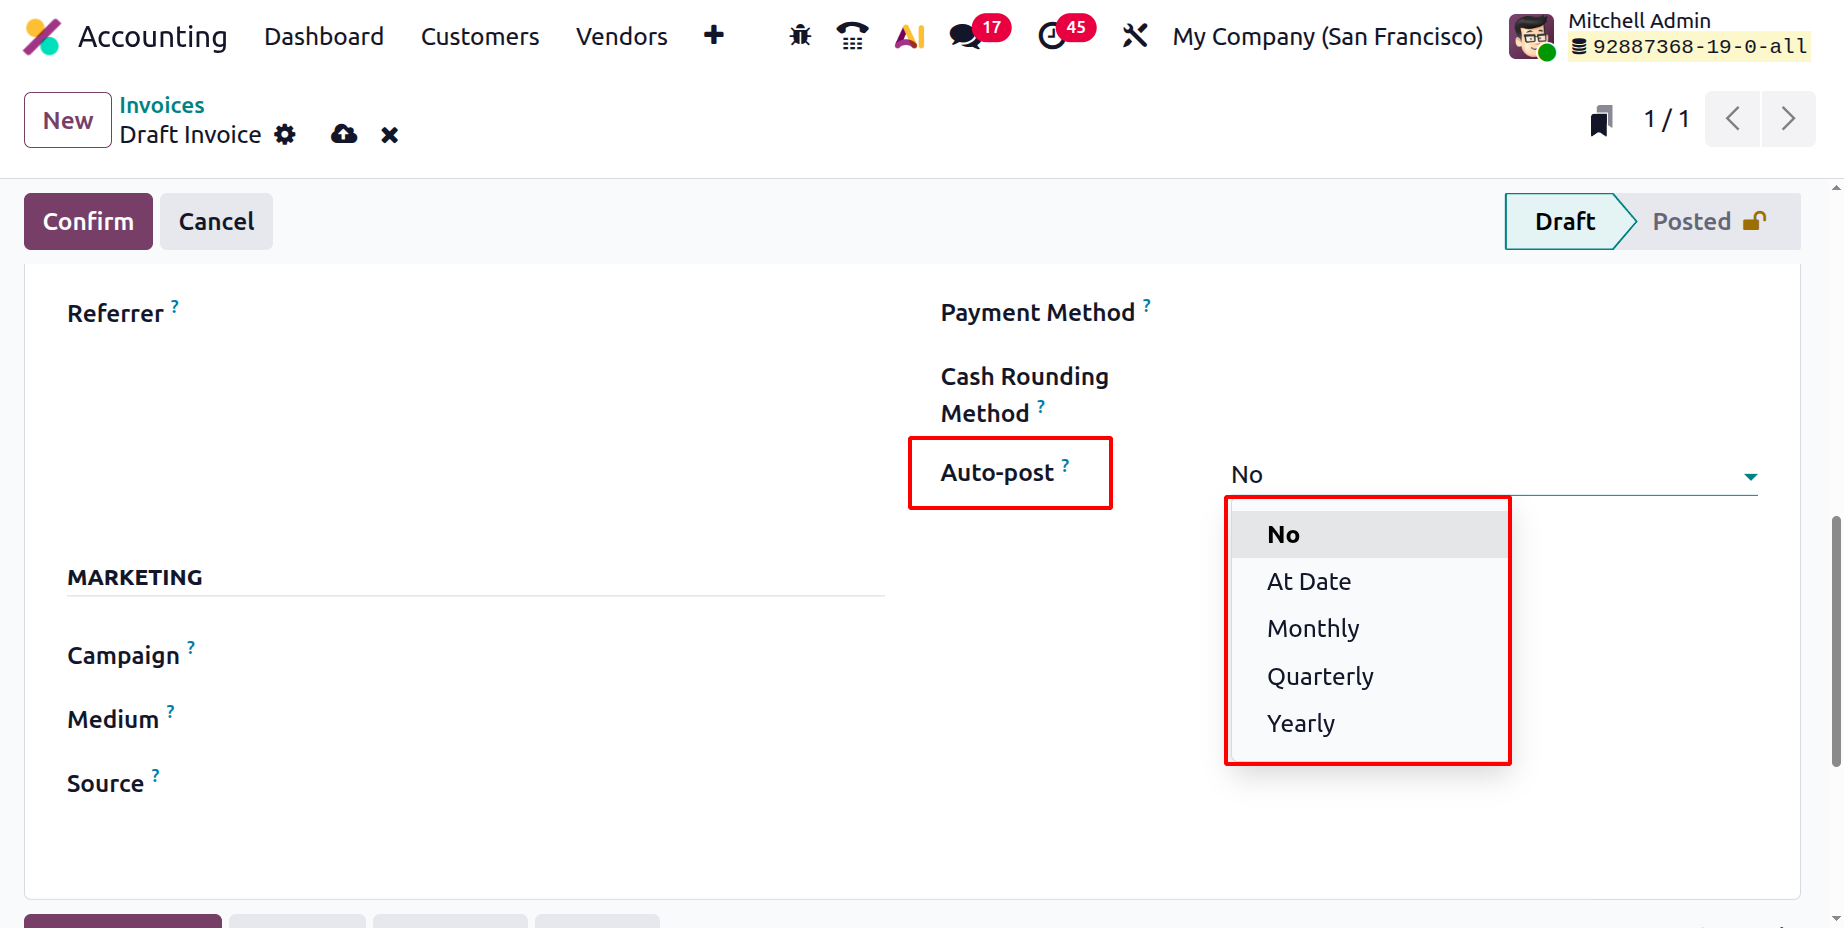
The enhanced Auto Post feature allows invoices to be posted automatically on a set schedule. Users can define whether invoices should be auto-posted Monthly, Quarterly, or Yearly, depending on the business cycle. For those who prefer full manual control, the Auto Post option can be set to “No.” The Auto Post Until field allows users to specify the end date for automatic posting, offering flexibility for recurring or time-bound billing scenarios.
The Marketing section allows users to record campaign details, such as Campaign, Medium, and Source, making it easier to track the performance of marketing efforts linked to sales.
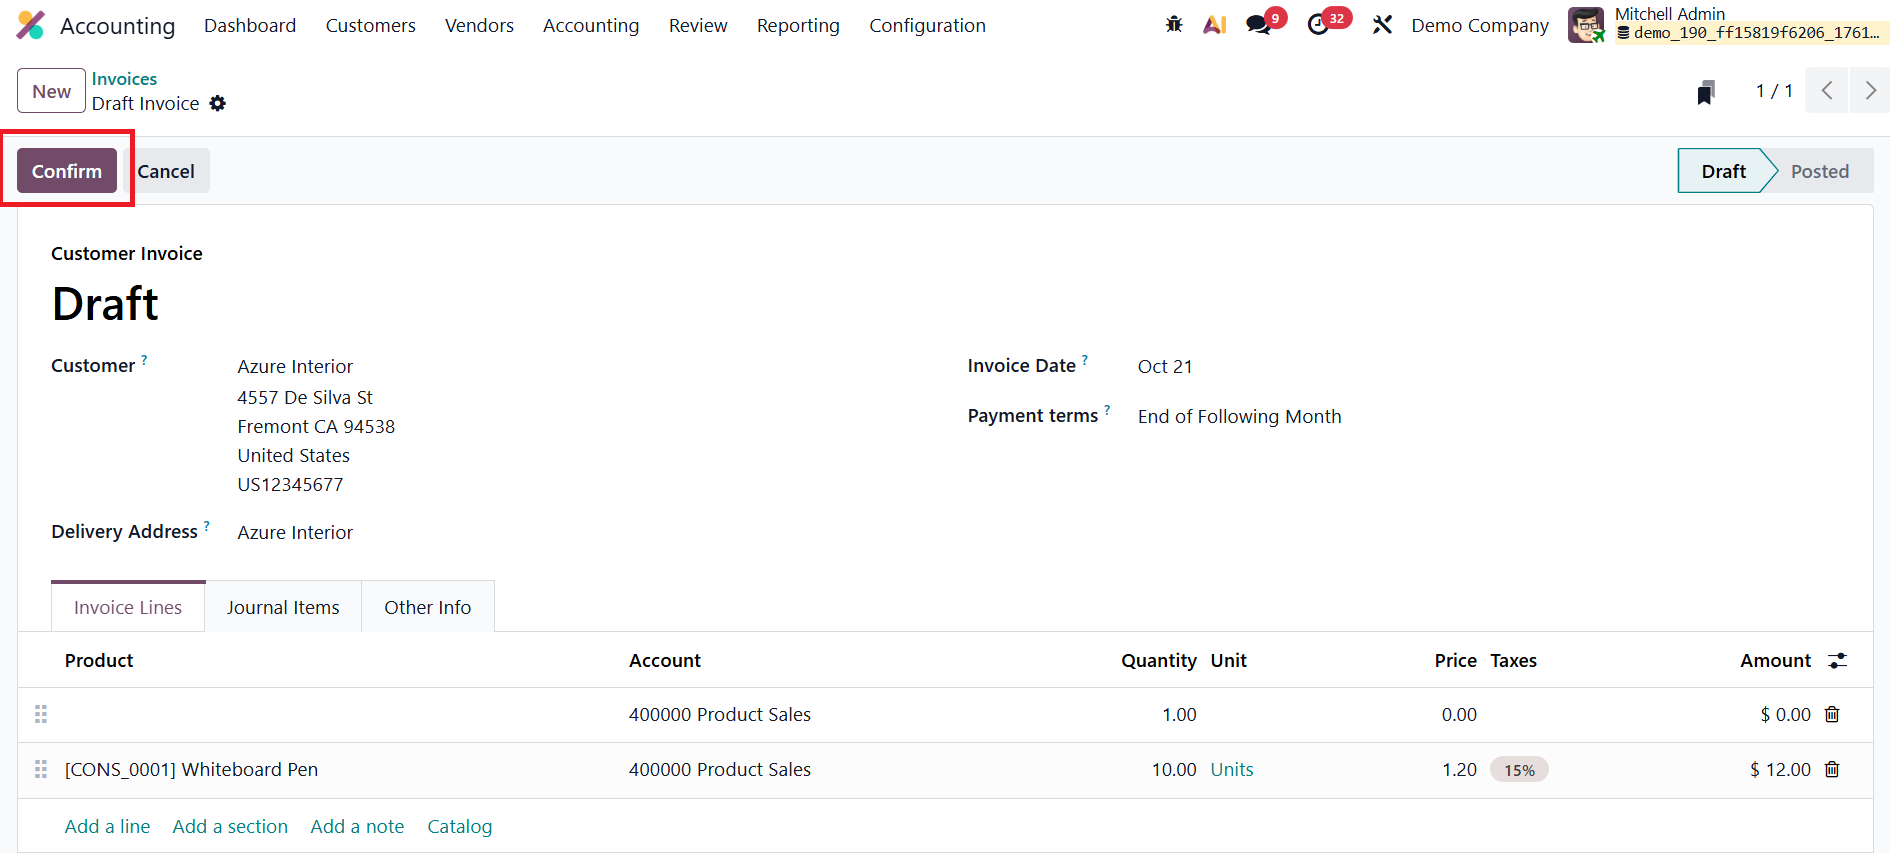
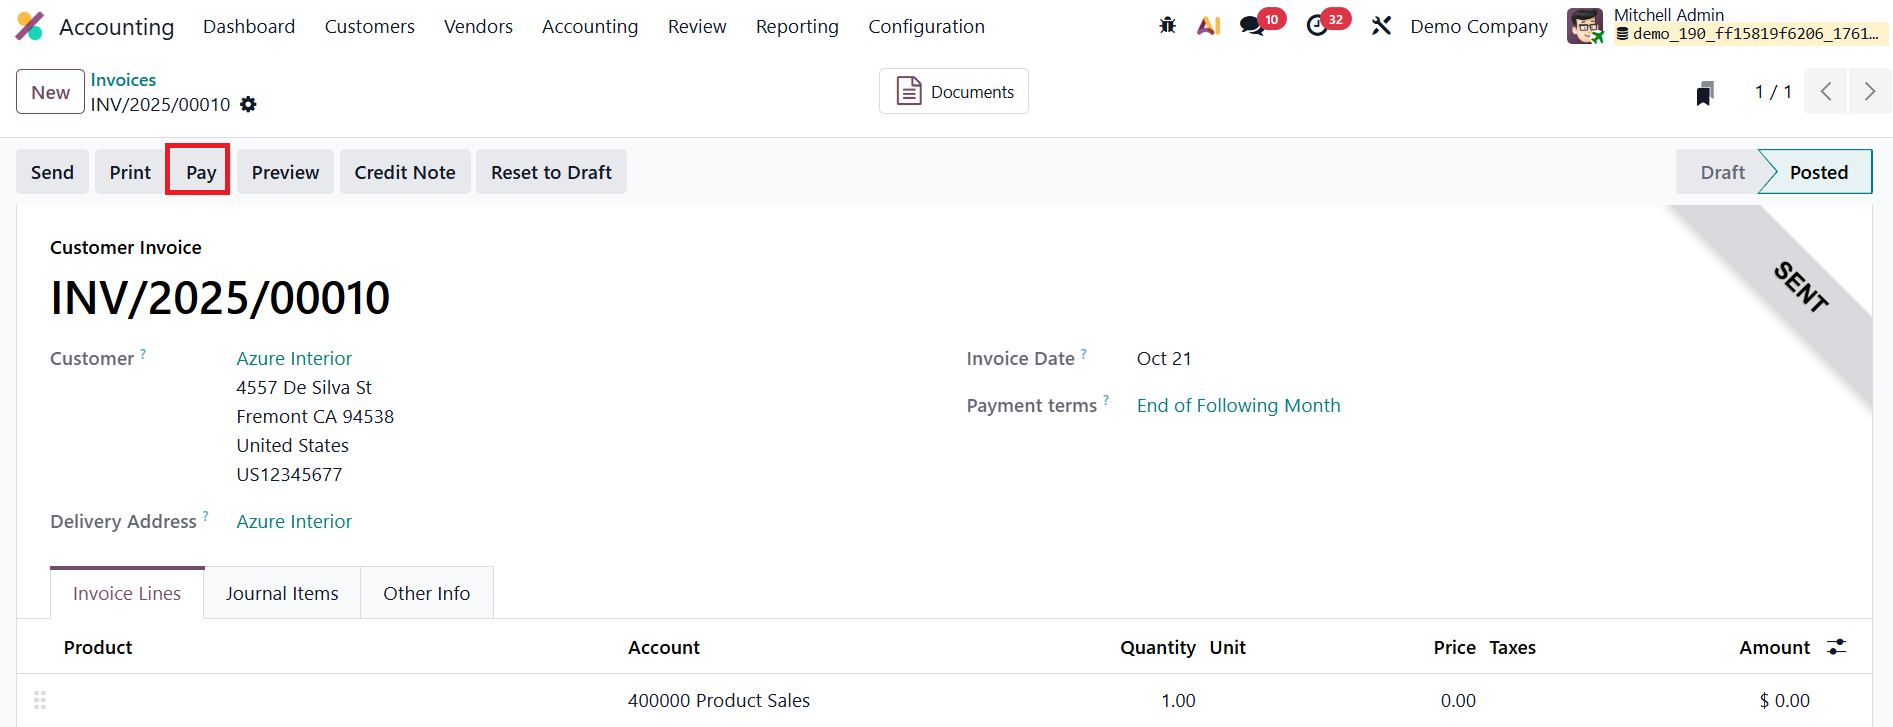
Once all necessary details are filled in, users can finalize the document by clicking the Confirm button. This action changes the invoice status from Draft to Posted, officially recording it in the system.
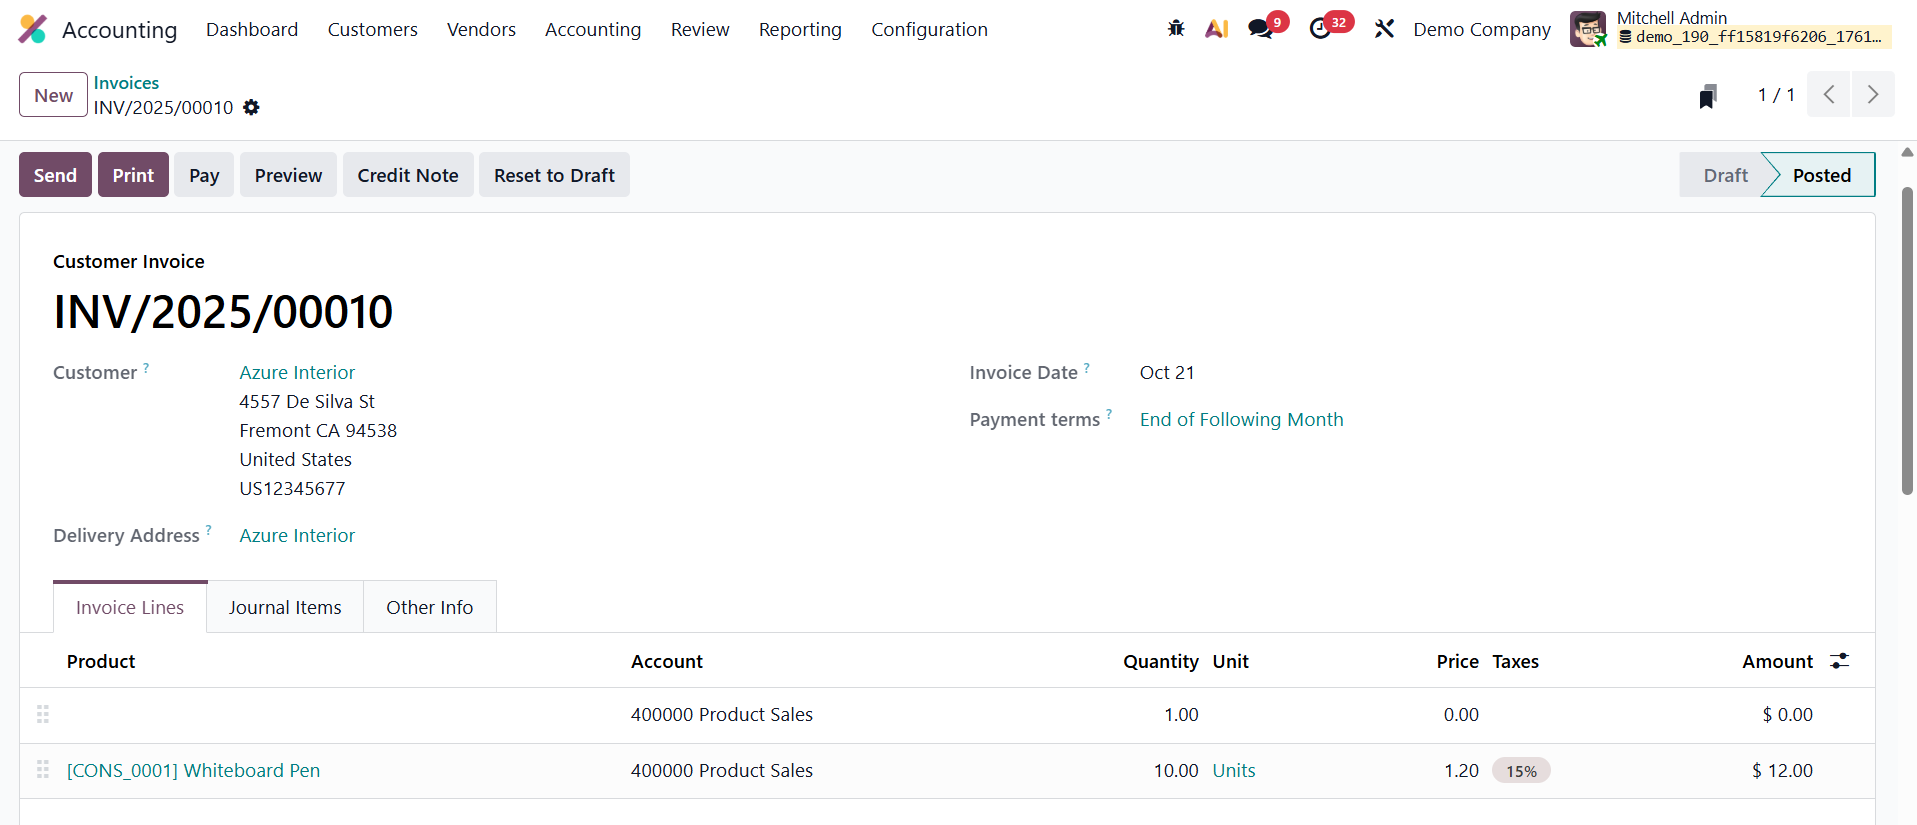
From this stage, users can proceed with sending the invoice to the customer, registering payments, or initiating follow-up actions for overdue invoices. If necessary, a posted invoice in Odoo 19 Accounting can be reverted to the draft state using the Reset to Draft option. This feature is particularly useful when you need to make corrections or modifications to an already posted invoice before final confirmation.
The Preview button allows users to view the invoice exactly as the customer would see it, offering a client-side perspective before sending.
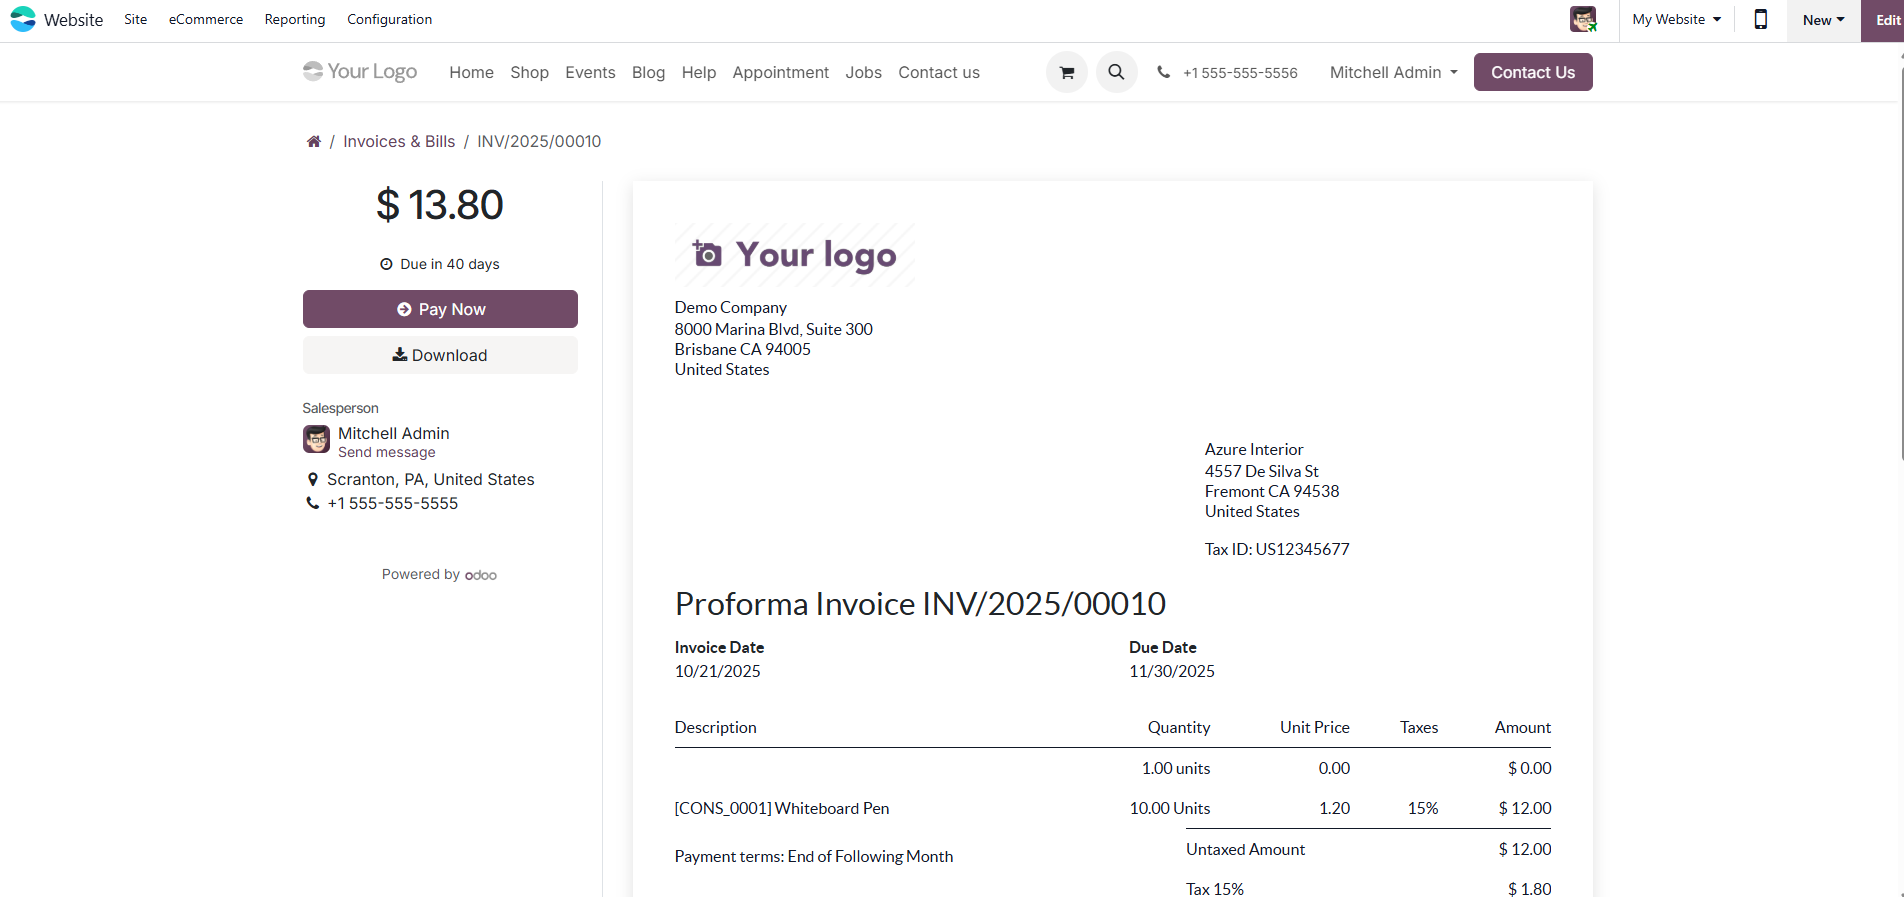
This client preview page provides options for the customer; they can view, download, print, or pay the invoice directly using their preferred payment method. Additionally, customers can communicate directly with the assigned salesperson via a built-in chat or messaging interface, ensuring seamless correspondence without switching platforms.
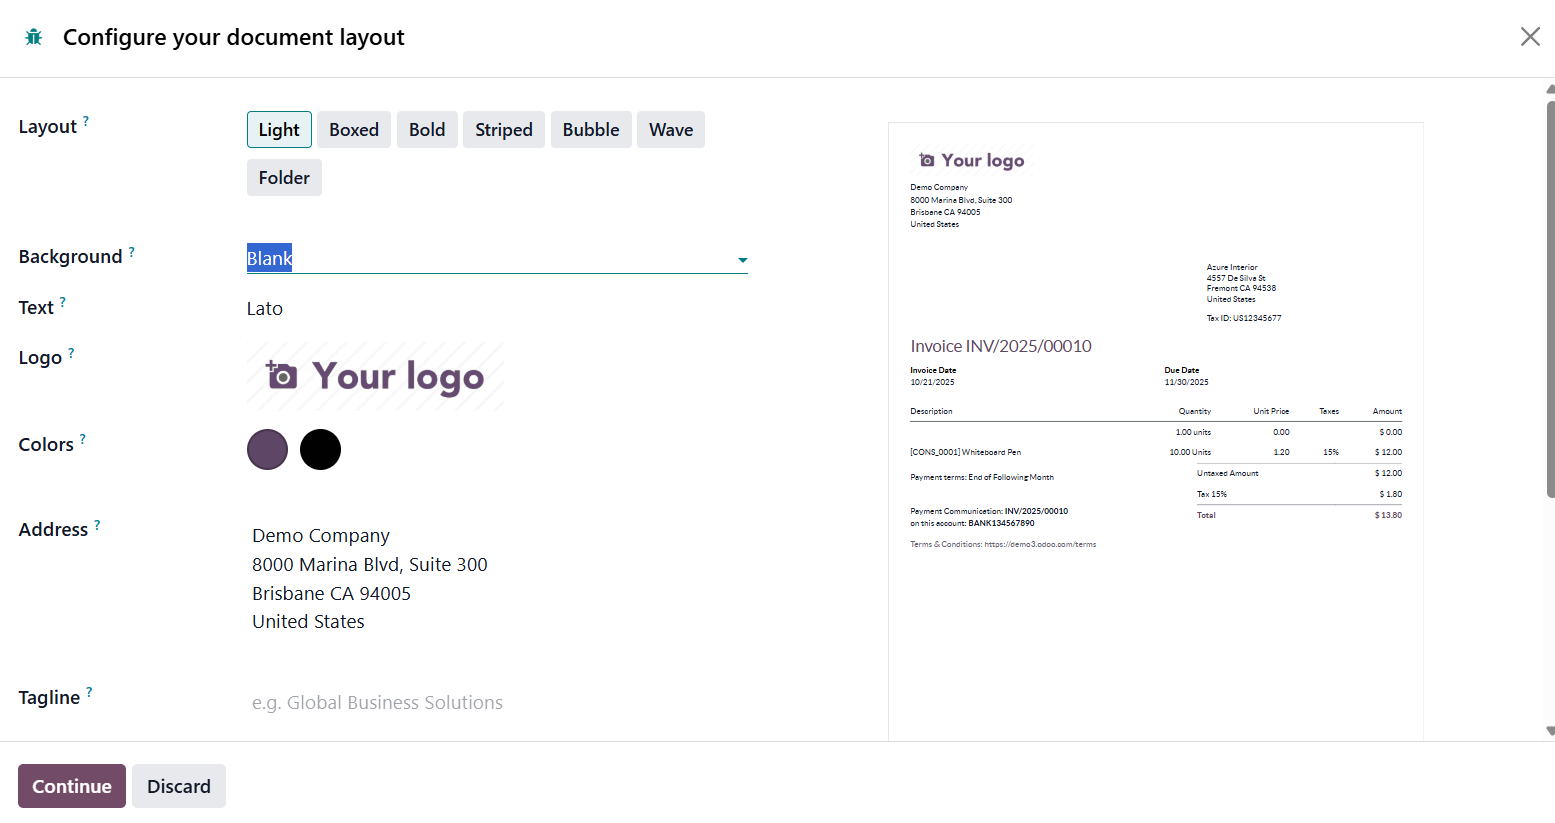
When you’re ready to share the invoice with the customer, selecting the Send option opens an auto-generated email template. From the Configure your document layout window, you can customize the email template by mentioning the Layout, Background, Text, Logo, Colors, Address, and Tagline.
This email can be fully customized; users can edit the recipients, subject line, and body content before sending.
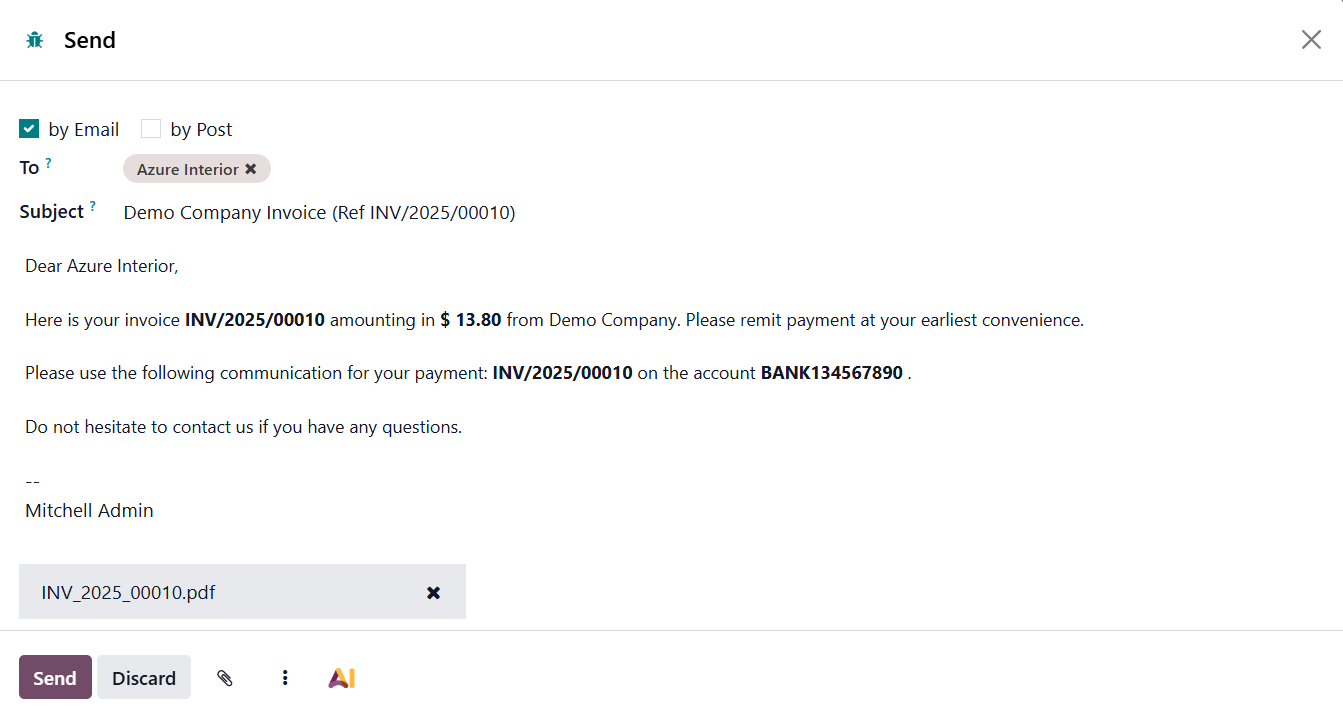
Once finalized, attaching the invoice and clicking Send will immediately deliver the email to the customer’s inbox. By clicking on the AI option, a new pop-up window appears, enabling users to quickly generate or refine email text with the help of artificial intelligence, ensuring a polished, personalized message for every client.
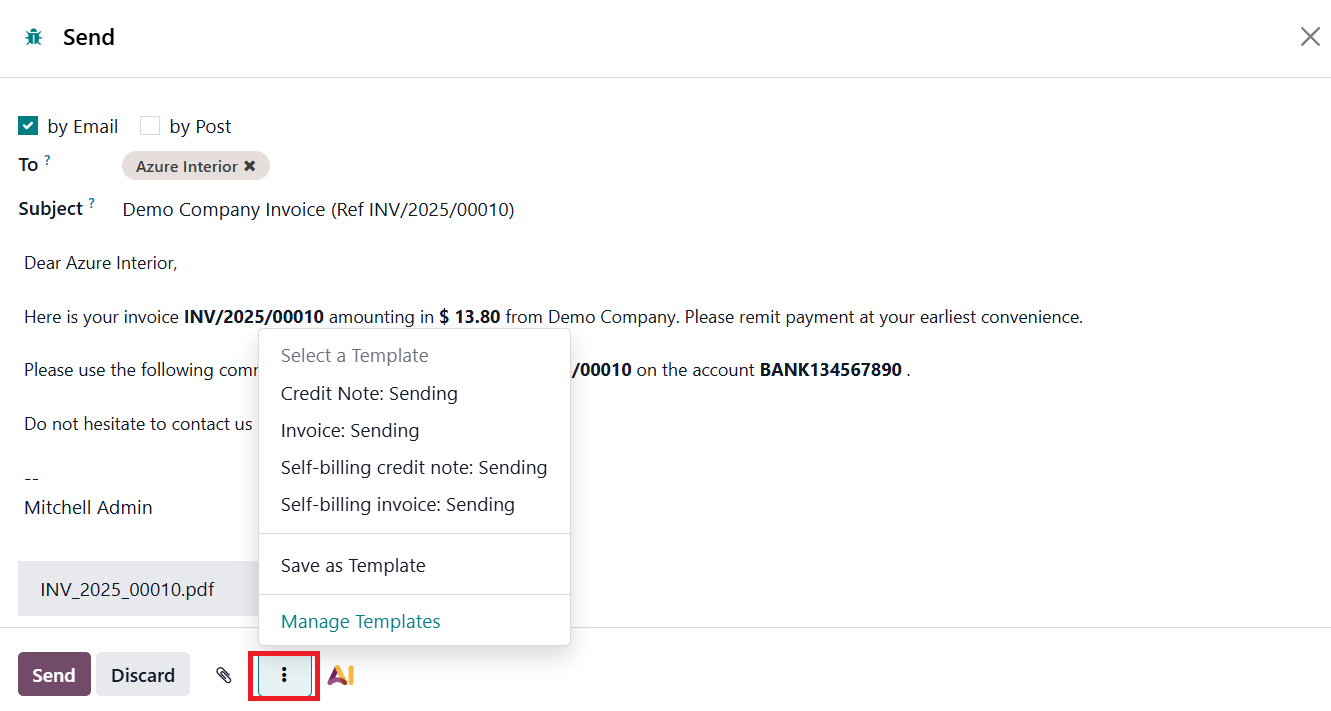
The three dots menu (⋮) in the email composer provides additional control options. Here, users can choose from existing email templates to maintain consistent messaging. If you’ve drafted a new email that you might want to reuse in the future, the Save as Template option allows you to save it for later use. All saved templates can be viewed, edited, or organized using the Manage Templates option.
Selecting Manage Templates opens a dedicated window listing all available email templates in the system.
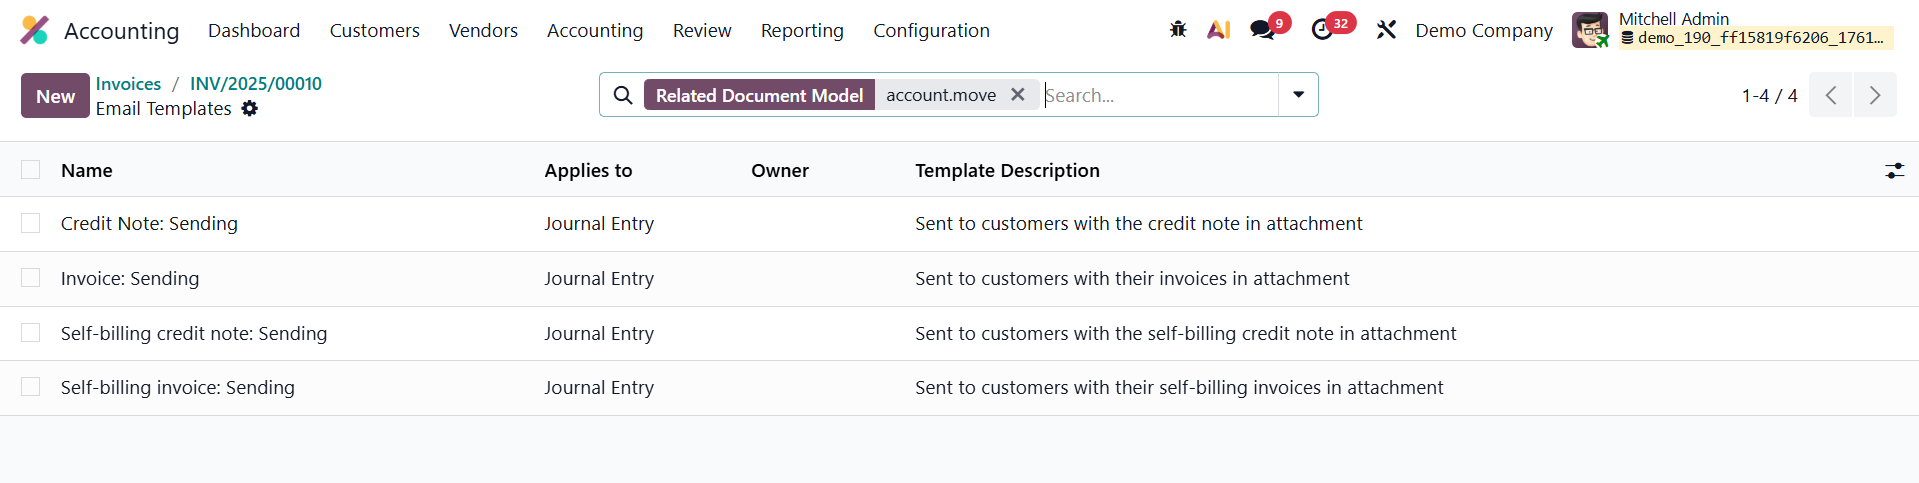
From here, you can click the New button to create a fresh template. During template creation, you can assign a Name and specify the Applies To field, which determines the document type or model the template will be linked to (such as invoices, sales orders, or quotations).
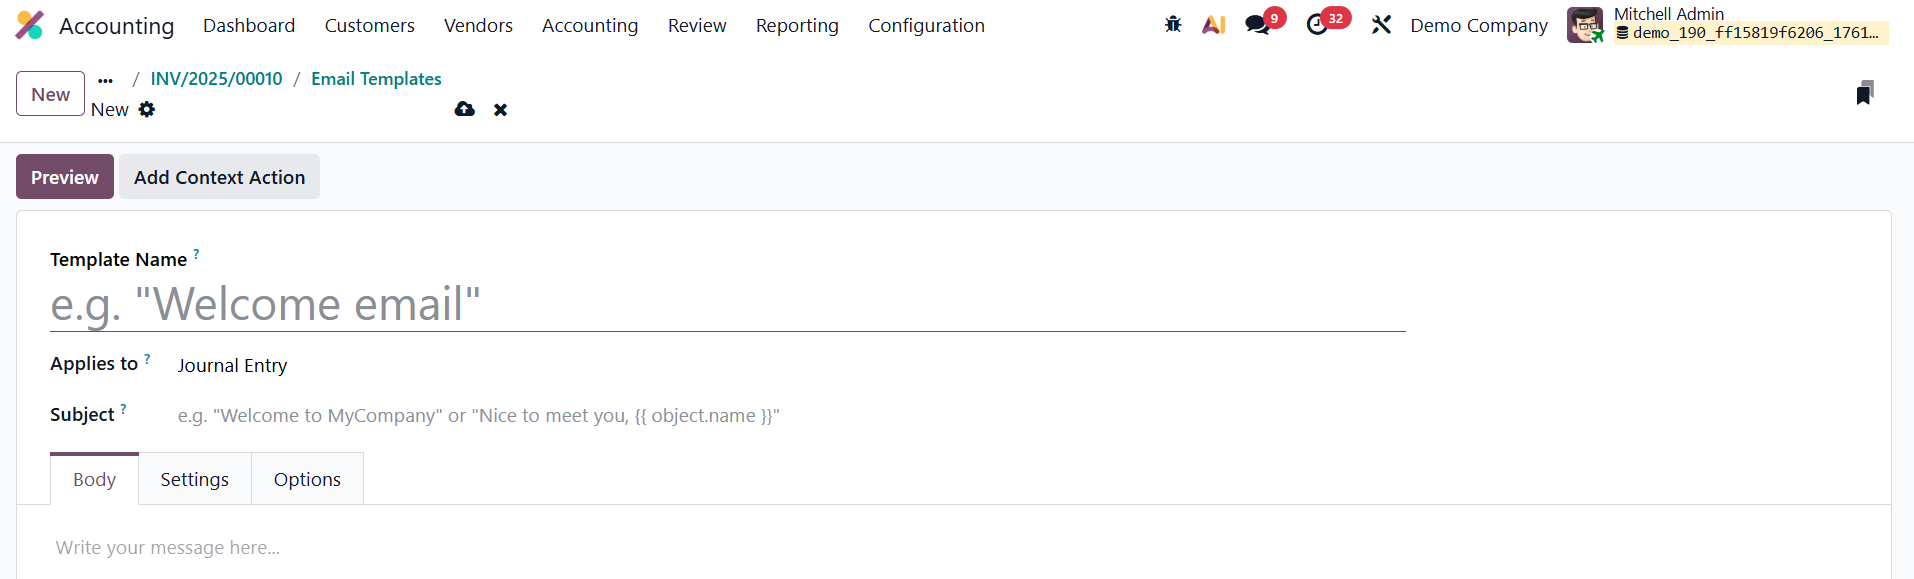
Under the Subject field, you can specify the subject line that will appear in the email header, and the main email content can be crafted under the Body tab using customizable HTML or text fields.
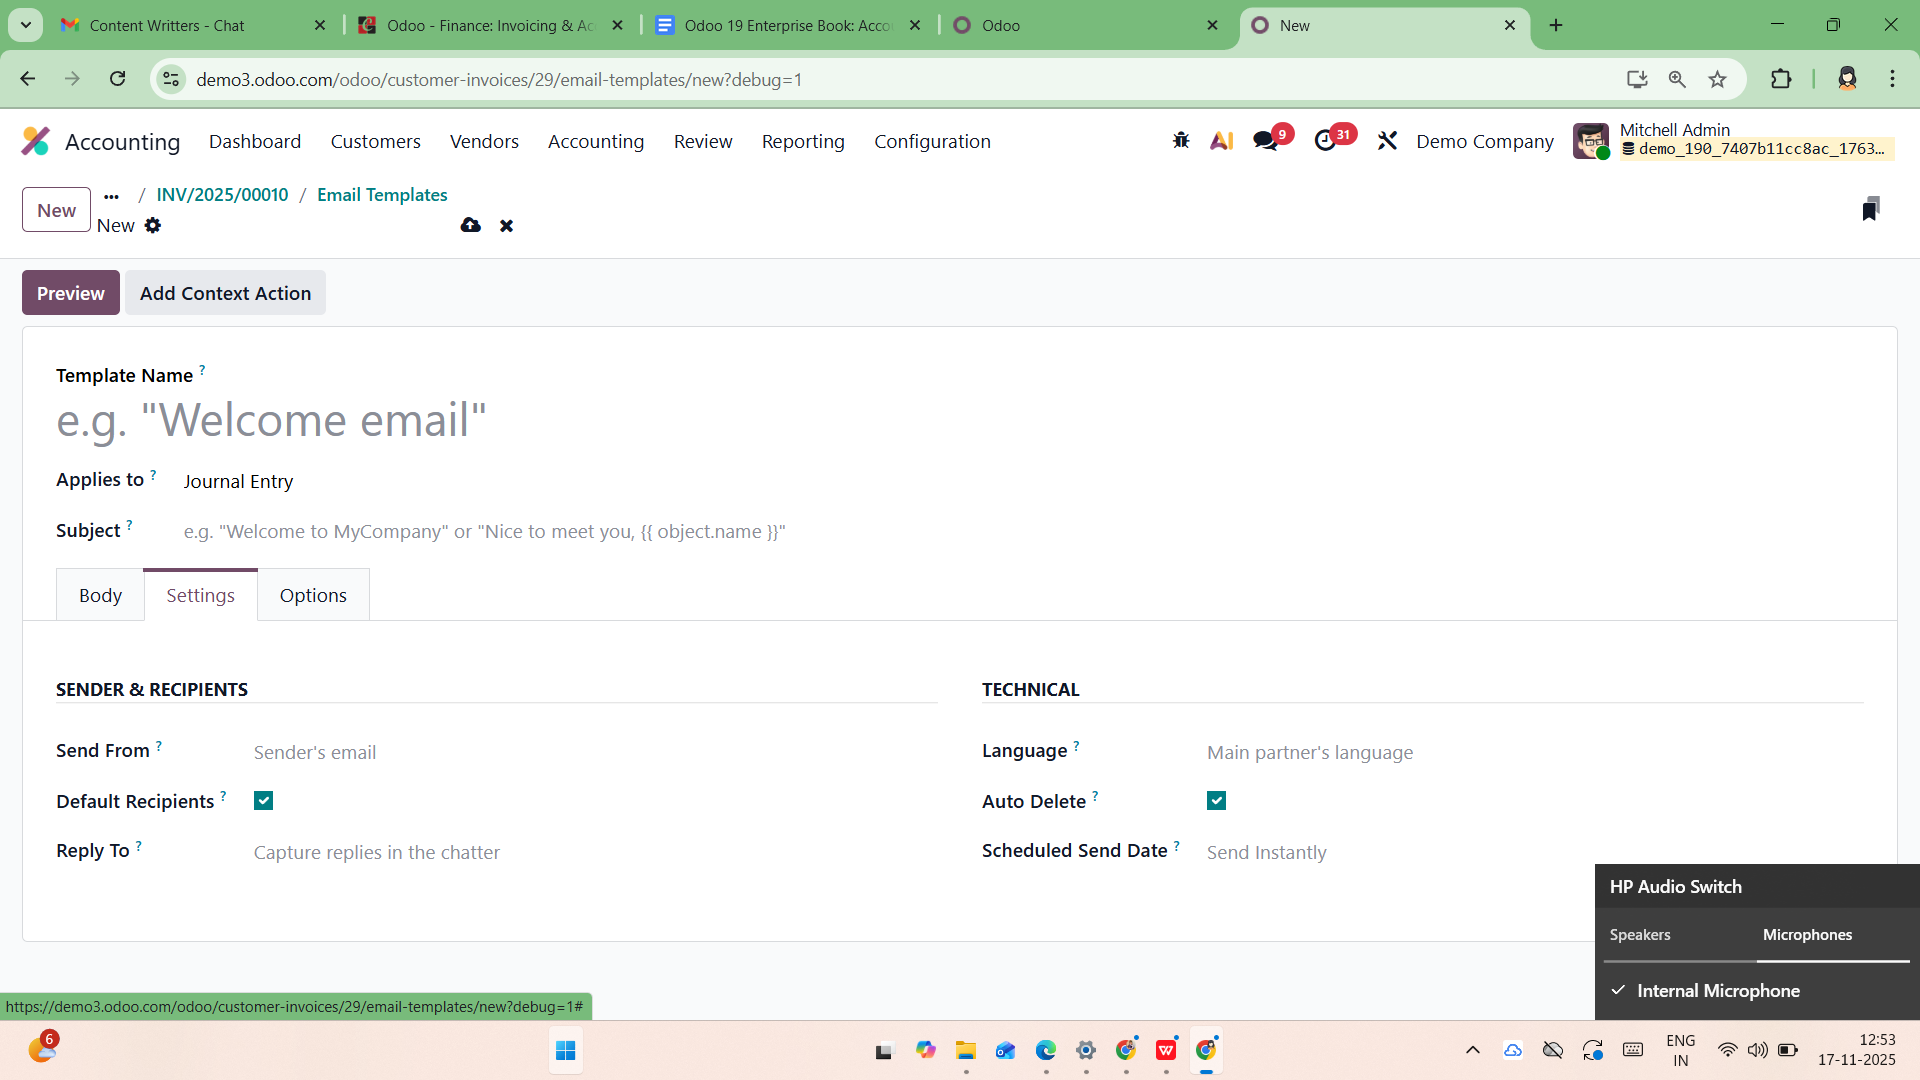
Within the Settings tab, users can define essential parameters such as the From address, Default Recipients, Reply-To address, Language, and Scheduled Send Date, providing flexibility for automated or delayed email dispatch. The Auto Delete option determines whether emails generated from this template should be automatically removed after being sent.
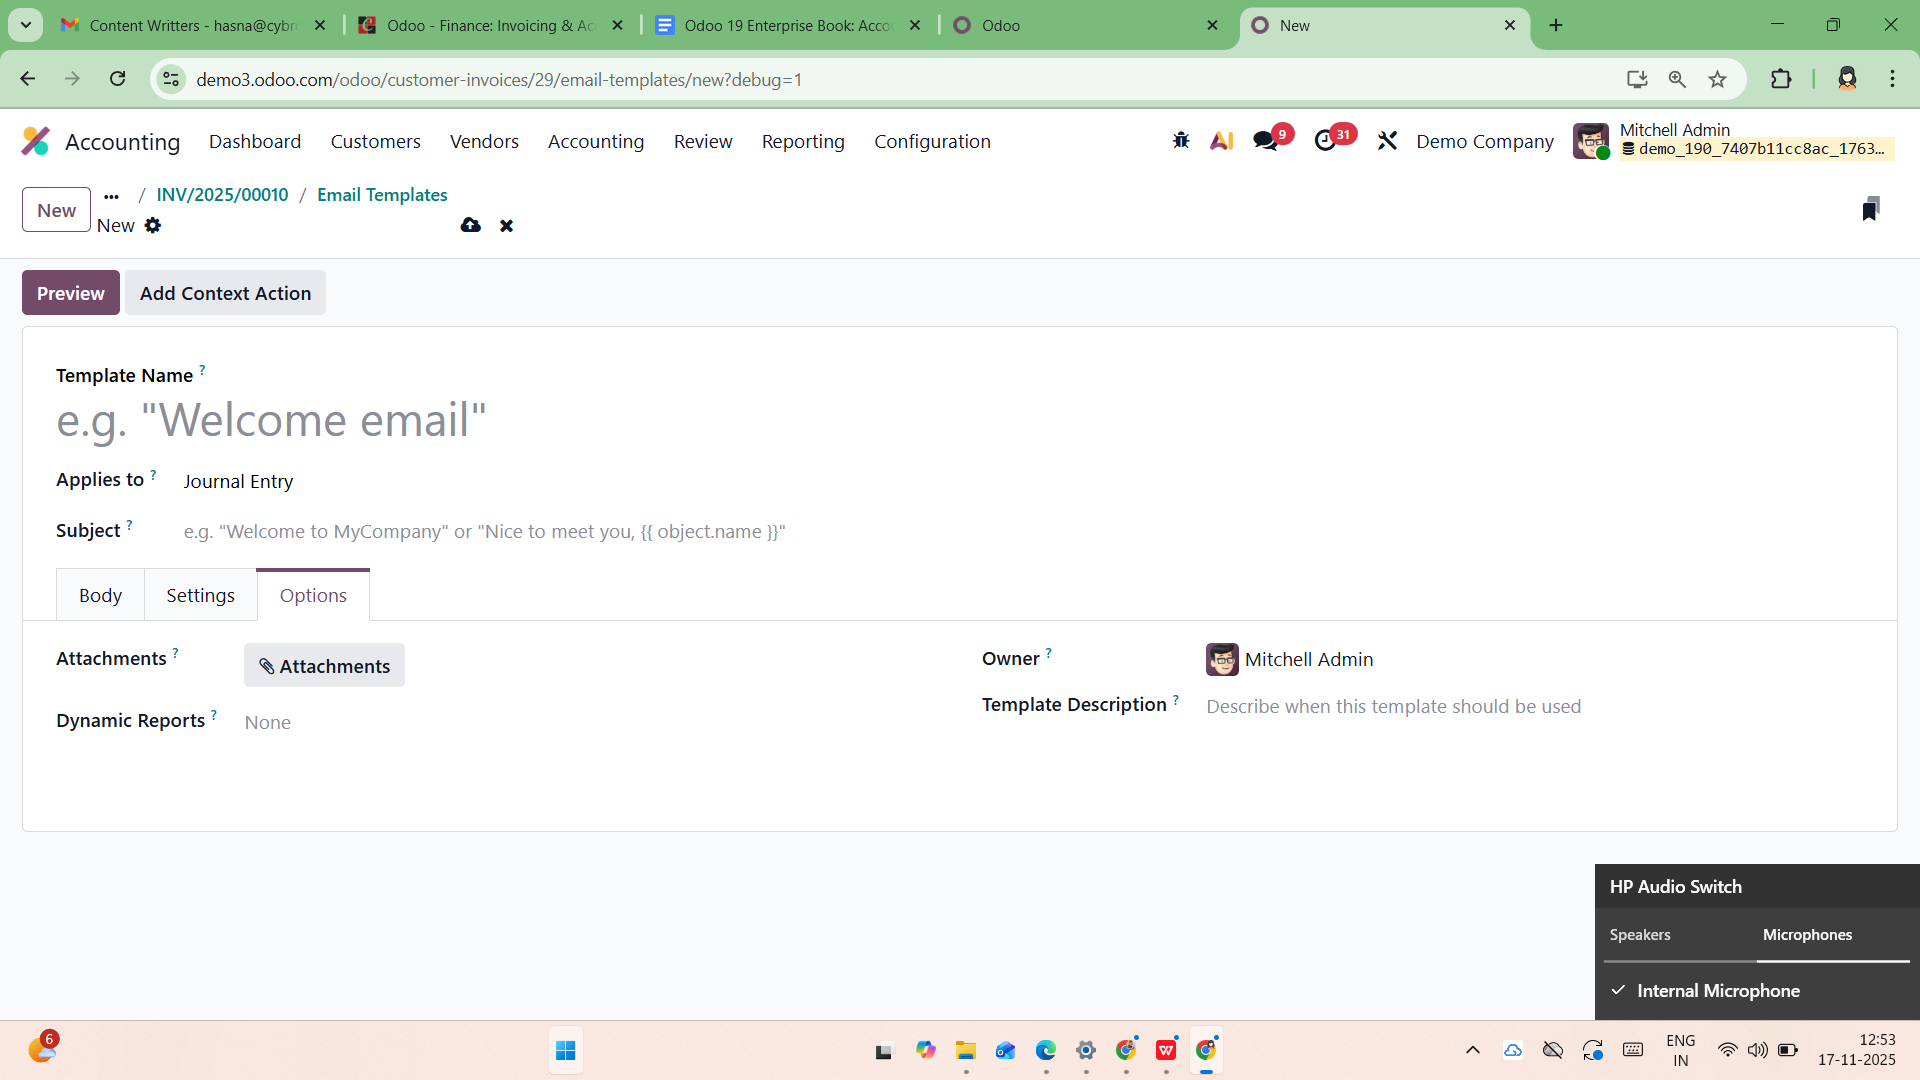
The Options tab offers advanced options such as choosing the Attachments, Dynamic Report (to attach dynamic documents like invoices or receipts), Owner, and Template Description.
Once the customer completes payment, the Pay option is used to record the transaction within the system. When this option is selected, Odoo opens a payment registration pop-up, displaying fields such as the Journal, Payment Method, Recipient Bank Account, Amount, Payment Date, and Memo.
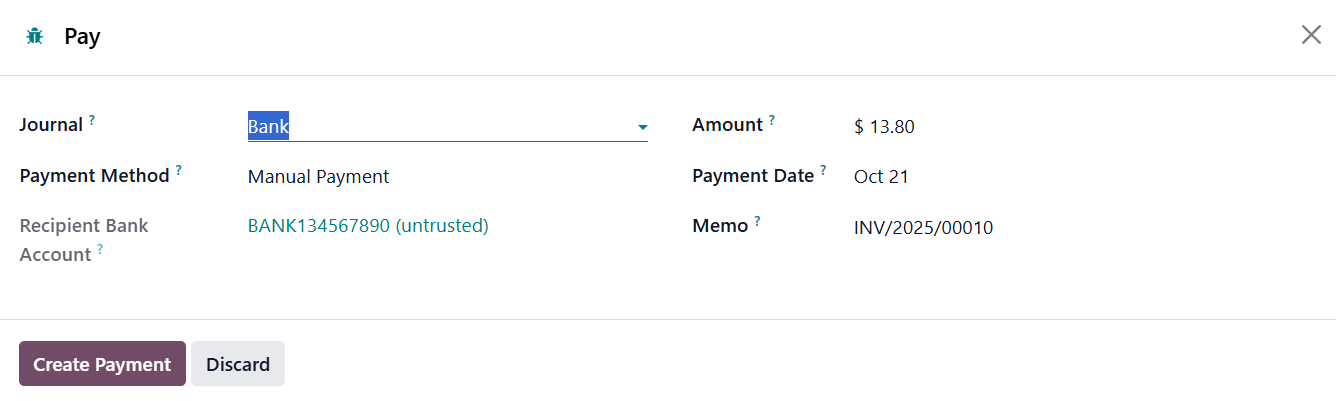
Each field can be reviewed or modified as necessary to ensure accuracy. By clicking Create Payment, the transaction is validated, and the invoice status automatically updates to In Payment, indicating that the payment has been initiated or processed.

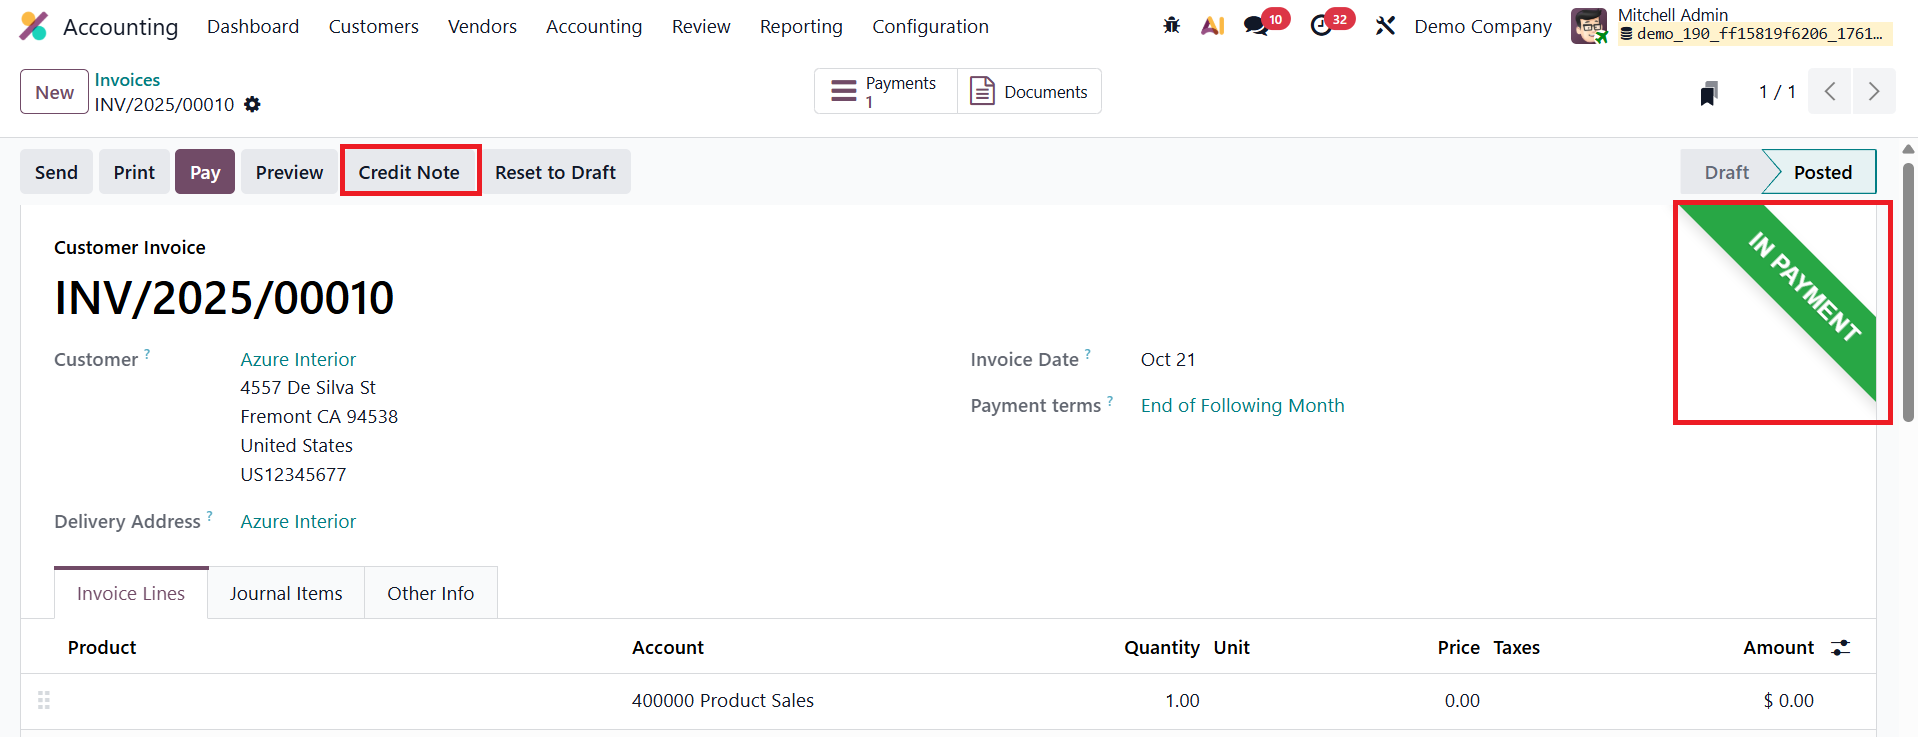
In situations where customers return products, receive damaged goods, or reject services, businesses may need to issue a Credit Note to adjust the original invoice. This process can be initiated using the Credit Note button.

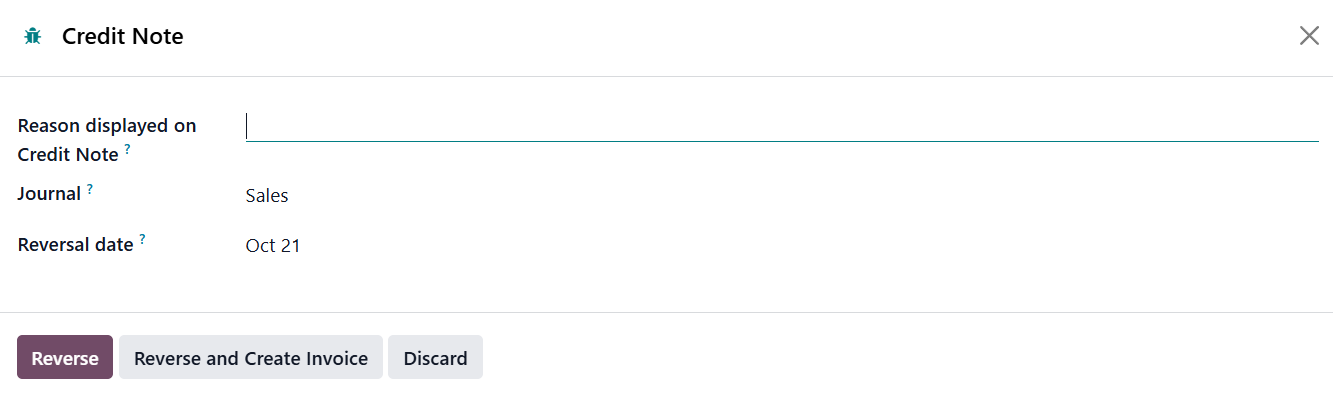
When clicked, a wizard window appears where the user specifies details such as the Reason for issuing the credit note, the Reversal Date (which can either match the original journal entry date or a custom date), and the Journal to which the reversal will be posted.
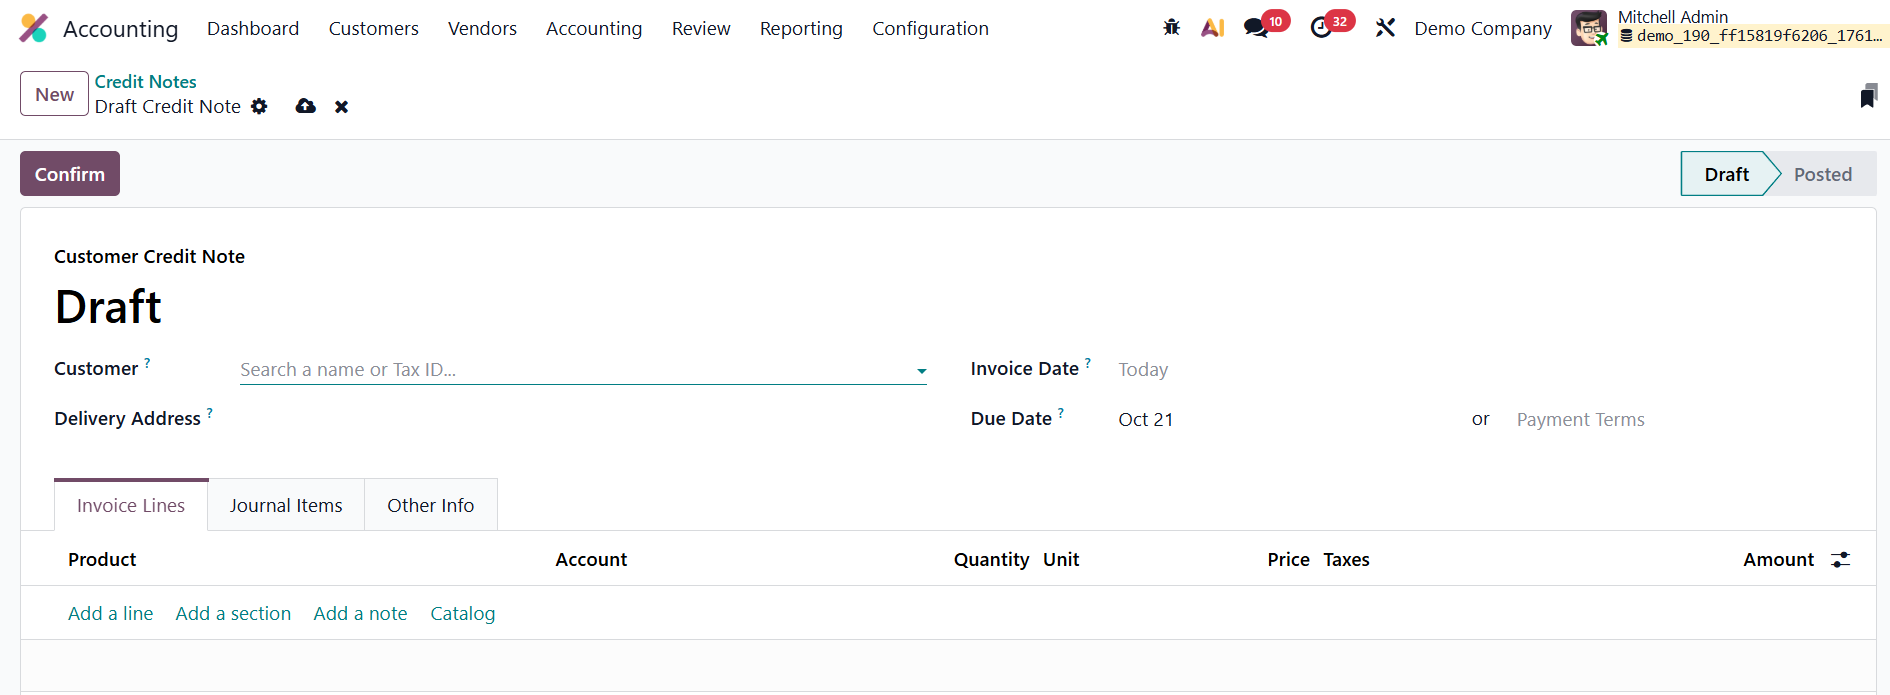
After entering the necessary information, clicking Reverse will automatically generate a draft credit note linked to the original invoice. The system then redirects the user to a new window displaying this draft credit note.
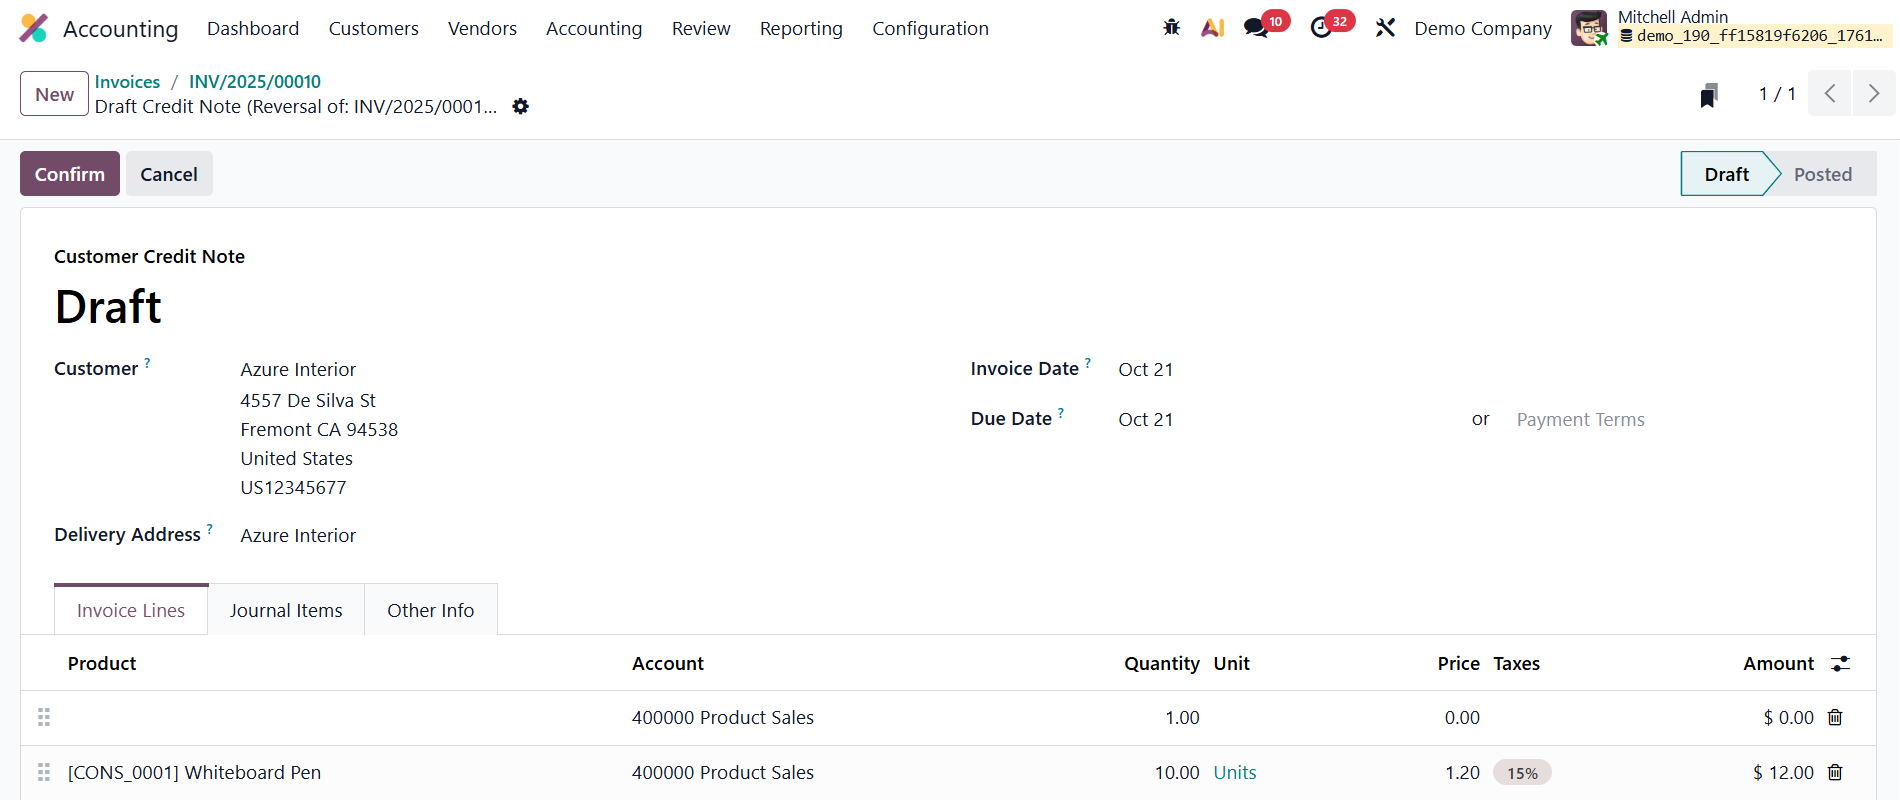
Once reviewed, clicking Confirm validates the document, officially recording it in the system. The Pay option can later be used to handle the payment or refund process associated with the credit note, ensuring that the company’s financial records remain accurate and transparent.
1.2 Credit Note
In Odoo 19 Accounting, credit notes continue to serve as a vital tool for managing financial adjustments and maintaining accuracy in business transactions. Whether caused by billing errors, product returns, overcharges, or service rejections, credit notes help businesses reverse or correct invoices while preserving complete financial transparency.
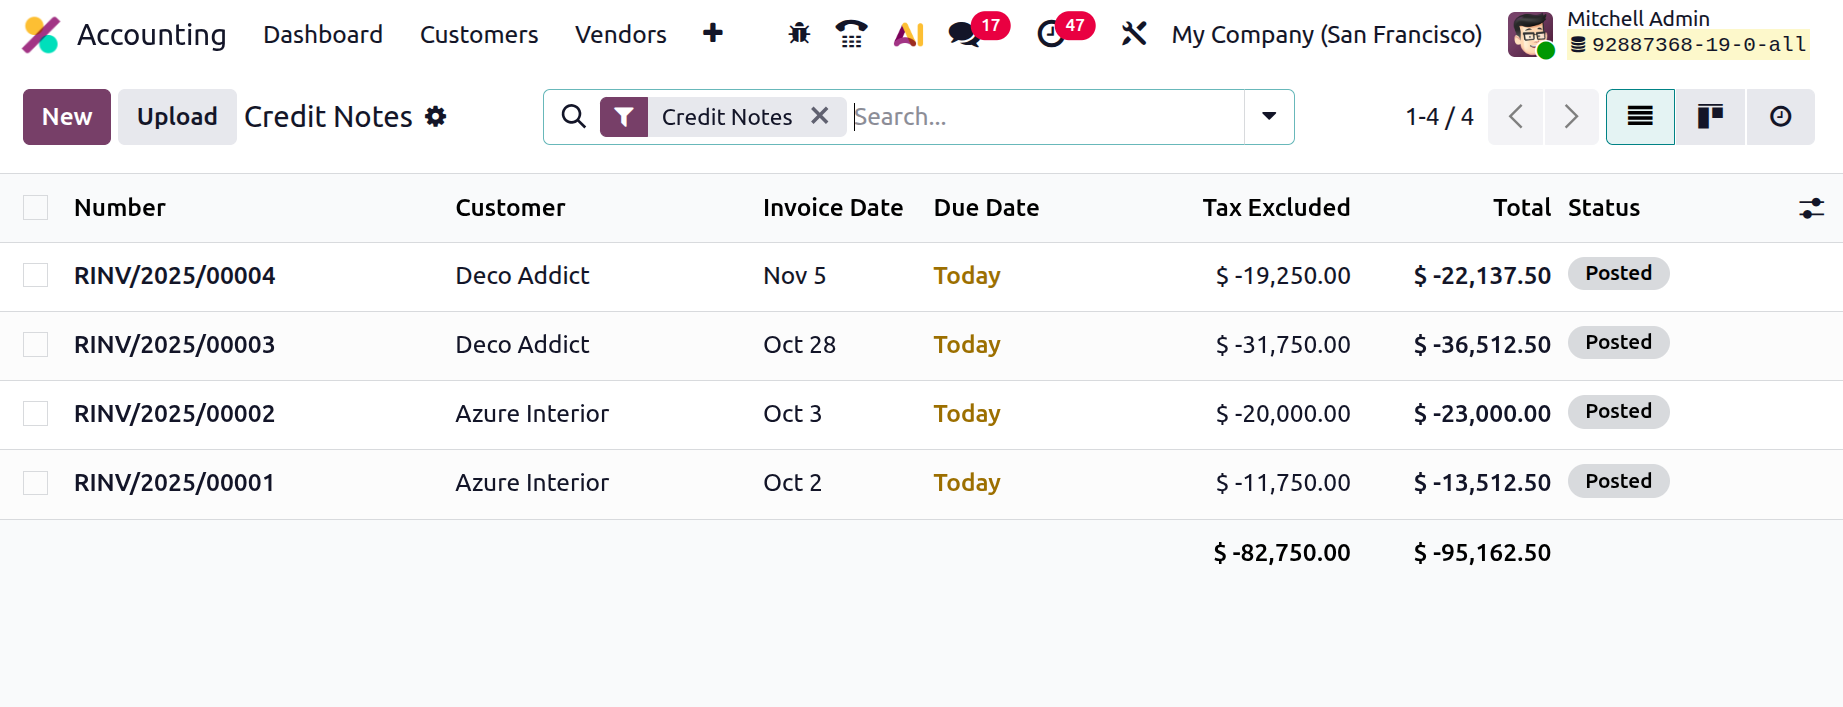
The Credit Notes section can be accessed directly under the Customers menu within the Accounting module.
This section acts as a centralized dashboard where all generated credit notes are listed in a structured and user-friendly format. The layout mirrors that of the Invoices dashboard, displaying essential fields such as Credit Note Number, Customer Name, Invoice Date, Due Date, Tax Excluded Amount, and Status.
When it comes to creating and managing credit notes, Odoo 19 provides two primary methods: automatic credit note generation from an existing invoice and manual creation through the Credit Notes dashboard.
If a customer returns a product, disputes a charge, or if a correction is required, users can simply click the Credit Note button within the respective invoice.
This action launches the Credit Note Reversal wizard, a guided interface where users can specify:
- The Reason for issuing the credit note (e.g., product return, damaged goods, pricing error).
- The Reversal Date can either match the original invoice date or be manually set.
- The Journal in which the reversal should be recorded (default or custom).
Once the necessary details are entered, clicking Reverse automatically creates a draft credit note linked to the original invoice. The draft can then be reviewed, edited if necessary, and confirmed to finalize the adjustment. This automation significantly reduces manual effort and ensures the reversal is properly reflected in the company’s accounting records.
In addition to automated reversals, Odoo 19 allows users to manually create a new credit note from the Credit Notes dashboard by clicking the “New” button. The credit note creation form is designed to mirror the familiar invoice creation layout, ensuring an intuitive workflow for users.
Within the form, users can input essential details such as:
- Customer and Delivery Address
- Invoice Date and Payment Terms
Under the Invoice Lines tab, users can list the specific products or services being credited. Each line includes information such as Product Name, Quantity, Unit of Measure, Unit Price, Applicable Taxes, and Amount.
Odoo 19 automatically generates the Journal Items in the accounting entries based on these credit lines, though users can manually adjust them if required for precision.
The Other Info tab offers additional flexibility for recording supplementary details, including:
- Salesperson and Sales Team
- Customer Reference or Order Number
- Marketing Campaign, Medium, and Source (for integrated sales tracking)
- Referrer ID and Recipient Bank Account
- Fiscal Position, Incoterms, and other accounting configurations
After ensuring all details are correct, clicking Confirm will post the credit note, marking it as an official accounting entry in the system. Once validated, the system automatically updates the corresponding journal entries and balances.
To maintain proper documentation and ensure compliance, Odoo 19 allows users to attach supporting documents, such as scanned receipts, delivery notes, or signed acknowledgments, directly to the credit note using the Upload button. These attachments are stored within the document record, ensuring that all related files are easily accessible for auditing, verification, or future reference.
1.3 Payments
In Odoo 19 Accounting, the Payments feature provides a complete and user-friendly system for recording, managing, and tracking both customer receipts and vendor disbursements. This feature ensures smooth financial control, accurate reconciliation, and transparency across all payment operations.
The Payments dashboard can be accessed under both the Customers → Payments and Vendors → Payments menus. Each section is designed to streamline the workflow for recording incoming and outgoing payments separately.
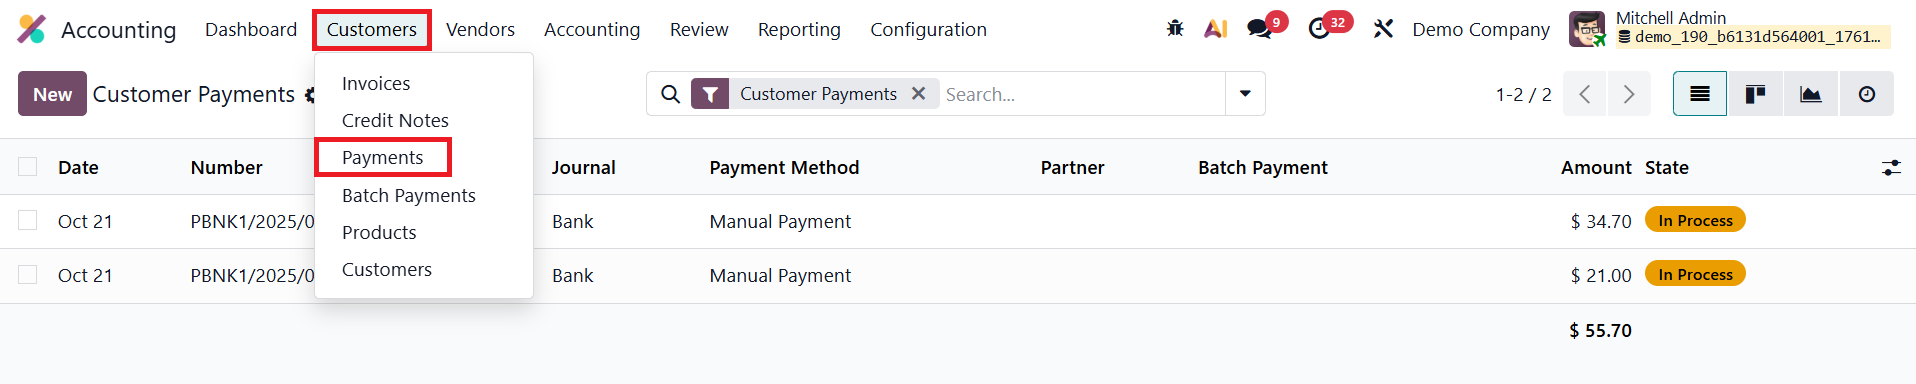
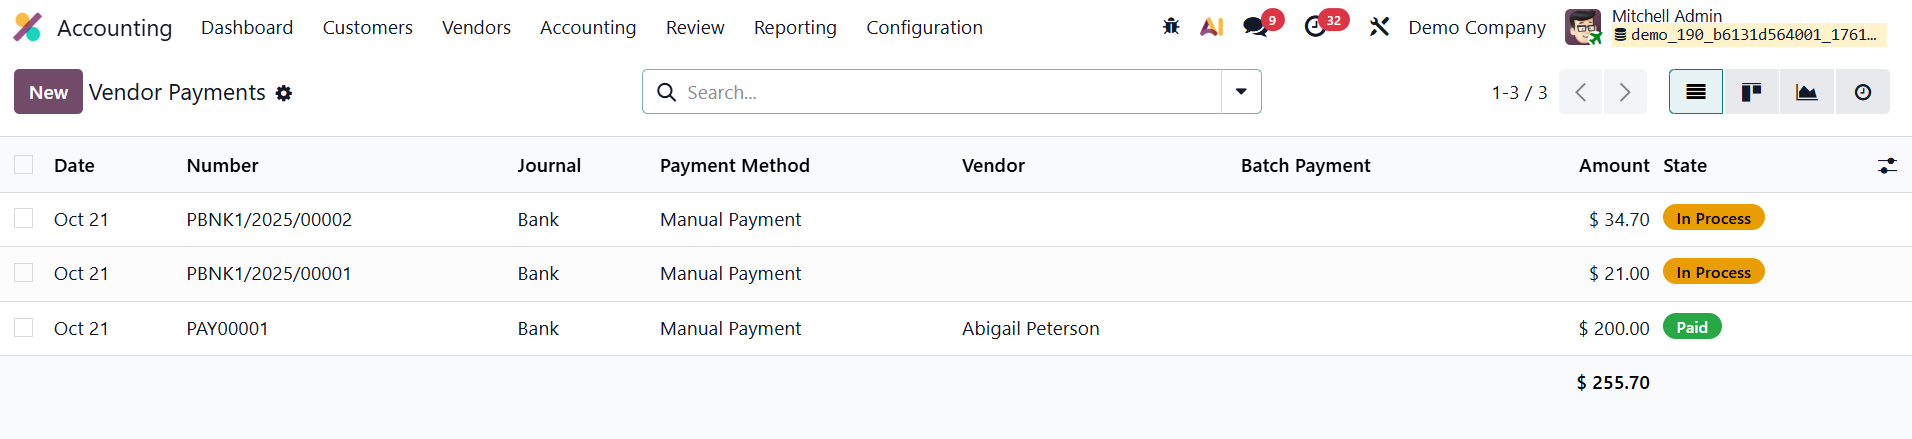
Under Customers → Payments, users can view all incoming payment records, representing money received from customers. The dashboard presents a clear list view displaying critical information such as Payment Date, Payment Number, Journal, Payment Method, Customer (or Partner Name), Batch Payment, Amount, and Status. Depending on preference or reporting needs, users can switch between List, Kanban, and Graph views.
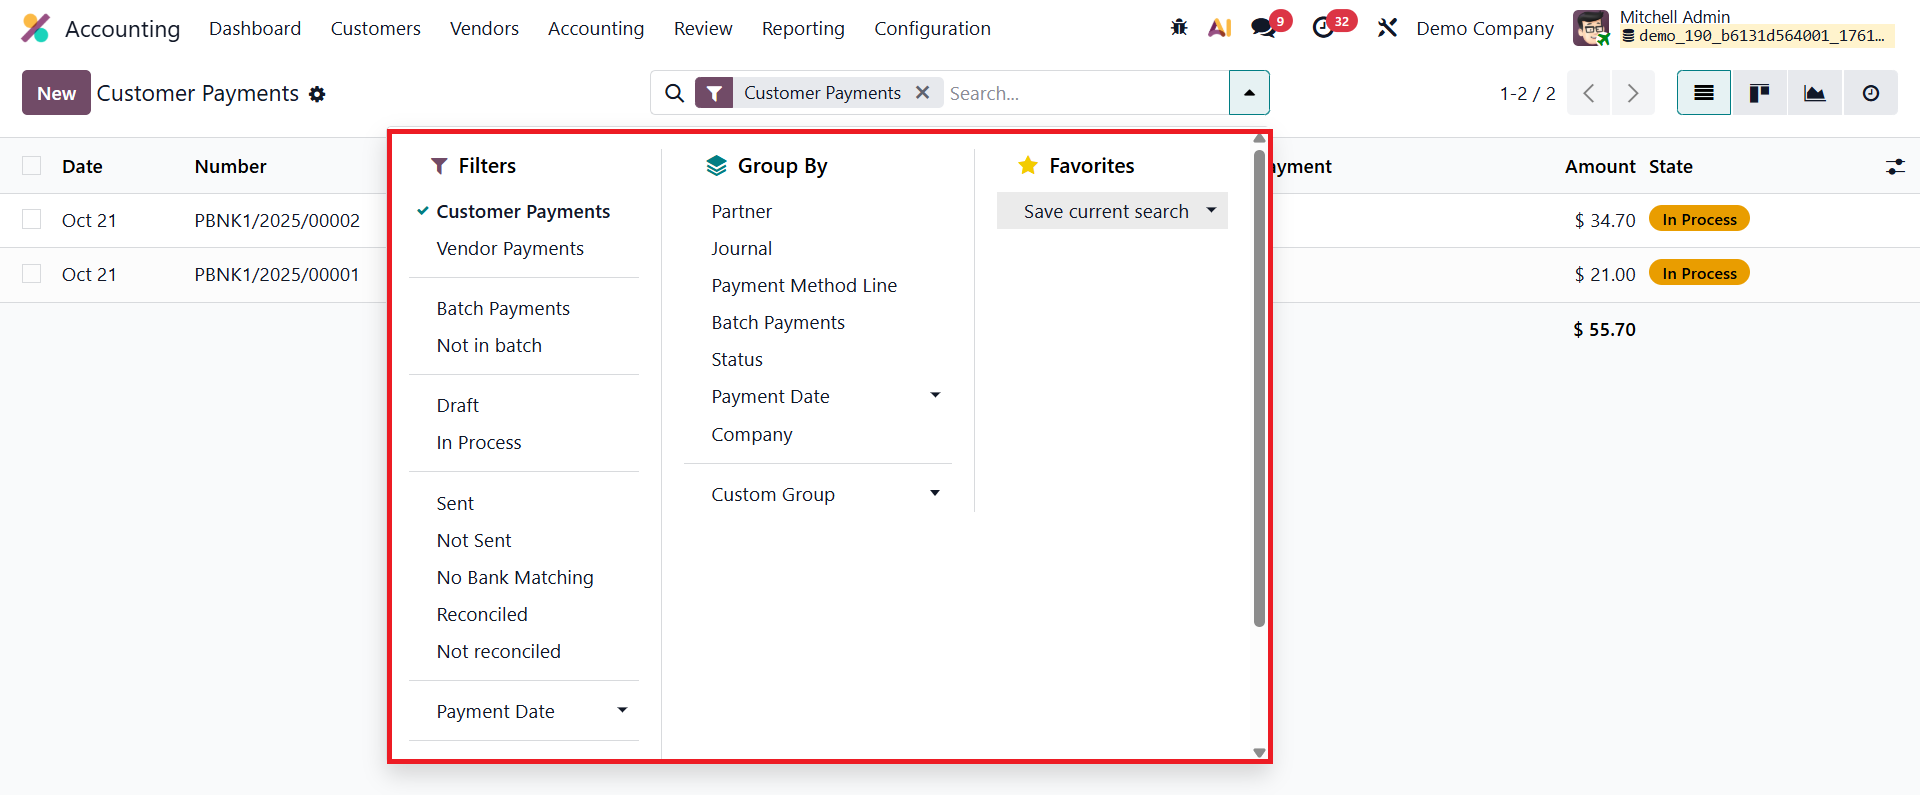
Built-in Filters enhance visibility, allowing users to segment records using predefined options like Customer Payments, Vendor Payments, Not Batch Payments, Batch Payments, Draft, In Process, Sent, Not Sent, No Bank Matching, Reconciled, Not Reconciled, and Payment Date. In addition, the Add Custom Filter function enables the creation of advanced filters to isolate specific transactions based on user-defined criteria. Similarly, the Group By feature allows grouping by key fields such as Partner, Journal, Payment Method Line, Batch Payments, Status, Payment Date, or Company, providing a structured view for analysis. Odoo 19 also enables saving custom filters and groupings for quick access in future sessions.
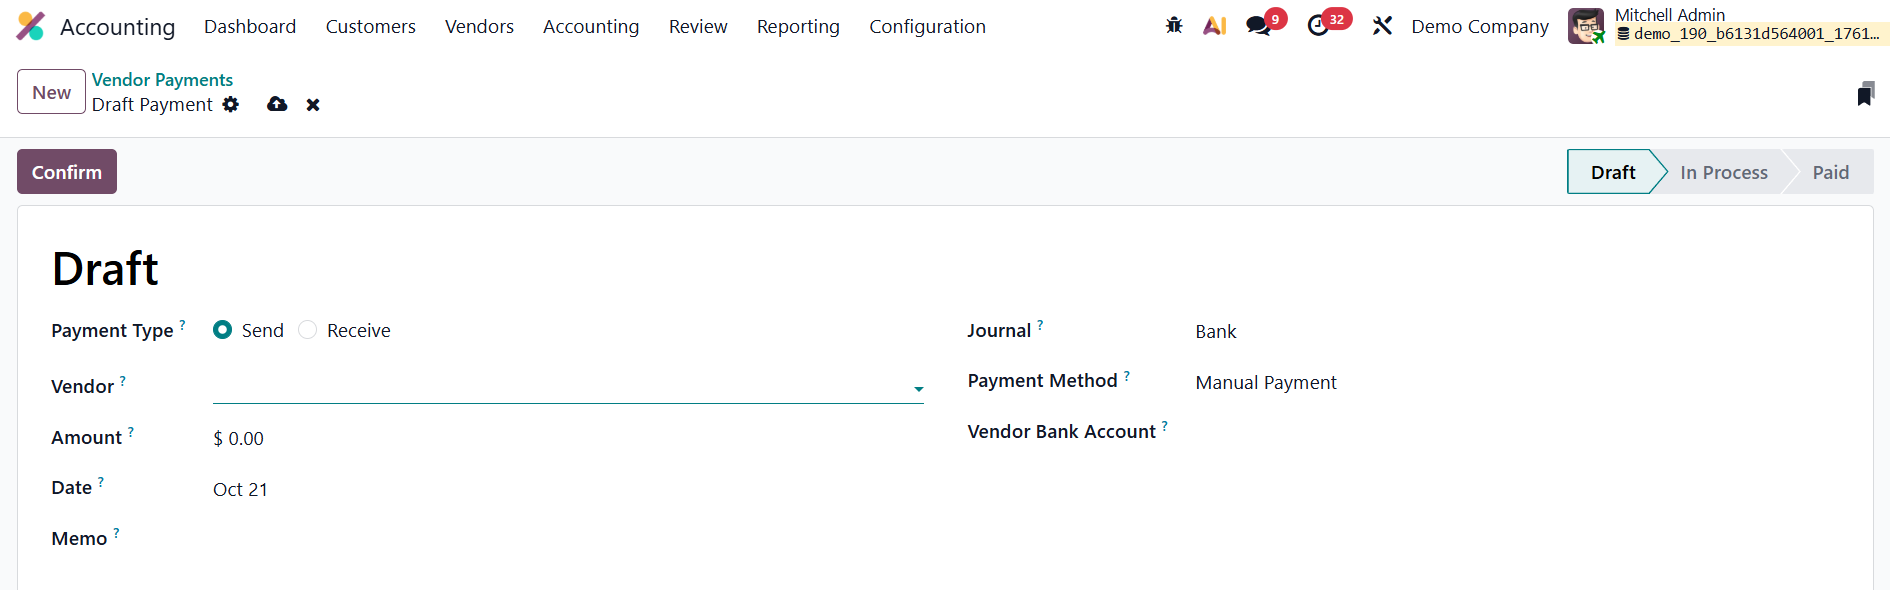
To manually record a new payment, users can click the New button.
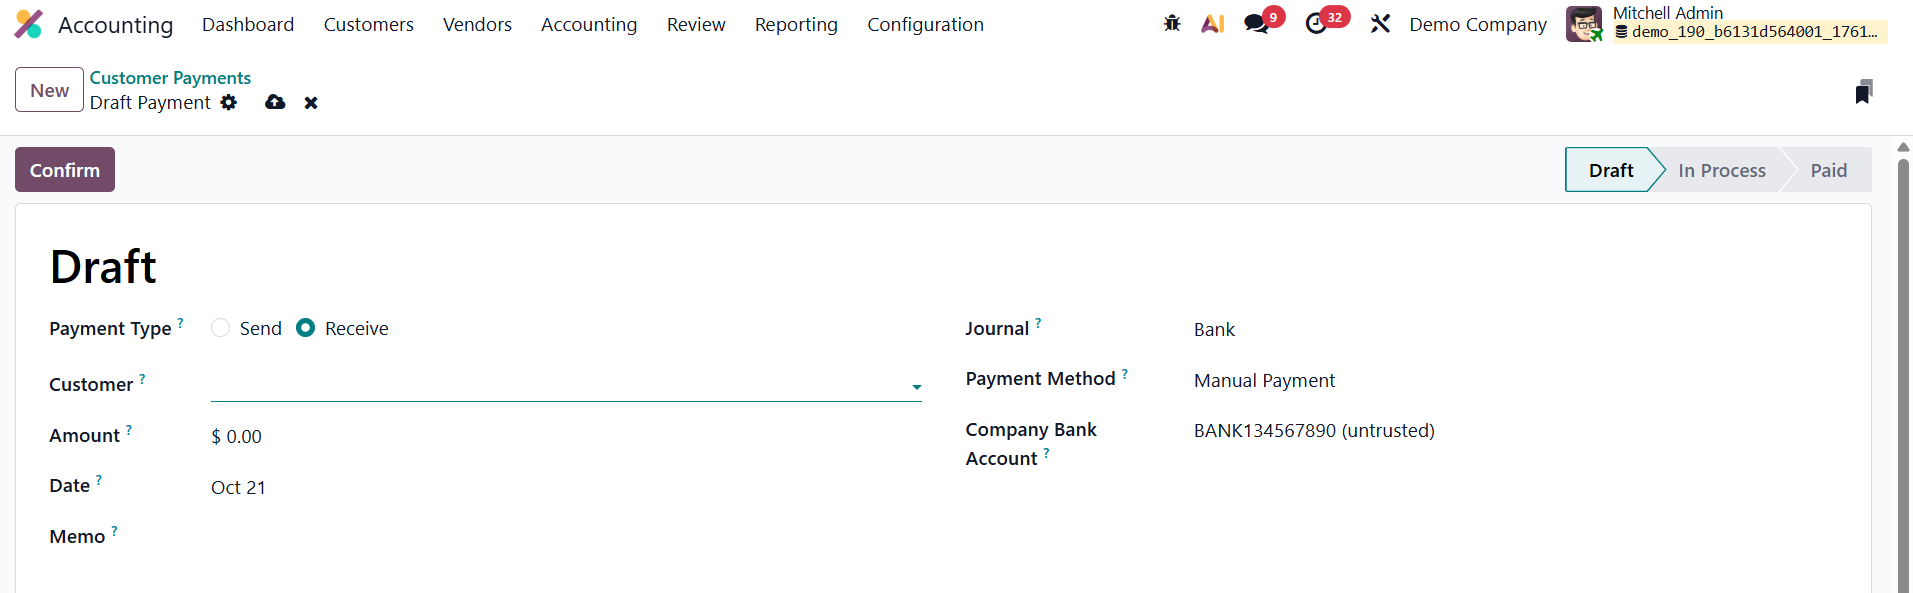
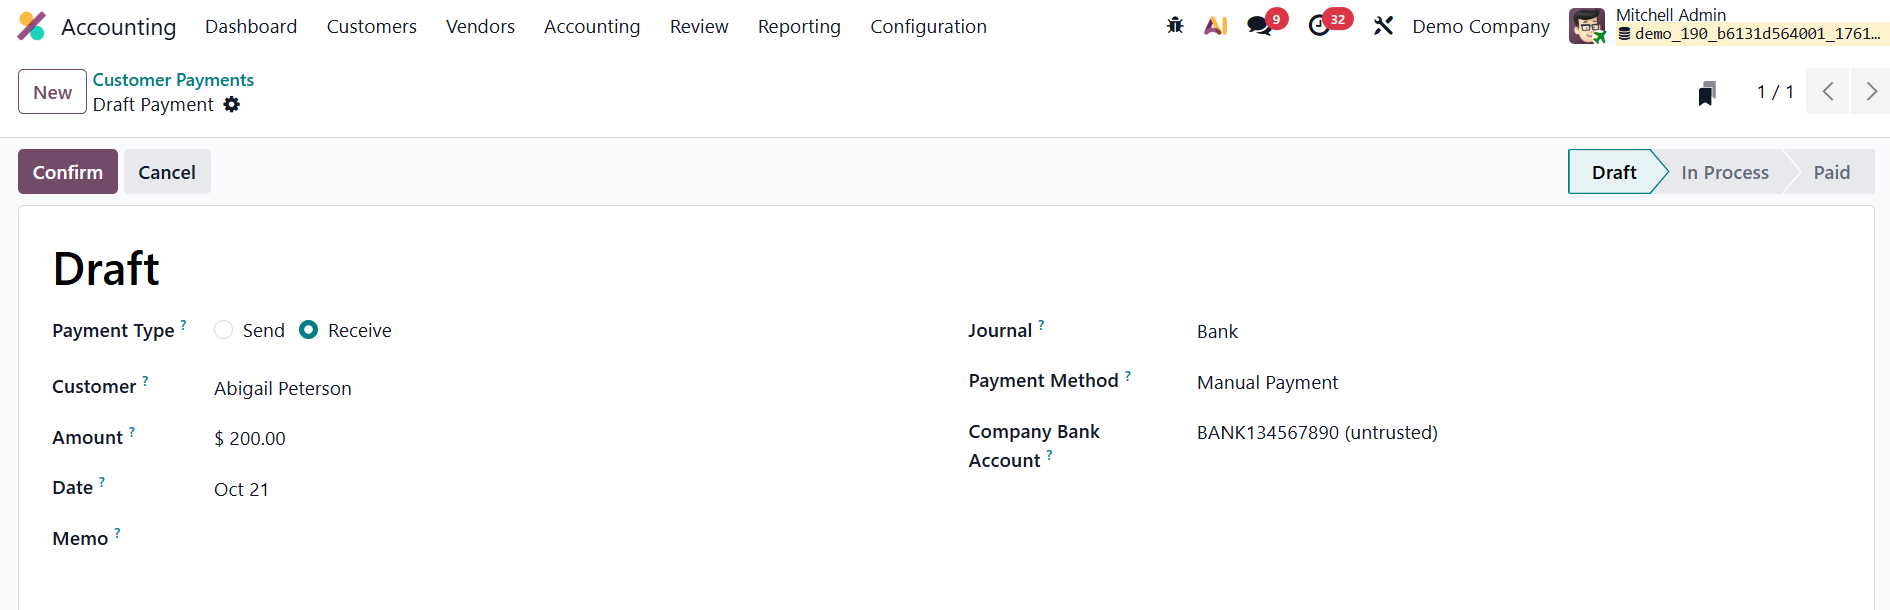
This opens the Payment Creation form, where essential fields must be completed. The user must first select the Payment Type: Receive (for customer payments) or Send (for vendor payments). Then, the following details are added: Customer/Vendor Name, Payment Amount, Payment Date, Memo, Journal, Payment Method, and Company Bank Account.
Odoo 19 supports a wide variety of payment methods, including Manual, Check, Batch Deposit, SEPA Credit Transfer, SEPA Direct Debit, and Online Payment options (such as Stripe or Razorpay, if integrated). Once all details are filled in, clicking the Confirm button posts the payment to the company’s accounting records, automatically generating the corresponding journal entries.
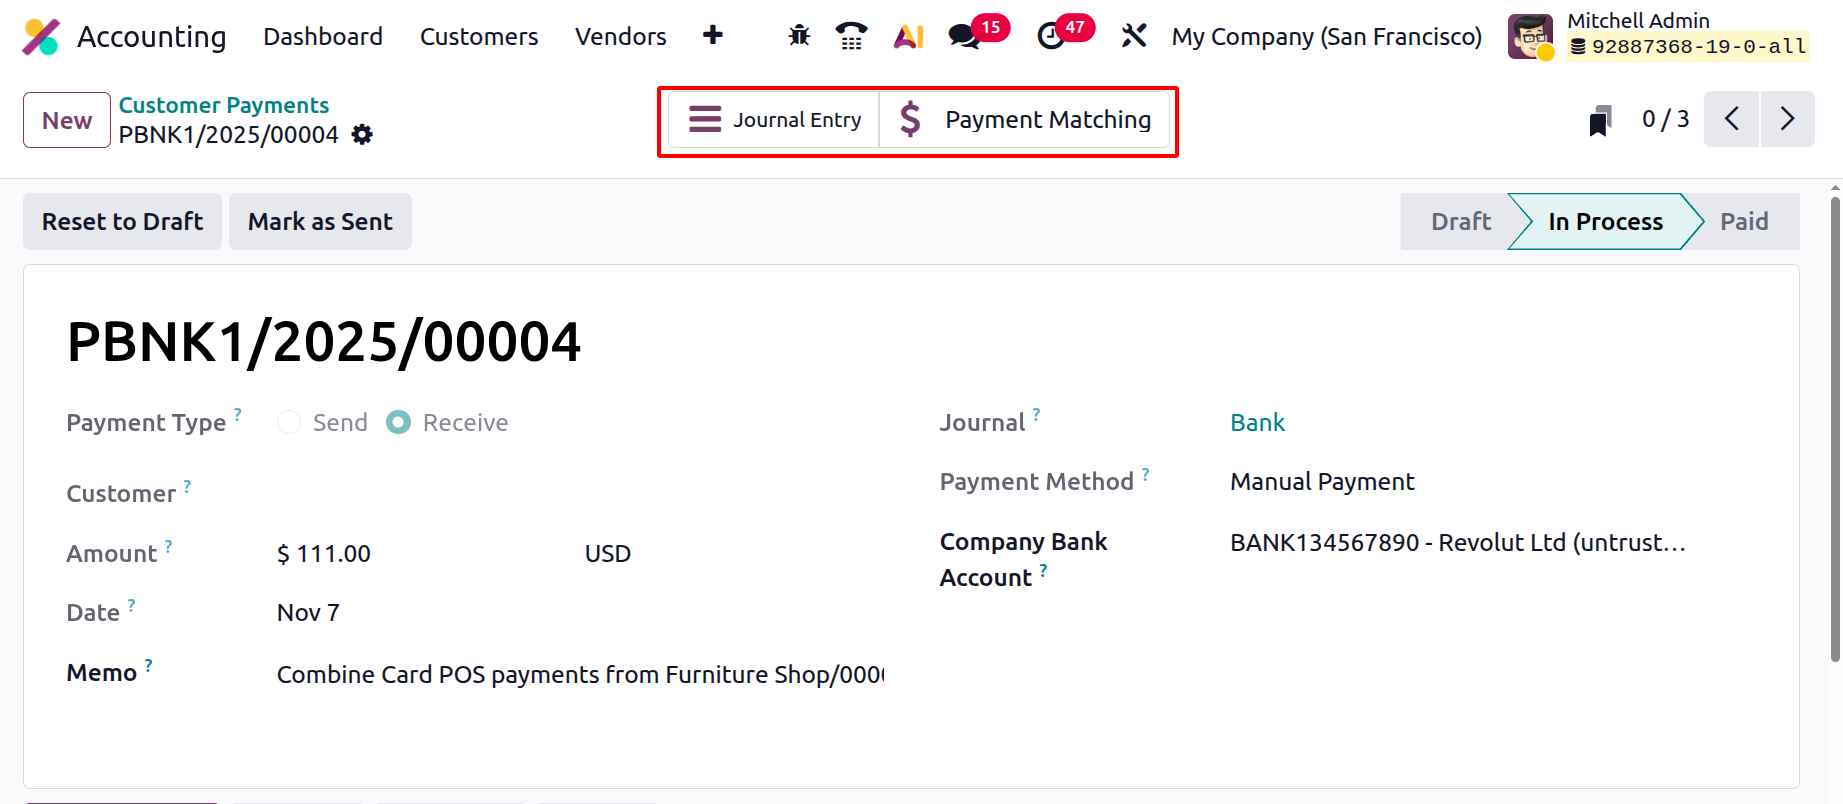
The Journal Entry and Payment Matching smart tabs provide quick access to important accounting actions related to the payment. The Journal Entry smart tab opens the actual accounting entry that was generated when the customer payment was created. The Payment Matching smart tab, on the other hand, helps you reconcile the payment with the corresponding customer invoices. When opened, it displays a reconciliation interface where you can match the received amount with outstanding invoices or credits.
The same workflow applies to Vendor Payments, accessible under Vendors → Payments.
The interface closely resembles the customer payments section, but focuses on outgoing payments. When creating a vendor payment, users must select the Vendor ID, specify the Vendor Bank Account, and choose Send as the Payment Type.
After confirming, Odoo automatically posts the corresponding journal entries and provides reconciliation tools to match the payment with outstanding vendor bills.
1.4 Batch Payments
The Batch Payments feature in Odoo 19 Accounting is designed to make managing multiple payments faster, more organized, and easier to reconcile. Instead of processing and reconciling each transaction separately, users can group several payments into a single batch, which then appears as one consolidated entry in the bank statement. This enhancement is particularly useful for companies dealing with frequent customer receipts or multiple vendor payments, ensuring smooth financial management and simplified reconciliation workflows.
To activate this feature, go to Accounting → Configuration → Settings and enable the Batch Payments option.

Once enabled, Odoo 19 introduces a Batch Payments menu under both the Customers and Vendors sections, allowing users to efficiently manage inbound (customer) and outbound (vendor) payments from dedicated dashboards.

The Batch Payments dashboard provides a detailed overview of all existing batches, displaying columns such as Reference, Bank, Date, Total Amount, State, and PIS Status. Users can switch between List and Kanban views for better visualization of payment batches. To create a new batch payment, click the New button.
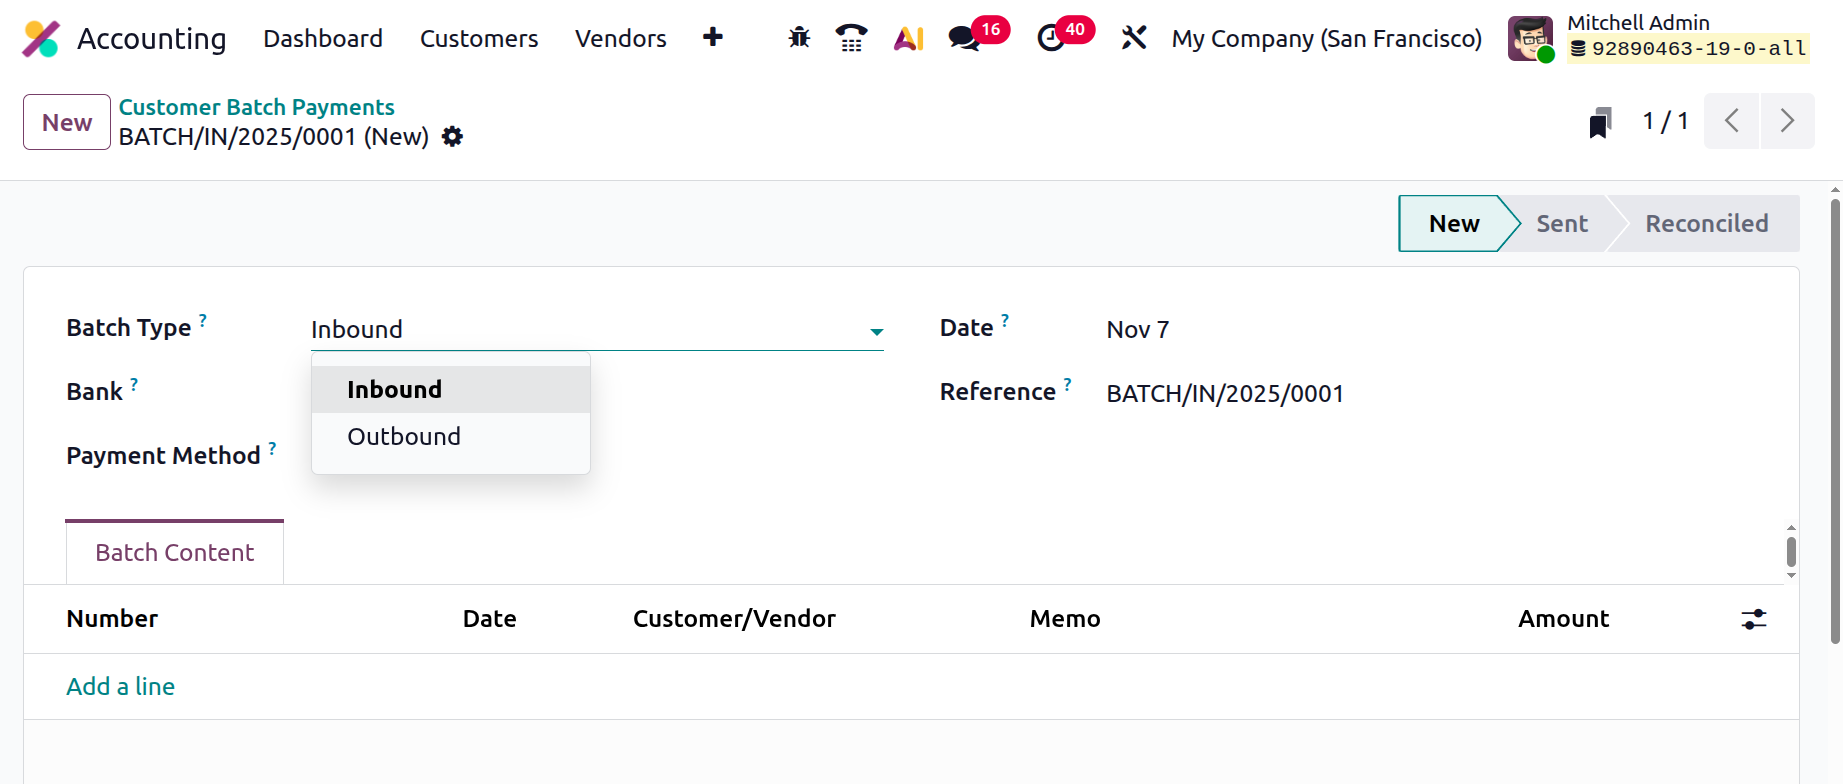
In the configuration form, select the Batch Type: Inbound for customer payments or Outbound for vendor payments, and then specify the Bank, Payment Method, Journal, and Reference.
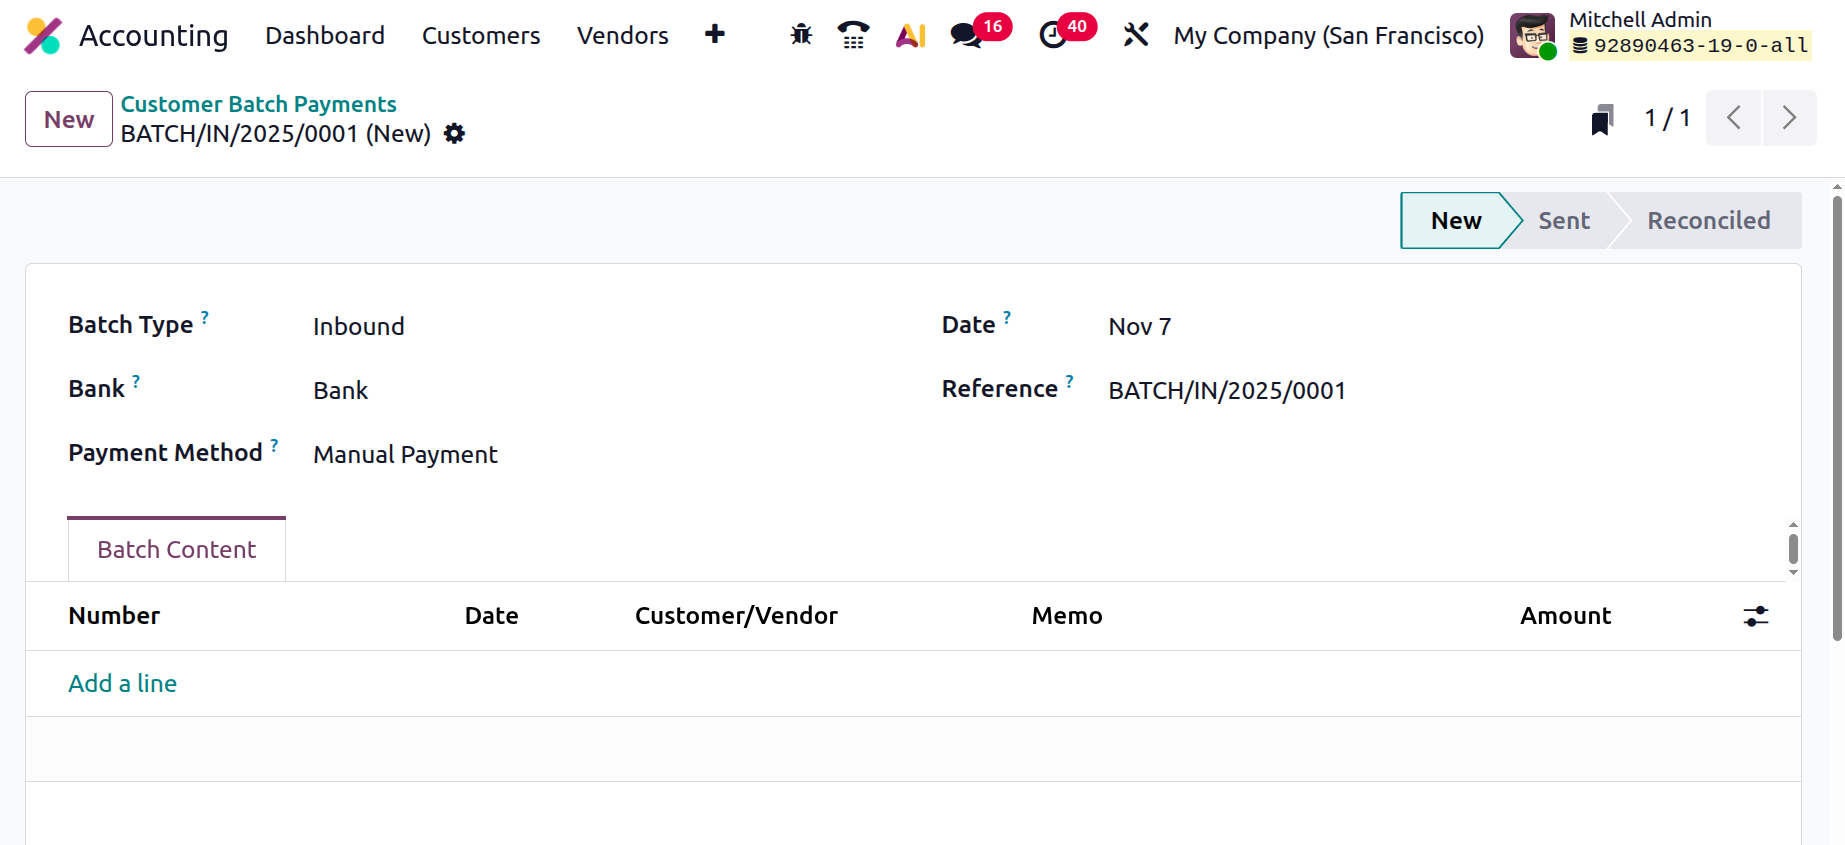
The heart of the process lies in the Batch Content tab, where individual payments can be added by selecting Add a Line. A pop-up will appear showing a list of available customer or vendor payments based on the batch type.
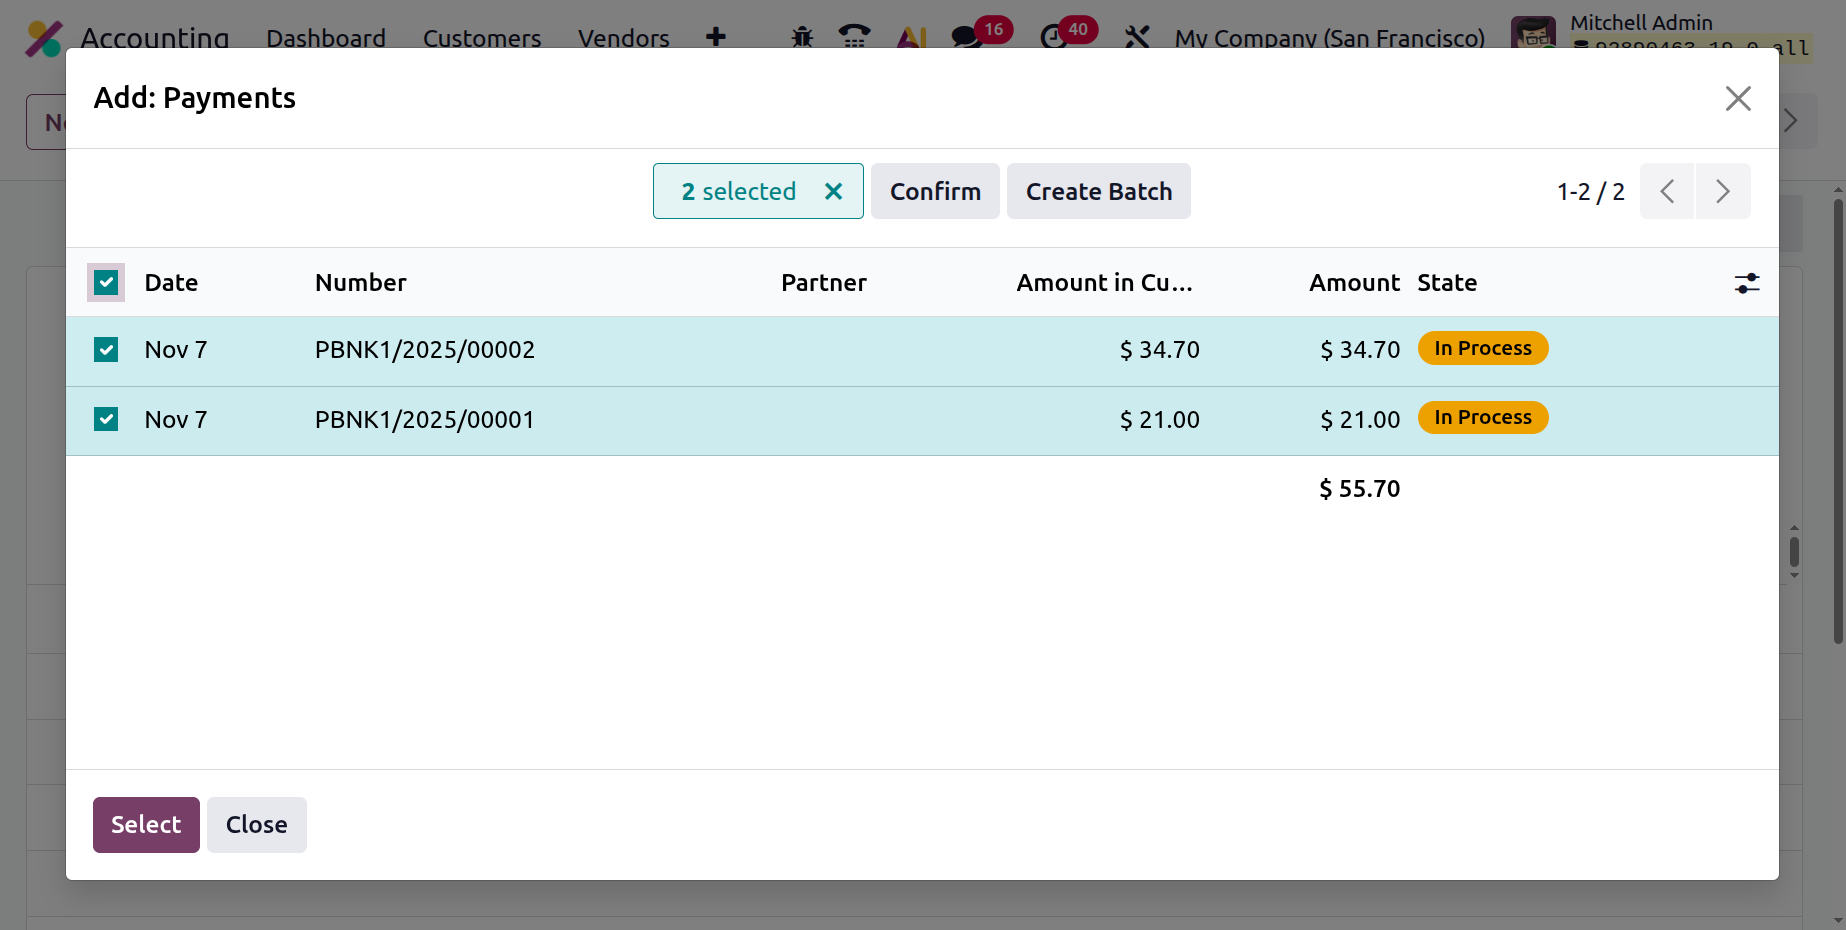
After selecting the desired payments, click Validate to confirm.
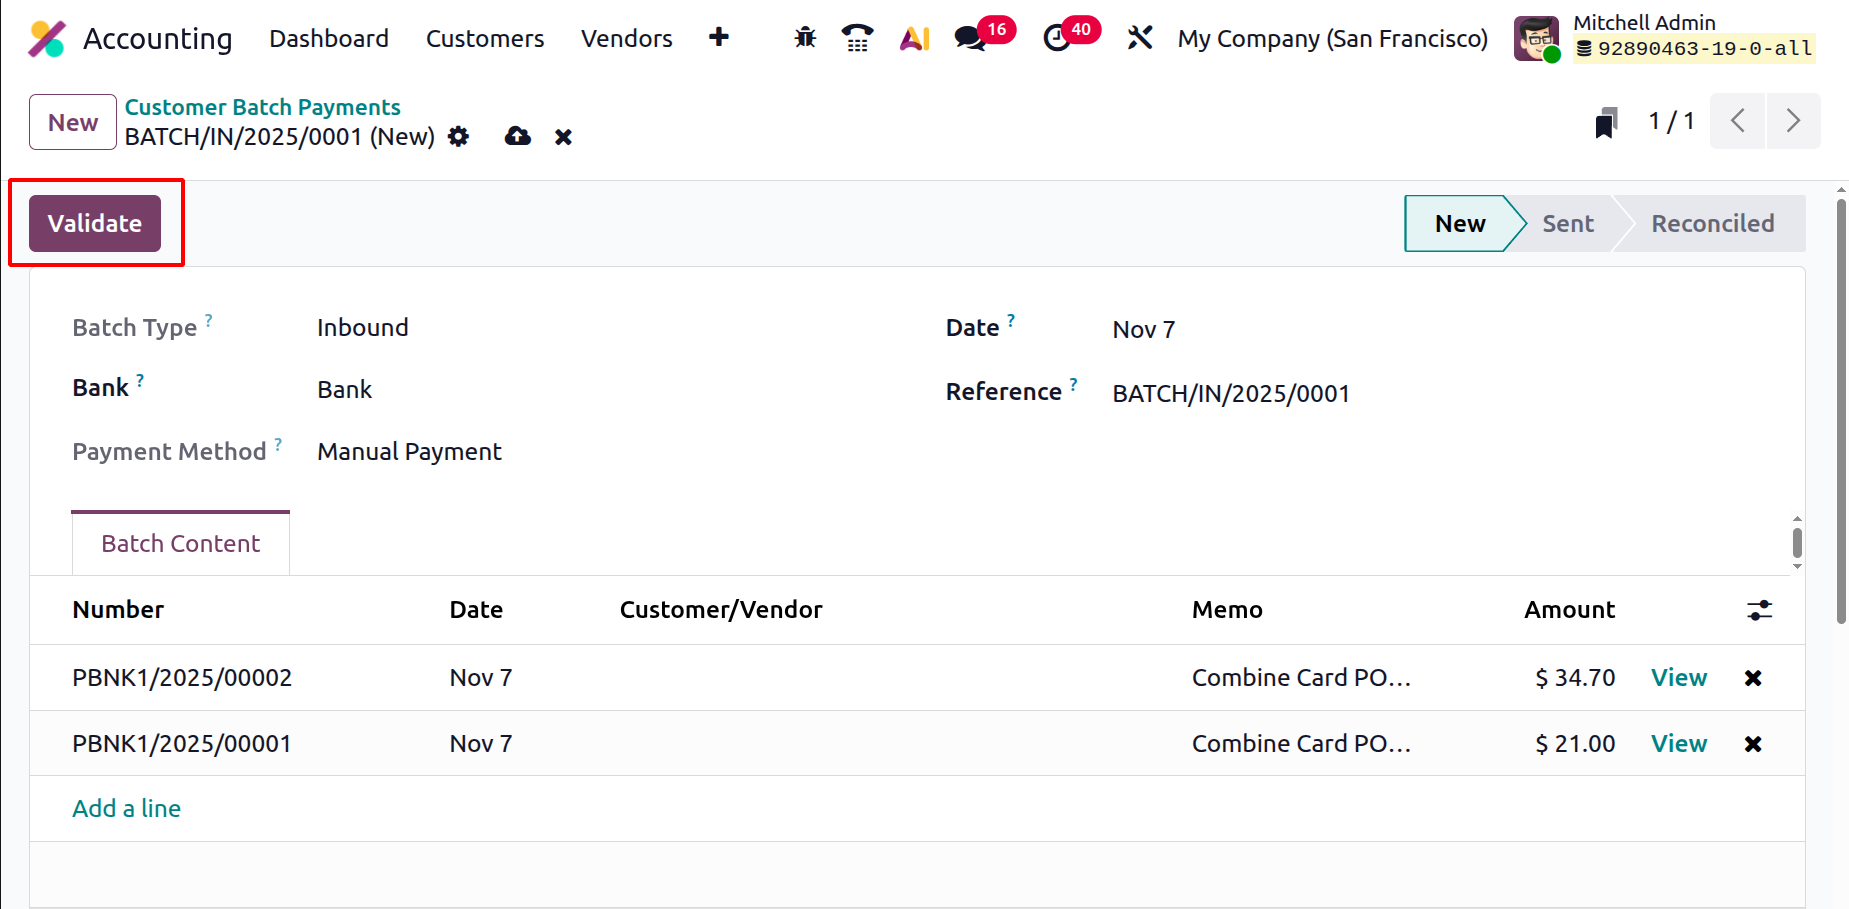
Once validated, the batch moves into the Sent state, signaling that it’s ready to be processed or matched with the corresponding bank transactions.
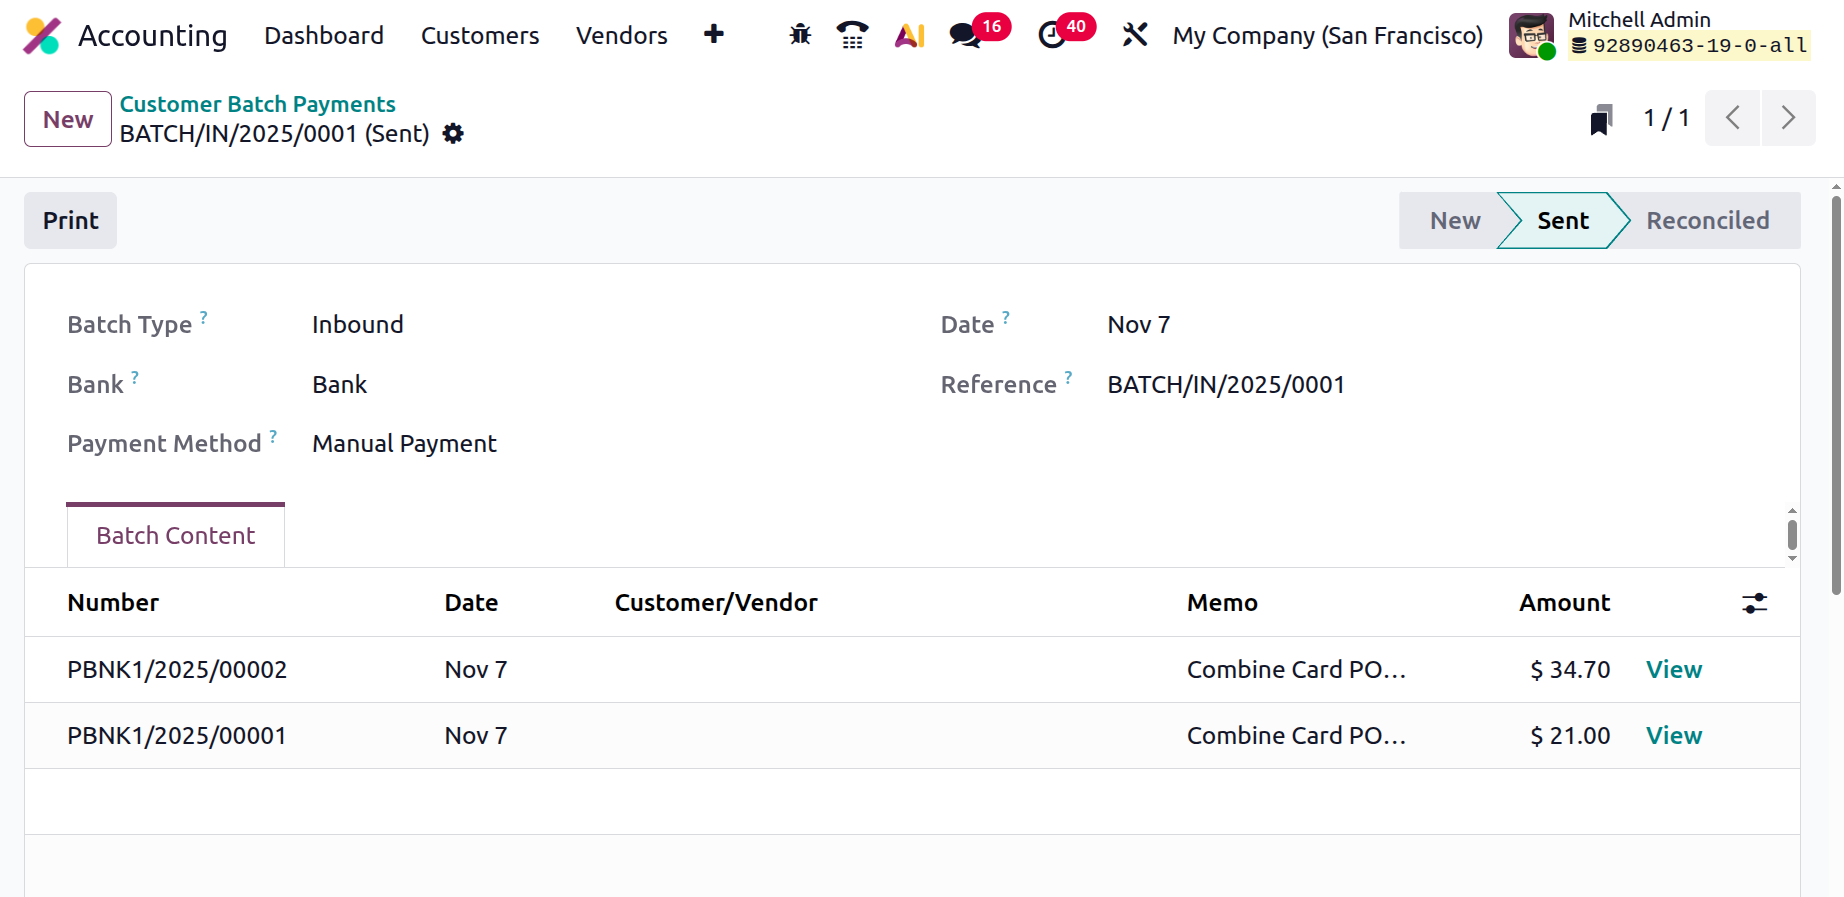
This feature not only saves time but also ensures greater accuracy and control in payment management.
1.5 Direct Debit Mandates
The Direct Debit Mandate feature in Odoo 19 Accounting enables businesses to automatically collect recurring payments directly from customers’ bank accounts in a secure and compliant manner. This functionality is especially valuable for subscription-based services, memberships, or long-term contracts where regular, authorized payments are required.
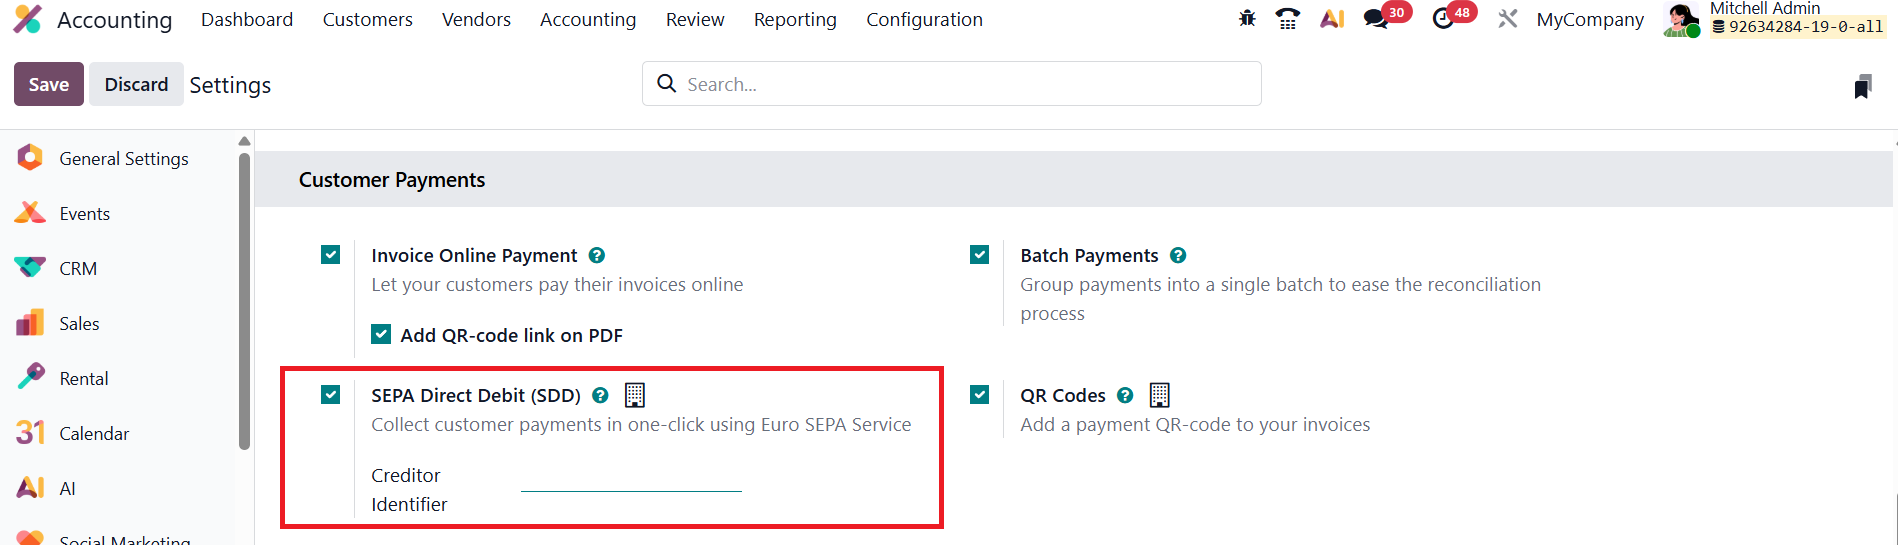
In Odoo 19 Accounting, the system provides seamless integration with the EURO SEPA Direct Debit (SDD) service, allowing businesses operating within the Single Euro Payments Area (SEPA) to automatically collect payments from customers’ bank accounts. This integration streamlines cash collection, reduces manual processing, and ensures compliance with European banking standards.
To enable this feature, go to Accounting ▸ Configuration ▸ Settings, scroll to the Customer Payments section, and activate the SEPA Direct Debit (SDD) option. Once enabled, you’ll need to enter your organization’s Creditor Identifier (CI), a unique code issued by your bank that authorizes you to initiate SEPA transactions on behalf of your customers.
After activation, Odoo 19 automatically adds the SEPA Direct Debit payment method to the available payment options for customer invoices. You can create new mandates from Customers → Direct Debit Mandates.
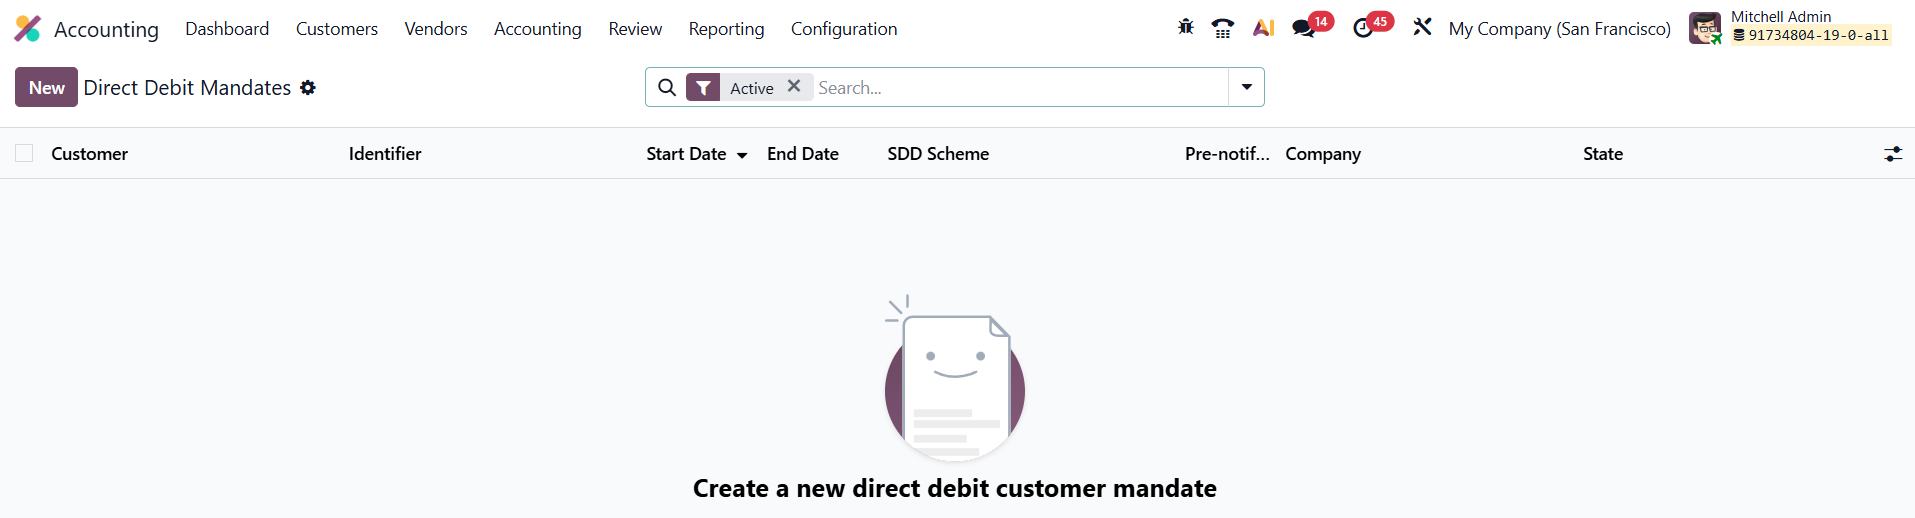
In the mandate creation form, specify essential details such as the Customer, their IBAN (bank account number), and the SDD Scheme (either CORE for consumer payments or B2B for business-to-business collections).

You can also assign a unique Mandate Identifier and define the Start Date, End Date, and Company. The minimum notice period in days, used to inform the customer prior to collection, can be specified in the Pre-notification field. Once the details are entered, click Validate to activate the mandate, officially authorizing your company to collect funds from the customer’s account.
In Odoo 19, the Direct Debit process has been further optimized. When invoices are created for customers with active mandates, the system automatically generates a SEPA Direct Debit (SDD) XML file compliant with banking standards. This file can then be uploaded to your bank portal to initiate payment collection. The smart button on the mandate record allows you to instantly view Transactions using the mandate, ensuring full transparency over recurring transactions.
1.6 Products
In Odoo 19 Accounting, the Products feature remains a vital bridge between the Accounting, Inventory, and Sales modules, offering a centralized platform for managing all product-related financial data. This seamless integration ensures that every product movement, sale, or purchase is accurately reflected in the company’s accounting records, supporting precise reporting and efficient financial management.
To access product records, navigate to Accounting → Customers → Products. This section provides a comprehensive list view of all products in your database, displaying essential details such as Internal Reference, Product Name, Sales Price, Cost, Sales Taxes, On Hand, Forecasted, Unit, and Purchase Taxes.
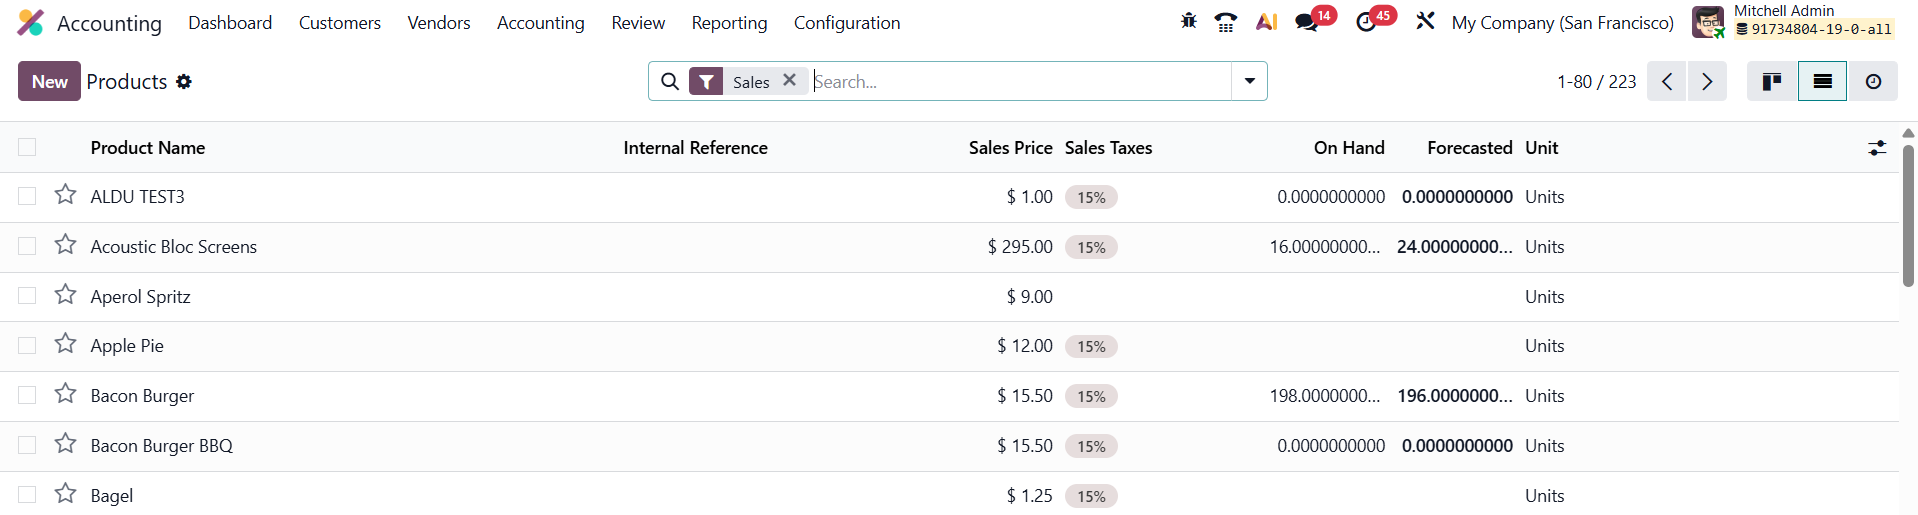
The streamlined interface helps accountants and finance teams quickly locate key financial information for each product without switching between different modules.
The streamlined interface helps accountants and finance teams quickly locate key financial information for each product without switching between different modules.
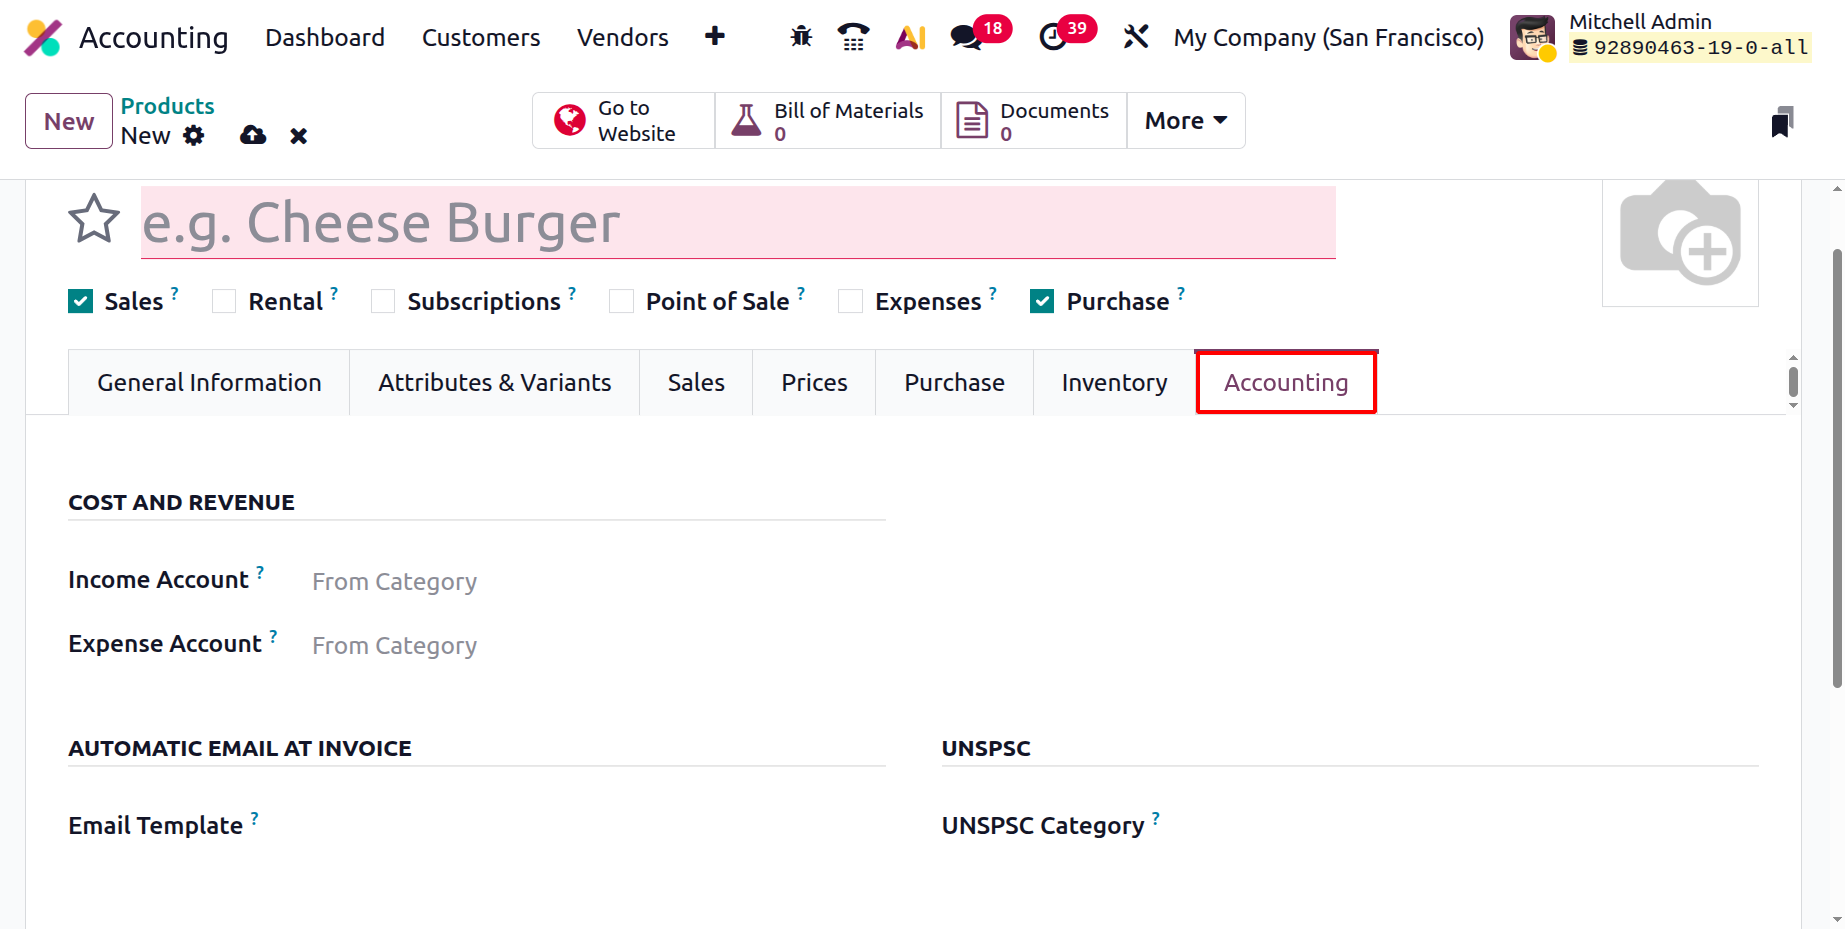
In Odoo 19 Enterprise, the Accounting tab of each product record has been refined to provide more comprehensive financial tracking options. Under the Cost and Revenue section, you can specify the Income Account, which records revenue generated from sales of that product. The Expense Account is used to log purchase-related costs, ensuring that all procurement expenses are accurately captured in the books.
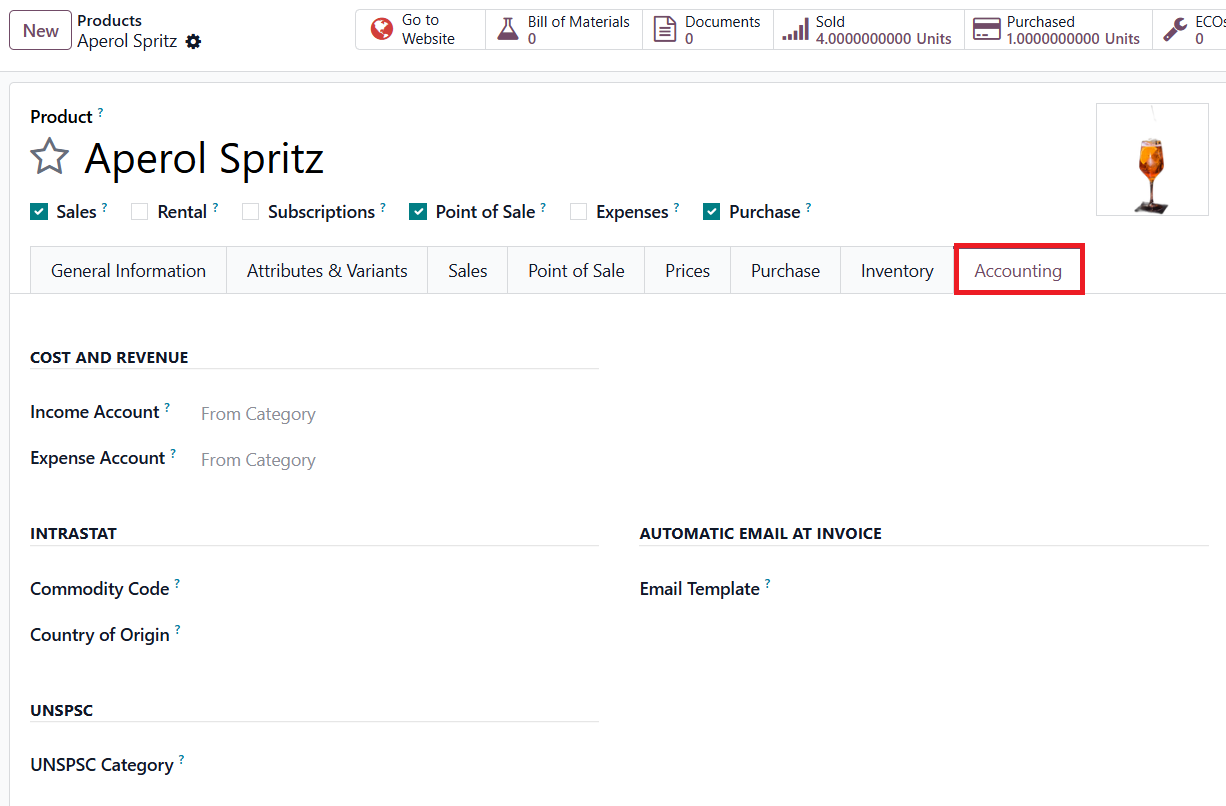
For international trade and compliance, Odoo 19 supports fields like Commodity Code and Country of Origin under the Intrastat section, which are crucial for cross-border trade reporting. The UNSPSC Category field enables businesses to assign standardized product classification codes (UNSPSC), enhancing procurement consistency and global trade compliance. You can send a product-specific email once the invoice is validated by selecting the corresponding Email Template in the Automatic Email at Invoice section.
By consolidating all product-related financial settings and automation under one interface, Odoo 19 Accounting helps businesses maintain transparency, reduce manual effort, and achieve greater accuracy in accounting, taxation, and reporting.
1.7 Customers
In Odoo 19 Accounting, the Customers feature provides a highly efficient and integrated platform for managing all customer-related financial and contact information.
Accessible through Accounting → Customers → Customers, this section enables businesses to maintain accurate records of their clients, streamline invoicing operations, and improve receivables management.
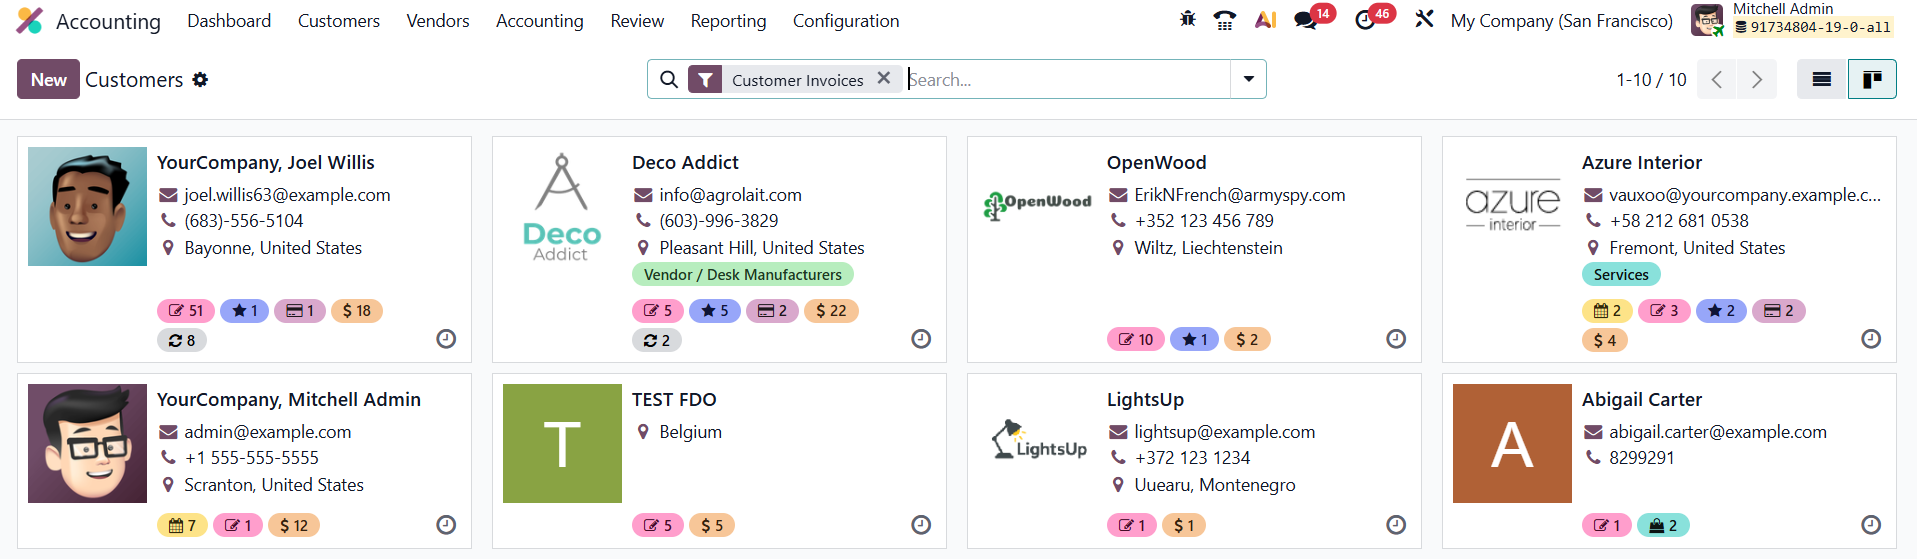
The Customer dashboard in Odoo 19 offers both List and Kanban views. The List view presents detailed information about each customer, such as their Name, Company, Email, Phone, and Invoicing Activity, while the Kanban view offers a more visual layout ideal for quick navigation. By default, Odoo applies the Customer Invoices filter, displaying only partners marked as customers who have at least one posted invoice or related transaction.
To create a new customer, click New, which opens a detailed customer form. Here, users can enter essential information such as Customer Name, Address, Email, Phone, Company Association, and Fiscal Details. Odoo 19 ensures that every piece of financial and contact data is well-structured for easier reporting and follow-up.
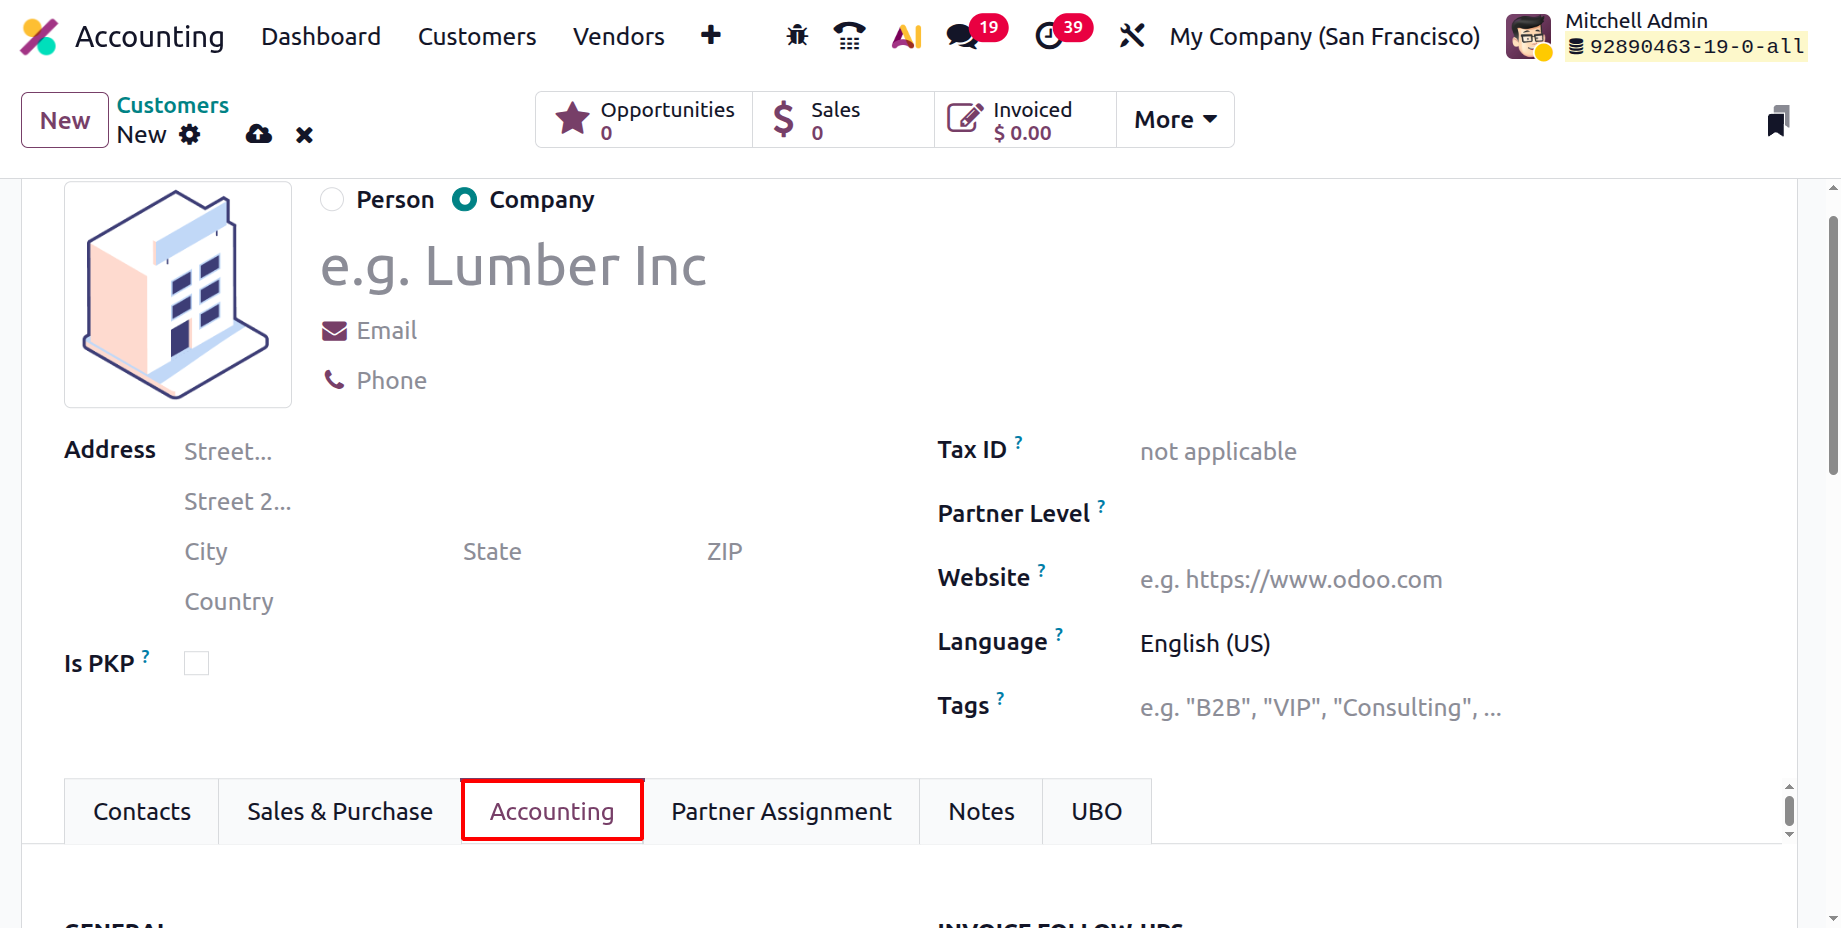
Within the Accounting tab, Odoo 19 provides several key fields and options for managing a customer’s financial information. Under Banks, users can record the customer’s Bank. The Invoice Follow-ups section helps businesses maintain strong cash flow by automating and monitoring payment reminders.
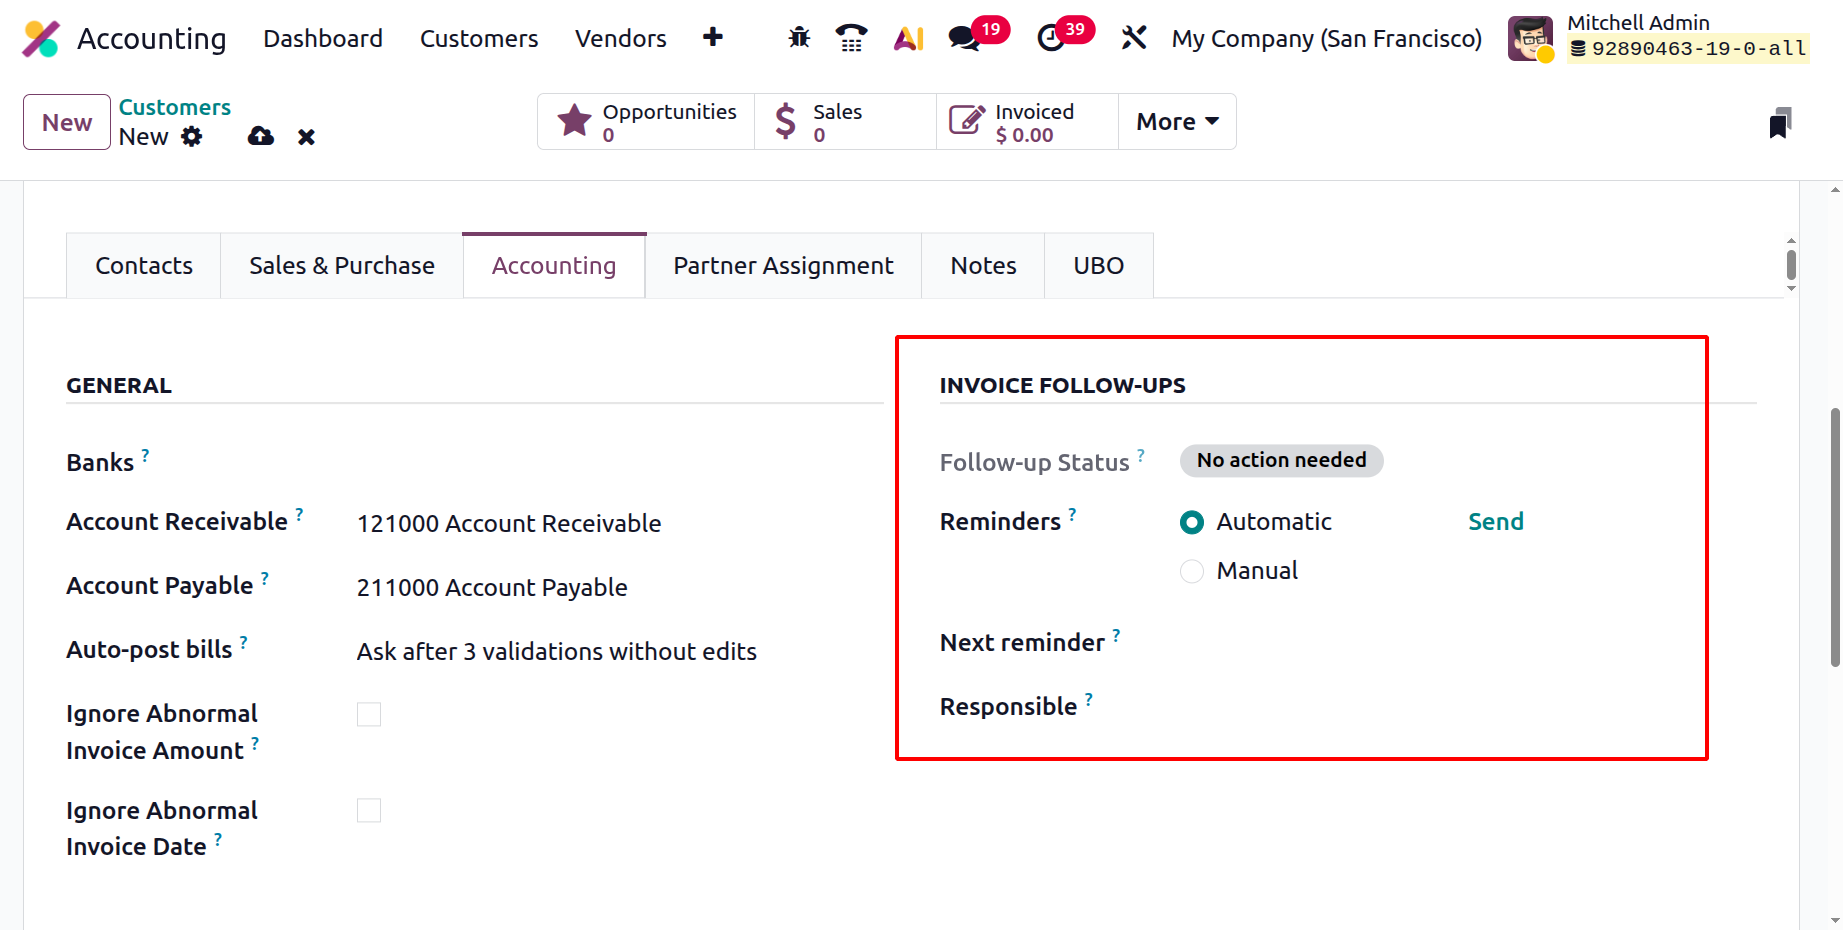
The Follow-up Status field provides a quick snapshot of a customer’s current reminder stage. Odoo 19 supports both Automatic and Manual Reminders. Automatic reminders are triggered by rules defined in the follow-up configuration (e.g., a set number of days after the invoice due date), while manual reminders can be sent by users as needed. The Next Reminder field indicates when the next follow-up communication will occur, and the Responsible field allows businesses to assign accountability for follow-ups to specific team members.
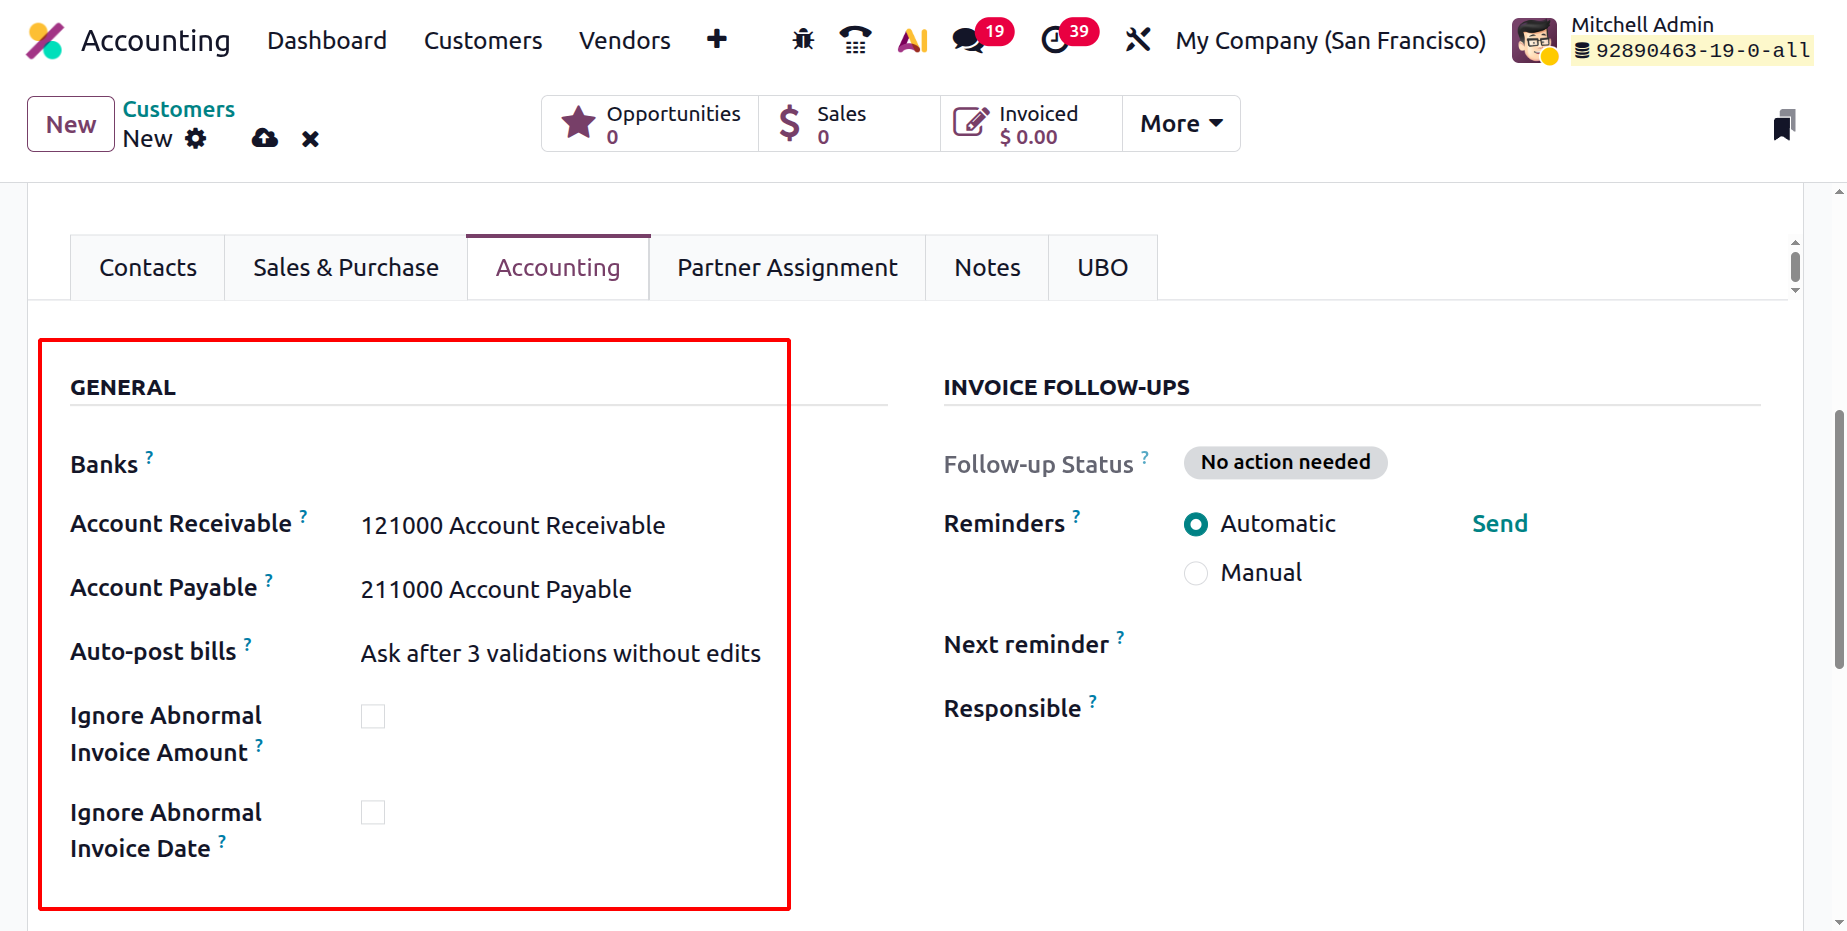
In the General tab, the Account Receivable and Account Payable fields play a crucial role in financial transparency. Account Receivable records all amounts due from the customer, giving a clear overview of outstanding invoices and payment history. Meanwhile, Account Payable can be used for businesses that act as both customers and vendors, tracking any outgoing payments. The Auto-post Bills automatically posts recurring or verified vendor bills, improving accounting efficiency. The Ignore Abnormal Invoice Amount and Ignore Abnormal Invoice Date settings act as smart validation tools, flagging invoices that significantly deviate from standard amounts or expected dates, thus ensuring higher accuracy and reducing the risk of fraud.
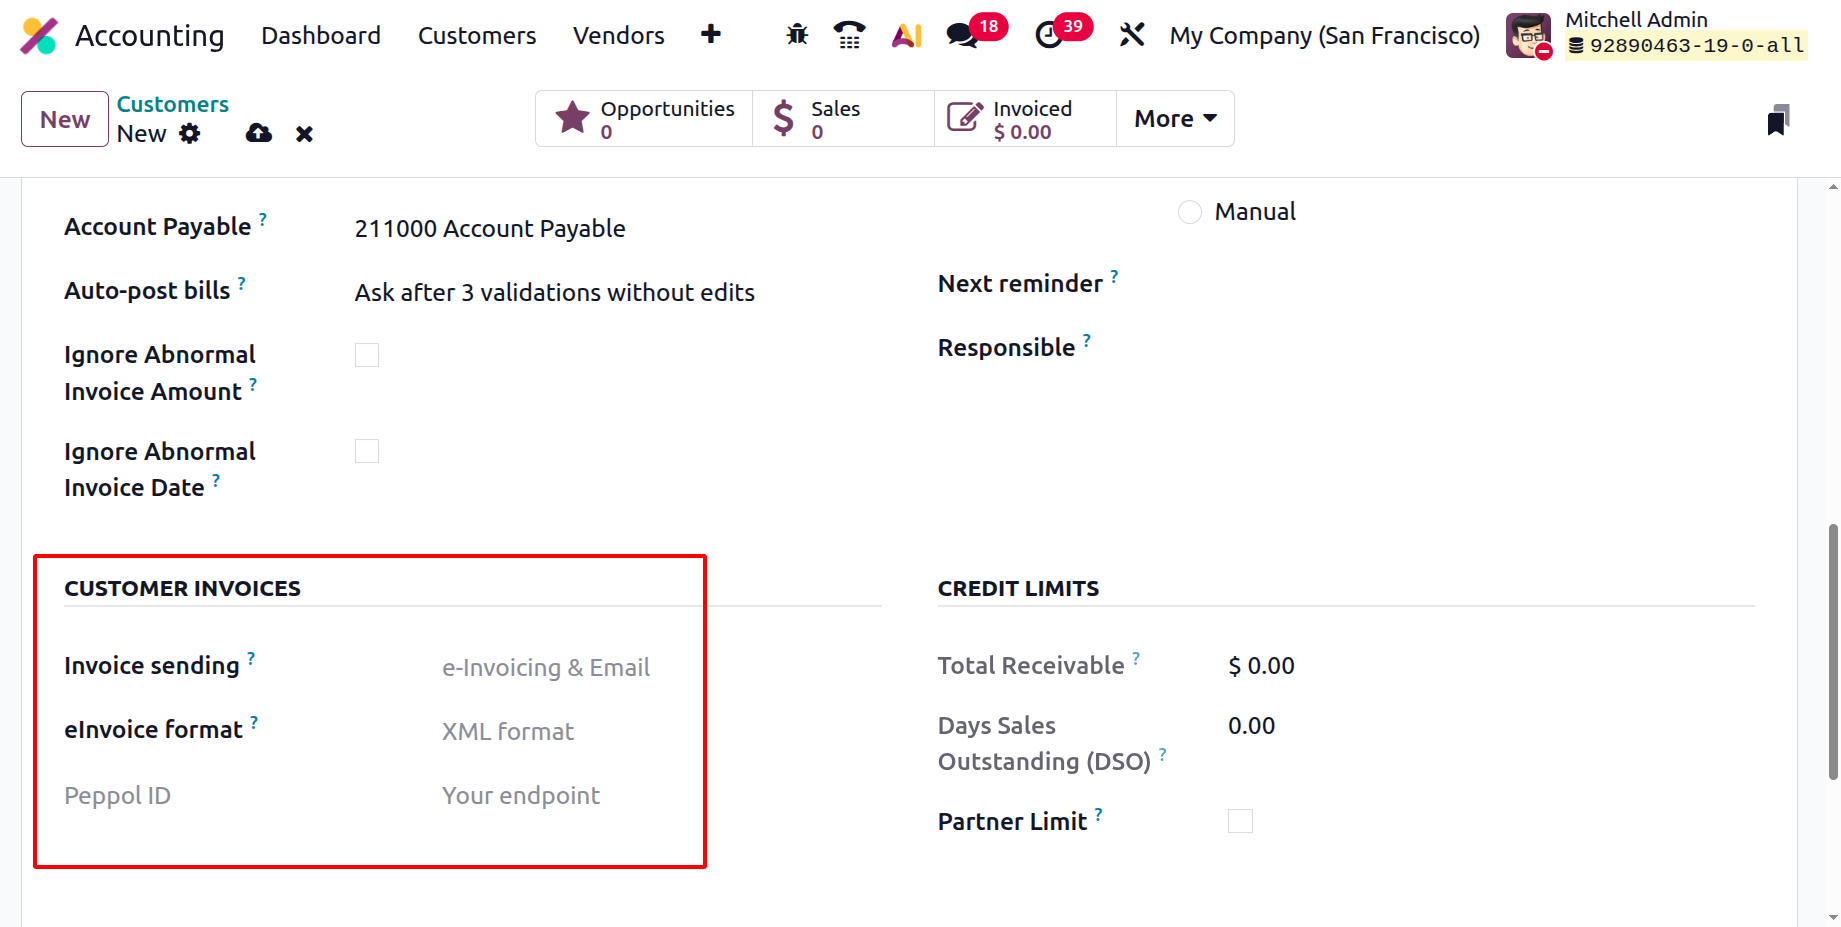
The Customer Invoices section allows configuration of how invoices are delivered to each customer through the Invoice Sending option, whether by Email, Printed Copy, or other preferred channels. Odoo 19 also enhances compliance through eInvoicing features such as eInvoice Format (for generating standardized electronic invoices) and Peppol ID (for exchanging invoices via the Peppol network).
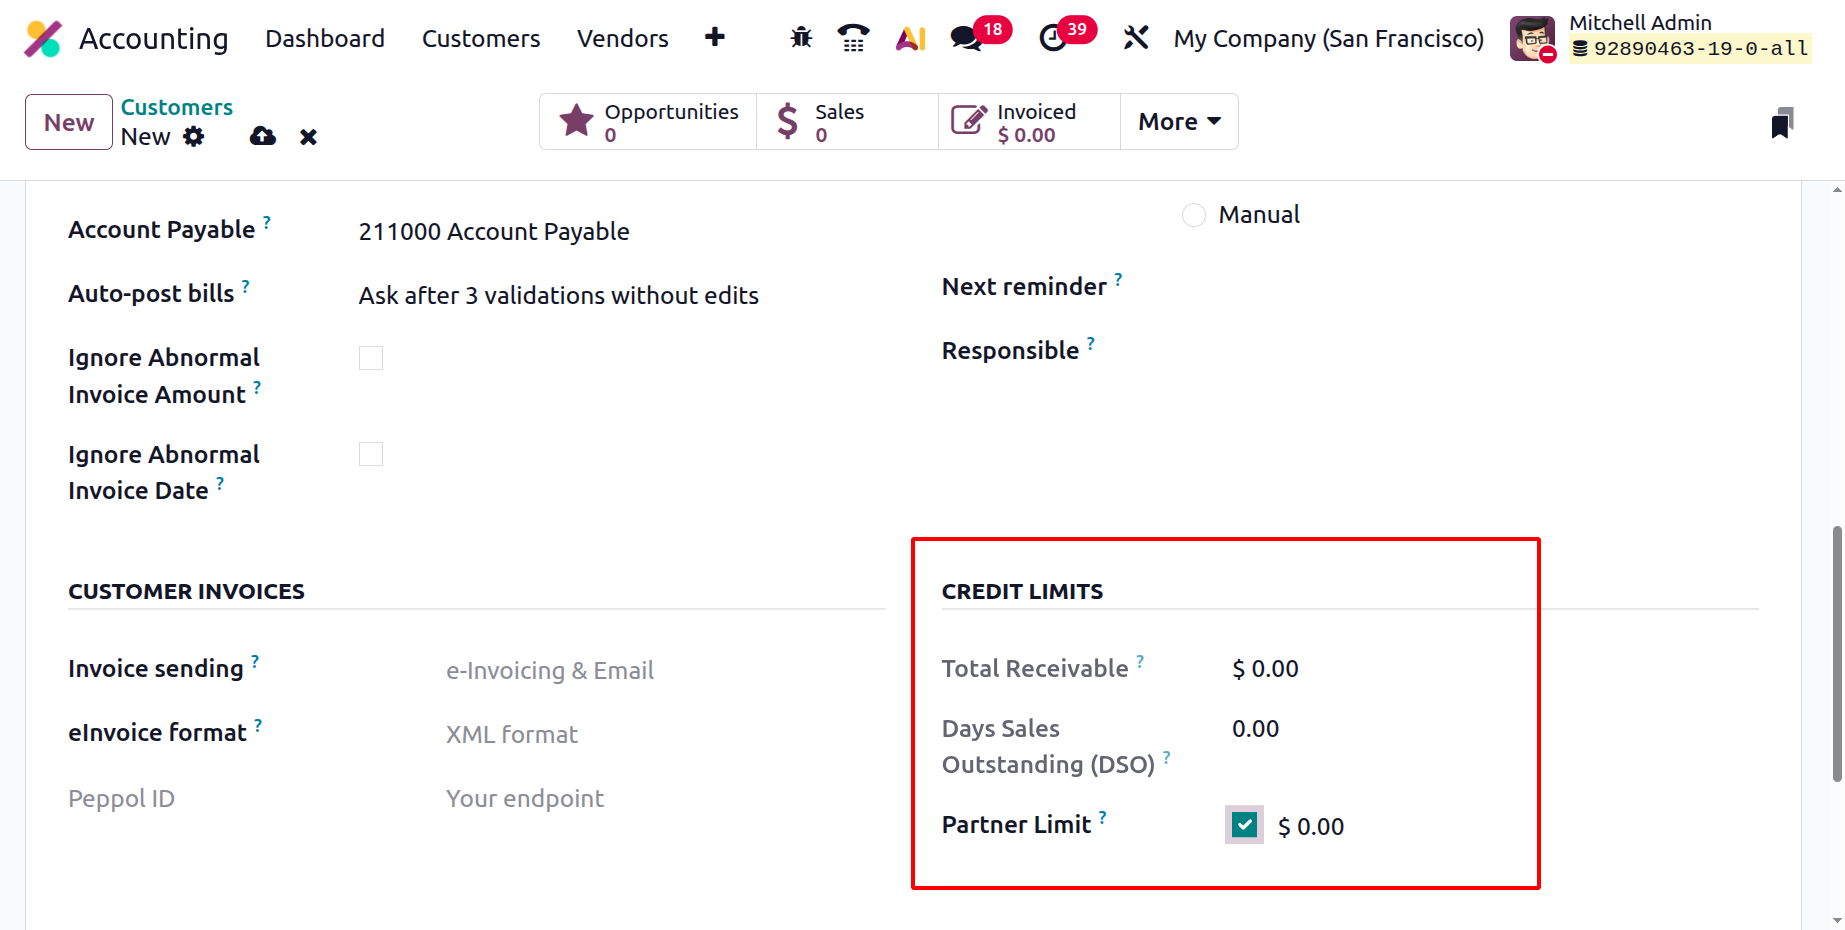
The Credit Limits section provides a financial snapshot of customer credit performance. It includes:
- Total Receivable: the total outstanding amount owed by the customer.
- Days Sales Outstanding (DSO): a key metric showing the average number of days it takes to collect payments, useful for evaluating payment efficiency.
- Partner Limit: defines the maximum credit the business extends to the customer, minimizing financial risk.
By combining automation, enhanced compliance support, and flexible configuration options, Odoo 19 Accounting enables businesses to maintain cleaner records, ensure timely payments, and build stronger financial relationships with customers.