Review
1.1 Journal Items
In Odoo 19 Accounting, the Journal Items section provides a detailed, centralized view of all debit and credit lines generated across journal entries. Each journal item corresponds to a specific transaction line and collectively reflects the complete financial movement under the double-entry bookkeeping system.
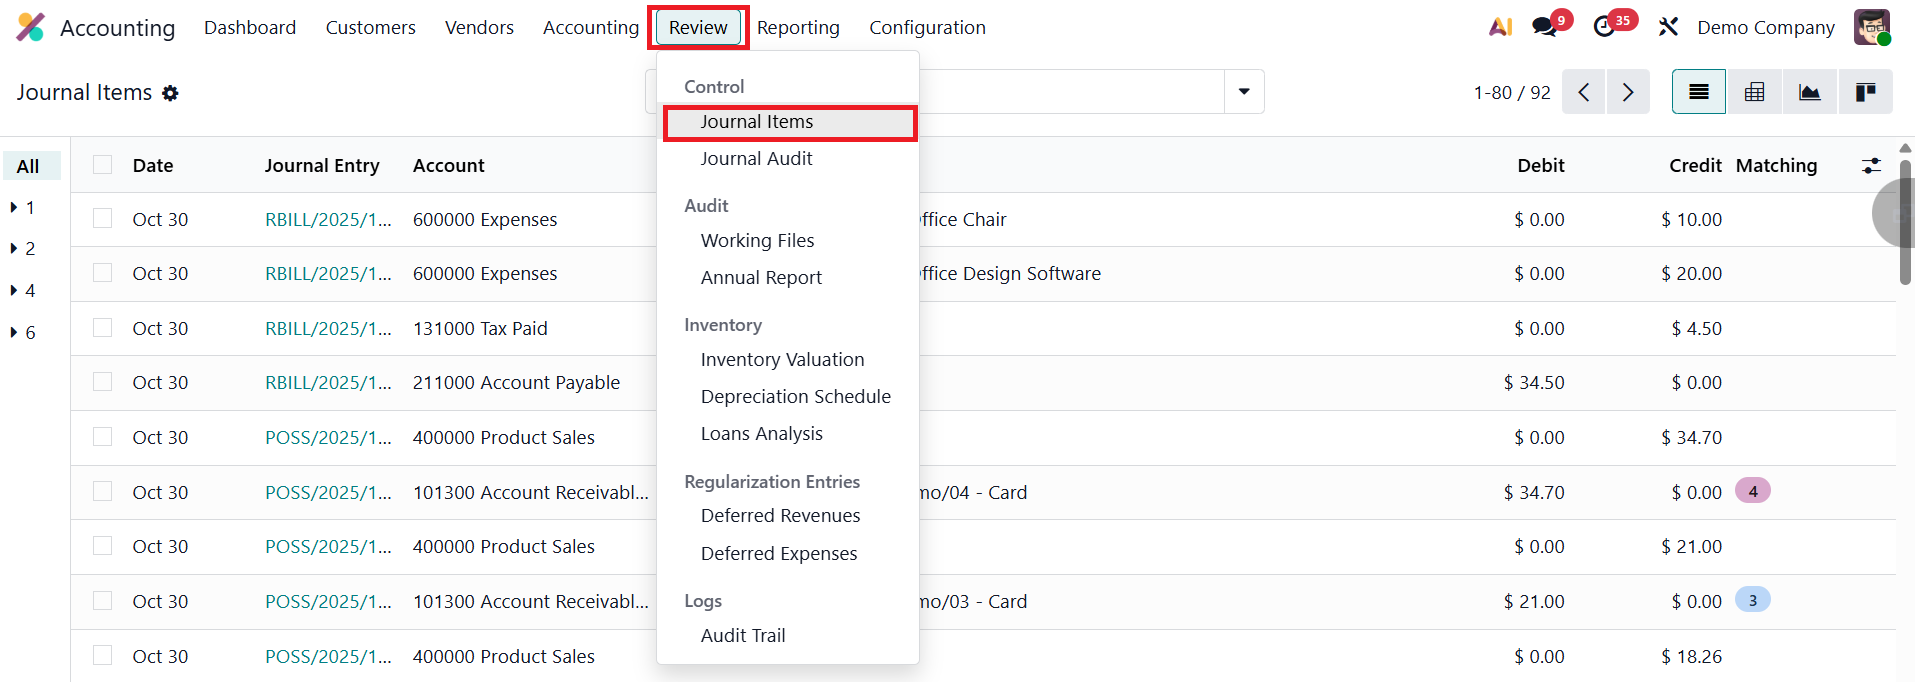
You can access this feature by navigating to the Accounting module and selecting Journal Items from the Review menu.
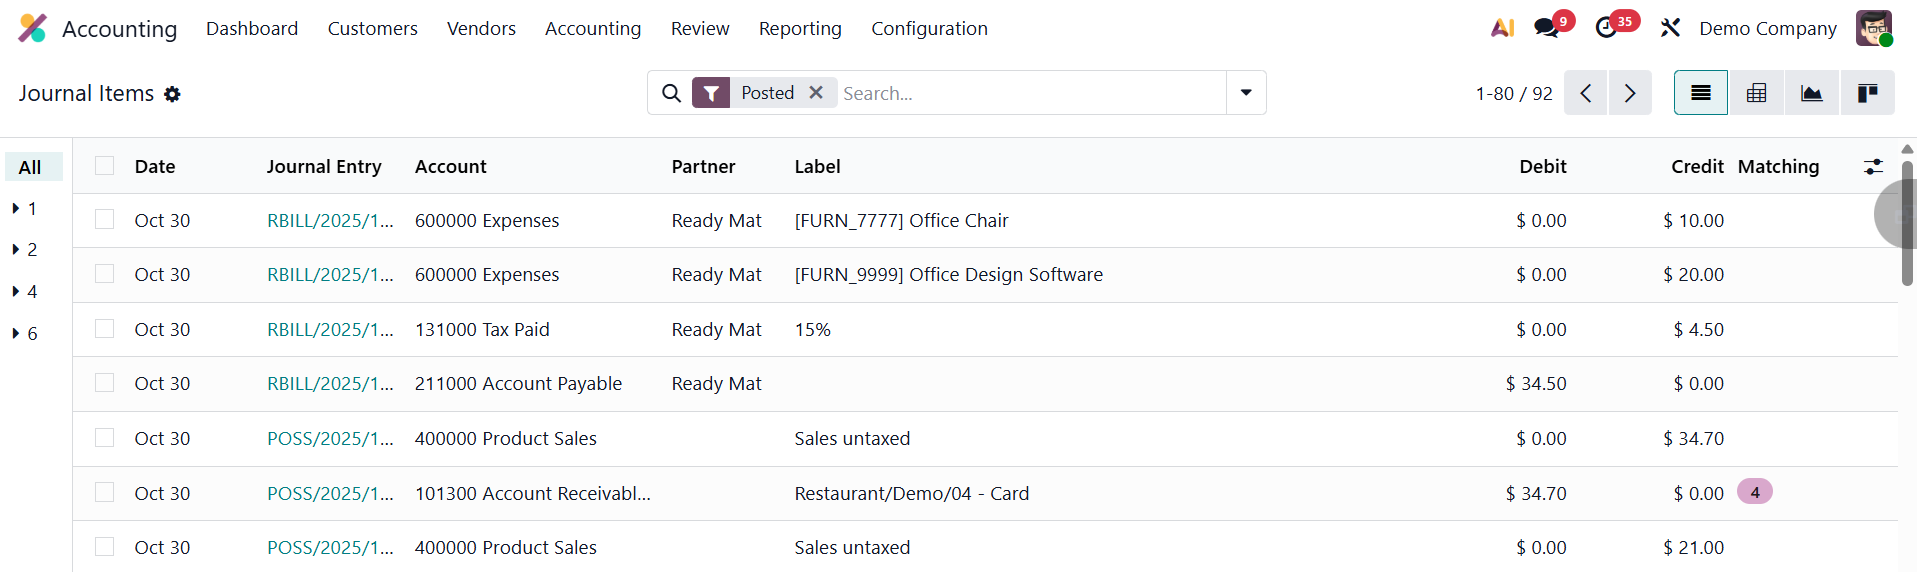
The list view displays comprehensive details such as the Date, Journal Entry Number, Account, Partner (if applicable), Label, Debit, Credit, and Matching Number.
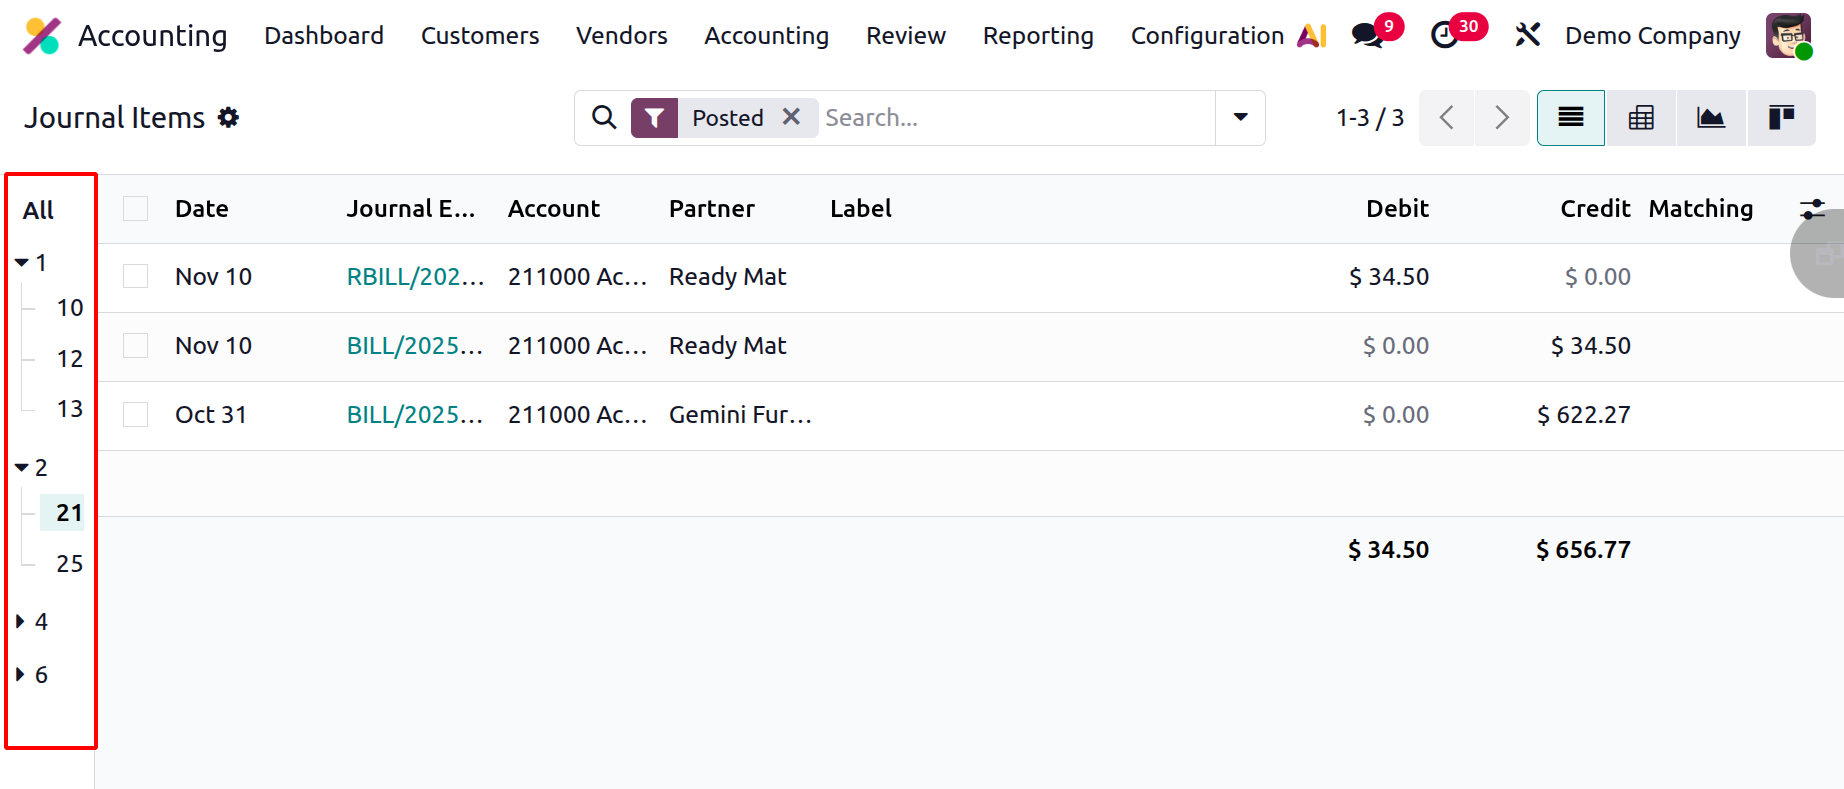
In the Journal Items list view of Odoo 19, the “All” button displays a sequential number assigned to each journal item, which helps maintain the proper order of entries for auditing and control. When you click on this sequential number, the line expands to show the starting number of the account, indicating where the sequence for that particular account began.
With enhanced filtering, grouping, and sorting options in Odoo 19, users can easily trace, verify, and analyze financial data across different accounts, journals, and periods. This section provides accountants and auditors with an efficient tool to monitor transaction accuracy, ensure ledger consistency, and maintain transparent and reliable financial records.
1.2 Analytic Items
In Odoo 19 Accounting, Analytic Items continue to play a crucial role in providing a deeper understanding of internal cost and revenue distribution across various business dimensions, such as departments, projects, or cost centers. Each analytic item corresponds to a financial transaction linked to an analytic account, offering granular insights that support budgeting, cost control, and performance analysis.
You can access and manage analytic items by navigating to the Accounting module and selecting Analytic Items under the Accounting menu.
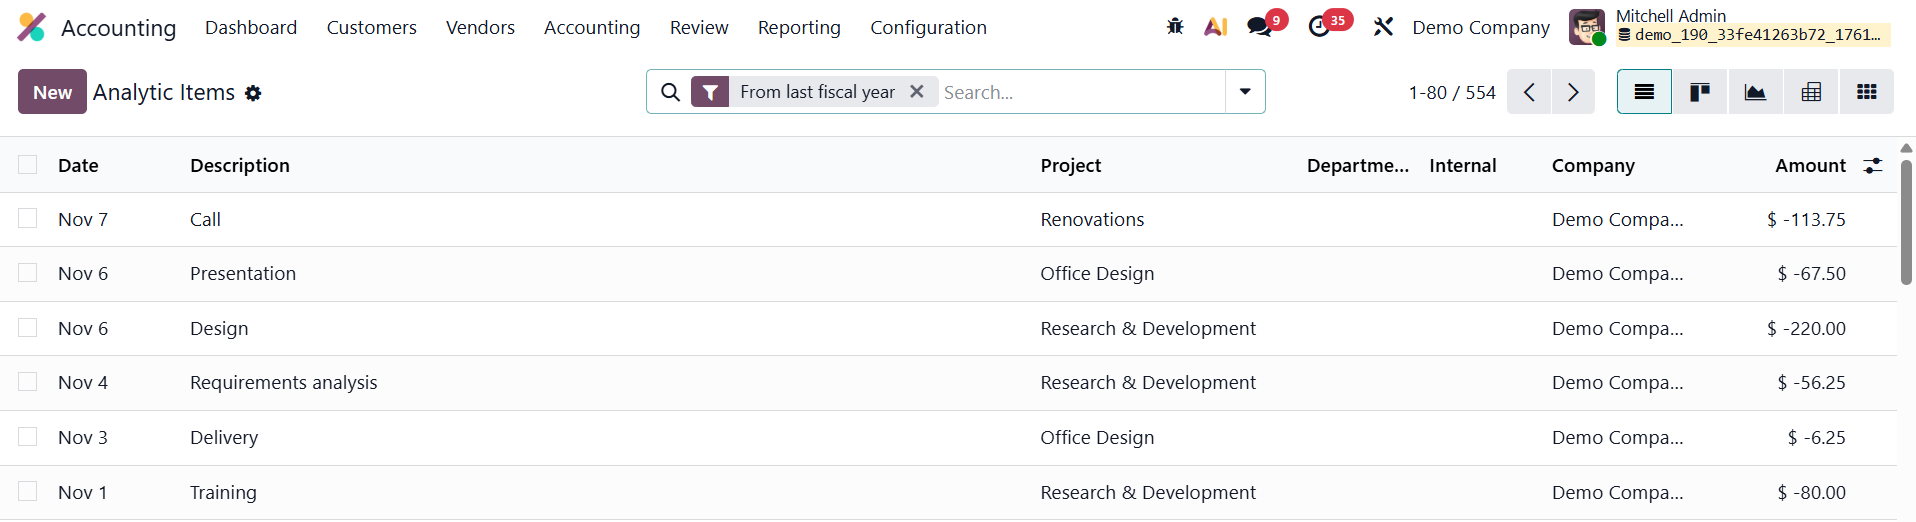
The list view presents essential details such as the Date, Description, Analytic Account, Project, Company, and Amount, helping users visualize how specific transactions contribute to various operational or project-related financial flows.
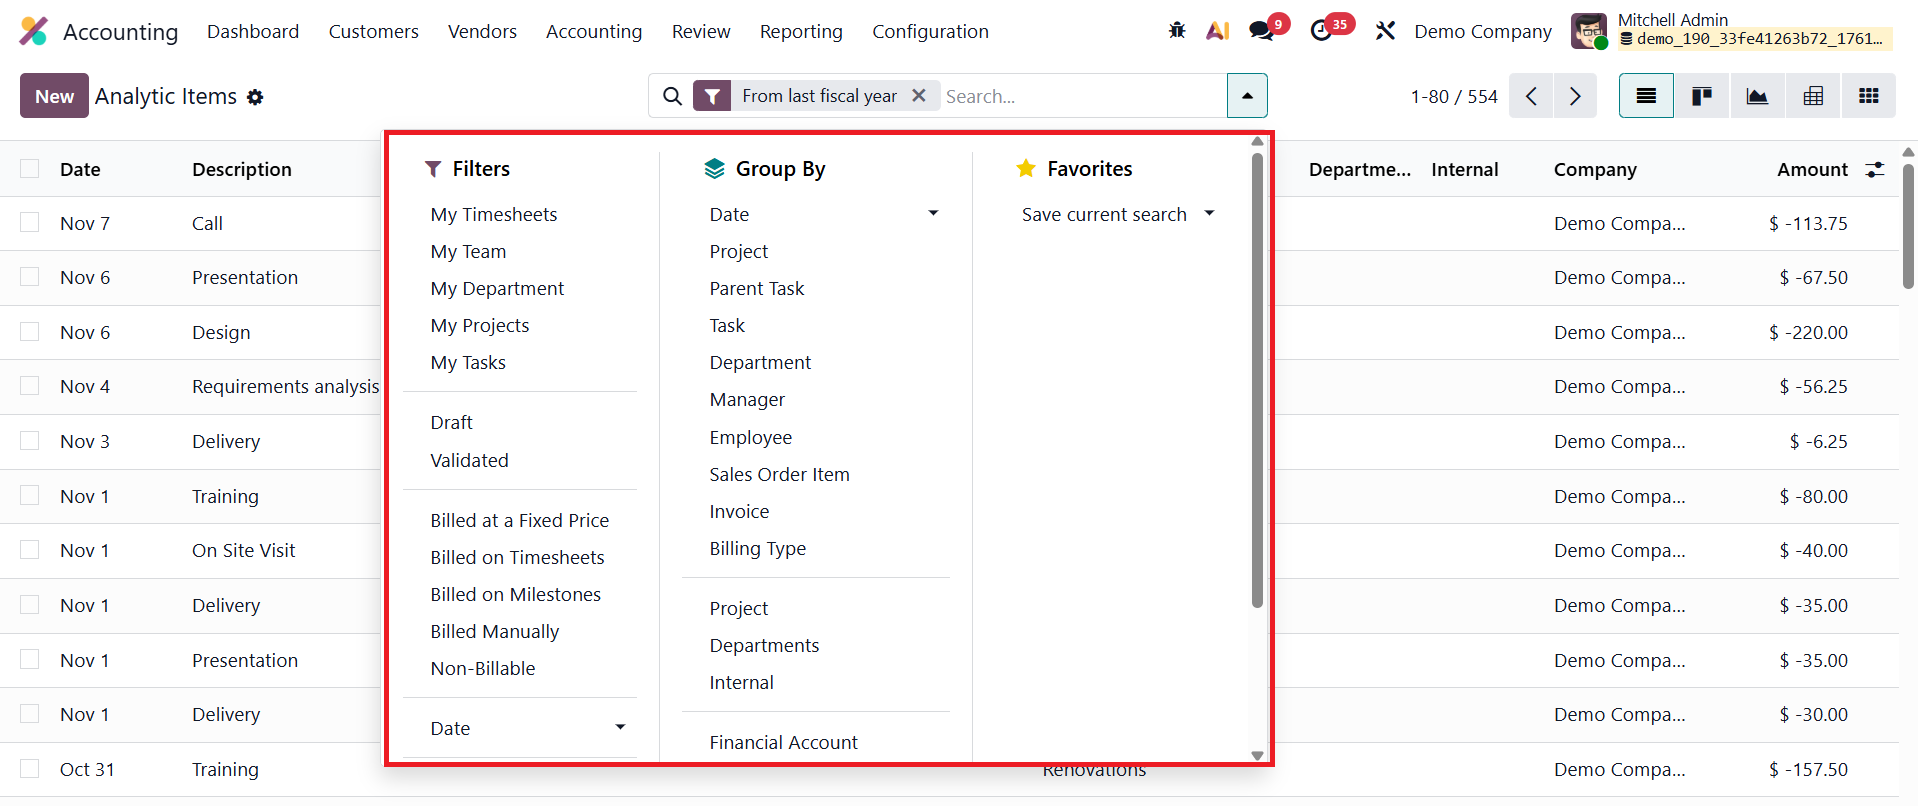
Odoo 19 enhances usability with improved filtering, grouping, and pivot analysis features, allowing users to organize data by analytic accounts, projects, partners, or other dimensions for clearer insights.
To manually create a new analytic item, click New and fill in the relevant fields.
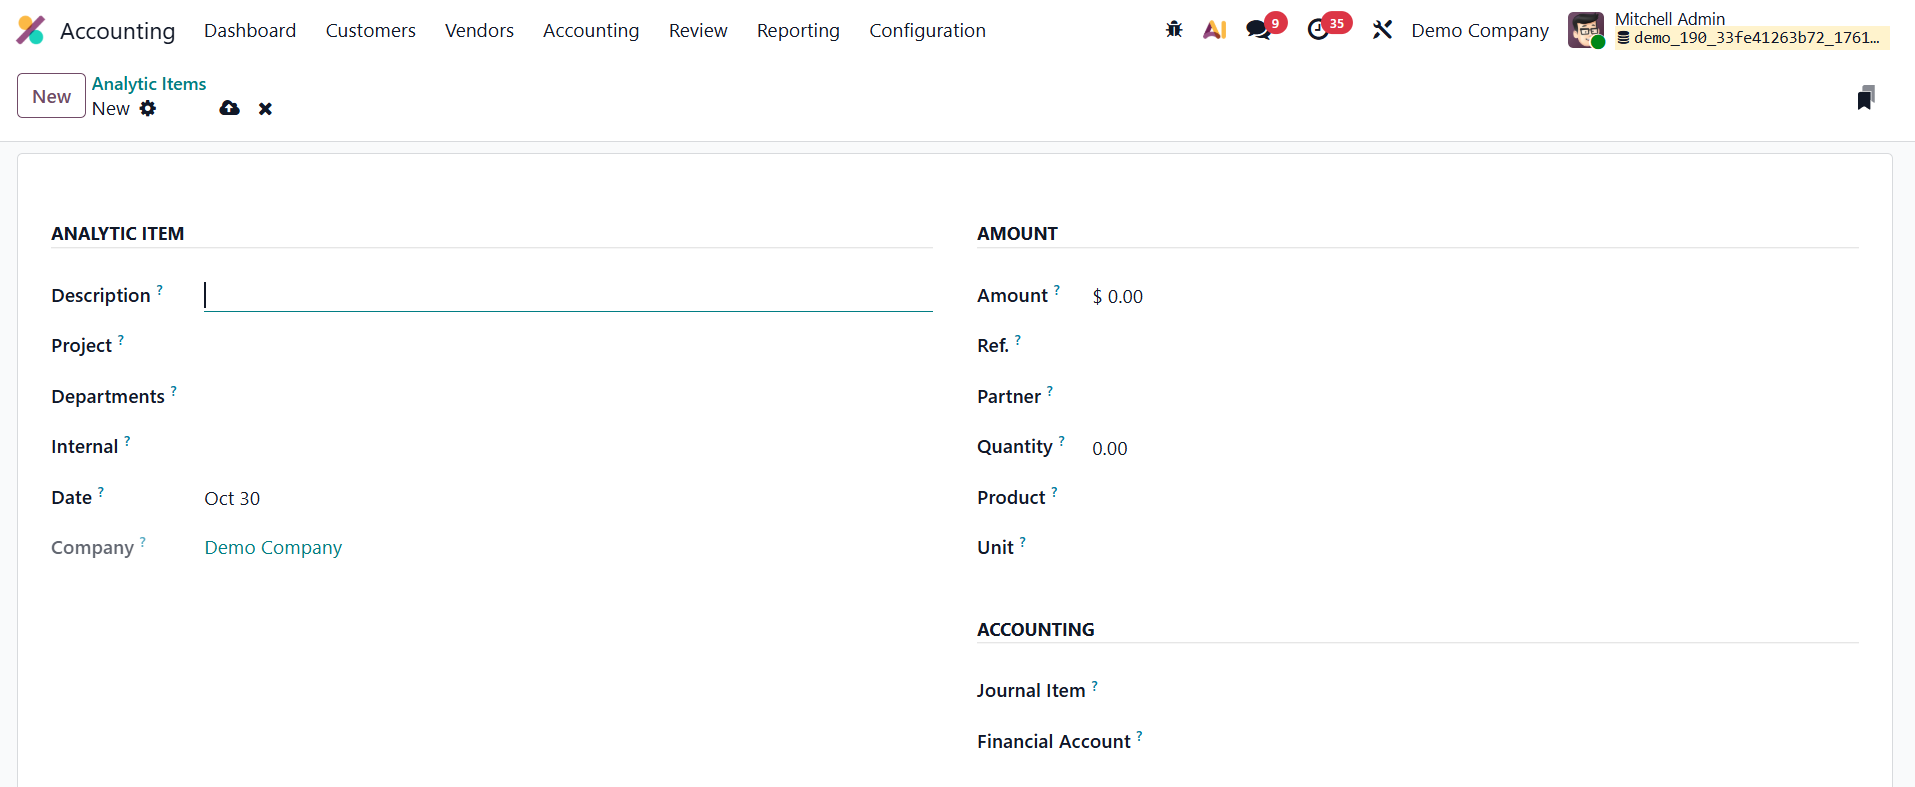
The Description field lets you define the nature or purpose of the transaction. The Date field determines the posting date, ensuring synchronization with accounting periods. The Company field is especially useful in multi-company setups, ensuring proper allocation. The Analytic Account field links the item to a particular cost center or project, while the Project and Department fields offer additional classification.
In the Amount field, you can enter either income (positive values) or expenses (negative values). The Reference field helps associate the analytic item with source documents like invoices or bills, ensuring traceability. You can also specify the Partner, Quantity, Product, and Unit of Measure, providing more context for each transaction, such as hours worked or goods sold.
Finally, you can link the analytic item to a Journal Item or a Financial Account, ensuring accurate mapping between analytic and general ledger data. Once saved, the analytic item becomes part of the system’s analytic reporting, allowing businesses to monitor financial performance across different operational levels.
1.3 Depreciation Schedule
In Odoo 19 Accounting, the Depreciation Schedule offers a clear and detailed overview of an asset’s entire depreciation journey, ensuring complete transparency and control over asset valuation. Accessible through the Review menu, this report compiles all depreciation postings linked to each fixed asset and presents them in an organized format. It displays key information such as the Acquisition Date, Method, Duration/Rate, Assets, Depreciation, and Book Value after each entry is processed.
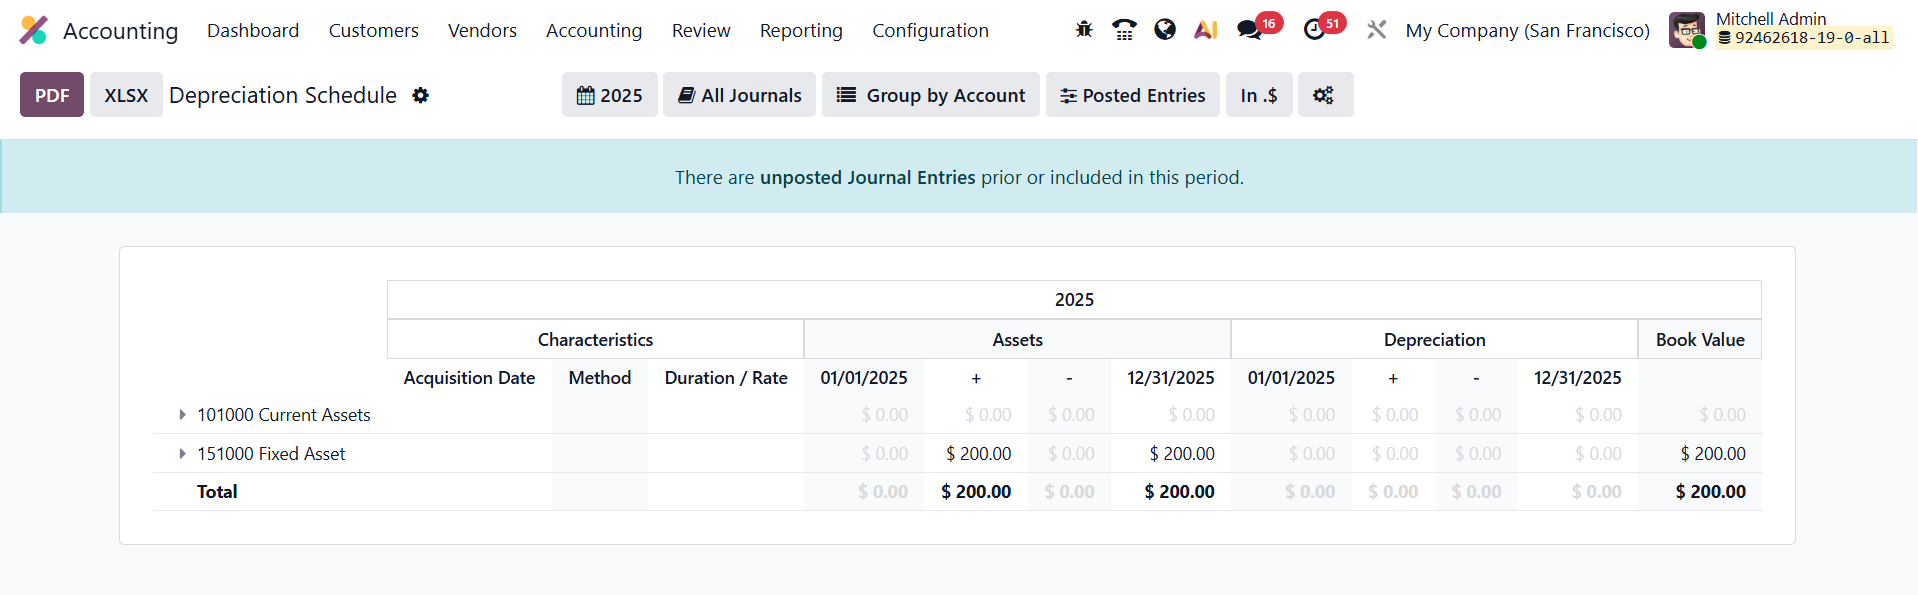
The Depreciation Schedule dynamically updates every time a new depreciation line is generated, whether it’s created automatically by the system’s scheduler, added manually by the user, or results from actions such as revaluation, disposal, or modification of an asset. This continuous synchronization ensures that finance professionals always have access to real-time, accurate data reflecting the asset’s financial position.
1.4 Loans Analysis
In Odoo 19 Accounting, the enhanced Loan Analysis Report provides a powerful, data-driven overview of your organization’s active and closed loans, helping finance teams monitor repayment progress, evaluate interest expenses, and assess overall debt performance with precision.
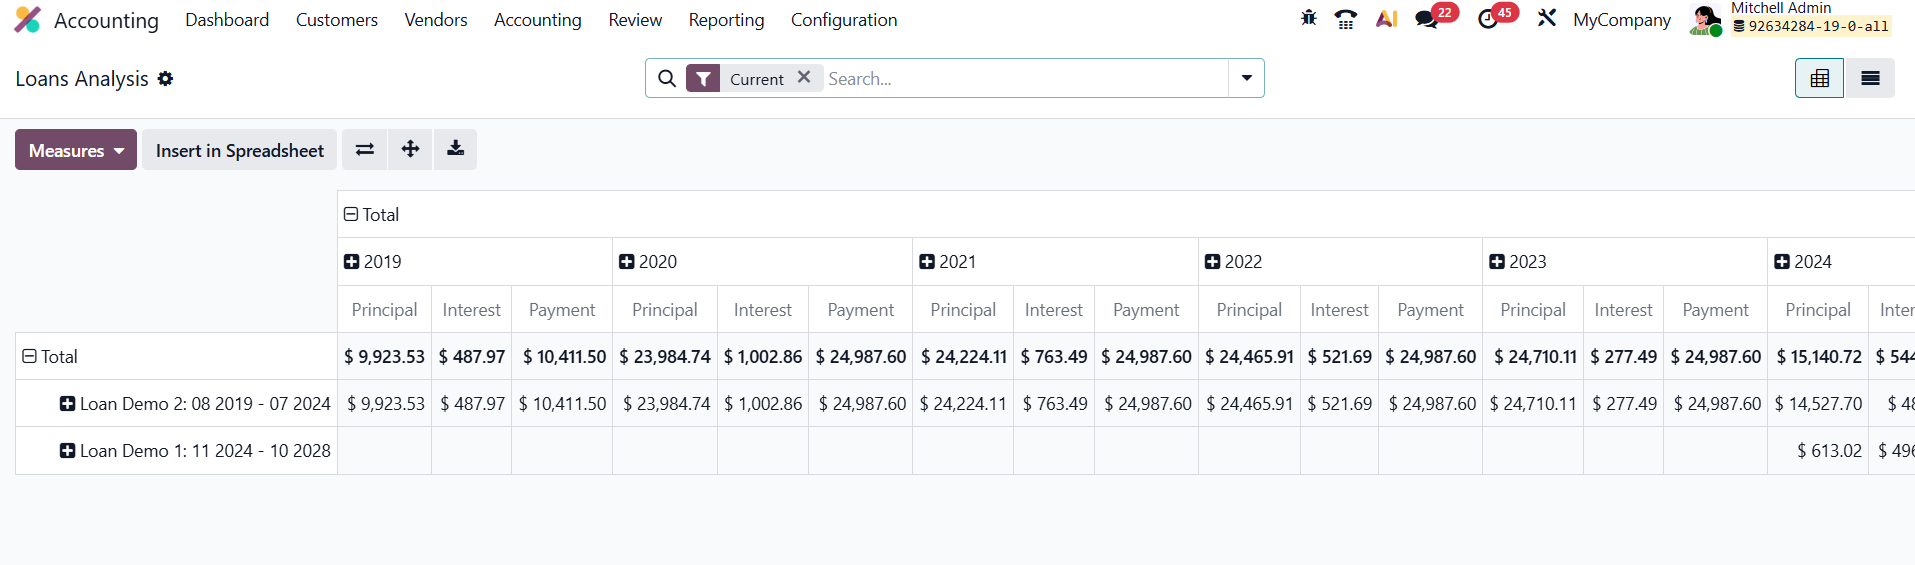
Accessible from Review › Loan Analysis under the Inventory Reports section, this feature offers a comprehensive analytical dashboard that supports both high-level financial tracking and in-depth review of loan activity. By default, the report opens in a pivot view, where each loan name is listed along the Y-axis, while the columns represent fiscal years or selected time periods. The pivot table displays essential financial metrics such as Principal Repaid, Interest Incurred, and Total Payments, giving users an instant snapshot of how each loan has evolved over time.
This structured visualization enables finance teams to quickly understand repayment trends, evaluate how loan obligations impact cash flow and liquidity, and identify which loans contribute most to the company’s long-term liabilities. The report can easily be switched to a list view, which presents every installment or transaction in detailed, line-by-line format, ideal for audits or reconciliation tasks.
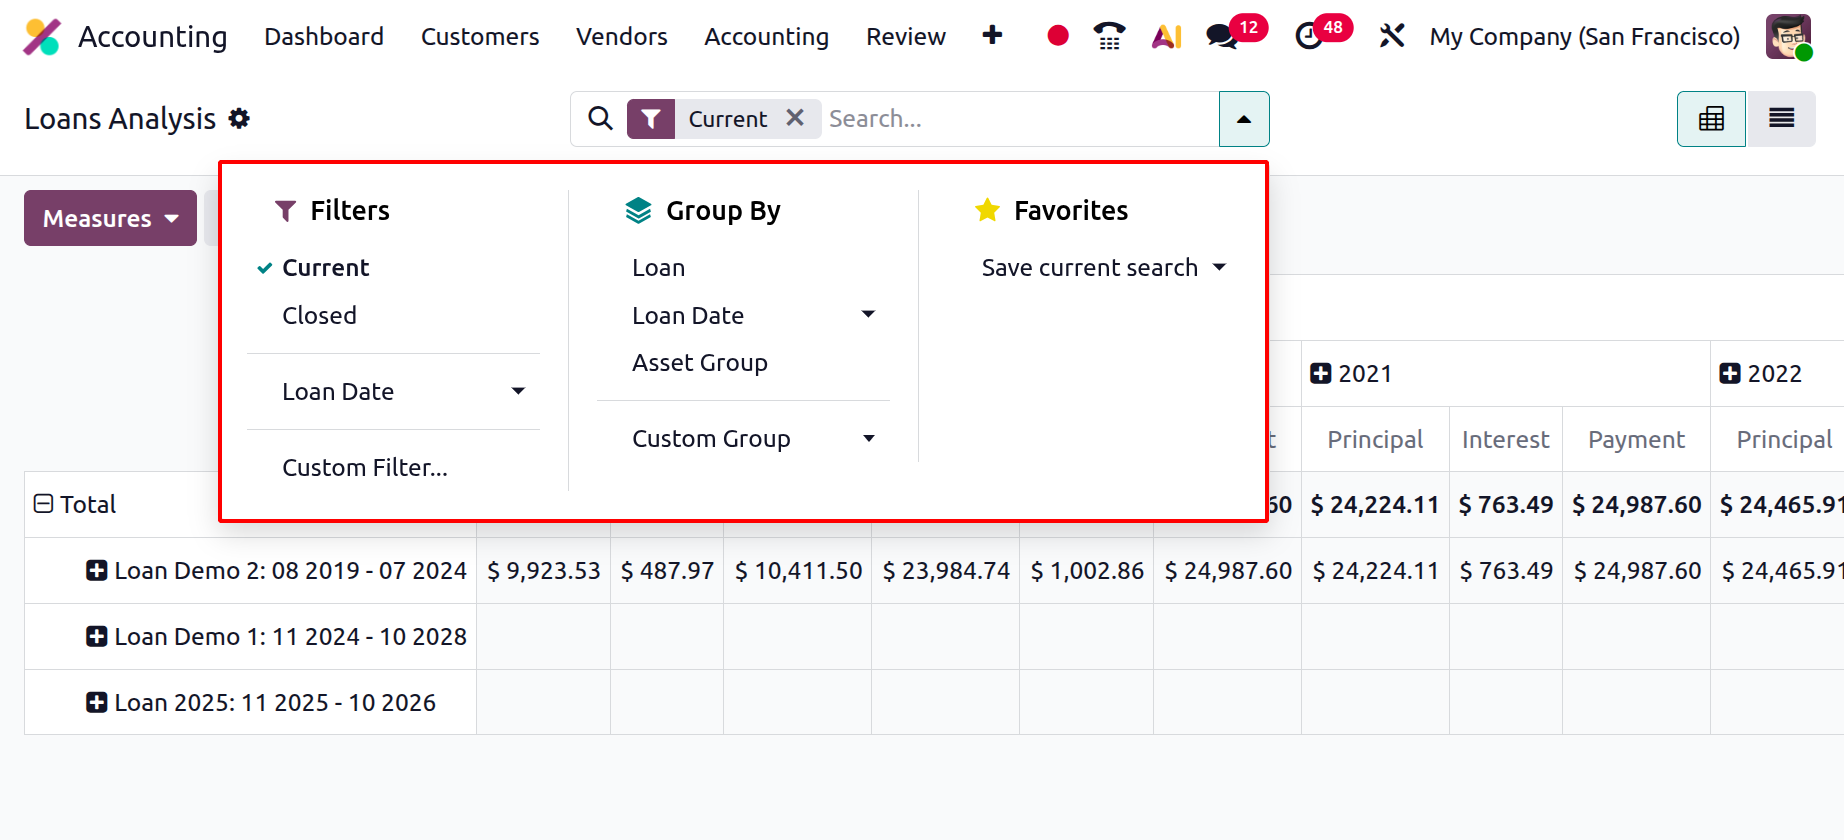
Odoo 19 further refines usability through dynamic filtering and grouping options. Users can apply predefined filters such as Current Loans, Closed Loans, or Loan Date, or create custom filters based on specific conditions like asset type or responsible department. The Group By functionality allows quick restructuring of the report by Loan, Loan Date, or Asset Group, enabling multi-dimensional analysis from various accounting perspectives. For convenience, Odoo 19 also lets users save custom report layouts, so frequently used filters and pivot configurations can be reloaded instantly.
1.5 Deferred Management
In Odoo 19 Accounting, the Deferred Management feature provides an enhanced and automated approach to managing prepaid expenses and unearned revenues, ensuring accurate financial reporting in line with accrual accounting principles. When a company pays for goods or services in advance or receives payment before delivering its own services, Odoo 19 automatically generates deferral journal entries that distribute the recognition of those transactions across the relevant future accounting periods. This functionality helps maintain precise matching between income and expenses, ensuring compliance with accounting standards.
1.5.1 Deferred Revenue
Deferred Revenue, also known as Unearned Revenue, refers to the payments a company receives from customers for goods or services that are yet to be delivered. Since the revenue has not yet been earned, it cannot be recognized immediately in the Profit and Loss statement. Instead, the amount is temporarily recorded as a current liability on the balance sheet until the service or product is delivered, either entirely or progressively over time.
For example, if a business sells a one-year software subscription for $1200 and invoices the customer upfront, the total amount cannot be recognized as income at once. The full amount is initially posted to a Deferred Revenue Account, and over the next twelve months, $100 is recognized as earned income each month. This ensures that revenue recognition aligns accurately with the delivery of the service.
In Odoo 19 Accounting, this process is fully automated through the Deferred Revenue feature. The system generates periodic journal entries based on a defined deferral model, which can be configured to post monthly, quarterly, or according to a custom schedule. These automated entries ensure precise and timely revenue recognition, significantly reducing manual intervention and the risk of accounting errors.
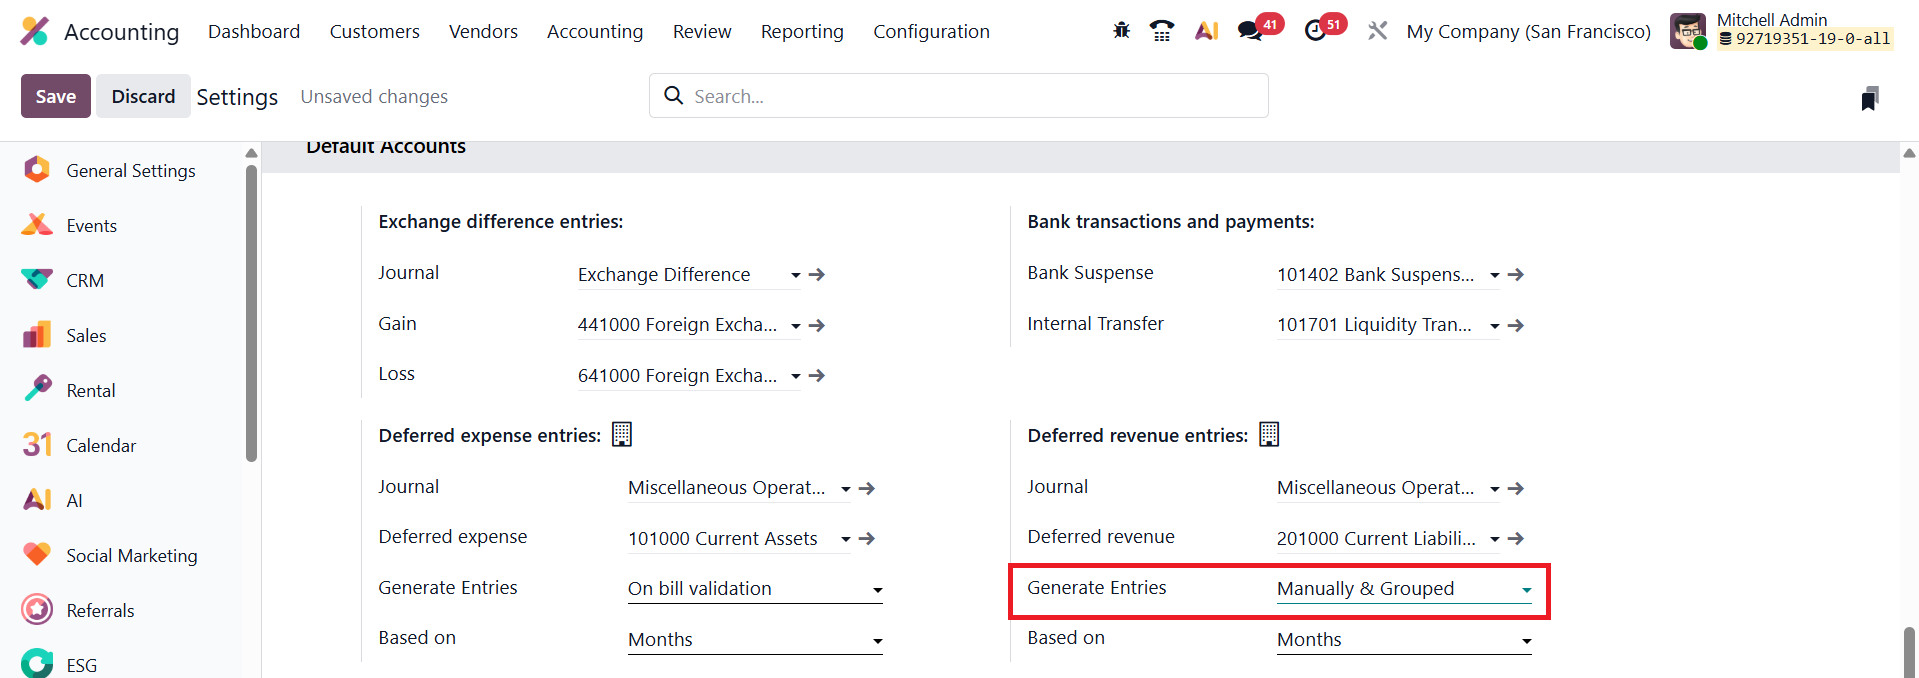
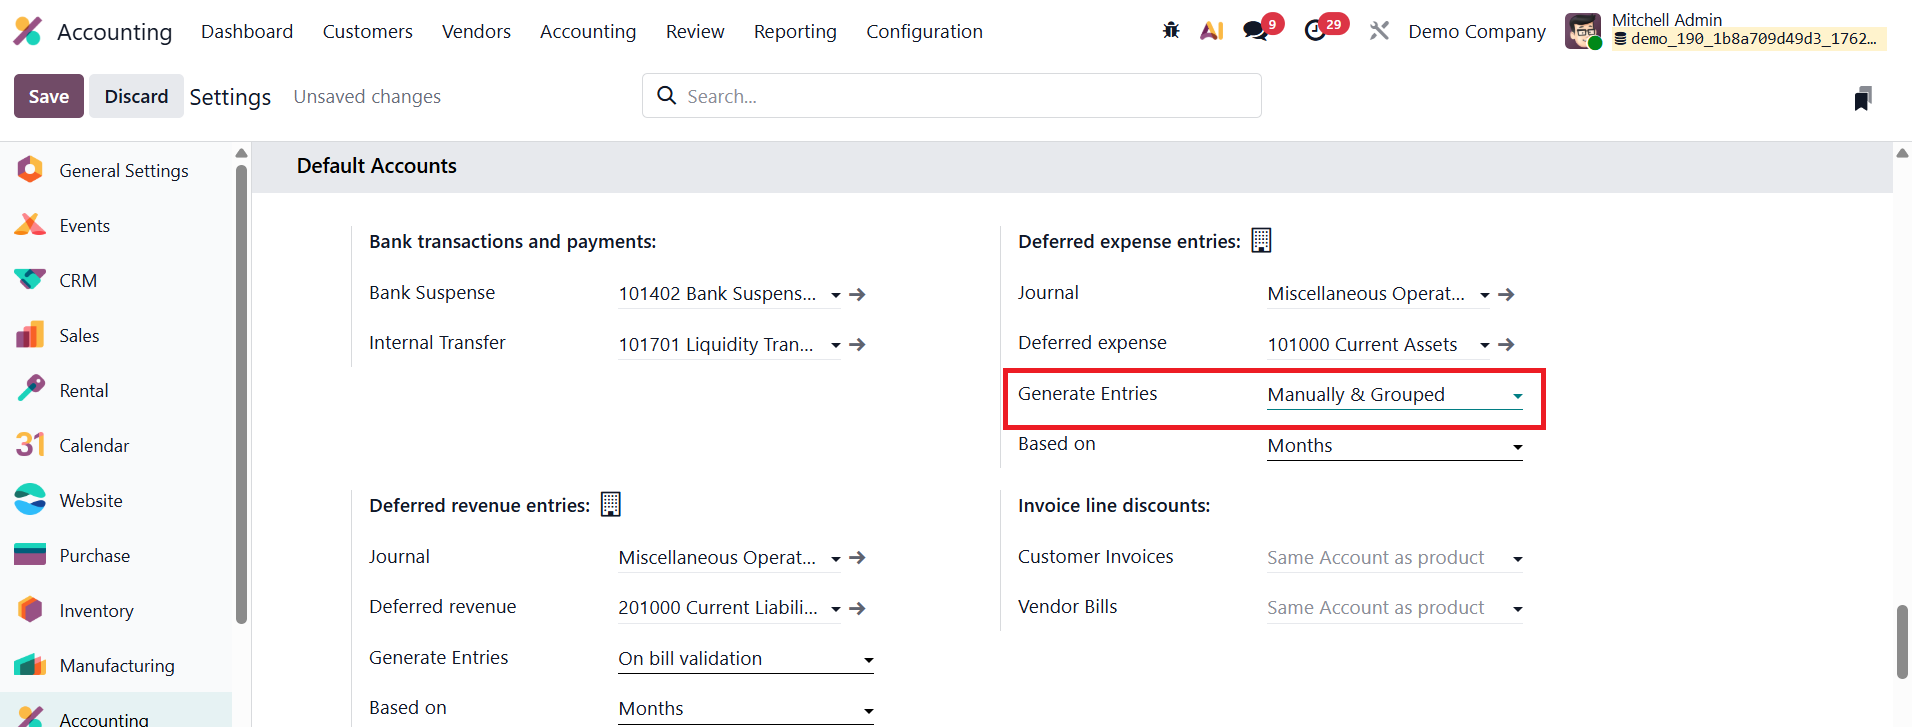
Configuration options for Deferred Revenue are accessible under Accounting → Configuration → Settings, within the Default Accounts section.
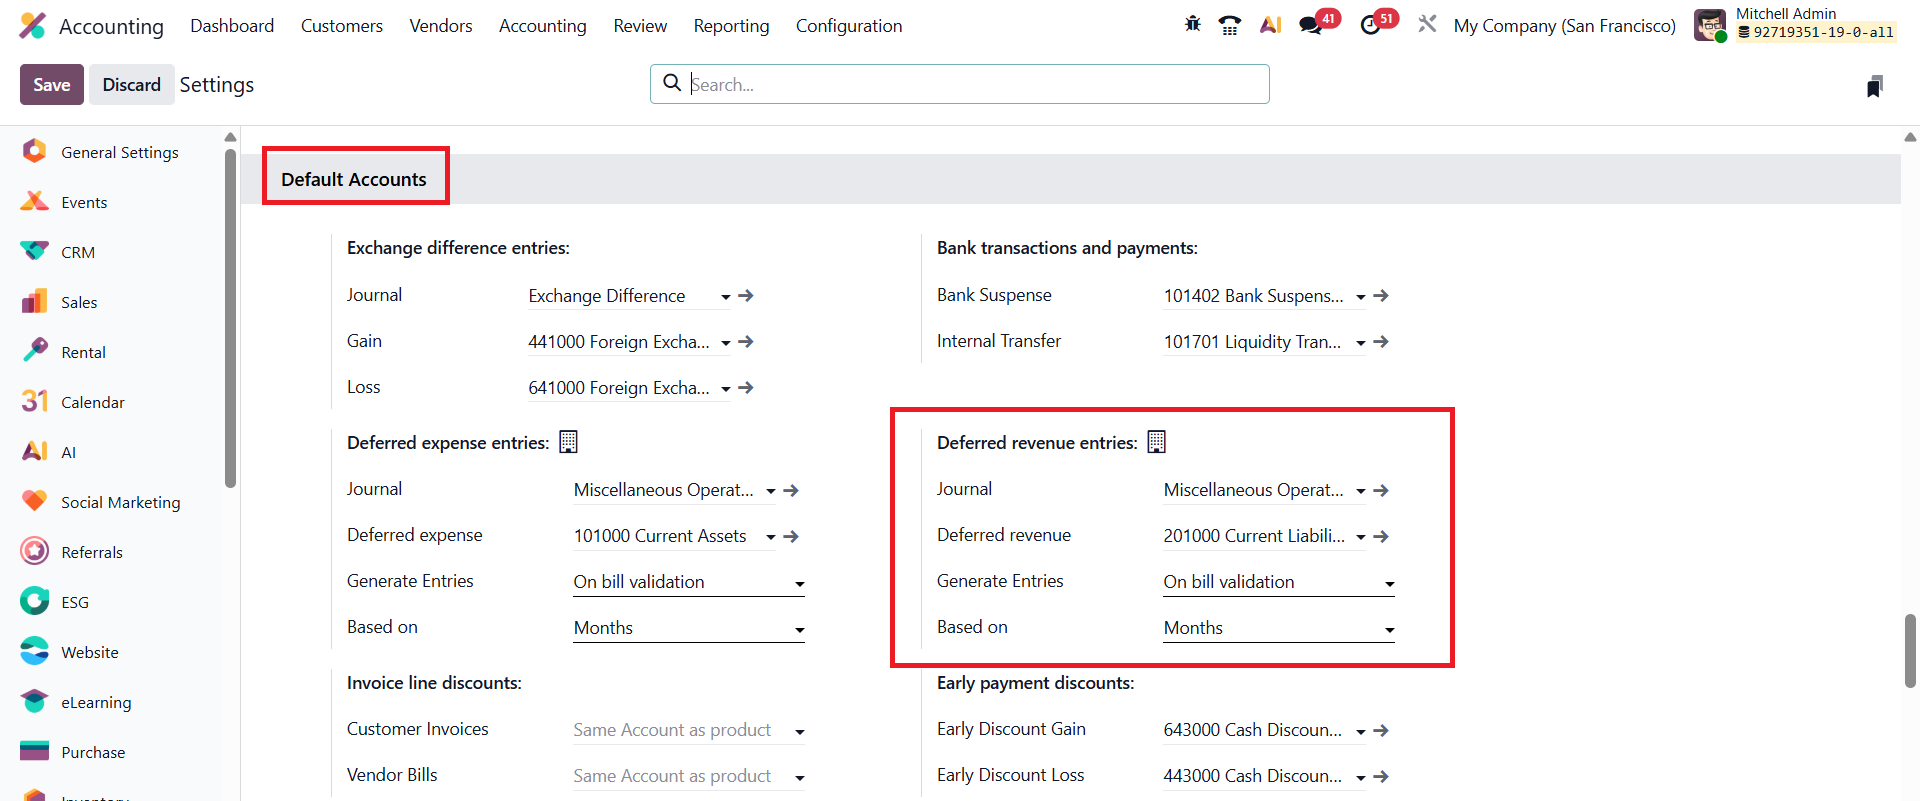
Here, users can define the Deferred Revenue Account, which serves as the holding account for unearned income until it becomes eligible for recognition. In addition, users can specify the Journal used for deferred entries, providing flexibility in how deferred transactions are recorded and tracked. Odoo 19 also offers advanced control over how deferral entries are generated. Businesses can choose between On Bill Validation, where entries are created as soon as invoices are validated, or Manual & Grouped generation, allowing accountants to review and post entries manually or in batches. Furthermore, Odoo allows users to define how revenue should be spread over time, either by Days for precise daily calculations, by Months for evenly distributed recognition, or using the Full Months option to ensure recognition aligns with calendar months.
Generate Entries on Bill Validation
In Odoo 19 Accounting, the Generate Entries on Bill Validation feature provides a more automated and streamlined approach to managing deferred revenues and expenses. When this option is enabled, Odoo automatically creates the required deferral journal entries as soon as a bill or invoice is validated, eliminating the need for manual scheduling or separate posting.
For instance, consider a scenario where a customer subscribes to a service plan offered by a company.
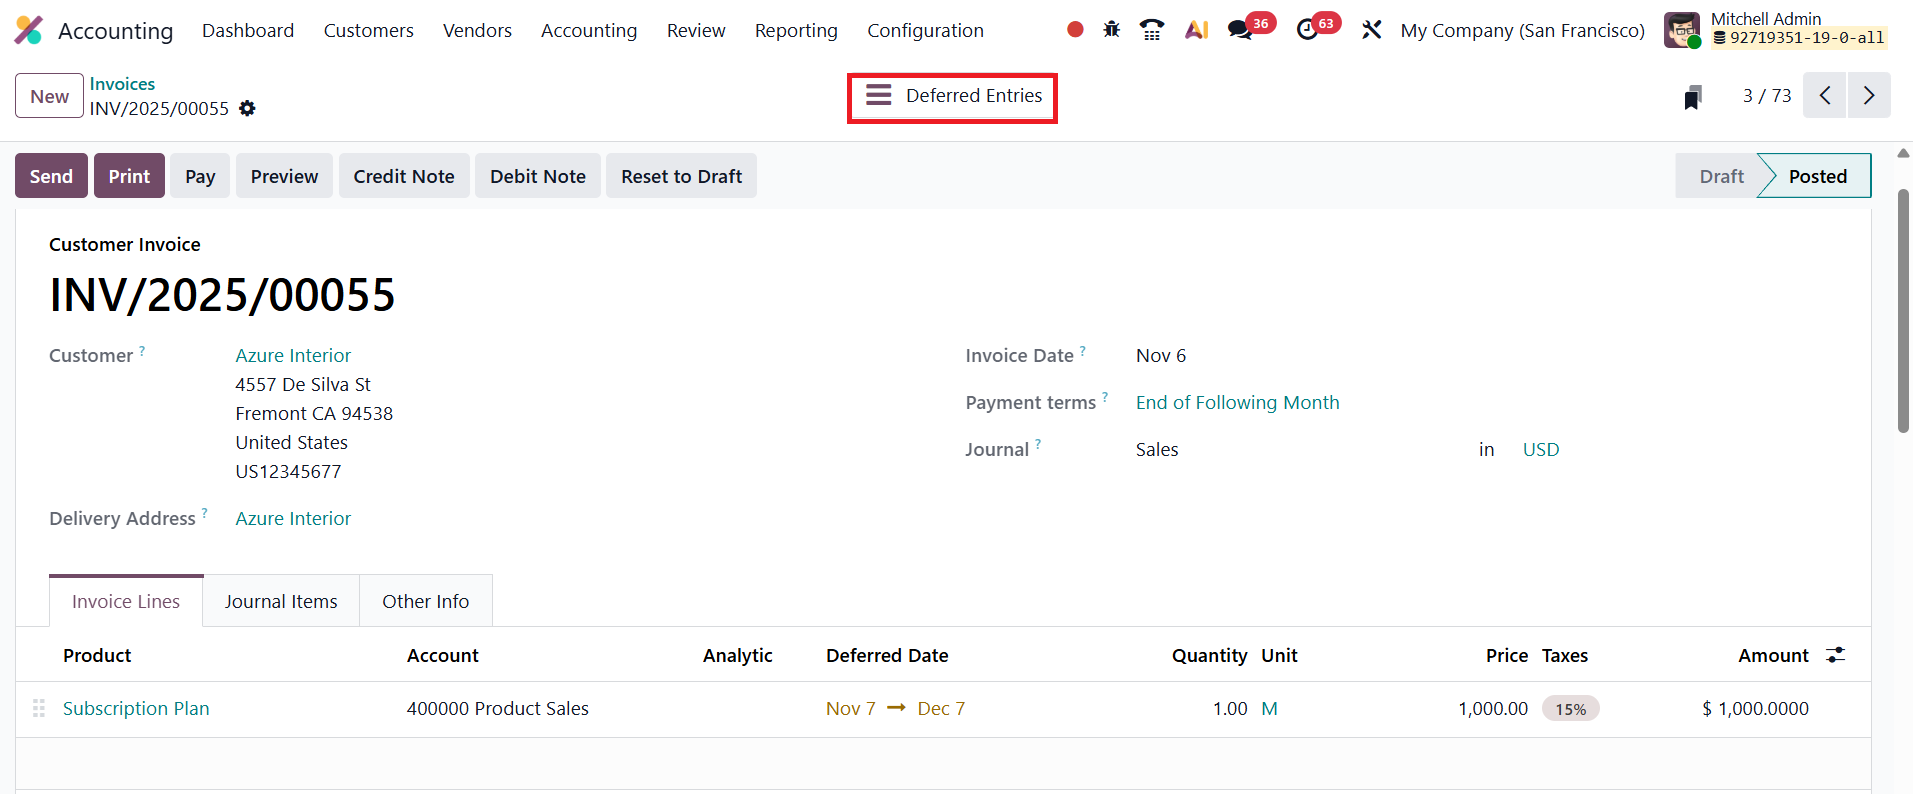
In Odoo 19, this process begins by navigating to Accounting → Customers → Invoices, and clicking New to create a new invoice.
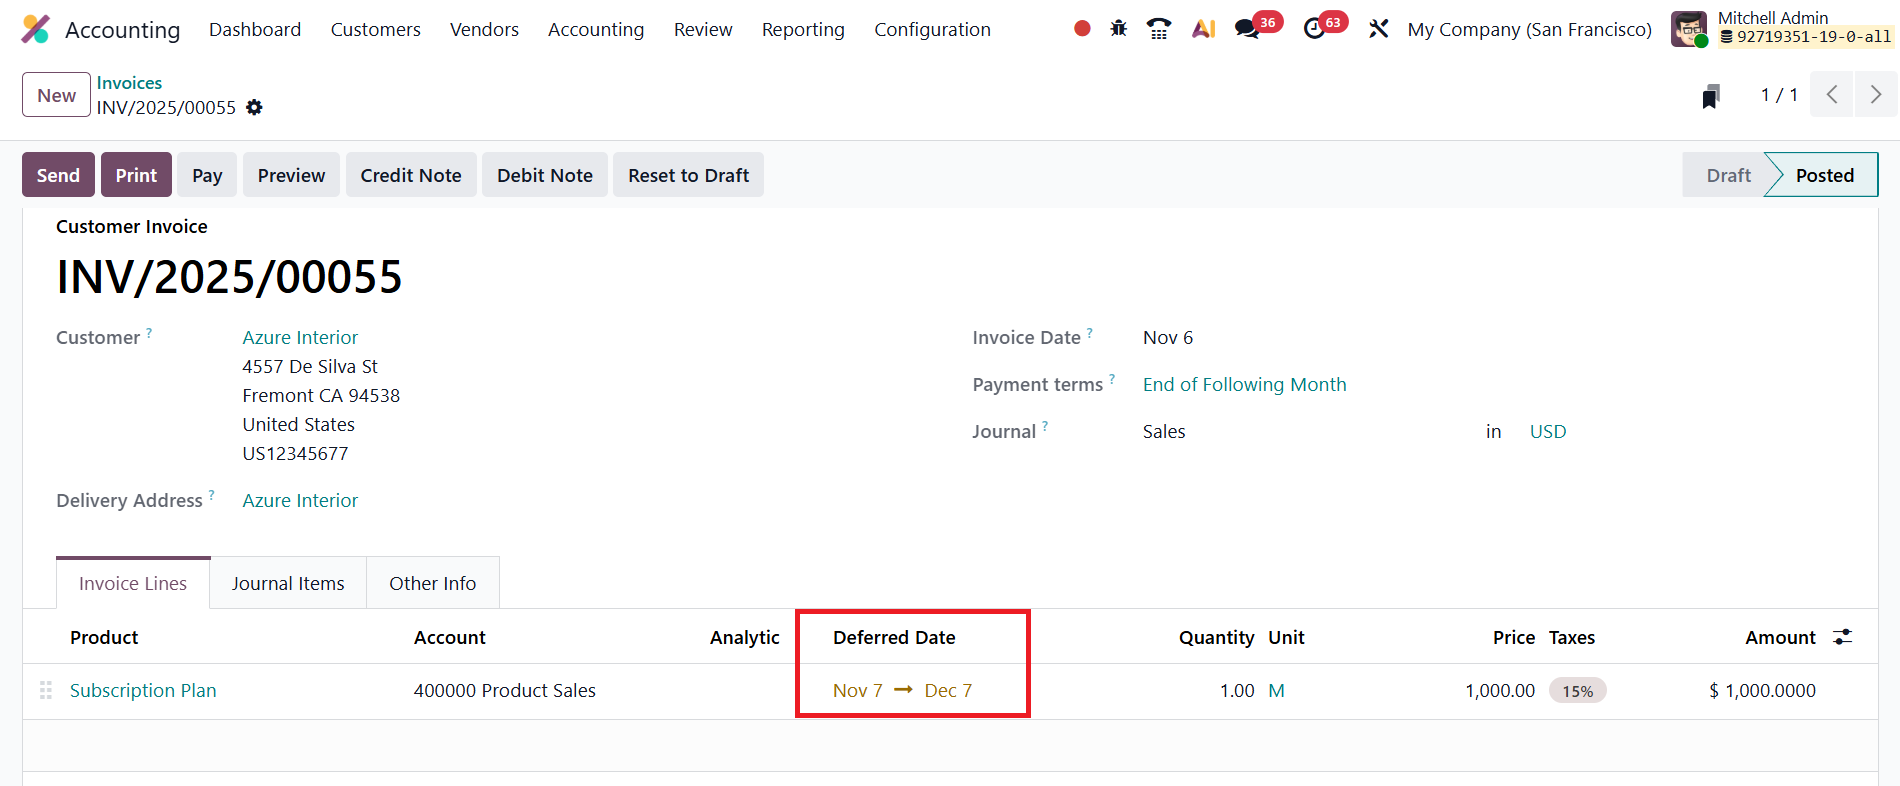
After selecting the Customer and filling in essential fields such as Invoice Date, Payment Terms, and Journal, the user can add the product or service under the Invoice Line section.
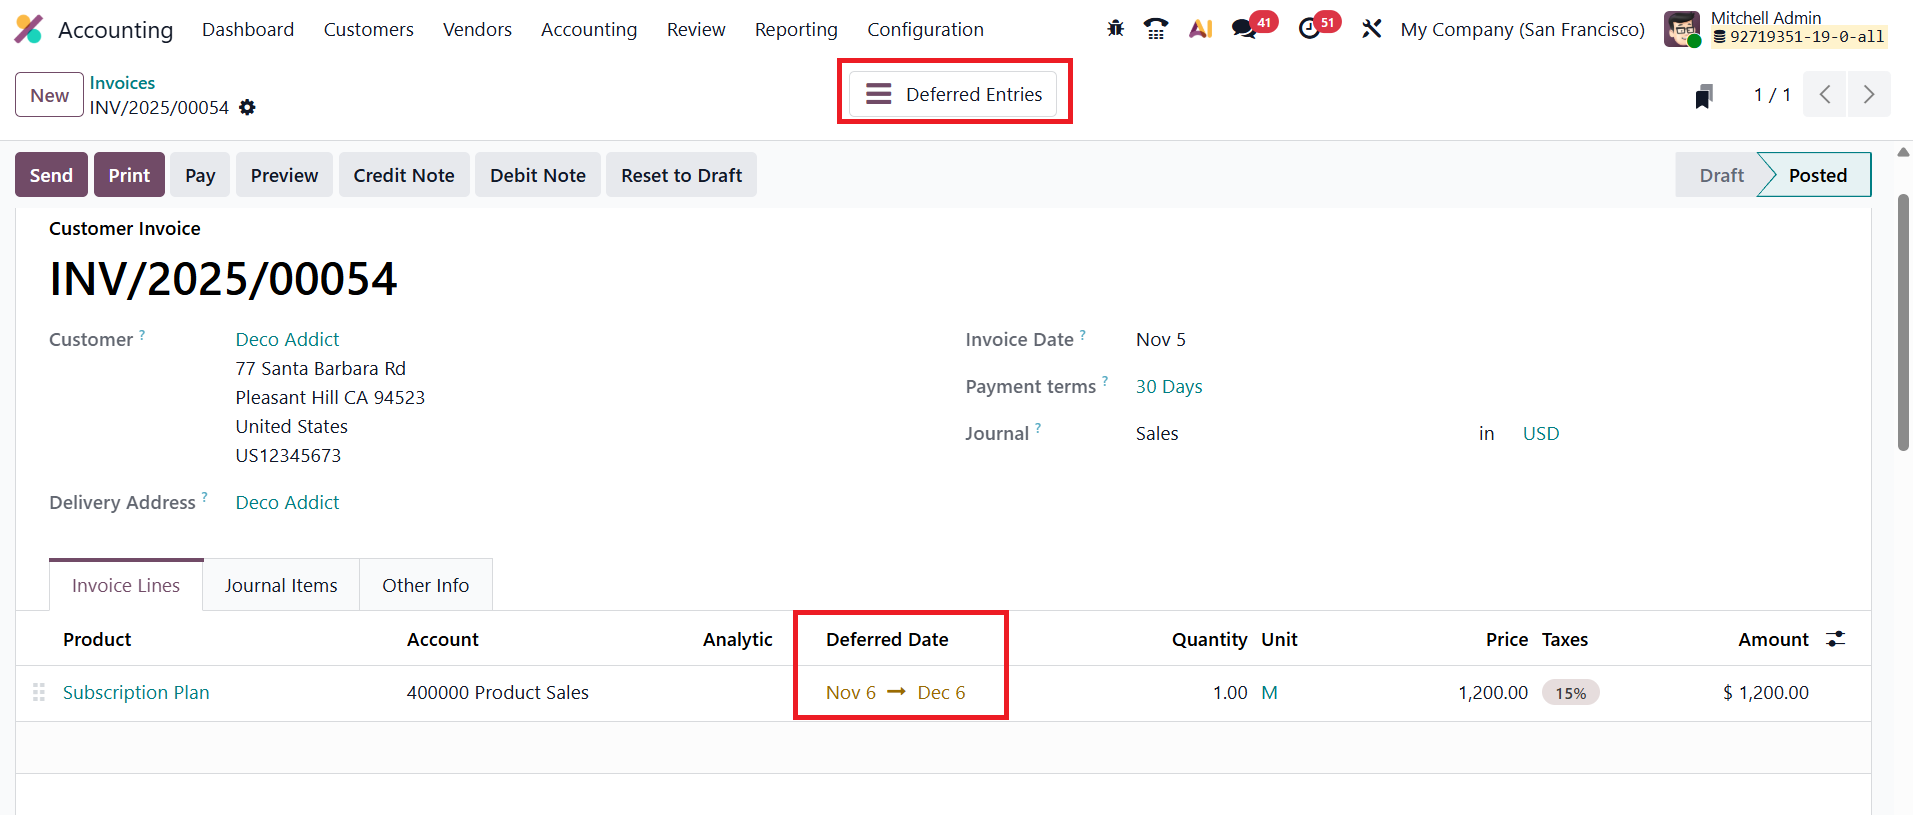
For time-based services like subscriptions, Deferred Date defines the duration of the service. These dates determine how Odoo distributes the revenue recognition over the specified period.
Once the invoice details are entered and the document is confirmed, Odoo 19 automatically generates the corresponding deferred entries. You can access them using the Deferred Entries smart button.
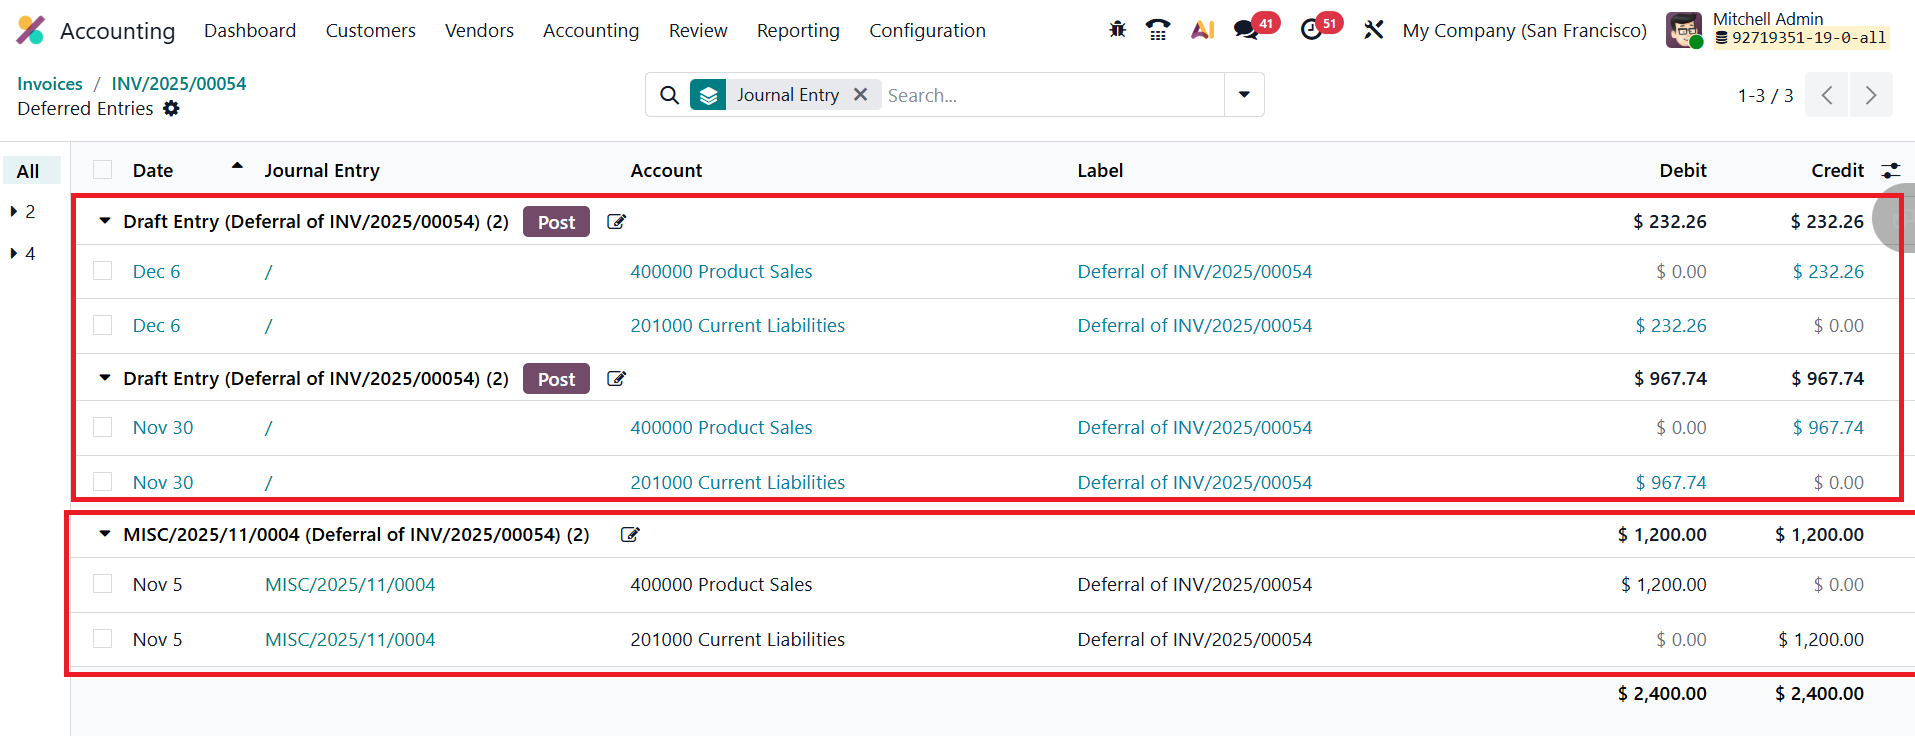
The first journal entry, dated the same as the invoice’s accounting date, transfers the full invoice amount from the Income Account to the Deferred Revenue Account, ensuring that unearned revenue is temporarily recorded as a liability rather than immediate income. This prevents premature recognition of revenue in the Profit and Loss statement.
Following the initial transfer, Odoo automatically creates a series of deferral entries, posted periodically based on the configured deferral method (daily, monthly, or full months). These recurring entries progressively move portions of the amount from the Deferred Revenue Account back to the Income Account as time passes or as services are delivered. The system continues this process throughout the duration defined by the Start and End Dates, ensuring that revenue recognition is evenly and accurately distributed over the service period.
Generate Entries Manually and Grouped
In Odoo 19 Accounting, the Generate Entries Manually & Grouped method offers greater flexibility and control over how deferred revenue and expense entries are created. Unlike the automatic generation option, this mode does not create journal entries at the time of bill or invoice confirmation. Instead, users can manually trigger the creation of deferred entries at their preferred intervals, such as monthly or quarterly, allowing for more oversight in financial adjustments and reporting.
To enable this option, navigate to Accounting → Configuration → Settings, and under the Deferred Entries section, locate the Generate Entries field. Change the setting to Manually & Grouped, then save the configuration. Once this mode is activated, Odoo will no longer automatically create deferral journal entries when invoices or bills are validated.
Next, create and confirm a new invoice by going to Accounting → Customers → Invoices and clicking New. Enter all necessary details, including the Customer, Invoice Date, Journal, and the relevant Product or Service. After confirming the invoice, no deferred journal entries will appear automatically, since the system is now configured for manual generation.
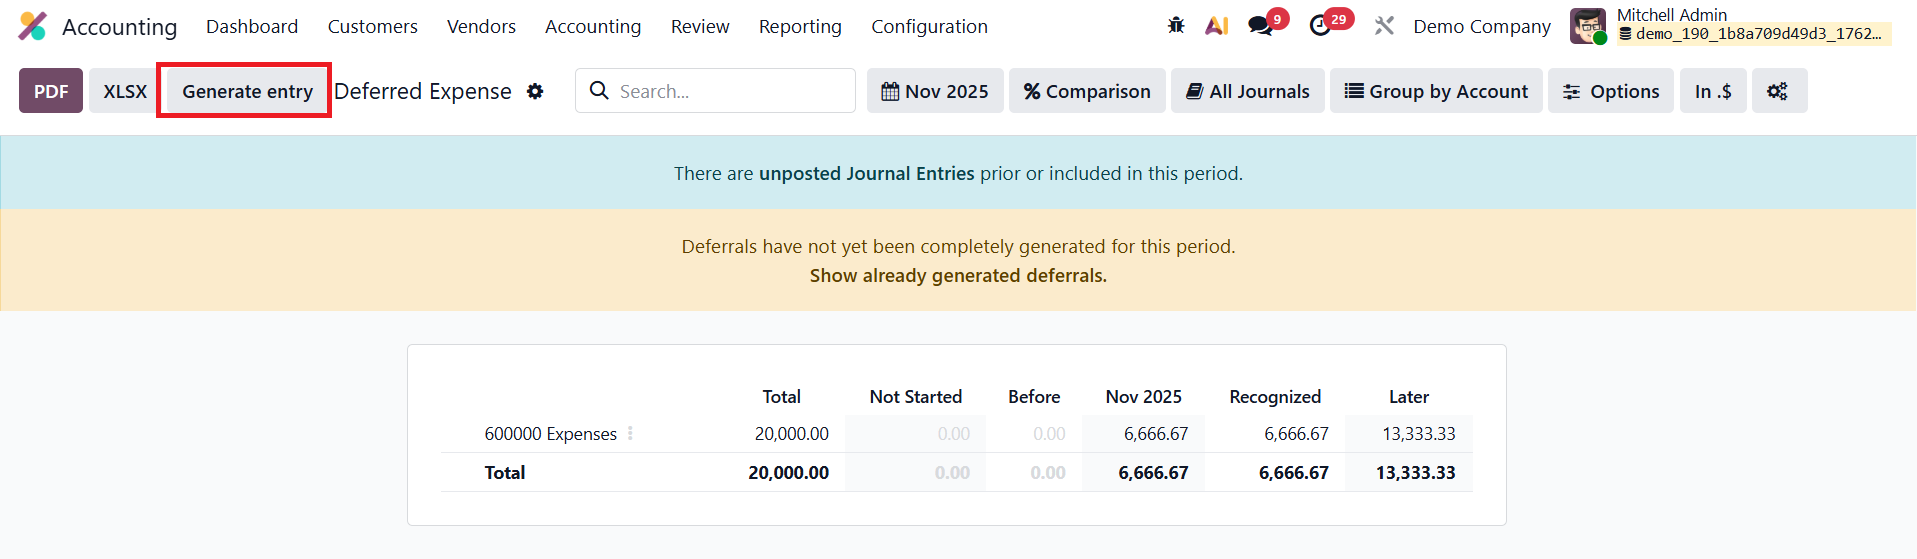
To recognize deferred revenues at the end of a reporting period, users can access the Deferred Revenue Report under Accounting → Review → Deferred Revenue.
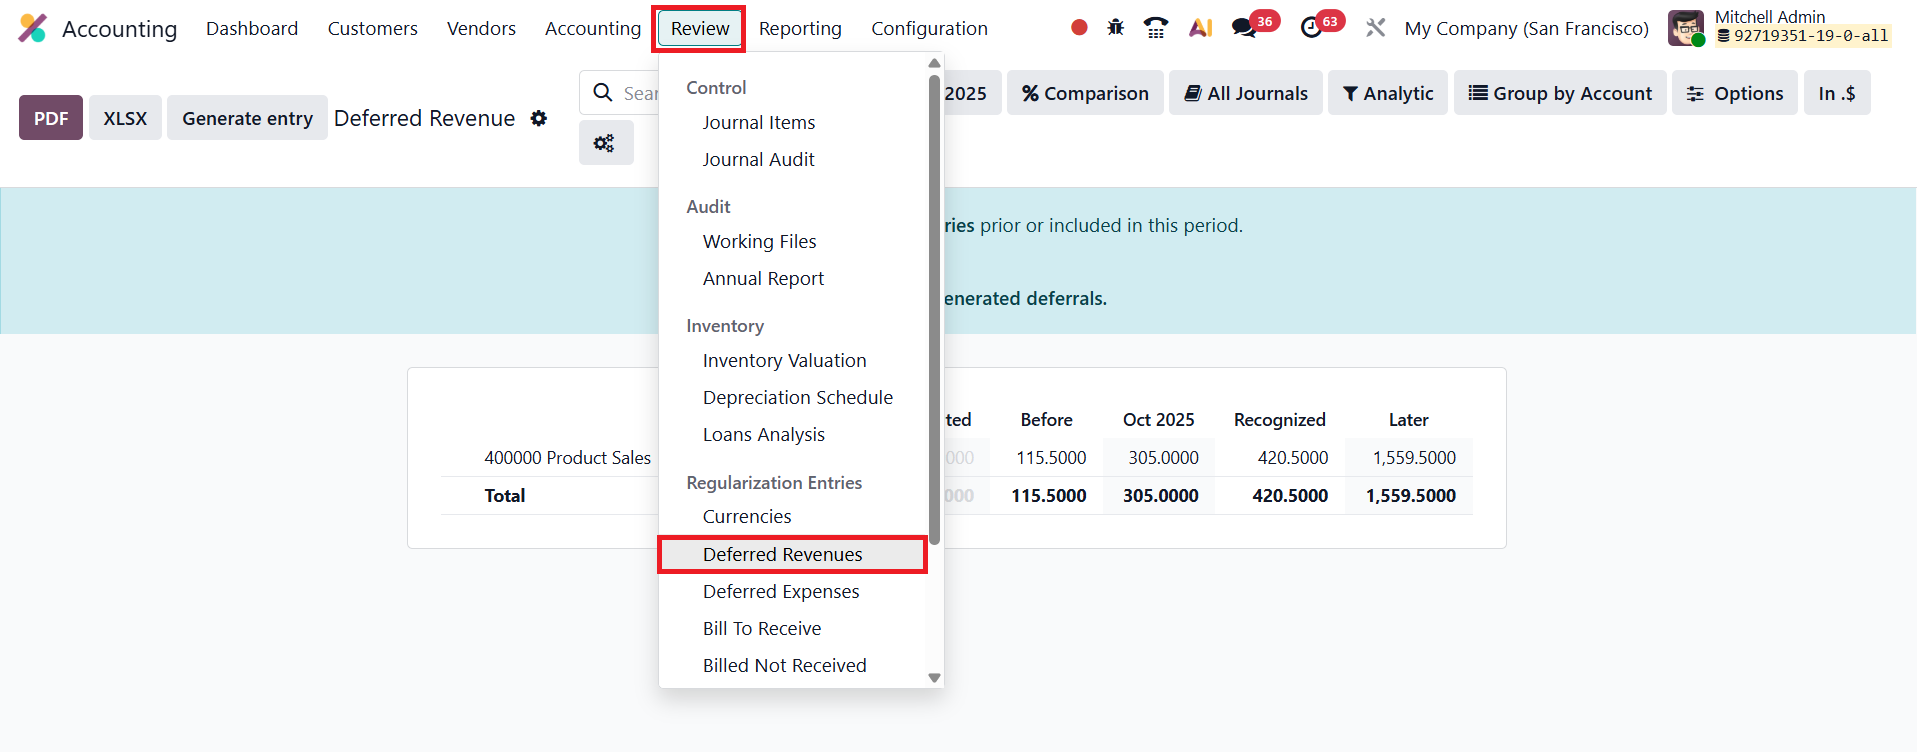
This report provides a consolidated view of all invoices and bills that have deferred revenue components awaiting recognition.
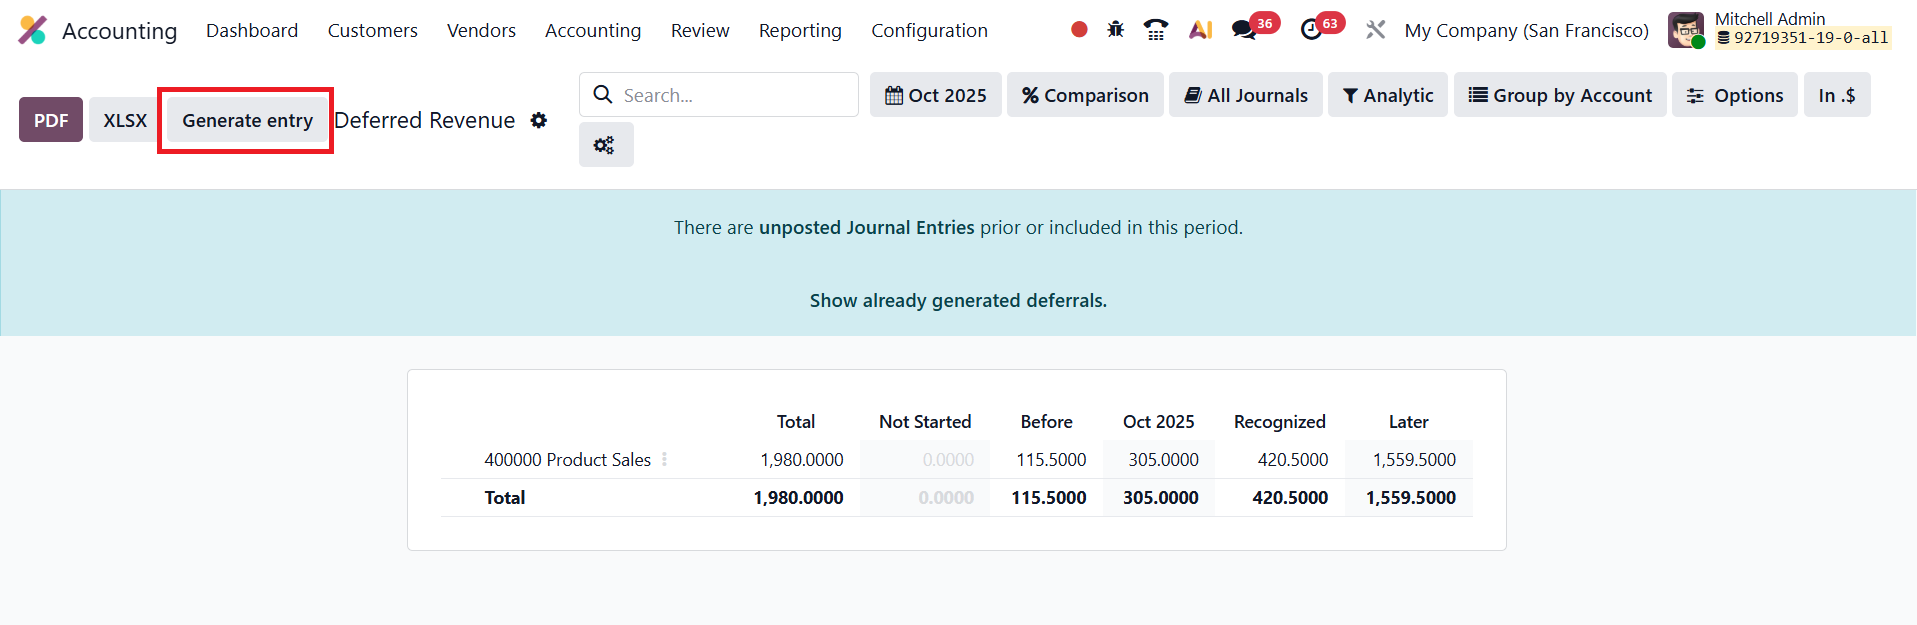
From this screen, click the Generate Entries button to create the required journal entries for the current period.
Users can review these generated entries directly from the smart tab that appears on the invoice form, offering easy access for verification or adjustments.

When the entries are generated, two journal entries are created for each relevant deferral. The first entry, dated at the end of the current month (or reporting period), recognizes the portion of deferred revenue earned during that period, moving the corresponding amount from the Deferred Revenue Account to the Income Account. The second entry, automatically created on the following day (the first day of the next month), reverses the previous entry, resetting the deferred revenue balance for the next accounting cycle.
4.5.2 Deferred Expense
In Odoo 19 Accounting, the Deferred Expense feature provides an efficient and automated way to manage prepaid expenses, ensuring accurate expense recognition in line with accrual accounting principles. Deferred expenses represent payments made for goods or services that will be received or consumed in the future. Although the payment has already been made, the benefit derived from that expense belongs to future periods. Therefore, such costs are initially recorded as assets on the balance sheet rather than immediate expenses in the Profit and Loss statement. Over time, as the goods or services are consumed, these deferred expenses are gradually recognized as actual expenses, either in full or periodically, depending on the duration and nature of the benefit.
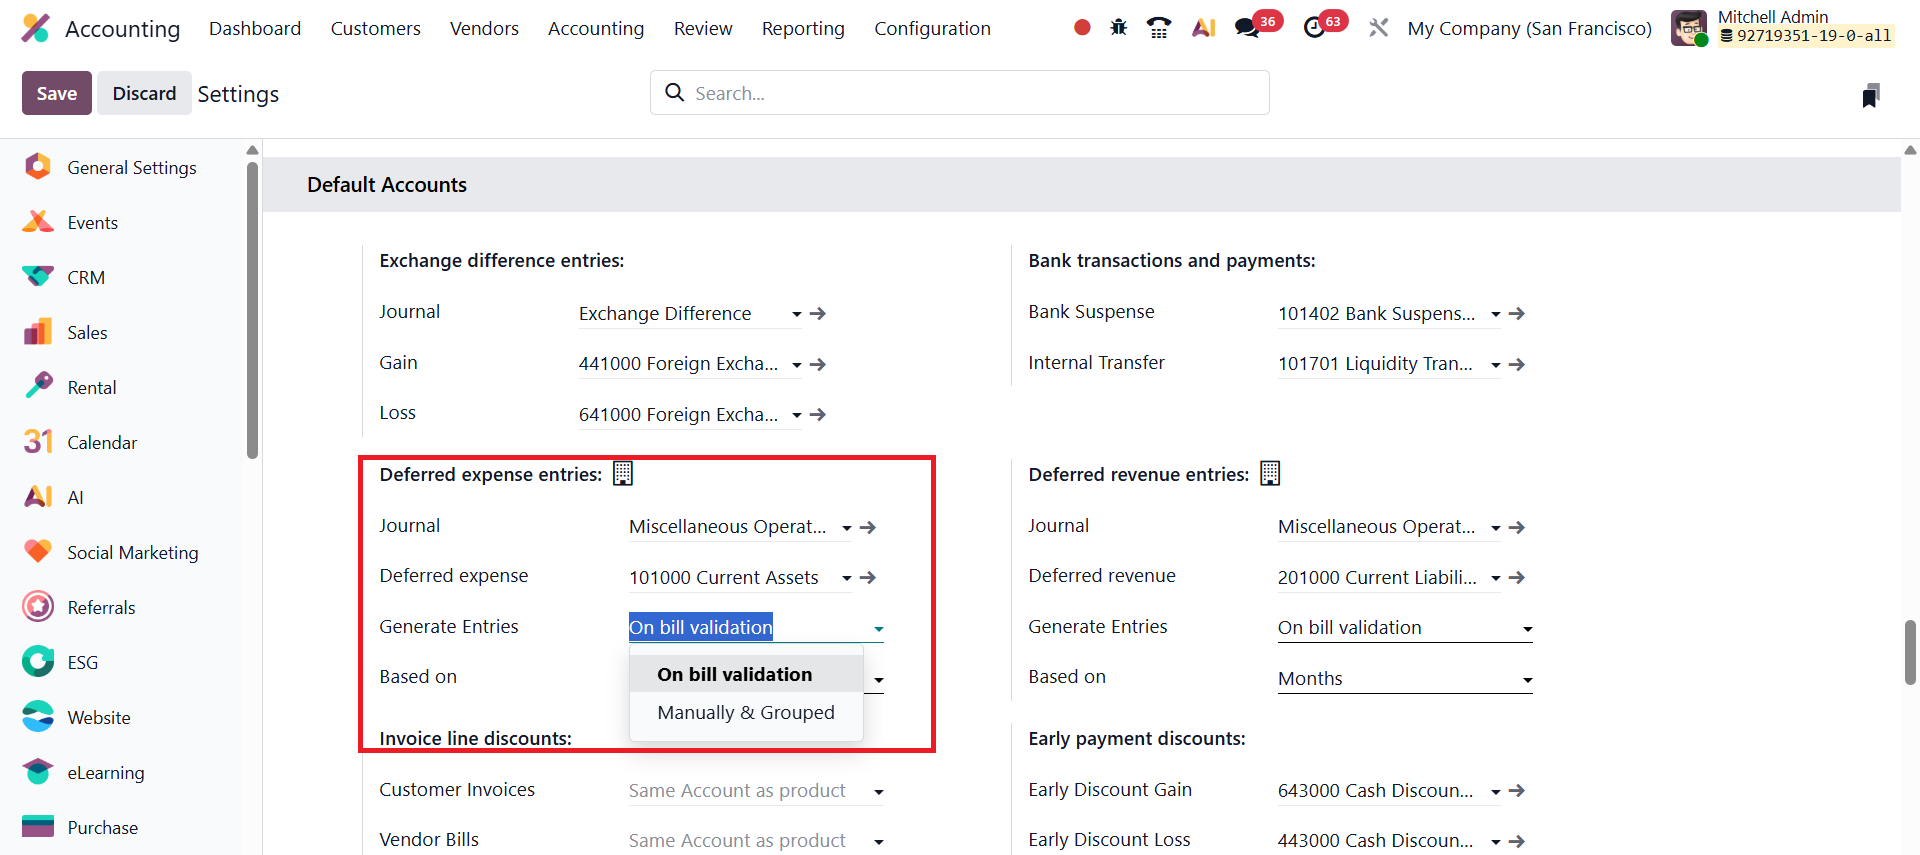
To configure deferred expenses in Odoo 19, open the Accounting module and go to Configuration → Settings. Scroll down to the Default Accounts where the configuration options for deferred expense entries are available. Within this section, you can define the Journal that will be used to record deferred expense entries and specify the Deferred Expense Account, which typically belongs to the Current Assets category.
Odoo 19 offers two primary methods for generating deferred expense entries: Generate Entries on Bill Validation – In this automated method, Odoo immediately creates the necessary deferral journal entries when a vendor bill is validated. Generate Entries Manually – When this option is selected, journal entries are not created automatically upon bill validation; instead, the user manually triggers the posting process when required.
Additionally, Odoo 19 Accounting provides flexible options for calculating the amortization of deferred amounts. Users can choose from three calculation methods, Based on Days, Based on Months, or Full Months. The Based on Days option ensures precise daily allocation of deferred expenses, Based on Months evenly distributes the expense across each month, and Full Months aligns recognition with calendar months for consistent monthly reporting.
Generate Entries on Bill Validation
In Odoo 19 Accounting, when the Generate Entries field is set to On Bill Validation, the system automatically creates all necessary deferral entries at the moment a vendor bill is validated. This automation significantly simplifies the management of deferred expenses, ensuring that accounting entries are generated promptly and accurately without requiring manual intervention.
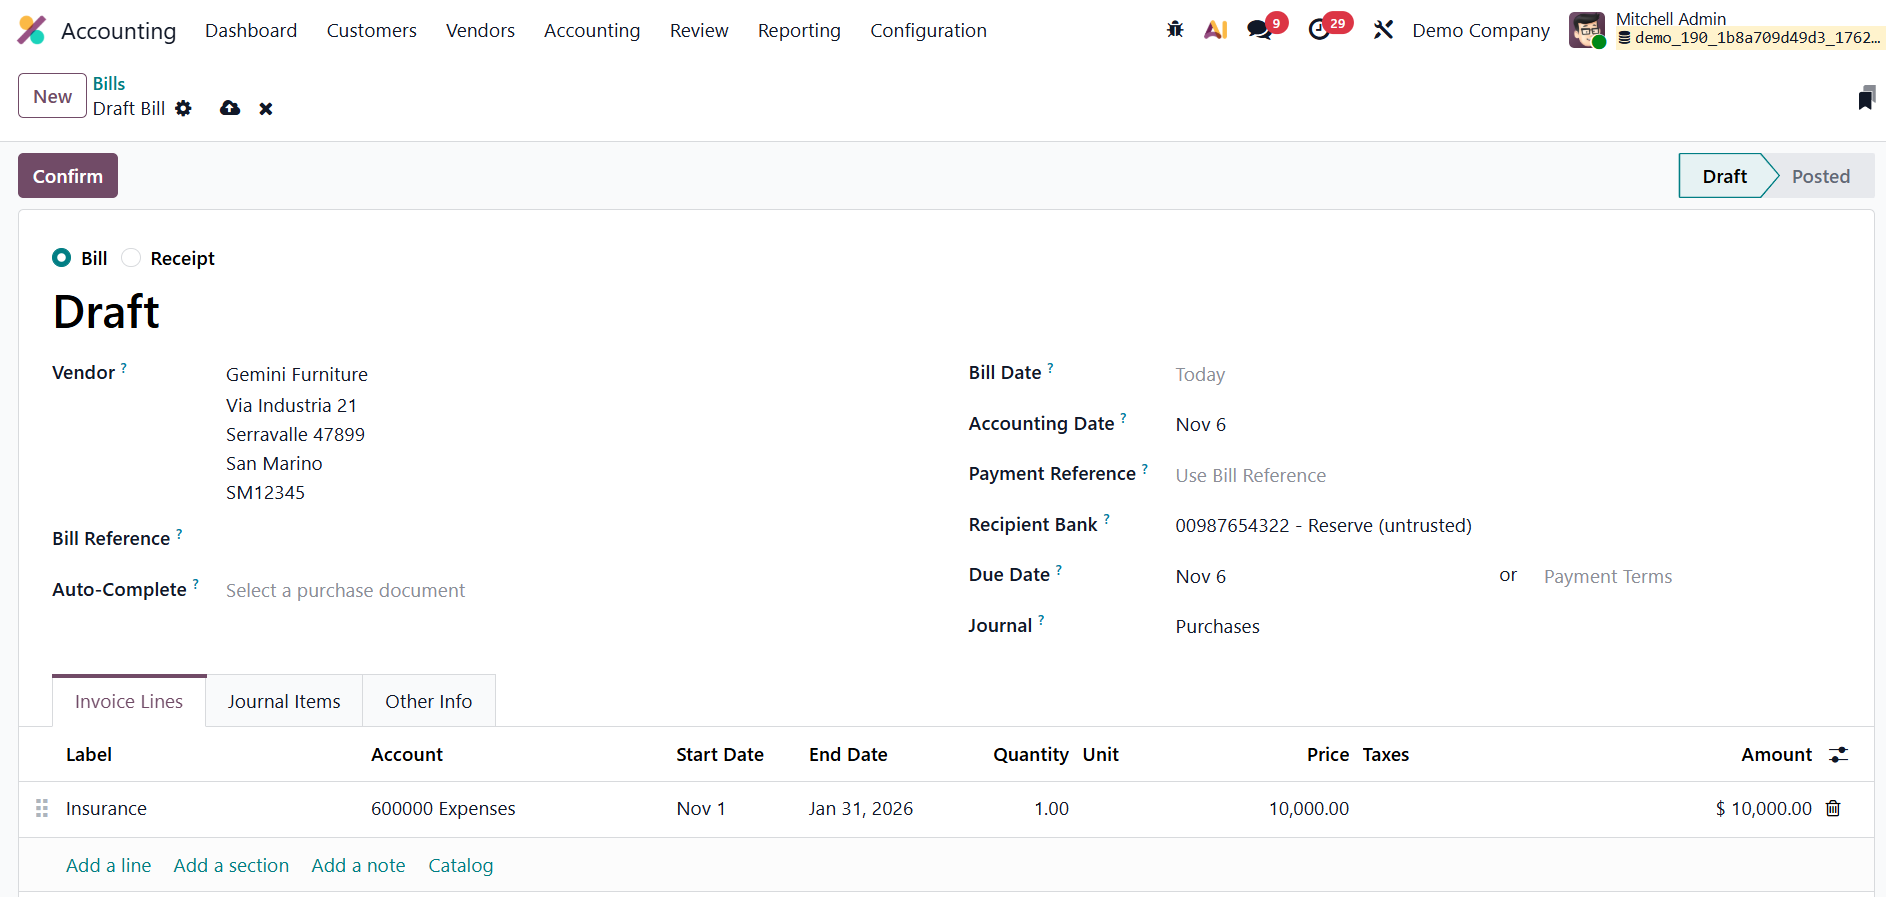
To explore this feature, navigate to Accounting → Vendors → Bills, and click New to create a vendor bill. Begin by entering the Vendor’s Name, followed by details such as Bill Reference, Bill Date, Accounting Date, Payment Reference, Recipient Bank, Payment Terms, and the Journal. The Auto-Complete field in Odoo 19 can streamline this process by automatically filling in information from related purchase orders or previous vendor transactions.
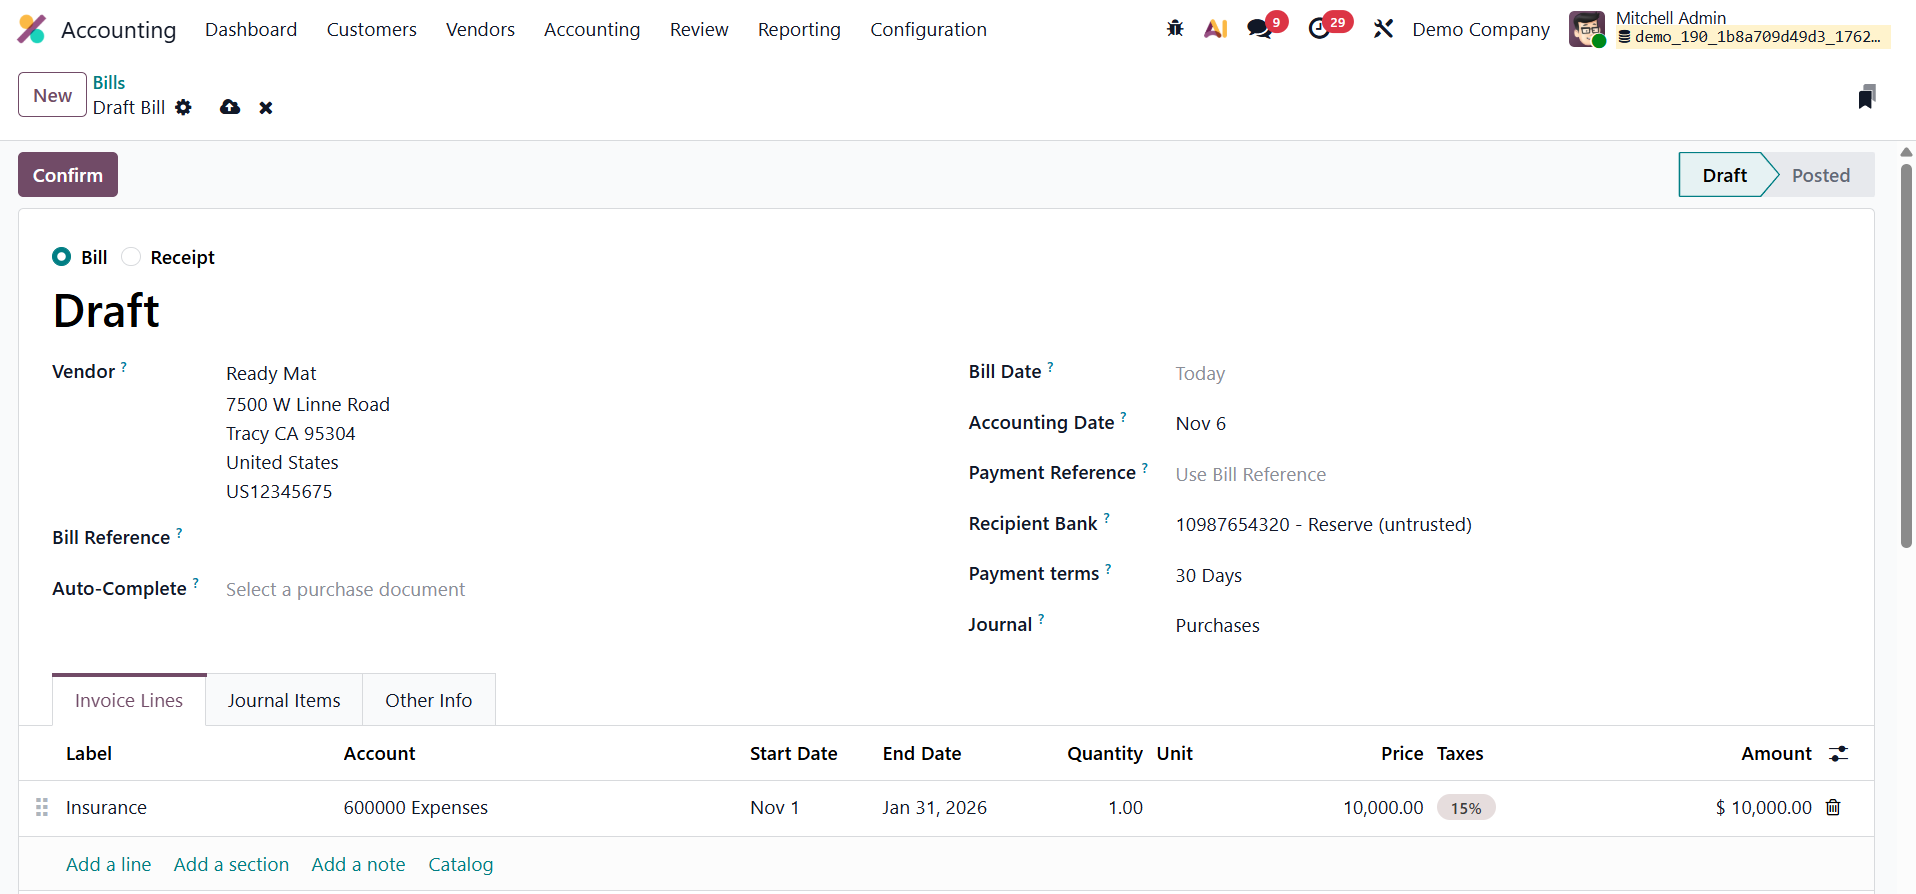
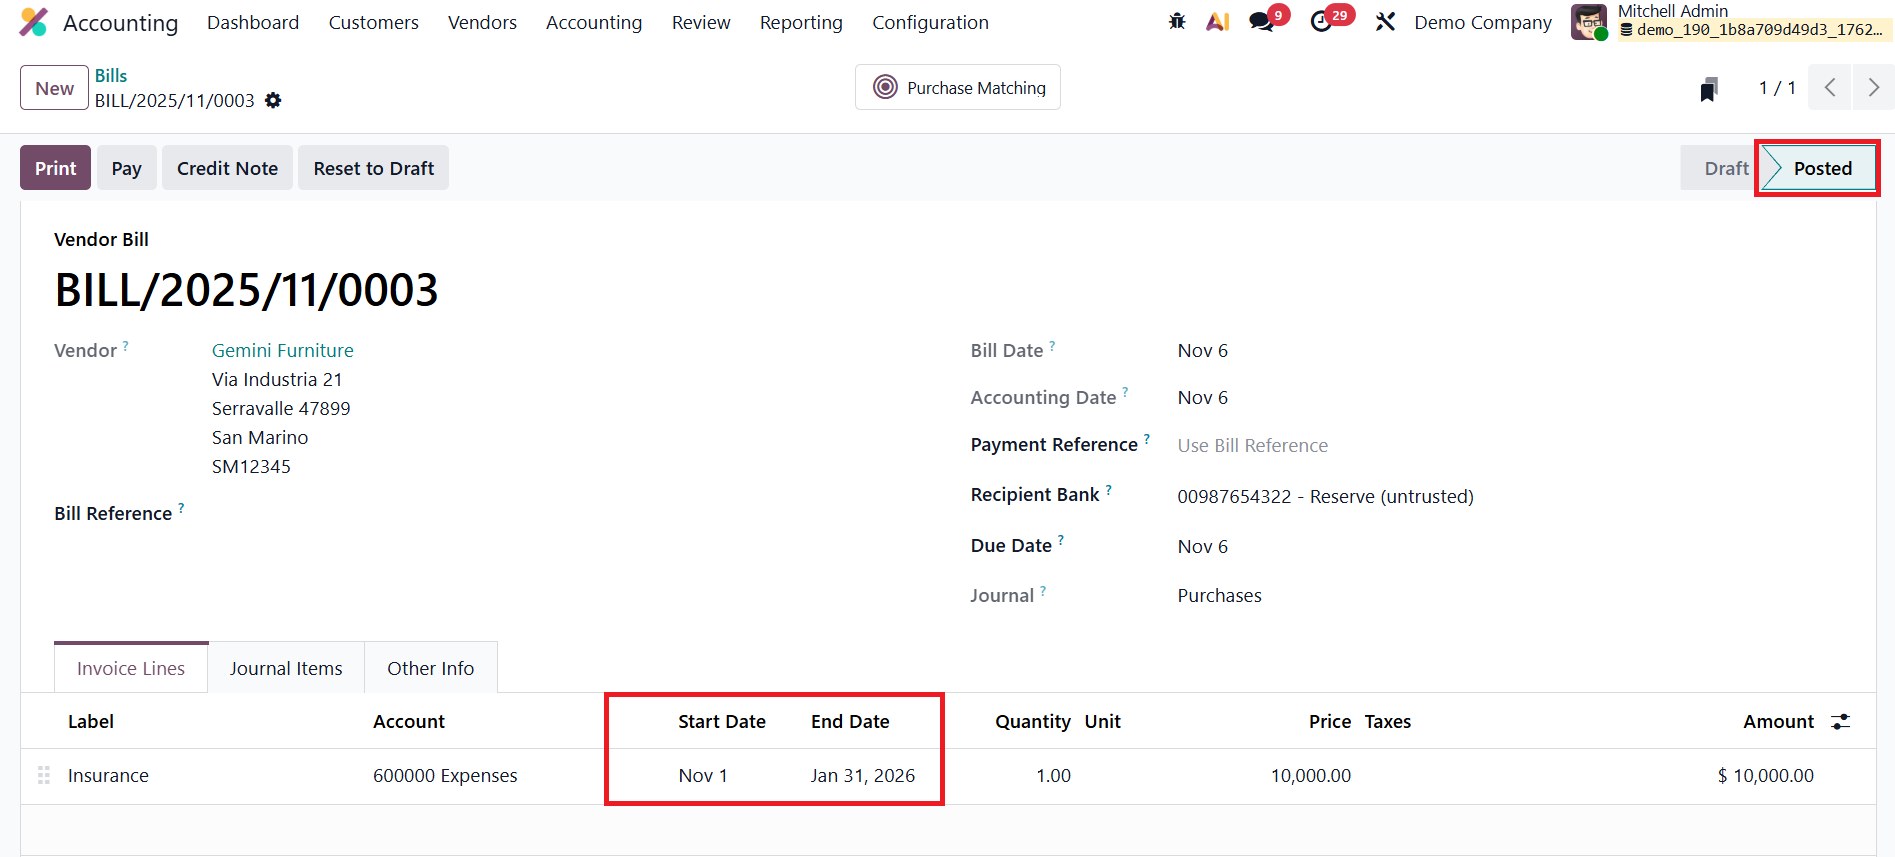
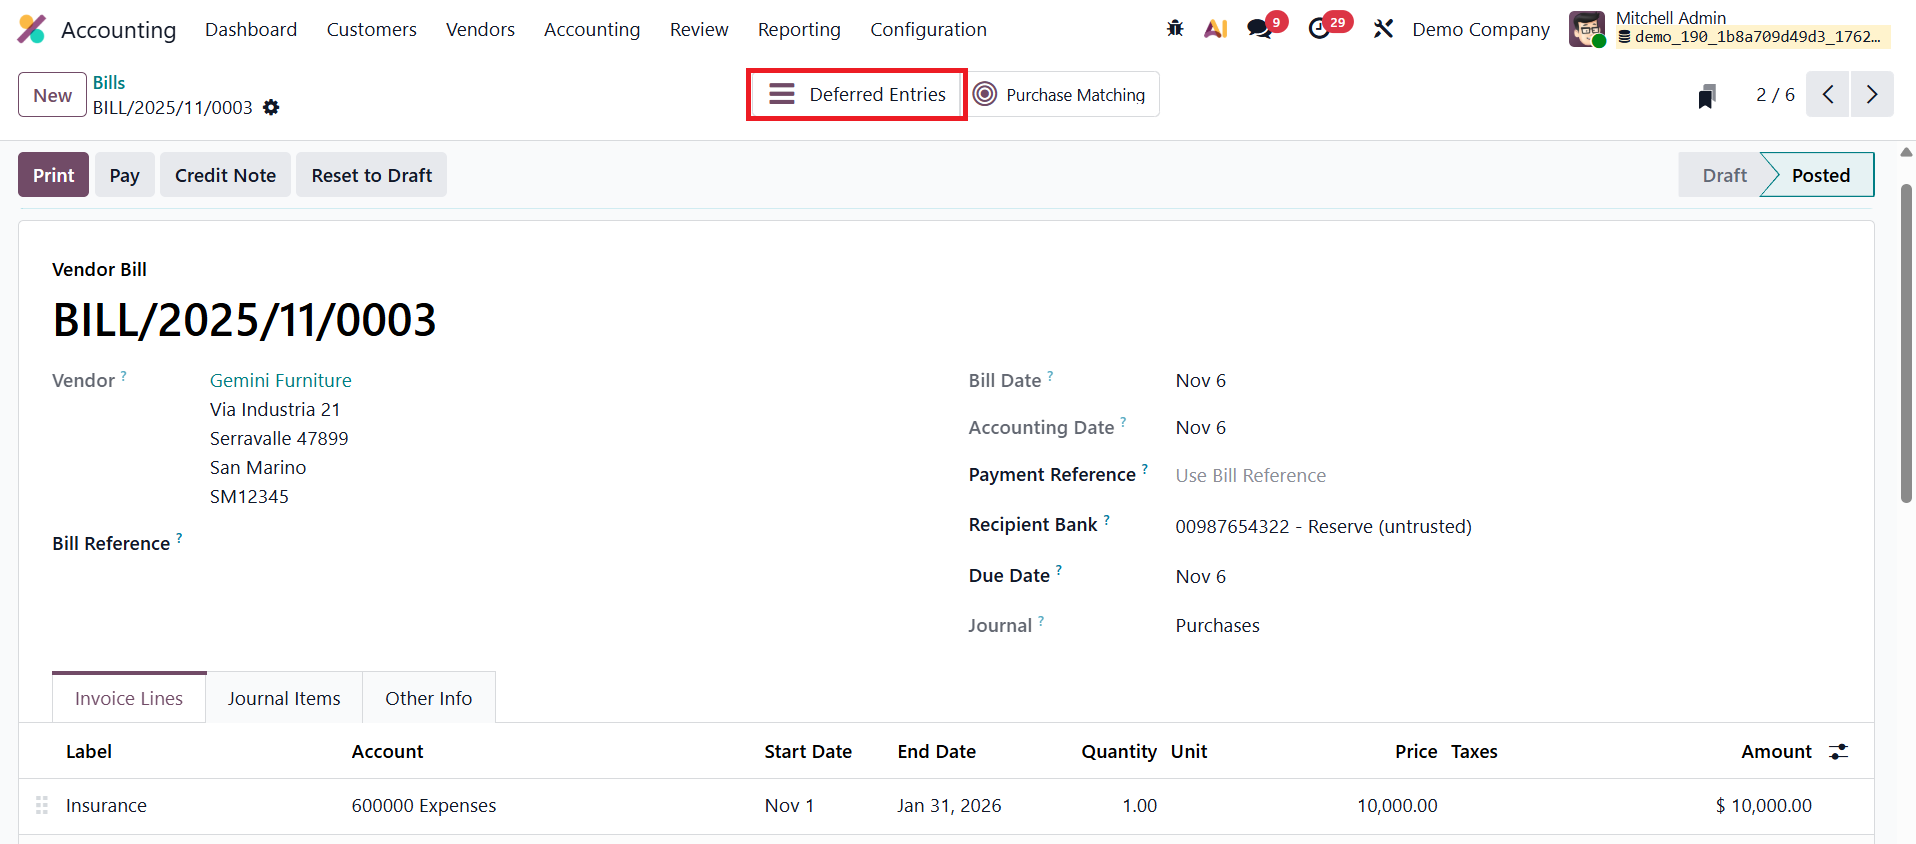
For example, consider a case where the company receives a vendor bill for a three-month Insurance service. In the Bill Line section, select the appropriate Service Product and specify the Start Date and End Date to clearly define the coverage period of the service. Once all details are entered, confirm the bill. After confirmation, the bill’s status changes to Posted, and a smart tab labeled Deferred Entries appears at the top of the bill form. Clicking on this tab opens the automatically generated deferral entries associated with that bill.
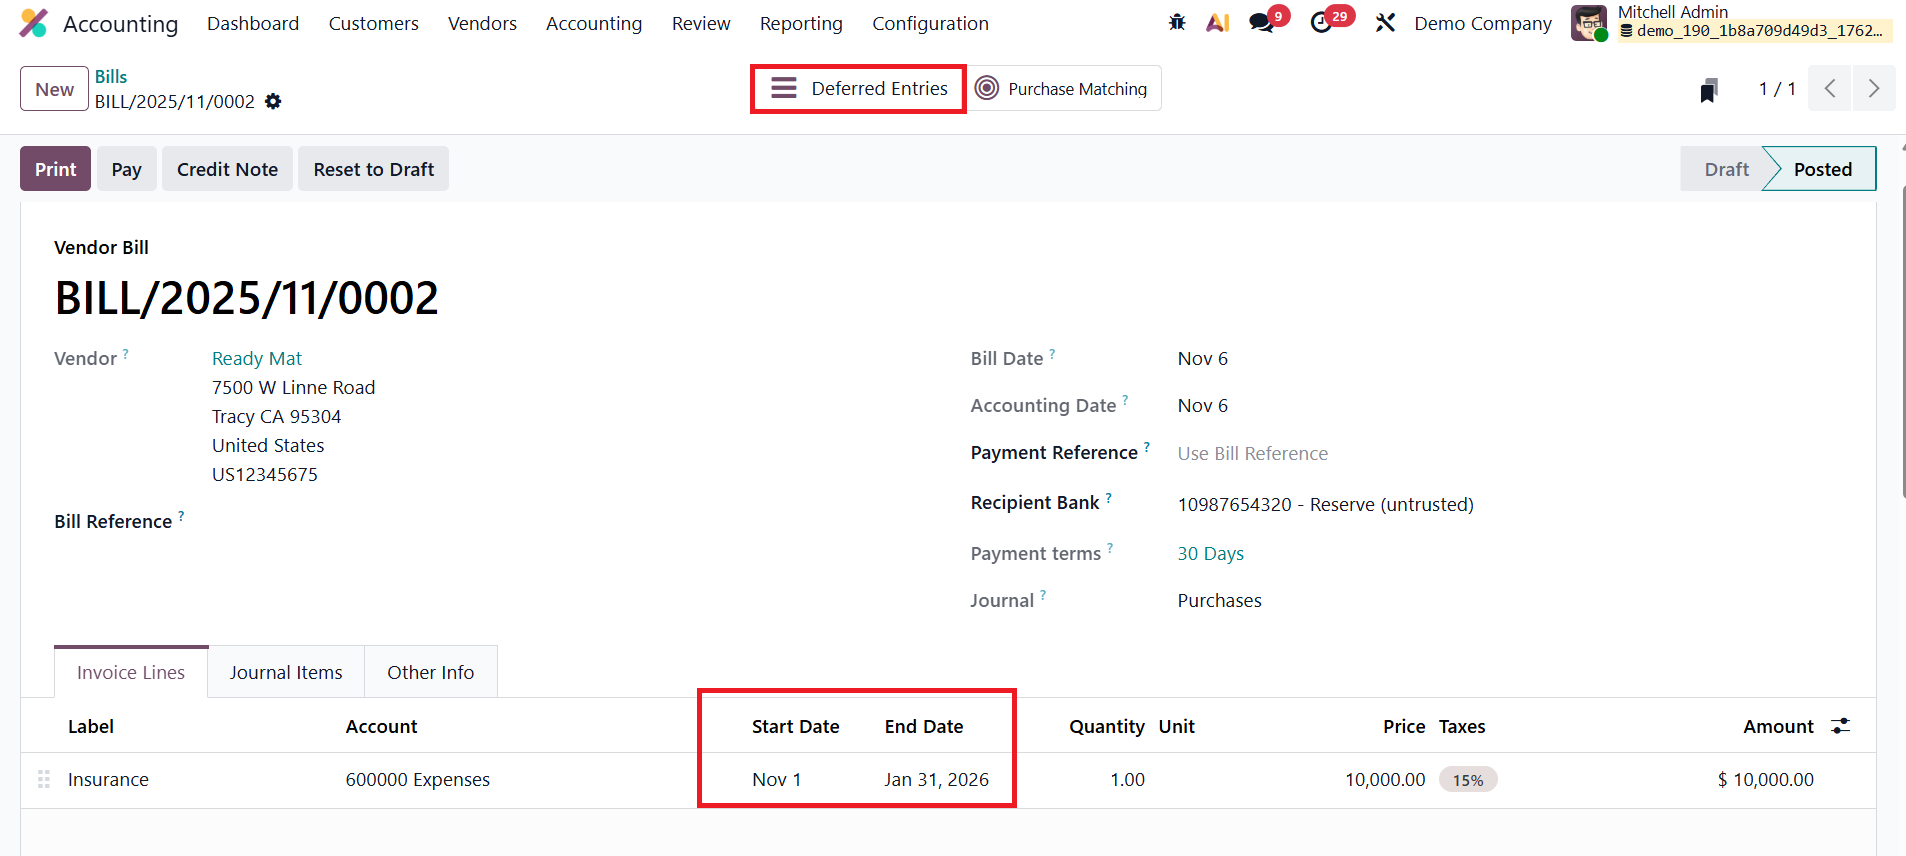
Upon validation, Odoo 19 automatically creates two types of journal entries to handle deferred expense recognition in compliance with accrual accounting principles. The first entry, dated on the same day as the bill’s accounting date, transfers the full bill amount from the Expense Account to the Deferred Expense Account. This ensures that the expense is not immediately recognized in the Profit and Loss statement, as the related benefit will be realized over future periods.

Subsequently, Odoo generates a series of deferral entries according to the configured schedule, typically monthly, but optionally daily or based on full months. These entries progressively move a portion of the total amount from the Deferred Expense Account back to the Expense Account, recognizing the relevant share of the expense for each accounting period. This systematic allocation continues until the full amount has been recognized, aligning expenses with the periods in which the benefits are actually consumed.
Generate Entries Manually and Grouped
In Odoo 19 Accounting, companies that handle a large volume of deferred revenues or expenses can optimize their accounting workflow by using the Manually & Grouped method for generating deferral entries. This approach helps reduce the number of automatically generated journal entries while still ensuring accurate and timely recognition of expenses.
To activate this setting, open the Accounting module, navigate to Configuration → Settings, and scroll to the Deferred Entries section. Under the Generate Entries field, select Manually & Grouped, then click Save. This configuration instructs Odoo not to automatically create individual journal entries for each bill but to allow users to manually generate grouped deferral entries at the end of a specified period, typically every month.
Next, create a new vendor bill by going to Vendors → Bills and clicking New. Enter the Vendor Name, Bill Reference, Bill Date, Accounting Date, Payment Terms, and Journal. In the Invoice Line, add the service product, for example, Insurance, and specify the Start Date and End Date to indicate the period over which the service applies. Once the details are complete, confirm the bill.
After confirmation, the bill’s status changes to Posted.
However, unlike in the On Bill Validation method, no deferral entries are generated automatically because the process is now set to manual. To create the deferred entries, navigate to the Review→ Deferred Expense section.
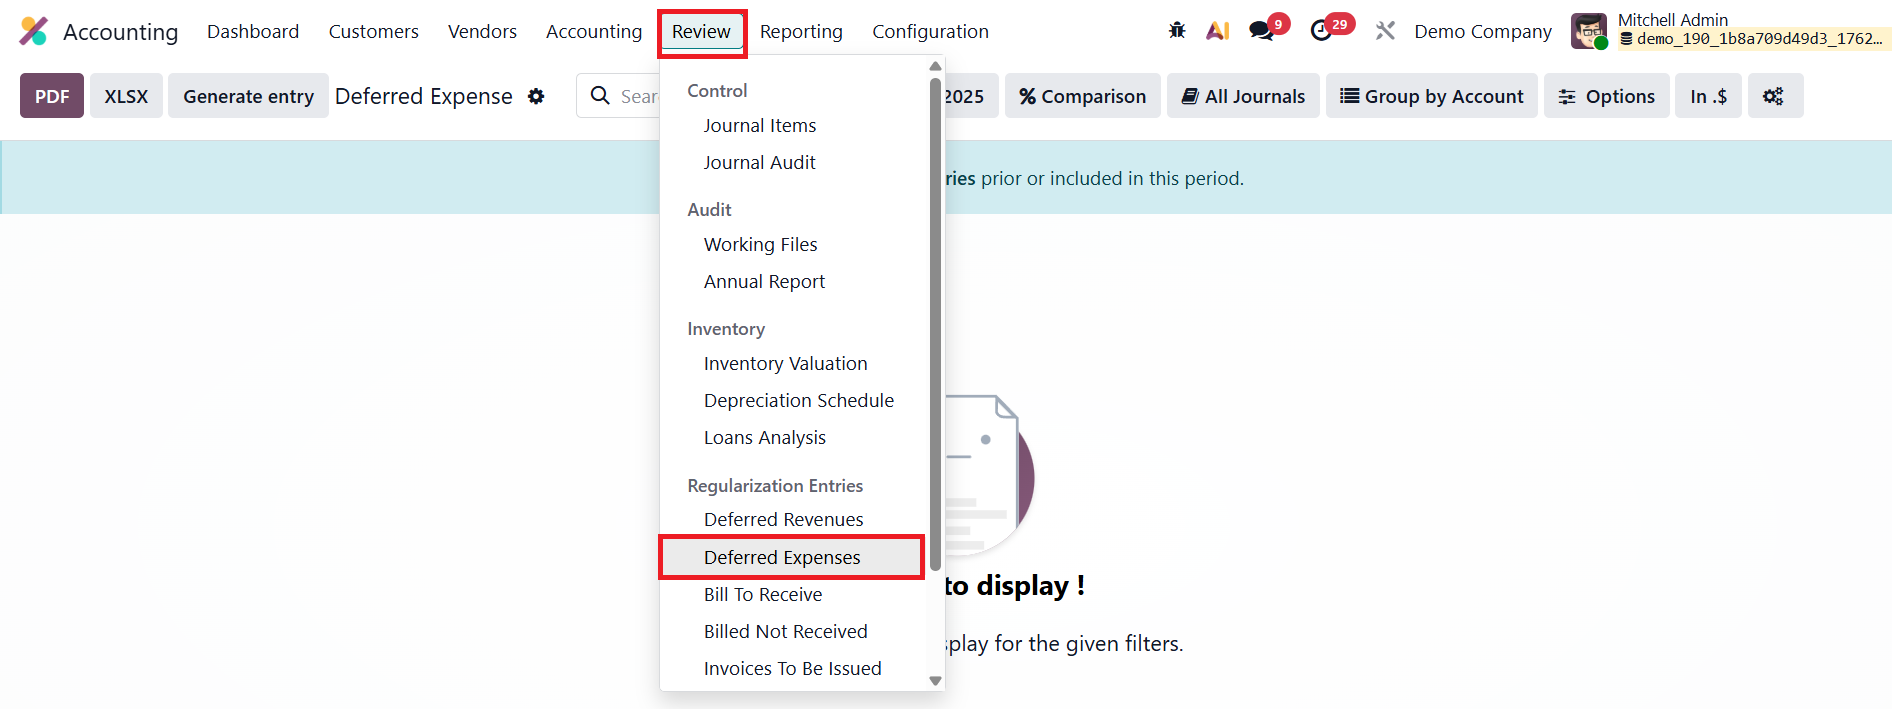
At the end of each month, accountants can generate all pending deferred entries at once by clicking the Generate Entries button in the Deferred Expense Report.
Users can review these journal entries through the Deferred Entries smart button available on the vendor bill.
Odoo then creates two grouped journal entries for each relevant account: The first entry is dated on the last day of the month and aggregates all deferred amounts that need to be recognized for that period. It transfers the corresponding portion of expenses from the Deferred Expense Account to the Expense Account, ensuring that only the part of the prepaid cost used during the month is reflected in the Profit and Loss statement.
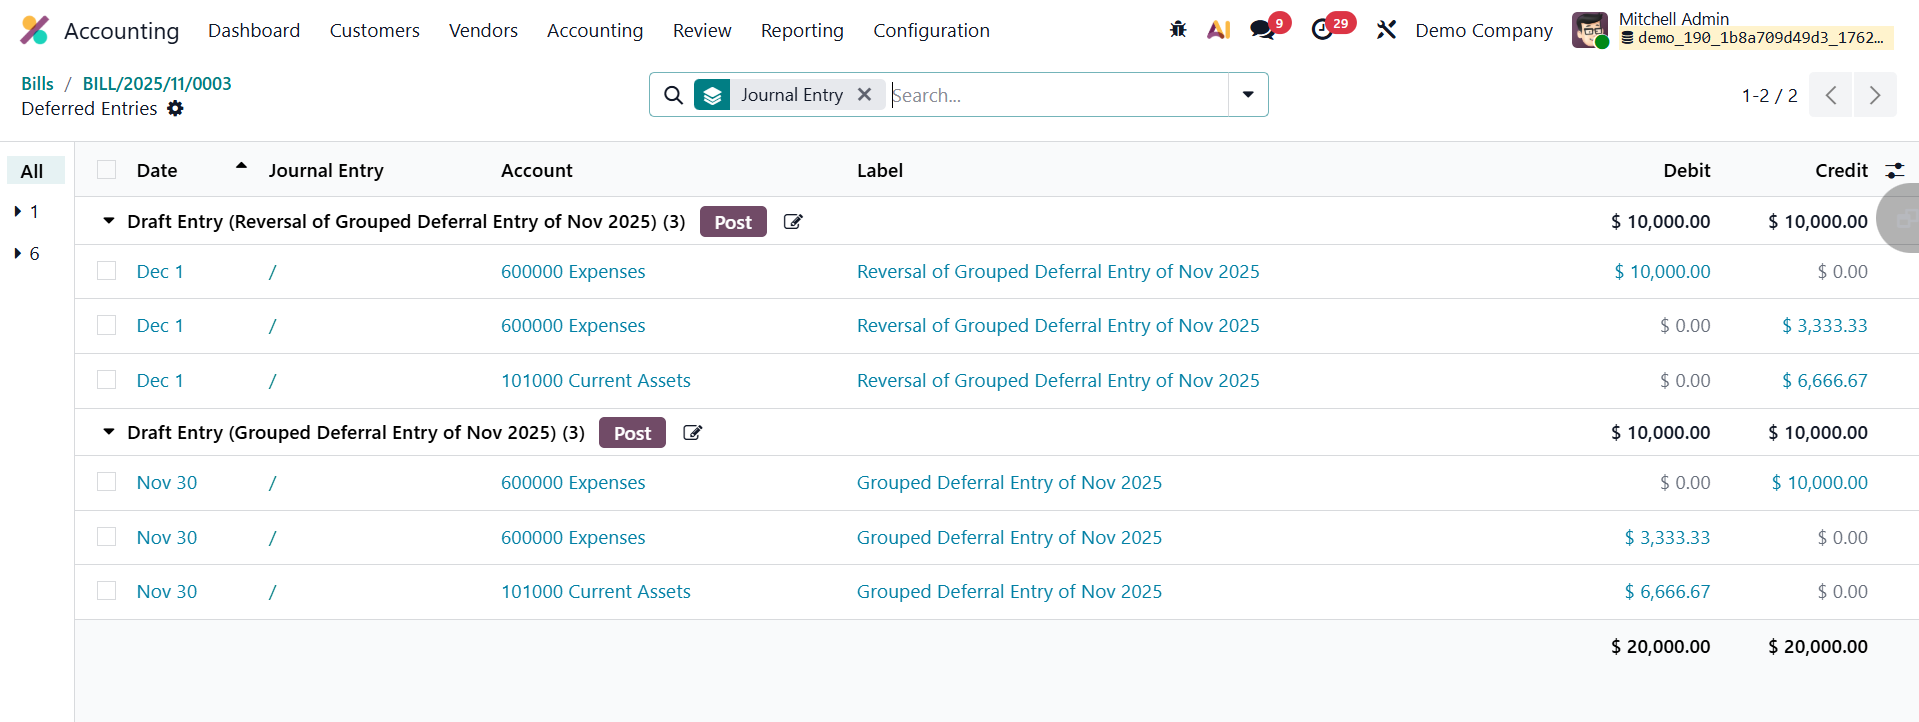
The second entry, dated on the first day of the following month, automatically reverses the previous month’s recognition entry. The reversal ensures that the deferred balances are correctly reset, allowing new recognition entries to be generated for the subsequent period without overlap or duplication.
1.6 Audit Trails
In Odoo 19 Accounting, the Audit Trail feature continues to serve as a crucial tool for maintaining transparency, accountability, and compliance within financial operations. It ensures that every modification made to accounting records is systematically tracked, allowing auditors and administrators to verify data accuracy, detect inconsistencies, and prevent fraudulent activity.
To enable this feature, navigate to Accounting → Configuration → Settings, and under the Reporting section, activate the Restrictive Audit Trail option.
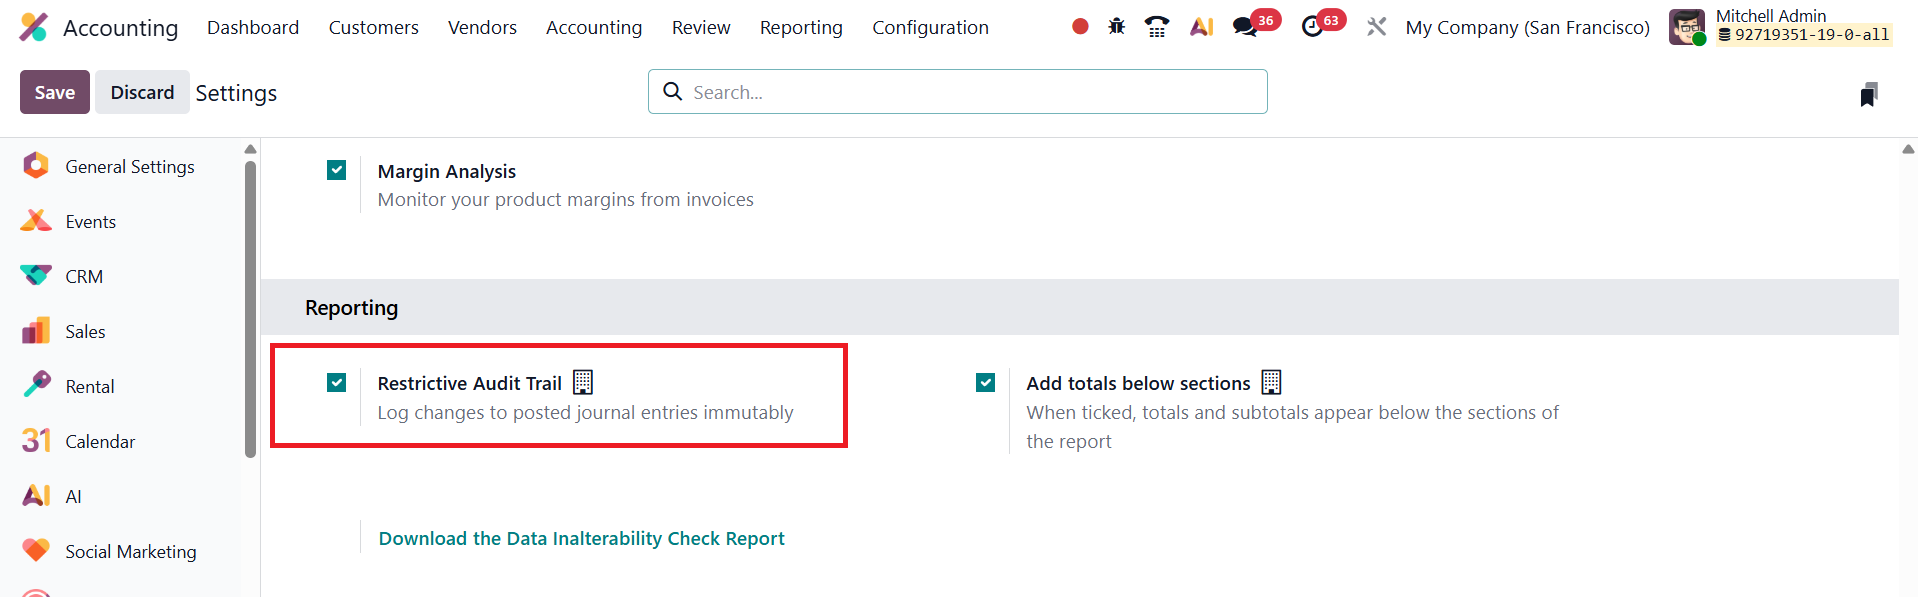
Once enabled, Odoo automatically records all actions performed on financial documents such as invoices, bills, and journal entries. Each modification is timestamped and linked to the user who performed the action, creating a permanent, tamper-proof record of all accounting activities.
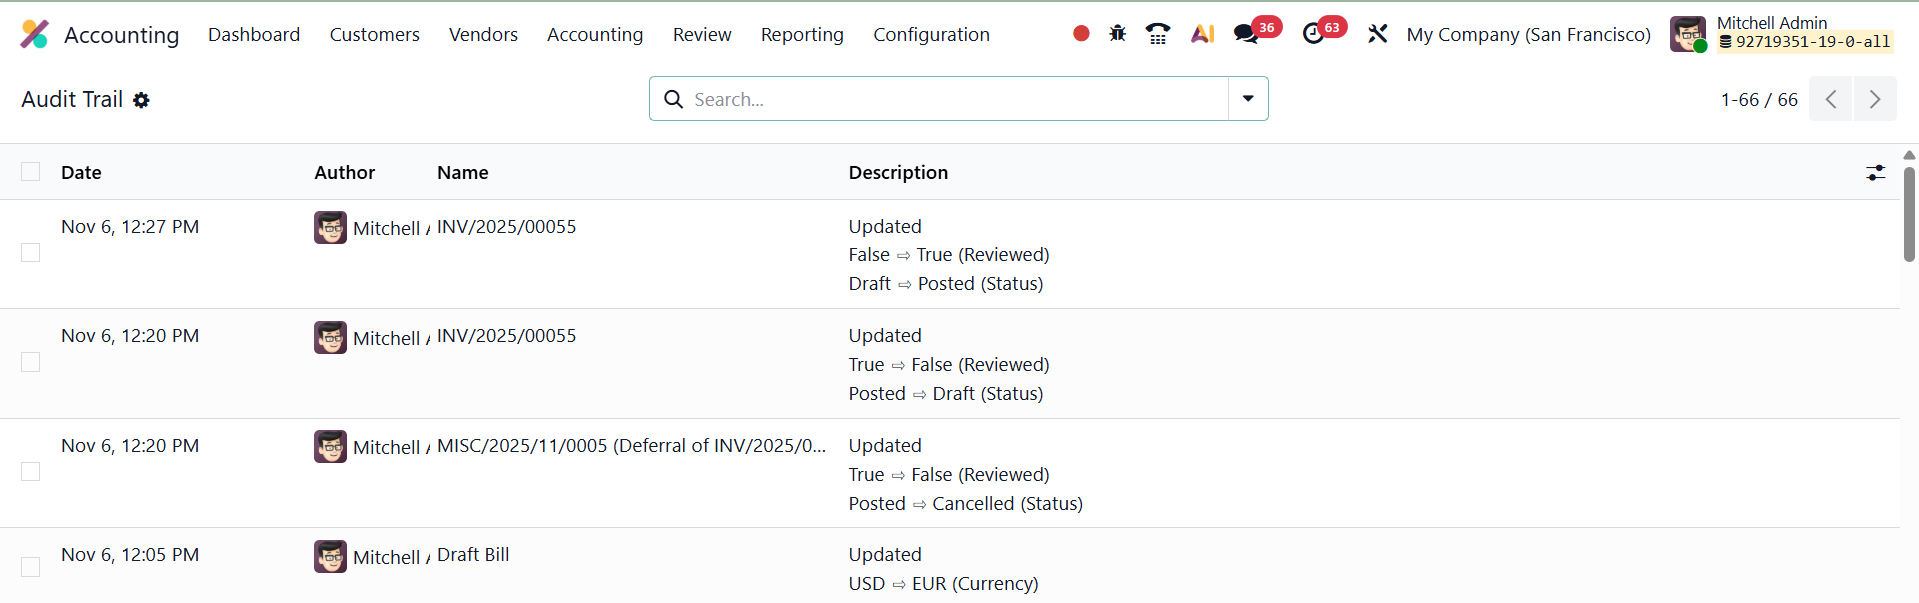
You can access these records by going to Review → Audit Trail. The report displays a detailed chronological log that includes the date and time of each change, the user responsible, the journal entry or document affected, and a summary of the modification made. This structured view allows auditors to easily trace every adjustment, ensuring that all financial data remains transparent and verifiable.
In Odoo 19 Accounting, the Review menu includes several essential analytical tools designed to help accountants verify the accuracy and completeness of financial operations. Among these, the options Bills To Receive, Billed Not Received, Invoices To Be Issued, and Invoiced Not Delivered play a crucial role in reconciling transactions between the Purchase, Sales, and Inventory modules.

The Bills To Receive report lists all vendor bills that are yet to be received, even though the corresponding goods or services have already been delivered.

On the other hand, the Billed Not Received report displays all vendor bills that have been recorded in the system even though the goods or services have not yet been delivered.

Similarly, the Invoices To Be Issued report focuses on the sales side.
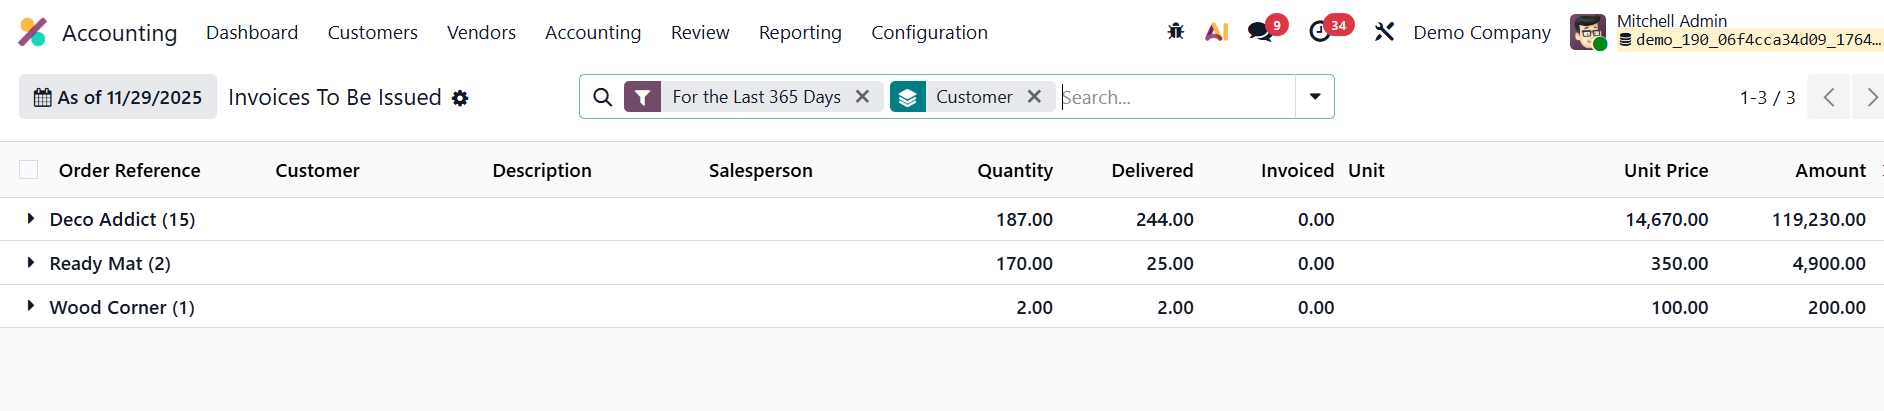
It highlights all customer deliveries or completed services for which invoices have not yet been issued.

The Invoiced Not Delivered report, conversely, lists all customer invoices that have been created before the corresponding deliveries or services have been completed.
1.7 Journal Audit
In Odoo 19 Accounting, the Journal Audit feature under the Review menu provides a detailed overview of all transactions recorded within a specific journal.
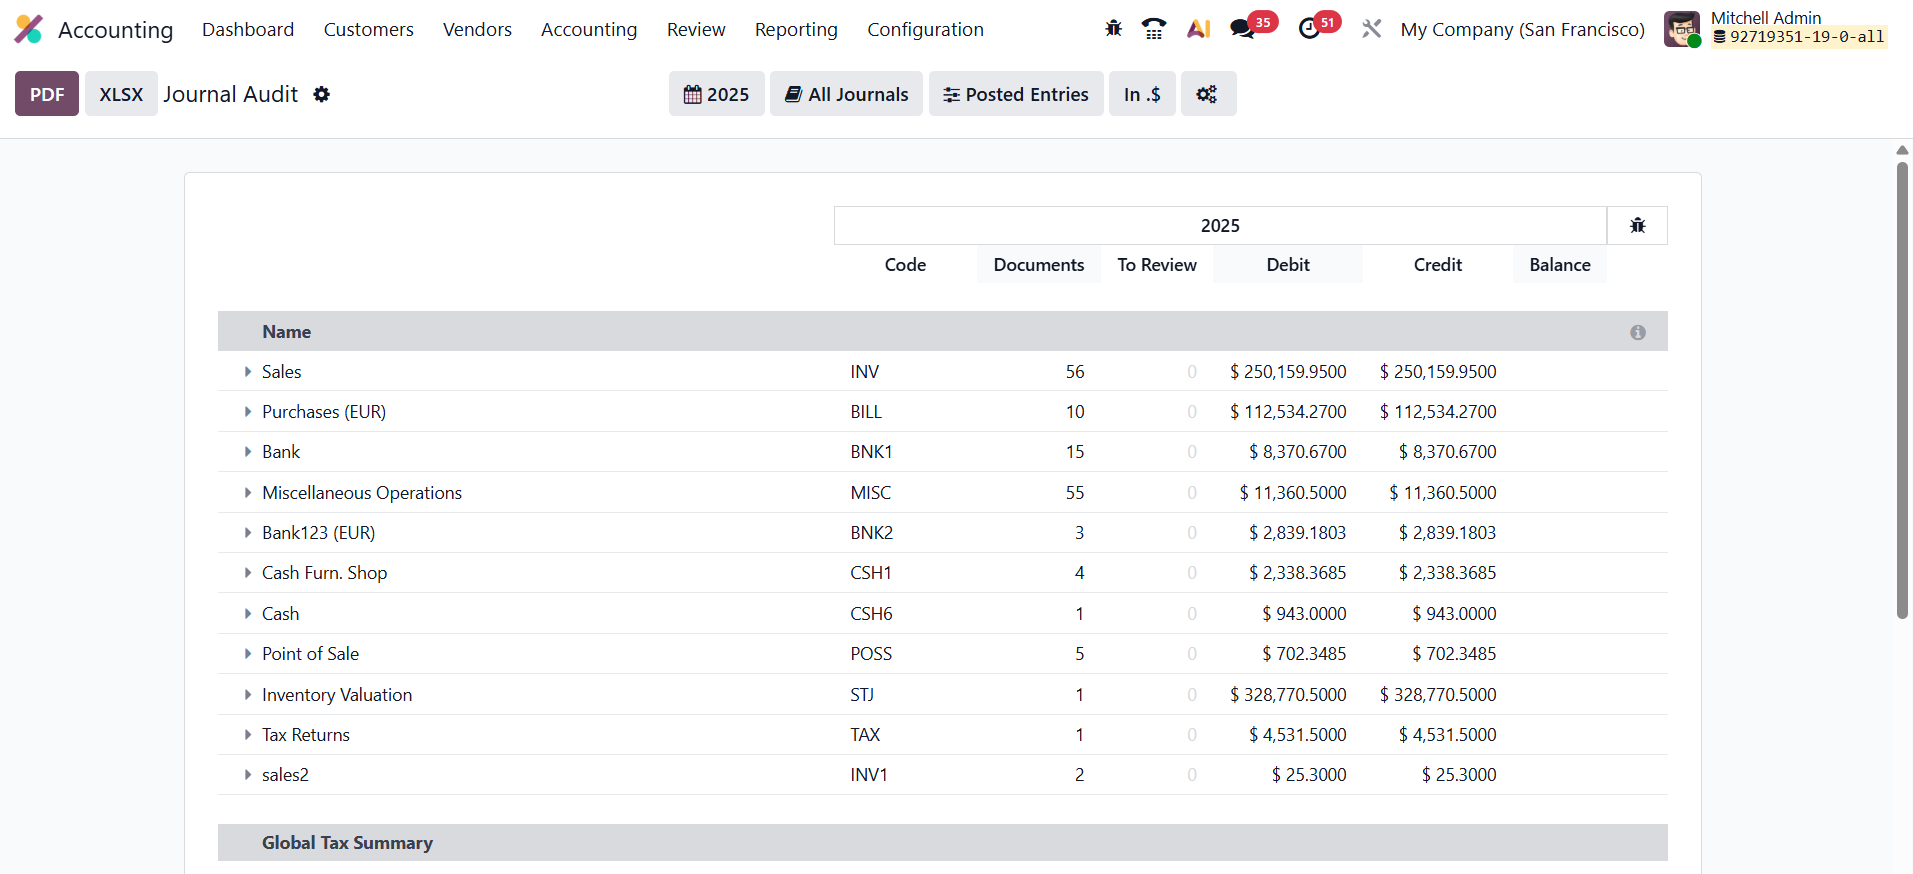
Accessible from the Review menu, this report lists every entry associated with the selected journal, displaying key details such as the entry name, journal code, debit, credit, and balance.
It serves as a valuable audit tool, enabling accountants to review journal activity, verify accuracy, and ensure that all postings align with the company’s financial policies and reporting standards.
1.8 Audit
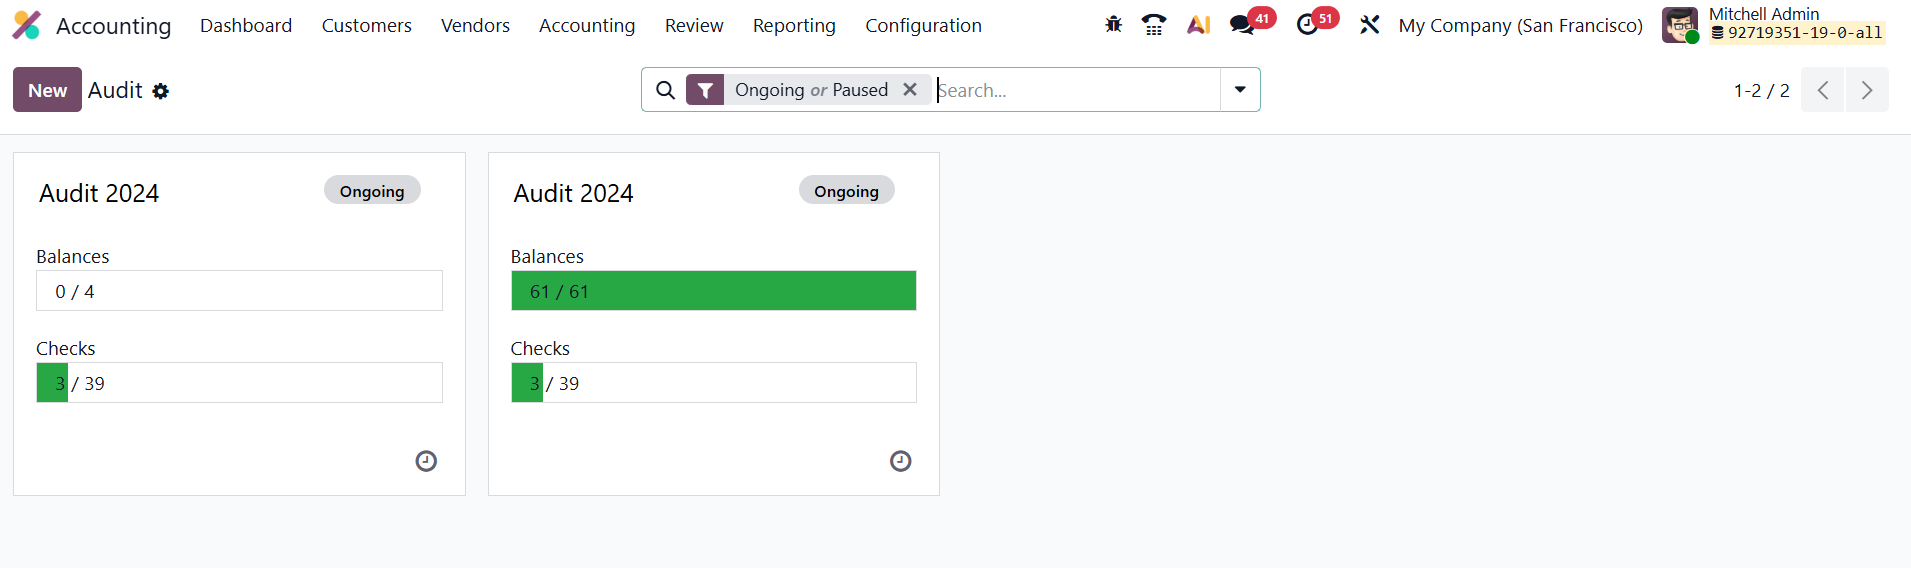
A new Audit menu is found in the Review menu, which includes options to create and manage audit reports.

The core functionality allows users to create an audit report from a template, edit its content, and generate a print-ready report entirely within Odoo.

Clicking the New button from the Annual Reports menu available in the Review will assist you in creating a new Audit Report.
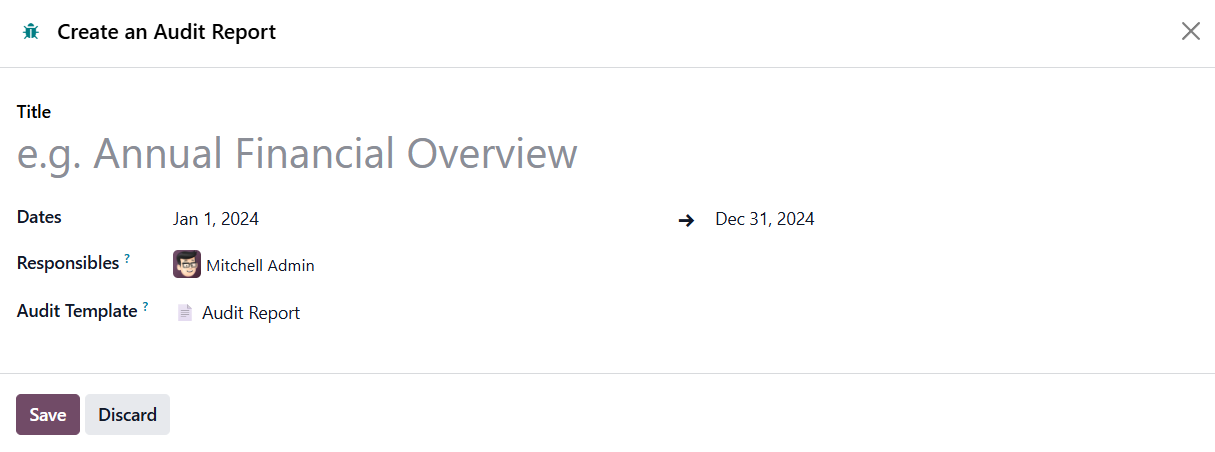
Here, you can mention Title, Dates, Responsibles, and Audit Template.

Odoo generates a predefined template for the audit report, sourcing the content and structure from the Knowledge section. Clicking the template redirects the user to the Knowledge section, where the complete, preloaded hierarchy of the audit report is visible. Other components like PNL and preamble content are also part of this structure, allowing users to build and connect their audit reports to auditors. The feature allows for quick generation of the entire report in a nicely formatted, printable PDF. The final printed report includes a summary, title, logo, selected company information, and a comprehensive table of contents based on the selected content.
In Odoo 19 Accounting, the Working Files feature, found under the Review menu, serves as a practical tool for managing and standardizing internal audit processes. It allows users to create structured templates for audit-related checklists and to-do items, such as vendor performance reports or purchase order reviews.
Each working file can be organized with headers and customizable checklists, helping auditors ensure that all necessary validations are completed consistently across audit cycles.
Clicking the New button will help you start a new audit.

Here, you can mention the Return Type, Date, and enable required Cycles.
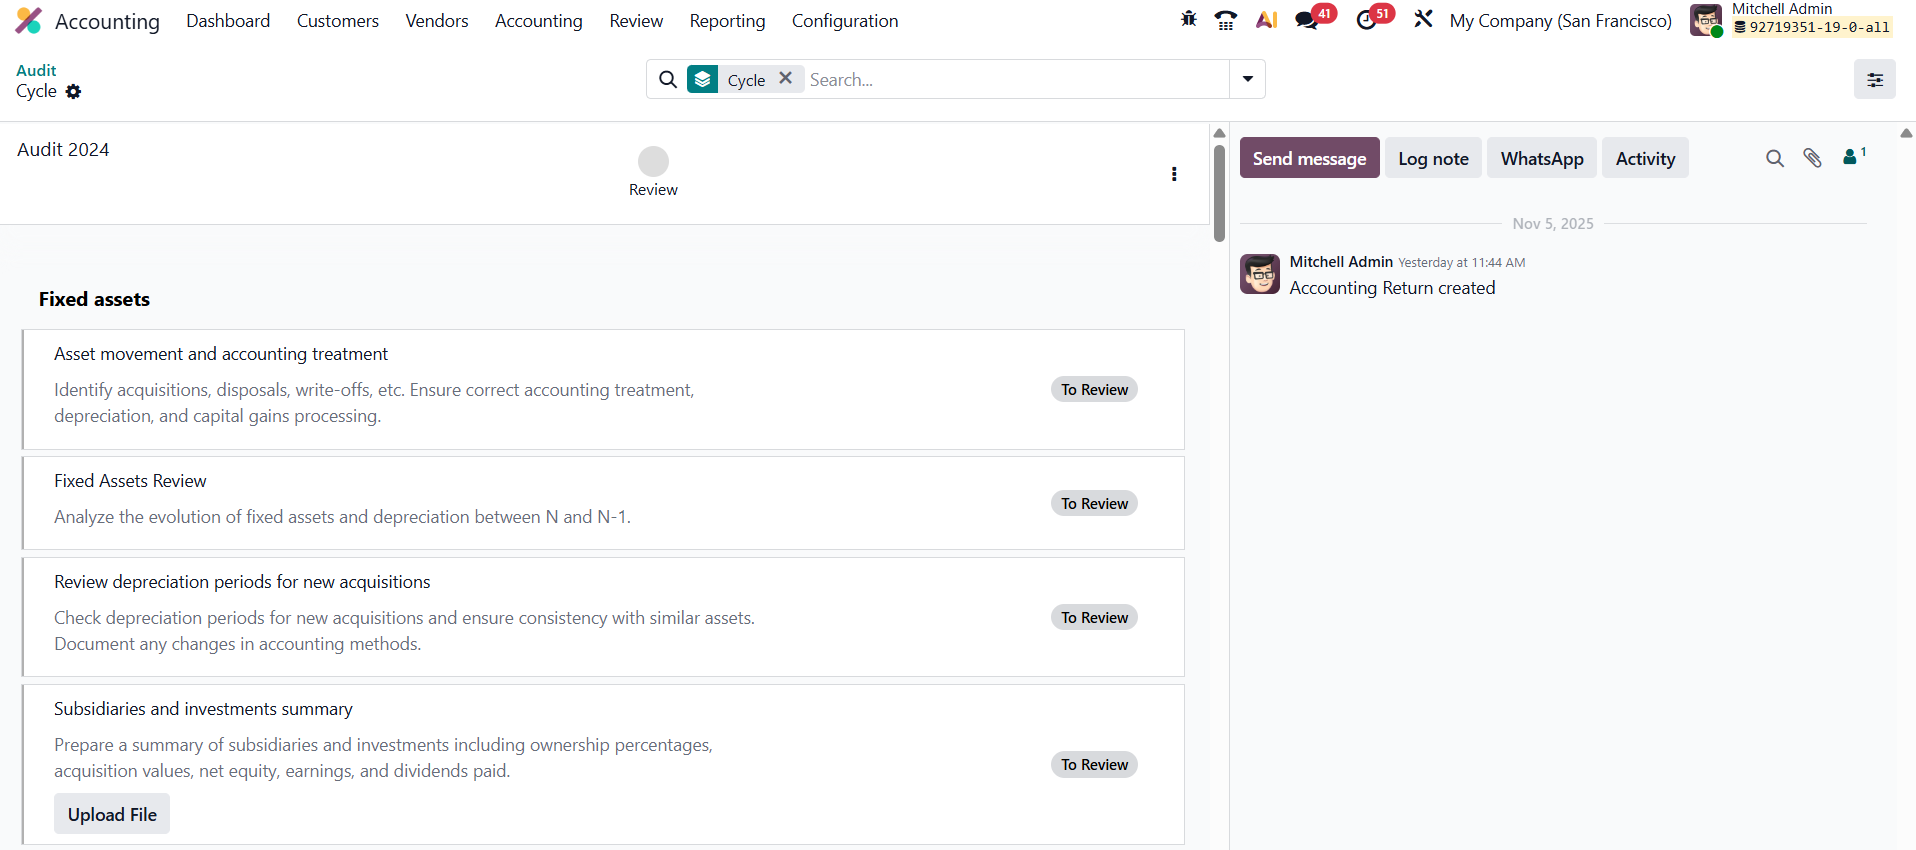
This action creates a complete checklist option for the financial audit, which can be validated upon completion. An administrator can review and mark the checklist as validated and complete. This allows the creation of a complete audit cycle, from reporting to validation, using predefined headers and checklists.
Within this framework, you can:
- Create Audit To-Dos: Assign specific audit tasks to team members directly from the working file.
- Define Checklist Masters: Establish master checklists under key headers (e.g., vendor performance, order lines) to maintain uniformity.
- Generate Reports: Switch between working files to compile targeted audit reports based on predefined actions.
- Validate Items: Mark checklist entries as complete once they are verified.
- Build Audit Cycles: Combine predefined headers and new checklists to structure comprehensive audit reviews.
Unlike regular accounting reports such as the Balance Sheet, General Ledger, or Invoices, working files function as an internal control and audit management tool, streamlining the review and validation of financial operations within Odoo 19.
In Odoo 19 Accounting, the Check Templates feature, available under Configuration → Check, is an advanced tool designed to enhance audit and review processes. It enables users to create reusable templates for audit checklists and review procedures, ensuring consistency and efficiency in financial audits.
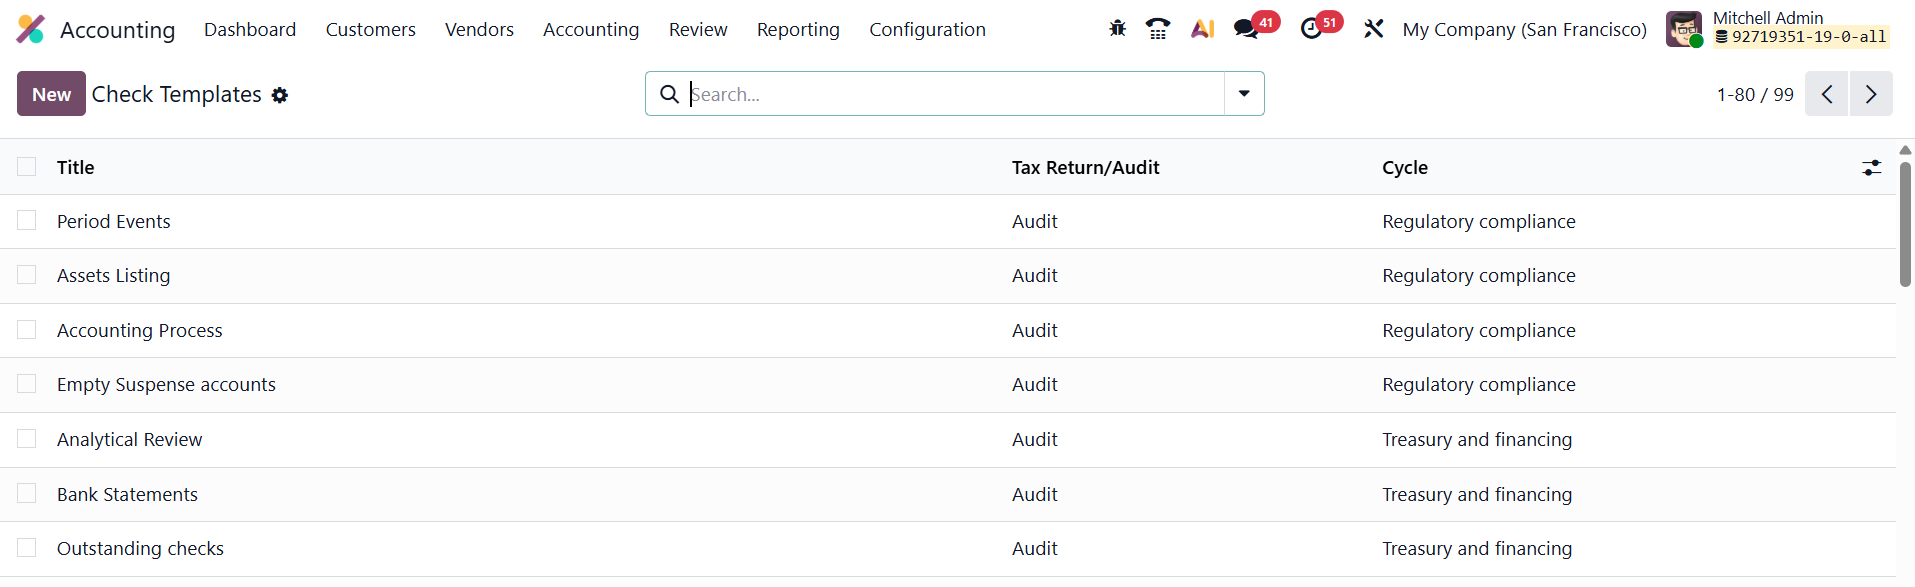
To create a check template, navigate to Accounting → Configuration → Check Templates, and click New. The creation form includes several key fields.
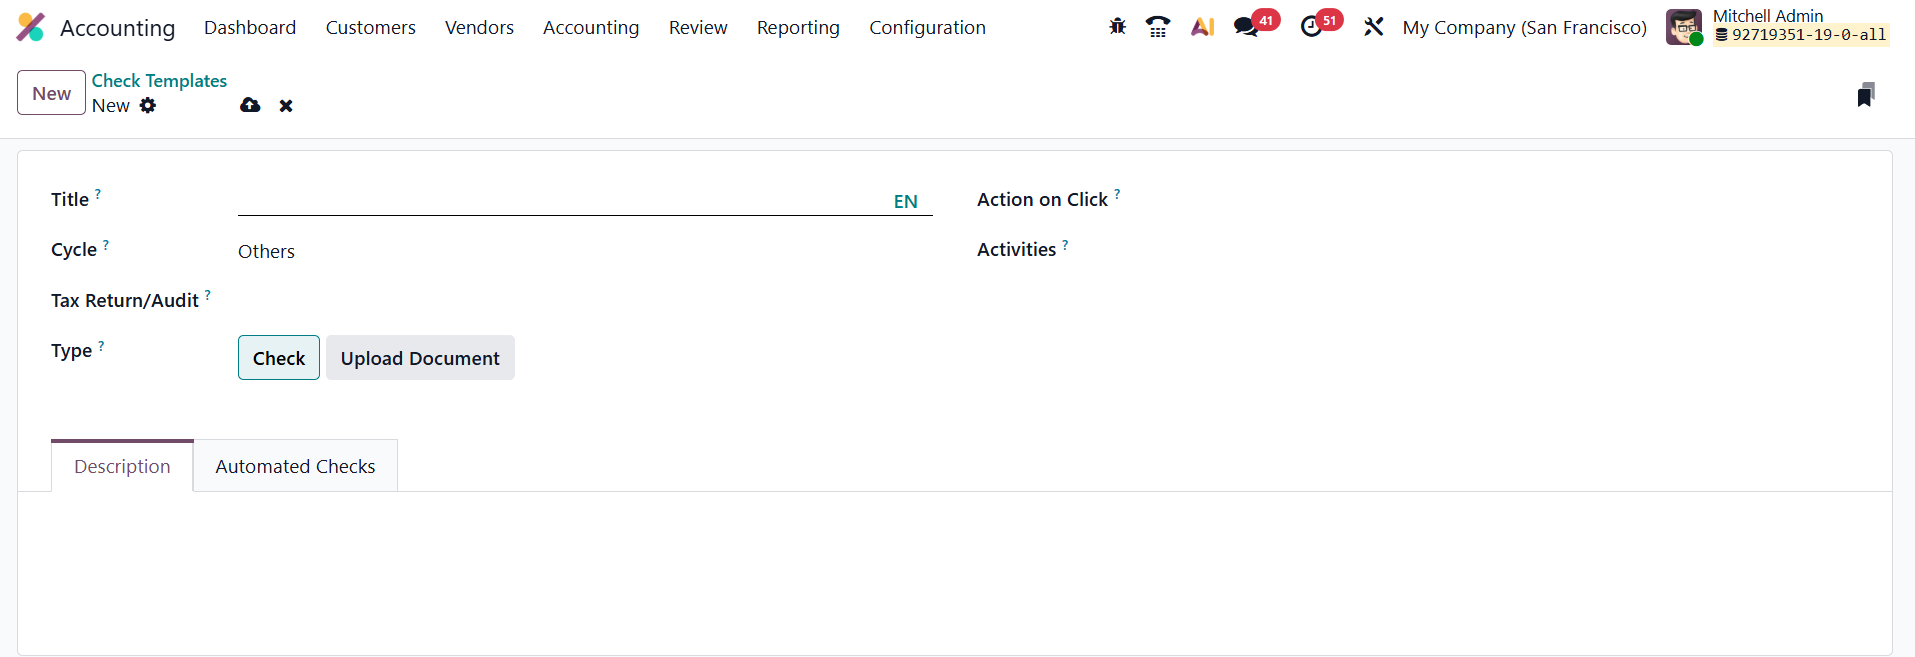
The Title field requires a clear and descriptive name, which helps identify the purpose of the template during audits. The Cycle field allows you to assign the template to a particular audit or review cycle, ensuring that the template automatically appears during that specific stage of audit preparation. In the Tax Return / Audit field, you can specify whether the template relates to a tax return process or an audit operation. The Type field defines the kind of check being created. The Action on Click field determines what happens when the user interacts with a check line during an audit. Additionally, the Activities section allows users to add tasks that must be completed as part of the check. Add Description and Model for Automated Checks.
Once created, check templates can be integrated into Working Files under Accounting → Review → Working Files.
Users can create or open an existing audit working file to import predefined check templates. The system automatically loads all related checks and activities into the working file.

Each check appears with an actionable button based on its configured action, allowing auditors to perform validations, mark activities as complete, add comments, or attach supporting documents. This facilitates real-time tracking of audit progress and ensures that all checks are executed systematically. Finally, after completing an audit or review cycle, the results derived from check templates are reflected in Audit Reports under the Review menu. Managers can generate comprehensive reports displaying completed, pending, and failed checks, offering greater audit transparency and oversight.
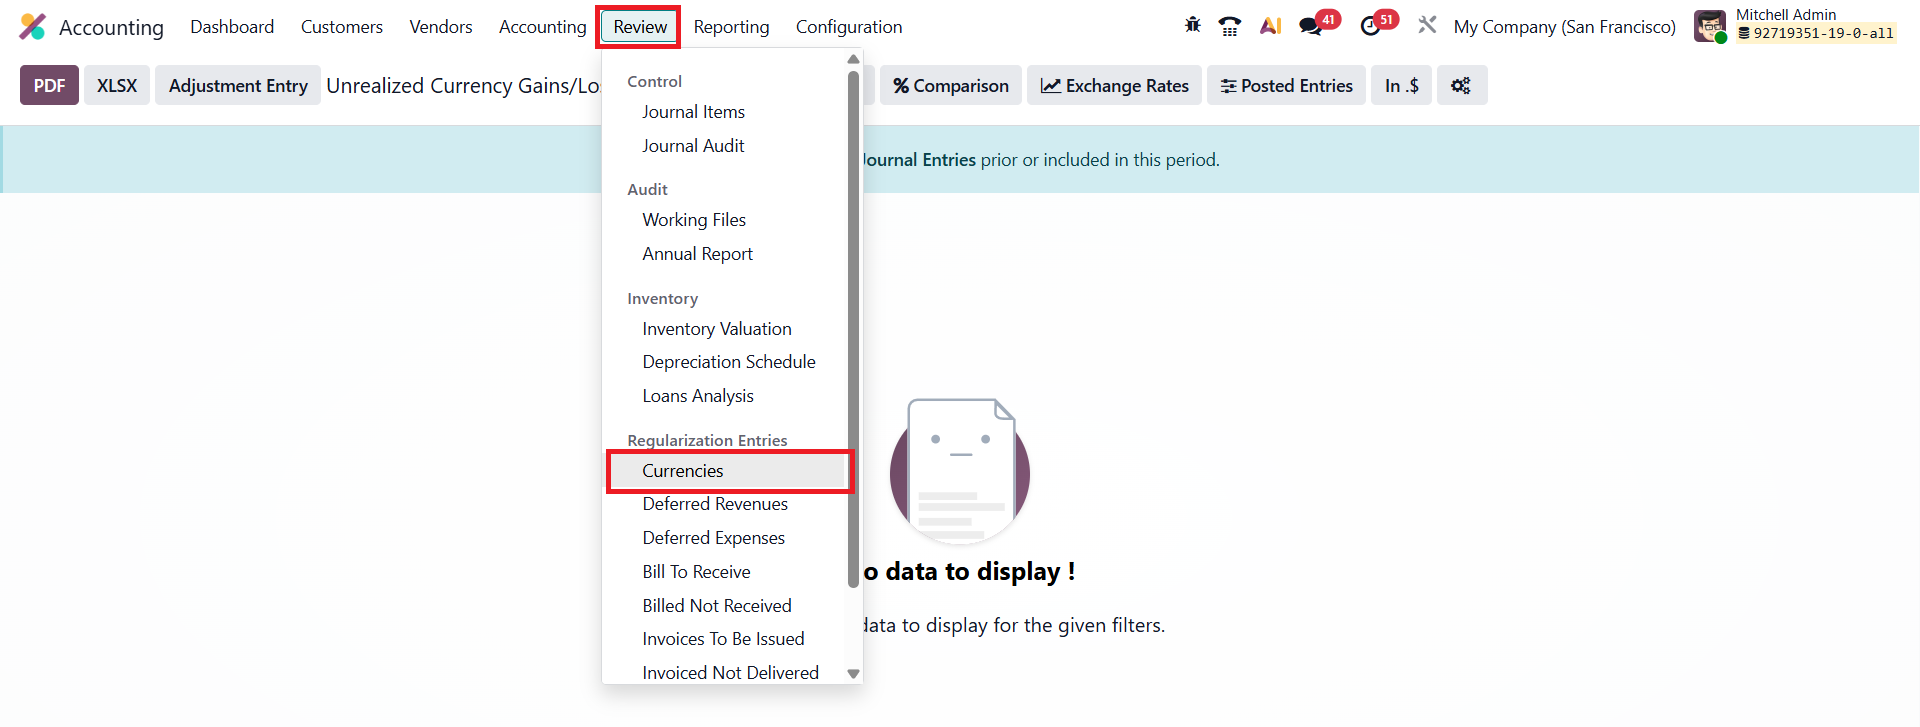
1.9 Inventory Valuation
In Odoo 19 Accounting, the Inventory Valuation Report, accessible through the Accounting → Review → Inventory Valuation menu, provides a clear summary of the
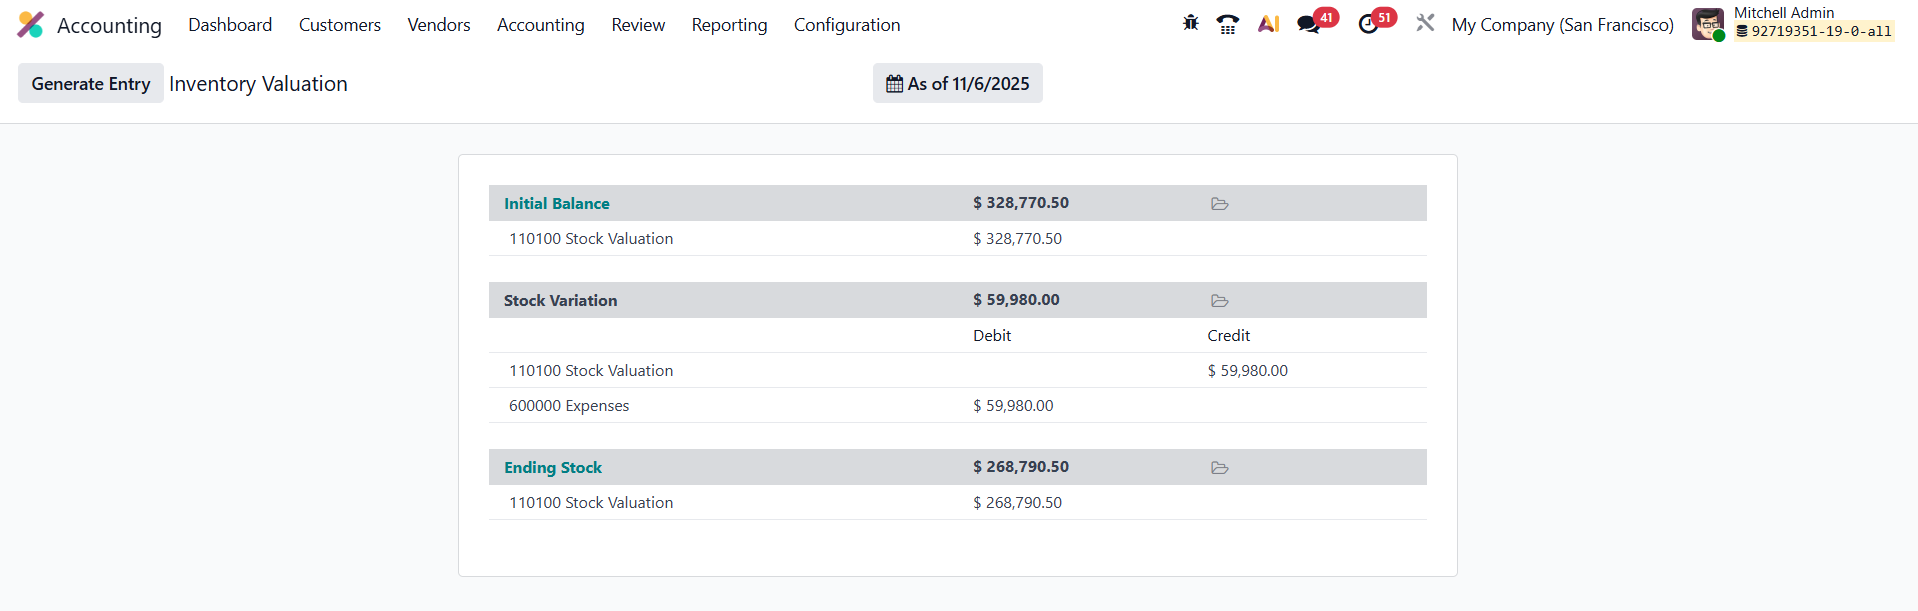
It shows the Initial Balance, Stock Variation, and Ending Stock of the selected period.
1.10 Unrealized Currency Gains/Losses
In Odoo 19 Accounting, the Unrealized Currency Gains/Losses report, available under the Review menu, provides an updated and detailed overview of all open balance sheet accounts that require revaluation based on the latest exchange rates.
The report automatically groups data by the currency used in each account and displays essential details such as Balance in Foreign Currency, Balance at Operation Rate, Balance at Current Rate, and the corresponding Adjustment Amounts. You can directly generate revaluation entries through the Adjustment Entry button. This action automatically posts the necessary accounting entries to record unrealized gains or losses, ensuring that your books align with the current exchange rates.