Settings
Fiscal Localization
Fiscal localizations in Odoo 19 are country-specific modules designed to ensure full compliance with each country’s fiscal and accounting requirements. While they primarily support the Accounting app, they may also be required for other applications such as Point of Sale, eCommerce, and more, depending on the local fiscal regulations. In Odoo 19, the fiscal localization core modules are automatically installed based on the company’s country when the corresponding module is added. Additional localization modules can be installed manually as needed. You can refer to the list of supported countries to check availability and access their specific documentation. In a multi-company environment, each company can use its own fiscal localization package.
To verify that the correct localization package is installed, go to Accounting ‣ Configuration ‣ Settings, and check the Package field under the Fiscal Localization section. Select a different package if required.
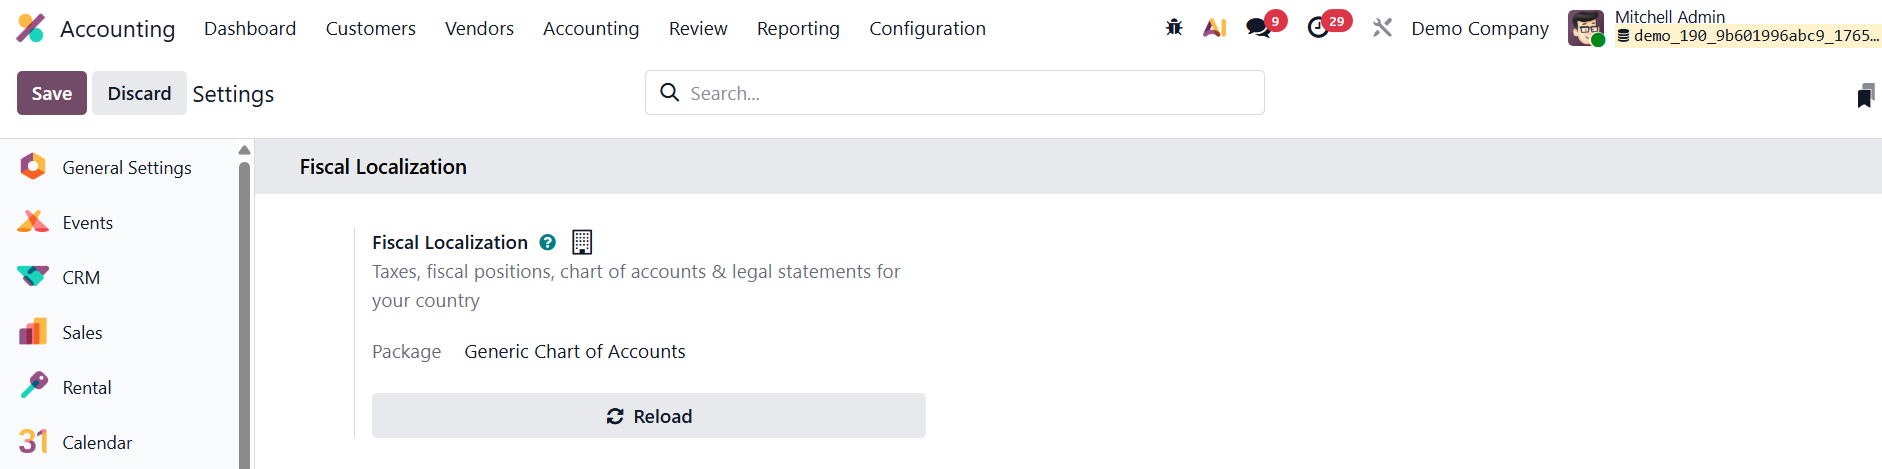
Changing the fiscal localization package is only possible if no accounting entries have been posted. Each localization package requires additional configuration, including fine-tuning the chart of accounts, enabling the appropriate taxes, setting up country-specific statements and certifications, and, in some cases, additional adjustments.
Accounting Import
In Odoo 19 Accounting, the Accounting Import feature has been further enhanced to provide a faster, more intuitive, and structured way to configure and manage your company’s financial data. This tool simplifies the setup process by allowing users to import essential accounting elements, such as contacts, chart of accounts, and journal items, directly into the system with just a few clicks.
It can be accessed by navigating to the Accounting → Configuration → Settings menu, where users can choose between Review Manually and Import options when setting up their Chart of Accounts.
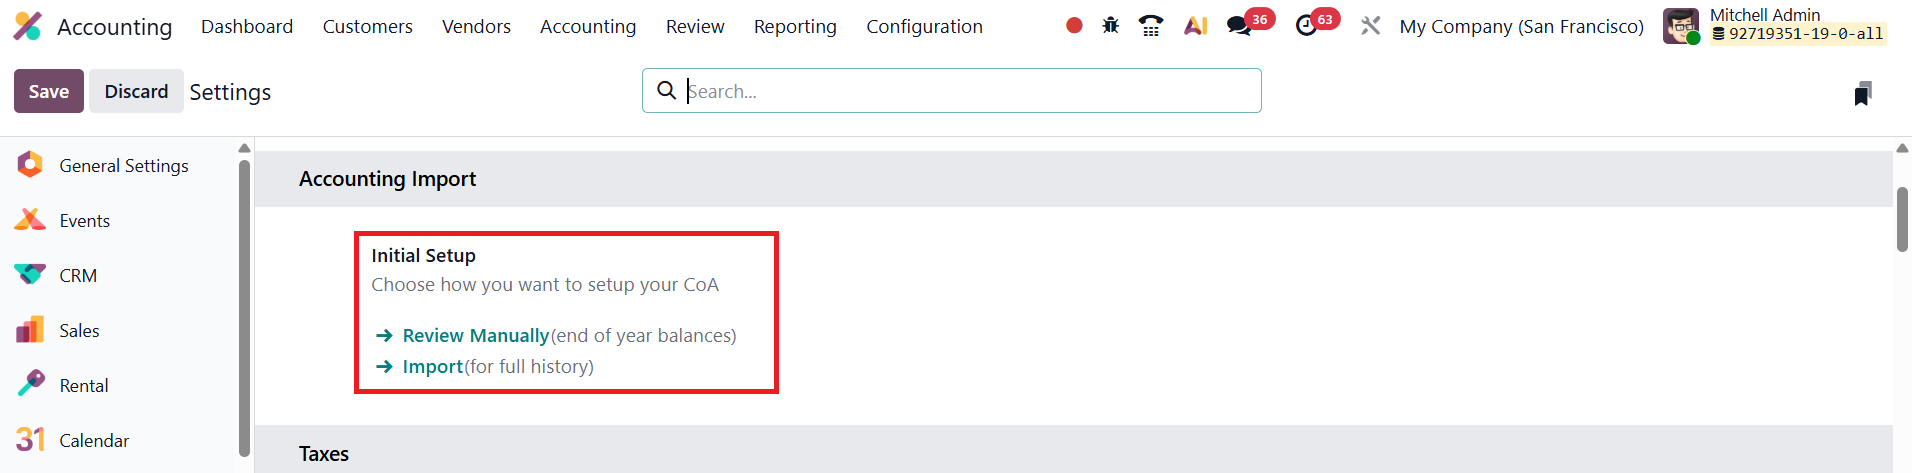
If the Review Manually option is selected, users can browse, edit, or validate the existing Chart of Accounts already defined for their company. This approach is useful for organizations that prefer to review and customize their accounts line by line.
Alternatively, the Import option provides a more streamlined workflow, ideal for new implementations or migrations from another accounting system.
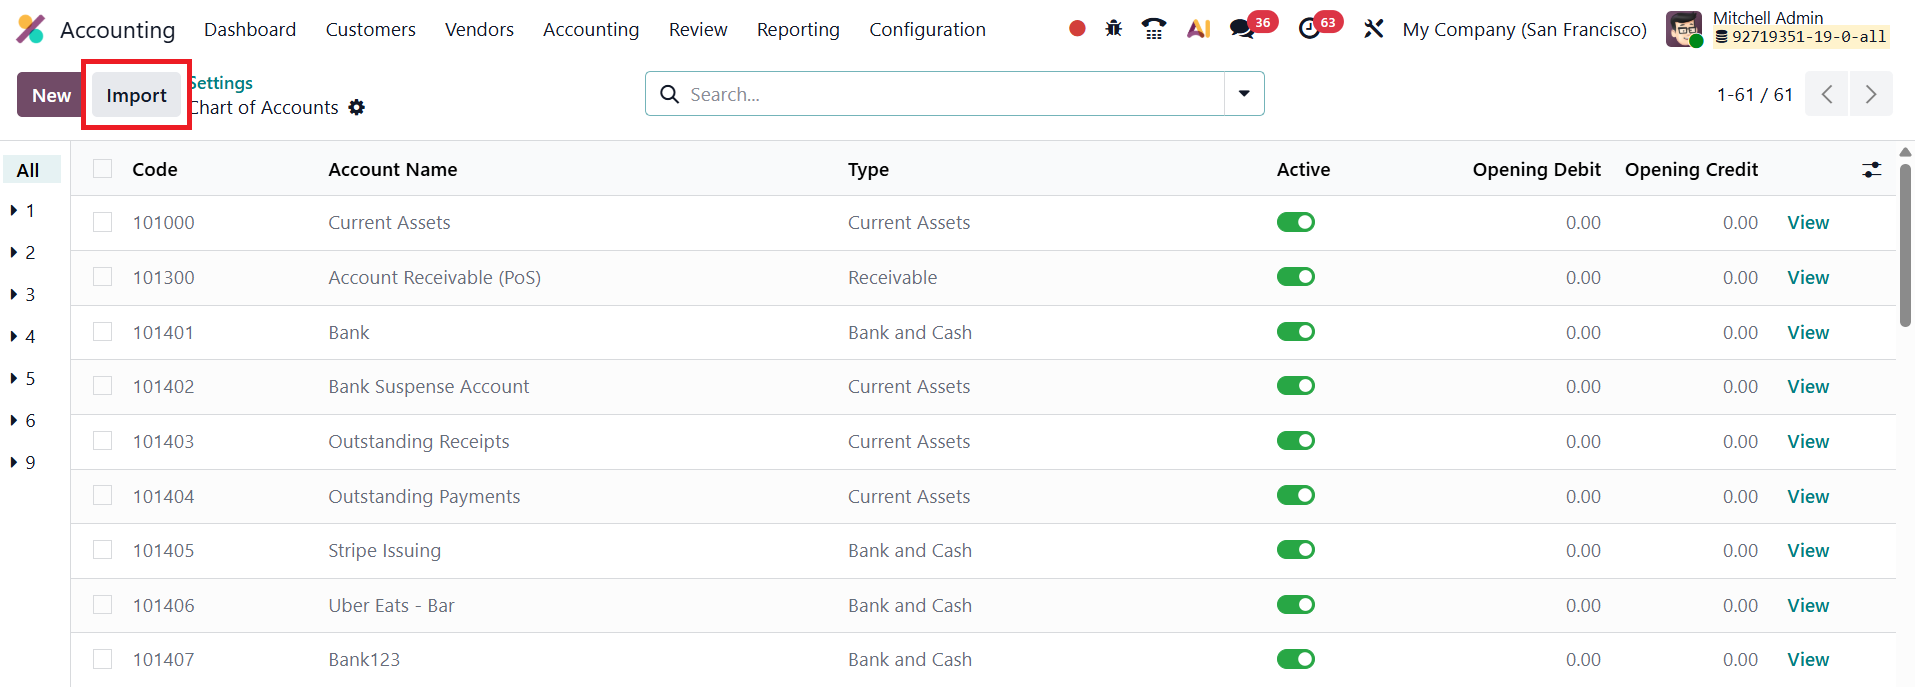
Clicking the Import button opens a dedicated import interface, from which users can upload various accounting datasets. Odoo 19 supports importing files in both CSV and Excel formats, ensuring flexibility and compatibility with external systems.
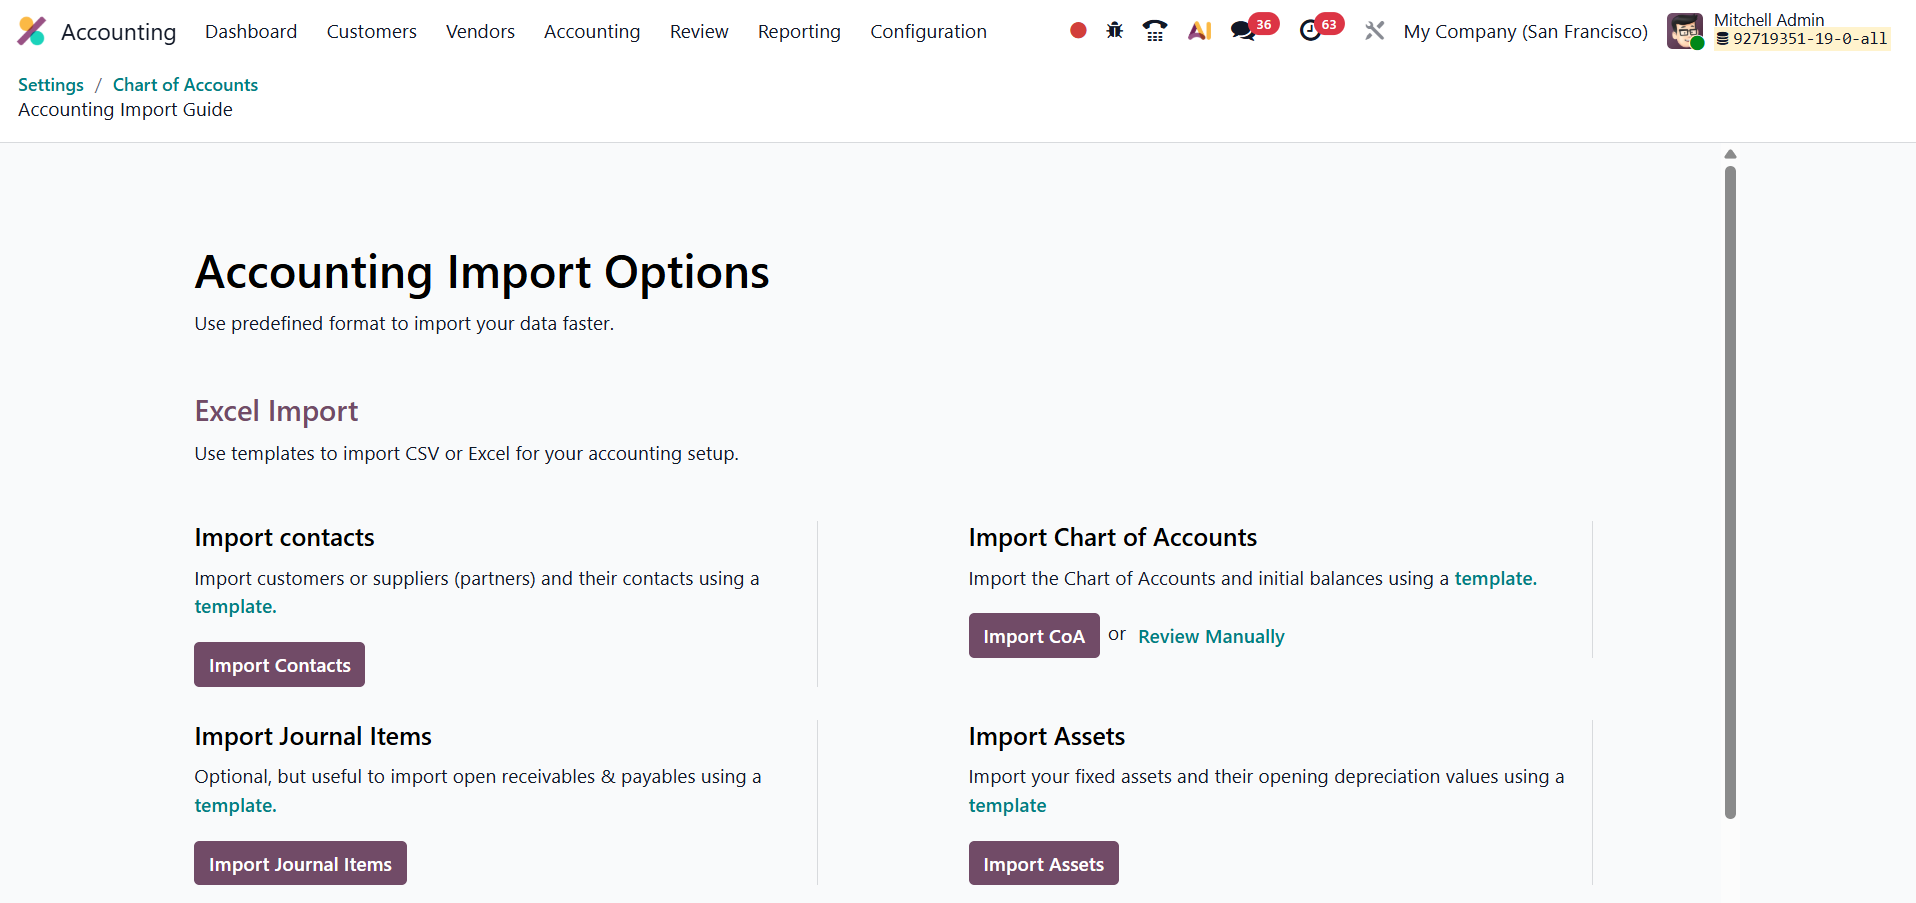
Within this interface, several import options are available:
- Import Contacts – Enables users to upload customer, vendor, and partner details along with their contact information.
- Import Chart of Accounts – Allows users to import their account structure and opening balances, making it particularly useful during company setup or when migrating financial data from legacy systems.
- Import Journal Items – Facilitates the import of unreconciled accounting entries for accounts receivable, accounts payable, and other ledgers, ensuring continuity in financial records.
- Import Assets - Import your fixed assets and their opening depreciation values using a template.
The process is simple and user-friendly. By leveraging this enhanced Accounting Import feature in Odoo 19, businesses can achieve a smooth and efficient setup process, minimize manual data entry, and ensure consistency and accuracy across all financial configurations.
Default Taxes
In Odoo 19, the Default Taxes feature ensures consistent and automated tax application across transactions when no specific tax is assigned to a product or service. This functionality streamlines accounting operations by automatically applying preset Sales Tax and Purchase Tax whenever new items or financial records are created. Users can modify or override these defaults at the product level if needed, but in the absence of specific tax rules, Odoo relies on these predefined settings to maintain accuracy and uniformity.
To configure or update these defaults, navigate to the Accounting module → Settings → Default Taxes section, where internal links guide you to set both sales and purchase tax preferences.
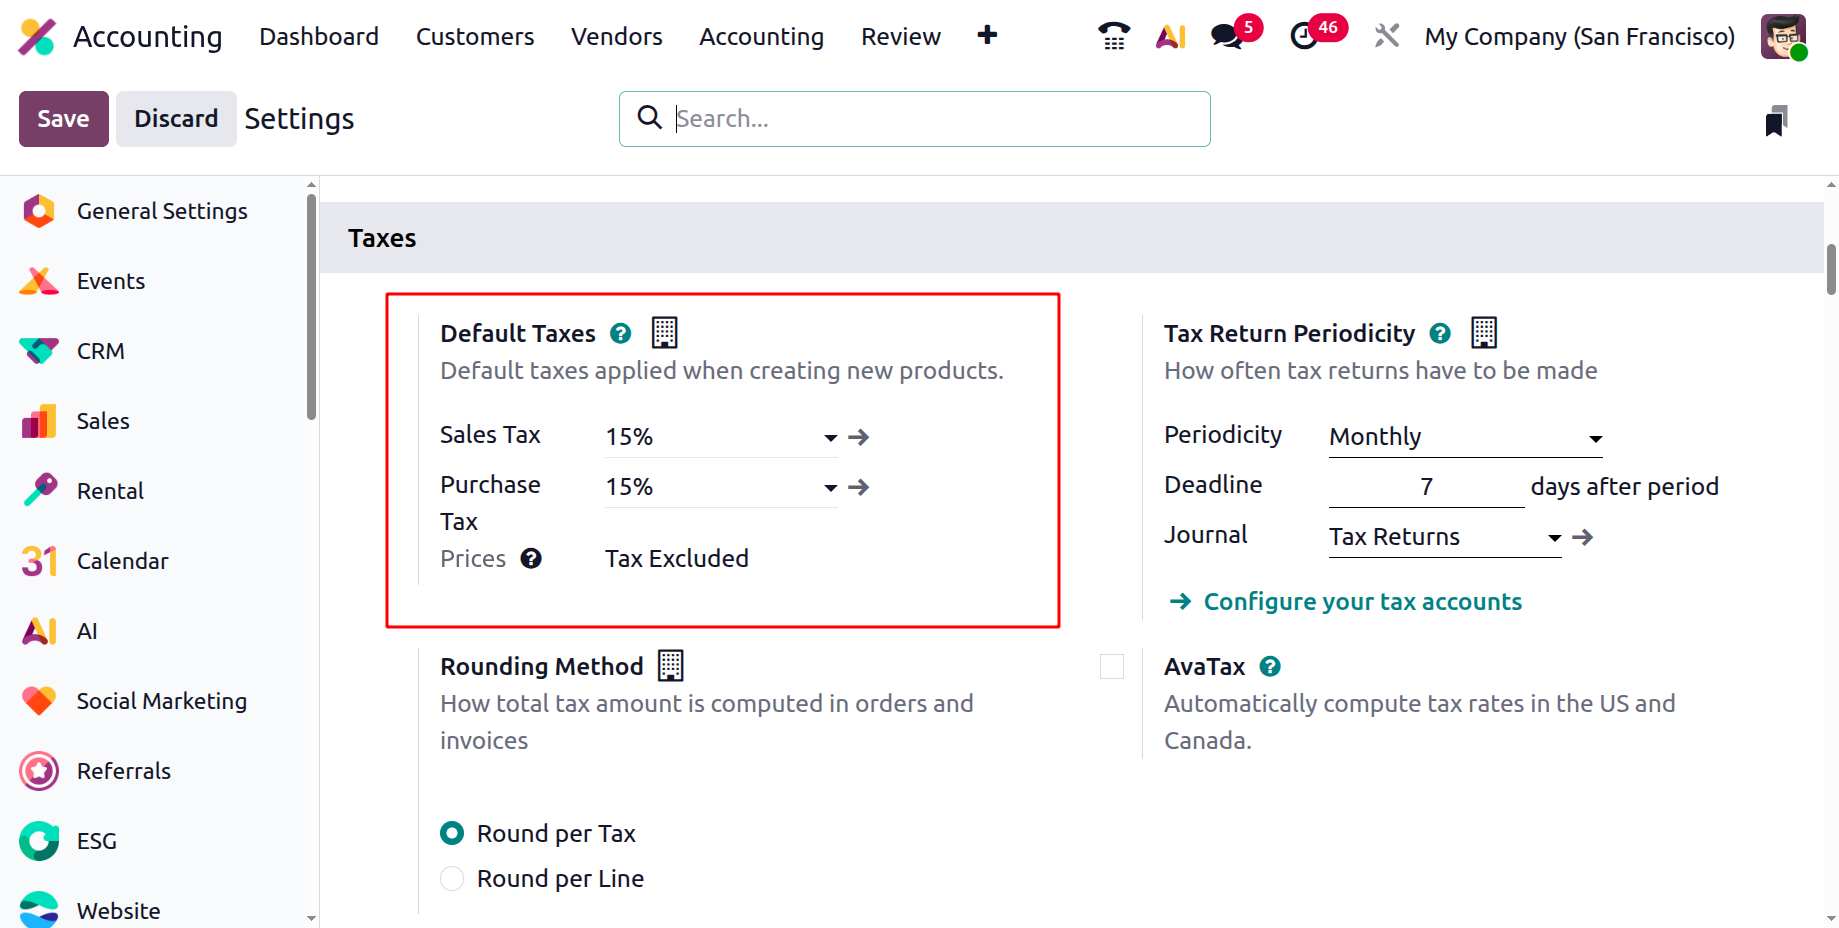
Additionally, Odoo 19 provides flexibility in how tax totals are computed through the Rounding Method option, which offers two modes: Round per Line or Round per Tax. When prices include taxes, it is generally best to use the per-line rounding method to ensure precision, as it calculates the total by summing the rounded amounts for each line item.
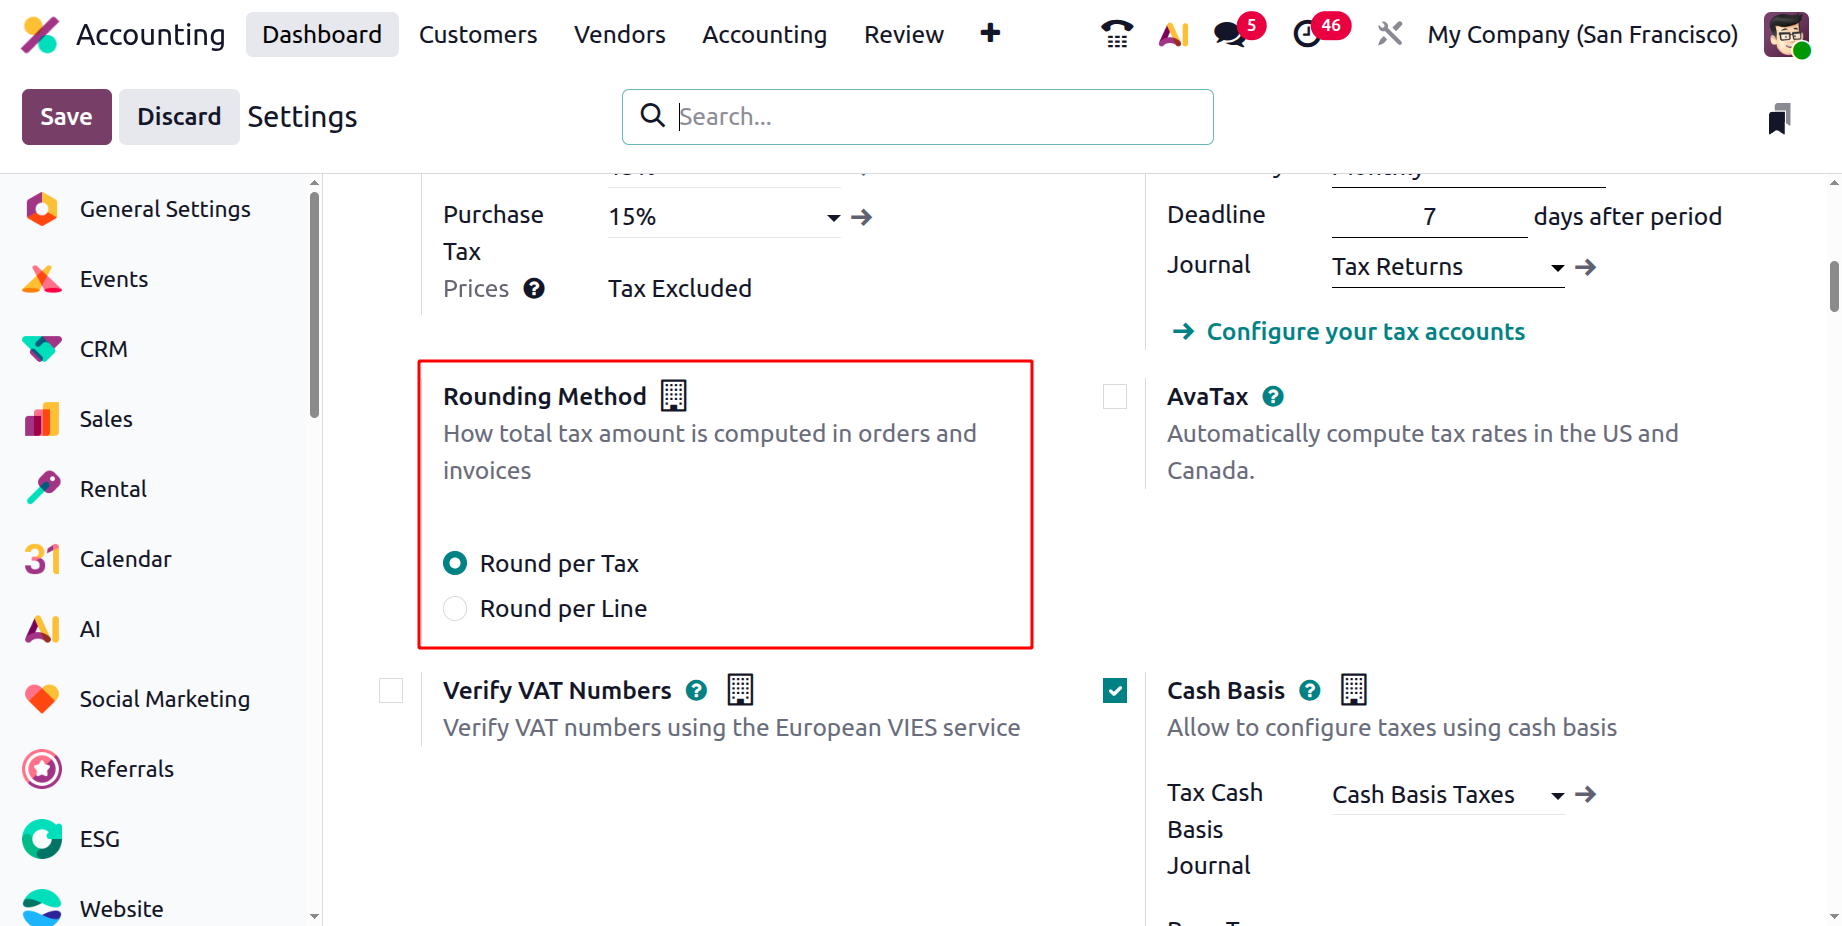
This feature not only reduces manual effort but also guarantees consistent and transparent tax computation across all business transactions.
AvaTax
In Odoo 19, AvaTax provides seamless, real-time tax rate calculation for orders and invoices, ensuring full compliance with regional tax regulations.
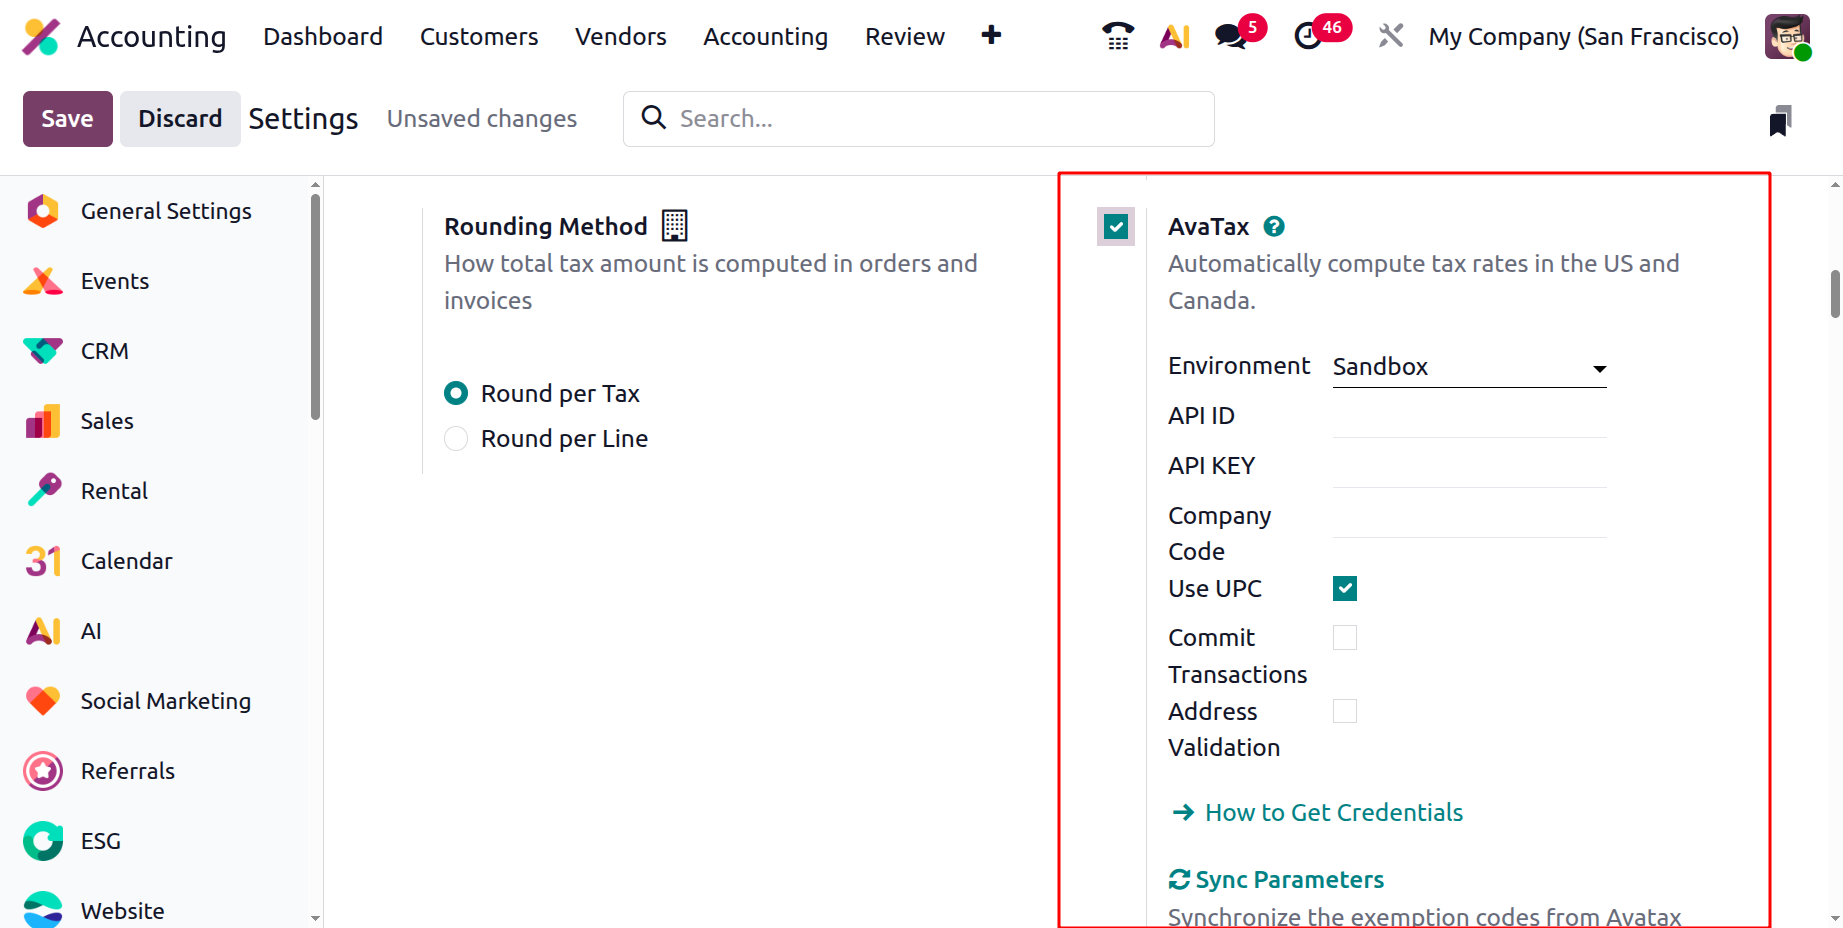
To configure AvaTax, go to the Accounting module → Settings → AvaTax section, where you can specify the Environment (Production or Sandbox), API ID, API Key, and Company Code. Additionally, you can enable advanced options such as Address Validation (to verify and standardize billing or shipping addresses), Commit Transactions, and Use UPC (to identify products through Universal Product Codes). AvaTax can also be linked with specific product categories and items, allowing Odoo to apply the correct tax rules automatically across all operations. This integration minimizes manual intervention, eliminates calculation errors, and ensures that every invoice and order reflects accurate, regulation-compliant tax values.
EU Intra-community Distance Selling
In Odoo 19, the EU Intra-community Distance Selling feature ensures automatic VAT compliance for cross-border transactions within the European Union by applying the correct tax rate based on the customer’s delivery address. This functionality is essential for businesses engaged in online sales or cross-border trade under EU VAT rules.
To activate it, navigate to the Accounting module → Settings → EU Intra-community Distance Selling and enable the option.

Once enabled, Odoo dynamically determines and applies the appropriate VAT rate of the customer’s country of delivery, rather than that of the seller’s location. This automation ensures that tax reporting aligns with EU distance-selling thresholds and regulations, reduces manual intervention, and minimizes the risk of errors in VAT declarations. You can activate the Verify VAT Numbers option which will verify VAT numbers using the European VIES service.
Cash Basis
In Odoo 19, businesses can manage tax reporting on a cash basis, ideal for organizations that recognize tax obligations only when payments are received or made rather than at the time of invoicing. To enable this feature, navigate to the Accounting module’s Settings and activate the Cash Basis option.
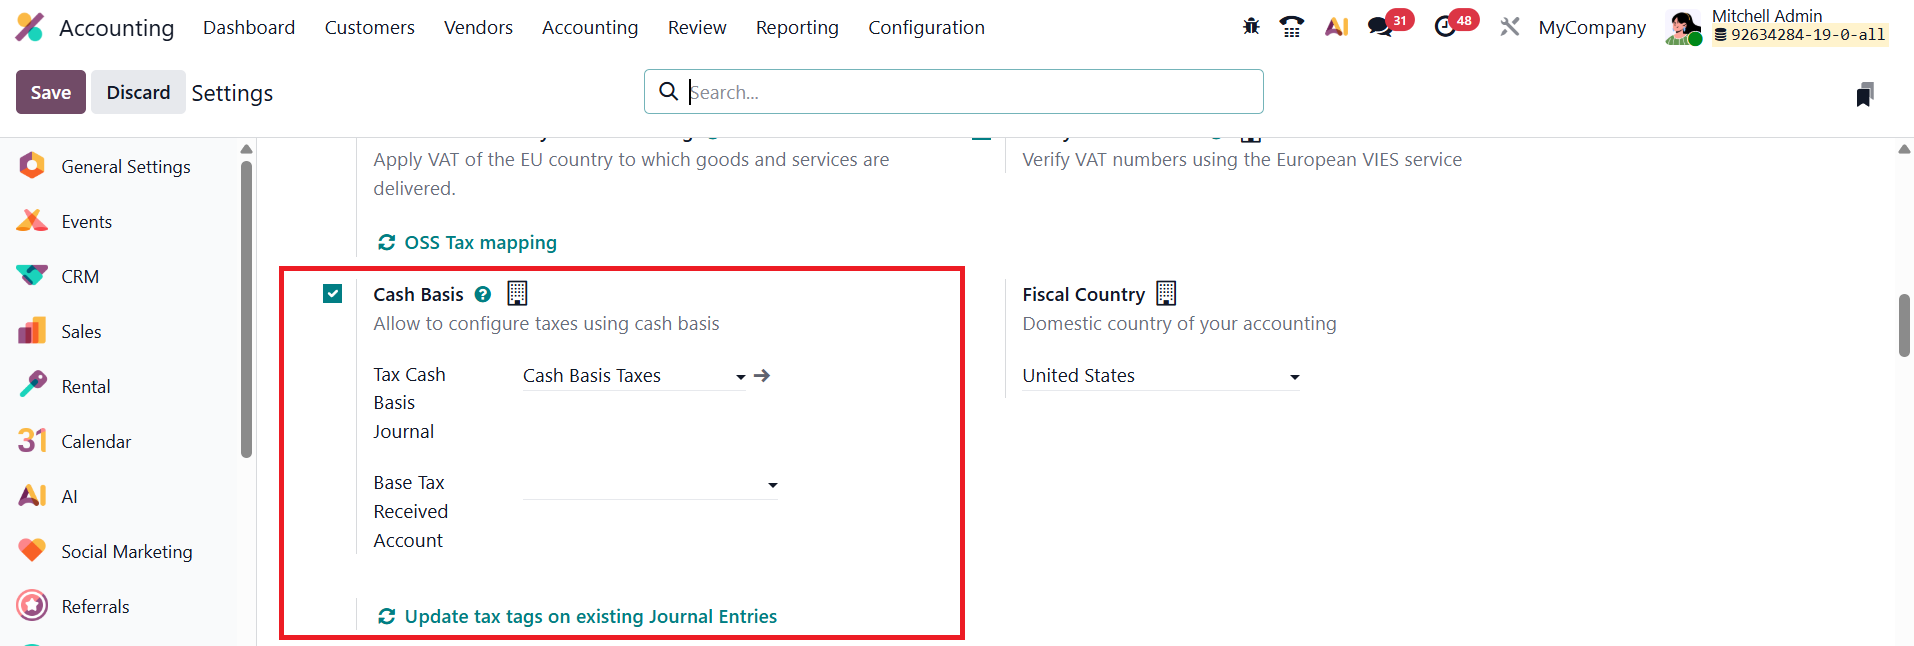
Once enabled, you must configure dedicated accounts to handle these transactions accurately. This setup includes specifying a Base Tax Received Account to record the taxable base amount upon payment and selecting a Tax Cash Basis Journal, where all corresponding tax entries are automatically posted during the reconciliation process. By using this configuration, Odoo 19 ensures that tax amounts are reported precisely in alignment with payment activity, maintaining full compliance with cash-based accounting standards and simplifying audit tracking.
While configuring cash basis tax rules in Odoo 19, Advanced Options tab offers detailed controls that ensure taxes are applied and reported correctly. A key feature here is Tax Exigibility, which defines when tax should be recognized. You can choose Based on Invoice for accrual accounting or Based on Payment for cash basis accounting.
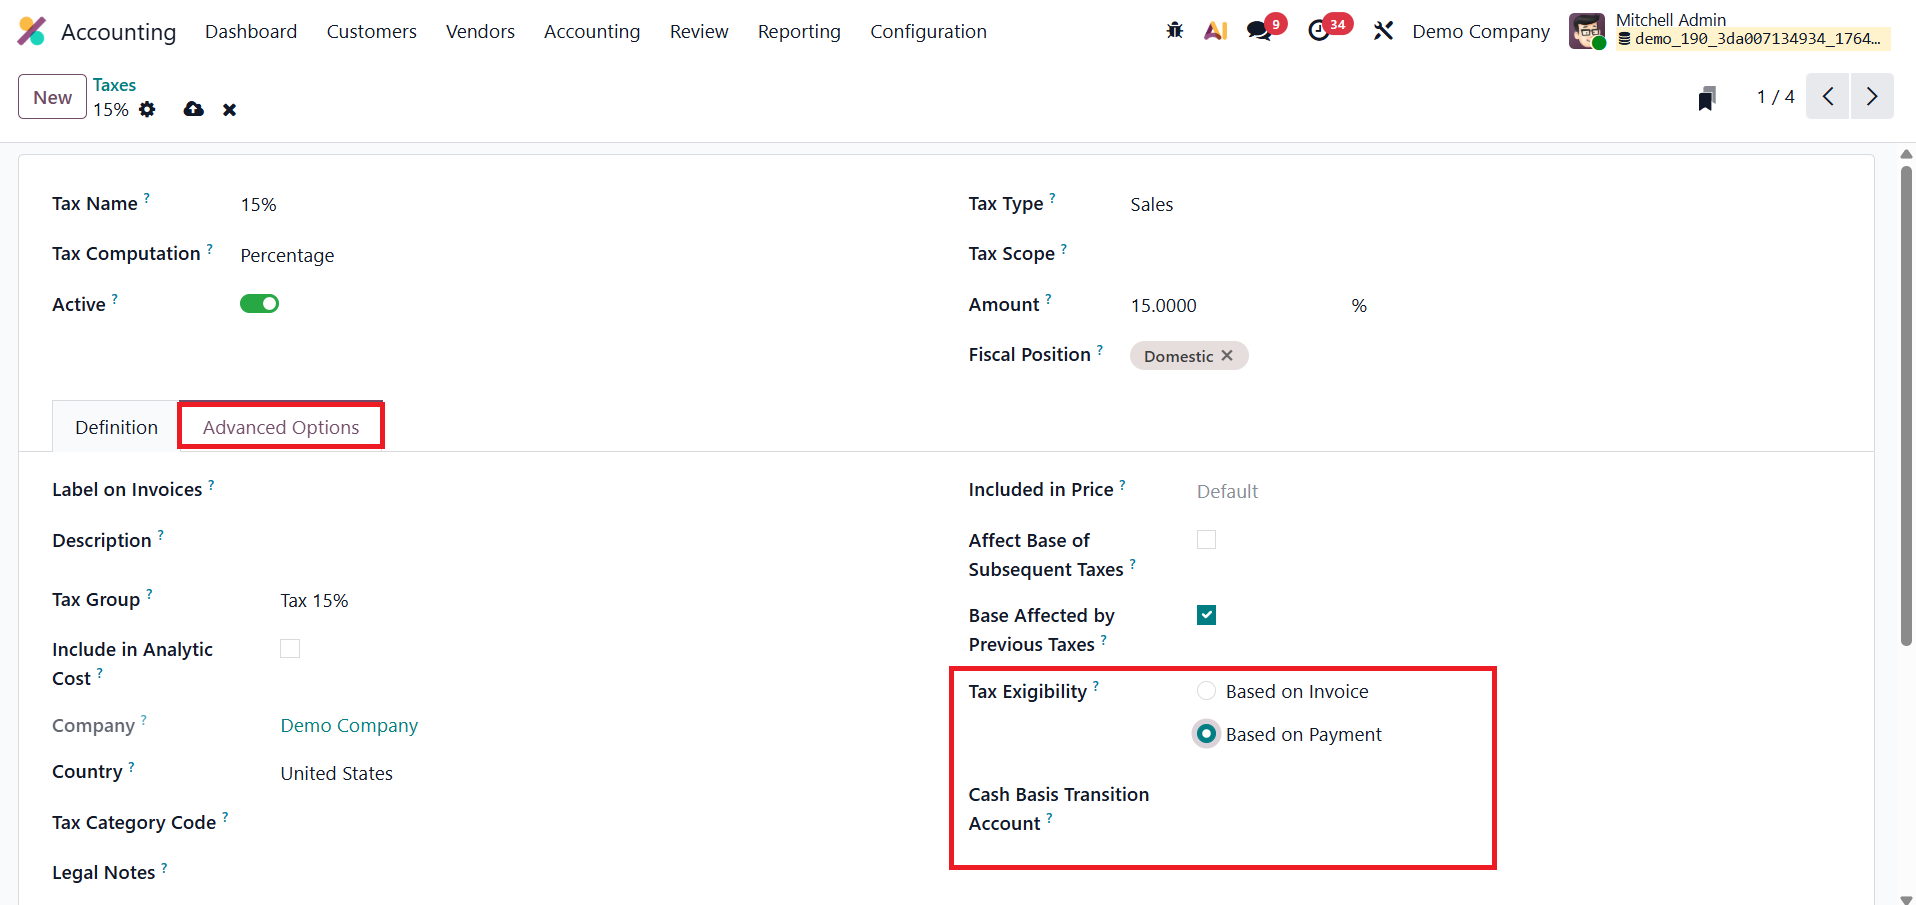
When the cash basis option is enabled, tax is recorded only after the invoice is paid. Until payment reconciliation occurs, Odoo temporarily posts the tax amounts to a dedicated Cash Basis Transition Account, which functions as an intermediary holding account to ensure accurate tax recognition and compliant financial reporting.
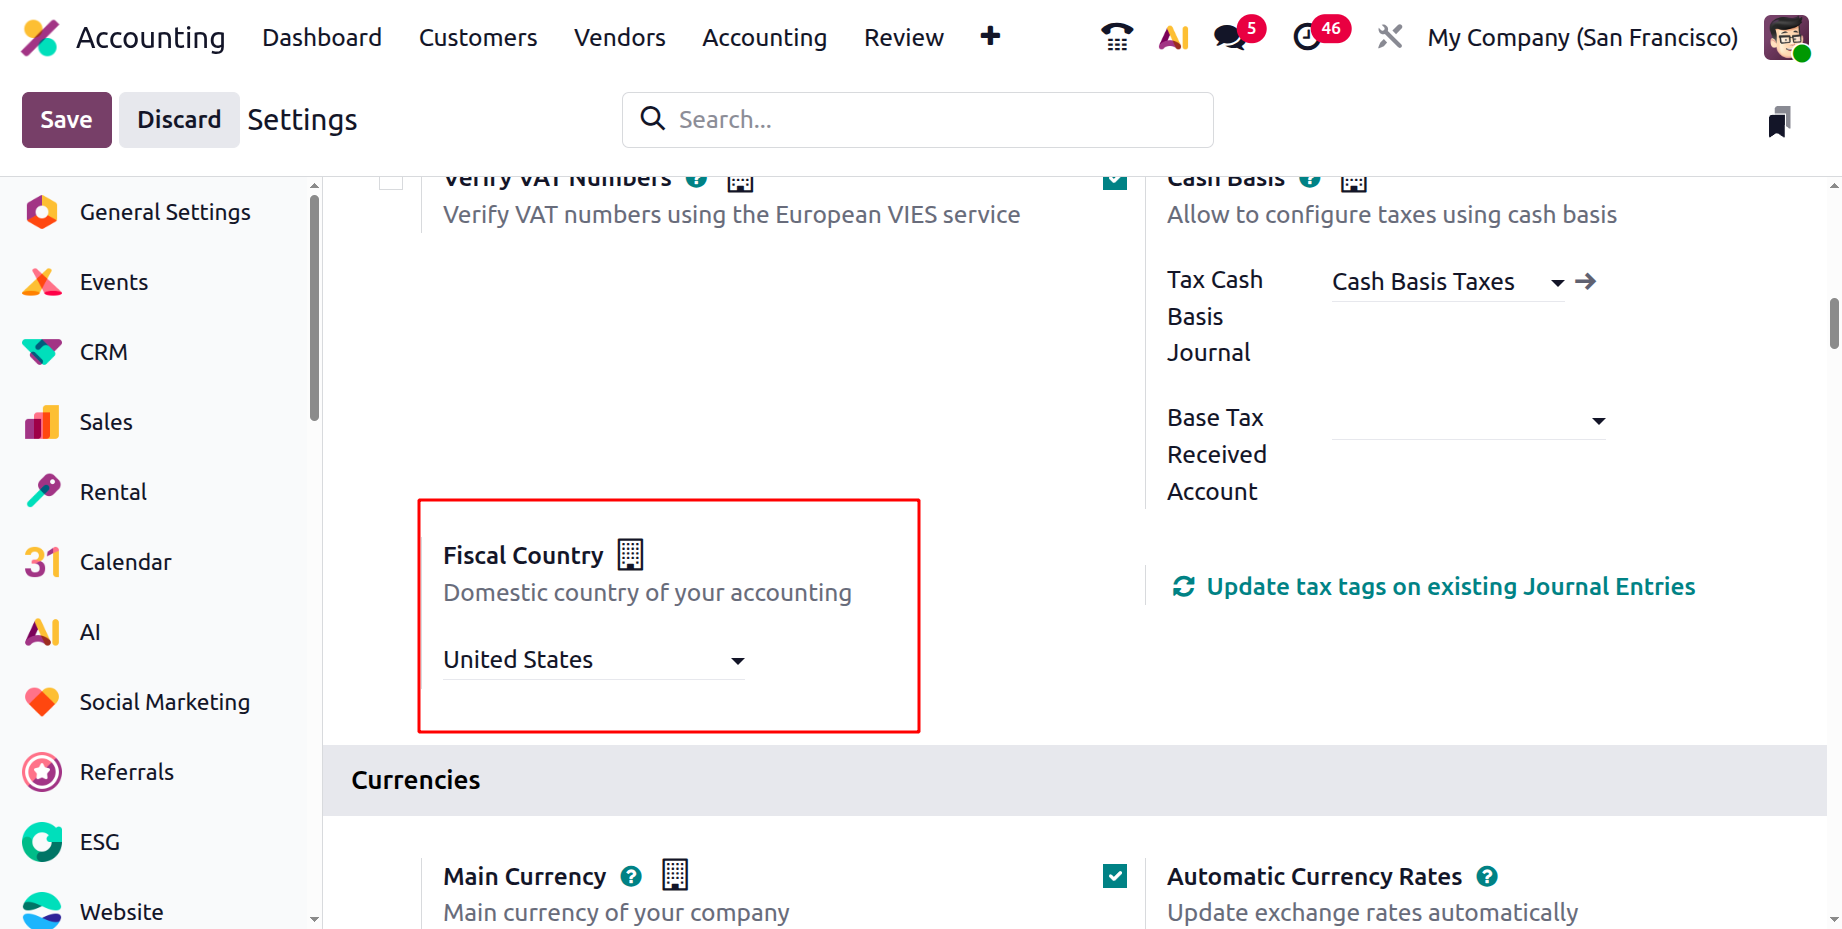
Fiscal Country
Within the Taxes section, set your Fiscal Country, which designates your company’s home jurisdiction for tax purposes. This selection determines the default tax rules, rates, and reporting structures that Odoo applies to your transactions.
Currencies
In Odoo 19, you can define the primary operating currency for your business by navigating to the Settings menu. Under the Currencies section, select your preferred Main Currency to ensure that all accounting records, reports, and financial transactions align with your chosen base currency. This configuration standardizes all operations and simplifies financial management.
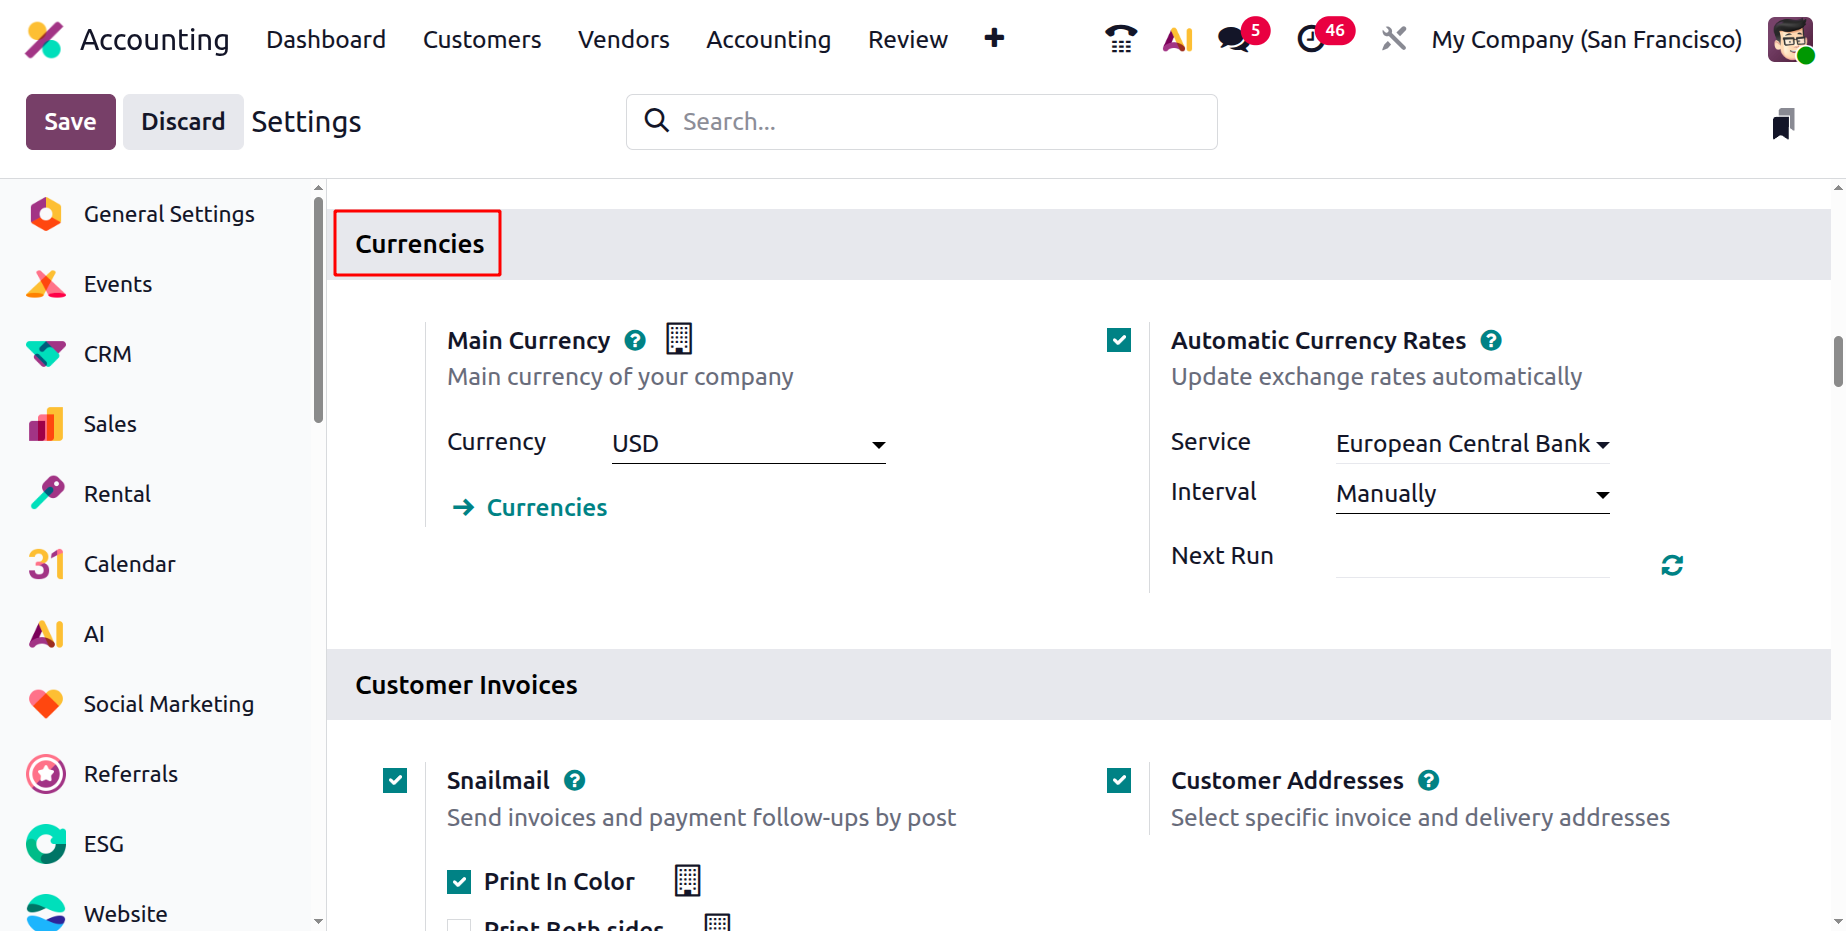
To maintain accuracy in international transactions, Odoo 19 also includes an Automatic Currency Rate Update feature. When enabled from the Accounting Settings, this tool automatically fetches real-time exchange rates from your selected service provider. You can choose how often these rates are updated based on your business requirements. The Next Run field displays the scheduled time for the next update, providing visibility into when the system will refresh exchange rates. This automation ensures that all currency conversions remain up-to-date, reducing manual work and ensuring precision in multi-currency accounting and reporting.
Snaimail
Sending documents by postal mail can be a powerful way to capture customers’ attention, especially at a time when email inboxes are often overcrowded. Odoo 19 offers a built-in Snailmail feature that allows businesses to send invoices and follow-up reports directly by post to customers anywhere in the world, without leaving the Odoo database. This feature is particularly useful for formal communications, legal documents, or customers who prefer physical copies over digital ones.
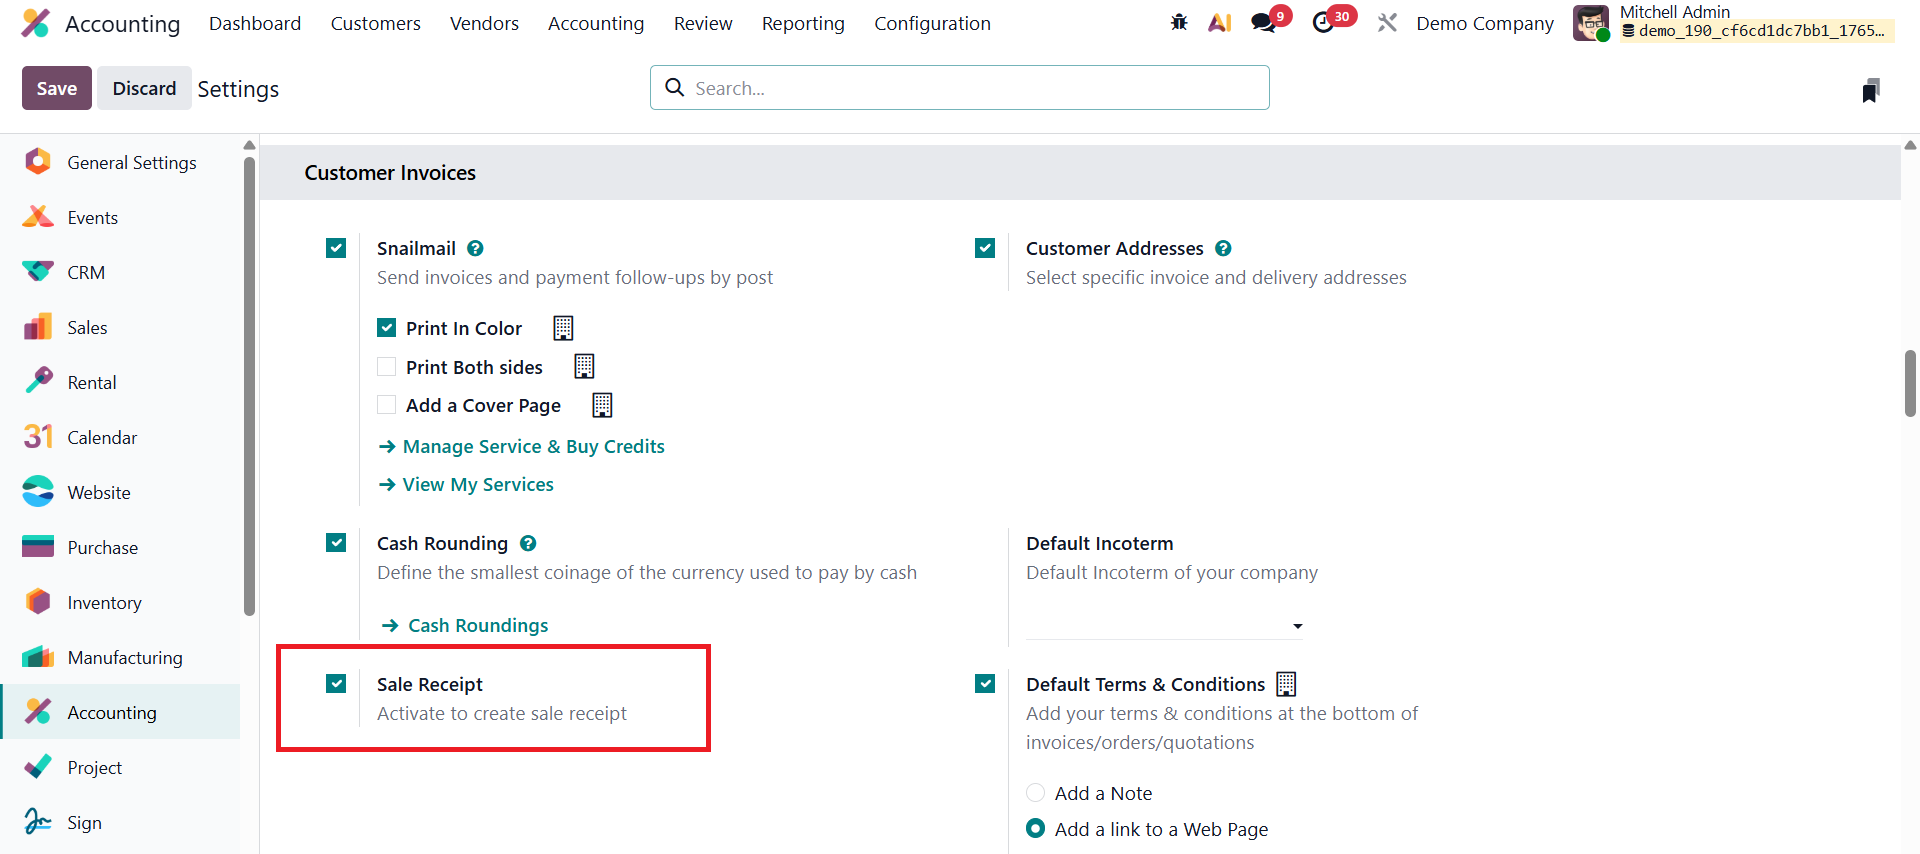
To configure Snailmail in Odoo 19 Accounting, navigate to Accounting ‣ Configuration ‣ Settings and scroll to the Customer Invoices section. Here, activate the Snailmail option.
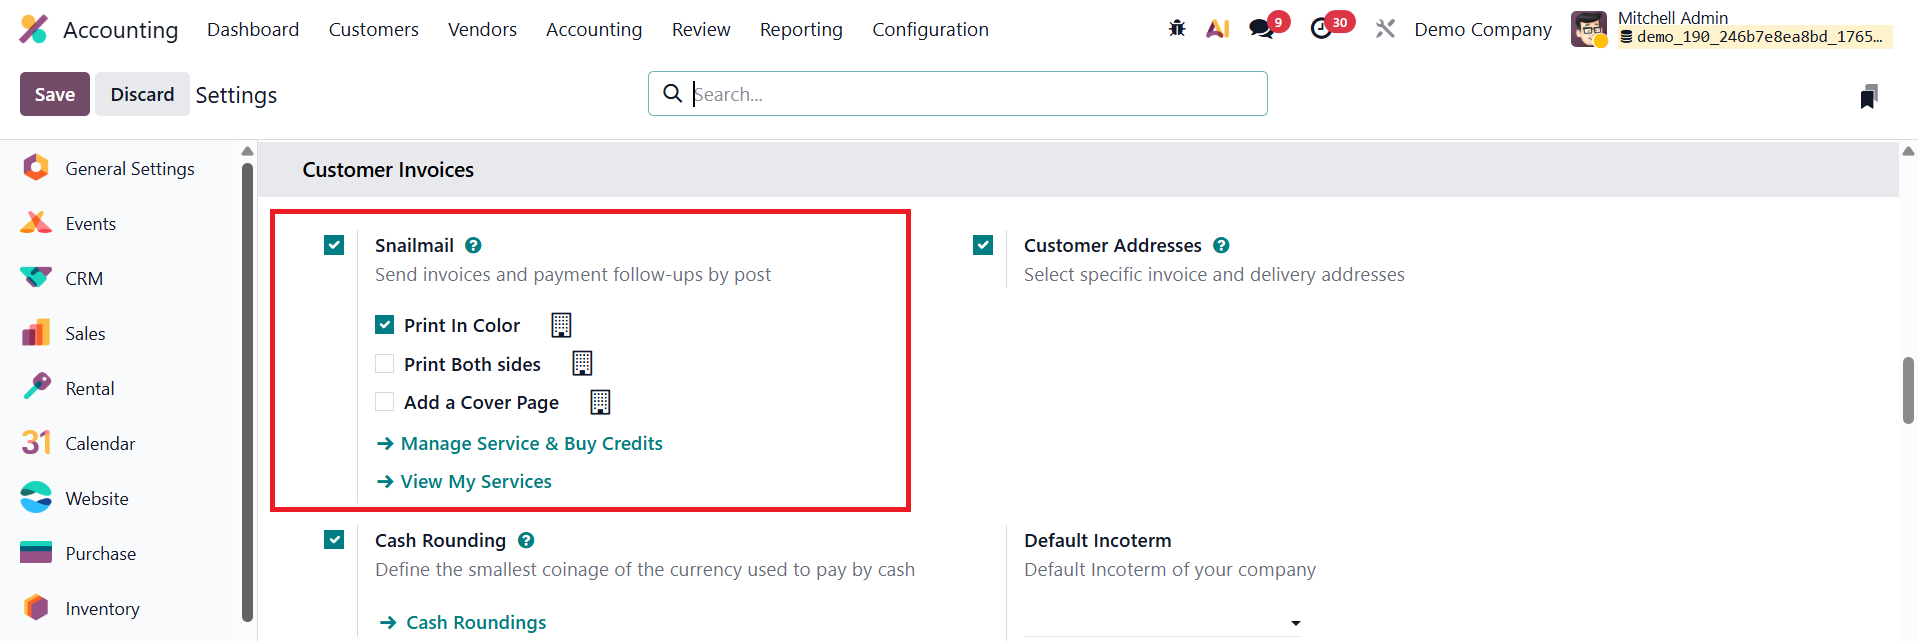
Snailmail works as an In-App Purchase (IAP) service, meaning it requires prepaid credits, commonly referred to as stamps. Each document sent by post, such as an invoice or a follow-up letter, consumes one stamp. After enabling the feature, scroll down to the Snailmail section in the same settings page and click Buy Credits to purchase the required number of stamps for your business needs.
Once the configuration is complete and sufficient credits are available, sending a document by post is simple. Open the relevant invoice or follow-up report and ensure that the customer’s address is complete and accurate, with the country field properly set, as this is mandatory for postal delivery. Click the Send button, choose the Send by Post option, and then confirm by clicking Send.
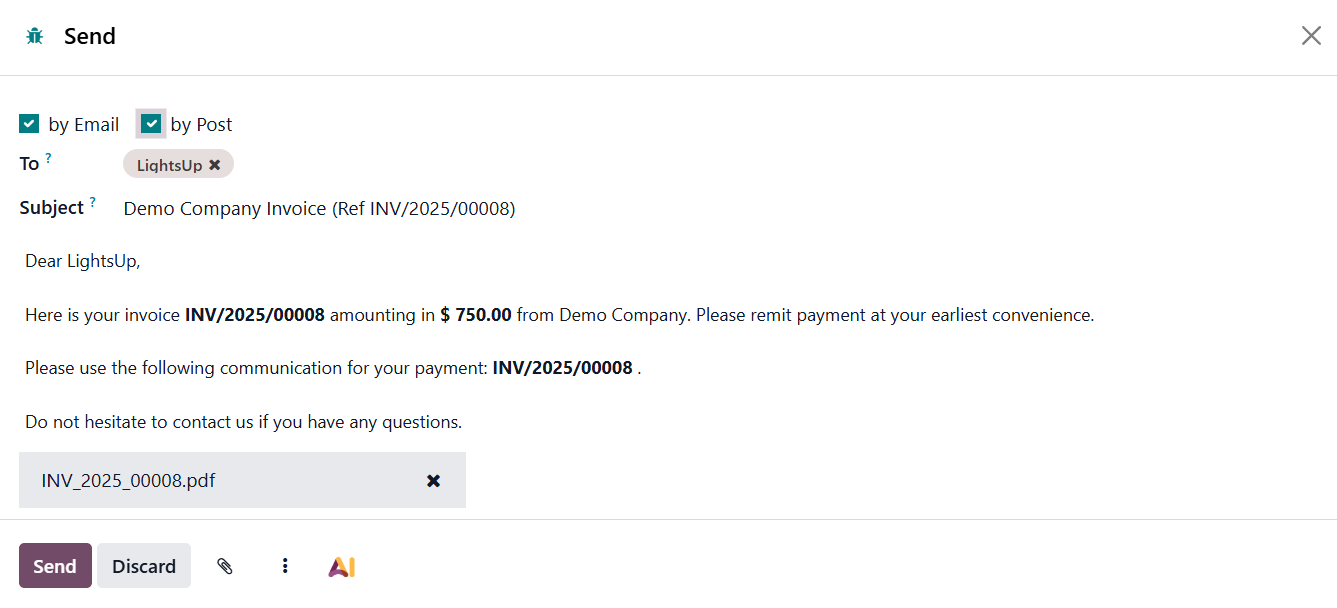
Odoo 19 will automatically handle the printing, enveloping, and worldwide mailing process, allowing you to manage both digital and physical customer communications efficiently from a single platform.
Customer Addresses
Businesses often deal with customers who have more than one address, for example, one address for receiving invoices and another for receiving deliveries. Odoo’s Customer Addresses feature helps manage this easily by allowing you to select the right address for each purpose.
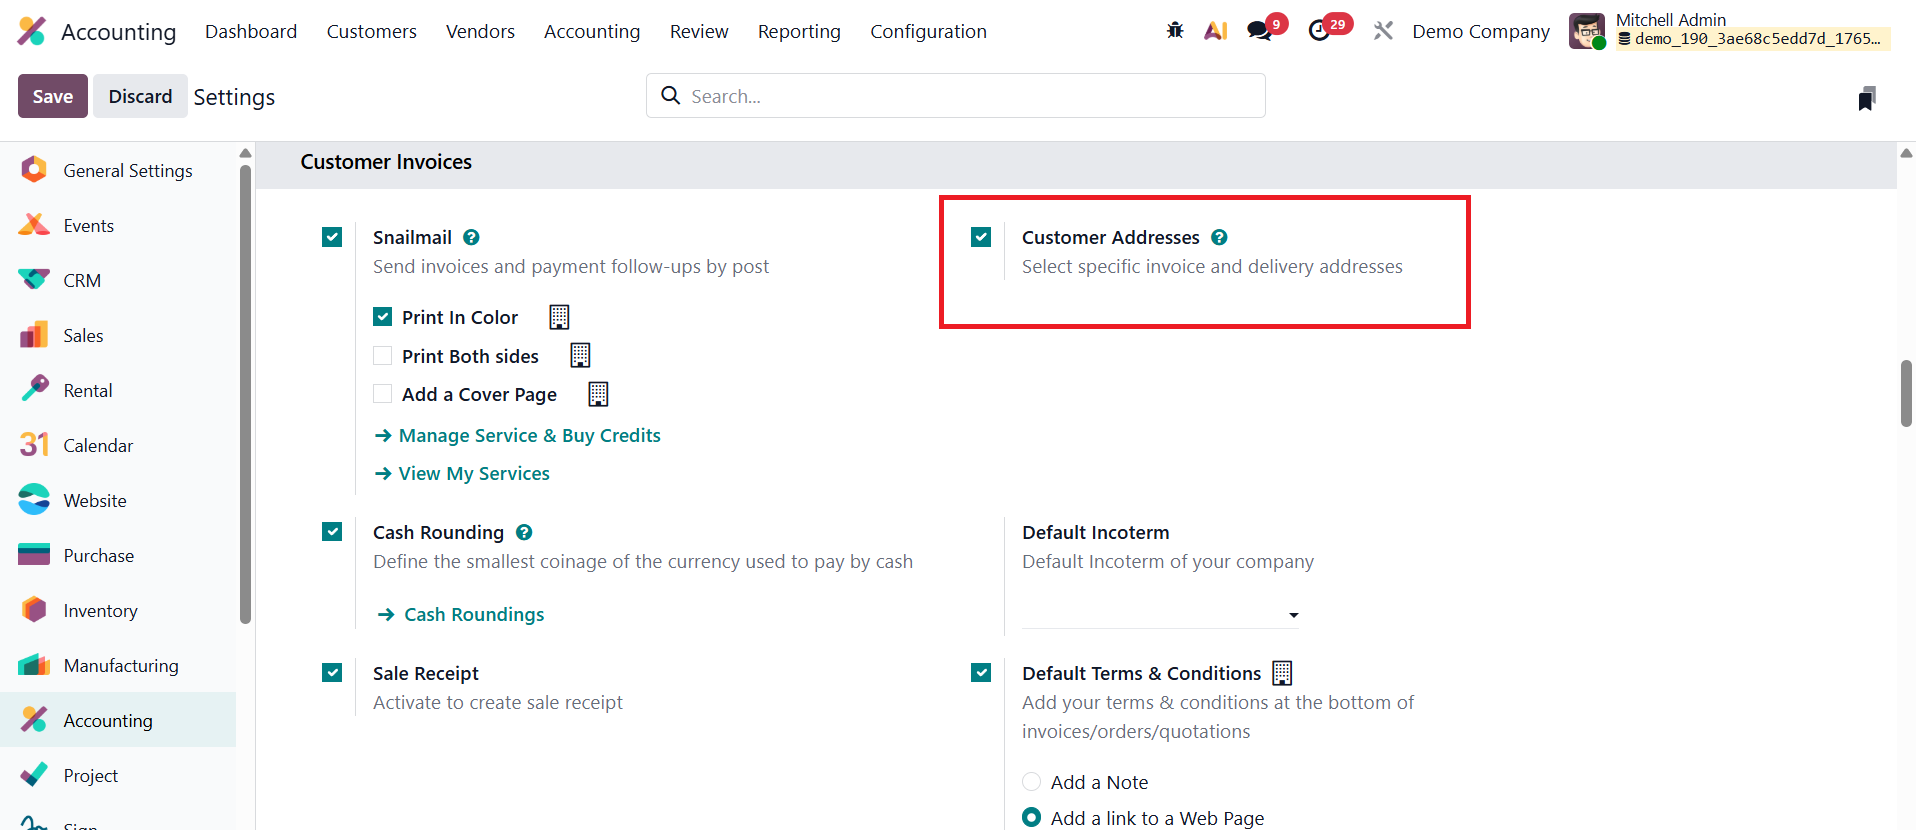
To set up invoice and delivery addresses for sales orders, go to Accounting ‣ Configuration ‣ Settings. Under the Customer Invoices section, enable Customer Addresses and click Save.
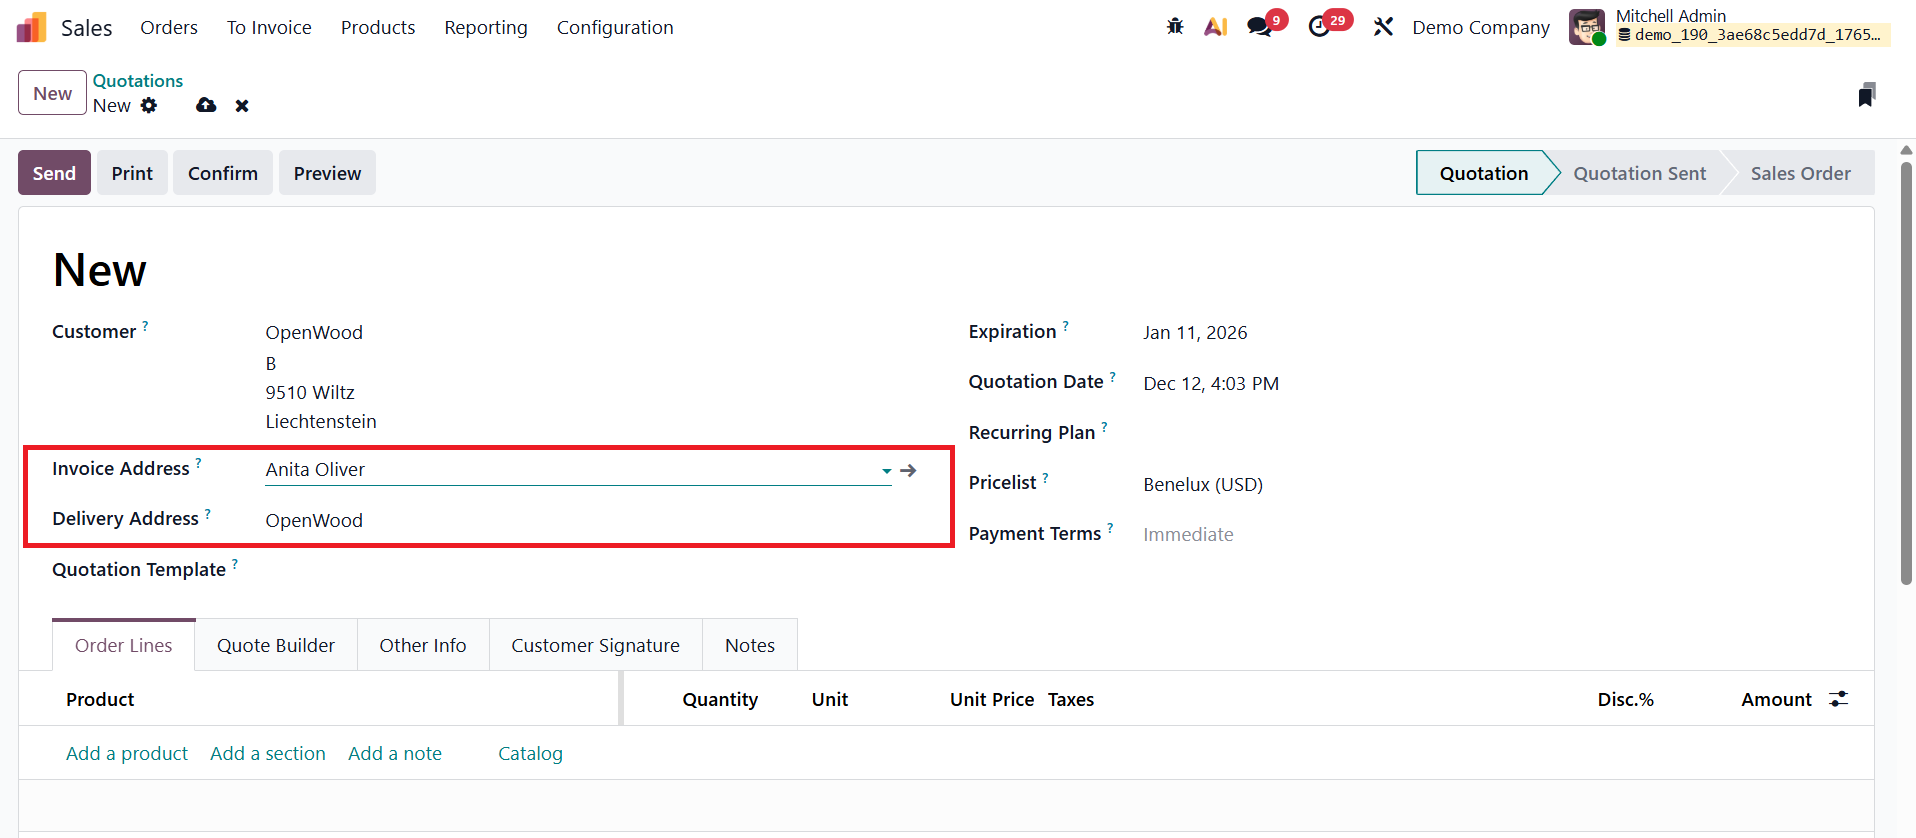
Once this feature is activated, quotations and sales orders will display two separate fields: Invoice Address and Delivery Address. If a customer already has these addresses saved in their contact record, Odoo will fill them in automatically. However, you can always choose a different contact or address if needed.
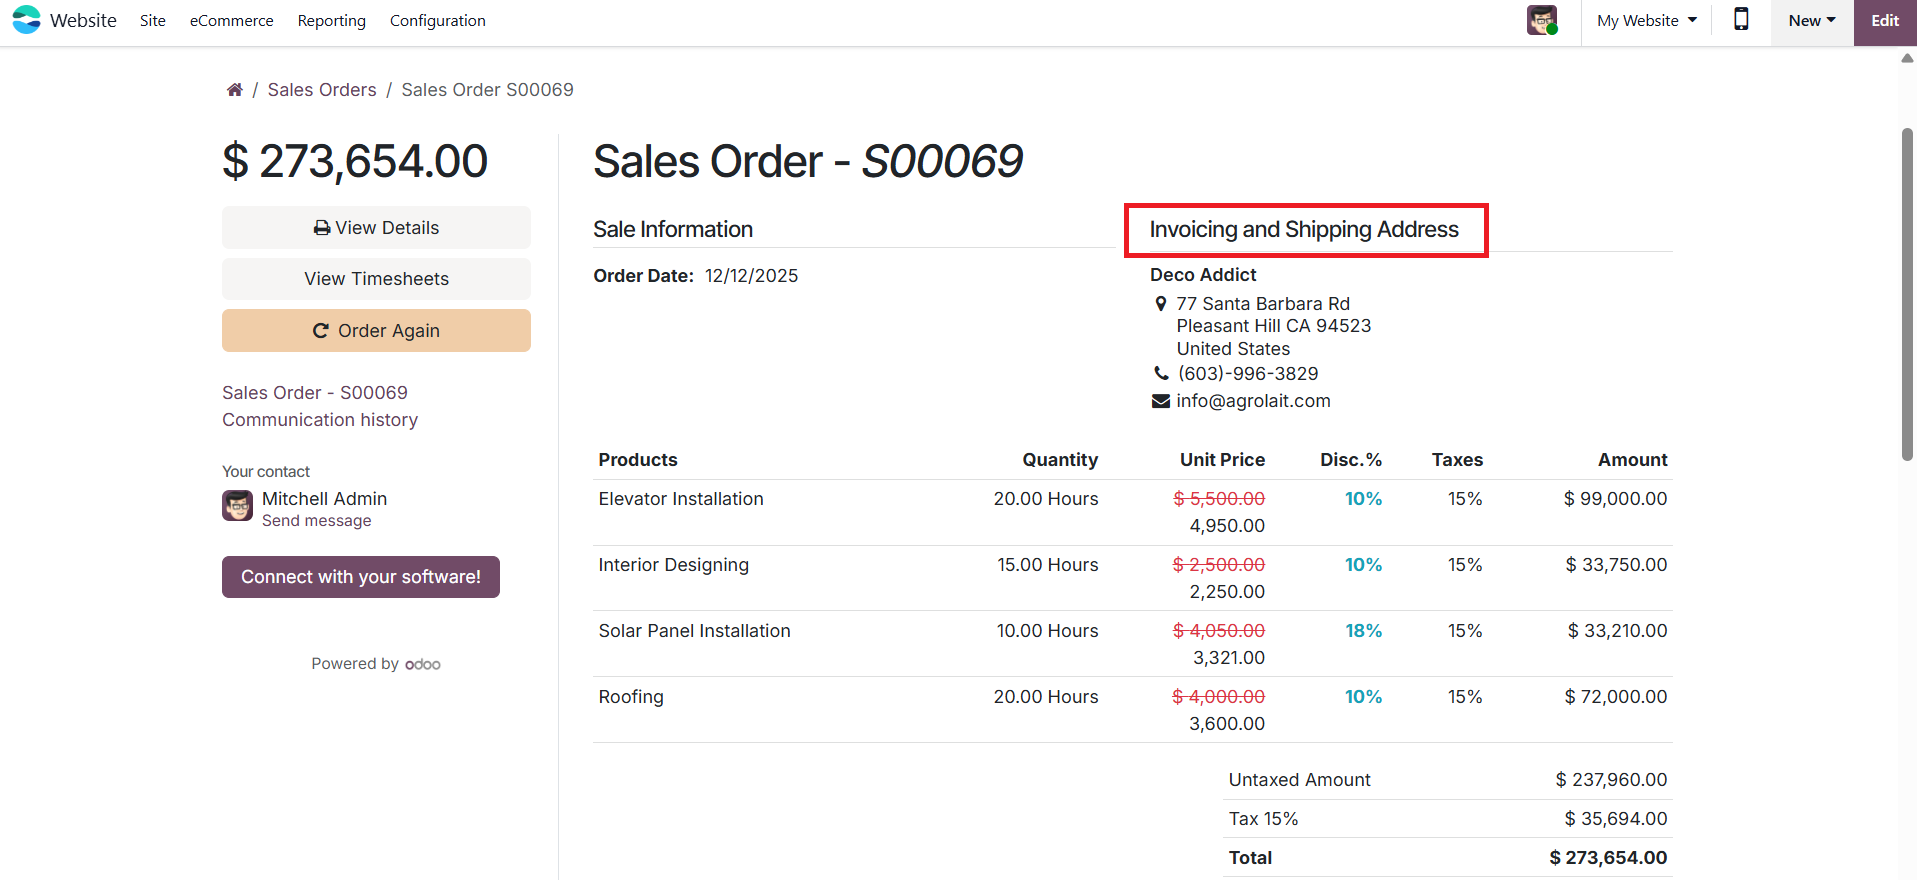
The address selected as the Delivery Address is used for delivery orders and appears on the delivery slip report. Invoice reports, by default, show both the shipping address and the billing address so customers can confirm that their products will be delivered to the correct location.
Email communication adjusts accordingly as well. Quotations and sales orders are sent to the customer’s main email address, while the invoice is sent to the email listed under the Invoice Address. This ensures each document reaches the right person without confusion.
Sale Receipt
A sales receipt in Odoo serves as an official acknowledgment that goods or services have been sold to a customer and payment has been received. It plays an important role in revenue recognition, day-to-day accounting, and customer service, especially for cash or immediate payment transactions where a full invoice workflow may not be required.
To configure sales receipts in Odoo Accounting, go to the Accounting module and open the Settings page. Under the Customer Invoices section, enable the Sales Receipt option and save the changes.
Once this feature is activated, Odoo adds a new Receipts boolean field that can be selected while creating accounting documents.

This option becomes available in the invoice submenu under the Customer menu as well as in the bills submenu under the Vendor menu, allowing users to easily mark a document as a receipt instead of a standard invoice or bill. By using sales receipts, businesses can simplify their accounting process for immediate sales while still maintaining accurate financial records in Odoo.
Sales Credit Limit
In Odoo 19 Accounting, the Sales Credit Limit feature offers businesses an effective way to manage customer credit exposure by monitoring receivables and controlling new sales transactions based on predefined financial thresholds. This functionality helps organizations minimize credit risk and maintain healthy cash flow by ensuring that customers do not exceed their permitted credit limits.
The feature can be activated by navigating to Accounting → Configuration → Settings, and under the Customer Invoices section, enabling the Sales Credit Limit option.
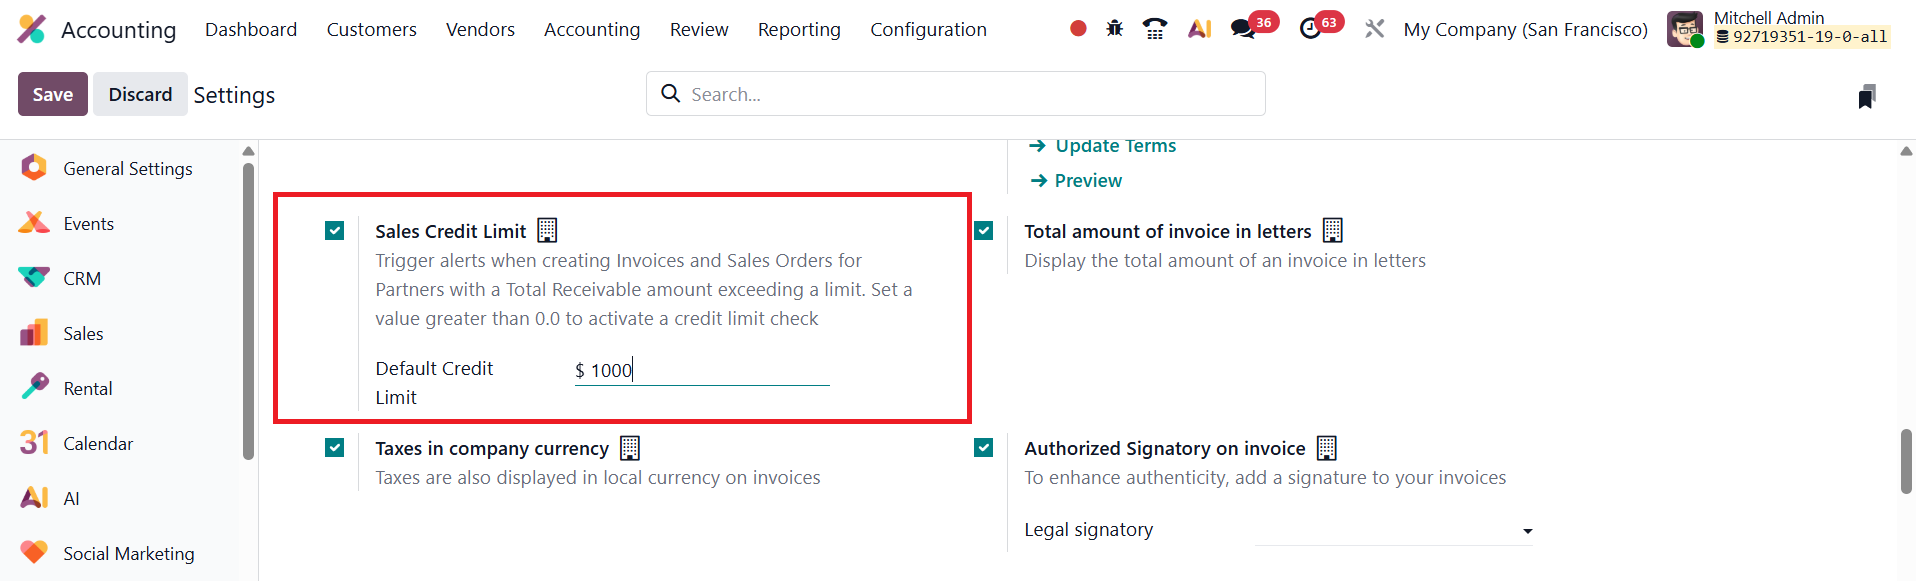
Once enabled, a field appears allowing users to define a default credit limit applicable to all customers. For example, if the limit is set to $1000, Odoo automatically tracks each customer’s outstanding receivables and issues alerts when their total due amount exceeds this threshold.
Odoo 19 also provides flexibility to define individual credit limits for specific customers. To configure this, navigate to Accounting → Customers, select a customer record, and open the Accounting tab in the customer form.
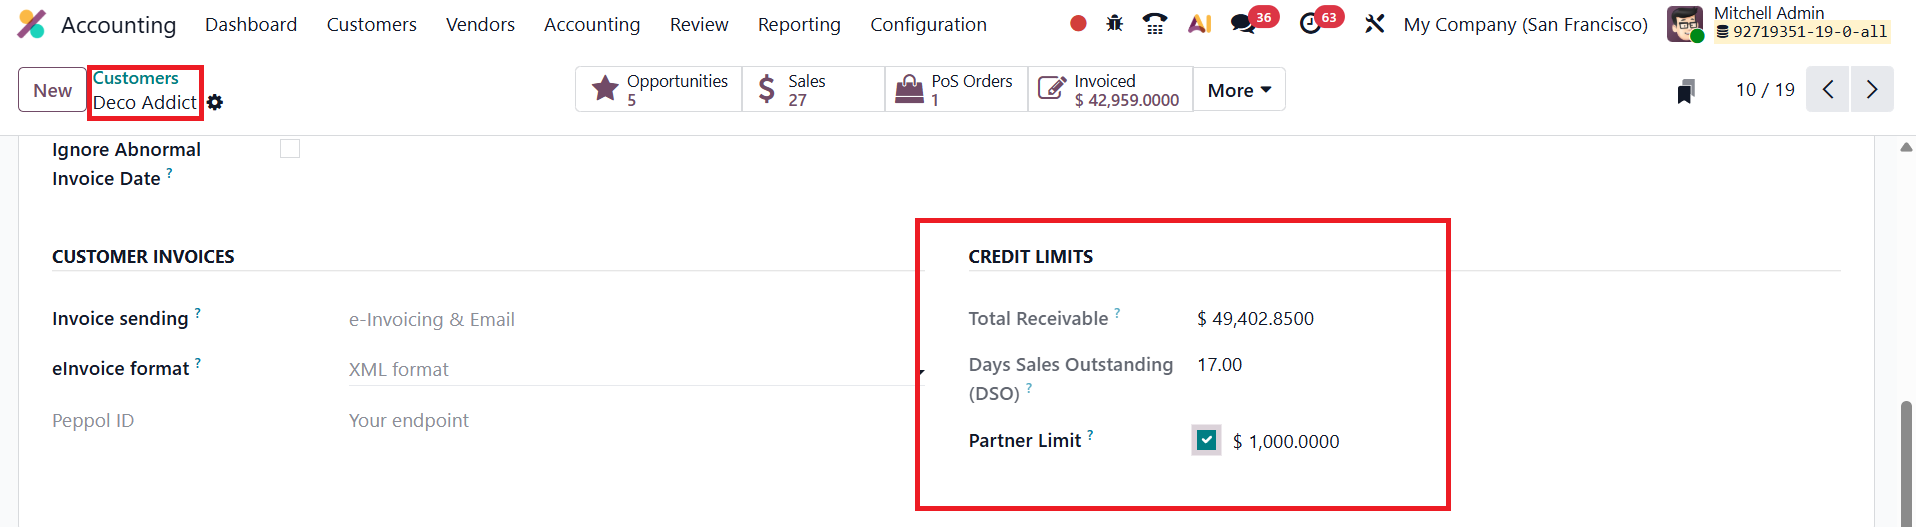
Enable the Partner Limit option and specify a custom credit limit for that customer. The customer’s current outstanding balance is displayed in the Total Receivable field, offering real-time visibility into their credit position.
When a user attempts to create or confirm a sales order or customer invoice for a customer whose balance surpasses the set limit, Odoo displays an on-screen warning message. This notification highlights that the credit limit has been exceeded and shows the total receivable amount owed by the customer.

This prompt allows sales and accounting teams to take appropriate action, either reviewing the customer’s payment history, requesting advance payment, or postponing further sales until previous dues are cleared.
Default Terms and Conditions
In Odoo 19 Accounting, the Default Terms and Conditions feature provides businesses with an efficient way to maintain consistency and professionalism across all customer documents by automatically including standard contractual information on invoices, quotations, and sales orders.
The feature can be configured by navigating to Accounting → Configuration → Settings, and under the Customer Invoices section, locating the Default Terms and Conditions option.
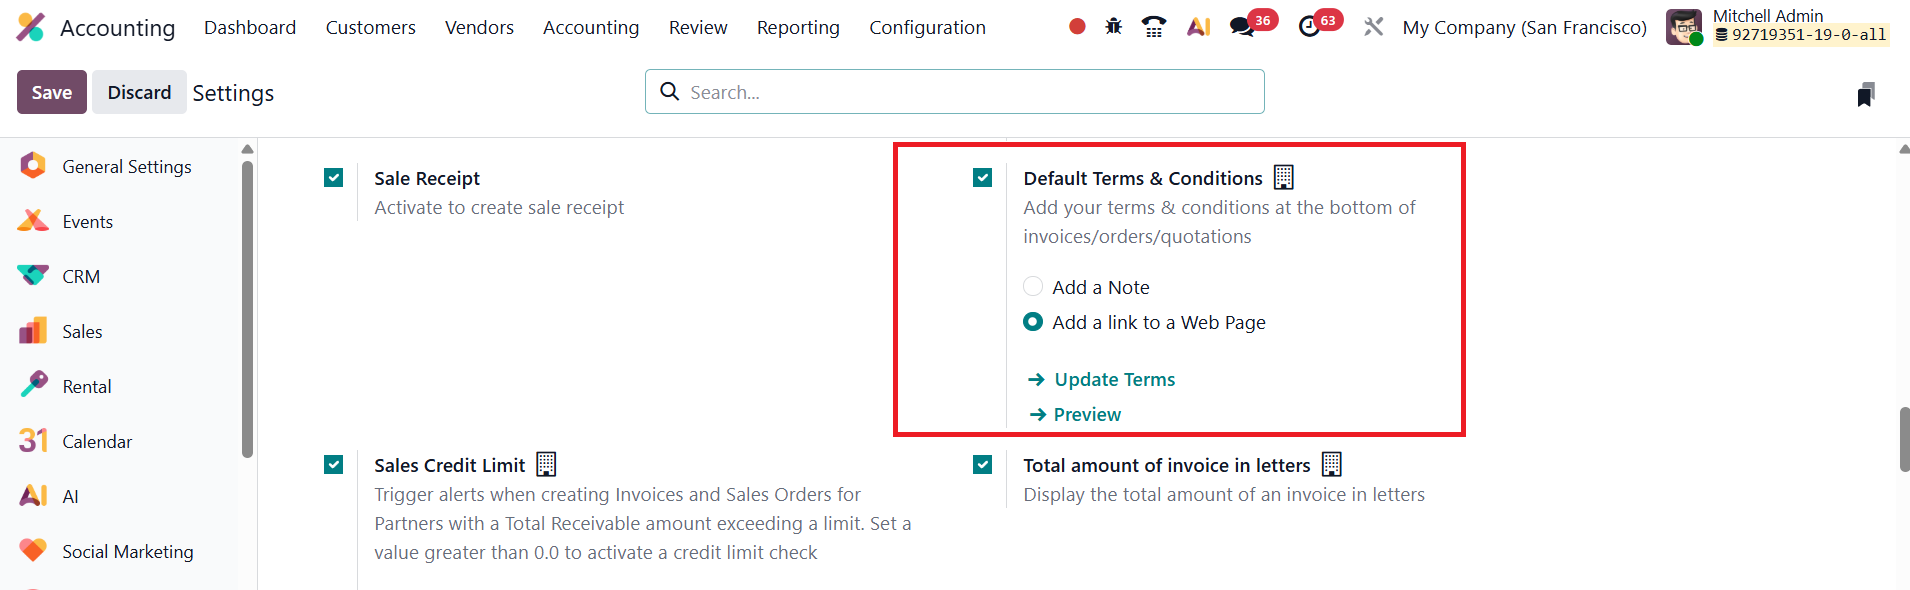
Once enabled, users can enter their company’s standard terms directly in the provided text box. These terms can include payment timelines, refund policies, delivery conditions, or any other legal or commercial clauses relevant to customer transactions. Odoo 19 offers flexibility in how the terms are displayed. Users can either input the terms as plain text, which will appear directly on the document, or insert a hyperlink that directs customers to a webpage containing the full version of the terms and conditions.
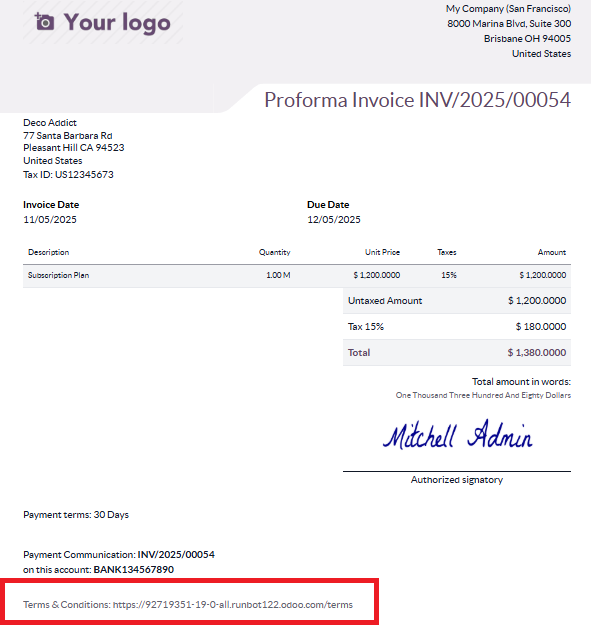
After configuration, Odoo automatically includes the defined terms and conditions at the bottom of all sales orders, quotations, and customer invoices generated within the system. This automation not only ensures uniformity across all documents but also minimizes the risk of missing important legal details.
Total Amount of Invoice in Letters
In Odoo 19 Accounting, the Total Amount of Invoice in Letters feature continues to be a valuable enhancement that adds both clarity and professionalism to financial documents.
This feature can be enabled by navigating to Accounting → Configuration → Settings, and under the Customer Invoices section, activating the Total Amount in Letters option.

Once enabled, Odoo automatically converts the total invoice amount from numerical form into written words and displays it directly on the invoice.
For example, an amount such as “₹10,250.00” will also appear as “Ten Thousand Two Hundred Fifty Rupees Only.”
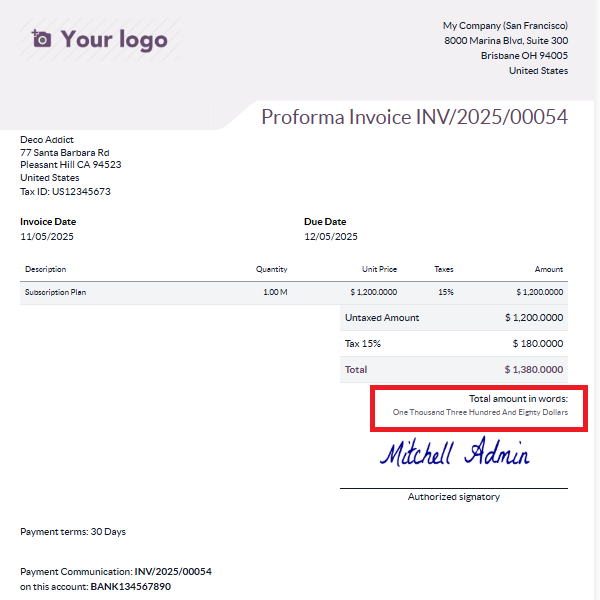
This functionality is particularly useful in formal, legal, and banking contexts where invoices, contracts, or payment documents require the amount to be stated in words to prevent discrepancies or fraud.
Taxes in Company Currency
In Odoo 19 Accounting, the enhanced Taxes in Company Currency feature provides businesses with greater transparency and consistency when handling multi-currency transactions. This functionality ensures that all tax amounts are displayed in the company’s base currency, regardless of the transaction currency, making financial reporting and tax reconciliation more accurate and straightforward, particularly for companies operating internationally.
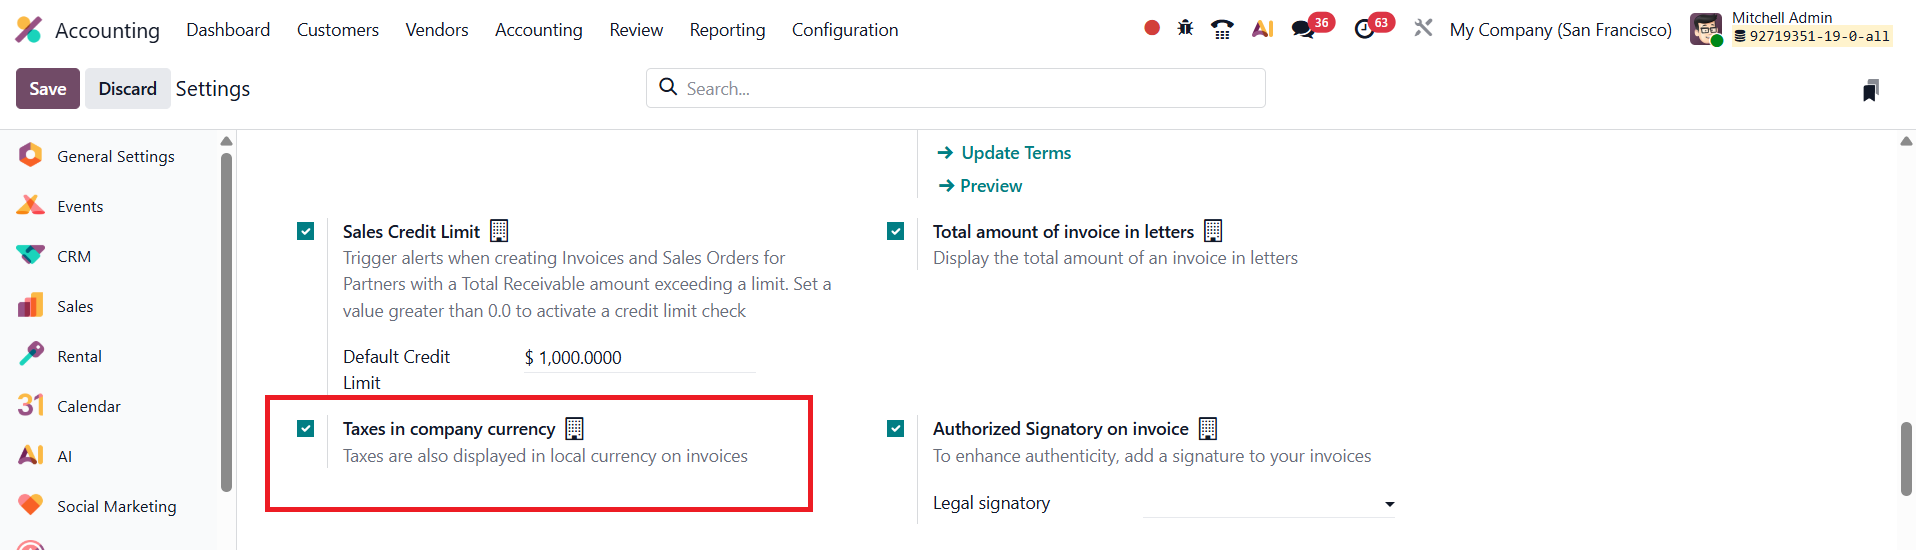
To enable this option, navigate to Accounting → Configuration → Settings, and under the Customer Invoices section, activate the Taxes in Company Currency feature.
Once enabled and saved, Odoo automatically converts and displays all tax amounts in the company’s base currency on invoices and related financial documents, even when the invoice itself is issued in a foreign currency.
For example, if an invoice is created in EUR for a company whose base currency is USD, Odoo will automatically calculate the equivalent tax amount in USD and display it clearly on the invoice under a dedicated Taxes (USD) section.
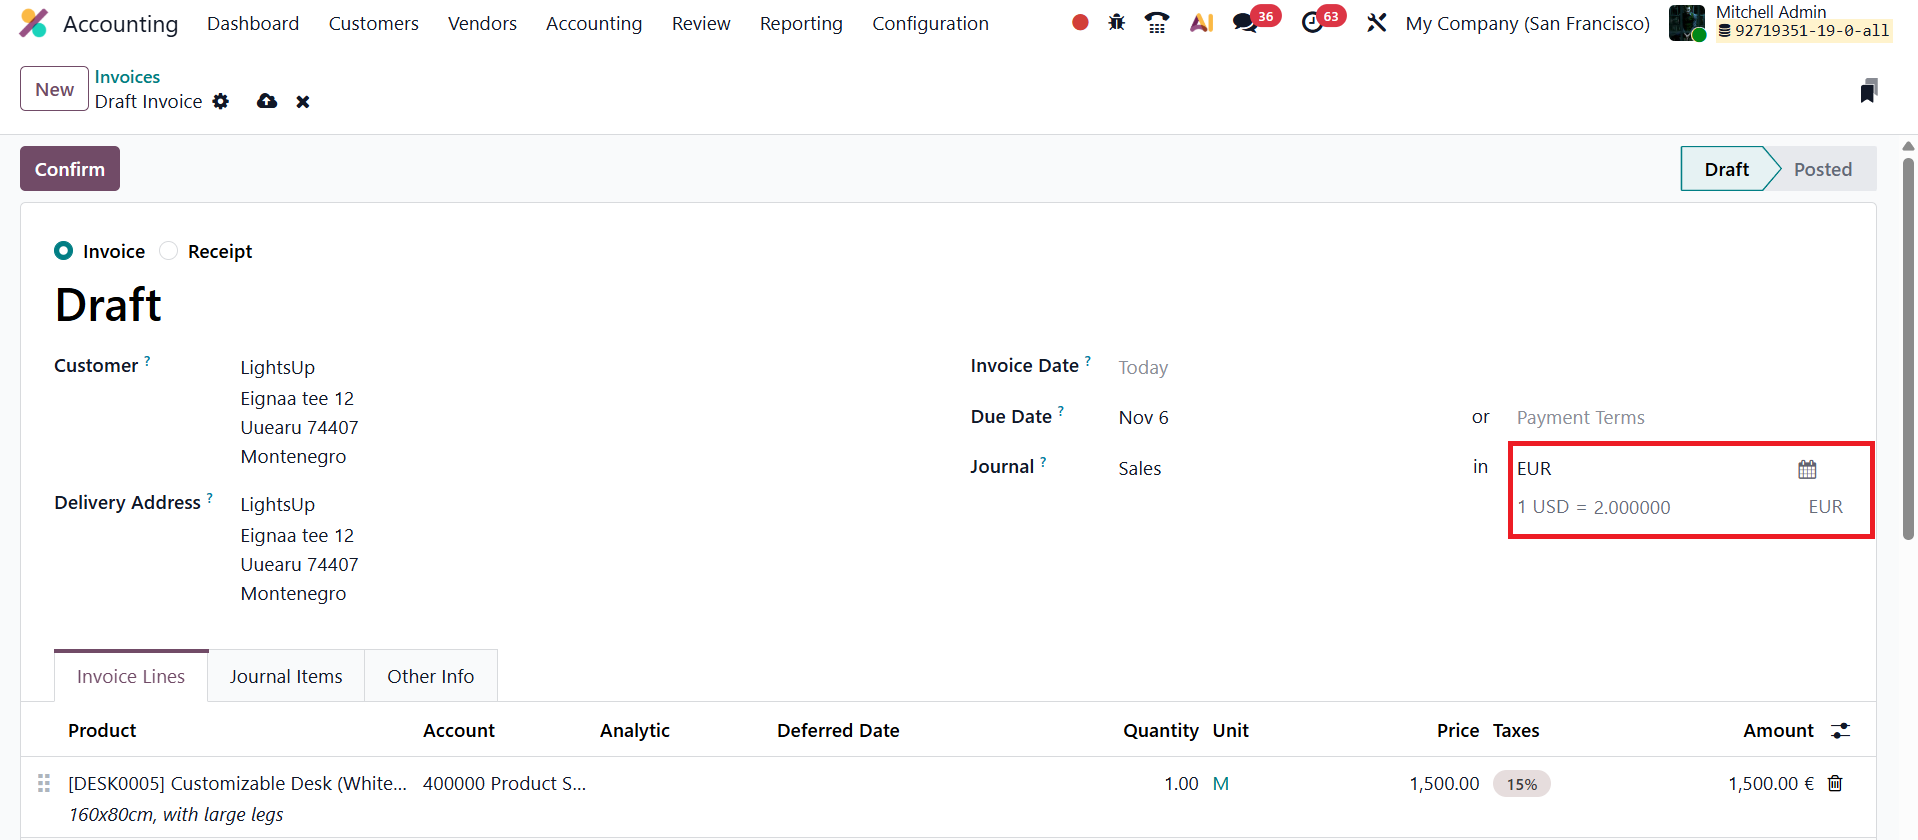
When the invoice is confirmed, users can print the document by clicking the Print button, and the generated invoice will show both the transaction currency and the tax values in the company’s base currency.
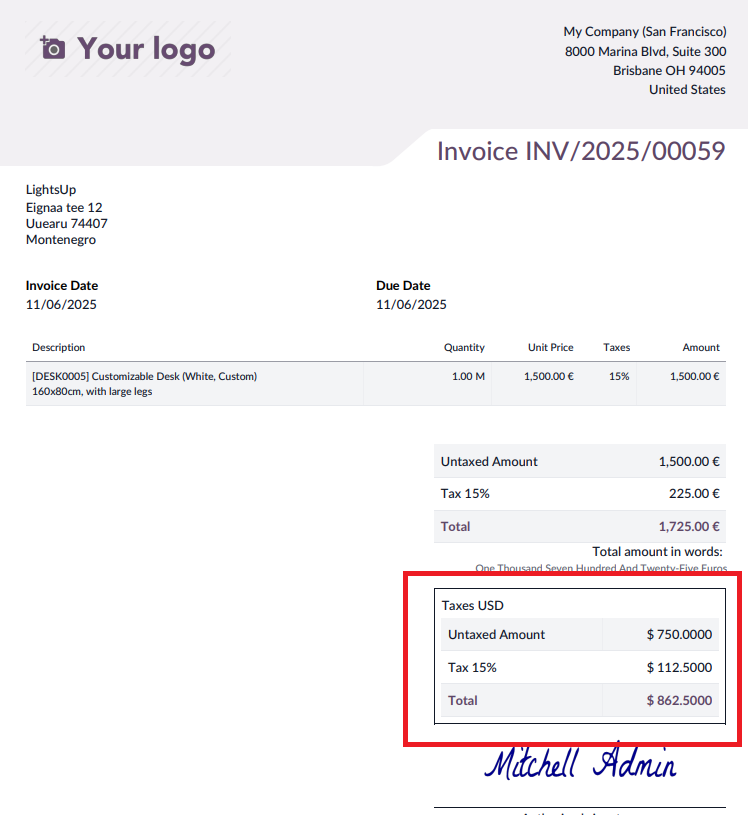
This improvement in Odoo 19 Accounting enhances financial clarity, minimizes currency conversion errors, and ensures tax compliance across different markets, making it an invaluable feature for global businesses managing complex, multi-currency operations.
Authorized Signatory on Invoice
In Odoo 19 Accounting, the Authorized Signatory on Invoice feature continues to play an important role in strengthening the authenticity, professionalism, and legal compliance of financial documents. This functionality allows businesses to include the name and signature of an authorized individual on all outgoing invoices, ensuring that each document carries official validation.
To configure this feature, navigate to Accounting → Configuration → Settings, and under the Customer Invoices section, enable the Authorized Signatory option.
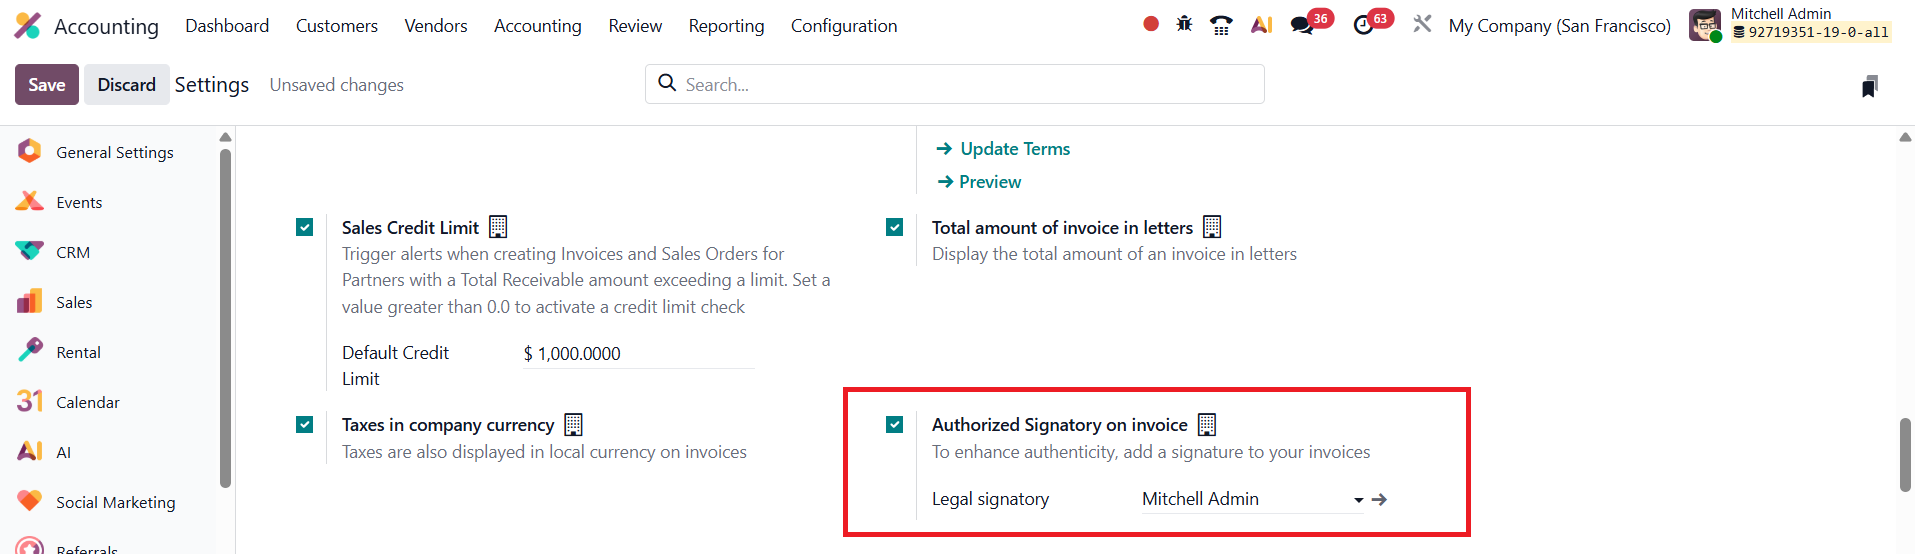
Once activated, a new field labeled Legal Signatory becomes available. Here, users can assign a specific employee or manager as the official signatory for company invoices.
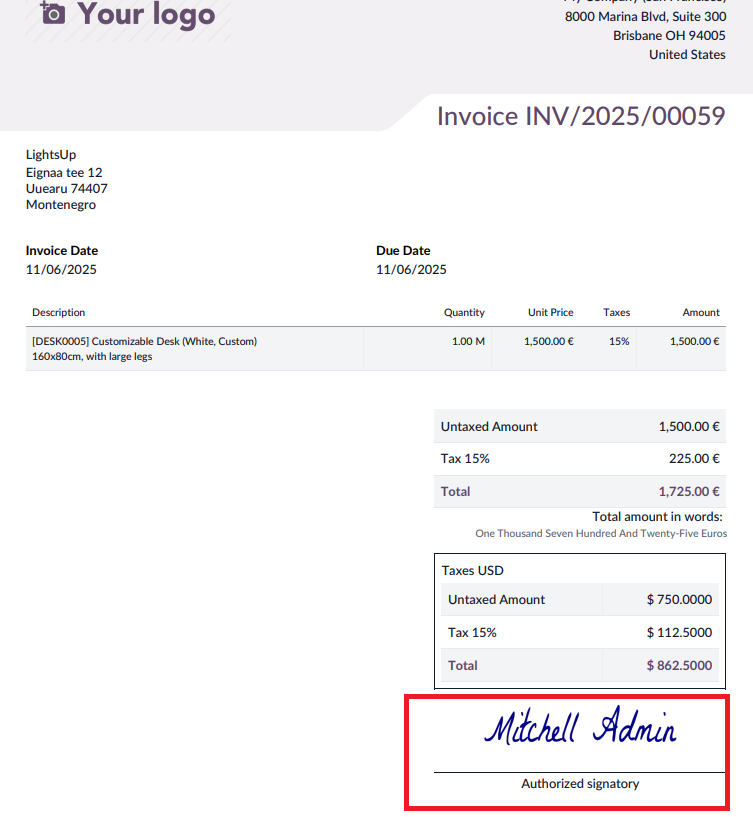
When a Legal Signatory is selected, their name, and digital signature, if one is configured in their user profile, will automatically appear on all customer invoices generated through the system. This integration ensures that each invoice carries a verified and traceable authorization, which is particularly important in organizations that follow structured approval hierarchies or must comply with regional legal and audit requirements.
Units of Measure & Packagings
In many business scenarios, handling products in different units of measure (UoM) becomes essential. For instance, a company may purchase goods from a country that follows the metric system and sell them in a market that uses the imperial system, making unit conversion unavoidable. Another common case arises when products are bought from suppliers in bulk or large packs and then sold to customers as individual units. To manage such situations efficiently, Odoo allows multiple units of measure to be defined and used for a single product.
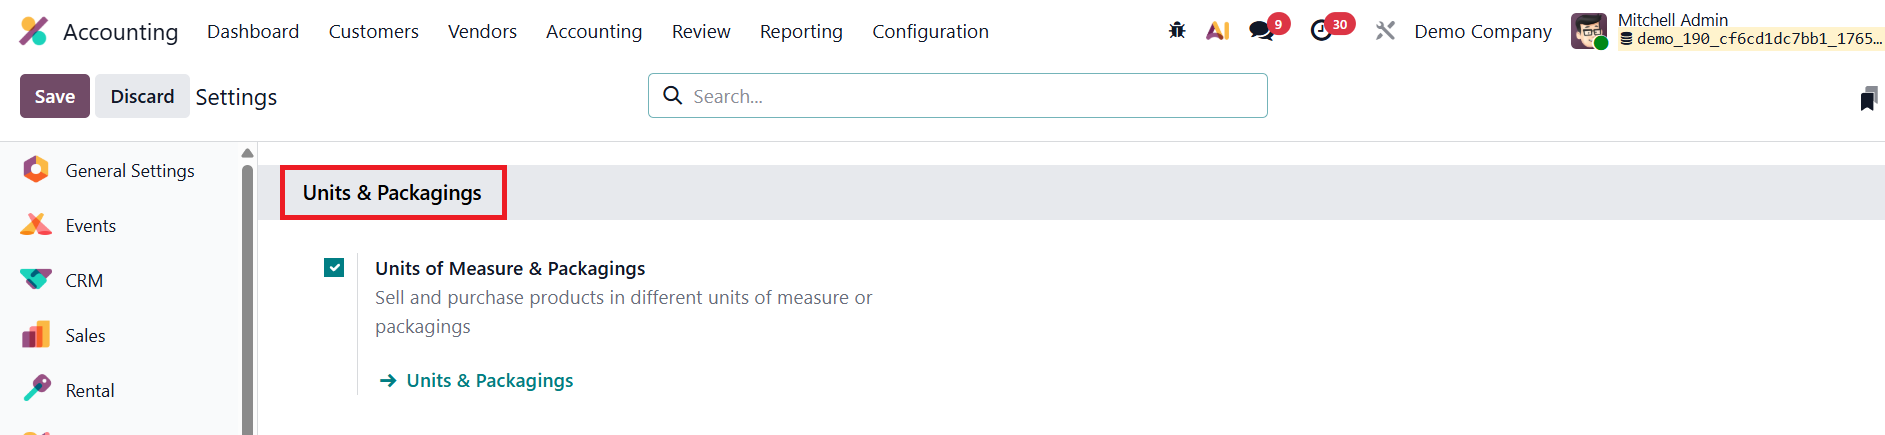
To enable this feature in Odoo, navigate to the Accounting app ‣ Configuration ‣ Settings and, under the Units & Packagings section, activate the Units of Measure & Packagings option. Click Save to apply the changes.
Once enabled, units of measure can be assigned at the product level. Go to Accounting app ‣ Customers ‣ Products, open the required product, and define the relevant units in the product form.
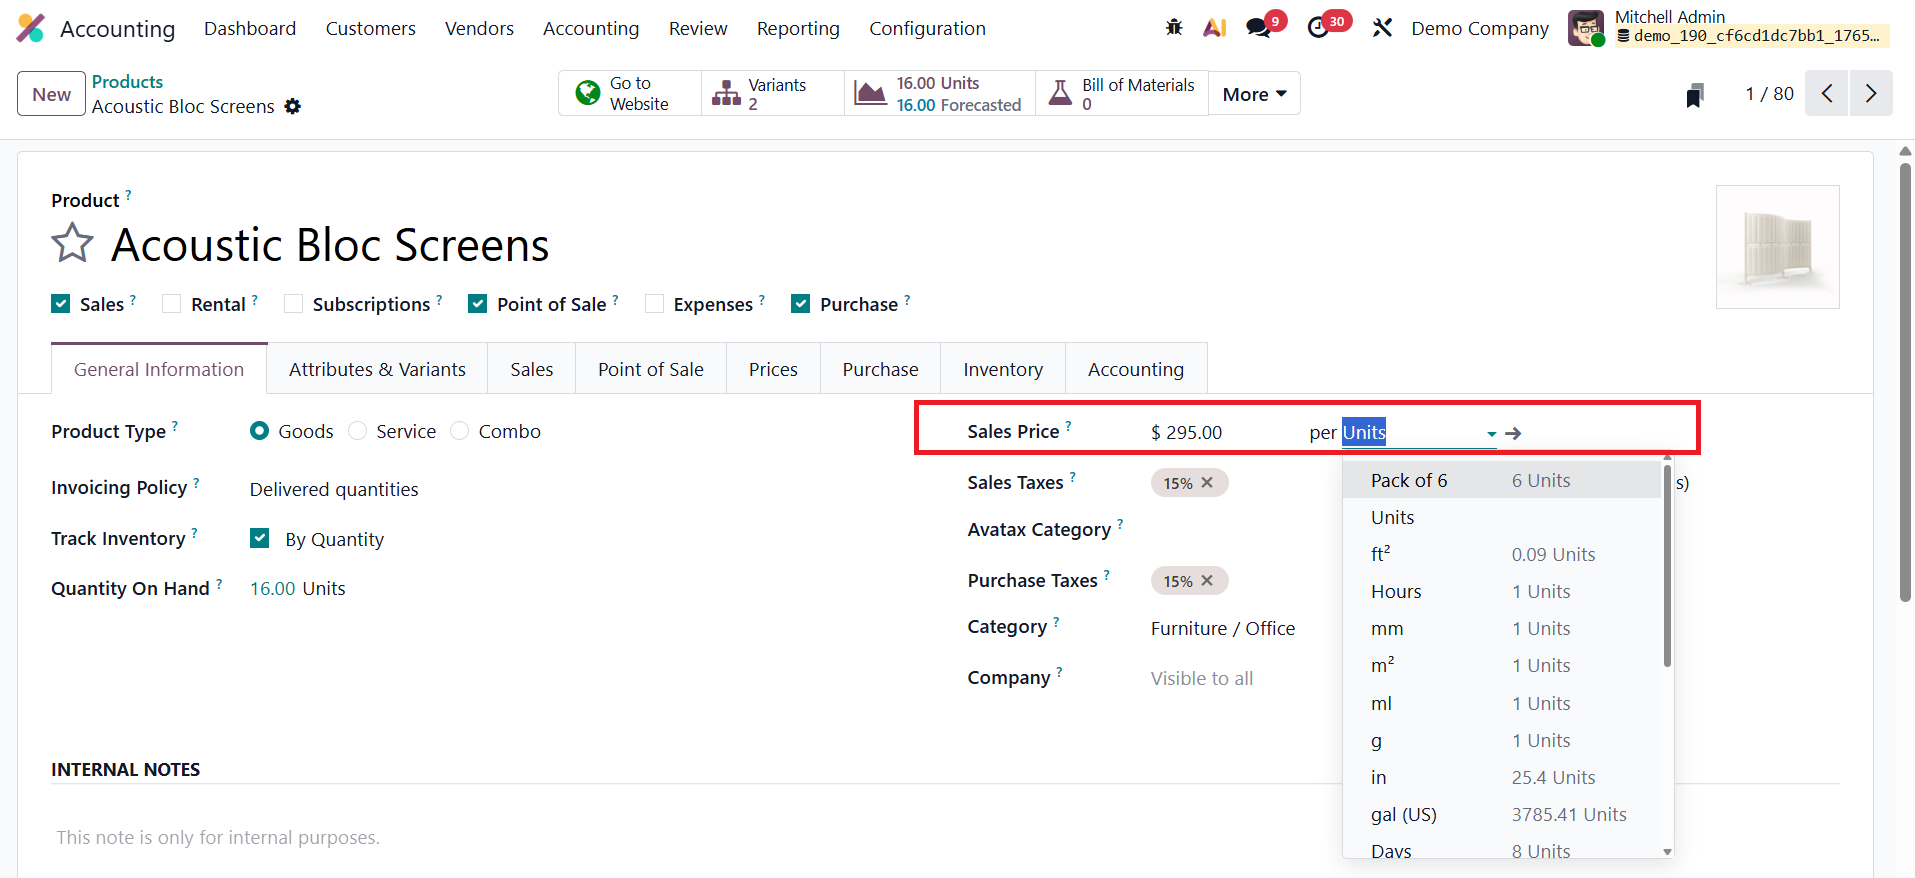
The unit in which the product is purchased is specified under the Purchase tab.
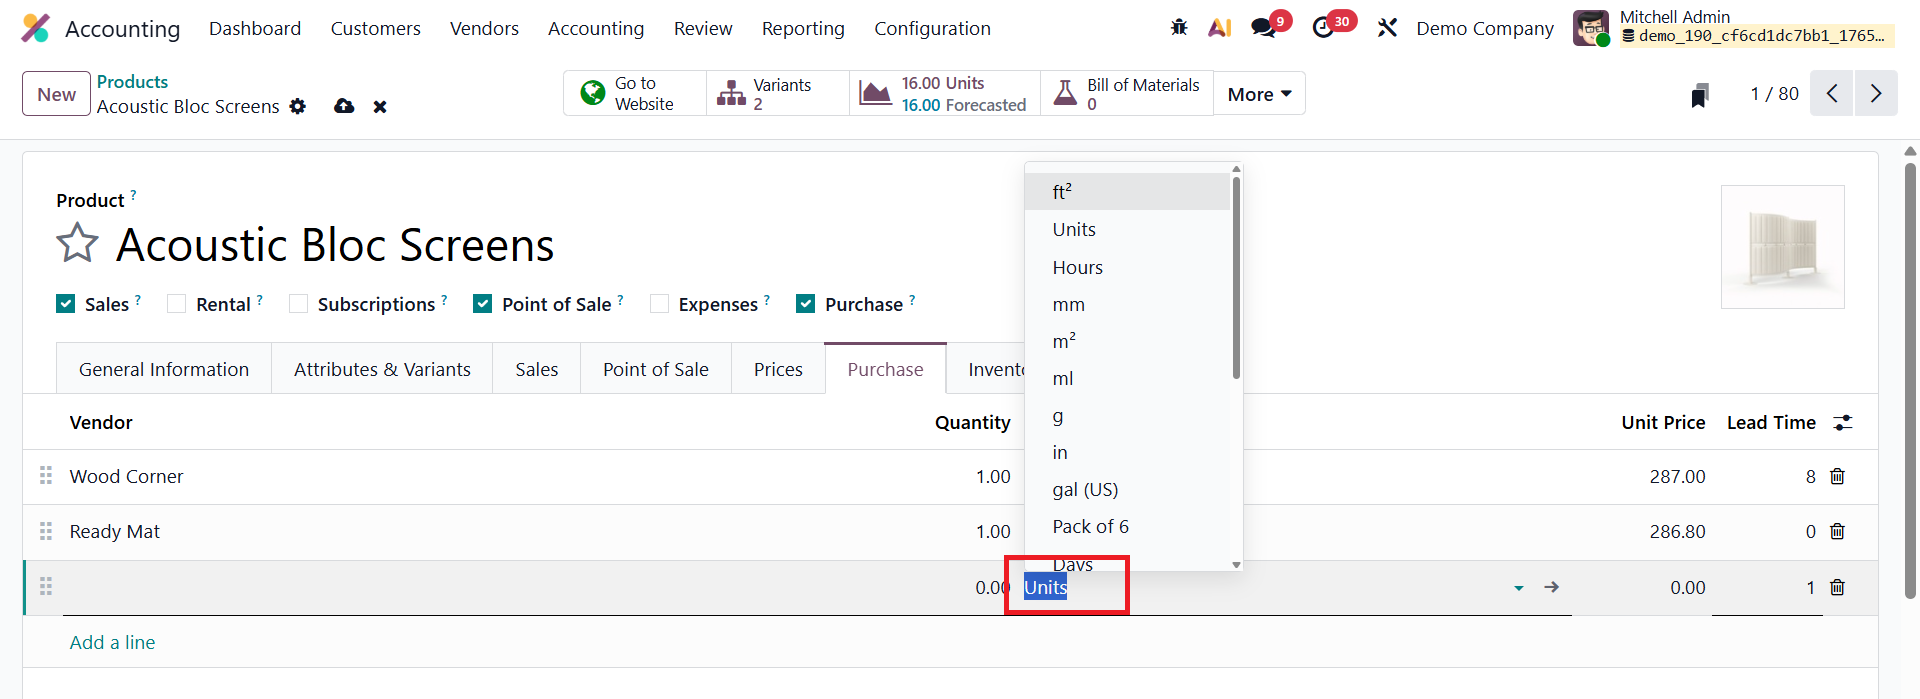
After configuring vendor price lists, purchase orders can be created using these purchase units. It is important to note that the purchase unit of measure must belong to the same UoM category as the product’s default unit, ensuring accurate conversions and consistent stock and accounting records.
In Odoo Accounting, packaging refers to disposable containers that hold multiple units of a single product, enabling businesses to manage and sell products in predefined quantities. Packagings can be created and managed directly from the product form.
To do this, go to Accounting app ‣ Customers ‣ Products and open the required product.
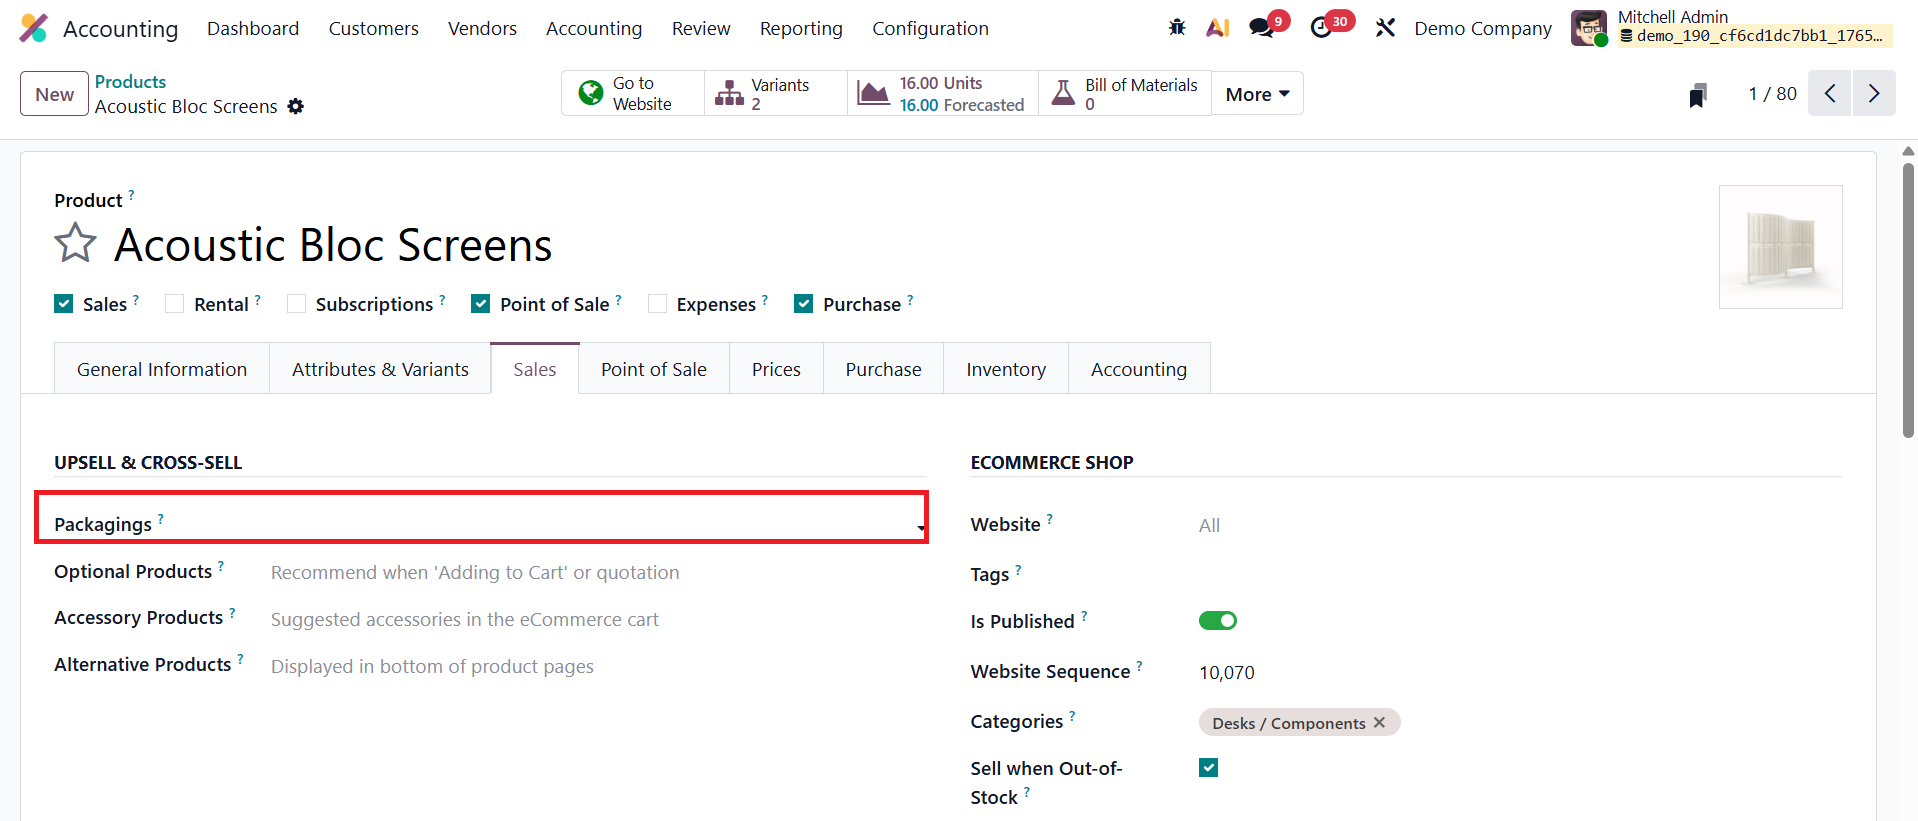
To define sales packages, navigate to the Sales tab of the product form and locate the Upsell & Cross-Sell section. Here, you can select existing packages or create new ones by clicking Create and Edit. When this option is selected, the Create Packagings window opens, allowing you to configure the packaging details.
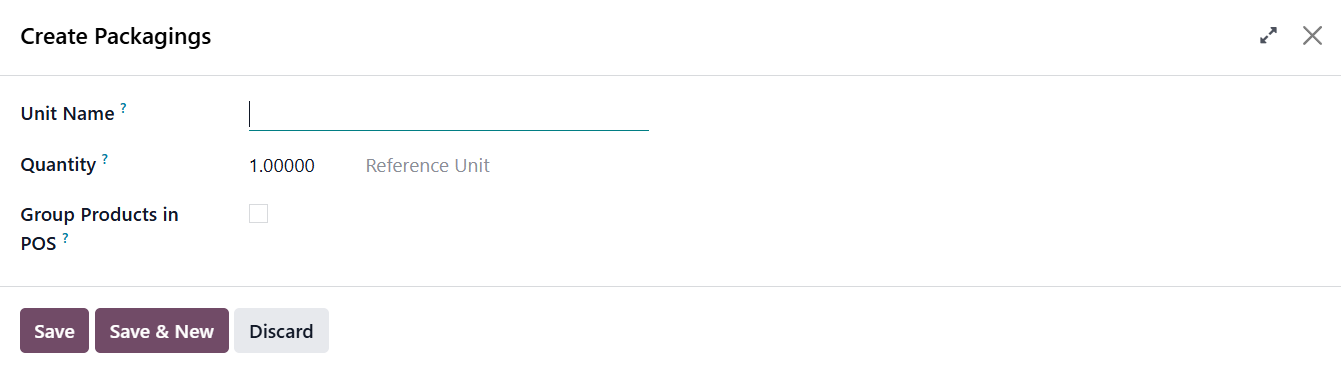
You must provide a Unit Name, which is the label that appears as a packaging option on sales or purchase orders, along with the Quantity, which specifies how many units of the product are included in the package. You can enable the Group Products in POS option to group products of this unit in point of sale orders.
Invoice Online Payment
In Odoo 19 Accounting, the Invoice Online Payment feature continues to enhance the customer payment experience by enabling clients to settle their invoices directly through the online portal. This feature streamlines the payment process, reduces manual follow-ups, and ensures faster cash flow for businesses.
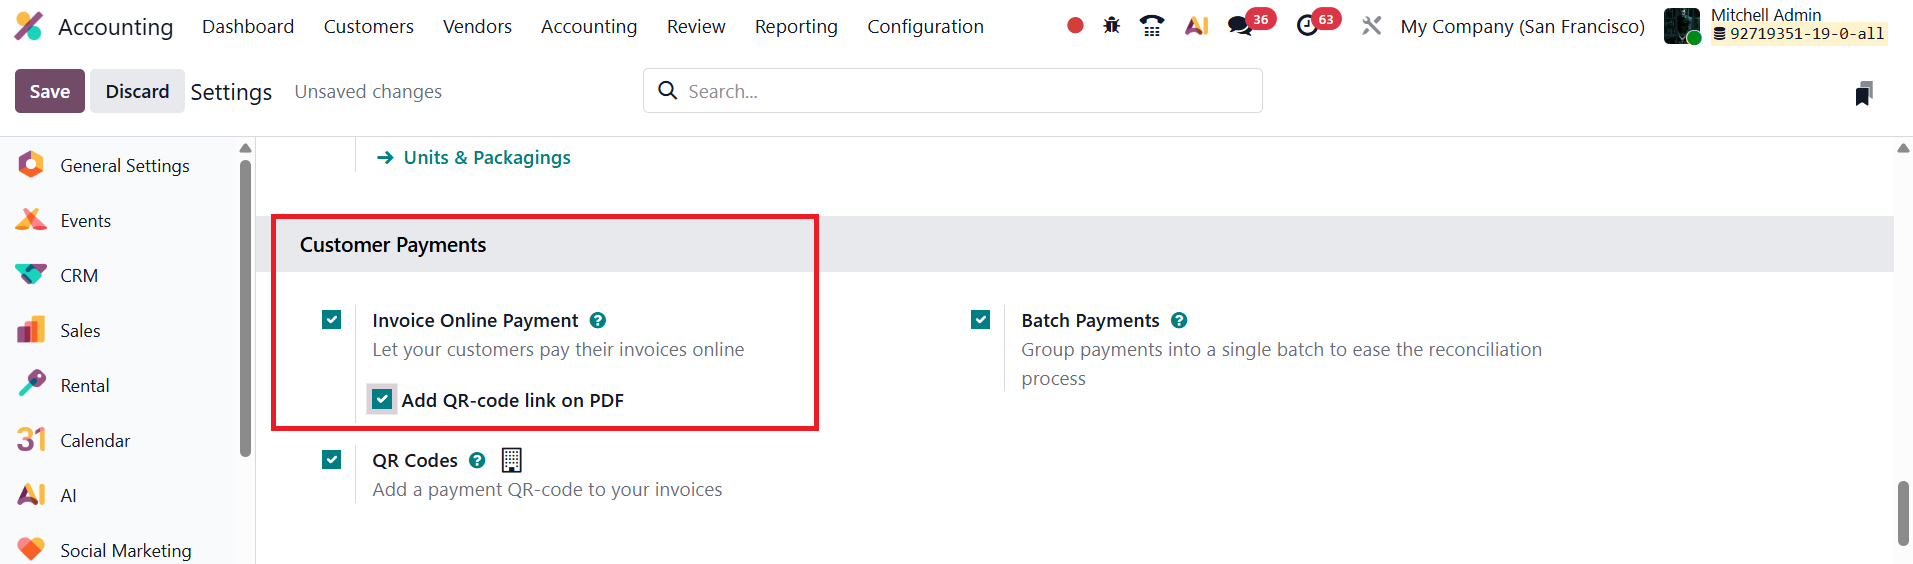
You can activate this functionality by navigating to Accounting → Configuration → Settings, and under the Customer Payments section, enable the Invoice Online Payment option.
Once activated, customers who receive their invoices through the portal will see a Pay Now button displayed on the invoice page.
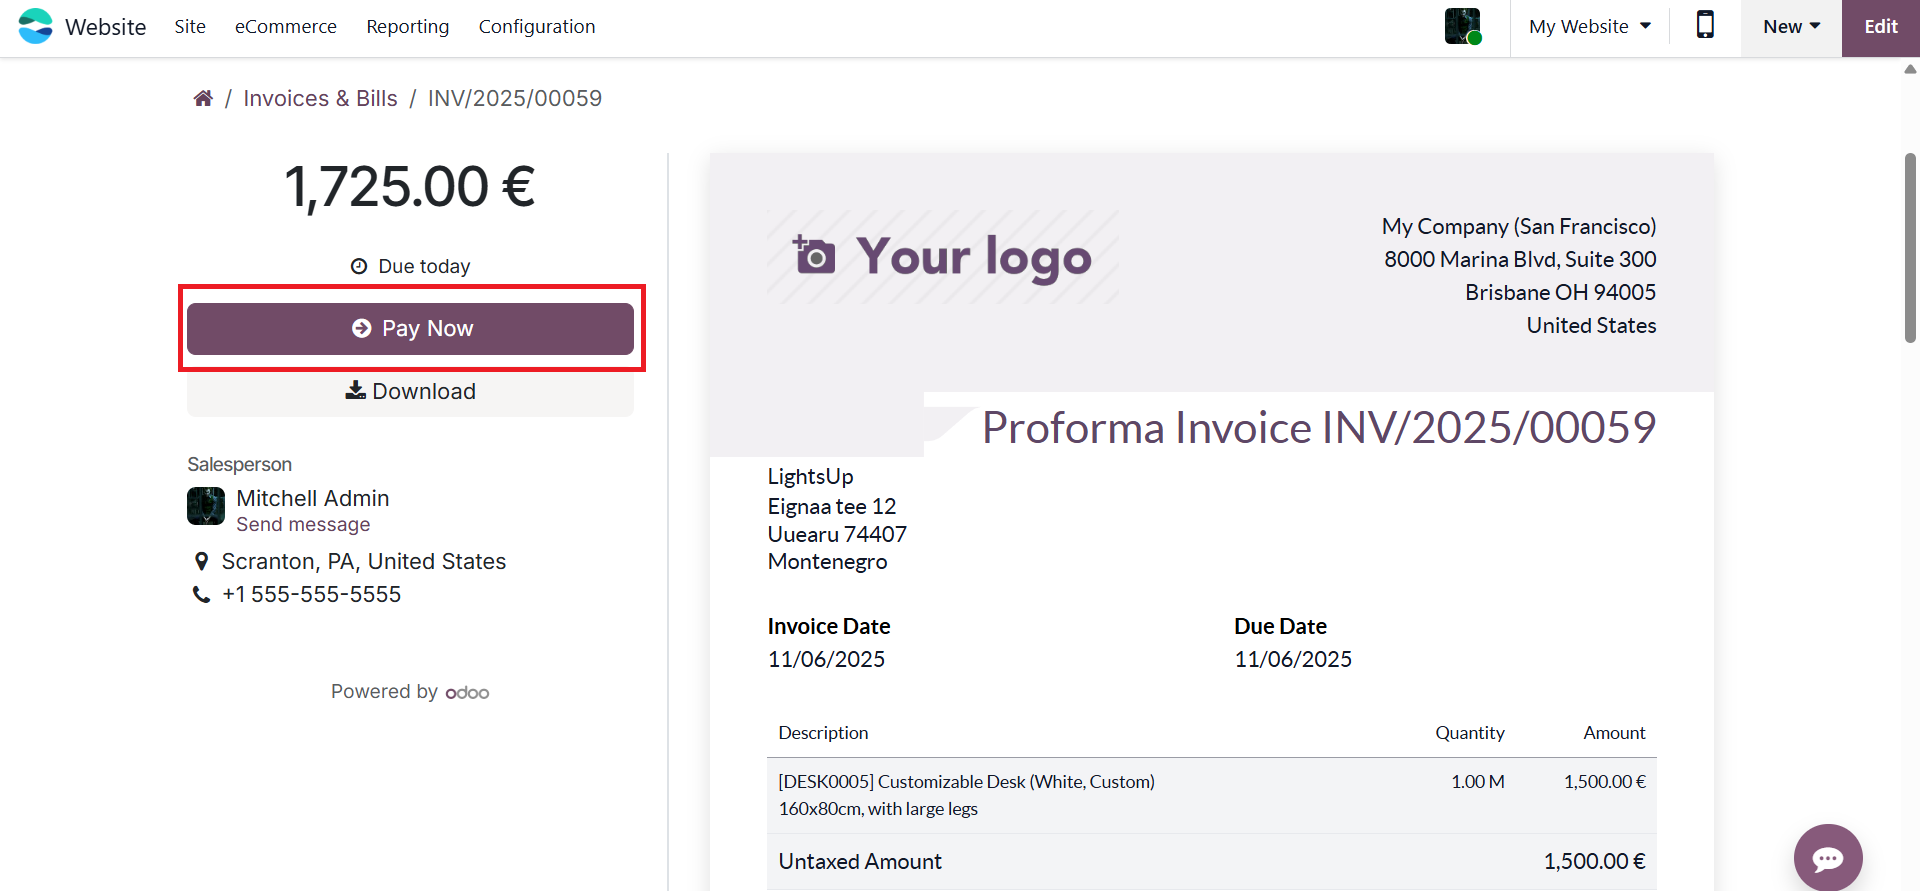
When customers click Pay Now, they are directed to a secure payment interface where they can complete their transactions using the available payment acquirers, such as Stripe, PayPal, or other integrated gateways supported by Odoo.
Add QR-code link on PDF option under the Invoice Online Payment feature allows you to include a QR code directly on the PDF version of customer invoices.
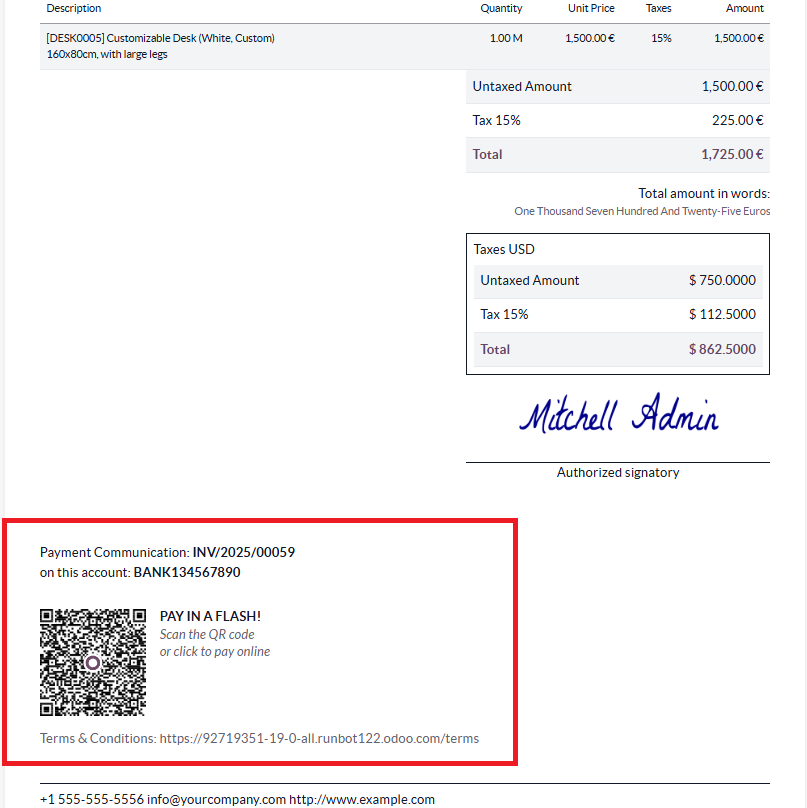
When this option is enabled, Odoo automatically generates a unique QR code for each invoice. This QR code contains a direct payment link to the online payment portal associated with that invoice.
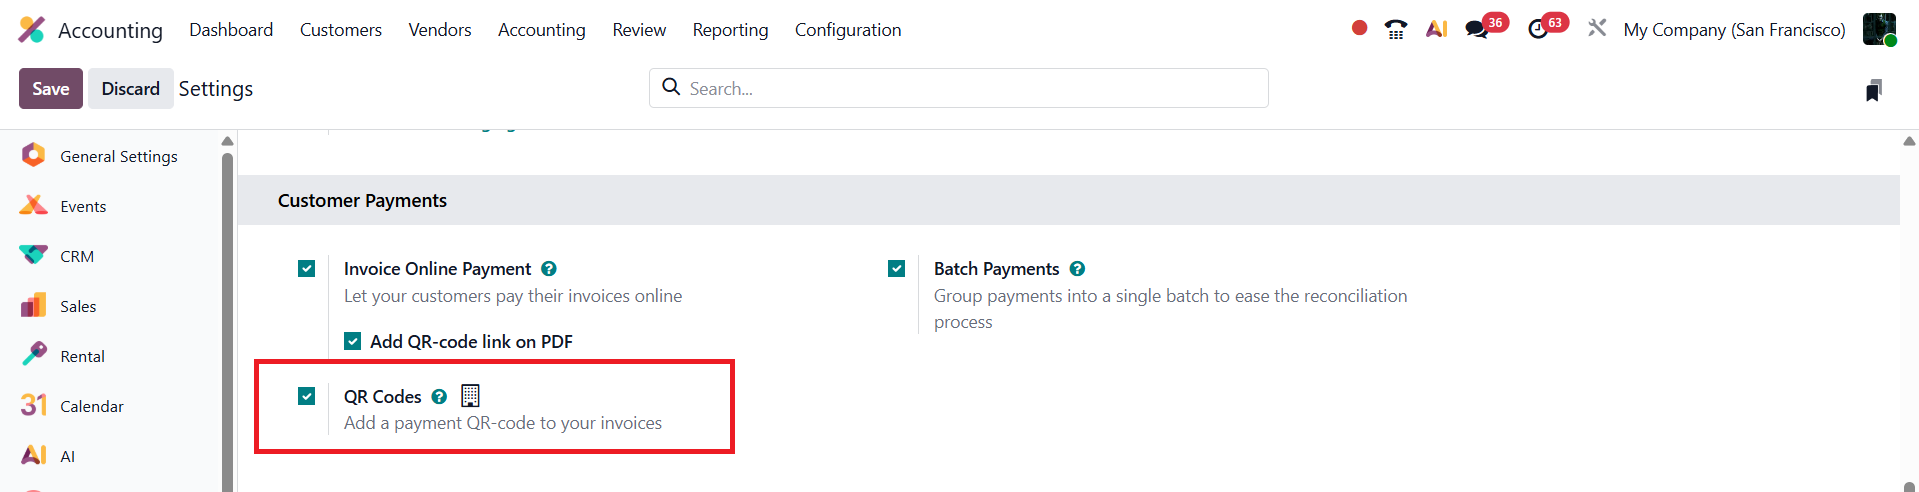
In Odoo 19 Accounting, the Payment QR Code feature further enhances the e-invoicing experience by enabling businesses to integrate instant payment options directly within their invoices. To configure this feature, navigate to the Accounting module, open the Settings menu under Configuration, and activate the QR Codes option located in the Customer Payments section. After saving the changes, Odoo allows you to define the type of QR code you want to use for payments.
When creating or editing an invoice, go to the Other Info tab, where you’ll find the Payment QR-Code field.
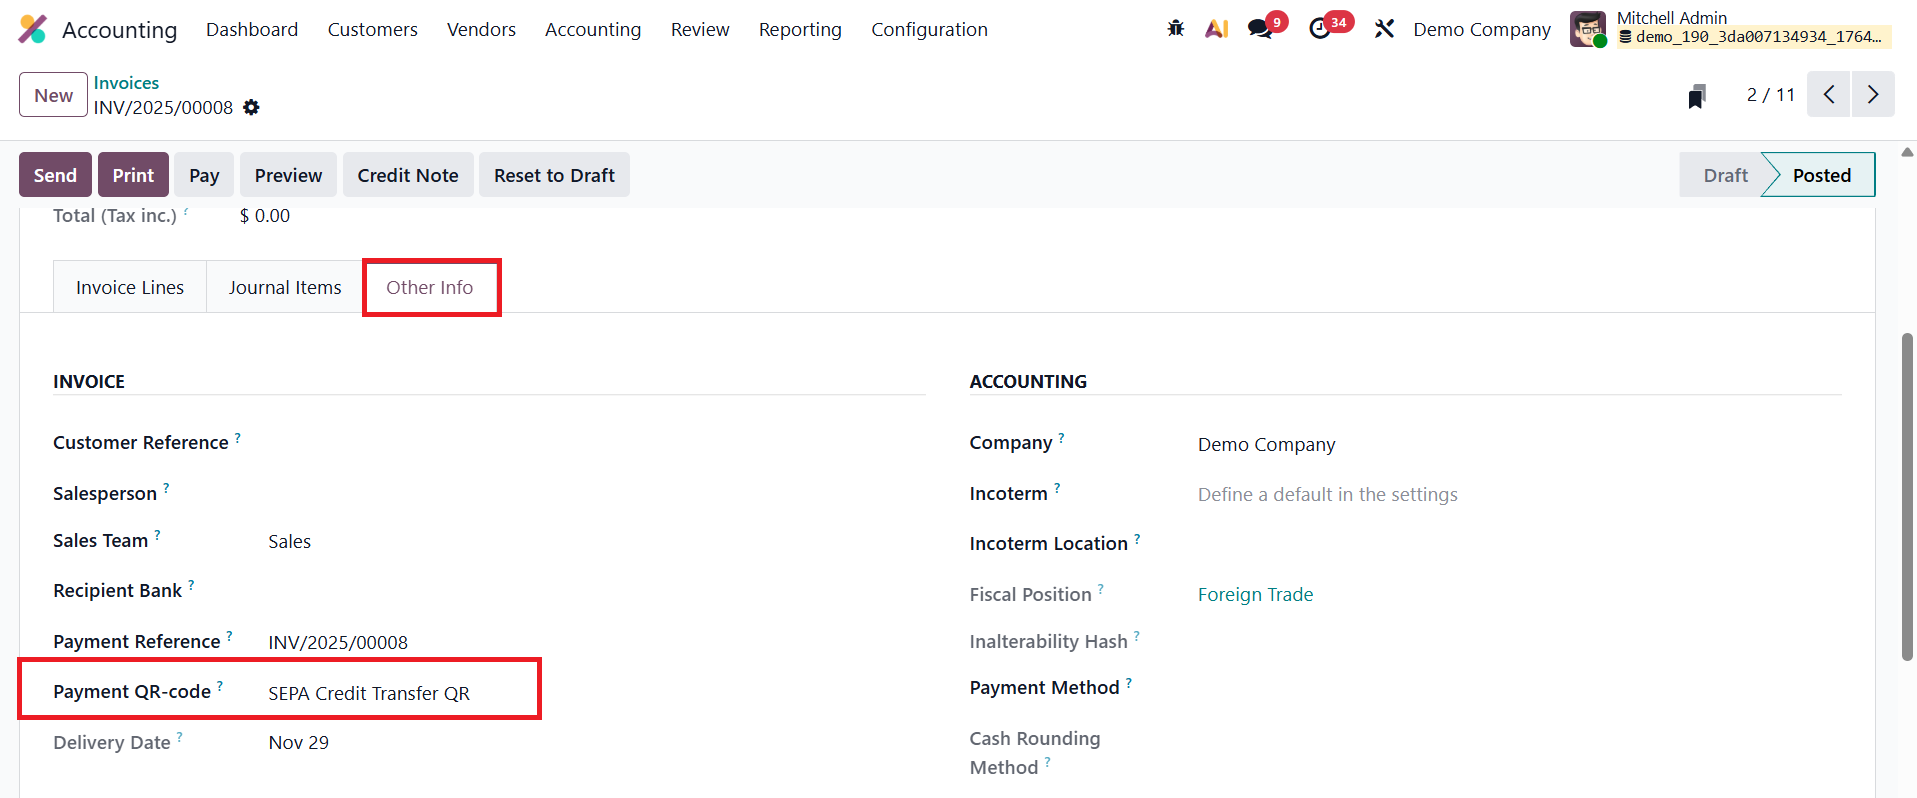
From here, you can select the desired QR code type supported by your payment acquirer. Once the invoice is filled out and confirmed, click Preview to see how the QR code appears on the final invoice document.
Auto-Validate Bills
In Odoo 19 Accounting, the Auto-Validate Bills feature enhances billing efficiency by allowing vendor bills to be automatically validated upon import, provided no manual edits are made. This intelligent automation helps businesses minimize repetitive tasks and streamline their vendor bill management process.
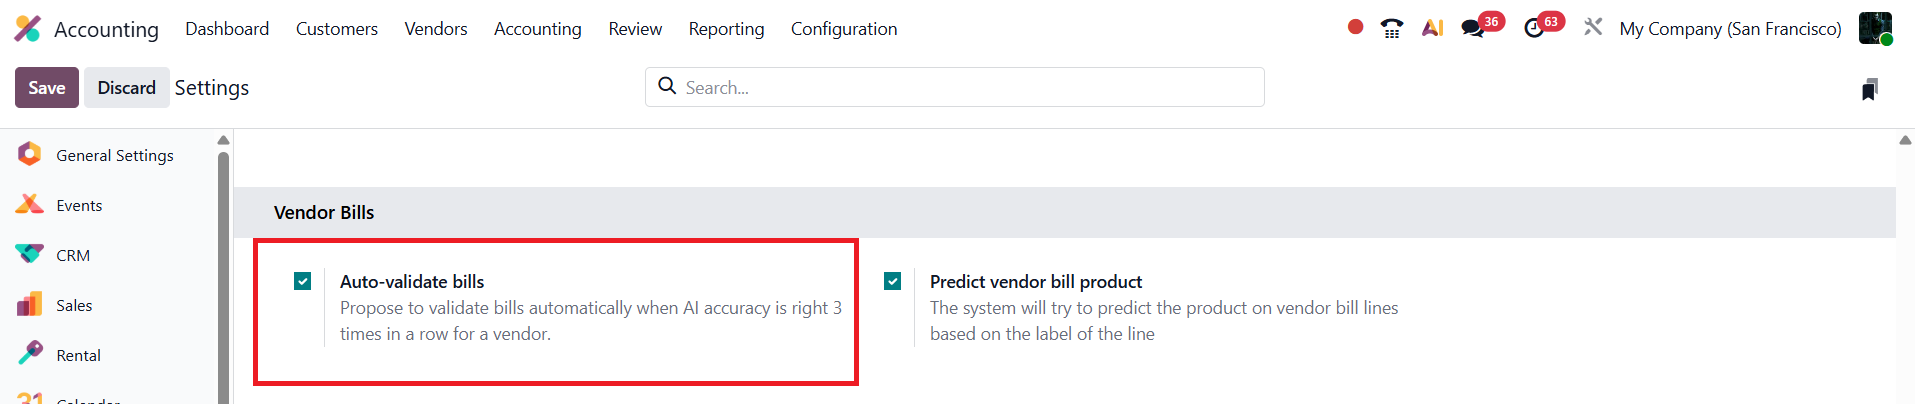
When a company imports vendor bills, Odoo monitors user behavior. After three consecutive imports for the same vendor are completed without any manual modifications, the system automatically suggests enabling the Auto-Validate option for that vendor. Once activated, all future bills imported for that vendor will be validated automatically upon import, saving significant time for accounting teams.
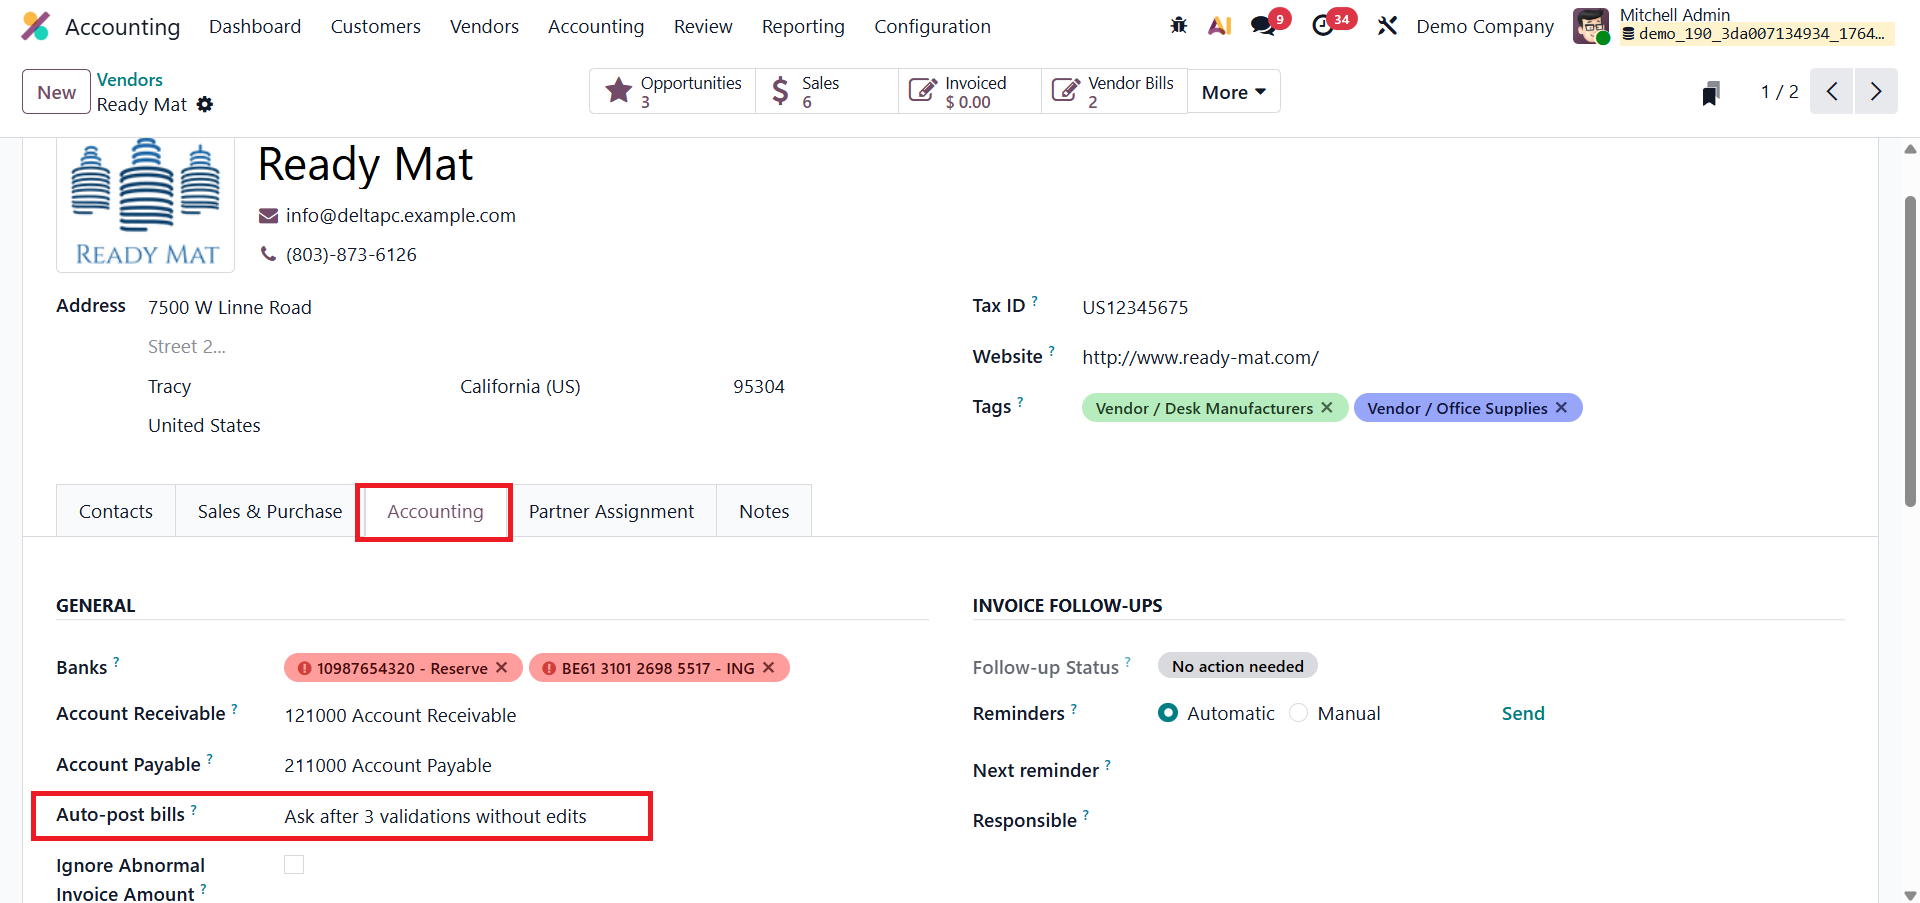
This feature can be managed directly from the vendor’s profile under the Accounting tab, where users can enable or disable the option at any time. By automating bill validation, Odoo 19 reduces manual review steps, ensures faster posting of bills, and helps maintain accurate and up-to-date financial records, all while allowing users to retain full control over when and how automation is applied.
Predict Vendor Bill Products
In Odoo 19 Accounting, the Predict Vendor Bill Products feature enhances automation and accuracy in vendor bill processing by intelligently suggesting products based on previously recorded data. This option will be available in the Vendor Bill section of the Settings menu.
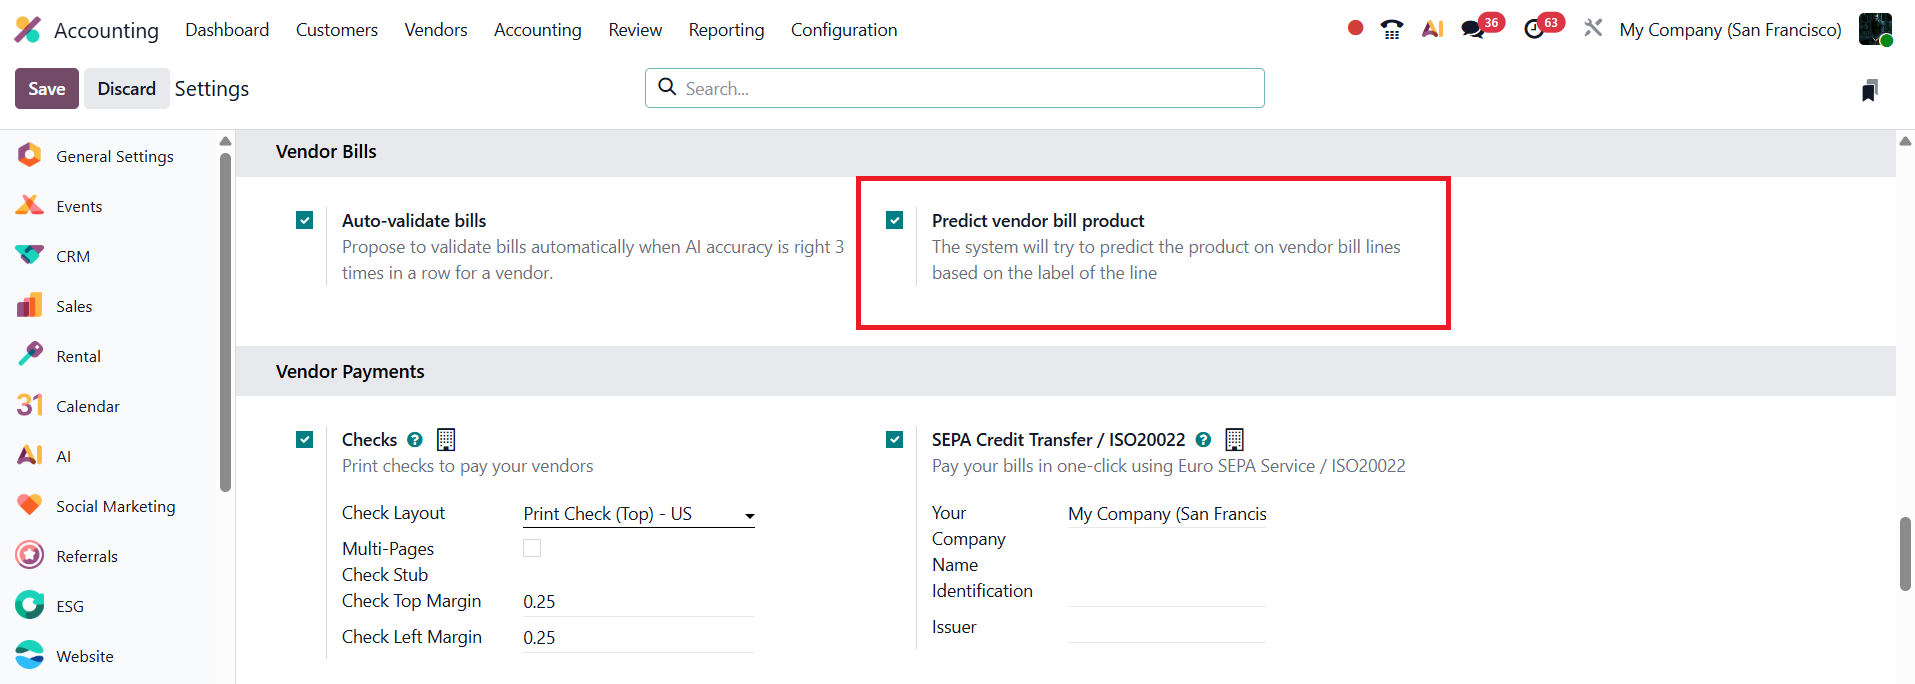
When creating a vendor bill, users typically enter details such as product labels, quantities, and prices. With this feature enabled, if a user enters only a label in a bill line without selecting a specific product, Odoo 19 automatically analyzes the label text and predicts the most relevant product from past billing records.
The system then auto-fills the Product field with the best match, minimizing manual selection and ensuring consistency in product mapping.
SEPA Credit Transfer / ISO20022
In Odoo 19 Accounting, the SEPA Credit Transfer / ISO20022 feature enables businesses operating within the Single Euro Payments Area (SEPA) to process secure, standardized, and automated euro-denominated bank transfers efficiently. This system eliminates the complexities of cross-border transactions by ensuring all transfers follow a unified ISO20022 XML format recognized by European financial institutions.
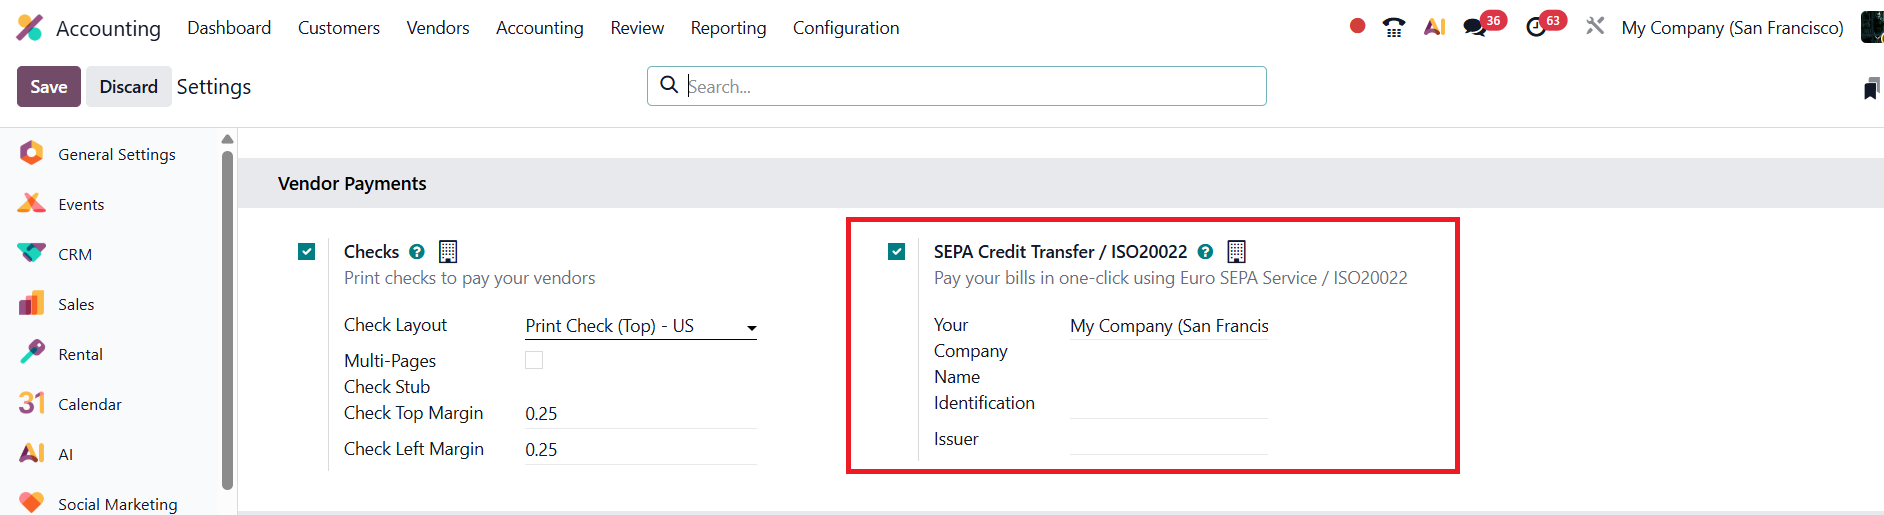
To activate SEPA payments, navigate to Accounting ▸ Configuration ▸ Settings, and under the Vendor Payments section, enable the SEPA Credit Transfer (SCT) option.
Before using this feature, ensure your company details are properly configured, including the IBAN, BIC, and other required identification fields such as Identification and Issuer. These details ensure the system can generate valid and compliant SEPA files.
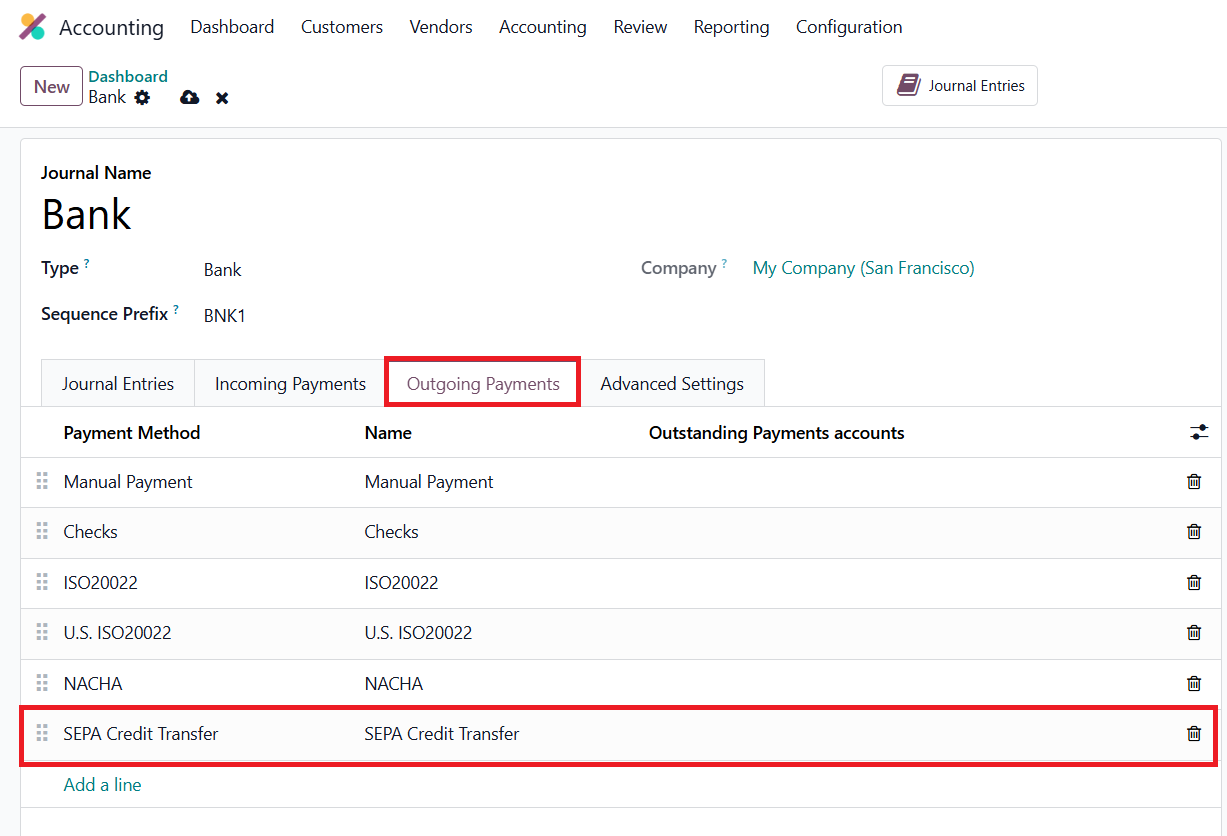
Once the feature is enabled, configure your bank journal to support SEPA payments.
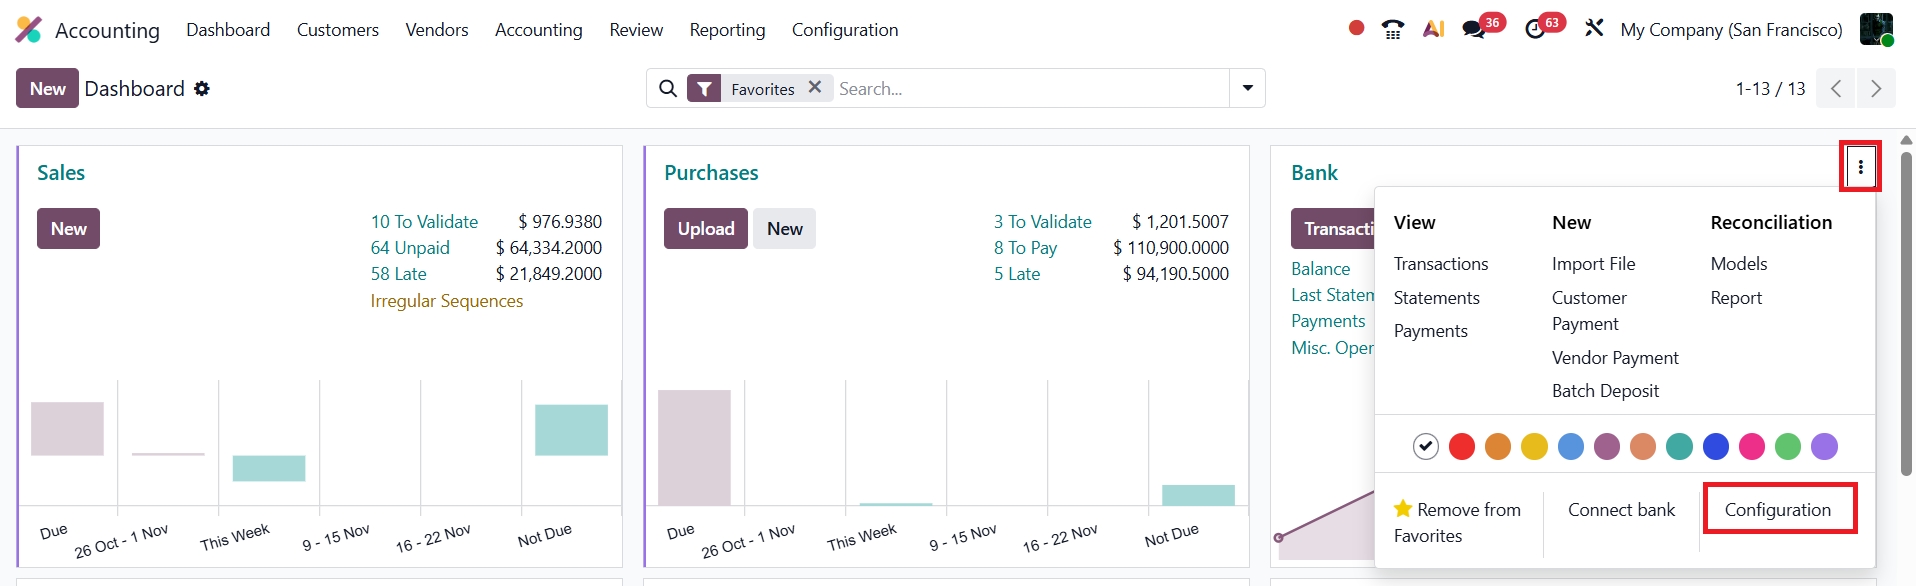
From the Accounting Dashboard, open the three-dot menu (⋮) beside your bank journal, select Configuration, and under the Outgoing Payments tab, make sure SEPA Credit Transfer is listed as a valid payment method. If it isn’t, you can easily add it using the Add a line option.
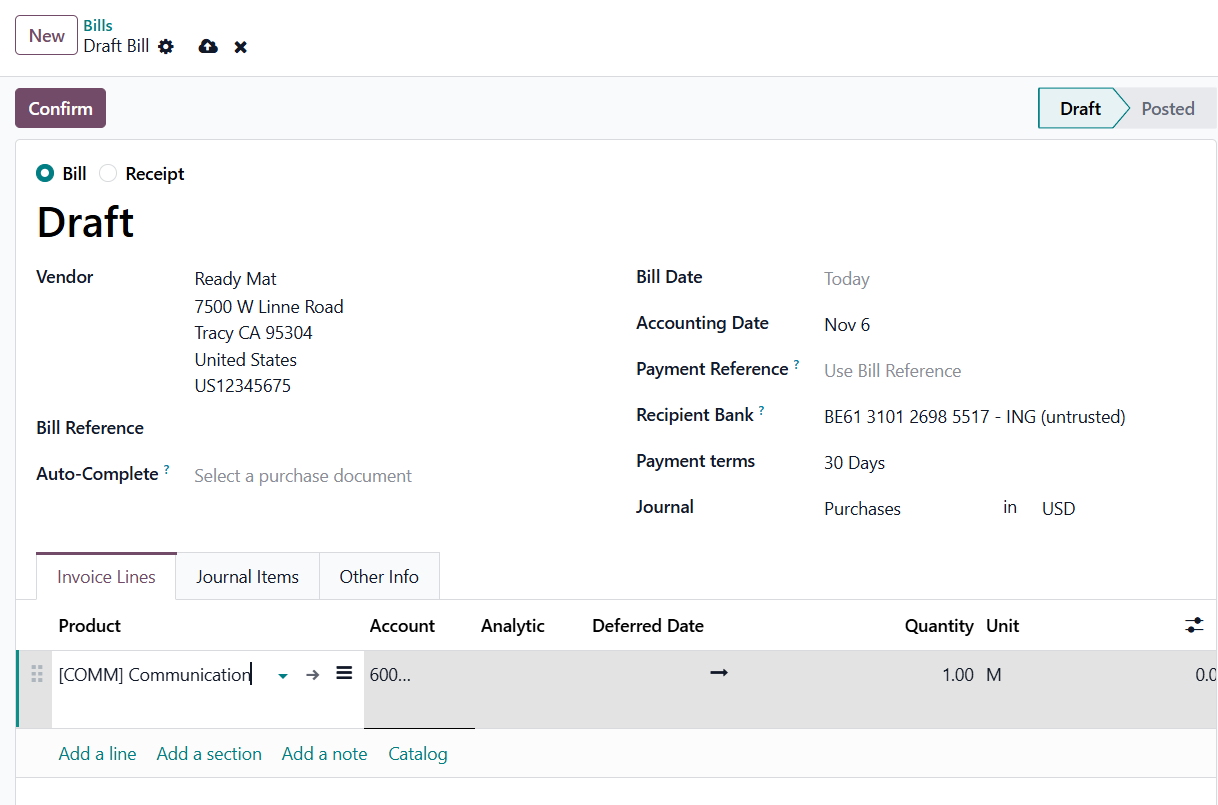
When processing payments to vendors, go to Accounting ▸ Vendors ▸ Payments, and select SEPA Credit Transfer / ISO20022 as the Payment Method.
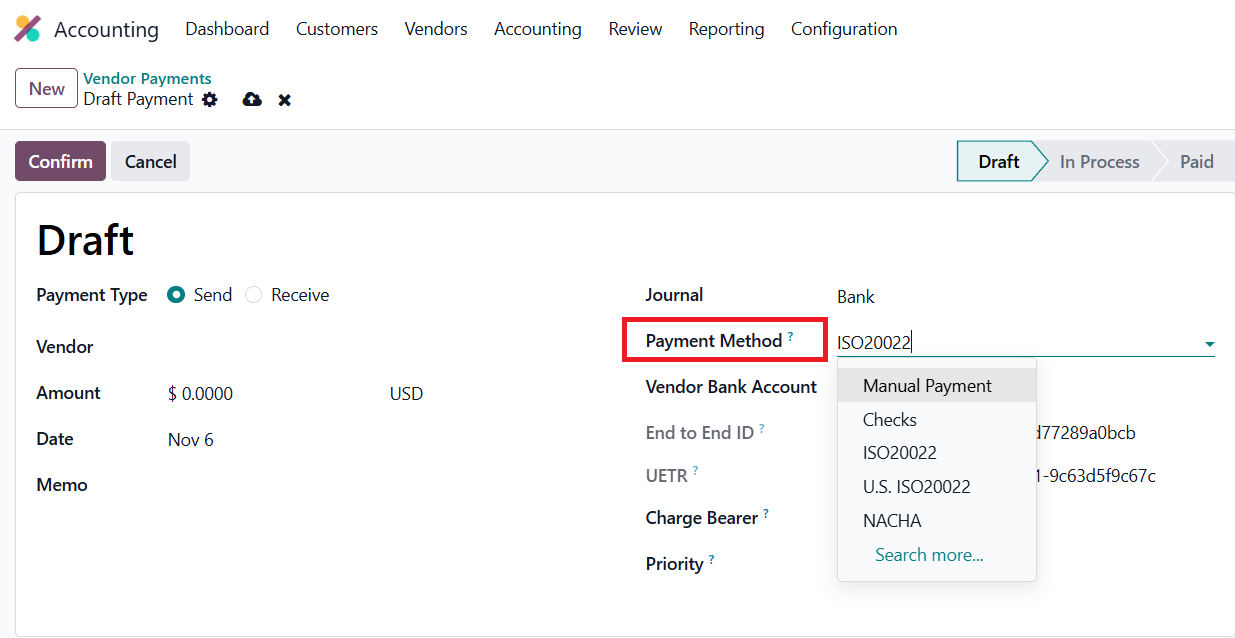
You can also register SEPA payments directly from a vendor bill by clicking the Pay button. Odoo will open the payment form, link the payment to the bill, and handle reconciliation automatically once the payment is confirmed.
Checks
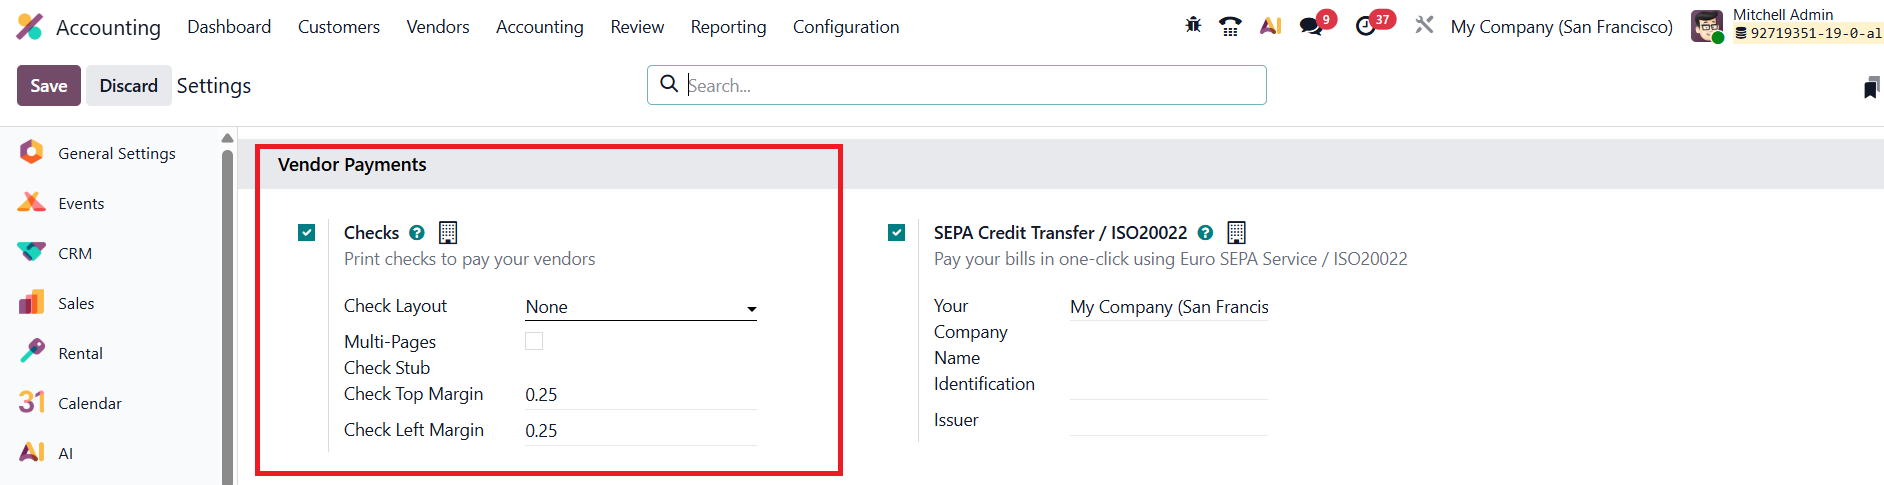
In Odoo 19 Accounting, managing vendor payments through checks has become more efficient and user-friendly, with improved layout options and enhanced reporting capabilities. To activate this feature, navigate to Accounting › Configuration › Settings, scroll down to the Vendor Payments section, and enable the Checks payment method. Here, you can also configure your Check Layout, including the preferred paper format, top and left margins, and alignment settings for printing. Once the setup is complete, click Save to apply your configuration.
After enabling the feature, open your Bank Journal from the Accounting Dashboard.

Under the Outgoing Payments tab, add Checks as one of the available payment methods.
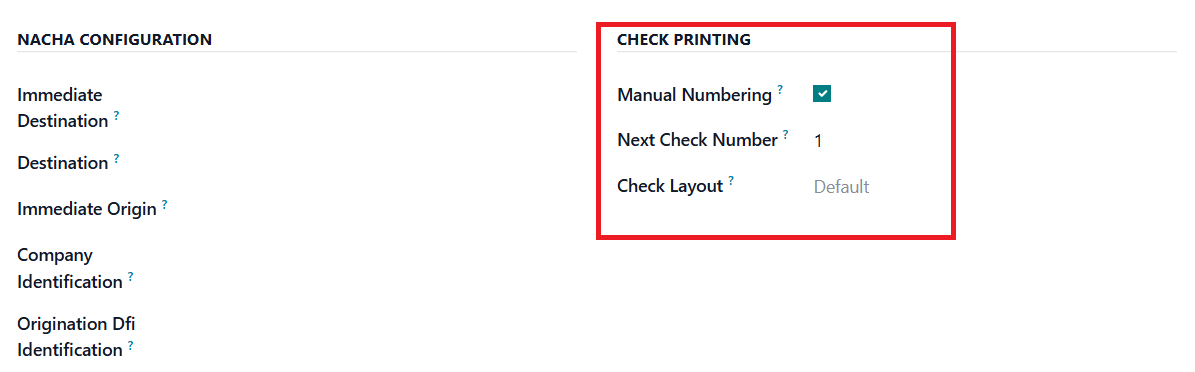
A Check Printing section will now appear at the bottom-right of the journal form, where you can enable Manual Numbering and specify the Next Check Number. Odoo 19 will automatically increase this number with each new check issued, ensuring smooth and accurate sequencing.
When processing a vendor payment, open the corresponding bill and click Pay.
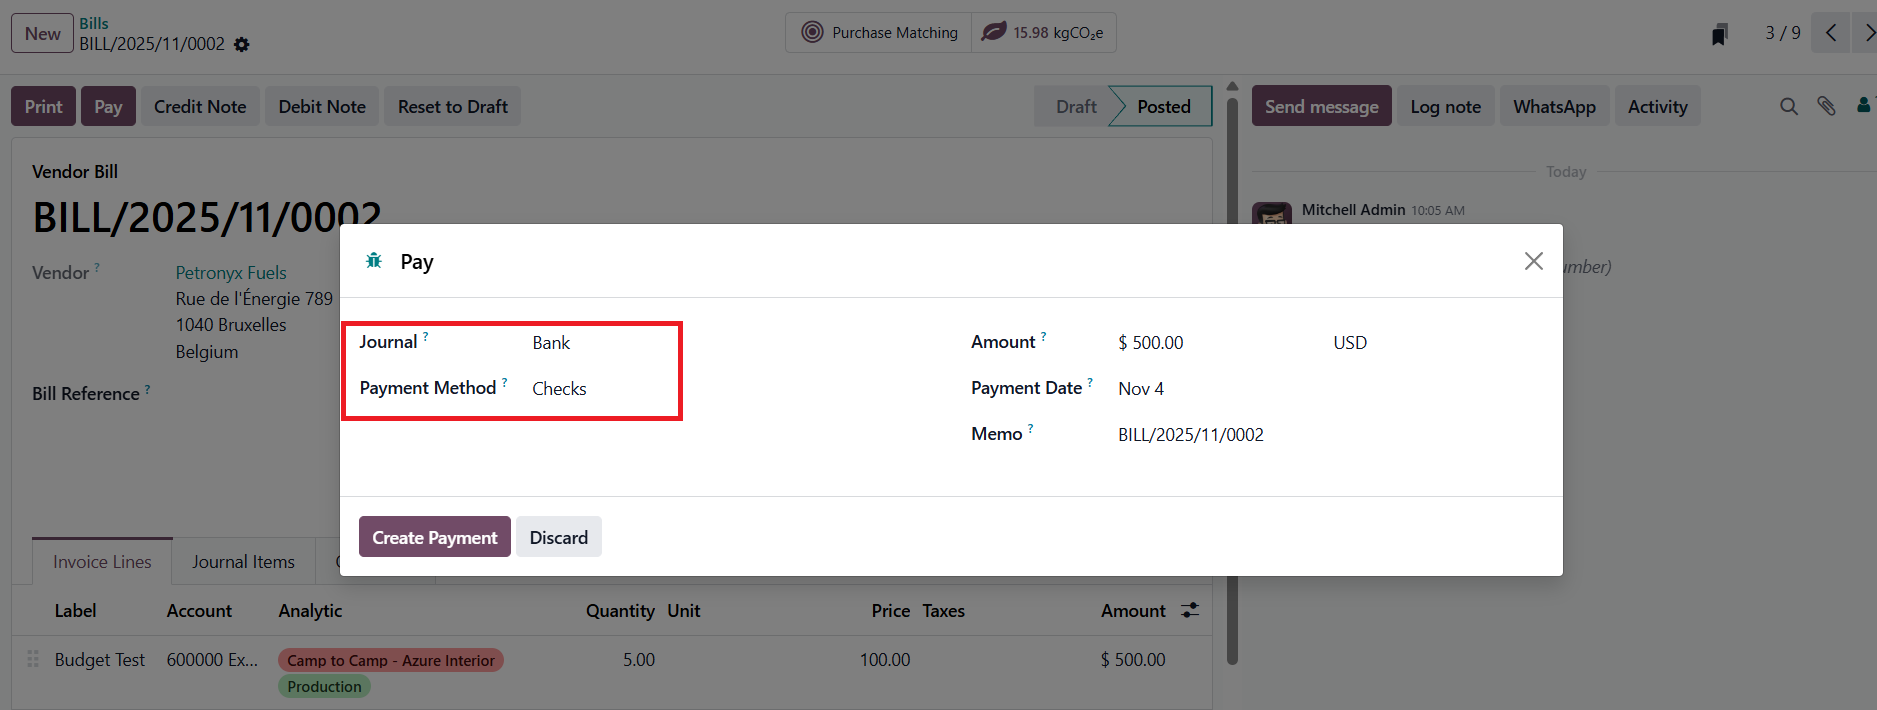
Choose the bank journal that supports checks and select Check as the payment method. Once the payment is validated, you can print the check immediately using the configured layout. For bulk processing, select multiple payments from the list view and click Print to generate all checks in a single batch.
Document Digitization
The Document Digitization feature in Odoo 19 Accounting harnesses the power of AI and Optical Character Recognition (OCR) to automate data entry from scanned or PDF documents, streamlining the management of vendor bills, customer invoices, and bank statements. By intelligently analyzing uploaded documents, Odoo automatically extracts and fills in relevant details, such as product lines, taxes, and totals, based on both the document’s content and the system’s existing accounting records. This significantly reduces manual data entry, minimizes errors, and speeds up financial processing.
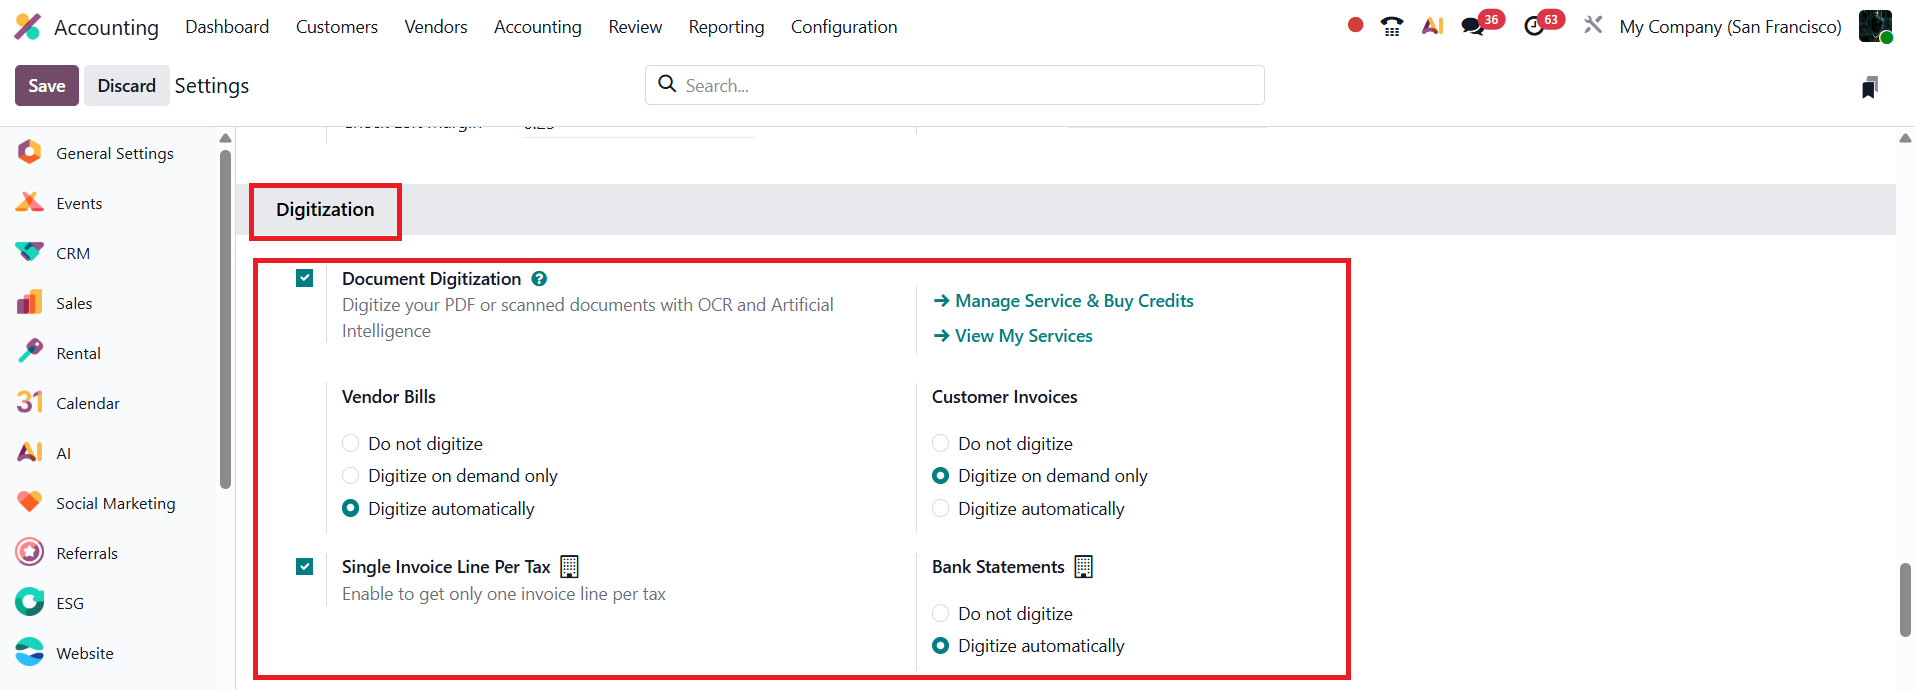
To activate this feature, navigate to the Accounting ▸ Configuration ▸ Settings menu. Under the Document Digitization section, users can define how documents should be processed by choosing one of the following options:
- Do Not Digitize – disables OCR processing.
- Digitize on Demand Only – processes documents only when users manually request it.
- Digitize Automatically – automatically detects and digitizes uploaded or received documents.
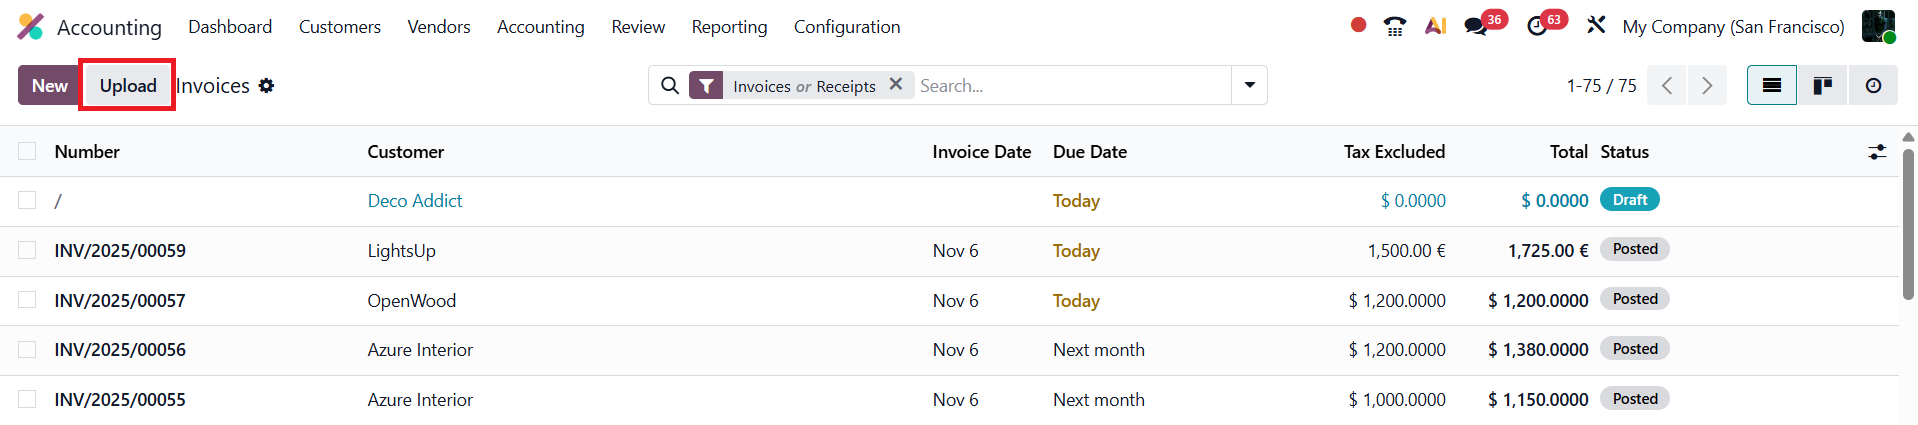
Once enabled, users can upload invoices or bills directly using the Upload button on the Customer Invoices or Vendor Bills pages, or they can forward them via a configured email alias for automated processing.
When uploaded, Odoo scans the document and auto-populates fields such as partner details, dates, amounts, and taxes according to your preferences.
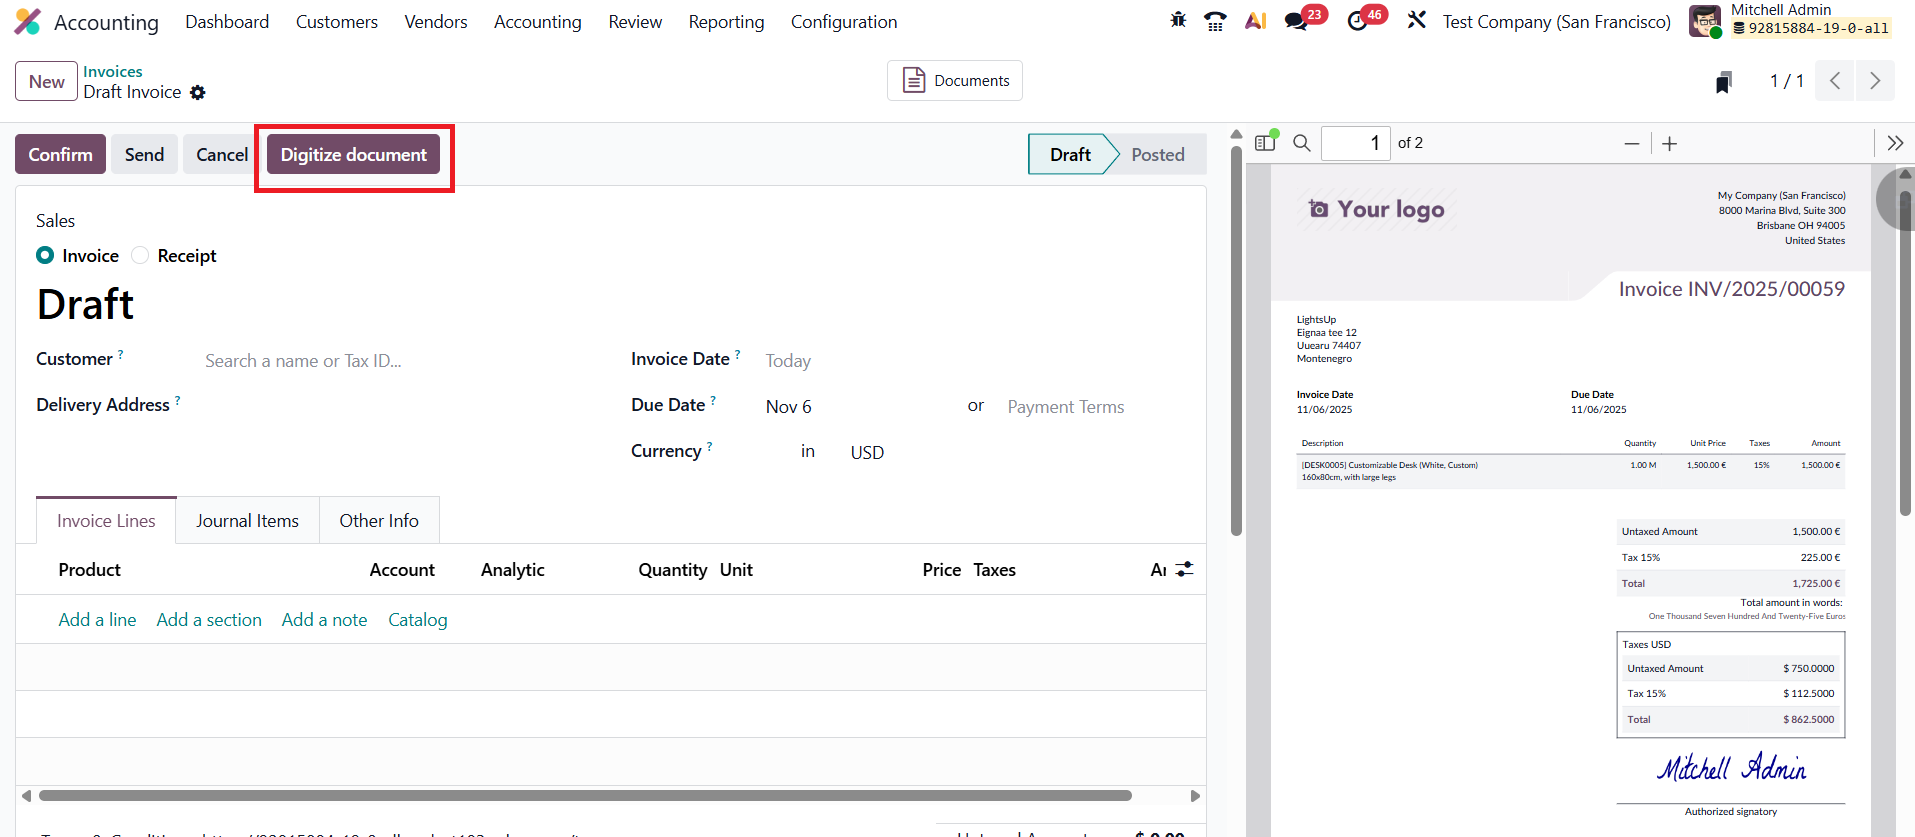
For users who prefer to review the document before finalizing, the Digitize Document button allows manual verification and editing of extracted data before posting it. Additionally, the Single Invoice Line per Tax option can be activated to consolidate invoice lines based on their tax rates for cleaner, more organized entries.
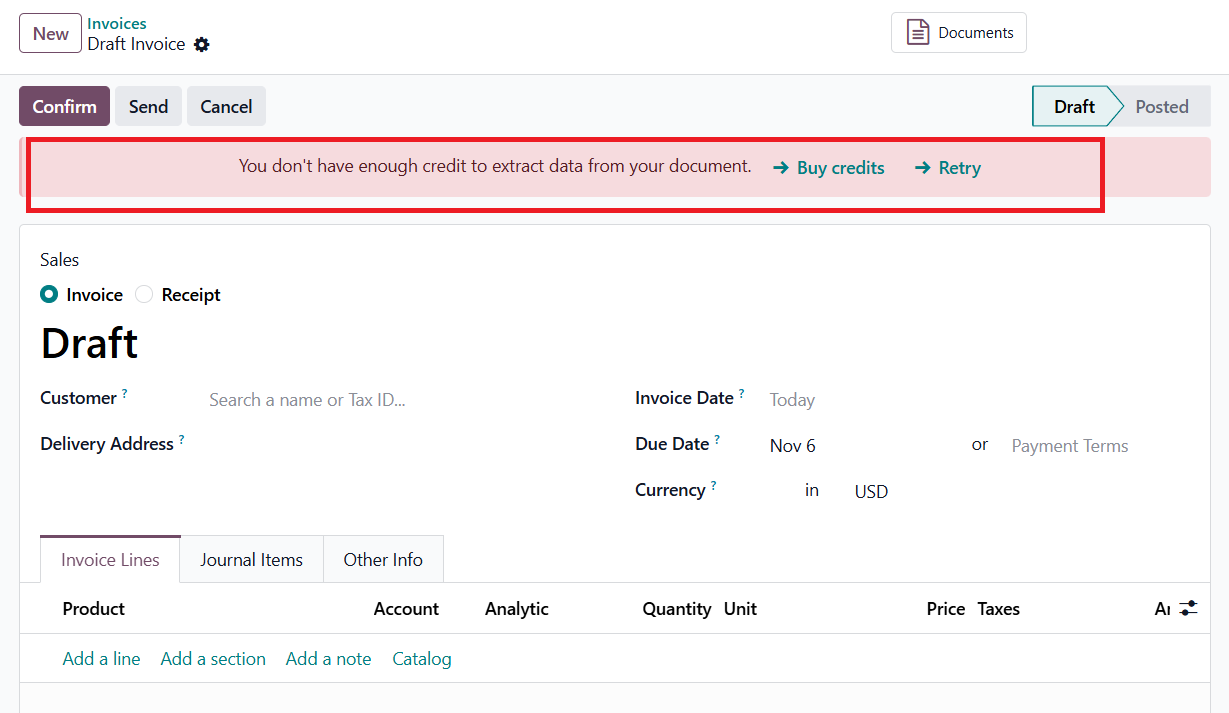
All digitized data is stored securely in your Odoo 19 database, making retrieval and audit tracking simple and efficient. It’s important to note that this functionality operates on a credit-based system, meaning that digitization credits must be purchased to process and extract data from scanned or PDF documents.
Single Invoice Line Per Tax
In Odoo 19 Accounting, the Single Invoice Line Per Tax feature is designed to simplify invoice presentation and improve clarity in tax reporting. When this option is enabled, Odoo groups tax amounts by tax type and displays them as a single consolidated line on the invoice, instead of showing separate tax lines for each invoice item.
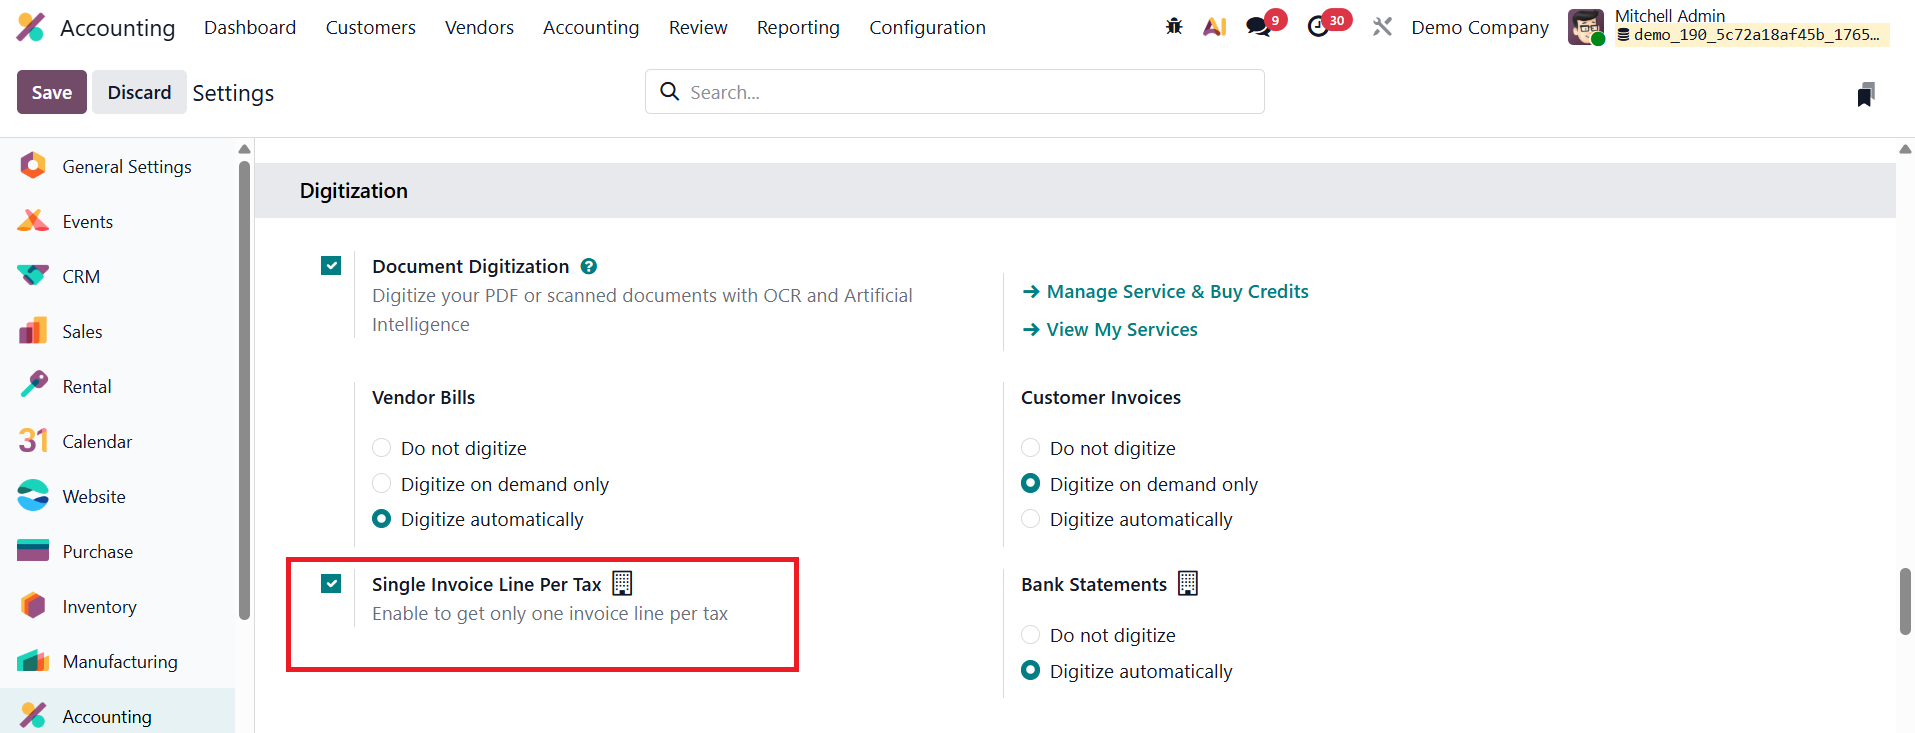
This feature is particularly useful when an invoice contains multiple products that share the same tax rate. Rather than repeating the same tax information across multiple lines, Odoo calculates the total taxable amount and shows one tax line per tax. This results in cleaner invoices that are easier for customers to read and for accountants to review.
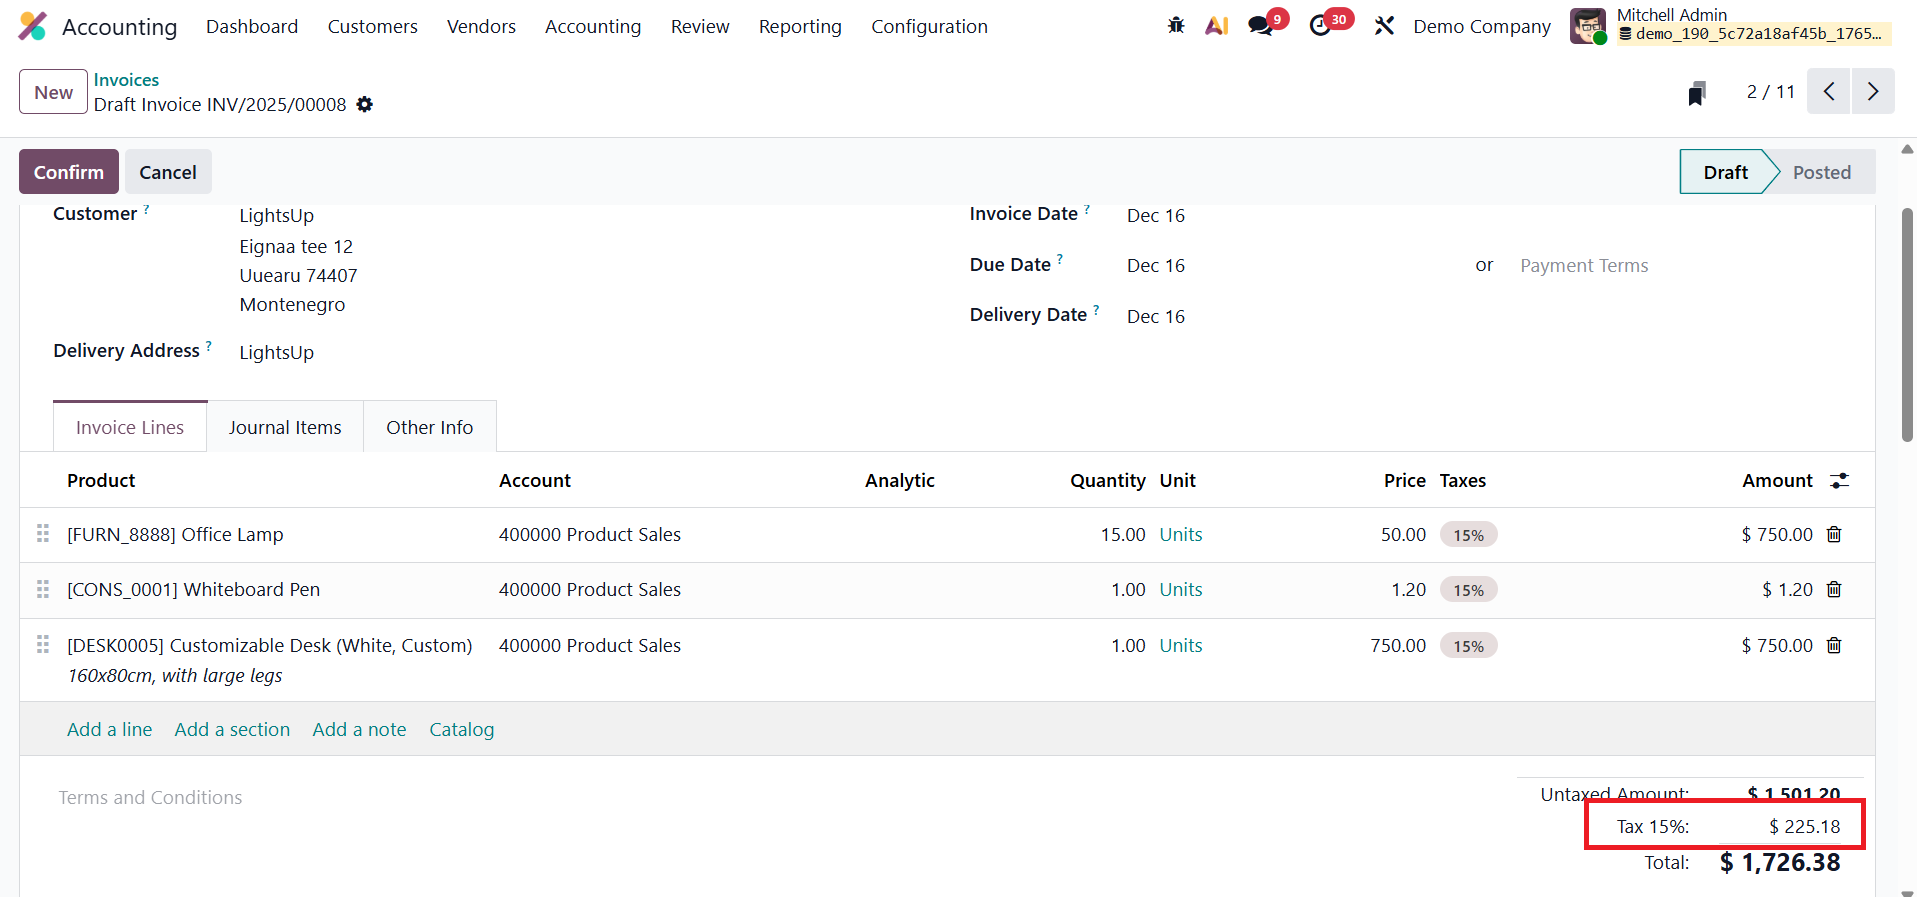
From an accounting and compliance perspective, Single Invoice Line Per Tax helps reduce visual clutter while maintaining accurate tax calculations in the backend. It also improves consistency in tax summaries and reporting, especially for businesses that issue invoices with numerous line items. Overall, this option enhances invoice readability without affecting the correctness of tax posting or financial records in Odoo 19.
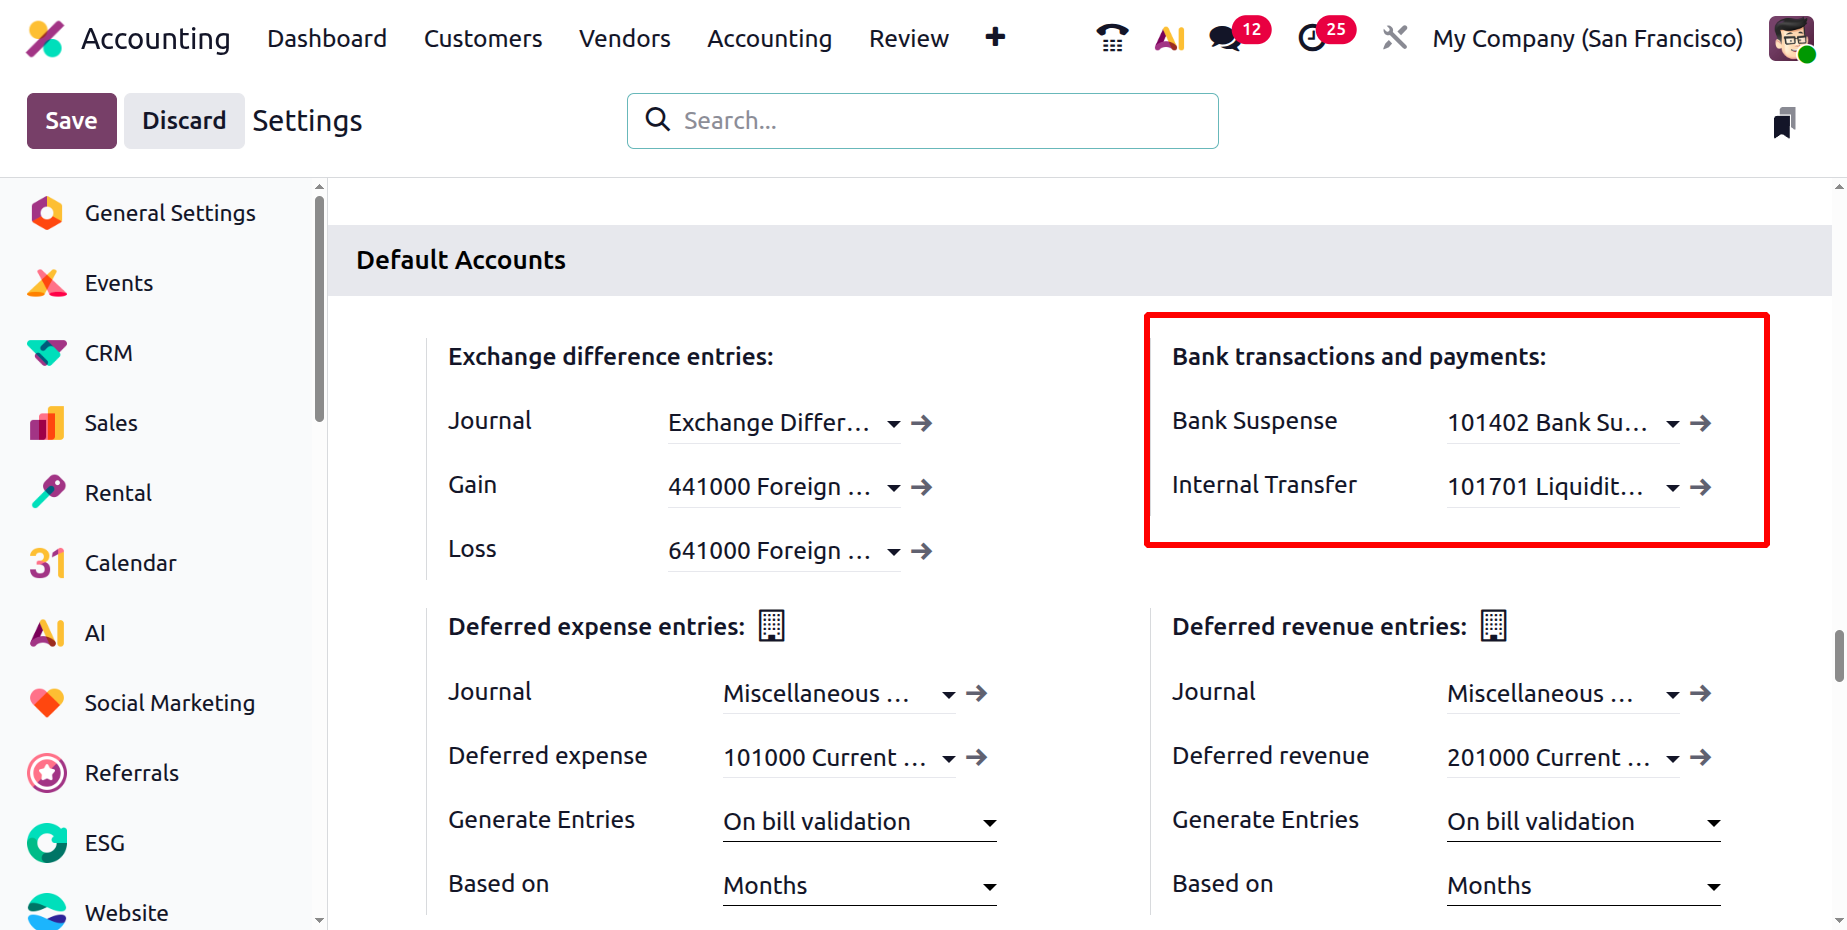
Default Accounts
In Odoo 19 Accounting, the Default Accounts section defines the ledgers and journals that Odoo uses automatically when posting specialized or system-generated entries. Setting up these defaults once ensures that every automated transaction, from currency revaluation to deferred revenue recognition, is posted consistently and accurately without manual account selection.
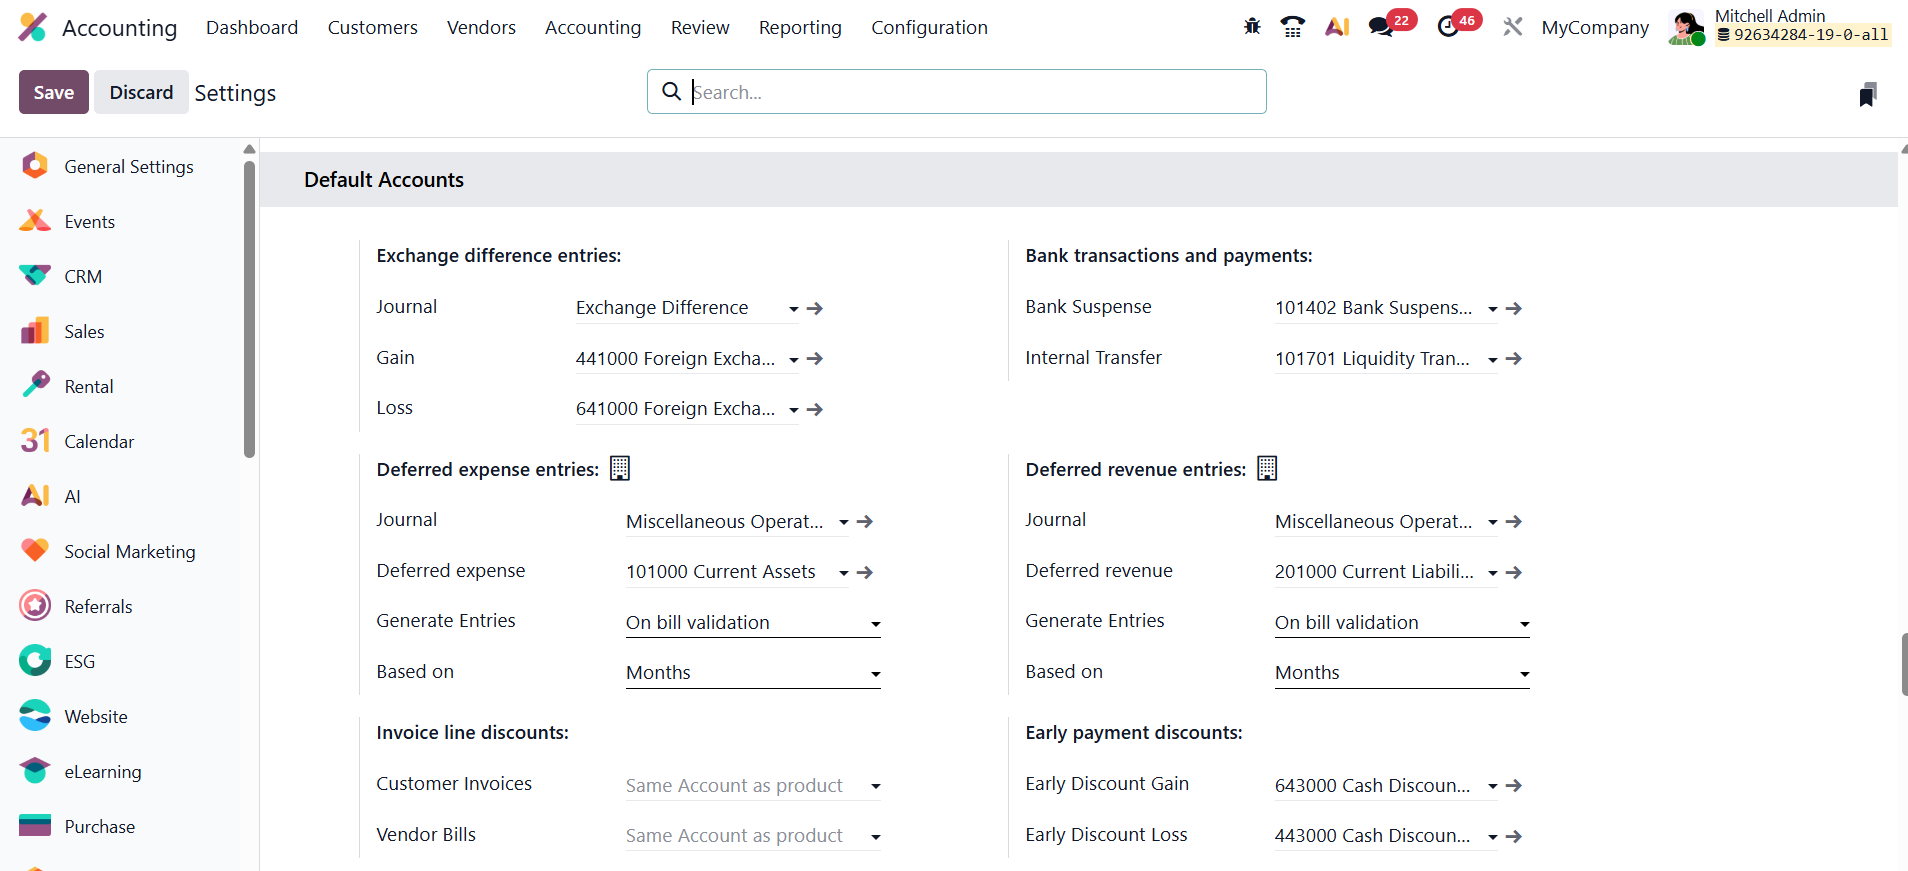
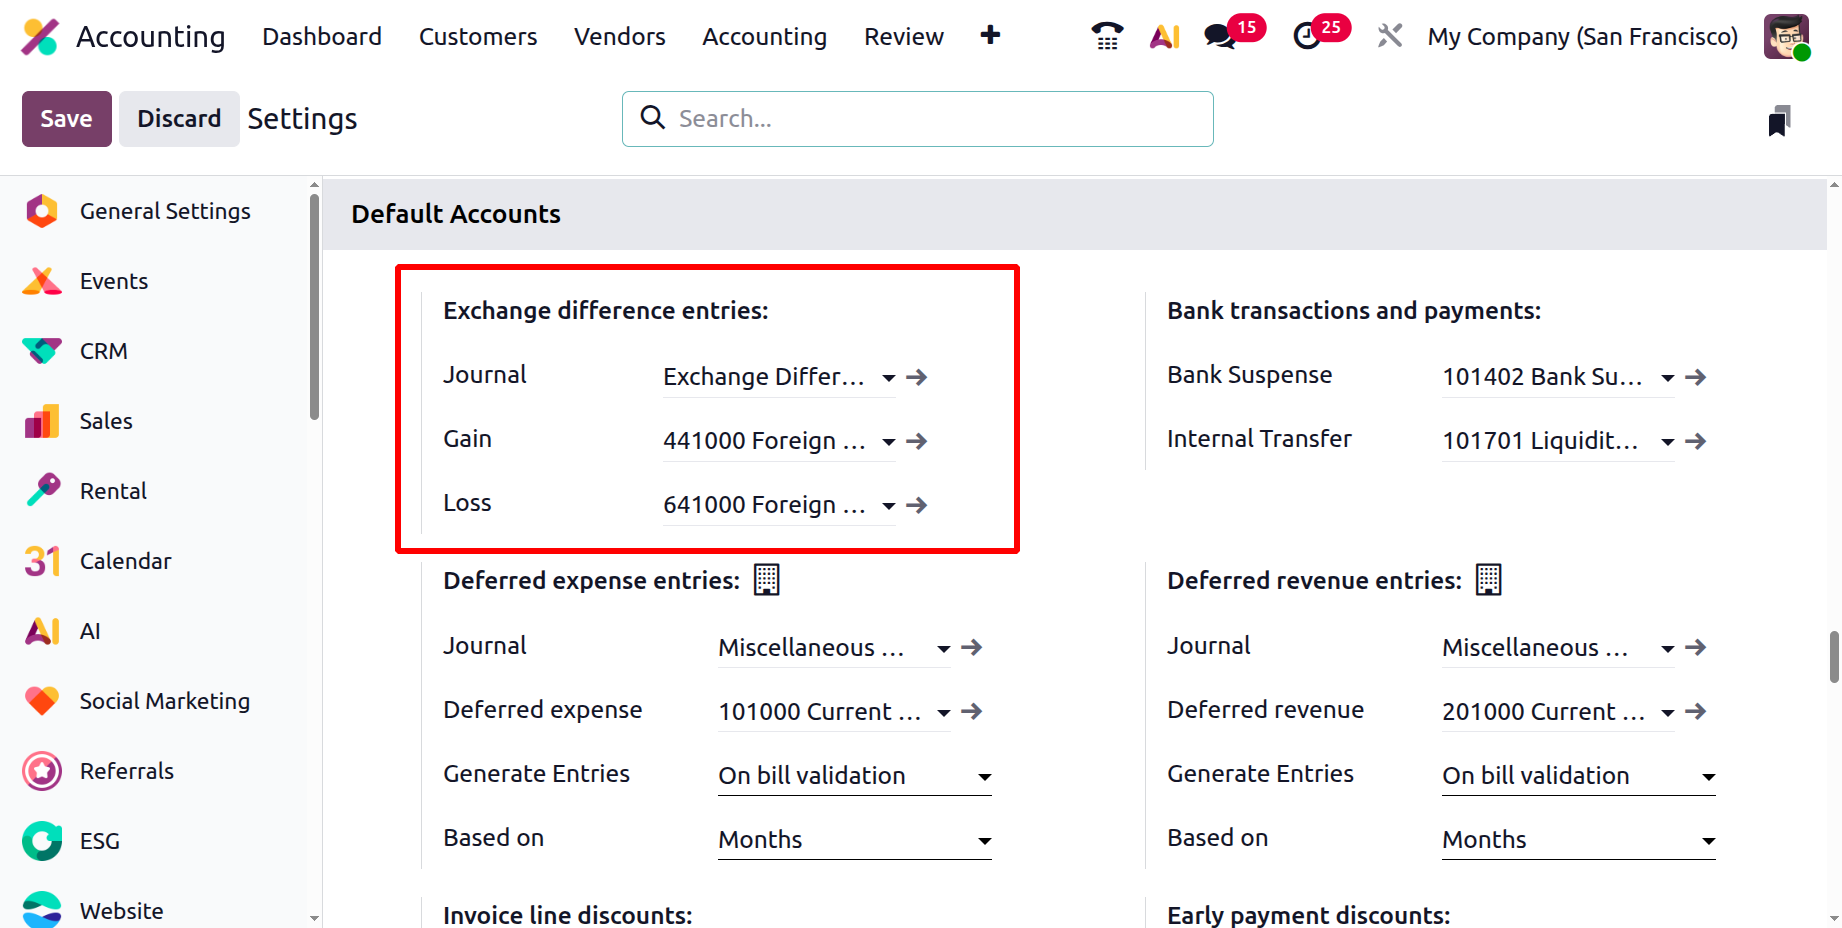
Exchange Difference Entries
Exchange-difference entries handle currency revaluations that occur when foreign-currency invoices are settled or when end-of-period remeasurements are performed.
In this section, you specify:
- The Journal where Odoo posts the revaluation adjustments.
- The Exchange Gain and Exchange Loss accounts, typically profit-and-loss accounts, that capture the resulting differences.
Deferred Expense Entries
Deferred expenses represent prepaid costs such as insurance or rent that need to be recognized over time.
Here you define:
- The Journal that records each monthly amortization entry.
- The Deferred Expense Account, typically a current asset sub-ledger, which temporarily holds the prepayment balance.
- The Generate Entries option determines how the system creates the periodic amortization entries: when set to On Bill Validation, Odoo automatically schedules the deferral entries as soon as a vendor bill containing a deferred expense product is validated, saving manual effort and ensuring timely recognition. Alternatively, selecting Manually & Grouped allows the accountant to generate these amortization entries manually, typically in batches for multiple deferred expenses at once, providing more control over when and how adjustments are posted.
- In the Based On field, the Based on Days, distributes the expense proportionally according to the number of days in each period; Based on Months, divides the amount equally across the specified number of months; and Full Months, treats each entire month as a full period regardless of billing date, often used when businesses want simplified period-to-period consistency in expense recognition.
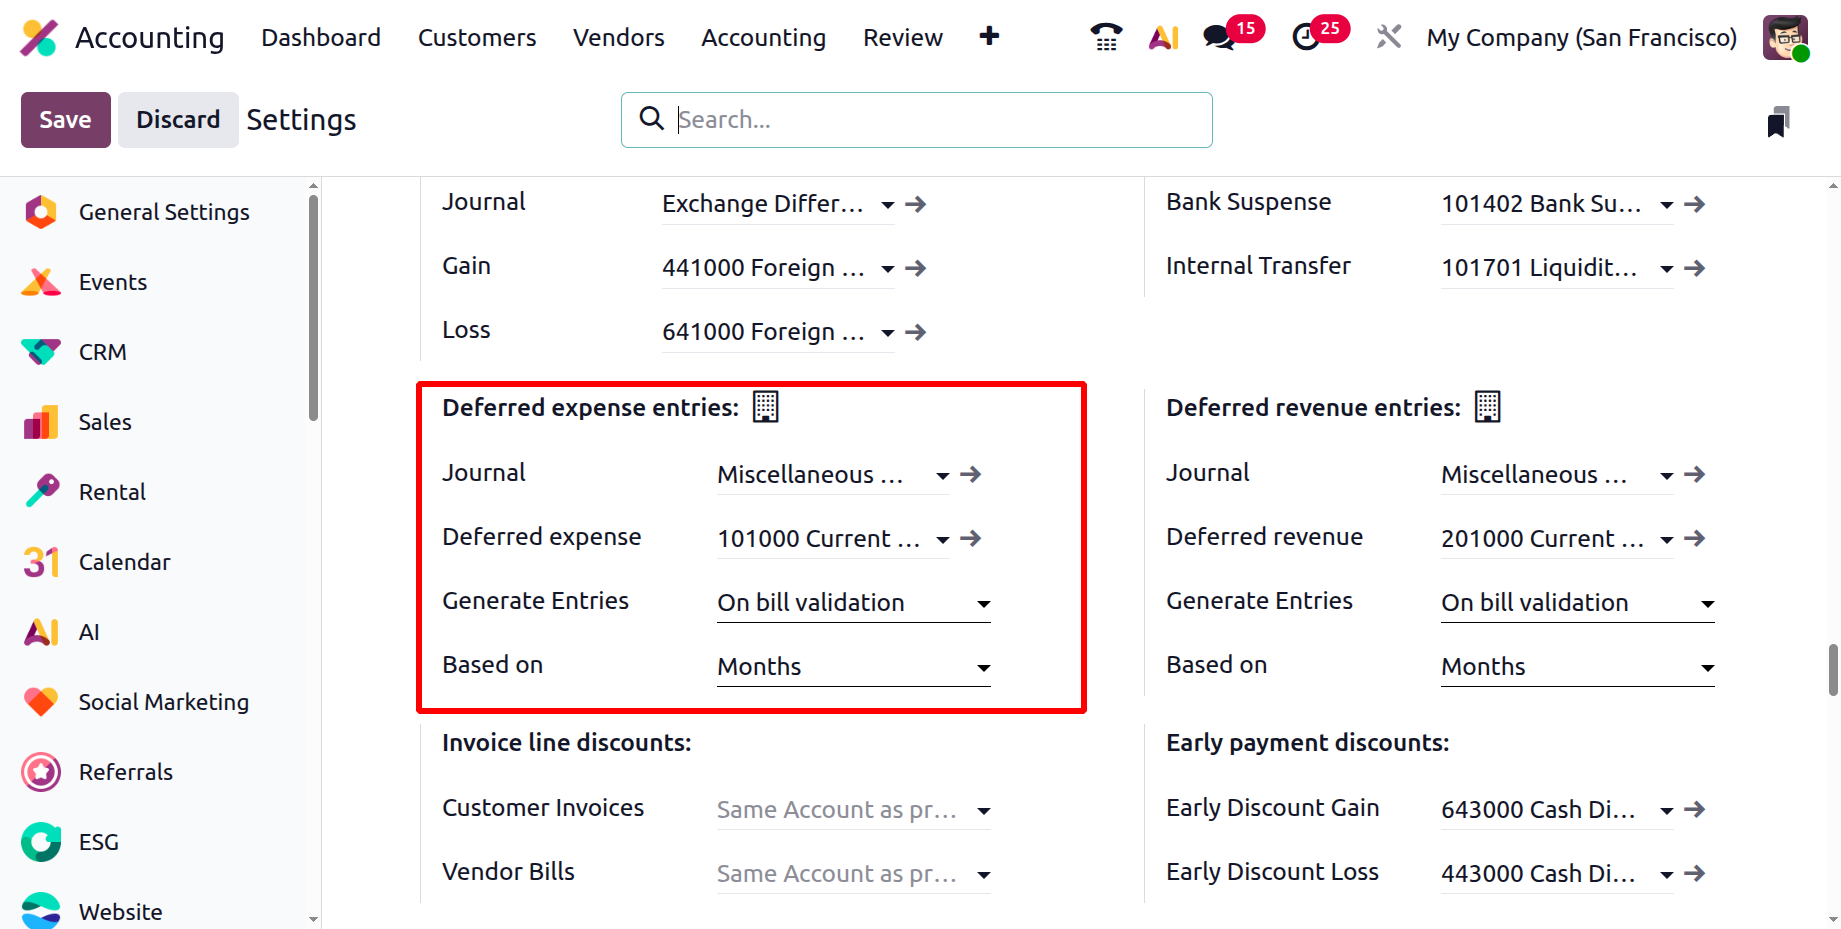
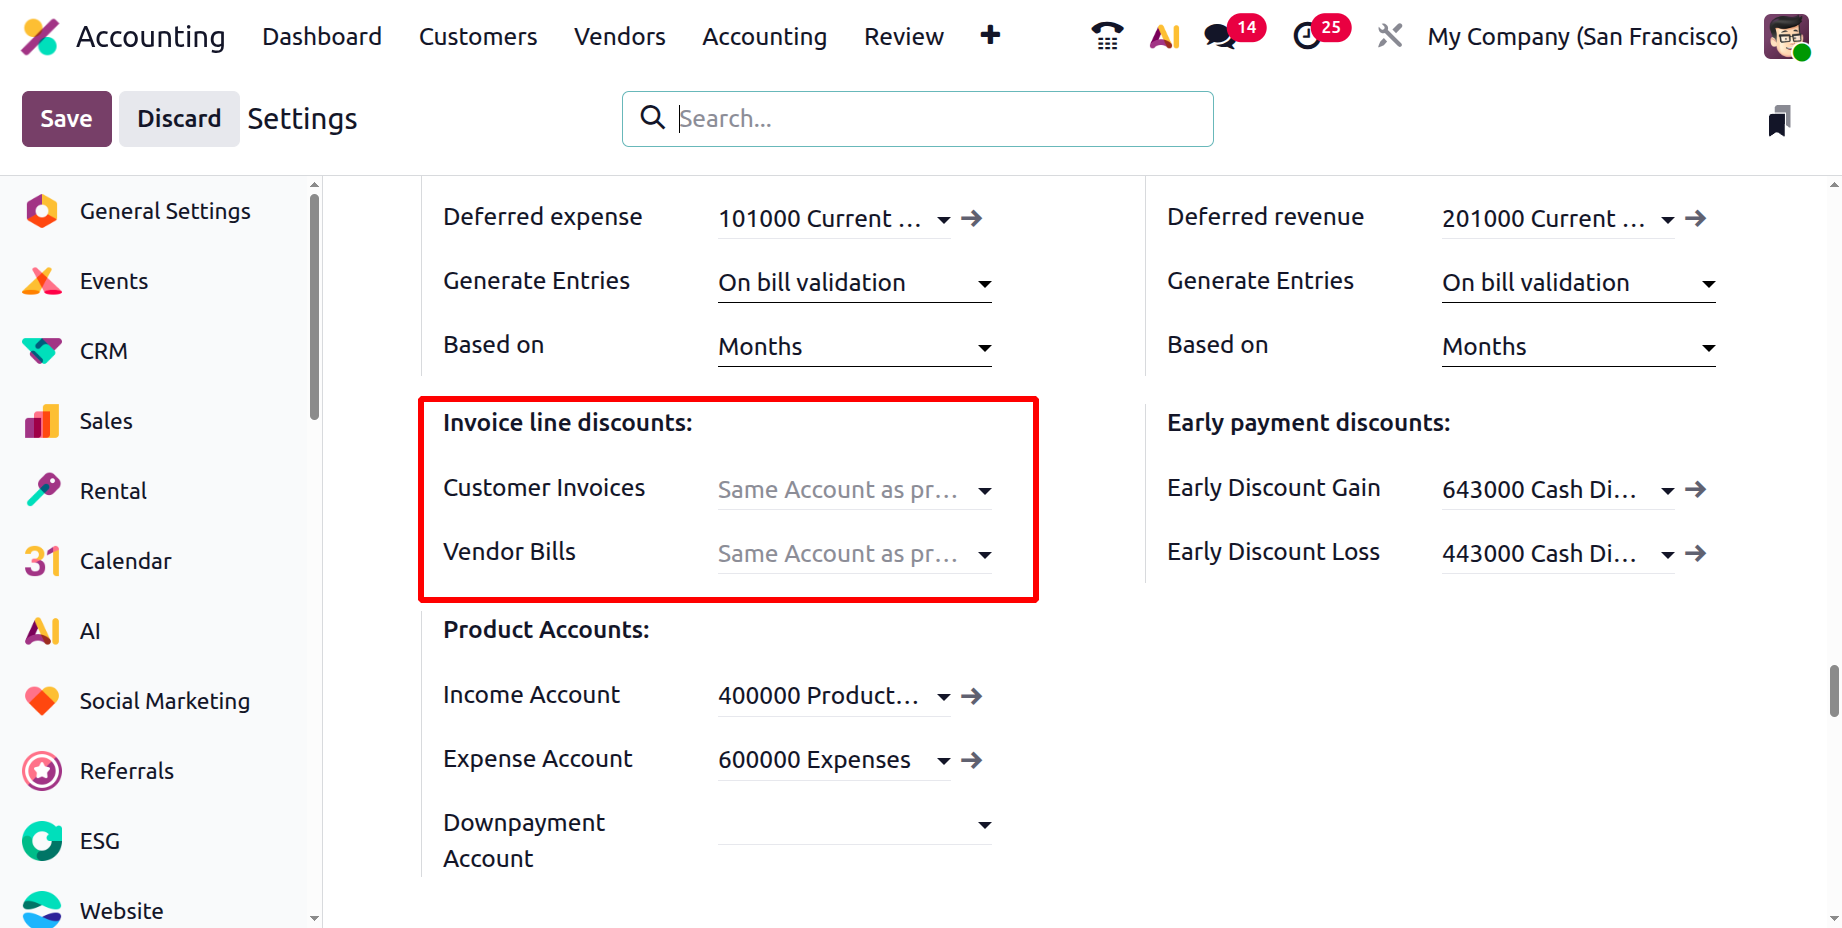
Invoice Line Discounts
When invoice lines include price reductions or discounts, Odoo 19 uses the Invoice Line Discounts Mapping to determine which accounts absorb the adjustment.
- One default account offsets discounts granted on Customer Invoices.
- Another handles discounts received on Vendor Bills.
Bank Transactions and Internal Transfers
Under Bank Transactions and Payments, two default clearing accounts keep your cash book reconciliations precise:
- Bank Suspense Account – the temporary holding account for imported statement lines not yet matched to invoices, bills, or miscellaneous entries.
- Internal Transfer Account – a required intermediary ledger that enables and tracks money transfers between your own bank or cash accounts.
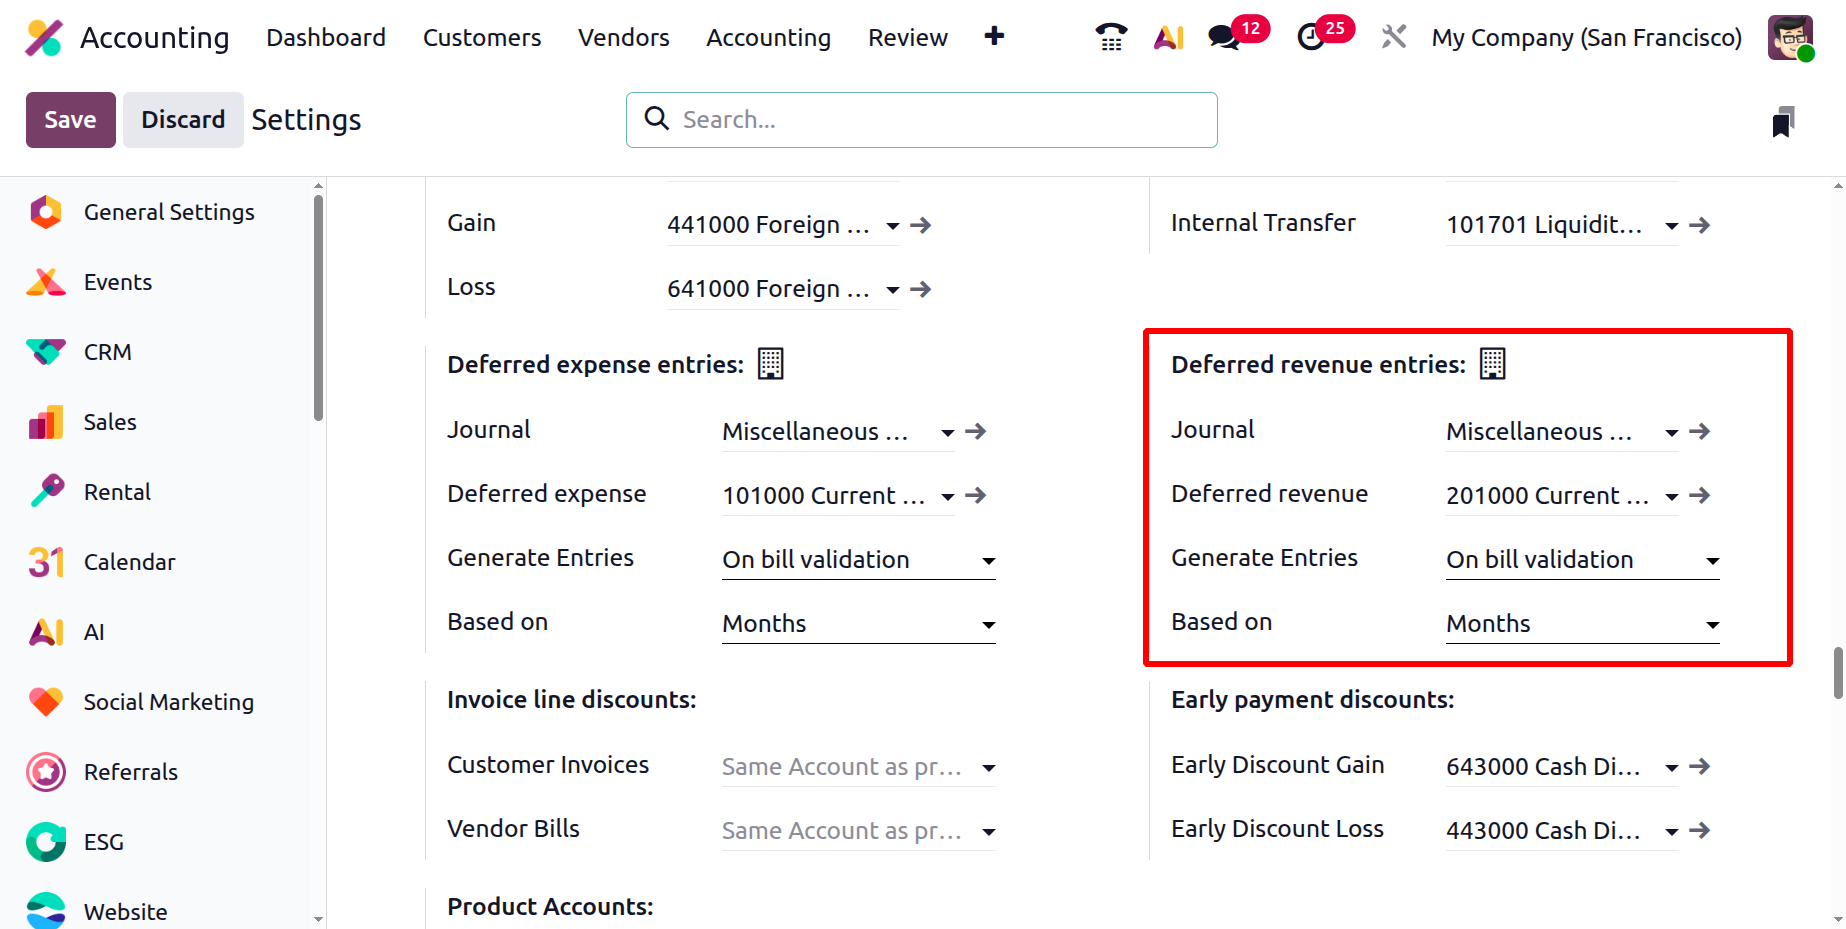
Deferred Revenue Entries
Deferred revenue functions as the mirror of deferred expenses, handling unearned income such as prepayments for long-term service contracts or subscriptions.
You define:
- The Journal used for recurring revenue recognition entries.
- The Deferred Revenue Account, typically a liability account to hold unearned income.
- The Generate Entries method. Selecting On Invoice Validation ensures that Odoo automatically schedules revenue recognition entries as soon as the customer invoice is validated, while Manually & Grouped gives the accountant flexibility to generate these entries in bulk when needed.
- Define the calculation method using Based on Days for daily proportional allocation, Based on Months for equal monthly distribution, or Full Months where revenue is recognized per complete month for simpler and more consistent period accounting.
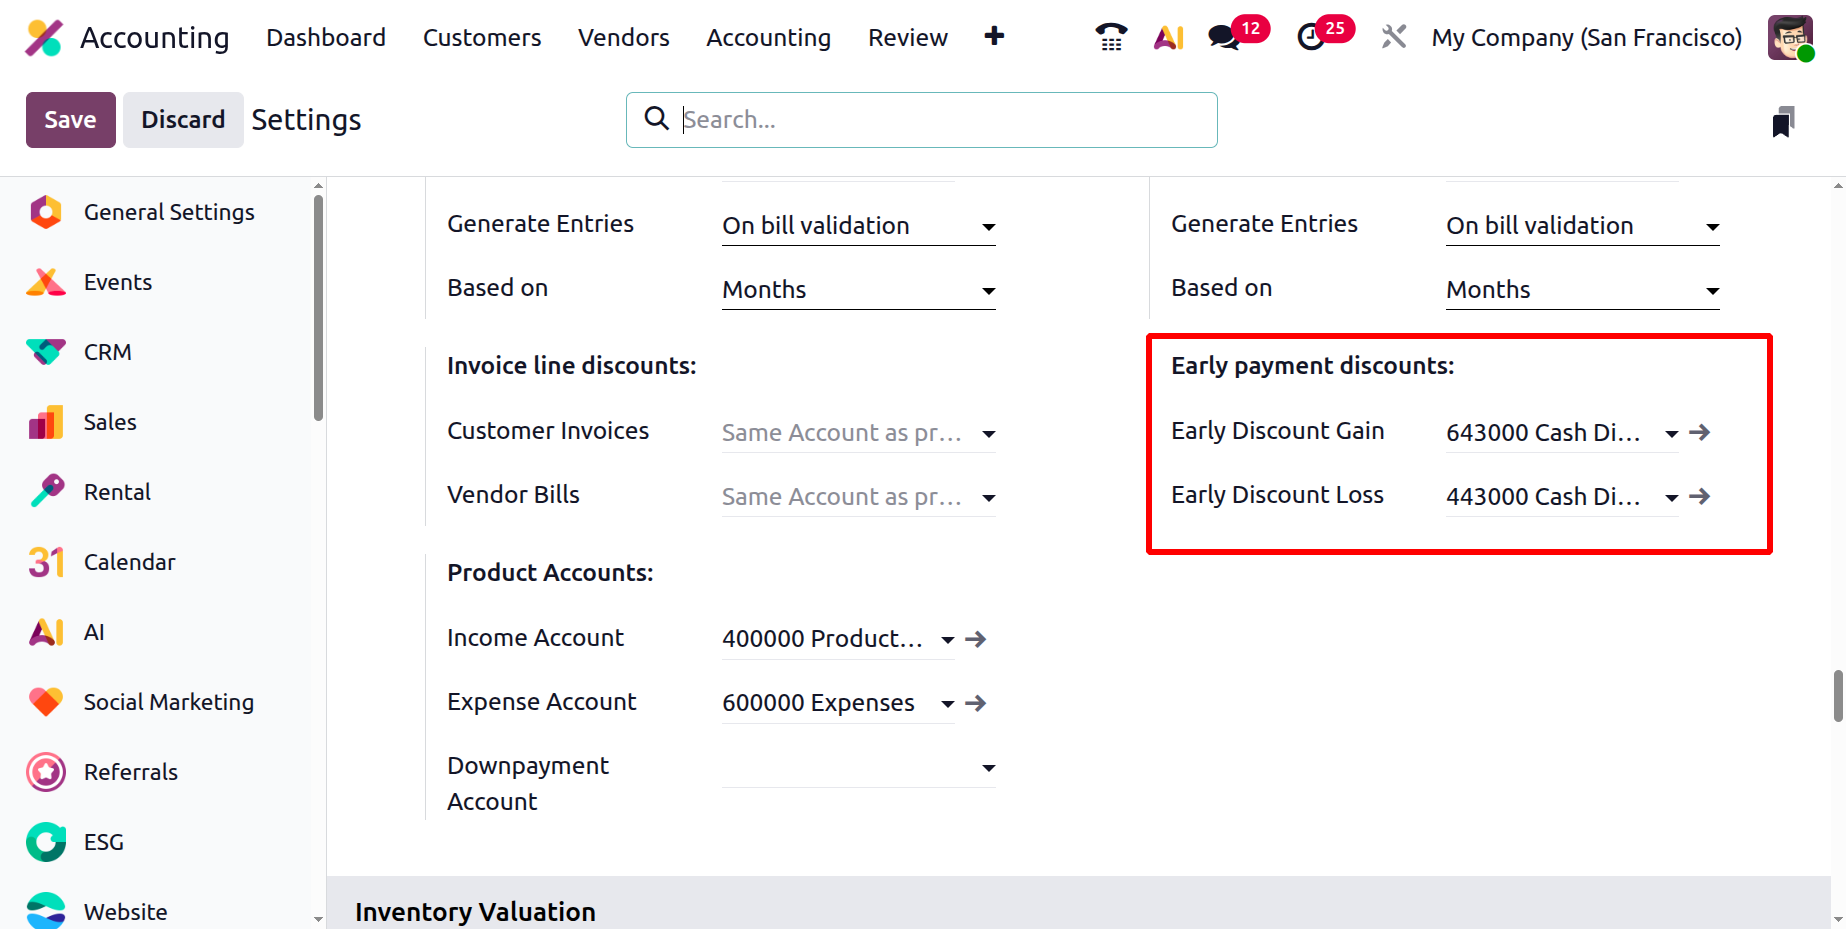
Early Payment Discounts
Early-payment discounts automate the recognition of financial impacts arising from settling invoices before their due date.
- When your company pays a supplier early and earns a discount, Odoo posts the difference to the Early Discount Gain account.
- Conversely, when a customer pays early and receives a concession, the lost revenue is recorded in the Early Discount Loss account.
Early Payment Discounts
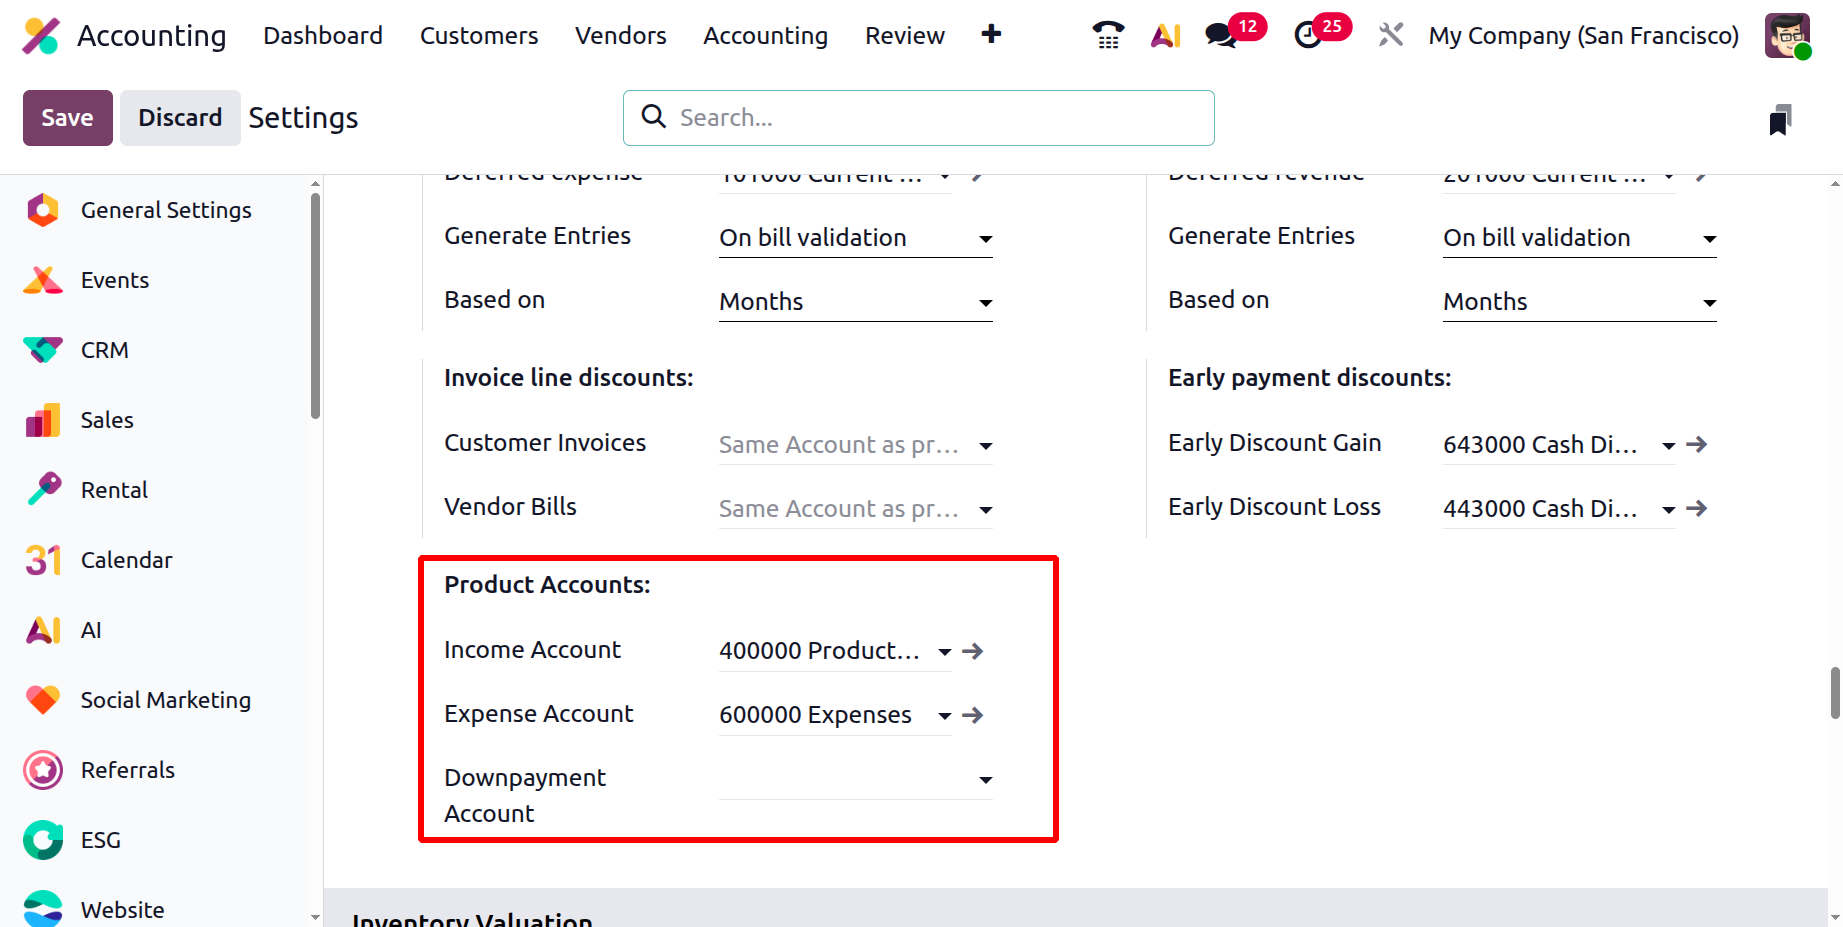
Product Accounts define where financial transactions related to products are recorded.
- The Income Account records all revenue generated from the sale of goods or services. When a customer invoice is validated, the corresponding sales amount is automatically credited to this account.
- The Expense Account is used to record the cost of goods or services purchased by the company. When a vendor bill is posted, Odoo automatically debits this account for the corresponding product or service cost.
- The Downpayment Account handles advance payments or deposits made or received before the delivery of goods or completion of services.
Inventory Valuation
In Odoo 19 Accounting, the Inventory Valuation section in the settings menu helps define how stock values are tracked and recorded in the company’s accounts. Users can set default accounts, journals, valuation types, and cost methods for inventory, which can also be customized for each product category.

The Inventory Valuation method can be set to Perpetual (at invoicing) for real-time updates, or Periodic for manual valuation at the end of a period. The Periodic Valuation can be set as Manual, Daily, or Monthly. The Inventory Cost Method, such as Average Cost (AVCO), Standard Price, or First In First Out (FIFO) determines how product costs are calculated when new stock is received.You can also configure accounts like the Stock Valuation Account, which tracks the total inventory value, and the Inventory Valuation Journal, where all related entries are recorded.
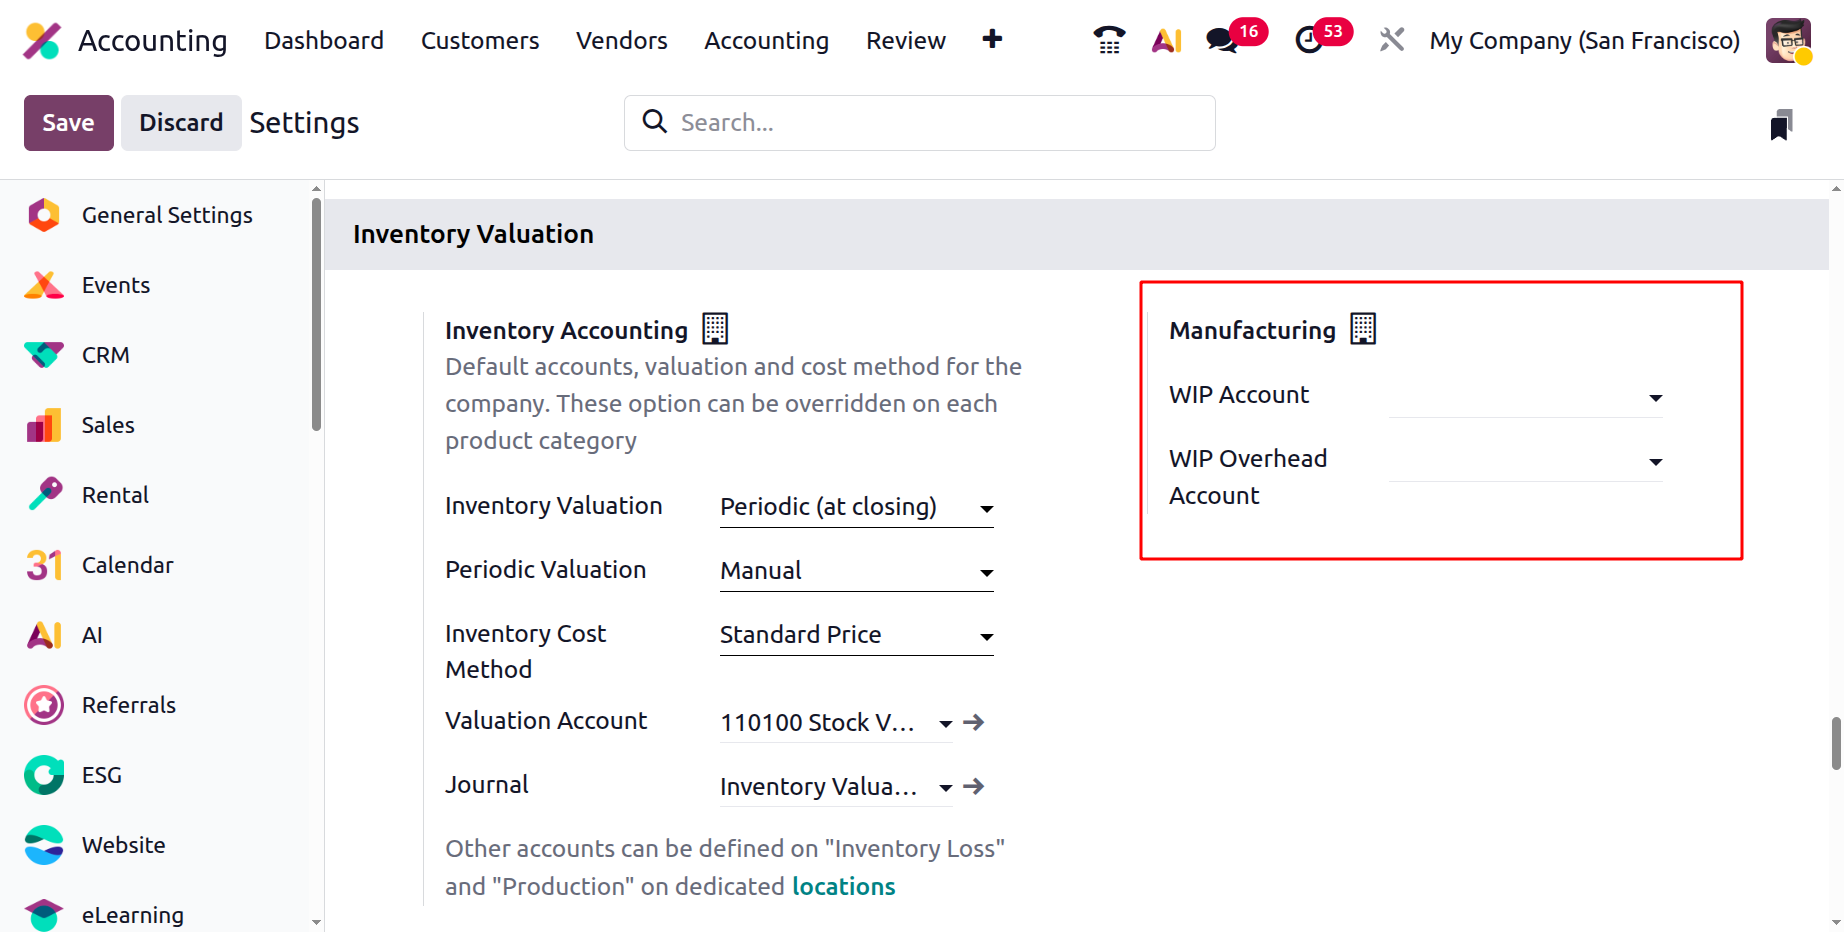
For companies using manufacturing, Odoo includes WIP (Work in Progress) and WIP Overhead Accounts to track production costs and overheads during the manufacturing process. These settings ensure accurate and transparent financial tracking of all inventory activities.
Fiscal Period
In the Fiscal Period section, you can define the last day of your financial year. Odoo uses this information to automatically manage and open new accounting periods as each year ends. For organizations that operate on non-standard accounting periods, either longer or shorter than 12 months, you can enable the Fiscal Years option to accommodate those customized reporting cycles.
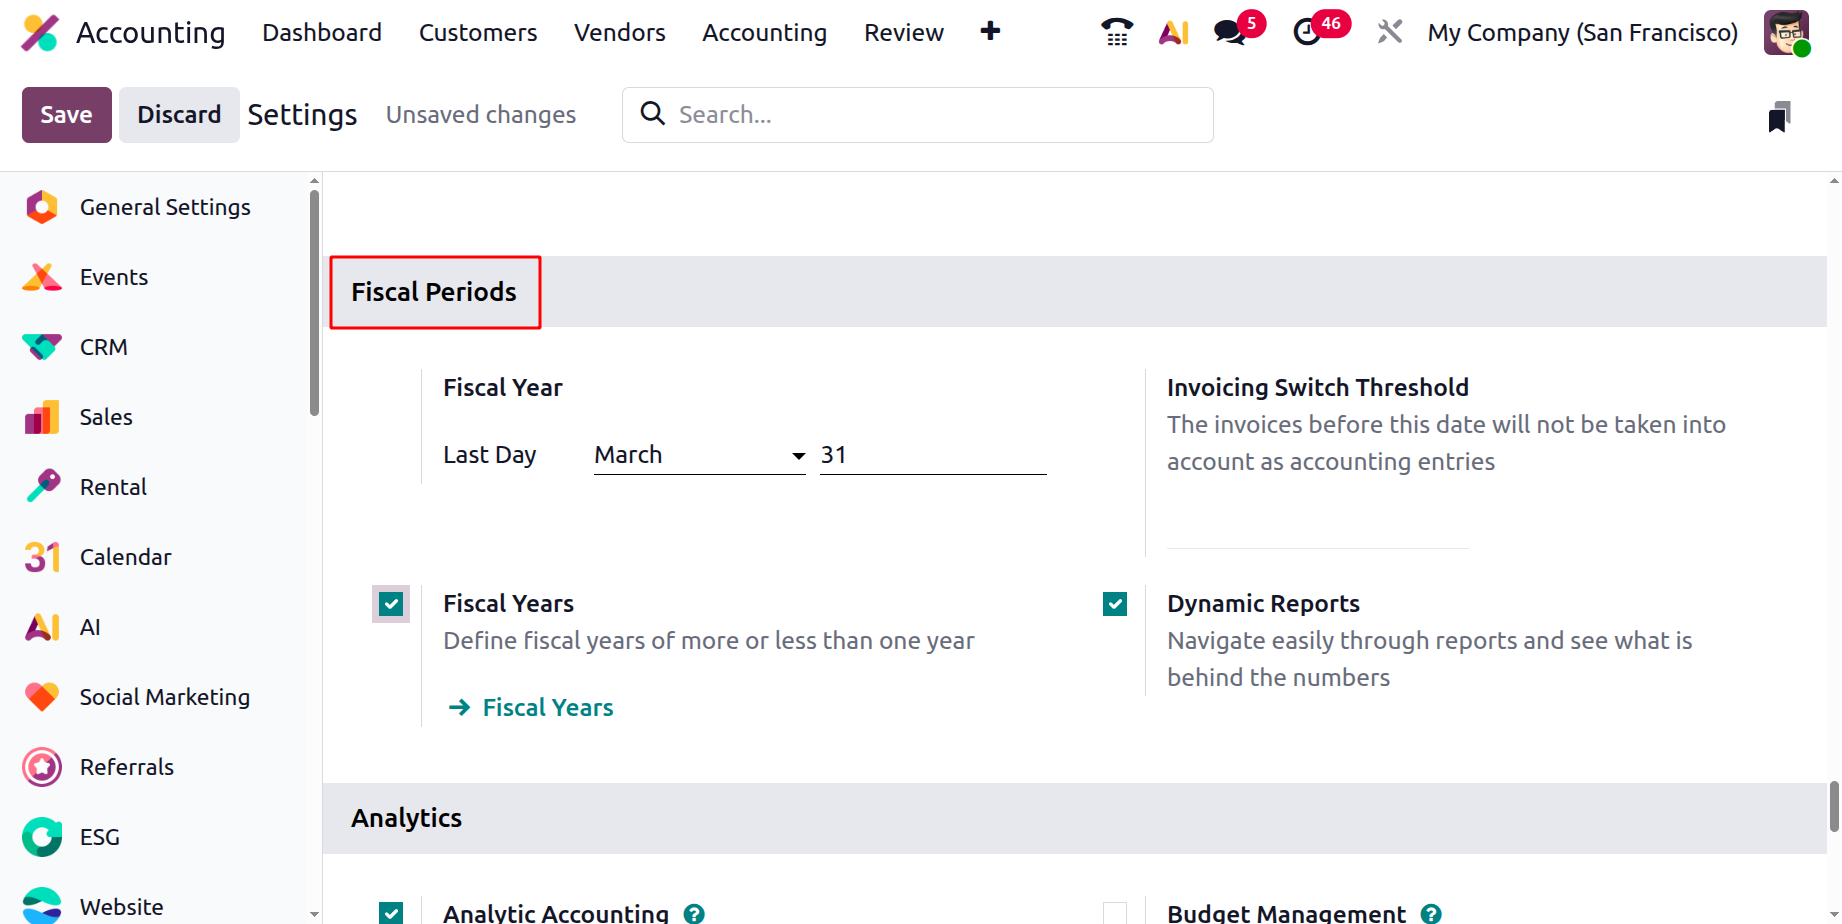
Invoicing Switch Threshold
In Odoo 19 Accounting, the Invoicing Switch Threshold feature provides an efficient way to manage the transition of invoices into accounting records. By setting a specific threshold date, businesses can define from which point onward invoices should be included in accounting entries. Any invoices created before this date will be excluded from the accounting books, allowing for a clean cutoff in financial reporting.
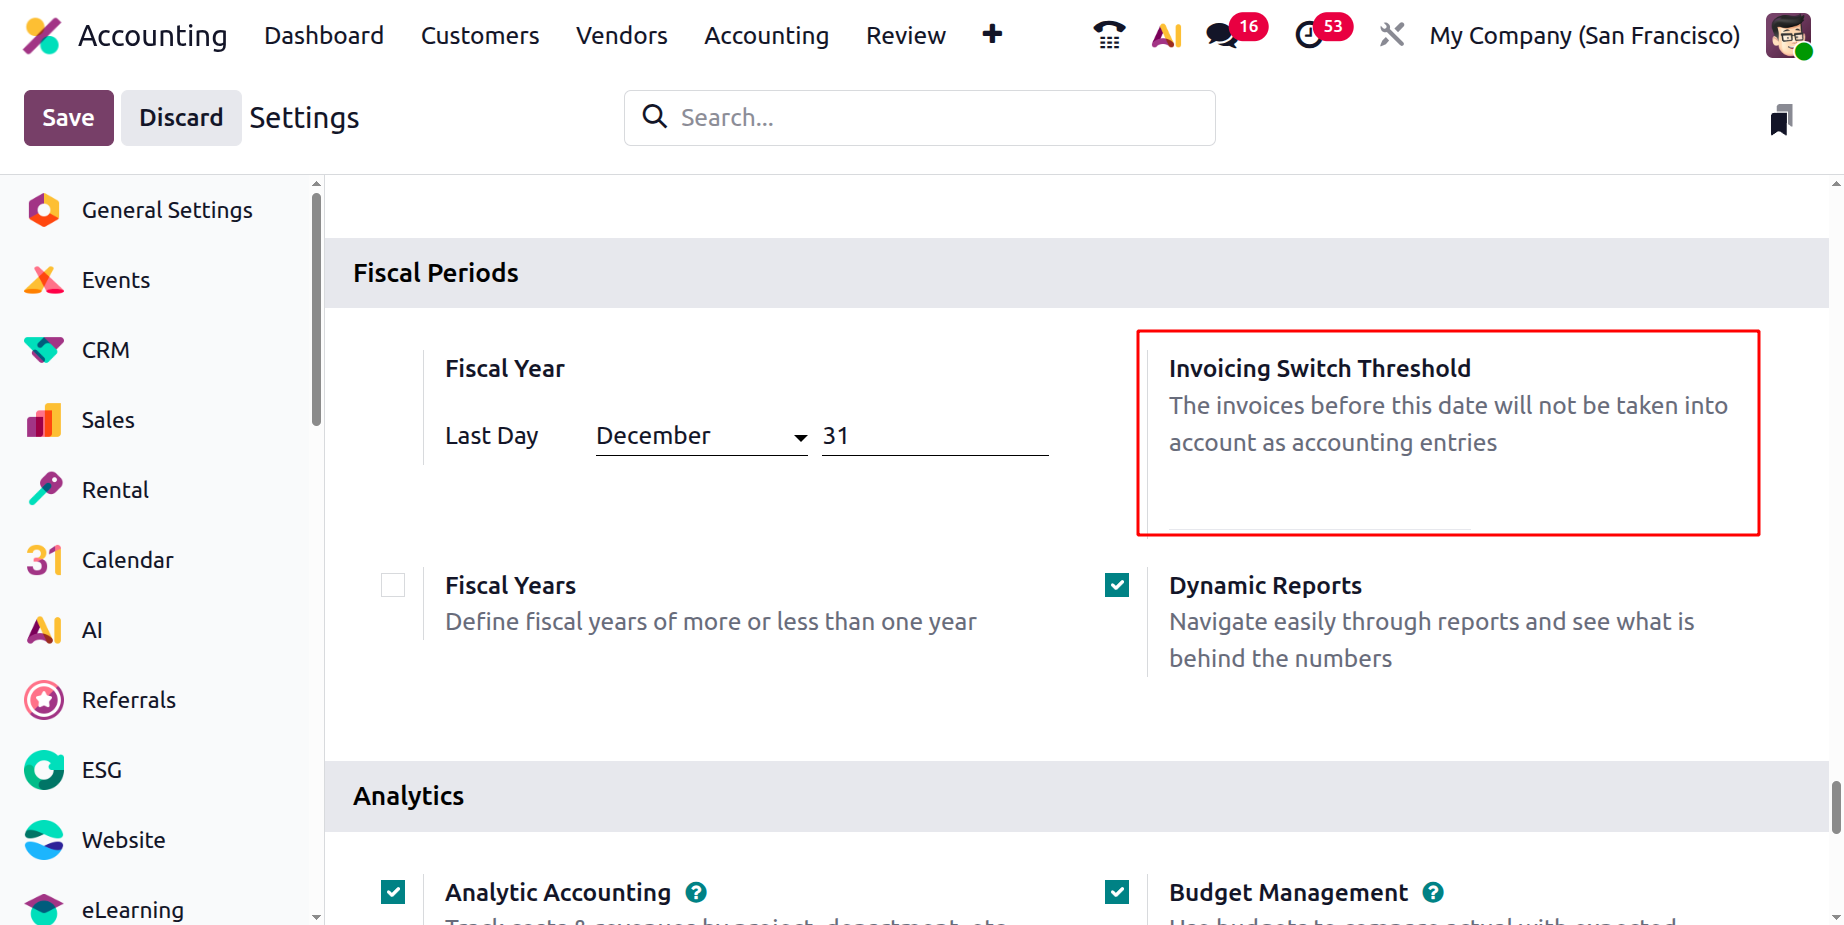
This feature is especially useful when migrating from another accounting system or starting a new fiscal period. It ensures that only relevant invoices are posted to the company’s accounts, helping maintain accuracy, avoid duplication, and simplify the overall bookkeeping process.
Once you enable the Fiscal Years option from the Settings menu in Odoo 19 Accounting, a new configuration option titled Fiscal Years will appear under the Configuration menu.
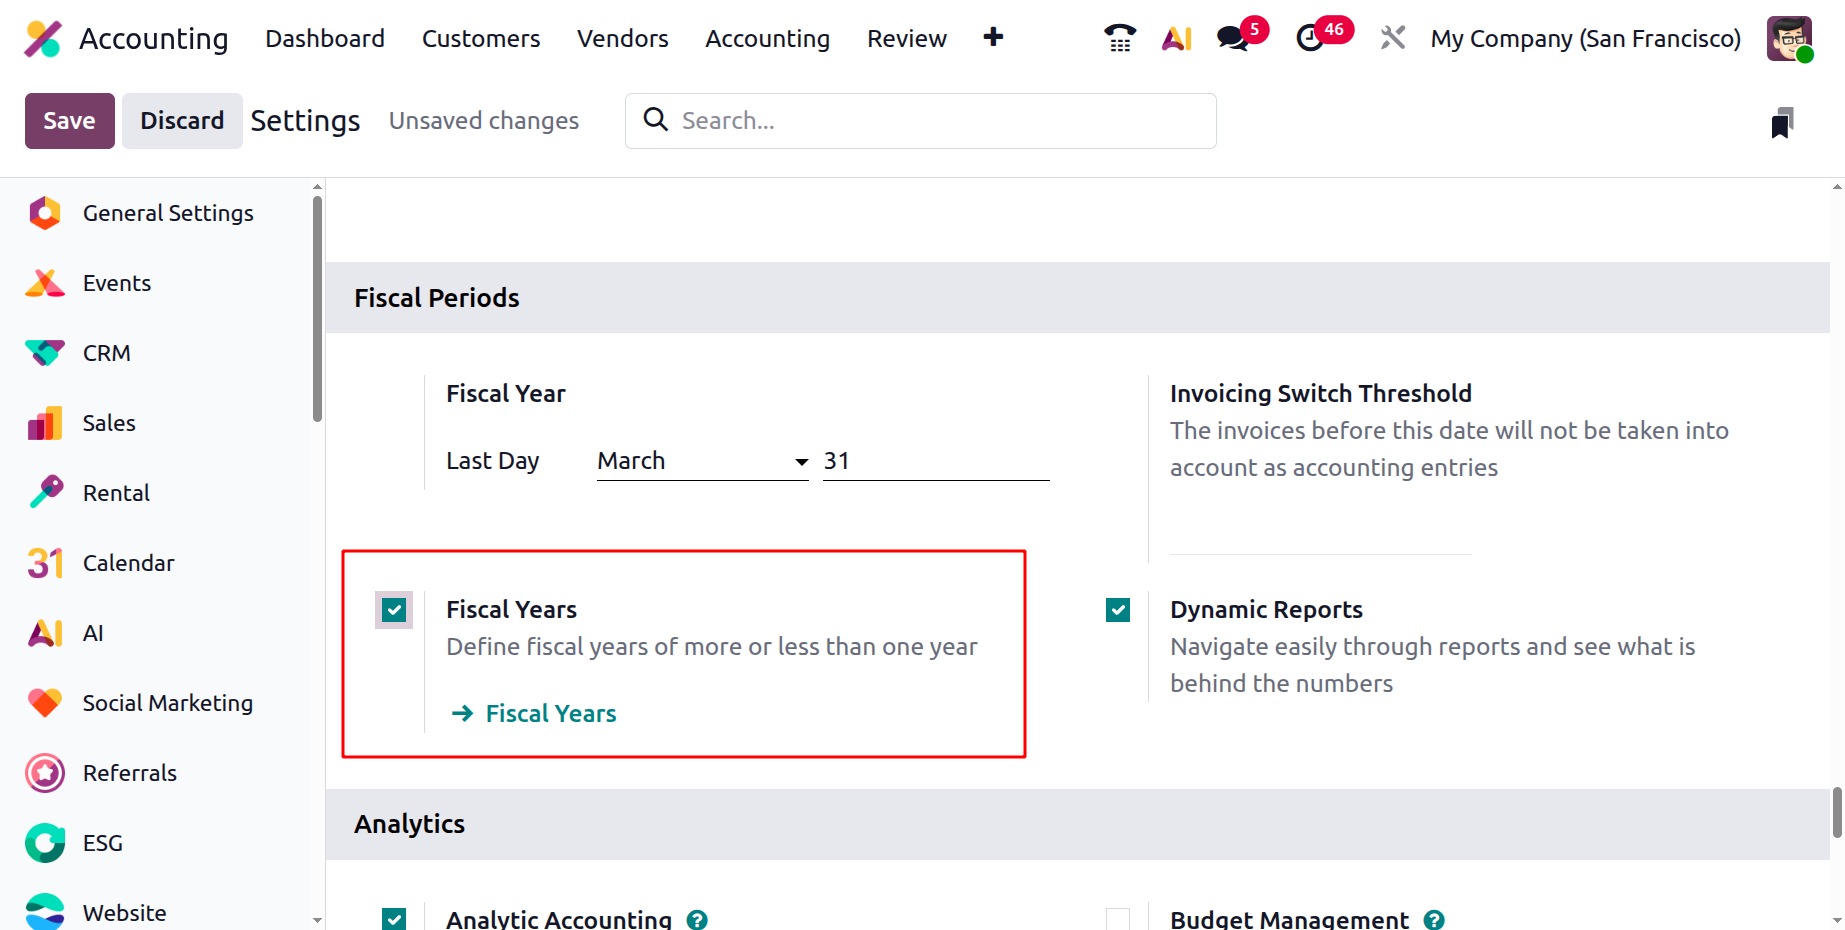
This feature allows you to define and manage custom fiscal periods that differ from the standard 12-month calendar year, accommodating organizations with unique financial cycles.

By clicking the New button, you can create a new fiscal year and specify its essential details. In the configuration window, enter the Name, Start Date, End Date, and Company in the respective fields. These fields ensure that each fiscal year is clearly identified and properly associated with the relevant company entity within a multi-company environment.
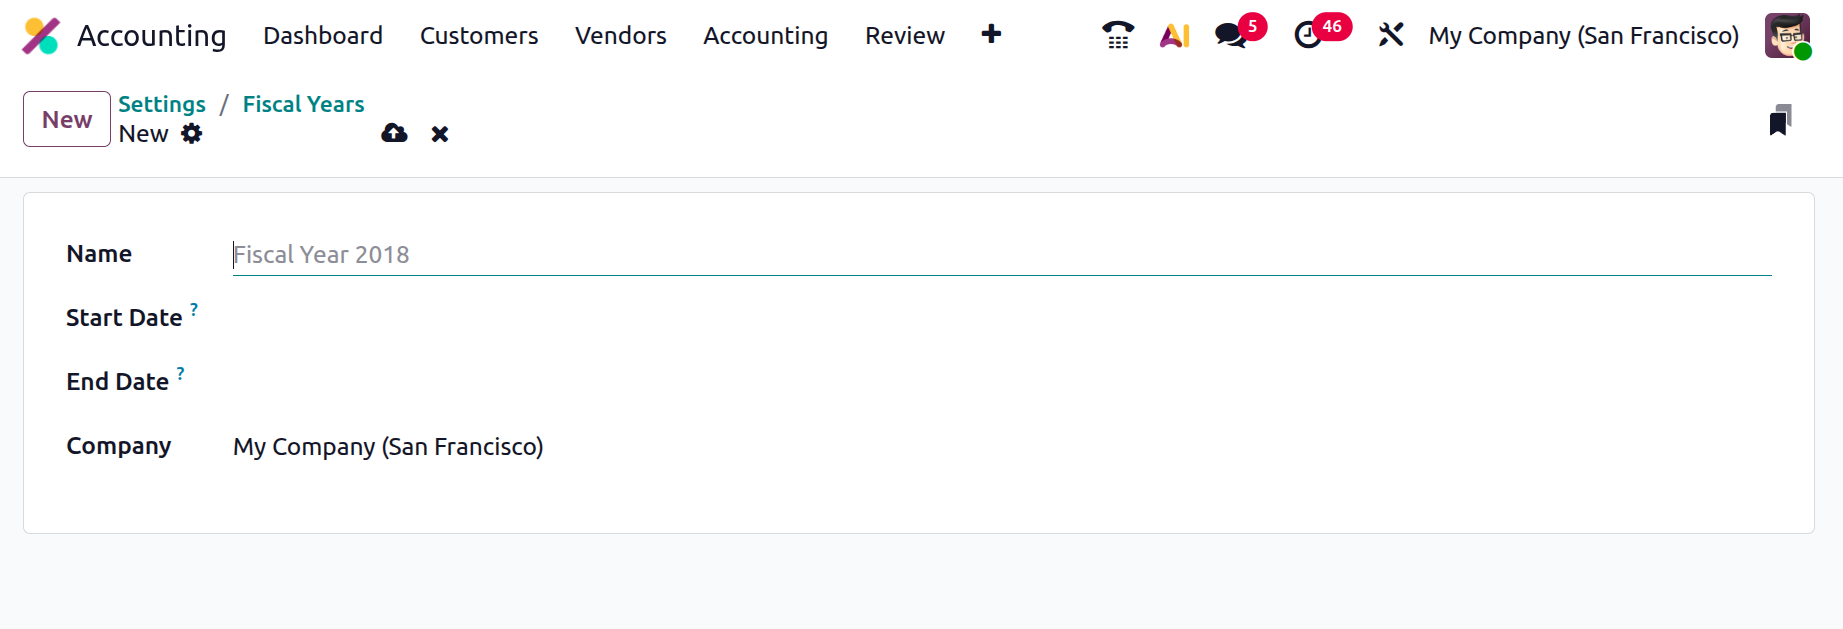
Once saved, the defined fiscal year will automatically guide Odoo in managing accounting entries, financial reports, and closing operations within the specified date range.
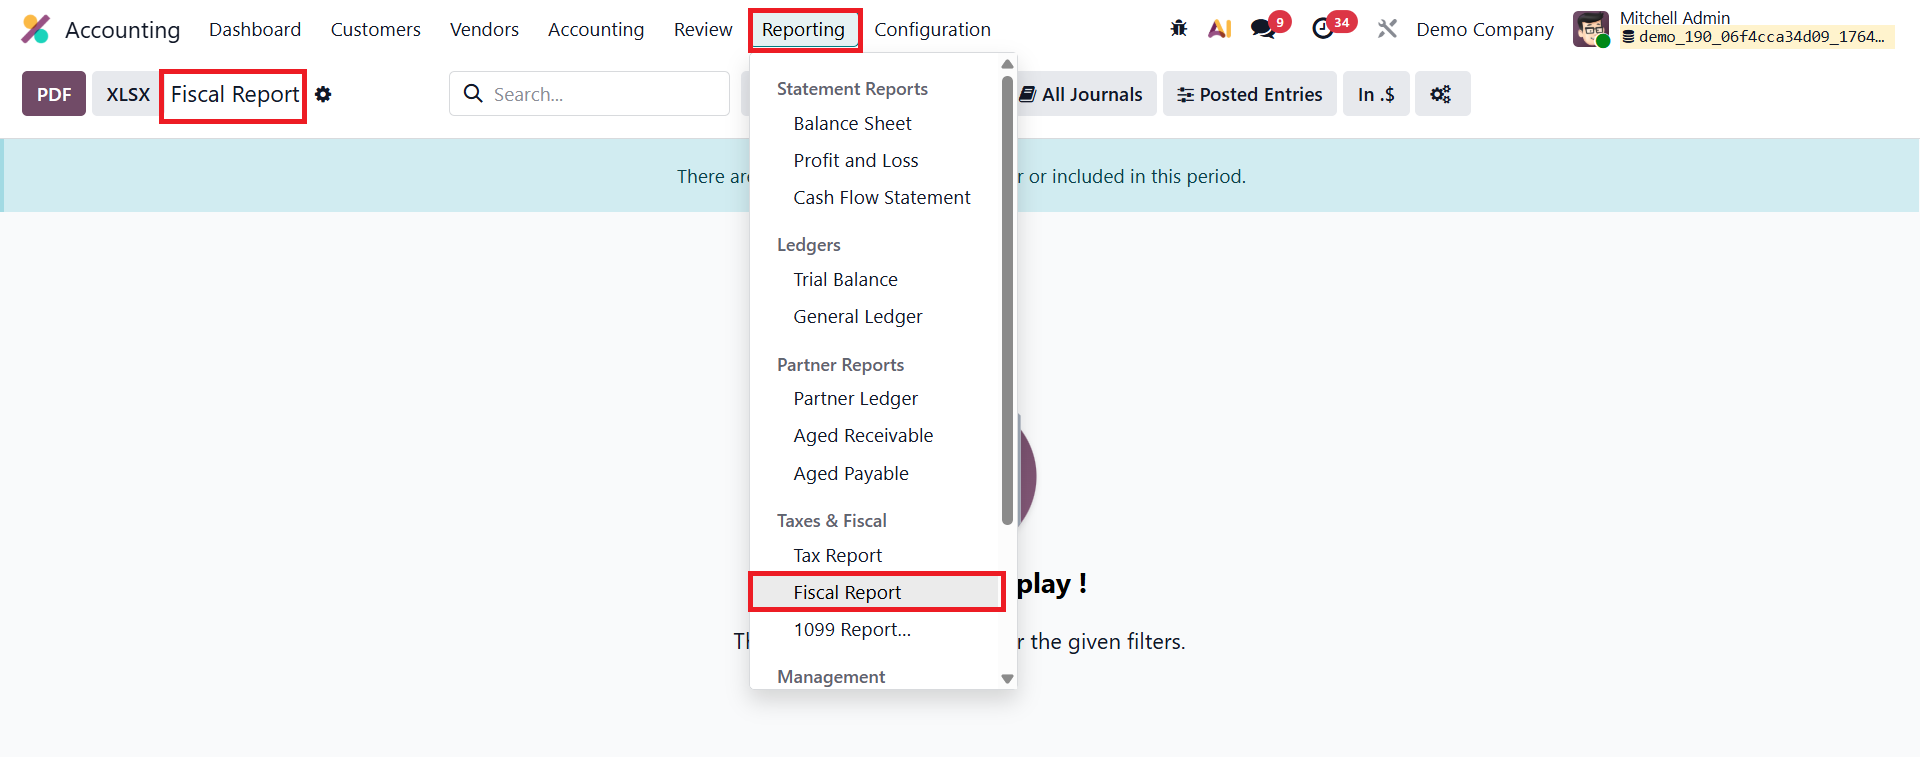
In Odoo 19 Accounting, the Fiscal Report available under the Reporting menu provides a structured financial overview tailored for statutory and regulatory compliance. It consolidates key accounting figures, such as revenue, expenses, assets, liabilities, and equity, based on local fiscal requirements, allowing accountants to review and verify financial accuracy before final submission. This report is essential for preparing official financial statements, supporting audit processes, and ensuring that the company’s books align with government-mandated accounting standards.
Dynamic Reports
In Odoo 19 Accounting, the Dynamic Reports feature enhances financial analysis by allowing users to interact directly with reports and explore the data behind each figure.
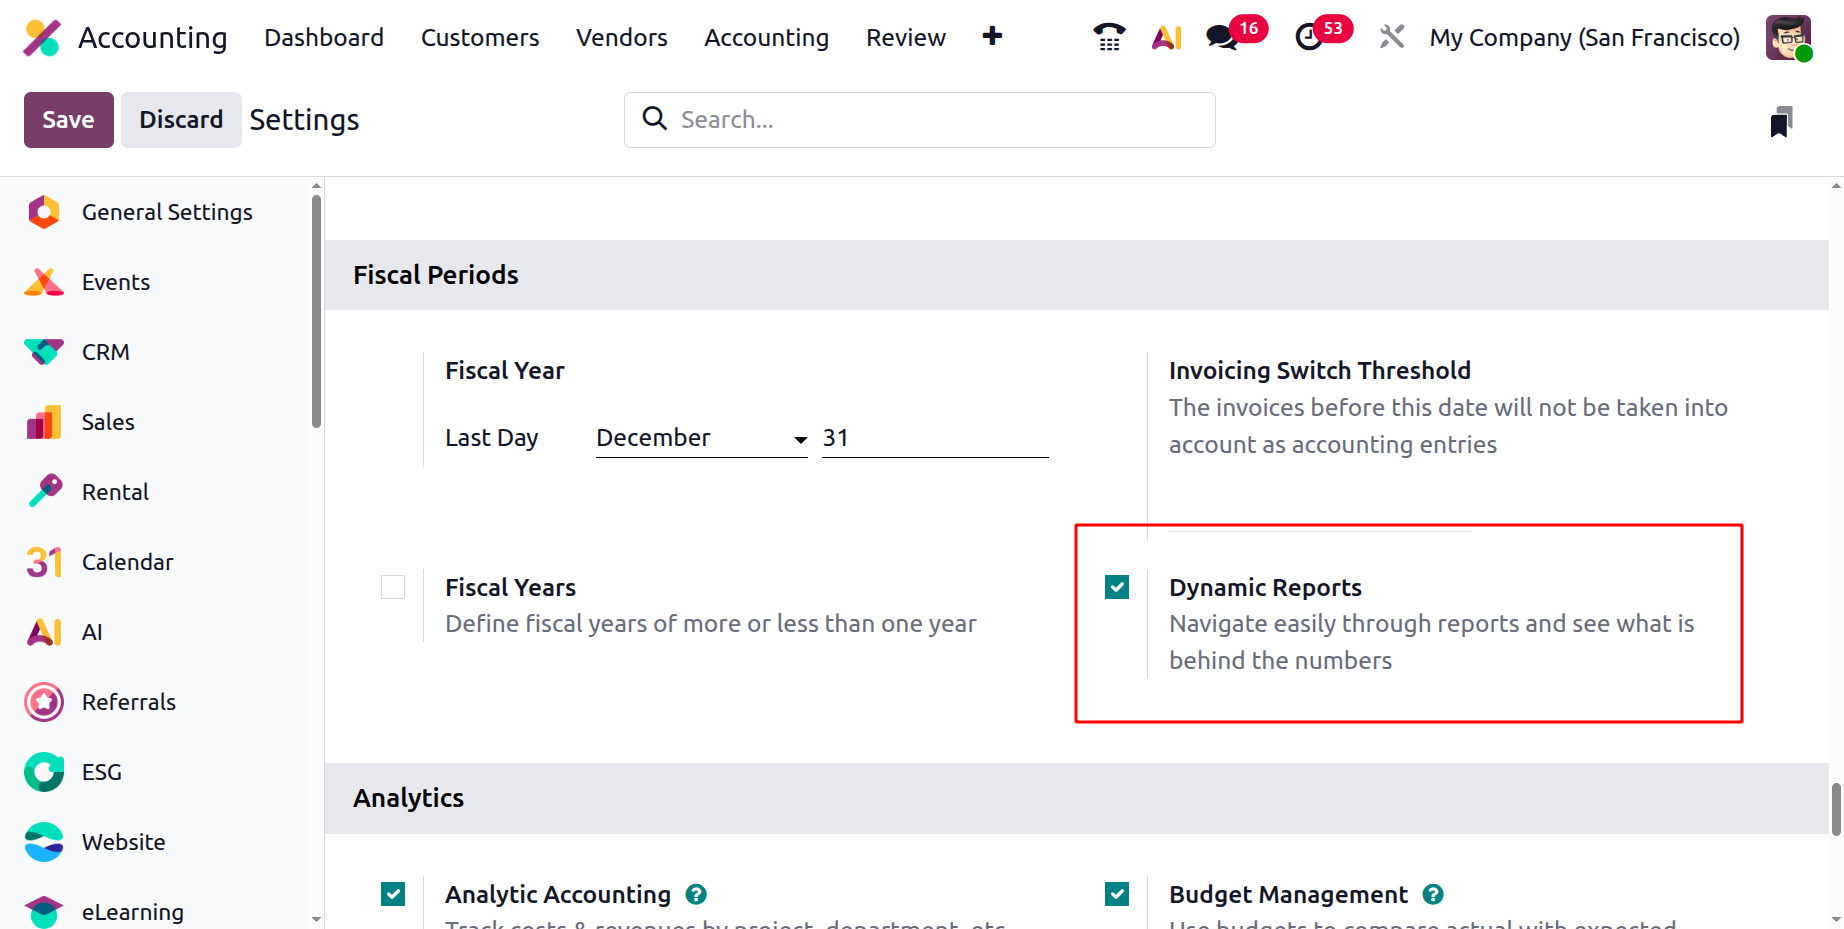
When this option is enabled under the Fiscal Period section in the Settings, users can click on any value within financial reports, such as the Profit and Loss or Balance Sheet, to instantly open the related journal entries.
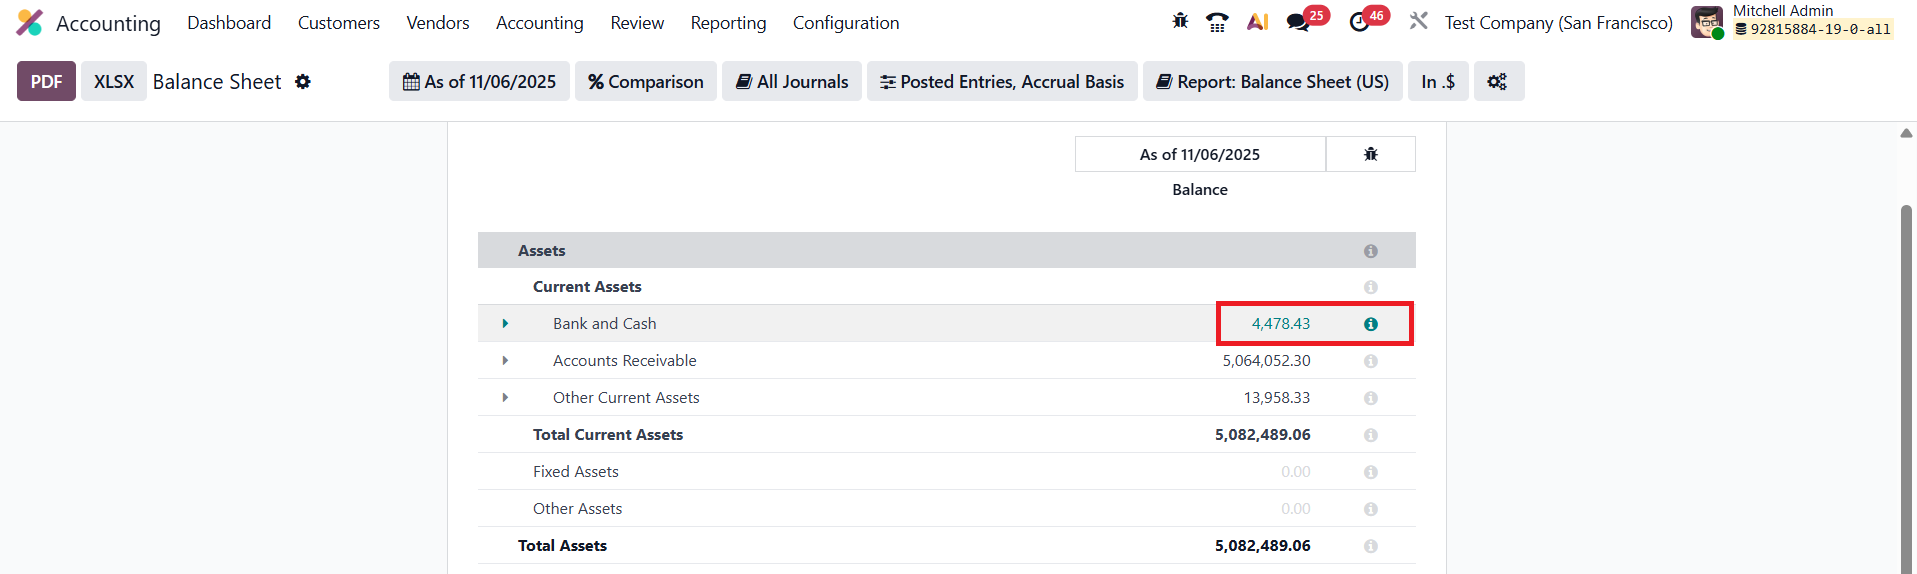
This drill-down capability provides a clear and intuitive way to verify figures, trace transactions, and ensure data accuracy.
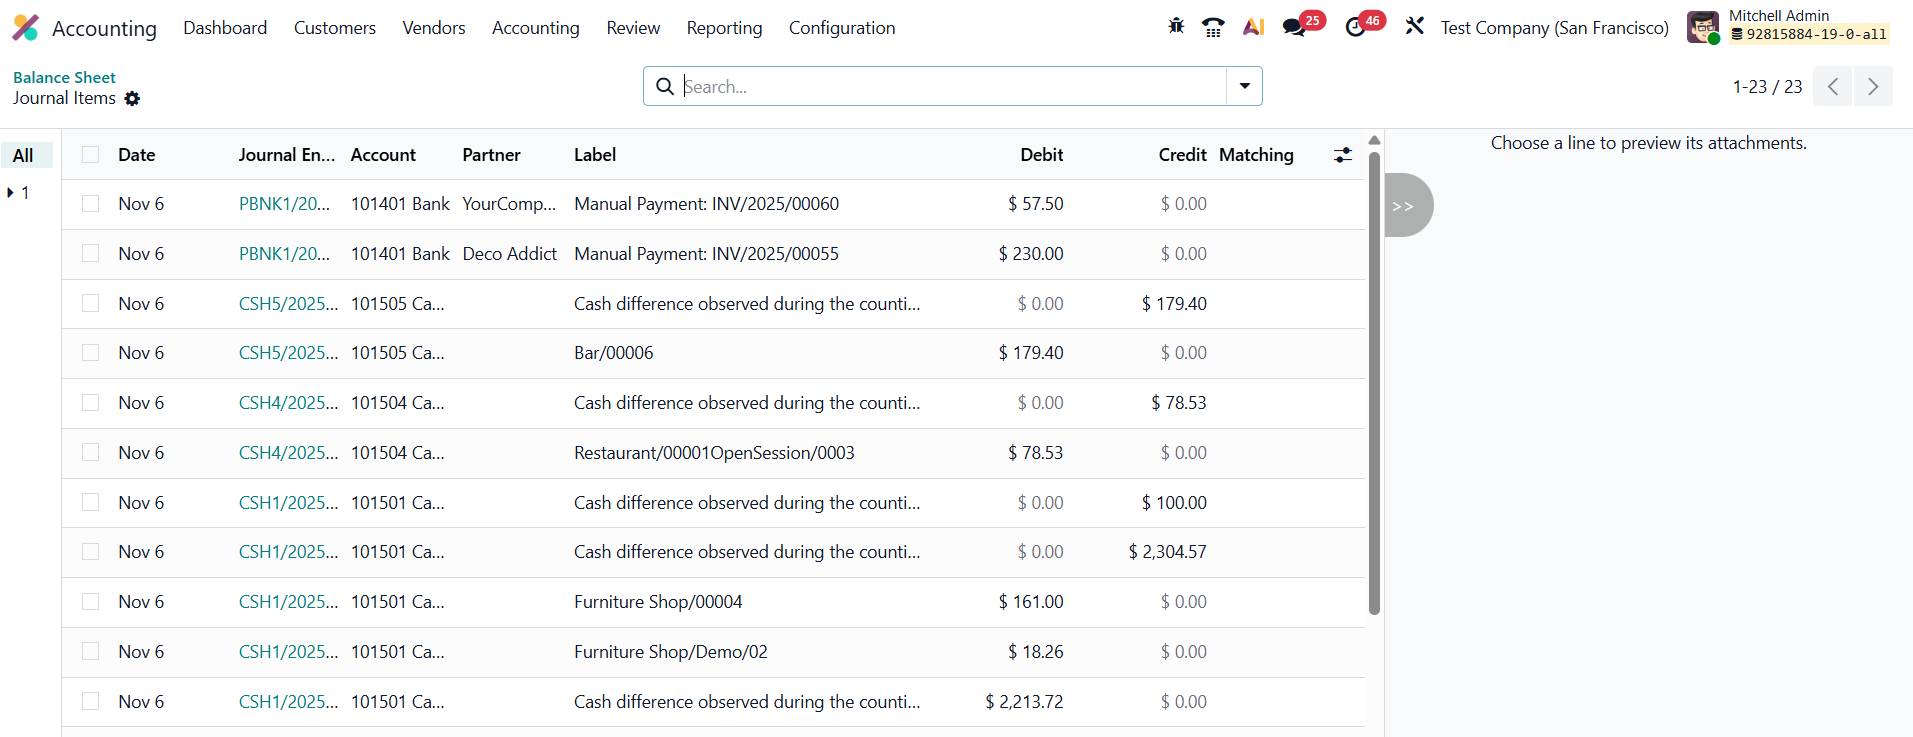
By connecting summarized financial data to its detailed records, Dynamic Reports make financial reviews faster, more transparent, and easier to manage.
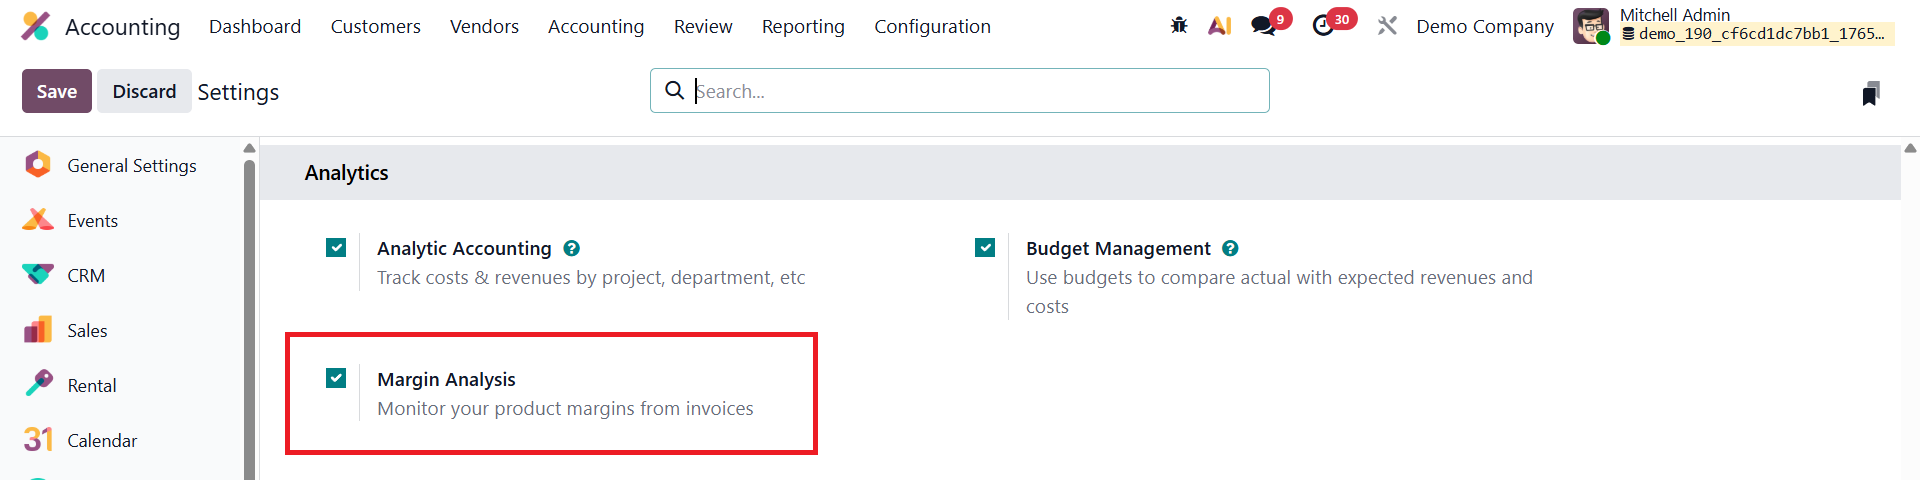
Margin Analysis
Margin Analysis in Odoo 19 Accounting allows businesses to closely monitor the profitability of their products directly from customer invoices, helping them make informed pricing and sales decisions. By comparing the sales price with the cost of the product, Odoo automatically calculates the margin for each invoice line, giving clear visibility into how much profit is generated from every sale.
Add Totals Below Sections
In Odoo 19 Accounting, the Add Totals Below Sections feature enhances the clarity and presentation of financial reports by displaying totals and subtotals at the bottom of each section.
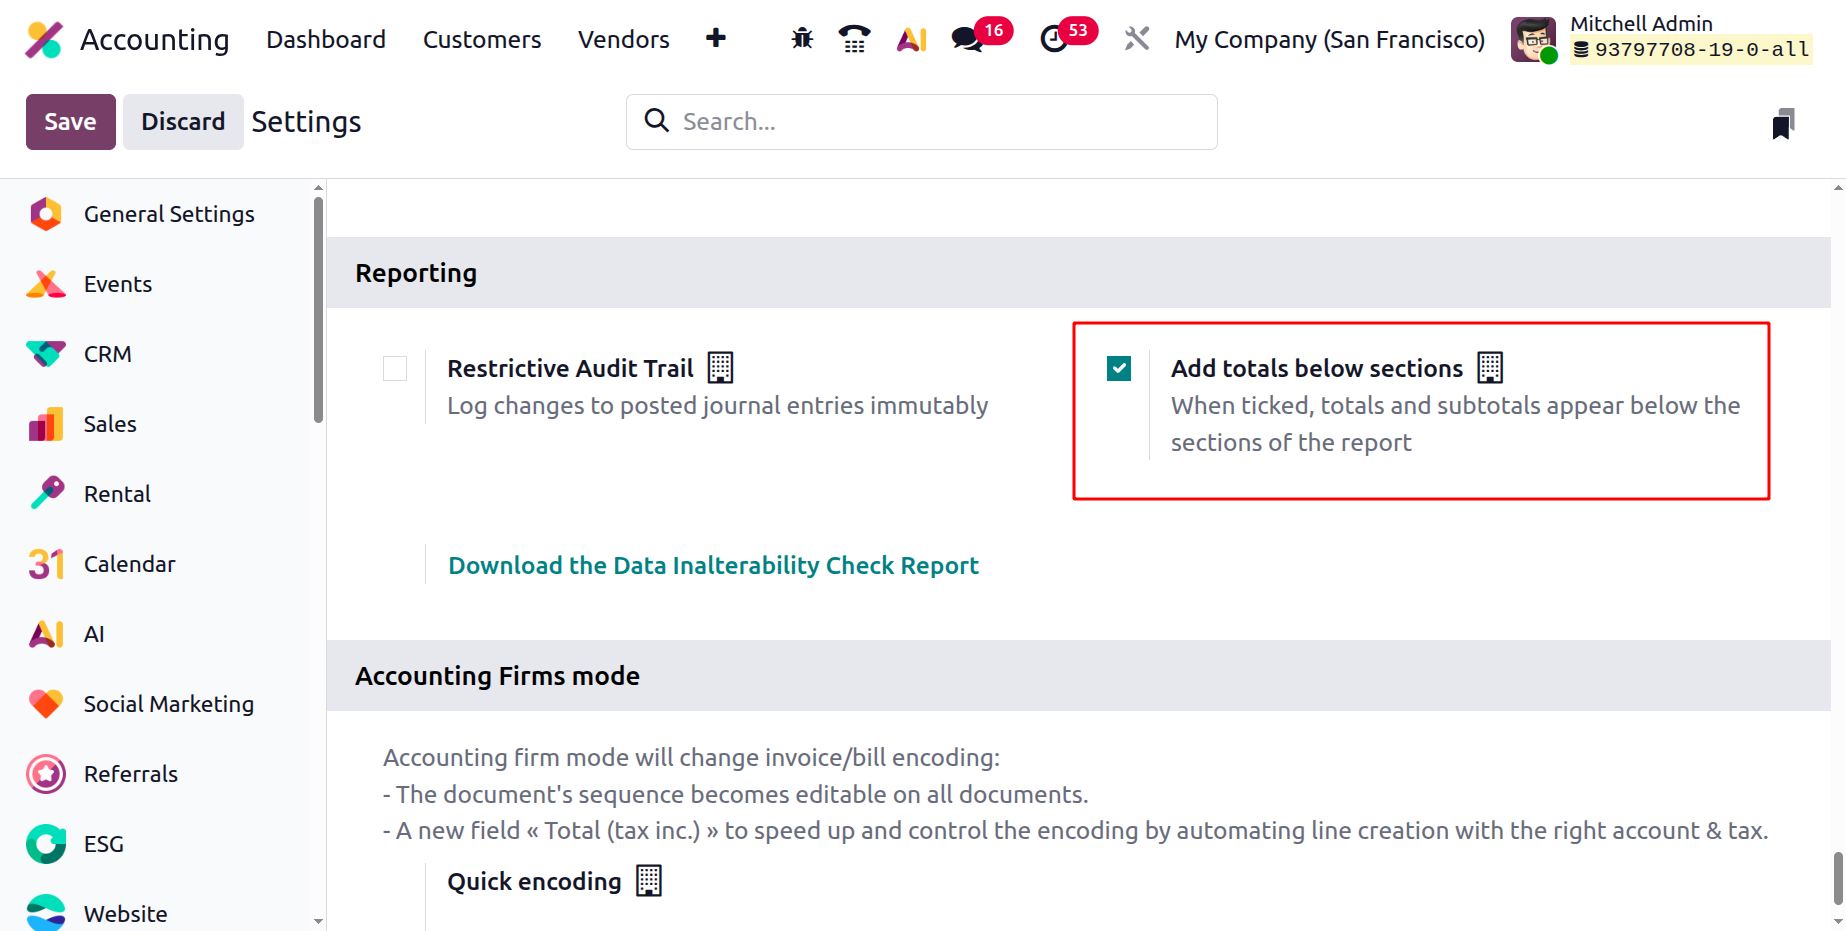
When enabled in the accounting settings, this option automatically adds summary lines that show the total amounts for specific report categories, such as assets, liabilities, or expenses.
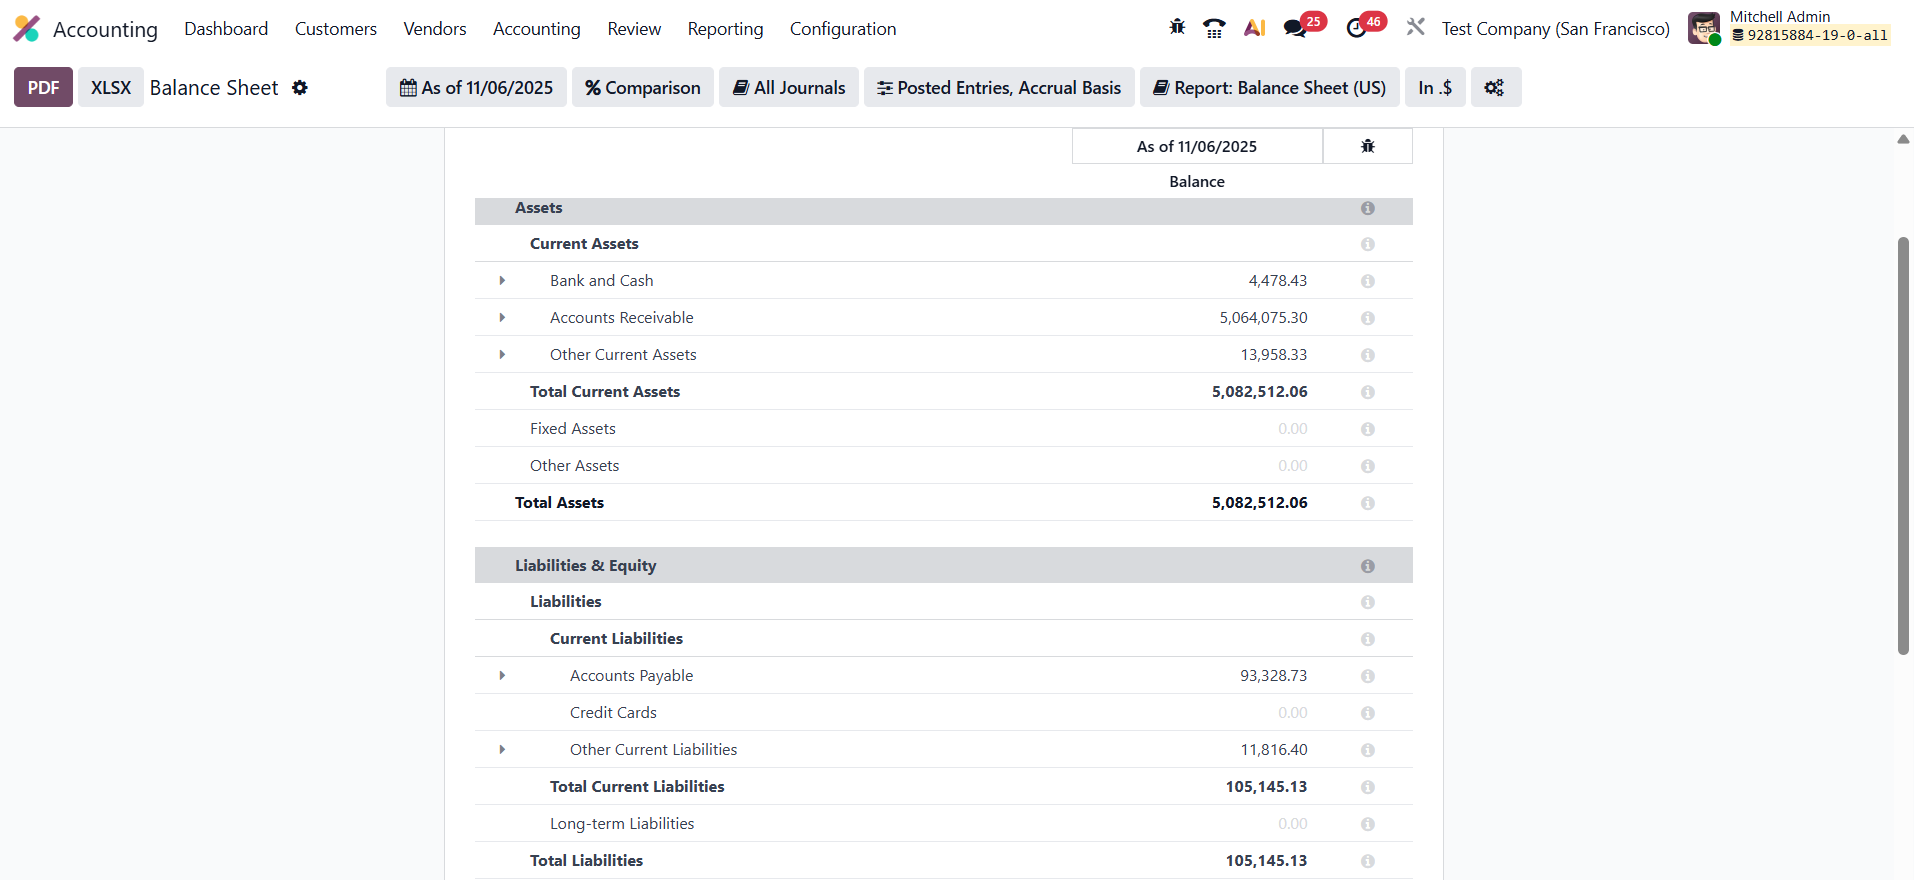
This feature helps users quickly interpret financial results without manually calculating section totals. By clearly displaying summarized values at the end of each section, Odoo 19 makes reports more readable and supports faster, more accurate financial analysis.
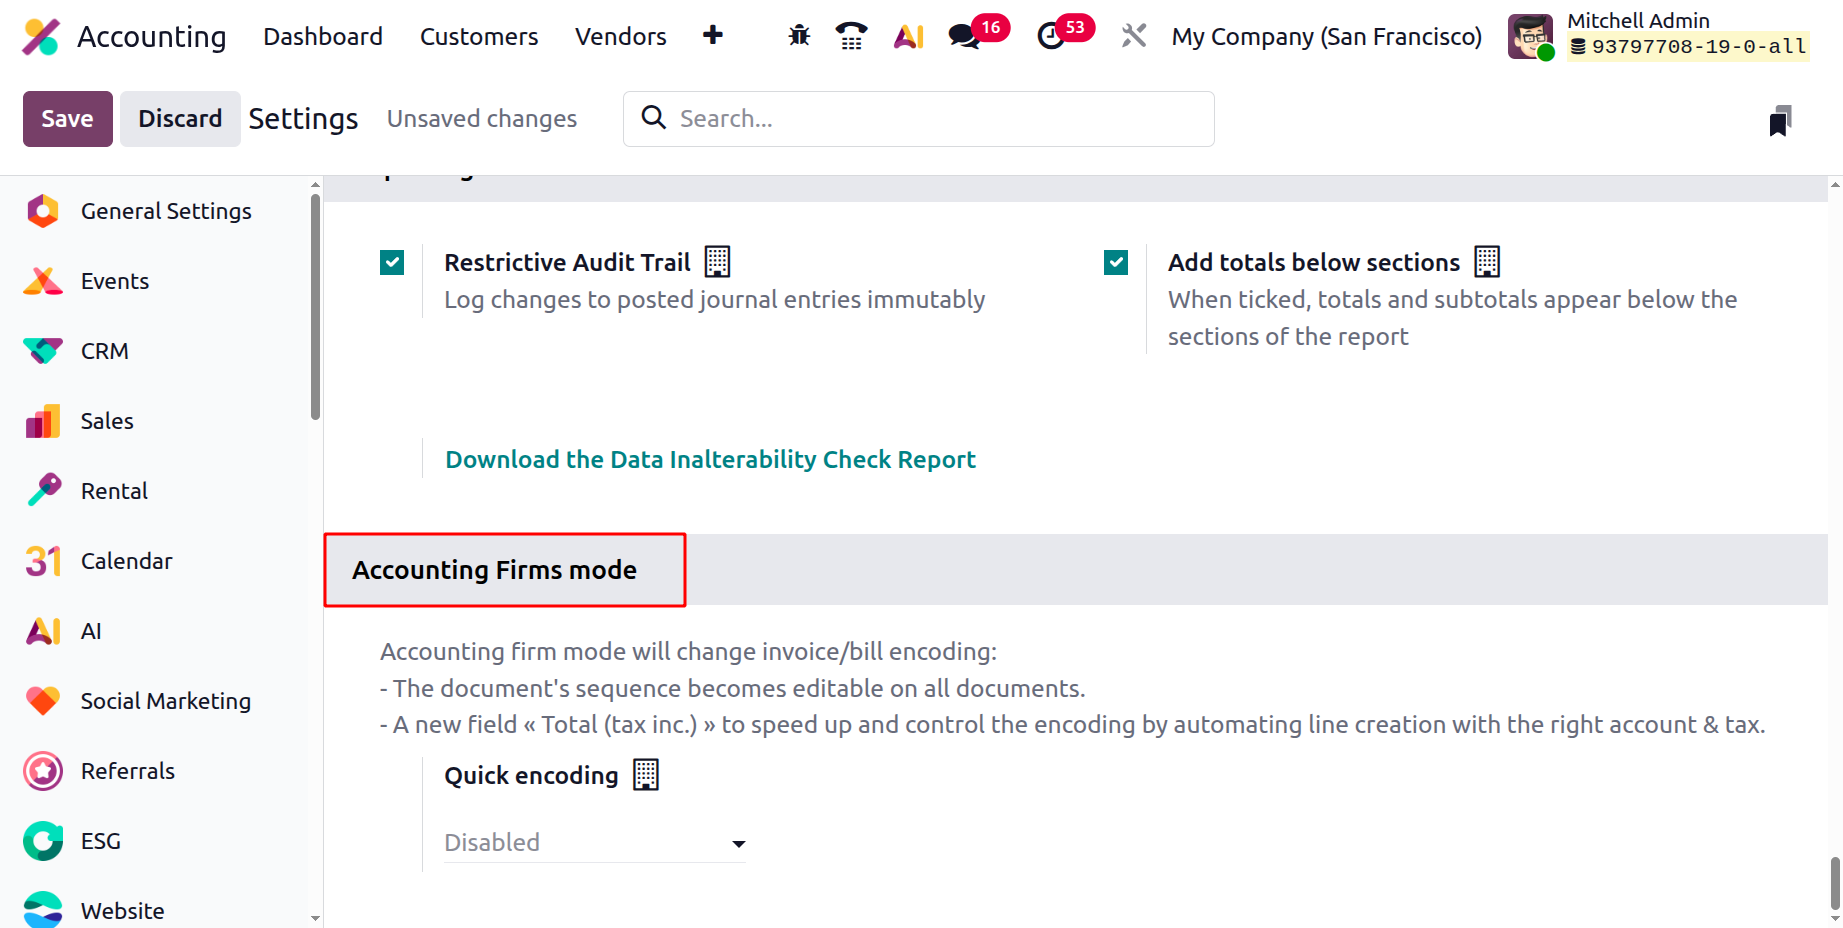
Accounting Firms Mode
In Odoo 19 Accounting, the Accounting Firms Mode is designed to streamline and enhance the process of encoding invoices and bills, making data entry faster and more accurate. This option is available in the Settings menu of the Accounting module and is especially useful for accountants and users who frequently manage or adjust invoice and bill details.
When enabled, Accounting Firms Mode introduces several key improvements. It allows users to edit the sequence numbers of invoices and bills, ensuring better organization and tracking of financial documents. The system also automatically suggests default dates for vendor bills and customer invoices, reducing manual entry and saving time. Additionally, a new field called “Total (Tax Inclusive)” helps automate the creation of invoice lines with the correct accounts and tax details, improving accuracy.
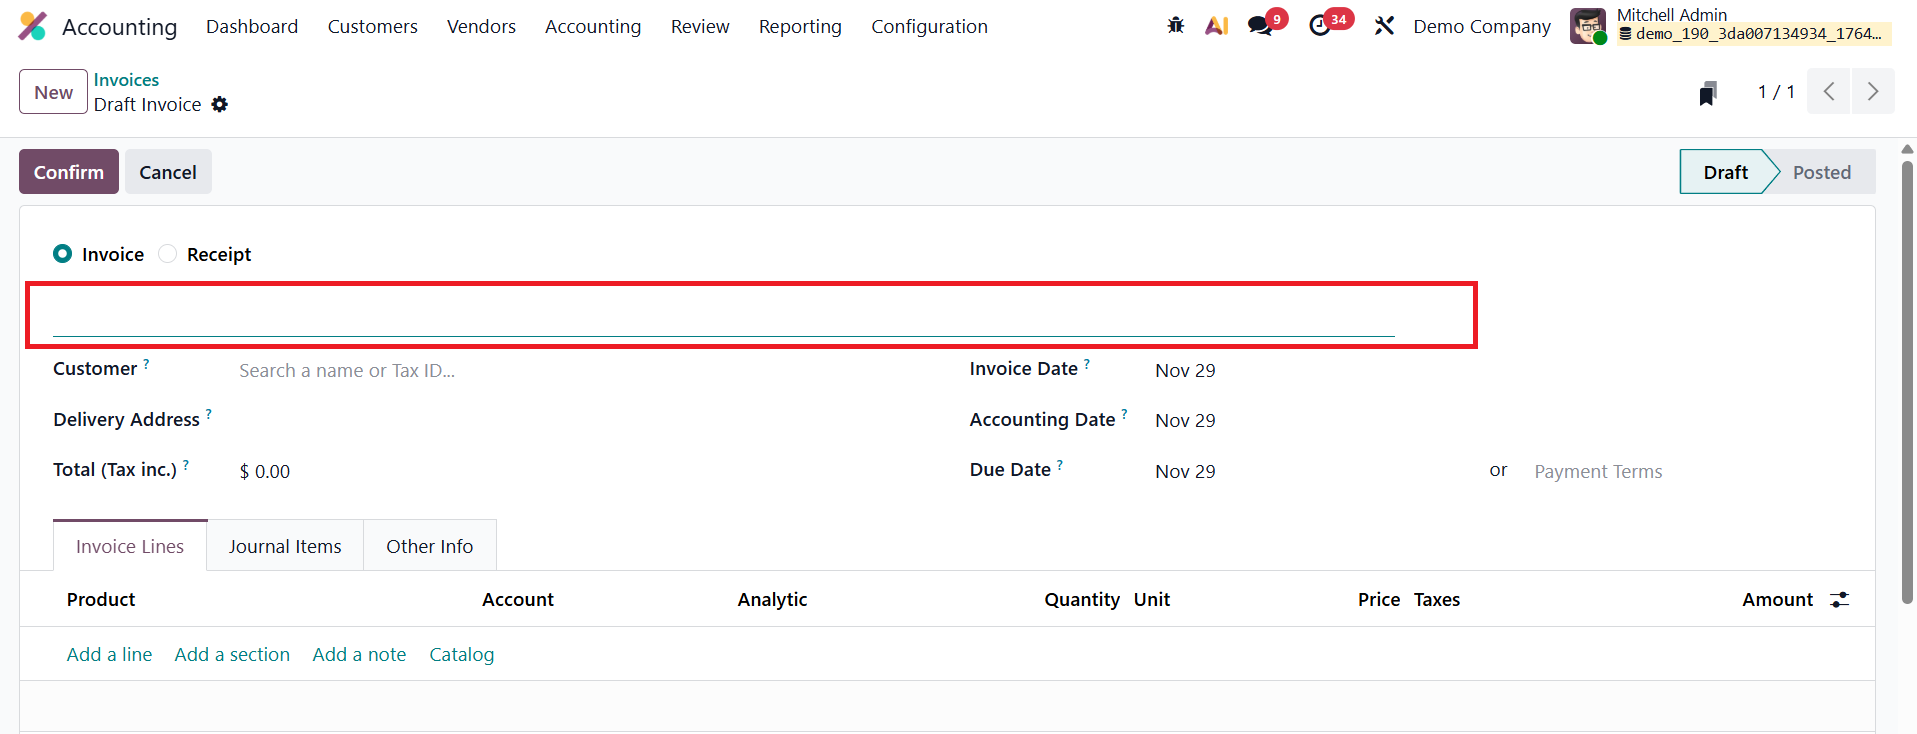
In practical use, this mode enables users to set a custom invoice sequence number when creating invoices, while Odoo automatically fills in the bill date and accounting date, both of which can still be modified if needed.
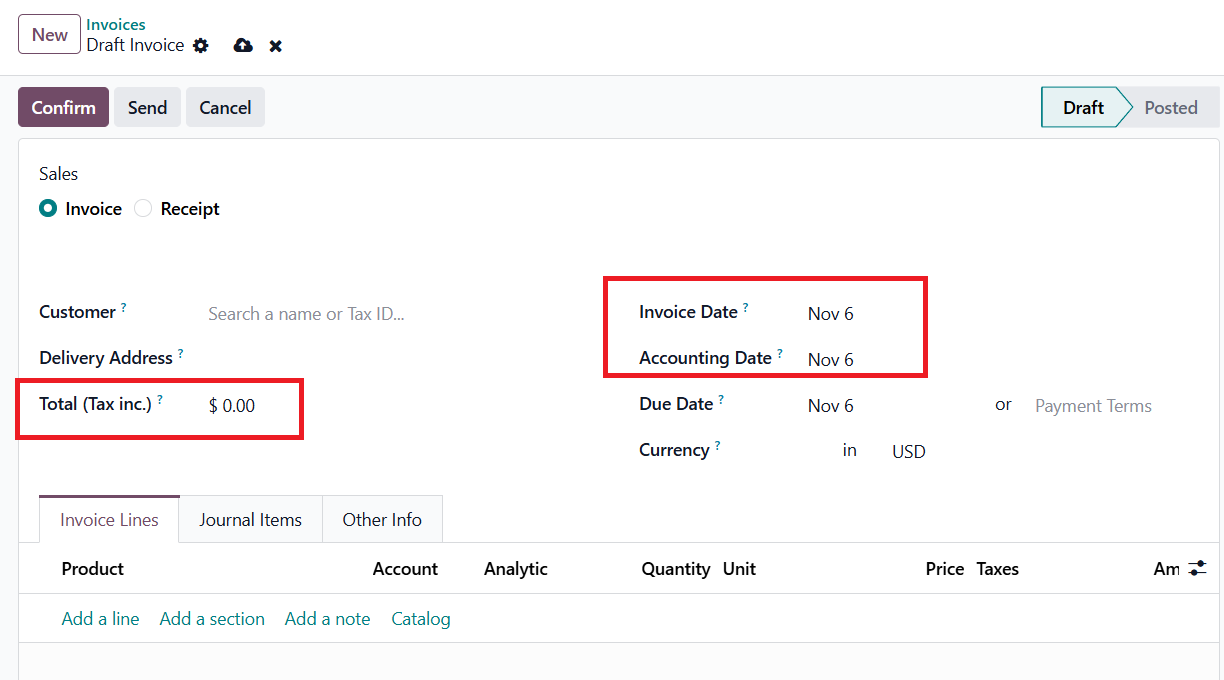
Moreover, users can enter the total amount including taxes before adding individual product lines, and Odoo will automatically calculate and distribute the values accordingly. Overall, the Accounting Firms Mode in Odoo 19 simplifies and accelerates invoice and bill management, ensuring a smoother and more precise workflow for financial professionals.