Odoo 19 Planning is a simplified module designed to help companies effectively manage resources, schedule teams, and organise workloads. Managers can easily assign tasks, shifts, or projects by its user-friendly, drag-and-drop planning interface. Real-time visibility helps to maintain proper staffing levels and keeps workloads evenly balanced. Workers can use any device to view their schedules, make changes, and keep track of upcoming tasks. Smooth departmental coordination is made possible by integration with Odoo's Projects, HR, and Timesheets modules. Odoo 19 Planning boosts communication, increases productivity, and facilitates better decision-making for both small and large teams with forecasting tools, skills matching, and conflict detection.
The Planning module has five menus: Schedule, Open Shifts, My Planning, Reporting, and Configuration.
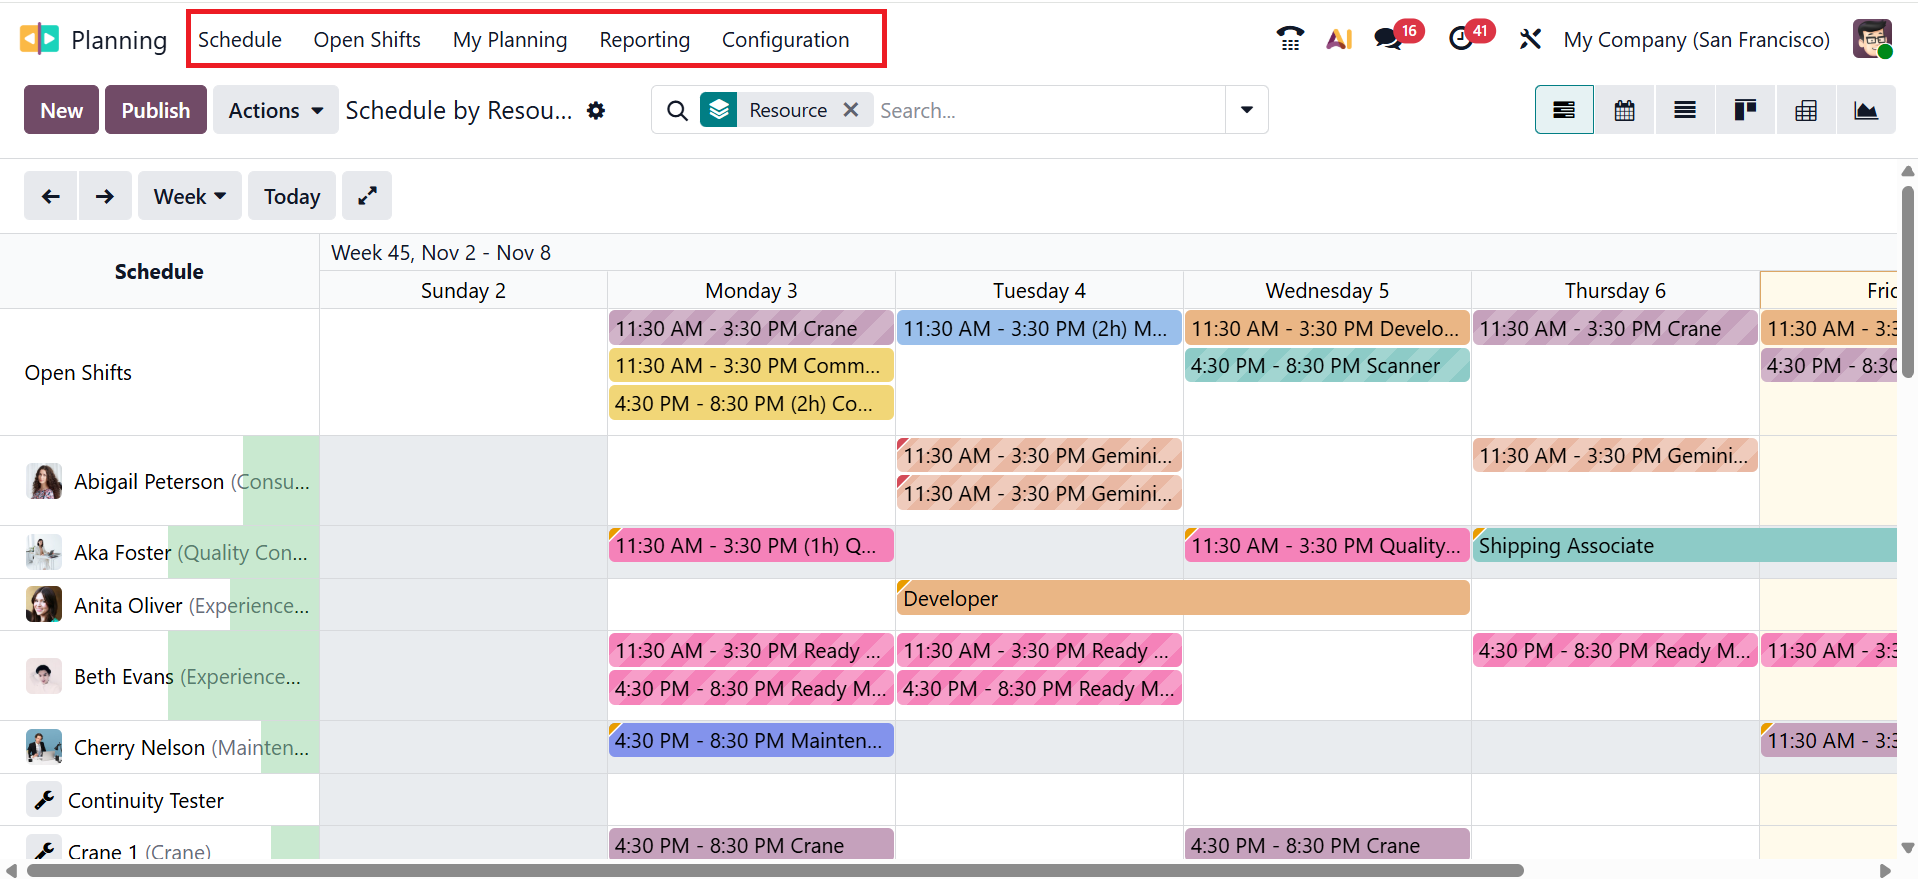
1. Schedule:
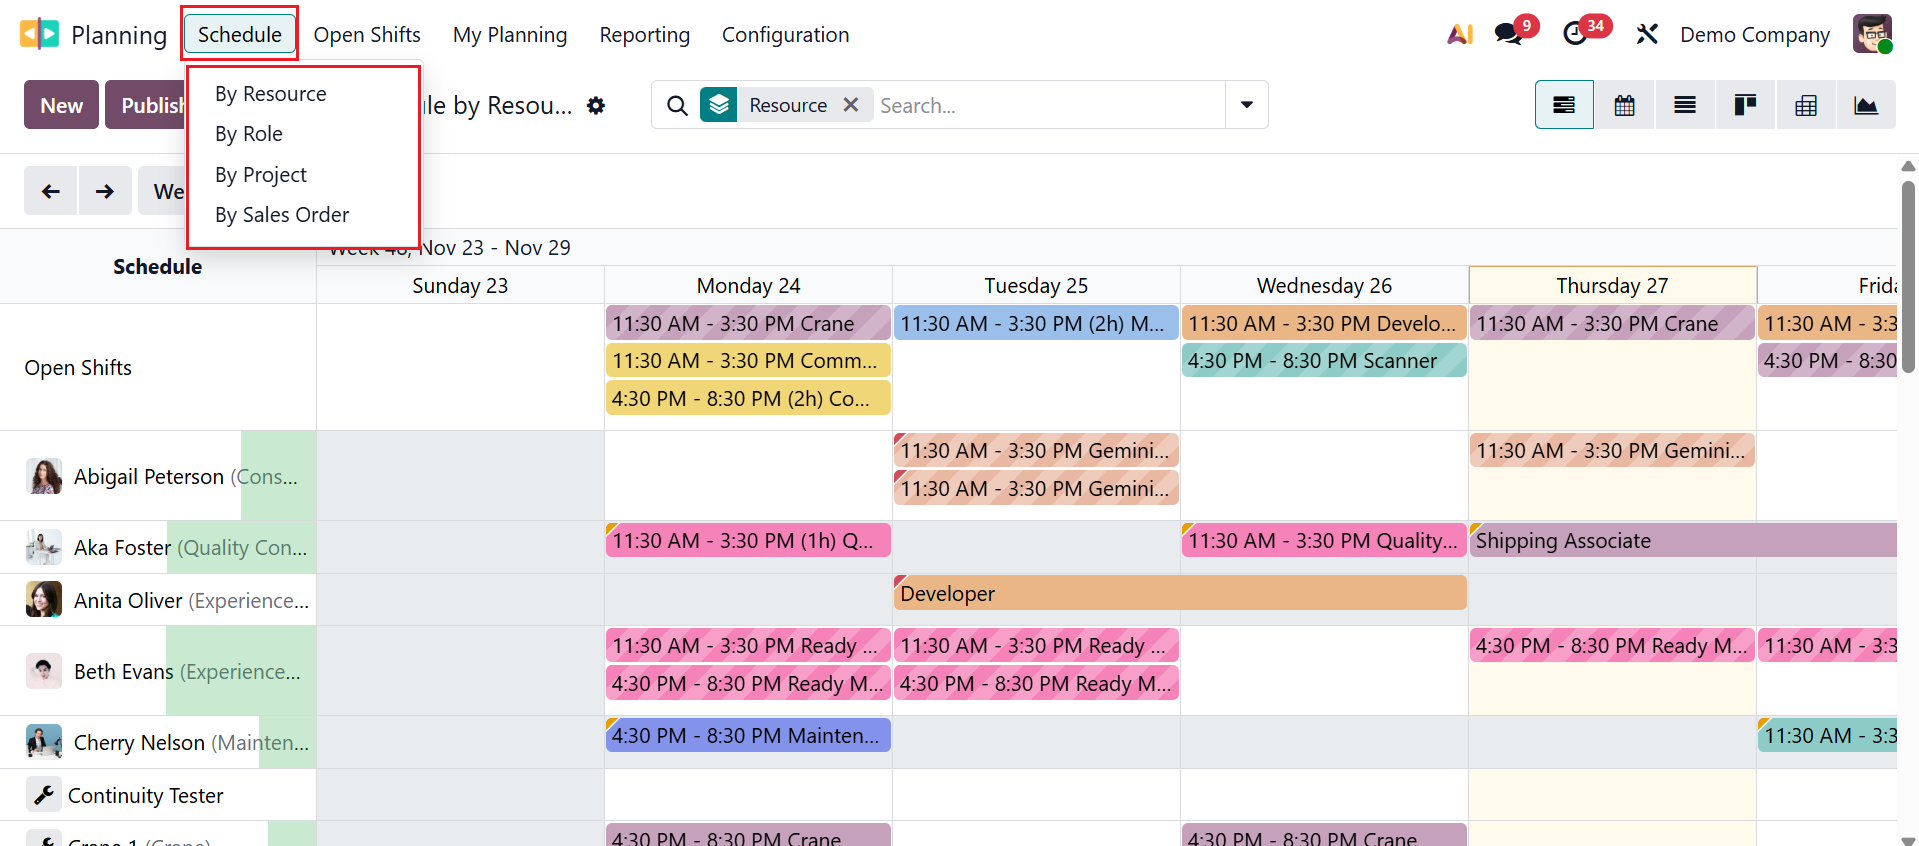
By default, the Schedule menu shows the main dashboard of the Planning module. The dashboard's calendar interface makes it easy to arrange activities. It helps to organize employee shifts, tasks, or resources into a clear timeline for specific dates and time slots. The Schedule menu has four options: By Resource, By Role, By Project, and By Sales Order.
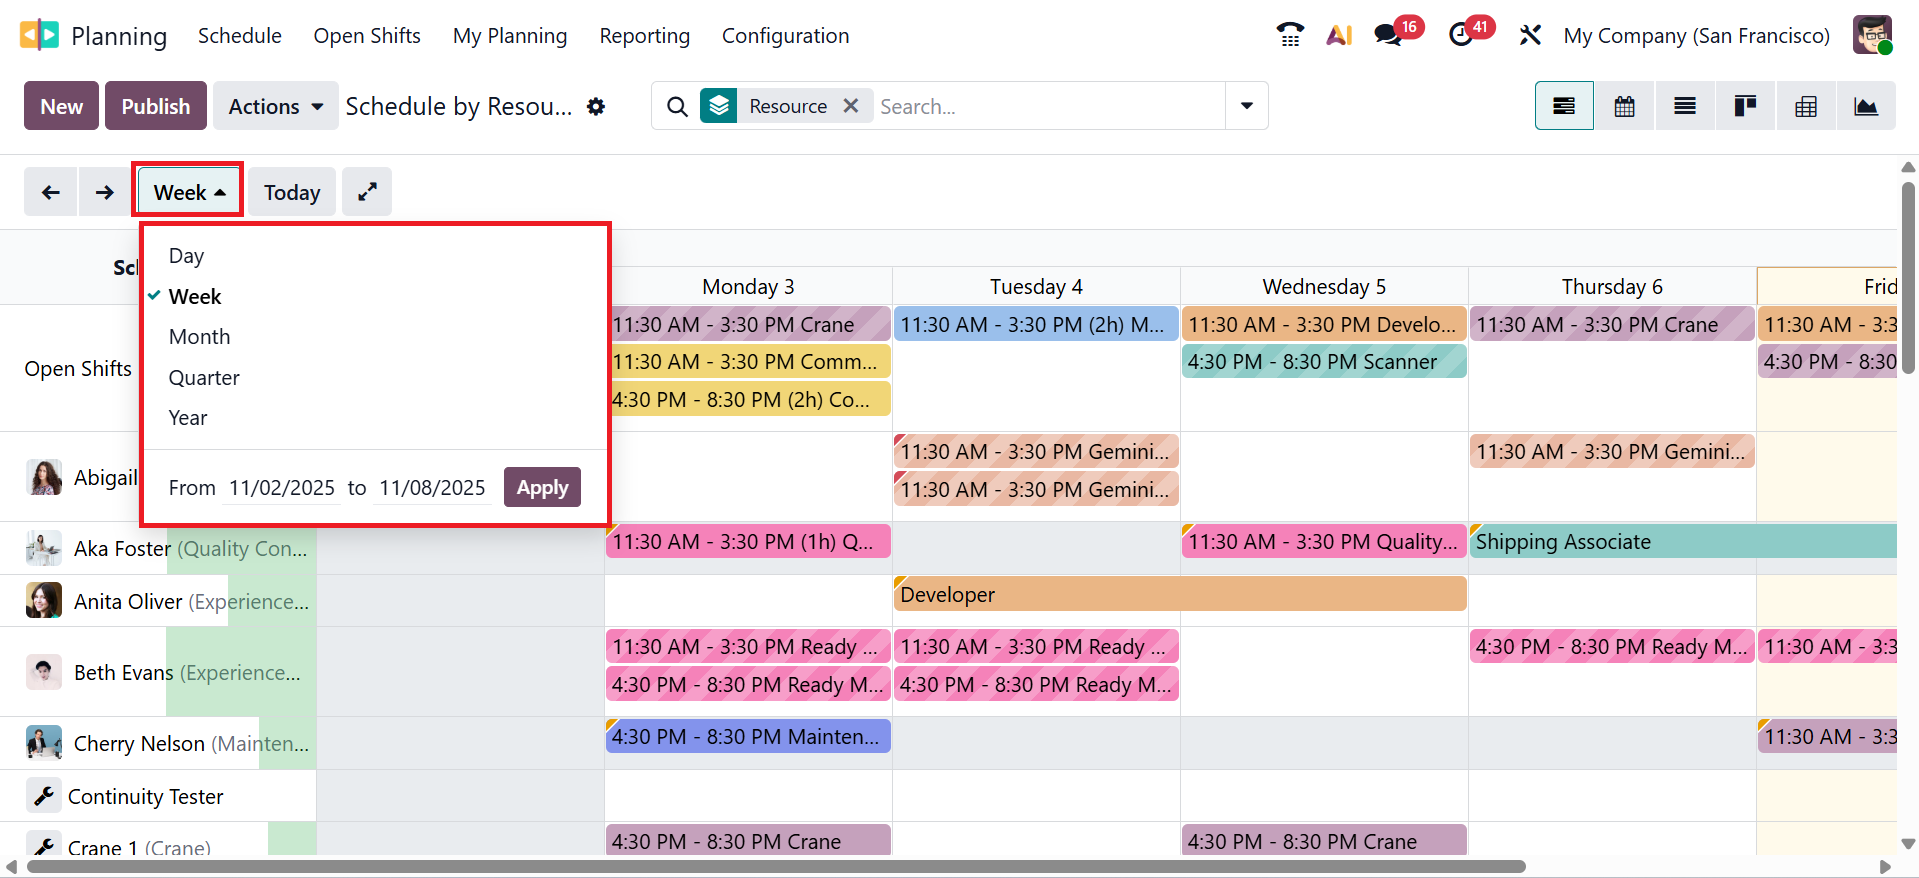
You can arrange the schedules based on Day, Week, Month, Quarter, Year, or select a date range to view the schedules, and then click the Apply button as shown below:
Here, you can view a complete overview of a person’s schedule, which helps to make planned decisions. The Planning module offers a high degree of flexibility in planning your activities.
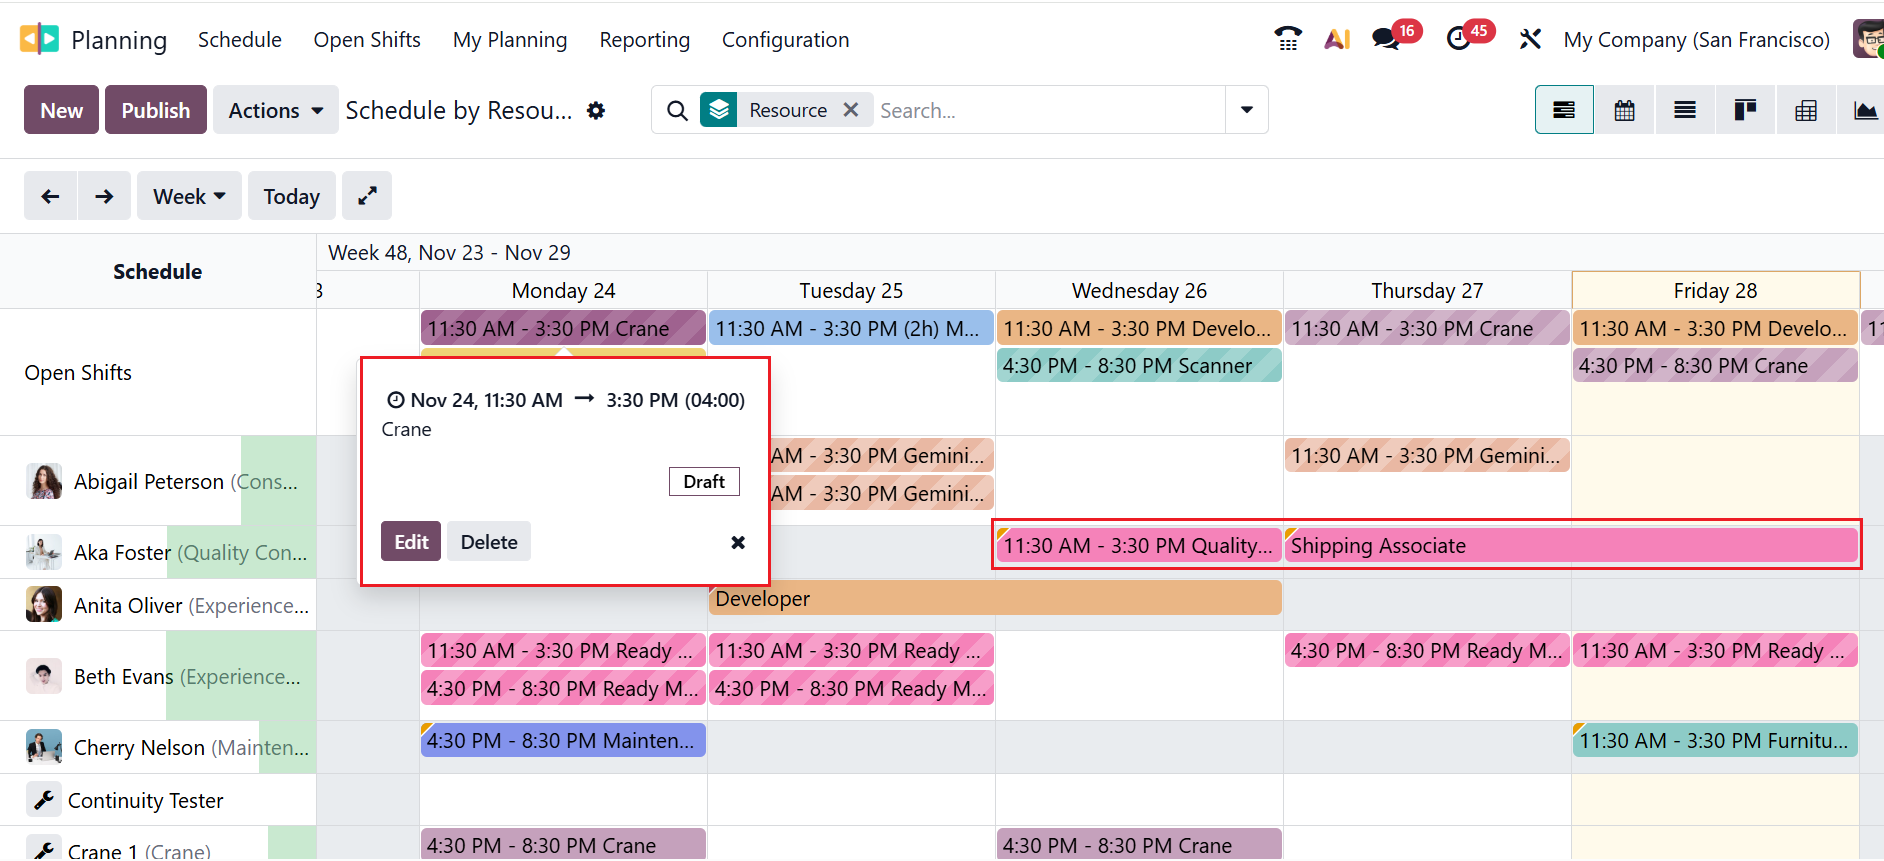
When you move to each schedule, you can view a preview of that particular schedule, as shown below. There, you can view the scheduled time and the resource. You can also choose to either edit or delete the schedule. When an employee schedules multiple shifts, a tiny red tag appears in the upper left corner of the schedule.
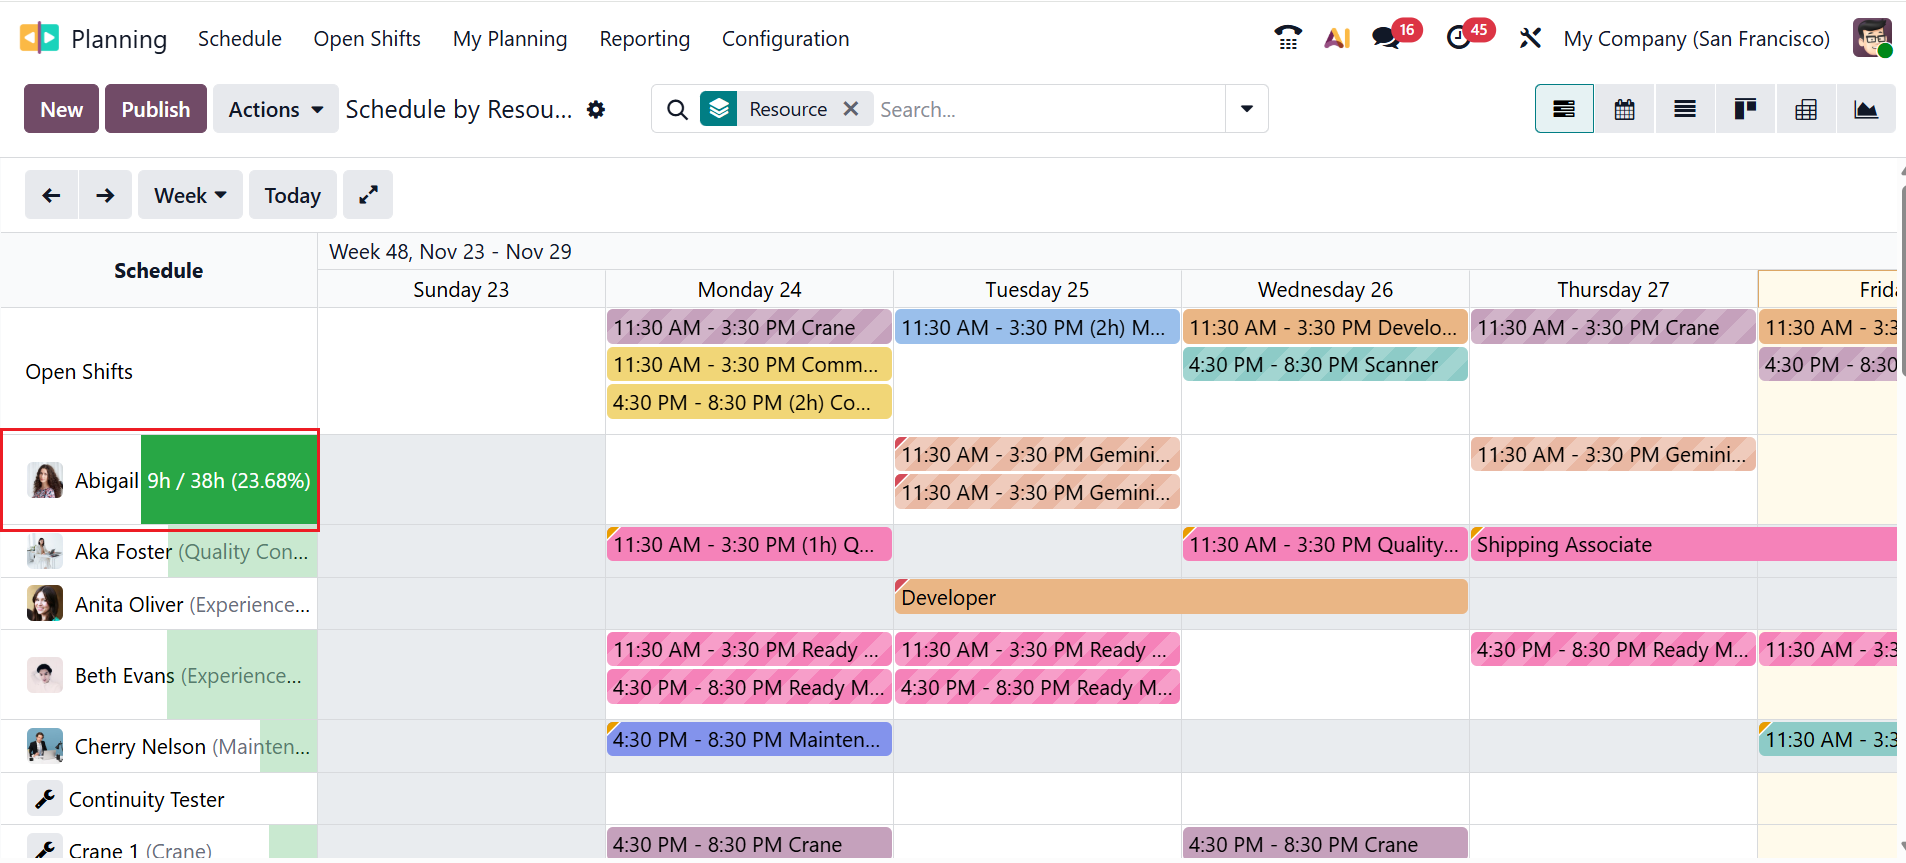
When you move through each person’s field, you can view the number of hours the employee worked during the selected period.
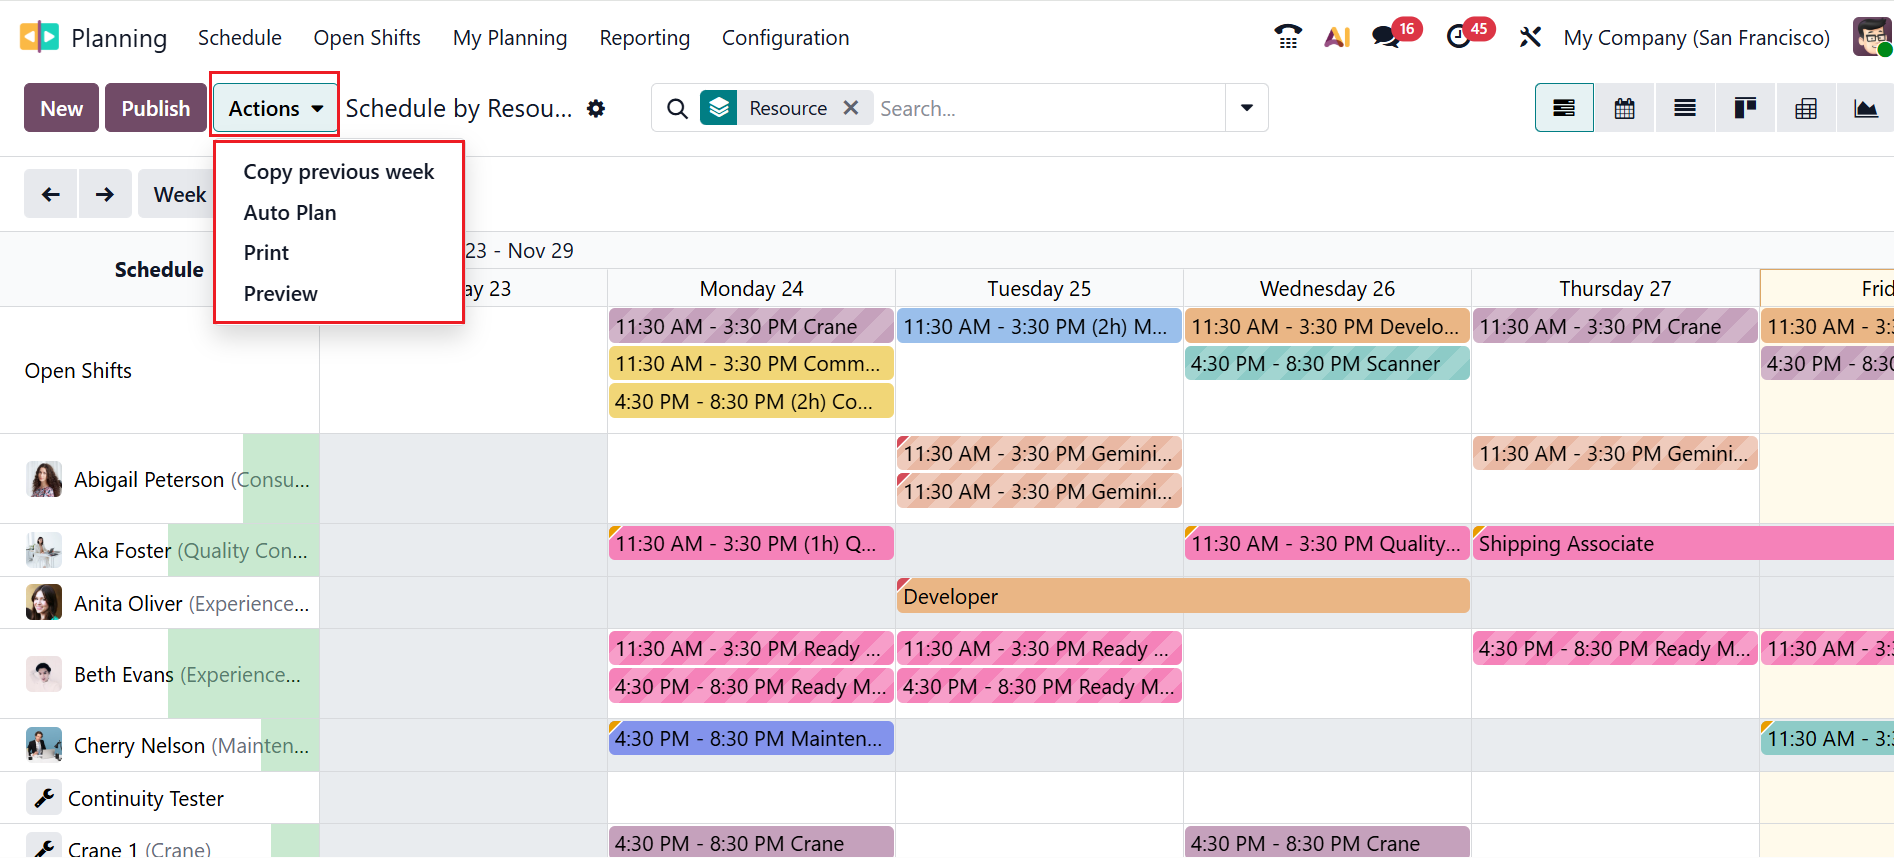
Click on the Actions button to view the options such as Copy previous week, Auto Plan, Print, and Preview. The Copy preview week option helps to copy the shift from the prior week. The Auto Plan option automatically schedules shifts for employees according to their availability. The Print option generates a print of the schedule. The Preview option shows how the schedule will appear to employees before it is published.
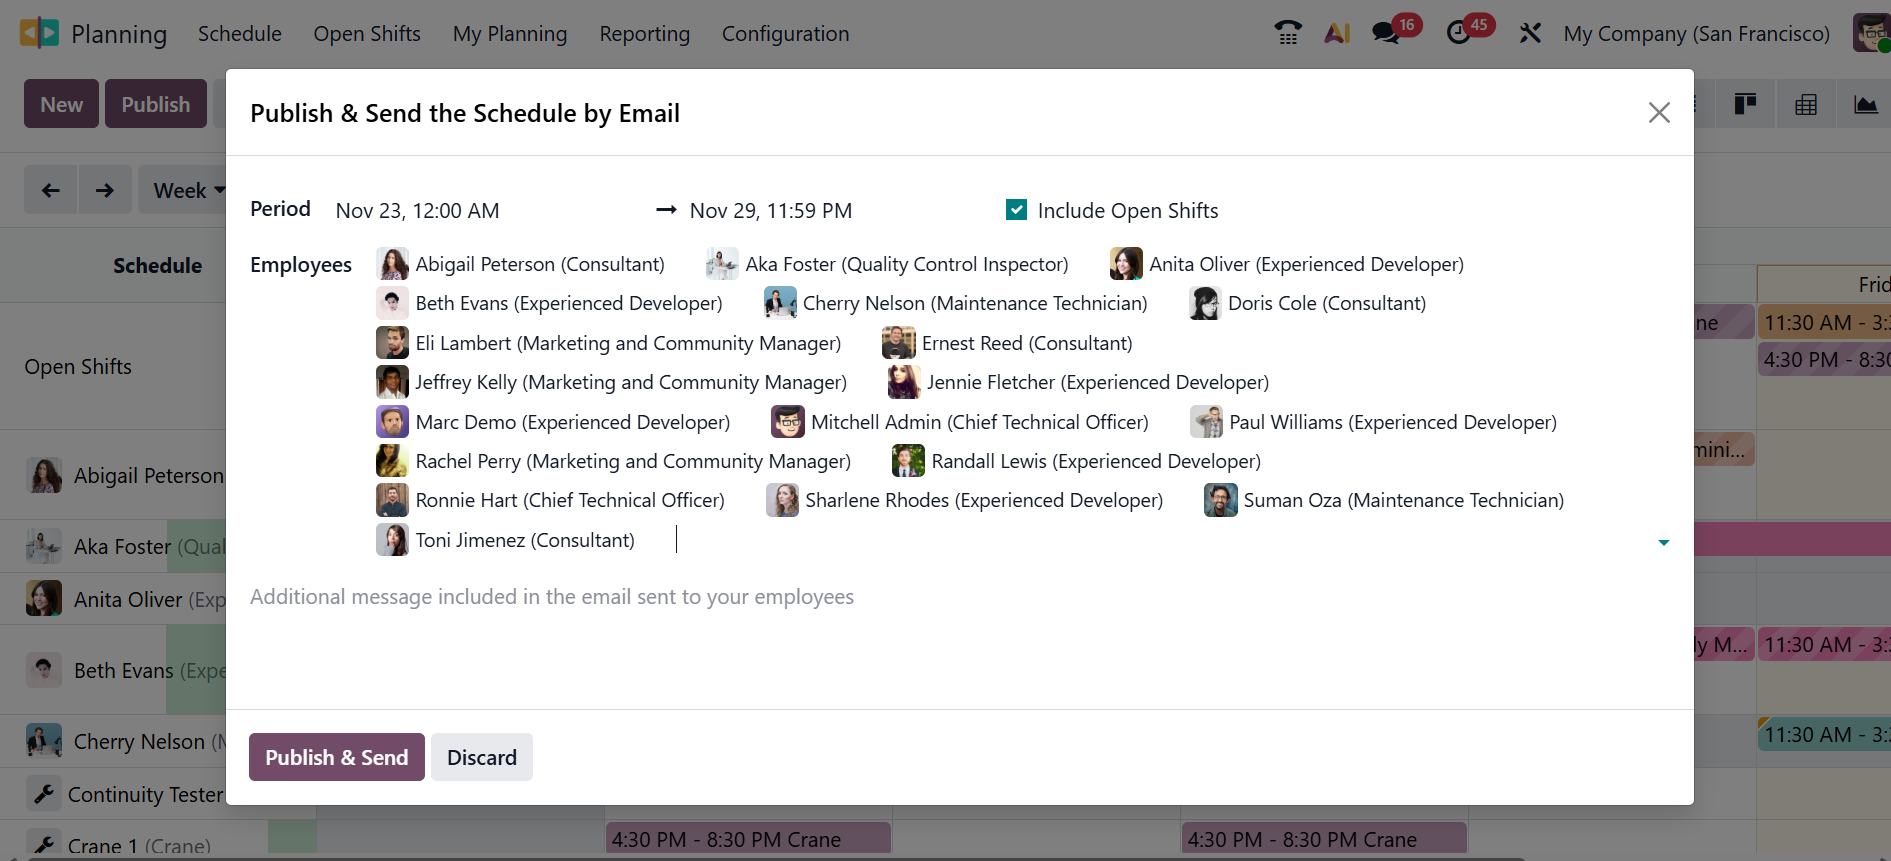
When you click the Publish button, a pop-up window will appear, as shown below. Here, you can send the scheduled request to the selected employee through email. You can choose the date and time range in the Period field. If needed, you can enable the Include Open Shifts option. Then select Employees, add additional messages to the employee, and click the Publish & Send button.
The following visual elements show the shifts in the schedules:
- Full color:shifts that are published and planned.
- Diagonal Stripes: shifts that are not published, but already planned.
- Grayed-out background: Employees who are taking time off.
- Progress bar: shifts currently in progress, with a linked timesheet.
- Grayed-out shift: when shifts are copied, they temporarily appear greyed out, but the newly copied shifts show up in full colour. The original shifts revert to either full colour or diagonal stripes when the page is refreshed or the filter is removed.
Click the New button to open a pop-up window, as shown below. This feature helps you to create a new shift with a single click.
In the Resources field, add either employee or material as a resource. Select a Role for the assigned resource to perform. In the Project field, you can link a project to a shift to track the change based on the selected project. The Sales Order Item field allows you to link the sales order to the change. Then select the Date, Allocated Time, and Company, and add any additional notes to be sent to the employee.
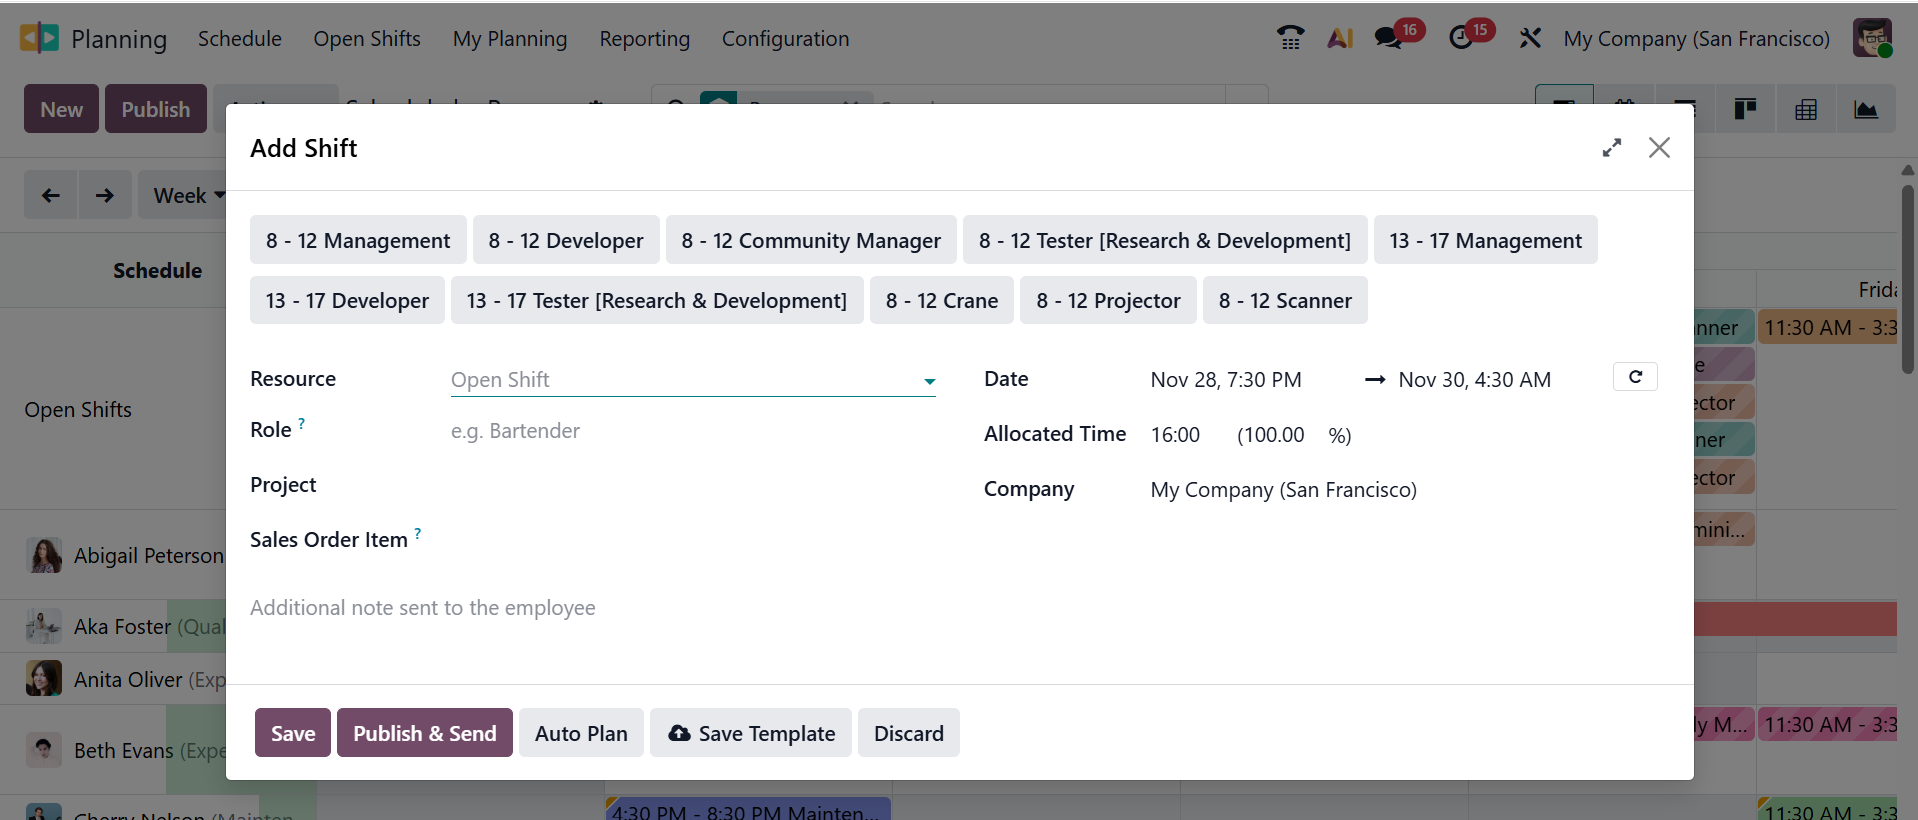
You can save the new template or choose the pre-existing templates from the upper section of the window. Click on the Publish & Send button to receive the notifications. By using the Auto Plan button, you can assign open shifts—shifts without an assigned resource—and generate and assign shifts linked to sales orders or projects.
*Schedule By Role:
In Odoo 19 Planning, you can assign shifts to a role instead of directly assigning an employee. This allows managers to plan staffing needs even when the specific person isn’t known yet. Later, Odoo helps match employees to the best available role-based shift. Select the New button to create a new schedule based on role.

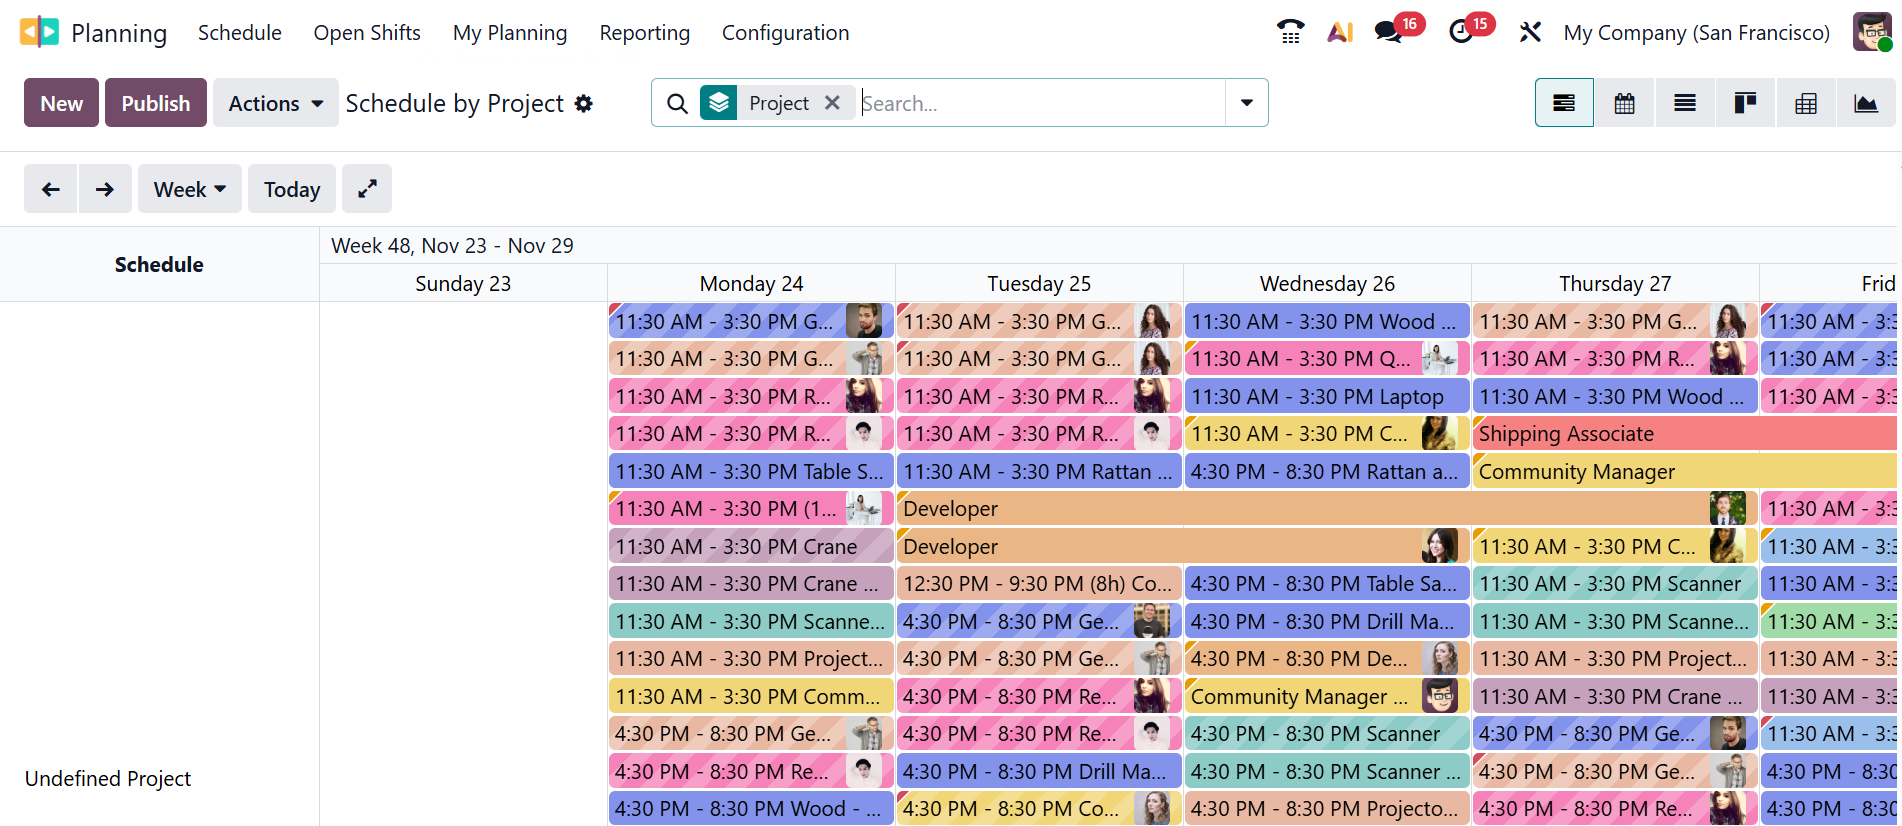
*Schedule by Project:
You can organize and assign employees’ work based on specific projects rather than by individual tasks alone. It provides a clear, visual timeline showing who is scheduled to work on which project and when. This helps teams balance workloads, avoid conflicts, and allocate project resources efficiently.
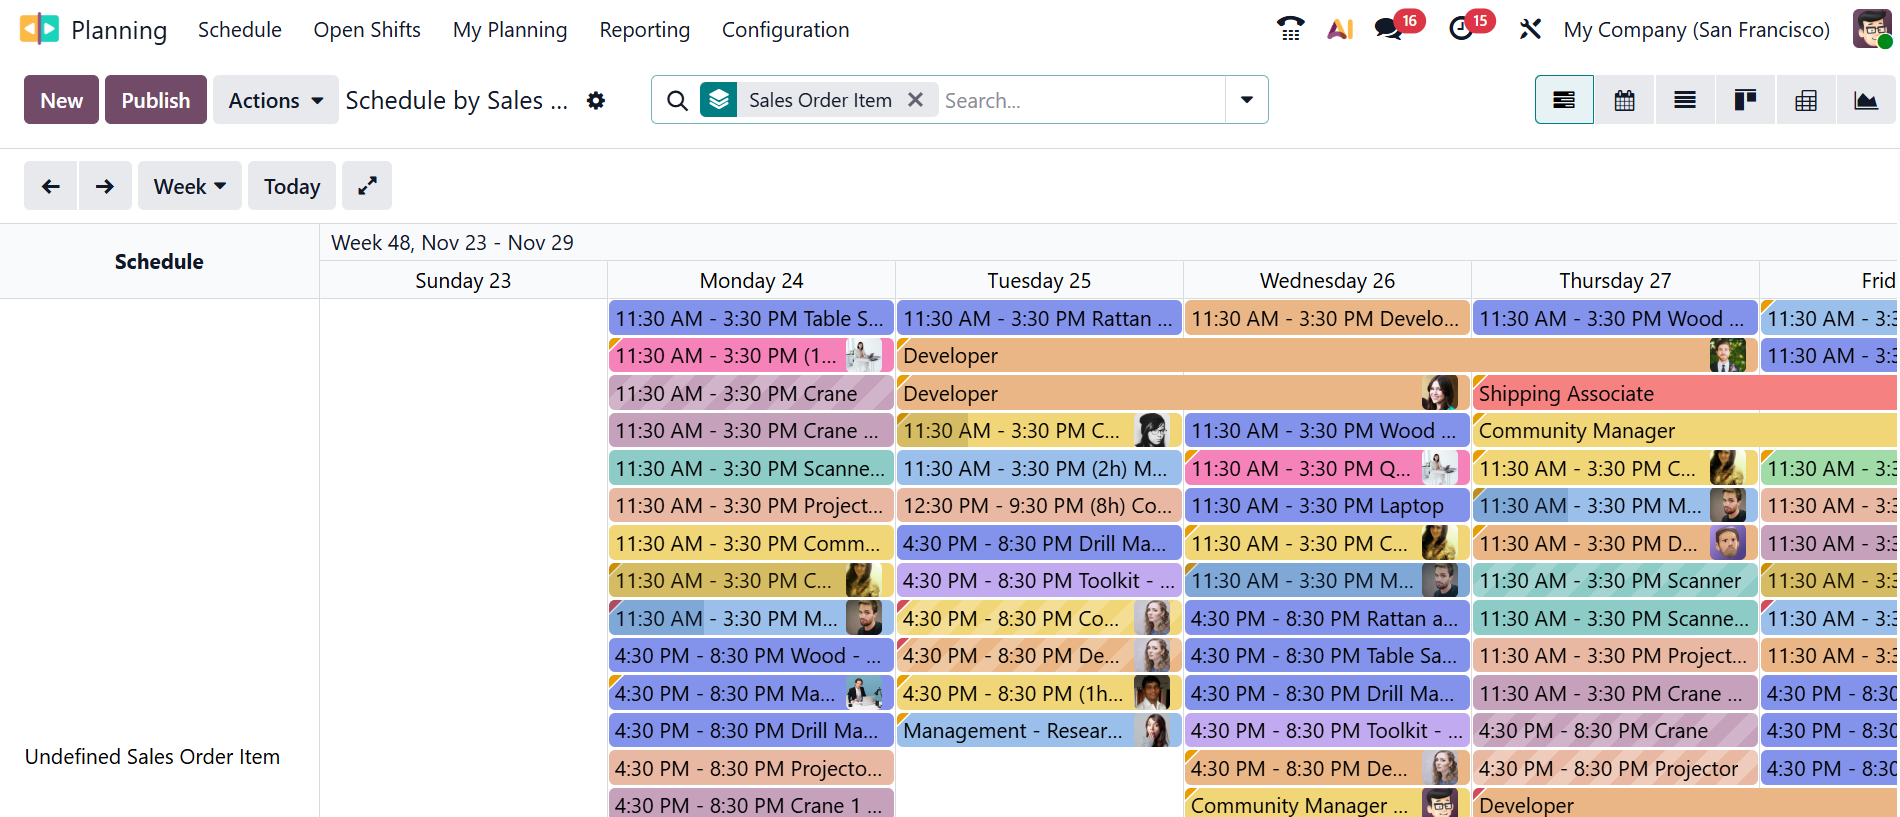
*Schedule by Sales Order:
You can plan work directly based on confirmed sales orders rather than projects or tasks. Each sales order item can generate planned shifts or time assignments, making it easy to allocate resources as soon as a sale is made. This ensures smooth delivery planning by linking your team.
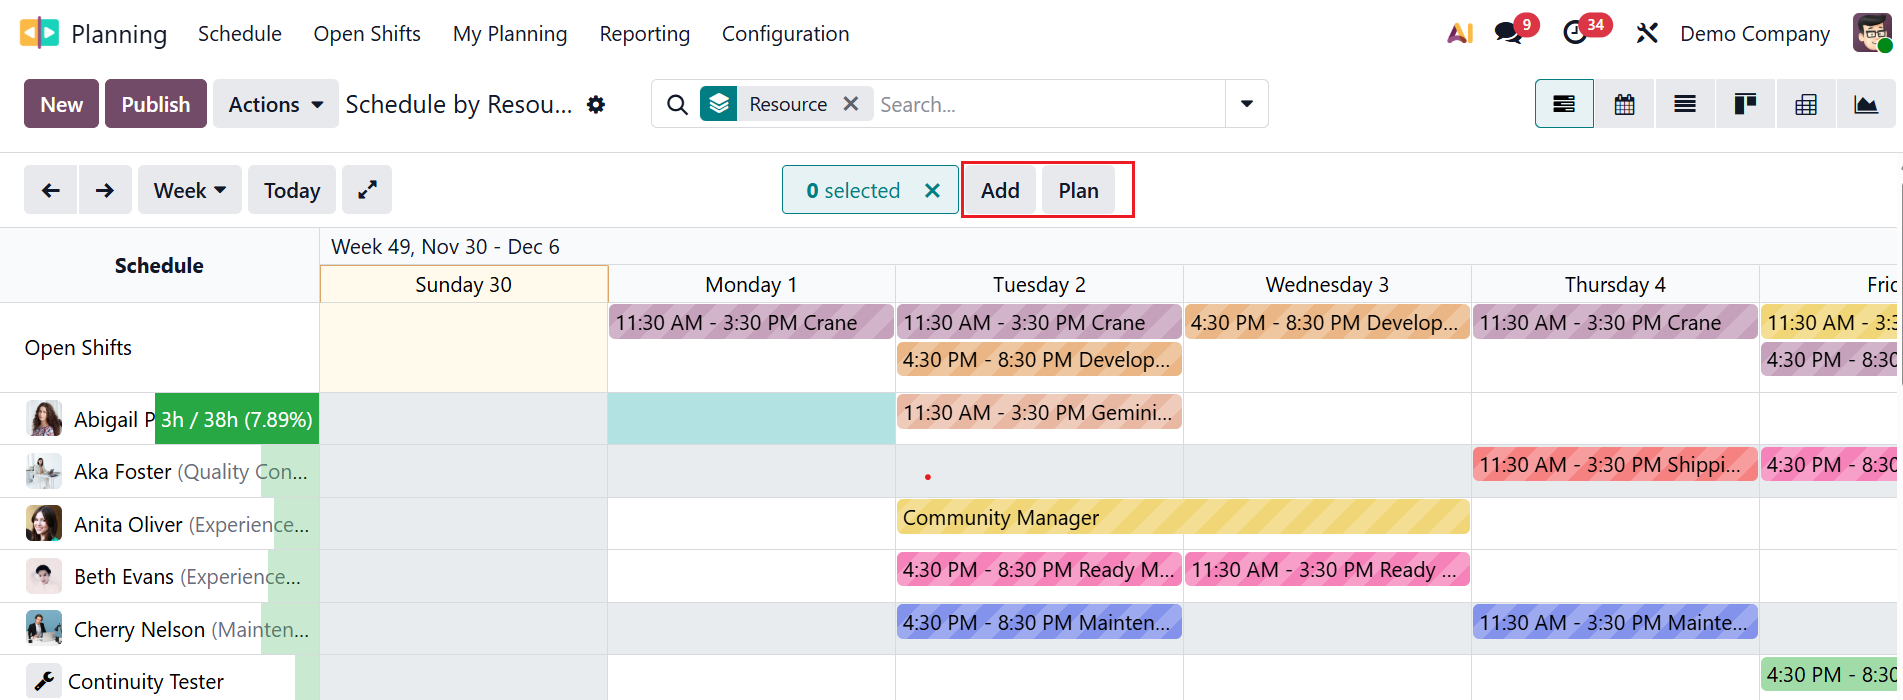
The Add and Plan buttons let you create and schedule a new shift in a single step. This feature helps to insert new schedules without navigating through multiple menus.
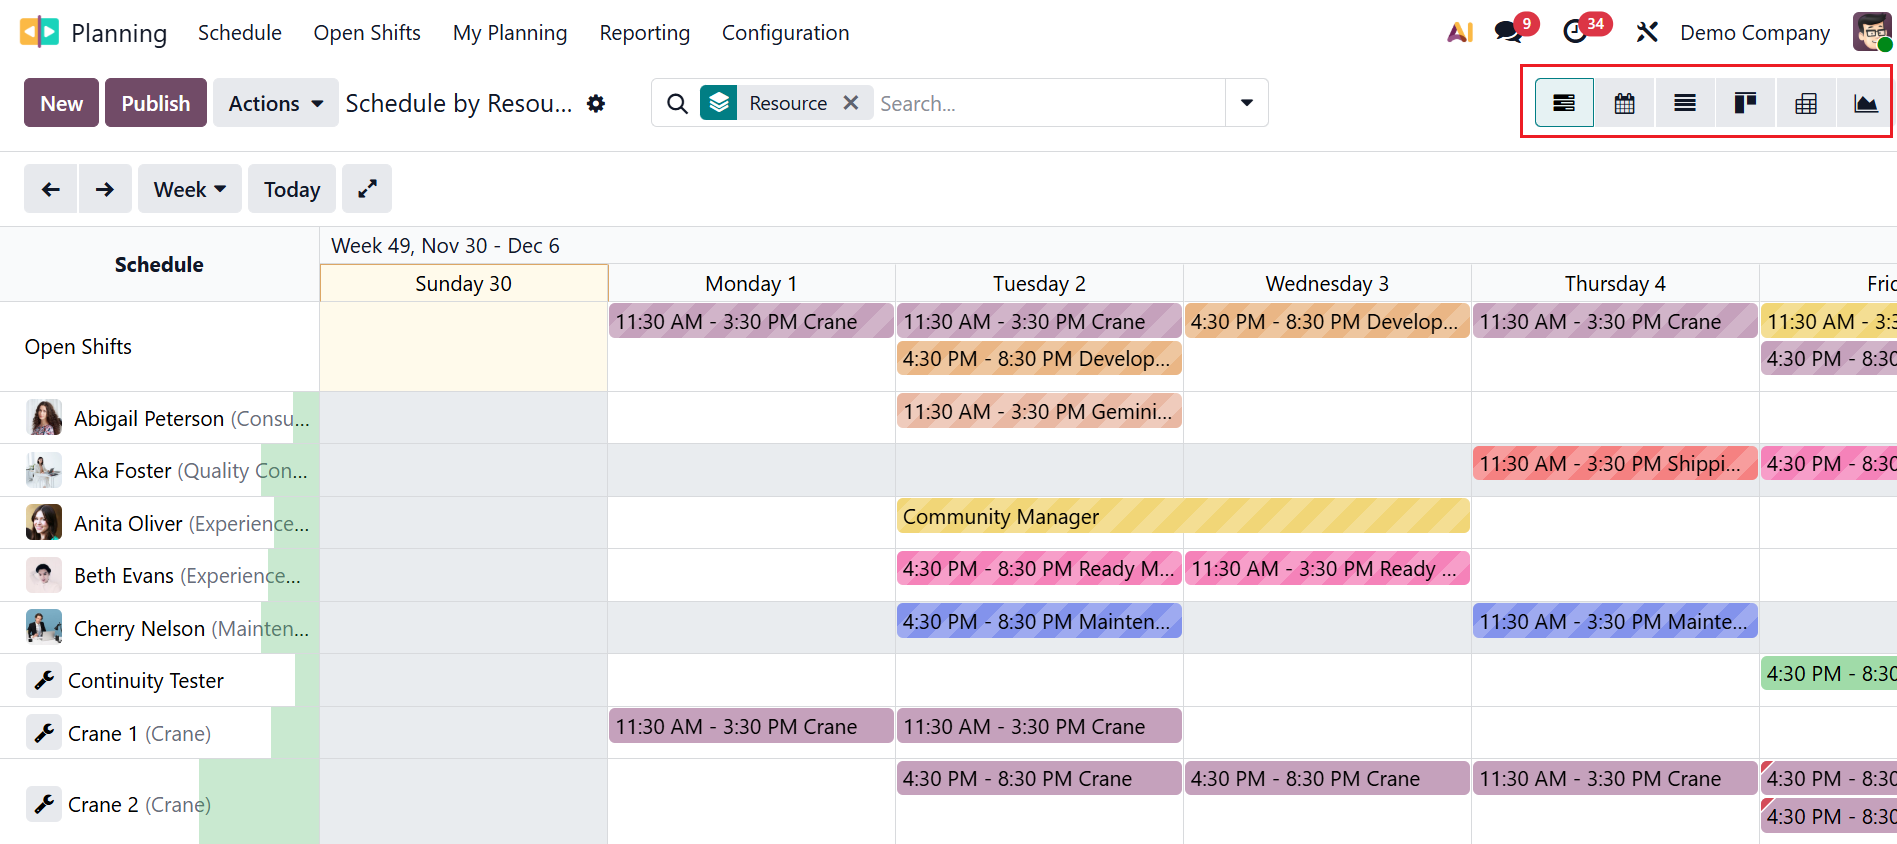
By default, you can view the Odoo 19 Planning module in Gantt view. You can also switch the view to Calendar, List, Kanban, Pivot, or Graph.
You can view the Filters, Group By, and Favorites options when you click on the drop-down menu in the search bar. Under the Filters section, you can view the options such as Open Shifts, My Shifts, My Team, My Department, Requests to Switch, My Roles, My Projects, My Sales Orders, Shifts in Conflict, Employee on Time Off, Employees, Materials, Billable, Non-Billable, Draft, Published, Start Date, End Date, and Custom Filter.
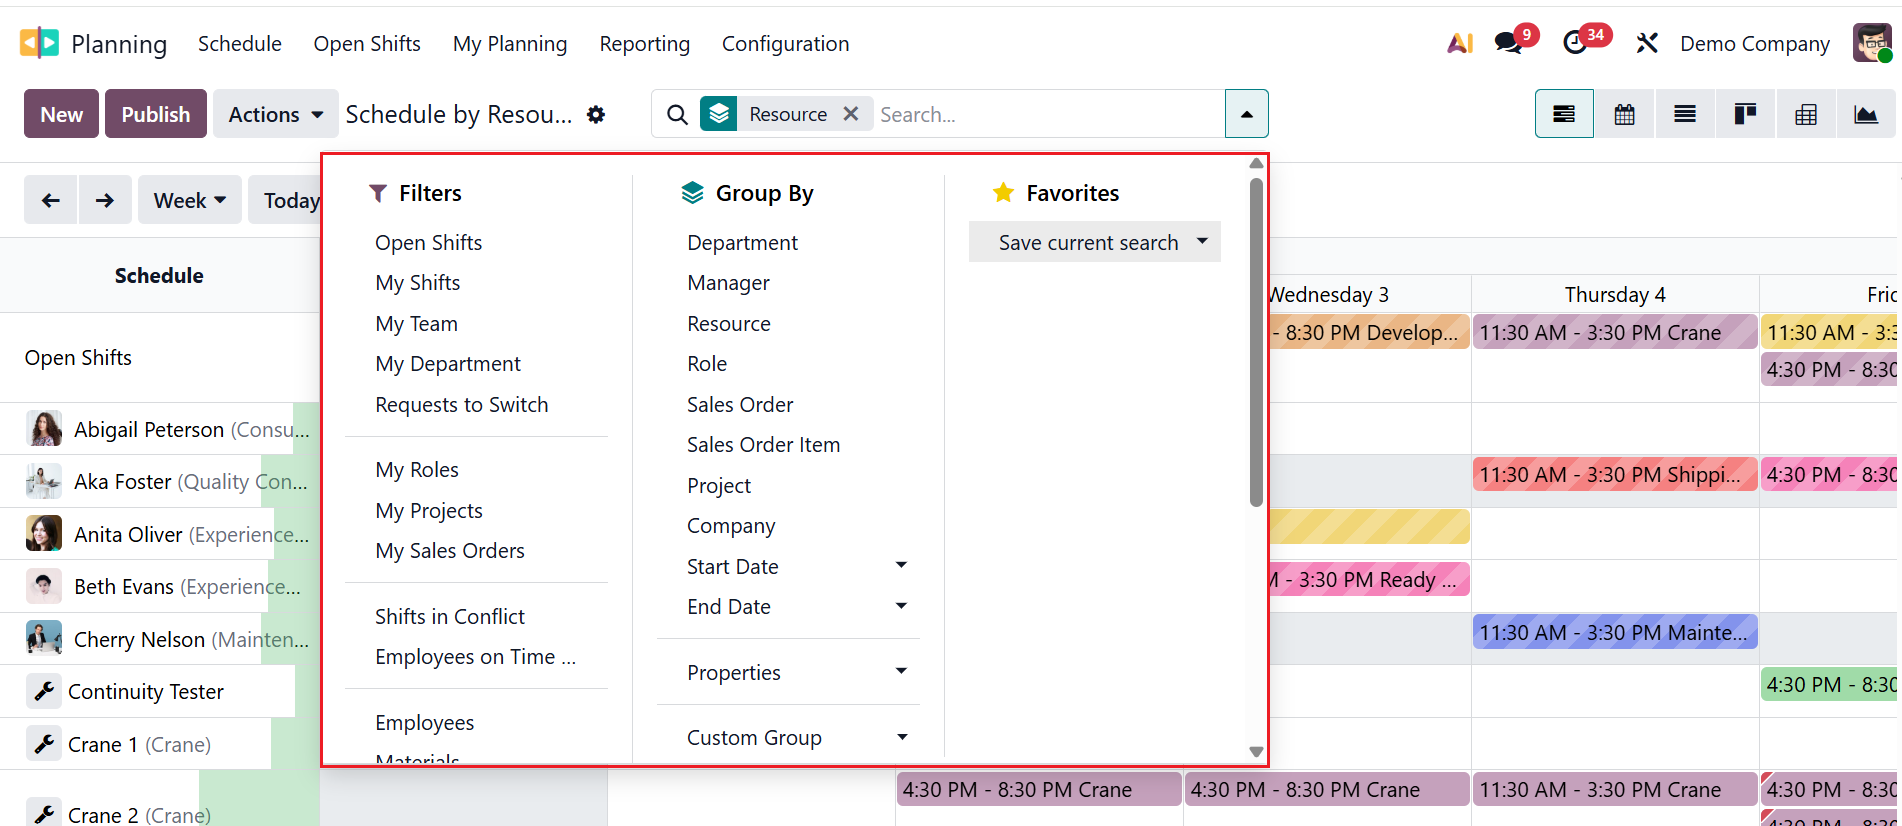
In the Group By section, you can choose from options like Department, Manager, Resource, Role, Sales Order, Sales Order Item, Project, Company, Start Date, End Date, Properties, and Custom Group. You can also use the Favorites feature to save searches for later use.
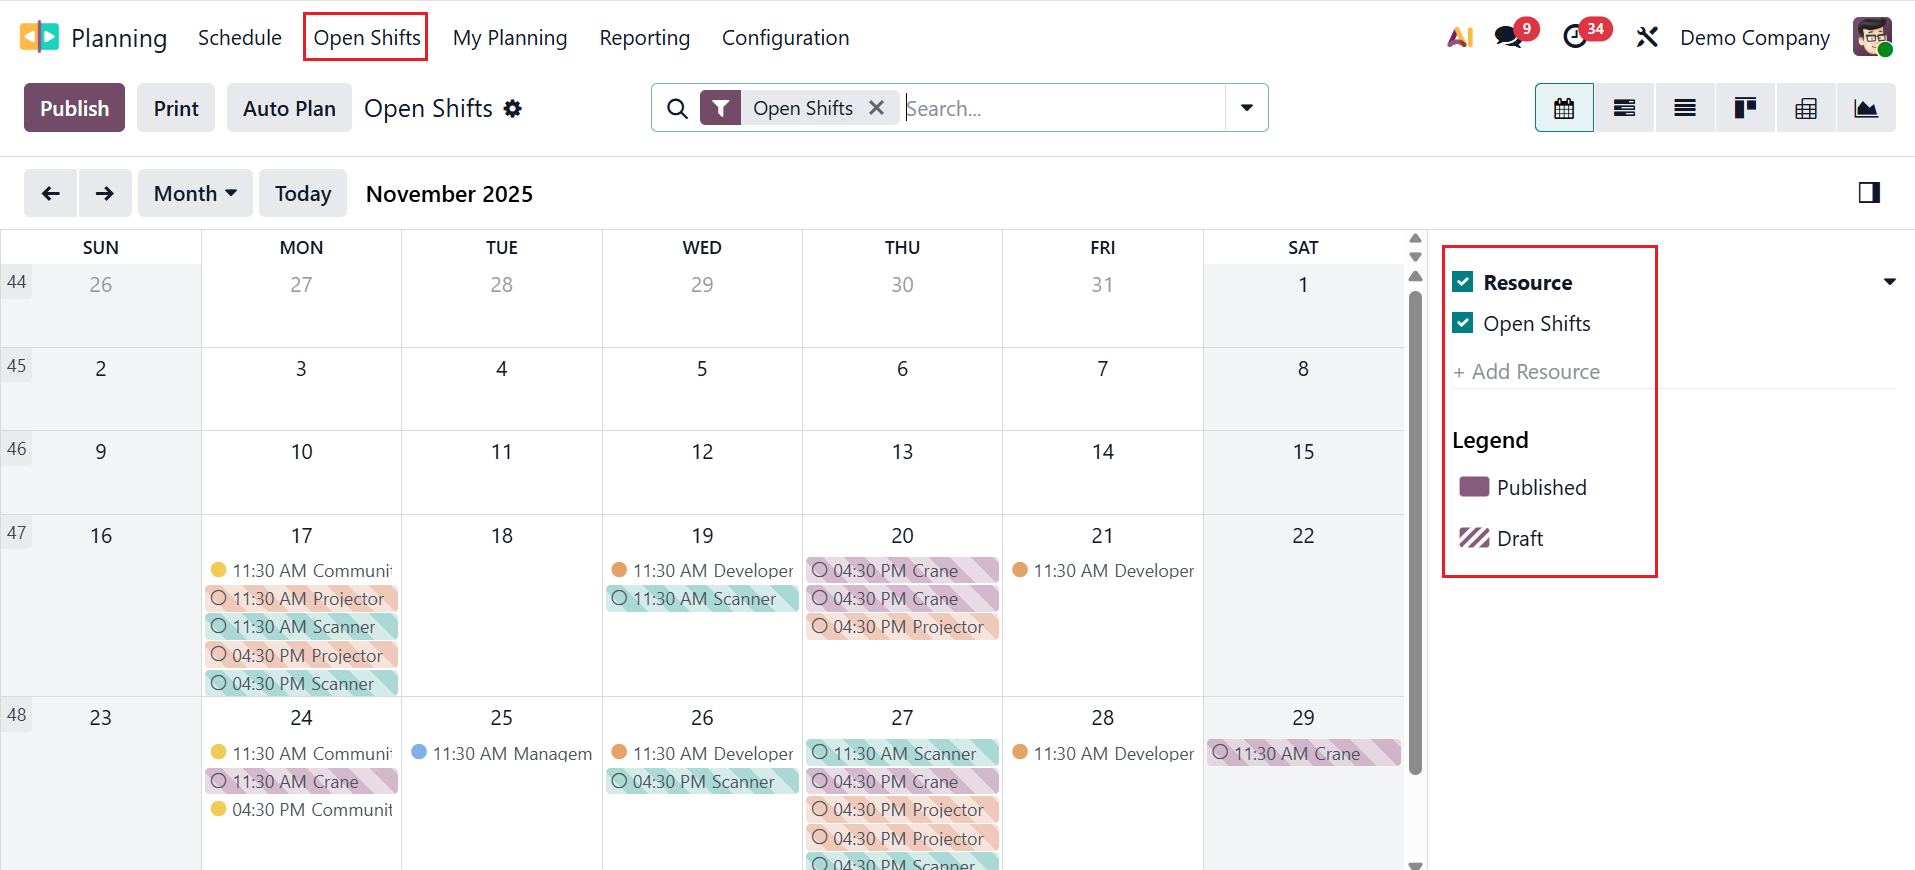
2. Open Shifts:
Open Shifts are unassigned work shifts that do not yet have an employee assigned to them. The Managers can create shifts in advance even if they haven’t decided who will work them. This helps to visualize workforce needs and identify staffing gaps.
By default, you can view Open Shifts in Calendar view, which shows all open shifts for the selected month/week/day. Each colored block represents an open shift. You can click +Add Resource to add resource filters such as employee, role, or department. The Legend section shows the colors and patterns of the shifts. The solid-color shifts appear as Published, and the striped-background shifts appear as Draft.
The Publish button makes all shifts visible to employees, and the Draft shifts become Published. The Print button creates a printable view of the planning schedule. The Auto Plan button helps to assign employees automatically based on availability and role.
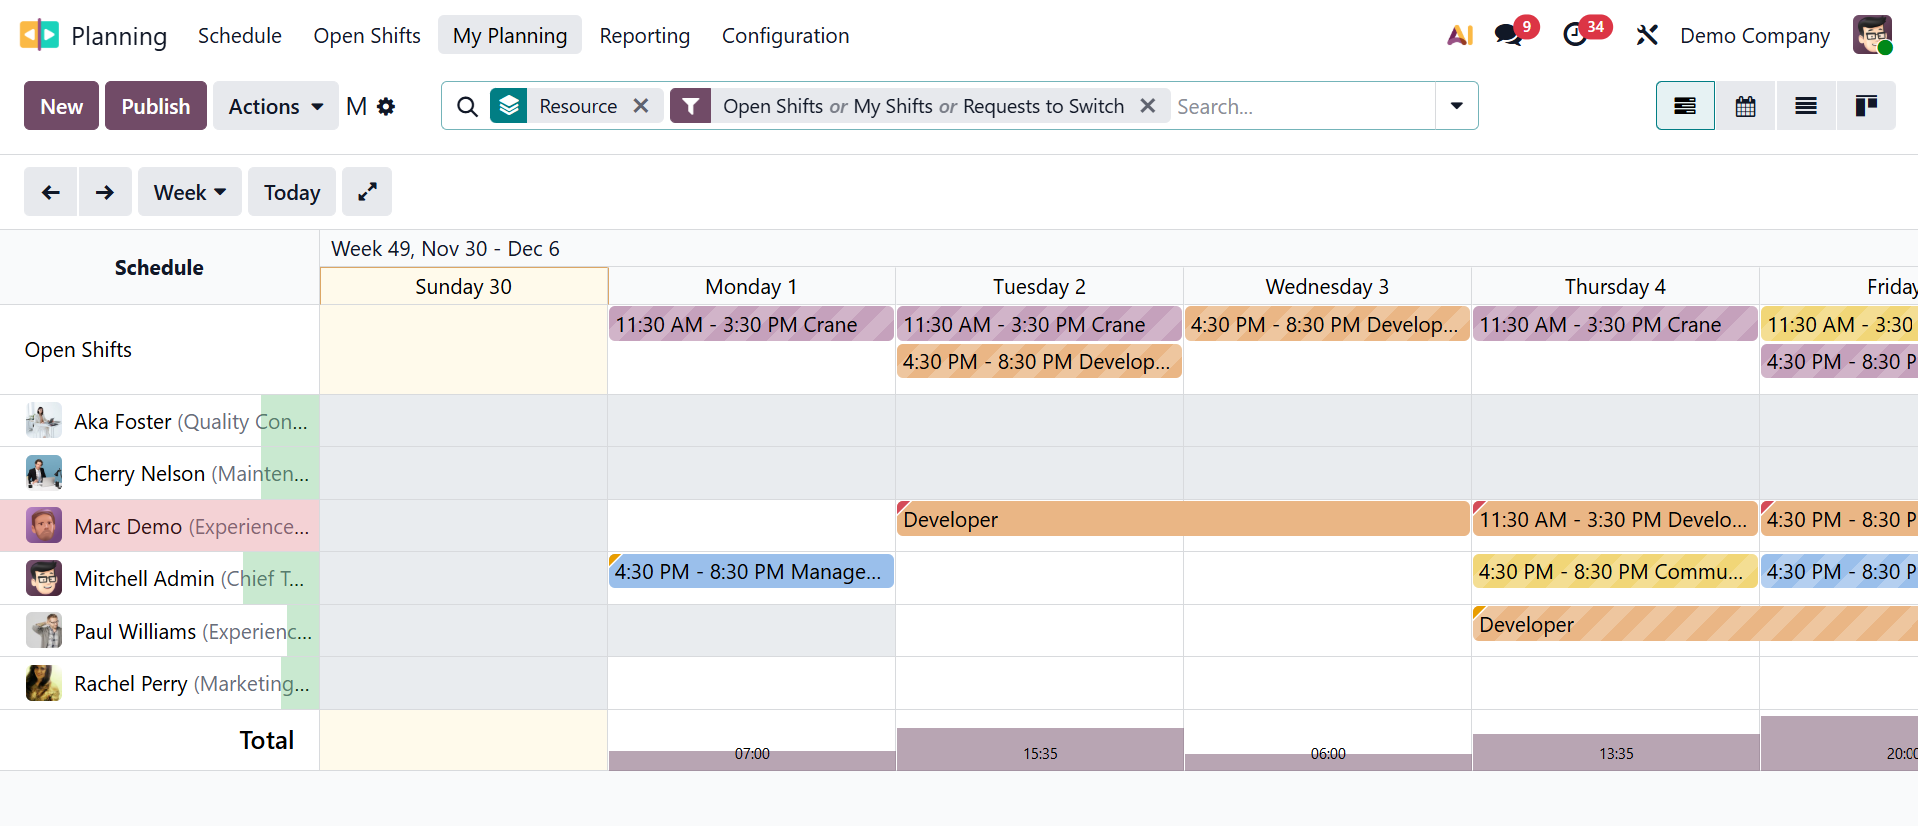
3. My Planning:
The My Planning menu in Odoo 19 is a personal workspace designed for employees. It displays only the shifts assigned to the logged-in user, helping them clearly view their working schedule for the week, month, or day.
In Odoo 19, the My Planning option is a personal shift diary that helps check upcoming shifts, identify open shifts, request changes, understand workload, and pre-plan work.
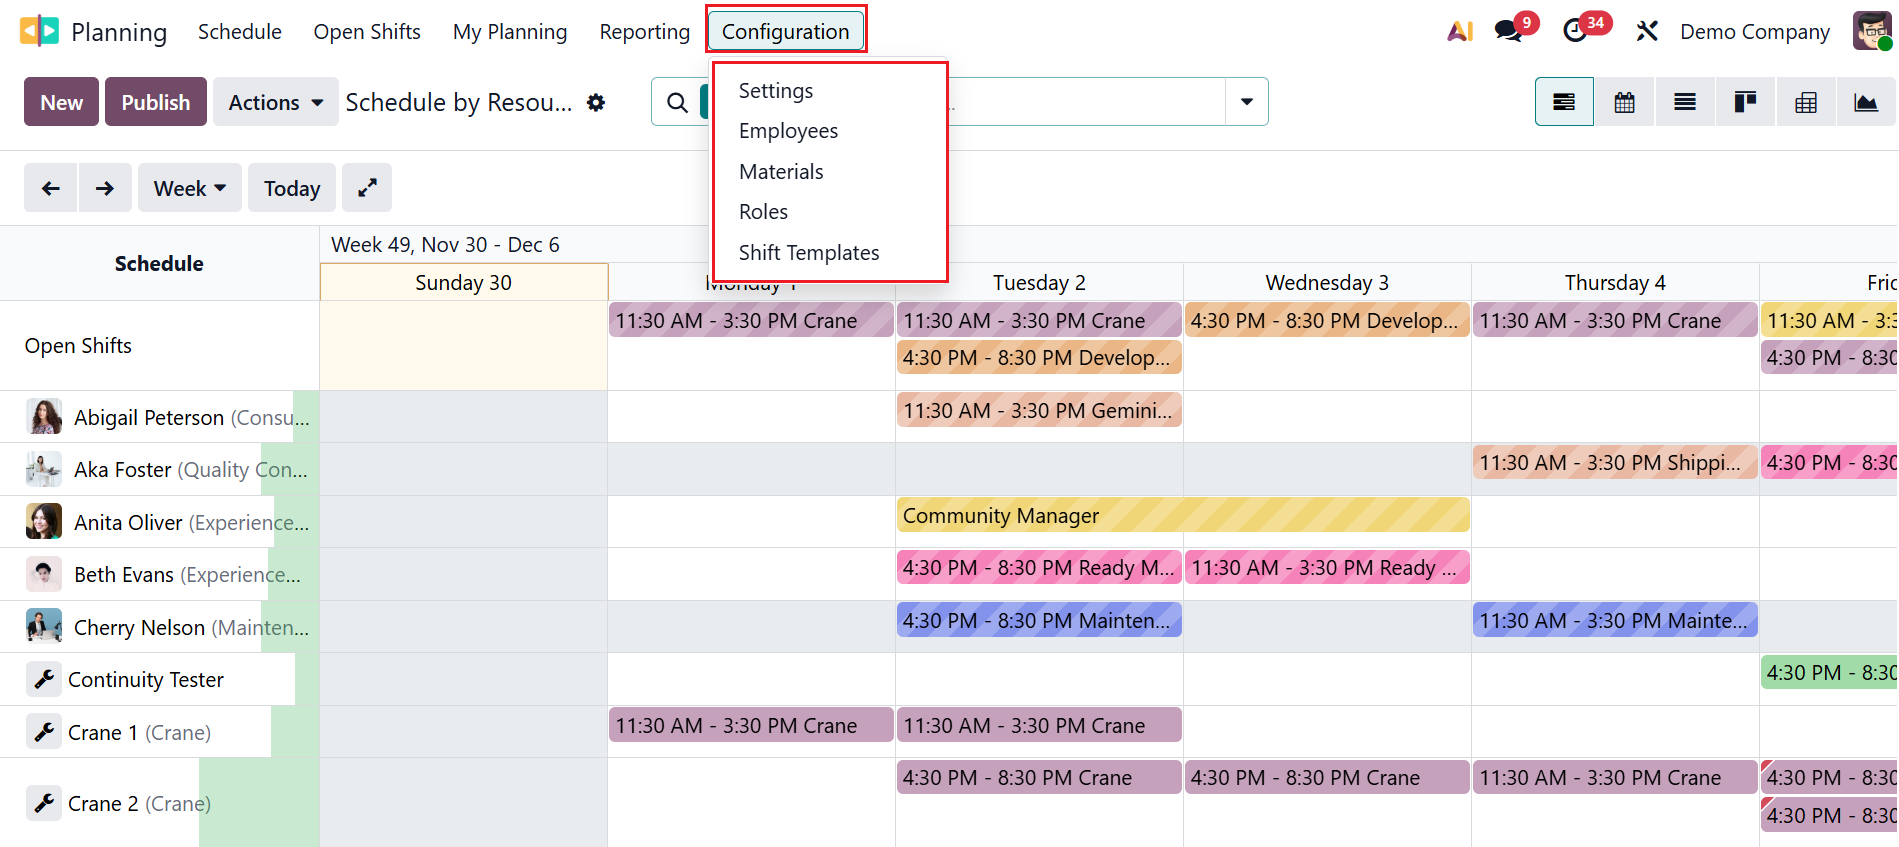
4. Configuration:
Under the Configuration menu, you can view the options such as Settings, Employees, Materials, Roles, and Shift Templates.
4.1 Settings:
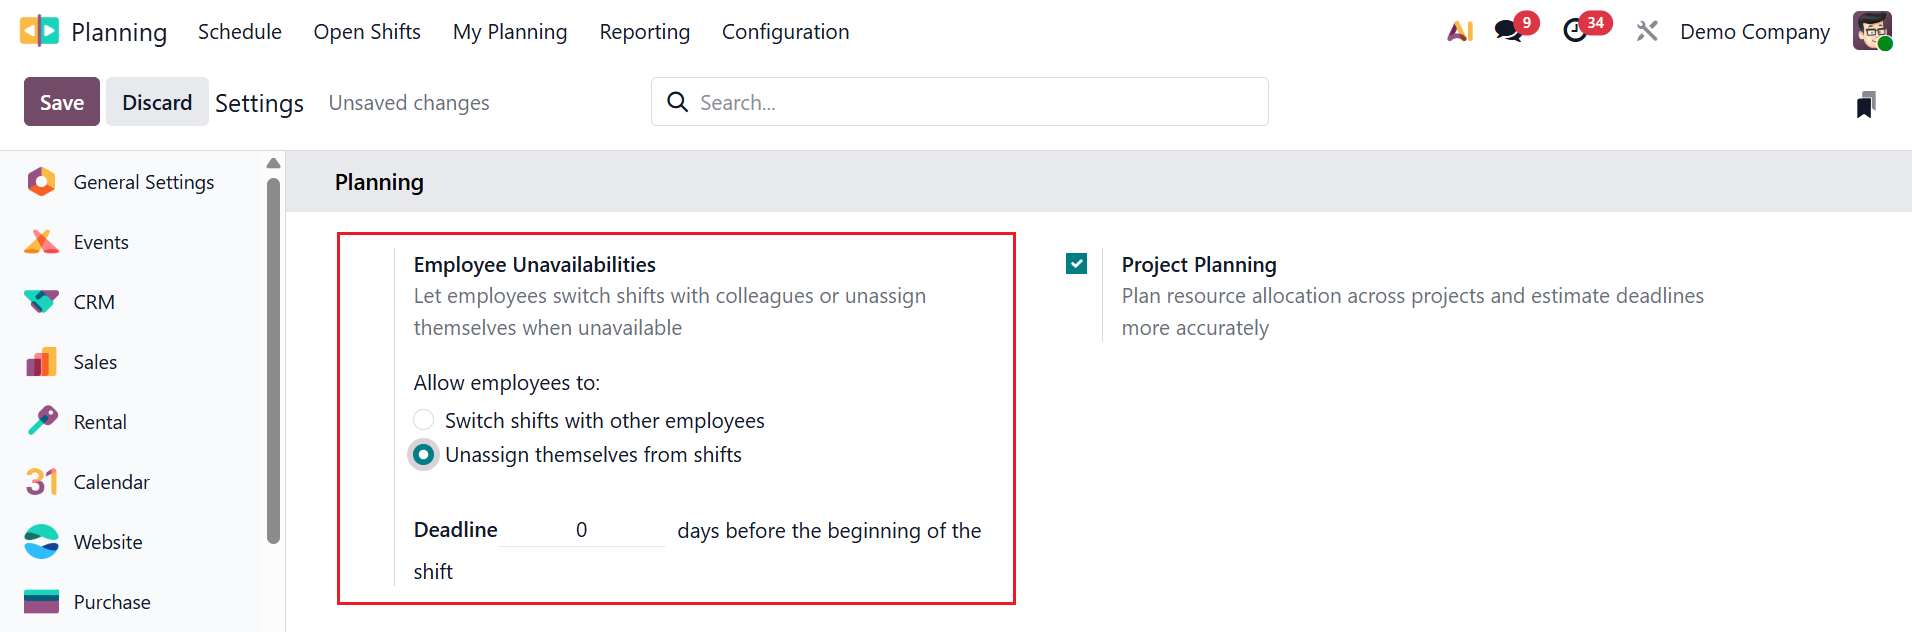
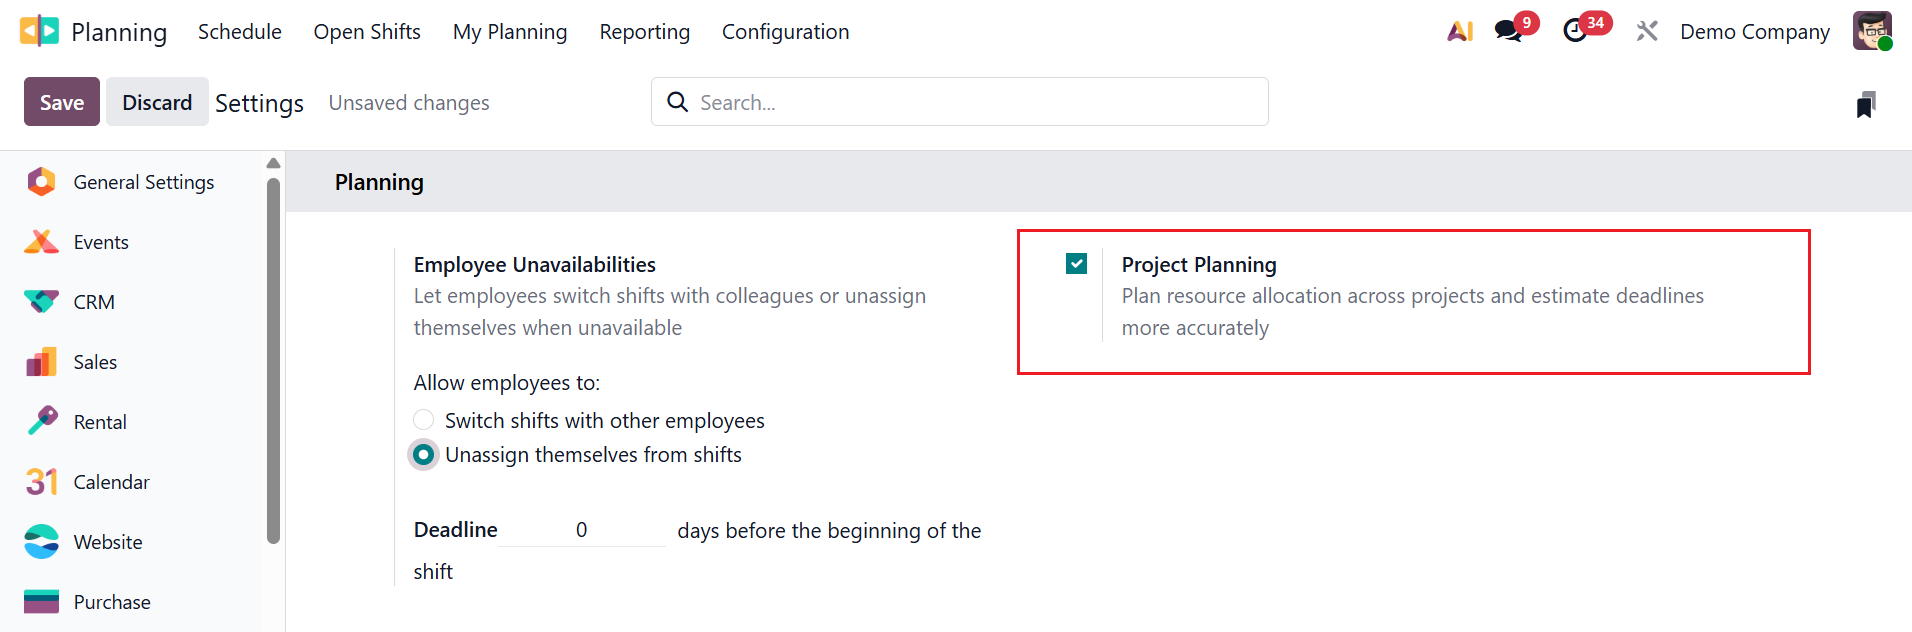
The Settings option allows the administrator to decide how scheduling, shifts, resources, and planning should work in the company. Under the Settings option, you can see two features: Employee Unavailability and Project Planning.
- * Employee Unavailability:This option controls how the system handles the times when employees cannot work. It allows you to record and manage periods when an employee cannot take shifts. Here, the employees can either Switch shifts with other employees or Unassign themselves from shifts.
The Deadline option will appear when you select the "Unassign themselves from shifts" option, as shown below. In the Deadline option, you can set the number of days before the shift begins.
- *Project Planning: This feature helps you to organize tasks, assign resources, and schedule work phases to ensure a project runs smoothly. It provides a clear timeline view to manage deadlines efficiently.
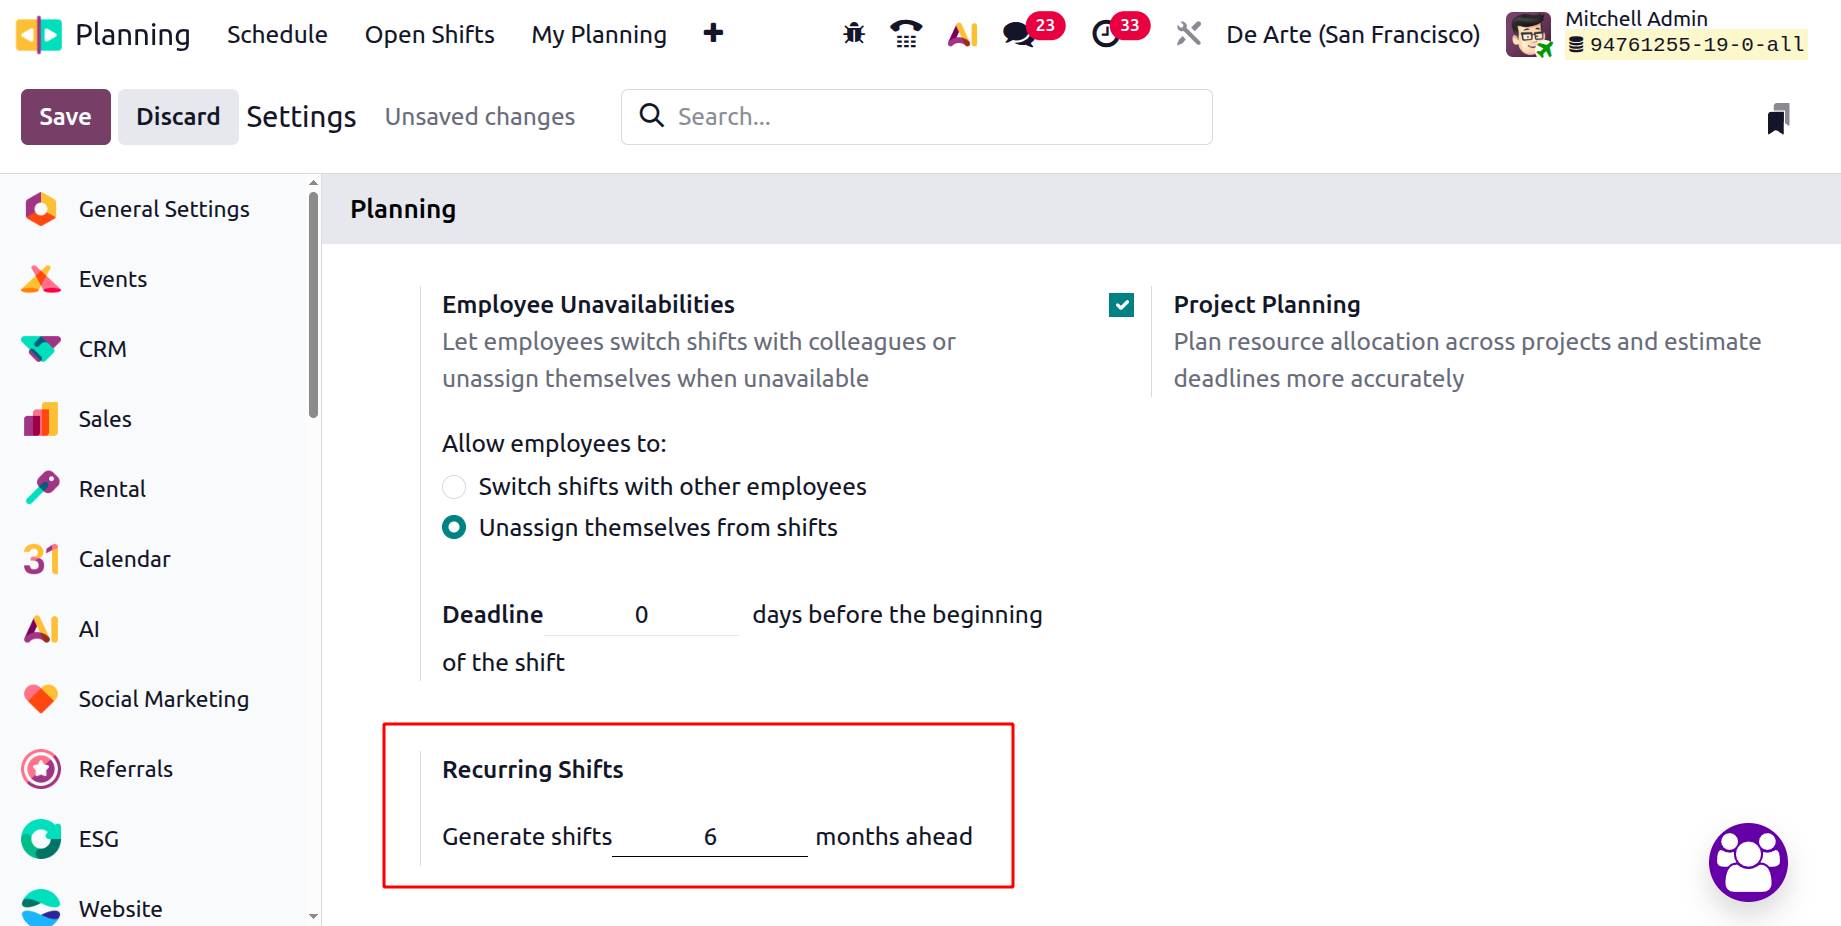
- *Recurring Shifts: When you activate the Developer Mode, you can view a new option named Recurring Shifts under the Settings, as shown below. Recurring shifts are the shifts that repeat automatically over a selected period of months. Instead of creating the same shift again and again, you can set it once, and Odoo will generate shifts based on the recurrence pattern.
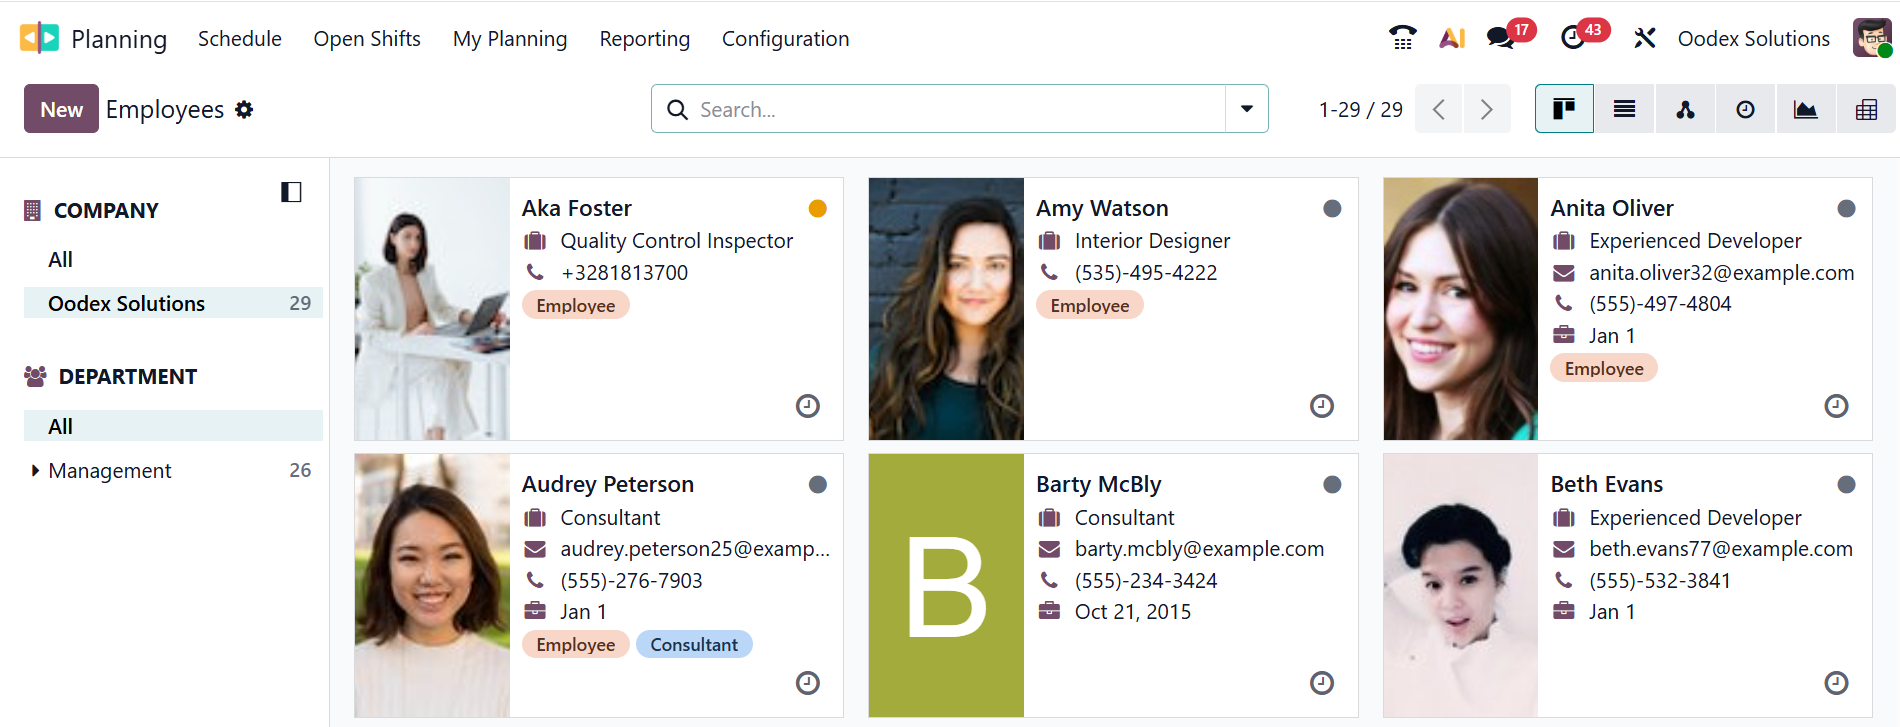
4.2 Employee:
In the Odoo 19 Planning module, the Employees menu lists all employees who can be scheduled for shifts or tasks. It allows the manager to view each employee’s role, working hours, availability, and planning-related settings needed for proper scheduling. Click the New button to add employees to the list.
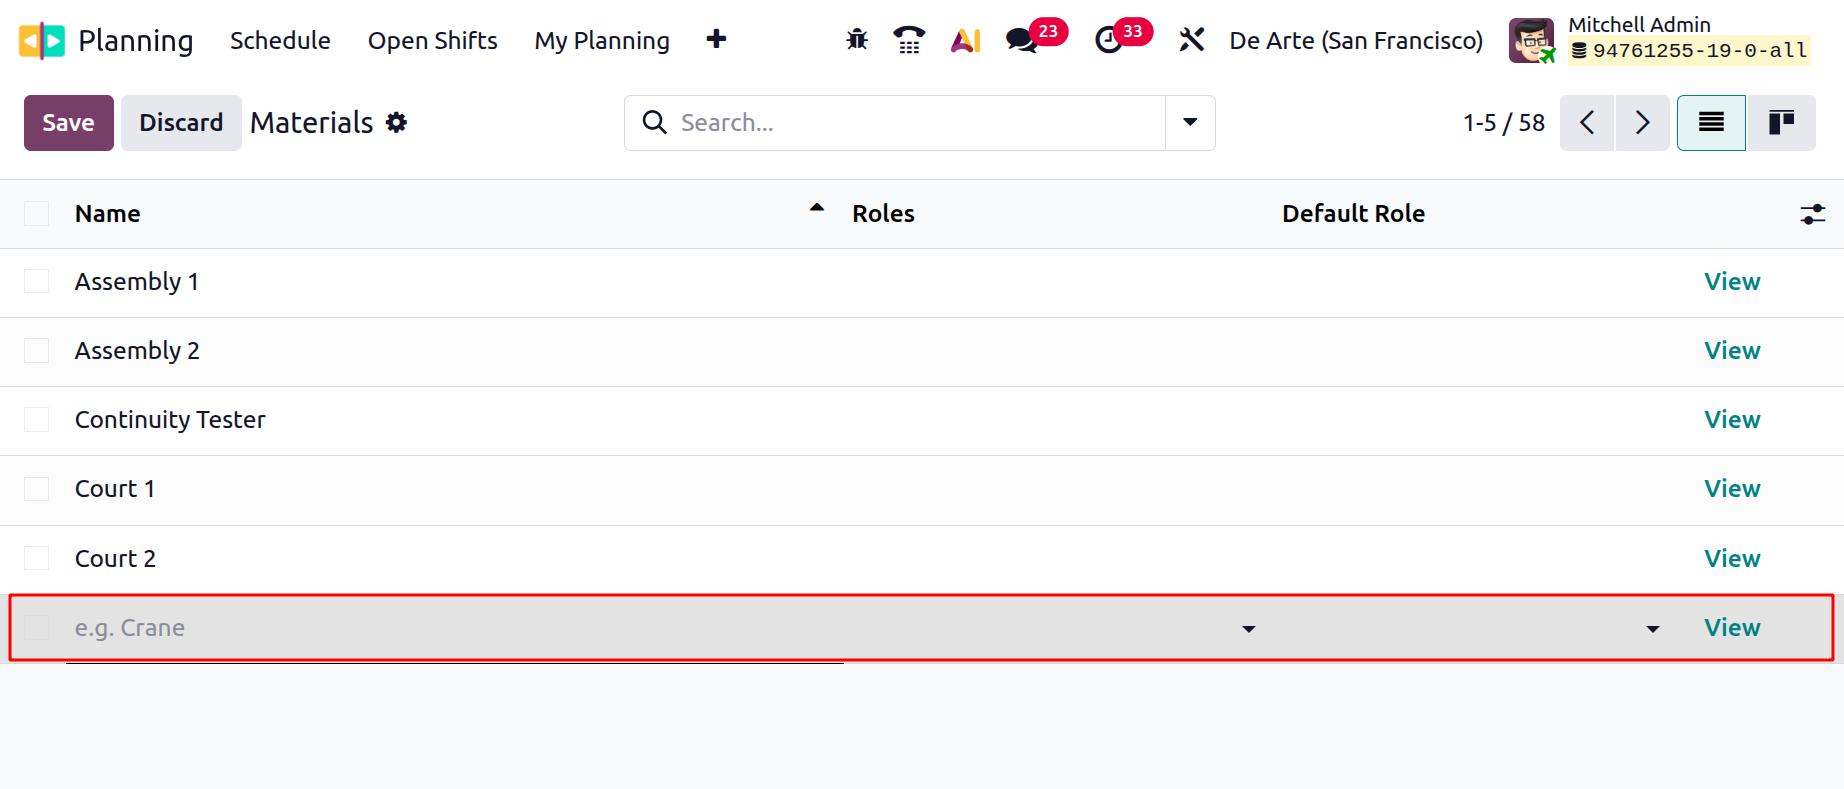
4.3 Materials:
In the Odoo 19 Planning module, Materials are the resources or items needed to perform planned shifts or activities required for employees during their scheduled work. This option lets you create, define, and manage materials, so you can link them to shifts and ensure the right resources are available at the right time.
In List view, you can view the details of Materials, including Name, Roles, Default Role, Company, Working Time, Timezone, and Color. To add a new material to the list, click on the New button. A new line will appear where you can add the details of the new material.
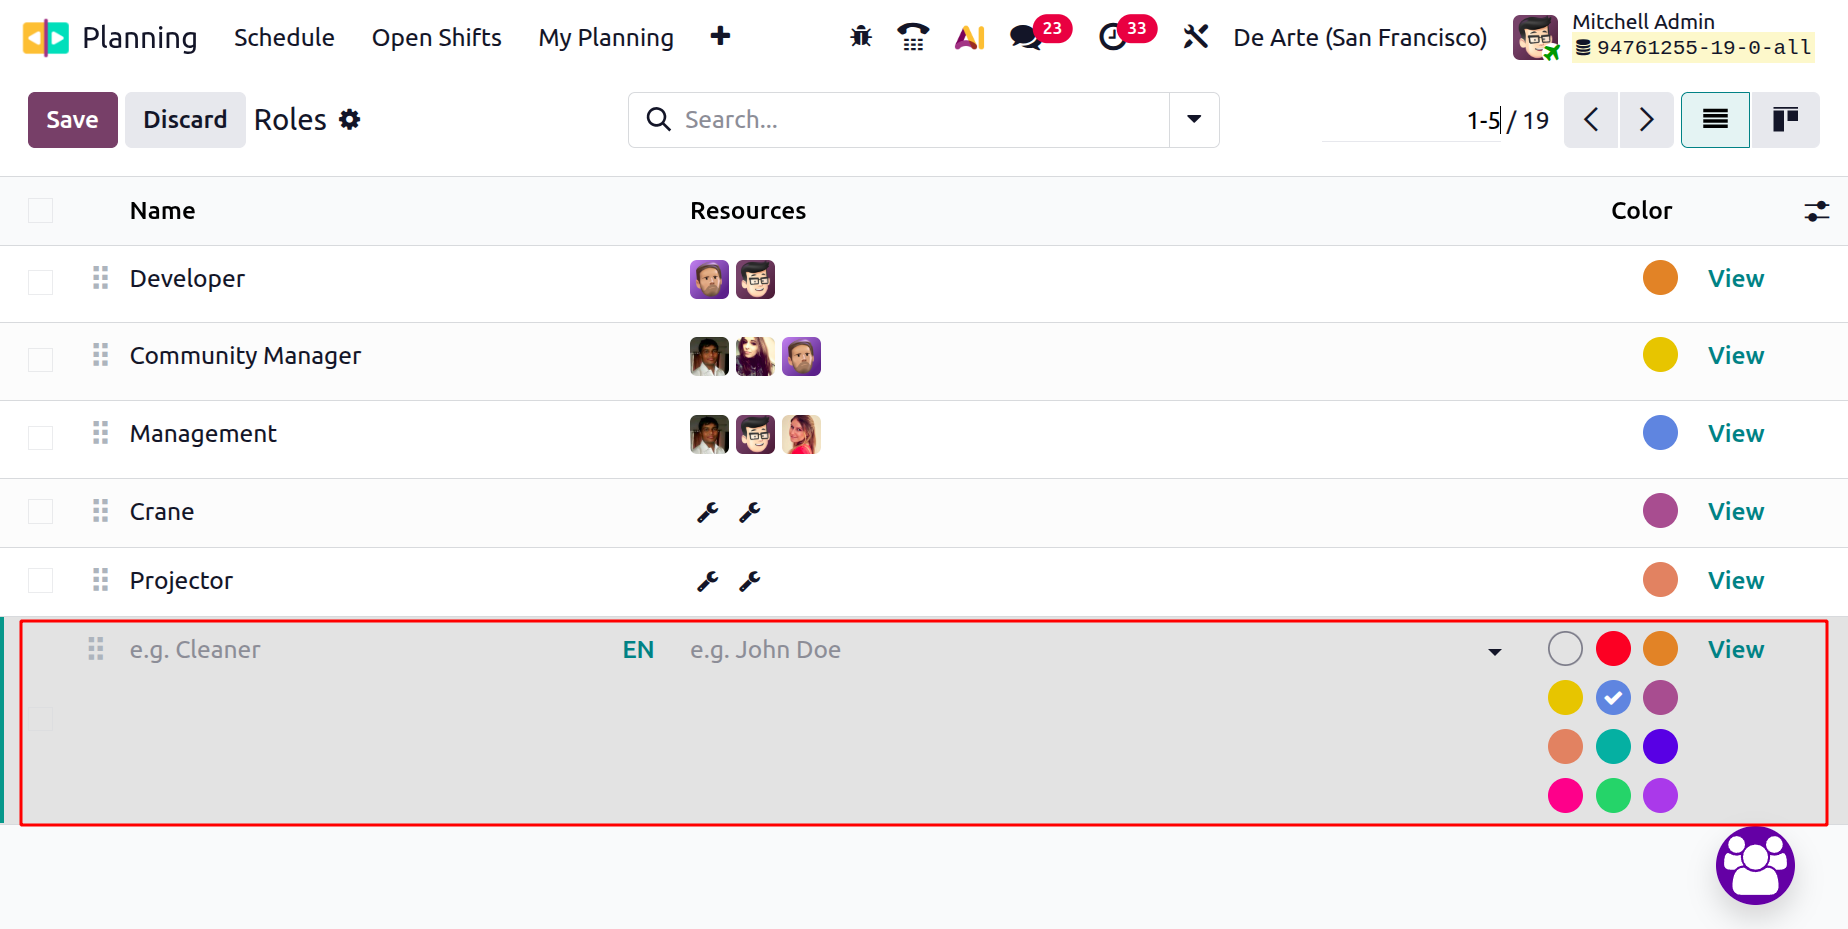
4.4 Roles:
In the Odoo 19 Planning module, Roles represent the type of work or position an employee performs during a shift. It helps define what kind of task a shift represents and helps managers assign the right employee with the right skills. In the List view, you can view the details of roles, including Name, Resource, and Color, as shown below. To add a new role, click the New button. A new line will appear for entering the role’s details and saving them.
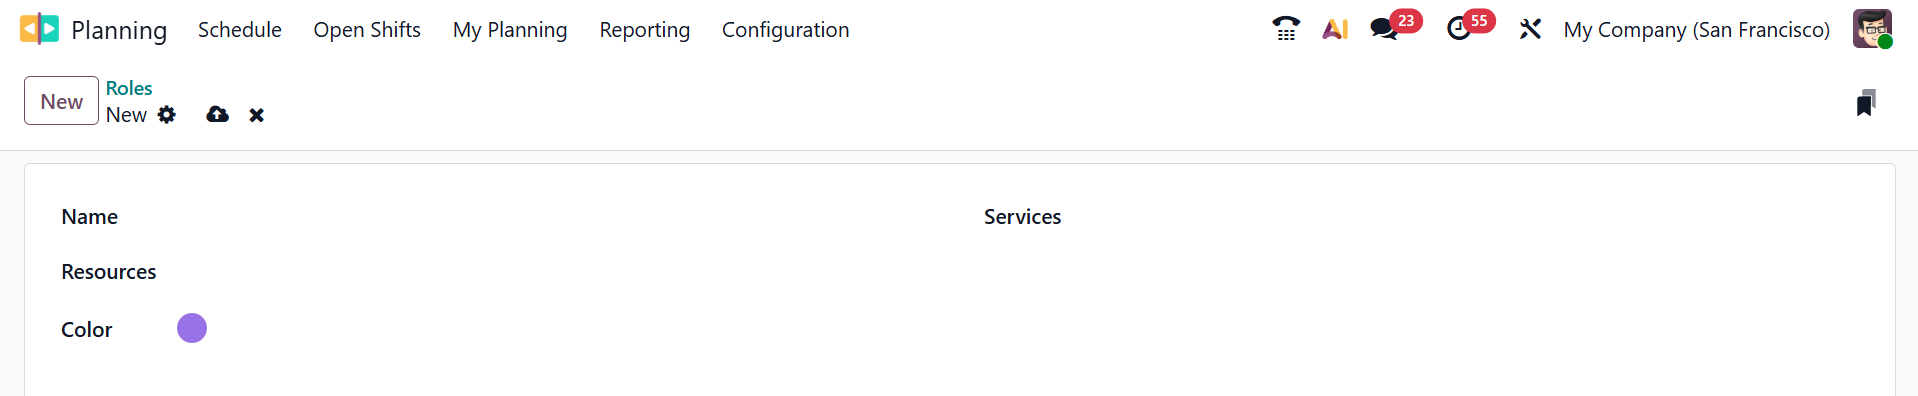
When you click the View button, a new window will open, as shown below. Then, add a name for your field in the Name field. Add a Resource to perform the selected role. Select an appropriate color for the role, and specify which roles are needed to perform the services in the Services field.
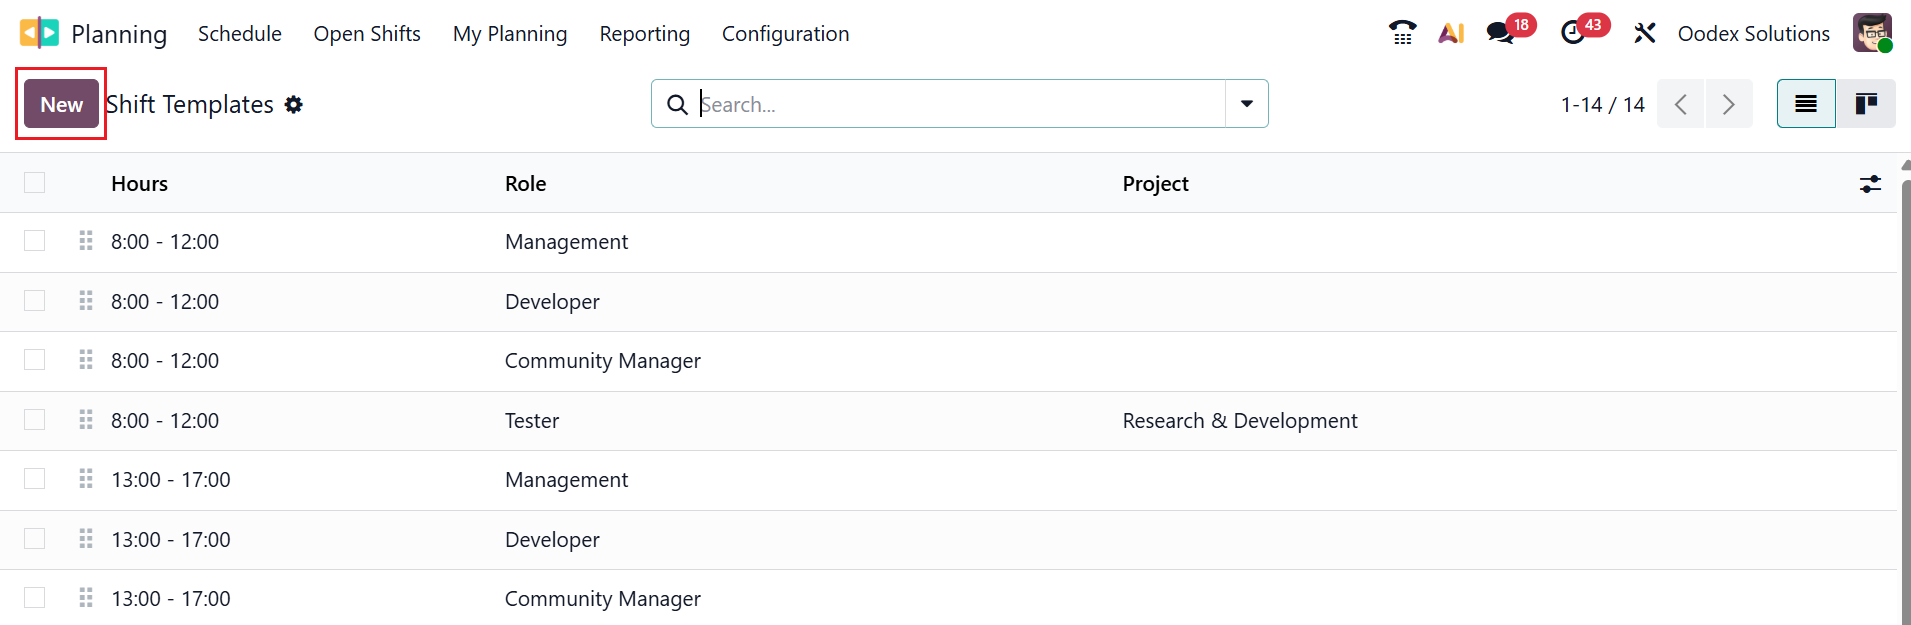
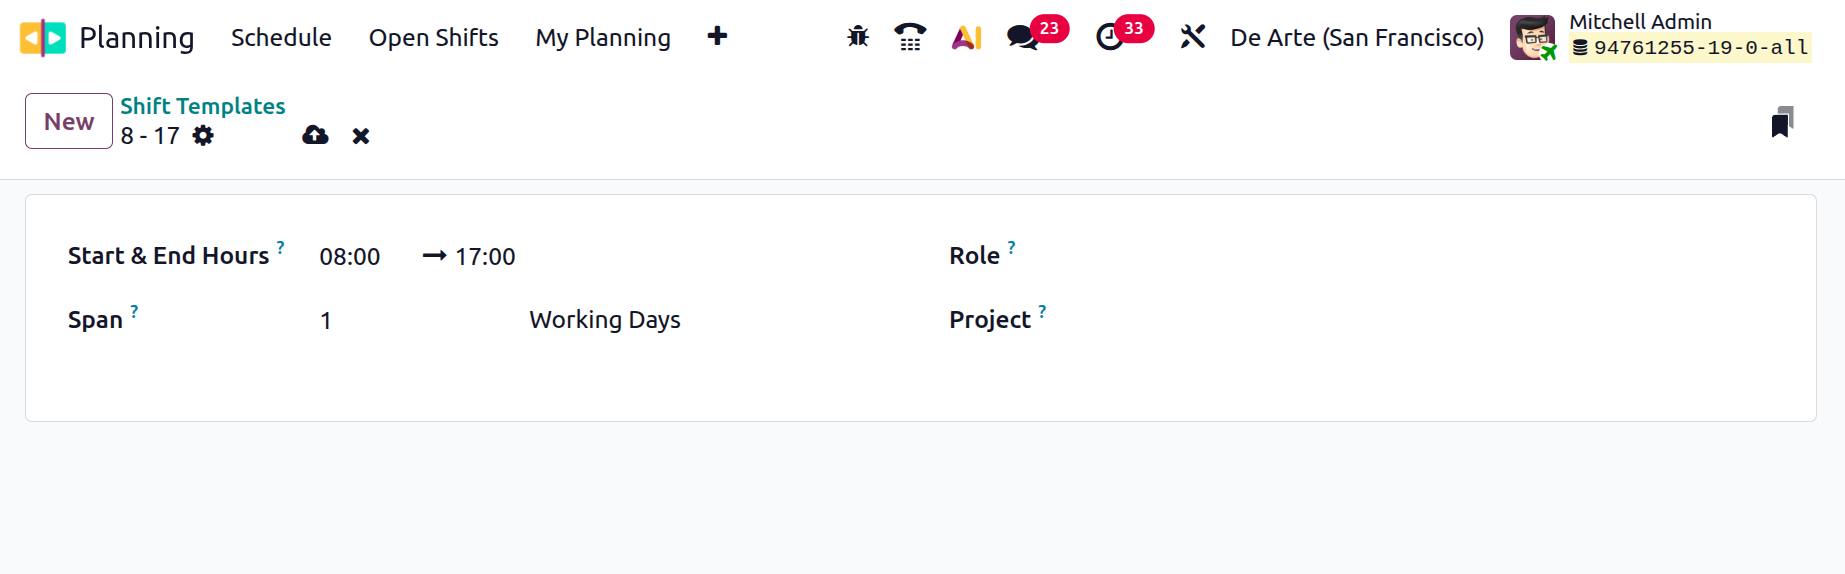
4.5 Shift Template:
In the Odoo 19 Planning module, the Shift Template is a pre-defined shift model that defines the start time, end time, role, and other details of a shift. It helps to save time and ensure consistency by allowing managers to generate shifts instantly with a single click, using standard timings and roles.
In the List view, you can see the details of the shift templates, including Hours, Roles, and Project. To create a new shift template, click the New button, as shown below.
Then, enter the Start and End Hours according to the working schedule, and in the Span field, specify the number of working days. In the Role field, link the shift to the specific role. You can also monitor changes in a particular project.
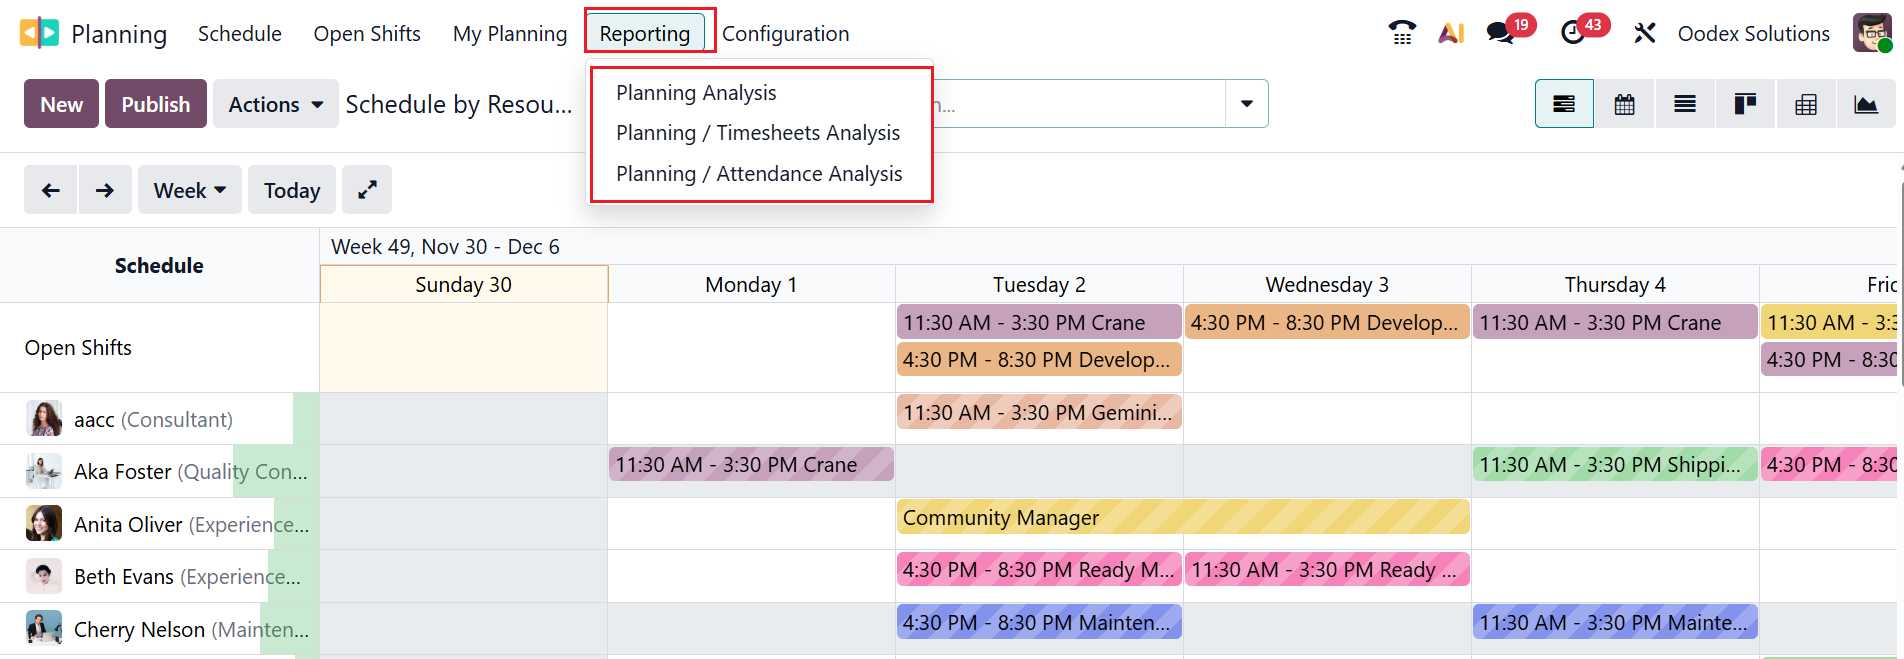
5. Reporting:
Reporting in the Odoo 19 Planning module provides analytical views that show how shifts, workloads, and employee allocations are distributed over time.
Under the Reporting menu, you can see three options: Planning Analysis, Planning / Timesheets Analysis, and Planning / Attendance Analysis.
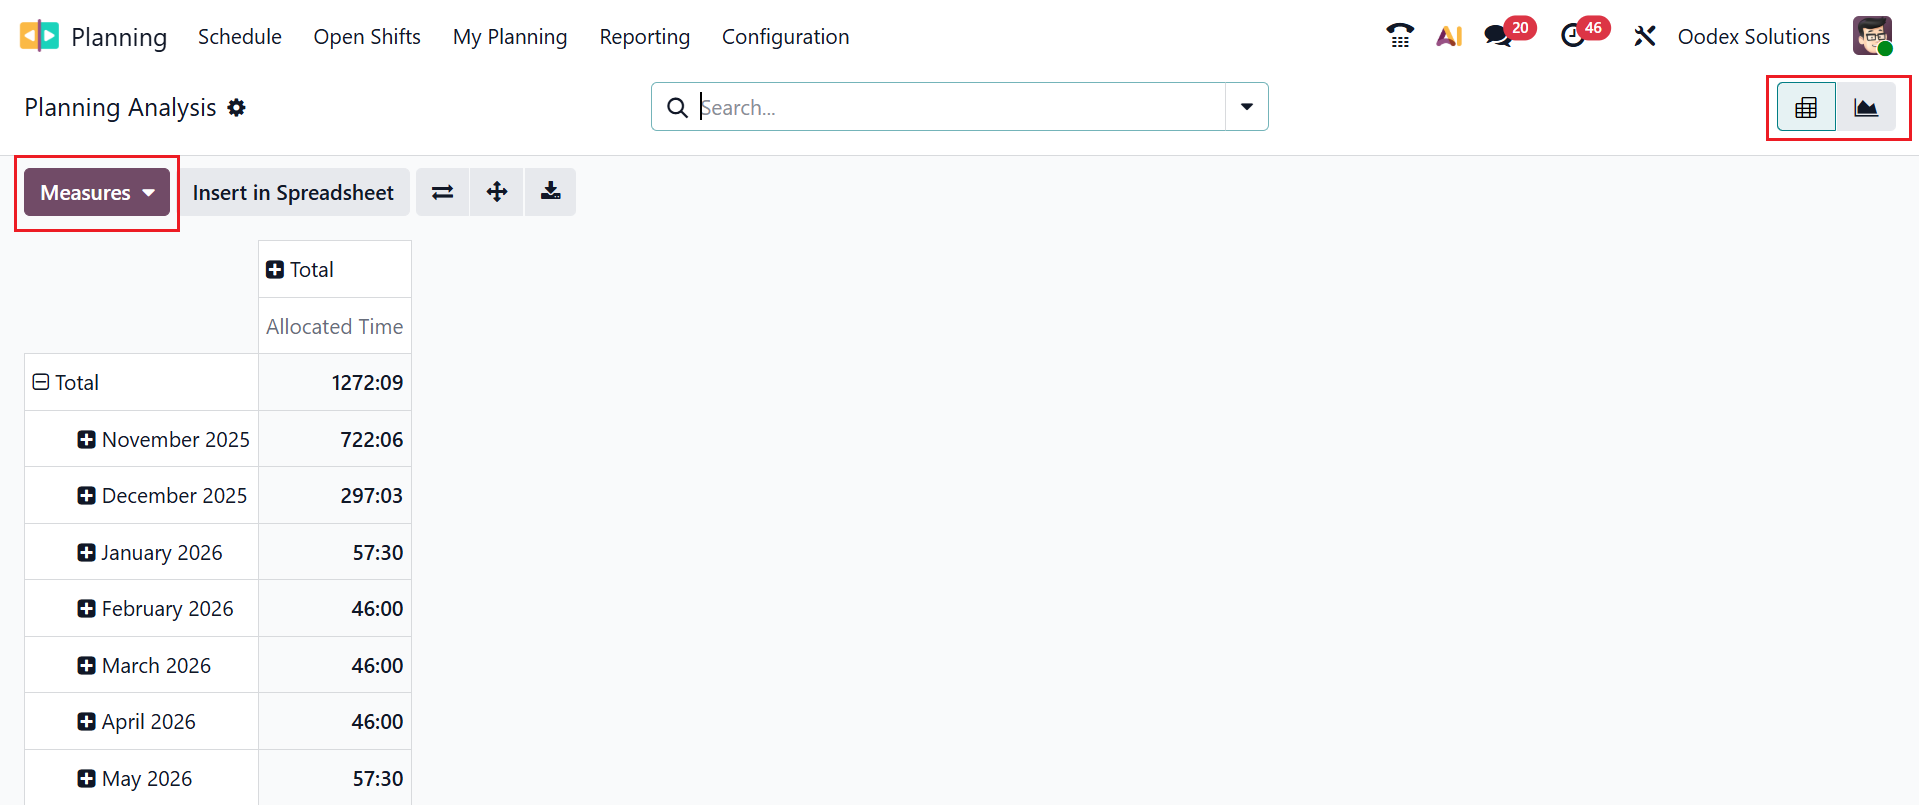
5.1 Planning Analysis:
In the Odoo 19 Reporting menu, Planning Analysis provides a detailed analytical view of scheduled shifts, roles, projects, employees, sales, start & end dates in Pivot or Graph views. Click on the Measures button to add numerical values such as Allocated Time, Allocated Time (%), Allocated Time Cost, Billable Time Allocated, Effective Time, Effective Time Cost, Non-billable Time Allocated, Progress, Time Remaining (%), and Count.
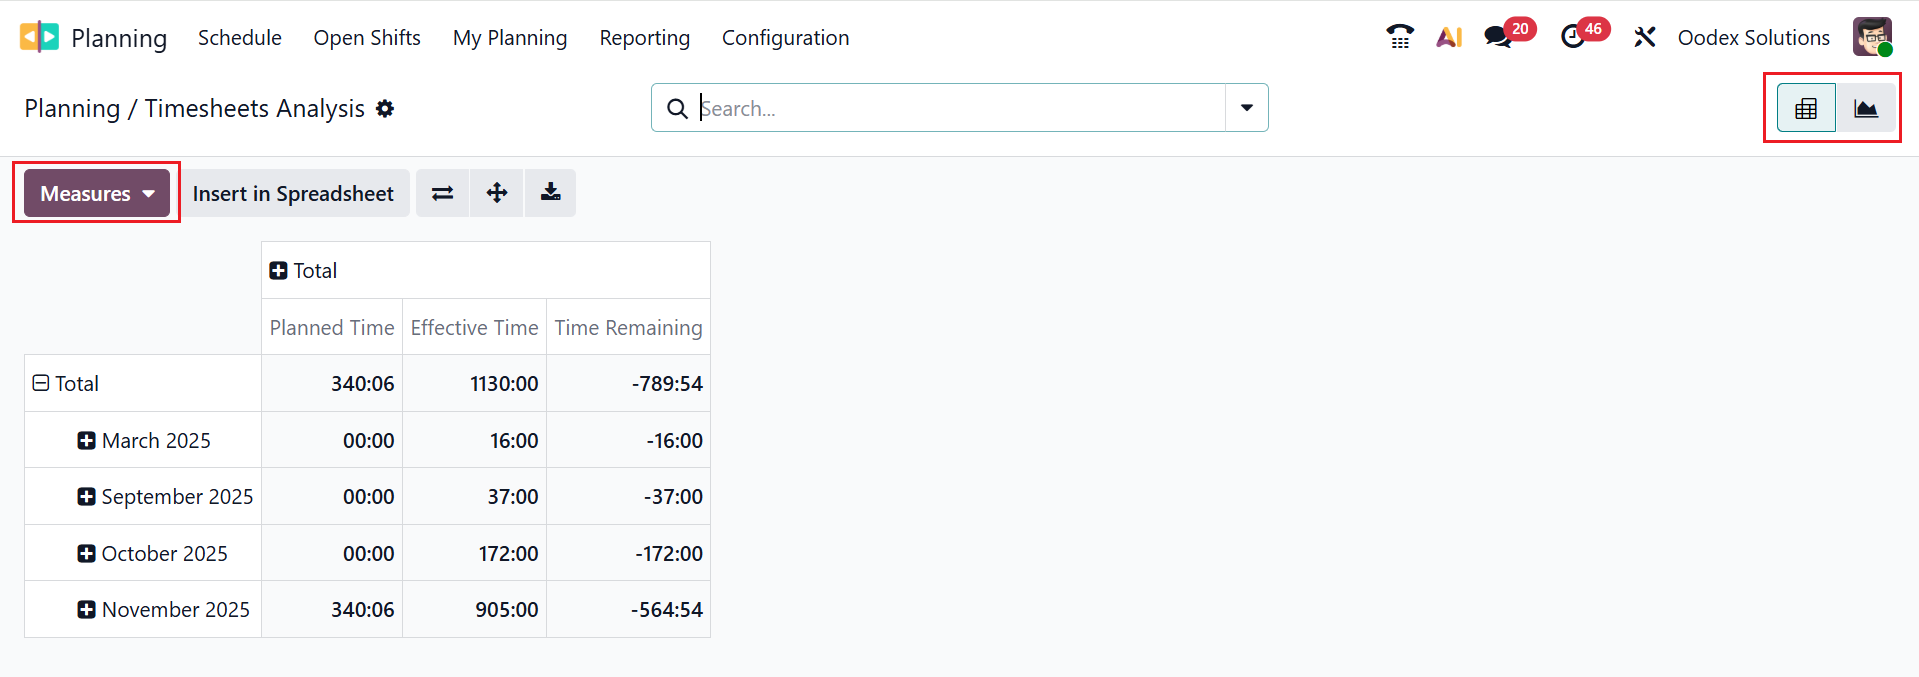
5.2 Planning / Timesheets Analysis:
In the Odoo 19 Reporting menu, the Planning / Timesheets Analysis section helps track planned and actual working hours by employee, project, and date, in a pivot or graph view. Click on the Measures button to add numerical values, such as Effective Billable Time, Effective Costs, Effective Margin, Effective Non-Billable Time, Effective Revenues, Effective Time, Planned Billable Time, Planned Costs, Planned Margin, Planned Non-Billable Time, Planned Revenues, Planned Time, Time Remaining, and Count.
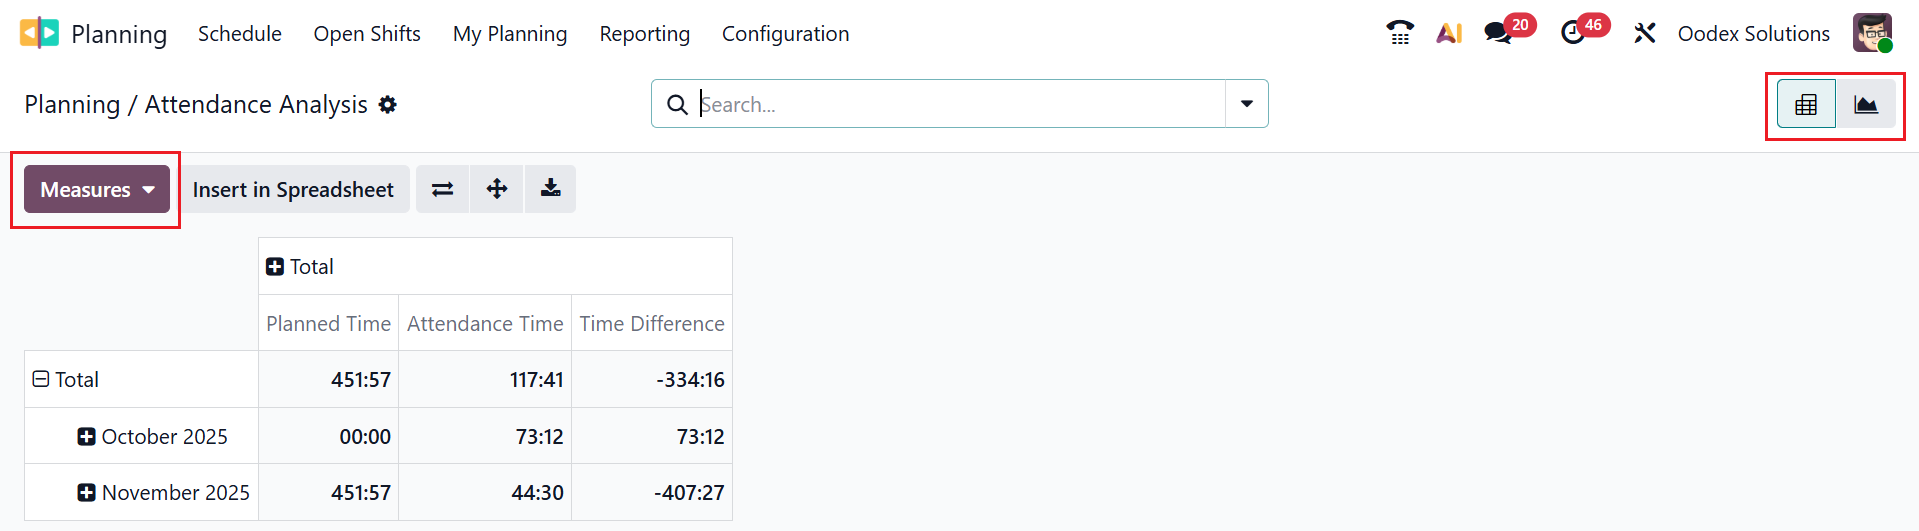
5.3 Planning / Attendance Analysis:
In the Odoo 19 Reporting menu, Planning / Attendance Analysis compares the shifts planned for employees with their actual attendance, recording who was present, absent, late, or worked extra.
Click on the Measures button to add numerical values, such as Attendance Cost, Attendance Time, Cost Difference, Planned Cost, Planned Time, and Count.
The Odoo 19 Planning module streamlines workforce scheduling with improved clarity, automation, and collaboration. Its user-friendly interface helps managers anticipate capacity requirements, minimise conflicts, and allocate resources effectively. Ultimately, Odoo 19 Planning empowers organisations to optimise workloads, support informed decision-making, and efficient operations, making it a valuable asset for teams of any size or industry.