Project Management
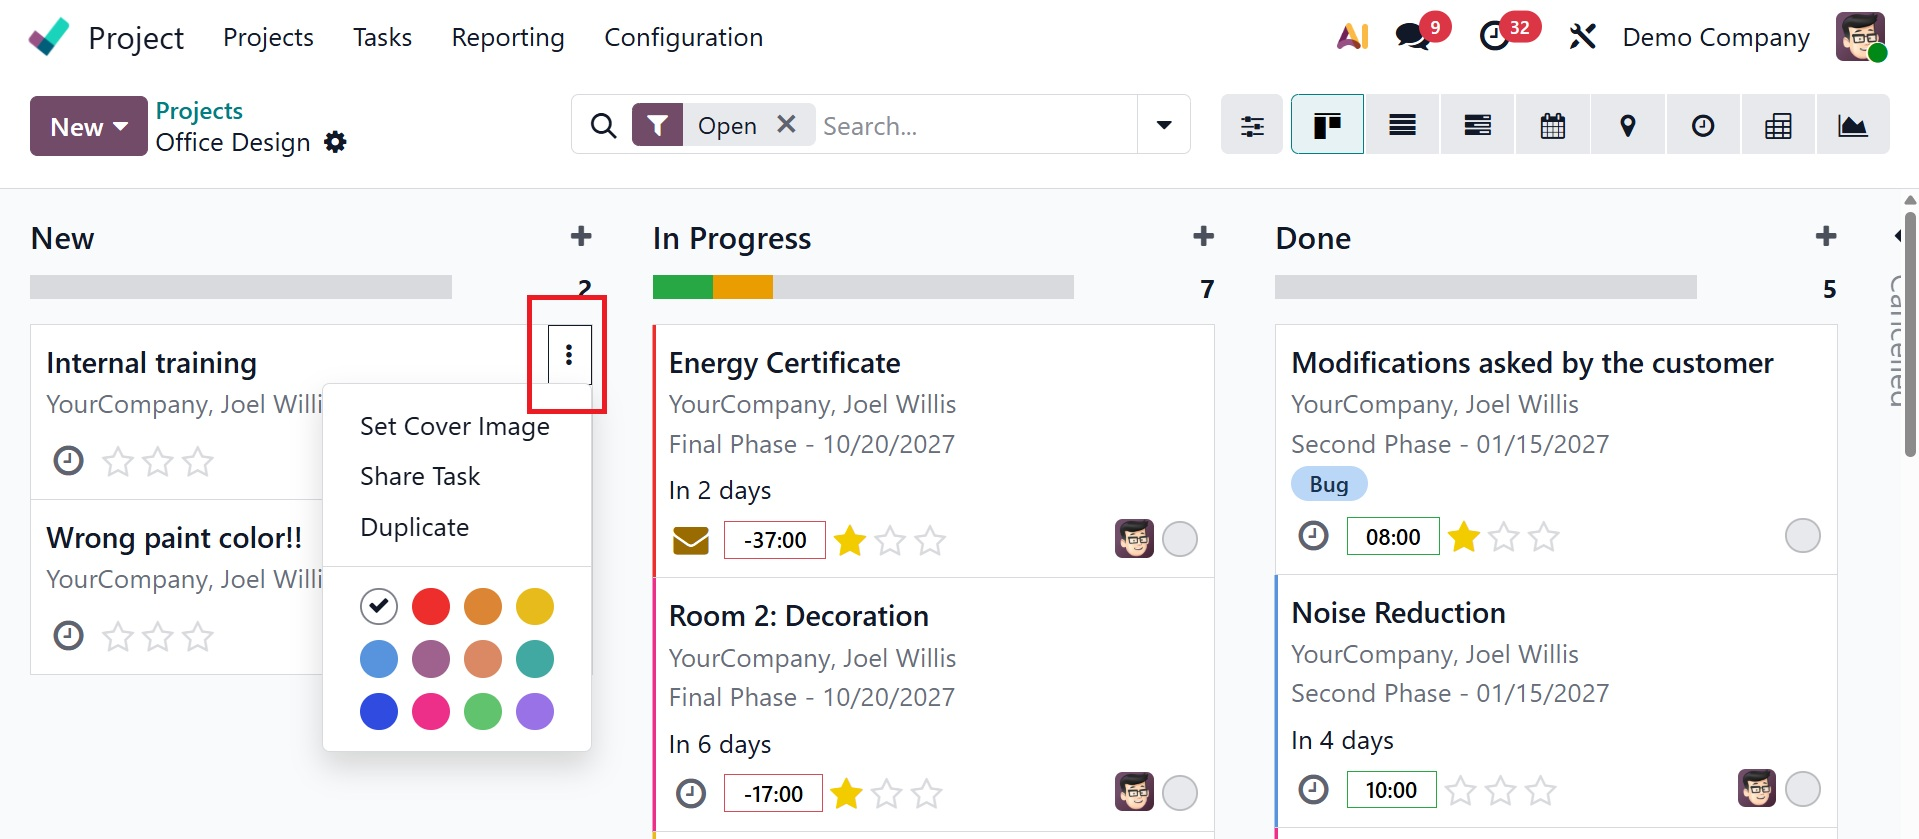
If you choose the project module, Odoo19 will take you to the main dashboard for that module. The project dashboard's Kanban view is shown below.
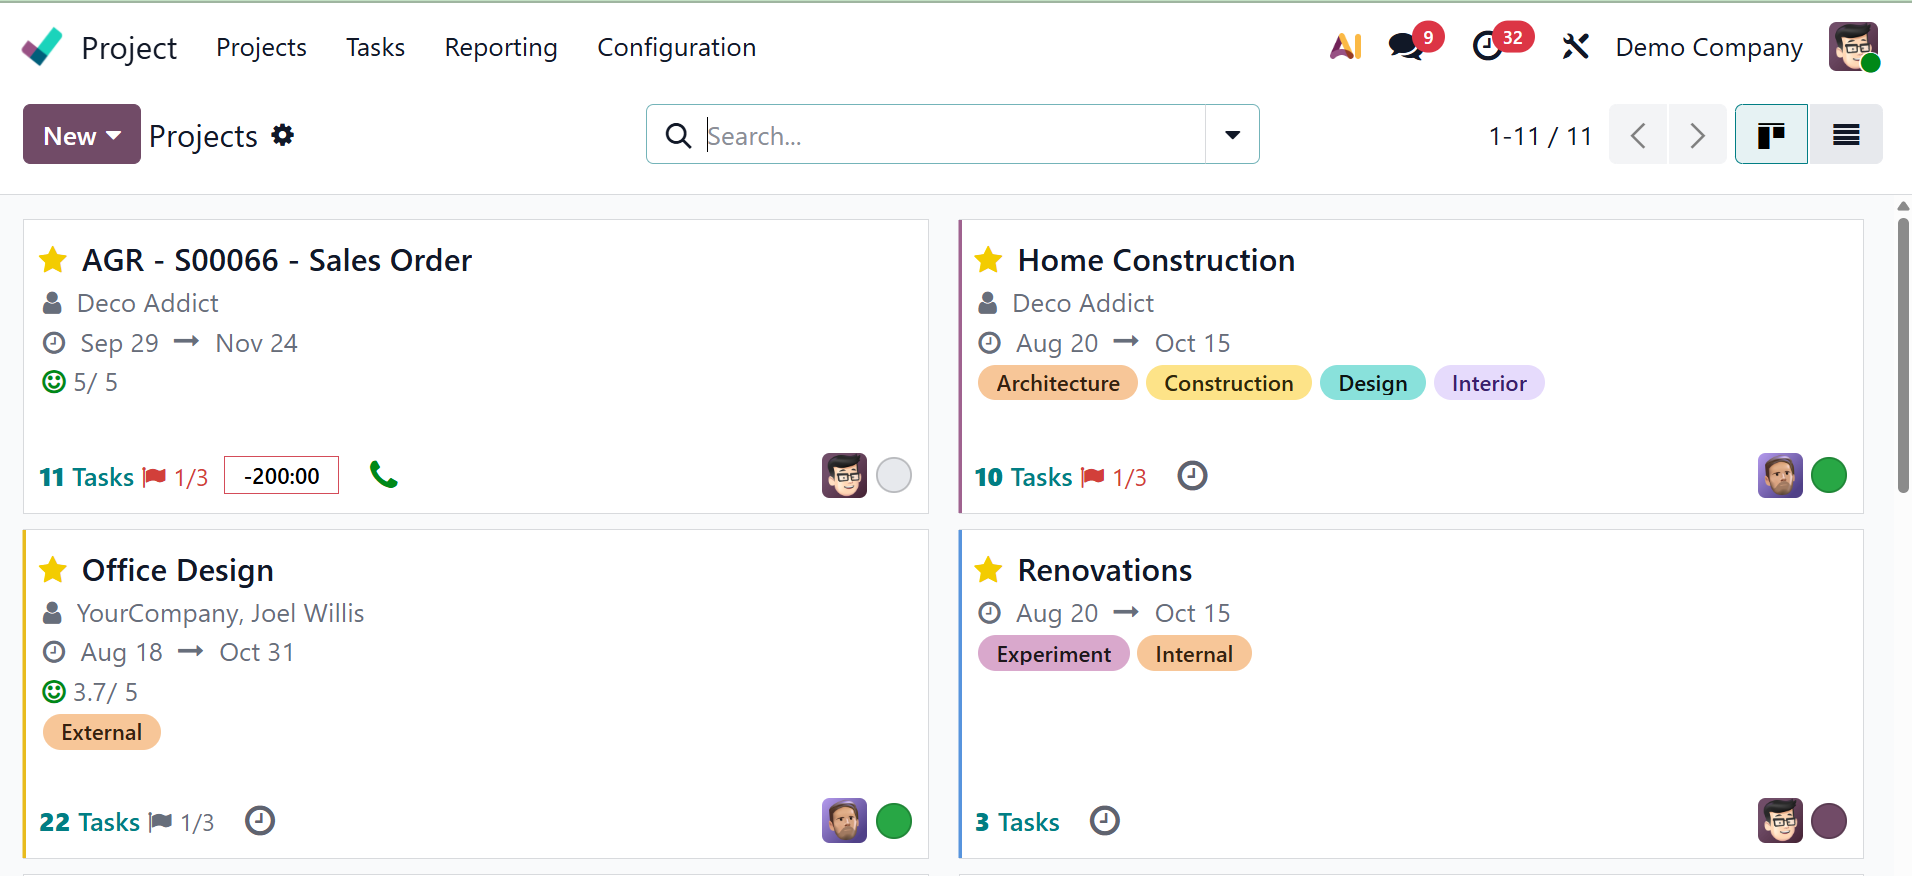
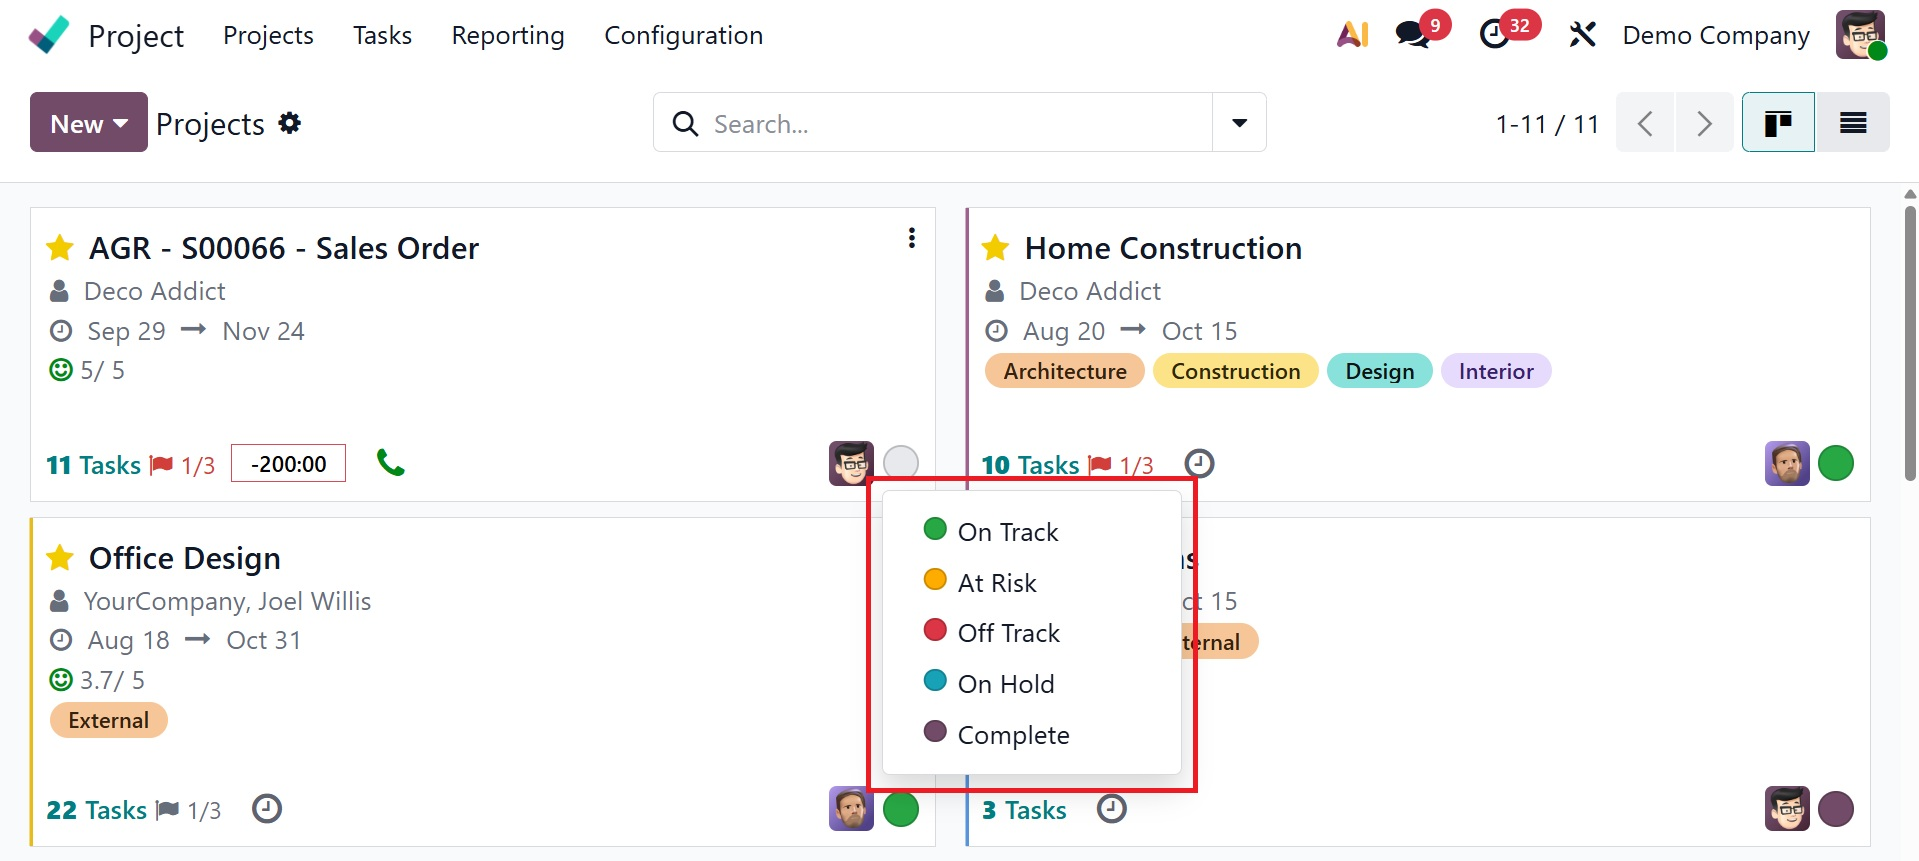
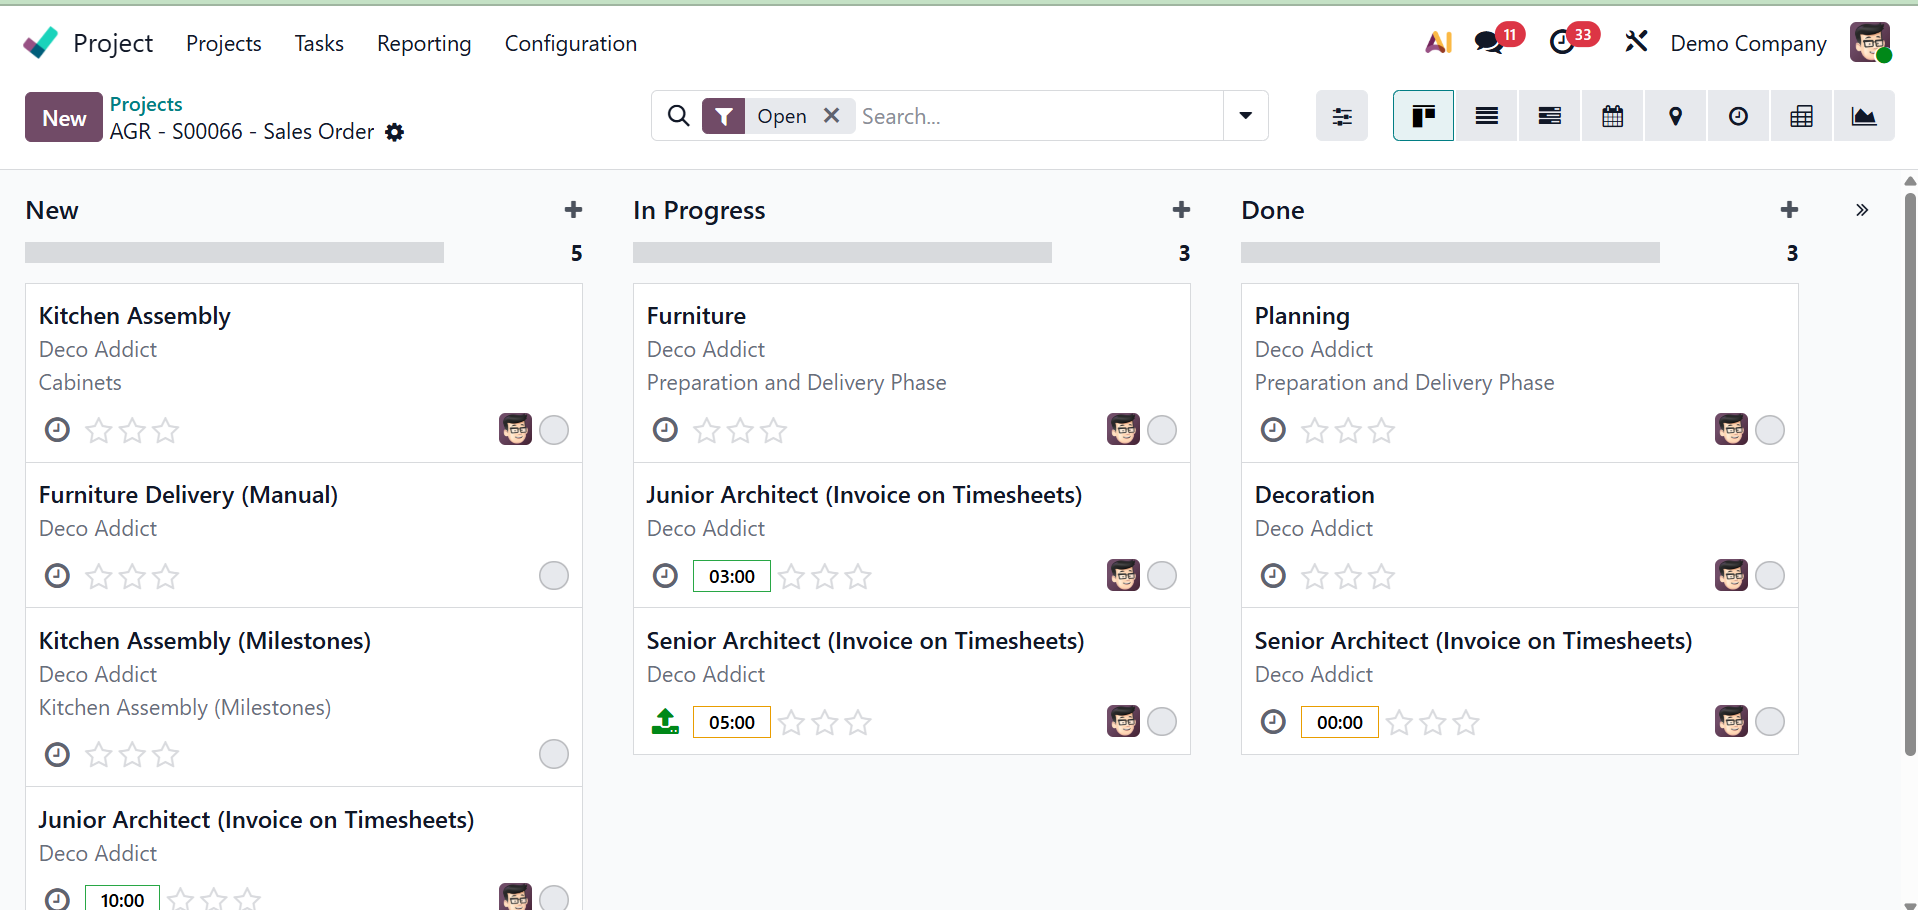
From the Kanban perspective, the existing projects are shown. Each project includes a list of the due date, partner, customer rating, number of tasks, milestones, and number of hours needed. Each project's status is displayed using a variety of colors, each of which stands for a different meaning. These colors include At Risk, Off Track, On Hold, Off Track, and Done, as shown below. To add the project to your list of favorites, use the star icon.
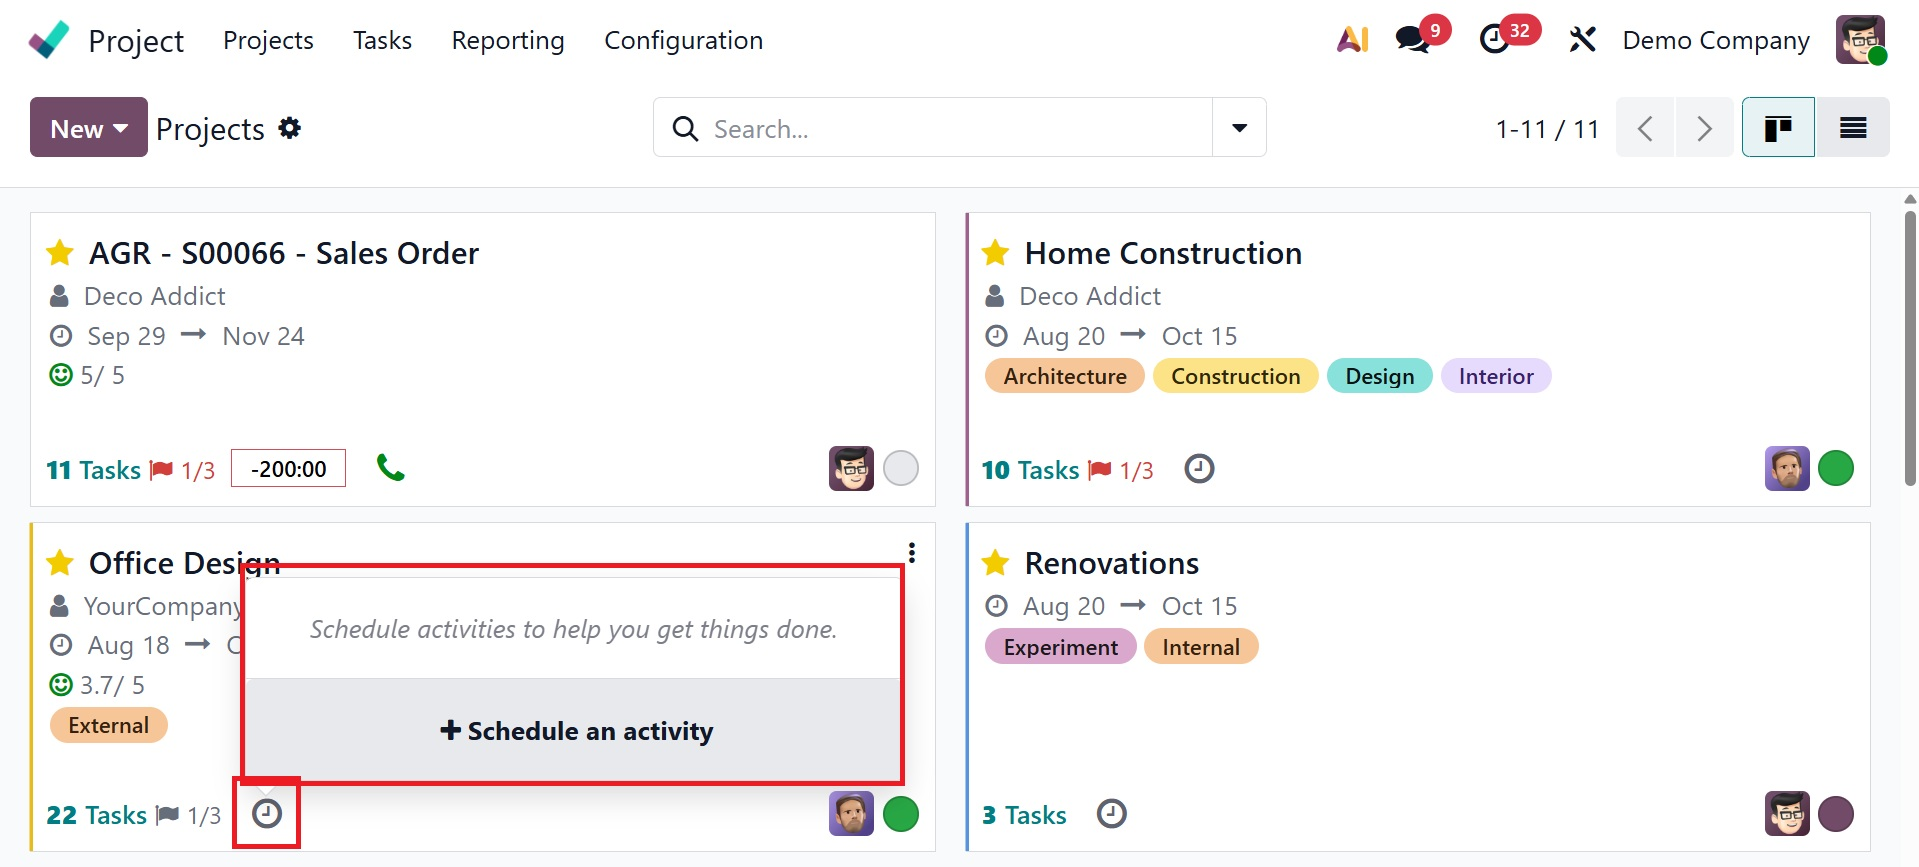
You may schedule tasks to help you get things done by clicking on the little clock indicator, which will open a pop-up window. You may quickly arrange an activity by using the schedule as an activity tool. The colored bubbles aid in monitoring the progress of the project.
Each task has a little three-dot menu in the upper right corner that lets you examine the task's set cover image, share it, and duplicate it.
As seen in the screenshot below, the following smart buttons are situated in the upper left corner of the project module's dashboard.
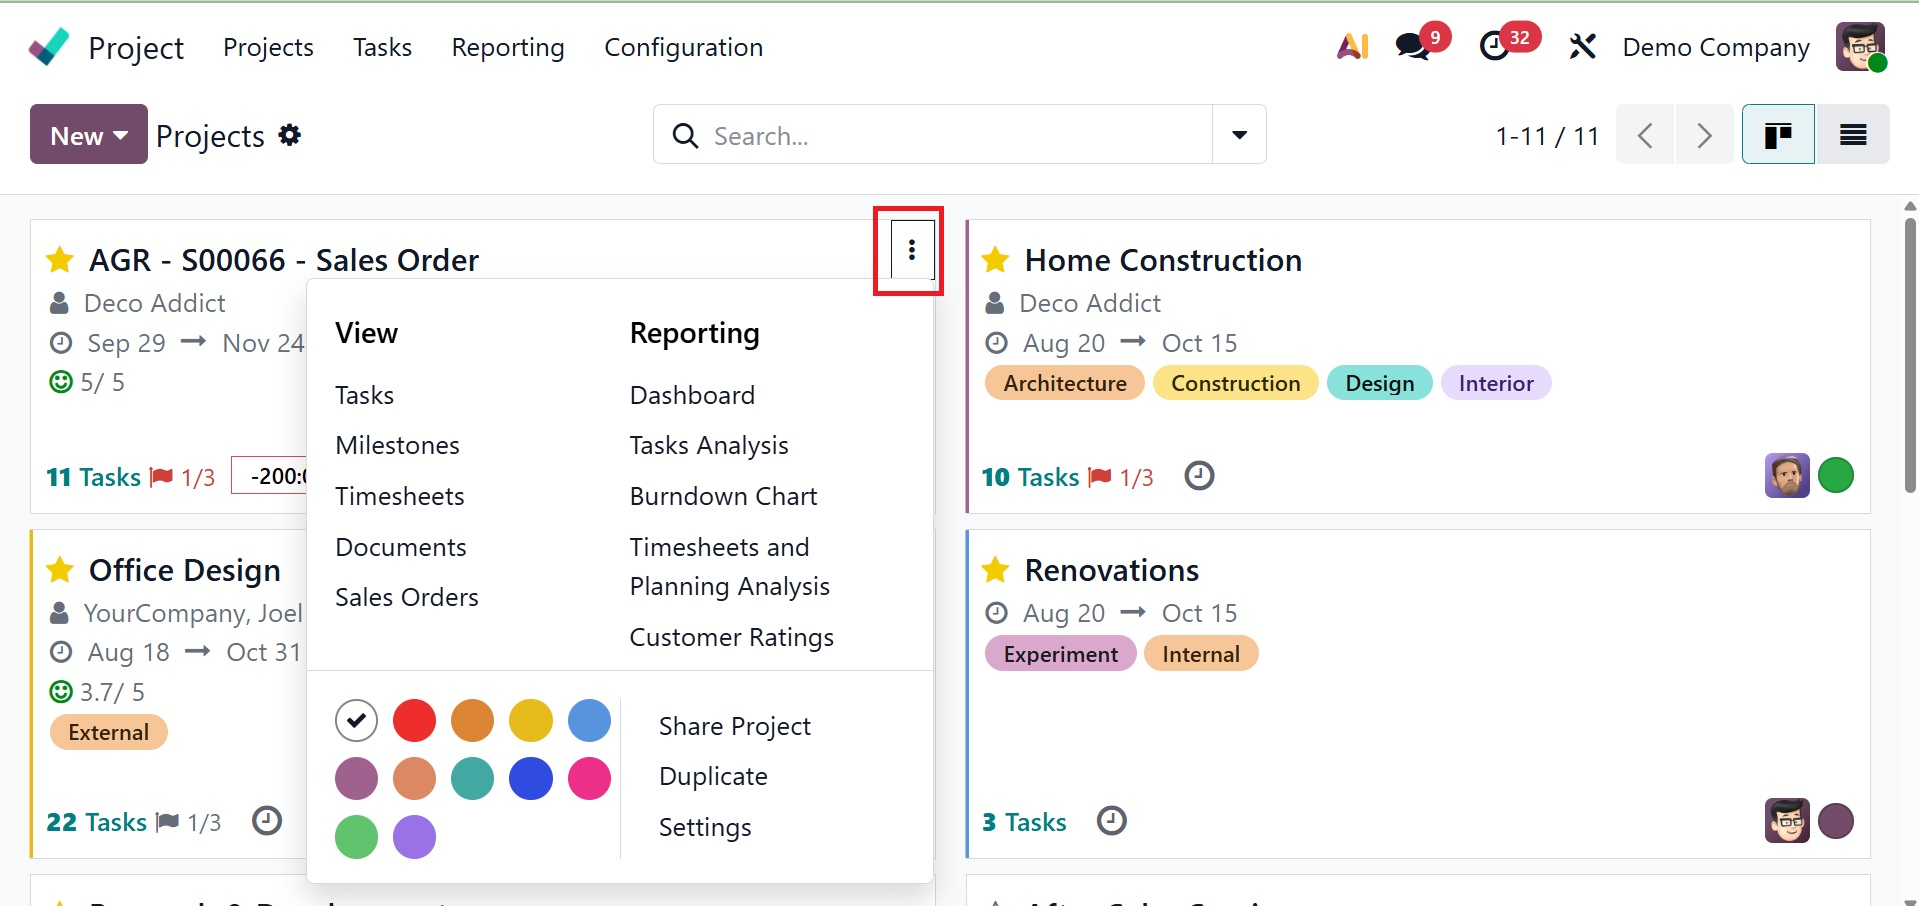
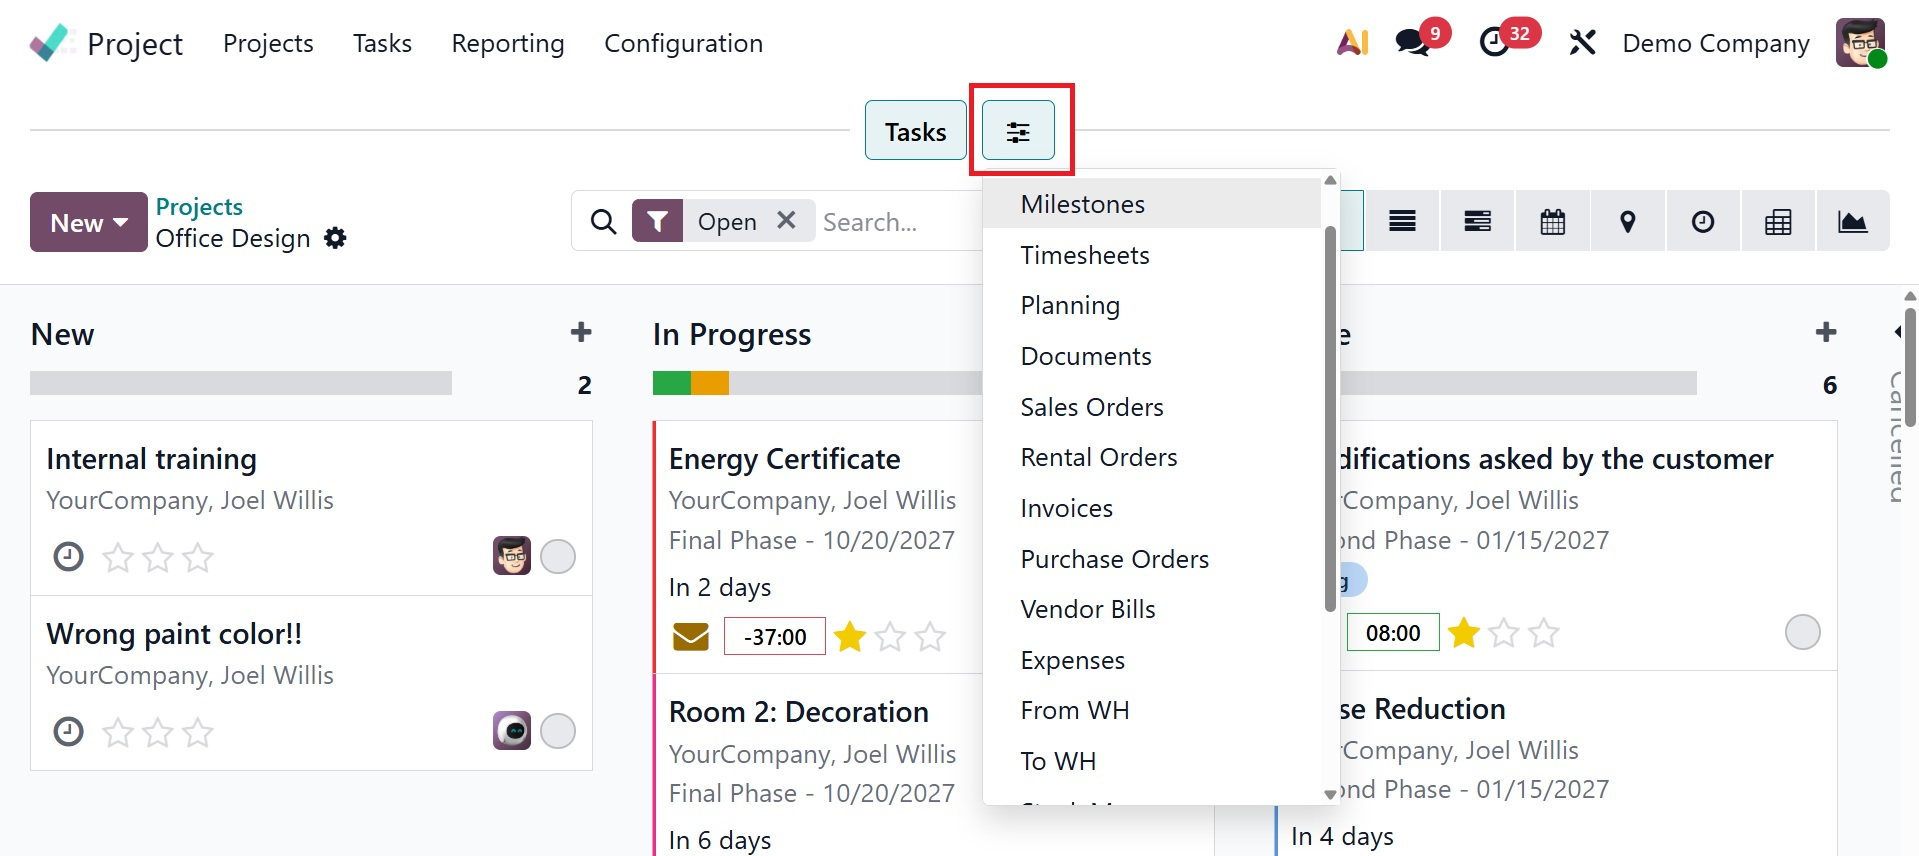
There, you have choices such as
- Tasks:this allows you to examine or manage the tasks associated with the project by opening their list.
- Milestone: This section displays the milestones that have been established for this project.
- Timesheets:the quantity of hours or days associated with the project, contingent on the Timesheets app settings. This covers all timesheets, regardless of whether they have undergone validation.
- Documents: shows all of the documents in the workspace for the project.
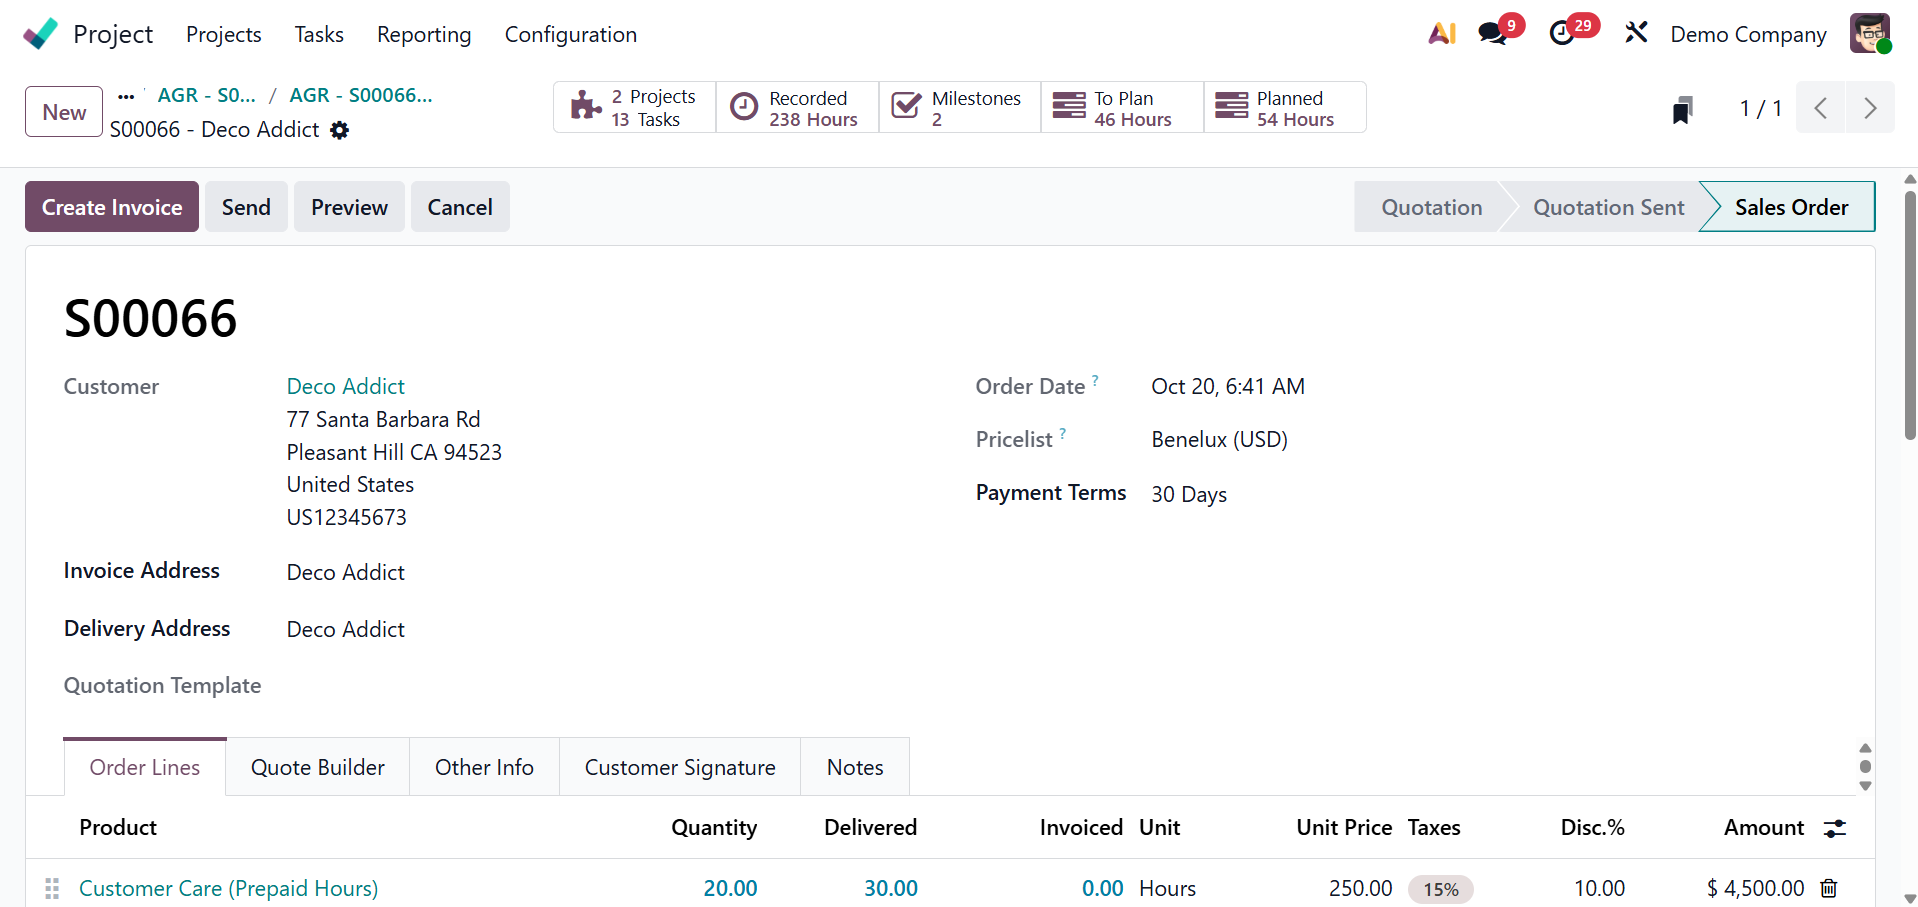
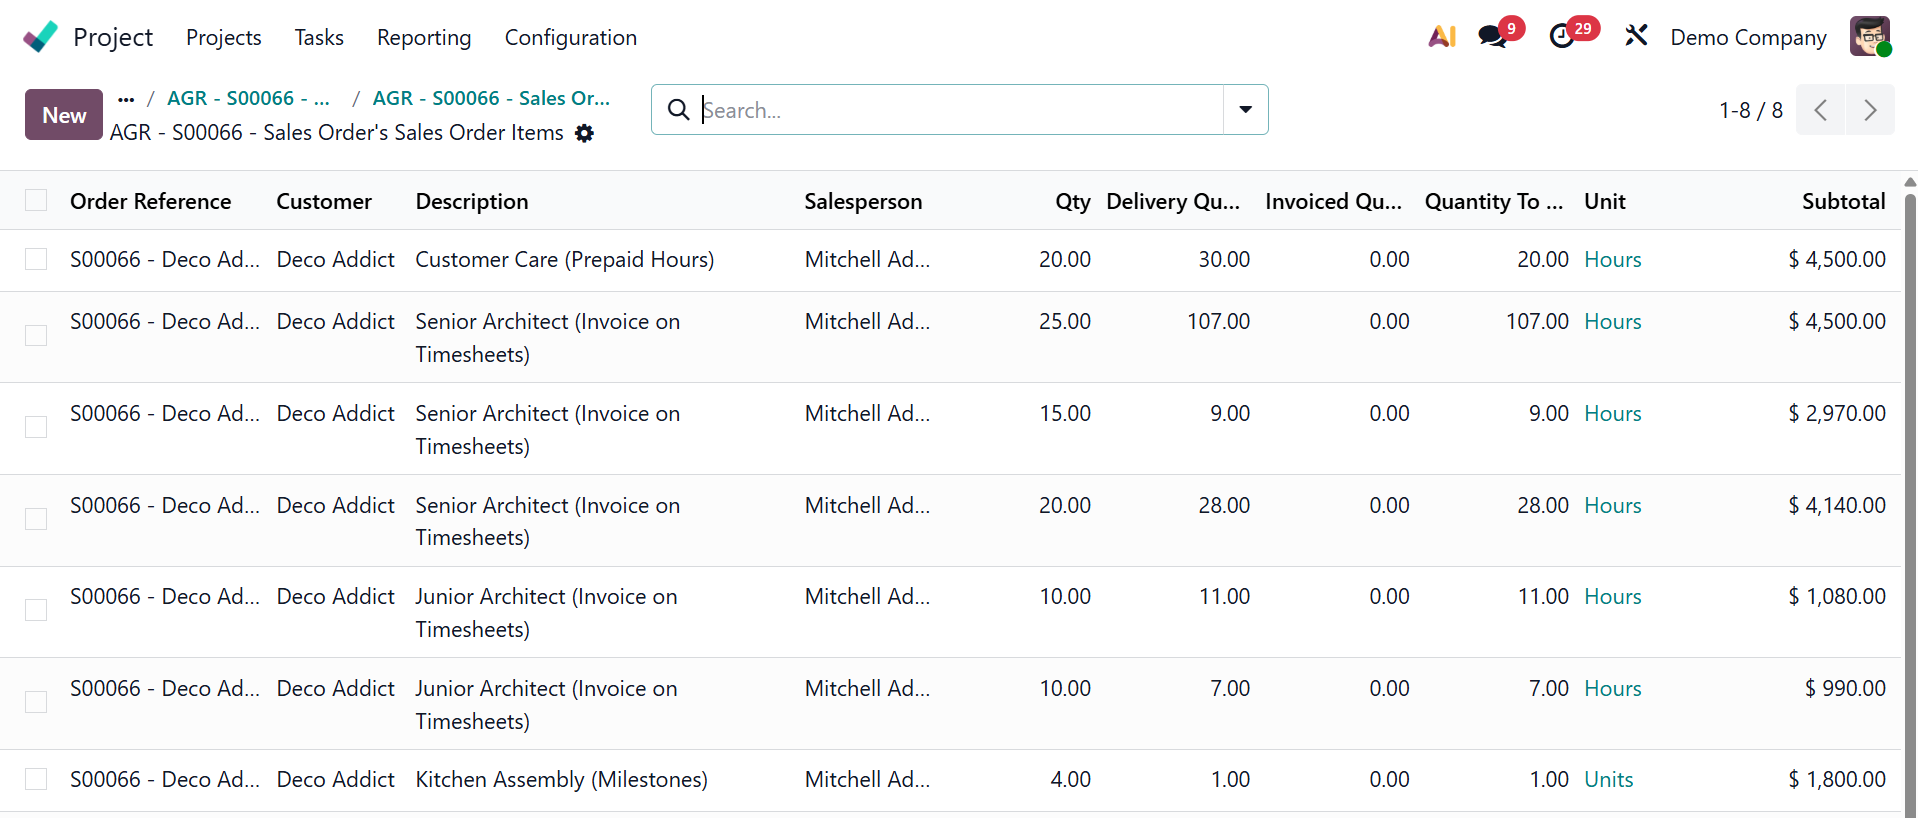
- Sales orders: Provides the ability to view and manage sales orders associated with a project. This tool is very helpful for creating invoices for customer work and keeping track of billable tasks.
- Dashboard: the option uses reports and charts to provide a visual summary of the performance of your project.
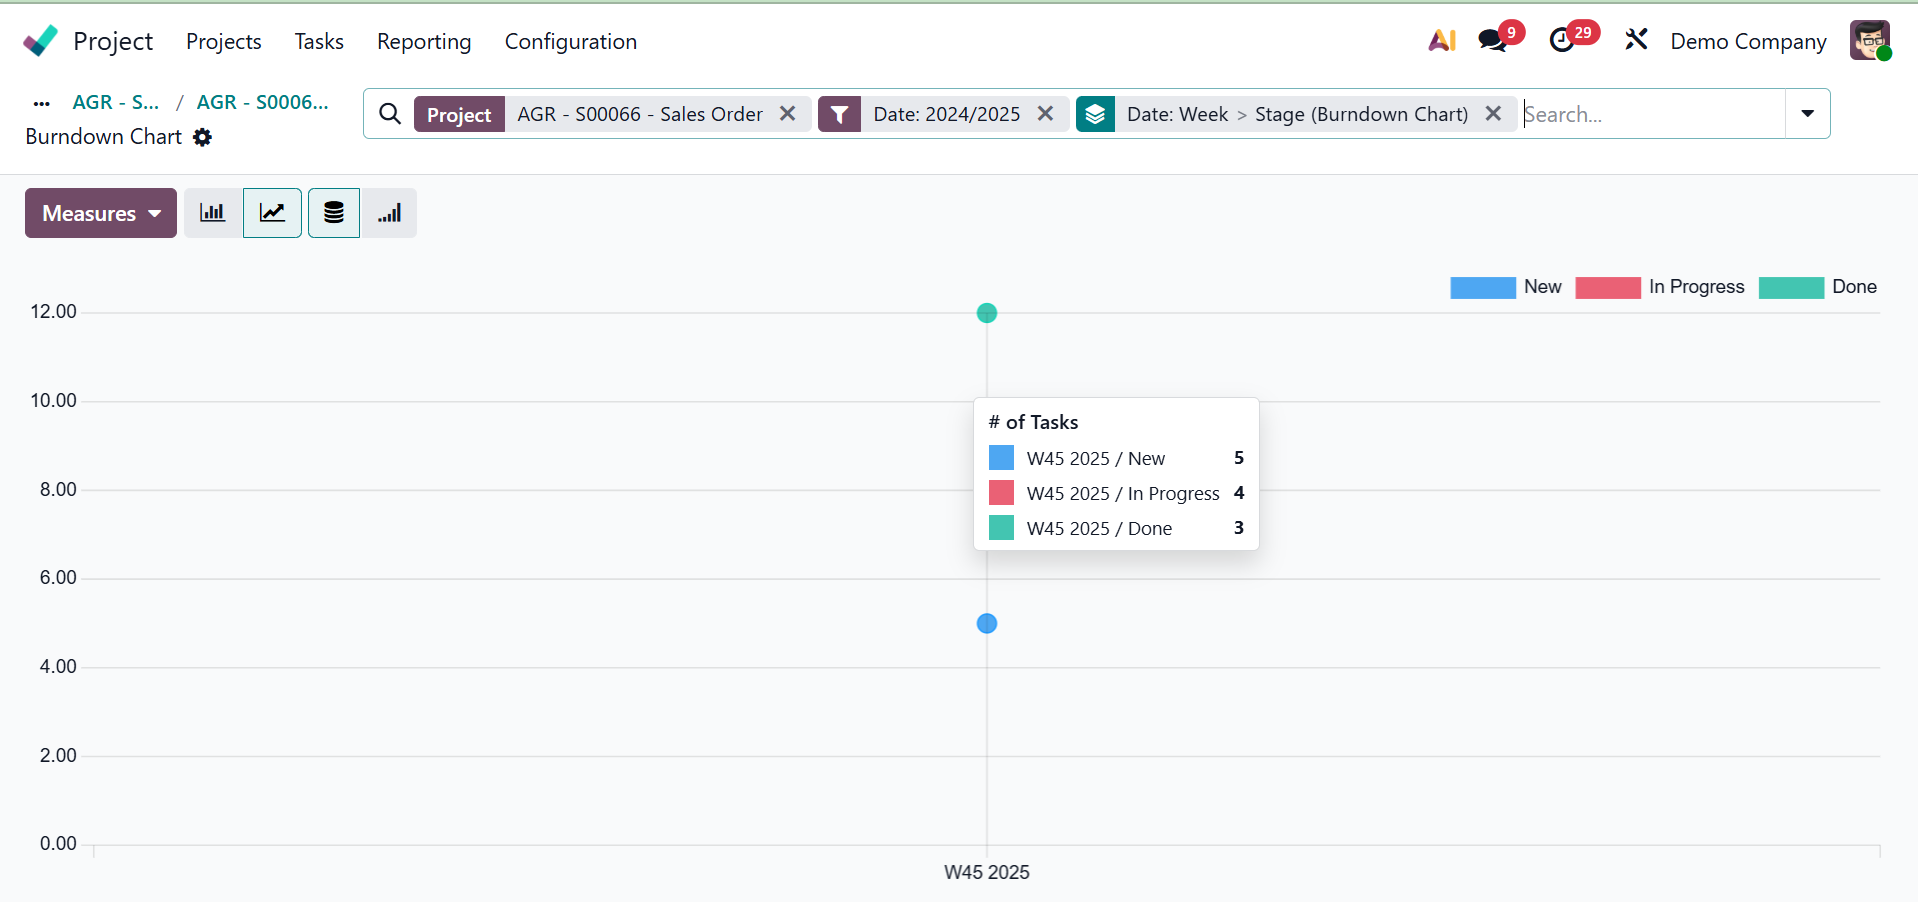
- Task analysis: aids in task analysis. Using the reporting option, task analysis may also be used to generate a burndown chart for a particular project.
- Burndown Chart: To view a report on the project's task status over time.
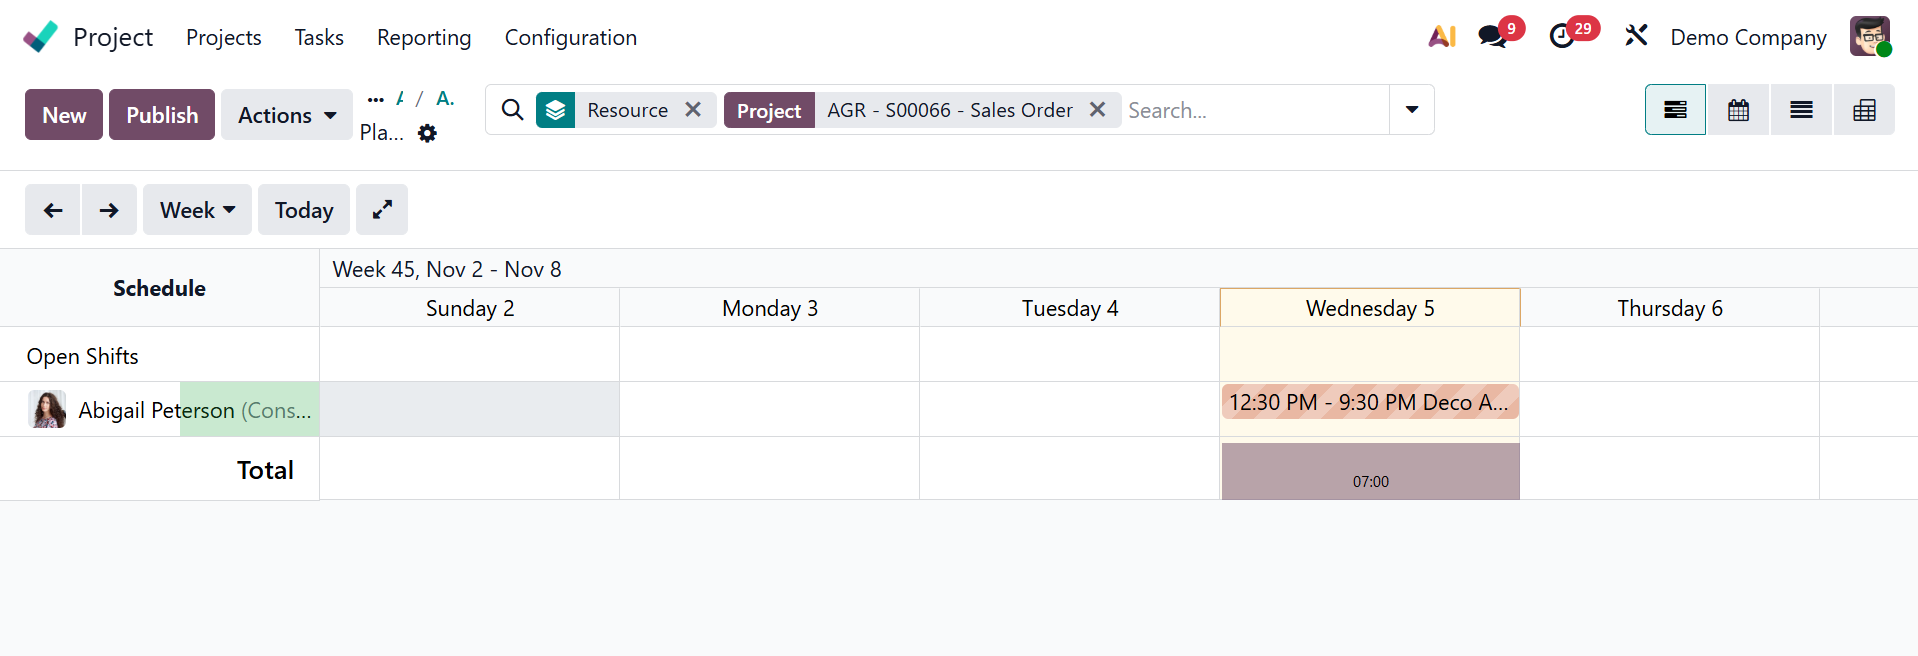
- Timesheets and Planning Analysis: To get a report on the project's timesheets and shifts, click the smart button.
- Customer Rating: Customers' comments and satisfaction ratings for the project's services or tasks are displayed in this option.
- Share project: You enable external users to be in sync with you when you share your projects or tasks. By ensuring that the appropriate information reaches the appropriate individuals, it prevents miscommunication, streamlines communication, and makes your business more organized.
- Duplicate: aids in work duplication
- Settings: You can modify details, control visibility, and set up different parts of the job or project using the settings.
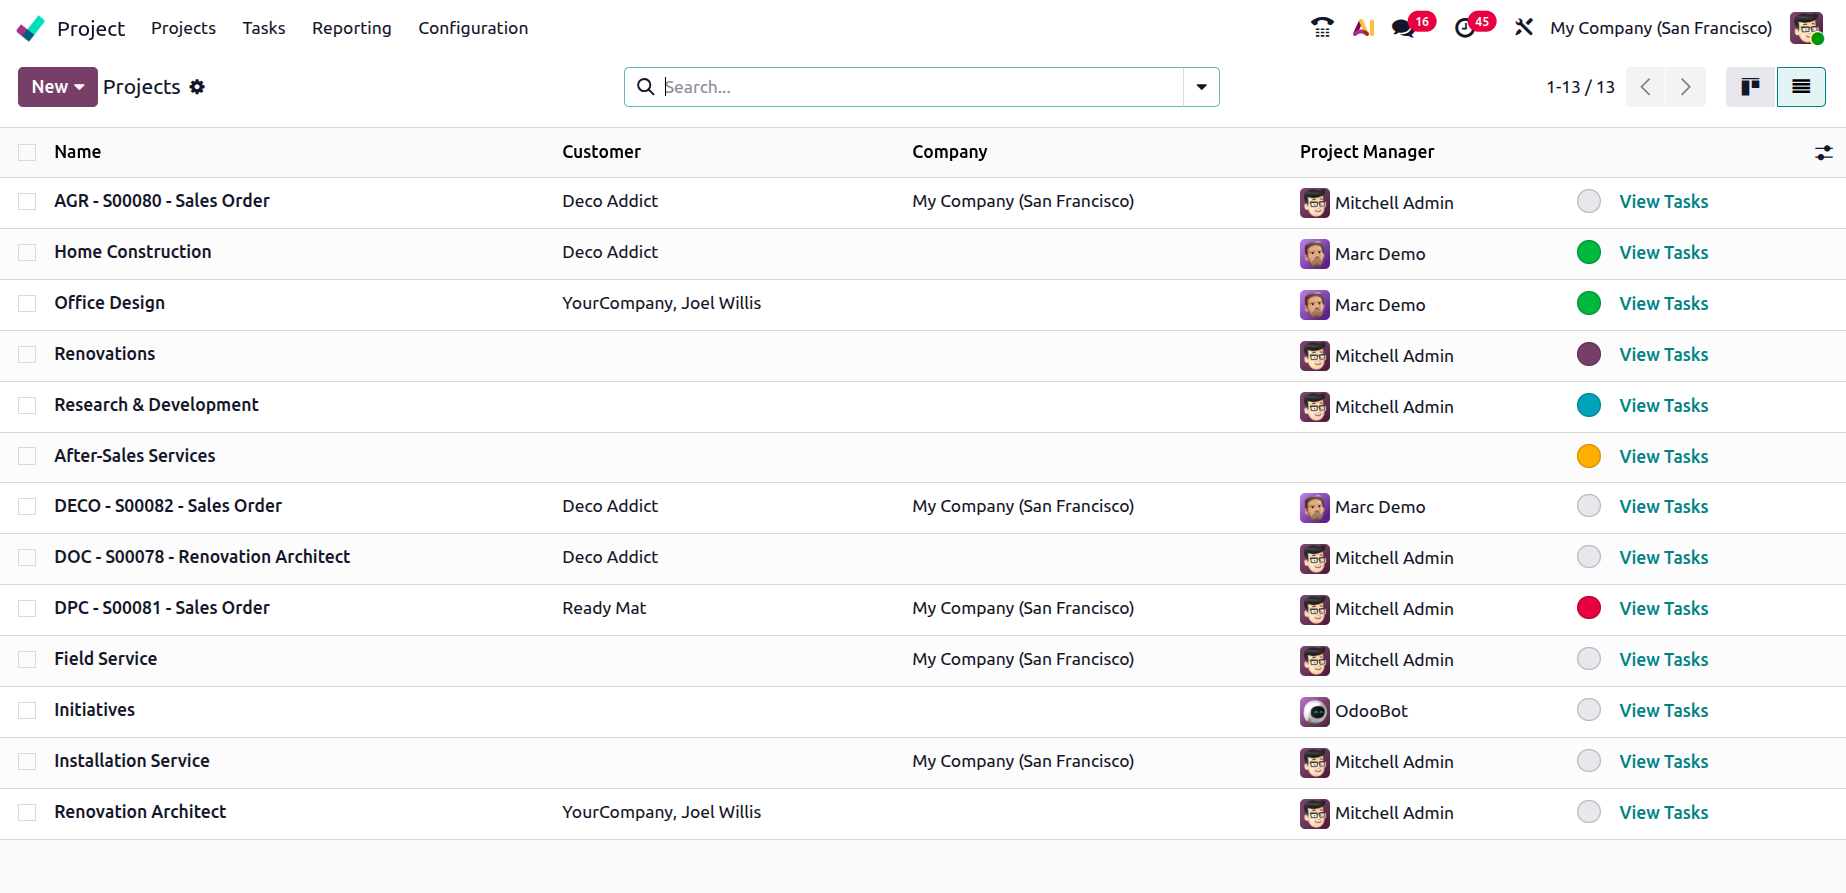
List view on the list view, you can have the details like, name of the project, customer, company, project manager, and option to view task as well.
Here, you can have various filters and group by options, as shown below.
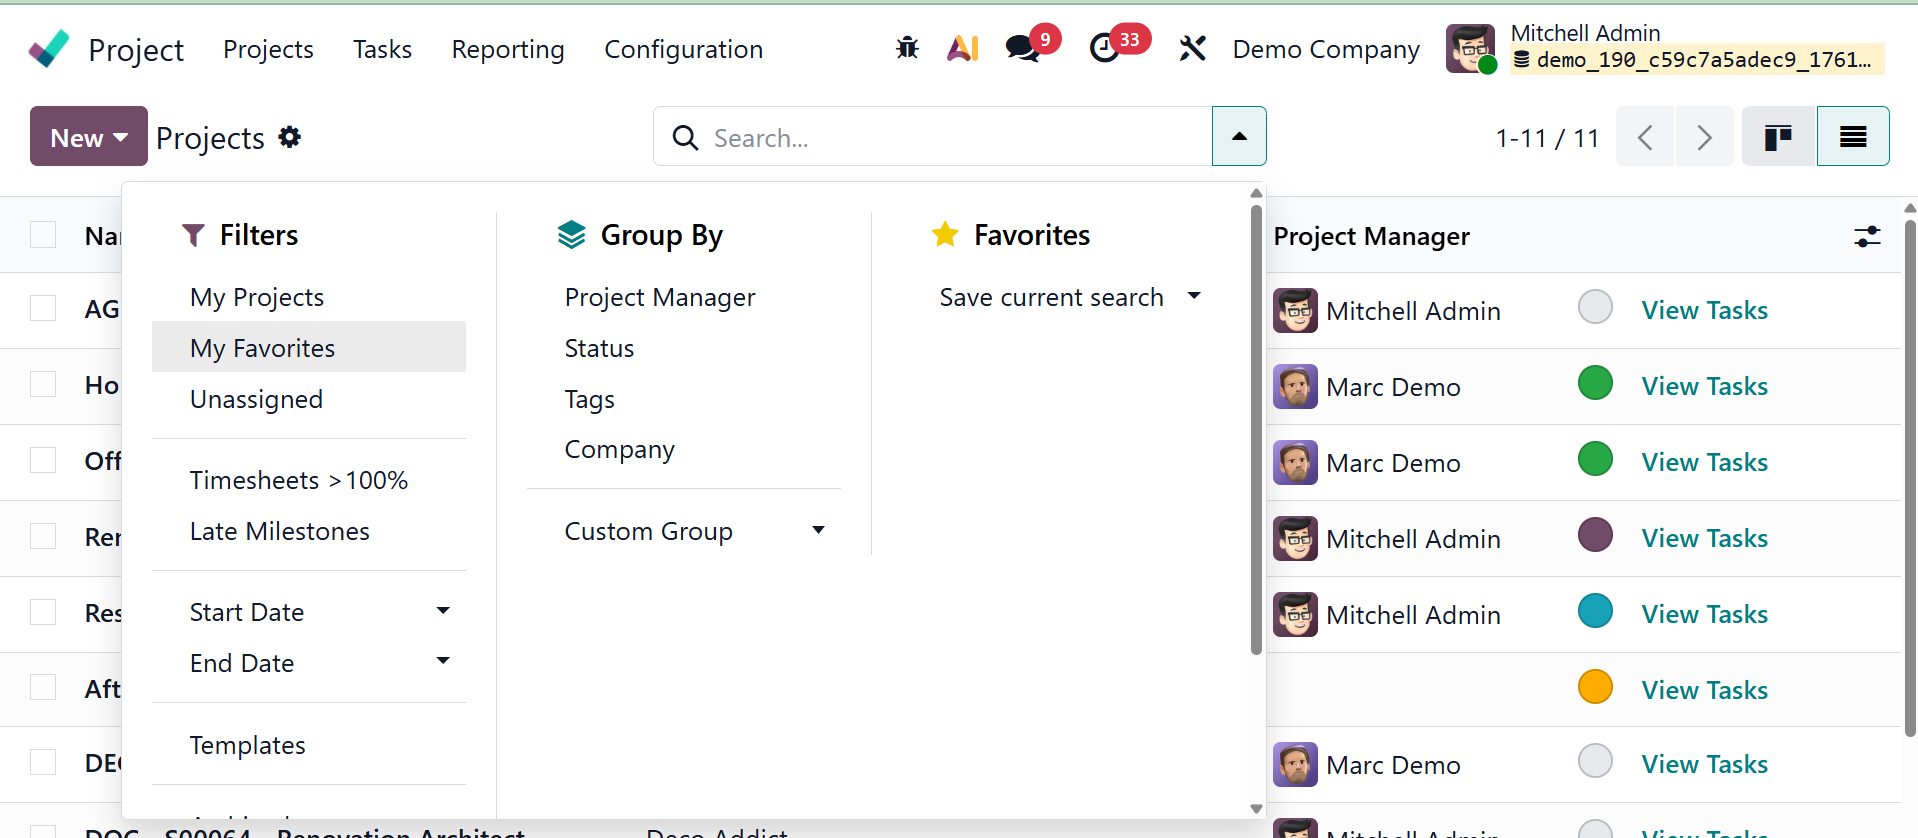
Under the filters, you can have the My project, My favorite, Unassigned, Timesheet, Late milestone, Start date, End date, and Templates. Under group by, you have the Project manager, status, tags, company, and custom group, respectively. You can also make use of the favorites options if required.
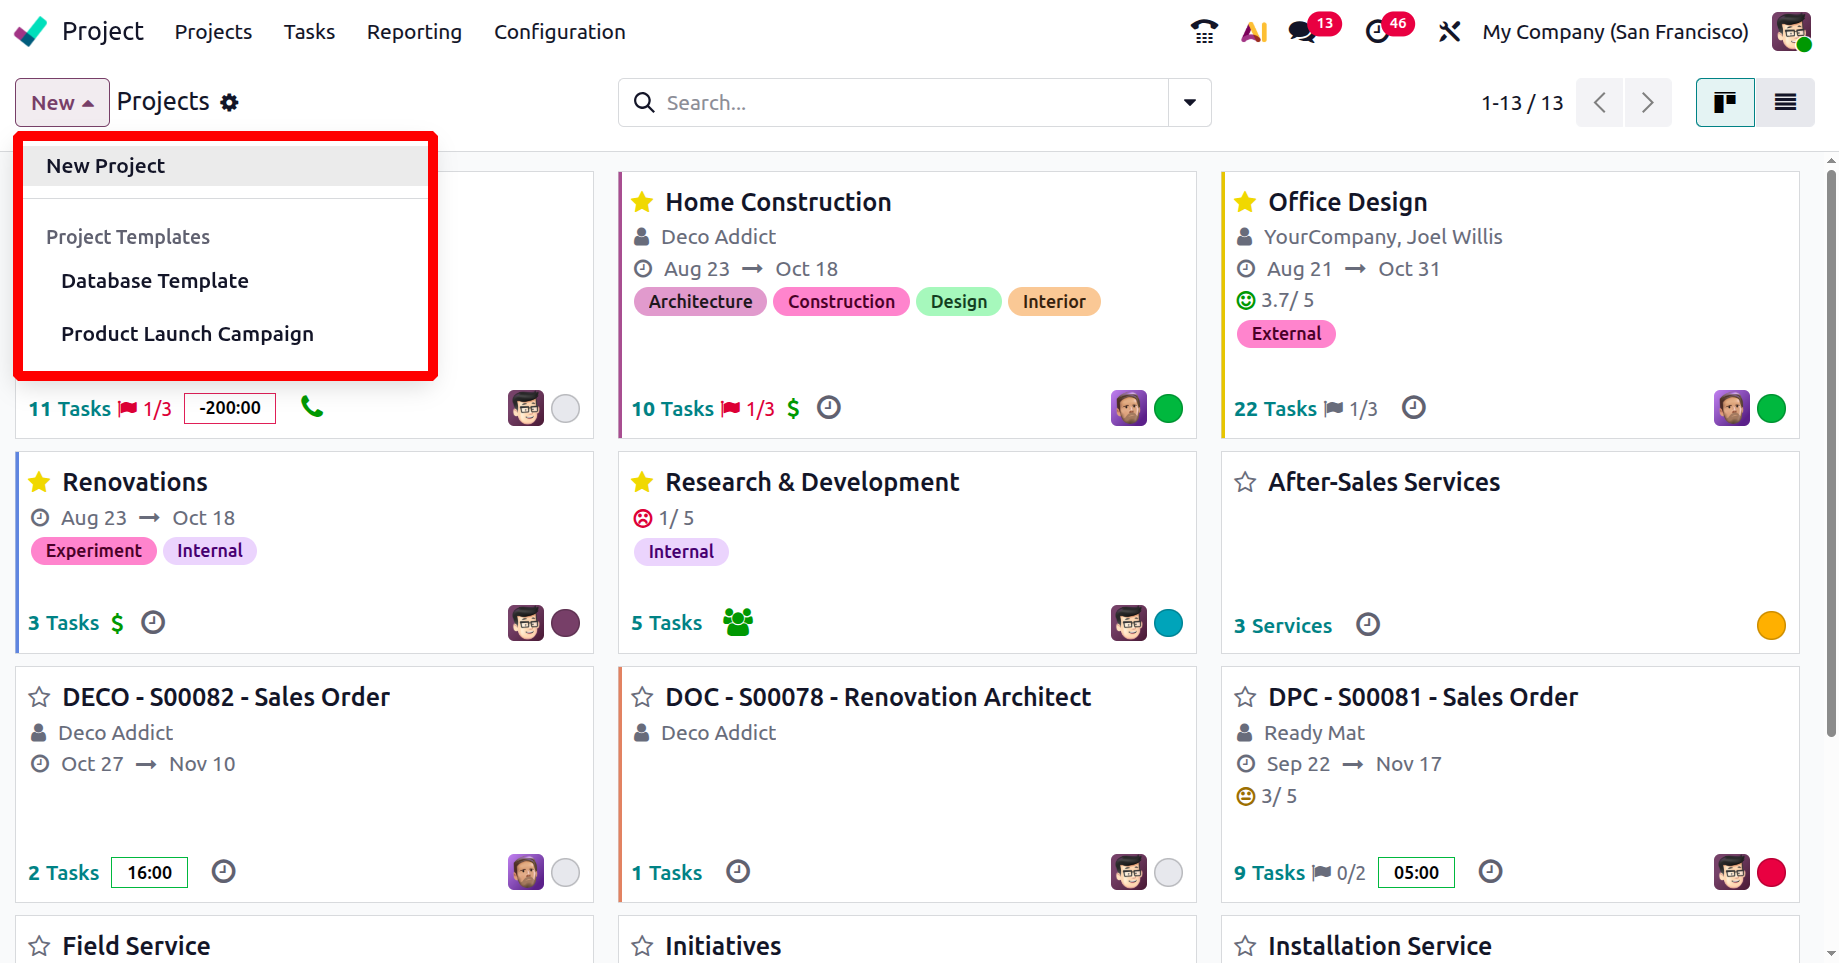
Click on the New button, there shows options like:
New Project enables you to start from scratch and add unique details to your project, such as a name, client, due dates, and team members.
- Project Template:This tool enables you to quickly set up a project by utilizing a pre-made template that has pre-made tasks, stages, and parameters.
Clicking the New button will launch a pop-up window as seen below, allowing you to start a new project.
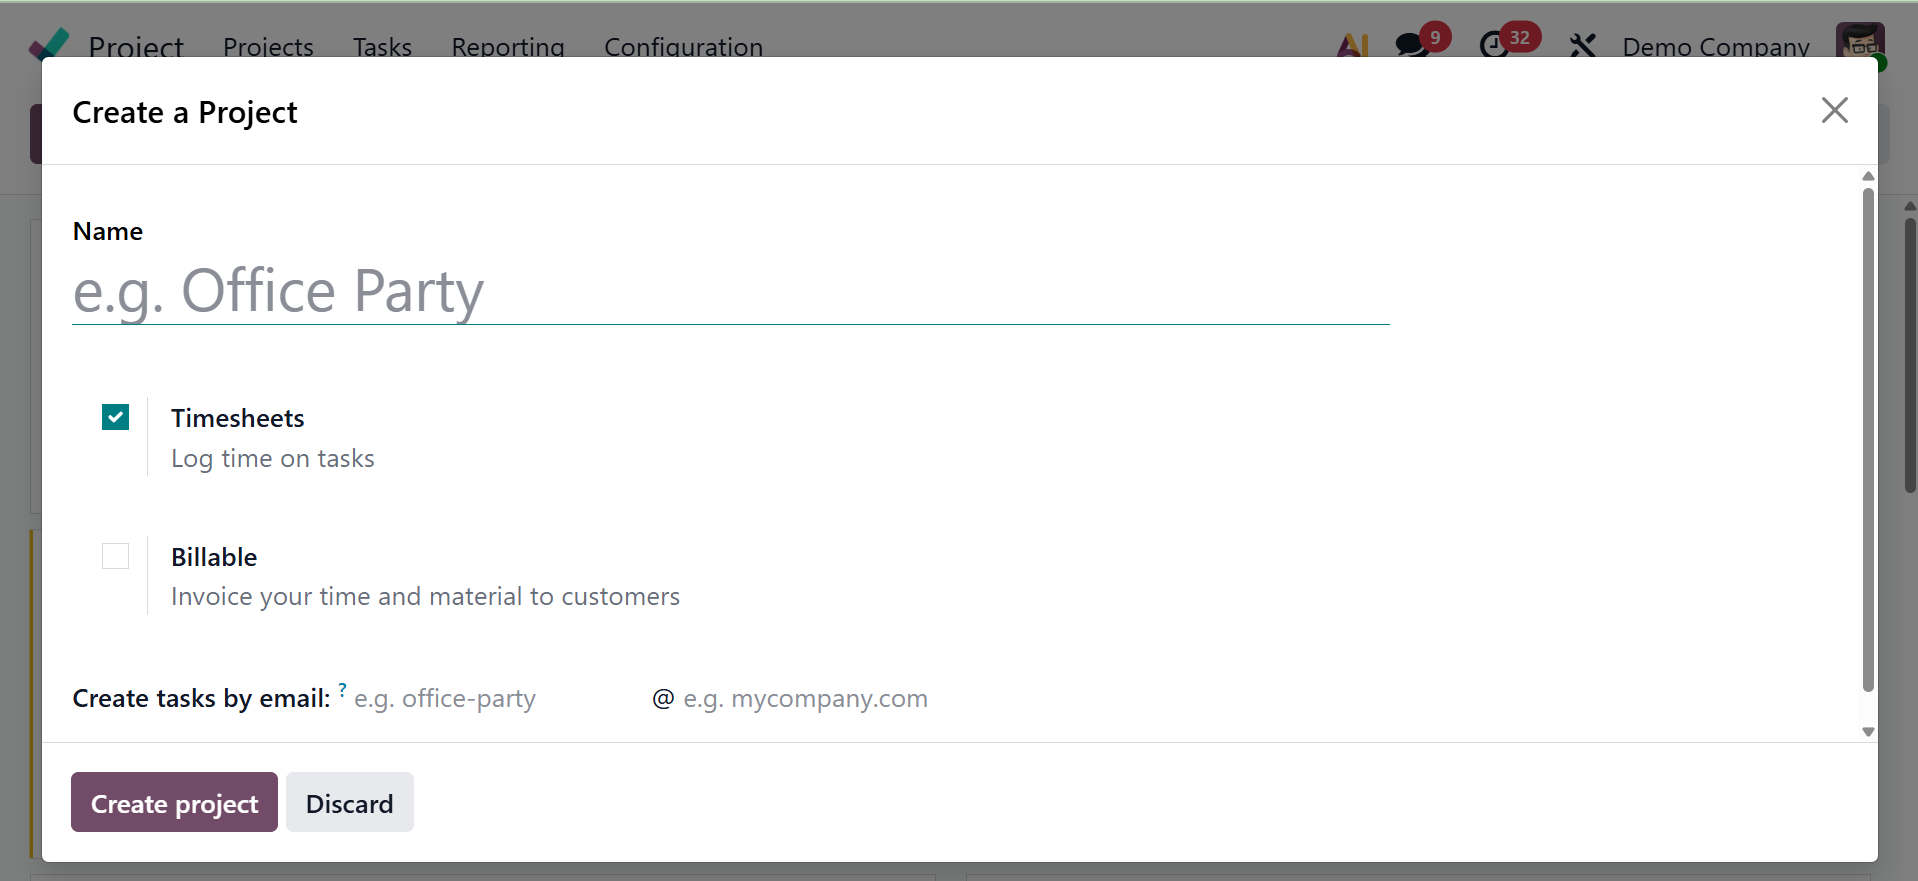
Enter the project's name in the appropriate field. If you want to send clients invoices for this project, make sure the Billable field is enabled. By turning on the Timesheets box, you can keep track of how much time is spent on each activity in this project. The email alias that will be used as the receiver of an email and cause a new task to be created within the project is defined in the "Create tasks by email" field. Setting this field allows you to create tasks more quickly by sending an email rather than creating them by hand in the Odoo 19 interface. Lastly, you can choose the Create Project option to begin a new project, which will open a new window where you can add Task Stages. Add the stage name, then click on the tick icon.
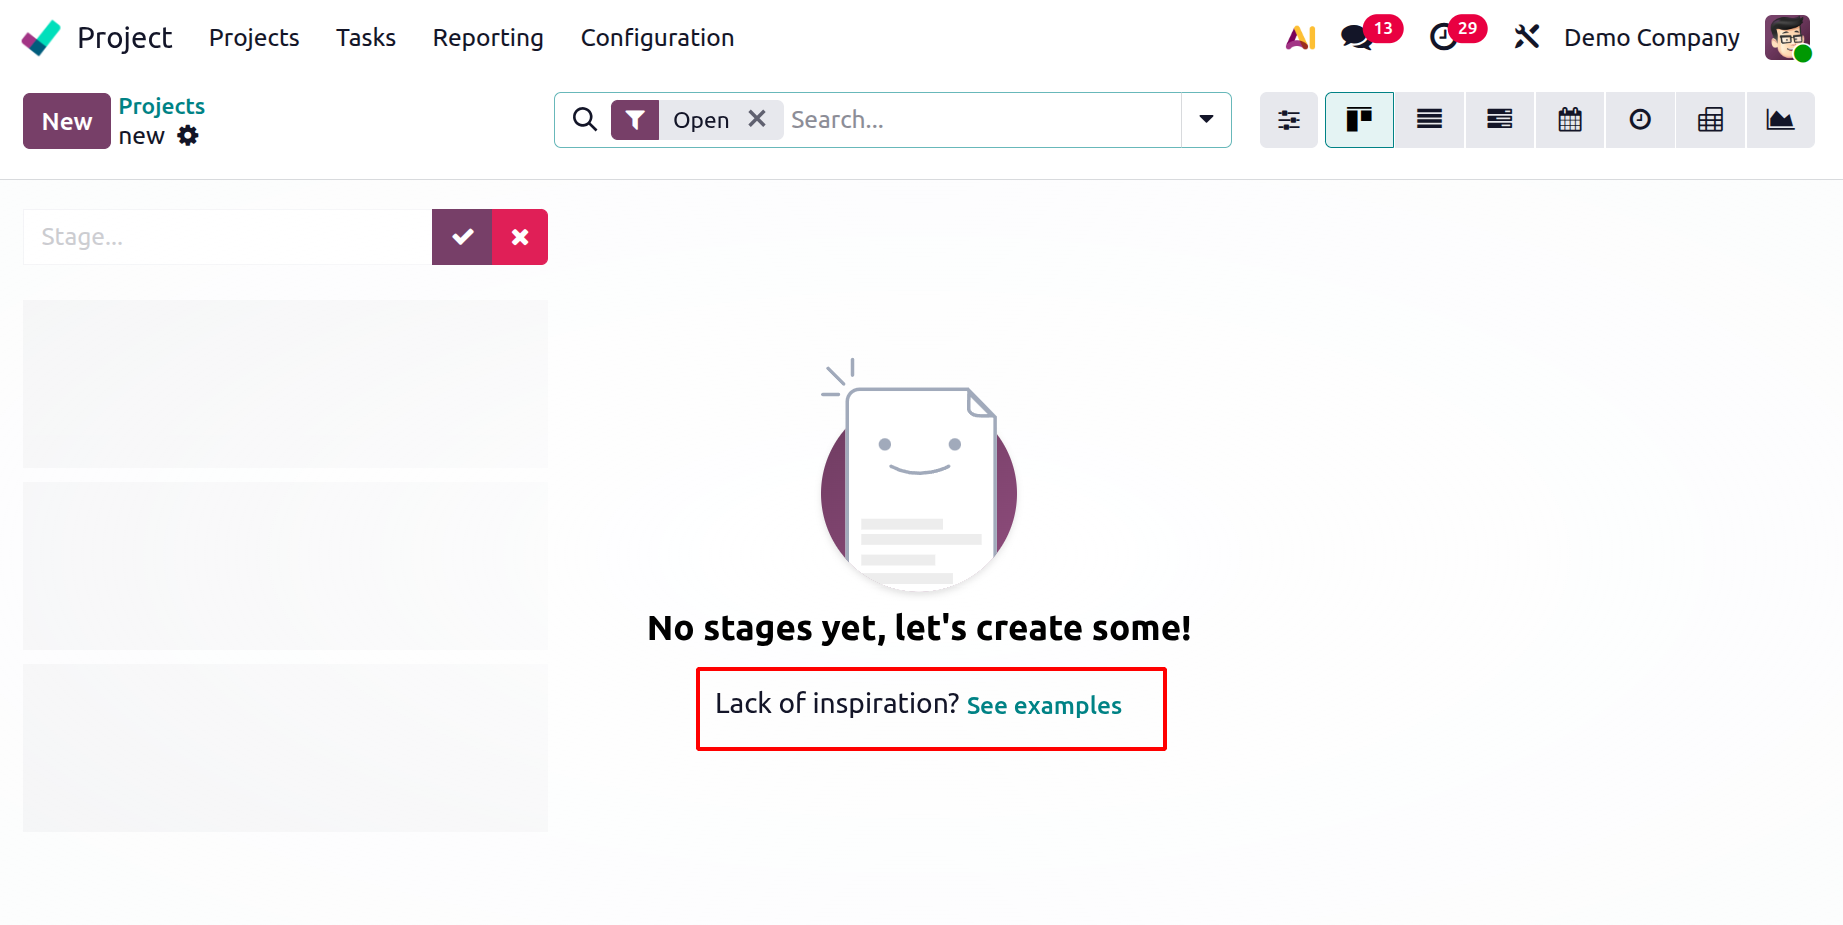
On the creation page, there is a "See example" option, which is a UI feature that gives users pre-filled, illustrative data or templates to show how a project should be set up or what a finished project might look like, as shown above. On selecting the option, you have the page, as shown below.
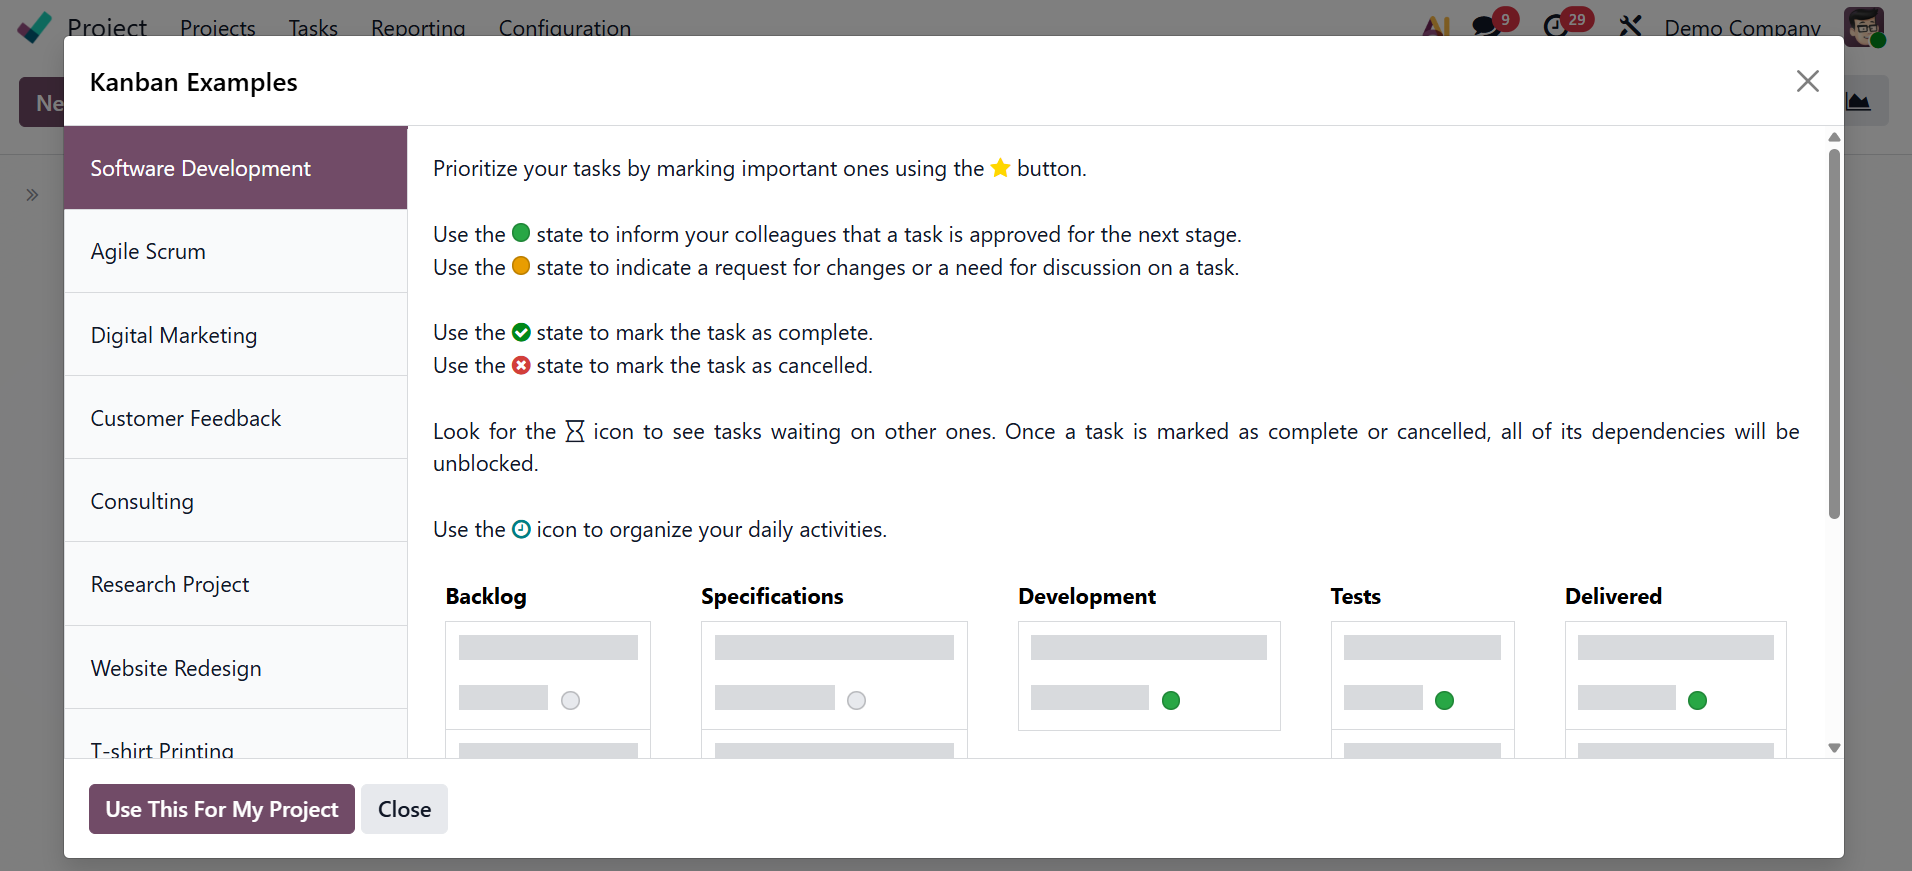
An essential component of the Kanban project management approach, the example page demonstrates how to build up a Kanban board through a visual representation.
It depicts the progression of tasks (represented by cards) through several phases (represented by columns) in a typical project process.
It usually consists of the conventional columns "To Do," "Doing," and "Done," offering a straightforward but efficient project management framework.
The page gives visitors a specific example of what to put in each column by providing sample task cards to fill the board.
As a starting point and best-practice guide for creating a new project board, the example enables users to rapidly grasp how to apply Kanban to their own project.
Phases might be established before the project's duties are finished. To do this, enter the stage name in the appropriate field and then click the Add button. Similarly, you can create new stages for tasks. Fold, Edit Stage, Delete, and Automation are among the choices available via the little settings icon adjacent to the stage title.
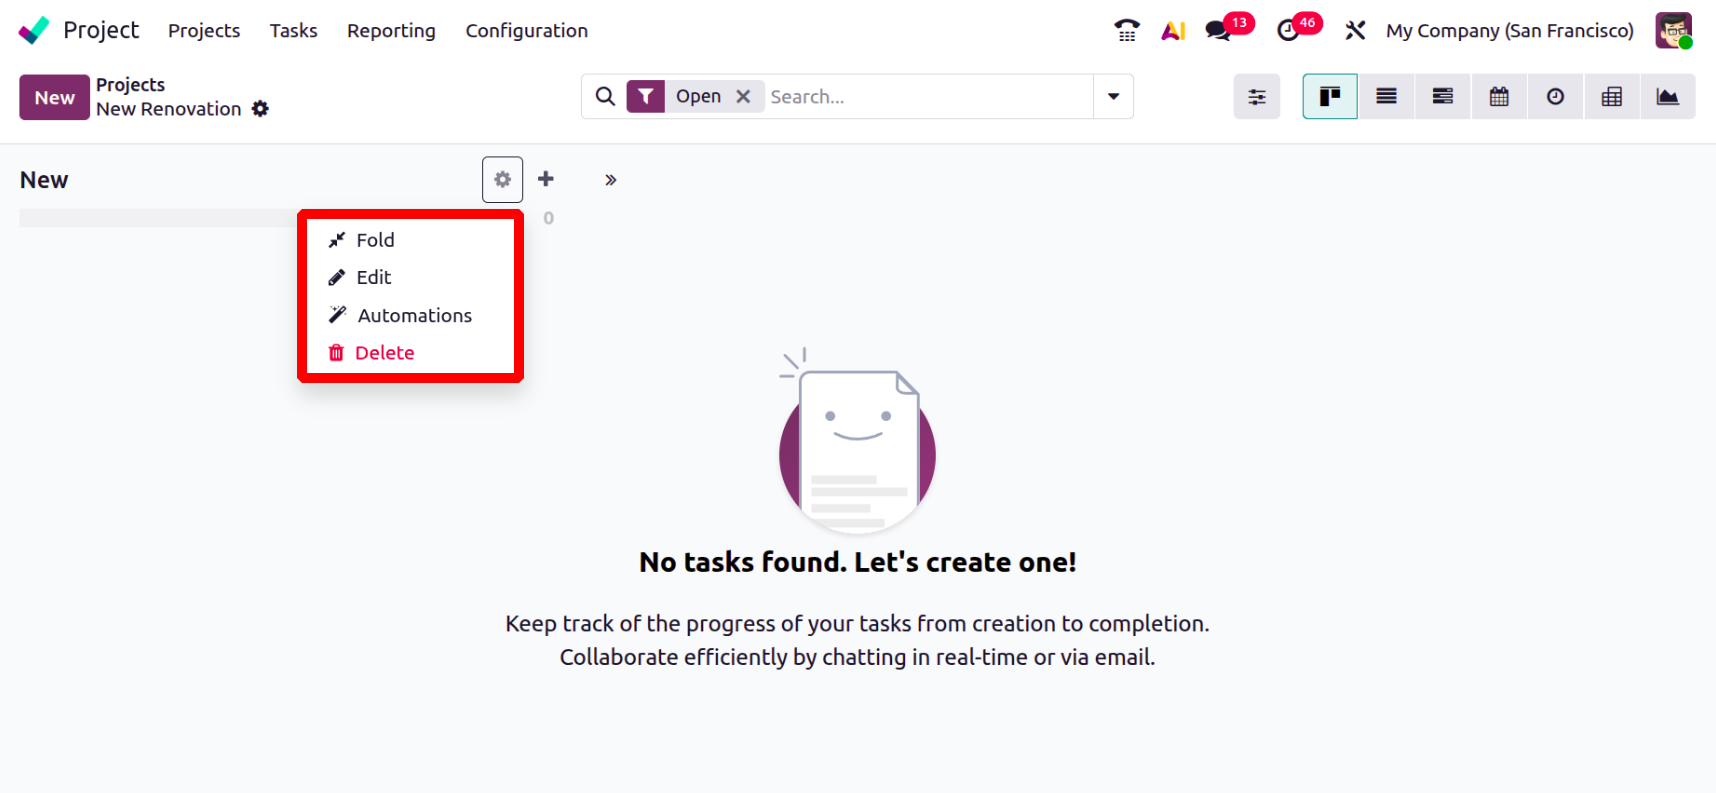
- Fold:to prevent the Kanban view from seeing the task stage and every task within it.
- Edit: to change the steps of the task.
- Automations: to develop unique rules that initiate automated processes (e.g., sending webhook notifications, adding followers, or initiating activities). The activation of Studio in your database may affect your pricing plan, so keep that in mind.
- Delete: To remove this stage, use Delete.
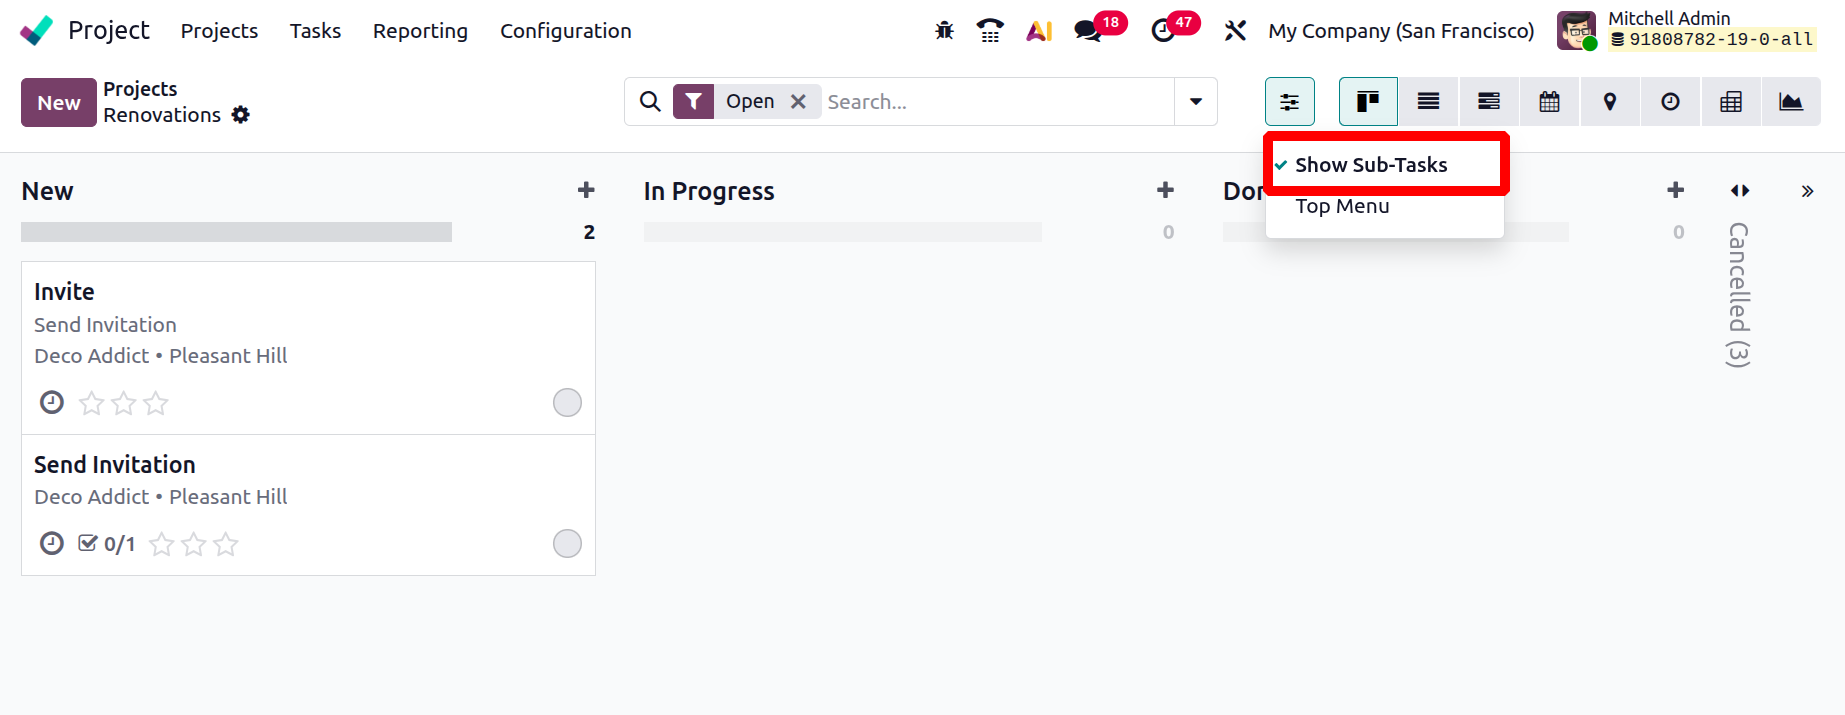
Here, you have an option to show the sub task and top menu, as shown below.
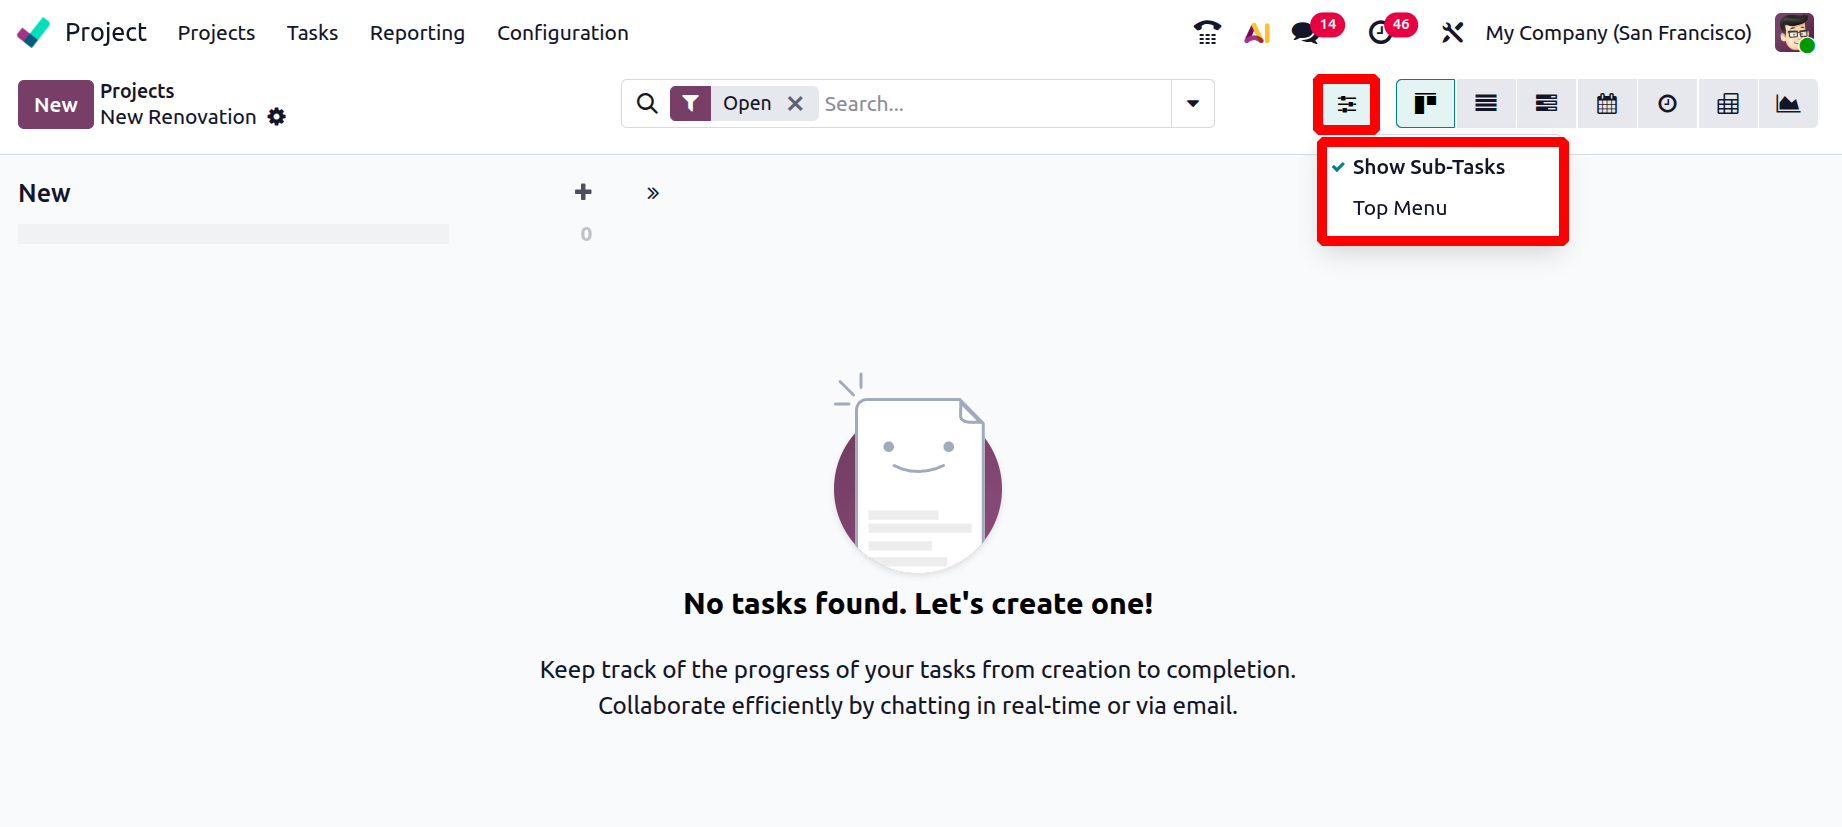
A sub-task is a smaller, easier-to-manage work that is nestled inside a bigger "parent" task in Odoo's Project module. Numerous tools for organizing and evaluating activities, projects, and resources are available through the Top Menu selections.
The sub-task functionality facilitates the decomposition of intricate tasks, streamlines productivity, and allows team members to be assigned distinct components for improved responsibility.
The Project module's top menu serves as a primary navigation bar that gives users access to all of the important project management tools and data. As seen in the image below, you can also have the project details in the top bar for convenient access to the project's record. Tasks, timesheets, plans, documentation, sales orders, purchase orders, invoices, vendor bills, and more are all found there.
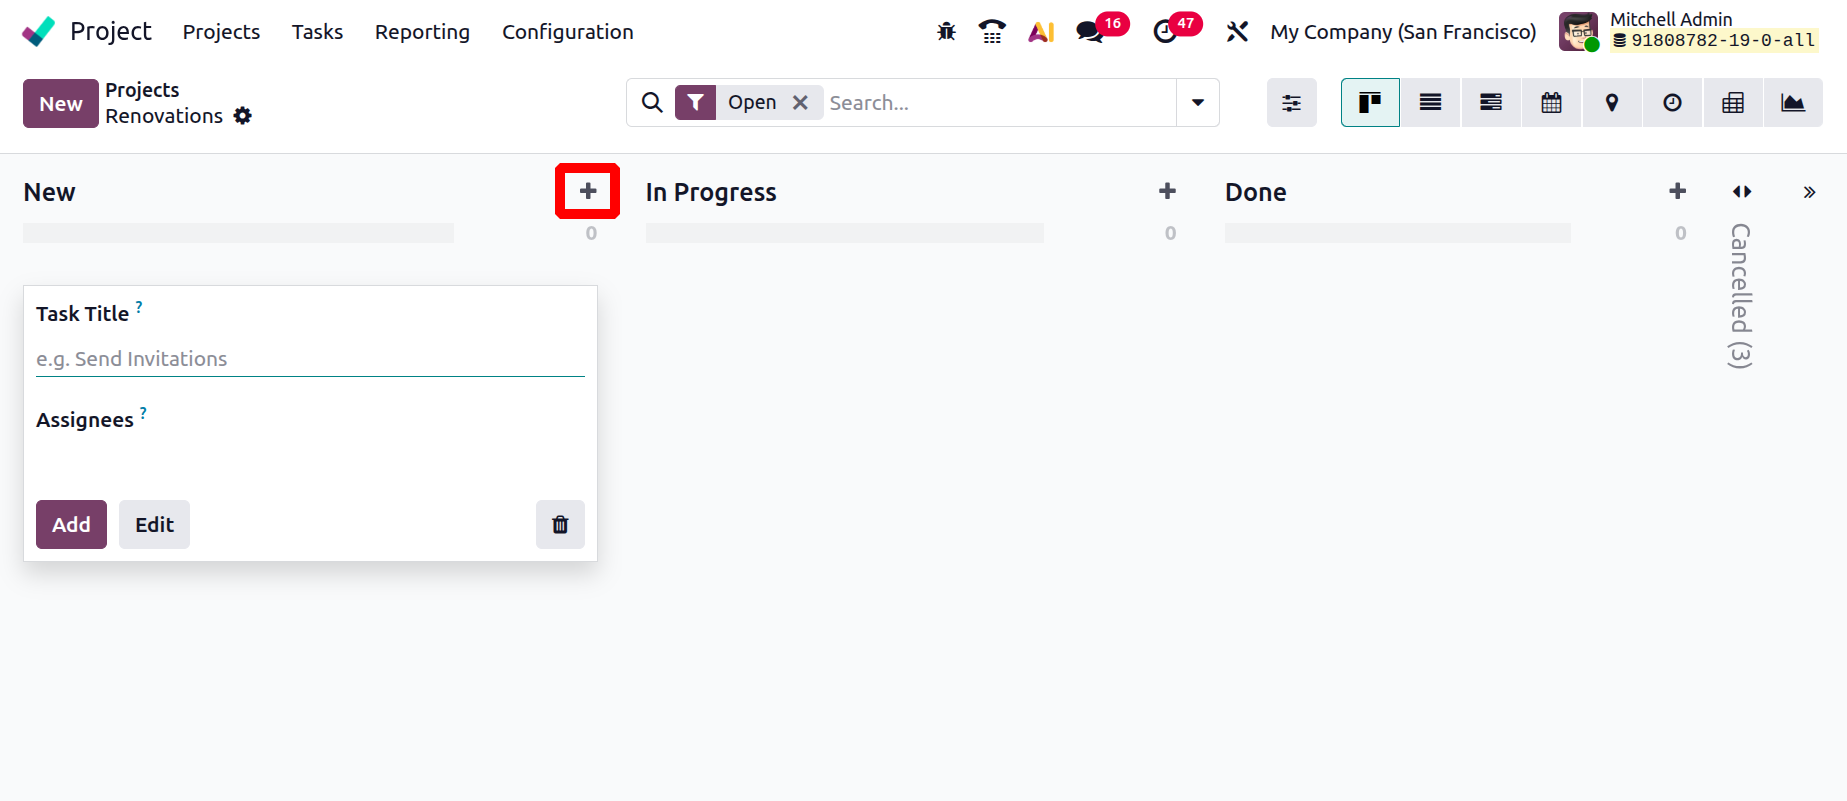
You can now rapidly add new tasks to a certain stage by using the + icon, as shown in the figure below.
1.1 Project Creation
You may now see a three-dot icon in the top right corner of the project page. Clicking it will reveal the settings; select it to view the project in detail, as shown in the picture below.
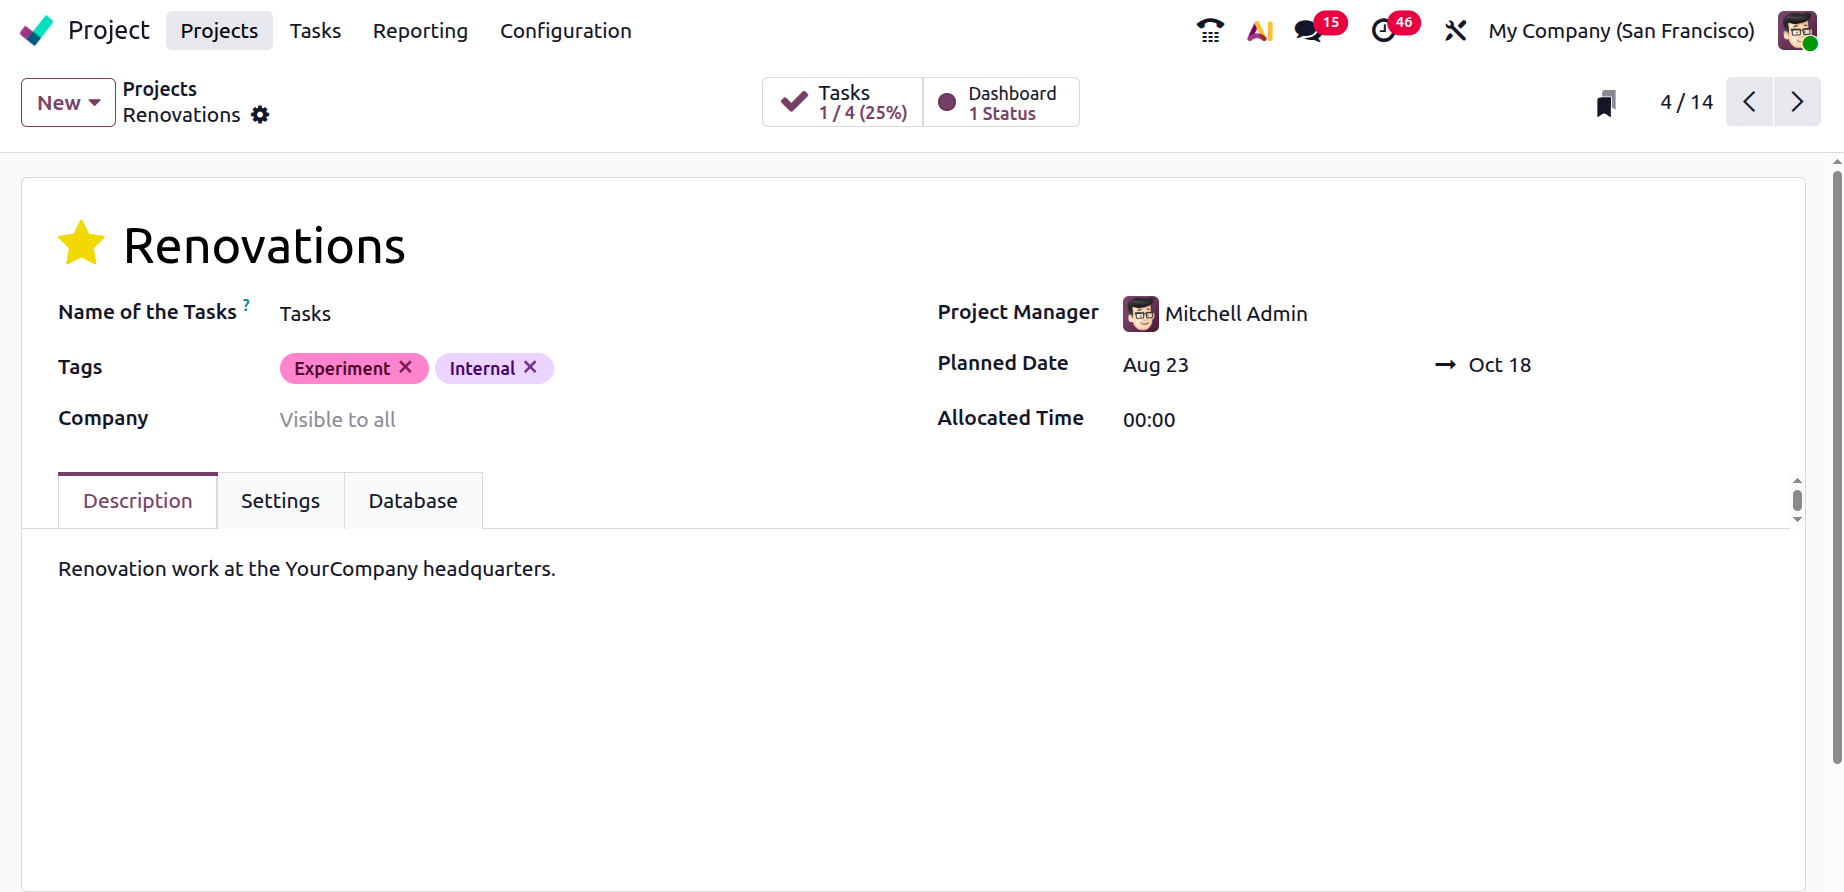
Details such as the Name of the Task, Customer, Tags, Company, Project Manager, Planned date, and Allotted time are provided on that page.
- Name of Task: The task's primary name or title that you are coming up with.
- Customer: The person or business that the task is being completed for.
- Tags : Keywords or labels (such as "Urgent" or "Design") that are used to classify and make tasks easier to find.
- Company: The entity that owns or is in charge of the work and project.
- Project Manager: The individual responsible for overseeing and administering the project is known as the project manager.
- Allotted Time: The approximate number of hours or time needed to complete the assignment.
- Planned Date : The anticipated beginning and ending dates for the task.
As seen in the illustration below, there is a recurring icon, near to the Planned date.
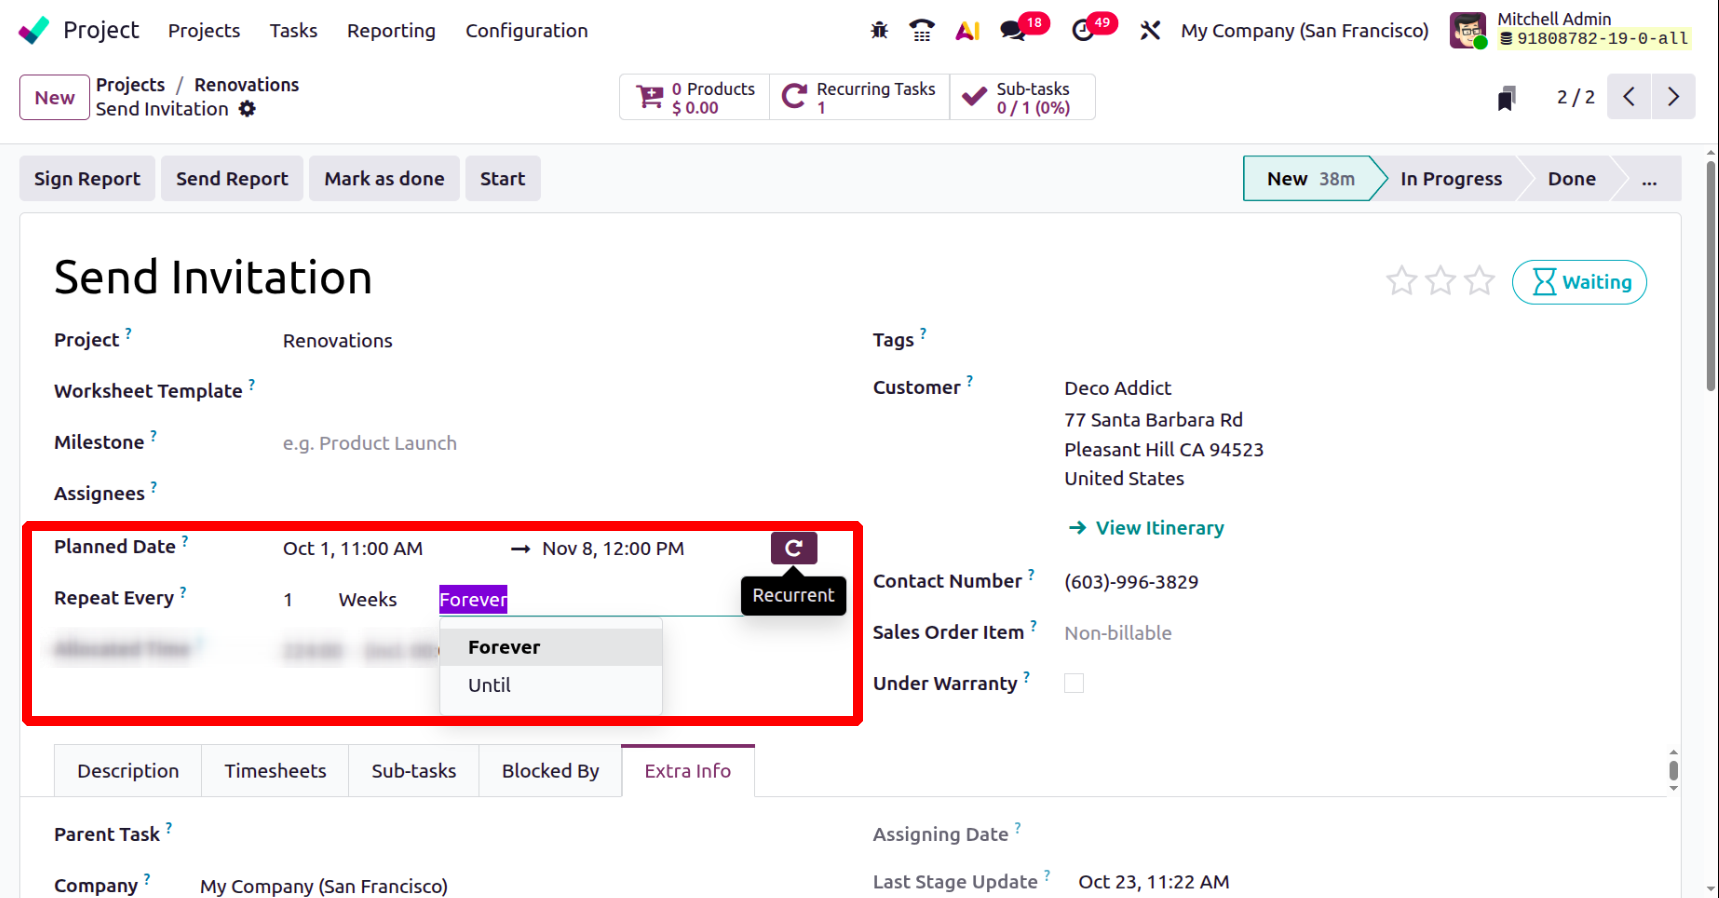
Clicking the repeating icon brings up an extra field named Repeat Every, as shown above. You can specify the interval (days, weeks, months, or years) at which the task should repeat in this area. There is also a box where users can specify an end date or set the task to recur indefinitely. A date field that allows users to specify the last time the recurring job occurred is displayed if the Until option is used.
The Description, Settings, and Invoicing options are all given to you. You can include the project description beneath the description.
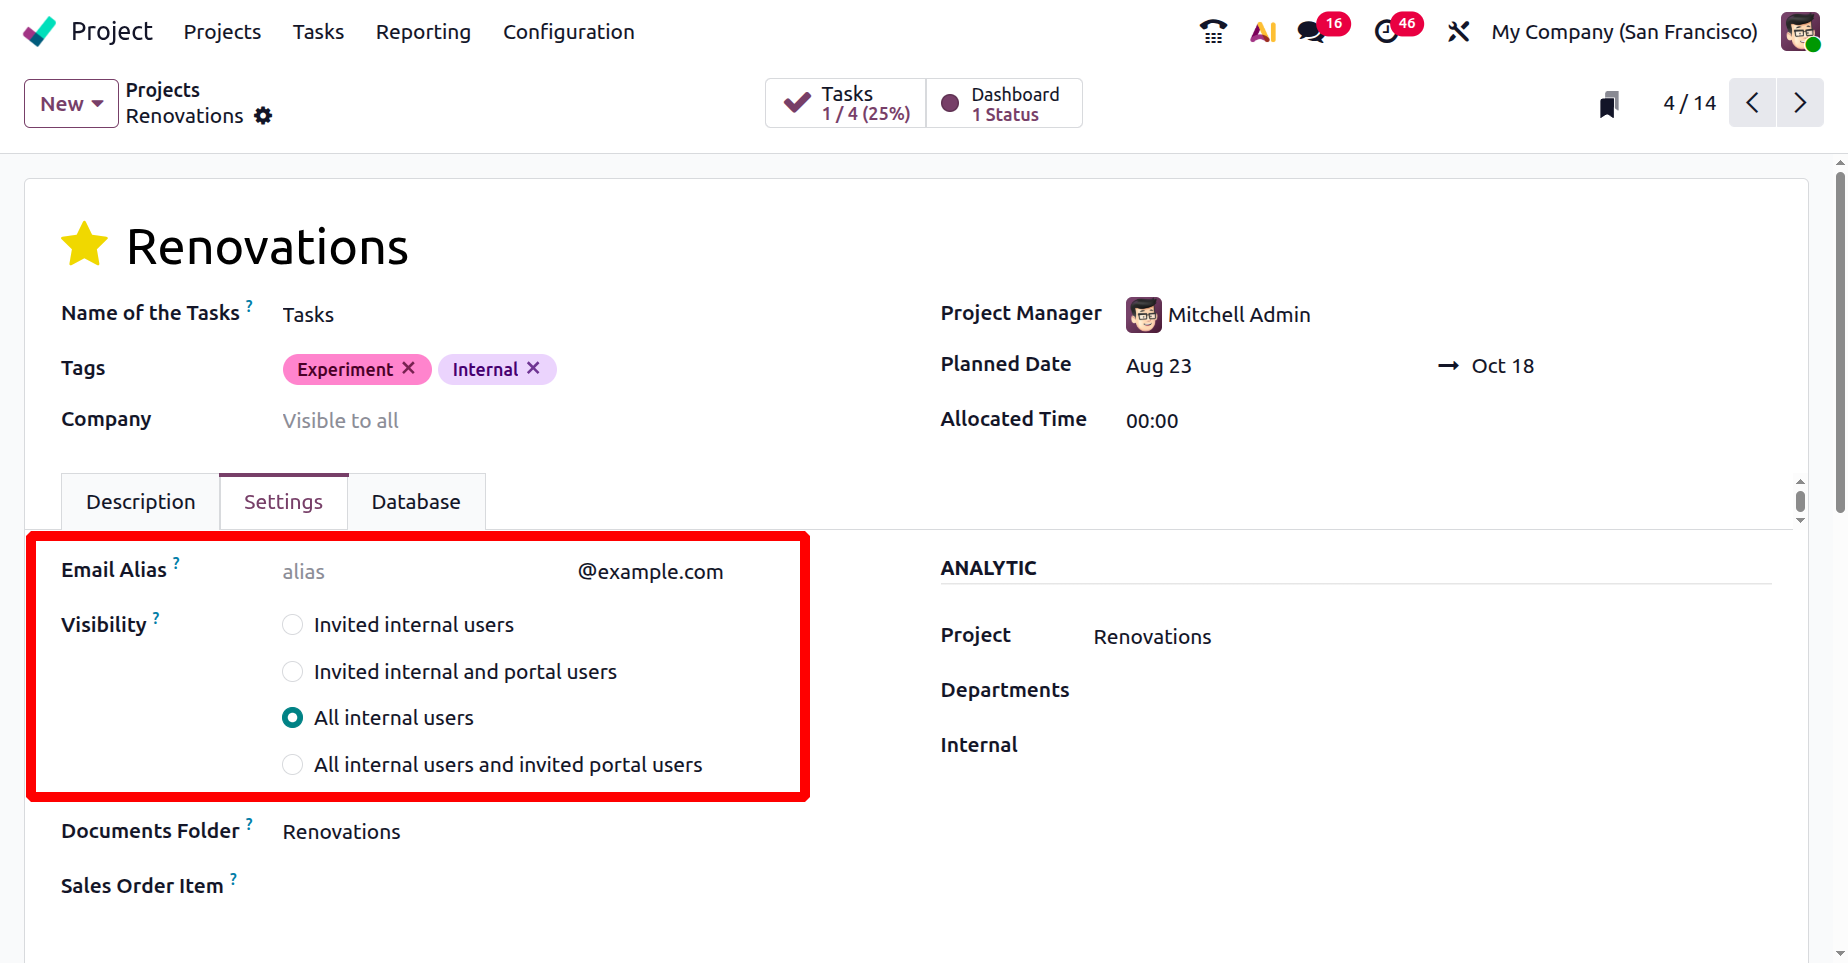
Options such as sales order, sale order item, visibility, task management, time management, sales and invoicing, documents and analytics, field service, and generating tasks by sending an email are all found under the settings option. You are also provided with options like Email Alias and Visibility.
By receiving emails at a particular address, an Email alias enables the automated generation of new tasks.
Users who can access and interact with a project and its tasks are controlled by Visibility options that are set up in the project's settings. Here, you have options like:
- Invited Internal User:The project is only visible and accessible to internal users who have been expressly invited.
- Invited Internal and Portal Users:The project is viewable by both invited external users (such as clients) and chosen business users.
- All Internal Users:The project is accessible to and usable by all employees of the organization.
- All Internal user and Invited Portal User:Every employee and invited external user has access to the project and can work together on it.
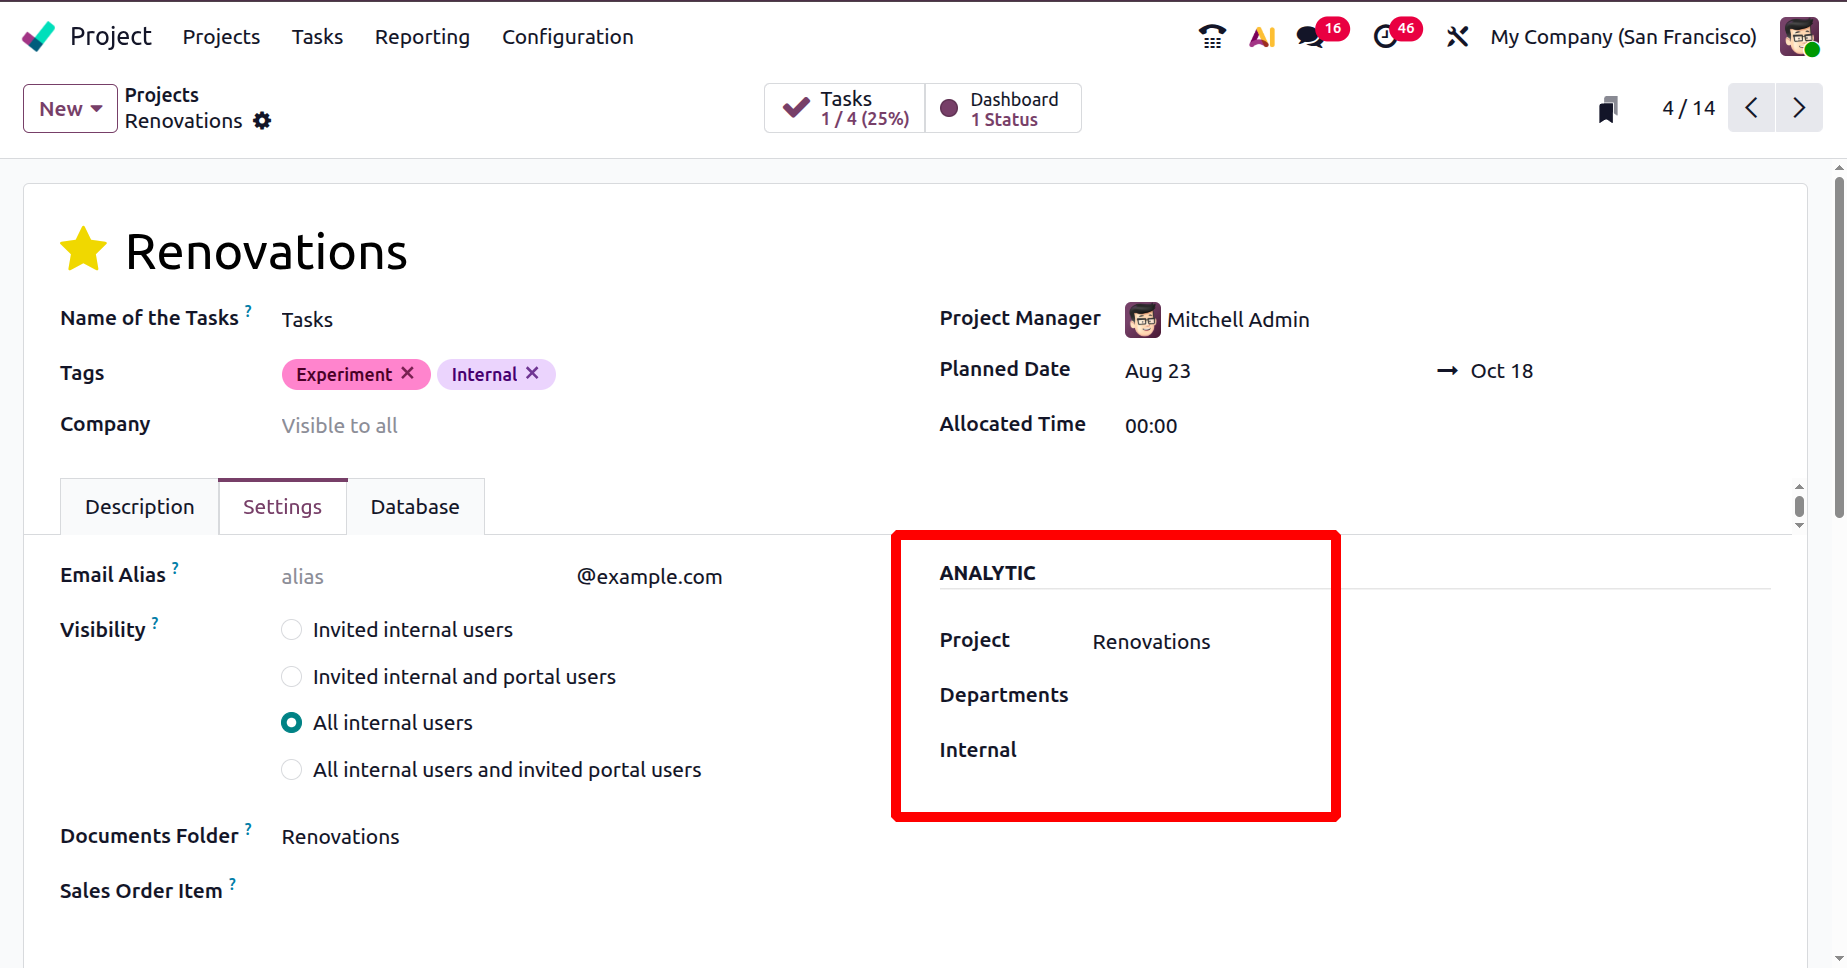
Under the analytic field, you can include project, department, and internal, as shown below.
- Project: Assigns analytical data to a particular project in order to monitor associated expenses and income.
- Department: Assigns analytical data to a specific department in order to track departmental performance and expenses.
- Internal: Used to keep track of internal expenses or operations unrelated to projects or clients outside the company.
Below the visibility, you have the options like:
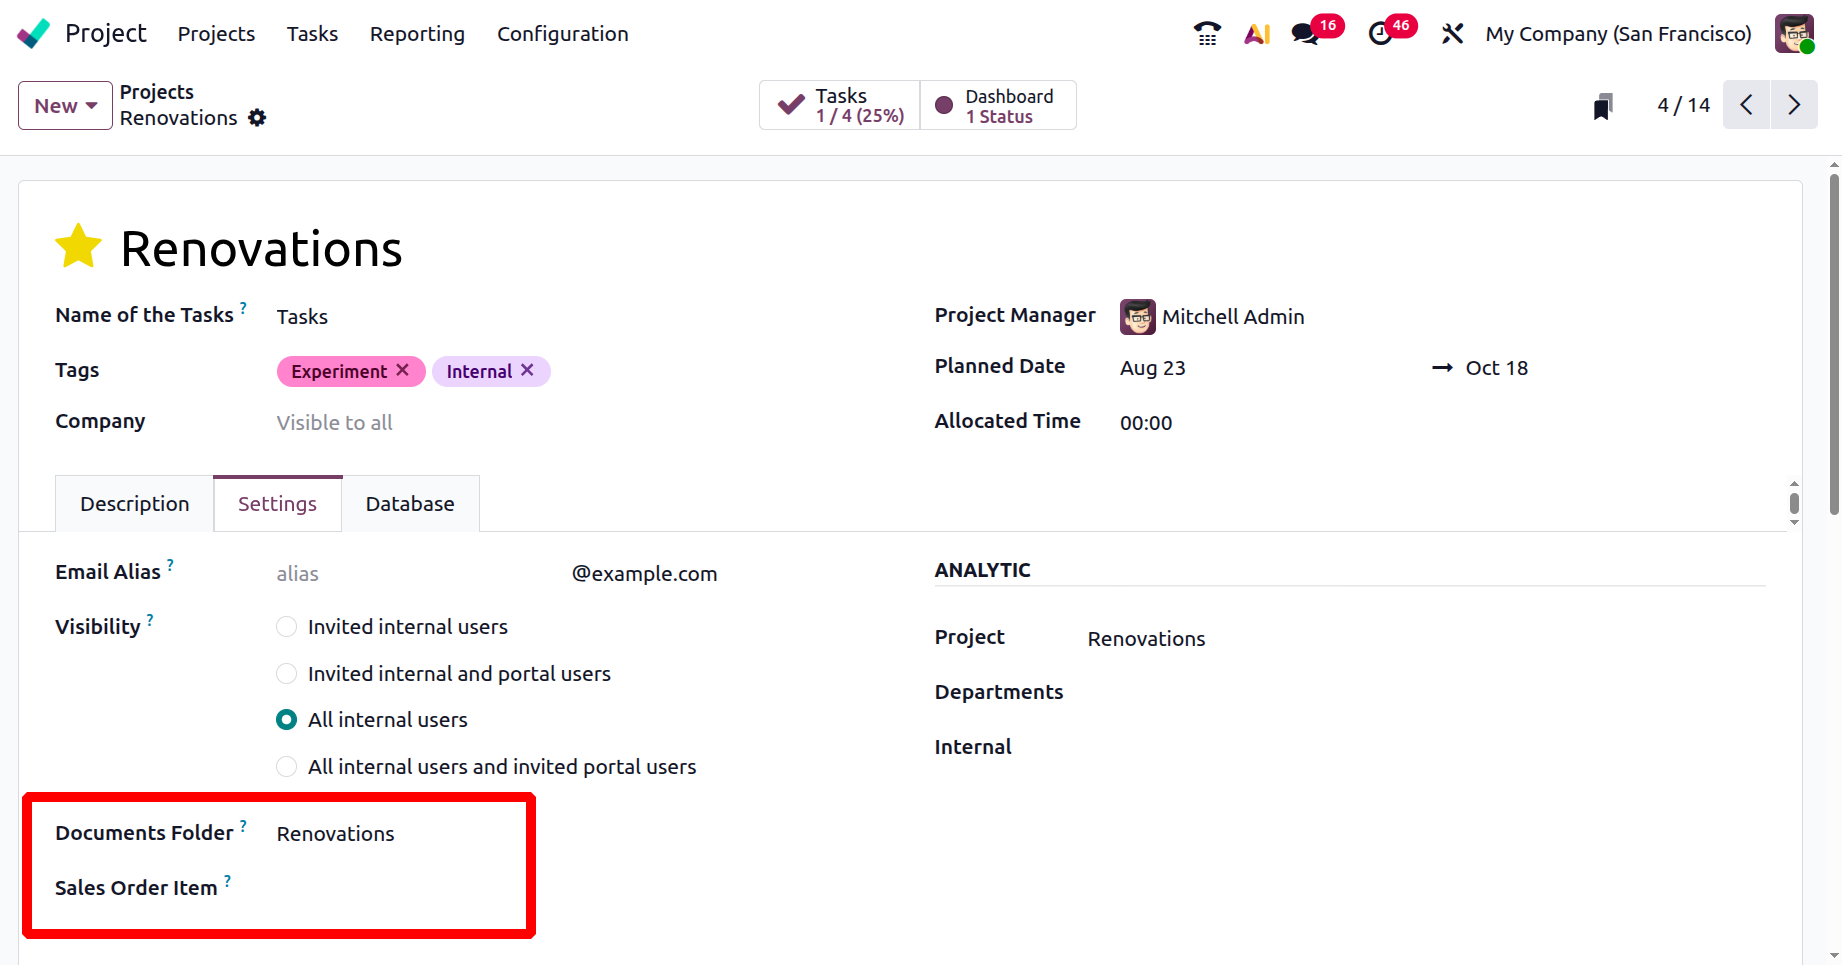
- Document Folder: Indicates the folder in which all project-related files and documents will be kept and handled.
- Sale Order Item: Assists in tracking the work or services sold through a sales order by connecting the project to a particular sales order line.
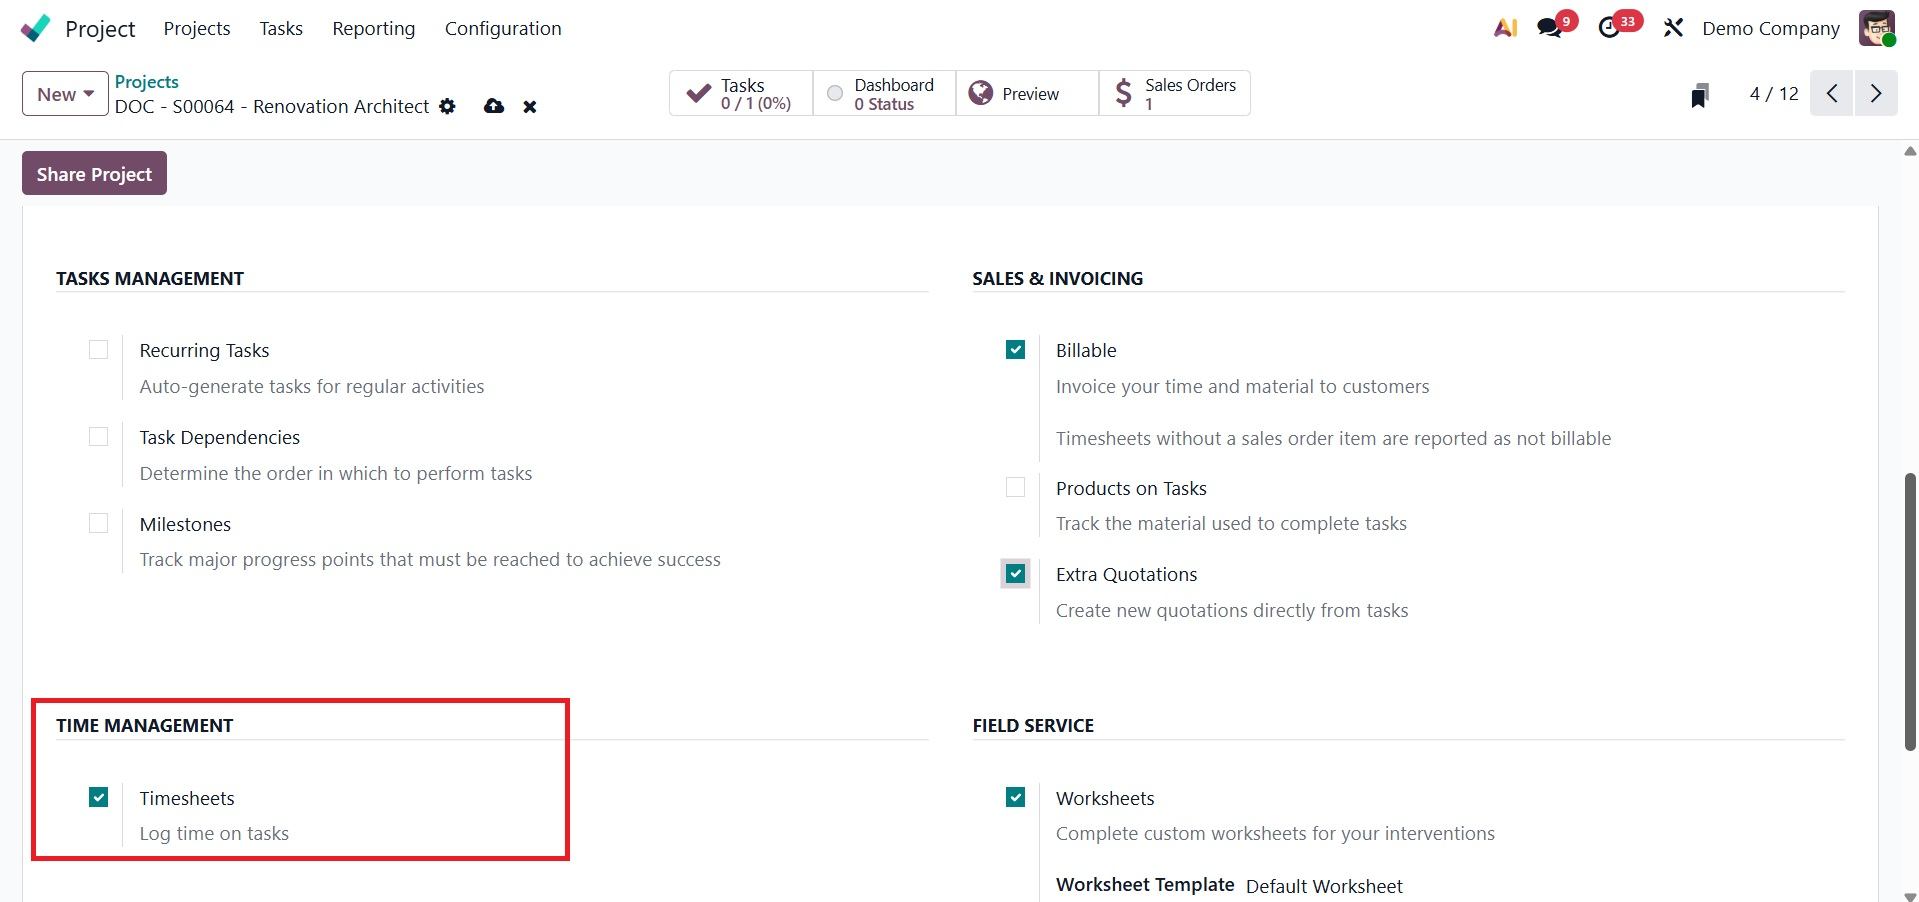
Below that, you have the fields like Tasks Management, Sales & Invoicing, Time Management, and Field Service, as shown below.
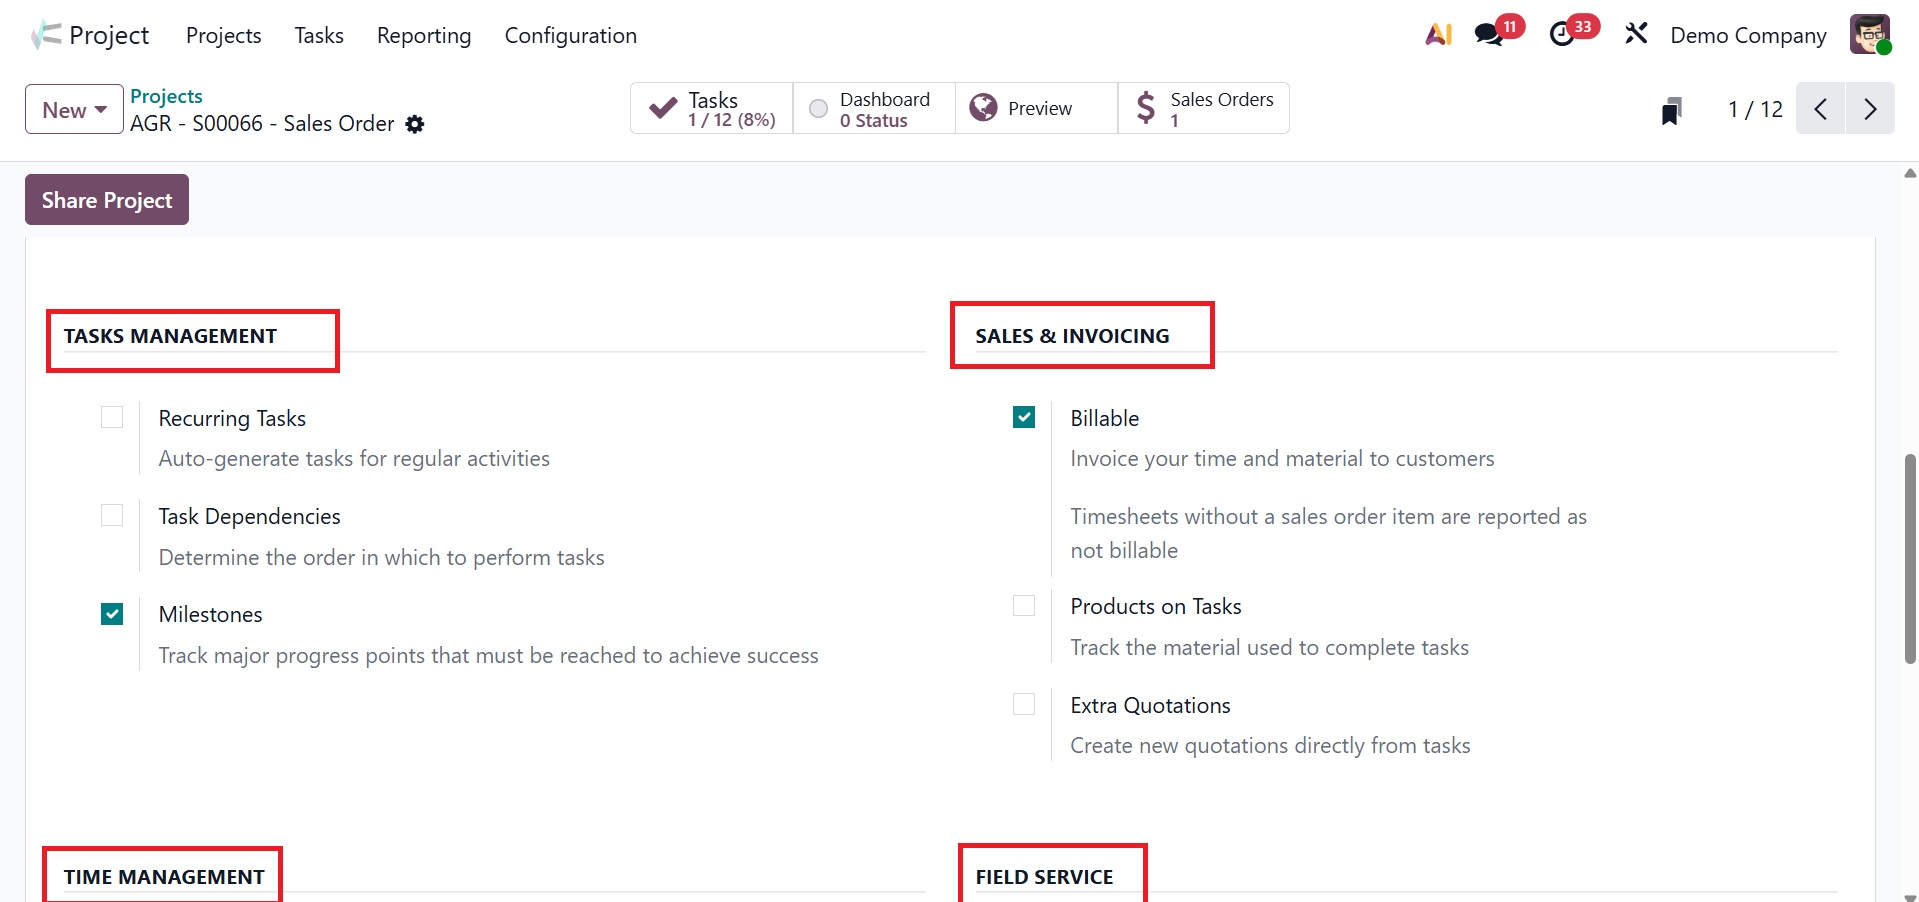
Under the TASK MANAGEMENT, you have got recurring tasks, task dependencies, and milestones to activate.
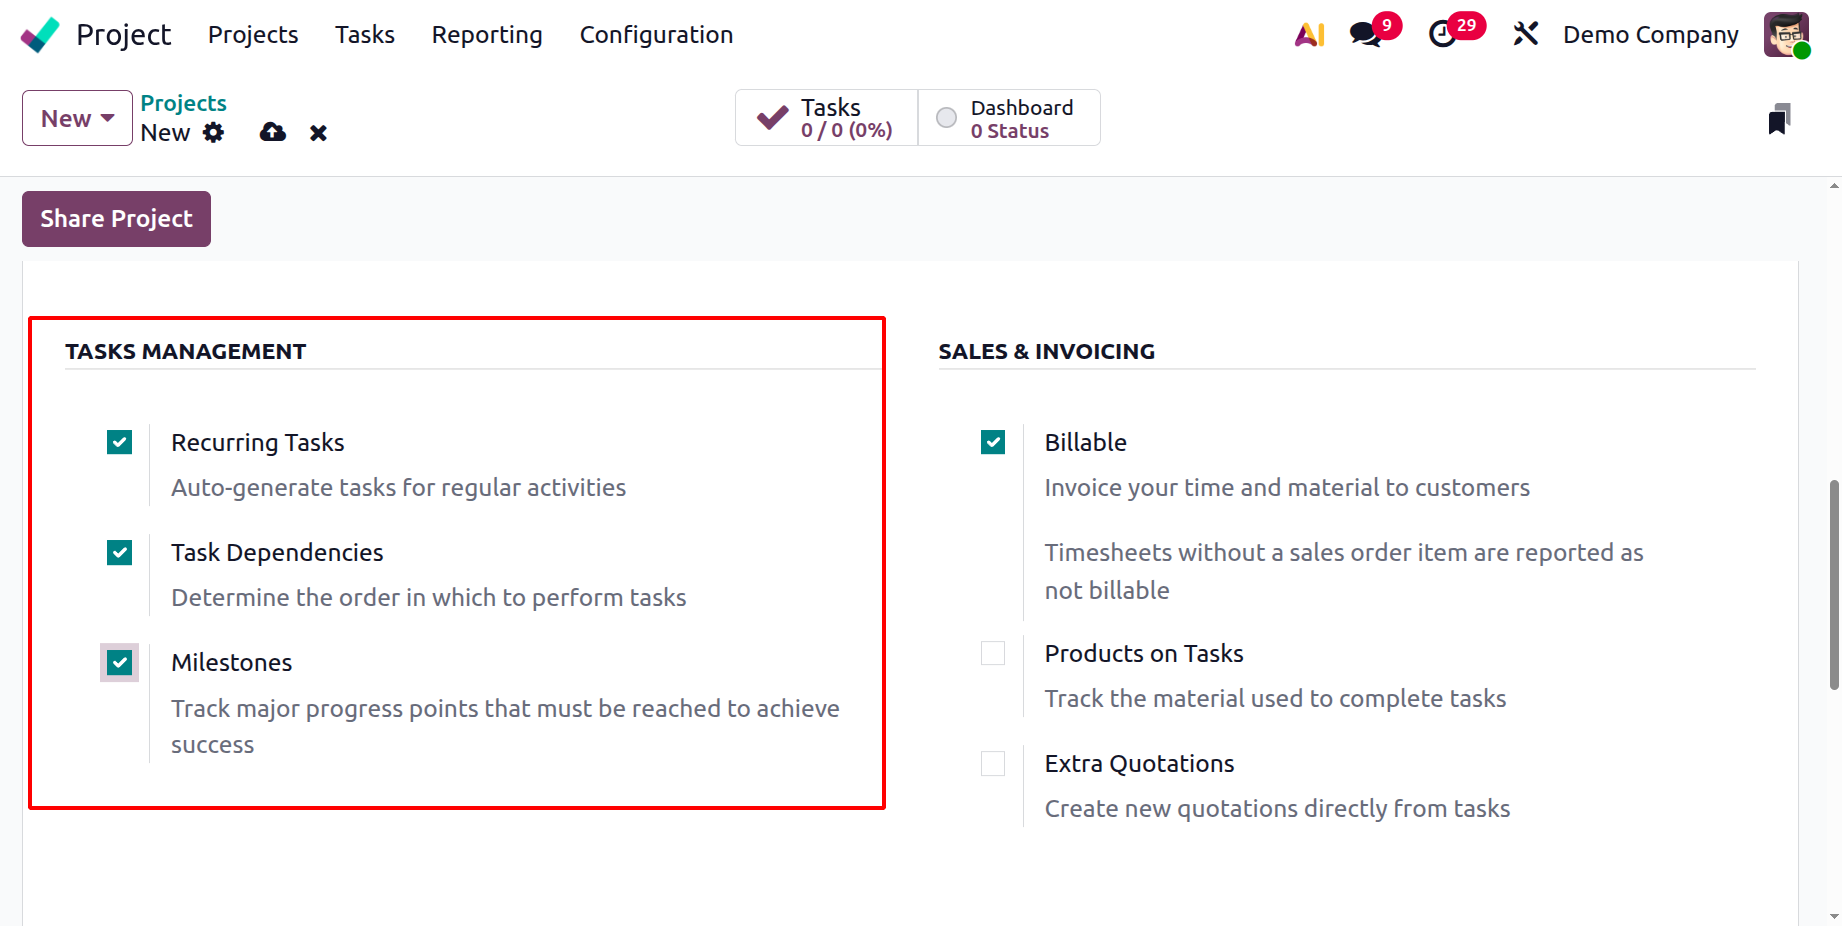
- Recurring Task: Creating tasks that regularly recur at predetermined intervals, like daily, weekly, or monthly, is made possible by the Recurring Task feature.
- Task dependencies: The ability to link tasks so that one begins only after another is finished is known as task dependency.
- Milestone: Specifies significant phases or objectives in a project to monitor significant advancements.
Under the SALES AND INVOICING, you have the options like,

- Billable: Allows you to bill customers for the materials and labor used to complete activities.
- Products on Tasks: This feature lets you keep track of and bill for the goods used on a task.
Here, you can hide prices on the customer report to activate. One setting that determines whether cost- or price-related information appears in project reports shared with customers is "Hide Prices on Customer Report."
- Extra Quotations: Lets you write more quotes for jobs that need more effort.
Under the TIME MANAGEMENT, you can activate the Timesheet option to ensure precise time tracking and reporting, so that staff members can attach timesheets to tasks.
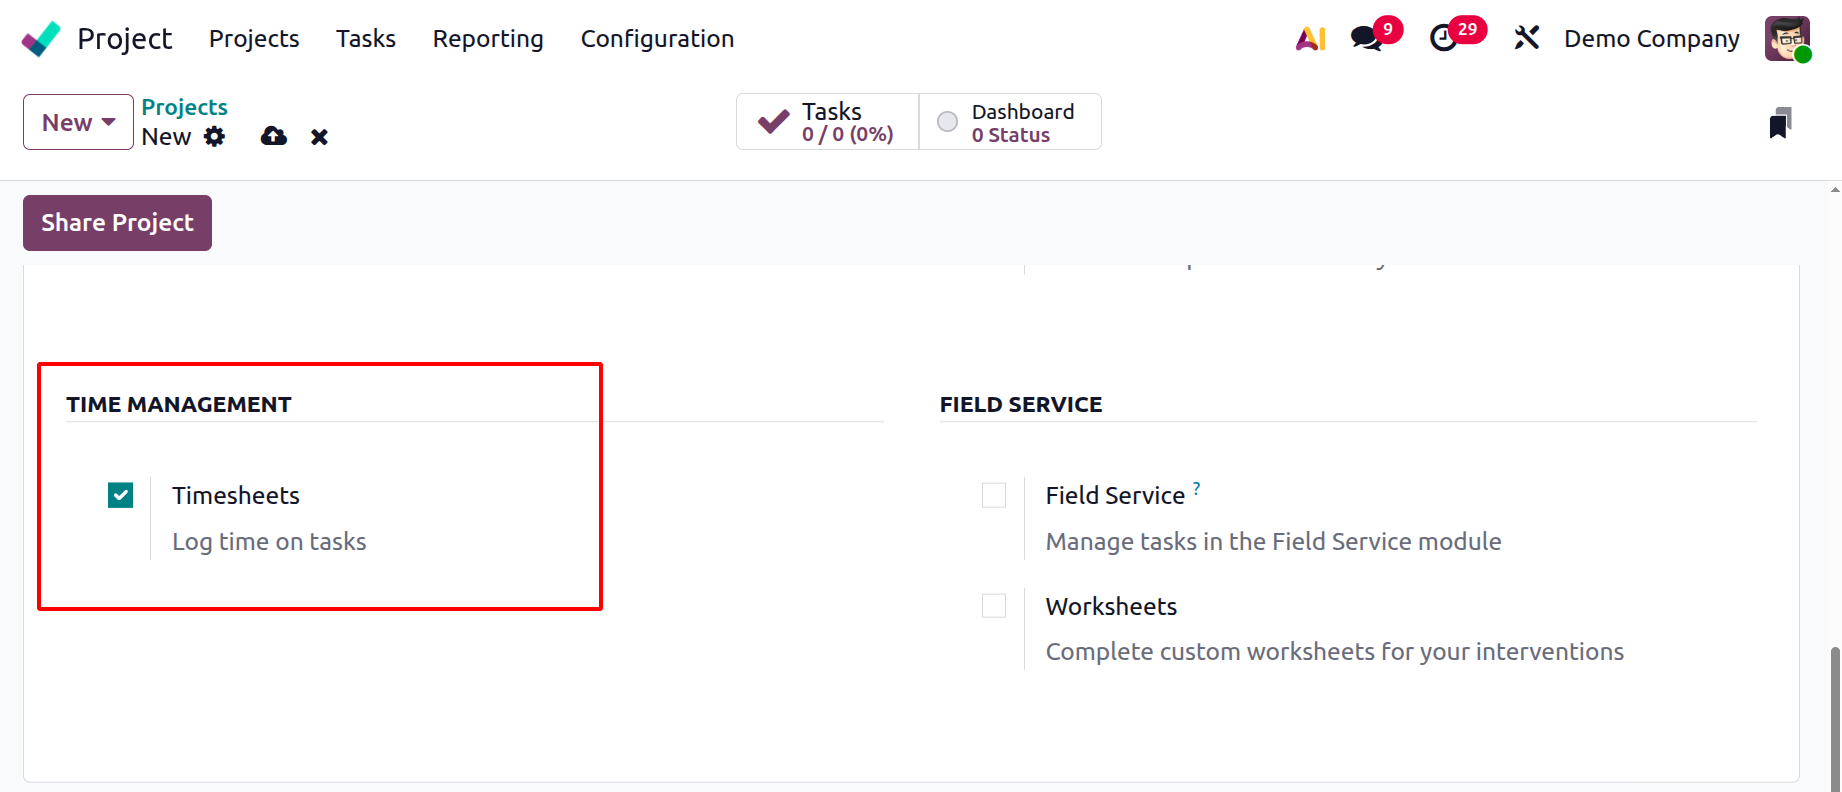
And finally, FIELD SERVICE field provides the options like:
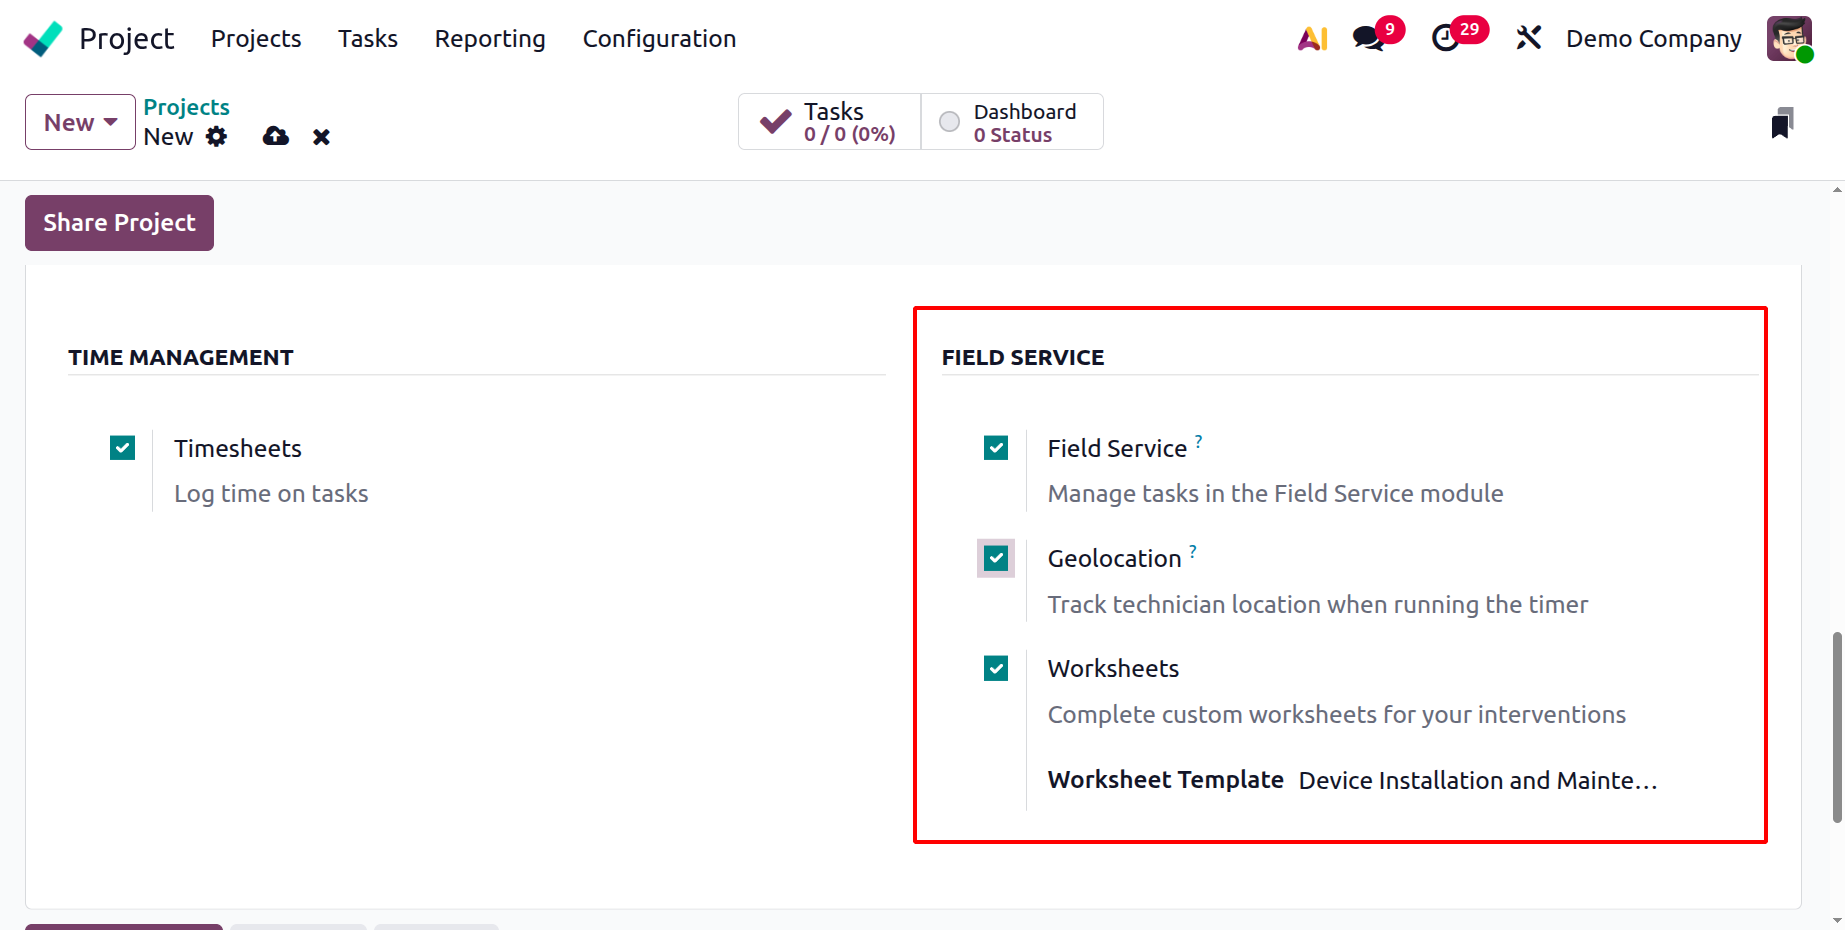
- Field Service: Allows for direct project management of on-site work through connectivity with the Field Service app.
- Geolocation: Using GPS coordinates, geolocation tracks the whereabouts of field personnel or service locations.
- Worksheet: Enables field personnel to complete personalized service reports or checklists following a task. You can avoid creating the same worksheet every time you plan a similar field service activity by creating a custom worksheet template option.
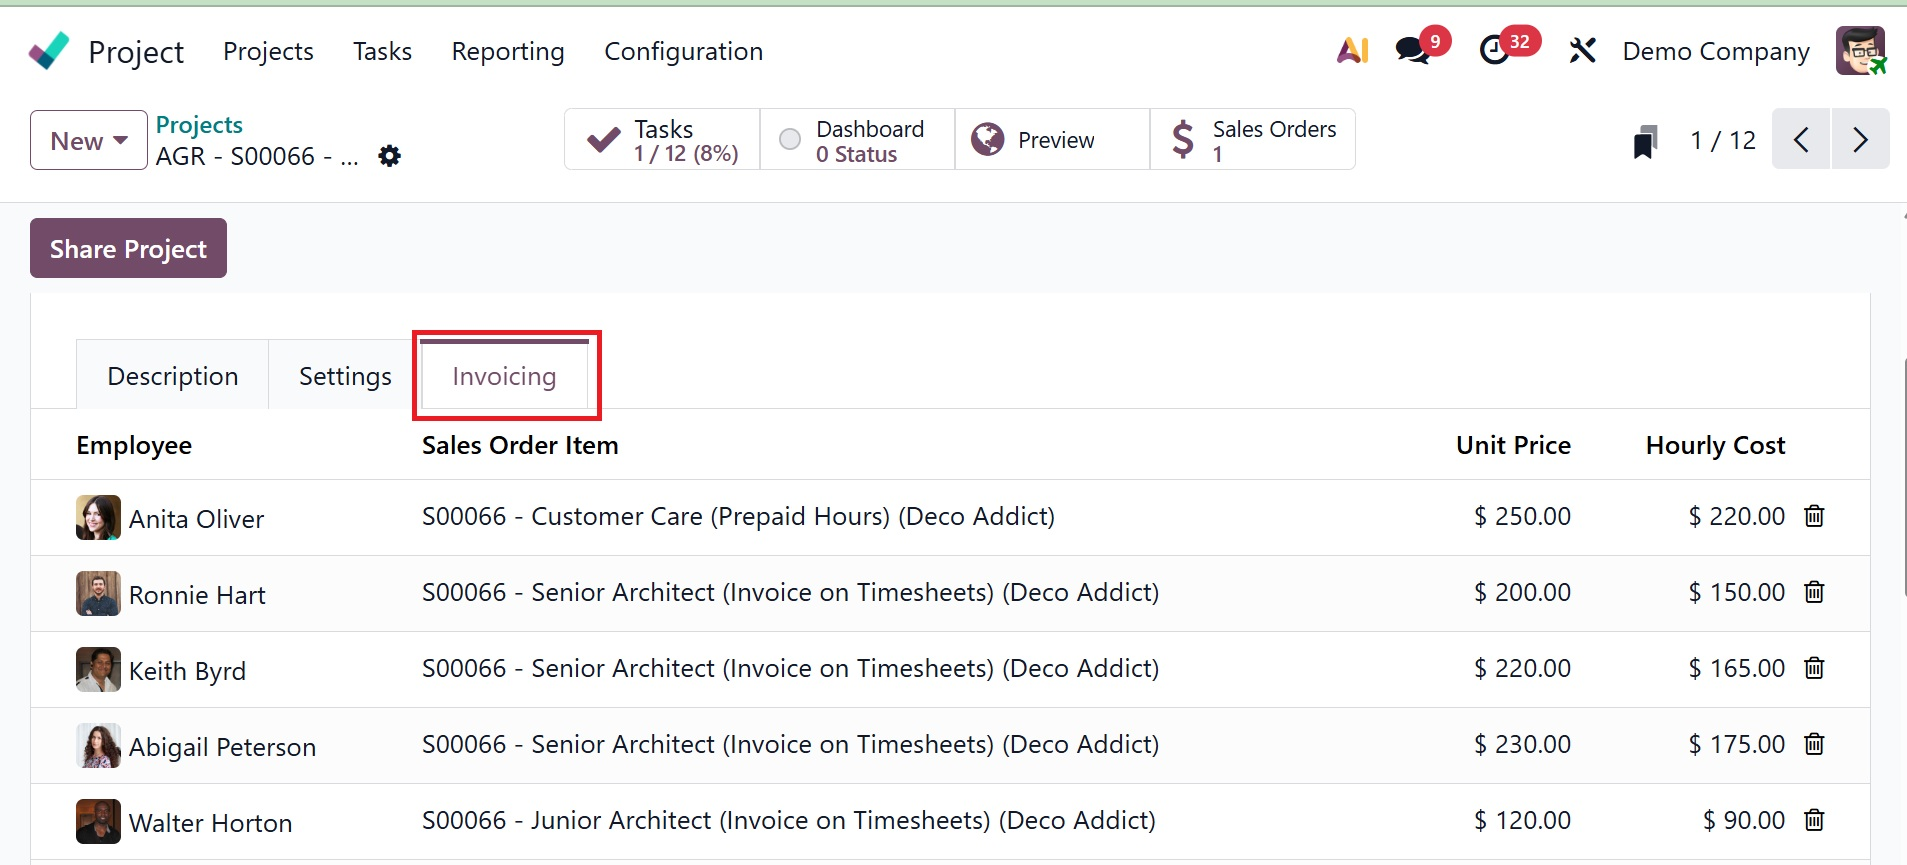
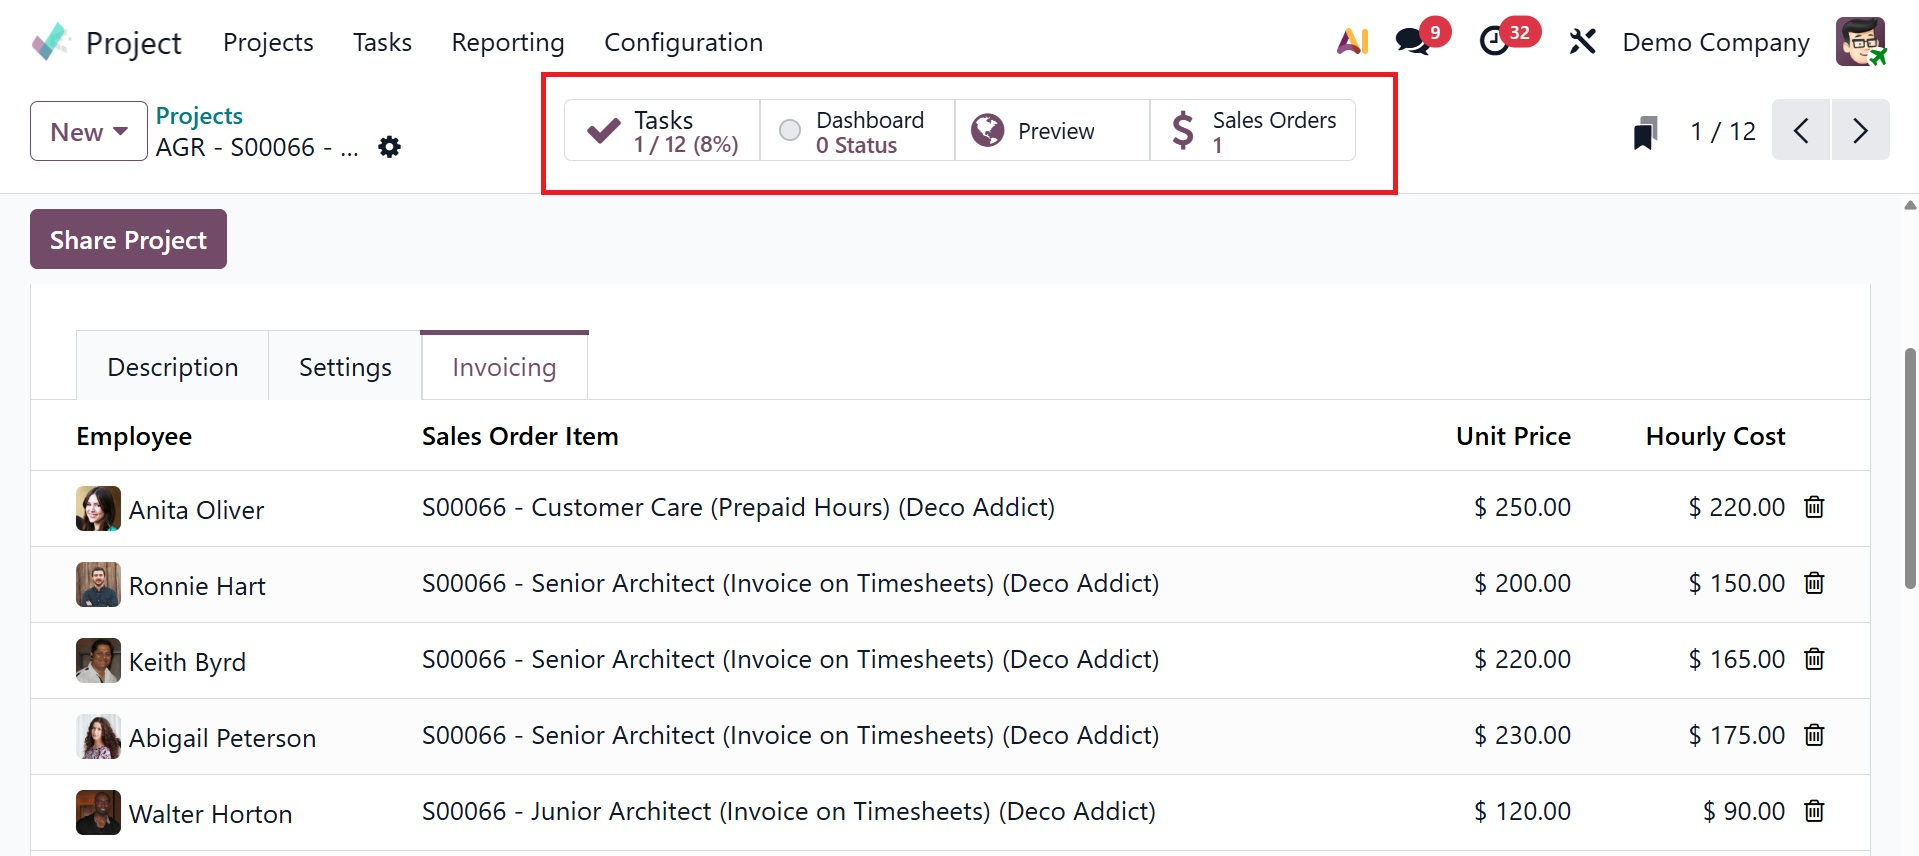
As seen in the figure below, you can now find the employee's data, sale order item, unit price, and hourly cost under the invoicing tab.
Several smart tabs, including task, dashboard, customer preview, and sales order, are now visible there.
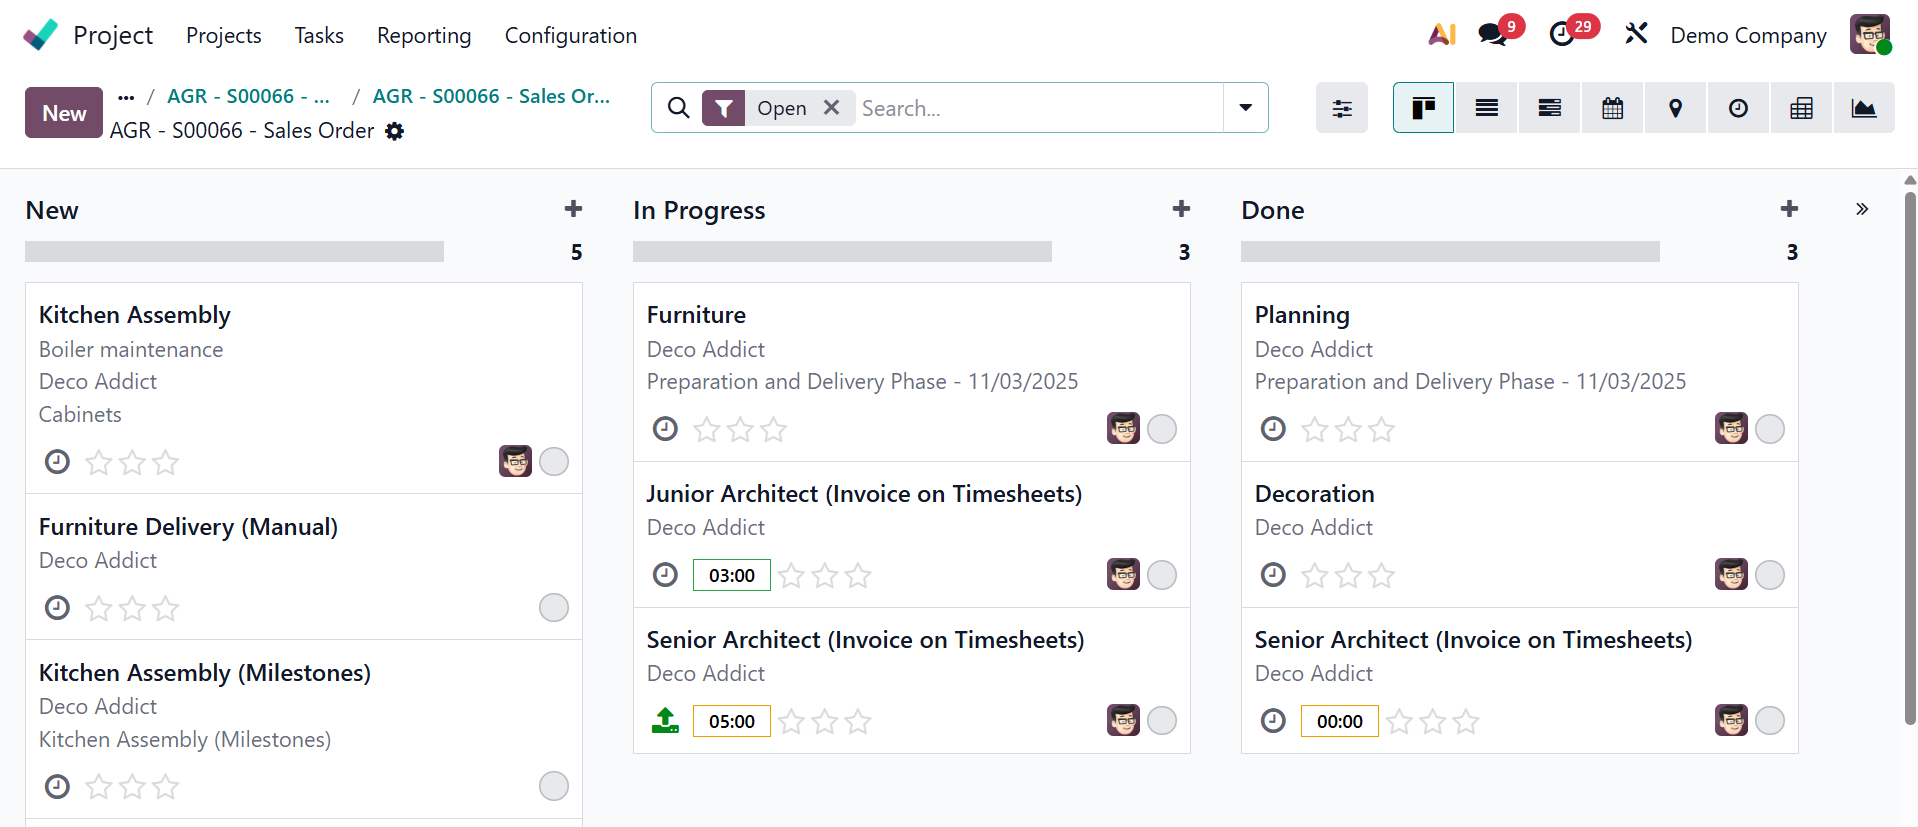
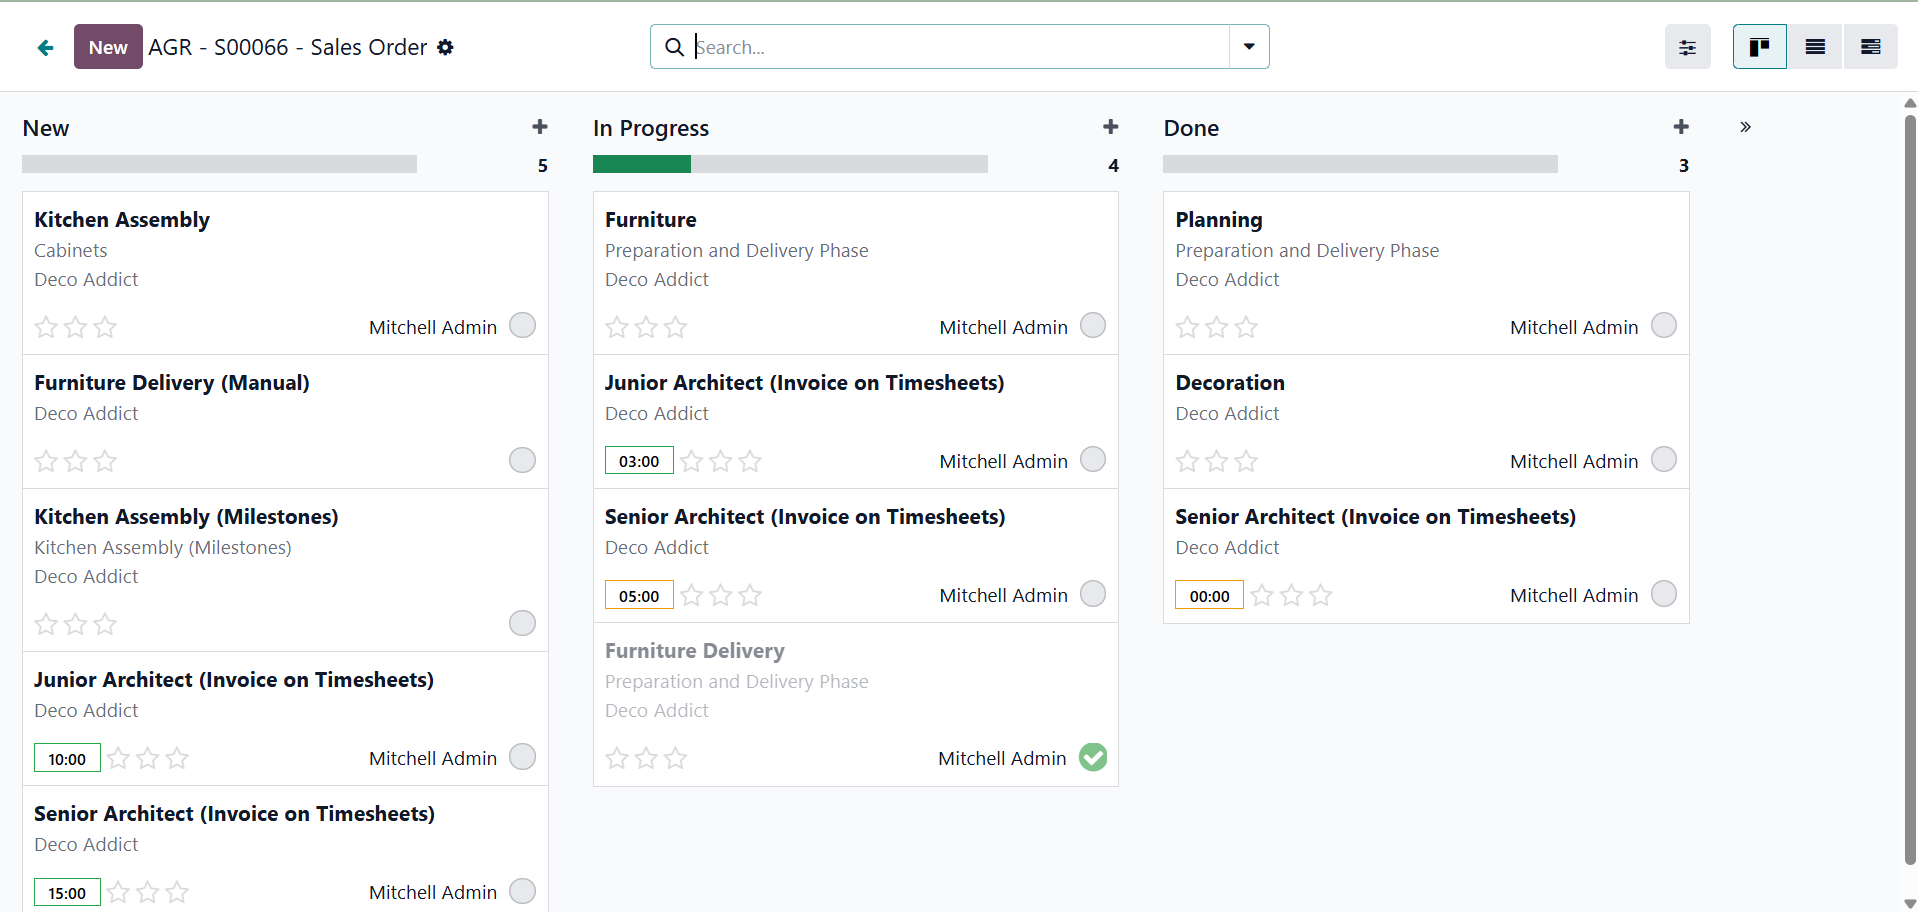
- 1. Tasks: This tab acts as a hub for managing various tasks within a project. Users can create, examine, and amend task information, assignees, deadlines, and other relevant data. On selecting the task, you will get the page, as shown below.
- 2. Dashboard: This page offers a high-level overview of the project's status, advancement, and key performance indicators. Using graphs, charts, and other widgets to visualize project data provides a concise summary of the project's current state. On selecting the page, you will get the page, as shown below.
On the dashboard, you have got several options, like project updates can be added once you click the New icon.
Tasks, which provide the details regarding the task that are ongoing, completed as well on percentage basis as well.
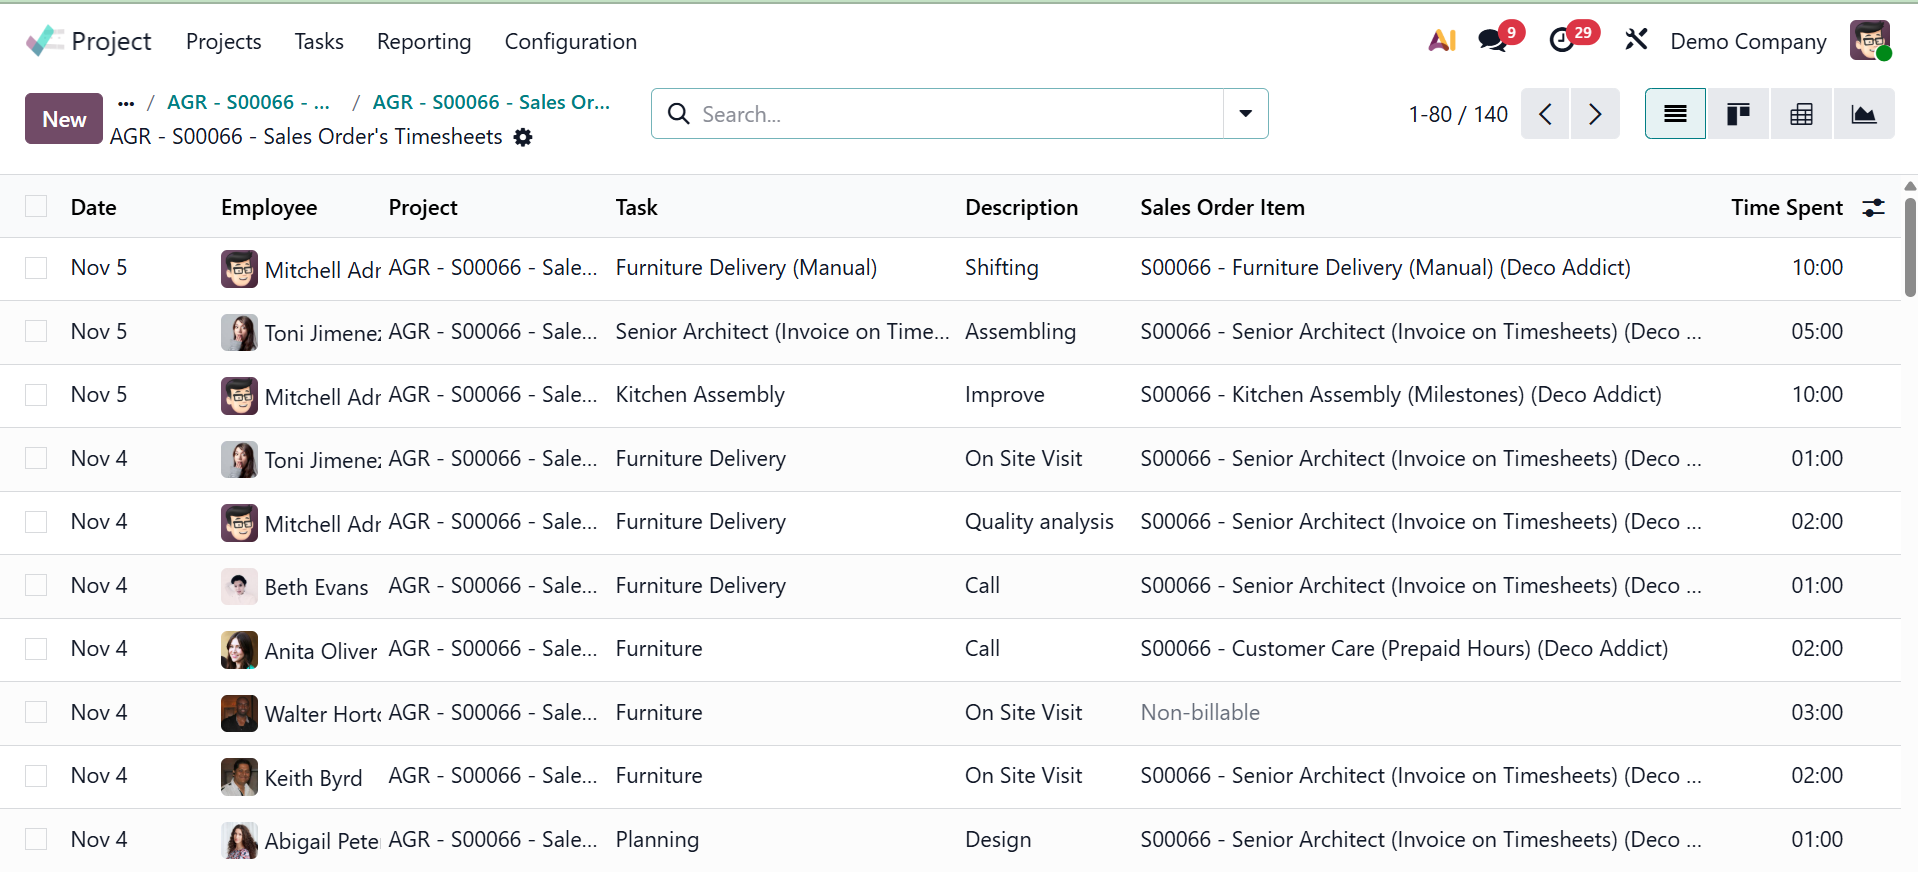
Timesheet option provides data regarding total hours allocated, spent, and the list of the created timesheet as well. The New button allows adding timesheets.
Next, you have the Extra hours option, where you have the details regarding the extra hours added to the timesheet.
Then, Planned option, which determines the planned time for completing a particular task.
Sale orders give the whole sales orders created for the project.
Sale order items provide the details on the list of items under the sale order.
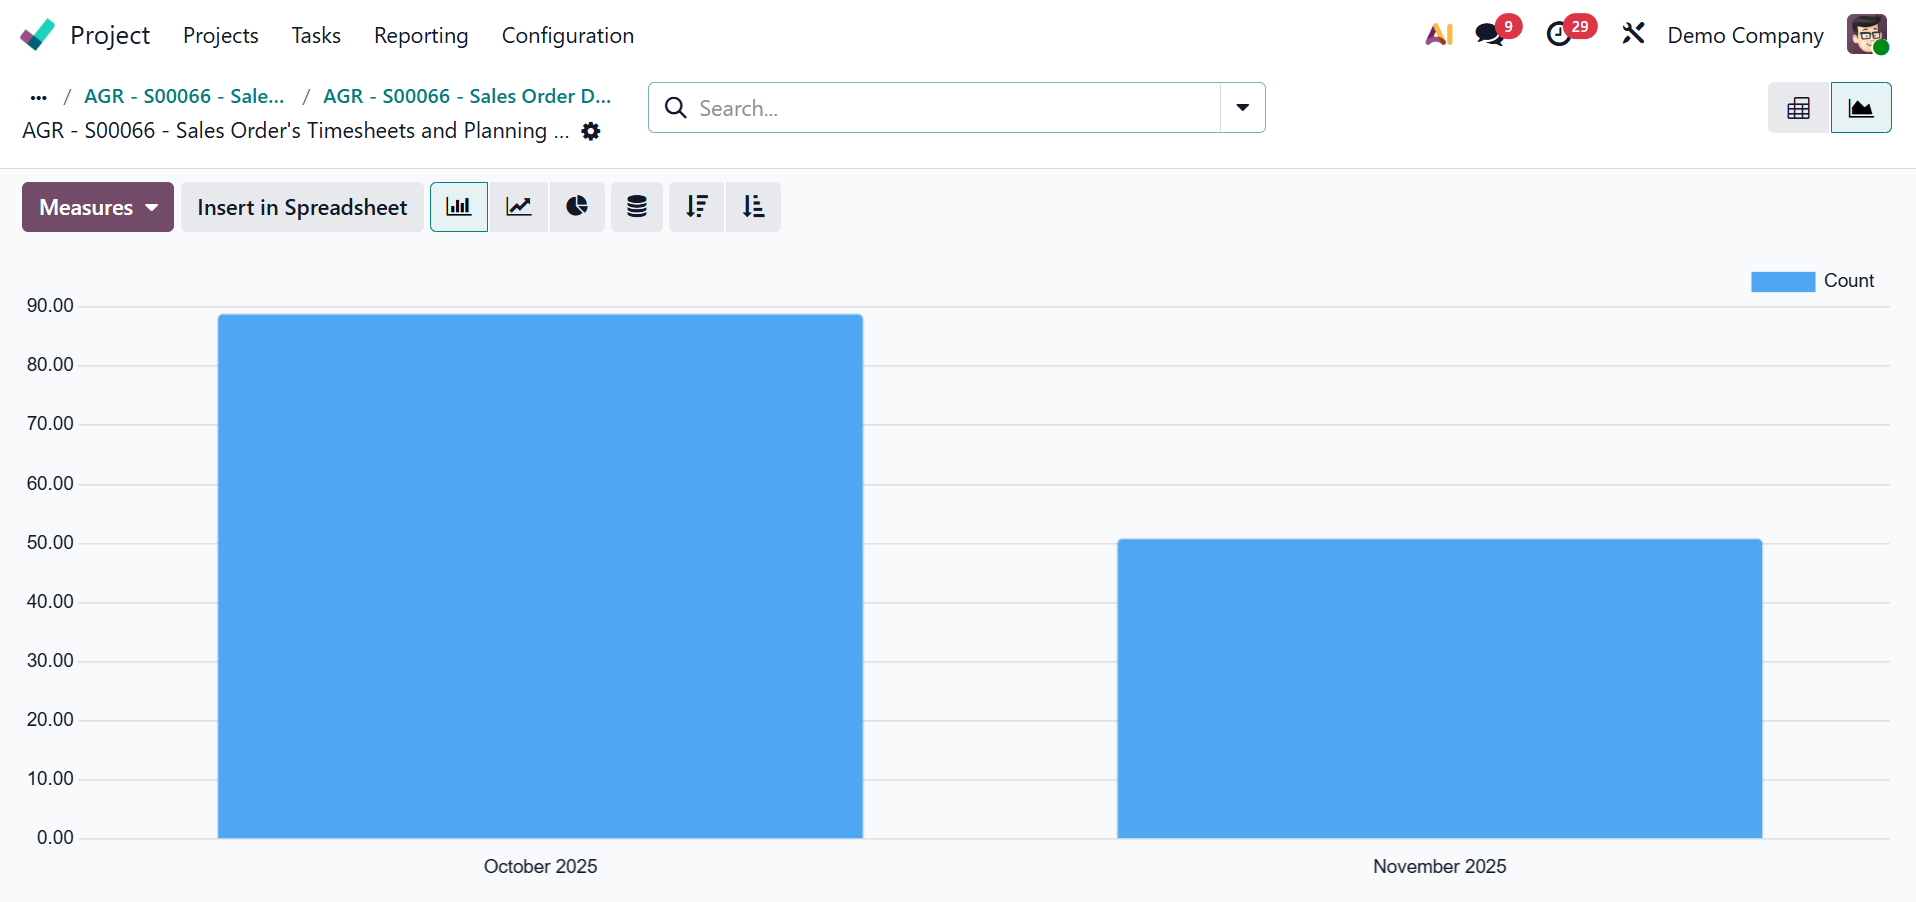
Burndown charts provides the analysis regarding the task, as shown below.
Timesheets and planning option gives the total timesheets and planning in a graphical view and pivot view as well.
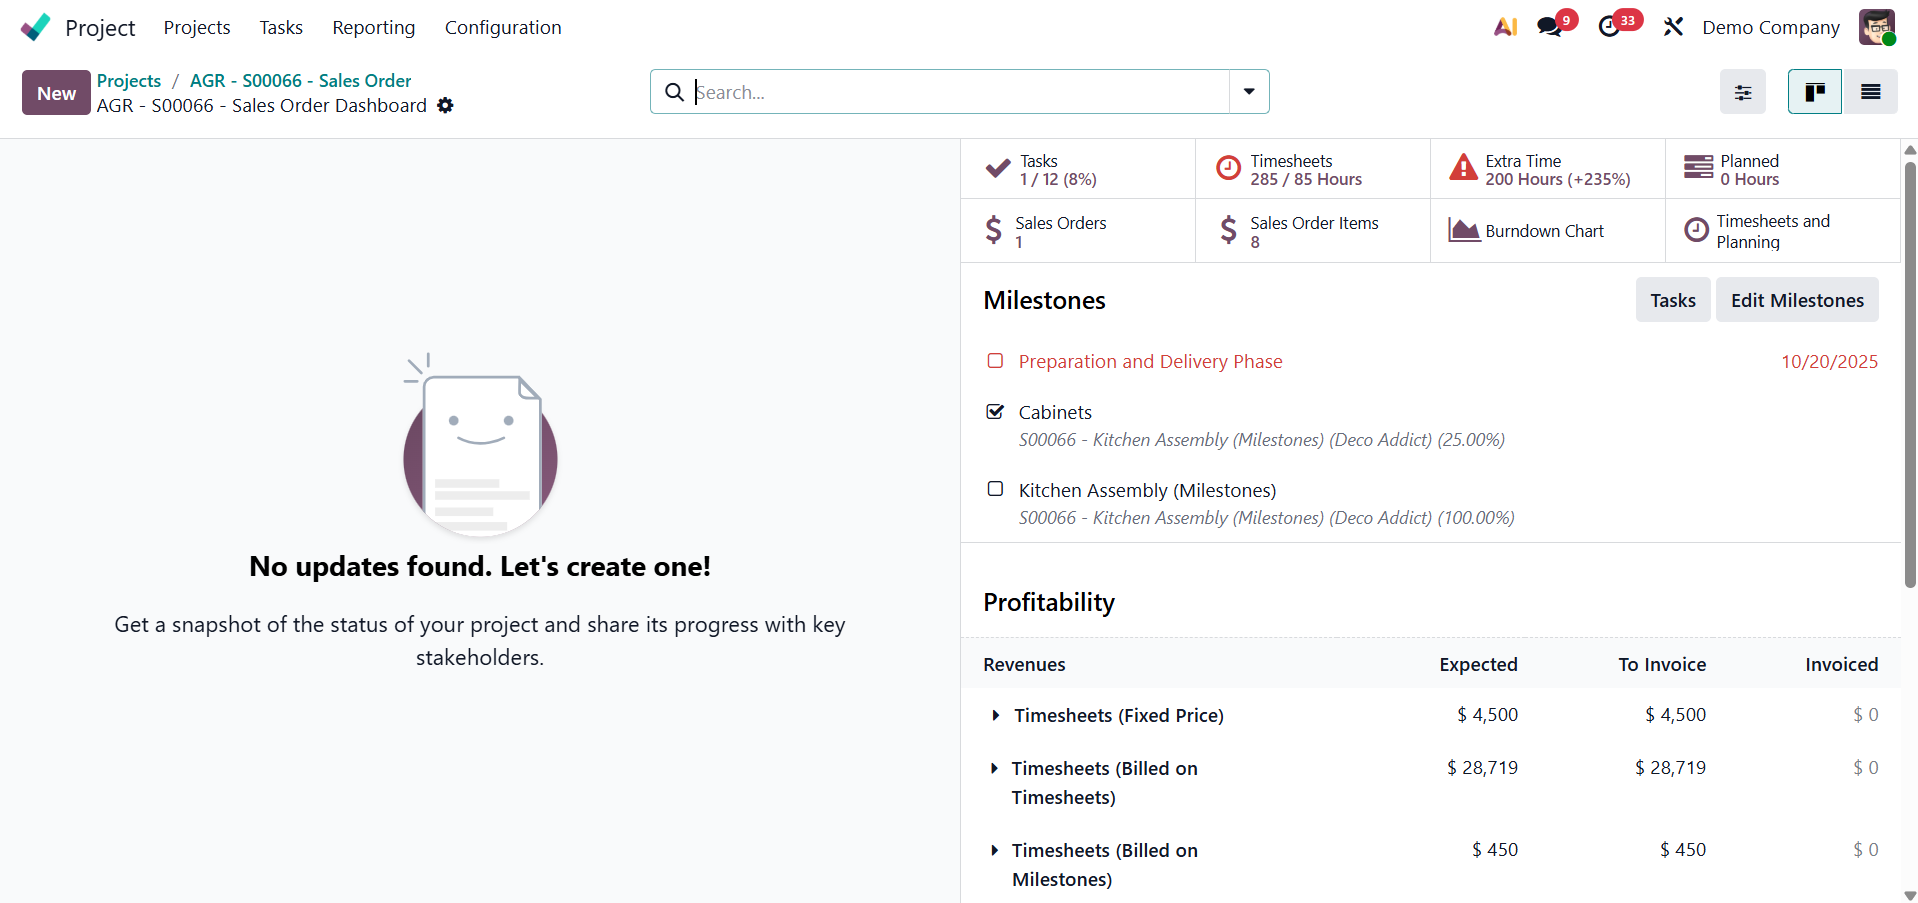
Below that, you have the Milestone option, as in the screenshot below.
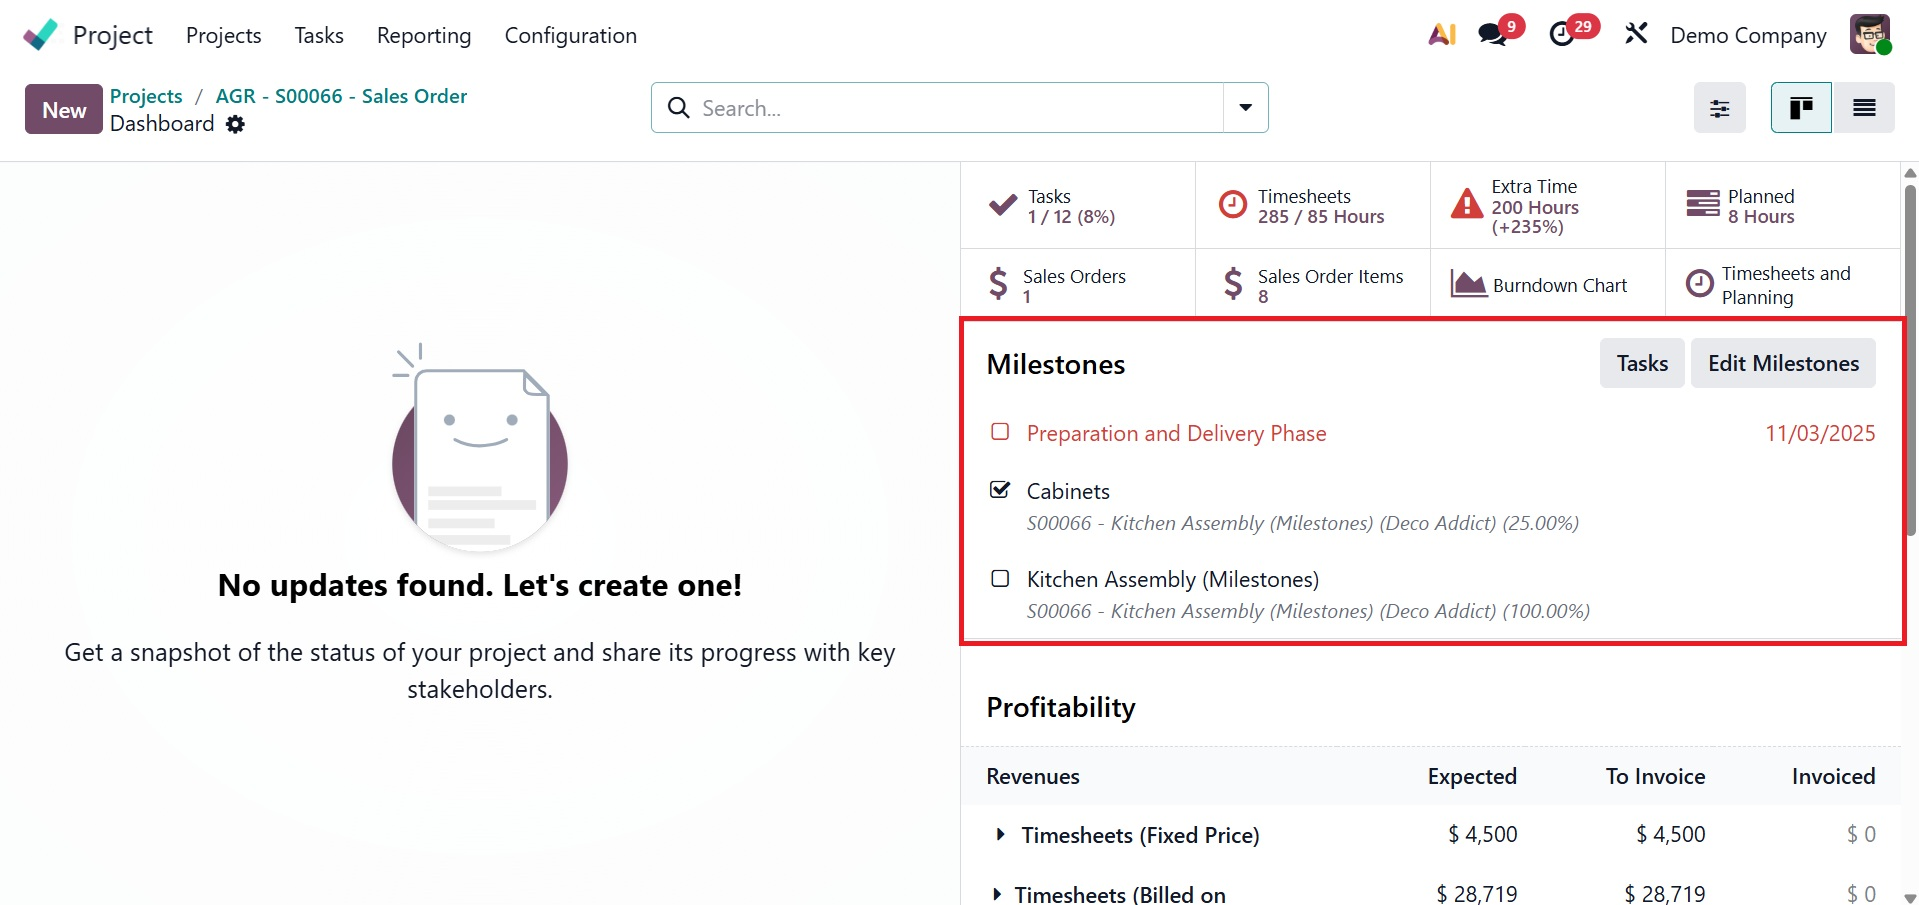
It can be created and edited as well. There, the tasks under them can also be viewed. The Milestone smart button on a project's dashboard offers the option to "Edit Milestone." It allows users to access and modify the current milestone records associated with that particular project.
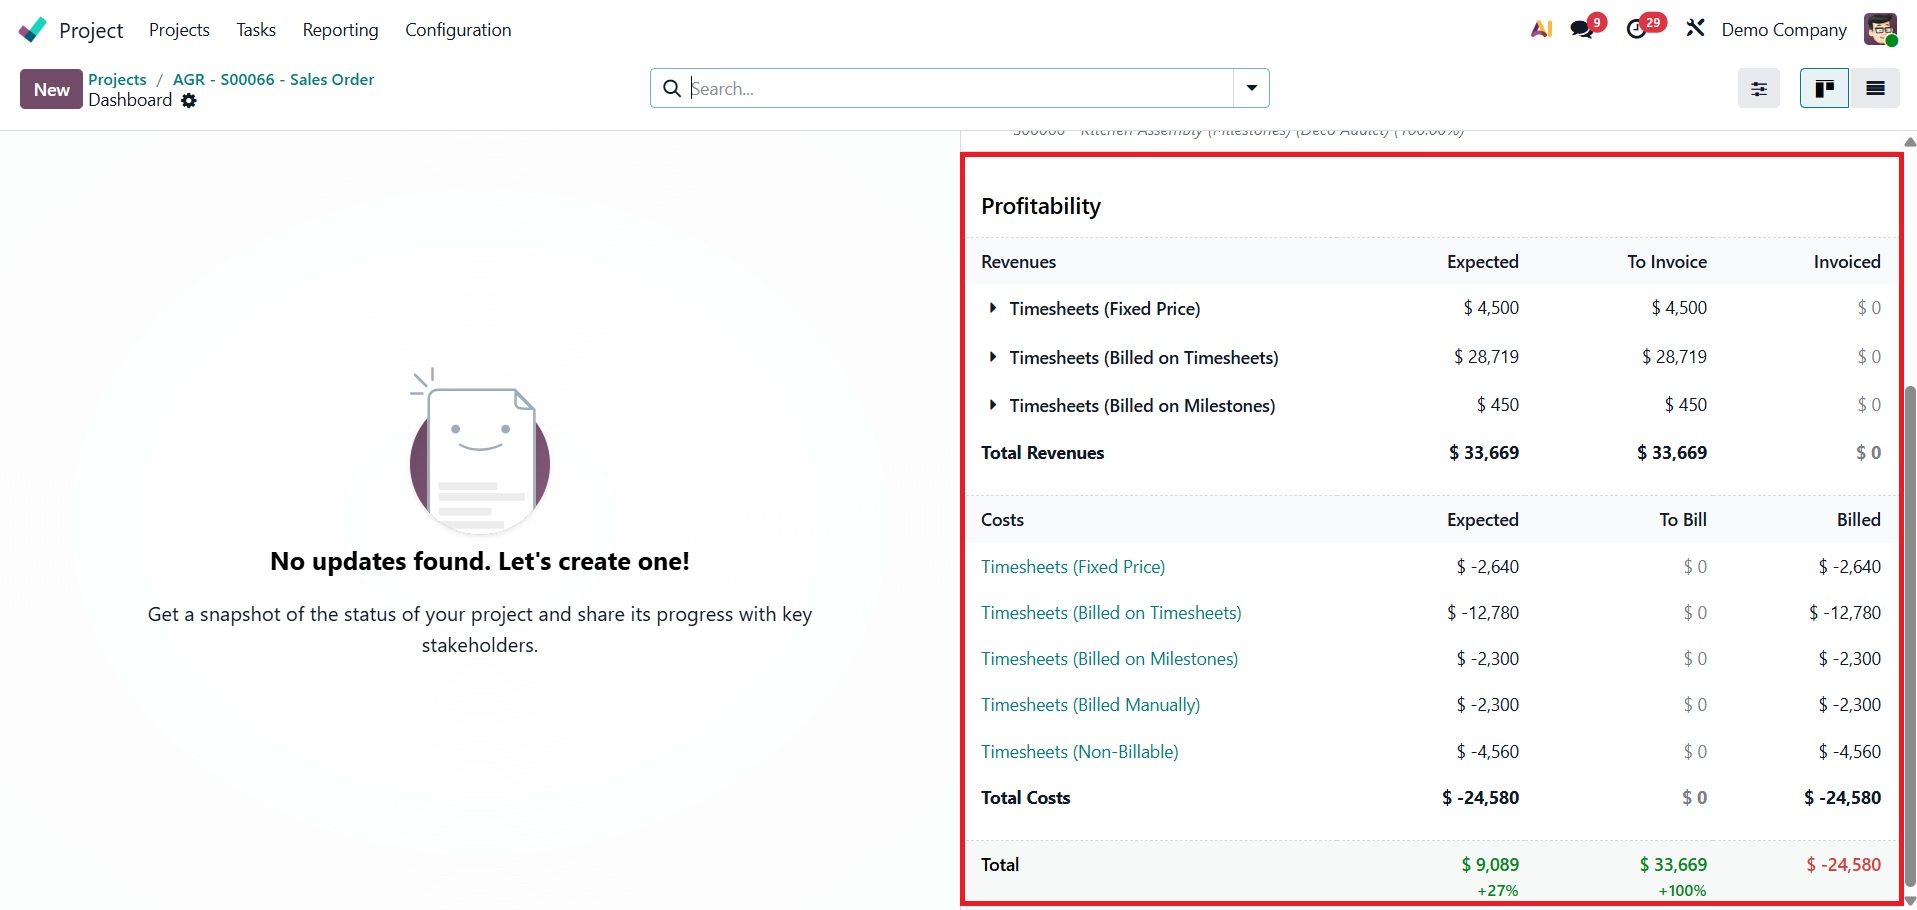
Then, you have the Profitability options, as in the screenshot below.
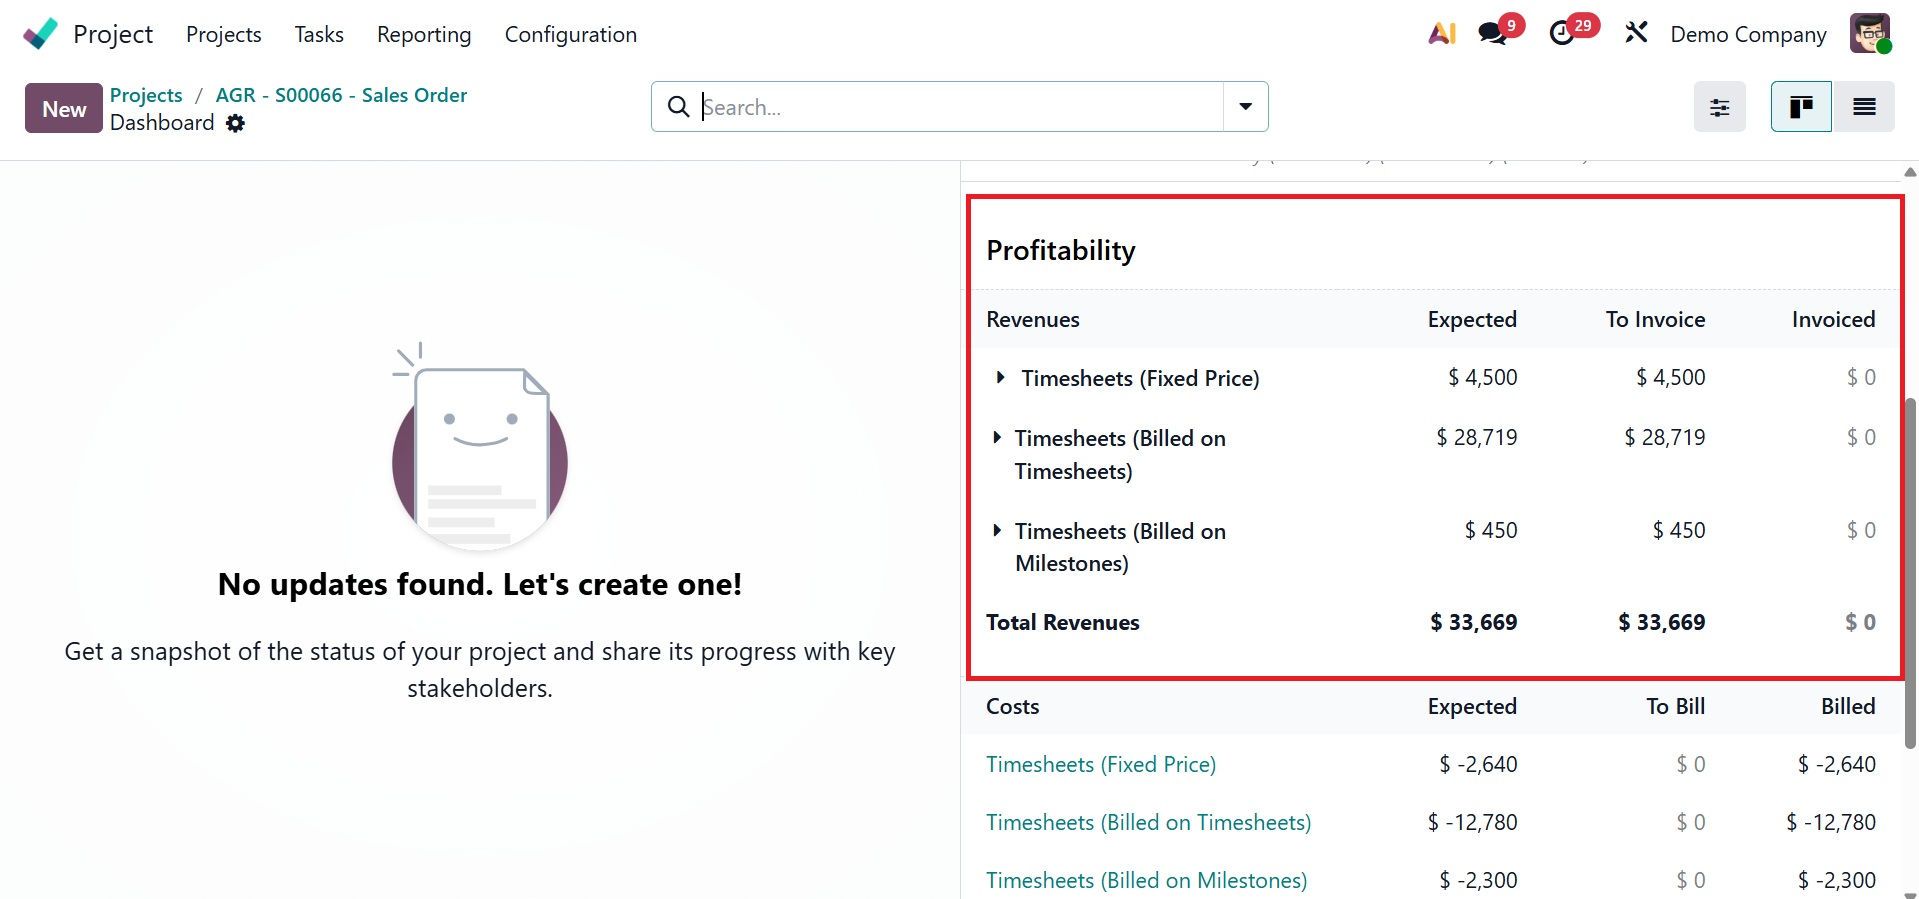
The profitability of the project can be calculated from here. The difference of revenues and cost will be calculated under the profitability field. The Odoo19 project dashboard's profitability feature compares a project's revenue and expenses to show how financially sound it is. It gives a brief summary of the project's costs, which originate from timesheets, purchases, and expenses connected to the analytic account, as well as its revenue, which contains all revenues from sources like sales orders and invoices.
- 3. Preview: On the website or customer portal, users can view the task or project exactly as the customer would. Administrators can examine timesheets, worksheets, and reports from the client's perspective, which is very useful for field service positions. The preview will be, as shown below.
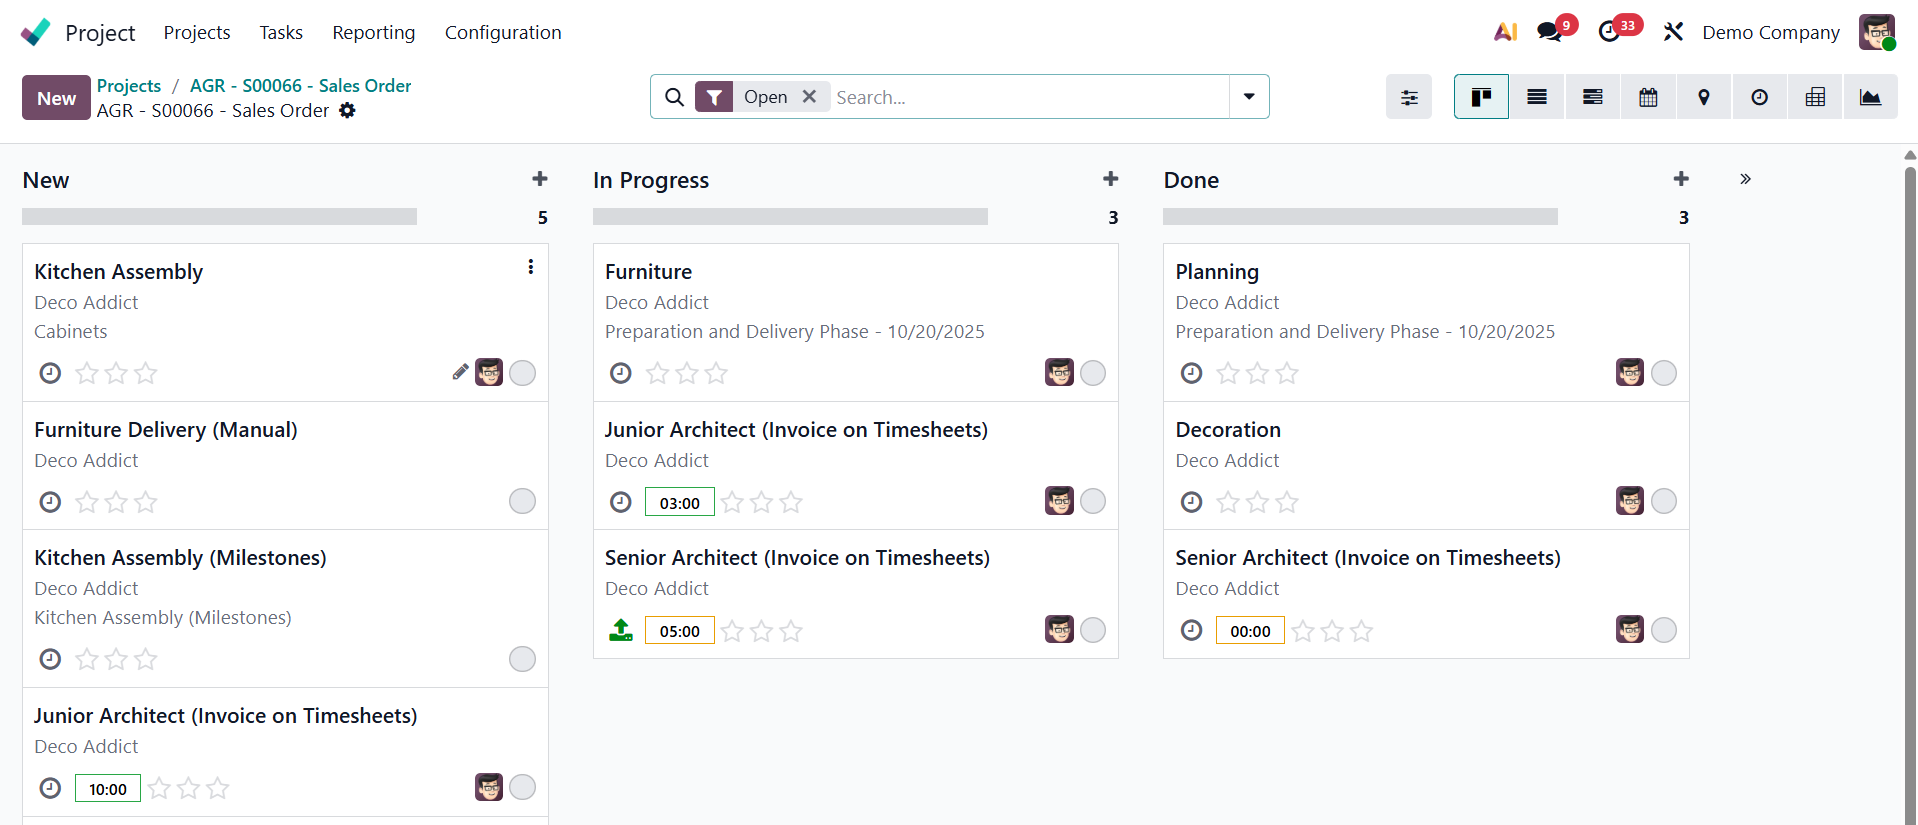
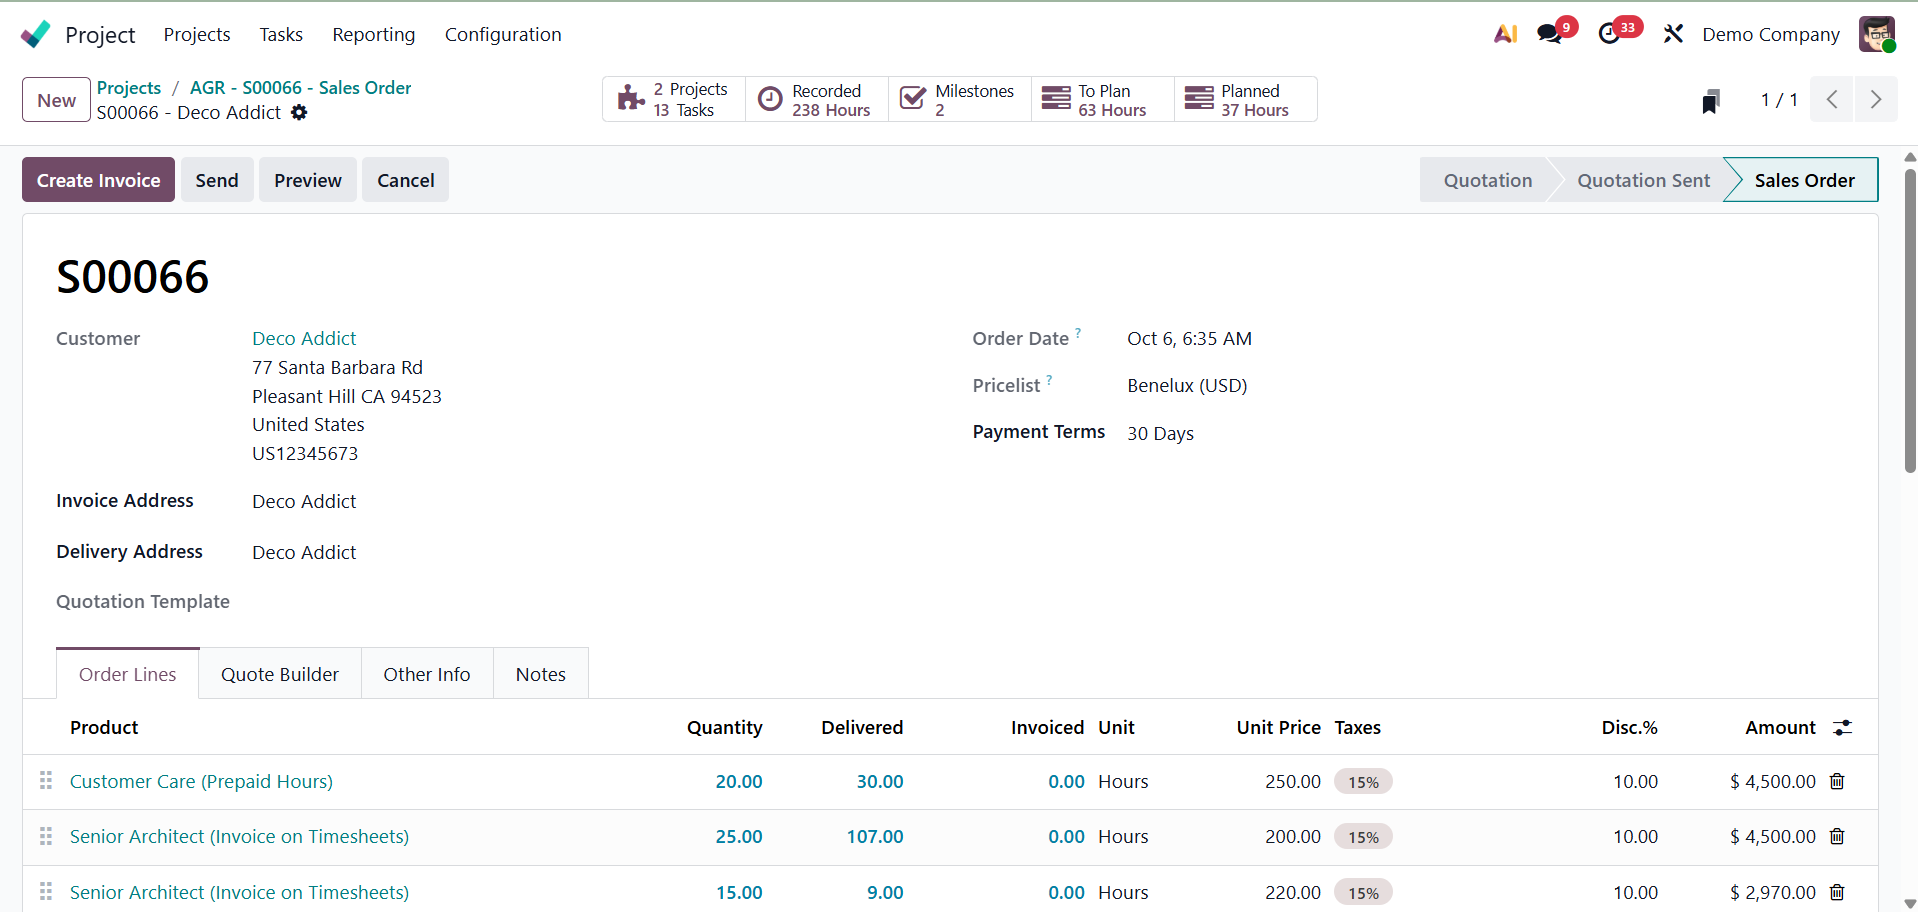
- 4. Sale Order: Users can link a project or task to a specific sales order using the Sale Orders feature. It allows them to create tasks from sales orders, track the progress of related sales orders, and create invoices depending on project activities.
These smart tabs make project management easier by providing a centralized and intuitive way to view, manage, and interact with different project components within Odoo, as shown below.
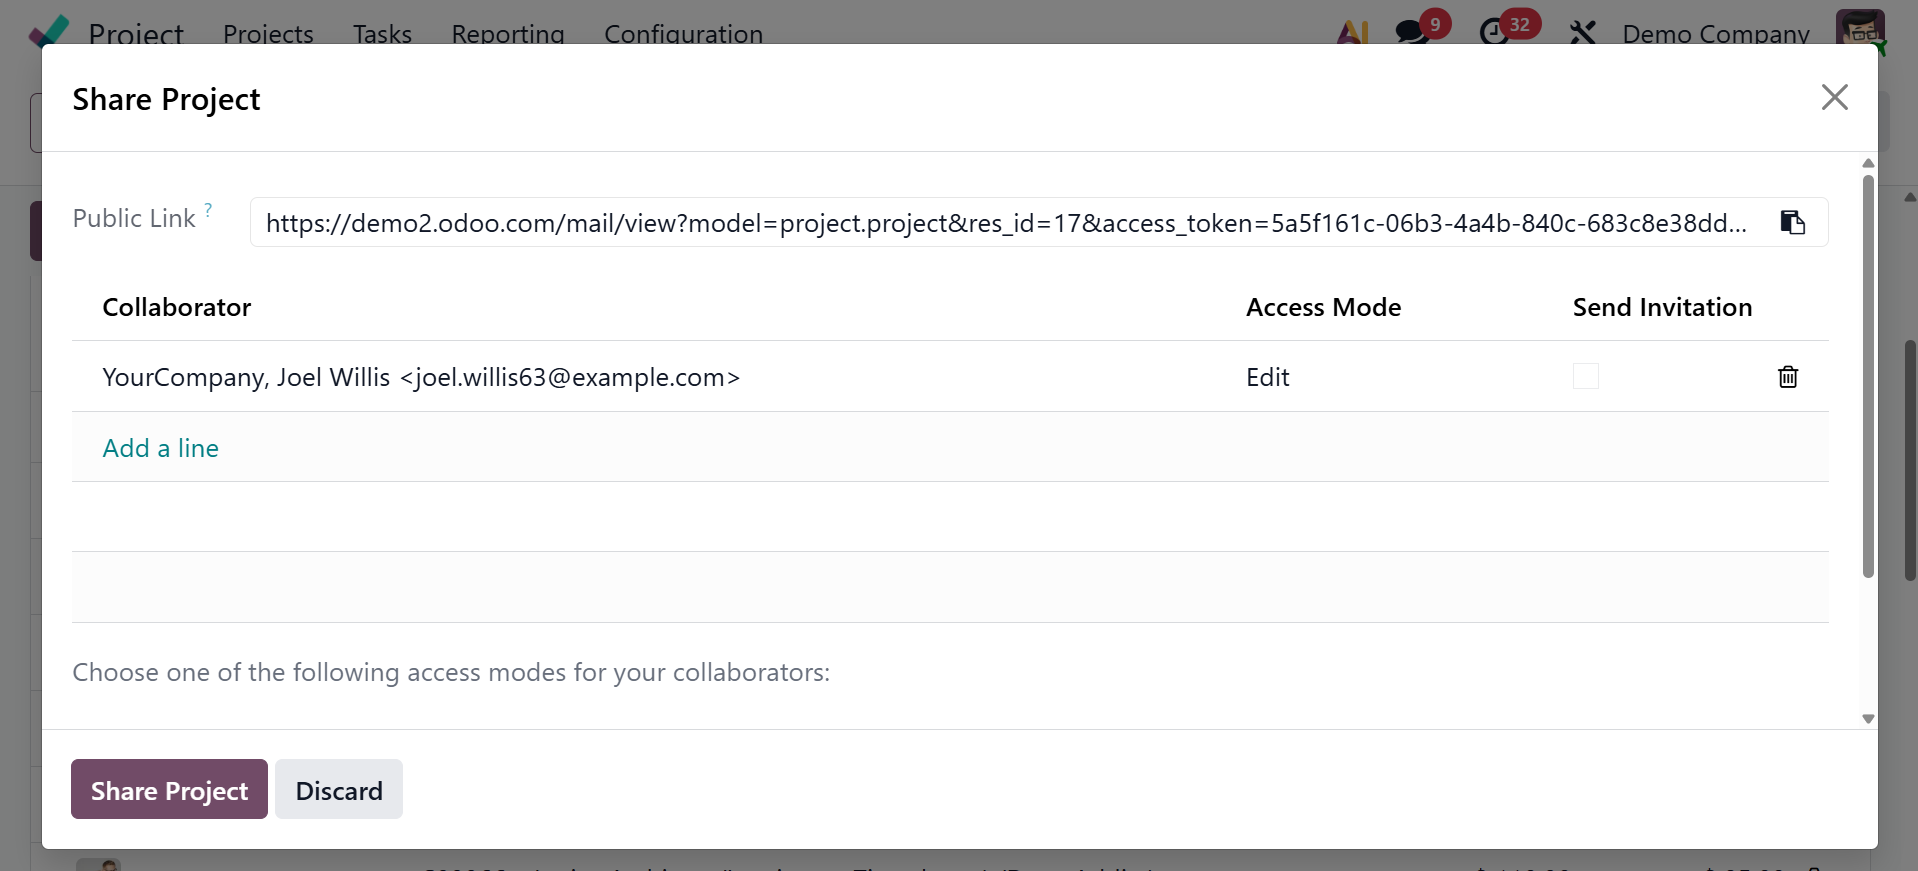
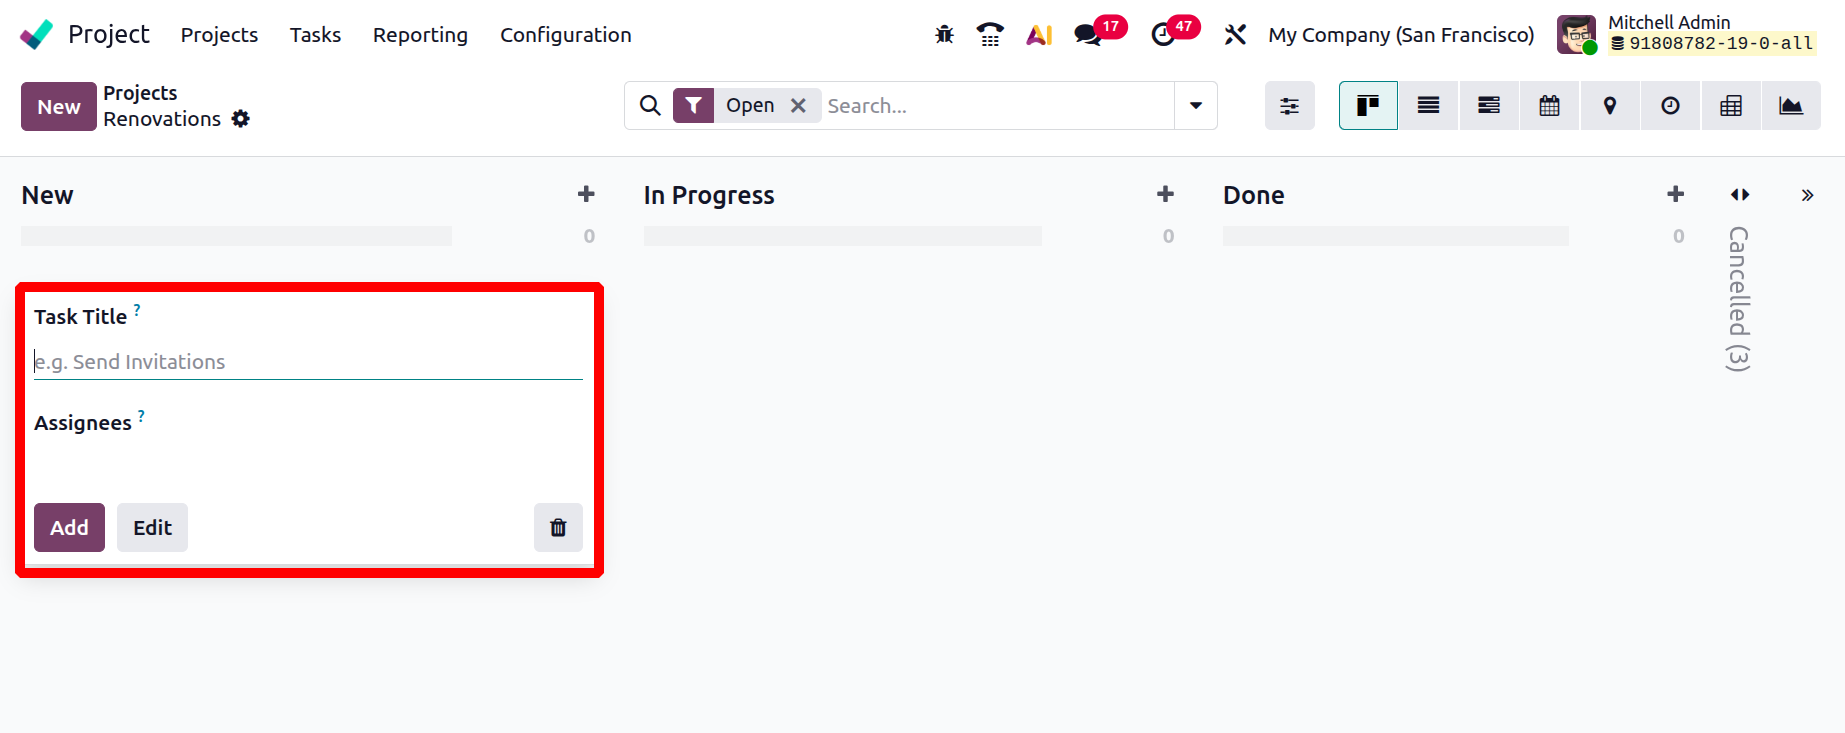
You can share the project by using the share project icon on the page. When you click the icon, the page appears as shown in the image below.

The relevant fields need to be filled in with the task title and assignees. You can click the Edit button to add more information.
1.2 Task Creation
New tasks can be created either from the Tasks menu, or by creating a new project as shown below.
Click on the Edit button, which leads to the creation form as shown below. Here, you have the options like,
- Project Name: This is the project's official title.
- Worksheet Template: This allows you to select a pre-made report or checklist template that you may fill out while you work on the task.
- Milestone: Tracks the task's progress toward important project objectives by connecting it to a particular milestone.
- Assignees: The users or staff members in charge of finishing the assignment are known as assignees.
- Customer: The person for whom the project or task is being completed.
- Contact Number: The customer's or the task's contact person's phone number.
- Sale Order Item: This allows you to track billable work or deliverables by linking the task to a specific sales order line.
- Under Warranty: Indicates if a warranty applies to the task or service.
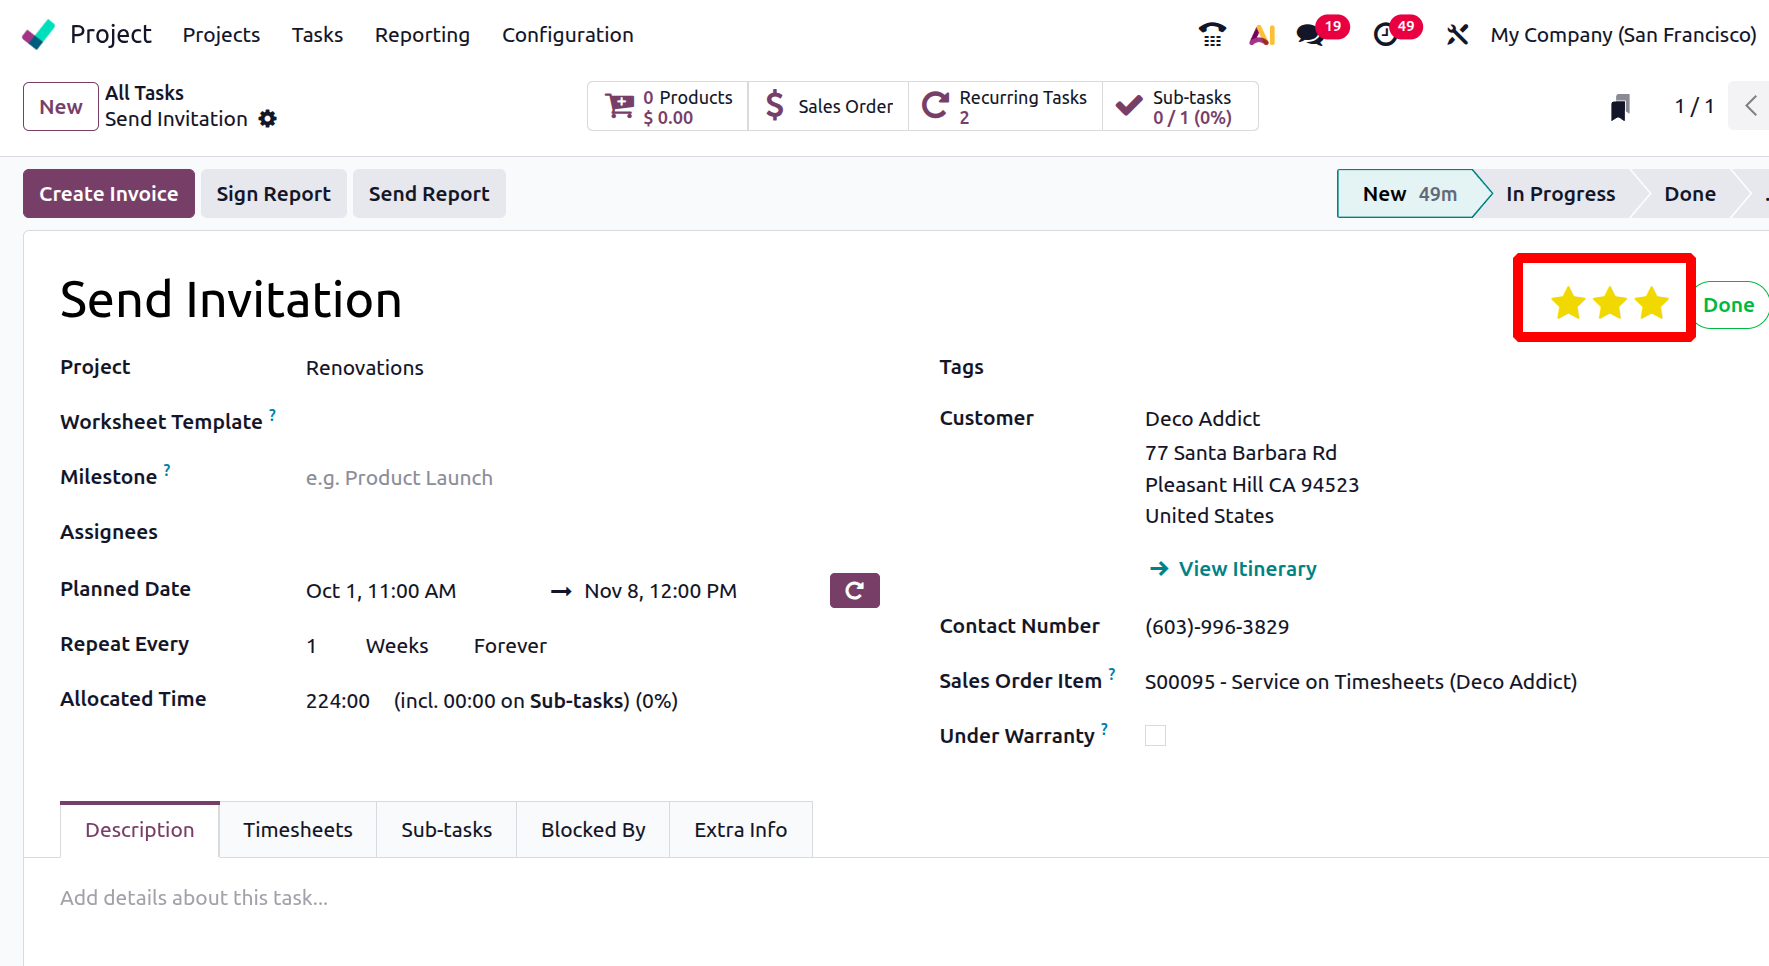
- Star: Users can "star" a project using the star icon, which makes it simpler to locate and rank later. For improved organization, starred projects may be easily accessed and sorted.
- Customer: Choose the customer here if the project is linked to them.
- Planned Date: This section shows the project's anticipated start and completion dates. These dates can be changed by users as necessary.
- Allotted Time: This field makes an estimate of how much time will be spent on the project overall.
- Tags: Use pertinent tags to classify and arrange projects here.
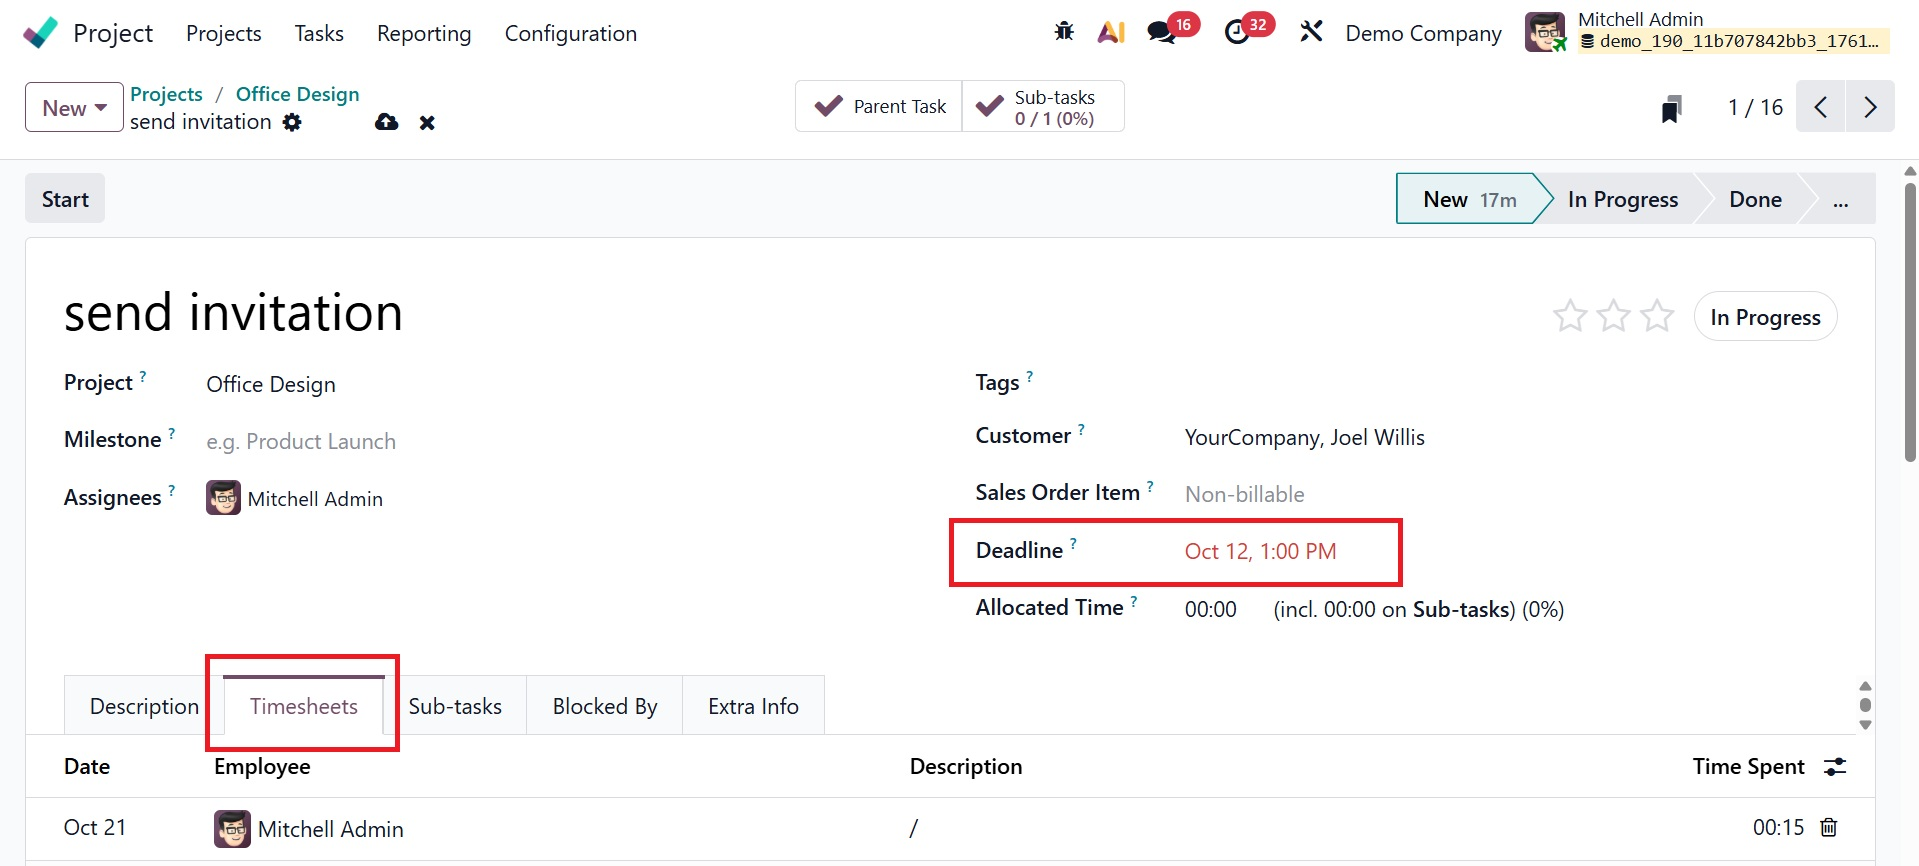
Set a deadline for the Task. Odoo 19's Deadline field now allows you to enter the start and end dates. You can also include the allotted time beneath that. Add the appropriate tags after that. You can provide a thorough explanation of the Task in the Description tab.
Set a deadline for the Task. Odoo 19's Deadline field now allows you to enter the start and end dates. You can also include the allotted time beneath that. Add the appropriate tags after that. You can provide a thorough explanation of the Task in the Description tab.
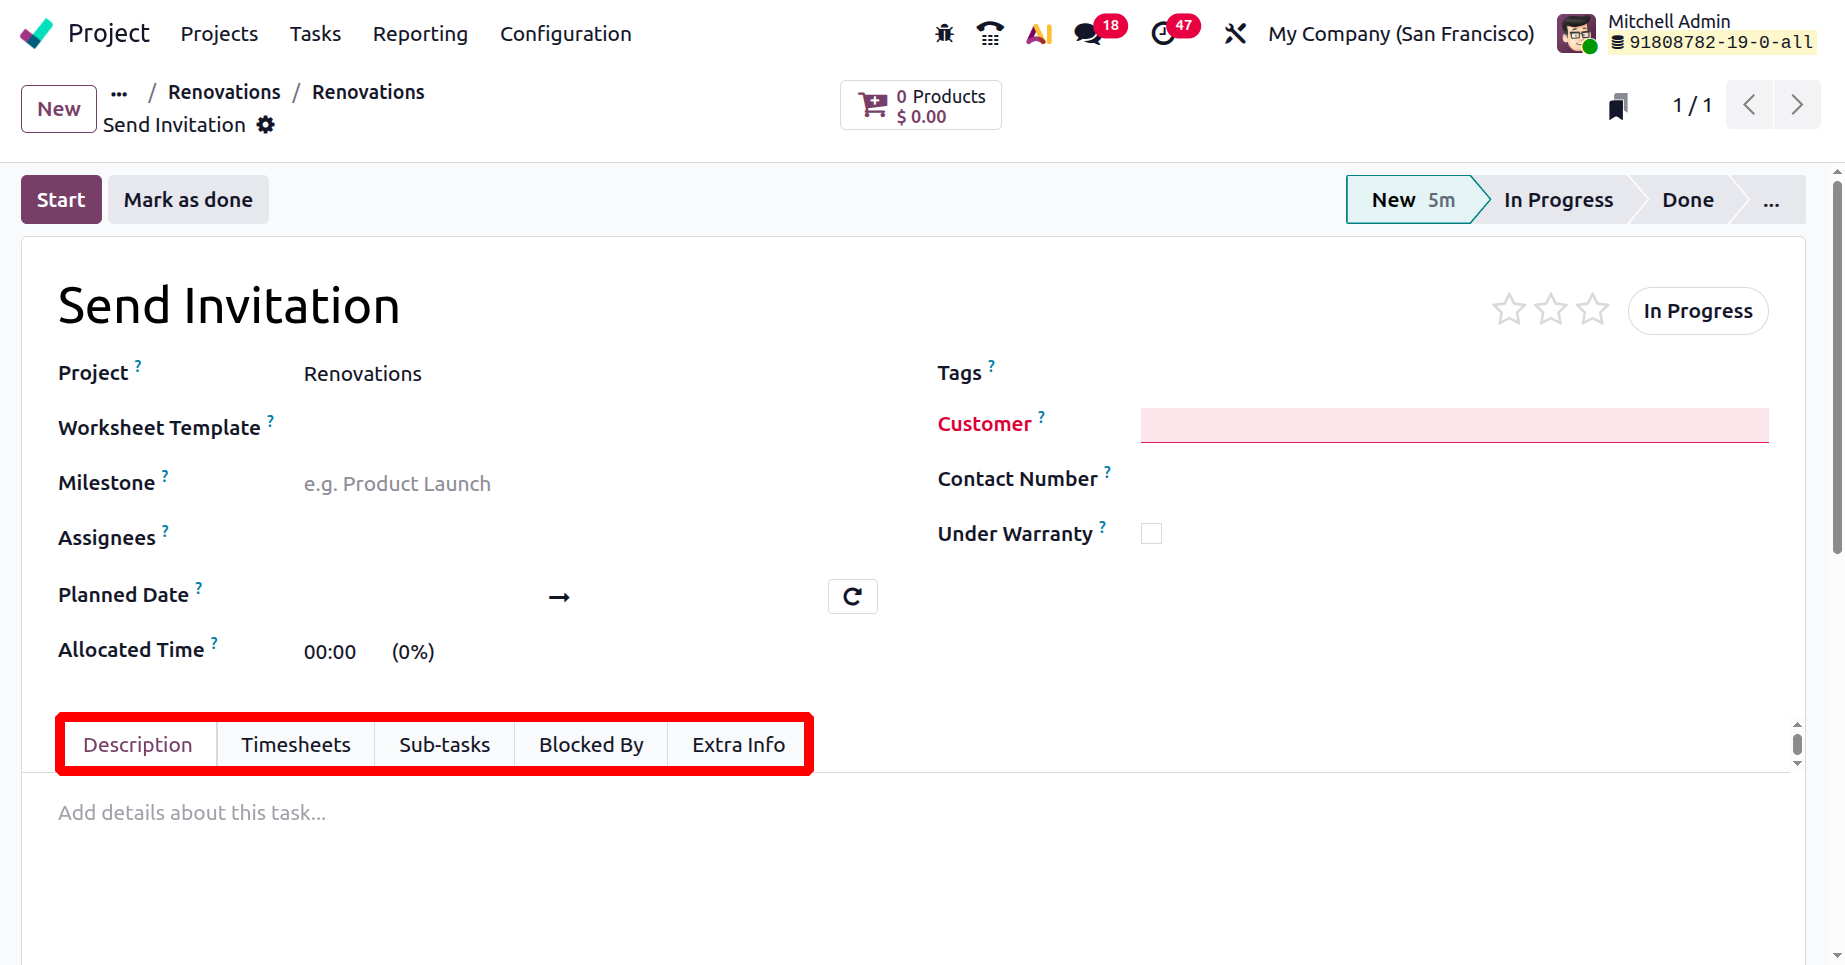
There are another tabs named Timesheets, Sub-tasks, Blocked By and Extra Info
You can activate the Timesheet option from the module's Settings tab under the project creation page if you wish to keep track of how much time you spend on a task or project.
When this Timesheet is enabled inside the Project Settings, the Timesheet tab will automatically appear in the task's form view, as shown below.
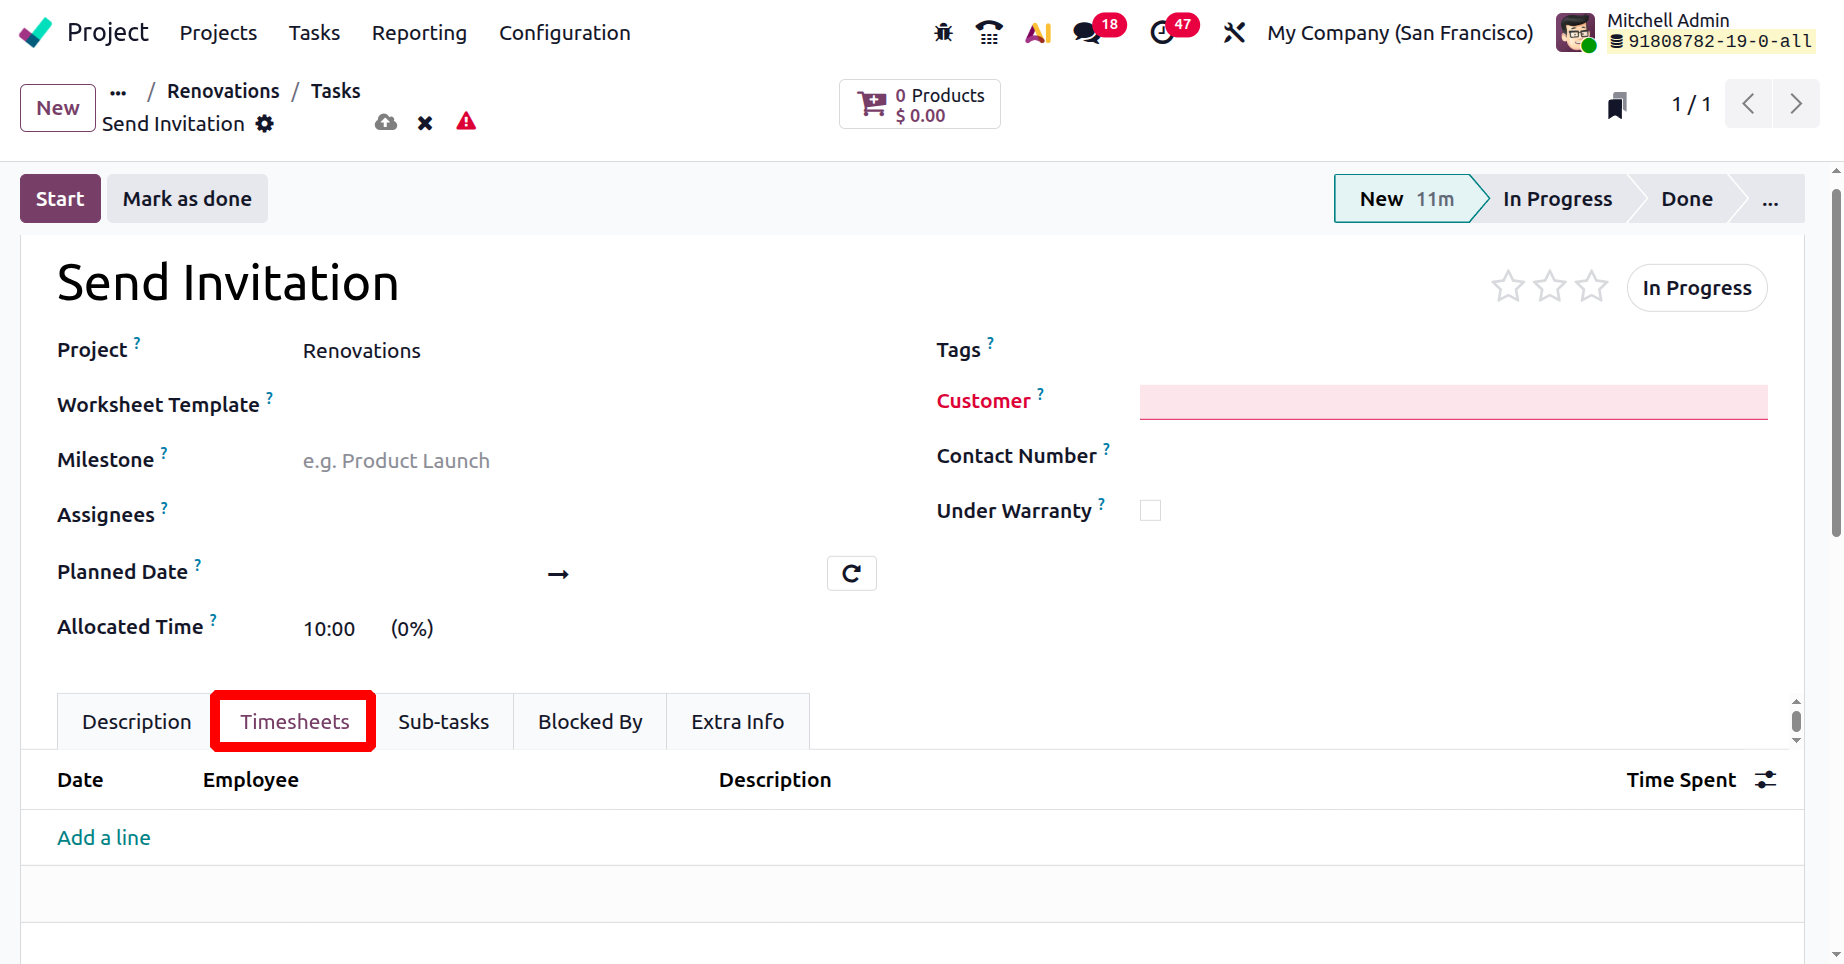
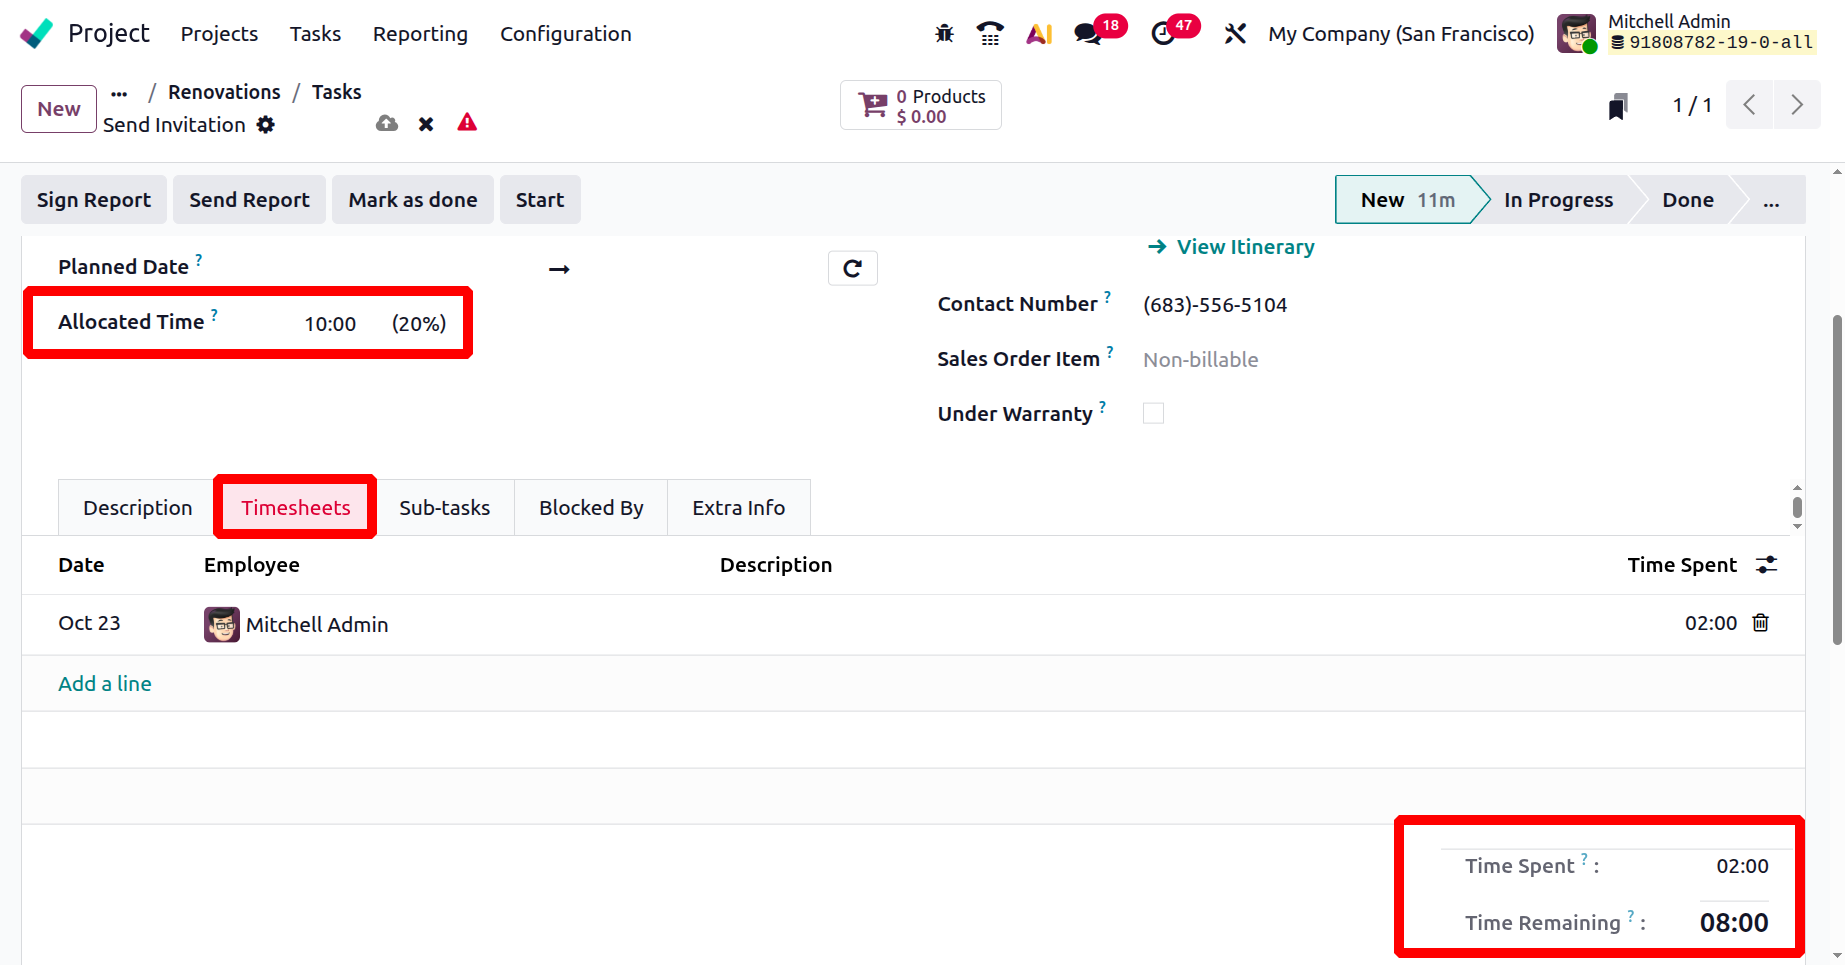
The Allocated Hours column can be used to specify the required number of hours. The Add a Line button can be used to manually record the employees' time worked. Under this page, you may view the work's progress based on the total number of hours spent on it.
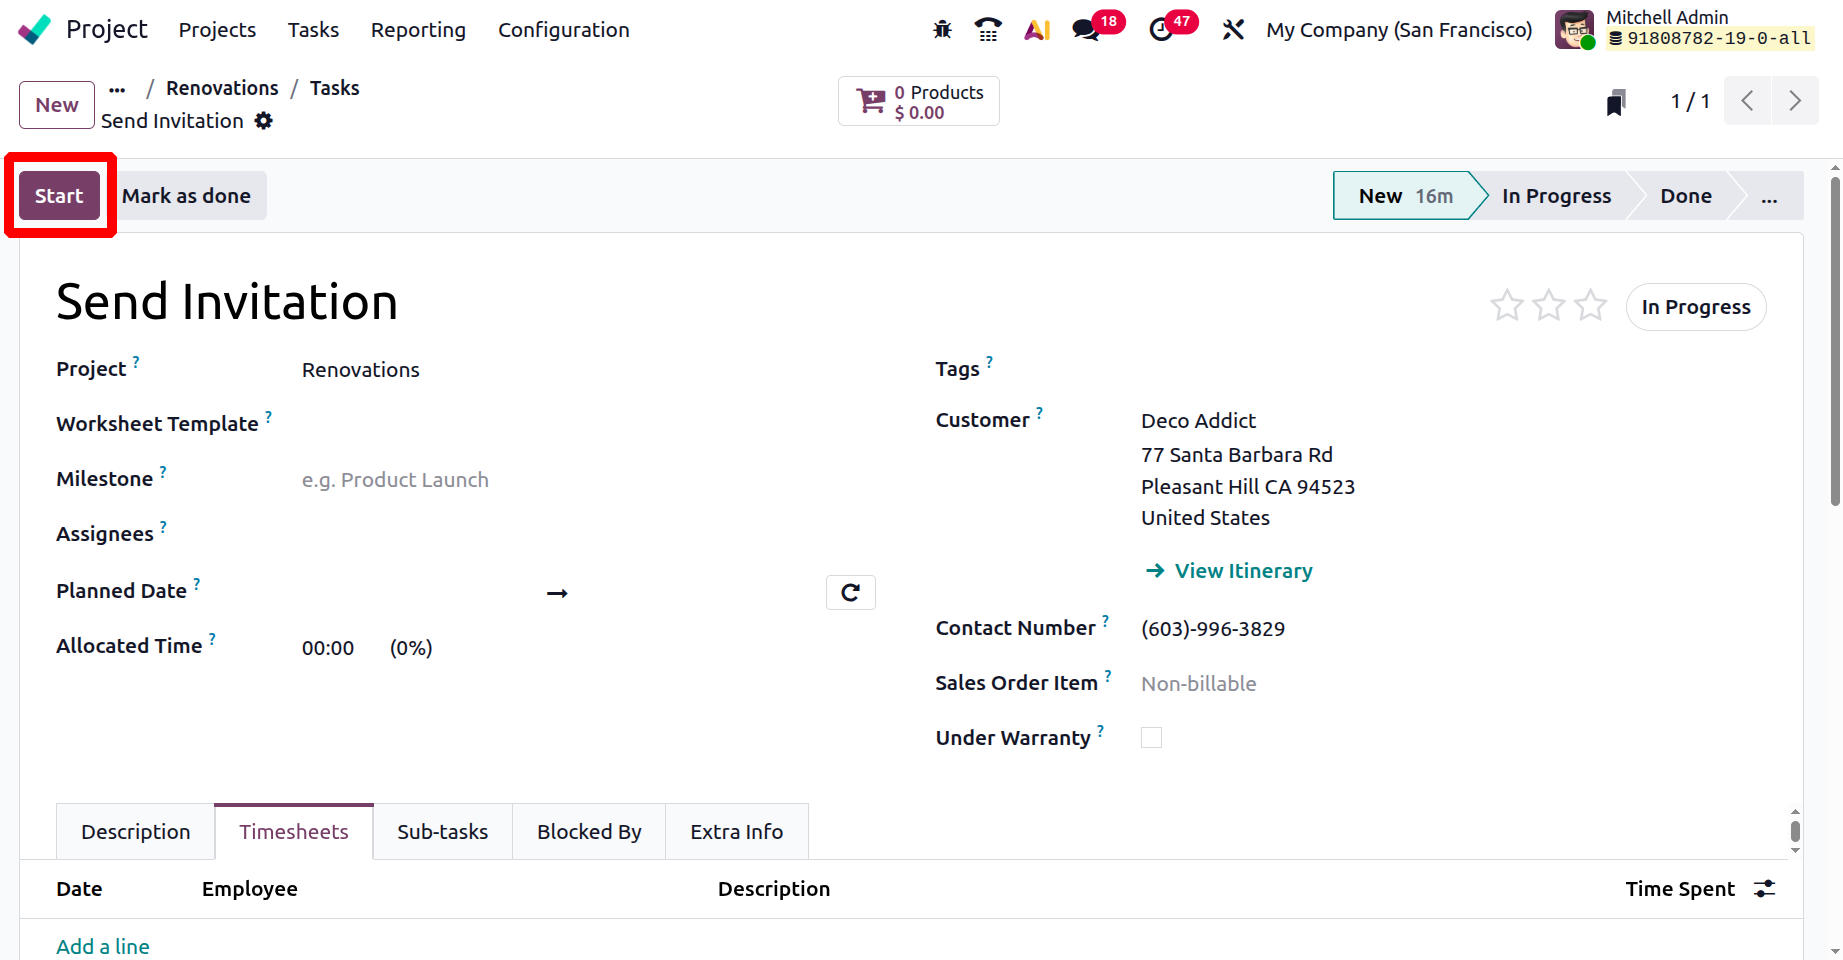
An automatic timer is started to record the amount of time spent on a task when the user clicks the "Start" button. To show that work is ongoing, the task's status frequently changes to "In Progress" or a comparable level.
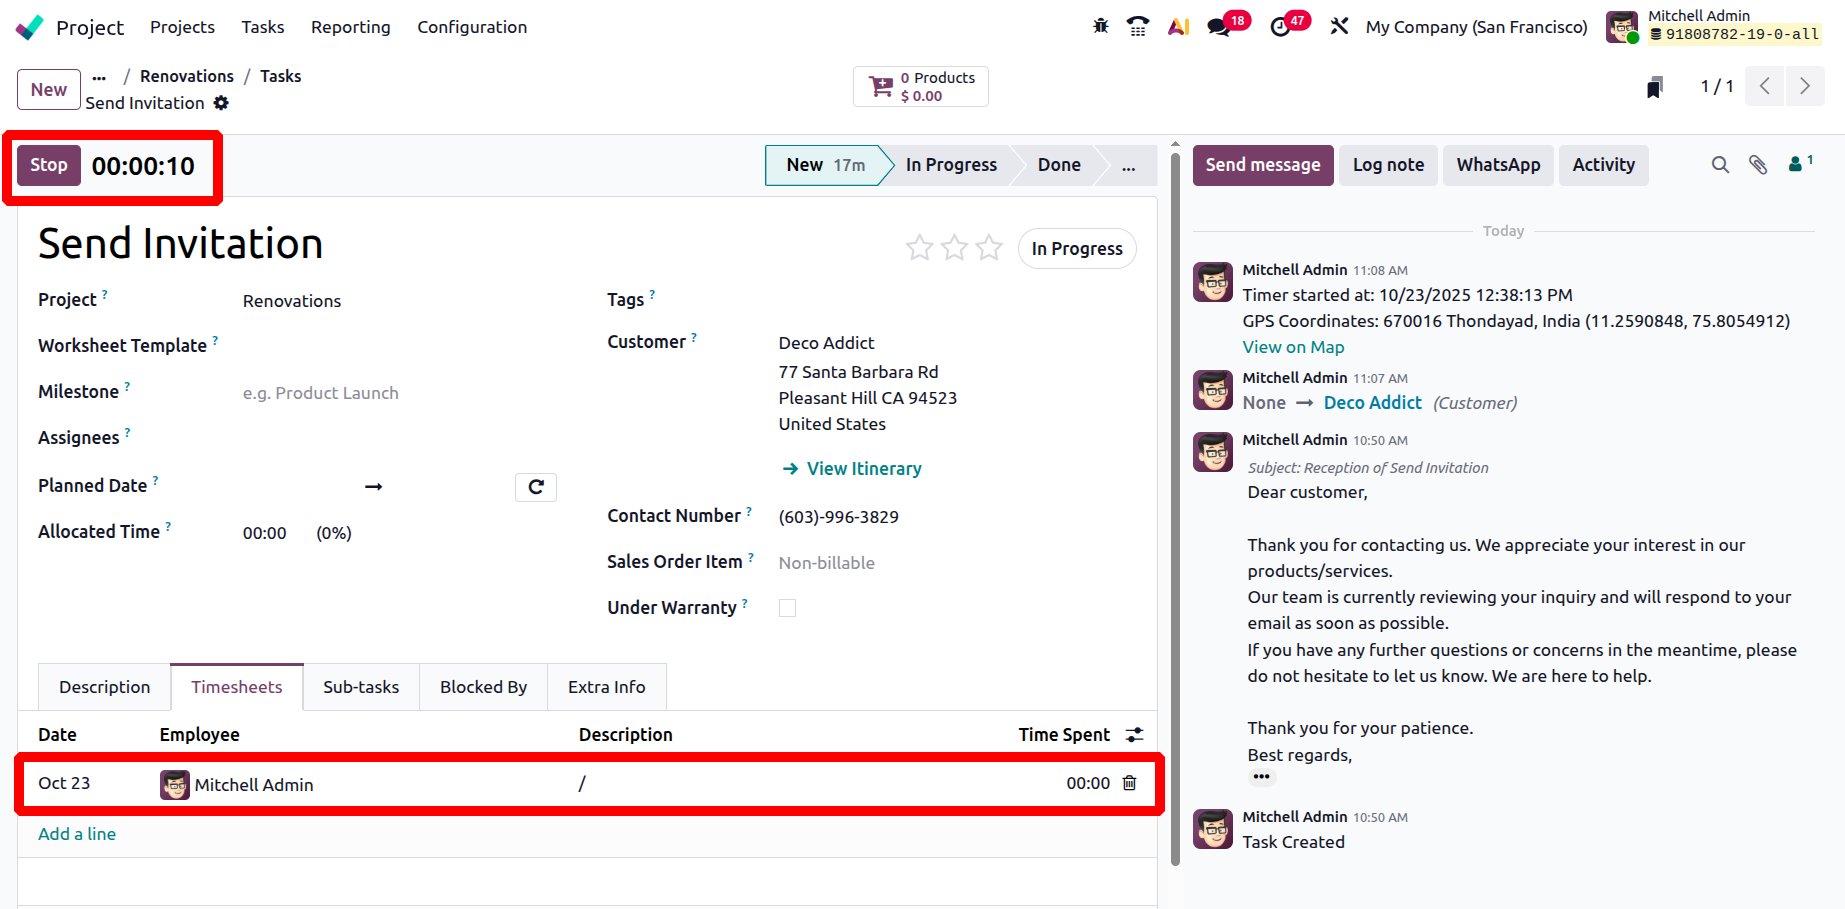
The timer for that task stops when the "Stop" button is clicked. The user may be prompted to validate the amount of time spent and, if desired, provide a description of the job completed.
Odoo automatically generates a timesheet entry with the task's time and description once it has been verified, as shown below.
Dividing your work into subtasks could help the project run more smoothly. You can add each one individually by clicking the Add a Line button under the Sub-Tasks tab.
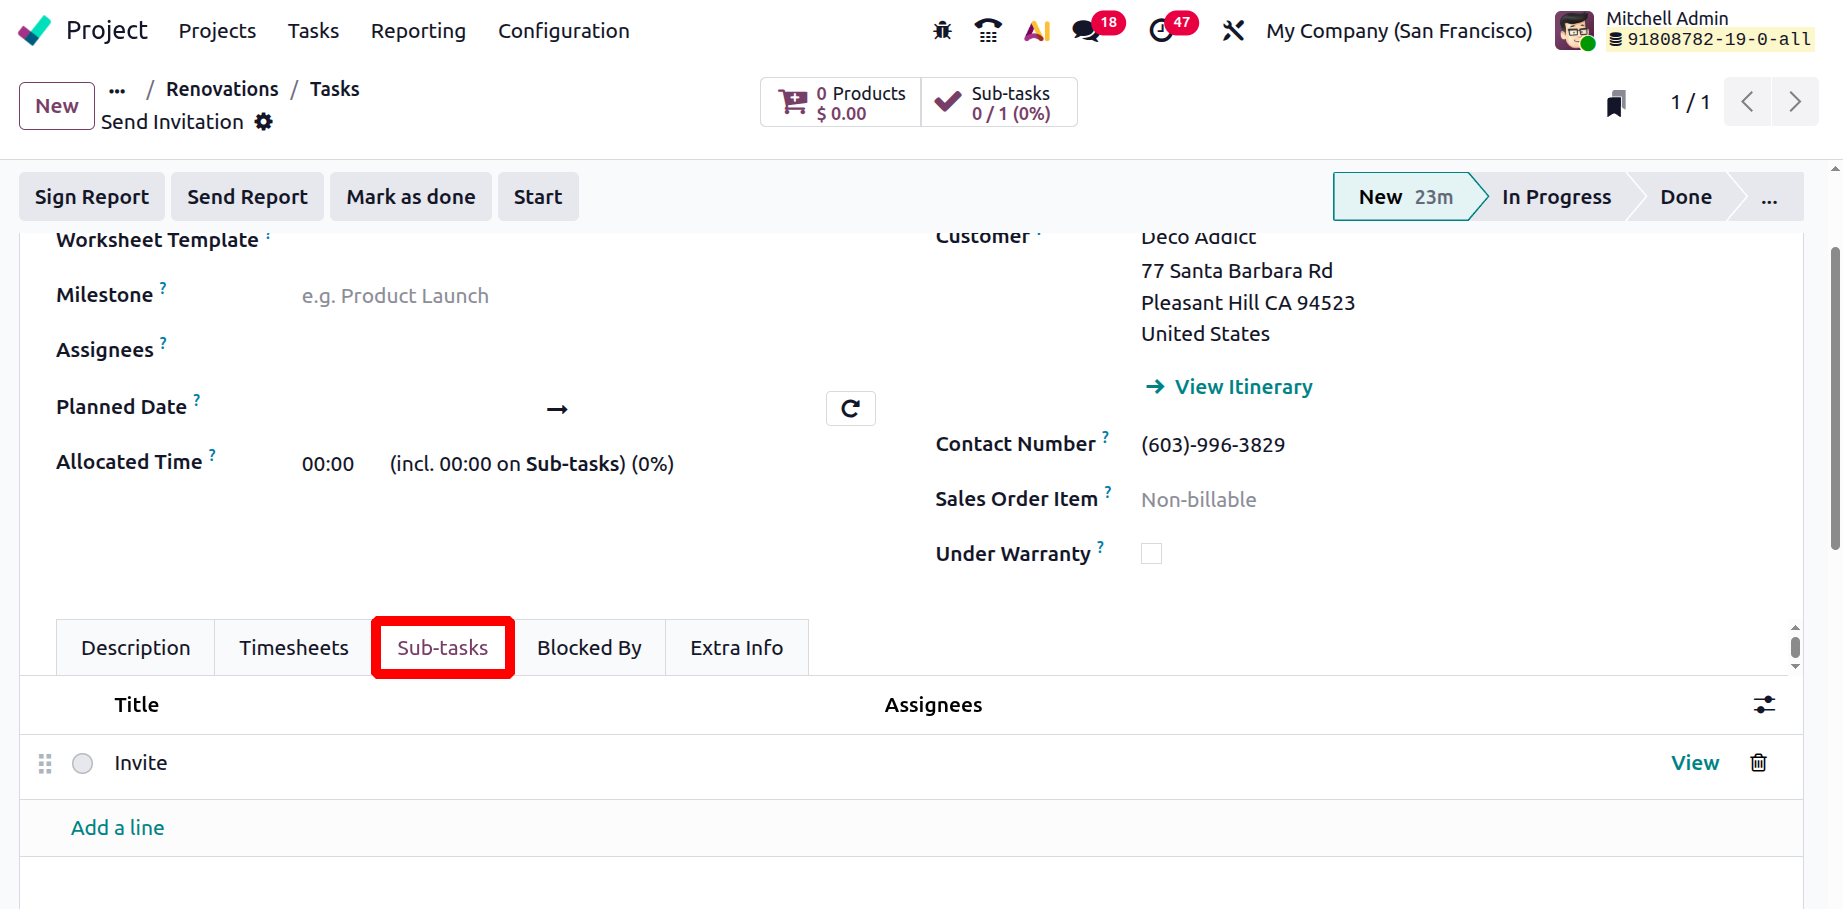
The Kanban card can also be used to generate this subtask. The Sub tasks can be viewed from the kanban view as shown below.
Can add a new subtask by clicking on the plus icon. The title, assignees, deadline, and stage are among the specifics. To view the subtask in detail after it has been created, click the created task.
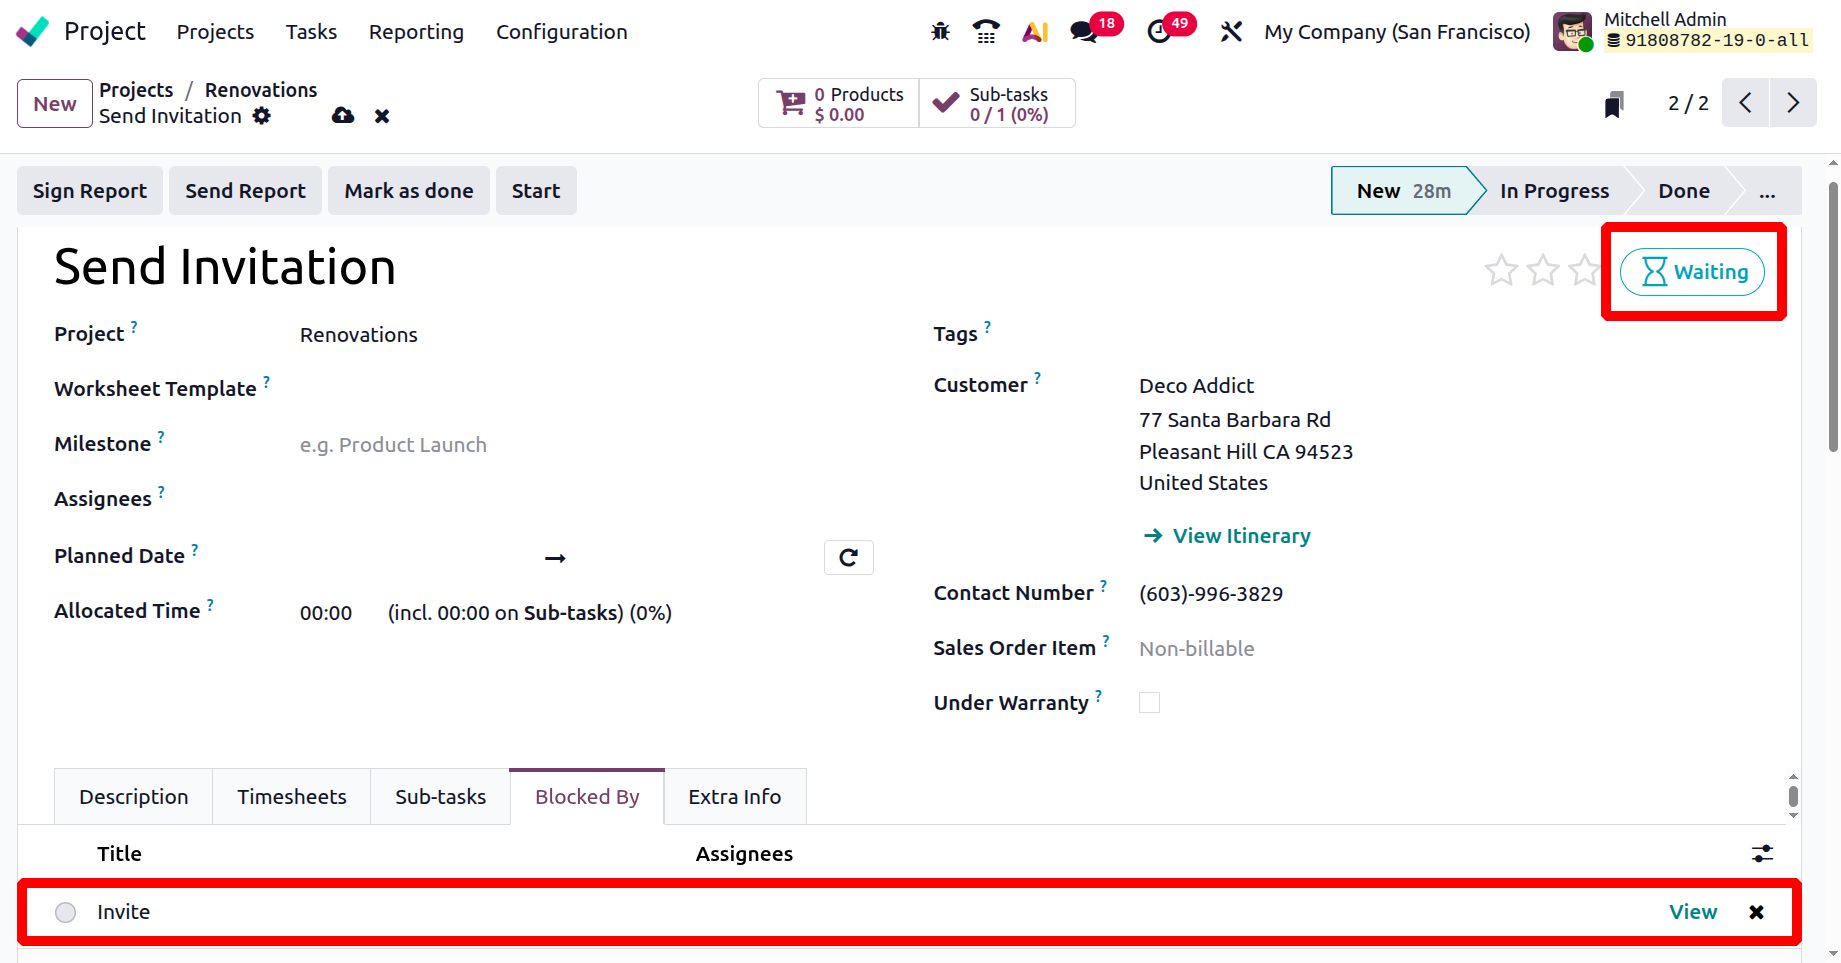
A variety of jobs might need to be completed for some projects. It is crucial to explain the work sequence in these circumstances. Next to the Sub-task tab, you have the Blocked By tab, as shown below.
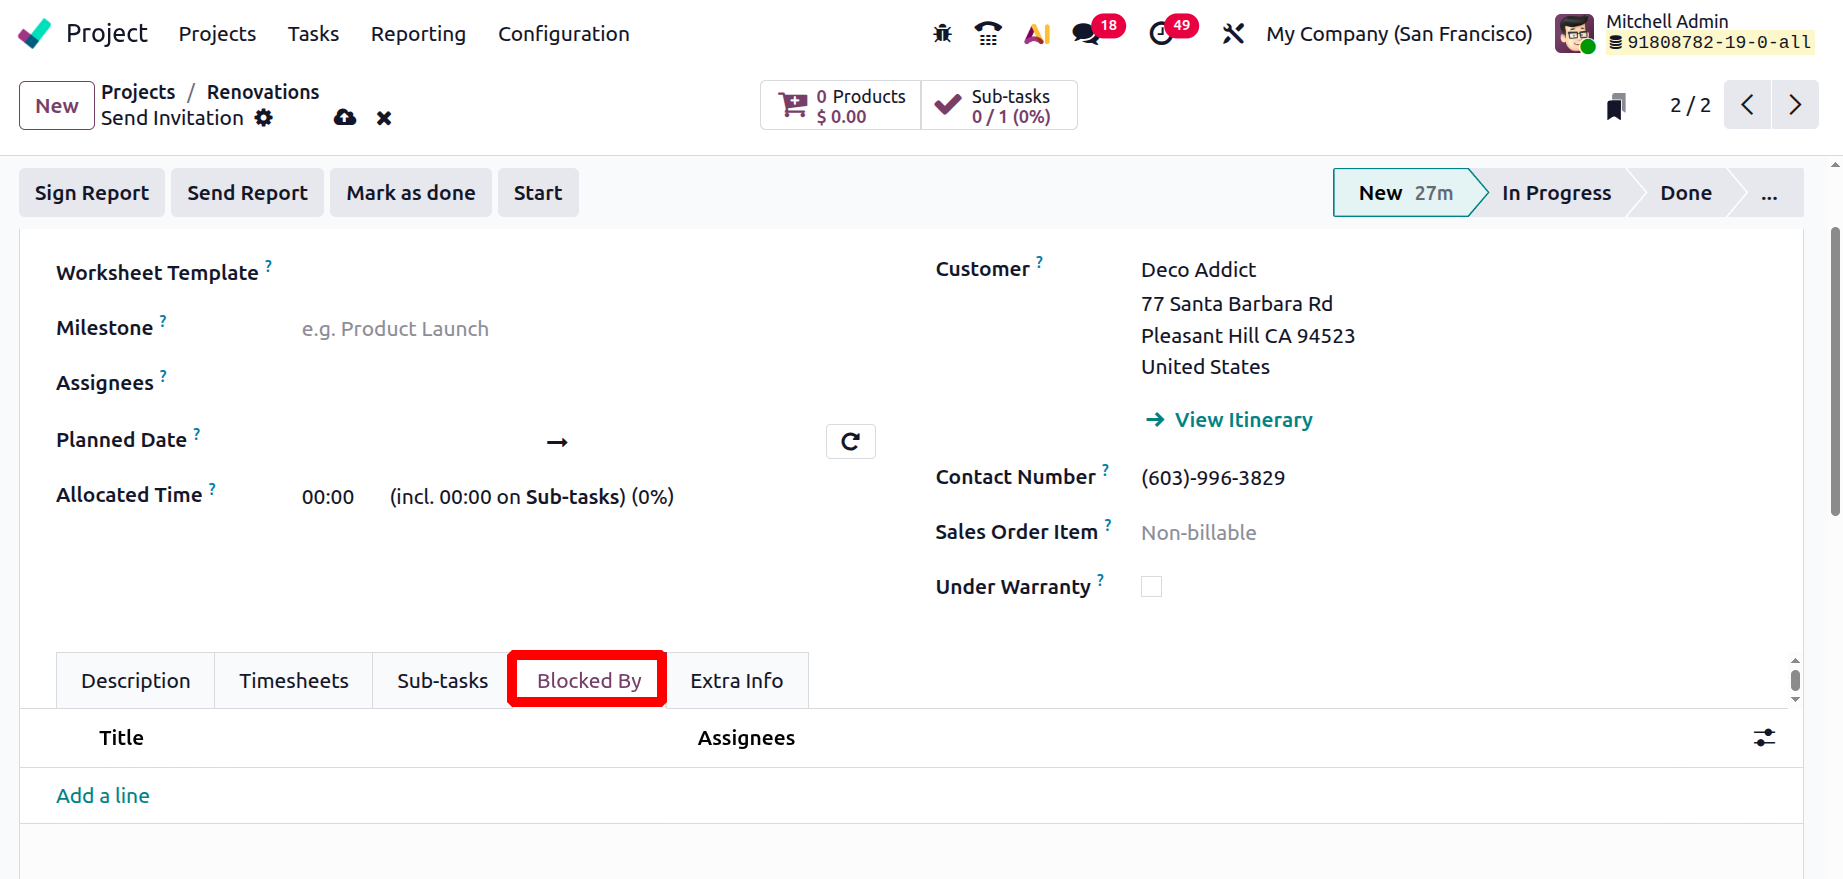
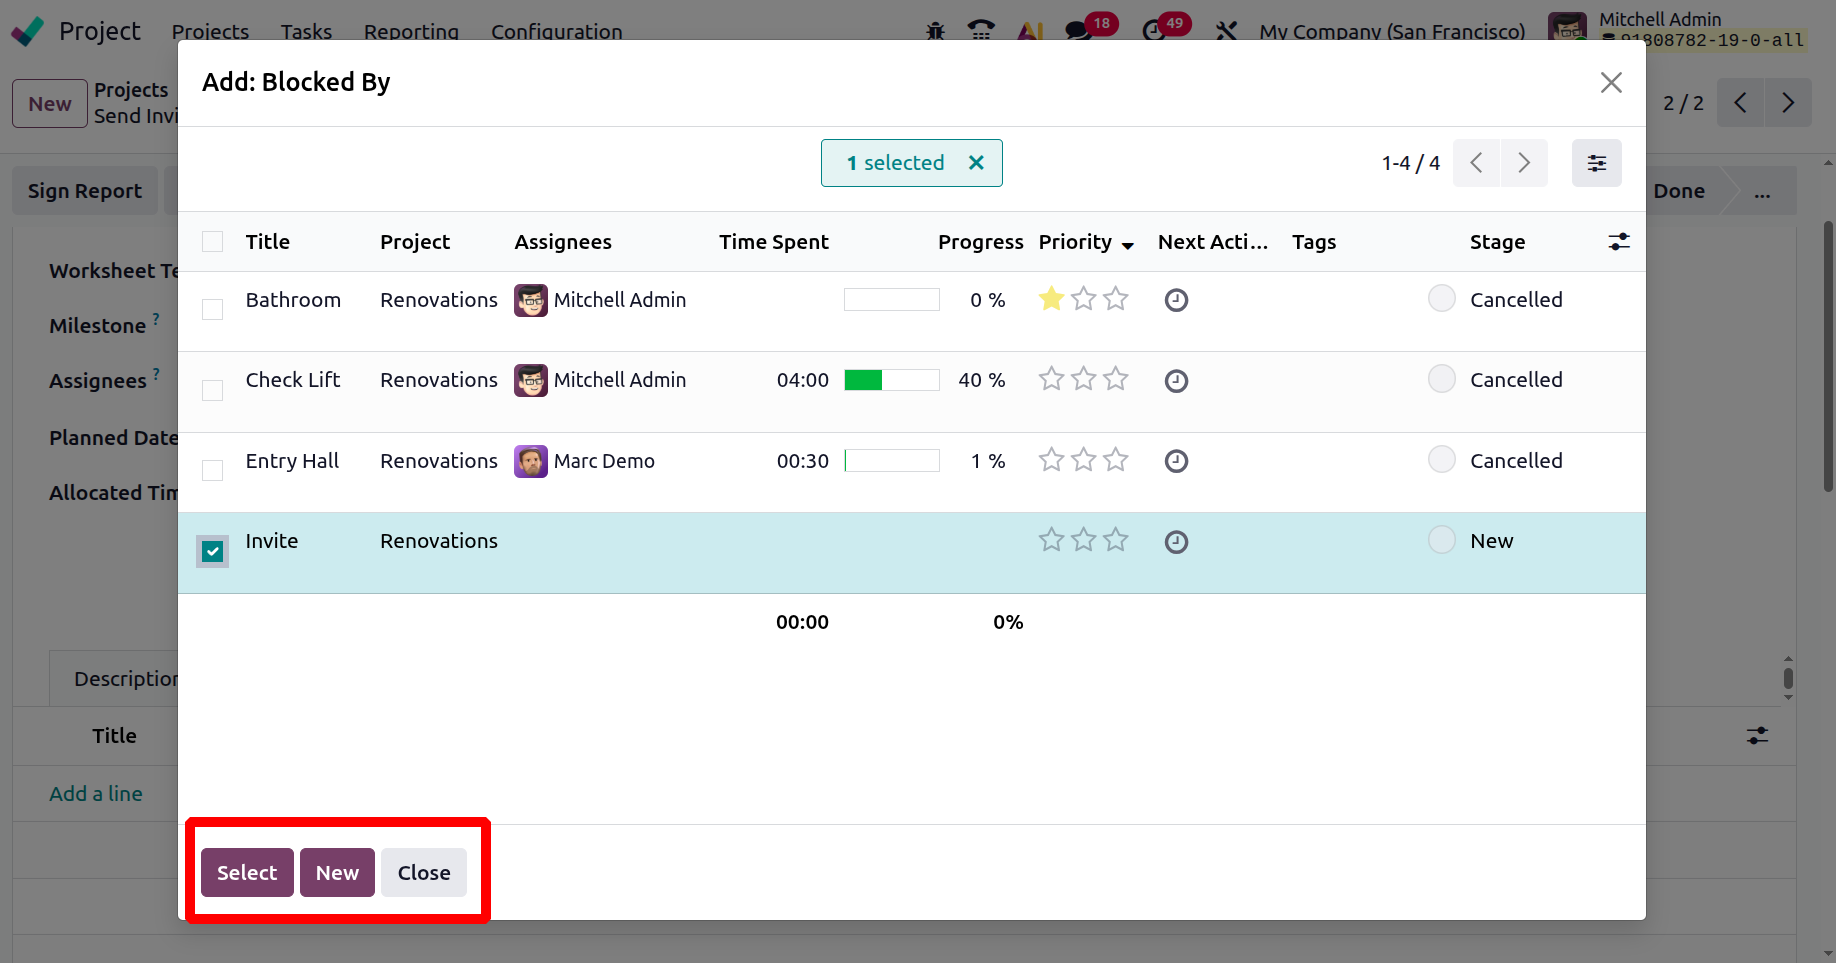
The Add a Line button can be used to stop this task from happening if you would want to complete it before the other. While clicking on the Add a line a new popup window shows all the tasks belonging to the project. Select button allows you to add the selected task, or click on the New button to create a new task.
If a task is added inside the Blocked By, then the status of the current task will change to Waiting as shown below. Because the current task can only perform after completing the task added inside the Blocked by.
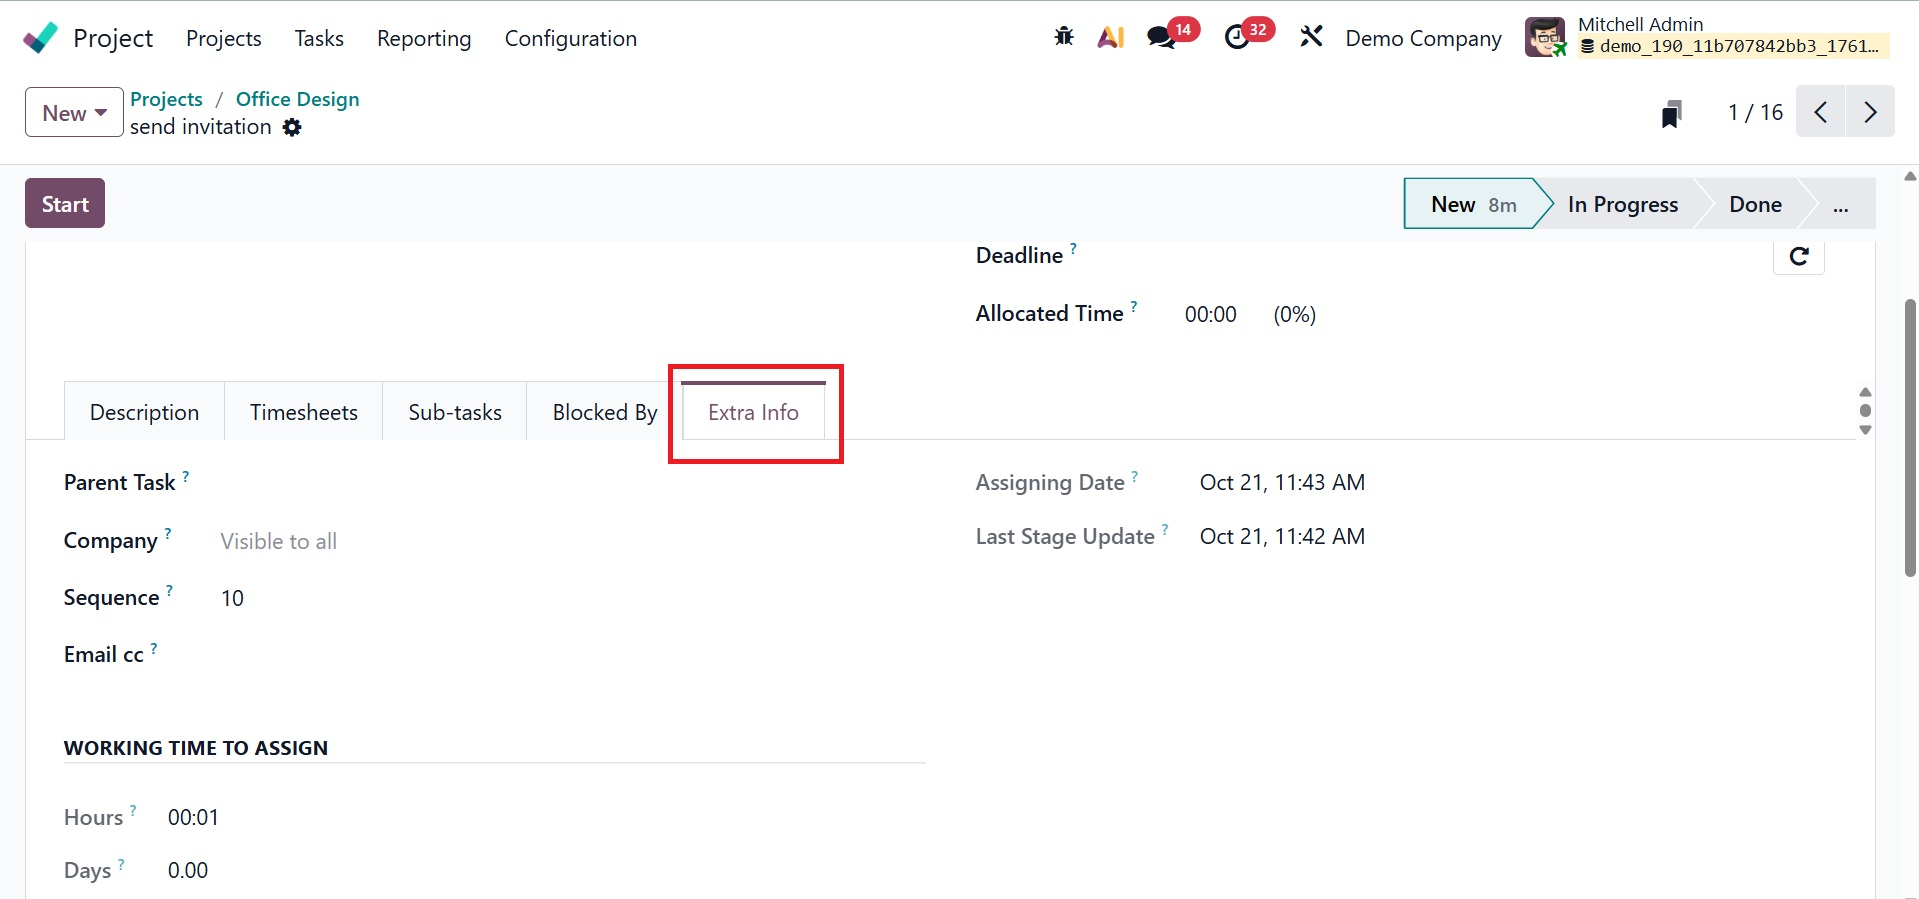
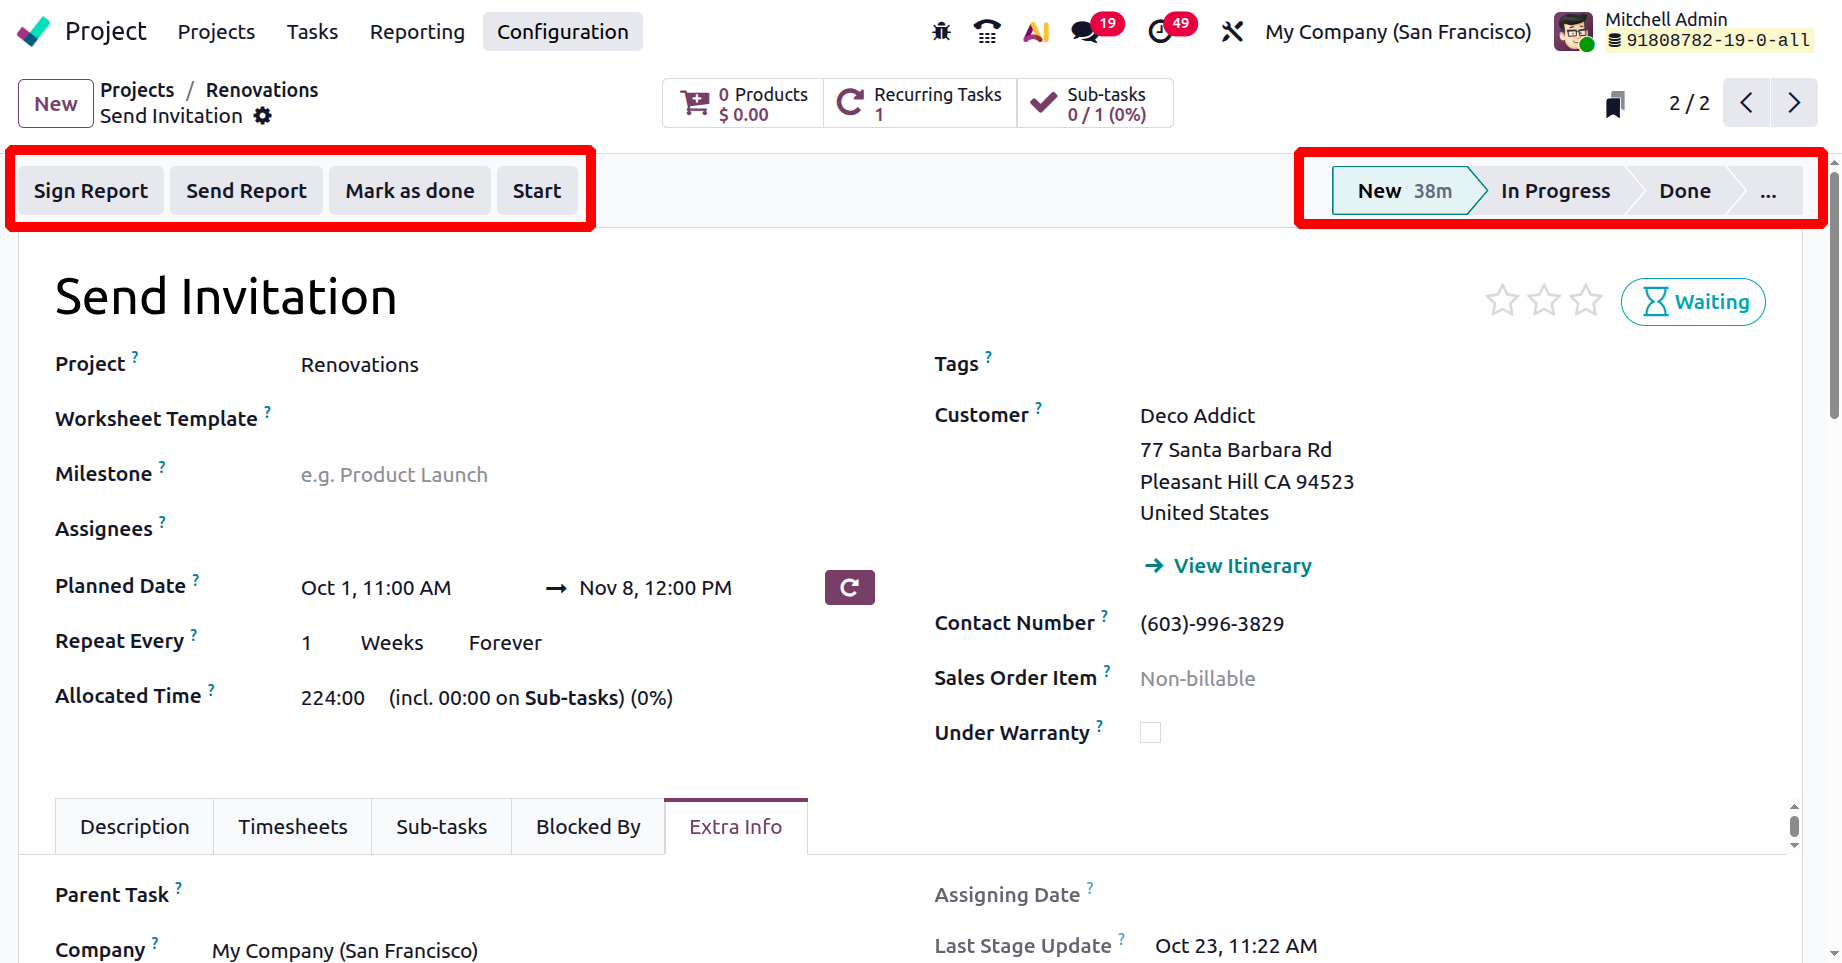
The Extra Info tab allows you to include the Parent Task, Analytic Account, Company, Sequence, Email cc, and Cover Image. The Last Stage Update and Assigning Date will be in the corresponding fields, as shown below.
- Parent Task:Assists in grouping smaller tasks under a primary task by connecting the present task to a parent task.
- Analytic Account: Assigns the task to a particular analytic account in order to monitor expenses and income.
- Company: Indicates which firm is responsible for the work (helpful in multi-company setups).
- Sequence: Defines the task's placement on the task list or Kanban display.
- Email CC: This adds email addresses to get copies of emails pertaining to tasks.
- Cover Image: Uploading a picture to graphically depict the task in the list or Kanban view is possible with the Cover Image feature.
- Last Stage Update: Shows the time and date of the task's most recent stage change.
- Assigning Date: Indicates the day on which a user was given the assignment.
This is how tasks are added to a new project.
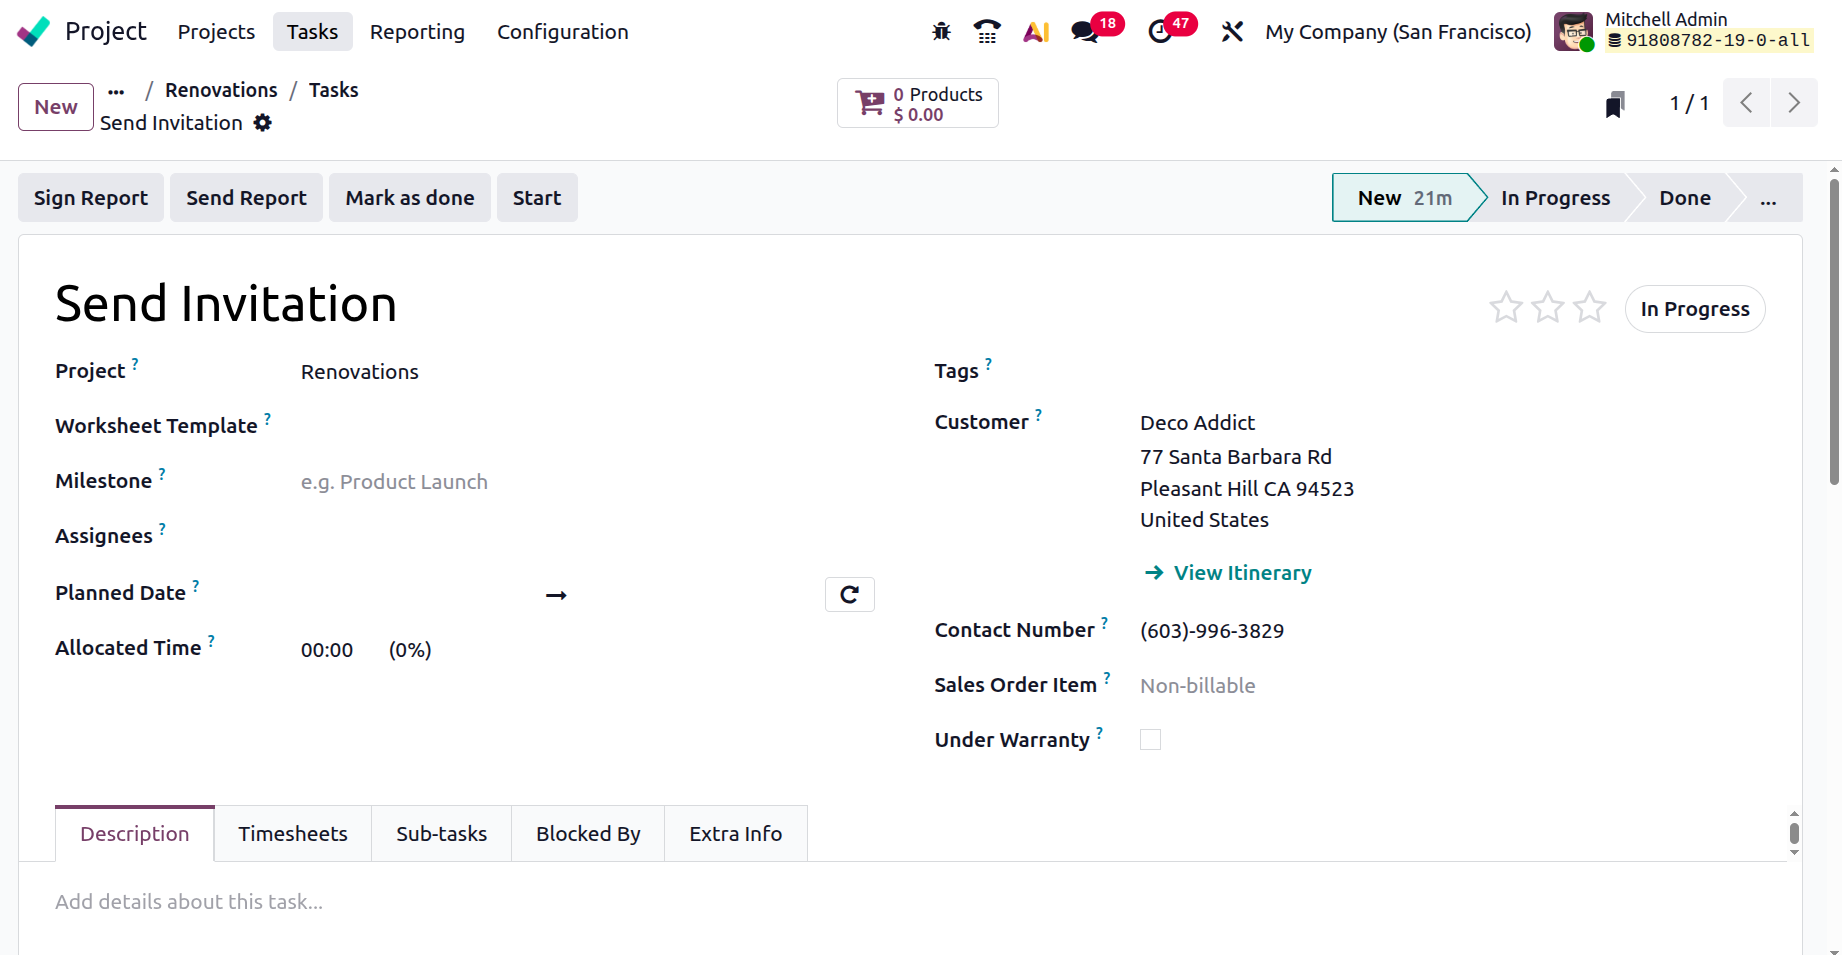
The Start button, which is located here, allows you to keep track of how much time you spend on this specific activity. When you press this button, Odoo19 will begin to record the time.
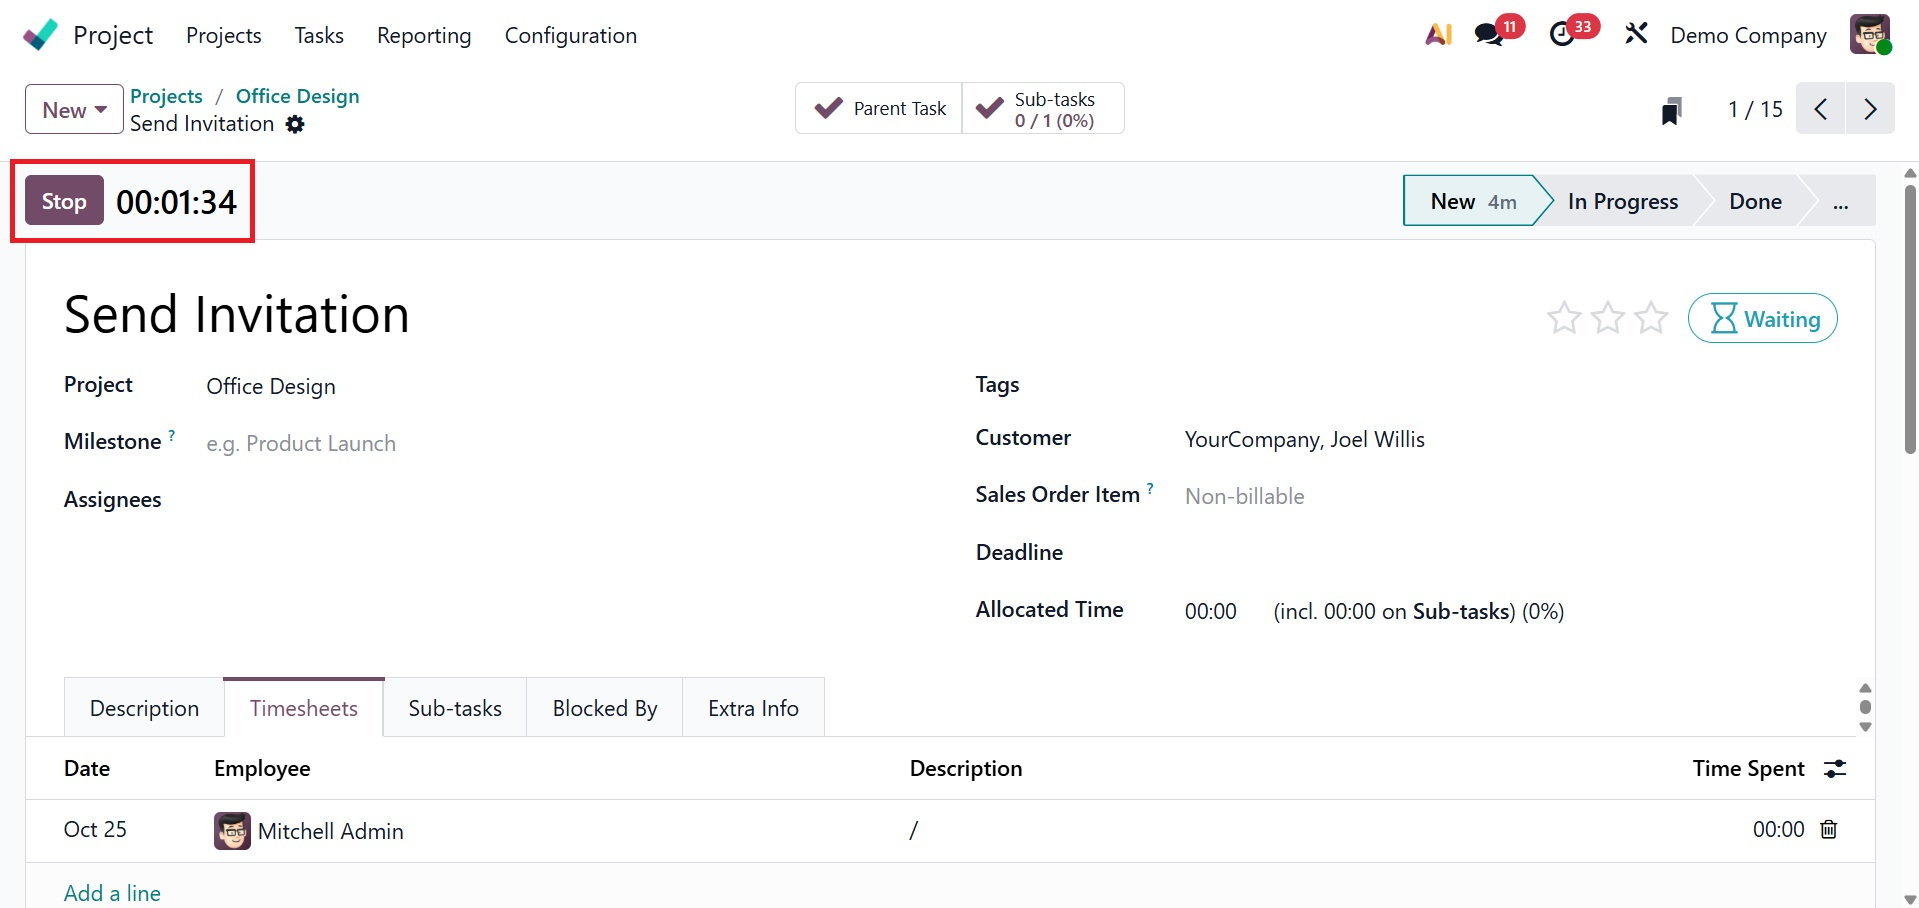
The Stop button is accessible to take the required action. You can click the Stop button once the task is finished. To confirm the time that was recorded, a pop-up window will appear.
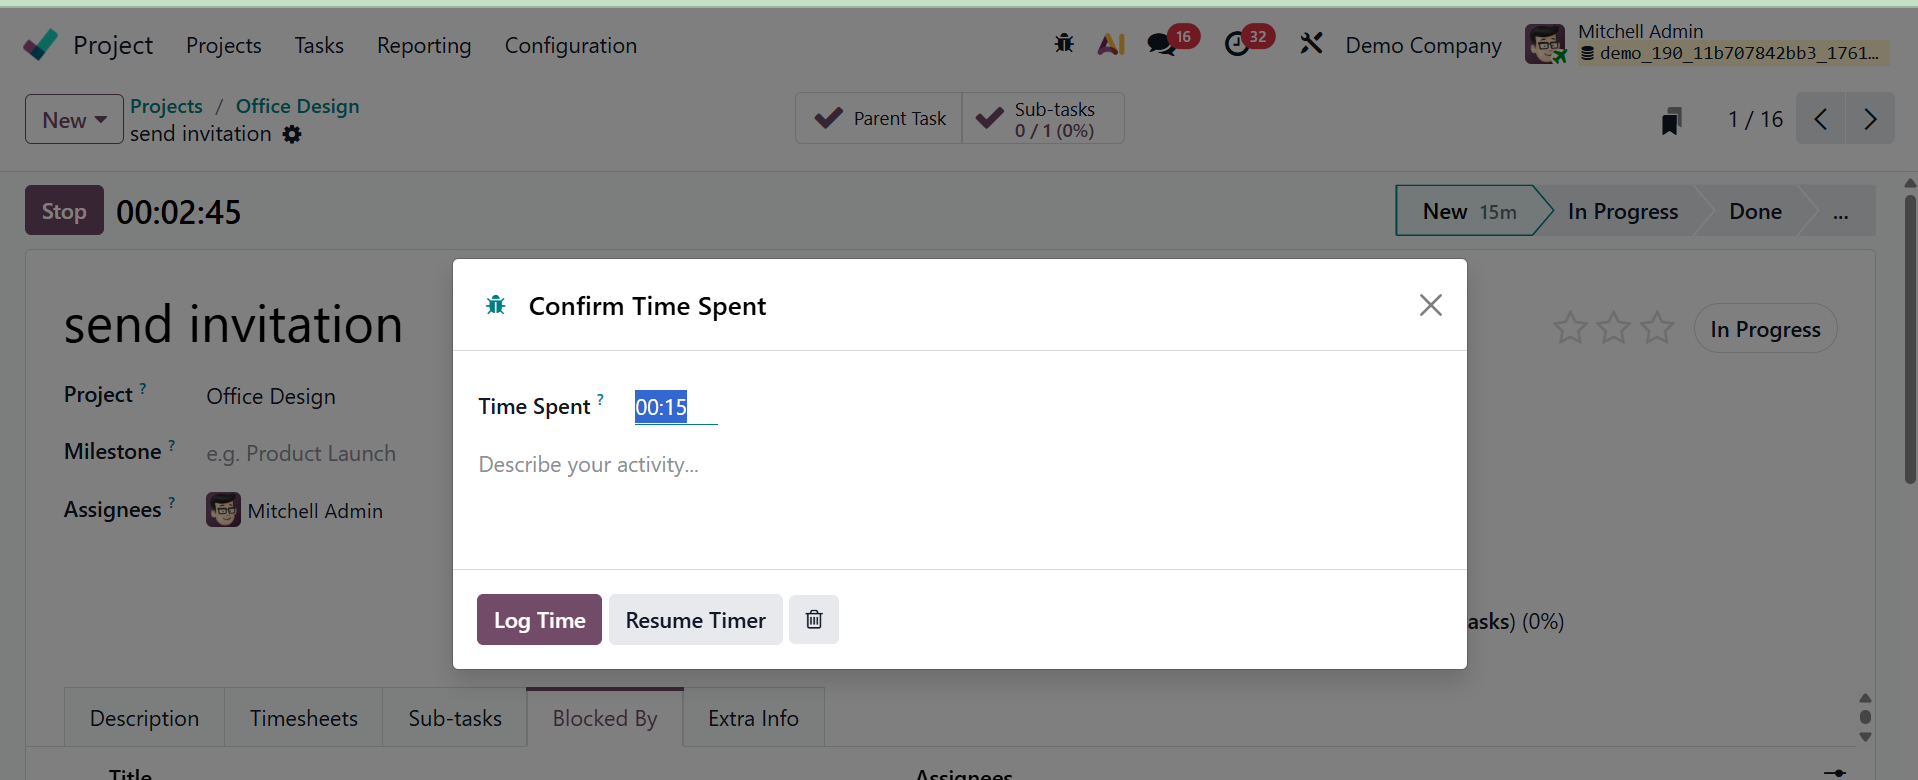
The pop-up window will display the number of hours spent, and you can use the spaces provided to describe your activities. After that, press the "Save" button.
The monitored time is now shown on the Timesheets tab in the form view. On this screen, you can view the task's progress and the number of hours left.
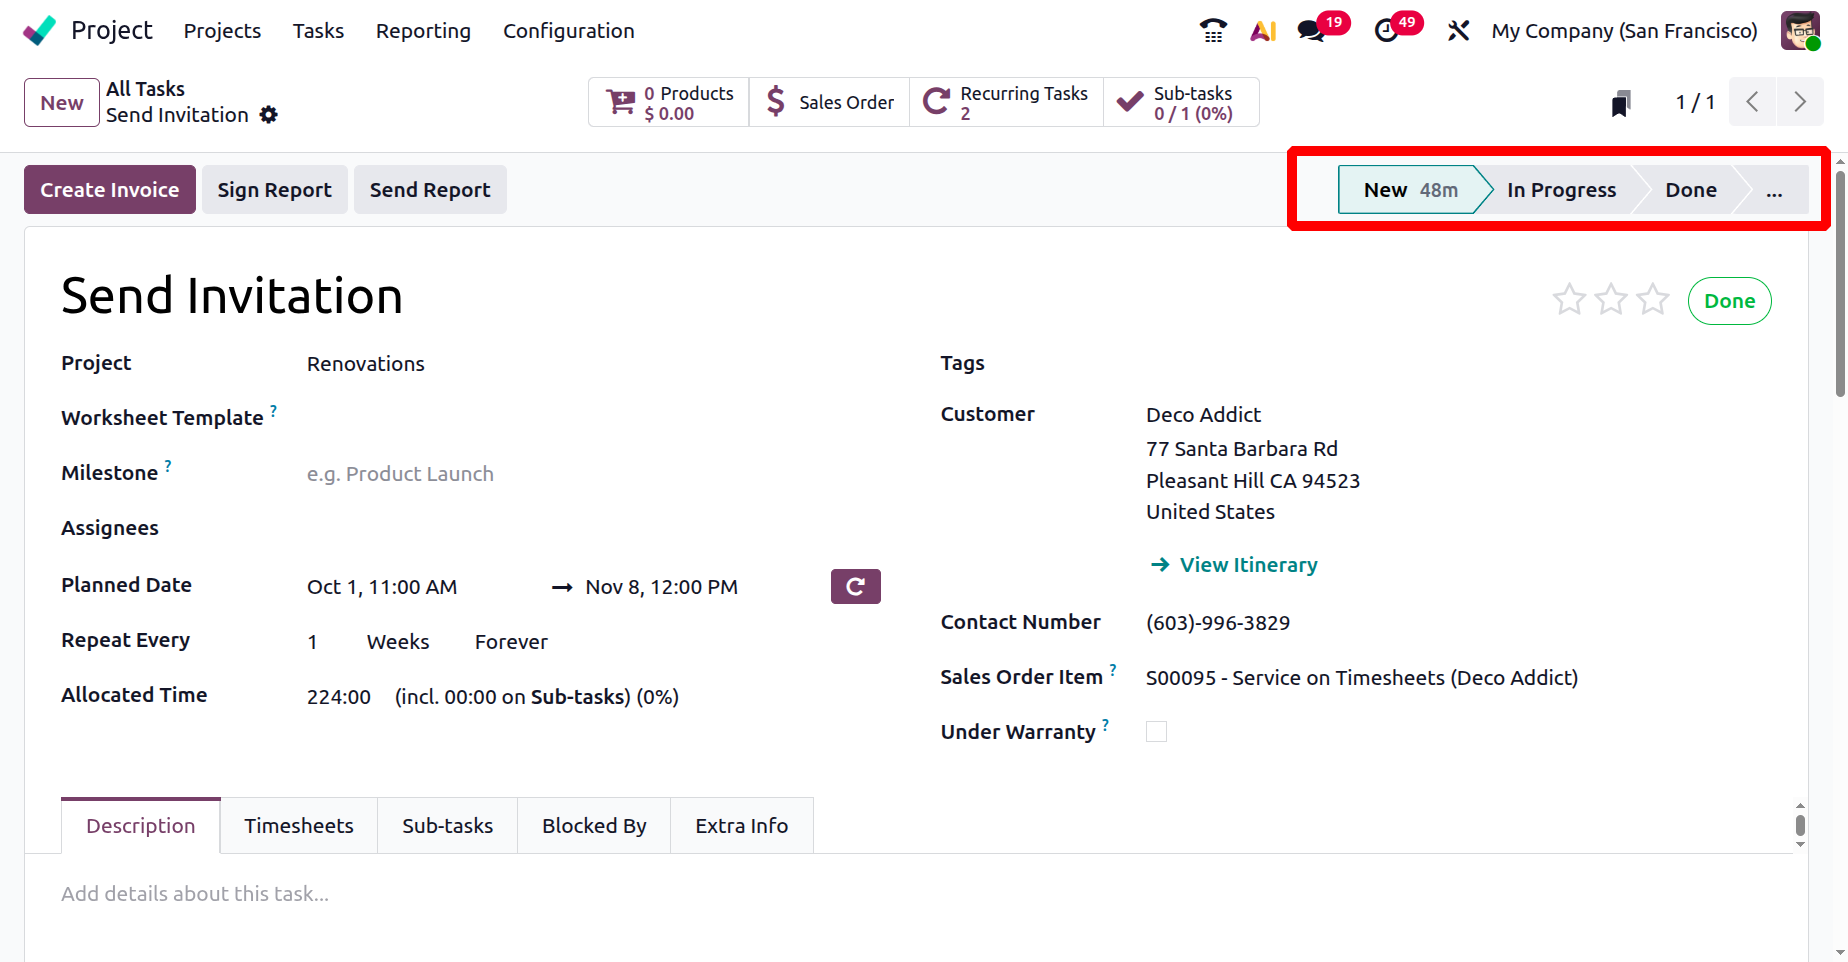
Now, in the page, you can view the status of the project created like:
- New : The task has just been created and work has not started yet.
- In Progress :The task is currently being worked on by the assigned user or team.
- Done :The task has been completed and no further action is needed.
Now, you can have some icons like:
- Sign Report: This feature enables users to digitally sign reports or documents pertaining to a project for approval.
- Send Report: This feature enables users to send or distribute the project report to team members or clients.
- Mark as Done: This is used to indicate that a task or project is finished when all of the work has been accomplished.
- Start: Starts keeping track of the amount of time or effort put into a task or project activity.
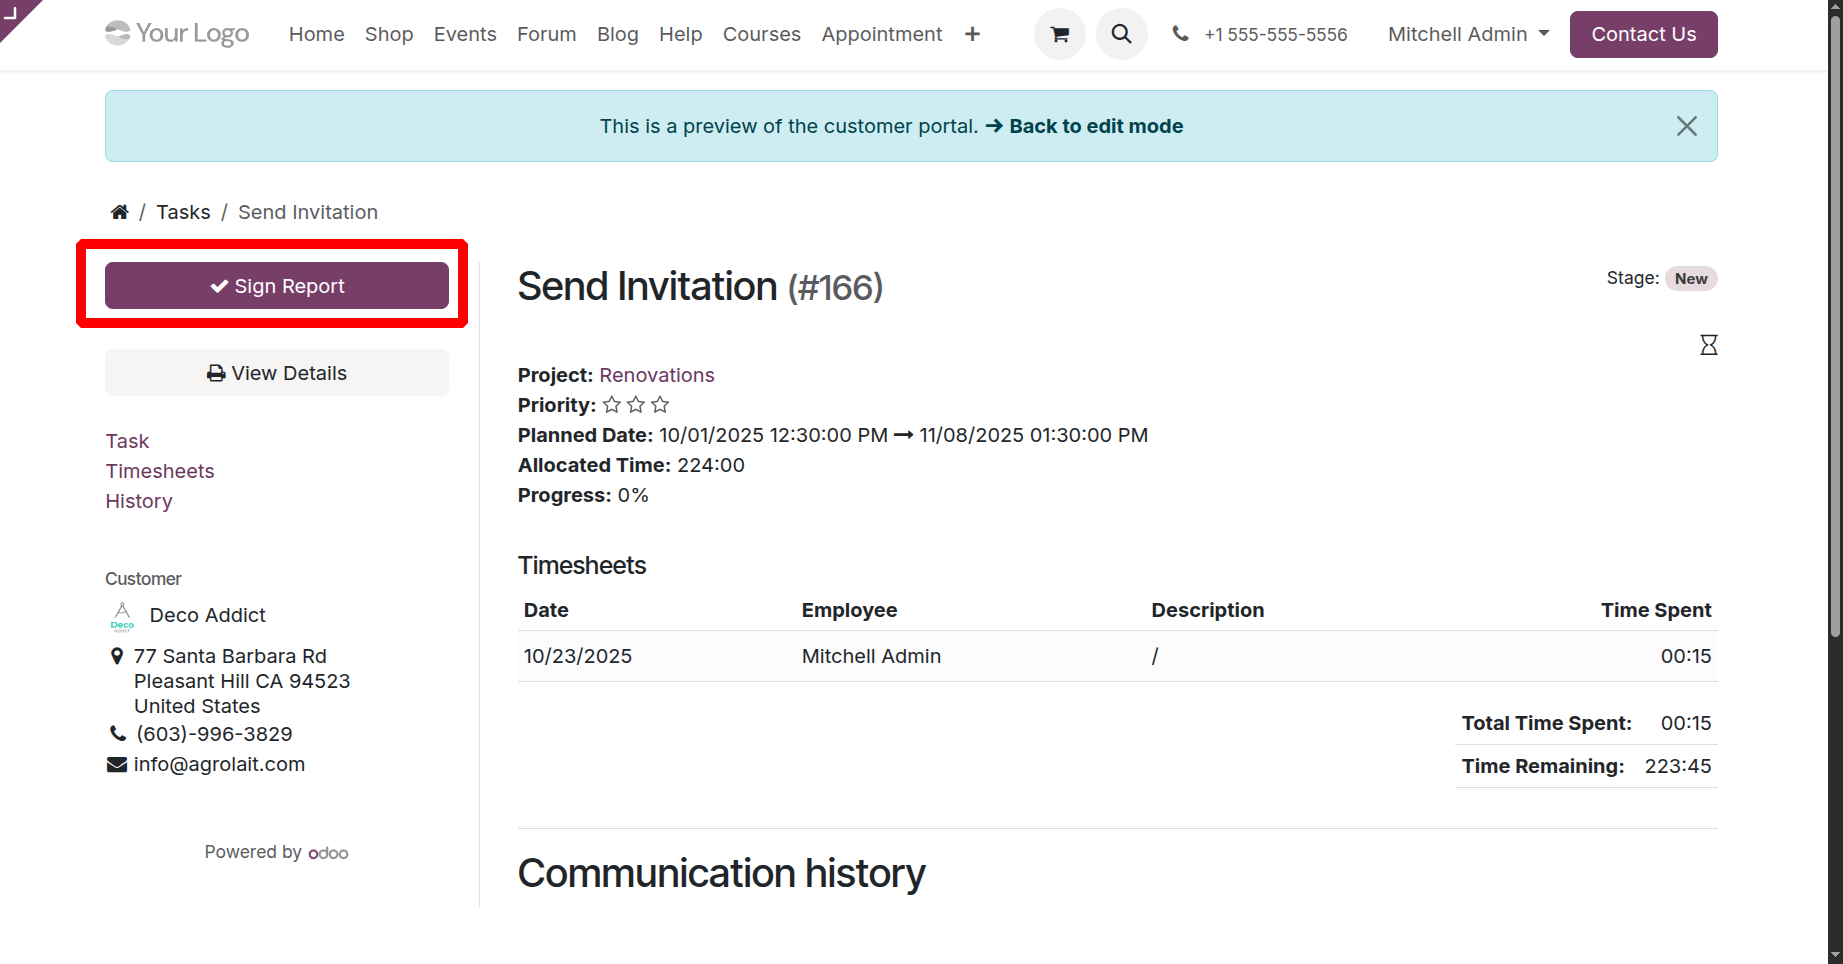
In order to ensure authenticity and lessen the need for manual signatures, users can digitally sign project-related reports or documents for validation and approval using the Sign Report option in the Odoo Project settings. On clicking the option, as shown in the above screenshot, you will be directed to the page of the website, as shown below.
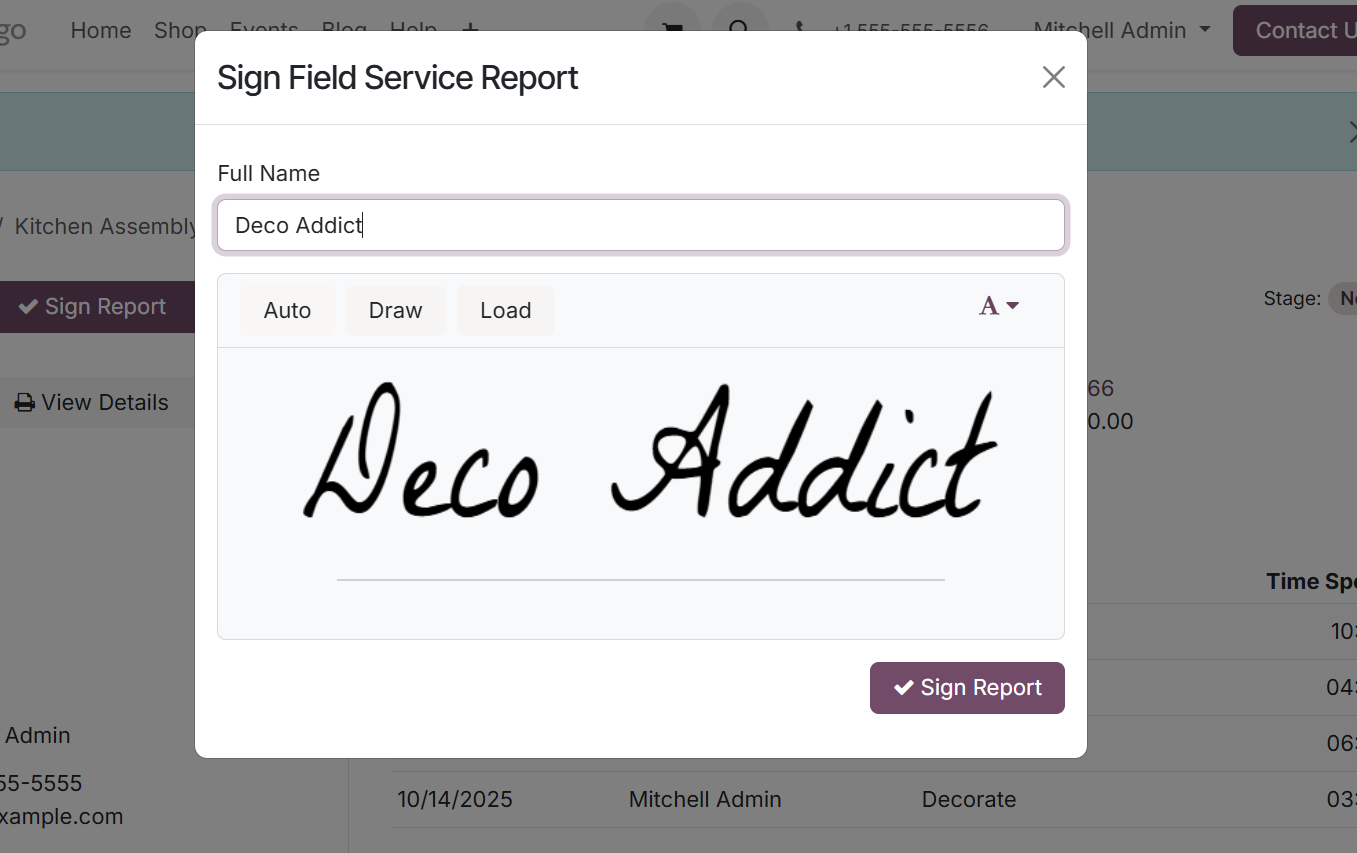
There, on clicking on the marked option, you will get a pop-up of the signature, and then you can confirm the signature.
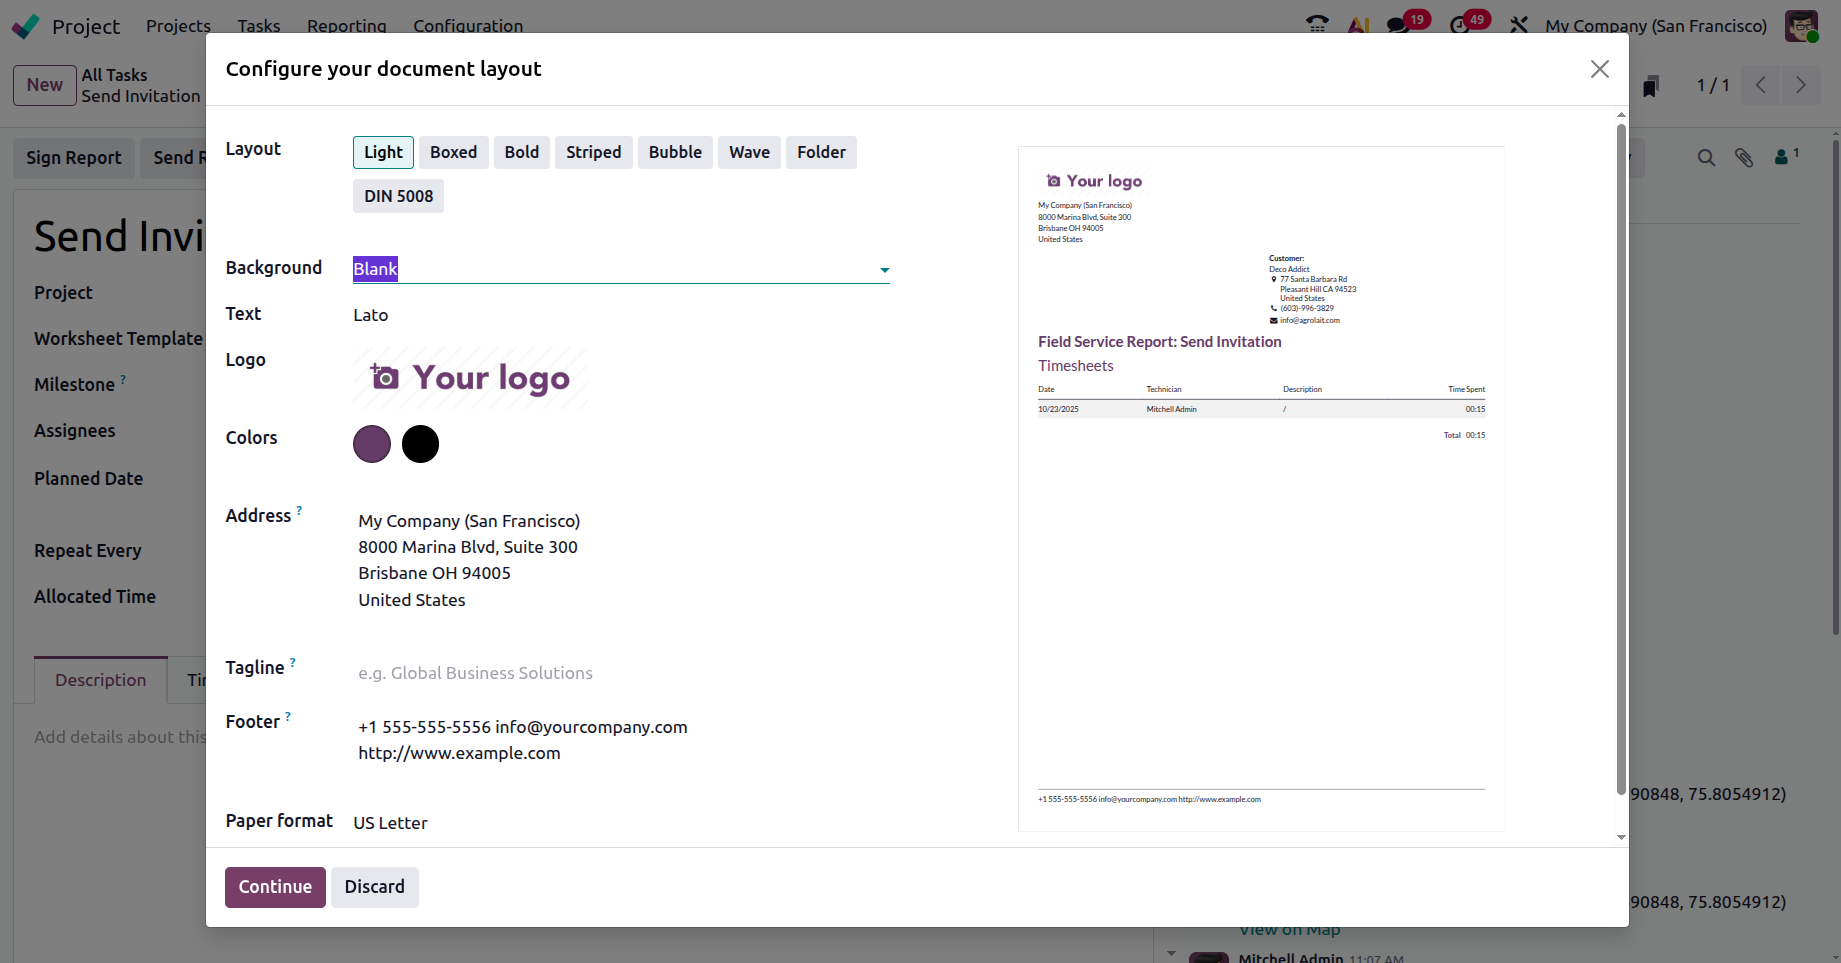
The next option is 'Send Report', as shown below.
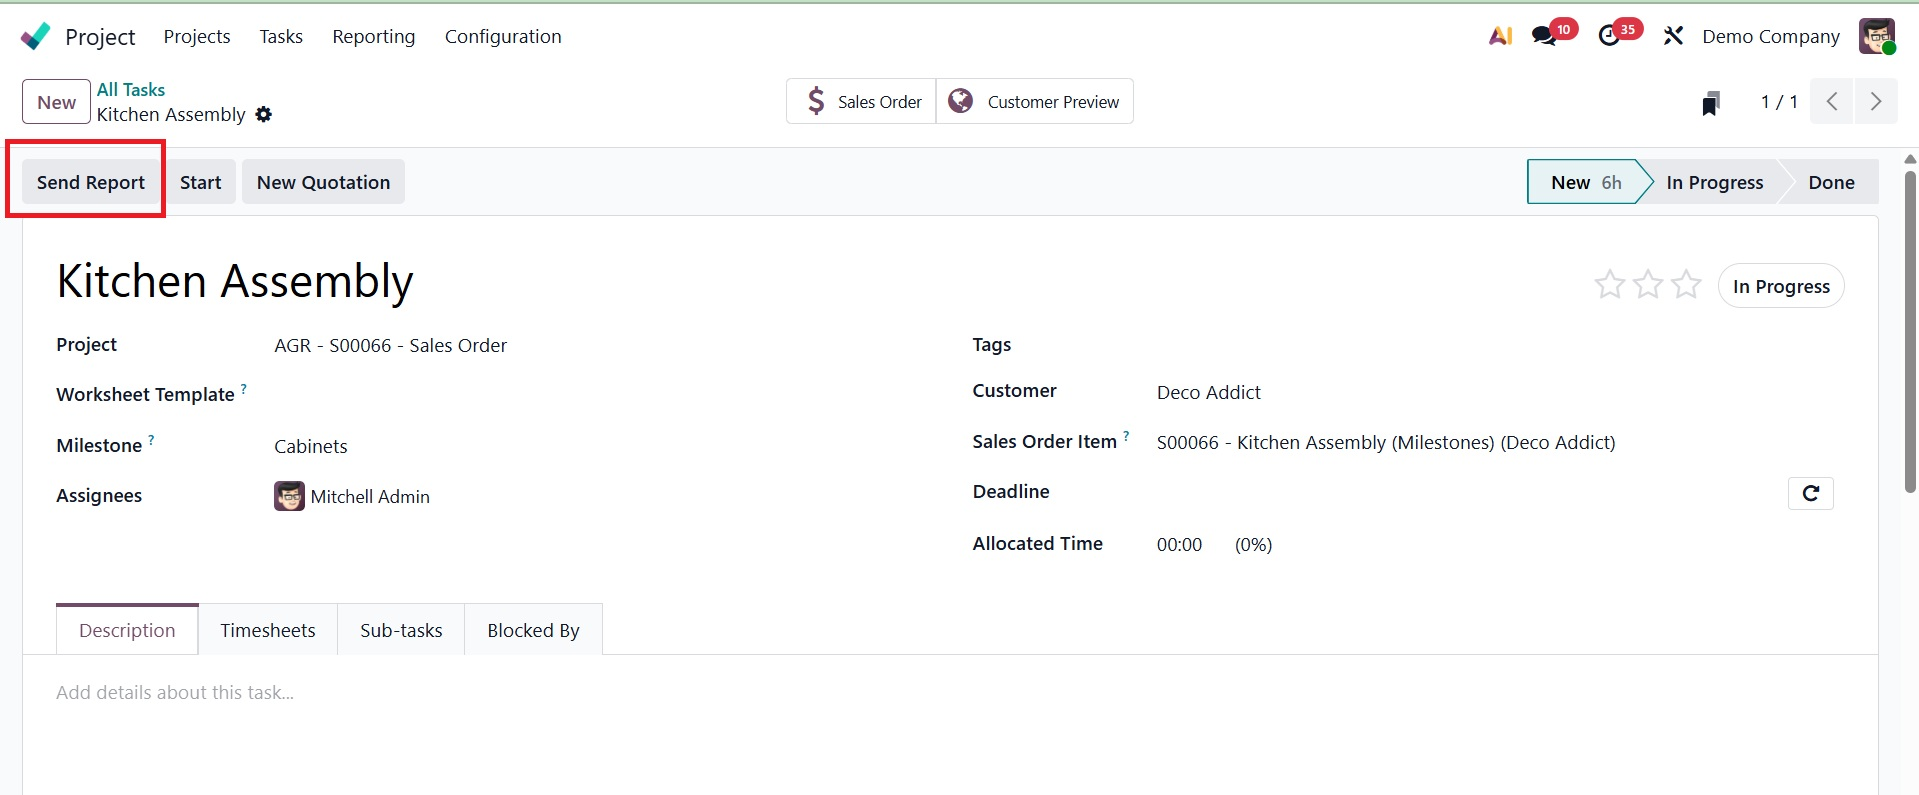
A common communication tool for sharing project details with clients or team members is the Send Report option. There is no legally binding digital signature procedure involved. This can be applied to analytical reports, tasks, and timesheets. On selecting the option, you will get the page to customize the document layout as well.
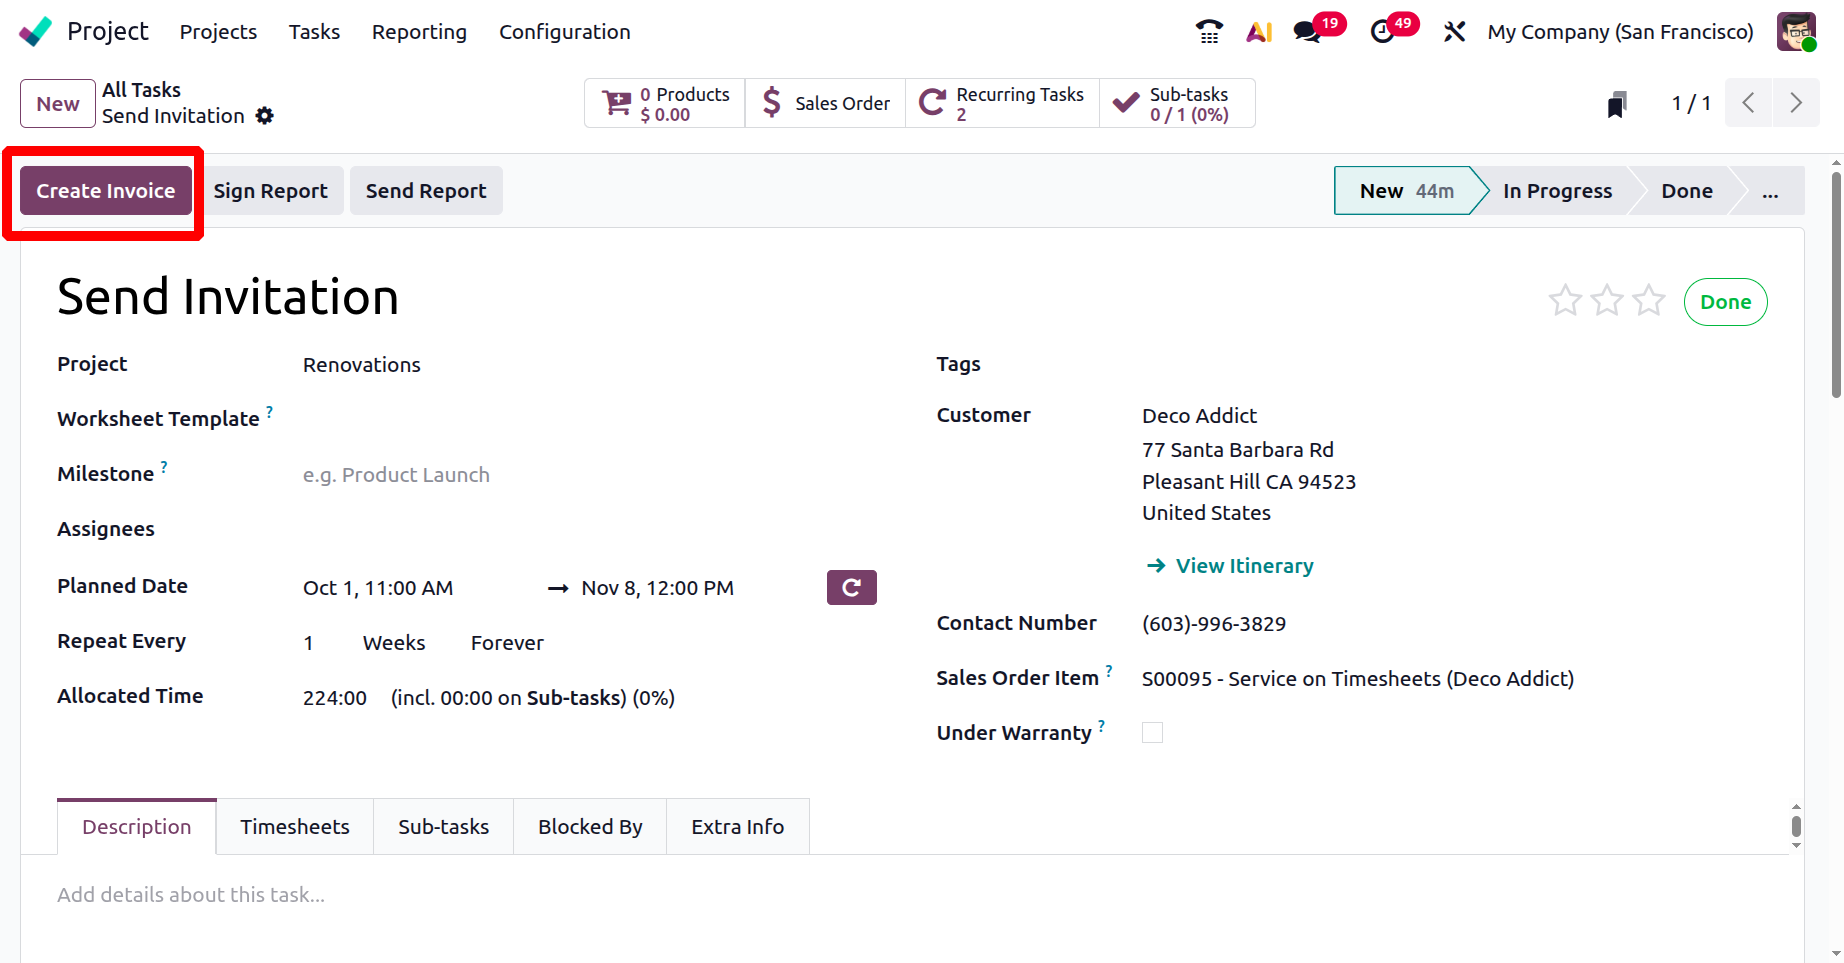
Then the last one is the Mark as Done button. After clicking on the Mark as Done button, the status changes to Done and users can create the invoice.
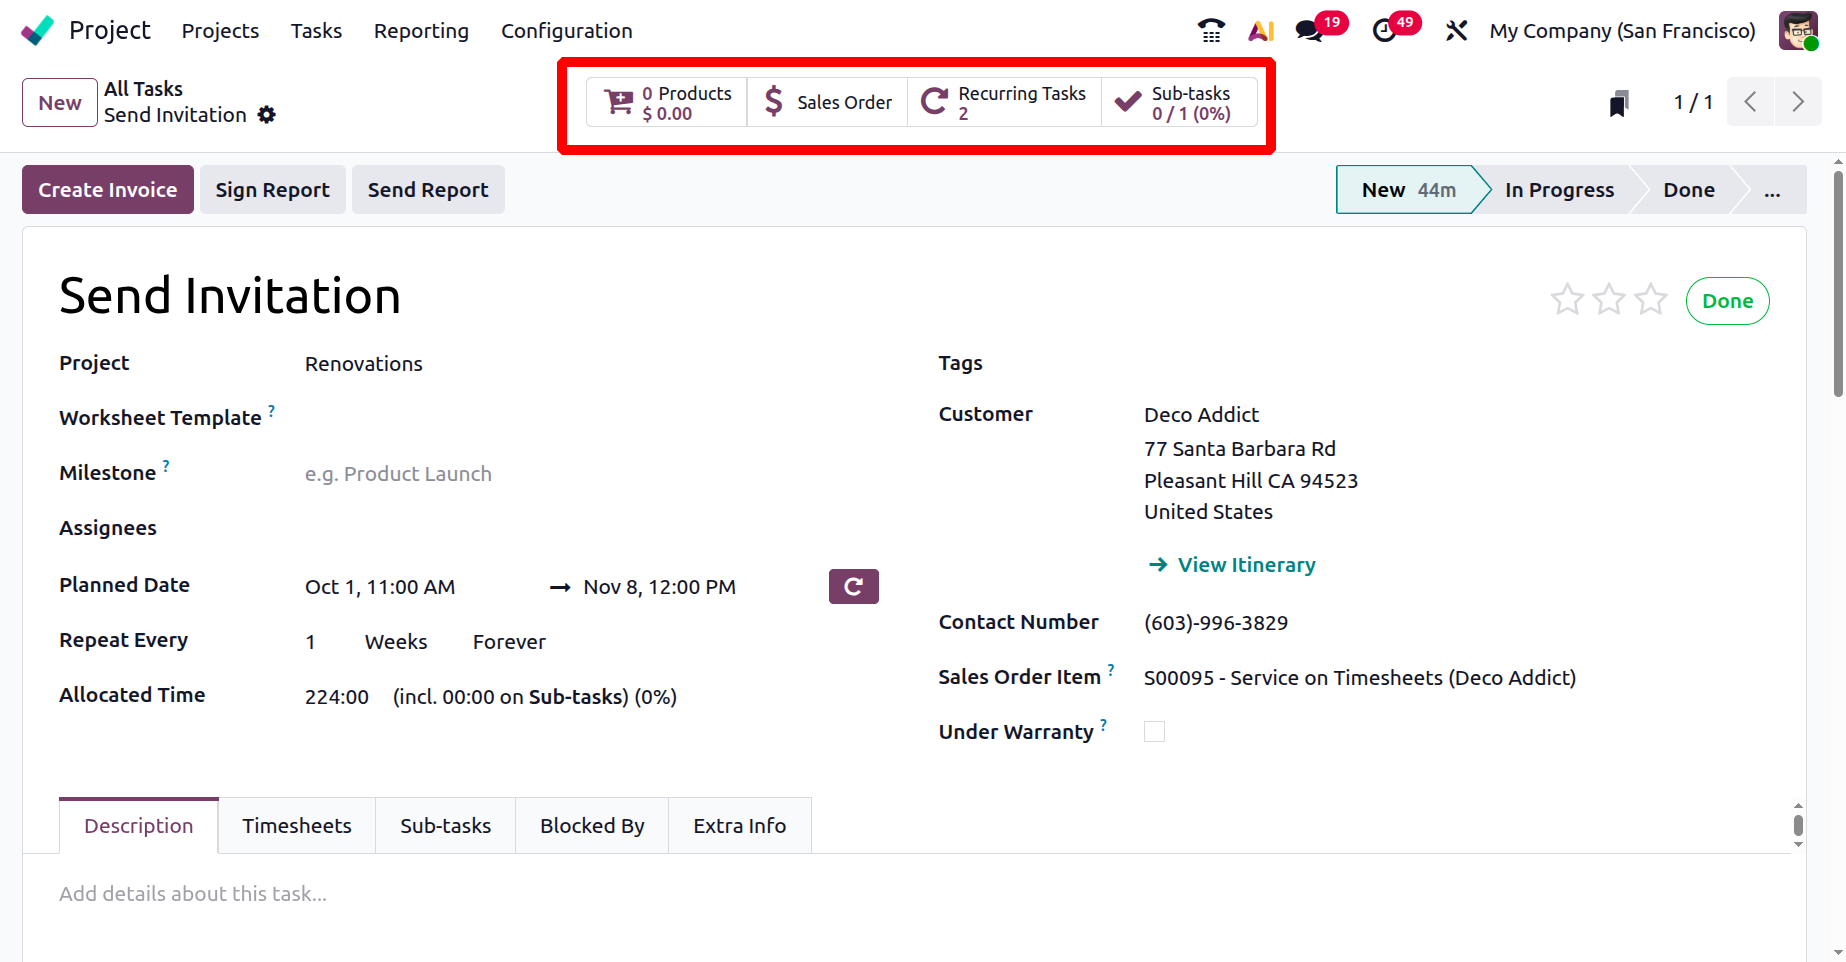
Now, in the page, you can view some smart tabs, such as :
- Product: displays the service or product associated with the task, typically in relation to sales or billable labor.
A recurring task is one that is automatically repeated at predetermined intervals as part of a repeating schedule.
- Sale Order: This link connects project work to customer billing or sales data by displaying the sales order associated with the task.
- Sub Task :To divide work into digestible chunks, a subtask is a list of smaller tasks generated under the primary task.
Recurring Tasks smart tab view is shown below. There is a Recurring Tasks smart tab where the task that has been set as a recurring task can be viewed along with the task's assignees, the stage it is currently in, and any time logged to the recurring task can be viewed in the Time Spent field. The task's progress will also be shown based on the time spent. You may also click on the clock icon under the Next Activity to complete any activities that need to be established for the job. From here, you can also view the tags that have been added for the job.
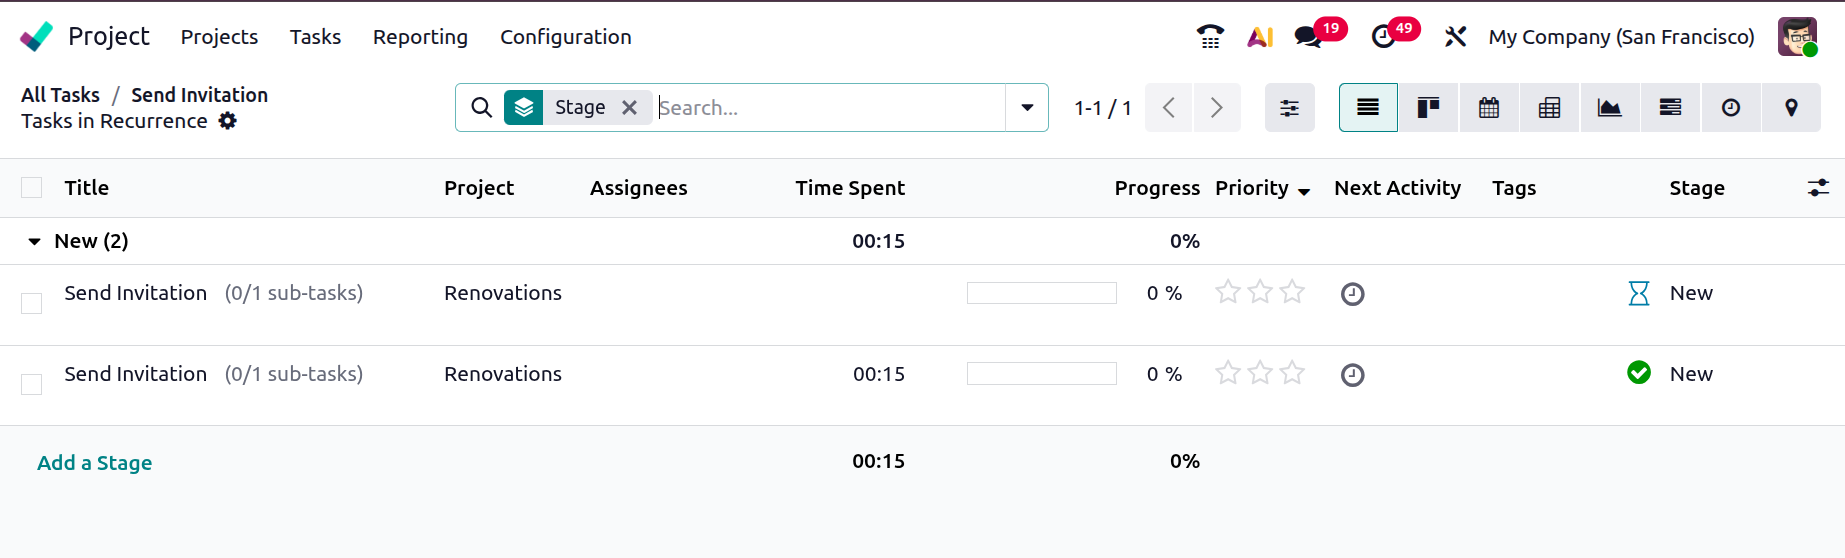
Mention Time Indication in the All Tasks view shows the progress of time spent on a task compared to the intended (estimated) time.
It enables you to rapidly determine whether a task is on schedule, going behind schedule, or taking longer than anticipated. Managers can monitor workload and deadlines by using the time indication to see progress if a task that was scheduled for five hours has already been completed in four hours.
A straightforward and efficient method of defining and visualizing a project task's importance is to use the star icon. When the star is clicked, the job is marked as "high priority," and in the Kanban view, it is immediately moved to the top of its column.