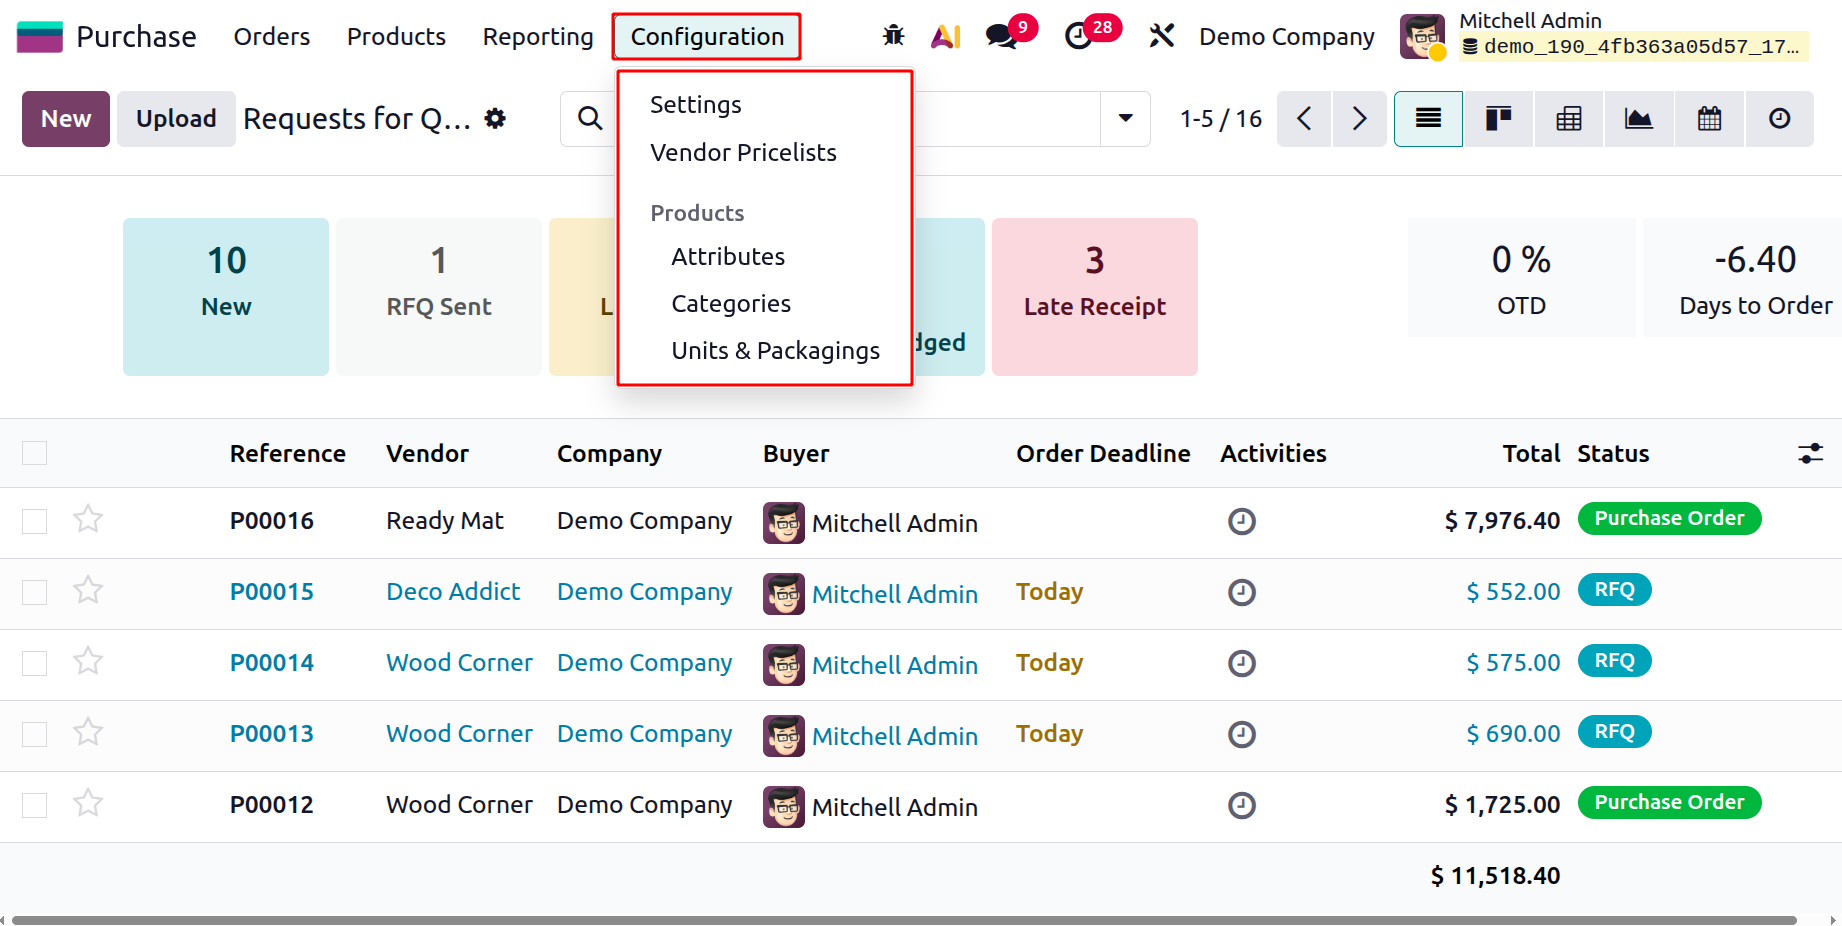
Configuration
The ‘Configuration’ menu of the Odoo 19 Purchase Module lets you manage the general Settings, Vendor Pricelists, Attributes, Categories and Units & Packagings. Now, let’s discuss them in detail.
1.1 Vendor Price List
Maintaining a well-organized vendor price list is essential for achieving efficient and profitable purchasing operations. Vendor price lists allow organizations to establish predefined pricing agreements with suppliers for specific products within a defined validity period. When products are purchased from a vendor, the applicable price list is automatically applied, ensuring consistency and accuracy in procurement costs.
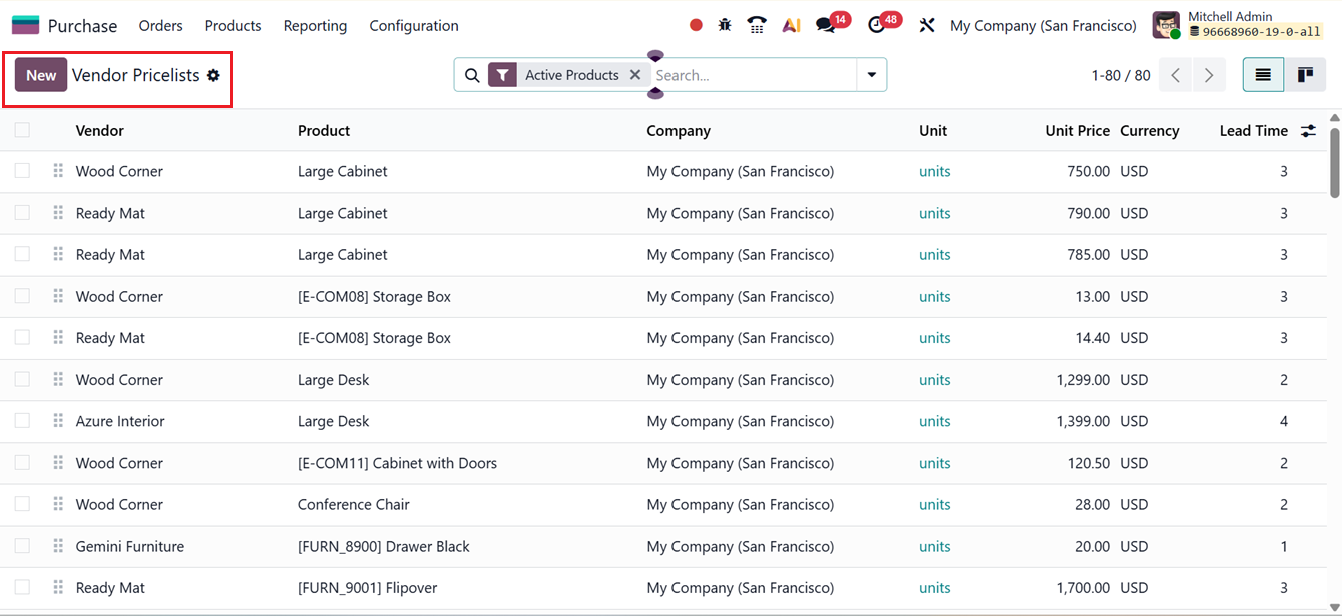
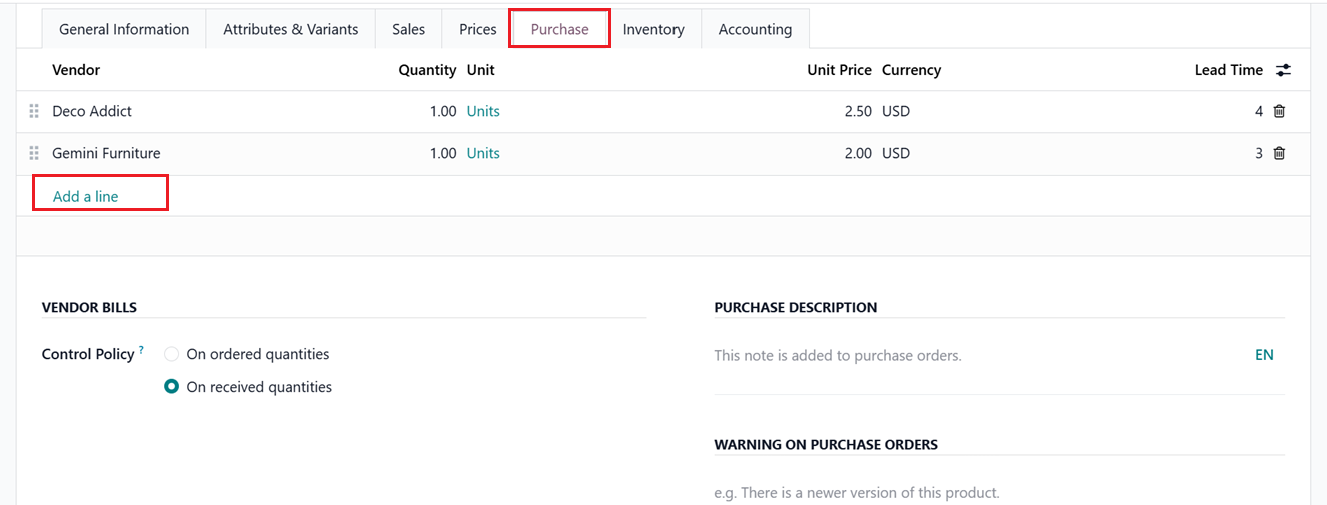
Within the Configuration menu, you will find the Vendor Price Lists option. Selecting this opens the Vendor Price Lists window, which displays a structured list view containing critical information such as Vendor, Product, Company, Unit, Unit Price, Currency and Lead Time, as shown in the screenshot below.
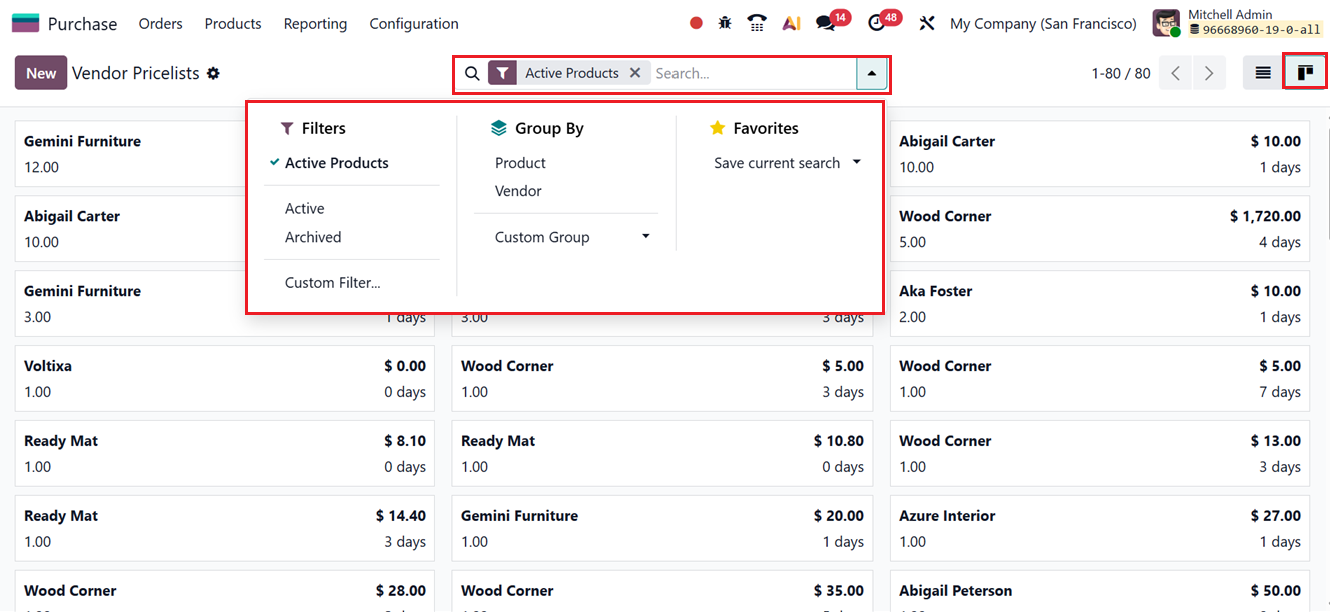
You can also change the list view into kanban views using the relevant icon placed at the top right corner of the page and can organize and refine the displayed data using the Filters, Group By, and Favorites options available in the search bar. Similar to other areas of Odoo 19, custom filters and grouping rules can be created manually to meet specific reporting or operational requirements.
To create a new vendor price list, click the New button. This opens a new configuration form where you can enter the Vendor’s name and define the Vendor Product Name, which is the name displayed on RFQs. If this field is left empty, Odoo automatically uses the internal product name. You can also specify a Vendor Product Code as a unique reference and define the Lead Time, representing the number of days between order confirmation and product delivery.
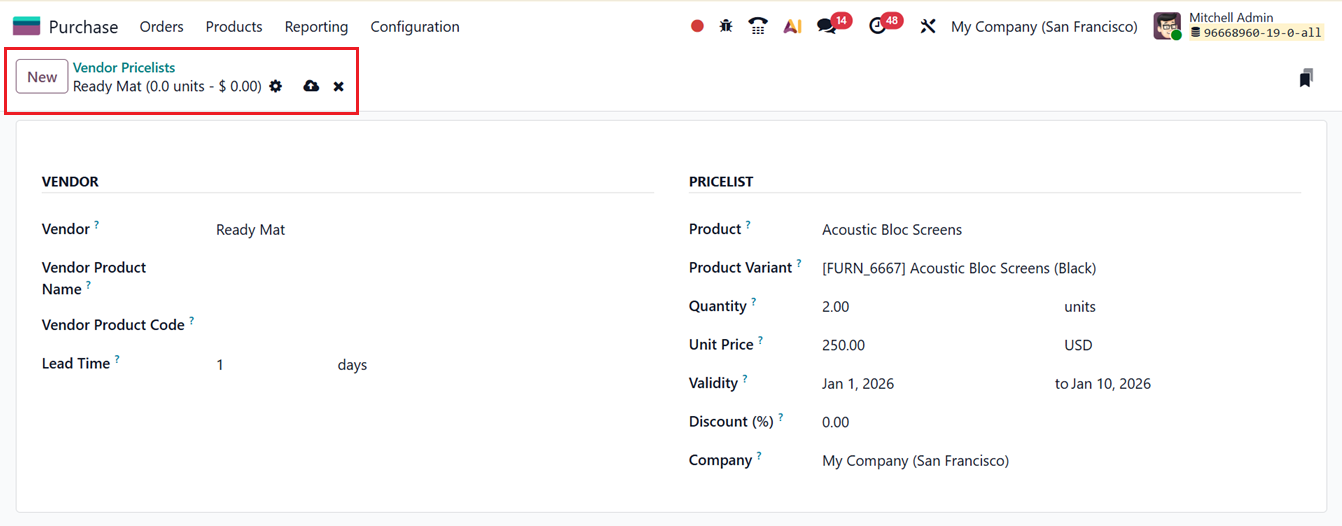
Under the PRICELIST section, you can assign the relevant Product and its Product Variant which is applicable for this pricelist. Additional details such as Quantity, Unit Price, Validity, Discounts, and the associated Company can also be defined, as shown in the screenshot above. After completing all required fields, save the record to store the vendor price list for future use.
The Vendor Pricelists option allows businesses to maintain different pricing rules for products depending on the supplier. After enabling this setting, users can create vendor-specific prices from the Purchase tab within the product form.
This includes support for time-based pricing, quantity breaks, and vendor-specific rates. Once defined, these pricelists automatically apply to RFQs and purchase orders, minimizing errors and ensuring accurate cost calculations throughout procurement.
1.2 Attributes
The Attributes feature in the Purchase module is primarily used in conjunction with products to define and manage product variants. Attributes such as color, size, or material allow businesses to efficiently handle product variations throughout the purchasing process. This configuration is particularly important for products that are available in multiple specifications or options.
Before configuring attributes, product variants must first be enabled. This can be done from the Settings window under the Configuration menu. In the Products section, activate the Variants option and save the changes.

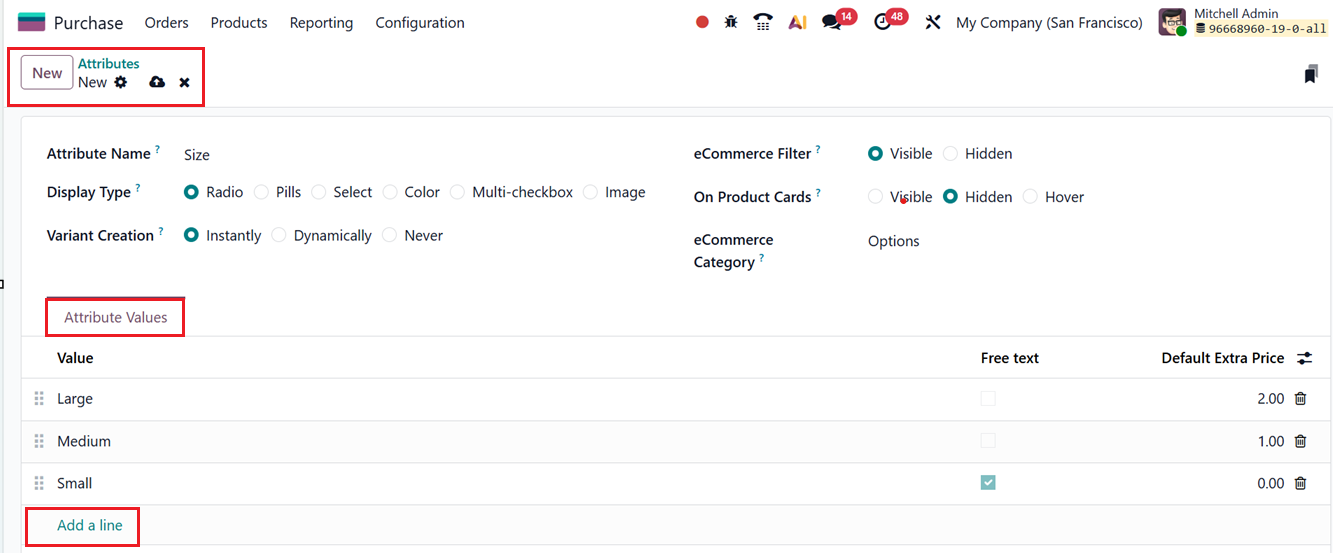
Once enabled, attributes and product variants can be created or managed either by clicking the Attributes link under the Variants settings or by selecting Attributes directly from the Configuration menu. Both approaches open the attributes dashboard, which displays all available attributes, as illustrated below.

To create a new attribute, click the New button. In the attribute form, enter the Attribute Name (for example, Color or Size), select a Display Type such as Radio, Pills, Select, Color, Multicheckbox and Image.
Then, define the Variants Creation Mode (Instantly, Dynamic or Never). This defines when product variants are generated from an attribute in Odoo. With Instantly, all possible variants are created as soon as the attribute is added to a product. Dynamic creates variants only when they are first used in transactions, reducing unnecessary records. Never prevents variant creation and uses the attribute only for informational purposes. These options help manage system performance, data volume, and variant handling efficiently.
The eCommerce Filter option determines whether the variant is visible on the online store. You may also assign an eCommerce Category to group related attributes for easier comparison on the website. Under the Attribute Values tab, add the relevant values (e.g., Red, Blue, Green for Color), then save the record.
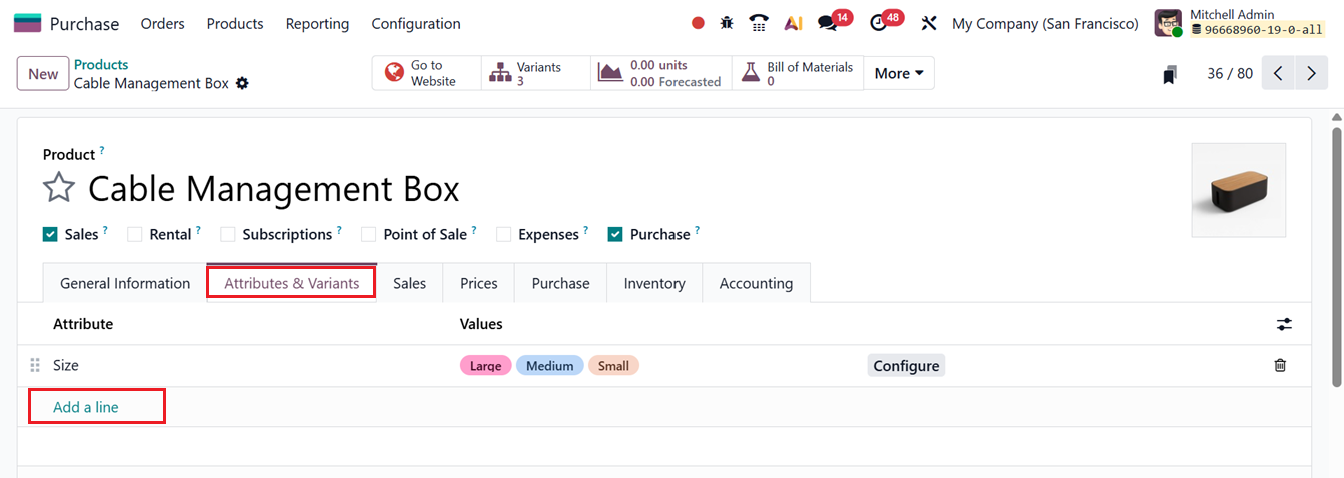
These attributes can then be linked to specific products. Open the product configuration form and navigate to the Attributes & Values tab. Use the Add a line button to assign the desired attributes and values, as shown in the screenshot below.
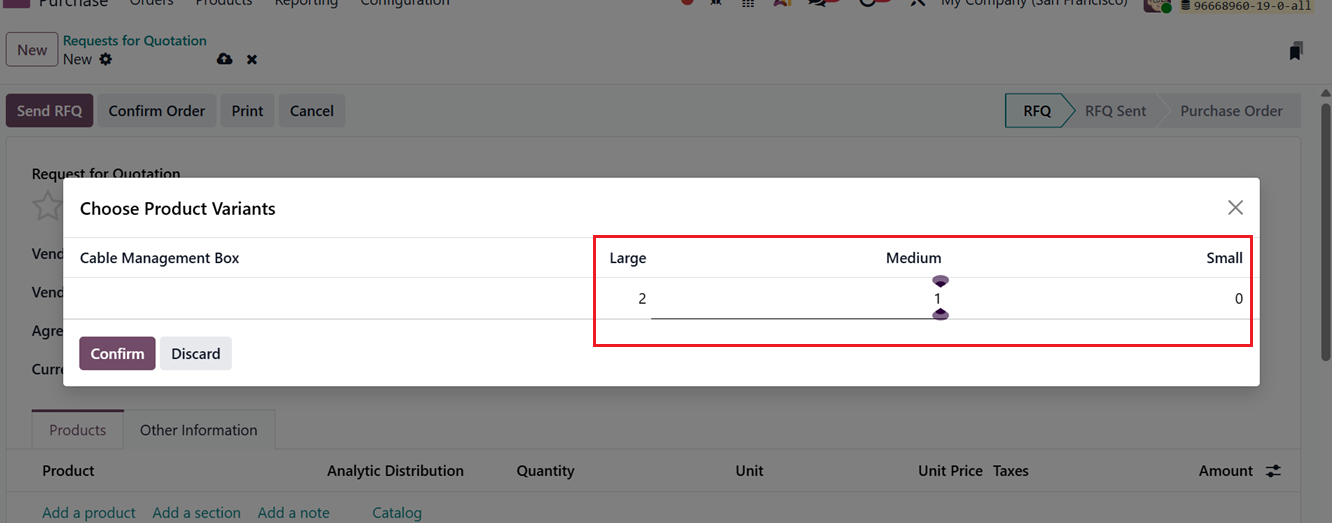
When creating a Request for Quotation (RFQ) or a Purchase Order, users can select the required product variant from the Products tab using the variant grid selection option, as illustrated below.
During billing, each product variant is handled as an individual item, with separate pricing, inventory tracking, and vendor-related details.
1.3 Categories
The Categories feature in the Purchase module enables businesses to organize products by grouping them according to shared characteristics such as usage, type, or procurement method. Each category can be configured with unique accounting rules, inventory valuation methods, and procurement strategies, directly impacting product costing, stock handling, and purchasing workflows.
Product categories can be configured by selecting Product Categories from the Configuration menu. The system displays a dashboard listing all existing categories, as shown below.
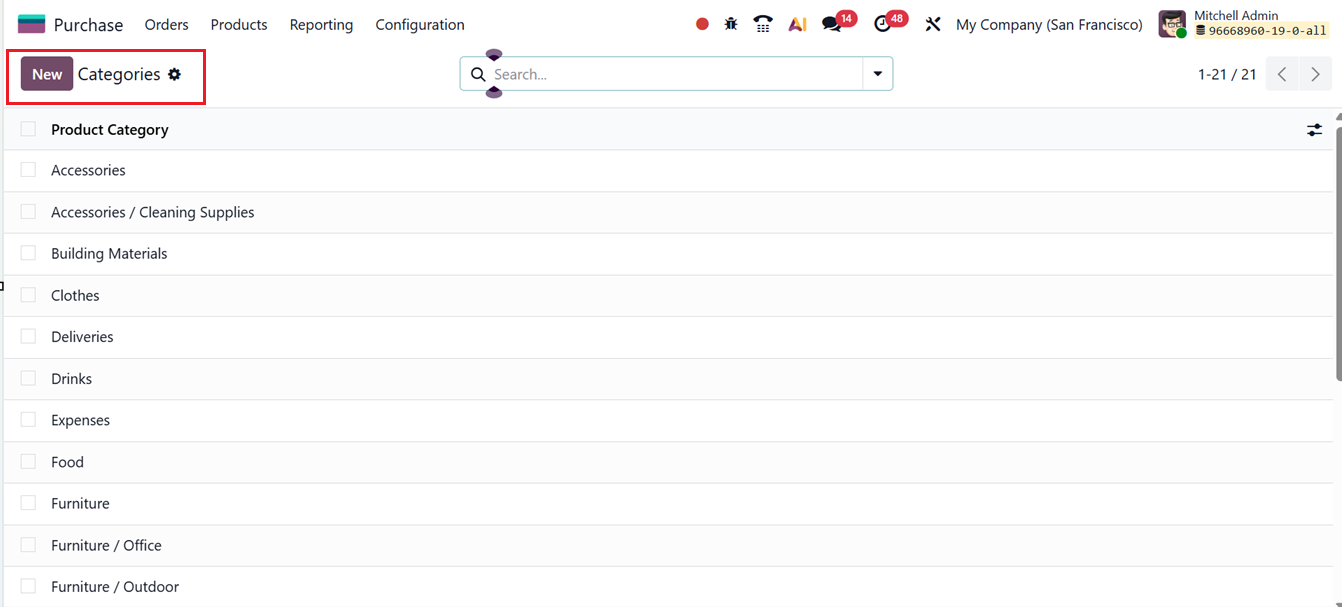
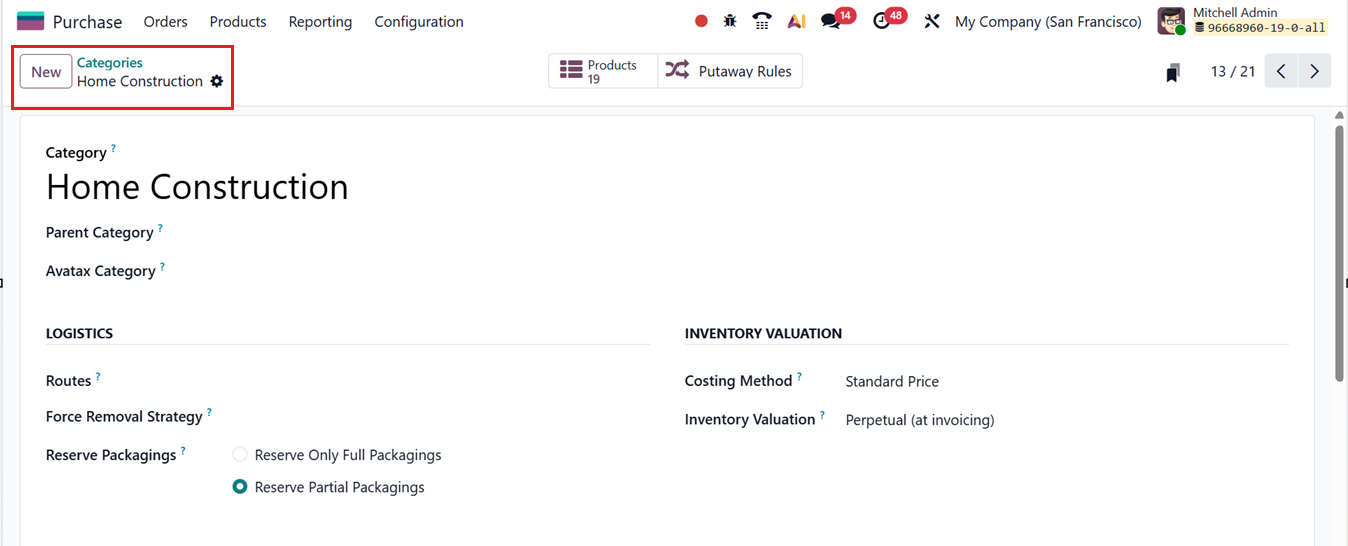
To create a new category, click the New button. While setting up a category, you can define the Category Name (for example, Raw Materials or Office Supplies), assign a Parent Category for hierarchical structuring, and configure strategies such as Force Removal Strategy (FIFO, LIFO, etc.), Reserve Packagings, Costing Method (Standard, Average, or Real Price), and Inventory Valuation (Periodic (at closing) and Perpetual (at invoicing).
The Periodic valuation updates inventory value only at the end of a period through manual journal entries, while Perpetual valuation records inventory value automatically in real time as receipts and vendor bills are processed. The appropriate method depends on the company’s accounting needs and desired level of inventory tracking.
Relevant accounting settings such as Income Account, Expense Account, and Down Payment Accounts for sales and purchases can also be specified, as illustrated in the screenshot below.

Force removal strategies in Odoo link inventory operations with purchasing by determining how stock is consumed, valued, and tracked. These strategies are especially important for managing physical inventory. Below is a brief overview of the available force removal strategies in Odoo 19:
- FIFO (First In, First Out): Consumes the oldest stock first, ensuring accurate valuation.
- LIFO (Last In, First Out): Uses the most recently acquired stock first; applicable in limited scenarios.
- Closest Location: Selects stock from the nearest storage location to improve picking efficiency.
- Least Packages: Prioritizes locations with fewer units to consolidate inventory.
- FEFO (First Expiry, First Out): Uses items with the earliest expiration dates first, which is critical for perishable goods.
Assigning a product category ensures that products automatically inherit the inventory and accounting rules defined at the category level. After categories are created, they can be assigned to products by navigating to the Products dashboard, opening a product form, and selecting the appropriate category from the Category field under the General Information tab, as shown below.
1.4 Unit of Measures & Packagings
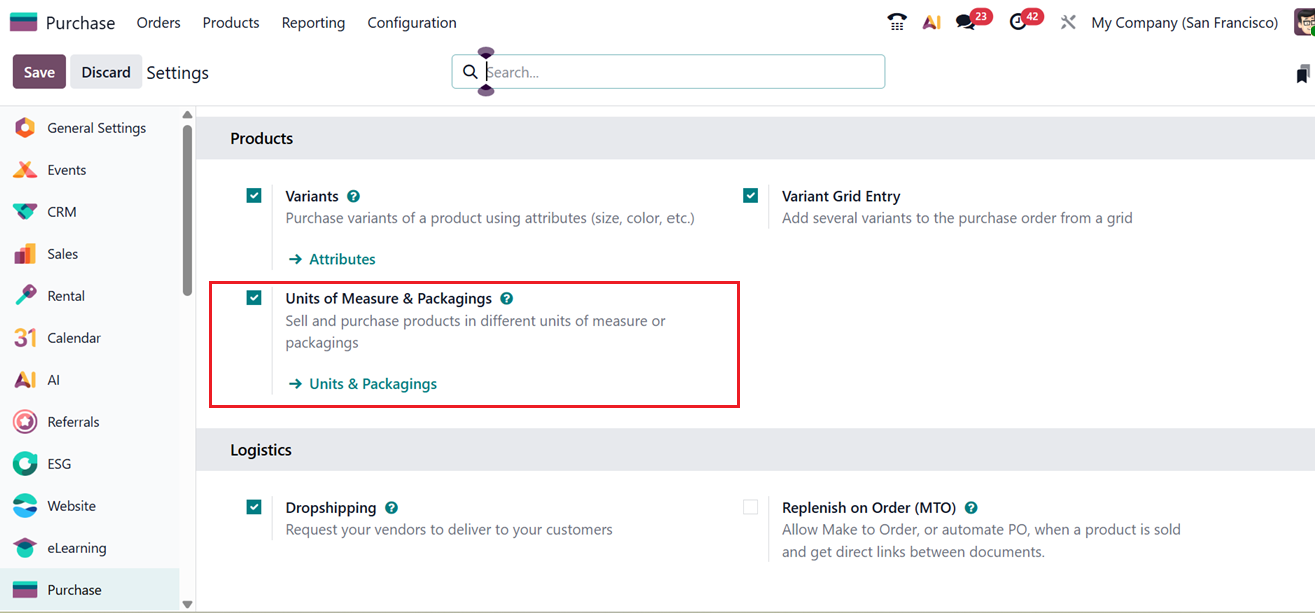
The Unit of Measures & Packagings setting lets organizations manage products in different measurement systems, such as boxes, pieces, kilograms, or liters. Users can define UoM categories, conversion ratios, and rounding rules. This is especially useful when working with suppliers or departments that use varying units.
To configure this feature in your Purchase Module, enable the ‘Unit of Measures & Packagings’ option inside the ‘Products’ tab of the general ‘Settings’ window, as shown in the screenshot below.
The detailed configuration is done via the Units & Packagings link in the Settings or from the Units & Packagings option in the Configuration menu. This will open the list of available units and packaging options in a list view, as shown in the screenshot below.
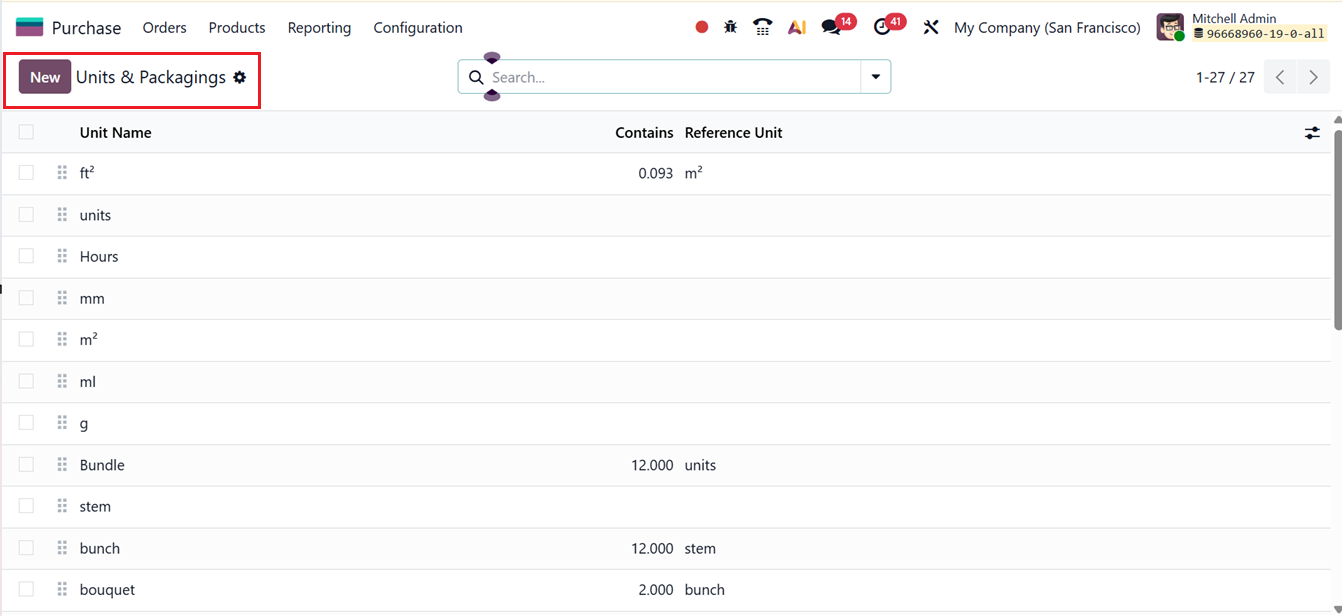
To create a new unit of measure or packaging option, start by clicking the “New” button. This will open a form where you can define and customize the details of the unit or package, as shown in the screenshot below.
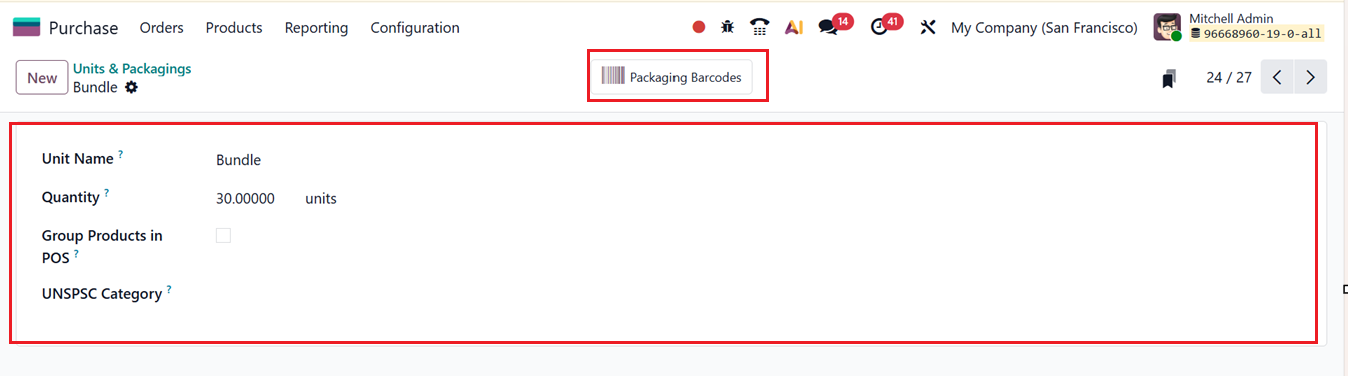
In the form fields, complete the following fields including:
- Unit Name: Enter the name of the unit or packaging (for example, Box, Pack, or Carton). This name will be used to identify the unit throughout the system.
- Quantity: Specify the number of individual items or base units contained within this unit or package. For example, a box may contain 12 individual products.
- Group Products in POS: Choose whether to enable or disable this option. When enabled, products using this unit of measure will be grouped together in Point of Sale (POS) orders; when disabled, they will appear as separate line items.
- UNSPSC Category: Select or enter the appropriate UNSPSC code that corresponds to this unit of measure. This code helps classify the product according to international standards.
Once all required information is entered, save the record to make the new unit of measure or packaging available for use. The ‘Packaging Barcode’ smart button can be used to manage and access barcode information related to a product’s packaging. Its main function is to link barcodes to specific packaging units so they can be recognized during purchasing and inventory operations.
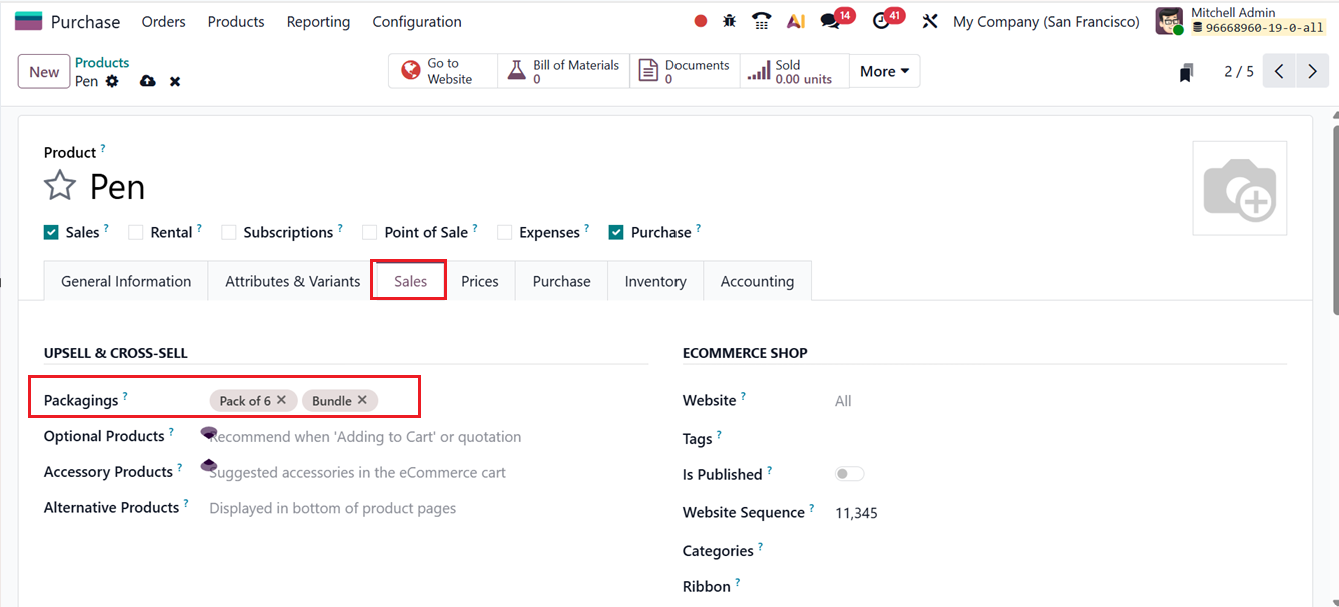
With the Unit of Measures & Packagings feature, users can define how items are grouped or packaged, such as “Pack of 6,” “Bundle,”or “Pallet of 96” etc. Activating this feature allows packaging details to be configured under the Sales tab of the product form, as shown in the screenshot below.
1.5 Settings
The Settings area of the Odoo 18 Purchase module offers a variety of configuration options that help tailor the purchasing process to a company’s operational needs. These options include features such as Purchase Agreements, Purchase Order Approvals, Lock Confirmed Orders, Vendor Pricelists, Warnings, Receipt Reminders, Purchase Alternatives, 3-way Matching, Product Variants, Variant Grid Entry, Product Packaging, Units of Measure, Dropshipping and Replenish on Order (MTO), as shown in the settings interface.
Below is a detailed explanation of the functionality of each setting:
Purchase Order Approval: Odoo 19 allows you to set up a manager approval workflow for purchase orders that exceed a certain minimum value. You can activate this by enabling Purchase Order Approval in the Settings. Once enabled, a field appears where you can define the Minimum Amount. Any purchase order surpassing this threshold will require approval from a manager before proceeding.
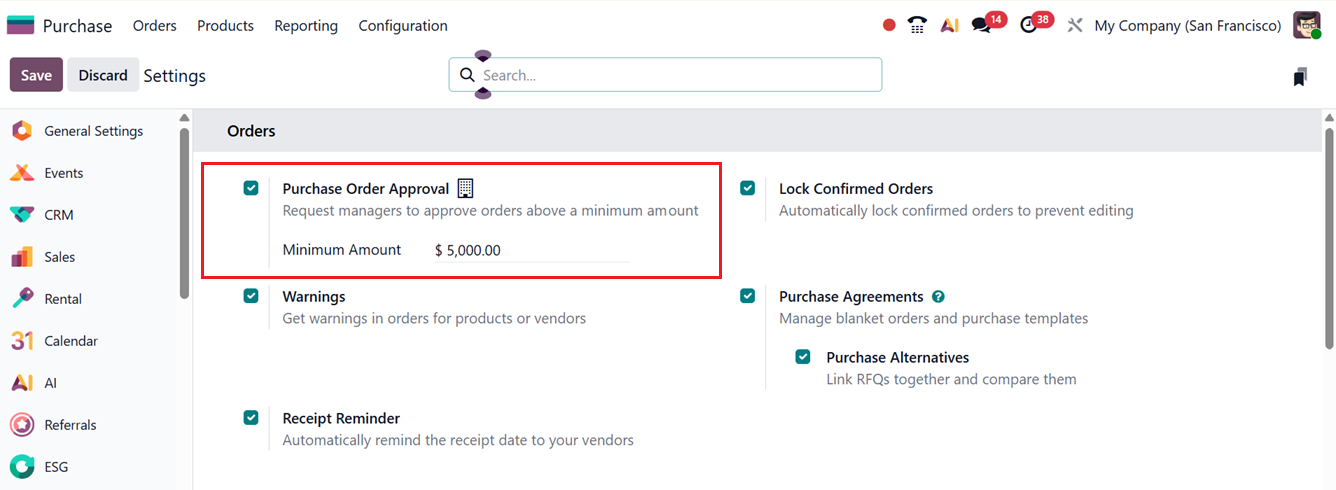
When a purchase representative creates an RFQ exceeding the set limit, confirming it will move the order into an Approval state instead of generating a purchase order. A purchase administrator can later review and approve the order.
Lock Confirmed Orders: When the Lock Confirmed Orders feature is active, purchase orders become locked and uneditable once they are confirmed.
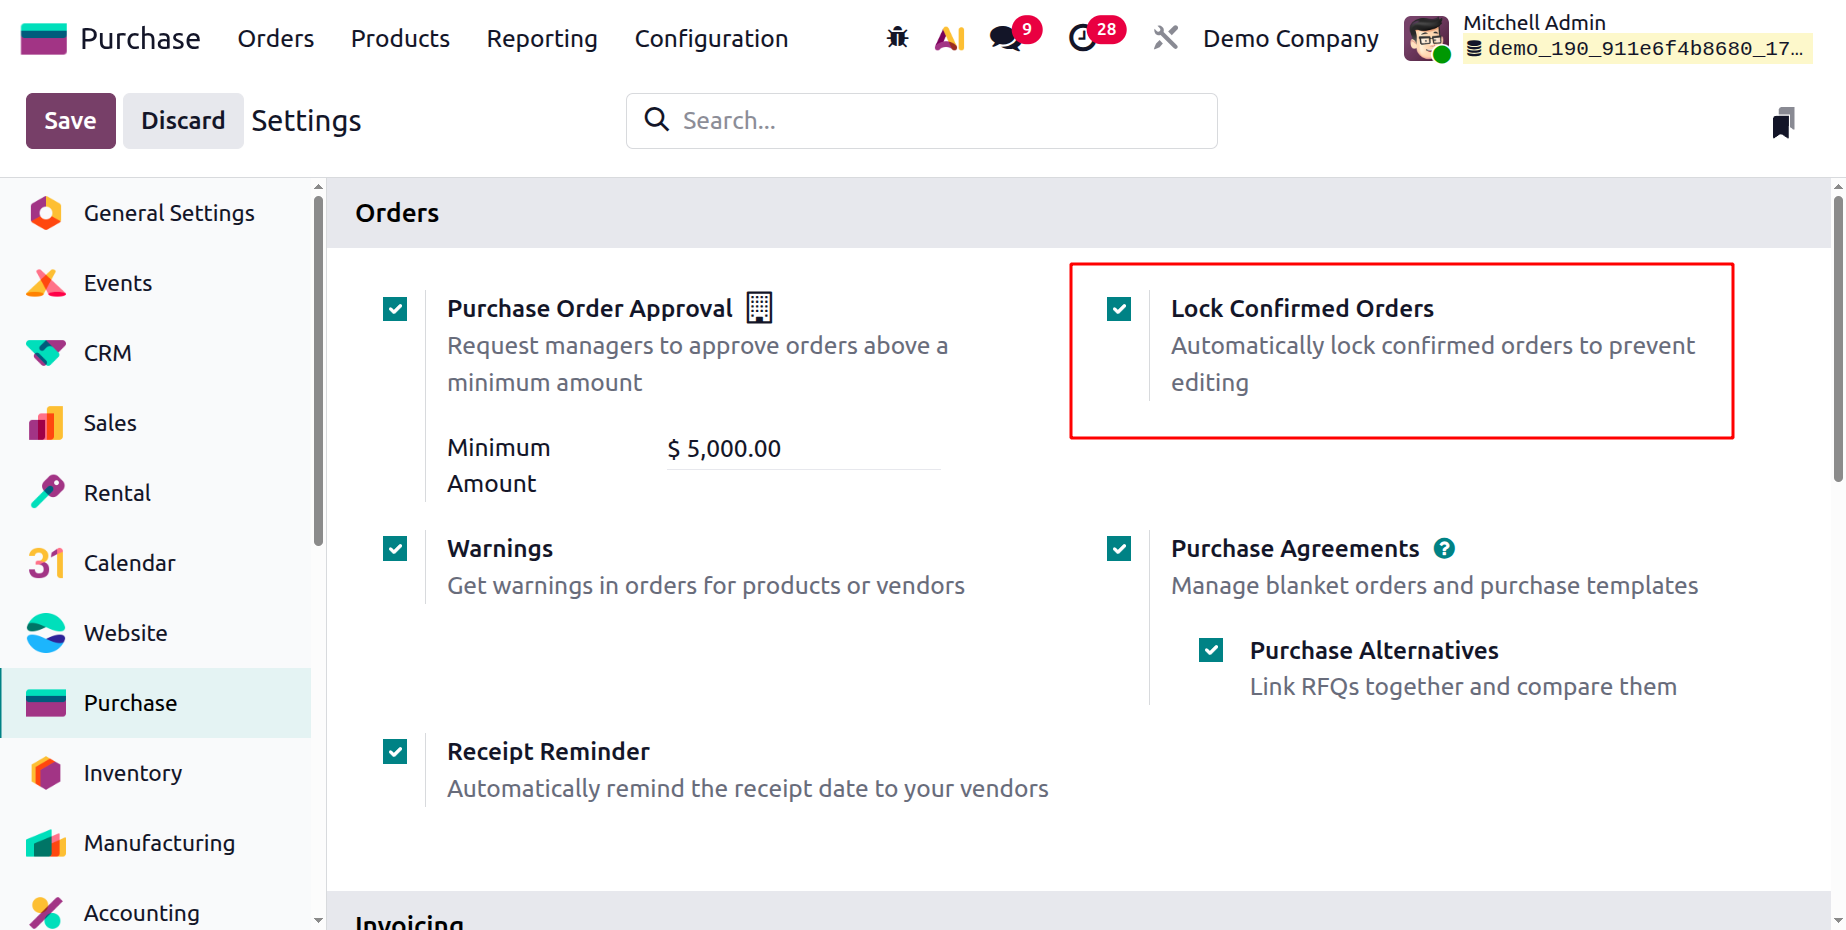
This prevents accidental or unauthorized changes to key procurement details such as vendor information, quantities, or pricing. You can Lock or Unlock orders via the corresponding buttons in the purchase order form, as depicted in the screenshot below.
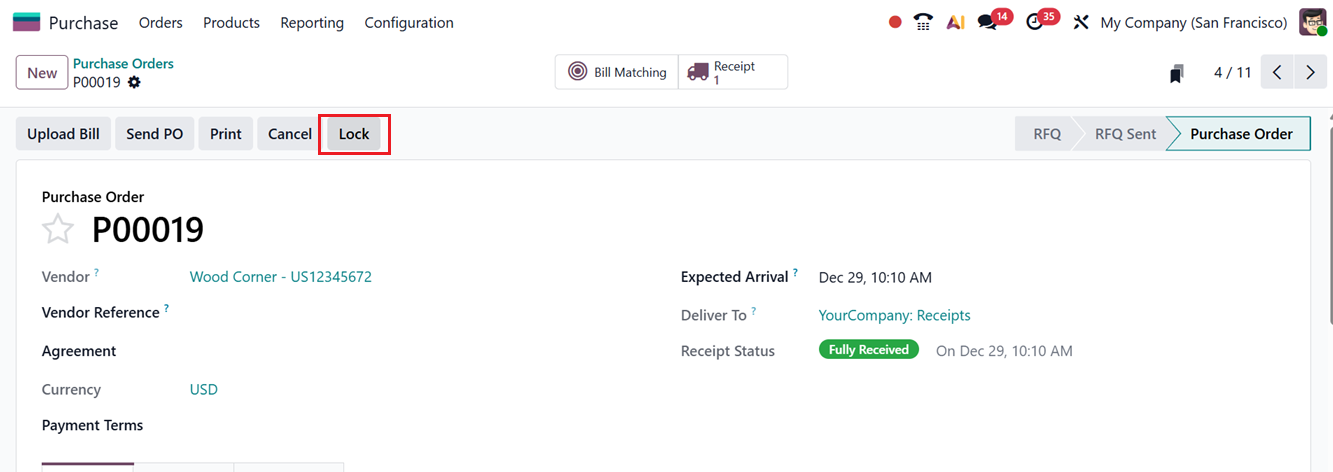
Only users with sufficient access rights can unlock and modify confirmed orders, helping preserve data accuracy and ensuring consistency in validated purchase transactions.
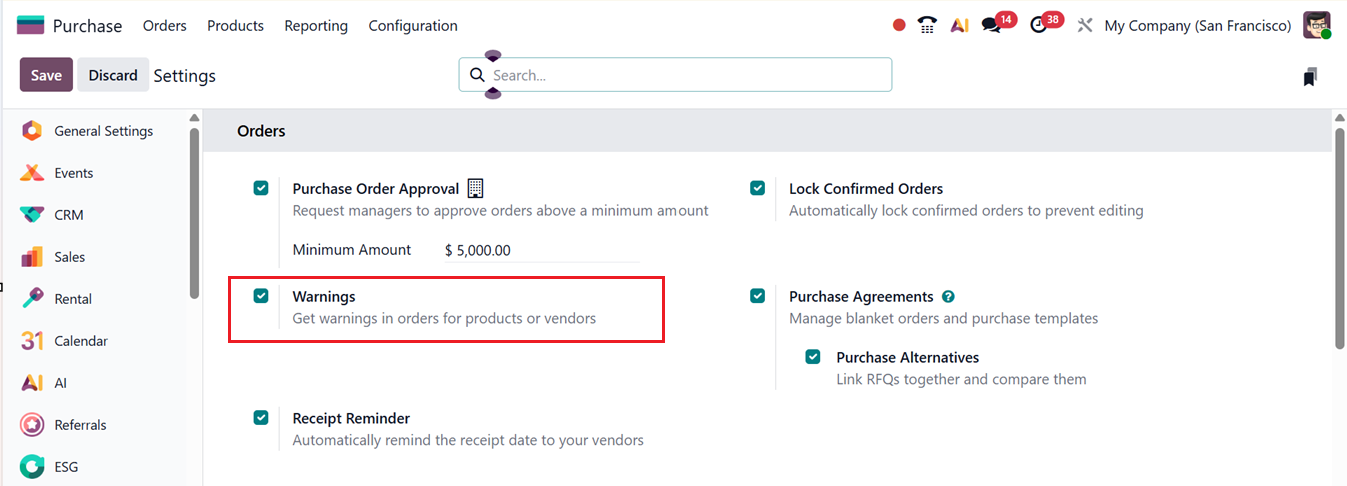
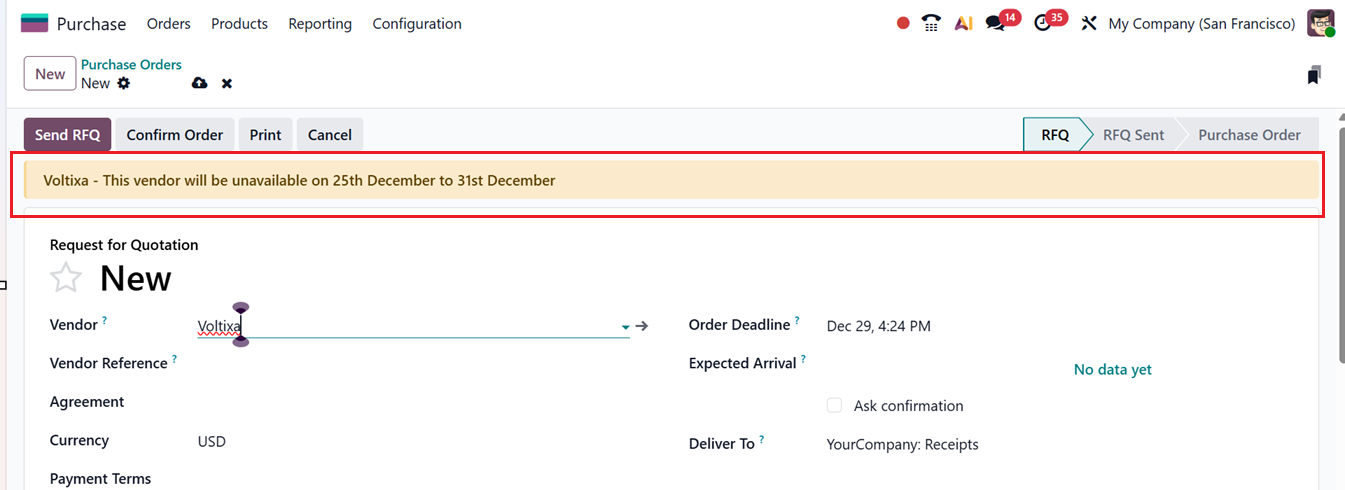
Warning Messages: The Warning Messages feature provides an extra layer of caution when dealing with certain vendors or products. Once the Warnings option is enabled from the Purchase module settings, alerts or blocking messages can be configured for both products and vendors.
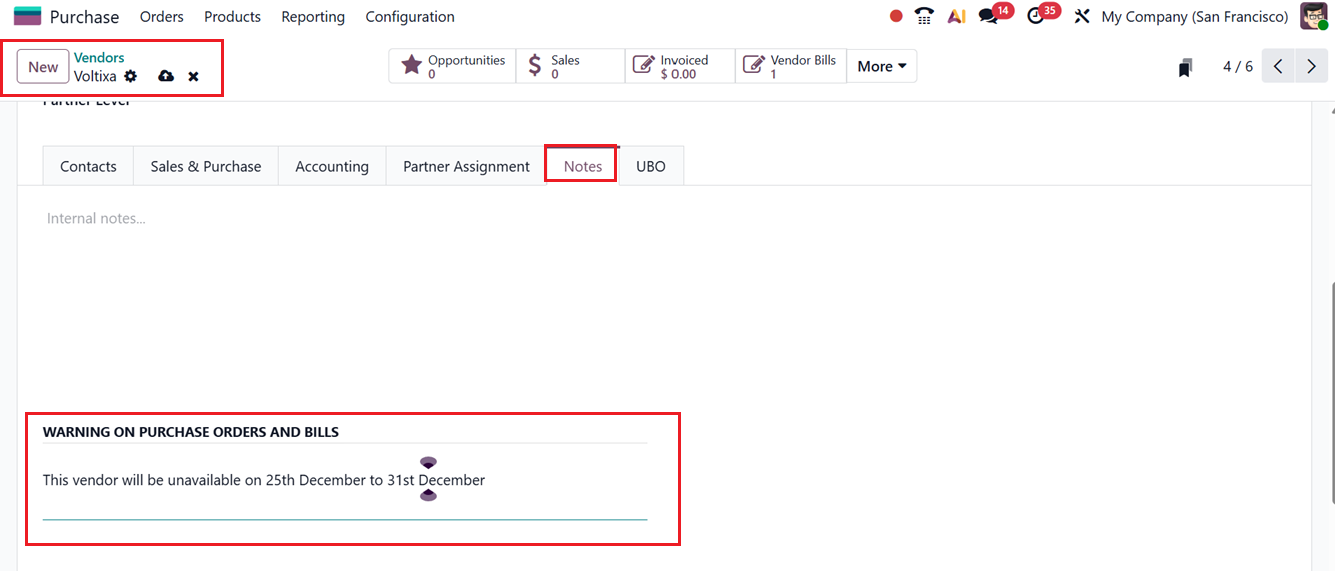
Vendor warnings are set in the Notes tab of the vendor form, under the WARNING ON PURCHASE ORDERS AND BILLS section. You can edit the warning message or note depending on past issues or vendor reliability, as illustrated in the screenshot below.
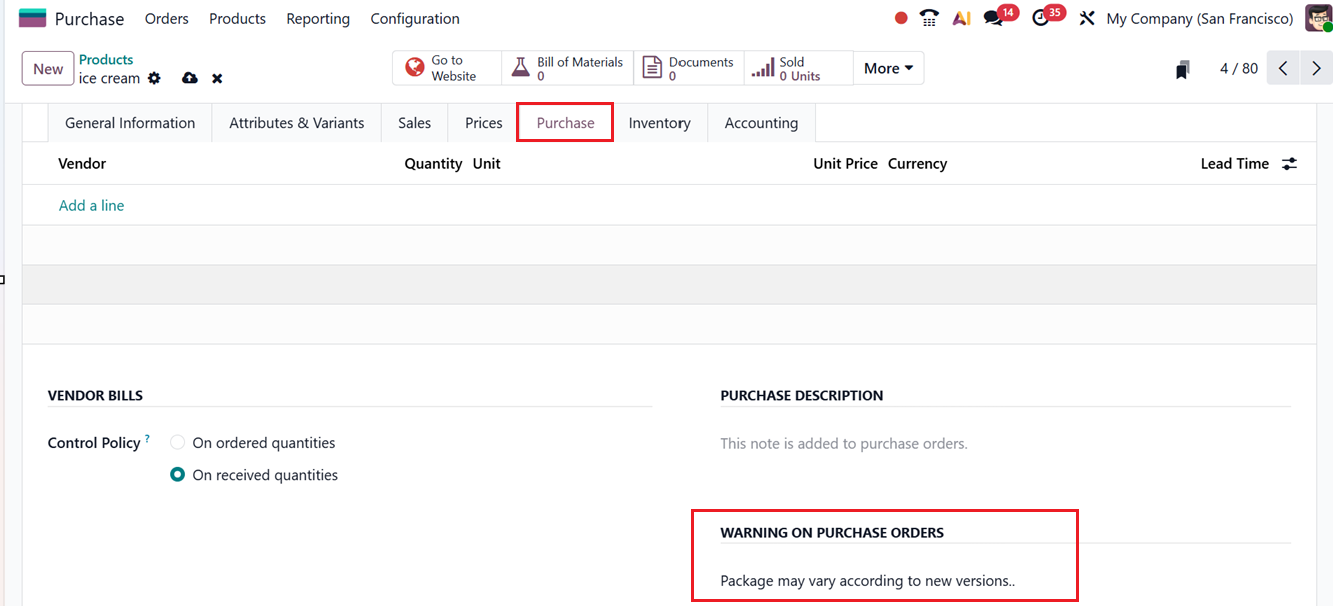
A similar configuration is available for products under the WARNING ON PURCHASE ORDERS field in the Purchase tab of the product form, as depicted in the screenshot below.
Whenever a purchase order involves a vendor or product with a warning, Odoo automatically displays the alert to notify users of potential concerns, as shown in the screenshot below.
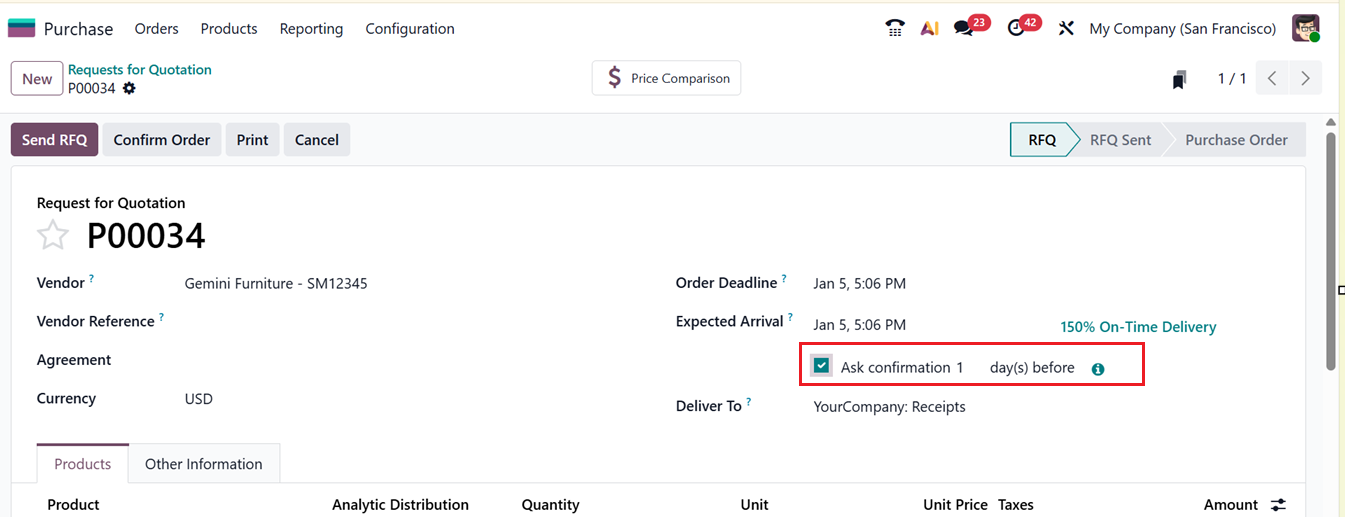
Receipt Reminders: Activating the Receipt Reminders enables Odoo to send automated notifications to vendors regarding expected delivery dates. These reminders help maintain smooth communication, reduce delays, and improve coordination between the company and its suppliers.
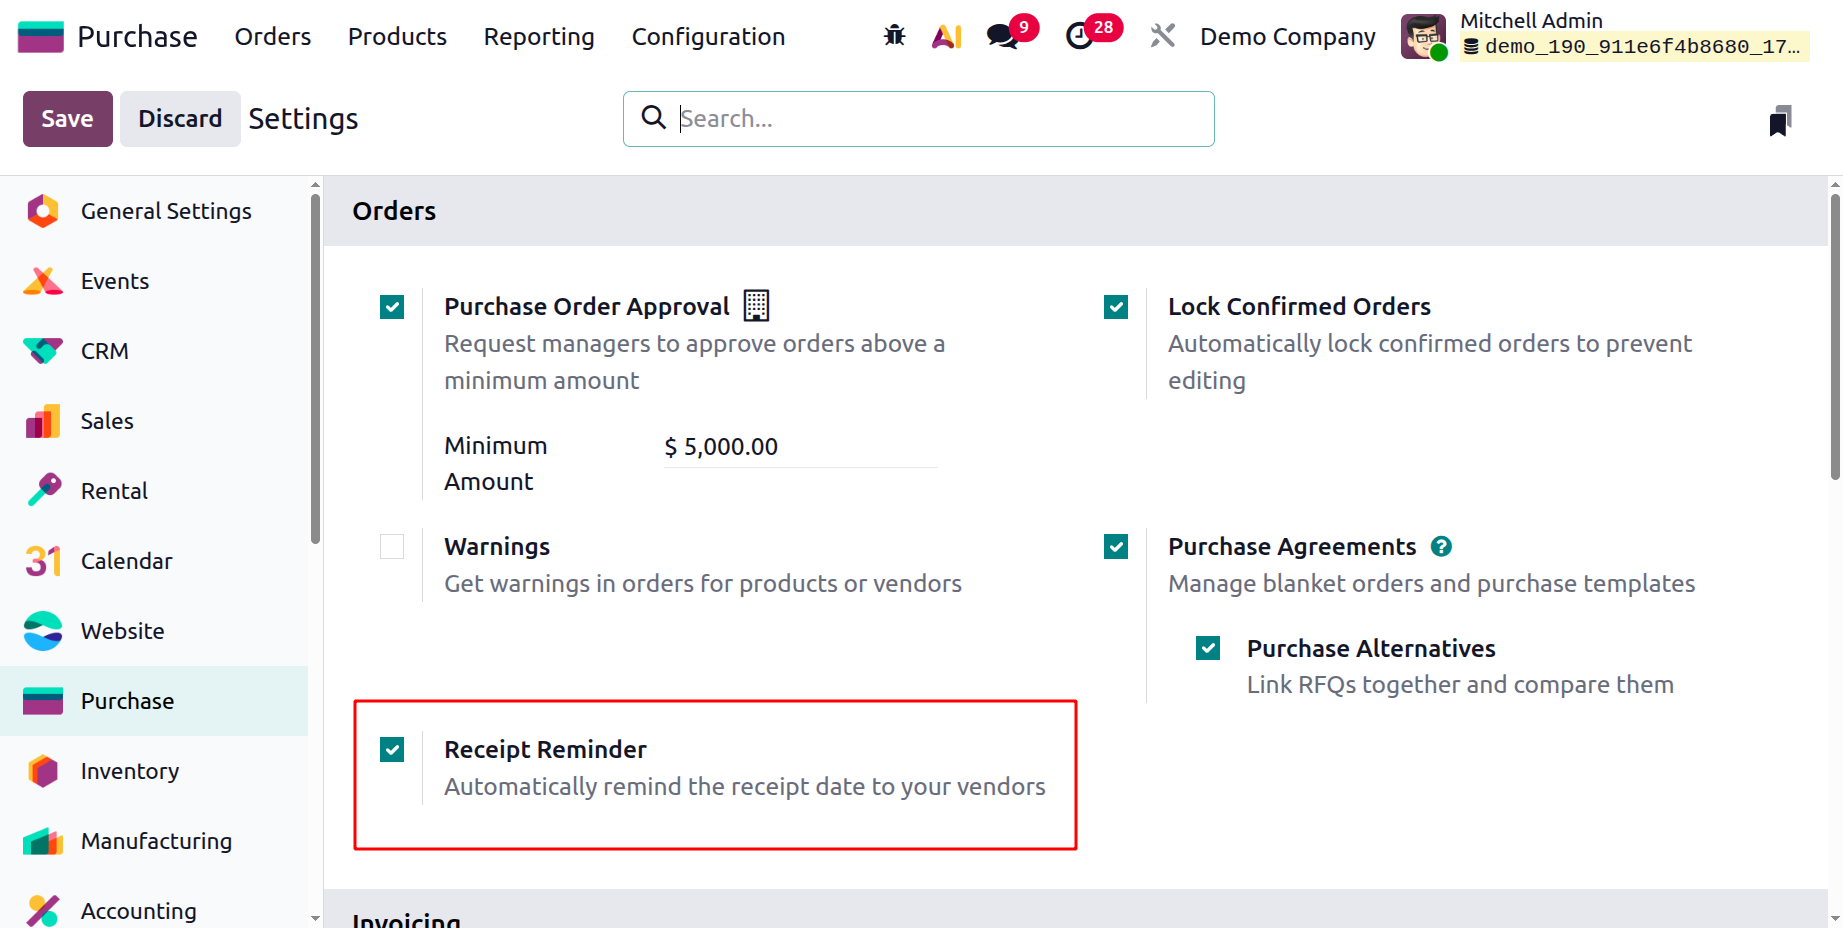
Enabling the ‘Receipt Reminder’ option will display an ‘Ask Confirmation’ button inside every RFQ Order creation form. This will automatically send a mail to the vendor ‘x’ days before the expected receipt date to ask them to confirm the exact date. You can set the number of days as per your preference, as shown in the screenshot below.
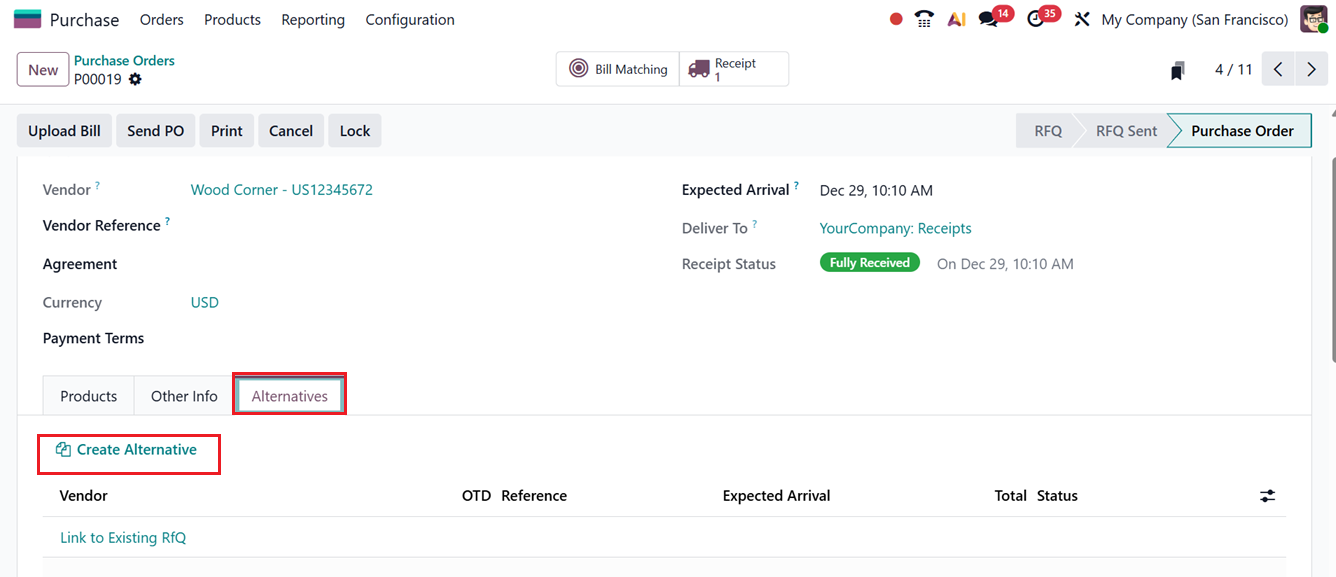
Purchase Alternatives: The Purchase Alternatives feature lets users define alternative products for procurement. This becomes especially useful if a primary product is delayed or unavailable.
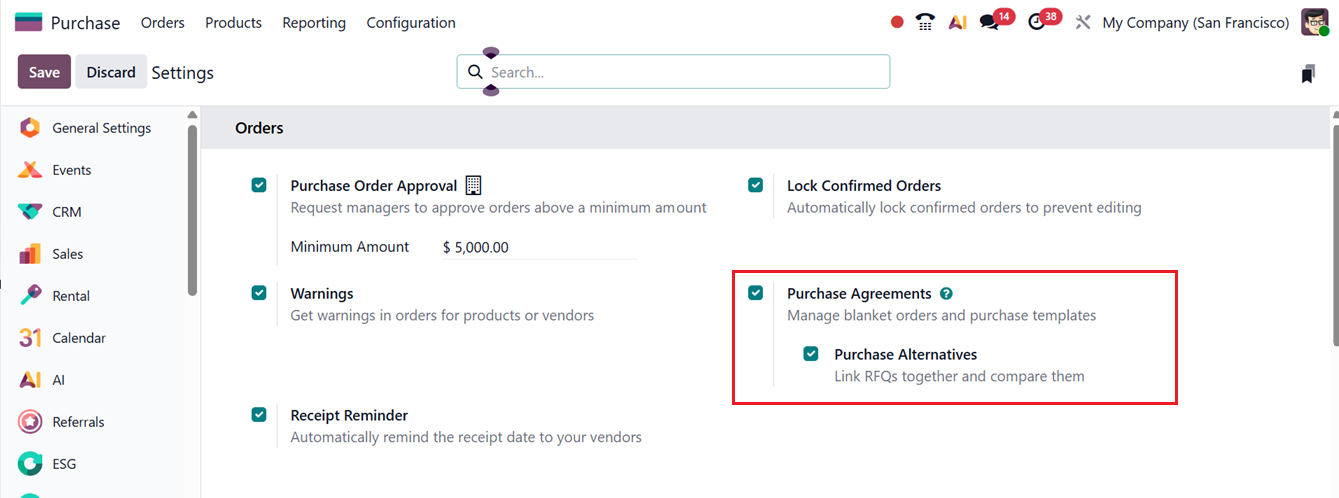
After enabling the feature, you can check the functionality within a purchase order, the Alternatives tab will allow you to compare and manage multiple RFQs for the same product from various vendors. By using the Create Alternative button, you can generate additional RFQs quickly, simplifying vendor comparison and improving sourcing efficiency, as depicted in the screenshot below.
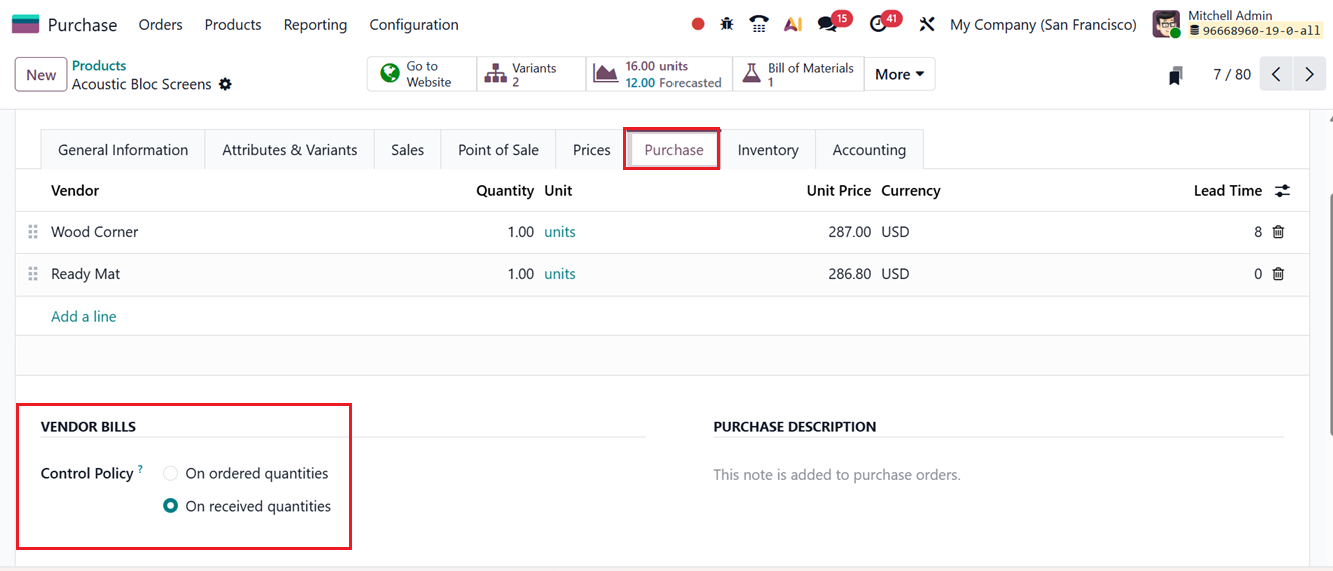
3-Way Matching: The 3-Way Matching feature ensures that vendor bills are only paid after items have been received. Here, Odoo compares: the Purchase Order, the Receipt and the Vendor Bill to detect errors or prevent fraud.
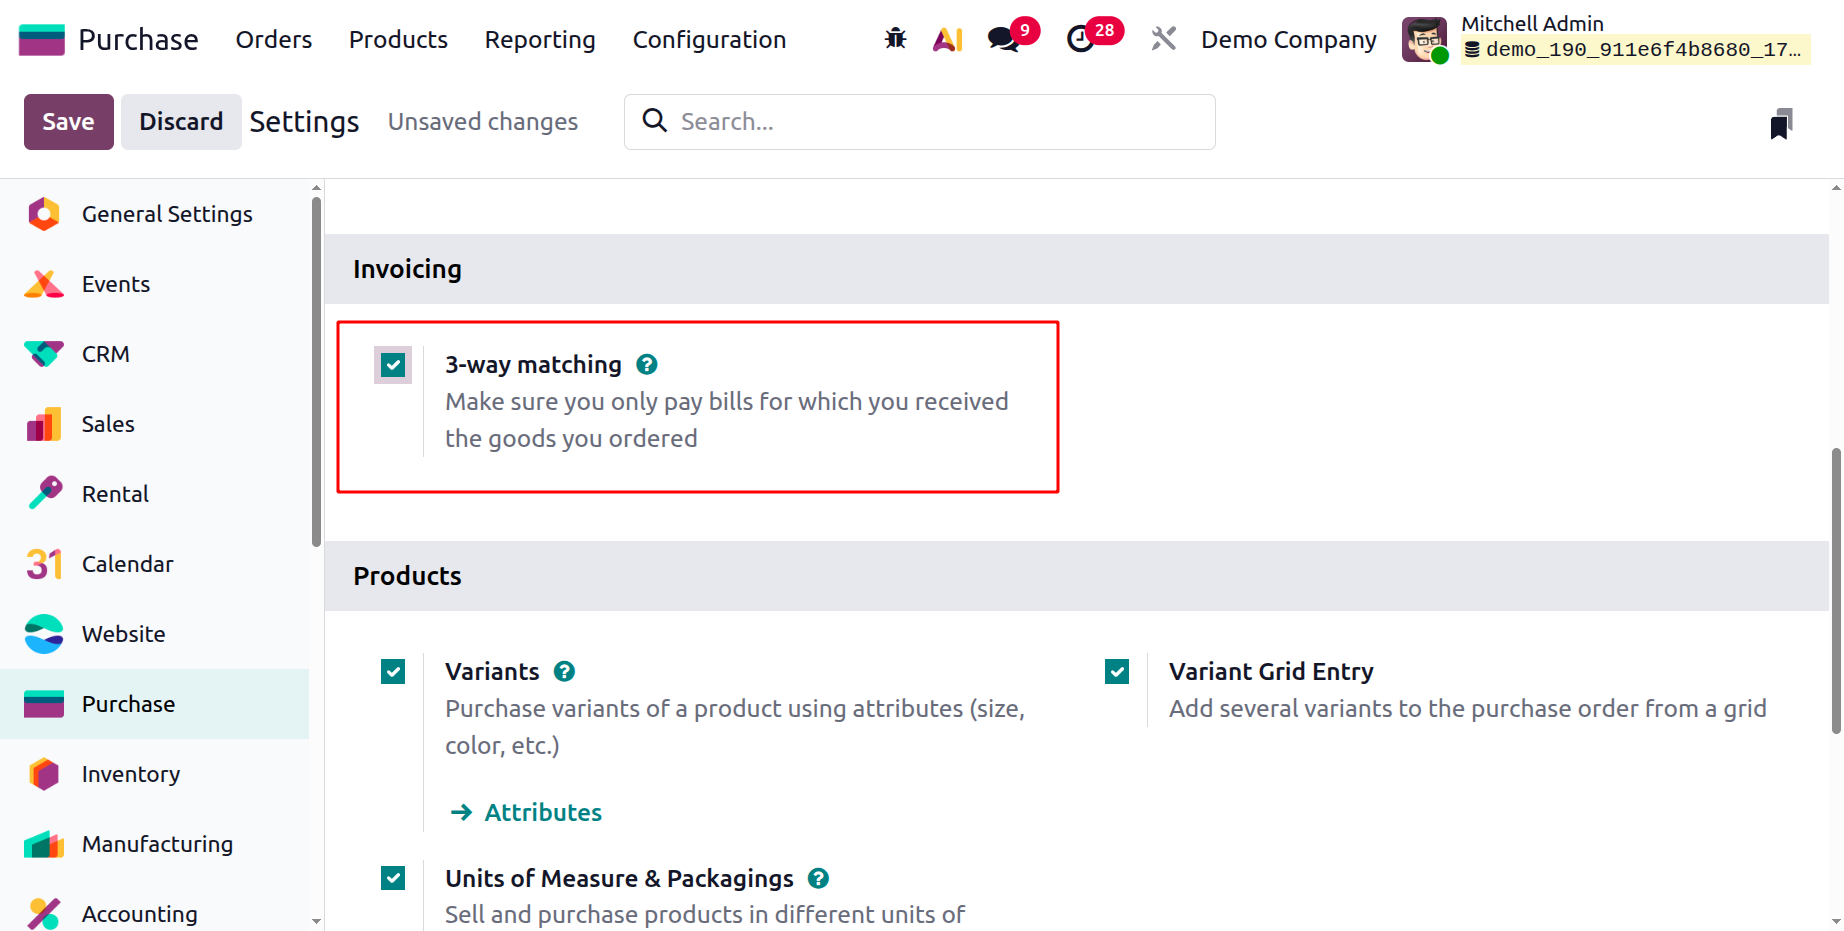
To activate this feature, set the Bill Control policy to ‘On received quantities’ in the Settings or within the product configuration. This can be done inside the Purchase tab of the form, as shown in the screenshot below.
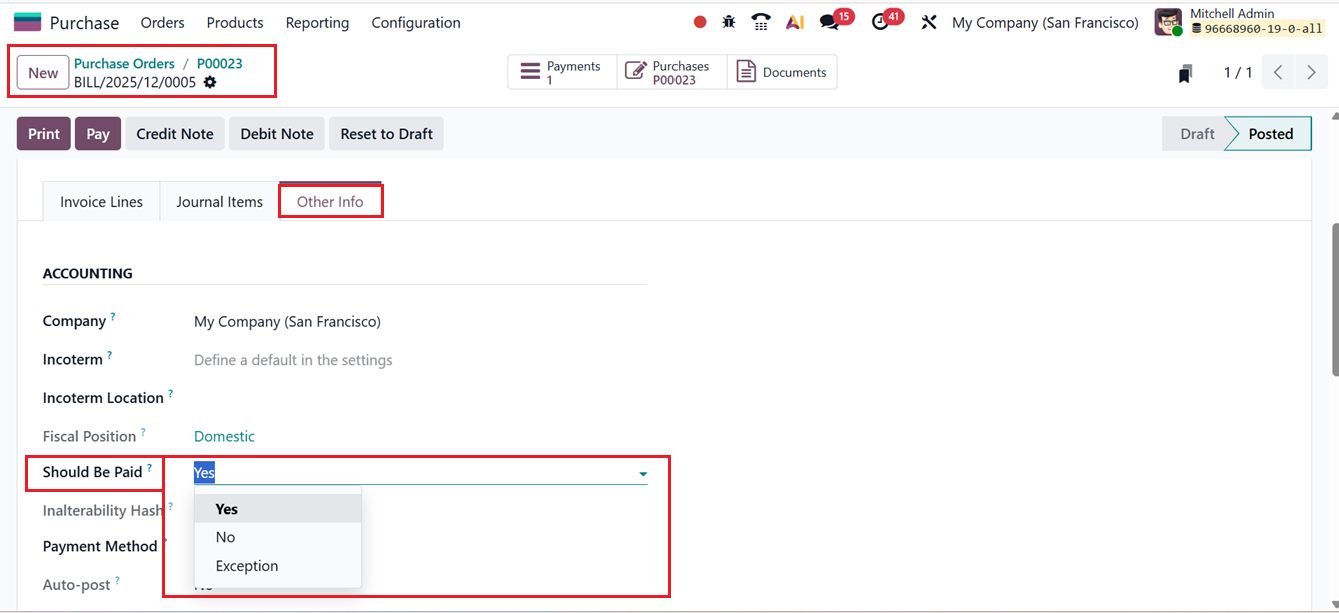
Odoo will then determine automatically whether a vendor bill need to be paid or not in the ‘Should Be Paid’ field with possible statuses being:
- Yes (items received)
- No (items not yet received)
- Exception (discrepancies found)
This status is available in the ‘Other Info’ tab of a vendor bill form by opening the ‘Vendor bills’ smart button of any Purchase Order.
Once a purchase order is created and confirmed, and the products are received, Odoo updates the vendor bill accordingly. In the Other Info tab of the bill. The Should Be Paid field indicates the system’s evaluation, as shown in the screenshot below.
Variant Grid Entry: The Variant Grid Entry option improves usability by providing a matrix-style interface for selecting multiple variants at once.
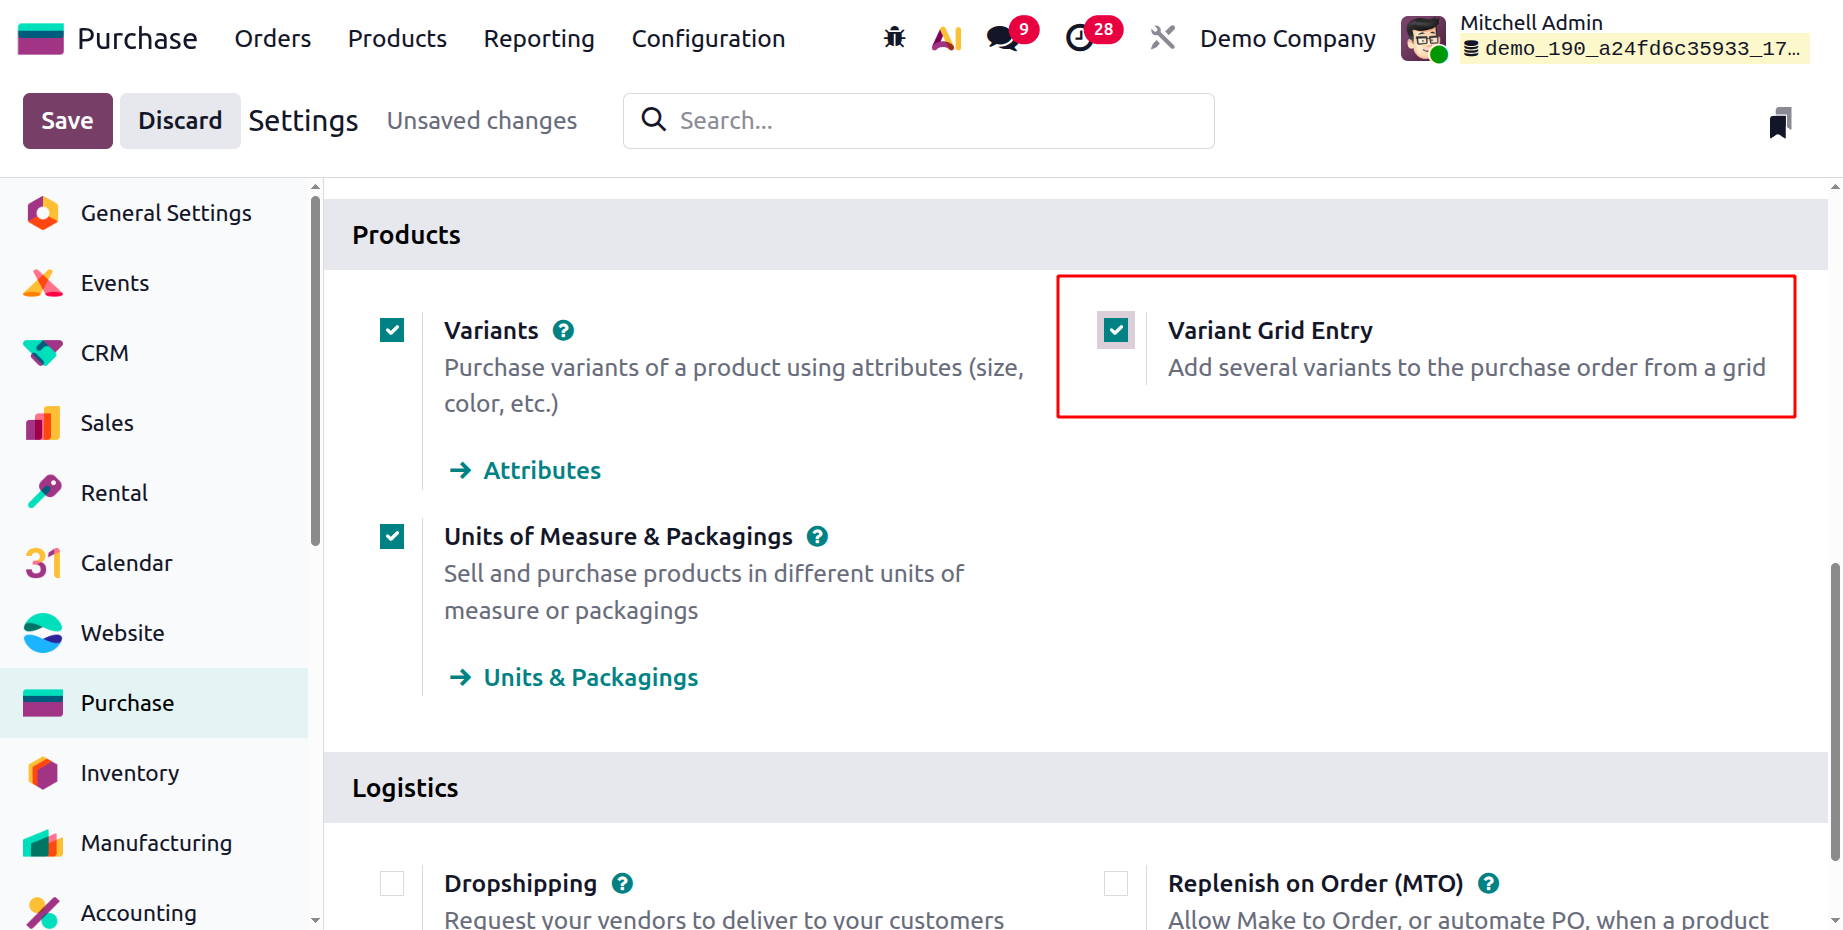
When adding products to a purchase order, a Choose Product Variants pop-up appears, allowing users to quickly select variant combinations.
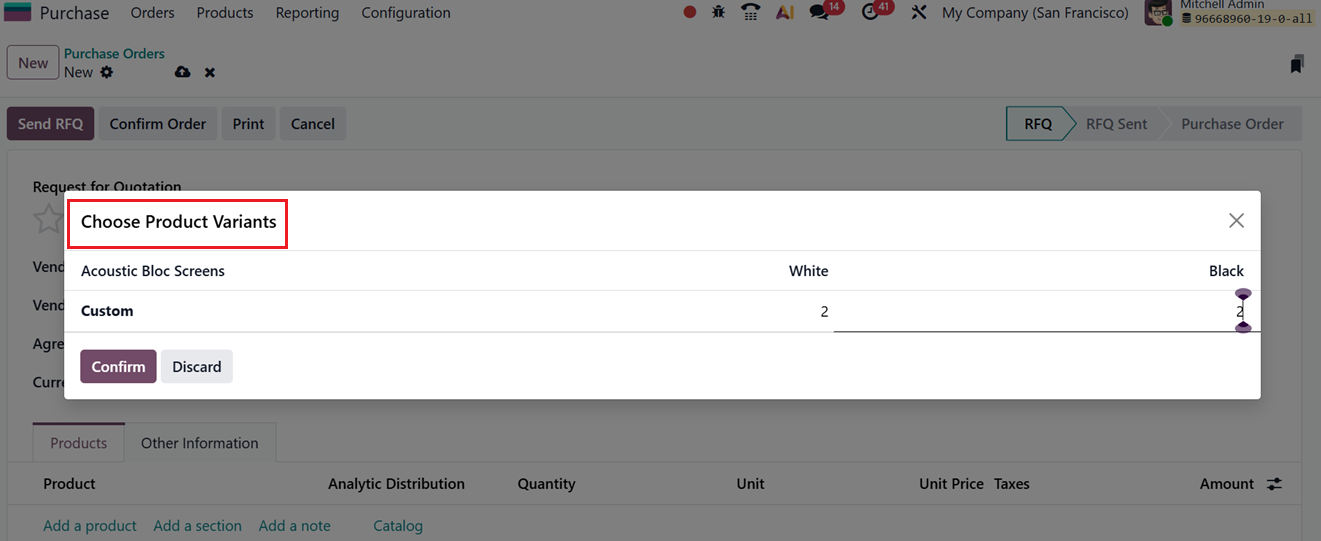
This grid layout speeds up data entry and reduces errors by displaying all attribute variations in a single view.
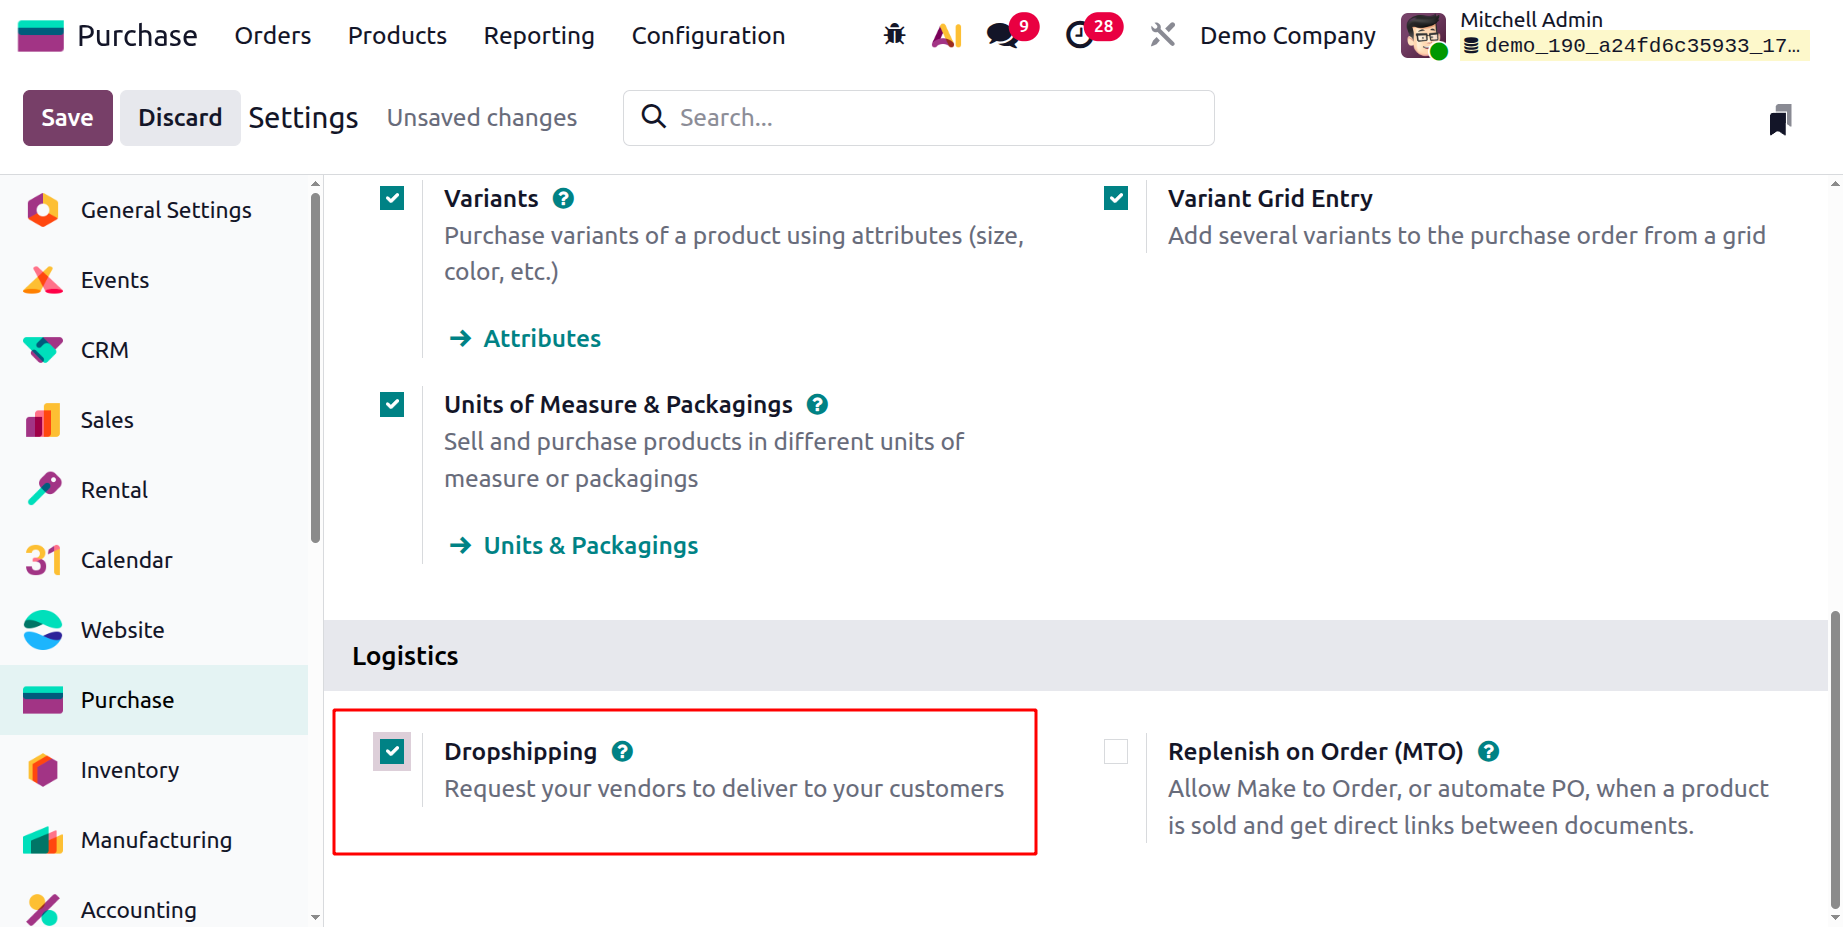
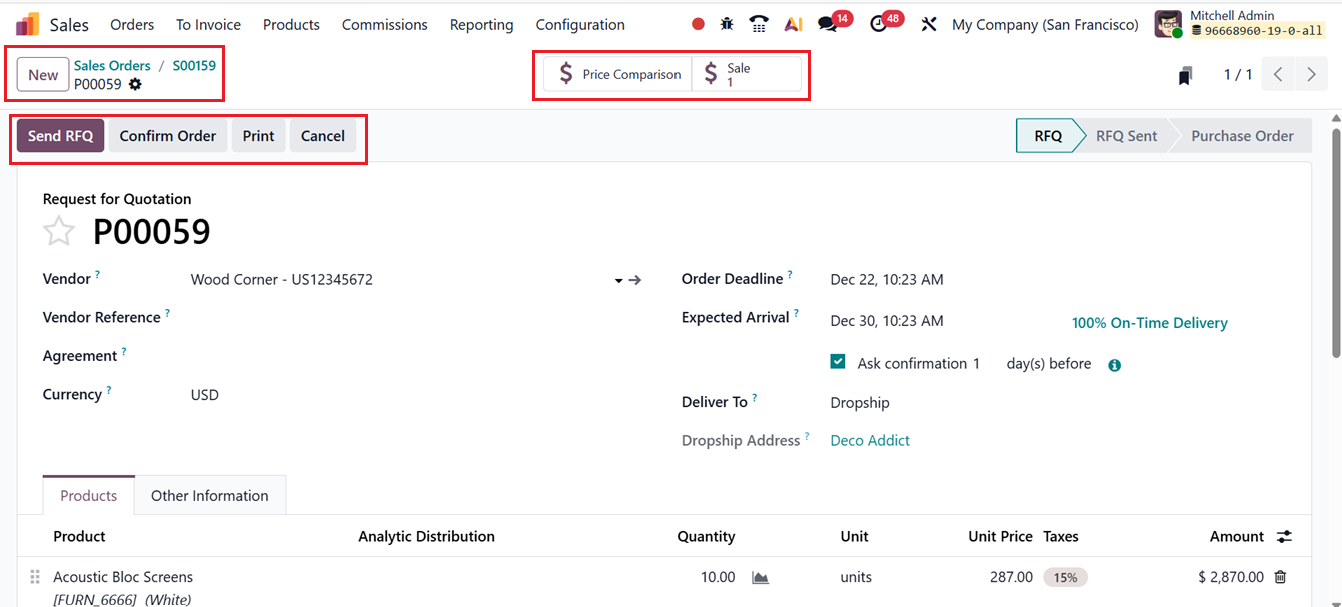
Dropshipping: The ‘Dropshipping’ feature allows businesses to sell products without keeping inventory. When enabled, products are shipped directly from the vendor to the customer. After setting the Dropship route and assigning a vendor, confirming a sales order automatically creates a linked purchase order. Odoo then tracks and validates the drop shipment, helping reduce storage costs and expand product offerings without stock constraints.
The ‘Dropshipping’ functionality can be activated from the Settings tab located under the Logistics section of the Purchase module.
Once this option is enabled, users can navigate to the Inventory tab within the product form and configure the product’s Routes by selecting “Dropship”, as demonstrated in the screenshot below.
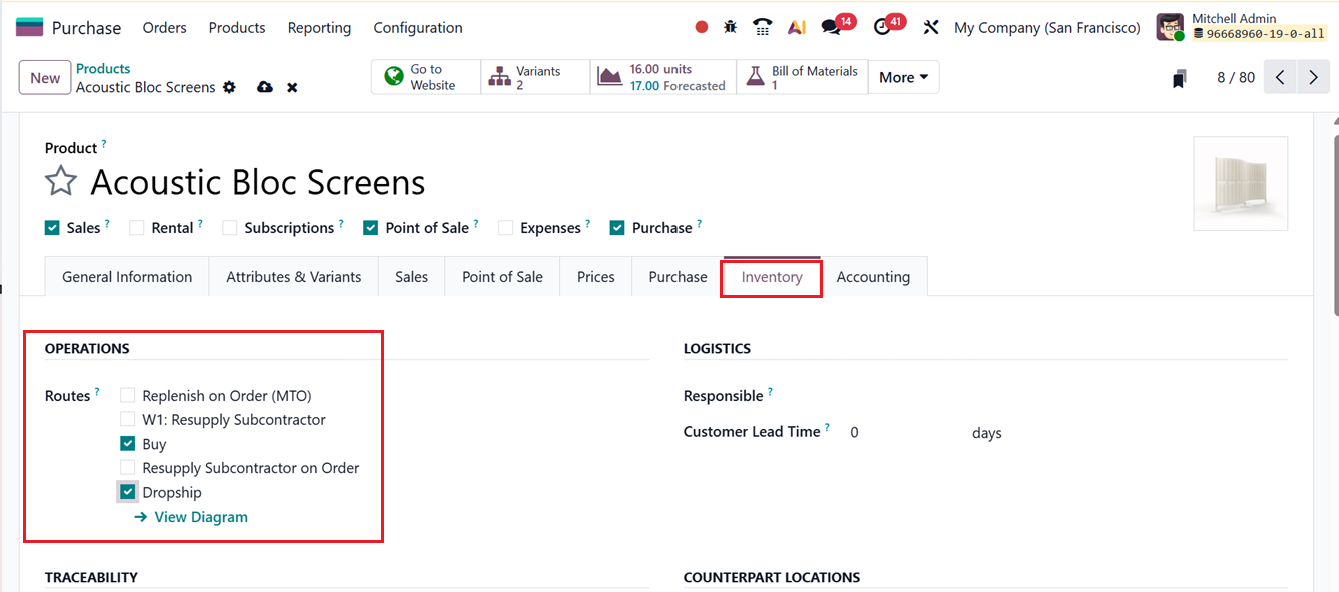
In Odoo 19, assigning the dropshipping route to a product ensures that all sales transactions for that item follow the dropshipping process. After defining the applicable operational routes, the product can be handled more effectively through the Inventory module. To finalize the setup, it is necessary to specify a vendor in the Purchase tab of the product form. This vendor represents the supplier responsible for shipping the product directly to the end customer, as shown in the accompanying screenshot.
To validate the dropshipping workflow, you can create a Sales Order for the dropship-enabled product from the Sales module.
Enter all required customer information and sales details in the relevant fields to proceed.
Once the sales order is confirmed by clicking the Confirm button, Odoo automatically generates a linked Purchase Order for the same product and assigns it to the corresponding vendor. This automatically created purchase order can be accessed through the Purchase smart button available on the sales order form, as depicted in the screenshot below.
After opening the Purchase smart button, confirm the purchase order by selecting the Confirm Order button.
After confirming the purchase order, you can create purchase bills, and Odoo will display both Dropship and Sale smart buttons, as illustrated in the screenshot below.
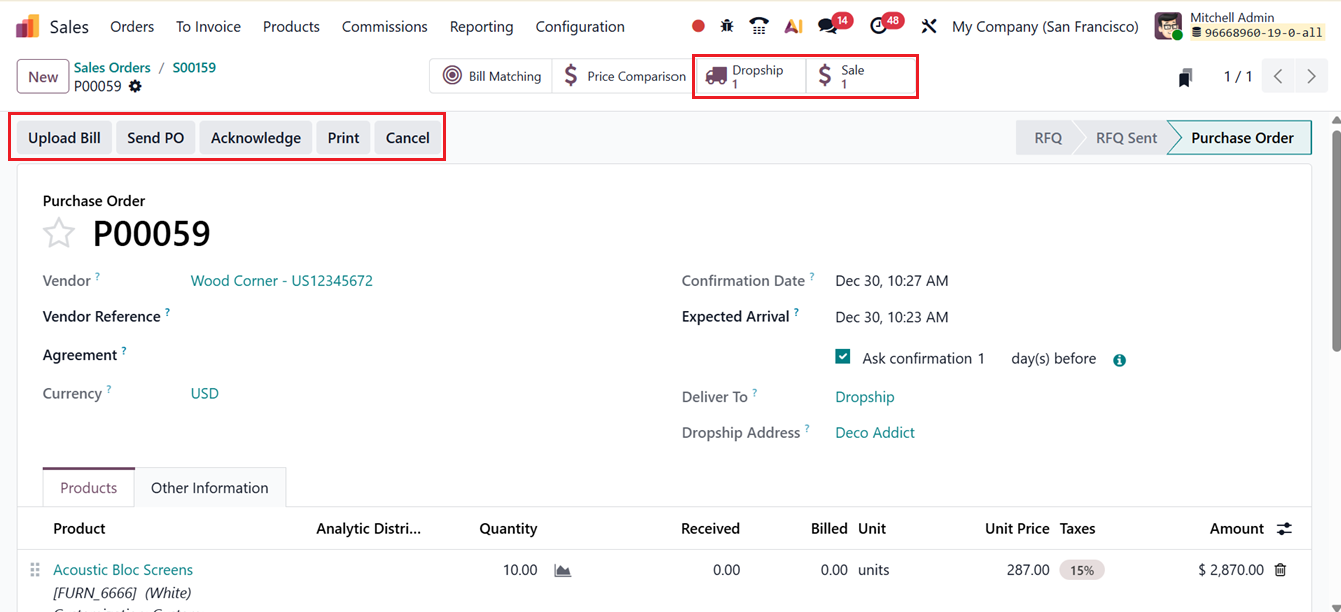
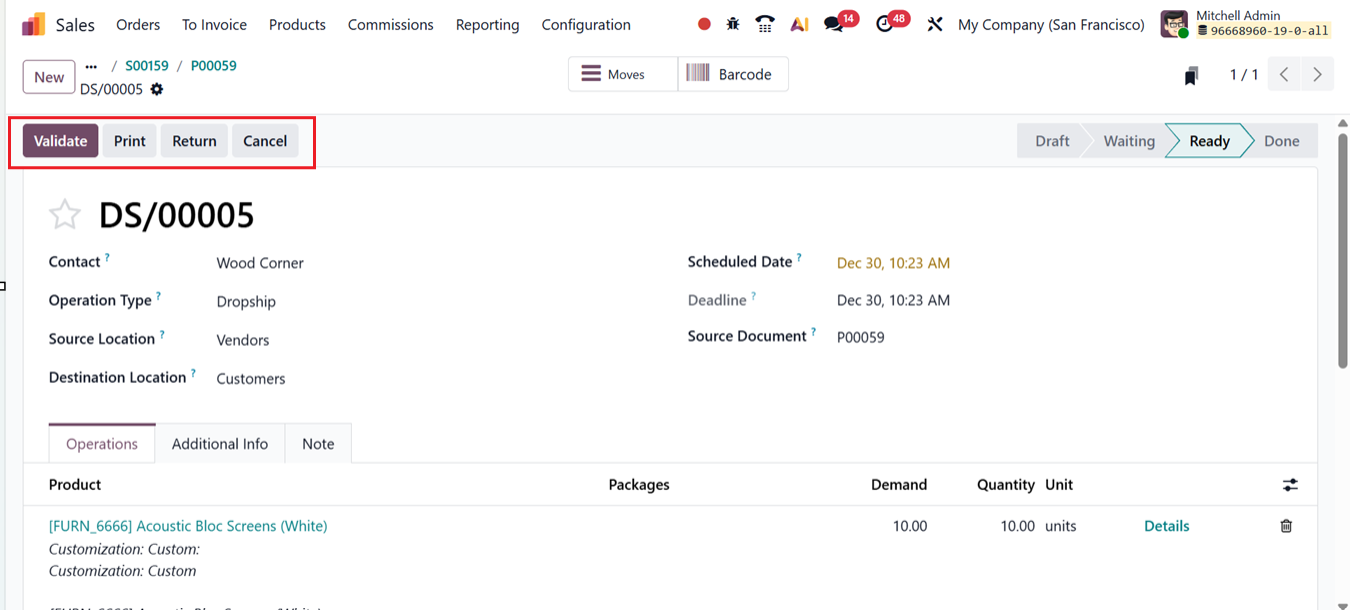
After the purchase order confirmation, the supplier initiates the shipping process. Odoo tracks and records each step automatically, ensuring complete operational transparency. By opening the Dropship smart button, you can review the shipment details and validate the dropship operation by clicking the Validate button, thereby confirming that the product has been successfully delivered to the customer.
Overall, the dropshipping feature helps businesses lower operational expenses and simplify workflows. It enables companies to expand their product offerings without the need for physical storage, making it a highly scalable solution that minimizes inventory investment while supporting business growth.
Replenish On Order (MTO):In Odoo 19 Purchase, the Replenish on Order (MTO) procurement method automatically creates a purchase order or manufacturing order as soon as a sales order is confirmed, ensuring products are sourced only based on actual customer demand. This approach links each sales order directly to its procurement or production, improving traceability, accuracy, and on-time fulfillment while keeping inventory levels low and reducing carrying costs.
MTO is ideal for customized or non-stocked items, as it improves cash flow, avoids overstocking, and supports flexible order handling.
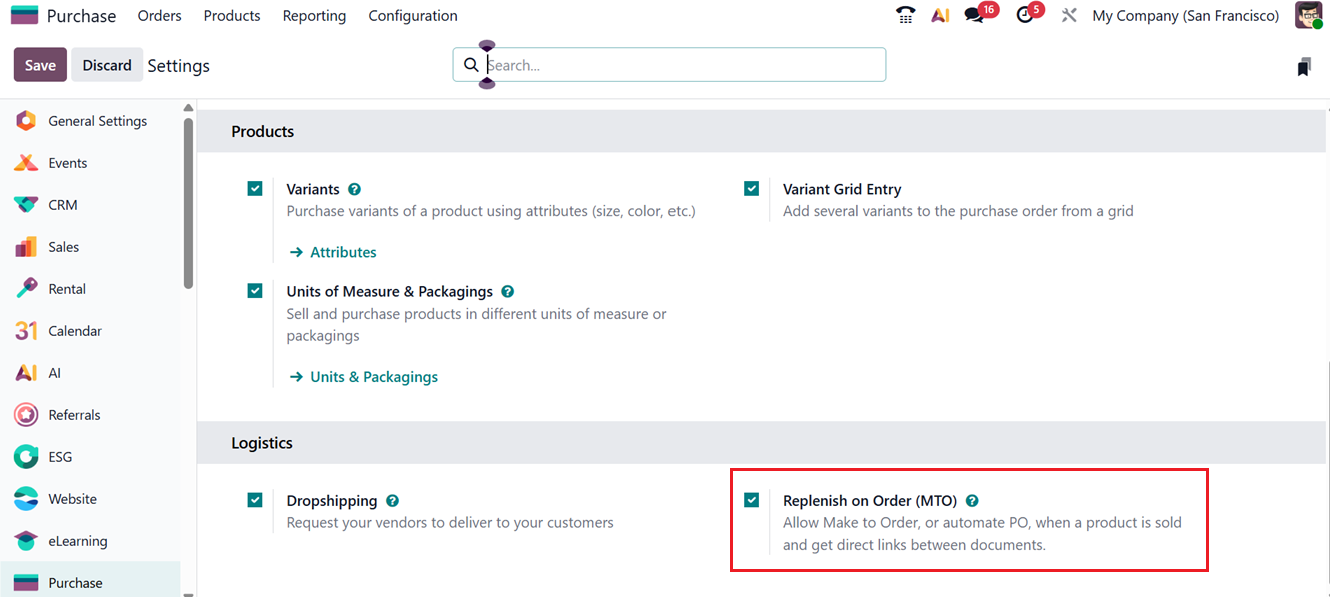
To use this feature, enable the ‘Replenish on Order (MTO)’ option under the ‘Logistics’ section from the Configuration ‘Settings’ page, as shown in the screenshot below.
Automating a Purchase Order Using Replenish on Order (MTO)
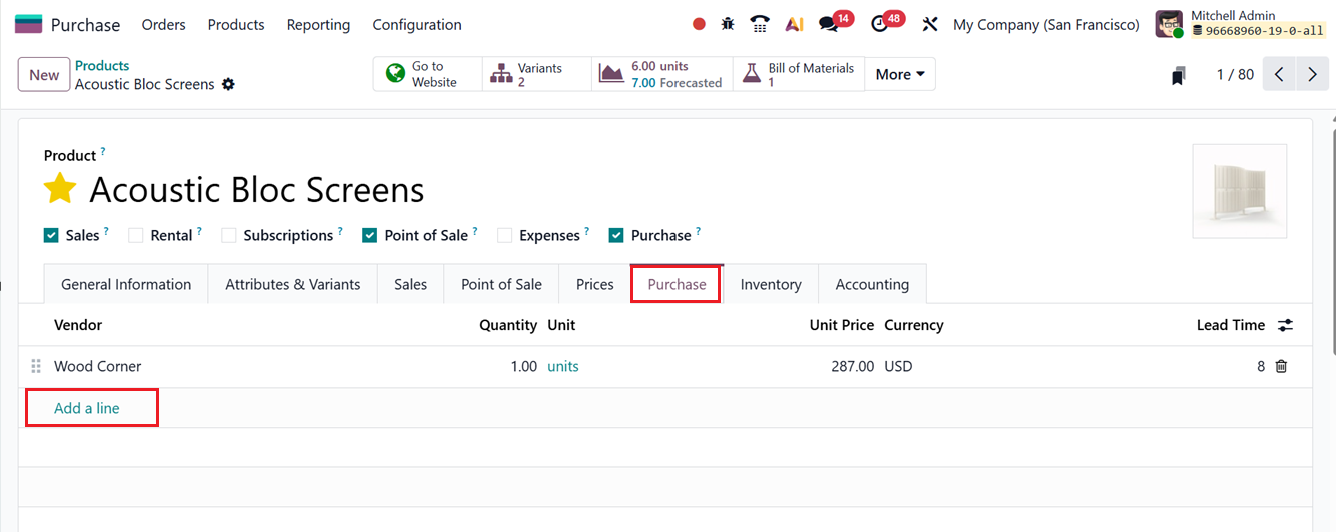
The Replenish on Order (MTO) feature allows purchase orders to be generated automatically as soon as a sales order is confirmed. To illustrate this process, consider a product called “Customized Cabinet” This item is not stored in inventory, meaning there is no available stock. When reviewing the product form, no Bill of Materials (BoM) is defined, confirming that it is neither manufactured nor pre-stocked.
Next, in the Inventory tab, enable the Replenish on Order (MTO) option. Once the product is saved, it is fully set up to trigger procurement whenever a customer places an order, as shown in the screenshot below.

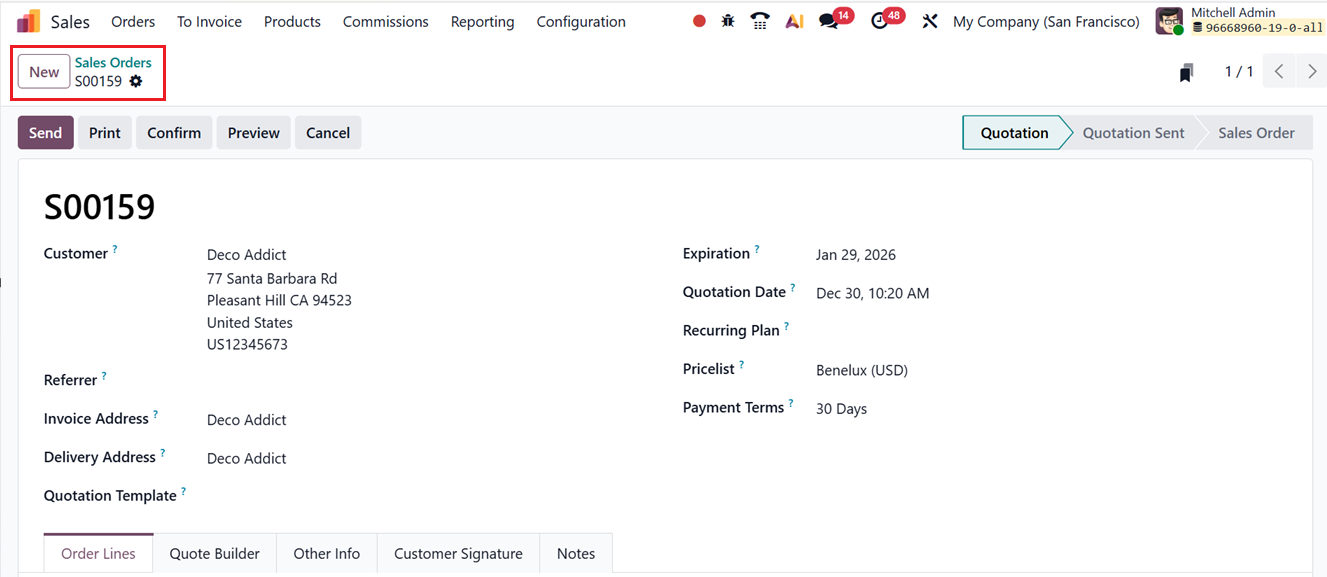
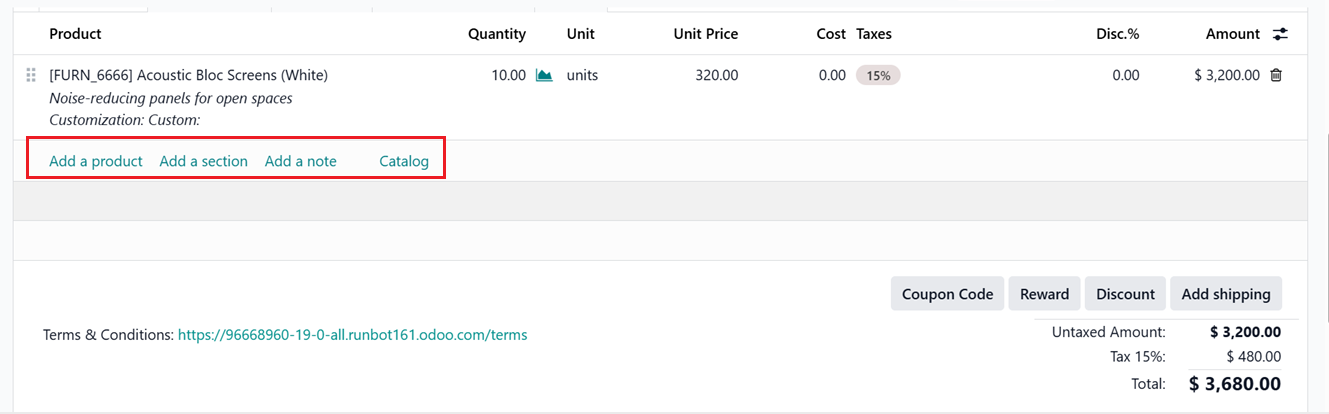
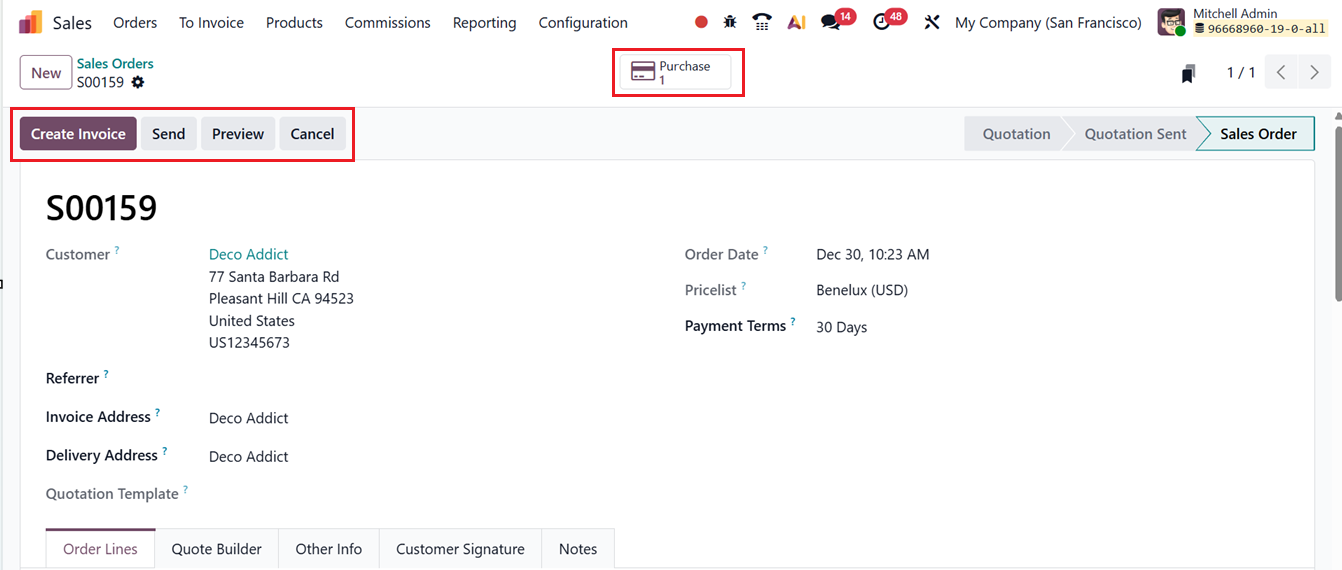
The next step is to create a sales order. From the Sales module, a new quotation is created for a customer requesting five units of this product. After adding the product to the order line and confirming the quotation, Odoo detects that the item is not in stock. As a result, two smart buttons appear on the sales order: Delivery and Purchase Order, as shown in the screenshot below.
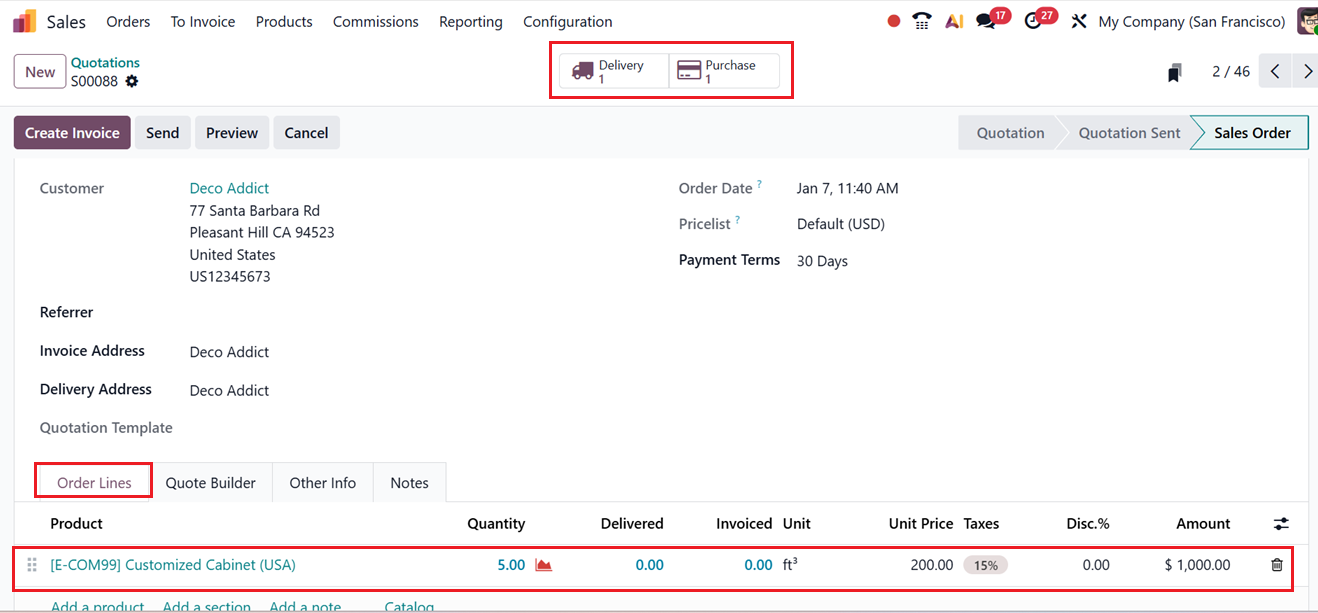
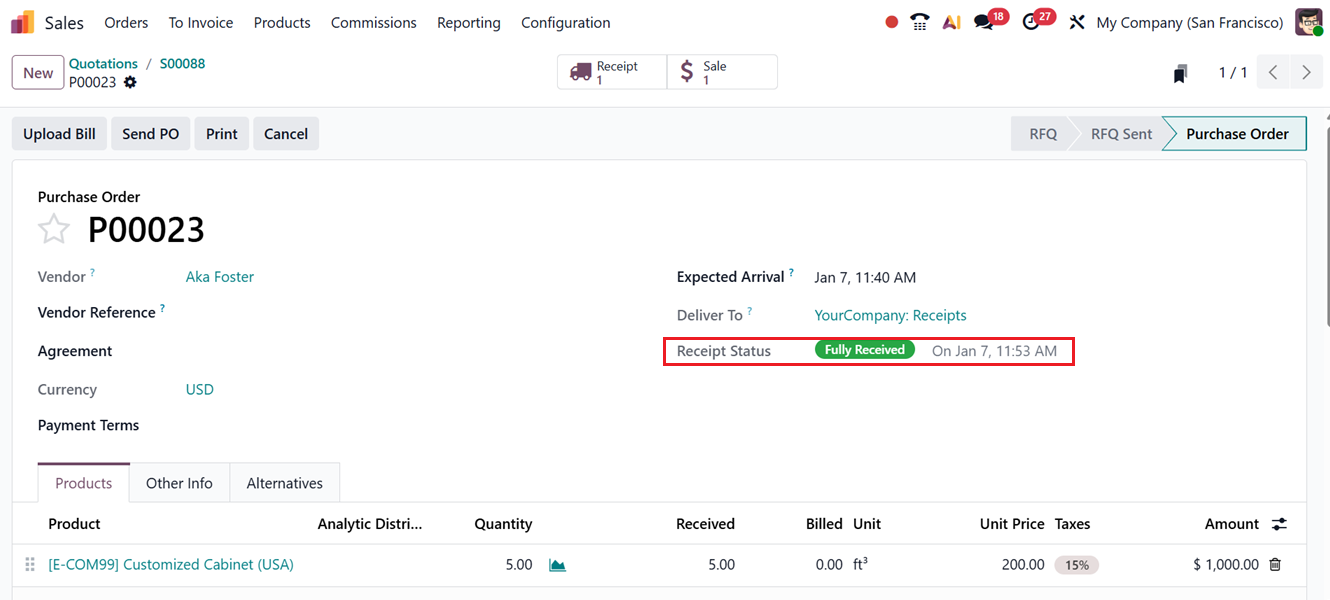
Before processing the delivery, open the automatically generated Purchase Order using the ‘Purchase’ smart button. This purchase order was created directly due to the MTO rule.
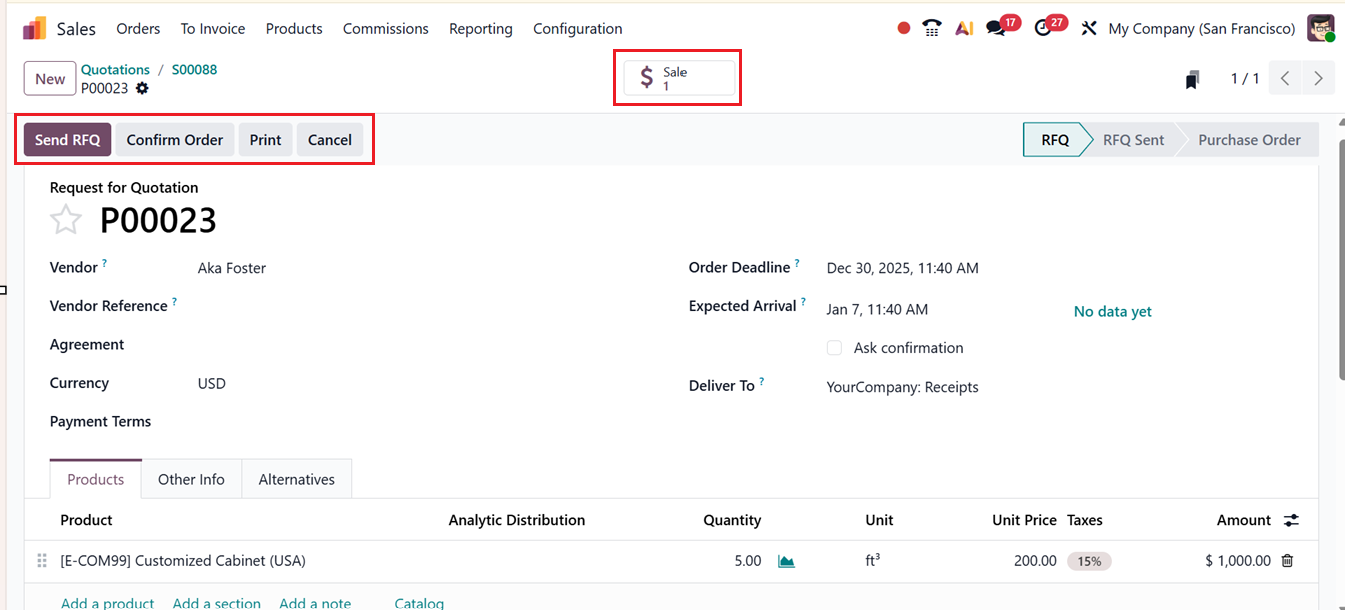
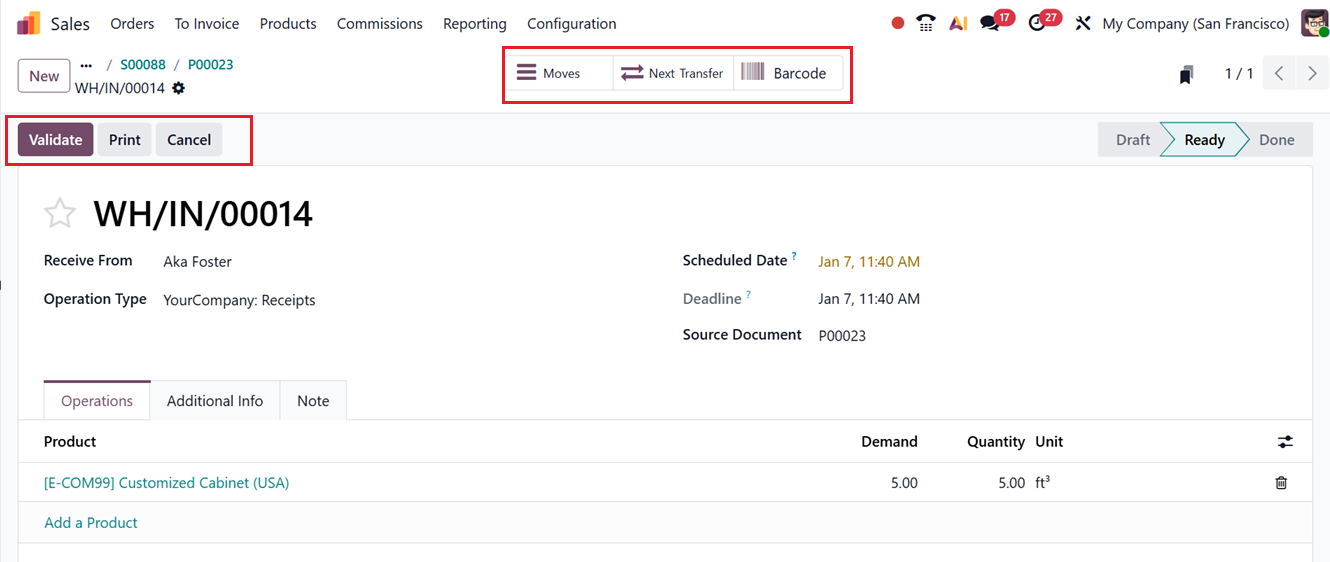
Then you can confirm the order using the ‘Confirm Order’ button. This will display an ‘Receipt’ smart button and the product receipt is validated within the receipt form, bringing the items into the company’s inventory, as shown in the screenshot below.
Once the goods are received, the workflow returns to the sales order. By opening the Delivery smart tab or using the Next Transfer option, the delivery order can be accessed and validated manually. After validating the quantities, you can see the ‘Available’ status on the ‘Product Availability’ field.
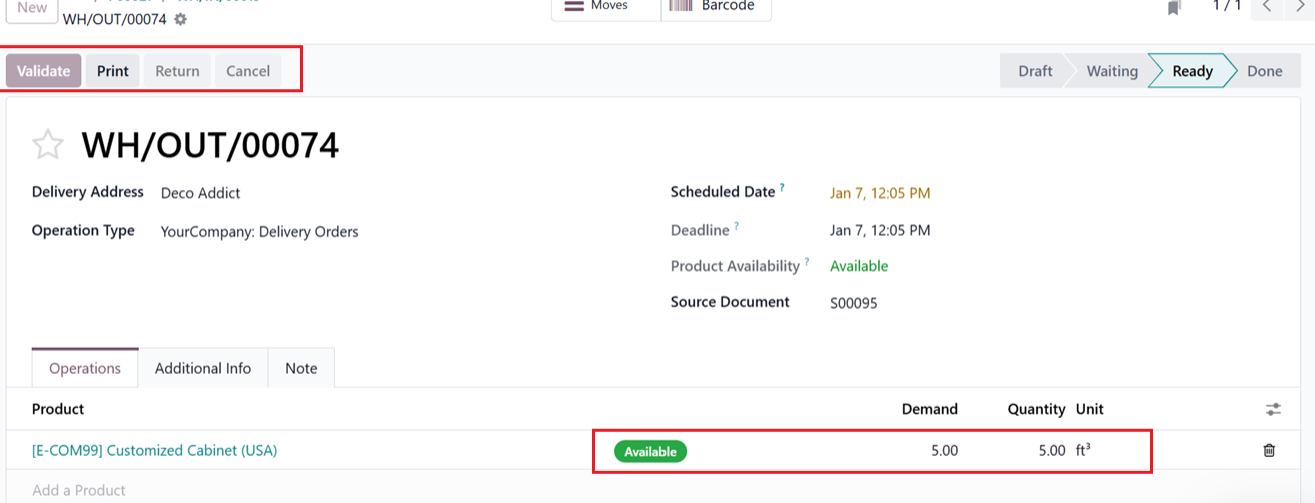
Since the product is now available in stock, the delivery can be validated and completed successfully. Then, you can proceed with the next billing and payment process as usual, as shown in the screenshot below.
The same replenishment process can also be done for Manufacturing Orders. So, let's discuss it in detail.
Automating a Manufacturing Order Using Replenish on Order (MTO)
The Replenish on Order (MTO) feature in Odoo 19 automatically creates a Manufacturing Order when a product is sold. This ensures production starts only when there is real demand, helping businesses reduce excess inventory, use resources efficiently, and better align manufacturing with sales
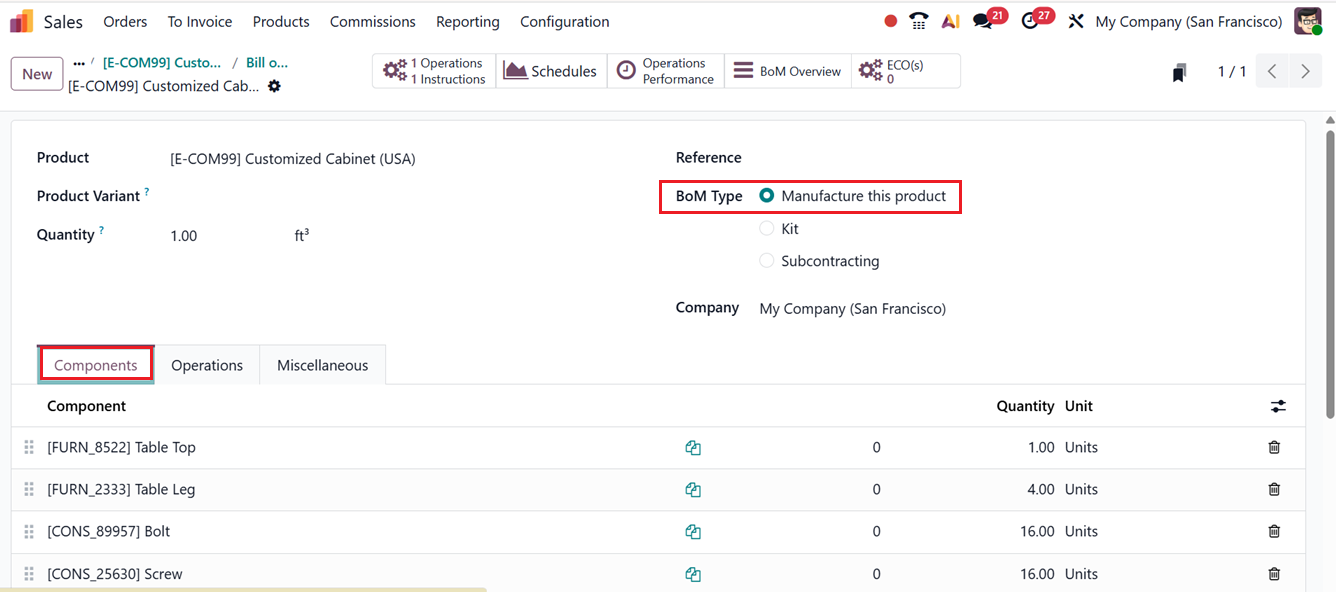
To check the workflow, open the same product, Customized Cabinet(USA). The on-hand quantity remains zero, indicating that the product is not stocked. On the product form, there is a smart tab labeled Bill of Materials. Upon opening this tab, you can see the available Bill of Materials for the product in a dashboard. To create a new one, you can click on the New button.

While creating the BoM, set the BoM Type to Manufacture this product. In the Components tab, add the required raw materials needed to produce the product. These components define what materials will be consumed during the manufacturing process.
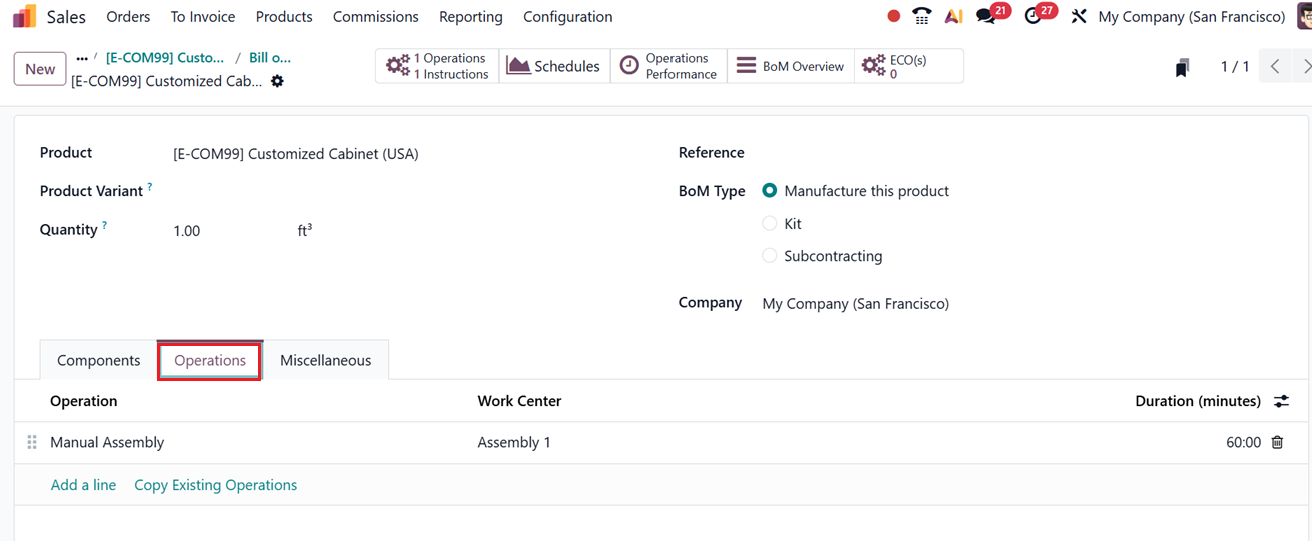
Next, move to the Operations tab and add the necessary operations involved in producing the product. These operations represent the manufacturing steps that must be performed during production. Once the components and operations are configured, save the Bill of Materials.
You can check more about creating BOM for a product through the Manufacturing Module. After saving, the newly created Bill of Materials is now visible in the smart tab, confirming that the product is ready for manufacturing through MTO.
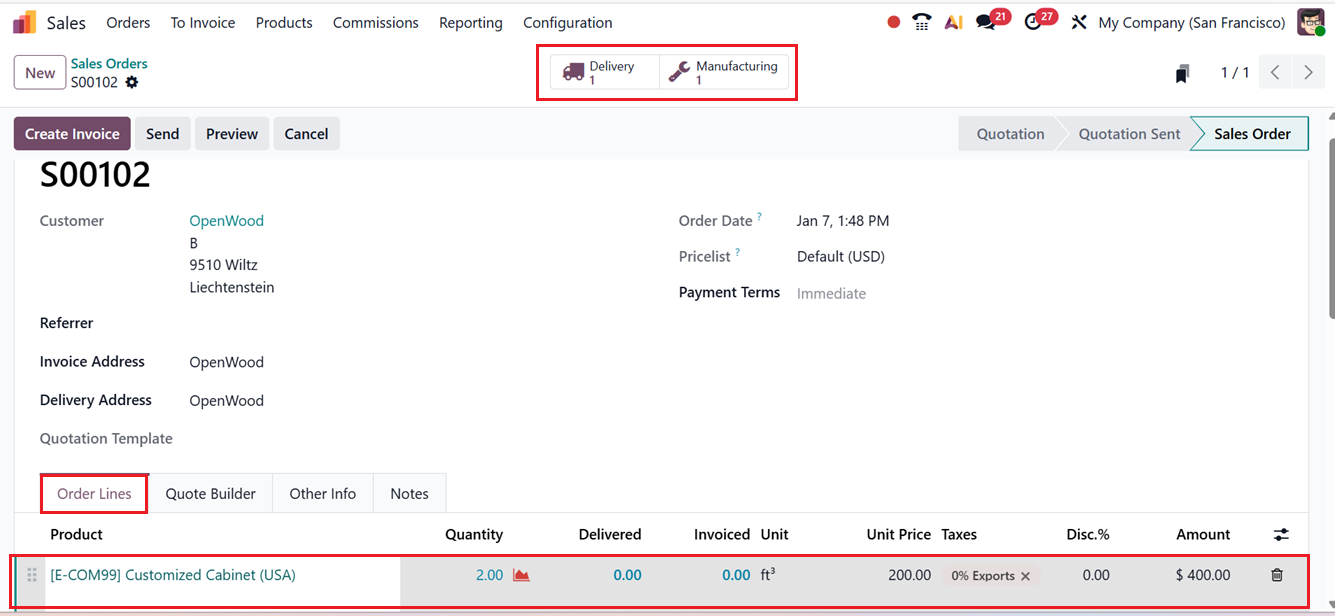
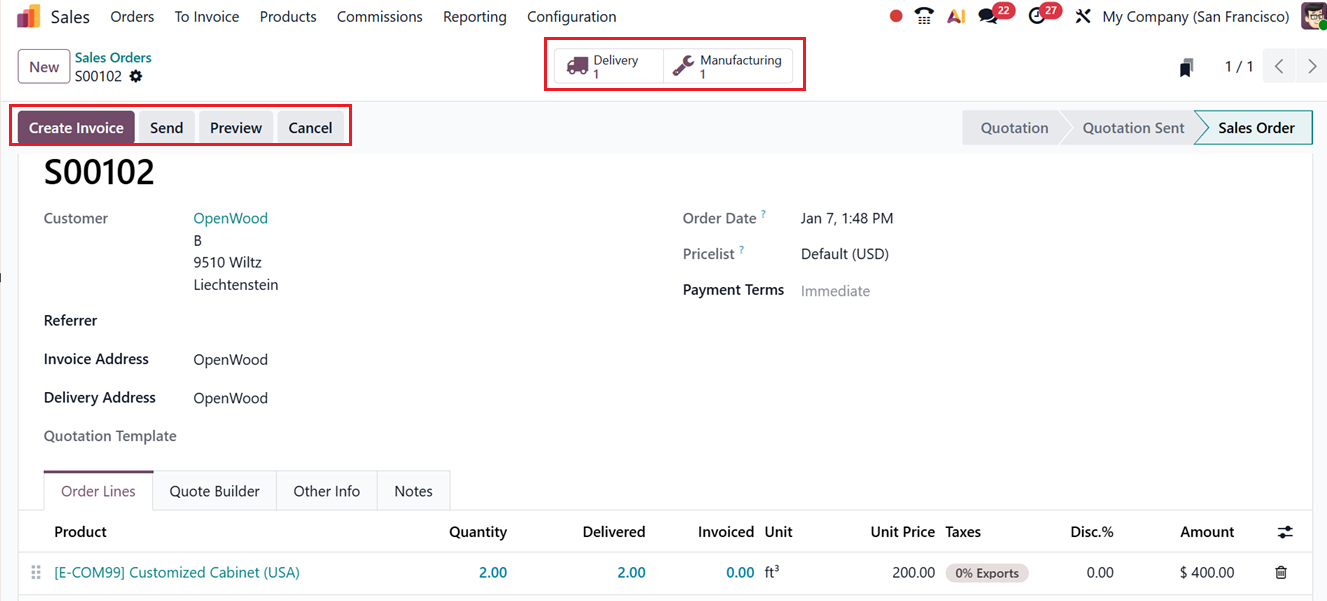
Now, create a new sales order for the product Customized Cabinet(USA) from the Sales module. Add the product to the order line with a quantity of two units, then confirm the order. As in the earlier scenario, two smart tabs appear on the sales order. A ‘Delivery smart tab and instead of a Purchase Order, the second smart tab is now Manufacturing, indicating that a Manufacturing Order has been generated, as shown in the screenshot below.
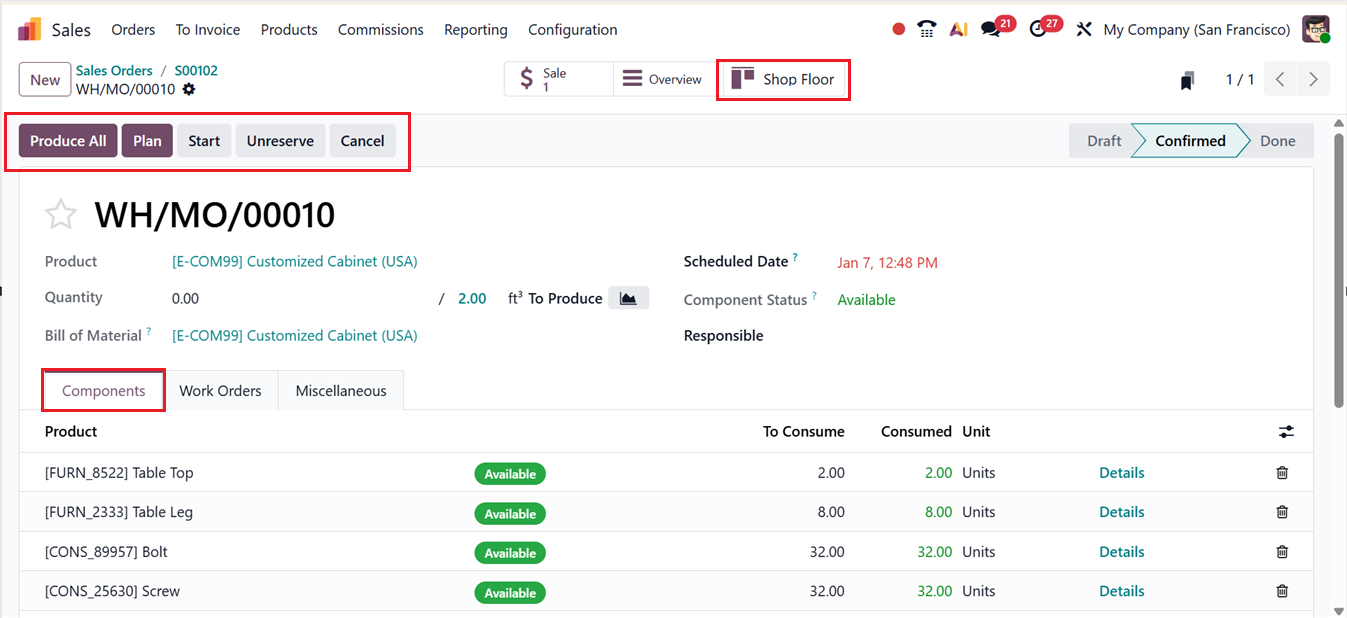
Open the Manufacturing Order from the smart tab. The system automatically displays the Components and Operations defined in the Bill of Materials. Here, you can plan the manufacturing order for a suitable timing using the ‘Plan’ button or immediately start the production process using the ‘Start’ button. Once production is complete, click on Produce All to finish the manufacturing operation, as shown in the screenshot below.
Finally after completing all the manufacturing procedures, return to the sales order and open the Delivery smart tab. Since the product has now been manufactured and is available in stock, validate the delivery to complete the process and create invoice as usual.
Through this process, Odoo 19 efficiently links sales, purchasing, and inventory operations, ensuring that products are procured only when needed and delivered promptly to customers using the Replenish on Order (MTO) strategy.