Orders Menu
The Orders menu within the Odoo 19 Purchase module serves as a unified control center for managing all procurement-related processes. It grants users access to essential components such as Purchase Orders generated once RFQs are approved Purchase Agreements, which accommodate long-term contracts or blanket orders, and Requests for Quotation, where purchasing inquiries can be initiated with vendors.
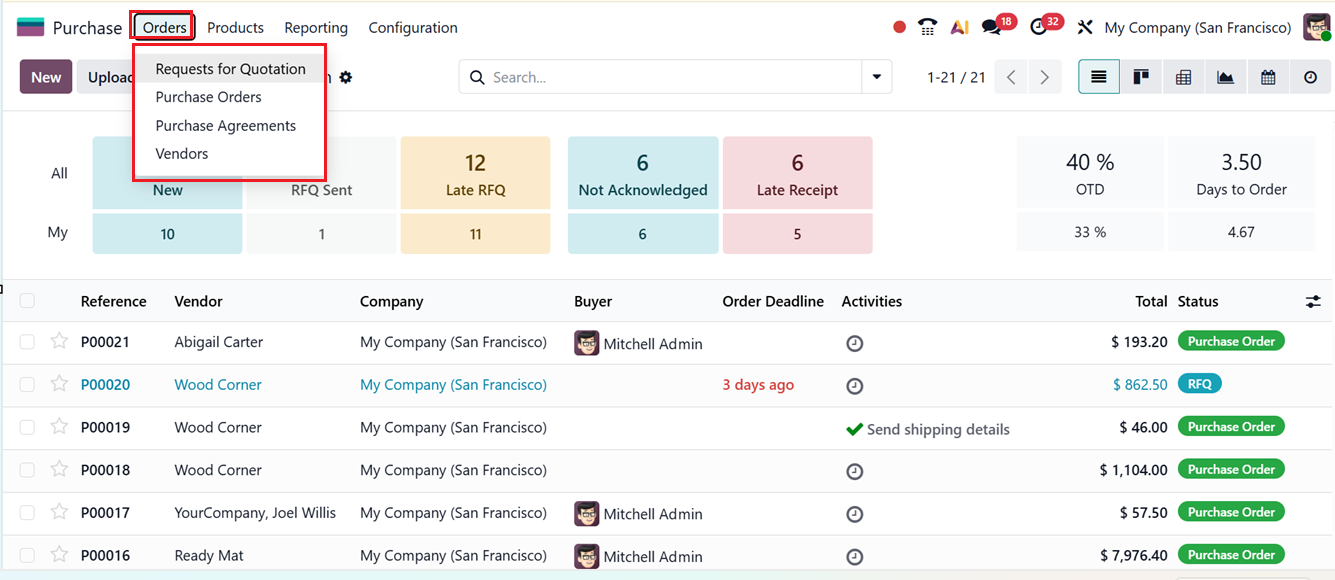
This menu also contains a dedicated Vendors section, allowing teams to manage supplier records, analyze vendor performance, and update -contacts and pricing information. Its structured layout allows businesses to oversee their procurement workflow efficiently from one organized dashboard.
1.1 Requests for Quotations
The Request for Quotation (RFQ) functionality in Odoo 19 streamlines the manner in which organizations create, track, and evaluate quotation requests, enhancing overall procurement effectiveness. Whether sourcing raw materials or specialized services, the system enables users to draft RFQs, compare offers from multiple suppliers, and select the vendor that provides the best value.
To access RFQs, navigate to the Orders menu within the Purchase module. Here, you’ll find a clear and intuitive interface listing active, pending, and past RFQs, giving users a complete overview of all procurement tasks.
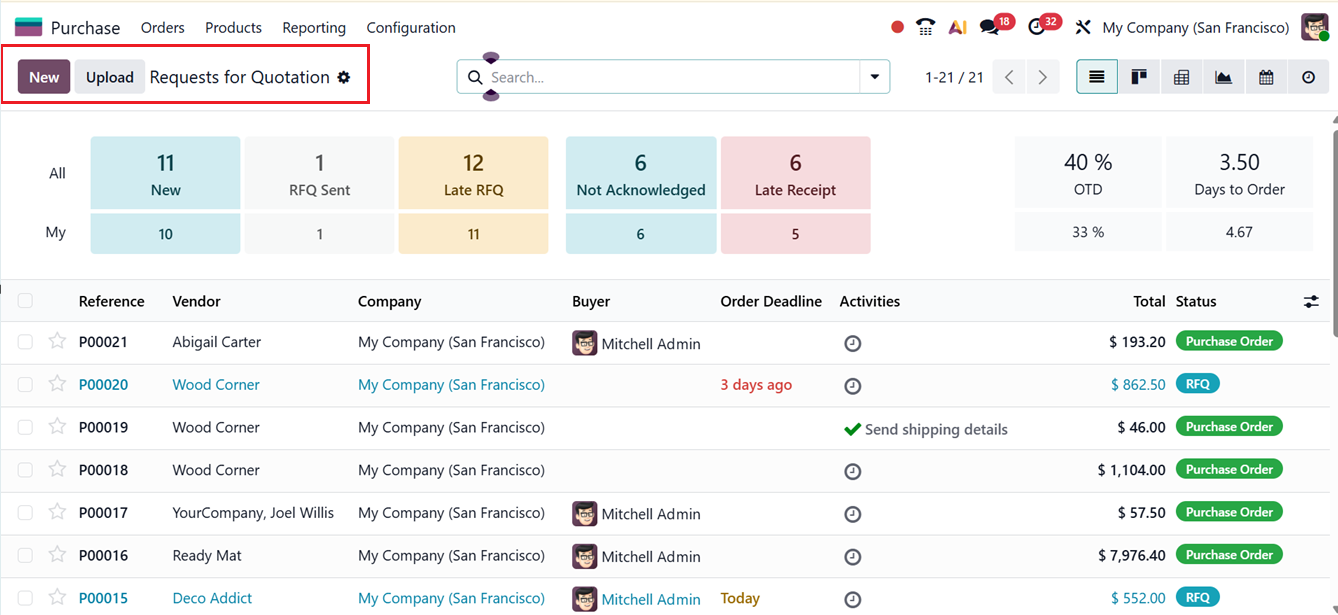
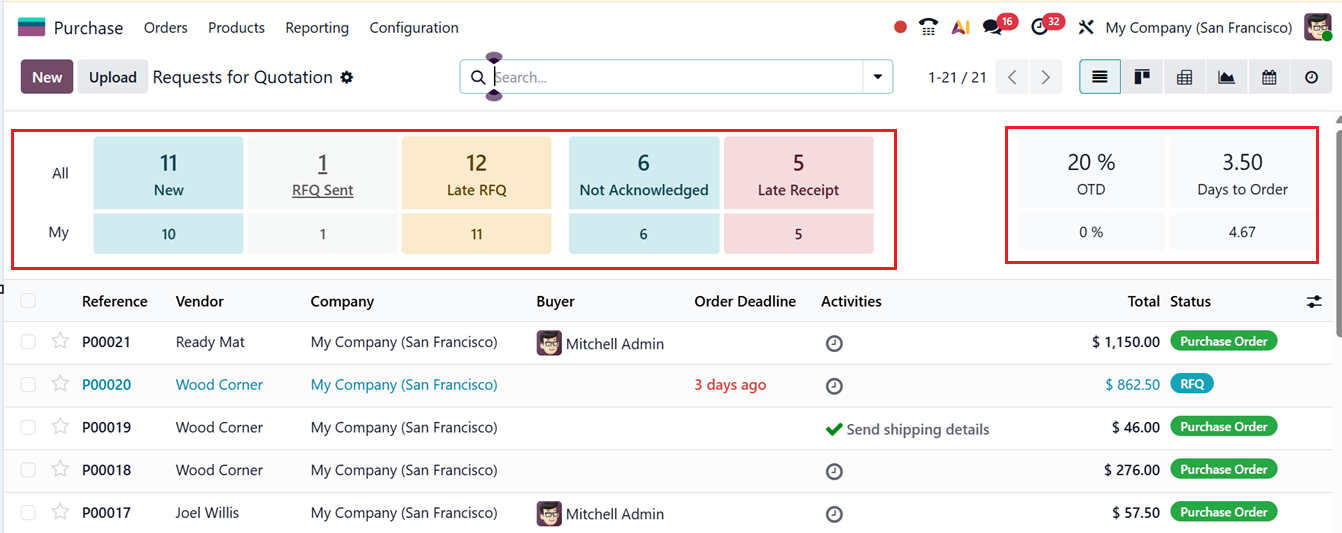
The main dashboard presents the total number of RFQs segmented by stages such as To Send, Waiting, and Late. Additional metrics including Average Order Value, Lead Time to Purchase, items purchased recently, and RFQs sent in the last few days are displayed alongside the detailed list.
By default, the RFQ list view shows an organized table containing key information such as Reference, Vendor, Company, Buyer, Order Deadline, Activities, Total Amount, and Status. Each RFQ line includes a star icon, allowing users to highlight priority or urgent requests for quick follow-up. Multiple viewing modes Kanban, Pivot, Graph, Calendar, and Activity can be selected to visualize data from different analytical angles.
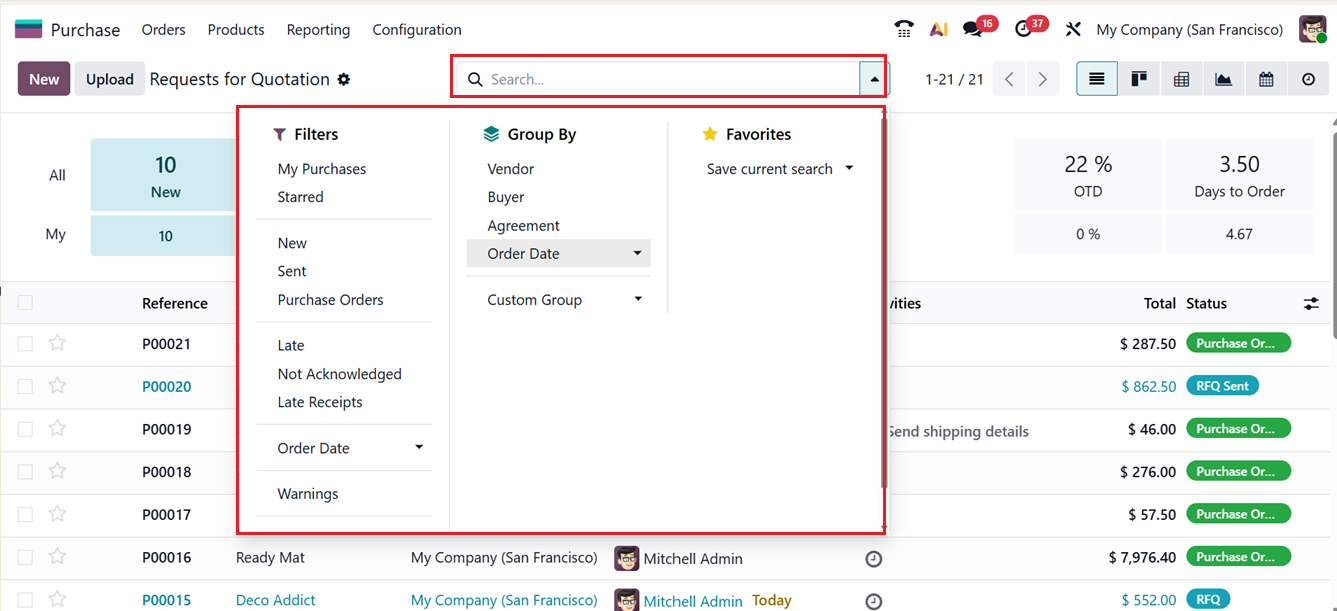
To refine searches, the system offers Filters and Group By tools in the search panel. Preconfigured filters such as My Purchases, Starred, New, Sent, Purchase Orders, Late, Not Acknowledged, Late Receipts, Order Date and Warnings make it simple to locate specific records. Users may also create their own filters using the ‘Custom Filter’ option. Grouping can be performed by Vendor, Purchase Representative, Order Date, and other criteria, with an option to define custom groups as needed. The Favorites menu allows saving frequently used search configurations.
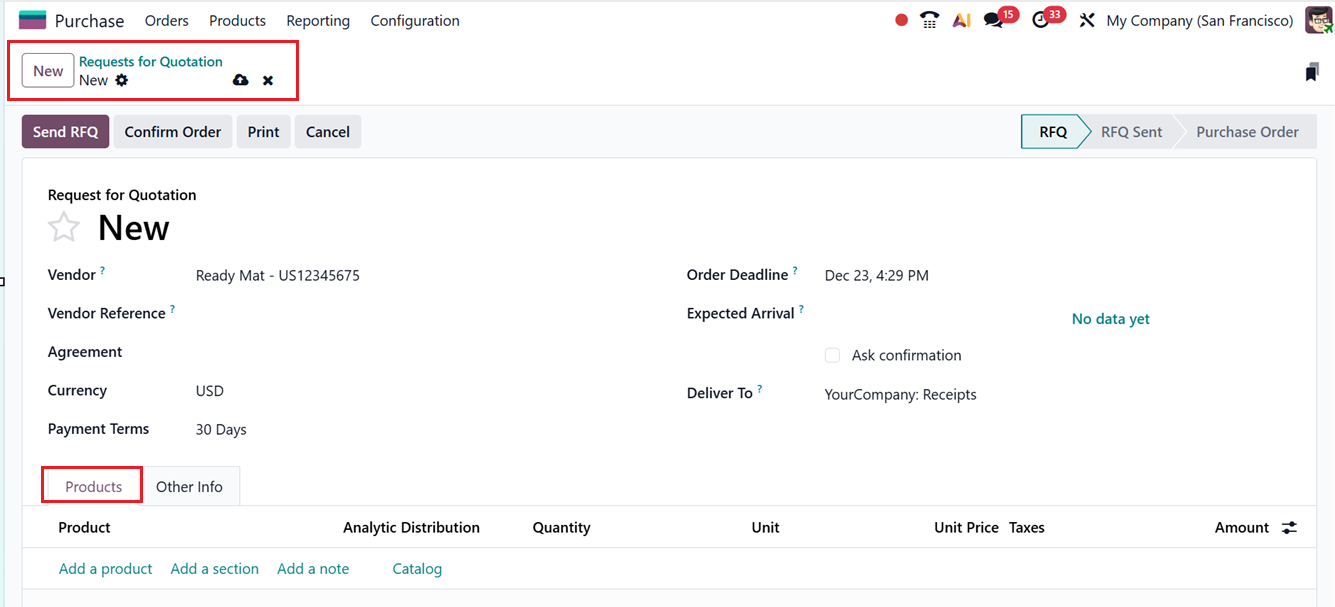
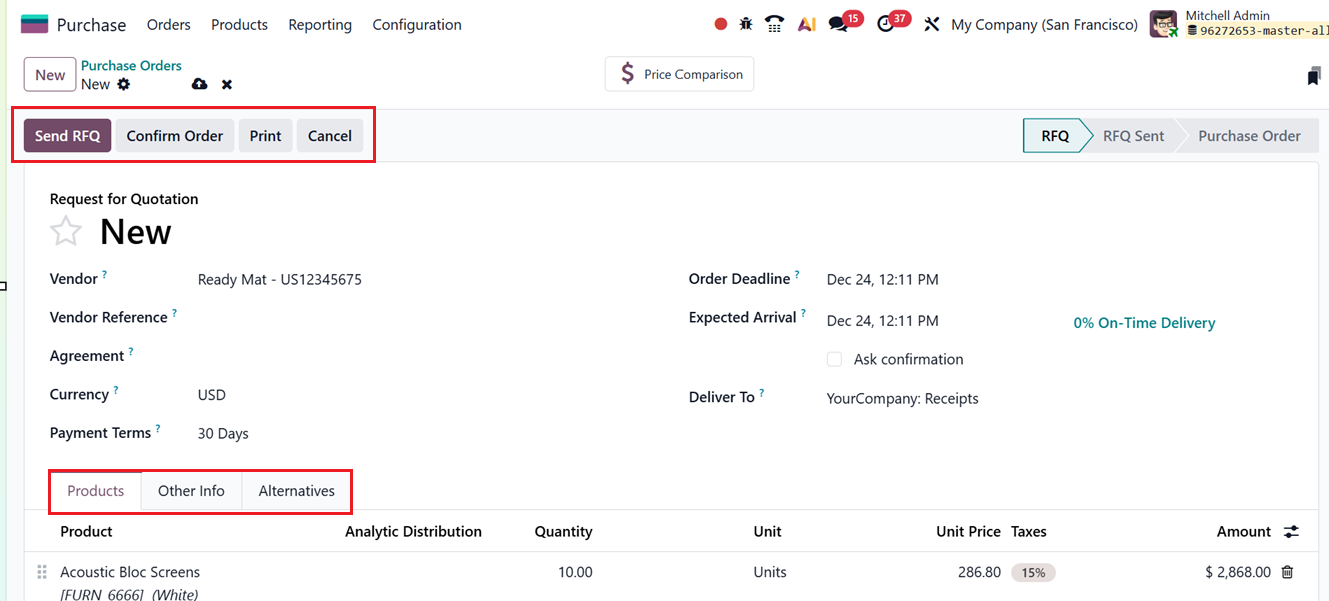
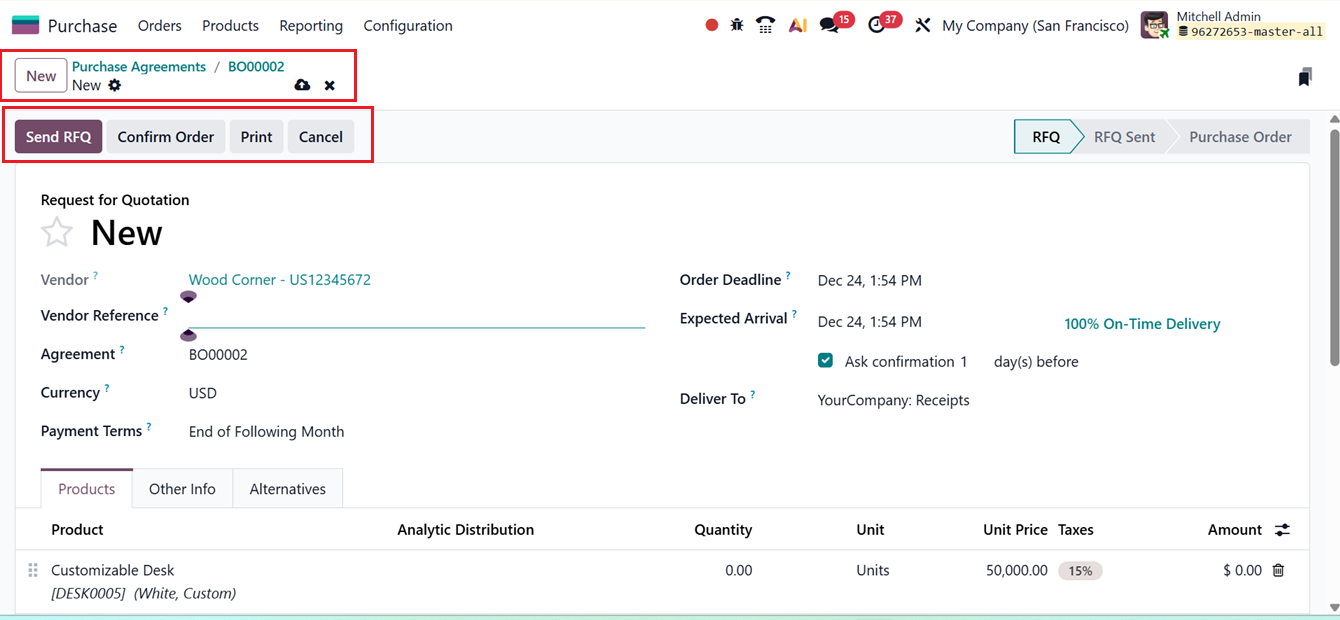
To create a new RFQ, go to the Request for Quotation menu and click on the New button. Begin by selecting a vendor from the list of suppliers maintained under the Vendors menu, as shown in the referenced screenshot. You may also enter a vendor reference commonly a vendor’s offer or bid number to assist in matching received shipments to the quotation. If a Purchase Agreement is relevant, it can be linked in the Agreement field. Next, set the Currency, define an Order Deadline, and specify an Expected Arrival date. Enabling the Ask Confirmation sends an automatic email requesting the vendor to verify expected delivery dates. Choose the appropriate Operation Type under Deliver To field, and indicate a related Project if applicable.
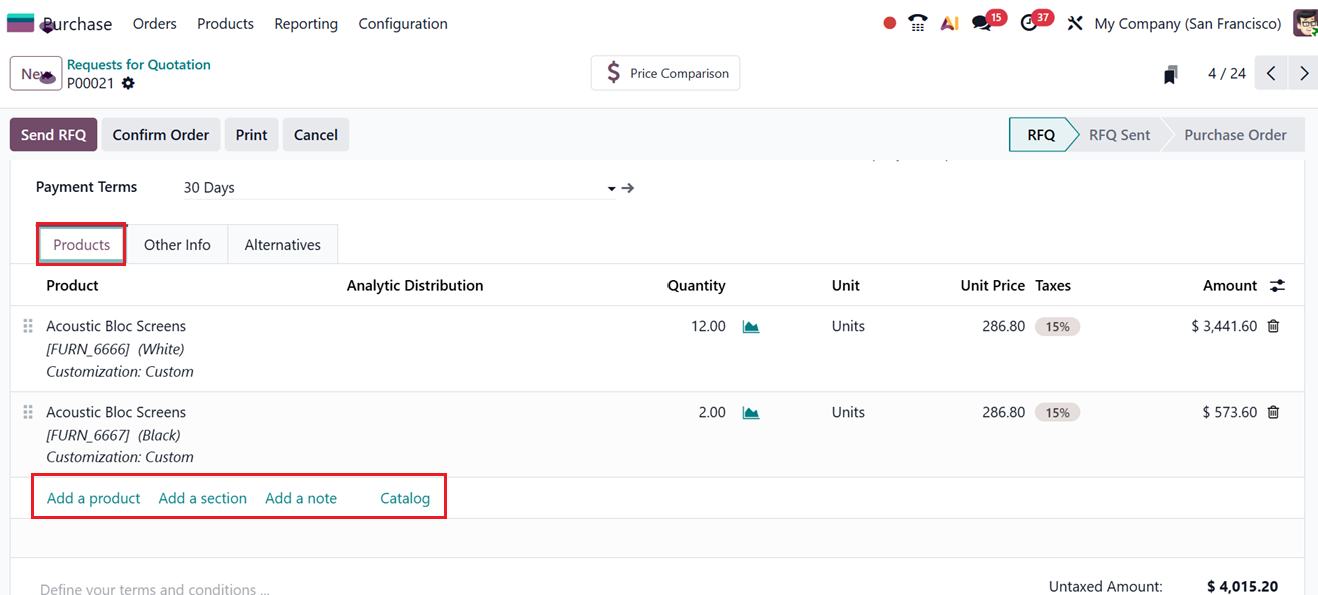
Within the Products tab, items can be added quickly from the product database by clicking on the ‘Add a Product’ or selecting from the product catalog using the ‘Catalog’ button.
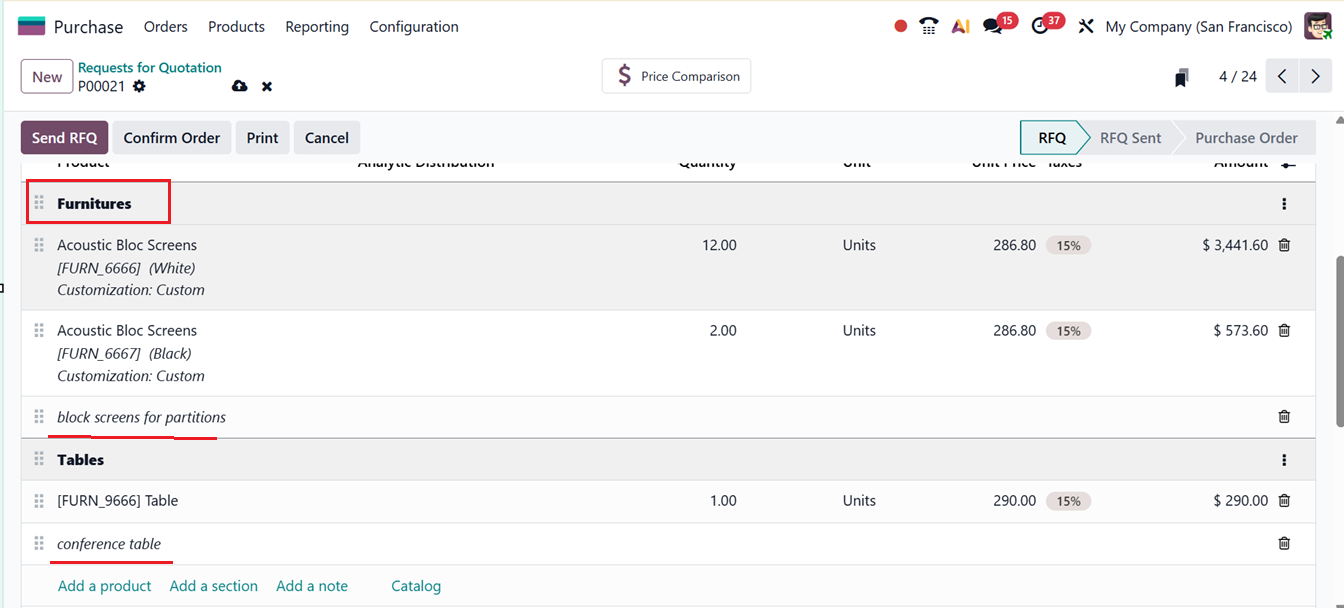
- Add a section: This tool allows users to divide products or services into categorized sections within an RFQ, Purchase Order, or Purchase Agreement. It becomes easier to review and evaluate items when they are grouped according to specific classifications.
- Add a note:This option allows users to insert additional comments or instructions directly into the RFQ documents. Notes are helpful for clarifying requirements, adding special conditions, or providing extra context to vendors.
The sections and notes feature visually organized items like Furnitures and Tables into their own categories, with notes appearing in italic text for emphasis, as depicted in the screenshot below.
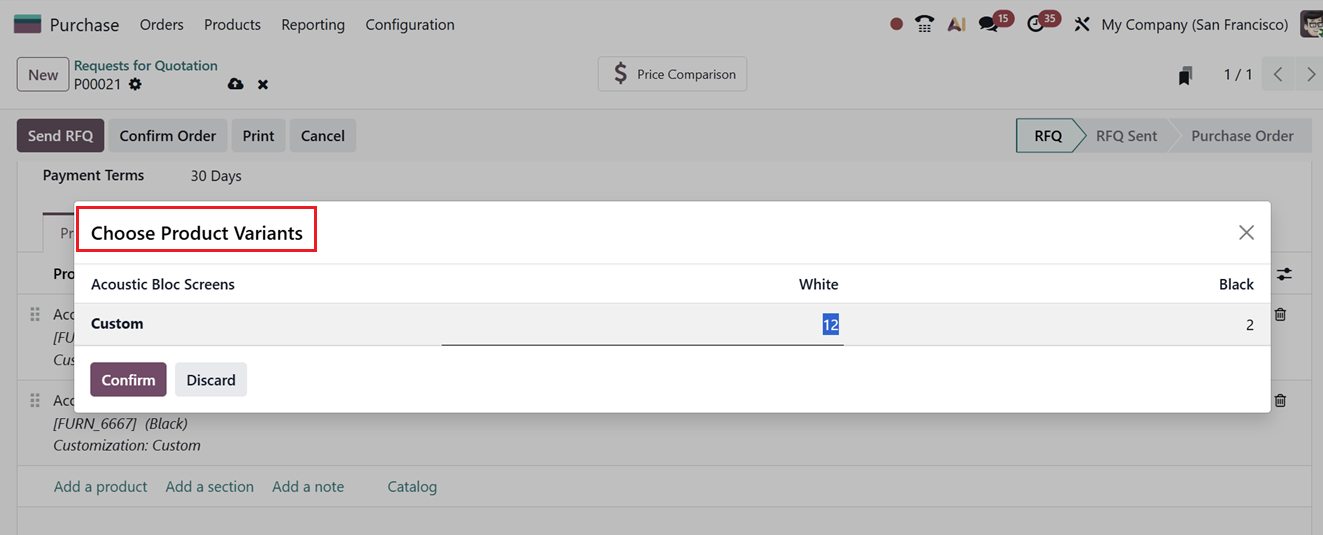
Selecting product variants from grid
If a product has multiple variants, the products will be shown in a grid view. Here you can choose from the available variants, as shown in the screenshot below.
The Other Information tab stores supplemental details such as the responsible Buyer, the company making the purchase.
Odoo also supports international trade through the Incoterm and Incoterm Location fields, which specify shipping responsibilities, logistics handling, insurance coverage, customs requirements, and the precise transfer point where risk and responsibility shift between buyer and seller. Additionally, Fiscal Position ensures that taxes and accounts are mapped correctly based on regional rules and company policies.
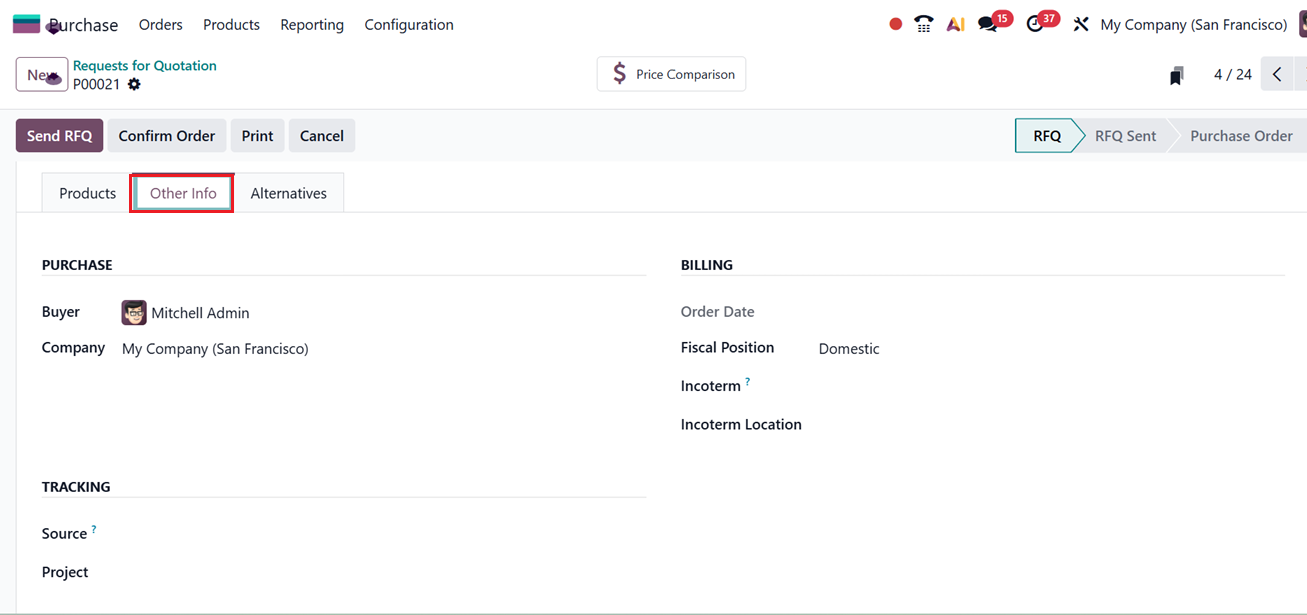
Then, you can add a Source Document linking the record to other transactions and corresponding Project of the quotation.
Alternatives Tab
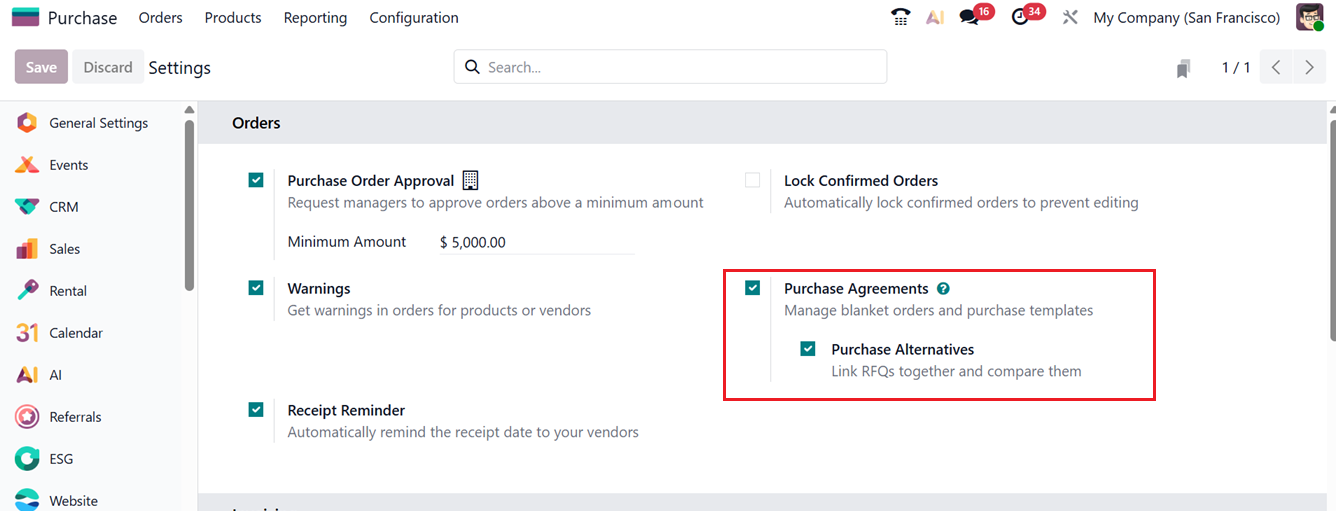
The Alternatives tab in Odoo 19 provides an advanced comparison tool that lets users evaluate multiple RFQs from different suppliers for the same items. To get the ‘Alternatives’ tab in a quotation form, we need to enable the ‘Purchase Alternatives’ option from the Configuration Settings window of the Module prior to creating the quotation, as depicted in the screenshot below.
After enabling the feature, you can see the ‘Alternatives’ tab and a ‘Create Alternative’ option inside the tab which is valuable when assessing vendor competitiveness based on price, availability, and delivery schedules, as shown in the screenshot below.
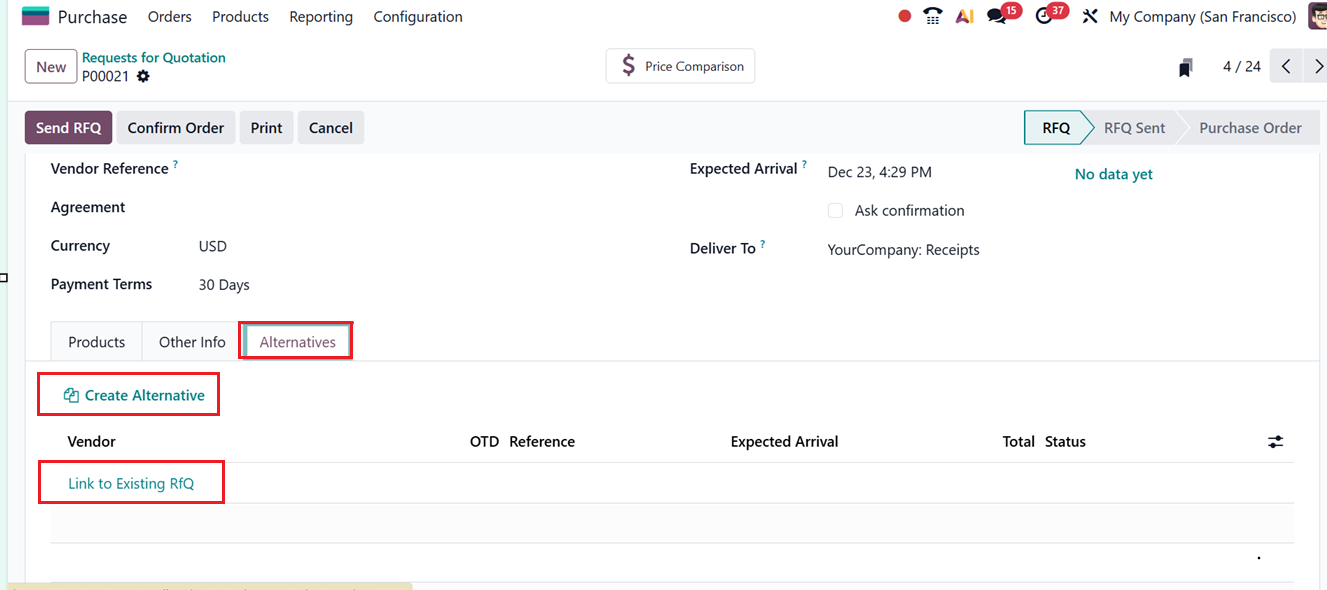
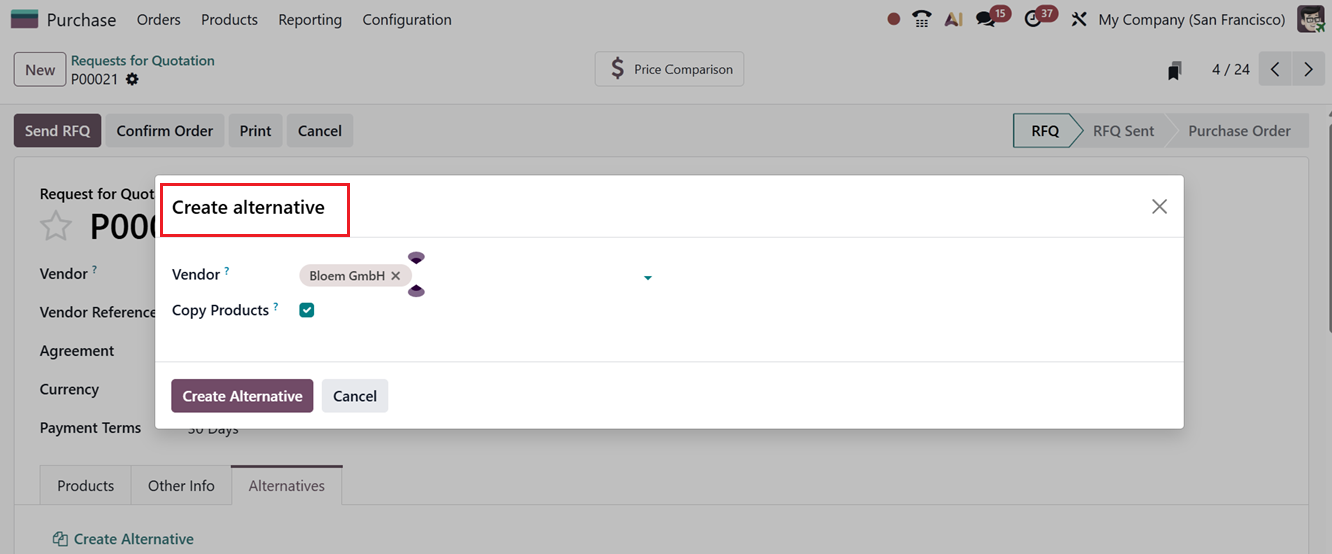
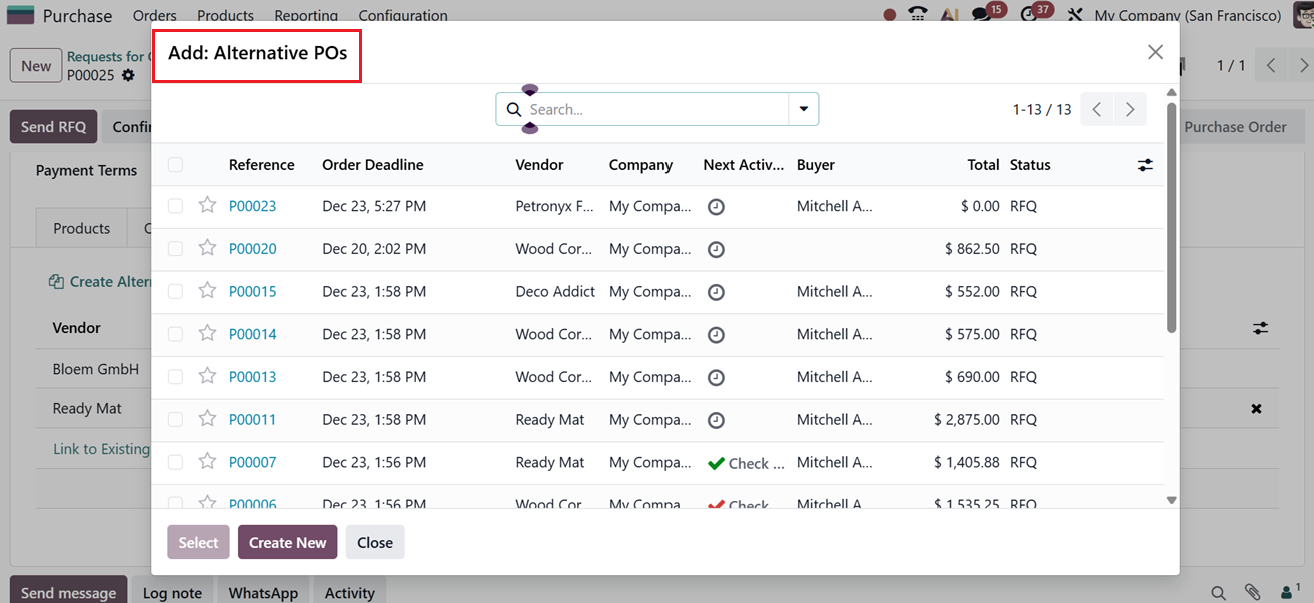
By clicking on the ‘Create Alternative’ button, a pop-up window appears where users can choose an alternate vendor and optionally copy product details from the primary RFQ.
Alternatively, the ‘Link to Existing RFQ’ option allows users to connect RFQs previously created for the same products, preventing duplication of work.
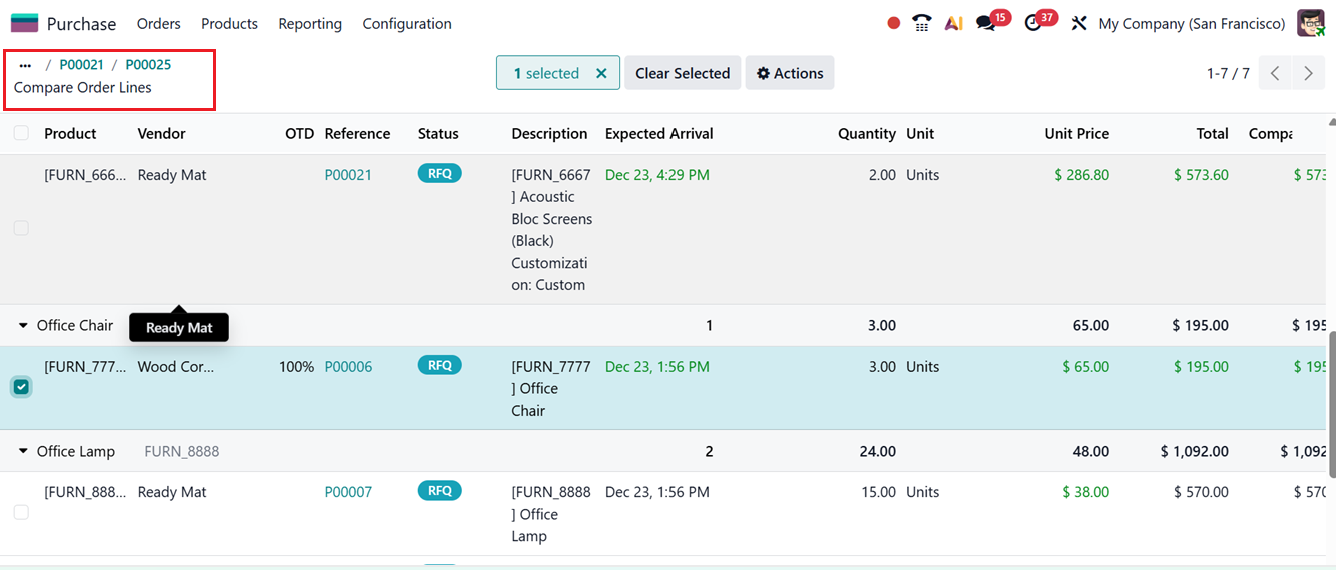
Once multiple RFQs are linked, selecting Compare Product Lines displays a side-by-side comparison of offers.

Details such as Product Name, Vendor, Reference, Status, Description, Quantity, Unit Price, Total Cost, and Company are shown, enabling strategic selection of the most favourable supplier.
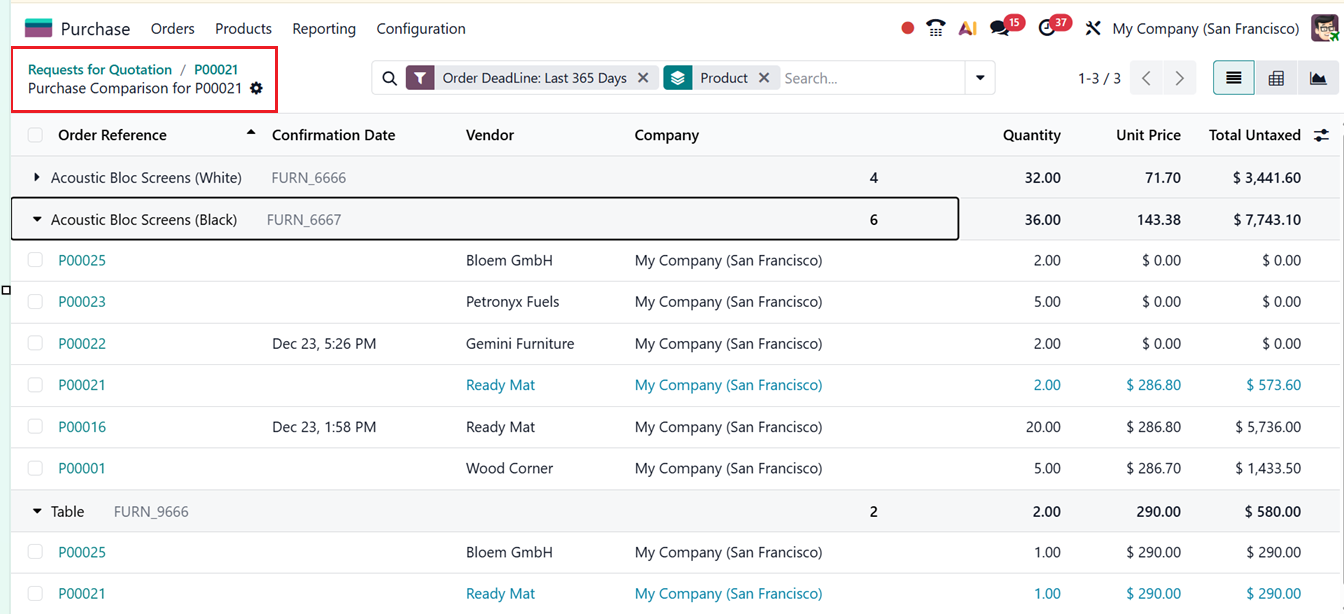
The Price Comparison smart tab offers a quick overview of price comparison details for the product across different vendors, as illustrated in the screenshot below.
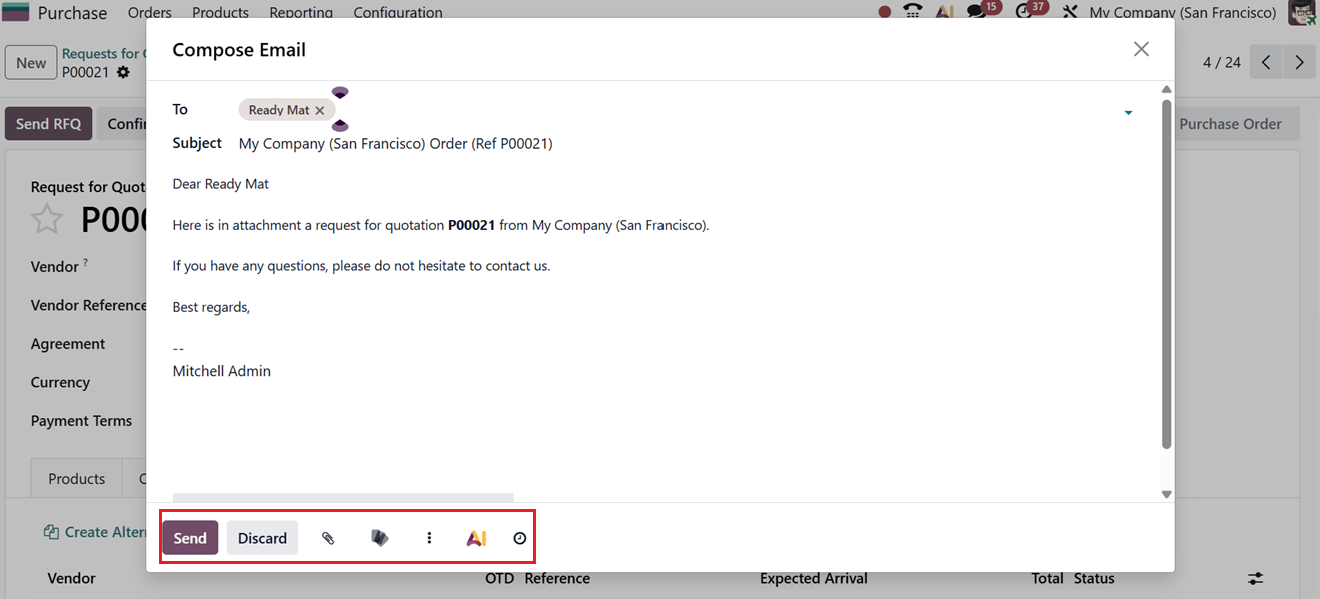
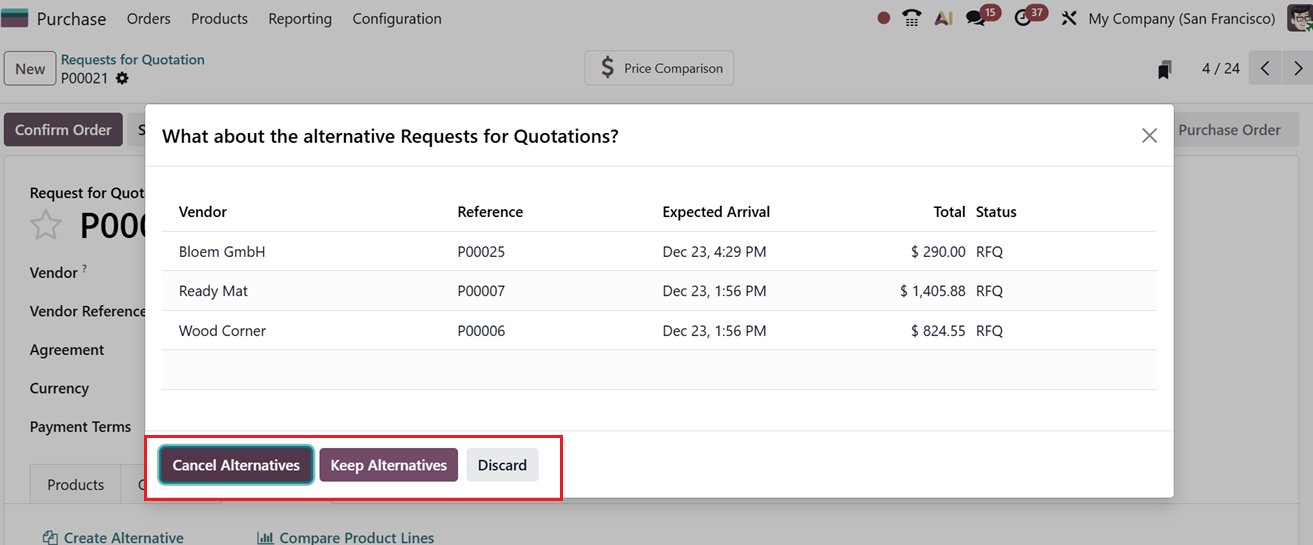
When comparisons are complete, the RFQ can be emailed to the selected vendor using the ‘Send RFQ’ option. Odoo automatically generates a preloaded email template that can be customized as needed. Users can specify recipients, attach supporting files, and send the message.
After sending, the RFQ status updates to ‘RFQ Sent’. The Cancel Alternatives button helps to cancel all the product alternatives from this quotation. If you want to keep the product alternatives requests for this quotation, click on the ‘Keep Alternatives’ button. Then the ‘Discard’ button lets users end the quotation process when required. Here, we are proceeding with the ‘Cancel Alternatives’ option.
Then, you can come back to the main quotation form and use the ‘Confirm Order’ button. This action will convert the RFQ into an official Purchase order. The Print RFQ feature allows generating a physical copy for documentation or record-keeping. The ‘Print’ and ‘Cancel’ buttons can be used to print the RFQ details and cancel the order.
1.2 Purchase Order Management
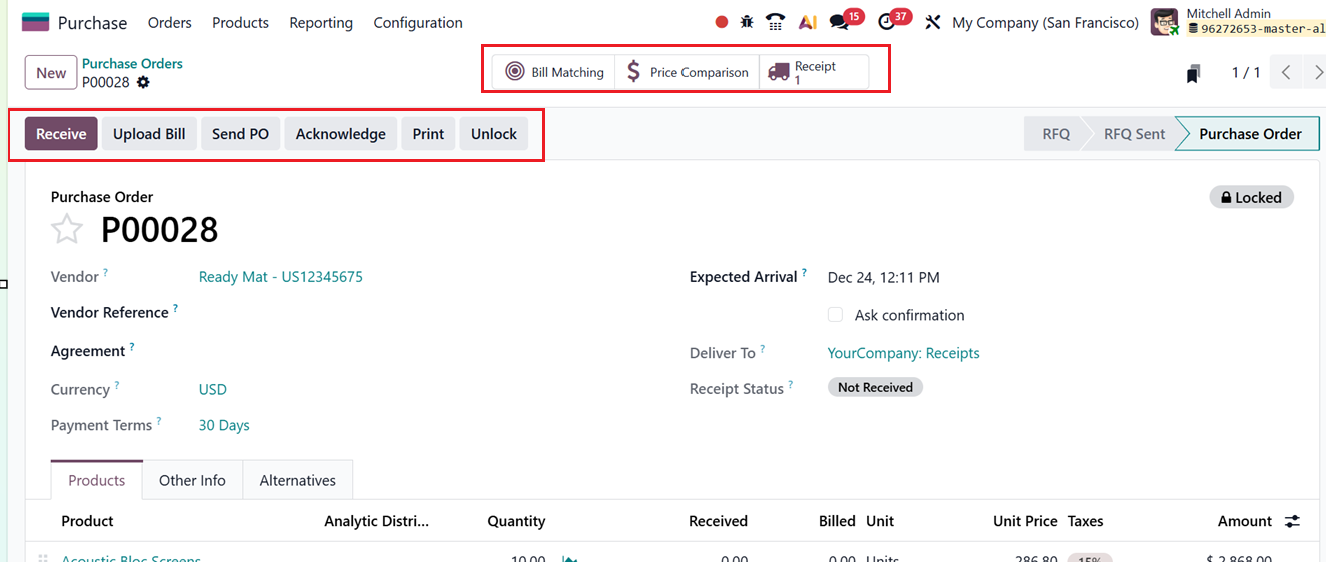
After clicking on the ‘Confirm Order’ button, Odoo 19s activates several tools designed to help users follow, execute, and control the purchase order lifecycle.
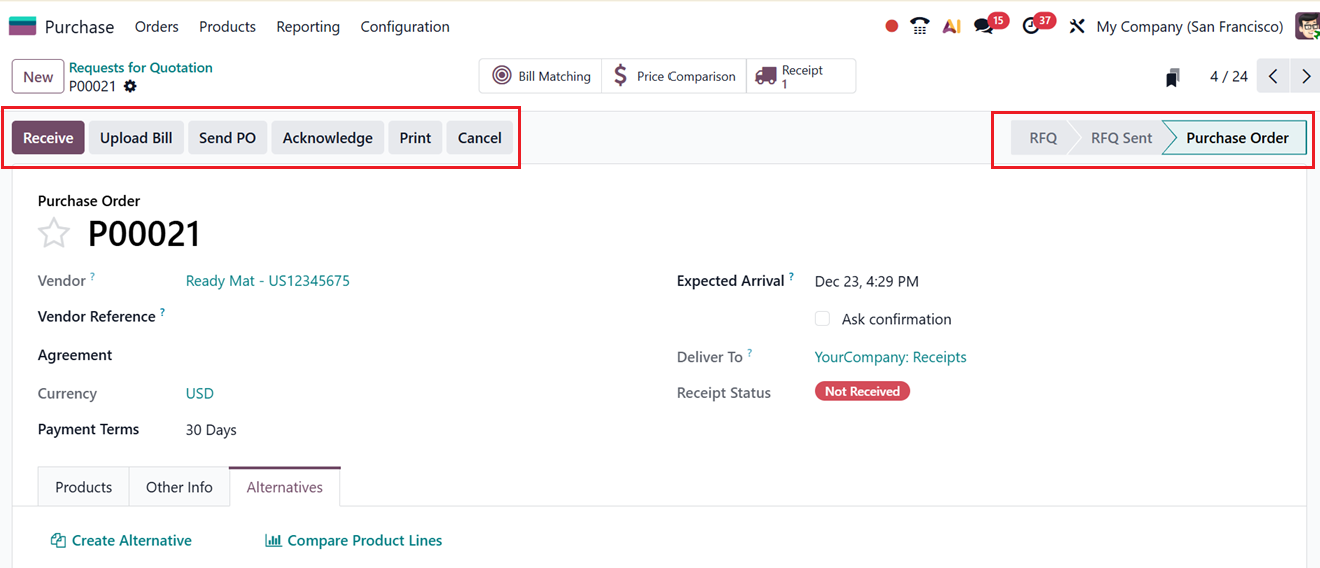
Then, you can perform essential actions directly within the ‘Purchase Order’ form. When the vendor dispatches the items, the receiving process can begin by selecting the ‘Receive’ button. After the products have arrived, a vendor bill can be issued using the ‘Upload Bill’ option to process payment. If necessary, the purchase order can be cancelled by clicking on the ‘Cancel’ button.
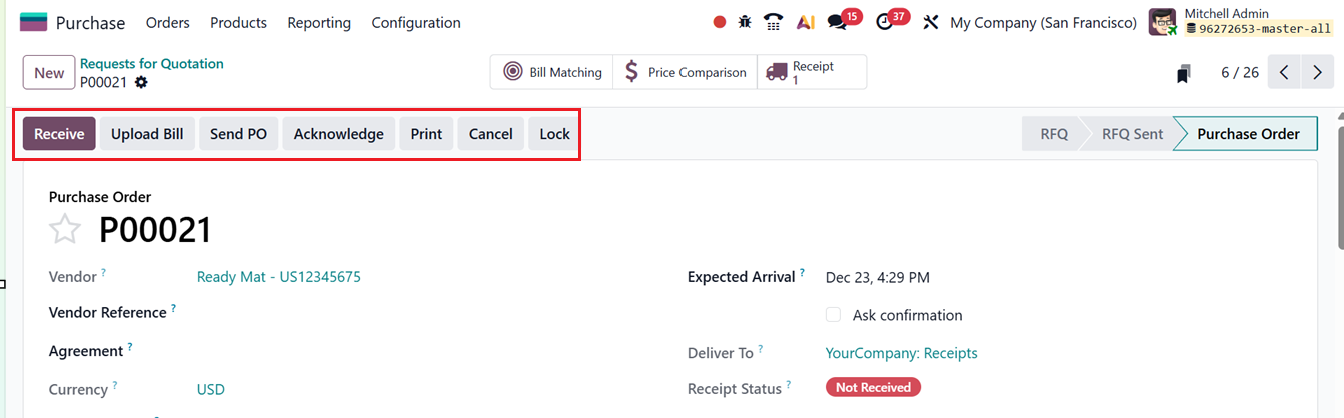
To prevent accidental modifications to approved purchase orders, Odoo 19 includes a Lock Confirmed Orders feature, which can be enabled through the Purchase Settings menu. When activated, all confirmed POs display a ‘Lock’ button that restricts editing. If updates are needed, users may unlock the order by clicking the ‘Unlock’ button.
You can also print the quotation using the ‘Print’ button and the Acknowledge feature confirms that the vendor has received and accepted the Purchase Order, helps track supplier responsiveness, updates the order status, and improves visibility and follow-up in the procurement process. The ‘Send PO’ button can be used to send the purchase order details through mail to the relevant person.
Receiving goods is the next step following order confirmation. Odoo simplifies this by presenting a ‘Receive’ button within the purchase order. This opens a detailed window summarizing incoming shipment information. The same data can also be accessed using the ‘Receipt’ smart button.
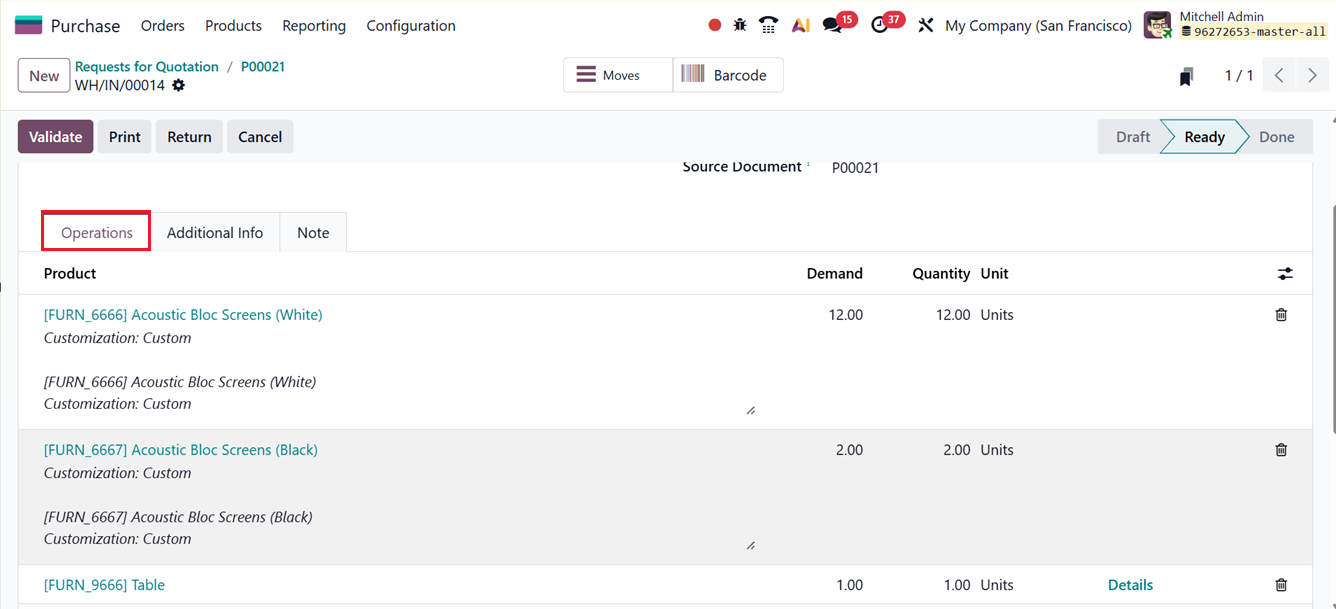
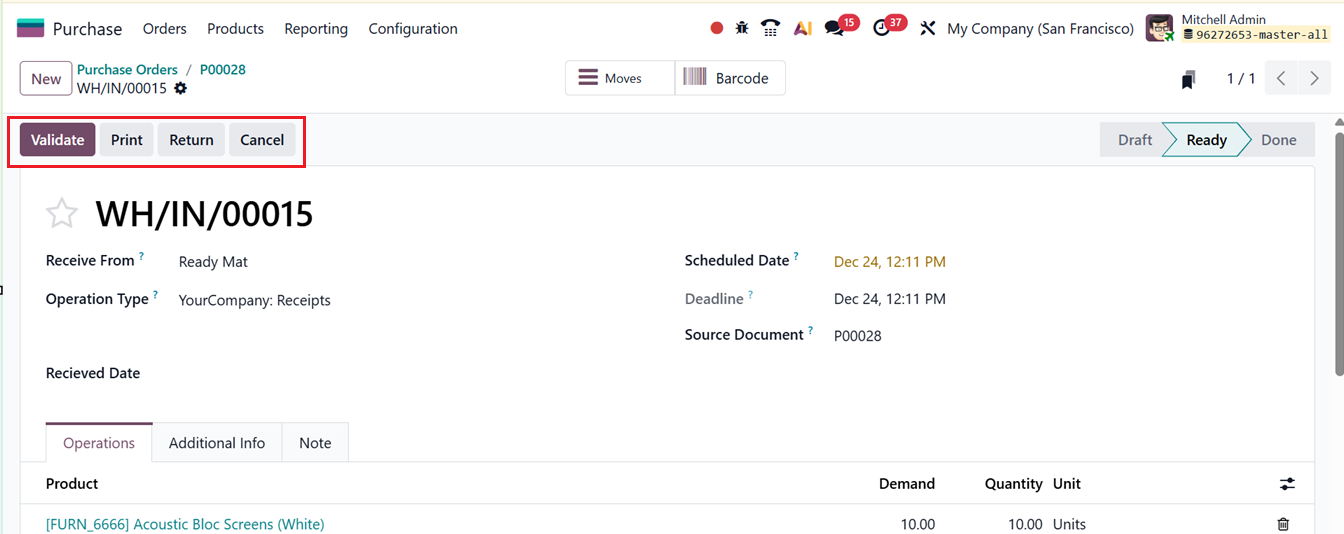
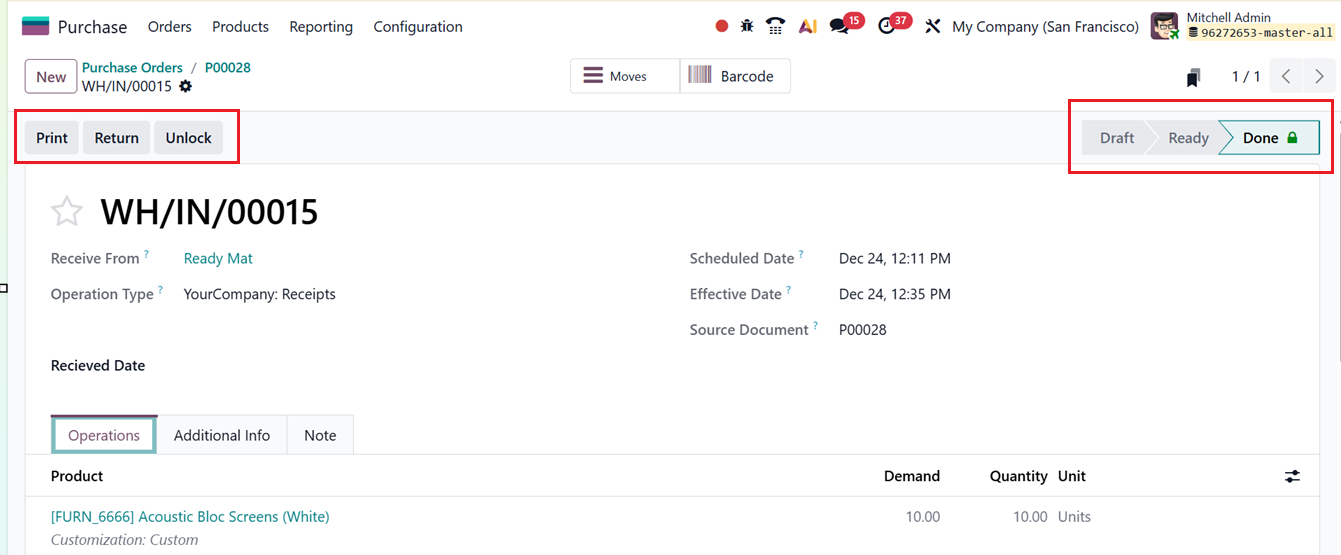
After physically receiving the products, you can validate them using the ‘Validate’ button. The receiving form shows key information such as the supplier (Receive From), the Operation Type, and both the Scheduled Date and the Deadline for the shipment. The Source Document indicates which purchase order the receipt corresponds to, as depicted in the screenshot below.
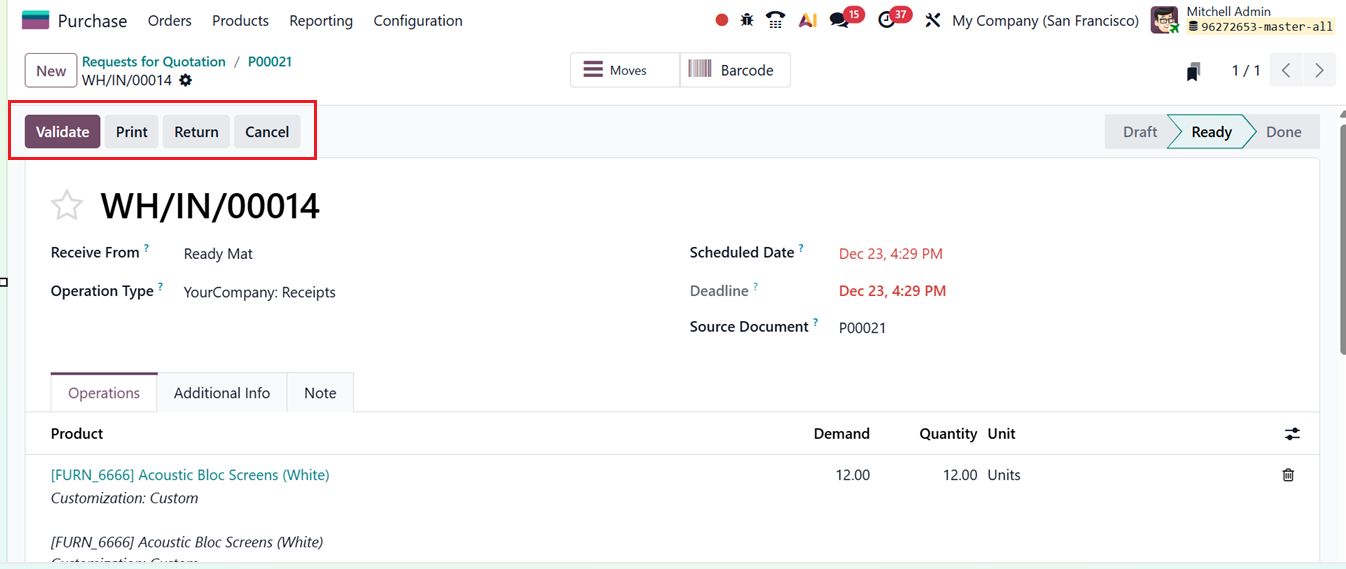
In the ‘Operations’ tab, users see a breakdown of product-specific details including the Product ordered, Demand (the requested quantity), Quantity (what is actually received), and the Unit of Measure. Forecast reports and stock movement insights are accessible through buttons next to these fields, ensuring transparency in product handling.
The ‘Additional Info’ tab lists shipping-related data. Under the SHIPPING INFORMATION section, you can see the Carrier name, Tracking Reference numbers,Weight and recorded Weight for shipping are displayed. In the OTHER INFORMATION section, details on the Responsible employee, corresponding Sales Order, Responsible, Company, Batch Transfer and Project can be provided, as shown in the screenshot below.

The ‘Note’ tab can be used to add extra comments or clarifications related to the incoming shipment.
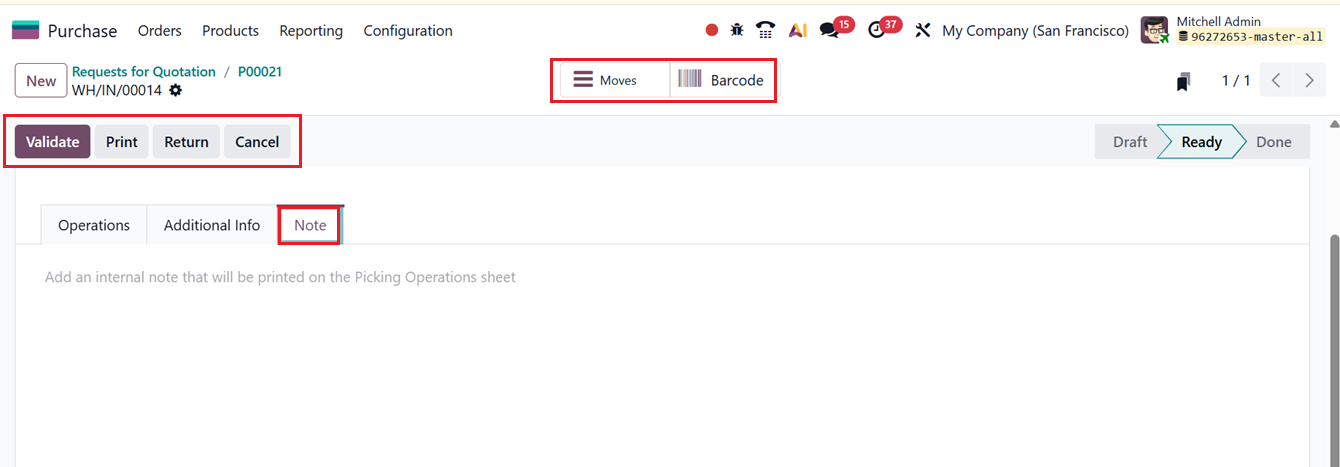
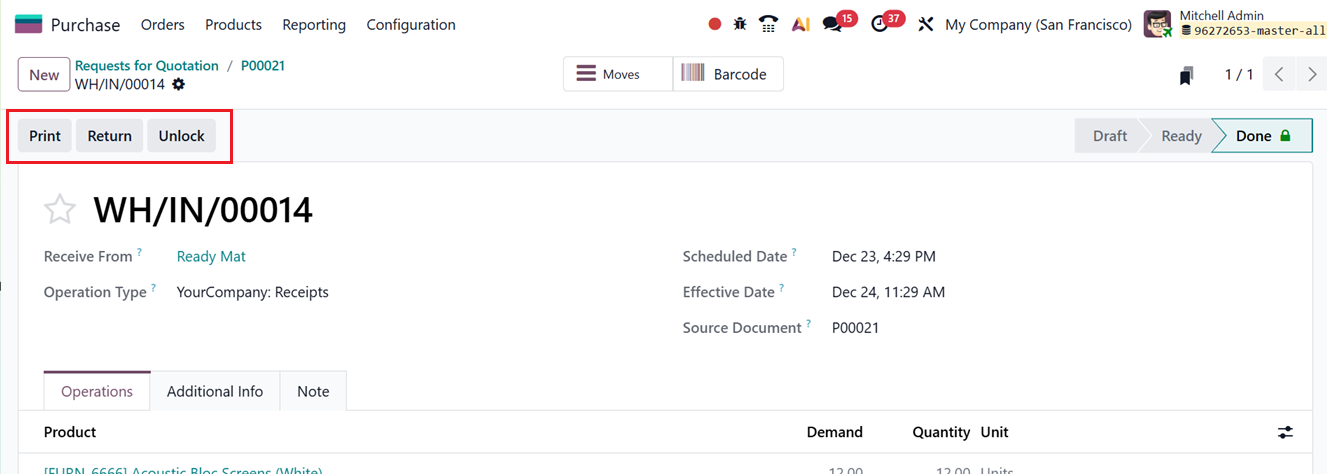
After confirming the details, clicking on the ‘Validate’ button finalizes the receipt, updating its pipeline status to ‘Done’ to show that the products have been successfully received. Then, you can print the transfer using the Print button, return items via the Return button, or unlock the editing restriction, click on the Unlock button. Then, Odoo allows you to review product movements using the ‘Moves’ smart button.
The Barcode button creates another transfer operation linked to the order and leads you straight into the Odoo Barcode module interface. So, you can perform the transfers or pickings as per the requirements.
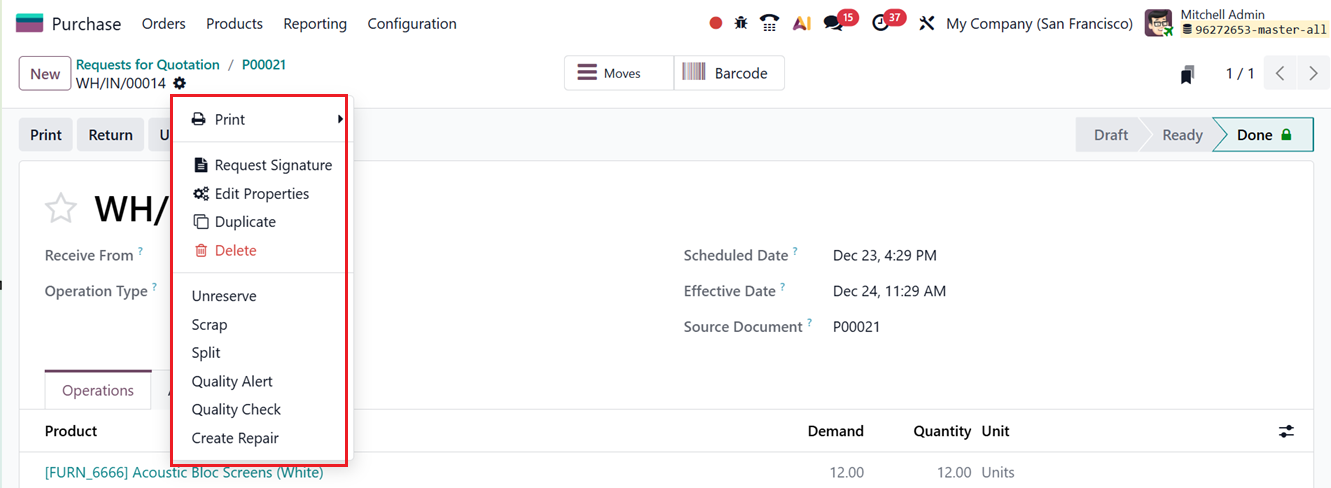
The ‘Action’ menu placed on each form view of the Purchase module contains several tools, such as;
- Print:Generates printable documents such as receipts or labels.
- Request Signature: Initiates a digital signature request for approvals or confirmations.
- Duplicate: Copies the existing record to create similar documents quickly.
- Delete: Removes the record permanently.
- Unreserve: Releases reserved stock back into inventory for other operations.
- Scrap: Marks products as scrapped if damaged or unusable.
- Split: Separates product quantities into multiple lines to handle partial deliveries.
- Quality Alert: Reports quality issues and triggers corrective workflows.
- Quality Check: Initiates a manual inspection to ensure product quality compliance.
- Create Repair: Creates repair orders quickly.
- Edit Properties:This feature allows inserting new custom fields to the form. Upon selecting this button, a pop-up box will appear where you can assign a Label name(Field), choose Field Type, define a Default Value, set a Suffix value. Then, you can configure Display in Cards visibility settings to whether or not display this field in Calendar, Kanban and Card views. Finally, enable or disable the AI suggestions, as shown in the screenshot below.
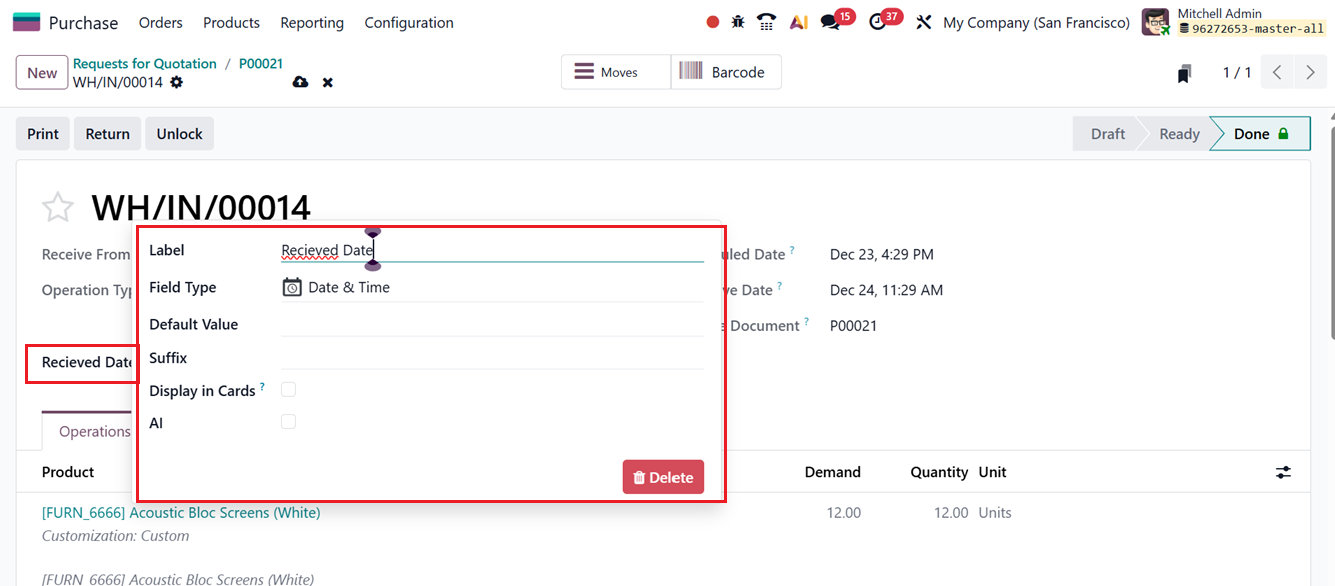
This property editing feature in Odoo will help users to add additional form fields according to their requirements.
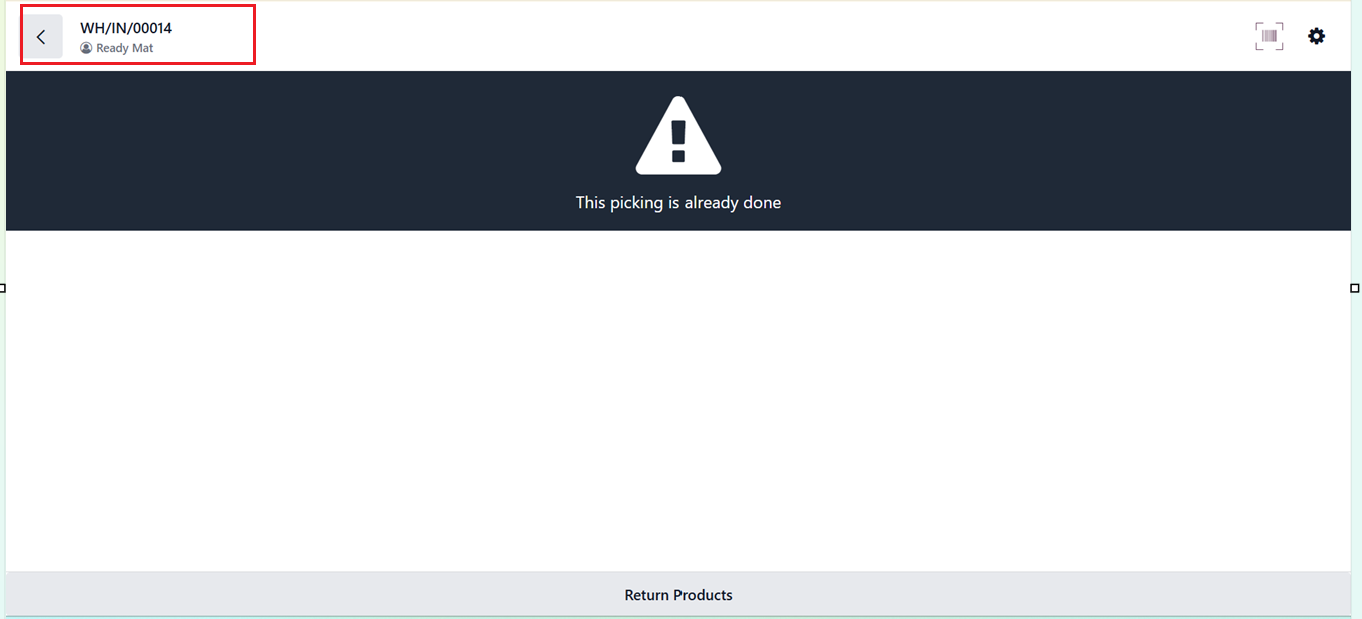
After receiving and validating the products, you can use the Return button that lets users return the received items back to the vendor by reversing the original receipt. This will open a pop-up window, where you can specify the return Product and its Quantity using the ‘Add a line’ button, as described in the screenshot below.
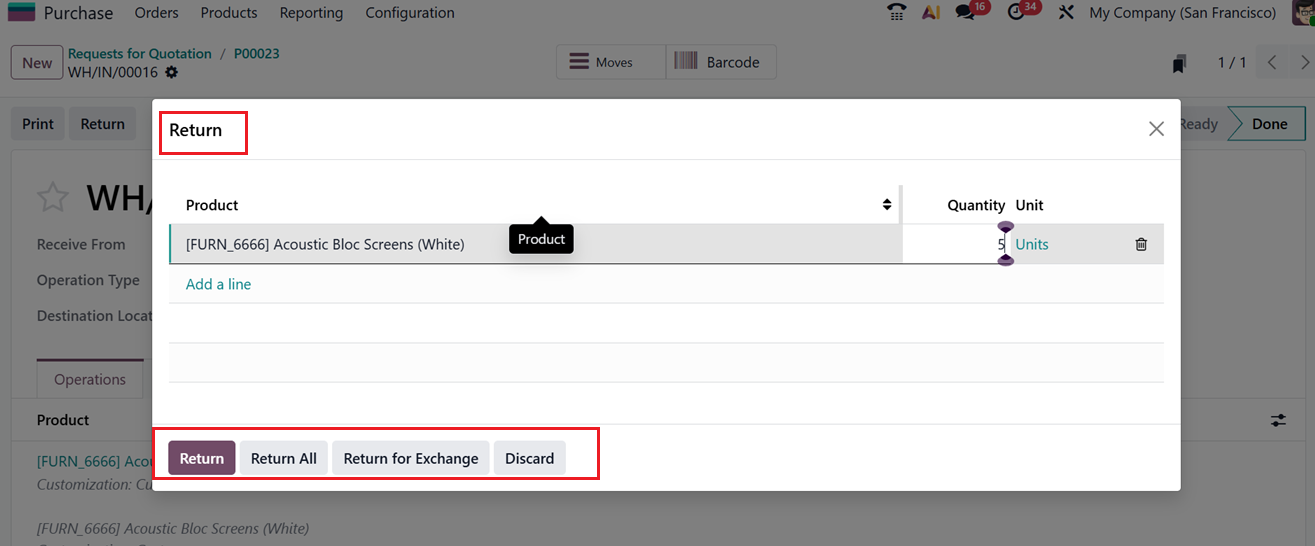
Then, you can use the Return button to send a return request for selected items, the Return All button to return all received products in case of damage, or the Return for Exchange button to exchange the received items as needed.
This creates a return transfer and you can see an ‘Returns’ smart button on the RFQ form. This facility updates inventory and stock valuation, and keeps traceability with the original receipt, as shown in the screenshot below.
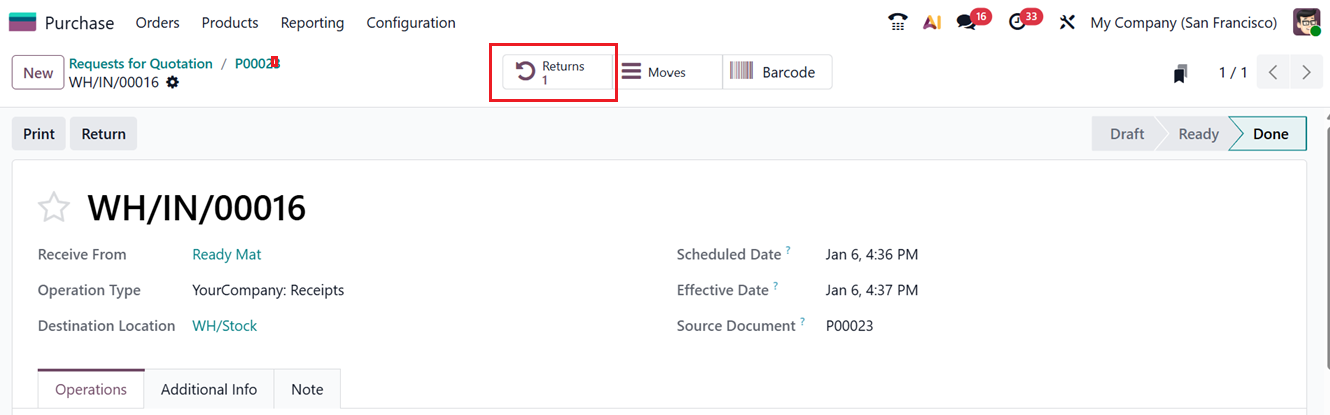
Overall, the ‘Return’ feature is very convenient for returning and documenting the damaged, incorrect, excess, or rejected goods in a Purchase environment.
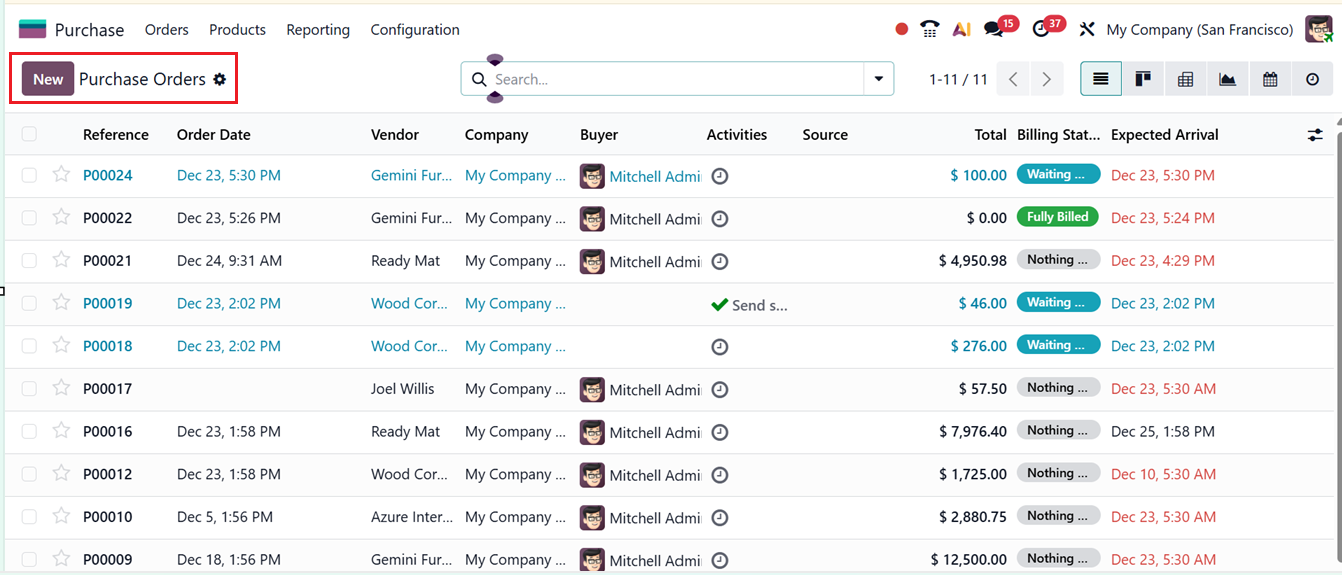
1.3 Purchase Orders
Once a Request for Quotation (RFQ) is created, it can be sent to the appropriate vendor for review. After the RFQ is submitted, the next step is confirming the Purchase Order. Odoo 19 includes a dedicated workspace for handling purchase orders, located inside the Orders menu of the Purchase module.
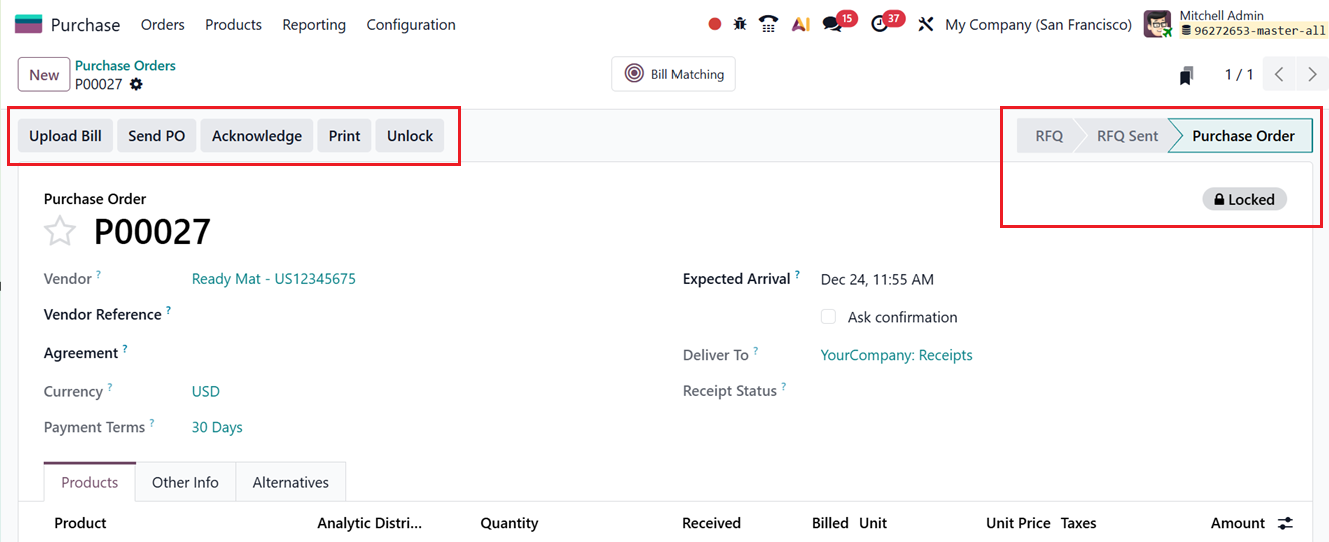
The layout of this window is very similar to the one used for managing RFQs. Here, you can view important details including Reference, Order Date, Vendor, Company, Buyer, Activities, Source, Total, Billing Status and Expected Arrival dates, as shown in the screenshot below.
A new purchase order can be started at any time using the “New” button. The form fields and tab sections are almost the same as a RFQ creation form that we have discussed earlier. So, mention details, such as the Vendor, Vendor Reference, Agreement, Currency, Payment Terms such as any particular frequency. Then, mention the Order Deadline date, Expected Arrival date, Company and an operation type of the incoming shipment in the Deliver To field.
Then, mention the products in the Products Tab and include the purchase and other billing details in the Other Info Tab. then you can create and manage product alternatives in the Alternatives Tab.
The ‘Bill Matching’ smart button is used to compare the vendor bill with the corresponding Purchase Order and received quantities. Its purpose is to ensure that the billed prices and quantities match what was ordered and received, helping users detect discrepancies, prevent overbilling, and maintain accurate accounting before validating the vendor bill. Then, you can compare the product price of different vendors using the ‘Price Comparison’ smart button and check receipts using the ‘Receipts’ button.
Then, receive the products and validate the order using the ‘Validate’ button, as shown in the screenshot below.
Then you can review information like the supplier, delivery address, scheduled arrival date, and related source documents. The Operations Tab shows product quantities, units of measure, and forecasted reports. Details such as carrier information, tracking numbers, and weight are stored under the SHIPPING INFORMATION and OTHER INFORMATION sections. The Additional Info Tab includes responsible users. Finally, the Info Tab will show any additional notes regarding the order.
Selecting the “Validate” button confirms the receipt and updates its status to Done, indicating that the delivery was successfully processed, as shown in the screenshot below.
You can also print documents, return products, review stock movements, or create the next transfer using the Print, Return, Moves and Barcode button tools provided in the Purchase Order form. The Lock and Unlock buttons can be used to restrict or allow further editings inside the completed purchase order.
Vendor Bills
Vendor bills are an essential part of the procurement cycle, as they record payments made to suppliers. Odoo 19 simplifies this process by generating vendor bills directly from purchase orders. Depending on company policy, bills can be created based on either ordered quantities or quantities actually received.
Generating a Vendor Bill
To test this feature, create and confirm a purchase order. You will then see an Upload Bill button, as shown in the screenshot below.
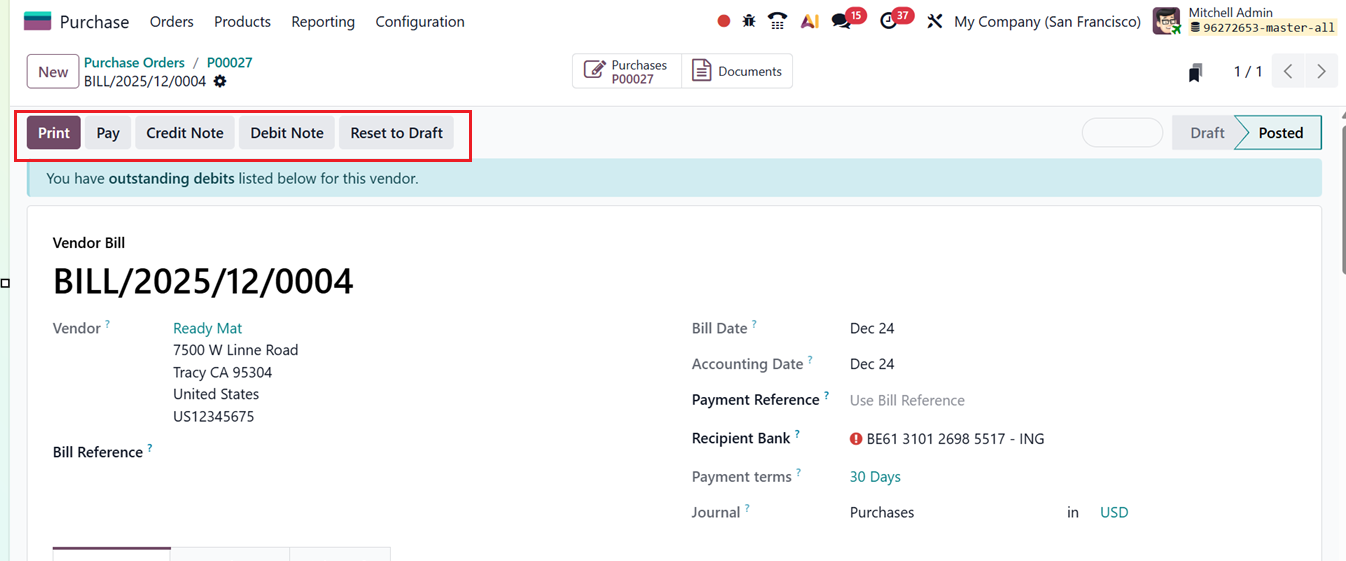
Selecting this opens a draft vendor bill, automatically populated with information such as Vendor, Bill Date, Reference, Due Date, Journal, Bank details, and Payment Reference. Users may upload an existing bill or related purchase order to auto-fill fields.
The Invoice Lines section lists all products included in the purchase order. The Journal Items tab will show the journal entries related to this particular order. Likewise, the Other Info tab will provide the Accounting related data.


After uploading the bill, you can confirm the bill using the ‘Confirm’ button. The purchase details will be included in the ‘Purchases’ smart button and other relevant documents will be listed inside the ‘Documents’ smart button.
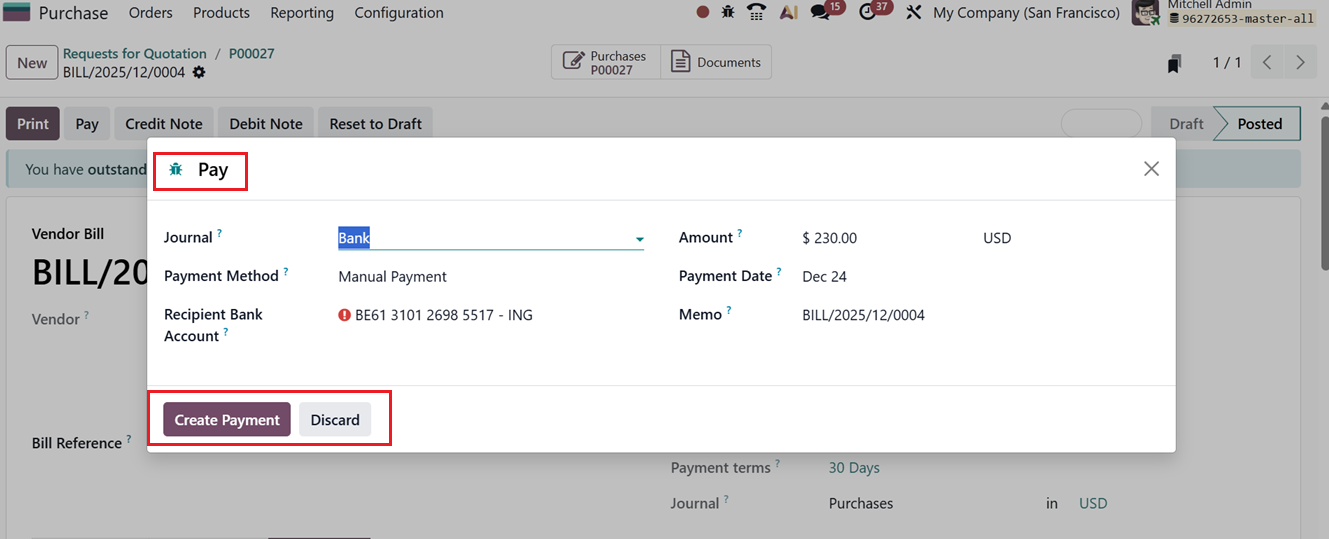
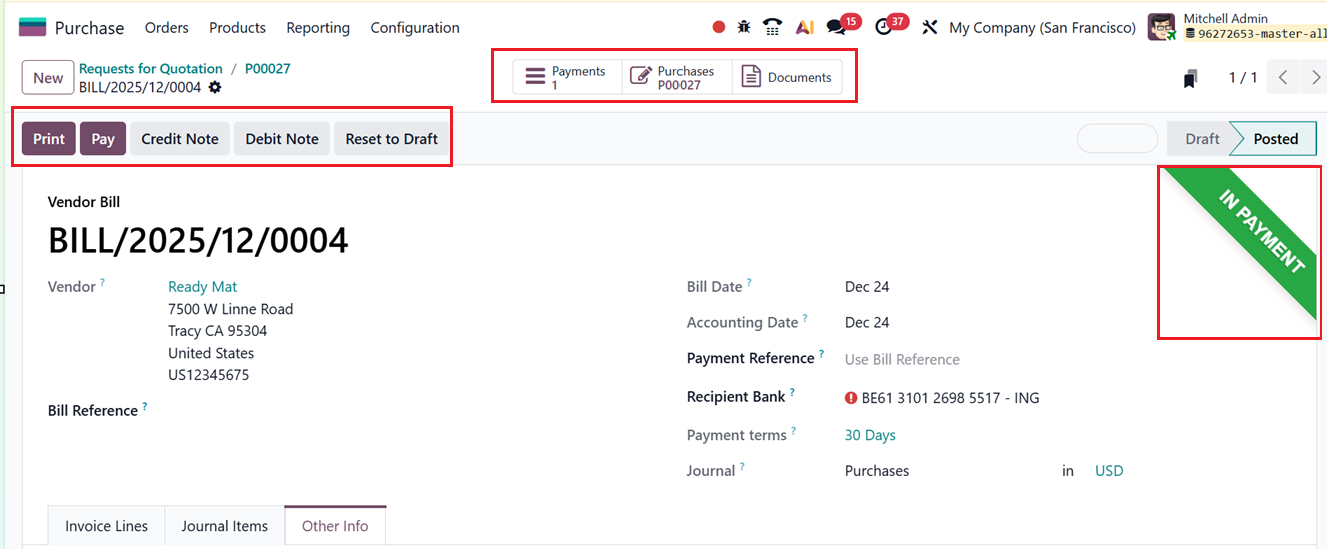
After reviewing everything, you can click on the Confirm button to proceed with the payment using the Pay button, as depicted in the screenshot below.
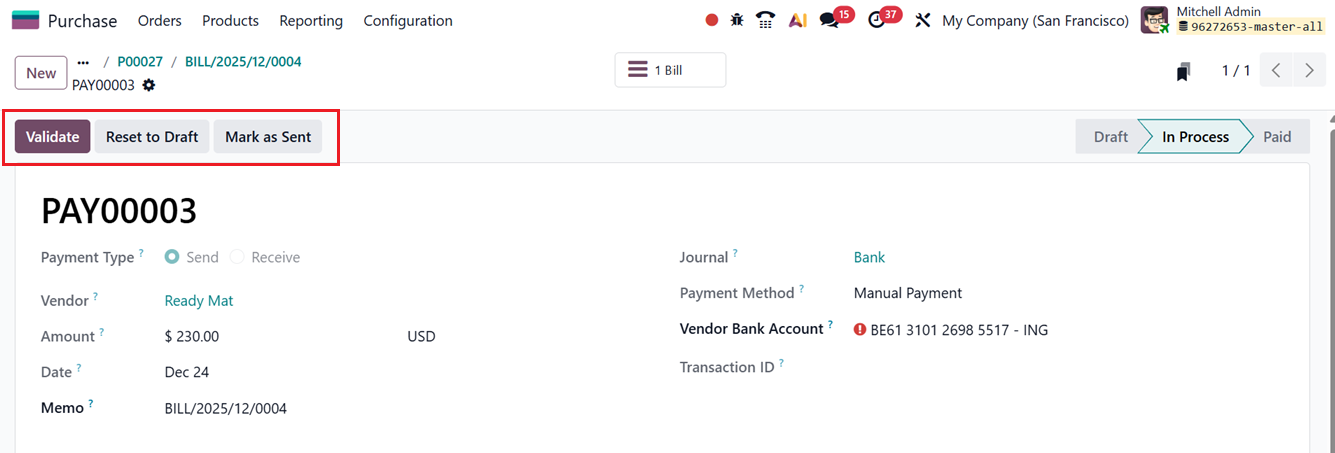
When paying the vendor, you have to choose the relevant account Journal, Payment Method, whether it is a Cash, Card, Check, SEPA Credit Transfer etc.Then, mention the Recipient Bank Account, Amount, and Payment Date. You can see the payment memo ID from the Memo field. To validate the payment, click on the ‘Create Payment’ button, as shown in the screenshot below.
After submitting, the bill status changes to In Payment, and finally to Paid once completed. After validating the payment, you can print the payment receipts, Reset the order to draft, Create credit and debit notes using the Print, Reset to Draft, Credit Note and Debit Note buttons respectively from the main quotation form, as shown in the screenshot below.
You can then manually validate the payment using the Validate button provided in the payments dashboard by opening the ‘Payments’ smart button.
This entire workflow ensures proper tracking of vendor payments and billing accuracy. Now, let’s discuss the vendor management feature of the Purchase Module.
The next sub-menu under Orders relates to Purchase Agreements, so we will now look at how Odoo supports creating and managing these agreements.
1.4 Purchase Agreements
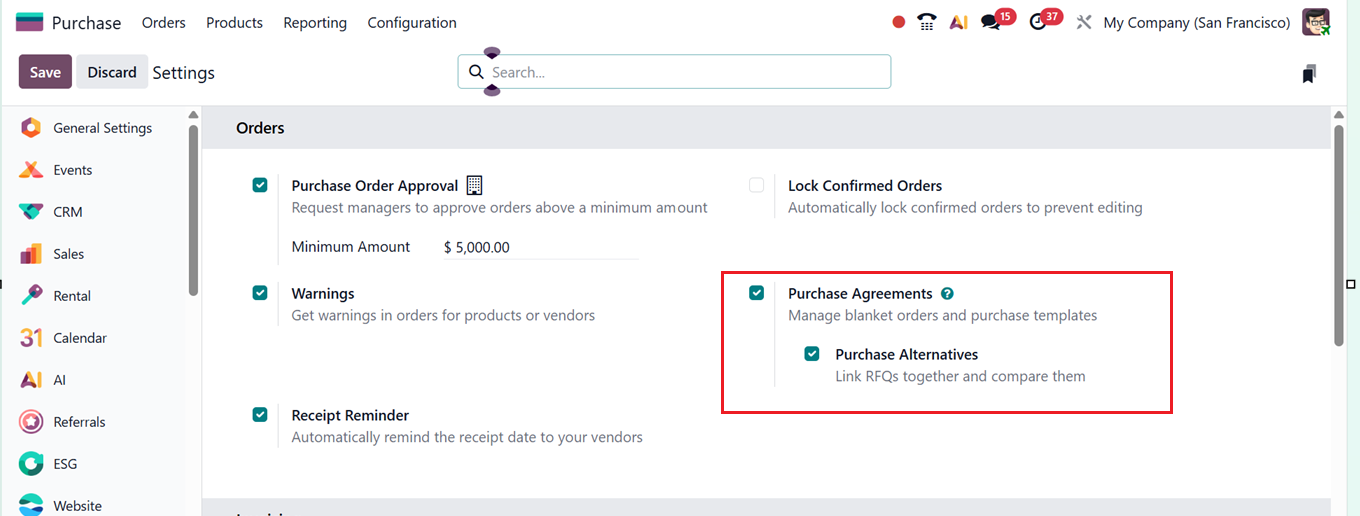
A purchase agreement defines the terms under which a buyer and a supplier will carry out a purchase. Before a purchase order is finalized, both parties must agree to these conditions. Odoo 19 provides a dedicated system for creating and managing these agreements, allowing a company to prepare multiple agreements for various products with one or several vendors. Once configured, these agreements can be used directly when generating purchase orders. To activate this feature, enable Purchase Agreements from the Purchase module’s Settings menu.
Types of Purchase Agreements in Odoo 19
Odoo 19 supports two main types of purchase agreements:
1. Call for Tender: A Call for Tender helps compare offers from multiple suppliers for the same products. Users can generate several RFQs for different vendors to evaluate pricing, delivery time, and other conditions. When creating an RFQ, the Alternatives tab can be used to add quotations from different vendors, making it easy to run a tender process.
2. Blanket Orders: A Blanket Order is ideal when working with regular suppliers. This agreement type allows companies to negotiate recurring purchases, customize product lists and pricing, and schedule multiple deliveries within a predefined timeframe. It is also useful when buying the same product from different suppliers or receiving items in repeated batches.
Managing Blanket Orders
To set up and manage Blanket Orders in Odoo 19, go to the Orders menu and select Purchase Agreements. The dashboard displays a list of agreements, including Reference, Purchase Representative, Company, Ordering Date, Deadline, Source Document, and Status, as shown in the screenshot below.

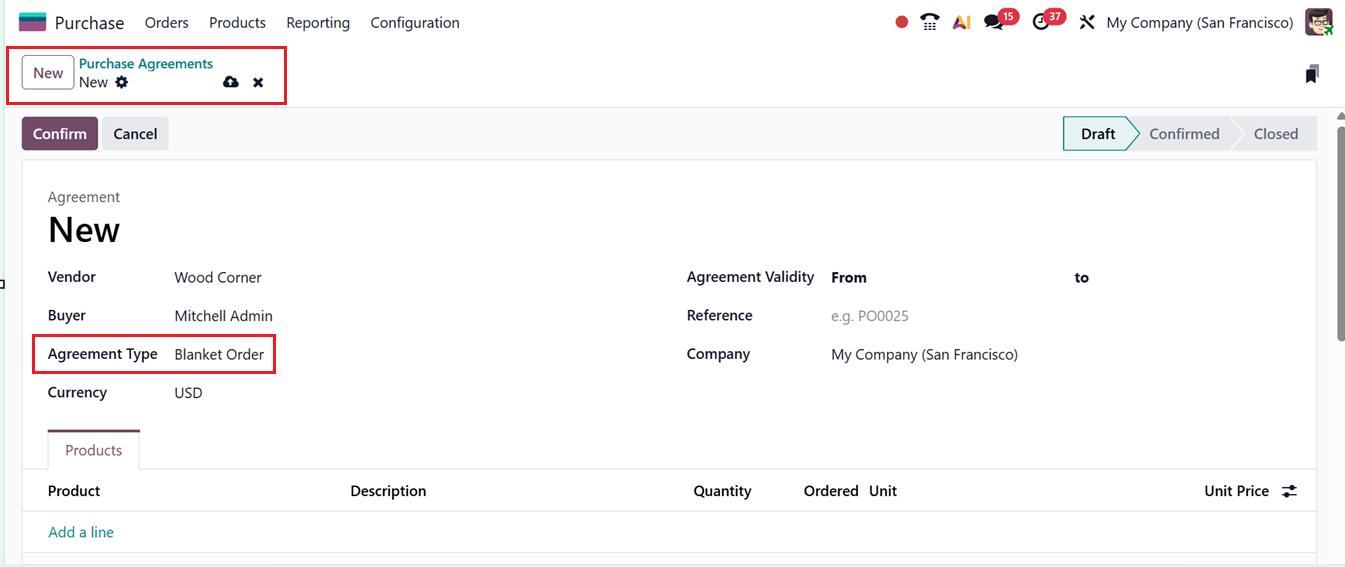
You can switch between list view and kanban view. If many agreements exist, the Filters and Group By features help narrow down the data. Clicking on the New button opens a form where you can enter agreement details including;
- Buyer: Name of the person responsible for the purchase,
- Agreement Type: Automatically filled as Blanket Order,
- Vendor: Select a vendor from your contacts,
- Currency: Define the currency used for the agreement,
- Agreement Validity: Set the expiration date,
- Reference: Enter related documents or internal references,
- Operation Type & Company: Choose the appropriate options, as shown in the screenshot below.
Under the Products tab, add items using the Add a line button, making sure to include the unit price for each product. The Terms and Conditions field can be used to define agreement rules or additional notes.
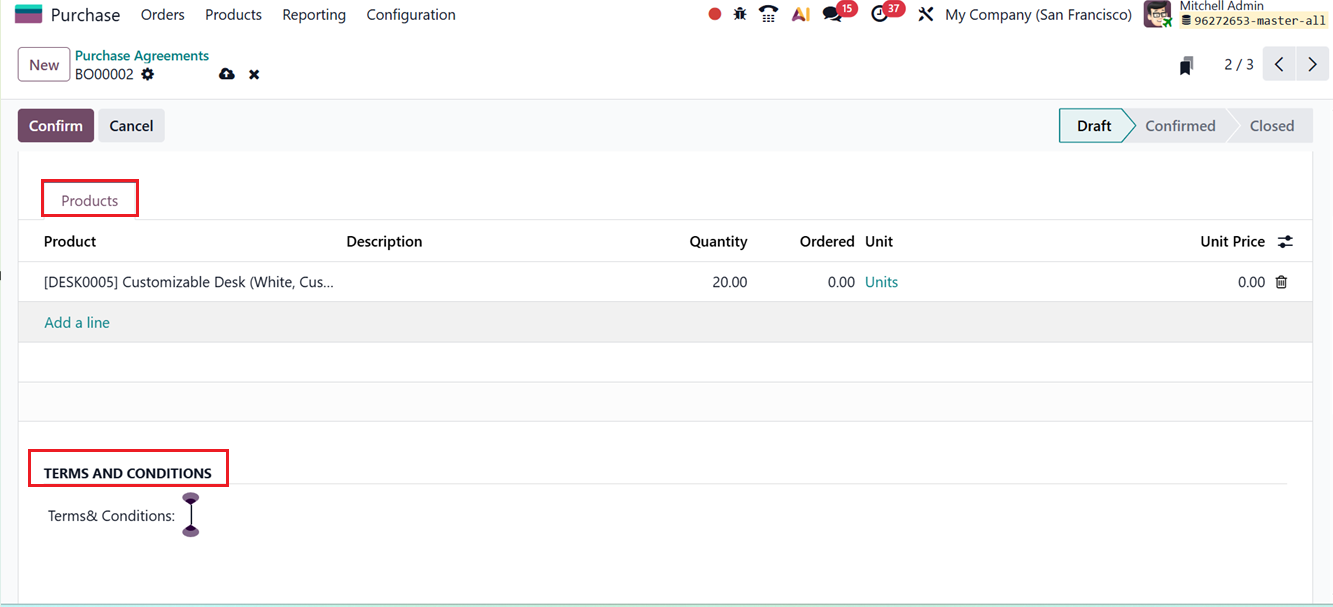
After completing the required fields, click on the Confirm button. Odoo updates the status from Draft to Confirmed. When the agreement’s validity period ends, Odoo automatically moves it to the Closed stage.
Using Blanket Orders to Create RFQs
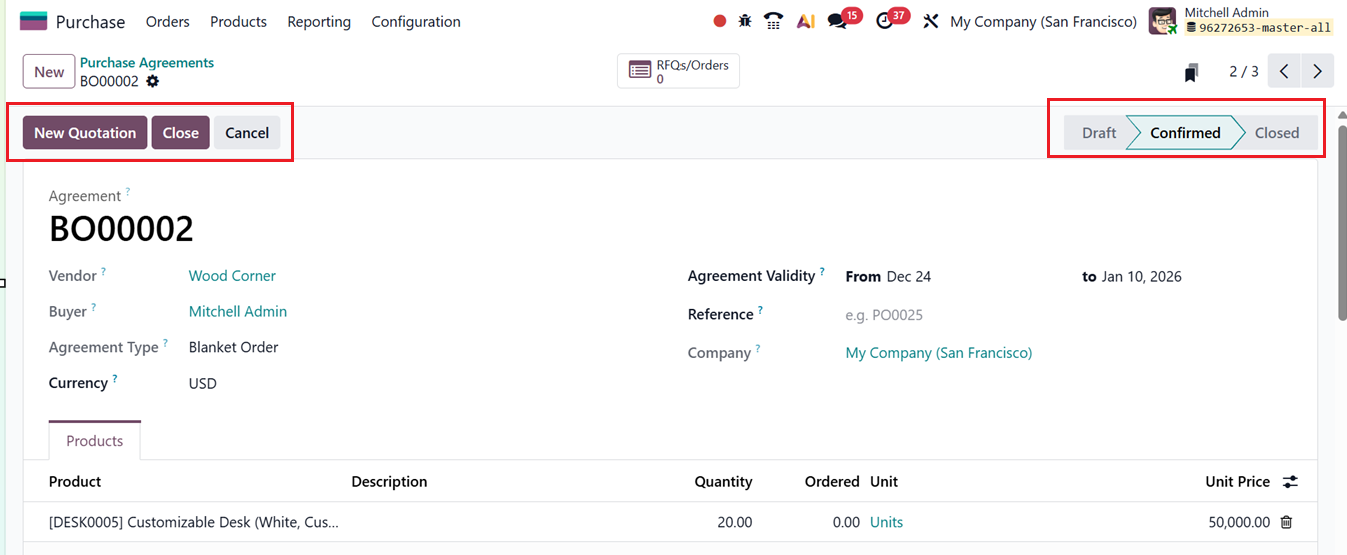
From the confirmed blanket order, you can generate new RFQs or Purchase Orders using the New Quotation button from the blanket order creation form. After applying this button, Odoo will automatically fill the RFQ with information taken from the agreement, reducing manual entry. After reviewing, confirm the RFQ as usual, as shown in the screenshot below.
A blanket order can remain active for multiple purchases as long as it is within the valid time period. You can create several quotations from the same agreement or close the agreement manually using the Close button from the main blanket order creation form.
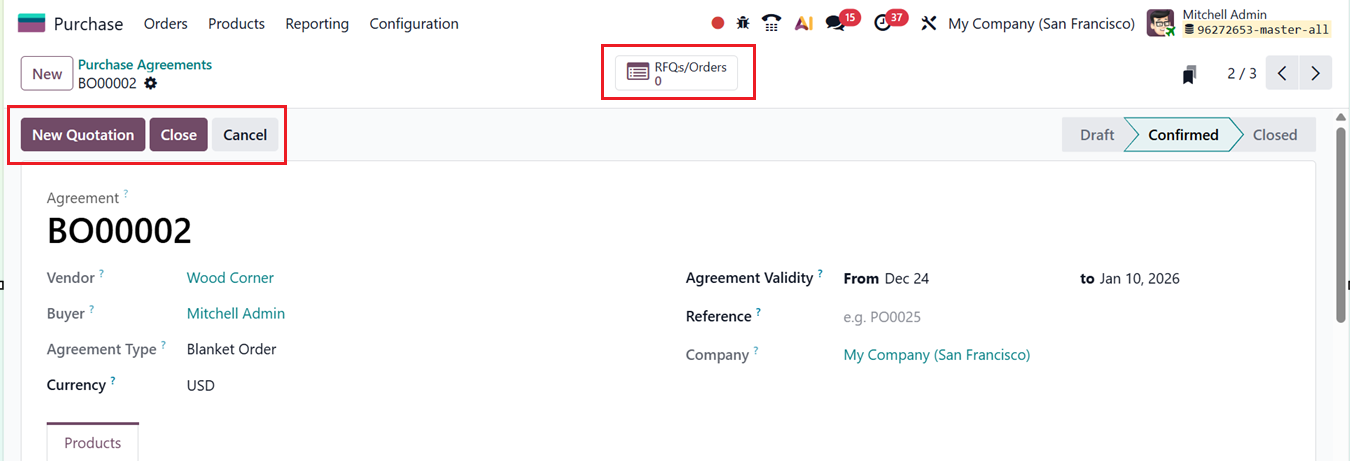
The RFQs/Orders smart button displays all RFQs and purchase orders linked to the blanket order in a list view, as shown in the screenshot below.

Purchase Templates
The Purchase Templates act as a simplified type of purchase agreement designed to speed up the creation of RFQs for recurring purchases. They allow users to add products and adjust quantities easily, making them flexible and efficient. Unlike blanket orders, which are tied to a specific vendor, purchase templates can be reused with multiple vendors. They also support quantity reuse, which is helpful for regular or repeated orders.
Create a new Purchase Agreement and select a vendor if desired. Choose Purchase Template as the ‘Agreement Type,’ then fill in the necessary fields, as shown in the screenshot below.
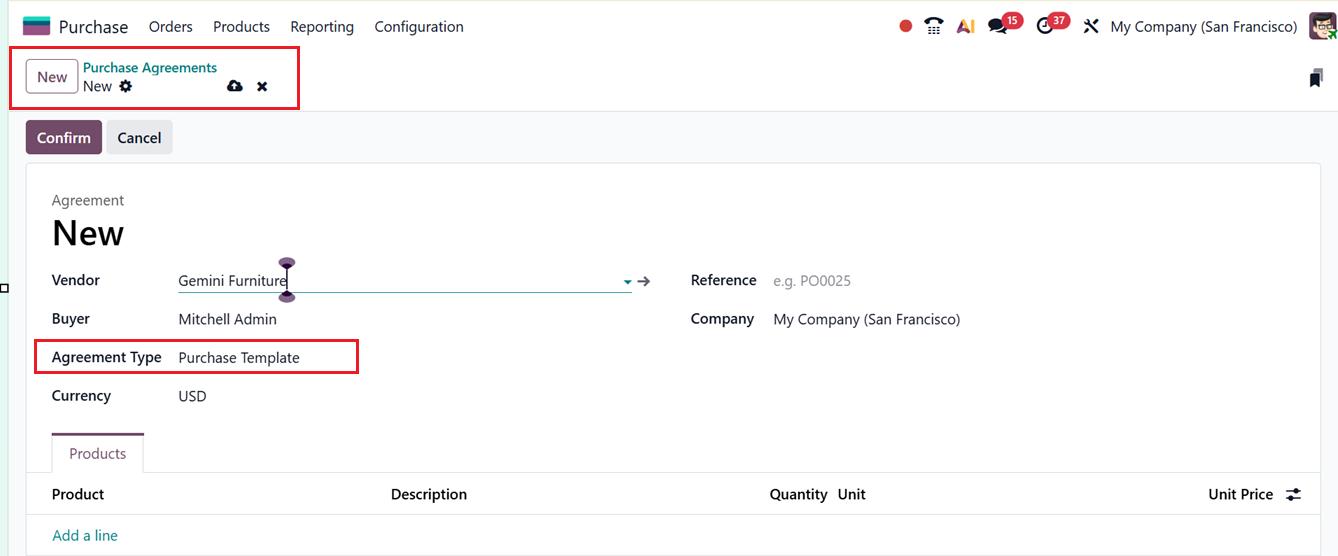
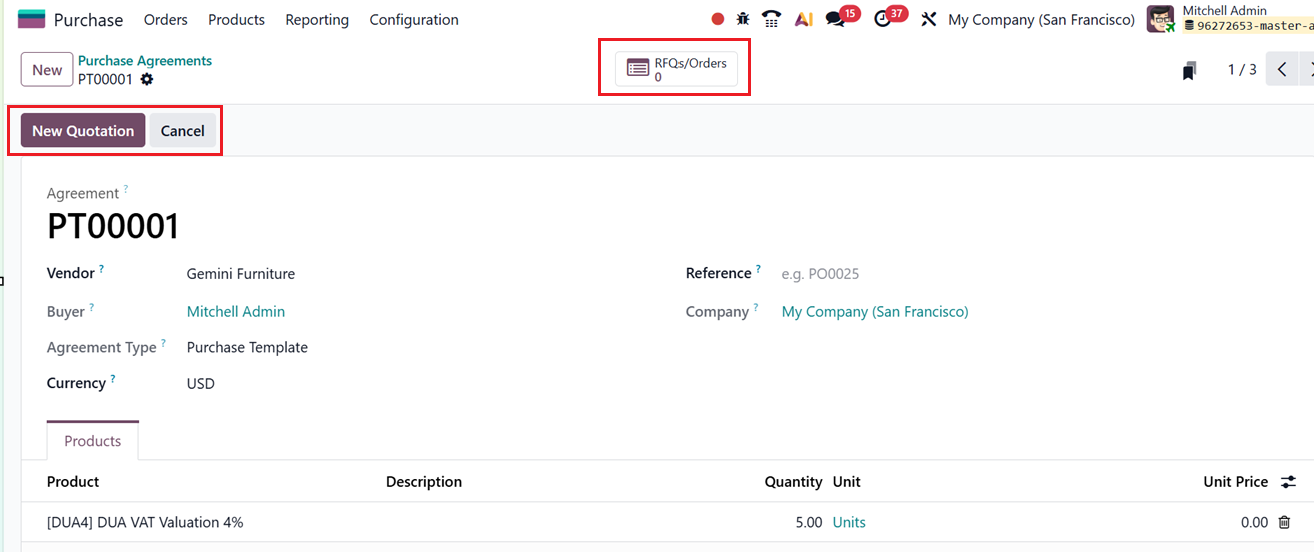
In the Products tab, add the required items, set their quantities, and enter unit prices manually, since Odoo does not auto-fill them. Once finished, click on the Confirm button to finalize the template. New RFQs can later be generated from the template using the New Quotation button, similar to the process used for blanket orders.
1.5 Vendor Management
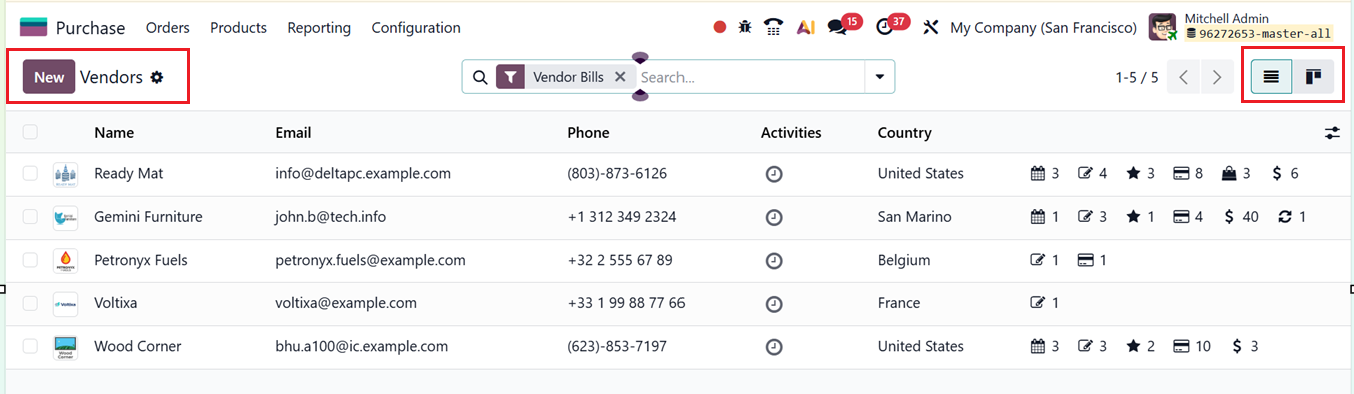
Strong supplier relationships are crucial in procurement. The Vendor Management system in Odoo 19 helps maintain an organized database of suppliers and centralizes all vendor-related processes. To view the vendor list, open the Orders menu and select the Vendors option.
The Kanban cards display vendor details such as name, contact information, tags, meetings, opportunities, and purchase history. The List view shows structured information like Name, Email, Phone, Activities and Country.
The dashboard also displays a quick view of the number of Meetings, Invoices/Bills/Mandates, Opportunities, Purchases, Shopping Cart, Sale Orders and Subscriptions in small icons within each vendor column, as shown in the screenshot below.
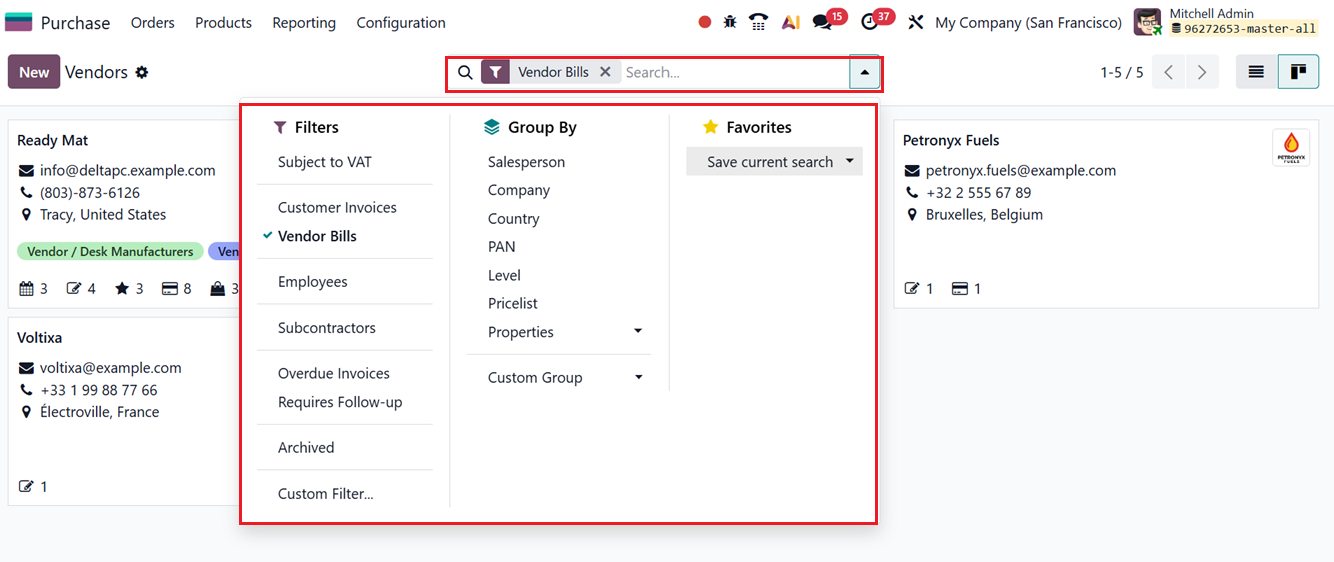
Vendors can also be assigned activities using the clock icon. Here, you can switch between Kanban and List views. Using the Filters, Group By, and Favorites filter options, you can refine or organize vendor data as needed. It is also possible to create custom filters and groups using the ‘Custom Filter’ and ‘Custom Group’ options provided under each section.
To add a new vendor, click on the New button and provide the basic vendor details including their Name, Address, TIN, Partner Level, Job Position, Website, Language, Task etc. Then, fill in the fields across the tabs: Contacts, Sales & Purchases, Accounting, Partner Assignment, Notes and UBO. This process is similar to creating customers in the Sales module.
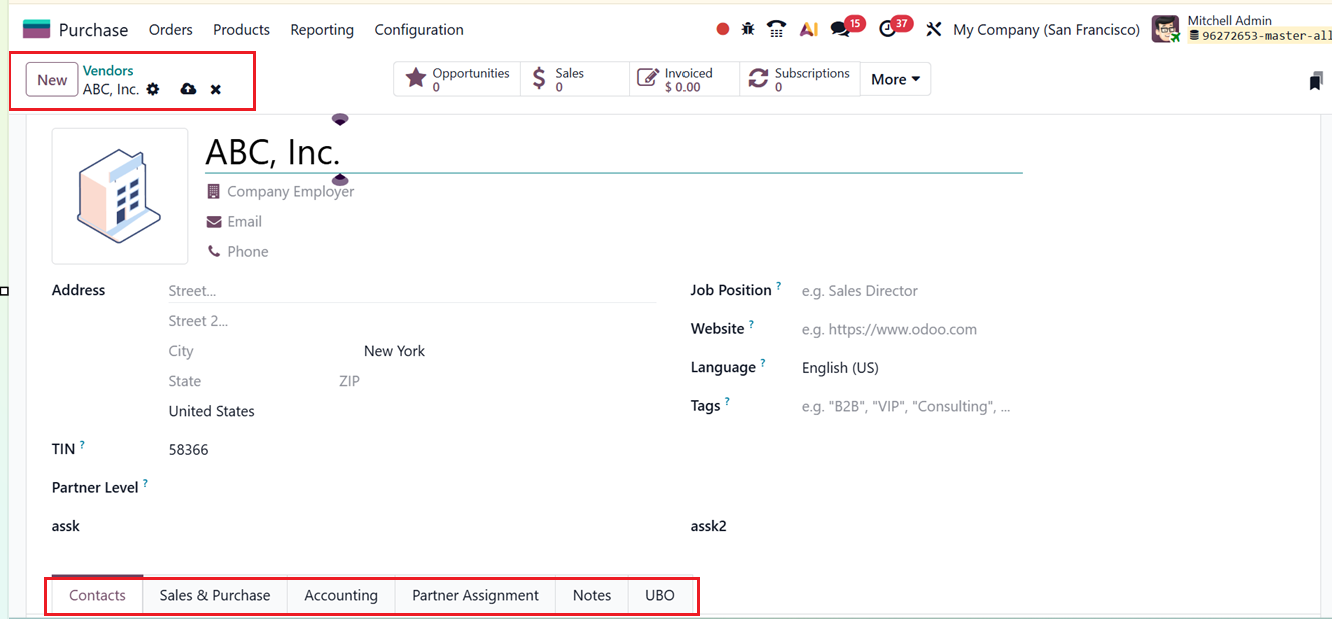
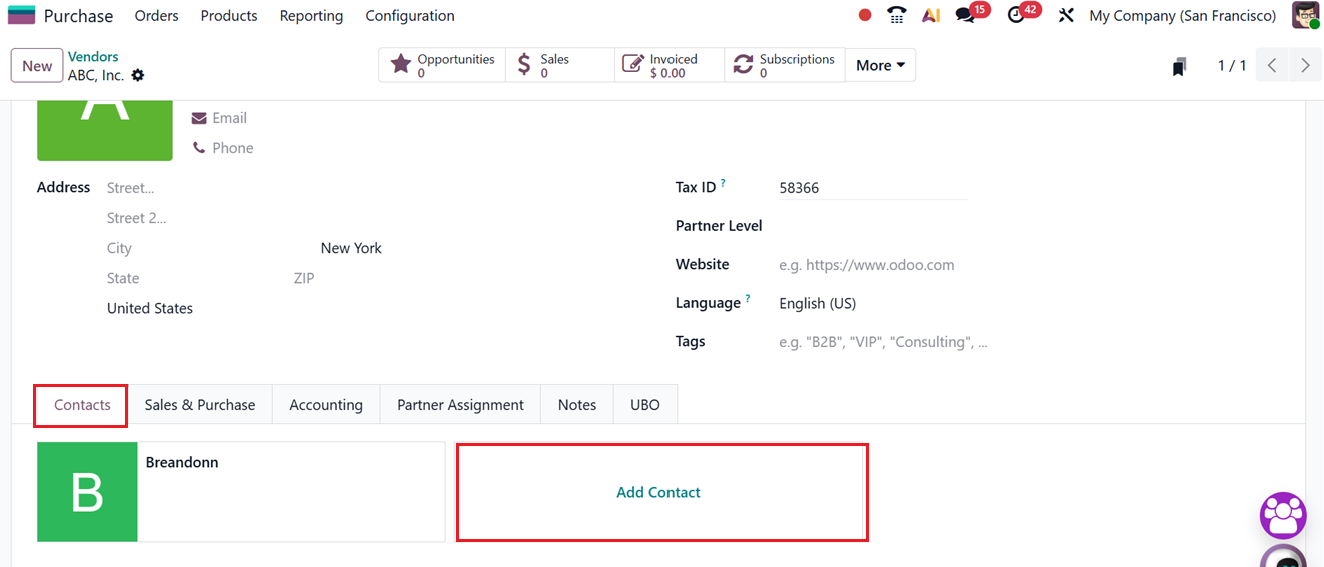
The ‘Contacts’ tab of the Vendor form can be used to add the responsible persons for contacting the vendor using the ‘Add Contact’ button. You can add multiple contacts to a vendor contact list.
The Sales & Purchases tab of the vendor configuration form in the Odoo 19 Purchase module contains essential settings related to both purchasing and sales operations.
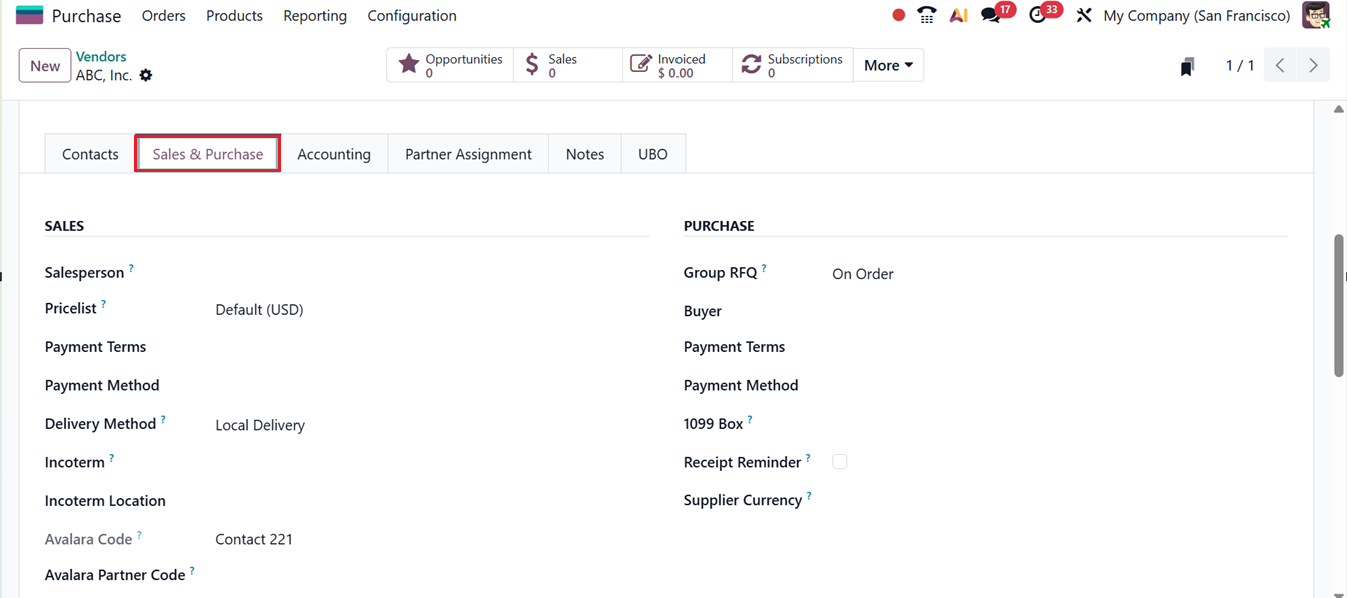
In the ‘PURCHASE’ section, each field serves a specific function to streamline procurement and accounting processes:
- Group RFQ: When enabled, multiple purchase requests to the same vendor can be grouped into a single Request for Quotation, reducing duplicate RFQs and simplifying vendor communication. Here, you can choose the grouping options such as; On Order, Daily, Weekly and Always.
- Buyer: Specifies the internal user responsible for managing purchases from this vendor, ensuring accountability and easier follow-ups.
- Payment Terms: Defines the conditions under which vendor bills must be paid, such as due dates or installment rules.
- Payment Method: Determines the preferred method for settling payments with the vendor, such as bank transfer or manual payment.
- 1099 Box: Used for vendors subject to 1099 reporting, allowing correct categorization for tax compliance.
- Receipt Reminder: Enables reminders to follow up on pending receipts when goods have not been received on time.
- Supplier Currency: Sets the default currency used for transactions with the vendor, ensuring accurate pricing and accounting in multi-currency environments.
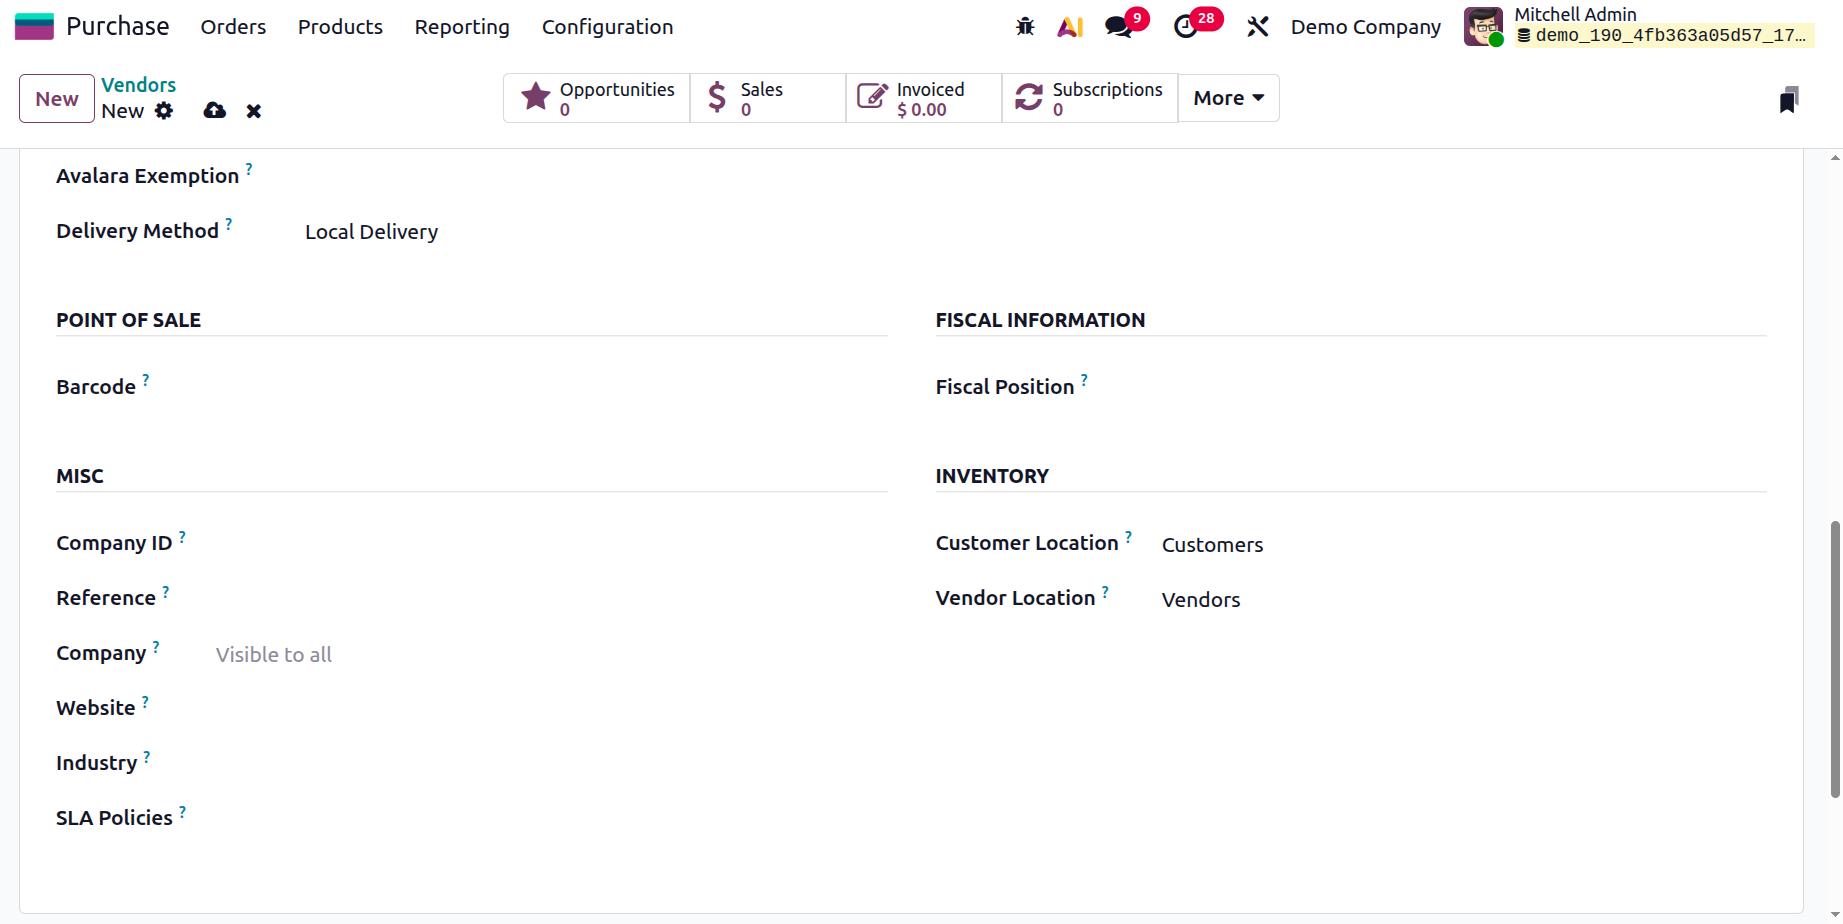
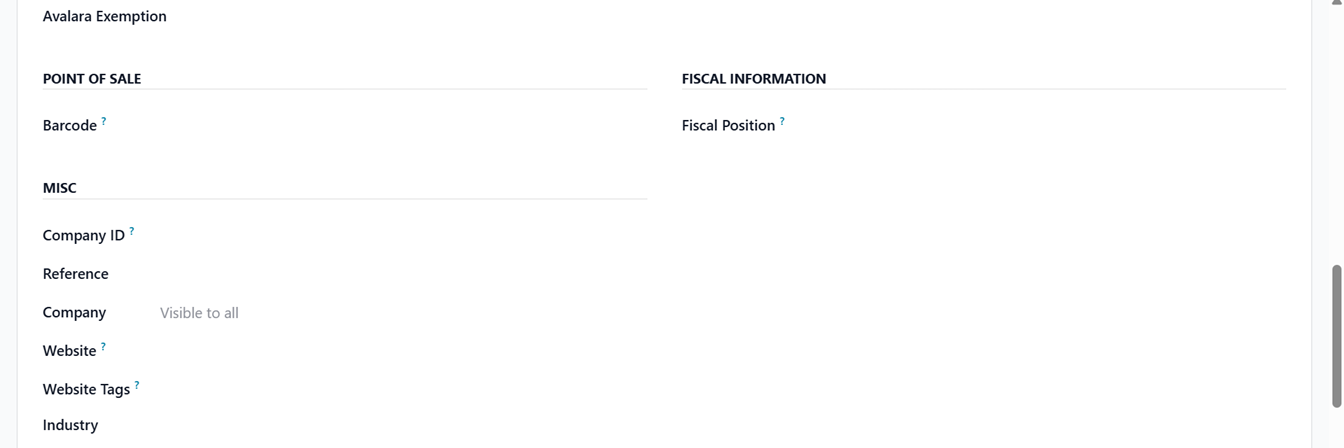
Then, edit the form fields inside the SALES, POINT OF SALE, MISC, FISCAL INFORMATION and INVENTORY sections including;
- Salesperson
The responsible user to manage the vendor relationship and purchase activities.
- Pricelist
Defines the vendor's purchase price list used to automatically apply agreed prices on purchase orders and RFQs.
- Avalara Code
Specifies the Avalara tax code used to determine the correct tax treatment for products or transactions during tax calculation. This will be used to cross-reference in the Avalara portal.
- Avalara Partner Code
Identifies customer code set in Avalara for this particular vendor.
- Avalara Exemption
Indicates whether a vendor or transaction is tax-exempt when using the Avalara tax integration, ensuring correct tax calculation and compliance.
- Delivery Methods
Defines how goods are delivered (e.g., Local Delivery, Standard Delivery, The Poste, Express Delivery, DHL US, BPost World Express Pro etc), helping manage logistics and shipping flows.
- Barcode
Stores a barcode value for quick identification of vendors or related records using barcode scanners.
- Fiscal Position
Automatically maps taxes and accounts based on the vendor's fiscal rules, such as regional tax regulations or exemptions.
- Company ID
Identifies the company associated with the vendor or transaction, useful in multi-company environments.
- Reference
A vendor-specific reference or internal identifier used for tracking and communication.
- Company
Specifies the company to which the vendor record belongs when multiple companies are managed in Odoo.
- Website
Stores the vendor’s website URL for quick access and reference.
- Website Tags
Used to categorize vendors for website display or internal filtering purposes.
- Industry
Defines the business sector of the vendor, useful for reporting and segmentation.
- SLA Policies
Links Service Level Agreement rules to the vendor, helping track delivery performance and service commitments.
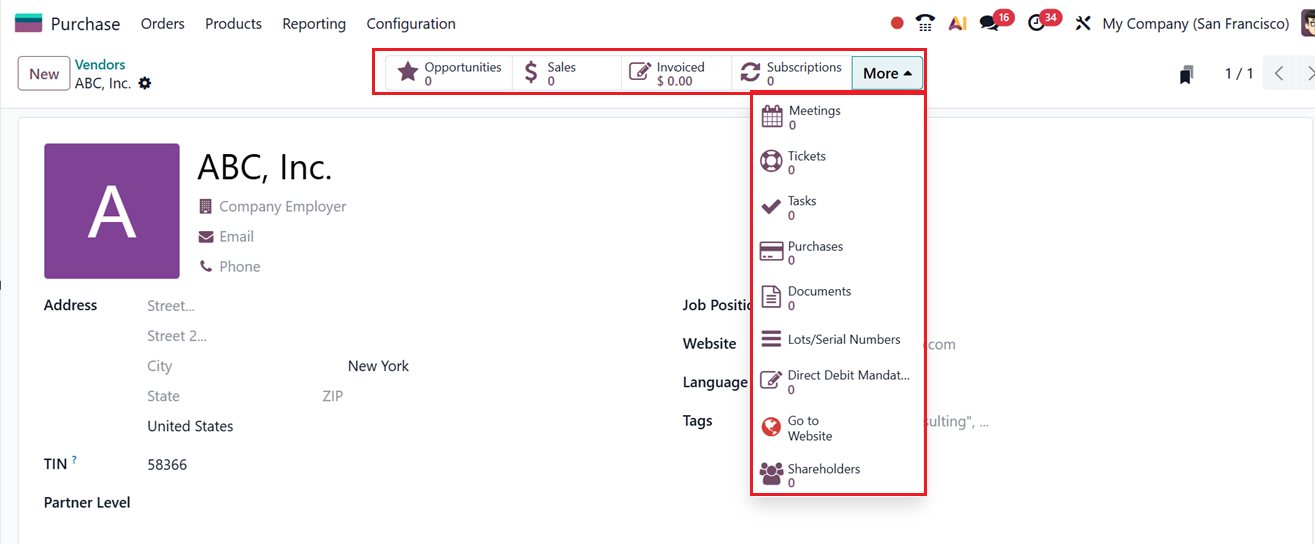
Once the vendor record is saved, additional smart buttons appear, giving access to Opportunities, Sales, Invoiced, Subscriptions. Selecting the More dropdown expands options such as Meetings, Tickets, Tasks, Purchases, Documents, Lots/Serial Numbers and Direct Debit Mandates. A button is also available to preview the vendor’s Website profile and Shareholders as shown in the screenshot below.
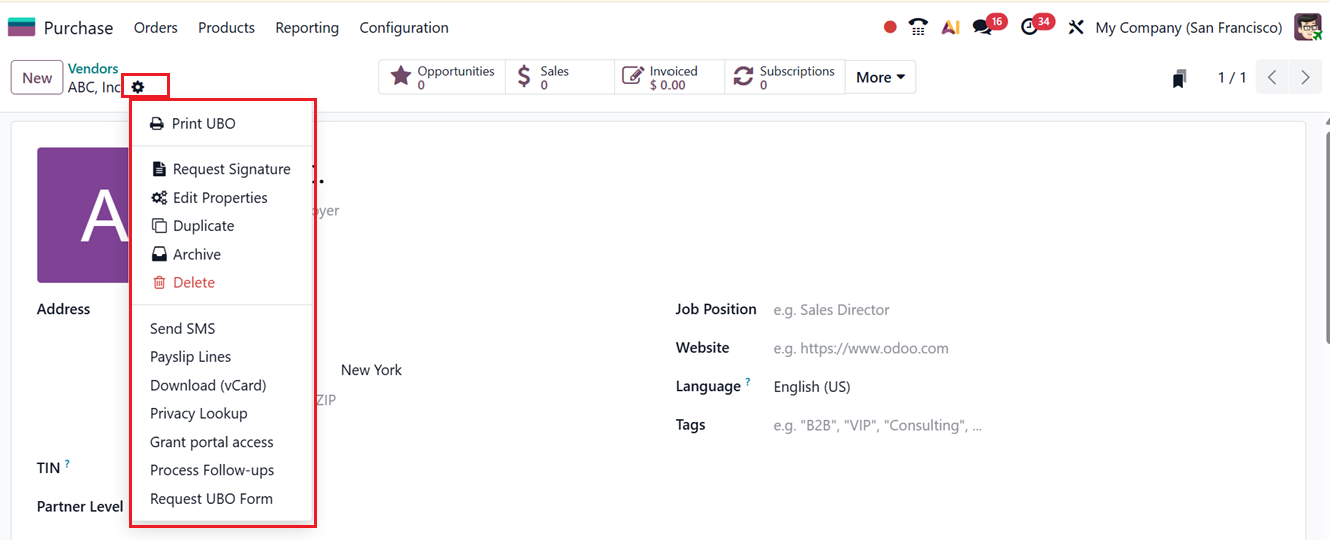
After saving the vendor data, you can choose the vendor for future purchases and orders. Then, the ‘Action’ menu offers additional tools including;
- Print UBO: Generates and prints the Ultimate Beneficial Owner (UBO) information for compliance and regulatory purposes.
- Request Signature: Sends a document to the vendor requesting an electronic signature.
- Edit Properties: Allows addition of extra form fields or system-level properties related to the required record.
- Duplicate: Creates a copy of the current record to save time when entering similar details.
- Archive: Deactivates the record without deleting it, keeping data for future reference.
- Delete: Permanently removes the record from the system.
- Send SMS: Sends an SMS message directly to the vendor for quick communication.
- Payslip Lines: Displays payslip-related entries when the contact is linked to payroll operations.
- Download vCard: Downloads the vendor’s contact details as a vCard file.
- Privacy Lookup: Shows stored personal data related to the contact to support data privacy compliance.
- Grant Portal Access: Provides the vendor access to the customer/vendor portal to view documents and transactions.
- Process Follow-ups: Manages and triggers follow-up actions for pending payments or communications.
- Request UBO Form: Sends a request to the vendor to submit or update their UBO declaration form.
These features help maintain clean, accurate vendor records and improve supplier communication. Odoo 19’s vendor management framework is designed to keep supplier information organized and easily accessible, supporting a smooth procurement workflow.