Products
Under the products menu, you have options like Products, Product variants, Price list, Discount and loyalty, Gift cards & e-wallets, respectively, as shown in the screenshot below.

It goes without saying that the product is an essential component of every business. If you want to run a successful business, you should always prioritize product management, regardless of whether the product is a service or a consumable. Owing to the significance of effectively managing a business's products, Odoo 19 Enterprise offers a dedicated portal for monitoring all relevant data on product management. Important information about the products that are configured in the system for sales operations will be tracked thanks to this platform. Utilizing Odoo 19's distinctive product management solution can benefit you in numerous aspects of your company.
With the product configuration tool, you may maintain a well-organized record of every item you sell. Each product configuration window features pertinent tabs to record accounting, purchasing, inventory, eCommerce, and many other kinds of data related to product management operations.
Here, we'll discuss the Odoo 19 Sales module's Products menu. When creating new quotes or sales orders in the sales module, you must provide the product details.
It is essential to maintain track of all sales products in order to facilitate the creation of quotations or sales orders in the Sales module. This allows you to swiftly and easily select the required item from your system with just a single click. The high level of integration in the Odoo 19 ERP system allows the Sales and Inventory modules to work together, allowing you to acquire product stock information straight from the Sales module. Therefore, before creating a sales order, make sure you configure the required products in the Sales module.
The Odoo 19 Sales module's main menu bar will show the Products menu. It contains submenus for items such as Price lists, Product Variants, Discount and Loyalty, gift cards, and e-wallets.
We shall discuss each of these sub-menus in detail. First, let's look at the Product management window in the Sales module.
1.1 Products
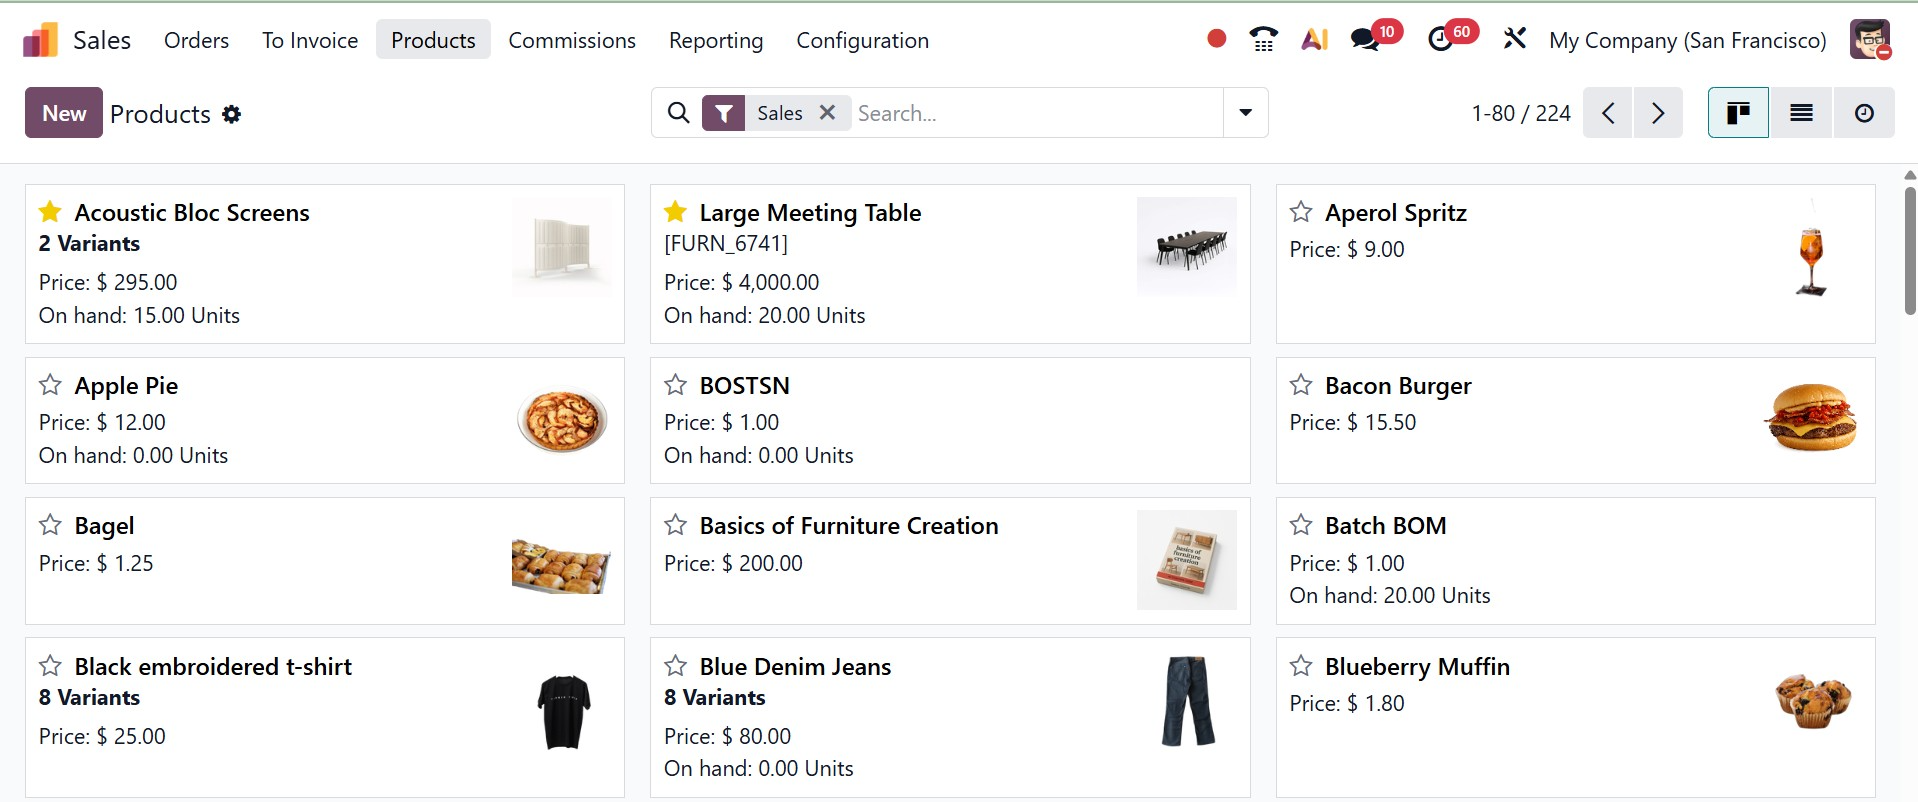
When you select the items submenu in Odoo19, a list of all the configured items in the Sales module will appear in a new window. This window supports the List view, activity view, as well as Kanban view. The following screenshot displays the Kanban view in the product management window.
Odoo 19 has changed the Kanban view symbol, much like what we saw in the CRM module. You will have access to the Activity view on this platform, which shows a list of the activities planned for different sales-related operations for different items, in addition to the kanban and list views.
In any case, this box also has the Filters and Group By choices to help streamline the sorting process.
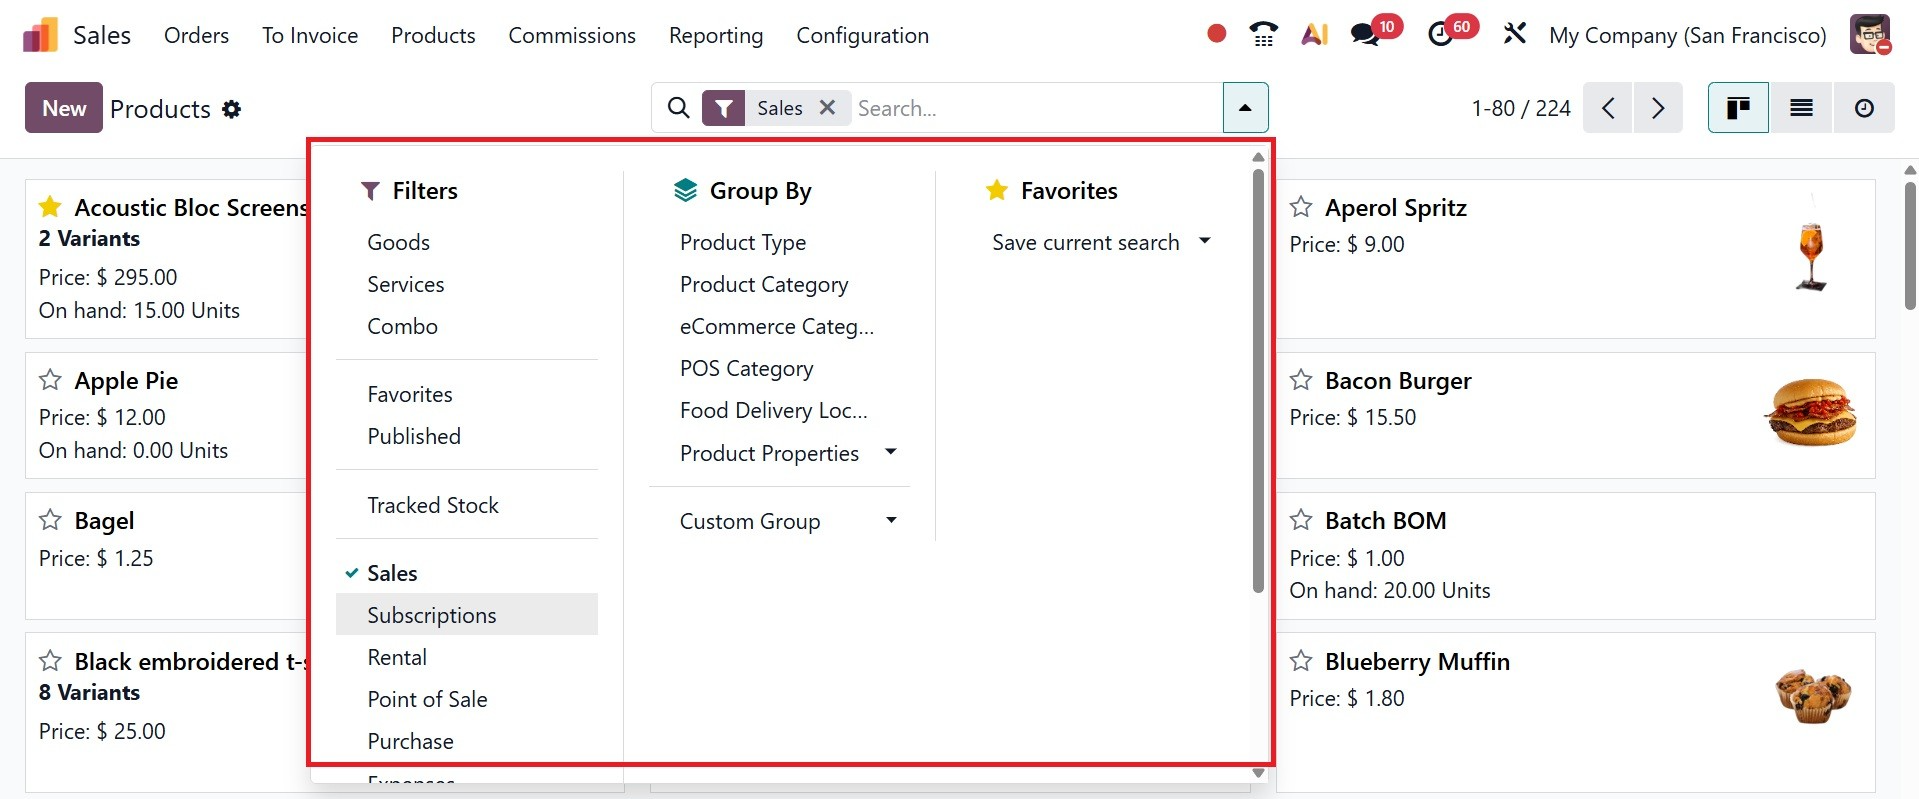
Both sorting techniques include adjustable features that make it simple and quick to get the info you need. You can add a product to your favorites list by clicking on its star icon.
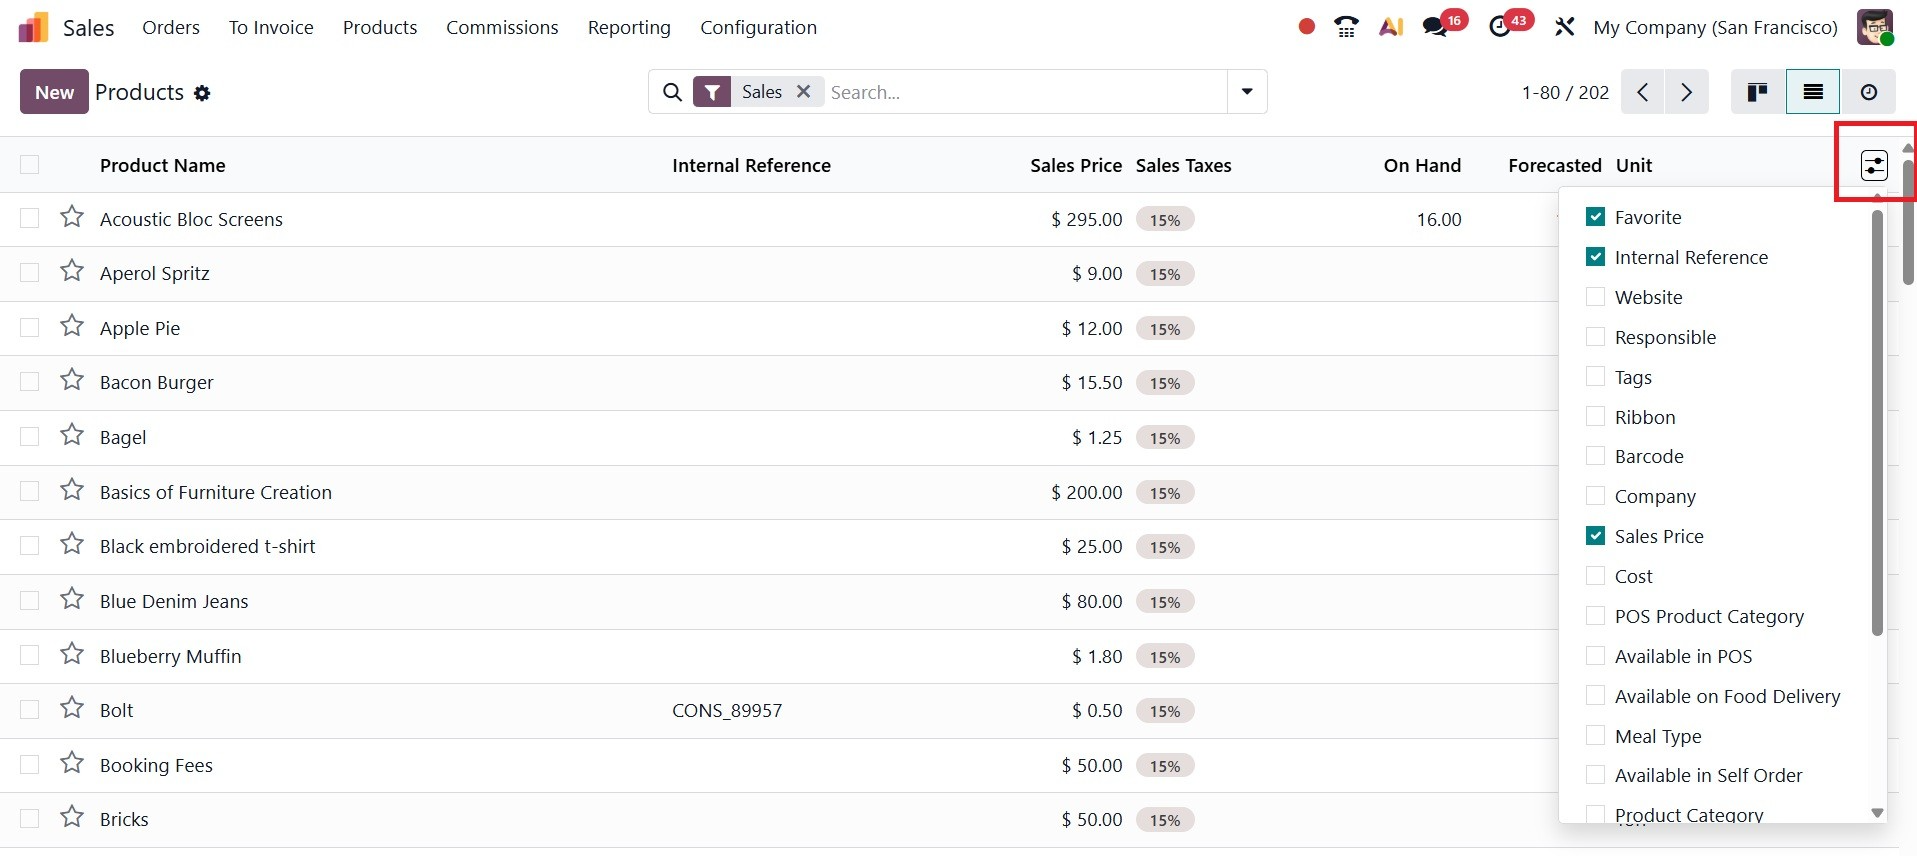
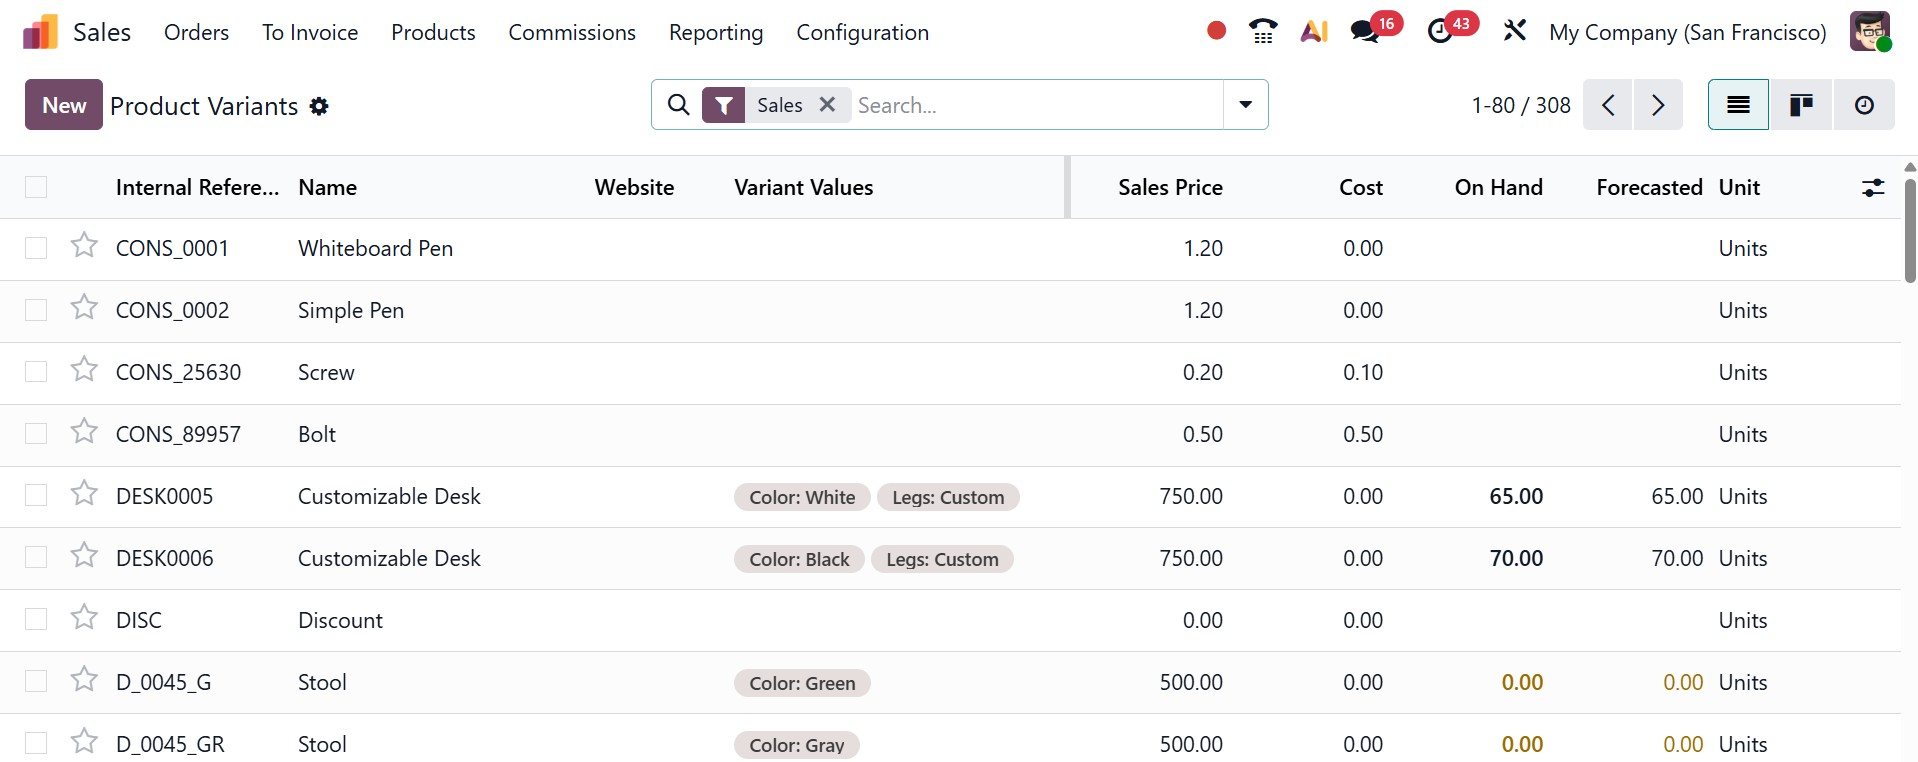
The List view of the product window provides specific information on the Product Name, Internal Reference, Sales Price, Sales taxes, On Hand, forecasted, and Unit. You can add more default fields and custom fields to the list view by using the icon in the window's right corner, as seen in the screenshot above.
Now let's see how the Odoo 19 sales module is set up for new products. If you want to change the products that are currently available, you can select the required items from the list that is supplied and make the necessary changes. To create a new record, you are told to click the New button. A screenshot of the new product configuration window may be found below.

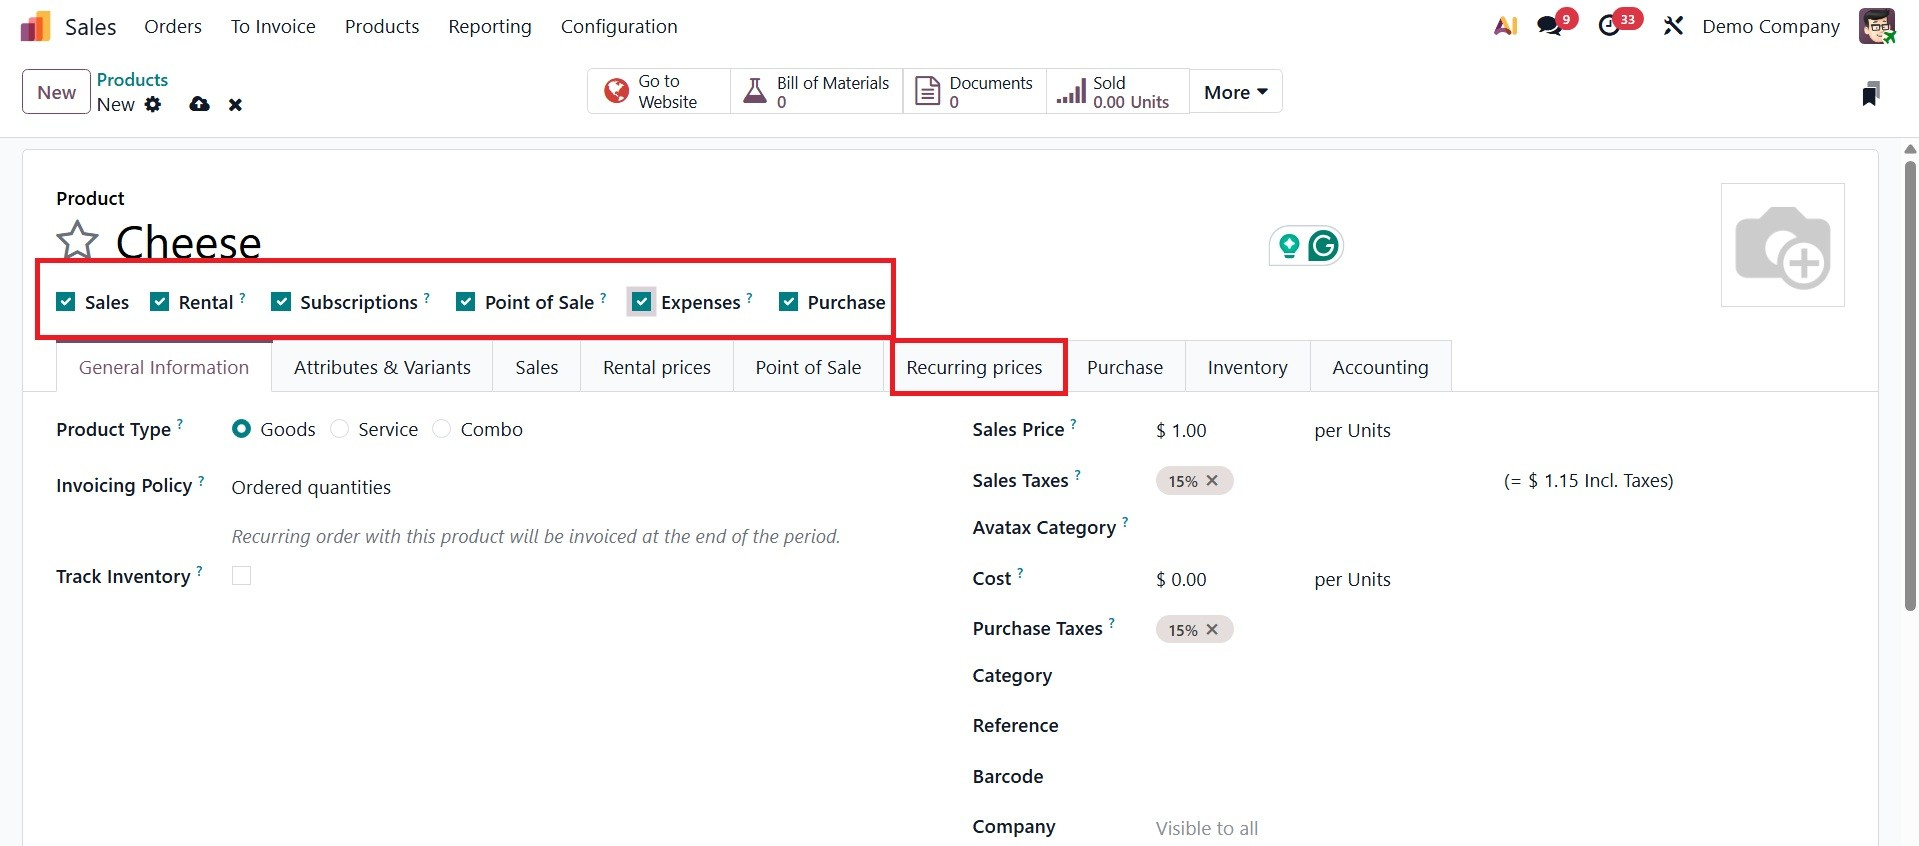
The name of the product may appear in the Product Name column. As previously mentioned, you can use the star icon to add this product to your favorites list. This product can be purchased, sold, rented, expensed, or recurring, depending on your preference.
- Sales: Makes it possible to sell the product using the Sales module. It can be included in sales orders and quotations.
- Rental: Indicates that the item is available for rent. After that, it may be utilized to create rental orders and contracts in the Rental module.
- Subscription: Makes it possible to offer the product as a recurring subscription. In order for sales orders to generate recurring subscription plans, it connects with the Subscription module.
- Point of Sale: Enables direct sales in retail or restaurant operations by making the goods available in the POS (Point of Sale) system.
- Expense: Enables workers to enter this item in the Expenses module, typically for reimbursements (e.g., office supplies, travel expenses).
- Purchase: Makes it possible to buy the product using the Purchase module. It can be included in purchase order for vendors.
A subscription will be established if you select the Subscription option when confirming a sales order for this product, as shown below.
The Sales module in Odoo 19 is connected with numerous other crucial modules. Depending on which modules are loaded in your database, you can access advanced tabs in the product setup window. Let's examine each of them in greater detail.
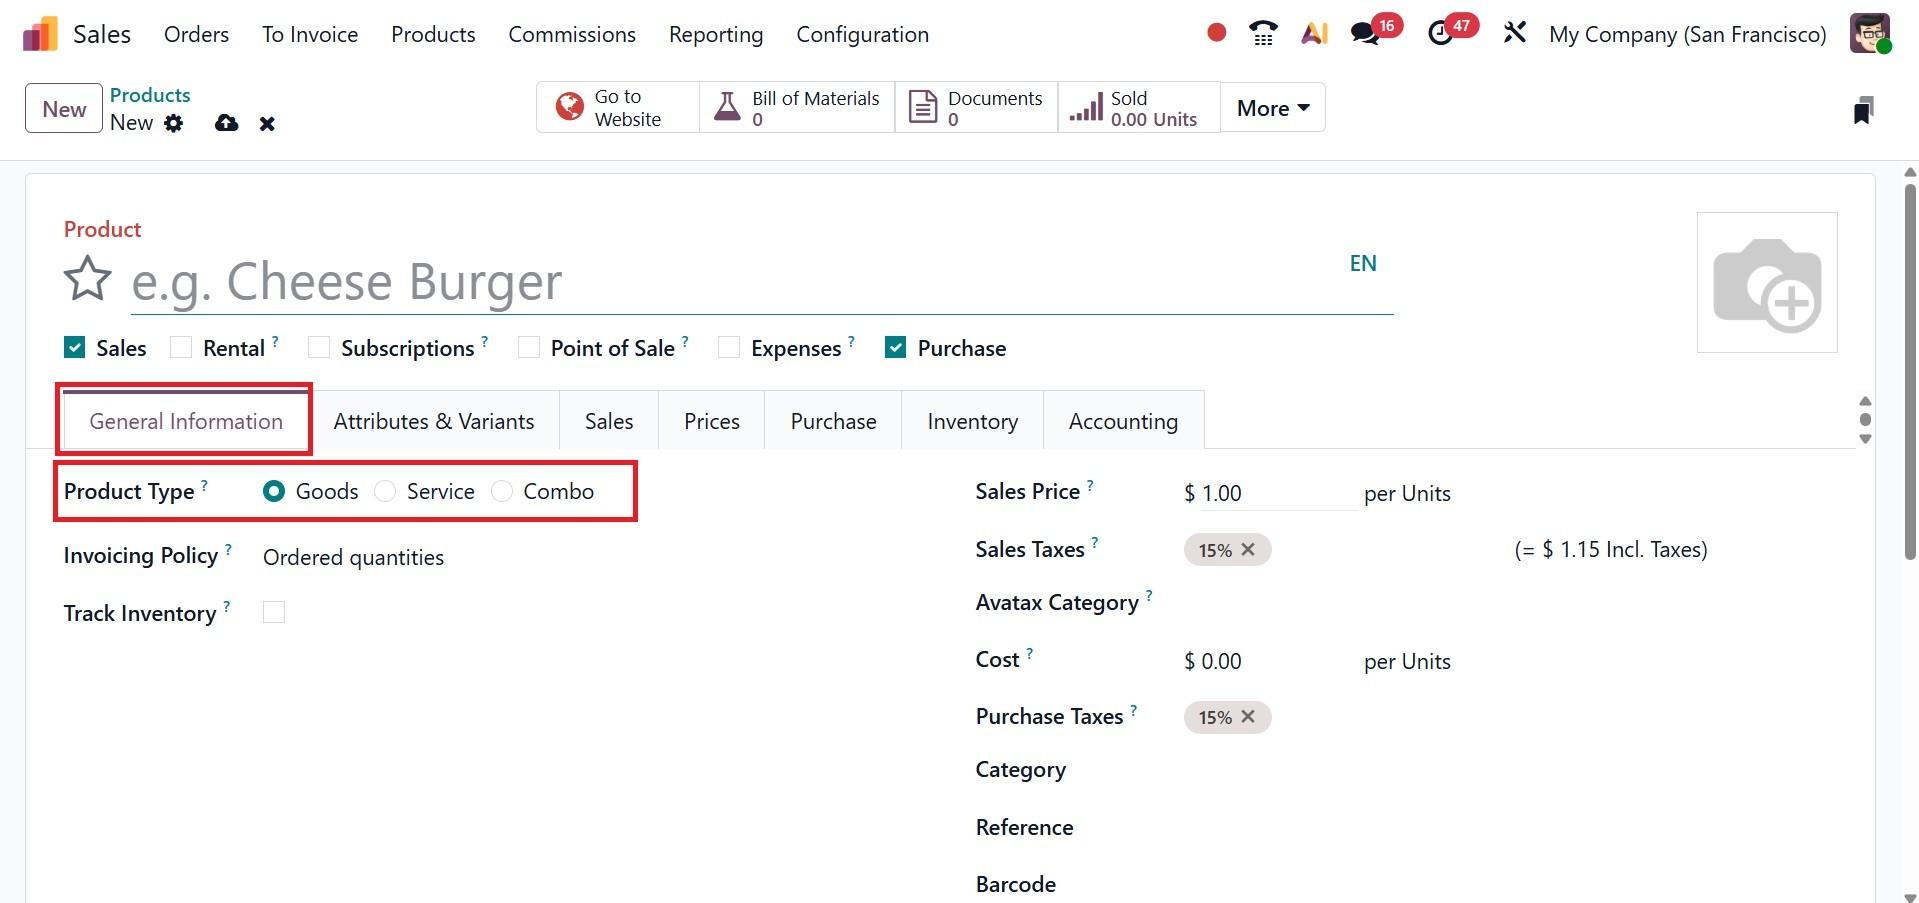
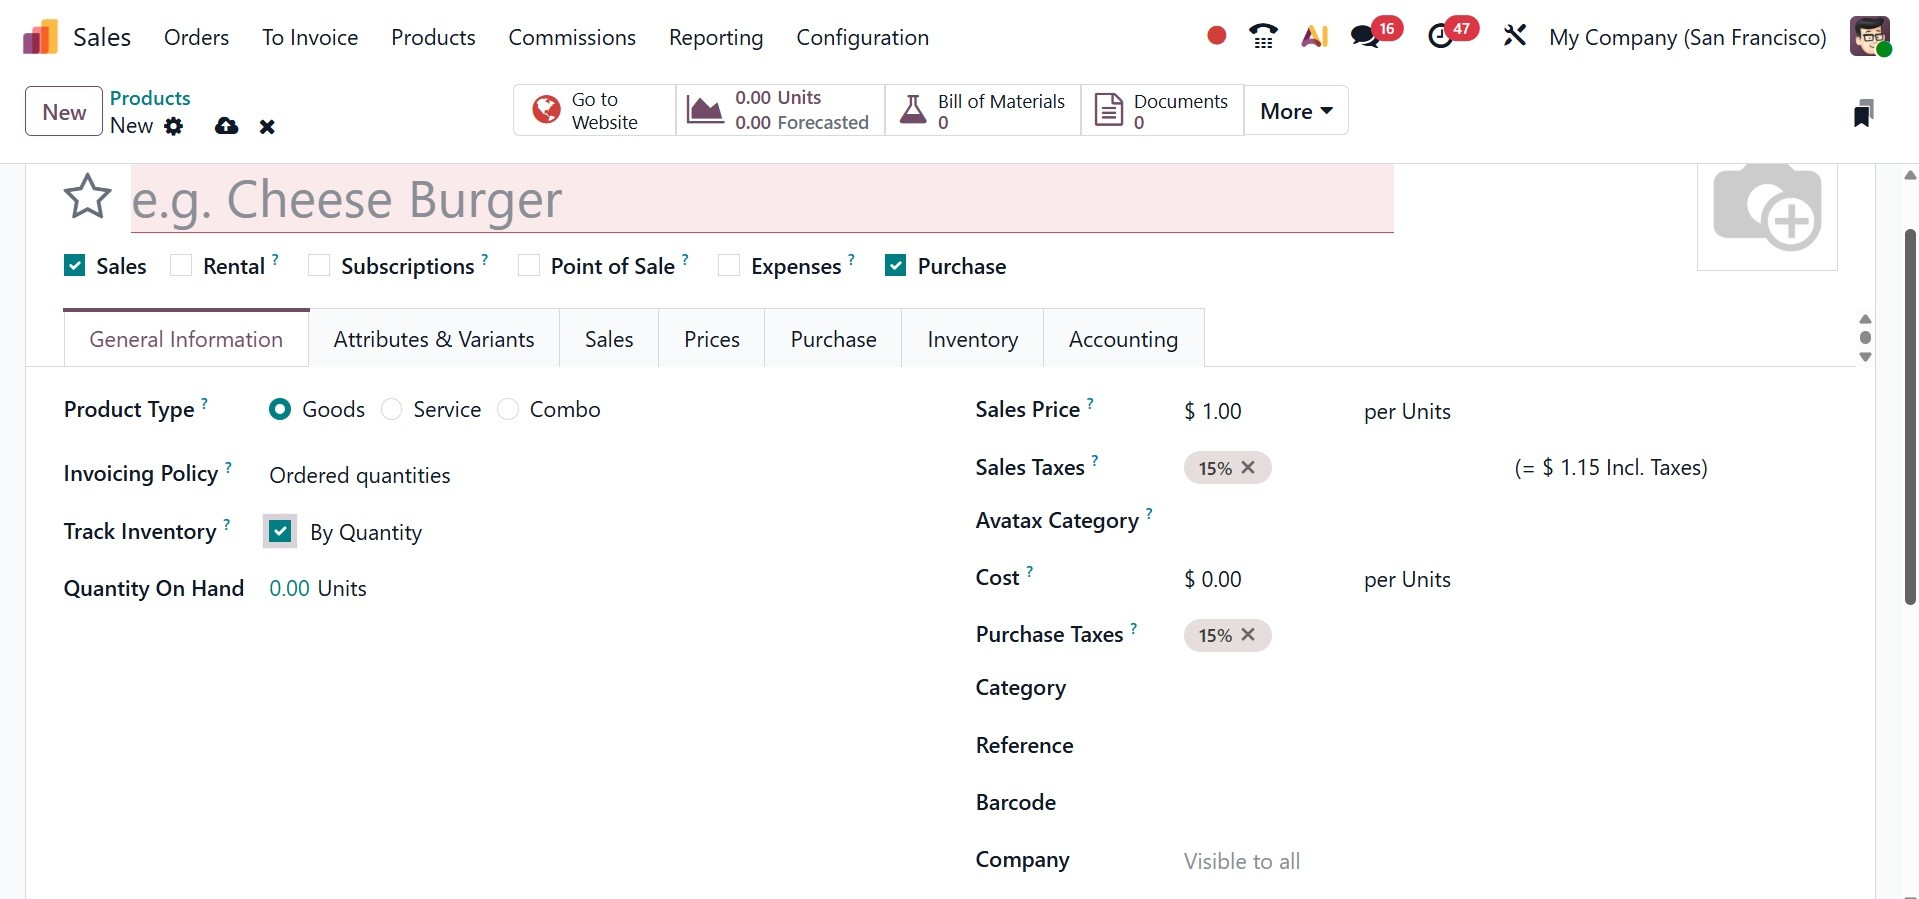
The General Information tab contains the product's general information. Select the ideal Product Type from the list of alternatives.
- Goods:these are physical, material objects, such as a house or a hamburger.
- Service:an immaterial, intangible good or service (e.g., a haircut, a repair, call center support)
- Combo: any combination of products and services (for example, a new car, which is a good, plus an oil change, which is a service).
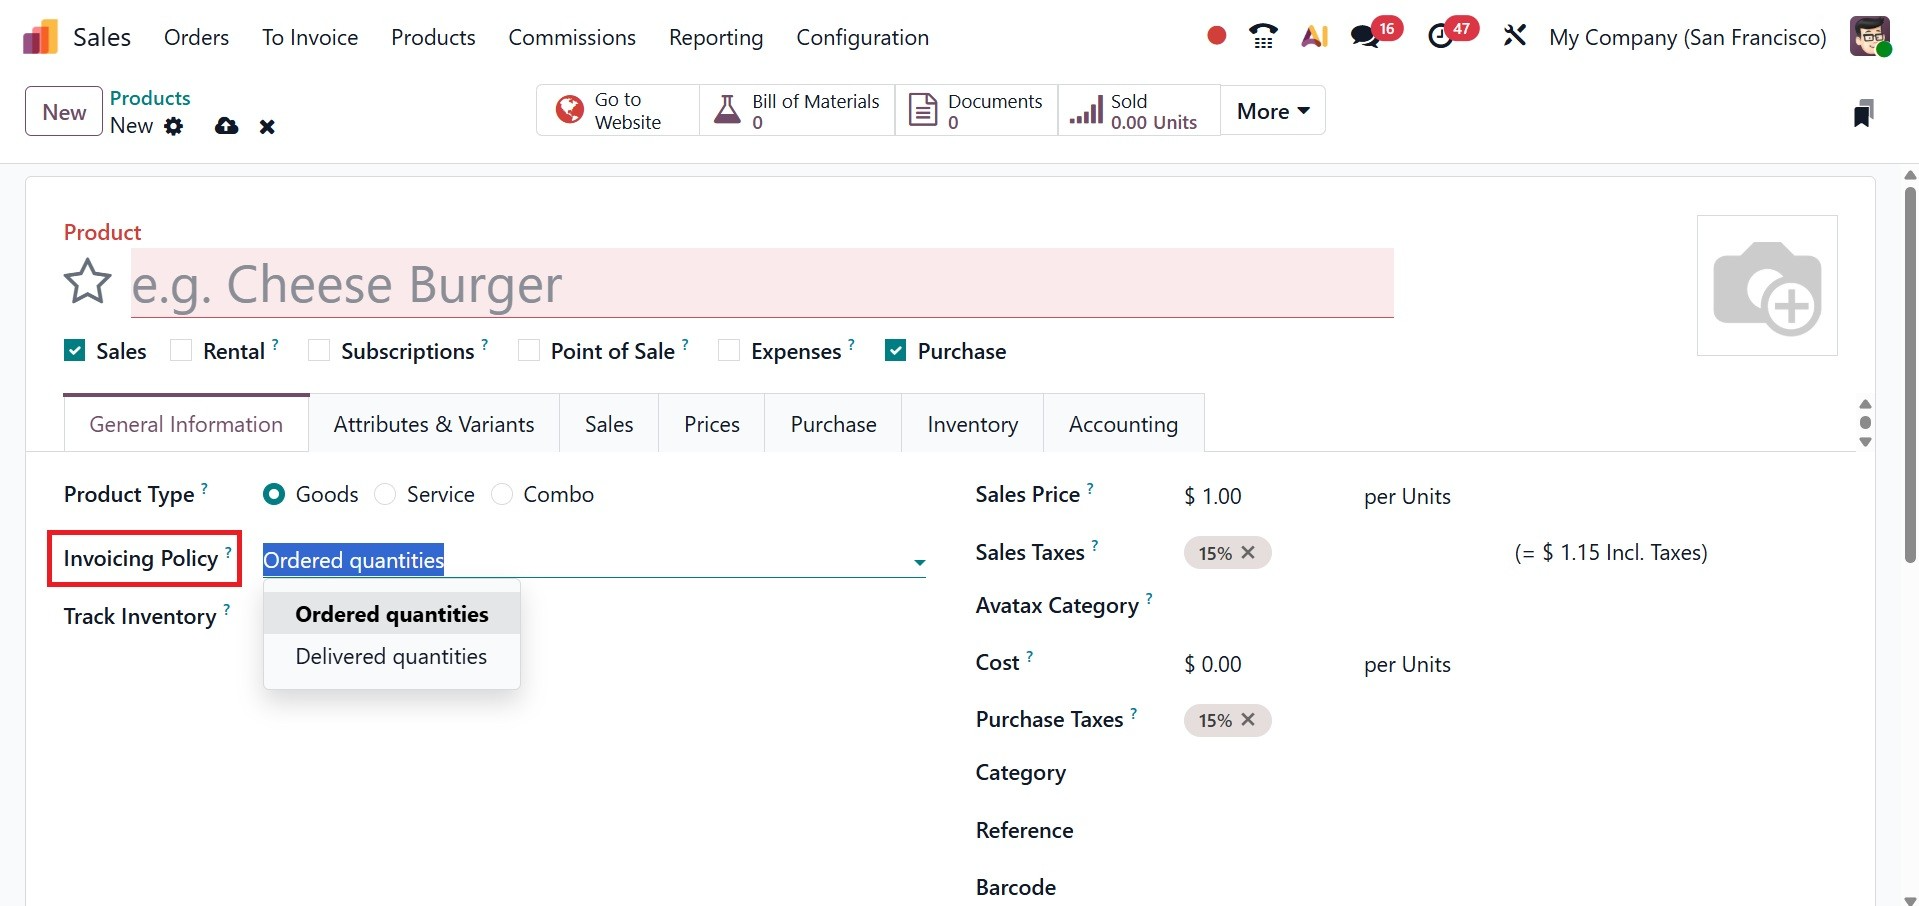
After the Product Type is mentioned, you can supply the Invoicing Policy. There are of two types.
- Ordered Quantities:Odoo will enable you to create invoices prior to delivery if you have chosen this invoicing policy.
- Delivered Quantities:Before the goods is delivered, a user cannot generate an invoice. When a user creates an invoice without verifying the delivered quantity, you will be presented with an error notice indicating that there isn't an invoiceable line, indicating that the product has a "Delivered Quantities" invoicing policy.
You Track inventory option is the checkbox which determines whether Odoo tracks inventory for this product. The Quantity on hand, Sales price, Sales taxes, Avatax Category, Cost, Product Taxes, Category, Category, Reference, Barcode, and Company details can all be entered in the appropriate areas.
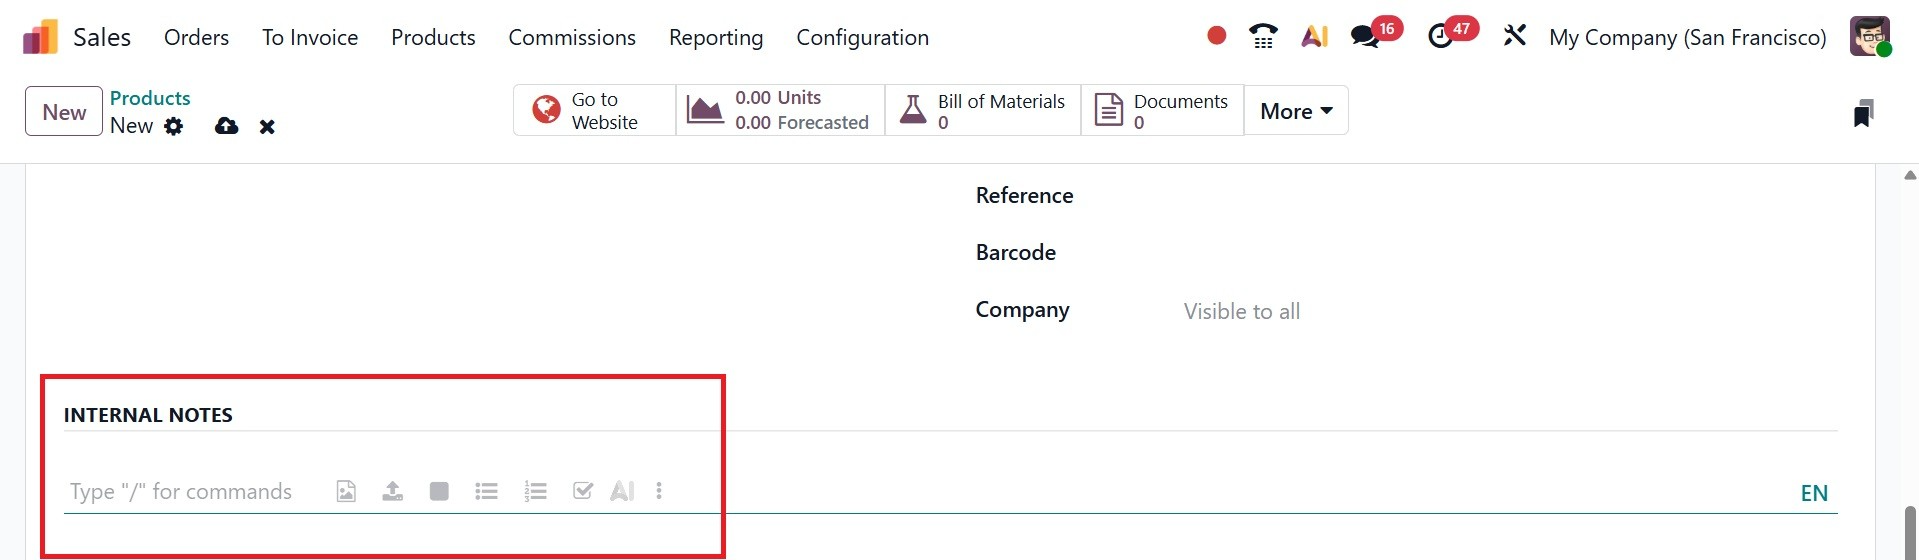
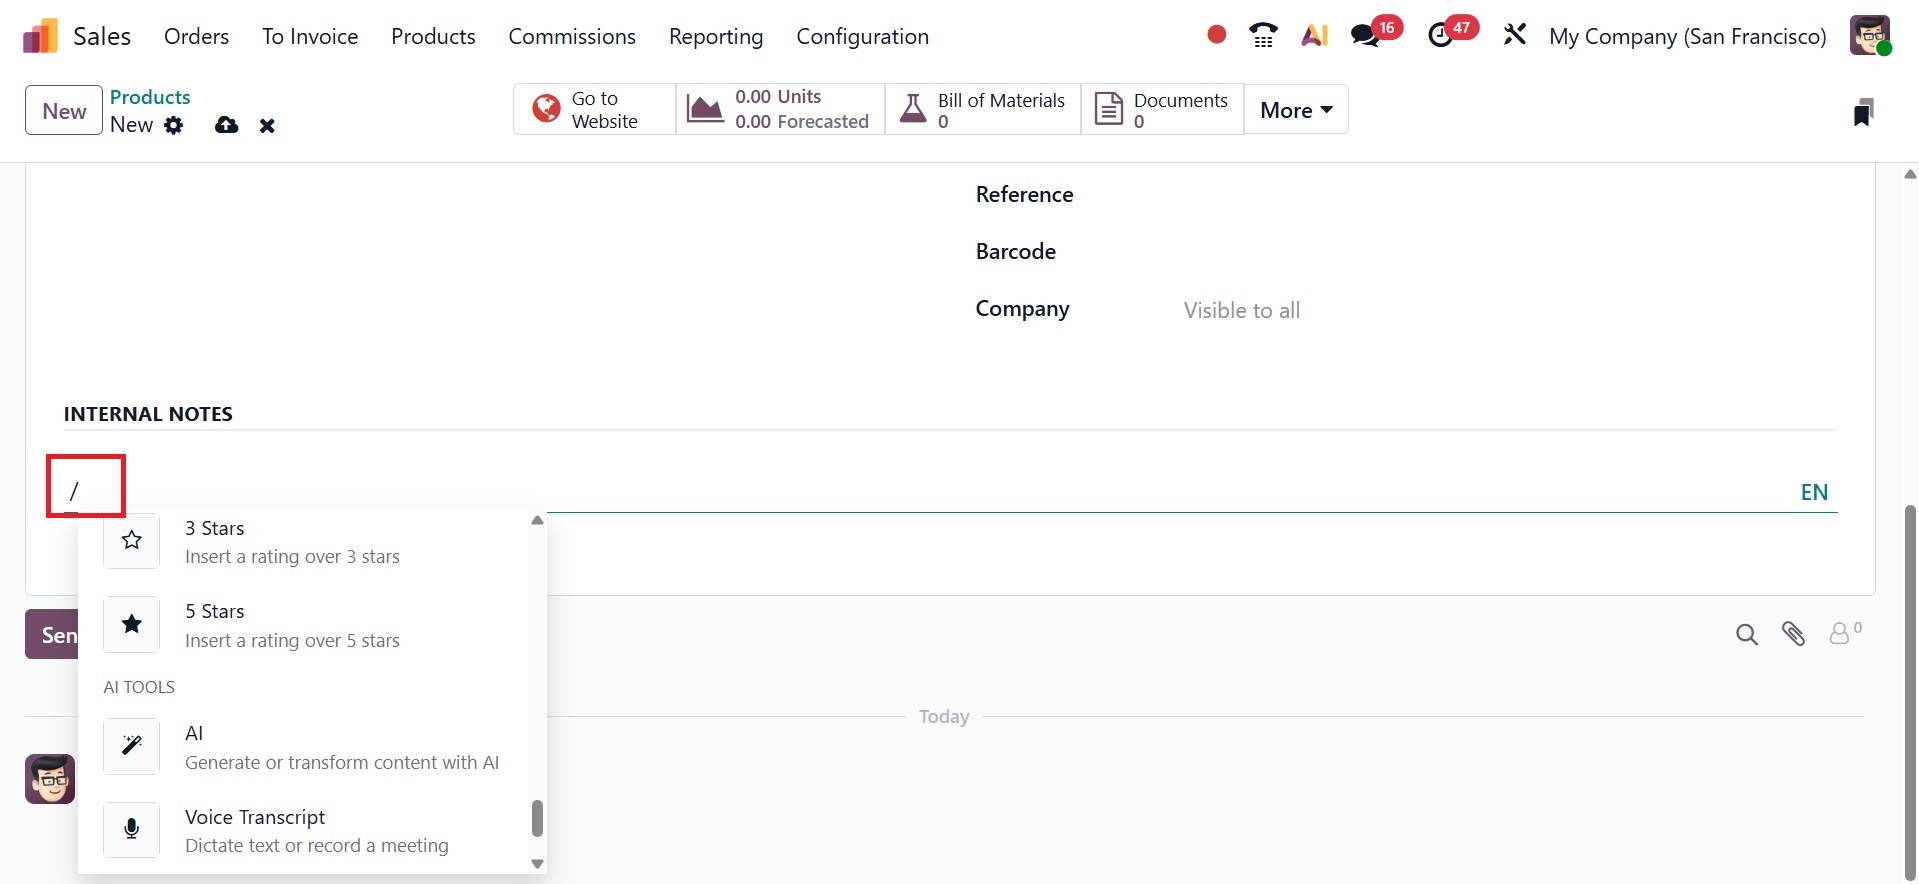
The General Information tab's Internal comments area is where you can put comments for internal use. Thus, a brand-new Chat GPT integration option was released by Odoo. Put a "/" in the internal note section to activate the Chat GPT option. This enables users to generate or edit material using AI, as in the screenshot below.
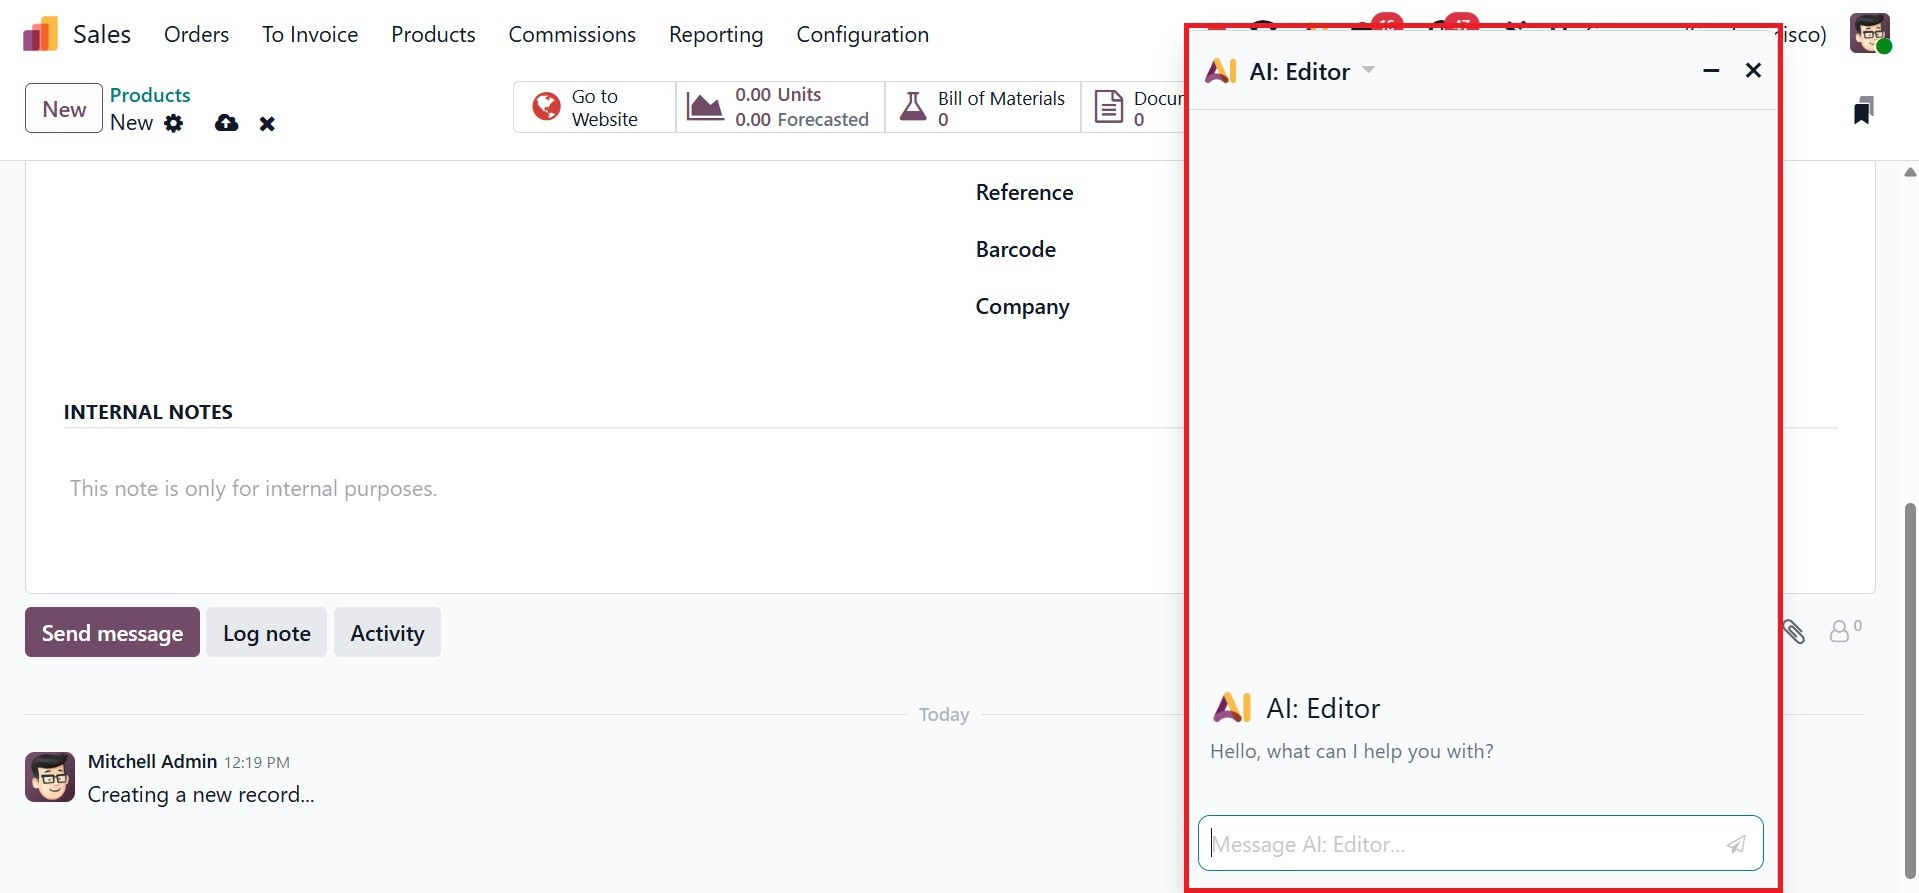
A pop-up window for AI-powered text production will appear after choosing AI tools, as in the screenshot below.
Click the green button next to our requests after adding them in the Send Message section.
Sometimes there are multiple versions of a product, each with a unique set of features. The attributes and variations of a product can be listed under the Attributes & Variants tab.

By choosing the Add a Line option, you may input the Attributes and Values in the appropriate places, as in the screenshot above.
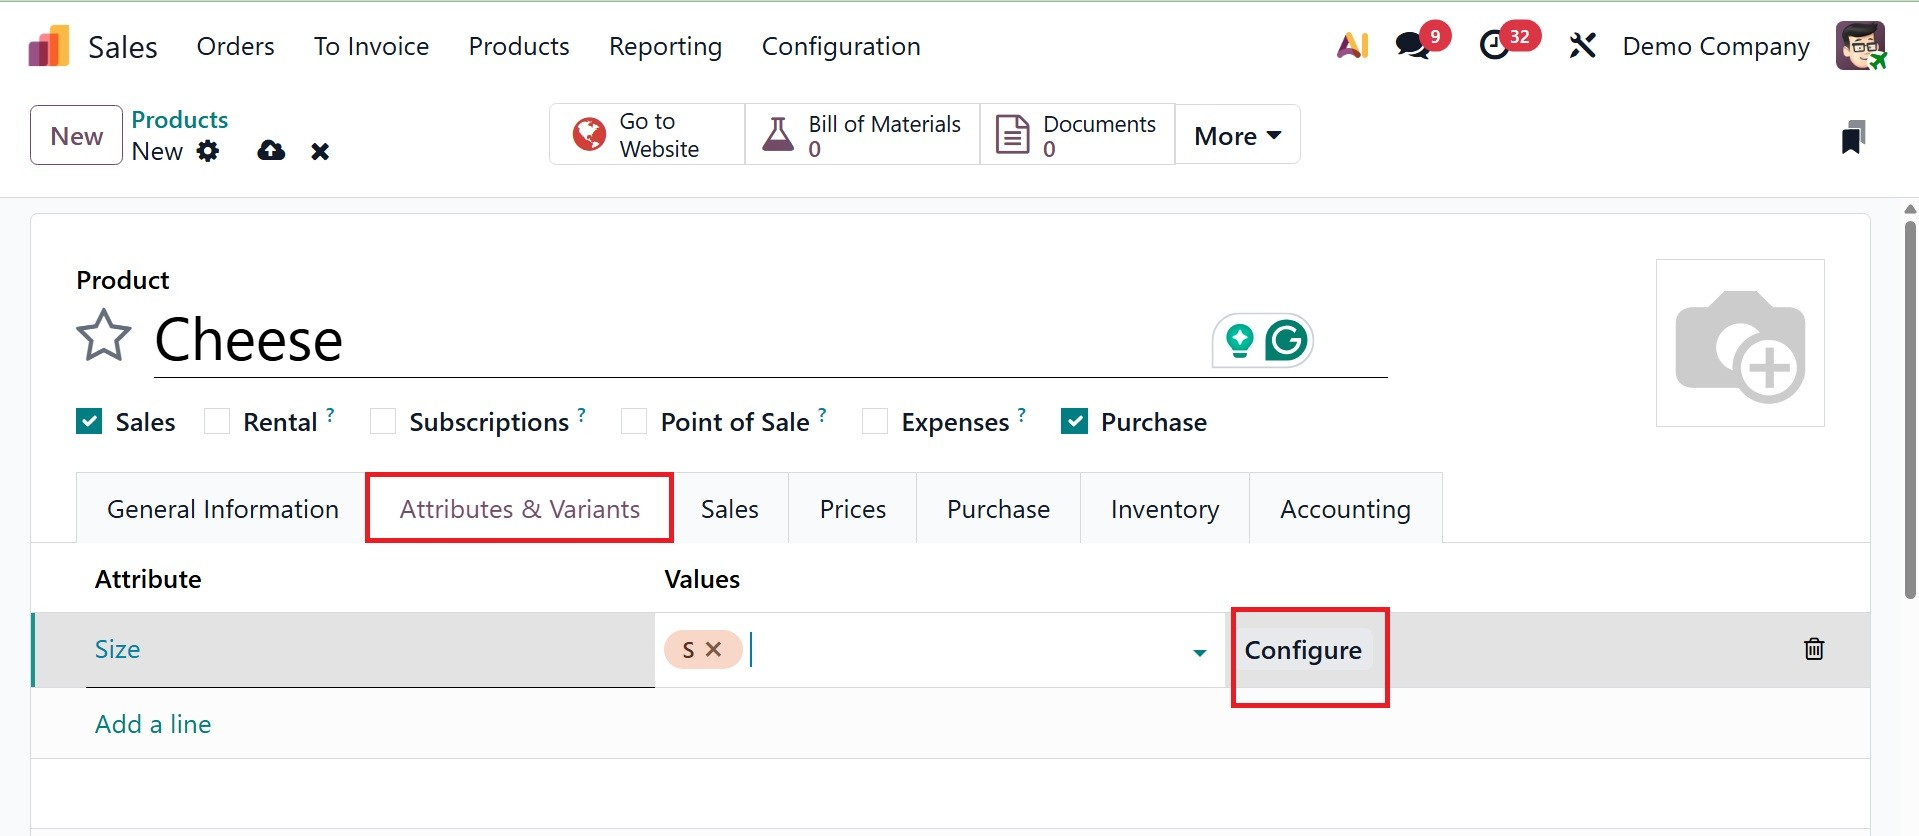
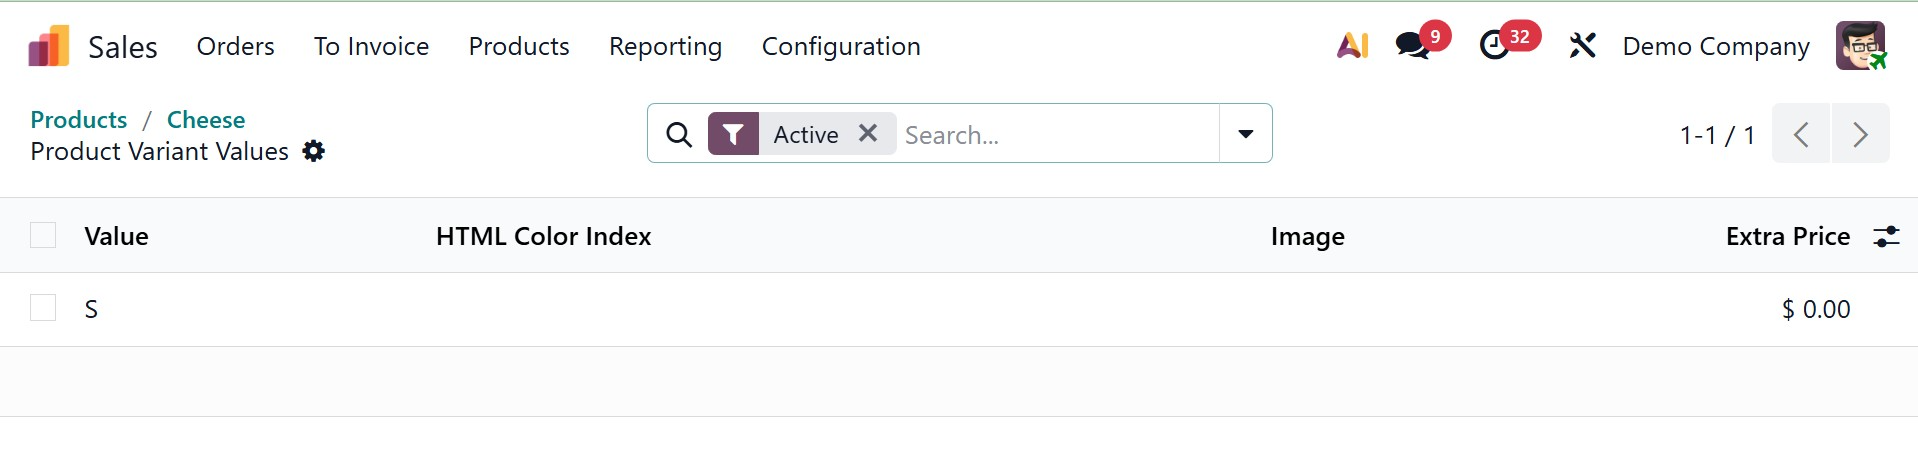
On selecting the Configure icon, you can add the product variants values and other details, as in the screenshot below.
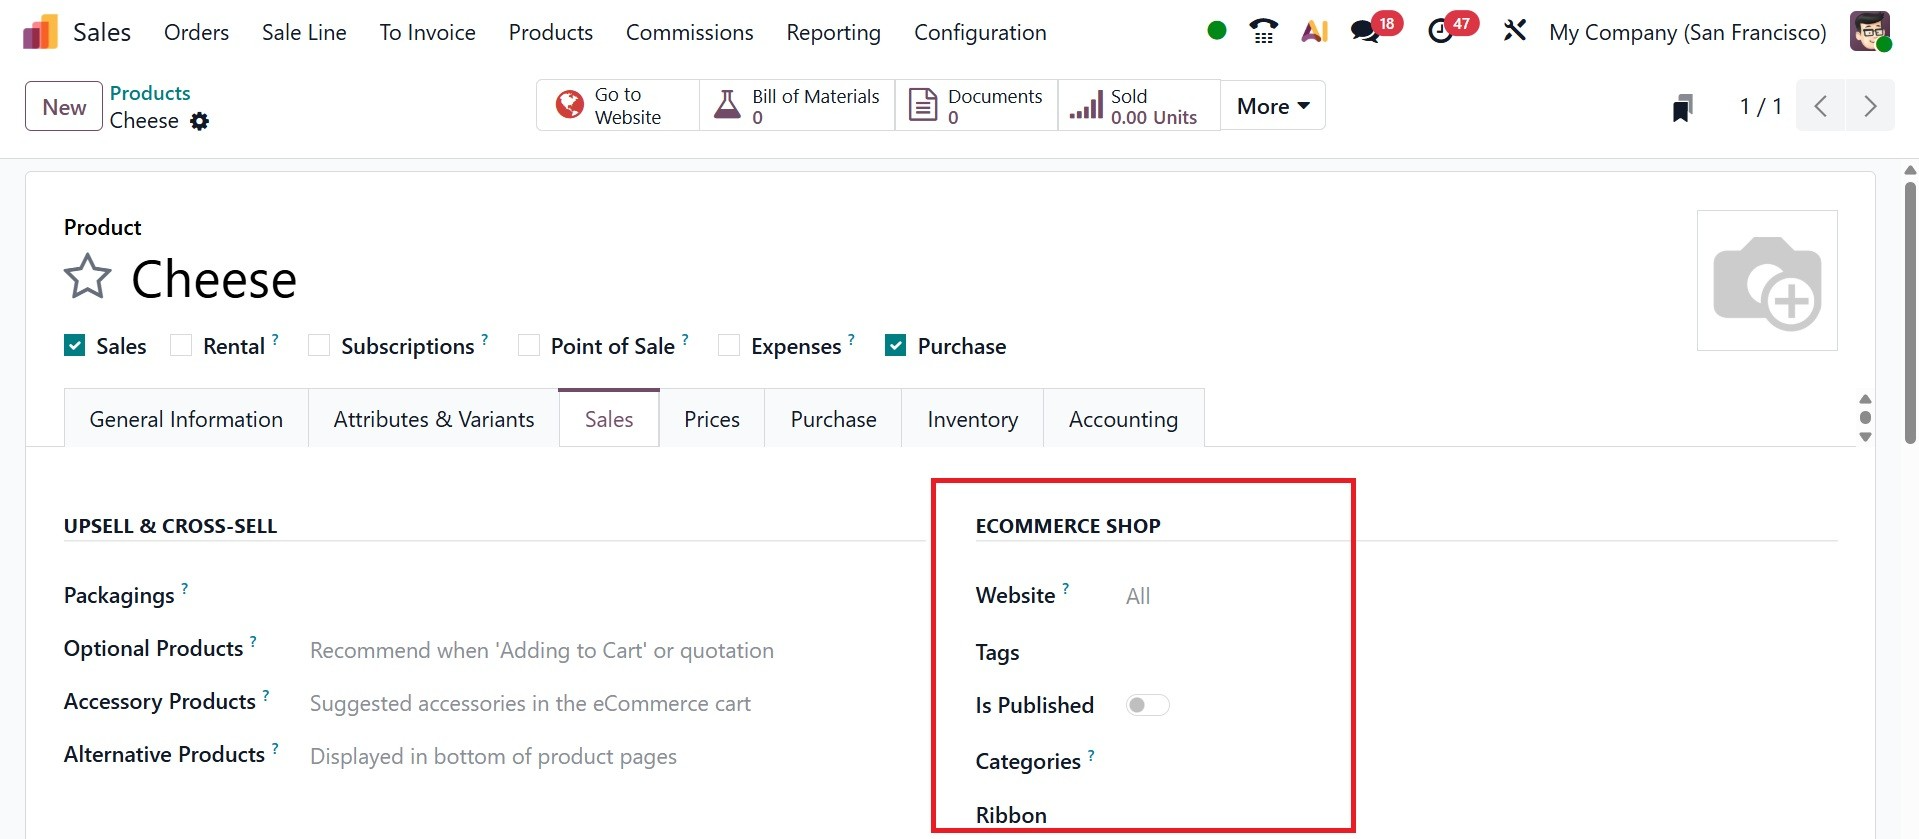
Sales data for the new product will be available on the Sales tab of the product setup window. You can specify your eCommerce shop, point of sale, and upselling and cross-selling strategies in this section. The screenshot below shows the Sales tab for a product. Under the Upsell & Cross-Sell box, you can designate Alternative Products, Accessory Products, and Optional Products in the appropriate positions.
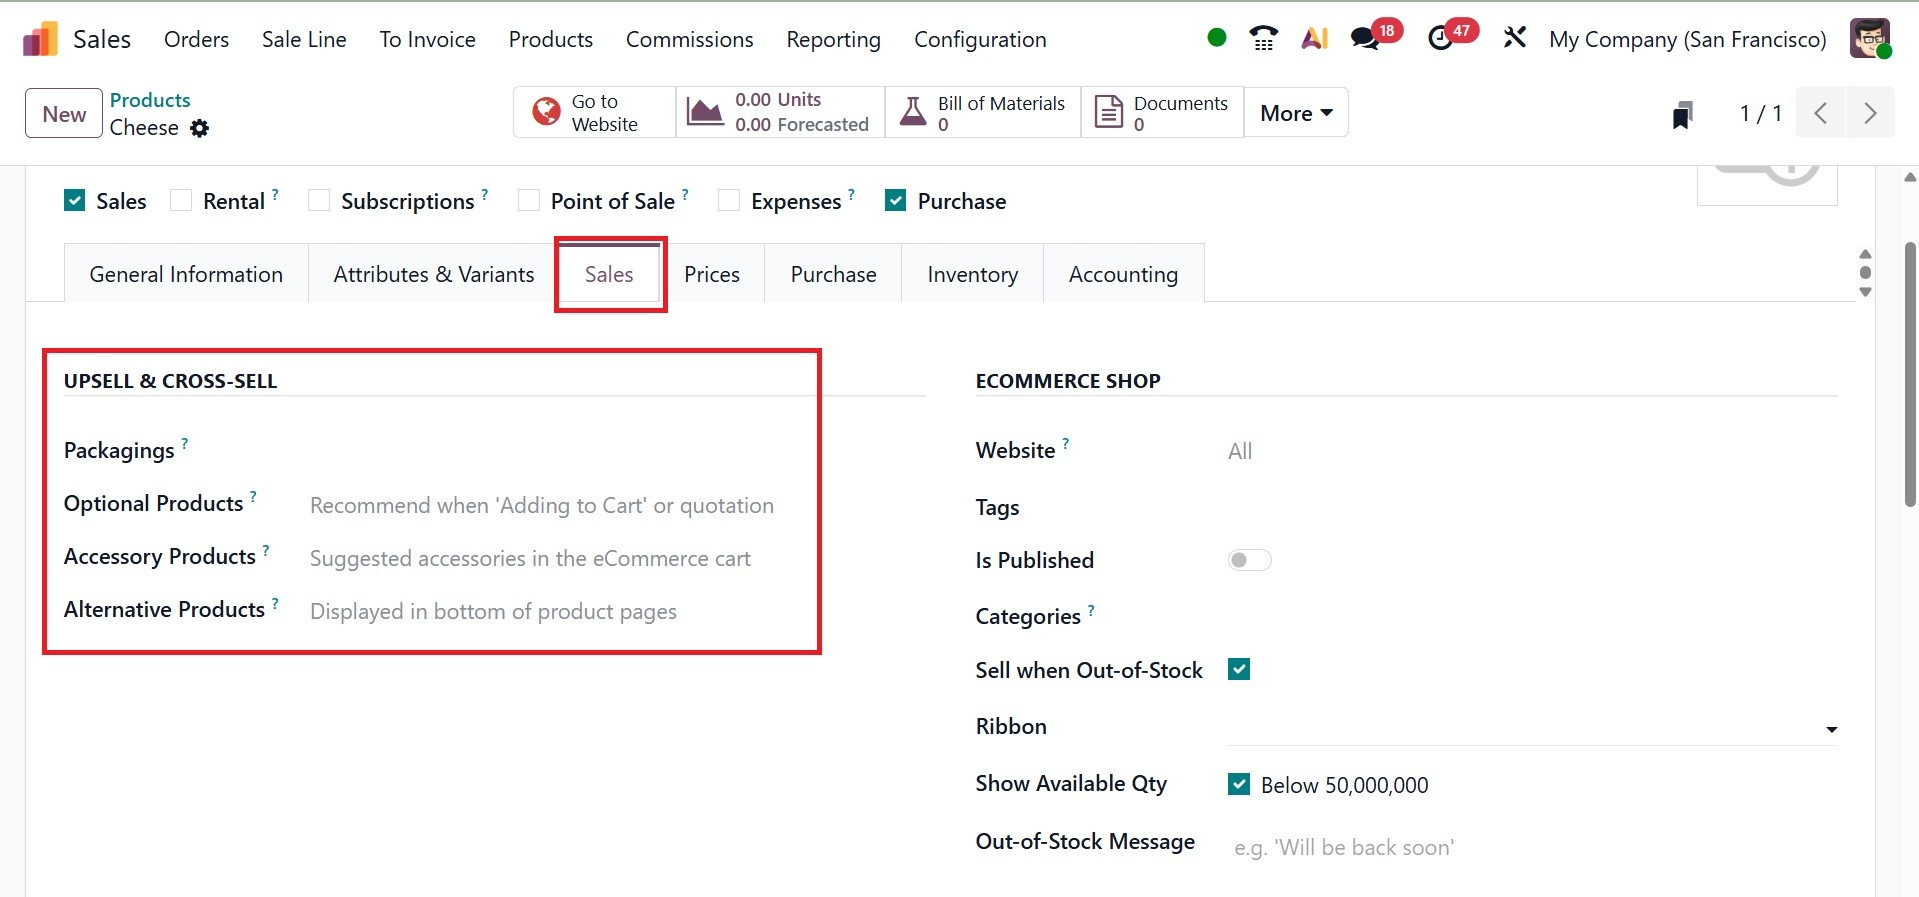
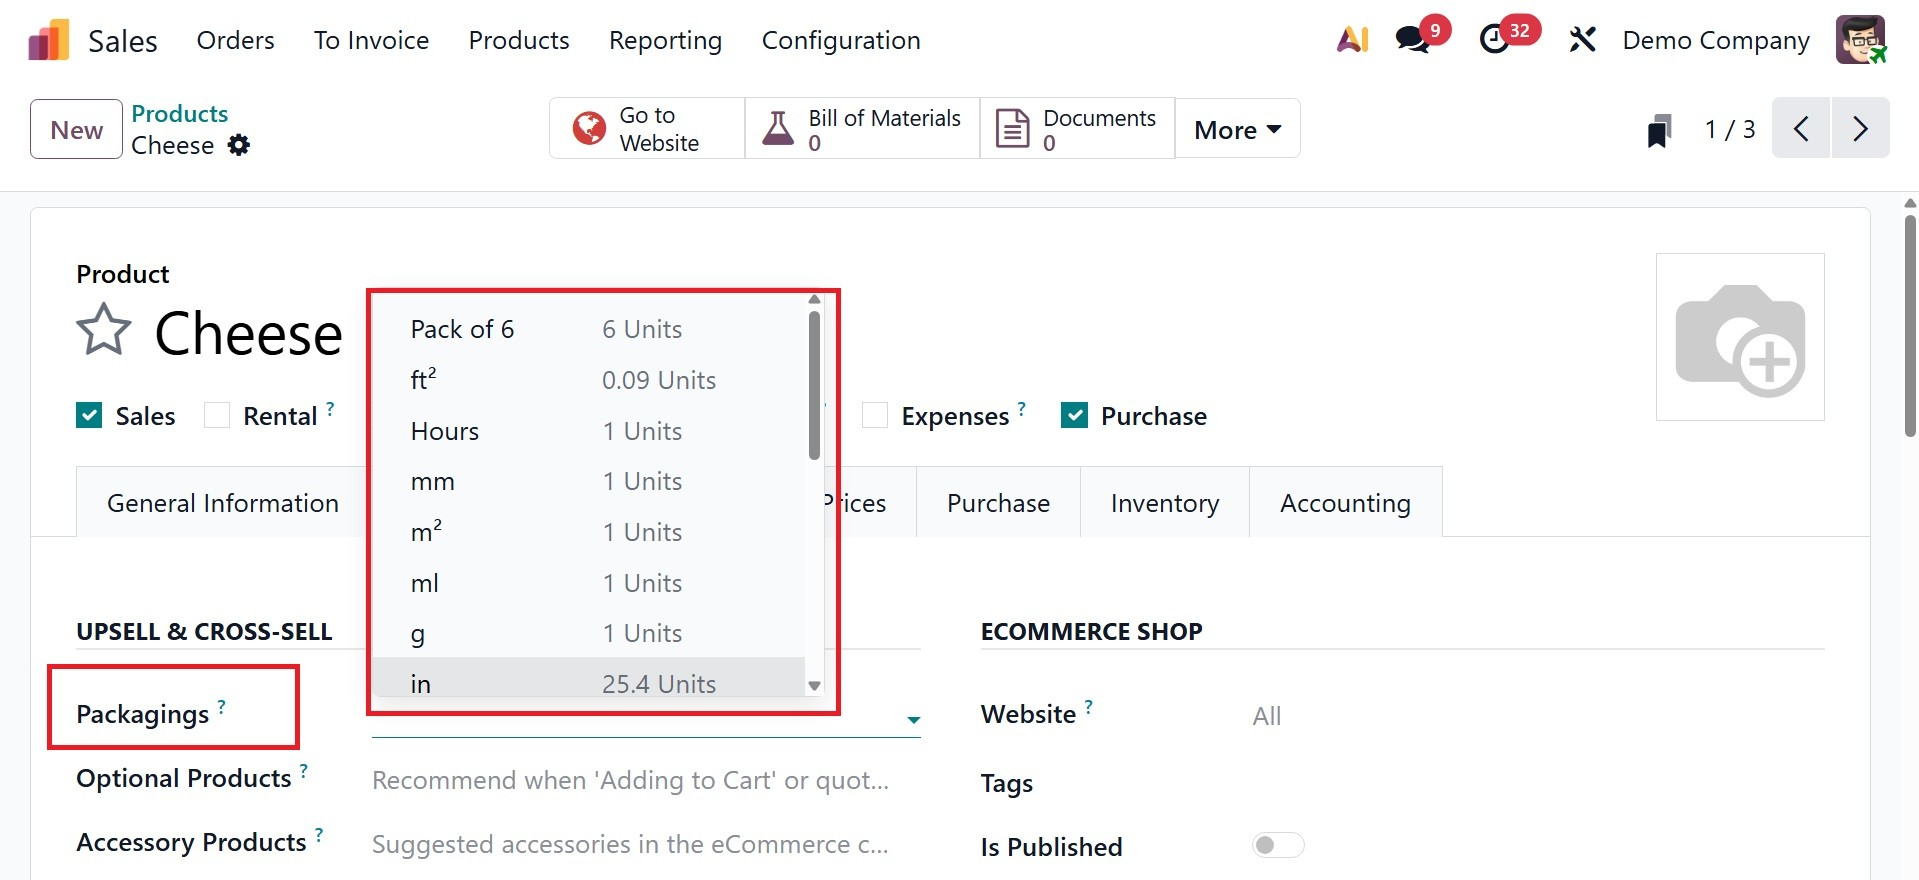
- Packaging: Combines the same products in order to sell or receive them in predetermined amounts. Here, you can add the units along with the packaging details, which is new in Odoo 19.
- Optional Products: When a customer clicks the 'Add to Cart' button on an eCommerce page, a cross-selling strategy suggests related products.
- Accessory product: When a customer checks their shopping cart before checking out, accessory items are suggested as an additional cross-selling strategy.
- Alternative Products: This upselling strategy highlights items on the product page that are substitutes for a certain item.
To publish the goods for online sales, you can provide details about your eCommerce website in the Commerce Shop area. The Website Sequence will determine the display order of the eCommerce page. The Categories section may include a reference to the e-commerce category of the goods. When publishing a product on an e-commerce page, you may use ribbons with phrases like "New," "Out of Stock," "Limited Stock," etc., to attract customers. These ribbons can be included in the Ribbons field. You can add related tags and use the Is Published option to publish the product.
The Add Media option in ECOMMERCE MEDIA allows you to add more product media for the product.
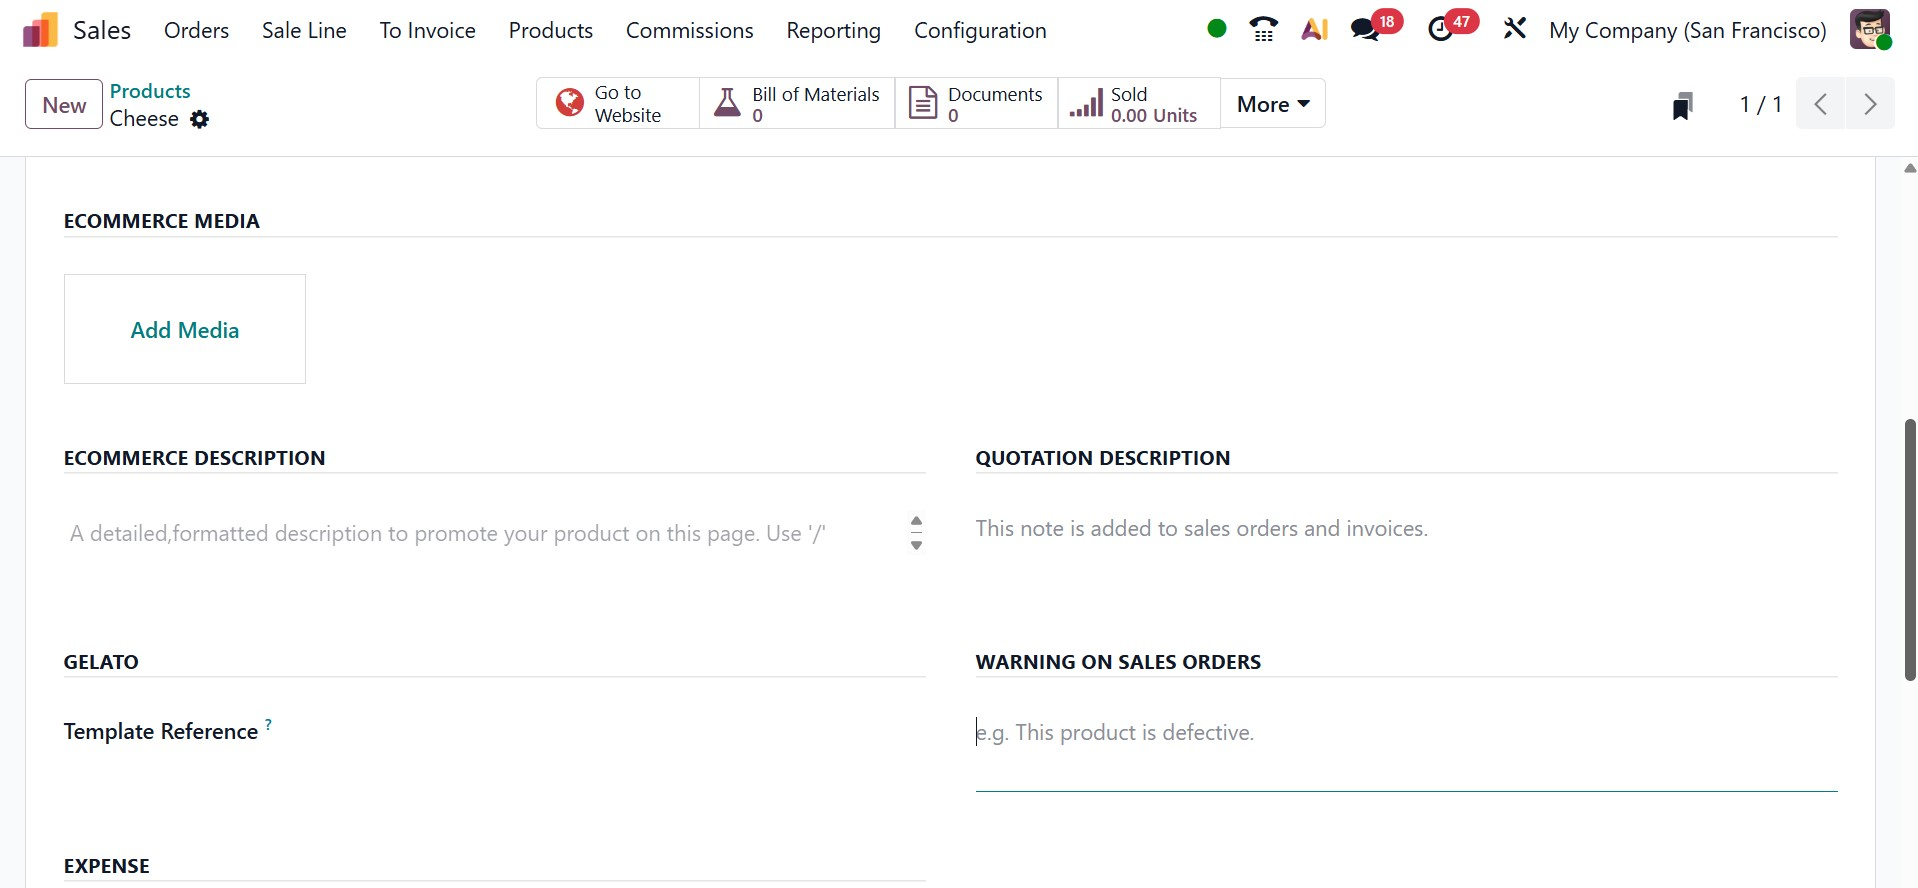
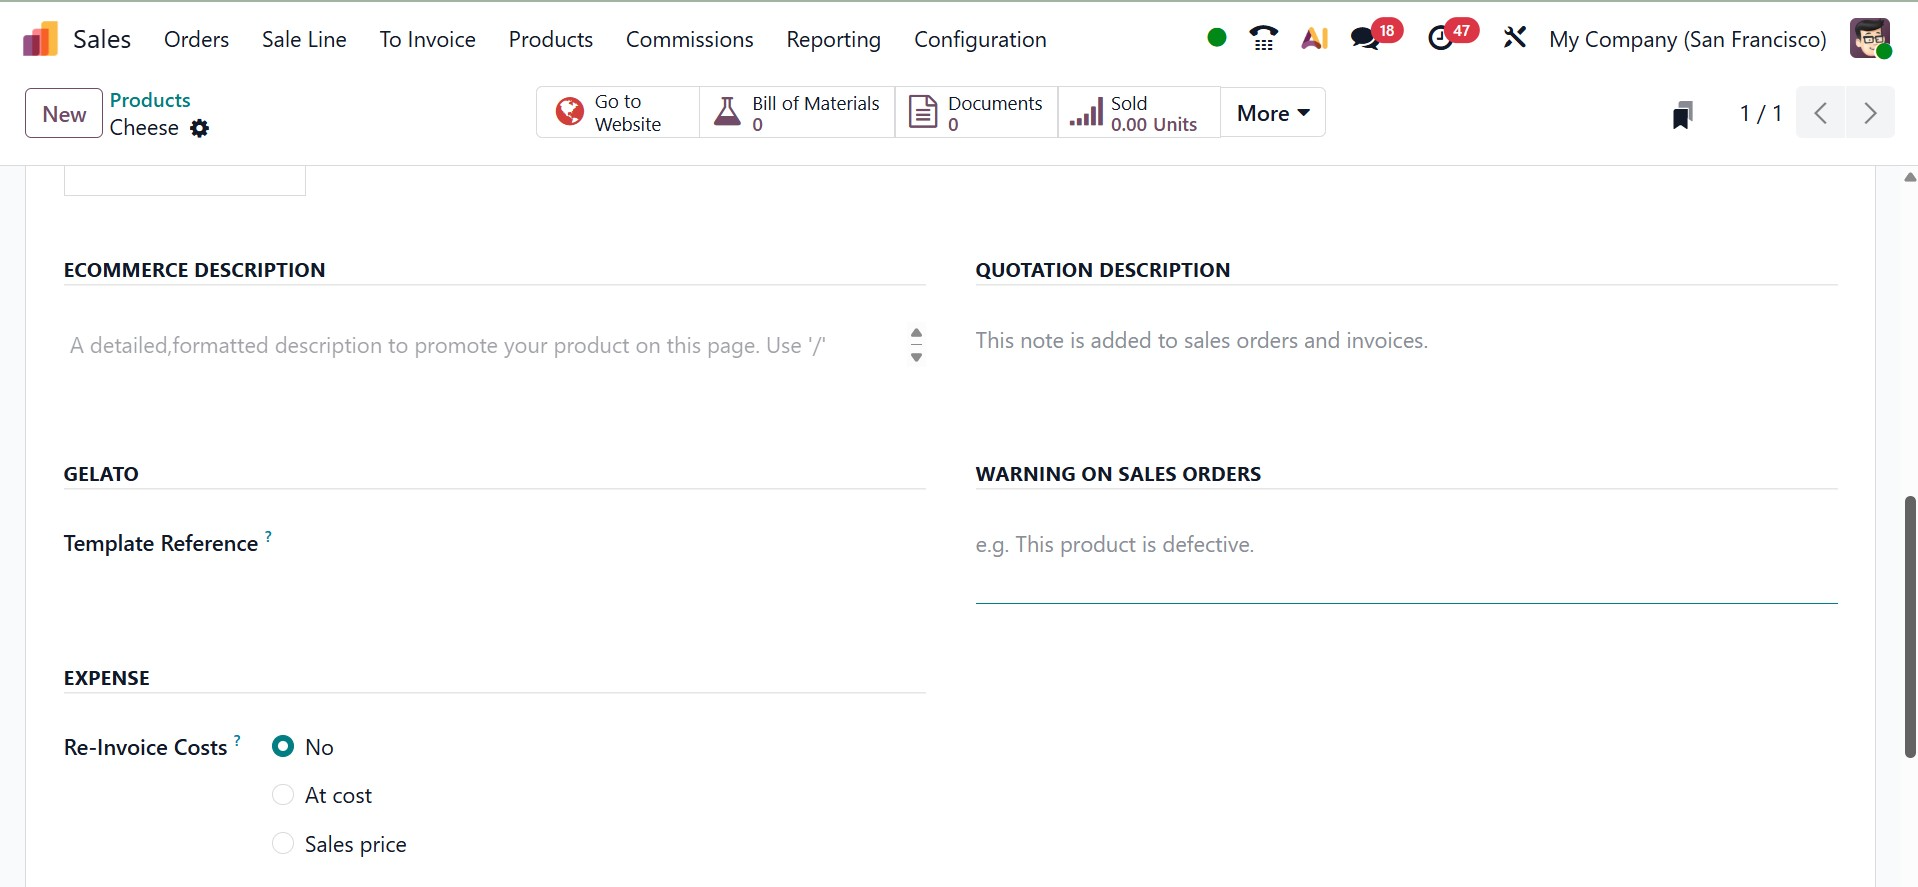
Using the ECOMMERCE DESCRIPTION column, you may add ecommerce-related notes that will appear on the sales orders and invoices for this particular product. The QUOTATION DESCRIPTION is added to the sales orders and invoices. Under the GELATO, you can add a template reference.
You have the option to create product warning messages in Odoo 19. You can activate this feature from the Settings menu in the Sales module.
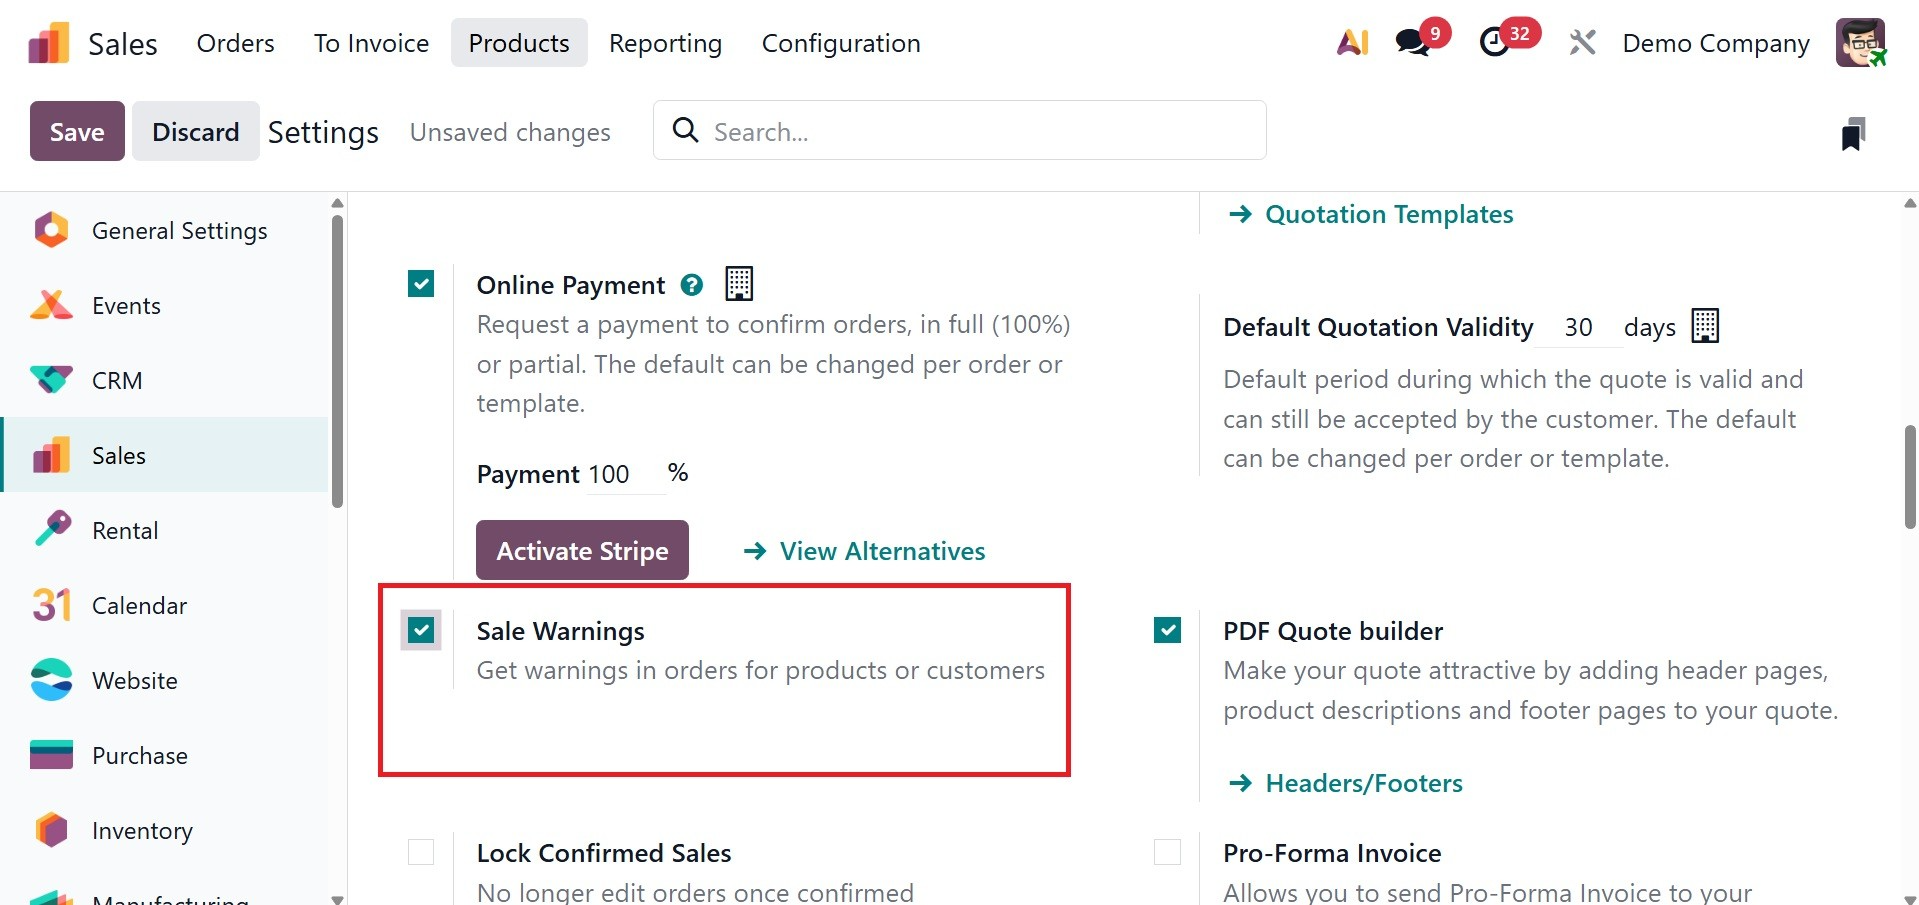
This feature allows you to get warning messages in orders for products or customers.
Under the EXPENSE option, you can set the re invoice cost as No, At cost, or Sales Price.
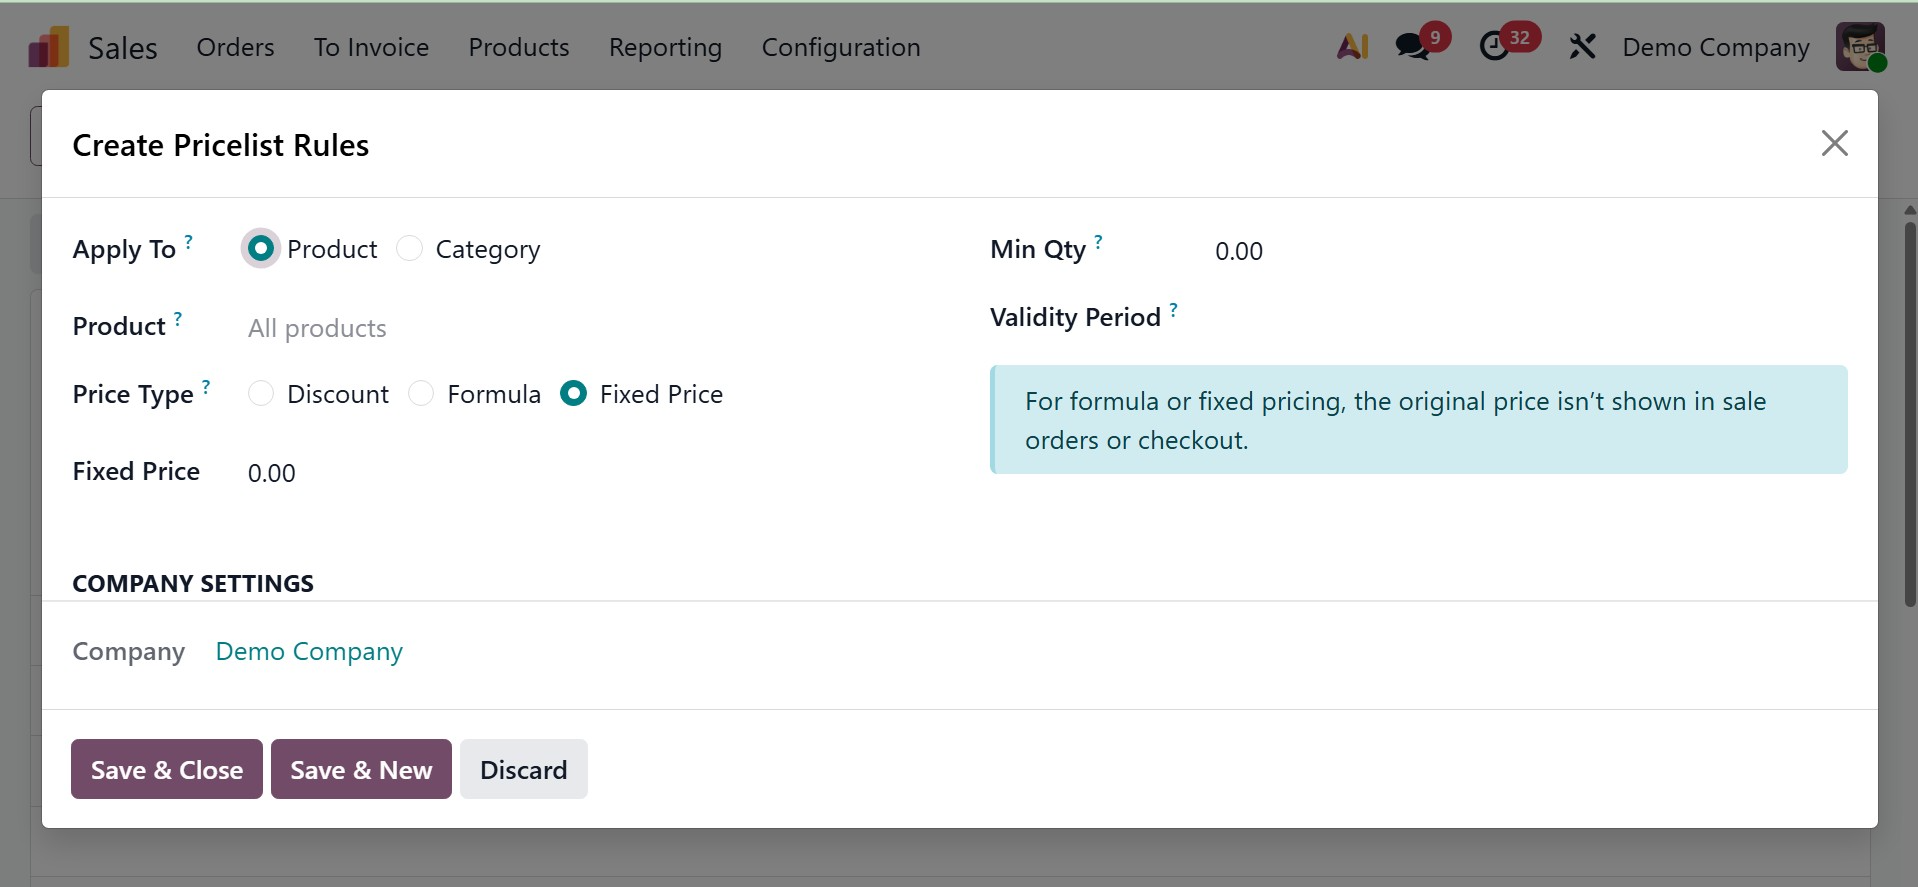
Now, the next tab is Prices, which can be used to add the price list, as in the screenshot below. Which is a new feature in Odoo 19.
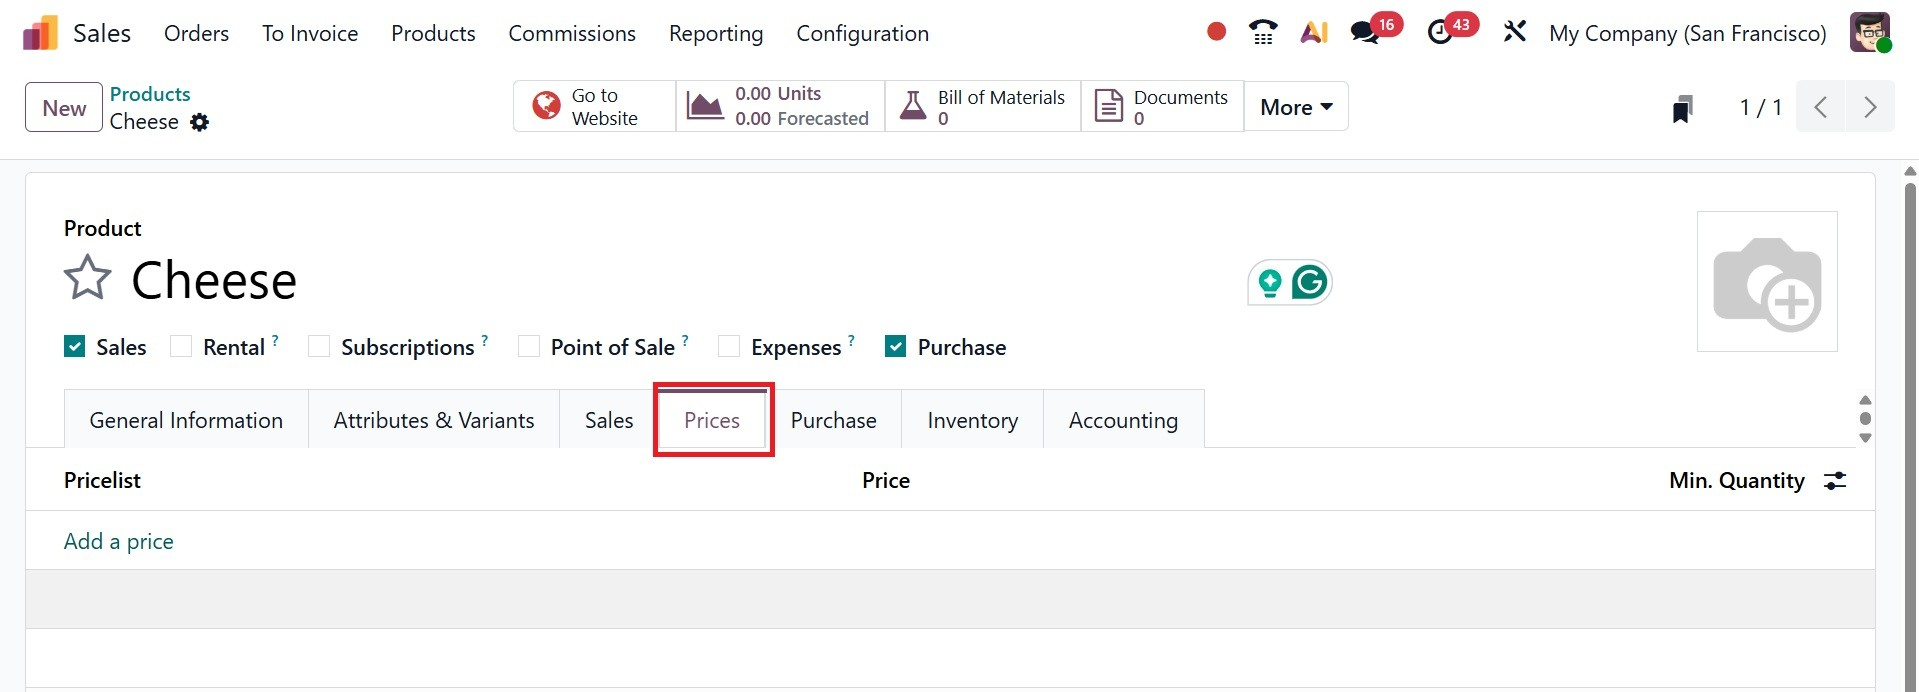
In order to apply customized pricing to the sales order where the price list is applied, each line generates a new record. Clicking Add a line will open a new price list rules box where you may construct a new price rule. On selecting the Add a Line option, you will get a pop-up, as in the screenshot below.
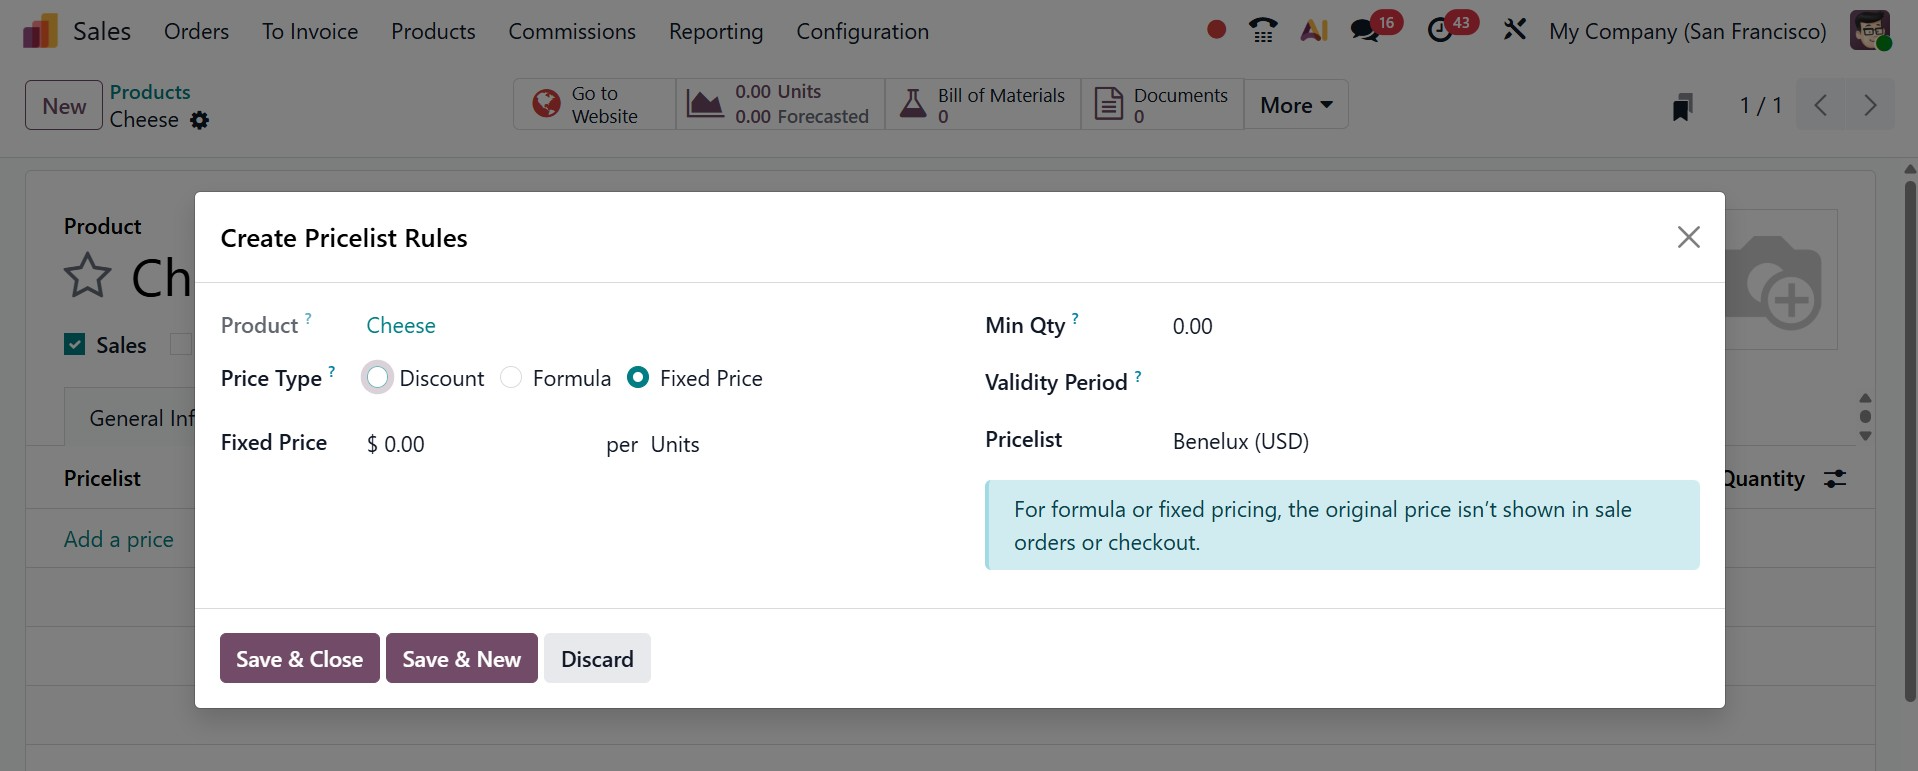
- Product: Use this field to pick one or more goods to which this pricelist will apply, if it is selected in the Apply To field.
- Price Type: Decide if the customized pricing will be classified as a fixed price, formula, or discount. There will be different setups for applying the price list depending on the type of price.
- Fixed Price: For this price list, provide the set price. This pricing will be applied to all product lines in the quotation form.
- Minimum Quantity: Indicate how many of the chosen products must be purchased in order for this price list to be applicable.
- Validity Period: Indicate the beginning and ending dates to this price list is applicable to quotes.
- Pricelist: the preconfigured pricelist can be added here.
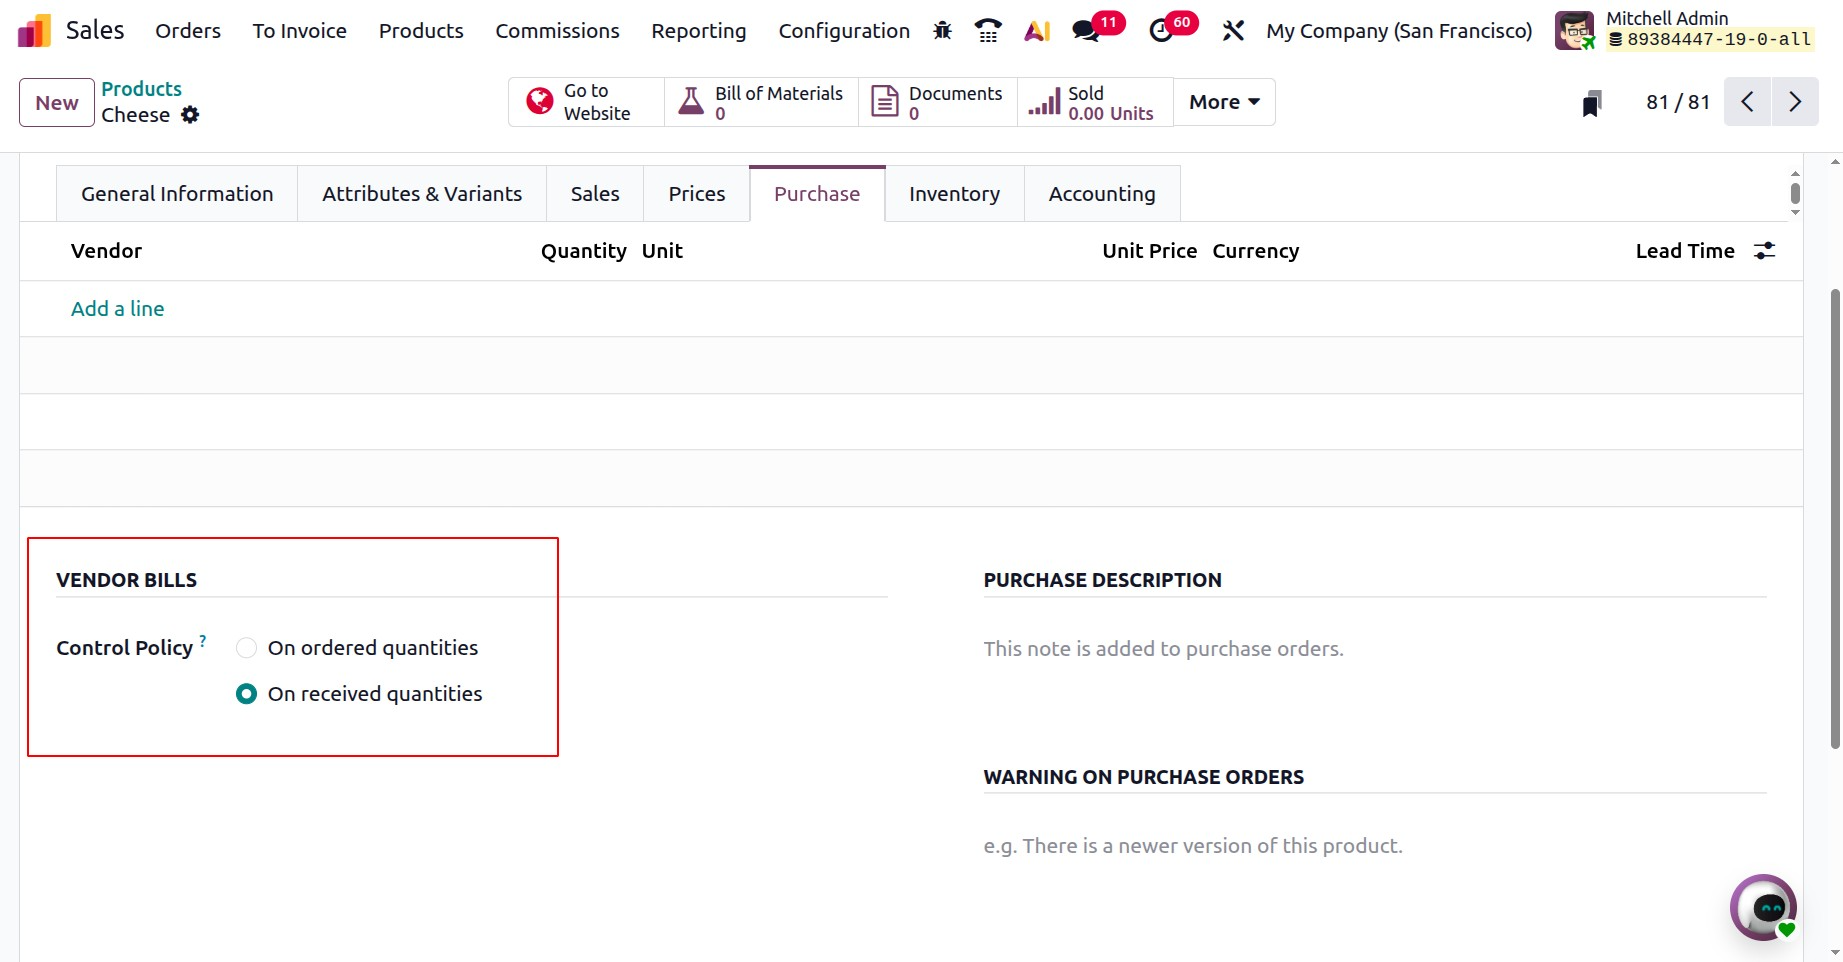
When setting up a product that is available for purchase, the Purchase tab can be used to specify the purchase-related information. Here, you can list the Vendor Pricelists by clicking the Add a Line option. You can add several vendors to a product by using this option
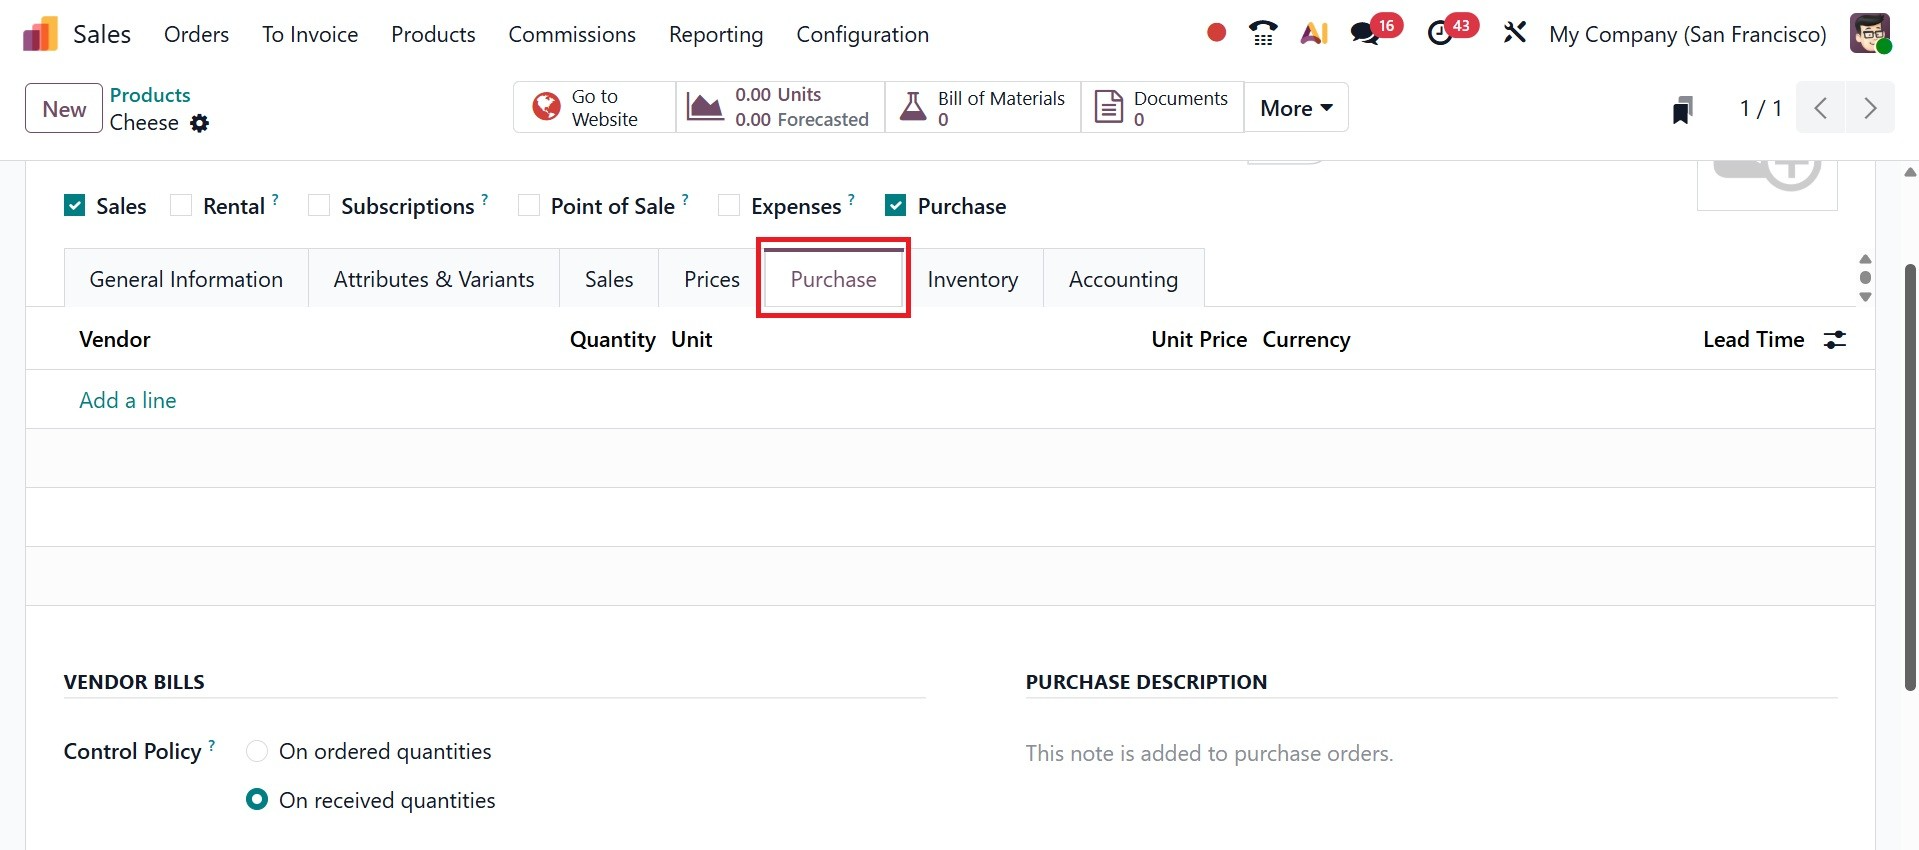
The best currency to use for your purchase operations with the selected vendor, the quantity you must purchase from this vendor to receive the price expressed in the vendor's product unit of measure, the default unit of measure used for purchase orders, the price to buy this product, and the delivery lead time are all fields that require you to enter the necessary information. The delivery lead time is the number of days that pass between the confirmation of the purchase order and the product's arrival at your warehouse.
Either ordered quantities or received quantities can be set up in the Control policy, which will control bills according to those amounts. The notes entered in the Purchase Description section will be added to purchase orders.
As can be seen, the information required to manage the product's inventory will be found on the Inventory tab of the product setup window. You can select from the options offered for the routes of operation of the particular product. This will allow you to specify the path of the product according to the modules loaded in your database. A user might be mentioned in the Logistics field's Responsible section. This user will be responsible for the following tasks related to the product's logistical operations. In the respective sections, you can enter the product's weight, volume, and customer lead time.
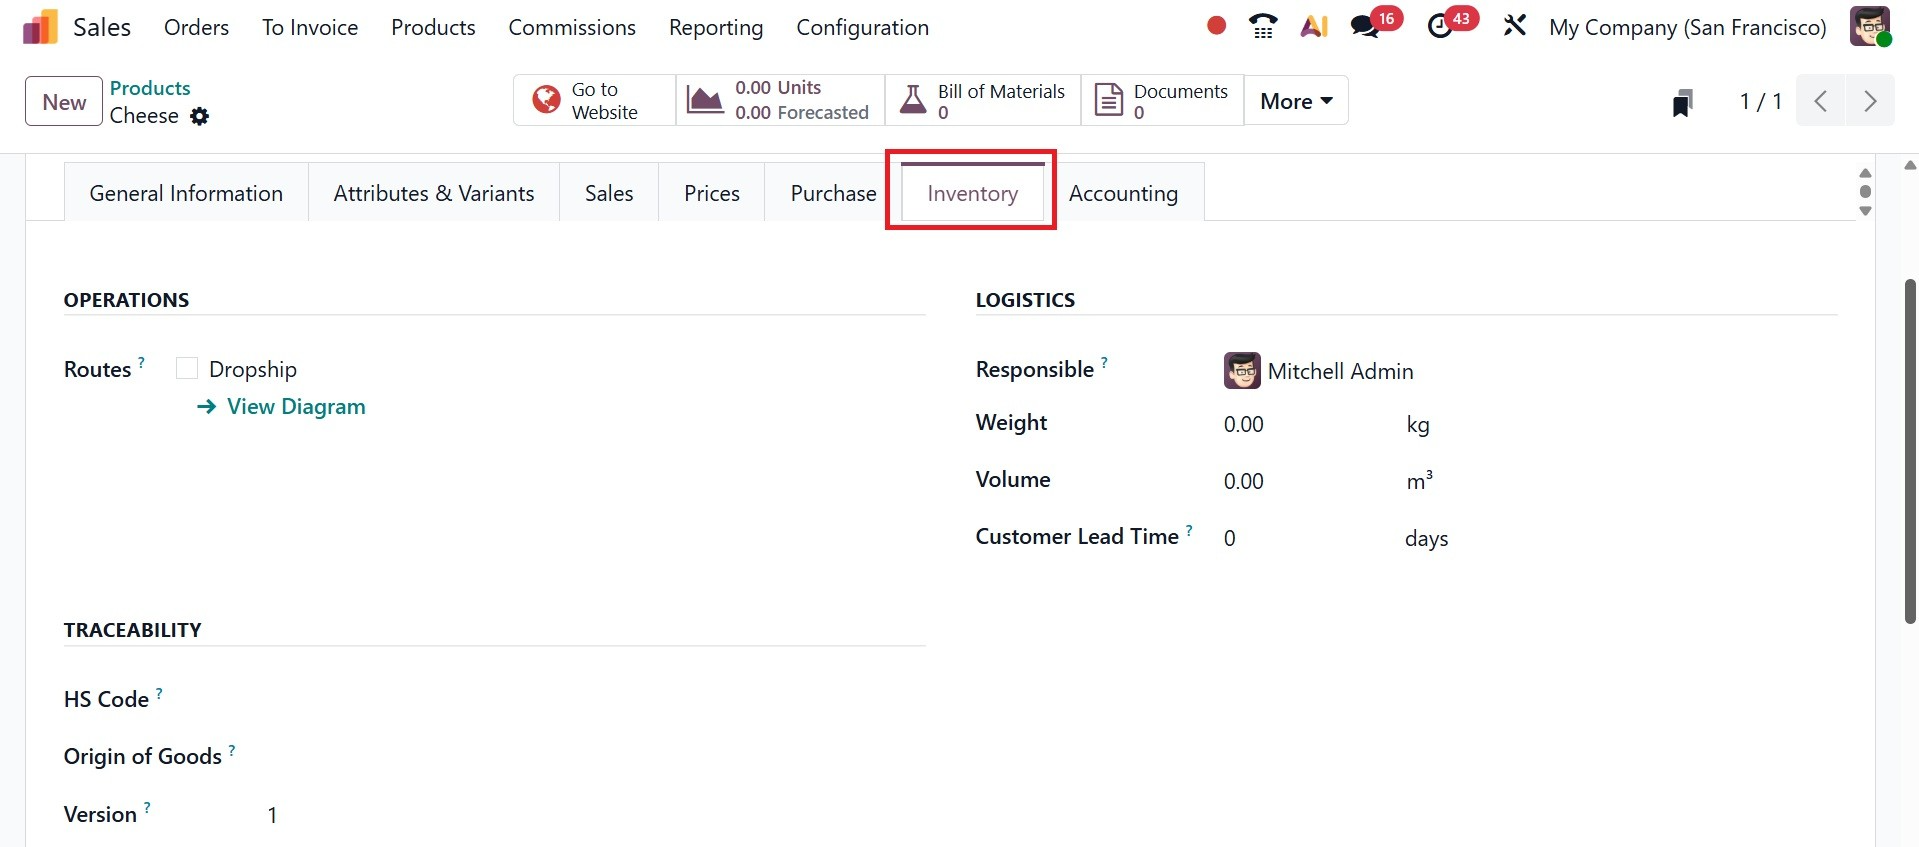
The customer lead time option allows you to enter the delivery lead time in days. It is the number of days promised to the customer between the confirmation of the sale and the delivery.
In the Traceability field, mention the HS Code, a standardized identification for international shipping and product declaration. FedEx is the only shipping company that uses it at the moment. The Origin of Goods field will show where the items originated, which is the place where they were manufactured, rather than where they were sent. You can also mention the Version as well. Here, there are some extra fields like Valuation by Lot/Serial, Custom Lot/Serial, which are new under Odoo 19.
Valuation by Lot/Serial : Tracks the product’s cost and stock value based on each specific lot or serial number, useful for precise accounting and inventory control.
Custom Lot/Serial : Allows you to manually assign or create lot or serial numbers for products instead of Odoo generating them automatically, giving more control over tracking.

Then, on activating the expiration date option, you will have some sub fields, as in the image below.
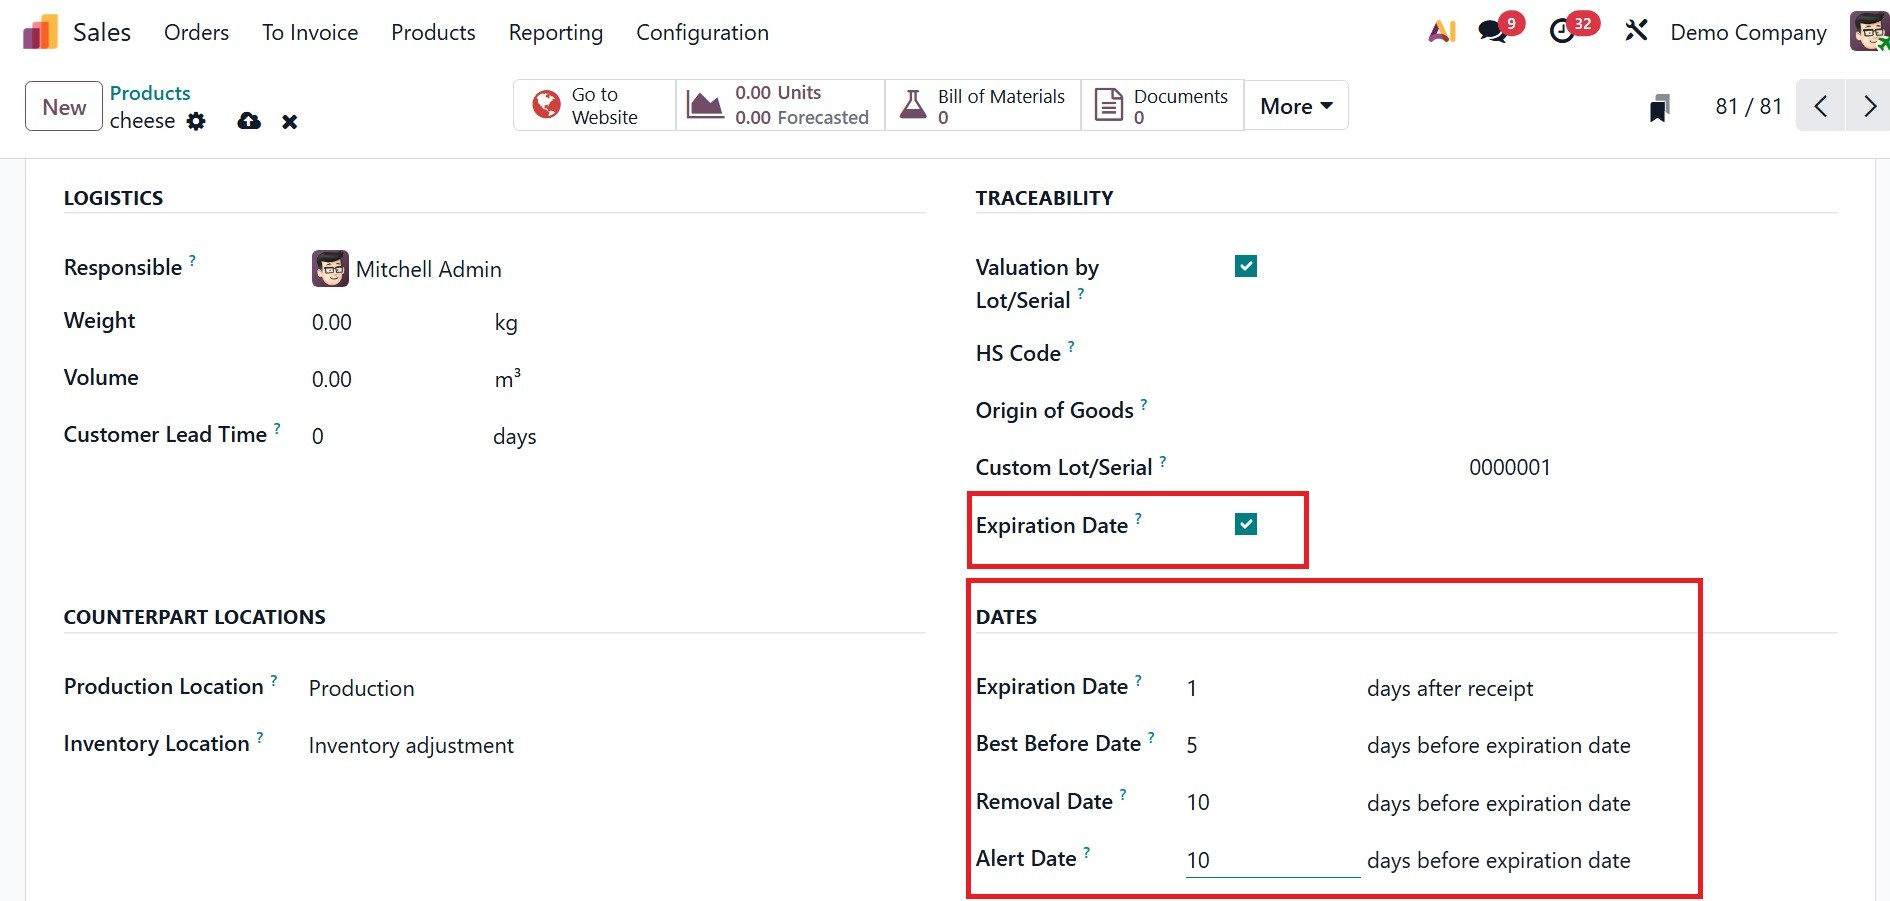
Four sorts of expiration information can be configured for the product under the Dates section:
The number of days after a product is received (from a vendor or in stock following production) that it may become harmful and should not be used or consumed is known as the Expiration Date.
- Best Before Time:how many days before the product's expiration date it begins to deteriorate without becoming hazardous.
- Removal Time:the number of days leading up to the product's expiration date when it should be taken out of stock.
- Alert Time: the number of days prior to the expiration date when a product in a specific lot or with a specific serial number should trigger an alert.
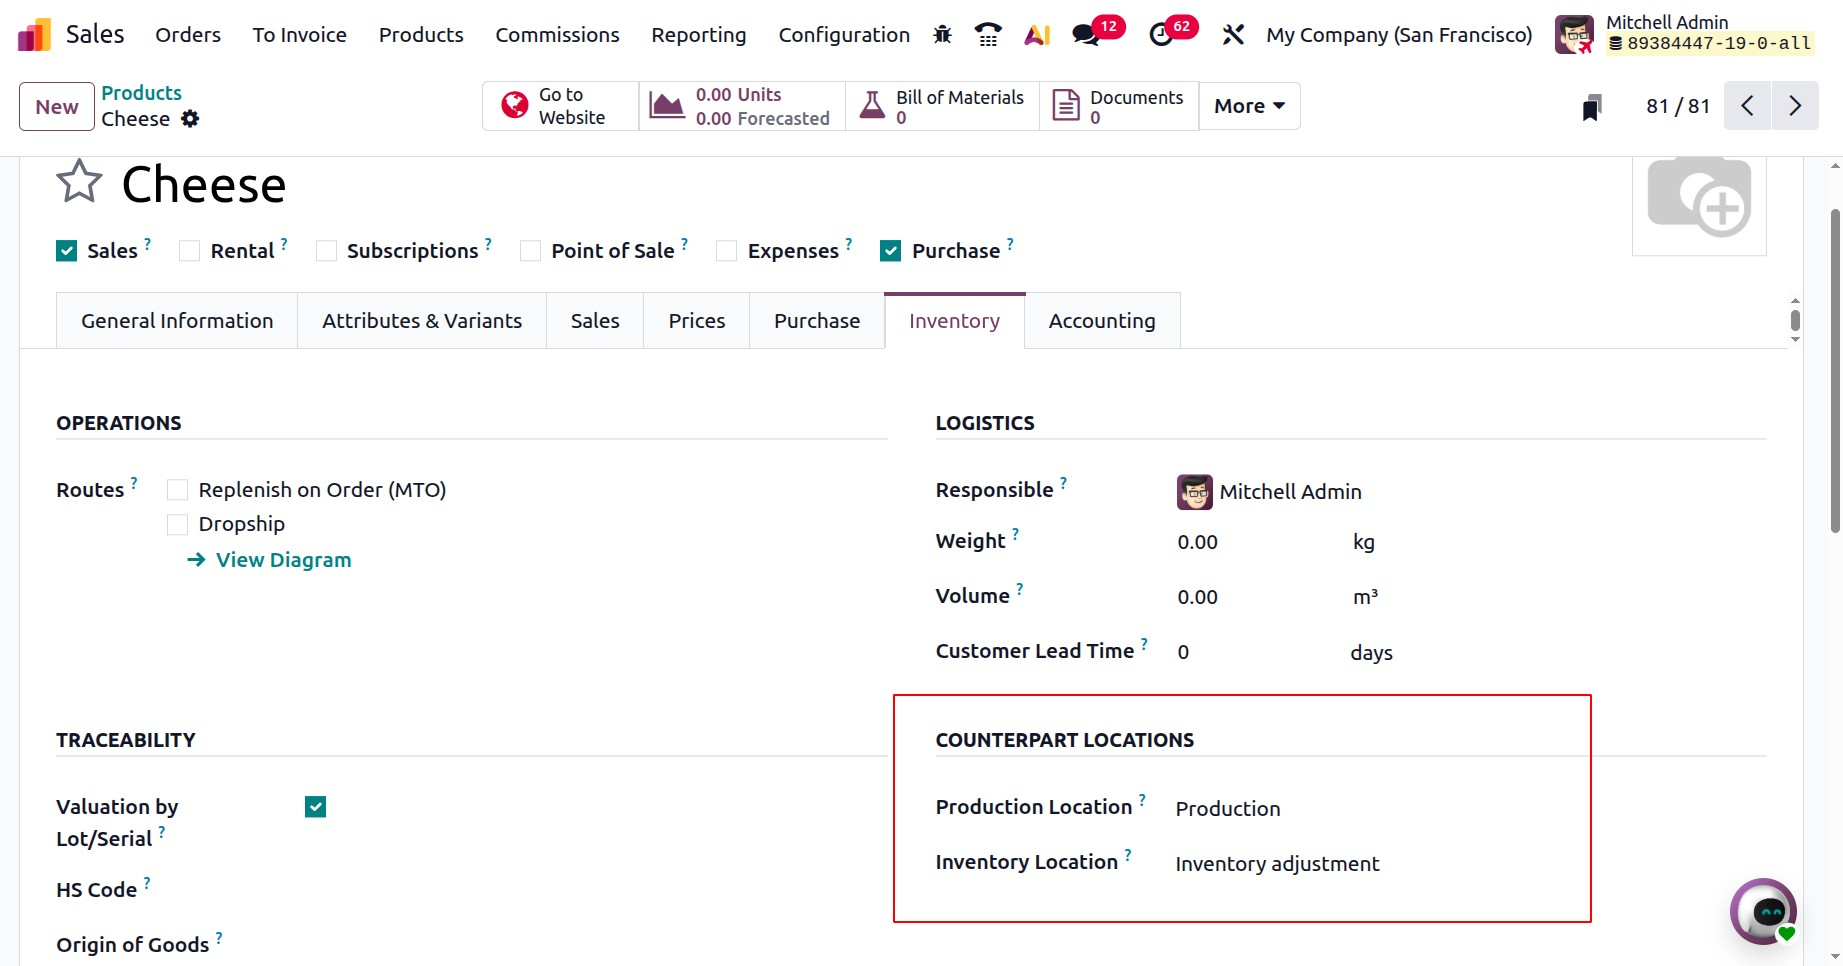
Under the Counterpart location you have the options like,
- Production Location – The place where raw materials are consumed and finished goods are produced (used in manufacturing).
- Inventory Location – The place where products are stored in stock, either as incoming goods or ready-to-sell items.
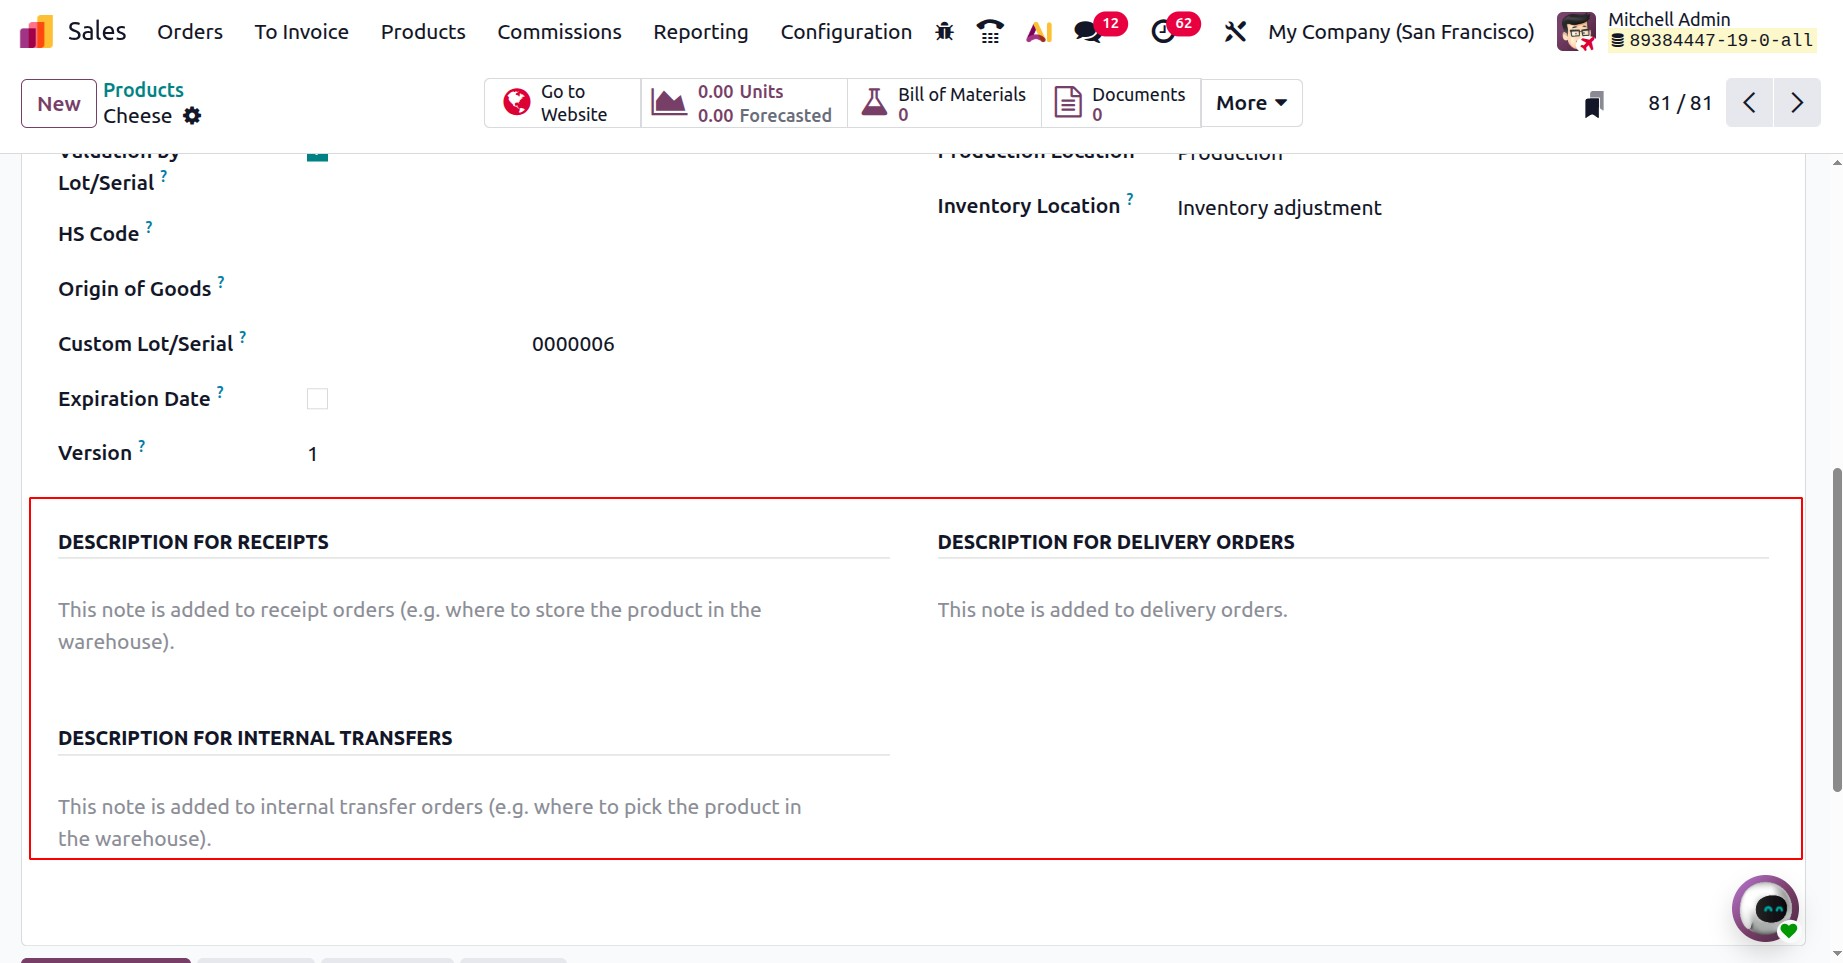
Below that, you can add a description for receipts, which will be added to the receipt orders. And then, you have a description for delivery orders as well.
The Accounting tab will be helpful in monitoring the financial details of a product. The Cost and Revenue section allows you to select the Income Account and the Expense Account. The Intrastat box allows you to enter the Country of Origin and Commodity Code.
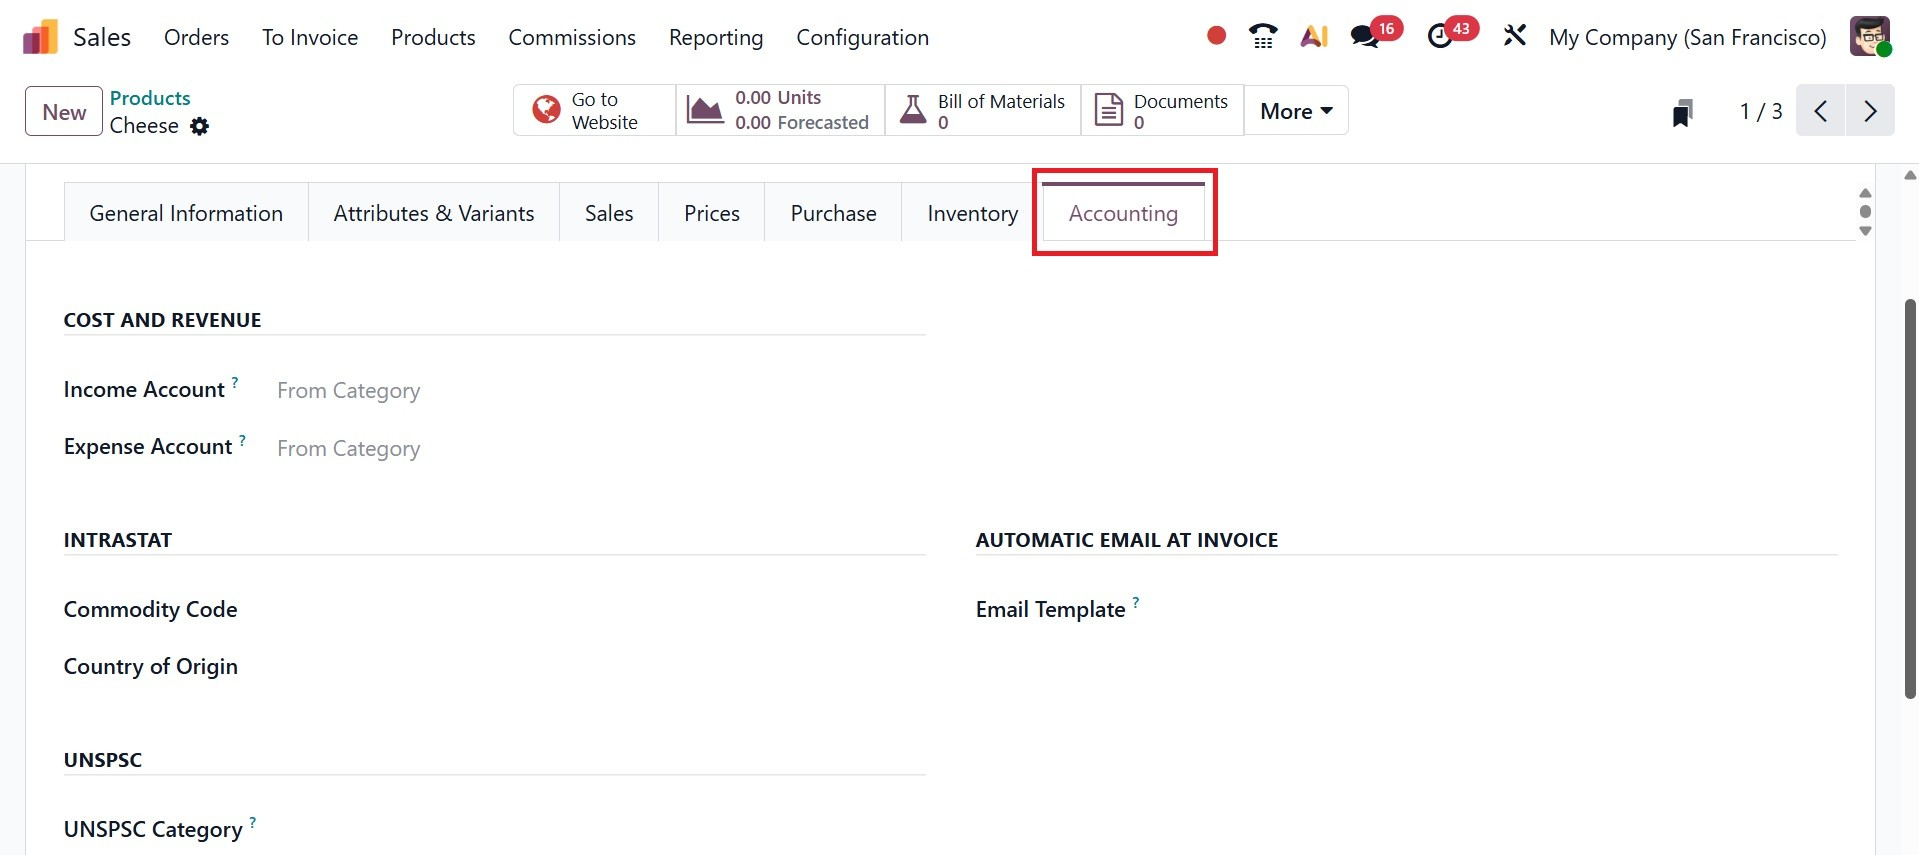
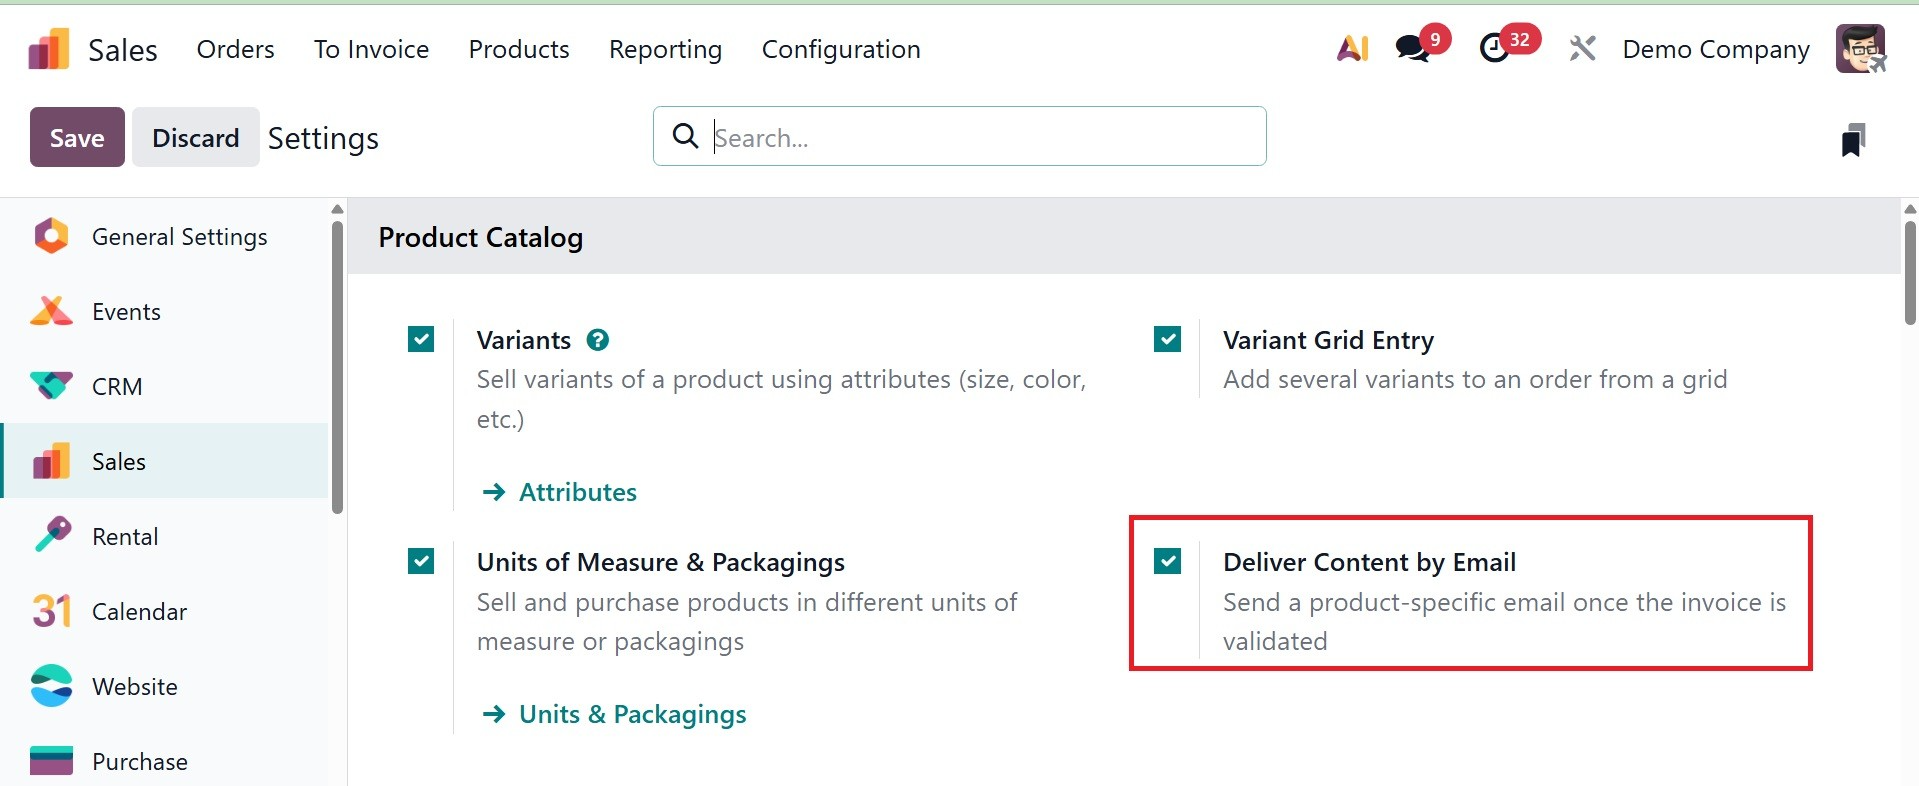
If an email template is specified in the Automatic Email at Invoice field, Odoo 19 will automatically send a product-specific email after the invoice has been verified. For that, you have to activate the Deliver Content by Email option form the settings, as shown below.
The UNSPSC code linked to the product can be entered in the UNSPSC Category box.
Under the products page, you can have various smart tabs, such as go to website, variants, units, bill of materials, documents, sold, purchased, reordering rules, in and out, respectively.
- Go to Website – Open the product’s page on the website if it is published online. On selecting the tab, you will have the website page of the particular product.
- Variants – Shows the different versions of a product, such as size or color. On selecting the tab, you will get the page with different variants of that particular product.
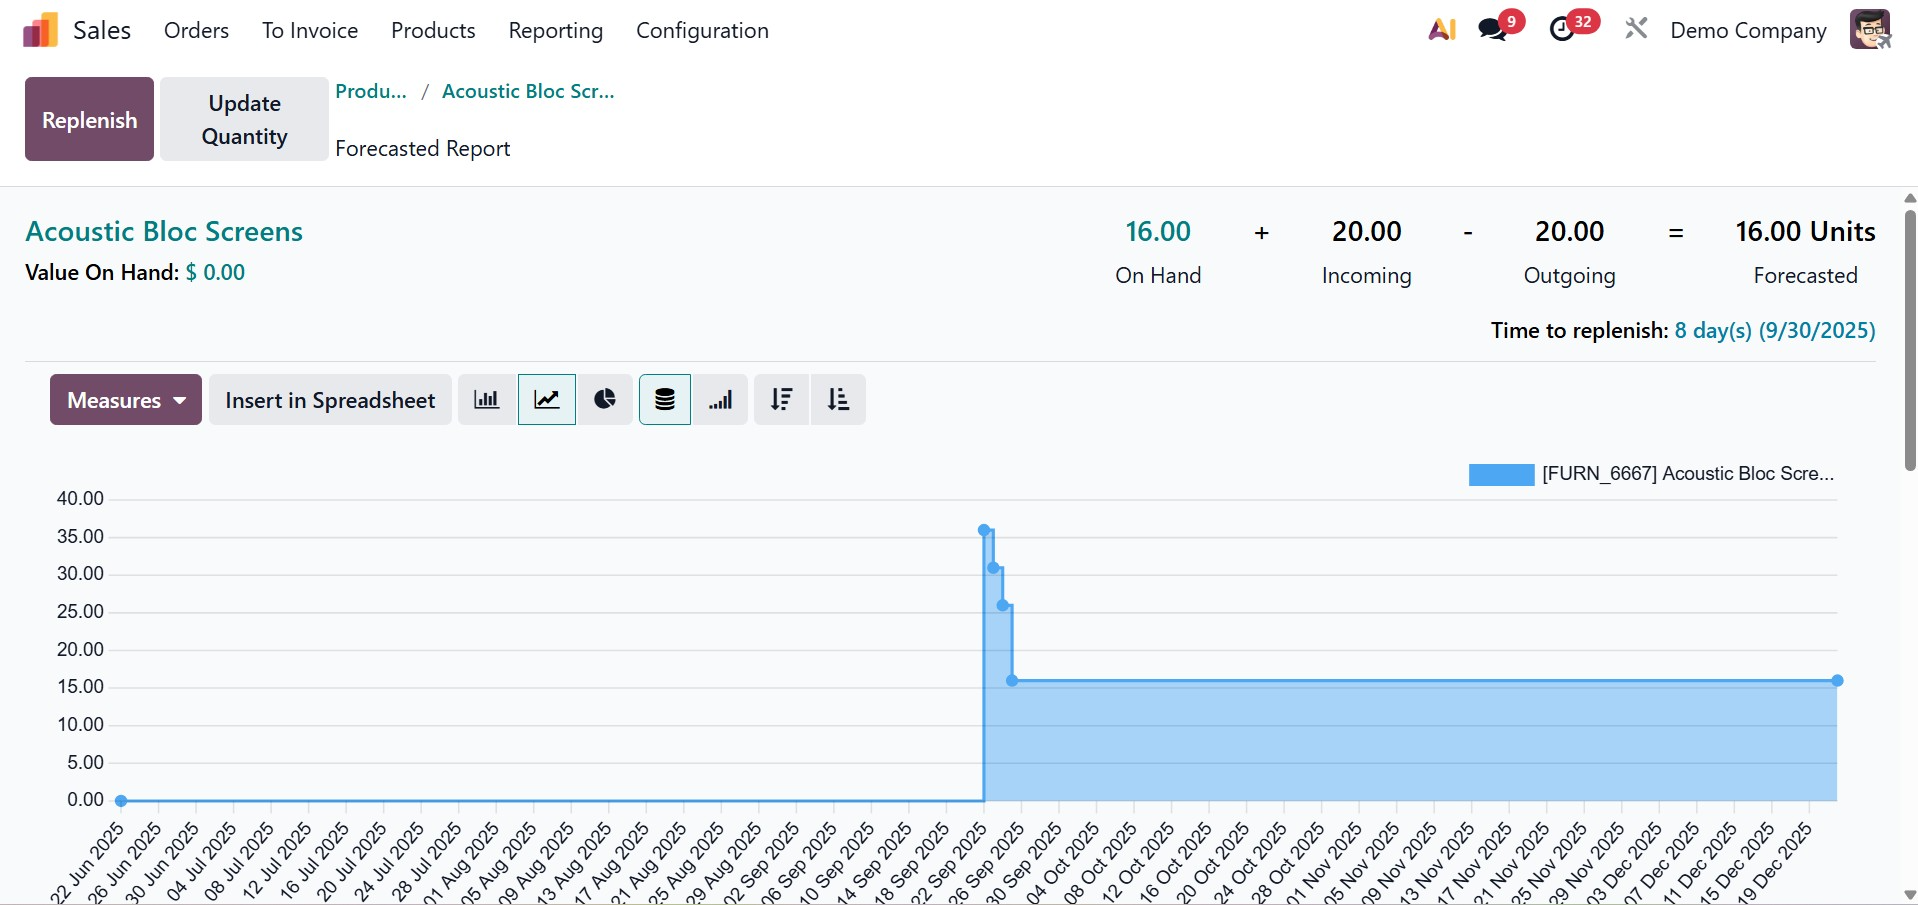
- Units–Displays the different units of measure used for the product, like pieces, boxes, or kilograms. The tab provides the graphical representation of the on hand product.
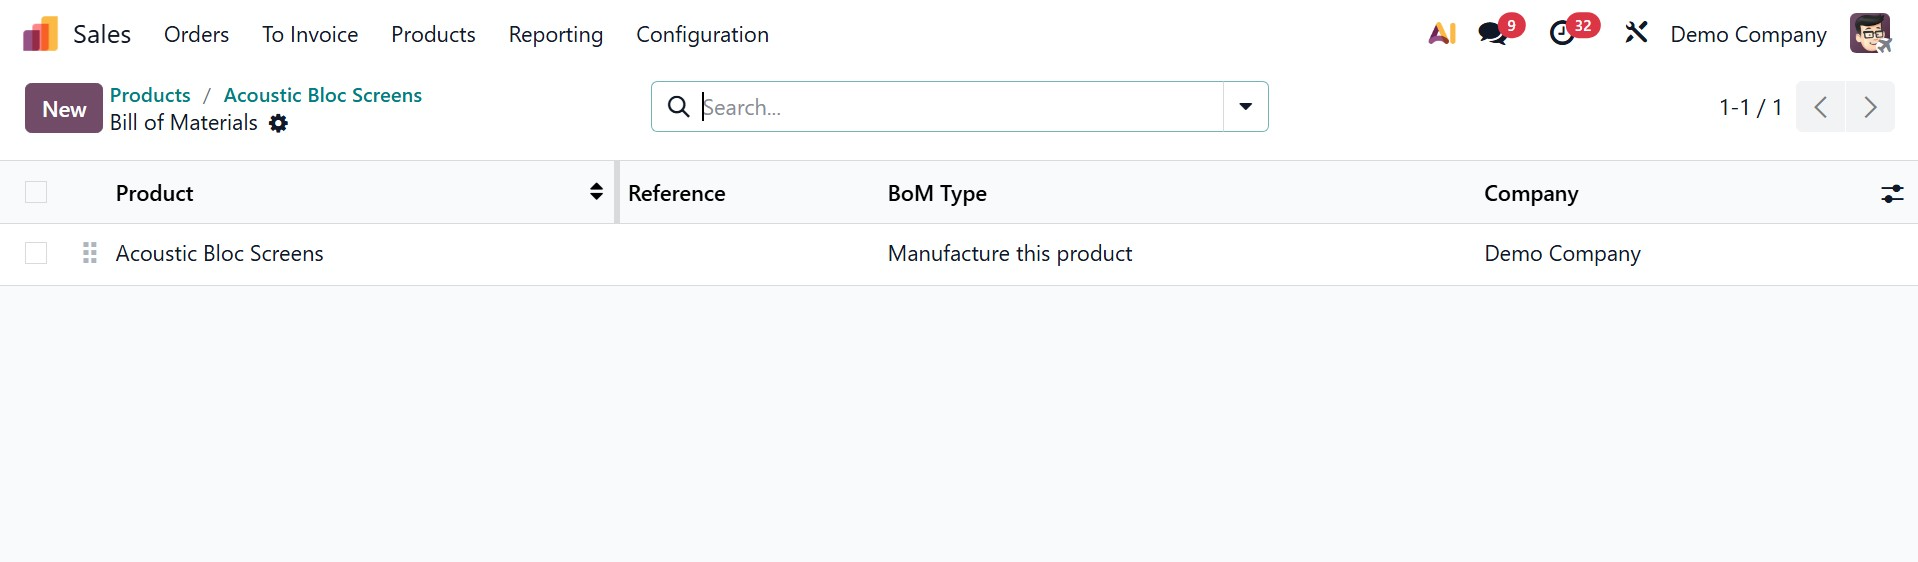
- Bill of Materials (BoM) – Lists the raw materials or components needed to make the product (mainly for manufacturing). On selecting the smart icon, you will get the details regarding it.
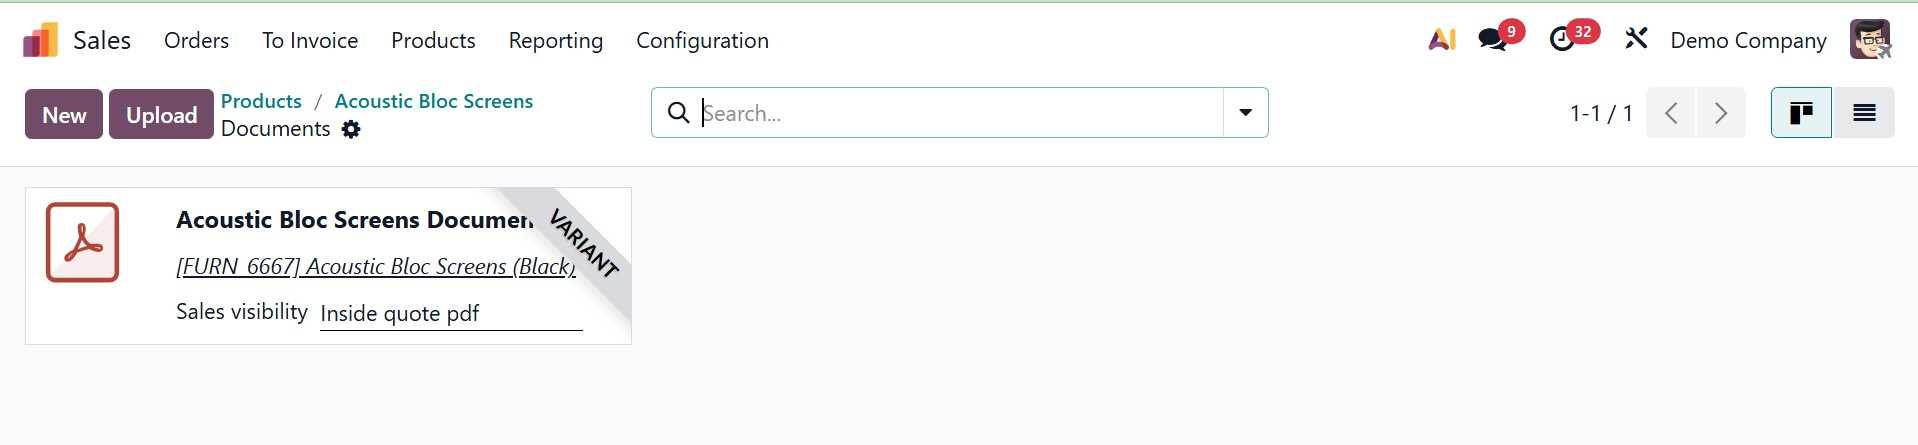
- Documents – Shows files linked to the product, such as images, manuals, or specifications. Here, you will get the documents, as shown below.
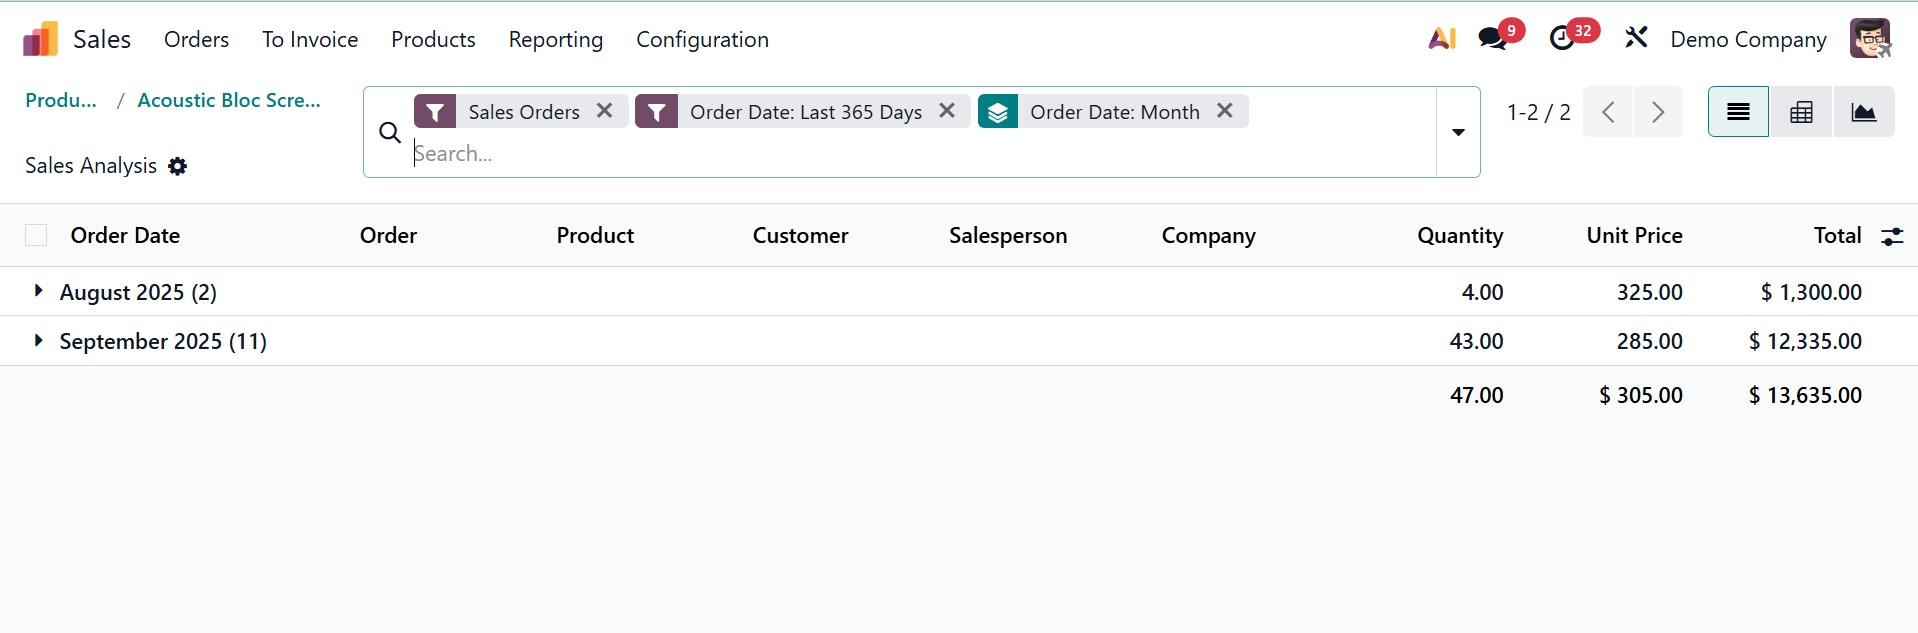
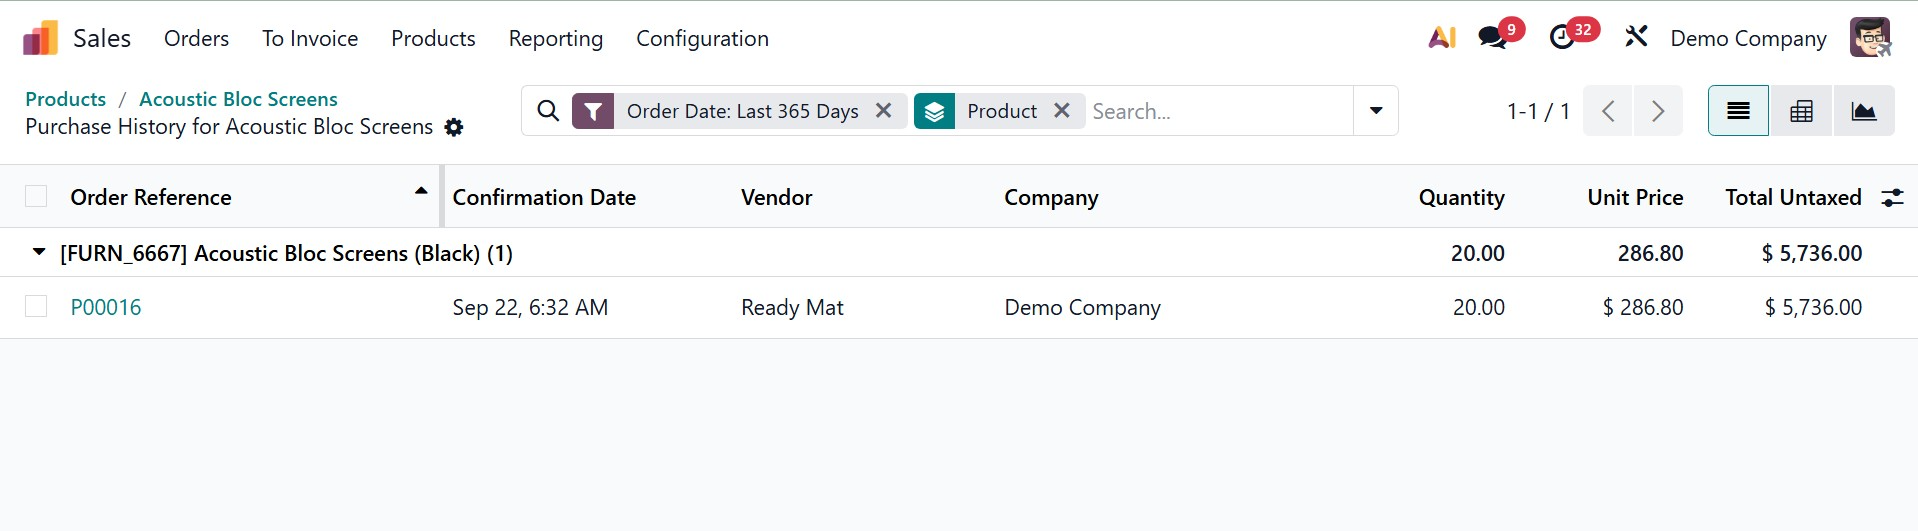
- Sold –Displays sales data, showing how many times the product has been sold, as shown below.
- Purchased – Displays purchase data, showing how many times the product has been bought from vendors, as in the image below.
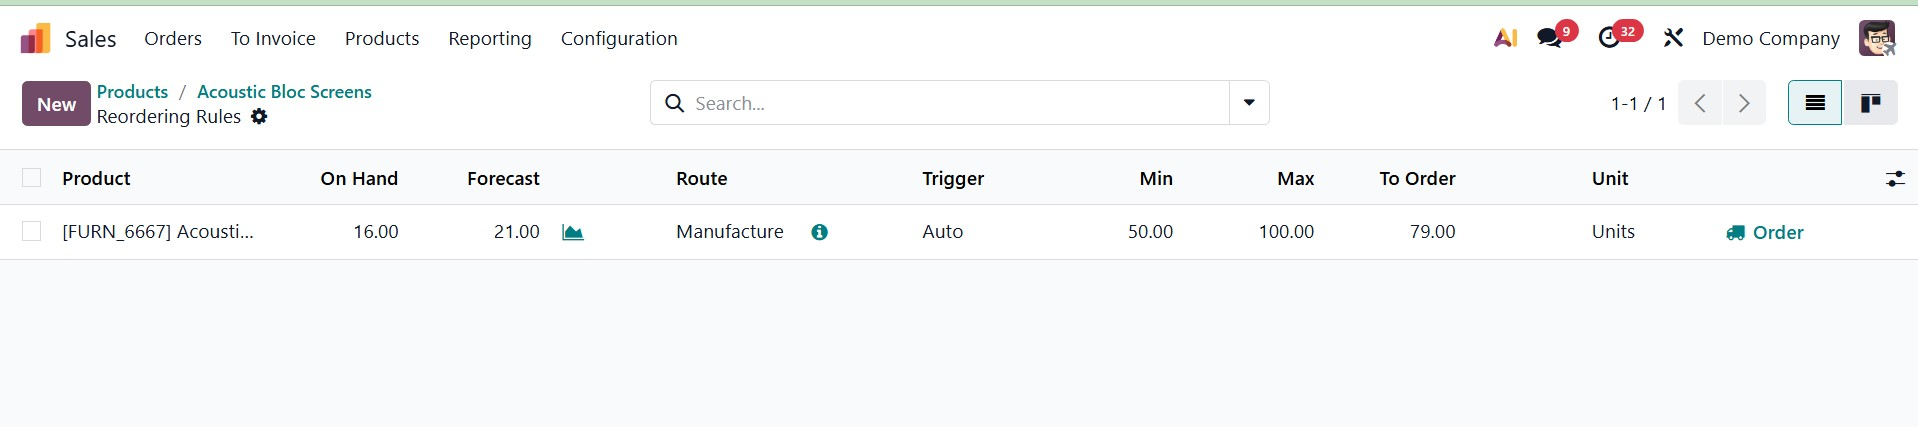
- Reordering Rules –Shows the rules set to automatically reorder the product when stock is low.
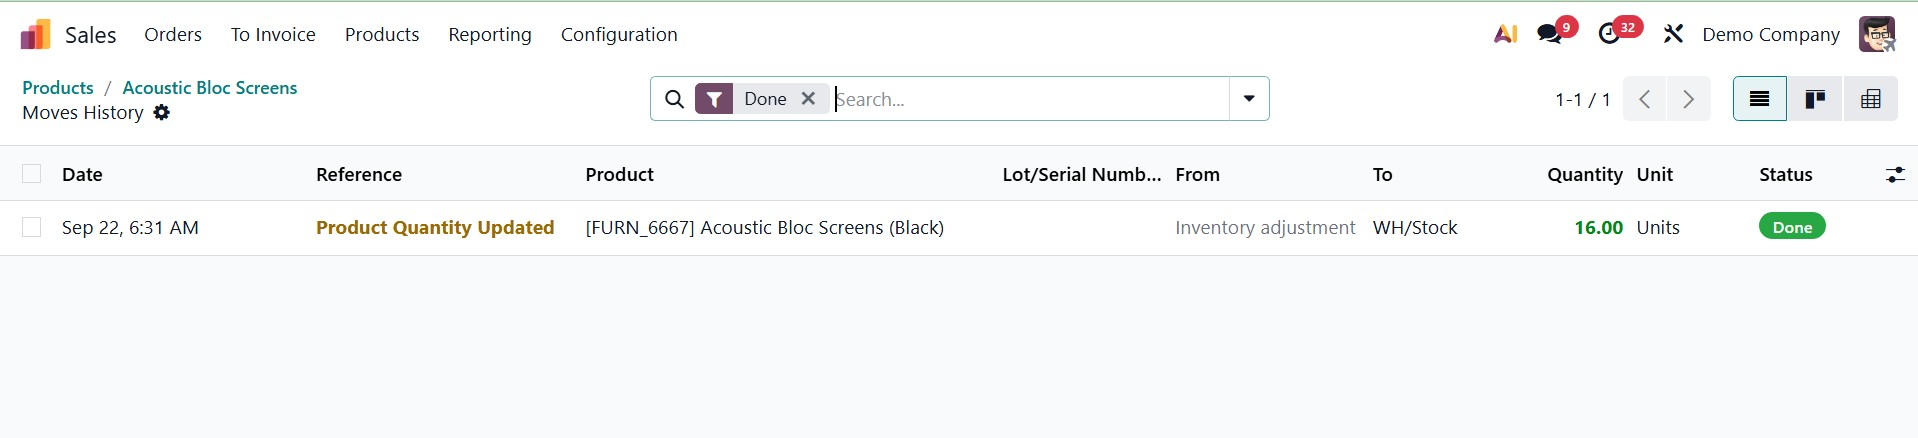
- In and Out –Tracks the stock movements of the product, showing incoming (purchases) and outgoing (sales/deliveries).
Now, after providing all the necessary details, you can save the data.
3.2 Product Variants
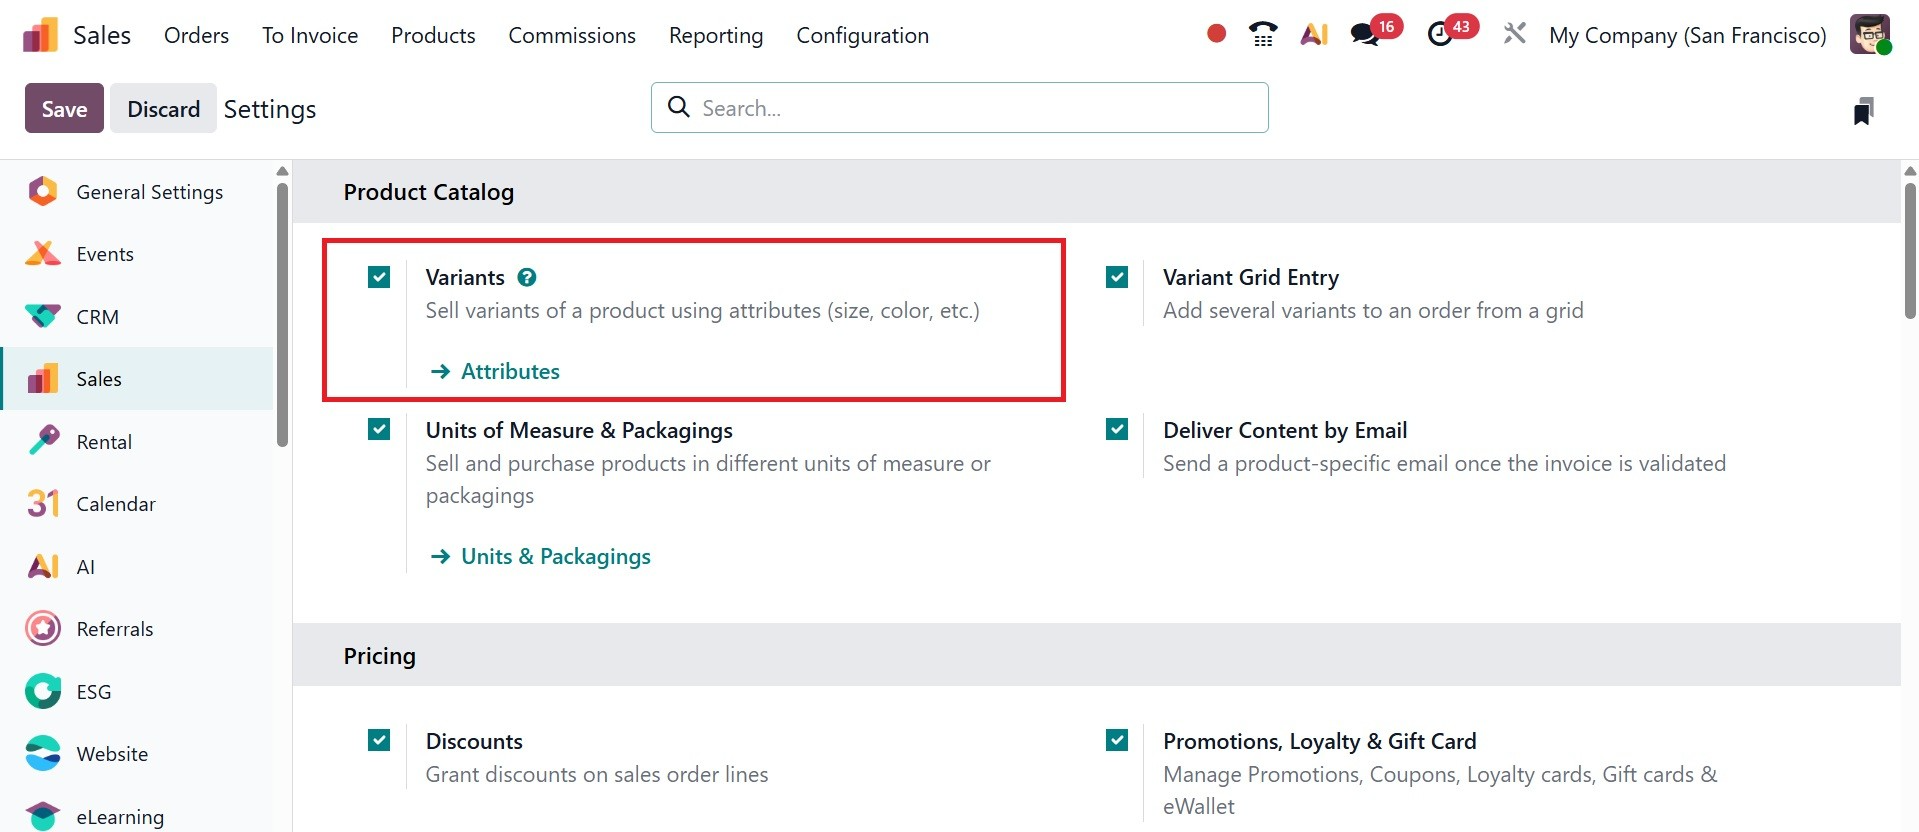
You can provide your customers with more options for a product by configuring its variants in the Odoo 19 Sales module. From the Settings menu, you may activate the Variants feature. The screenshot below shows the Settings menu for the Sales module. Here is where you may turn on the Variants option under the Product Catalog menu. Once this feature is enabled, you may use characteristics to provide various product variants.
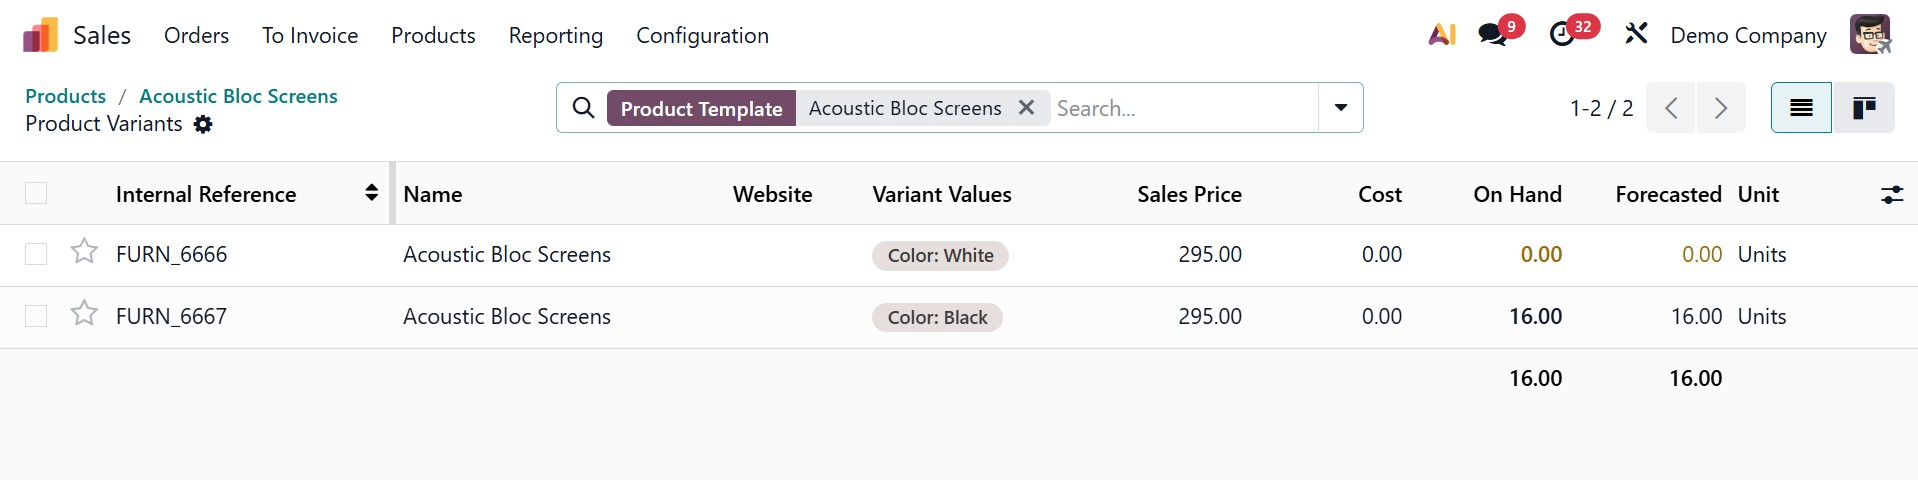
The Product Variants option under the Products menu allows you to set up new product variants in your database. A product's variant configuration is similar to the product configuration we discussed earlier.
A list of product variants that have already been configured is available, as can be seen in the image above. Using the New button and the same method as the product configuration, you may add a new one easily. The creation form is as similar as product configuration.
3.3 Pricelist
Odoo 19 provides advanced pricing solutions to support the pricing strategy of your business. With these features, you can quickly create new price lists for specific customers. You can create and oversee new price lists in the Odoo 19 Sales module by using the company's pricing strategies.
To access the platform where new price lists can be configured, you must enable the relevant feature from the Sales module's Settings menu. The Pricelists function can be instantly activated from the Pricing page, as shown in the image below.
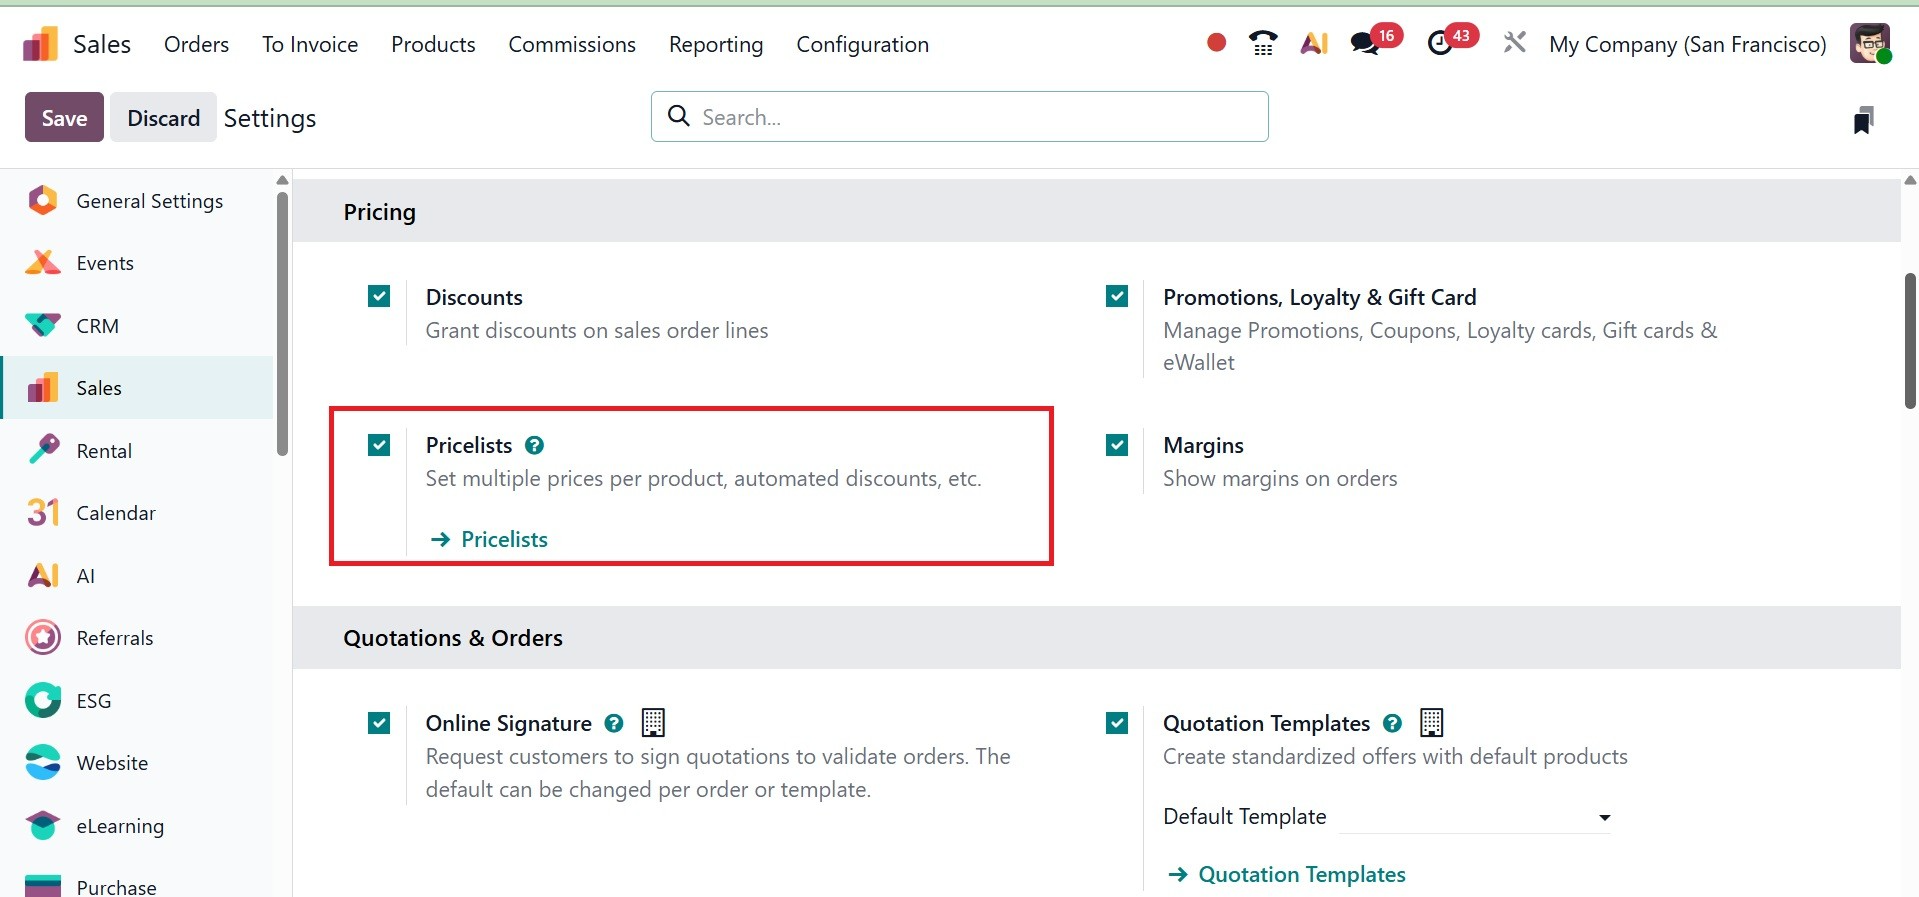
As seen in the screenshot, once the Pricelist feature is enabled, you can access the Pricelists platform by choosing the relevant item from the Products menu.
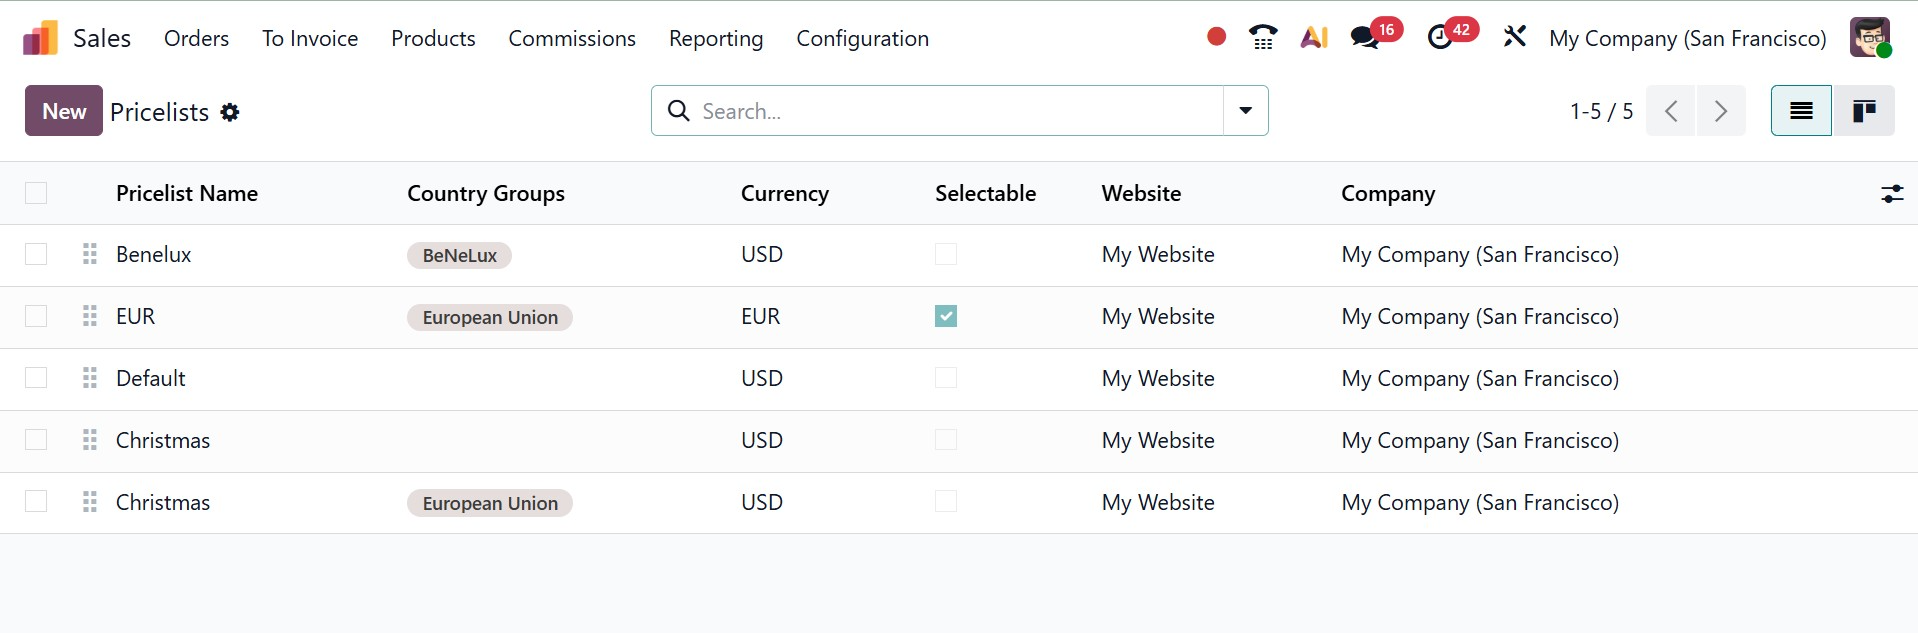
This platform's list view shows the Pricelist Name, Country Groups, Currency, Selectable, Website, and Company data.
To change the view to Kanban, click the Kanban icon in the top right corner of the window. Odoo 19 lets you create two kinds of price lists, as we have already discussed.
Now navigate to the Pricelist menu item under the Product menu. The Pricelist platform will be visible to you. Clicking the New button will take you to a new pricelist setup window. Below is the pricelists settings window.
You can enter the title of your updated price list in the designated field. After selecting the relevant currency from the menu, you may input the name of your business in the relevant fields. Three tabs in the pricelist configuration window provide further details about the updated price list.
You can choose which pricelist to update from the Pricelists page, or you can click New to create a new pricelist, which displays a blank pricelist form that can be set up in a variety of ways.
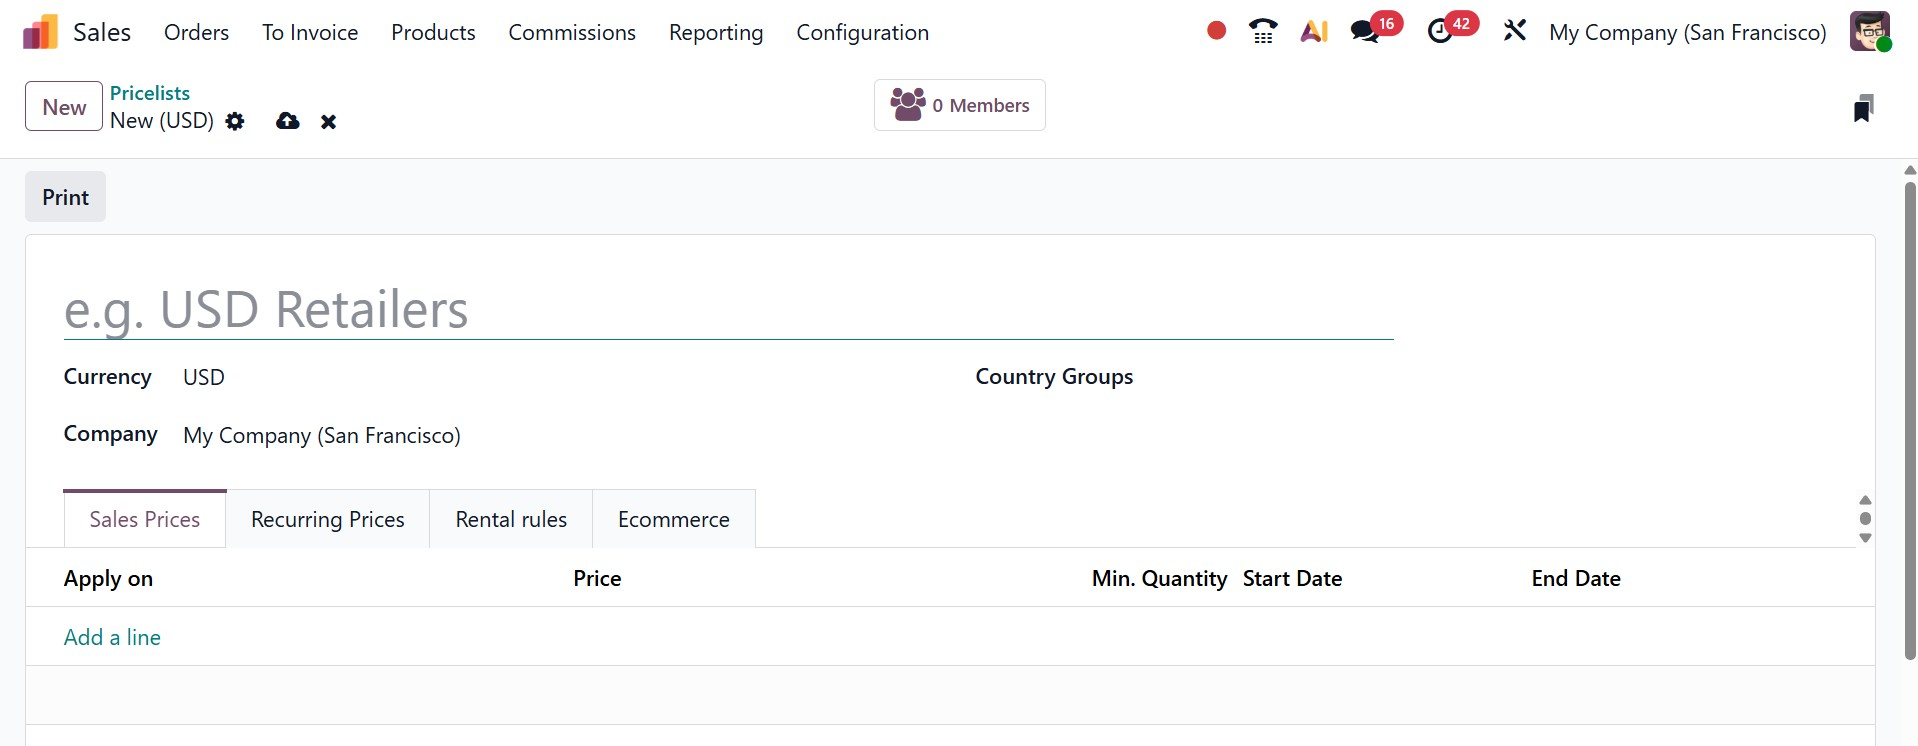
To begin establishing a new pricelist, enter the pricelist's name in the form's blank area at the top. Choose the currency to be used next.
Choose which Company in the Company field this pricelist should be applied to if you work in a multi-company setting. The price list is automatically applied to every company in the database if this field is left empty.
Choose the nations where this pricing list will be applicable in the Country Groups column if you work for a multinational corporation. Now, below that, you have the tabs like sales price, recurring price, rental rules, and ecommerce.
To apply customized pricing to the sales order when the pricelist is applied, each line in the Price Rules tab creates a new record. Clicking Add a line will open a new pricelist rules box where you may construct a new price rule. Next, decide if a product or category should be subject to this set of guidelines. There are numerous configuration choices available from here, as in the image below.
You can set either product or category under the Apply To option.
- Product: Use this field to pick one or more goods to which this pricelist will apply, if it is selected in the Apply To field.
- Category: Choose one or more product types that this pricing list will be applicable to.
- Price Type: Decide if the customized pricing will be classified as a fixed price, formula, or discount. There will be different setups for applying the pricelist depending on the type of price.
- (1) Discount: Type in the desired percentage. You can configure a mark-up by entering a negative number in this field.
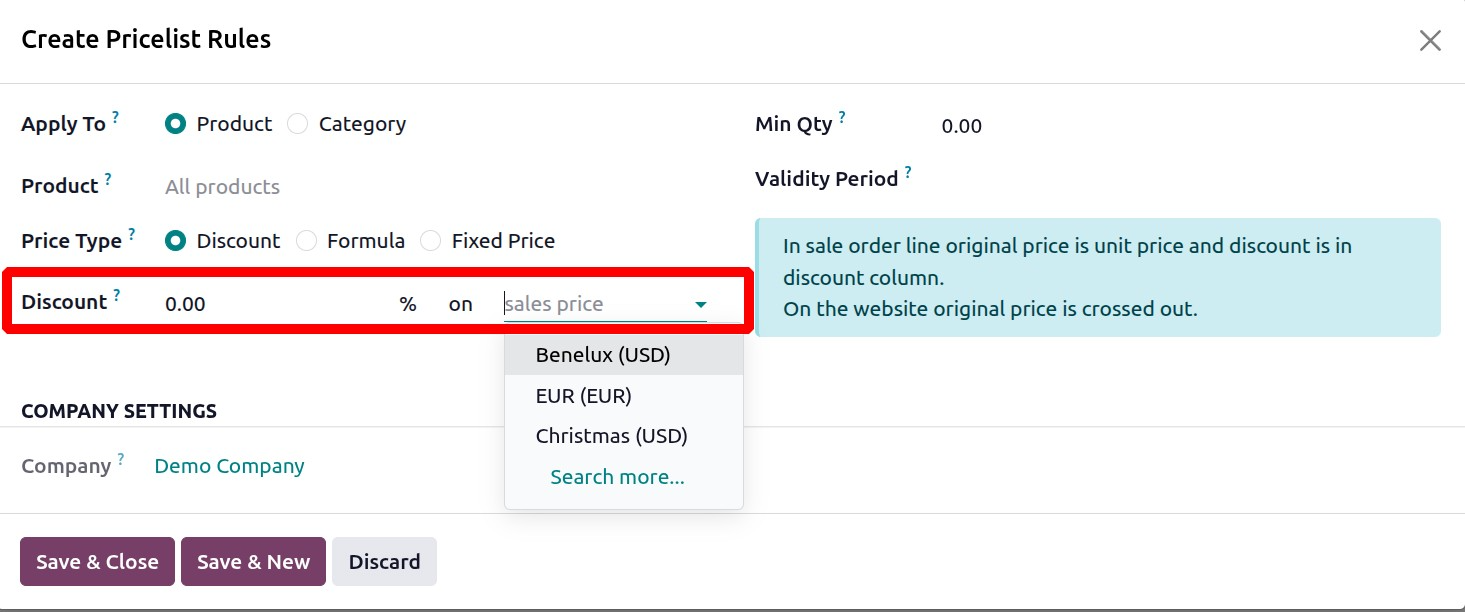
If a pricelist is applied to a sales quotation with the discount Price Type set as Discount, the discount will be visible to the customer. You can provide the discount percent in the allotted space, as shown above with a drop down option of other pricelists to select. The discount can be added based on the sales price or other pricelists.
- (2) Formula: The buyer won't be able to see the discount if a pricelist is applied to a sales quotation with the discount Price Type set to Formula.
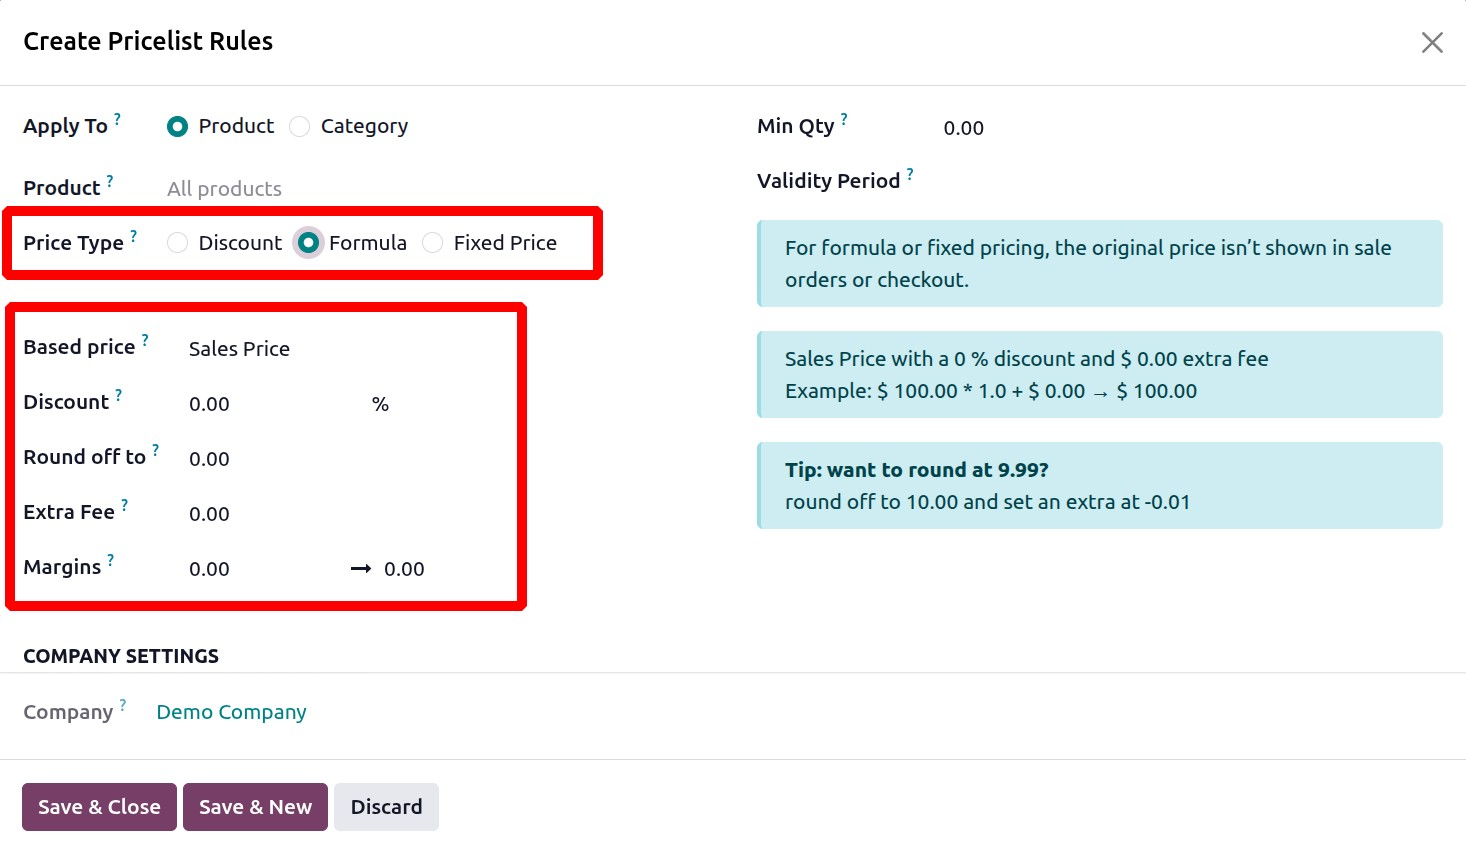
On selecting the price type as Formula, then, you have got the options like based price, discount,
round off to, extra fee, and margins, respectively.
Based Price:
- Sales Price: Uses the product's standard sales price as the base for calculations.
- Cost Price: Uses the product's cost price as the base for calculations.
- Other Pricelist:: Uses the computed price from a different, previously defined pricelist as the base.
- Discount:This field is for applying a percentage discount to the base price.
- Round off to: A number that serves as a round-off multiple and is applied following a discount. The price is set using the rounding method to be a multiple of the value in this field.
- Extra Fee: A set sum that is added or deducted after the discount and round-off have been applied.
- Margin: This field specifies a minimum and maximum margin that must be kept over the base price. If a calculation results in a price below the margin, the price will be increased to meet the minimum margin requirement. The maximum margin in Odoo's sales pricelist function establishes a ceiling, limiting excessive pricing for a product, while the minimum margin sets a floor beyond which a product's price will not go, guaranteeing it satisfies a minimal profit criterion.
Minimum Margin: Indicate the product's lowest allowable margin percentage or value.
Maximum Margin: Type in the highest allowable margin amount or percentage.
- (3) Fixed Price: For this price list type, provide the set price. This pricing will be applied to all product lines in the quotation form.
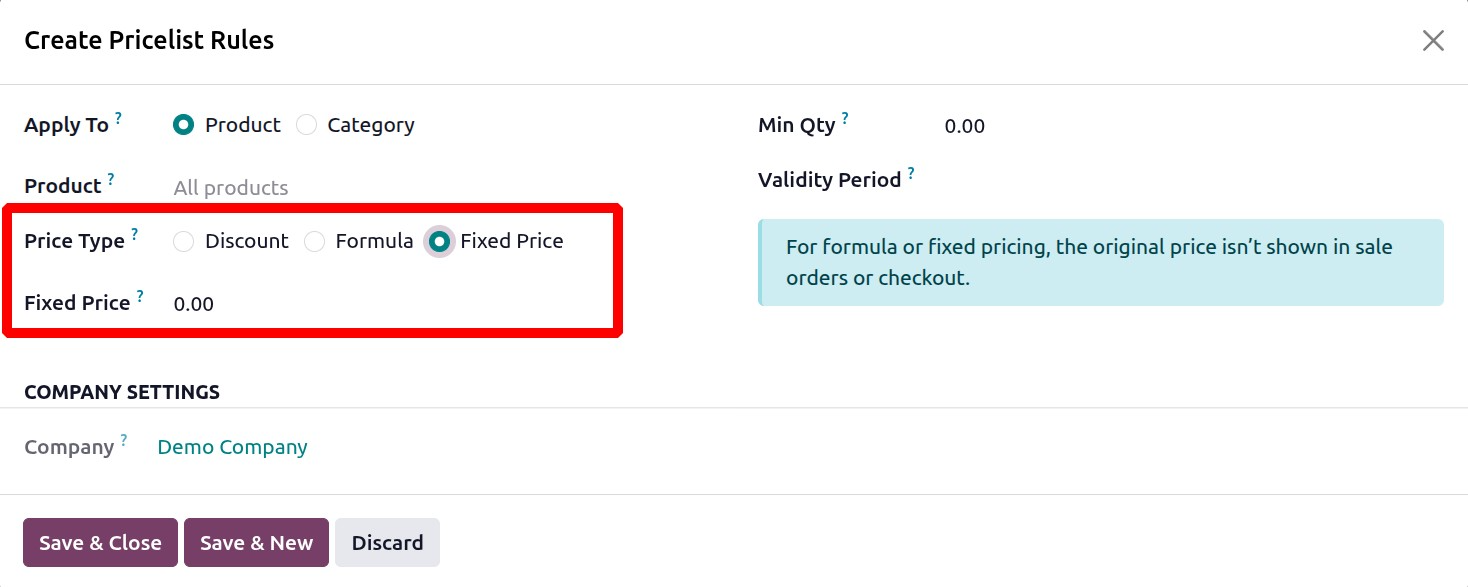
- Minimum Quantity: Indicate how many of the chosen products must be purchased in order for this price list to be applicable.
- Validity Period: Indicate the beginning and ending dates that this price list is applicable to quotes.
Next tab is Recurring Prices Tab specifically, time-based constraints are applied to subscription offerings.

Pricelists are set up using the same options as in the Price Rules page under the Recurring Prices tab, but with extra columns for Product Variants and Recurring Plan. Actually these are used for Subscription. Product variations are set up under items with one or more characteristics, like size, color, etc. If applicable, choose the desired product variants to be included in the price rule after a product has been chosen under the Products Tab. Next, a drop-down menu with pre-designated recurrence periods will appear when you pick the blank entry in the Recurring Plan column. Finally, in the recurring Price column, enter the desired price for this recurring price rule.
Next tab is rental rules. Using the same process as the Price Rules and Recurring Prices pages, price rules may be set up for rental products under the Rental rules tab.
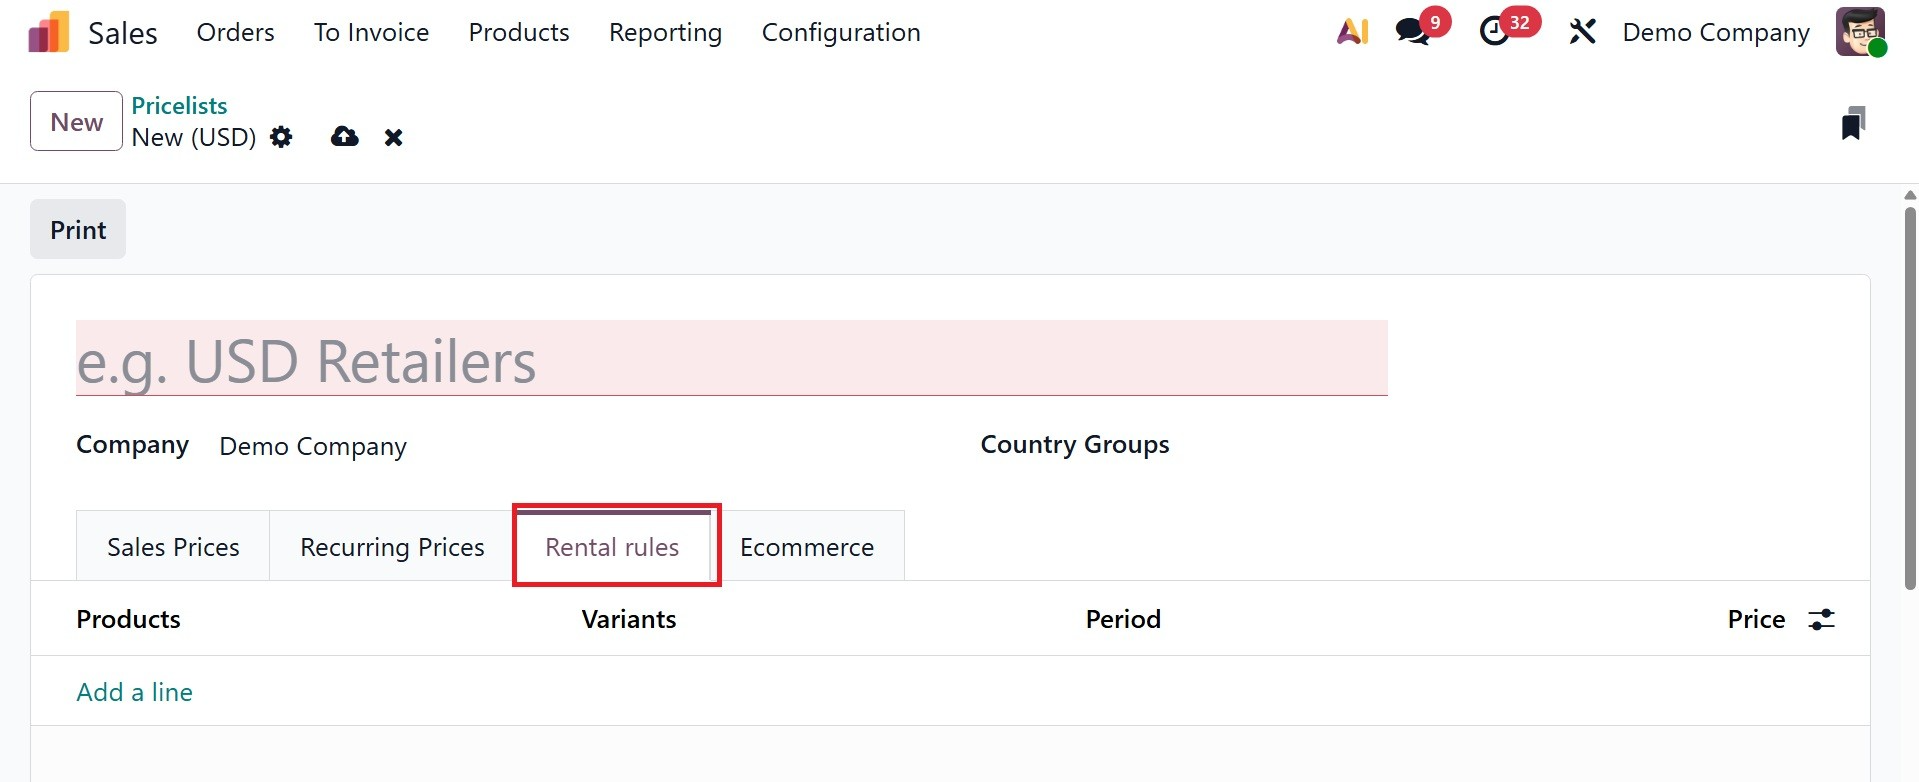
Click Add a line and choose a product in the Products column to add a rental rule. Then, if required, choose any particular variants. Next, decide on a time frame (daily, hourly, etc.) for the renting regulation. Finally, set a price in the corresponding column for the rental rule.
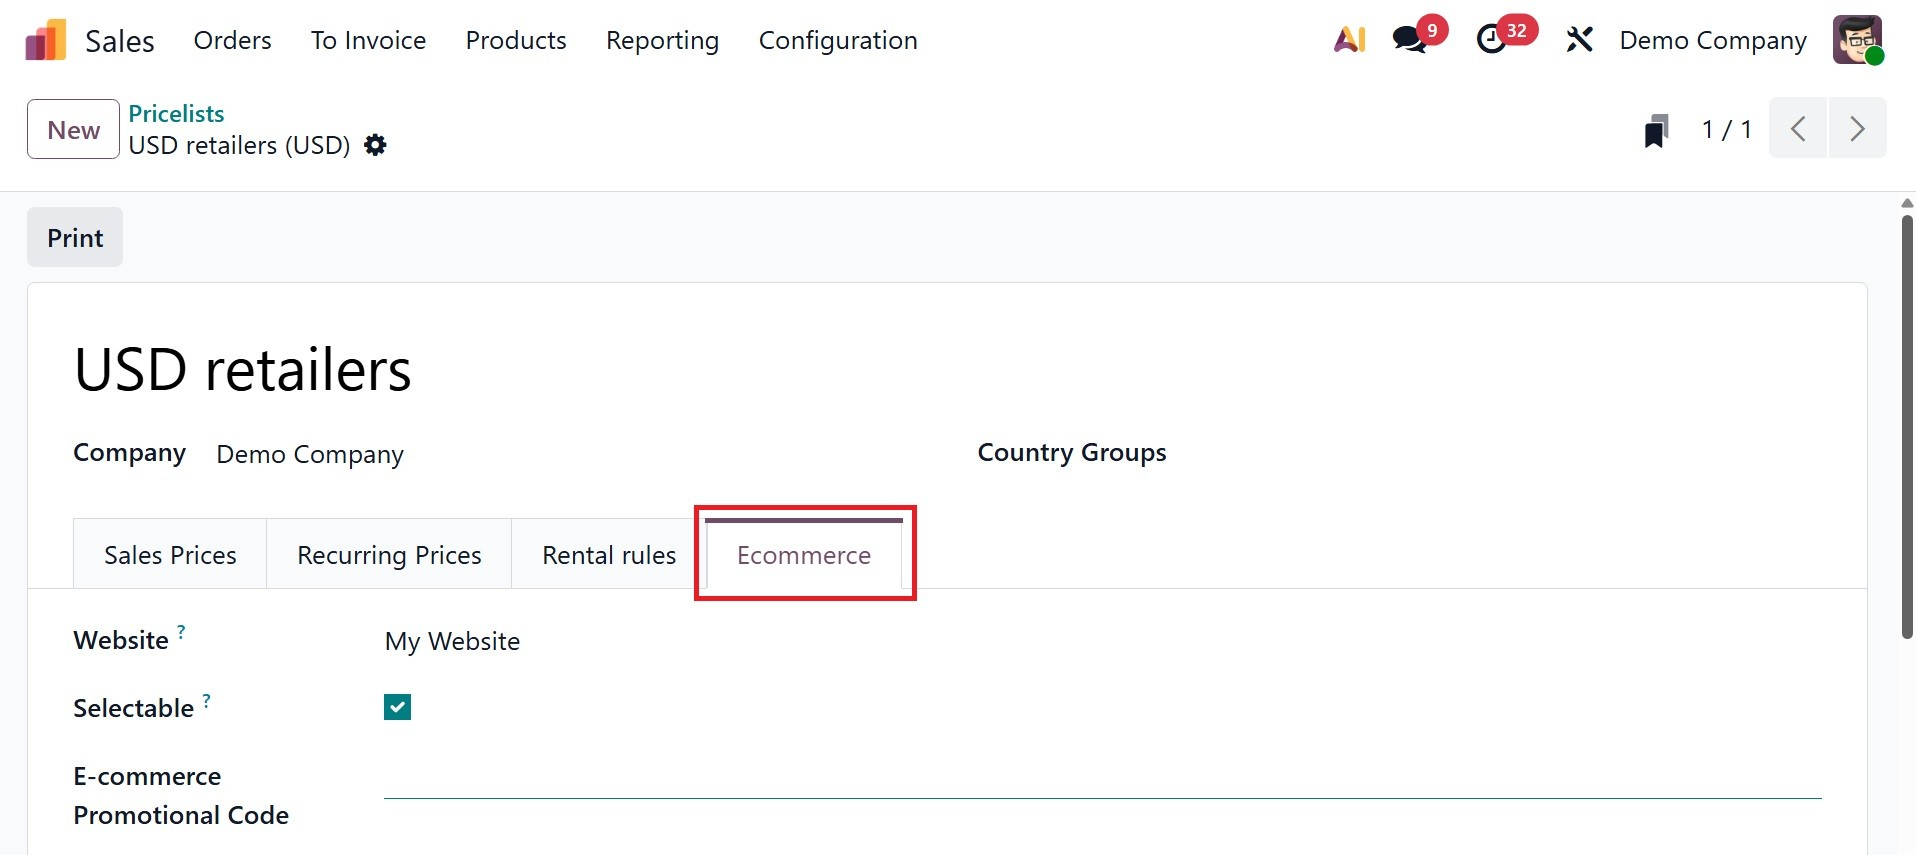
Finally, you have an ecommerce tab. Price regulations for goods sold on an e-commerce website can be set up under the Ecommerce tab. Choose the target website in the Website section to make the price list visible. When Selectable option is enabled for a pricelist, it allows users to actively select it for their purchases, making the pricelist available for public use, whereas if it's unchecked, only the default or assigned pricelist is visible. To make this pricelist a selectable option for customers to pick from while they shop, tick the Selectable checkbox.
Finally, an E-commerce Promotional Code can be added. To add a code, insert the required promo code that, even if the consumer does not meet the previously stated requirements, applies the price list to them when they check out.
3.4 Discount and Loyalty
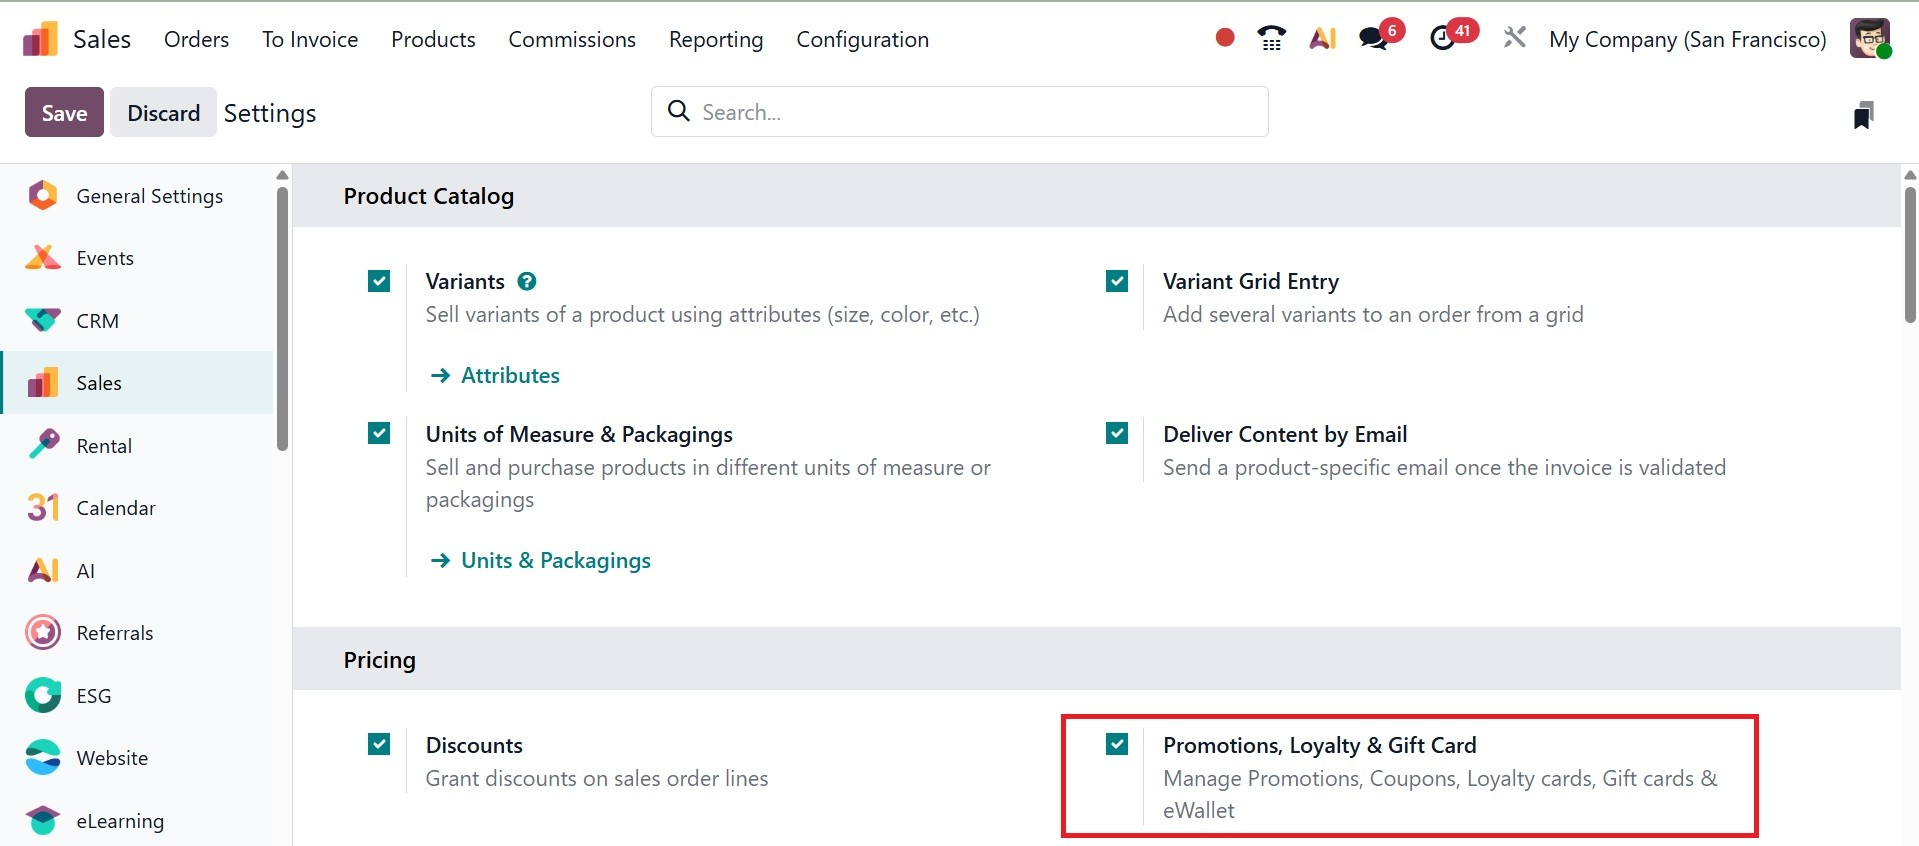
Instead of the Promotion and Coupon Programs that were included in earlier iterations, Odoo 19 offers a unified platform for setting up Discounts, Gift Cards, eWallets, and Loyalty under the Product menu. You can activate this feature from the Settings menu in the Sales module.
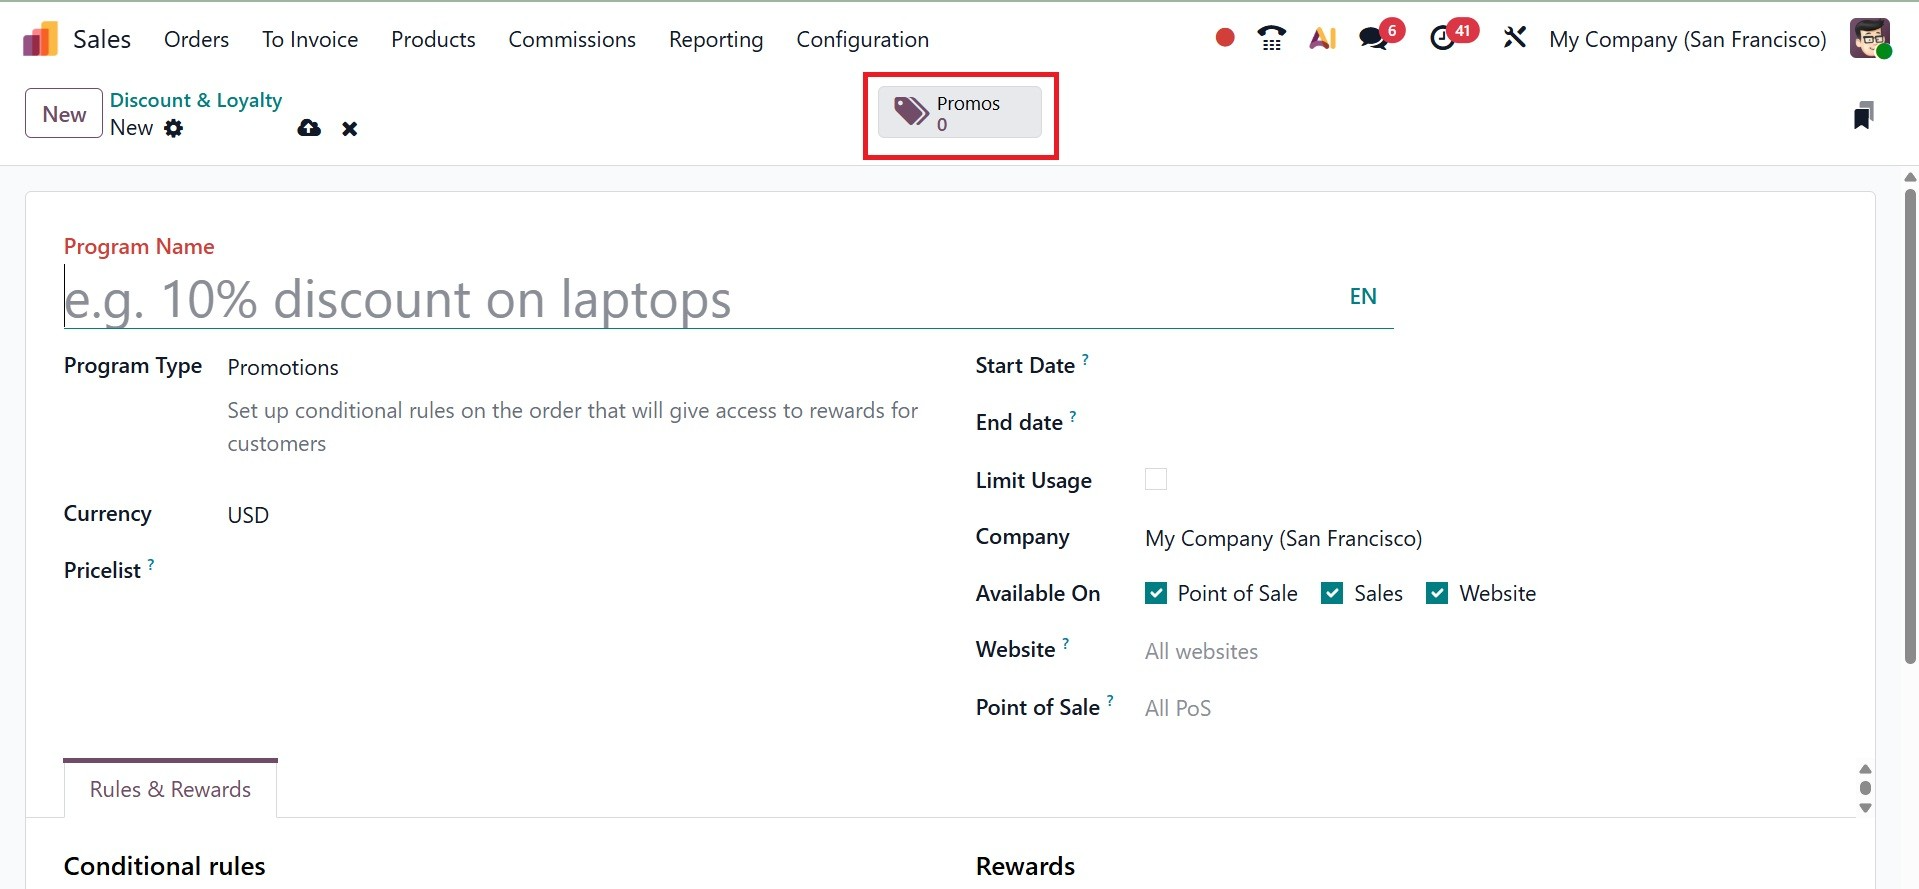
Select the discount and loyalty option, which is available under the Products menu. The program form opens when a program is created or edited.
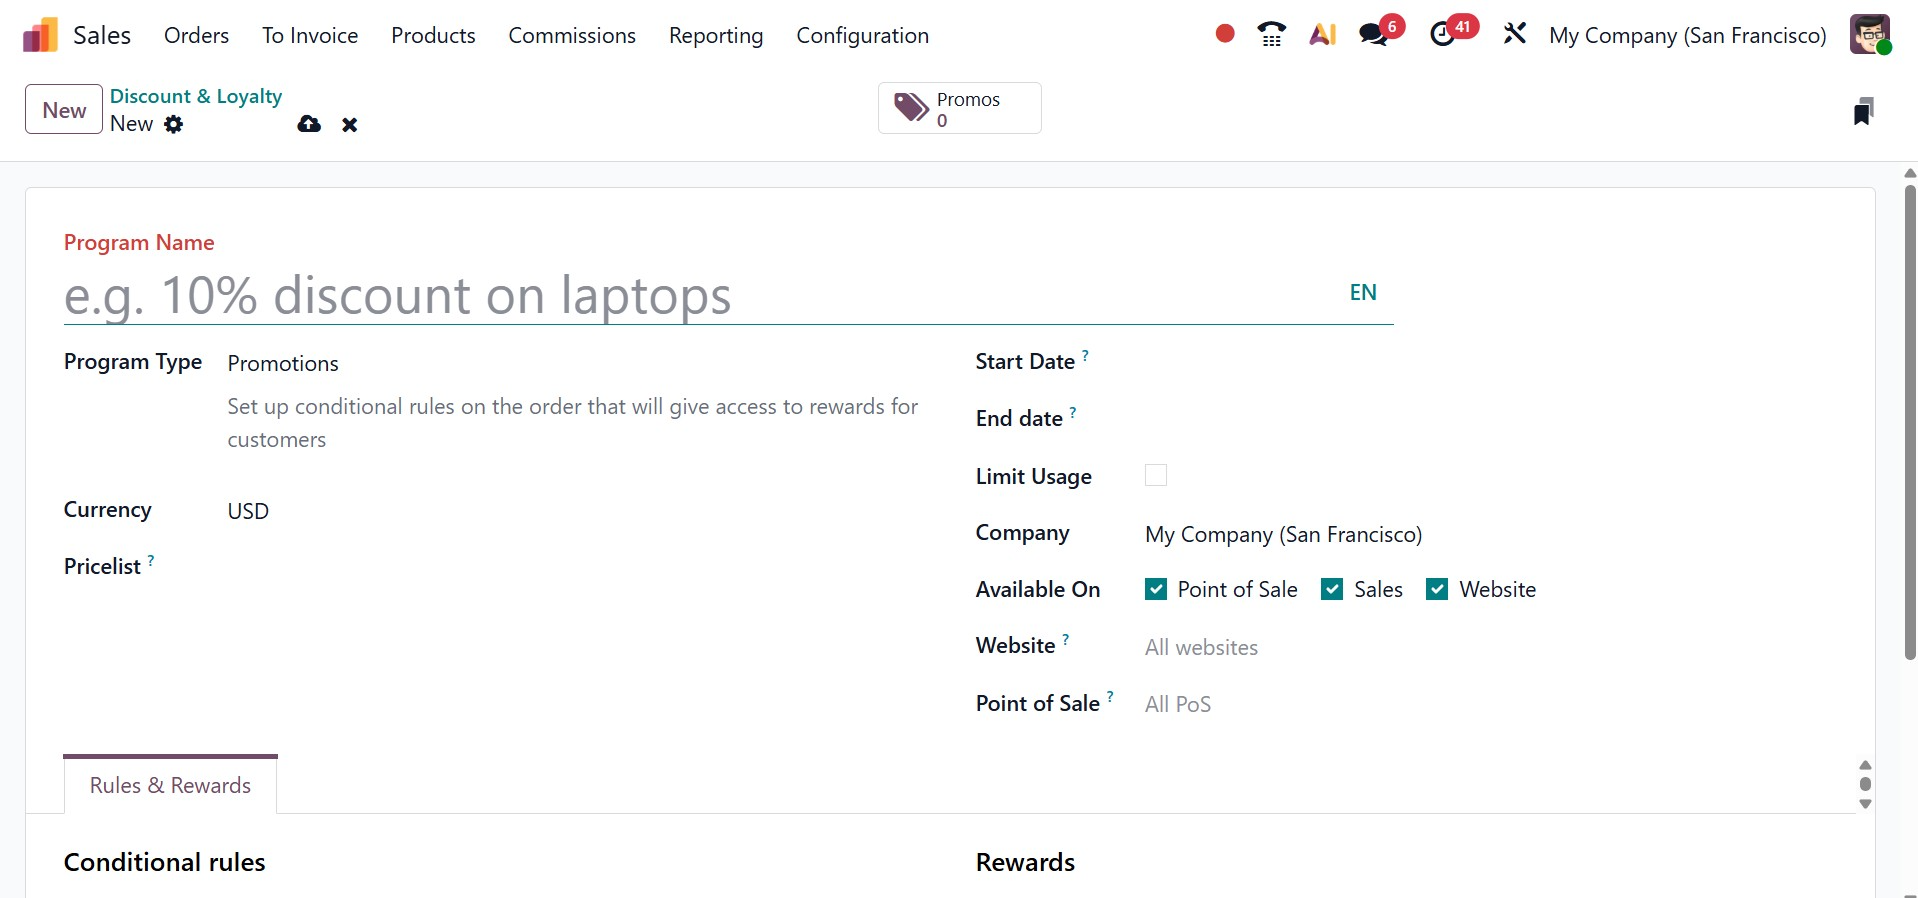
The following fields are present on the program form:
- Program Name: Type the program's name in this space. The customer cannot see the program name.
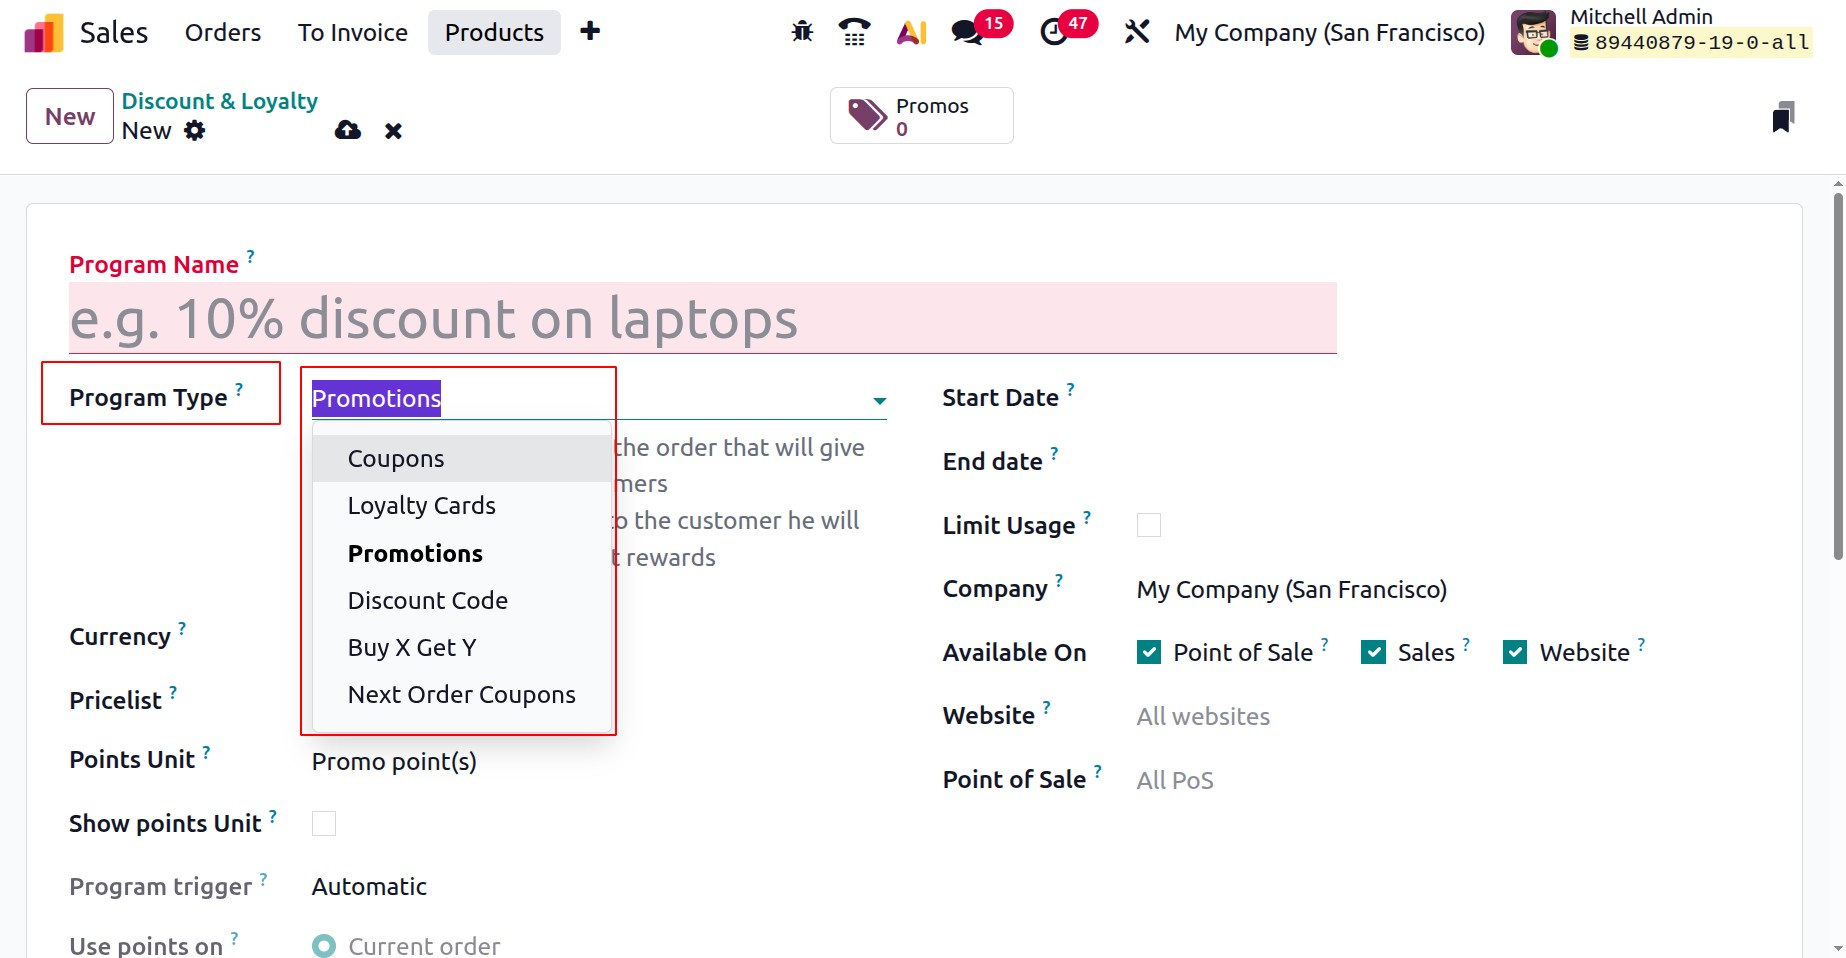
- Program Type: From the drop-down menu, choose the preferred program type. The program form offers the following several program types:
- Currency: Decide on the program's currency.
- Pricelist: To have this loyalt
y program applied to a particular pricelist (and customers related to the pricelist), choose a pricelist from the drop-down menu if you'd like. In this area, you can choose from many pricelists. It is feasible for various consumer segments to have distinct pricelists but the same loyalty programs when a single loyalty program is connected to several pricelists. The program is applicable to everyone, regardless of pricelist, if this field is left empty.
- Start Date: Choose the day the program goes into effect. If you want the program to remain active and never expire, leave this option empty.
- End Date: Choose the end date, which is the day the program expires. If you want the program to remain active and never expire, leave this option empty.
- Limit Usage: To restrict how many times the software can be used during its validity period, check this box and enter a number of usages.
- Company: Select the single company for which the program is offered if you are dealing with a multi-company database. All businesses in the database can access the program if it is left blank.
- Available On: Choose which applications the program is compatible with.
- Website: Choose a website that offers the program. To make it accessible on all websites, leave this form empty.
- Point of Sale: Decide which point or points of sale offer the program. To make it accessible at any PoS, leave this field empty.
The smart button at the top of the form provides access to all of the current cards, codes, coupons, etc. that have been created for the program.
The program form offers the following program types:
- Coupons:Create and distribute one-time coupon codes that provide instant access to benefits.
- Loyalty Cards:The consumer earns points for purchases, which can then be used for incentives on present and/or future orders.
- Promotions: Establish conditional guidelines for product orders that, if met, give the consumer access to rewards.
- Discount Code: Set codes that provide customers with discounts when they enter them at the register.
- Buy X, Get Y gives the consumer one credit for each (X) item they purchase. The customer can exchange their credits for the (Y) item once they have accrued a certain number of them.
- Next Order Coupons: Create and distribute one-time-use coupon codes that enable customers to receive discounts on their subsequent purchases.
Next, set up the conditional rules that control when a customer's order is affected by the program. To include conditions in the program, click Add a rule in the Rules & Rewards page, as in the image below.
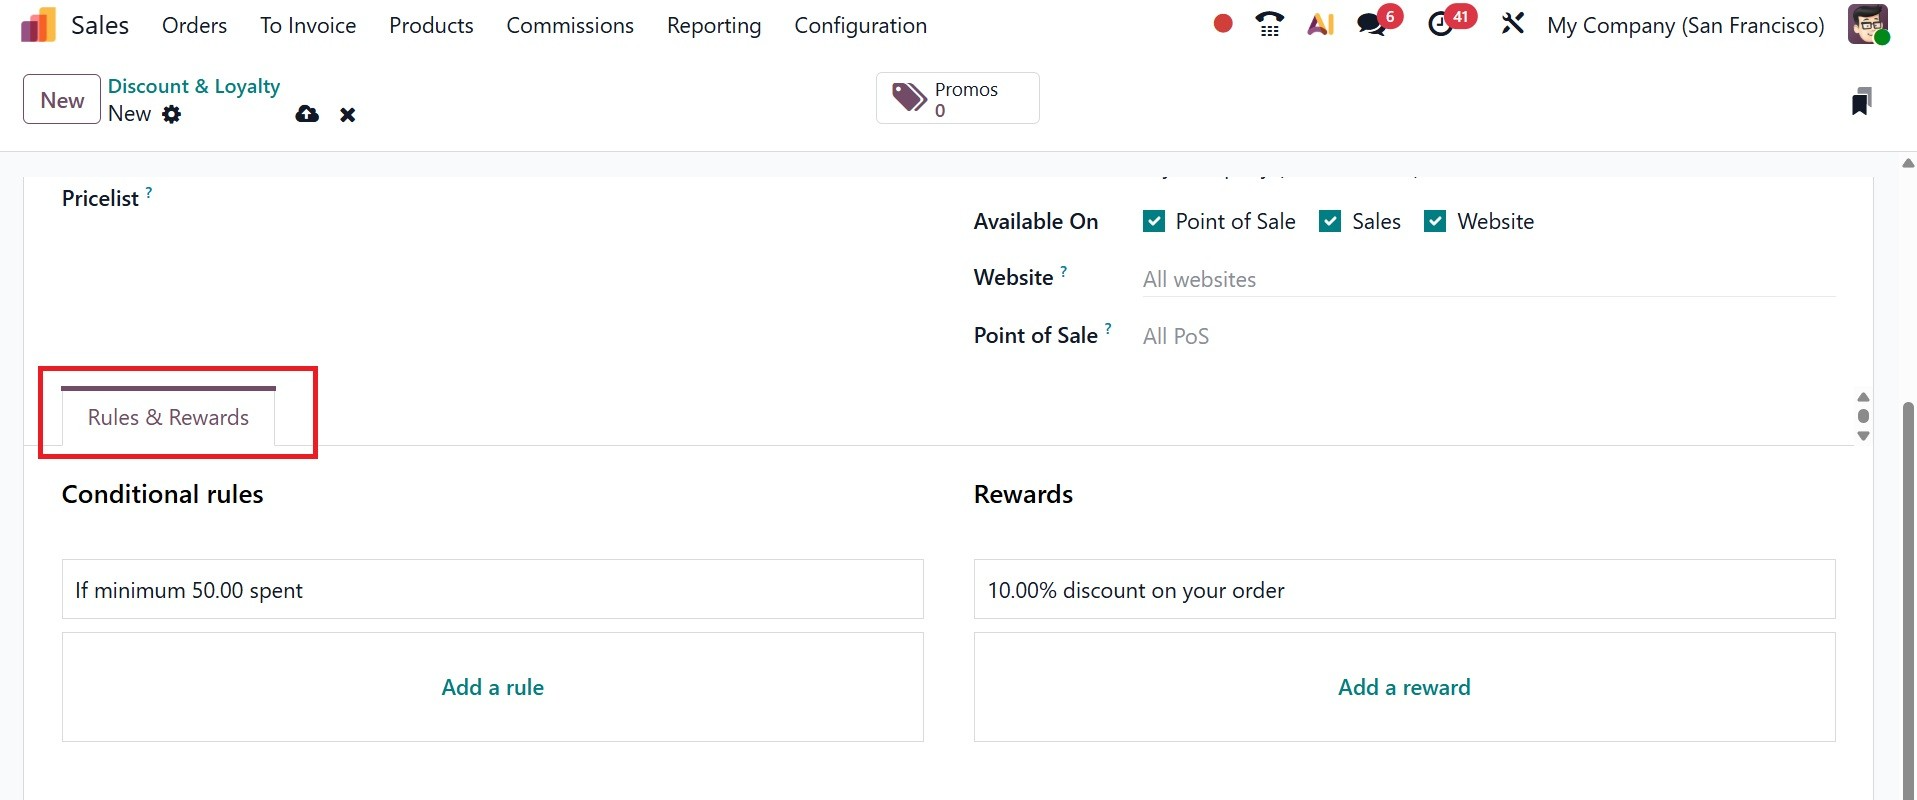
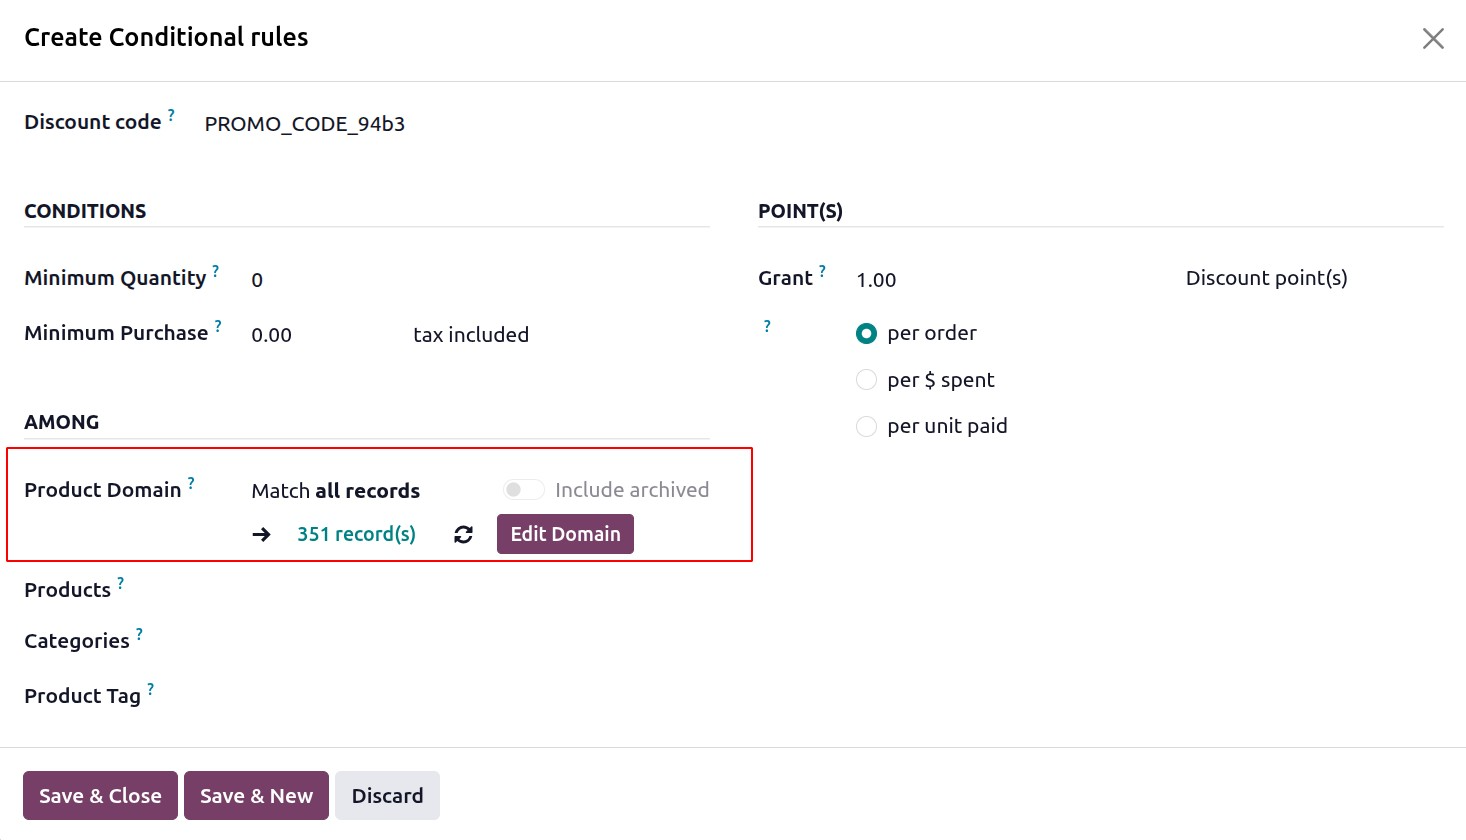
A pop-up window titled "Create Conditional rules" appears. Conditional rules can be configured using the following options:
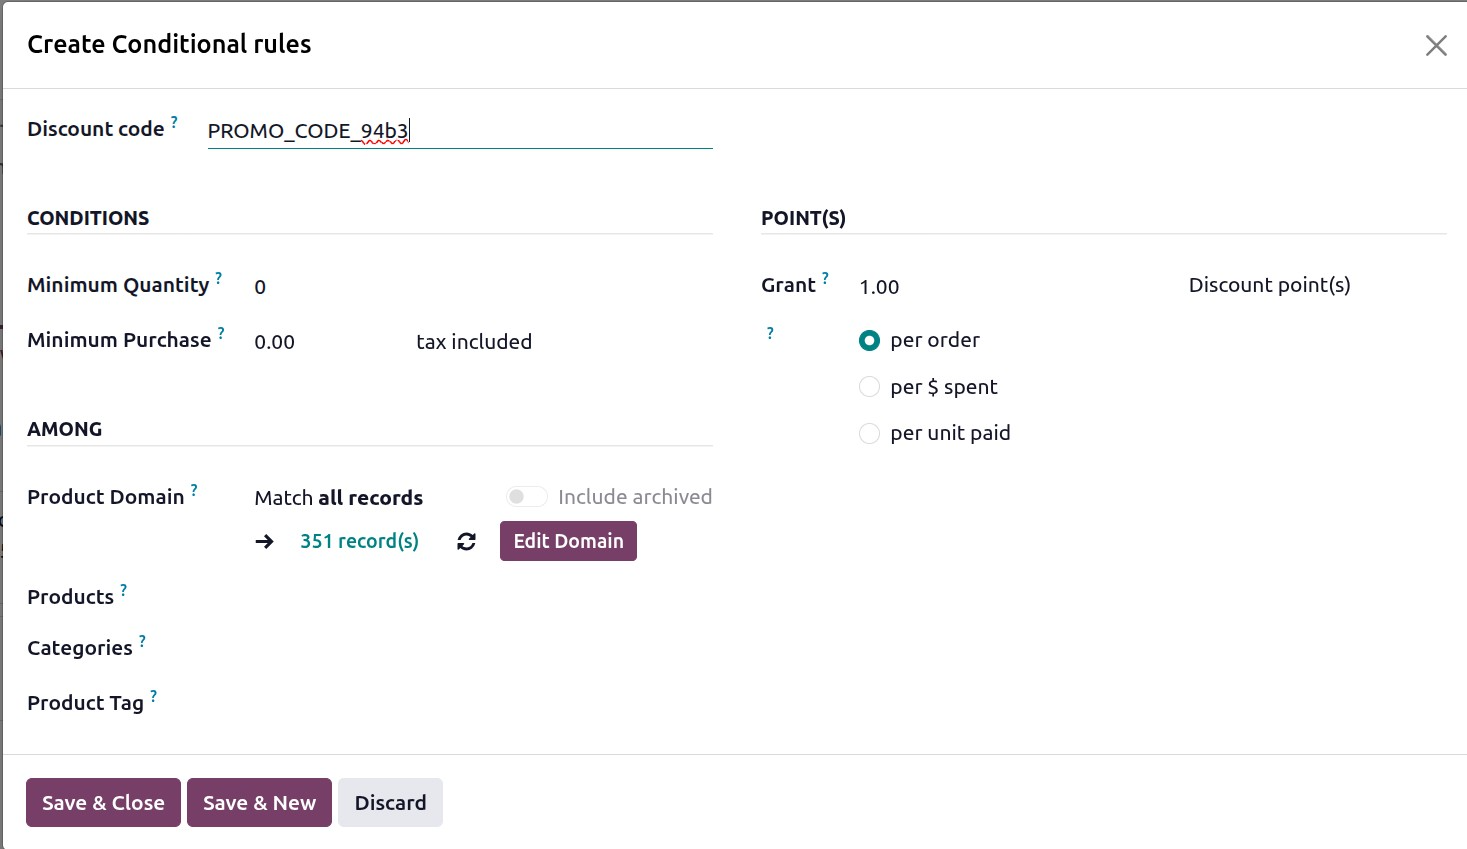
- Discount Code: Use the default code that Odoo generates or enter a custom code to be used for the Discount Code program. Only when the Program Type is set to Discount Code is this field accessible.
- Minimum Quantity: Indicate how many products must be bought in order to qualify for the prize. To guarantee that the customer must make a purchase in order to receive the incentive, set the minimum quantity to at least 1.
- Minimum Purchase: Indicate how much money must be spent (in currency), tax included or tax excluded, in order to receive the incentive. If you enter both a minimum quantity and a minimum purchasing amount, then the customer’s order must meet both conditions.
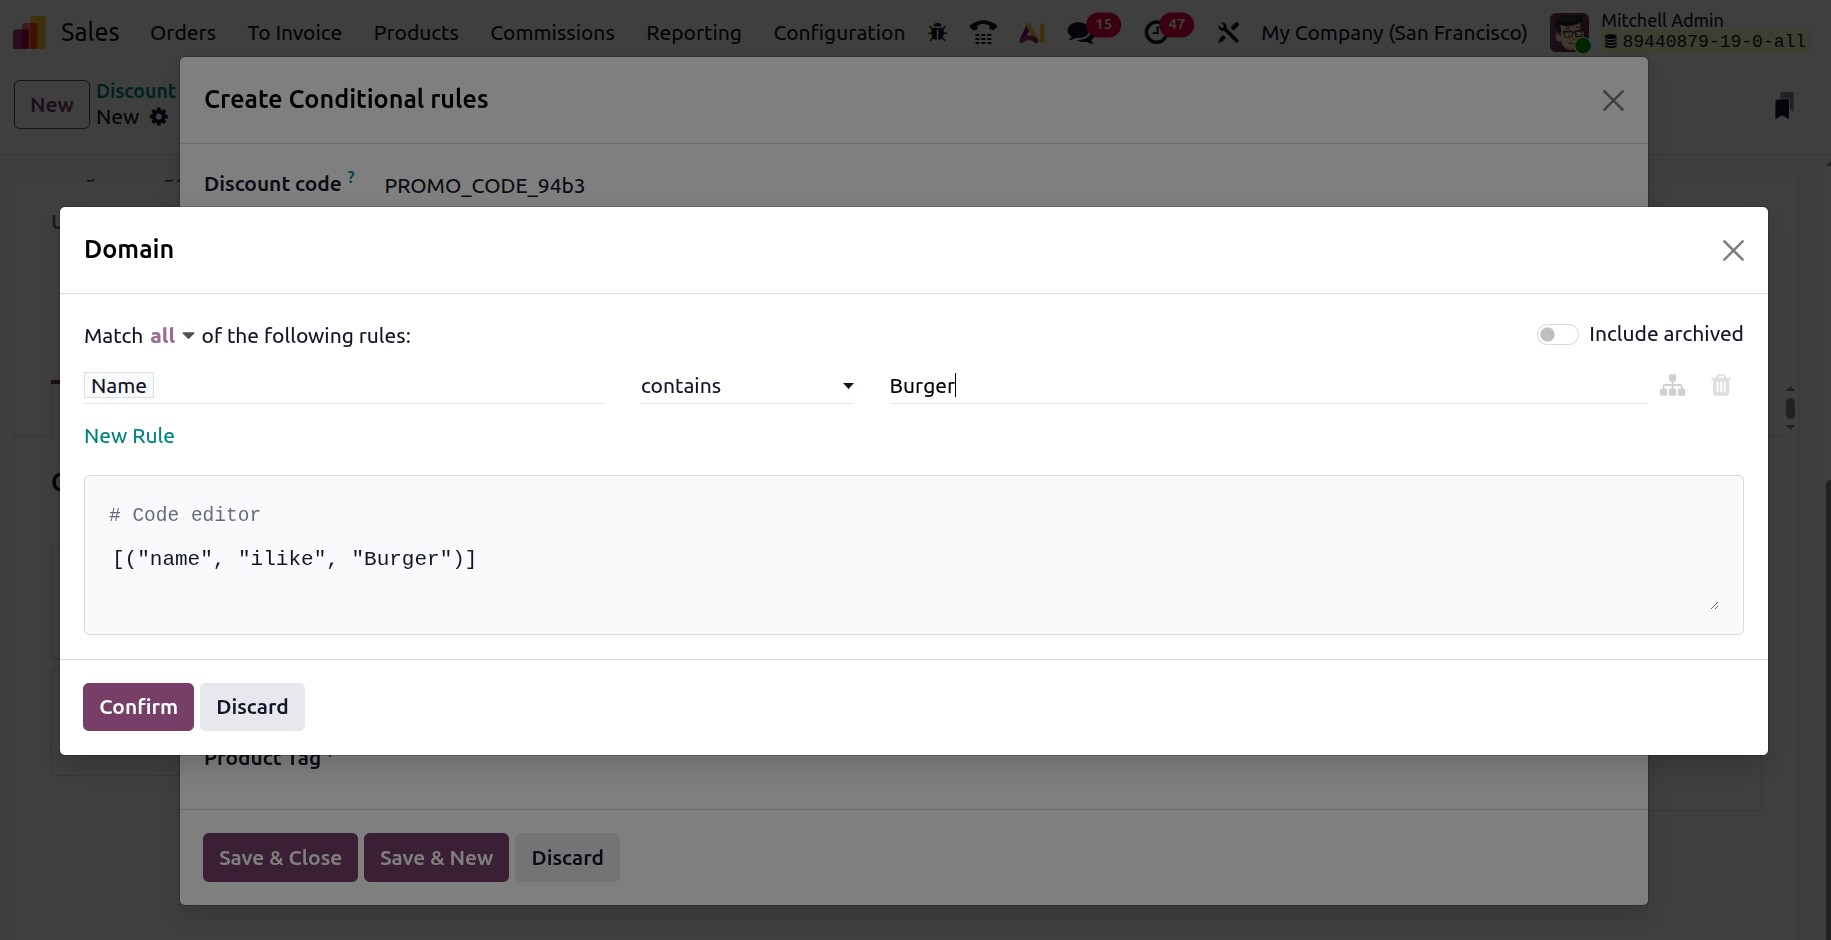
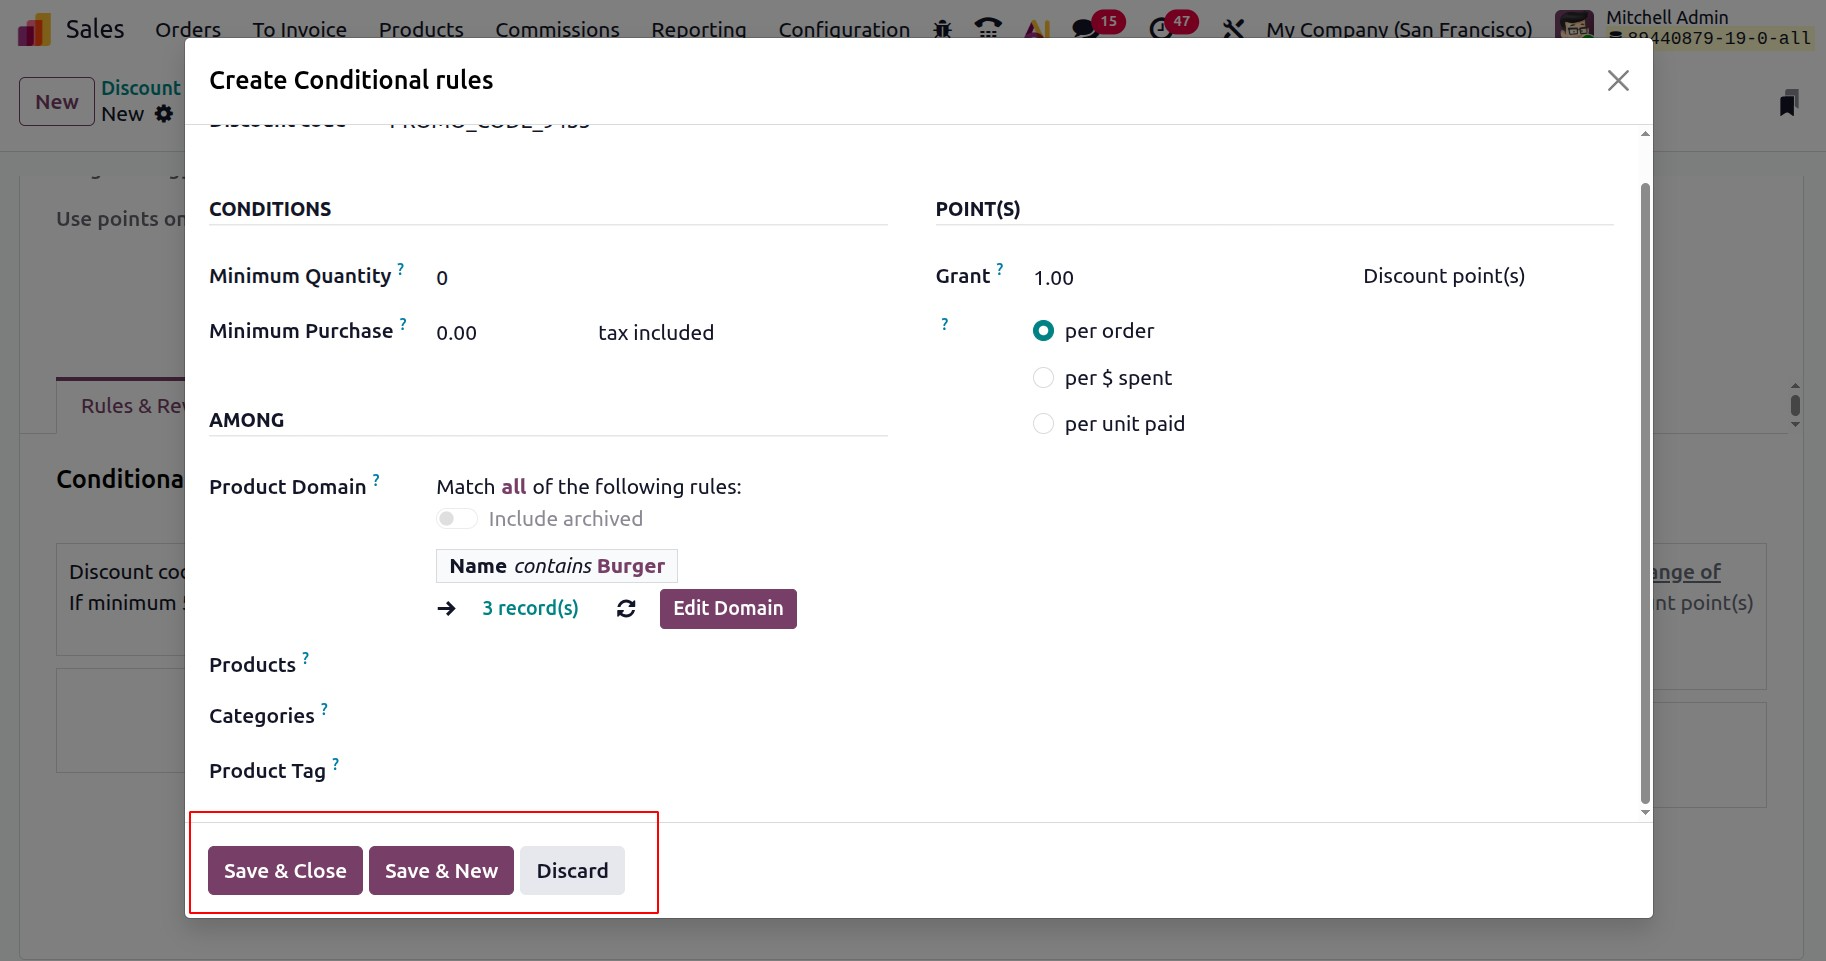
Click on the Edit Domain to add certain conditions on products.
By using this users can add rules, and according to that rule the reward will get. For example the given rule here is Name contains Burger. So the product name should contain the word Burger on it to get the reward. Click on the confirm button then.
- Products: Choose the particular product or products that are covered by the program. To apply this field to all goods, leave it empty.
- Categories: Choose the product category that the program is applicable to. To apply it to every product category, select All.
- Product Tag: To apply the program to products that have a particular tag, choose a tag.
Either click Save & New to save the rule and instantly create a new one, or click Save & Close to save the rule and exit the pop-up window.
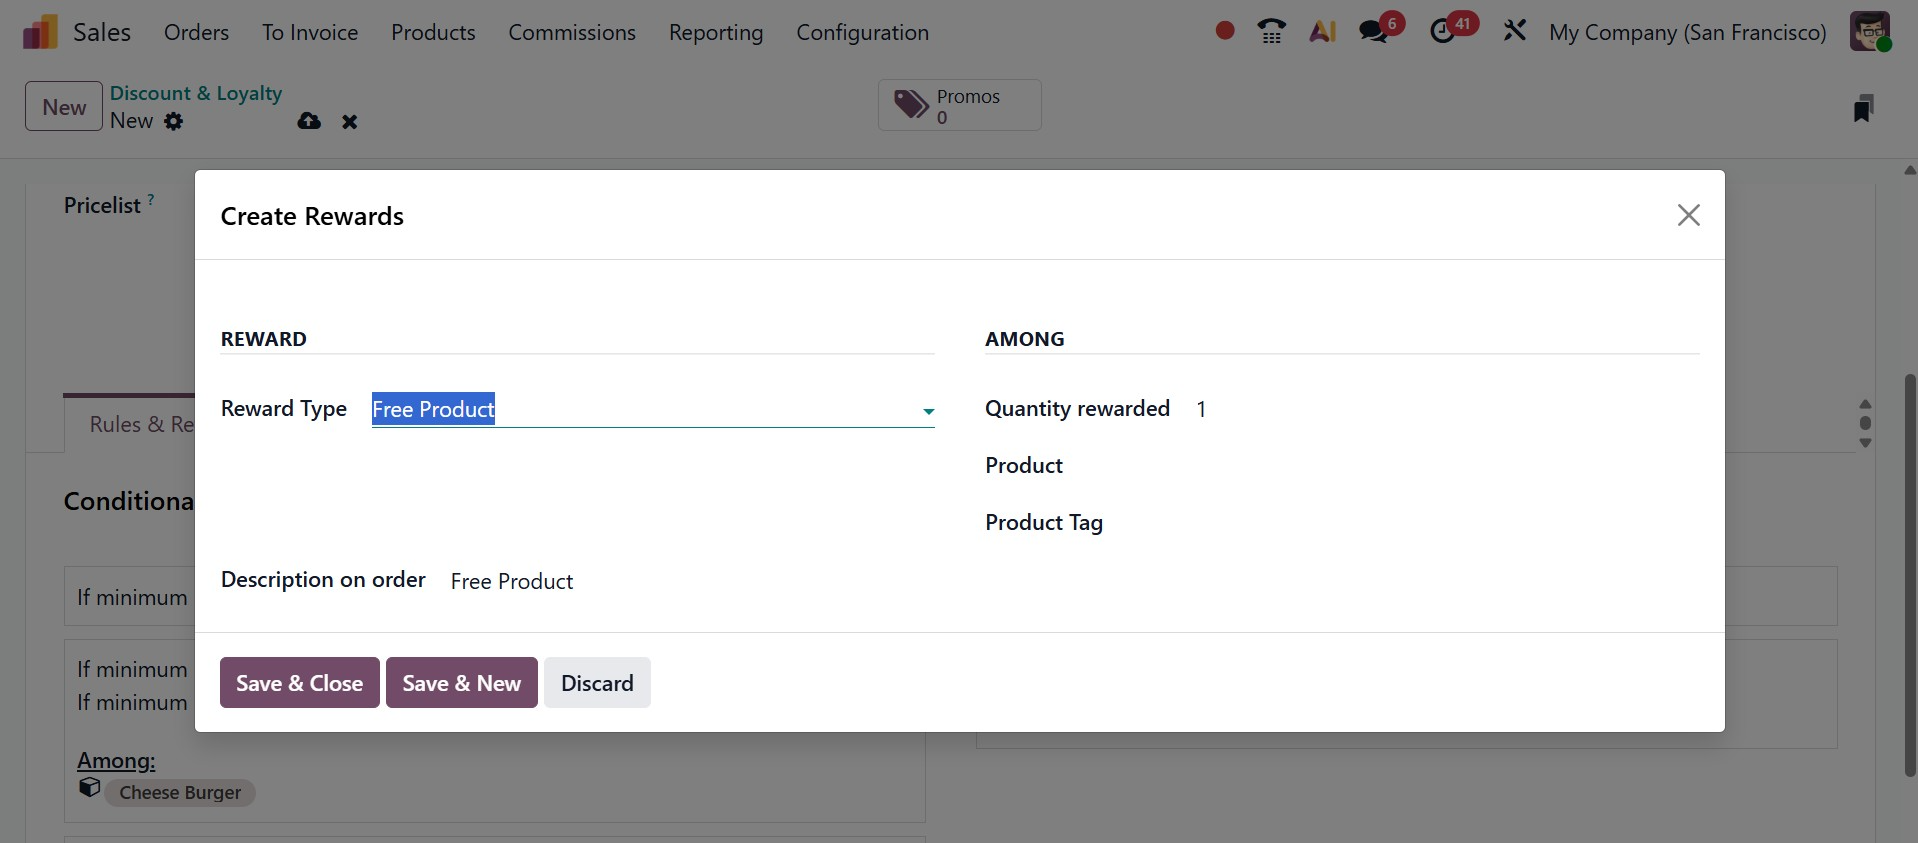
To add awards to the program, click Add next to awards in the Rules & Rewards tab of the program form. A pop-up window labeled "Create Rewards" appears.
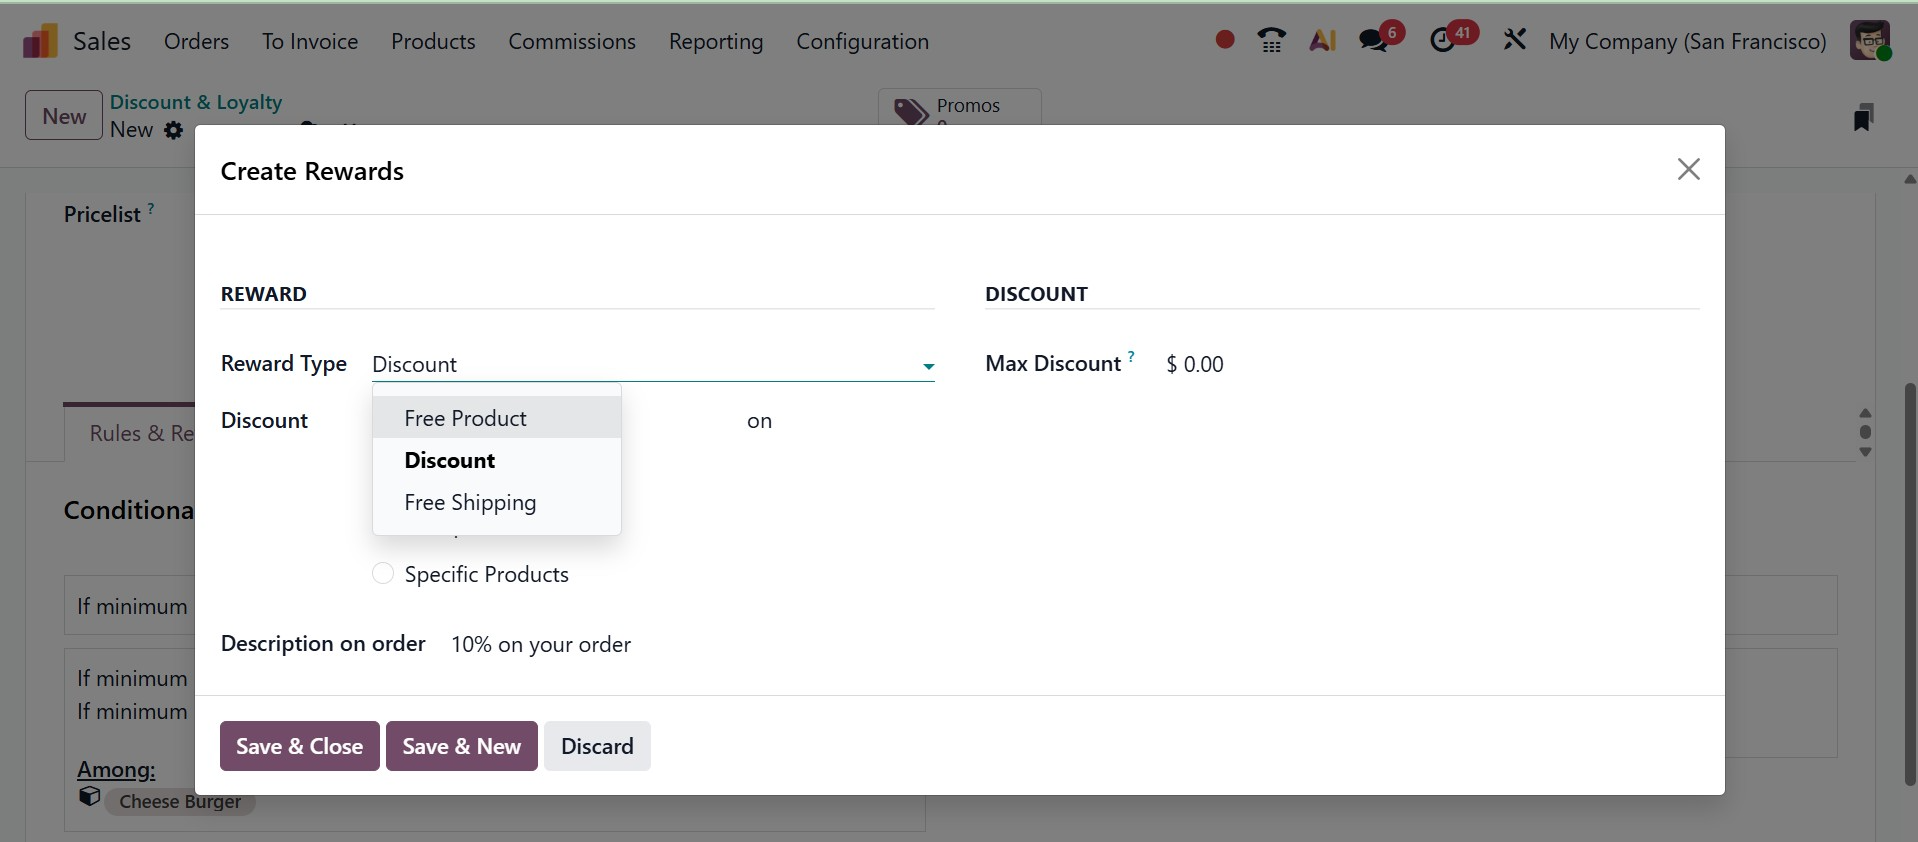
Rewards can be configured using the following options:
Choose from the following incentive options: Free Product, Discount, or Free Shipping. The Reward Type chosen determines the remaining reward setup options.
Free Product:
- Quantity Rewarded: Decide how many complimentary items the consumer will receive.
- Product: Choose the complimentary product offered as a prize. You can only choose one product.
- Product Tag: To further identify the free product that qualifies for the prize, select a tag.
Discount:
- Discount: Type in the amount that has been reduced as a percentage, currency per order, or currency per point. Next, choose if the discount is applied to Order, Cheapest Product, or Specific Product.
- Order The discount applies to the entire order.
- Cheapest ProductDiscount applies to the lowest-priced item.
- Specific Product – Discount applies to selected products in the order.
- Description on Order: a user-defined text message that appears on the customer's sales order when a discount, loyalty program, or other reward is applied.
- Max Discount: Indicate the highest possible discount (in currency) that this award is eligible to offer. For no limit, leave this field at 0.

Free Shipping:
- Max Discount:Indicate the highest possible discount (in currency) that this award is eligible to offer. For no limit, leave this field at 0.
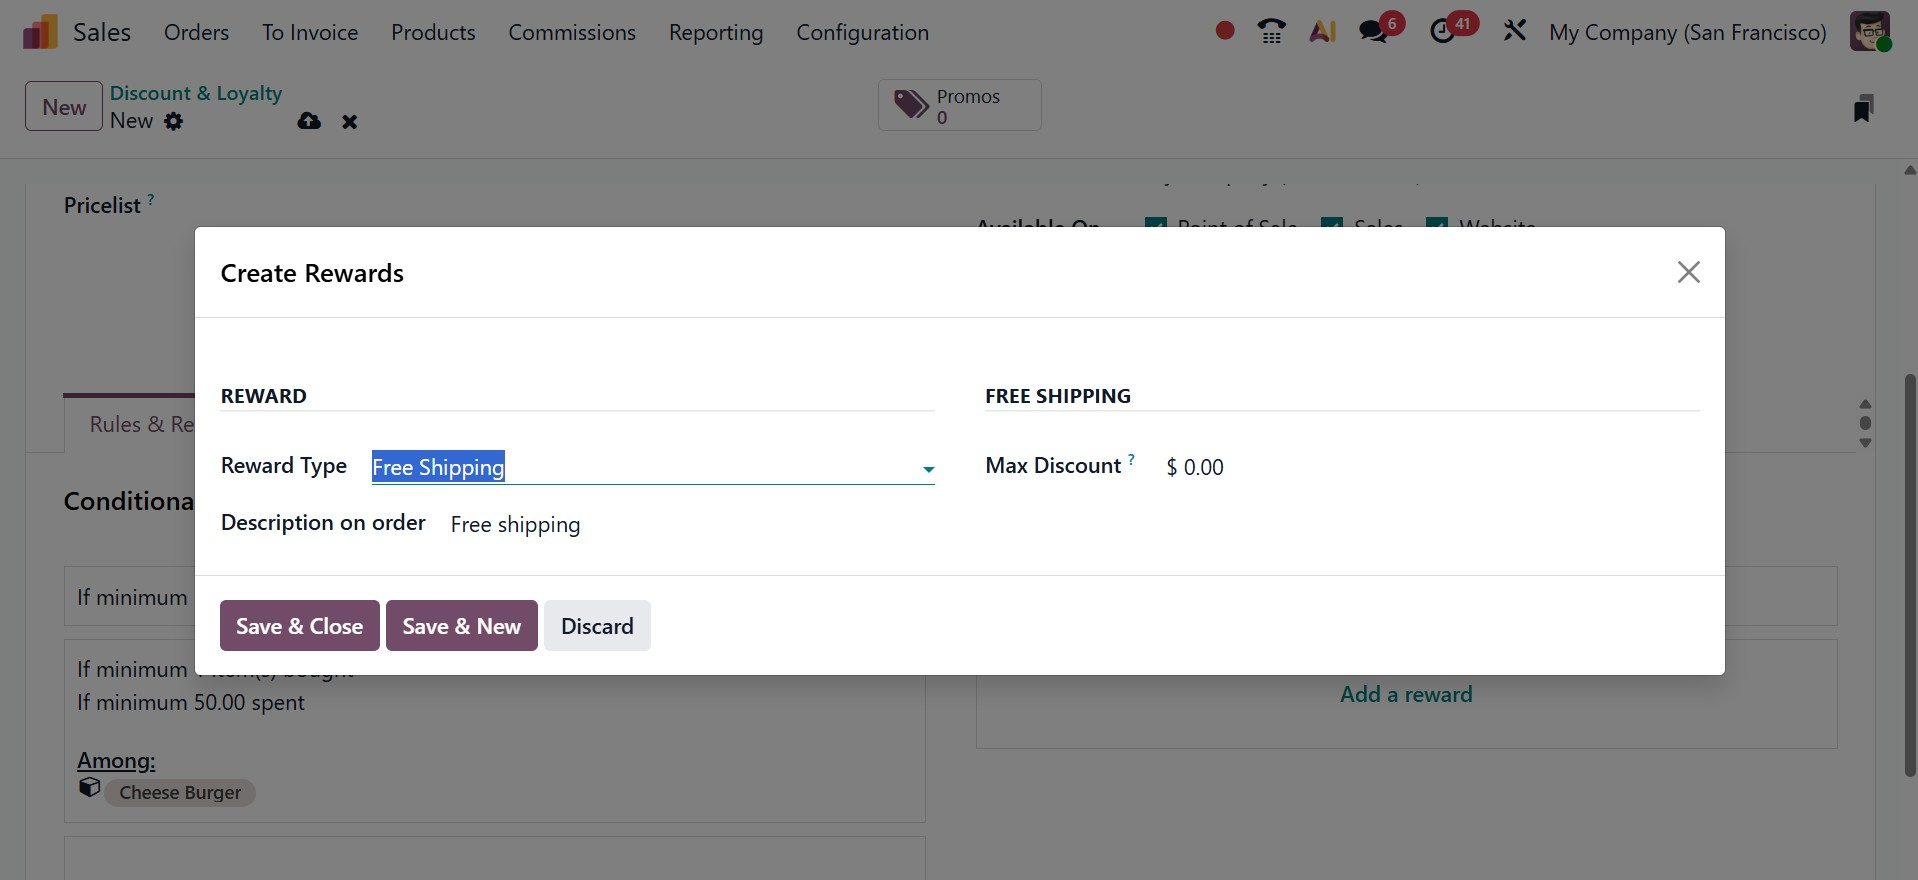
- Description on Order:Enter the reward's description, which the buyer will see when they check out.
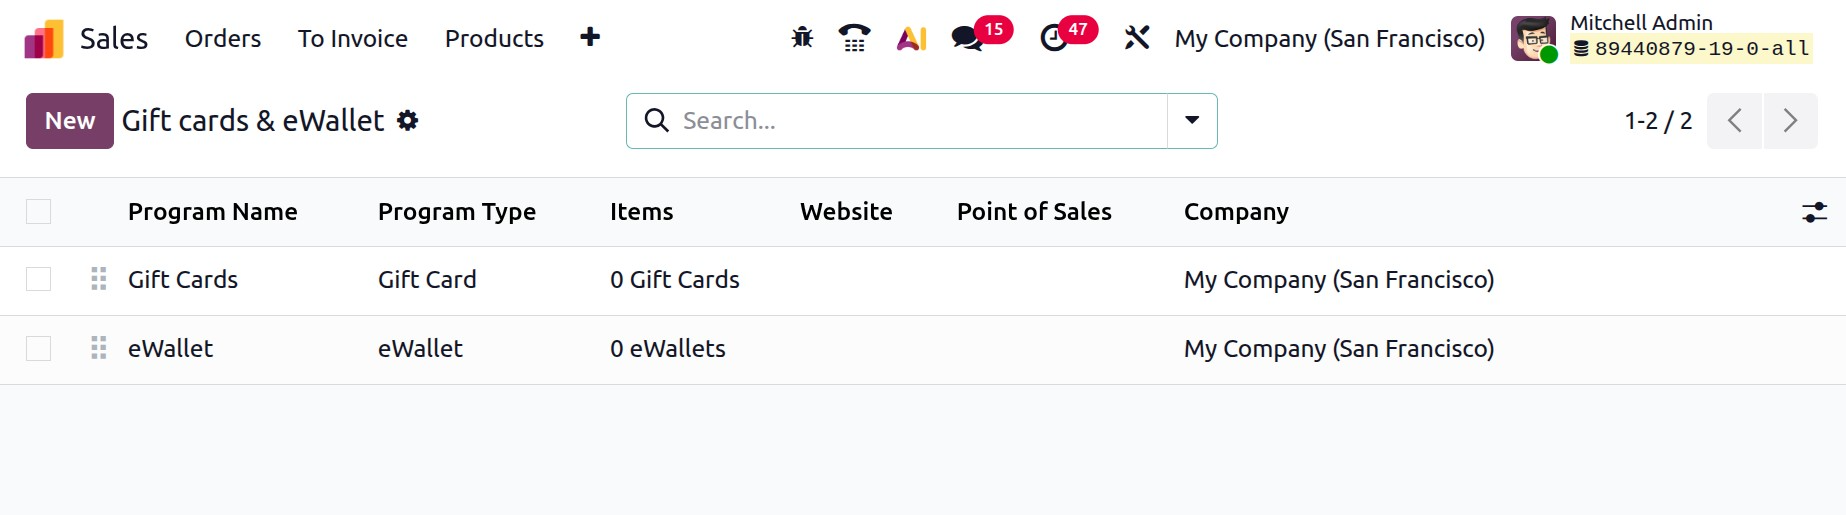
3.5 Gift cards and e-Wallets
A new feature in Odoo 19 is a menu specifically designed for managing eWallets and gift cards. The new Odoo 19 Sales module offers access to the eWallet's features. As seen in the screenshot below, the platform shows a list of gift cards and eWallets together with details about the Program Name, Program Type, Name, Website, PoS Configuration, and Company.
Customers can buy gift cards, which they can then use as payment when they check out at an e-commerce store or point of sale. To add a new Gift card/eWallet click on the new button.
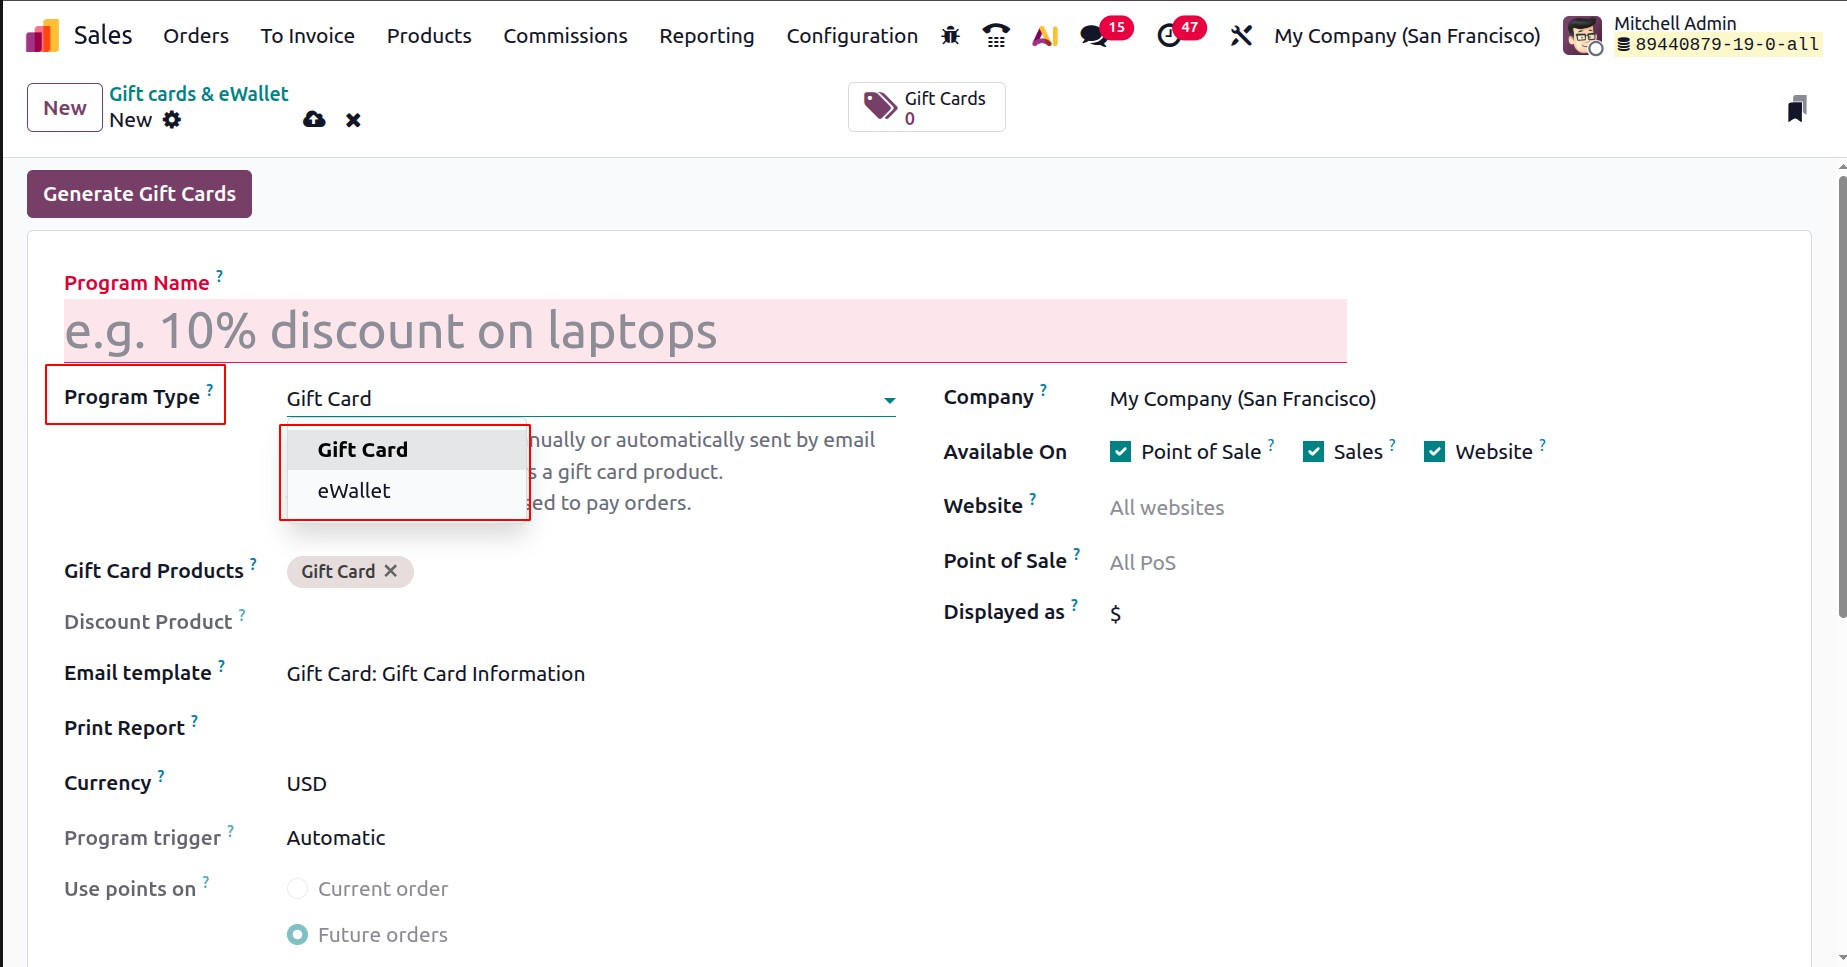
- Program Name: Give the Gift Card/eWallet program a name.
- Program type: two program types available one is Gift card and second one is eWallet.
- Gift Card/eWallet Products: pick the previously made gift card product, which is a service product. It is used to give digital gift cards that customers can later use to pay for future purchases. If you made gift card products in varying amounts, repeat the procedure.
- Email template: The option in Sales Gift Cards and eWallets lets you choose a ready-made email that can be customized. This email is sent automatically to the customer to share their digital gift card or eWallet details after they make a purchase or take an action.
- Print report: To print the report, choose Gift Card.
- Currency: decide which currency the gift card program will utilize.
- Company: choose the business for which the program is available and valid.
- Available On: pick the apps where the program is accessible and valid.
- Website: choose the website where the program is accessible and valid. If you want to include all websites, leave this area empty.
- Point of Sale:Choose the Point of Sale (PoS) where the program is offered and valid. In order to include all PoS, leave this parameter empty.
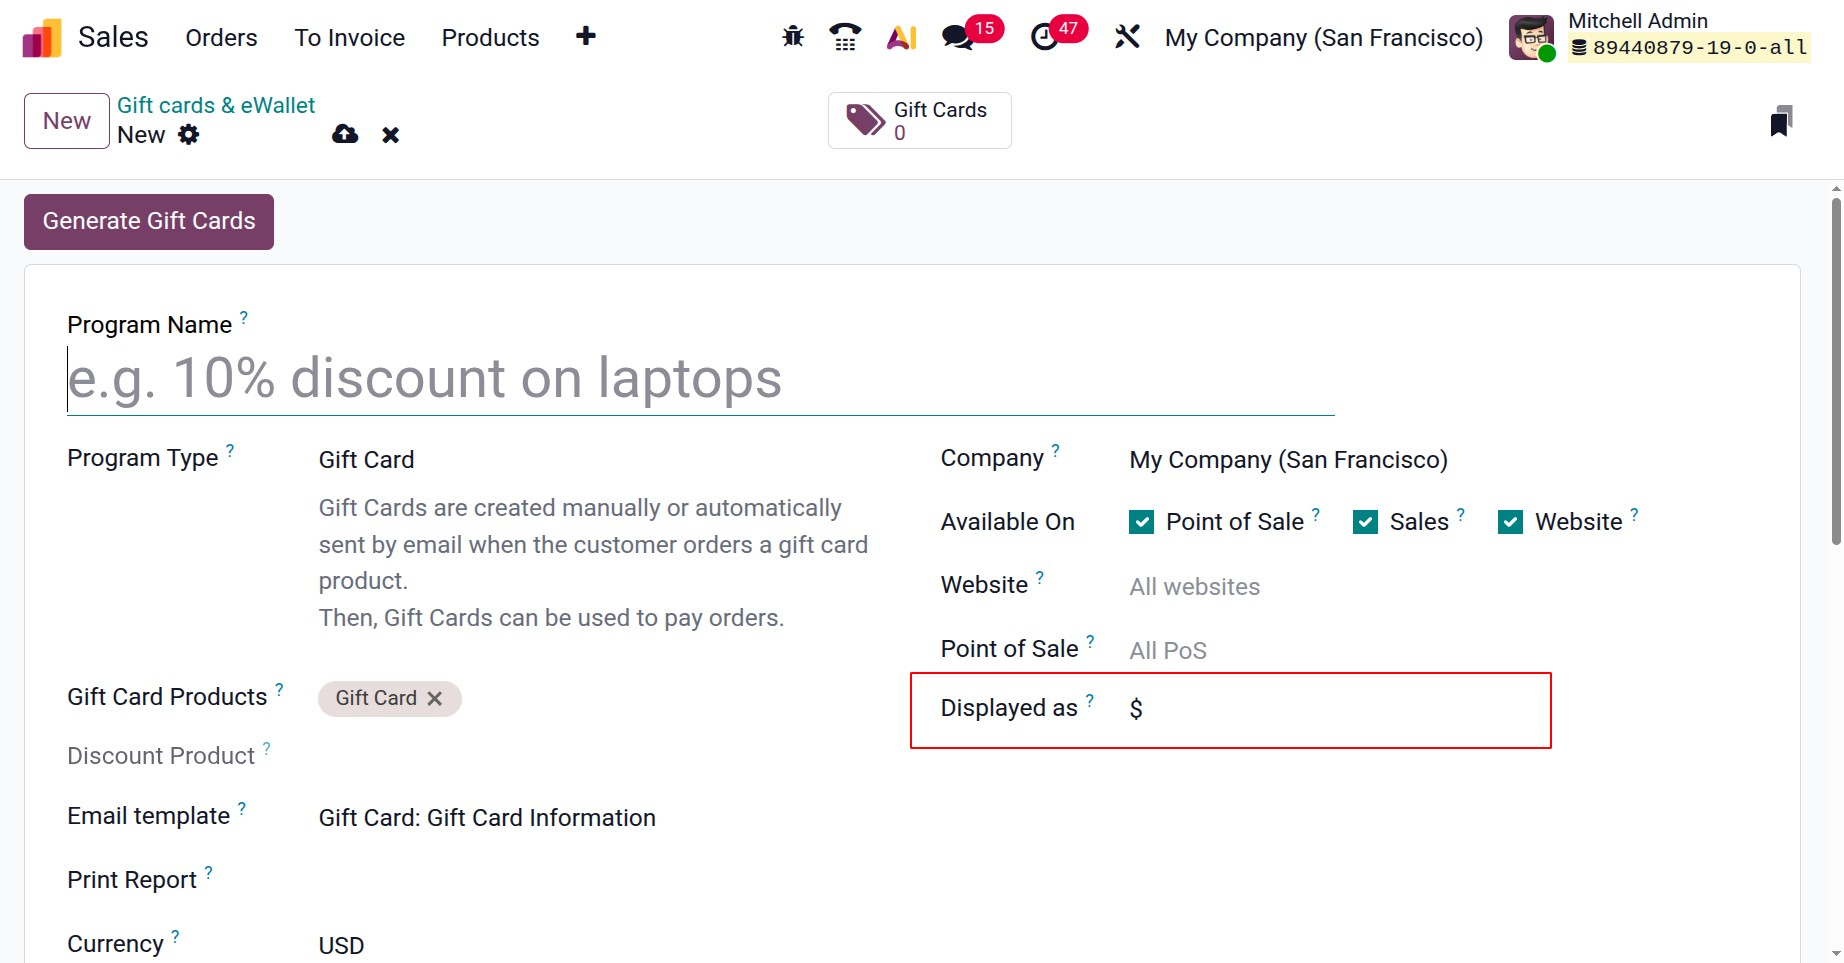
- Displayed as:within the Sales Gift Cards and eWallets feature defines the unit of value presented to the customer. It provides a customizable label to make the gift card or eWallet value more meaningful and relevant to your customers.
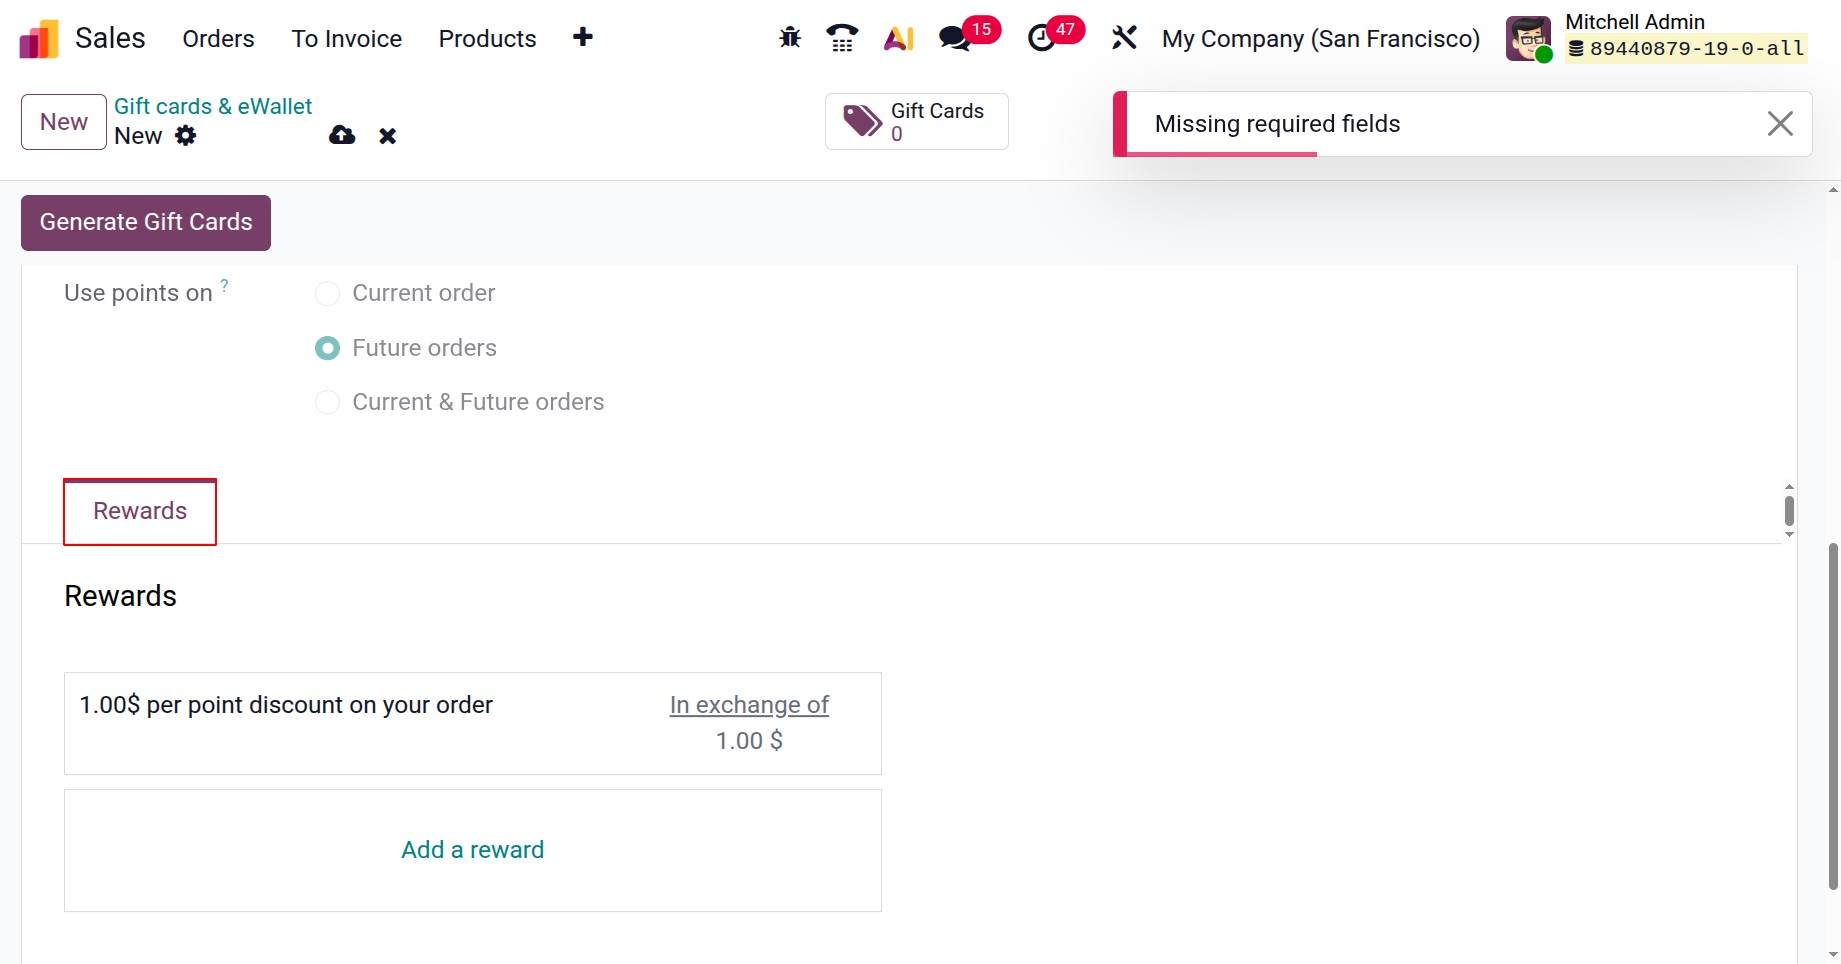
As mentioned before, it's possible to set rewards for these programs too. For that click on the Add rewards button under the Rewards tab.
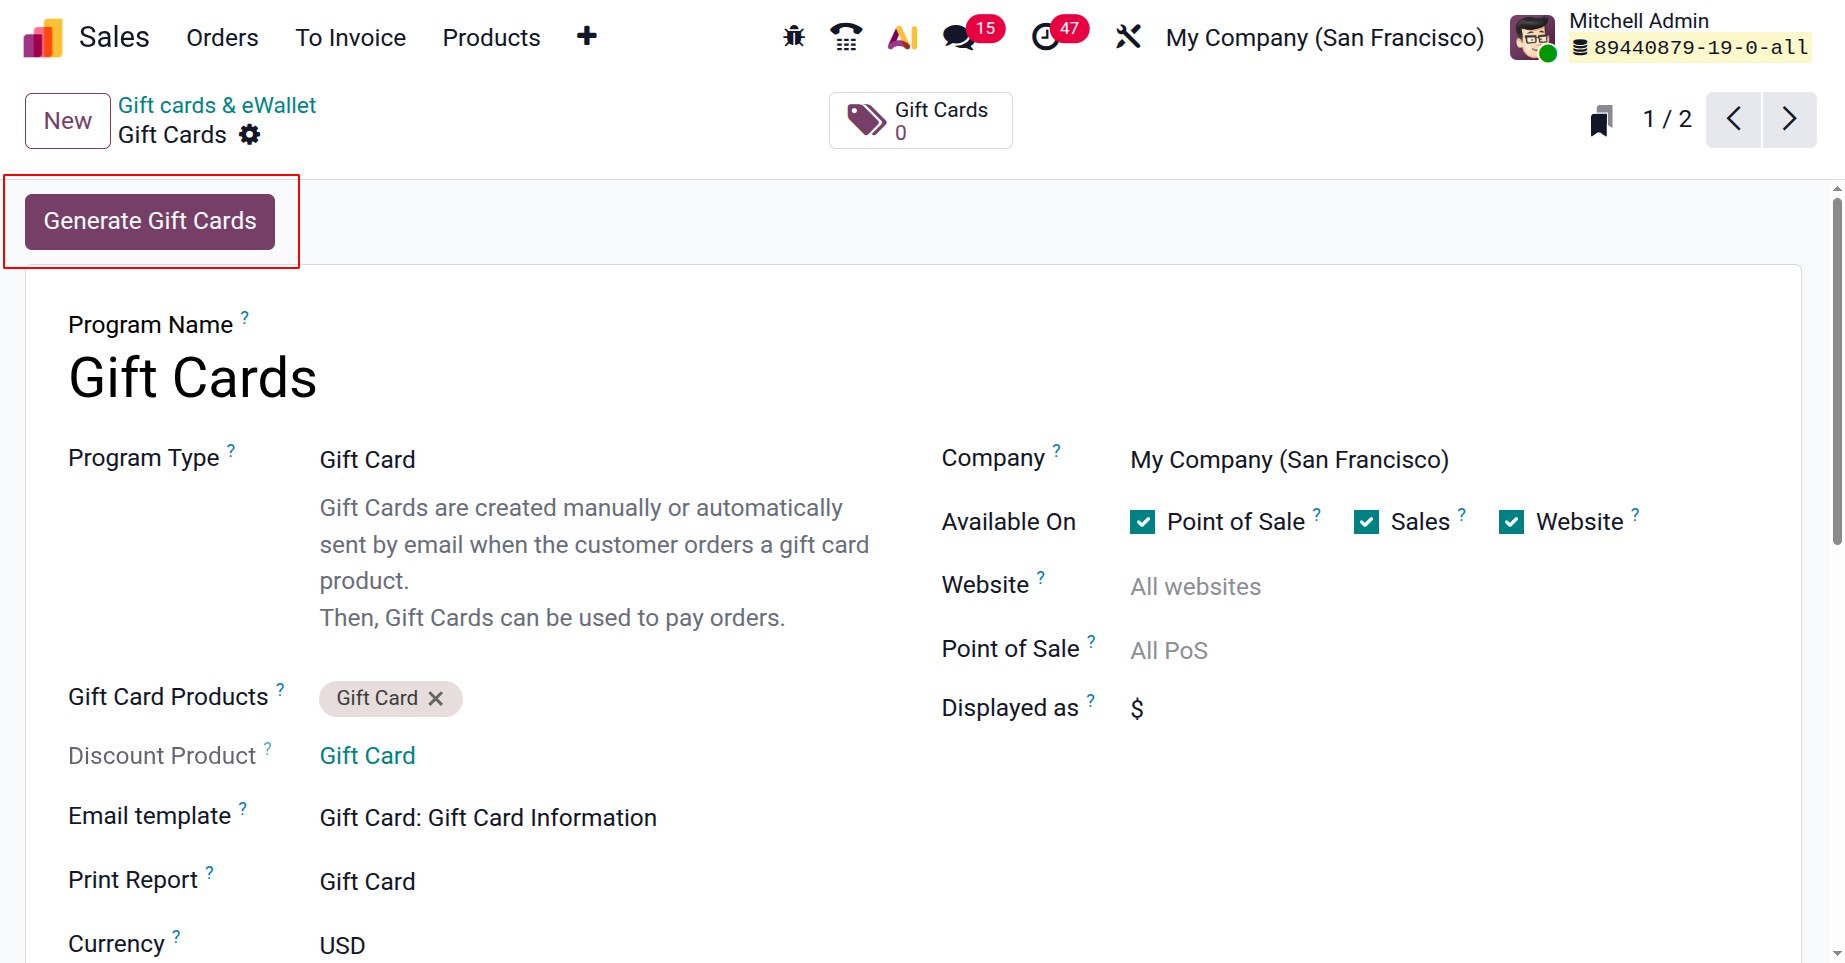
To create gift cards, click the Generate Gift Cards button in the top-left corner of the software after it has been configured.
It is possible to create gift cards for both selected and anonymous customers. Choose the Customers and/or Customer Tags for Selected Customers, or set the Quantity to generate for Anonymous Customers. Next, determine the value of the gift card. Lastly, if applicable, set the Valid Until time.
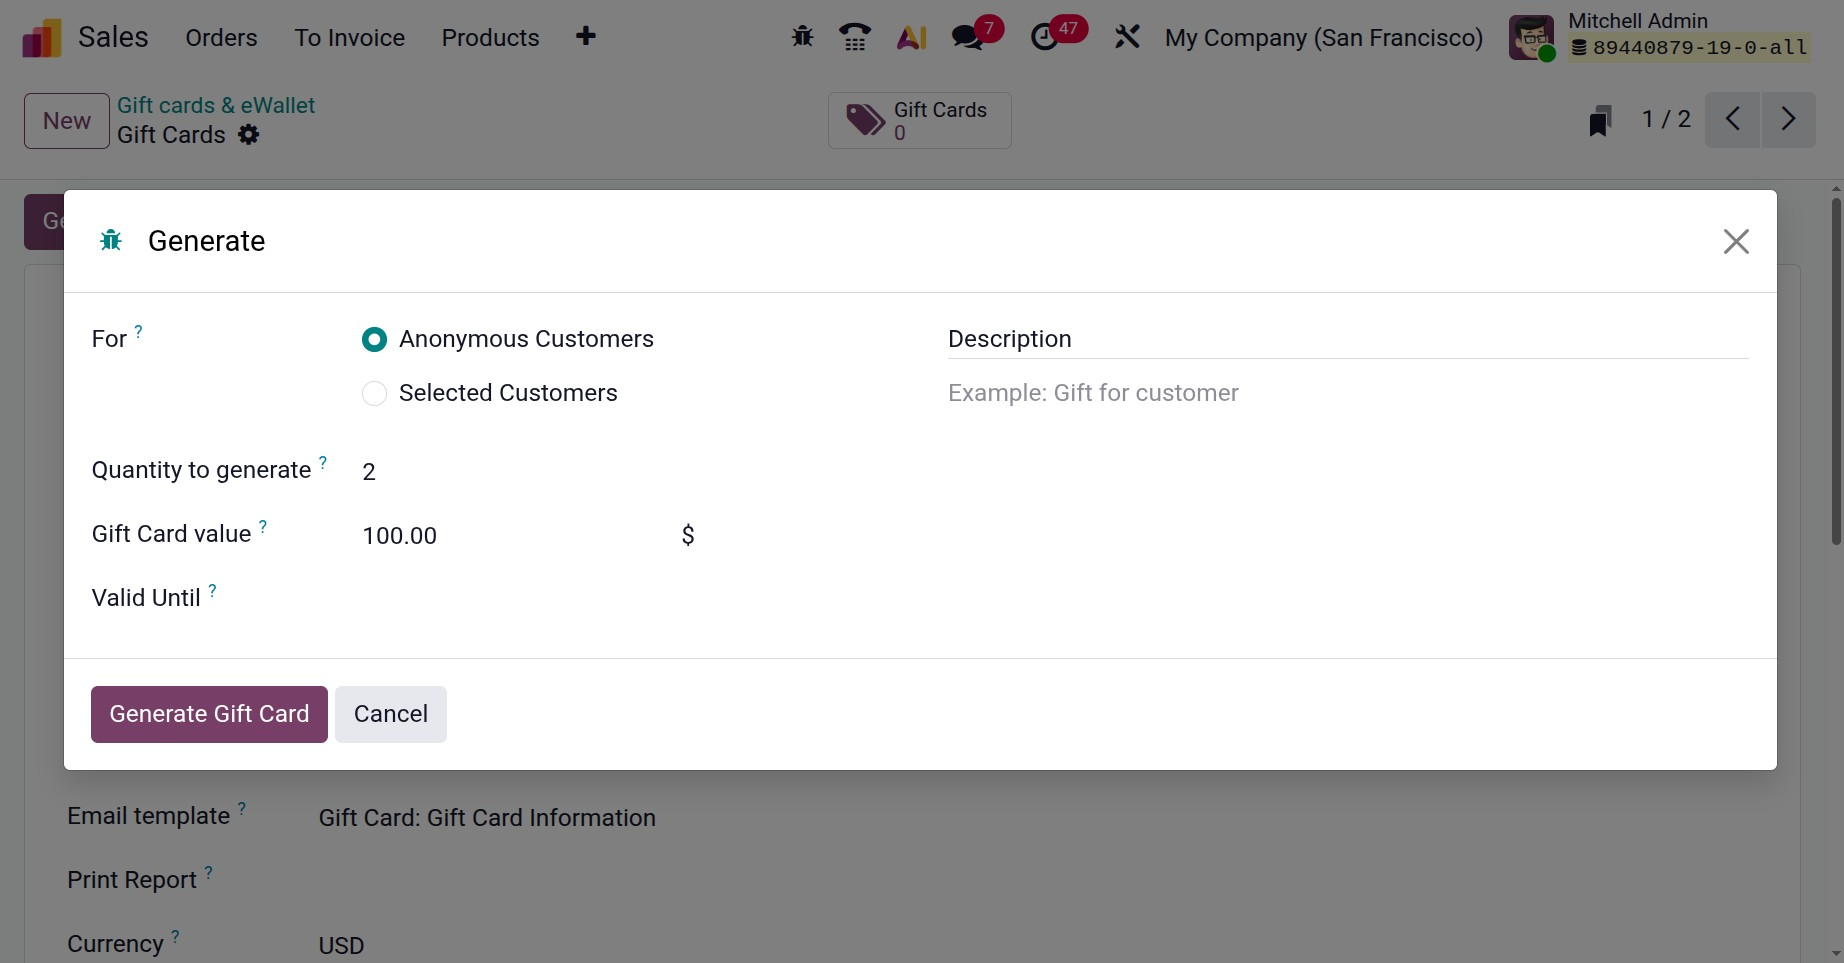
For:If the option is selected, you can set it as, selected customer or anonymous customer.
Selected Customer: Only that particular customer is able to use the gift card or eWallet because it is associated with them.
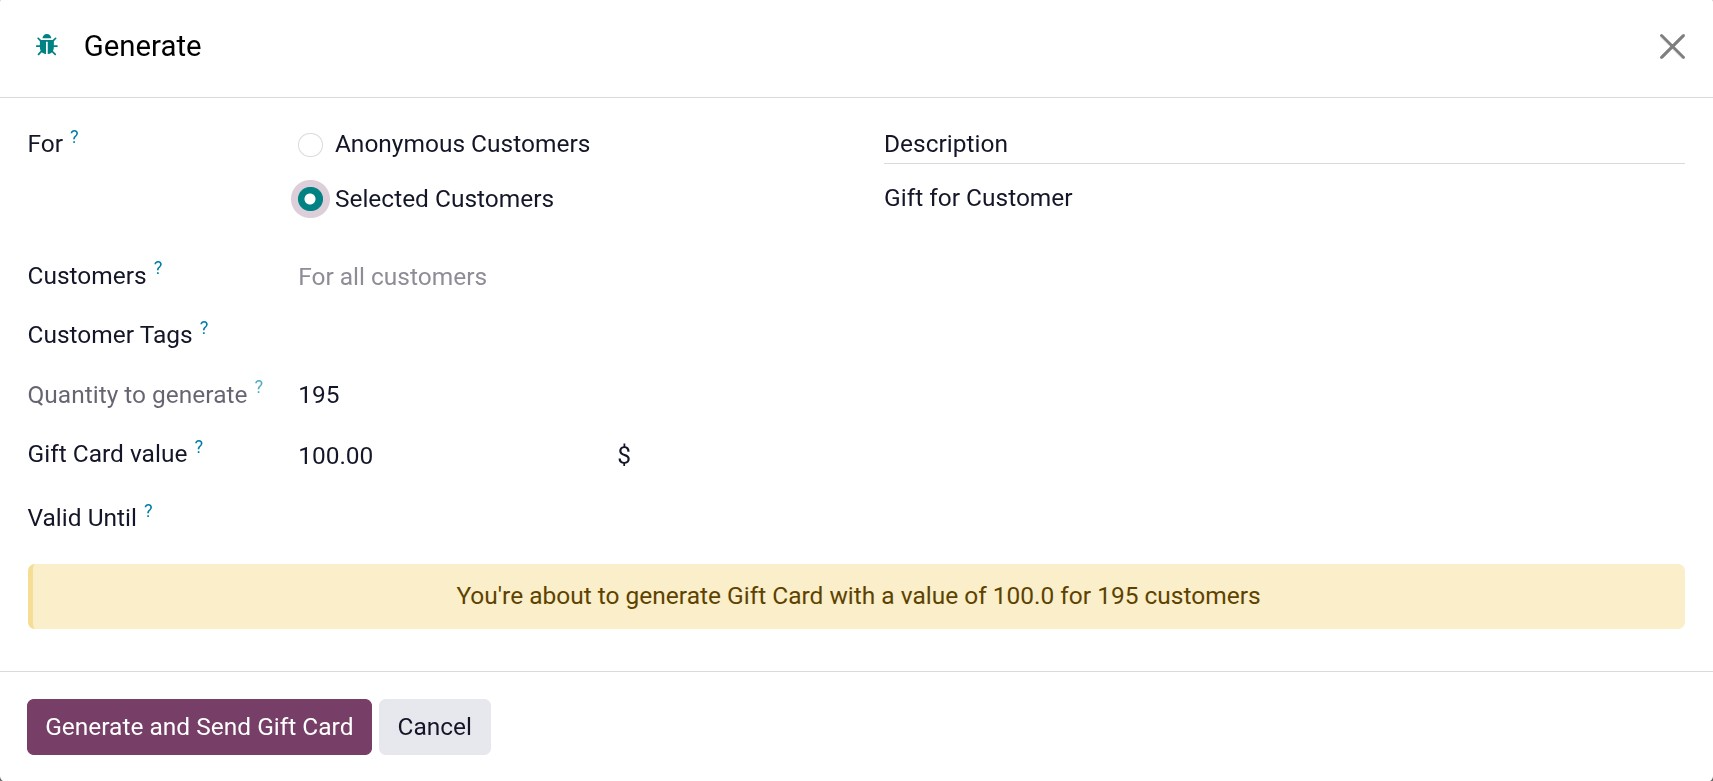
- Anonymous customer: Anyone with the code can use the gift card or eWallet since it is not linked to any specific client.
- Quantity to generate: How many gift cards are intended to be produced?
- Gift Card Value: The amount that each gift card generates
- Valid until: How long the gift cards that are being generated are valid
- Description: What is displayed when using these gift cards.
Next, click the "Generate and Send Gift Card" option to create a large number of gift cards based on the number provided. At the top, there will be a smart tab for gift cards.The Gift Cards smart button in the top-right corner provides access to generated gift cards. The gift cards can then be sent or shared by email or a URL link.
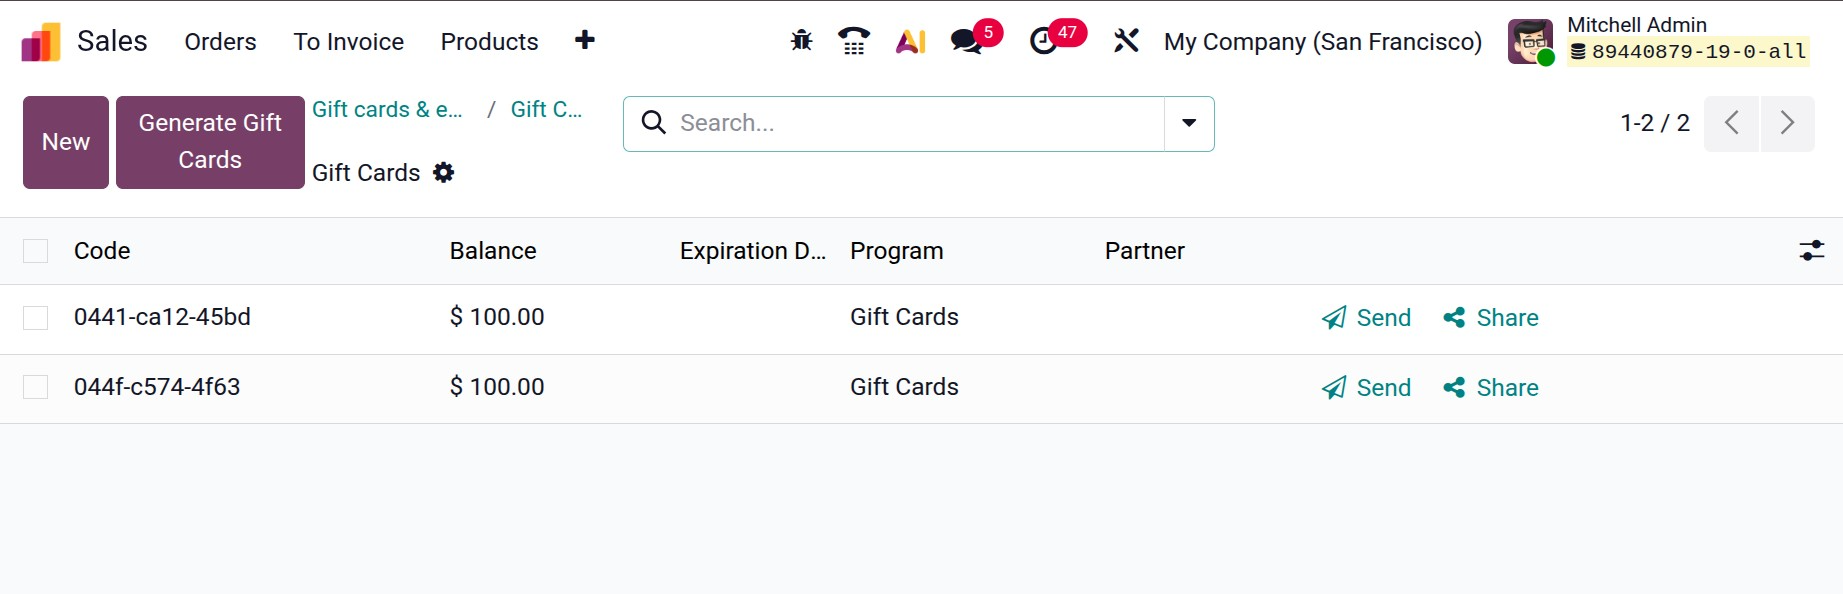
To modify a gift card's Balance, Partner, or Expiration Date, click on it. A gift card's code cannot be altered, removed, or duplicated.
If the program type chosen is eWallet, the button will be named as Generate eWallet. On selecting the Generate Ewallet icon, you will get the pop up, as shown below.
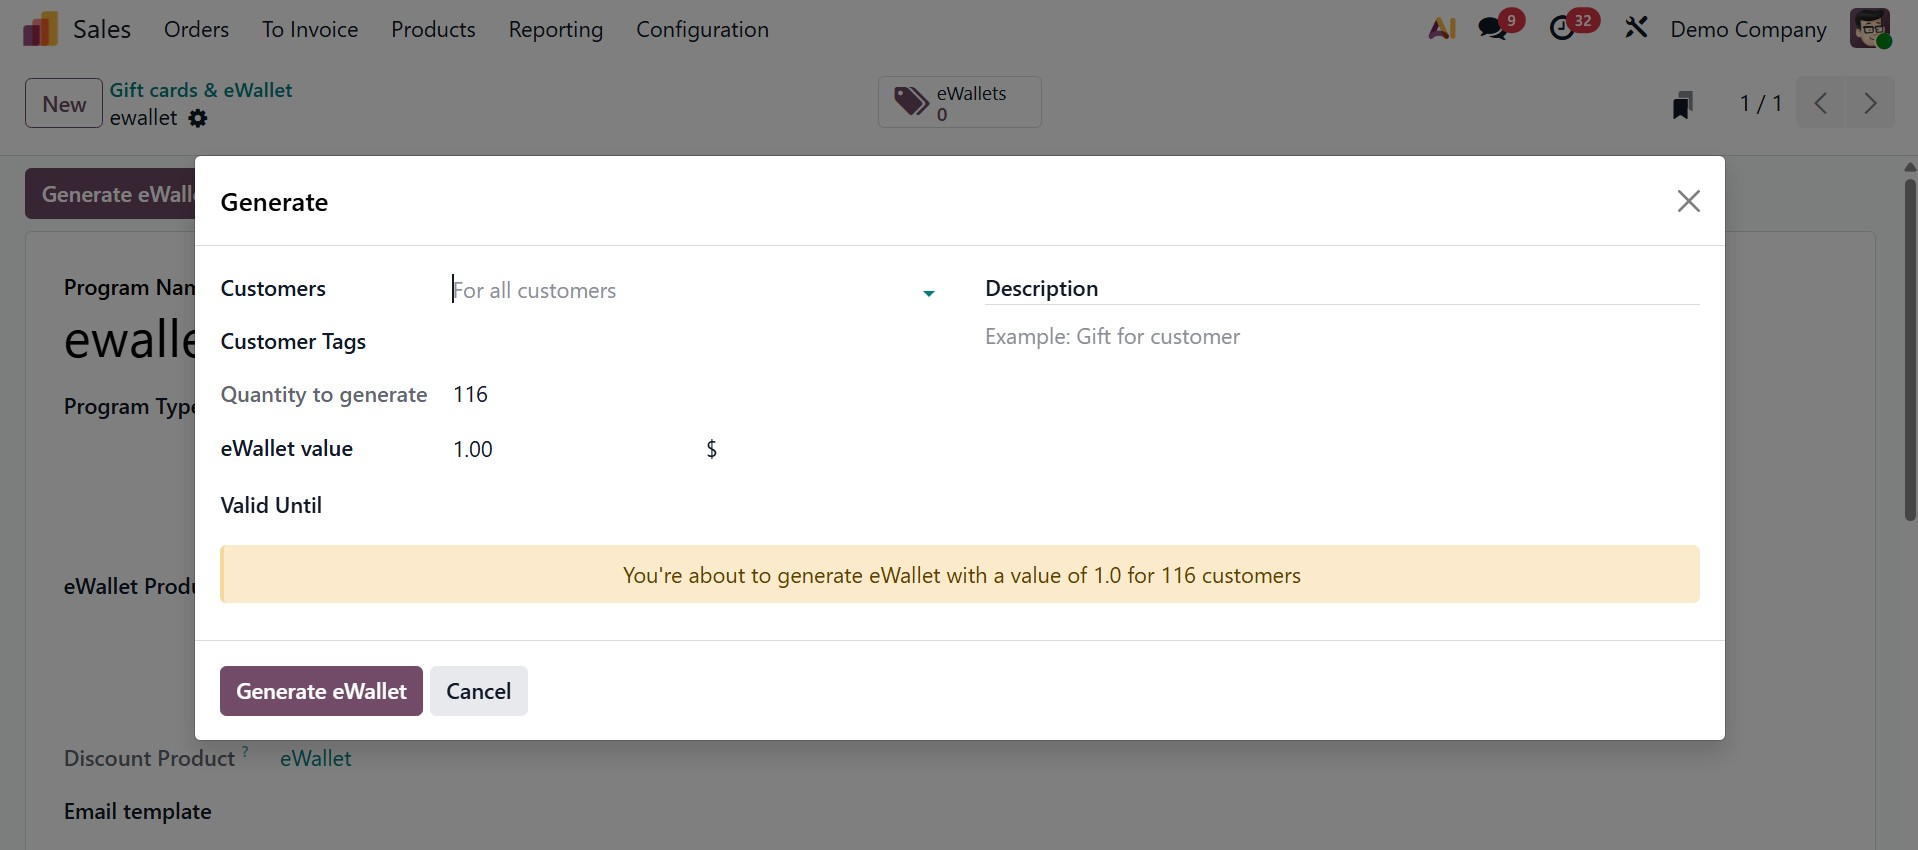
- Customers: which user type the ewallets are being generated for. Regardless of whether it's for a specific customer or for all the customers.
- Customer tags: customers related tags can be added here.
- Quantity to generate: if customer is set as for all customers, then, quantity will be automatically set, or else, you can decide the quantity accordingly.
- Valid Until: here, you can provide the validity date, upto which the ewallet will be available
- Description: here, you can add any short description on the ewallet.
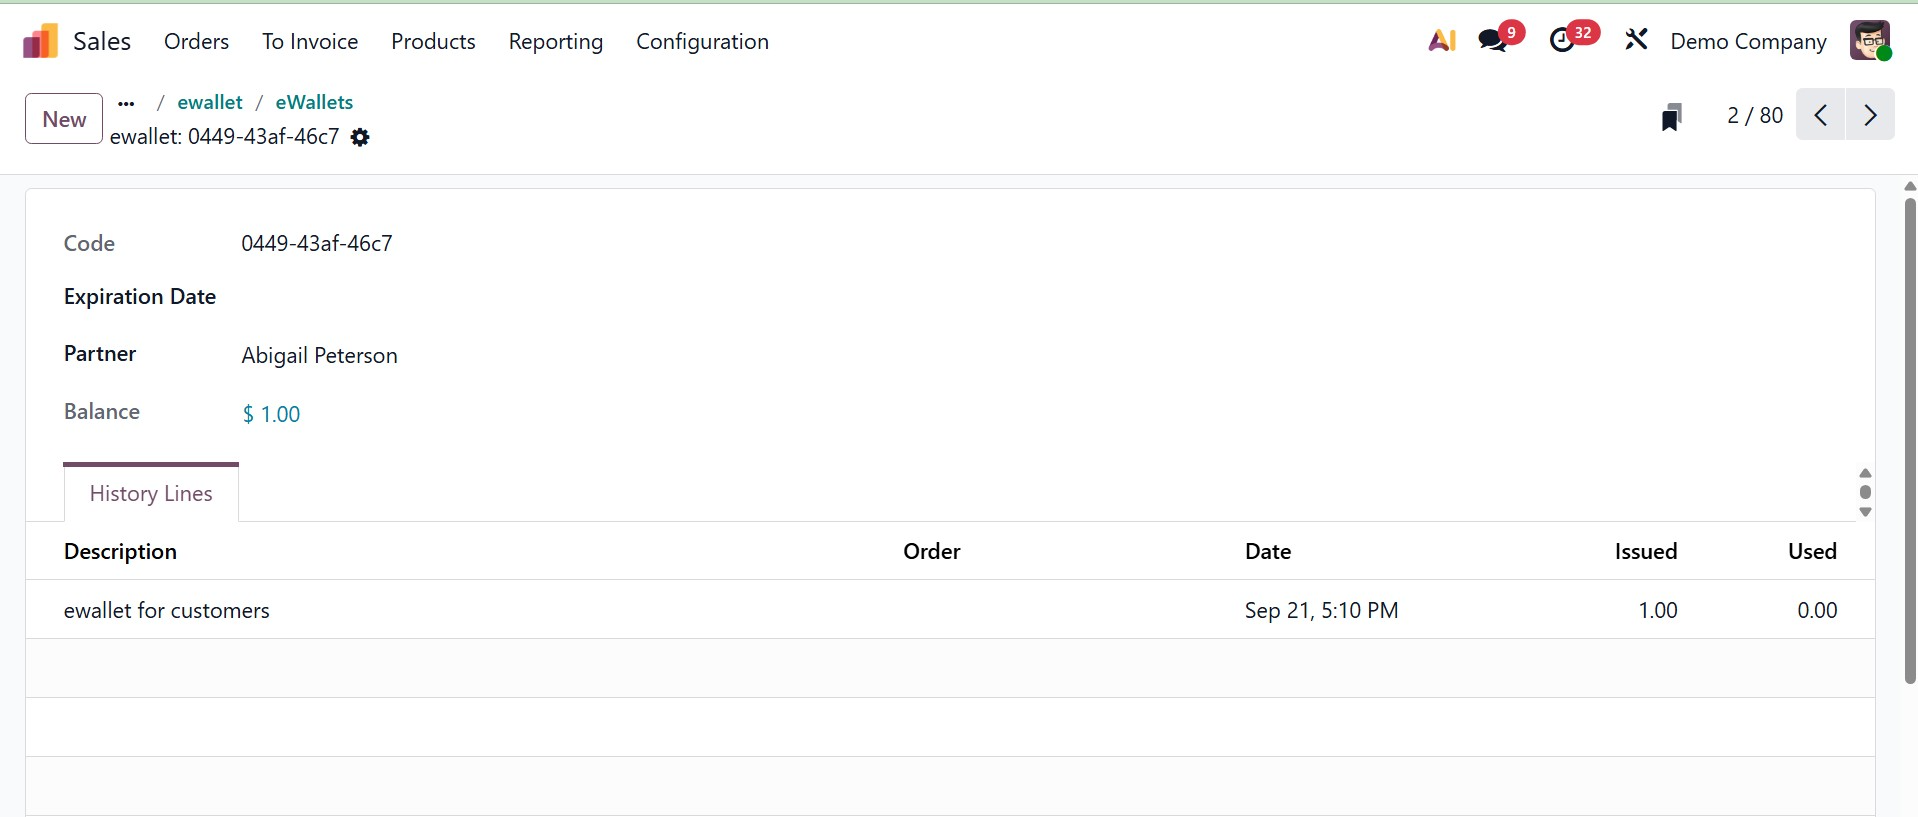
Finally, go for the Generate eWallet option, and then, you can have the smart button of the generated ewallet.
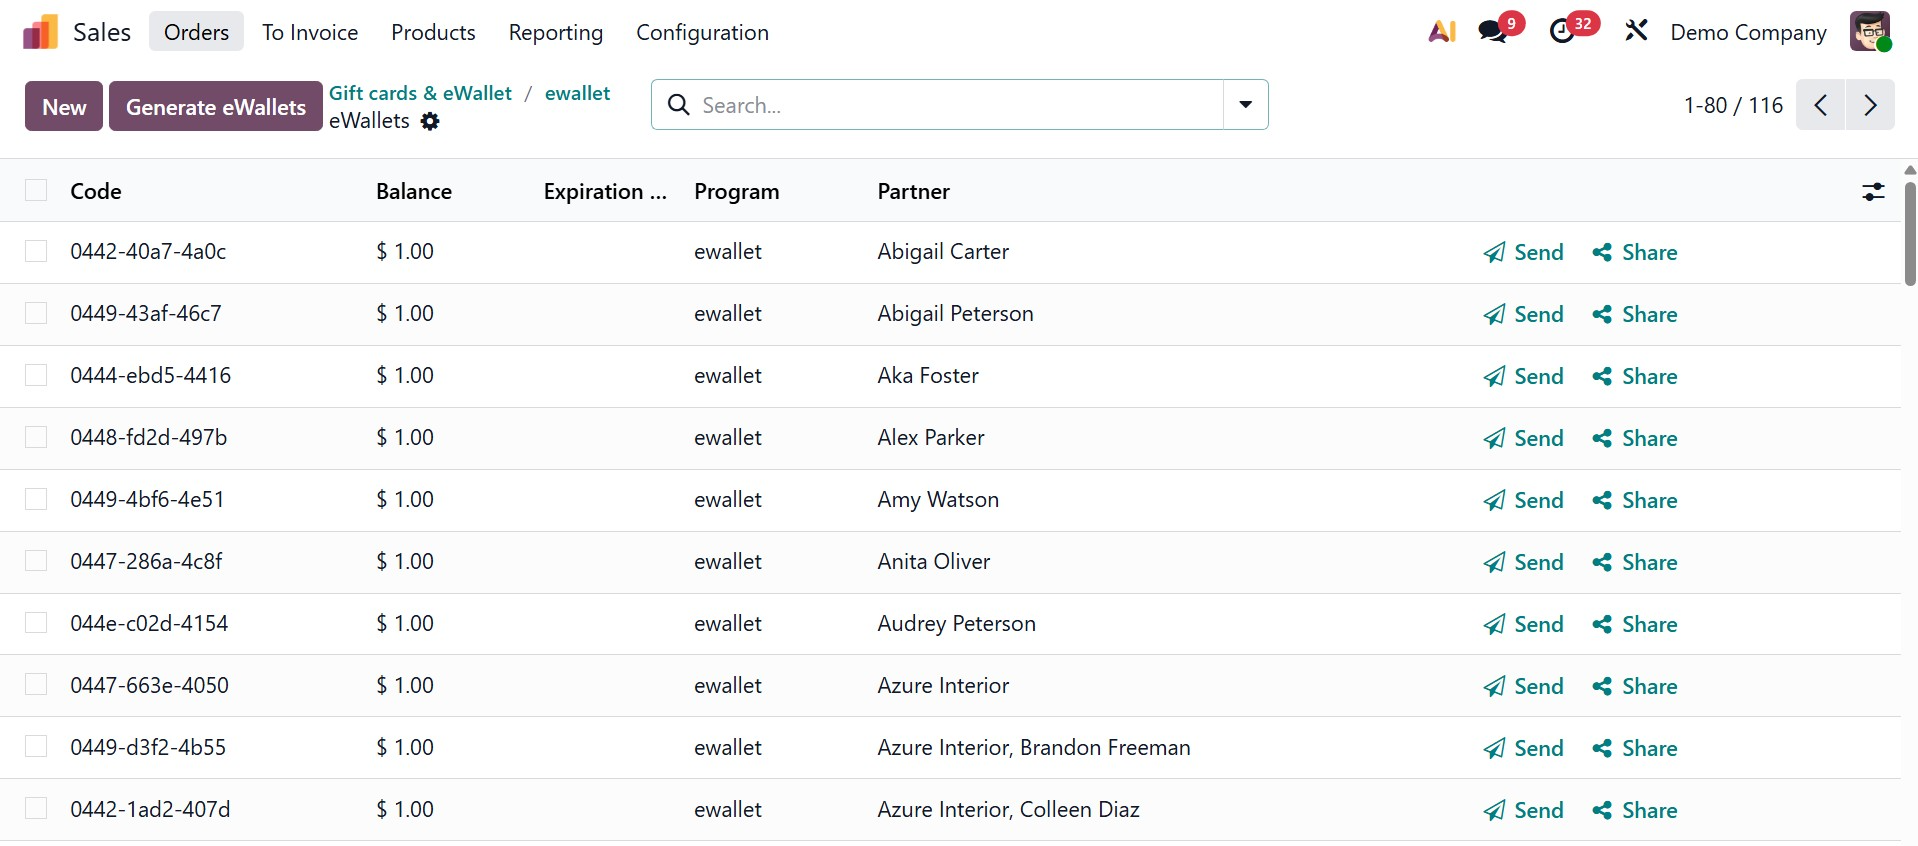
Here, as we have created ewalltes for all the customers, you can see the list here. Here. you have the send and share icon, which helps you to send the ewallet to the required one and can share it as well. On selecting a particular one, you can have a detailed analysis of the ewallet here.