Effective expense management is crucial for businesses of all sizes and industries. Yet, the traditional methods of handling expenses can be tedious and prone to errors, often resulting in inefficiencies and financial discrepancies. This is where the Odoo 18 Expense Module proves invaluable, offering a comprehensive and automated solution to simplify expense tracking and control.
In this blog, we’ll take a closer look at how the Odoo 18 Expense Module functions and how it can transform your company’s expense management practices. From logging expenses and sending them for approval, to generating insightful reports, Odoo 18 makes the entire process smooth and error-free.
By switching to this automated system, companies can eliminate manual tracking and reduce the risk of inaccuracies. The intuitive interface and powerful features of the Odoo 18 Expense Module not only improve financial accuracy but also boost transparency and operational efficiency. It’s an indispensable tool for any business aiming to optimize expense handling and ensure timely, precise reimbursements.
Here’s an overview of how the Odoo 18 Expense Module simplifies organizational expense management:
Accessing the Expense Module
To begin using the Expense Module in Odoo 18, users must first ensure that the module is installed from the Apps section. Once installed, they can easily access it by navigating to the main dashboard and clicking on the "Expenses" icon. This opens up the module interface, where employees can start managing and submitting their expenses efficiently.
Upload and Create Expenses:
You can upload an expense report from your system by clicking the Upload icon.
Additionally, you can add a new expense by selecting the New icon in the My Expenses window.

Create New Expense:
Fill out the Description field in the new window with details about your spending, and then select the appropriate Category.
Users have access to various expense categories, such as:
- Communication – expenses related to phone, internet, and other communication services.
- Meals – business-related food and beverage expenses.
- Gifts – items purchased as gifts for clients, partners, or employees.
- Mileage – reimbursement for personal vehicle usage for business purposes.
- Travel and Accommodation – expenses for transportation, lodging, and related travel costs.
- General Expenses – any other business-related costs not covered in the above categories.
Enter the total amount of the expense in the Total column.In the Employee field, you can select the name of the employee associated with the expense.
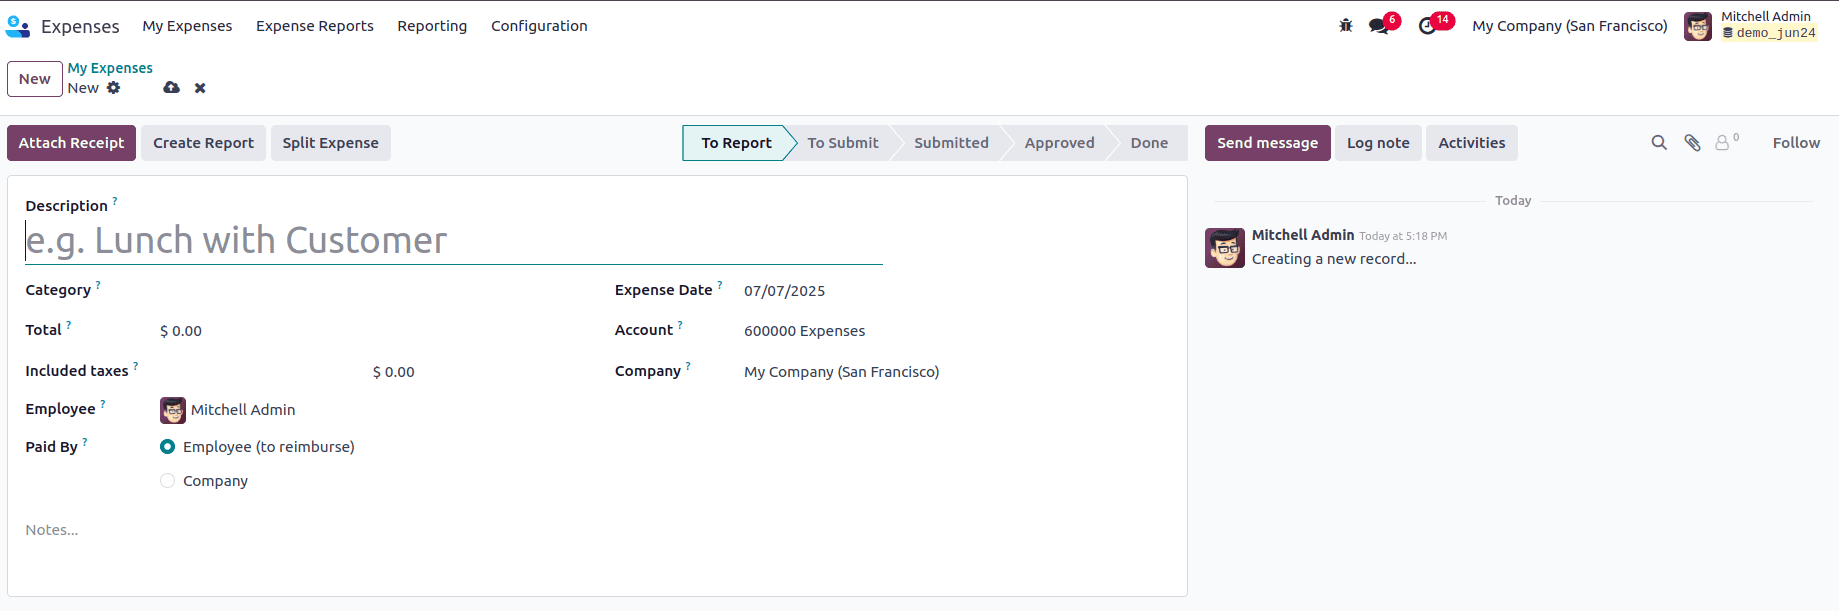
Additionally, you can specify who should pay the expense in the Paid By section. You can choose either the Company or the Employee. If the employee pays, the company will later reimburse the employee for the incurred expenses.
You can also add the Expense Date, which indicates the date the item was billed. The expected expense account can be selected using the Account field. Furthermore, you can specify the Company name.
You have the option to categorize the expense status as To Report, To Submit, Submitted, Approved, Refused, or Done.
Attaching Receipts: Once an expense is created, users can upload receipts or supporting documents to provide proof of the expense.
Click the Attach Receipt icon to upload the relevant receipt.
Create Report: To create an expense report quickly, click the Create Report icon located in the My Expenses section.
Spit Expense:
If the expense needs to be divided into multiple parts, use the Split Expense option.
Users can break down one expense—for example, a $130.00 lunch—into several individual line items. Each line can have its own amount, analytic distribution, and cost allocation. This approach helps track expenses accurately for different projects, departments, or clients, while still preserving the original total and tax details.

Expense Dashboard Overview
Once inside the Expenses module in Odoo 18, users are greeted with a comprehensive dashboard that offers a clear overview of all recorded expenses. The dashboard features a filtered list of expenses along with essential details, including the expense date, description, employee name, payment Mode (Paid By), related activities, company, total amount and status.
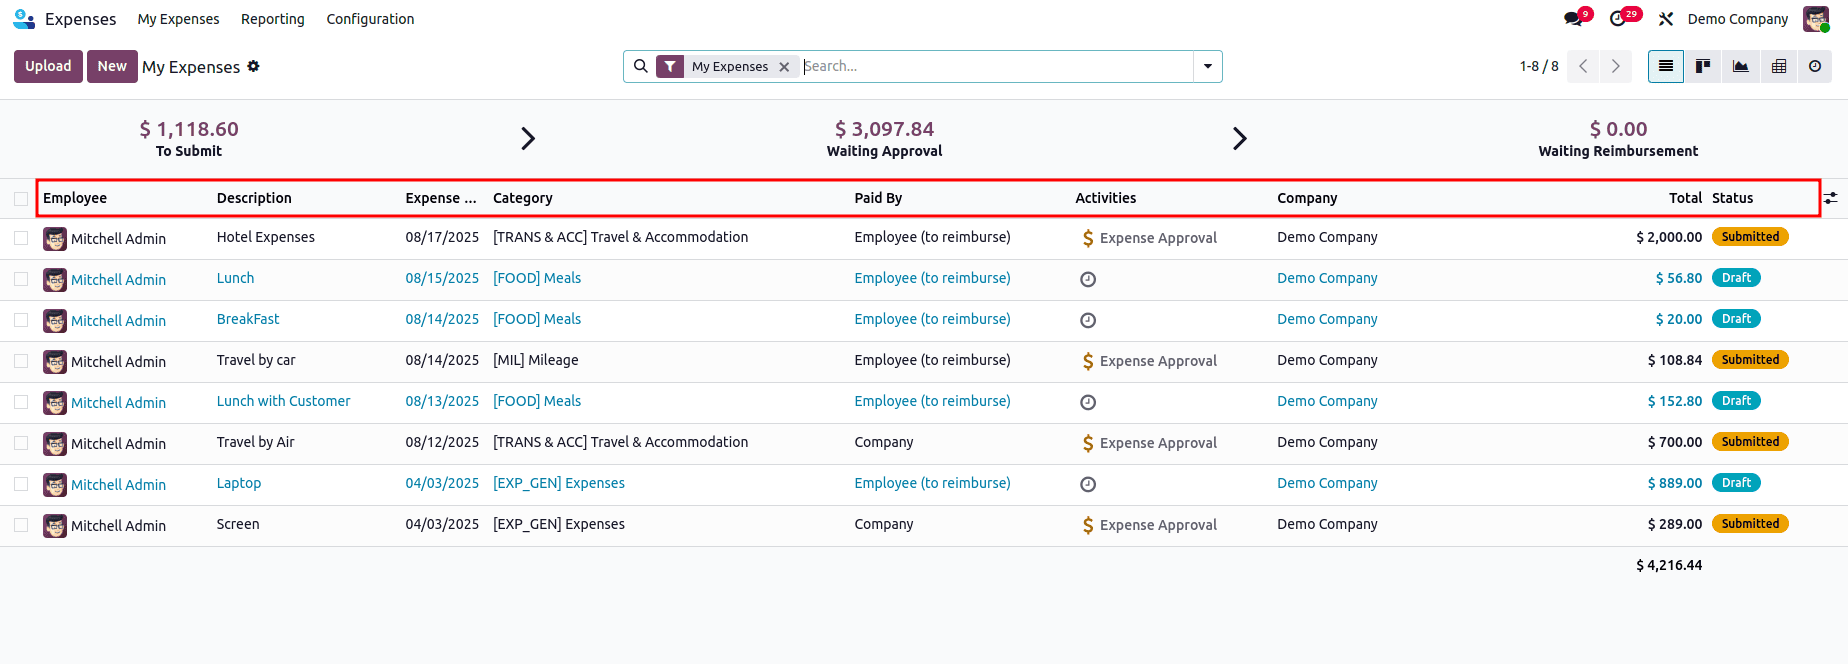
Users can apply various filters and use the "Group By" option to customize their expense view based on specific criteria.
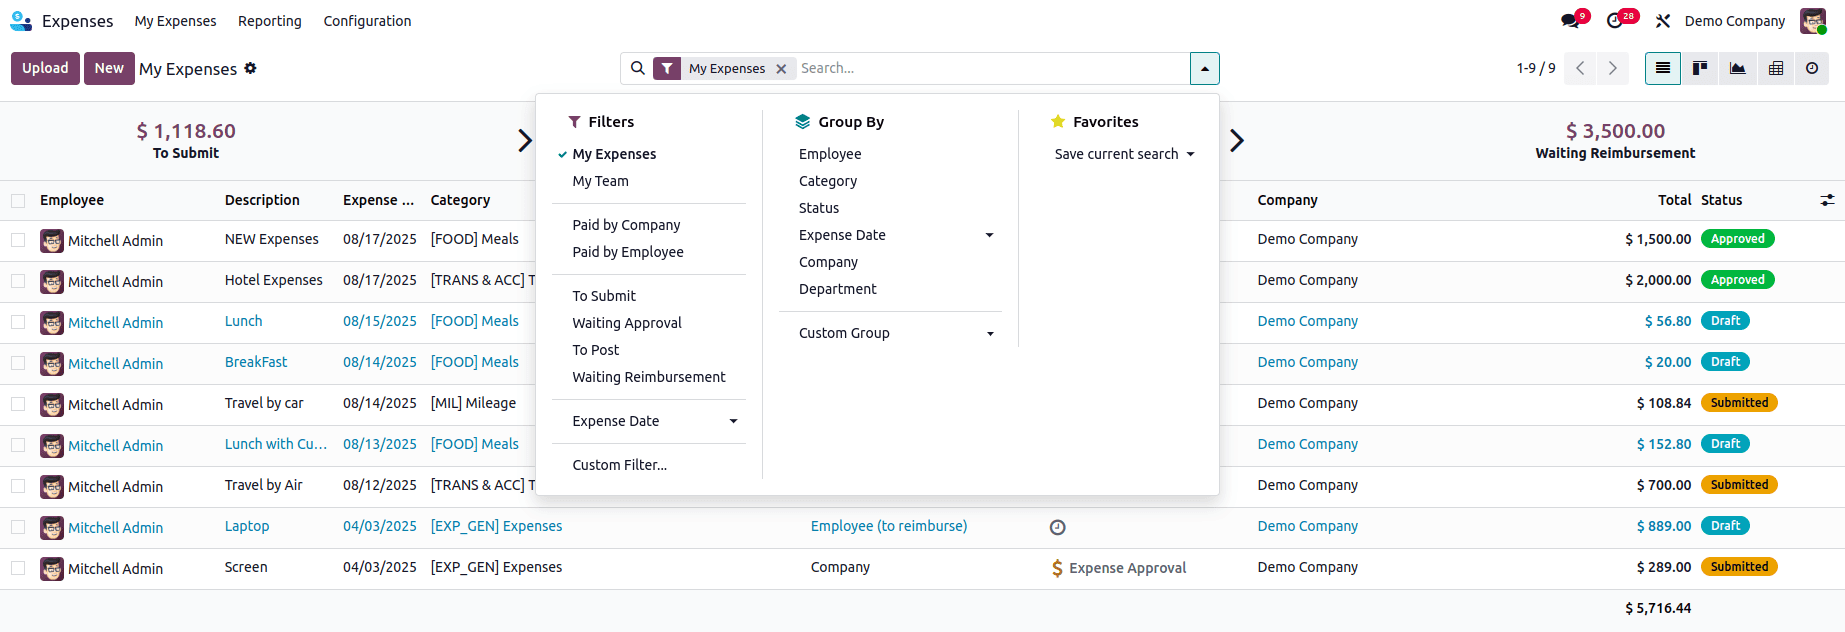
This centralized view allows users to monitor the status of their expenses at a glance and ensures better tracking and accountability across the organization.
My Expenses:
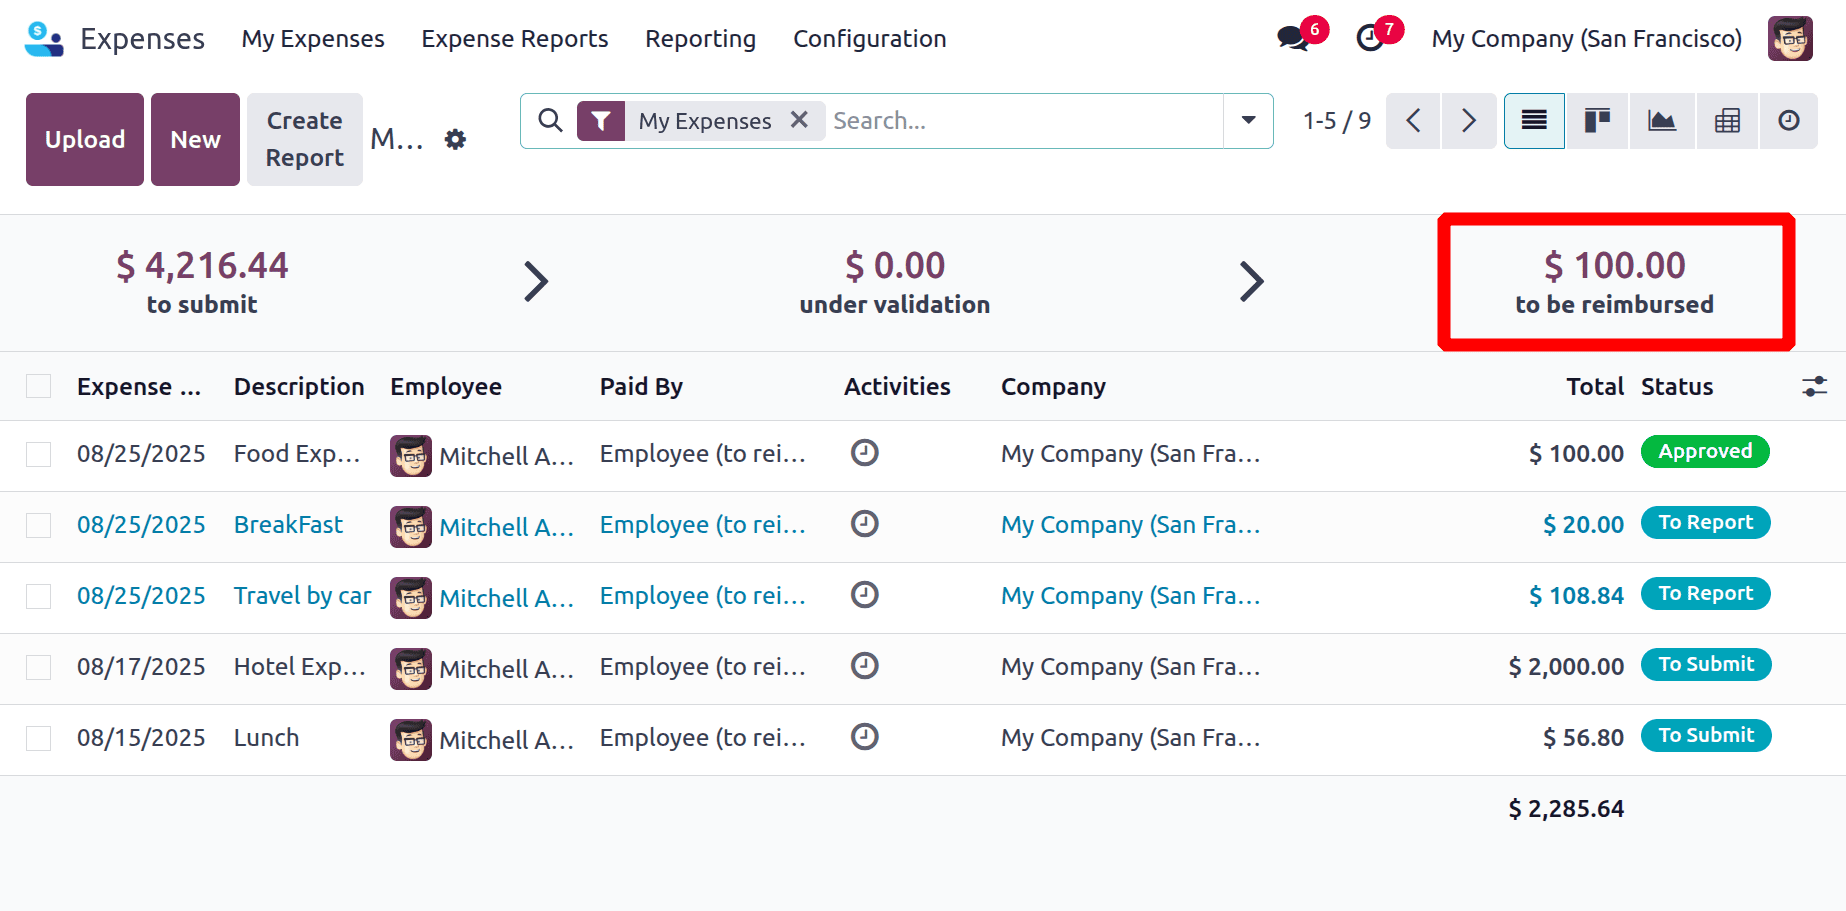
At the top of the Expenses dashboard, users can quickly view their expense records categorized into three main statuses:
- To Submit
- Under Validation
- To be reimbursed
They are basically numbers computed from the user’s personal expenses. Clicking on any of the status categories, will take you directly to a filtered view displaying the relevant expense records.
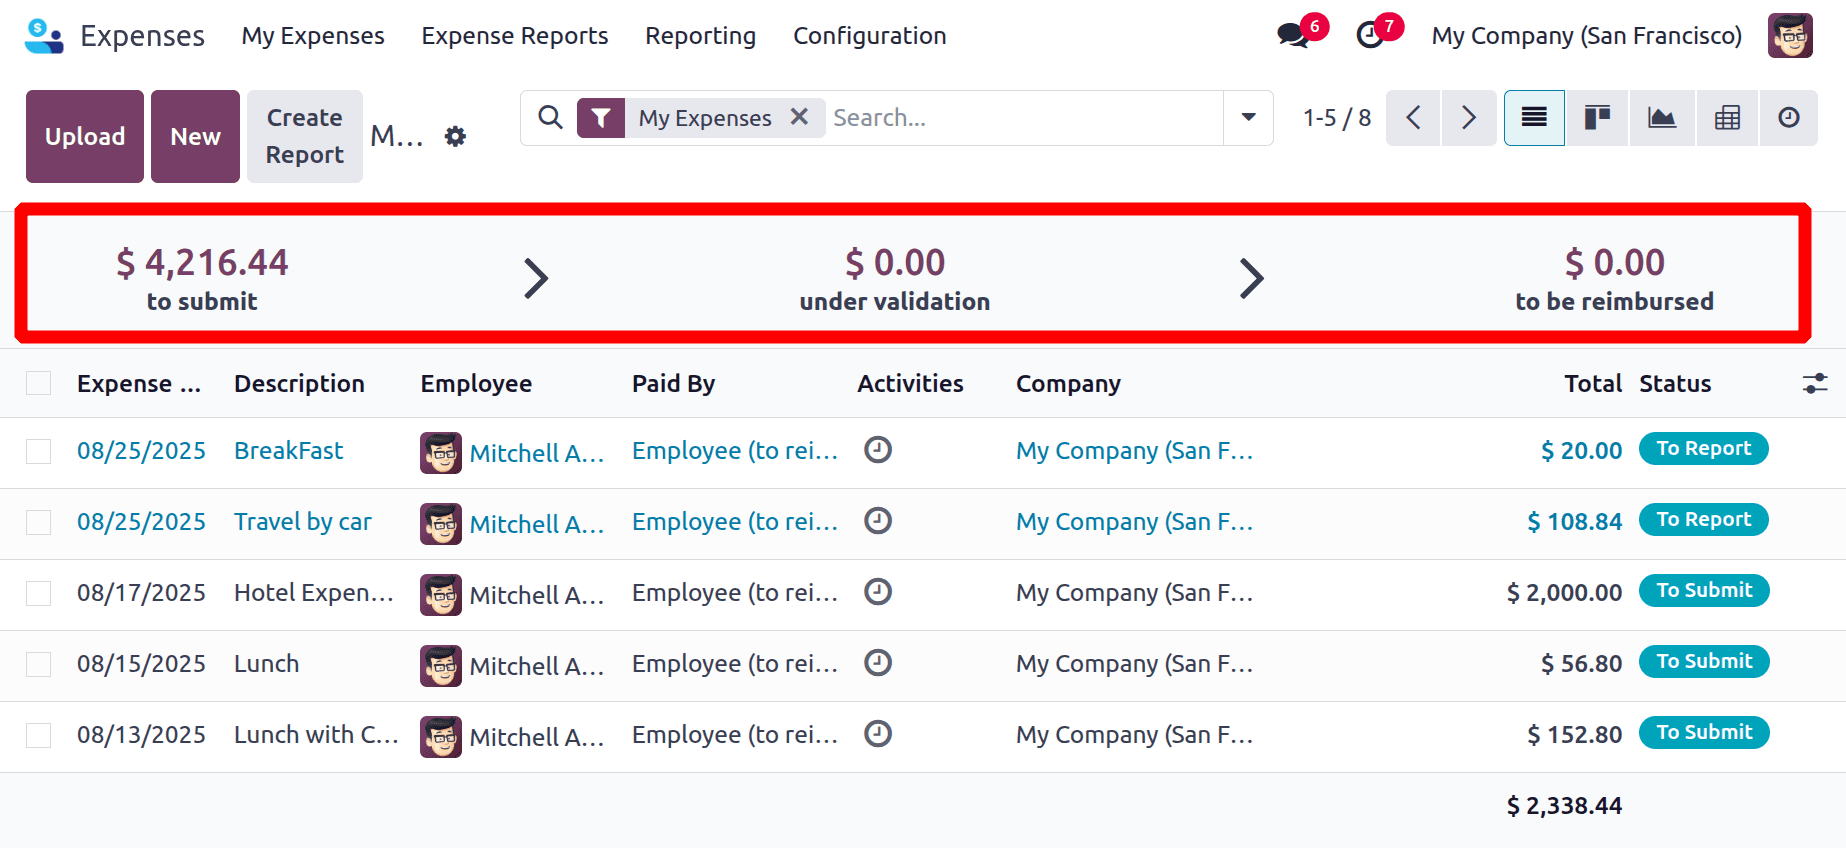
Here the value of to submit is shown as $4216.44. Let's create a new expense to check those stages.
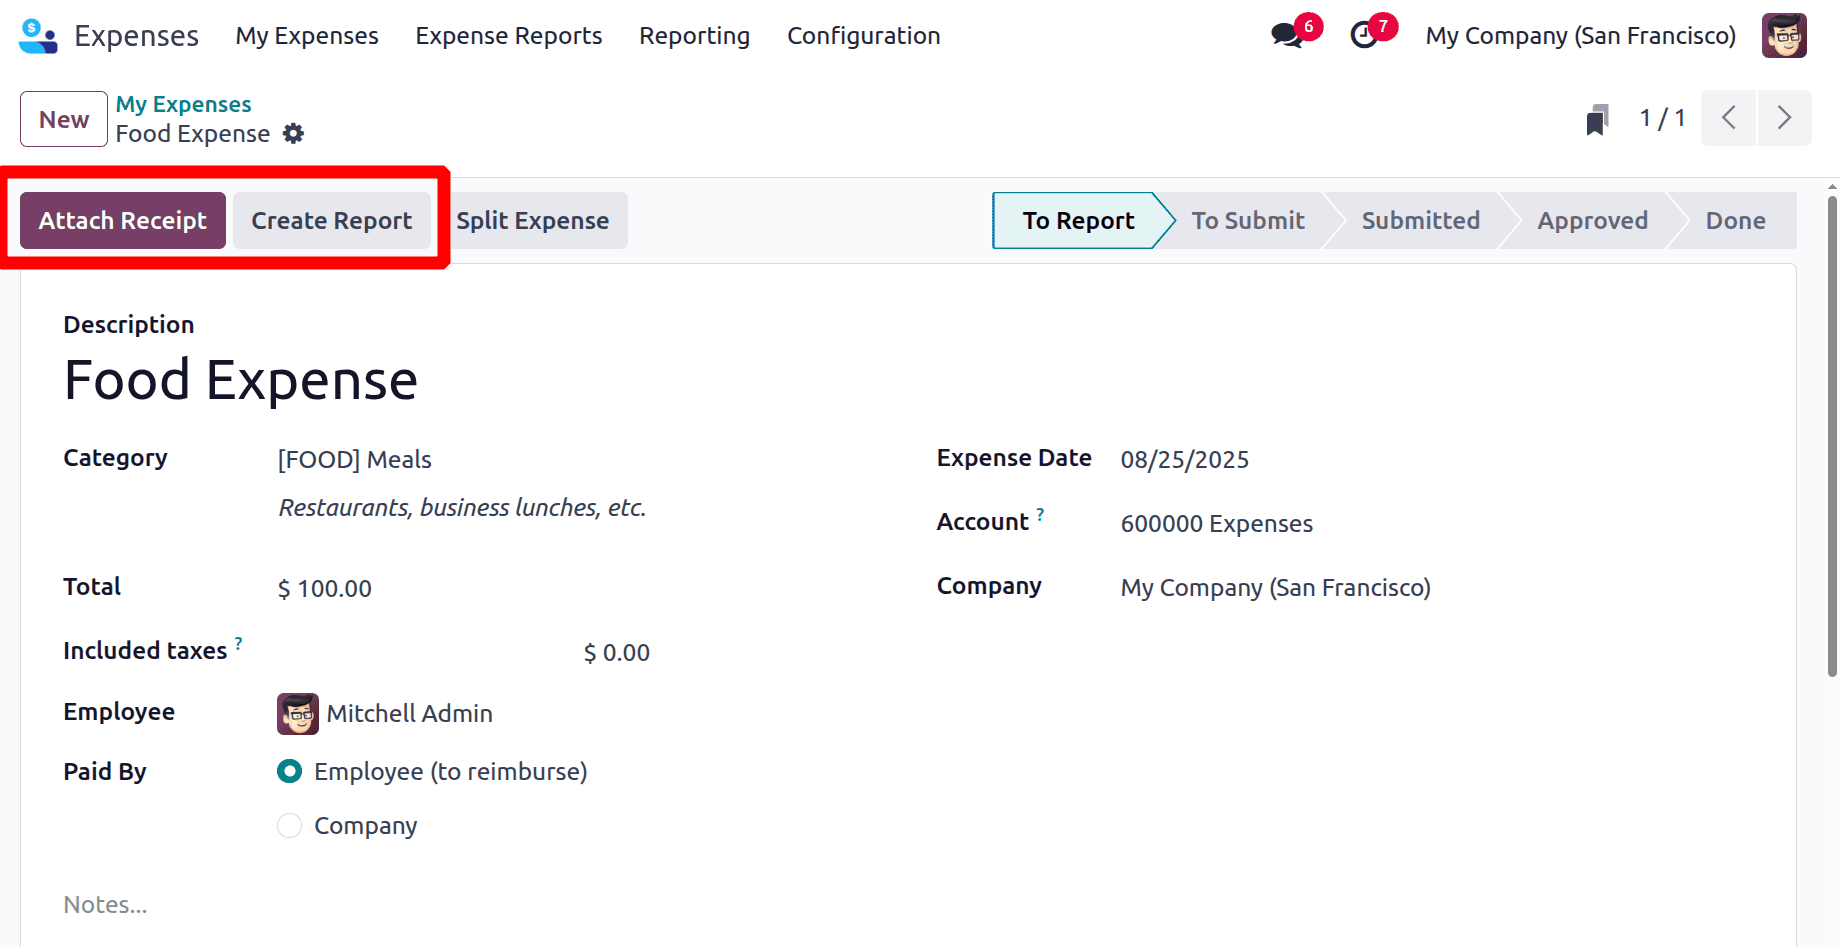
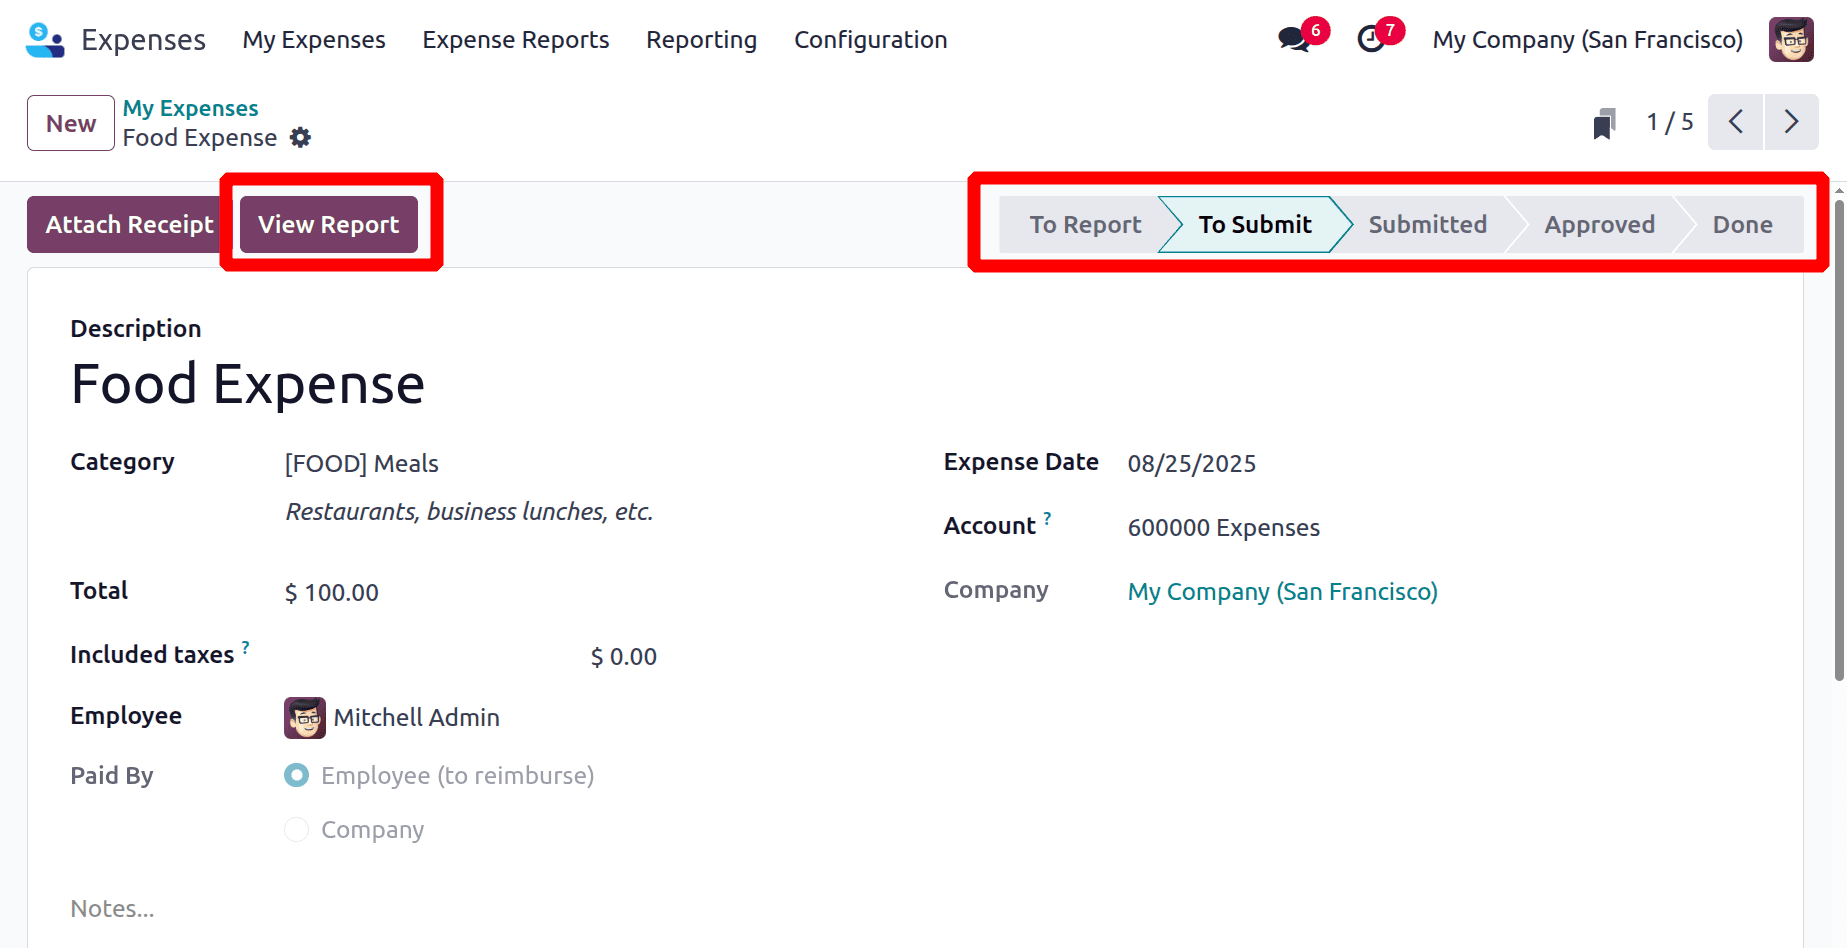
Here the Description is added as Food Expense and the Category chosen is Meals, here the cost is $100.
The "Attach Receipt" button in the expense form allows employees to upload supporting documents, such as receipts, invoices, or bills, related to their expense claim.
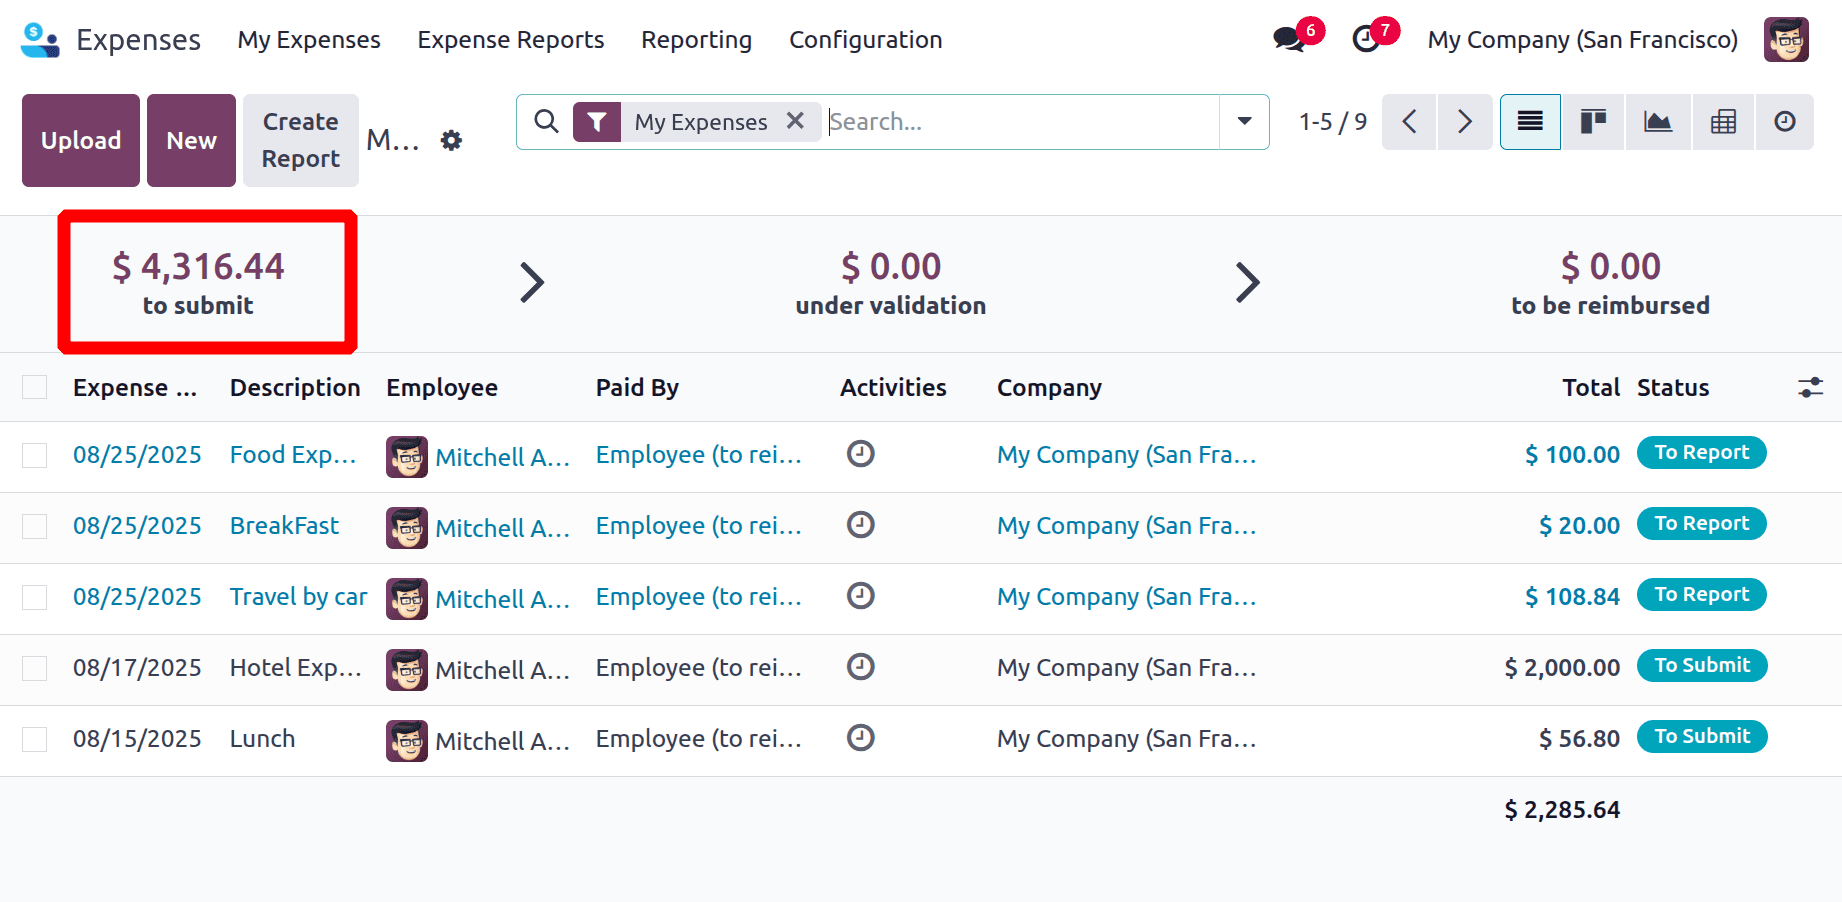
Now it is in the draft state, which is not yet submitted. Click on the Create Report button, then it will be available under 'To Submit' status. The amount of this expense will be reflected in the header-level total amount of the stage. The total of the stage will increase as new expense records are added under it and will decrease when they are removed. And the value increased to $4316.44.
To Submit: will show all expenses that have been created but not yet submitted for approval. The total amount of these pending expenses is also clearly displayed in the header, giving users a quick understanding of how much is awaiting action.
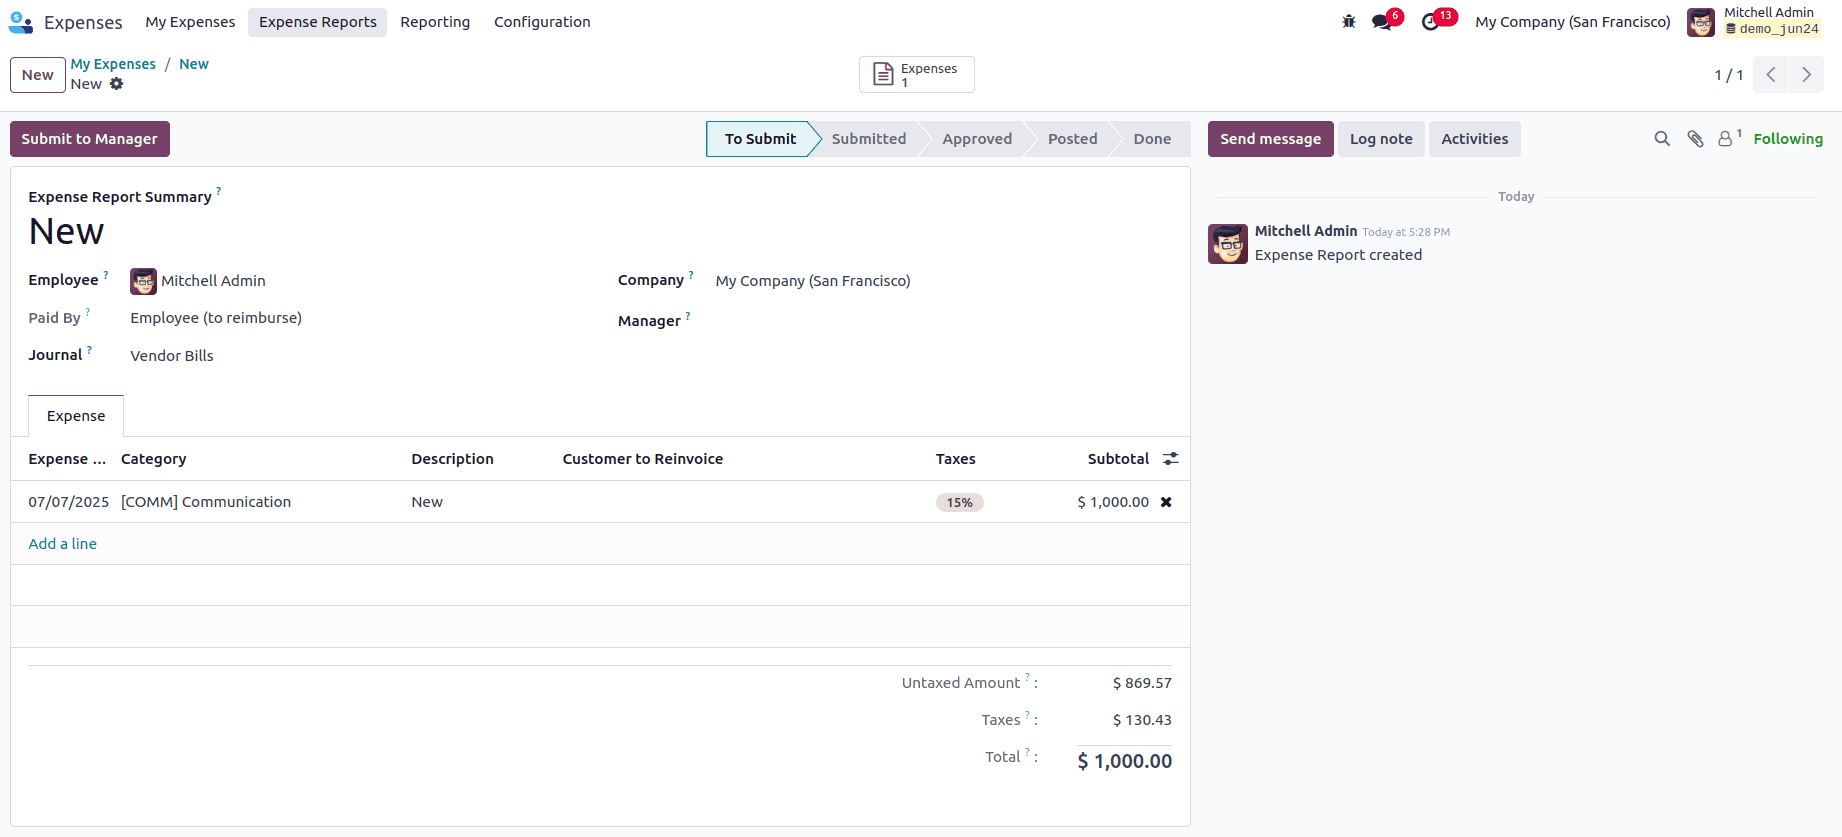
Let's open the submitted expense. Then click on the View Report button.
Then the Expense report is created and click on the Submit to Manager button. Then the manager can approve or reject the report.
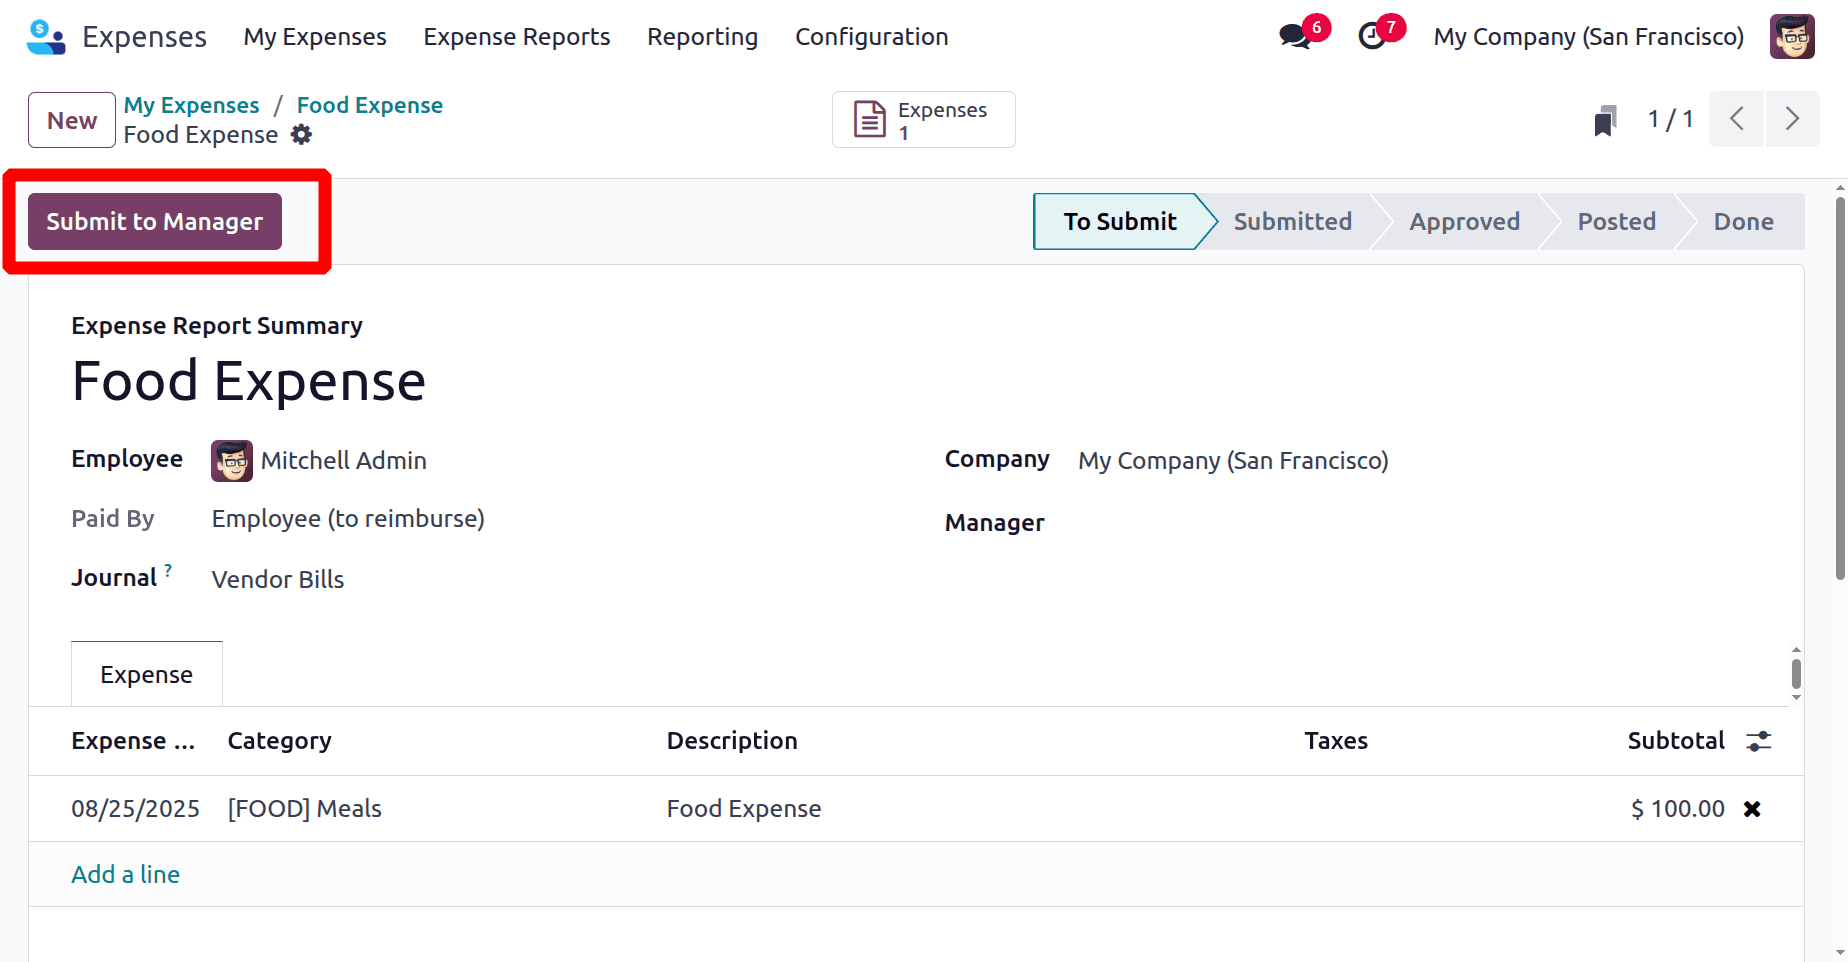
The stage changed to Submitted, but the expense report is waiting for approval. The corresponding amount of the expense is now deducted from the 'To Submit' stage and added to the 'Waiting Approval' stage.
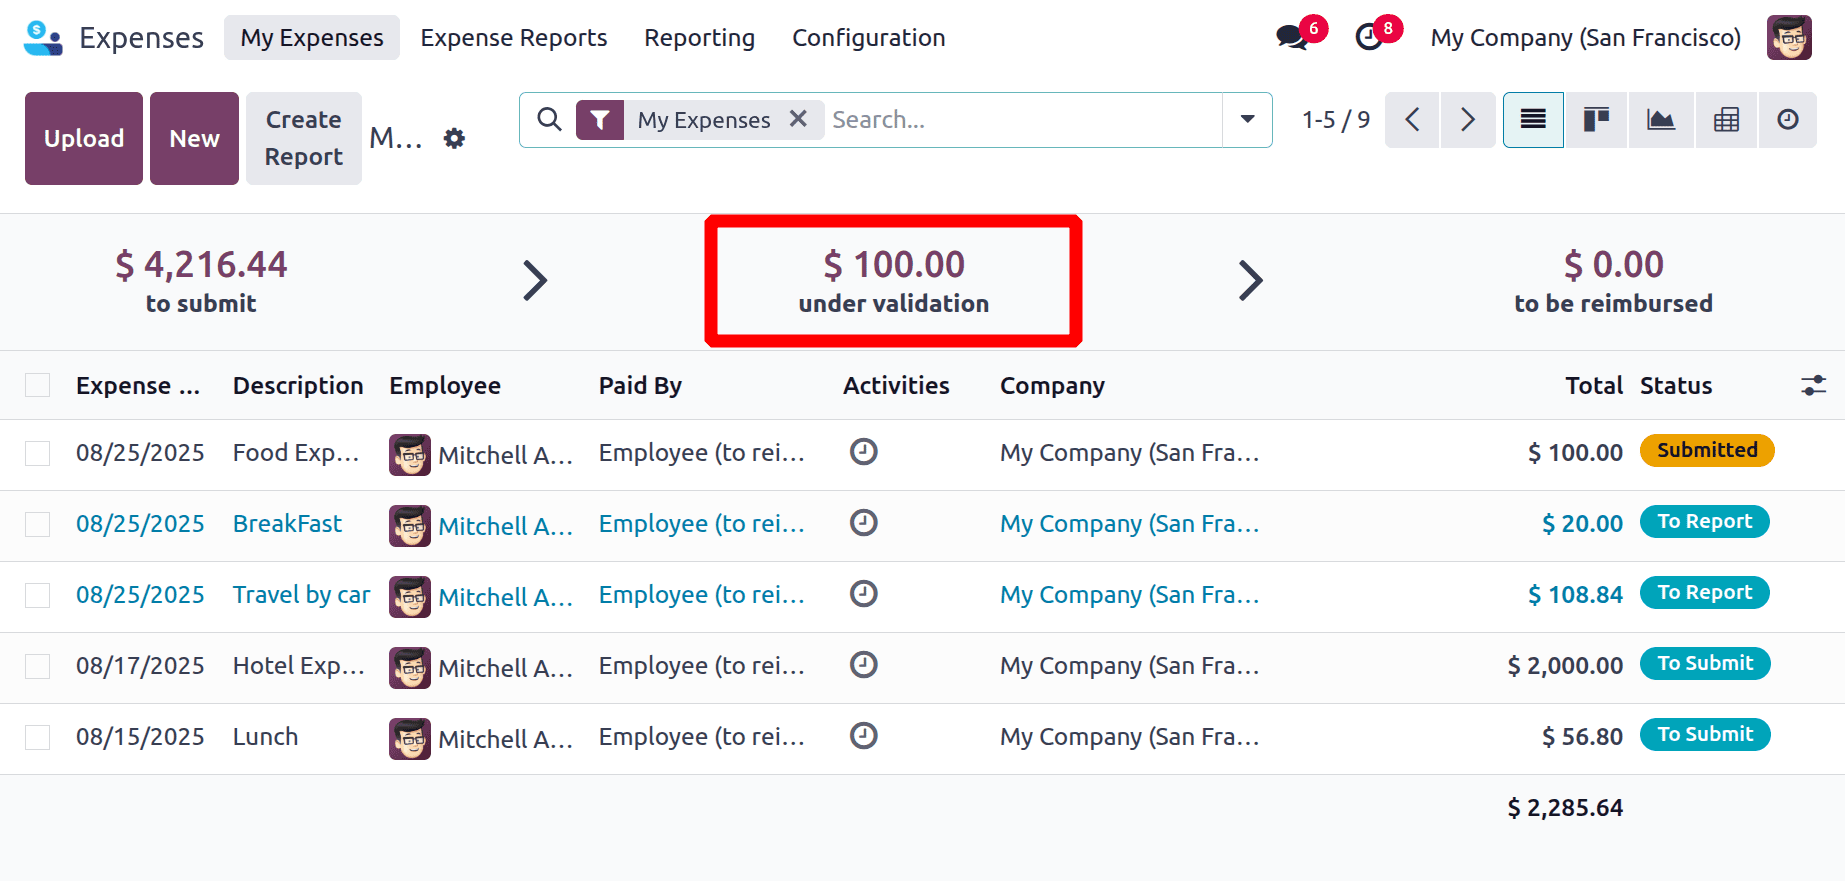
Under Validation: Expenses that are currently in the approval process and awaiting managerial review and approval. The value increased to $100 as shown below.
Now open the expense again. We can either Approve or Reject the expense.
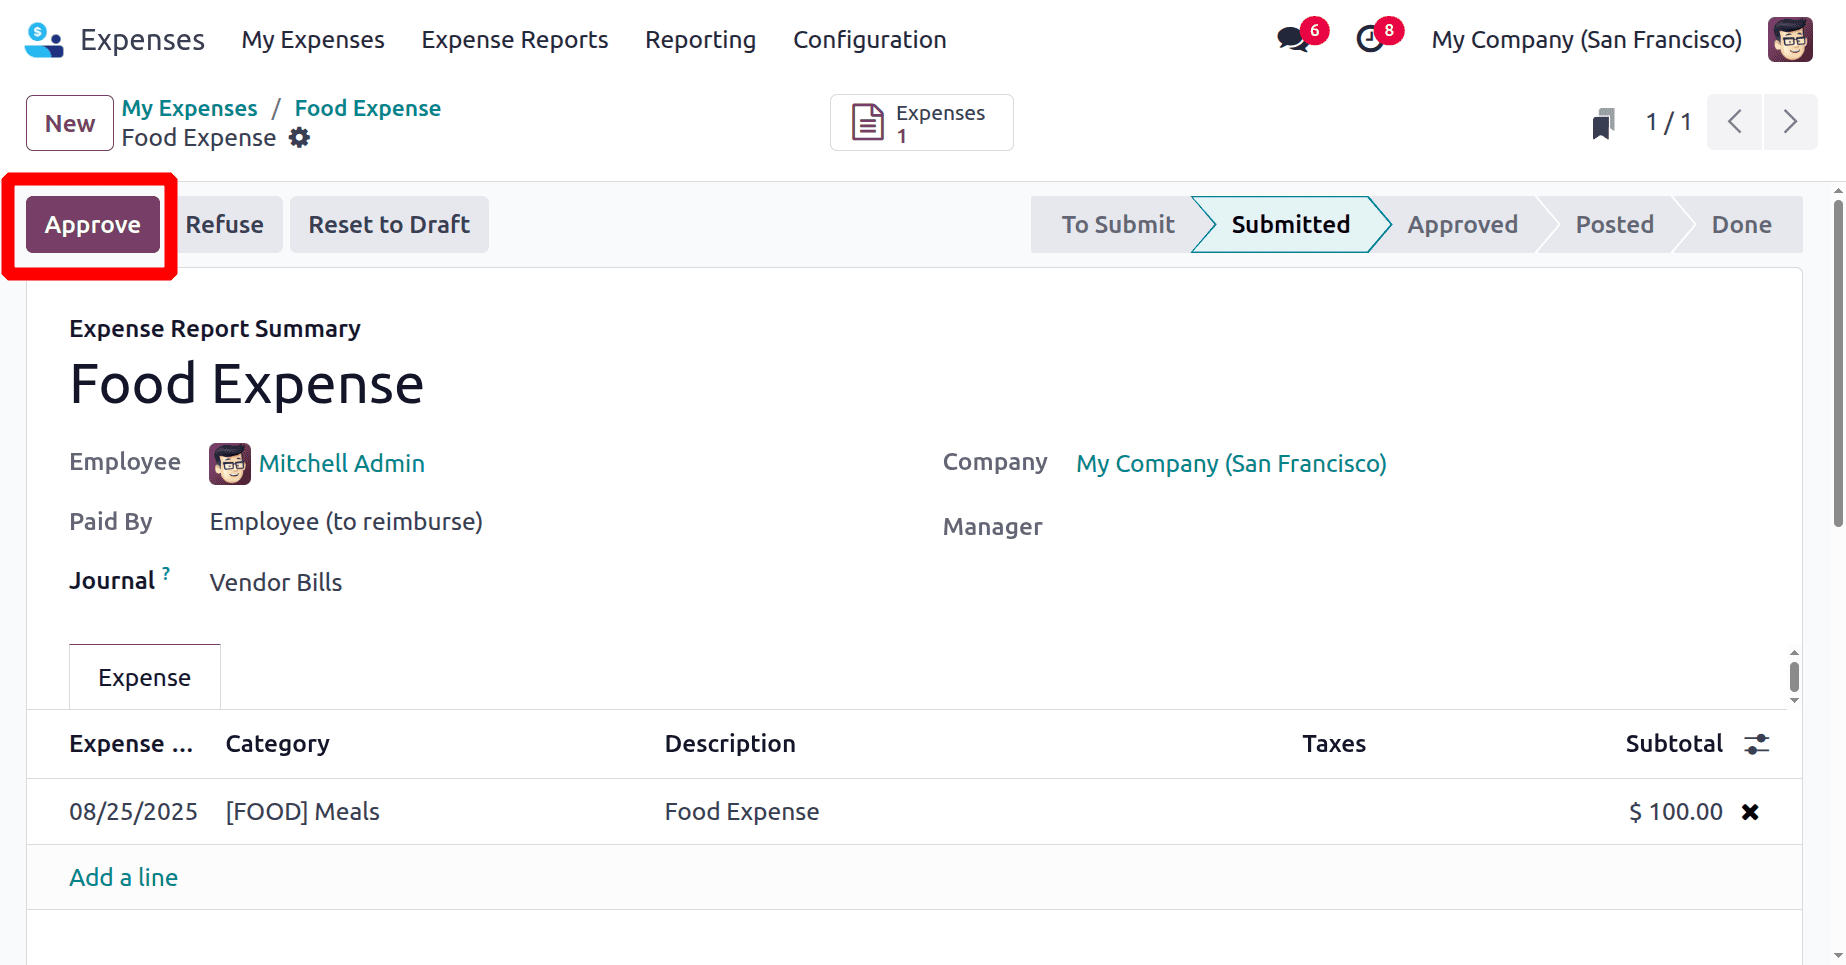
If the manager approves the expense, then it will be available under ‘Waiting Reimbursement’.
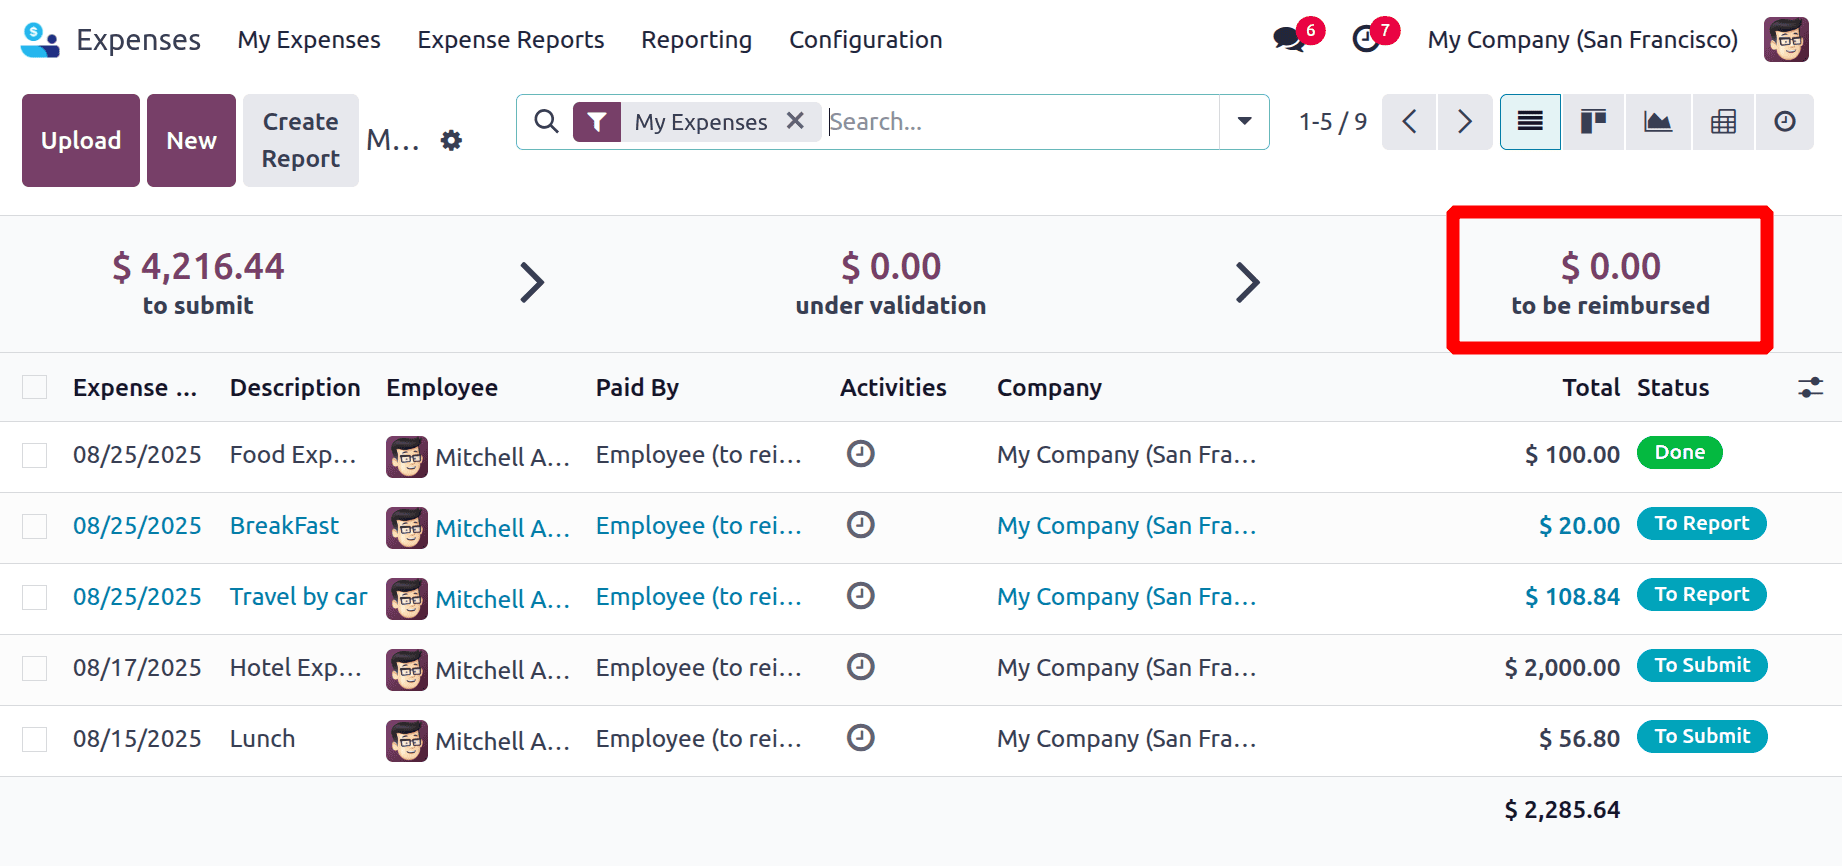
To be reimbursed: Approved expenses that are pending reimbursement to the employee. The amount $100was added as shown below.
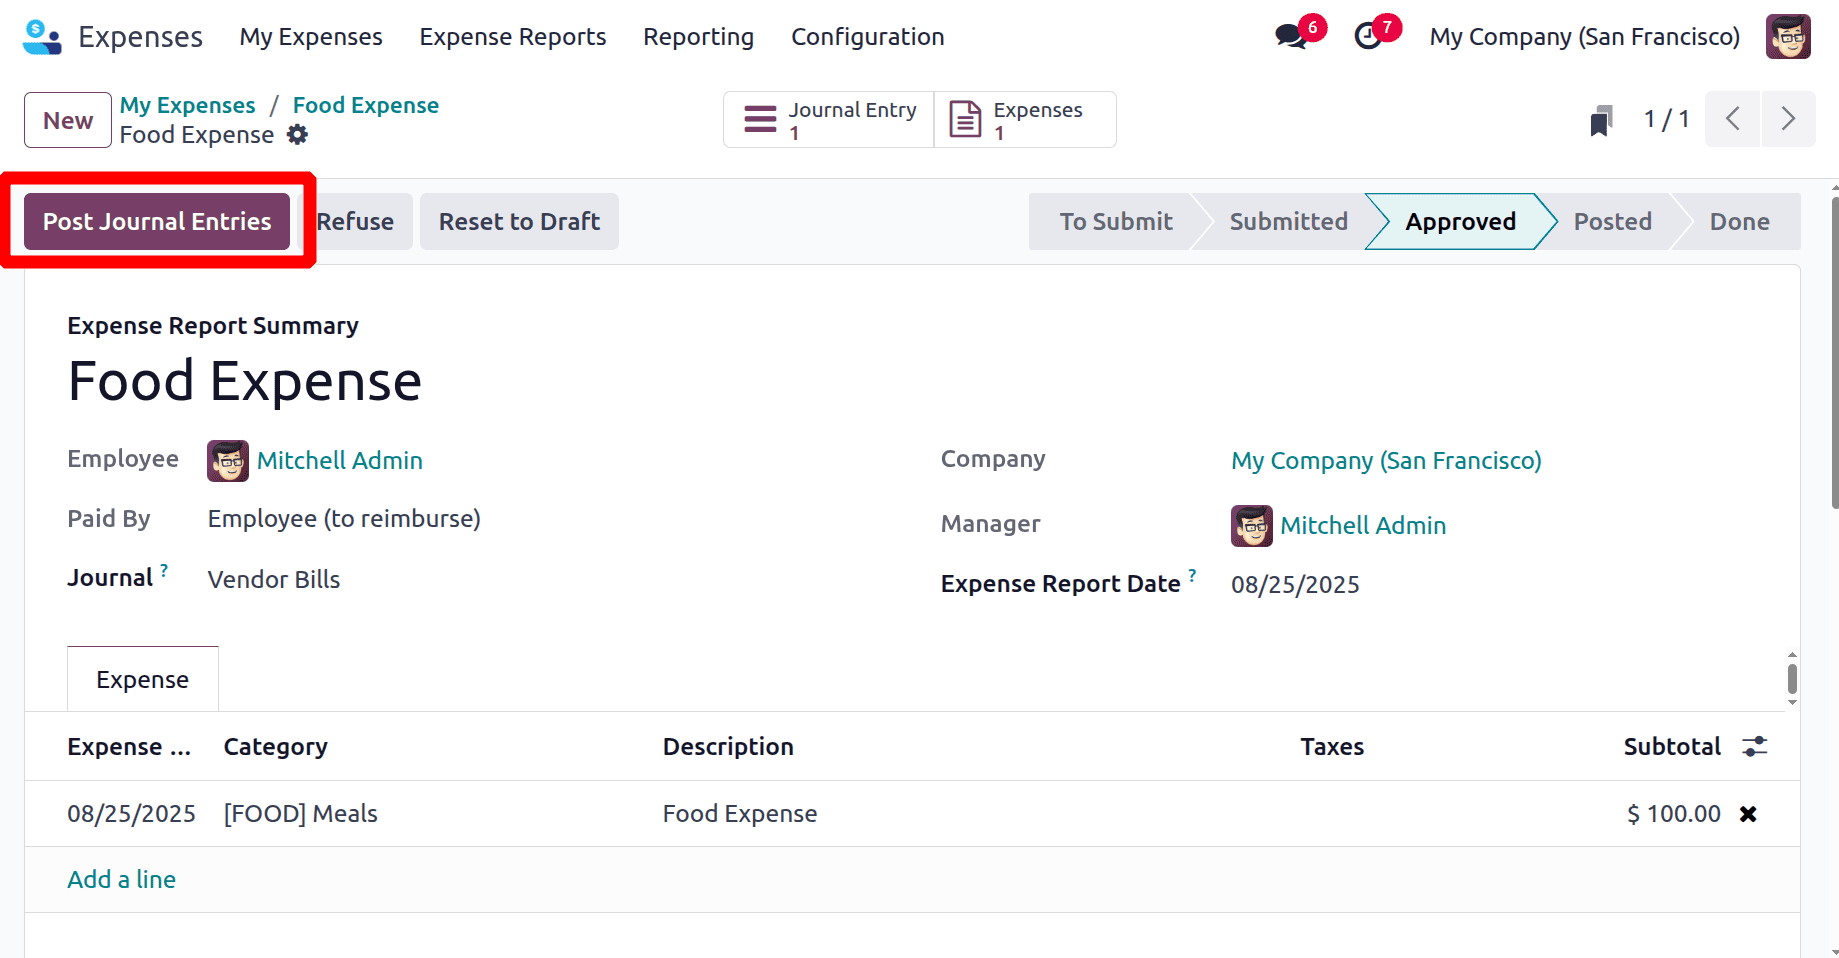
To reimburse an individual expense report, we can post the journal entry through the button action.
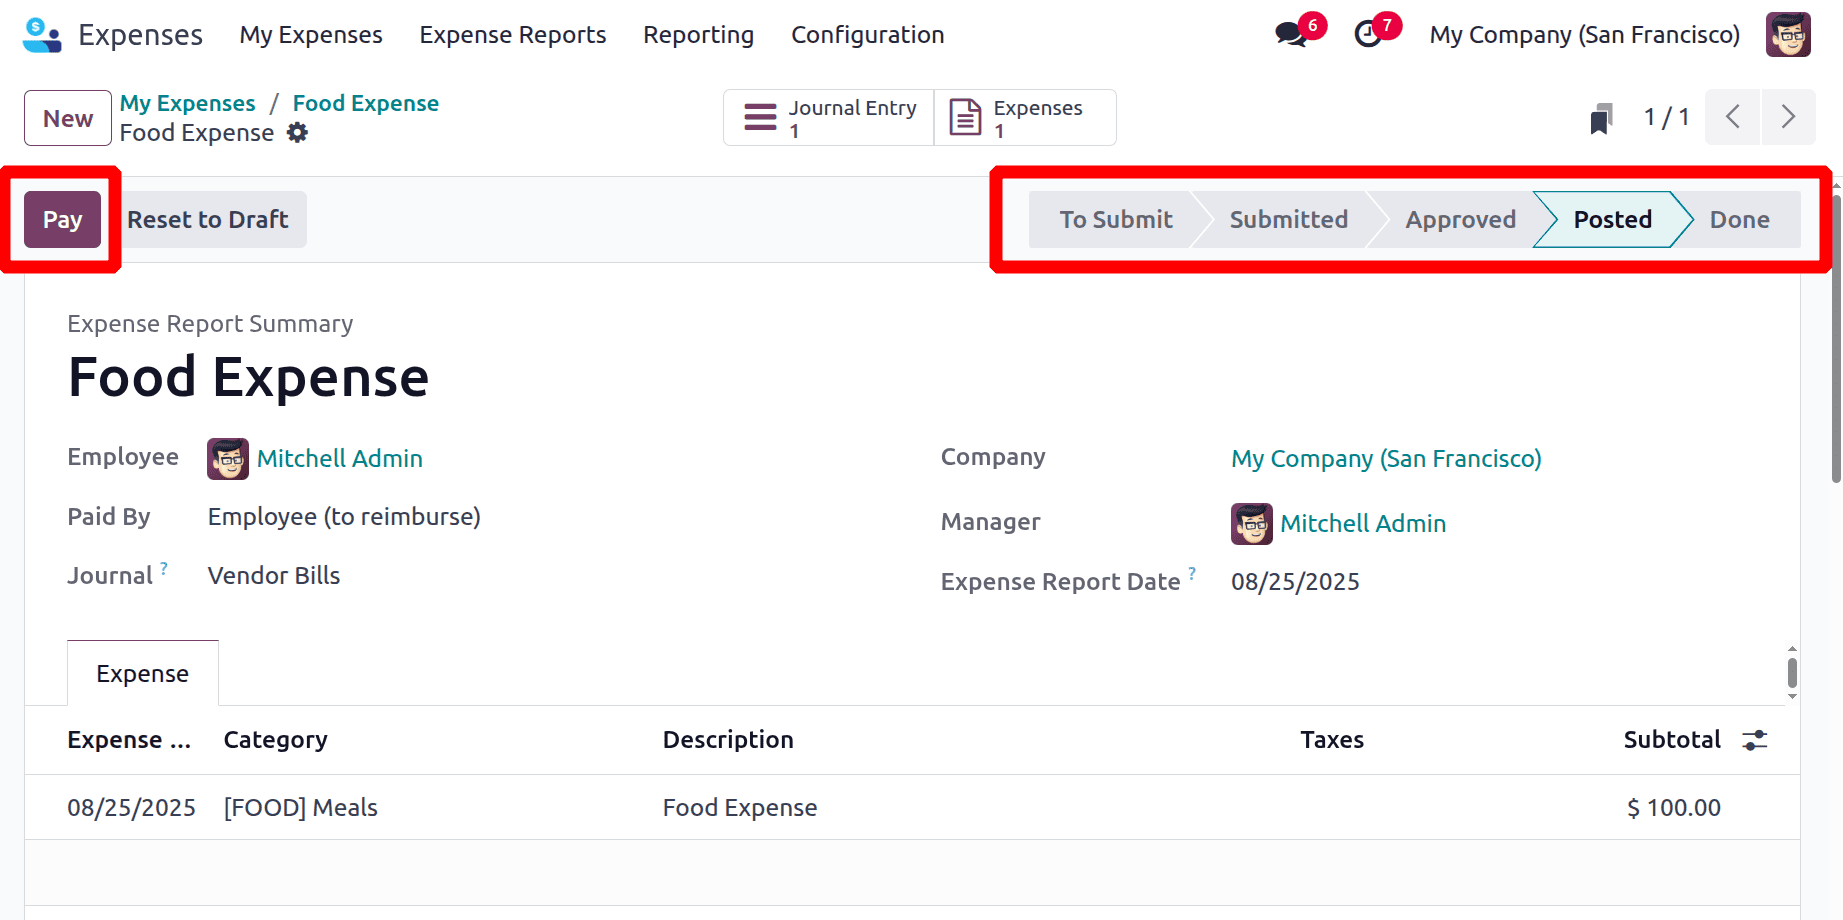
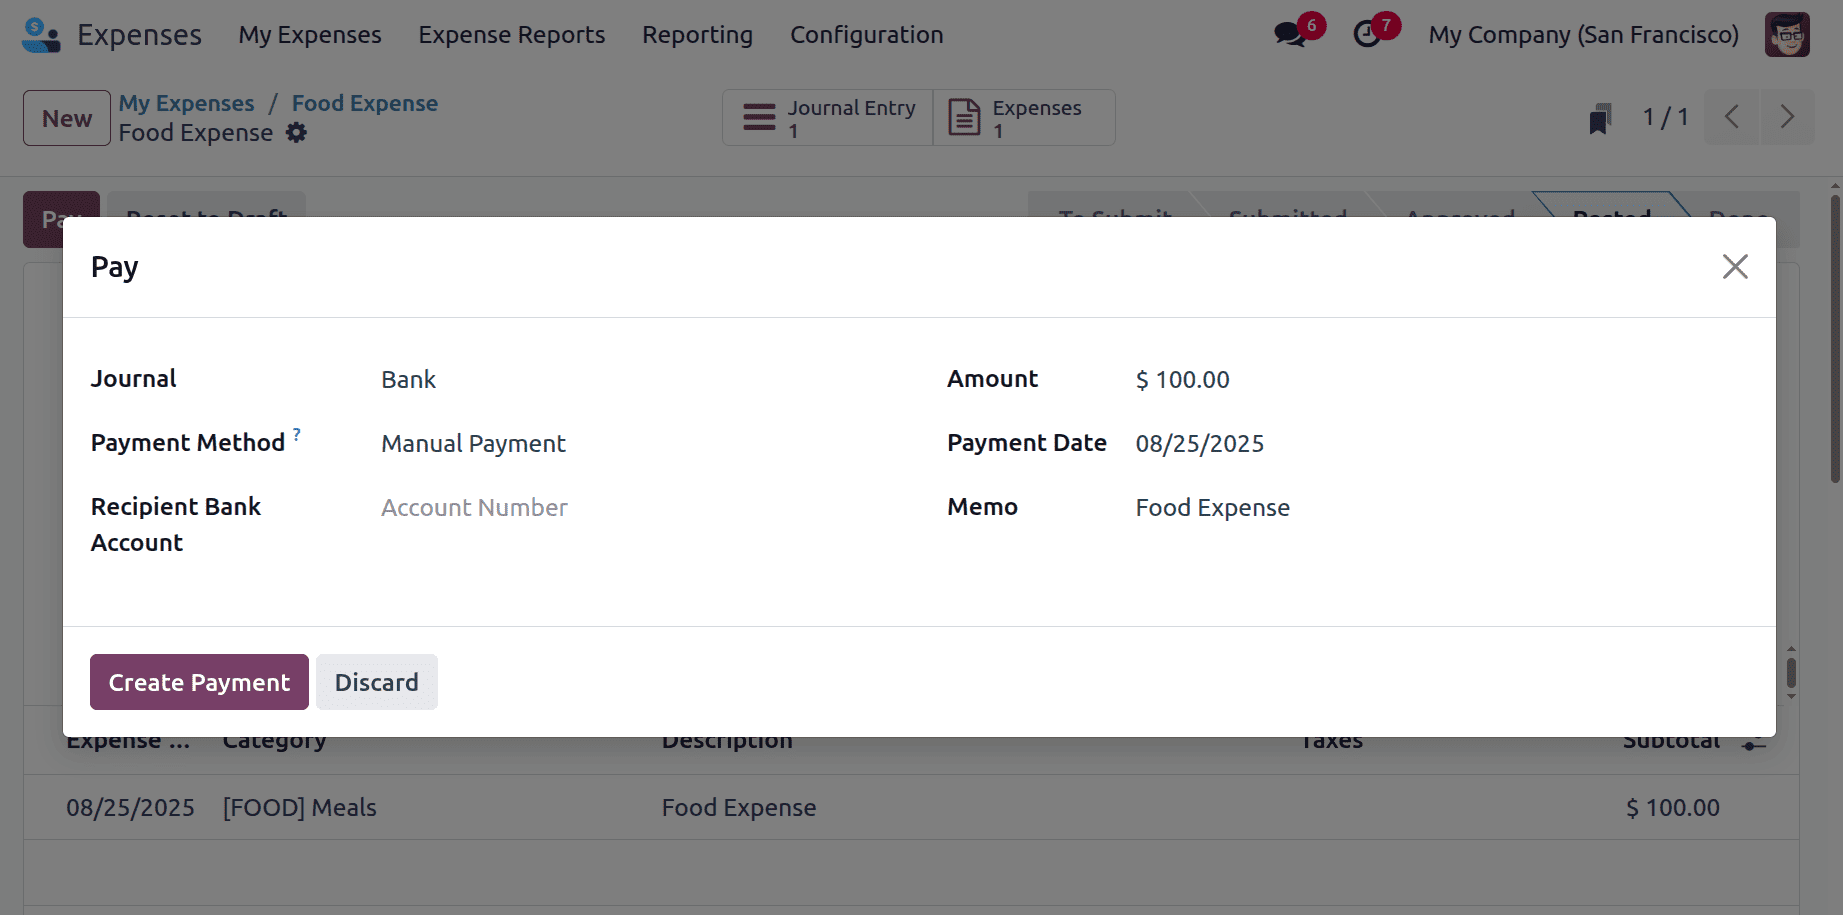
Then the stage will change to Posted. Click the Pay button in the top-left corner of the journal entry to open the Register Payment pop-up window. In this window, provide the following details:
- Journal: Choose the accounting journal where the payment will be recorded. The default options are Bank or Cash.
- Payment Method: Select the method of payment. If Cash is chosen as the journal, the only option available is Manual. If a Bank is selected, the default options are Manual or Checks.
- Recipient Bank Account: Select the employee’s bank account to which the payment will be sent. If the employee’s bank account is already saved in the Private Information tab of their employee record in the Employees app, it will automatically populate this field.
- Amount: The total amount being reimbursed populates this field by default. The currency, located to the right of the field, can be modified using the drop-down menu.
- Payment Date: Enter the date the payments are issued in this field. The current date populates this field by default.
- Memo: The text entered in the Bill reference field populates this field by default.
This interactive navigation streamlines the expense management workflow by enabling users to easily track and act on expenses based on their current status.
Then again, check the dashboard for the value deducted from the dashboard as shown below.
Thus, the Odoo 18 Expenses Module offers an efficient and user-friendly solution for managing business expenses. With features such as expense creation, receipt attachment, report generation, and approval workflows, it enables organizations to streamline expense tracking, enhance financial transparency, and make informed decisions with confidence.
To read more about An Overview of the Expense Module in Odoo 18, refer to our blog An Overview of the Expense Module in Odoo 18