In today’s highly competitive retail landscape, attracting customers is only half the battle retaining them is where sustainable growth truly lies. Businesses are increasingly relying on smart incentives such ,as loyalty programs, targeted promotions, and strategic discounts to keep customers engaged and encourage repeat visits. With the release of Odoo 19, the Point of Sale (PoS) system has advanced to make these strategies more powerful, flexible, and easier to manage than ever before. Odoo 19 PoS seamlessly integrates customer rewards and promotional tools into daily sales operations, enabling businesses to create personalized experiences right at the checkout. Whether it’s rewarding repeat purchases with loyalty points, launching time-sensitive promotions, or offering instant discounts to boost sales, the platform provides a unified and efficient solution.
In this blog, we’ll explore how to effectively use loyalty programs, promotions, and discounts in Odoo 19 Point of Sale, and how these features can enhance customer satisfaction, drive repeat business, and increase revenue while simplifying your workflow.
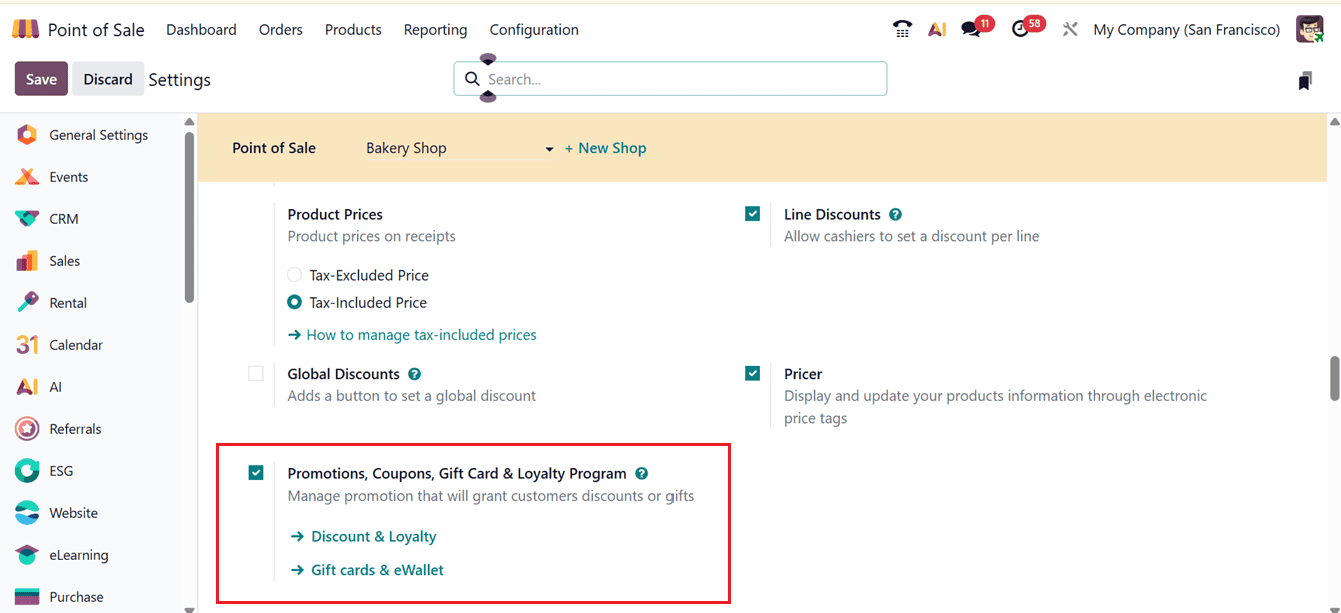
To enable discounts and loyalty programs, activate the "Promotions, Coupons, Gift Cards & Loyalty Program" feature under the PoS pricing settings tab, as shown in the screenshot below.
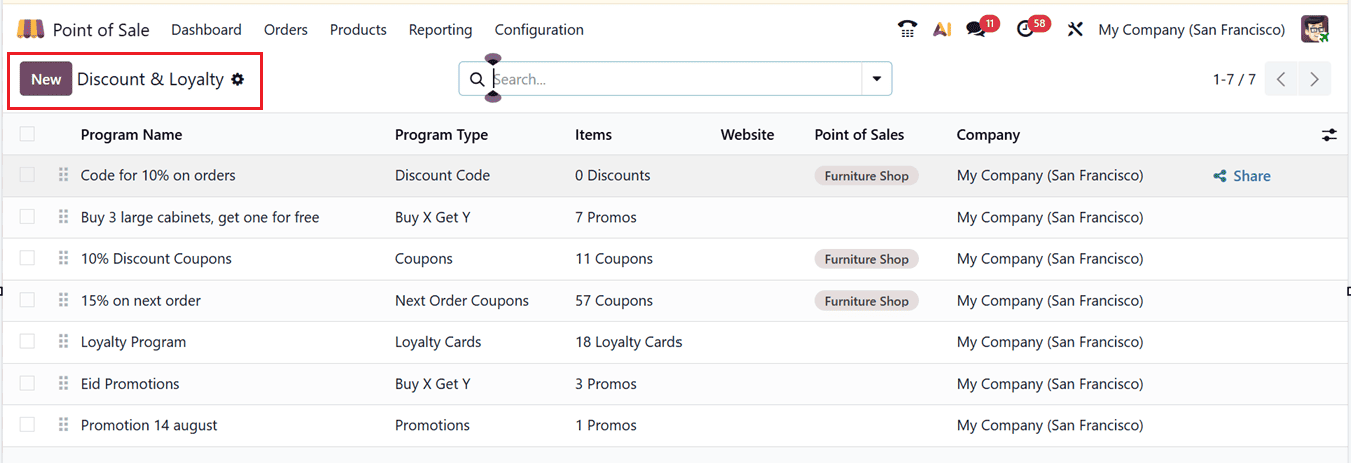
To create a new Discount or Loyalty program, select the "Discount and Loyalty" option from the "Products" menu. As shown in the screenshot below, this section provides you with a list of all the current Discount or Loyalty programs along with information such as Program Name, Type, Applicable Products, PoS Availability, Website, and Company.
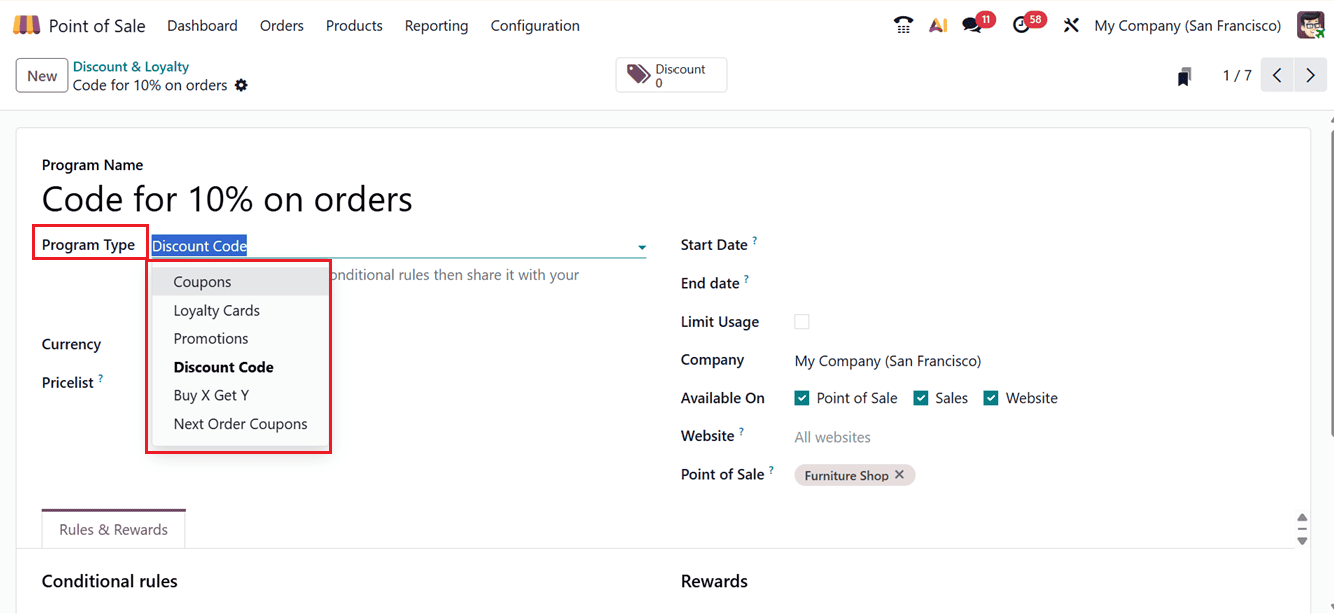
Clicking on the "New" button and selecting a suitable "Program Name" is the first step in creating a new promotional program in Odoo. To start, choose one of the following Program Type options:
- Coupon: Provides clients with a special code for incentives or savings. For instance, "Get a $10 coupon for your purchase." redeemable online or in PoS.
- Loyalty Cards: Give points to loyal consumers. For instance, "Get a free item after 50 points; earn 1 point for every $1." You can exchange points for prizes.
- Promotions: When certain requirements are completed, automatically add discounts such as "10% off drinks" or "Buy 2 get 1 free."
- Discount Code: Customers enter a code, e.g., “SAVE10,” to get a discount during checkout.
- Buy X Get Y: Offer free or discounted items, e.g., “Buy 2 coffees, get 1 free.” Triggered automatically when conditions are met.
- Next Order Coupons: Generate a coupon after purchase for future use, e.g., “Spend $50, get $5 off your next visit.”
Next, choose the currency you want to use for the discount program and set up a corresponding pricing list if needed. Set the Start Date and End Date to specify the duration of the program's operation. To make the program useful in the PoS system, you can activate the Available on Point of Sale option and designate the website where the offer should be displayed.
Apply restrictions under the Limit Usage section to restrict how frequently or by whom the offer may be utilized. Lastly, specify whether the discount program should be used on your eCommerce website, in sales sessions, or at the point of sale. If it is selected in the "Available On" section, you can additionally include the name of the corresponding Point of Sale and website in the appropriate fields.
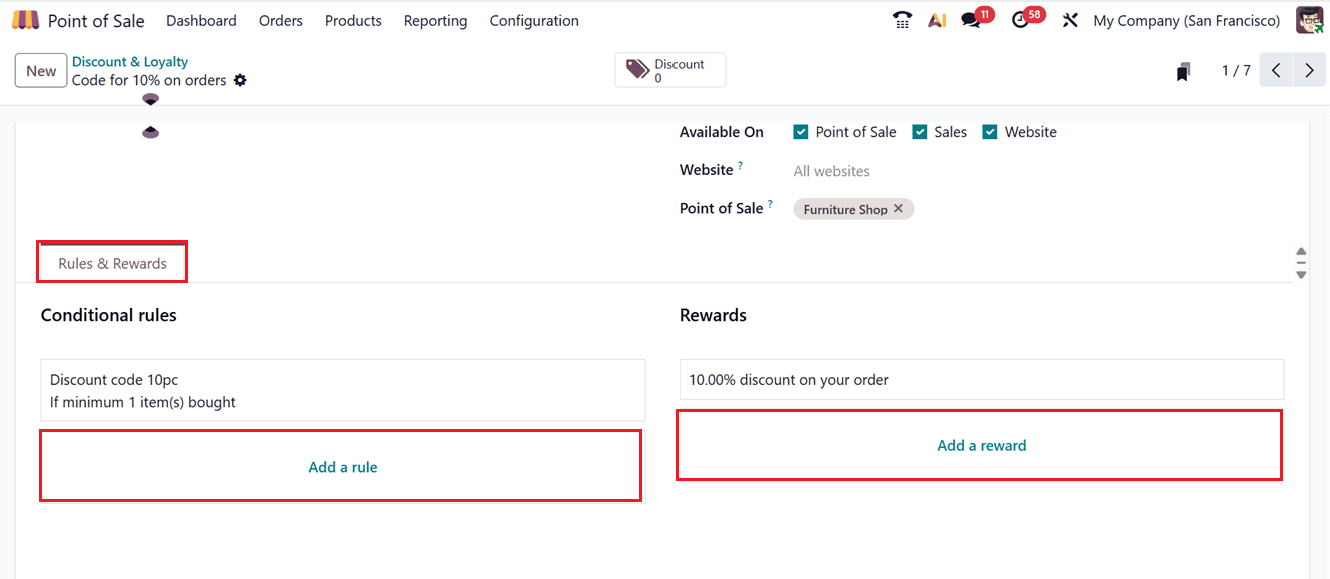
Then, click on the "Add a rule" button after selecting the "Rules & Rewards" page to create a discount rule.
The "Minimum Quantity" box, which activates the rule based on the number of goods purchased, and the "Minimum Purchase" field, which triggers the rule based on the total amount of the order, are both included in the "CONDITIONS" section of the form where you may construct the discount code rules.
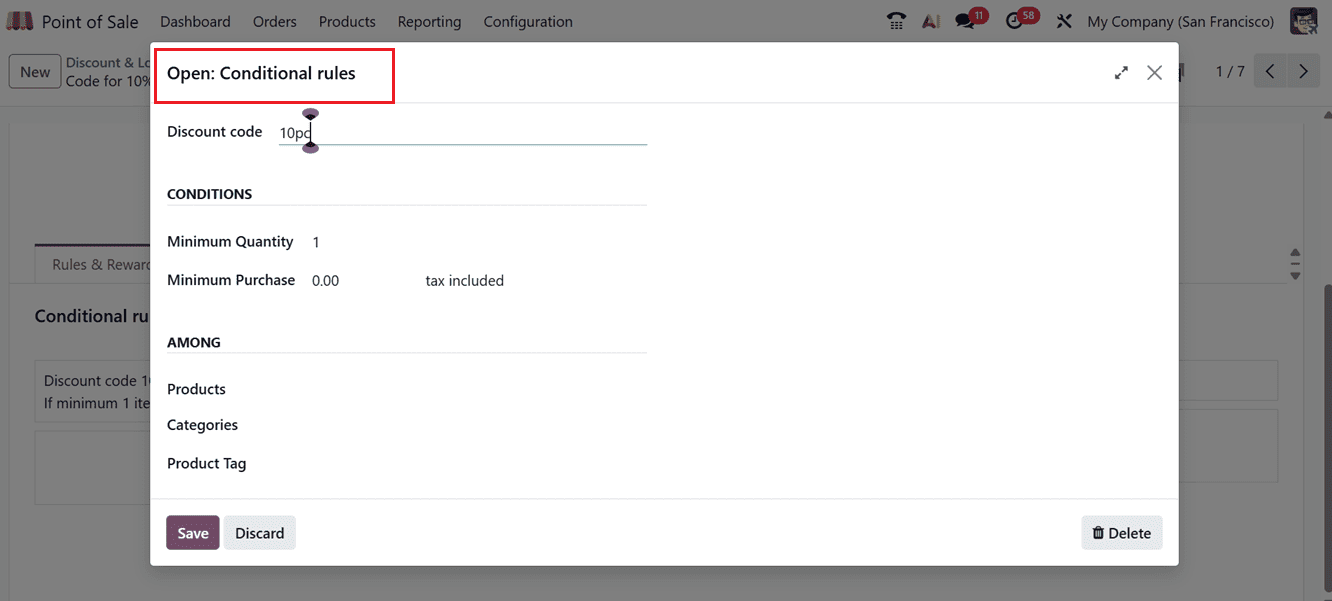
Next, choose which Products, Categories, or Product Tags to include using the "AMONG" tab. While the "Categories" field applies a rule to all products inside a selected category, the "Products" field is used to apply a rule to particular items. However, as the screenshot below illustrates, the "Product Tags" column applies the criteria to any items that have the same tag, regardless of whether they are in different categories.
To set the prize, click the "Add a reward" option in the Rewards section. Here, Odoo offers three different kinds of rewards, such as:
- Free Product: When customers spend a specific amount of money or buy a certain quantity, they receive a free item.
- Discount: On certain goods or orders, customers receive a reduced price, either a percentage off or a set sum off.
- Free shipment: If customers fulfill the reward requirements, they are not required to pay for shipment.
A brief "Description on order" can also be added.
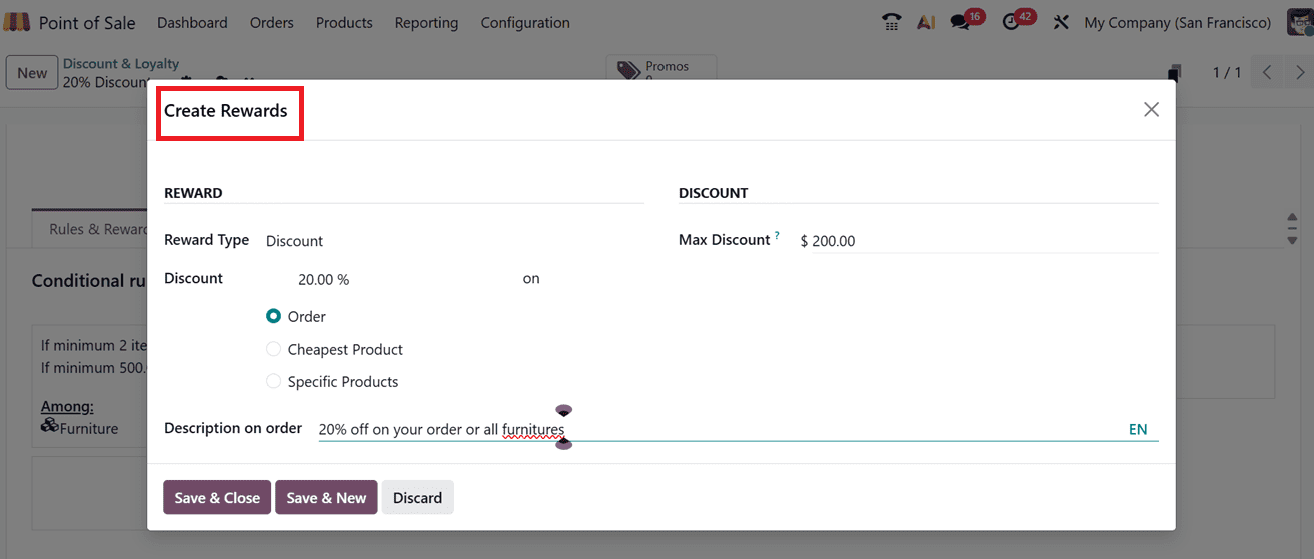
Discount: Select the "Discount" option as the reward category and enter the "Discount" as a percentage on an "Order," "Cheapest Product," or "Specific Product."
- Order: Discount applies to the whole order.
- Cheapest Product: Discount applies to the lowest-priced item.
- Specific Product: Discount applies to a chosen product only.
Additionally, you have the option to specify the "Maximum Discount," which indicates the maximum discount permitted by the program. If you do not wish to establish a restriction, leave the form empty. Next, utilize the "Discount" section to indicate whether the discount is applicable to a specific product, an order, or the cheapest product. After completing all the fields, click on the "Save" button to complete the setup of your discount program. The award creation for the "Discount" reward type is displayed here, as seen in the screenshot below.
The form will display different fields depending on the prize type you select when creating a reward. Let's examine each type's fields.
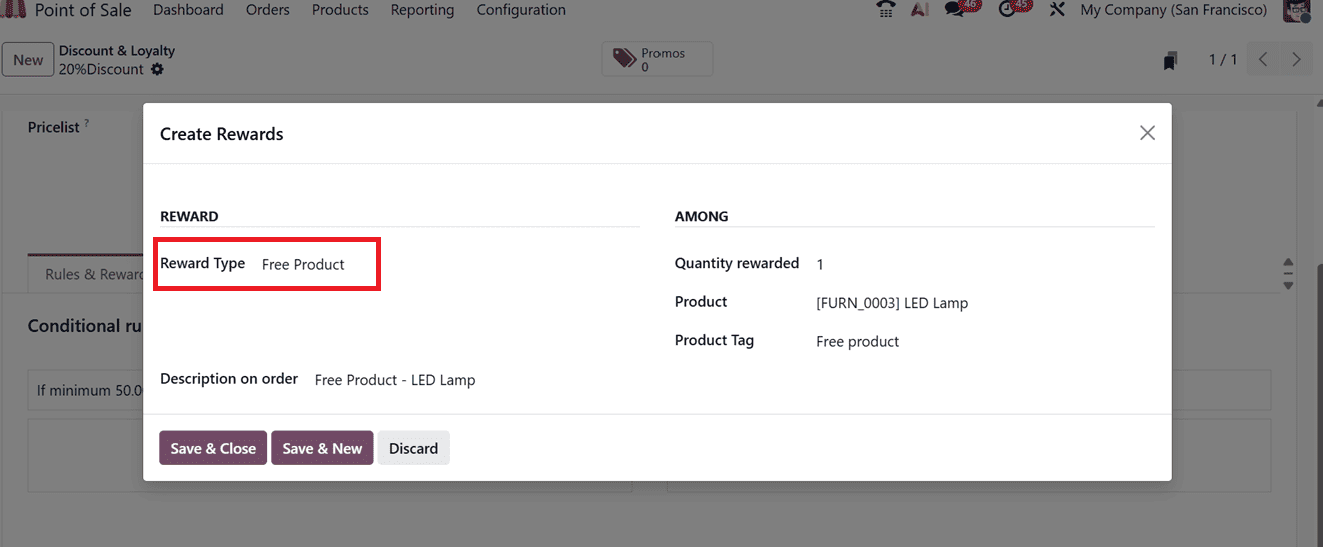
Free Product: The form will display distinct fields for that category if you select "Free Product" as the Reward category. In the "Quantity rewarded" area, you must indicate the number of free products that will be given.
Next, choose the product that will be free in the "Product" area. To make it stand out in the sales order, add a "Product Tag." Lastly, you have to provide a brief description of the free product in the "Description on order" section, which will show up on invoices, receipts, or order lines, as seen in the screenshot below.
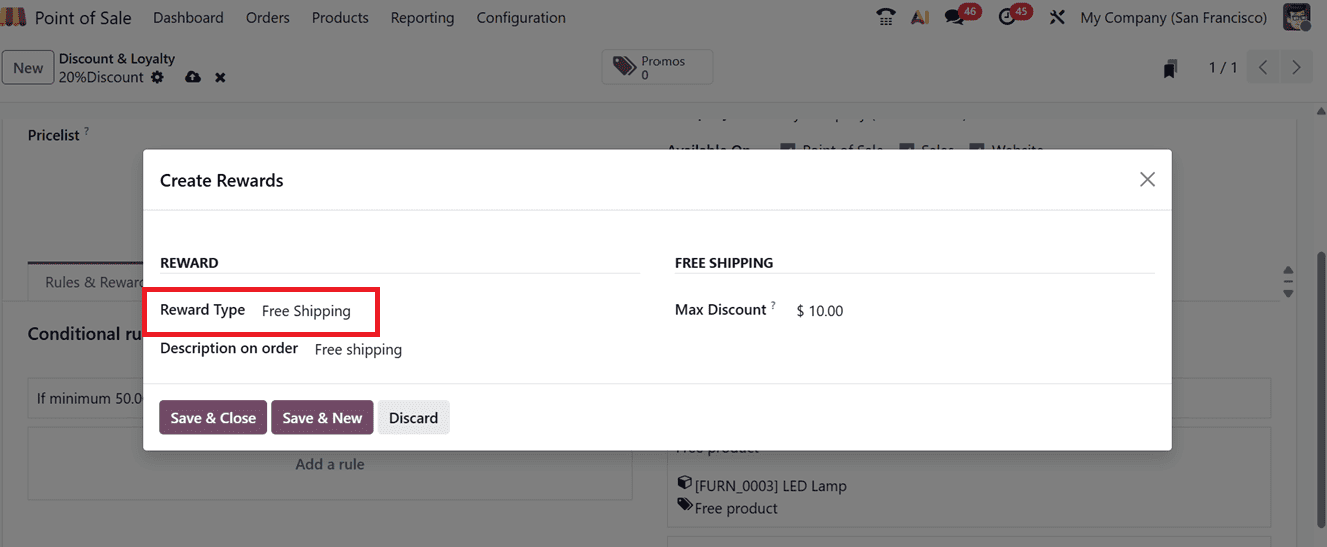
Free Shipping: You must enter the maximum discount amount permitted for this award in the "Max Discount" section under the "FREE SHIPPING" tab if you choose "Free Shipping" as the award Type. Next, enter a description of the award in the "Description on order" section, as seen in the screenshot below.
The "Rules & Rewards" tab will display every reward rule that has been set up. Then, by selecting the "Promos" smart button, you can immediately create discount coupons.
The smart tab name in Odoo 19 Point of Sale varies according to the "Program Type" that is chosen in the main configuration form, displaying various fields and settings unique to that promotion or discount program. This makes it simple for users to configure discounts, loyalty cards, coupons, and other features.
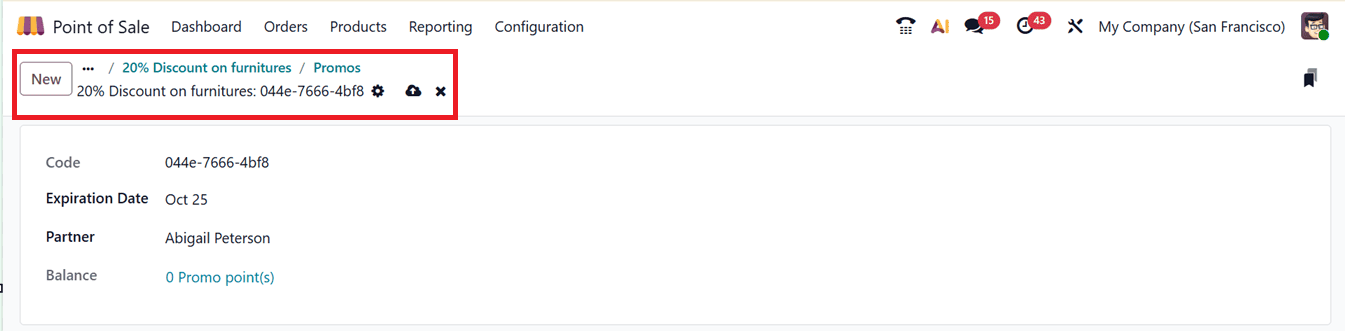
Here, you can check the "Promos" smart button to manage the reward coupons after setting the reward type to "Discounts" and saving the configurations. This contains information such as the discount code, balance, expiration date, related program, and partner data, as seen in the screenshot below.

You only need to click on the "New" button to create fresh discount coupons. Odoo will therefore automatically produce the new discount code. As seen in the example below, you can then enter the "Expiry Date” and the “Partner/Customer” name in the coupon generation form.
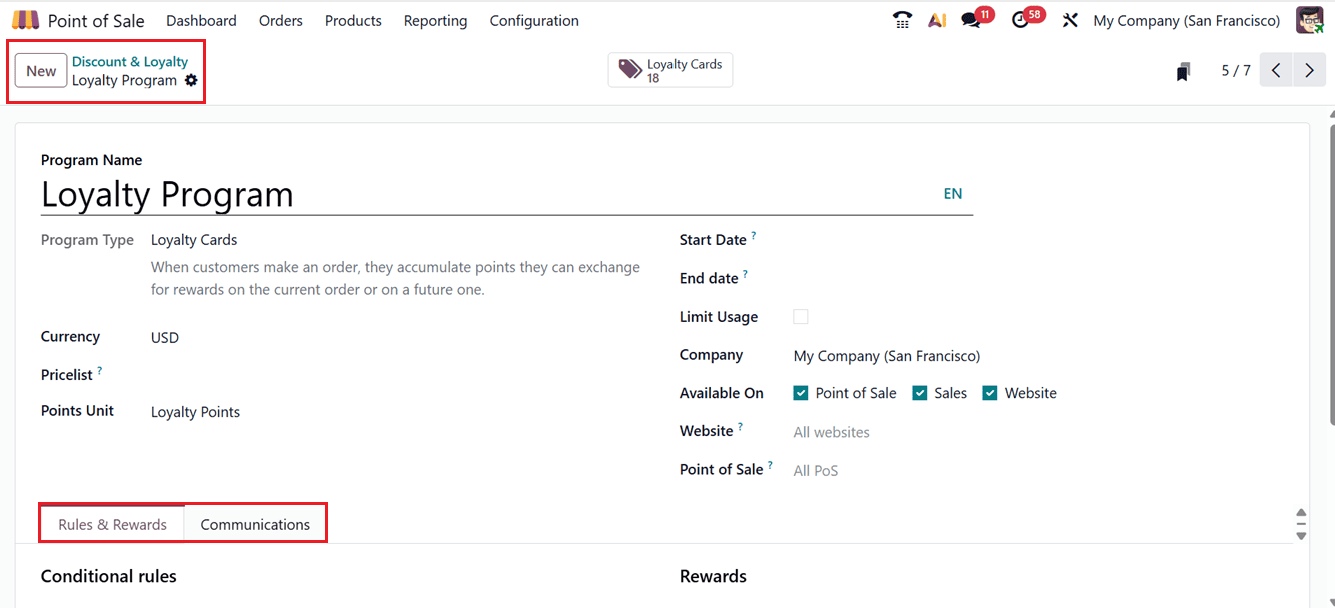
The procedures are also the same when establishing a new loyalty program. The primary distinction is that you will choose the "Loyalty Cards" as the "Program Type." The Discount program feature is identical to all other form fields. However, there is an additional form tab called "Communications" on the Loyalty Card configuration form.
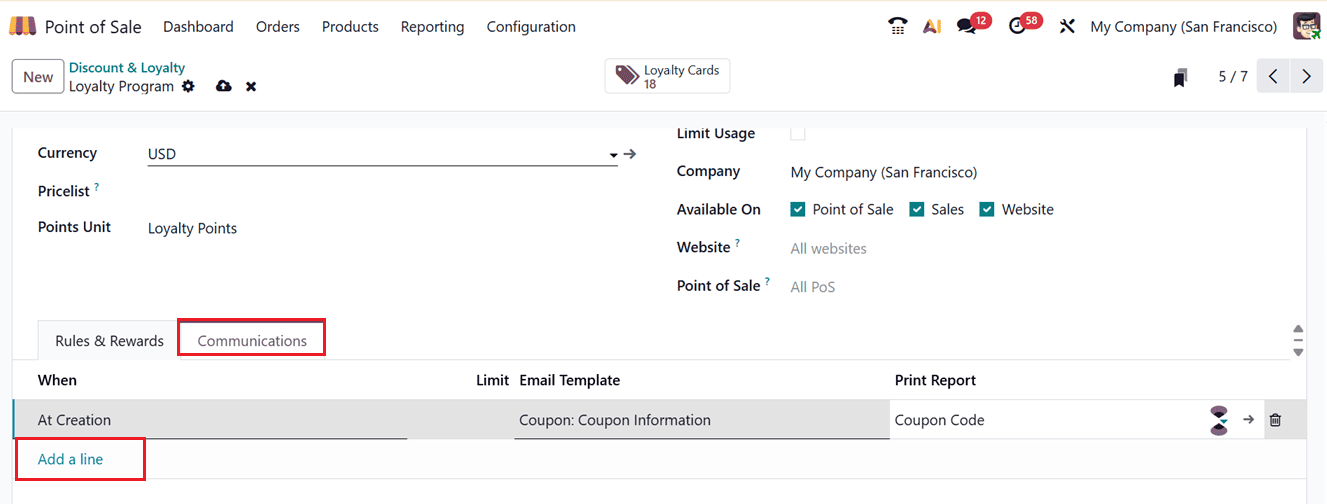
This enables companies to use the "Add a line" option to automate when and how messages are sent to customers in the loyalty program. In the "When" column, you can choose "When Reaching" or "At Creation" for the communication. Additionally, as shown in the screenshot below, you can set the "Limit" and "Email Template".
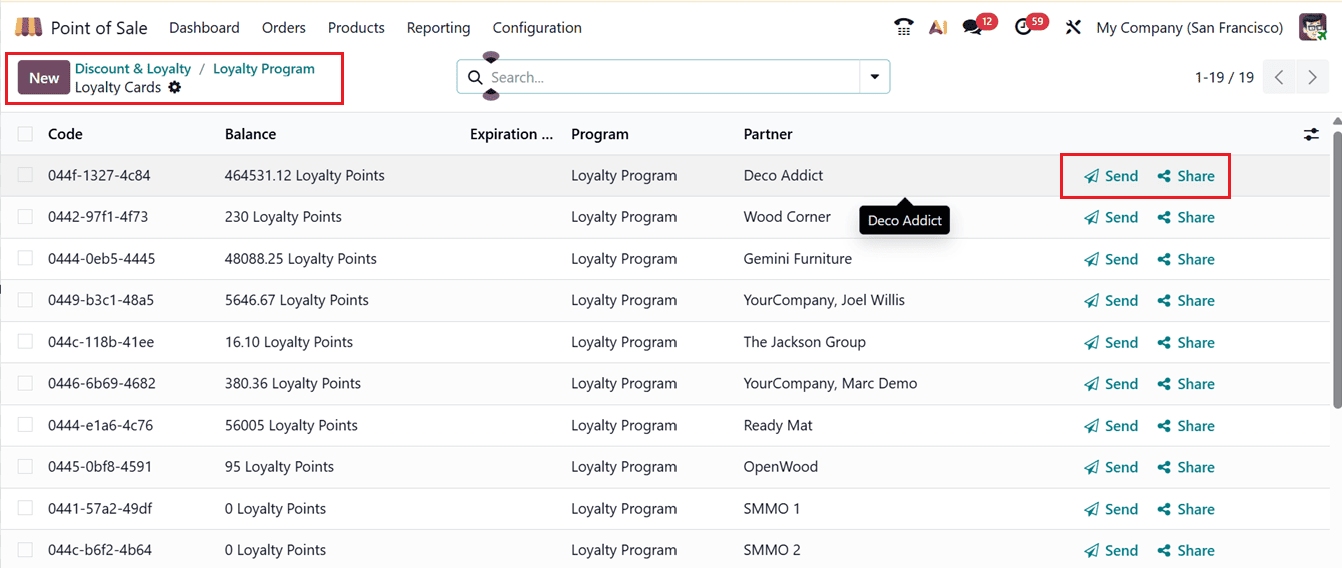
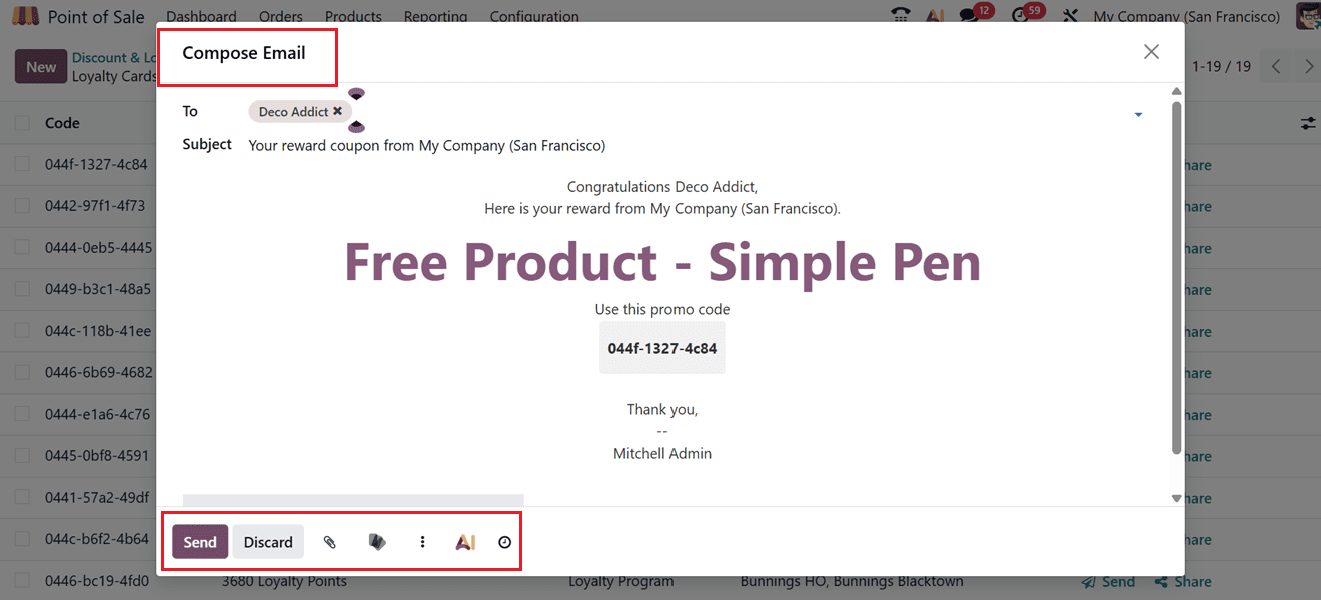
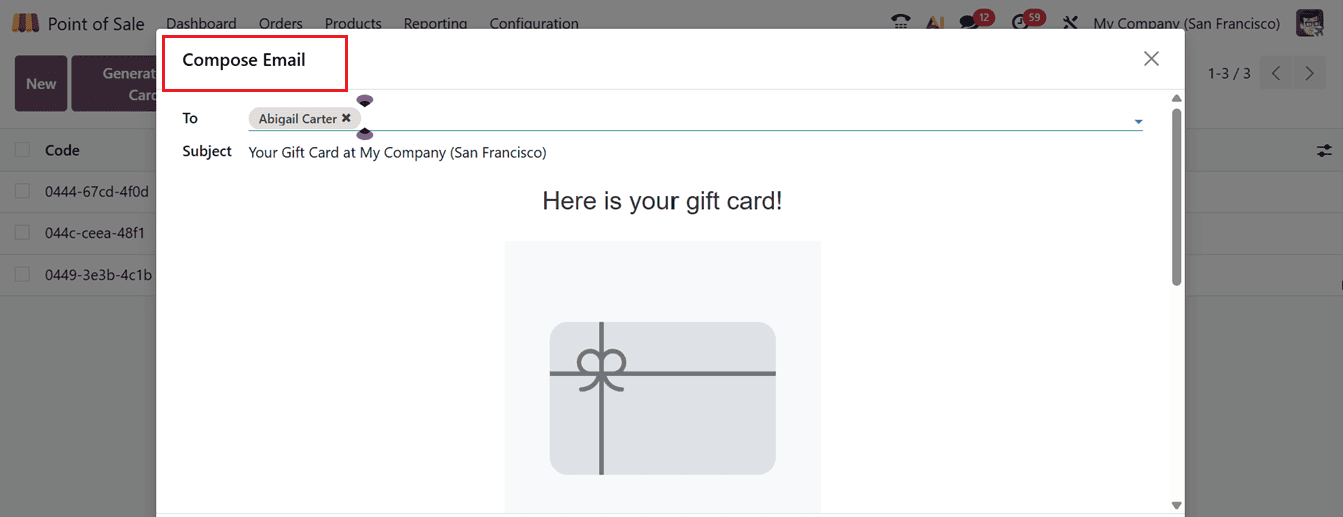
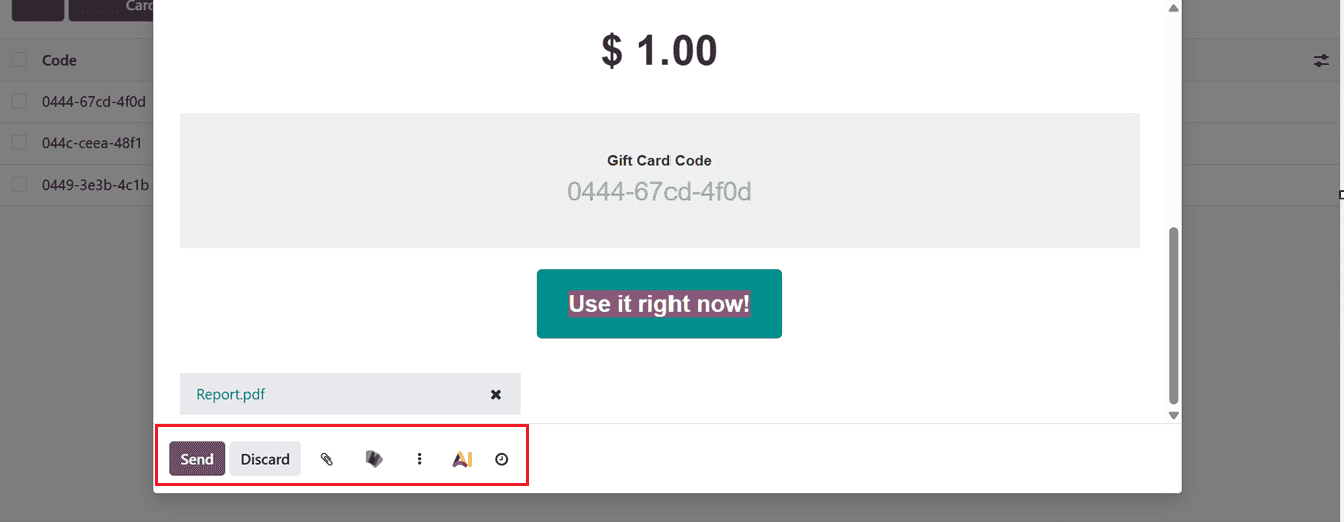
The "Loyalty Cards" smart tab, which contains a list of all current discount coupons, is used for coupon administration. The "Send" and "Share" buttons on this interface allow you to send coupons to clients.
Then, click on the "Send" button to deliver the loyalty cards or discount. Thus, a window for writing emails will open. You can change the subject and mail address in the window. Additionally, as demonstrated below, you may schedule mail, create templates, ask AI, and attach any document.
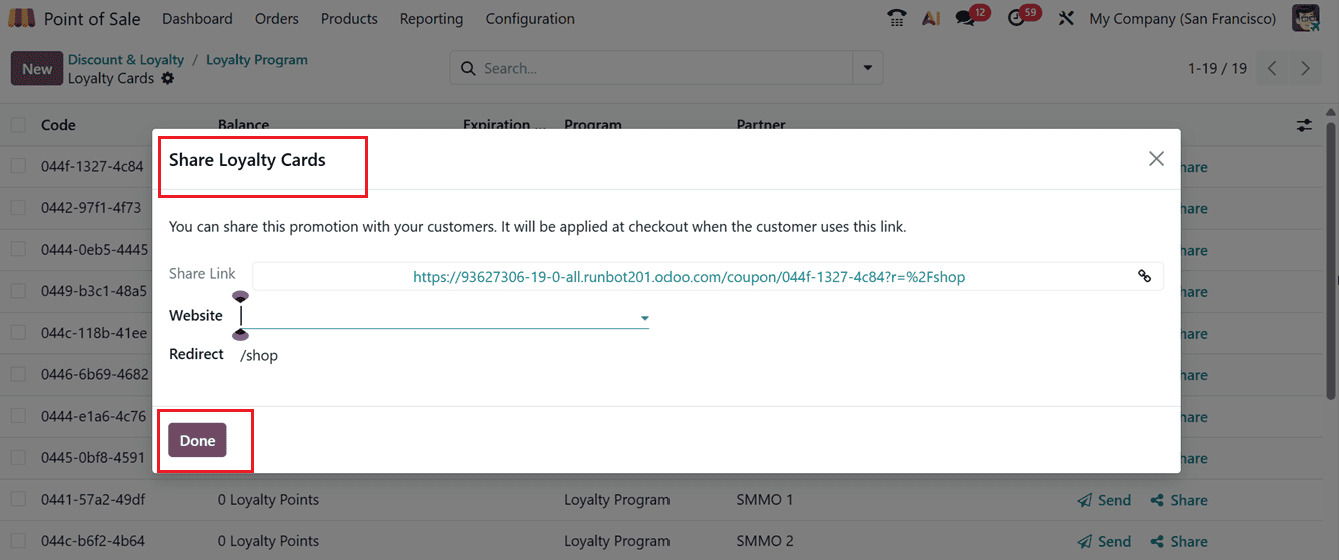
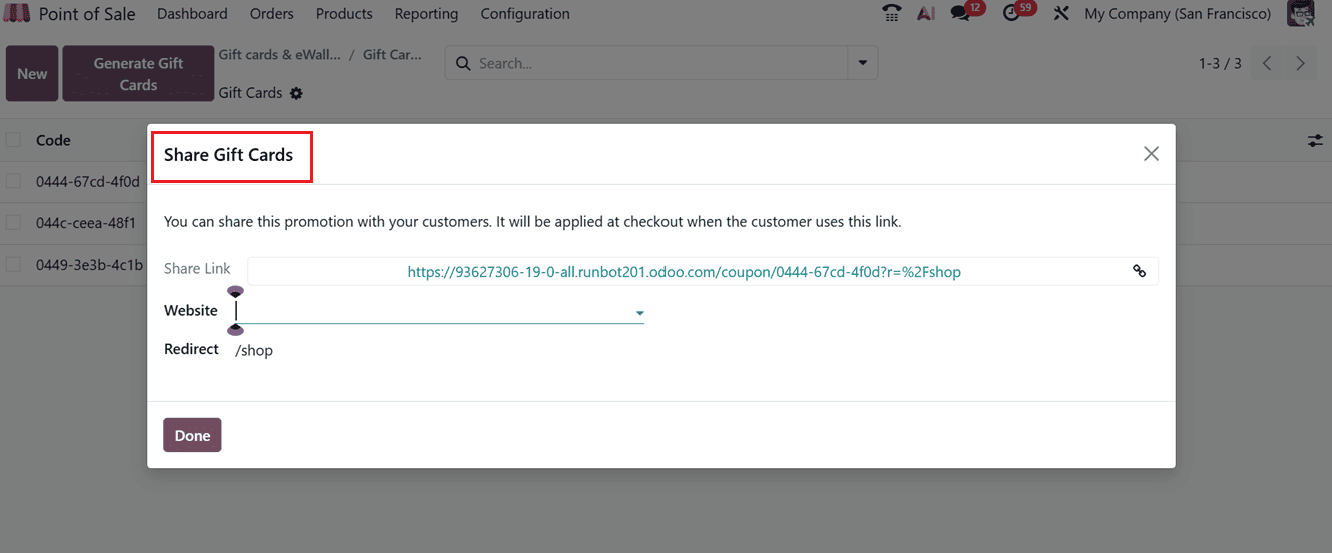
To share Loyalty Cards, click on the "Share" button on the Loyalty Cards dashboard in Odoo 19. You can copy the card's URL and enter the website to which the link should be placed in the window that appears,as shown in the screenshot below.
It is equally simple to manage the balance of points for loyalty programs. Enter the new balance in the pop-up box by going to the "Balance" field. Then, you can add the New Balance here in the "Update Balance" field, as shown in the screenshot below.
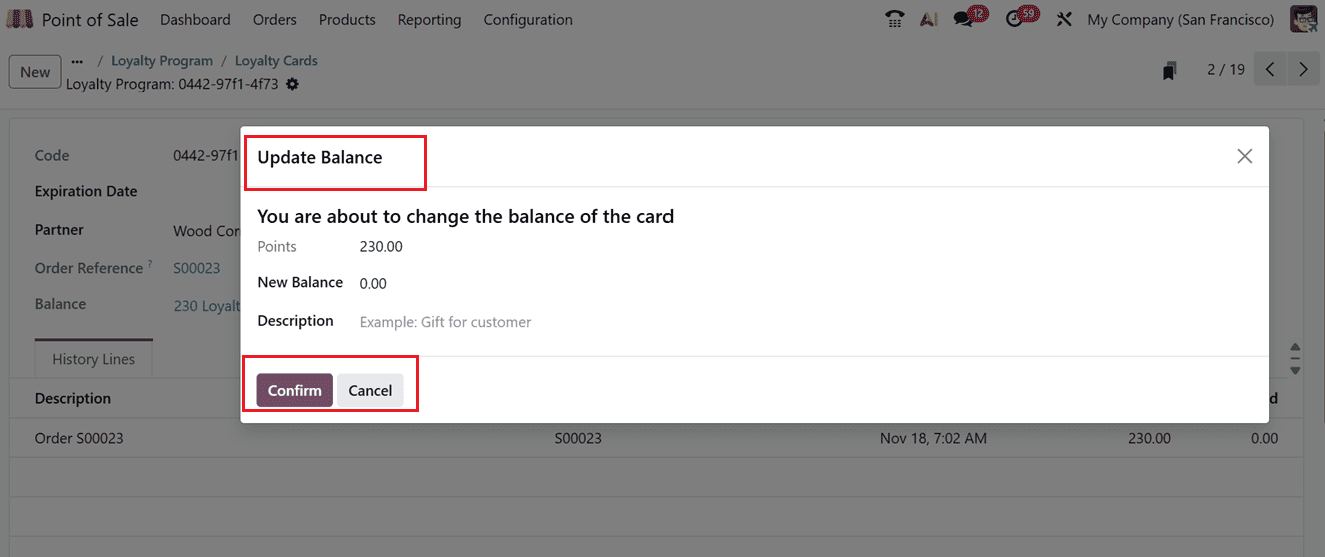
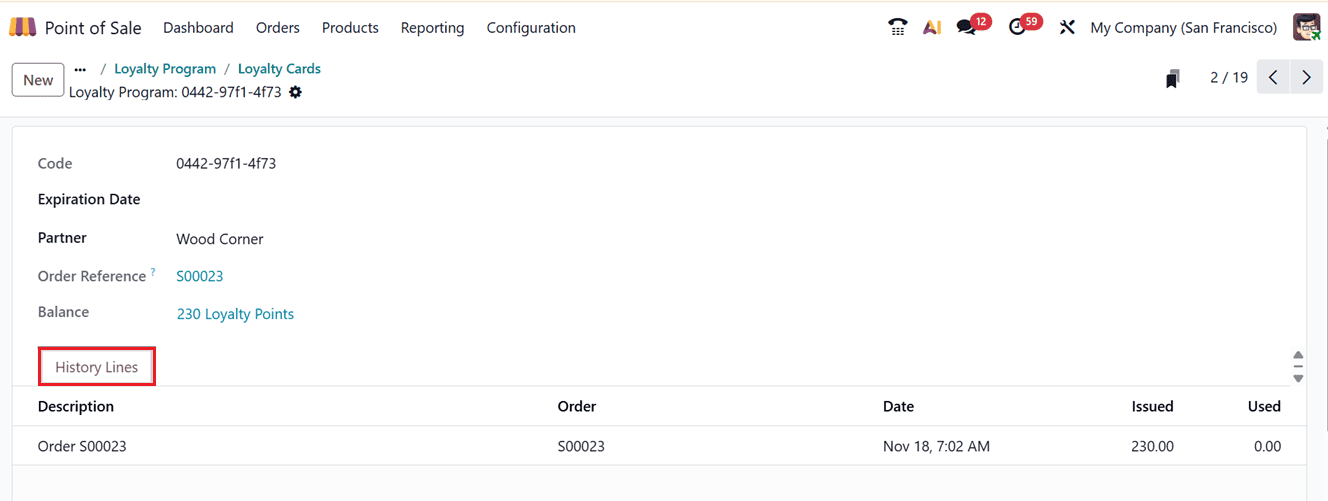
This transaction will be noted under the "History Lines" tab of the loyalty card production form once it has been saved. The customer can start using their points or discounts during Point of Sale transactions after the update, as seen in the screenshot below,
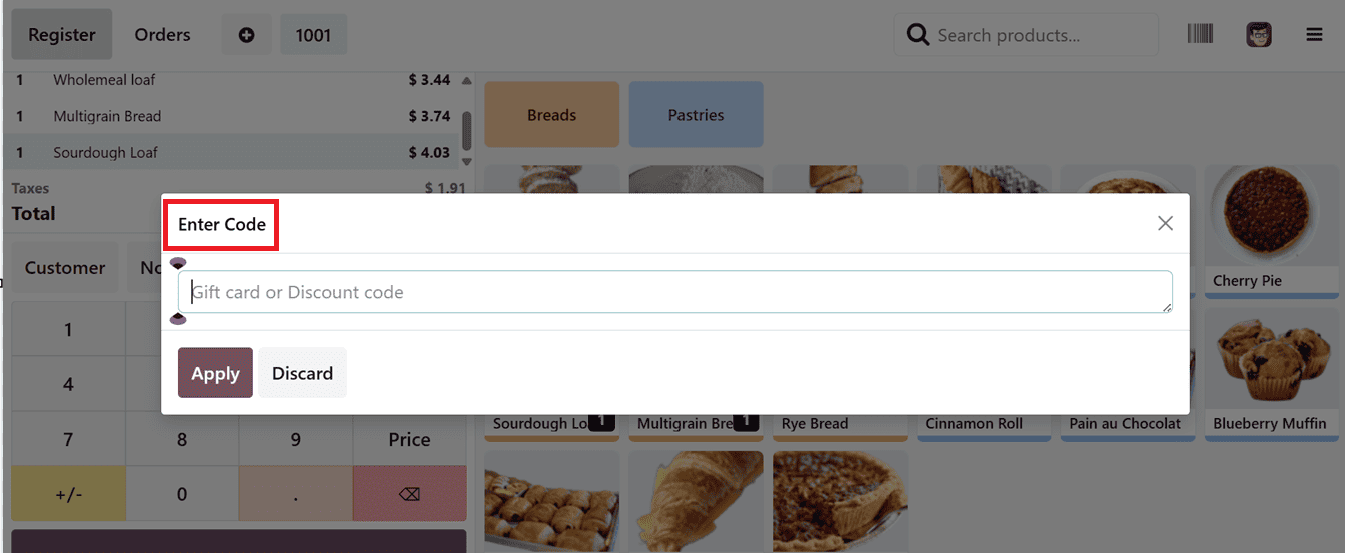
As seen in the screenshot below, you can apply discount codes during a Point of Sale (PoS) session in Odoo 19 by clicking the "Actions" button (three dotted menu) on the left side of the POS Sales interface and choosing the "Enter Code" button.
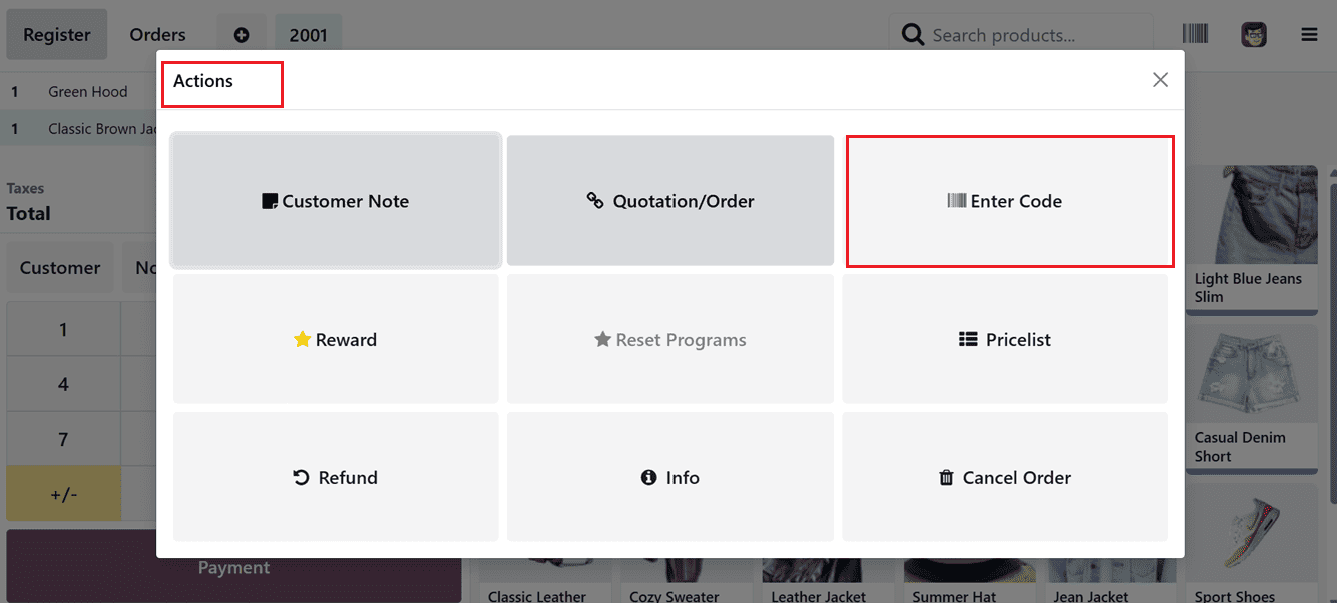
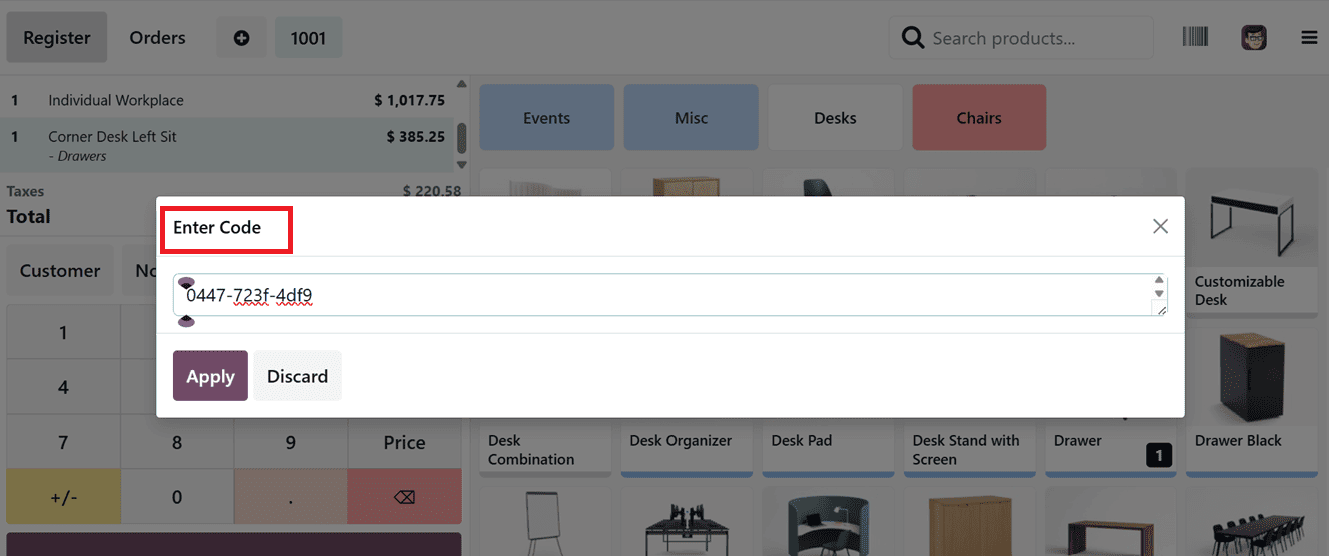
Then, you can enter or change the discount code or gift coupon code in the "Enter Code" window that appears as a result. The discount is automatically applied to the invoice after you click on the "Apply” button changing the total cost of the chosen products.
The "Rewards" option allows you to apply for promotional offers as well. Once you've chosen your products, select "Rewards" from the "Actions" option. The available incentive programs will appear in a pop-up window, as seen in the screenshot below.
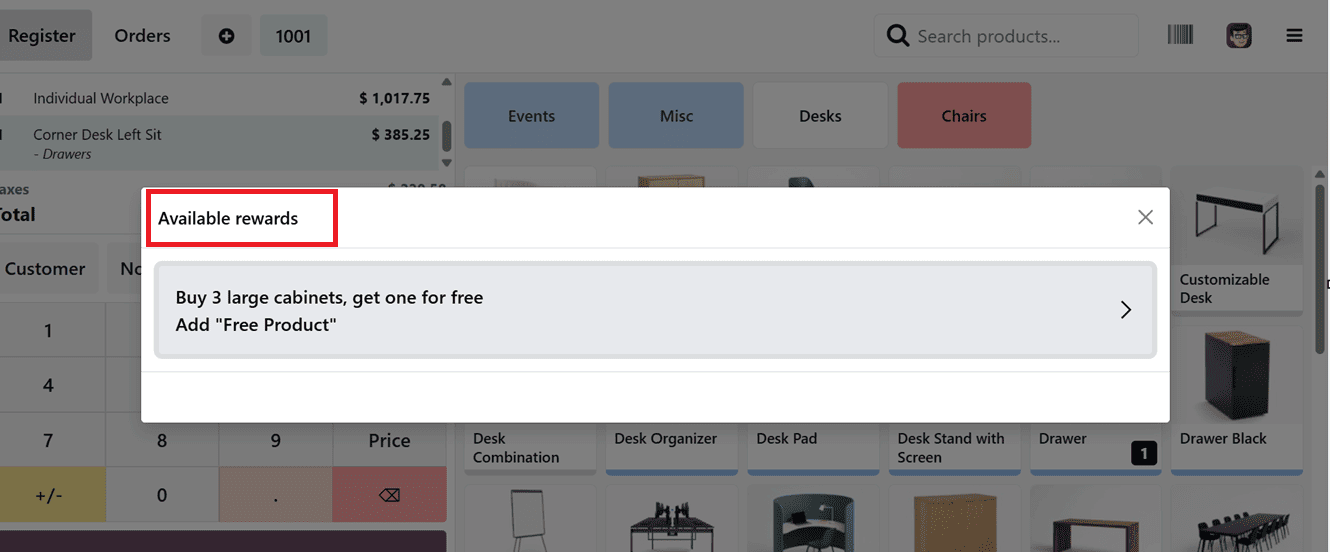
Once you select a reward, the associated benefit is applied to the POS order. This discount will reduce the total amount, while free gift items are added directly to the cart.
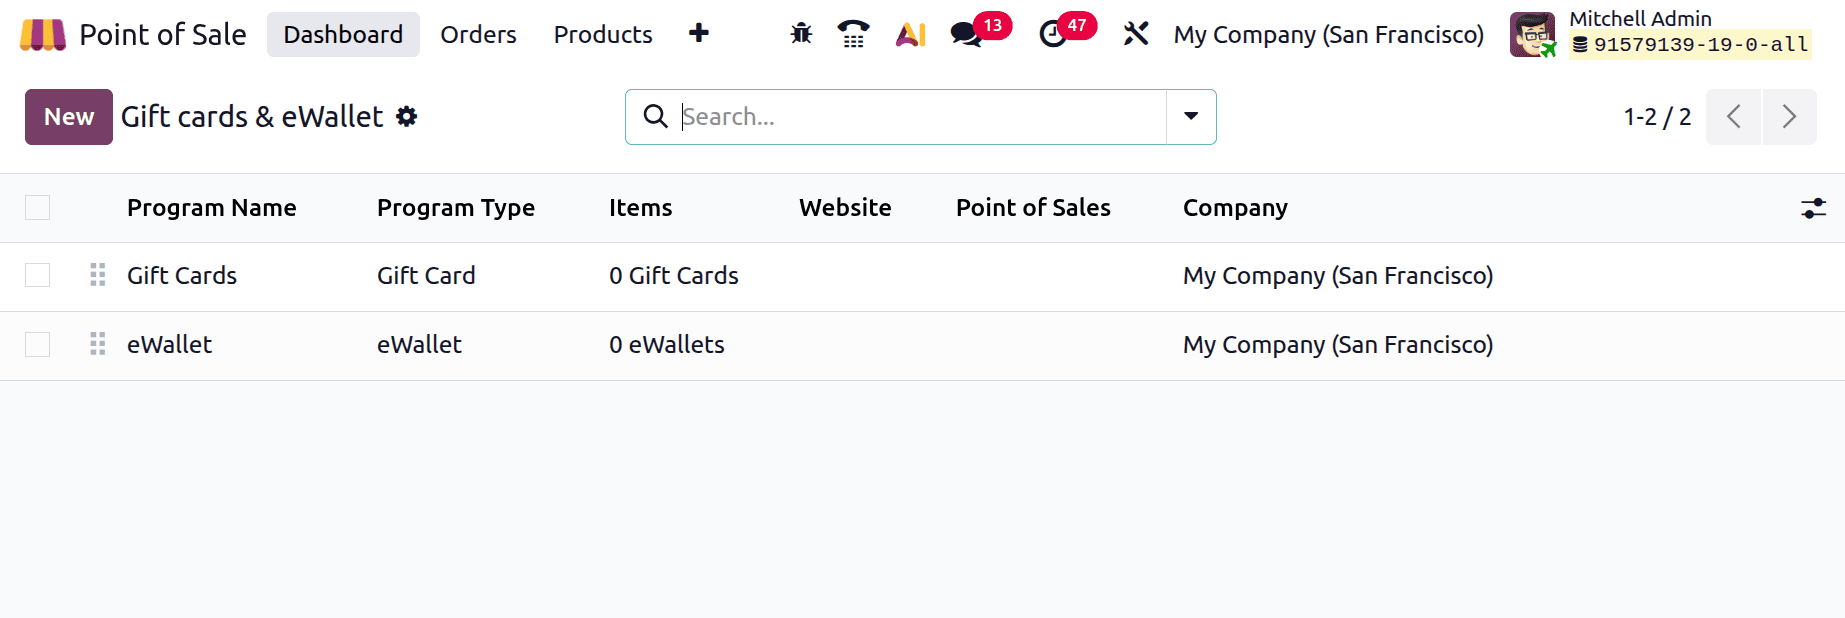
Gift Cards & eWallets
The "Gift Cards & eWallets" section of the "Products" menu is where you can manage gift cards and digital wallets. This part displays active programs along with details like Program Name, Program Type, Items, Website, Company, and Point of Sale Sales channels. Click on the "New" button to create a new eWallet or gift card, as seen in the screenshot below.
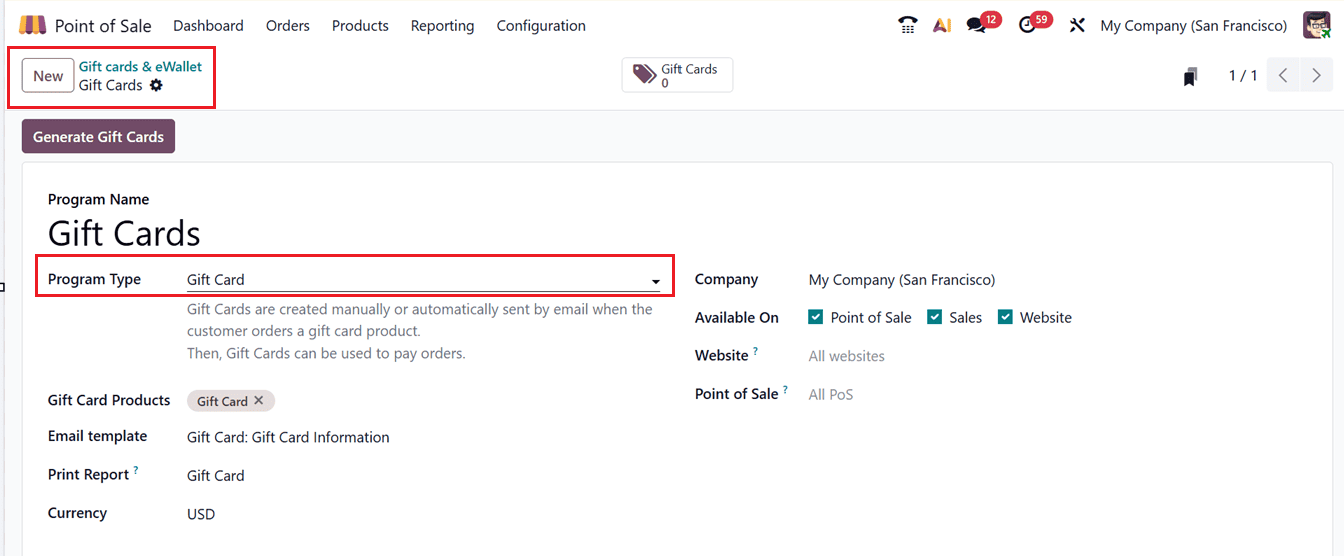
Creating Gift Card
In the "Gift Card Products" area, enter the program name, select the program type, and pick the products that the gift card will be associated with. To ensure correct transactions, enter additional information such as the "Currency" field, which sets the currency for the gift card's value. Print Report Options provide clear documentation by allowing you to select the format of the report or receipt that is printed when the gift card is issued. Using a pre-made template, the Email Template enables clients to get gift card details automatically and professionally.
In the "Available On" field, you can additionally select where the card can be used, such as at the Point of Sale (PoS), in sales, or on a website. Additionally, as shown in the example below, you can mention your exclusive Point of Sale session or website in the designated areas.
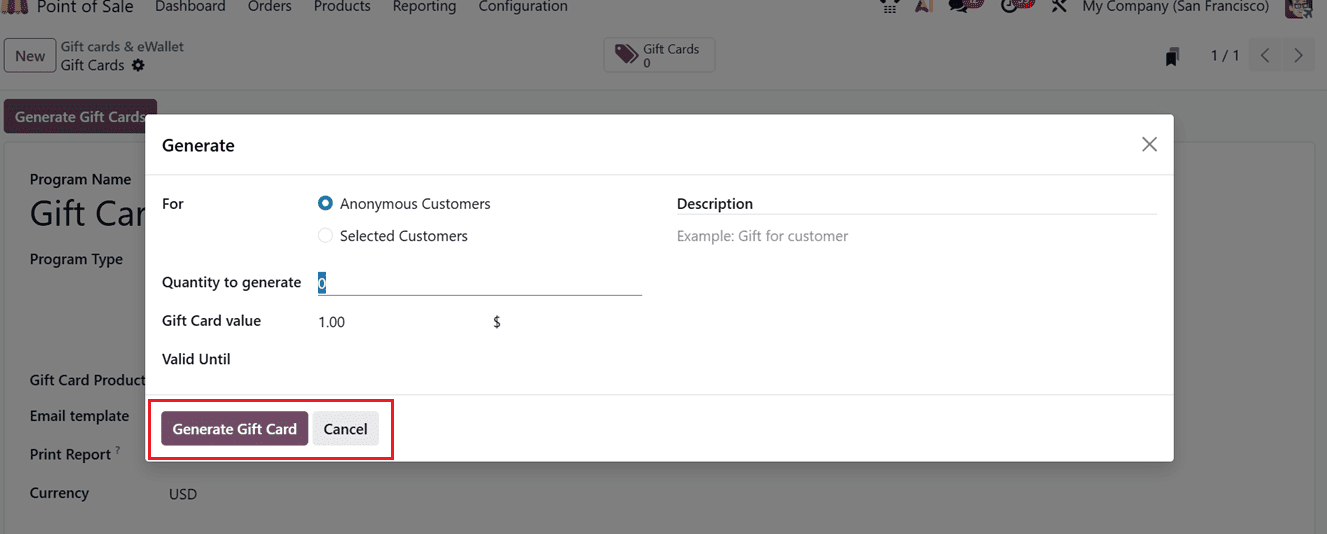
When you're done with all the configurations, click on the "Save" button and select "Generate Gift Cards"to generate new gift cards.
A window will pop up where you can enter whether the gift card is for the ‘Anonymous Customers’ which lets anyone use the card or for the ‘Selected Customers’ which limits its use to specific customers you choose, as depicted in the screenshot below.
Then, choosing selected customers from the ‘Customers’ field lets you select the recipient, linking the card to their record for tracking and personalized service. The ‘Customer Tags’ allow you to categorize customers (e.g., VIP, Frequent Buyer) for better segmentation, marketing, and reporting. The ‘Gift Card Value’ sets the monetary amount loaded onto the card, reflecting what the customer can spend at your POS. Then, the ‘Quantity to Generate’ specifies how many gift cards of that value you want to create, making bulk creation quick and easy.
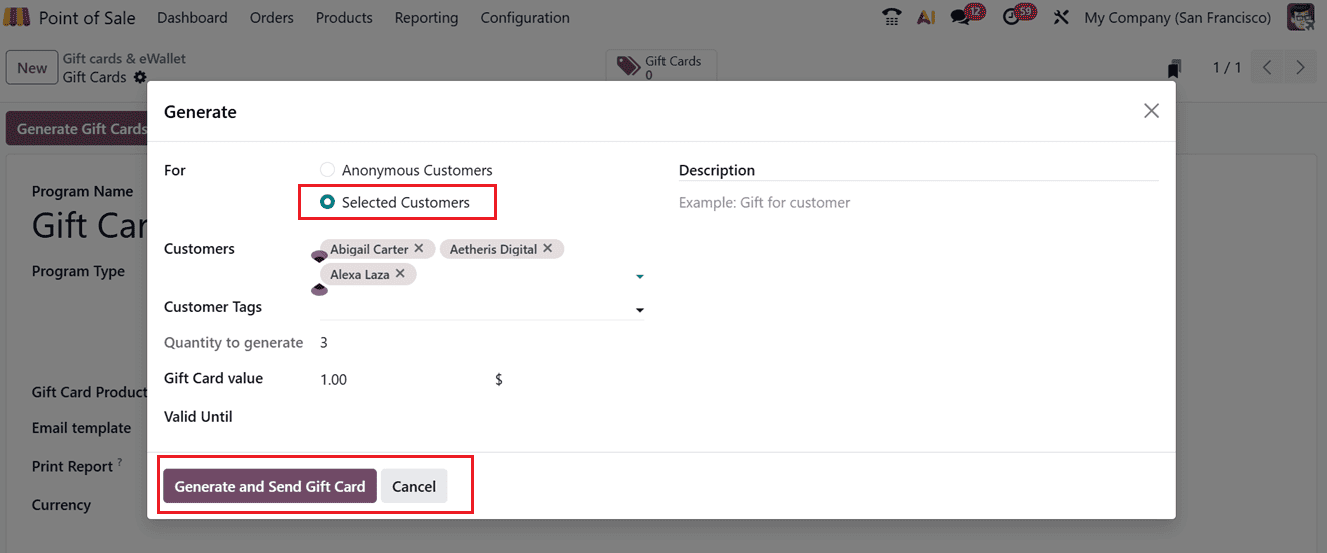
Additionally, you choose the ‘Valid Until’ period to determine how long the card remains active before expiring, and add a brief ‘Description’ to note any relevant details or promotions.
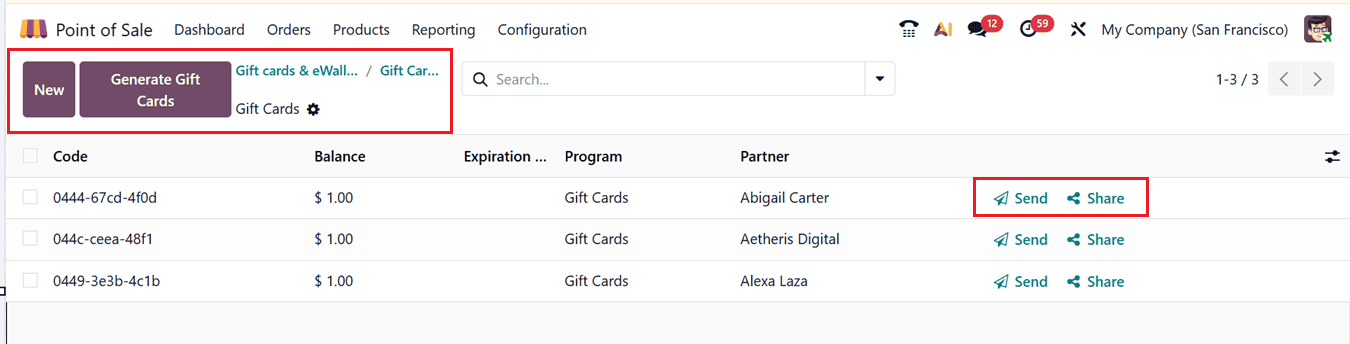
Then, click on the "Generate and Send Gift Card", and the system will create the cards. All created gift cards will be shown in the Gift Cards tab. From there, you can easily send or share them. If you need more, you can generate new ones anytime.
Sending a Gift Card
Click on the "Send" button from the dashboard next to the specific gift card column to send a card. The Gift card code, value, and expiration date will appear in a mail window. Click "Send" after adding the recipient's email address and a subject. The coupon and a link to redeem it will be sent to the customer via email, as shown in the screenshot below.
Sharing a Gift Card Link
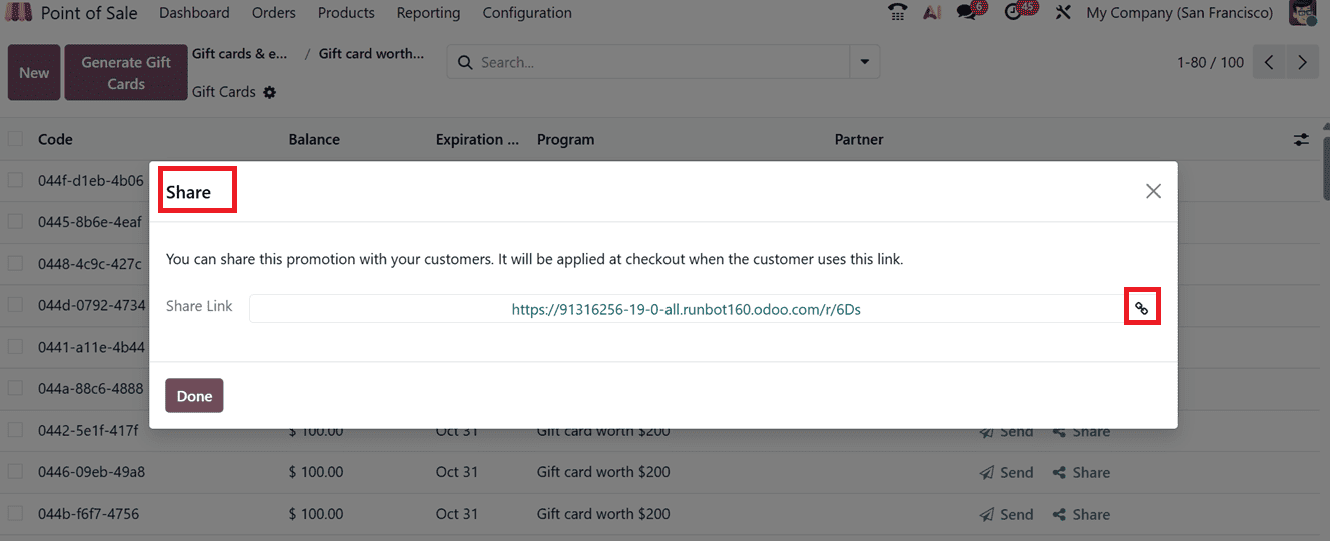
To share the card through a link, click on the "Share" button. This will open a pop-up with a gift card URL, as depicted in the screenshot below.
You can copy this link to send to the customer, or use the "Generate Short Link" option to make a shorter version of the shared link. If you want to copy a code yourself, go to the Gift Cards list and click on the one you need. A detailed page will open where you can copy the code directly.
To redeem a gift card during the checkout process, begin by launching a Point of Sale (PoS) session and adding the desired products to the cart. Click on the three dotted menu( “Actions” ) button and choose the “Enter Code” option from the POS Sales interface.

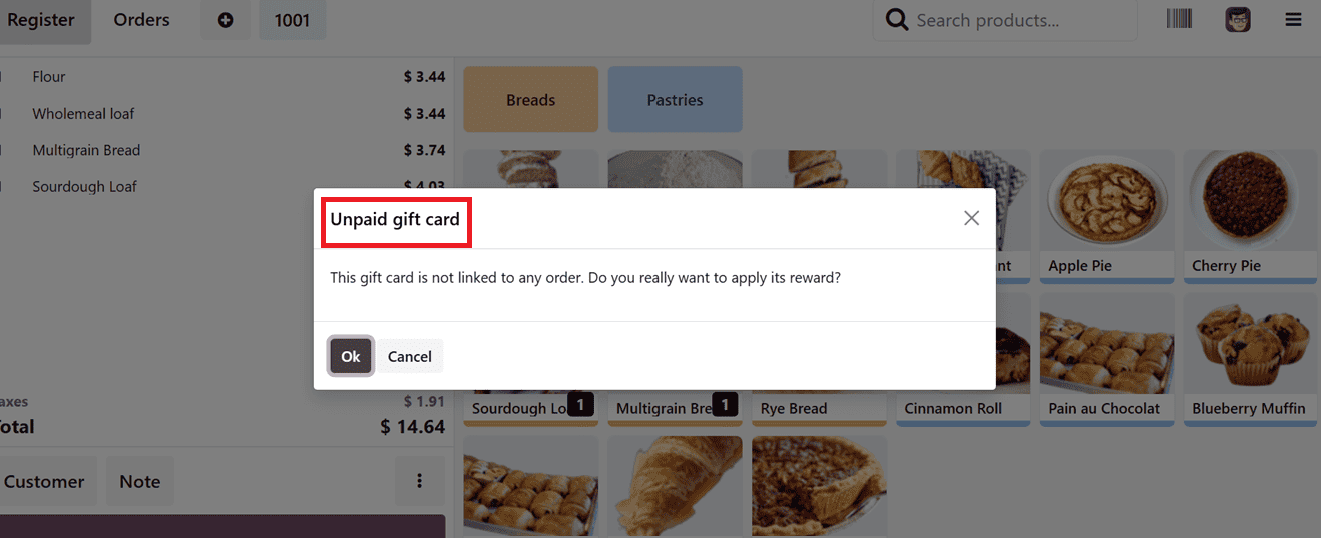
In the new Enter code window, paste the Gift card/Discount code and click on the“Apply” button, as shown below.
After applying the code, you’ll need to confirm the transaction again to complete the purchase, as shown in the screenshot below.
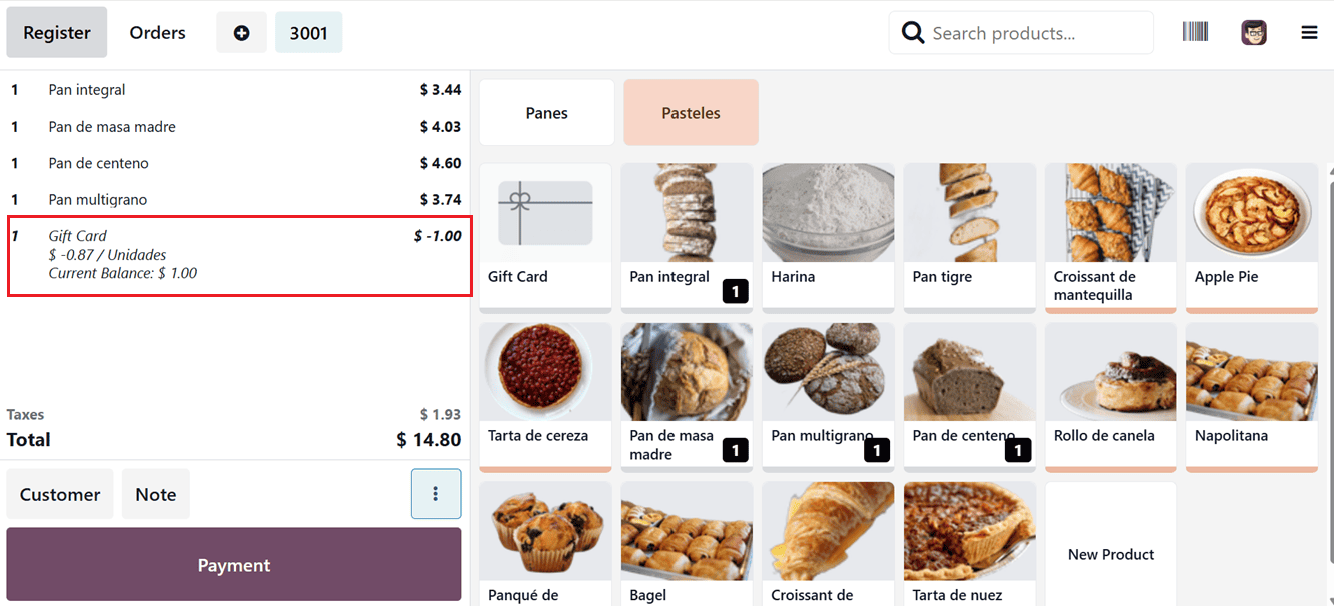
The gift card amount will be deducted from the total bill, and any remaining balance can be paid using the ‘Payment’ button.
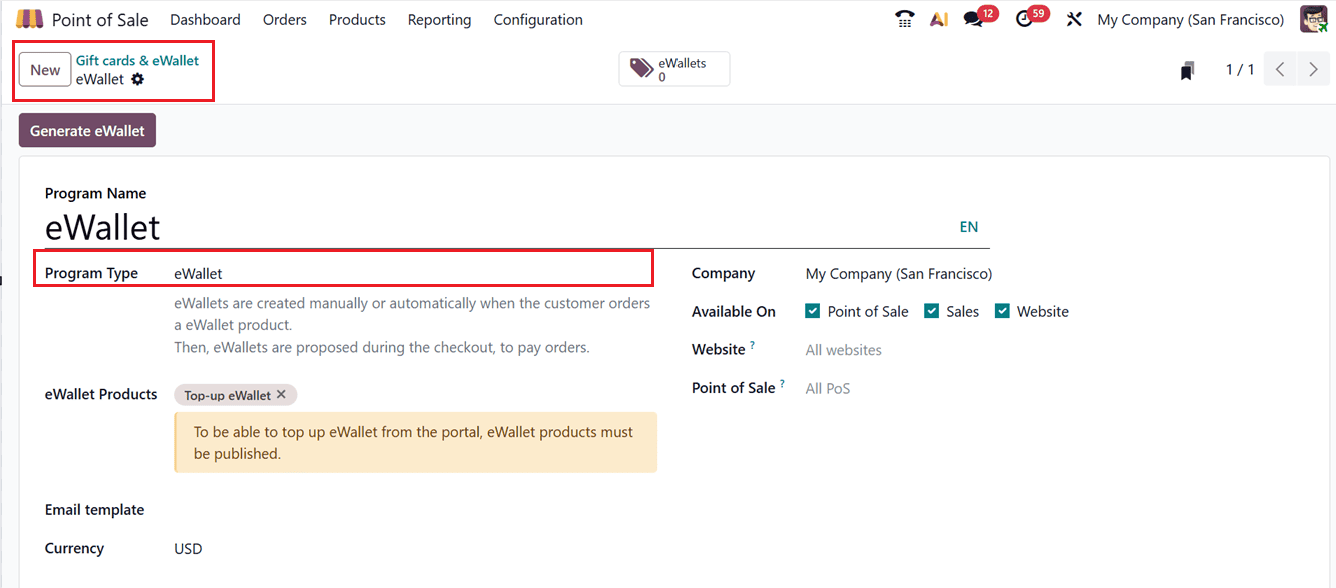
Creating eWallets
Creating eWallets follows a process similar to gift cards, with one key difference. So, you can select “eWallets” as the ‘Program Type.’ These eWallets are created manually or automatically when a customer buys an eWallet product and can be used for payment at checkout.
In Odoo 19 POS, top-up eWallet products let customers add funds to their eWallet by purchasing prepaid recharge options. Offering different prices provides flexible amounts, making it easy for customers to recharge and pay quickly and cashlessly at checkout. This simplifies wallet management and encourages repeat use. You can create and publish the eWallet top up product like a normal product, as shown in the screenshot below.
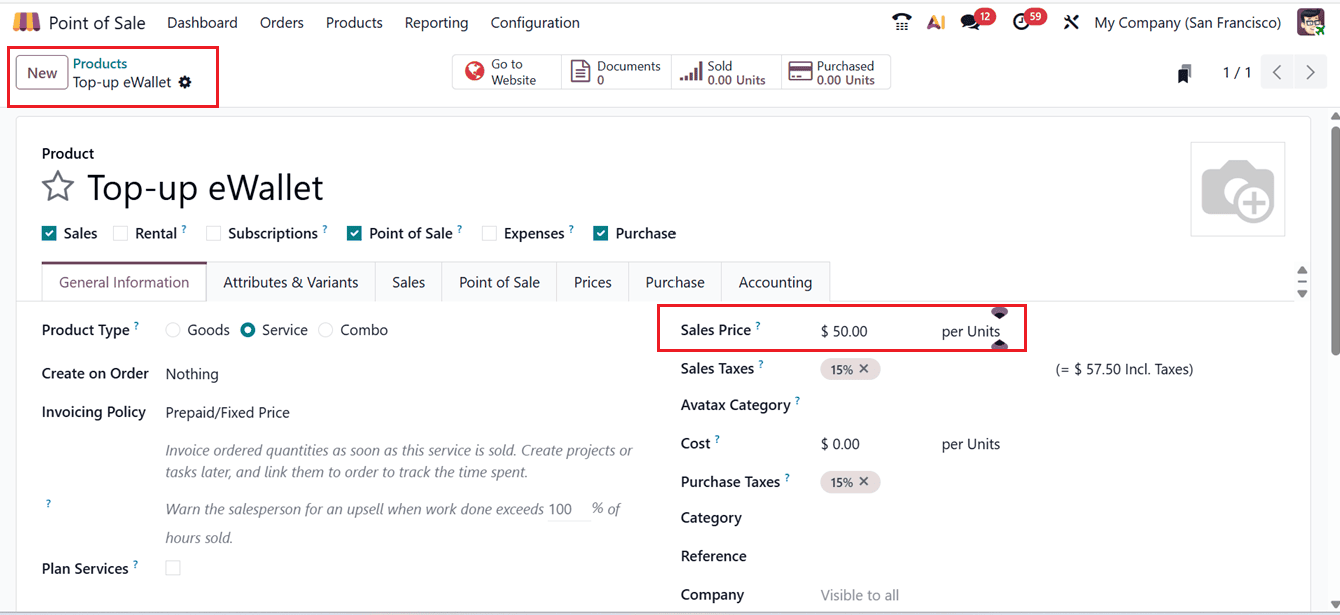
Then, set the key fields such as eWallet Products, where you select recharge options customers can buy; Discount Product, linking discounts for eWallet use; and Email Template, for sending notifications about eWallet activity. You also set the Currency and Company for correct financial and organizational management. The Available On, Website, and Point of Sale fields control where the eWallet products appear, while Displayed As determines how they show up to customers, as depicted in the screenshot below.
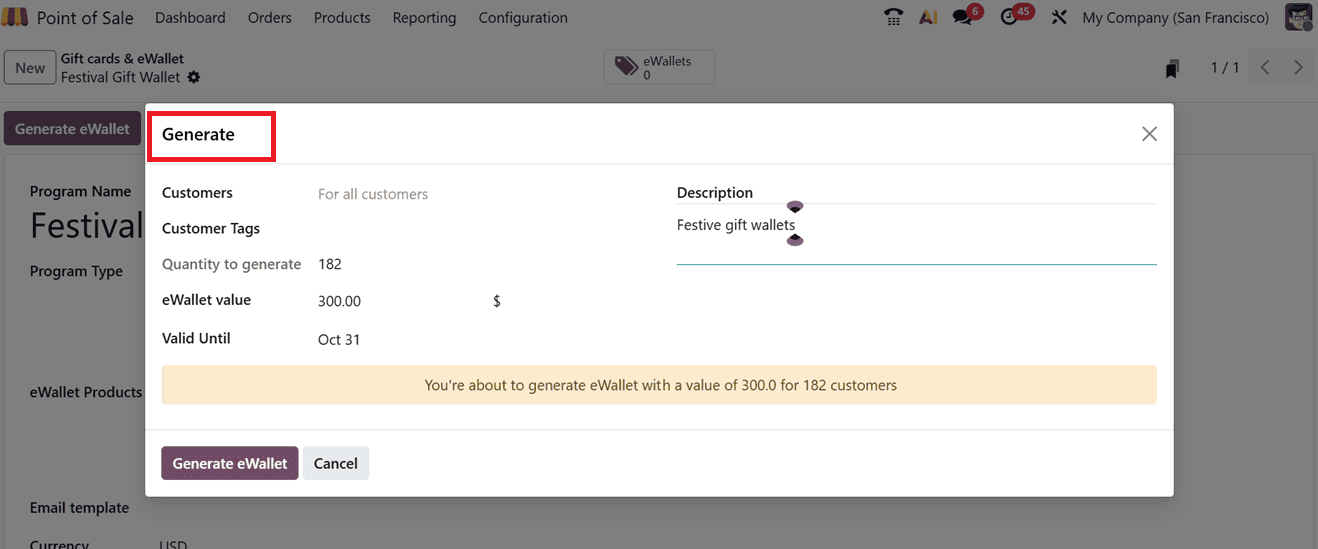
After configuration, click on the “Generate eWallet” button, this will open a pop-up where you can input Customer details, Customer Tags, eWallet value, Quantity to generate, Valid Until period, and a short Description if needed. Once complete, click “Generate eWallet” to issue the wallets.
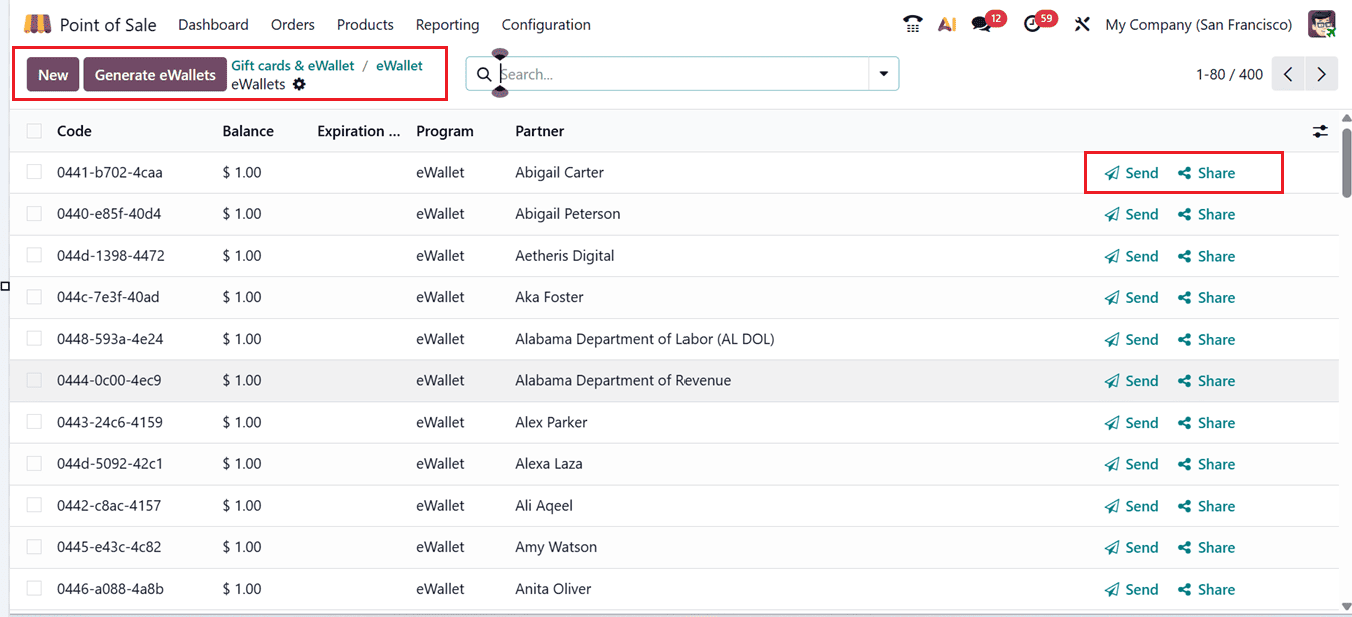
All created eWallets are available in the “eWallets” smart tab in the wallet configuration form. From this section, users can monitor balances and issue new eWallets when required. The eWallet smart tab will show the dashboard of all the generated eWallets with their Code, Balance, Expiration Date, Program, Partner with the Send and Share buttons, as depicted in the screenshot below.
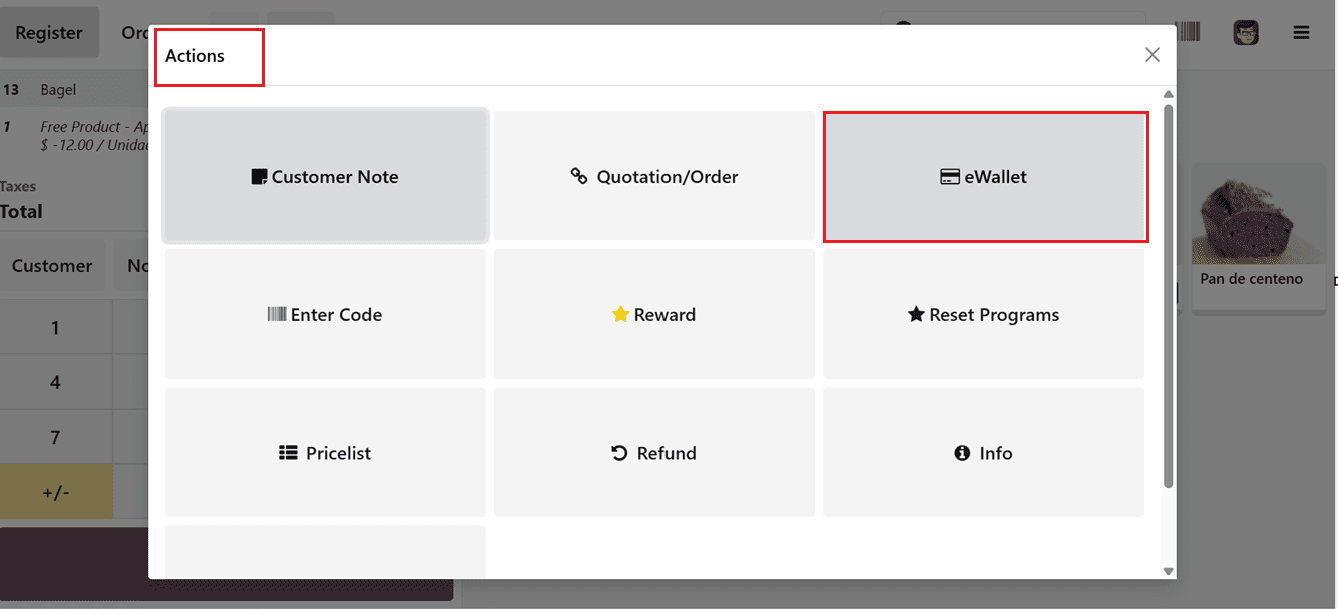
You can send and share the eWallet codes to the targeted users using the same method as we discussed in the giftcard session above. To apply an eWallet during a PoS transaction, use the “eWallet” option under the “Actions” menu in the PoS window.
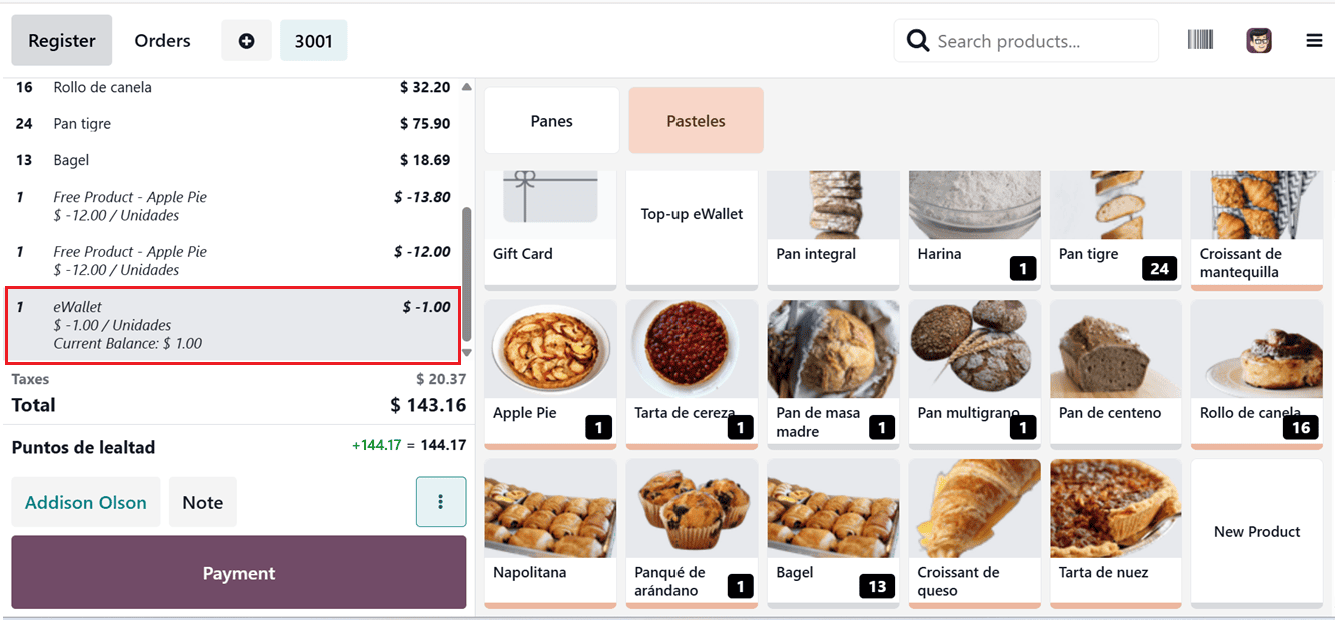
After applying the eWallet option for the selected customer, you can pay the order with the eWalletPay option. So the ewallet will apply to the total amount of the POS order, as depicted in the screenshot below.
Integrating gift cards, eWallets, and loyalty programs can significantly enhance customer engagement and streamline the checkout experience.
In conclusion, these Loyalty Programs, Promotions, and Discounts features help attract new customers, encourage repeat business, and boost revenue through personalized incentives like rewards points and targeted offers. With real-time tracking and flexible campaign management, businesses can quickly adapt strategies to meet customer needs. When used thoughtfully, these tools go beyond simple sales tactics, driving customer satisfaction, loyalty, and long-term growth.
To read more about How Discounts, Promotions & Loyalty Can Be Used in Odoo 18 POS, refer to our blog How Discounts, Promotions & Loyalty Can Be Used in Odoo 18 POS.