Odoo 19 Enterprise’s Data Recycle is a potent tool that helps businesses effectively and safely handle lost records. Odoo sends deleted records to a recycle bin rather than erasing them, giving users the option to review, restore, or permanently remove them as needed. Better data management is ensured, unintentional data loss is avoided, and compliance requirements are supported. Important business records, such as contacts, documents, or transactions, can be recovered by authorized users within a specified time frame. Data Recycle maintains a clean and orderly database environment while improving data security, accountability, and confidence.
In the Data Cleaning module, you can see three rules: Deduplication, Recycle Record, and Field Cleaning.
Here, the dashboard view shows a list of duplicate papers. The right side of the screen displays a description of the copies, and the left side shows the Rule option. Using Rules, Odoo 19 allows you to define the parameters used to find duplicate documents. These rules can be set up using the Configuration menu.

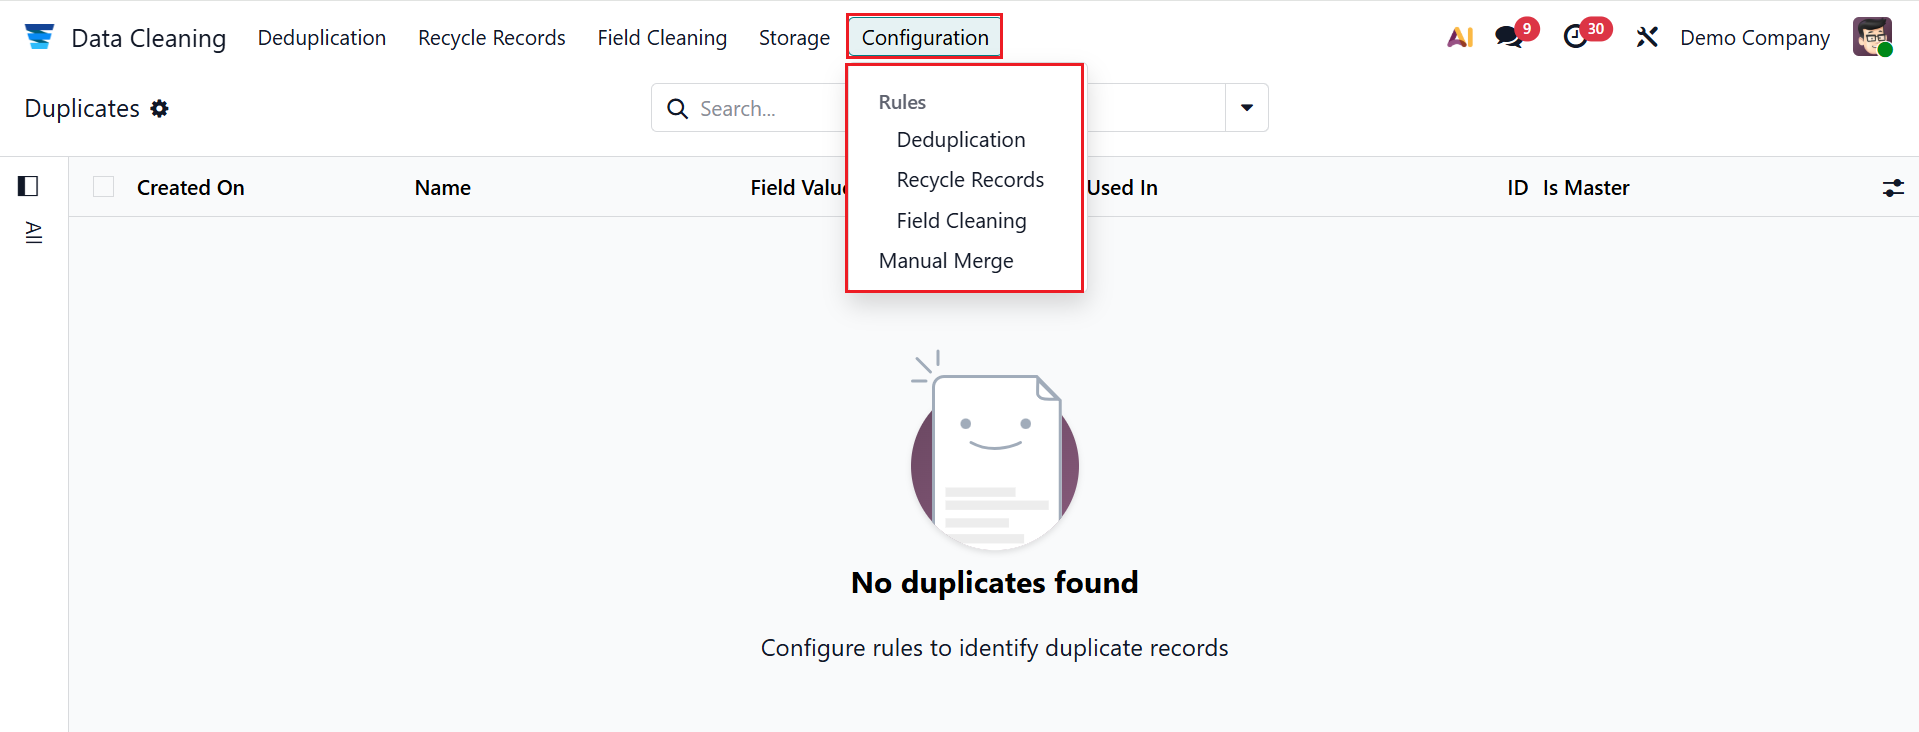
1. Configuration:
Under the Configuration menu, you can see the options such as Deduplication, Recycle Records, Field Cleaning, and Manual Merge.
1.1 Deduplication:
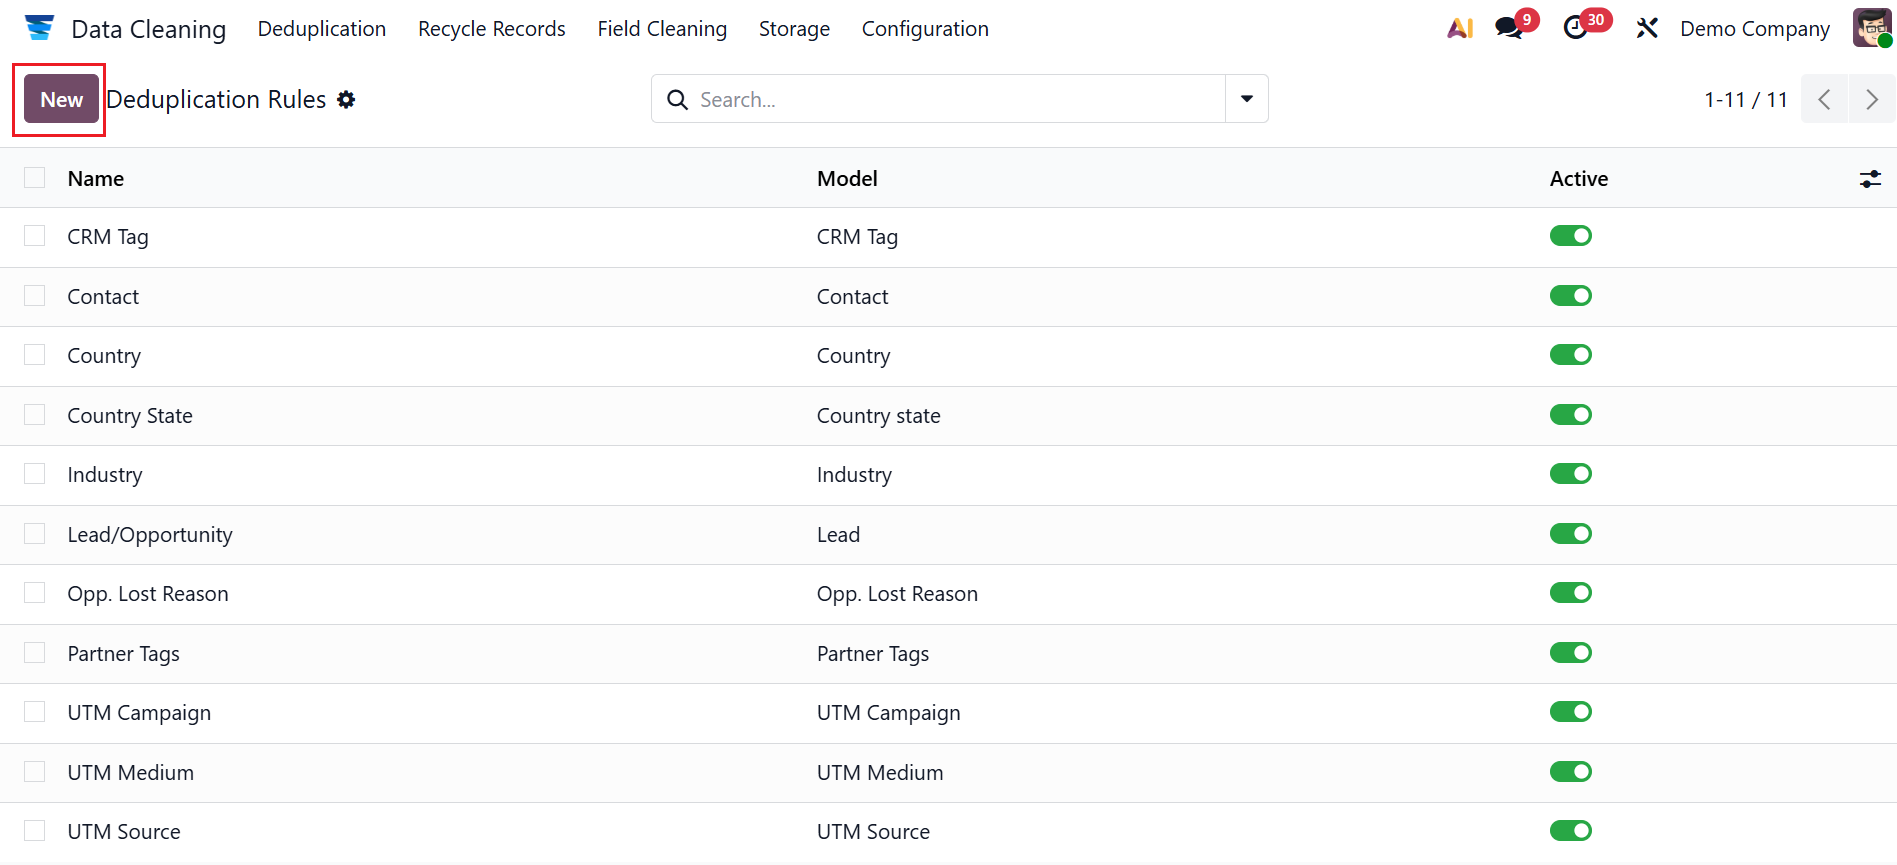
The Deduplication rule defines the conditions for detecting duplicate records. It automatically identifies and merges duplicates, ensuring clean, accurate, and consistent data across the system. Here, you can see a list of deduplication rules, including the details such as Name, Model, and Active. To create a new deduplication rule, click on the New button.
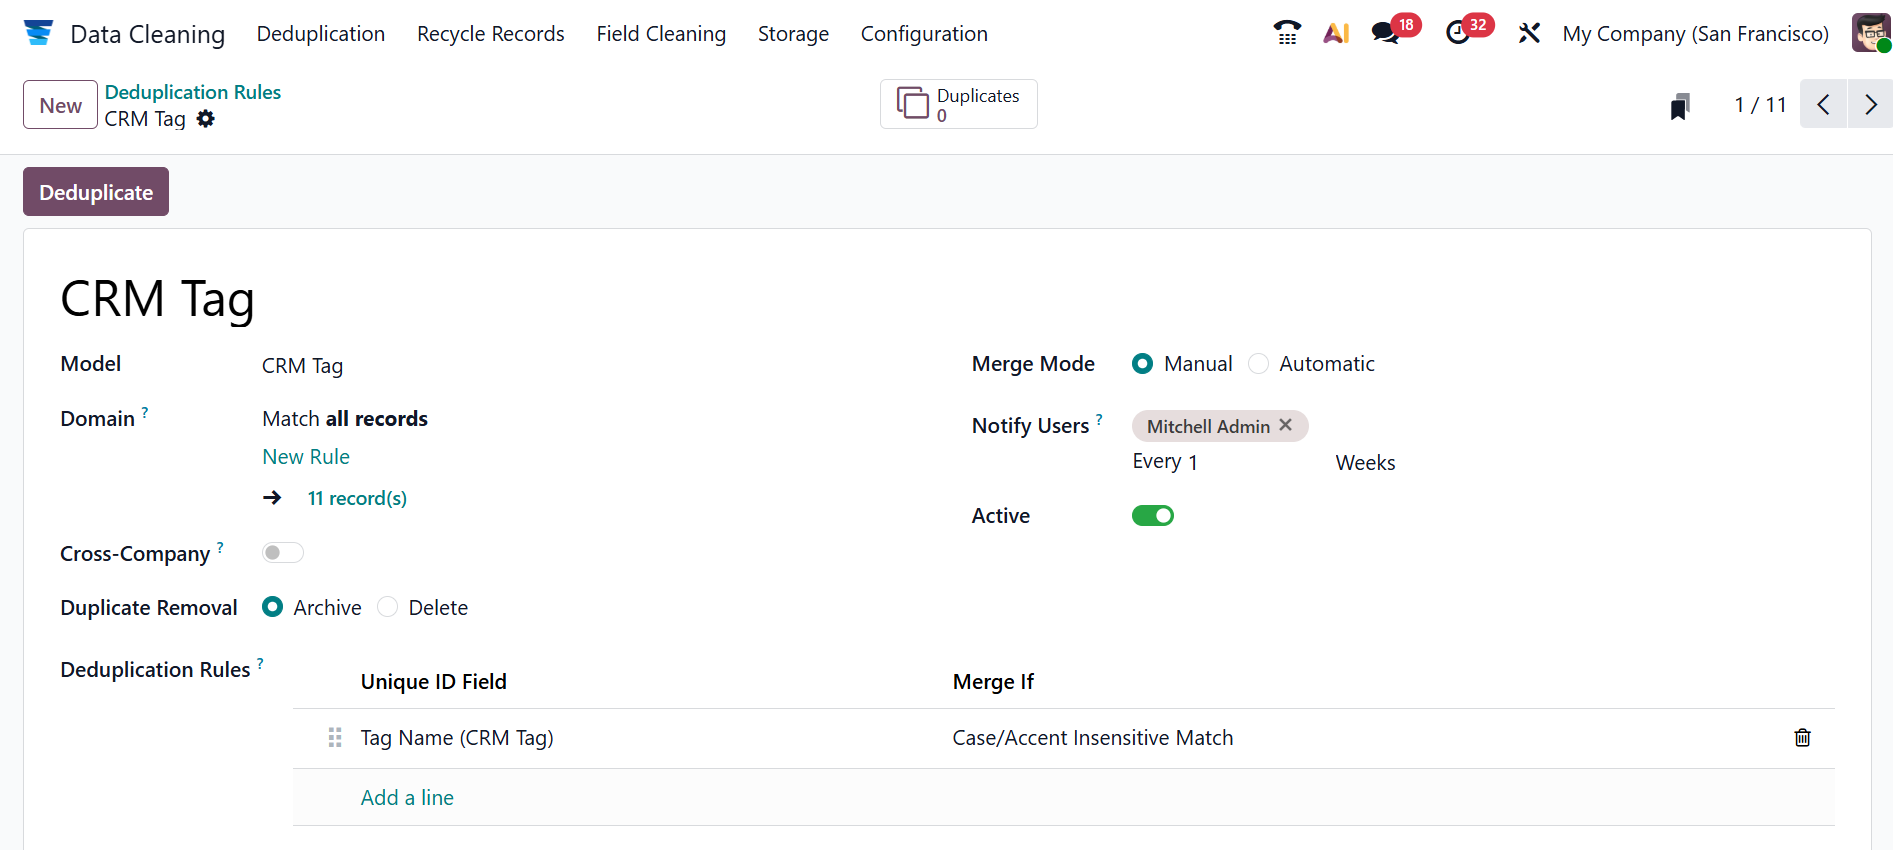
Firstly, add a name for the new rule or select an existing one. You can select a Model for the rule from the list. In the Domain field, you can specify the number of records eligible for the rule. Enable the Cross-Company field to suggest duplicates across different companies. In the Duplicate Removal field, select either Archive or Delete option based on the selected Model. In the Merge Mode field, select either Manual (manually merges duplicate groupings) or Automatic (automatically merges duplicate groupings). You can see a Notify Users field when using the Manual Merge model. Enter a list of users in this box to be notified when new entries need to be merged. Enable the Active field to start capturing duplicates. In the Deduplication Rules field, click the Add a line button under the Unique ID Field column to select a field from the drop-down menu. Select Exact Match or Case Accent Insensitive Match in the Merge If field.
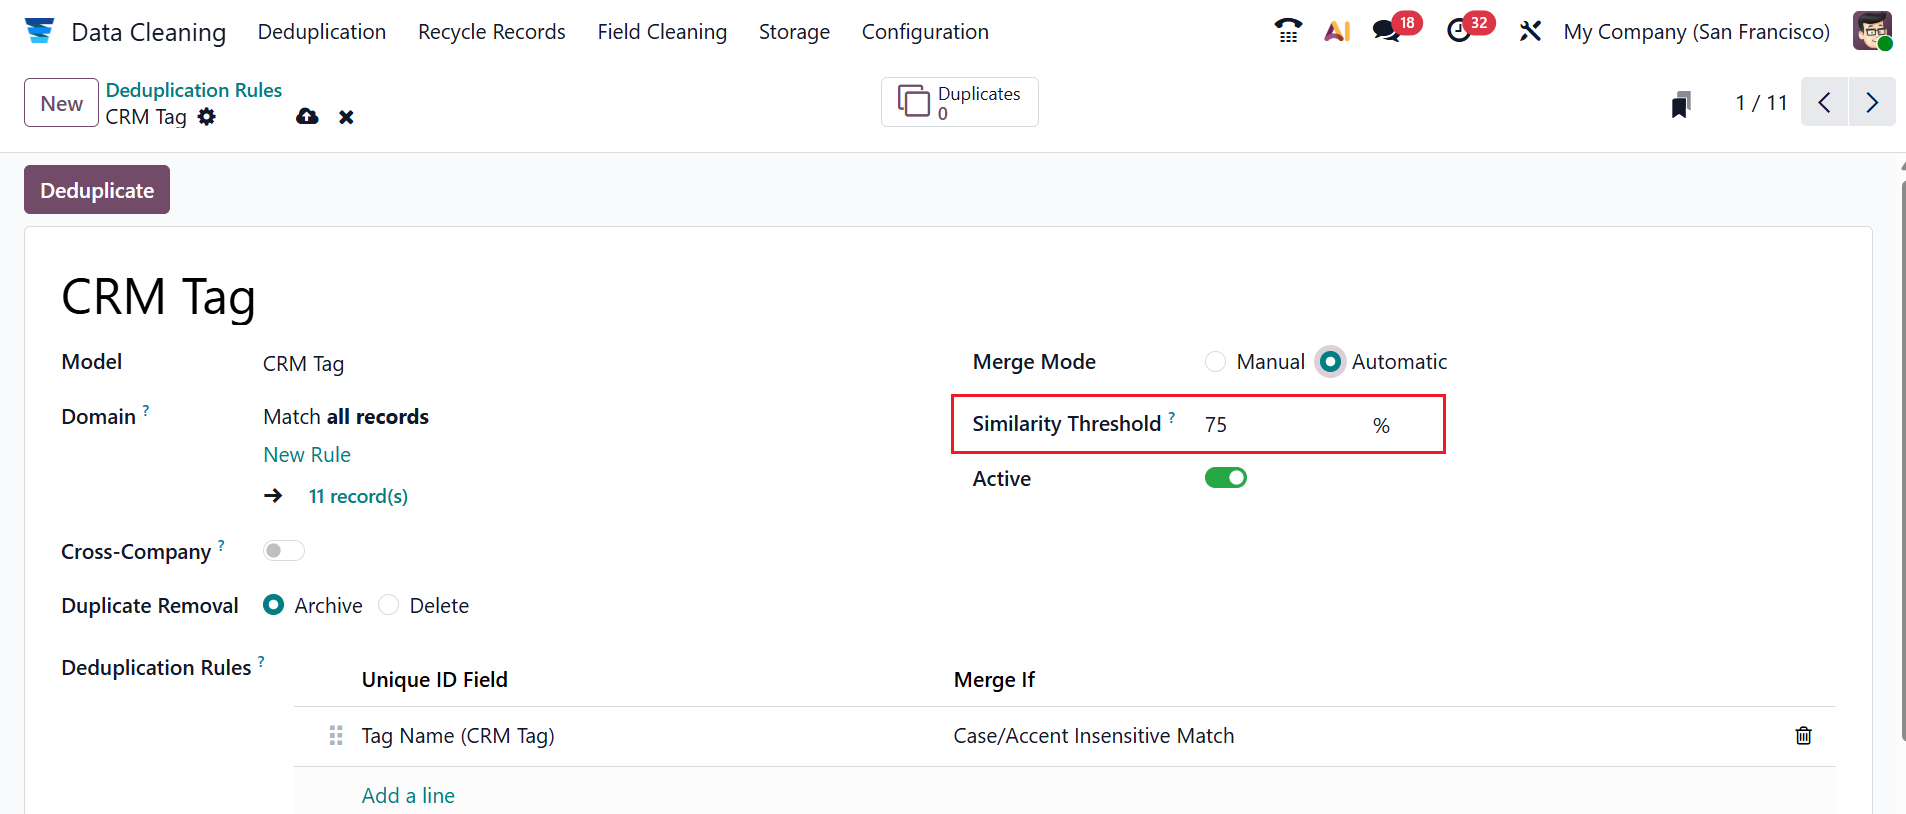
When Merge Mode is Automatic, the Similarity Threshold field appears—records with similarity above this percentage will merge automatically.
Then, click on the Deduplicate button as shown below:
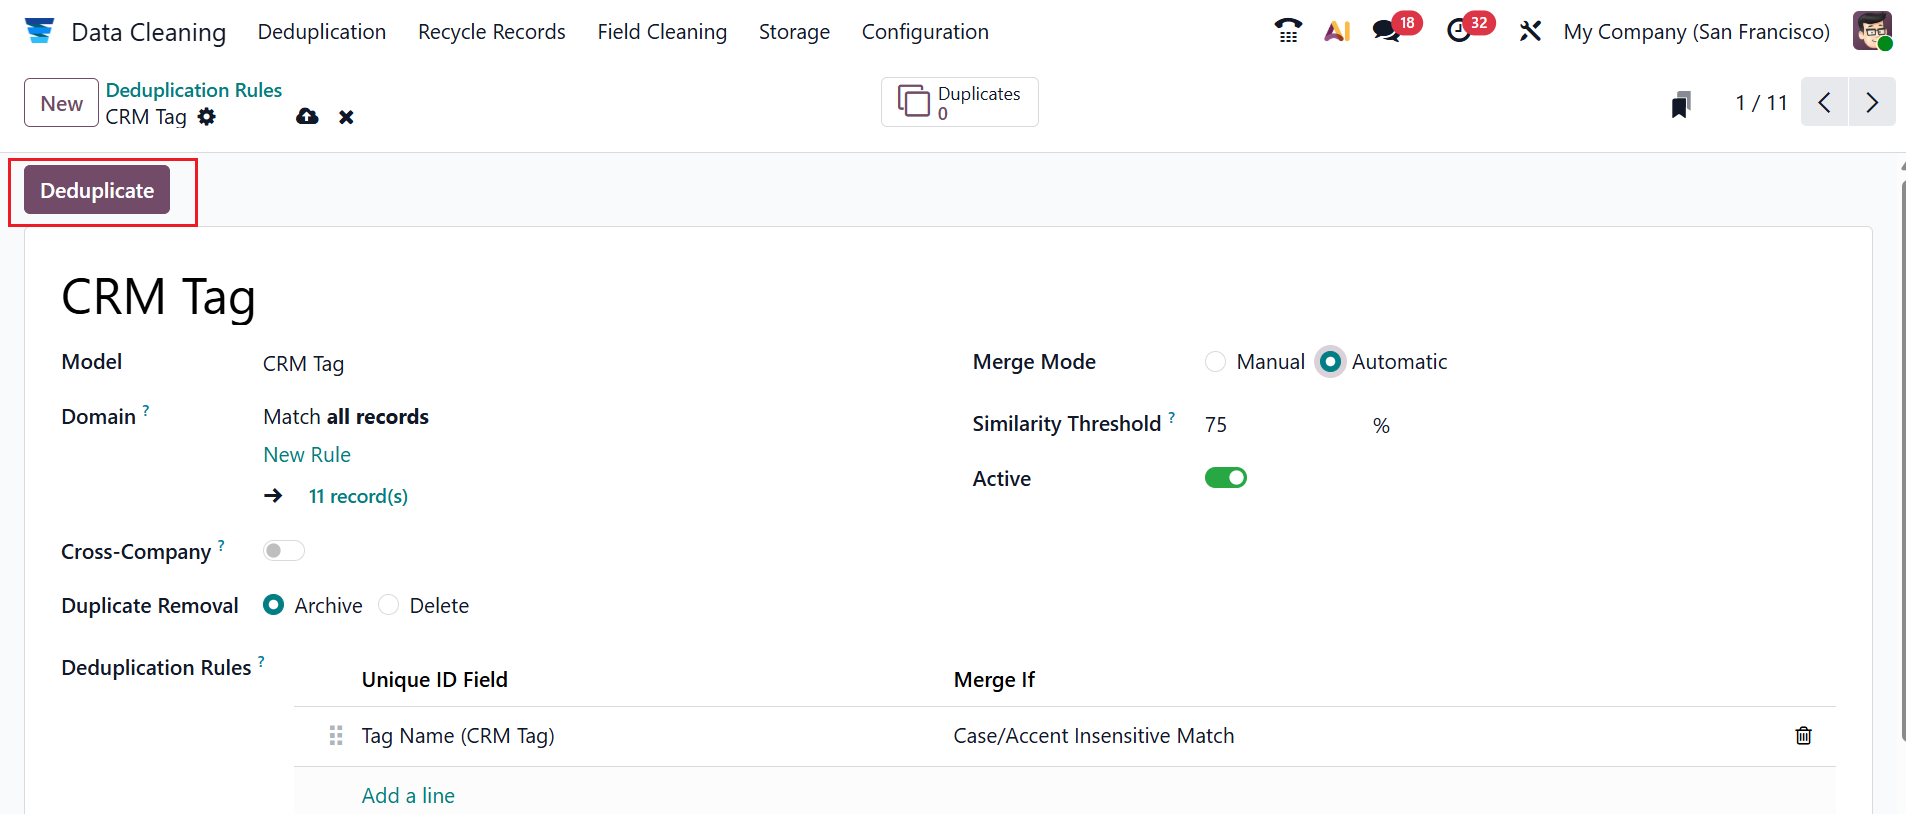
Under the Rule option, you can see the CRM Tag model records.

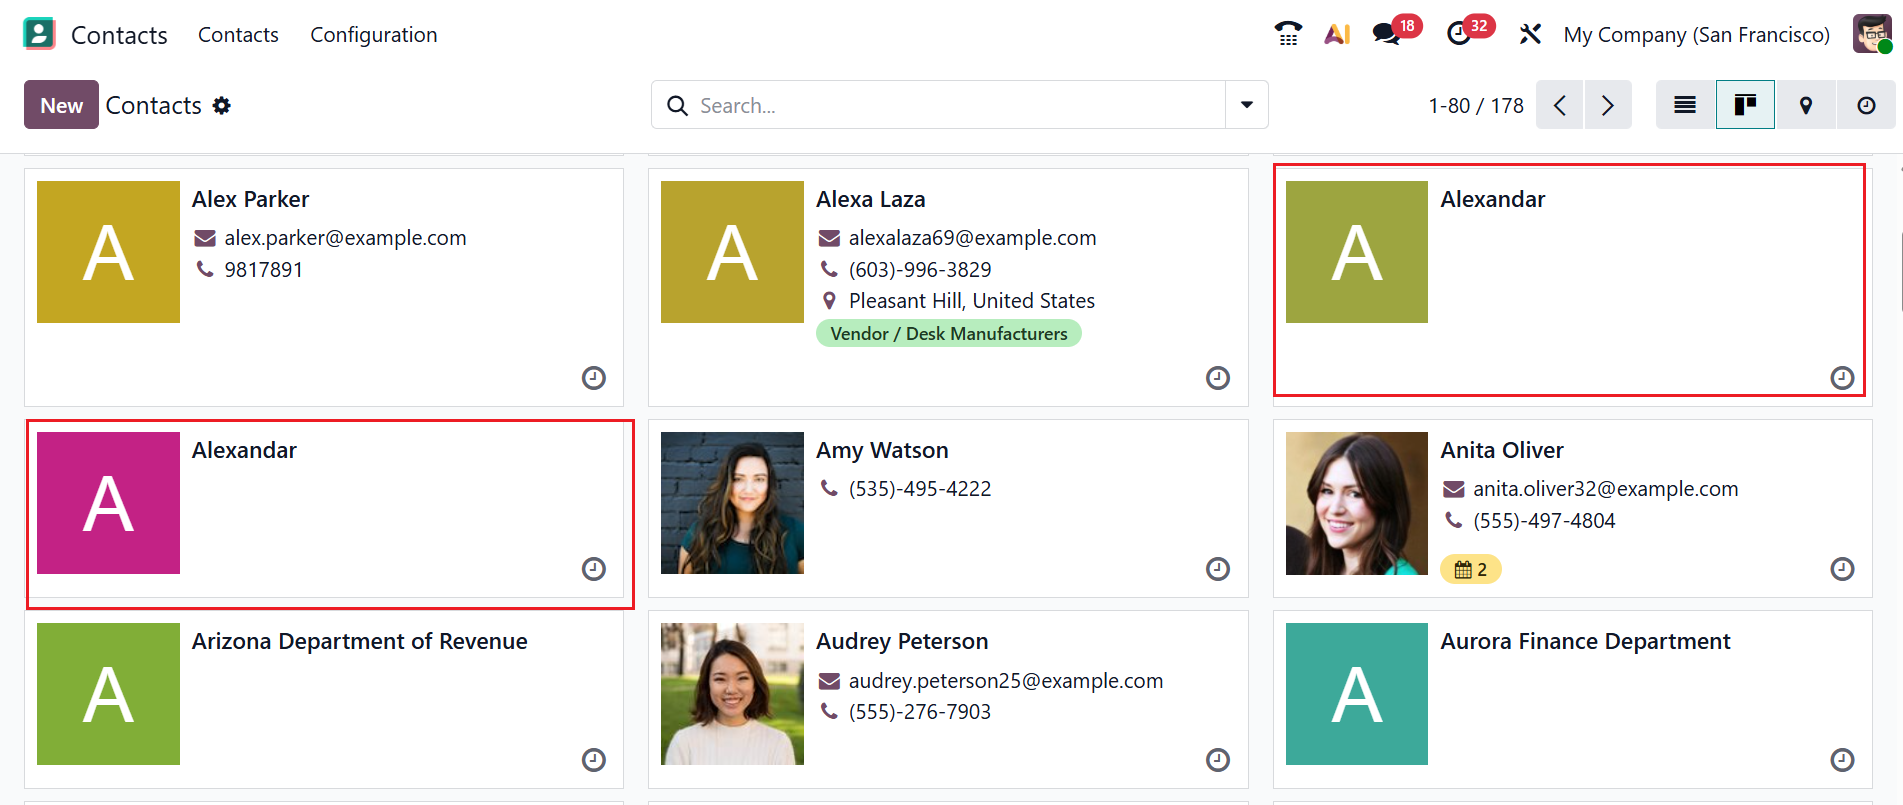
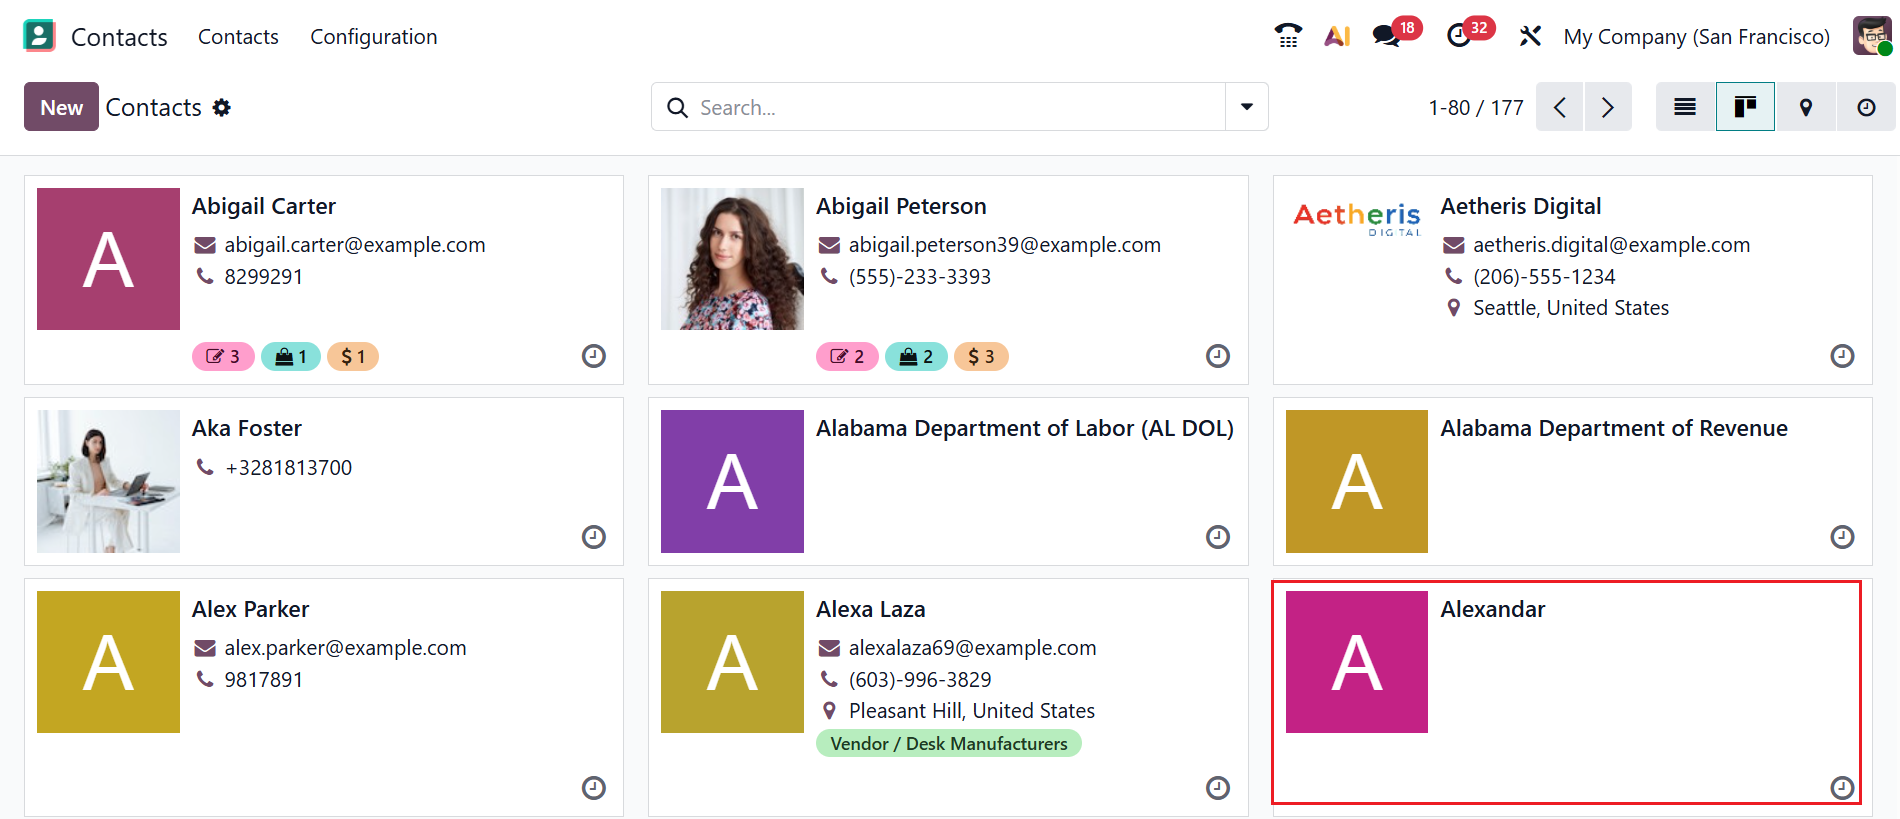
Let’s check the Deduplication Rules by combining two contacts. For that, create two contacts with the same name in the Odoo 19 Contacts module. Create two contacts named “Alexandar”, as shown in the screenshot.
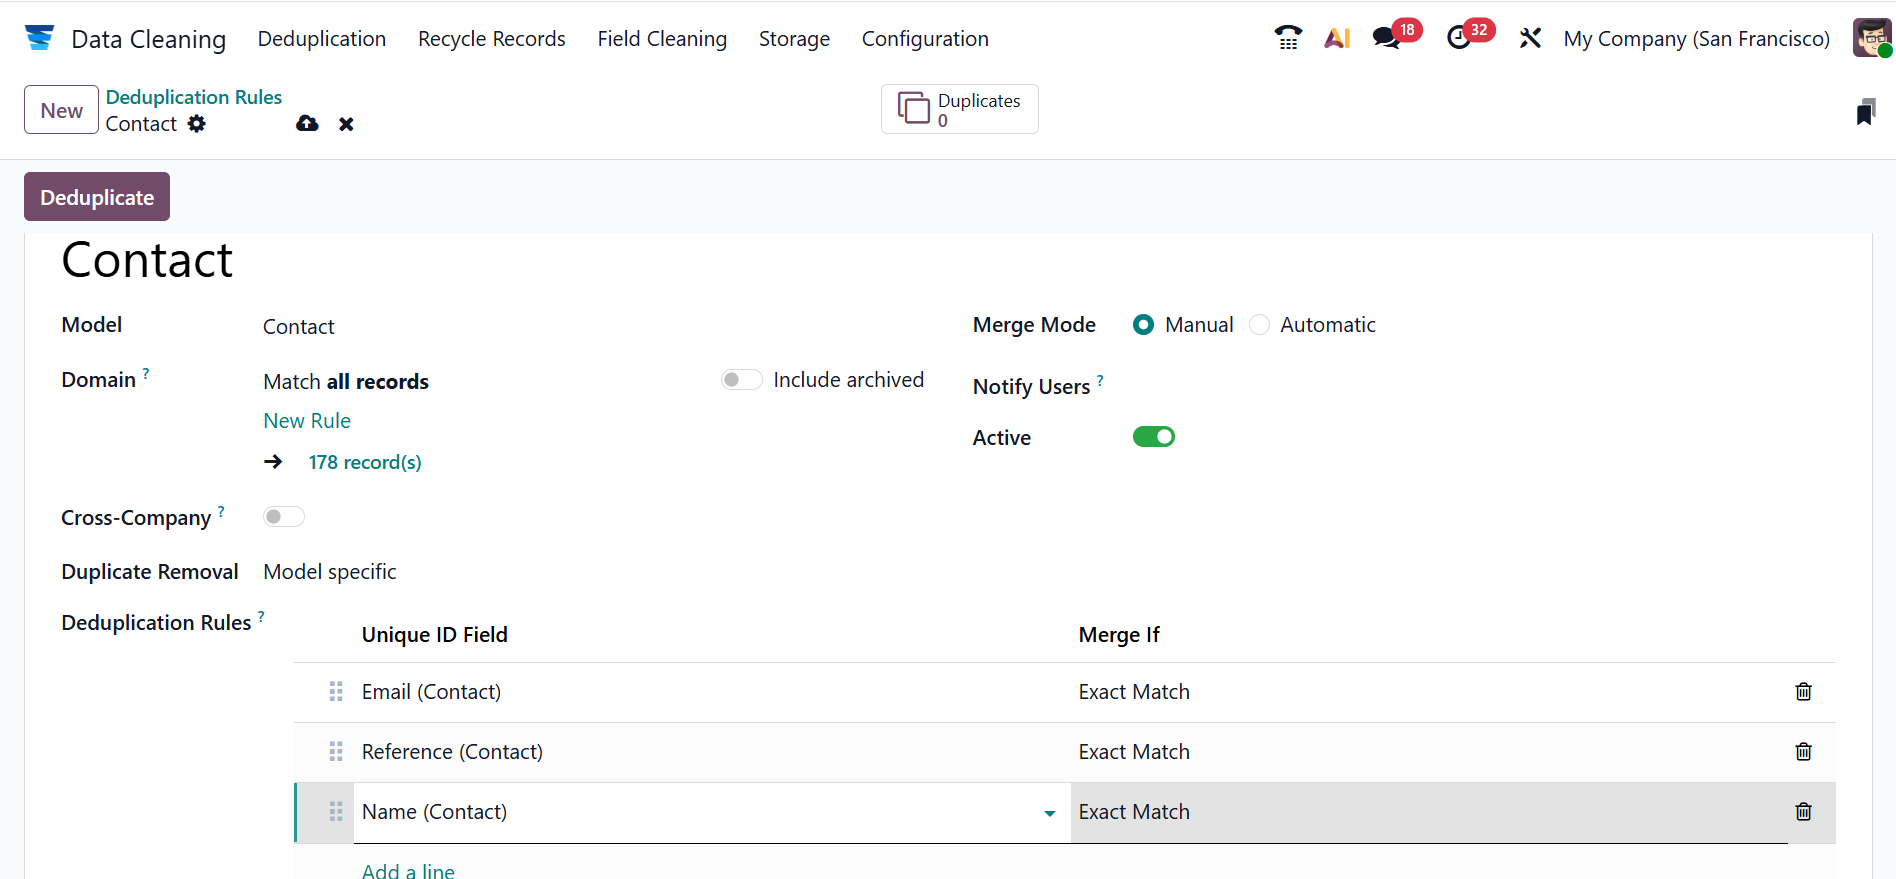
Then, move to the Odoo 19 Data Cleaning module. As illustrated in the screenshot below, set the deduplication rule model to Contact. In the Deduplication Rules field, click Add a Line to specify the unique ID fields for the contacts.
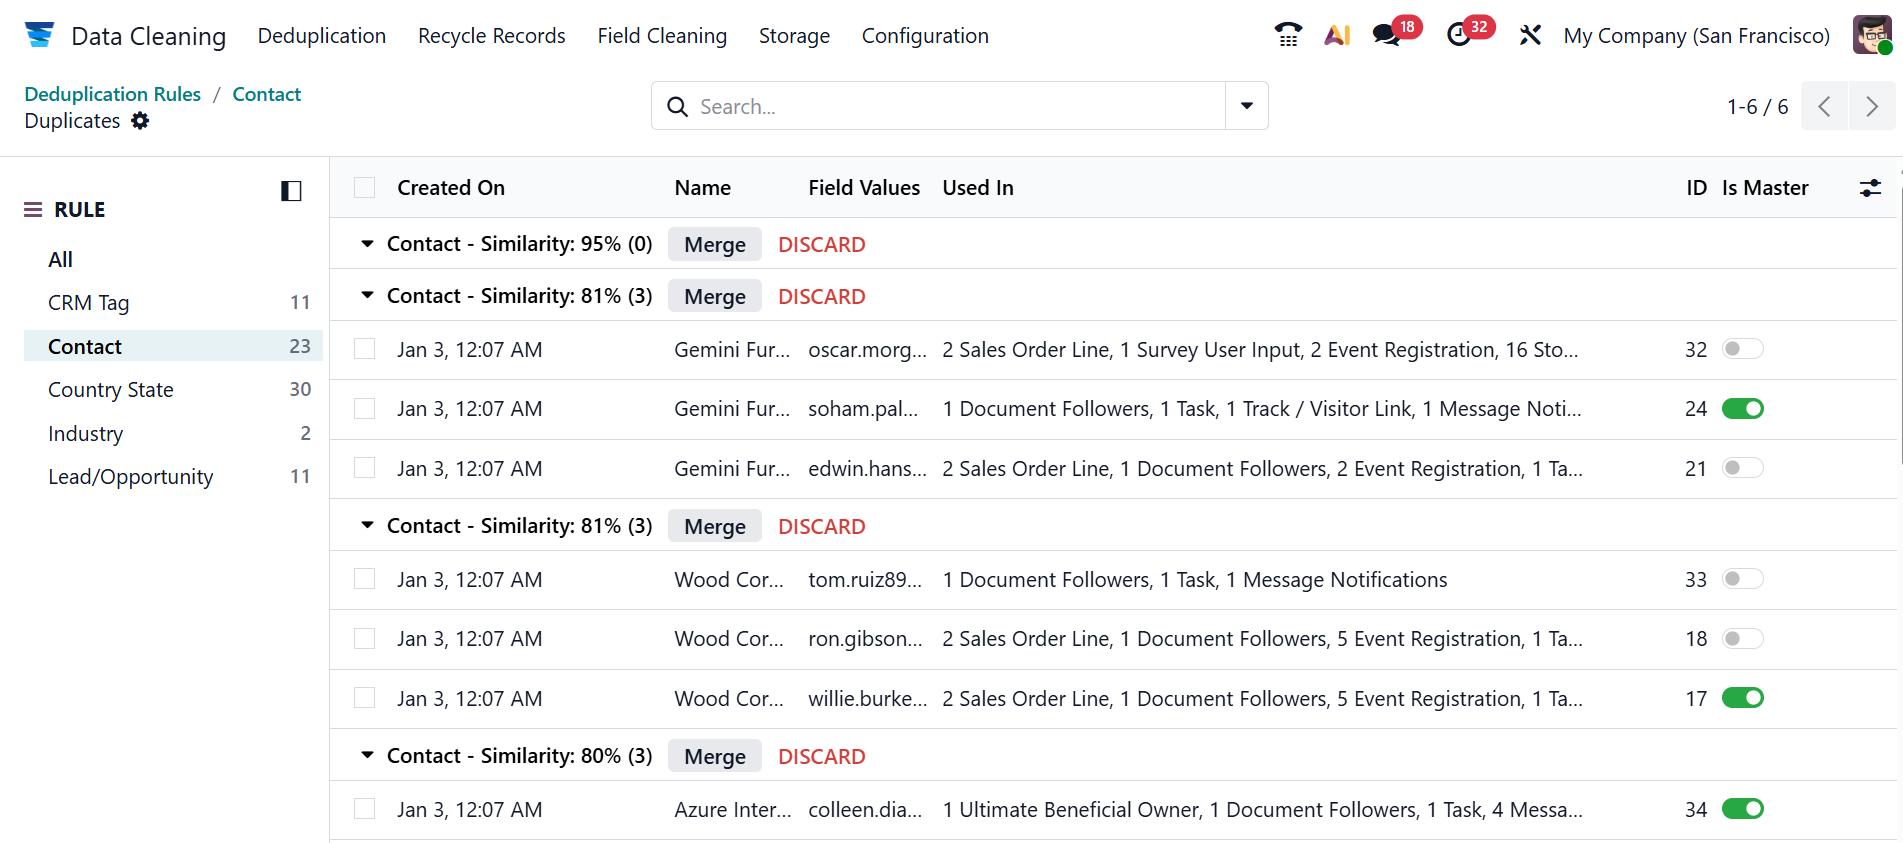
In the Deduplication dashboard, you can view the duplicate contacts with details such as Created On, Name, Field Values, Used In, Record ID, and Is Master. This shows the similarity between the two contacts in percentage. You can see 95% resemblance in these contacts. To avoid duplicate records, select the Merge button. A pop-up will then appear to confirm the merge. Click on the OK button, and you can see that two records are combined into a single format as shown below:
Then, move back to the Odoo 19 Contacts module. In the screenshot below, you can see that only one contact is available as ‘Alexandar’. Thus, the Odoo 19 Data Cleaning module helps to merge duplicate contacts.
1.2. Recycle Records:
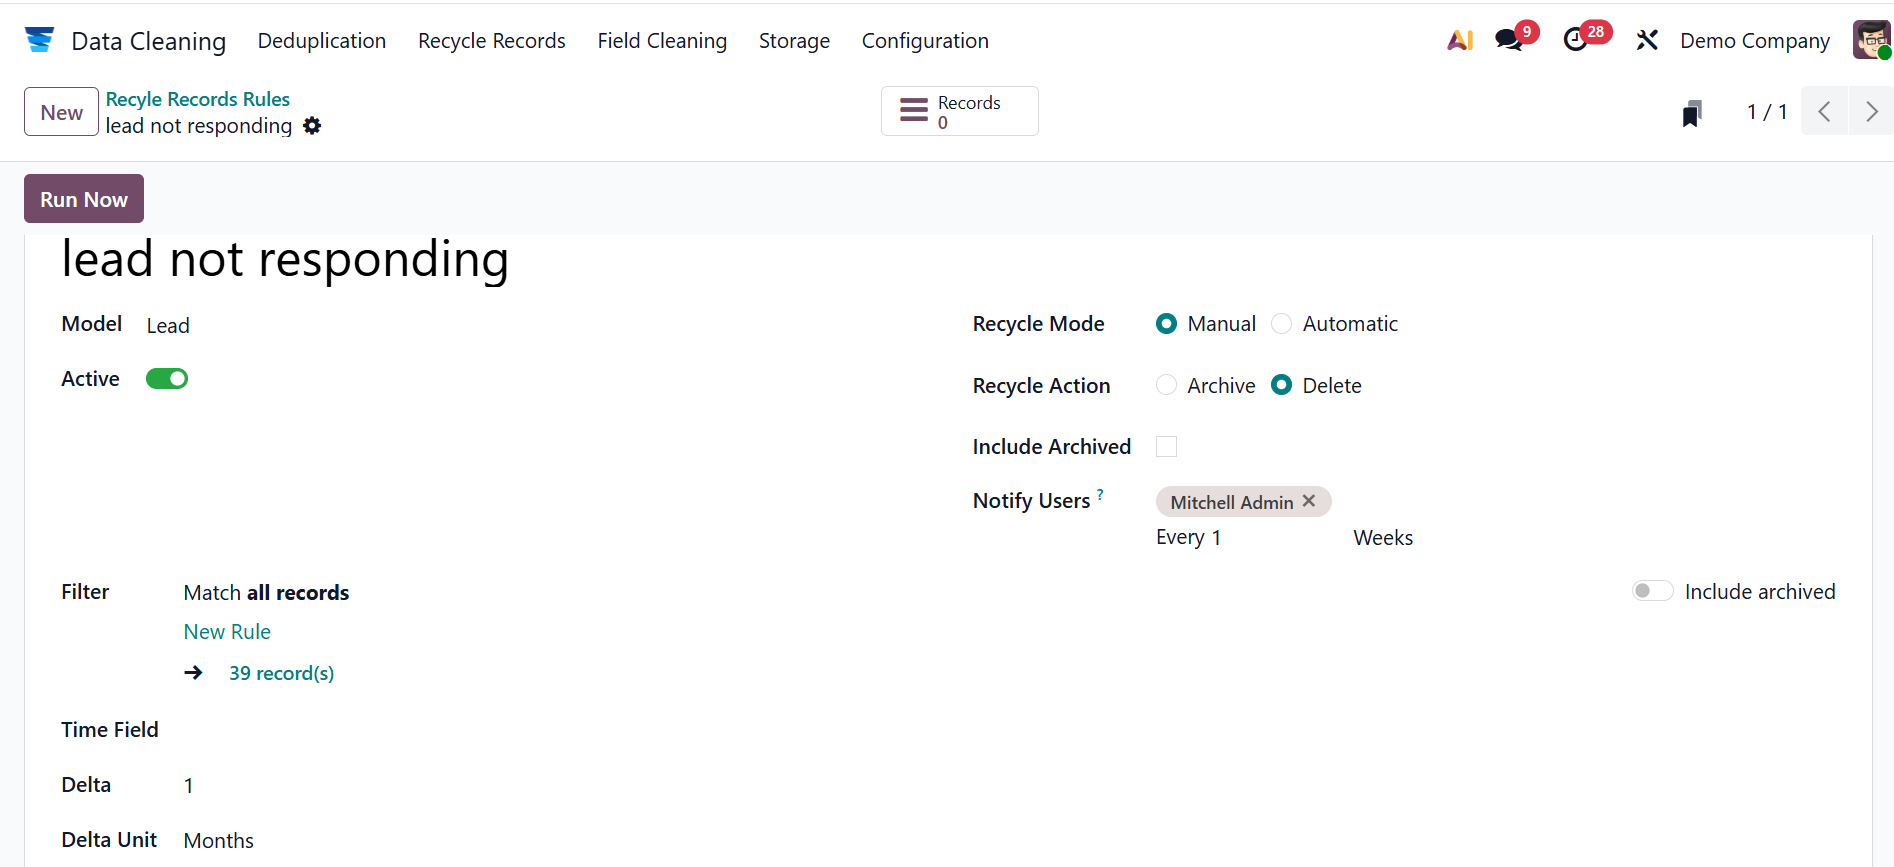
In Odoo 19, the Recycle Record defines the conditions that decide which old or unused records should be automatically moved to the recycle bin instead of being permanently deleted. Select the New button to create a new rule. Firstly, add a rule title and select a Model for this rule. Turn on Active to activate the rule, and use the Filter field to define eligible records. Select a model based on time in the Time Field. In the Delta field, add the length of the time, which should be a whole number. In the Delta Unit field, choose a unit of time from the following options: Days, Weeks, Months, or Years. In the Recycle Mode field, select either Manual (the record should be manually recycled) or Automatic (the record should be automatically recycled). When you select the recycle mode as Manual, a new field will appear named Notify Users, where you can add a list of users to notify when there are new records to recycle. In the Recycle Action field, select either Archive or Delete. When Delete is selected, specify if archived records should be included, then click Run Now to recycle the record.
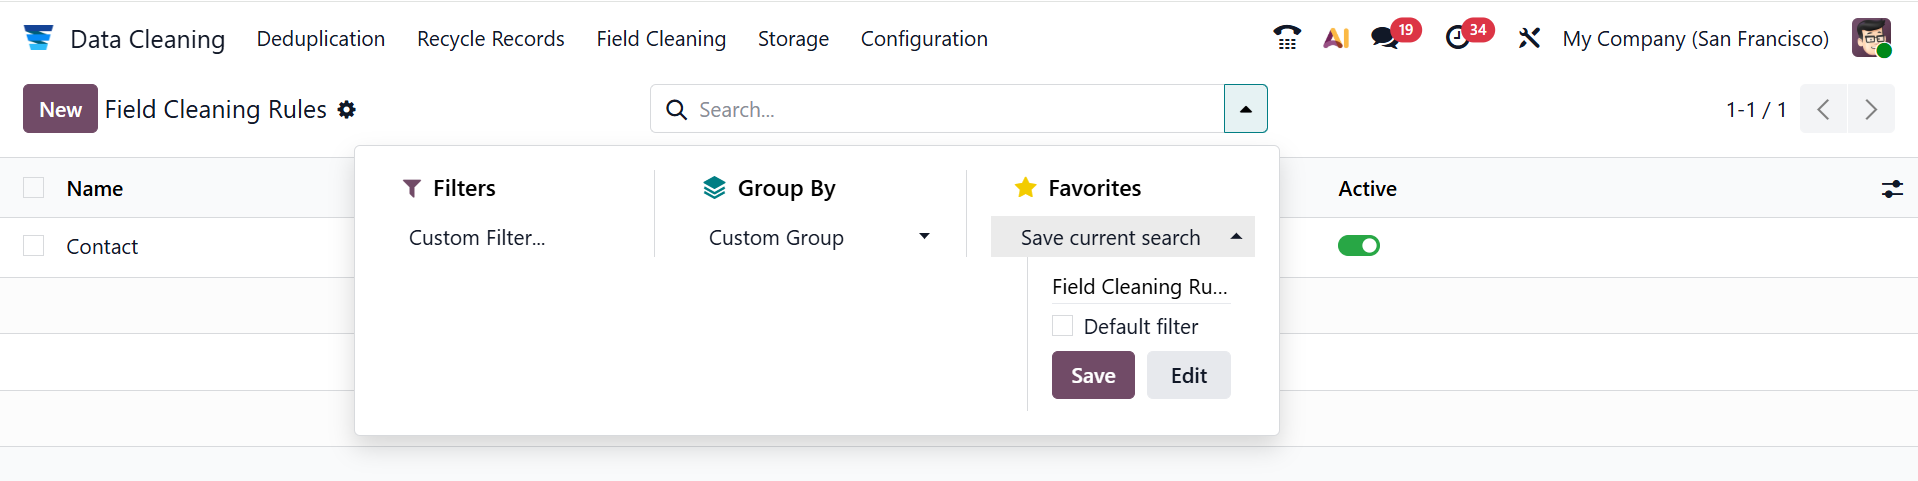
Use Filters, Group By, and Favorites to sort the data.
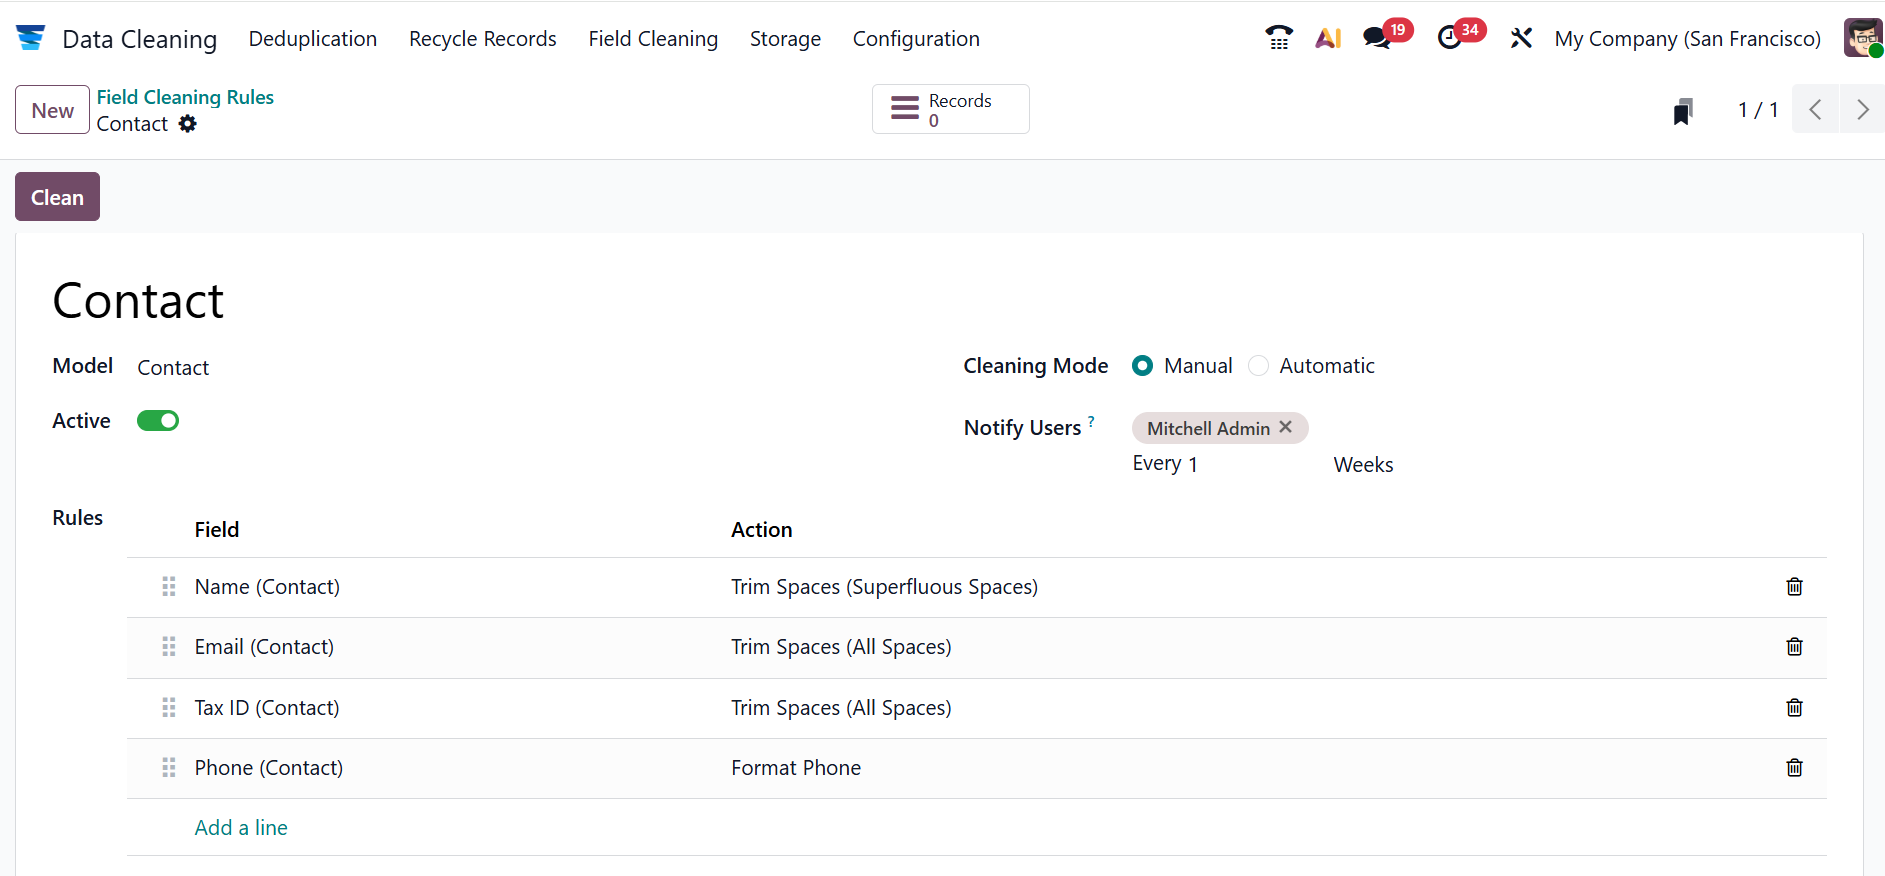
Here, you can add a rule name and select a Model from the list. To activate the rule, you can enable the Active field. In the Cleaning Mode field, select either Manual or Automatic. When Manual is selected as the Cleaning Mode, add users to the Notify Users field to notify them of new records to clean.
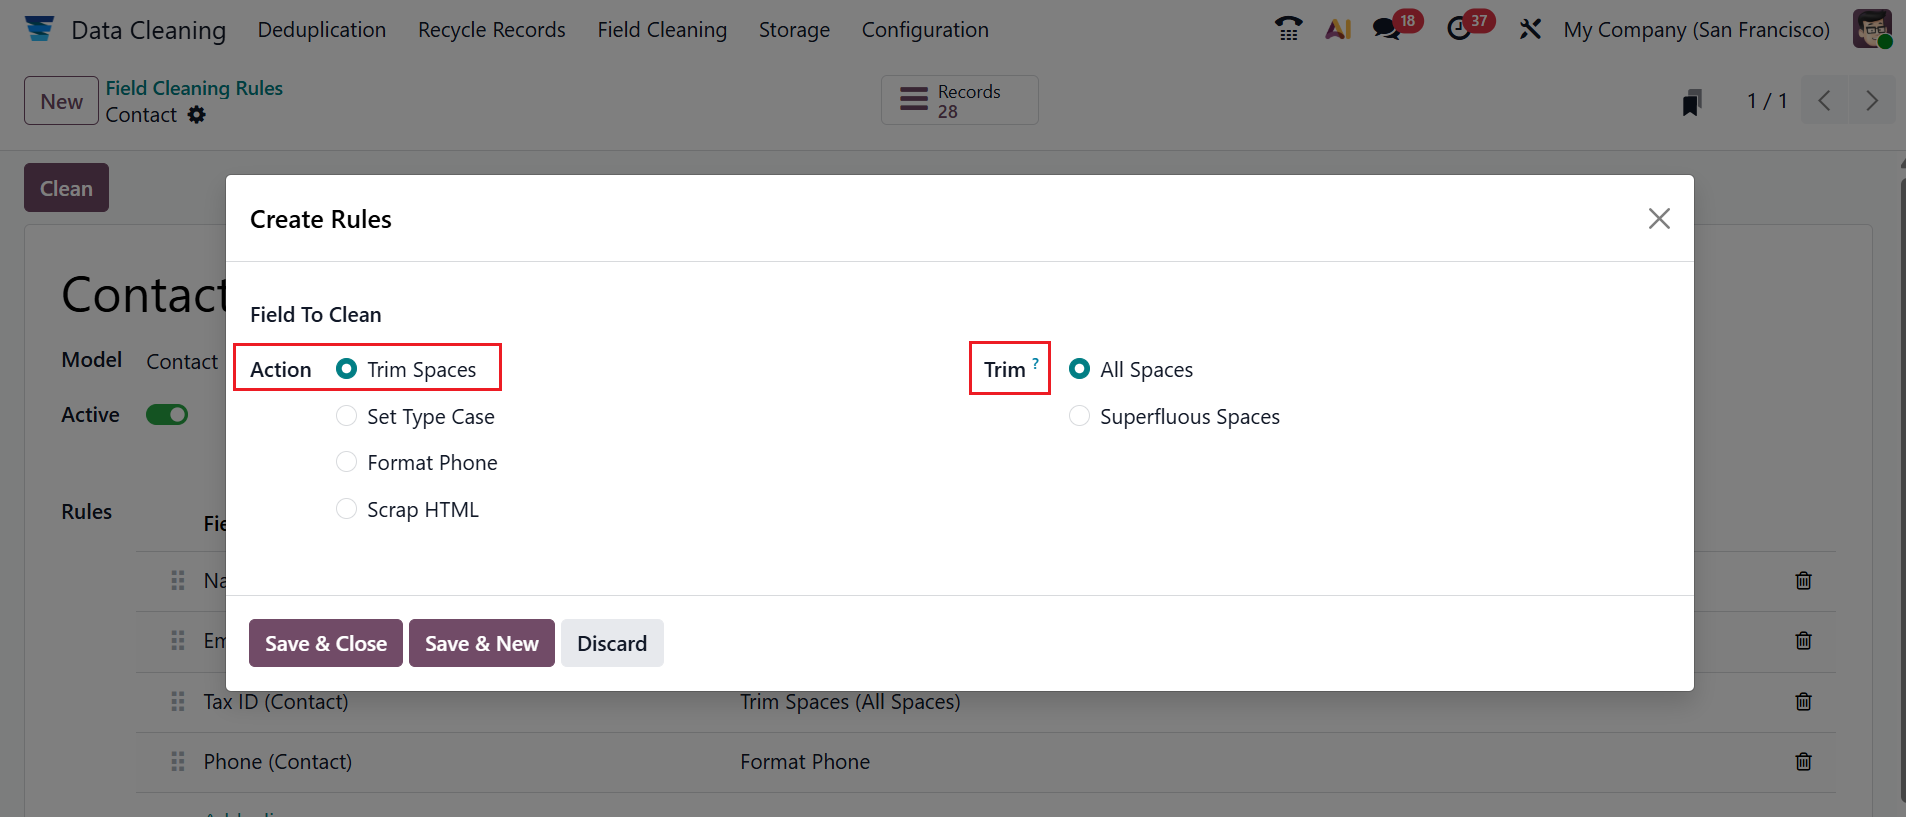
Under the Rules field, click on the Add a line button to define the rule. A new pop-up screen appears, as shown below. In the Field to Clean field, specify the field to be cleaned. You can select an action such as Trim Spaces, Set Type Case, Format Phone, or Scrap HTML. When you select Action as Trim Spaces, you can trim the spaces of the rule as either All Spaces or Superfluous Spaces.
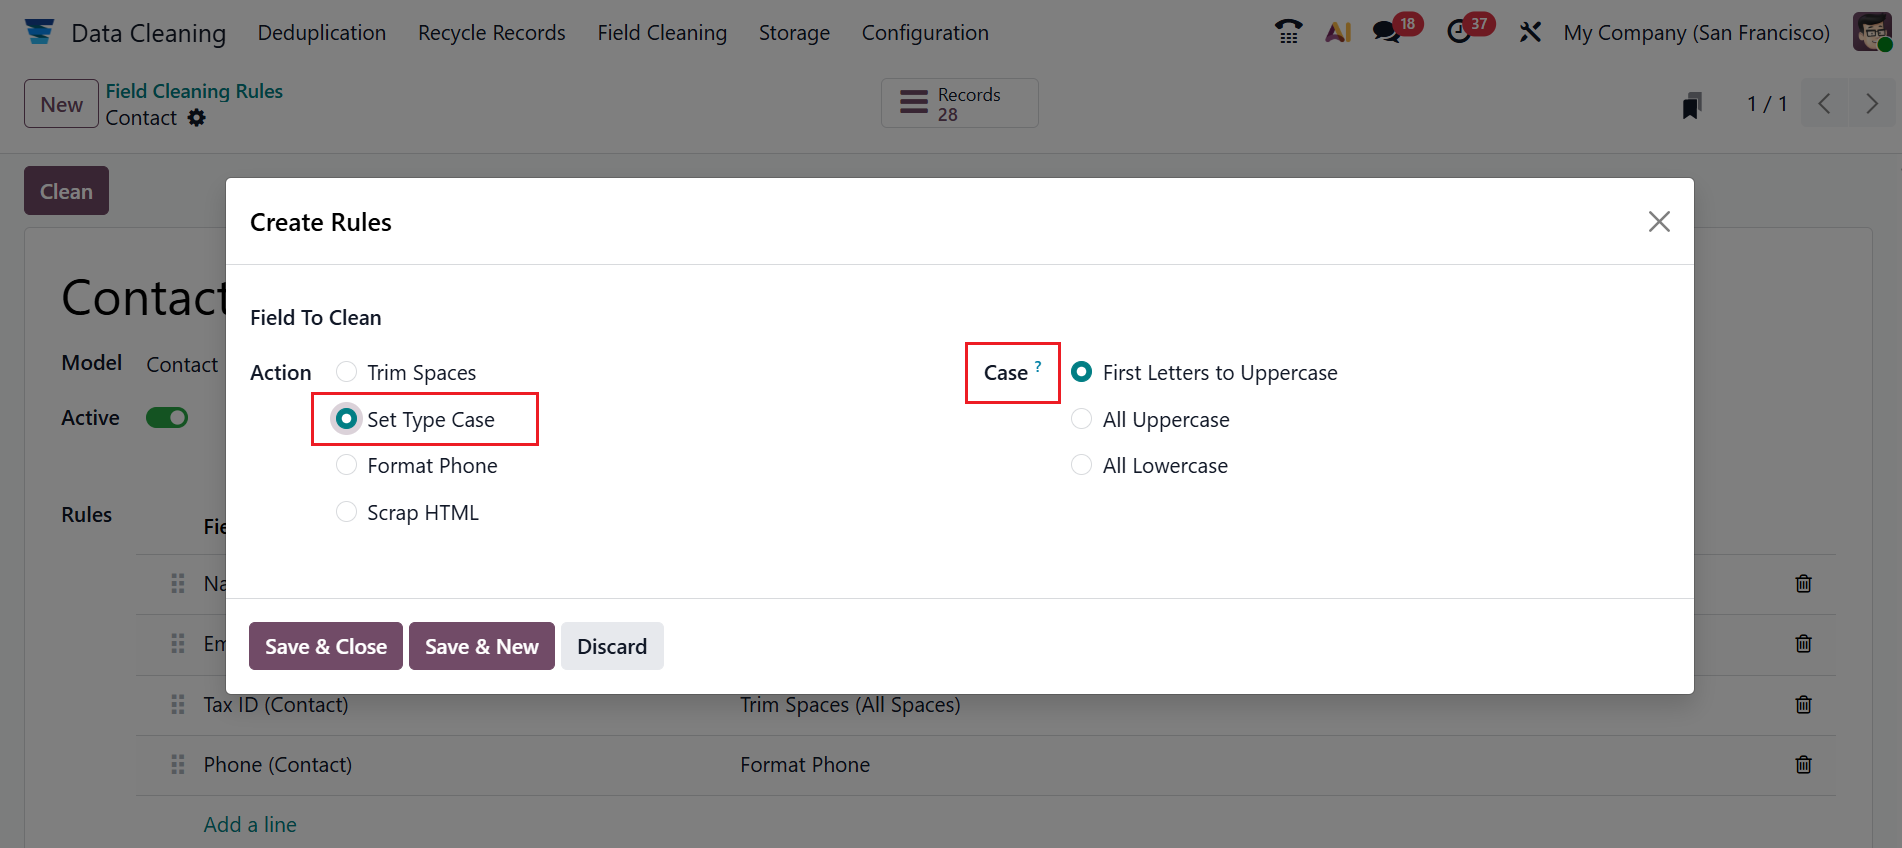
When you select Action as Set Type Case, you can change the upper and lower cases of the rule as either First Letters to Uppercase, All Uppercase, or All Lowercase.
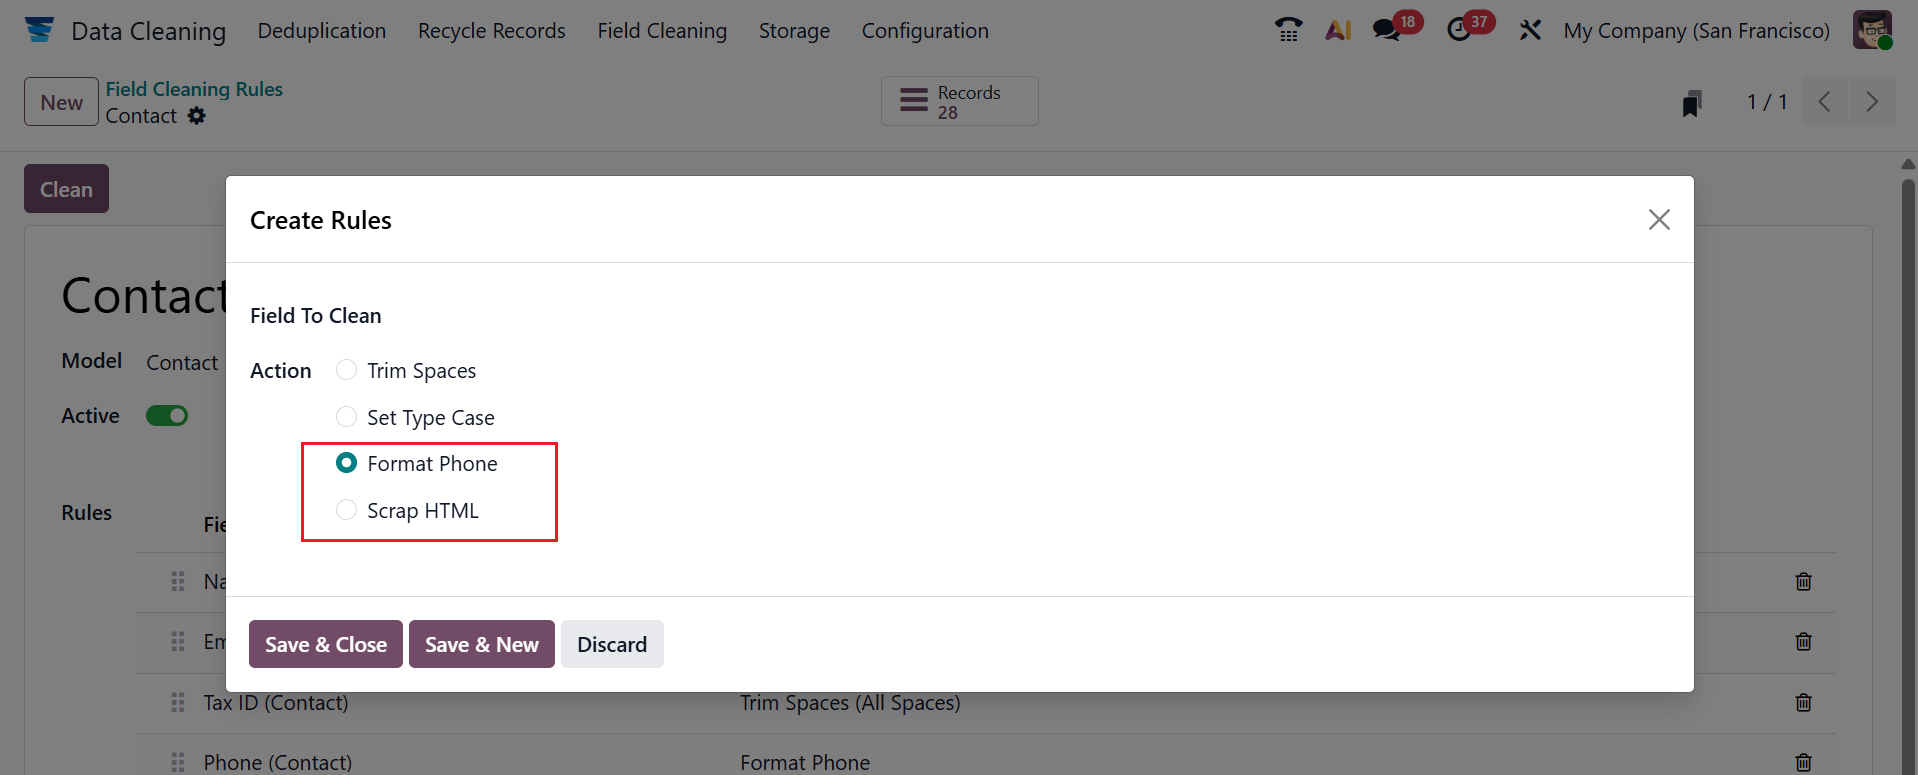
You can also select the Action as either Format phone or Scrap HTML. The Format Phone helps to convert phone numbers into a clean format. The Scrap HTML removes HTML tags from a field value. Then, click on the Save & Close button. To clean the records, click on the Clean button.
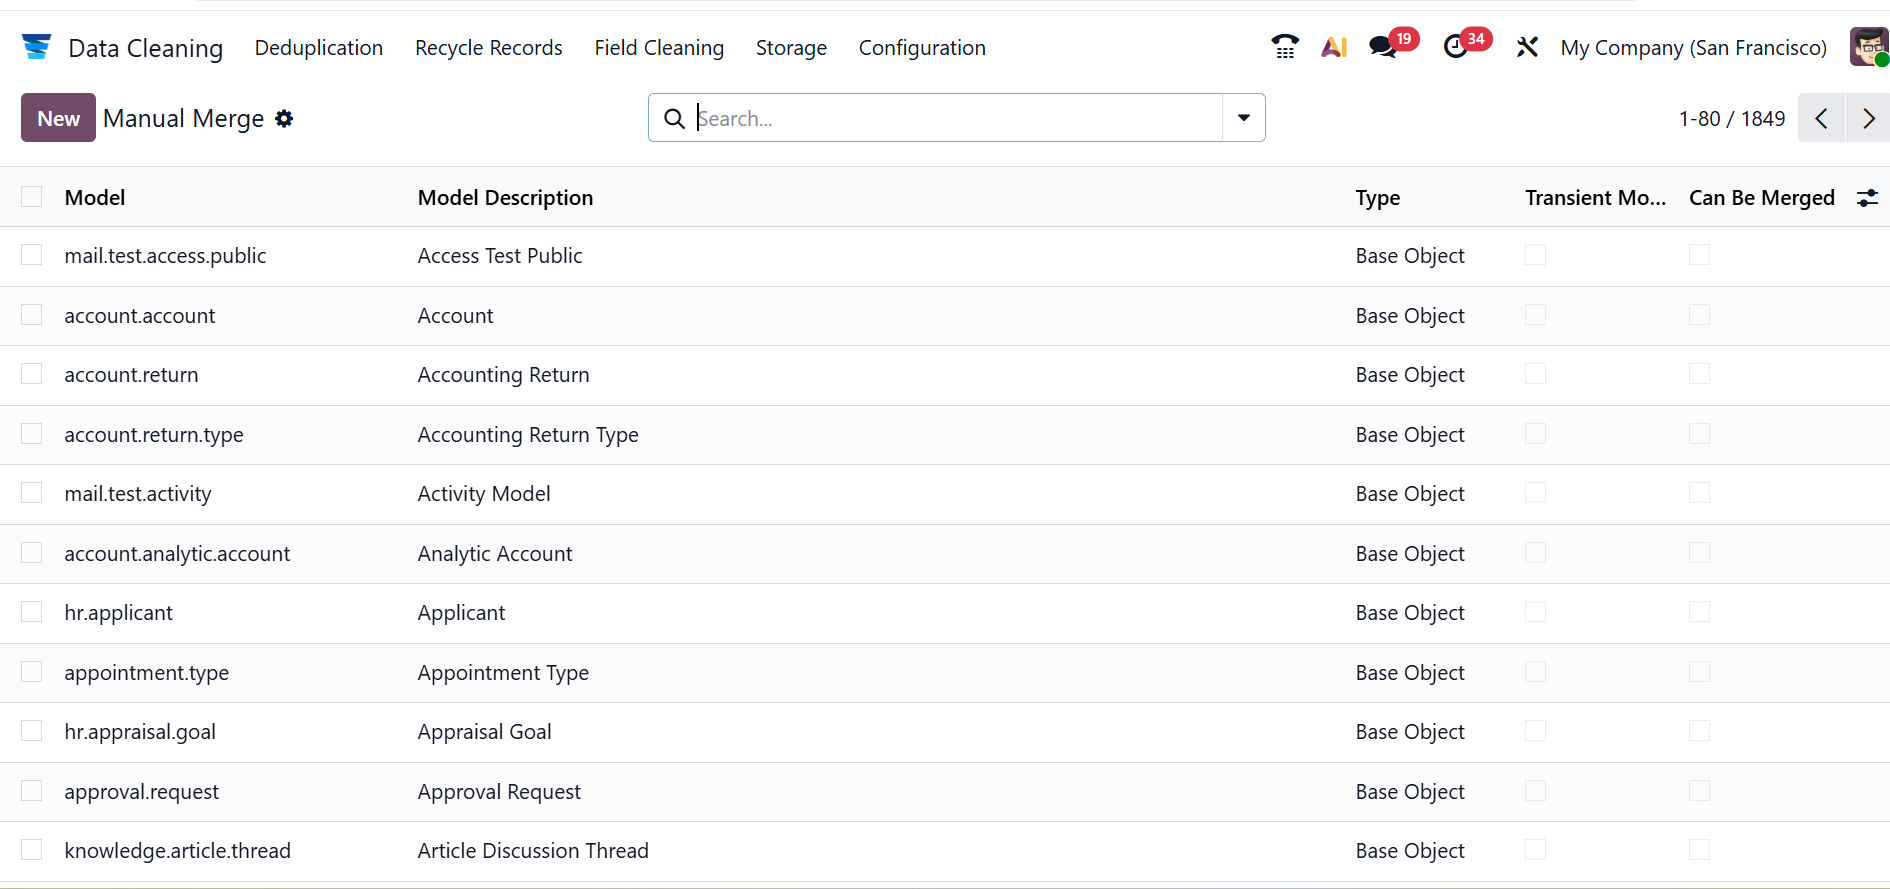
1.4 Manual Merge:
In Odoo 19, Manual Merge allows users to manually combine duplicate records by choosing which data to keep in the final record. Here, you can see the details of the manual merge, such as Model, Model Description, Type, Transient Model, and Can Be Merged. Click the New button to create a new record.
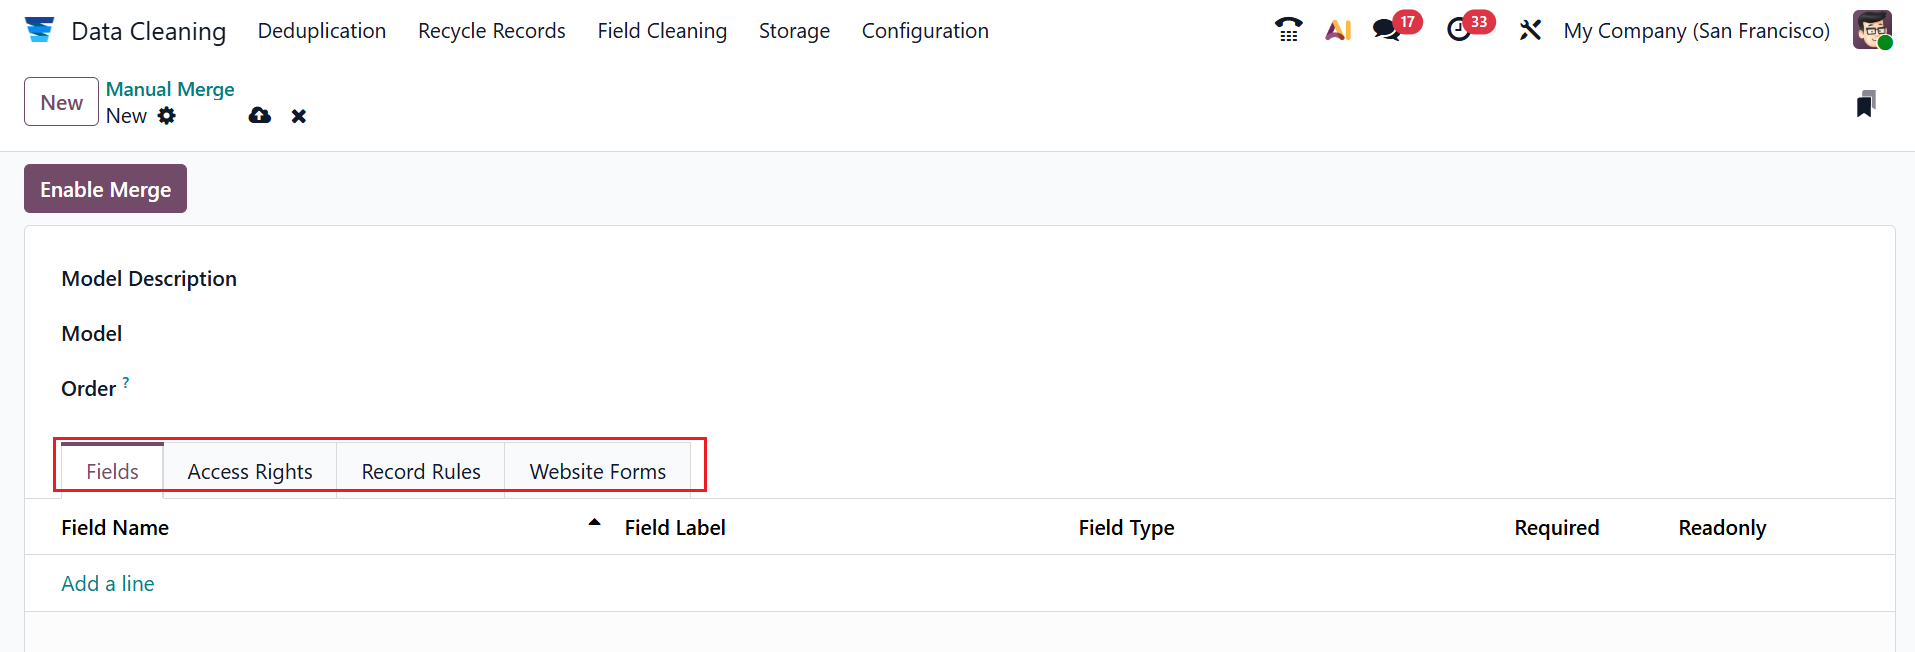
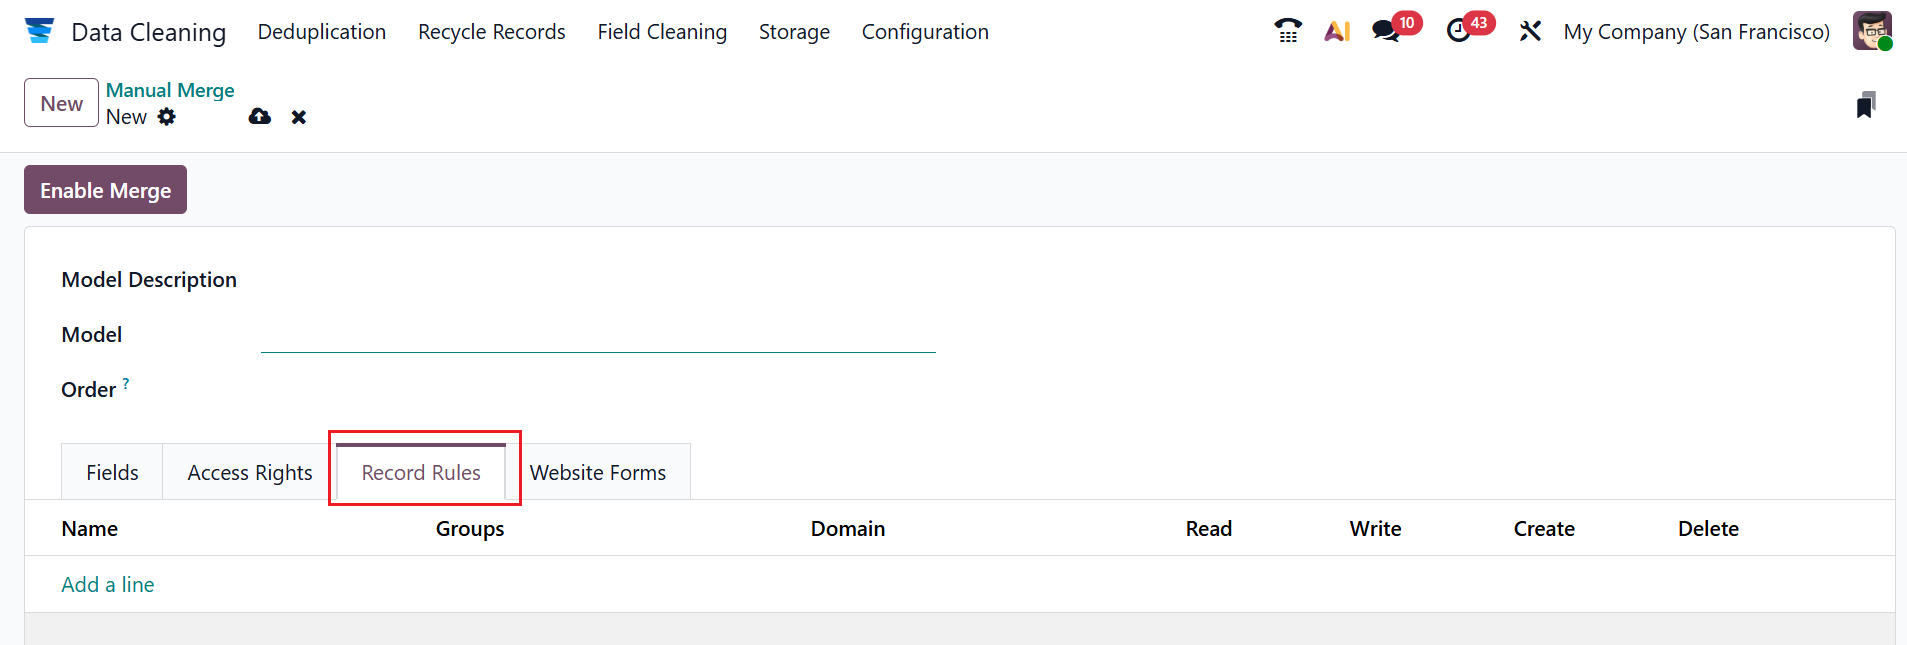
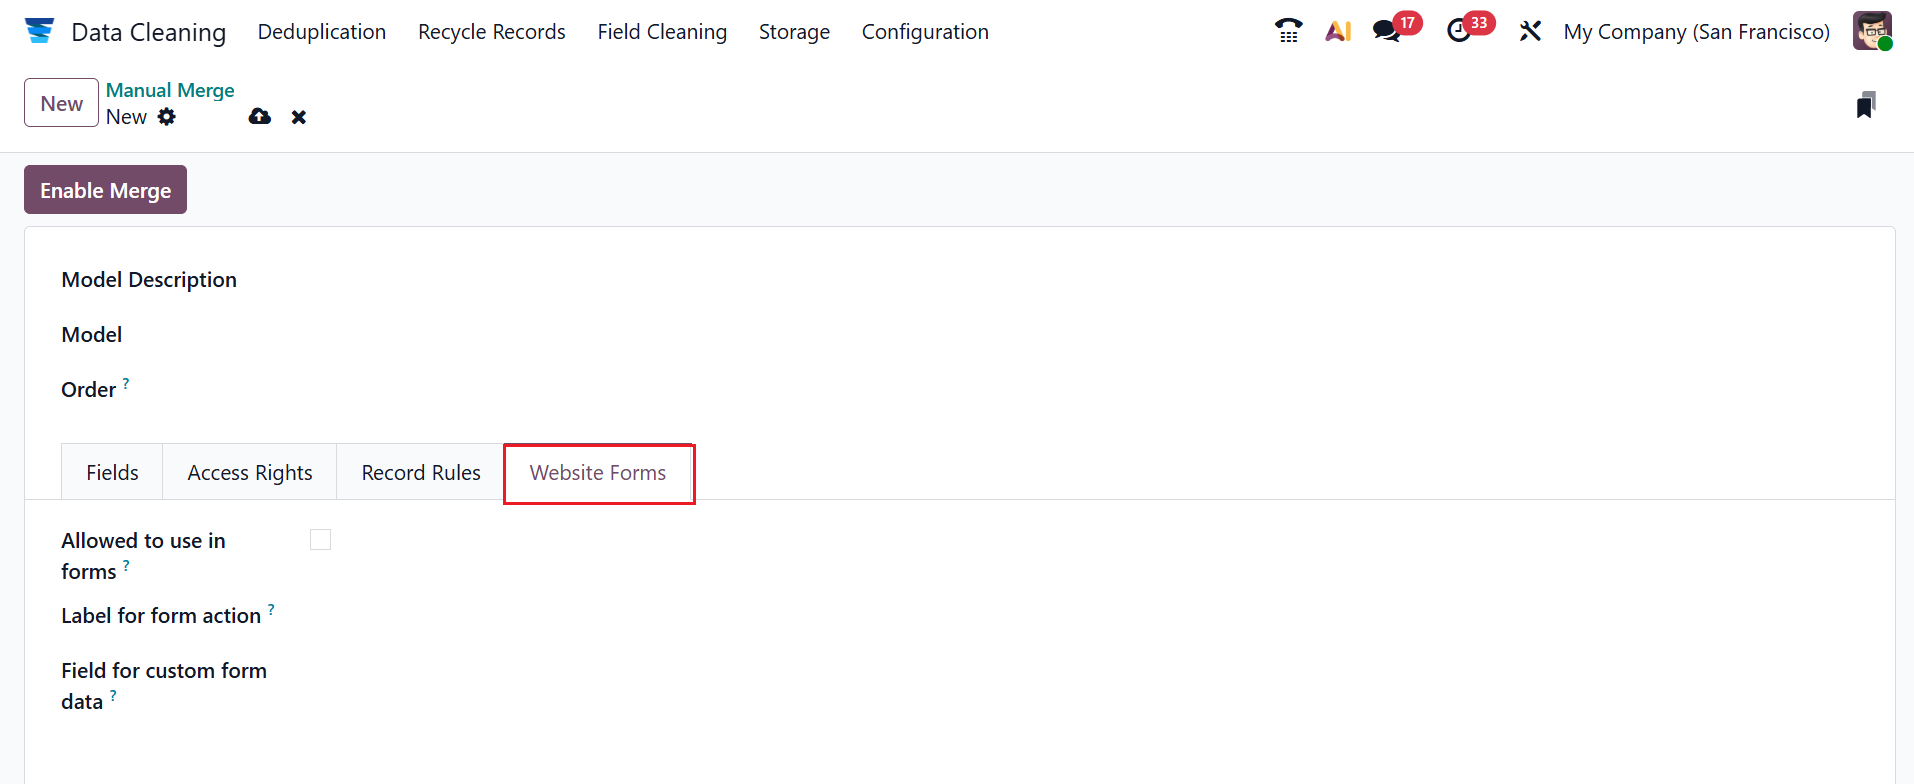
In the Model Description field, add a display name for the model. Add a technical name of the model in the Model field. In the Order field, you can add the SQL expression for ordering records in the order. Here, you can see four tabs: Field, Access Rights, Record Rules, and Website Forms.
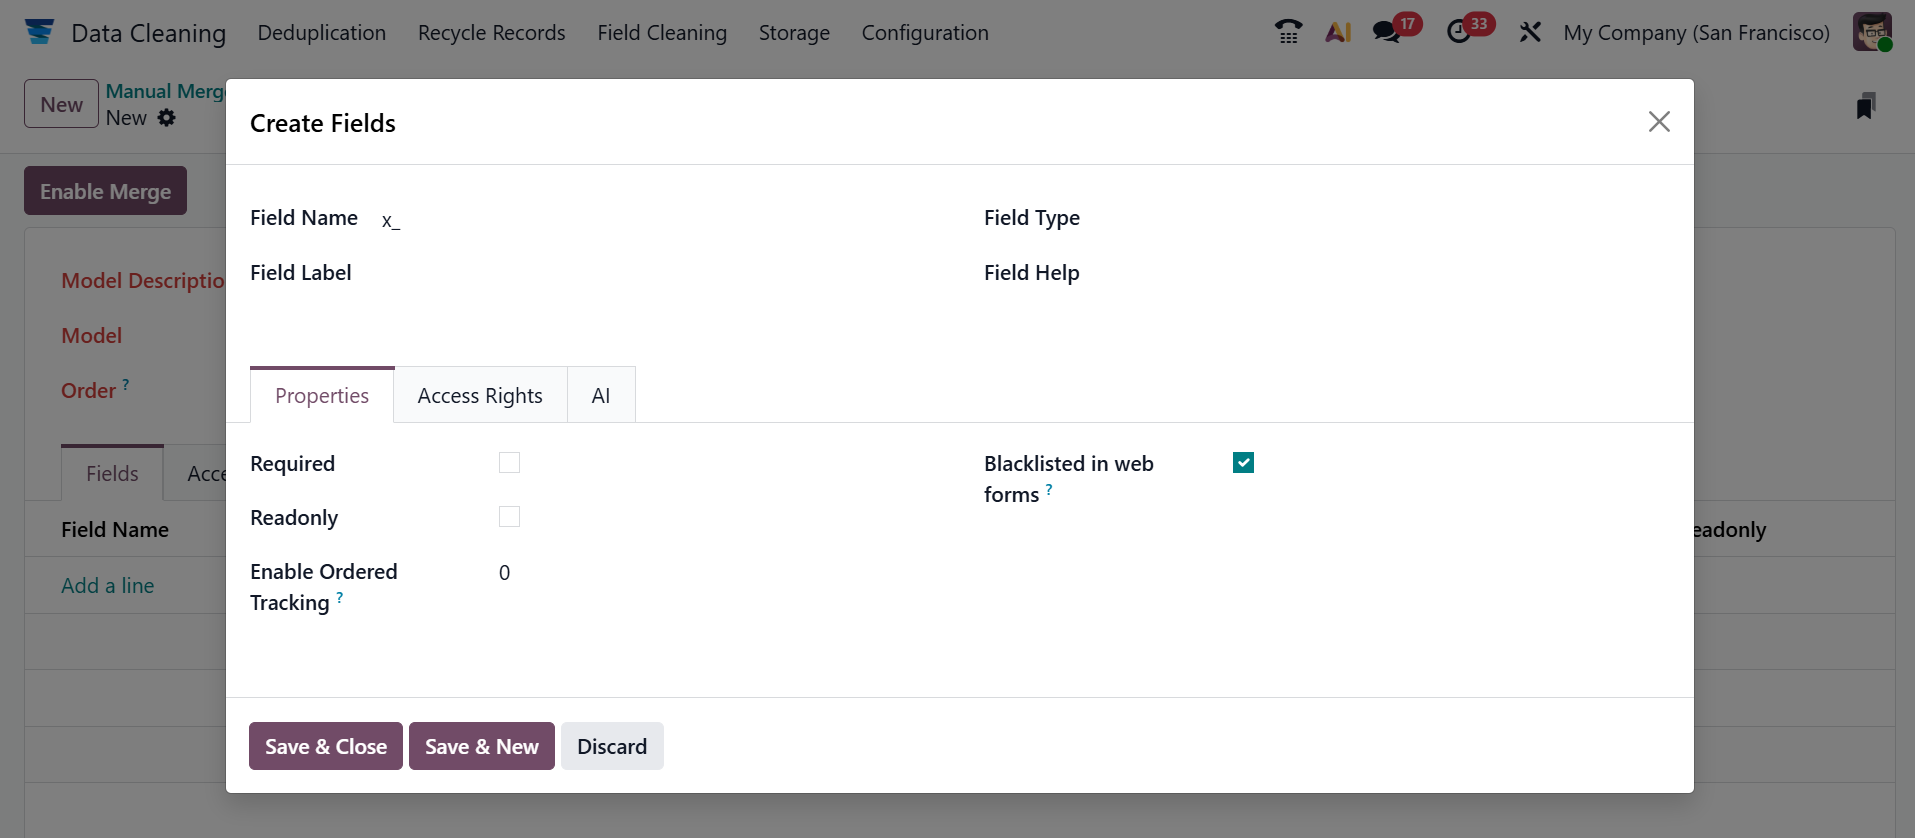
Under the Fields tab, click on the Add a line button under the Field Name field. The following pop-up screen will appear. To create a new field, add Field Name, Field Label, Field Type, and Field Help. Here, you can see three tabs: Properties, Access Rights, and AI. Under the Properties field, enable the Required and Readonly fields. In the Enable Ordered Tracking field, you can add order tracking values. Enable the Blacklisted in web forms field to blacklist this field.
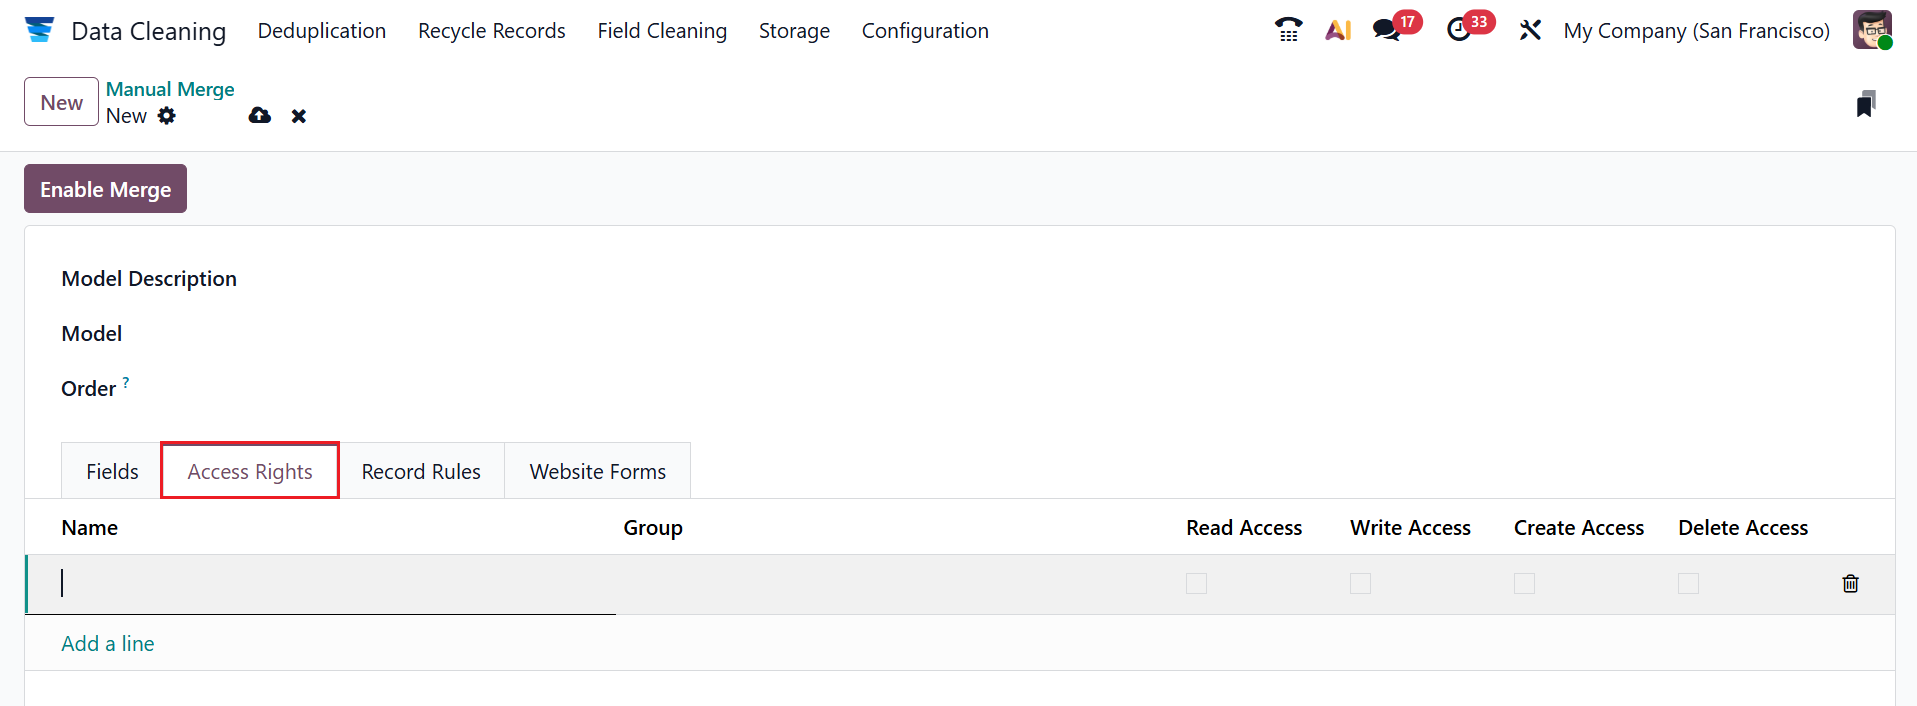
In the Access Rights tab, click Add a Line to specify the privilege and name for this field.
Under the AI tab, you can compute the field with AI in the AI Field.
Under the Access Rights field, click on the Add a line button to add Name and Group for the model. You can also enable the options such as Read Access, Write Access, Create Access, and Delete Access.
Under the Record Rules tab, click on the Add a line button to add Name, Group, and Domain for the model. You can enable additional options, including Read, Write, Create, and Delete.
Under the Website Forms tab, enable the Allowed to use in forms field to enable the form builder feature. In the Label for form action field, you can add text displayed on the submit button of a website form. In the Field for custom form data field, you can specify the field where Odoo stores additional information submitted through the website form that does not correspond to standard model fields.
2. Deduplication:
Under the Deduplication menu, you can view all the duplicate records with details such as Created On, Name, Field Values, Used In, ID, and Is Master.
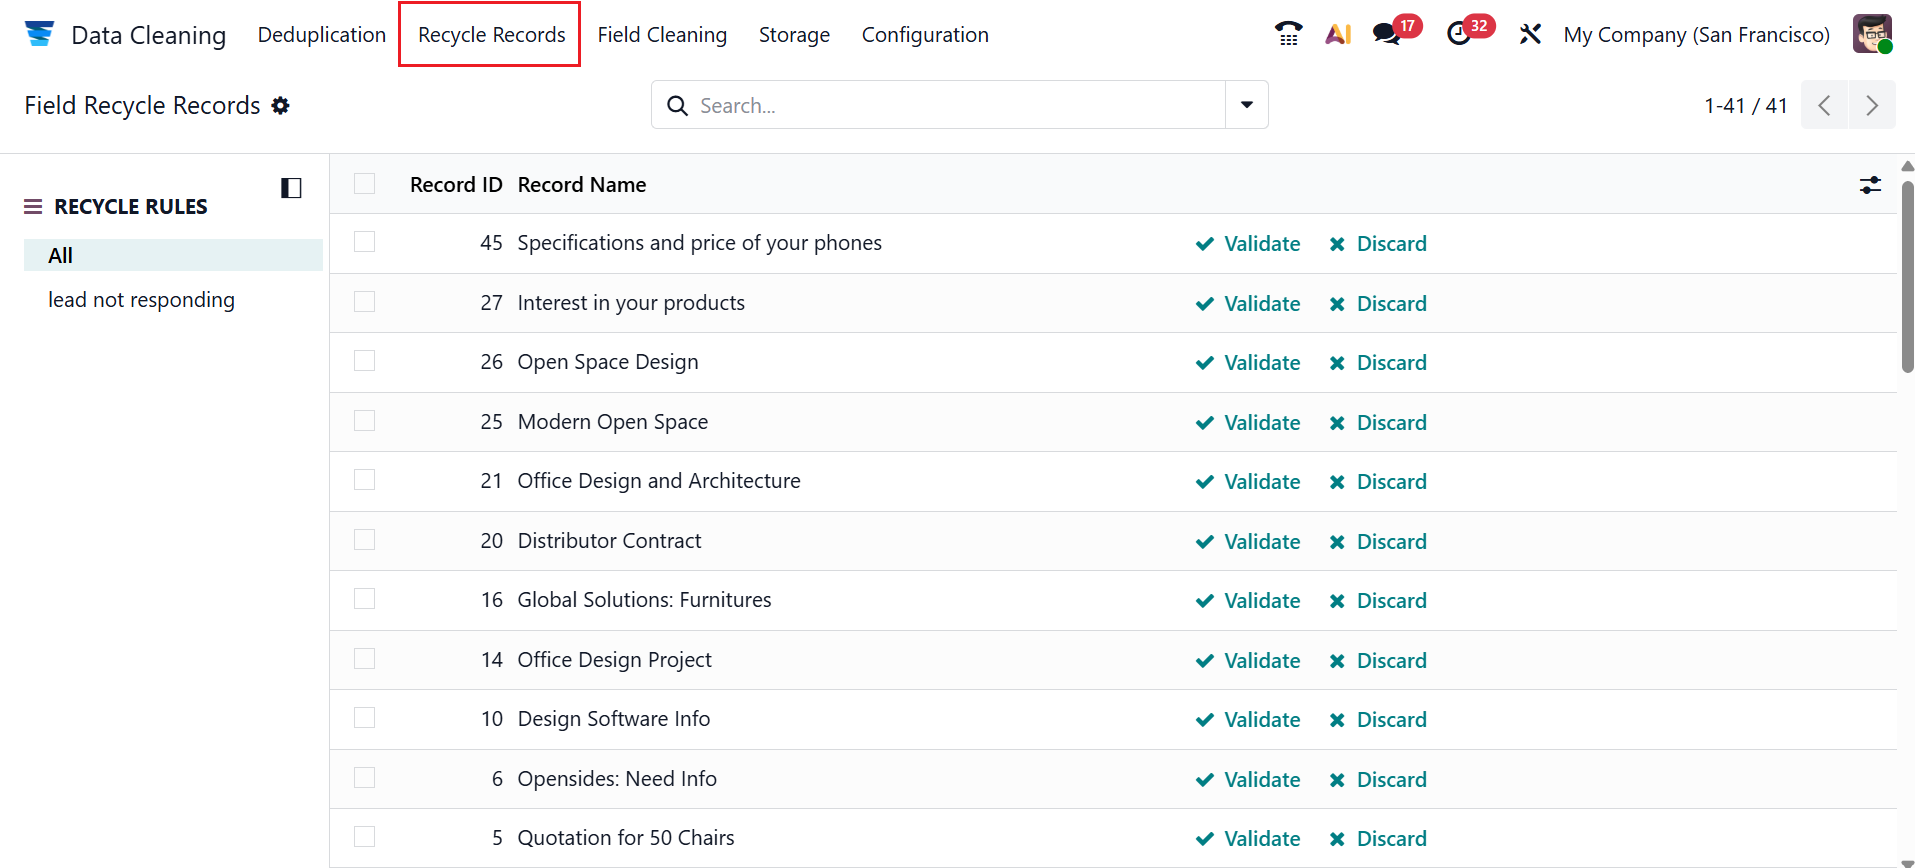
3. Recycle Records:
Under the Recycle Records menu, you can view all the recycled records. Here, you can either validate or discard the records.

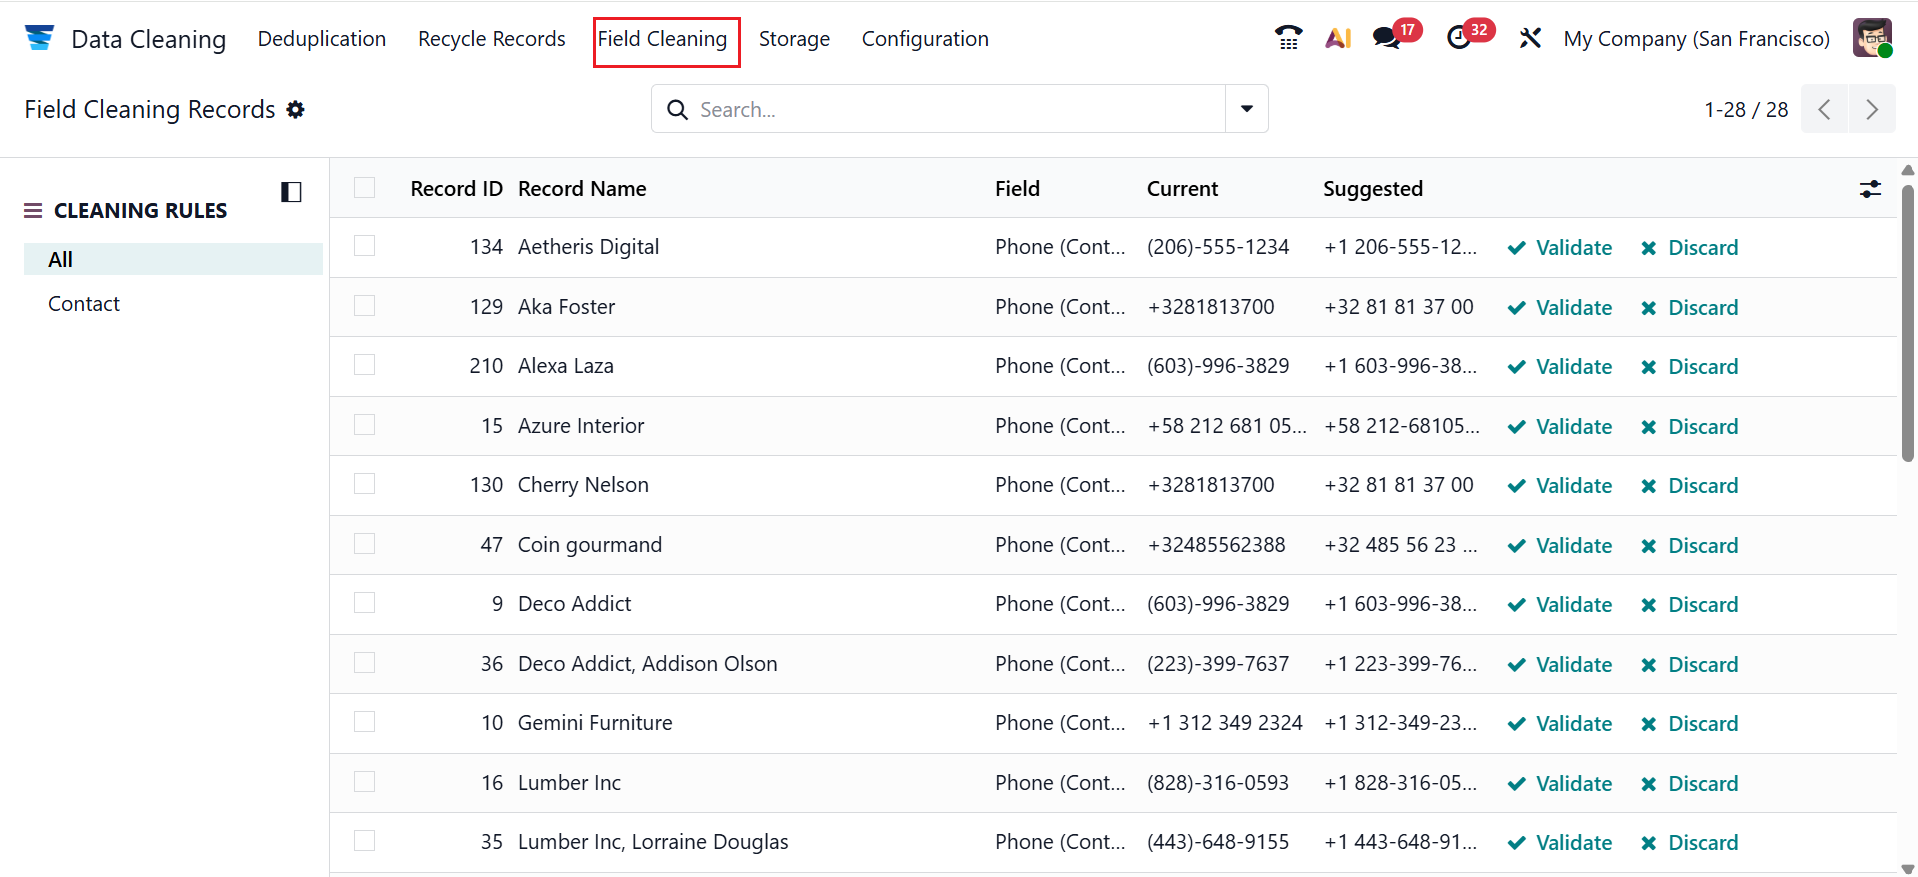
4. Field Cleaning:
Under the Field Cleaning menu, you can view all the cleaning records with details such as Record ID, Record Name, Field, Current, or Suggested.
5. Storage:
In Odoo 19, the Storage menu shows recycled and cleaned records along with the space they occupy in the database. You can view each record’s Name, Model, and Total Size. Click the Details button to view the selected record’s information.
Data cleaning in Odoo 19 is a critical step for ensuring accurate, reliable, and efficient business operations. By removing duplicate records, correcting inconsistencies, and standardizing data formats, organizations can improve reporting quality and decision-making. Odoo 19 provides powerful tools such as automated deduplication, data validation rules, and import cleansing features that simplify this process. Clean data enhances system performance, reduces operational errors, and improves user confidence across modules like Sales, Accounting, and CRM. Ultimately, effective data cleaning in Odoo 19 supports scalability, compliance, and long-term business success by maintaining a single source of truth.