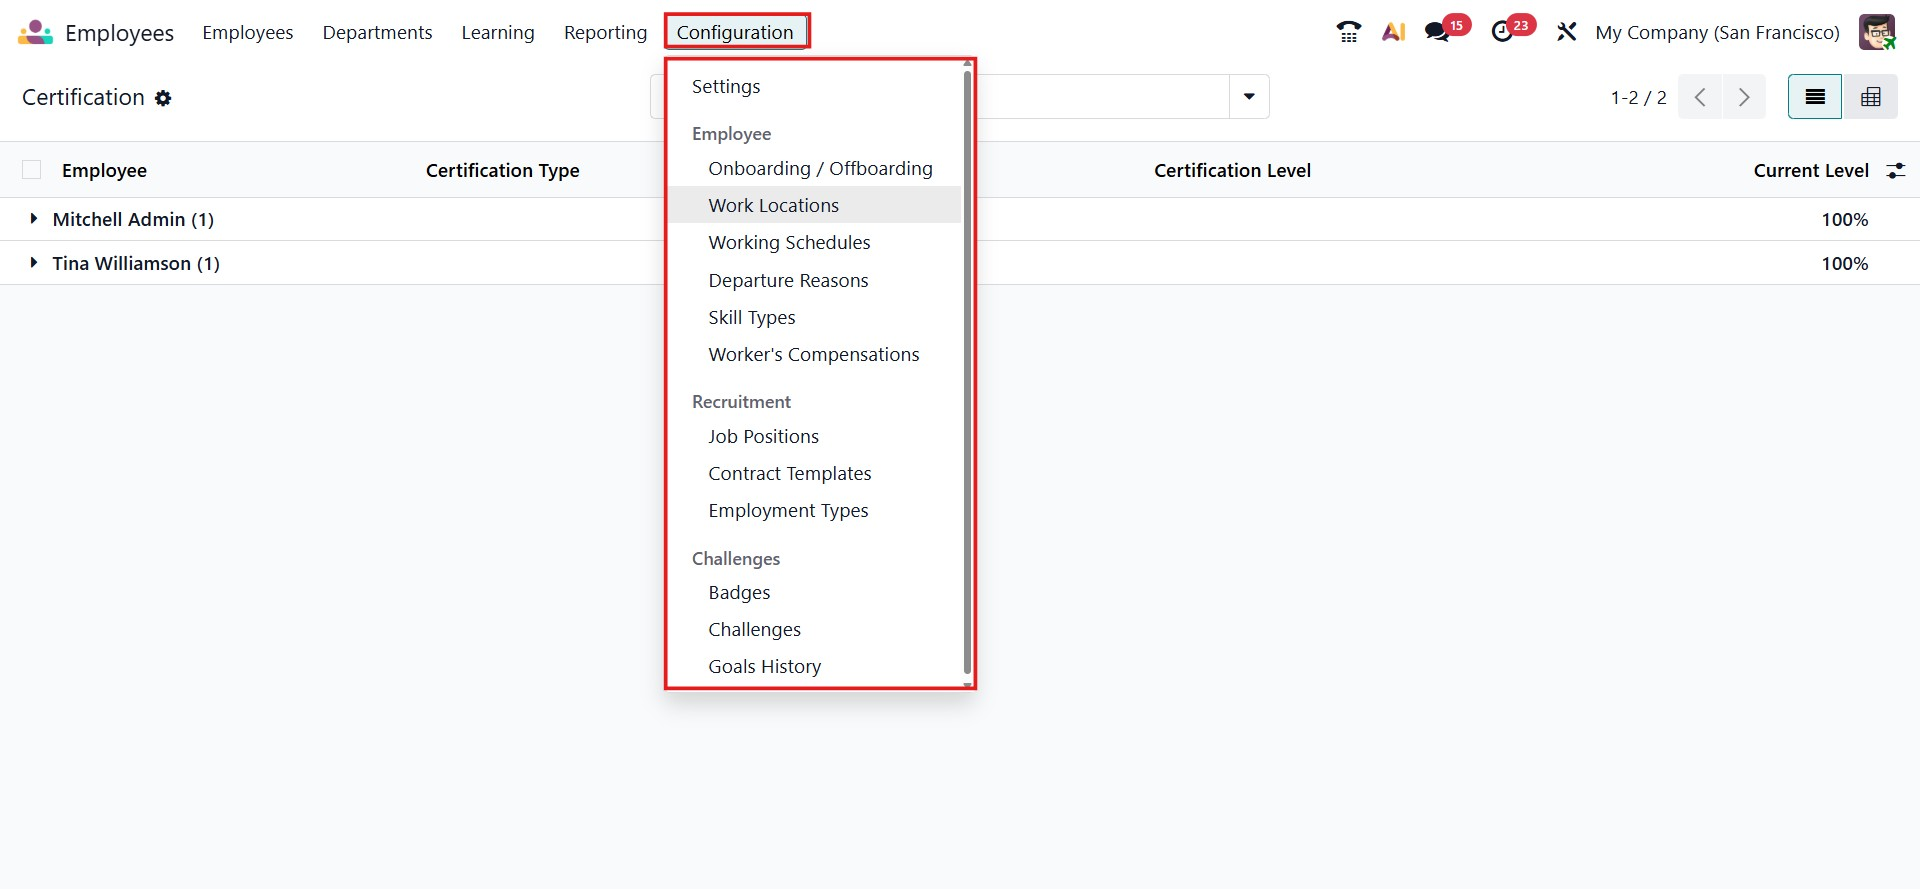
Configuration
The Configuration menu of the Odoo 19 Employees module allows administrators to define core settings related to employee management, work organization, contracts, and salary configuration. These settings help standardize employee data and automate HR processes across the organization.
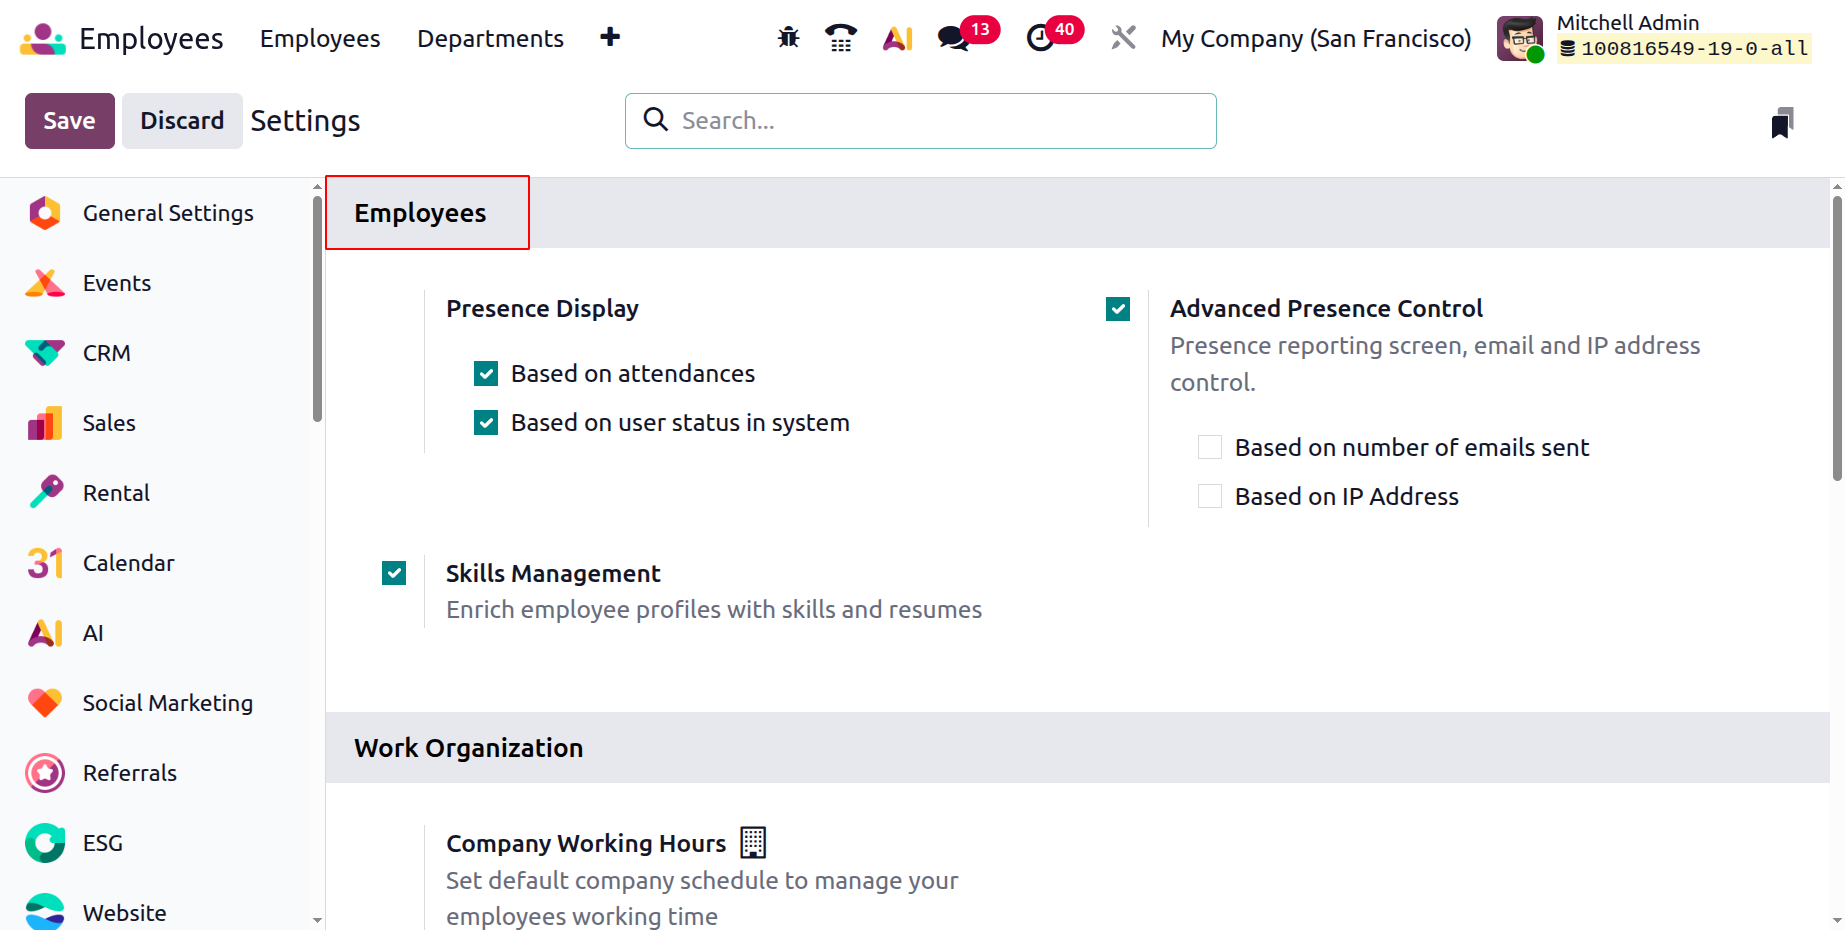
Settings
Under the Employees section, Odoo 19 provides options to control how employee presence is displayed in the system. The Presence Display can be configured based on attendance records or the user’s status in the system, enabling accurate visibility of employee availability. Advanced Presence Control can also be enabled to manage presence reporting using additional parameters such as email activity or IP address control. Additionally, the Skills Management option allows organizations to enrich employee profiles by enabling skills and resume tracking.
In the Work Organization subsection, users can configure contract expiration alerts and set work permit expiration notice periods, ensuring timely follow-ups and compliance.
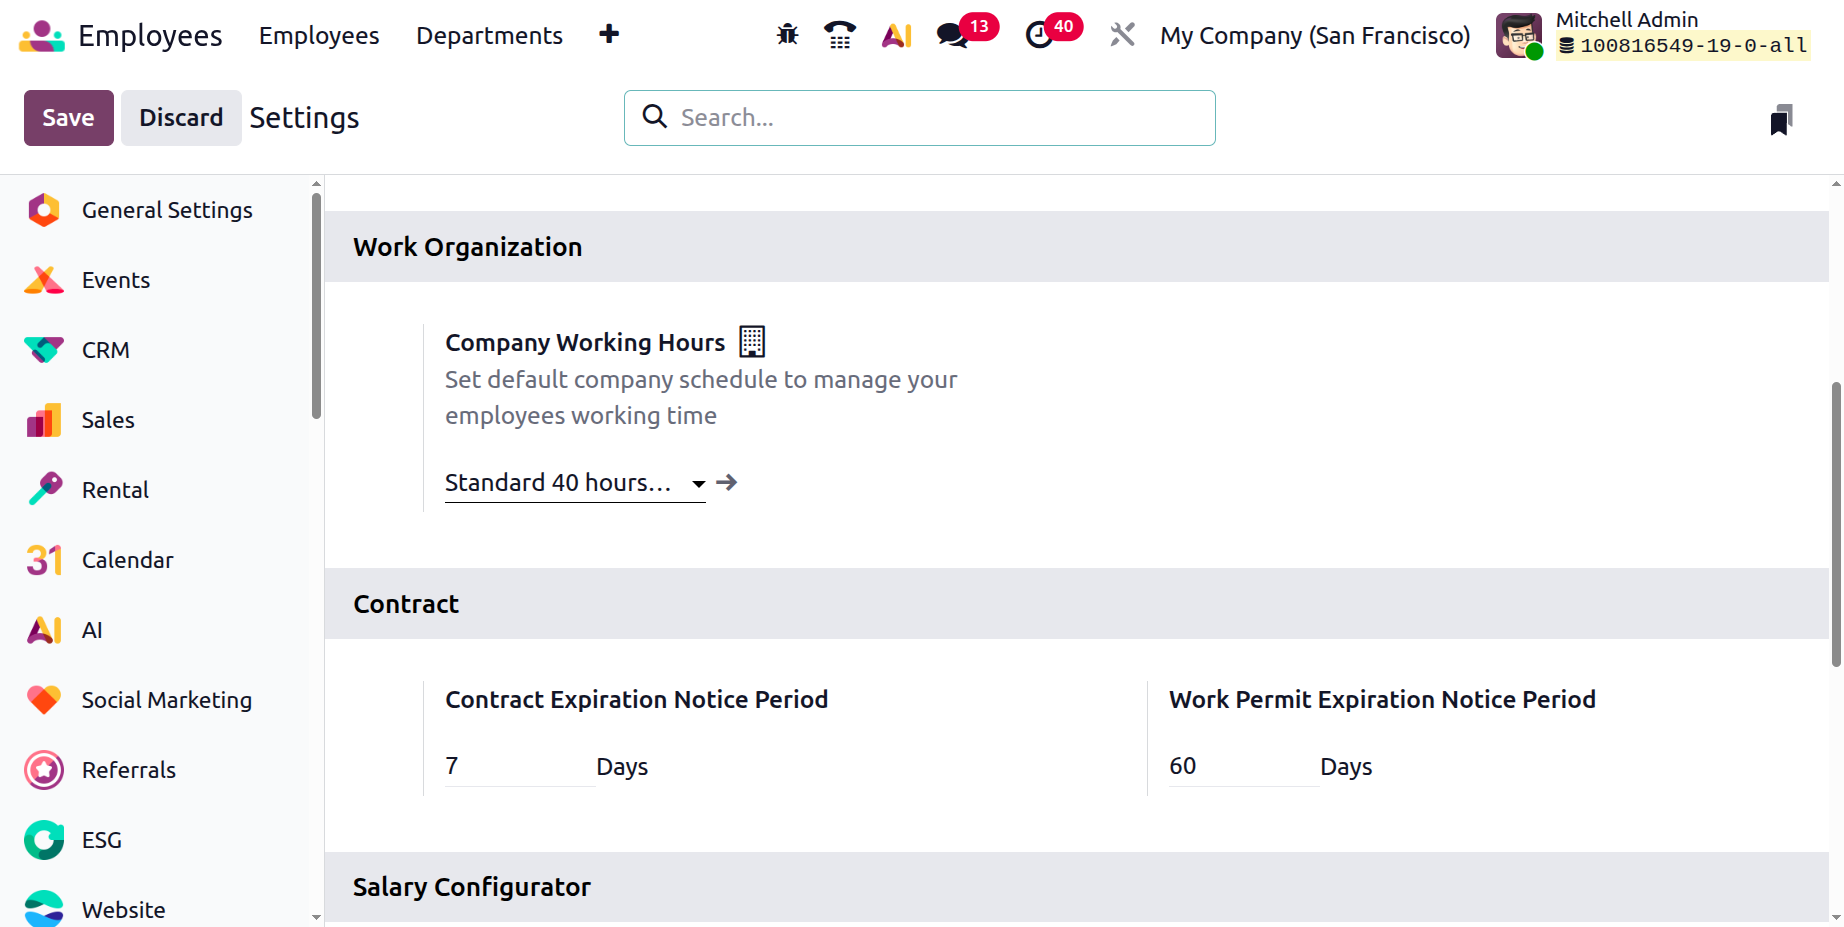
In the Contract section, organizations can configure automated notifications related to employee contracts and legal documentation to ensure timely action and compliance. This section includes options such as the Contract Expiration Notice Period, where users can define the number of days in advance the system should generate an alert before an employee’s contract ends. This helps HR teams and managers plan renewals, extensions, or offboarding processes without missing critical deadlines. Additionally, the Work Permit Expiration Notice Period allows organizations to set advanced reminders before a work permit expires, ensuring sufficient time to complete renewal procedures and maintain legal compliance, especially for international employees. By centralizing these expiration alerts within the system, Odoo streamlines contract monitoring, reduces administrative risks, and supports proactive workforce management.
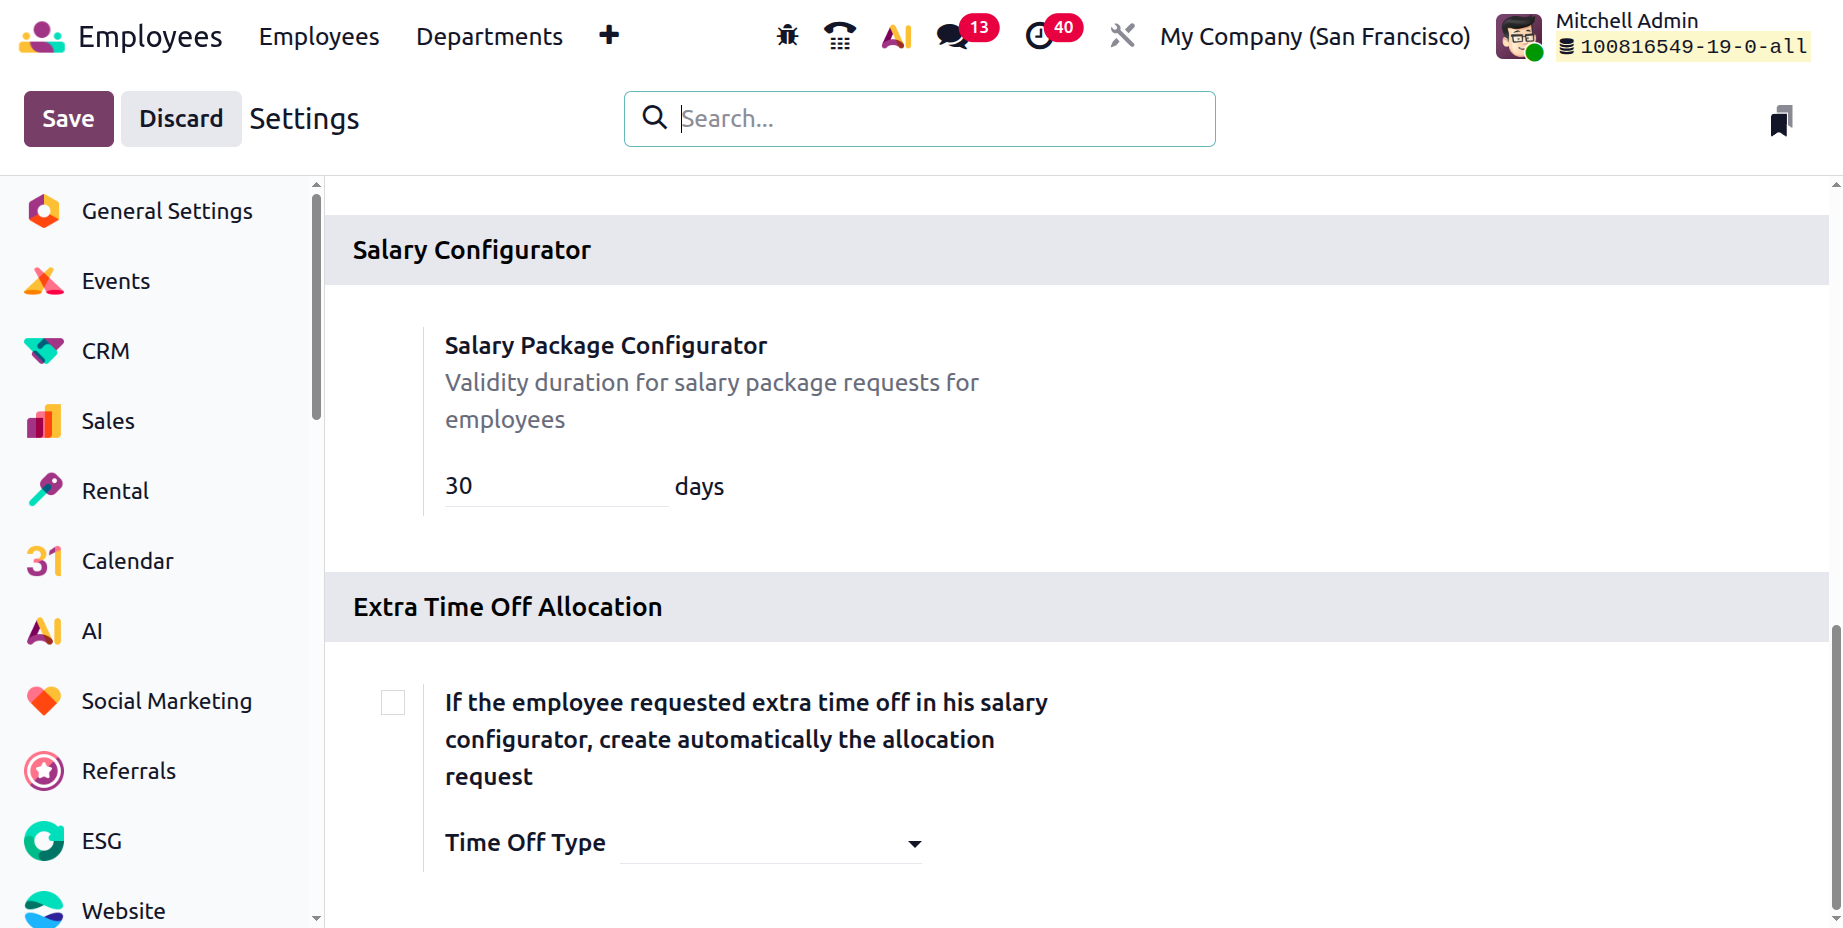
The Salary Configurator provides options for configuring salary-related rules, while Extra Time Off Allocation allows organizations to define additional leave entitlements beyond standard allocations.
Employee
The Employees configuration area in Odoo 19 is dedicated to defining the structural and operational elements required for effective employee management. These settings help organizations standardize employee records, automate HR workflows, and maintain consistency across departments.
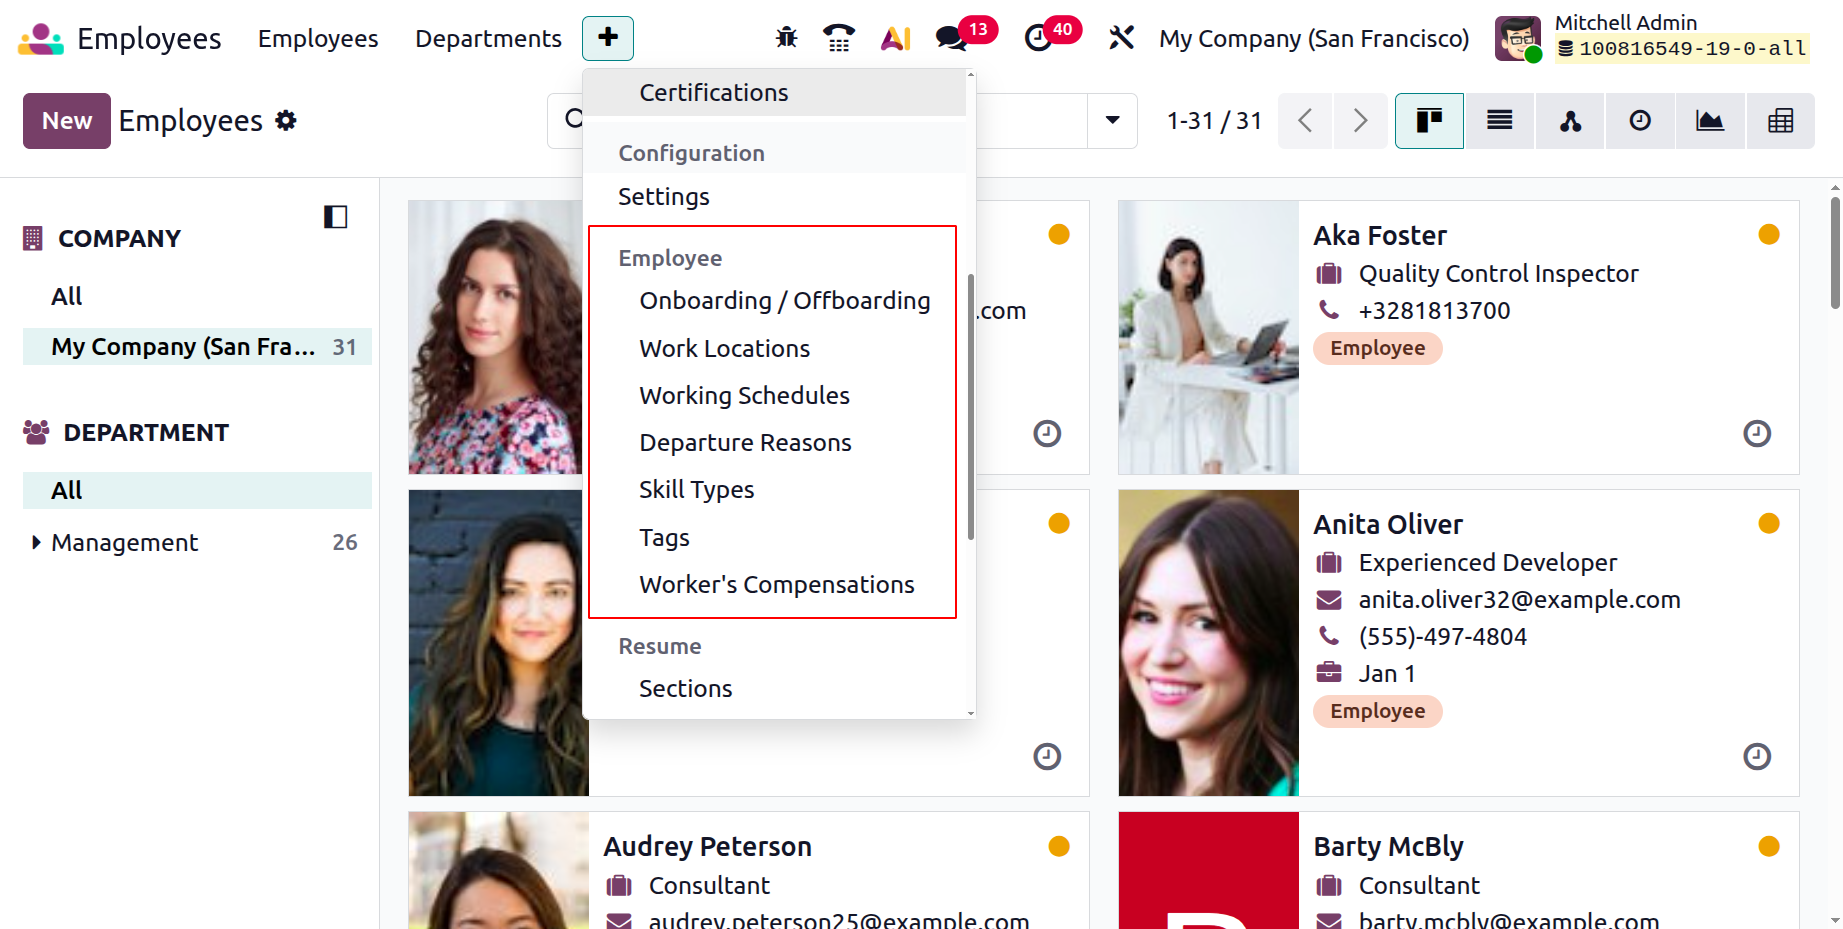
Onboarding and Offboarding
The Onboarding and Offboarding Plans are designed to automate and standardize employee lifecycle processes. These plans help organizations ensure that all required activities are completed at the right time and assigned to the appropriate people. For example, an onboarding plan can include tasks such as preparing IT equipment, scheduling training sessions, assigning mentors, or completing HR documentation. Similarly, an offboarding plan can include revoking system access, collecting company assets, conducting exit interviews, and processing final settlements. By defining these structured activity plans in advance, companies can maintain consistency, reduce manual follow-ups, and ensure smooth transitions for both new hires and departing employees.
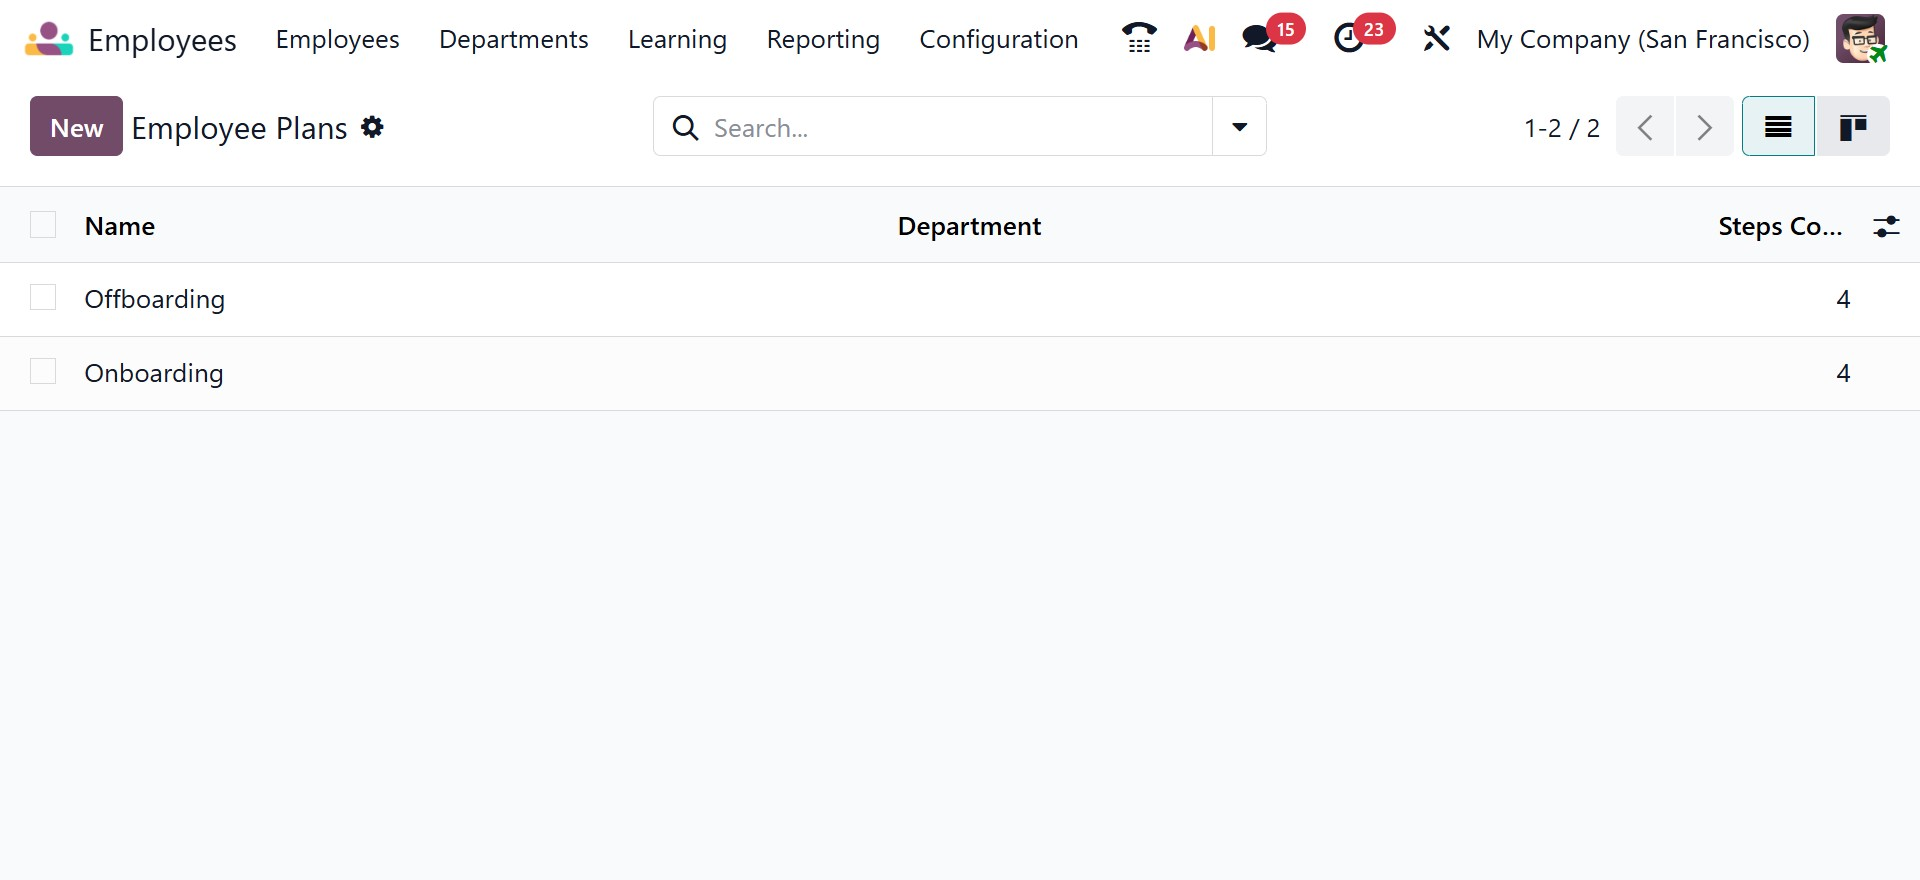
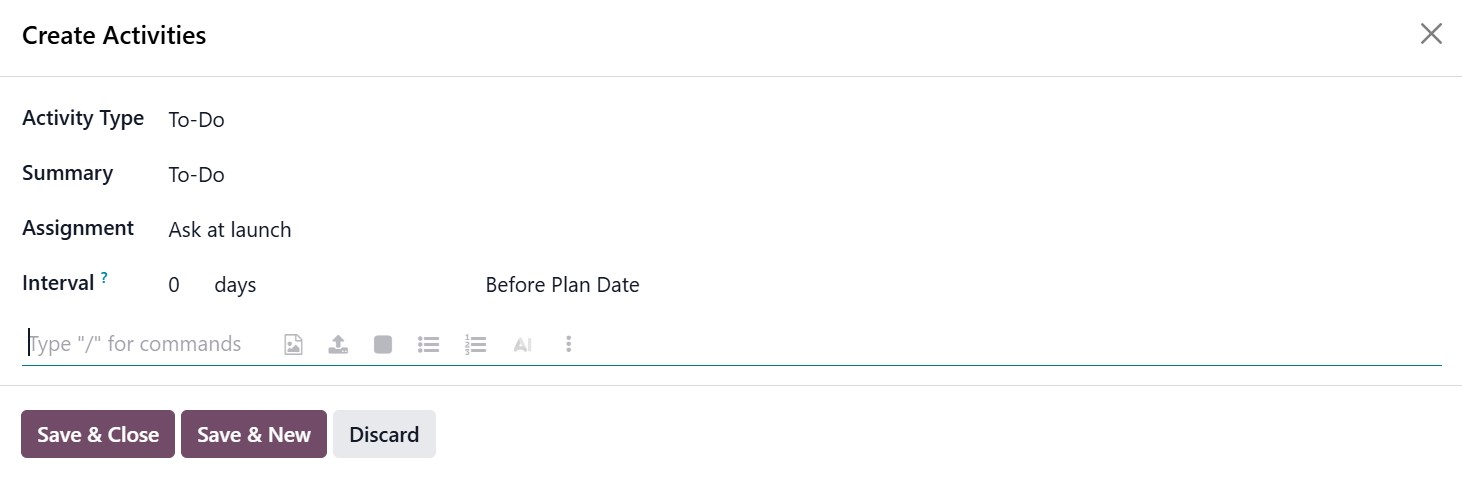
Each plan is configured under Employees → Configuration → Employee Plans. When creating or editing a plan, you can define the Plan Name, select the related Model (such as Employee), and specify whether it applies to a particular company or department. Inside the plan, the Activities to Create tab allows you to add multiple predefined activities using the Add a Line option. When you click Add a Line, a dedicated activity creation form appears where you can configure the details of the activity. In this form, you can select the Activity Type (such as To-Do, Call, or Meeting), enter a clear Summary, and define the Assignment, which determines who will be responsible for the task (for example, ask at launch or assign to a specific user). You can also configure the Interval in days and specify whether the activity should be scheduled before or after the Plan Date, ensuring accurate trigger timing. After entering the required details, you can use Save & Close to return to the plan or Save & New to immediately create another activity. This structured setup ensures that all necessary tasks are automatically generated at the right time whenever the employee plan is applied.
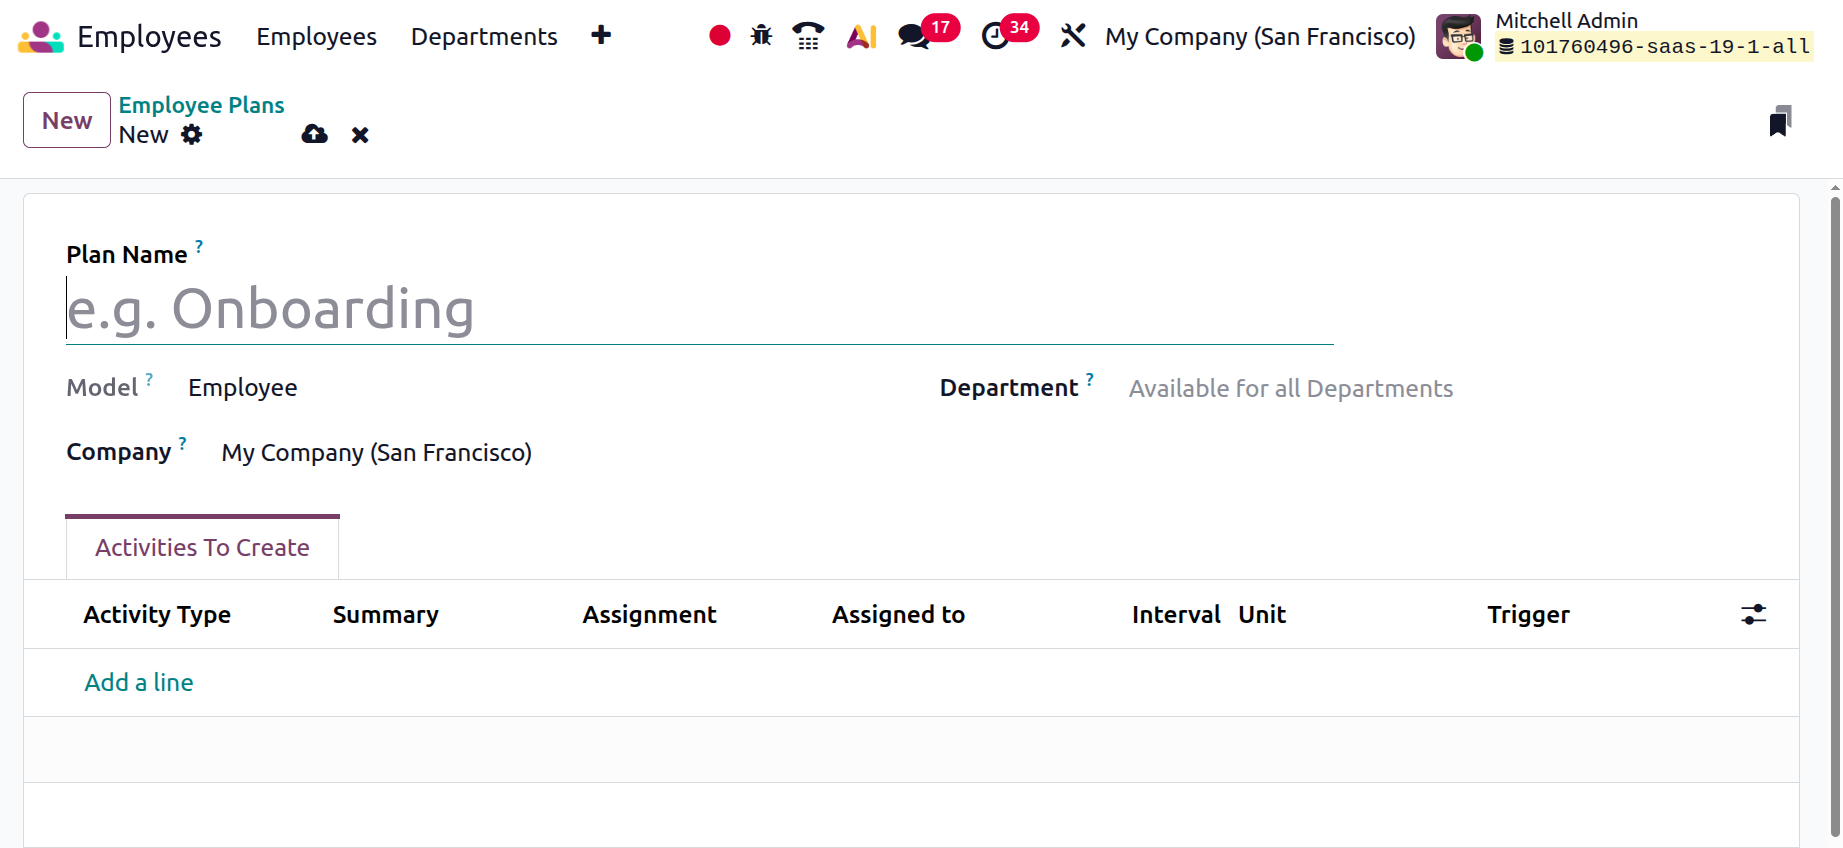
When you click the New button to create a new onboarding or offboarding plan, a configuration window opens where you can enter all these details. This window allows you to fully define the structure of the plan, including company visibility, department applicability, and the sequence of activities. Once saved, the plan can be linked to an employee record, and Odoo will automatically generate the configured activities based on the defined triggers. This automation ensures that managers, HR teams, and employees receive timely reminders and clearly assigned responsibilities, making the onboarding and offboarding processes organized, efficient, and error-free.
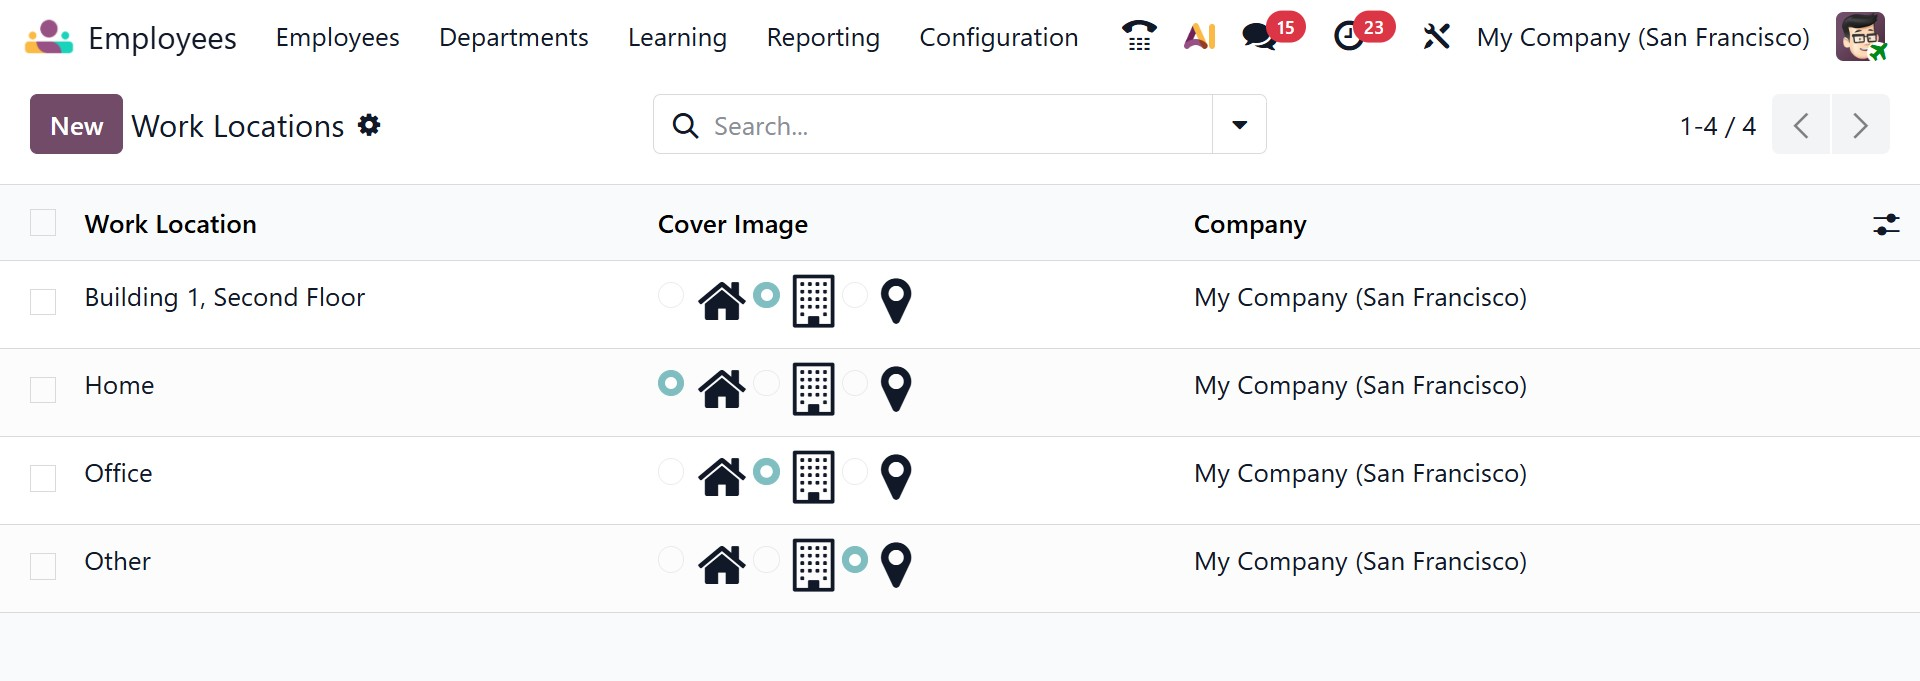
Work Locations
The Work Locations configuration enables organizations to predefine various employee work locations. These may include corporate offices, branch locations, home offices, or other remote working setups. This is particularly useful for companies operating across multiple regions or following hybrid work models. Once configured, these locations can be assigned to employees and are reflected in their profiles, allowing managers to clearly identify where each employee is working from.
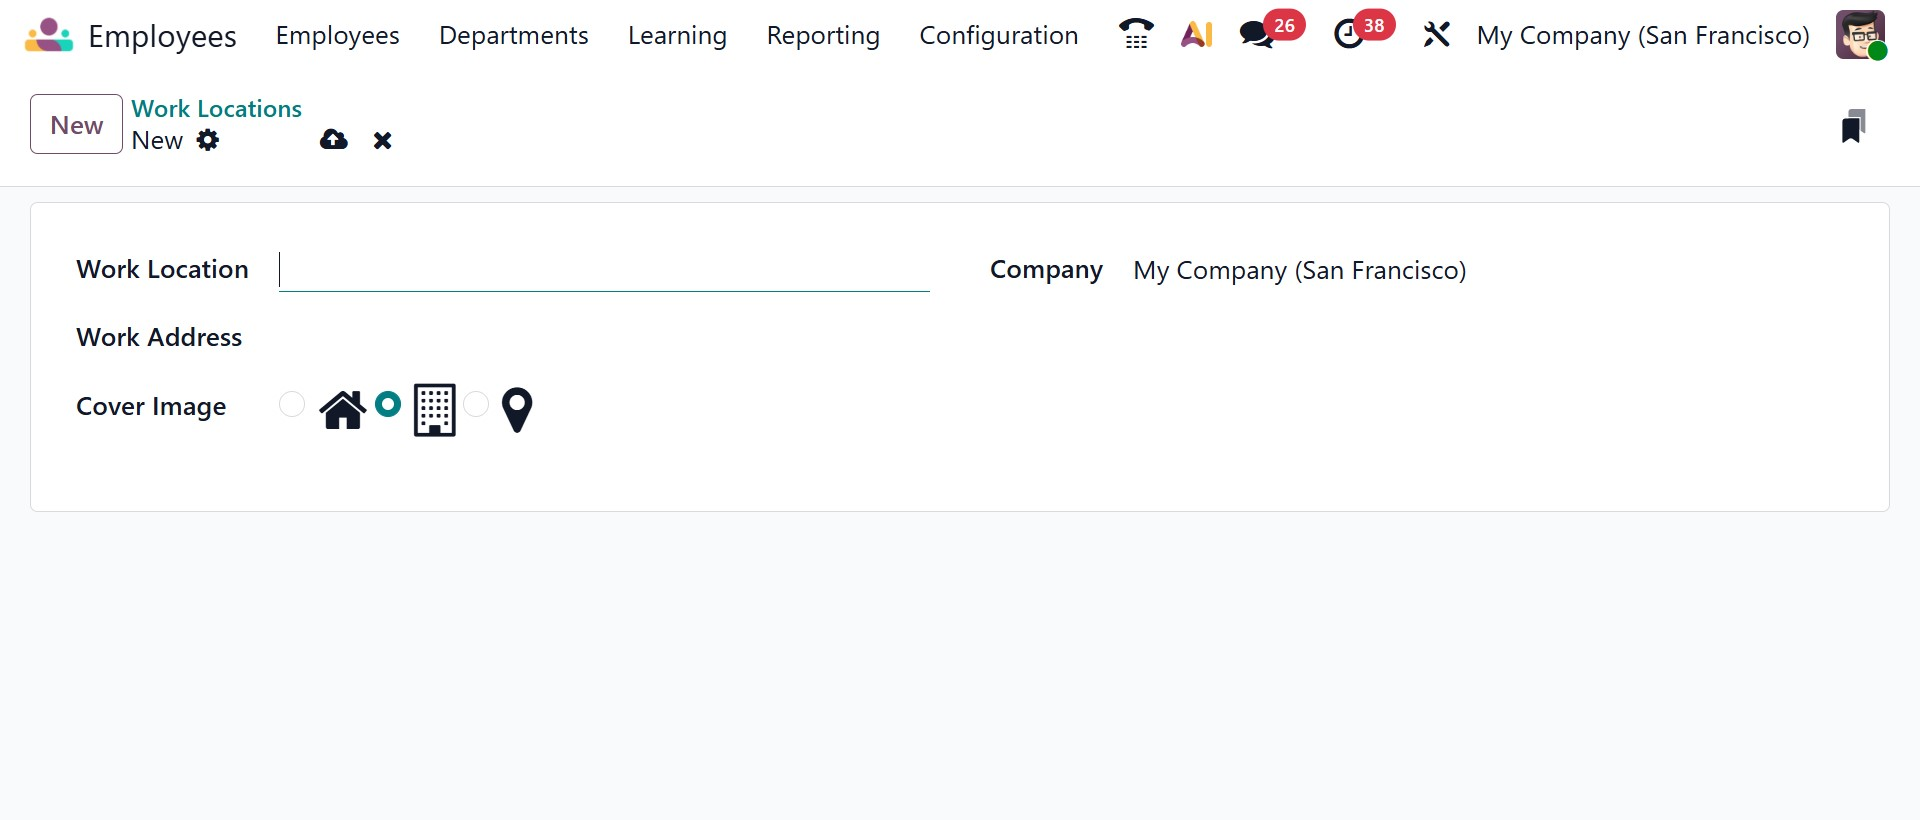
When you click the New button, a configuration form opens where you can create a new work location record. In this window, you can enter the Work Location name to clearly identify the place, such as Head Office, Branch Office, or Remote. You can then specify the Work Address, which links the location to a particular company address for accurate identification and reporting. The Company field automatically displays the related company, ensuring the location is assigned correctly in multi-company environments. Additionally, you can choose a Cover Image using the available icons (such as home, office building, or location pin) to visually represent the type of workplace. Once saved, the new work location becomes available for assignment to employee profiles, helping organizations manage and track employee workplace distribution efficiently.
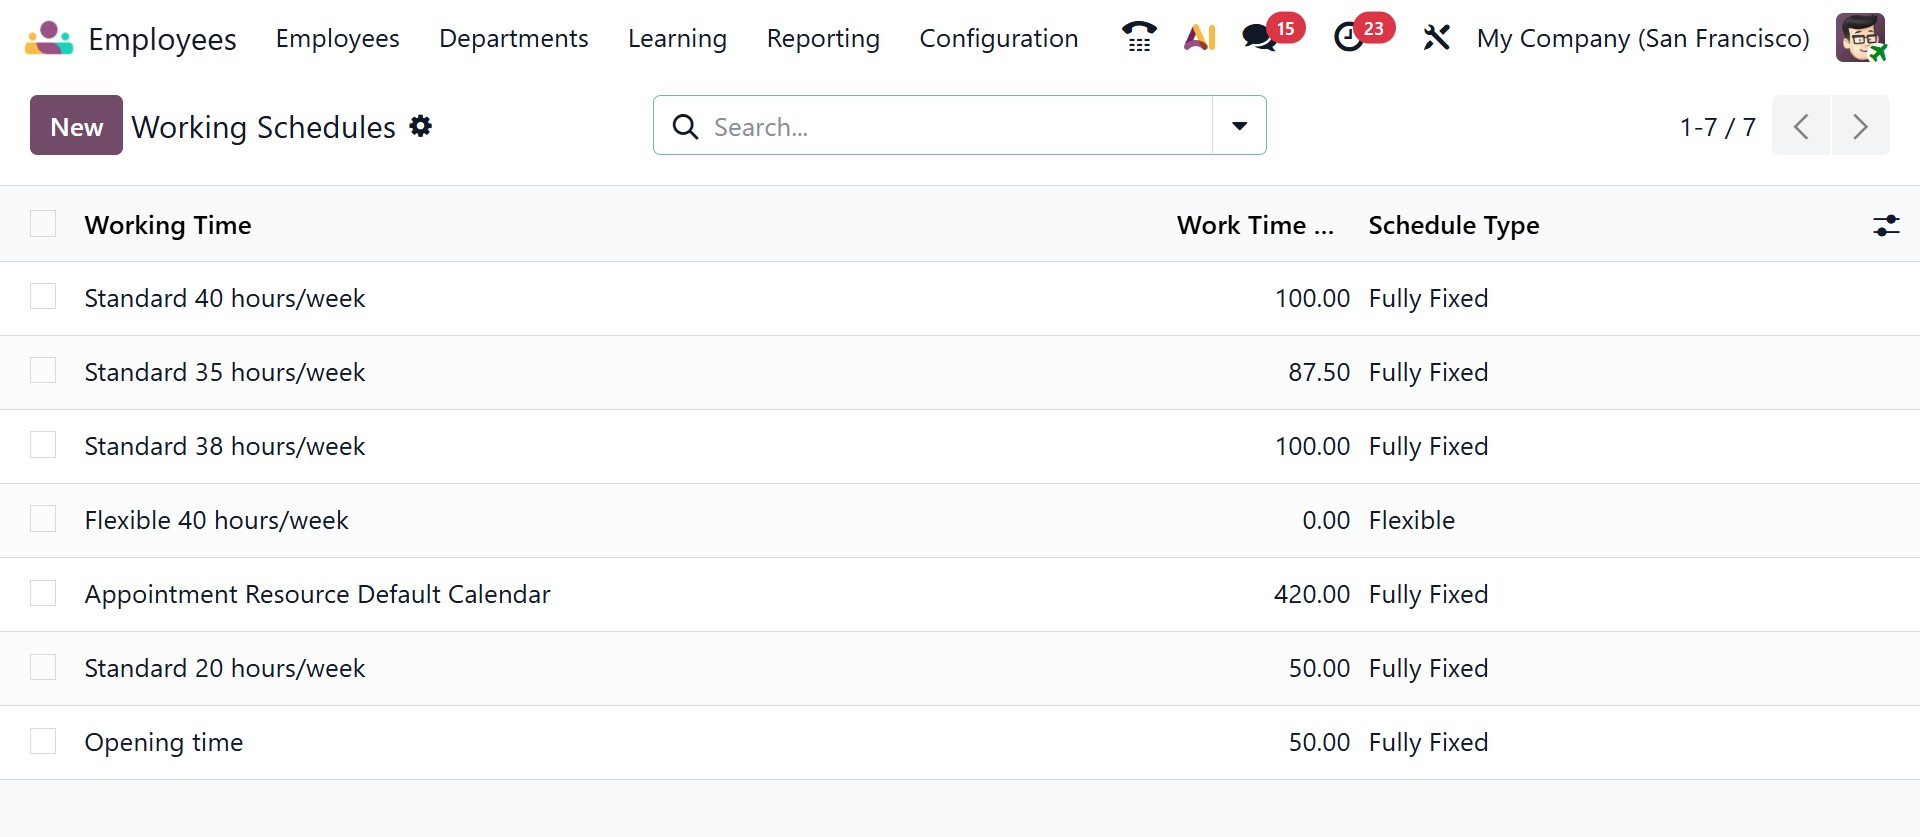
Working Schedules
The Working Schedules section allows administrators to define standard working hour patterns within the organization. Common schedules such as 40-hour, 38-hour, or 35-hour workweeks can be created and maintained here. These schedules are then assigned to employees through their contracts, ensuring accurate attendance tracking, payroll calculations, and compliance with labor regulations.
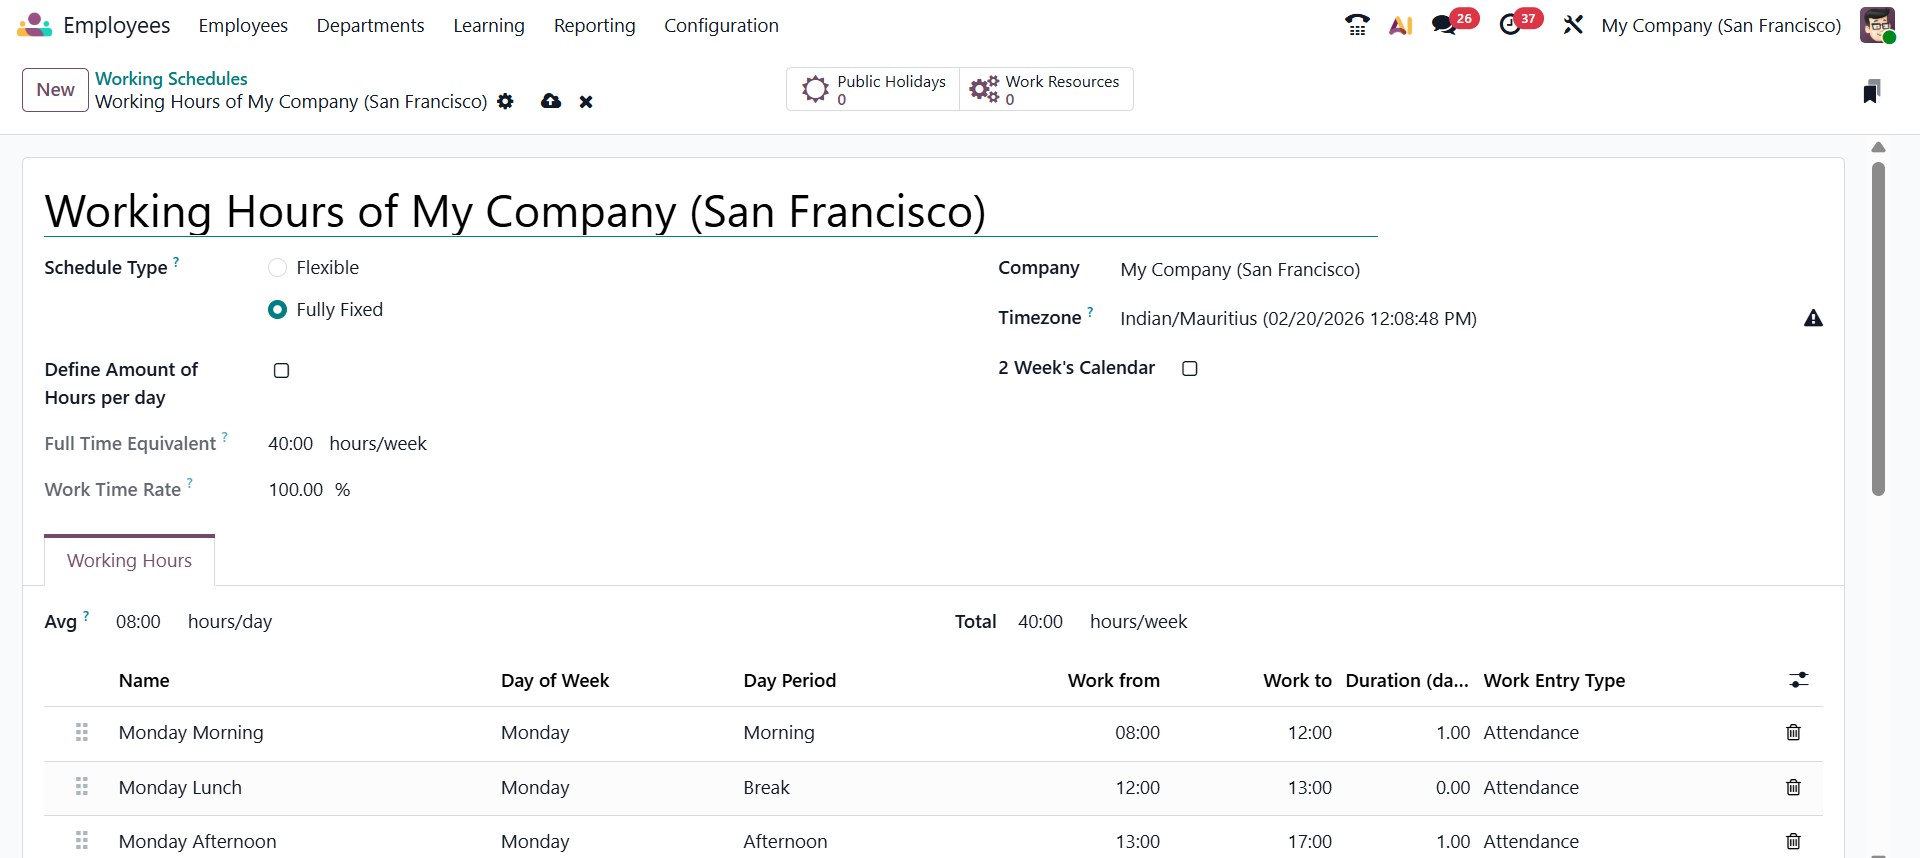
When you click the New button in the Working Schedules section of Odoo 19, a detailed configuration window opens, allowing you to create a new working time schedule for the company. At the top of the form, you can define the Schedule Name, select the related Company, and set the appropriate Timezone. You can also choose the Schedule Type, depending on whether employees follow fixed working hours or adaptable time slots. Additional options like Define Amount of Hours per Day and 2 Weeks Calendar can be enabled to customize further how the schedule is structured.
The form also displays key indicators such as Full Time Equivalent (hours/week) and Work Time Rate (%), which help standardize workload calculations. Under the Working Hours tab, you can define daily attendance lines by specifying the Day of Week, Day Period (Morning, Afternoon, Break), Work From and Work To times, and the corresponding Work Entry Type. The system automatically calculates the total weekly hours based on the configured time slots. Once saved, this schedule can be assigned to employee contracts, ensuring accurate attendance management, payroll processing, and compliance with company policies.
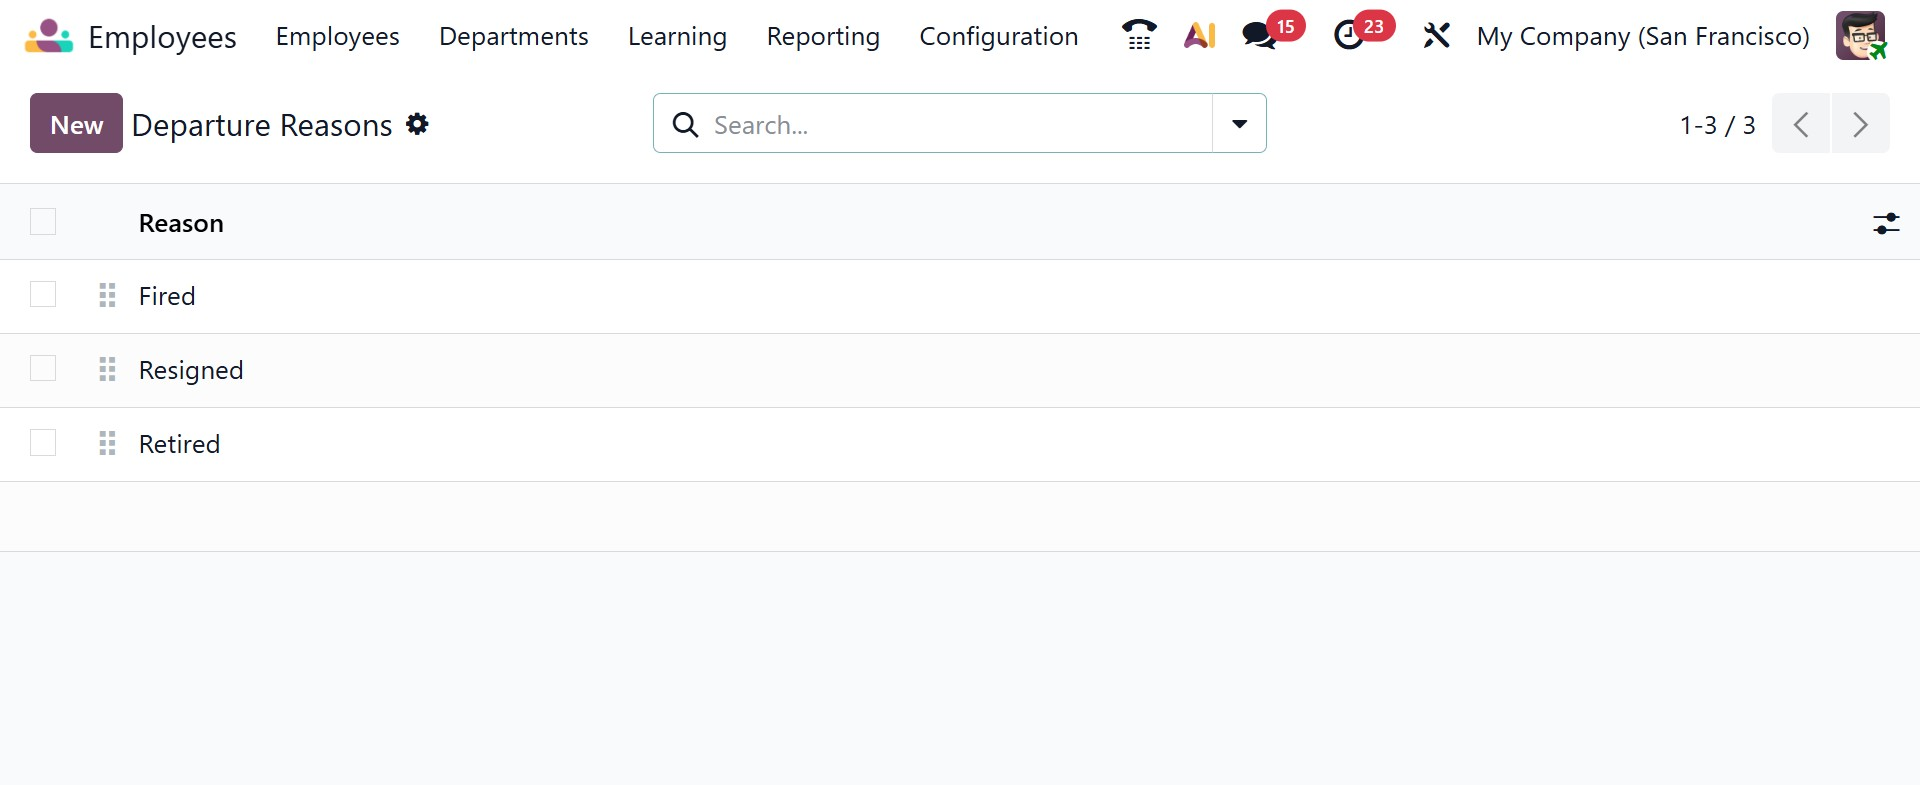
Departure Reasons
The Departure Reasons configuration helps organizations categorize employee exits. Reasons such as resignation, retirement, termination, or contract completion can be predefined in this section. When an employee record is archived, HR users can select the appropriate departure reason, enabling better reporting and analysis of employee turnover trends.
Skill Types
The Skill Type configuration allows HR teams to define different categories of skills that are relevant to the organization. These may include language skills, technical competencies, certifications, or soft skills. Each skill type can include multiple proficiency levels, making it easier to assess employee expertise accurately. This structured approach supports skill-based reporting, workforce planning, and training needs analysis.
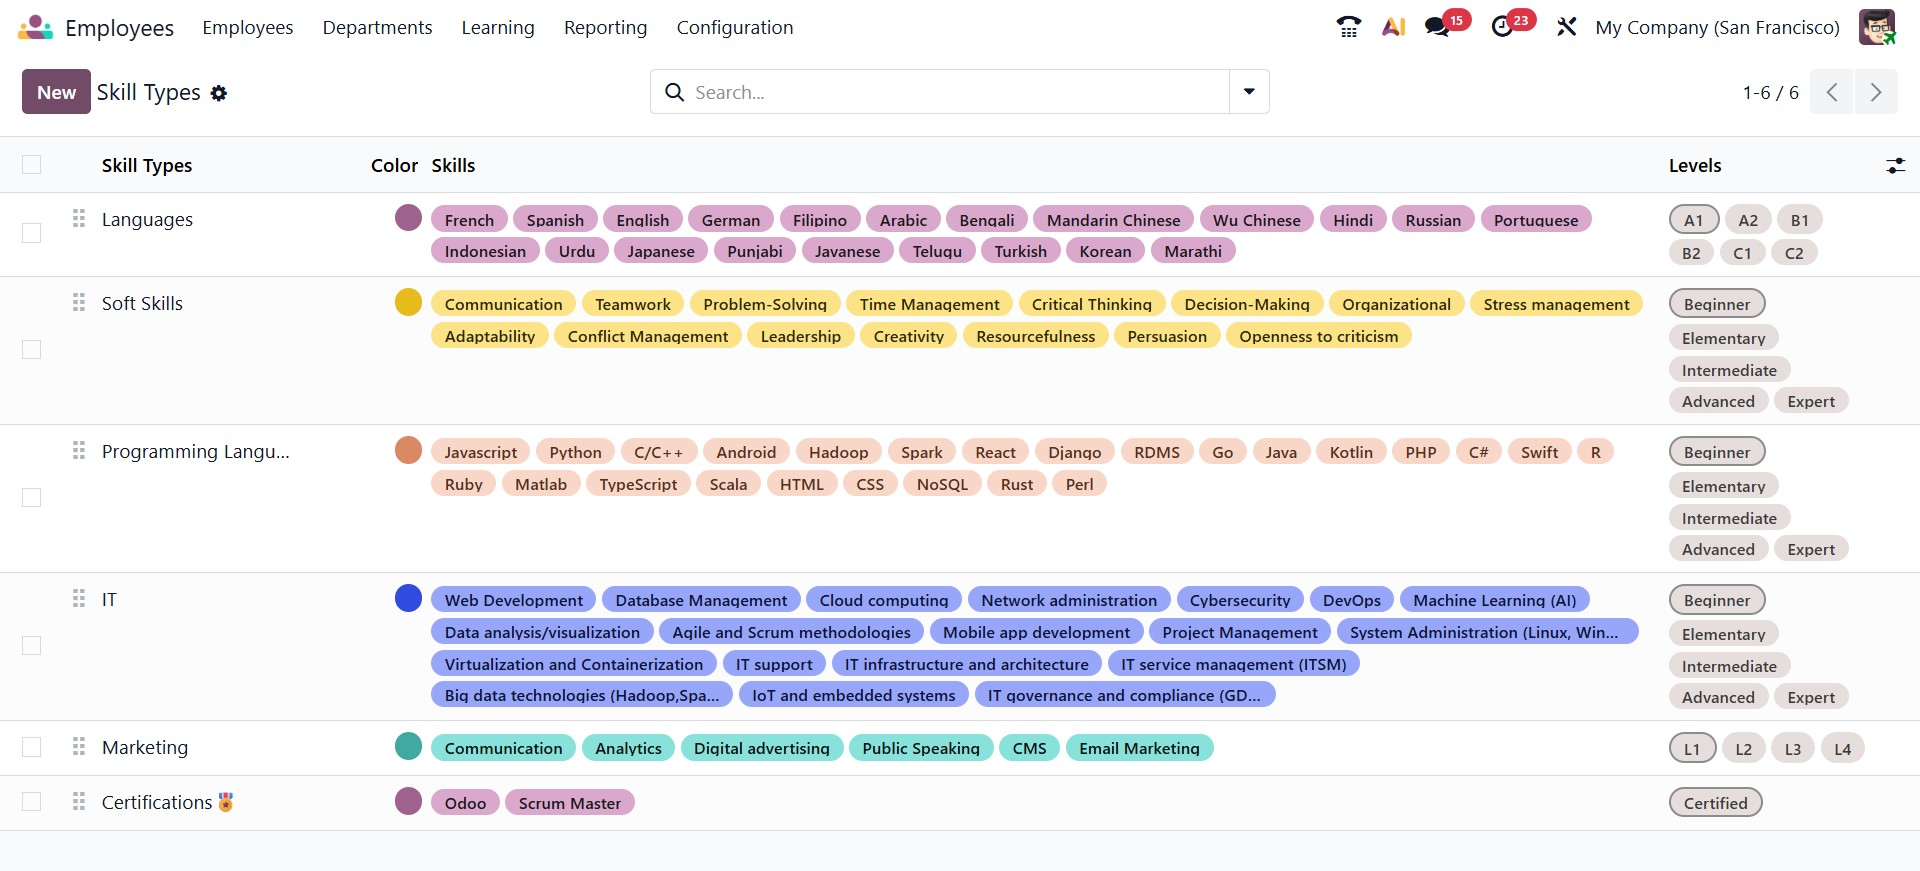
When you click the New button, a configuration form opens where you can create a new skill category by entering the Skill Type Name, selecting a Color for visual identification, and enabling the Certification option if the skill requires certification tracking. The form includes a Skills section where you can add individual skills under the category using the Add a line option, and a Levels section where you define proficiency stages by specifying the Level Name, setting the Progress percentage, and selecting a Default Level if applicable. Once saved, this skill type structure can be used in employee profiles to support organized skill tracking, evaluation, and reporting.
Tags
The Employee Tags configuration allows HR teams to create and manage labels that help categorize and organize employees within the system. These tags can represent roles, work schedules, departments, special responsibilities, or classifications such as Sales, Trainer, Consultant, or High Potential. By assigning tags to employee records, organizations can simplify filtering, reporting, and segmentation processes. This structured tagging system improves searchability and supports better workforce organization and analysis.
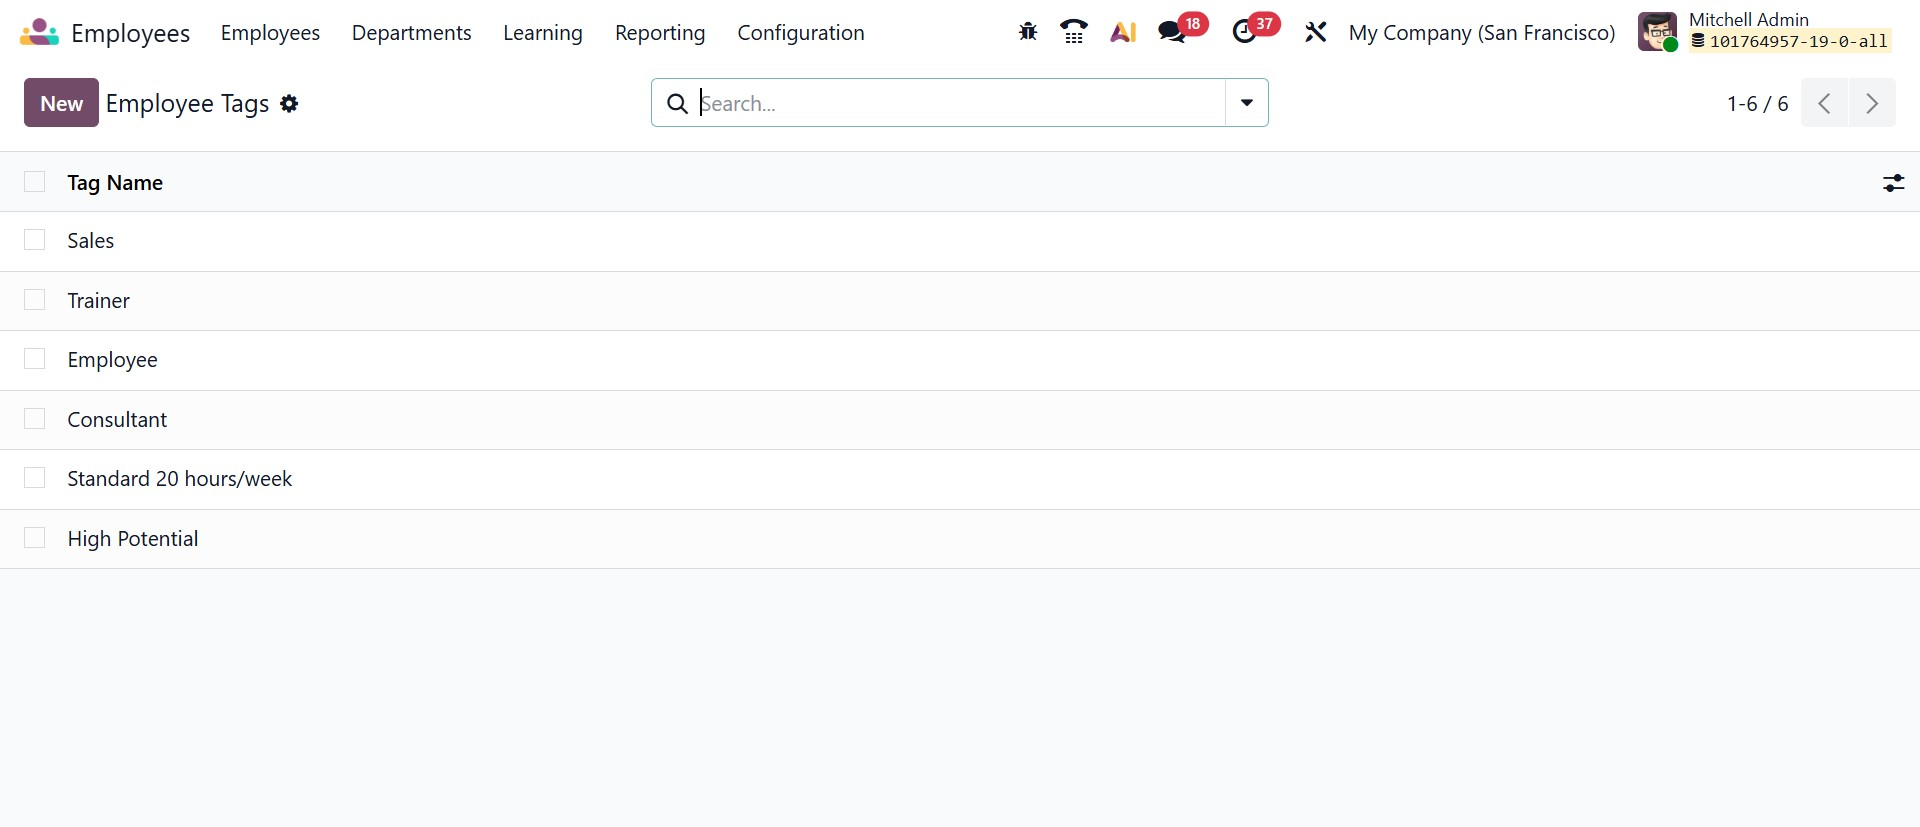
When you click the New button, a configuration form opens where you can create a new tag by entering the Tag Name and selecting a Color for easy visual identification. Once saved, the tag becomes available for selection in employee profiles.
Worker's Compensation
The Worker’s Compensation configuration allows you to create and manage compensation records that can be linked to employee contracts for accurate payroll and insurance processing.
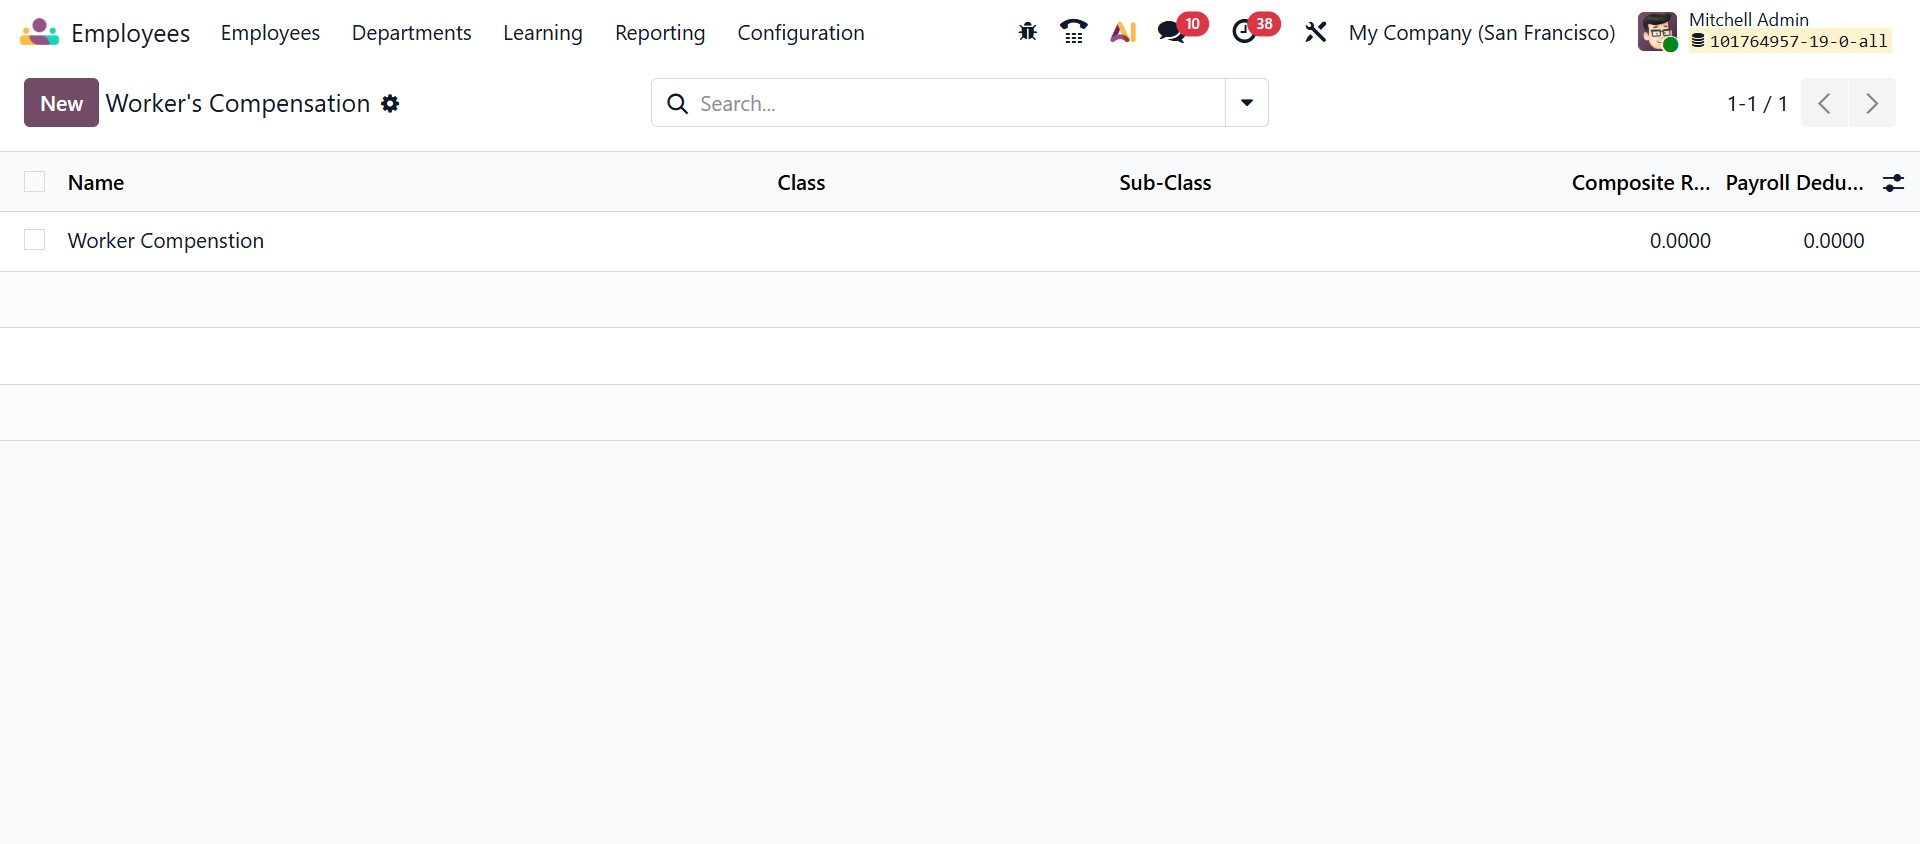
When you click the New button, a form opens where you can enter the Worker Compensation Name to clearly identify the compensation type. You can then specify the Class and Sub-Class, which help categorize the compensation according to job roles or insurance classifications. The Composite Rate field allows you to define the total rate associated with this compensation type, while the Payroll Deduction field lets you enter any deduction amount that should be applied through payroll. The Active checkbox ensures that only valid and currently used compensation records are available for selection.
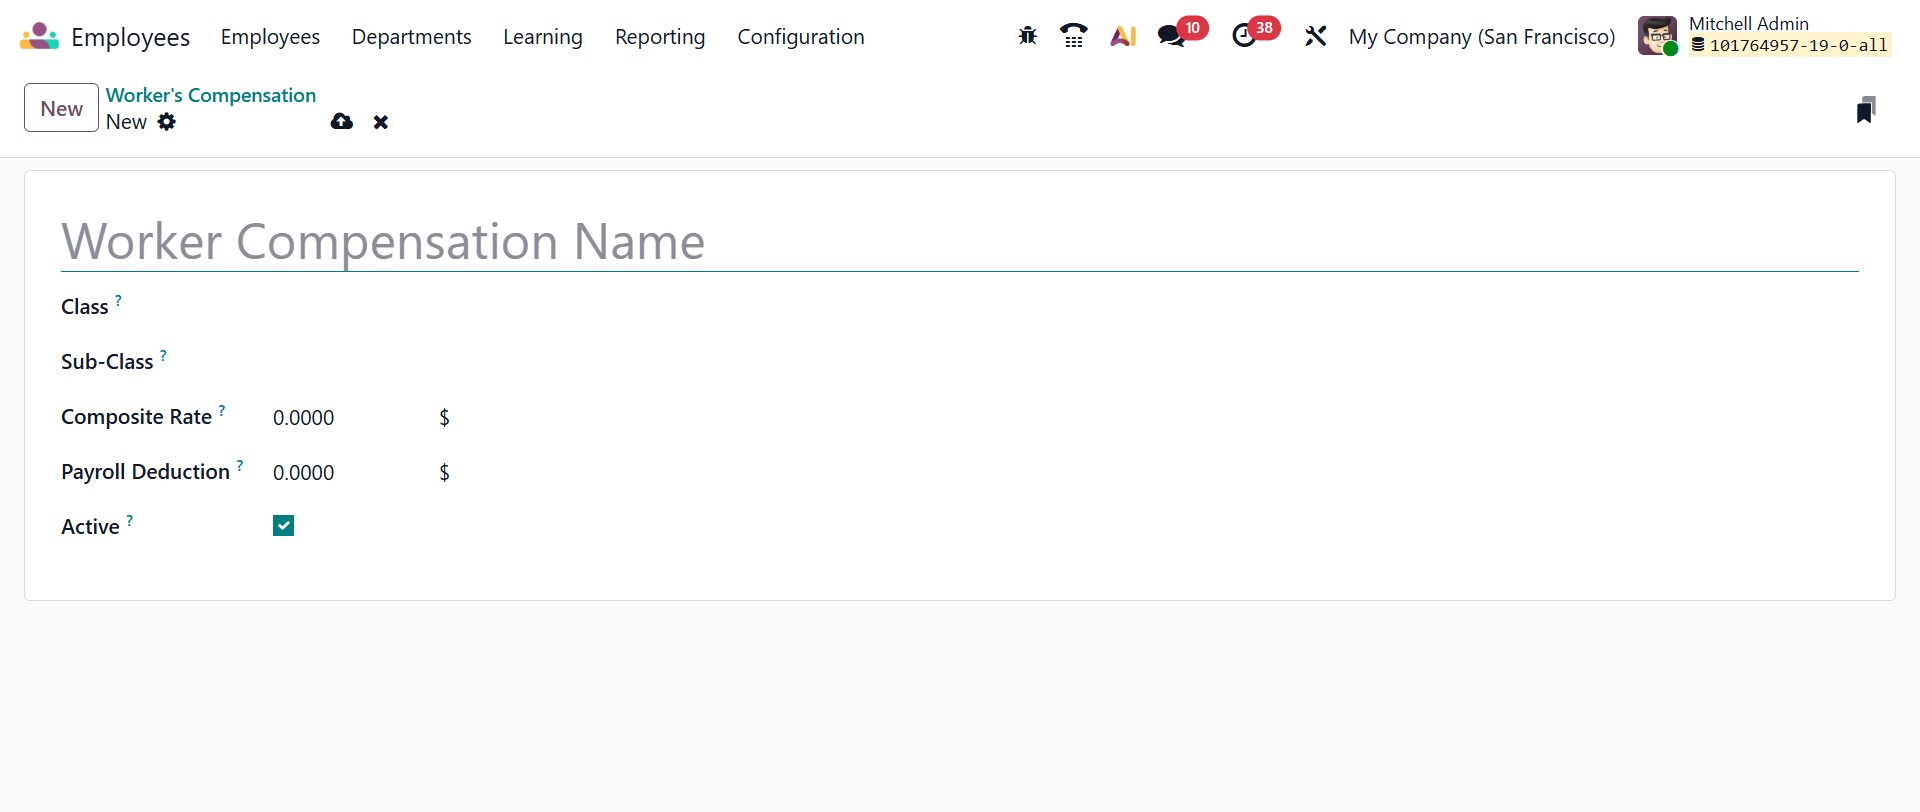
Once the details are completed and saved, the workers’ compensation record becomes available to assign within employee contracts, ensuring proper classification, compliance, and accurate payroll calculations.
Resume
Sections
The Resume – Sections configuration in Odoo 19 provides a centralized interface to define and manage the different sections that appear in employee resumes. From this screen, you can view a structured list of existing sections such as Other Experience, Education, Training, Side Projects, and Internal Certification. By clicking the New button, you can create an additional section and specify its name according to your organizational requirements. The list view allows you to easily reorder sections using the drag handle, ensuring the resume layout follows a consistent and logical structure. A dedicated Course checkbox column enables you to indicate whether a particular section is related to courses or training programs, which helps differentiate educational records from other professional details.
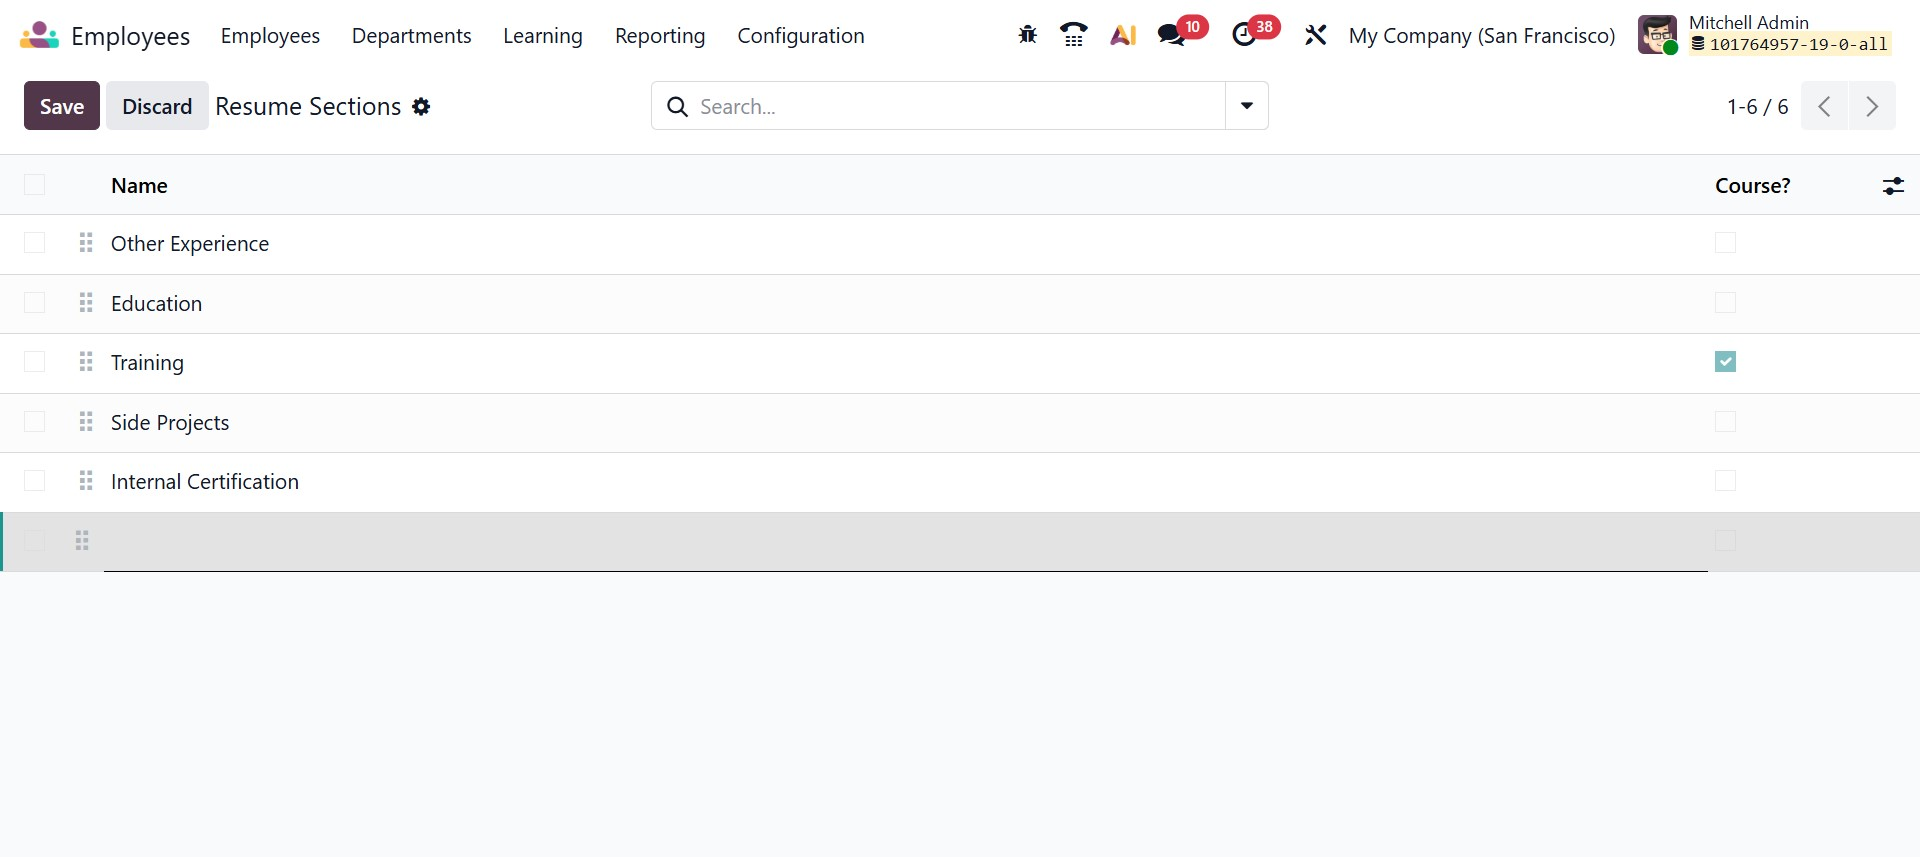
Once the sections are configured and saved, they become available within employee profiles, allowing HR teams to systematically organize resume information and maintain a uniform presentation across all employee records.
Recruitment
The Recruitment subsection within the Configuration menu focuses on managing hiring-related structures and standardizing recruitment processes.
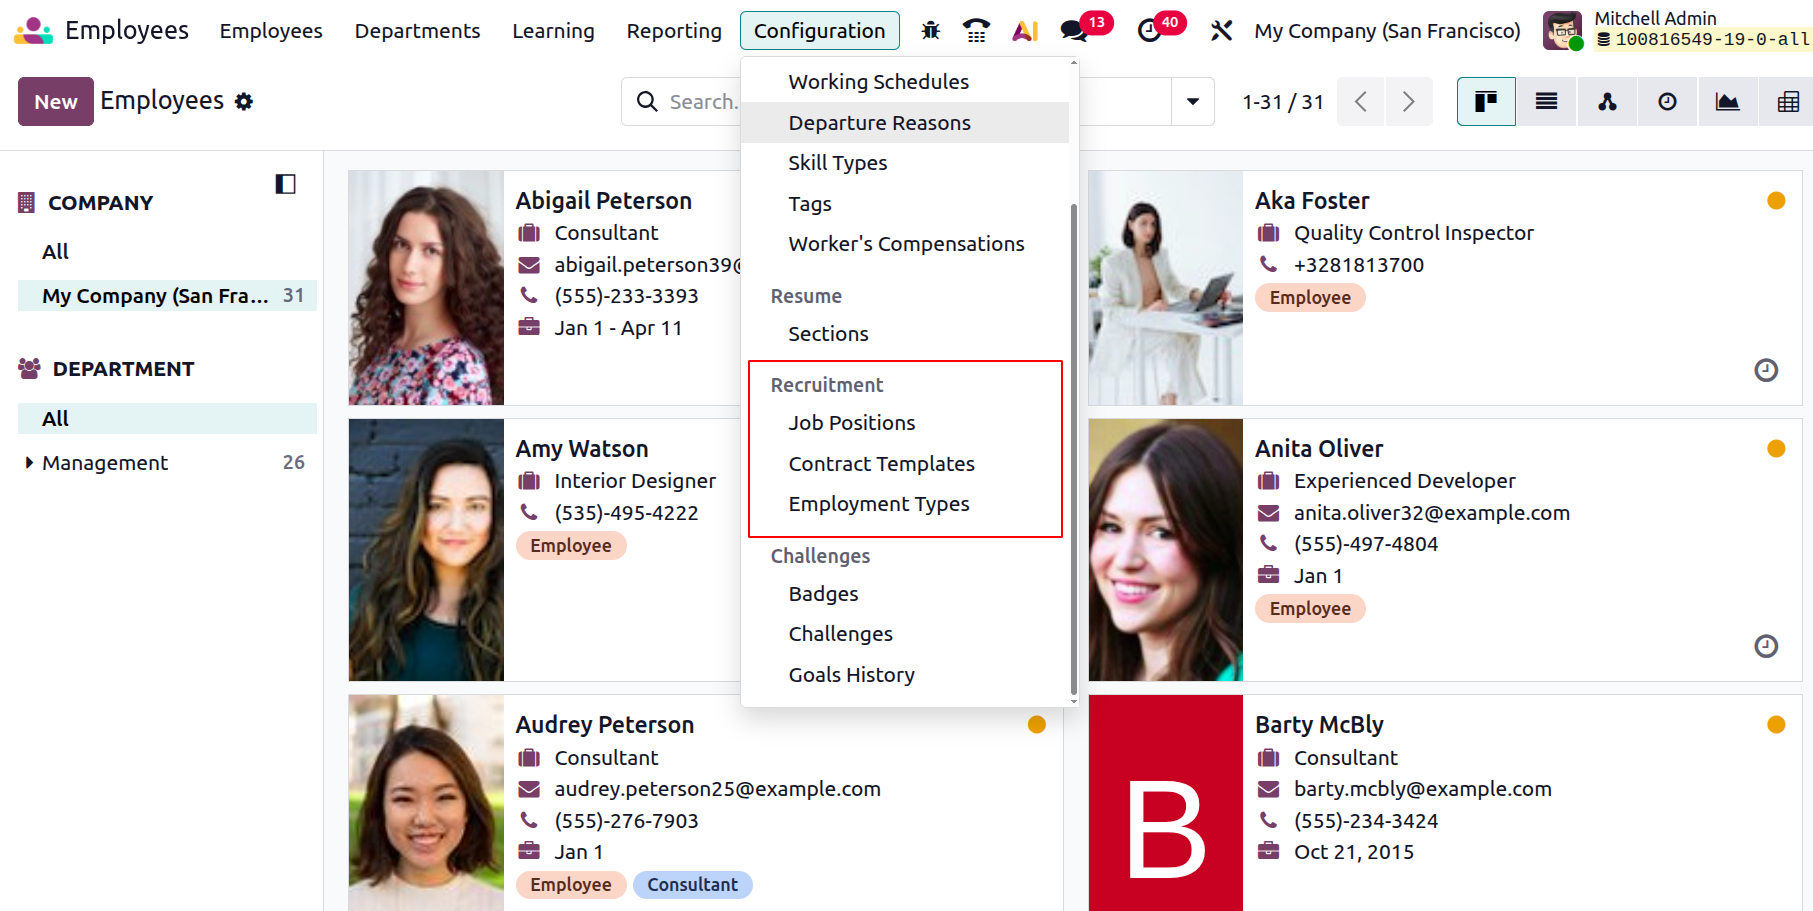
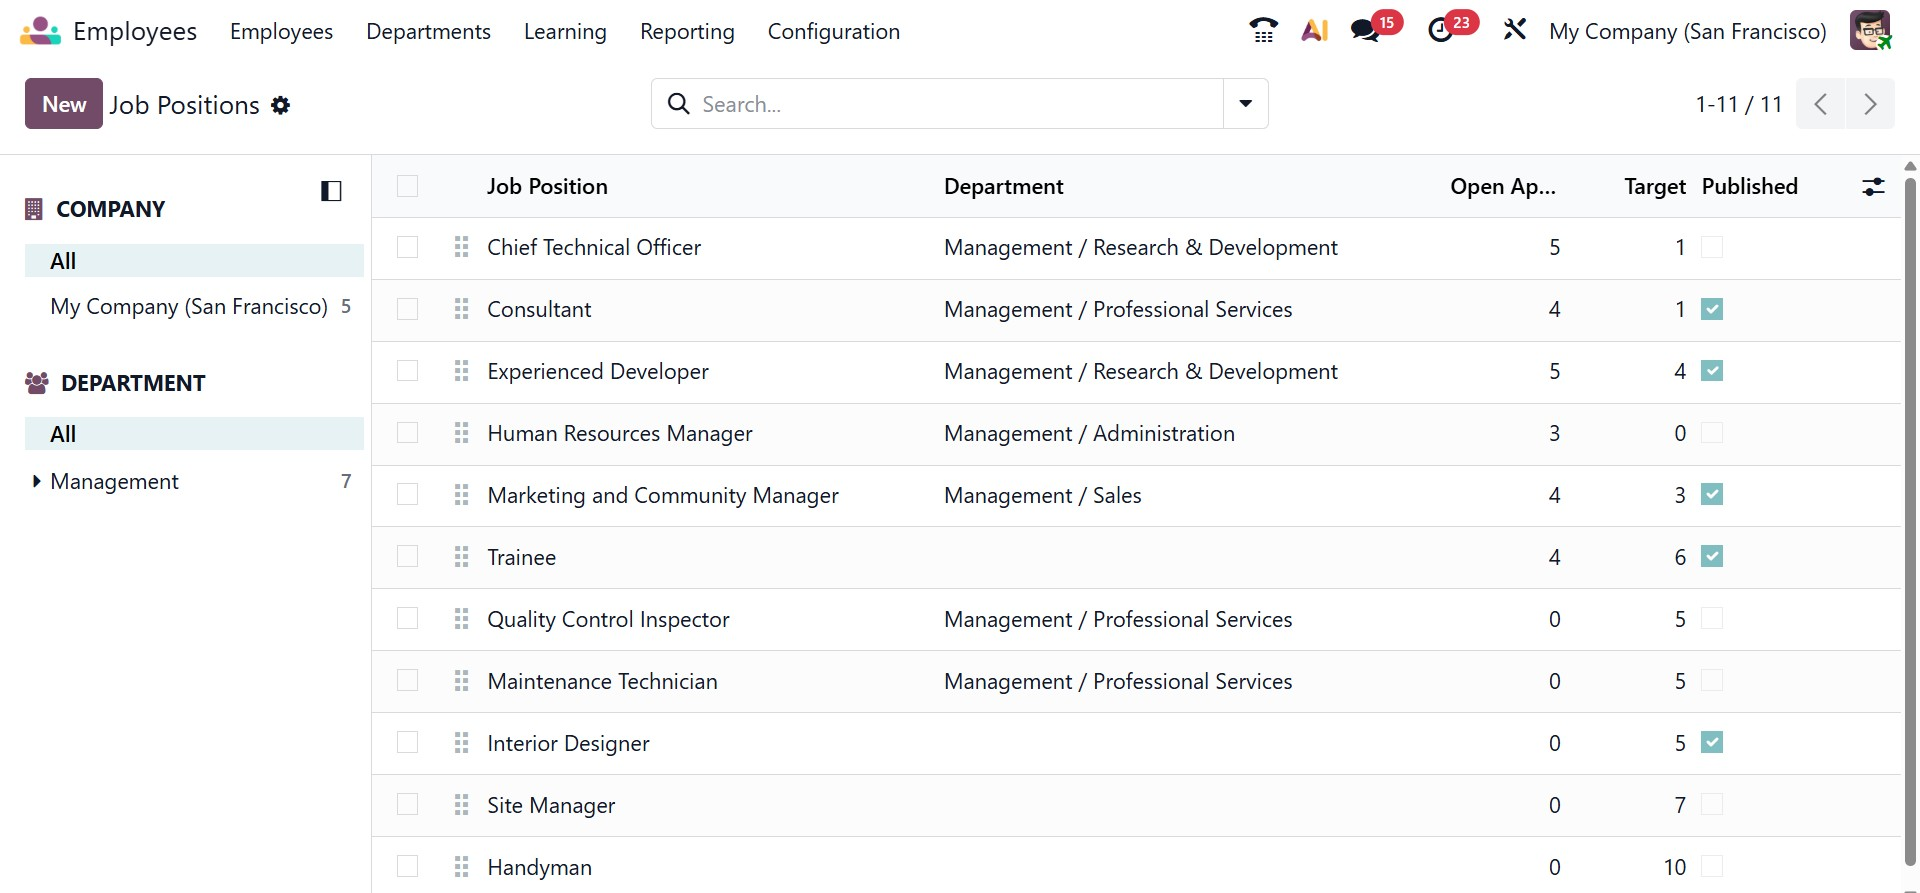
Job Positions
The Job Positions menu displays all active roles within the organization. From here, administrators can create new job positions by defining details such as job titles, departments, recruitment workflows, job postings, and associated contract information. This ensures that recruitment activities are aligned with organizational needs and that each role follows a consistent hiring process.
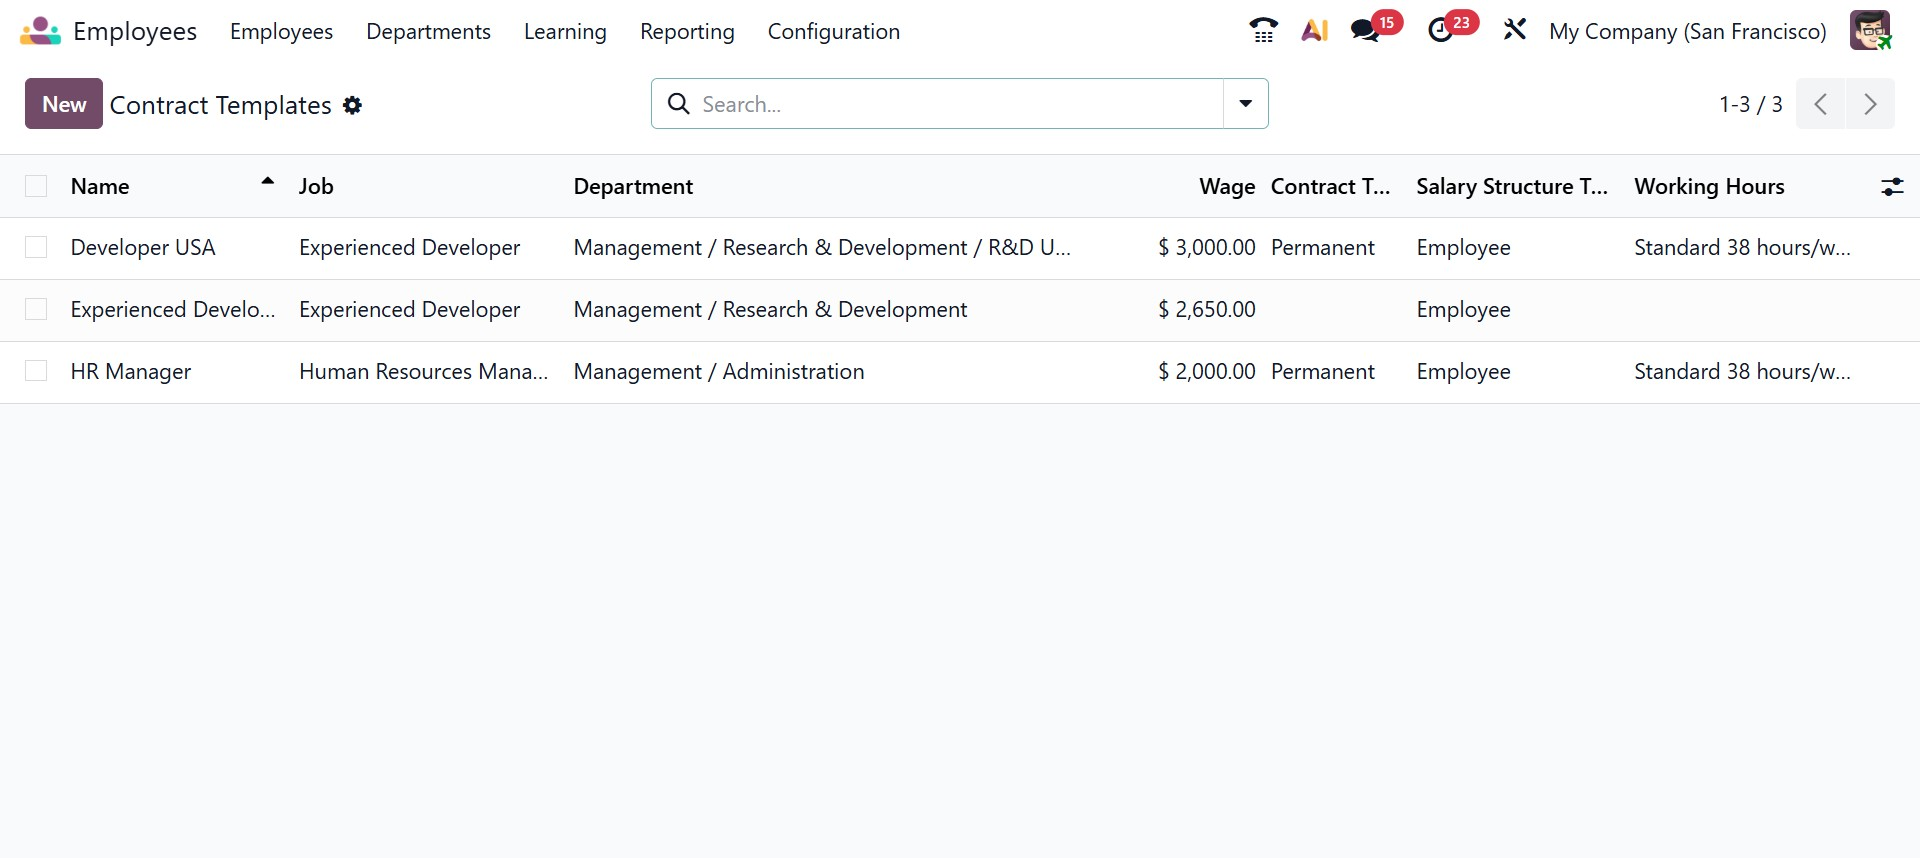
Contract Templates
The Contract Templates feature allows organizations to create reusable contract formats for different employee categories. These templates can include predefined salary structures, working hours, benefits, and legal clauses. By using contract templates, HR teams can quickly generate employee contracts while maintaining consistency and reducing the risk of errors.
When you click the New button in the Contract Templates menu of the Odoo 19 Employees module, the contract template creation form opens. This window allows HR administrators to define a reusable contract structure that can later be applied to multiple employees. At the top of the form, you can enter the Template Name, select the related Job Position, assign the Department, and specify the HR Responsible person. You can also configure the Analytic Distribution, which helps allocate employee costs across different analytic accounts for reporting purposes.
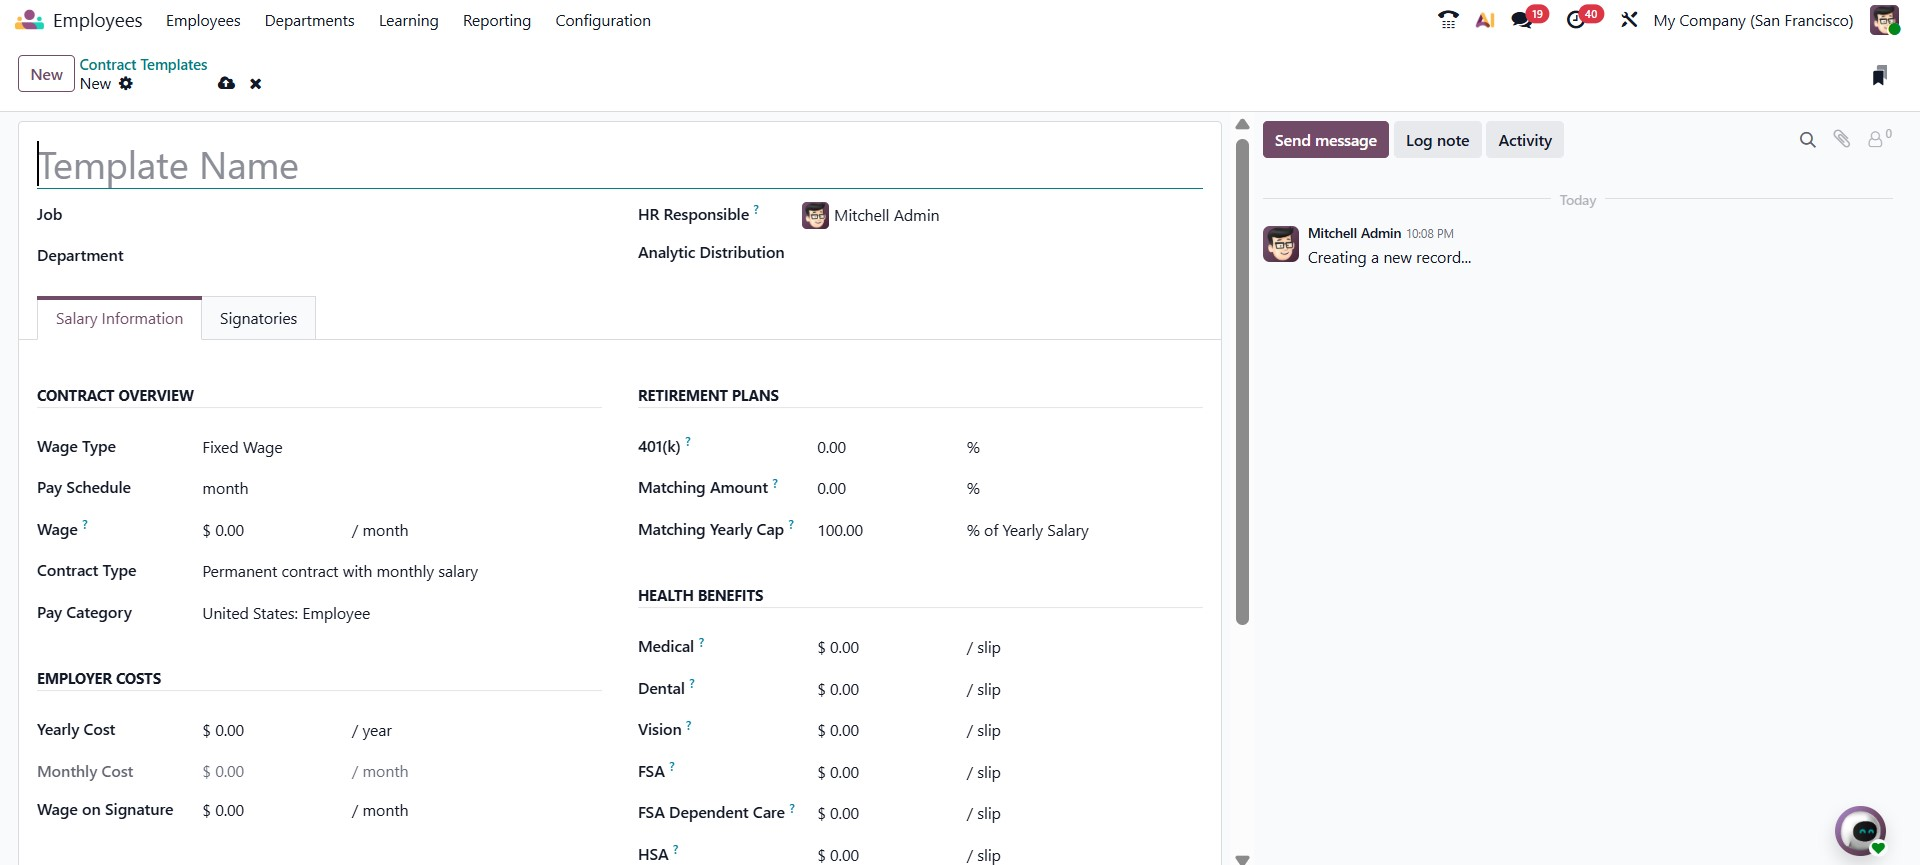
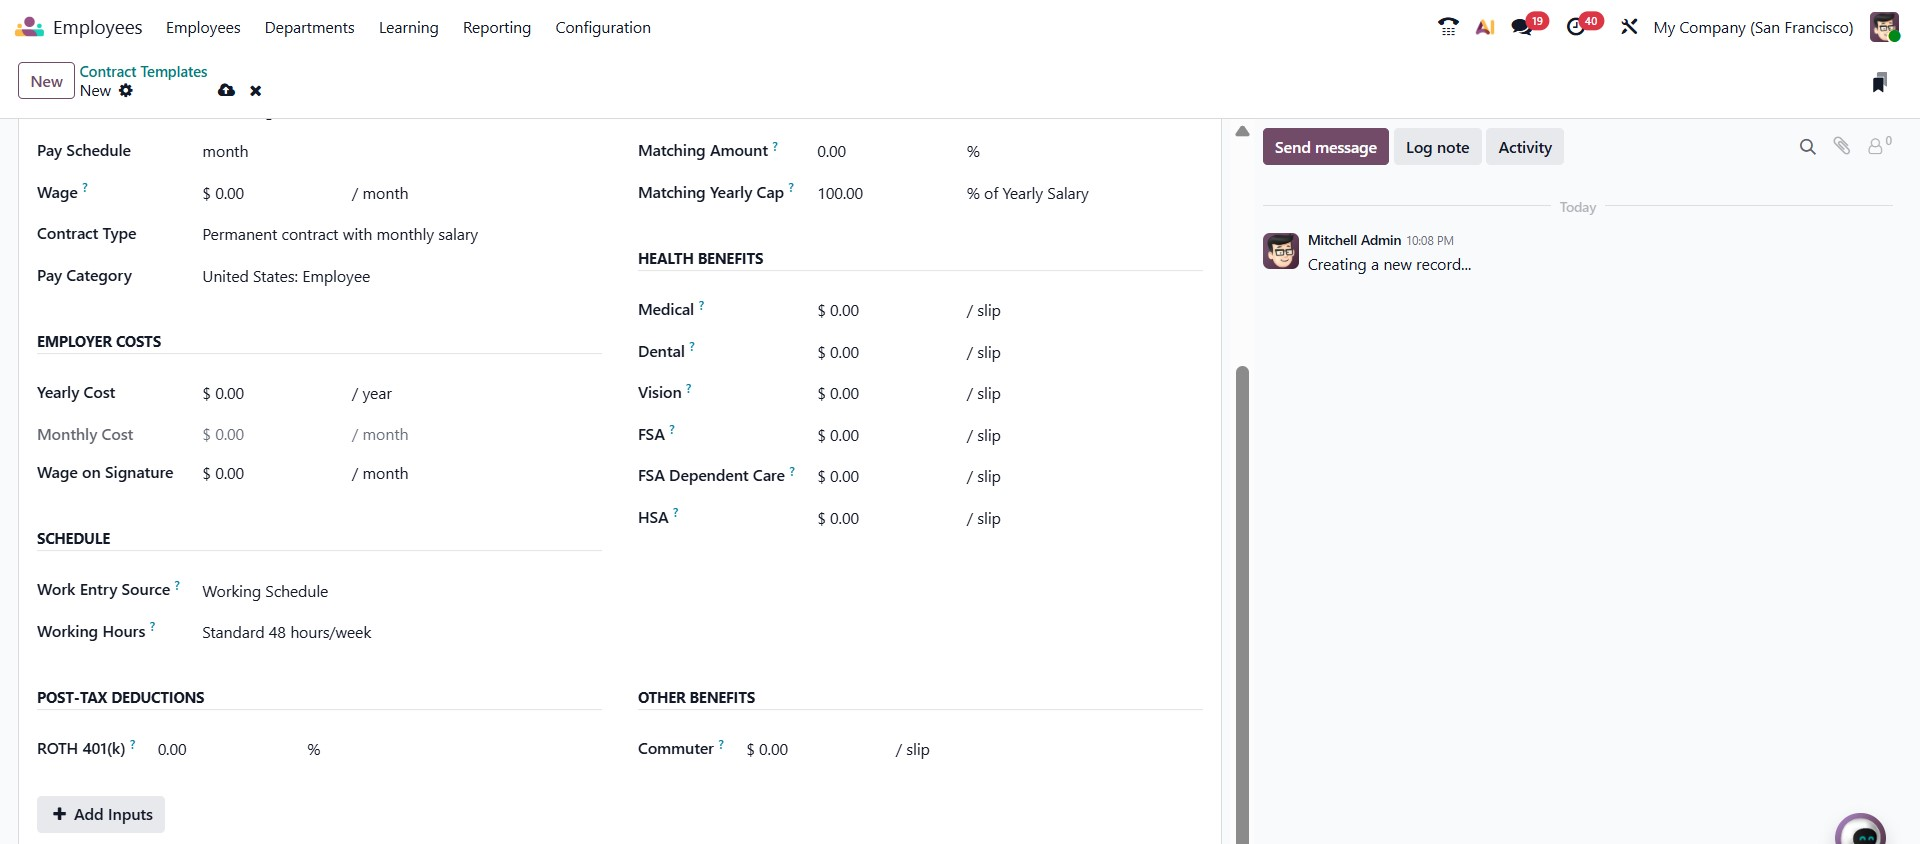
Under the Salary Information tab, the form is divided into several structured sections. In the Contract Overview, you can define the Wage Type, Pay Schedule, Wage amount, Contract Type, and Pay Category. The Employer Costs section automatically calculates and displays the yearly and monthly employer expenses based on the defined salary. The Schedule section allows you to specify the Work Entry Source and assign the standard Working Hours, ensuring accurate attendance and payroll calculations.
The form also includes benefit-related sections such as Retirement Plans, where you can configure 401(k) contributions, matching amounts, and yearly caps. In the Health Benefits section, you can define medical, dental, vision, FSA, and HSA contributions per payslip. Additional areas, such as Post-Tax Deductions and Other Benefits, allow you to configure deductions like Roth 401(k) and commuter benefits.
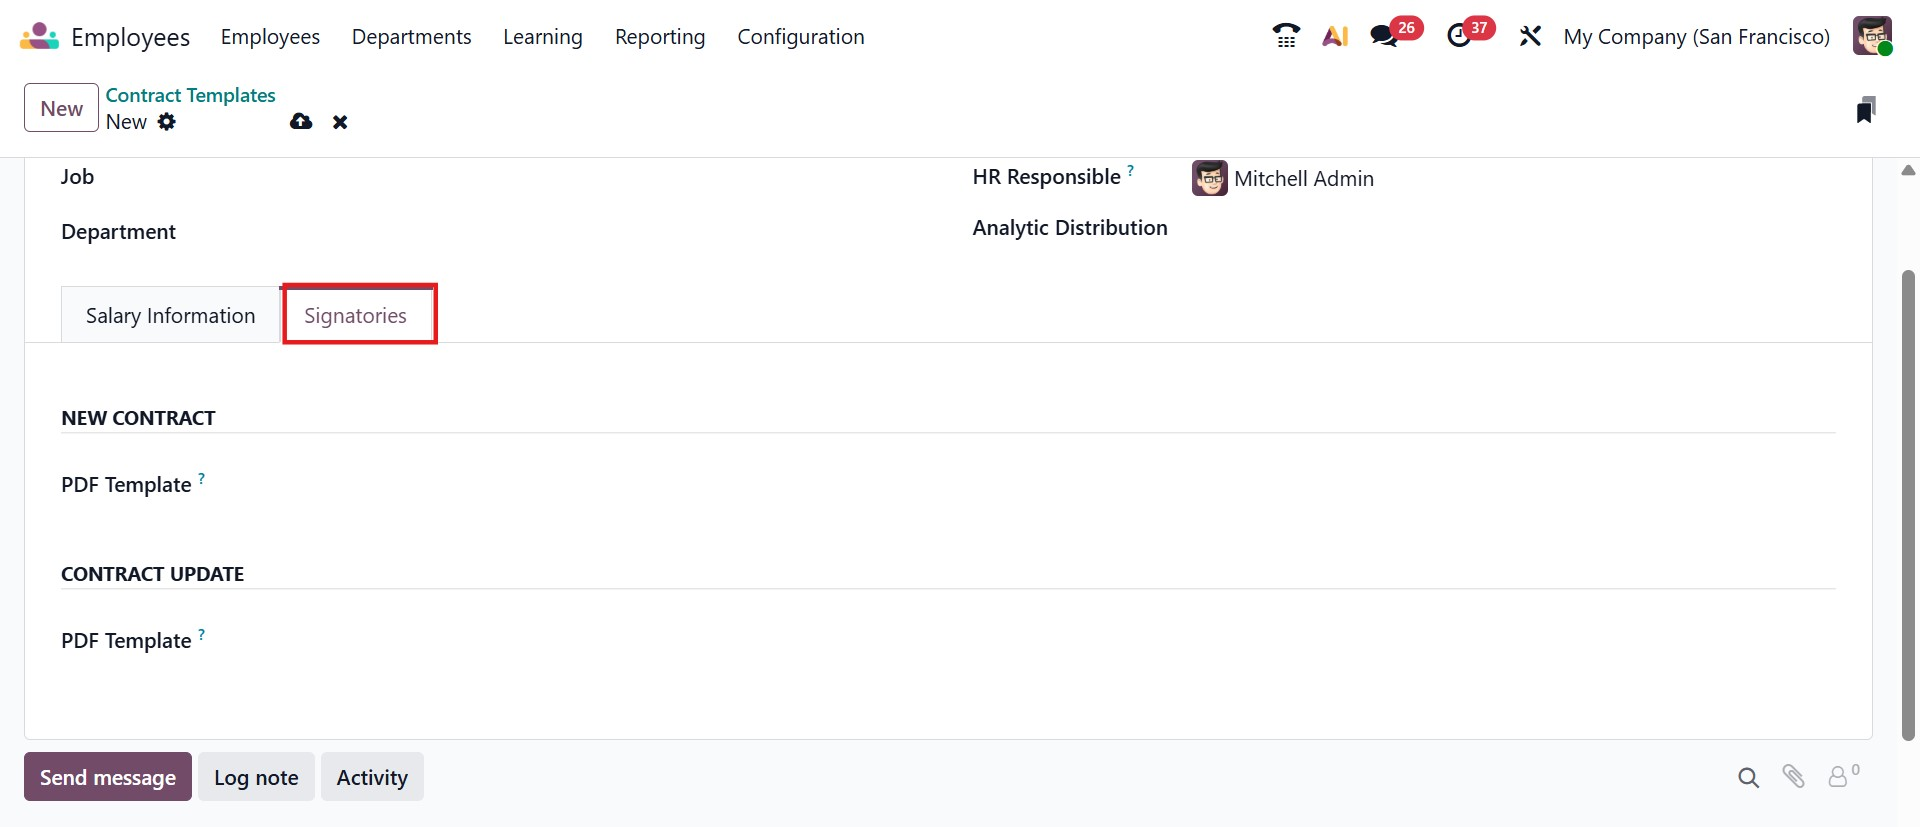
The Signatories tab in the Odoo 19 Contract Template form is used to define the authorized signers and PDF templates associated with employee contracts created from this template. In the New Contract section, you can assign a specific PDF Template that will be used when generating a new contract, ensuring that the document follows a standardized structure with predefined signature placeholders. Similarly, the Contract Update section allows you to select a separate PDF template for contract amendments or modifications, maintaining consistency during updates. By configuring this tab, HR teams can streamline the contract signing process, ensure compliance with company policies, and automatically apply the correct document format whenever the template is used.
Employment Types
The Employment Types option enables organizations to define various categories of employment, such as permanent, temporary, interim, seasonal, or full-time roles. These employment types can then be linked to employee contracts, helping HR teams clearly differentiate workforce categories and manage compliance, payroll, and benefits accordingly.

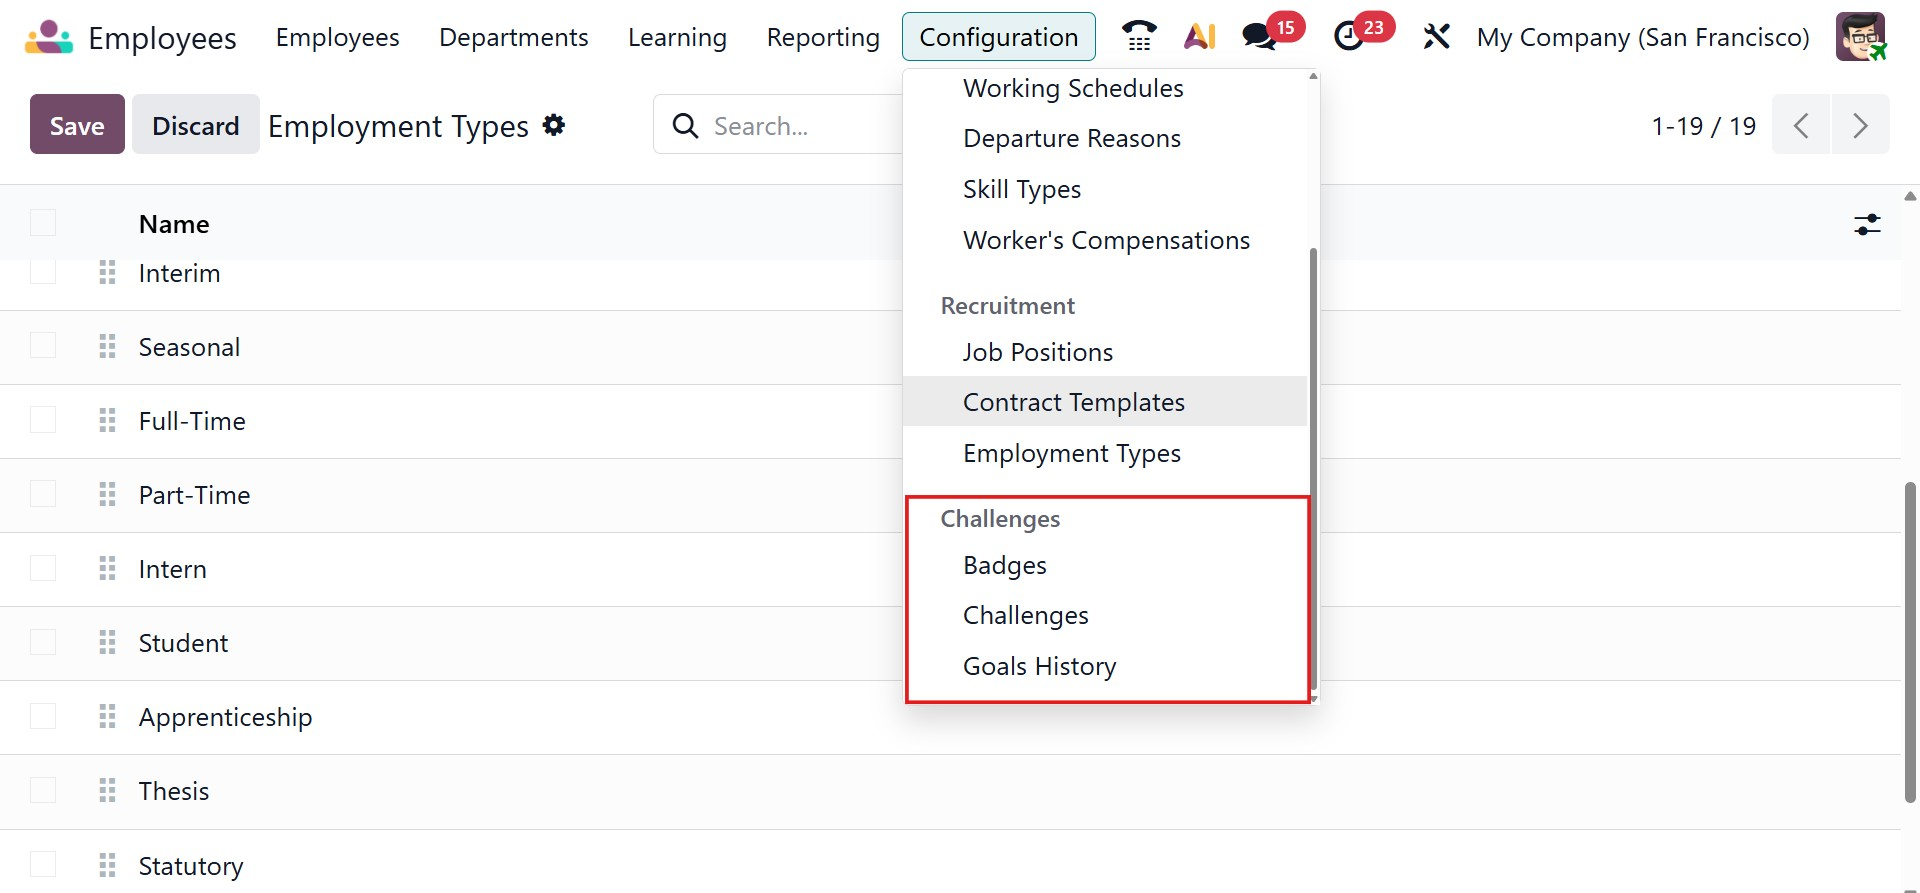
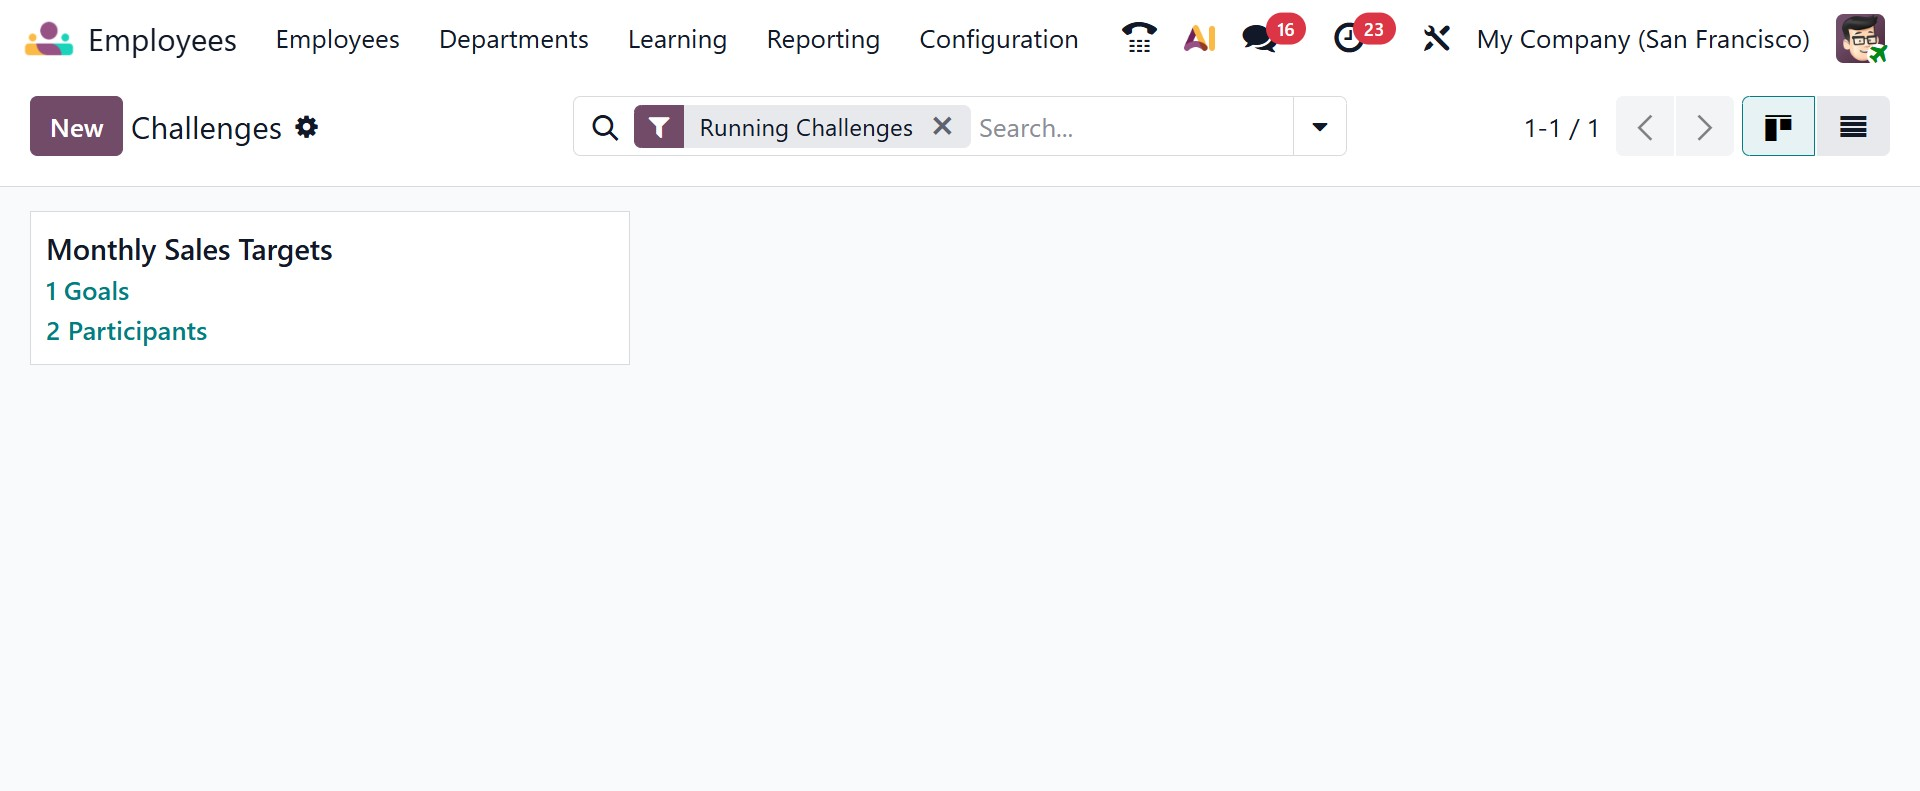
Challenges
Next, under Configuration, you have the Challenges section, as shown in the image below.
Badges
The Gamification system includes the Badges option in the Employee Module Configuration of Odoo. It enables companies to design, oversee, and award badges to staff members according to their performance, accomplishments, and training development.
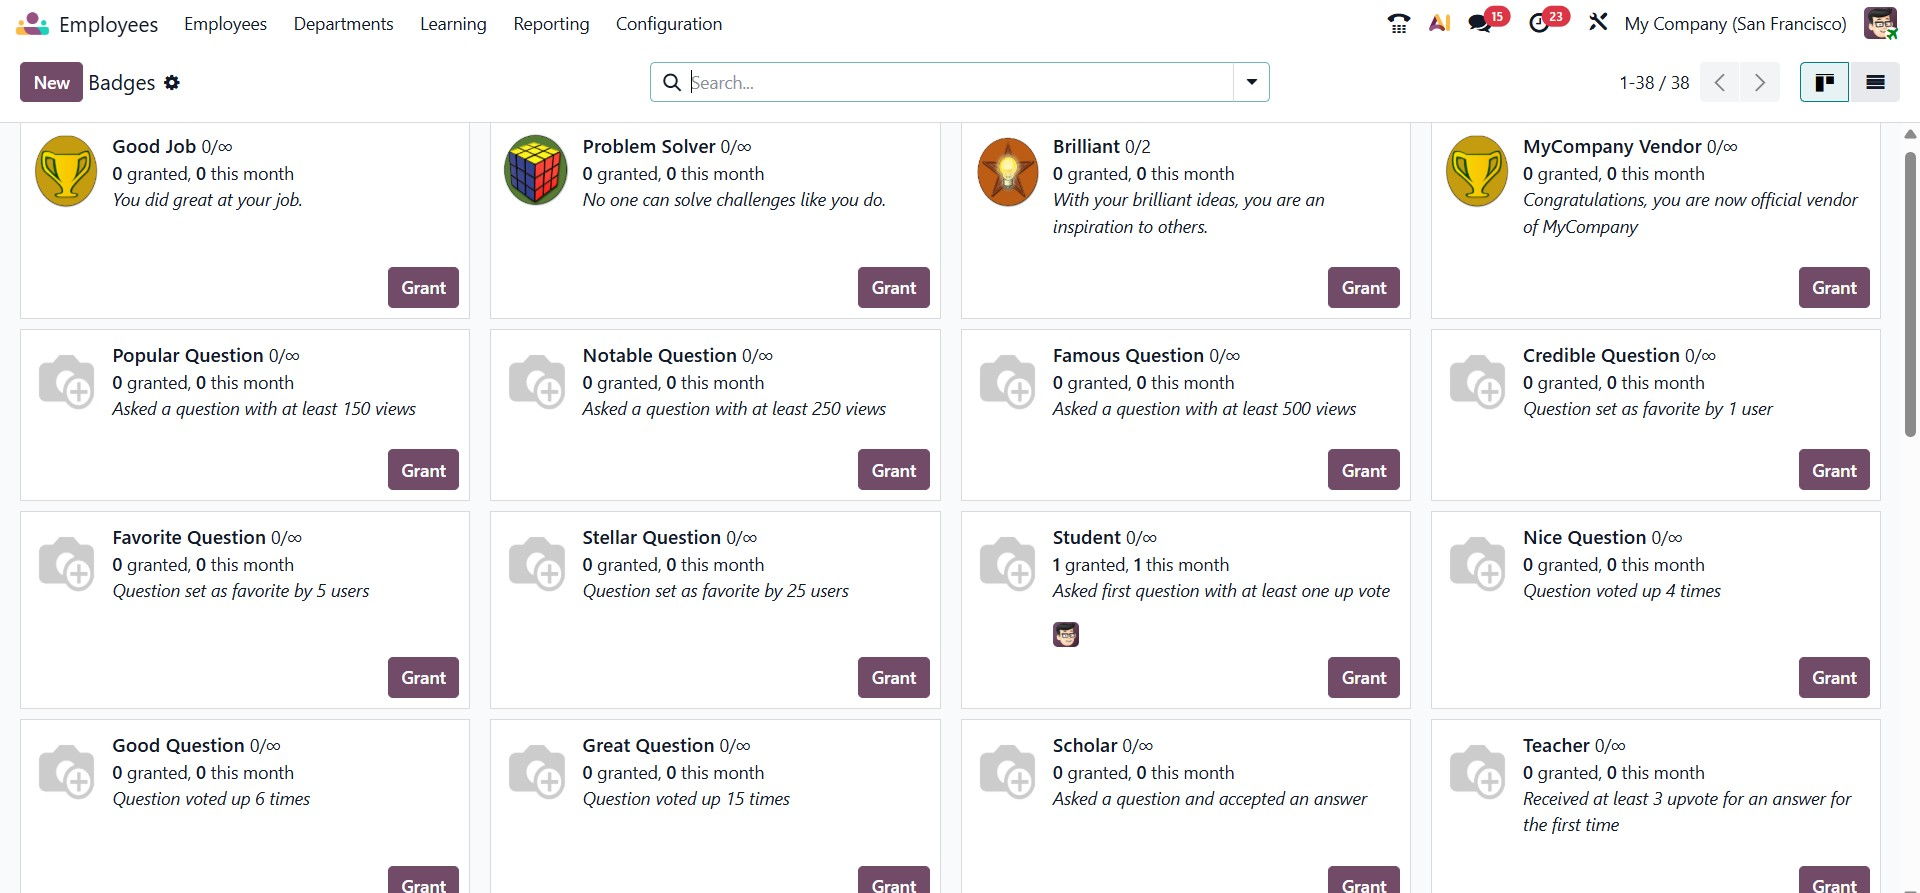
On selecting the NEW option, you have the creation page, as in the image below.
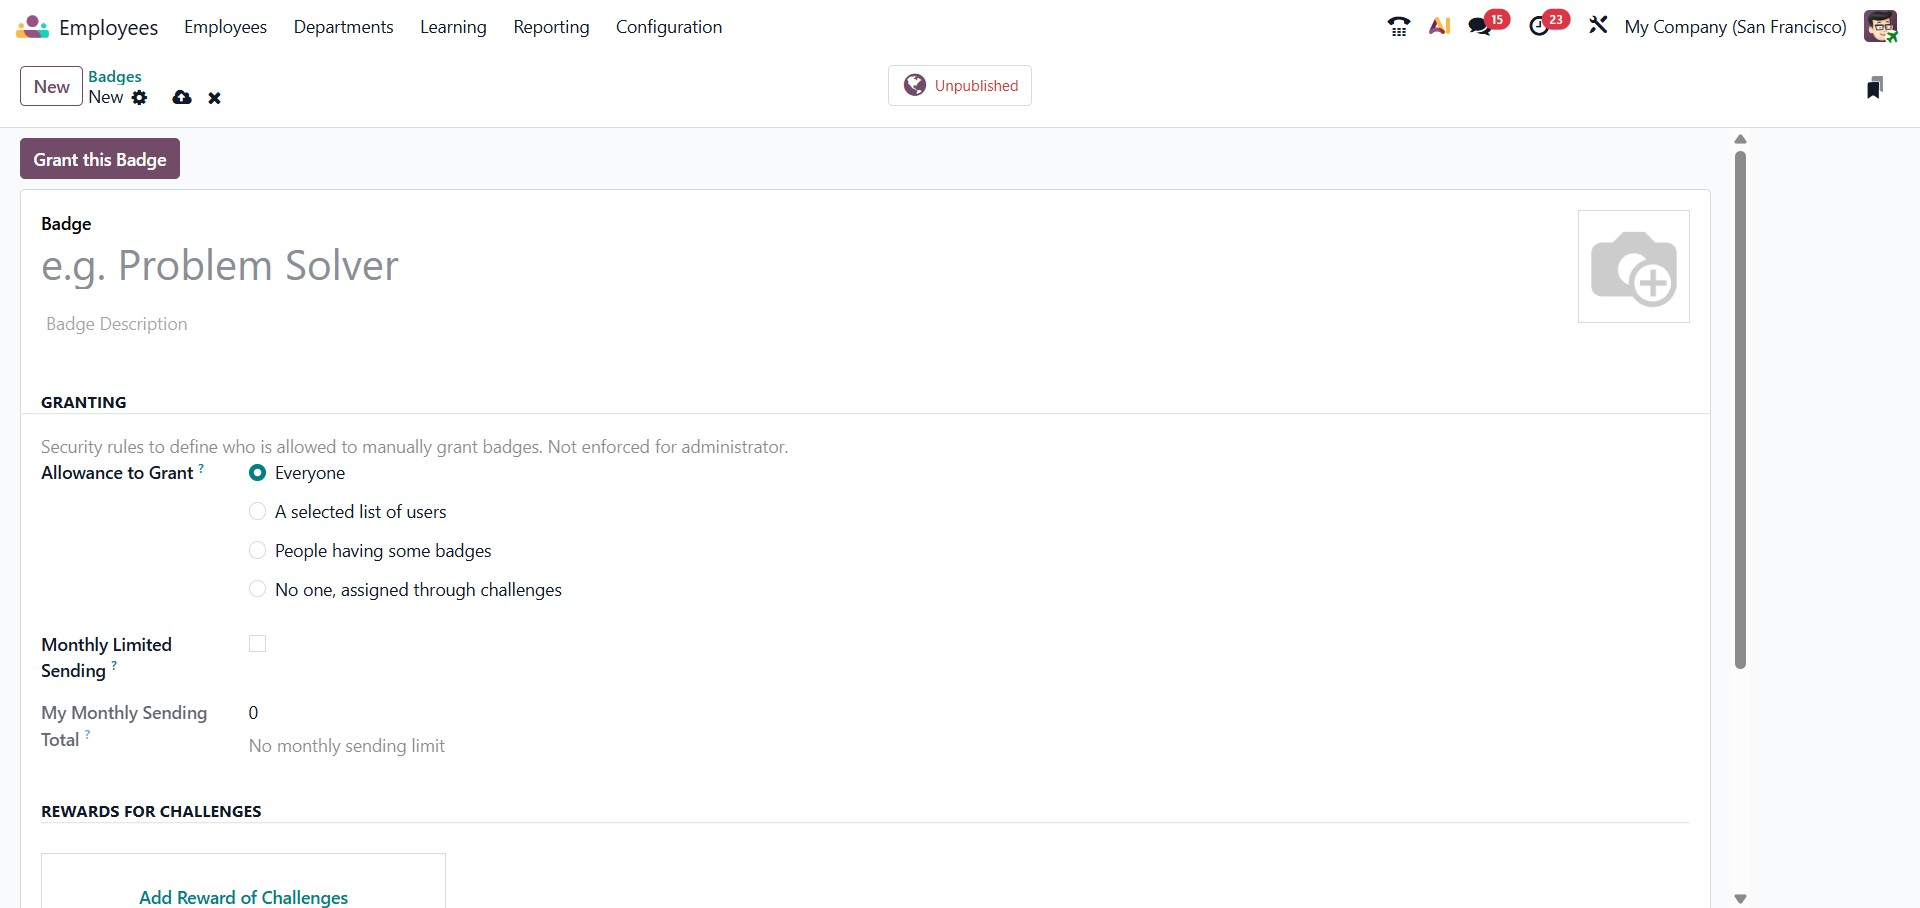
In this form, you can define the Badge Name and provide a clear description explaining the purpose or achievement criteria for the badge. A custom image can also be uploaded to visually represent the badge, making it more engaging and meaningful when awarded to employees.
In the Granting section, you can control who is allowed to manually assign the badge. The Allowance to Grant option lets you choose whether the badge can be granted by everyone, only by a selected list of users, by users who already hold certain badges, or by no one if it is intended to be awarded automatically through challenges. Additionally, the Monthly Limited Sending option can be enabled to restrict how many times a badge can be granted within a month, ensuring fair and controlled distribution.
The form also includes a Rewards for Challenges section, where the badge can be linked to specific performance challenges. When employees complete defined goals, the badge can be automatically awarded as a reward. Once the configuration is complete, the badge can be saved and granted to employees, helping organizations encourage motivation, engagement, and performance recognition in a structured manner.
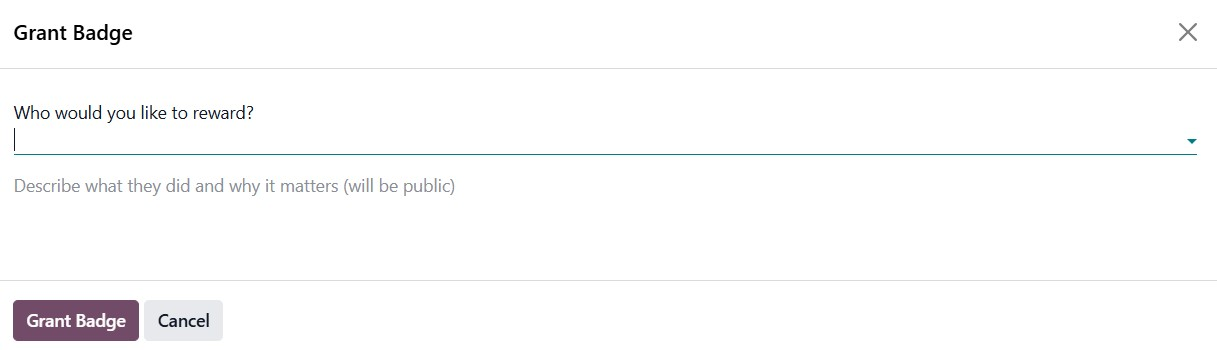
There, the administrator can grant a badge to an eligible employee by clicking on the Grant Badge button. This will give a pop-up, as shown below.
Challenges
The employee module includes the Challenges option in the Odoo Employee Configuration menu. It enables companies to set performance-based goals for staff members, monitor their development, and give them badges, points, or ranks as rewards. This feature is intended to increase engagement, inspire workers, and increase output. The page will be, as in the image below.
On selecting the NEW option, you will be directed to the creation page.
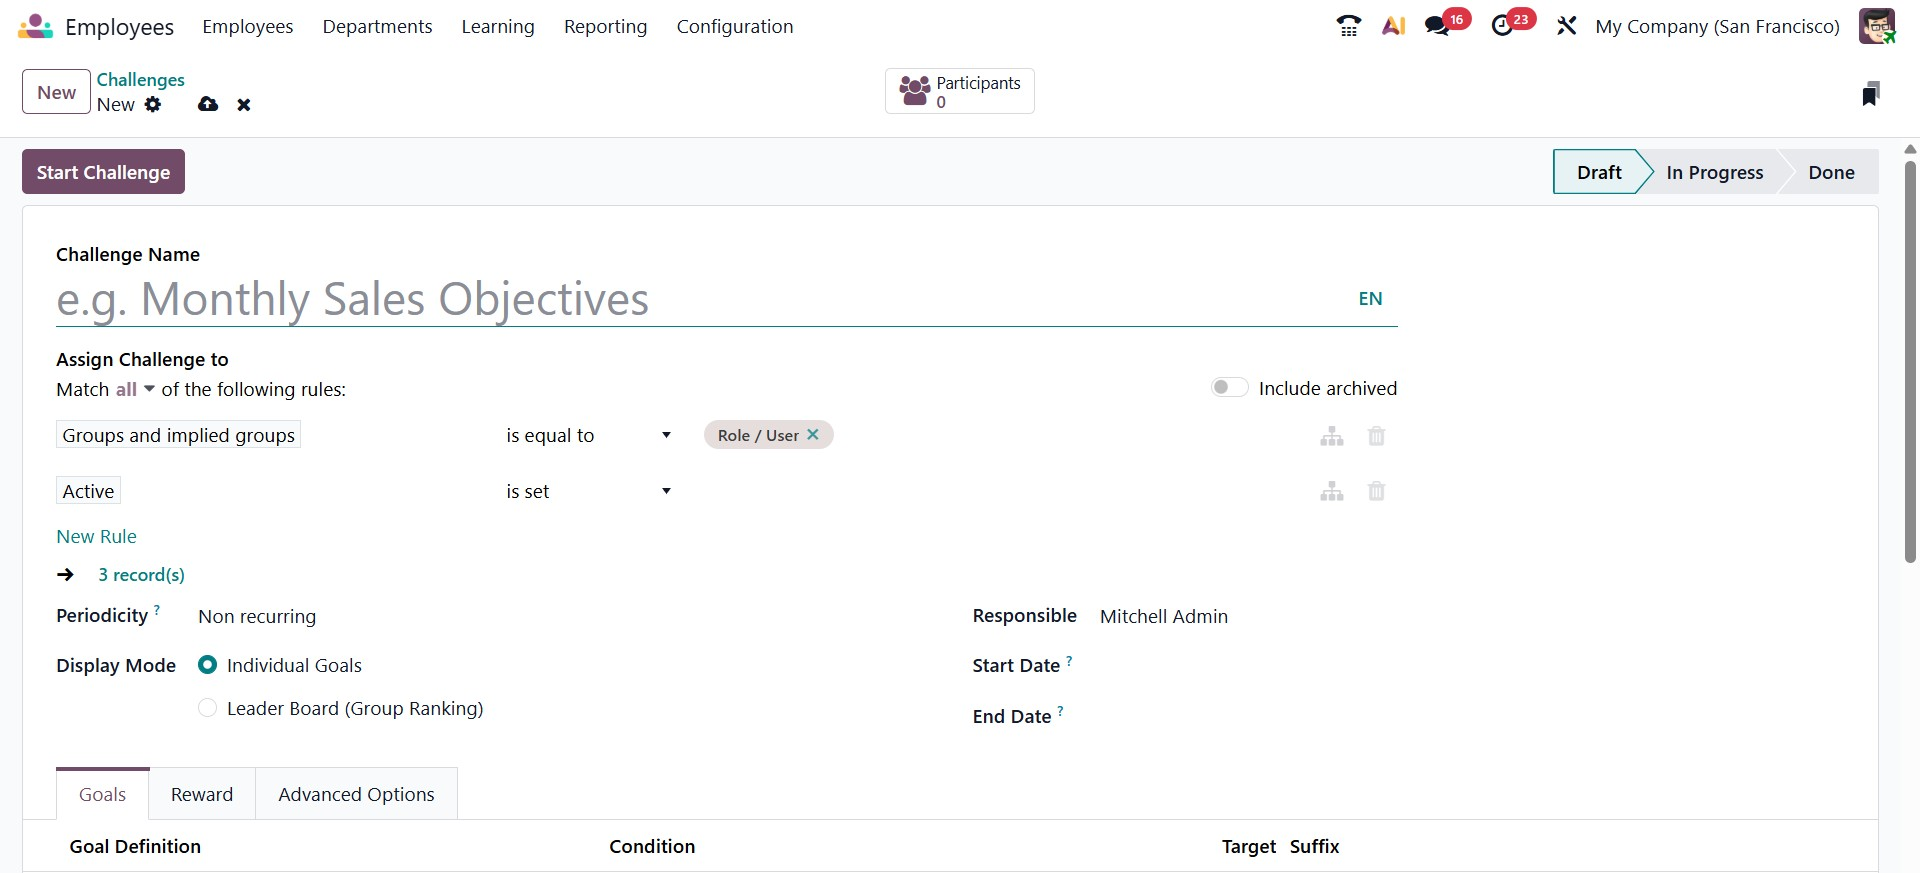
You will see a designated space to enter the Challenge Name here. You can configure users to allow Odoo to assign challenges to the records that match by using the Add Filter option. The Periodicity parameter allows you to specify the time frame for automatic challenge assignment. Daily, weekly, monthly, or annual are all possible. If you would like not to repeat the challenge, you may also set it to Non-Recurring. Leader Boards or Individual Goals can be selected as the Display Mode. The Responsible column allows you to specify which employee is responsible for handling this challenge. The Start and End date fields can be used to add the challenge's duration.
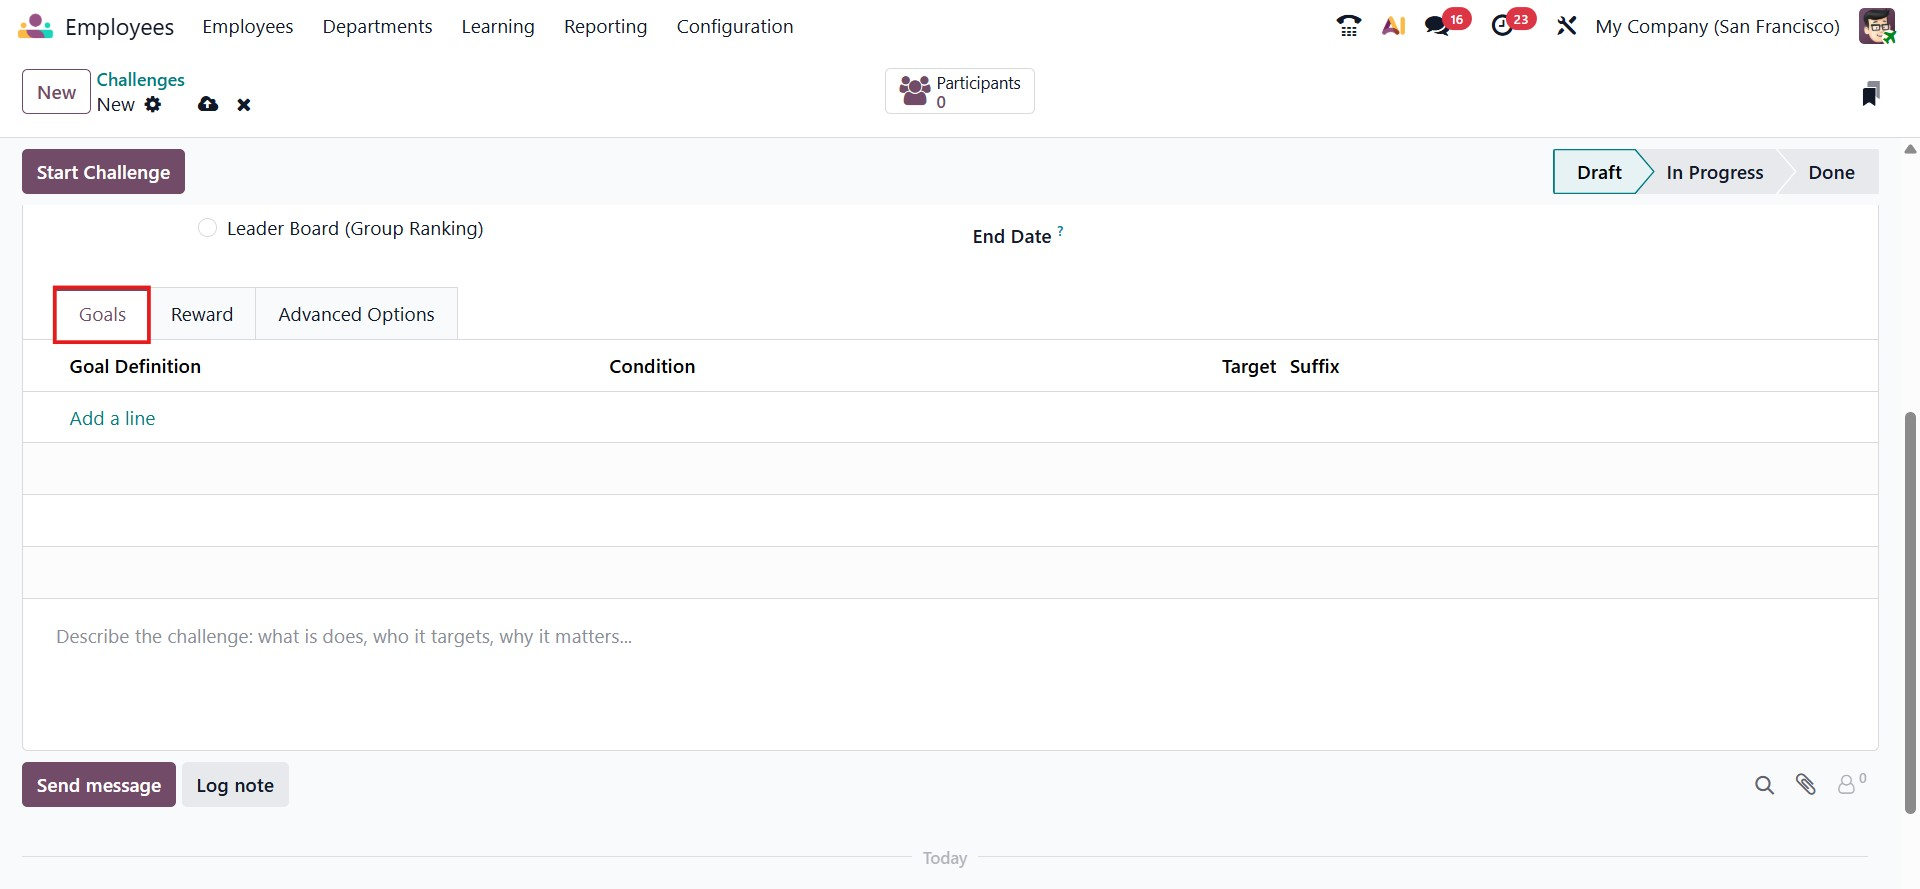
The Add a Line button on the Goals tab allows you to describe the challenge. It will assist a user in comprehending the challenge's requirements. Goal Definition, Condition, Target, and Suffix are all included.
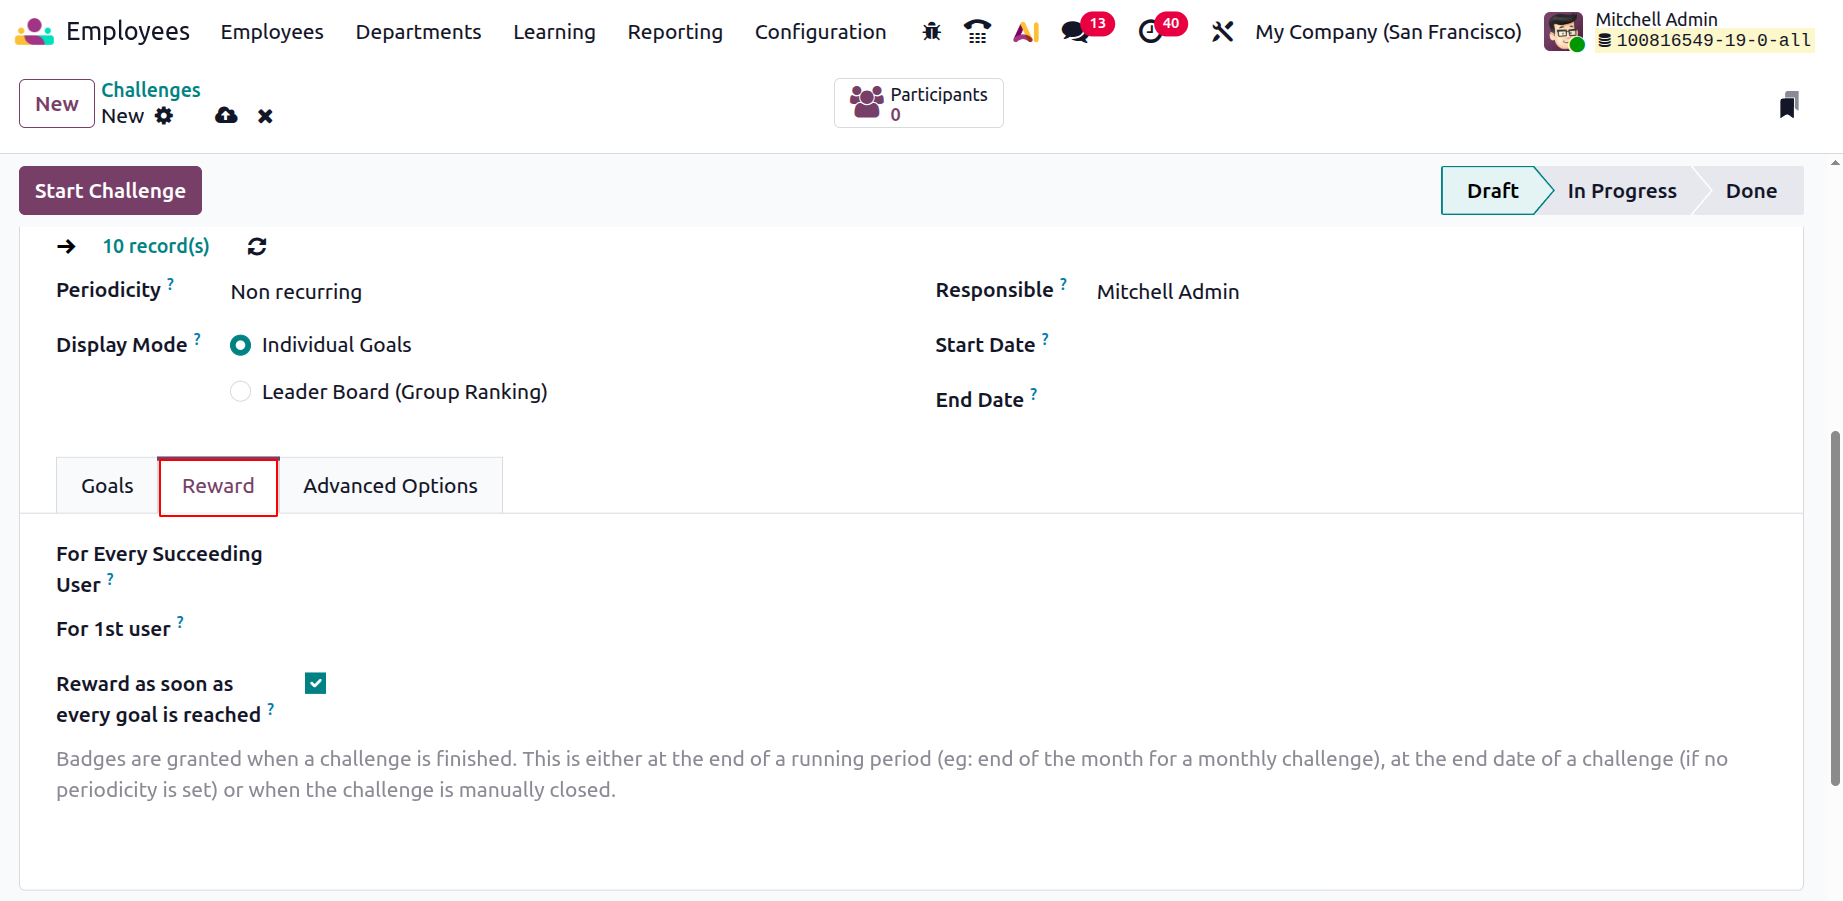
You may add the challenges' rewards under the Reward tab. Rewards can be specified for the first user and for each subsequent user. You can activate the reward as soon as each goal is accomplished if you want to give the worker a reward when the goal is finished.
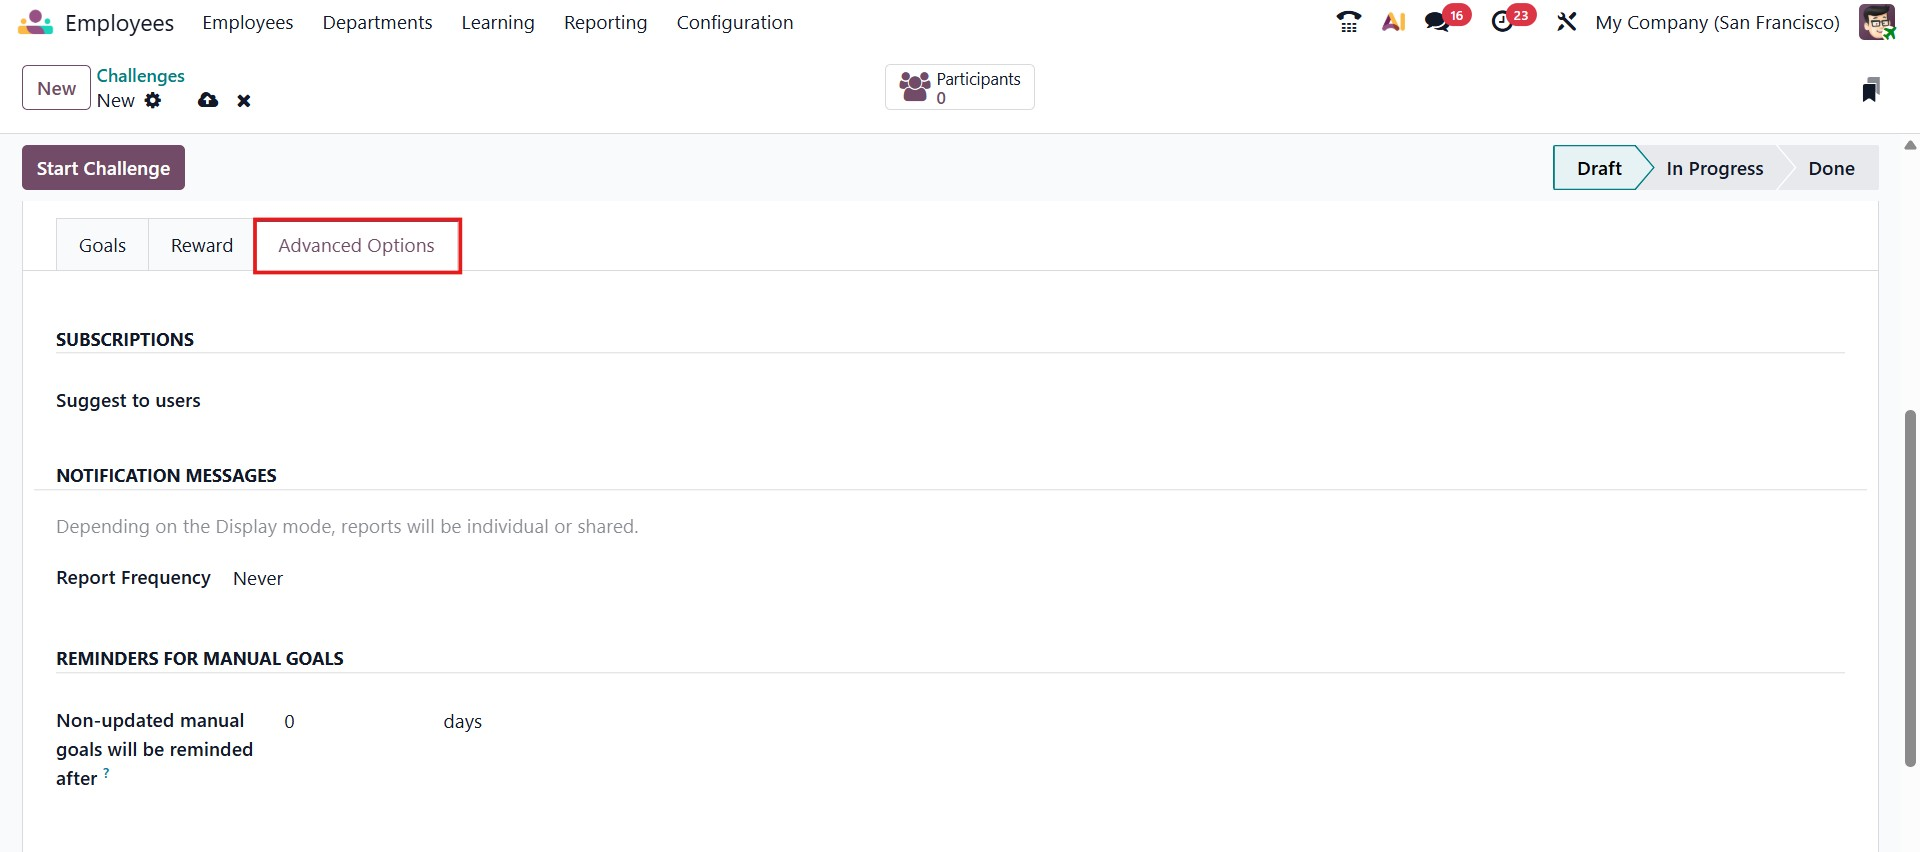
You can invite people by entering their IDs in the Suggest to people section under the Advanced Options tab. To alert the staff, place a notification message in the designated area. You can also configure the Report Frequency in addition to this. In the relevant field, set reminders for the manual goals. Lastly, use menus to specify the challenge's visibility.
You may begin using this challenge by clicking the Start Challenge button after you've finished configuring it.
Goal History
You can choose the Goal History option from the Configuration menu to look at the employees' performance. The employees' goal history will be shown in this window.
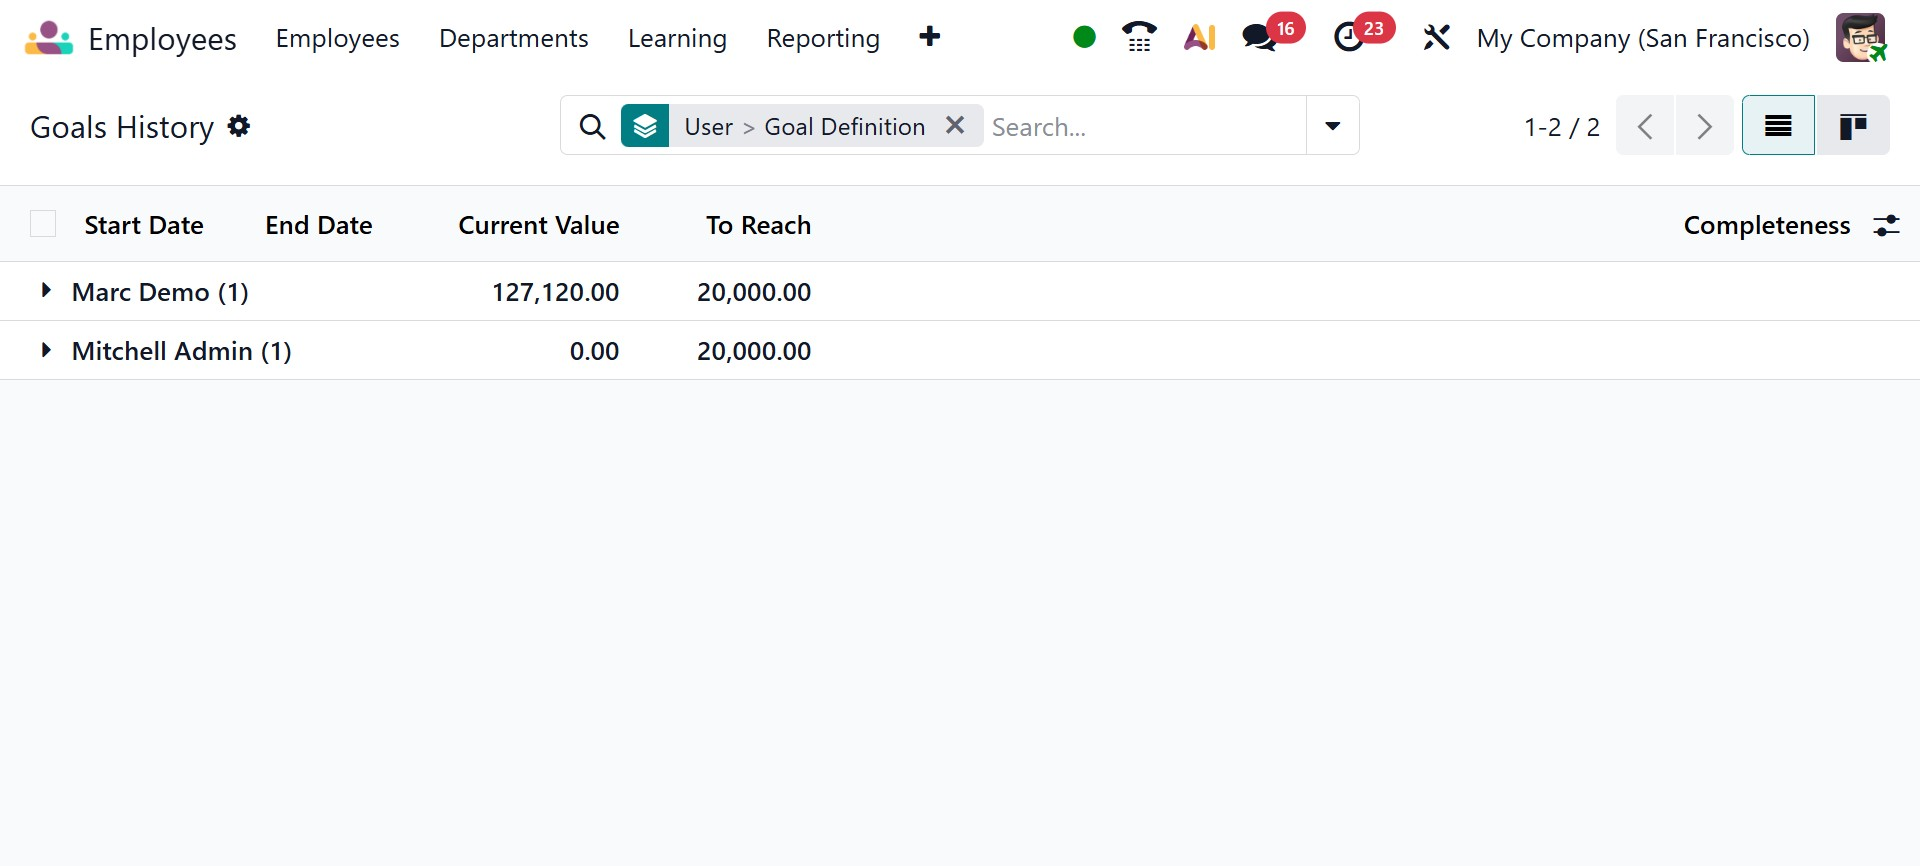
This platform allows you to examine each employee's performance level. Dates of Start and End, Current Value, To Reach, and Completeness are displayed. Employee motivation will be maintained by displaying goal history.