Configuration
You may handle job entries, employee salary data, and the salary package configurator in Odoo 19 Payroll through the Configuration tab. Now let's look at the important configuration components.
Settings
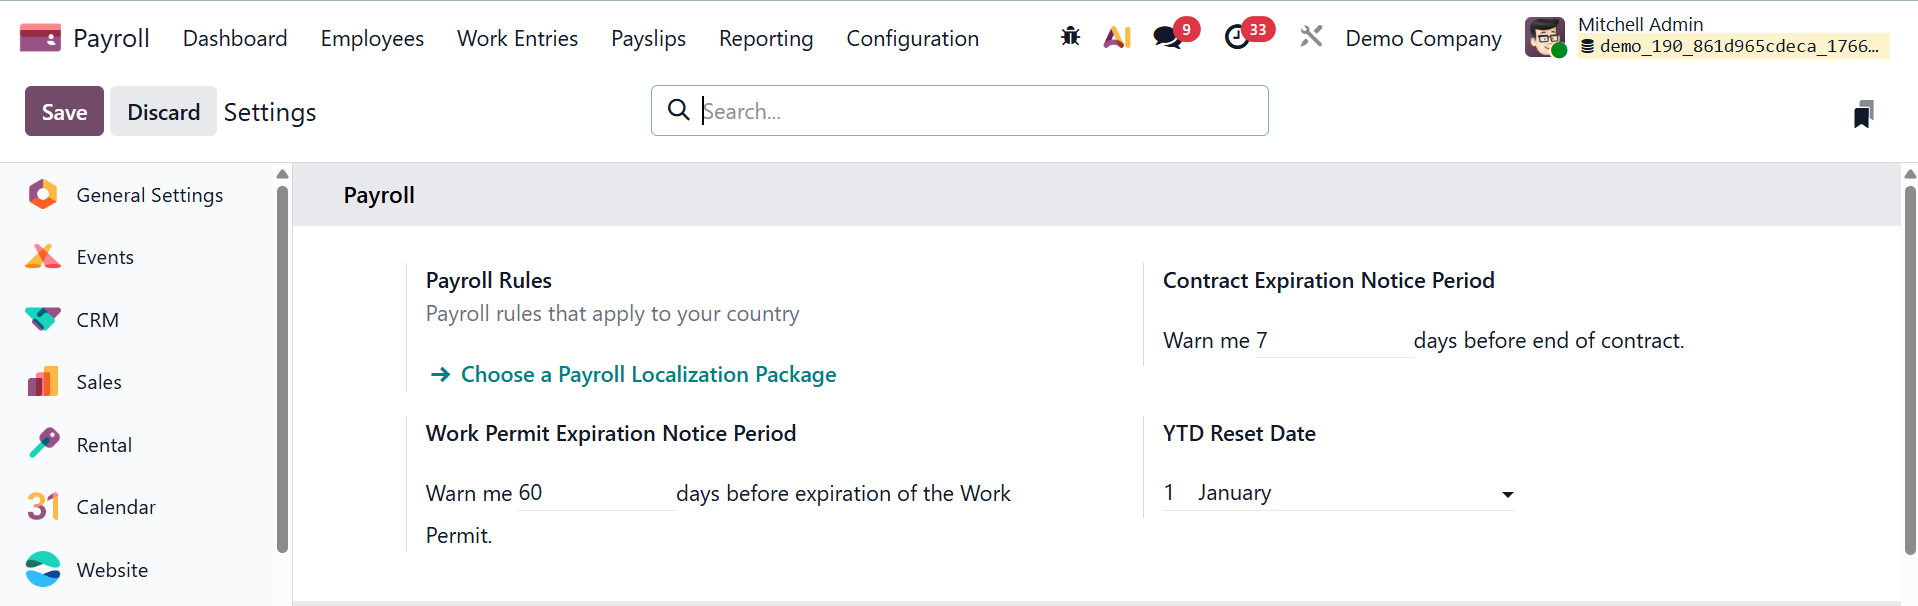
The "Settings" window is accessed via the "Configuration" option in the Odoo 19 Payroll Module. This settings page has four options tab sections: “Payroll”, "Accounting," "US Localization, Payroll," and "Time Off."
- Payroll: Under the payroll tab, you have the options like The Contract Expiration Notice Period and Work Permit Expiration Notice Period are set in days (under Employee Contracts or Payroll Settings) to trigger HR alerts prior to expiration, ensuring timely action; the YTD Reset Date, typically January 1st, determines when Year-To-Date figures reset for accurate annual tracking; and Payroll Rules define earning/deduction logic in Odoo Payroll settings.
- Payroll Rule:A payroll rule defines the logic used to calculate a specific earning, deduction, or contribution on an employee’s payslip.
- Contract Expiration Notice Period: This option sets the number of days in advance that HR is notified before an employee’s contract expires.
- Work Permit Expiration Notice Period: This option determines how many days before a work permit or visa expires that Odoo alerts HR for renewal or compliance action.
- YTD Reset Date: The YTD Reset Date specifies when year-to-date payroll totals are reset for a new payroll or financial year.
- Accounting: Batch Account Move Lines parameter can be configured under this option. All of the accounting entries for the same time can be combined into a single account move line using the batch account move lines option.
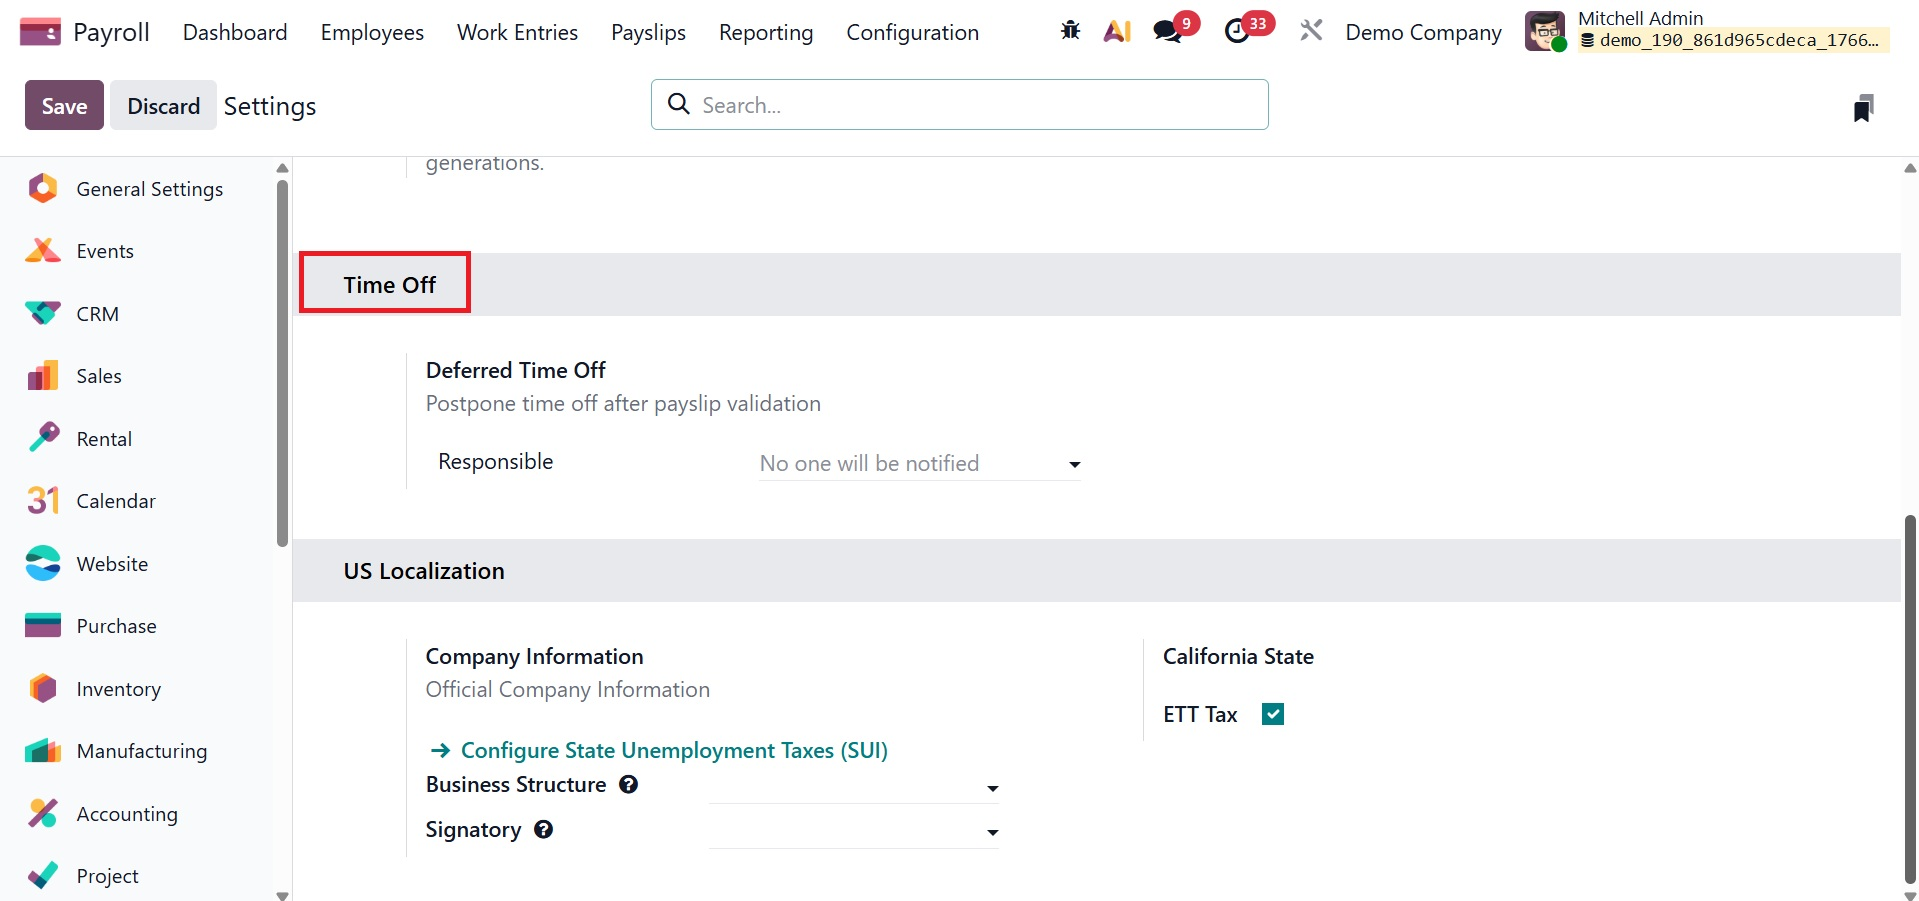
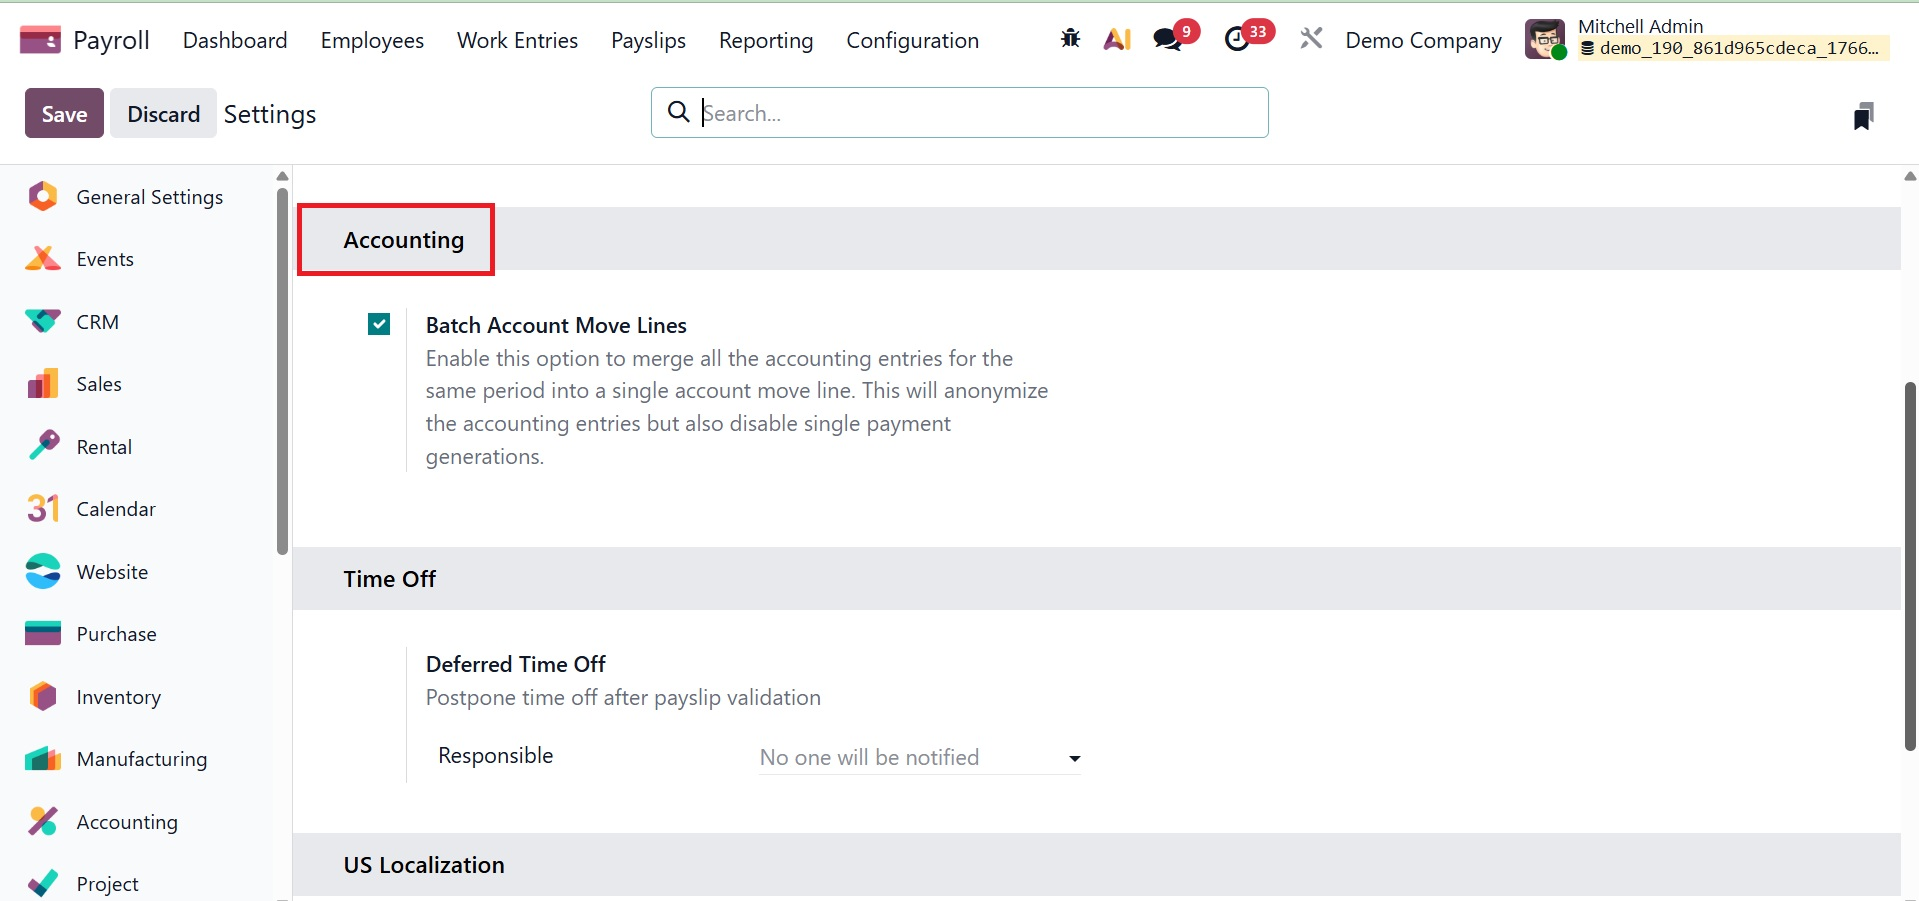 Time Off: In this section, you can activate the "Deferred Time Off" option. In order to ensure proper salary processing for that month, Deferred Time Off manages leave taken after payslips are processed by moving it to the following pay period through the Time Off to Report section under Payroll > Work Entries, where you choose, defer (Action > Defer), and report it.
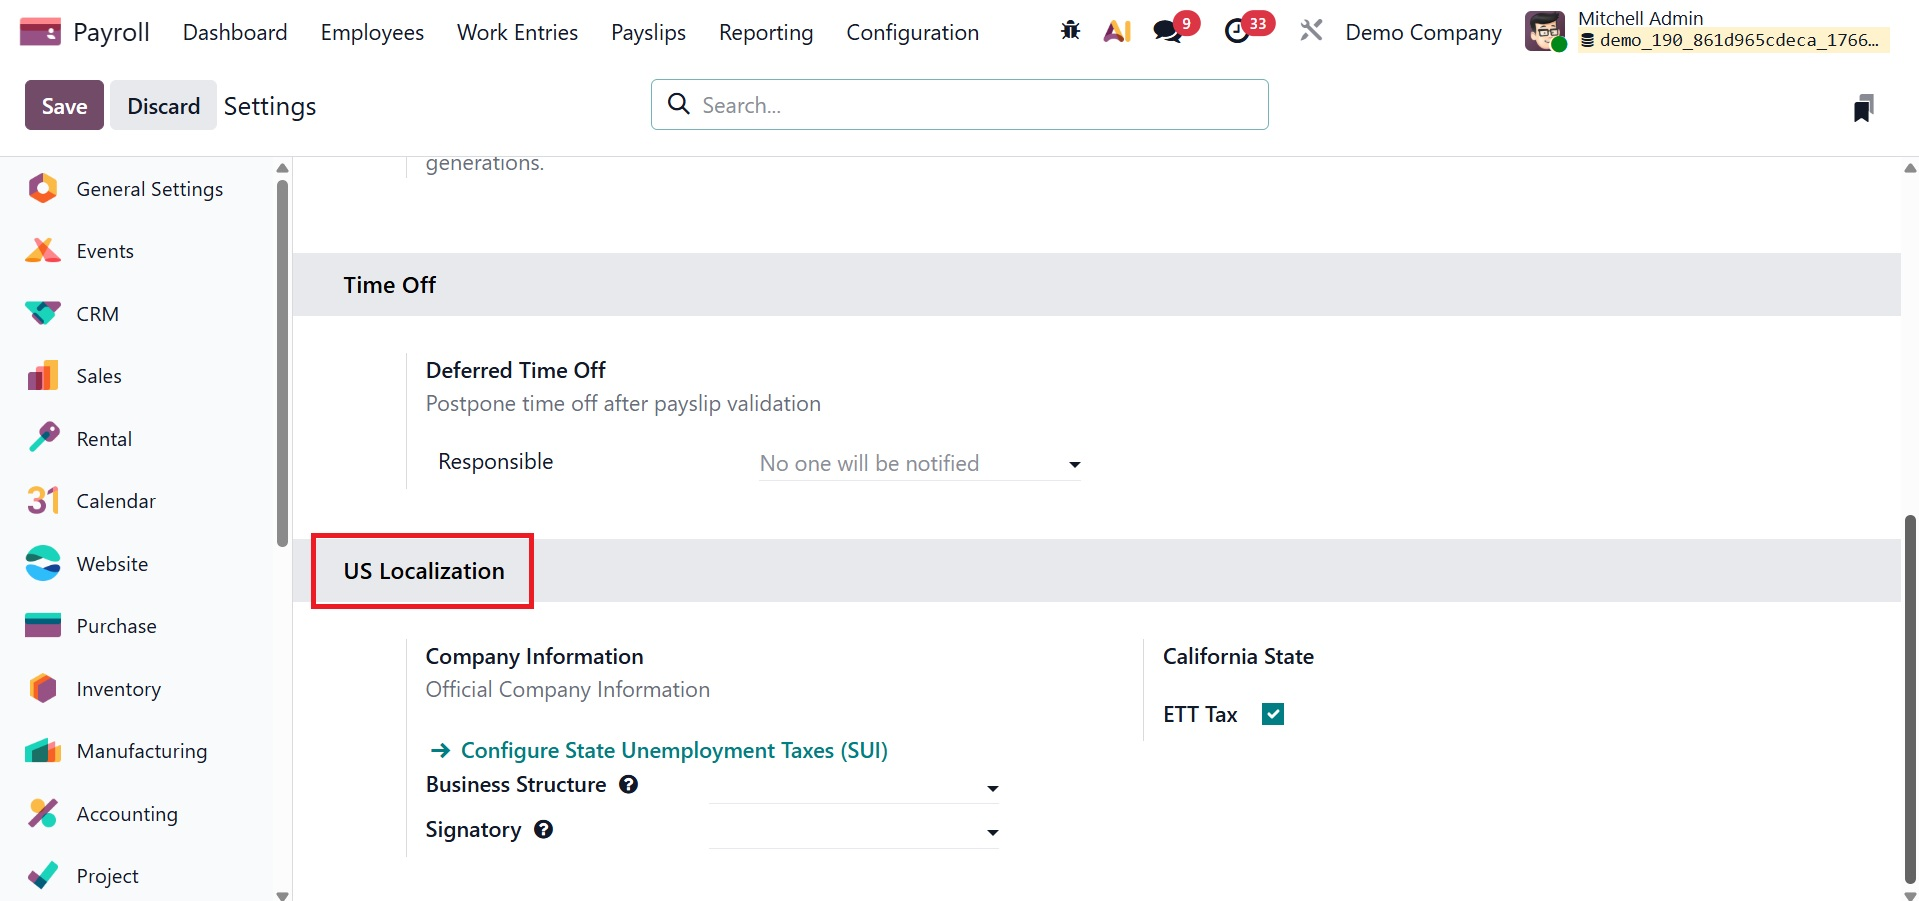
 US Localization: We may enable the Belgian localization options, which contain California state and corporate details, from this settings page.
- Company Information:This option stores the employer’s legal and identification details, such as company name, address, and federal or state IDs, required for U.S. payroll reporting and tax forms.
- Business Structure: This option defines the legal structure of the company (for example, sole proprietorship, partnership, or corporation), which determines how payroll taxes and filings are applied under U.S. regulations.
- Signatory: This option specifies the authorized person whose name and title appear on U.S. payroll reports and statutory forms, confirming their legal responsibility for the submitted information.
Template
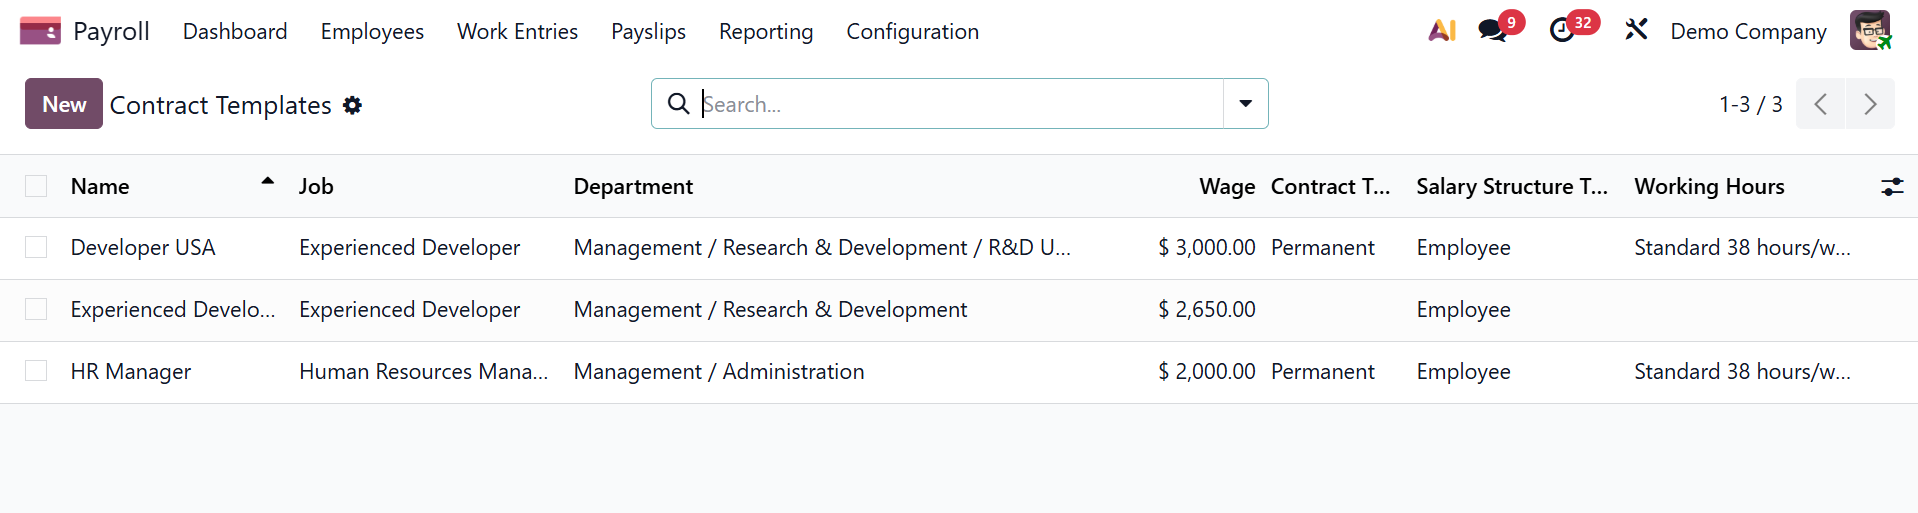
The Template option in the Configuration menu provides access to the contract templates. Click the New button to add a new one. The form creation view and the topics we covered in the contract are comparable.
You can see the creation page when you choose the NEW option, as seen in the picture below.
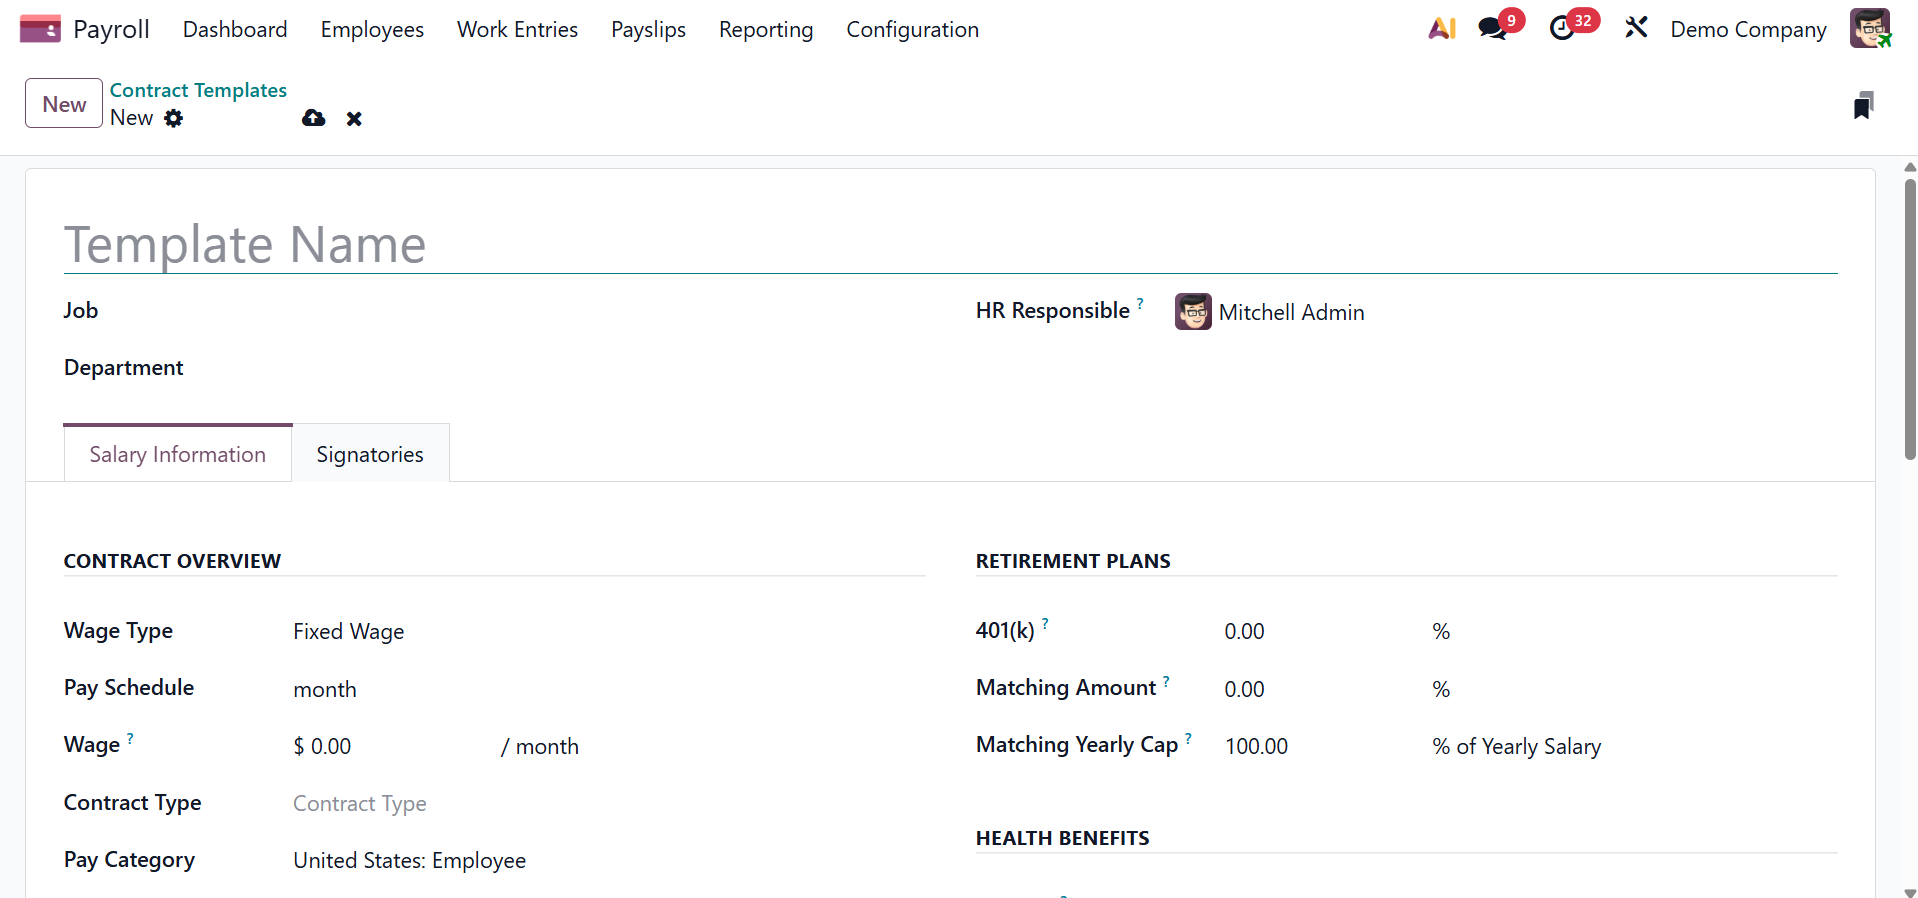
Under the creation page, you can add the Template Name, Job, Department, and HR Responsible. Under the Salary Information, provide the Wage Type, Pay Schedule, Wage, Contract Type, and Pay Category under the CONTRACT OVERVIEW field.
Under the RETIREMENT PLANS, add the 401(k), Matching Amount, and Matching Yearly Cap.
Then, you have EMPLOYER COSTS, where you can add Yearly Cost, Monthly Cost, and Wage on Signature. Then, there is the HEALTH BENEFITS field to add Medical, Dental, Vision, FSA, FSA Dependent Care, and HSA.
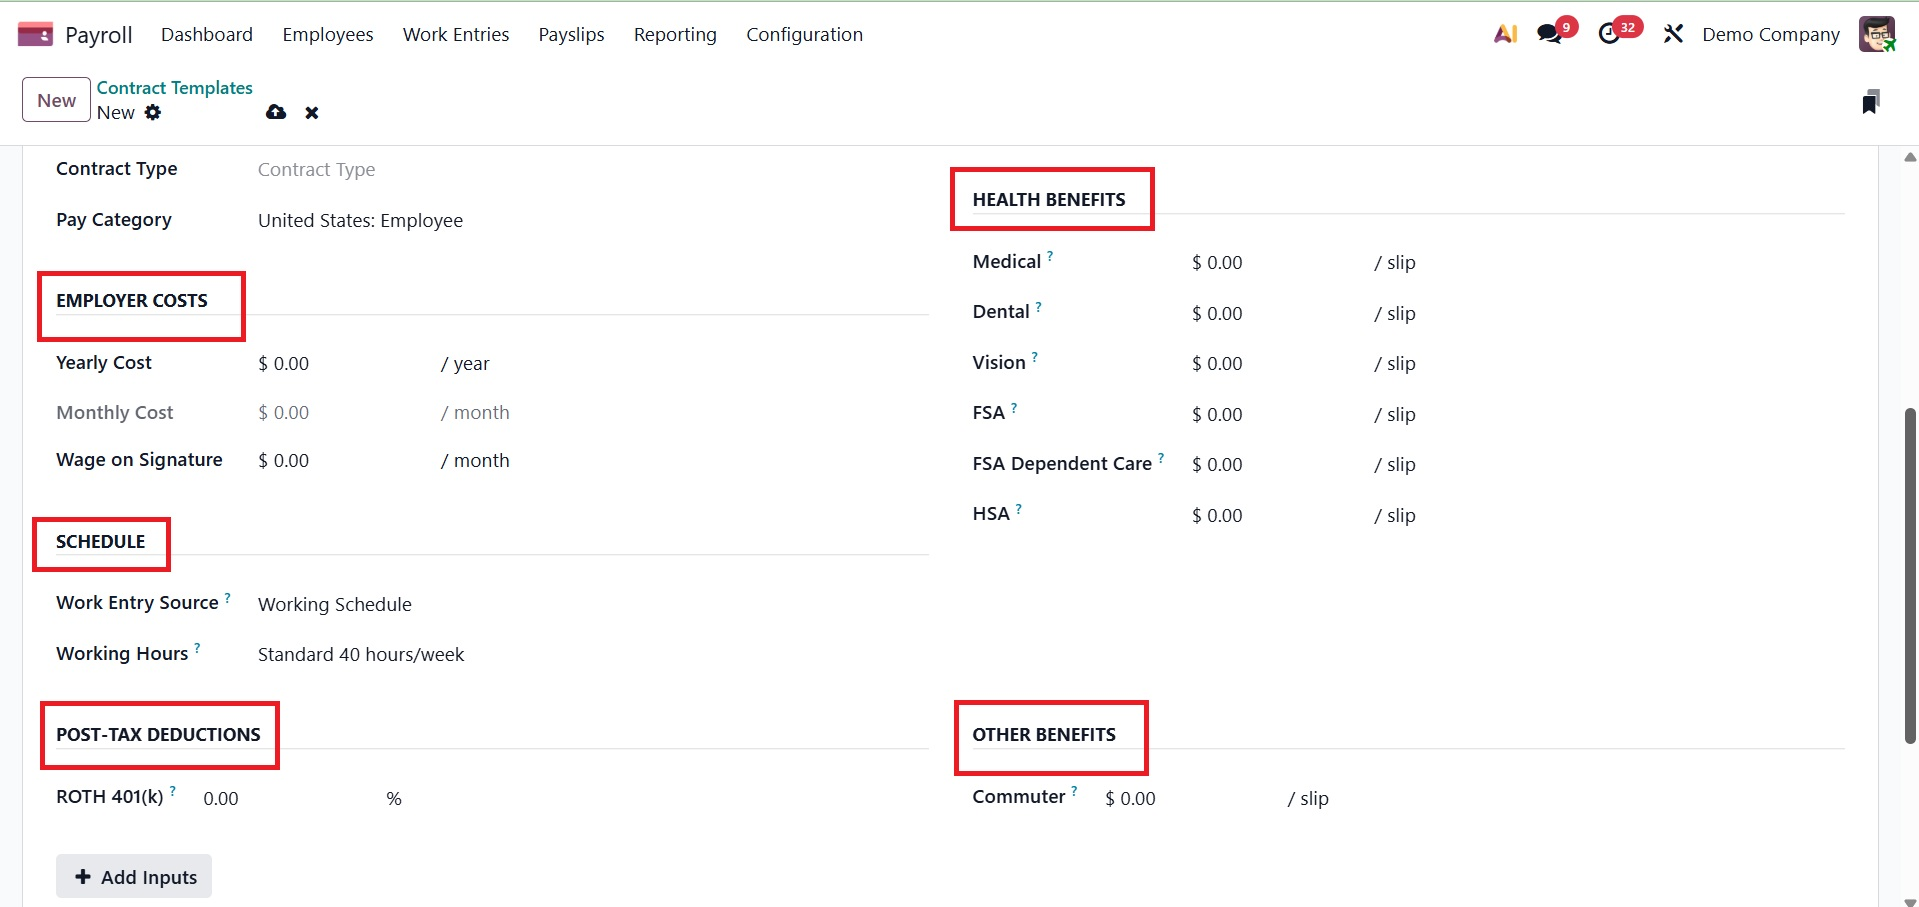
Under the SCHEDULE, you can add the Work Entry Source, and Working Hours. Next to that, you have POST-TAX DEDUCTIONS, where you can include the ROTH 401(K). And under the OTHER BENEFITS, add the Commuter as well.
Additional payroll inputs, such as bonuses, commissions, reimbursements, or deductions, can be defined using the Add Input button in the Odoo Payroll module's Contract Template. These inputs can be manually entered or automatically applied to employees' payslips based on contract template.
Employment type
To meet their needs, each type of employee in a company—trainees, permanent employees, and temporary employees—has a unique compensation plan. Under the Configuration option, these employee classifications can be set up as Employment Types.
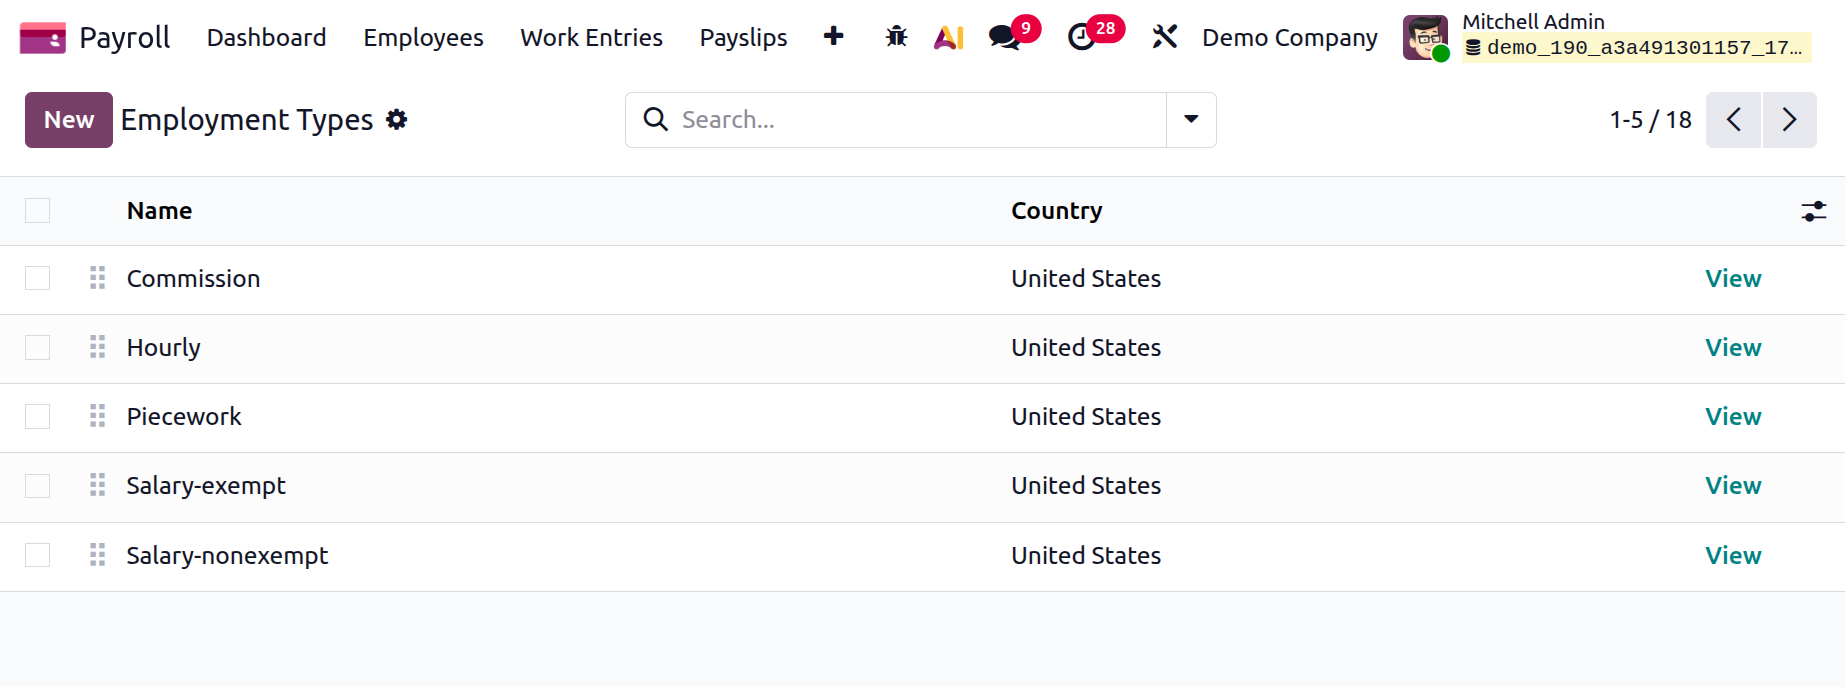
The Name, and Country are included in the list. Click the New button to add a new one. Below the list, a new line will appear.
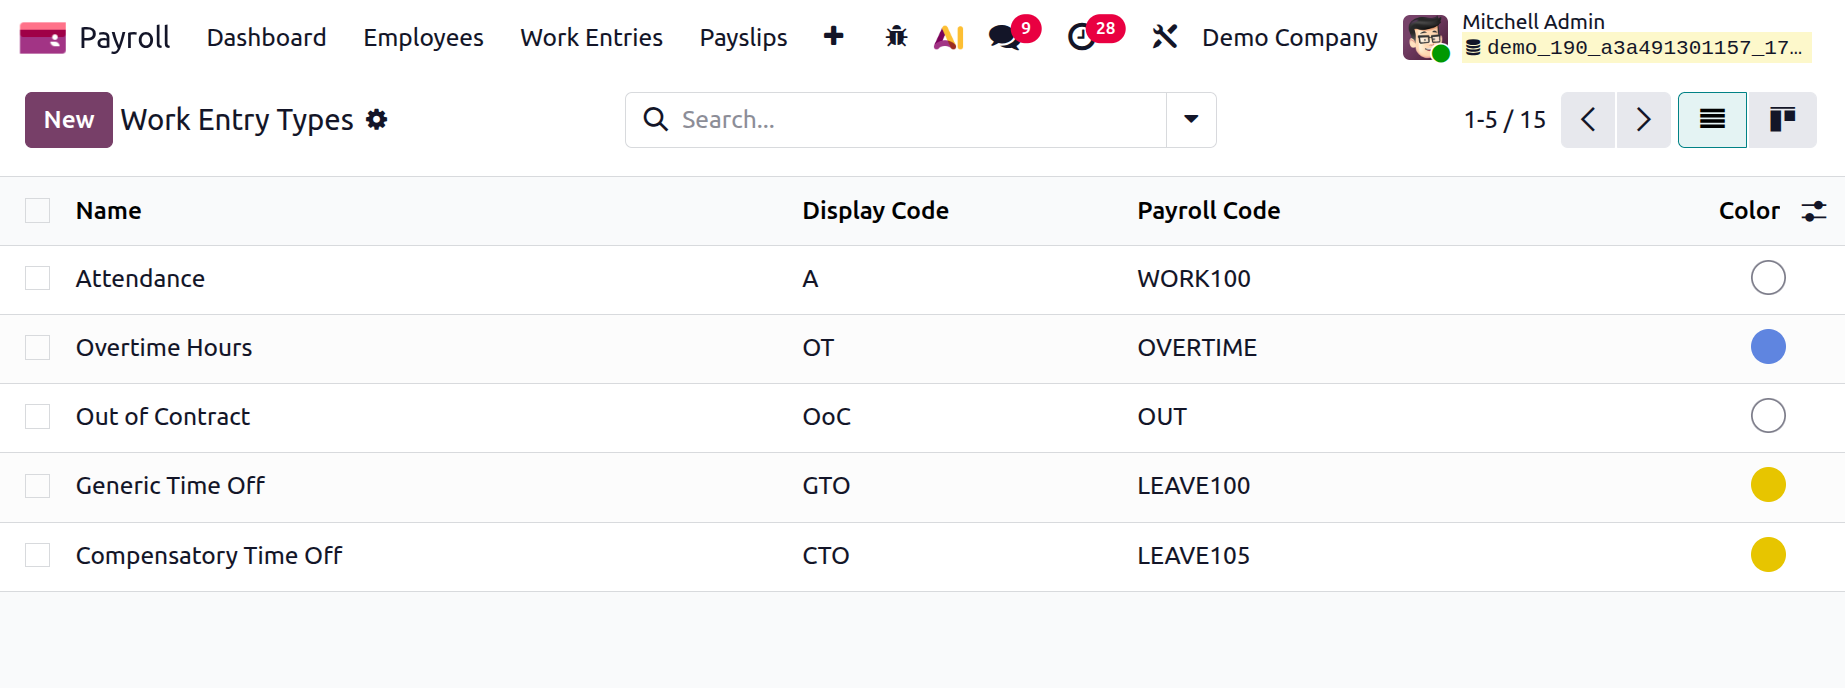
Work Entry Type
The list of work entry kinds, which includes the Name, Payroll Code, and Color, is now displayed in the Configuration menu. To add a new type of work entry, use the New button.
Enter the Workentry Type Name and Payroll Code. The DMFA Code is used to identify the work entry in the DMFA report; the external code exported the data to an external source; the value is rounded using the added rounding method when the entry is made on the payslip; the worker benefits from the Unpaid Structure Types, which prevent the worker from viewing their payslip.
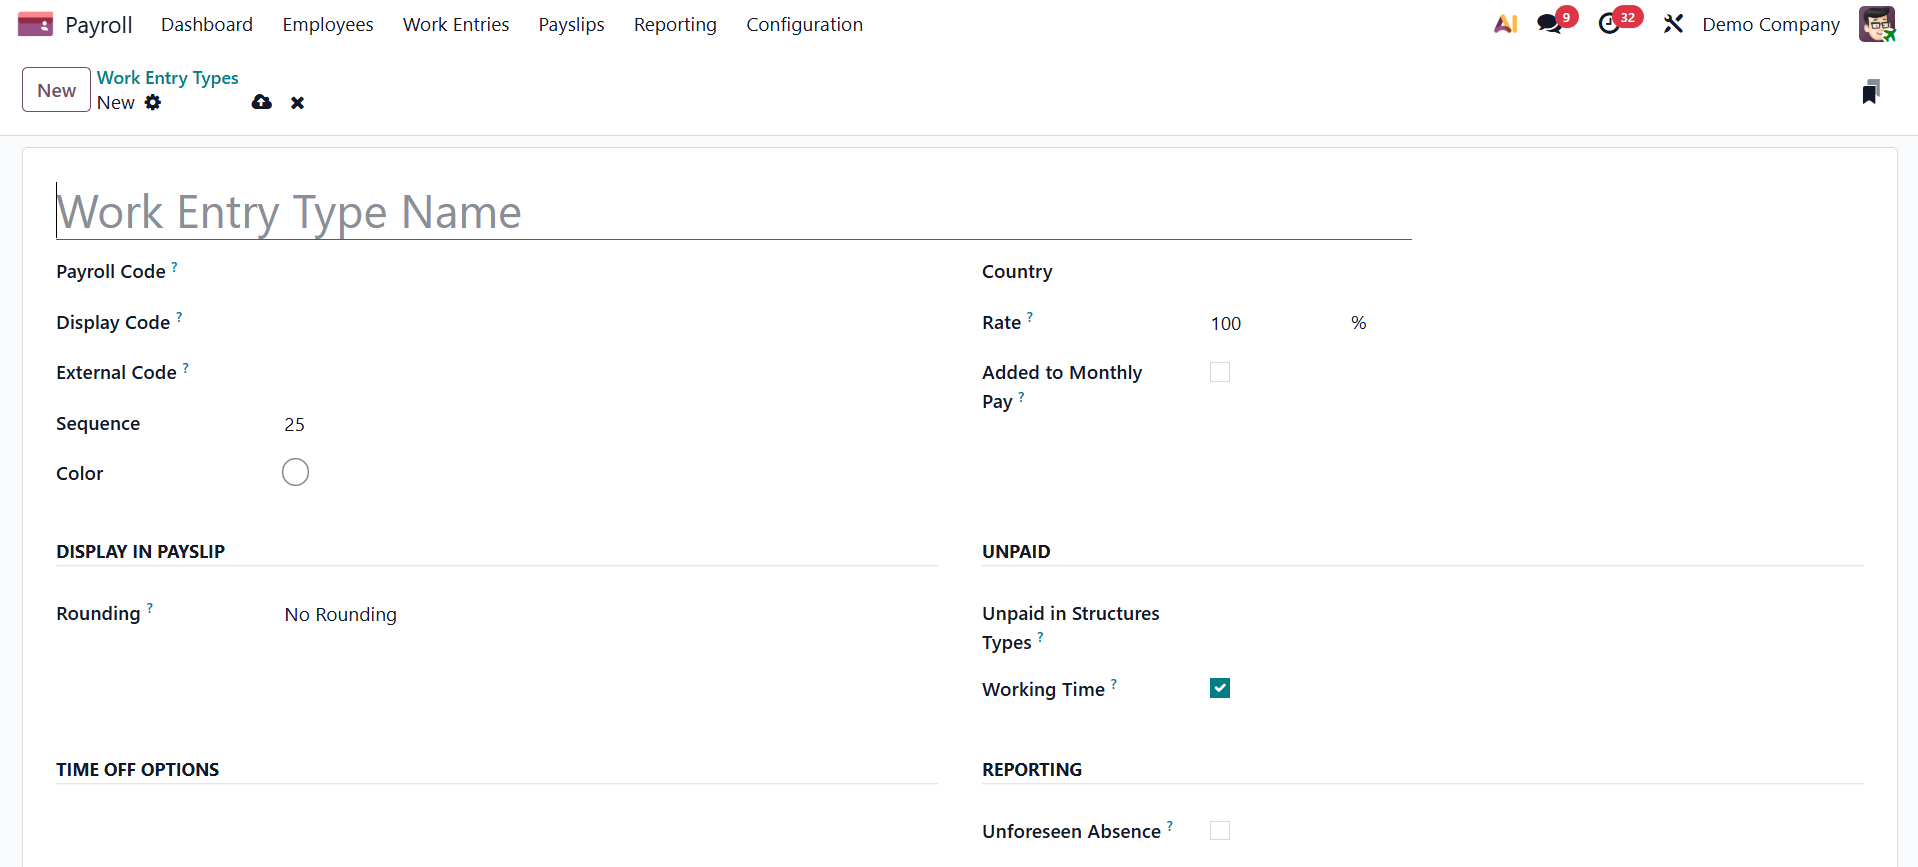
Here, provide the payroll code, display code, external code, sequence, color, country, rate, and added to monthly pay options, respectively. Now, under Display in Payslip field, you have a rounding option. Under the UNPAID field, you have unpaid structures type and working time. Now, you are also provided with a REPORTING field with an unforeseen absence option.
The job entries are eligible for reimbursement of various expenses, such as lunch vouchers, representation fees, and private vehicle charges, if each box is checked.
The work entry type can be linked to time off kinds by turning on the Time Off feature. Keep Time Off Right makes it possible for job input to be used toward vacation time in later years. The absenteeism at work report will include Unforeseen Absence if it is enabled in the job entry.
Working Schedule
Users may easily keep track of their working hours with the Odoo 19 Payroll module. You can increase organizational productivity with its assistance. Employers and workers are granted the flexibility they require to reach their greatest potential. Choose the Working Time option from the Odoo 19 Payroll Configuration tab. Data like Work Time Rate, Contracts using it, Working Time, and Company can be viewed in the Working Times box. You can create a new employee work schedule by selecting the New icon.
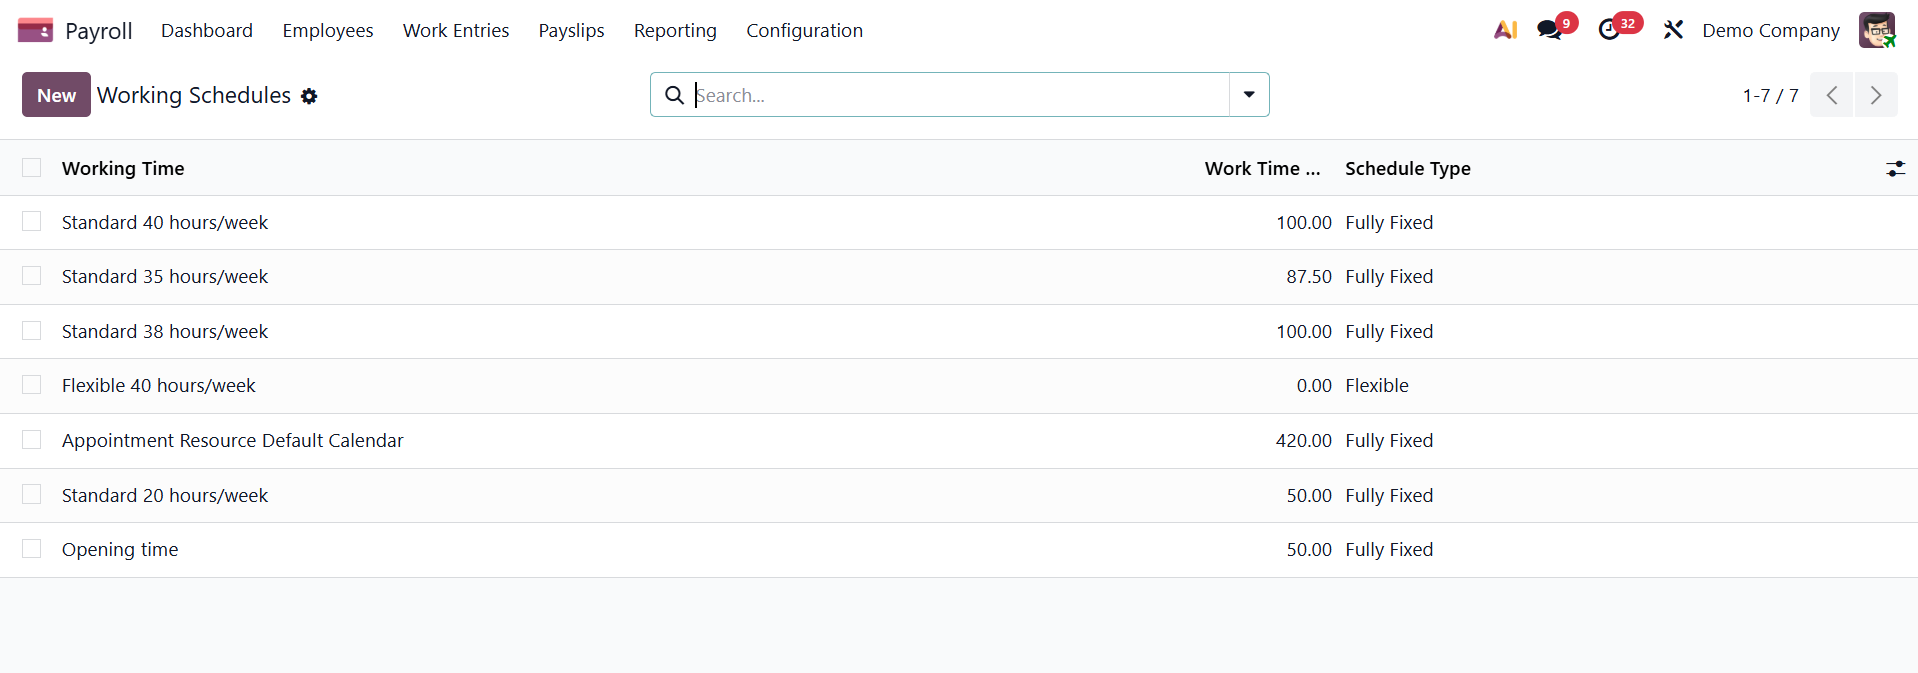
The user can apply the Company, Full Time, Average Hour per Day, and Timezone data once the Working Schedule window has been opened. Contracts, Public Time Off, and Work Resources are some of the smart buttons in the Working Times pane.
- Schedule Type: This option defines the structure of the working schedule, such as a fixed or flexible timetable, used to calculate attendance and payroll hours.
- Amount of Hours per Day: This setting specifies the standard number of working hours in a day for the schedule, which is used in payroll and overtime calculations.
- Full Time Equivalent (FTE): This option represents the workload of the schedule compared to a full-time schedule, helping measure employee capacity and prorated payroll values.
- Work Time Rate: This option determines the percentage or rate at which worked time is counted against the standard schedule, often used for part-time or special working arrangements.
- Timezone: This setting defines the time zone in which the working schedule operates, ensuring accurate attendance and payroll time calculations.
- 2 Weeks’ Calendar: This option enables a bi-weekly working pattern, allowing different schedules to be applied across alternating weeks.
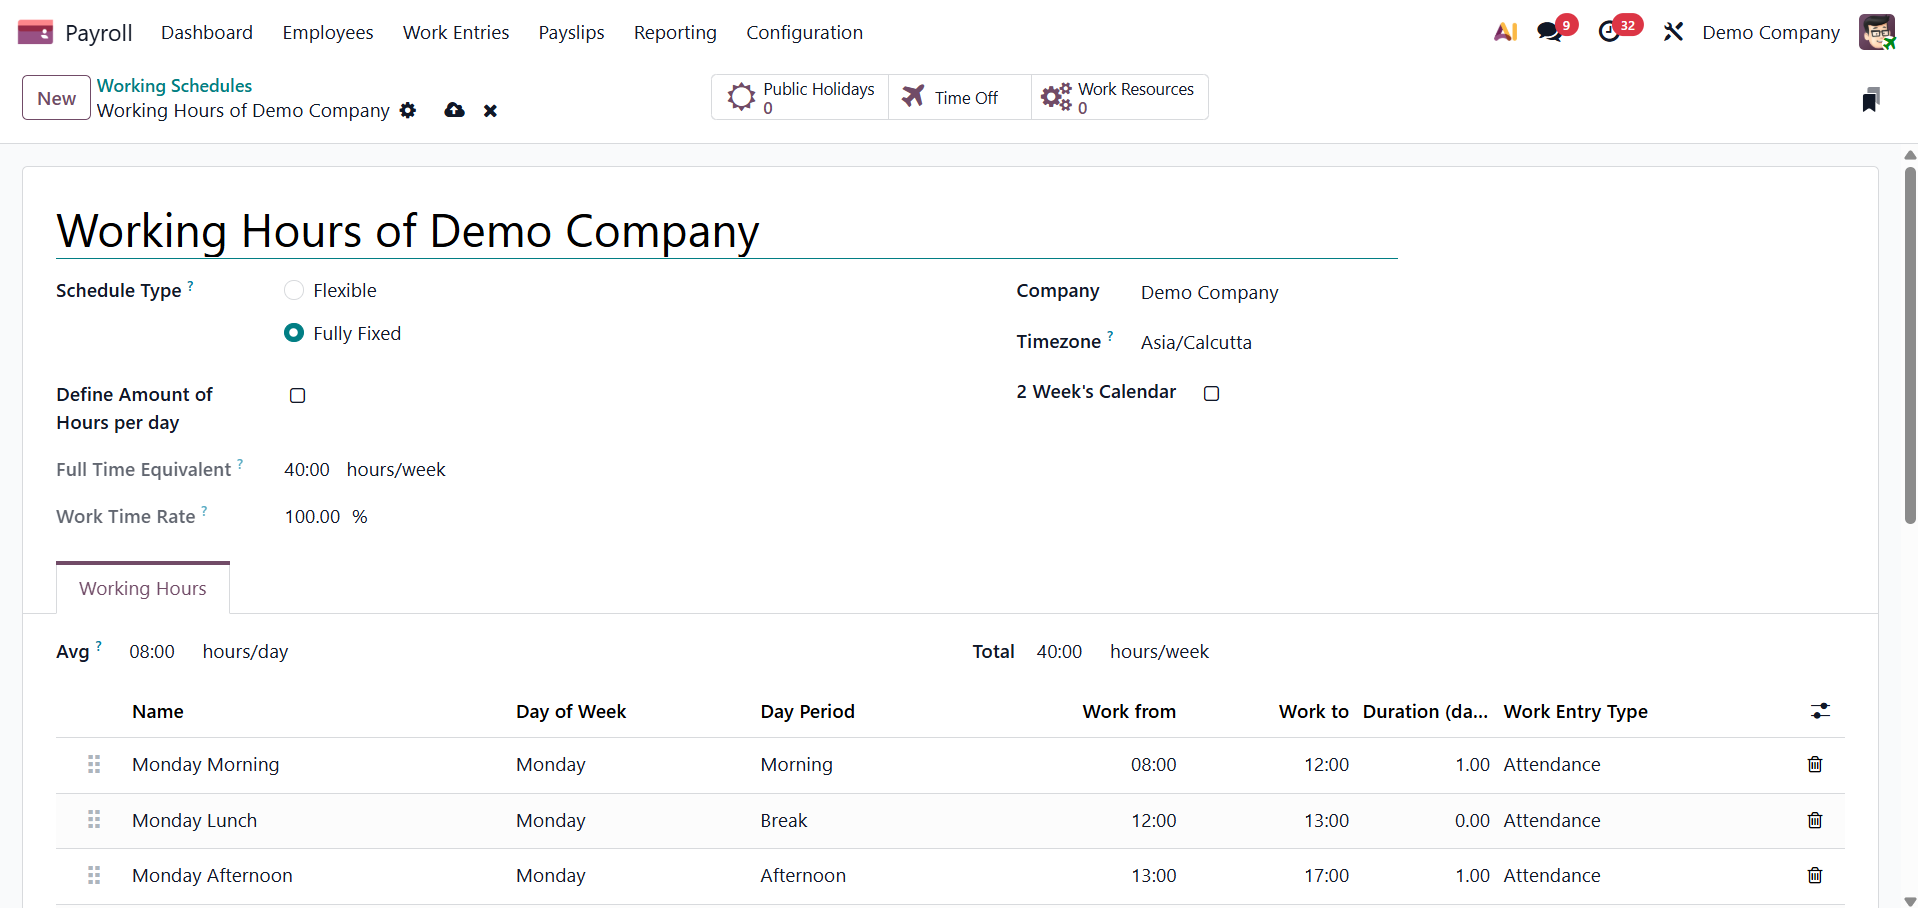
By selecting Add a line under the Working Hours tab, the user can change an employee's working hours. Under the Working Hours area, the user can enter their name, day period, type of work entry, day of the week, work from, and further information.
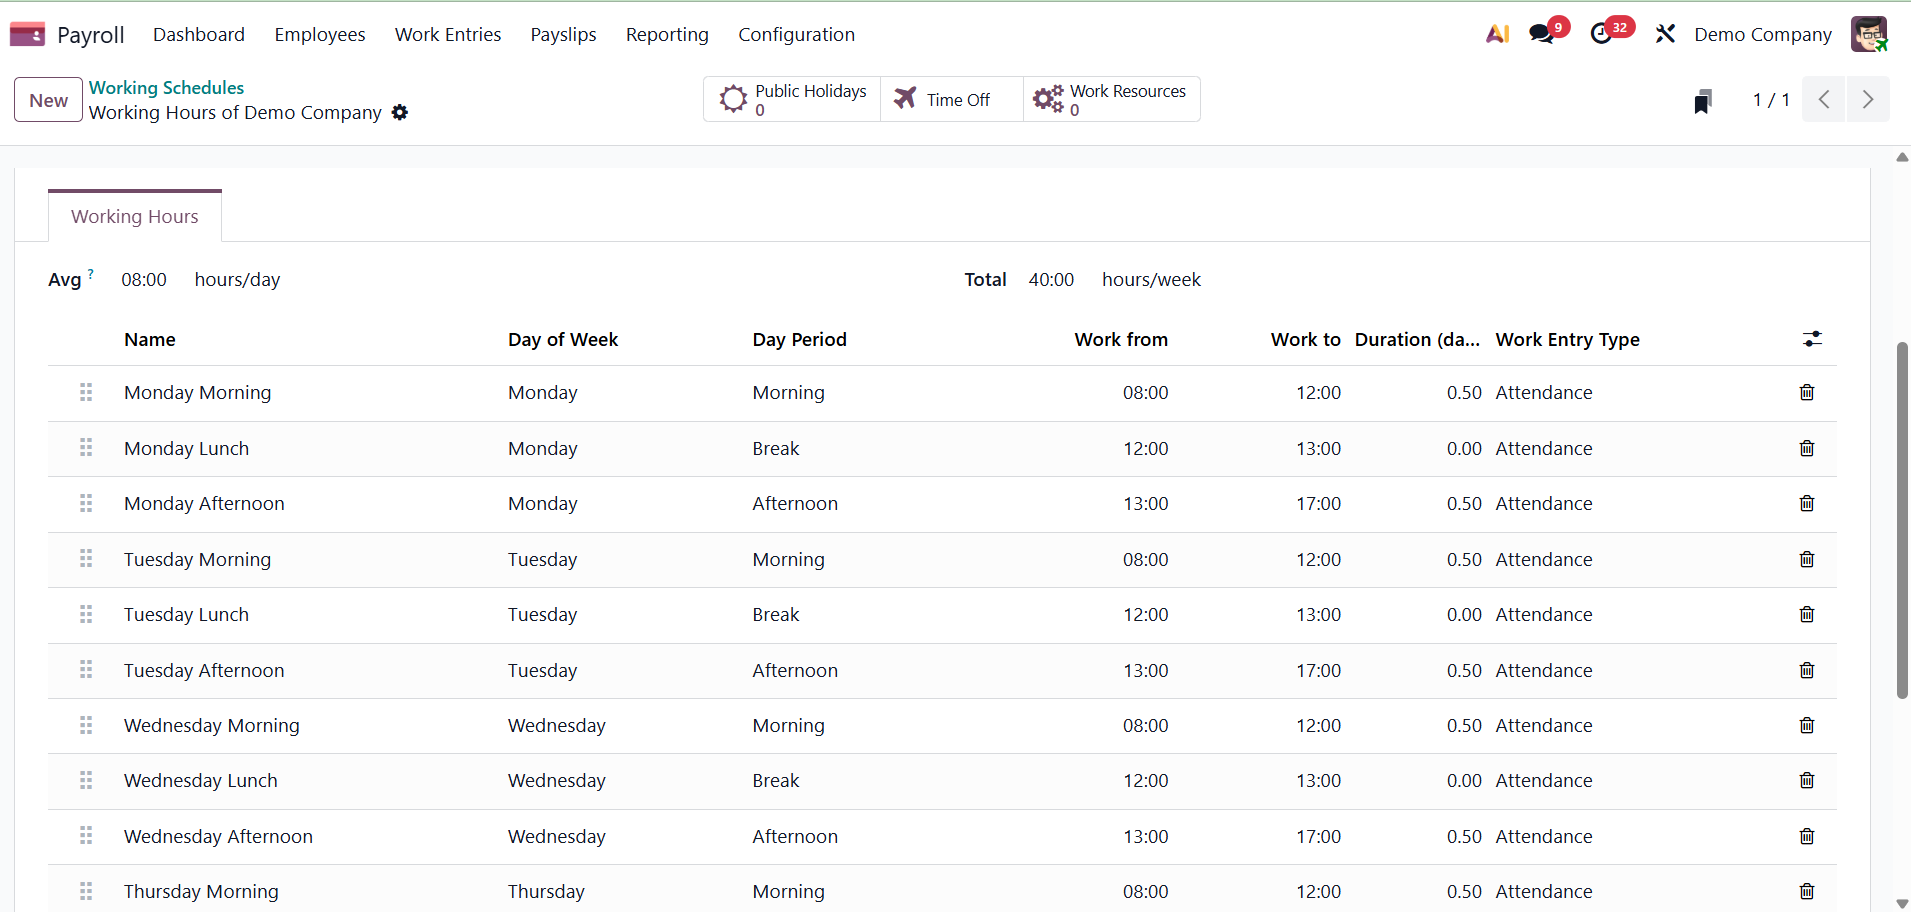
If the working hours are not consistent every week and are instead on a weekly schedule, the 2-week calendar option can be switched to. On the new default working hours form, click the Switch to 2-week calendar button at the top. This modifies the Working Hours tab to show two weeks of modifiable working hours. There are smart tabs, such as
- Public Holidays (Smart Button):This smart button opens the list of public holidays linked to the working schedule, allowing Odoo to automatically exclude those days from work time and payroll calculations.
- Work Resources (Smart Button): This smart button displays the employees or resources assigned to the working schedule, helping HR see which staff members are affected by that schedule for attendance and payroll processing.
We can specify policies and salary structures in the Configuration tab's Salary section. Rules, Other Input types, Structure sorts, Rule parameters, Rules, and other options are provided in the Salary area. Now we may talk about each of them independently.
Structure type
Odoo 19 Payroll allows you to set up new kinds of compensation arrangements. The Odoo 19 Payroll system allows users to specify salary structures for workers, employees, and trainees after outlining the various wage types on a monthly, hourly, or weekly basis.
After selecting the Salary Structures menu on the Configuration tab, users may specify the pay scales for their employees. Information about Wage Type, Regular Pay Structure, Default Scheduled Pay, Structure Type, and other subjects may be found in the Structure Types box. Clicking the New option in Odoo 19 allows us to build new structure kinds.
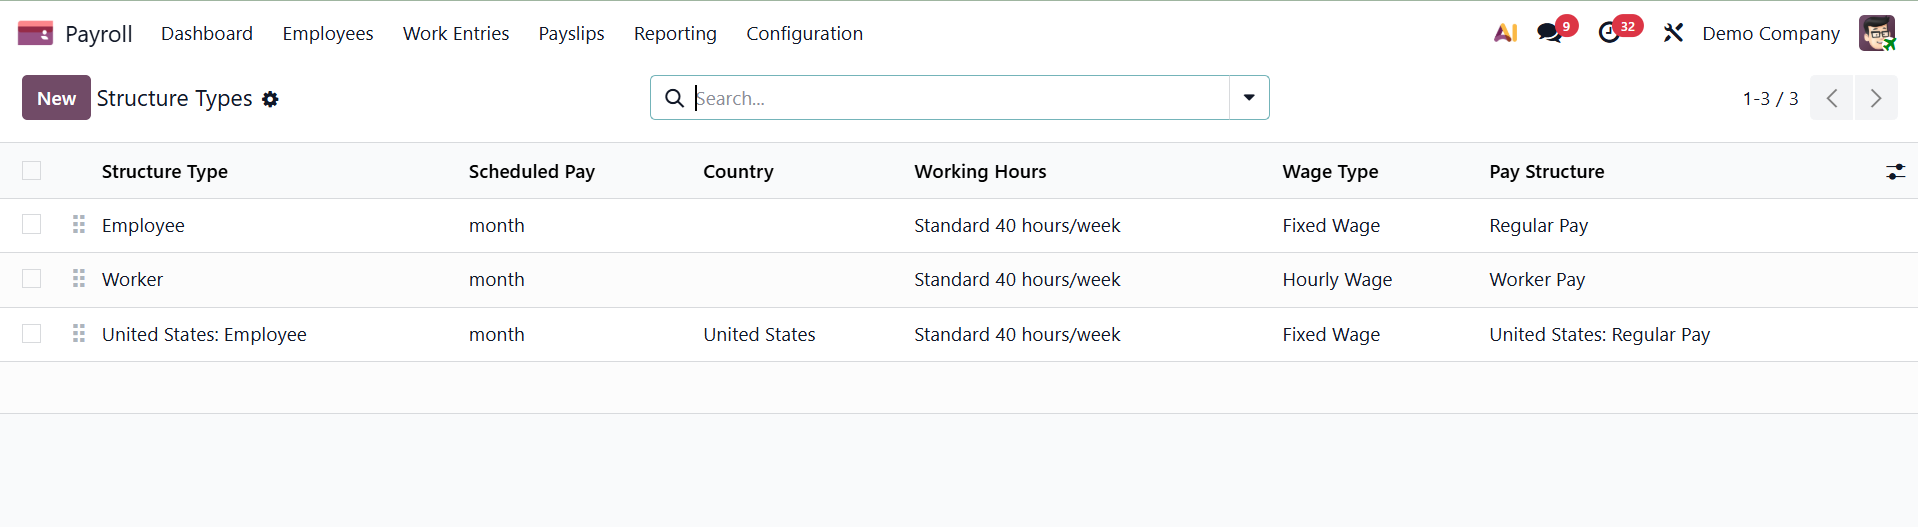
Enter your country and the name of the structure type in the open box. Setting the salary type to hourly or fixed monthly is simple.
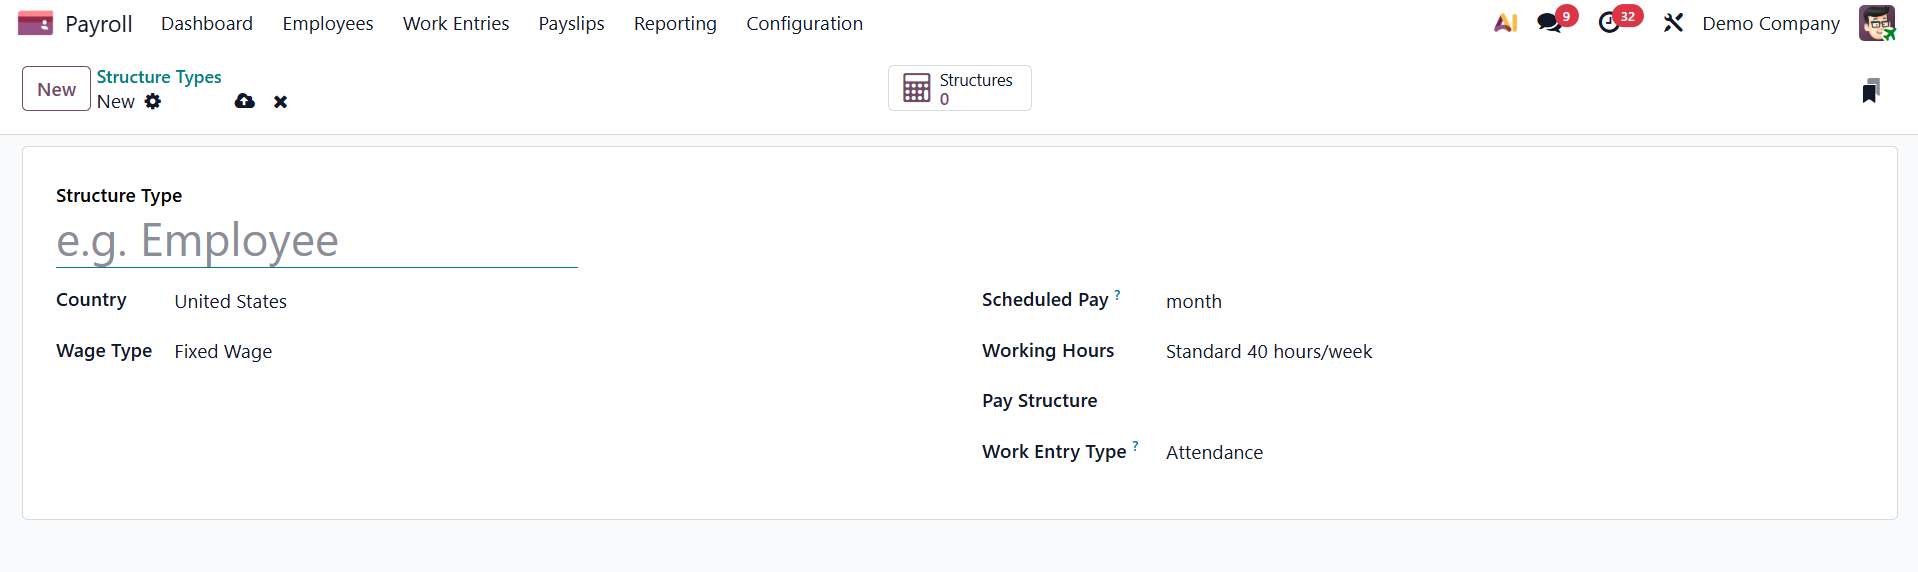
The Default Scheduled Pay section should then be filled in with the frequency of wage payments. The user can then specify the salary structure type's default working hours. The Structure Type section provides an explanation of the standard employee pay structure. In the Work Entry Type column, you can also indicate the type of work entry associated with regular attendance. The options here include,
- Country:This option specifies the country for which the payroll structure applies, ensuring compliance with local labor and payroll regulations.
- Wage Type: This option defines how an employee is paid, such as monthly, hourly, or daily wages, which affects salary and payslip calculations.
- Scheduled Pay: This option determines the payroll frequency, such as weekly, bi-weekly, or monthly, used to generate payslips.
- Working Hours: This option links a working schedule to the payroll structure, defining the expected work time for salary computation.
- Pay Structure:This option identifies the salary structure applied to employees, grouping the relevant payroll rules used to calculate their payslips.
- Work Entry Type: This option defines the types of work entries (such as attendance, overtime, or leave) that the payroll structure uses to calculate worked and non-worked time.
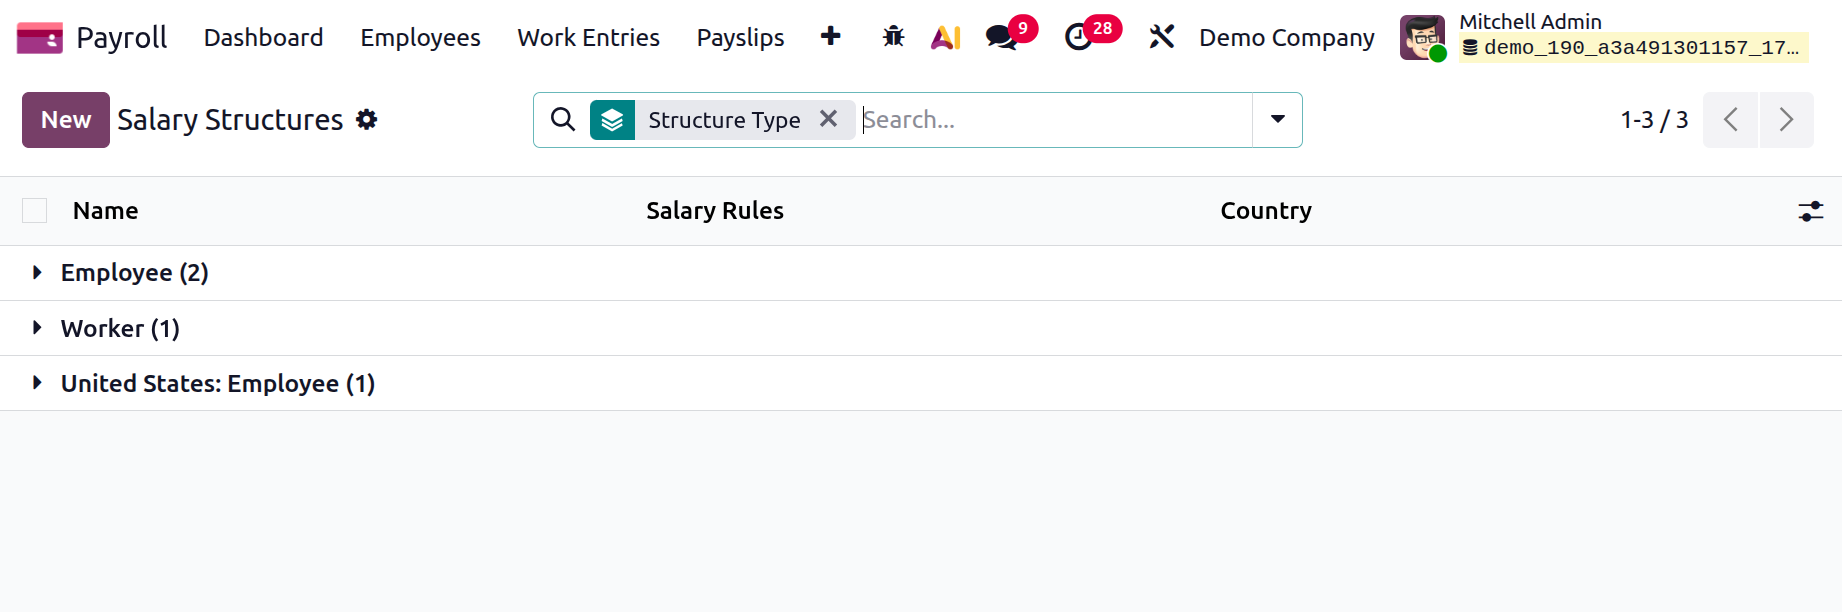
Once the Structures smart button is selected, the user can view every structure within each of the structure kinds.
Structures
Based on job postings, we may determine employee compensation within the wage structures and provide payslips for payroll. A wage structure allows you to establish a number of helpful guidelines for payslip computations. One salary system is used by the department or group as a whole. Once they select the Structures option in Configuration, users can describe a new compensation structure. The open window offers individual wage plans for workers and employees. Each employee's name, nationality, and wage regulations are easily visible in addition to the employee salary structure. Choose the New icon in the pay Structures box to enter the description of a new salary structure.
The Type and Structure Name columns on the new screen must be filled in with Employee/Worker for the category of the structure type. Choose the Use Worked Day Lines option to display working days on the employee payslip. This option enables the salary structure to calculate payslip amounts based on worked days and hours, such as attendance, leaves, and overtime.
Year to Date Computation: This option allows the salary structure to include cumulative year-to-date values in salary rule calculations for accurate annual totals and statutory reporting.
Mention the country while talking about the employee compensation plan. The country name, year-to-date computation, template, payslip name, hide basic on PDF, and salary journal are the next possibilities.
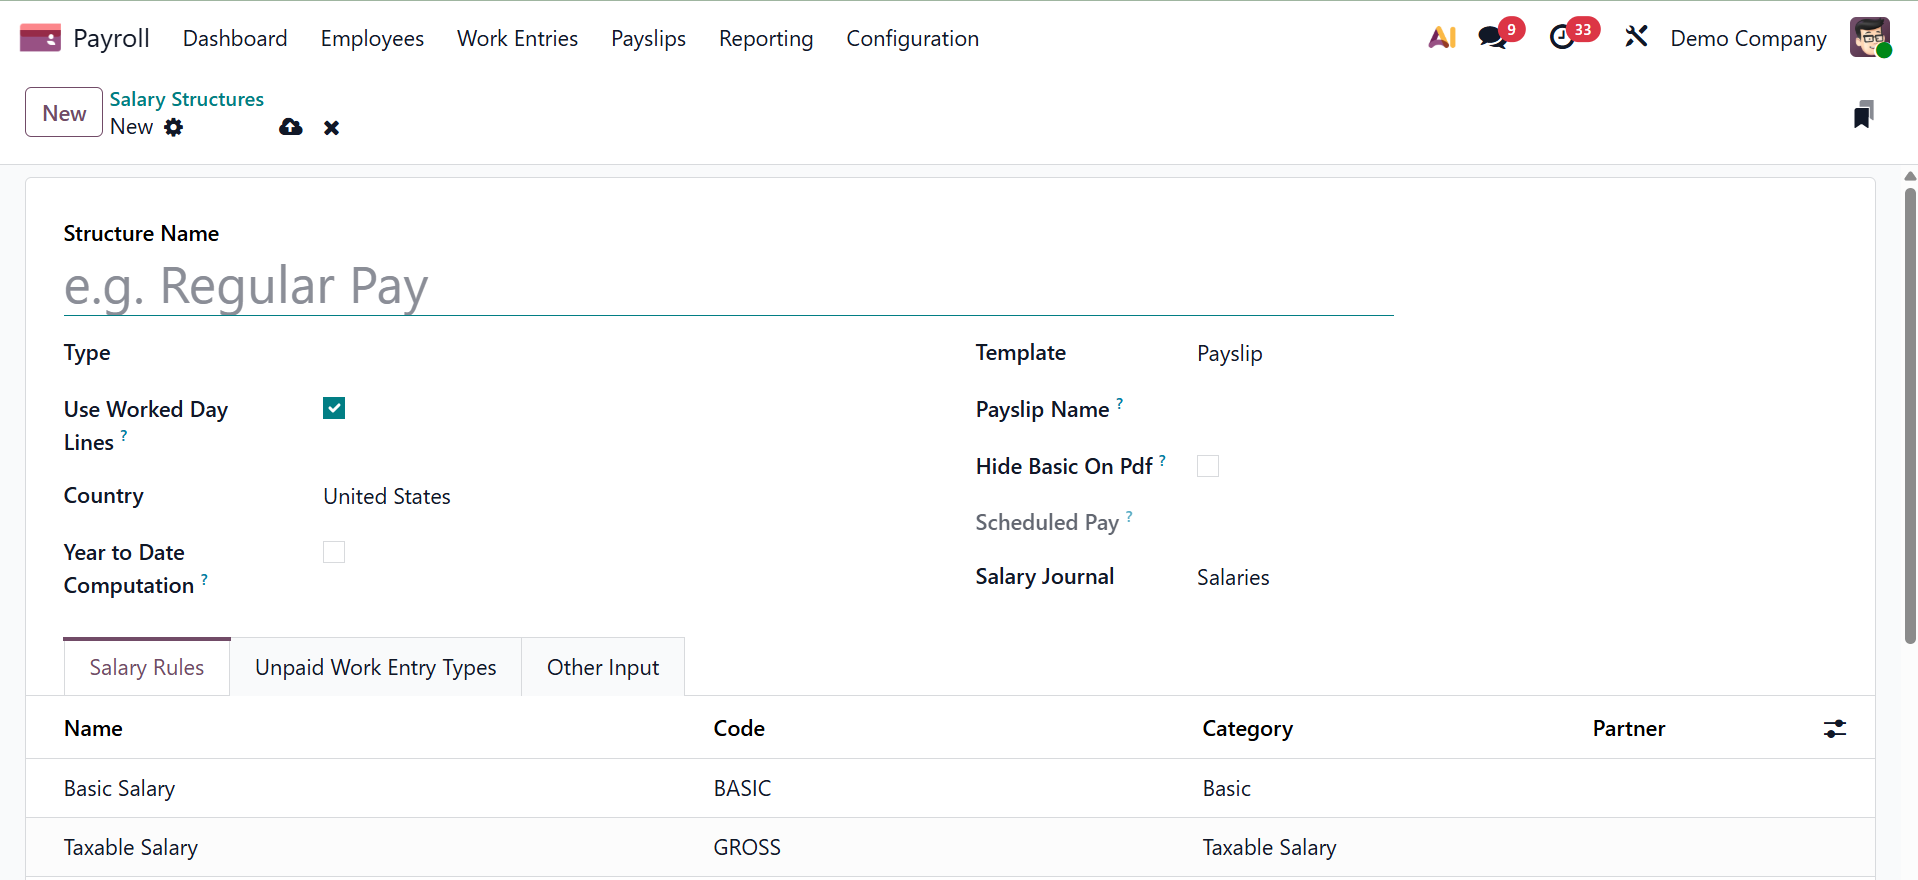
Users can access a variety of reports, including those on pay stubs, terminations, and other subjects. The Scheduled Pay section also offers options for weekly, annual, monthly, and other wage payments. In connection with the pay system, we can also select a certain salary journal.
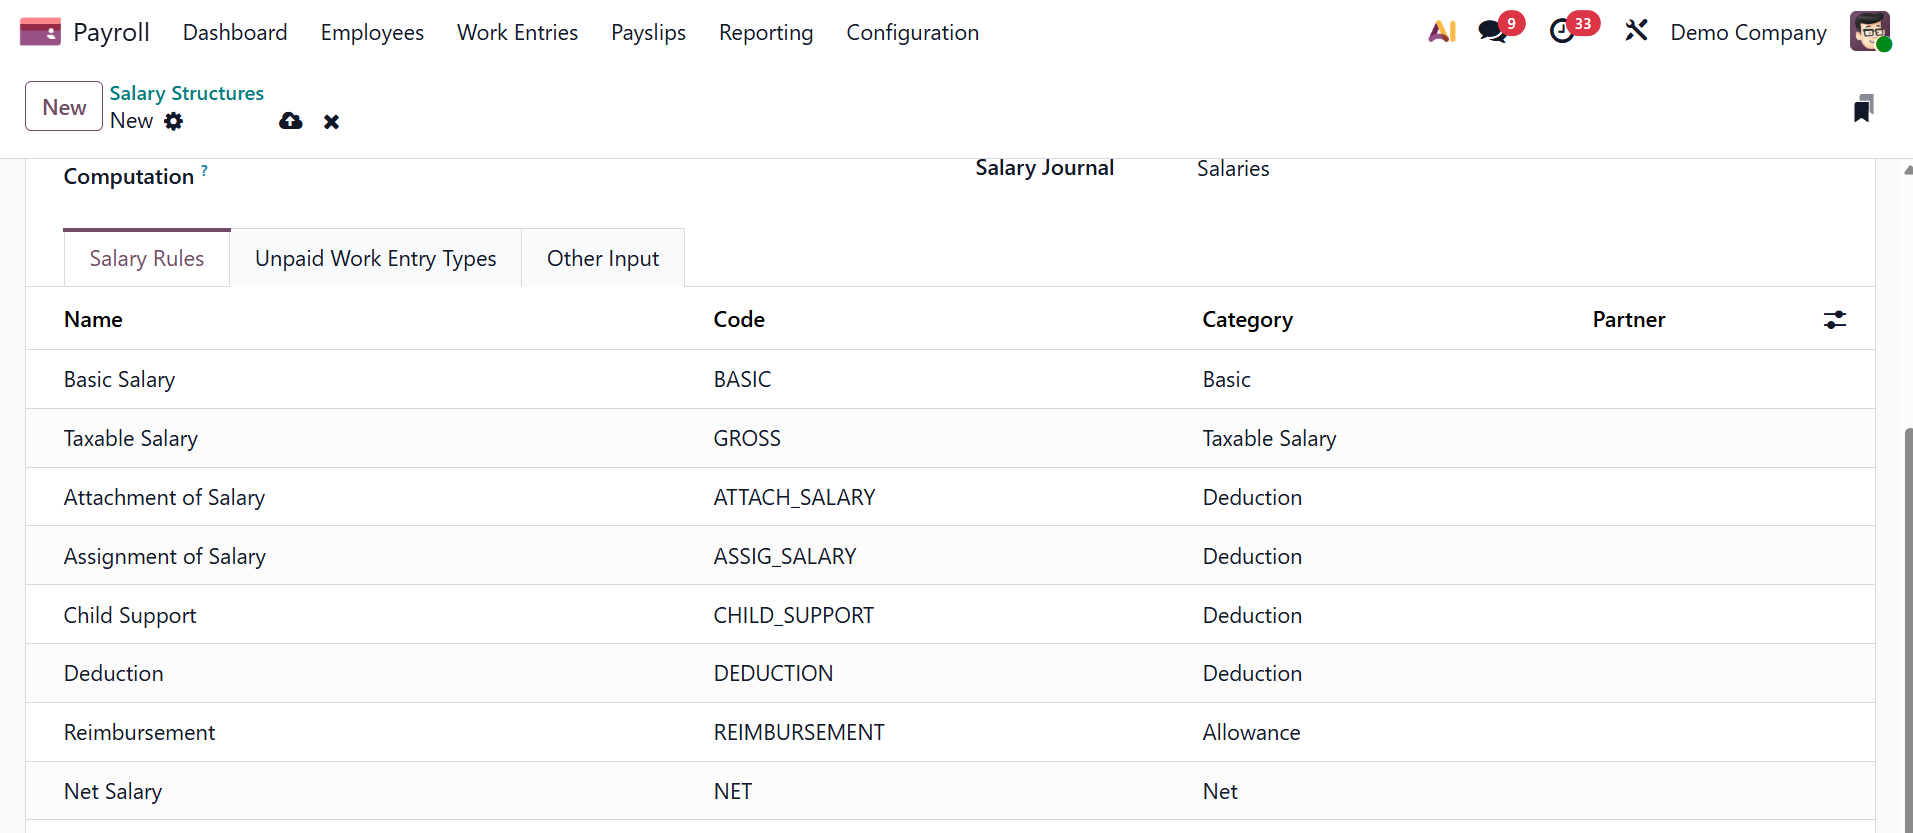
Rules pertaining to employee wage structures may be put into place. Select To achieve this, add a line from the Salary Rules menu with the details of your employee's pay scale. Each salary regulation's Category, Name, Partner, and Code might be mentioned. Next, you have the Unpaid Work Entry Types tab, as shown below.
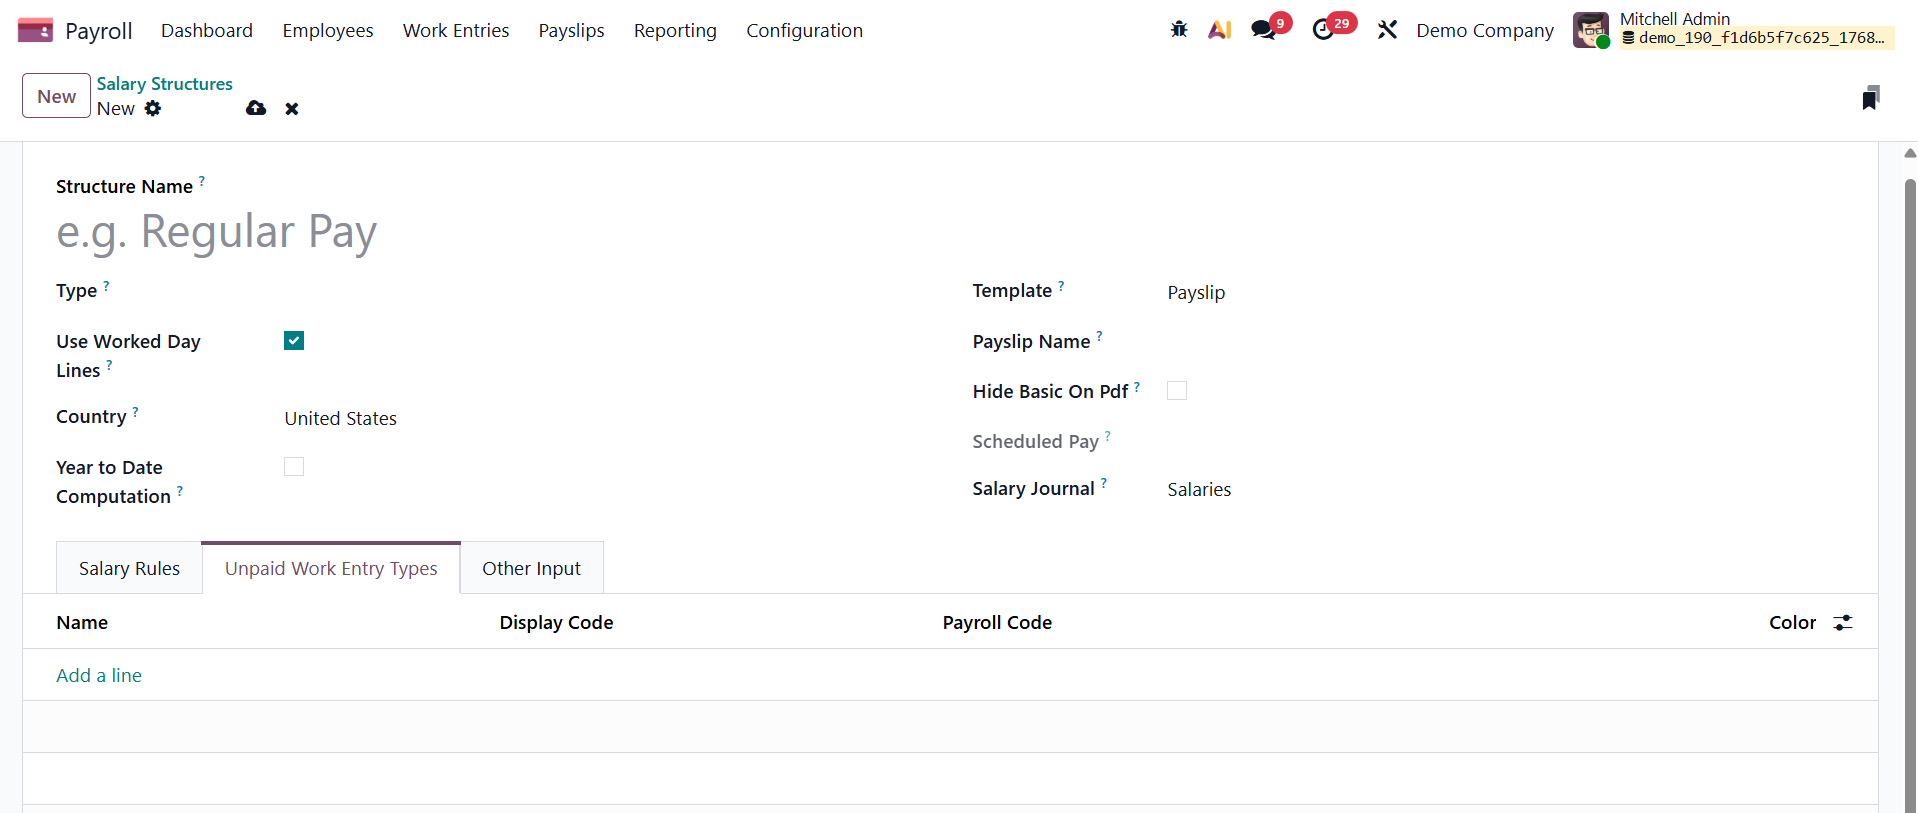
There, you can add the name, display code, payroll code, and color using the Add a Line option. Now, next to that, you have the Other Input tab, as shown below.
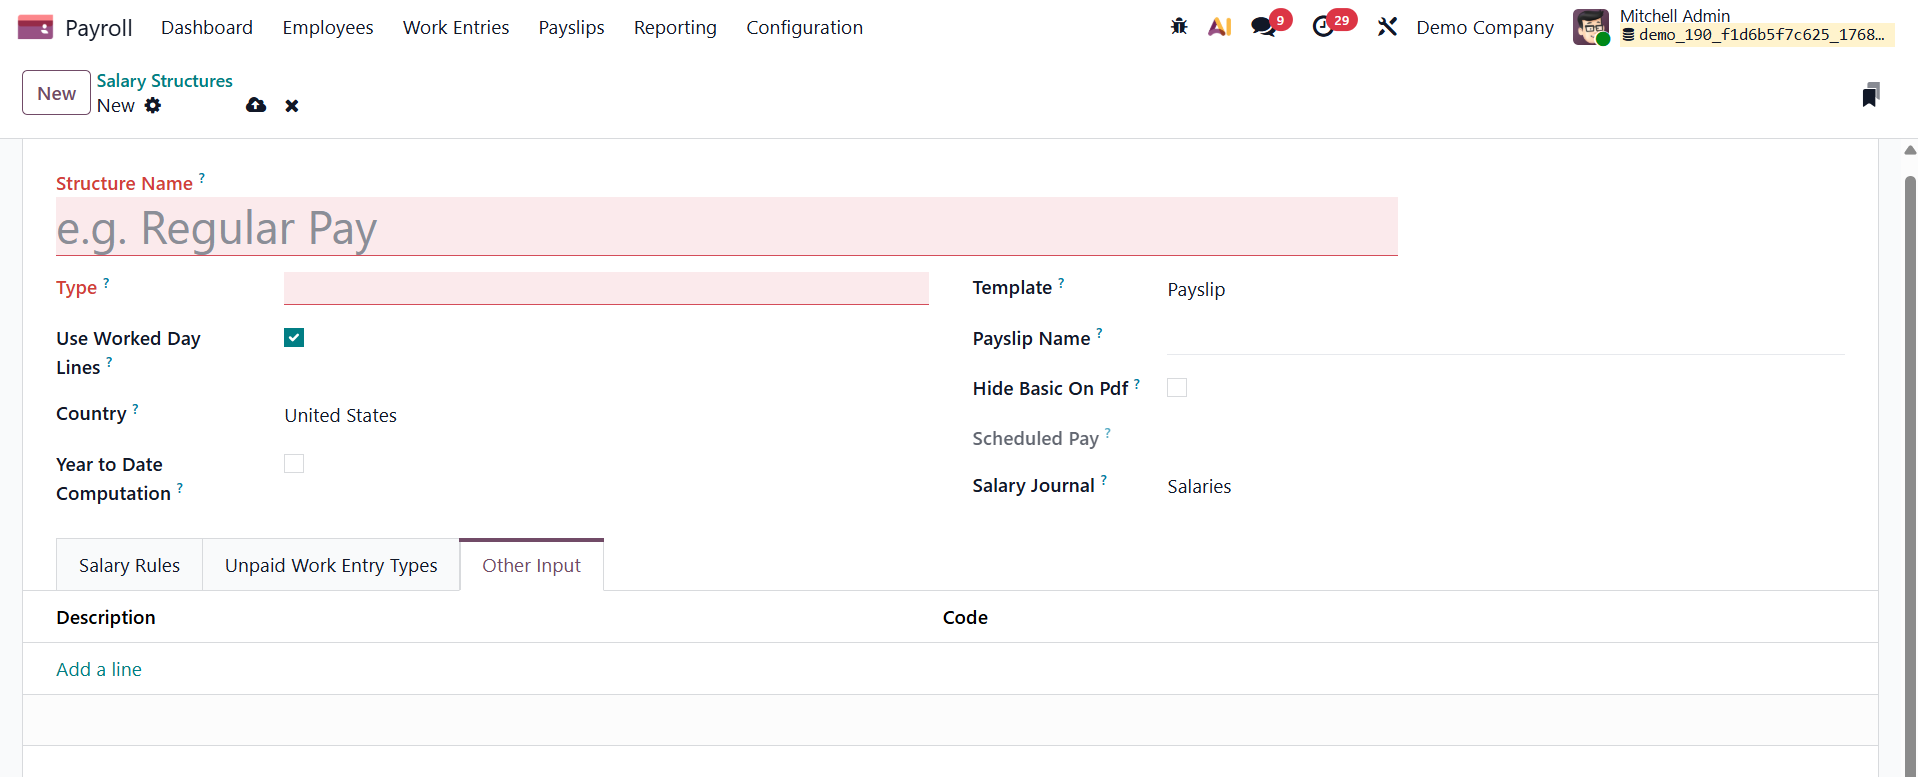
Here, also using the Add a Line option, you can add the description and code accordingly.
Rules
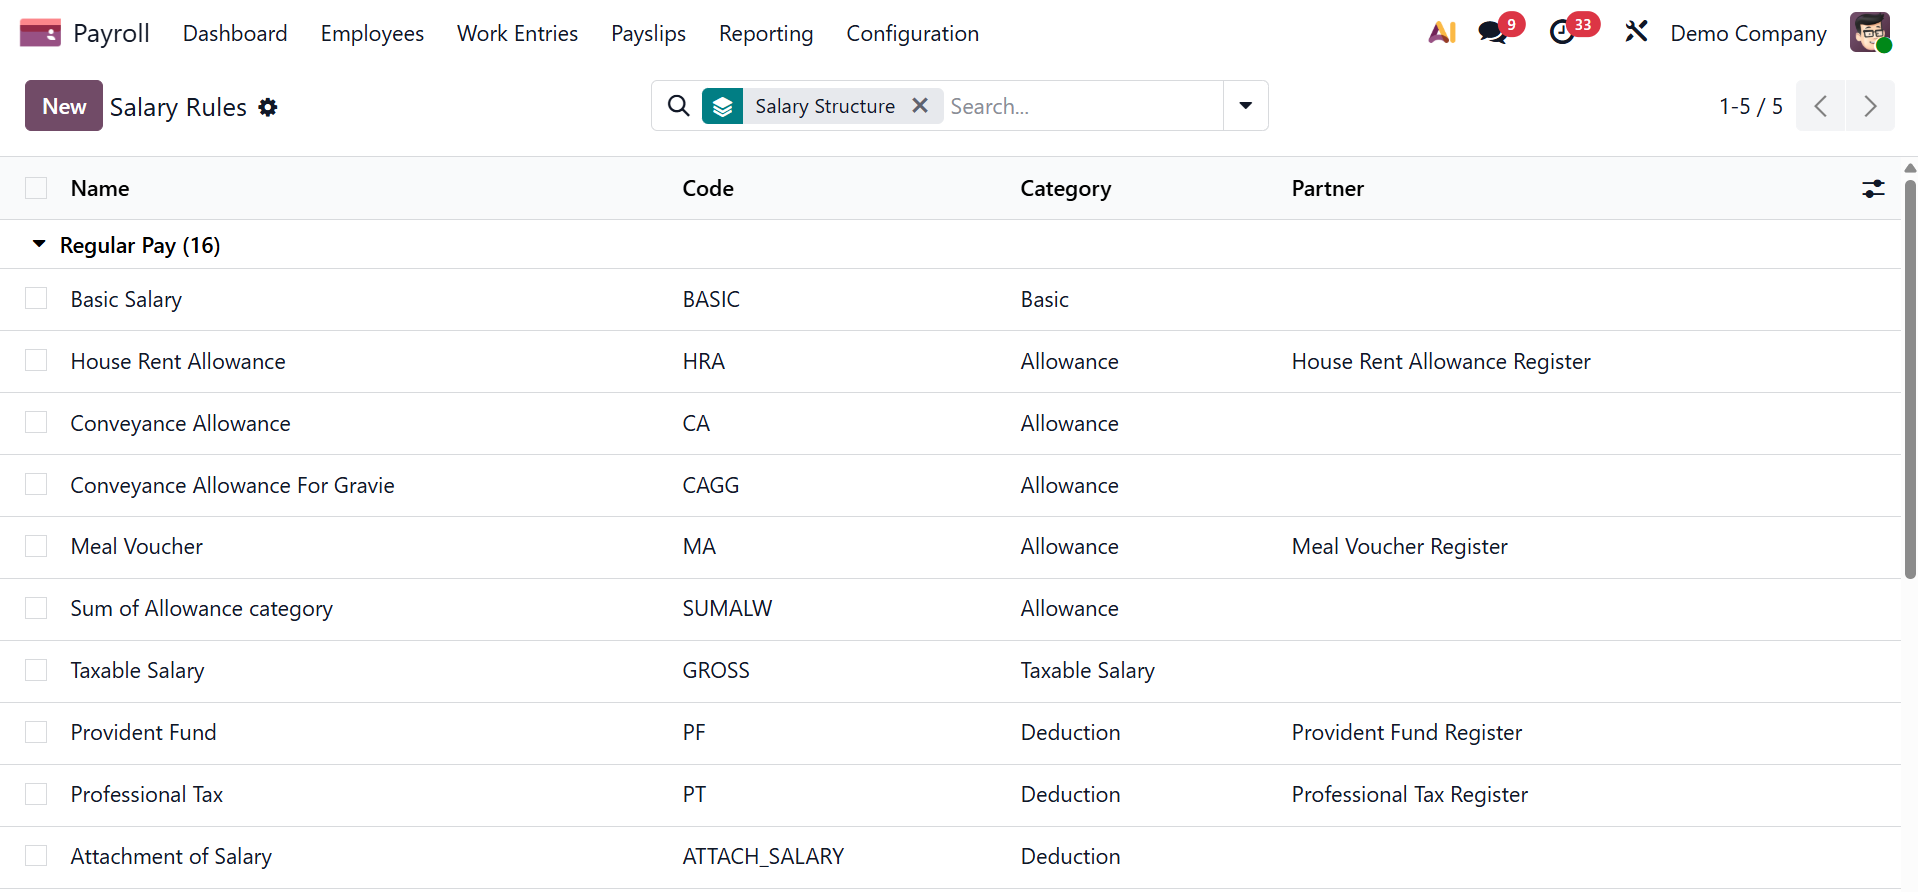
The creation and upkeep of a just pay structure is one of the most crucial elements of any organization. Effective business management involves a number of elements, including setting policies, determining appropriate compensation, and making advance plans. These regulations guarantee that you are free to choose how much to pay specific organizations. The Salary Rules pane can be accessed by selecting the Rules menu item under Configuration. Users can access all of the wage criteria outlined in Odoo 19. The user can view the salary structures for each compensation rule, which include information like Name, Code, Category, and Partner. We can create a salary rule in Odoo 19 by selecting the New option.

You can have structures and the rules, as shown in the picture below.
You will receive the specifics after choosing a certain rule, as seen in the figure below.

Here are the specifics, such as
- Sequence: In the order of all other rules, insert a number that indicates when this rule is calculated.
- Salary Structure: either enter a new compensation structure or choose one from the drop-down box that the rule applies to. This field is necessary.
- Appears on Payslip: To make the rule appear on an employee's printed payslip, check the corresponding box.
- Contributes to Employer Cost: Check the box to make the rule show up in the Payroll app dashboard's Employer Cost report.
- View on Payroll Reporting: To make the rule show up on payroll reports, check the box.
Use the NEW icon to make a new one. After adding the Rule Name to the resultant screen, select Category. By supplying a code, users may instantly recognize the rule. Additionally, remember to include a serial number to facilitate sequence calculation.
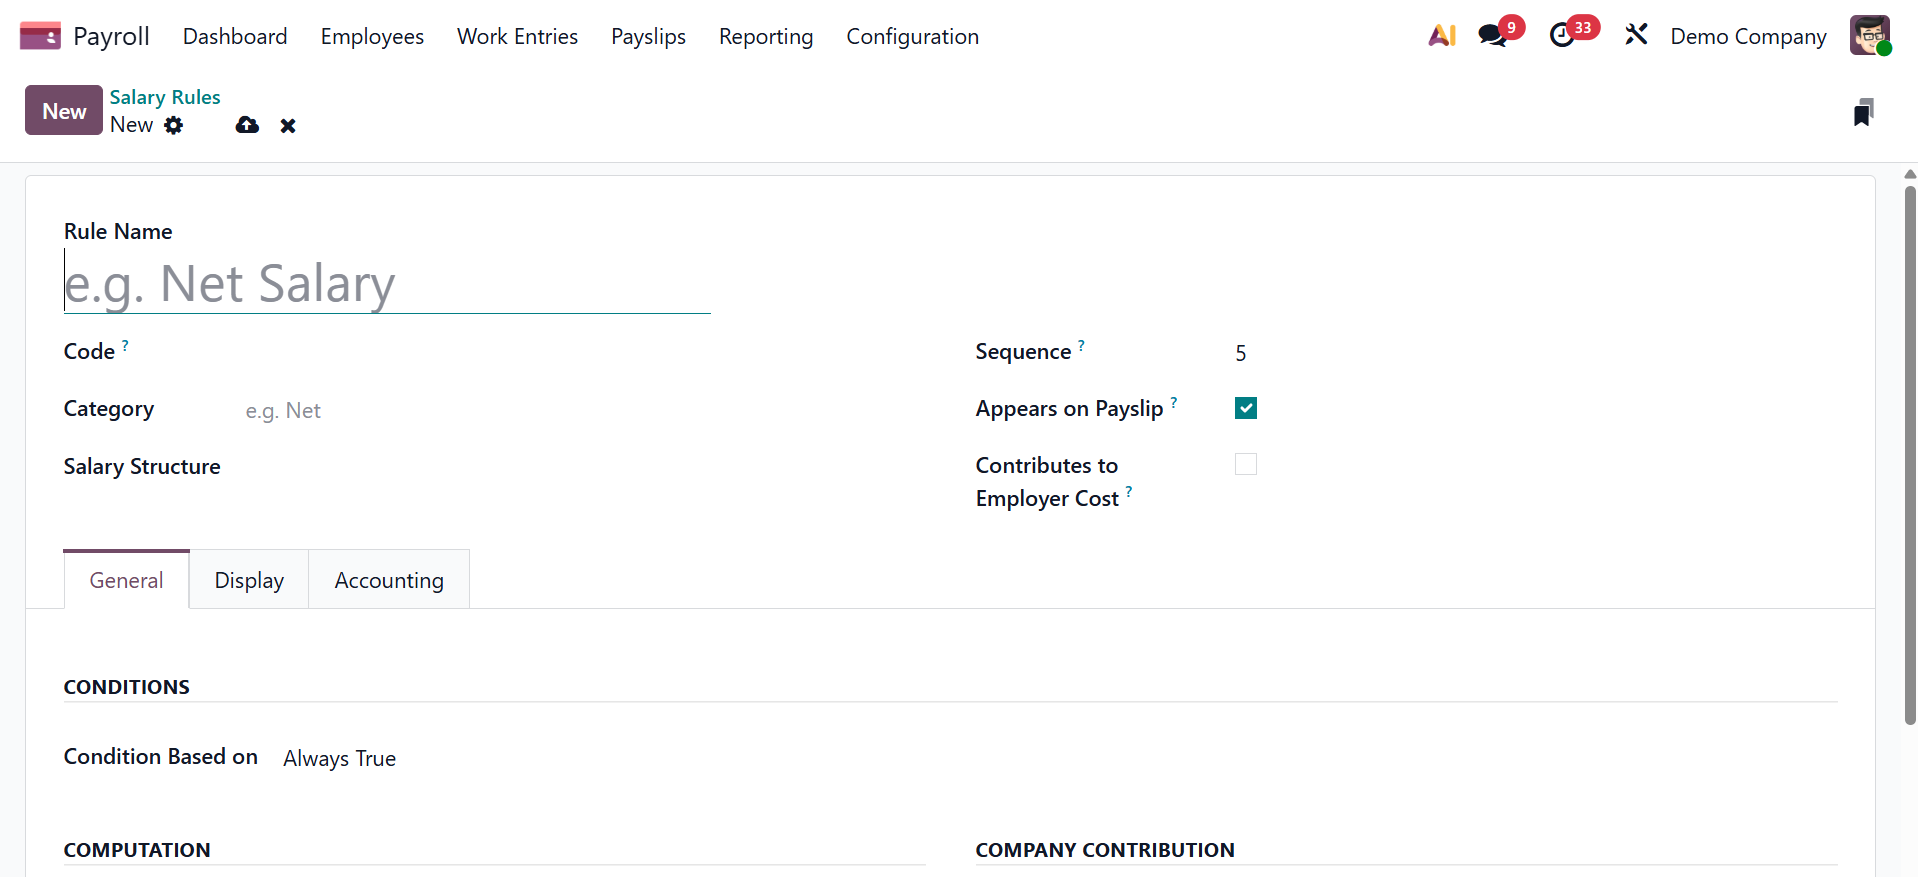
We may see the salary rule inside a payslip by using the Appears on Payslip option. We were able to view the employer cost value in the dashboard after activating the View on Employer Cost Dashboard. Turn on the View on Payroll Reporting field in the Salary Rules window to set the salary rule for payroll reporting.
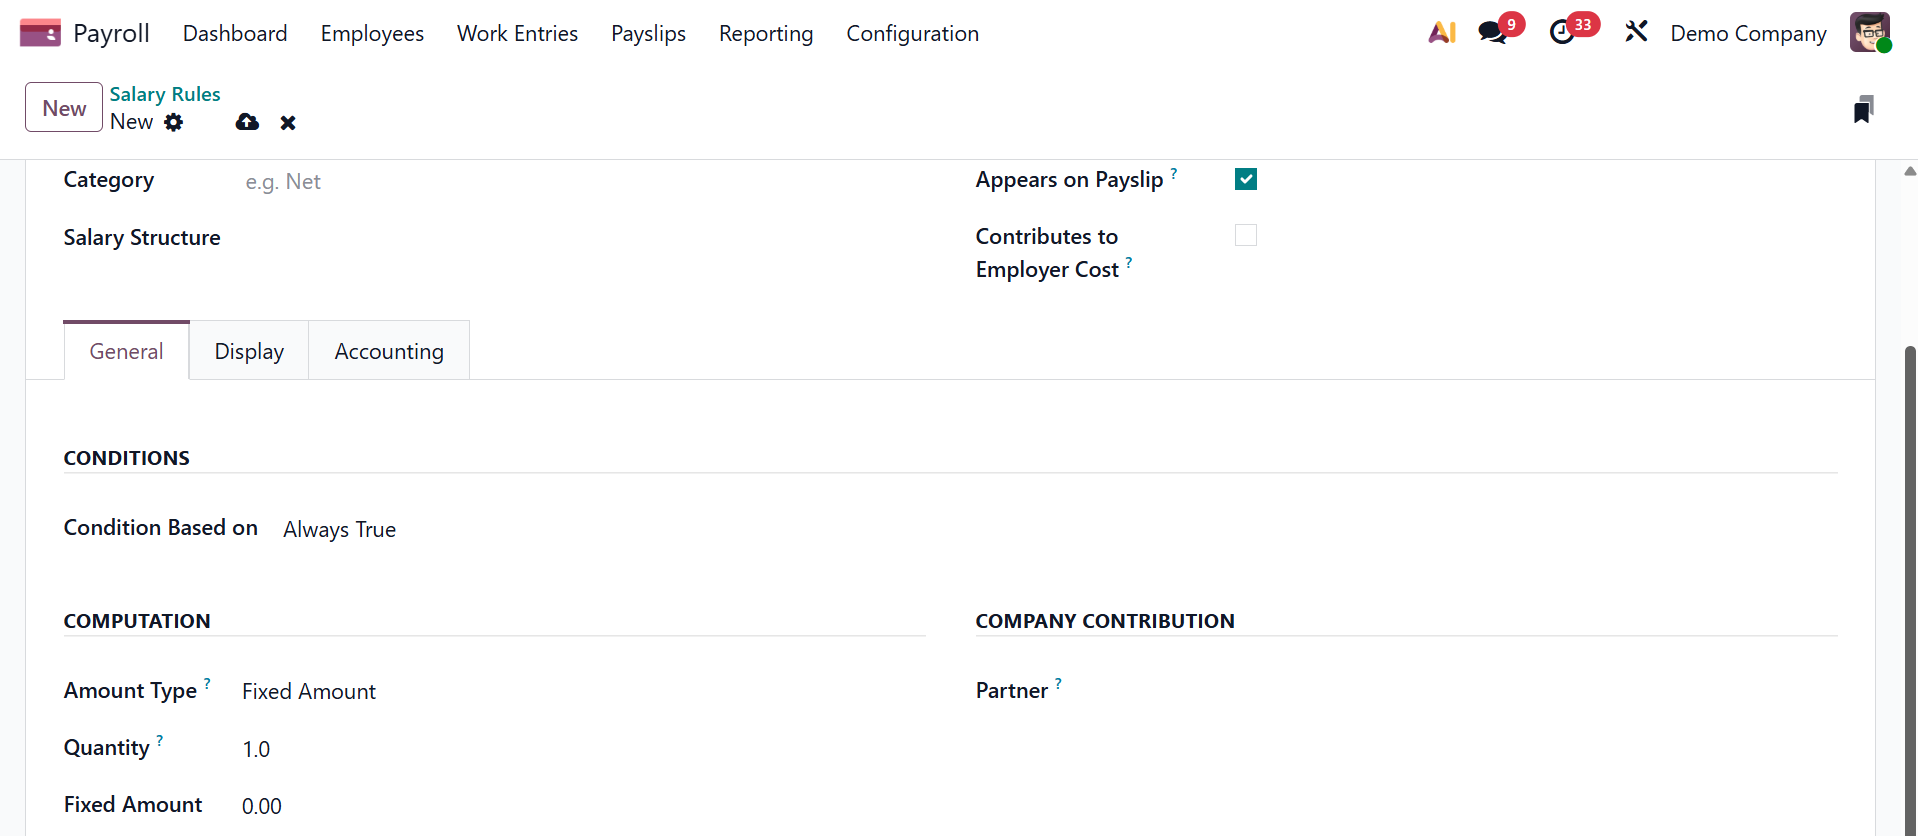
We are responsible for the computation, terms, and corporate contribution below the General tab. Enter Always True, Salary Input, Other Input, Python Expression, and Domain as the salary rule's condition in the "Condition Based on" column. Selecting the Always True option makes it simple to specify the necessary wage rule for salary computation, as shown above.
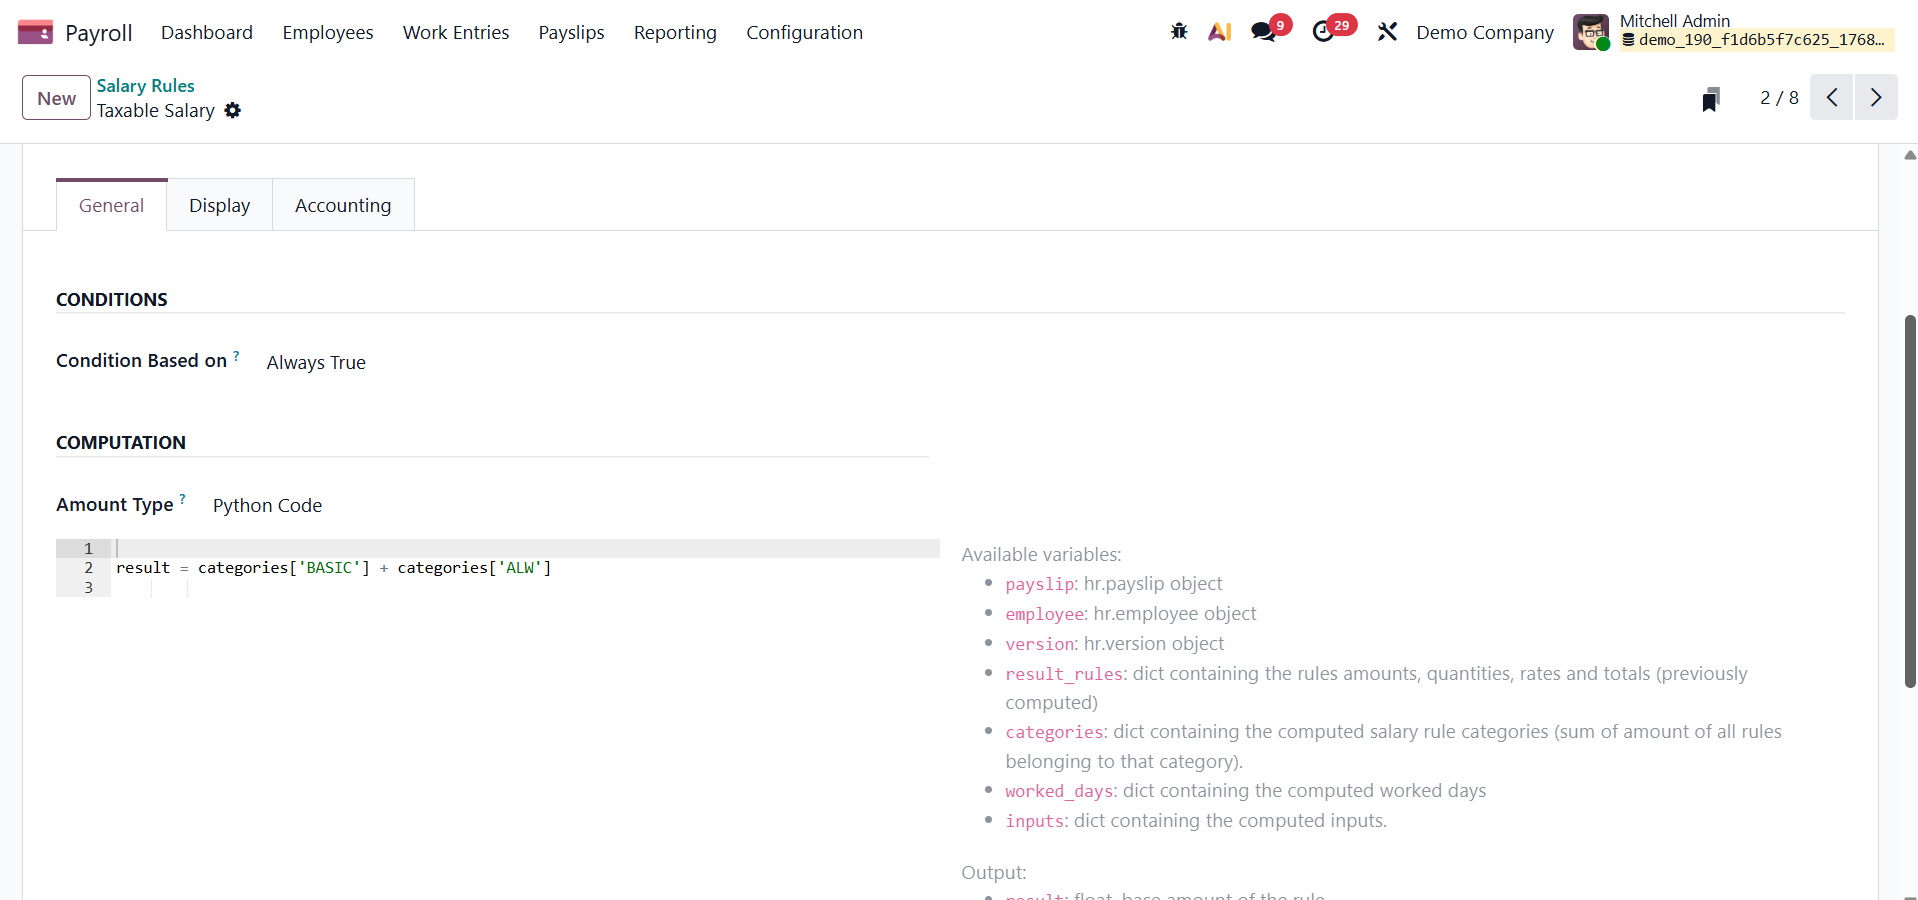
When we select Python Expression in the Condition Based on field, Odoo19 generates equations using the default technique.
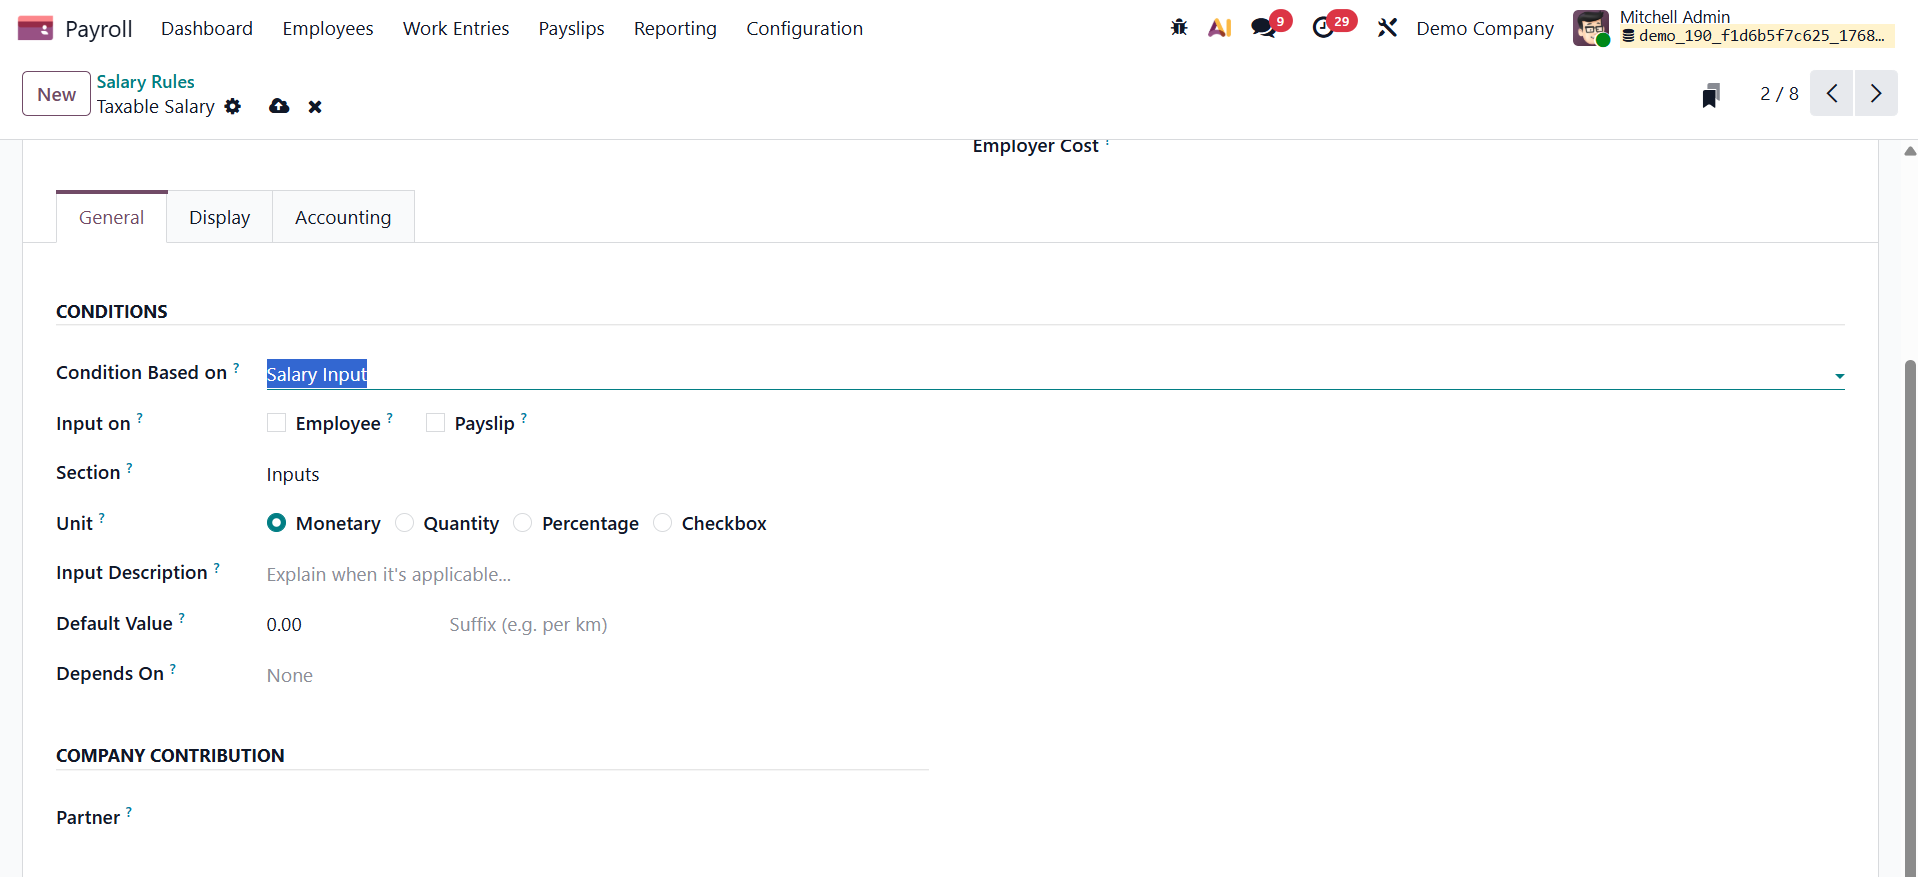
When we select conditions based on salary input, you have some options extra such as input on to set as employee or payslip, section, unit, input description, default value, and depends on, respectively.
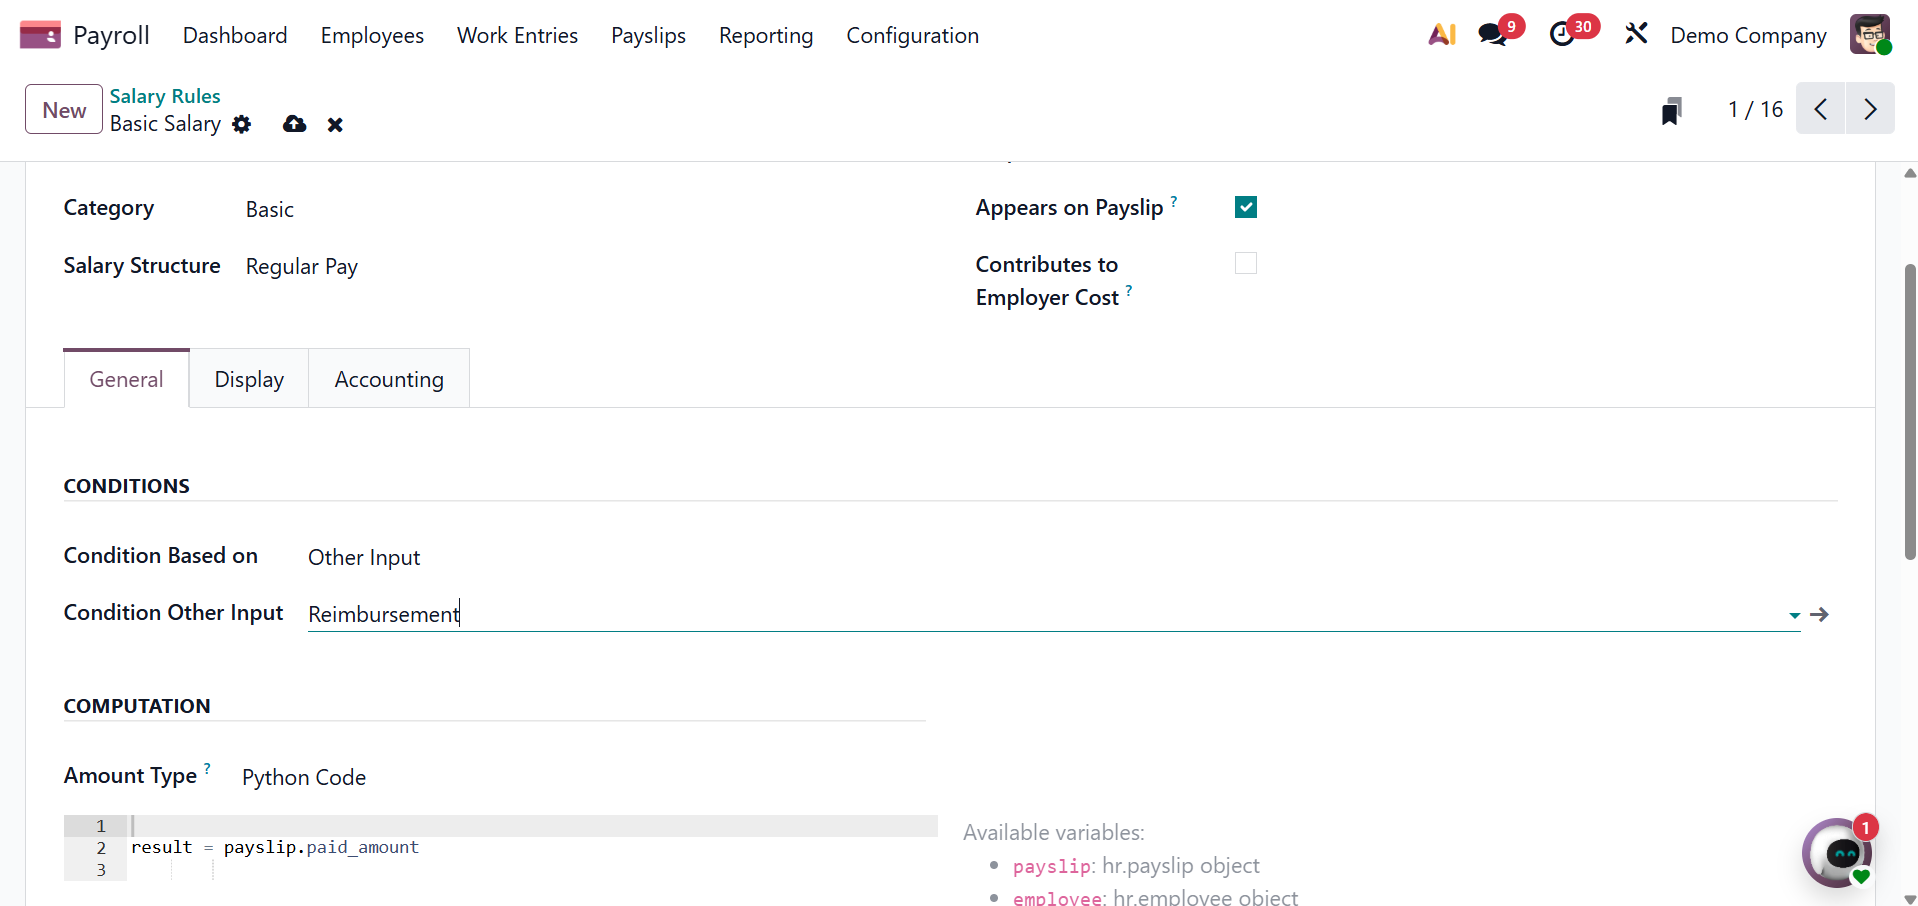
When we select conditions based on other input, then, you can add the condition other input form the drop down menu.
Next, if it is set as domain, then, you can set the applicability domain in the provided space.
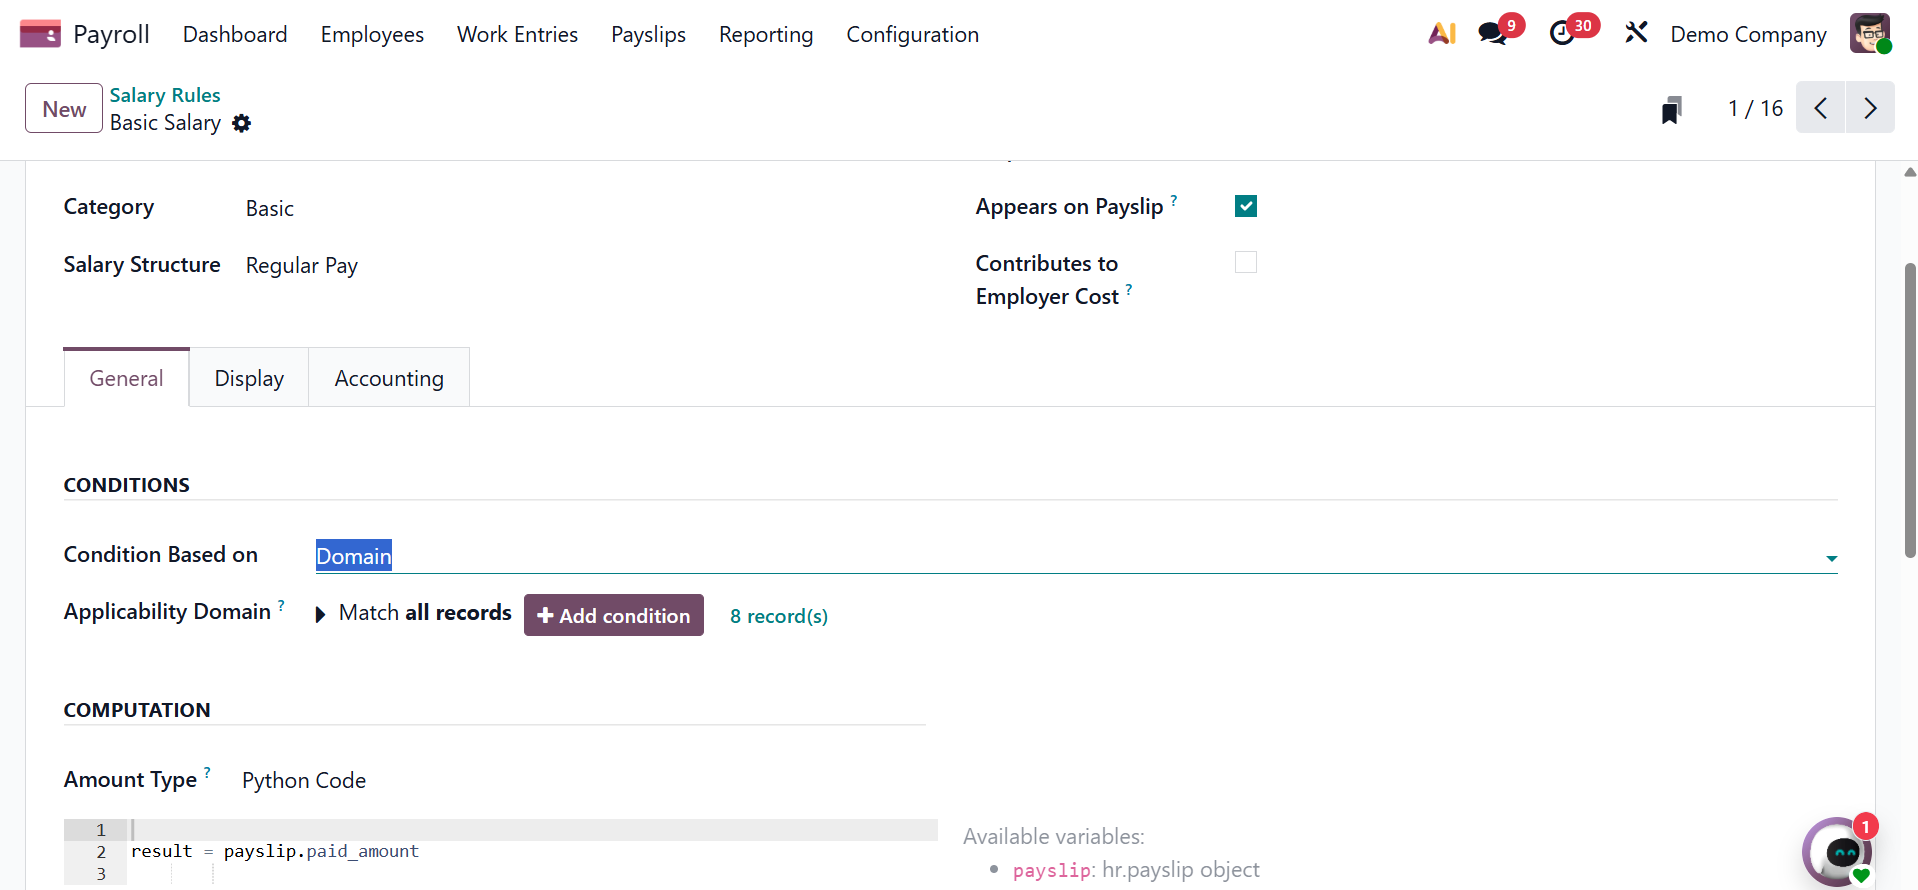
Once we choose it as the amount type, we may calculate the amount based on the percentage. We can create a fixed amount by selecting the Fixed Amount option in the Amount Type column. You can choose the quantity and fixed amount of the salary rule after choosing Fixed Amount.
The salary rule can also be computed by users using Python code. Enter Python code in the Amount Type column to accomplish this. The Python code can then be defined based on its attributes.
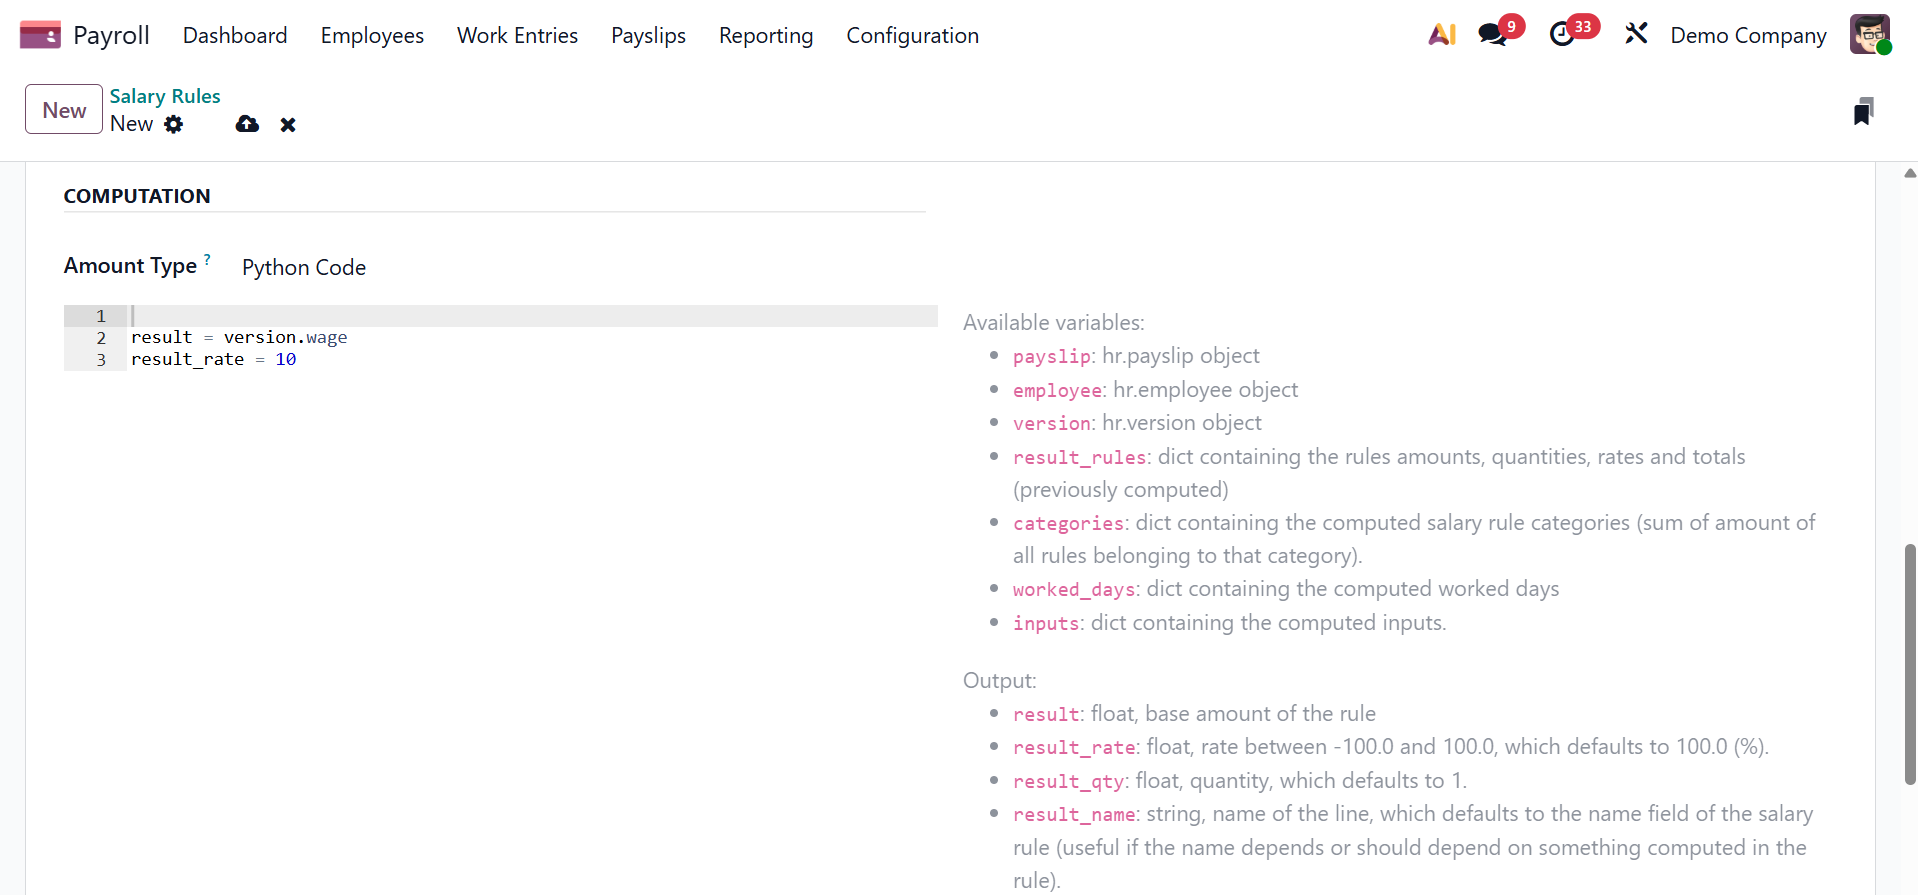
Under the computation, you are provided with five methods, such as percentage, salary input value, fixed amount, other input, and Python code, as shown below.
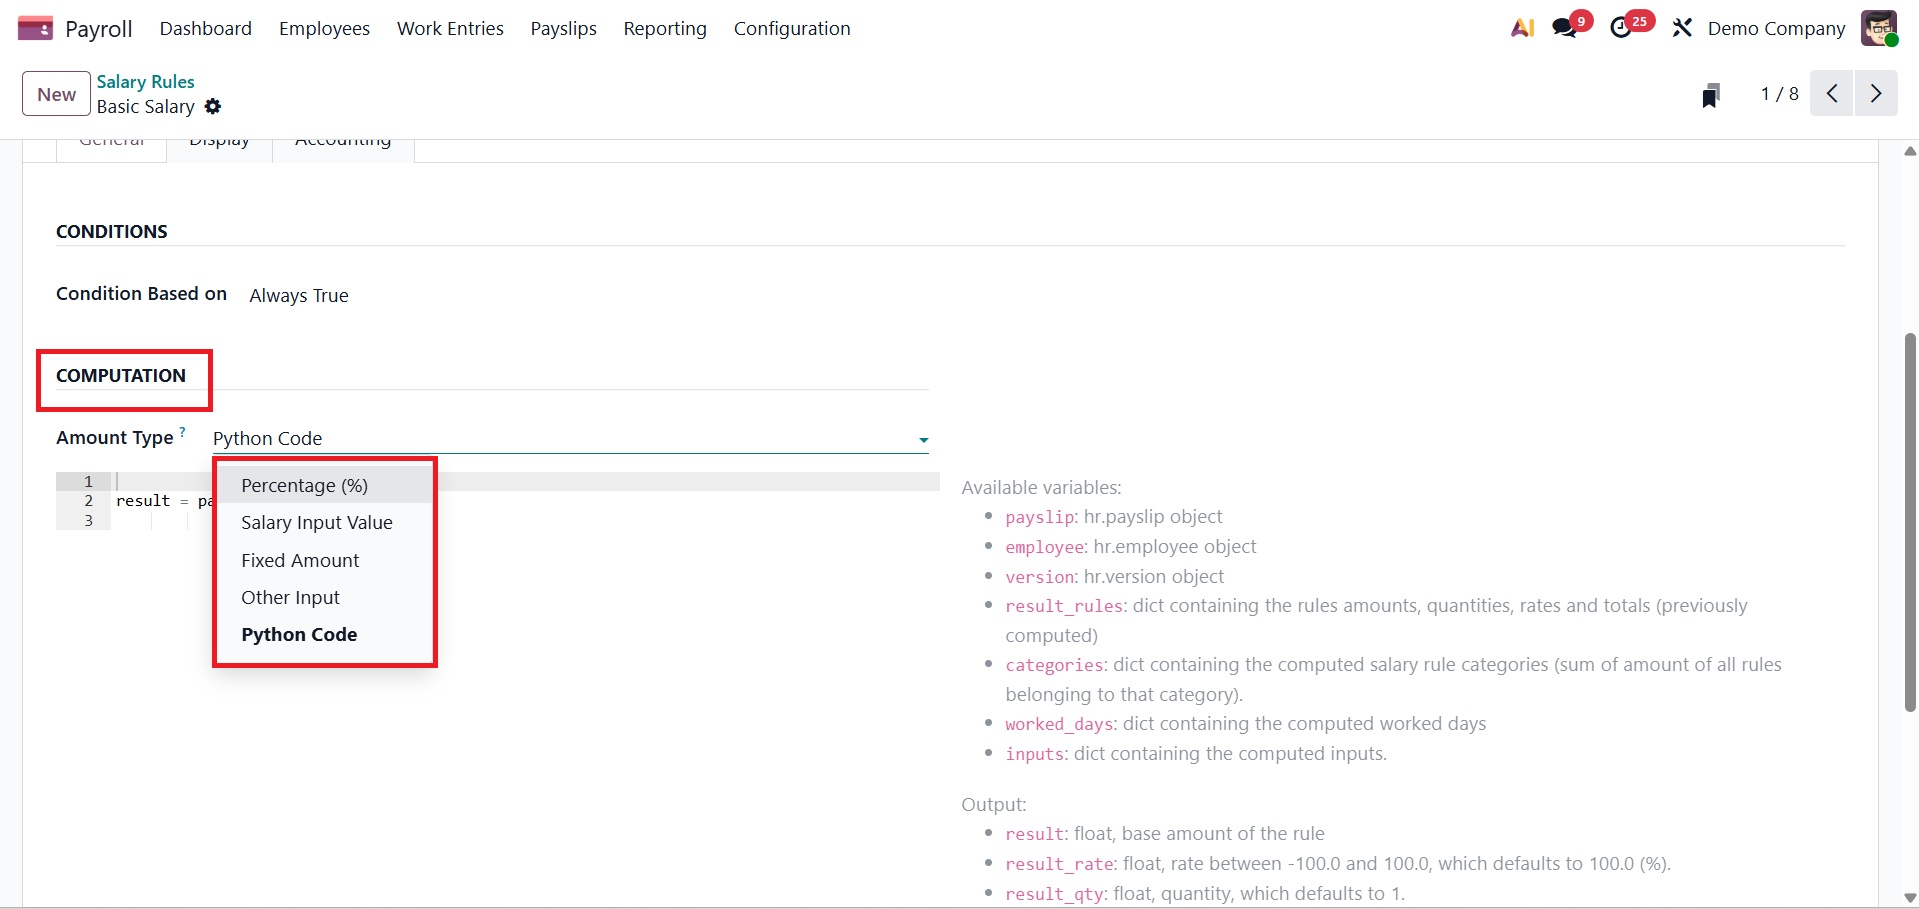
- Percentage: This method calculates the salary rule amount as a percentage of another salary component or predefined base.
- Salary Input Value: This method uses the value entered in the payslip’s salary input to compute the rule amount.
- Fixed Amount: This method applies a constant, predefined amount regardless of worked time or other variables.
- Other Input: This method calculates the amount based on values from another configured input or salary rule.
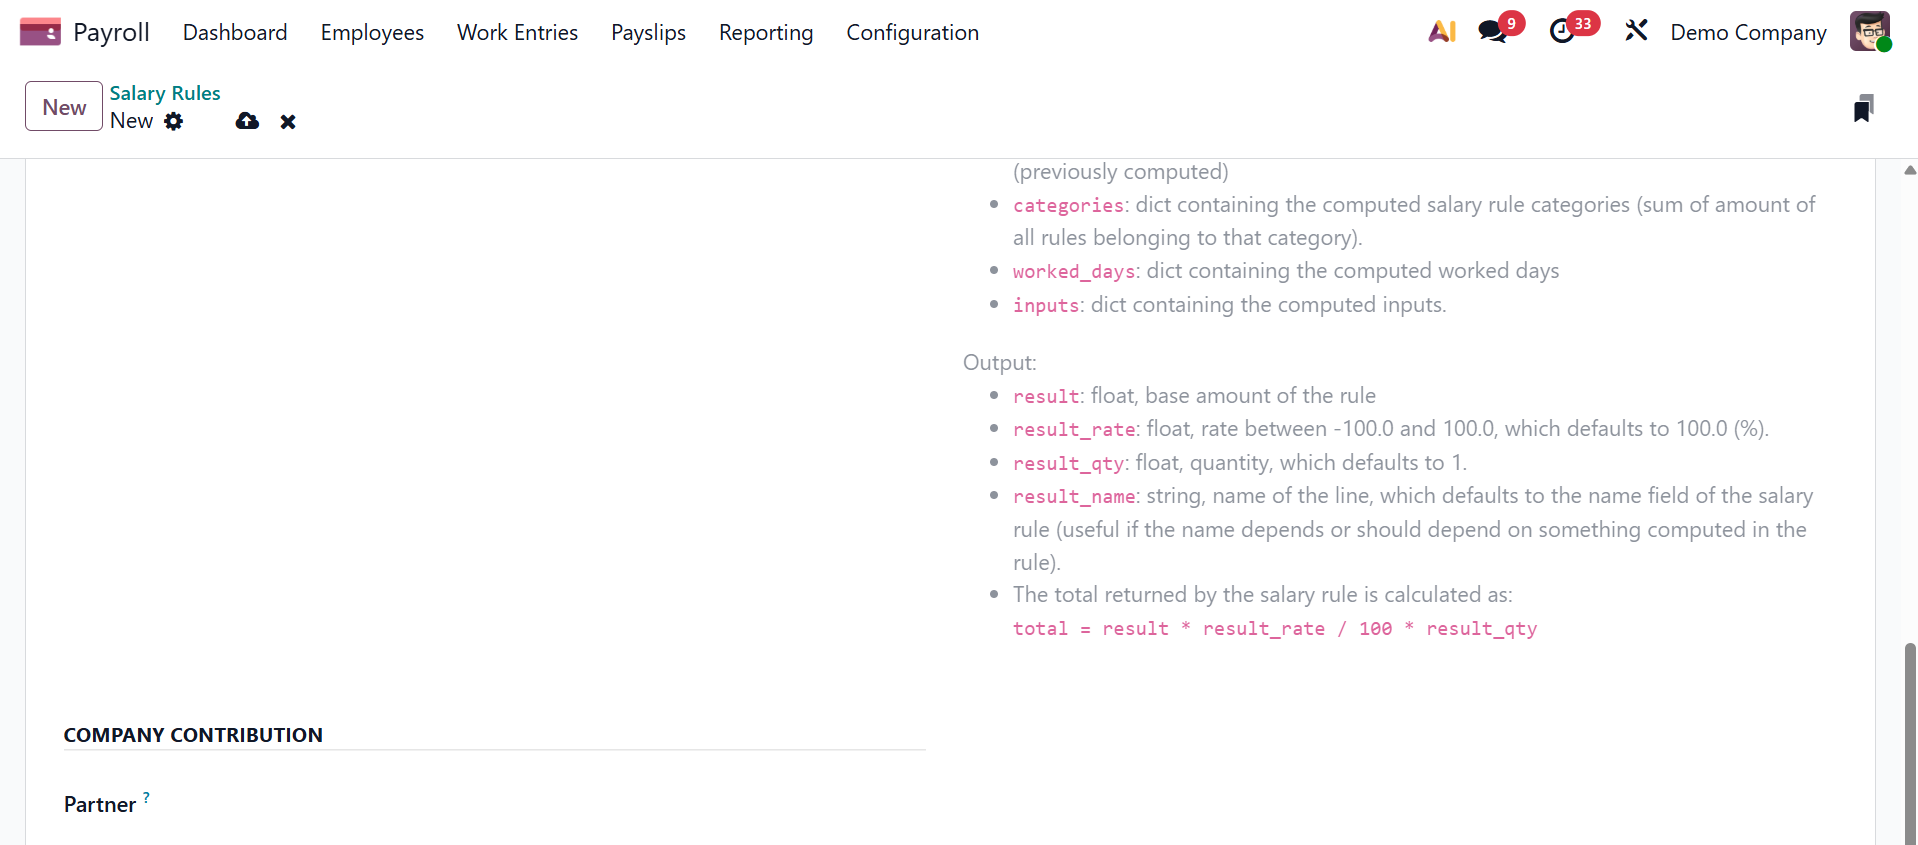
- Python Code: This method uses custom Python logic to calculate the salary rule amount dynamically based on contract, attendance, or other payroll data.
The third party that handles employee salary payments can be identified in the COMPANY CONTRIBUTION section.
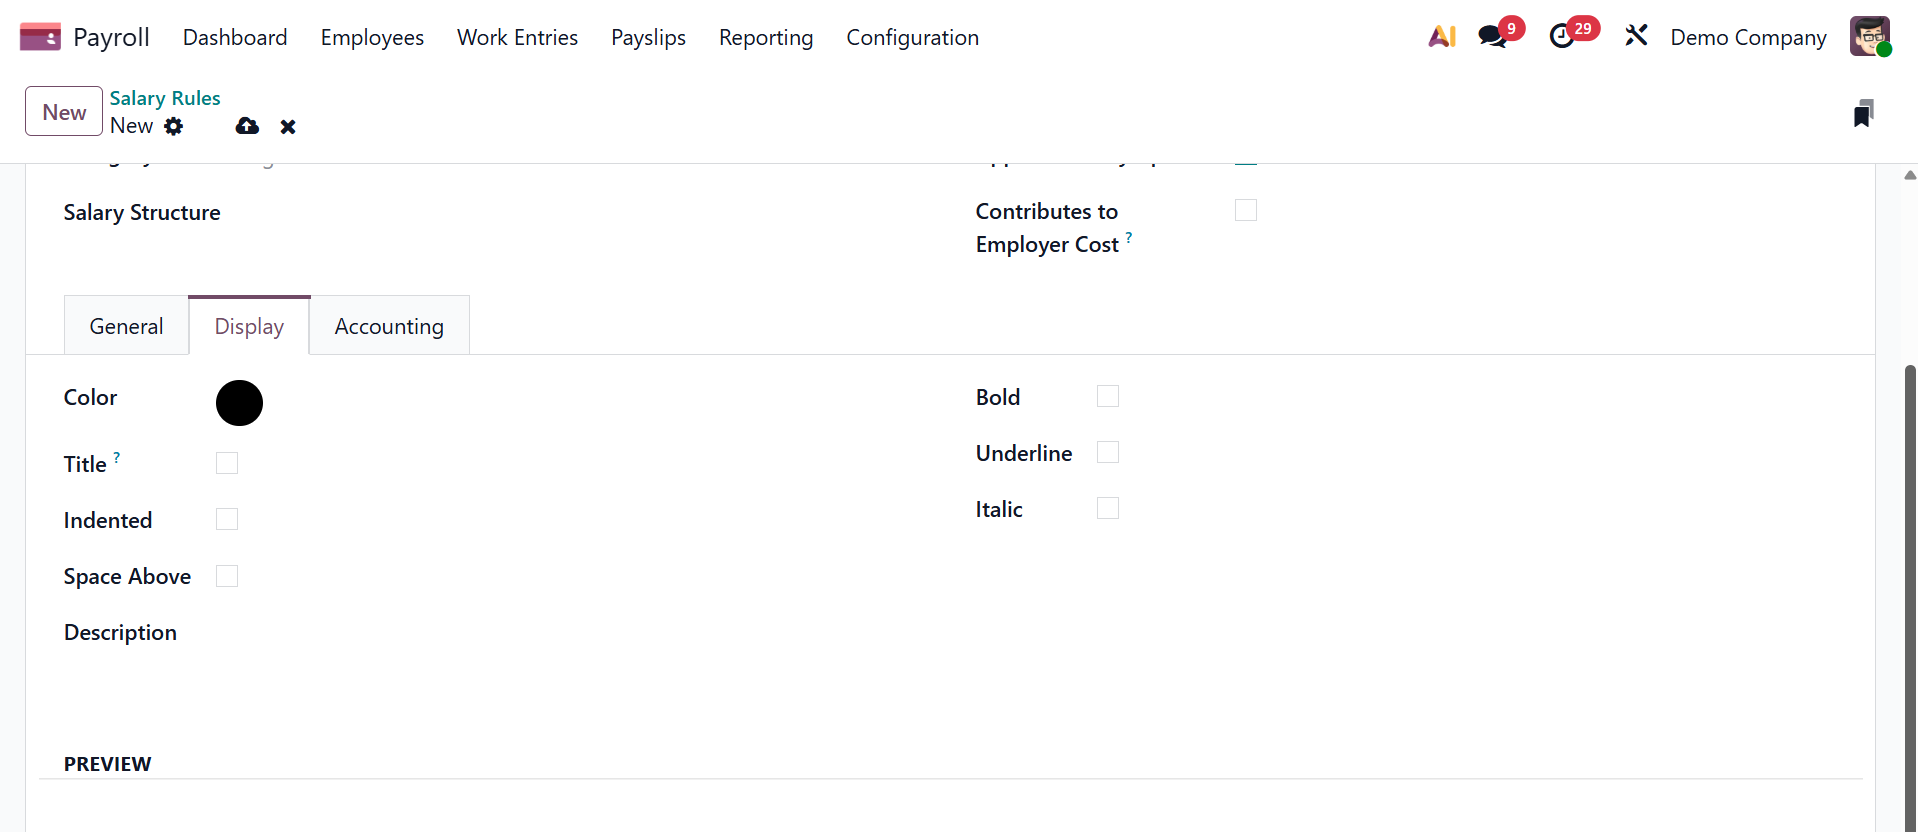
Under the display tab, you can add the Color, Title, Indented, Space above, Description, Bold, Underline, and Italic. You can also add a preview.
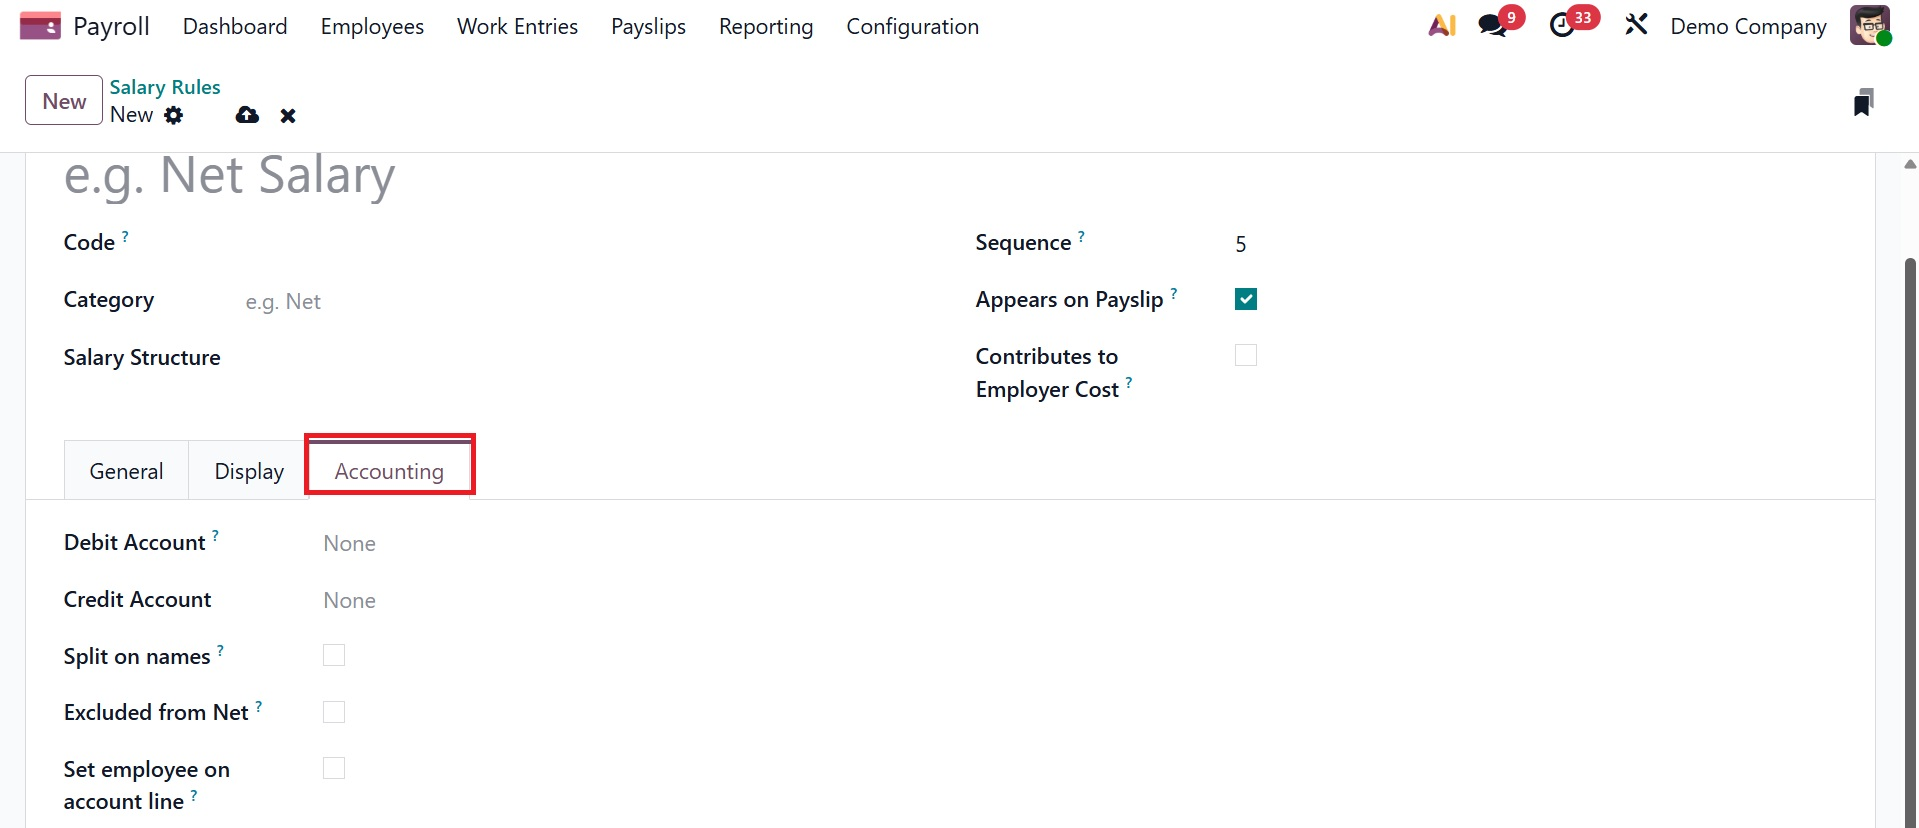
You can put the salary rule note inside the Description tab. You can enter information for the Analytic Account, Debit Account, and Credit Account under the Accounting tab. Once the Not Computed in net accountability option has been enabled in the Accounting section, you may remove the net salary rule value.
In Odoo 19 Payroll, the rules are stored.
Salary Rule Sections
The Salary Rule Section option under the Configuration of the Odoo Payroll module is used to organize and group salary rules into logical sections, making payslip structures easier to manage, read, and maintain during payroll calculation and reporting.

To create a new one, go for the New icon, and the page will be as shown below.
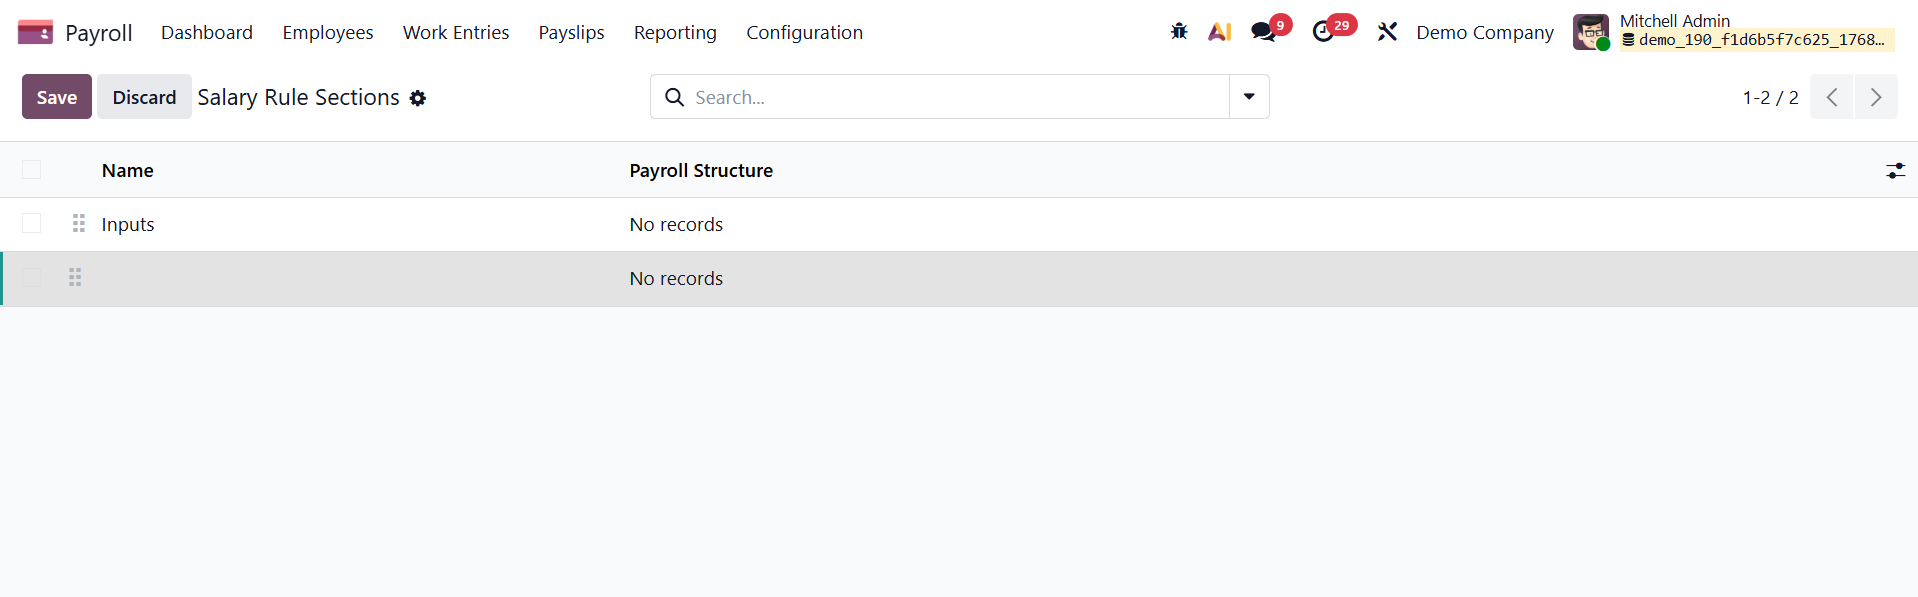
Here, using the next line, you can easily add a new one by providing the name and payroll structure.
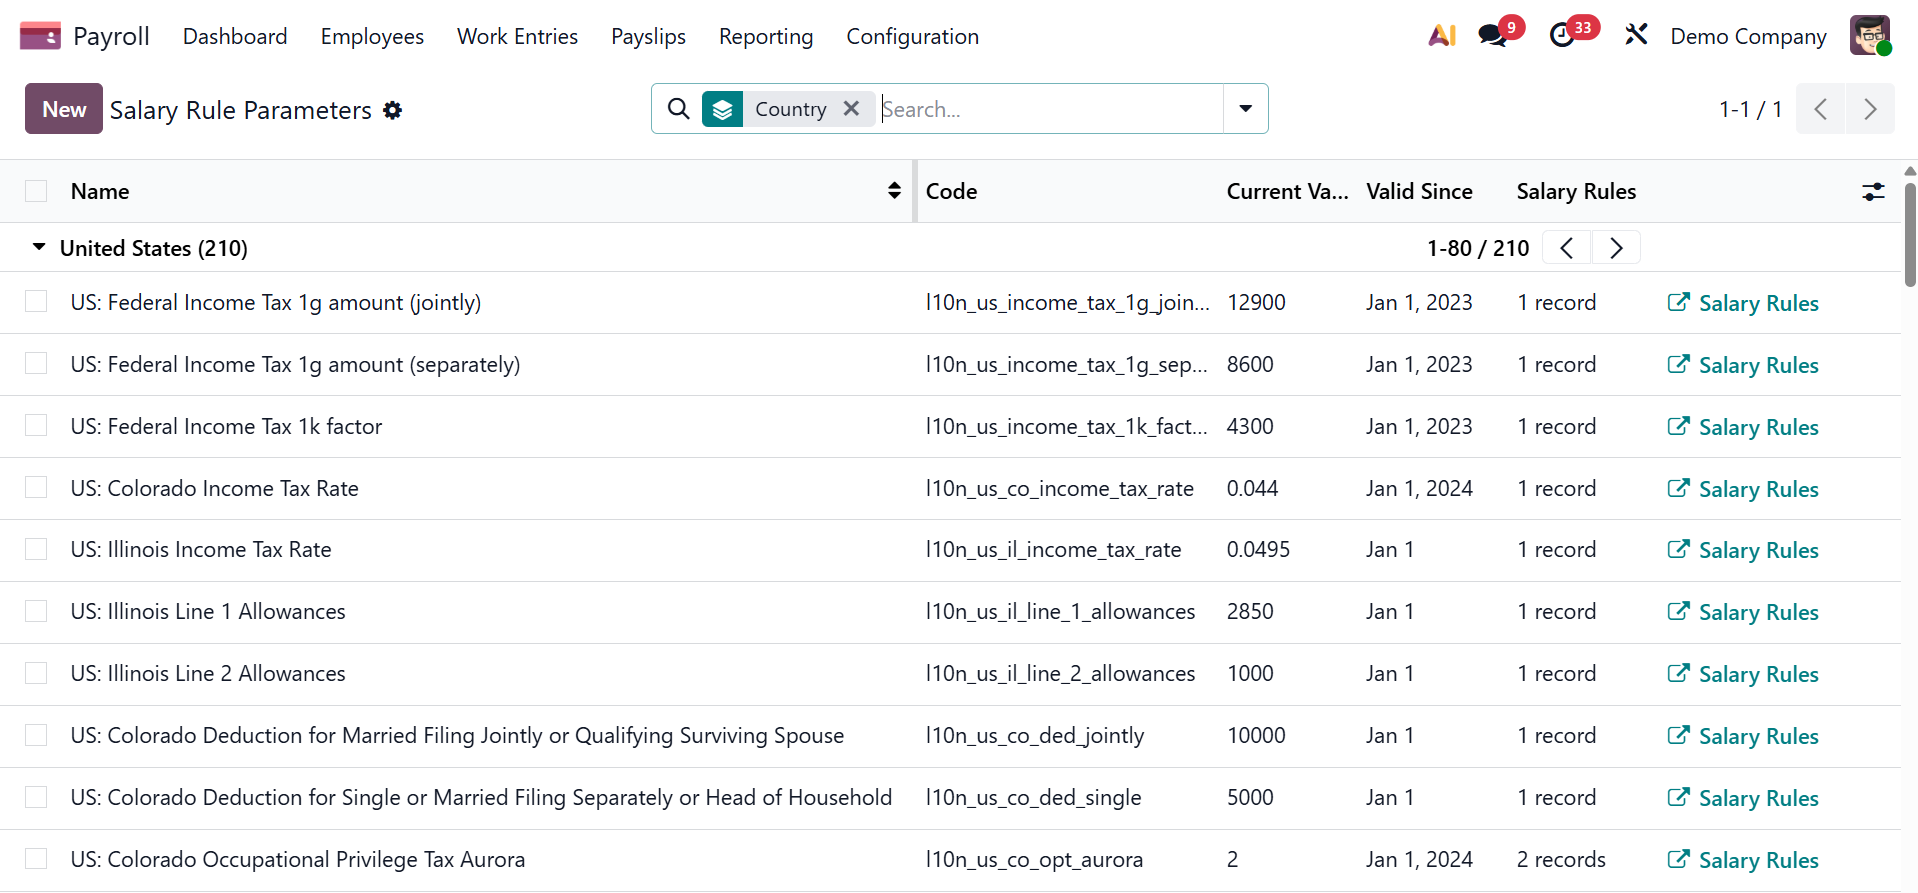
Rule Parameters
To adjust various rule parameters, select the Rule settings option under the Configuration tab. The Salary Rule Parameters box contains the code and name of each salary rule parameter. On the Salary Rule Parameters page, click the New icon to add a new rule parameter.
Apply the rule parameter's title to the Name option on the open screen. To incorporate the salary parameter, add code to the salary rule. Once these details are established, you can add more details about the salary rule parameter in the Description tab. Using the New option, you can add a new rule parameter.
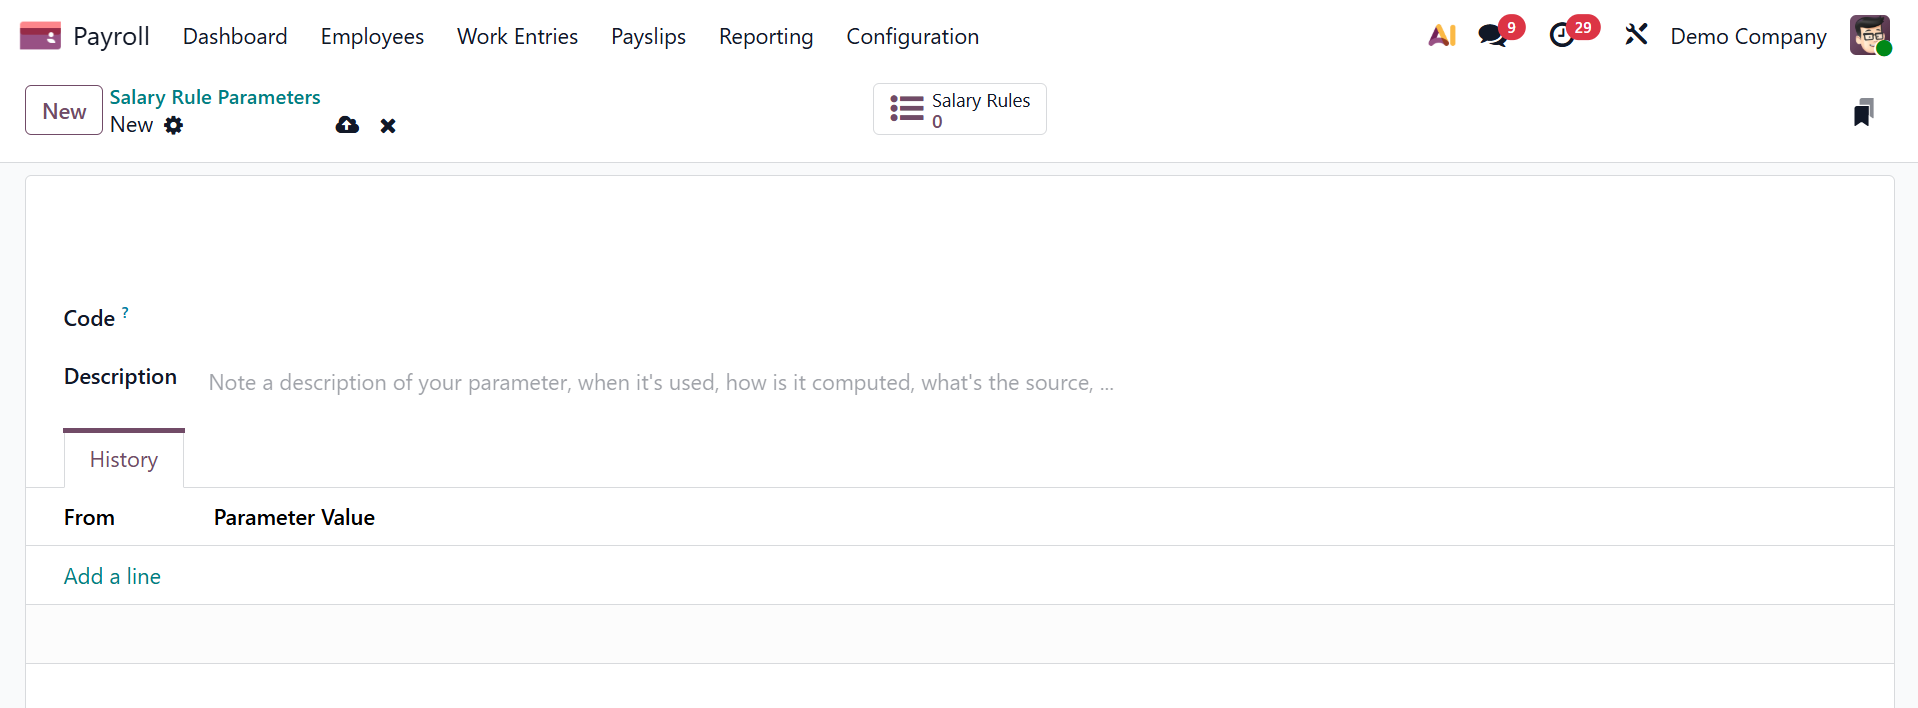
Here, provide the code and description regarding the rule parameter. Under the history, using the add a line option, you can add the rule parameter accordingly.
Rule Categories
Rule Categories are used in the Odoo Payroll module to organize salary rules into logical groups, such as Basic, Allowances, Deductions, or Net. This makes it easier to understand and manage payslip computations, reporting, and compensation structure organization.

The New page helps you to add a new salary rule category, as in the image below. To create a new form, go for the New option.

Here, provide the name, code, parent, country, and related notes for the salary rule categories in the provided space and save the details.
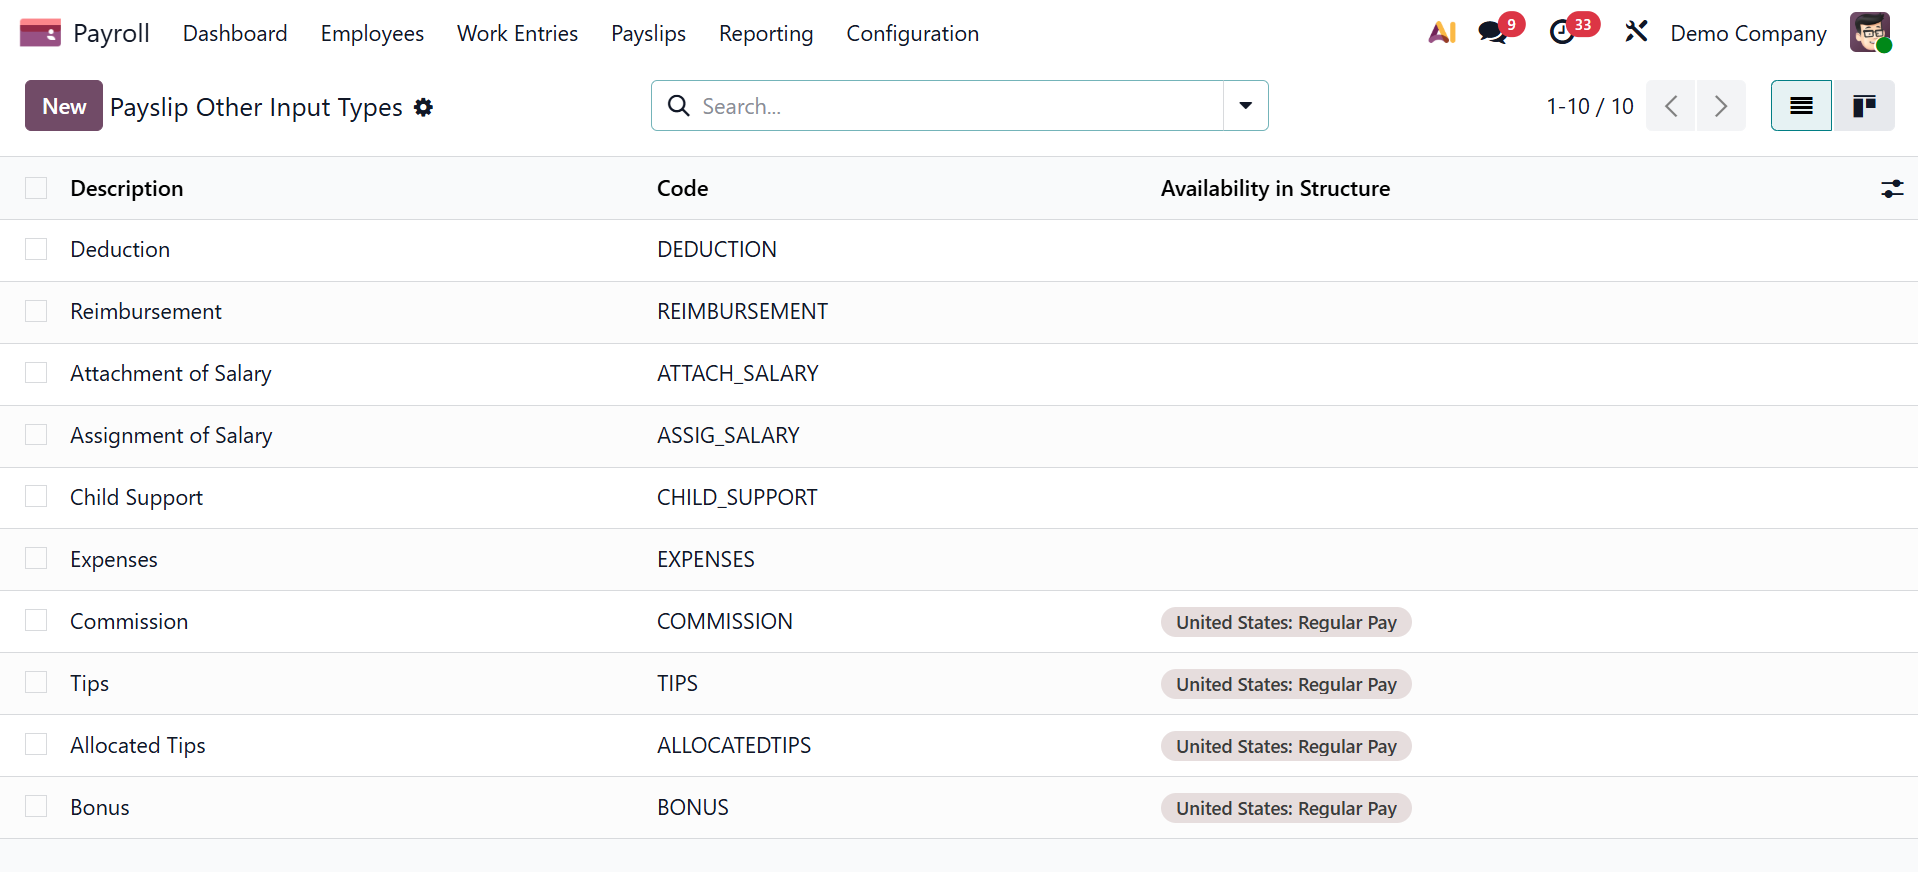
Other input types
Users can designate a payslip input type using the Other Input Types tab under Configuration. The Payslip Other Input Types box's List view allows you to inspect the Code, Description, and Availability in Structure independently. Click the Action icon after choosing the desired input types if you need to export the payslip input type. After selecting the required input types in Action, you can select the Export option.
Clicking the New button allows us to create a new payslip with a variety of input types. Consult the salary rule's description and code.
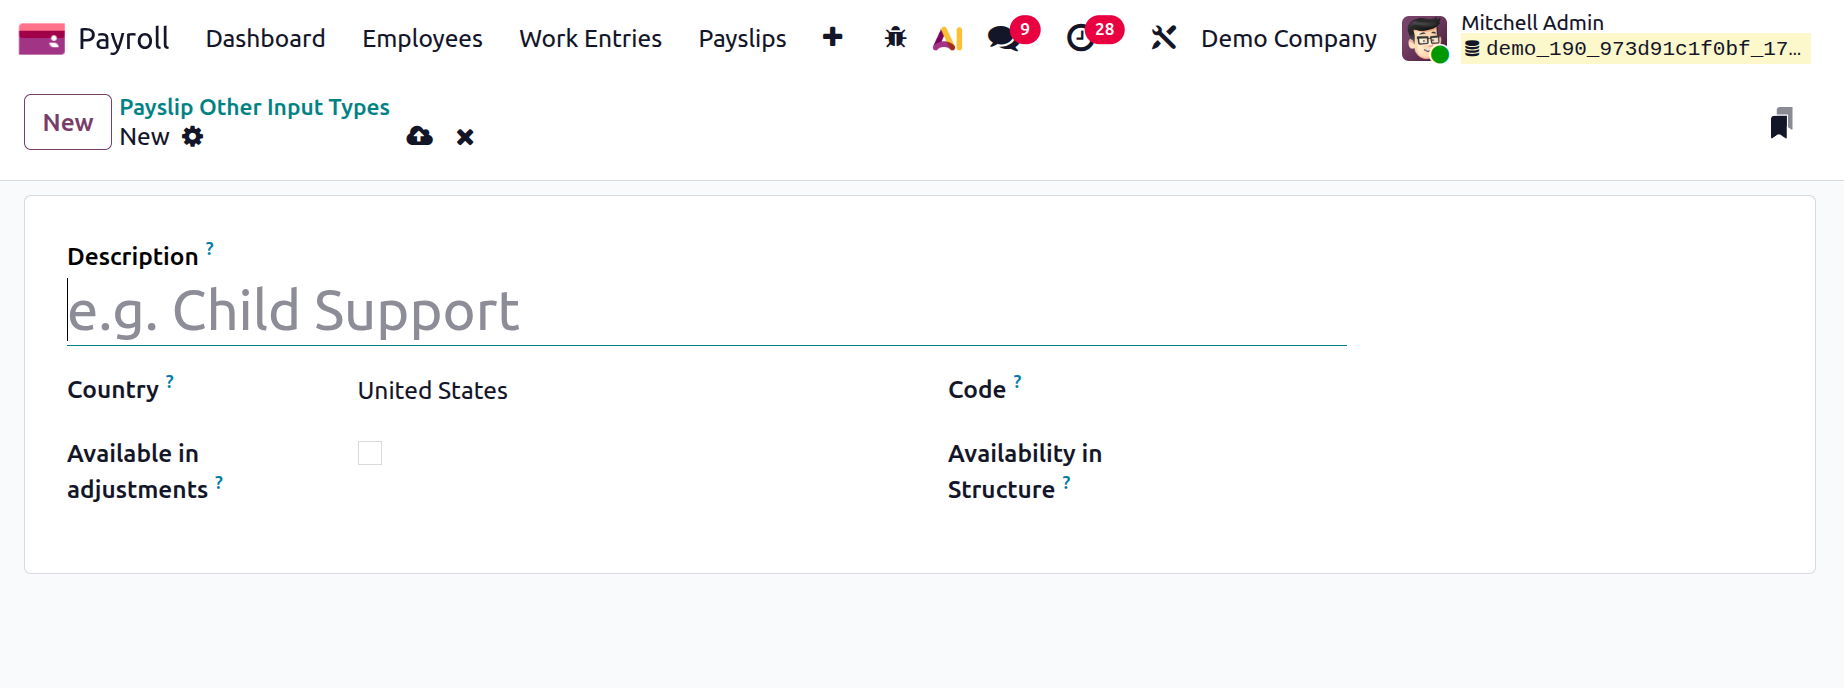
Give a description, and the available in adjustments option. Next, provide the code and its availability in the structure. The input is accessible in every structure if the availability is configured in the structure.
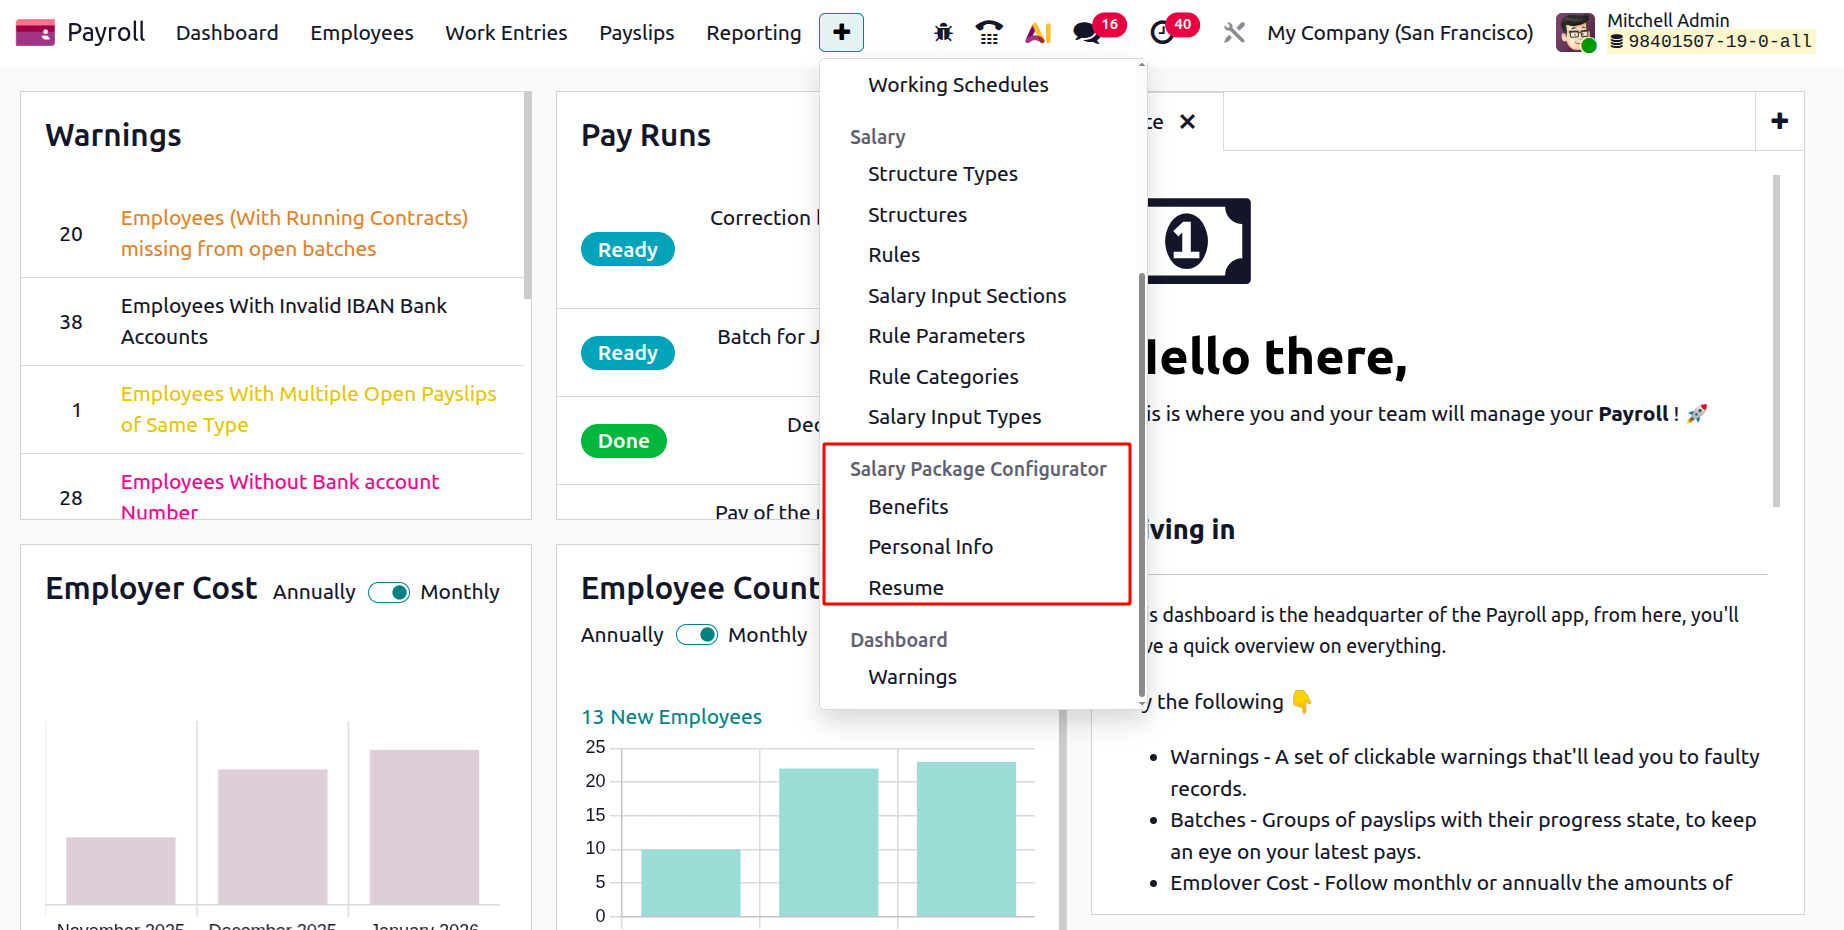
Salary Package Configurator
We may manage the resume, benefits, and personal data on the Configuration page, which is located beneath the Salary Package Configurator. Now let's review each detail separately.
Benefits
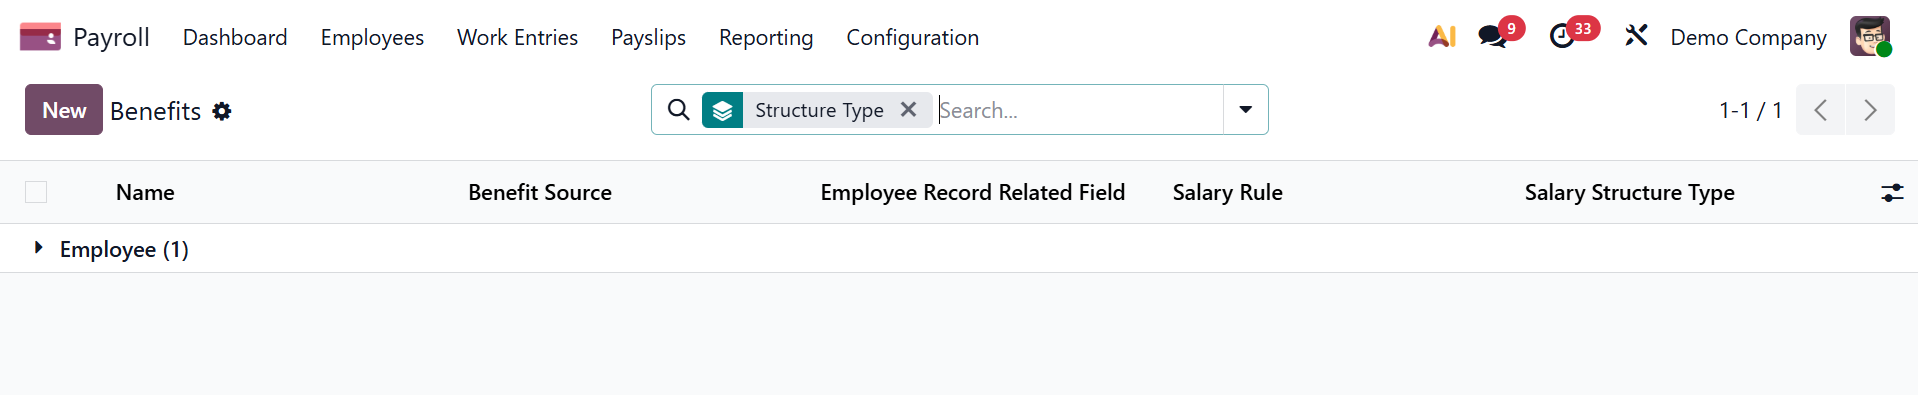
The Salary Package Configuration part of Configuration contains the Benefits menu. The perks panel allows you to put up additional compensation perks. Name, Benefits field, and Salary Structure Type are examples of configured advantages. We can designate a new benefit by choosing the New icon.
It is necessary to input the Benefits Name in the visible window. The Cost field should include both the contract field linked to an advantage's advantage and the contract field linked to an advantage's cost. You can also choose from a variety of benefit sources, including monthly cash benefits, non-monetary benefits, monthly rewards in kind, and more.
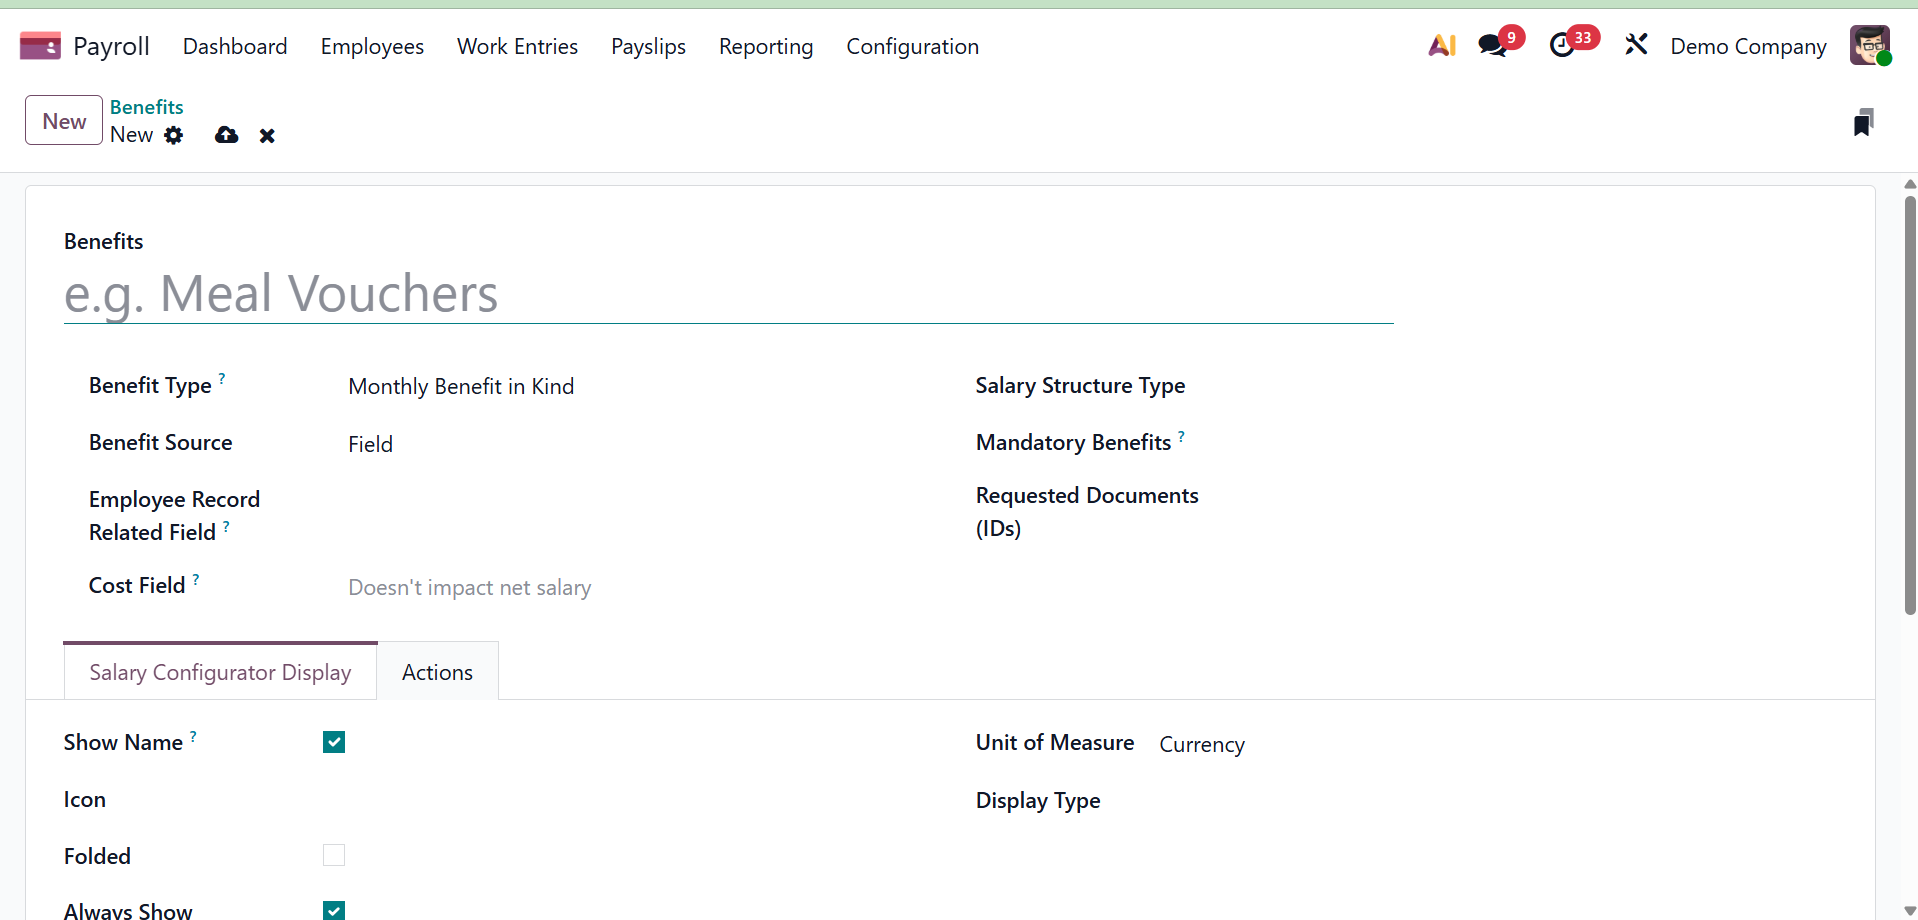
The next option is to select between the Employee and Worker Salary Structure Types. The required benefits option and the requested documentation are located below that.
Requested Documents: From the drop-down menu, choose any document that must be presented in order to receive this benefit.
Mandatory Benefits: Choose the benefit that is necessary for the employee to receive this particular benefit using the drop-down menu.
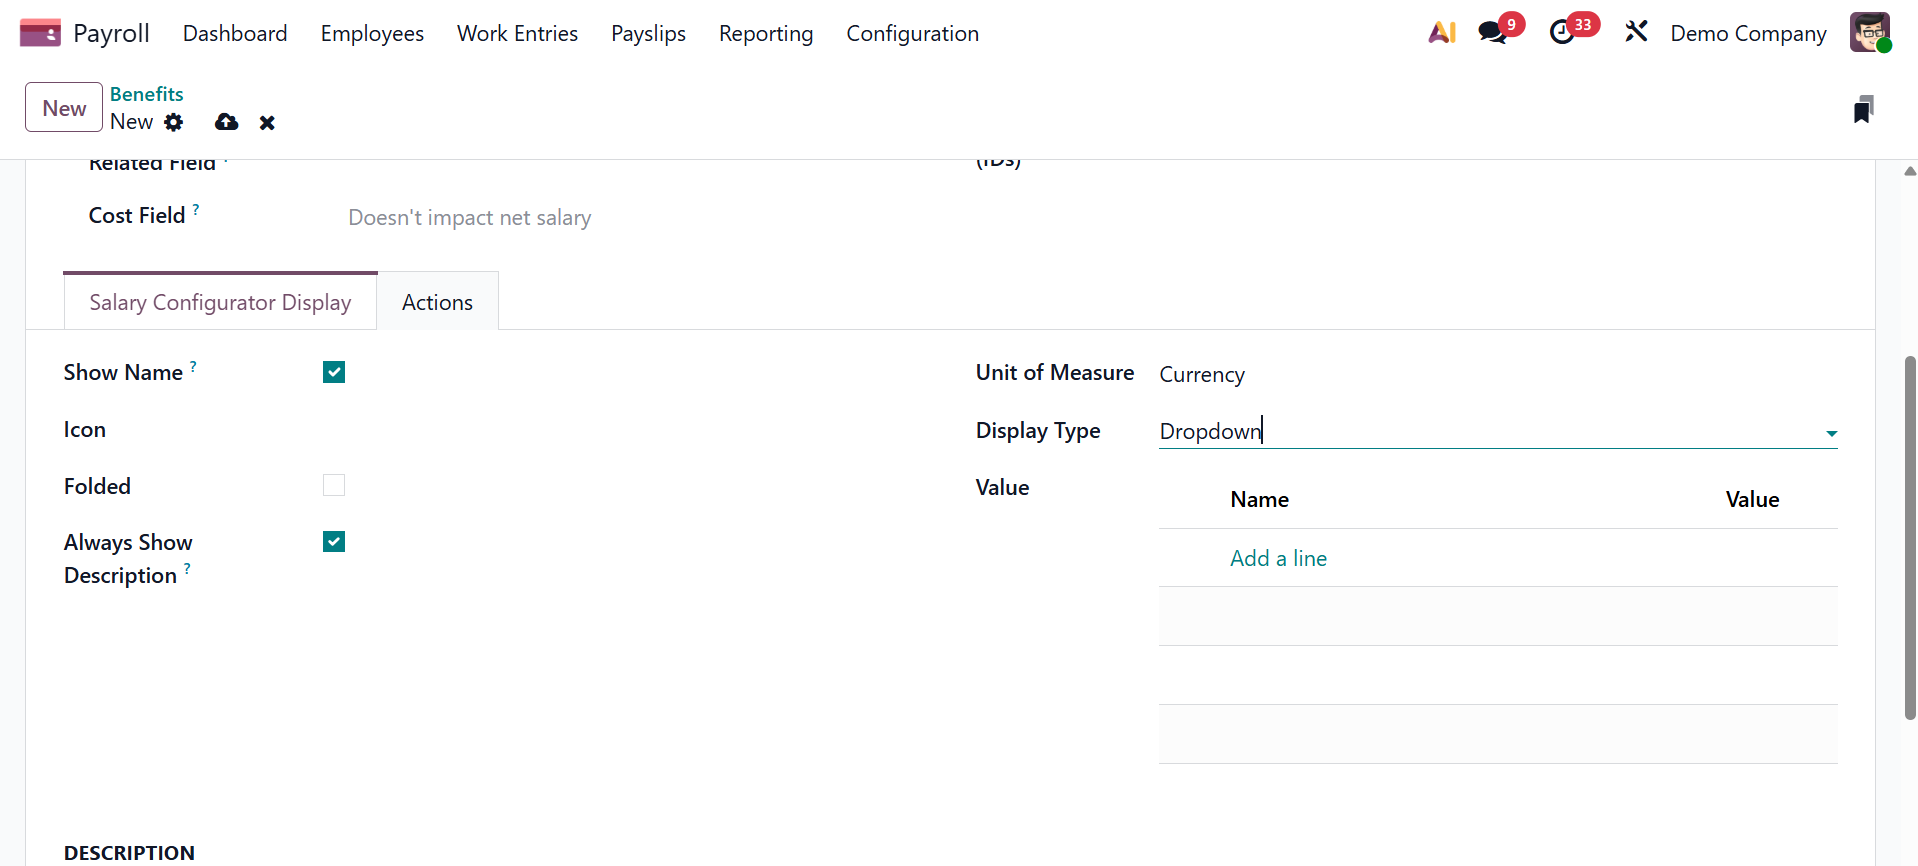
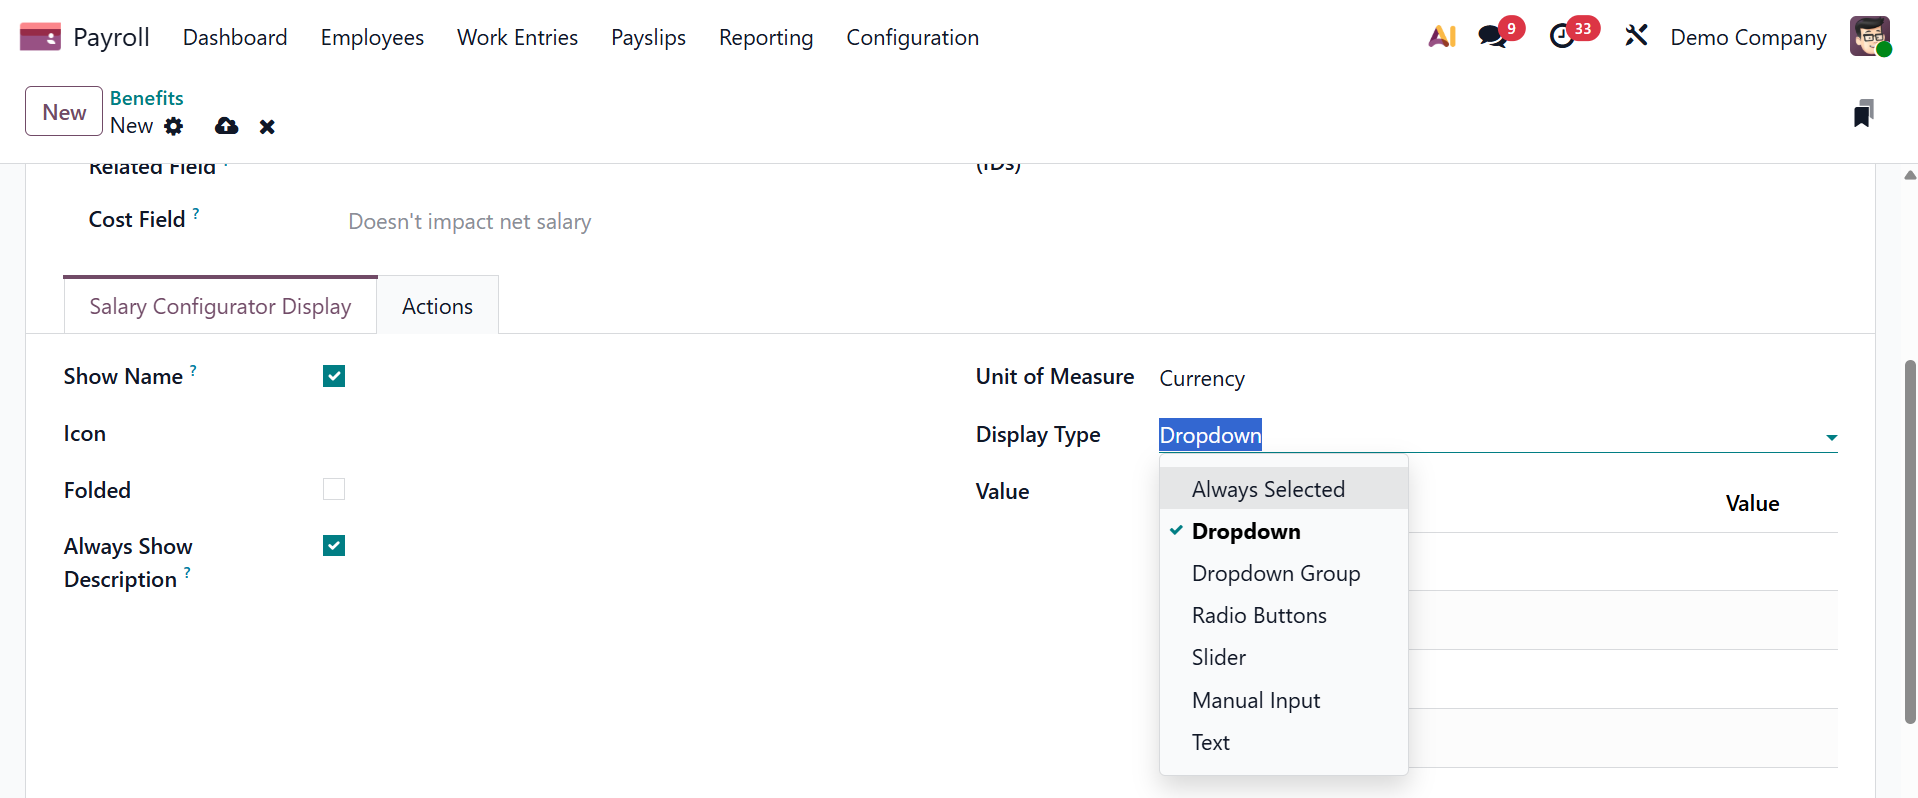
You must add an icon to the benefit once the type has been applied. We can later designate Currency, Days, and Percentage as the units of measurement for convenience. You can activate the show name option, icon, folded, and always show description under the salary configurator display. Show Name: To make the benefit name show up in the compensation package configurator, check the corresponding box. Choose the display type for this benefit from the drop-down menu. Always Selected, Dropdown, Dropdown Group, Slider, Radio Buttons, Manual Input, and Text are the available options. This field is necessary.
Folded: Check the box if the benefit should be buried or folded since it depends on another benefit option.
The benefits of an action can be summed up as an email, meeting, call, notification, etc. Once the employee chooses the reward, the activity type will be generated automatically.
Users can enable or disable the beneficial criterion in the Folded field. Additionally, offer options for display types like Text, Slider, Dropdown, and others. For an added benefit, you can include necessary documents in the desired documents section. Users have the ability to choose a template before signing the employee benefit. Near that, you have the Actions tab, as shown below.
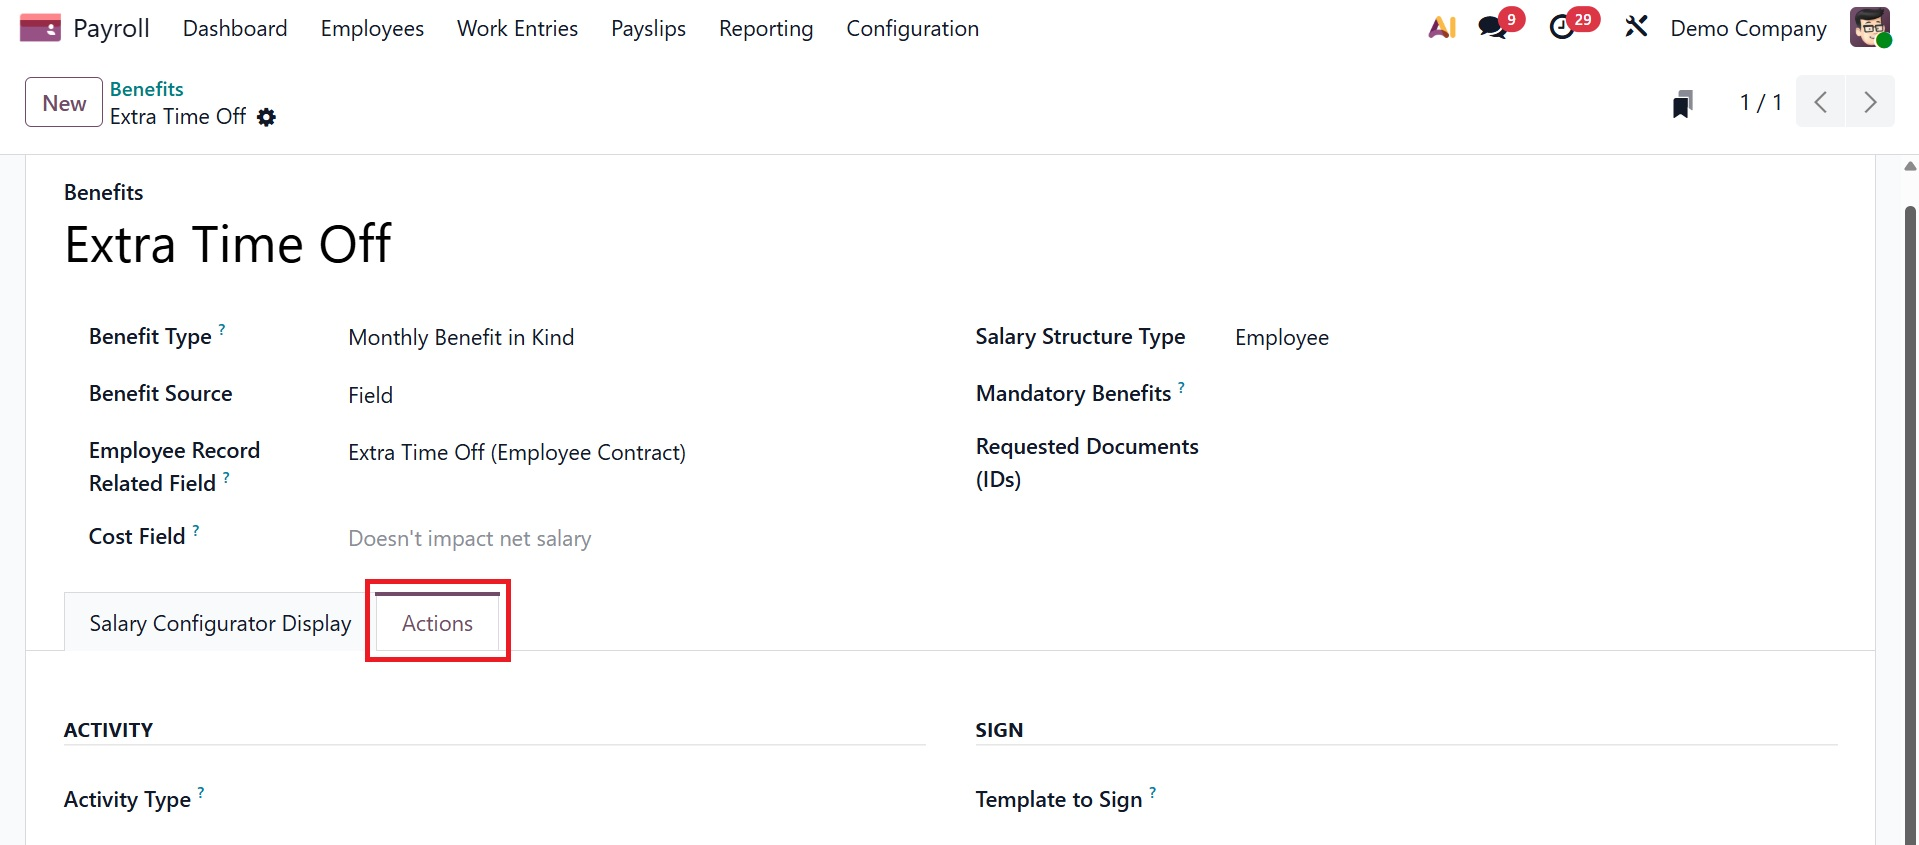
Here, you have the options like, activity type and template to sign as seen above.
Odoo 19 Payroll automatically saves all of these facts.
Personal Info
By choosing the Personal Info menu in Configuration, it is simple to understand the personal information linked to each employee's paystubs. We have individual access to all of the predefined personal data in the Personal Info box, including Name, Salary Structure Type, and Related field. Once you click the New button, describing a new record is simple.
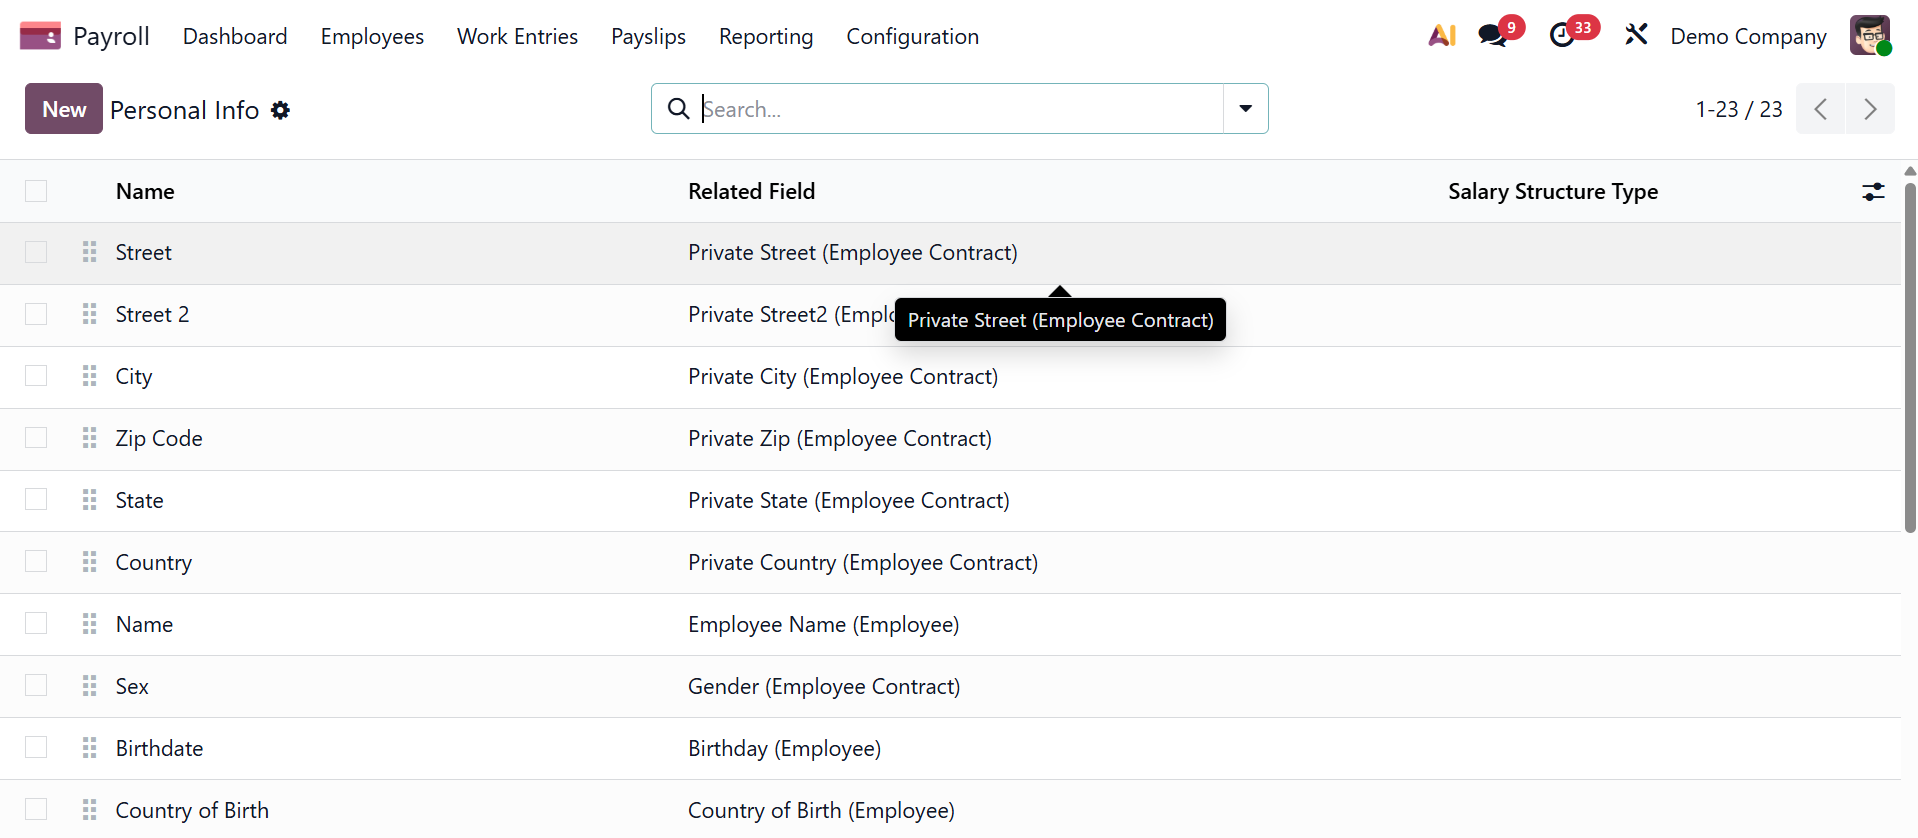
Enter personal information and the people it applies to in the open window. applied in the field, such as a bank account, a worker, and so forth. In the Related area, users can additionally enter the field name for personal information. You can also enter a range of personal information, such as your address, private papers, present circumstances, and more.
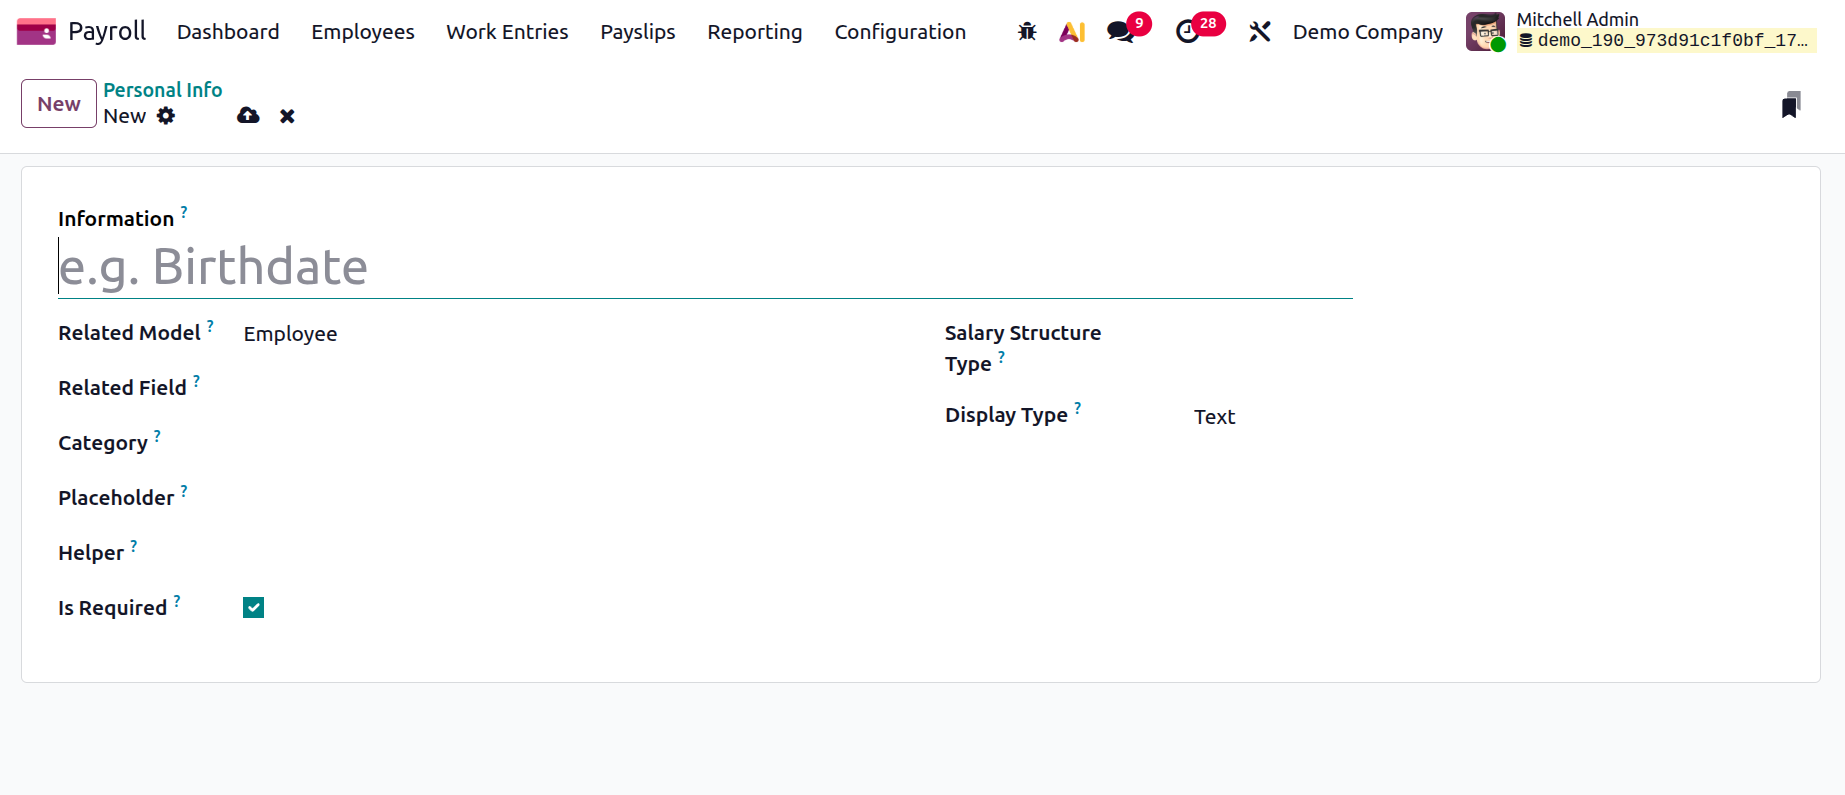
Next, select Worker and Employee as the Salary Structure Types for your personal information. You may also bring up the Placeholder and Helper in relation to employee personal information.
Users can occupy the Main Panel and Side Panel for Personal Information. The Display Type may then be listed as Radio, Email, Text, etc. As a result, using personal data in Odoo 19 is simple.
Resume
After selecting the Resume option on the Configuration tab, we may attach various resume kinds to a pay structure. All newly constructed resume information, including Name, Value Type, Code, and Salary Structure Type, is defined in the Resume window. We can create a new résumé by selecting the New icon.
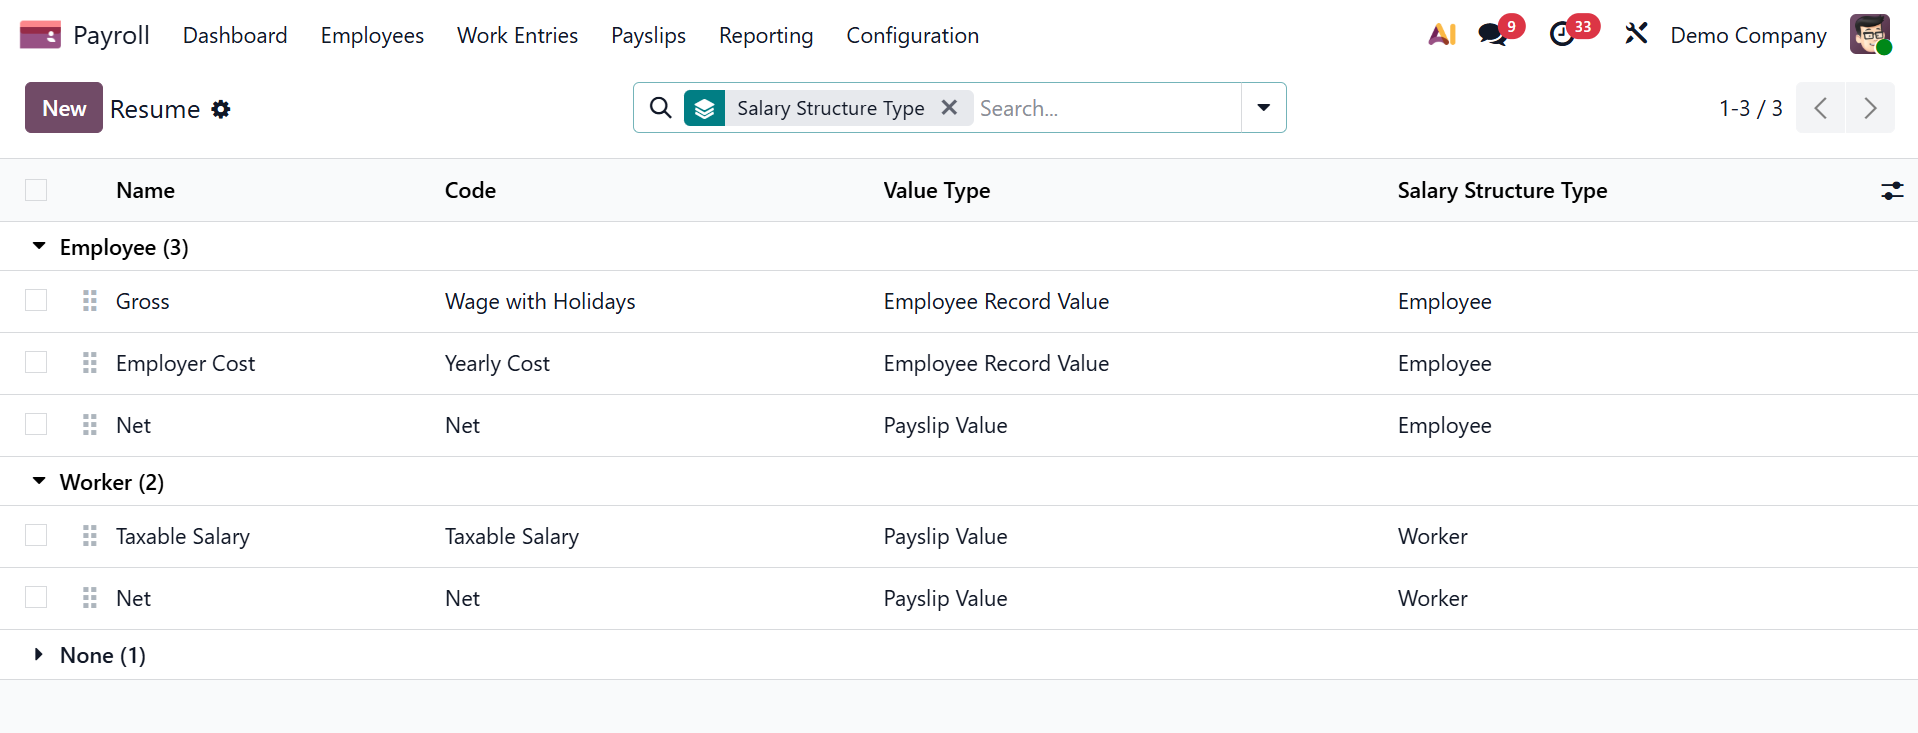
Mention the detailed synopsis in the Information box of the open screen. You must select the category—Monthly Salary, Annual Benefits, etc.—that best fits your résumé. Next, on the resume, choose your Salary Structure Type.

Turn on the Impacts Monthly Total option to view monthly expenses on the resume. Select your preferred Unit of Measurement going forward, such as days, percentages, etc. Moreover, a Value Type can be modified to be Fixed Value, Monthly Total, Payslip value, and more. The user can add a specific amount based on the value they have chosen after selecting the value type.
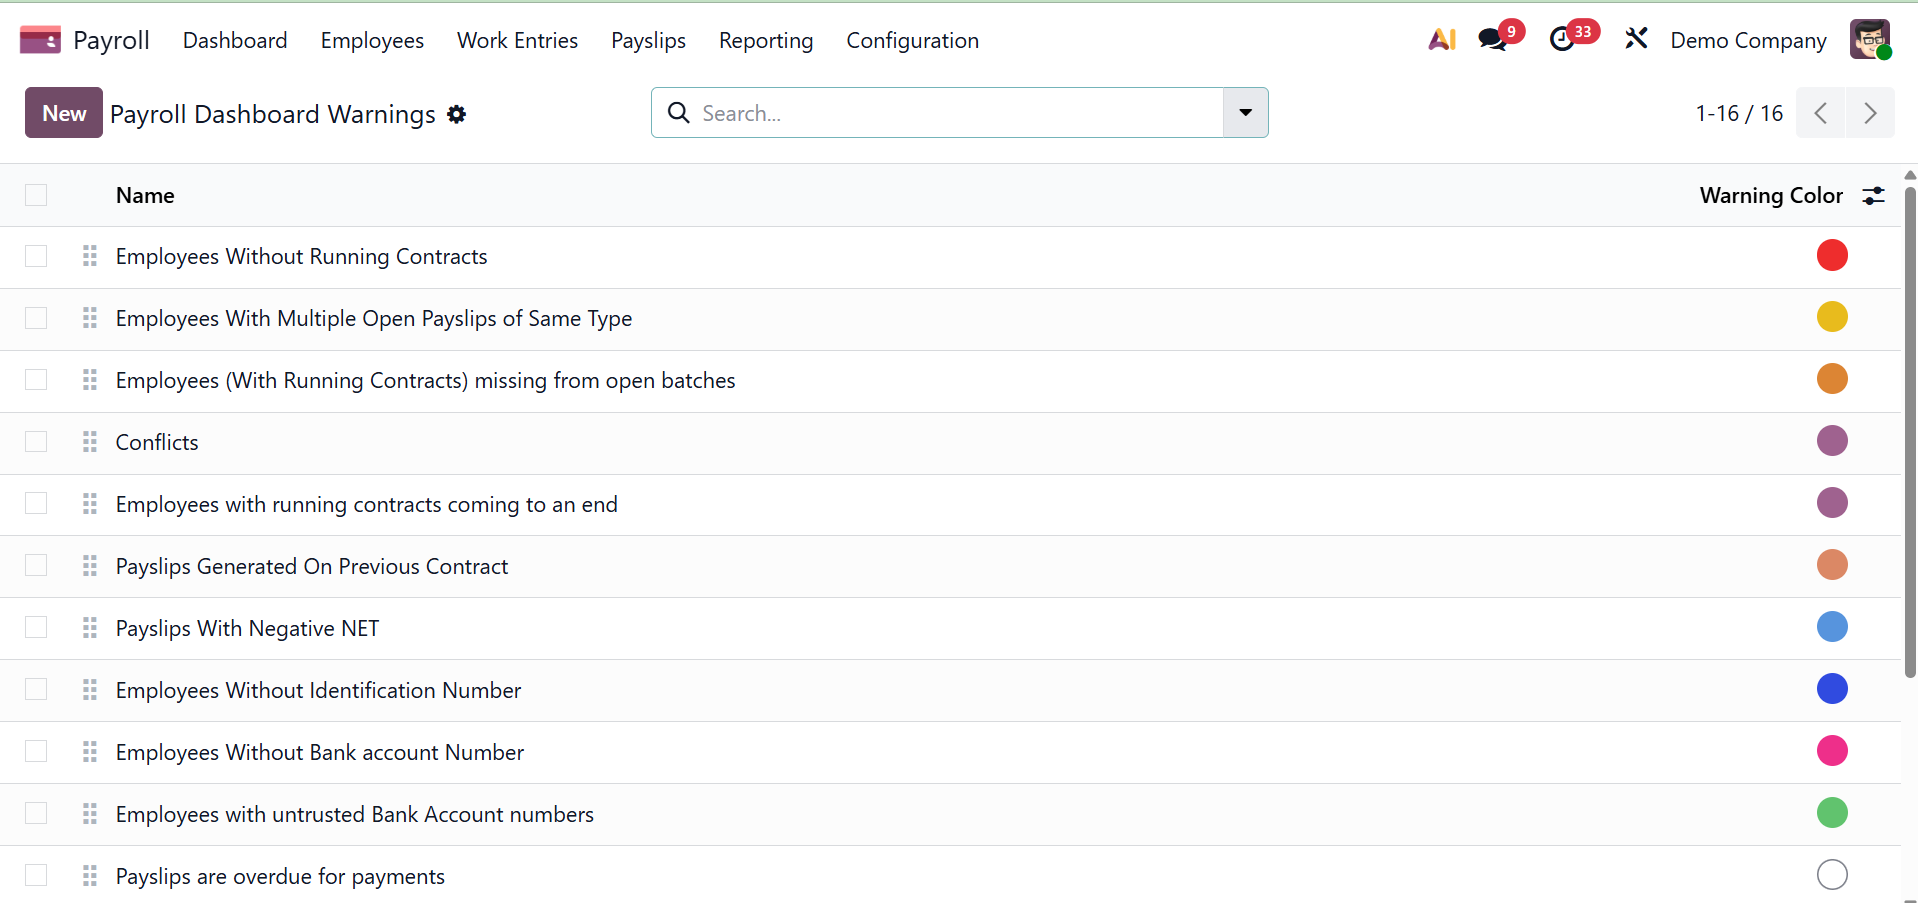
Warnings
The "Warnings" section is where users can find any important warnings about employment contracts.