Effective time tracking is essential for improving productivity, managing projects, and ensuring accurate billing. The Odoo 19 Timesheet module provides an easy-to-use solution for recording work hours, tracking tasks, validating timesheets, and generating detailed reports. With enhanced features and seamless integration with other Odoo applications, businesses can efficiently manage employee activities and streamline daily operations. In this blog, we will explore how to get started with the Odoo 19 Timesheet module, including timesheet management, reporting, invoicing policies, and configuration settings.

Timesheets Menu
When users open the Timesheet module, they are directed to the “My Timesheets” dashboard, which displays all previously recorded timesheet entries in a grid format. This interface provides an overview of completed activities such as projects, tasks, meetings, and other work-related operations along with the total tracked hours associated with each activity.
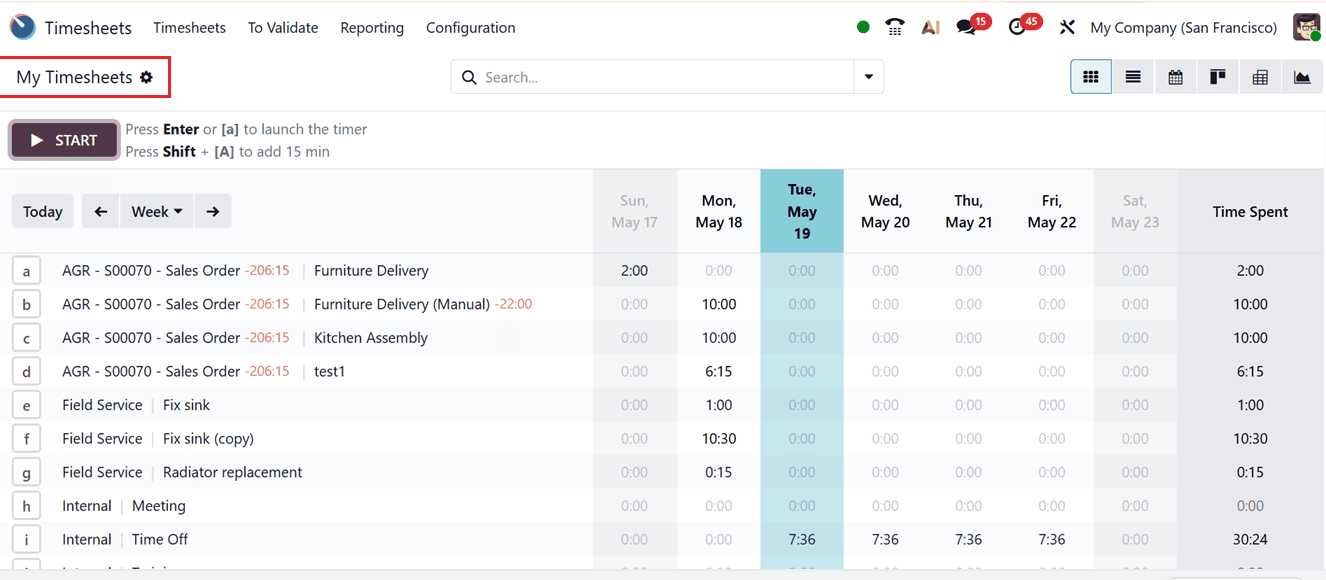
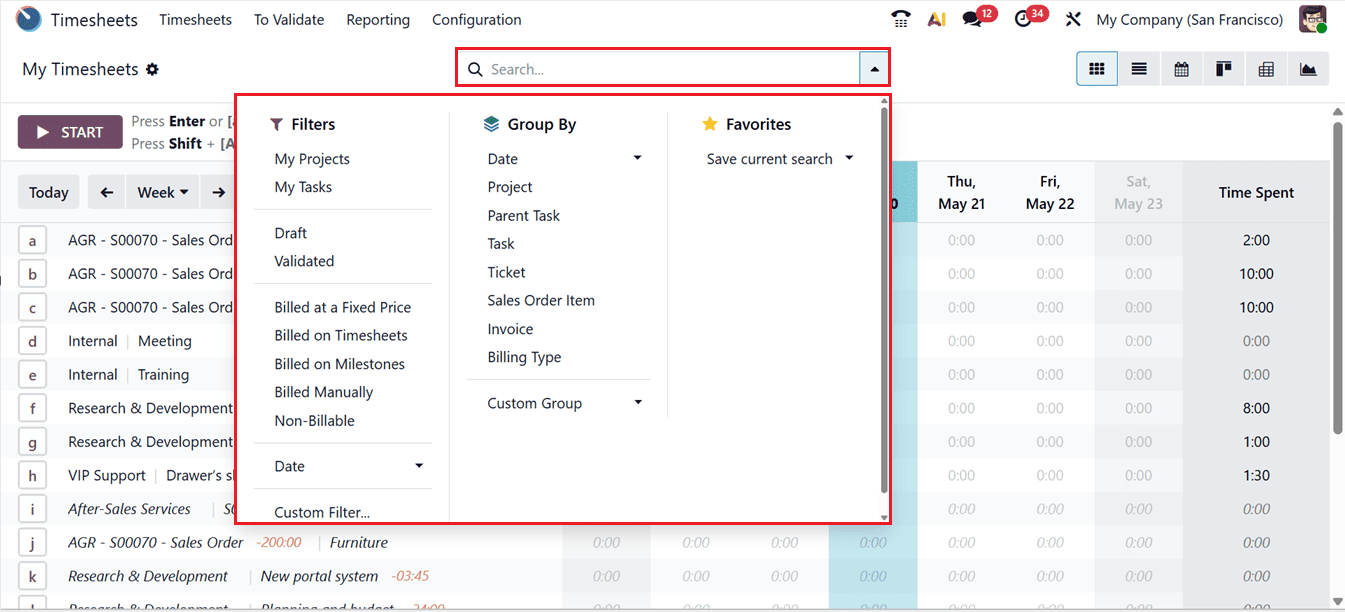
To review the amount of time spent on various operations during a particular week or month, you can select the appropriate time period directly from the dashboard. The module also supports multiple visualization modes including Kanban, List, Pivot, and Graph views. In addition, the advanced search bar includes predefined and customizable Filters and Group By options that simplify timesheet organization and analysis.
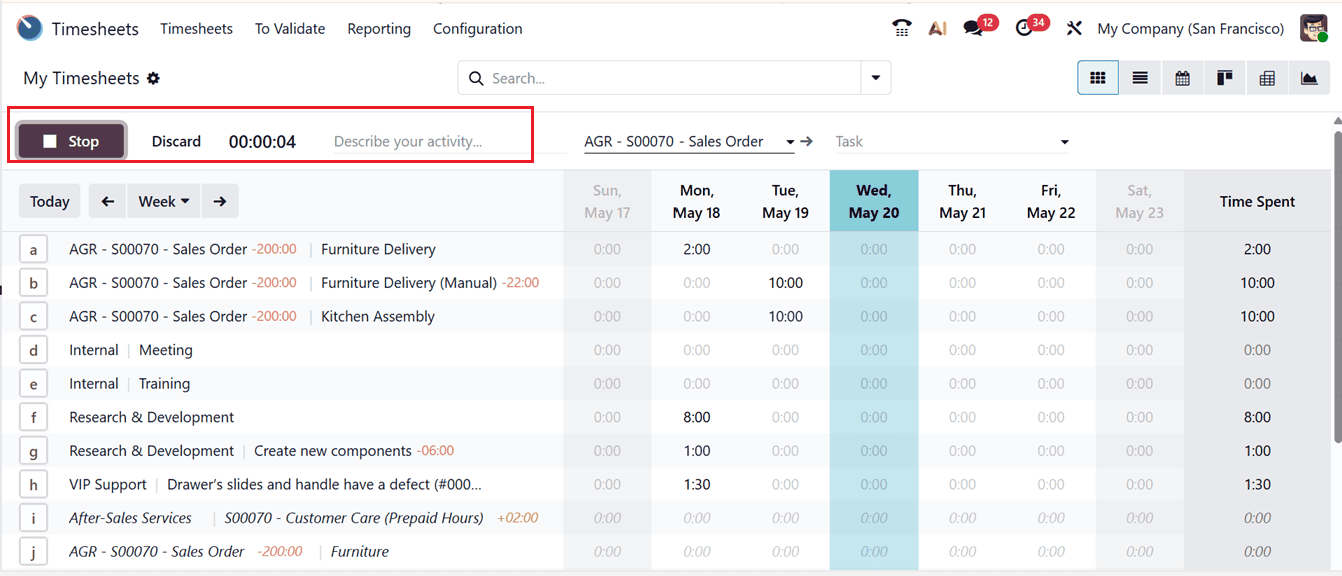
Then, you can begin tracking time for a project or task by clicking the ‘Start’ button. Once activated, additional fields appear where details such as the project name, assignment, and activity information can be entered. The built-in timer automatically calculates the duration spent on the task and can later be stopped using the ‘Stop’ button, as illustrated in the screenshot below.
You can also have the flexibility to manually adjust recorded hours simply by selecting the corresponding time entry field. Clicking on a specific timesheet entry opens the detailed task form associated with that activity.
A separate window then appears containing complete details such as the Date, Project, Task, Description, and Hours Spent. New timesheet entries can be created directly from the main dashboard by clicking the ‘Add a Line’ option.
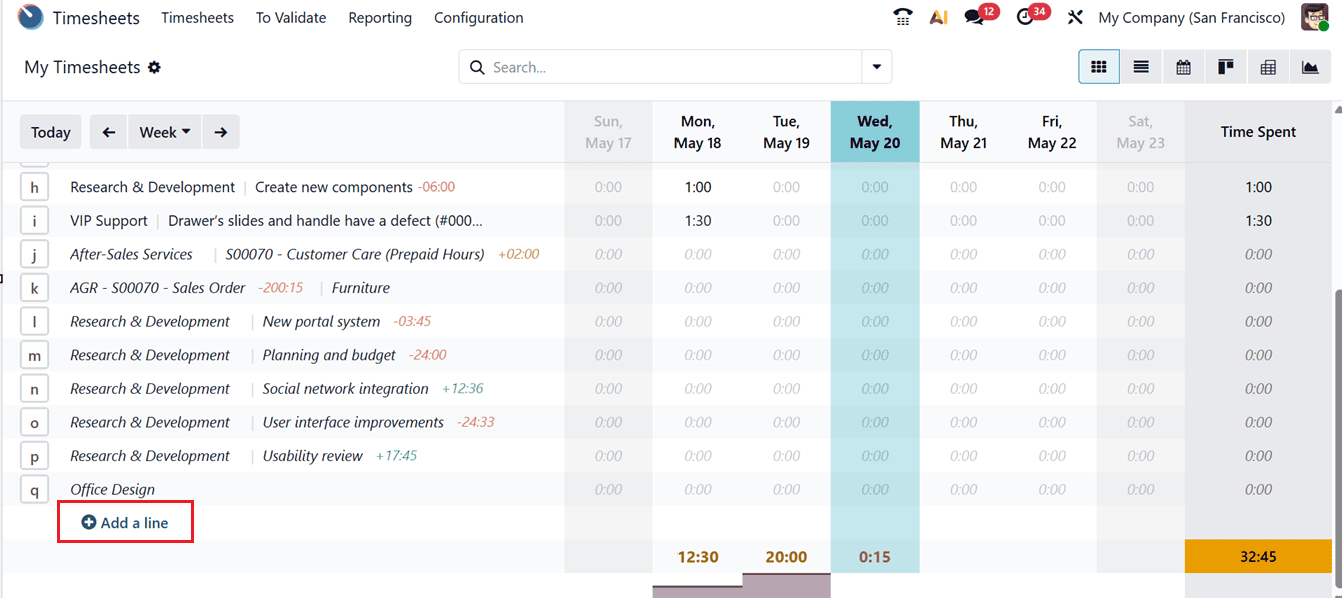
Selecting the ‘Add a Line’ button opens a pop-up window where you can enter information including the related Project, Task, Sales Order Item, Date, and Time Spent, as shown in the screenshot below. This functionality supports efficient timesheet-based billing and service tracking.
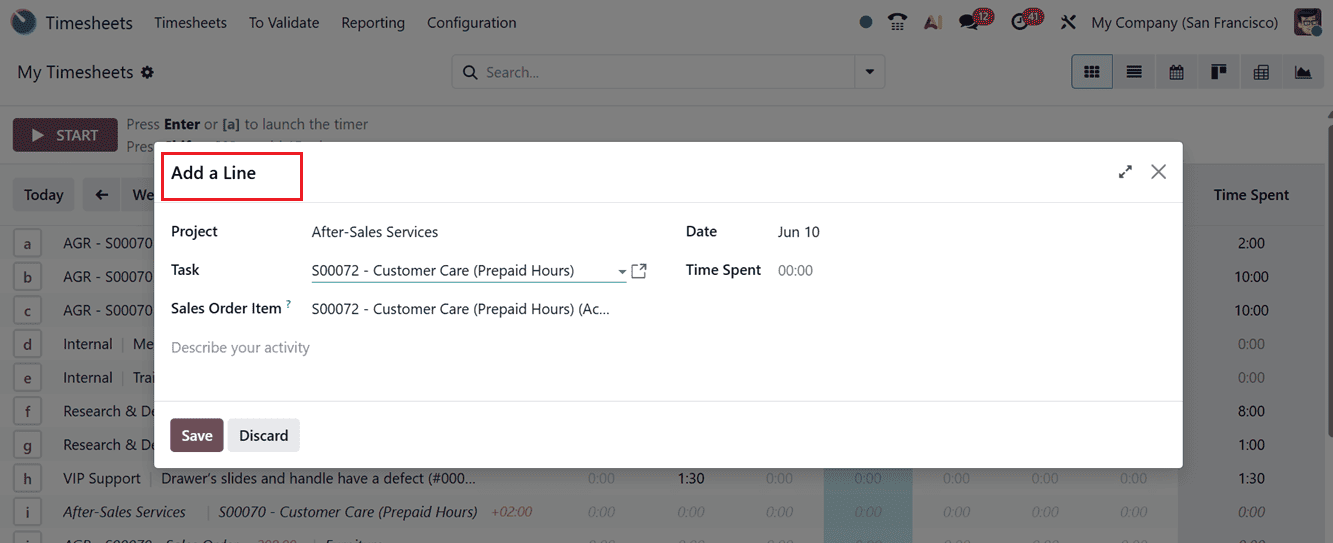
After entering the required information, users can save the entry and open the timesheet form to modify or expand additional details.
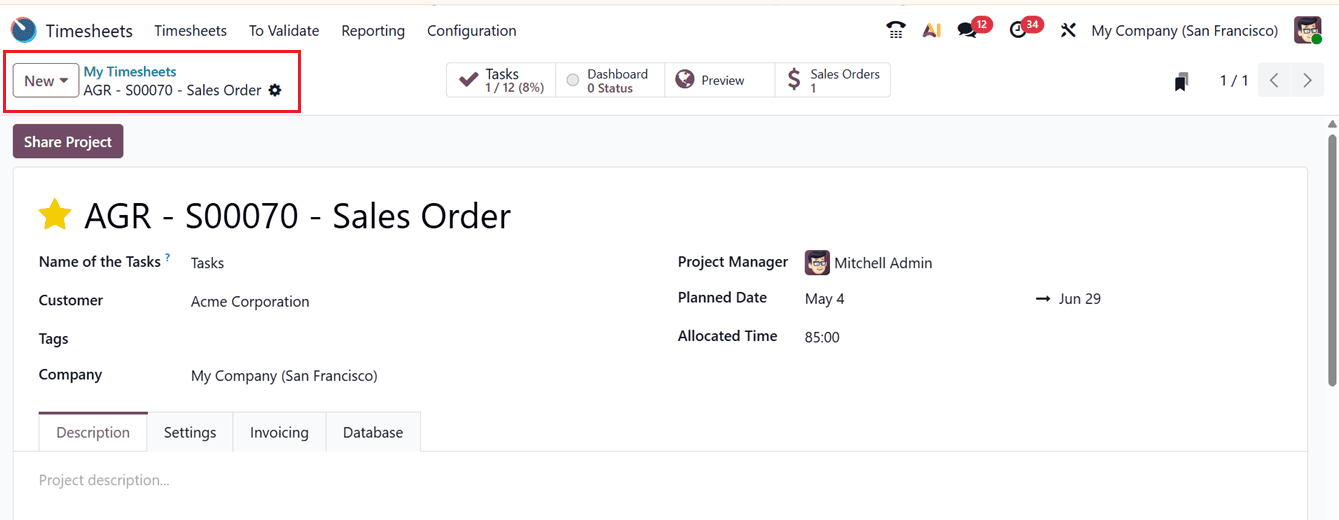
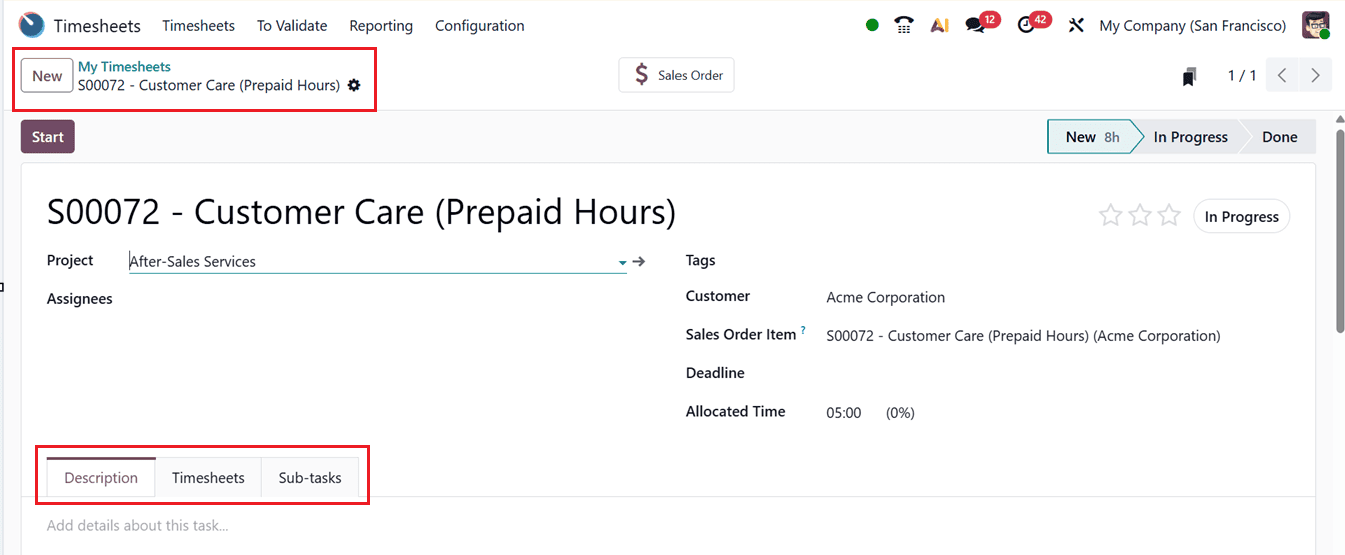
The timesheet form allows users to edit information such as the timesheet title, project, milestone, assigned employees, tags, customer details, sales order item, deadline, and allocated time according to the activity requirements, as illustrated in the screenshot below.
All Timesheets
The ‘All Timesheets’ section allows managers to access every timesheet entry recorded across the organization. Similar to the ‘My Timesheets’ dashboard, this view displays all the employees’ timesheet histories together with related projects and tasks, as shown in the screenshot below.
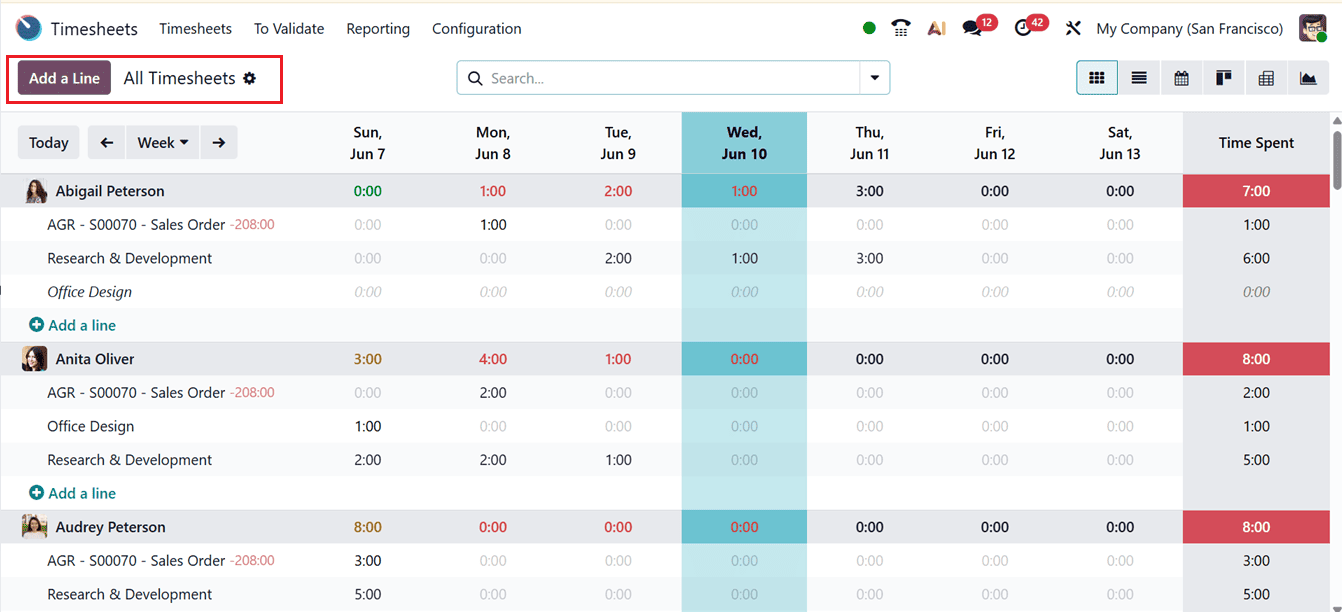
Managers can also create additional entries directly from the dashboard using the ‘Add a Line’ button, following the same process described earlier.
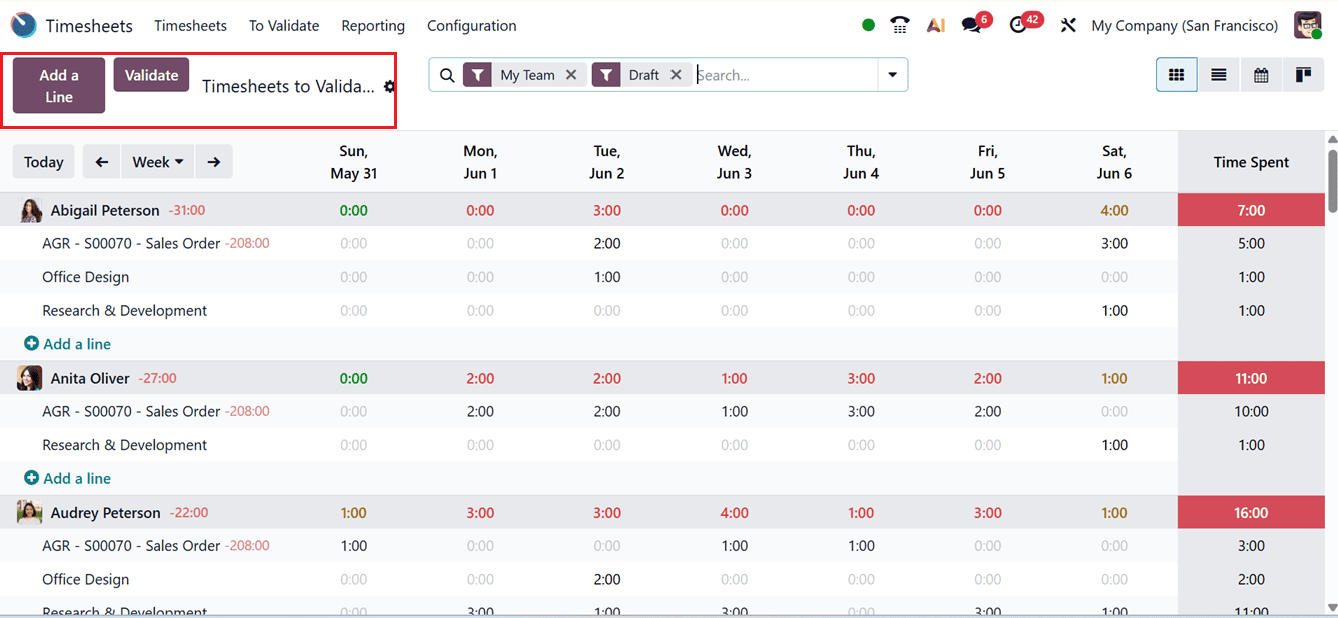
To Validate Menu
In Odoo 19 Timesheets Module, the ‘To Validate’ menu helps managers and approvers review, verify, and approve employee timesheets that are awaiting validation. For employees it serves as a centralized window to track submitted timesheet entries that can be examined before they are officially approved.
This menu contains two sub menu options including; Last Period and All Timesheets.
Last Period
The ‘Last Period’ section displays recently submitted timesheets awaiting validation. Managers can review entries based on daily, weekly, or monthly records, as shown in the screenshot below.
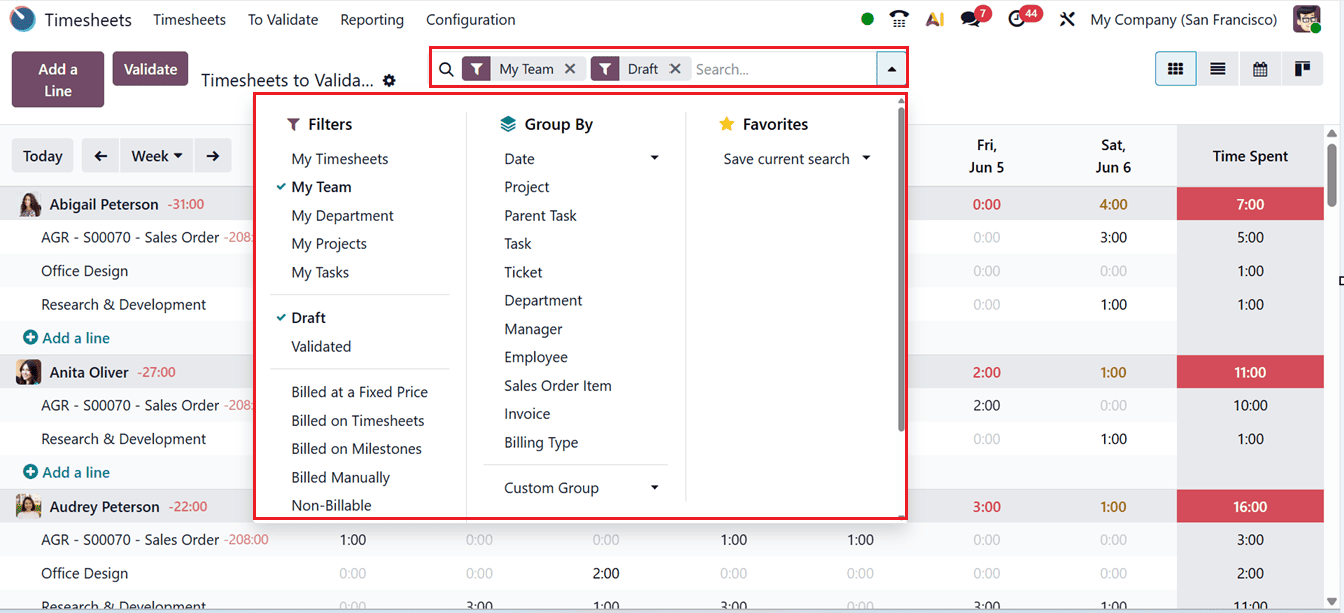
The employees can view their pending timesheets by day, week, or month and access them through various views, including Grid, List, Calendar and Kanban. The menu also provides filtering and grouping options to quickly locate records based on employees, projects, or specific periods.
Additionally, managers can validate individual or multiple timesheets at once using the ‘Validate’ button provided at the top left corner of the window. Then, it also compares logged hours with employee’s expected working hours to ensure accuracy and compliance.
The ‘Add a Line’ button allows managers to create new entries either for the general dashboard or for a specific project or task. Filters and Group By options can also be used to quickly locate required records.
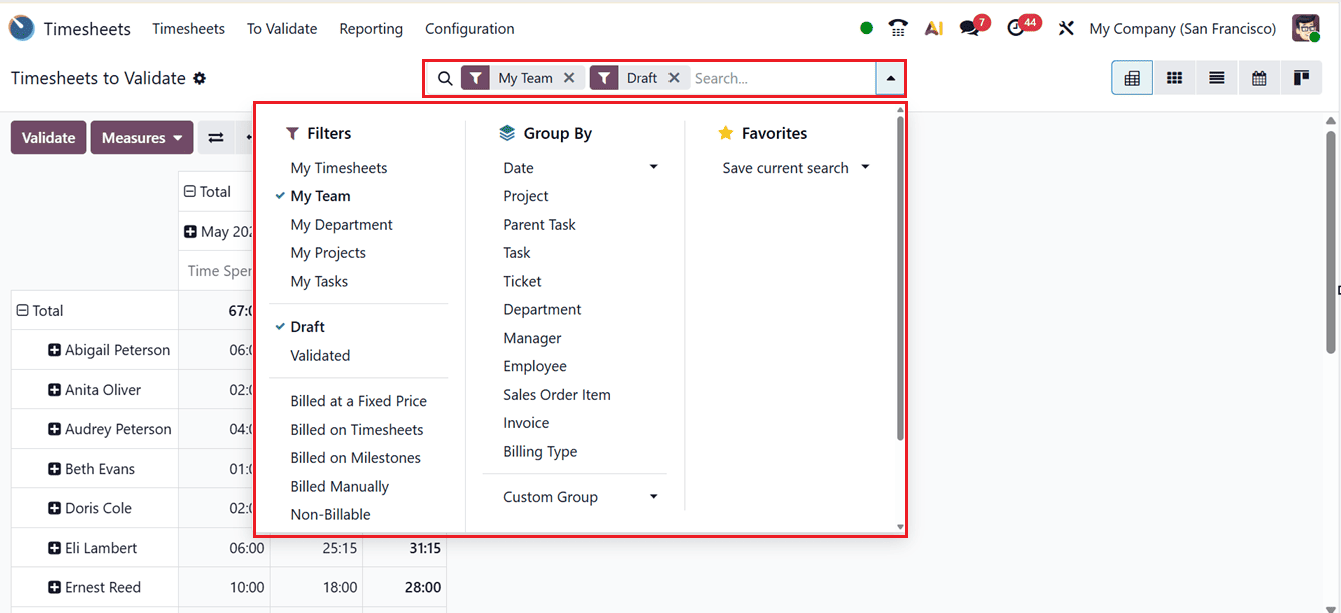
All Timesheets
The ‘All Timesheets’ section under ‘To Validate’ displays all pending timesheets in a Pivot view, as shown in the screenshot below.
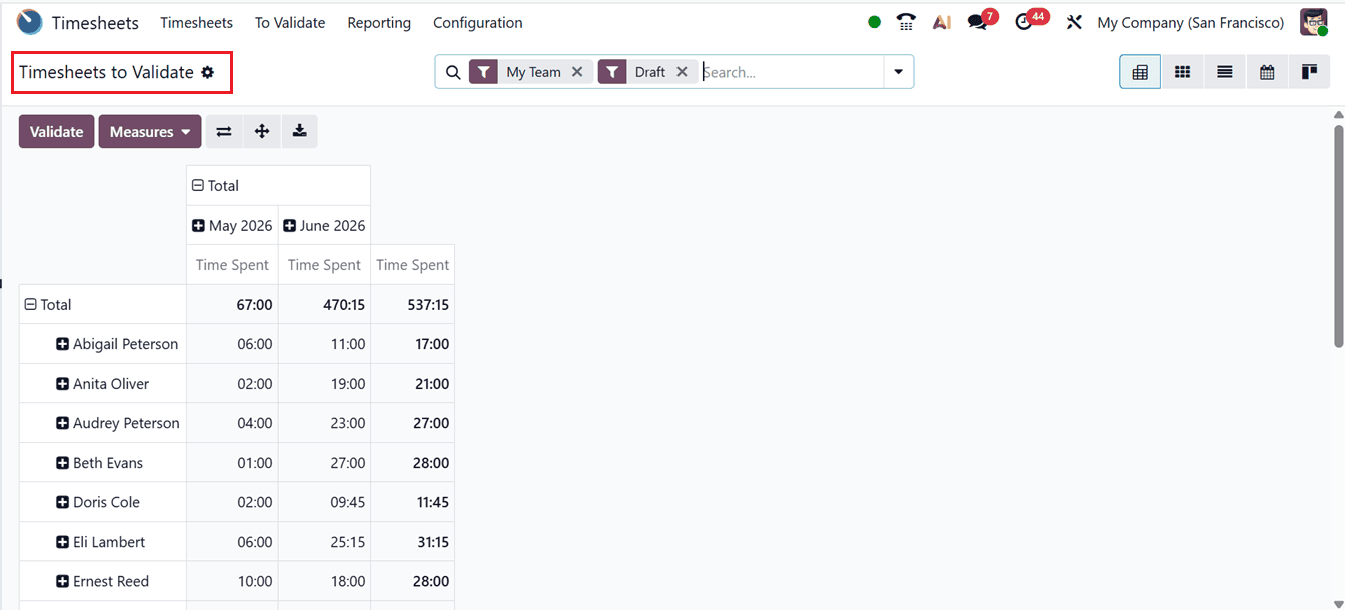
You can switch between Pivot, Grid, Kanban, Calendar and List views according to preference and validate entries using the ‘Validate’ button, as usual.
The view also compares the employee’s worked hours against the required contractual hours while displaying employee names and associated project details. Managers can apply filters to identify specific records and validate them accordingly using the Filters and Grouping options provided in the advanced search bar, as shown in the screenshot below.
Reporting
The ‘Reporting’ menu in the Odoo 19 Timesheets module provides dynamic reporting tools based on Employees, Projects, Tasks, and Billing Types. So, the available reporting options including; Timesheets By Employee, By Project, By Task, By Billing Type and Timesheets/Attendance Analysis.
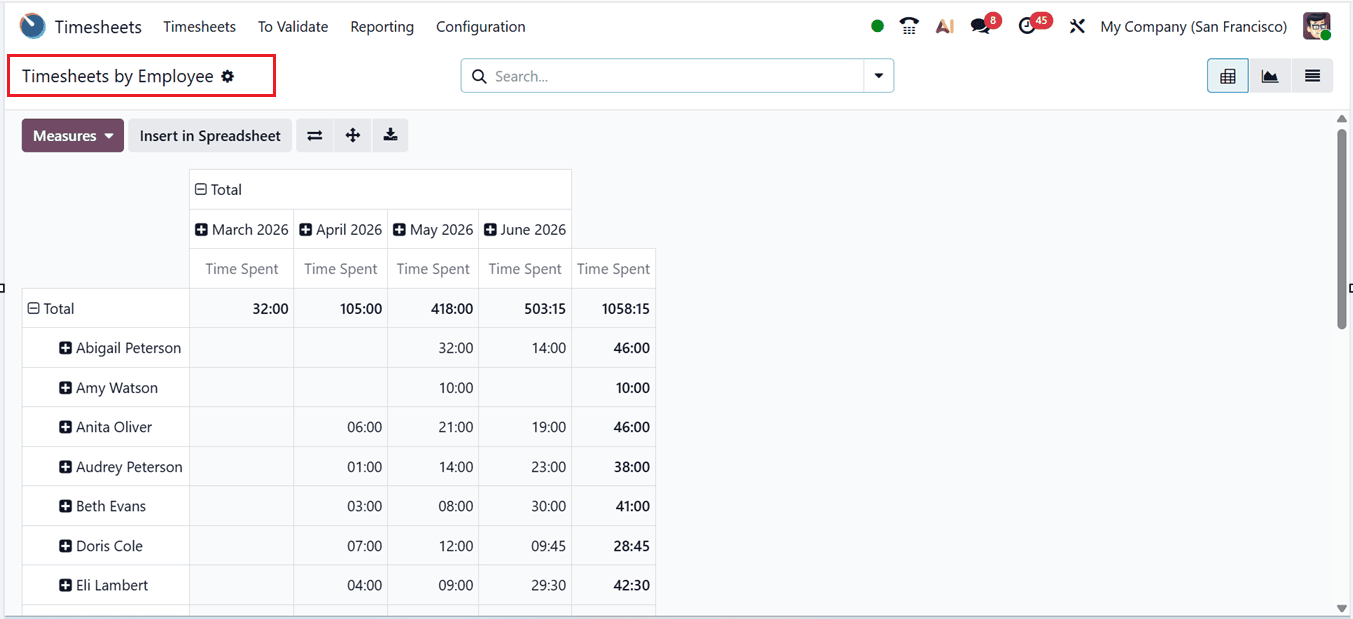
Timesheets By Employee
The ‘By Employee’ reporting option displays a detailed breakdown of timesheets categorized by employees. The Pivot view provides insights into the total hours worked by each employee within selected timeframes, as illustrated in the screenshot provided below.
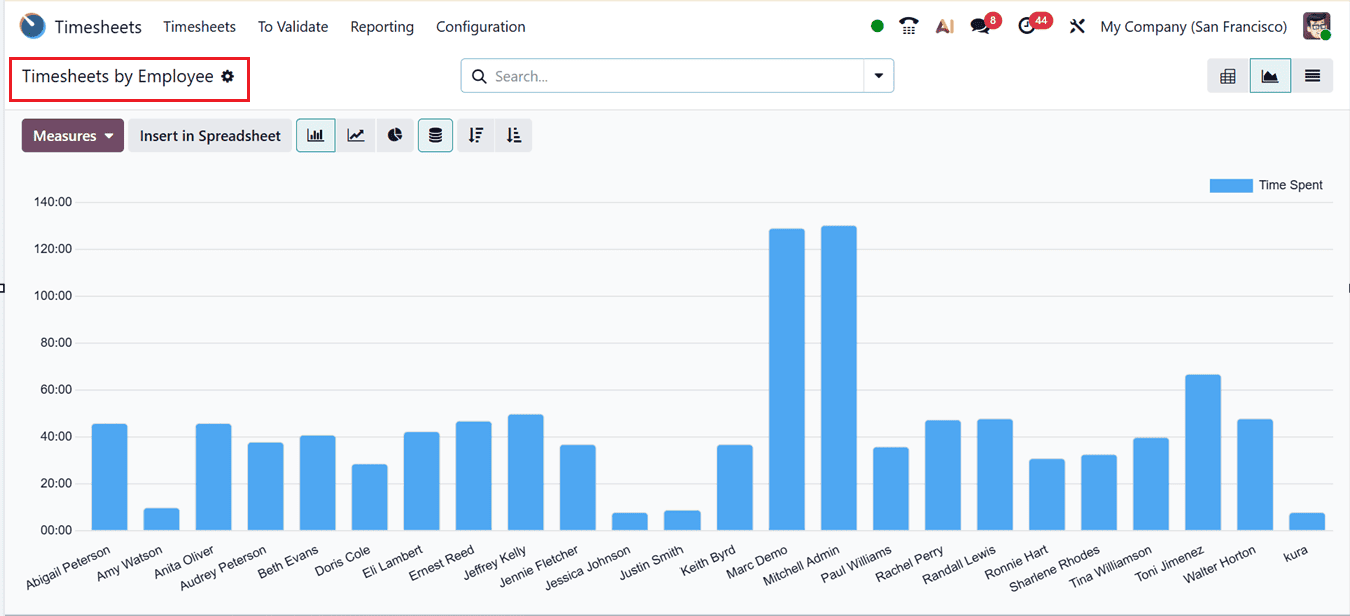
The Pivot view also supports exporting analytical data into spreadsheet format and includes multiple measurement tools for accurate reporting. Reports can be visualized in Pivot, Graph and List formats. The Graph view supports multiple analytical metrics through the ‘Measures’ section, as shown in the screenshot below.
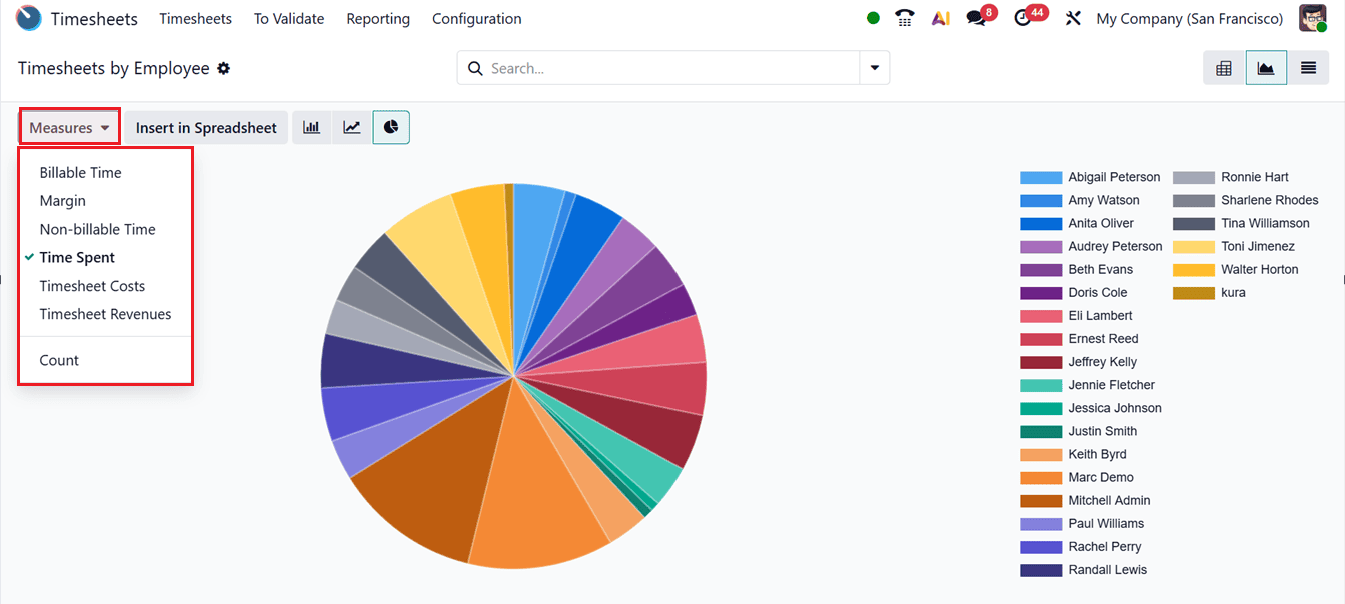
You can change the report perspectives using metrics such as Billable Time, Margin, Non-billable Time, Time Spent, Timesheet Costs, Timesheet Revenues and Count, as shown in the screenshot below.
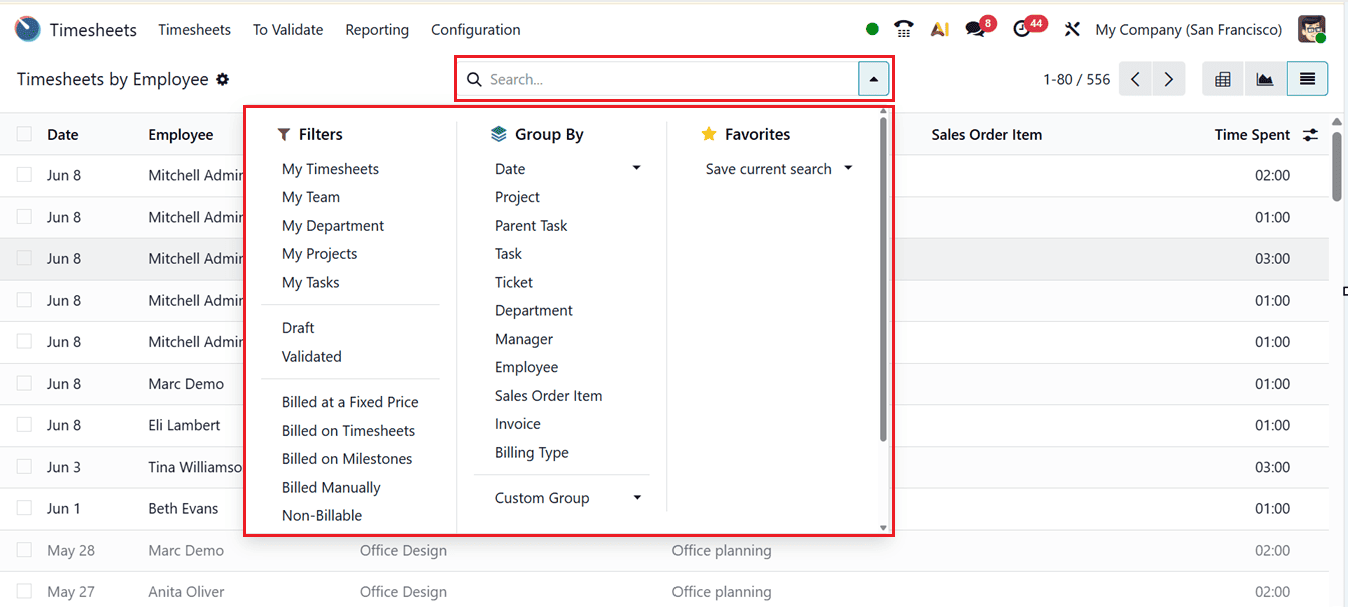
The search bar provides additional analytical tools including Filters, Group By, and Favorites. Frequently used configurations can be saved for quick access, while custom filters and groups can be created using the ‘Add Custom Filter’ and ‘Add Custom Group’ options.
Timesheets By Project
The ‘TBy Project’ report organizes entries according to projects, enabling businesses to analyze how many hours were allocated to each project within a selected timeframe. Data visualization is available in Grid, Graph and Pivot views, as shown in the screenshot below.
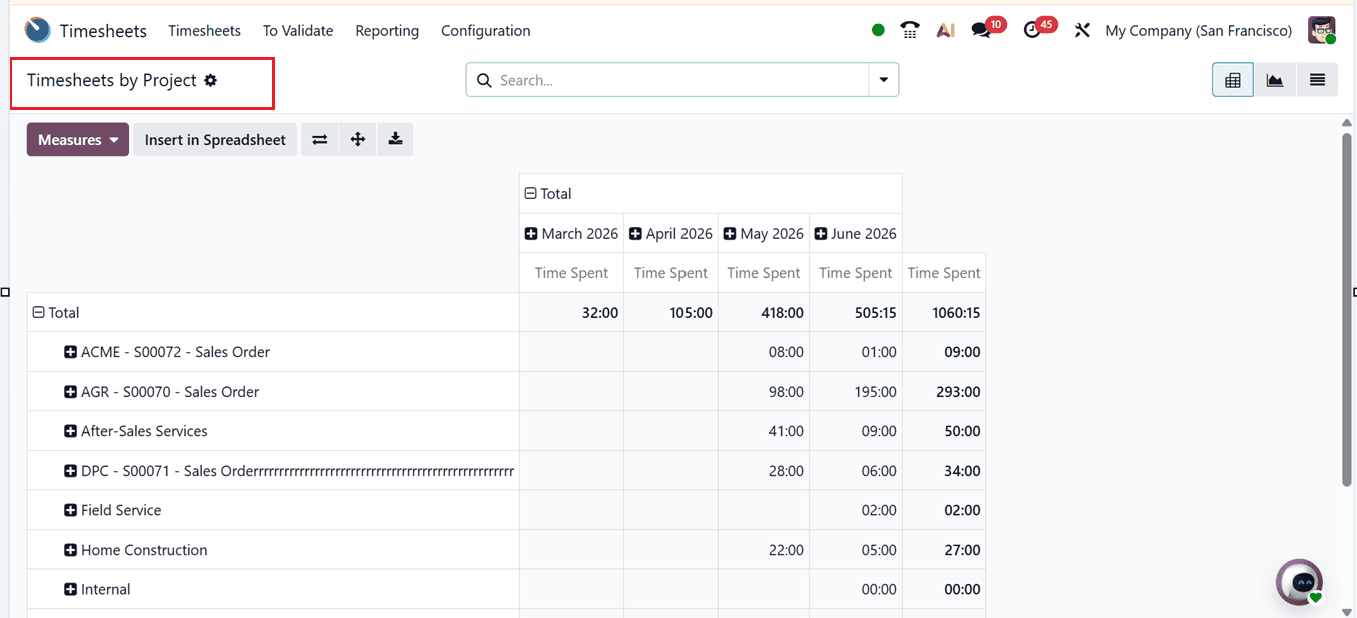
Here in the Pivot view, you can utilize features such as Flip Axis, Expand All, and Download XLSX to modify and export reporting data. Other reporting functionalities remain similar to the previous reporting section.
The reporting Measures options and Filtering options are still available in this reporting window and you can utilize them as per the requirement.
Timesheets By Task
The ‘By Task’ report in Odoo 19 provides a detailed overview of time entries categorized by individual tasks, making it highly useful for monitoring time allocation across assignments and projects.
The default view is a Pivot view that includes configurable measures such as Billable Time, Margin, Non-Billable Time, Time Spent, Timesheet Costs, Timesheet Revenues and Count, allowing users to analyze information in different formats, as shown in the screenshot below.
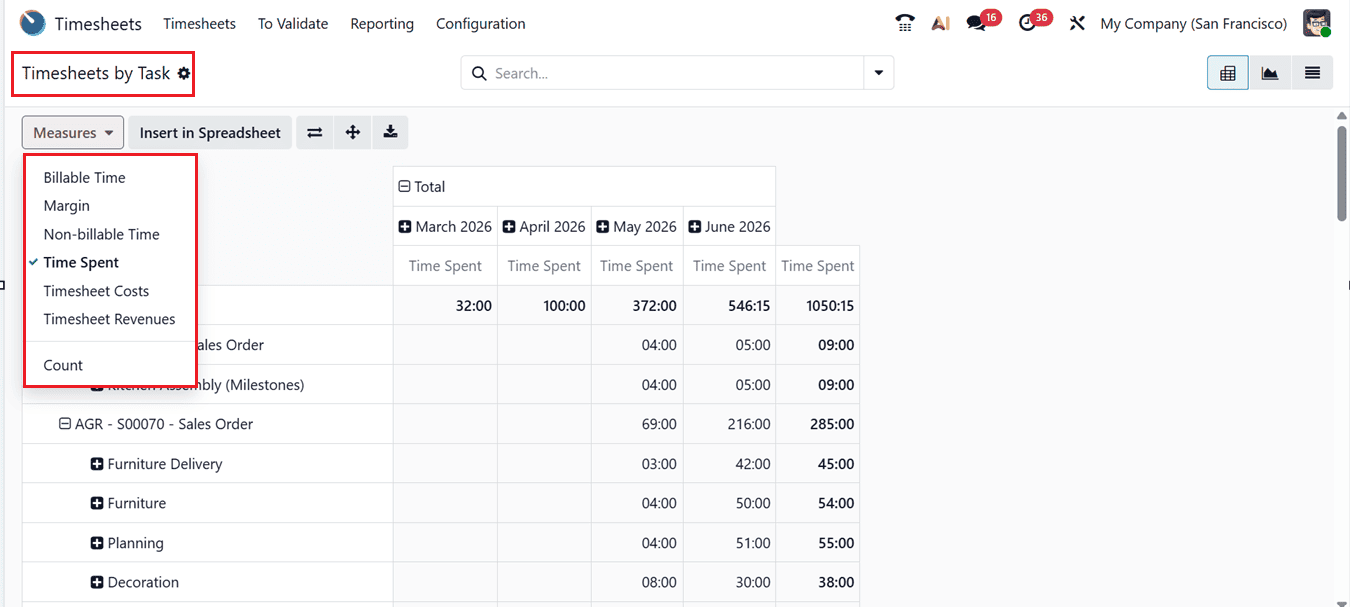
Additional tools such as Filters, Group By, and Favorites options in the search bar area helps you to refine specified data. Reports can also be viewed in List and Graph formats according to business requirements. This task-level analysis helps businesses understand workload distribution and identify productivity trends.
Timesheets By Billing Type
The ‘By Billing Type’ report categorizes time entries according to billing methods. So, companies can track hours logged for billable and non-billable services separately. In the default Pivot view, you can see the time spent on each month according to the billing methods, as shown in the screenshot below.
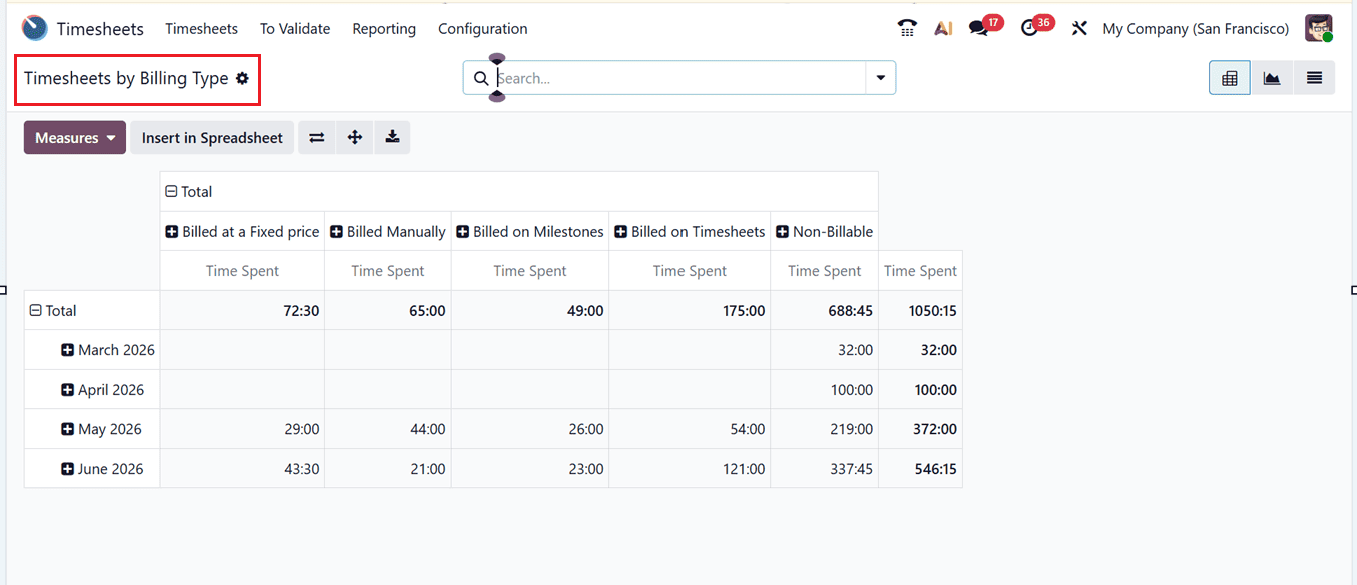
Users can switch between ‘Measures’ such as Billable Time, Margin, Non-Billable Time, Time Spent, Timesheet Costs, Timesheet Revenues and Count to analyze operational performance. The interface also supports advanced filtering, grouping, and favorite views for focused reporting like the previous reporting sections.
This feature helps organizations understand revenue-generating activities while identifying the amount of time allocated to non-billable work. It also supports profitability analysis, resource planning, and billing accuracy.
Timesheet/Attendance Analysis
The ‘Timesheet/Attendance Analysis’ report compares timesheet entries with employee attendance records. The Pivot view displays total Attendance time, Timesheets time and Time differences between them on a monthly basis, as shown in the screenshot below.
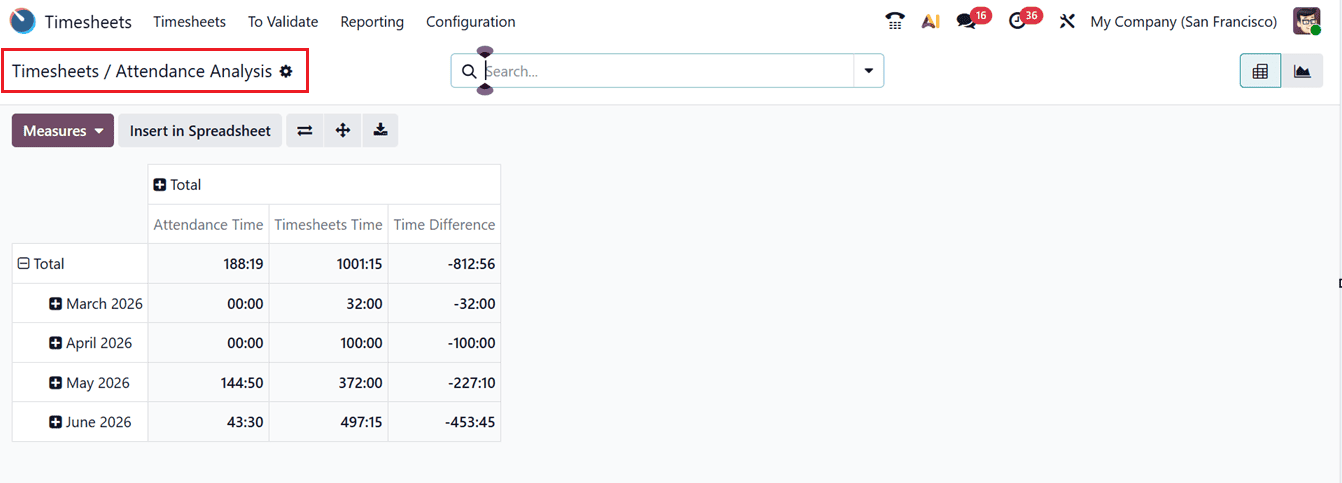
Additionally, you can analyze data through Pivot or Graphical representations such as pie charts, bar charts, and line charts.
Configuration Menu
The ‘Configuration’ menu in the Timesheet module provides access to the general ‘Settings’ section where you can customize module behavior and operational parameters.
Within the ‘Time Encoding’ section, the ‘Encoding Unit’ option defines the unit used for recording timesheet entries. The ‘Time Rounding’ feature allows configuration of Round Up Time and Minimal Duration values for timer-based entries, as shown in the screenshot below.
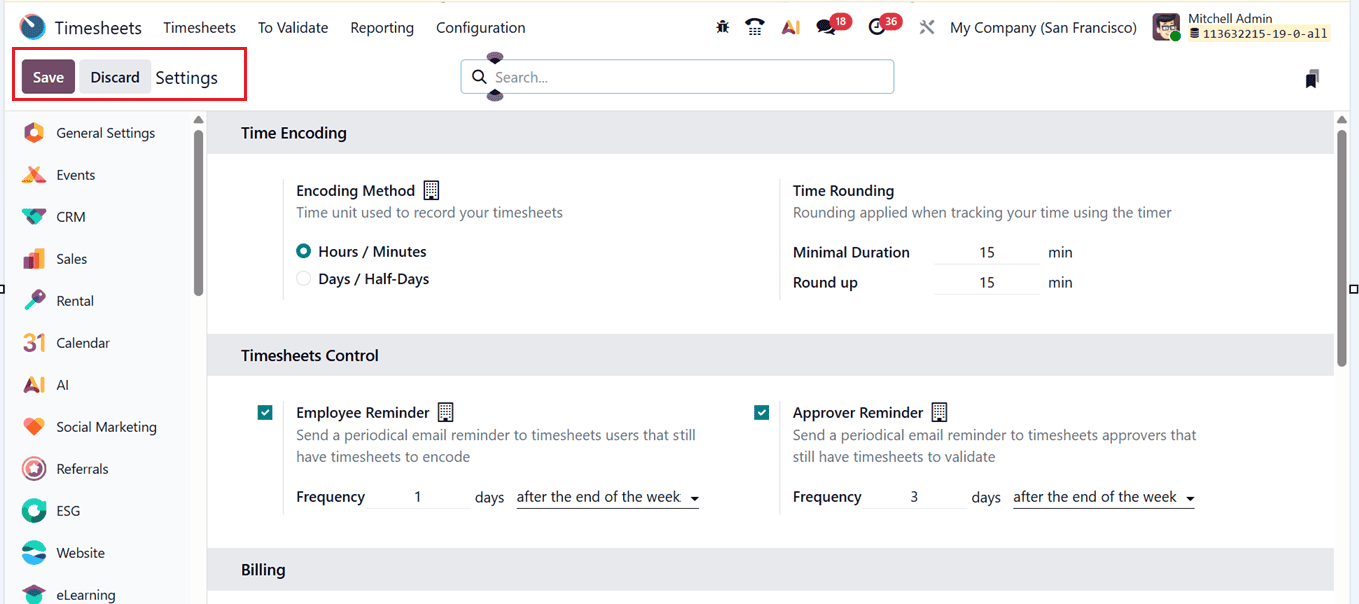
The ‘Employee Reminder’ option under ‘Timesheets Control’ sends periodic reminders encouraging employees to submit timesheets regularly. Similarly, the ‘Approvar Reminder’ feature sends reminder emails to managers at predefined intervals.
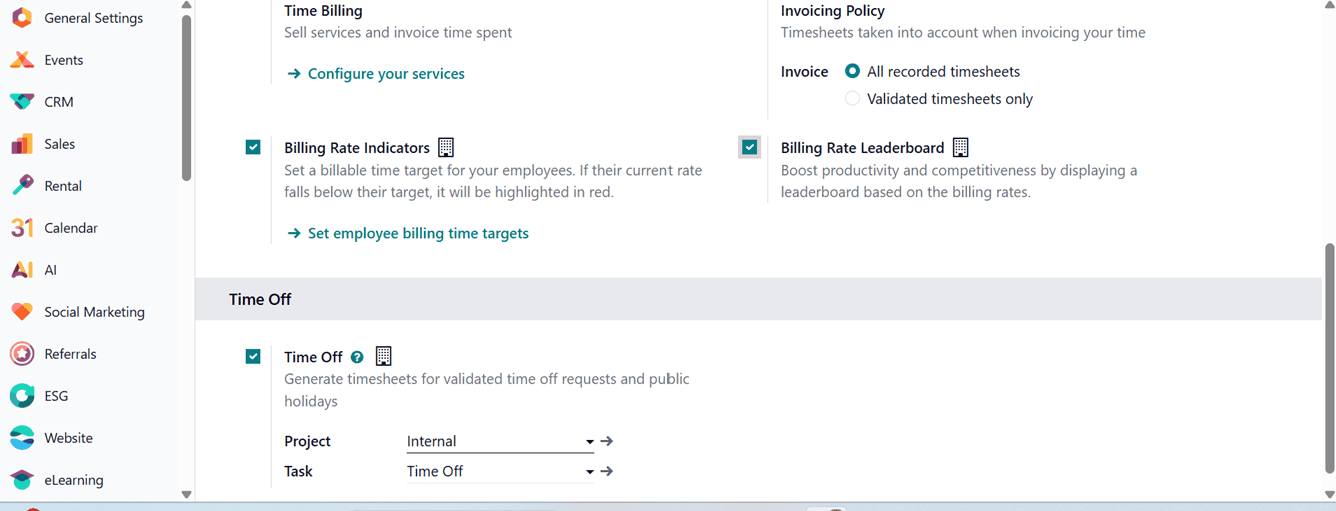
The ‘Time Billing’ option under the Billing section enables businesses to sell services and generate invoices based on recorded timesheets. Users can also configure ‘Invoicing Policy’ specifying whether all timesheets or only validated entries should be billed. The ‘Billing Rate Indicators’ option allows organizations to set employee billing targets, with underperforming billing rates highlighted in red.
The ‘Billing Rate Leaderboard’ promotes productivity by ranking employees according to billing performance. Additionally, the ‘Time Off’ feature ensures approved leave requests and public holidays are reflected automatically within employee timesheets.
The Time Off option allows you to specify the Project and Task that will be used when generating timesheet entries for users associated with this Timesheets application. Once configured, the system can automatically create timesheet records for approved time-off requests and public holidays, ensuring that employee absences are accurately reflected in timesheet reporting and project tracking.
In summary, the Odoo 19 Timesheet module provides an efficient system for recording employee work hours associated with projects and activities. This information supports accurate client invoicing, improved productivity tracking, and streamlined operational management.
To read more about How Timesheets are Validated by a Manager in Odoo 18 Timesheet, refer to our blog How Timesheets are Validated by a Manager in Odoo 18 Timesheet.