Employee
Odoo Employee management module allows you to efficiently manage employee directory,
employee details, contact details of the employee, and other operations related
to the employee management. Using this module, you can record all the information
related to your employees such as resumes, private details, work-related information,
contact details, and many more. Let us discuss the module in more detail.
The home dashboard of the Odoo Employee module is depicted below. In this Employees
window, you can view all the employees defined in the platform along with their
name, department, email id, and contact number. Like any other windows in the platform,
the Employee window also provides you all the default and customizable options such
as Filters, Group By, Favourite Search, and many more aspects. The window can be
viewed in list view also. Moreover, the Activity view of the window allows you to
schedule activities.
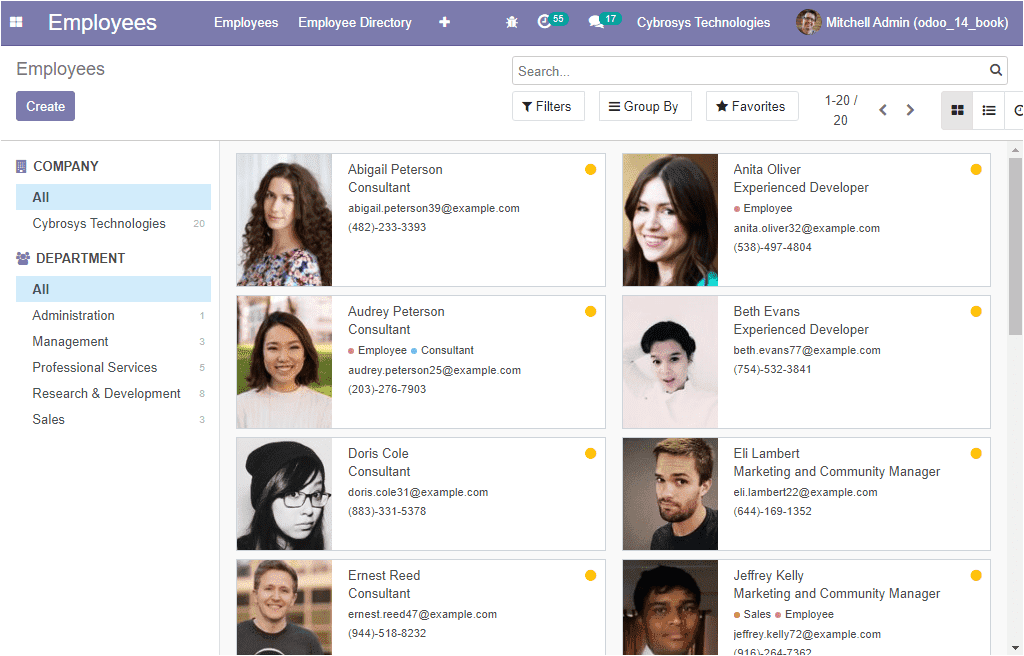
In the left portion of the window, you have various options and these options will
allow you to view the employee window Department-wise and Company-wise if the platform
is operating with multiple companies. The Create menu available in the window will
direct you to the employee creation window.
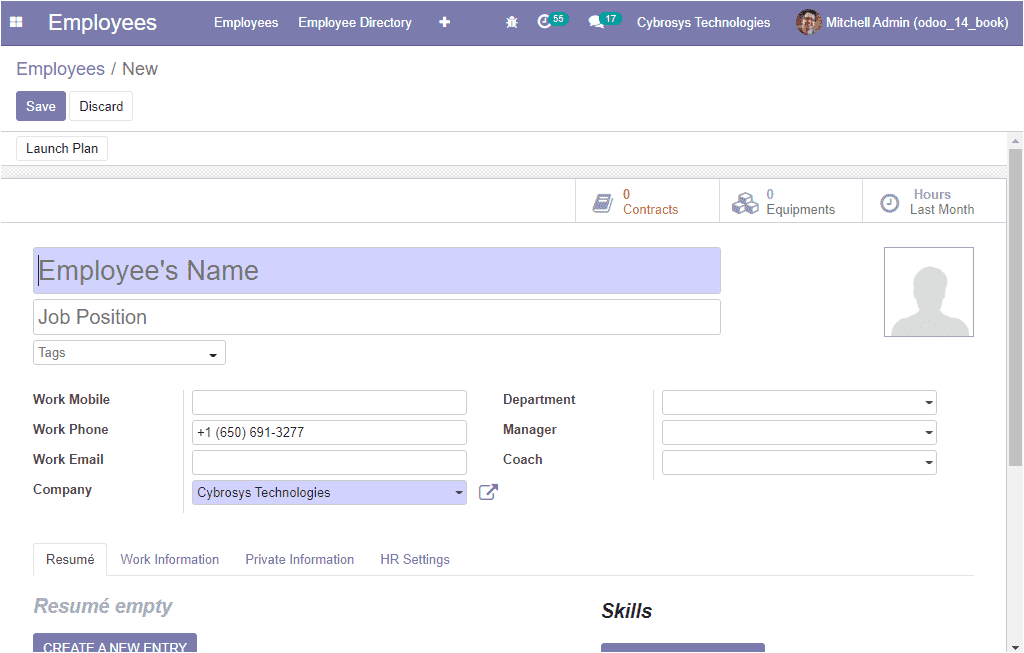
In this employee creation window, you can describe the employee’s name along with
the Job position. The Tags can be allocated from the list being defined in the platform.
In addition, you can attach an image of the employee in the allotted space. Then
you can allocate the official contact details of the employee such as Work Mobile,
Work Phone, Work Email. The company name is auto-allocated. Apart from these options,
you can also specify the department, Manager, and Coach associated with the employee.
The image of the employee creation window is depicted below.
Under the Resume tab of the employee creation window, you can add resume details
and skills. Before creating a resume entry, you have to create Resume Line Types.
This can be done from the configuration tab of the employee module. So we can go
to Employee -> Configuration -> Resume -> Types -> Create. Now you can view a Resume
Line Type window as pictured below.
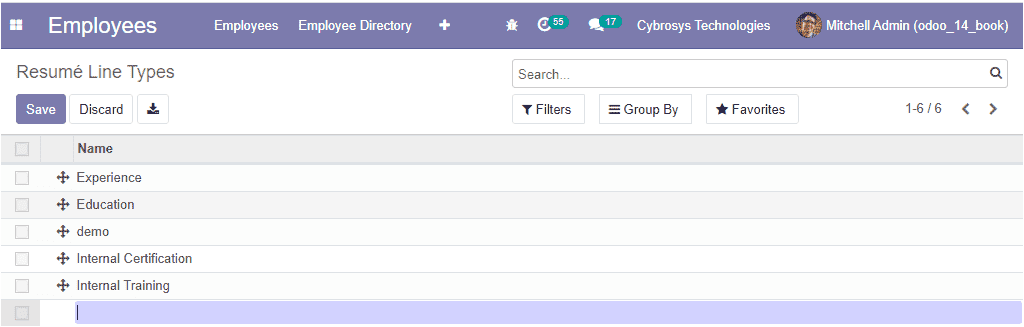
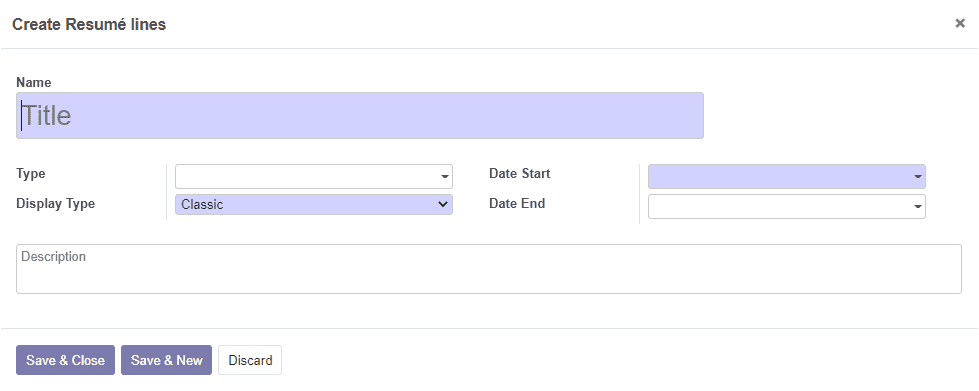
Here in this window you can add a resume line type and save it. Back in the Employee
creation window, now you are able to add resume entries by selecting the CREATE
NEW ENTRY button available. On selecting this button, you will be depicted with
a pop-up window as shown below where you can provide Name, Type, Display Type along
with the Date Start and Date End. The description can be provided in the description
box available.
Likewise, we can also add the Skills in the employee creation window. Before adding
skills we need to create skill types. The skill types can be created from Employee
-> Configuration -> Skills. Now you will enter the skill types window where you
can view all the existing skill types. The image of the window is shown below.
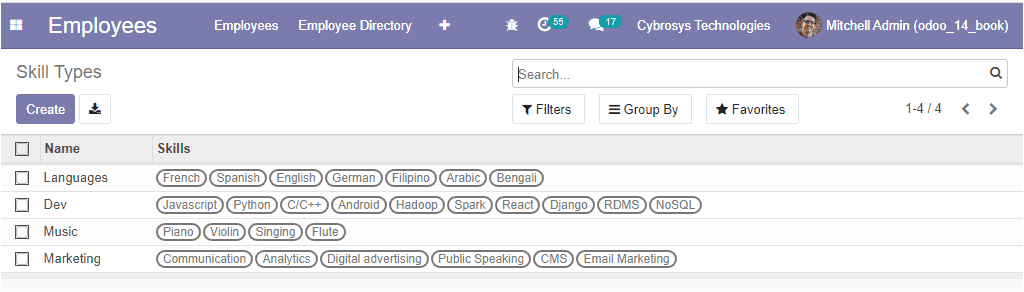
Using this window, you can create new skill types by selecting the Create icon available
on the top left corner. On selecting the create icon, you will be taken to a new
skill type creation window as depicted below.
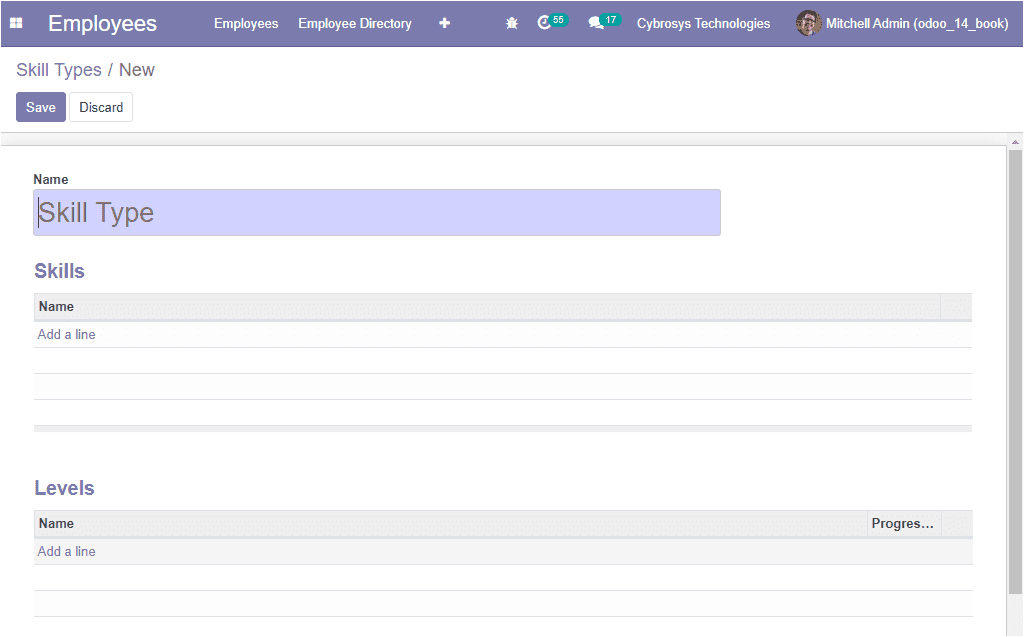
Here in the window, you can provide the name of the skill type and on selecting
the Add a line option, you can add skills and also be able to specify the level
of each skill. This can be done by clicking on the Add a line option available under
the Levels menu. The pop-up window is depicted below.

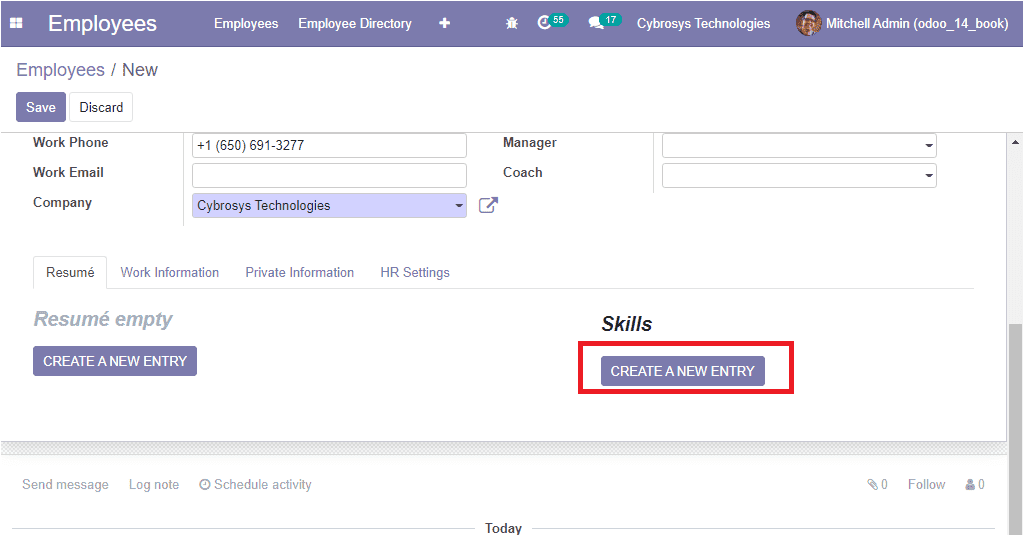
After completing these steps, you can add skills under the Resume tab of the Employee
creation window. For this, you can click on the CREATE NEW ENTRY button available
under the skills menu as shown in the below image.
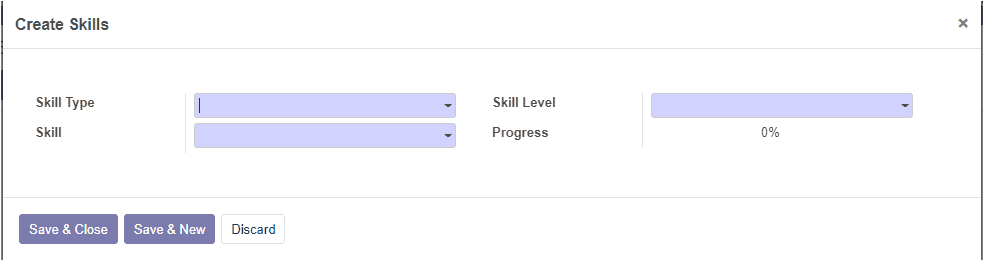
If you select this button, it will take you to another pop-up window as showcased
below. Here you can mention the Skill Type, Skill along with the Skill Level and
Progress. Then you can save the details. In addition, you also have the provision
for creating multiple skills using the Save & New button available. Now we are clear
on how to add skills and resume to the employee creation form. In the Odoo platform,
the resume and the skills of the employee are managed using the skill management
module.
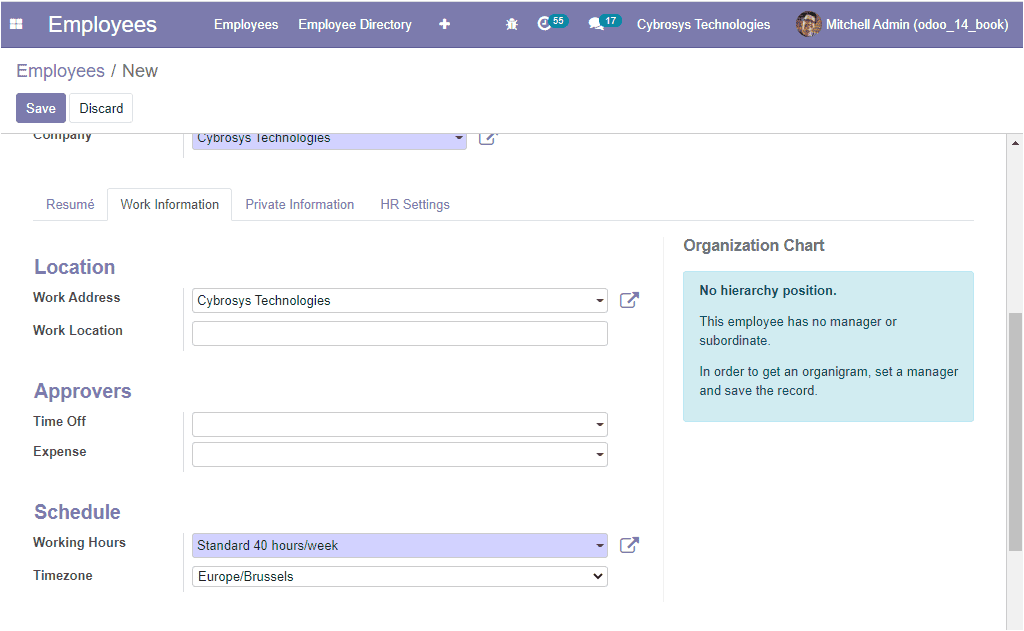
Now back in the Employee creation form, let us discuss the Work Information tab
of the employee creation window. Here you can allocate the Work Address, Work Location,
Time off, Expense, Working hours, Time zone.
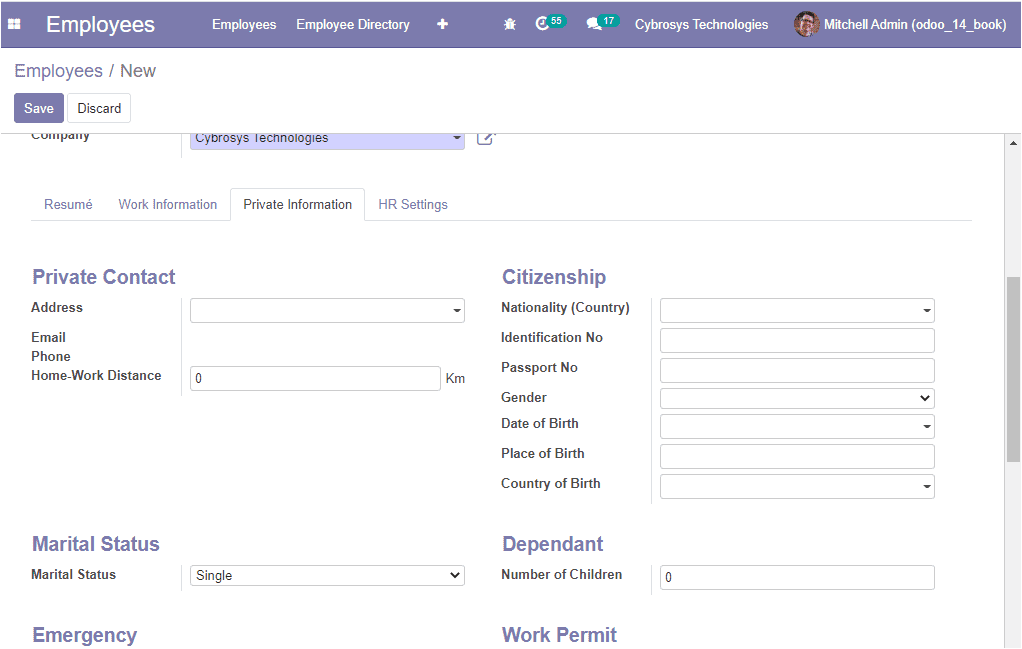
In the Private Information tab of the employee creation window, you can provide
the Private Contact details of the employee along with the Marital Status, Emergency
Contact Numbers, Educational qualifications, Citizenship related information, and
many more aspects.
Under the HR Settings tab of the employee creation window, you can fill in the fields
such as Related User, Job Position, Mobility Card along with the Pin code and Badge
ID. After providing all the information, you can save the details by selecting the
Save icon available. After successfully creating the employee, you can create the
contract by selecting the smart button Contracts available on the top right side
of the employee creation window. This action will lead you to the contracts window
where you can view all the contracts described for the employee. In the window,
you can view a create icon. On selecting this icon you will be depicted with a Contract
creation window like the below image.
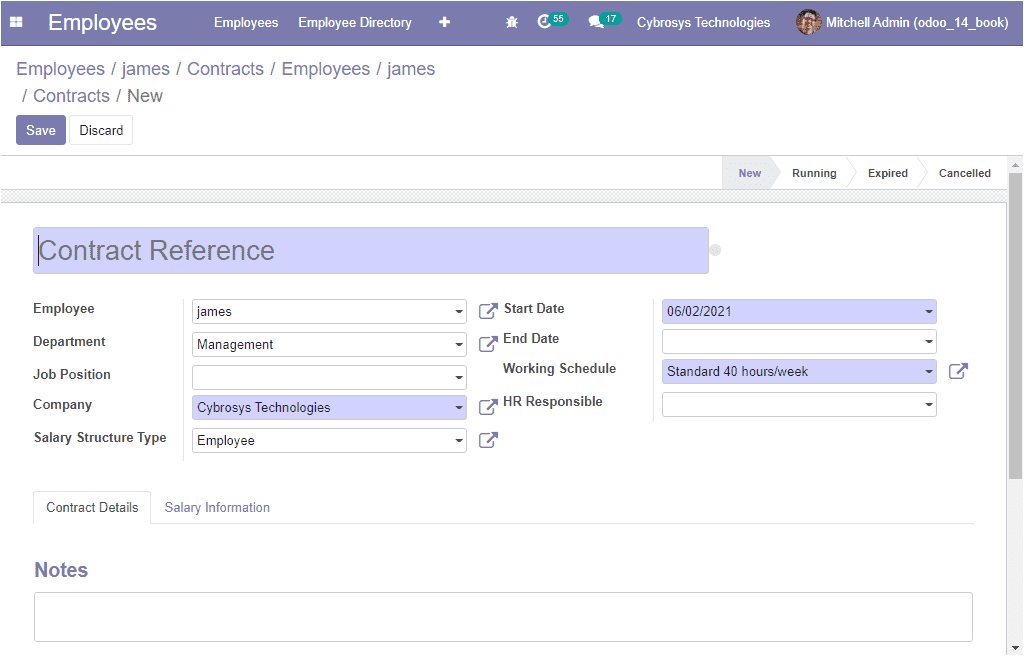
Now in the creation window you can enter the following data such as Contract Reference,
Employee name, Department, Job position, Company, Salary Structure Type along with
the Start date, End date, Working Schedule, and HR Responsible which is the person
responsible for validating the employee‘s contracts.
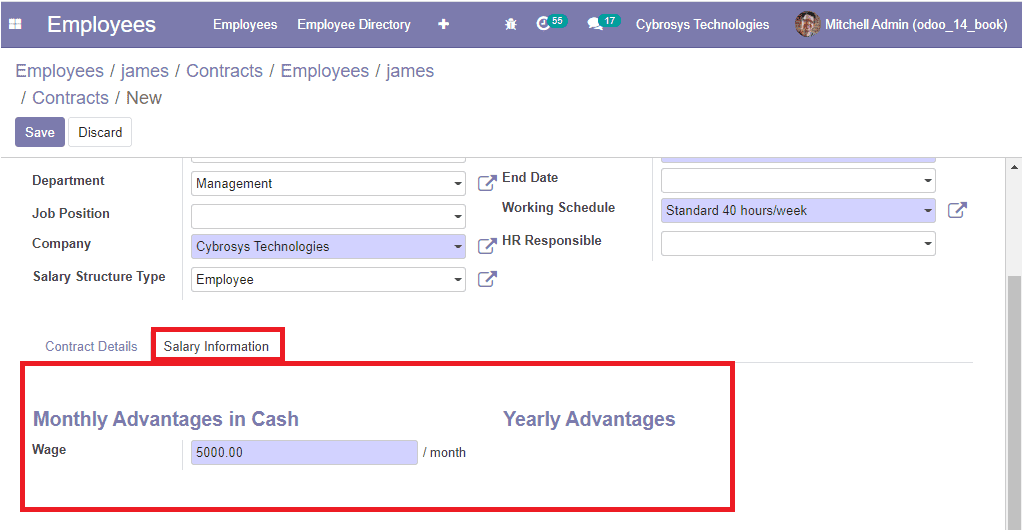
The contract details can be allocated under the Contract Details tab. Under the
Salary Information tab, you can include the information related to the monthly and
yearly advantages in cash.
We have discussed all the aspects regarding the Employee creation window and the
Contracts creation window. Now let us move on to the Job position window available
on the platform.
Job Positions
The Job positions window in the platform can be accessed from the configuration
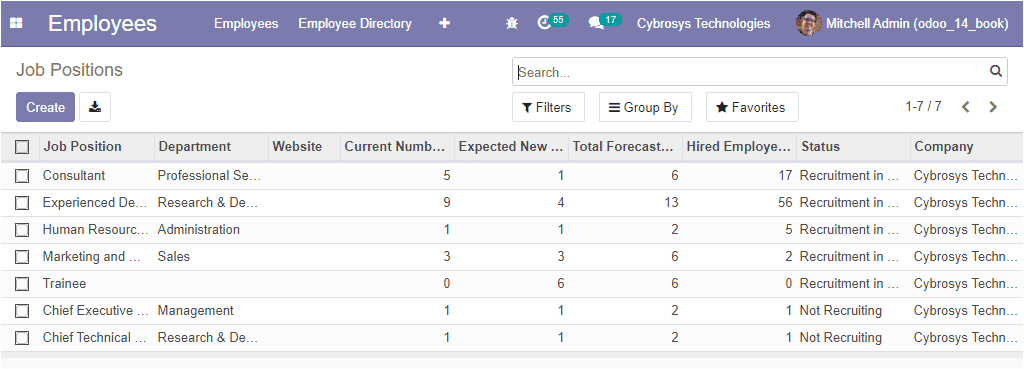
tab of the Odoo Employee module. The image of the window is displayed below where
you can view the various job positions described in the platform along with the
Department, Website associated with this operation, the Current number of employees,
Expected new employees, Total forecasted employees, Hired employees, company-related
and the Status are described.
On selecting the Create icon available, you can create new Job Positions. The image
of the Job positions creation window is depicted below. In the Job positions creation
window, you can enter the job position along with the job description. Under the
Recruitment tab, you can allocate the Company, Website, Department, Job location,
Expected new employees, and Recruiter. If you are provided all the required data,
you can save the details by selecting the Save icon available.

As we clear on the configuration of Job positions in the Odoo employees module and
now let us discuss the configuration of Employees tags in the platform.
Employee Tags
The Employee Tags window available in the platform can be accessed from the configuration
tab of the Odoo Employees module. Let us have a look at this window.
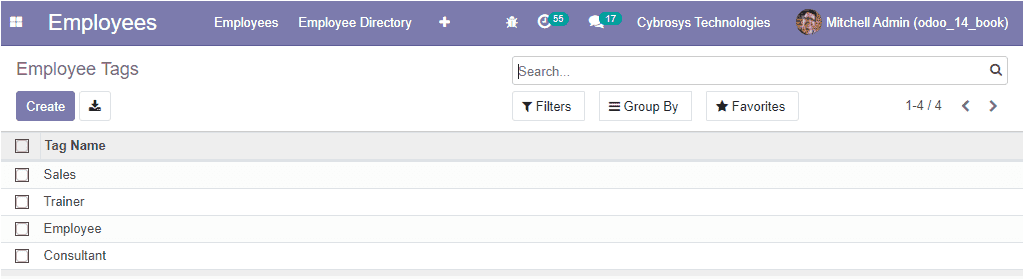
In this window, you can view all the Employee Tags which were defined earlier. The
Create icon available on the top left corner of the window will allow you to create
new Employee tags in the same window.
Now let us discuss how to configure the Departments in the platform.
Departments
The Department menu available in the employee module can be accessed from the configuration
tab of the module. The image of the window is showcased below.
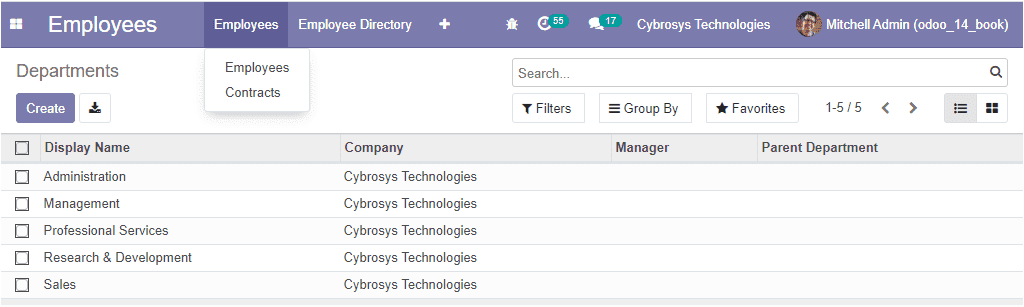
In this department window, you can view all the department names that are defined
in the platform along with the company information. The Create icon available in
the window allows you to create new departments. The image of the department creation
window is depicted below.
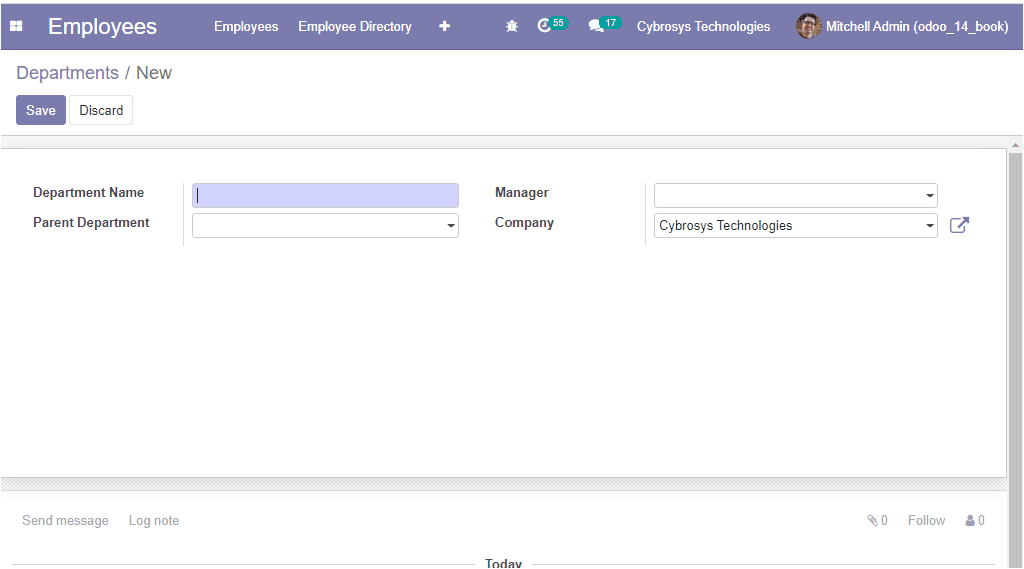
In this department creation form, you can provide the Department Name along with
the Parent Department, and the Manager of the department. The company associated
with this department is auto-allocated.
As we are clear on how to configure departments in the Odoo employee module and
now let us discuss the gamification details available in the module. In the Employee
module, you have the provision to create badges and challenges. Let us discuss the
Challenges option first.
Challenges
It is necessary to keep your employee motivated for their better outcome. The Employee
module available in the Odoo platform provides you provision to set challenges in
order to make your employee more attentive and productive. The Challenges menu available
in the platform can be accessed from the configuration tab of the module. The image
of the window is shown below.
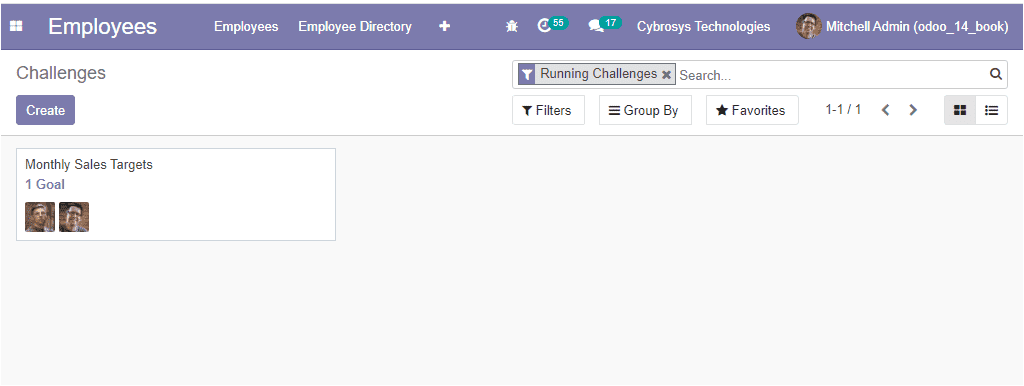
This is the image of the challenges window where you can view all the challenges
created in the platform. The create menu available in the window will allow you
to set challenges with the intention to challenge employees to gain specific targets.
The image of the Challenges creation window is displayed below.
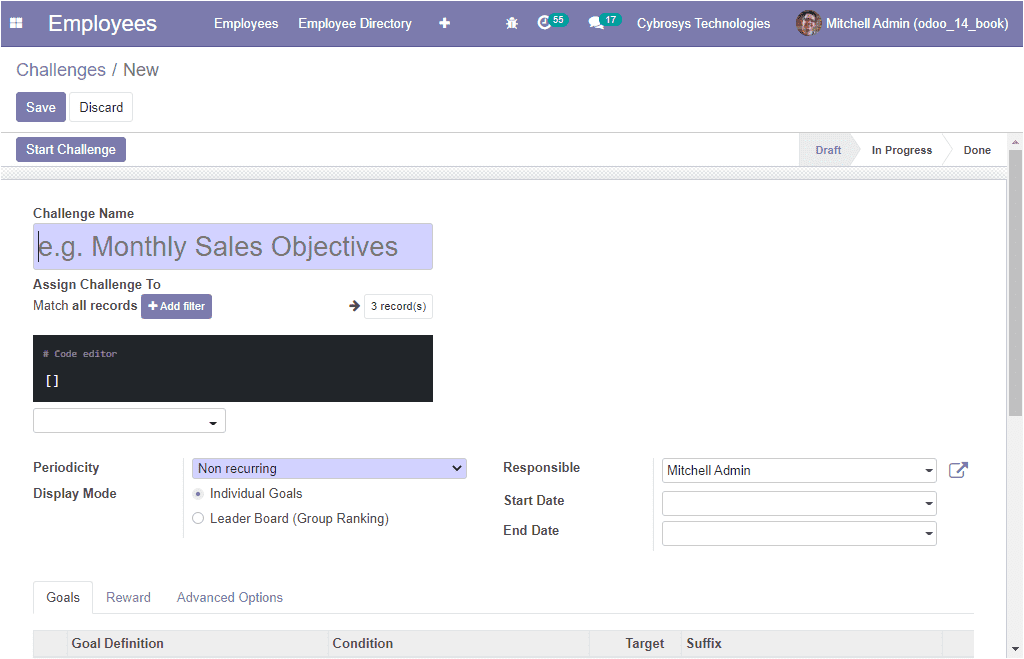
In the Challenges creation window, you can provide a name to the challenge. Then
you can view an option named Assign Challenge To. Furthermore, in this field, you
can define an alternative list of users for the challenge that is created. It is
also possible to add filters for selecting users to assign the challenges. This
can be done by selecting the Add Filters option available. On the right side, you
can view the corresponding number of records matched to the filter as shown in the
below screenshot.
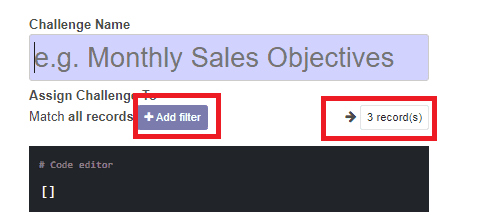
On selecting the records, you can view the matched records. In addition, you can
select properties for creating certain rules from the list defined. Also, you can
provide code for filters in the Code editor space. After that, you can allocate
the list of users participating in the challenge. Moreover, you can specify the
Periodicity from the list being described. If no one is selected, it should be launched
manually. The Display mode can be set either with Individual goals or Leader board(group
ranking). The user responsible for the challenge can be allocated along with the
challenge’s starting date and ending date.
The Odoo platform allows you to set multiple goals for the created challenge. The
goals can be assigned under the Goals tab available. This can be done by selecting
the Add a line option available. Also, you can provide a description of the challenge
including what it does, what it targets, why it matters, and many more in the description
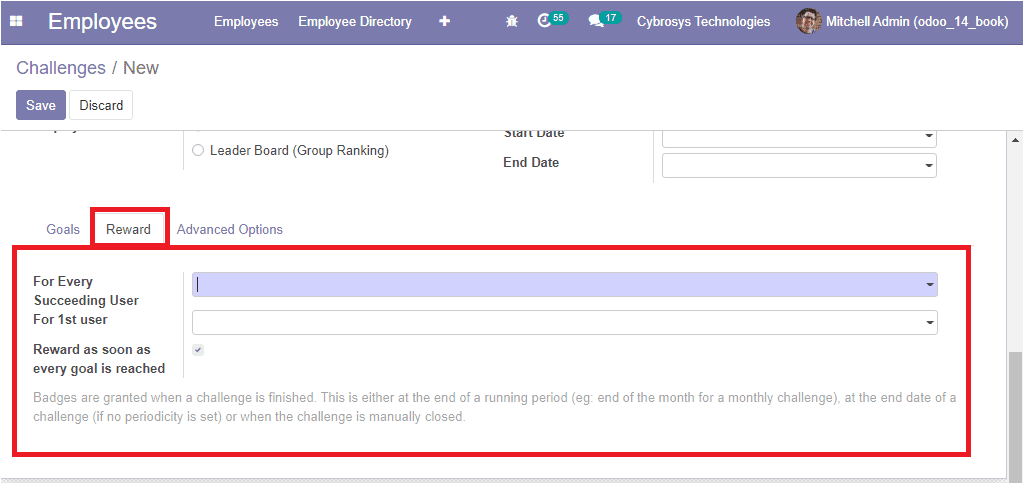
box. The reward for achieving the goal can be described under the Reward tab of
the Challenges creation window.
Under the Advanced Options tab, you can suggest to users. Also can set notification
messages along with the report frequency. In addition, the reminders for manual
goals and categories can be allocated.

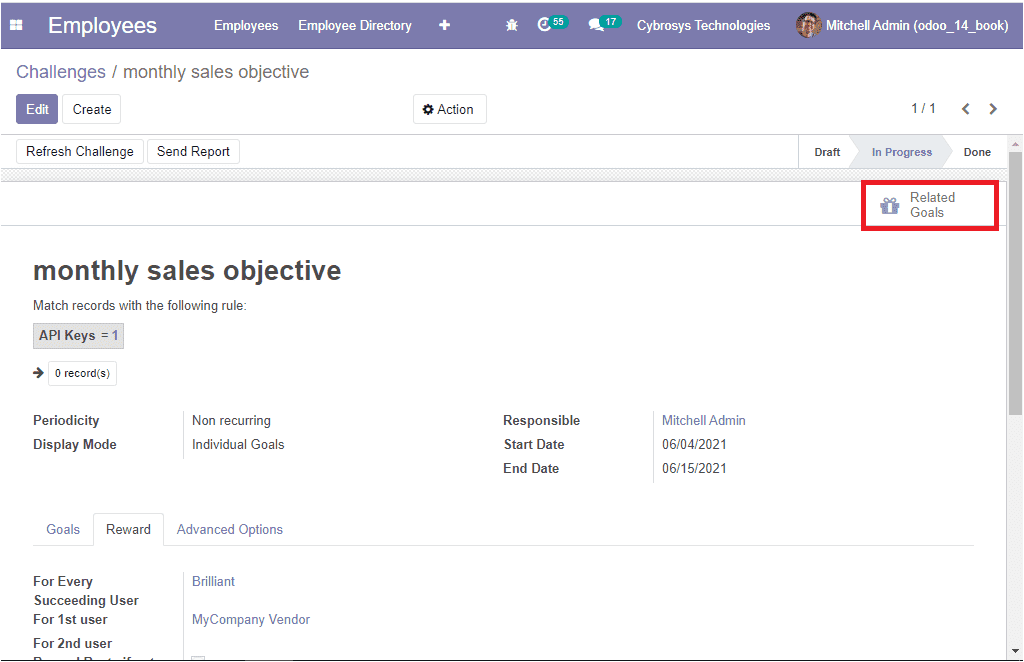
After providing all the required data, you can save the details by selecting the
Save button available. Now we have created the challenge. The next step is to select
the ‘Start challenge’ button available on the top left corner of the window. Upon
selecting this button, a new smart button named Related Goals will appear on the
right corner of the window as depicted below.
By selecting this smart button, you will be taken to a new window where you can
view the goals and their progressions.
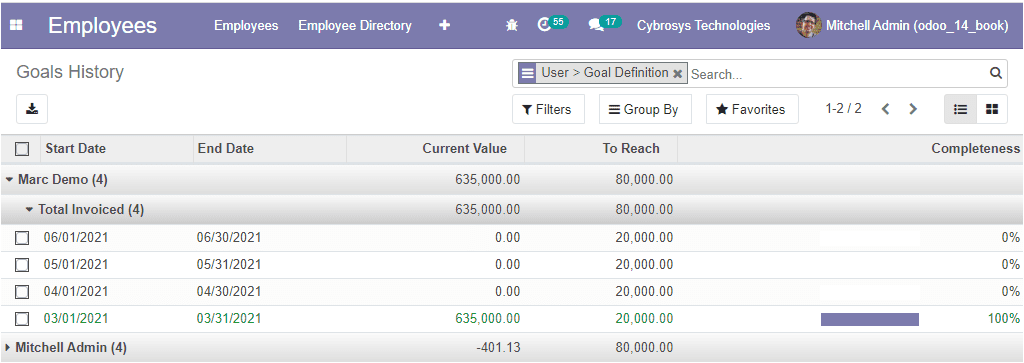
Now let us have a look at the Goals history window. This window can be accessed
from the configuration tab of the Odoo Employee module.
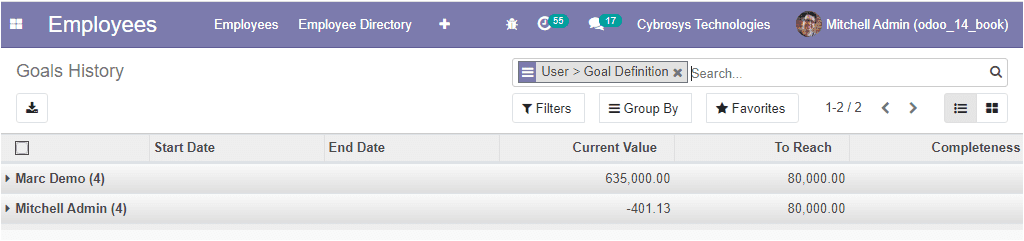
Here in this window you can view all the Goals, Assigned persons, Start date, End
date, Current value, To reach (target goal), and Completeness. Moreover, you can
view the details of the goal by entering on the corresponding line.
Now let us discuss how to configure Badges in the Employee management module. Badges
are the best tool to honor your employee on the basis of their performance. For
accessing the Badges window, you can go to Employee -> Configuration -> Challenges
-> Badges. The image of the Badges window is depicted below.
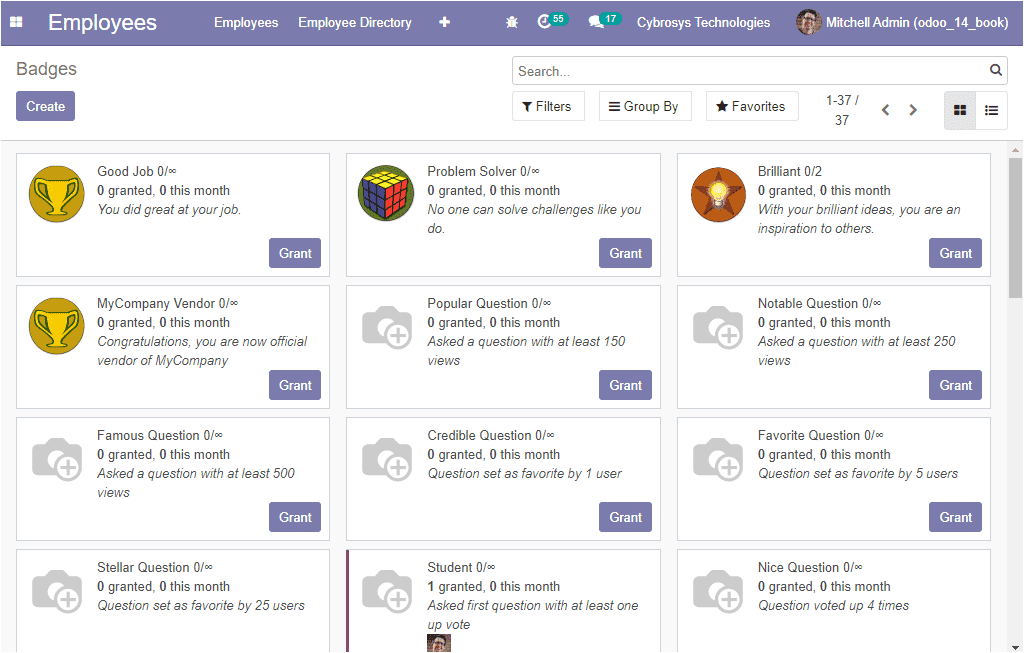
In this window, you can view all the badges described in the platform along with
the Grant option. On selecting the respective badge, you can view all the details
about the badge and you have the provision to make desirable changes by selecting
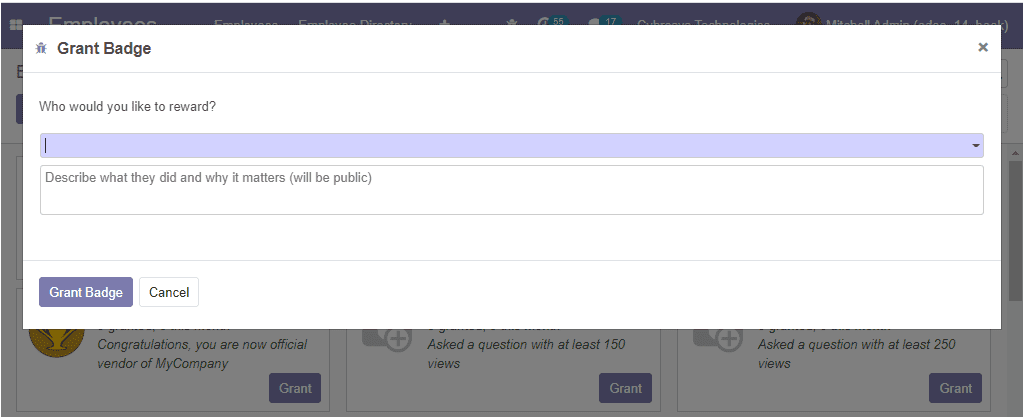
the Edit button available. If you select the Grant button, you will be displayed
with a pop-up window where you can assign the person whom you like to reward. The
image of the pop-up window is shown below.
The Create icon available in the window will definitely allow you to create new
badges. The badge creation window is displayed below. In this Badge creation window,
initially, you can provide the name of the Badge along with the Badge Description.
In addition, you can paste an image for the badge. Then you can set how you can
grant the badge. If you are selecting everyone, everyone can grant the badge. When
A selected list of users’ is selected, users allocated inside the authorized field
can only grant the badge. ‘People having some badges’ can be allocated who already
have the badges. In the case of ‘No one, assigned through challenges, badges can
be only allocated through challenges.
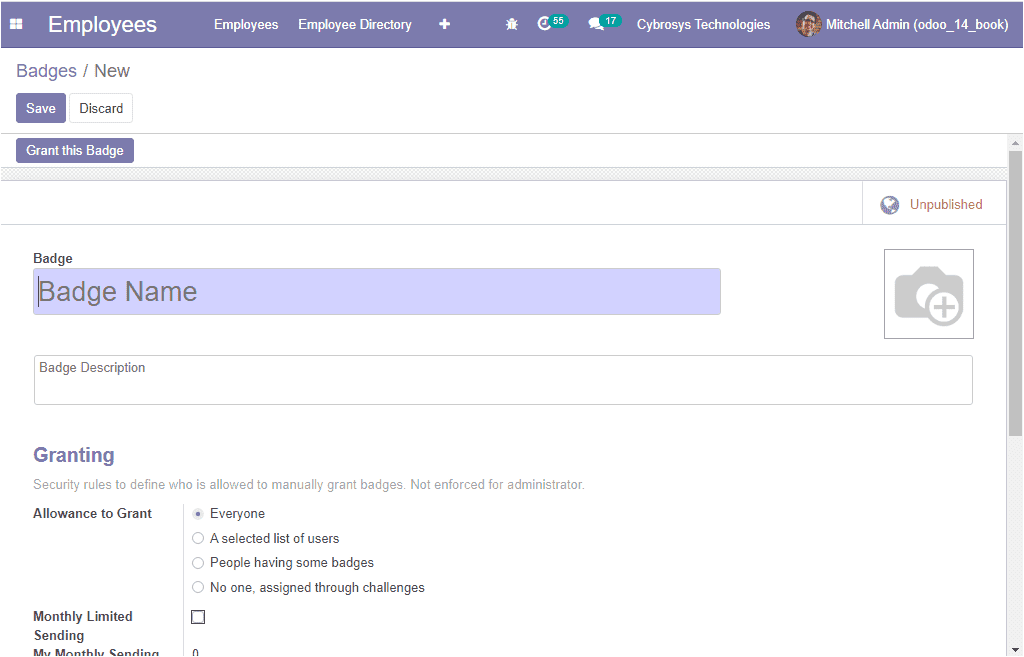
Moreover, you can check the box near the option ‘ Monthly Limited Sending’ to set
a monthly limit per person for sending this badge. The monthly limit can be assigned
in the ‘Limitation Number’ field. The case of ‘ My Monthly Sending Total’ depicts
the number of times the current user has to send this badge in this month.
Now you can add the reward for challenges by clicking on the Add button. On selecting
the Add button, you will be depicted with a new window of Reward of Challenges.
In this window, you can view all the rewards for challenges described in the platform,
and also you are able to create a new one. Using this window, you can add challenges
where the badge will be added as a reward for completing the selected challenge.
Now you can allocate the Forum badge level. Finally, under the statistics menu,
you can view the total number of times this badge has been received, Monthly total,
number of users, My total, and My monthly total.
A good Employee Management system like Odoo will promise you better employee management,
profitability, better outcomes from employees, and efficiency. This module will
provide an insight into keeping digitally all the documents related to your employee.
The module also helps you with employee evaluation and better management.