Orders
The Orders menu appears below, even though the orders were placed via the website. Each of these recordings is available to select and examine in depth.
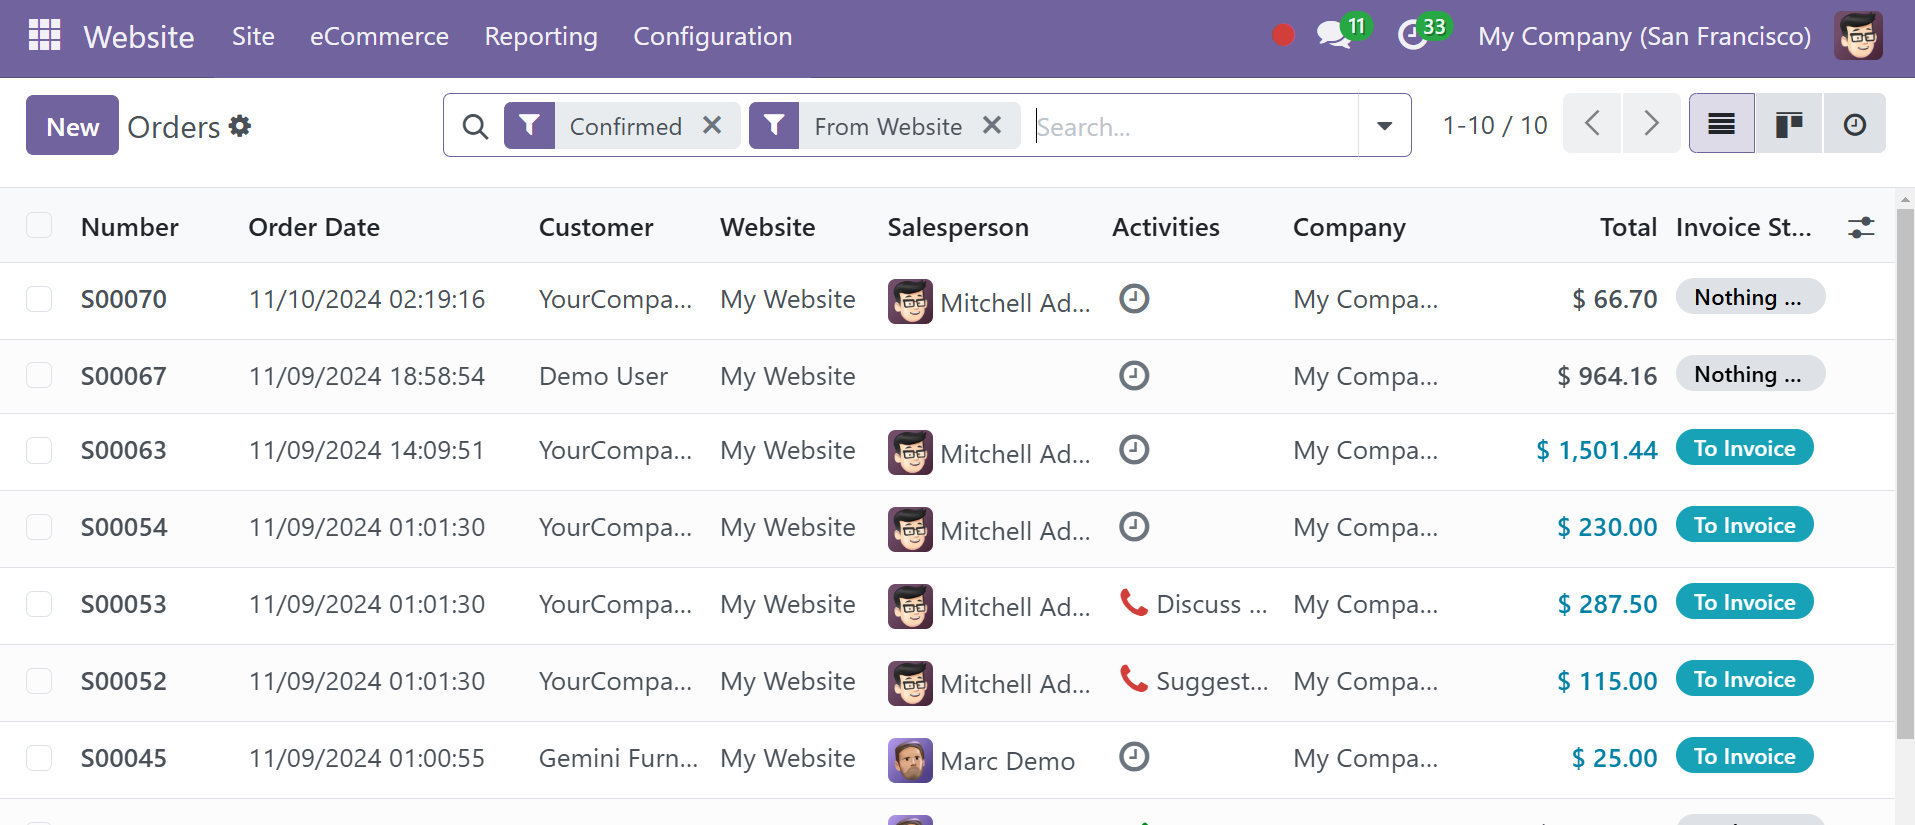
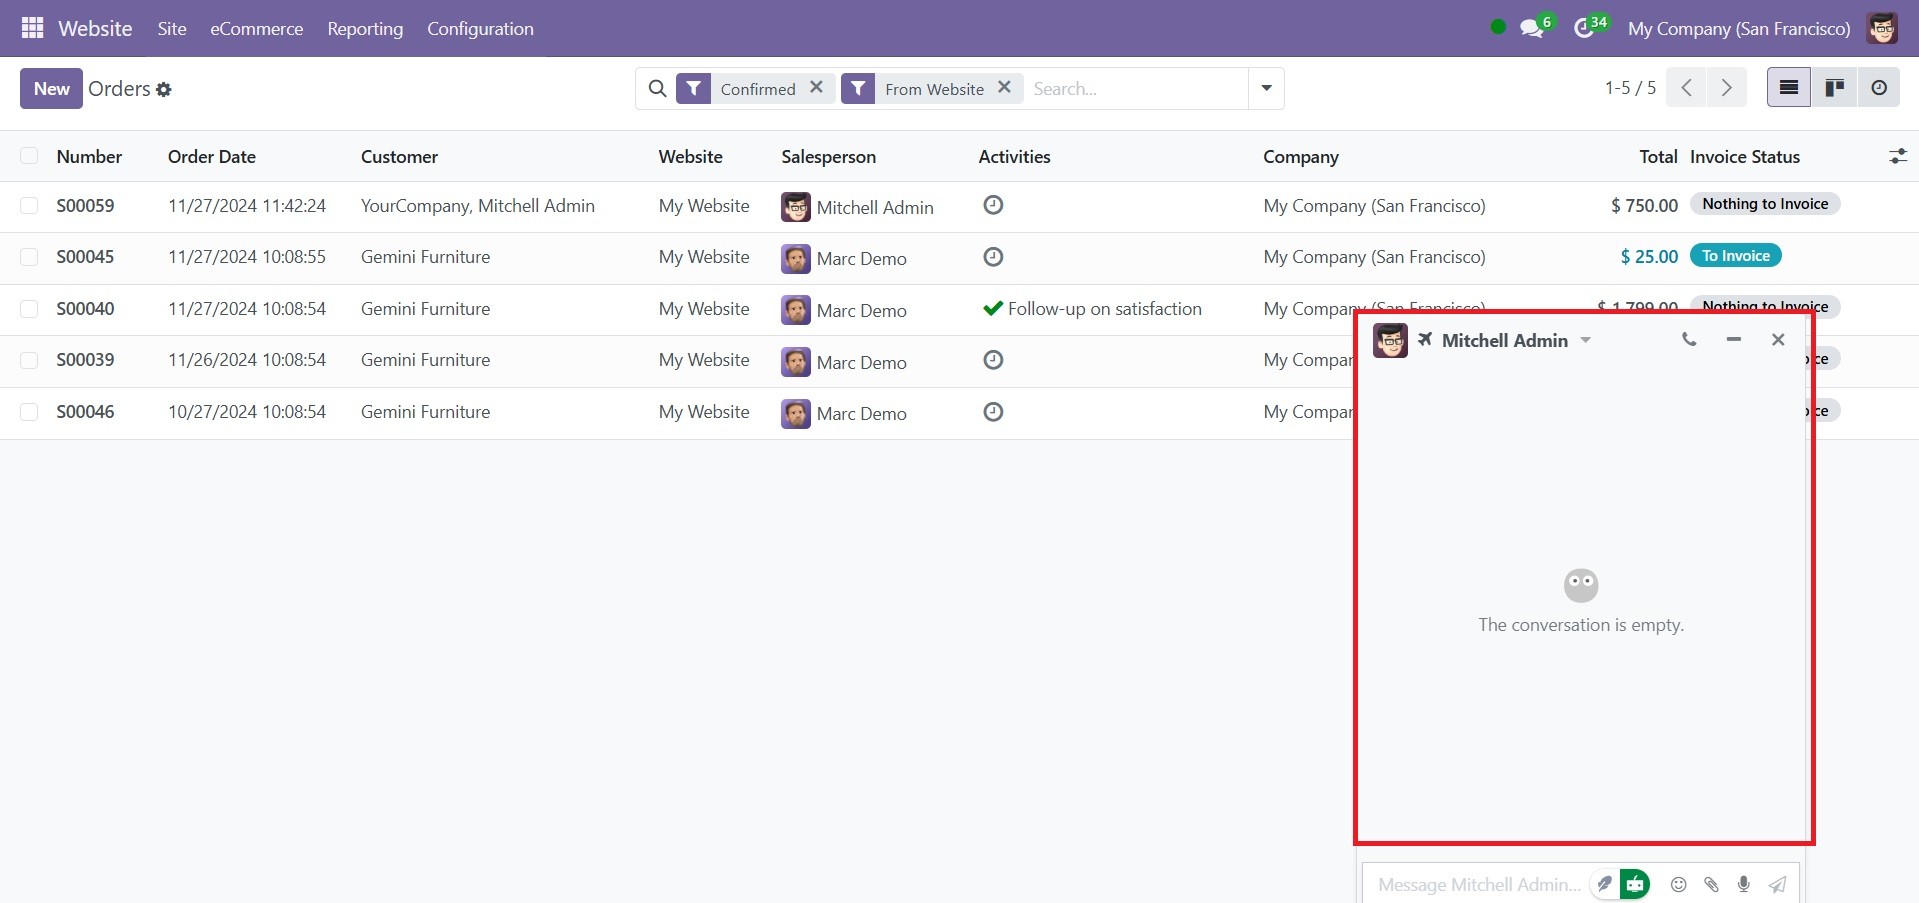
By using the corresponding menu item in the window's top right corner, you can view the window in a variety of formats, such as List, Kanban, and Activity. The List view will provide all of the relevant order information, such as the order number, order date, website, customer, salesperson, activity, company, total, and invoice status. The relevant salesperson's photo is displayed next to their name in the Salesperson field. You can start a conversation with that salesman by clicking the image. When you click this button, a popup chat window will appear on the screen, enabling you to continue.
Unpaid Orders
The Unpaid Orders feature allows you to monitor and manage all orders with outstanding debts. When you select Unpaid Orders from the E-Commerce option, as seen below.
A list of all unpaid orders produced by the e-commerce website is included in this section. The user can also monitor all pending orders associated with the company, including those from its e-commerce and retail businesses.
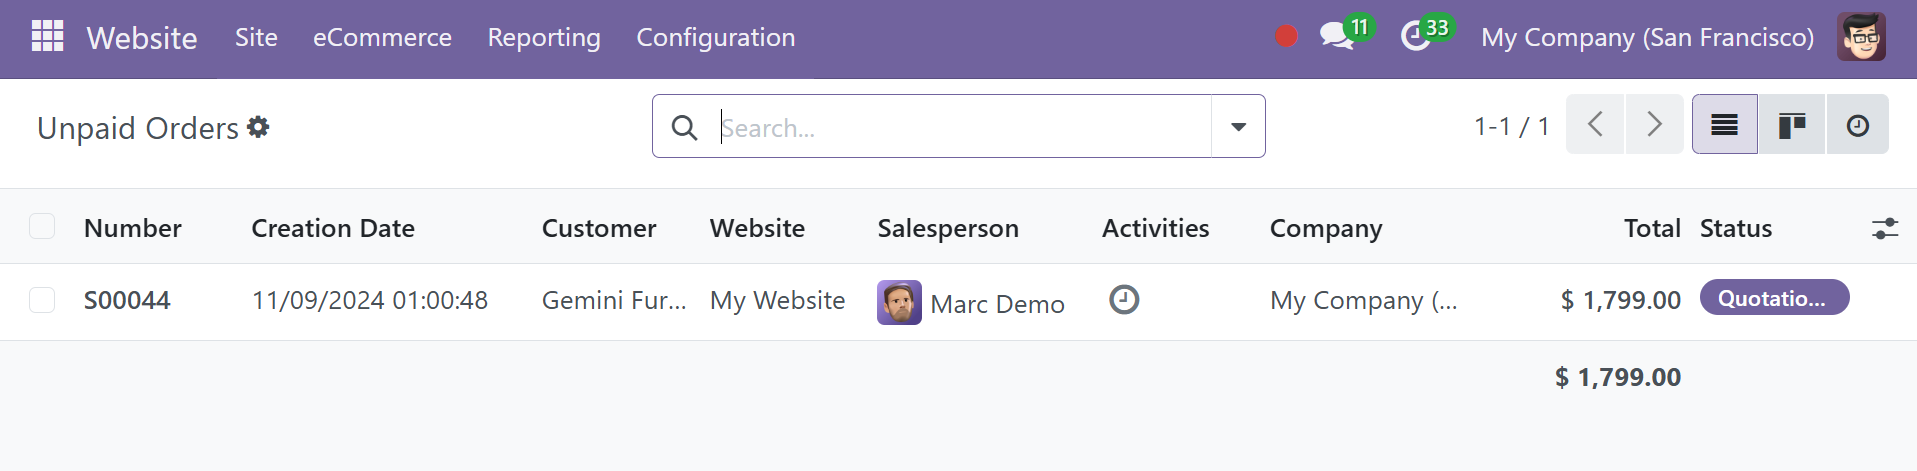
The entire amount, the associated business, the activities, the customer, the salesman, the creation date, the quantity of unpaid orders, the activities, and the order status will all be shown. To help you quickly check the amount owed, the total number of past-due orders is also displayed beneath the window.
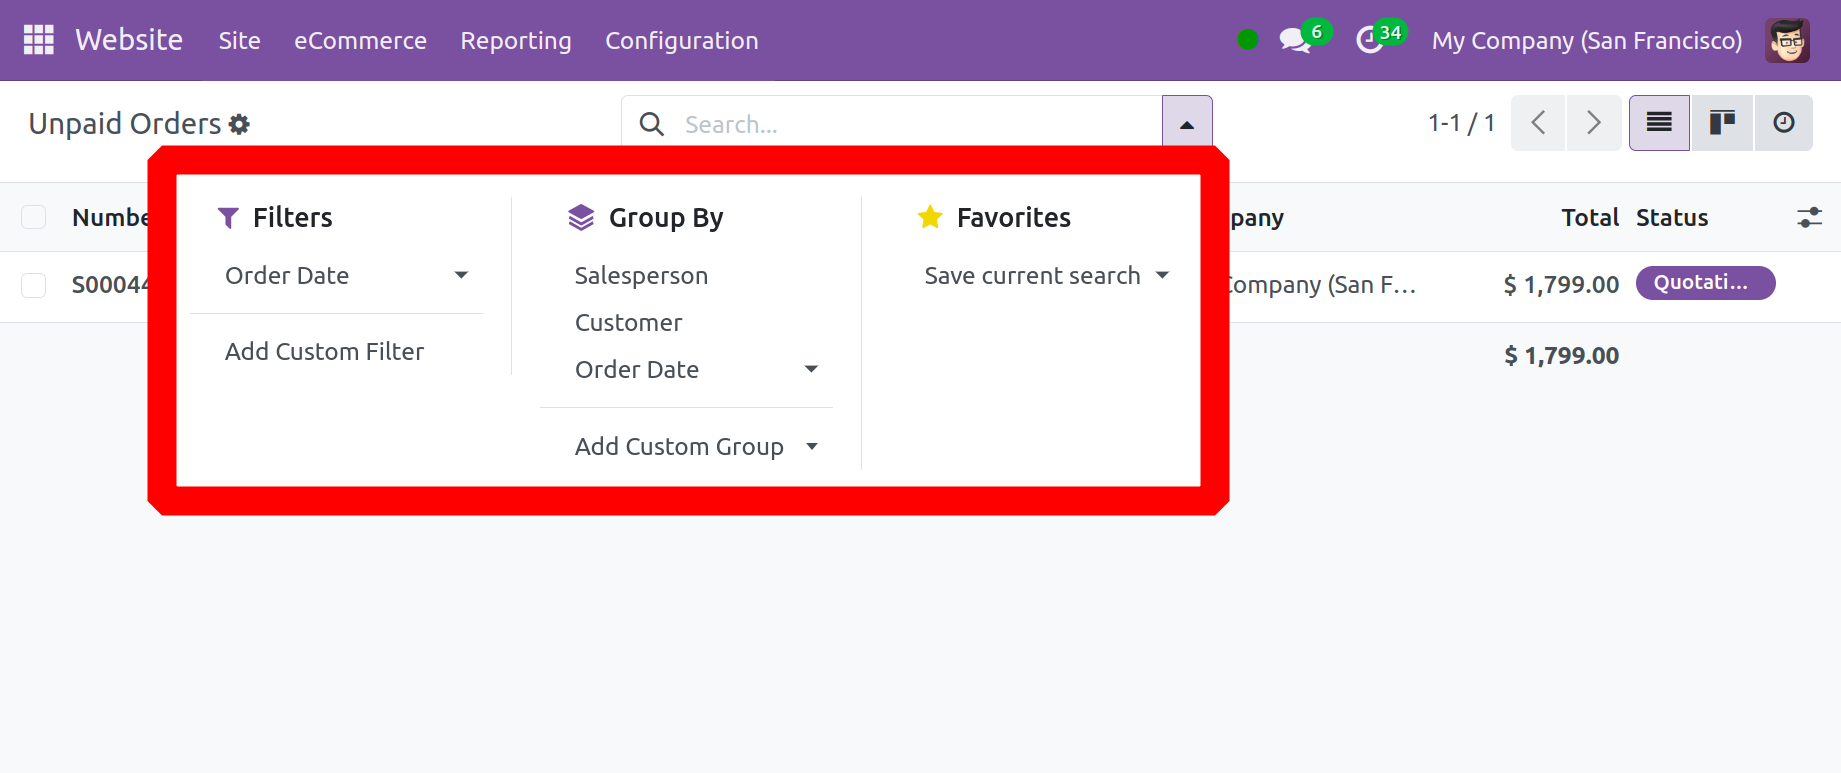
The Favorite, Group By, Search, and Filter tabs offer more sorting choices. These choices allow you to search for orders and open them to view more information. You may handle payments, set up payment reminders, and cancel orders that haven't been fulfilled from the order view. By using this Unpaid Order E-commerce to track payments, users may make sure that buyers pay for their purchases.
Abandoned Carts
The Orders menu's aspirate tab displays the orders for carts that have been abandoned. All of the carts that consumers have left behind, including those that were abandoned during the checkout process, are listed in this menu. You may quickly view your website's abandoned carts in this window. As shown below, it shows each cart's number, creation date, customer, salesperson, company, total, and status.
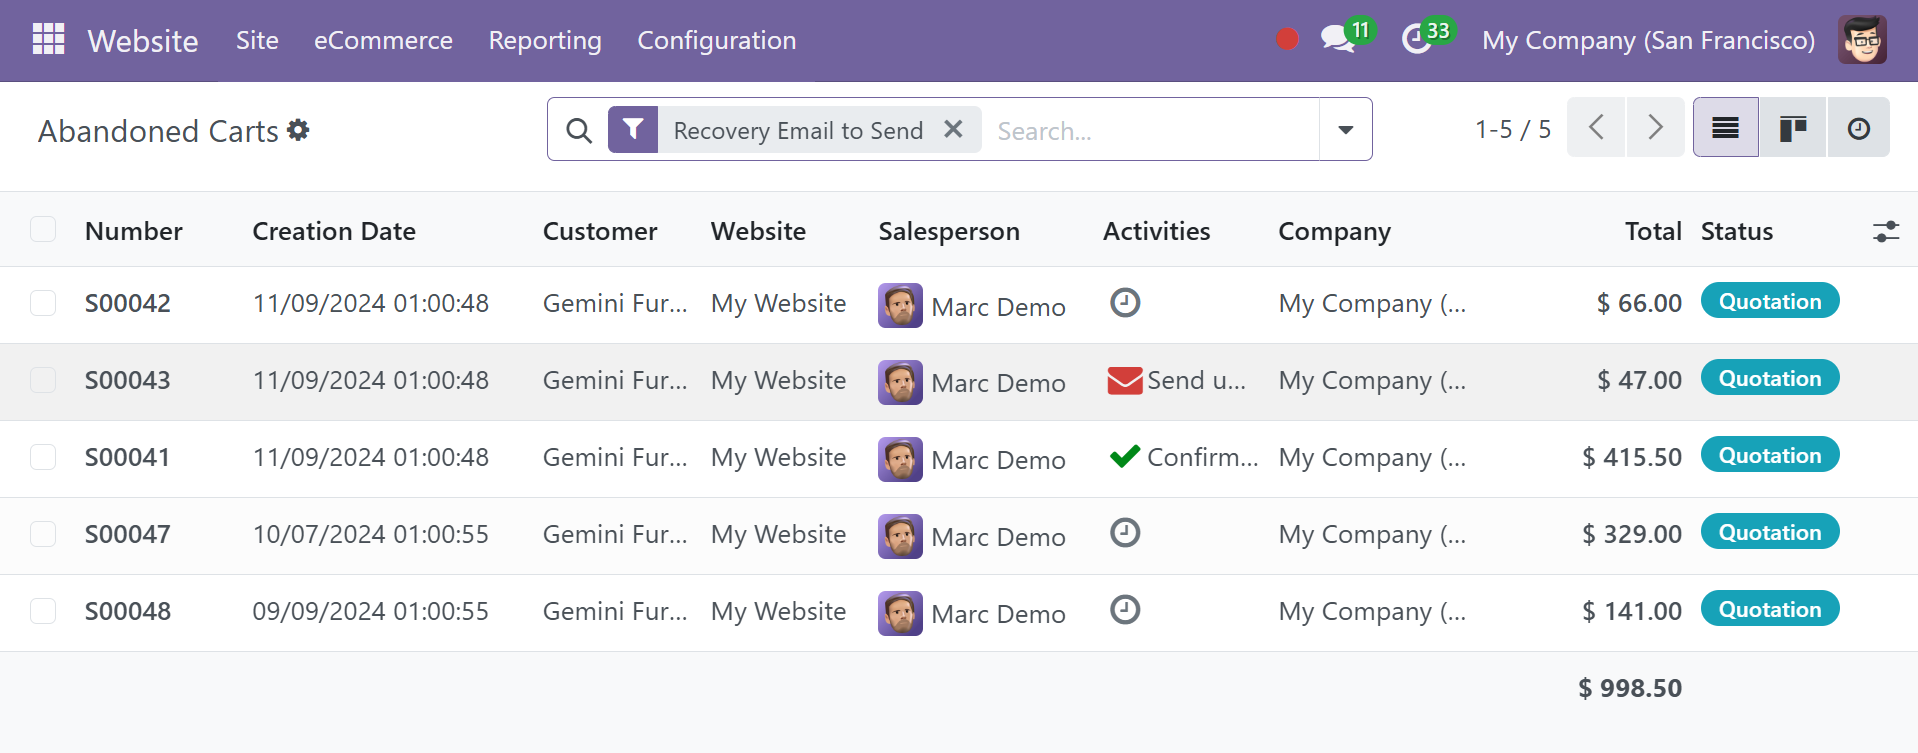
The user may see every completed order cart as well as any products the customer added but did not process for confirmation. The user can also email the customers to ask about the decision based on each order in the abandoned basket.
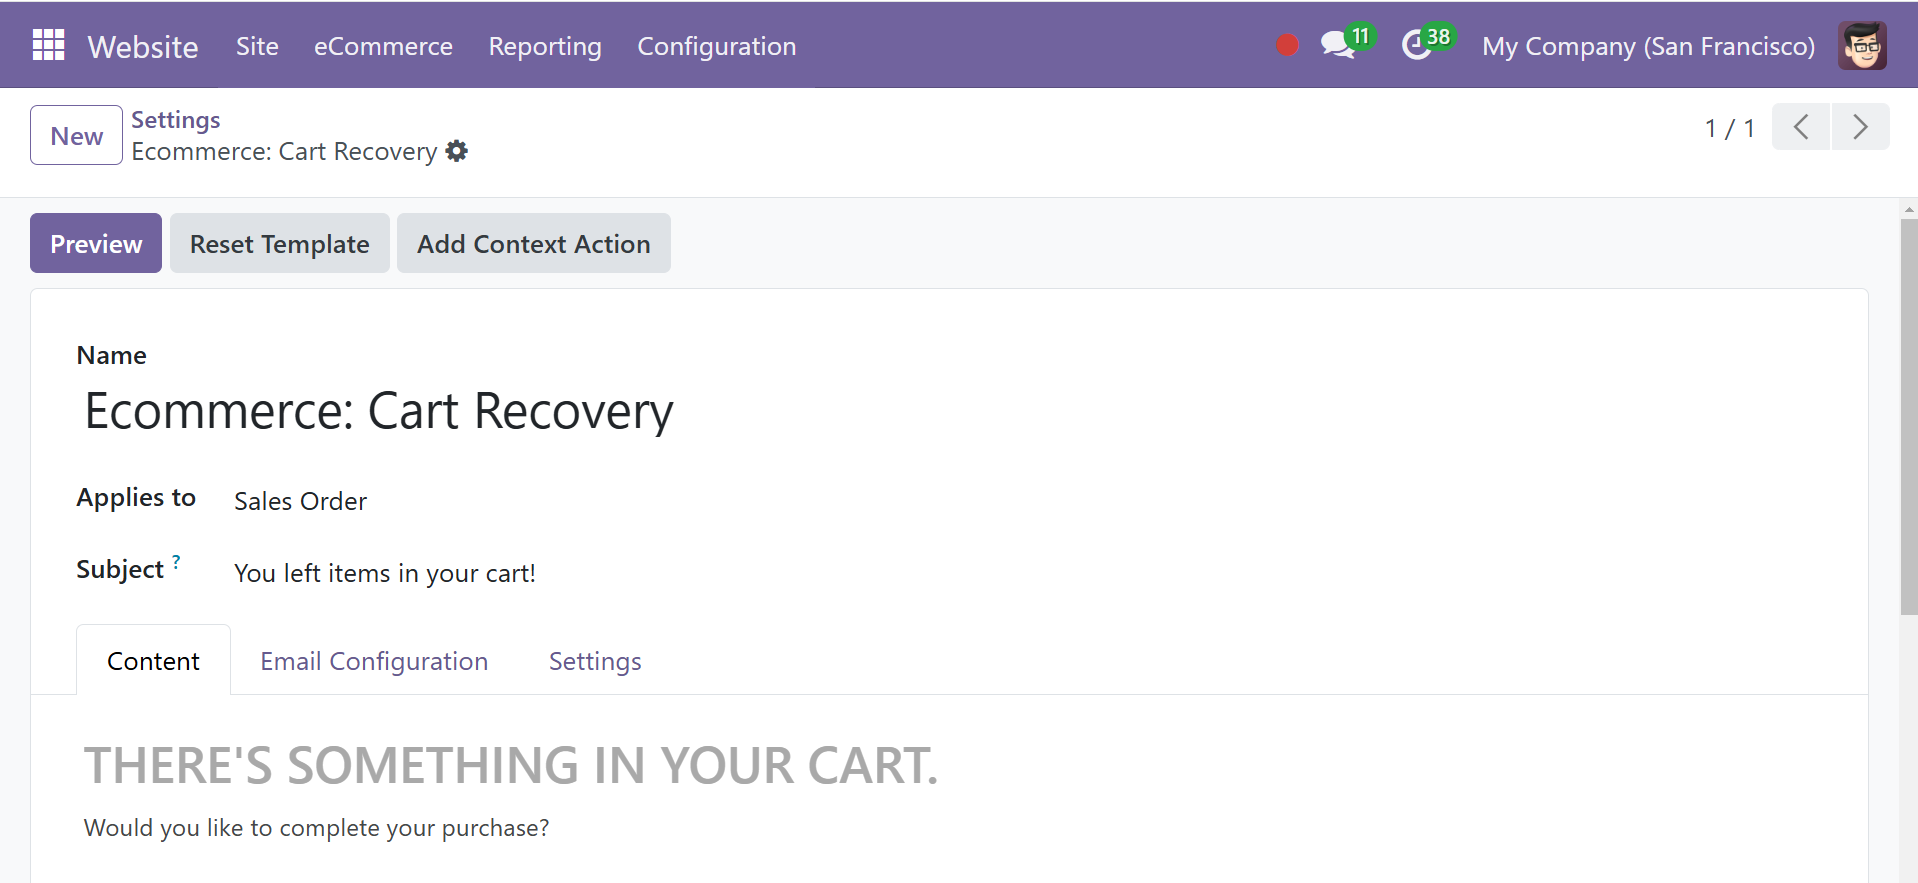
The user can customize the abandoned cart recovery option from the orders follow-up settings menu, as shown below.

Here, we can also change the email template for Odoo 18 E-commerce abandoned carts and specify how long a cart should be left unattended. In addition to adjusting other settings from this page, the user can preview and reset the template using the editing option in the cart recovery email.
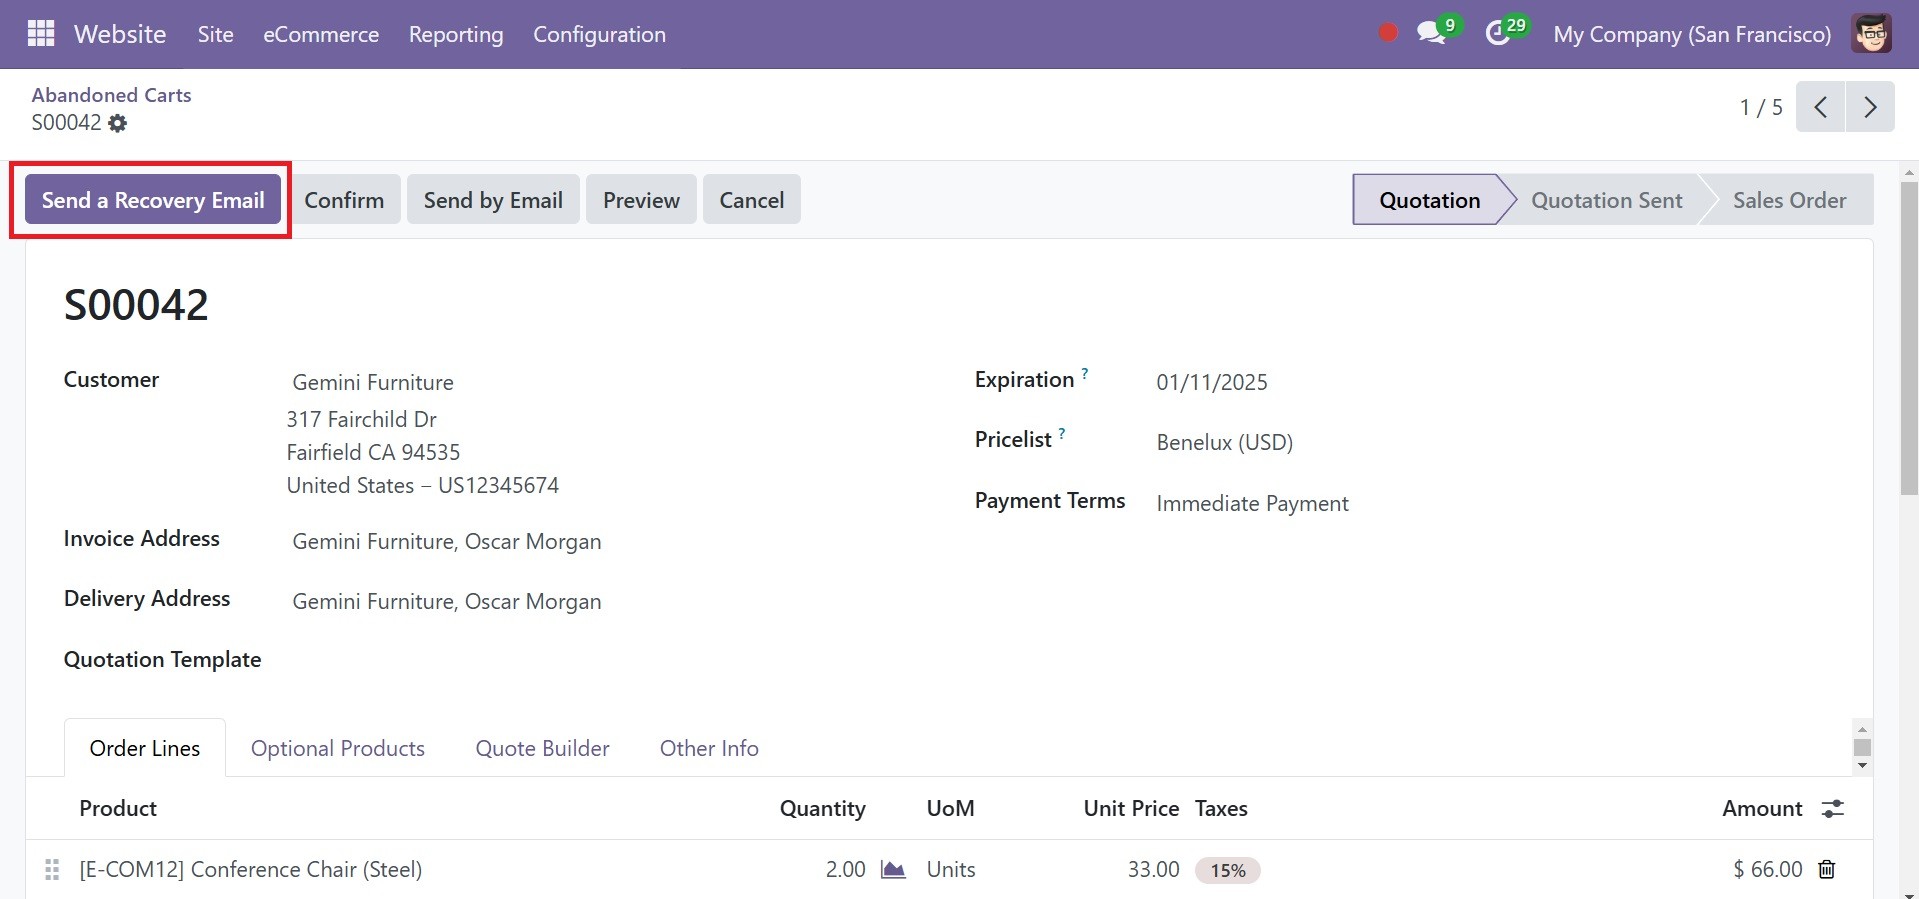
Assume that, as shown below, we add an item to our online basket but then forget to finish the payment and buy.
As a result, the buyer will receive an email urging them to complete the checkout process as soon as we establish a time limit, as seen below.
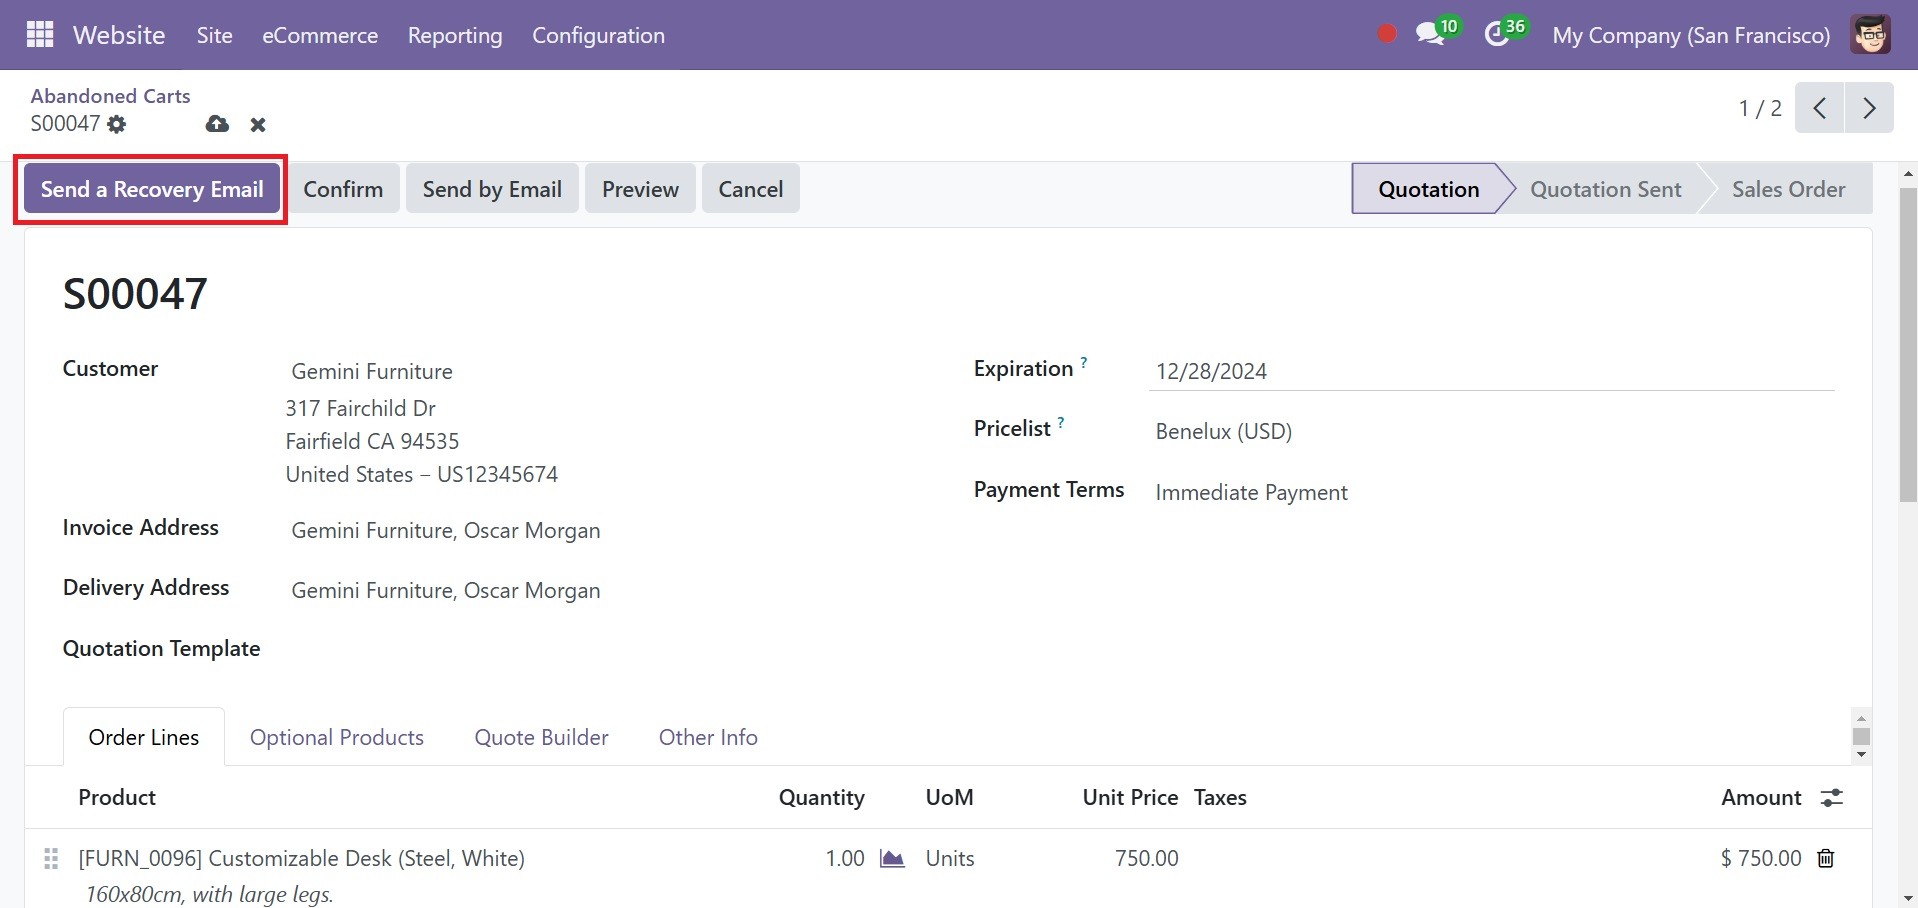
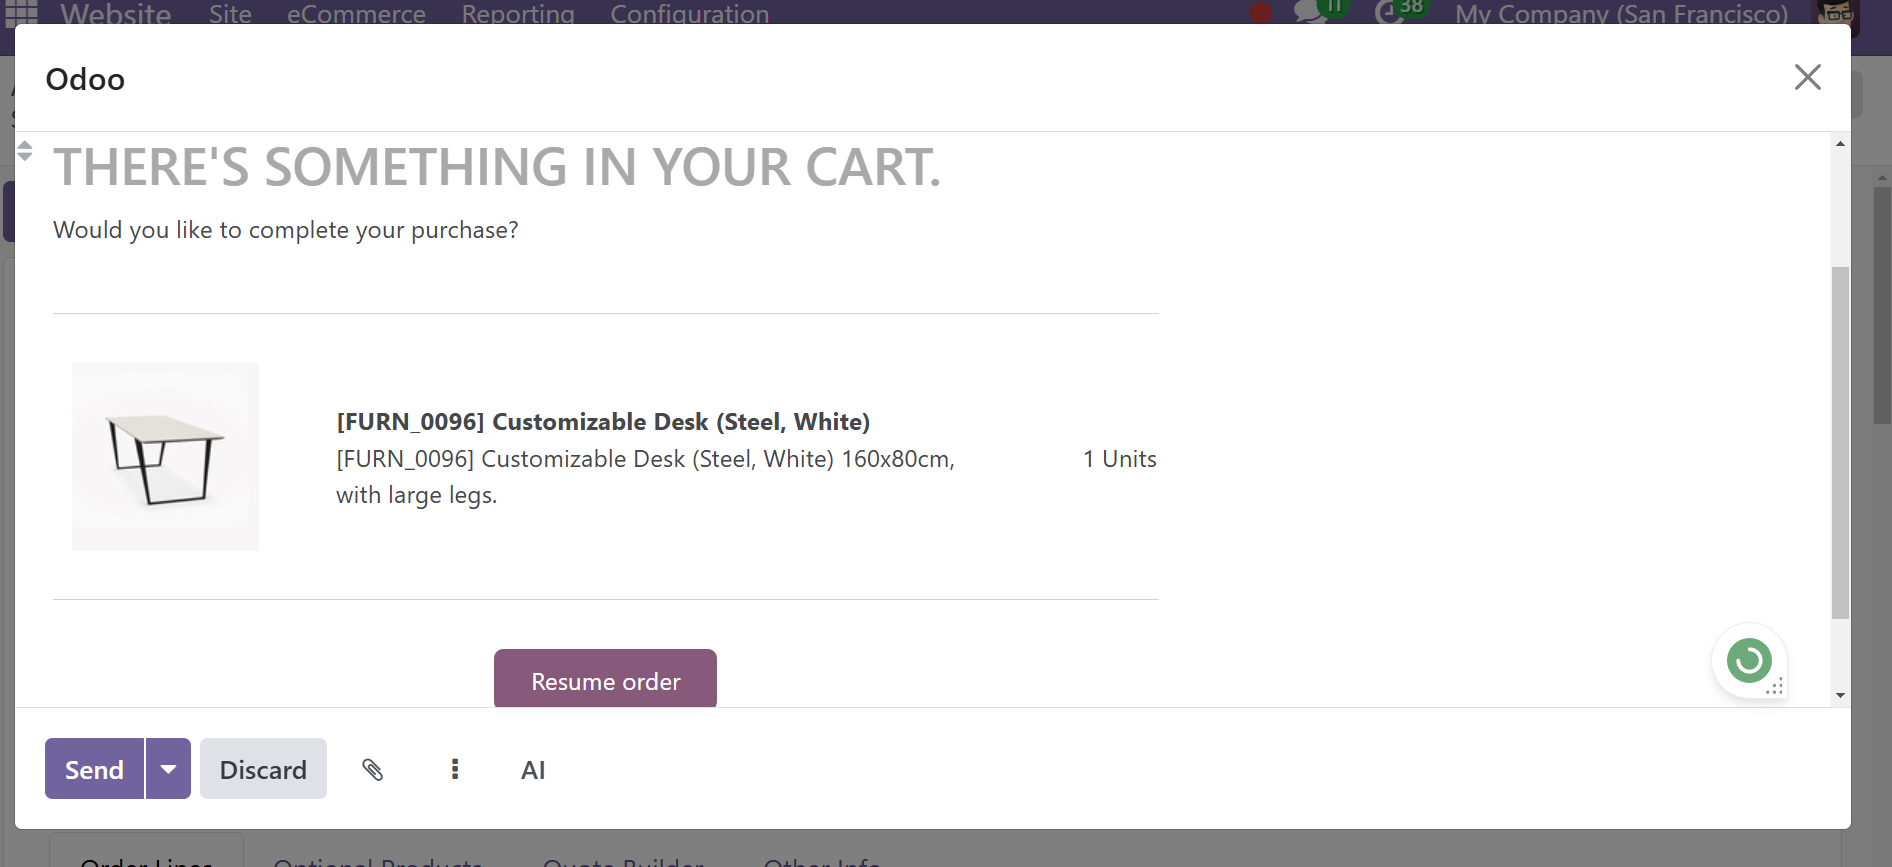
A pop-up window instructing us to write a letter to the receipt along with the relevant merchandise will show up as soon as we click the ‘’Send a Recovery Email button
Following up on orders may be assigned to a single salesman or a sales team. Under the abandoned cart description, the user can alter the email template that will be sent to the customer for recovery. Once a cart is abandoned, you can choose how long the email will keep sending automatically.
Customers
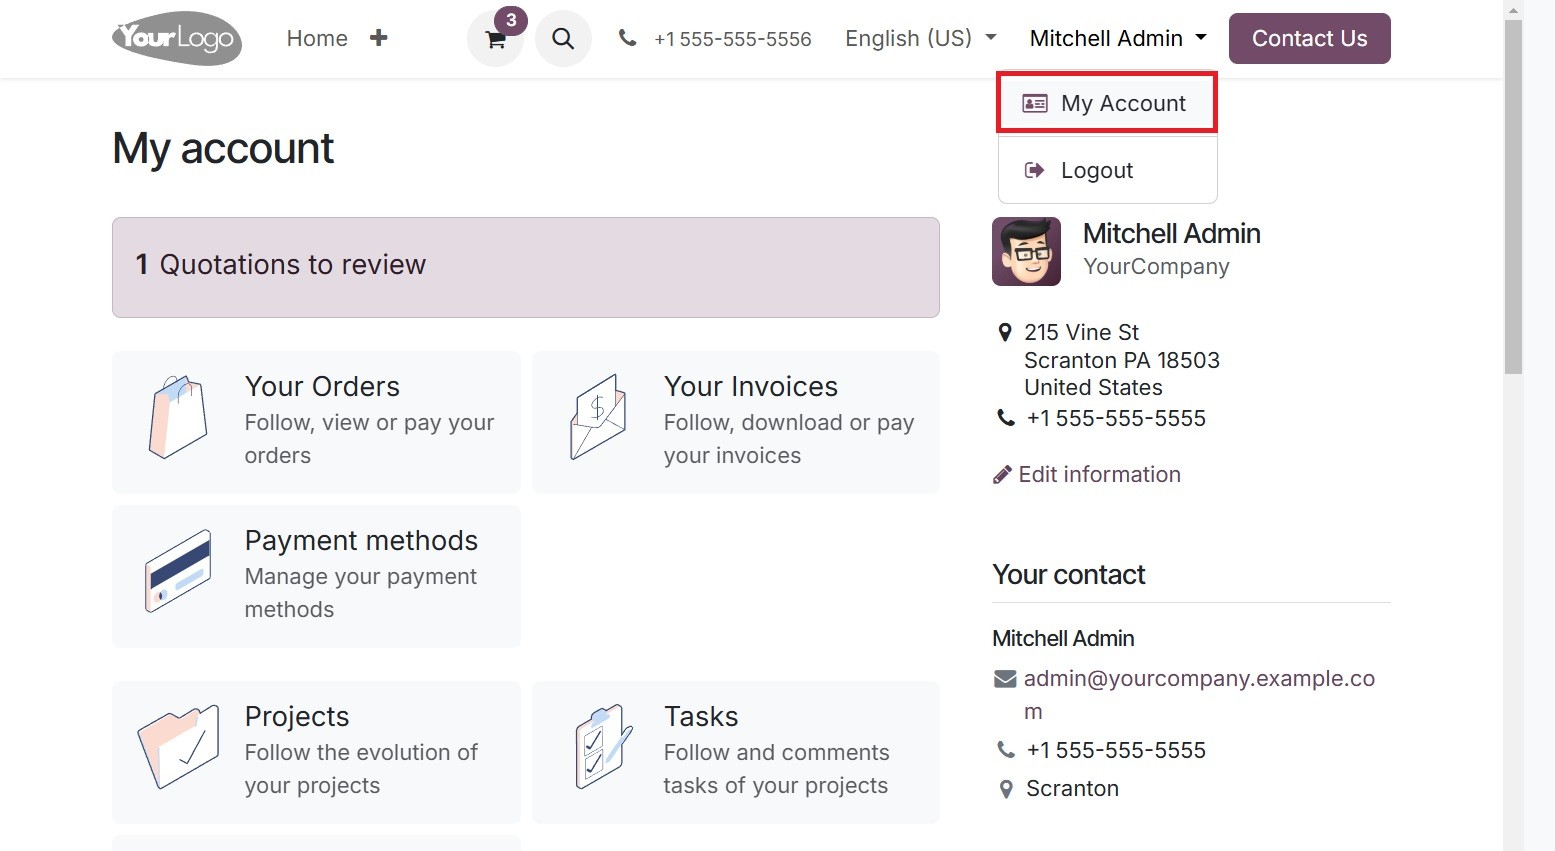
Customers may examine all of their documents in one location if they have accounts on e-commerce platforms. Customers must first log in to the online store. They then need to click on their username in the top-right corner of the website, and then click My Account. Customers can then view their quotes, invoices, orders, and more.
The Customer menu is included in the eCommerce tab of the Odoo 18 Website module and is used for customer management.
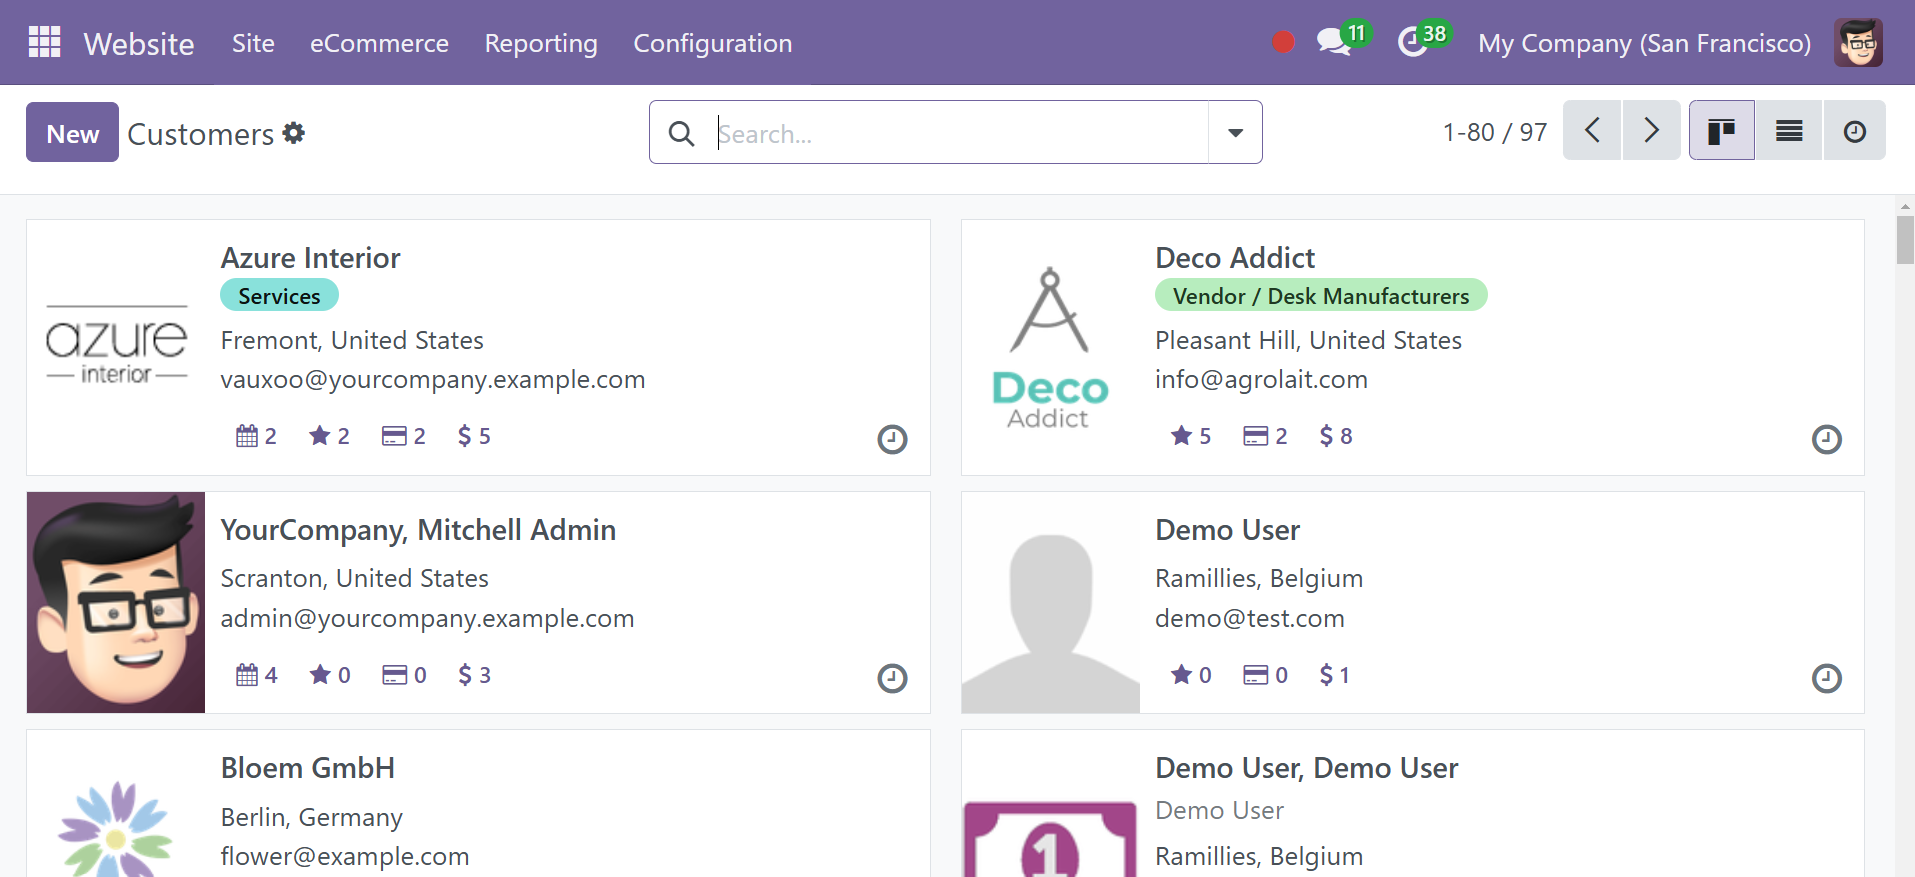
This tool allows you to receive payments, manage customer accounts, check customer details, and monitor customer activity. It may also create customer groups, send out email campaigns, create coupons and promotions for customers, and perform other tasks. The customer's menu also makes it easy for the business to monitor its customers, which allows them to tailor each eCommerce experience for the best possible result. As seen in the screenshot above, all previously configured client details will be displayed in the Customers menu.
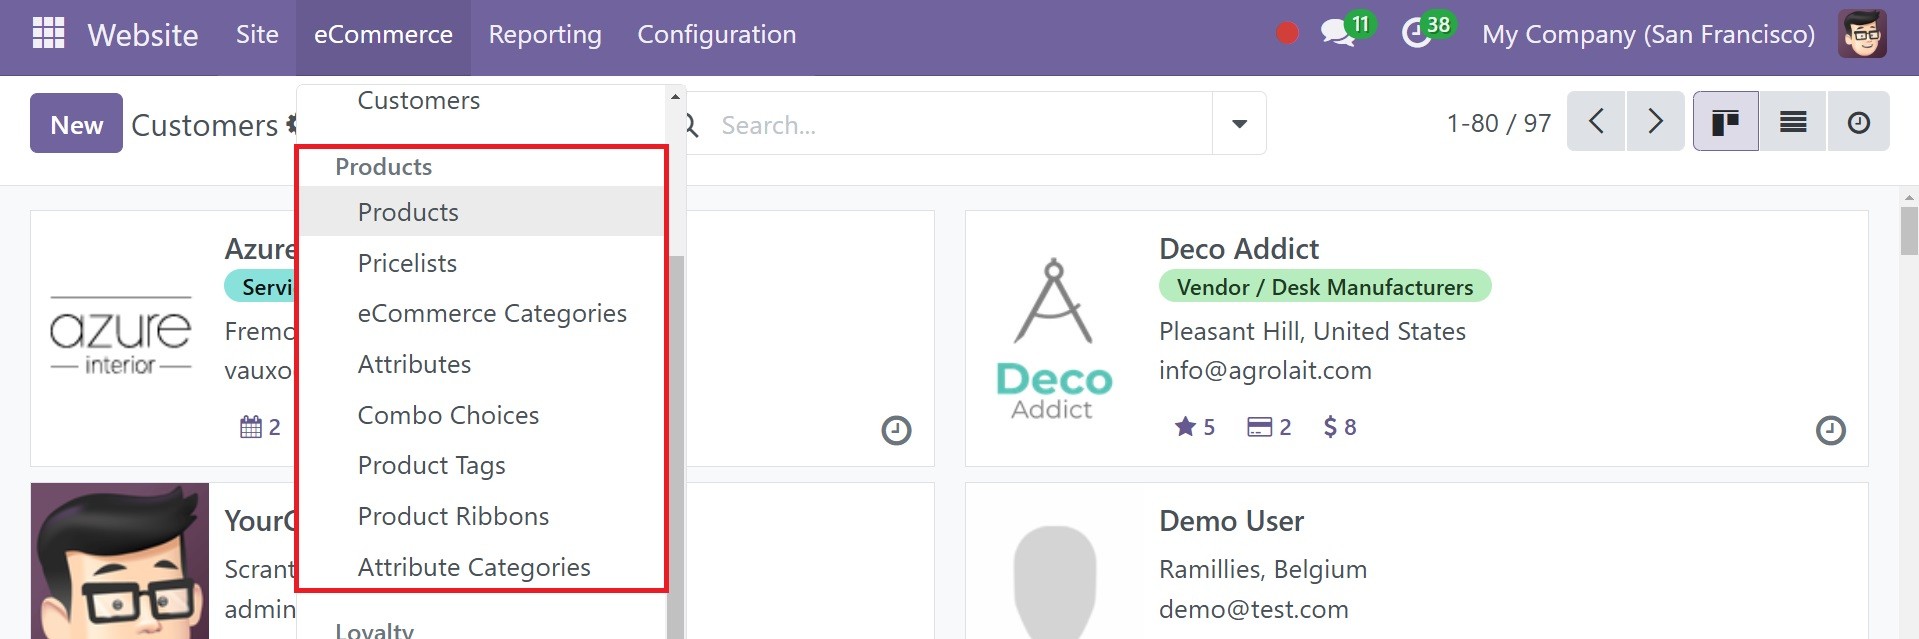
Product Management
The purpose of the product section of an eCommerce website is to manage all tasks pertaining to the product. This tool allows you to manage all of your offers and product information in one location. There are several possibilities in the Product area, including "Products, Pricelist, eCommerce Categories, Attributes, Product Tags, and Attribute Categories."
Products
The Odoo 18 Website app allows you to create, import, and manage your product pages. The Product option is included in the eCommerce menu of the website module.
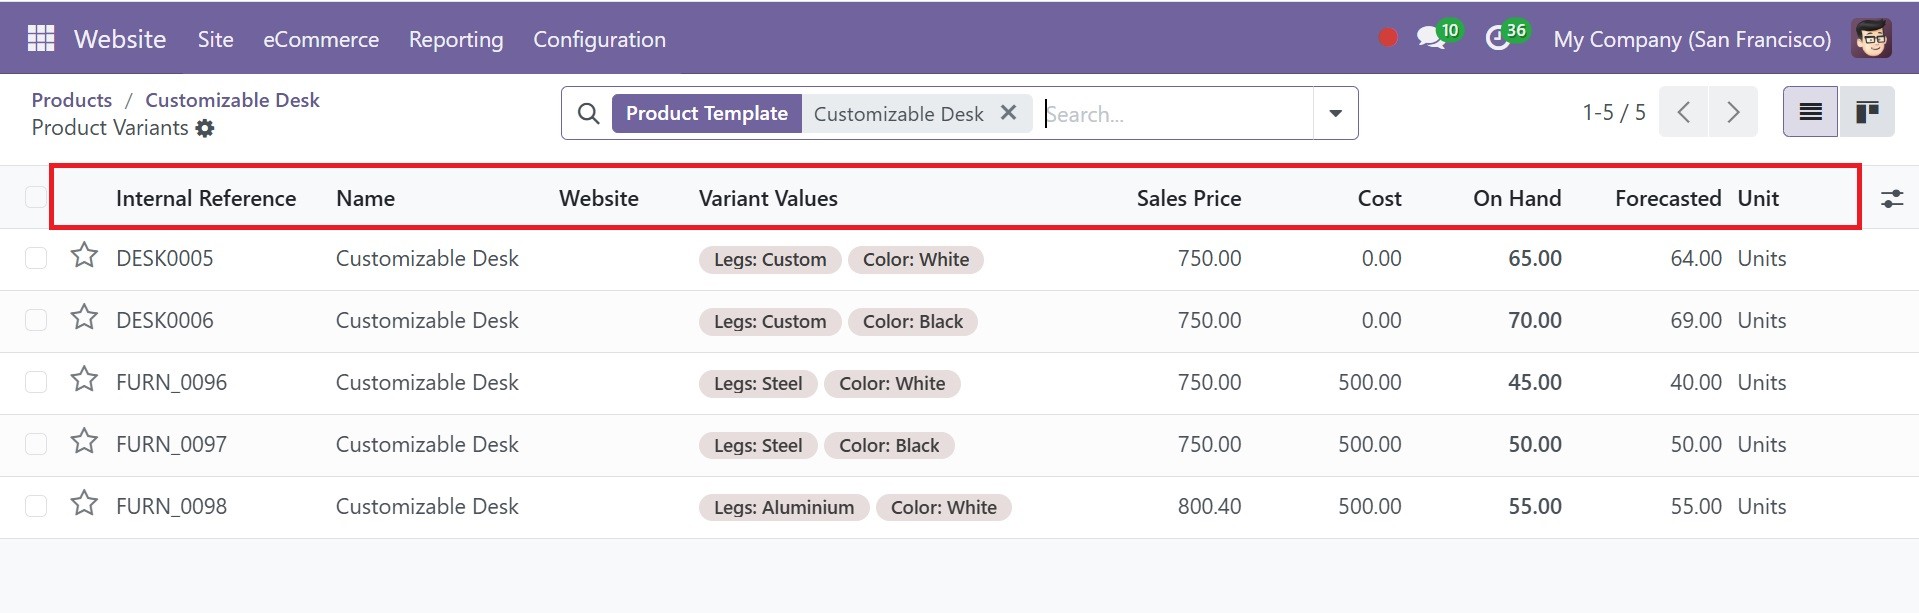
The Product window will be used to handle each of the Product Pages that are described in the platform. Each product page includes the following information: internal reference, name, website, variant, values, sales, price, cost, on hand, forecast, and unity.
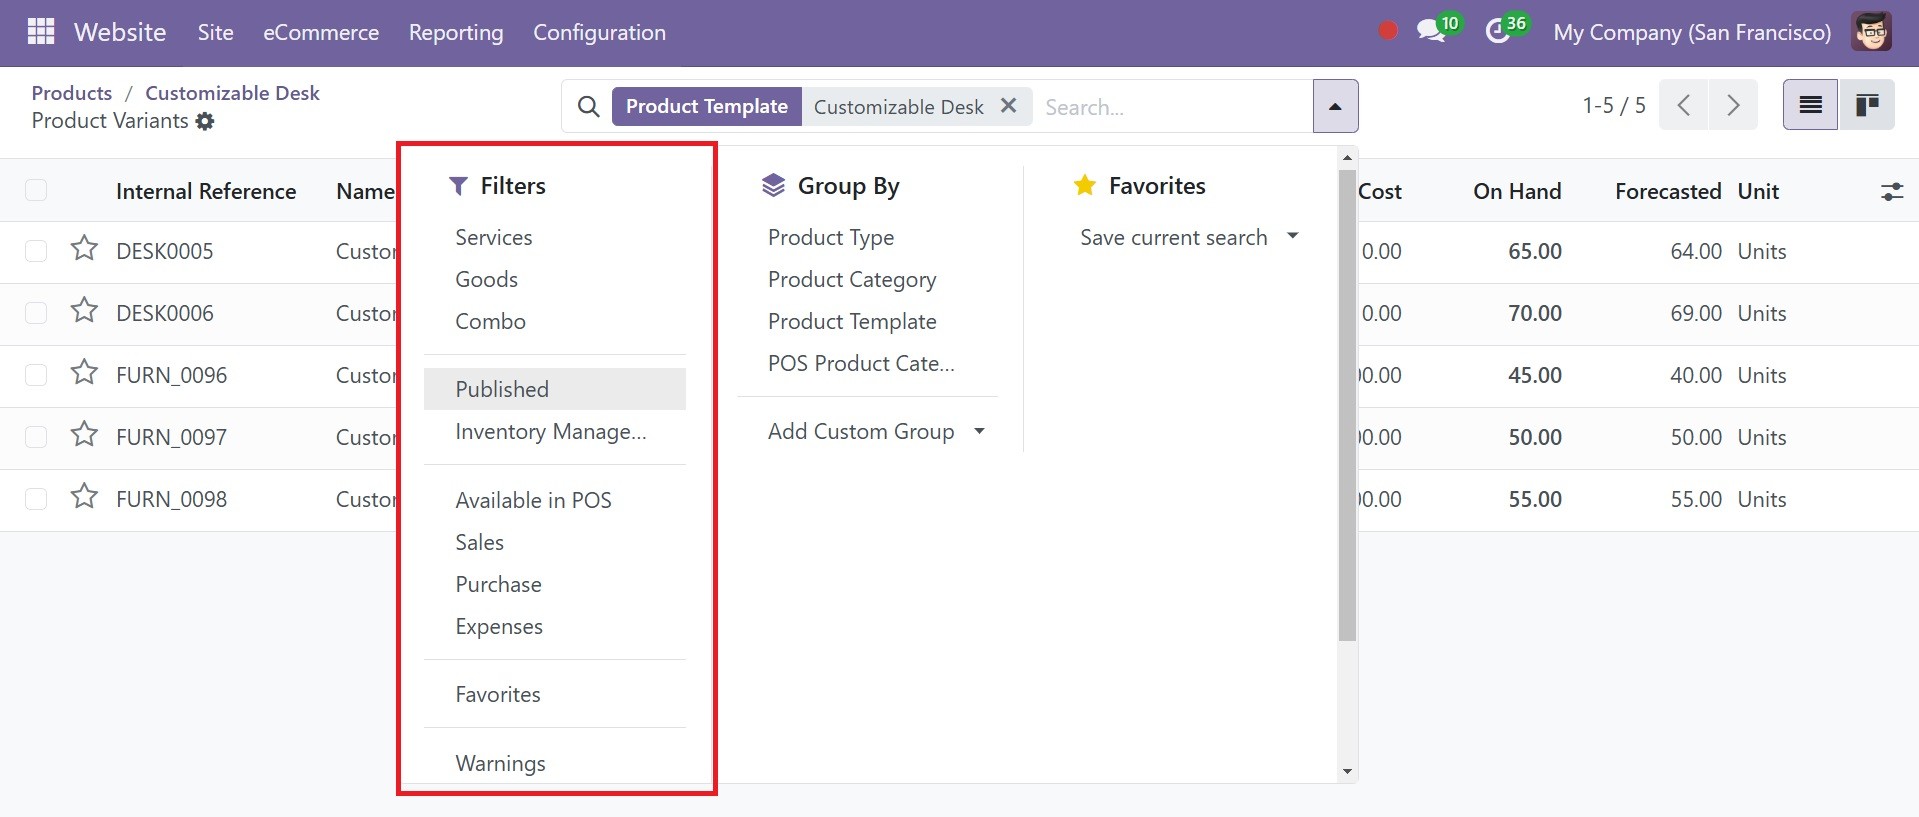
Additionally, you can filter your list using a variety of custom and preset filters on this page. Services, Goods, Combo Products, Published, Inventory Management, Available in POS, Sales, Purchase, Expenses, Favourites, Warnings, Archived, and Add Custom Filter are the selections that are automatically applied to the list, as in the image below. New custom filters can also be made using the Add Custom Filter option, which is found at the bottom of the filter selection
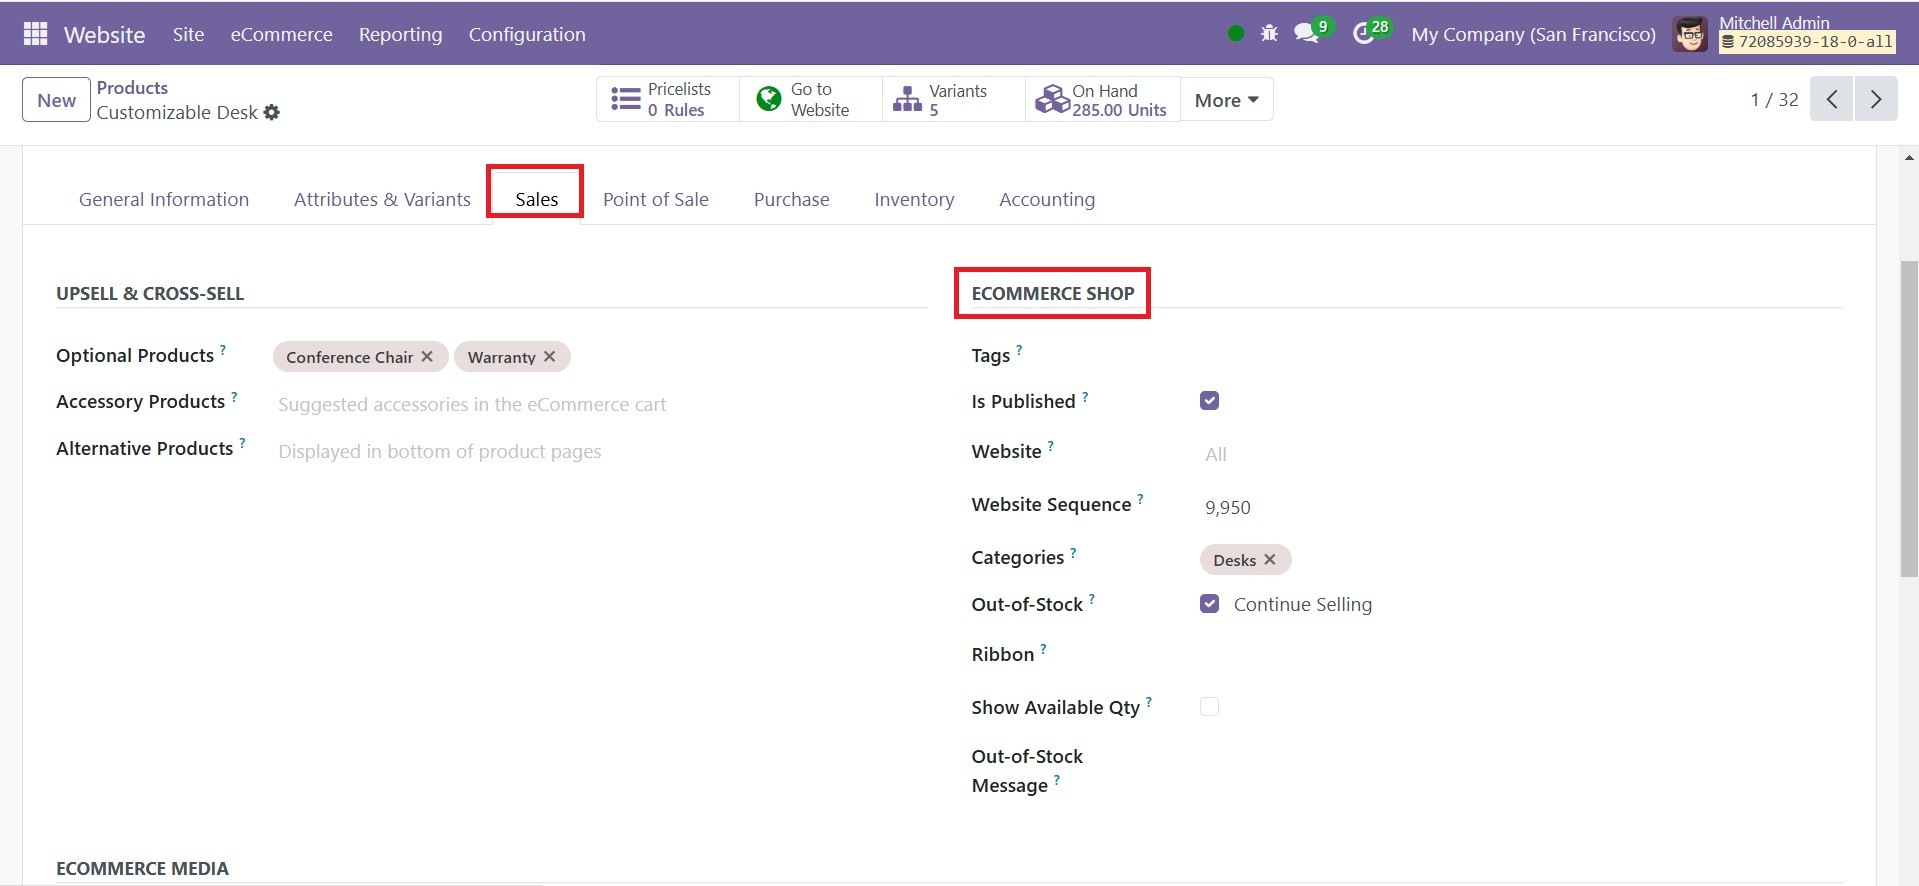
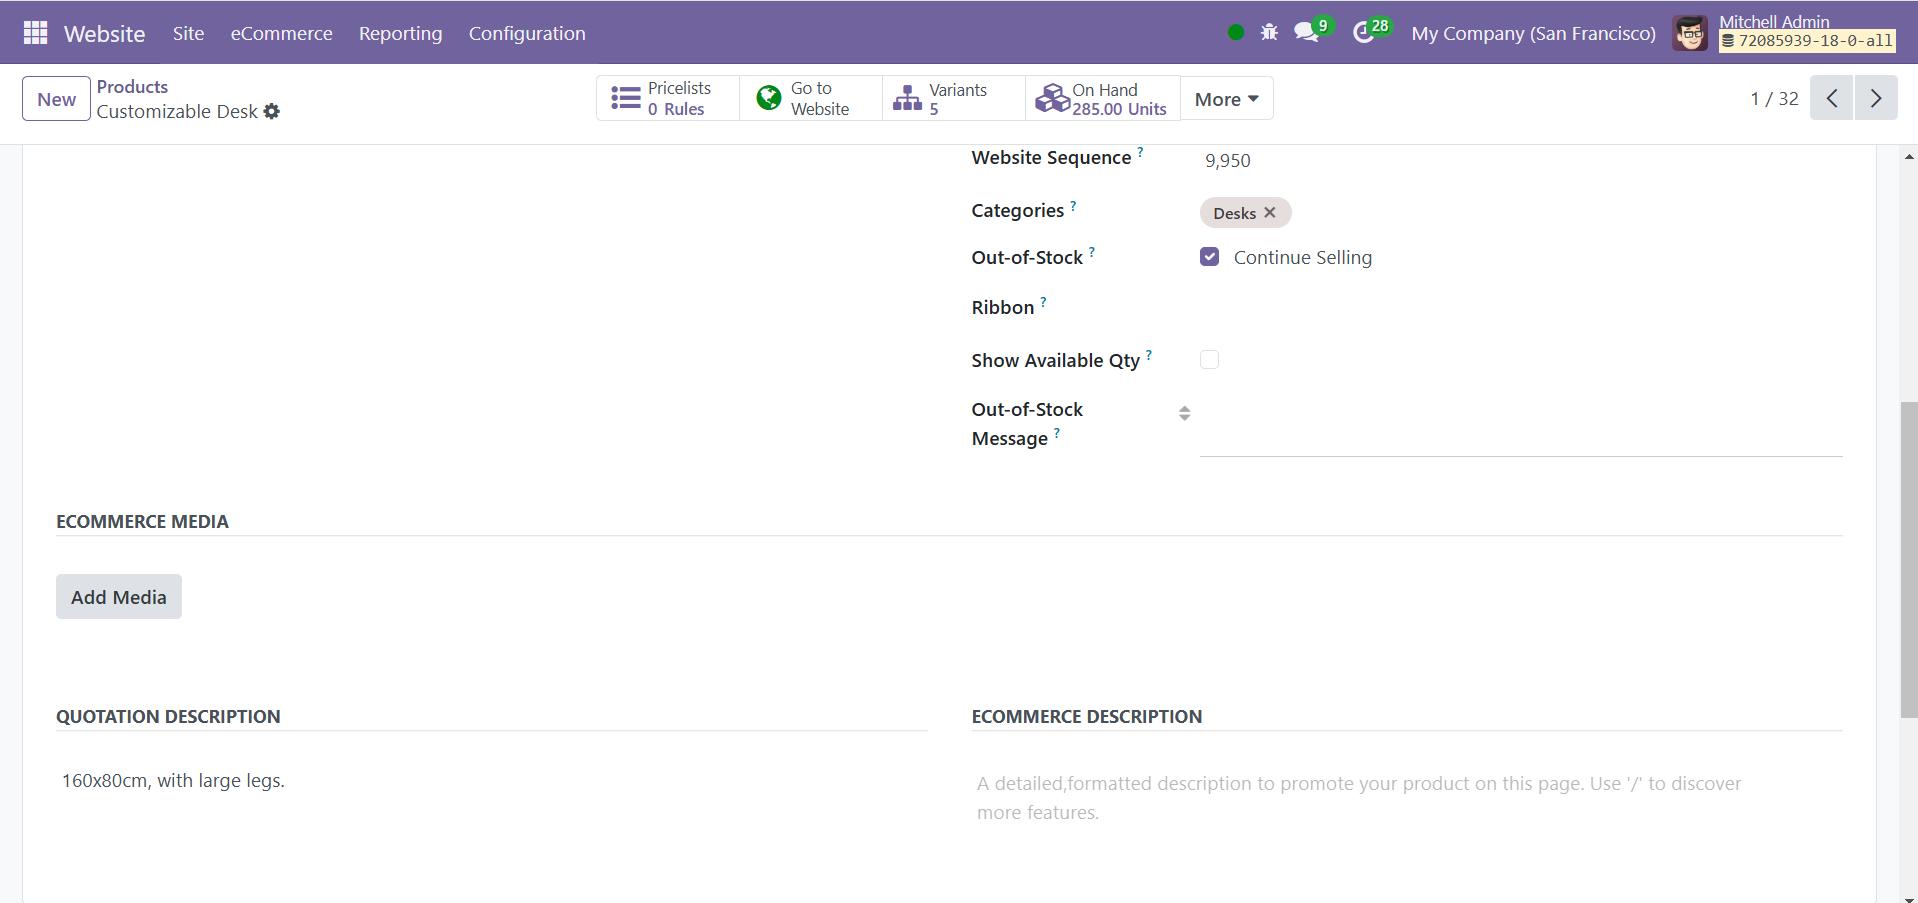
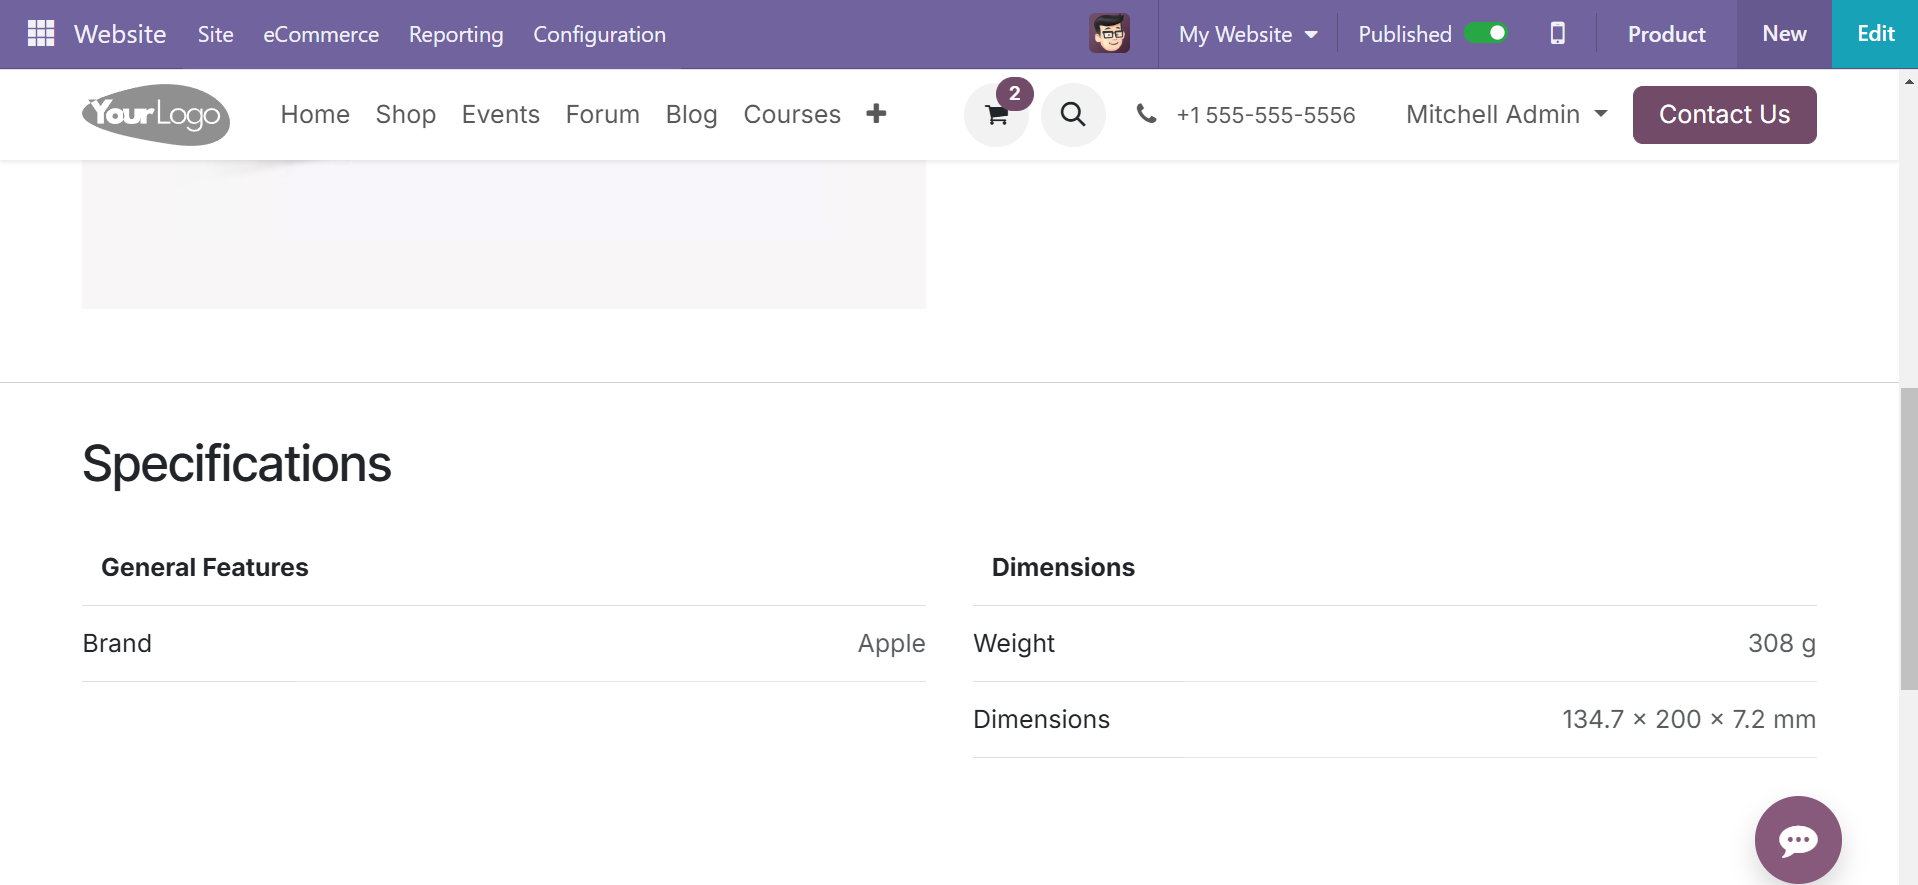
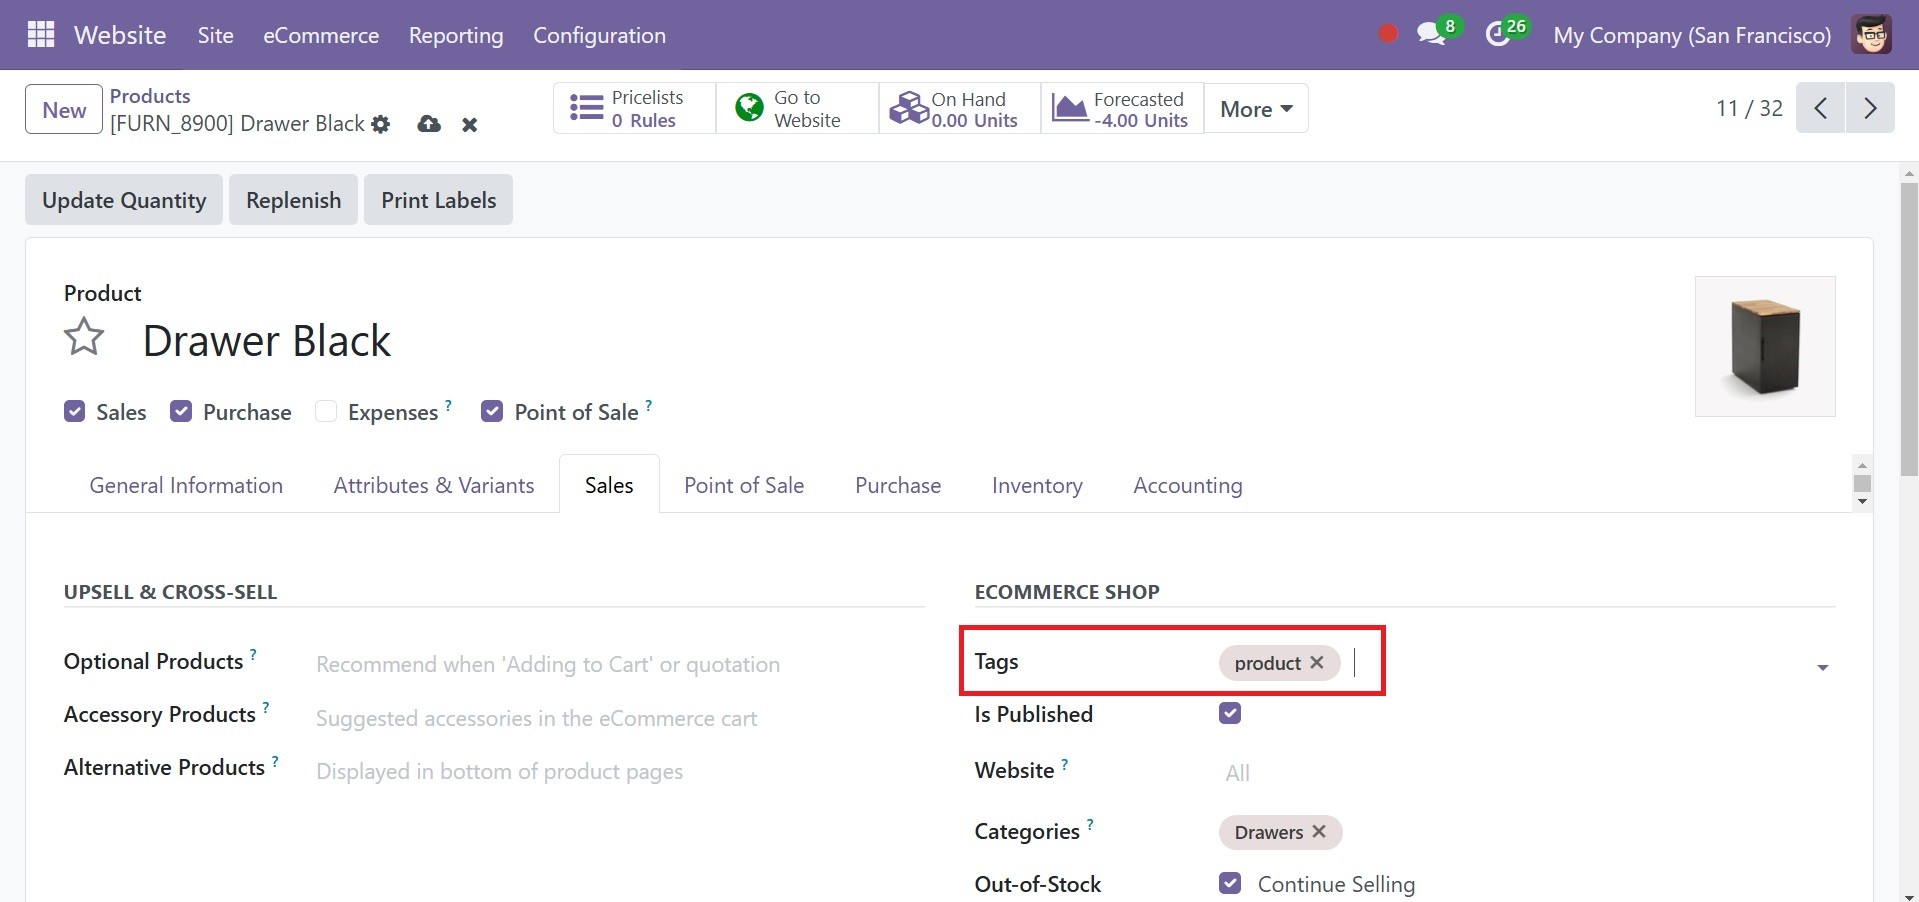
Open the product form, the Product form's Sales tab contains a section dedicated to an e-commerce store. The tags, is published, website, categories, out of stock, ribbon, show available quantity, and out of stock message are all under the Ecommerce shop option, as in the image below. The product-related tags can be added, is published allow you to publish the product to the website page, can add an e-commerce website, a website sequence, product sub categories, can set policies for out of stock products, product ribbons, can determine to show available quantity of product or not, and can add an out of stock message as well. The order in which products appear on the website is determined by the Website Sequence option in the Sales tab of a product configuration. When it comes to personalizing the product layout on your eCommerce storefront, this function is really helpful.
Optional products, accessory products, and alternative products are part of the upsell and cross-sell options.
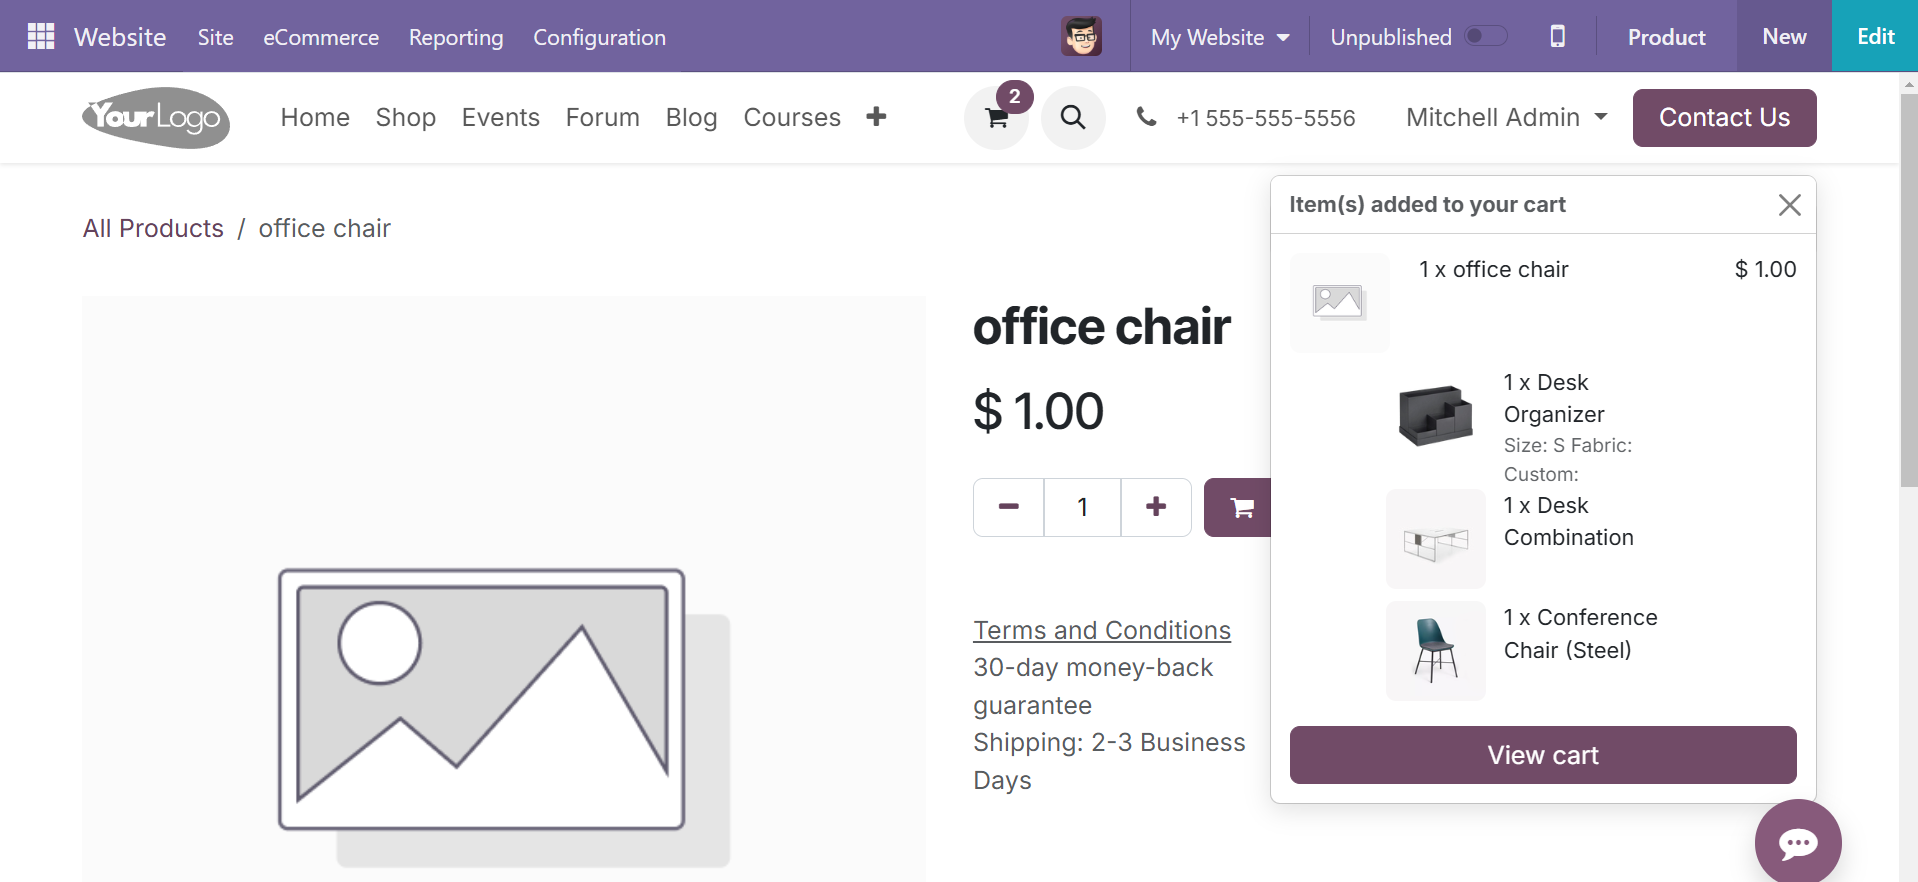
Optional Items: The items that are shown as optional are closely related to the item that is in the cart (for example, conference chairs' warranty, armrest, and LED base lighting are extra parts). Additionally, when the primary product is put to the cart, a second screen appears.
Alternative Products: Although they fall into the same category, alternative products vary in colors, materials, dimensions, and other aspects. These might also be distinct goods associated with the main item. To increase your earnings, it is highly recommended that you recommend more costly solutions for necessities. Your buyer will spend more time perusing your catalog in this way.
Accessory Products: These are the items that appear in customers' shopping baskets prior to their payment. For example, when someone is buying a computer, you could recommend a mouse or keyboard.
Under the Ecommerce Media, you can add the media. And below that, you can add the description of e-commerce and quotations.
Let's specify the accessory, alternative, and optional products for the Customisable desk product when adding it to the cart. Then, we can observe how these items appear on the website.

Now let's visit the website and choose this item so you can view the substitute product that has been linked to it, as shown in the product page below.
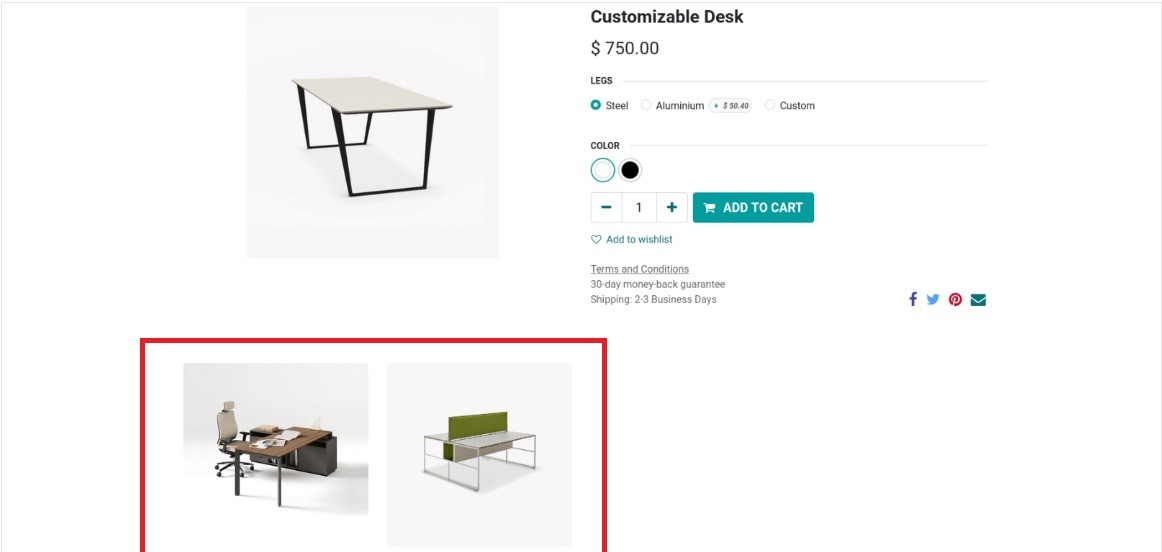
Furthermore, a window displaying the alterantive items connected to the main item, as seen below, opens as soon as you add this item to your cart, allowing the customer to choose one.

Additionally, the accessory product is shown beneath the principal product as a suggestion as you proceed to the checkout.

Products created in your eCommerce catalog are automatically marked as unpublished. To make your product accessible to visitors, go to the Website Site Homepage, click on your main store page, choose the product, and check the Published checkbox in the top-right corner.
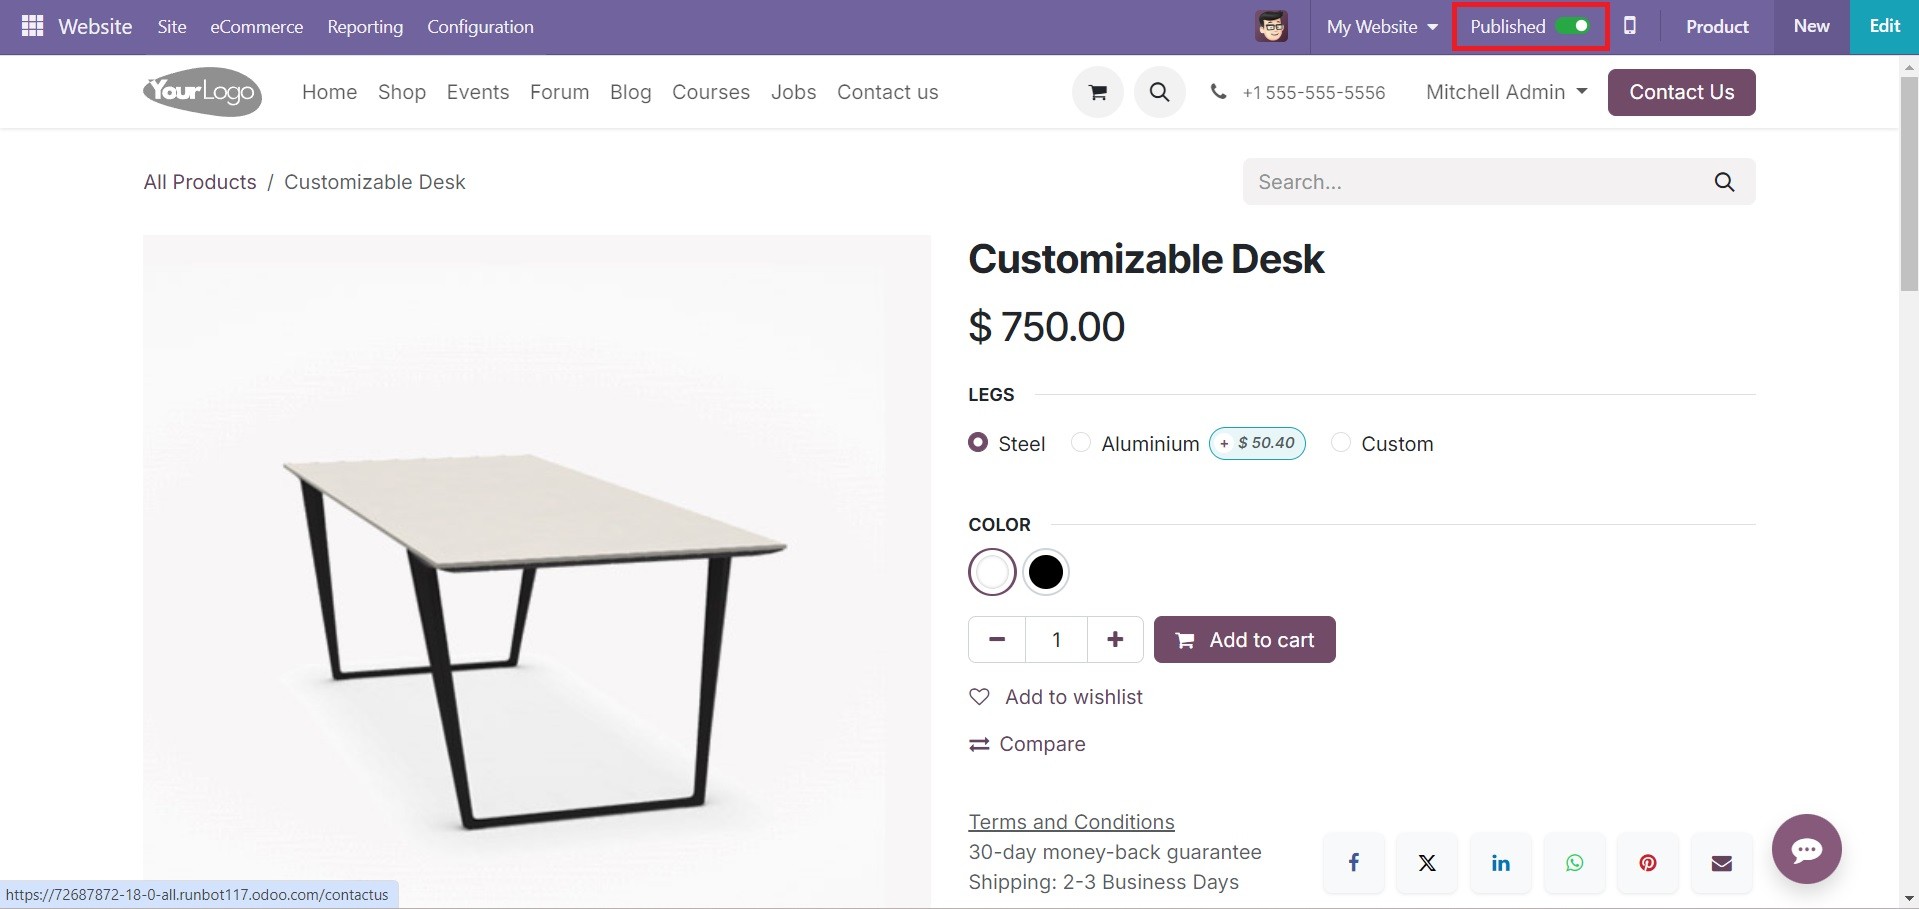
You can also have the option of Is Publish in the product form, as in the image below.

Pricelists
Running a successful business requires creating numerous product pricelists. For a specific period of time, a business can generate multiple price lists for specific clients based on specific criteria. The price list will be updated in accordance with the rules that apply to them. A business may adjust the price of its products and services in response to shifts in the market's demand or the season. Thus, if you want to run a profitable business, you must be cautious and employ a methodical approach while establishing pricing lists for your goods.
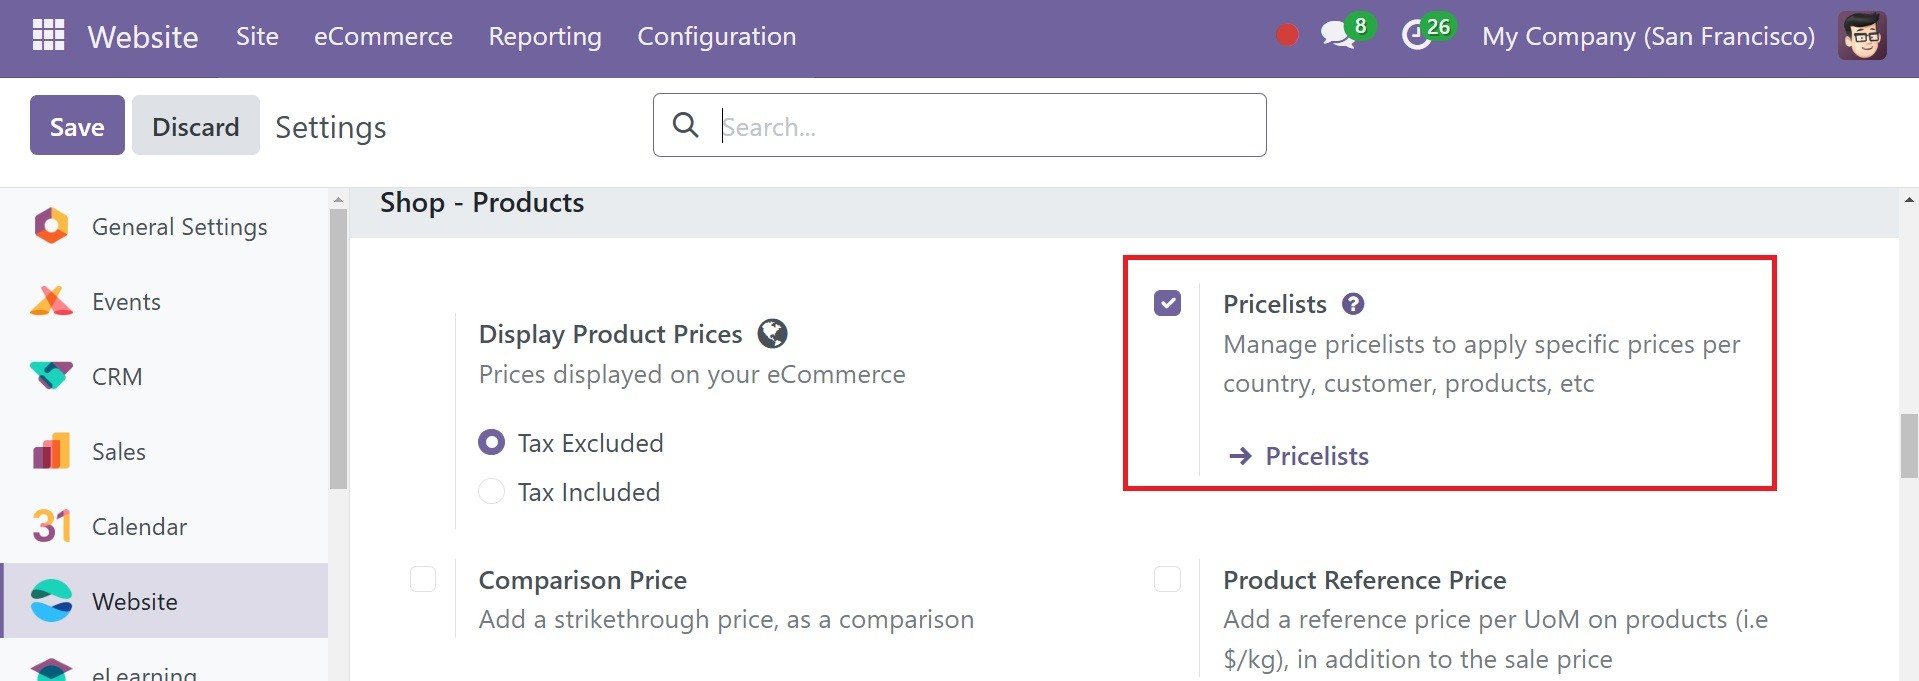
Odoo 18 eCommerce comes with a specific architecture for creating numerous product price lists and discounts, which is controlled by the Website module. You may control every facet of eCommerce from the Website module because these two modules are integrated. To access the platform for configuring the pricelist in the Odoo Website module, activate the Pricelists option under the Pricing tab of the Settings page, as indicated below.
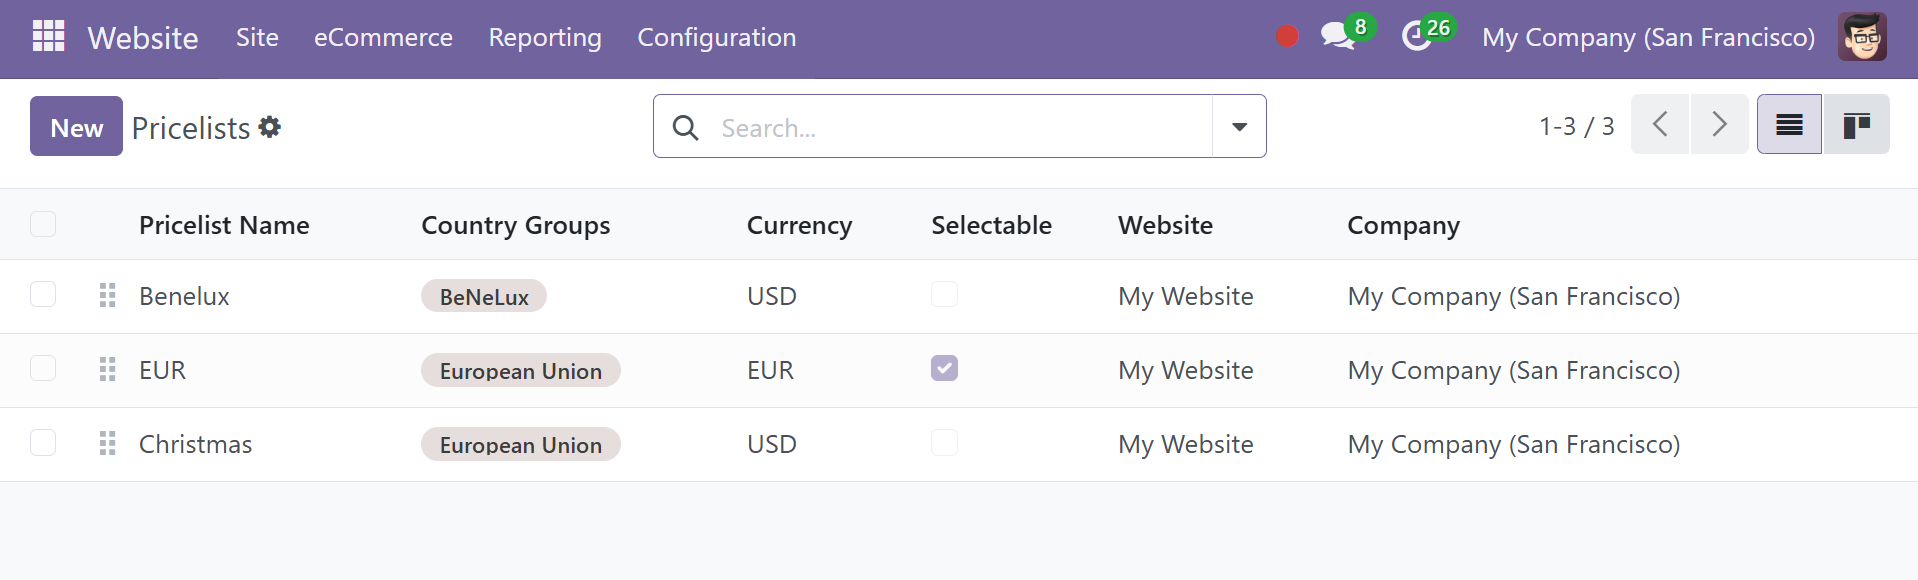
The Pricelist can be viewed by the user by choosing it from the e-Commerce menu of the website module once it has been activated. Here, you can have the details, such as pricelist name, country, groups, currency, selectable option to activate, website, and company respectively.
On selecting the New option; you have the creation page, as in the screenshot below.
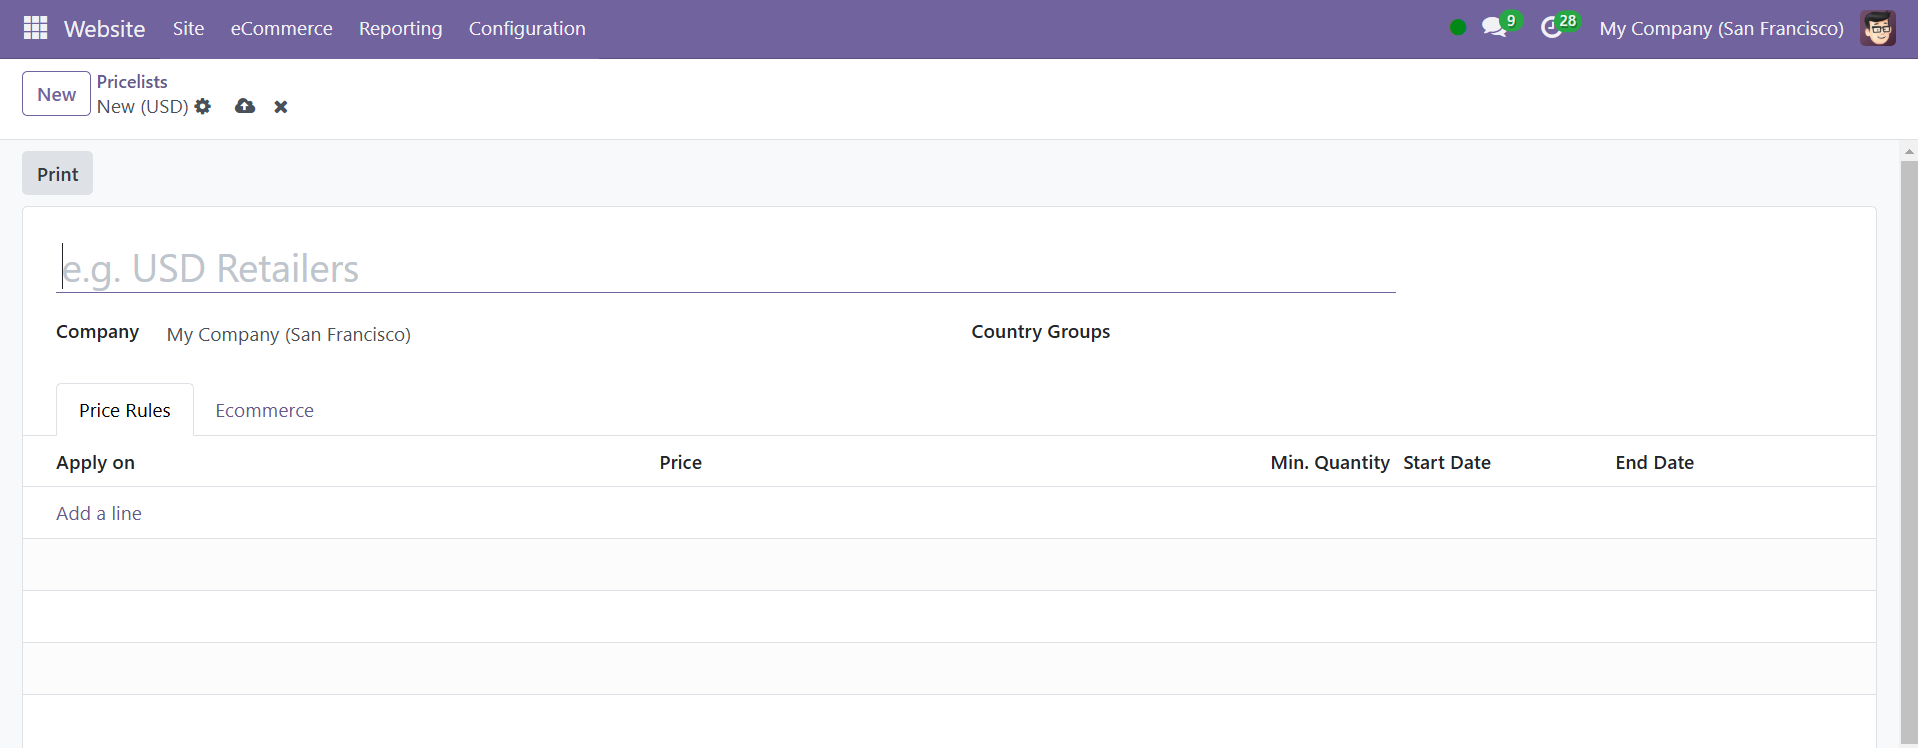
Here, you have the options, such as name of the pricelists, company, and country group.
The Add a Line option on the Price Rules page allows you to add the products you want in this pricing list. On selecting the Add a Line option, you have the pop-up window, as in the below image. There, you can select the option to either product or category, product field, price types, such as discount, formula, and fixed price, minimum quantity, and validity period. Finally, you can save and close or save and create another one.
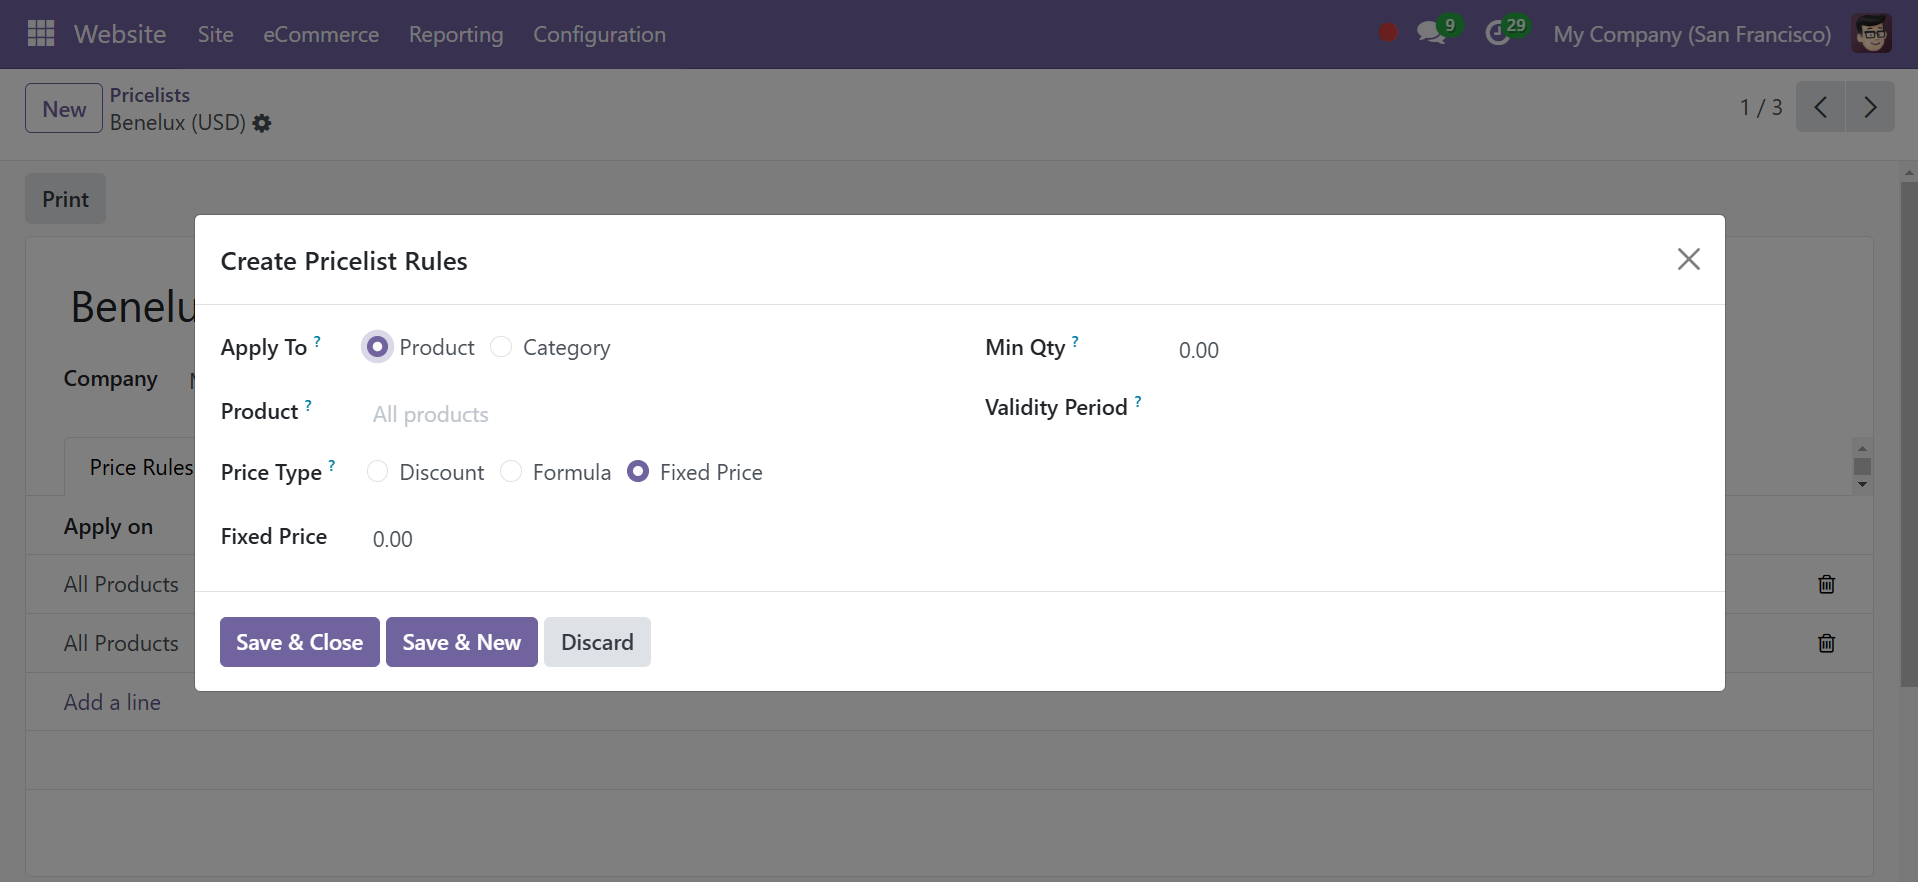
Here, you have different price types, such as discount, formula, and fixed price.
- Fixed Price: the price computation is based on a fixed price.
- Discount: the price computation is based on a discount.
- Formula: the price computation is based on a formula.
If Fixed Price is selected, enter the desired price in the Fixed Price field below. If Discount is selected, enter the desired discount percentage in the Discount field that appears.
If Formula is selected, a number of configurable options appear, as in the image below.
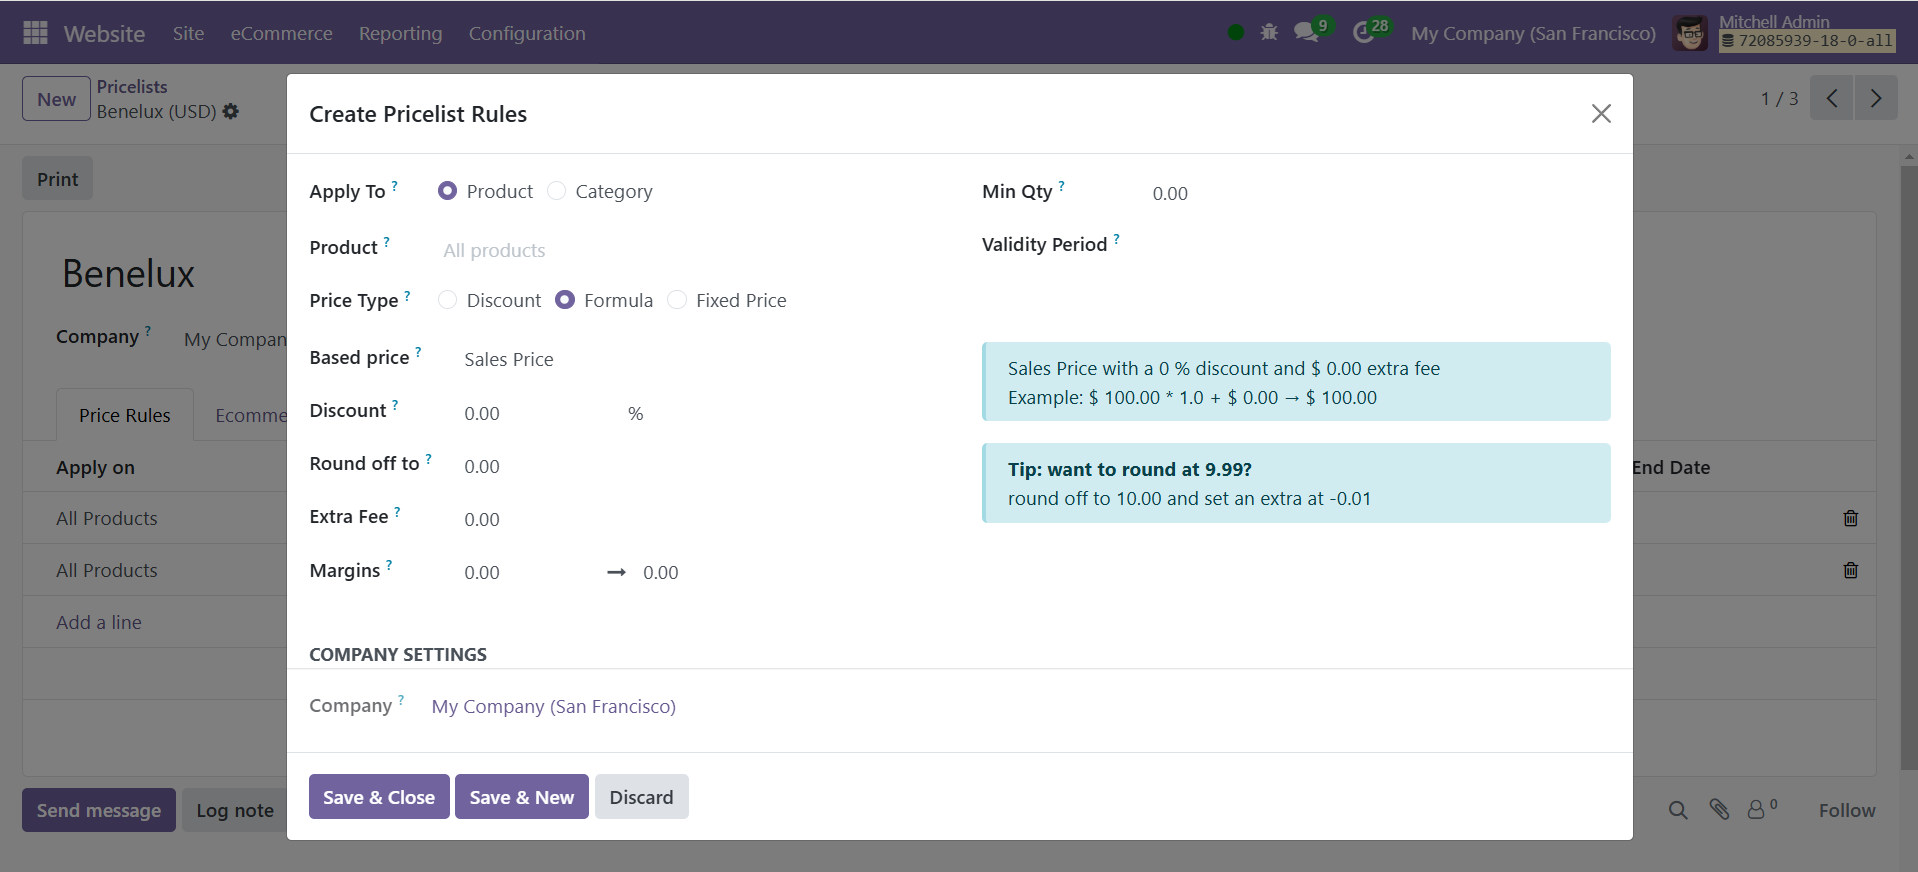
To configure the Formula computation option, start by selecting an option from the Based on field: Sales Price, Cost, or Other Pricelist. This determines what the advanced price rule formula will be based on.
Next, in the Discount field, determine how much of a discount should be applied. It should be noted that a mark-up can be applied by setting a negative discount in this field.
Next, enter a fixed amount to be added (or subtracted) from the amount determined using the discount in the Extra Fee area. Next, fill in the Rounding Method section with the appropriate number. The price is set using the rounding method to be a multiple of the field value.
Lastly, specify the minimum amount of margin over the base price in the Margins field.
Once all formula-related configurations are complete, Odoo provides an example of the formula in a blue block to the right of the configurations.
Then, In the corresponding fields, enter the Minimum Quantity, Prices, Start Date, and End Date as shown below.

The Ecommerce menu provides the options, such as website, selectable option to activate, and e-commerce promotional code as, in the below screenshot.
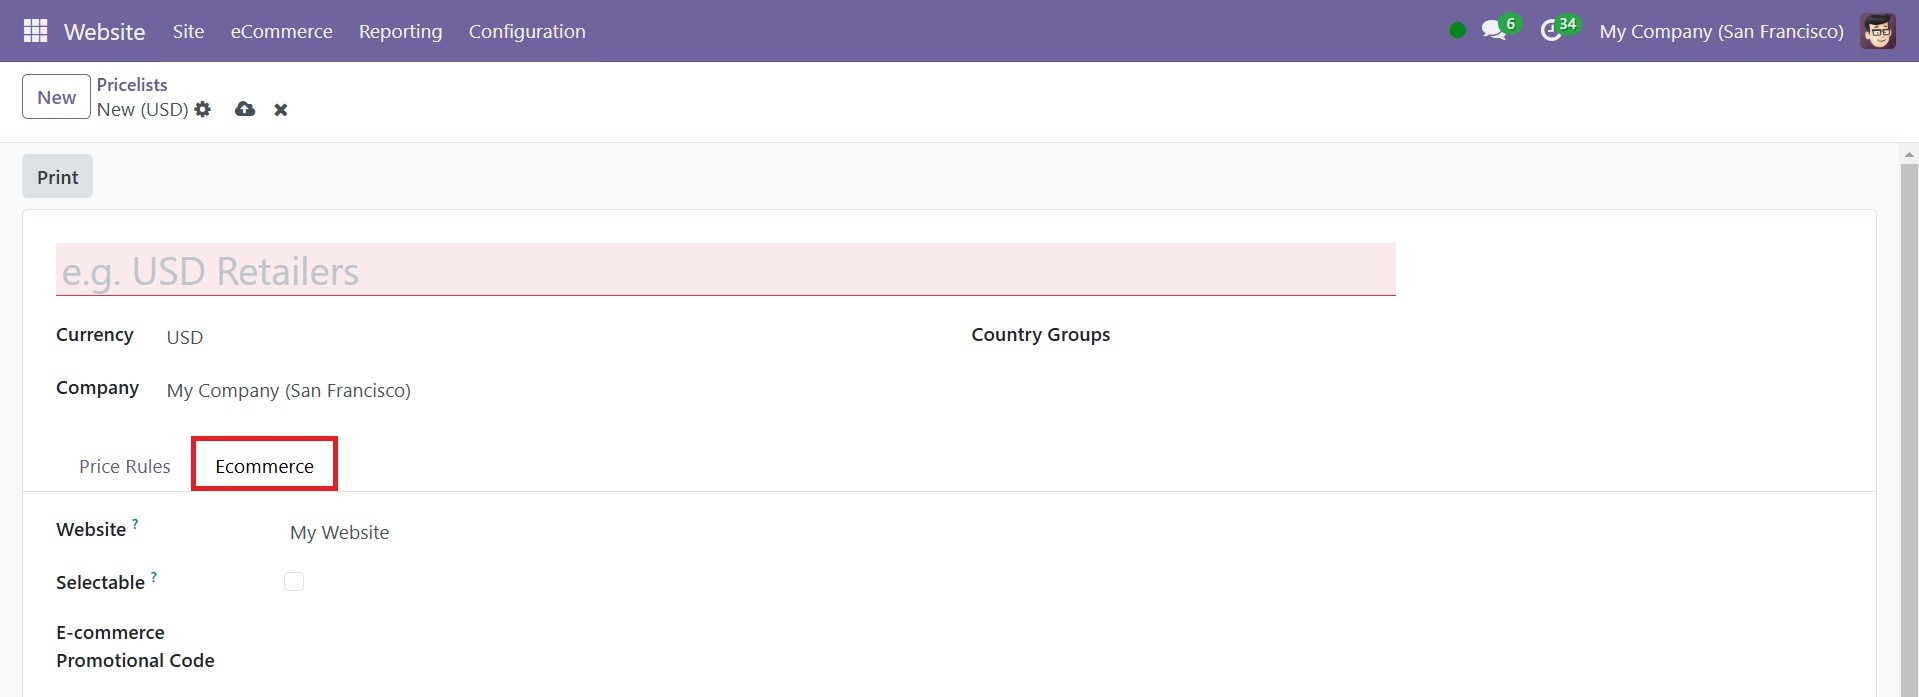
Adding an e-commerce promotional code is a possibility. To add a code, insert the required promo code that, even if the consumer does not meet the previously stated requirements, applies the price list to them when they check out.
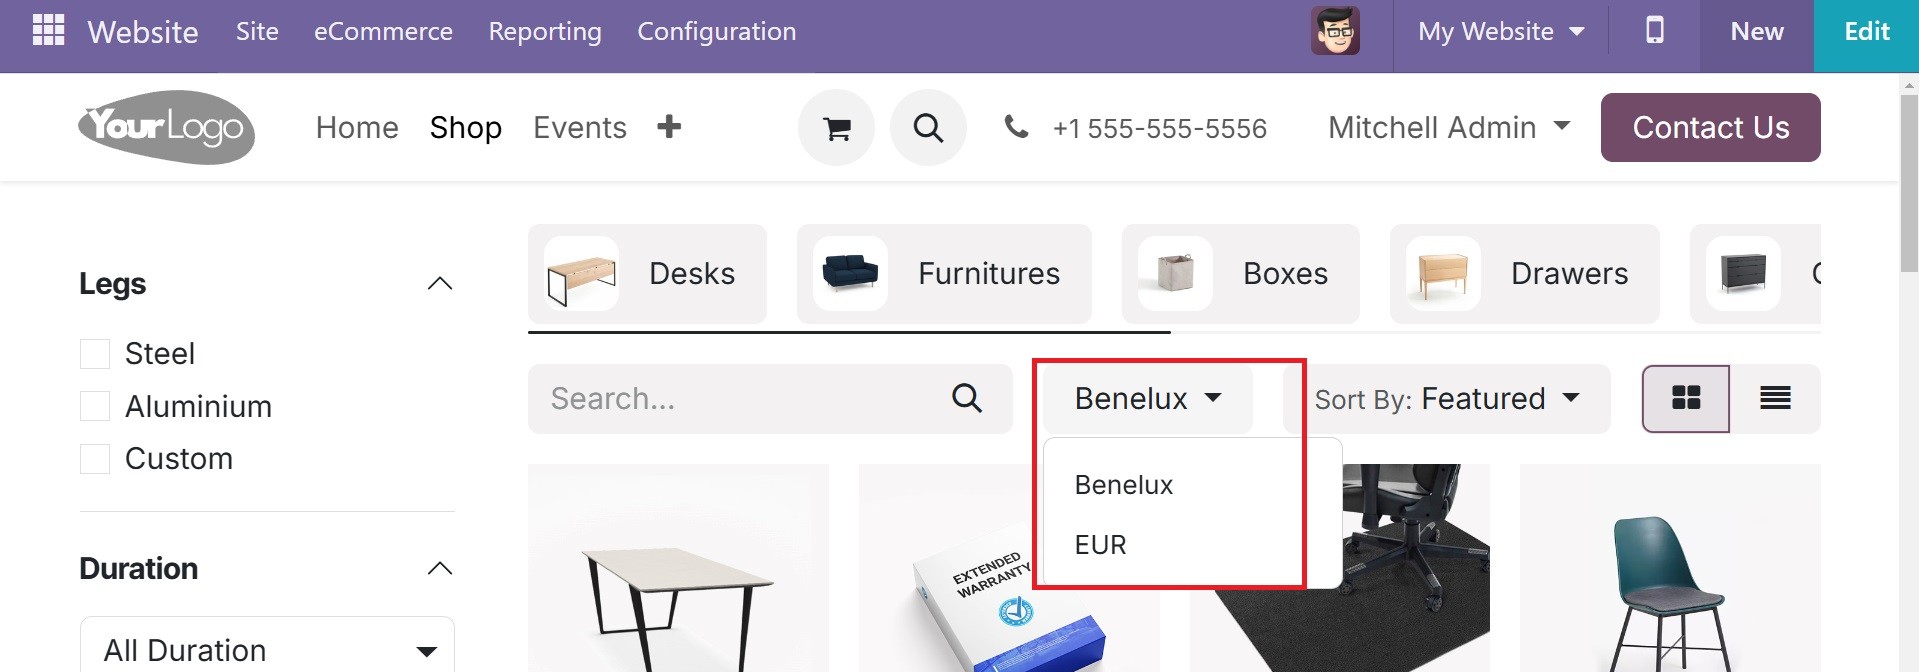
Customers can select the appropriate price list from the drop-down box next to the search bar if they sell in multiple currencies and have price lists in foreign currencies.
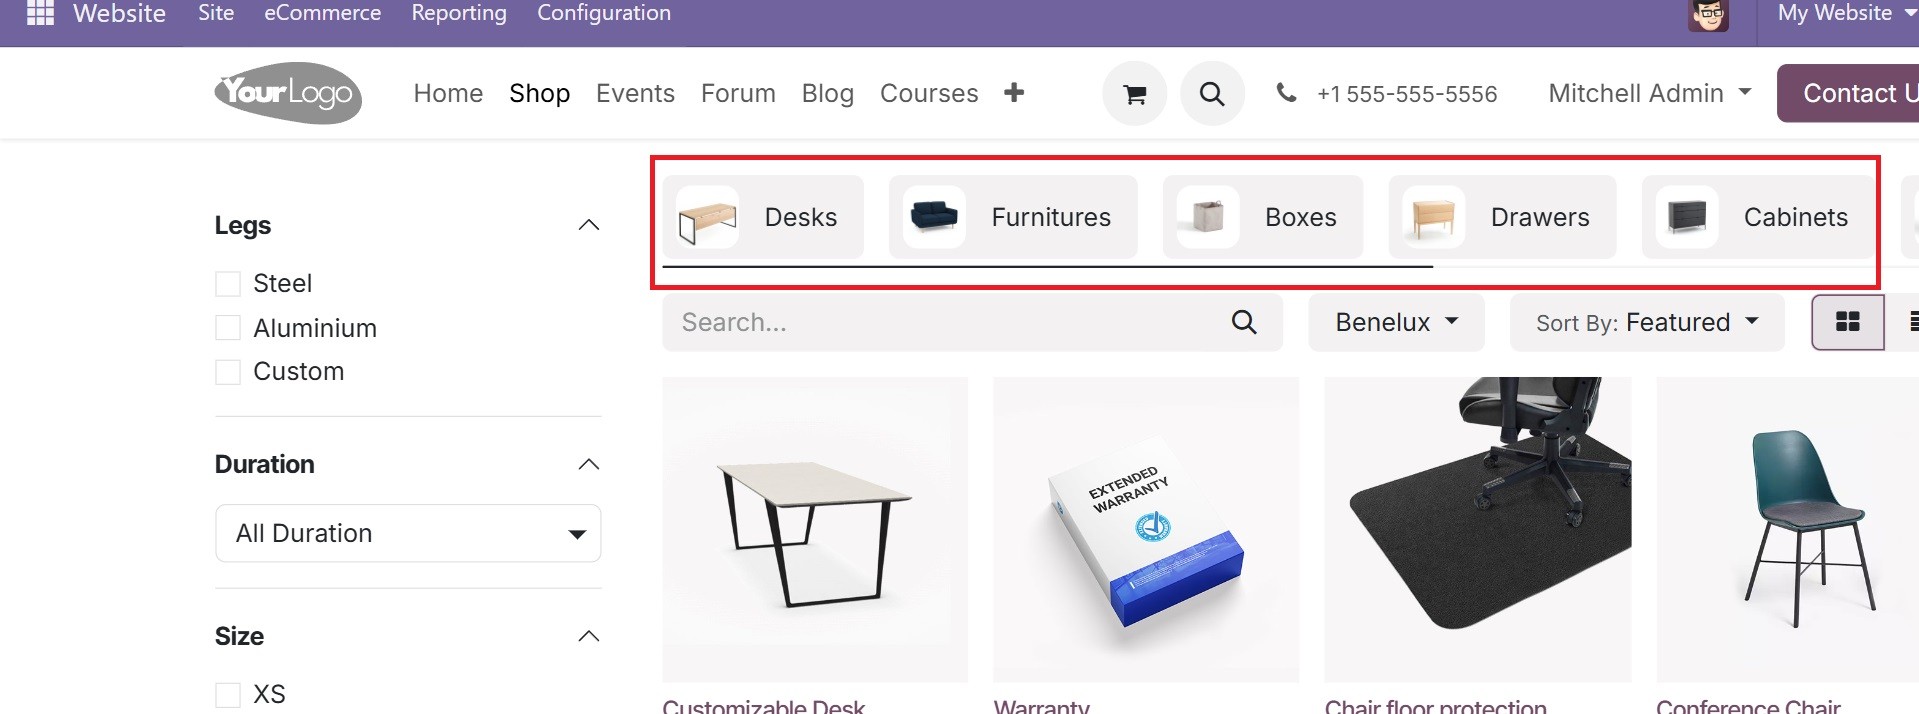
E-commerce Categories
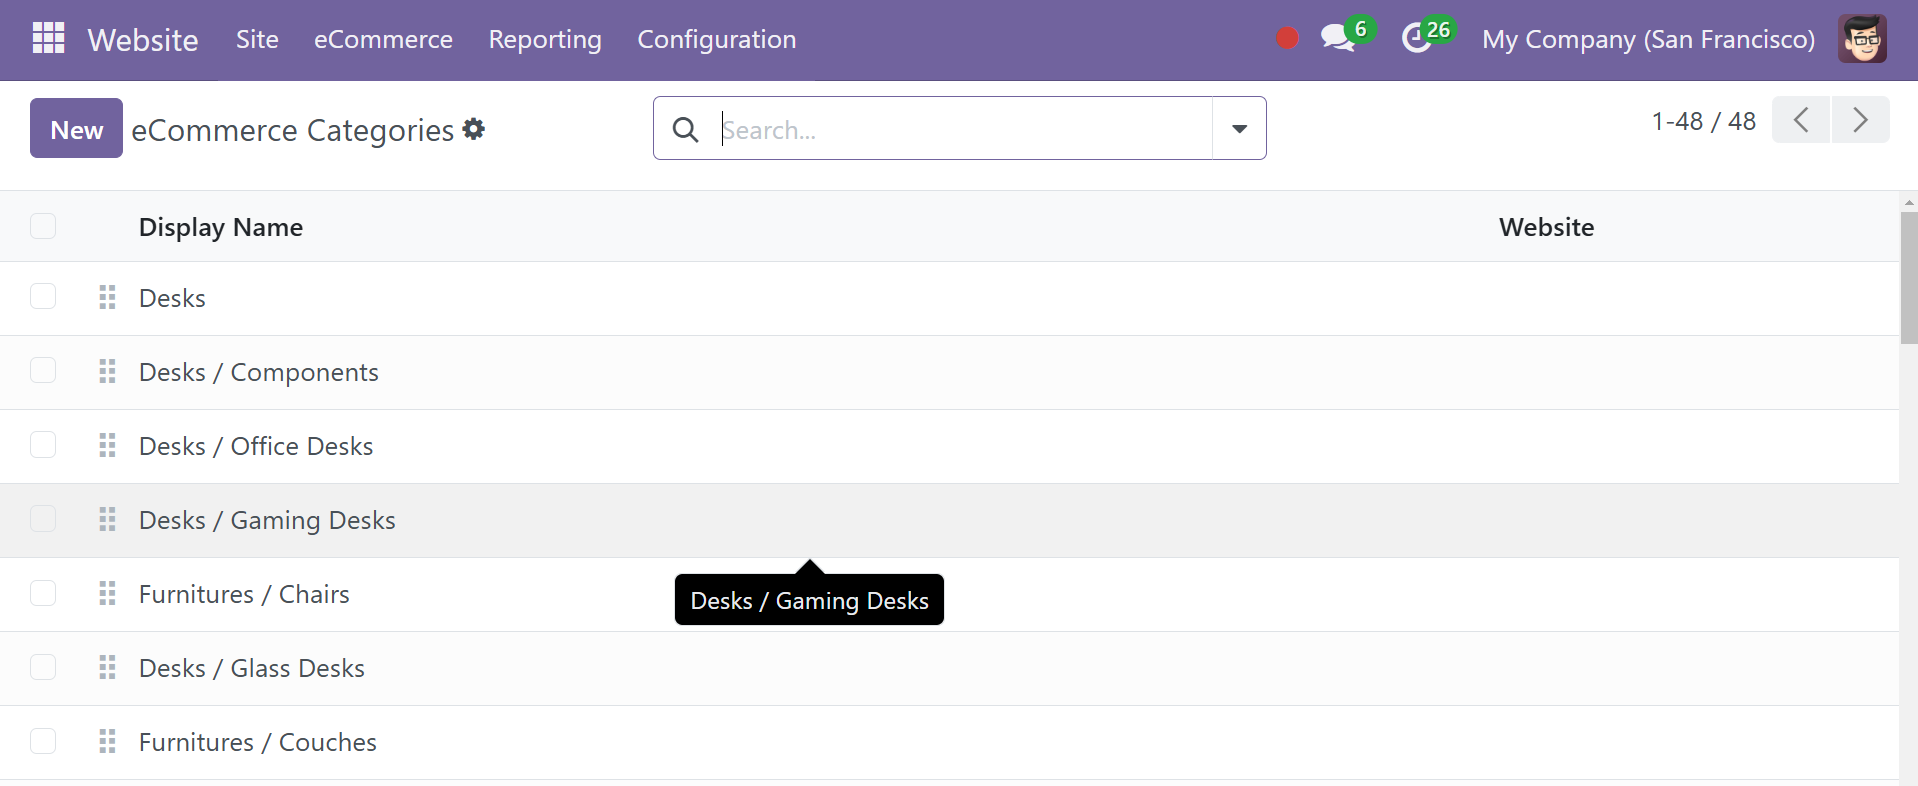
The Odoo 18 Website module's 'e-Commerce Categories' menu is a submenu located beneath the 'eCommerce' tab. In their eCommerce accounts, users have authority over the categories and goods. Users can link products to categories and create, modify, and remove them. Users may also add product filters, modify the layout of their category pages, and modify the way products appear on the page by selecting the 'eCommerce Categories' option. Users can also submit photos and change the SEO values for each category.
The eCommerce window can list all eCommerce Categories, the Display Name, and the associated Website. To add a new category, click the New button located in the upper left corner of the window.
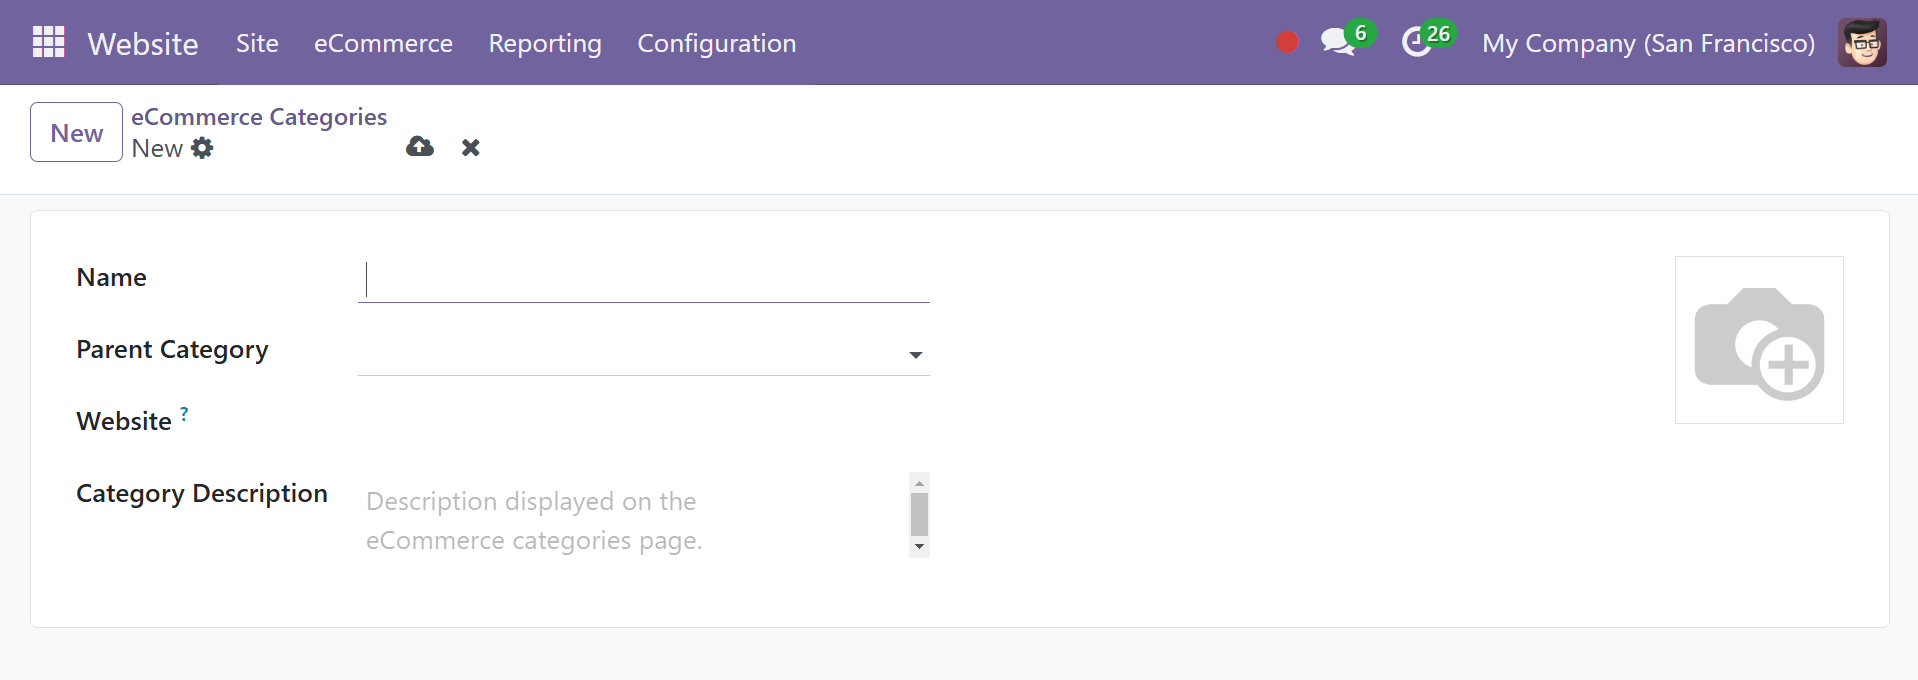
This is how the form for adding an eCommerce category will appear. Here, you have the options, such as name, parent category with drop-down menu, website to provide, and a short description which will be displayed on the ecommerce category page.
As can be seen below, the website also includes the established categories, which facilitate product identification.
Attributes
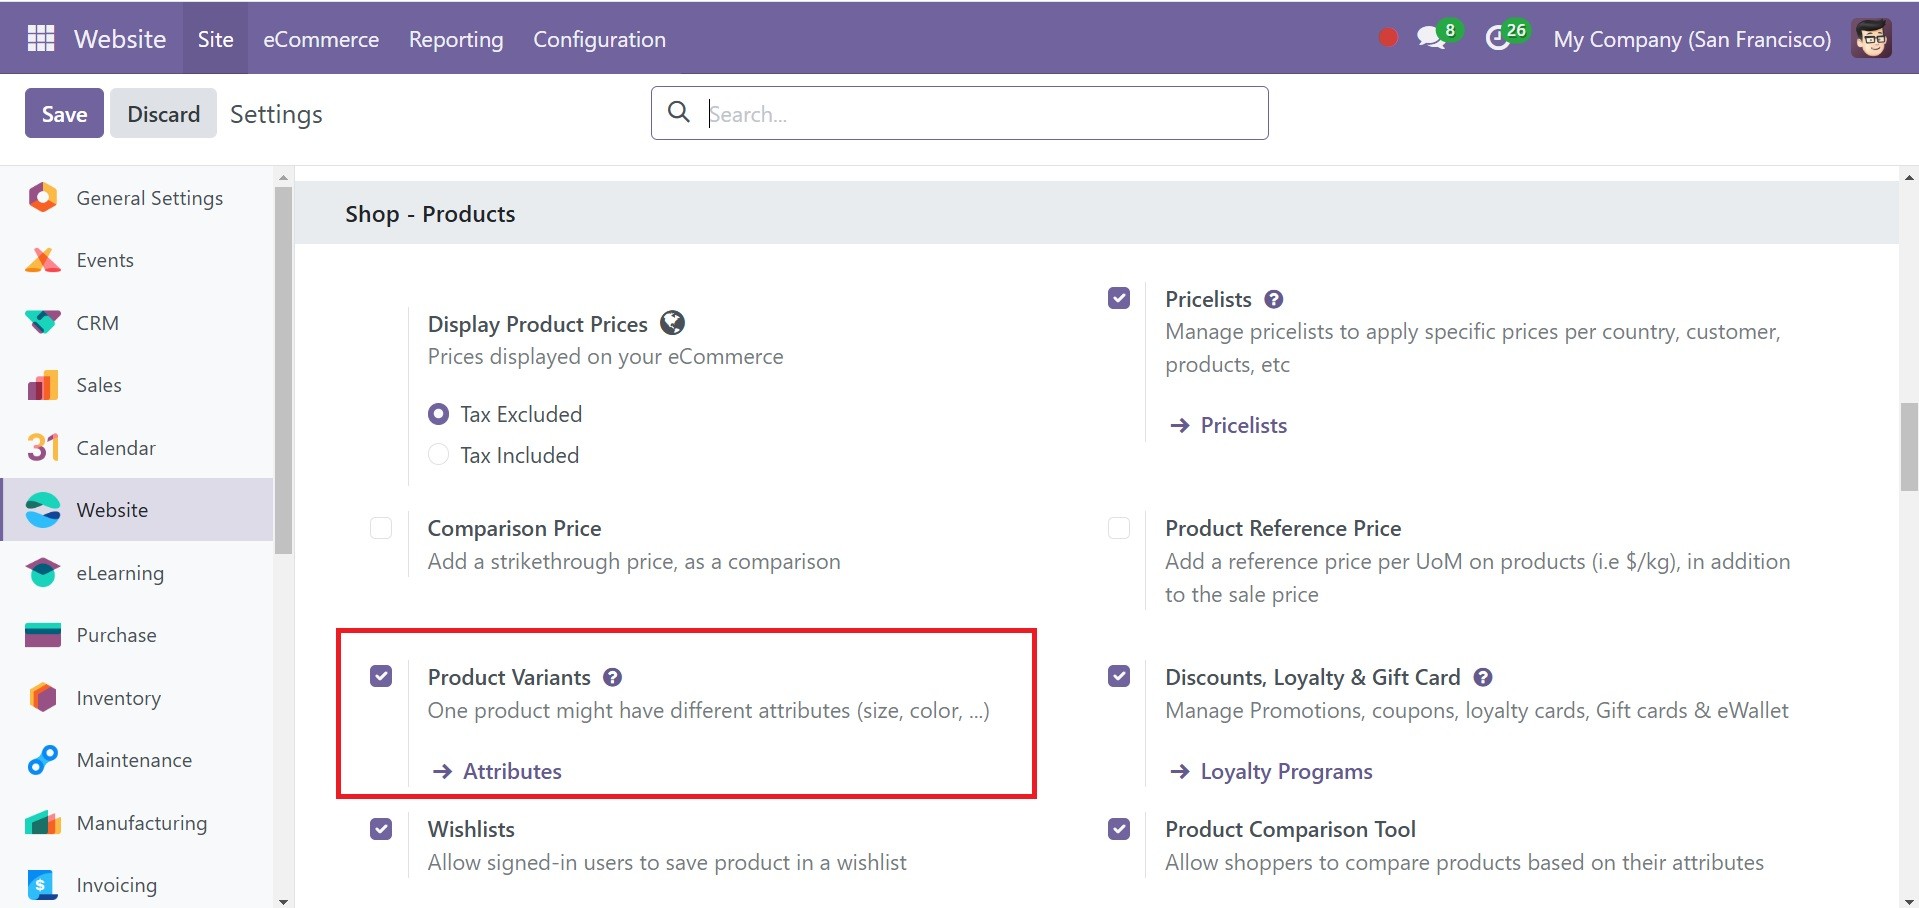
Product characteristics are features that differ depending on the product. Size, color, brand, dimension, and other criteria are examples of commodity attributes. For that, activate the product variants option in the settings.
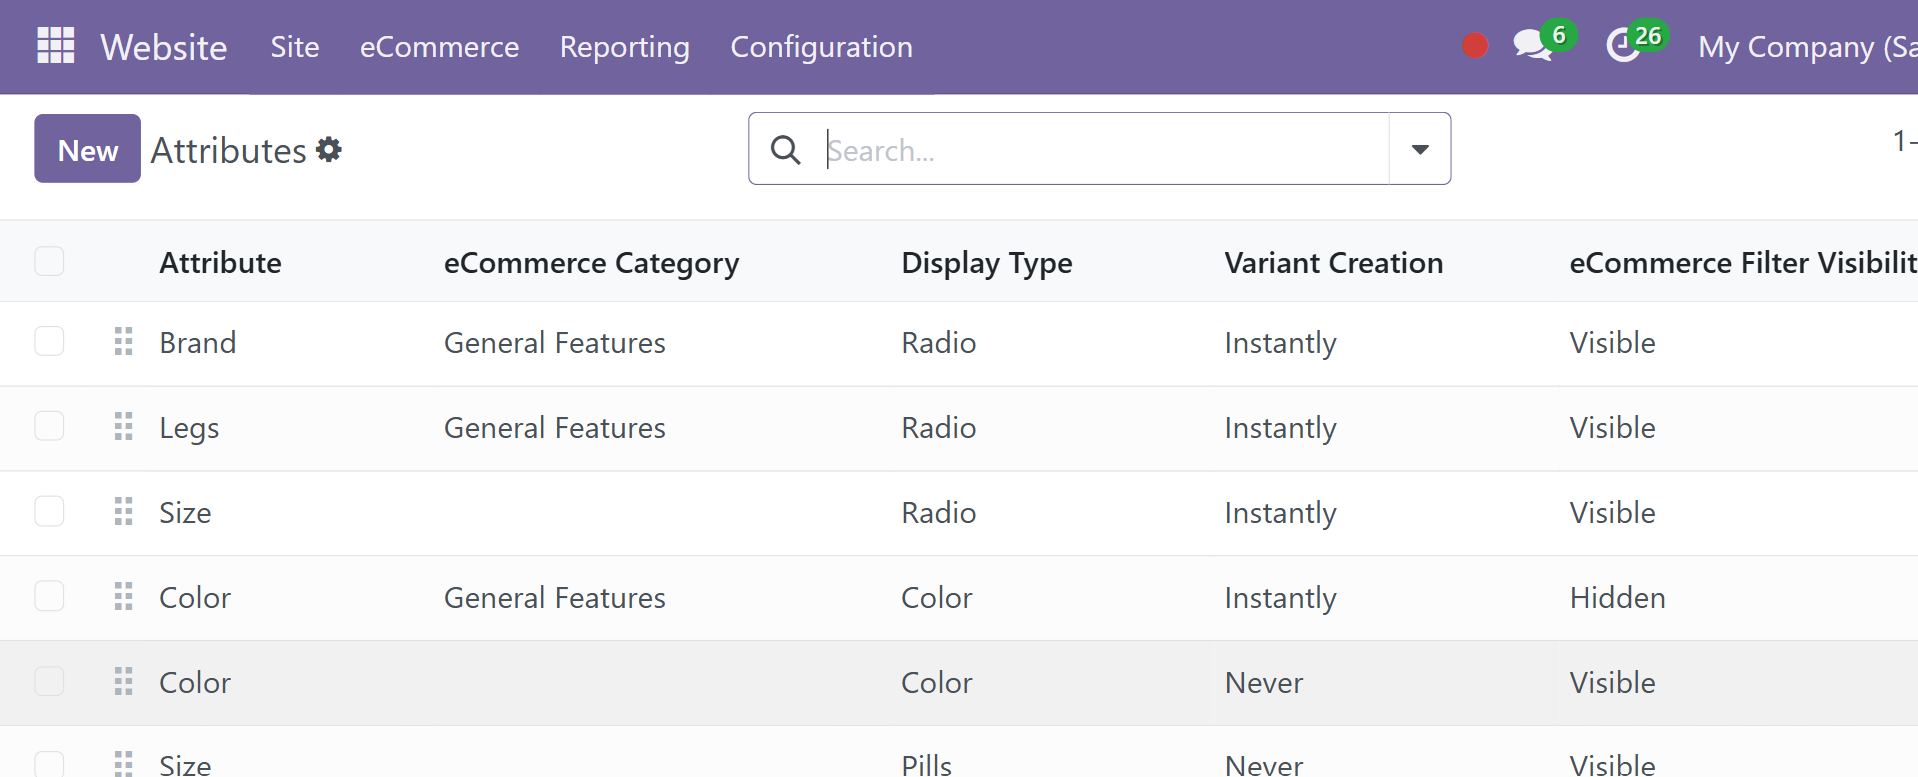
Features of a product are characteristics that change depending on the product. Commodity attributes include legs, brand, color, size, and more. To add a new feature to your product, select the Attributes option from the website module's E-commerce menu.
You can add an attribute by selecting the New icon, as shown in the screenshot below.
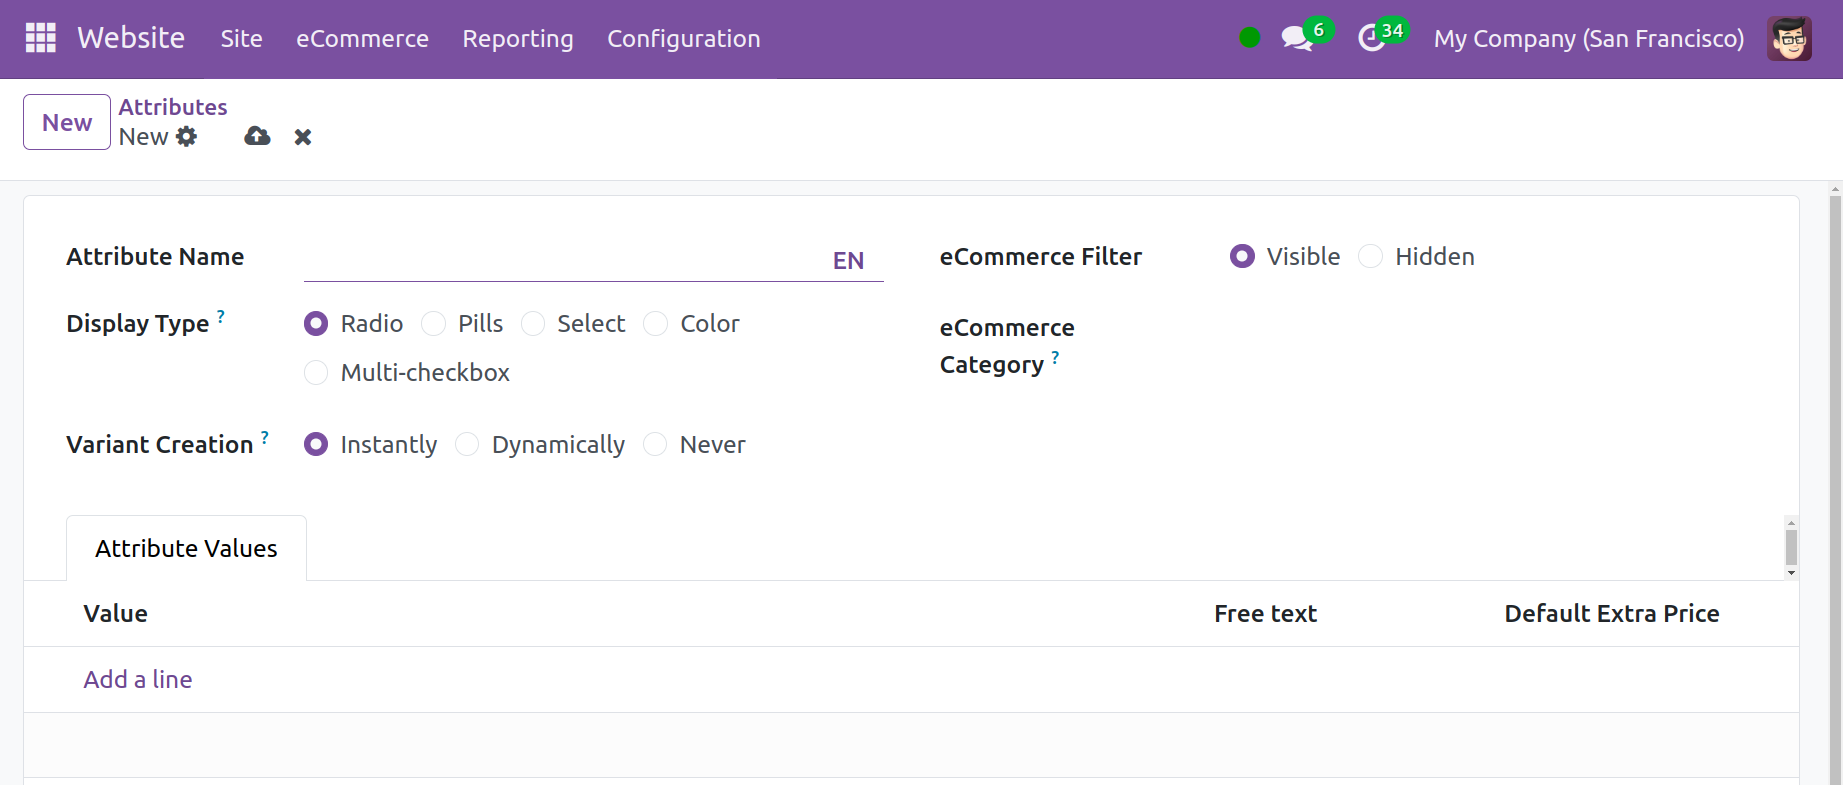
With the new window, we can now process attributes like color, size, brands, and many more. Along with choices to add a name for your product attribute, the category it belongs to, numerous display types, different variant generation modes, and E-commerce filter visibility, the attribute form includes a column for adding the attribute value.
The Variants Creation Mode can be set to instantaneous, never, or dynamic later on by the user. We can create every possible possibility as an attribute if we choose the Instantly option. Each variant is produced when appropriate attributes are added to a sales order and the "Dynamically" option is selected. On the other hand, no variants are created when the Never option is selected. After creating the desired property, save it and use it on products that need it.
The created attribute of a customizable desk is, as in the screenshot below.
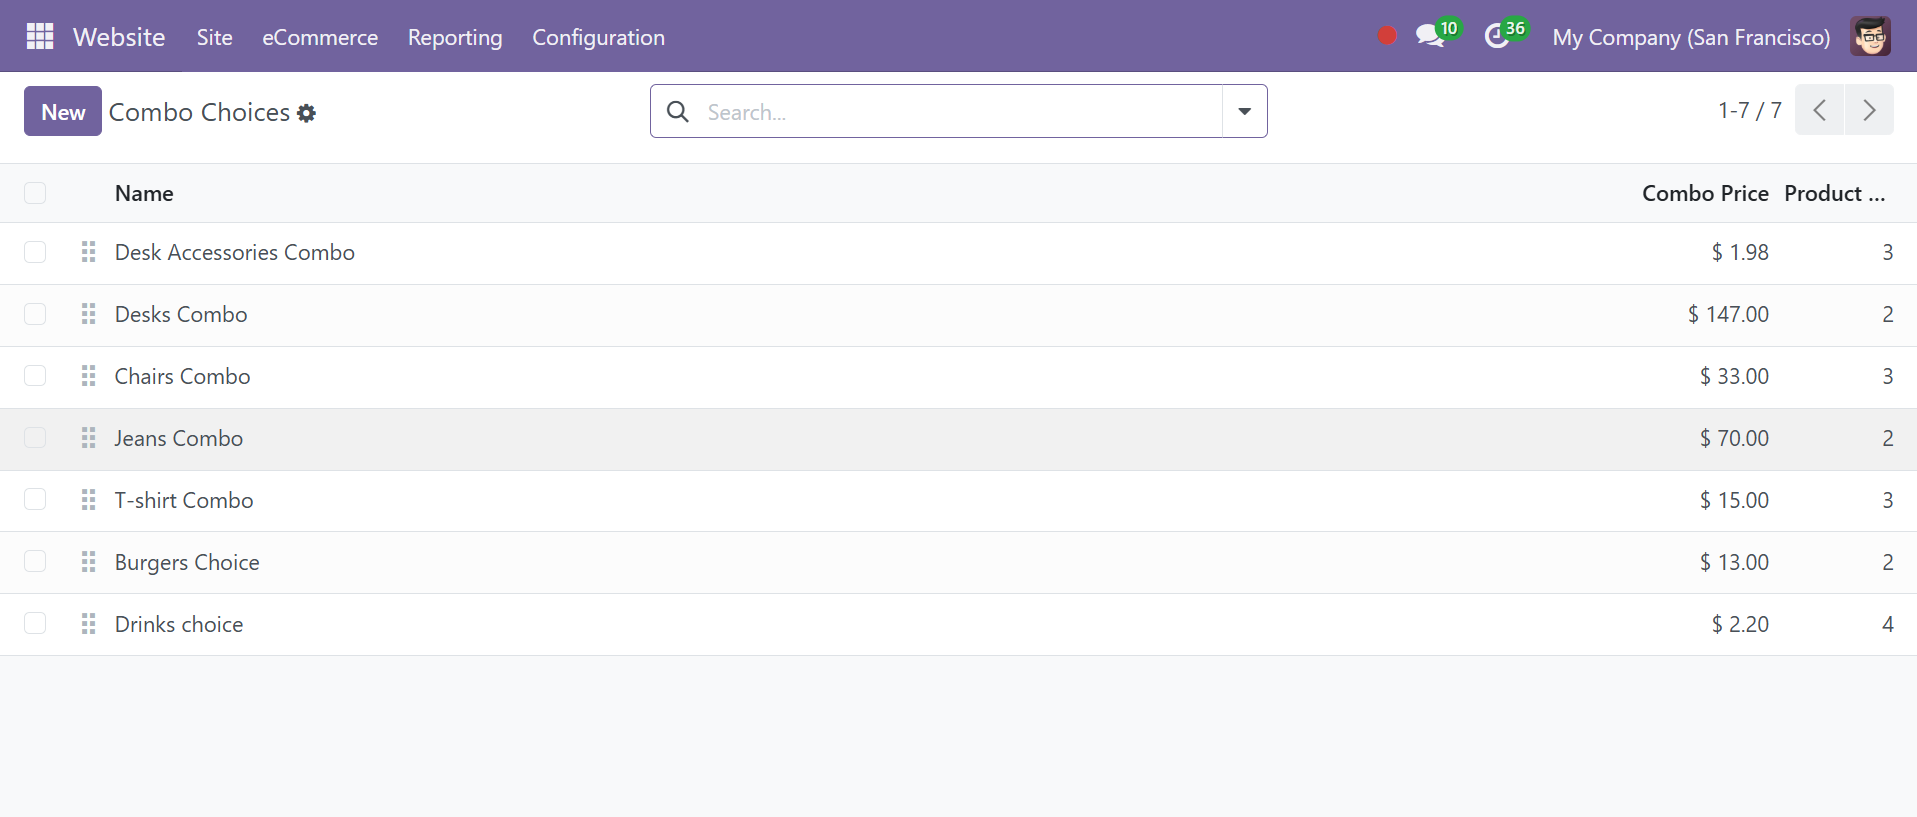
Combo Choice
Users can specify and control combination options for a single product using the Product Combos functionality. The functionality allows users to design multiple-choice menus for restaurants.
The option allows you to add combo products under the product form, as in the image below.

On the website page, you can have those combos, which can be added to the Cart, as in the screenshot below.
Product Tags
The ability to generate product tags for the website is enabled by this module. You can control the tag's color and order according to the product. Product tags for several websites can be managed by you. Product tags make it simple to handle things here.
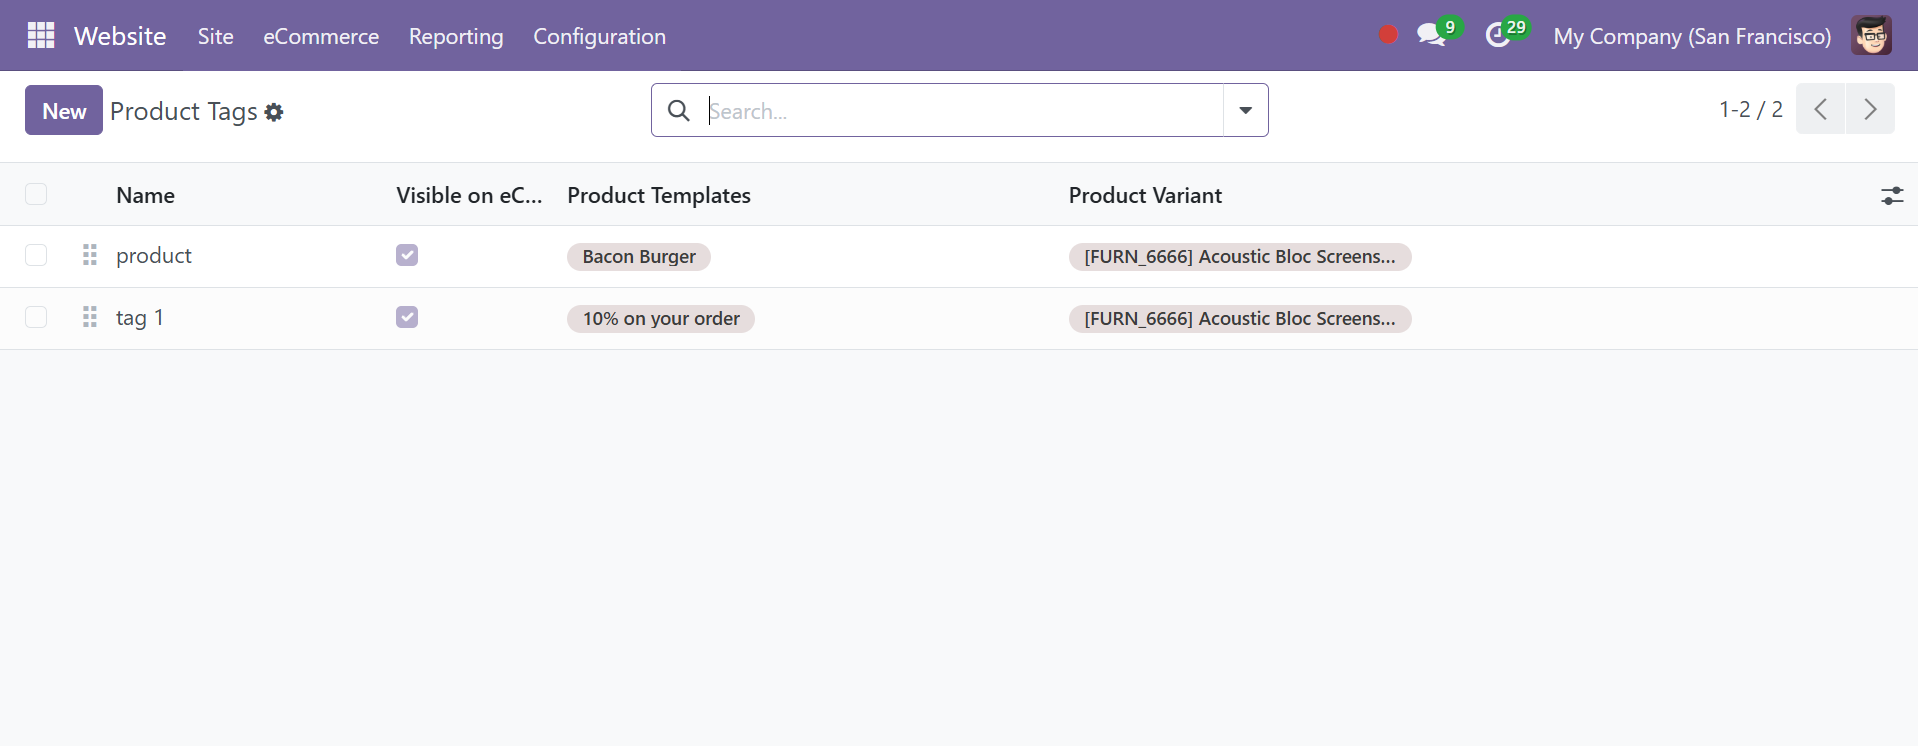
The added tag will be seen under the particular product, as in the screenshot below.
Product Ribbons
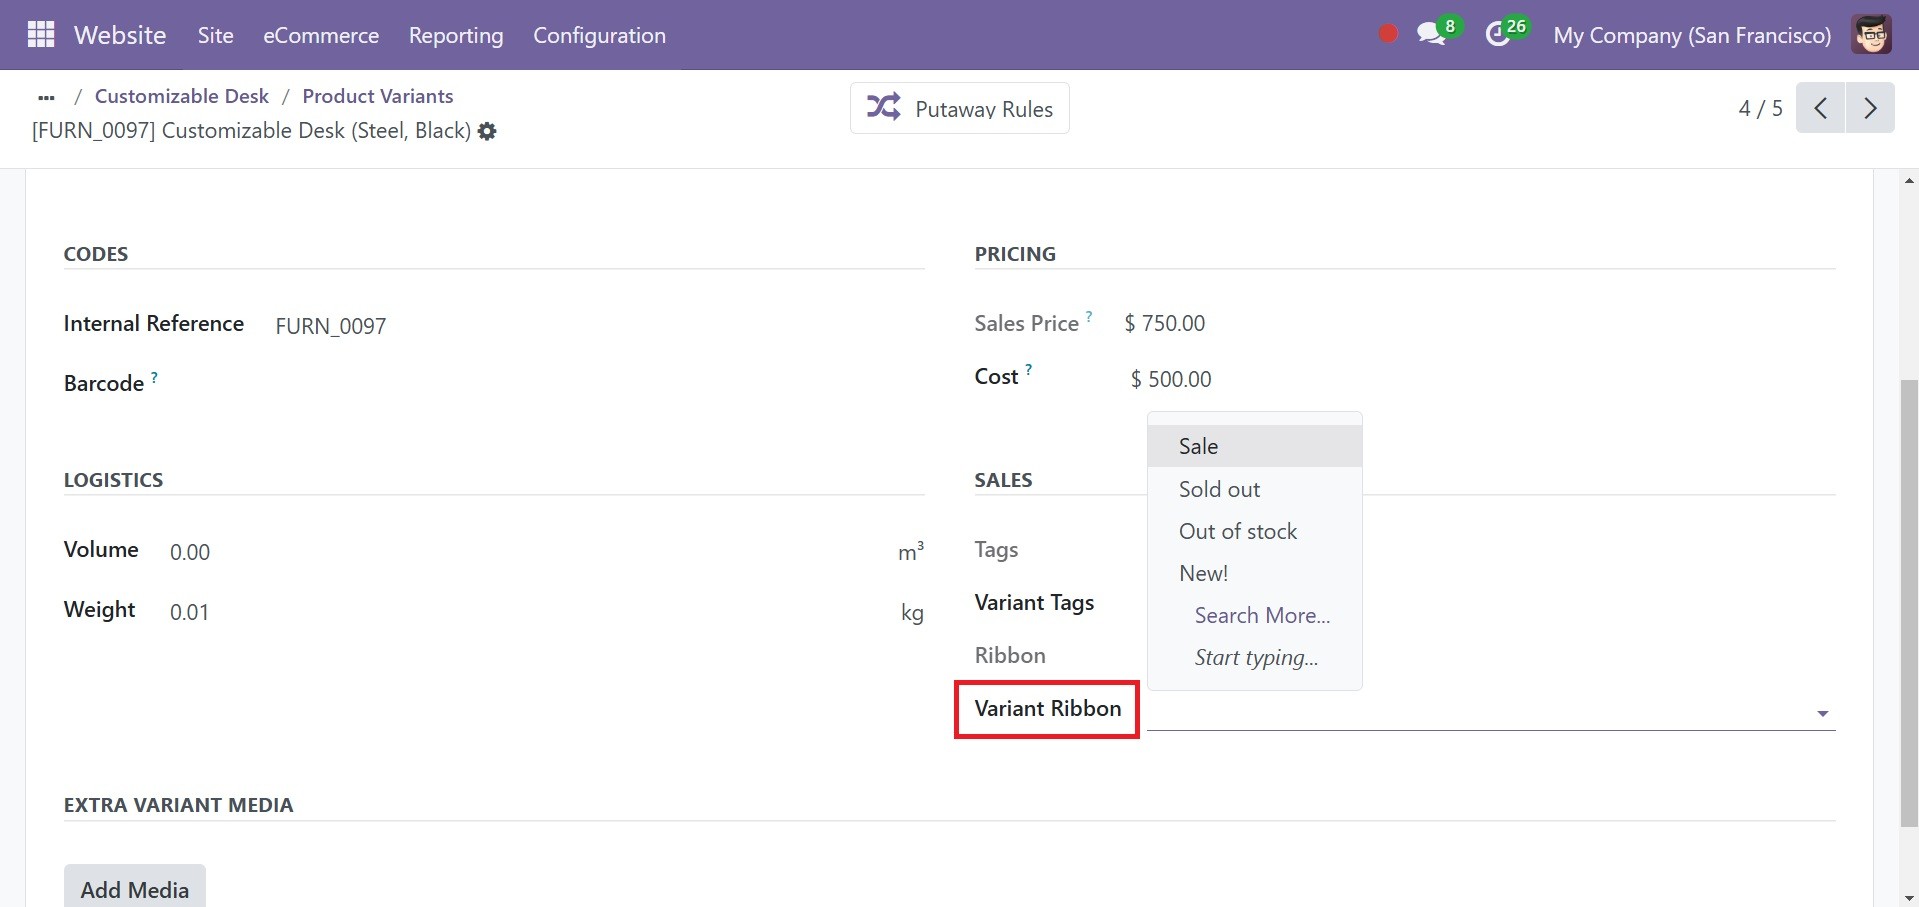
Here, you can easily create ribbons and apply them exclusively to product variants, and not just product templates.
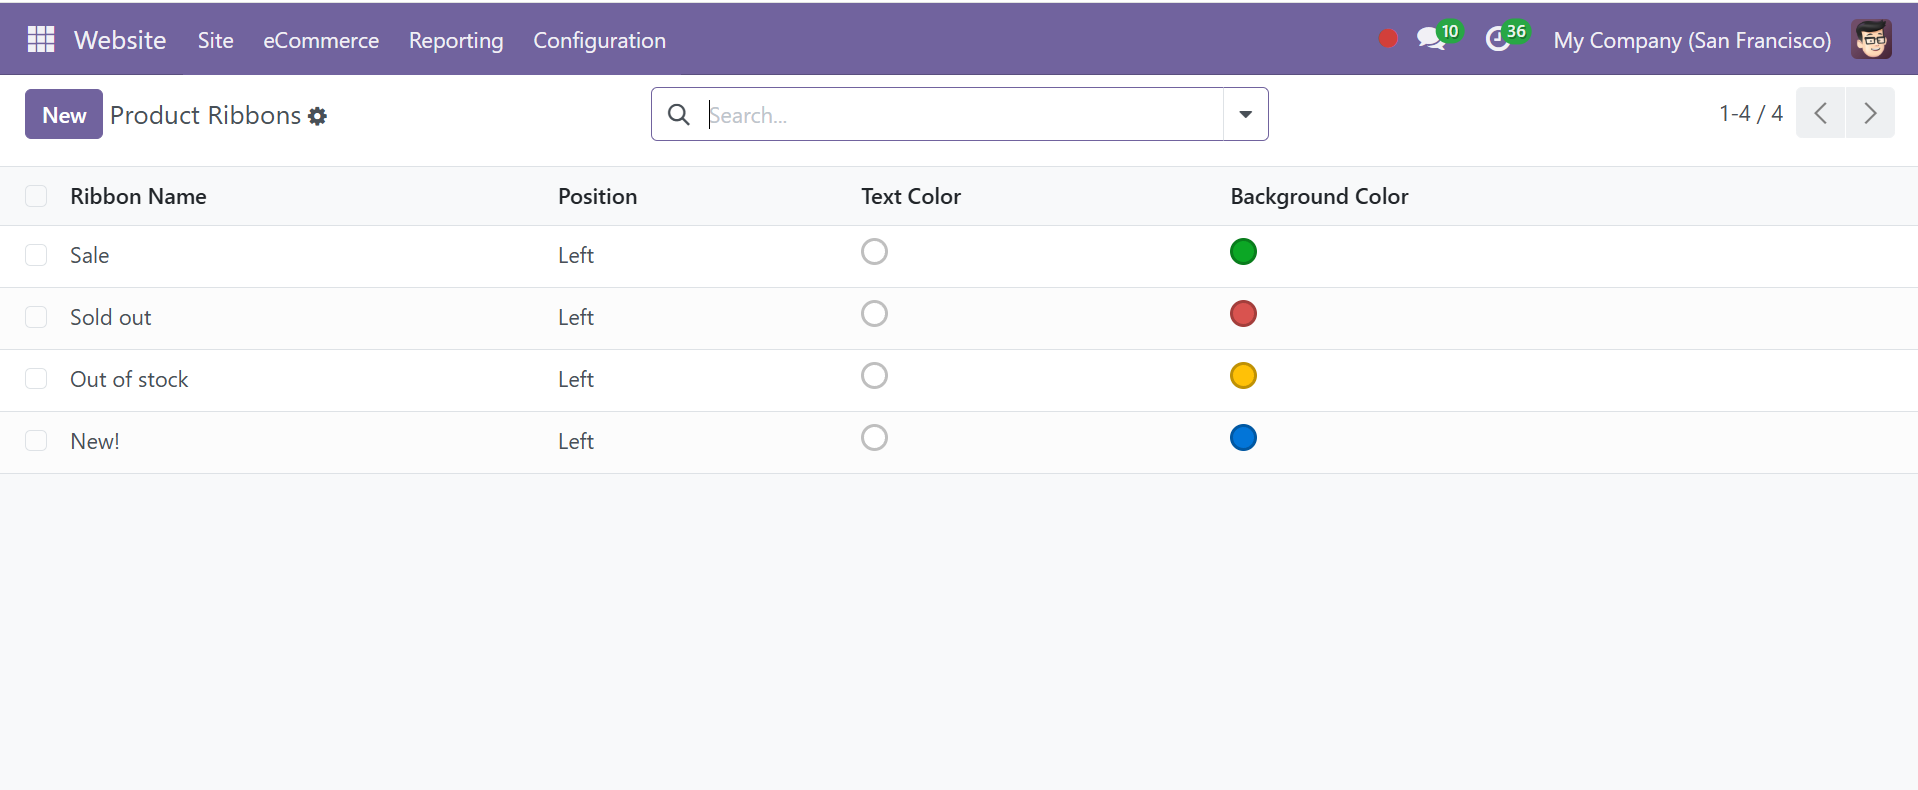
Here, you have the options like, ribbon name, position, text color, and background color, respectively. To view the product ribbon, select a product from the product list, and add the ribbon in the provided space.
Now, move to the website page, and you will see the created ribbon there.

You can also have the ribbon option from the customize area, by selecting a particular product from the catalog for editing. The option will as in the screenshot below.

You can add the ribbons like sale, sold out, out of stock, or new, accordingly.
Loyalty
Promotions, discounts, gift cards, and so on may help your product reach a wider audience and increase sales. Choose the Settings option from the Configuration menu to activate this function. "Discounts, Loyalty & Gift Card" should be activated.

One strategy to retain clients is to reward them with loyalty and promotion programs. This type of program might help you convince clients to continue purchasing products or services from your company. Customers can engage with your business and receive extra rewards through these types of promotional campaigns. The Loyalty and Promotion Program in Odoo 18 makes it easy to put these initiatives into place for your business.

The loyalty section includes eWallets, gift cards, and reward and discount opportunities. These are all necessary resources for an online store. After enabling these features in the module's settings, users can access the eCommerce module through the website module's menu as it appears.
Discount and loyalty
The Odoo eCommerce application allows users to create discounts and loyalty programs that customers can use for online and in-store shopping. These programs offer more varied, public, and time-sensitive pricing options than pricelists.
This function aids in keeping track of discounts and giving devoted clients exclusive deals. The already-created promotion programs, along with the discounts, coupons, and loyalty cards linked to them, are listed in the Discount & Loyalty window, as in the below image.

Let's now create a new program by clicking the New button. Clicking the "new" button will open a new window where you may make new offers to your customers, which will increase sales. You will be given a specific spot to specify the program's name, as shown in the screenshot below. You can choose a suitable title for the program in the Program Name section. Next, select the Program Type.

With Odoo 18, you can create coupons, loyalty cards, discount codes, buy X get Y coupons, and next-order coupons all in one location. Each of these several program types is created in a similar manner. The Company, Pricelist, Available on, Currency, and Website can be entered in the boxes. You can indicate the promotion program's expiration date in the End Date section. You may also limit the number of times the promotion program can be used by activating the limitation Use section and adding a restriction. By selecting the appropriate fields in the Available On section, the promotion program can be made available on the website, Point of Sale, and Sales.

You can create rules and appropriate incentives by choosing the Add option under the Rules & Rewards menu.

To add Conditional Rules, click the Add button in the Rules tab's upper right corner. As seen below, a new pop-up will show up to set rules.

To qualify for this promotion, you can specify the Minimum Quantity and Minimum Purchase Amount on the Conditions page. The minimum quantity is the minimum number of products that must be purchased in order to access the prize. Set the minimum quantity to at least 1 to ensure that the consumer must make a purchase in order to receive the reward. Minimum Purchase indicates how much money must be spent (in currency), tax included or tax excluded, in order to receive the incentive. If the buyer enters a minimum quantity and a minimum purchase amount, the order must satisfy both requirements.
You may make this promotion available for specific Products, Categories, and Product Tags by entering them in the relevant boxes. This will allow users to benefit from the newly modified rule.
Below that, you have the Points section, below which there are some options like, in exchange of field, clear all promo points, a space to add description on order, and discount product, respectively.
You can add Rewards to the promotion program by choosing the Add option. As seen below, a pop-up will show up on the screen.

Here, you can choose your reward type from a discount, such as free shipping. You can give your customer a discount if you select the Discount option. You can then choose how much of the discount you want to give your customer. By selecting the right choice, you can give a discount on an order, the cheapest product, or a specific product. The Maximum Discount that is granted as a reward can be changed under the Discount tab. Under the Points tab, you have the options like, in exchange of, clear all promo points, description on order, and discount product, respectively, in the image above.
You can deliver freebies to people as a reward in Odoo 18. You can do this by selecting the Reward Type as a Free Product.

The Quantity Rewarded section allows you to enter the amount of the free product. The Product section contains the description of the prize product, and the Product Tag box allows you to input the relevant tags.
You can select the Max Discount if you would like to use free shipping as a motivator.

For now, let's assume that we have created a marketing campaign similar to the one below: Get a free item and three large cabinets when you buy three.

Now let's go shopping for a big cabinet. As seen in the example below, we can see that the complimentary product is also added to the cart when we add the product in compliance with the rules established by the promotion program.

Gift Card and eWallet
Odoo 18 comes with a menu for handling eWallets and gift cards. The eWallet feature is part of the e-commerce module. The platform displays a list of gift cards and eWallets together with details about the program name, program type, website, PoS, and company, as seen in the image below. Here, you have the New option to create a new one.

You can enter the program's name in this section. You can choose the type of program you want to put up in the Programme Type box. It could be a gift card or an eWallet. Let's start by talking about gift card creation. When a customer uses a gift card to buy a product, the gift card is created either automatically or manually and sent via email

Orders can be paid for with the gift cards. After selecting Gift Card as the Program Type, you can activate product IDs in the Gift Card Products box. If the customer qualifies, you may upload an email template in the Email Template section that will be used to send them the gift card. The Print Report option will be used to print the gift cards that PoS generated. In the corresponding field, you can specify the currency used for transactions using this gift card. To enable this gift card to be used on the Website, Sales, and Point of Sale, you can check the appropriate boxes after the firm has been named.

Once the new gift cards have been created, click the Generate Gift Cards button, as seen in the screenshot above. Any further information needed to create the gift card can be entered in the pop-up box that appears.

Gift cards can be issued for specific customers or anonymously, depending on what you choose to enter in the "For" area. Odoo will offer extra fields where you may enter the Customers and Customer Tags if you would like to create gift cards for Selected Customers. You can select the total quantity of gift cards you wish to generate in the Quantity to Generate section, as in the screenshot below. Kindly incorporate the points that consumers receive in the Gift Card Value section as well.
The Valid Until column will display the newly created gift cards' validity term. Finally, by selecting the Generate Gift Card button, as in the image above. The necessary number of gift cards will be produced. You may see them by tapping the smart button on top, as in the image below.

You may grant your clients control over their e-wallets so they can use the Odoo 18 Website e-wallet module to make payments with ease. Customers can add funds to their wallets so they can use them for purchases. Your clients can use the safe Odoo 18 Website Wallet to make fast payments after funds are in the wallet. Long checkout procedures are one of the primary reasons why shoppers quit their shopping carts, therefore it improves their shopping experience.
Assume for the time being that we have created an eWallet code for a newly created eWallet, with the balance and expiration date shown below.

Let's go to a website and put something in our shopping cart. The user will have the option to pay using an eWallet while checking out, as shown in the image below.

The product that we have already added, as shown below, will be added to the cart along with the points as soon as you choose the choice.

Thus, the user can enhance the customer's shopping experience by using the eWallet and gift card.

Here, you can see how each Payment Acquirer is configured. At the top of the window, the Payment Acquirer's name shows. The platform then allows you to select whether the Payment Acquirer is engaged, deactivated, or in test mode. The State field is where this can be defined. Select the Enabled option to activate the field. Enabling the Test mode causes a test payment interface to process a fictitious payment. When configuring the acquirer, use this mode. The responsible company and website can then be located.

Mollie is one of the payment processors included in Odoo. Mollie is the name of the payment platform located in the Netherlands. All popular online payment options are accepted by Mollie.

You can build your company in any way you desire with Mollie, whether it's by growing abroad or focusing on a single market. To connect to your Mollie account, Odoo needs your API Credentials, which are made up of your API Key (either the test or the live API Key, depending on the provider's settings). Your login information from your Mollie account can be copied and pasted into the appropriate fields on the Credentials page. Log into your Mollie account, select Developers API keys, and then copy your Test or Live API key to obtain your API key.
Additionally, Odoo adds several new payment processors, such as Buckaroo, Flutterwave, Mercado Pago, Razorpay, Sips, and Asiapay. AsiaPay is a Hong Kong-based online payment company that takes payments from a number of Asian nations.
With its main office in Nigeria, Whirlwind Online Payment Processor Flutterwave provides payment gateway services to a number of African nations.
Mercado Pago is a Latin American online payment provider that accepts a variety of currencies and payment methods.
Razorpay is an online payment processor that accepts over 100 different payment methods, and it has its headquarters in India. Buckaroo, a Dutch firm, provides a range of online payment options.
Payment Token
To create and manage payment tokens, use the Payment Tokens option in the Odoo 18 Website module. Customers can securely store their payment information, such as credit card numbers, expiration dates, and security codes, for use in subsequent transactions by using tokenized payments—digital copies of their credit card data—through the menu. Users can complete online transactions quickly and easily with just a few clicks using Payment Tokens. In addition to setting up and managing payment partners, users may view and manage client payment tokens under the Payment Tokens option. Users can also set up a variety of other payment options that use payment tokens, including credit cards, debit cards, and PayPal.

Payment Methods
Any website that accepts online payments must obviously have payment methods. Users can easily ascertain which credit or debit cards and online payment methods are accepted on your eCommerce site thanks to these instantly recognizable icons. As a result, it will boost website confidence and improve users' purchasing experiences at checkout.
The Payment Methods menu in the Odoo 18 Website module lets users set up the many payment options that clients can use to buy products and services. Users can choose the payment method they wish to utilize on their website from a variety of options.

VISA, MasterCard, Paypal, Stripe, Authorize.net, and numerous additional payment methods are available. Users can also add details to the symbols to change their appearance. Customers can select their preferred payment method while making purchases thanks to this functionality.
Payment Transaction
Users can examine and control the details of their payment transactions by selecting the Payment Transactions option from the Configuration tab of the Odoo 18 Website module. When you have access to them, you can review and control their payment transactions and look up their payment history. Along with setting up automated refunds, customers can also review, record, void, and reimburse transactions.

You may access the Payment Transaction window by choosing the Payment Transaction option from the Configuration tab.
Shipping Method
With Odoo 18, you can choose from a variety of shipping options to customize how your products are delivered. Odoo 18 has incorporated dynamic features in the website module that maximize your business's sales performance in order to enhance product delivery management. As seen in the image below, the Website module's Settings menu contains a number of settings that can be enabled.

Under the configuration menu, you have the delivery methods option, as in the image below. Here, you will get the details, such as the delivery method used, provider, is published or not, website, name of the company, countries, and max weight, respectively.

You can add a new shipment method by choosing the New button, as shown below. A new page will be created where you can enter information about the new shipment method. In the specified field, you can type the name of the shipping method. Add the Margin on Rate to the form after choosing the Delivery Product, Company, and Website.

Under Delivery Product, enter the product you want to deliver using this shipping method. The rate margin is the percentage that will be added to the shipping cost. You can choose Fixed Price or Based on Rules in the Provider box.
If you choose the Fixed Price option, you can enter the Fixed Price on the Pricing tab.

If you choose in accordance with the rule, a new column will emerge where you can configure the rule based on criteria such as weight, quantity, price, volume, and weight*volume.

You can specify the place where your delivery service is available under the Availability page. You can also filter the delivery firms based on your customer's delivery address. On this page, you can select countries, states, and zip prefixes. The margin on the option indicates the percentage that is added to the shipping rate. The additional margin option indicates the fixed sum that is added to the shipping cost. Under the Content section, you have the maximum weight, maximum volume, must-have tags, and excluded tags options, respectively

In Odoo, you can include a description of the delivery method in an additional box. This will show up as an online quote on eCommerce.

When customers use Odoo 18 to make purchases online, the delivery method selection process is made simple. If the Shipping Address option is selected during checkout, the customer can enter a second shipping address.

During the Odoo checkout process, the shipping options for the selected product will be shown as shown below.

Select "Continue Checkout" from the menu. You will proceed to the following stage of the checkout process with Odoo.

You can enter your shipping and billing addresses here. When the locale is provided, Odoo shows all available shipping options. Clients can choose from a list of acceptable delivery options. Depending on the choice we select, the shipping costs might be displayed on the screen. The cost varies based on the delivery method. Once we've chosen a convenient payment option, we can pay the delivery fee and the purchase bill at the same time.
You can also have the delivery method option under the configuration menu, as in the screenshot below.

Here, you can view the already configured delivery methods, provider is published, website, company, countries, and maximum weight option, respectively.
Settings
The eCommerce settings' first option is the checkout Process. As seen below, the Shop checkout procedure consists of the following parts.
Add to Cart
Customers can add items to their shopping cart directly. The option can be activated from the Settings page, as in the screenshot below.

You can have the Add to Cart option, as in the below image.

Furthermore, as can be seen below, if we choose the "Go to the cart" option, the product will be placed in the cart and the page will redirect to the checkout.

When a product is put to the cart and the user has the opportunity to choose (dialogue), they can choose to either check out or keep shopping, as indicated.

Re-order From Portal
You can enable the Re-order From Portal option to let your customers add products from a prior order to their cart. This feature allows your customer to add products from previous orders to their cart.

Assume, for example, that a customer submits the product sale order as shown below after adding particular products to their cart.

After verifying the sale order and completing the payment, the order will be confirmed. You can now just place another order for this product using the customer portal. As indicated below, choose the My Account option from the customer site.

All customer-related documents, including sales orders, invoices, payment methods, projects, tasks, and many more, will be displayed in this window. Choose the option for Sales Order.

Customers ought to be able to see their order history here. Usually, this area shows previous orders together with information like the date, order number, and total amount. From their order history, customers can choose which items they would like to repurchase. As seen below, this entails clicking on a particular order to see the items it contains.

The "Order Again" button on the sales order will allow the consumer to place another order for this product, as shown in the screenshot above. A new pop-up window will open when you click this button.

Customers may be able to change the amounts of the items they want to reorder, depending on the arrangement. This enables them to be specific about how much of each item they wish to buy again.
Sign in/up at check out
Three settings are available for sign-in/check-out: disabled (purchased as a guest), mandatory (no guest check-out), and optional.

The word "Optional" enables customers to follow up on their order by registering from the order confirmation email. The visitor can add products to the cart and check out without logging in if the option is set to Disabled. Mandatory refers to customers who must log in to place orders.
Extra Step During Checkout
You can incorporate a customizable form into the checkout process by using the Extra Step at Checkout option. By adjusting these options, you can use the arrow key to customize the form.

The same can be altered. The page of extra info will be as shown in the image below.

Newsletter
Any mailing list's subscription fields can be added to the website using the Newsletter building blocks selection. The option shows a checkbox to sign up for the selected newsletter to guest users. The option will direct you to the below-shown page.


Here, you can activate the show in preference option as well.
Buy Now
A customer only has that one item in their cart when they click the "Buy Now" button on a product, which takes them straight to the checkout page. The option can be activated from the settings page.

The entire process may be completed in as little as two steps on the Odoo website, which expedites the time it takes to go from the product page to the payment page. For these clients, the Buy Now module on the Odoo 18 website offers a practical means of quick checkout. When the 'Buy Now' button is clicked, as in the below image, the consumer is taken straight to the shipping page, and the purchase is automatically put to their cart.