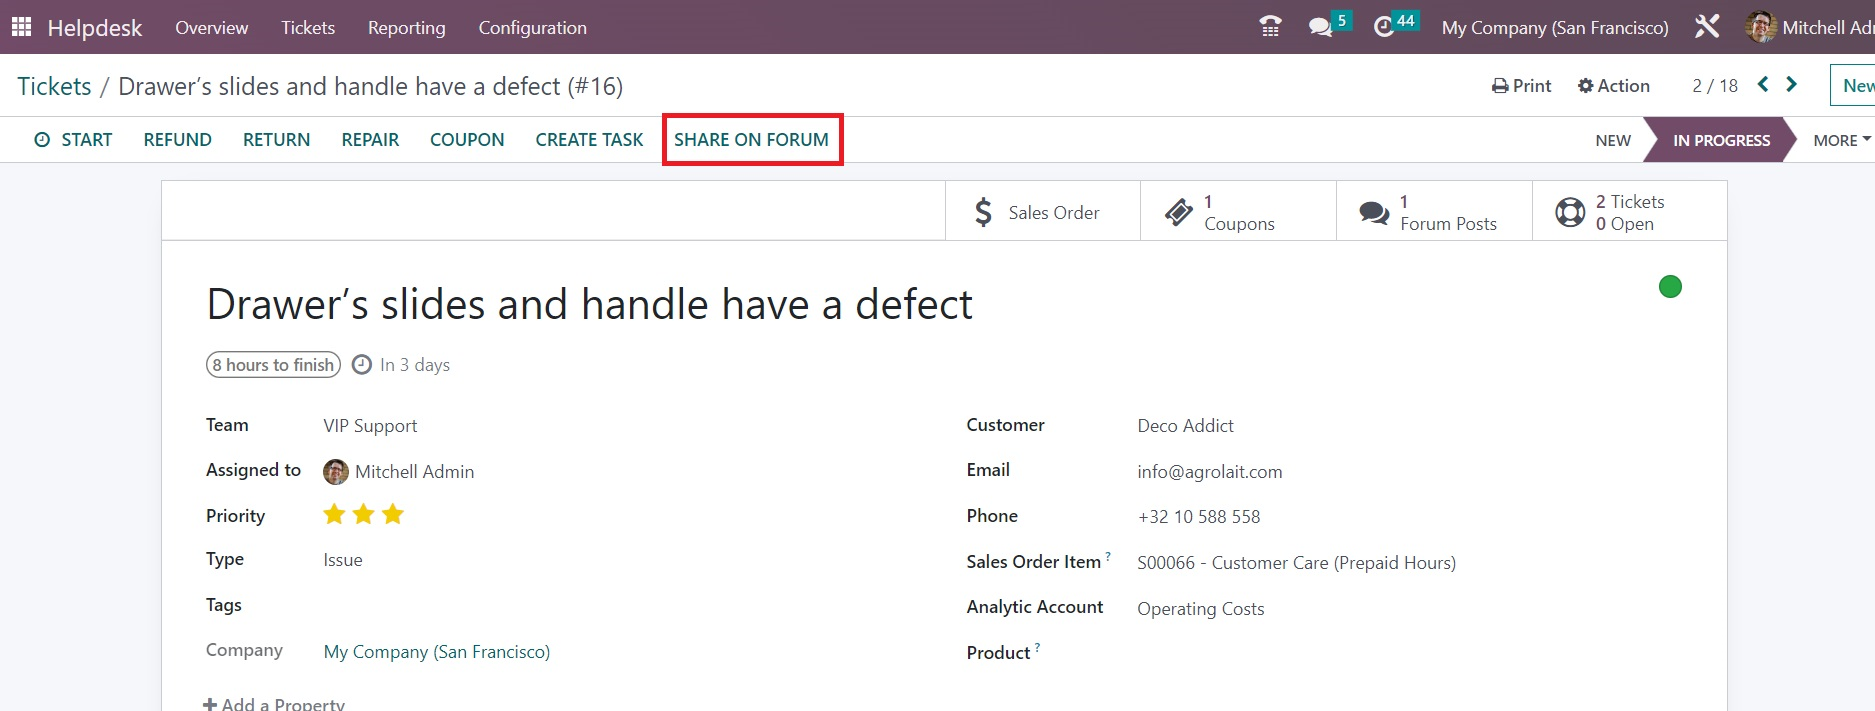
Tickets
The customers can report their issues or ask queries via various channels in Odoo 16. With the help of the Helpdesk module, you can provide support to your customers effortlessly. The customer can use live chat, message, contact us page, forum, website, email, and phone call options to get support from the helpdesk team of a company. When a customer asks for any kind of support from your company, you can register the issue by creating a ticket manually in the Helpdesk module. In Odoo, it is possible to automate the process of helpdesk ticket creation. All such tickets will be managed in the Tickets menu of the Helpdesk module in Odoo 16.
Under the Tickets menu, you can find My Tickets and All Tickets options. As the name indicates, the My Tickets platform will show the list of tickets assigned to you. The All Tickets platform can be used to observe the tickets of all helpdesk teams in your company.
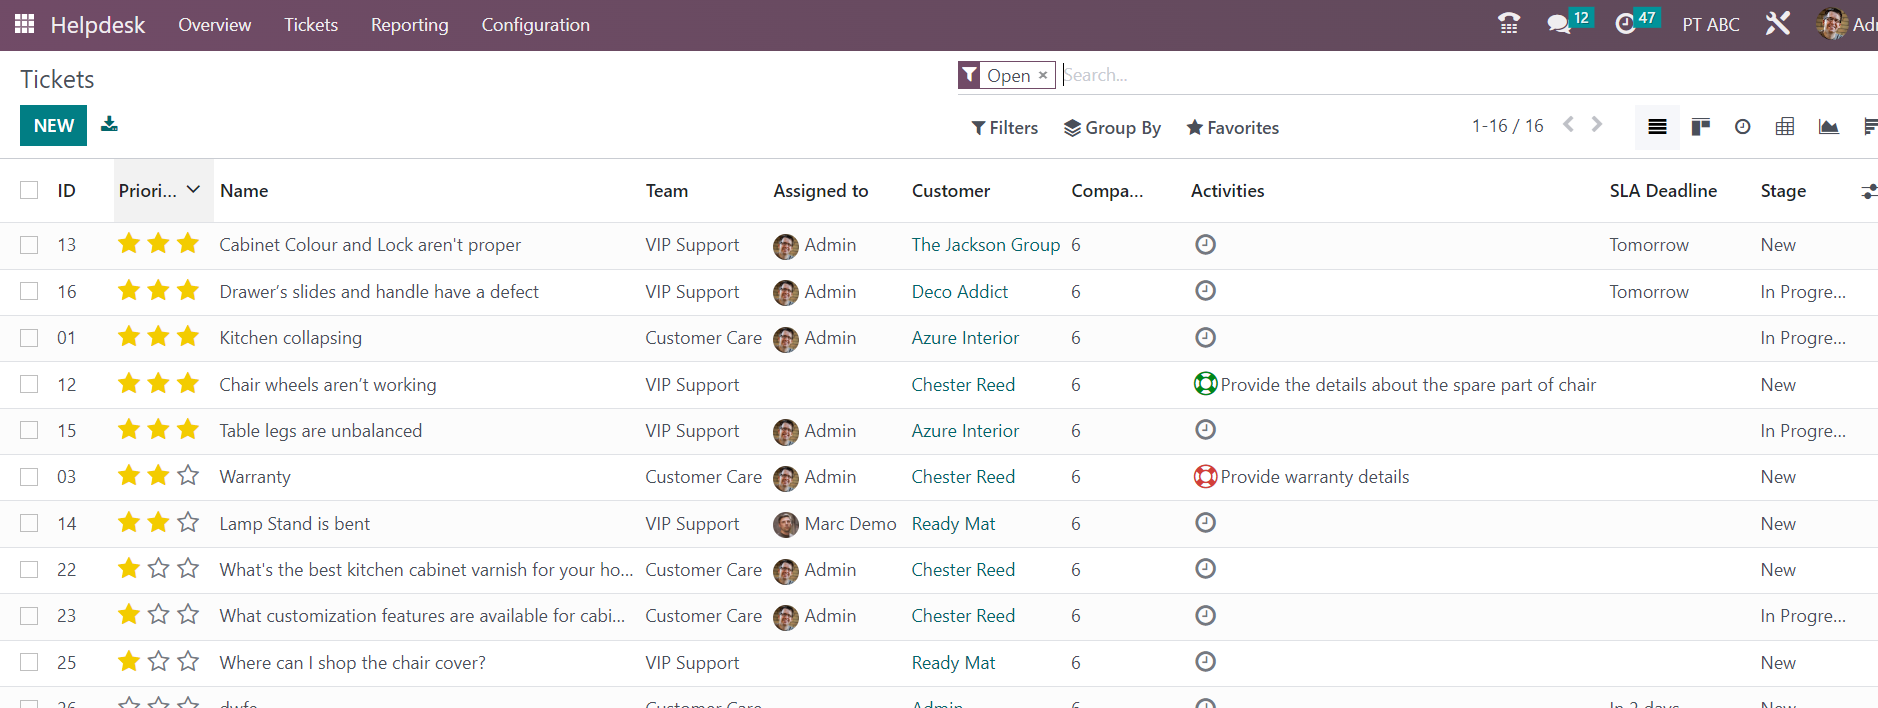
The list view of the Tickets is shown above. Apart from the list view, you can use Kanban, Activity, Pivot, Graph, and Cohort views as per your demands. The preview of the list includes ID, Priority, Name, Team, Assigned to, Customer, Company, Activities, SLA Deadline, and Stage. The view can be expanded using additional fields which can be activated from the list that appear after clicking on the menu available in the right corner of the list view.
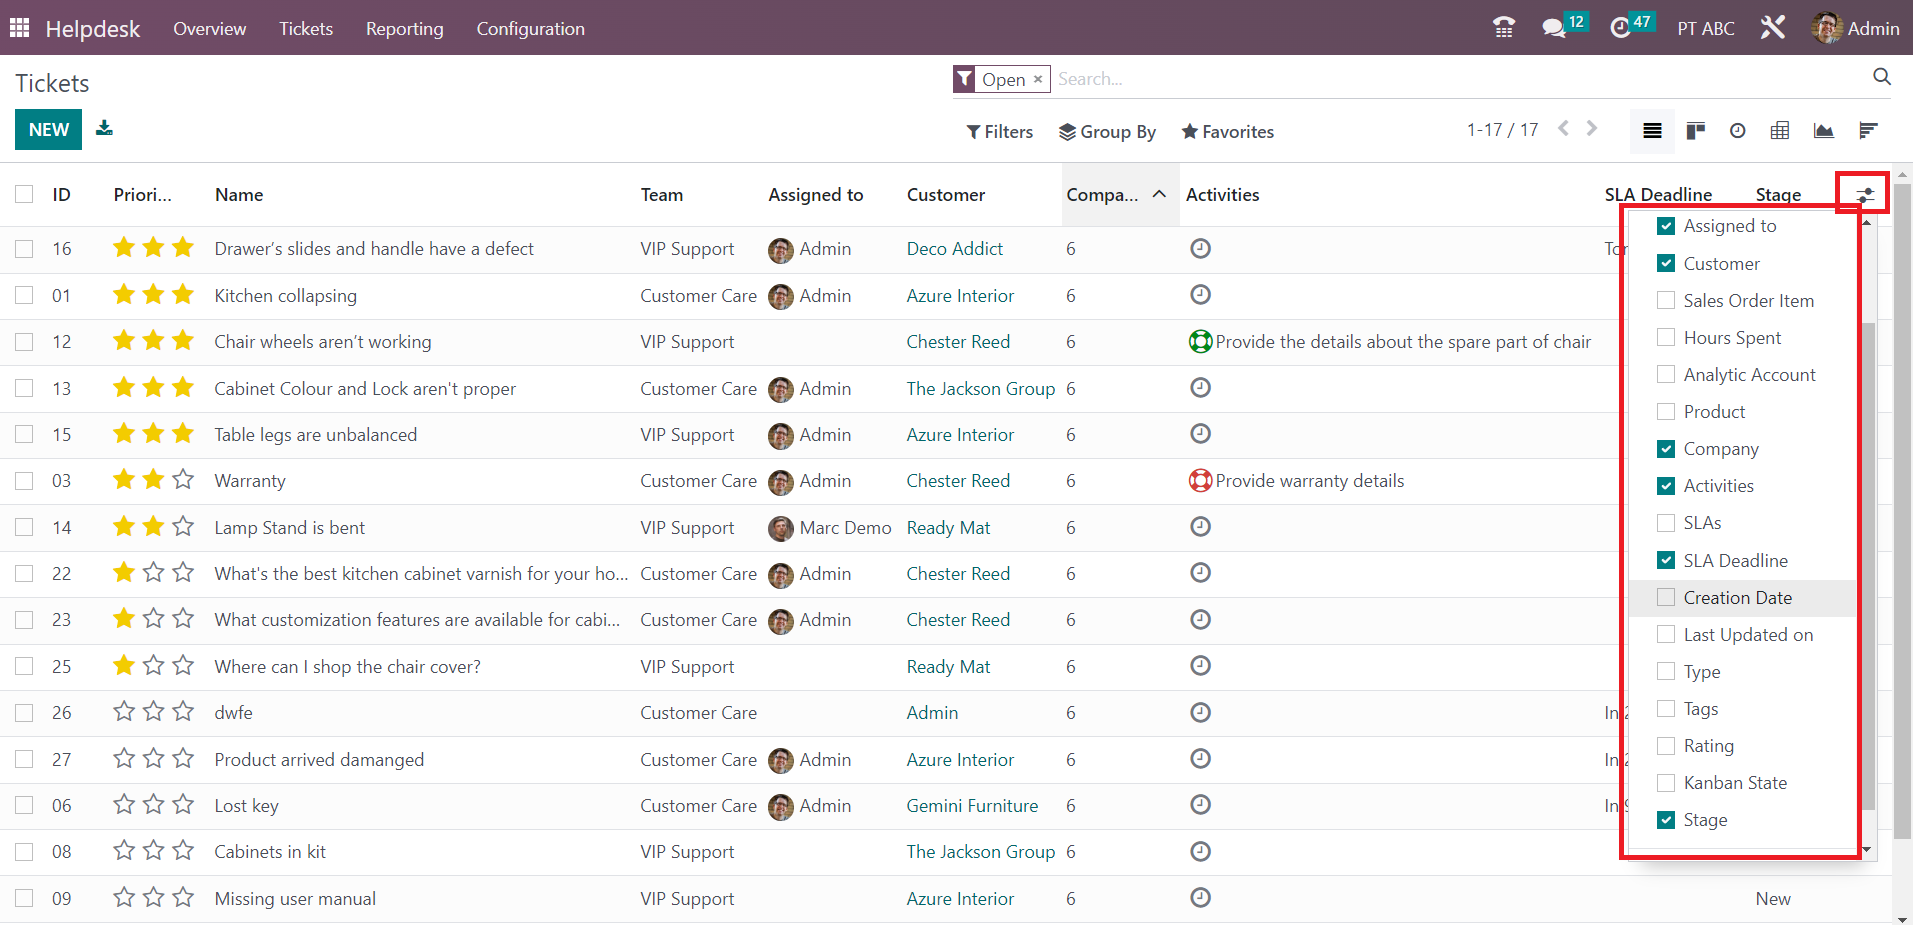
From this list, you can activate Sales Order Item, Hours Spent, Analytic Account, Product, SLSs, Creation Date, Last Updated On, Type, Tags, Rating, and Kanban State. On this platform, you can use My Tickets, My Team’s Tickets, My Department, Followed, Unassigned, Urgent, High Priority, Medium Priority, Low Priority, SLA Success, SLA in Progress, SLA Failed, Tickets in Overtime, Open, Closed, Closed in Last 7 Days, Closed in Last 30 Days, Satisfied, Okay, Dissatisfied, No Rating, Creation Date, and Archived as default filters. Use the Custom Filter option to create customized filters for tickets. As default, you can use Assigned to, Team, Stage, Type, Priority, Status, Customer, Company, Analytic Account, and Creation Date for grouping.
In order to create a new ticket manually, you can use the New button. This will lead you to a new form where you can mention the issue reported by the customer, as shown in the screenshot.
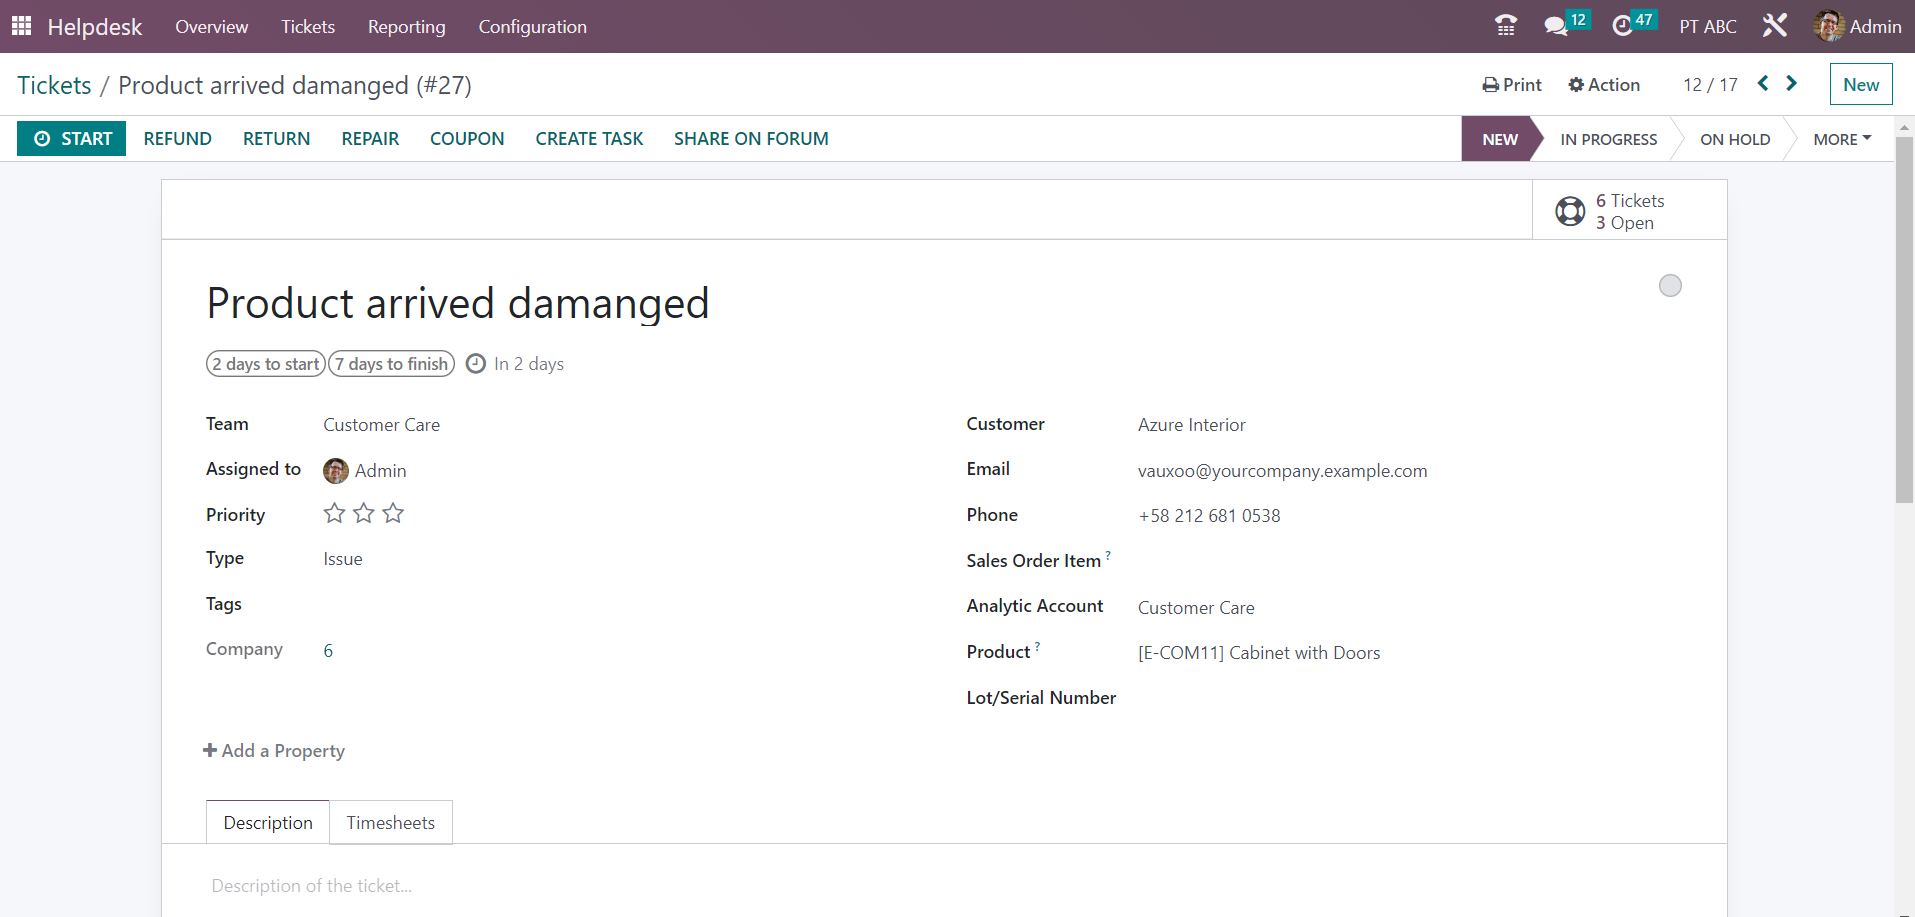
Provide a title for the ticket in the given space. According to the selected Helpdesk Team for this ticket, you can view the associated SLA Policies and SLA Deadline in the respective field. The ticket can be assigned to an employee by mentioning the user id in the Assigned to field. Based on the priority of the ticket, you can give stars in the Priority field. In the corresponding fields, you can specify the Type, Tags, and Company. The name of the customer can be selected from the drop-down. Based on the preconfigured details, the Email and Phone field will be auto-populated as soon as you select the customer name. If the ticket is being generated for support regarding any purchased item, you can add the respective sales order in the Sales Order Items field. Mention the Analytic Account to record the accounting details related to the operations of this ticket. If the ticket is related to any product of the company, you can specify it in the Product field. Additionally, you can add the Lot/Serial Number of the product also. Now, the Add a Property button can be used to add any customized fields to the form view.
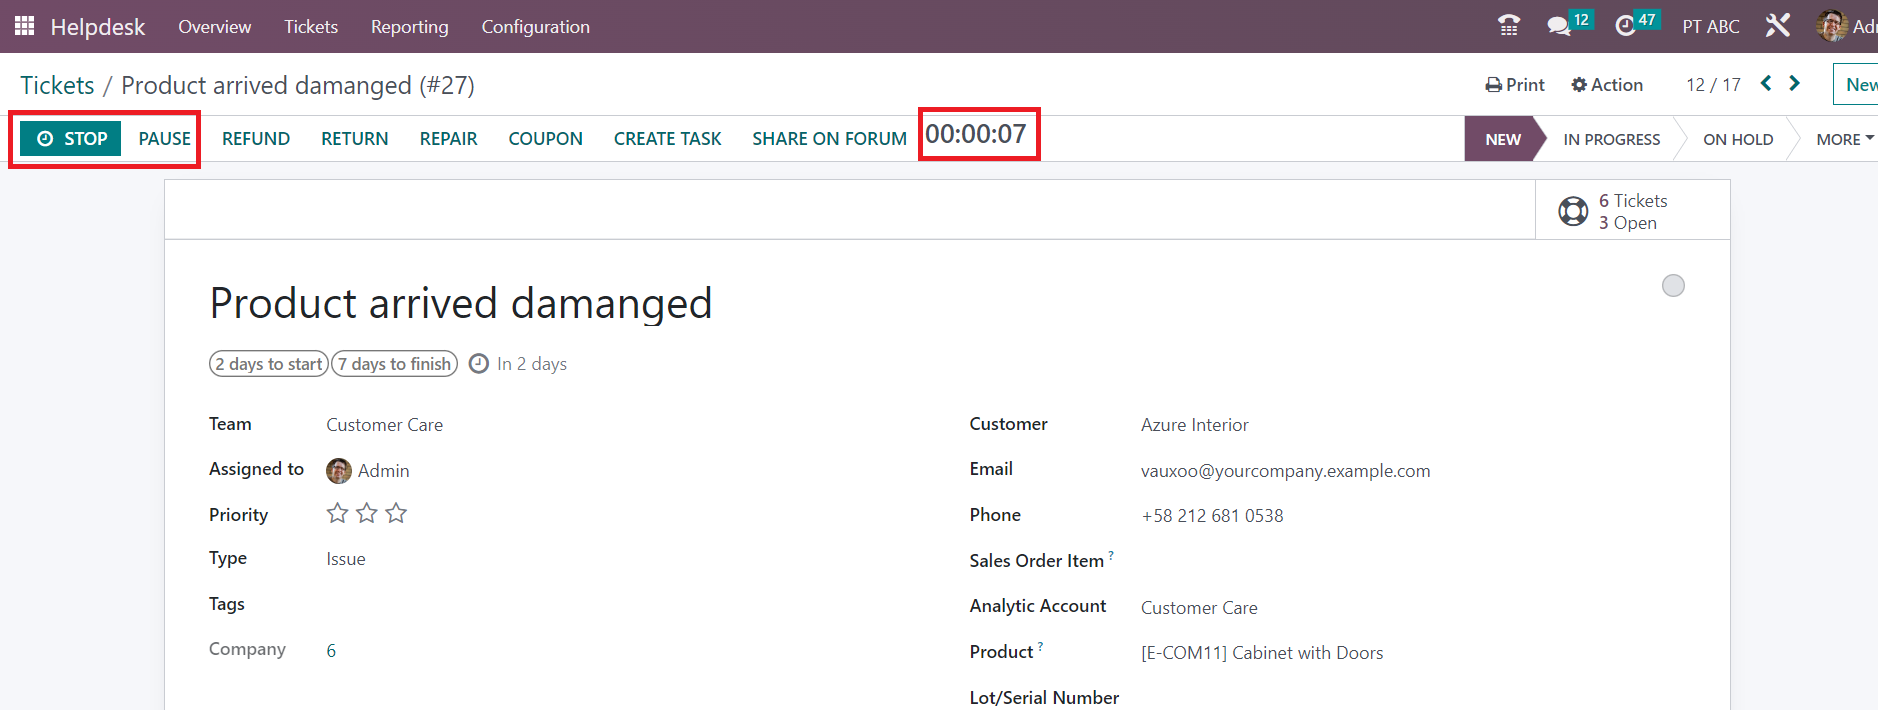
In the Description field, you can detail the issue reported by the customer and the information related to the ticket. The Timesheet tab will record the time spent on the ticket to solve the issue. This can be done manually and automatically. Once you complete the creation of the ticket, you will be able to get various operation buttons on the screen as shown below.
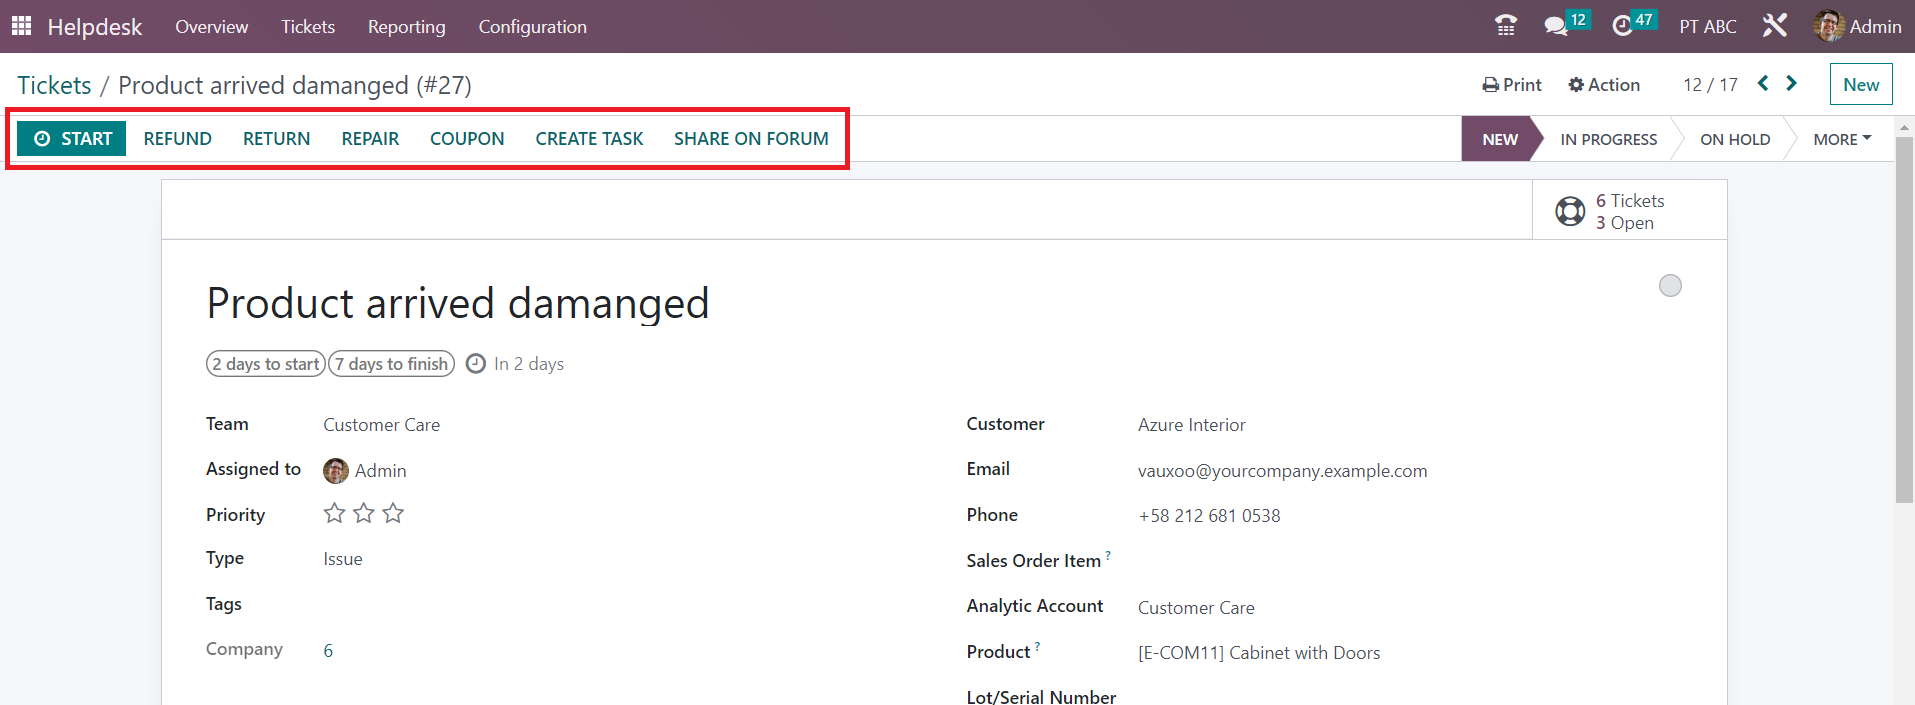
The Start button can be used to record the time worked on this ticket by the respective helpdesk team. Whenever an employee from this team works on the ticket, the user can click on the Start button. Odoo will start to record the time as shown below.
Once the work is completed, you can use the Stop button to stop the timer. This will open a pop-up window to confirm the time recorded by Odoo.
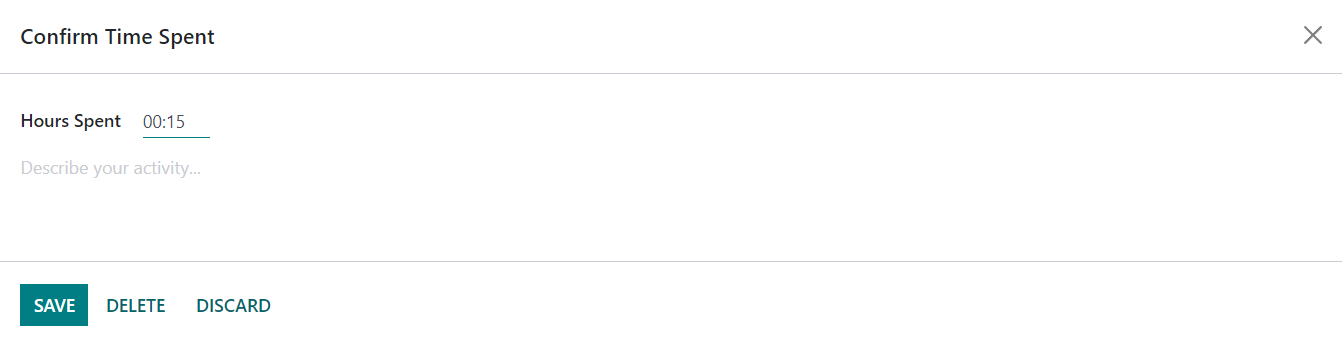
After checking the time, you can use the additional space to describe the activity. Use the Save button to save time into a timesheet. Under the Timesheet tab, you can see the confirmed time.
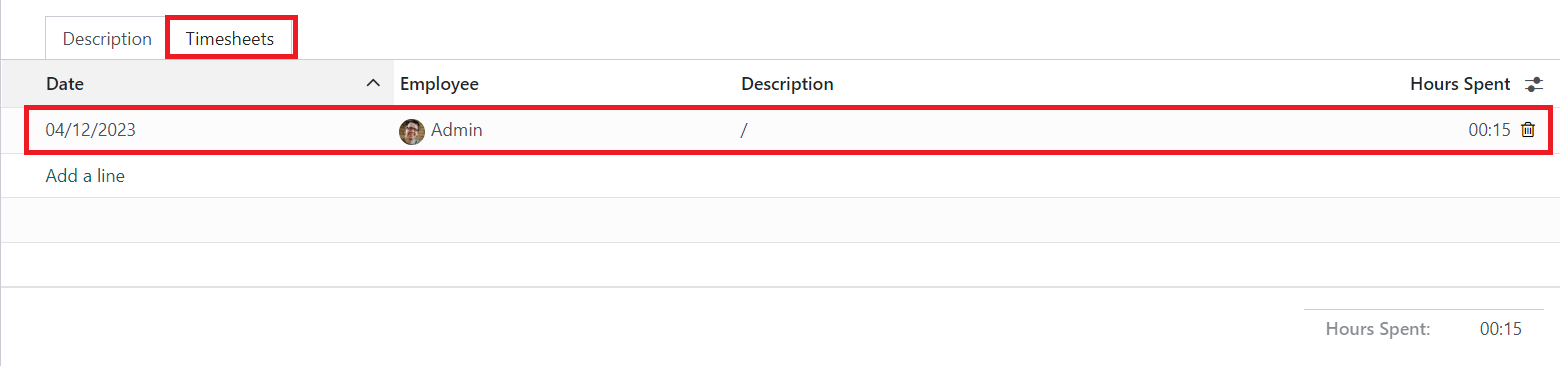
It will show the Date, Employee, Description, and Hours Spent.
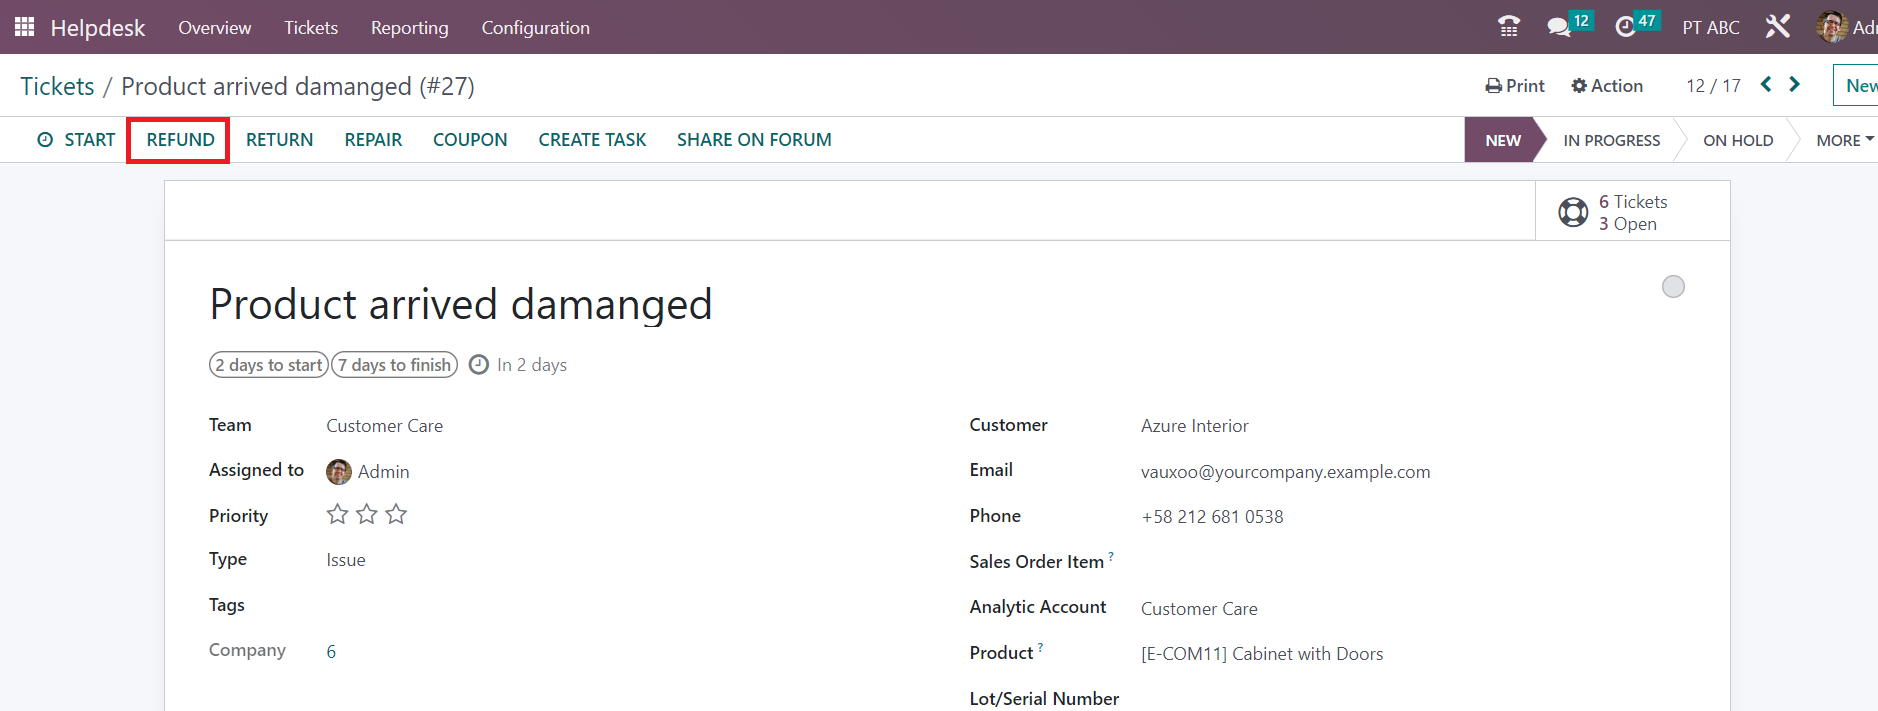
In some cases, companies often offer refunds to customers under certain rules and regulations. In order to offer a refund to a customer, you can use the Refund button available on the Ticket form view.
Clicking on the Refund button will open a pop-up window as shown below, which can be used to mention the details of the Refund.
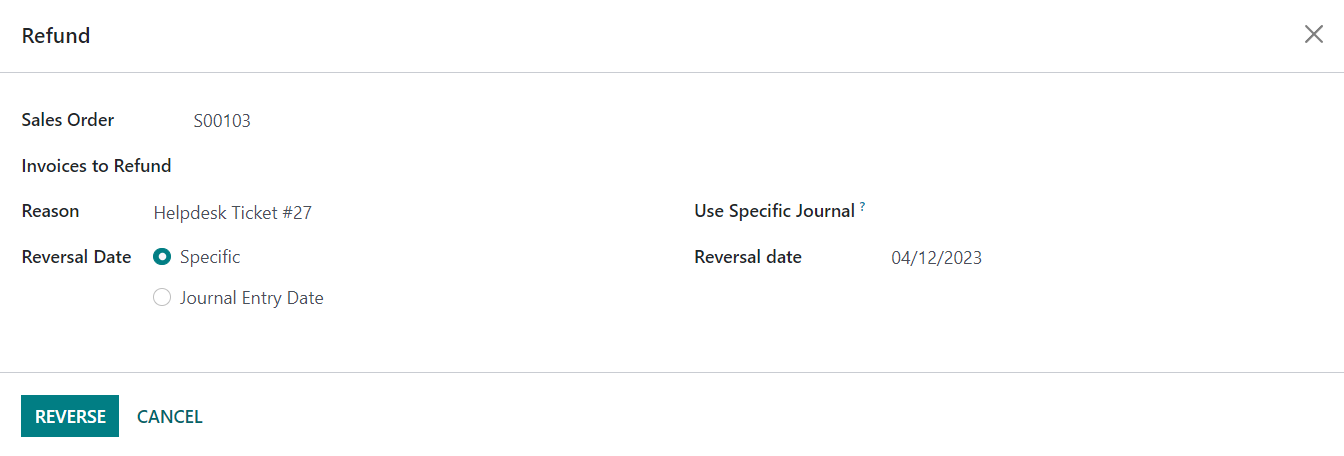
Here, you can add Sales Order, Invoices to Refund, Reason, Reversal Date, and Journal in the respective fields. Clicking on the Reverse button will reverse the invoice and create a customer credit note.
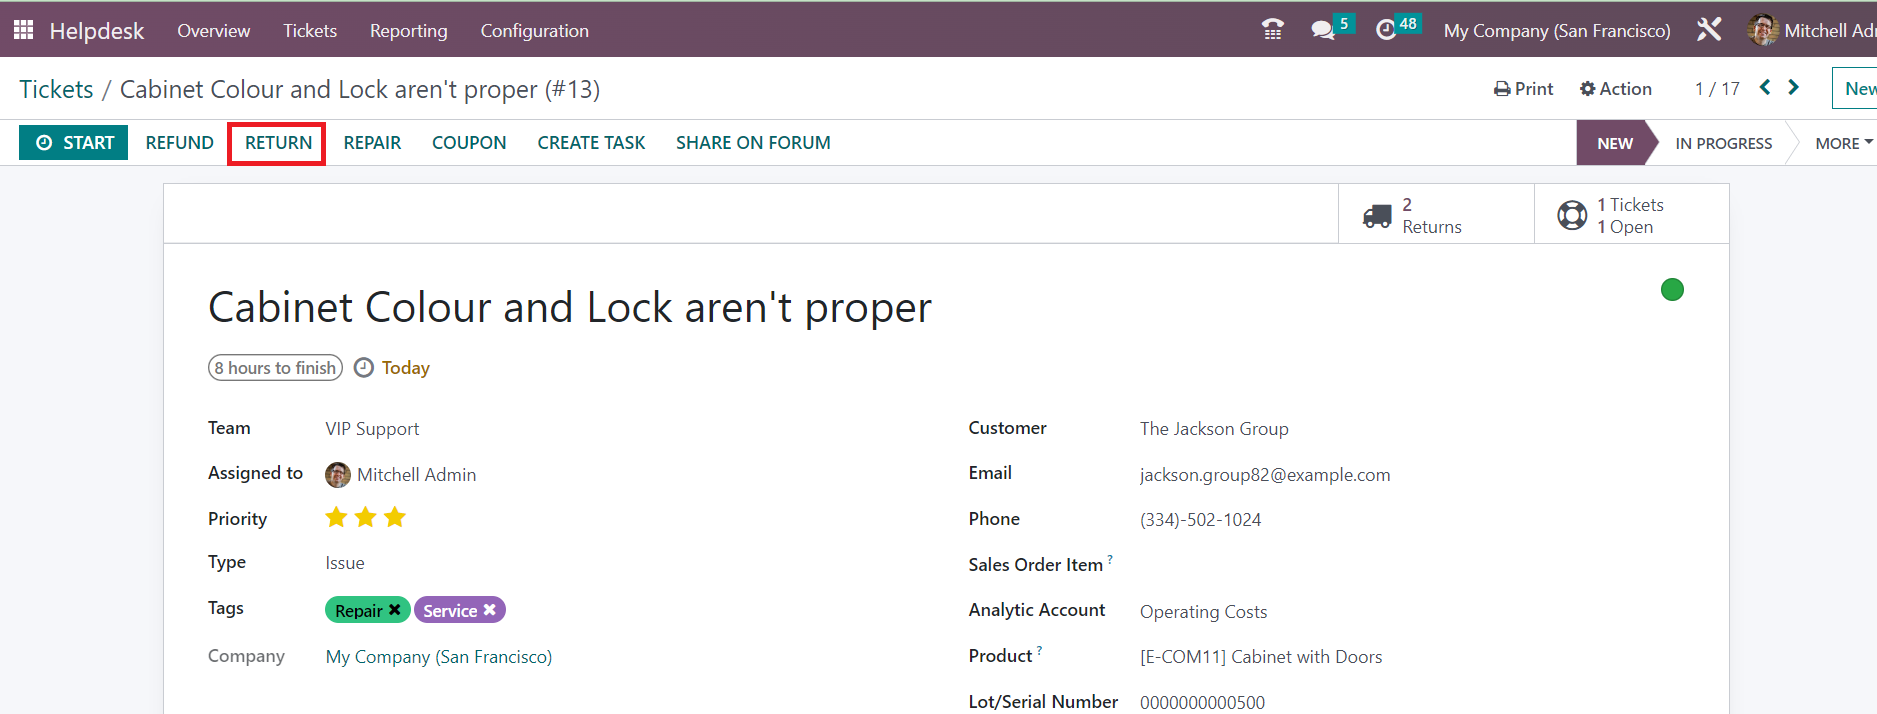
If the customer wants to return the product purchased from your company, you can record the return using the Return button available on the ticket.
When you click on the Return button, you will get a pop-up window.
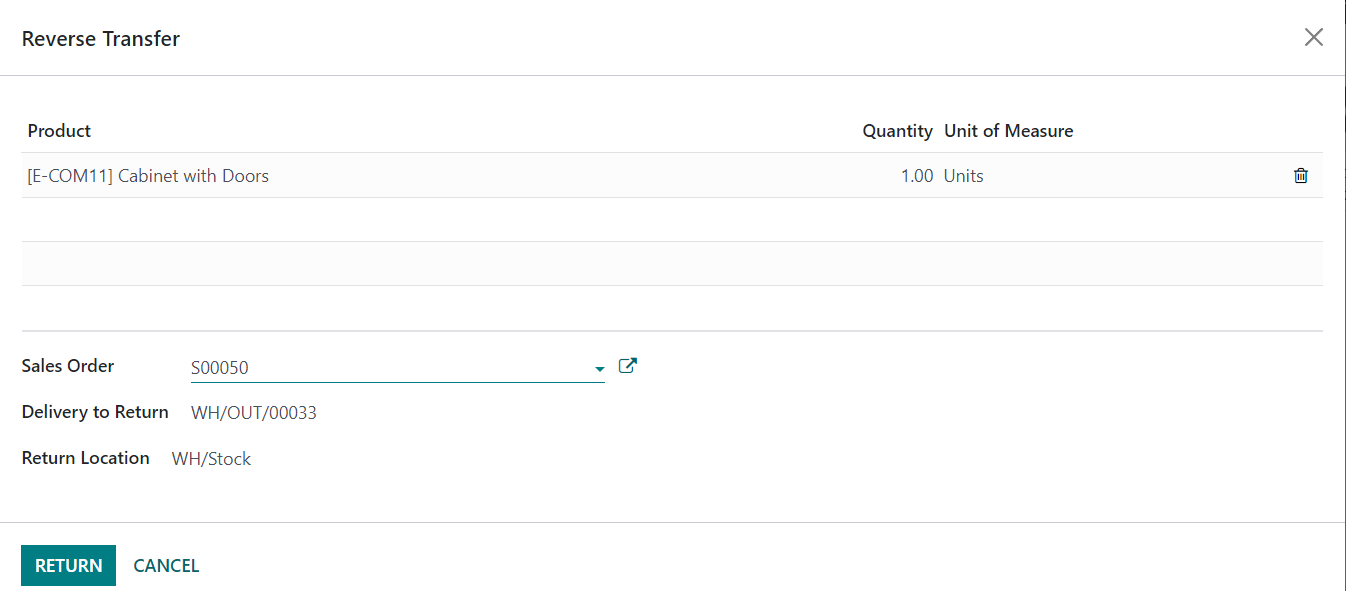
Here, the name of the product mentioned in the ticket will be available with Quantity and UoM. Additionally, you can add Sales Order, Delivery to Return, and Return Location details in this window and click on the Return button.
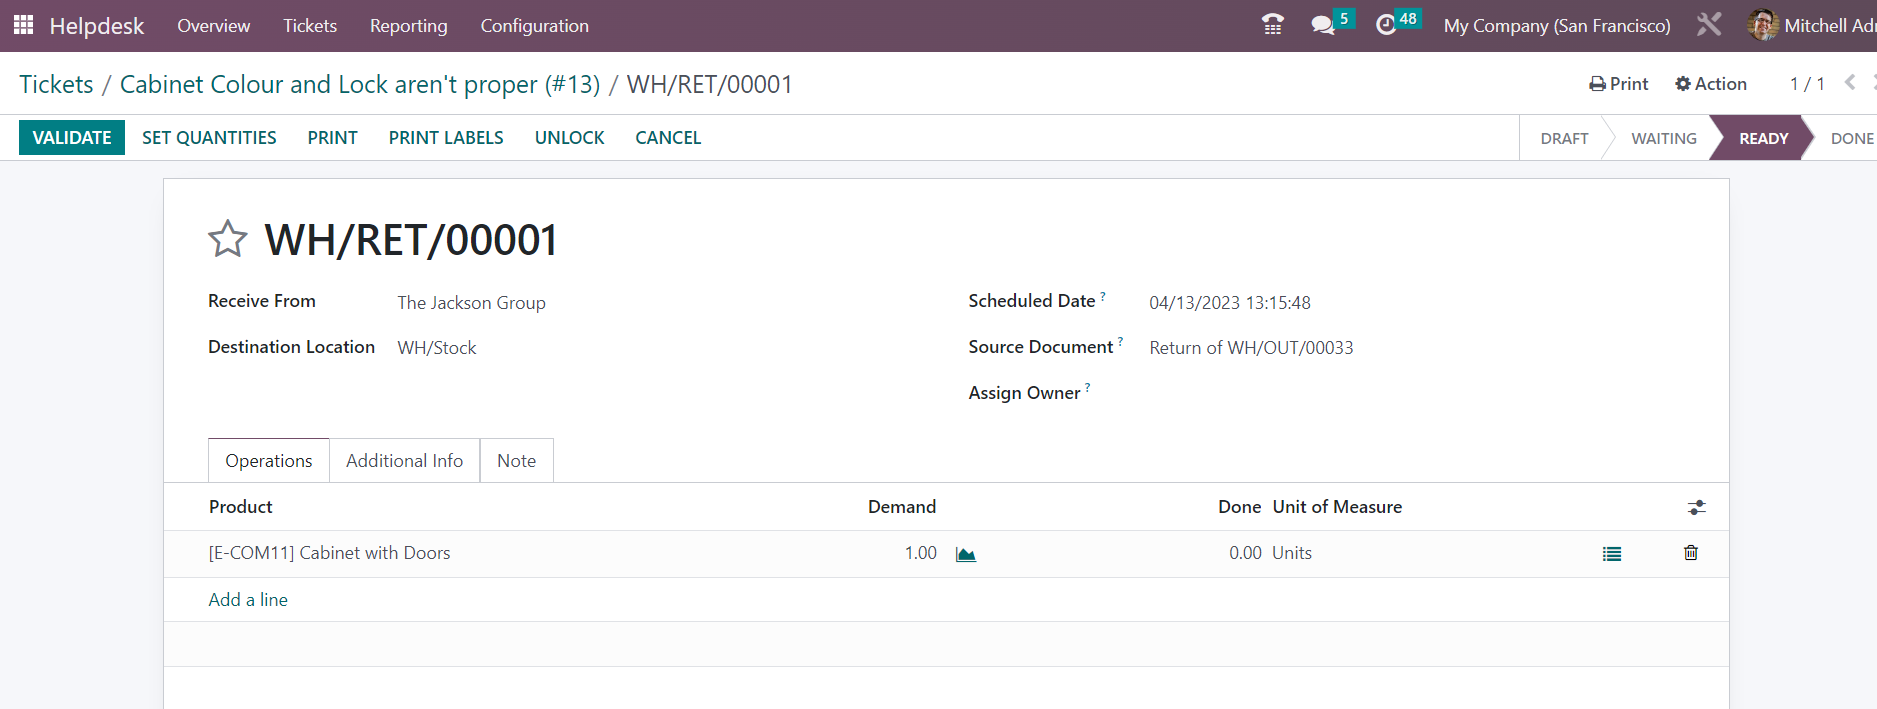
Now, you will get a return order as shown in the image above. You can click on the Validate button to confirm the return after checking the details available in this window.
If the product is damaged and the customer wants to repair it, you can generate a repair order for the product using the Repair button.
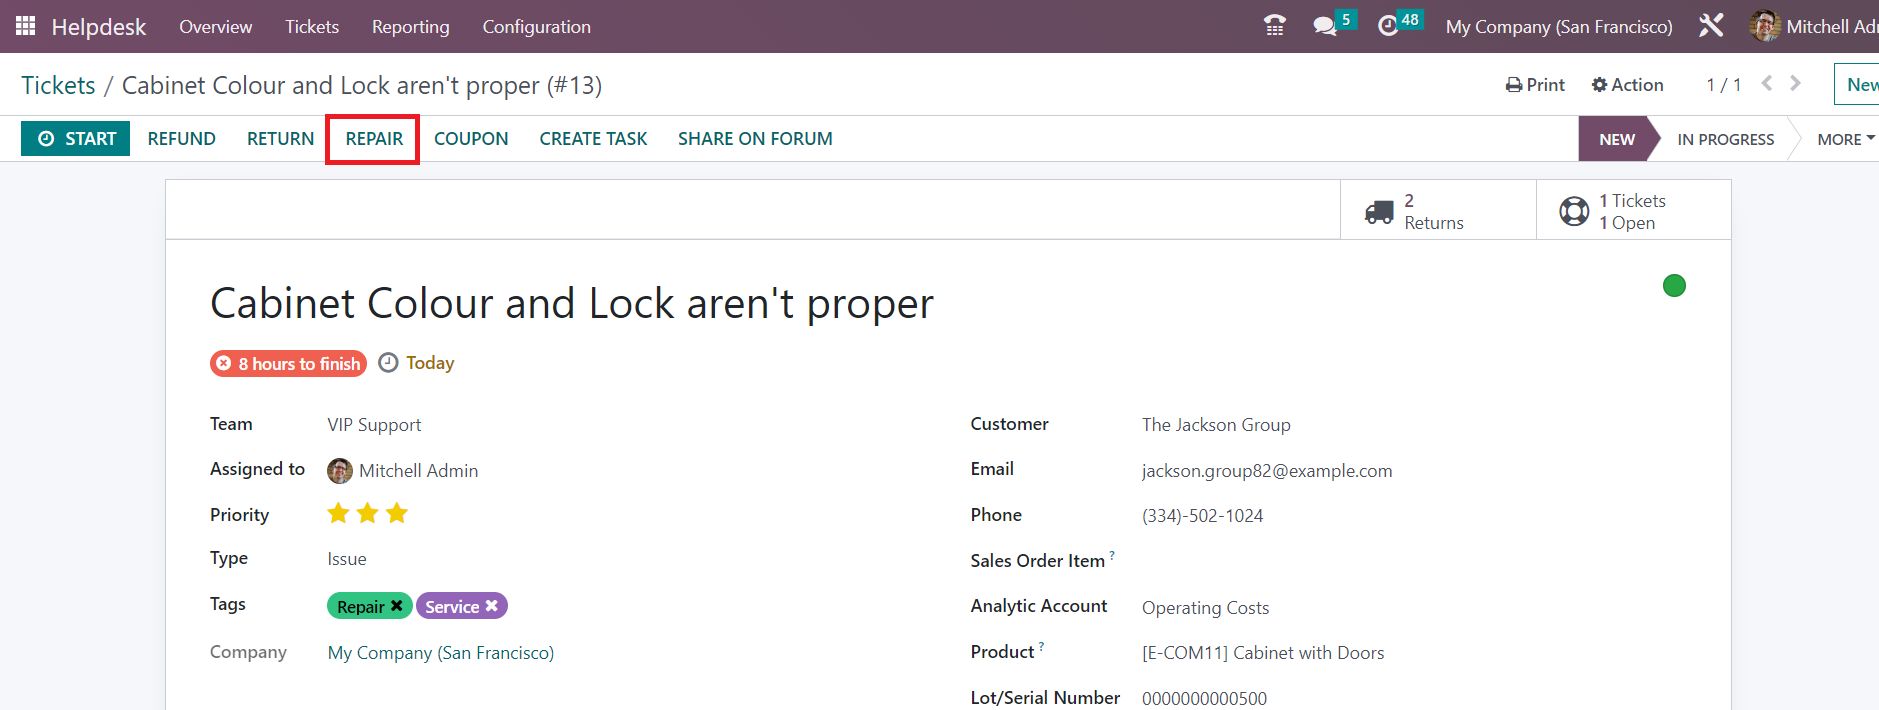
This will generate a repair order for the product.
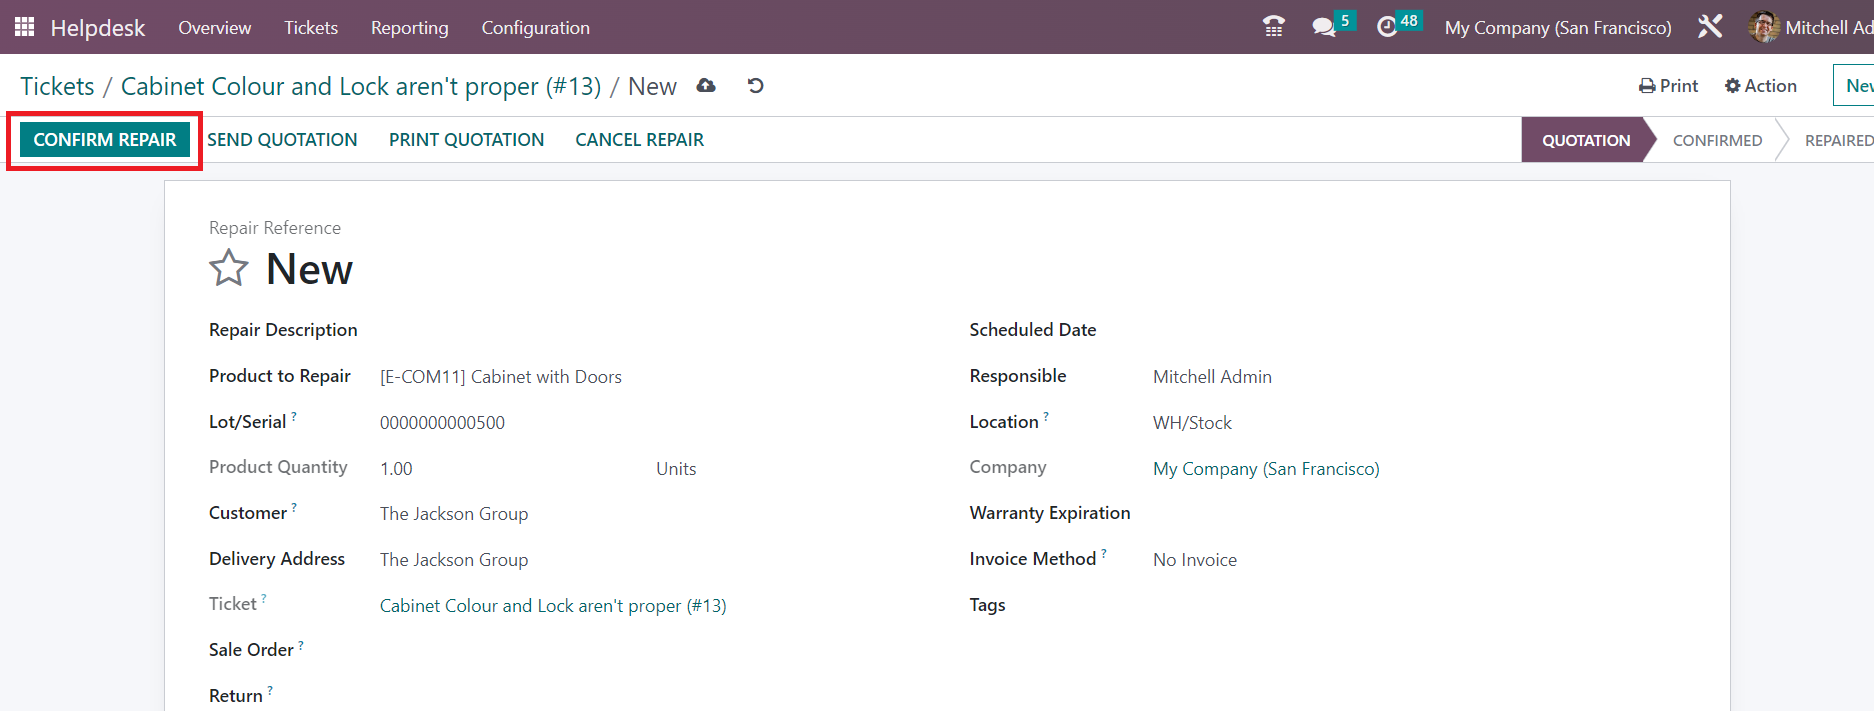
You can check the repair order and click on the Confirm Repair button.
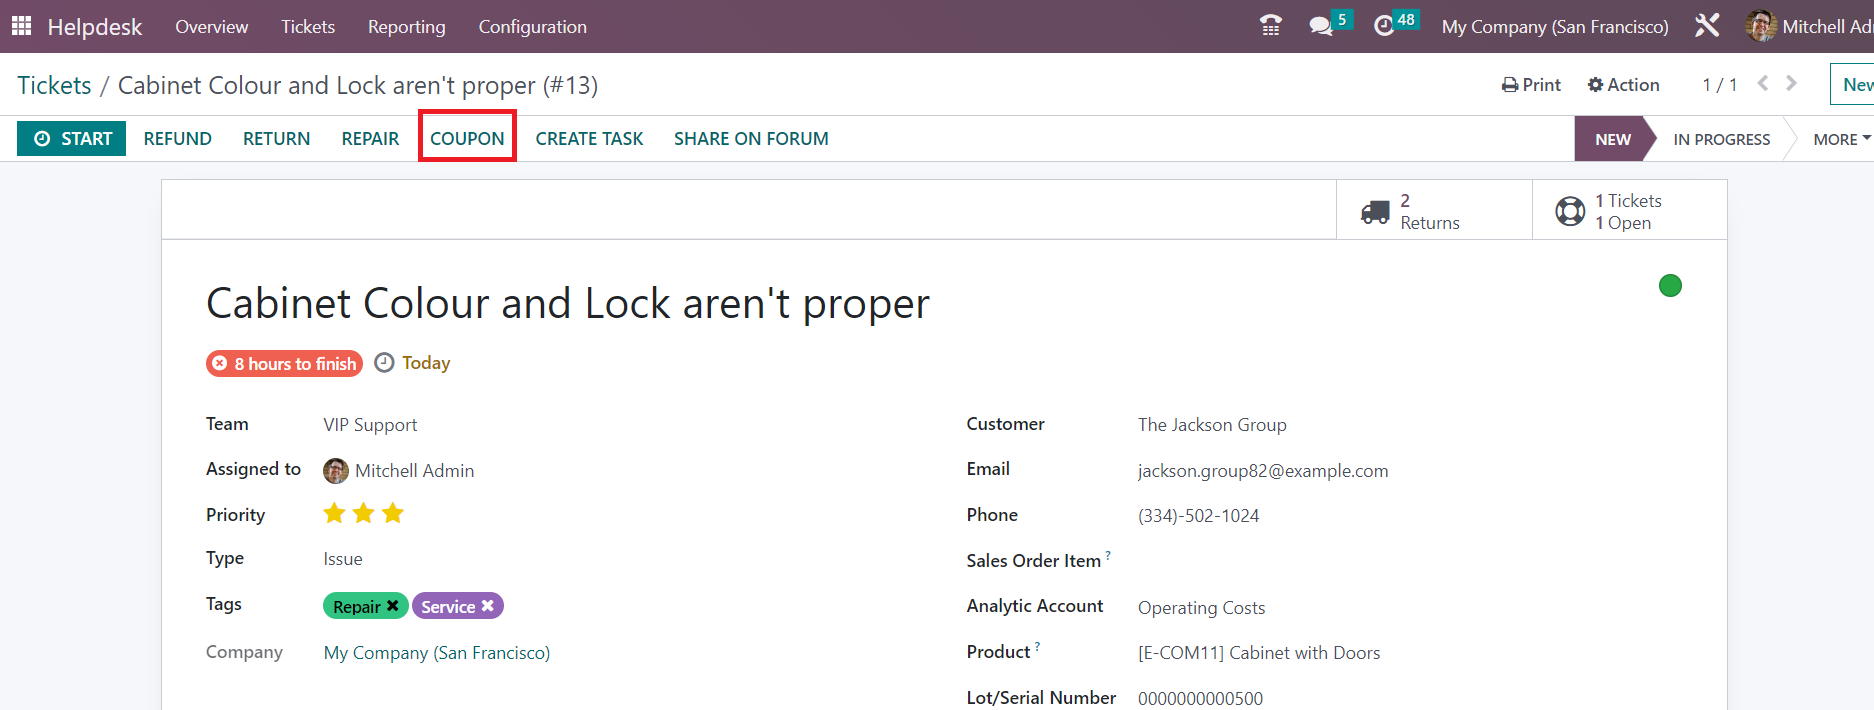
You can send rewards and coupons to your customers. The Coupons button will help you to send coupons to the respective customer.
Clicking on the coupon button will give a pop-up window as shown below. Here, you can mention the Coupon Program that you want to offer to your customer.
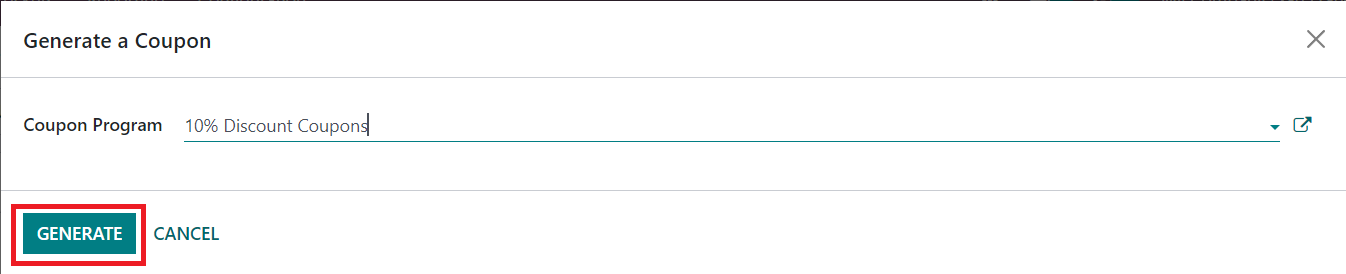
Click on the Generate button.
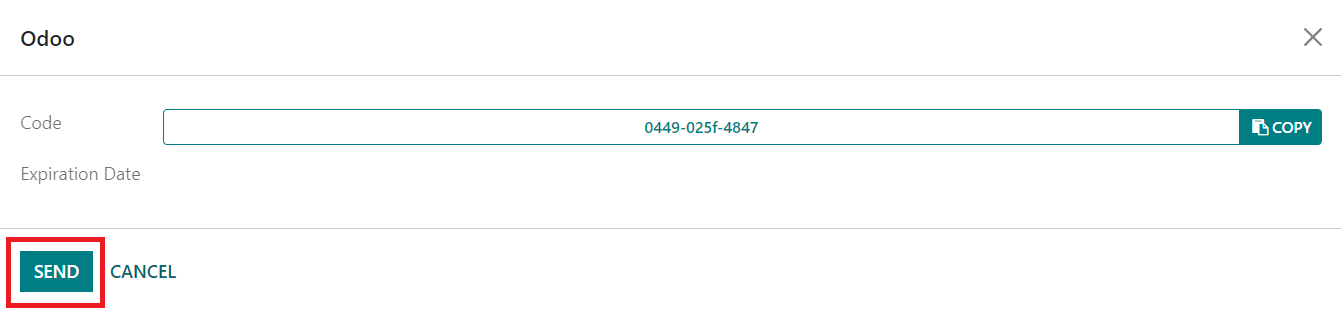
The coupon code will be available in this pop-up window. The Send button will help you to send the coupon to the respective customer.
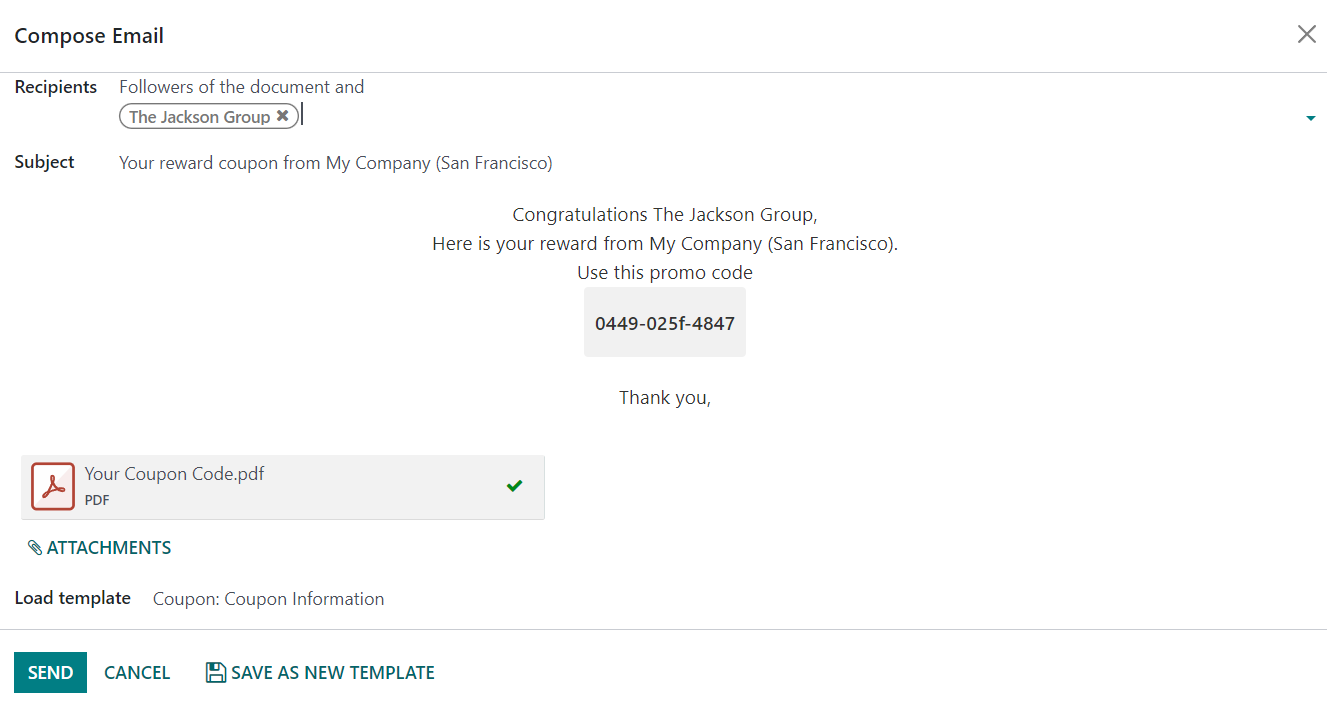
As you can see in the screenshot above, Odoo will generate an automated email with the details of the coupon with an attachment. By following this method, you can send coupons to your customers.
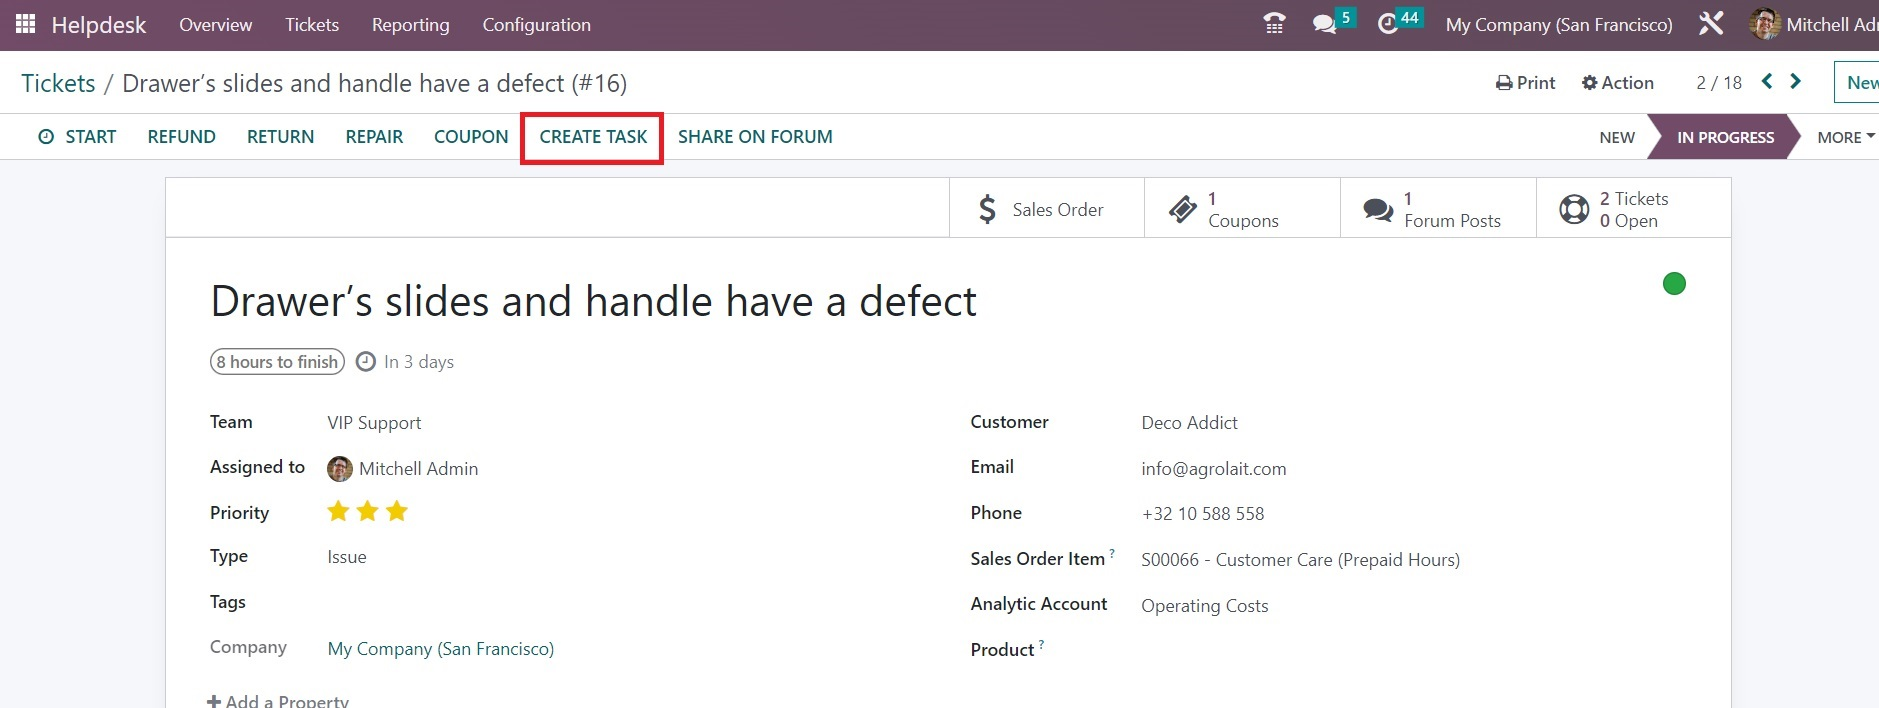
Some tickets demand field service operations to solve the issue raised by the customer. In such cases, you can use the Create Task button to create new tasks for field service operations.
When you click on this button, you will get a pop-up window to specify the details of the new task.
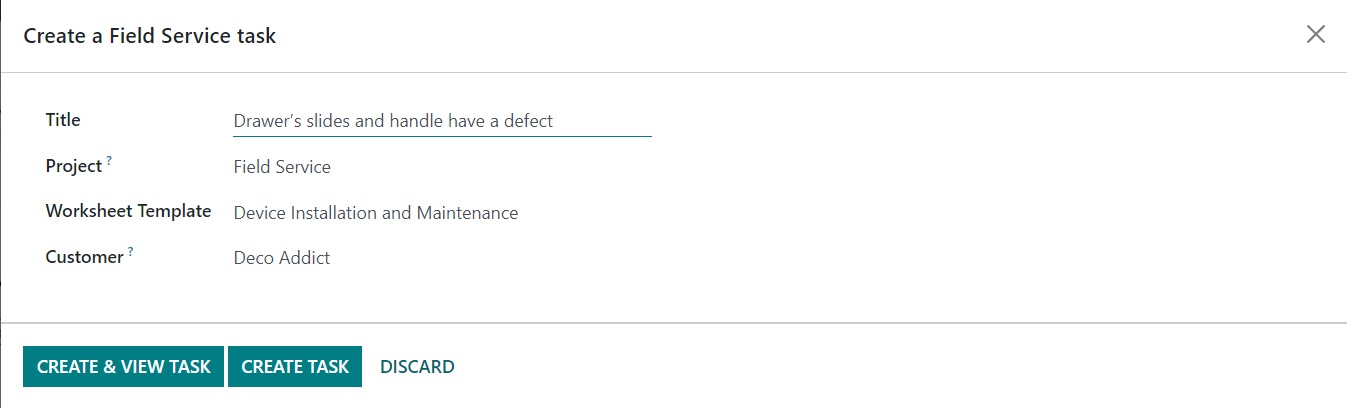
Here, you will get the Title, Project, Worksheet Template, and Customer details. You can check the information and click on the Create Task button. This will create a new task in the Odoo Field Service module. You can manage the task from the Field Service module and close the ticket once the task is completed.
You can share the query or issue raised by a customer on forums which will allow others to share their thoughts on the issue. In order to share the ticket on forums, you can click on the Share on Forum button.
You will get a pop-up window as shown below.
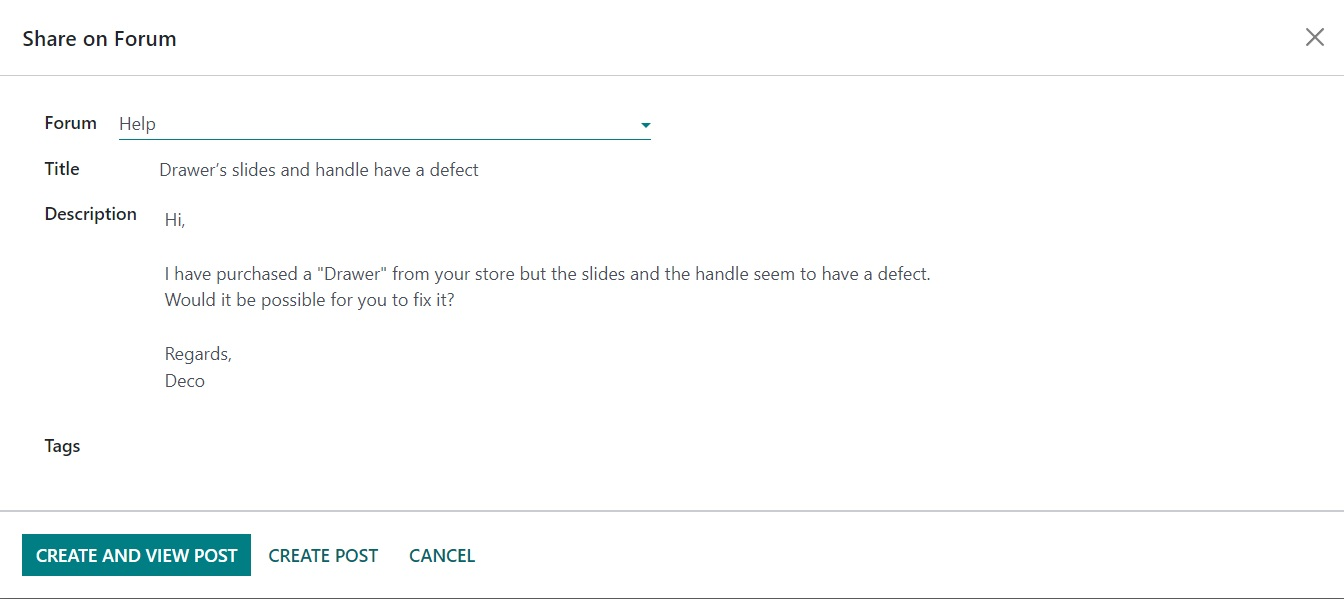
Here, you can mention the Forum on which you want to post this ticket. Provide a Title along with suitable Description and Tags in this window. Clicking on the Create Post button will create a new post on the Forum you mentioned.

Based on the operations you perform on the ticket, the corresponding smart buttons will appear on the window, which can be used to manage the respective operation directly from this window.
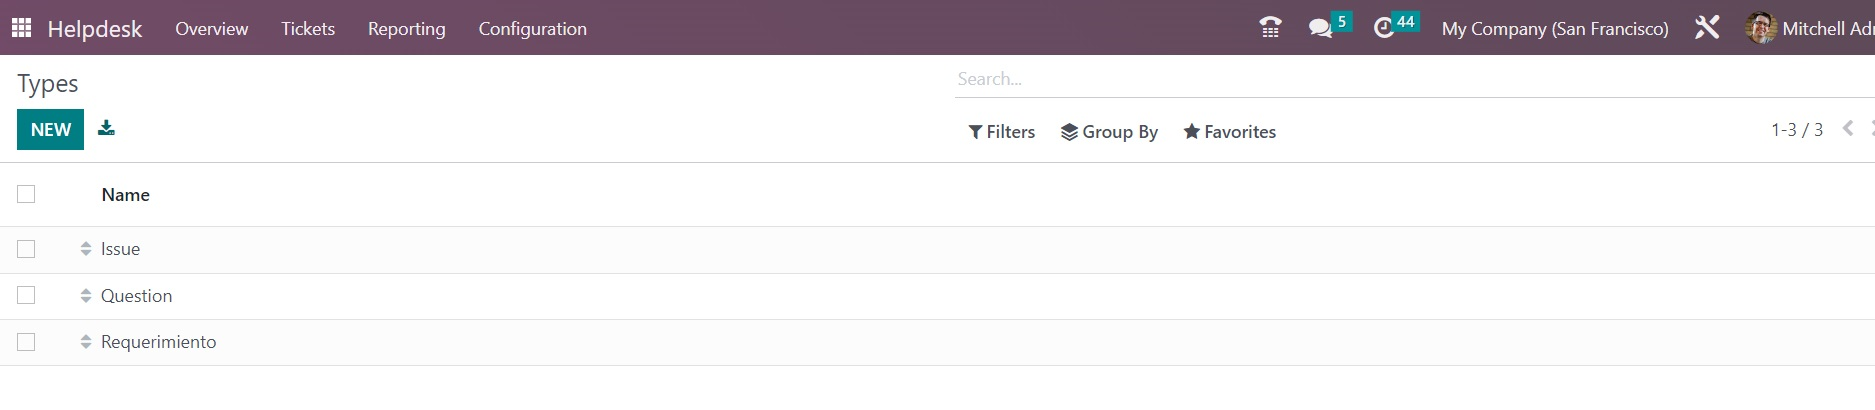
Under the Configuration menu of the Helpdesk module, you can find the Types option, which can be used to create various types of tickets. Clicking on this option will open a new window with the list of already created ticket types.
If you want to create a new type for the tickets, you can click on the New button which will open a new line under the existing list
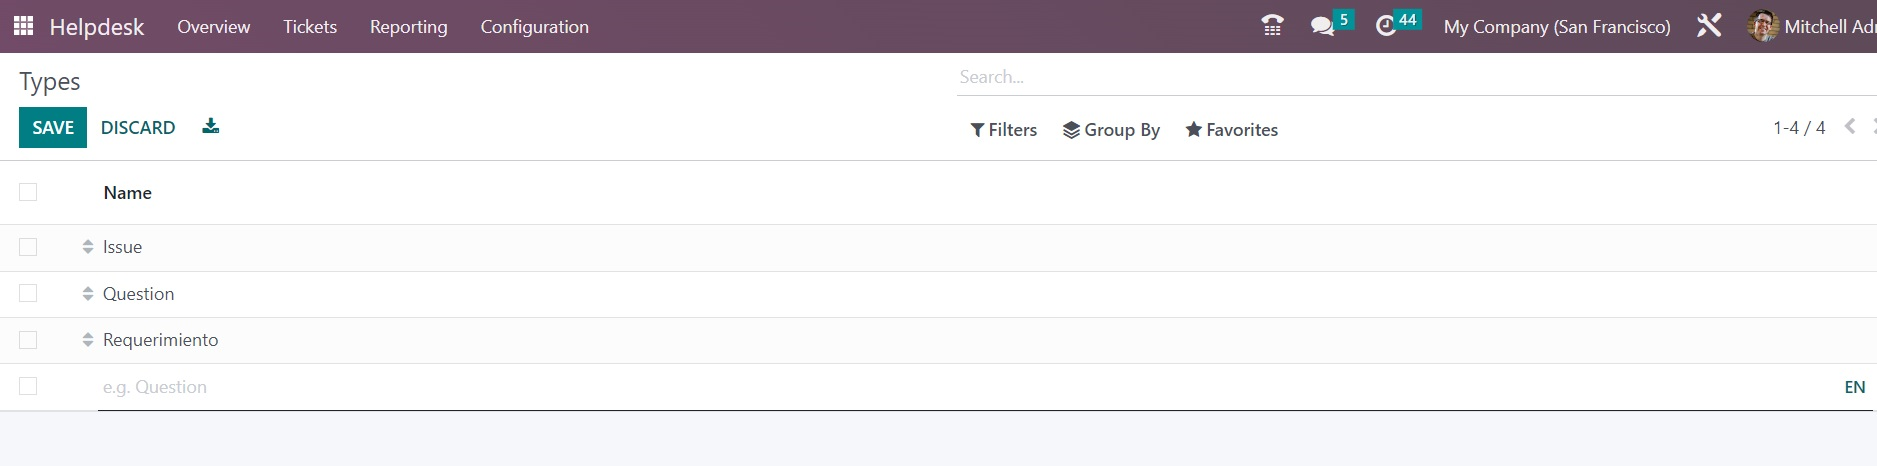
You can use this line to mention the Name of the new ticket type. Clicking on the Save button will add a new type to the ticket type in the Odoo Helpdesk module.