Employees
Successful management of employees in an organization is a crucial task in all kinds of businesses. In order to ensure a seamless workflow within the organization, human resources should be monitored and managed adequately. You need a proper system to manage all types of employee-related activities. Odoo ERP system will record all your employee data in a centralized database which helps you easily retrieve required information related to an employee within seconds. You can create records of employees in the Odoo Employee module based on their job titles and working departments. The Employee module can be integrated with other HR modules available in Odoo, which will expand the functionalities of the system.
This chapter will discuss the features and functionalities of the Employee module in Odoo 16.
The Employee module can be used to create an employee profile which includes personal details, work information, contract, resume, and many more. Once you create an employee profile in the module, you can use the profile window to schedule or plan activities with the respective employee, view documents, timesheets, contracts, equipment, work entries, and payslips related to the employee. When you open the module, you will get a Kanban view of the employee profiles recorded in the system.
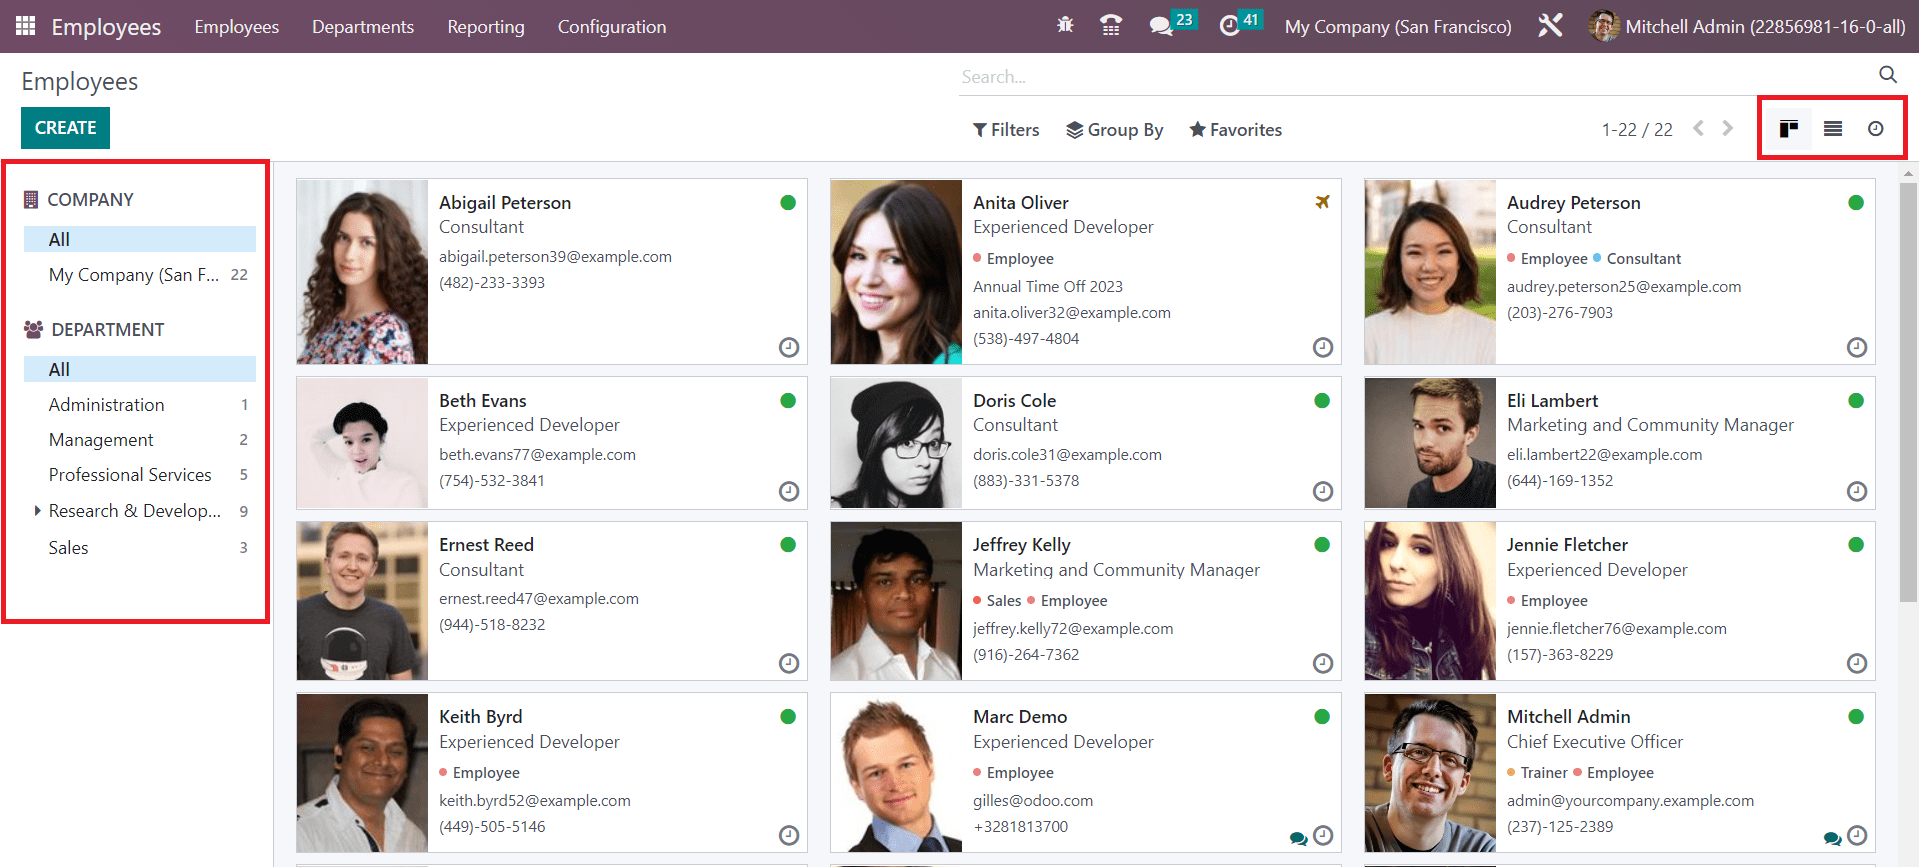
Each employee profile will show some basic information related to the respective employee such as name, job position, contact information, and photo. If you are working in a multi-company environment, you can easily categorize the employees of each company using the panel available on the left side of the screen. It is also possible to view employees based on their Departments.
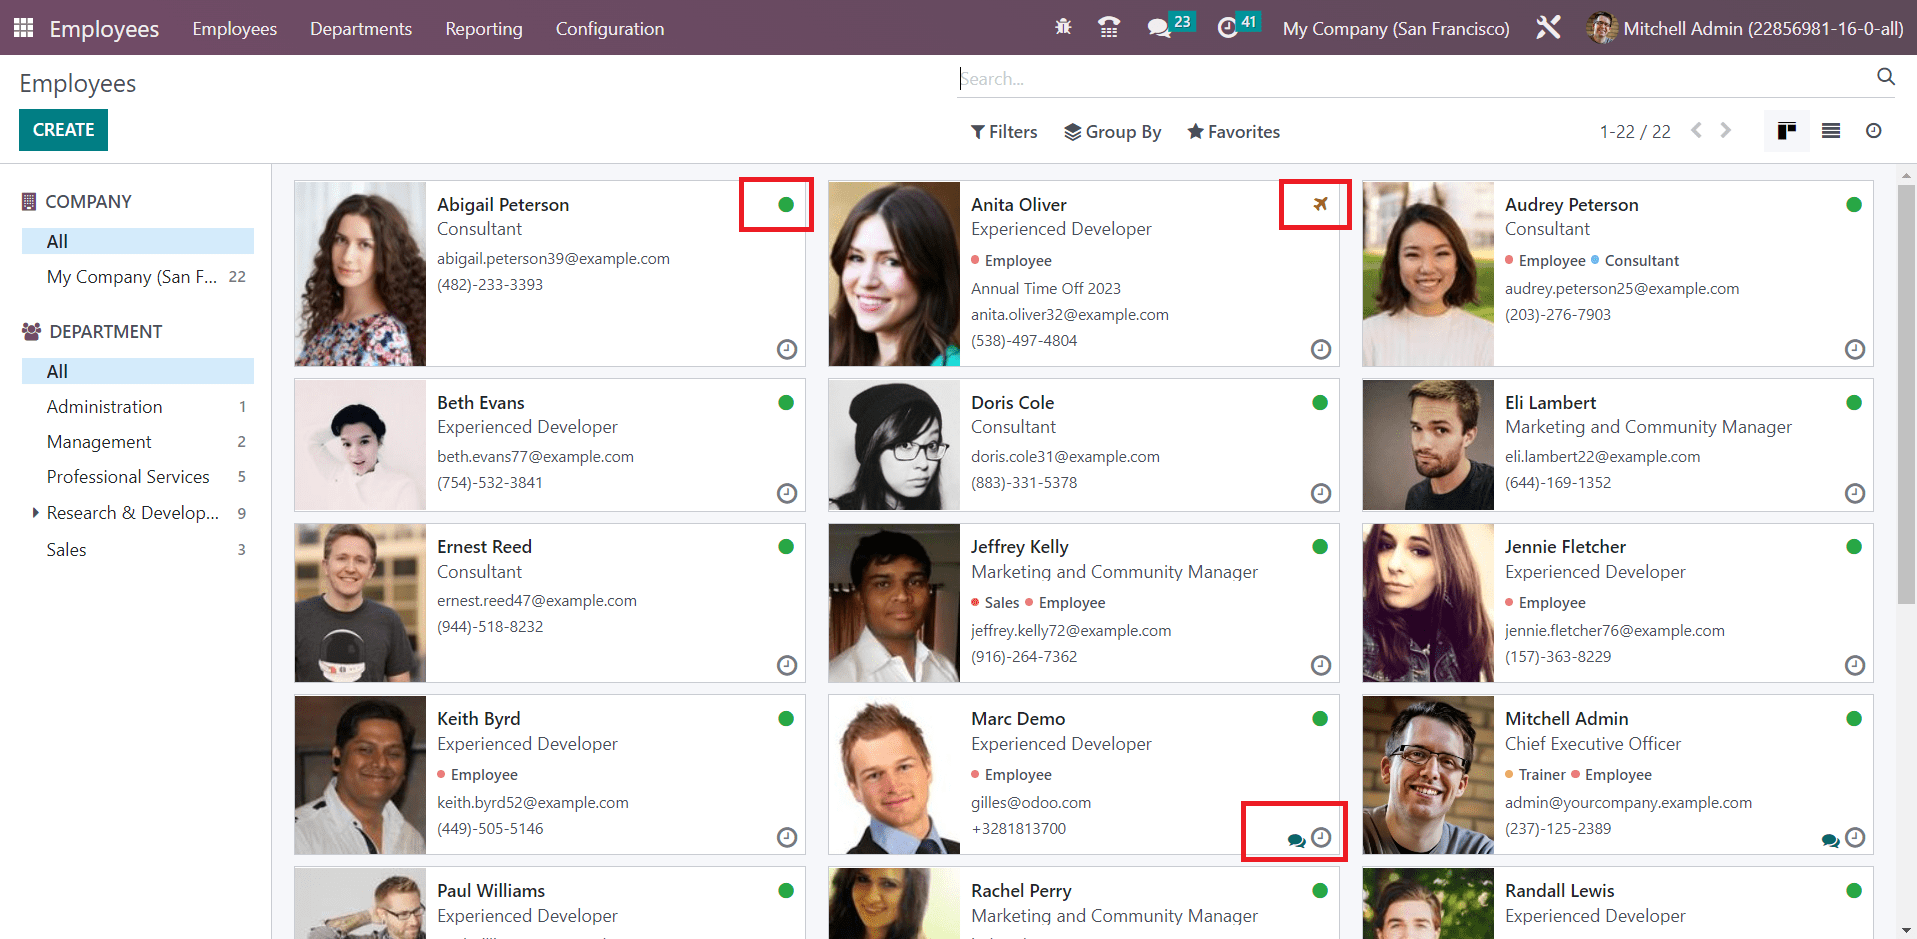
The small green circle on the employee profile indicates that the employee is online. If the profile shows a small airplane icon, you can figure out that the employee is absent. The small clock icon given on each profile can be used to schedule various activities with the corresponding employee. You can use the chat icon to directly connect with that employee.
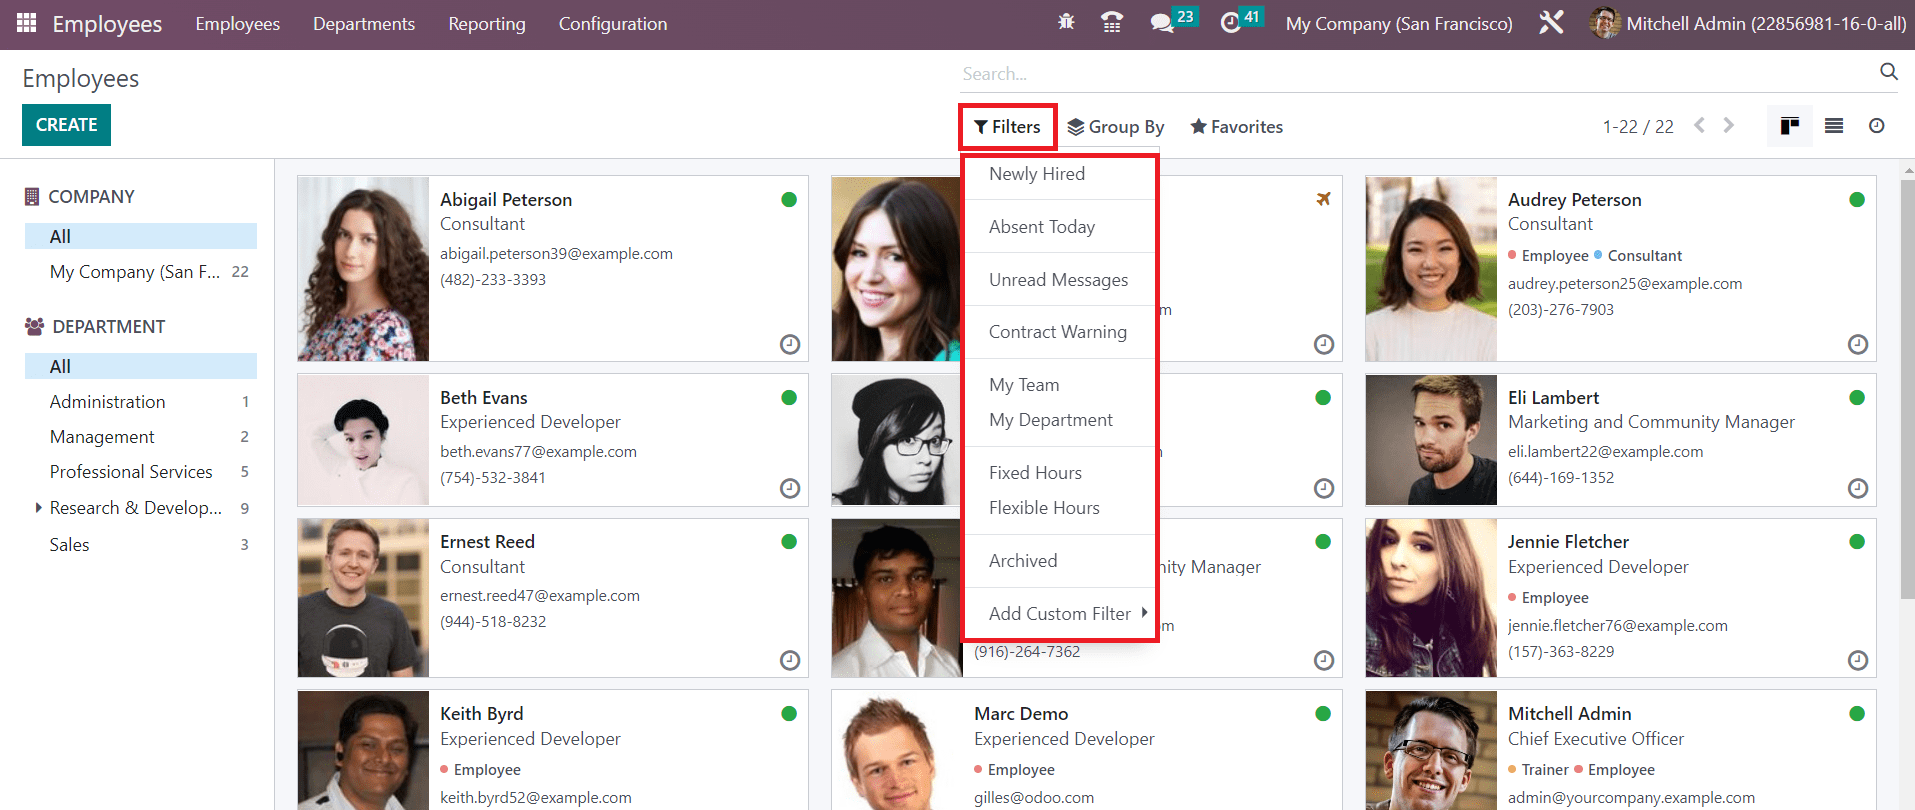
You will get Newly Hired, Absent Today, Unread Messages, Contract Warning, My Team, My Department, Fixed Hours, Flexible Hours, and Archived as default filters.
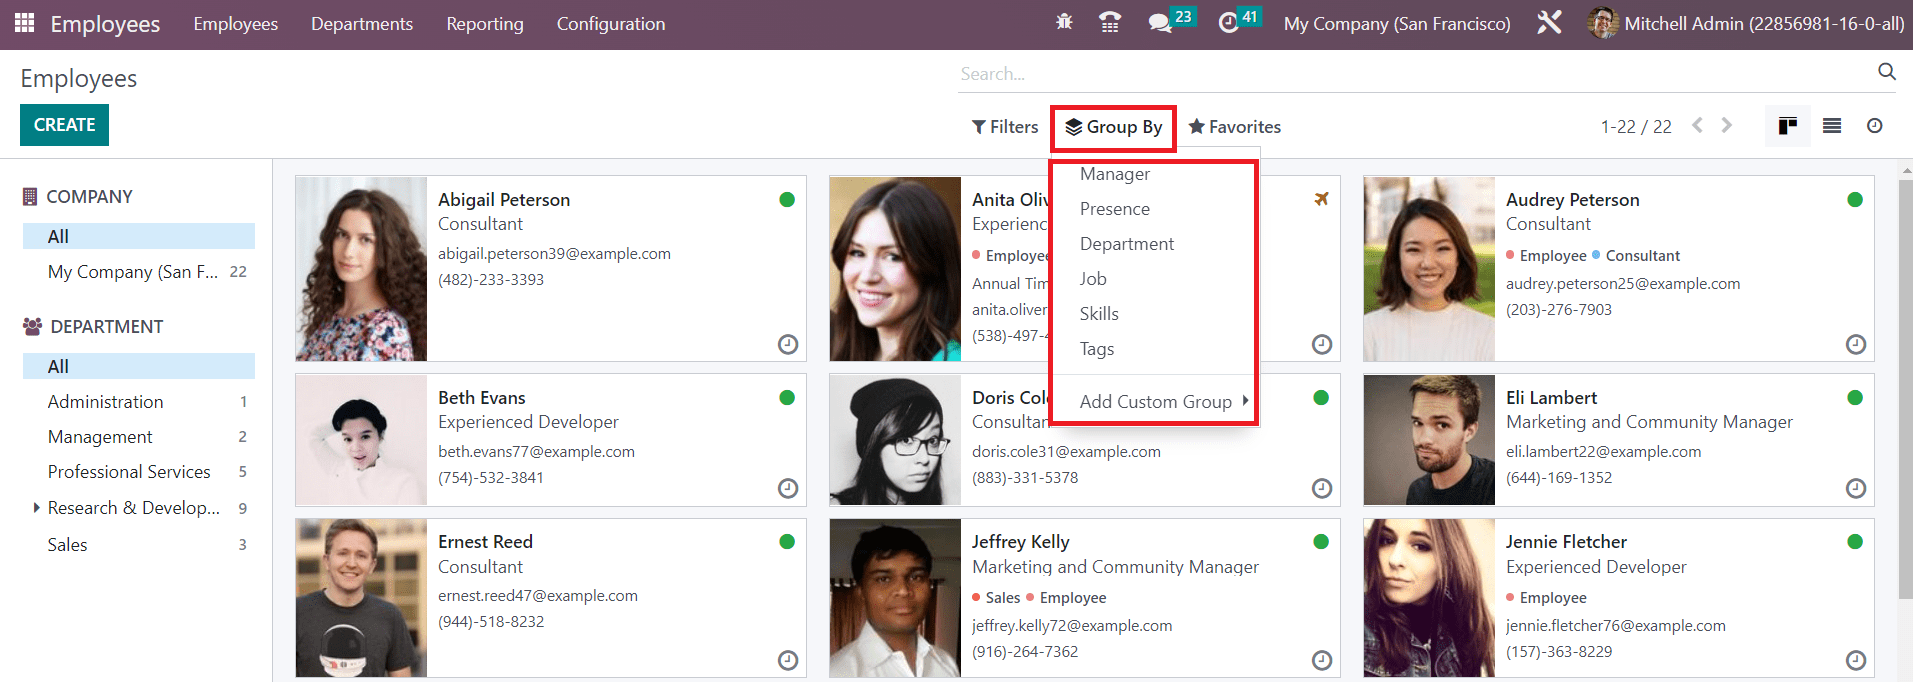
Use the Group By option to group the employees based on Manager, Presence, Department, Job, Skills, and Tags.
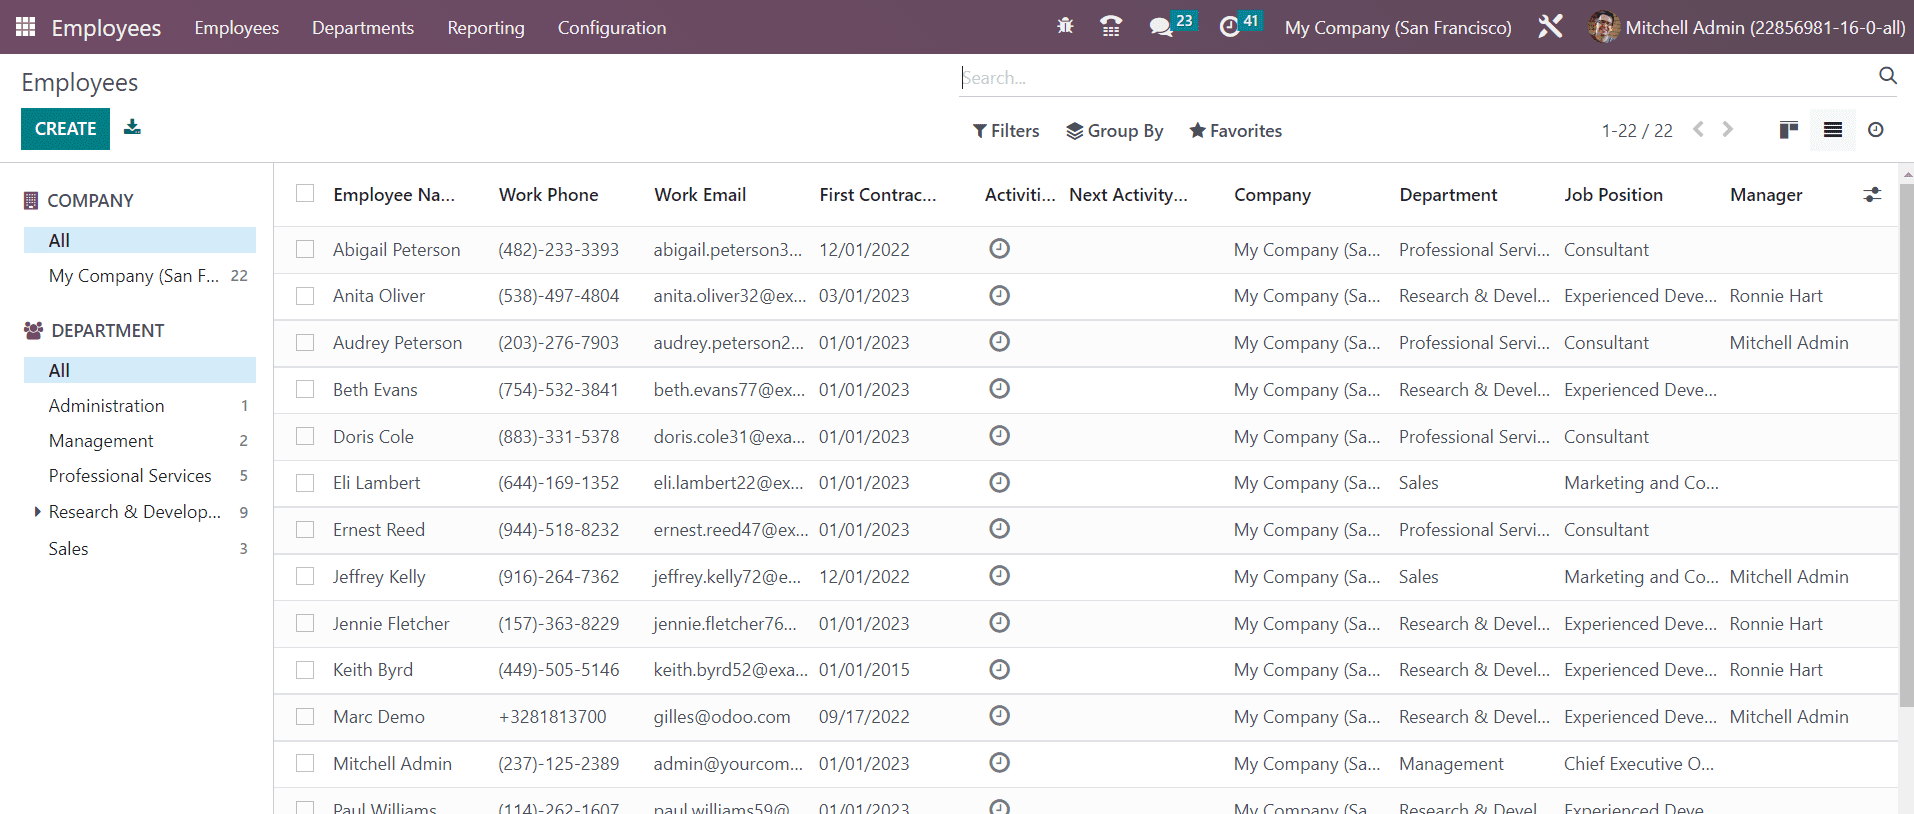
The list view of the employees will show the Employee's Name, Work Phone, Work Email, First Contract, Activities, Next Activities, Company, Department, Job Position, and Manager. Now, you can click on the Create button to create a new profile.
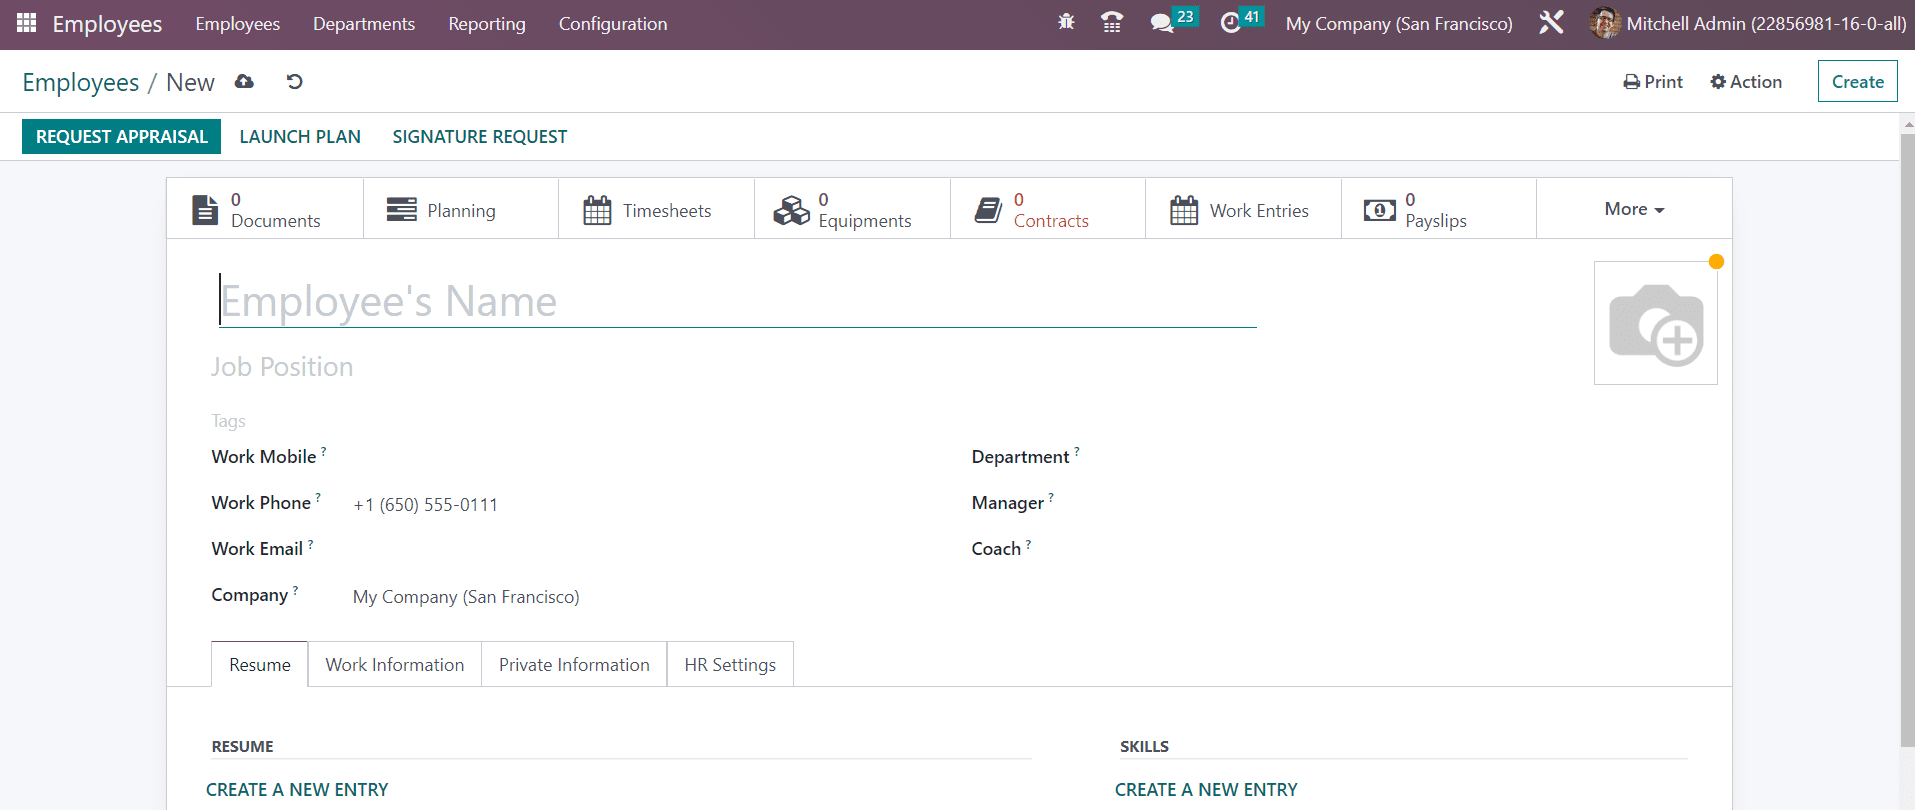
A new form view will appear where you can configure the details of the employee. Mention the Name of the employee and Job Position in the company in the respective fields. Additionally, you can add suitable tags to the employee. You will get specific fields to mention the Work Mobile, Work Phone, Work Email, Company, Department, Manager, and Coach of the employee. A specified area will be available to upload an image of the employee.
Now, let’s add Resume and Skills to the employee profile. For this, you will get the Resume tab, as shown below.

Use the Create a New Entry button to add resume lines to your profile. You can add your education details, work experiences, internal certifications, training information, and additional qualifications under the Resume. When you click this button, a pop-up will appear, as shown below.
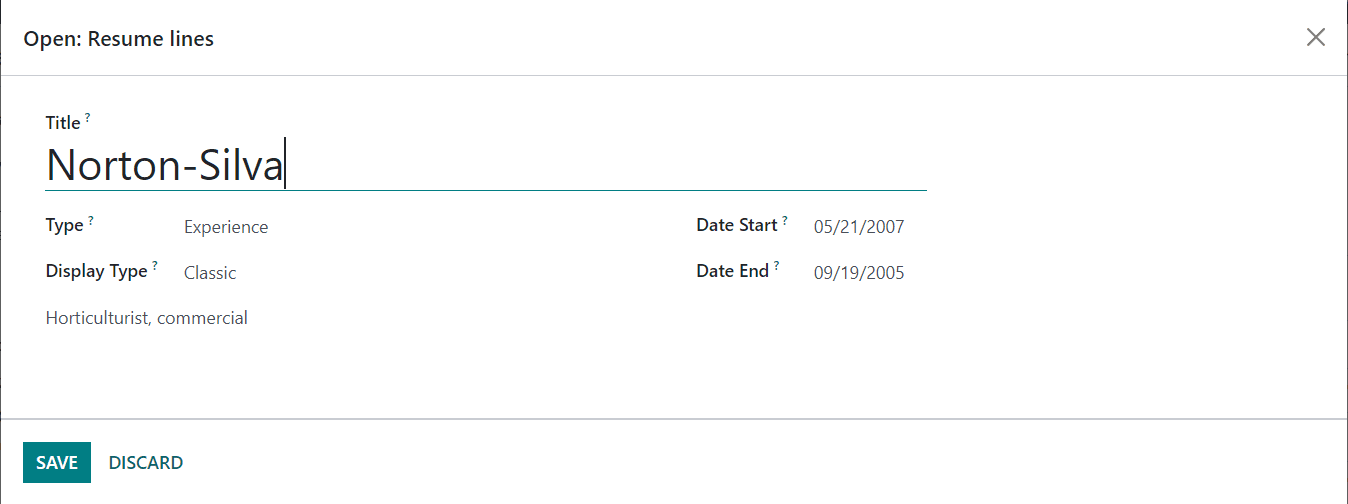
Specify the Title and select Type from the drop-down. It can be either Experience, Education, Internal Certifications, or Internal Training. You can also create a new Resume Line Type from the Configuration menu of the module. After mentioning the Type, you can set the Display Type as Classic, Certification, or Course. Mention the time period in the Date Start and Date End fields. Additional details related to this resume line can be added under the description field.
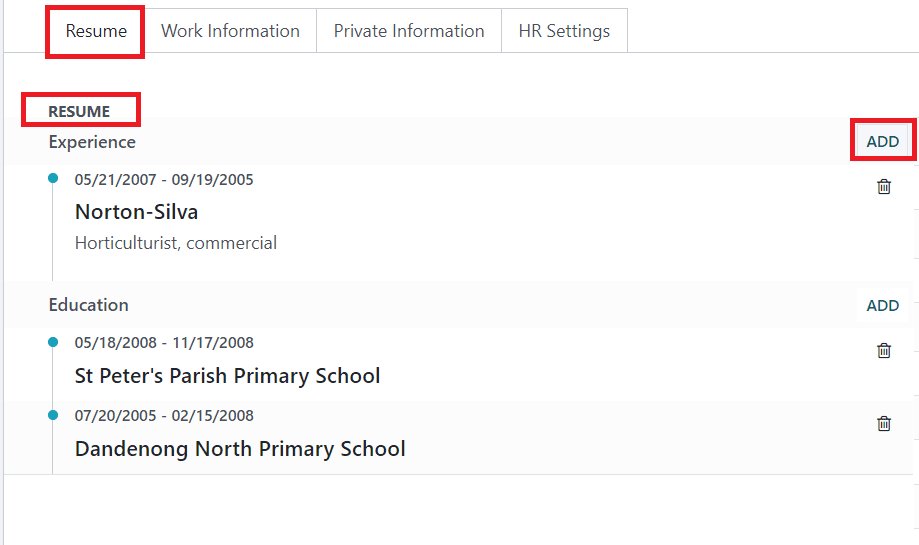
Once you add resume lines, this is how it looks. Using the Add button, you can add more resume lines to this tab. Now use the Create New Entry button available in the Skills field to add the skills of the employee.
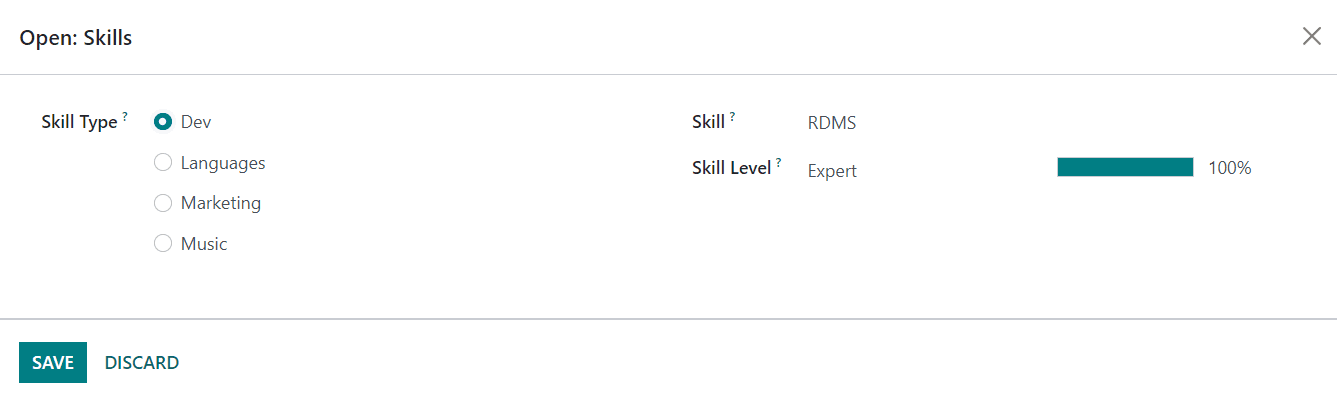
You will get a pop-up where you can select the Skill Type of the employee and mention a particular Skill. In the Skill Level field, mark the skill level of the employee.
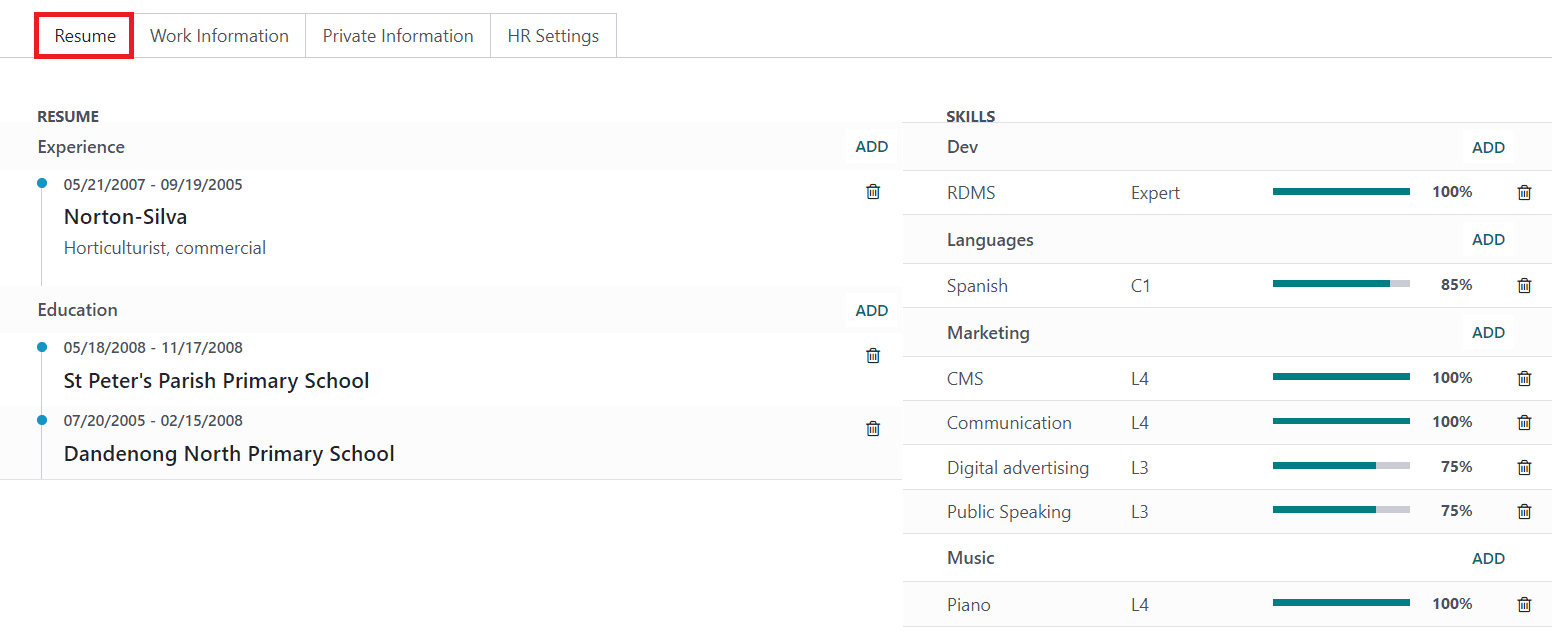
You can add new skills using the Add button available in the Resume tab.
The Work Information tab includes fields for the necessary work information related to the employee.
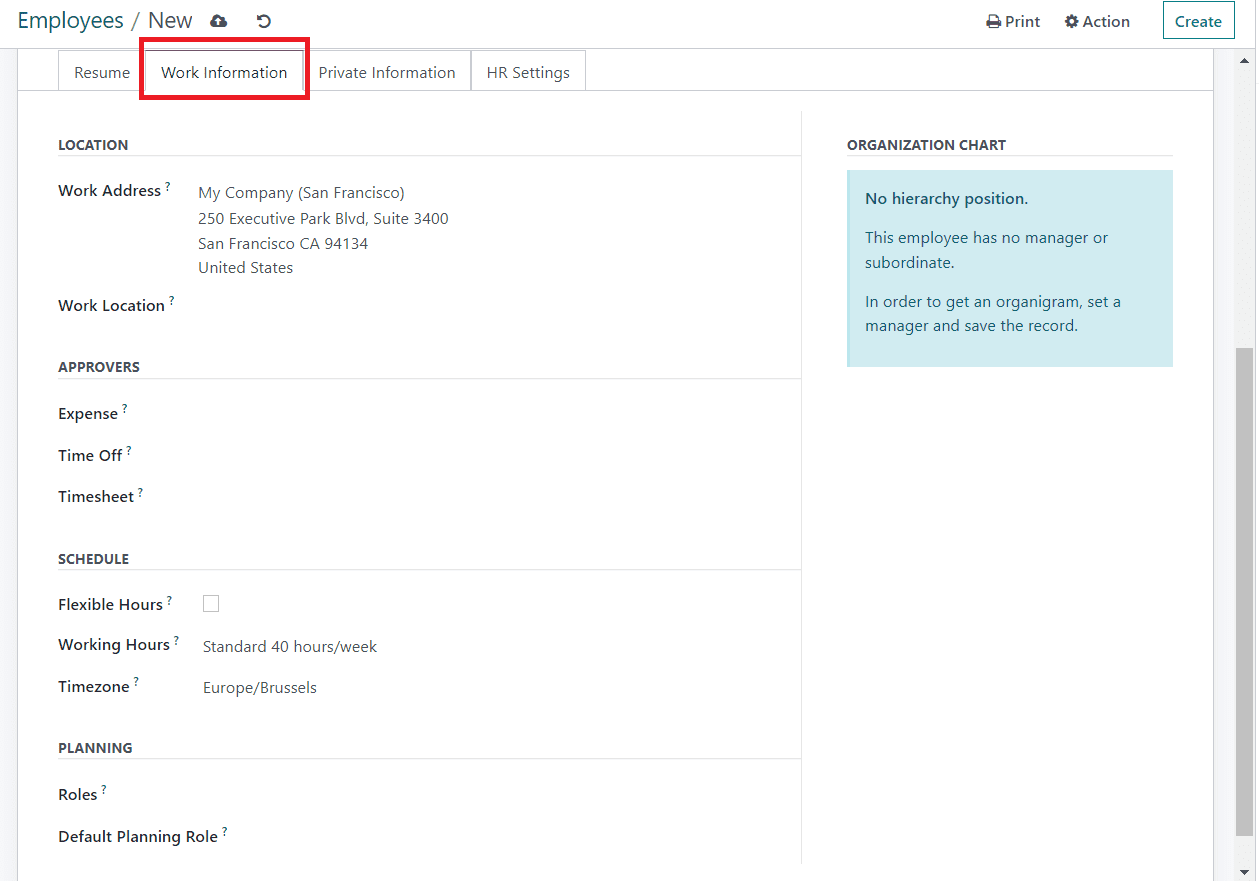
In the Location section, mention the Work Address and Work Location. The Approvers section can be used to mention the approvers of the Expense, Time Off, and Timesheet of this employee. The Schedule section will give information about the work schedule of the employee. If the employee is allowed to work flexible hours, you can activate the Flexible Hours field. Otherwise, you are required to mention the Working Hours of the employee per week. Set the Timezone in order to define in which timezone the resources will work. Mention the Role that the employee can fill in. When creating a shift for this employee, only the shift templates for these roles will be displayed. The role that will be selected by default when creating a shift for this employee can be specified in the Default Planning Role.
The Private Information tab can be used to mention details regarding Private Contact, Family Status, Education, Work Permit, and Citizenship.
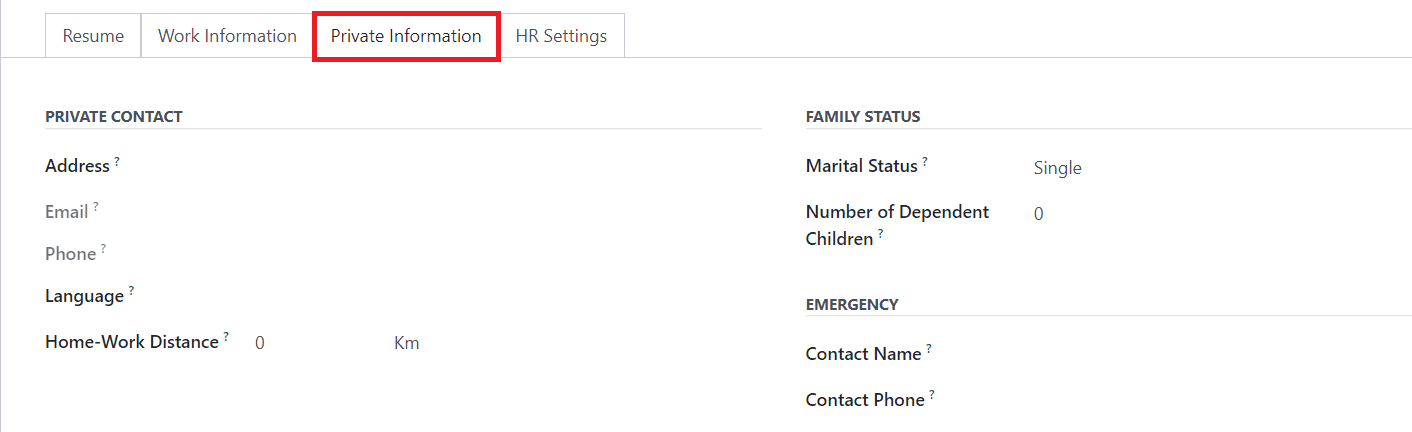
Under the Private Contact section, mention the private Address of the employee, Email, Phone, Language, and Home-Work Distance. As Family Status, you can add the employee’s Marital Status, Number of Dependent Children, Emergency Contact Name, and Contact Phone.
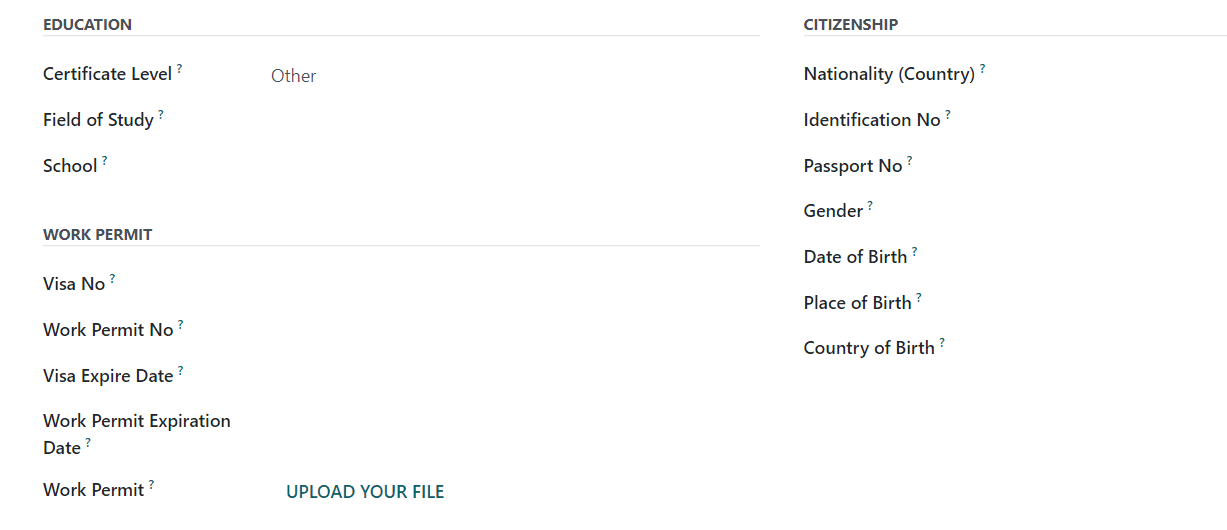
Under the Education section, you can add details of the Certificate Level, Field of Study, and School. The Visa No, Work Permit No, Visa Expire Date, and Work Permit Expiration Date can be added under the respective fields. You will get a specified field to upload the Work Permit of the employee. The details of Citizenship include Nationality, Identification No, Passport No, Gender, Date of Birth, Place of Birth, and Country of Birth.
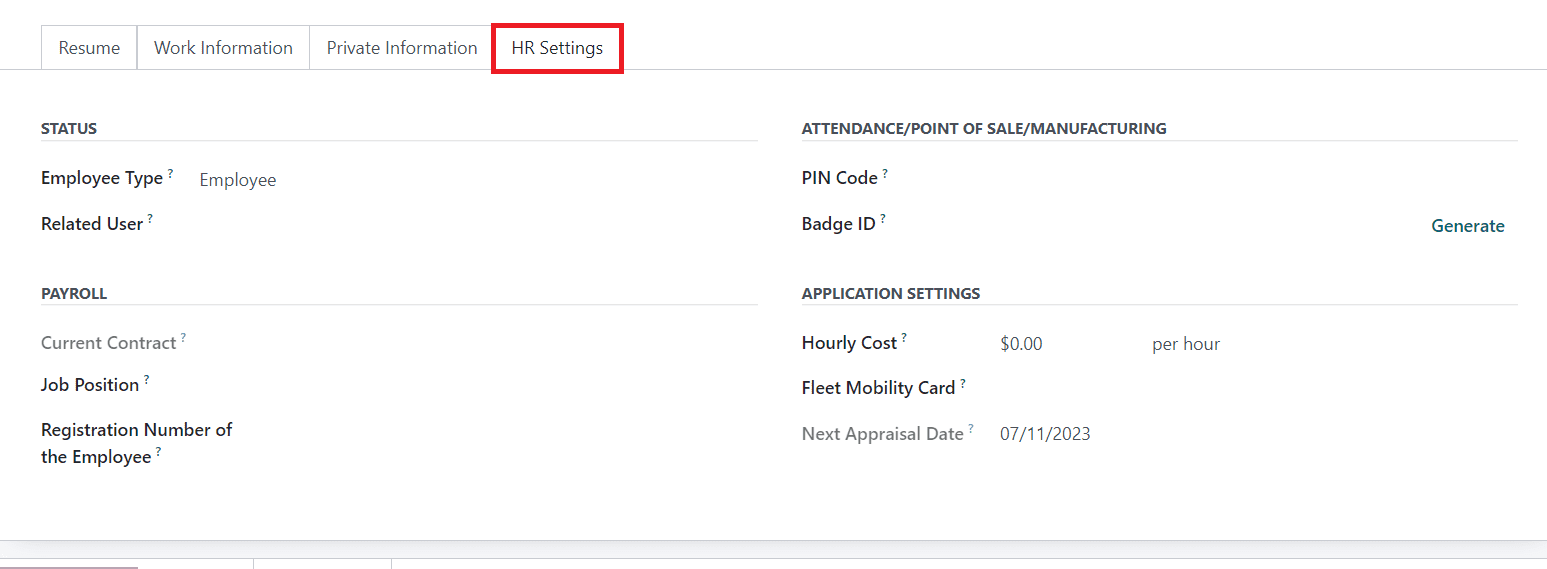
The HR Settings tab can be used to add the Status, Payroll, Attendance/PoS/Manufacturing, and Application Settings. The Employee Type can be set as Employee, Student, Trainee, Contractor, or Freelancer. A Related User name for the resource to manage its access can be added in the given field. Under the Payroll section, you can specify the Current Contract, Job Position, and Registration Number of the Employee. To log in to Attendance, PoS, and Manufacturing, you can set a PIN Code and Badge ID for the employee. In the Application Settings field, you can specify the Hourly Cost offered to the employee, Fleet Mobility Card, and Next Appraisal Date.
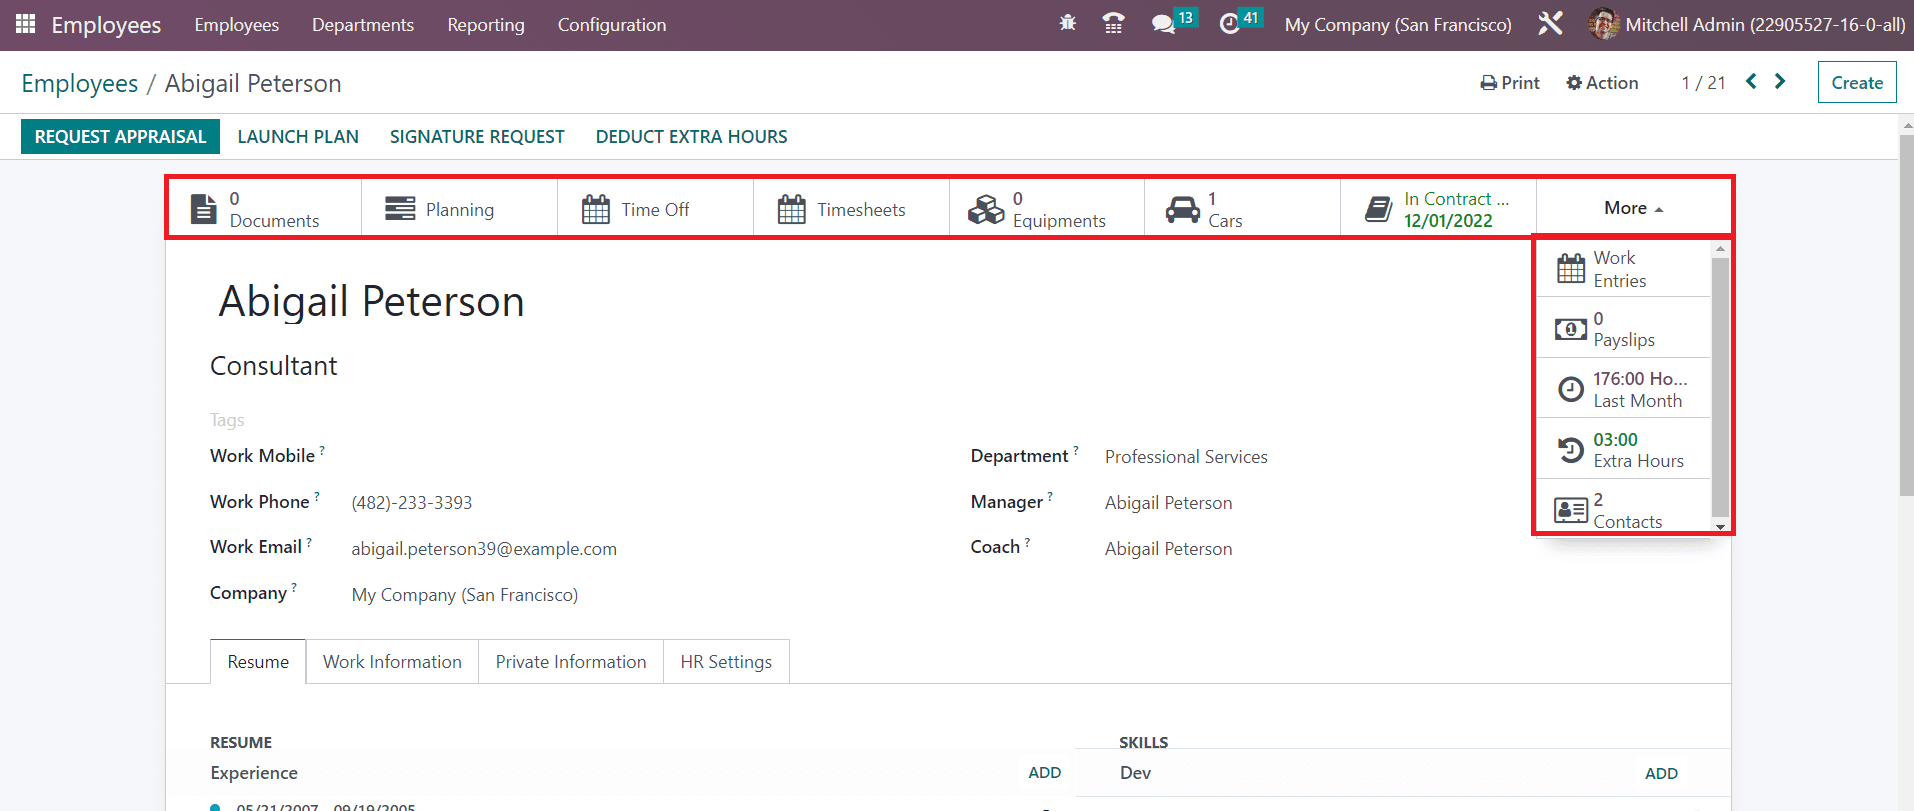
Once you complete the configuration of the employee profile, you will get various smart buttons on the form view to monitor the related operations of the employee. The Document button will display the related documents of the employee. If any equipment is assigned to the employee, you can manage them using the Equipment smart button.
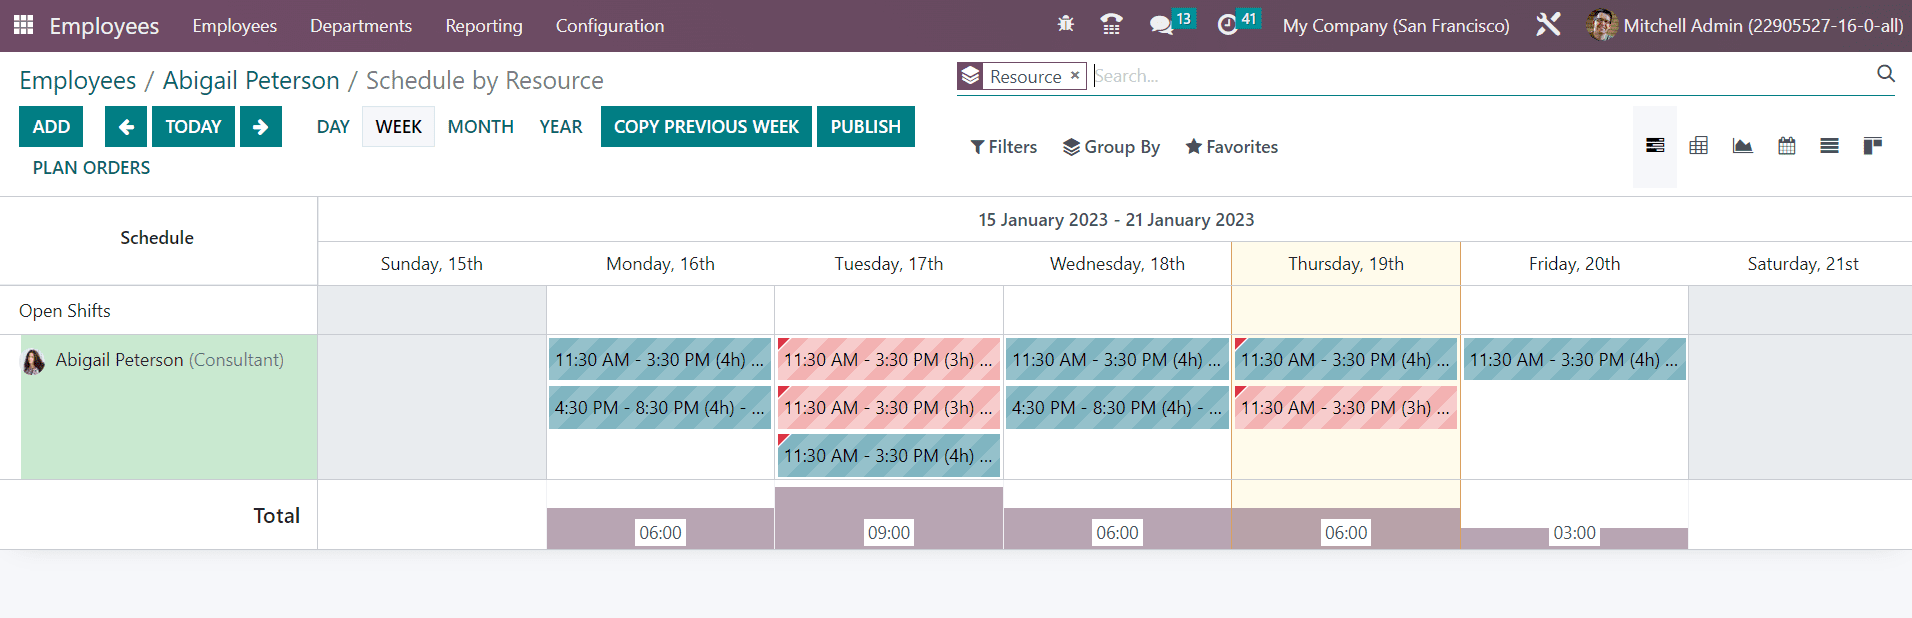
● Various activities scheduled with this employee can be observed using the Planning smart button. The Gantt view will provide the details of the scheduled activities as shown below. It is possible to plan new activities with this employee from this window.
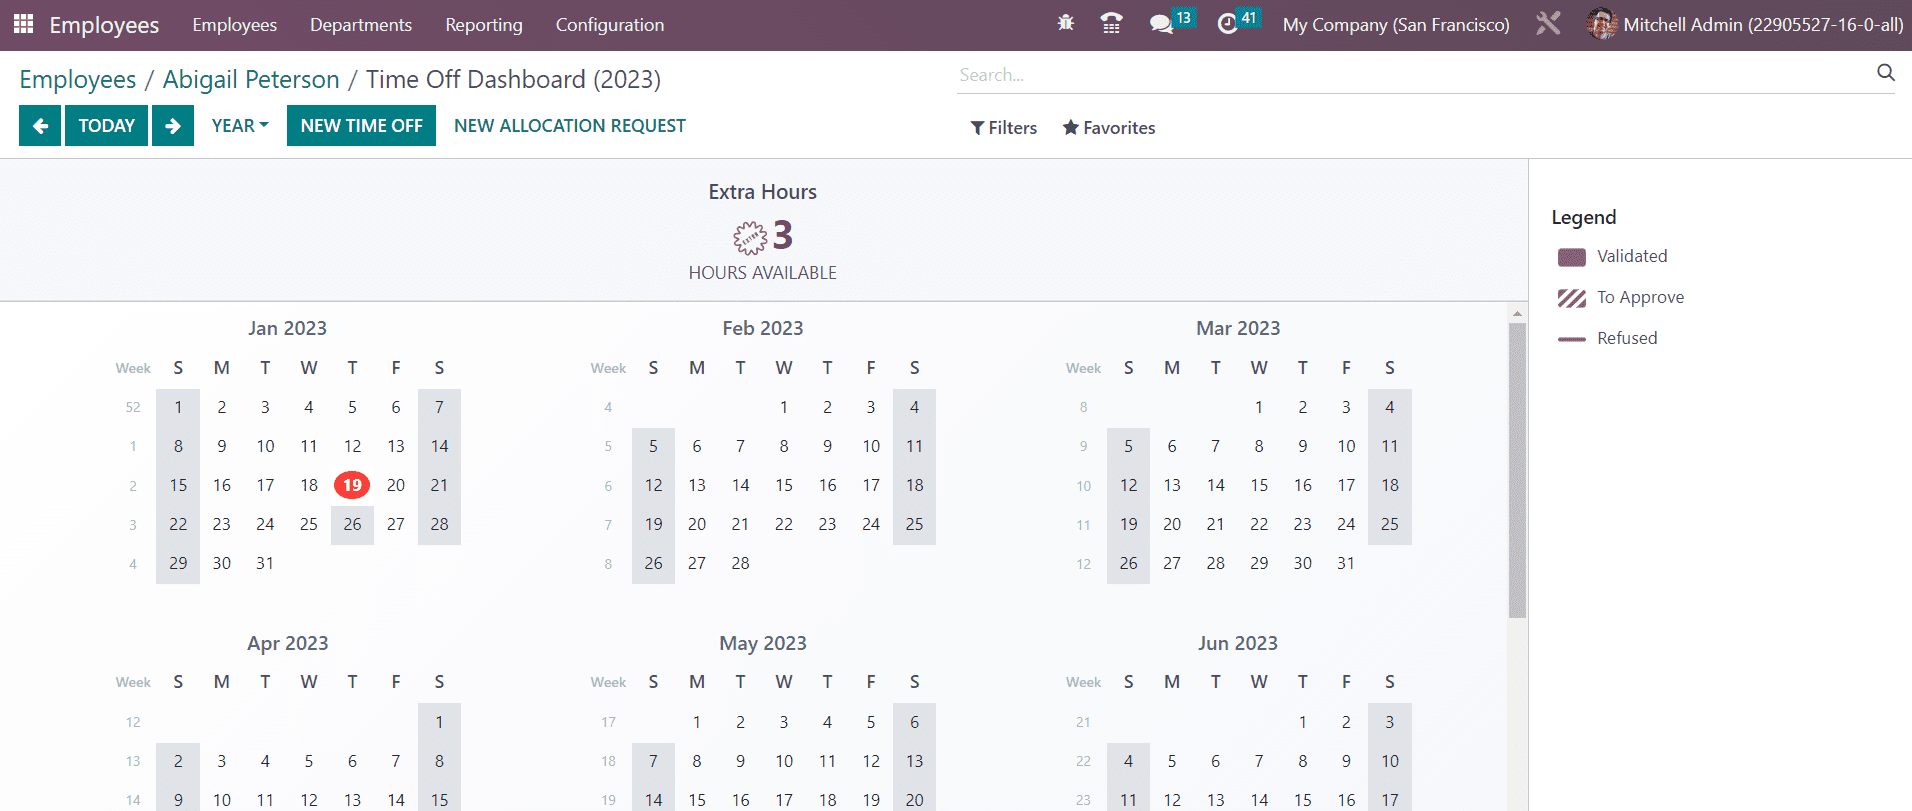
● The time off taken by the employee can be viewed on a monthly and yearly basis can be observed using the Time Off button.
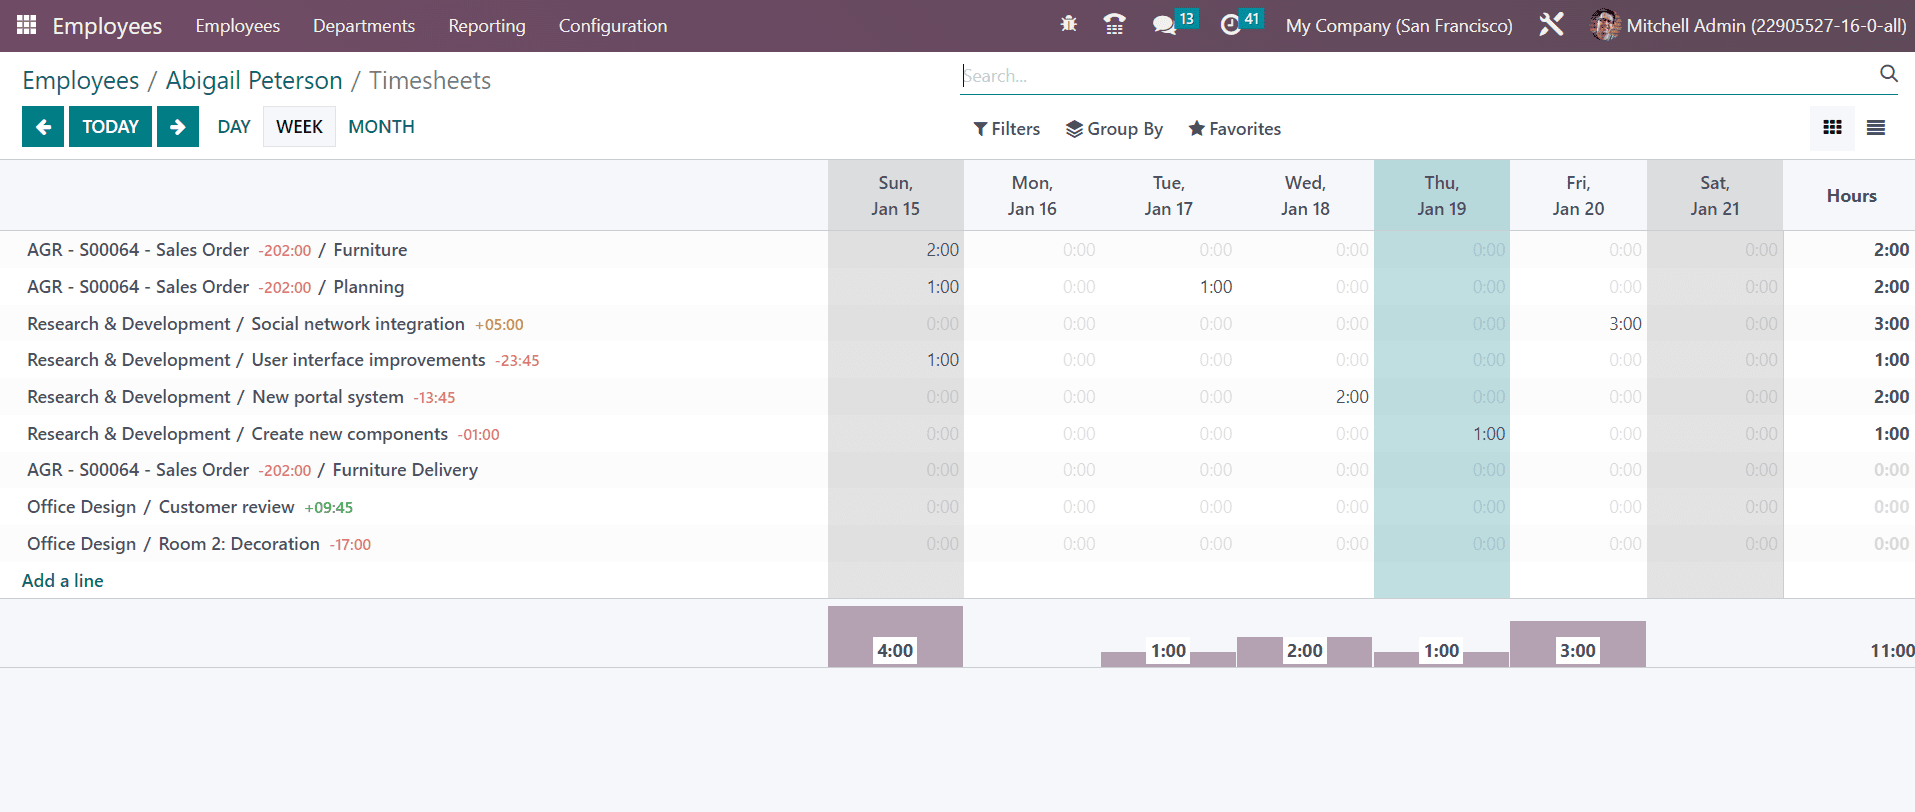
● The Timesheets button will open the recorded timesheet of the employee. It will show the recorded hours on various tasks assigned to the employee.
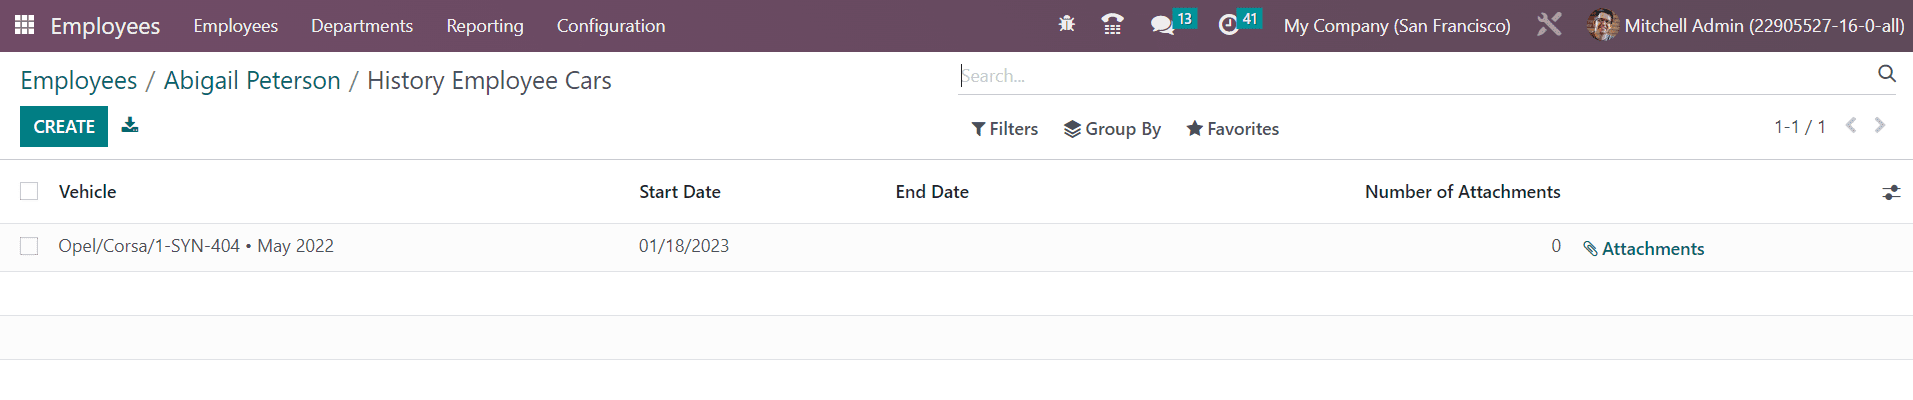
● The vehicle assigned to the employee can be seen by clicking on the Cars button. The history of employee cars will show the details of the Vehicle, Start Date, End Date, and Number of Attachments.
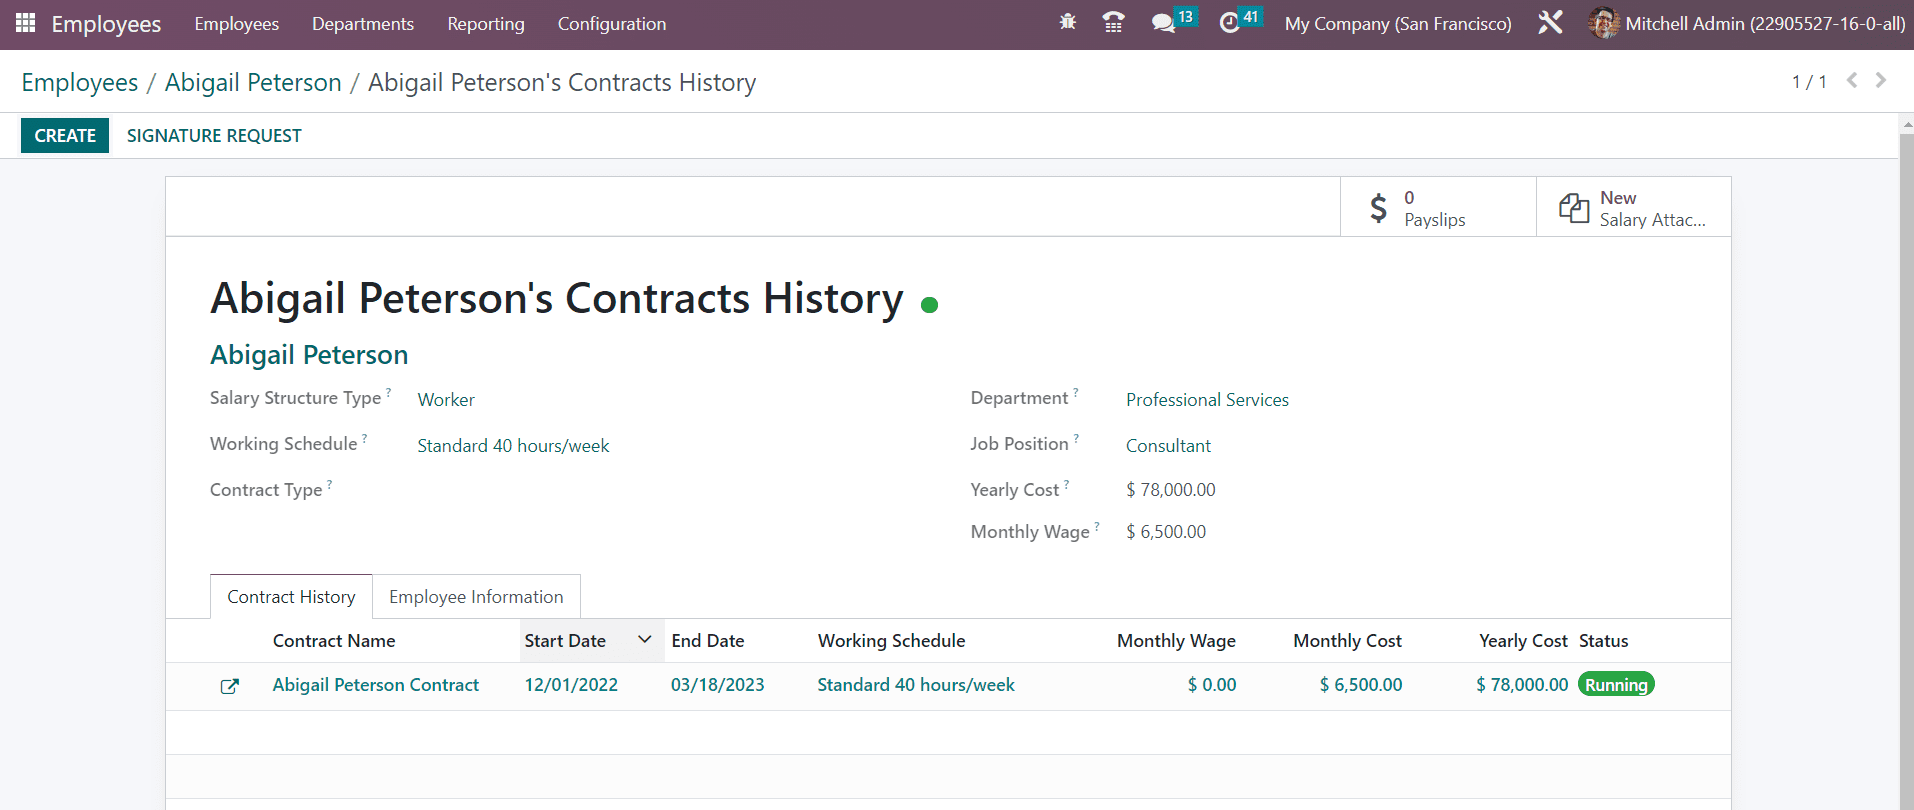
● The Contract smart button will display the running contract of the employee.
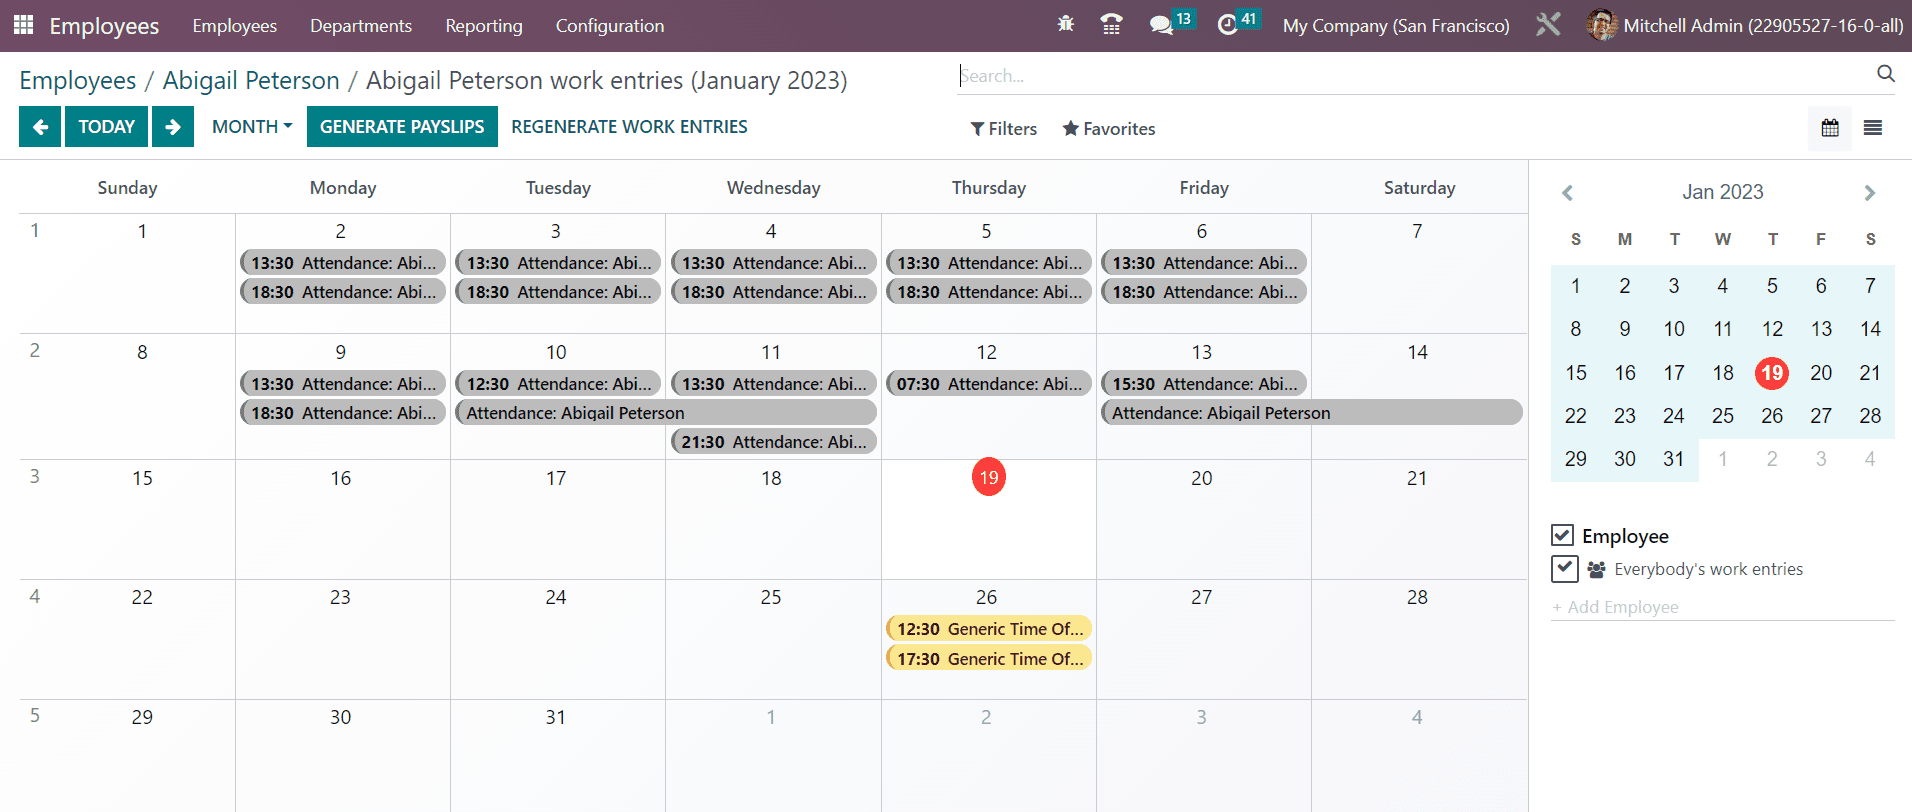
● Work entries related to the employee can be seen using the respective smart button. The calendar view will show the work entries of the employee in a particular month.
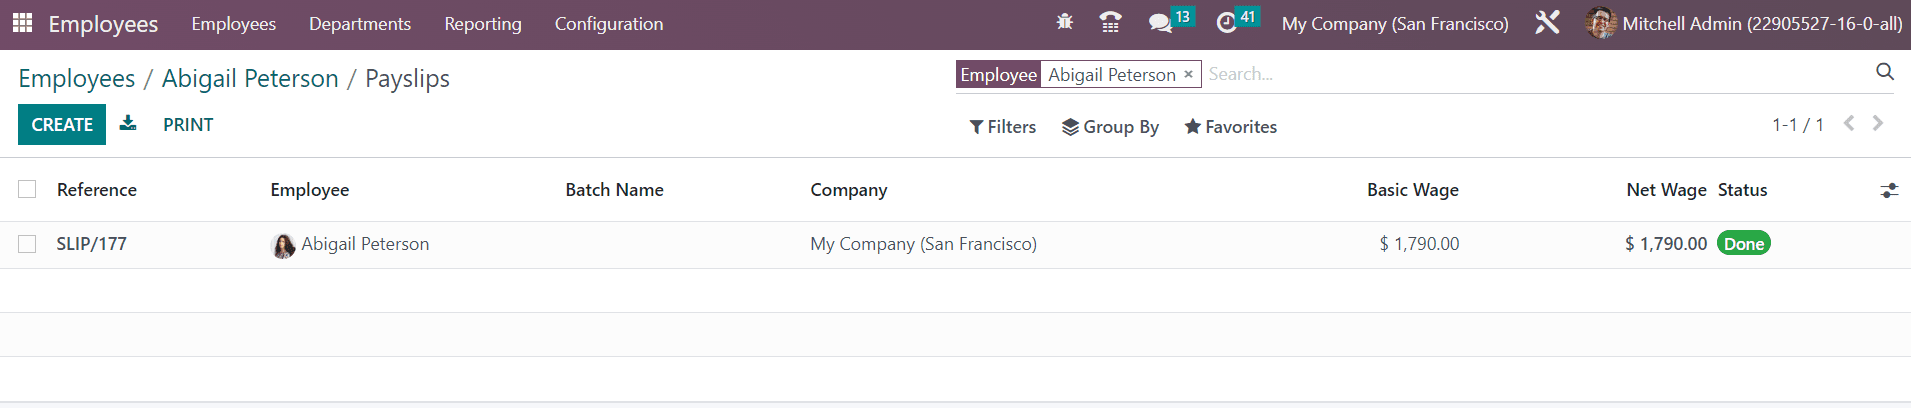
● The Payslip smart button will show the payslip generated for the respective employee. The list view shows the Reference, Employee, Batch Name, Company, Basic Wage, Next Wage, and Status.
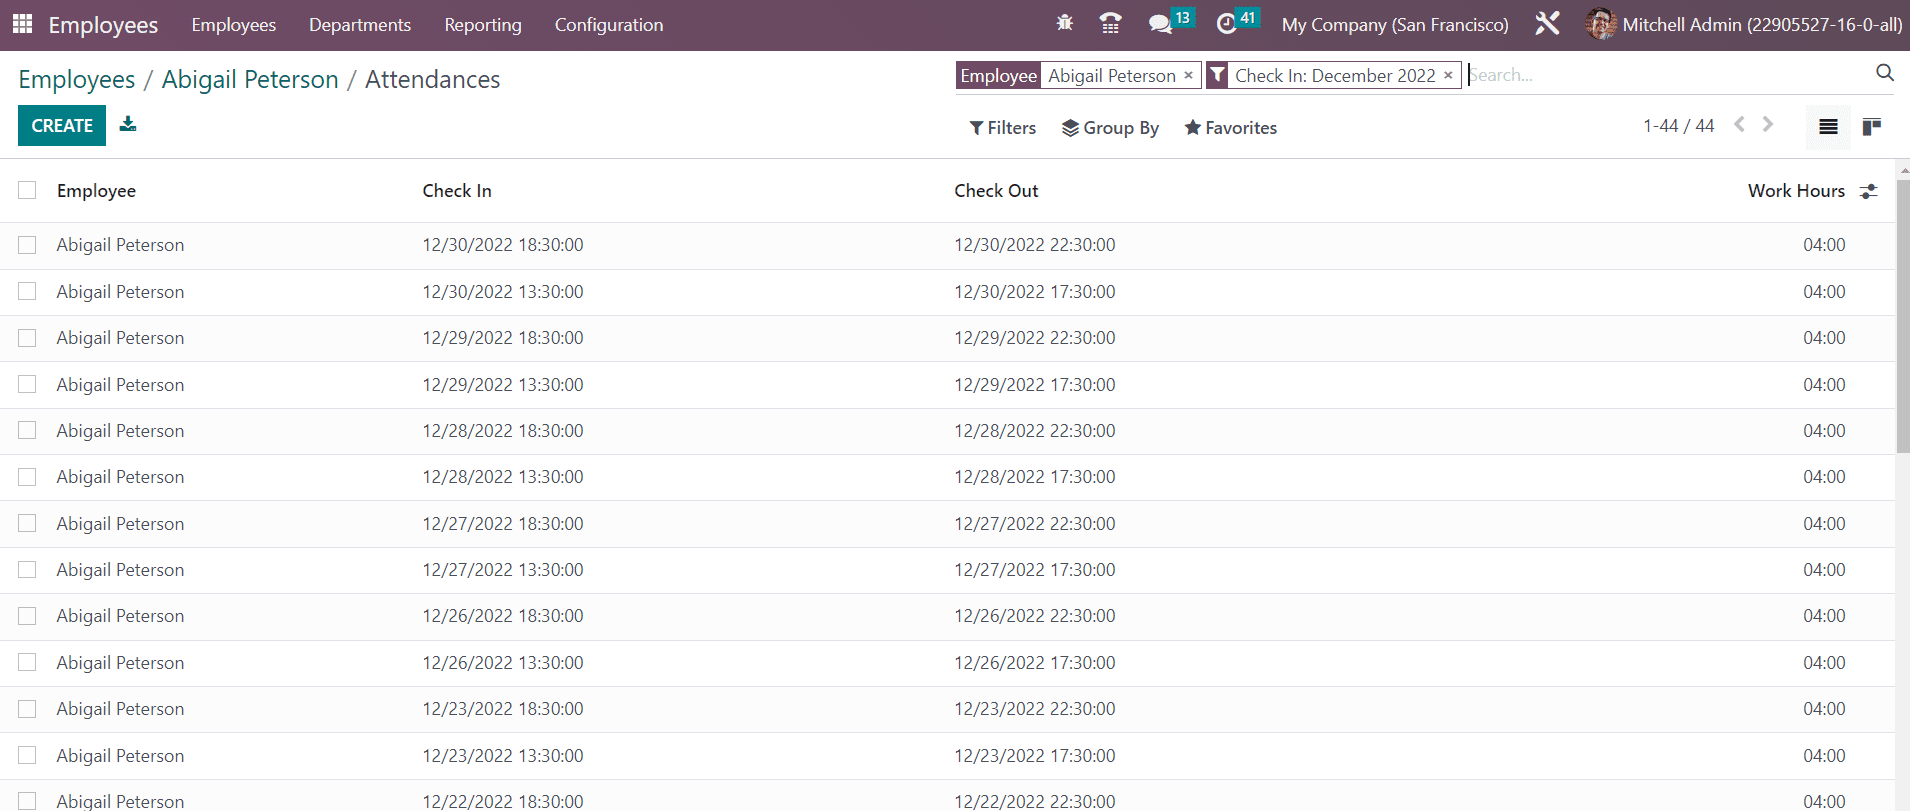
● The Attendance button will direct you to the attendance record of the employee which shows the Employee, Check In, Check Out, and Work Hours.
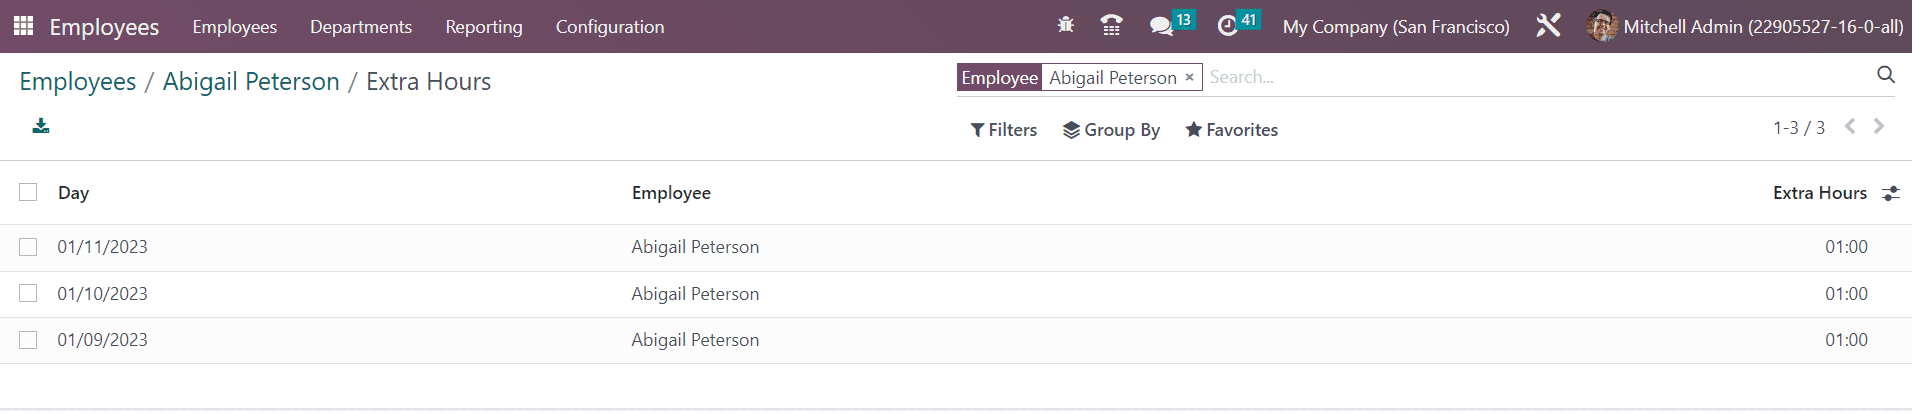
● If any extra hours are recorded for this particular employee, it can be monitored using the Extra Hours smart button as shown below.
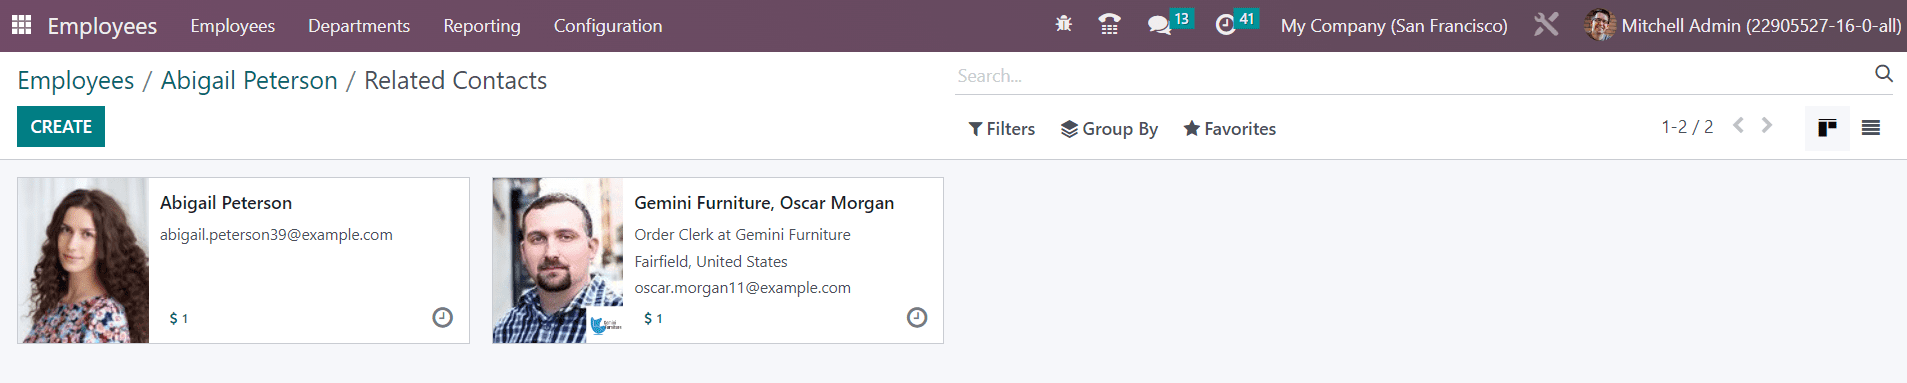
● The related contacts button will show the profile of employees related to the current employee.
You will get the Request Appraisal button on the form view which can be used to generate a request for the appraisal for the employee.
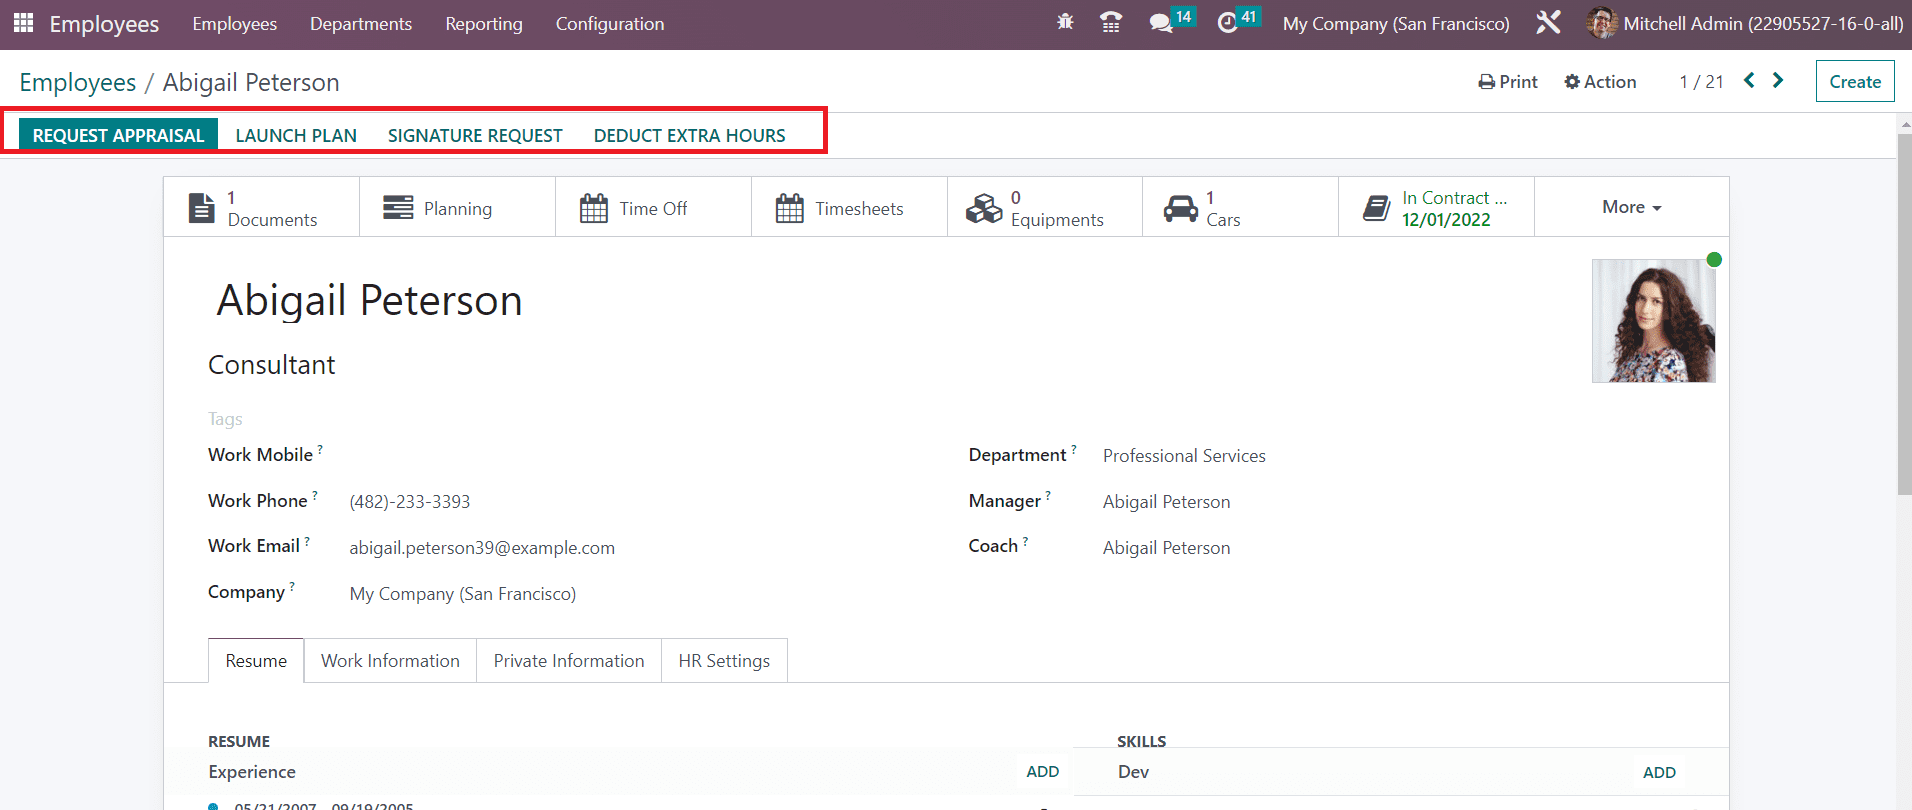
You can launch onboarding and offboarding plans for the employee using the Launch Plan button. Use the Signature Request button to send a request for signature on particular documents. In order to deduct extra hours, use the corresponding option available on the window.