Accrual Plans
For accrual-type allocations, it is necessary to configure suitable accrual plans in the Time Off module. These plans will help the employees to accrue their paid Time Offs. Using accrual plans, the employee will get extra time off allocations based on certain rules. From the Configuration menu of the Time Off module, you can set these rules to automate the accrual allocation of time offs.

The above-shown screenshot is the list view of the Accrual Plans window. The list view will display the Name, Levels, Time Off Type, and Employees. Using the New button, you can effortlessly create new accrual plans. The form view that appears after clicking on the New button is shown below.

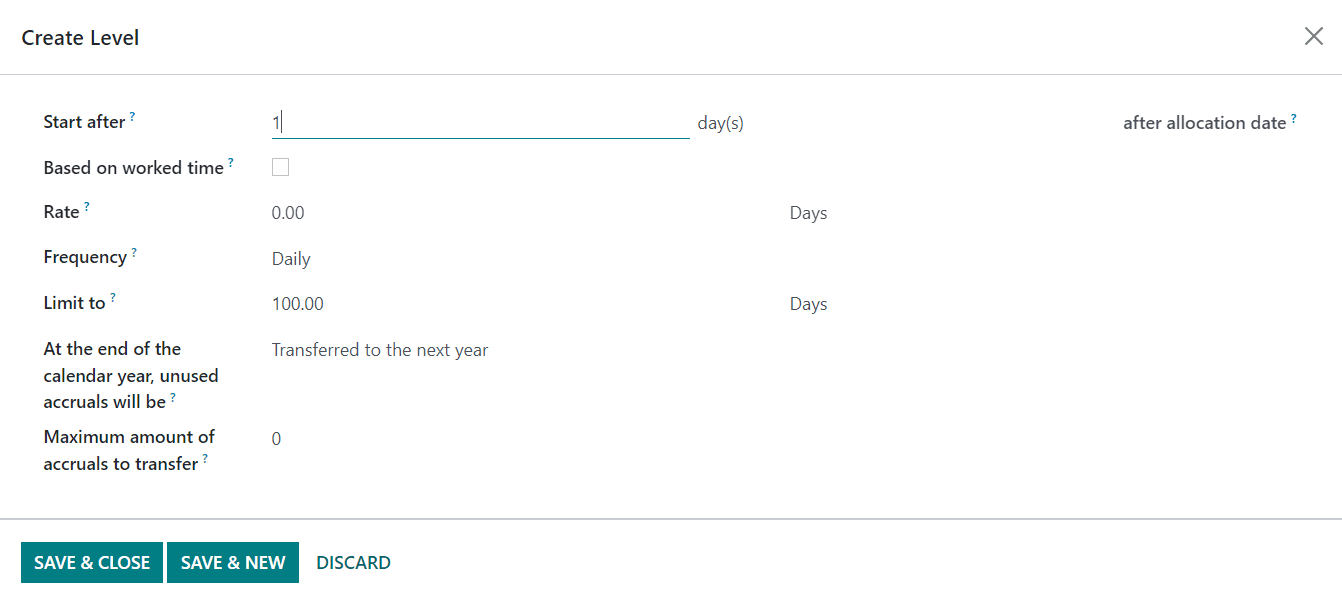
You can provide a name for the accrual plan in the Name field. If this accrual plan can only be used with a particular Time Off Type, you can mention that time off type in the given space. Otherwise, you can leave this field blank to use with any time off type. Now, you can set new levels for the accrual plan. For this, you can click on the Add a New Level button. As soon as you click on this button, Odoo will display a new pop-up as shown below.

In the Start after field, you can mention a defined period. The accrual plan will start after this mentioned period from the allocation start date. By activating the Based on Worked Time, the rate will be prorated on the time off type where the type is set on Working Time in the configuration. You can mention the Rate based on hours or days that will be incremented in the mentioned time off type for every period. Set a suitable Frequency from the given drop-down menu. The Limit to field can be used to set a cap for each accrual. You can decide what should be done with the unused accruals at the end of the calendar year in the given field. It can be either transferred to the next year or mark it as lost. Additionally, you can define the maximum amount of accruals to transfer to the next year in this window. After adding details, you can click on the Save & Close button.
Public Holidays
From the Configuration menu of the Time Off module, you will get access to the Public Holidays platform where you can configure the details of the public holidays available in a year. The list view of this platform is shown below.

In order to record a public holiday in this module, you can use the New button. When you click on this button, Odoo will display a new line on the screen where you can mention the Name, Company, Start Date, End Date, Working Hours, and Work Entry Type. Click the Save button to record the public holiday in your database.
Stress Day
The Stress Day option is a new feature introduced in Odoo 16. This option can be used to create a list of stress days so that the employee will be able to ensure their presence on such days. In case, your company wants to meet the target within a particular period, you can set those days as Stress days. It will inform the employees about their presence during that specific period. You can find the Stress Days option from the Configuration menu of the module.

The list view of the Stress Days is shown above. This window displays the Name, Start Date, End Date, Color, and Departments. Using the New button will help you to add a new stress day. You will get a new line where you can mention the necessary details in the respective fields. Use the Save button to save the new stress day.