Invoicing
Configurations
The platform provides various default configuration options and the menus available in the accounting module which will definitely help you to manage the financial aspects of the company. We can discuss each one below.
Bank accounts
In the Odoo platform, we can configure multiple bank accounts and can manage them easily by taking the route accounting- > configuration-> payment-> bank account. The image of the bank account window is given below.
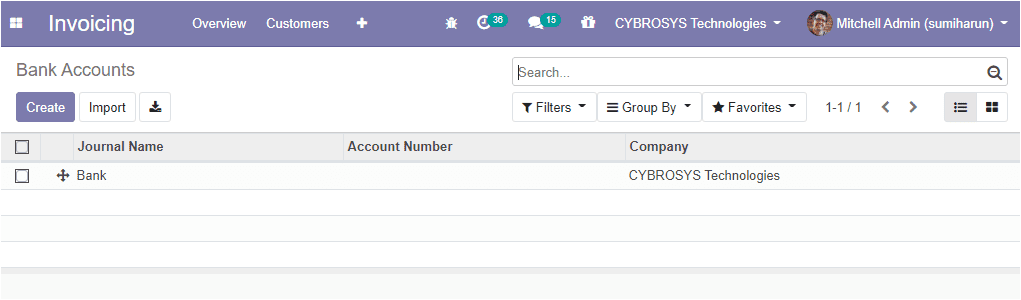
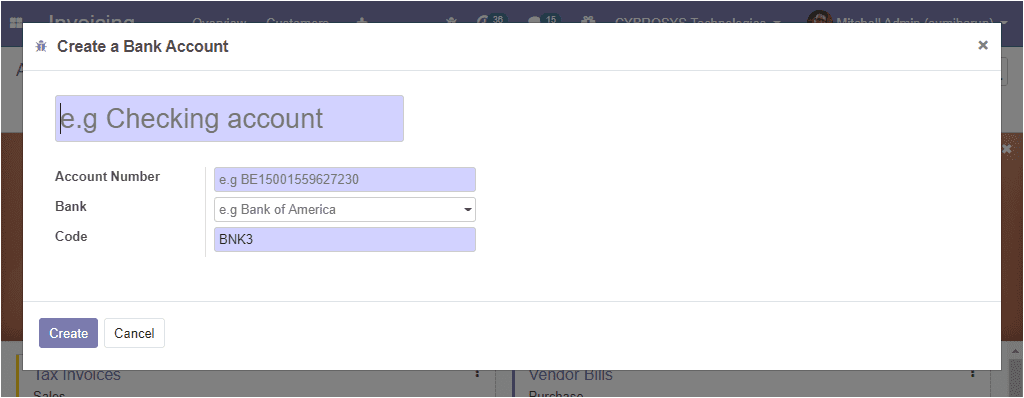
Using this window you can see the created bank accounts and can create several bank accounts by selecting the create icon. If you are selecting the create icon you will be depicted with a creation window as shown below.
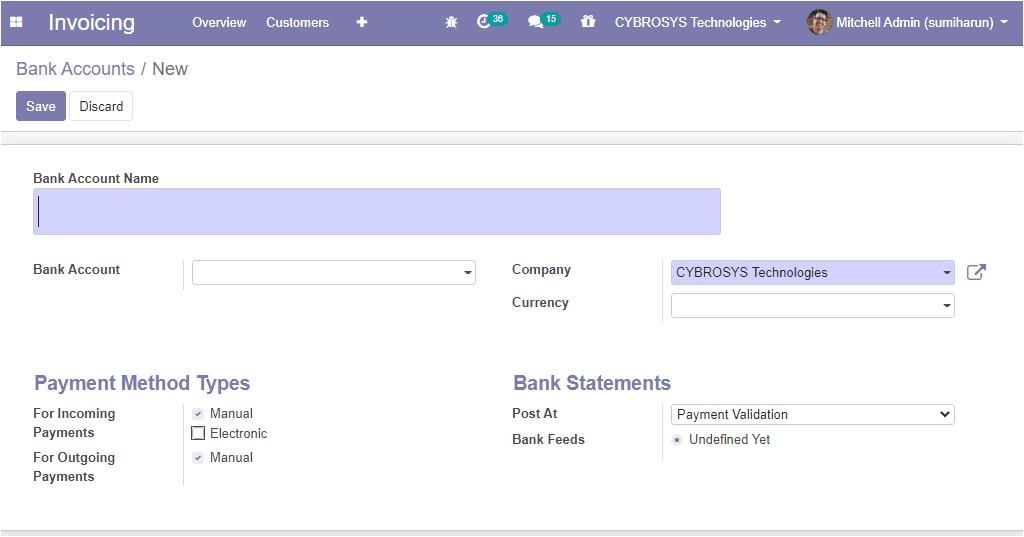
In the bank account creation window, you can provide the journal name and can allocate the bank account details and the currency used to enter the statement, also can define how the bank statement will be registered and can allocate the payment method types.
So far we were discussing the configuration of a bank account in the platform. Now let us discuss the configuration of the chart of accounts.
Chart of accounts
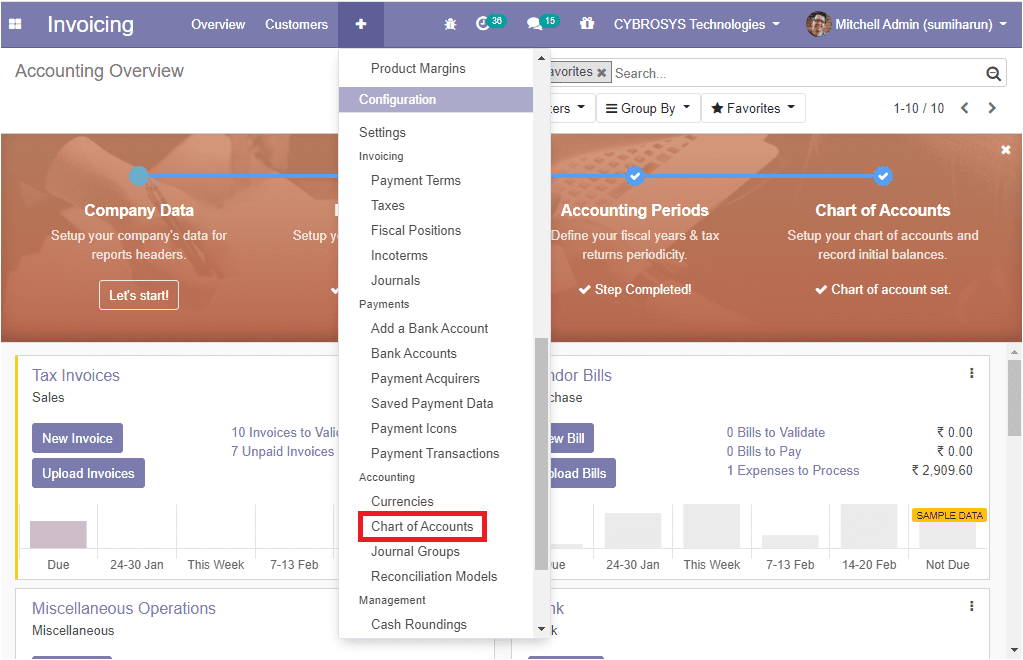
A chart of accounts is a list of accounts used in the ledger of a business organization for recording the various business transactions of that organization. In the Odoo platform, it includes the balance sheet, or profit and loss accounts. Different companies can prepare a different chart of accounts depending upon the business requirements. This chart of accounts can be viewed from the configuration tab of the invoicing module by taking the route invoicing -> configuration -> chart of accounts.
All the chart of accounts described in the platform can be viewed from the menu and you can also add new items by clicking on the create option available.
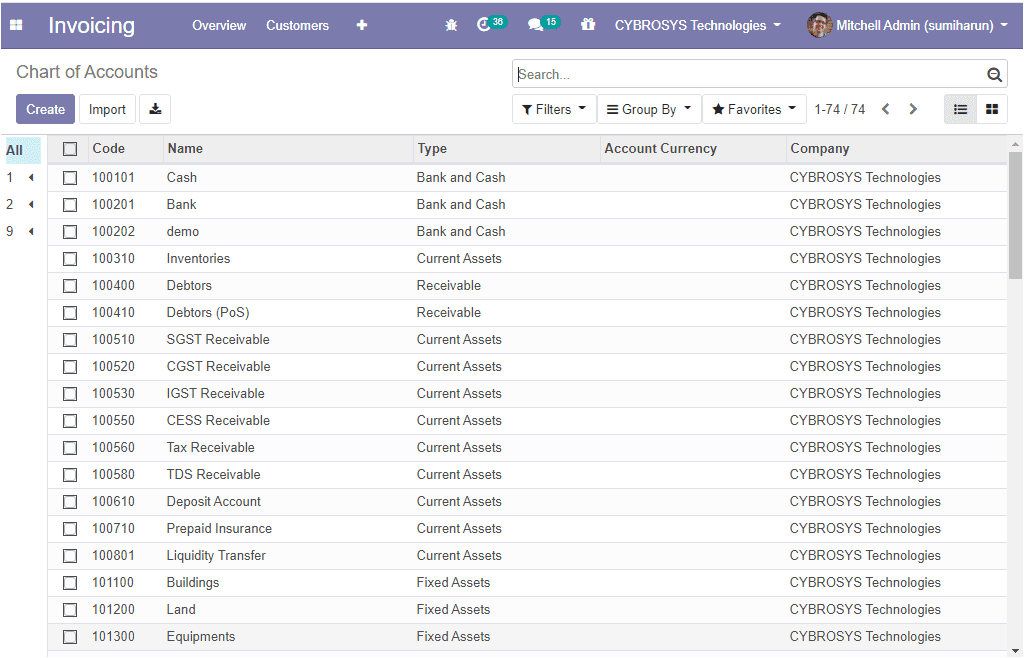
Using this window, you can see the list of different account names, types of accounts, and can allocate company of operation details where you have the provision to select each account separately and can make desirable changes by clicking the edit button available. The image of the window is depicted below.
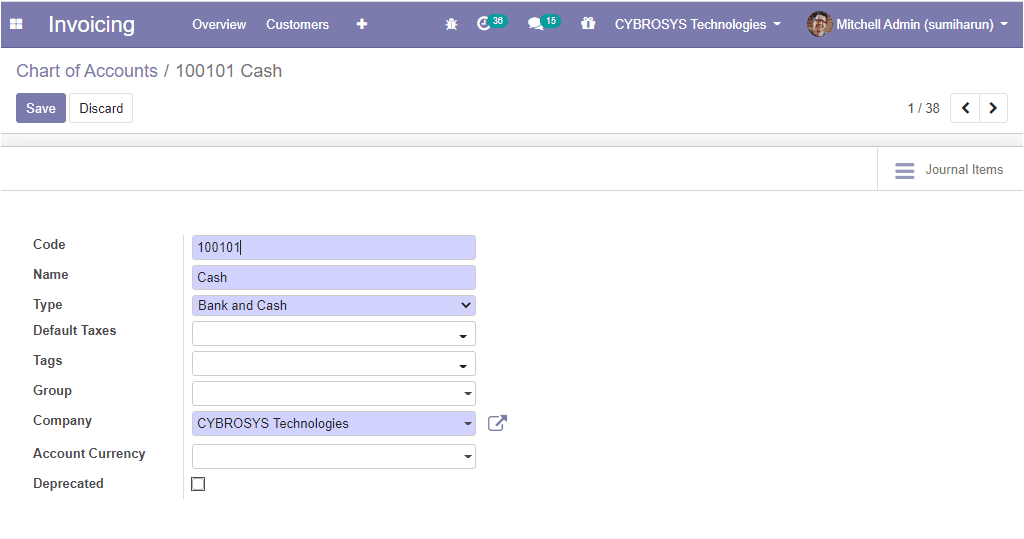
After making sufficient changes in the window you can select the save button to mark changes. Now let us see how to create a new account on the platform. You can create a new account by clicking on the create button available on the top left corner of the chart of accounts window. The image of the window is depicted below.
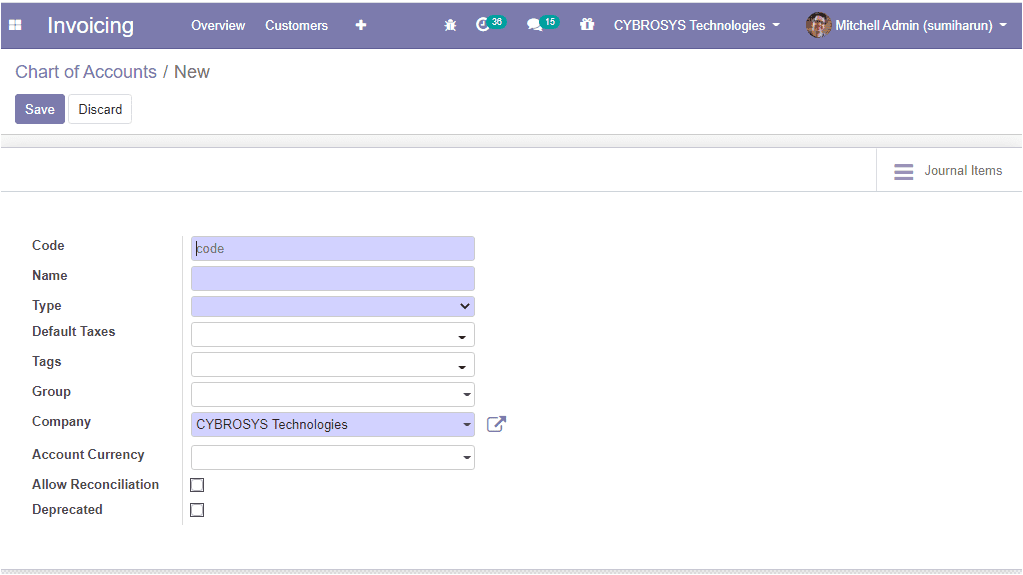
Here in this window, you can provide a code and name for the account and It is the identification mark of the respective account. Also, it indicates the account's purpose. After providing the name and code, the account type can be allocated and it is for the information purpose. To generate country-specific legal reports, also set the rules to close a fiscal year and generate opening entries. You can also define the default taxes and it will be applied if the account is selected for product sale or purchase. Additionally, you can allocate tags and account groups which is useful to list multiple accounts as sub-accounts of a bigger account. Moreover, the company and account currency can also be allocated. There are also other options such as allow reconciliation and deprecated. You can check the box near the option allow reconciliation if this account allows invoices and payments matching of journal items.
We have discussed the configuration of the charts of accounts and now let us move on to the next part tax configuration in the platform.
Tax configuration
The Odoo platform supports you to create and configure the various taxes for the credible operations of your company and the taxes menu can be accessed from the configuration tab of the invoicing module. The image of the window is depicted below.
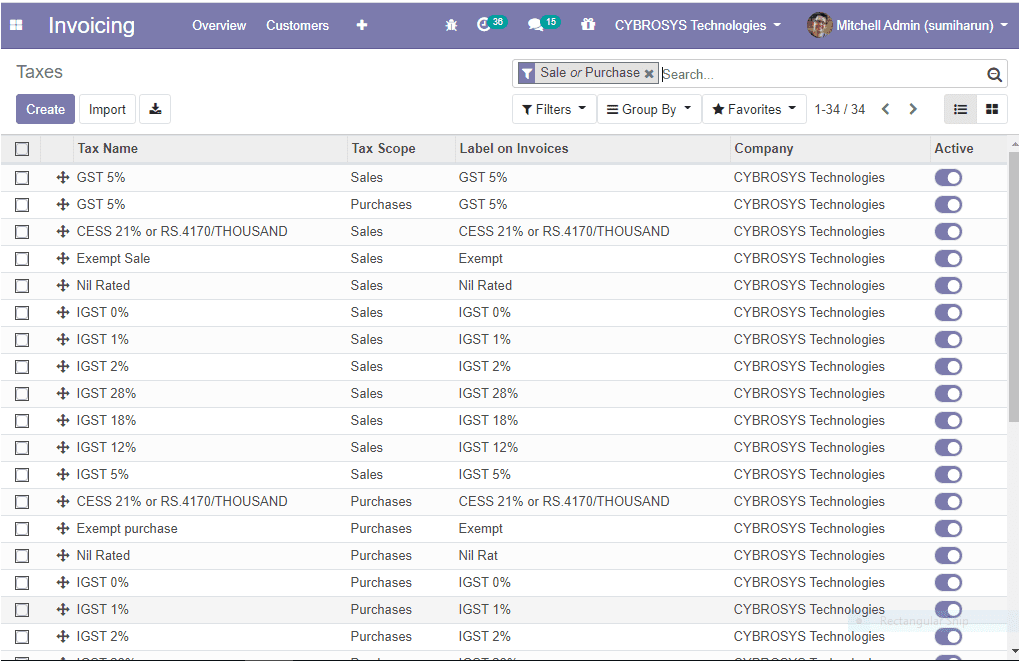
The platform will support a wide range of tax types such as value-added taxes (VAT), eco-taxes, federal /state/city taxes, retention tax and withholding taxes, and many more. The chart of accounts that you defined is automatically preconfigured with the main taxes of the country.
Now let us see how we can define new taxes in the platform.
You can create new taxes by accessing the creation window and for accessing the window you can select the create button available in the taxes window.
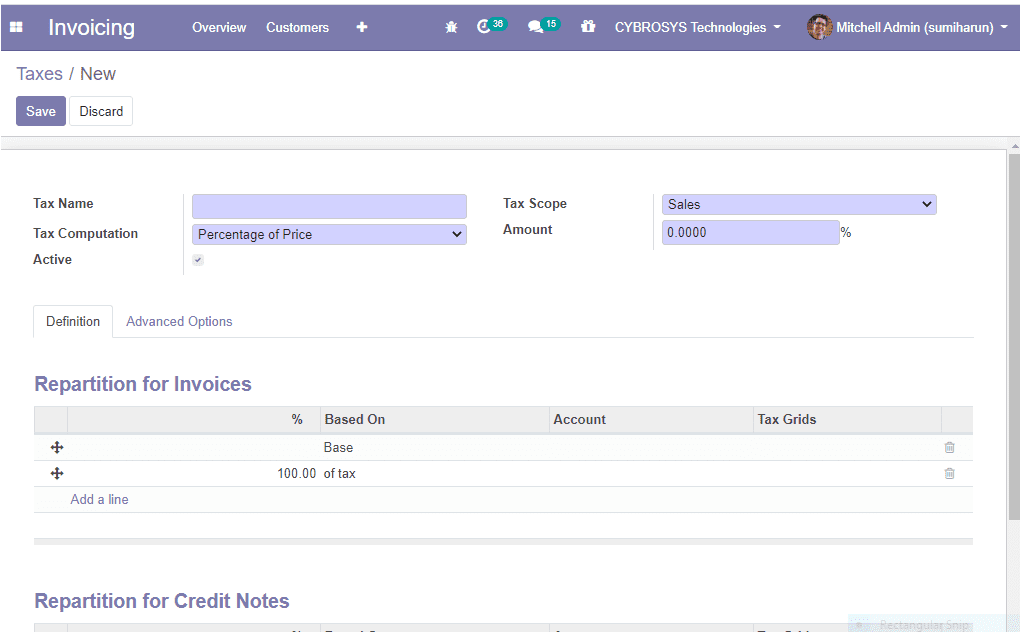
In this creation window, you can provide the tax name, allocate tax computation, tax scope, and amount. The tax scope determines where the tax is selectable with sales, purchase, or none and the none means the tax can’t be used by itself however it can still be used in a group. Odoo provides you four different types of tax computation which are the group of taxes, fixed, percentage of price, percentage of price tax included. You can set active to false to hide the tax without removing it. The taxing rule for the repartition of invoices and credit notes can be configured under the definitions tab.
You can define the following fields under the advanced options tab of this window as depicted below.
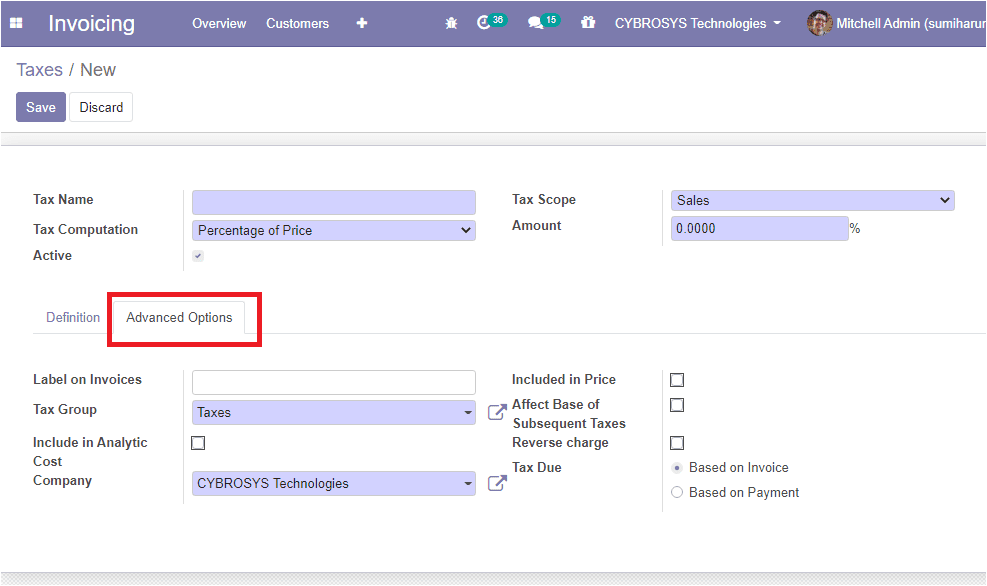
Here you can define label on invoices, tax groups, and allocate company details. If you are enabling the option include in analytic cost , the amount computed by this tax will be assigned to the same analytic account as the invoice line. You can enable the option included in price if the price you use on the product and invoices includes this tax. Additionally, affect the base of subsequent taxes and the reverse charges can be enabled or disabled. Also, the tax can be due based on invoices or based on payment.
As we clear on tax configuration in the platform and now let us move on to the next part, fiscal position.
Configuring Fiscal position
The fiscal positions in the invoicing module is a beneficial feature that helps you to place the tax according to the country’s tax policy. We all know that the major source of revenue for all governments is from taxes and each country follows different tax policies. So this feature will help you to operate with multiple currencies and company operations and you have the provision to configure the taxes and accounts specific to the country or region of operations.
The fiscal position of this module can be configured under the fiscal position menu accessible from the configuration tab. The image of the window is given below.
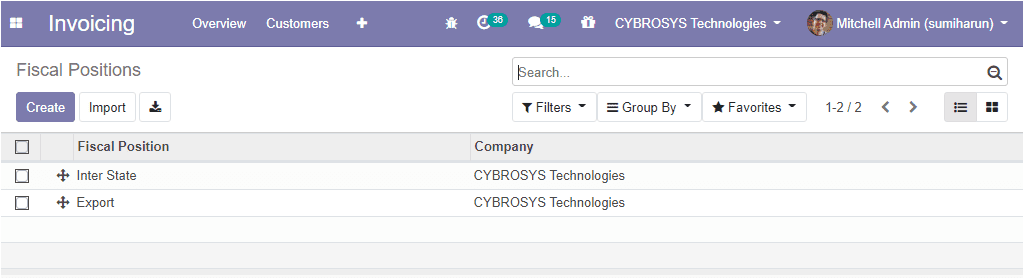
In this window, you will be depicted with all the fiscal positions defined and you have the provision to edit the details by selecting the respective one and it is also possible to create a new one by selecting the create icon available in this window. The image of the creation window is given below.
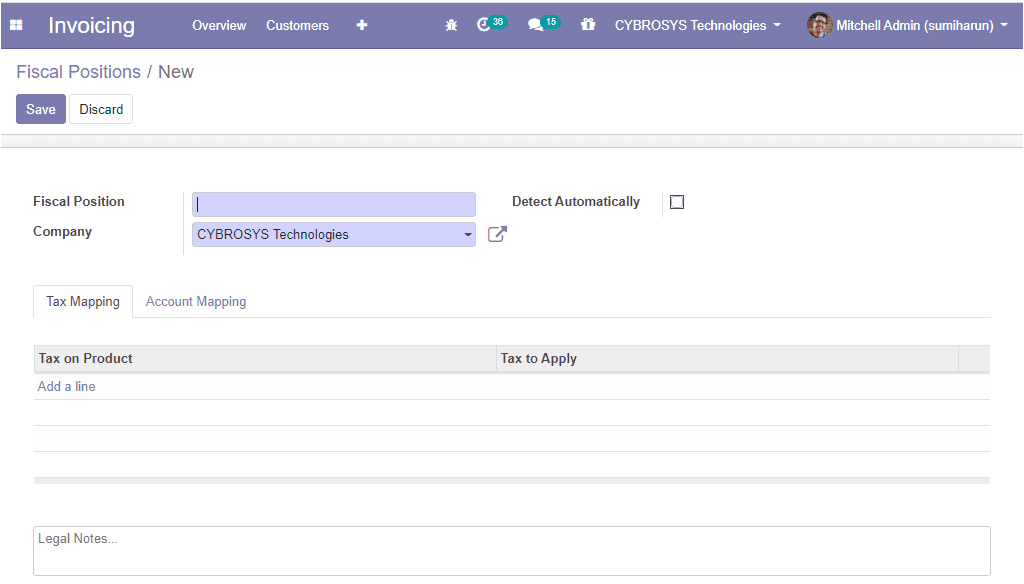
In this creation window, you can provide a name for the fiscal position and you can allocate a mapping by selecting the add a line option available under the tax mapping tab. You can provide a tax on products and a tax to apply for the fiscal position. Moreover, the account mapping can also be defined under the account mapping tab.

So far we were discussing the fiscal positions in this platform and now we can discuss the configuration of journals.
Configuring journals
In this platform, all the financial documents associated with a company are recorded as a journal entry. The journals are an effective data recording aspect of the accounting operations as regards the transactions conducted. This will help to manage everything without making mistakes or wasting time and energy. The journal feature can be accessed from the configuration tab of the invoicing module and the image of the window is depicted below
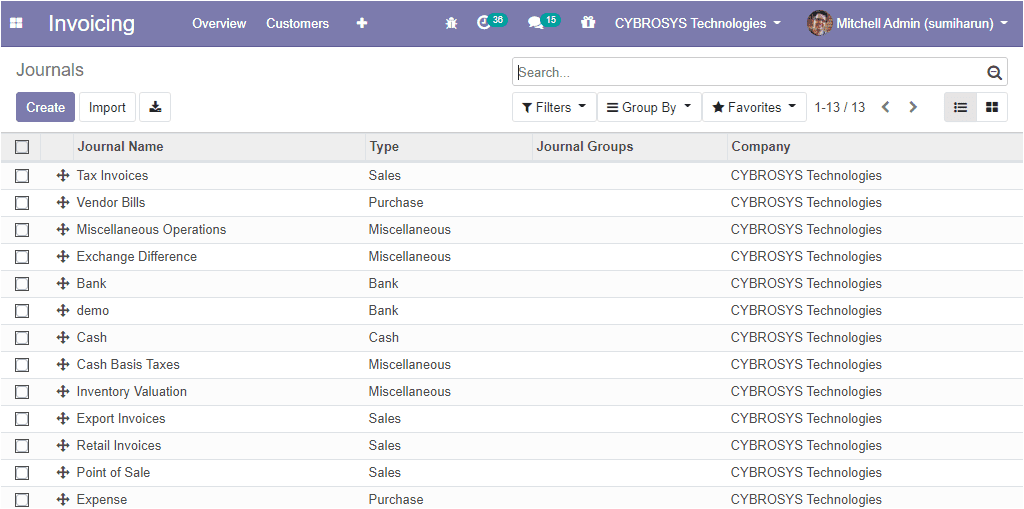
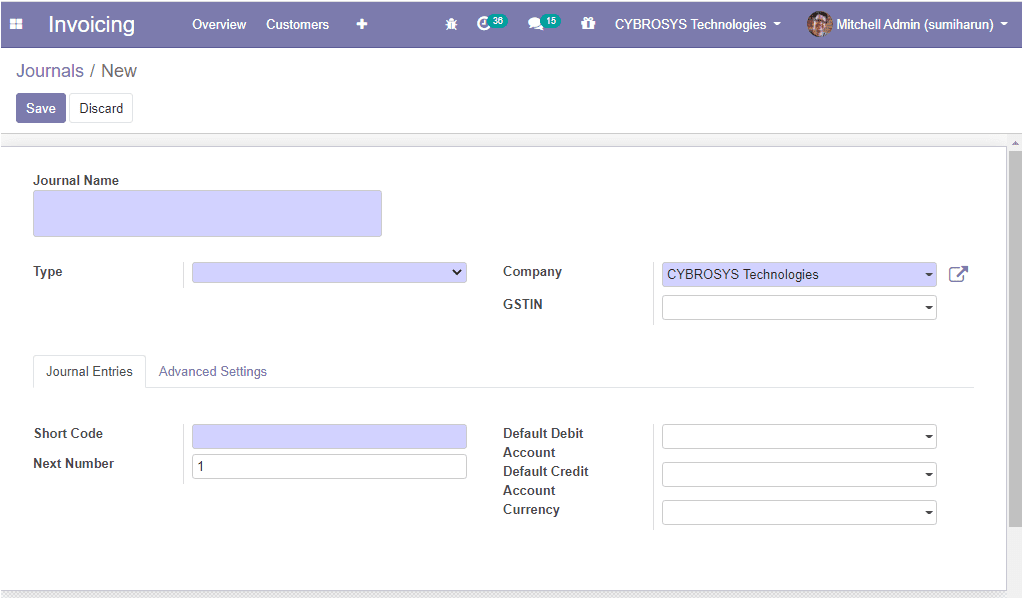
In this window all the journals described in this platform are enlisted and you can create new journals by selecting the create menu available. The image of the journal creation window is depicted below where you can provide a journal name, allocate type as sales or purchase or cash or bank or miscellaneous. Allocate the company details related to this journal and GSTIN.
Under the journal entries tab you can provide the various accounting details of the journal such as short code ( the journal will be named using this prefix), next number, default debit account, default credit account and the currency which is used to enter the statement.
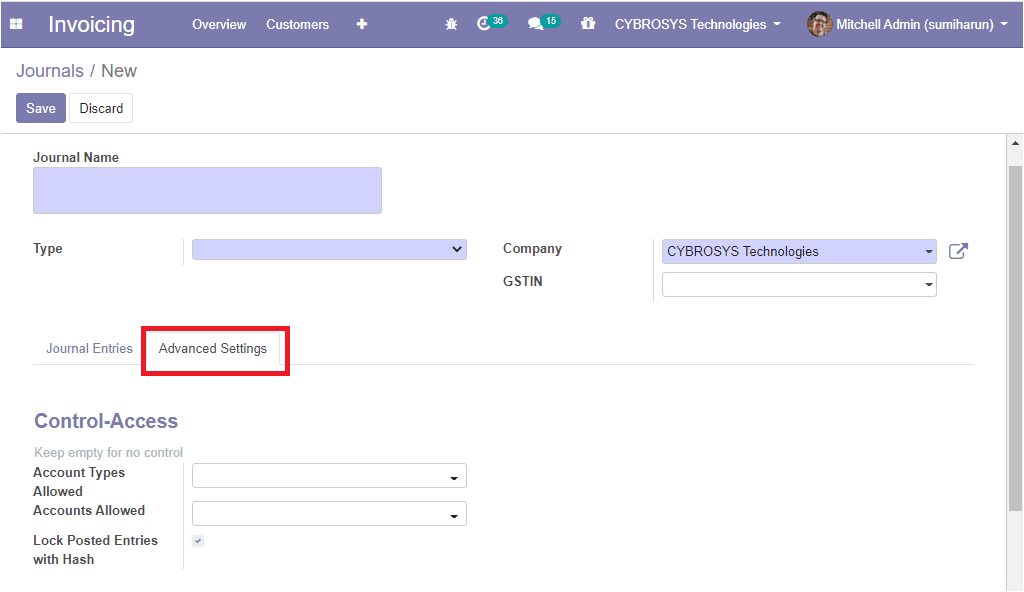
Under the advanced settings tab you can define the control access information such as allowed account type and accounts allowed. Additionally you can enable the option lock posted entries with a hash and if you are enabling this option the accounting entry or the invoice receives a hash as soon as it is posted and cannot be modified anymore. The image of the window is depicted below.
Now let us move on to the journal types
Journal types
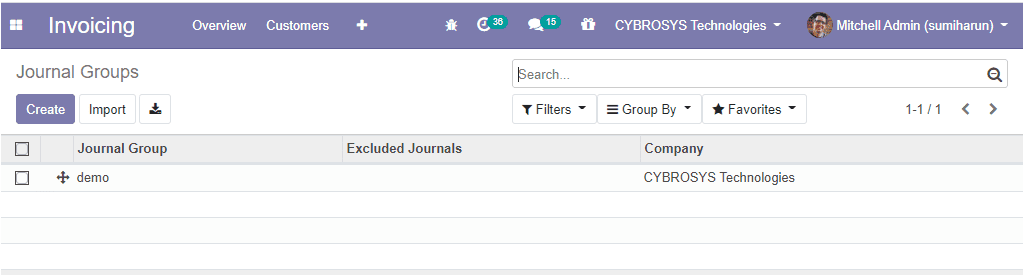
All the journal entries of this module should be configured for the operation under the journal types defined. That means by giving a journal type on journal entries you are specifying that the current journal comes under an accounting document. In this platform, the journal types can be defined under the journal types menu accessible from the configuration tab. The image of the window is depicted below and you can see all the journal entries defined in the platform and you can create a new one using the create option available.
So far we were discussing the journals configurations in the platform and now we can move on to the next feature intercoms.
Intercoms
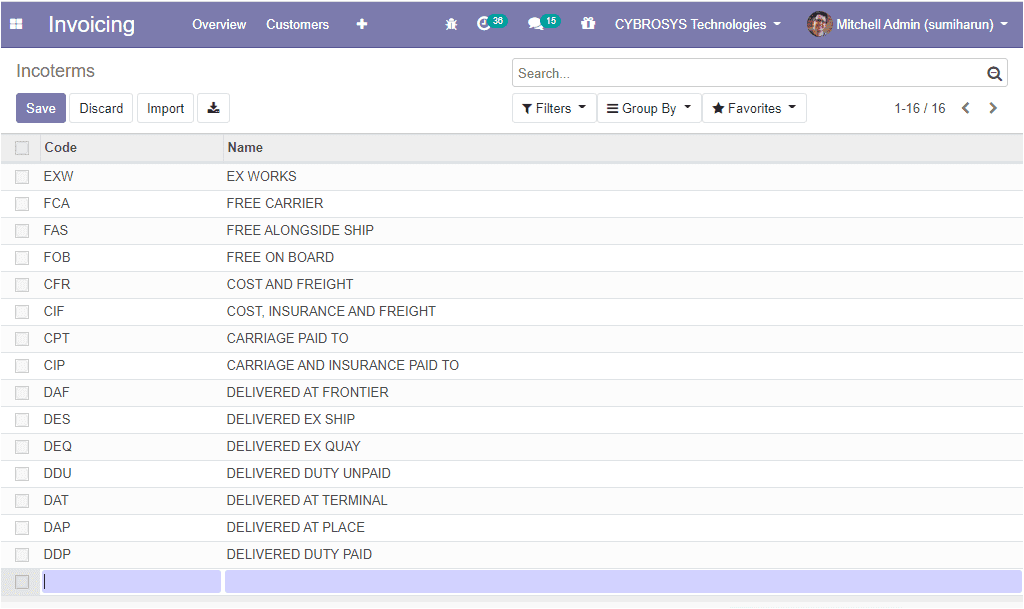
Intercoms are the abbreviation for international commercial terms. It is the series of fifteen sales terms described by the international chamber of commerce (ICC) which are globally accepted and used in both global and domestic business operations. This feature can be accessed from the configuration tab of the invoicing module where you are depicted with all the intercoms described in this platform and also you can create a new one using the create option available.
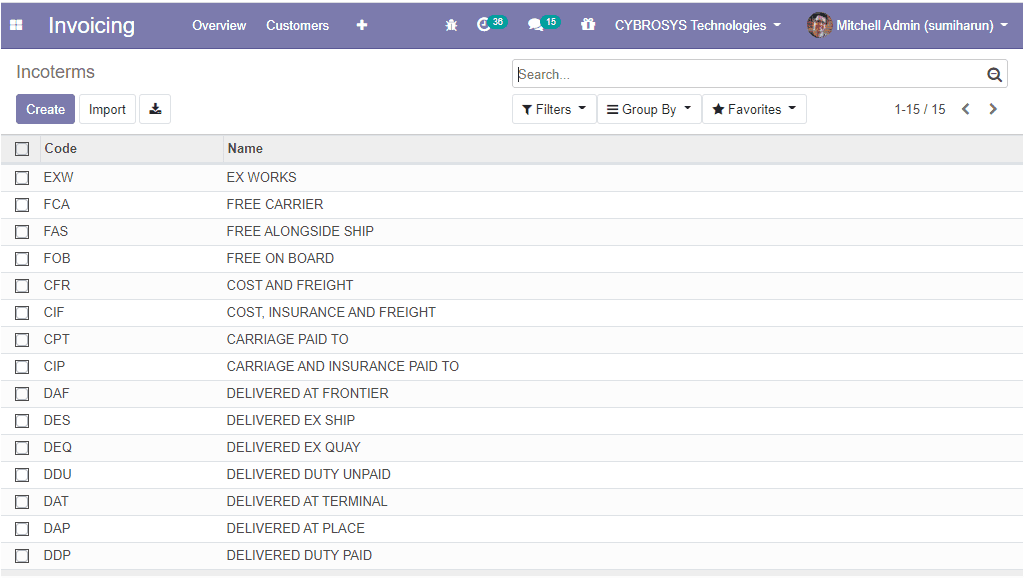
By selecting the create button, you can create a new one using the same window itself where you can enter the code and name and select the save button to mark the changes.
We discussed and made clear about the terminology intercoms and now let us move on to the configuration of payment terms.
Payment terms
The payment terms are the various payment methods followed by the customers and the company for making the payment of the product and services and it provides clear details about the expected payment on a sale. This module allows the user to define the various payment terminologies of the company operations. This feature can be accessed from the configuration tab of the invoicing module by taking the route
Invoicing module -> configuration -> invoicing -> payment terms
The image of the window is depicted below.
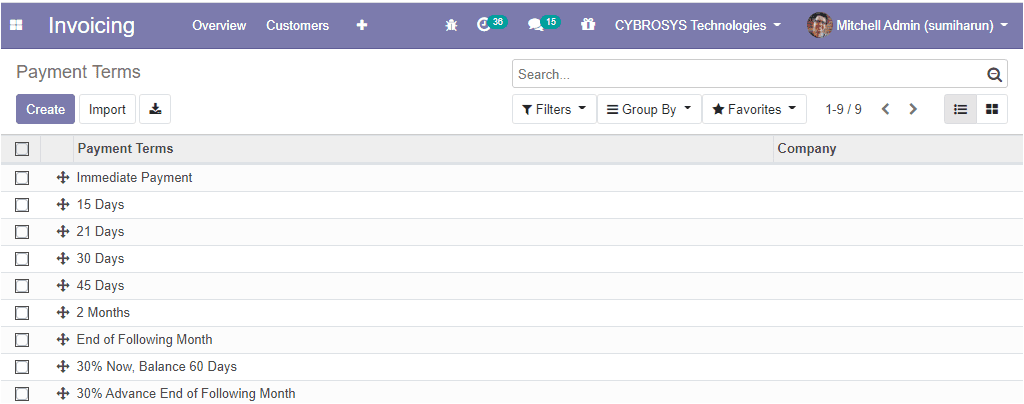
Using this window, one can utilise different payment terms such as immediate payment, payment in 15 days, 21 days, 30 days, 45 days, 2 months, end of following month, 30% now and balance in 60 days, 30 % advance end of following month etc depending on the occasions. You can also define new payment terms by selecting the create icon available. The payment terms creation window is given below.
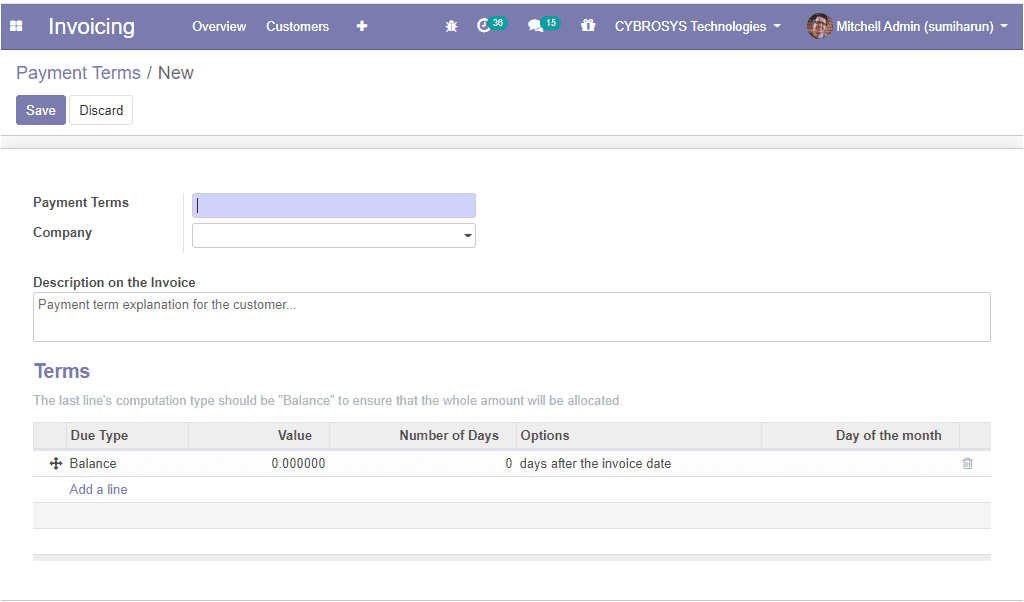
In this window you can provide a name for the payment terms and can allocate the company details and the details that should be mentioned on the invoice can be provided in the box under the option description on the invoice. This is the payment terms explanation for the customer. You can define the terms by clicking on the add a line option where you will be depicted with a create terms window and here you can choose the term type and due date computation. The image of the window is given below.
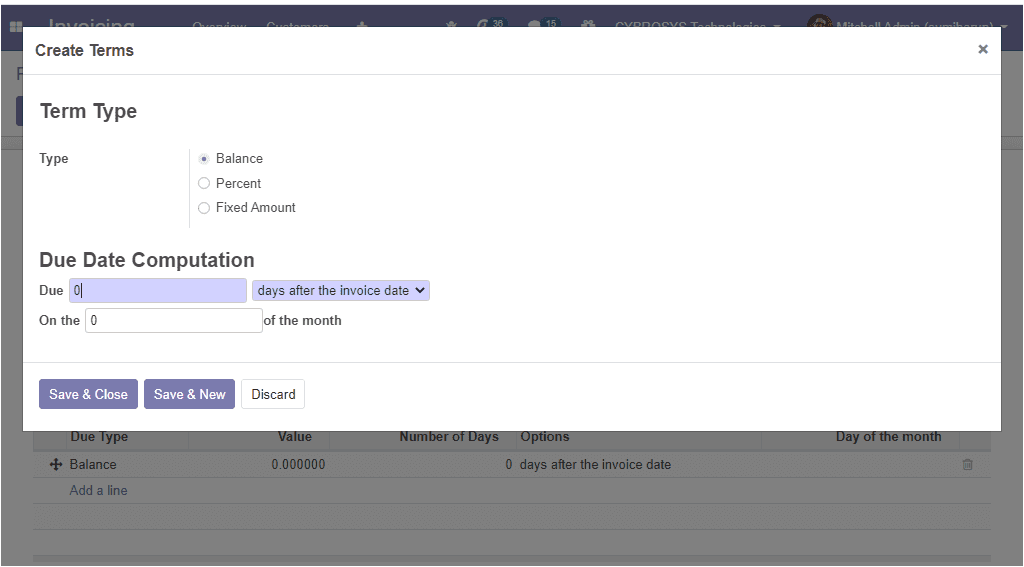
Odoo provides three kinds of term types named balance, percent, and fixed amount. You can select the term type depending on your business requirements. Moreover, the due date computation can be set based on the day after the invoice date, the last day of the following month, or the last day of the current month.
As we are clear on the configuration of payment terms and now let us move on to the analytical account option.