Kanban Cards
Kanban view is an application of the kanban board that organizes data as “cards.” Kanban cards are actually halfway between the listview and the read-only form view. Kanban cards can be viewed as a content area where the details of the records are displayed. This is usually defined inside kanban-box templates. A Kanban card is a structure that supports all the HTML tags. Along with Odoo provides its own simplified ways so that the cards can be more interactive.
<t t-name="kanban-box" >
    <!-- Set the Kanban Card color: -- >
    <div t-attf-class="
oe_kanban_color_#{kanban_getcolor(record.color.raw_value)}
oe_kanban_global_click" >
        <div class="o_dropdown_kanban dropdown" >
           #Top-right drop down menu here
        </div >
        <div class="oe_kanban_content" >
           # Content elements and fields go here
        </div >
        <div class="oe_kanban_footer" >
            <div class="oe_kanban_footer_left" >
               #Left hand footer
            </div >
            <div class="oe_kanban_footer_right" >
               #Right hand footer
            </div >
        </div >
        <div class="clearfix" > </div >
    </div >
   #end of kanban color
 </t >
As mentioned earlier, the kanban cards are included in a template called kanban-box. This can also have sub-containers for footers that can be further divided into left and right footers using classes or_kanban_bottom_left and or_kanban_bottom_right.
The example given sets an overall structure of the kanban card. The color field at the top is used to dynamically set the color of the map.
<div class="oe_kanban_content" >
    #Content elements and fields go here.
     <div >
         <field name="tag_ids"/ >
     </div >
     <div >
         <strong >
             <a type="open" >
                 <field name="name"/ >
             </a >
         </strong >
     </div >
     <ul >
         <li >
             <field name="user_id"/ >
         </li >
         <li >
             <field name="date_deadline"/ >
         </li >
     </ul >
  </div >
In the footer in the left side, let us add the priority widget;
<div class="oe_kanban_footer_left" >
    #Left hand footer
     <field name="priority" widget="priority"/ >
  </div >
This is similar to the field adding in a form view.
In the right-hand footer, the state widget and avatar can be added like this;
#Right hand footer
   <div class="oe_kanban_footer_right" >
      <field name="Kanban_state" widget="kanban_state_selection"/ >
      <img t-att-src="kanban_image(
  'res.users', 'image_small', record.user_id.raw_value)"
          t-att-title="record.user_id.value"
          width="24" height="24"
          class="oe_kanban_avatar"/ >
   </div >
In the kanban view definition the element <field> acts similar to the other view modes. The avatar image is inserted into the view using ![]() tag. The kanban view of the contacts module used this tag to show the images of the contacts. This is done as follows;
tag. The kanban view of the contacts module used this tag to show the images of the contacts. This is done as follows;
<img t-att-src="kanban_image('res.partner', 'image_medium', record.id.value)" class="o_kanban_image"/ >
Interactive kanban cards
Odoo has its own built-in features to make the kanban cards interactive. It’s also possible to use HTML tags, and along with this Odoo, it provides more ways to make it compatible with the user interface. Let’s go through some of the built-ins;
Color field in Kanban view:
<field name="color"/ >
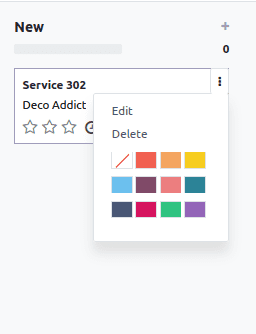
Drop down to choose a color in the kanban view:
         <t t-name="kanban-box" >
     <div t-attf-class="oe_kanban_color_#{kanban_getcolor(record.color.raw_value)} oe_kanban_card oe_kanban_global_click" >
         <div class="o_dropdown_kanban dropdown" >
             <a role="button" class="dropdown-toggle o-no-caret btn" data-toggle="dropdown"
               href="#"
               aria-label="Dropdown menu" title="Dropdown menu" >
                 <span class="fa fa-ellipsis-v"/ >
             </a >
             <div class="dropdown-menu" role="menu" >
                 <t t-if="widget.editable" >
                     <a role="menuitem" type="edit" class="dropdown-item" >Edit </a >
                 </t >
                 <t t-if="widget.deletable" >
                     <a role="menuitem" type="delete" class="dropdown-item" >Delete </a >
                 </t >
                 <div role="separator" class="dropdown-divider"/ >
                 <ul class="oe_kanban_colorpicker" data-field="color"/ >
             </div >
         </div >
     </div >
  </t >
For displaying the color of the kanban card, here the class t-attf-class=”#{kanban_color(record.color.row_value)} is added. Here value for the corresponding color field is used, and prepare a class based on that.
The given dropdown is used to show the options like Edit, Delete, and the kanban color picker. It is based on the access rights of logged-in users.
Now lets add the tags and popularity field;
<span class="oe_kanban_list_many2many" >
     <field name="category_id" widget="many2many_tags" options="{'color_field': 'color'}"/ >
  </span >
  <field name="priority" widget="priority"/ >
Here the priority widget as well as the many2many_tags are used. The priority field displays the field using the star icon. And the many2many_tags widget will show the field values as tags. The color_field is used to enable the color feature on the tags.
Activities and kanban cards
In order to keep track of your work, it is important to plan activities accordingly. Activities are planned to remind of the work that is needed to complete and schedule the upcoming activities. Activities can be managed from anywhere in Odoo. Thus, it is able to view and manage the activities from a kanban view. Let’s have a look at how the activities are used in the kanban view.
To achieve this, we require the dependent ‘mail’ to inherit the model activity mixin.
class MobileServices(models.Model):
   _name = 'mobile.service'
   _description = 'Mobile Services'
   _inherit = ['mail.thread', 'mail.activity.mixin']
Now we are able to make use of the fields that are declared on these models. And hence the field activity_state can be added to the kanban view as normal.
<field name="activity_state"/ >
Then the field activity_ids can be placed inside the kanban template to view and manage the activities from the view itself.
<field name="activity_ids" widget="kanban_activity"/ >
After adding these in the kanban view template, the view will be like this;
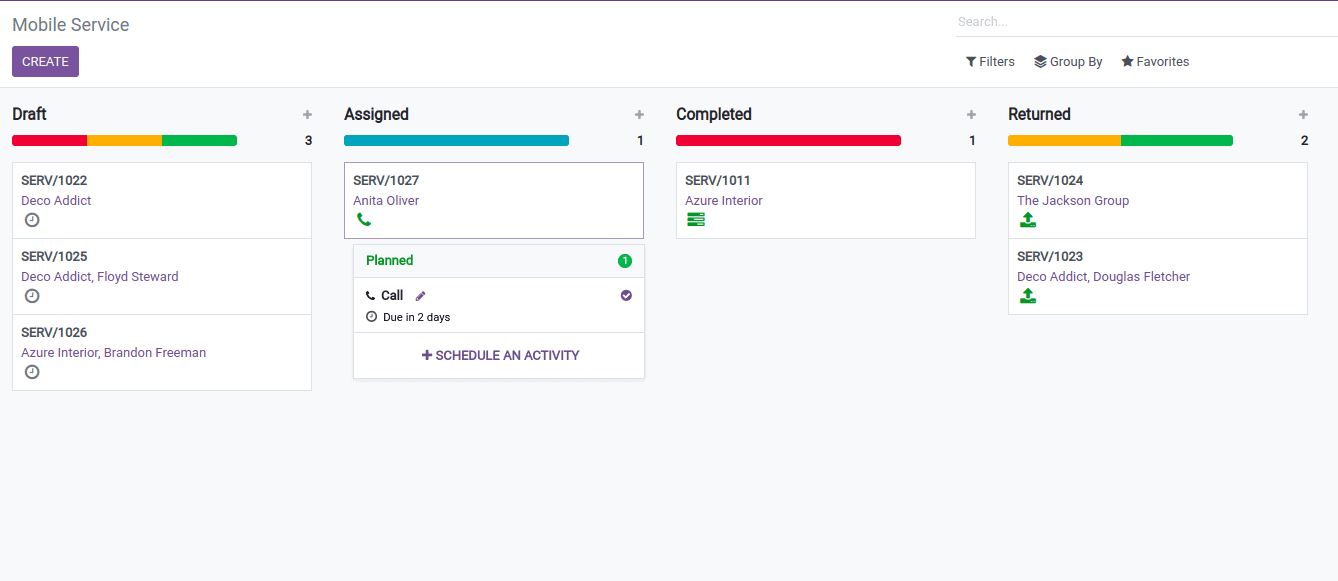
By clicking on the widget, it is able to view the already created activities, and also the activities can be scheduled.
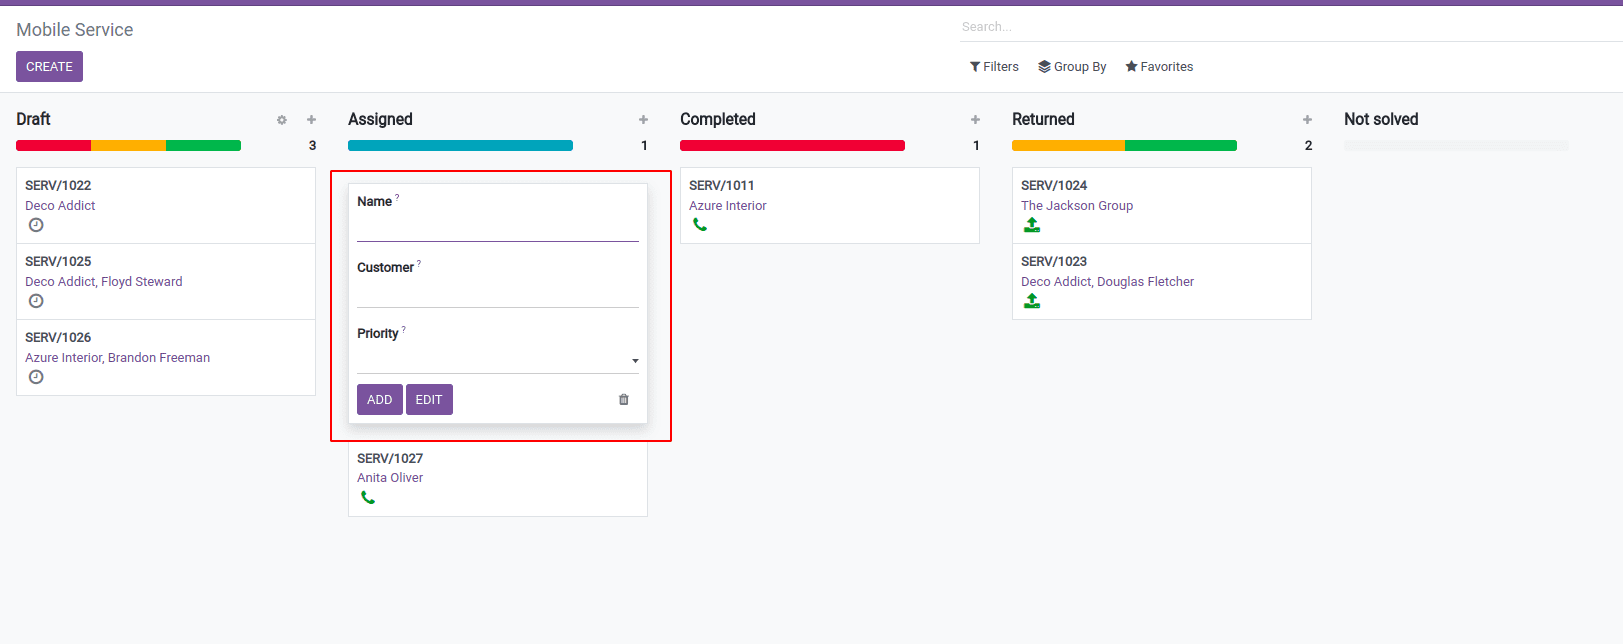
Quick create
Quick create is a feature uniquely available to the kanban view in Odoo. Generally, this feature allows you to create records of any particular model to create its record from the kanban view without rendering the form view. Instead, it will bring up a minimalist form from the kanban. This is achieved by clicking on the ‘+’ icon shown on the right top of each column.
This can be created with simple steps as follows.
Firstly, a form view needs to be created with the minimum required fields. This is actually used for displaying it once the ‘+’ icon is clicked.
<record id="mobile_service_view_form_minimal" model="ir.ui.view" >
         <field name="name" >Field Service Form </field >
         <field name="model" >mobile.service </field >
         <field name="arch" type="xml" >
             <form >
                 <group >
                     <field name="name"/ >
                     <field name="partner_id"/ >
                     <field name="priority"/ >
                 </group >
             </form >
         </field >
      </record >
After creating the form view, in the next step this view needs to be mentioned in the kanban view declaration. Here we use the attribute quick_create_view, which refers to the view's external id.
Here is the way to show how to add the quick create;
<kanban default_group_by="service_state" quick_create_view="mobile_service.mobile_service_view_form_minimal" on_create="quick_create" >
This will add the view to the kanban view. Thus when the plus icon is clicked, a small form view will appear to create the record from the kanban view.