Wizard
Odoo wizards are used to create interactive sections with users. Such interactive sections are extremely beneficial to any business flow. Transient and Abstract models are the most commonly used model classes in Odoo for wizard creation. However, the most common mode is the transient mode. This provides all of the characteristics of a model class except that the data in a Transient model is deleted on a regular basis, hence the name Transient. Wizards are commonly used to perform database persistent model operations.
Let's look at an example of a use case. Consider a model student.student for managing all of an educational organization's student records
from odoo import fields, models, api
class Student(models.Model):
   _name = "student.student"
   _description = "Student"
   name = fields.Char(string="Name", required=True)
   partner_id = fields.Many2one('res.partner', string="Partner")
   phone = fields.Char(string="Phone Number")
   email = fields.Char(string="Email", required=True)
   status = fields.Char(string="Status")
   leave_ids = fields.One2many('student.leave', 'student_id', string="Leaves")
For recording all of the student's leaves taken, there is an one2many type field. Let's make the model student.leave the required fields.
class StudentLeave(models.Model):
   _name = "student.leave"
   _description = "Student Leave"
   student_id = fields.Many2one('student.student', string="Student")
   date = fields.Date(string="Date")
   reason = fields.Char(string="Reason")
The wizard model will then be developed, allowing the user to select a date and add a reason for leave. For this wizard model, we use the transient model class.
from odoo import api, fields, models
class StudentLeaveWizard(models.TransientModel):
   _name = 'student.leave.wizard'
   _description = 'Student Leave'
   student_id = fields.Many2one('student.student', string="Student",
                                readonly=True)
   date = fields.Date(string="Date")
   reason = fields.Char(string="Reason")
Add a button for creating a leave record inside the student form view.
<header >
    <button name="create_leave" string="Leave" class="oe_highlight"
            type="object"/>
 </header>
In the student model, write a Python function for the button action. Let us return a widget where the user can enter the date and reason for leaving. Create a new leave record for the student using the widget values. Create a new record in the widget model with the student_id field set to the current student. Then, in the button click, return that object.
def create_leave(self):
   wizard = self.env['student.leave.wizard'].create({
       'student_id': self.id
   })
   return {
       'name': _('Student Leave'),
       'type': 'ir.actions.act_window',
       'res_model': 'student.leave.wizard',
       'view_mode': 'form',
       'res_id': wizard.id,
       'target': 'new'
   }
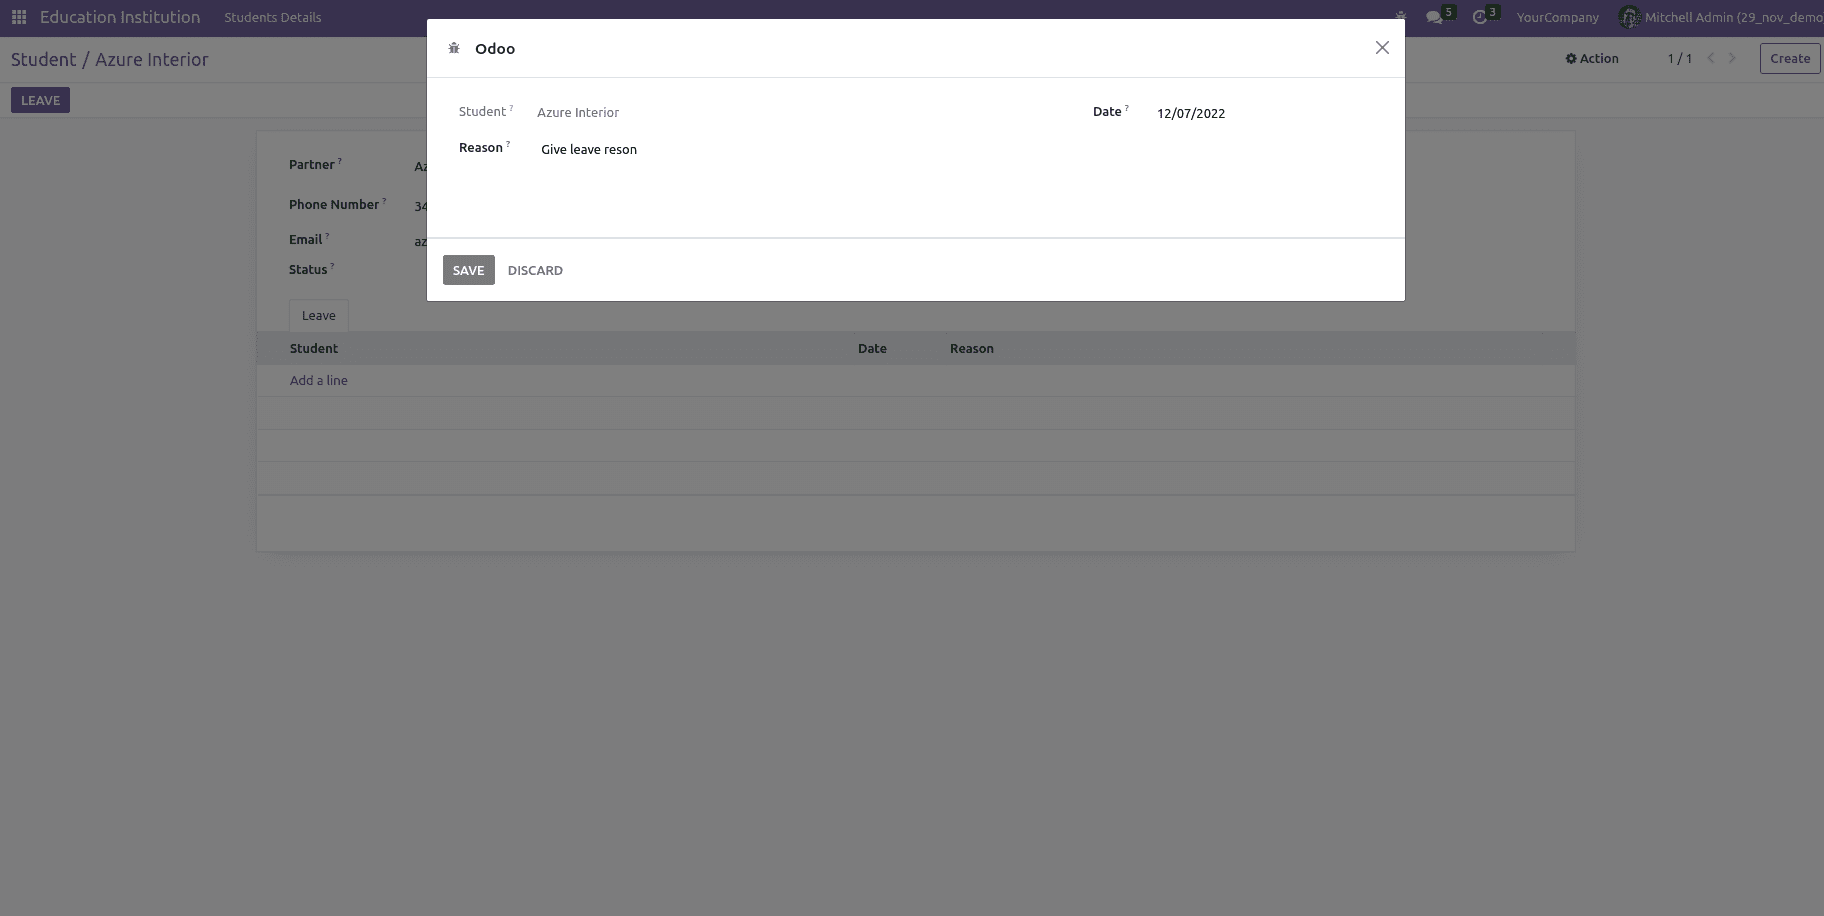
The next step is to create a form view for the wizard that includes buttons for performing actions on the record. For the wizard view, two buttons named CREATE and CANCEL are added, each with the functionality indicated by the name.
<record model="ir.ui.view" id="leave_wizard_form_view">
    <field name="name">Leave</field>
    <field name="model">student.leave.wizard</field>
    <field name="arch" type="xml">
        <form string="Leave">
            <sheet>
                <group>
                    <group>
                        <field name="student_id"/>
                    </group>
                    <group>
                        <field name="date" required="1"/>
                    </group>
                </group>
                <separator string="Reason"/>
            <field name="reason" required="1" nolabel="1" placeholder="Give leave reason"/>
            </sheet>
            <footer>
                <button type="object" name="create_leave_from_wizard" class="btn btn-primary"
                        string="CREATE"/>
                <button string="CANCEL" special="cancel"/>
            </footer>
        </form>
    </field>
</record>
On button click, this will return the widget form.
Now inside the create_leave_from_wizard method, it will perform the required action. Inside the wizard mode, this method has to be written. Create a new record in the model student.leave using the widget value on the button click.
def create_leave_from_wizard(self):
   self.env['student.leave'].create({
       'student_id': self.student_id.id,
       'date': self.date,
       'reason': self.reason
   })
Upgrade the module after making all the necessary changes, then verify that the student's new leave record was successfully created.
This is how a wizard is made, which enhances the user experience in general.