One among the significant and vital elements of an organization's accounting operation is its supervision. If it is not supervised with proper care and attention, your financial operation will become a headache. Therefore it is very crucial to take proper management actions and controls. The leading Odoo software offers adequate management and controlling tools which are very beneficial for polished accounting-related operations. With its advanced tools and features, you can set up everything smoothly.
This dedicated Odoo Accounting tool can fulfill every financial operation of the organization. The well-crafted management tools available in the platform have the power to redefine an organization’s finance management. In the following section, we have a close study of the available management options in the Configuration tab of the Accounting module.
Asset Models
Asset management is an important part of any organization’s operation. It is the process of managing an organization’s physical, financial, and intangible assets to maximize their efficiency and value. It involves tracking the assets' use and maintenance, taking proactive measures to reduce risks associated with them, and ensuring their timely replacement when necessary. Asset management also helps organizations make informed decisions about where to invest in new resources and how to manage existing ones. Proper asset management can help organizations save money, reduce liabilities, and create sustainable growth.
Asset Models in Odoo 16 Accounting module configuration empower you to handle your company’s fixed assets and generate depreciation entries. It enables you to track asset costs, calculate depreciation, and generate financial reports. This feature also allows you to manage and track insurance, maintenance, and other related information for each asset. It also helps you to track the cost of assets over their useful life and the associated depreciation expense. The asset models also provide a way to track the asset’s value at any point in time, as well as the current book value of the asset. Additionally, asset models can be used to generate reports to provide information about the asset’s current value and its historical performance.
In the Odoo Accounting module, the following asset models can be defined:
- Fixed Assets: These are tangible assets that are used in the business for a long period of time and have long-term value. Examples include land, buildings, furniture, and equipment.
- Depreciation: Assets are depreciated over a period of time. This can be done using different depreciation methods such as straight lines, declining balances, and sum of the year’s digits.
- Leasing: Assets can be leased from a third-party vendor.
- Intangible Assets: These are non-physical assets such as patents, copyrights, and trademarks. These assets are recorded as an asset on the balance sheet and amortized over their useful life.
- Impairment: Impairment occurs when the fair value of an asset declines. This can be due to various factors such as technological obsolescence, market conditions, or competitive pressures. The impairment must be recorded in the financial statements.
The Asset Models feature in Odoo allows you to define how assets are recorded and managed in Odoo. This feature enables you to define the depreciation calculation method, set the asset value, and set the depreciation rate for an asset. Additionally, users can set up specific depreciation rules for different asset models, such as different calculation methods for one type of asset and a different rate for a different type of asset. This provides for more flexibility in managing assets in Odoo and helps to ensure that the information is accurate and up to date.
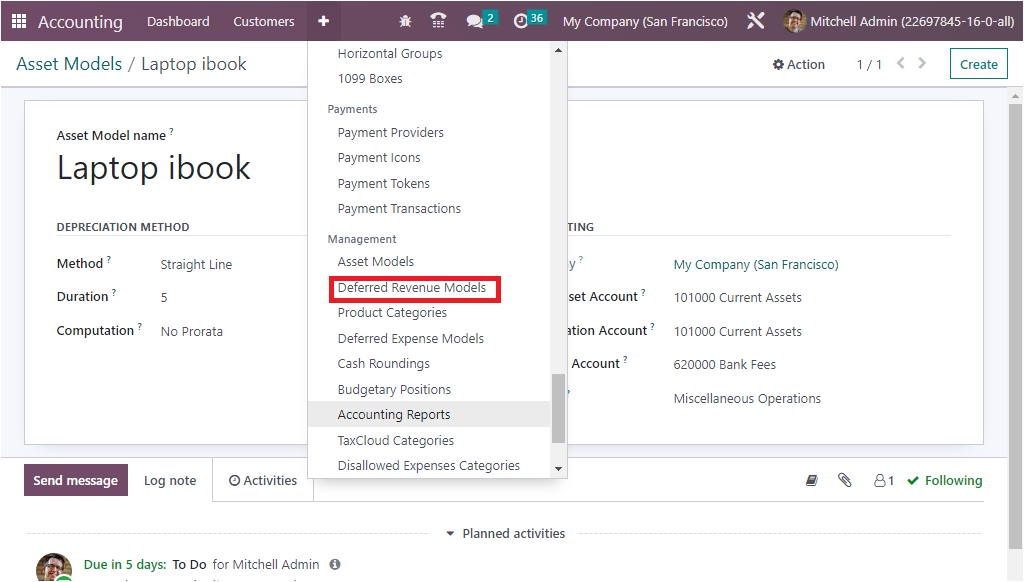
The main intention behind the asset models feature is to provide an easy way to manage and track assets for an organization. The dedicated Odoo Accounting module frames the asset management operations with the assistance of the Assets Models menu, which can be accessed from the Management section of the Configuration tab of the module.
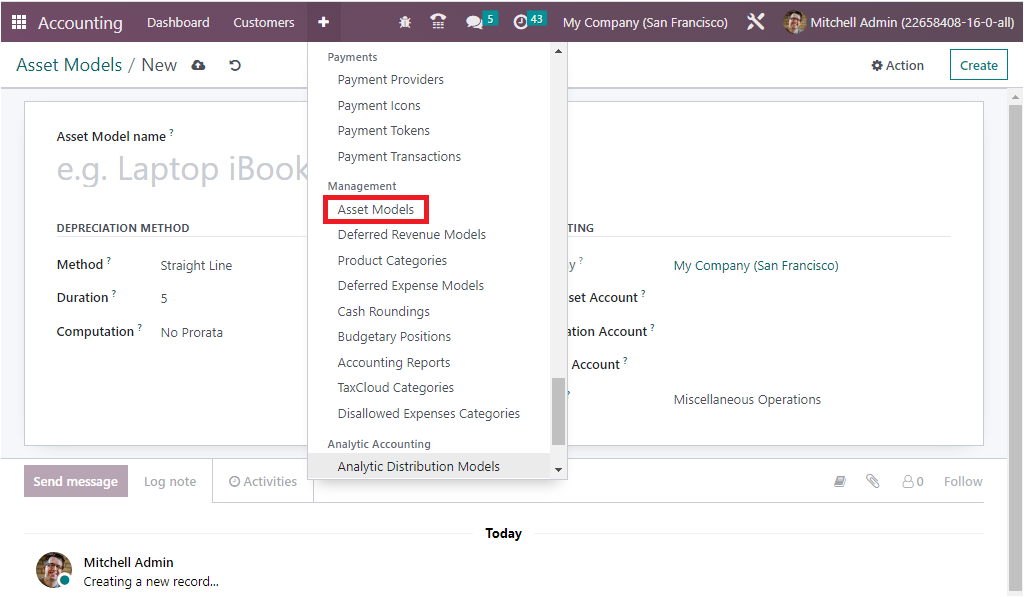
Using this menu, you can navigate to the Assets page, where you can view all existing asset models along with the details such as Asset Name, Fixed Asset Account, Depreciation Account, Method, Number of Depreciations, and Period length as shown in the screenshot below.

The previously configured assets models can be selected and viewed in detail. The Filter, Group by, and Search buttons in the window help you to find out and group the desired asset model from the whole list. The new Asset model can be created by clicking on the CREATE button. The screenshot of the creation form is depicted below.
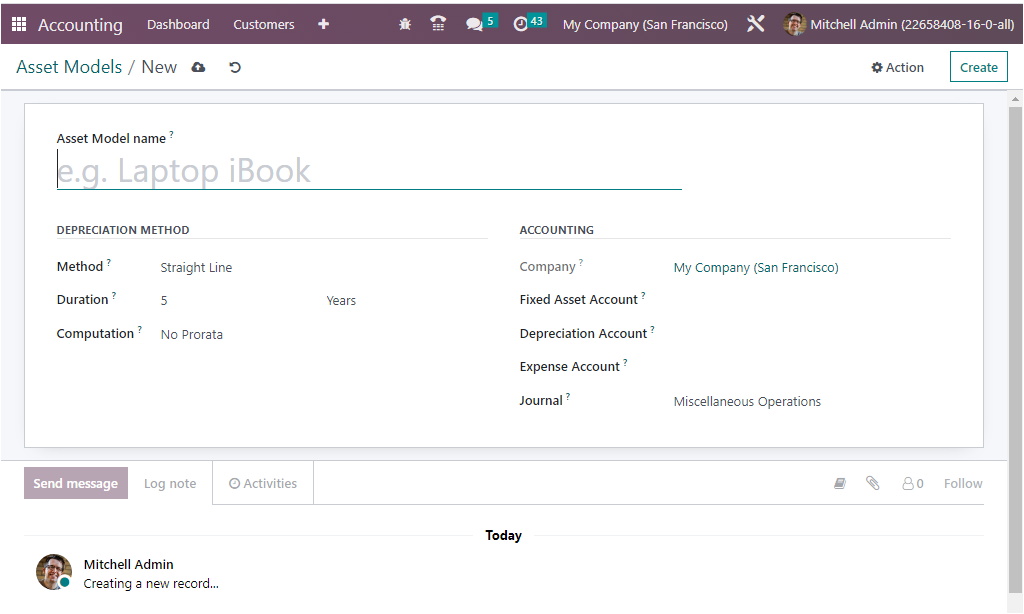
To define a new Asset model, enter the name of the asset model in the Asset Model name field. Then you can configure the operational elements of it in the specified fields. The DEPRECIATION METHOD section displays some fields to define depreciation aspects. So you can choose the suitable method to use to compute the amount of depreciation lines. It can be defined as either Straight Line, Declining, or Declining then Straight Line. When you choose the Straight line, it will calculate the Gross Value / Duration. In the case of Declining, it will be calculated on the basis of residual value. Finally, the Declining then Straight Line will equal to declining but with a minimum depreciation value equal to the straight line value. Then, the number of depreciations needed to depreciate your asset can be allocated on the basis of Years or Months in the Duration field.
The computation field will decide whether the depreciation calculation will be based on ‘No Prorata’, ‘Constant Periods’ or ‘Based on days per period’. No protara means, it will not consider the purchase date of the asset and the depreciation starts from the start of the fiscal year. If the computation is ‘Constant Periods’, it calculates the depreciation board from the purchase date or prorata date. The third computation method based on ‘Based on days per period’, will compute depreciation board per day for each period. Initially, it will consider the total period and compute per day’s depreciation, and based on per day’s depreciation, monthly or yearly (duration frequency) depreciation board will compute.
Likewise, in the Accounting section of the Asset models creation window, you can specify the Company associated operation in the Company field. The field will be auto-allocated with the system. Then you have the Fixed Asset Account field, where you can mention the account used to record the purchase of the asset at its original price. Next, you can choose the Depreciation Account, which is the account used in the depreciation entries to decrease the asset value. And also can define the Expense Account, which is the account used in the periodical entries for recording a part of the asset as expense. Finally, you can choose the Journal in the Journal field. Here all the accounts and the journals that we already configured in the platform are listed in the dropdown menus to choose the required one.
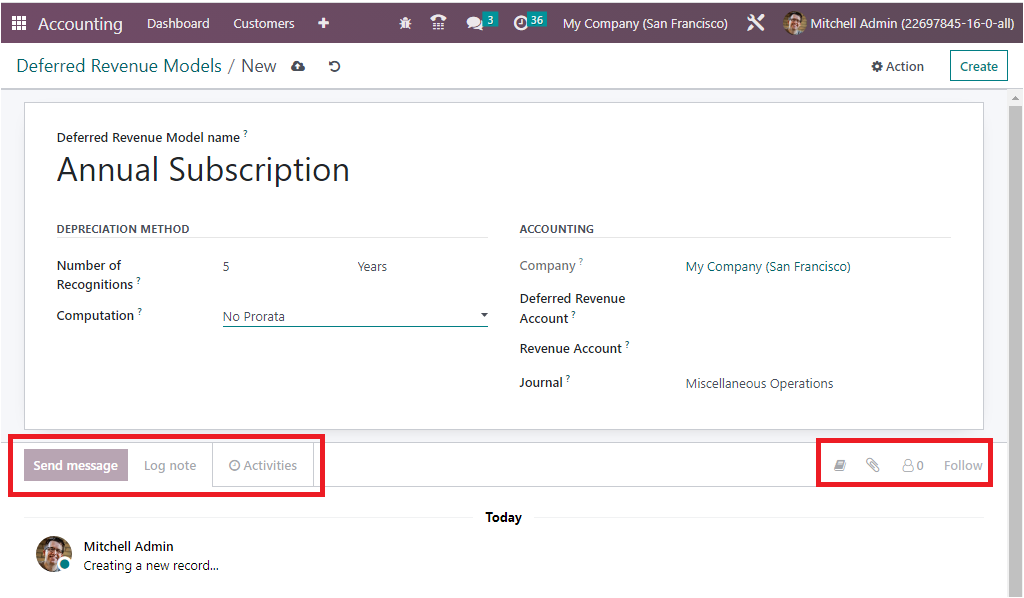
Once you provide all the details, the new Asset model will be saved into the system. Now you can add followers to this particular Asset model by clicking on the Follow option available on the bottom left. In addition, the system provides the Attachment option and also has the Search Knowledge Article option as shown in the image below.
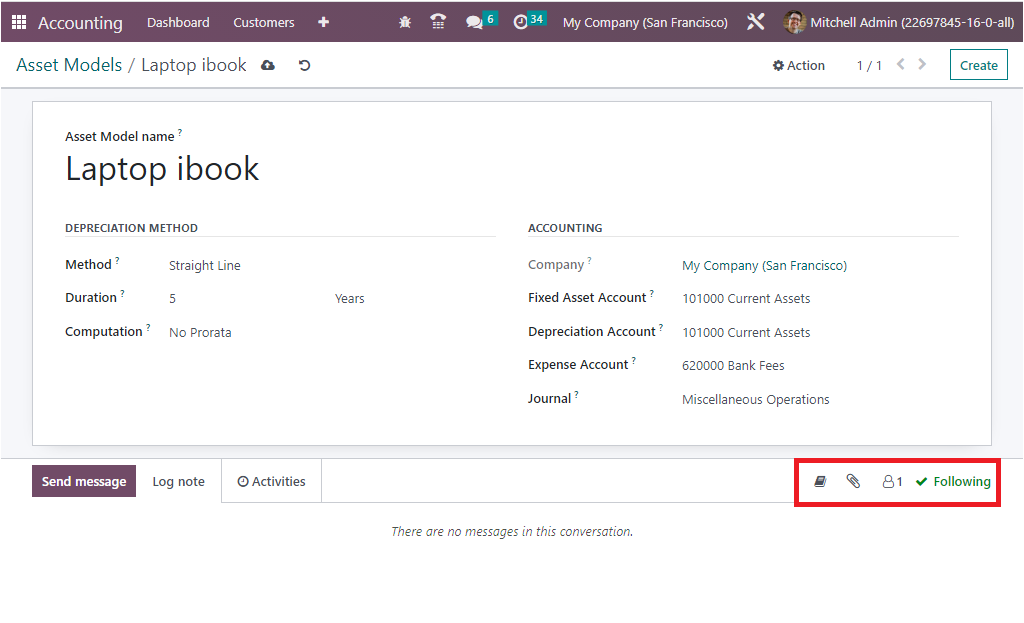
The Follow option allows you to follow the progress of the asset model and receive notifications when changes are made. The Attachment option helps you to upload documents, images, and other types of files that are related to the asset model. The Search Knowledge Article option is useful for searching the Odoo Knowledge Base for relevant articles that could help with the asset model creation process, and this is the new feature available in the 16 version. Likewise, when you look at the bottom left corner of the creation form, you will depict the Send Message, Log note, and Activities options as shown in the image below.
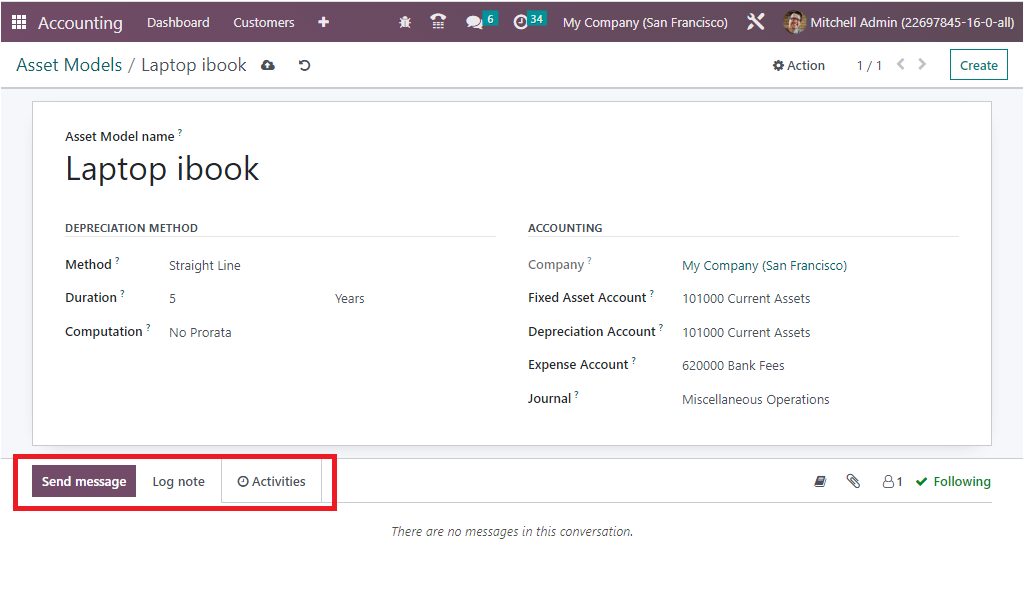
The Send messages option allows you to send information to the recipients of the asset model. The Log note option will feed all the changes made to the asset model and also you will get the chance to plan an activity with the followers concerning the asset model using the Activities menu. With this option, you can add, view, and track activities related to the asset model.
As we are clear on the Asset Models and how they can be defined and managed in the Odoo Accounting module, let's now move on to the next management menu option, the Deferred Revenue Models of the Odoo finance management in the following section.
Deferred Revenue Models
The next discussed management tool in the Odoo 16 Accounting platform is the Deferred Revenue Model. This model enables businesses to track customer payments in advance for services or products that have yet to be delivered. This feature is particularly useful for businesses that offer subscription services or have a recurring revenue model. This model assists businesses in tracking customer payments and book the revenue only when the service or product is delivered to the customer.
When a customer pays in advance, the amount is recorded as Deferred Revenue. This amount is then recognized as revenue when the service or product is delivered. This feature supports businesses to accurately track their revenue and gives them greater control over their financial records.
The Deferred Revenue model in Odoo 16 Accounting module is easy to set up and use. You can easily define the terms of the deferred revenue agreement, such as the date of the payment, the amount of the payment, and the date of the delivery. Then, when the customer pays in advance, the amount is recorded as deferred revenue, and the revenue is recognized when the service or product is delivered. It is considered as an excellent tool for any businesses that offer subscription services or have a recurring revenue model. It helps businesses to accurately track their revenue and gives them safety measures over the financial records. So the organization can accurately track its current and future liabilities and help to ensure that the company can meet its financial obligations and remain compliant with accounting regulations. The Deferred Revenue model also allows the company to better manage its cash flow, as it can see when and how much money it is expecting to receive in the future. It is suitable for services or products that are paid in advance, such as subscriptions or memberships. For example, a company may offer a subscription-based service and receive payments from the customer in advance of delivering the service or product. The company will record the payment as deferred revenue on the balance sheet, recognizing that the revenue has not yet been earned. This deferred revenue will then be recognized as actual revenue when the service is delivered.
Let us say a company offers one-year subscription services for $100. When the customer pays the fee, the company records $100 of deferred revenue on the balance sheet. Over the course of the year, the company delivers the service and earns revenue. At the end of the year, the company will mark the deferred revenue as actual revenue and will adjust the balance sheet accordingly.
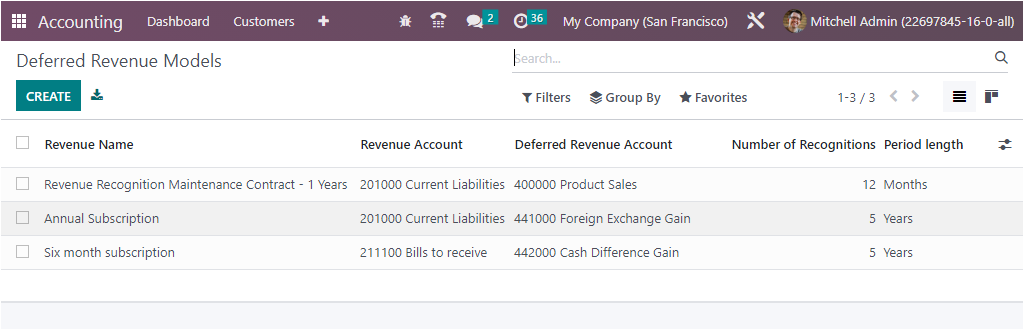
The Odoo Accounting module holds a single window to manage the Deferred Revenues of the organization. You can access the window using the Deferred Revenue menu equipped under the Configuration tab of the module.
The Deferred Revenues window will display the previously described record information, such as the Revenue Name, Revenue Account, Deferred Revenue Account, Number of Recognitions, and the Period length.
Odoo exhibits a single menu to manage the Deferred Revenue of an organization and you can find it out under the Configuration tab of the Odoo 16 Accounting module. The Deferred Revenue model come under the Current Liability account type. While conducting the business operations, the organization will be extending services to the consumers, and the amount will be received for the services which not yet been rendered and the payment has been collected in advance. As a result, the Deferred Revenue will represent a liability for the organization in the Odoo system. In addition, if the services are being provided every year to the customer for their advanced payment, then the liability is reduced until the next advance is received. Every detail regarding deferred revenue such as provided services and reduction of liabilities will be explicitly written down in the Balance Sheet of the platform.
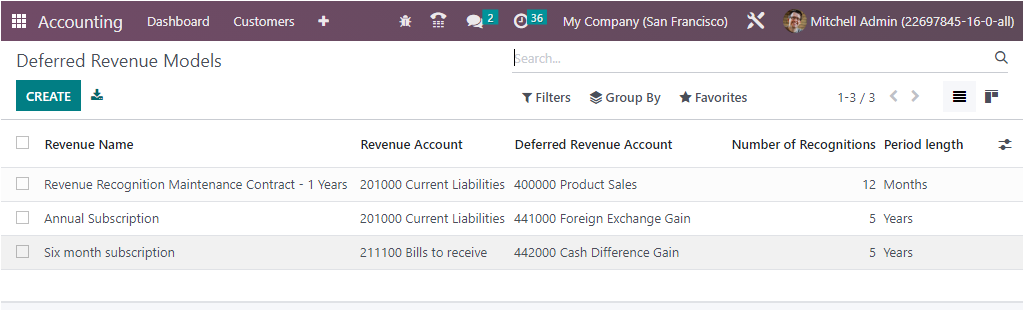
The Deferred Revenue Models window showcases every deferred revenue model which is being explained in the platform with essential information such as Revenue Name, Revenue Account, Deferred Revenue Account, Number of Recognitions, and Period length. Similarly like all other menus of the Odoo platform, here also you have the provision to Filter and Group By using the default and customizable options for quickly sorting out the needful Deferred Revenue Models.
The CREATE button helps you to create and configure a new Deferred Revenue Model in Odoo. the creation form will look like in the screenshot given below.
In the form view, first, you can allocate the Deferred Revenue Model name in the specified field. Then in the DEPRECIATION METHOD section, define the Number of Recognitions in terms of Months or Years. It is considered as the number of depreciations required to depreciate your asset.
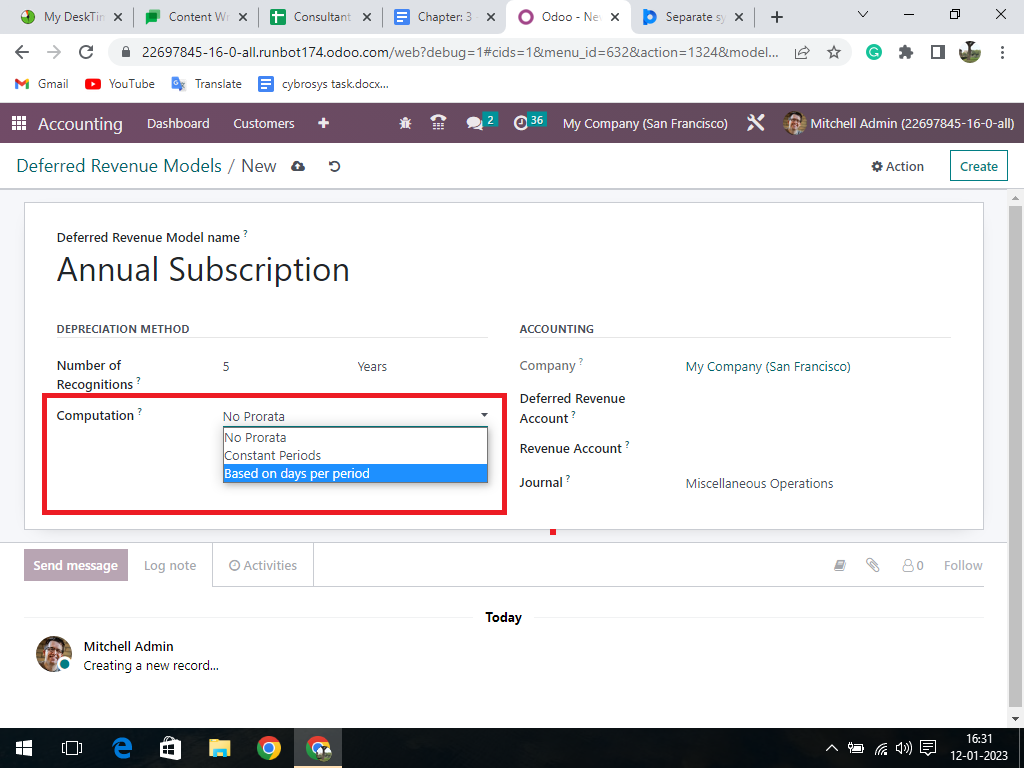
The computation can be ‘No Prorata’, 'Constant Periods’ and ‘ based on days per period’. No prorata is enabled to compute the revenue board equally among the number of recognition periods defined. Constant Period helps to compute the deferred revenue as prorata basis and the last method ‘based on days per period’ compute the revenue board according to the number of days per period.
In addition, you have the Accounting configuration fields where you can fill up the Deferred Revenue Account; it is the account used to record the deferred income. Next, you can mention the Revenue Account, this record is used to recognize the revenue. The Company field will be auto allocated based on the operation. Finally, you can describe the journal in the Journal field. All these fields display a drop-down menu for choosing the corresponding data. In the Asset model creation form, here, also you have the option to add followers using the Follow button. It is also possible to add an attachment to the model using the Attachment option displayed. Further, you can schedule activities, send messages to followers, and Log not option as shown below.
Every Log entry associated with the Deferred Revenue Model is copied in the Log note menu, and you can include more log not effortlessly. As we inferred about the Deferred Revenue Models option existing in the Odoo Accounting now, we can learn about the Product Categories feature.
Products Categories
Product Categories in business software provide a way to organize and manage large amounts of inventory. It helps to create an efficient system for tracking products, making it easier to find, order, and report on products. Having an organized list of products as well as commodities can also help ensure that customers are presented with relevant products. Additionally, product categories can help businesses identify trends in customer buying behavior.
The Odoo 16 Accounting module features Product Categories which grants users to organize and manage products in their inventory more efficiently. Product Categories enable you to group products into different categories making it delicate to search for them in the inventory. Product Categories also permits you to set different pricing rules for each category, making it easier to set different prices for different types of products. Additionally, product categories can be used to generate reports that provide an overview of products and their sales performance. With this feature, you can easily analyze your financial data by product categories. You can easily group your products into different categories and view the financial information related to each category. This feature also enables you to perform budgeting and forecasting by product categories and compare their performance with industry averages. Furthermore, you can also track the profitability of each product category and analyze the impact of pricing strategies on the overall performance.
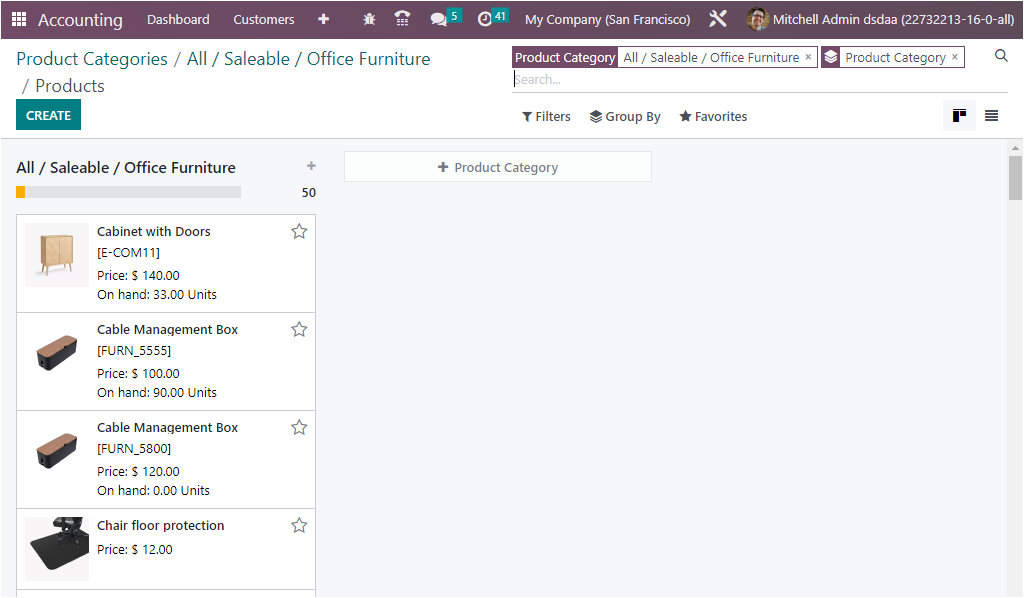
Under the Configuration tab of the Odoo 16 Accounting module, you will find the Products Categories menu in the Management section. Using this menu, you can easily navigate into the Product Categories window. The window will keep all the records of previously defined categories in a list format as given in the image below.
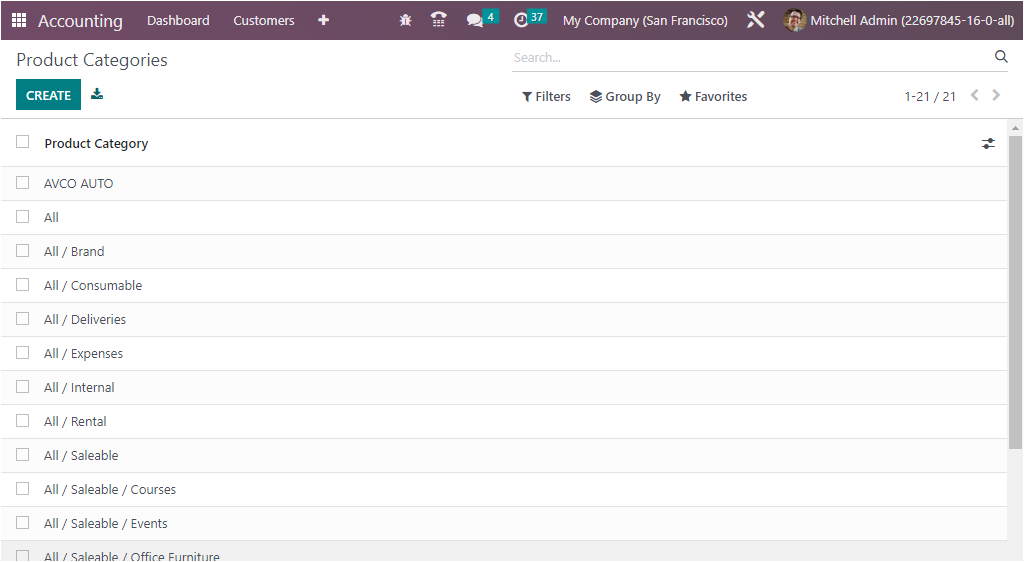
You can make use of the Filters and Group By options for quickly retrieving and grouping your required product category. All the defined categories can be selected and viewed in detail, and you have the provision to make changes in the records. In addition, you can create a new Product category using the CREATE button.
In the Product Categories creation form, you can initially feed the category name in the Category field. Then you can allocate the Parent Category and can assign the Avatax Category. After that, you have the TAXCLOUD menu, under which you can define the TaxCloud Category using the dropdown menu. The TaxCloud Category field indicates the TIC, which is the Taxability Information Code which are applied by TaxCloud to compute specific tax rates for each product type. This value is used when no TIC is set on the product. If no value is set here, the default value set in invoicing settings is used.
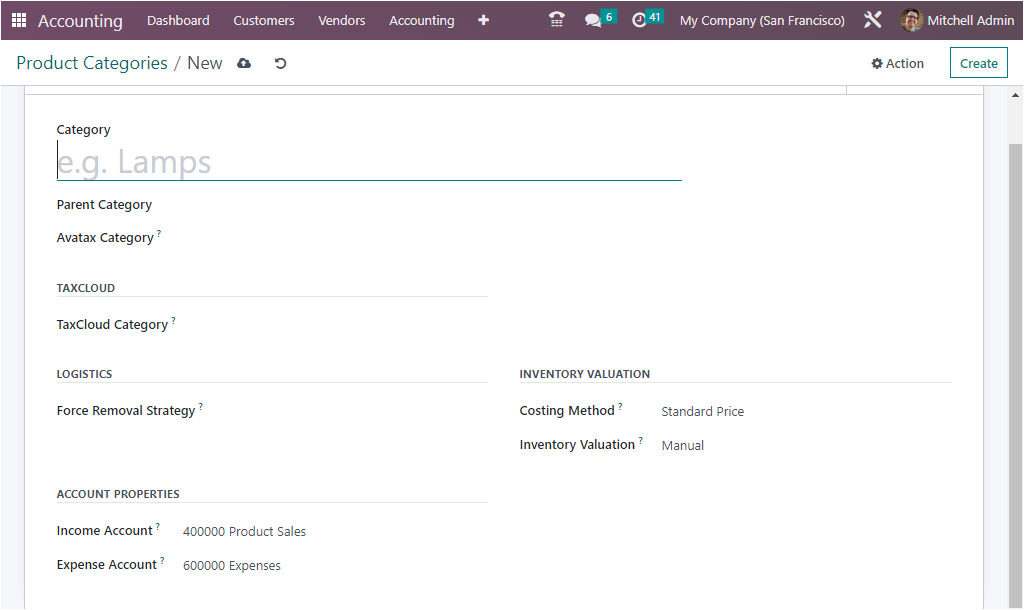
You can mention the Routes and the ‘Force Removal Strategy’ under the LOGISTICS section. With the help of the Force Removal Strategy field, you can set a specific removal strategy with the help of the dropdown menu. Then the removal strategy will be used regardless of the source location for this product category. The different removal strategies Odoo put forward are:
- FIFO (First In First Out)
- LIFO (Last In Last Out)
- Closest Location
- FEFO (First Expiry First Out)
When you want to sell the item that was stocked first, you can set the First In First Out strategy. Then the products or lots that were stocked first will be moved out first. This method is used when goods are to be sold or used in the order in which they were purchased or produced. This method is commonly used when managing product categories as it ensures that the oldest item is used up first. In some situations, you are required to move the item that was stocked last in first, in this case, you can apply the LIFO strategy. This method is the opposite of the FIFO, and this is used when goods purchased or produced last are used first. This strategy is most advantageous when the cost of goods is increasing, and it is important to minimize taxes.
If you are selecting the Closest Location option, the goods are to be removed from the closest storage location first. This is beneficial when goods require transport to a customer as it reduces the amount of time and effort required to transport goods. The last one, FEFO can be applied when goods have an expiry date, and it is important to ensure that the goods with the earliest expiry date are used up first. This is especially important for food products, drugs, and other items with a limited shelf life.
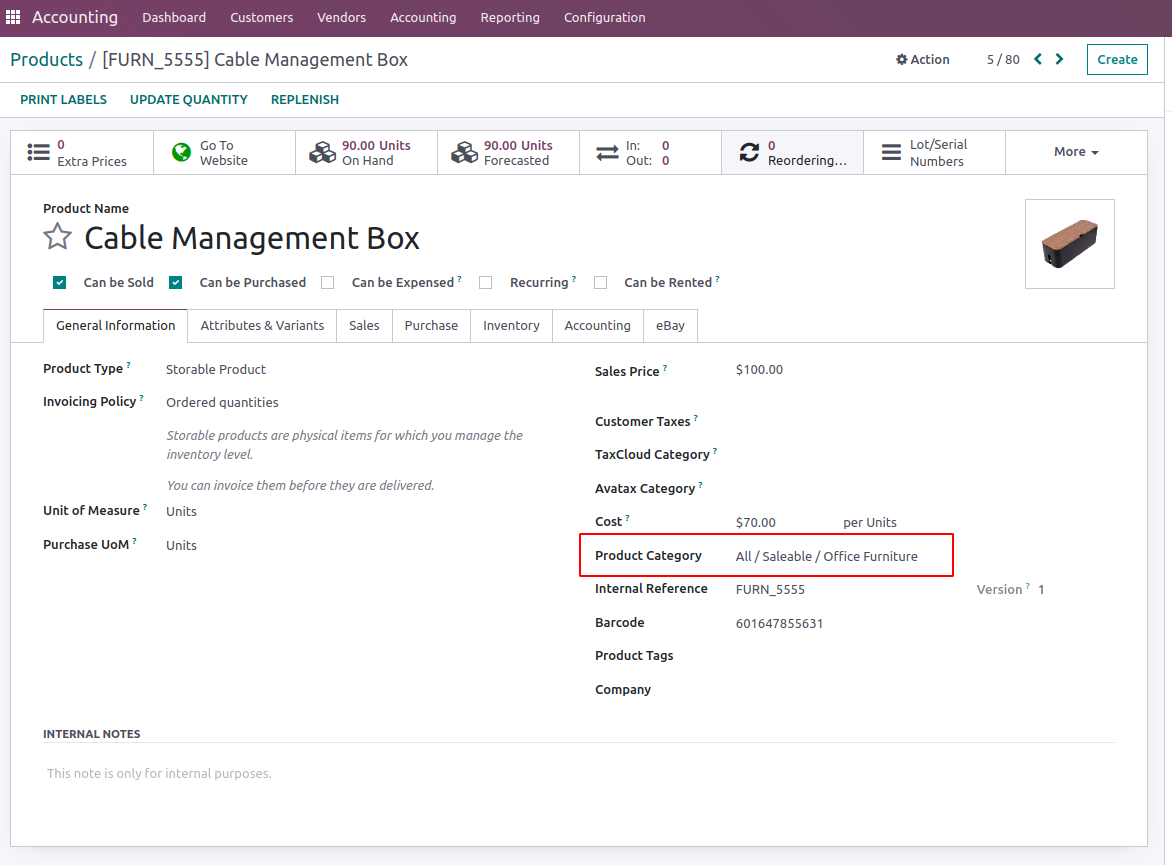
Similarly, the ACCOUNT PROPERTIES related fields, such as the Incom Account and the Expense Account can be defined either by choosing the dropdown menu or configuring a new one. The income account will record all the incomes generated from this product category, and the Expense Account will register all the expenses associated with this product category.
Furthermore, the inventory valuation configuration options, such as Costing Method and Inventory Valuation can be defined under the INVENTORY VALUATION section. The Costing Method can be defined as either Standard Price, Fist In First Out( FIFO), or Average Cost(AVCO). The Standard Price option allows you to set a fixed cost per product, while FIFO and Average Cost are dynamic methods that are based on the purchase cost of the product and the quantity in stock. FIFO will use the cost of the oldest stock in hand, while the average cost will average out the purchase cost of all stock in hand.
Once you filled in all these options, you have successfully configured a Product Category. In addition to all the options, the window will display smart tabs on the top right side of the window, as you can see the Products and the Putaway Rules tab, as shown in the image below.
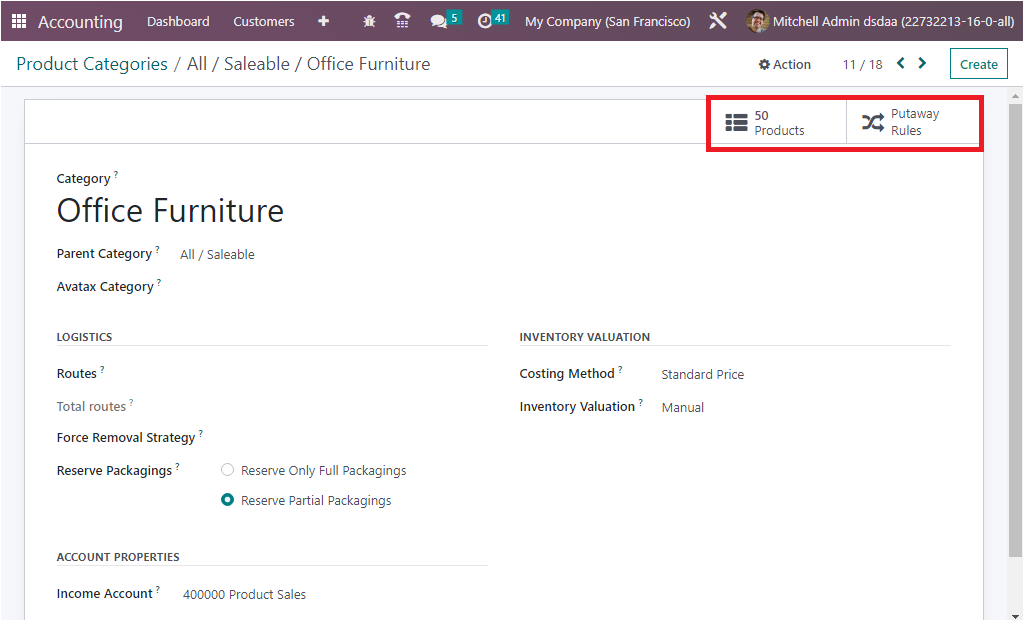
All the products that come under this product category will be displayed under the smart tab ‘Products’, accessible by clicking the button. The moment you select the smart tab, you will navigate into the Products window, where you can view all the products which fall under this category.
The product details in the product menu will be displayed based on the various stages and the creation of the respective category of the product that are described. It is also possible to remove the filters, and you can view the whole products that are being saved.
The smart tab Putaway rule in the category form will show all the configured putaway rules for the product that comes under that particular category. Under the Logistics section, define the routes, and removal strategy so that all products that belong to this category will be removed from the warehouse based on the removal strategy defined. Package reservations can either choose as ‘Reserve only full packagings’ or ‘Reserve partial packagings’.
The Inventory Valuation is carried out to validate how will be the stock journals should be defined for this particular category, the platform provisioning you to perform both manual and automatic operations. For initiating Automated Inventory Valuation, you should configure the mandatory definitions of the stock accounting properties under the ACCOUNT STOCK PROPERTIES section. Under this section, you can mention the Stock Valuation Account so that when automated inventory valuation is enabled on a product, this account will hold the current value of the products. Next, you can mention the Stock Journal. This stock journal will be very useful at the time of automated inventory valuation. The entries will be automatically posted in this account journal when stock moves are performed. Likewise, you can define the Stock Input Account to post equivalent journal items for all incoming stock moves if there is no specific valuation account. Finally can mention the Stock Output Account for recording all the outgoing stock moves. If there is not used any specific valuation account on the destination location, this will become the default value for all products in this category. It can also be set directly on each product.
As we are clear on the aspects of the Product Categories configuration, let's now move on to the next section, where the Deferred Expense Models will be discussed in detail.
Deferred Expense Models
Deferred Expenses are expenses that are incurred but are not yet due. In other words, they are expenses that have been incurred but will not be paid until a later point in time. Deferred expenses are important because they provide a way for businesses to recognize expenses for assets that will be used over a long period of time.
In Odoo Accounting, deferred expenses are managed through the use of Deferred Expense models. These models are meant to define the structure of how deferred expenses are handled in the system. For example, the model can be used to define the account posting rules and the timing of when the expense is recognized. Additionally, it can be used to set up a deferred expense account. This account is used to track deferred expenses and is updated as expenses are paid or recognized. This allows businesses to easily manage their deferred expenses and keep track of their financials and helps you to perfectly manage expense operations of the subscription based products. As we explained in the Deferred Revenue Model that the deferred revenue is associated with the elements of the payments
The Deferred Expenses model includes the expenses such as;
- Prepayment: This model is used when a company pays an expense before the goods or services are received. It is usually used for large purchases such as rent, insurance, or subscription payment.
- Accrued Expense: this model is used when a company incurs an expense but does not pay for it until a later date. This could be for items such as unpaid employee bonuses or unpaid interest on a loan.
- Depreciation: This model is used when a company purchases an asset and then expenses it over its useful life. This could be for items such as buildings, equipment, or vehicles.
- Amortization: This model can be applied when a company pays an expense over time, such as loan payments or software license fees.
As we mentioned in the Deferred Revenue Model where the Deferred Revenue is associated with the facets of the payments, which is paid by the customers before the product delivery, and it mostly occurs in subscription based products. On the contrary, the Deferred Expenses are closely associated with the subscription-based products and services that are purchased from various vendors.
The well-defined Deferred Expenses Model menu will be available under the Configuration tab of the Accounting module. Using this menu, you can easily enter into the Deferred Expenses Models window, where all the previously recorded deferred expenses models are saved and displayed, as shown in the image below.
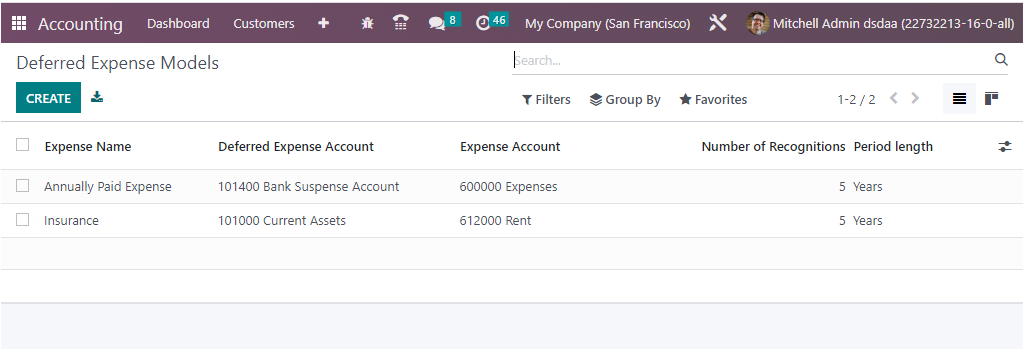
The window will depict the essential details of the Expense Name, Deferred Expense Account, Expense Account, Number of Recognition, and Period length. The Account Type of the Deferred Expense Account falls to the current assets. Even if the organization paid the amount for products or services which are not acquired so that the paid amount will be marked as an expense. Once the payment has occurred for the service or product and some of them are still not delivered, in these situations, the deferred expense will be considered as an asset for the company. And when the years are gone, the asset will be reduced as the service is released. This will be logged in the Asset section of the Balance Sheet.
To access the Deferred Expenses window, you can go to the Configuration tab of the Accounting module. Here under the Management section, you can view the Deferred Expense Models window, as shown in the image below.
The Deferred Expense Models window will equip you with all the previously configured Deferred Expenses data, as shown in the screenshot above. The preview will notify you of the Expense Name, Deferred Expense Account, Expense Account, Number of Recognitions, and Period length without selecting each record. If you are required to view the entire details of a specific Deferred Expense model, you can select the respective record and can view it in detail. The window can also be accessed in Kanban view using the Kanban view menu icon on the top right corner. The exclusive tools of the Odoo platform, such as the Filters, Group By, and Favorite tools, are available here in the window also. You can quickly and effortlessly acquire your required information using these options. In addition, the Export All button situated next to the CREATE button allows you to export all data to an excel sheet.
The exact moment you select the CREATE button, you will direct into the Deferred Expense Model creation window, as illustrated below.
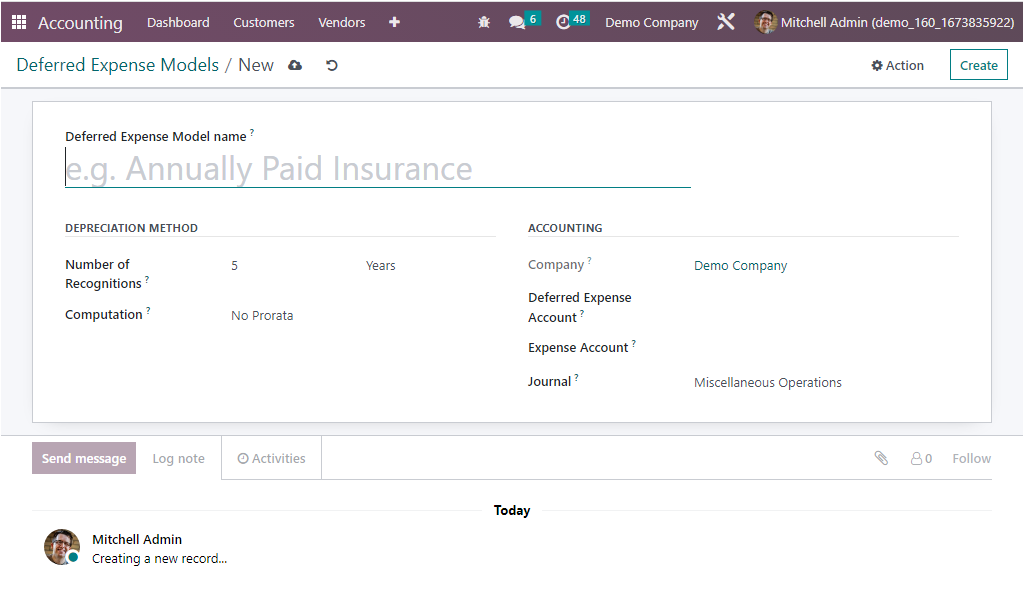
First, you can provide the model name in the Deferred Expense Model name field. Then you can define the depreciation method by assigning the number of depreciations needed to depreciate your asset in monthly or yearly terms in the Number of Recognitions field. Then you can mention the Computation method by choosing the required one from the dropdown menu. It can be set in three ways such as No Prorata, Constant Periods, or Based on days per period. When you select Prorata temboris , the depreciation will begin from the day the Deferred Expense Model is described.
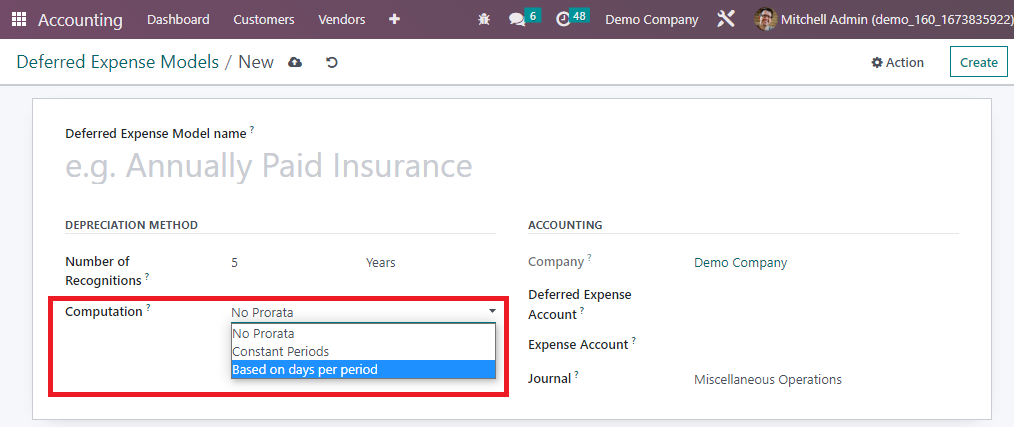
The ‘No Prorata’ : this option computes the deferred expenses without any prorata based on the amount entered in the Deferred Amount field.
Constant Period: this option allows you to specify a fixed period and divide the total referred expense by that period to calculate the monthly expenses.
Based on Days per Period: this option enables you to calculate the deferred expenses based on the exact number of days for each period in the selected period range. The deferred expenses are calculated by dividing the total deferred amount by the total number of days in the period range and then multiplying by the number of days in the current period.
In the Accounting section of the Deferred Expense Model creation form, you have the fields such as Company, Deferred Expense Account, Expense Account, and Journal to define.
Furthermore, the number of followers of this specific model will be depicted in this window in the bottom right corner, and you have the provision to add followers here. It is also possible to attach various attachments to the model using the Attachment option. In the bottom left, you can view the Send a message, Log note, and Activities options.
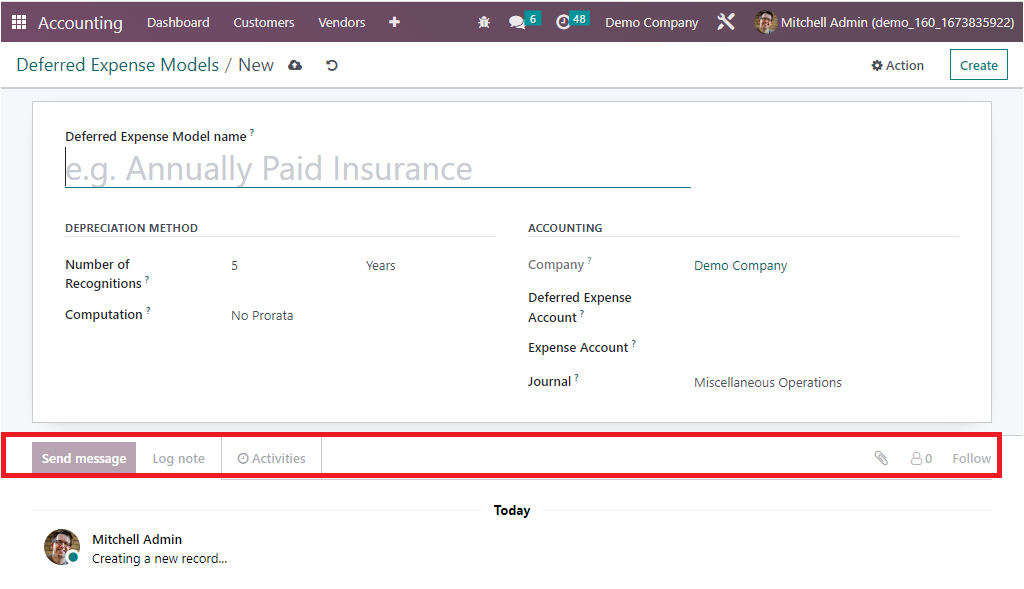
The Send message option allows you to send messages to the followers, and you can also define the Log note for the Deferred Expense Model and every log entry regarding this model will be displayed over here. The Activities option will allow you to schedule an activity with the followers.
As we are clear on the Deferred Expense Models of the Odoo Accounting module let's now move on to the next section where the Cash Roundings configurations are described.
Cash Roundings
The Cash Rounding feature in the Odoo Accounting module is a powerful tool that allows you to easily and accurately round off the total amount of a sale or purchase invoice. This can be used to easily adjust the total amounts to the nearest whole figure and can be configured to round up, down, or nearest. This feature is especially useful for businesses that accept cash payments, as it ensures that the total invoice amount is rounded off correctly and accurately. This feature can be configured to be automatically applied to all invoices or can be selectively applied to specific invoices as required. It helps to avoid the use of coins or small notes for payment. It automatically rounds the amount to the next nearest denomination. This feature is helpful for businesses that have a lot of cash payments, such as retailers. It helps to reduce the time taken to make payments and also reduces the amount of coins or small notes that are used in such payments. It can be applied to the businesses that regularly handle cash transactions and need to make sure all cash amounts are rounded to the nearest denomination. This feature can be enabled in the Accounting Settings under the Configuration tab. Once enabled, users can specify the rounding increment, which can be 0.05, 0.10, 0.25, or 1.00. When invoicing or making a receipt, the amounts will be rounded up or down to the specified increment. This tool is beneficial for businesses that need to ensure that all cash transactions are rounded off to the nearest denomination, eliminating the need for manual rounding off cash payments. Enabling this feature will allow you to configure rounding rules in the Accounting module. This feature helps users to easily round up or down any amount to the nearest applicable denomination. For example, users can configure the system to round off all payment amounts to the nearest dollar. This feature is useful for businesses that accept cash payments and need to round off the exact amounts that customers pay. Cash rounding can also be used to automatically round off invoices and other financial documents. This feature helps to ensure that all transactions are properly accounted for and that payment amounts are accurate.
The Cash Rounding option is available in the Configuration Settings of the Odoo Accounting module.
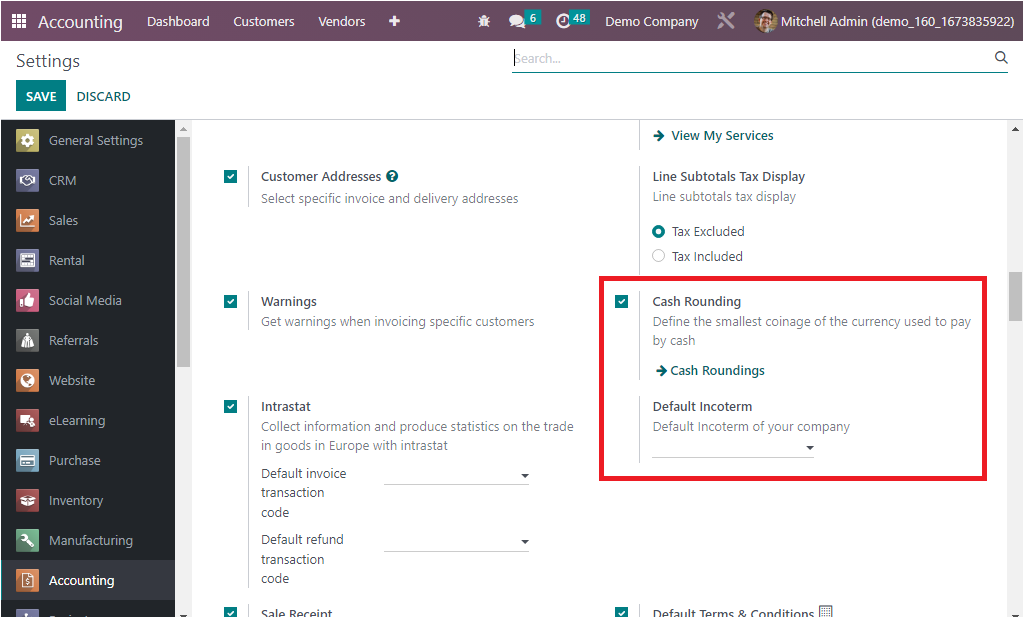
The activation of the Cash Rounding feature allows you to define the smallest coinage of the currency used to pay by cash. Once you have enabled the option from settings, you will be able to view the menu in the Accounting module.
]
After choosing the Cash Roundings menu from the Management section of the Odoo Accounting tab, you can view and define the Cash Roundings.
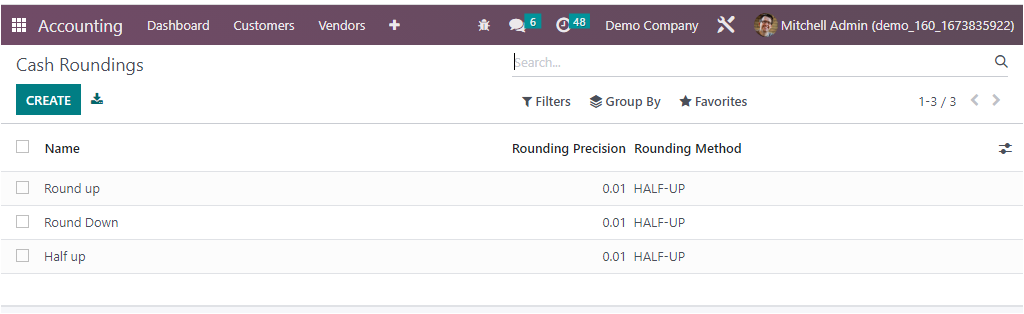
The sneak preview of all the previously defined Cash Roundings records can be viewed here in the window. The details such as Name, Rounding Precision, and Rounding Method are depicted. All these fields are selectable and viewable in detail. You can also apply the various default and customizable filters and grouping options to easily search and find required data. The CREATE button helps you to navigate into the Cash Rounding creation form. The screenshot of the window is depicted below.
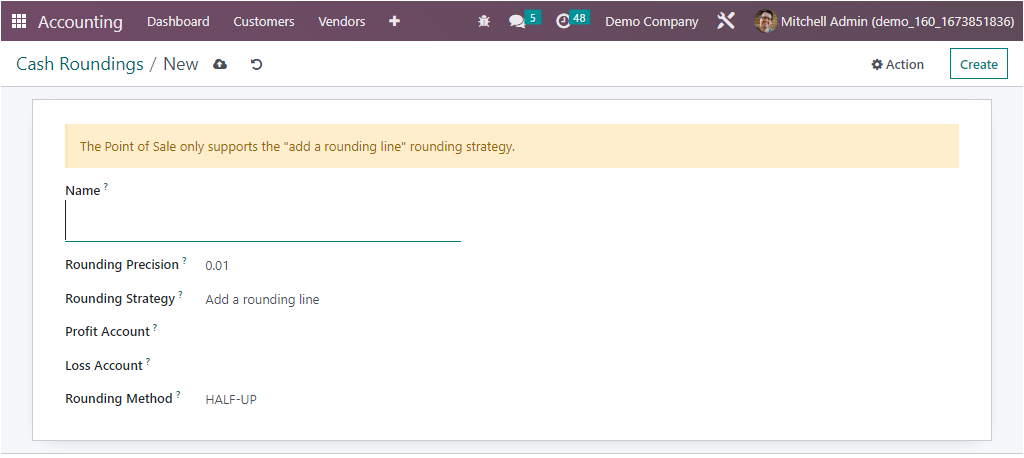
Here in the form view, you can allocate the cash roundings name in the Name field. Then you can represent the non-zero value smallest coinage in the Rounding Precision field. Next, you have the Rounding Strategy field, where you can specify which way will be applied to round the invoice amount to the rounding precision. Here you can apply the rounding strategy by either Add a rounding line or Modify tax amount.

These options are used to configure how you want Odoo to handle rounding amounts when creating invoices in the Accounting module. The Add a rounding line option adds a separate line at the end of the invoice with the amount of rounding, and the Modify Tax Amount option allows you to modify the tax amount of the invoice to include the rounding amount. This can be used when the rounding amount is not significant enough to warrant its own line item.
After defining the Rounding Strategy, you can mention the Profit Account and Loss Account. Consequently, once the rounding is completed, the total rounded value will move to a higher infinity which creates a profit, and it will be recorded in the Profit Account. In case the total round value moves to the lower infinity, it will create a loss, and it will be recorded in the Loss Account. Finally, you can specify the Rounding Method. The Odoo platform allows you to define it in three ways. UP, DOWN, and HALF UP.
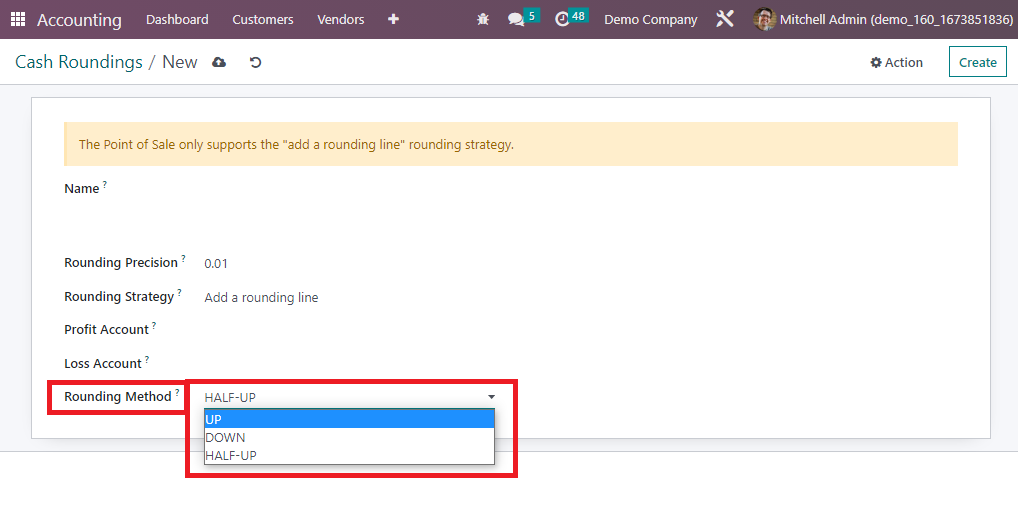
- UP: value rounds to plus infinity. This option will round the amount up to the nearest specified amount. For example, if the amount is $15.20 and the specified amount is 20 cents, then the result would be $15.40.
- DOWN: value rounds to lower infinity. In this case, it will round the amount down to the nearest specified amount. For example, if the amount is $15.20 and the specified amount is 20 cents, then the result would be $15.00.
- HALF-UP: If the decimal value is greater than 0.5 it will round up, and if the decimal value is less than 0.5 it will round down. This means this will round the amount half up to the nearest specified amount. When considering an example, if the amount is $15.20 and the specified amount is 20 cents, then the result would be $15.20.
Once the Cash Rounding is defined, you can save it, and will be depicted in the menu. This rounding can be applied to customer invoices or vendor bills in order to round the total amount.
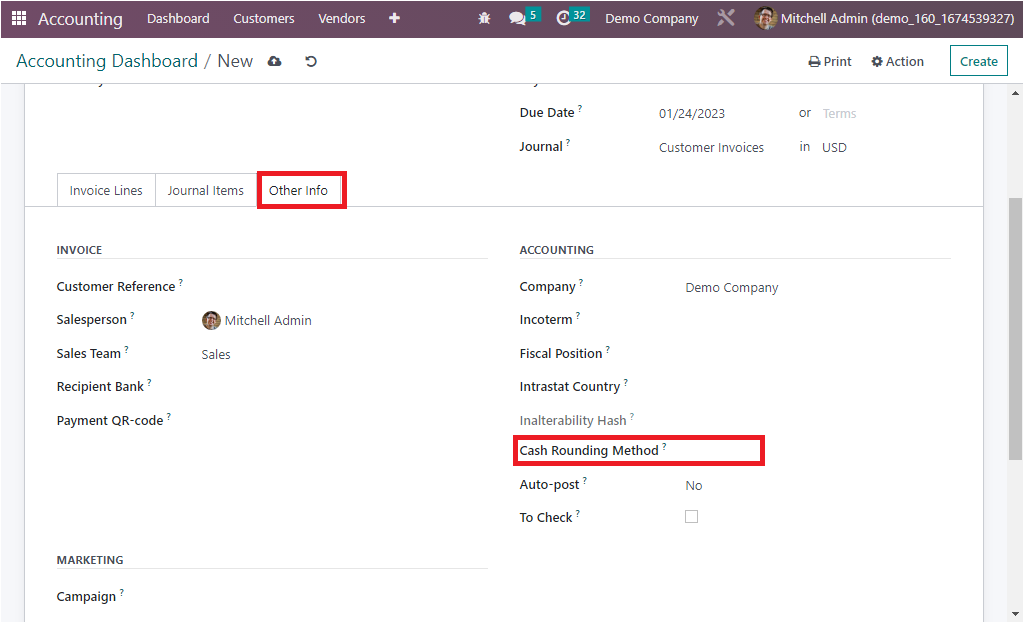
In the other info tab of the invoice, rounding can be applied. You also have the provisions for editing the Cash Rounding configuration that you have defined anytime that you want. As we are clear on the aspects of Cash Rounding configuration, let's now move on to the next section, where the Budgetary positions are being described.
Budgetary Positions
The Odoo 16 Accounting module offers an exclusive tool to create and manage different budgetary positions, which provides a structure for tracking amounts allocated to specific projects or departments. Users can specify budget lines for each budgetary position. They can then monitor the budget expenses in real-time, ensuring that the funds are being spent according to the set budget. It is also possible to set a budget limit for each position and receive alerts if the specified limit is exceeded. In addition, users can generate different reports to track budget allocations and spending. The sophisticated feature included in the Odoo Accounting module is very convenient for tracking budget allocations, expenditures, and related information. It helps you to keep your finances organized and ensures that resources are being efficiently utilized.
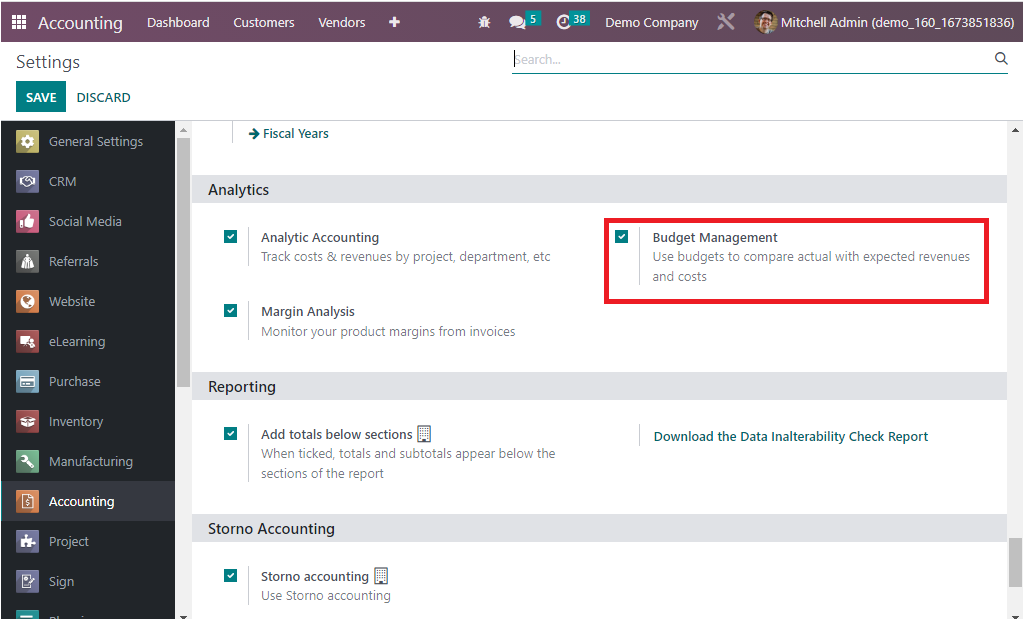
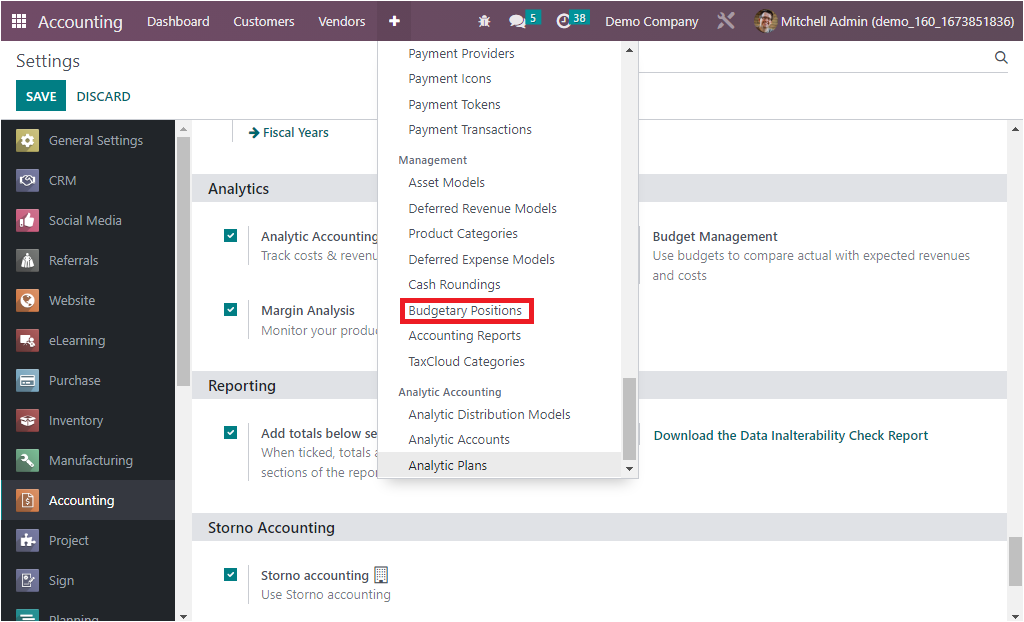
To make attainable the Budgetary Positions menu in the Configuration tab, you are required to activate the Budget Management feature available in the Configuration Settings window of the Accounting module. You can access the option under the Analytics section as shown in the image below.
Now you will be able to view the Budgetary Positions menu under the Management section of the Configuration tab.
A single click on the Budgetary Positions menu will take you to the Budgetary Positions window as highlighted in the Screenshot below.
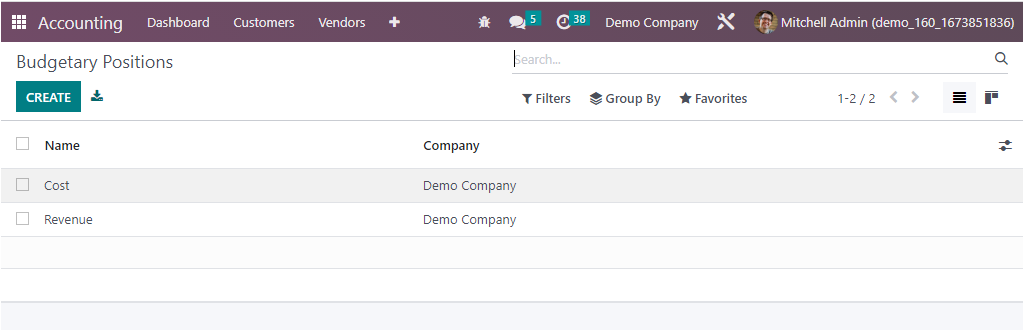
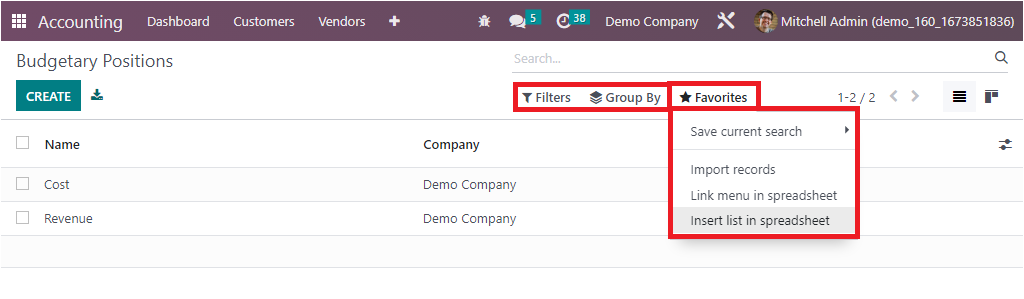
This Budgetary Positions window available in the Odoo platform manages all the previously mentioned Budgetary positions, which will also allow you to define new Budgetary Positions. The Filters, Group By, and Search options will help you to make the searching process easier. The Favorite tab includes the Save current search, import records, Link menu in spreadsheet, and Insert list in spreadsheet options as boxed in the image below.
The CREATE button is a great way to configure new Budgetary Positions. The screenshot of the well-defined Budgetary Positions creation window is depicted below.
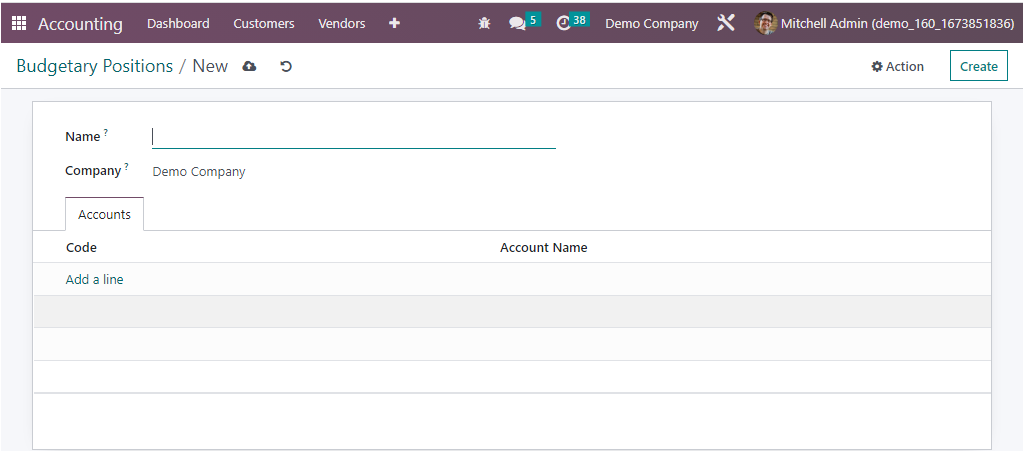
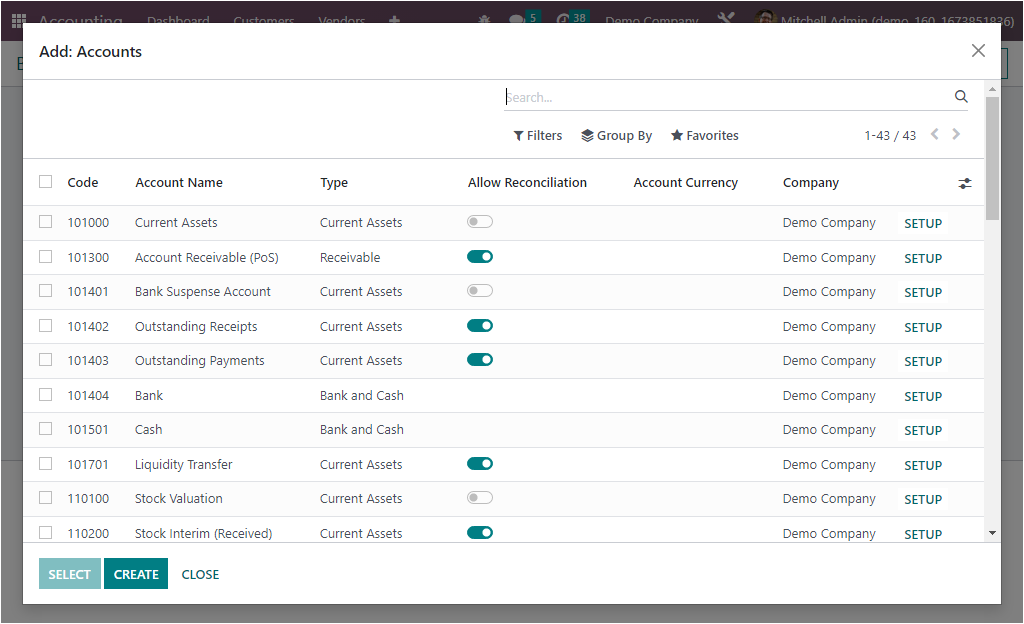
In the creation window, you can fill up the name in the Name field. Then you have the Company filed, which will be auto allocated and can be edited. After that, you can describe the accounts of the Budgetary Positions under the Accounts tab. To add accounts, you can click on the Add a line button. Now you will depict the pop-up window where the system mentions all the previously configured accounts. You can choose it from the pop window, or if it is a new account, you can create a new one using the CREATE button.
To create a new Budgetary position, you can select the Create option that is available, and you will be depicted with the following creations window where you can initially provide a Name. Further, you can provide the Accounts of the Budgetary positions, which acts upon this by selecting the Add a line option.
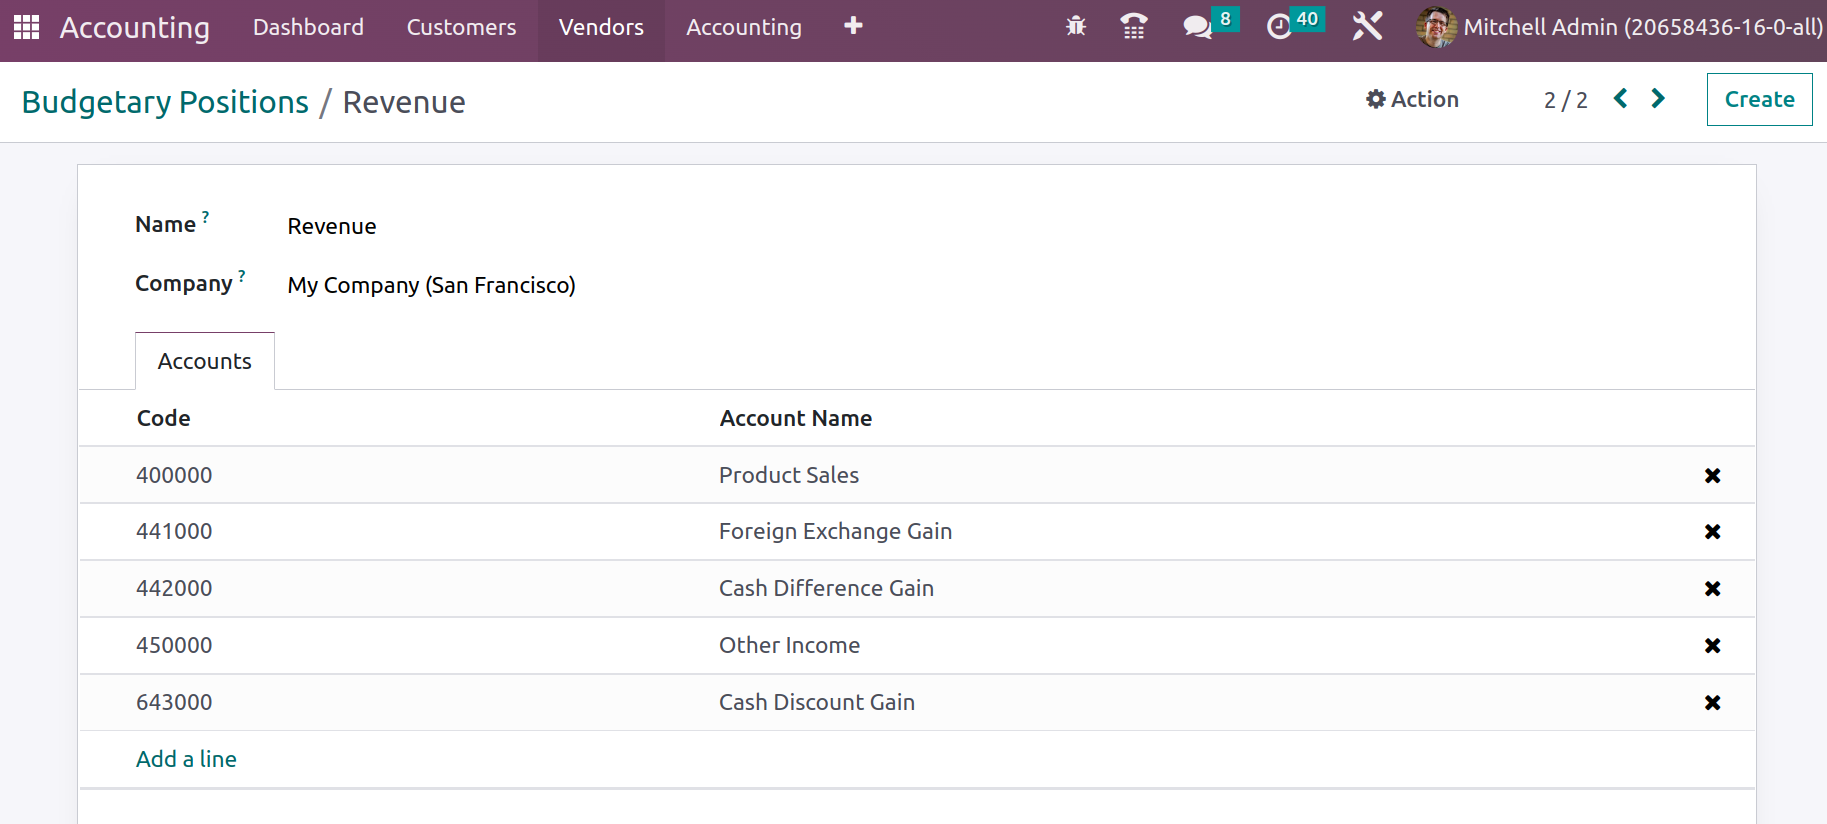
Likewise, you can add the required accounts.
So far, we have been discussing the Budgetary positions management option in the Odoo 16 Accounting module that acts as the perfect solution for budget management for organizations. Let's now move on to the next section, where we will be discussing the aspect of Accounting reports available in the configuration menu.
Accounting Reports
Another enhanced feature in Odoo 16 is the Accounting reports. Accounting reports can be considered as advanced version of financial reports in earlier versions. Accounting reports enable users to customize the financial statements to formulate new lines by setting rules and formulate to an extent.

Unlike the earlier version, Odoo 16 allows users to customize almost all financial reports. Odoo allows users to add more rows to each report and set domains, equations to the row, and thus respective values will be updated in the new line based on the equation provided.
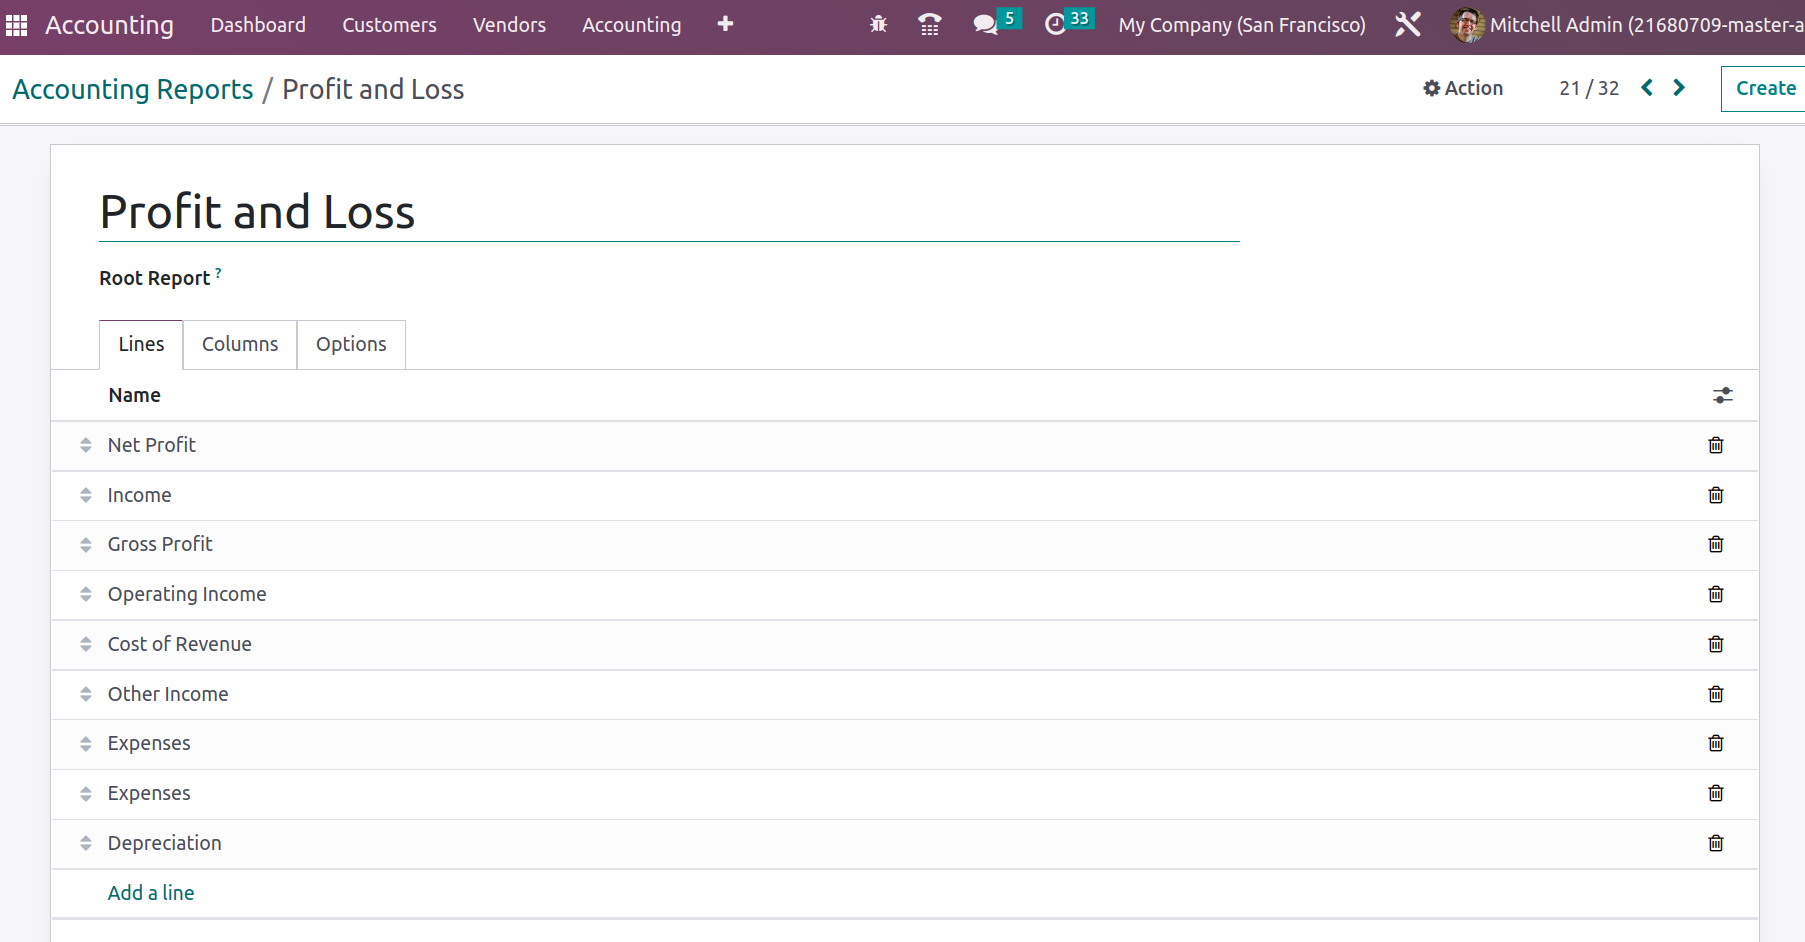
Once the report is opened, under the Lines tab, you will be able to add new lines.
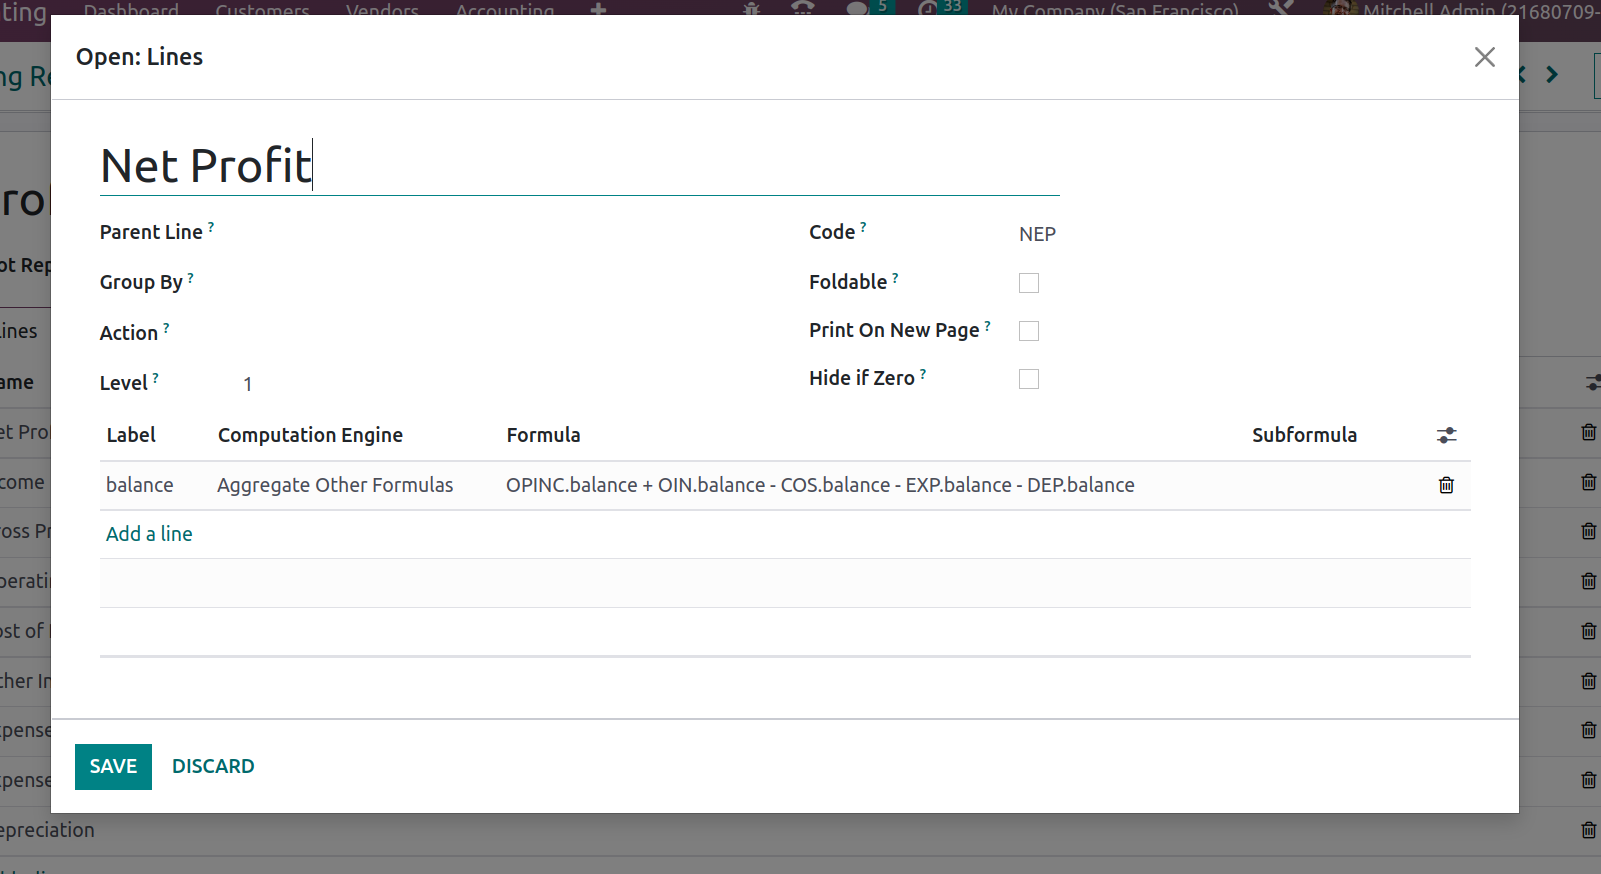
For drafting a new line, you can add its code and the parent line, thus the new line appears under the parent line. Also, other details like the level of whether the line is foldable, whether everything after this line printed in a new page or not, and under label computation of the new line can be added.
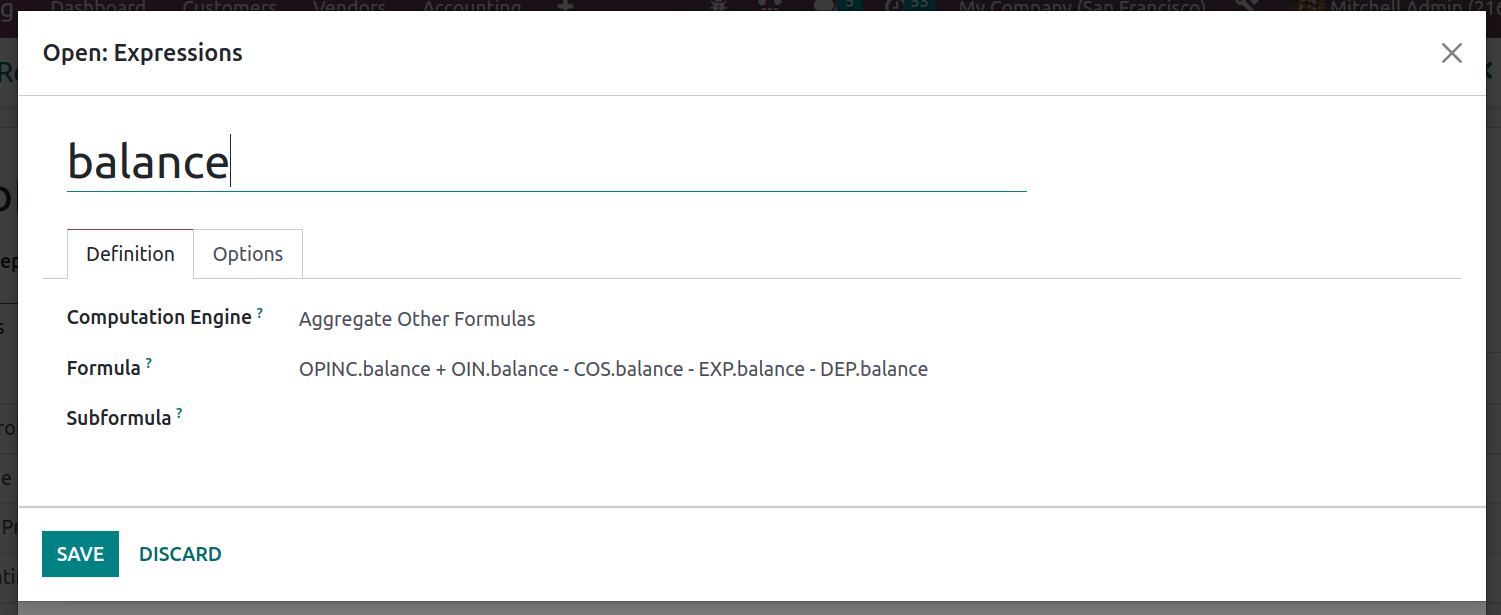
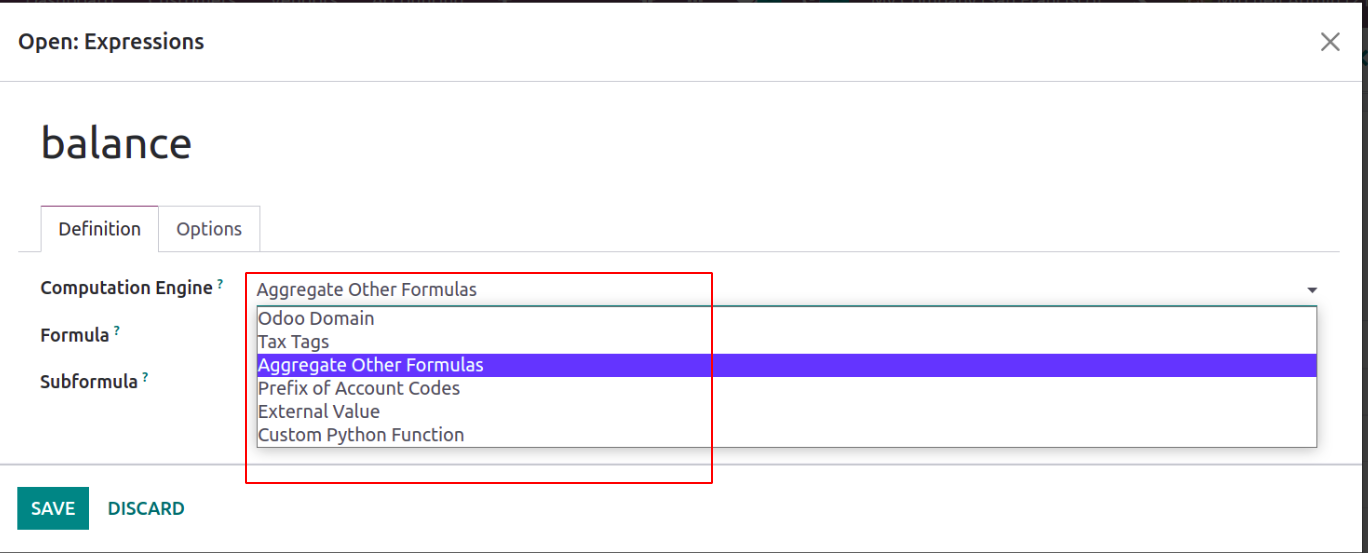
Add the expression, and under the definition tab, you can define the computation engine, formula, and sub formula. The computation engine enables us to calculate the formula. Odoo provides different computation engines as follows in the screenshot below.
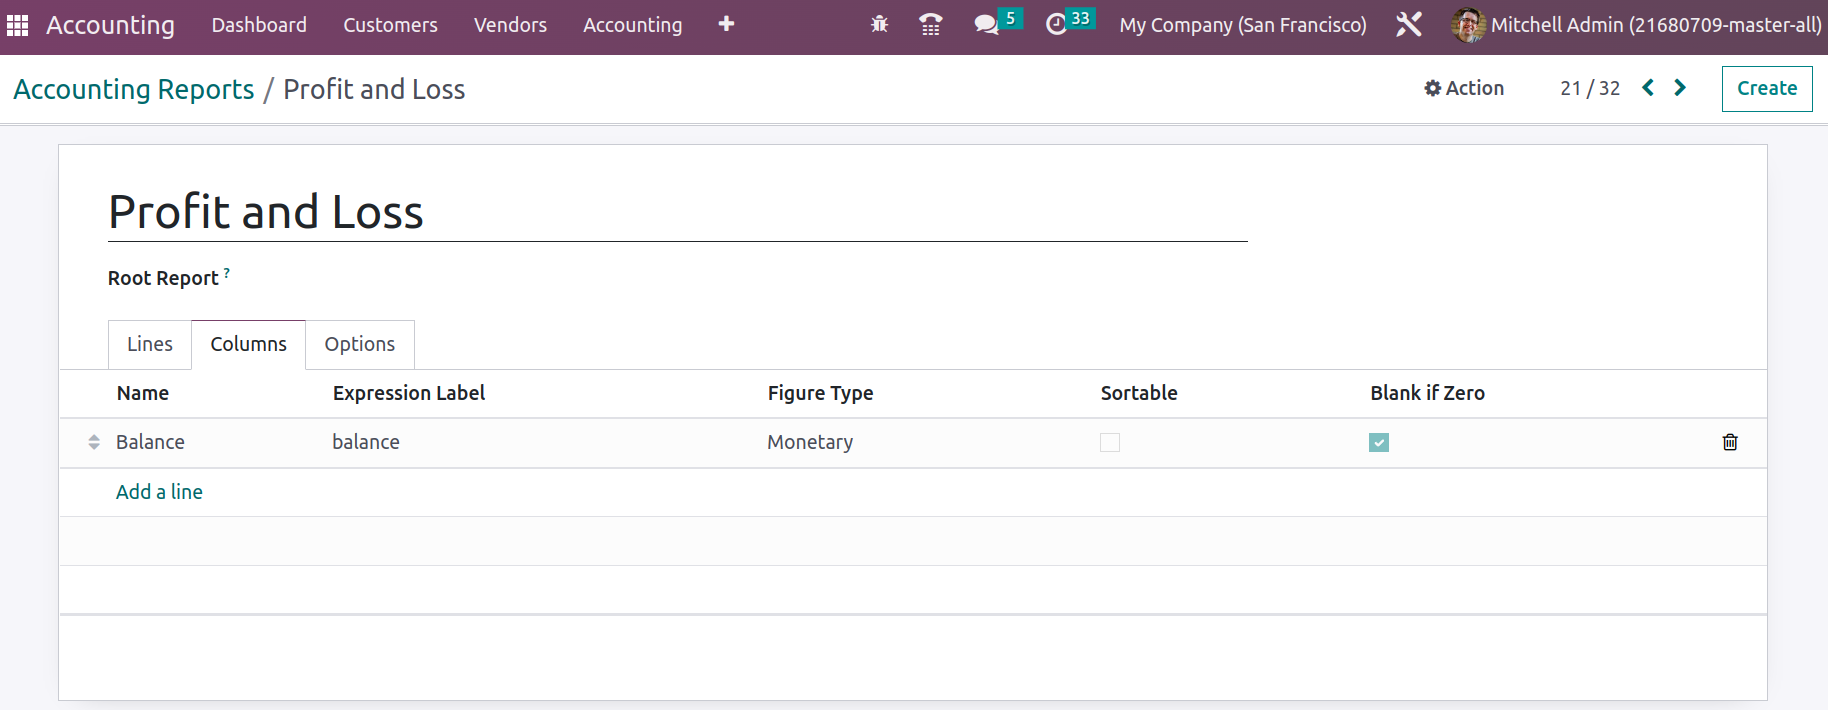
The columns tab of the accounting report defines the columns in the respective financial statements.
Under the ‘Options’ tab of the accounting report, the filters of financial statements can be decided.
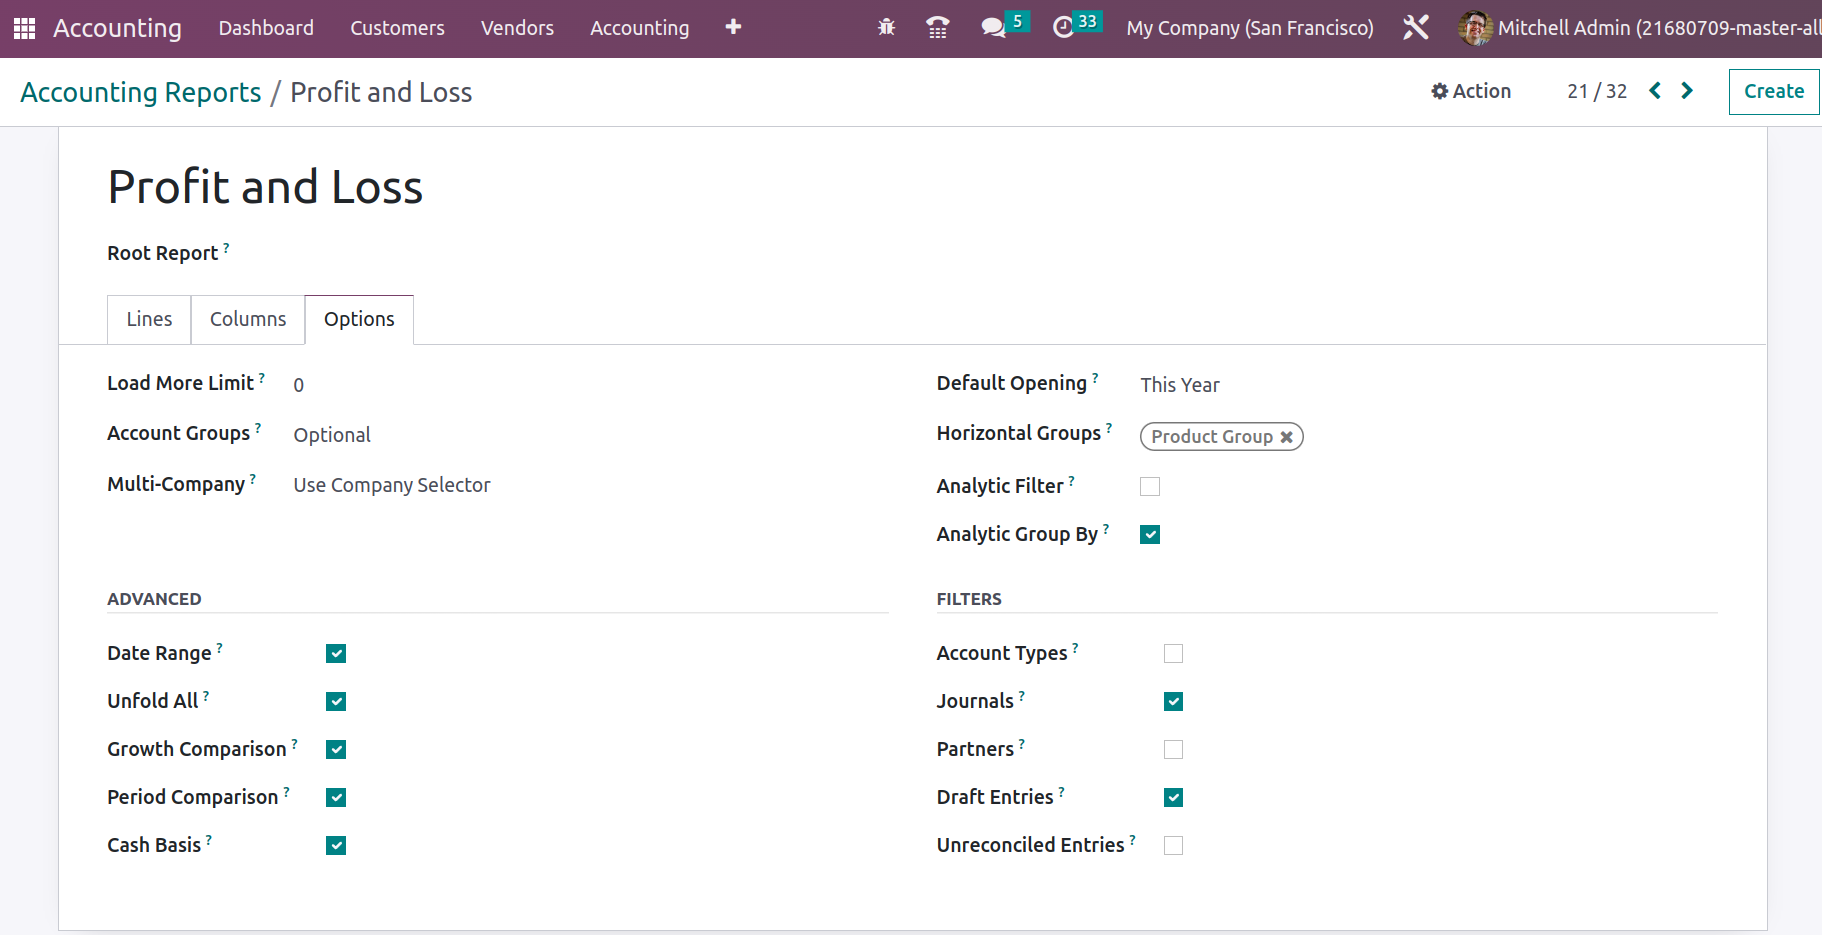
The ‘Load more Limit’ field restricts the number of rows visible when it unfolds. Default opening defines the default filter data that will be based on this year, this month, today, etc. Also, other options like account groups, multi-company, default horizontal groups, analytic filter, and group by can be set. Also, under the advanced and filter by section, we will be able to check the required default filter for the financial report.
As we discussed Odoo 16 accounting reports, let's move to the next topic Disallowed Expenses Categories.
Disallowed Expenses Categories
The Disallowed Expenses in Odoo 16 Accounting module are expenses that cannot be reported as deductible expenses or items for tax purposes. These include expenses for personal, living, and family use, such as meals, entertainment, travel, gifts, and other non-business related activities. Disallowed expense offer a number of benefits, such as
- Reduced taxable income: Disallowed expenses reduce the amount of taxable income an individual or business is subject to. This can help minimize tax liability, improving cash flow and profitability.
- Avoid penalties and interest: by not including Disallowed expenses on tax returns, individuals and businesses avoid penalties and interest that may be assessed if these items are incorrectly listed as deductions
- Better Accuracy: failing to correctly report disallowed expenses can create problems with the Internal Revenue Service (IRS). By properly identifying these expenses that are not including them on tax returns, organizations are able to ensure better accuracy on their filings.
- Streamlined Compliance: a clear distinction between allowable and disallowed expenses helps individuals and businesses stay compliant with tax regulations, reducing the risk of audit.
So with the assistance of the Disallowed Expenses feature in Odoo, you can deduct the respective expenses from the bookkeeping result without deducting it from the fiscal result. As a result, you will get the fiscal results in real-time by configuring disallowed expense categories and acquiring periodic changes. If you want to get the privileges of this option in your system, initially you are required to Activate the Disallowed Expenses modules from the App Store. For installing the module, you can remove the Apps filter in the search bar and search for Disallowed Expenses. Now the system will depict the result as shown in the image below.
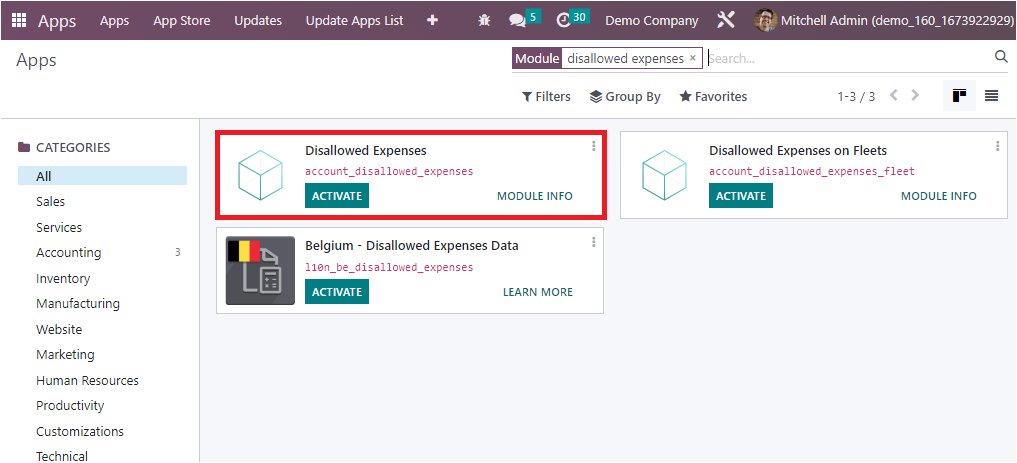
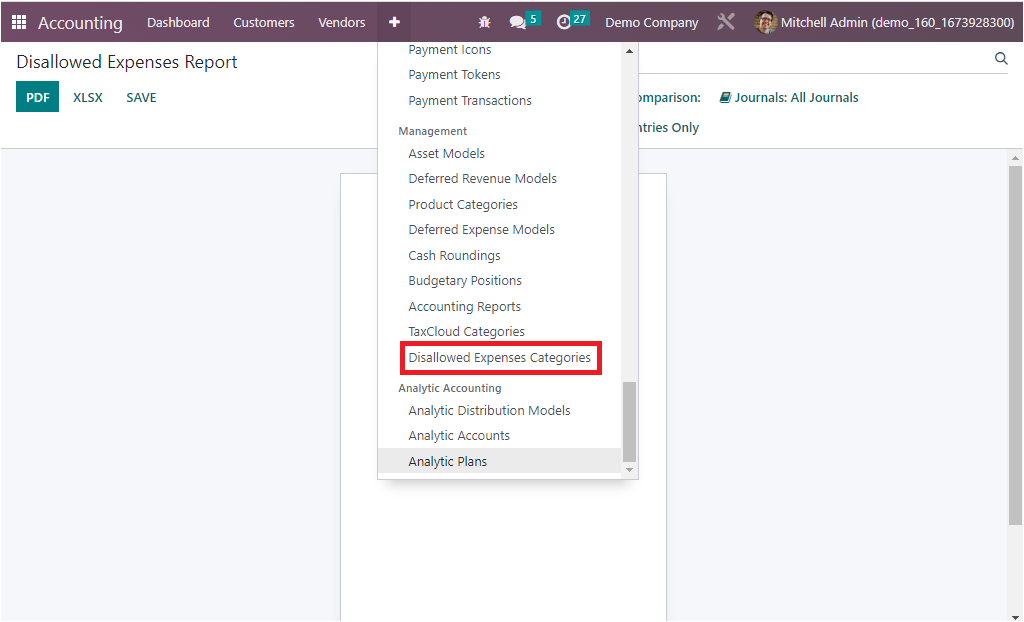
Once the module is activated, you will be able to view the Disallowed Expenses Categories menu in the Management section available under the Configuration tab of the Odoo Accounting.
Using the CREATE button, you can create new Disallowed Expenses Categories and the system will help you to keep track of all the configured Disallowed Categories.
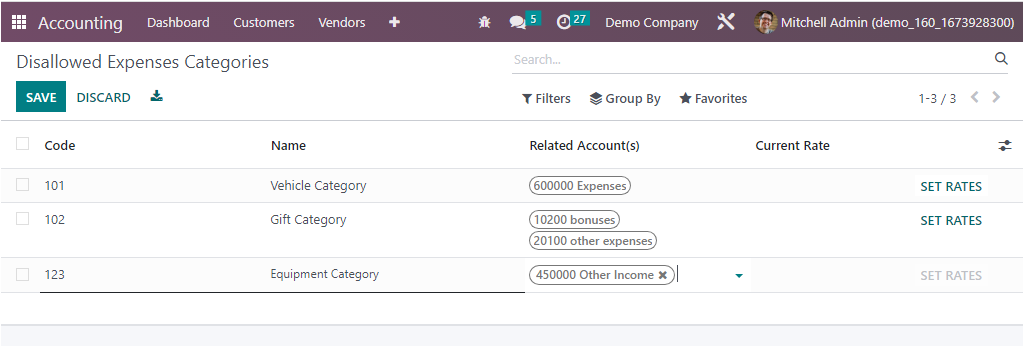
For creating a new Disallowed Expenses Categories, first of all, you can provide the Code and the Name. then you can choose related Accounts using the list of predefined accounts. It is also possible to create new accounts from here itself. Further, you can allocate the Current Rate by clicking on the SET RATES option available on the extreme left. Then you will get a complete view of the window where you can define the rate under the Rates tab.

Upon selecting the Add a line option, you can simply define the Start date and the rate of the Disallowed Expenses, and the Company field will be auto-allocated. This field is useful when operating on a multi-company basis.
In addition, the Disallowed Expenses Category is directly associated with the Expense Account when you set up a Chart of Accounts. So to view it, let us go to the Chart of Account window, where we can set up a Chart of account with expenses type. Now you can view the option for choosing the Disallowed Expenses Category, and it will be closely associated with the corresponding account.
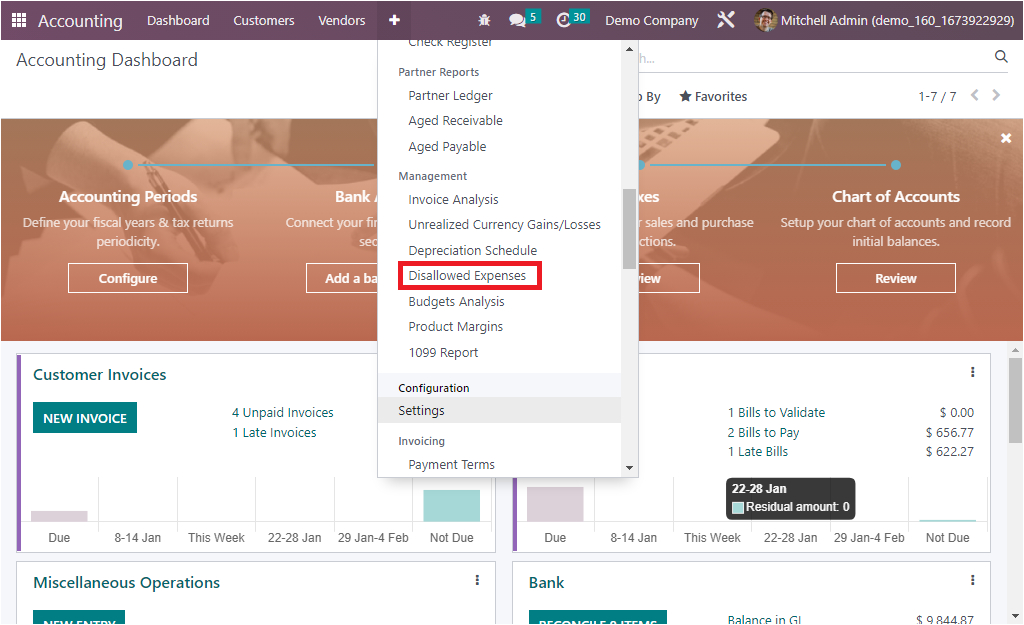
You can view the new report called Disallowed Expenses under the Reporting menu of the module.
Proficiency in establishing various Disallowed Expenses Categories is one of the greatest advantages of the platform. As we are clear on these features and we can now take a look at the next features where the Analytical Items are managed.