Odoo offers a variety of field widgets that assist in giving our fields specific functionality. To show an image in binary fields, for instance, use widget="image"; similarly, for date fields, widget="date"
Let's investigate how to construct a customised Odoo 17 widget with the features we want.
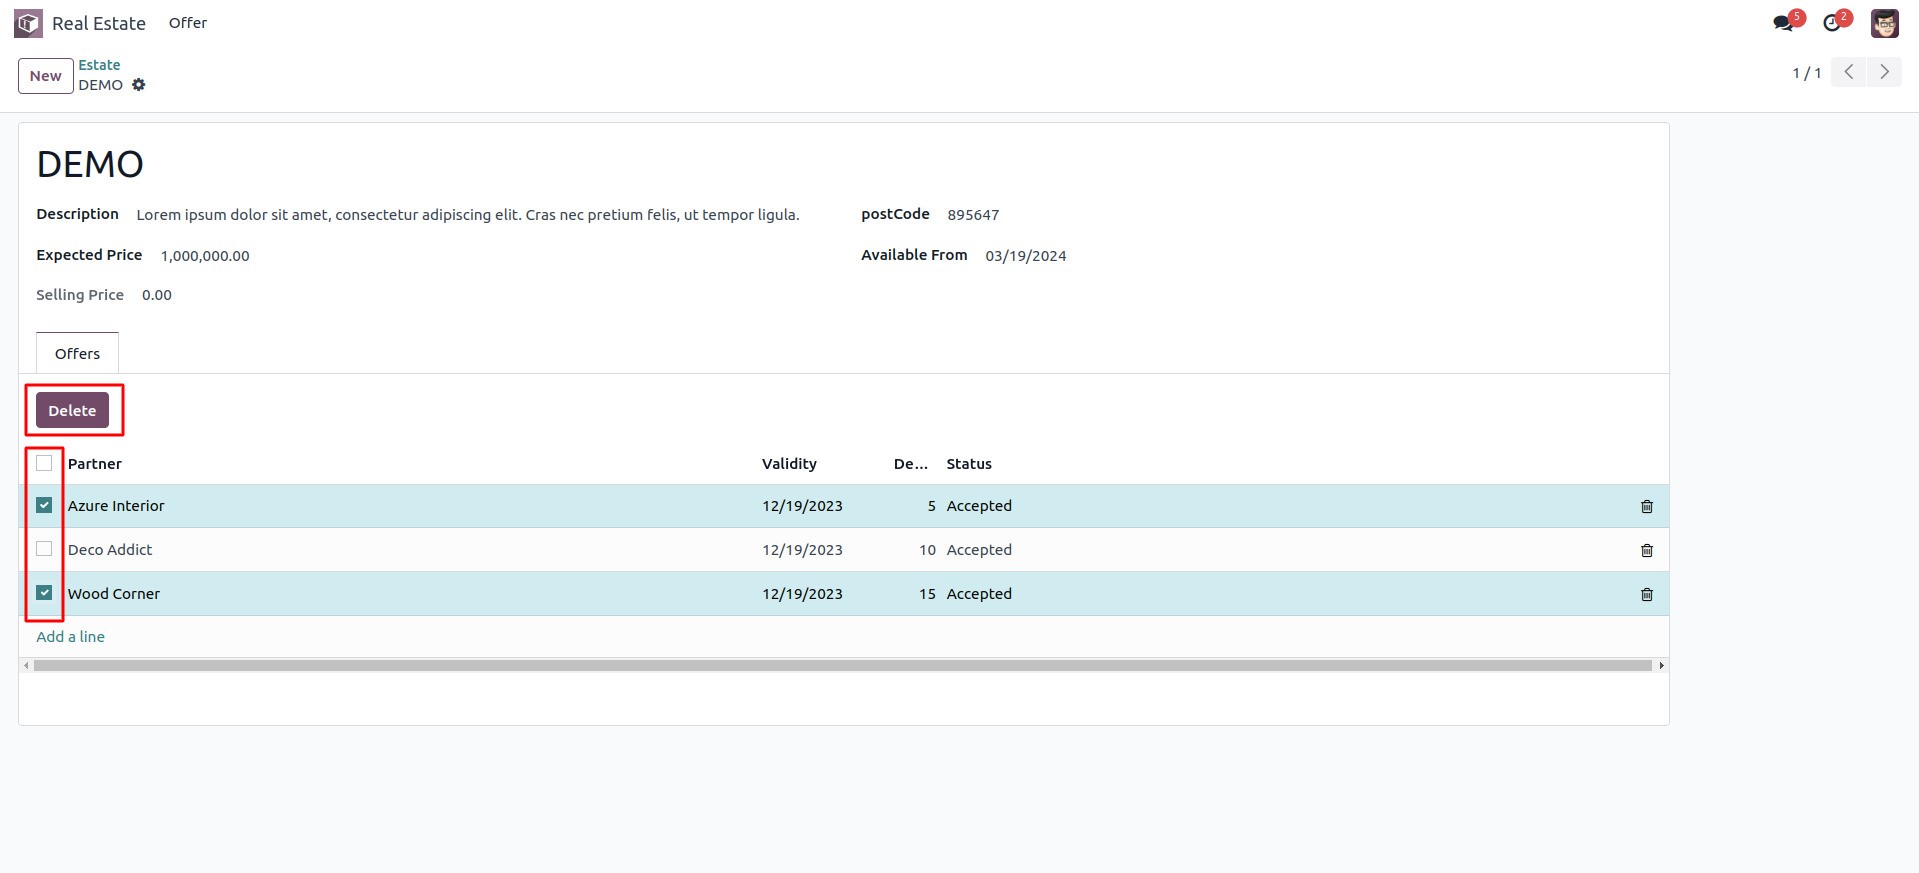
Using the creation of a widget named "one2many_delete" as an example, we may remove many one2many lines from the view.
We may follow the steps listed below to construct our unique widget.
1. First, we need to add a static/src/js/widget.js file inside our module.
Then we need to extend ListRenderer to create a new class O2MListRenderer to show selection bow in One2many fields and X2ManyField to create a new class O2mMultiDelete for deleting one2many records.
/** @odoo-module **/

import { ListRenderer } from "@web/views/list/list_renderer";
import { registry } from "@web/core/registry";
import { Pager } from "@web/core/pager/pager";
import { KanbanRenderer } from "@web/views/kanban/kanban_renderer";
import { X2ManyField, x2ManyField } from "@web/views/fields/x2many/x2many_field";
import { ConfirmationDialog } from "@web/core/confirmation_dialog/confirmation_dialog";
import { useService } from '@web/core/utils/hooks';

export class O2MListRenderer extends ListRenderer {
   get hasSelectors() {
       if (this.props.activeActions.delete) {
           this.props.allowSelectors = true
       }
       let list = this.props.list
       list.selection = list.records.filter((rec) => rec.selected)
       list.selectDomain = (value) => {
           list.isDomainSelected = value;
           list.model.notify();
       }
       return this.props.allowSelectors && !this.env.isSmall;
   }
   toggleSelection() {
       const list = this.props.list;
       if (!this.canSelectRecord) {
           return;
       }
       if (list.selection.length === list.records.length) {
           list.records.forEach((record) => {
               record.toggleSelection(false);
               list.selectDomain(false);
           });
       } else {
           list.records.forEach((record) => {
               record.toggleSelection(true);
           });
       }
   }
   get selectAll() {
       const list = this.props.list;
       const nbDisplayedRecords = list.records.length;
       if (list.isDomainSelected) {
         return true;
       }
       else {
         return false
       }
   }
}

export class O2mMultiDelete extends X2ManyField {
   setup() {
       super.setup();
       X2ManyField.components = { Pager, KanbanRenderer, ListRenderer: O2MListRenderer };
       this.orm = useService('orm');
       this.dialog = useService("dialog");
   }
   get Selected(){
       return this.list.records.filter((rec) => rec.selected).length
   }
   DltSelected(){
       let selectedRecords = this.list.records.filter((rec) => rec.selected)
       this.dialog.add(ConfirmationDialog, {
           body: 'Are you sure you want to delete selected records?',
           confirm: () => selectedRecords.forEach((rec) => {
                          if (this.activeActions.onDelete) {
                              selectedRecords.forEach((rec) => {
                                       this.activeActions.onDelete(rec);
                                   })
                              }
                          }),
           cancel: () => {},
       });
   }
}

export const O2manyMultiDelete = {
   ...x2ManyField,
   component: O2mMultiDelete,
};
O2mMultiDelete.template = "O2mMultiDelete";
registry.category("fields").add("one2many_delete", O2manyMultiDelete);
2. Now we need to add the template inside static/src/xml/widget.xml.
This will add a delete button if one2many records are selected in the form view.
    <?xml version="1.0" encoding="UTF-8"?>
    <templates xml:space="preserve">
       <t t-name="O2mMultiDelete" t-inherit-mode="primary"
          t-inherit="web.X2ManyField" owl="1">
           <xpath expr="//div[hasclass('o_x2m_control_panel')]" position="before">
               <div class="dlt_btn">
                   <button t-if="Selected" t-on-click="DltSelected"
                           class="btn btn-primary">Delete
                   </button>
               </div>
           </xpath>
       </t>
    </templates>
3. Now we need to widget.js and widget.xml files inside the manifest file.
'assets': {
   'web.assets_backend': [
       module_name/static/src/xml/widget.xml',
       module_name/static/src/js/widget.js'
   ],
},
Now we can add it to the view. First, we need to define a model and view for the defined model with a one2many field.
First we are defining the model.
from odoo import fields, models


class EstateProperty(models.Model):
   _name = "estate.property"
   _description = "Real estate"

   name = fields.Char(string="Name")
   description = fields.Char(string="Description")
   postcode = fields.Char(string="PostCode")
   date_availability = fields.Date(string="Available From", default=fields.Datetime.today() + relativedelta(months=+3),
                                   copy=False)
   expected_price = fields.Float(string="Expected Price")
   selling_price = fields.Float(string="Selling Price", readonly=True)

   property_type = fields.Many2one("estate.type", string="Property Type")
   offer_id = fields.One2many("estate.offer", "property_id", string="Offer")

class EstateOffer(models.Model):
   _name = 'estate.offer'
   _rec_name = 'property_id'

   price = fields.Float(string="Price")
   status = fields.Selection(string="Status", selection=[('accepted', 'Accepted'), ('refused', 'Refused')],)
   partner_id = fields.Many2one("res.partner", string="Partner")
   property_id = fields.Many2one("estate.property", string="Property Id")
   dead_line = fields.Date(string="Validity", default=fields.Datetime.today())
   validity = fields.Integer(string="Dead line", default="7")
offer_id is the one2many field we have defined.
offer_id = fields.One2many("estate.offer", "property_id", string="Offer")
Now we need to define the view for the created model.
    <?xml version="1.0" encoding="utf-8"?>
    <odoo>
    <!--    Form View-->
       <record id="estate_property_view_form" model="ir.ui.view">
           <field name="name">estate.property.view.form</field>
           <field name="model">estate.property</field>
           <field name="arch" type="xml">
               <form string="Test">
                   <sheet>
                       <h1>
                           <field name="name"/>
                       </h1>
                       <group>
                           <group>
                               <field name="description"/>
                           </group>
                           <group>
                               <field name="postcode"/>
                           </group>
                           <group>
                               <field name="expected_price"/>
                           </group>
                           <group>
                               <field name="date_availability"/>
                           </group>
                           <group>
                               <field name="selling_price" readonly="1"/>
                           </group>
                       </group>
                           <notebook>
                               <page string="Offers">
                                       <field name="offer_id">
                                           <tree editable="bottom">
                                               <field name="partner_id"/>
                                               <field name="dead_line"/>
                                               <field name="validity"/>
                                               <field name="status"/>
                                           </tree>
                                       </field>
                               </page>
                           </notebook>
                   </sheet>
               </form>
           </field>
       </record>
    <!--    Record Action-->
       <record id="estate_property_record_action" model="ir.actions.act_window">
           <field name="name">Estate</field>
           <field name="res_model">estate.property</field>
           <field name="view_mode">tree,form</field>
       </record>
    <!--    Main Menu-->
       <menuitem id="real_estate_management_menu_root"
                 action="estate_property_record_action"
                 name="Real Estate"/>
    </odoo>
Finally, we need to add the widget we have created to the one2many field.
<field name="offer_id" widget="one2many_delete">
Let’s check how the view looks like.
This is how we create custom widgets in odoo 17.