3. Configuration
The Odoo 18 CRM module's
Configuration menu offers a
separate platform for
creating leads according to
predetermined standards. In
the module's Configuration
menu, you can access this
platform by selecting the
Lead Mining Requests option
under the Lead Generation
tab.
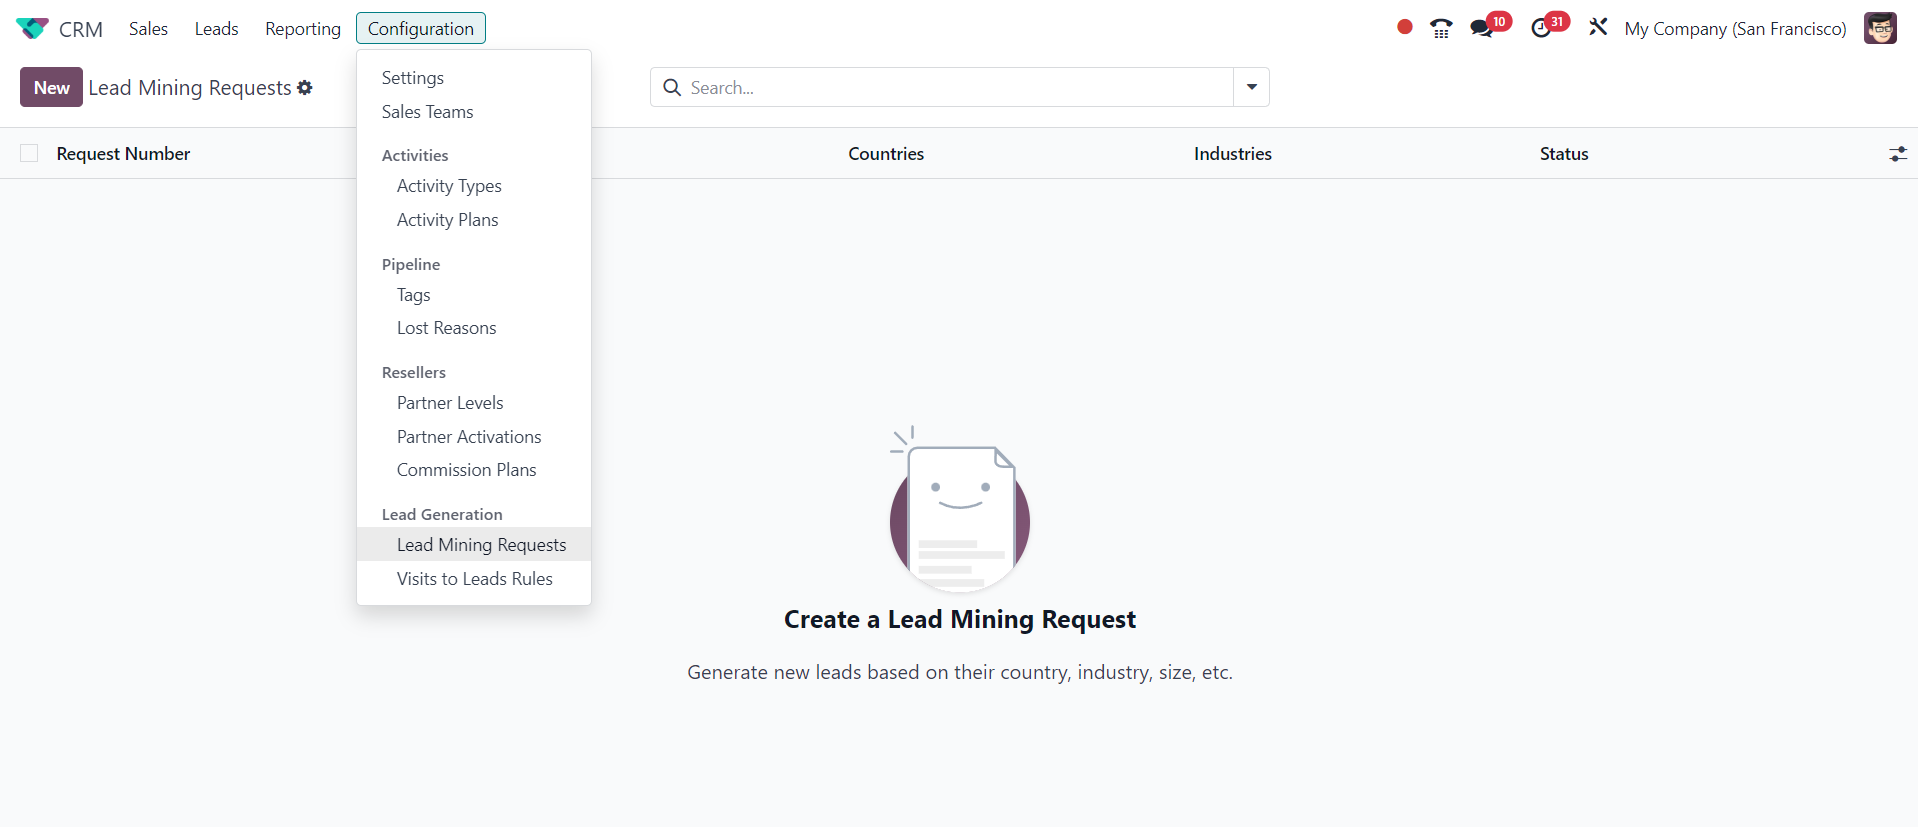
This platform will display all of
these lead-generating
requests together with
details about the Request
Number, number of Leads,
Target, Country, industries
and Status. Like we did
before, you can use the NEW
button to submit a new lead
mining request.
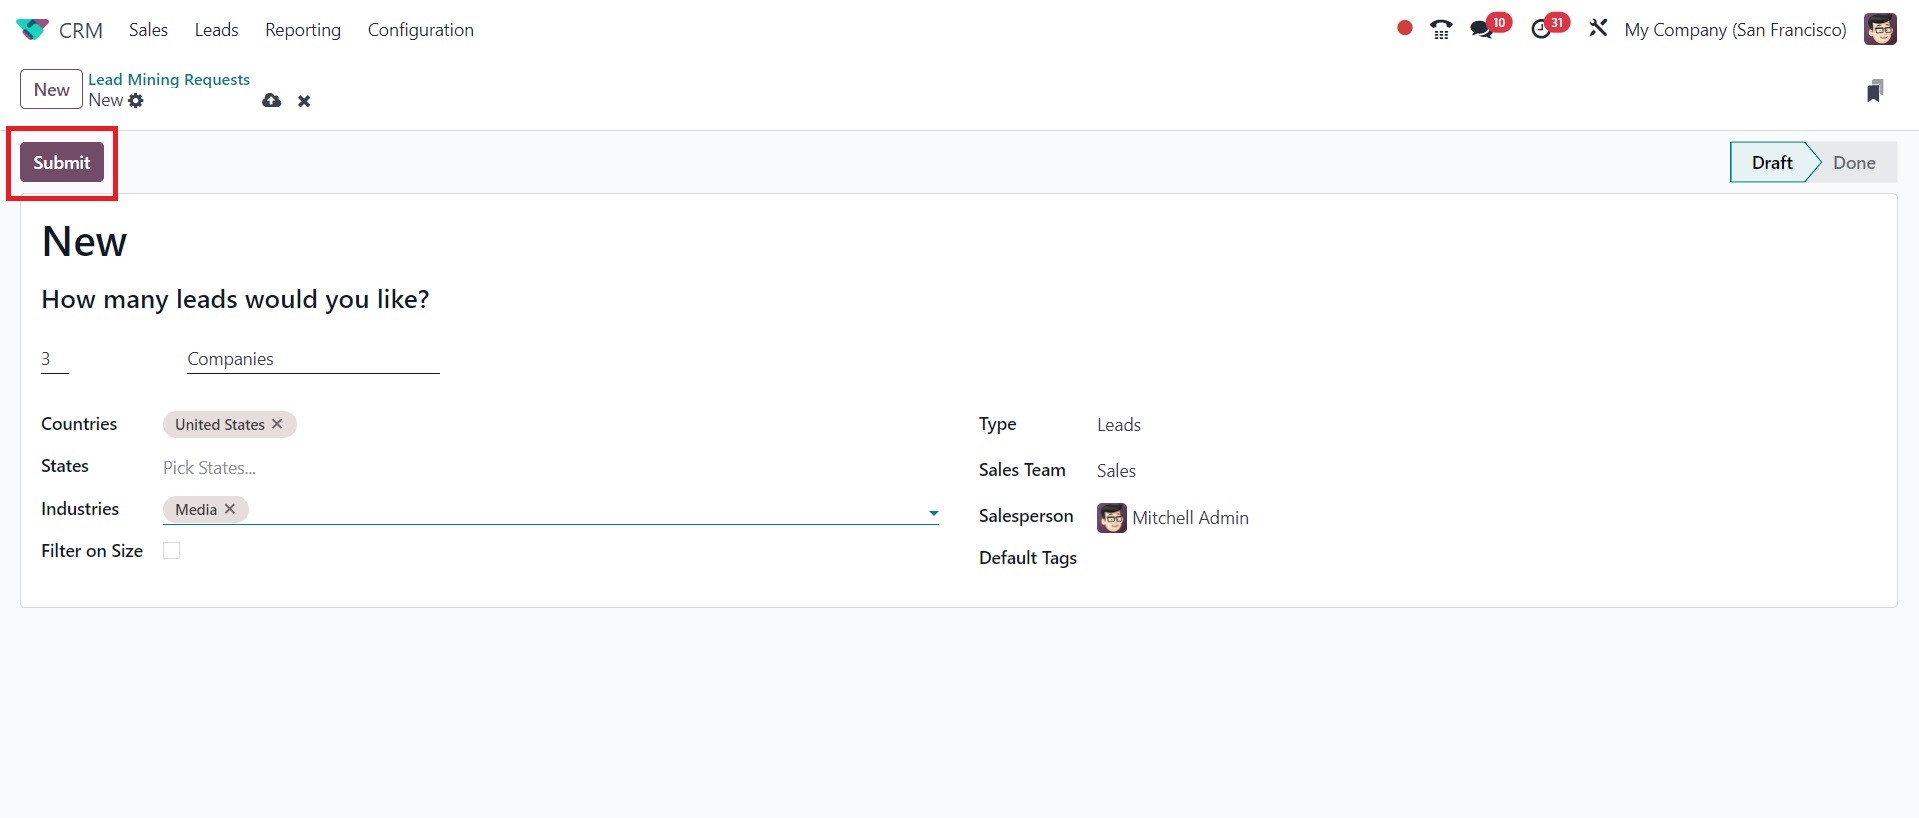
By entering the necessary lead
count, countries, states,
industries, type, sales team,
salesperson, and default tags
in the relevant areas, you
can create new lead mining
requests. These lead-mining
queries make it simple to
mine leads and possibilities.
To accomplish this, select
the appropriate option in the
Type field. Odoo will
instantly save all of this
data in your database, and
you may use the Submit button
to send in the request.
Now let's look at the other lead
creation options that the
Odoo18 CRM module provides.
3.1 Visit to Lead Rules
The Odoo 18 CRM module makes it
simple for the user to turn
website visitors into leads.
The visitors to Leads Rules
platform, which can be
accessed from the module's
Configuration menu under the
Lead Generation page, allows
you to create rules for the
conversion of visitors into
new leads. To use this
feature, you must enable the
Visit to Leads option from
the Lead Generation tab in
the Settings menu. Data
enrichment can be carried out
using the visitor's IP
address as a starting point.
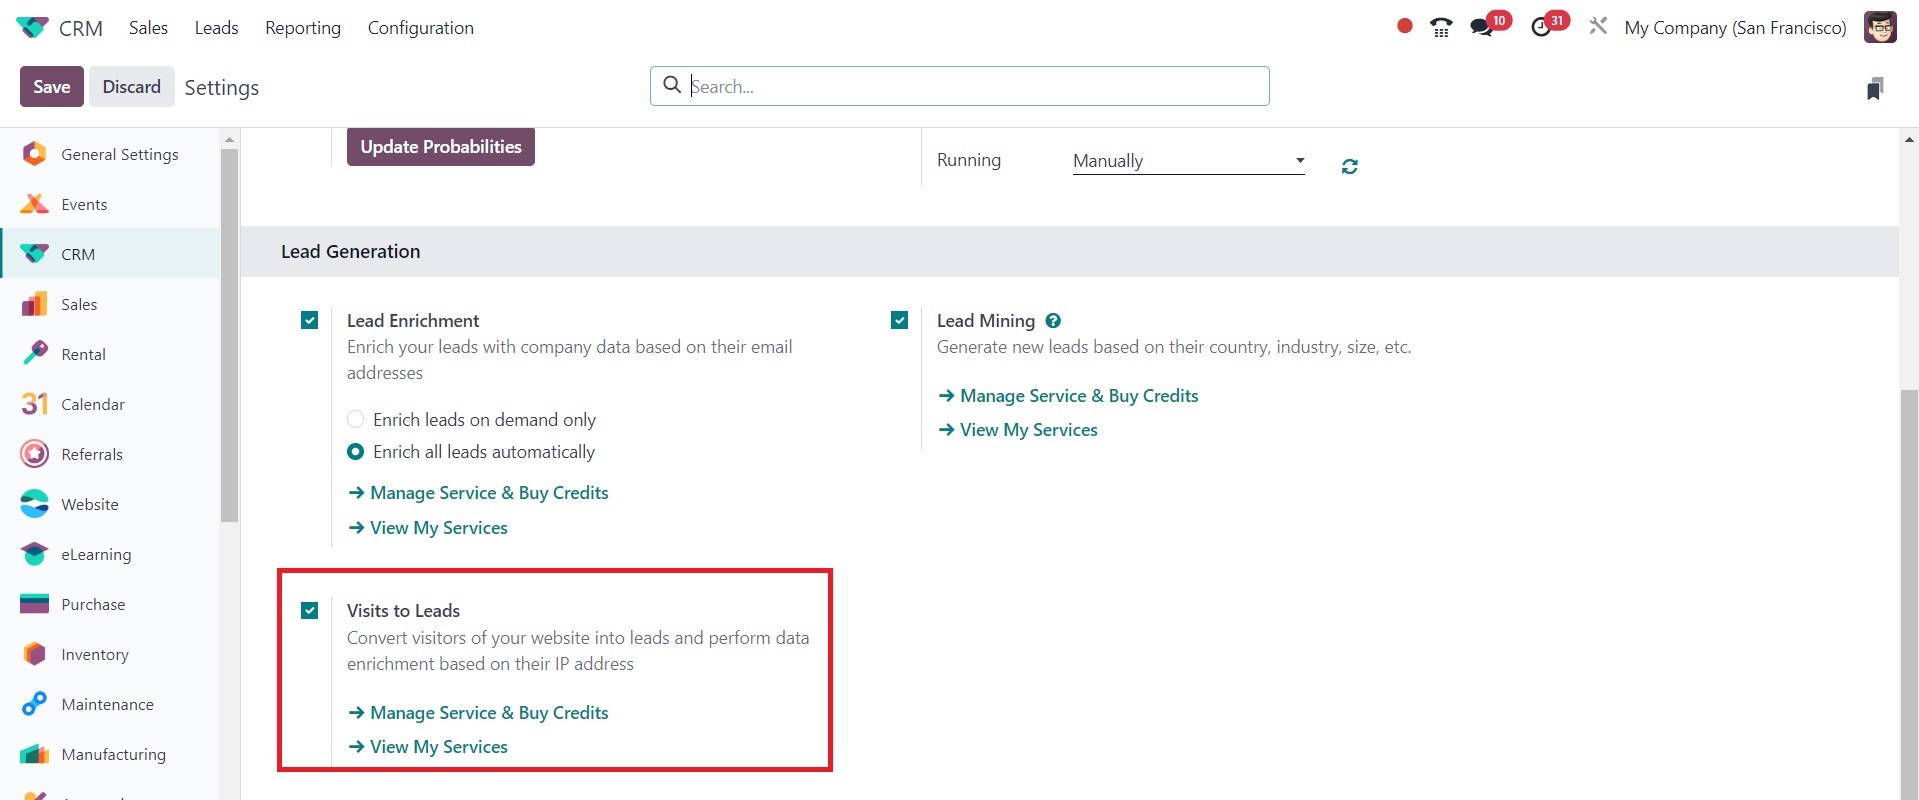
The Odoo Website module has this
feature built in. Therefore,
before utilizing this
functionality, make sure that
your database has the Website
module added. As previously
stated, the Lead Generation
tab of the module's
Configuration menu provides
access to this option.
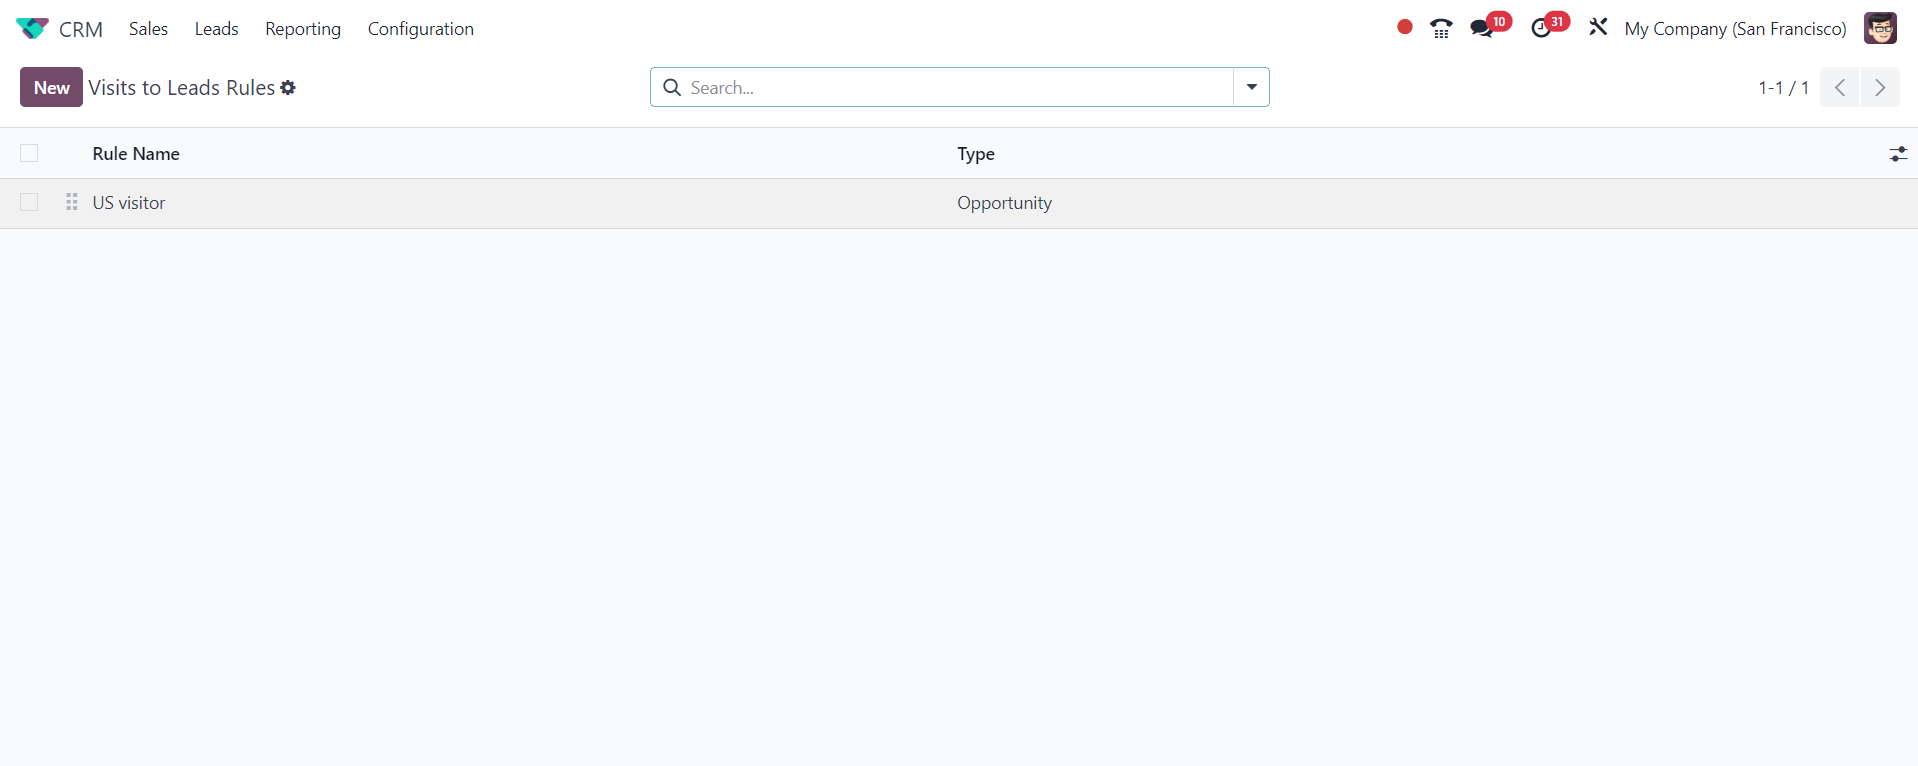
As you can see in the example
above, the Visits to Leads
Rules platform will show
previously set rules along
with the Rule Name and Type
information.
To add more guidelines for
turning website visitors into
leads, click the NEW button.
You can provide the
information required to
convert visitors into new
leads in a new window that
appears as soon as you click
the NEW button.
You can first choose a suitable
name for the rule in the Rule
Name section. Select the Data
Tracking target after that.
Other acceptable alternatives
are companies or companies
and their contacts. Clicking
the Active button will
activate the newly created
rule.
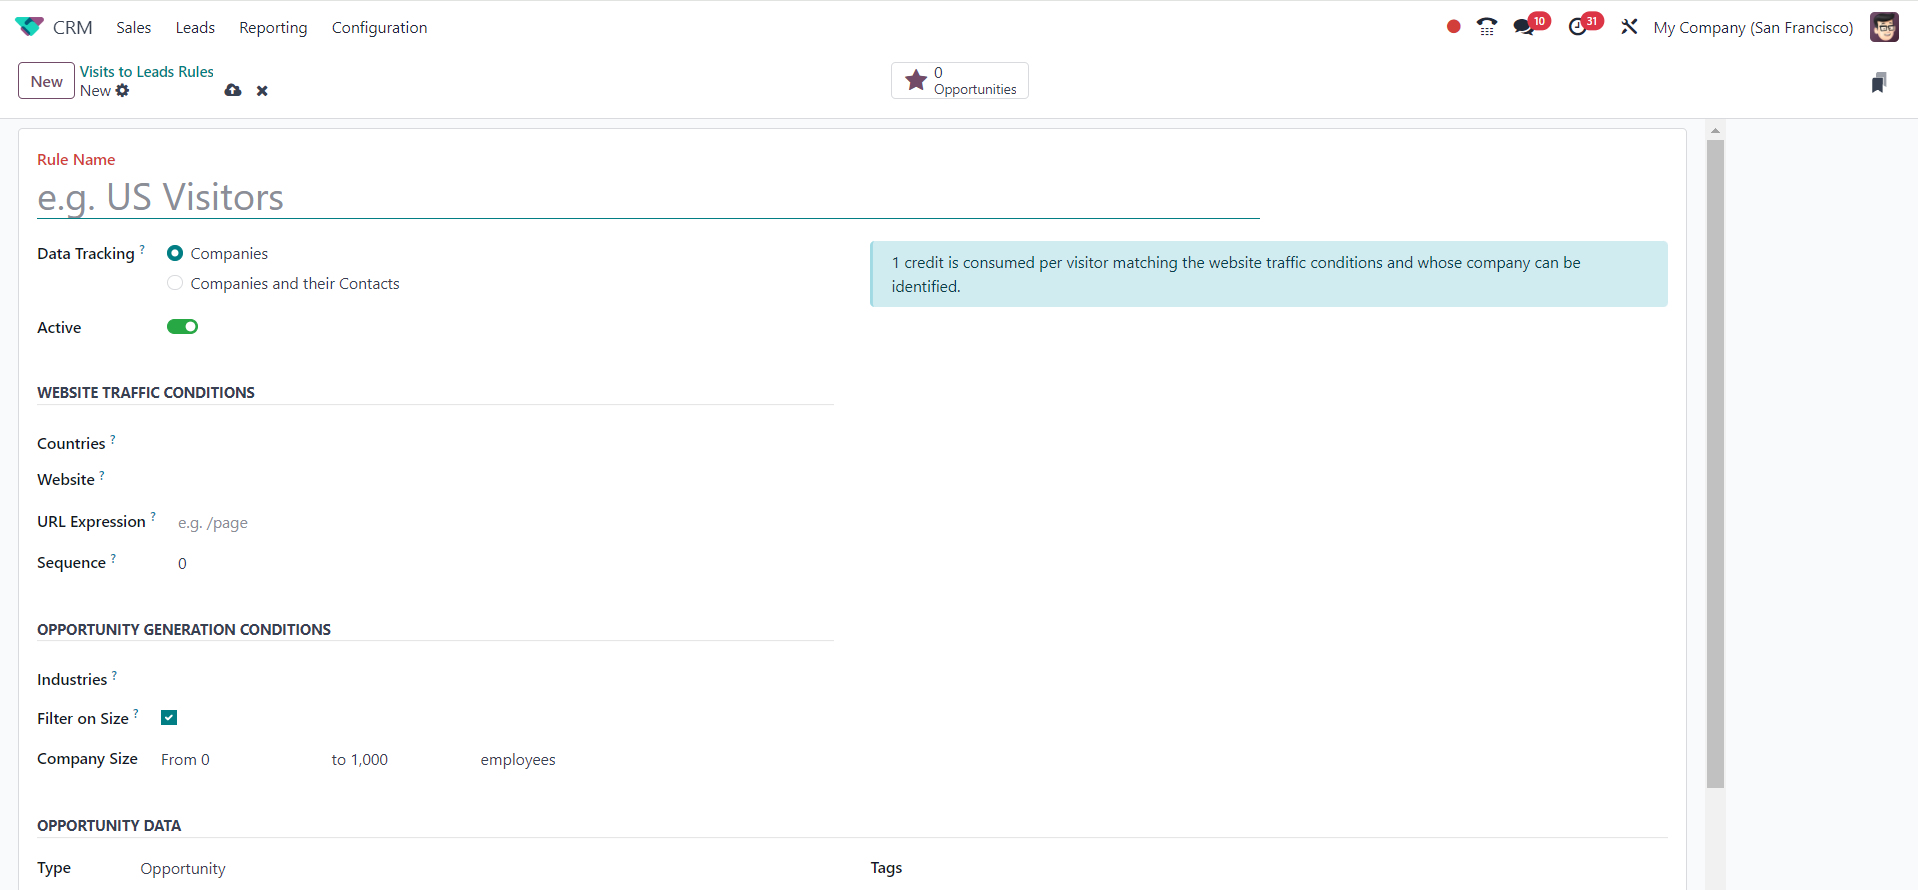
We are converting website
visitors, thus you need to
set up certain parameters on
the Website Traffic
parameters page. You can
select particular countries
in the Countries box to
ensure that visitors from
those countries result in
leads or opportunities. This
will be made possible using
GeoIP. In a similar manner,
you may restrict lead
generation to particular
websites by listing them in
the Website column.
If you want to track specific
websites, you can enter the
URL Expression in the
appropriate field. You can
leave this option blank if
you want to track the entire
website. Mention the order in
which the rules for the same
nations and URLs are
arranged. Rules with a lower
sequence number will be taken
into account first.
The Opportunity Generation
Conditions tab allows you to
set conditions for
opportunities. In the
Industries section, you can
list the industries you wish
to obtain leads from. To
match leads consistently, you
can leave this parameter
empty. You can filter
companies based on their size
by using the Filter on Size
option. By turning this one
on, you can get an extra
field to enter the size of
the company. The size of a
corporation can be
ascertained by the number of
employees.
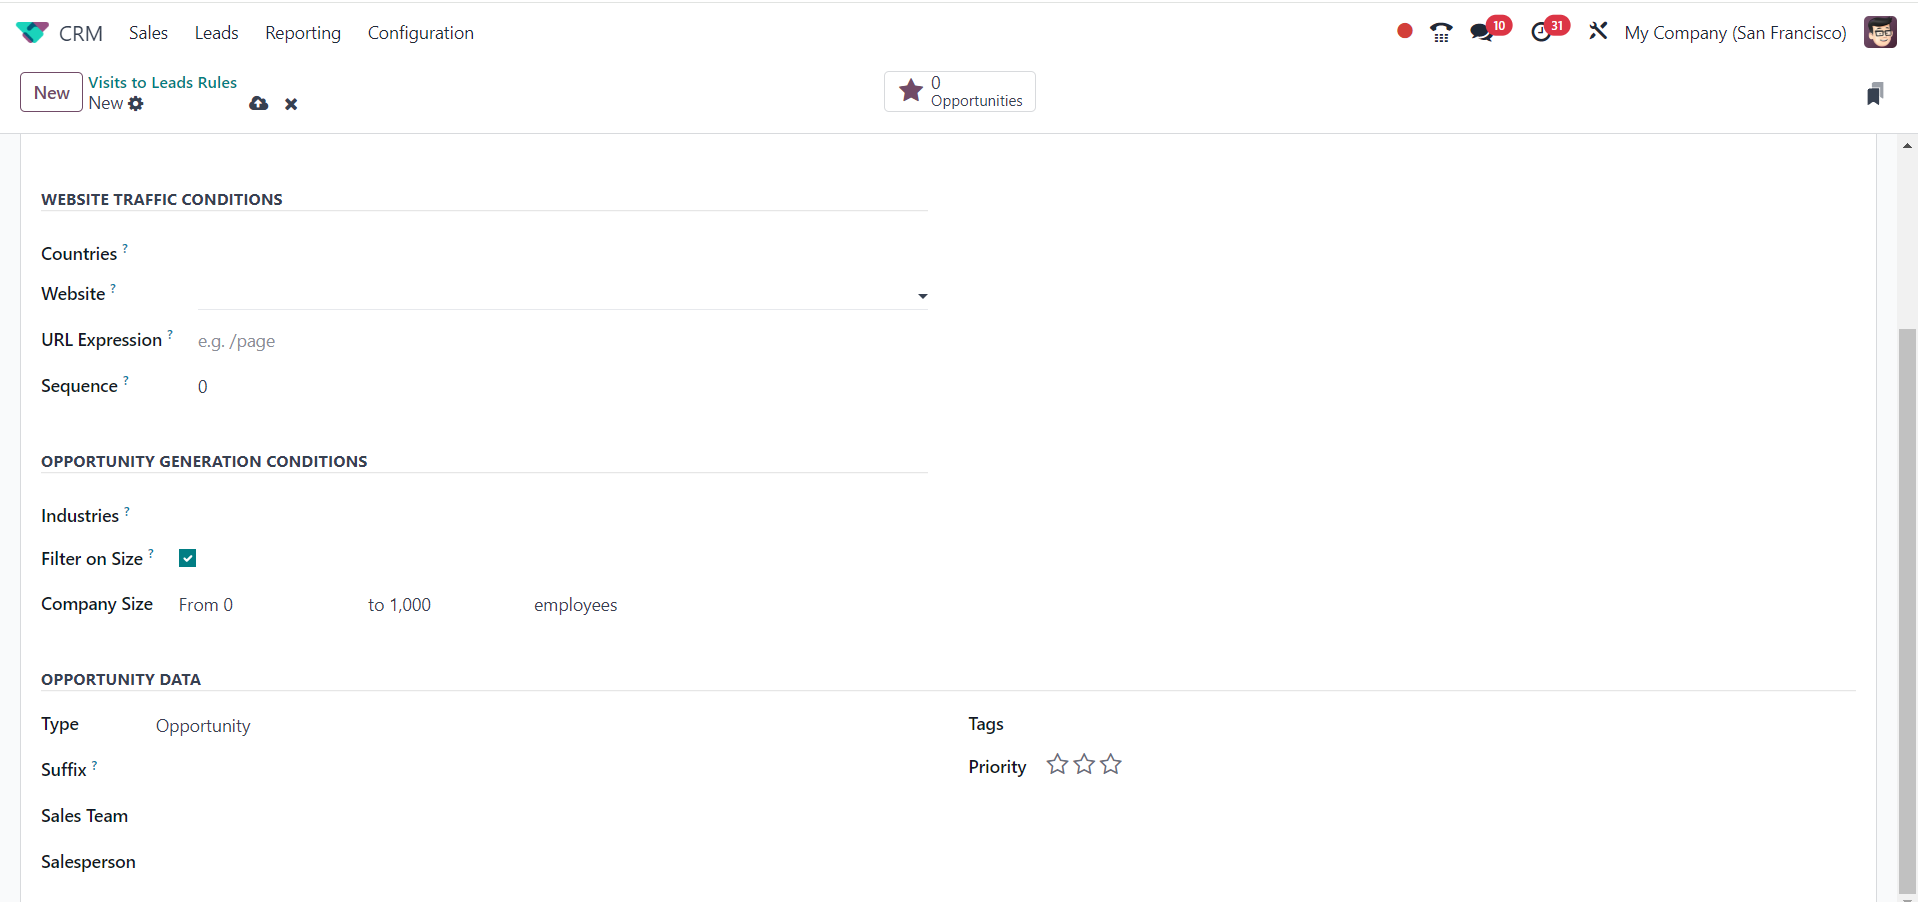
Under the Opportunity Data tab,
you may now select the Type
as Lead or Opportunity based
on your needs. By mentioning
the suffix in the designated
space, you may easily
identify the leads and
opportunities created by this
rule. The names of the
created leads will have the
suffix added. The leads
generated by this new rule
should be managed by a sales
team and salesperson. In the
Tags area, you can add
pertinent tags and highlight
the lead's priority with
stars.
Click the store button to
manually store the data after
you've completed all the
fields required to convert
website visitors into new
leads. This is how we create
new rules for turning website
visitors into leads and
opportunities using the
Odoo18 CRM module.
3.2 Conversion of leads into
opportunities
We went over every lead
generation option with the
help of the Odoo 18 CRM
module. We will now discuss
the process of converting
leads into opportunities. The
introduction of the CRM
module has made the process
of creating new leads easier.
With only a few clicks, you
can swiftly convert these
leads into profitable
prospects once the clients
reply positively. If the
terms are mutually agreeable,
you can use the CRM module to
convert a lead into an
opportunity. In certain
situations, you might be able
to convert a lead straight
into a sales quotation,
depending on how interested
the customer is in your
business.
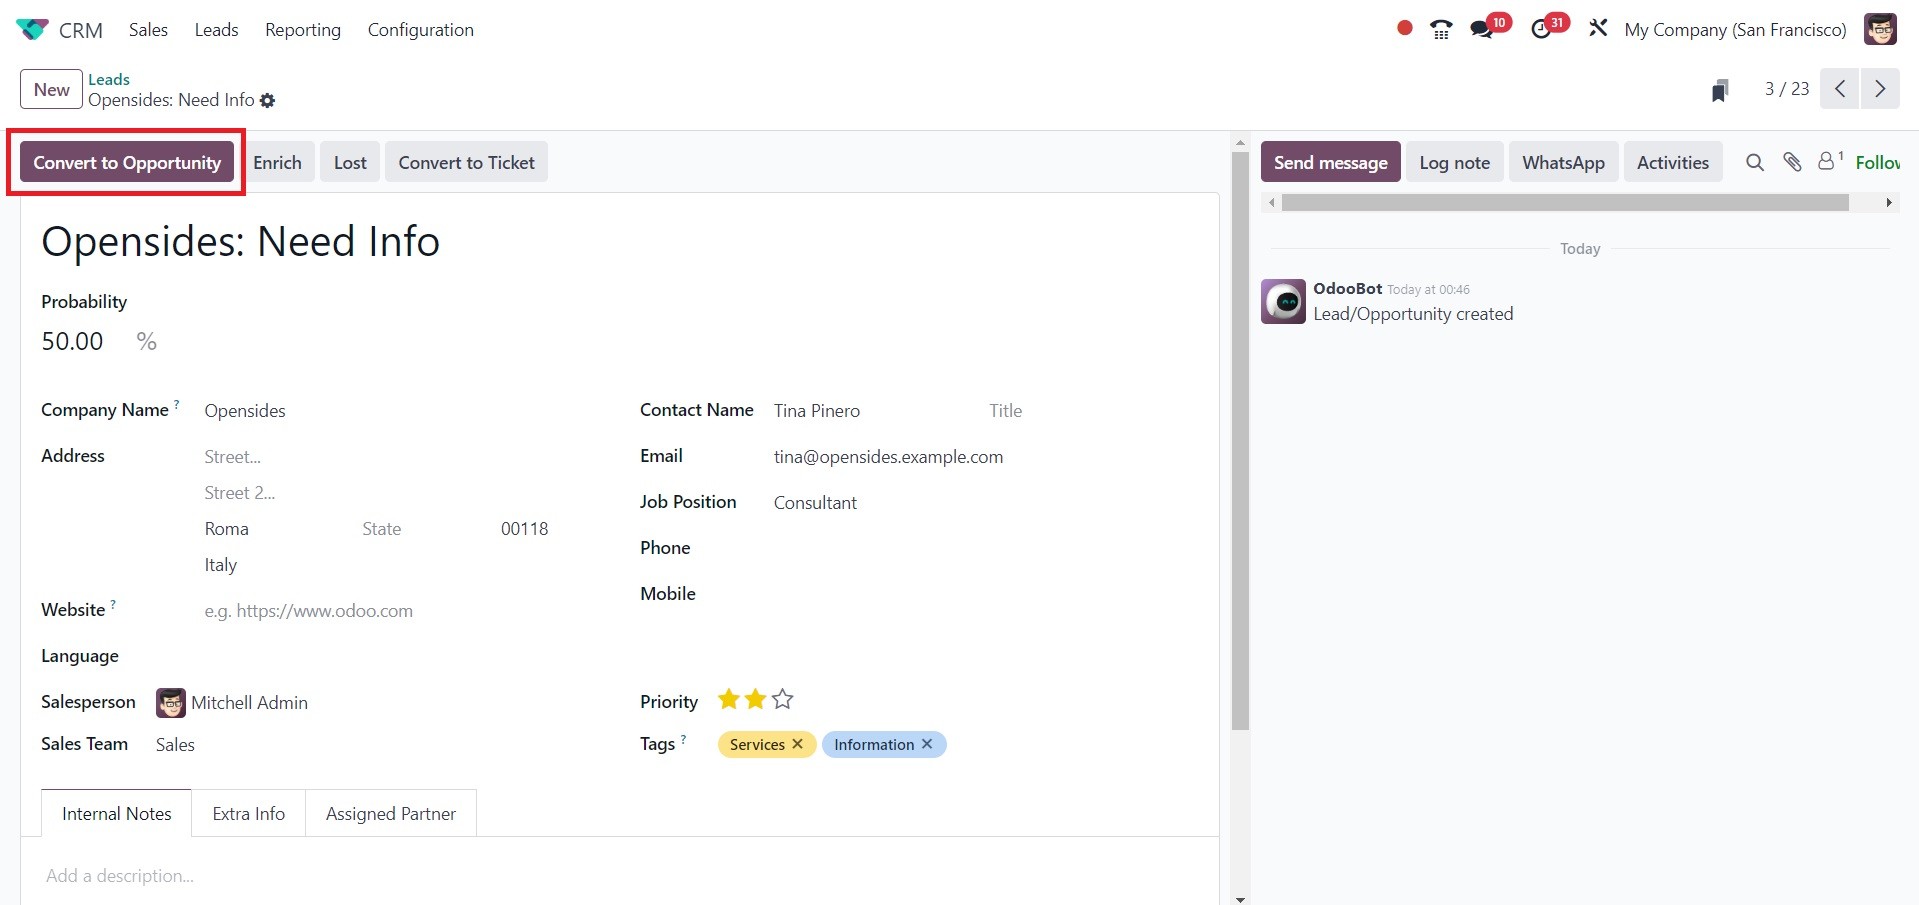
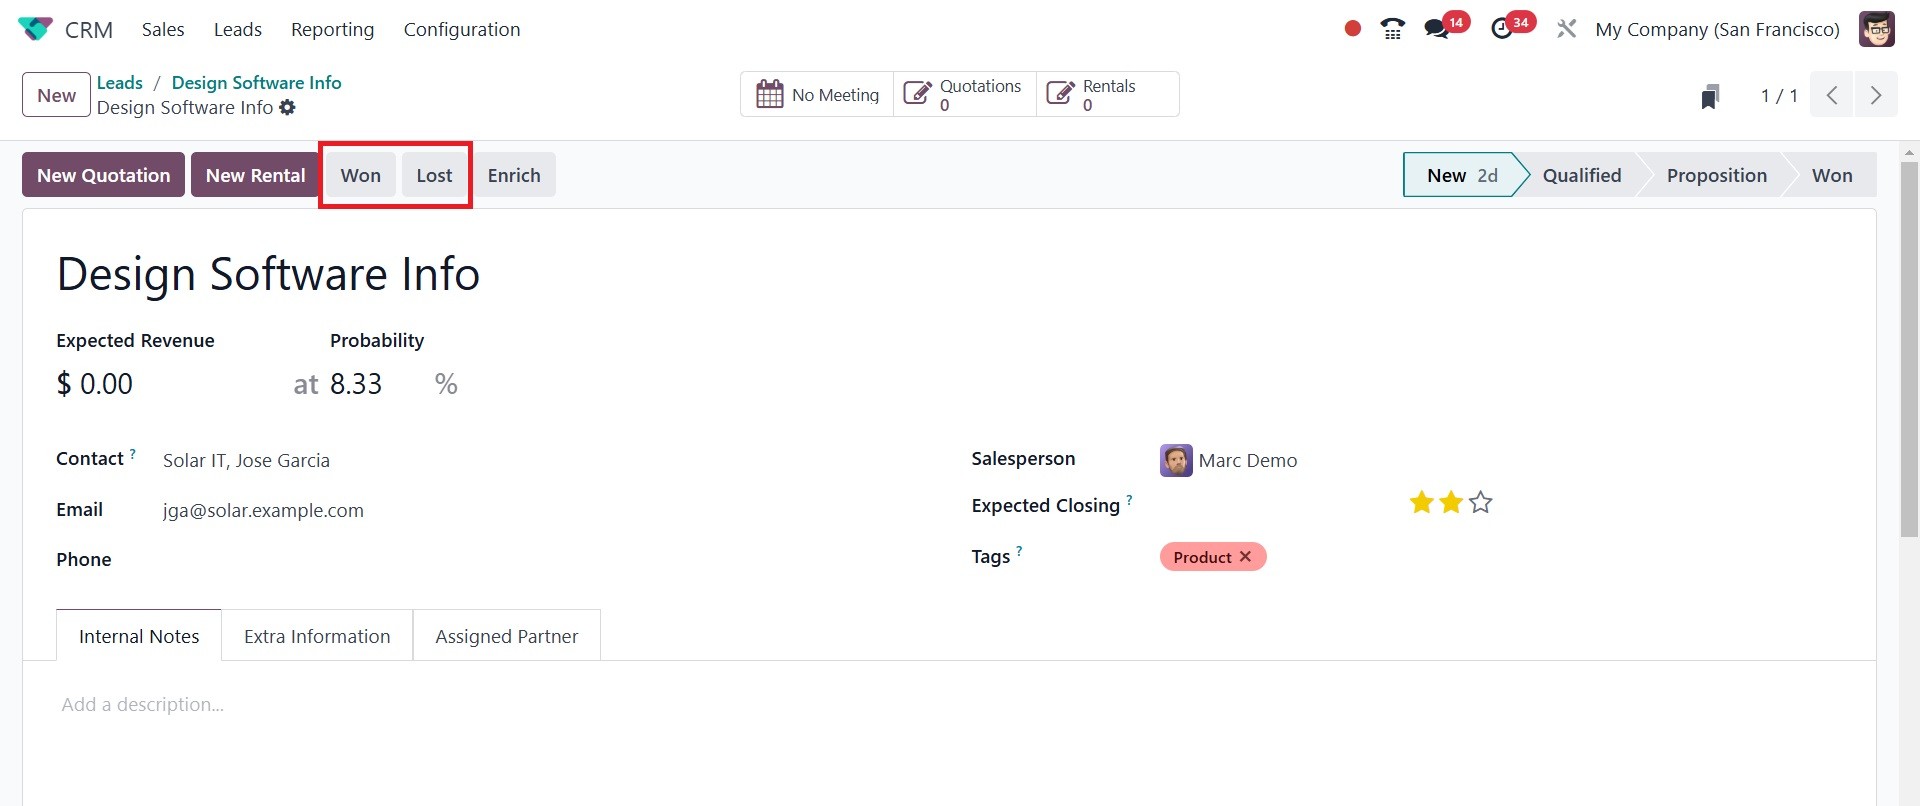
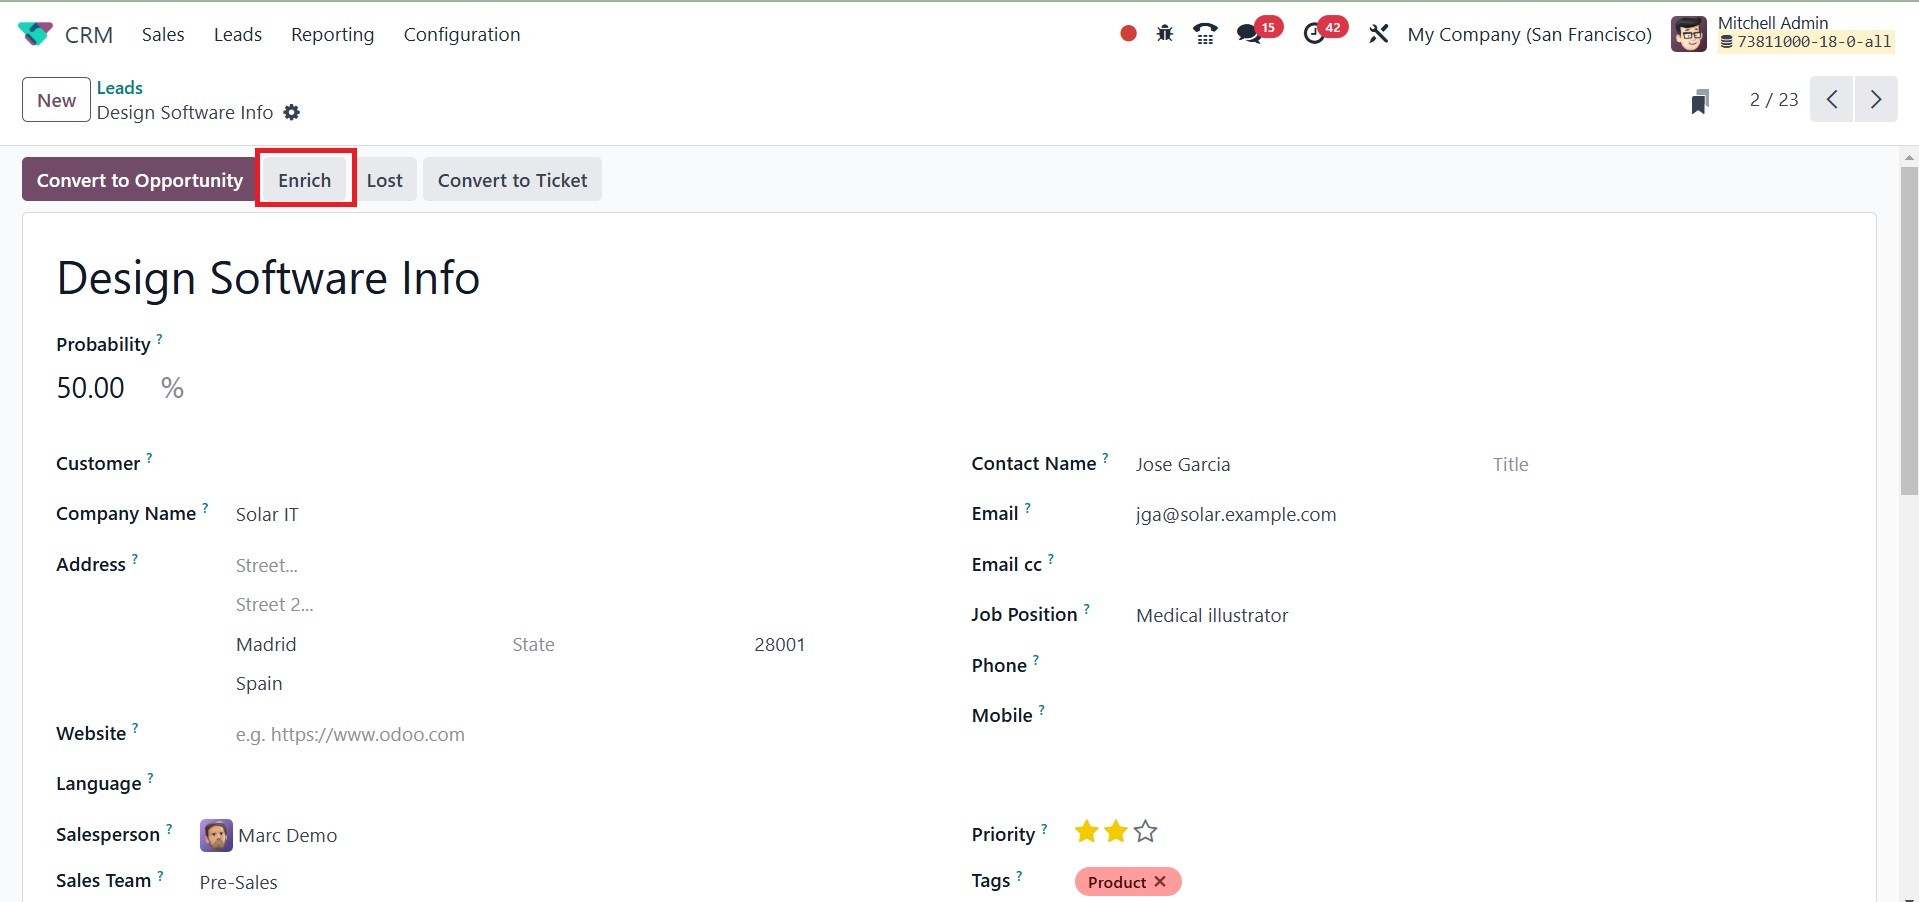
In this case, we select a
pre-generated lead from the
given list, as can be seen in
the screenshot above. You
will have options such as
Convert To Opportunity,
Enrich, Lost, and Convert To
Ticket buttons.
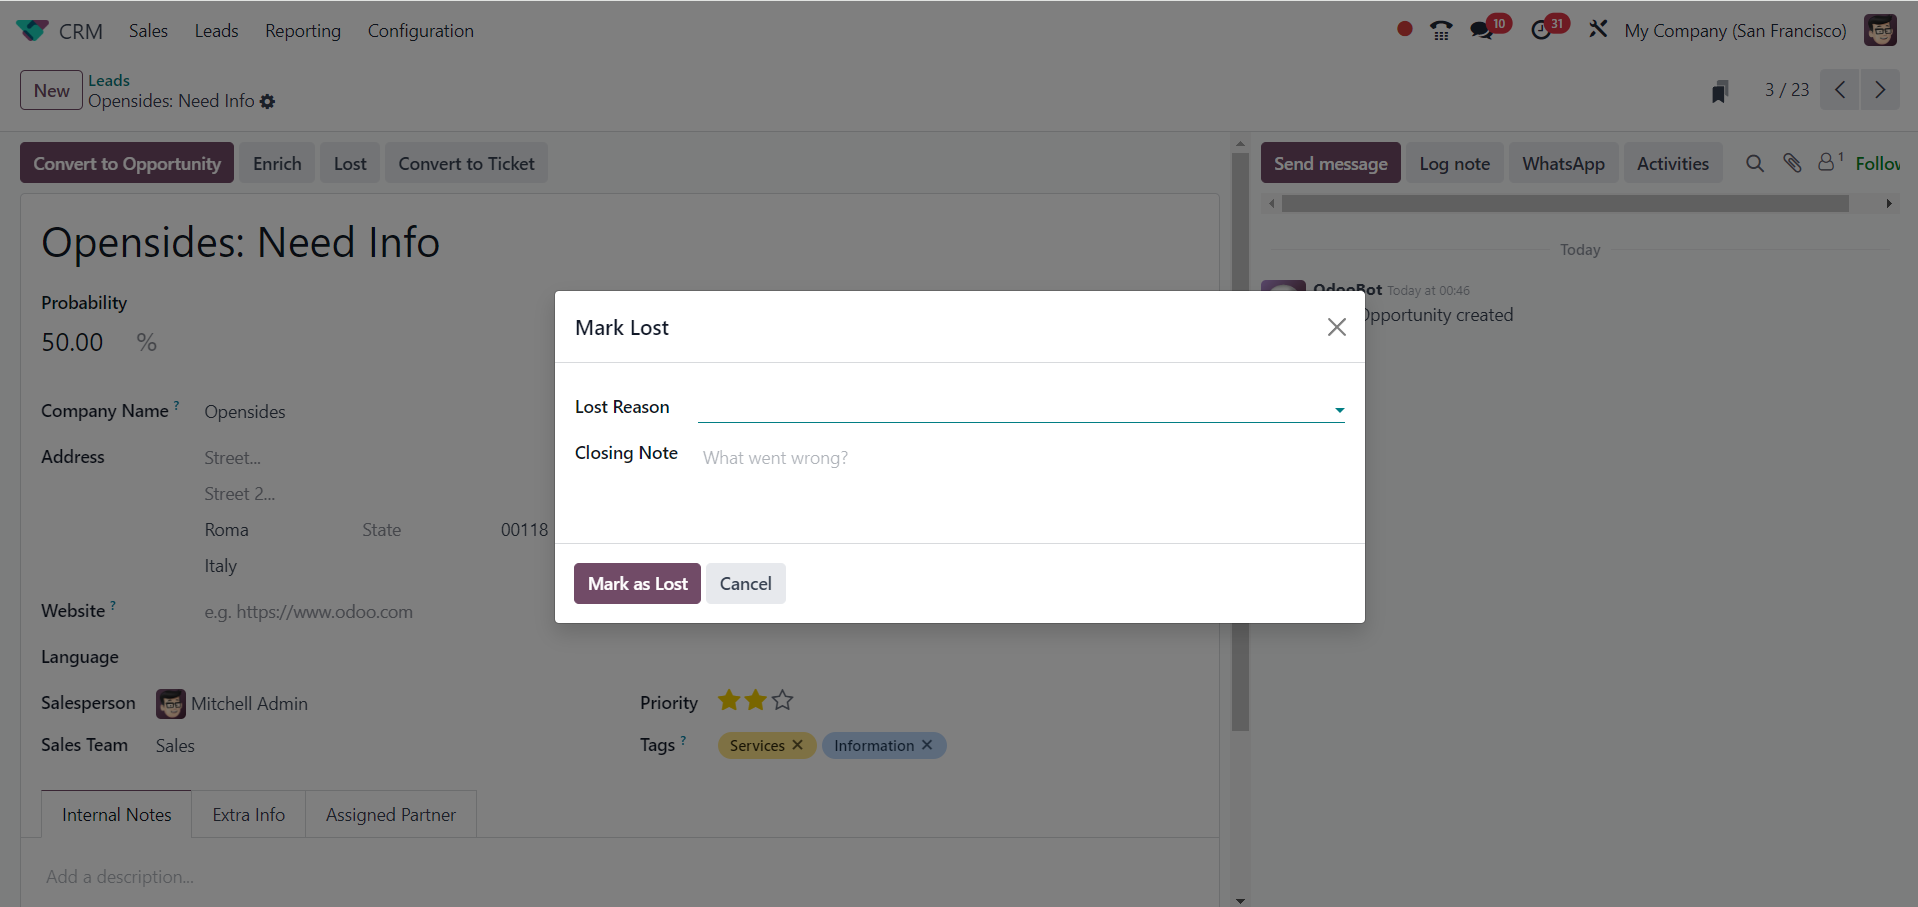
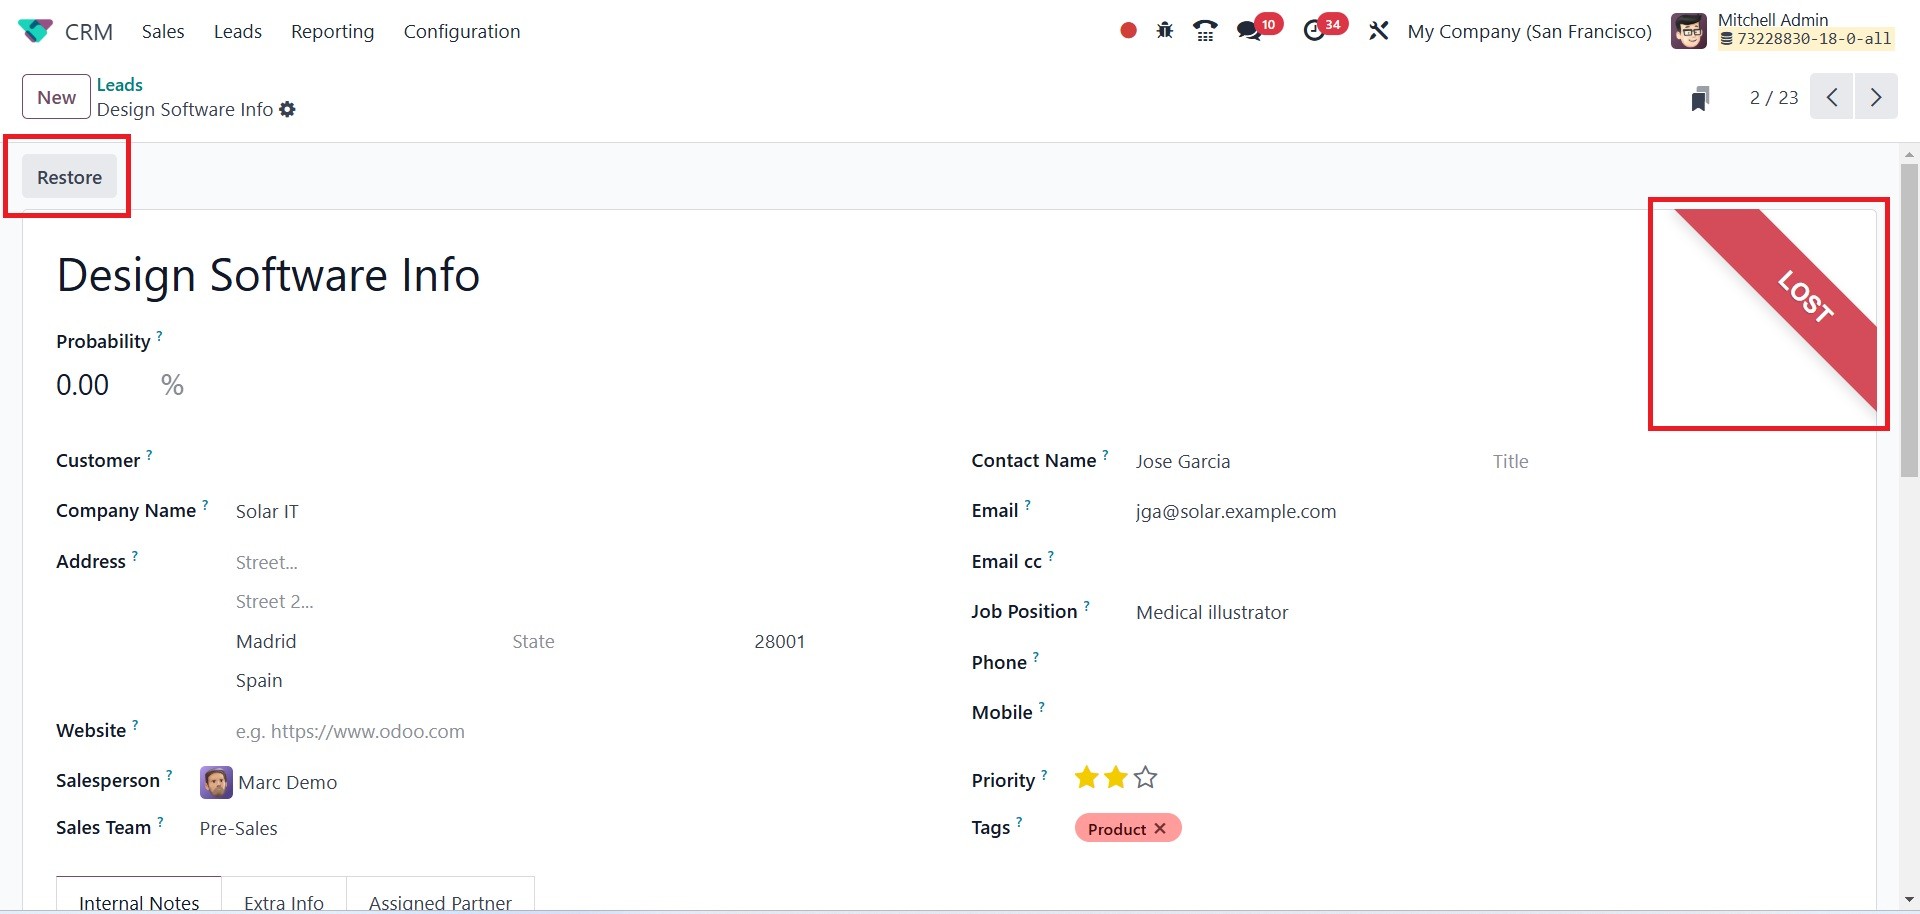
When you click the Lost button, a
new popup window will show
up. Enter "Lost Reason" in
the space provided. Next,
select the "Mark as Lost"
button.
The lead will enter the losing
stage. The Lost ribbon will
increase the lead. By using
the Restore button, the lead
can return to the prior step.
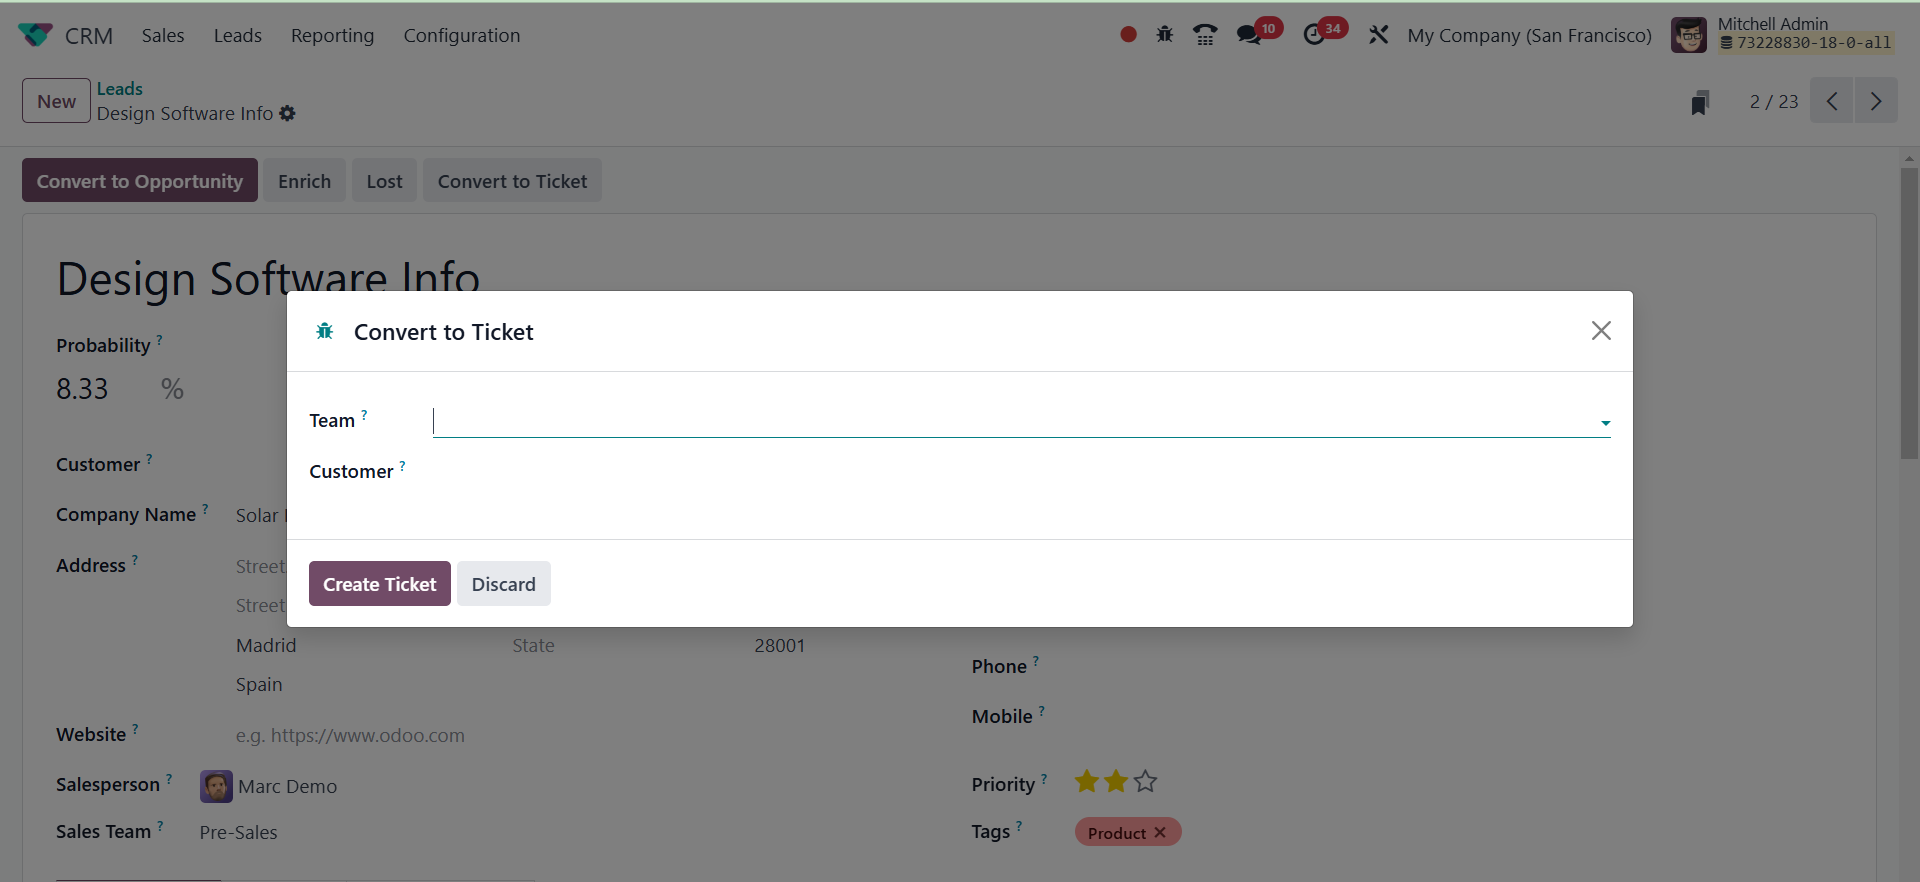
Converting the lead to an event
ticket can be done by
selecting the Convert to
Ticket option, which opens a
second popup window. Click
the Create Ticket button once
the Team, Ticket type, and
Customer have been chosen.
To convert this lead into an
opportunity, click the
Convert To Opportunity
button. A pop-up window with
details about the opportunity
will appear when you click on
this button.
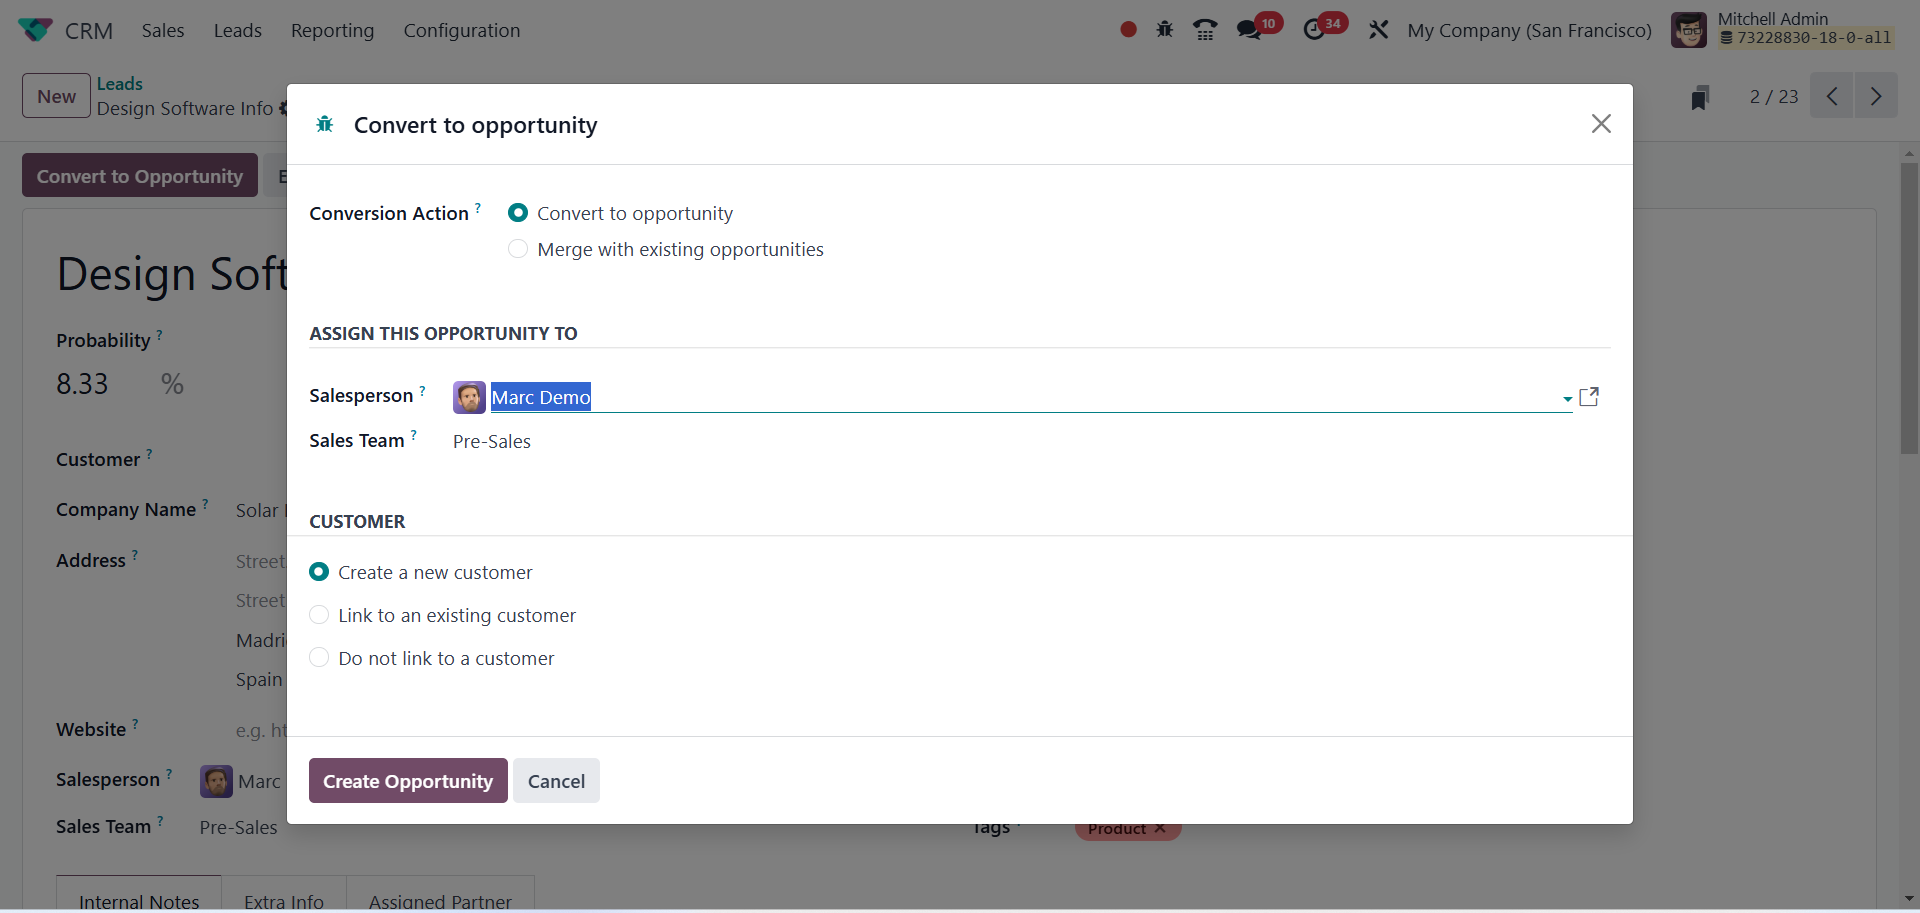
It is necessary to select
Conversion Action from the
list of options. This lead
could be coupled with other
opportunities or made into an
opportunity. You will see a
new section where you may
list the current
opportunities you want to
combine this lead with if you
select the option to combine
it with existing
possibilities.
You can designate this
opportunity to a specific
salesperson and sales team by
providing their names in the
relevant areas. A field
asking how to create a new
customer record from this
lead will appear if you
select the Convert to
Opportunity option for the
Conversion Action. You can
connect to an existing
customer, create a new one,
or leave the connection open,
depending on your needs.
To complete, click the Create
Opportunity button.
The lead has now been turned into
a new opportunity, as can be
seen in the graphic above.
You can now use this chance
to create a fresh sales
quotation based on the
customer's preferences.
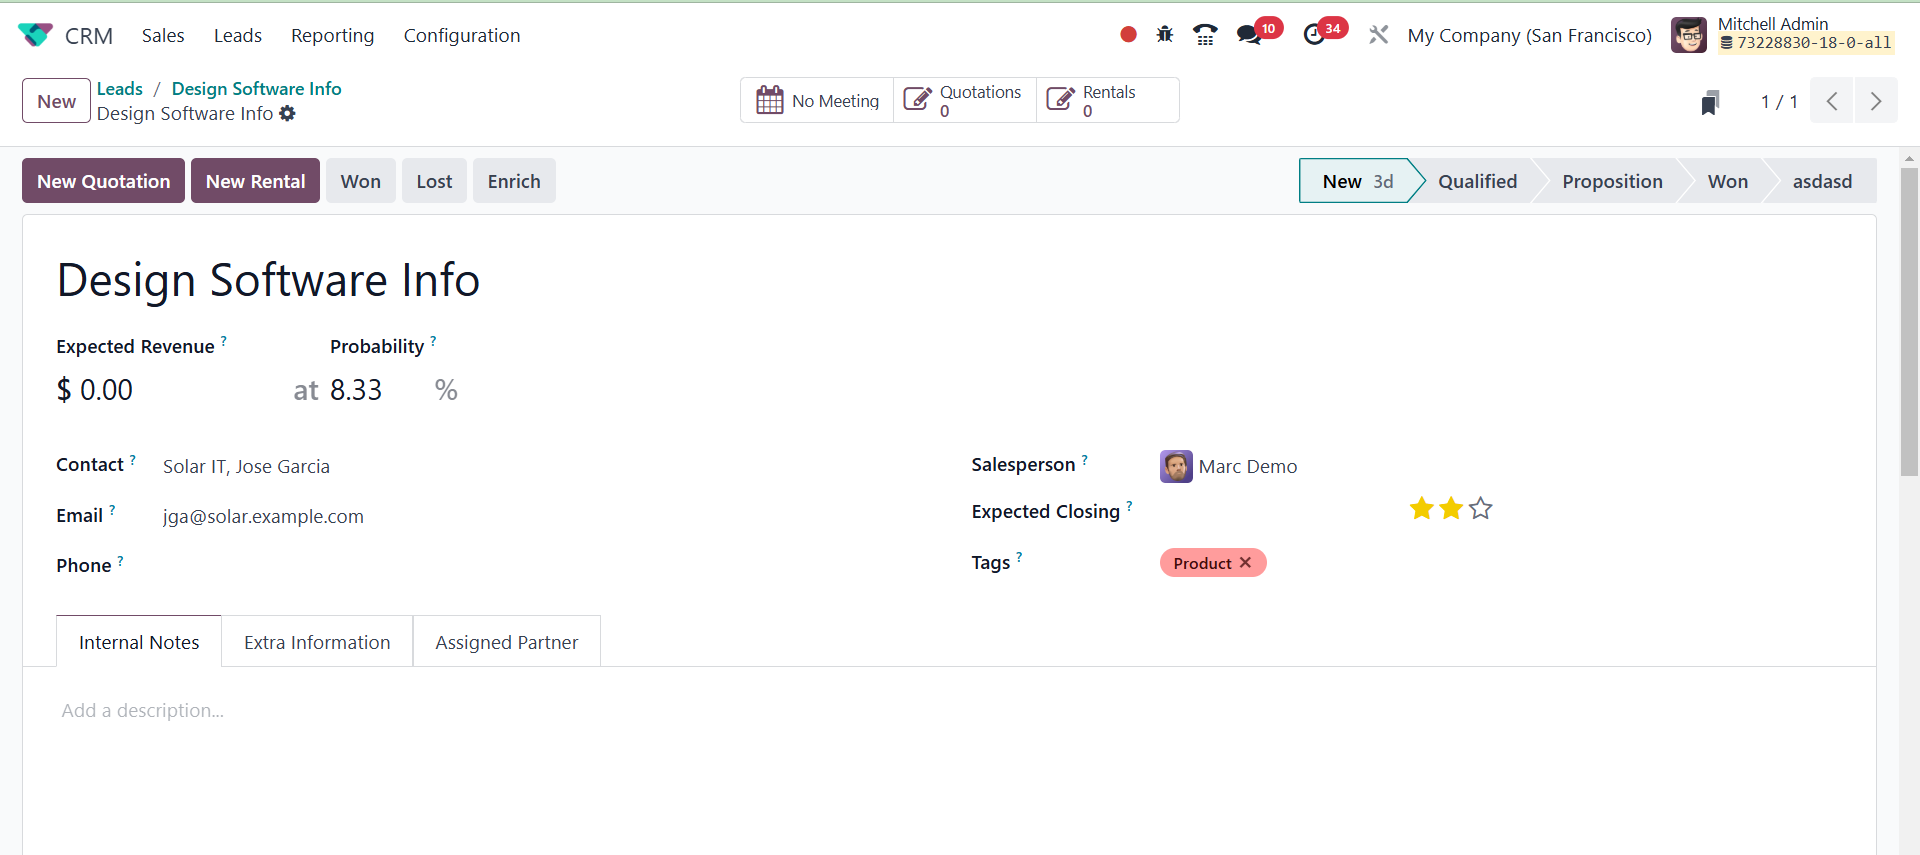
A portion of a company's revenue
that is expected to continue
in the future is known as
recurring revenue. A mention
of the expected revenue may
be included in the
opportunity itself. The
success rate of the
opportunity is then expressed
as a percentage by
probability. You can put an
estimate of when the
opportunity will be won as
the Expected Closing Date.
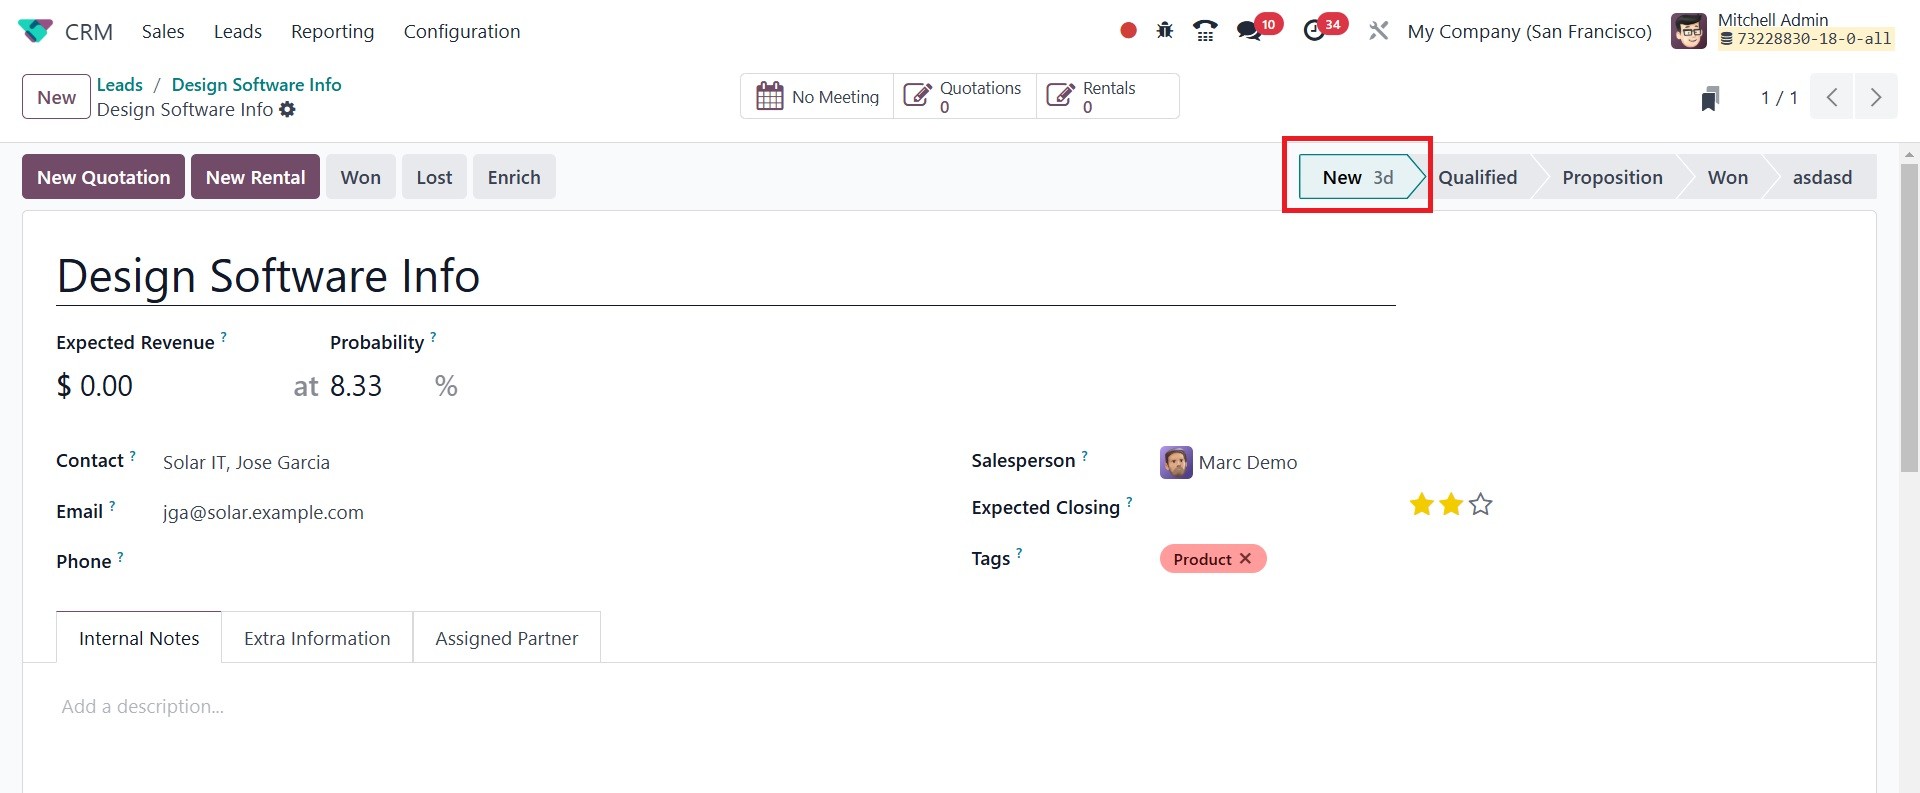
Timeline is a new feature in Odoo
18. The stage now features a
new time indication that
shows how long the lead will
remain in this particular
stage. The 3d in this case
signifies that the lead has
been in the new stage for the
last three days.
After discussing the conversion
of an opportunity from a
lead, let's move on to the
conversion of a sales
quotation from an
opportunity.
3.3 Opportunities to Sales
Quotation
Odoo allows you to create a new
sales quote from the initial
opportunity if the customer
shows interest in your
business after you convert
the lead into a new
opportunity. We have already
discussed how to create a new
lead and convert it into a
new opportunity in the
previous sections of this
chapter. We'll go into great
detail here on how to convert
an opportunity into a sales
quote using the Odoo18 CRM
module.
The screenshot that is supplied
below shows the opportunity
that we are going to
transform into a new sales
quotation. As shown in the
picture, the buttons for New
Quotation, New Rental, Won,
Lost, and Enrich will show up
on the screen.
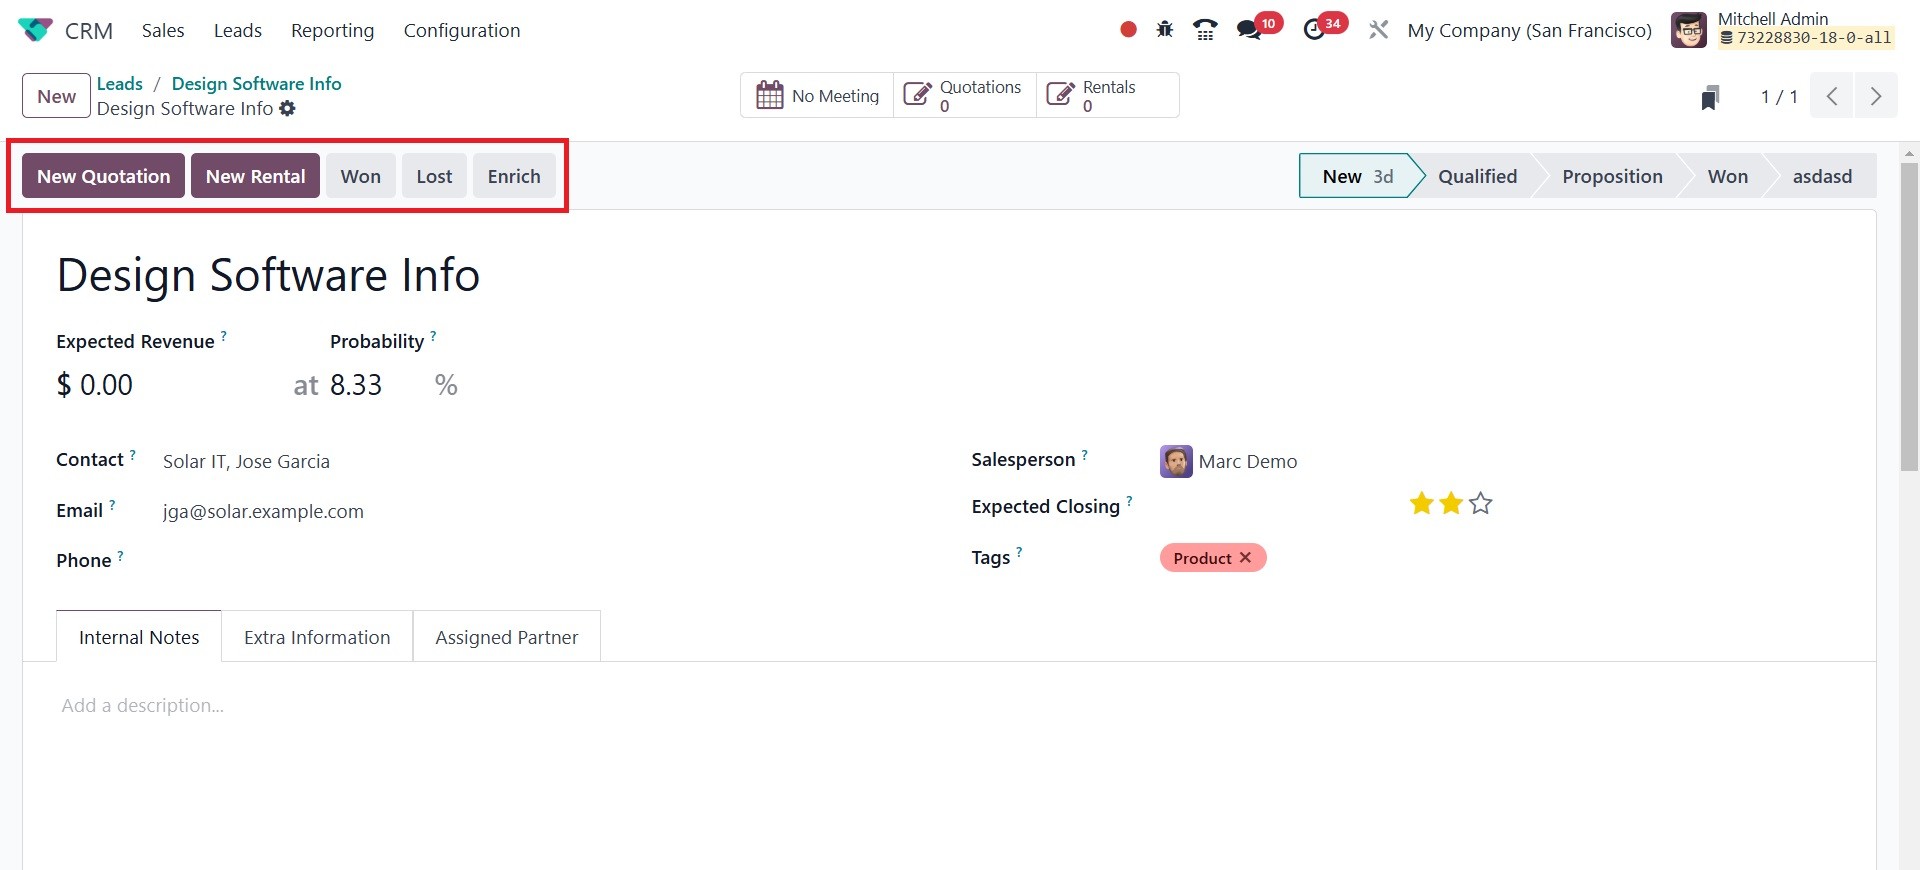
To initiate a fresh rental order,
click the New Rental button.
From that moment on, a rental
quote will be produced.
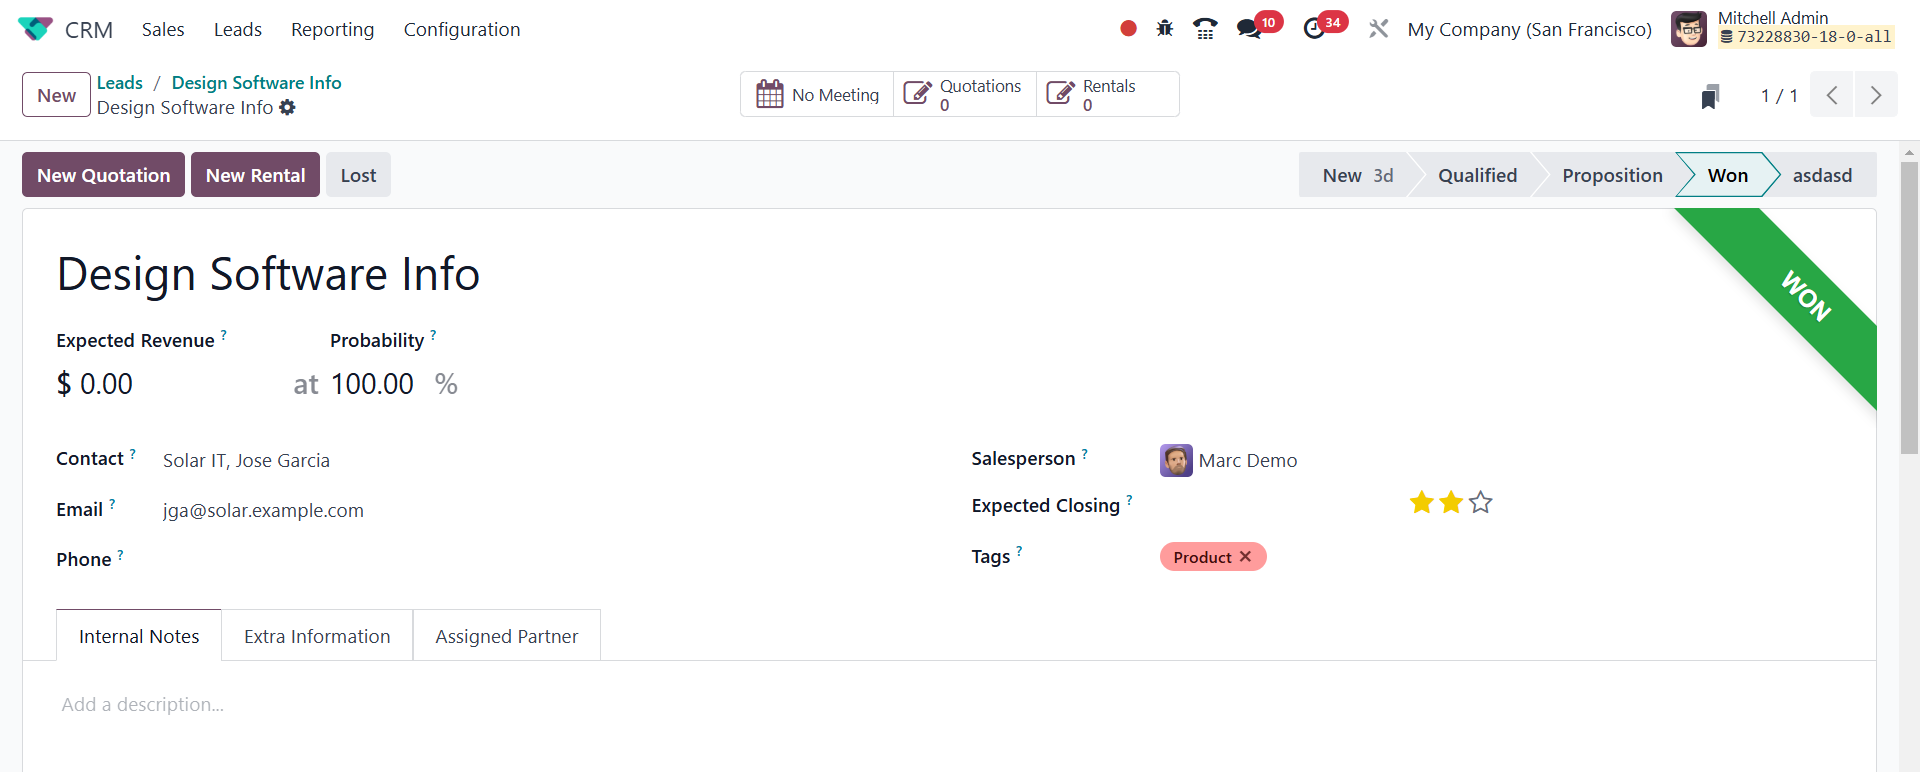
Clicking the Won button will
change the opportunity's
current state to Won.
To create a new sales quotation,
click the New Quotation
button here. Odoo will take
you to the opportunity's
sales quote window when you
click on this button. The
sales quotation we created
from the opportunity is shown
in the graphic below. As
previously mentioned, if the
Lost button is active, the
opportunity is lost and moves
to the Lost stage. To do
that, the user must provide
the Lost reason.
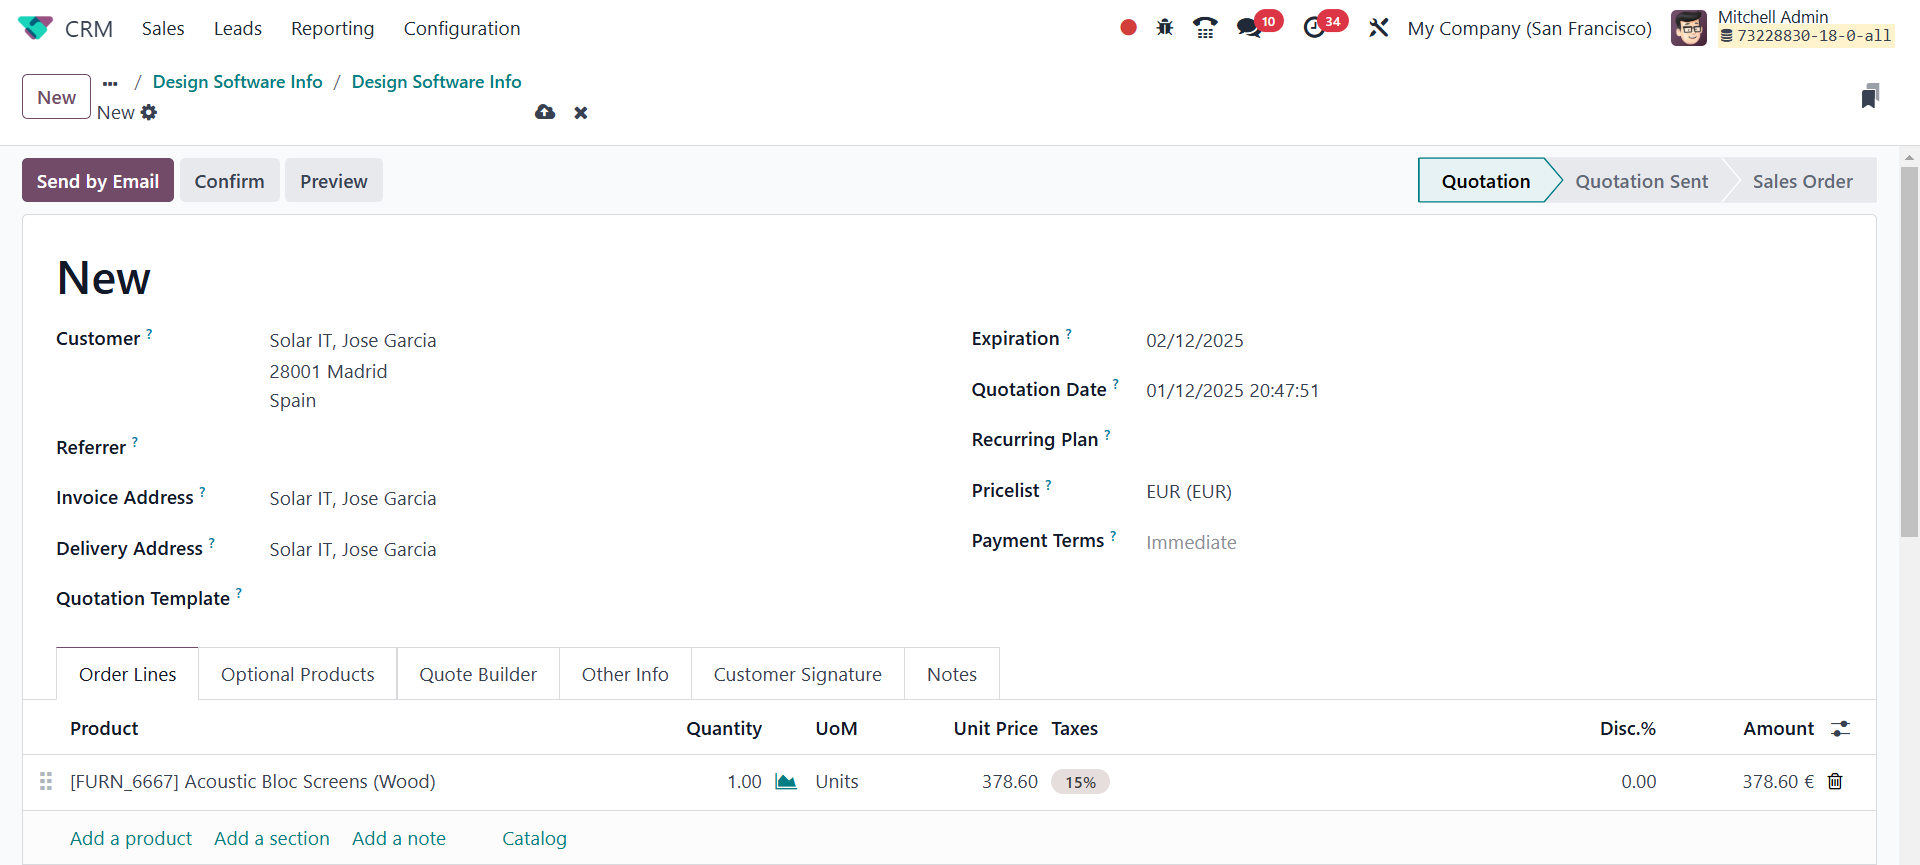
The quotation's details will be
automatically filled in based
on the information found in
the pertinent opportunity.
Additional information can be
entered in the Order Lines,
Optional Products, Quote
Builder, Other Information,
Customer Signature, and Notes
tabs. Once you have reviewed
the details, you can email
the quotation to the customer
in question by using the Send
By Email button.
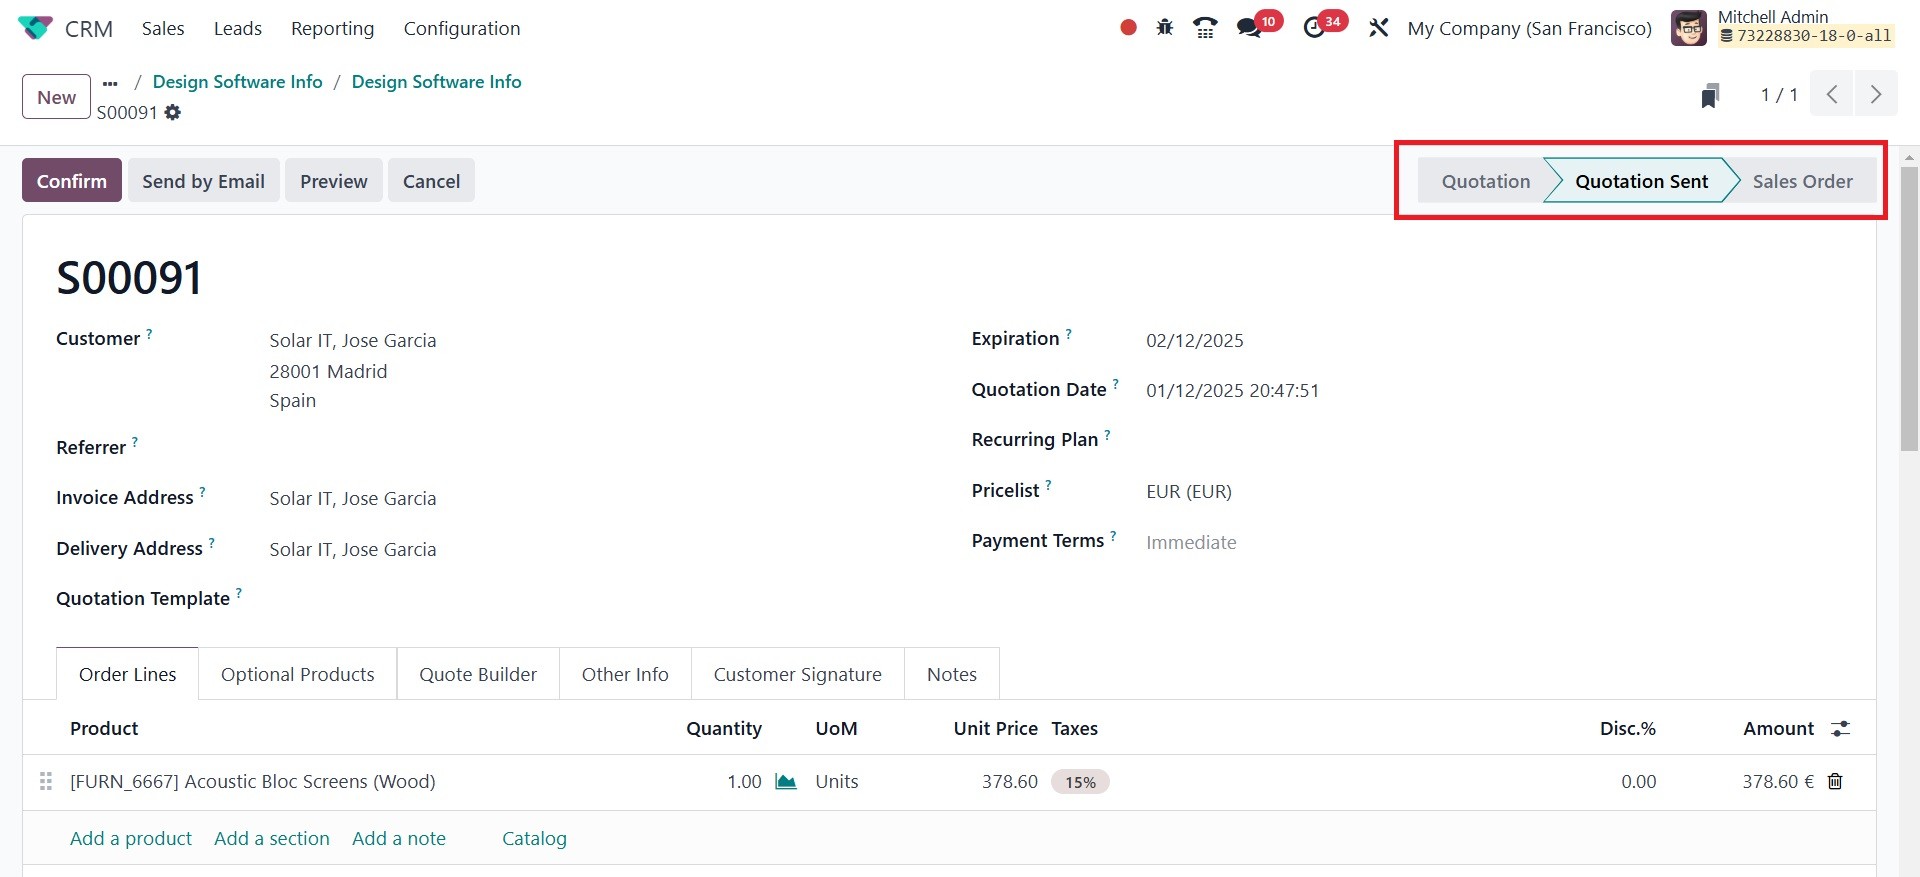
As shown in the accompanying
graphic, the quotation is
considered sent once it has
been sent to the relevant
client. The creation of sales
quotations and sales orders
will be covered in full in
the next chapter of this
book. The CRM module has a
special option under the
Sales menu called "My
Quotations," which allows you
to view all of the quotes
that were created from leads
and opportunities.
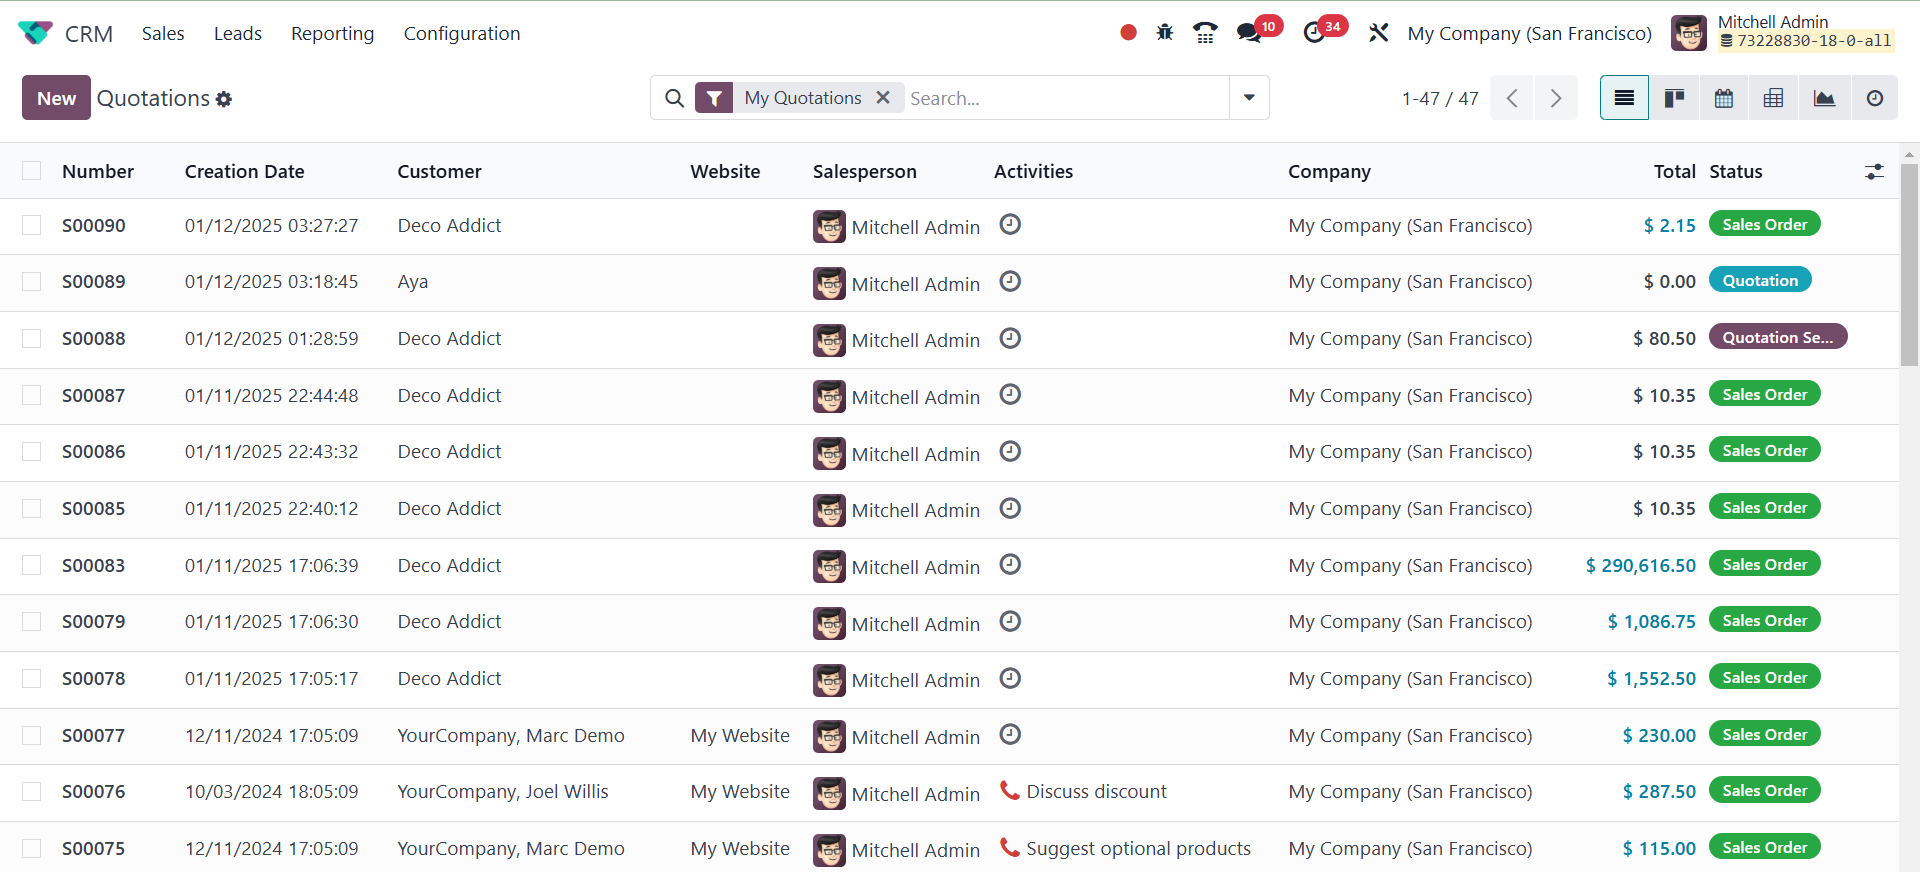
The list shows information about
the Number, Creation Date,
Customer, Salesperson,
Activities, Company, Total,
and Status. By selecting the
Create option, you may upload
fresh sales quotes to the CRM
module. As we look at the
Sales module, we'll also
discuss how to create quotes.
3.4 Sales team
By choosing the Sales Teams
option from the CRM module's
Sales menu, you can gain
access to the platform that
manages all sales teams. The
effective management of
leads, opportunities, and
other CRM-related procedures
depends on the assignment of
sales teams.
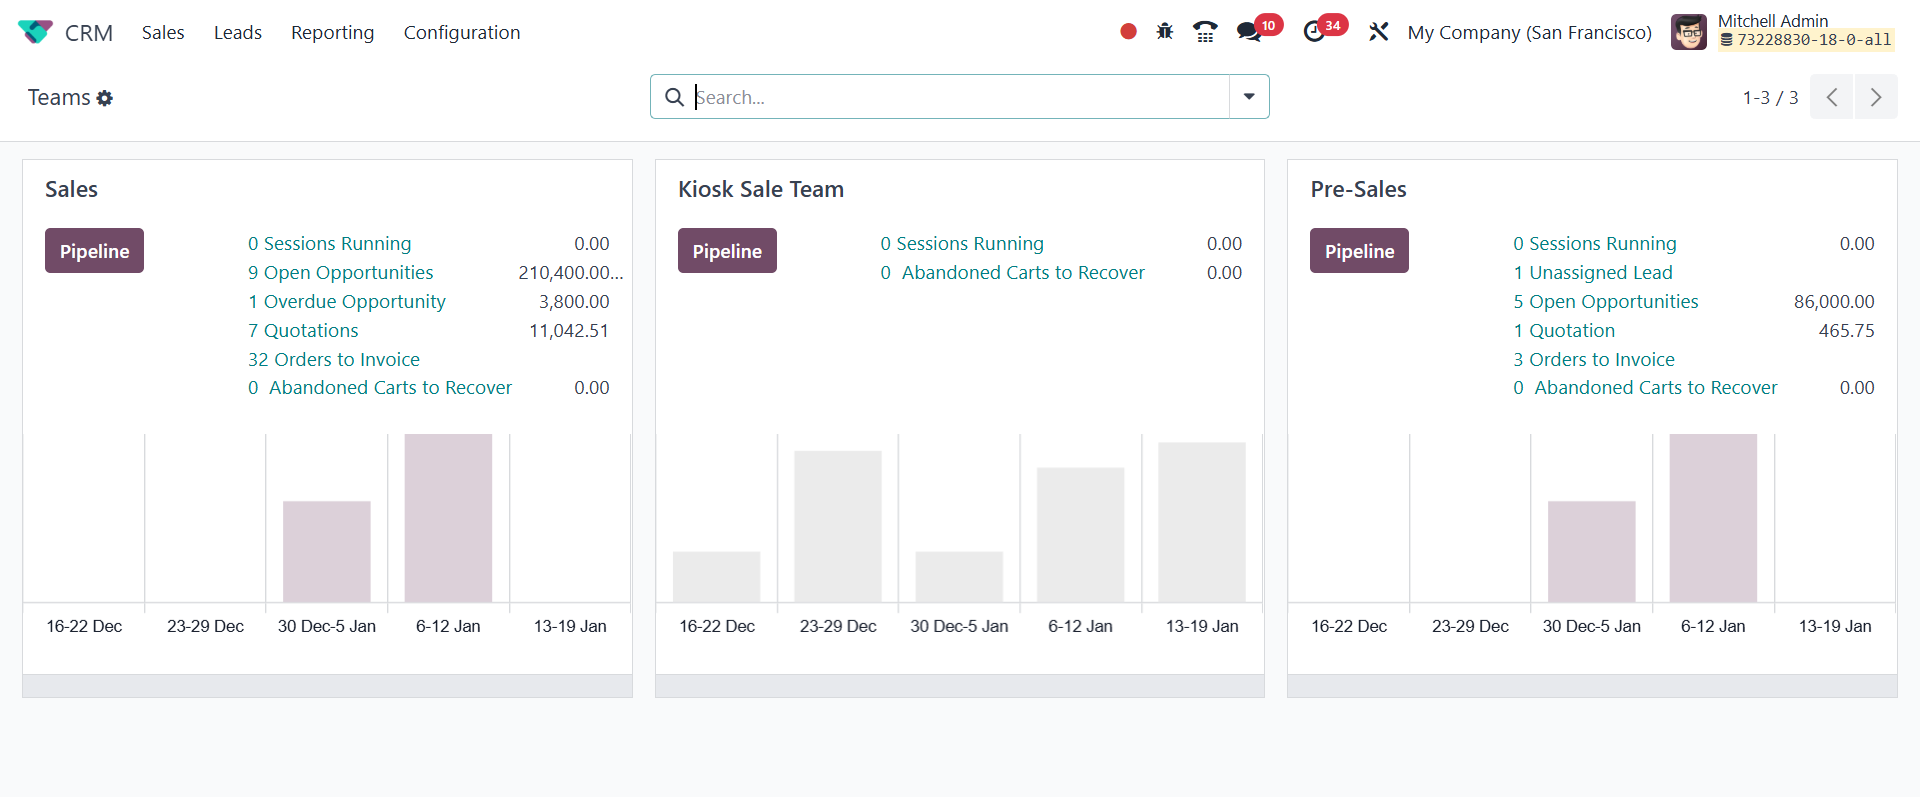
Each defined sales team in the
CRM module will have its own
tab, as seen in the picture.
The preview itself shows the
total amount of orders,
quotations, and possibilities
to invoice together with the
associated predicted income.
Odoo will direct you to the
pipeline of the relevant
sales team when you click the
Pipeline button.
By clicking on the three vertical
dots in the right-hand corner
of each tab, you may access
additional administration
options for each sales team.
There are options to view
leads, opportunities, quotes,
sales orders, and invoices
for that particular team.
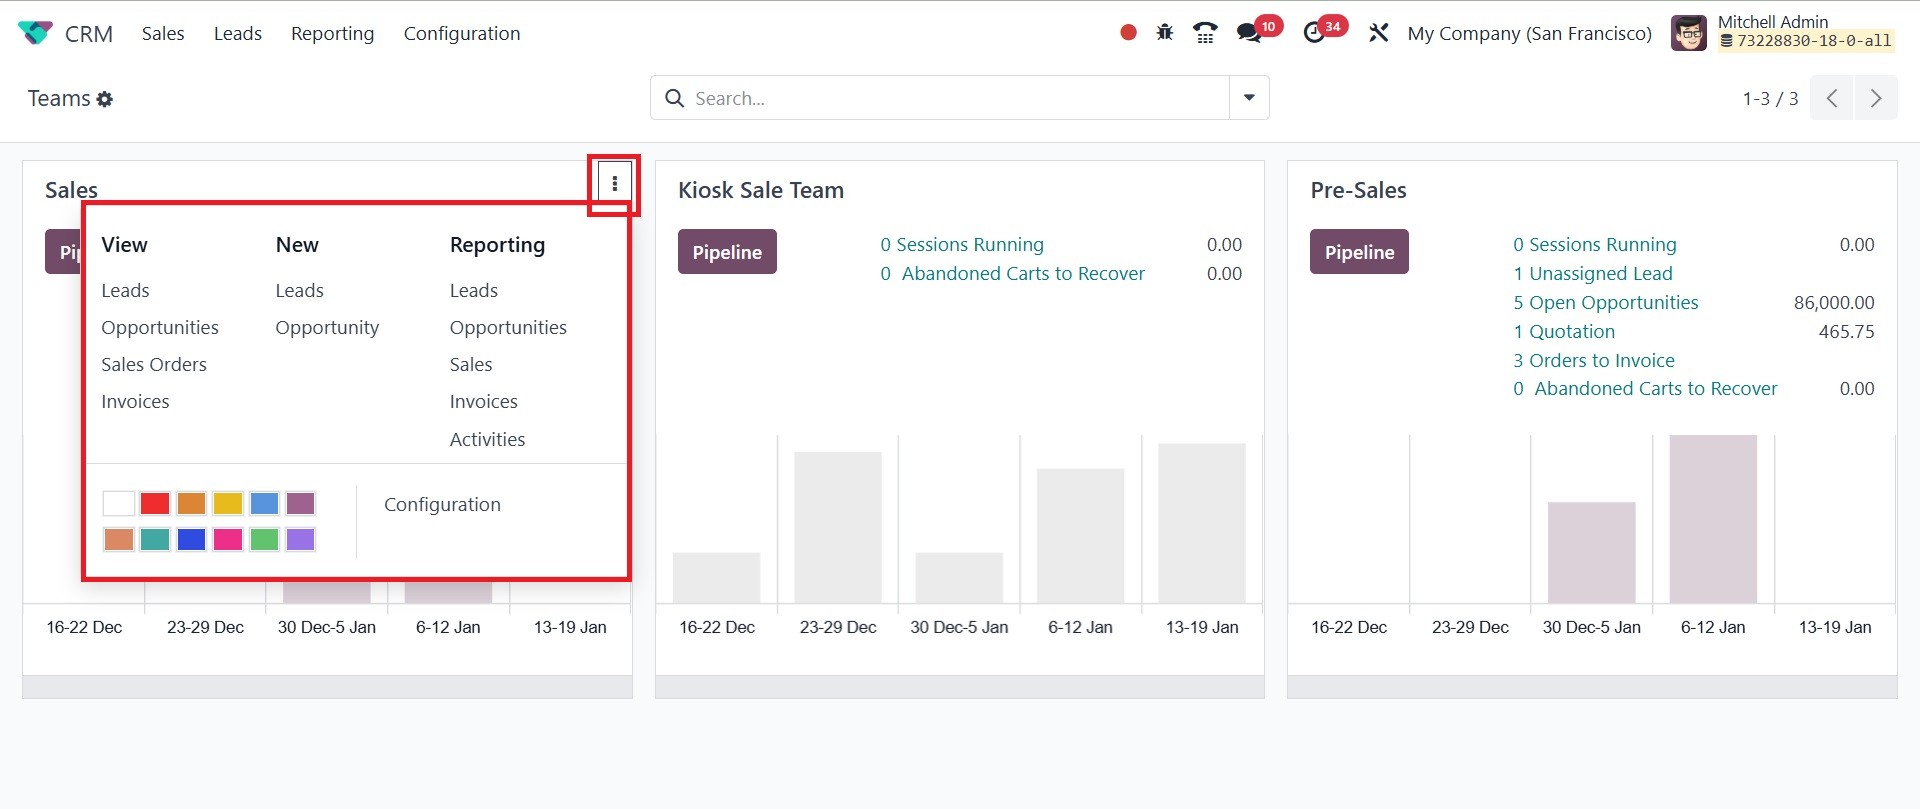
Under the New option, the sales
team members will be able to
generate New Leads,
Opportunities, and
Quotations. Reports on leads,
opportunities, quotes, sales,
invoices, and activities are
shown in each sales team's
advanced reporting option. In
addition to these options, a
Configuration button will be
available for you to change
the appropriate sales team.
In the Odoo18 CRM module, you may
establish and manage new
sales teams by selecting the
Sales Teams option from the
Configuration menu, as seen
in the image.
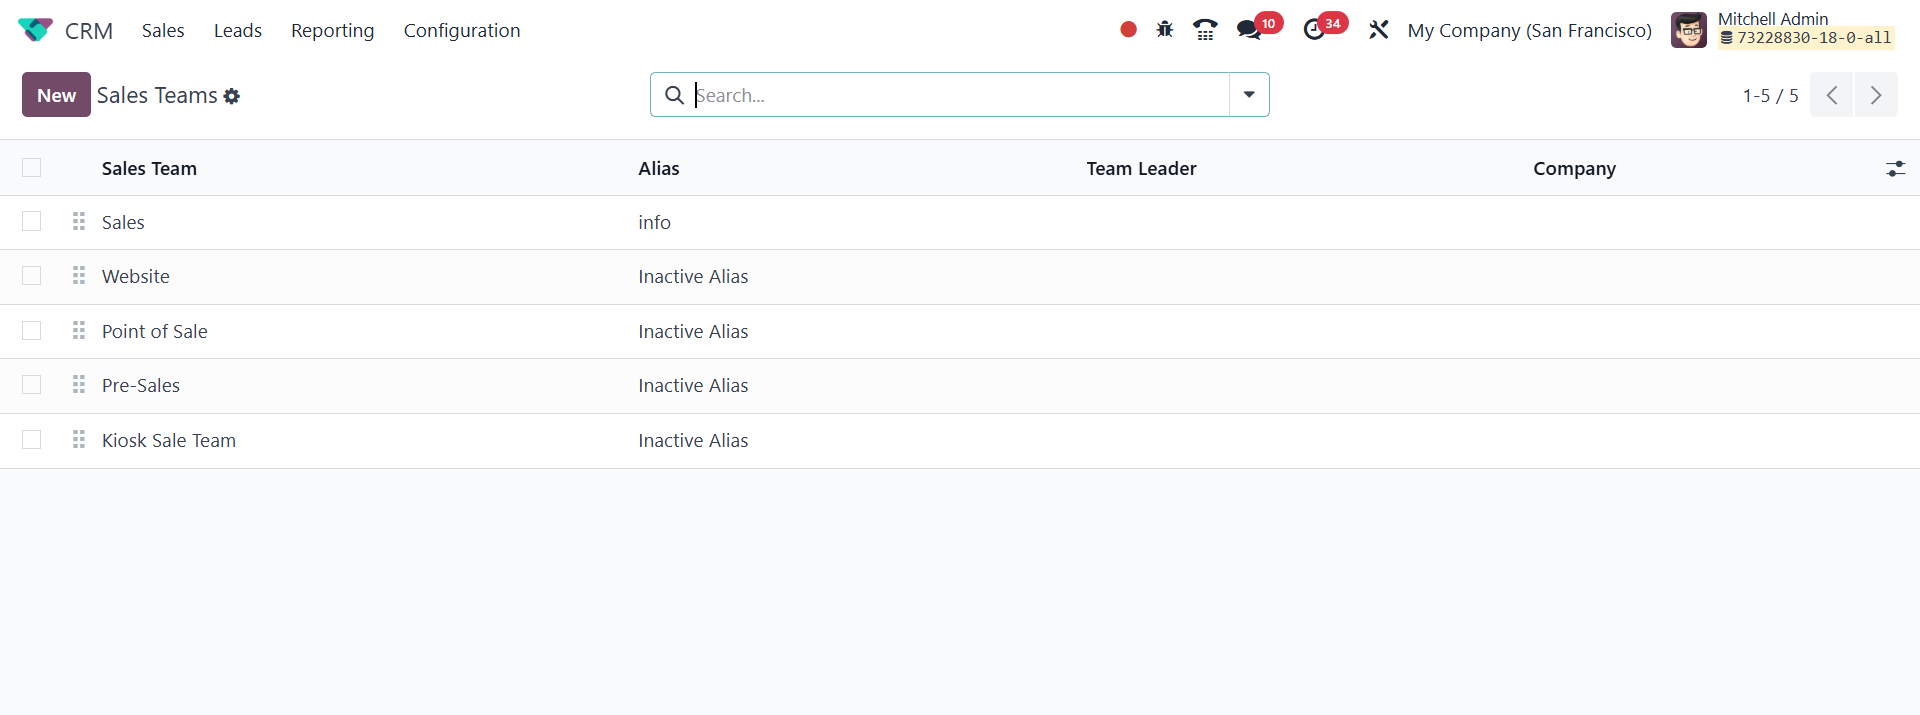
A list of previously established
sales teams, along with
details on the team's name,
alias, leader, and company,
may be found on this
platform.
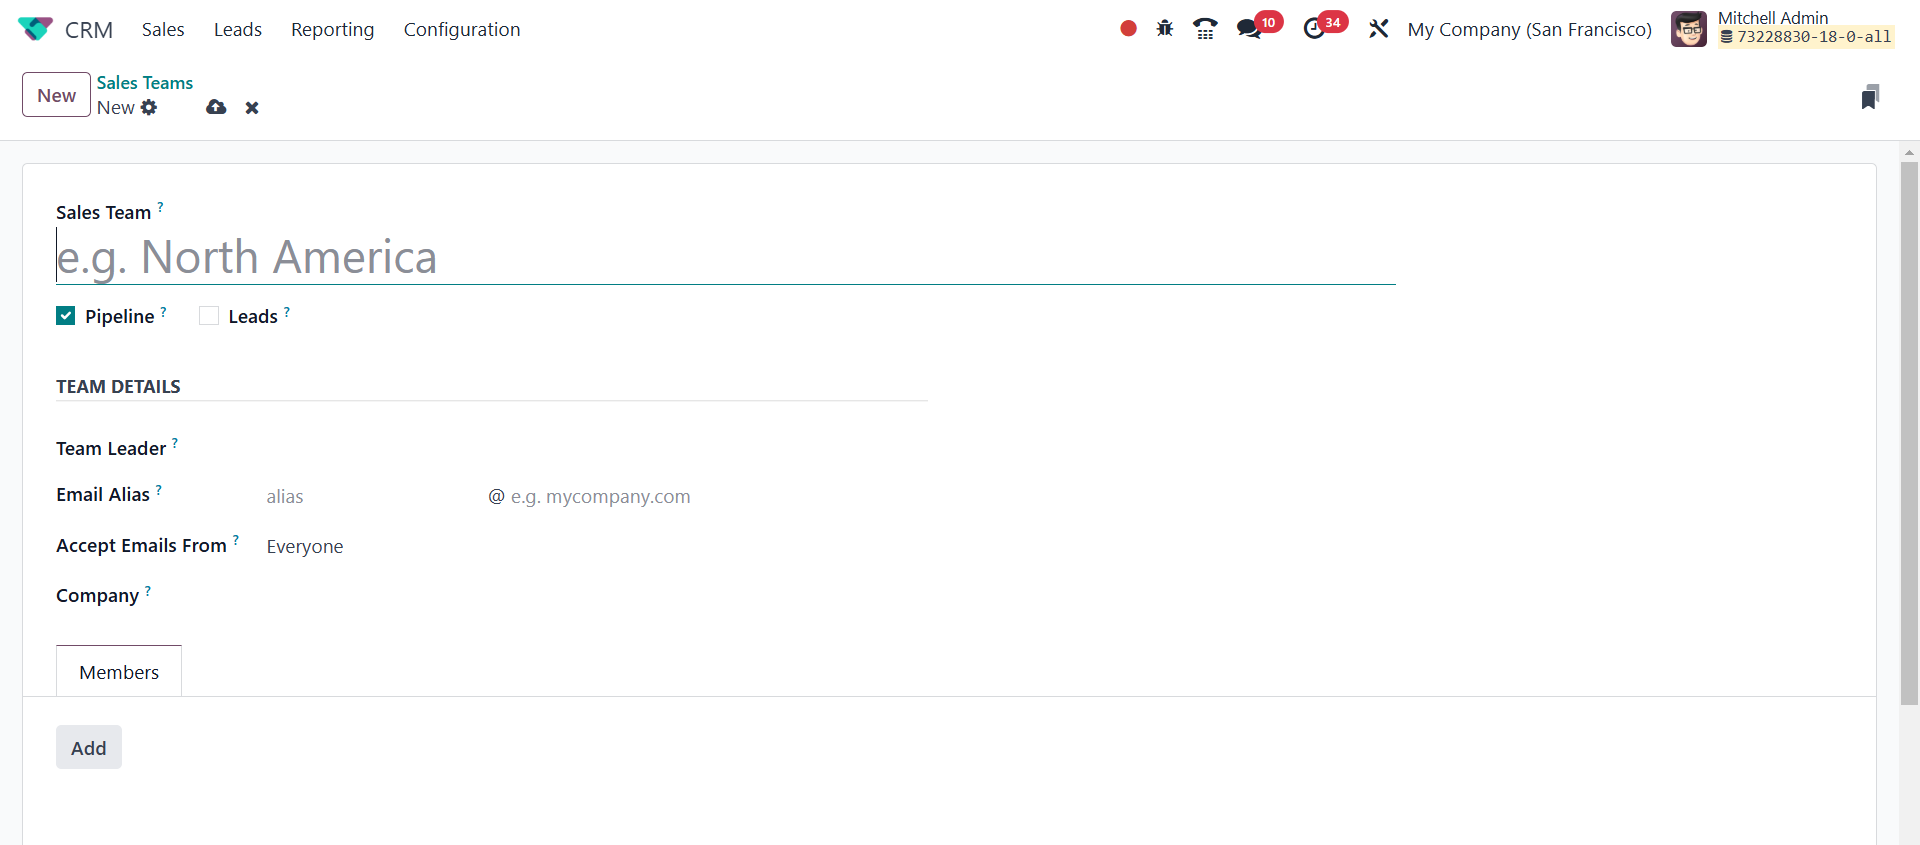
Using the New option, you may
create a new team to oversee
sales activities. The sales
team creation box is where
you can enter the data
required to construct a sales
team.
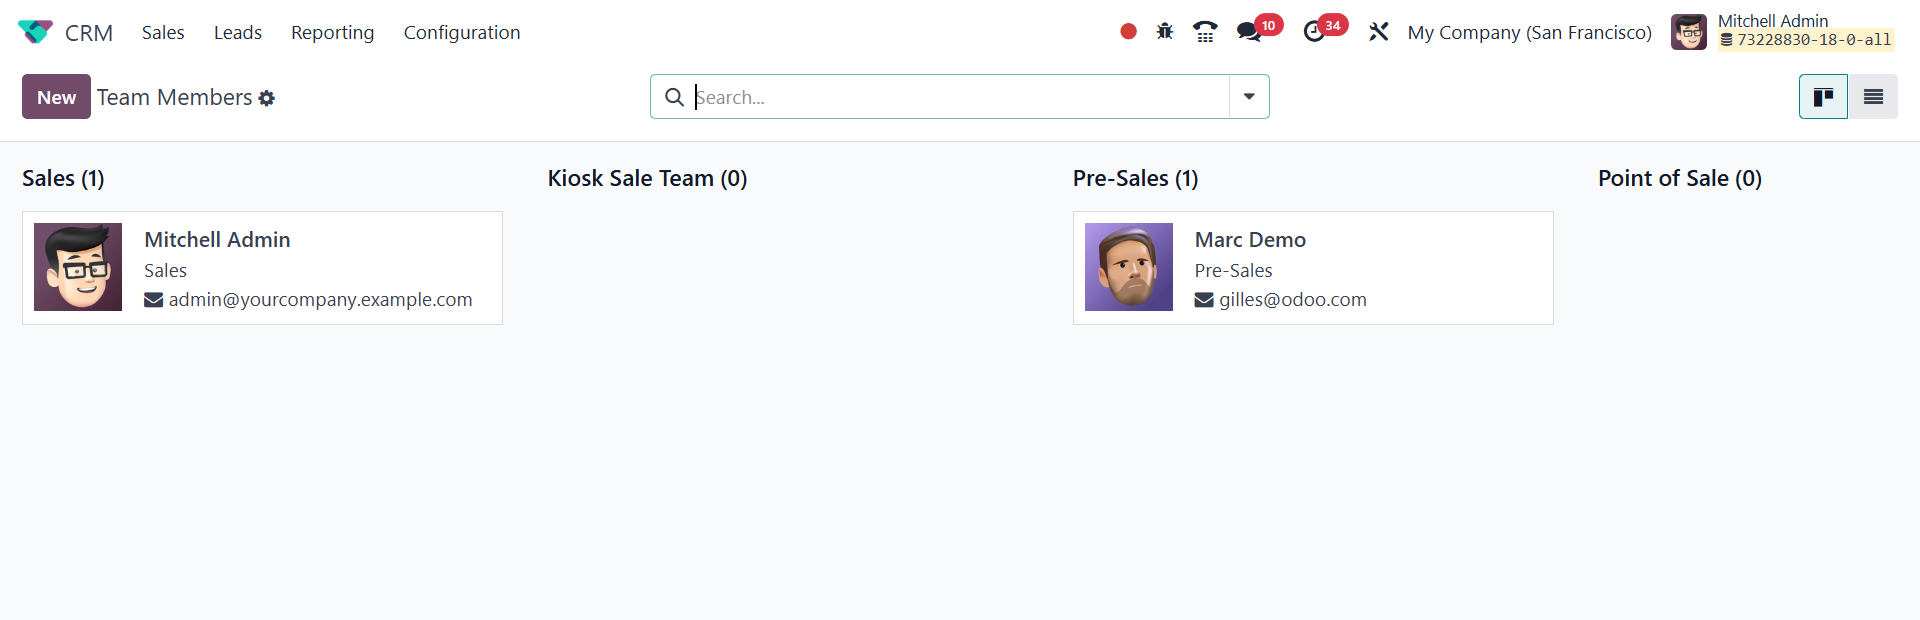
3.5 Team member
Each sales team's list of members
can be viewed independently
by selecting the Team Members
option from the Configuration
window. As seen in the image
below, each sales team has a
list of team members.
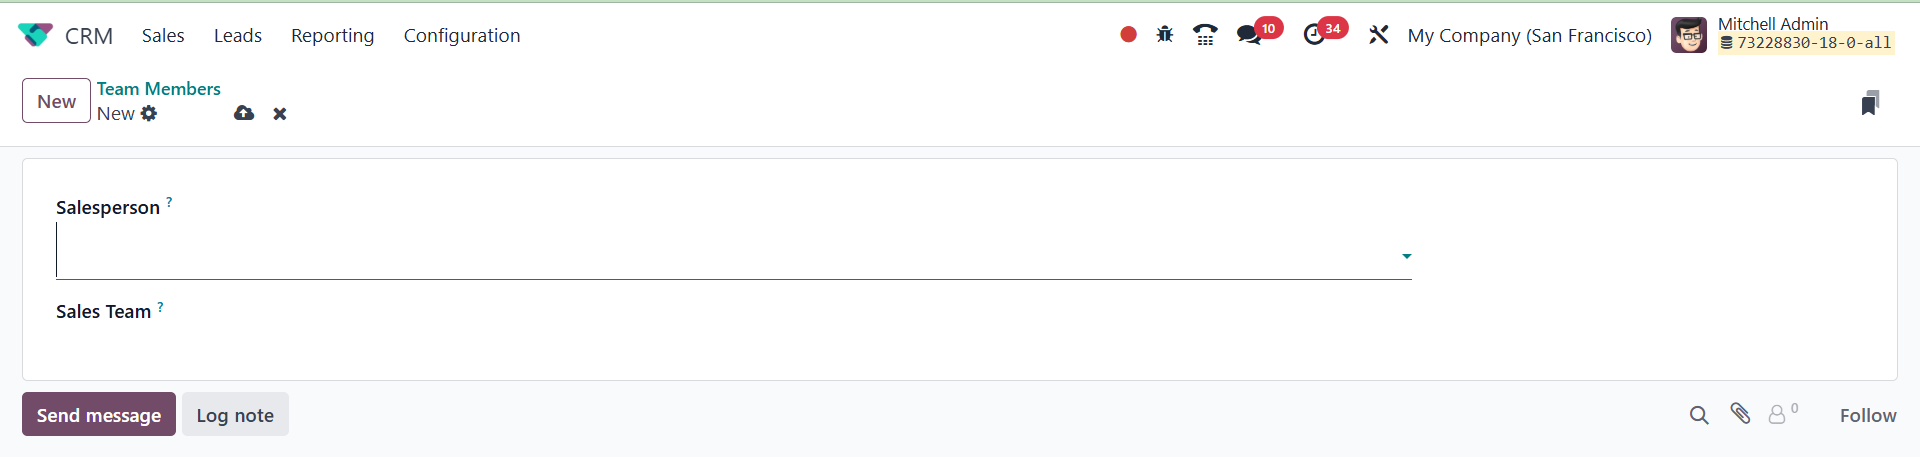
It's easy to add more team
members on this platform. To
accomplish this, click the
New button.
As can be seen below, a window
mentioning the salesperson
will appear. If the employee
mentions it on the form, they
will be added to the
designated sales team.
Under the Sales menu, there is an
additional option called
Customers that will track
every customer that was
created in Odoo 18 from
various sources.
Every new client obtained from
leads will be documented on
this platform.
3.6 Activity Types
If you want to take your company
to the next level, be in
close communication with the
clients who are worried. You
can plan a range of
activities with the customer
with the help of Odoo 18's
schedule activity feature.
This feature is present in
practically all of Odoo's
modules pertaining to sales
and customers. You can use
this capacity to communicate
with your customers through
organized programs. It's now
easy to configure different
activity types in Odoo 18.
The Activity Types option in
the Configuration menu allows
you to define new activity
kinds.
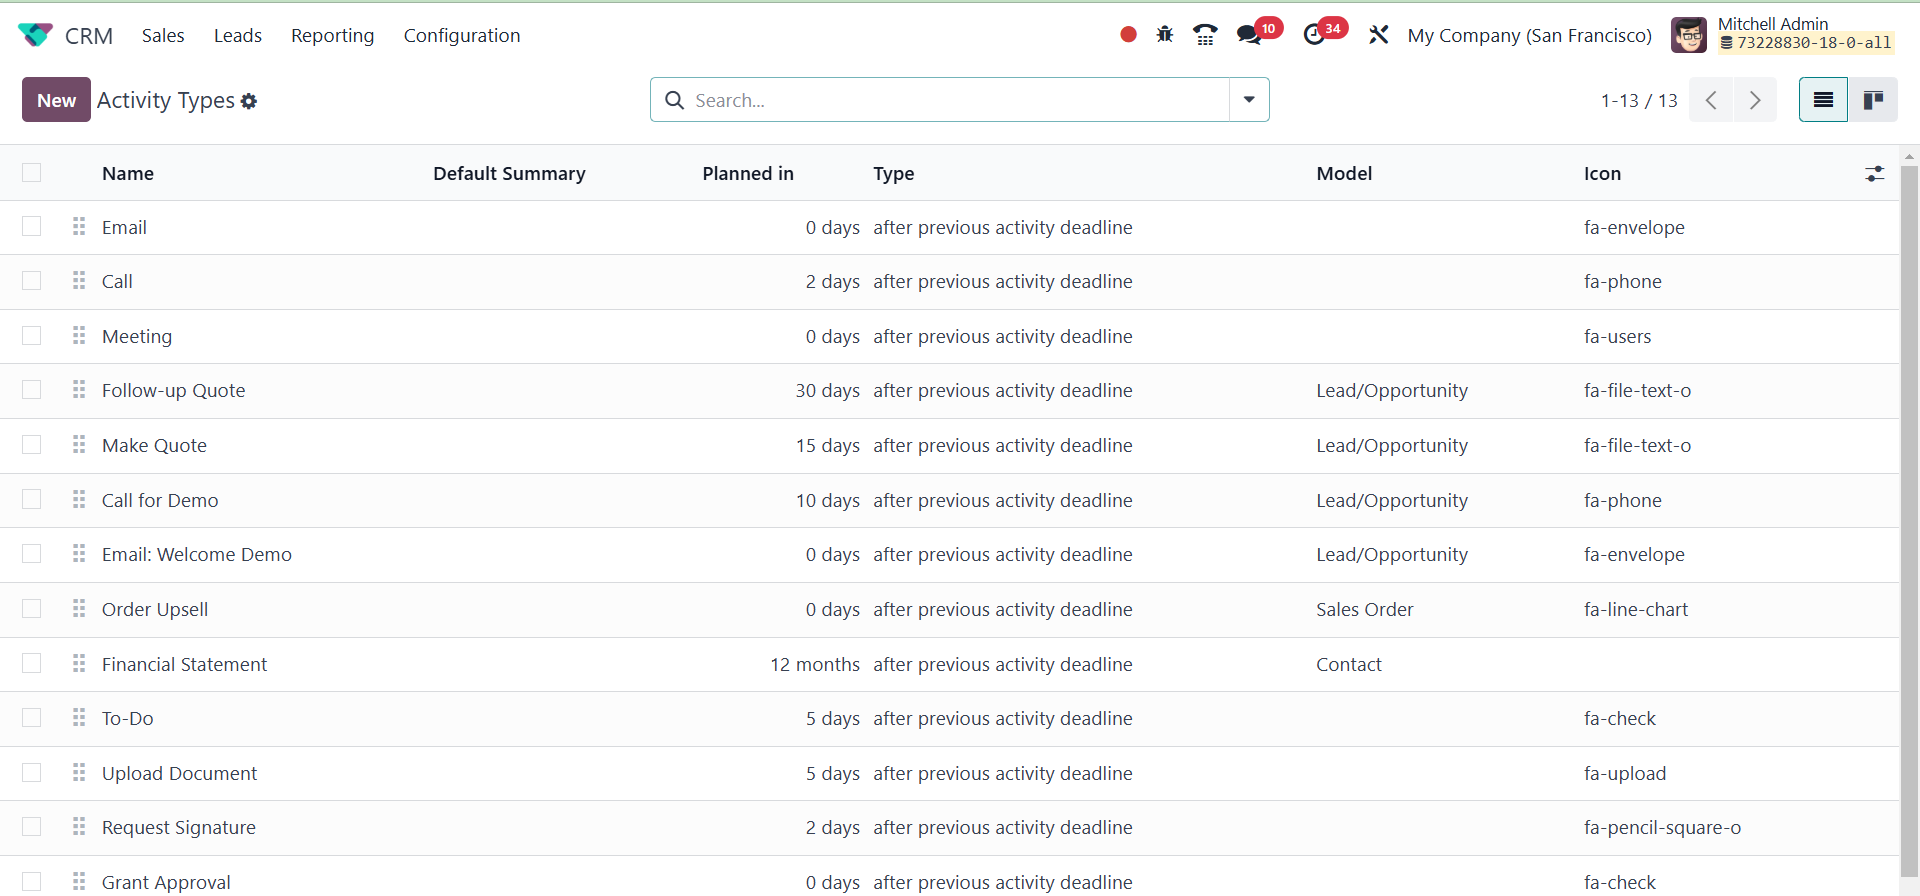
As seen in the screenshot below,
this platform displays the
previously specified activity
categories along with the
details of the Name, Default
Summary, Planned In, Type,
Model, and Icon. Now let's
look at how to construct a
new Activity Type on this
platform.
For this, you can click the New
button. To establish a new
activity type, you can first
type the name of the activity
in the box's specified space.
After stating the activity's
name, you can select a
suitable action from the list
that is supplied.
Actions like accessing the
calendar view or marking
something as completed when
it is submitted can cause
certain behaviors. The action
can be a phone call, meeting,
reminder, tax report,
document submission, or none
of the aforementioned. For
this activity type, include
the Model and Default User in
the relevant fields. This
activity type will only be
relevant to the model that is
described; it will not be
present when managing
activities for other models.
The default summary for this
specific activity type will
be the few sentences you
submit about the activity in
the Default Summary section.
You can specify the icon,
decoration type, and default
note for the activity type in
the appropriate areas.
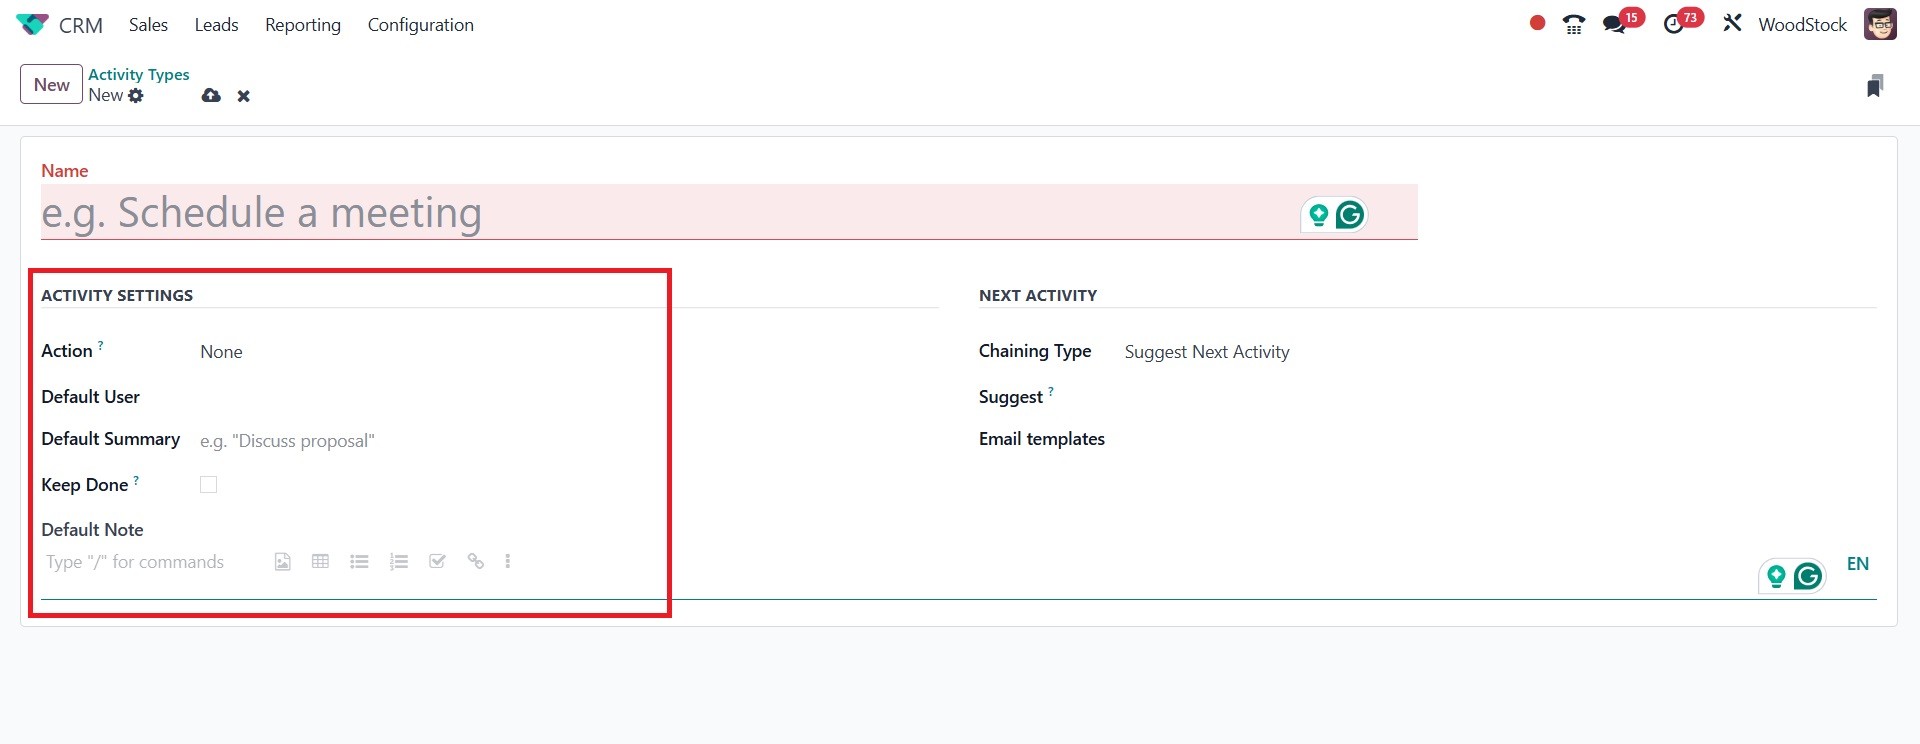
When creating a new activity
type, you will be presented
with an extra tab where you
can provide the details of
the NEXT ACTIVITY.
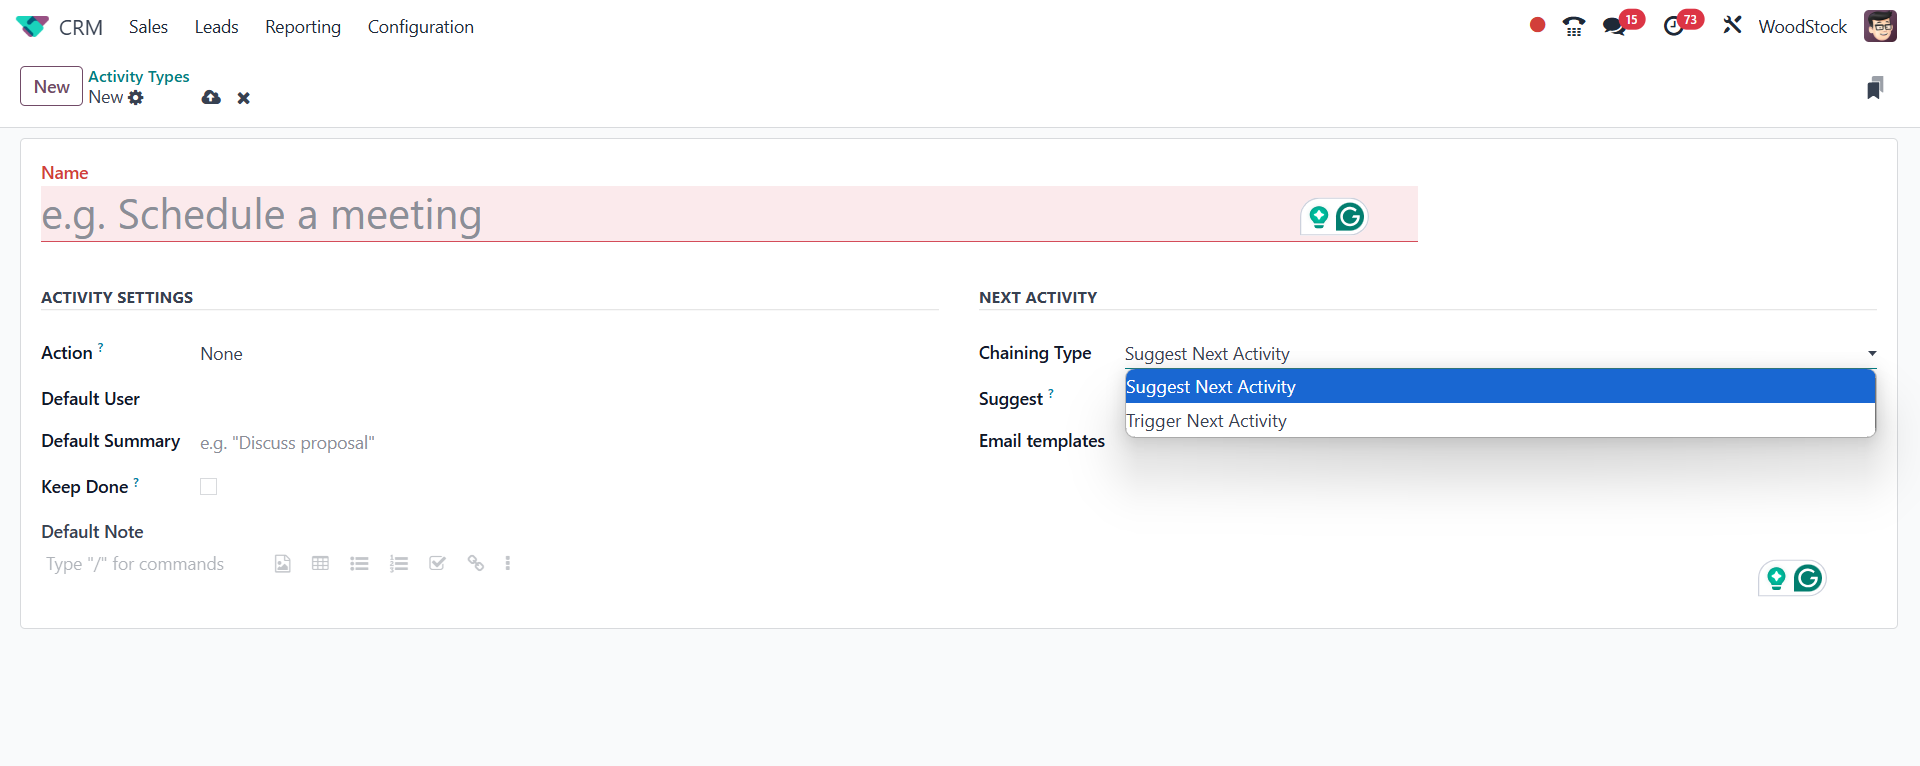
Under the Next Activity tab, you
can choose either Trigger
Next Activity or Suggest Next
Activity as the Chaining Type
action. Selecting the Suggest
Next Activity option will
allow you to input the next
activity as a proposal. By
doing this, Odoo will present
the previously mentioned
action as soon as the current
one is marked as finished.
When you use the Trigger Next
Activity option, you can
define the next activity in
the Trigger box. When the
current activity is finished,
Odoo will start the next one
right away. You can include
email templates that can be
used to send emails to the
impacted customers once this
activity is scheduled with
them. You can set the due
date for the action in the
Schedule box.
Here, you can specify the number
of days, weeks, or months
that must elapse until this
task is completed. By
following these steps, you
can quickly create new
activity types in Odoo 18.
Now let's discuss expanding the
Odoo 18 CRM pipeline with
more phases.
3.7 Stages
We mentioned how leads and
opportunities are arranged at
different stages of the
pipeline while we were
talking about the main
dashboard of the Odoo 18 CRM
module. It will always be
easier for you to see how
each operation is progressing
if you give recordings
distinct stages. Depending on
your needs, you can organize
data into various stages. If
you meet the requirements of
a certain level, you may
simply drag & drop the record
into the next stage. The
interface makes it simple to
design new stages. How to use
the pipeline to create new
stages is previously covered
in the previous section of
this chapter. Now let's look
at the stages creation
procedure using the
Configuration menu's Stages
option.
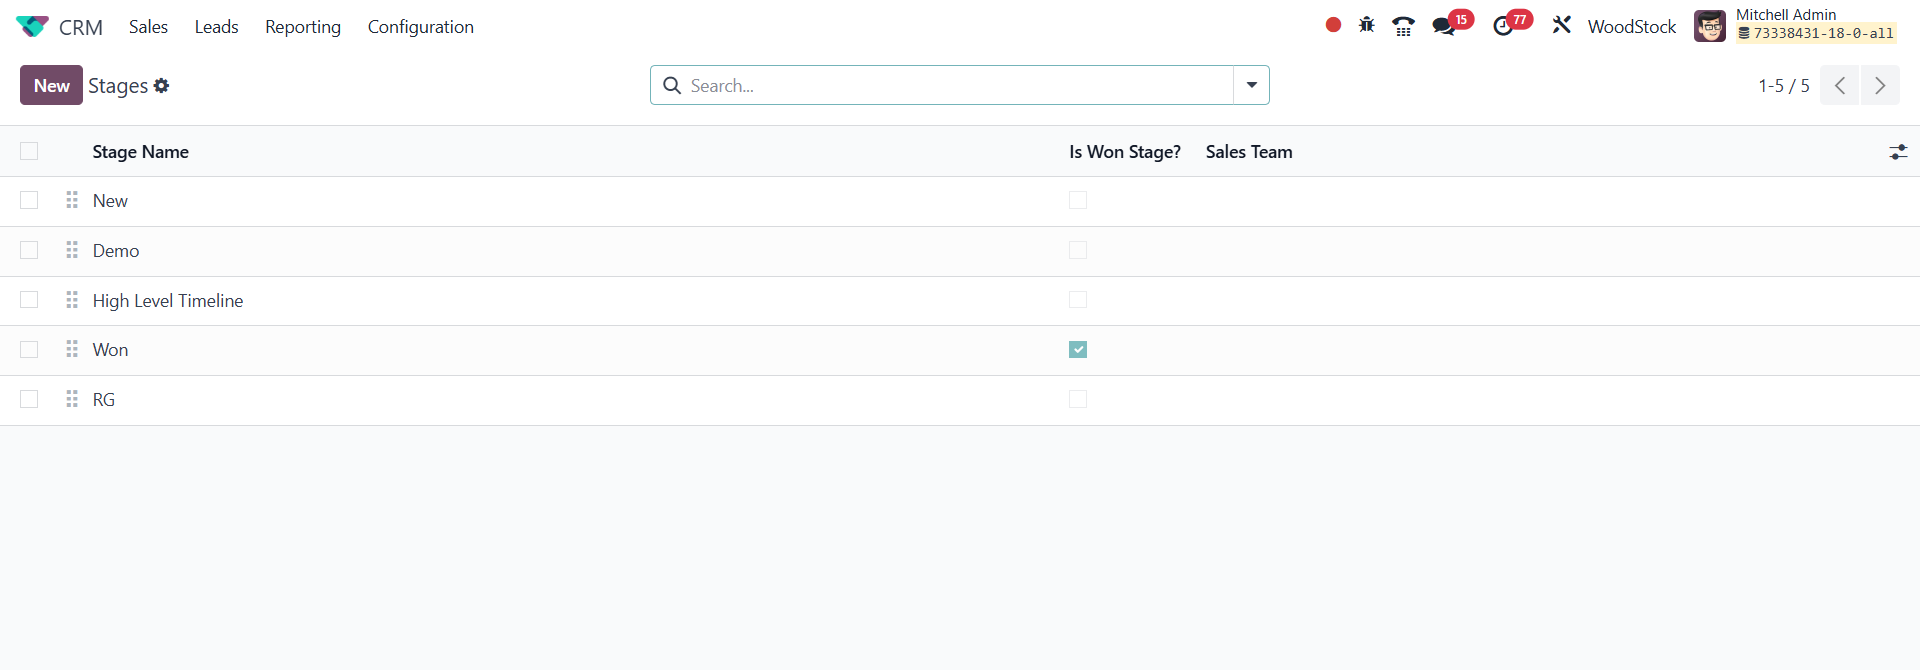
As can be seen in the image
below, this window displays a
list of the previously
defined stages. You can alter
the current stages by
choosing the required stage
from the list that is
supplied. To add a new stage
to your pipeline of leads and
prospects, click the New
button located in the upper
left corner of the screen.
Enter the stage's descriptive
name in the Stage Name field.
You can activate the Is Won
Stage setting if you want to
think of this particular
stage as the
Leads/Opportunities won
stage. This step can be
folded into the pipeline by
activating the Folded in
Pipeline option. You can list
particular teams that use
this stage in the Sales Team
section. Making a note of
this will stop other teams
from seeing or utilizing this
particular stage.
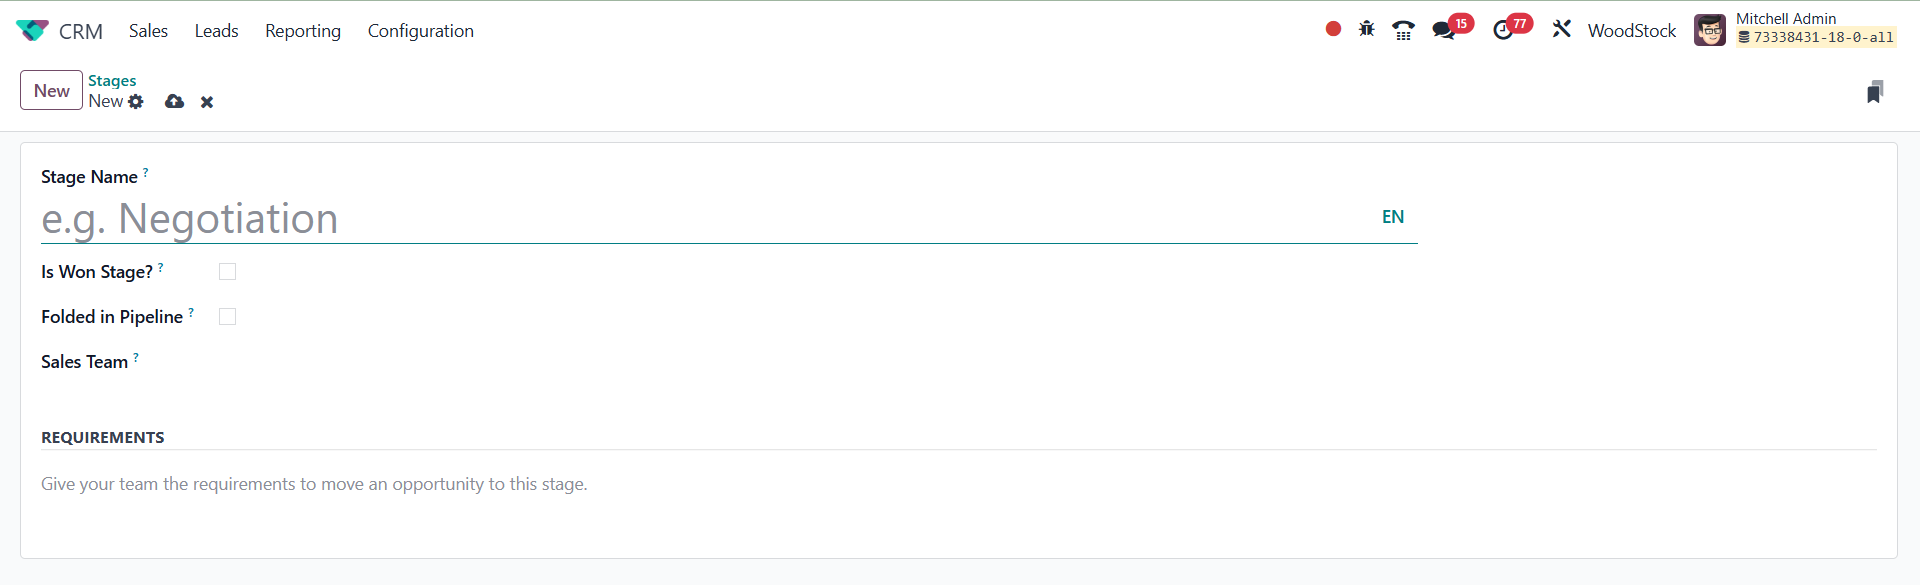
You can outline certain
conditions in the conditions
section to forward a lead or
opportunity to this stage.
After you have completed all
the necessary fields, the new
stage will be added to the
existing list of stages.
Creating new automations is one
new feature that Odoo 18
progressively adds. As can be
seen in the screenshot below,
the user can also alter or
change the pipeline's steps.
A brand-new Automation option
will appear. This allows
users to design rules that
will perform tasks
automatically.
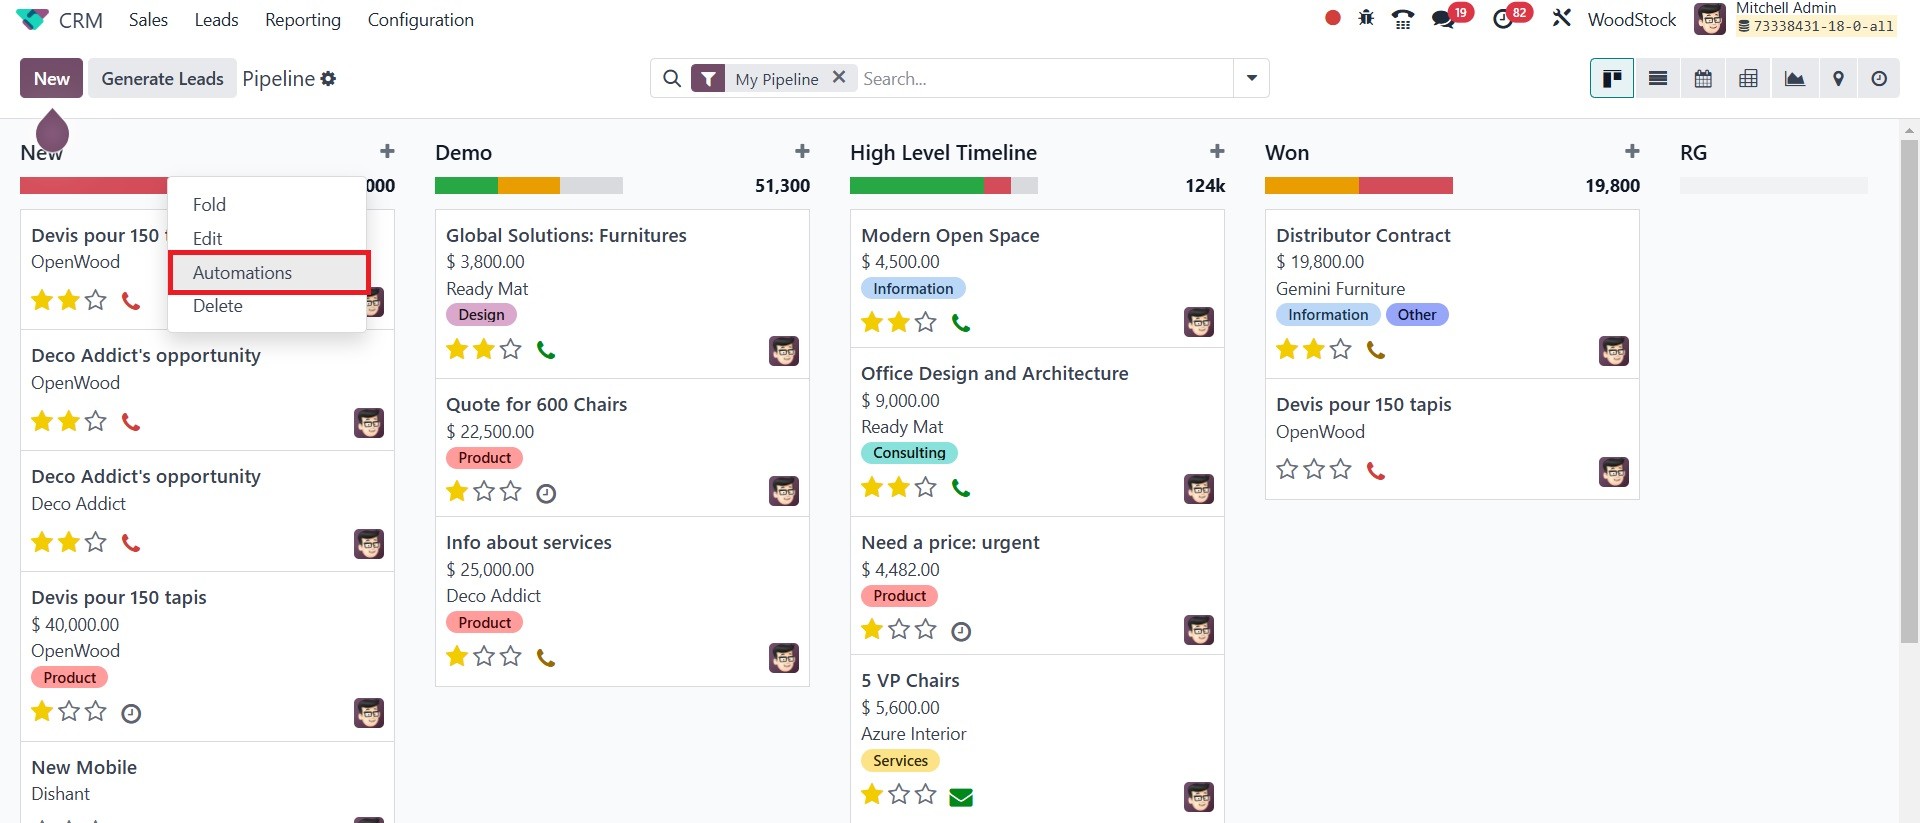
To add a new automation rule,
click the New button.
The Lead/Opportunity model should
be chosen. After choosing the
Trigger, you can add more
requirements by using the
Edit Domain option. The
Actions To Do tab allows you
to add actions. A new page
will open when you click the
Add an action button.

Decide on the type of action.
Records may be updated,
activities can be created,
emails and SMS can be sent,
followers can be added or
removed, code can be
executed, webhook
notifications can be sent,
and previously completed
actions can be executed.
TECHNICAL SETTINGS is where you
can add Allowed Groups. It
mentions the groups that can
execute the server operation.
Leave the pitch empty so that
everyone has room. Next,
provide the specifics of the
chosen action type in the
ACTION DETAIL box.
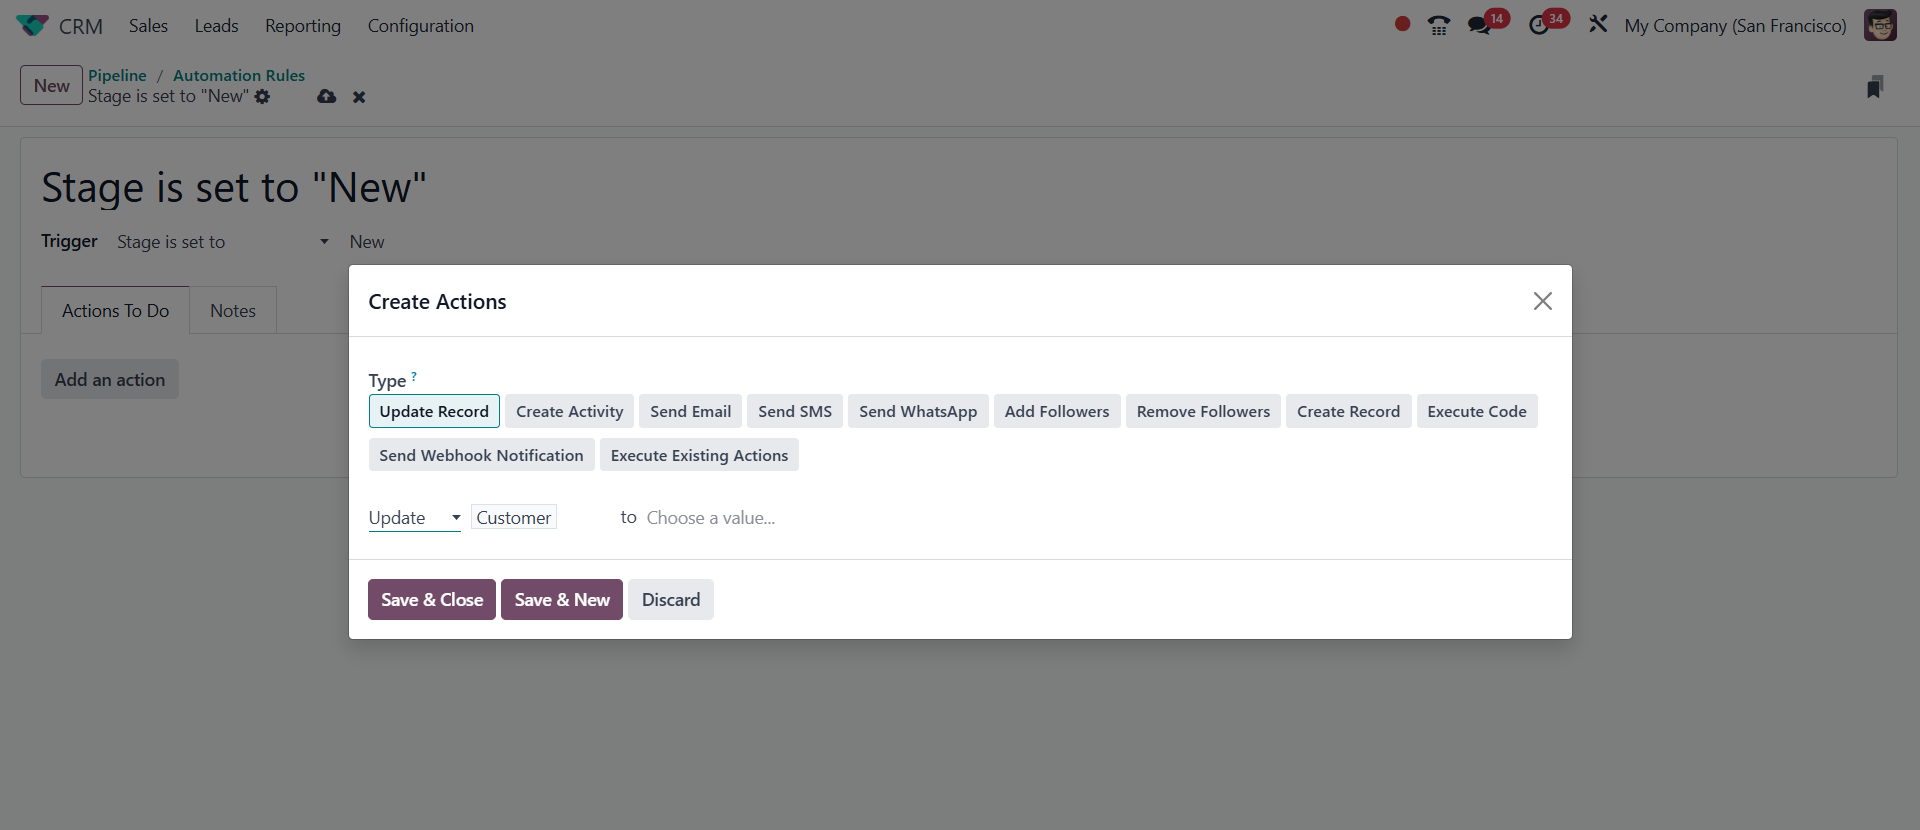
Once you have completed entering
all the information, click
Save & Close. The defined
automation action will then
start if the given condition
is satisfied.
3.8 Lost Reason
While dealing with them, you may
lose certain leads or
opportunities for a variety
of reasons. Odoo 18 CRM
allows you to track these
leads and opportunities as
well as the reasoning behind
them. Later, you might be
able to reclaim these lost
opportunities with the help
of Odoo 18. By choosing the
Lost Reasons option from the
CRM module's Configuration
menu, you may access the
platform to configure the
causes of lost leads or
chances.
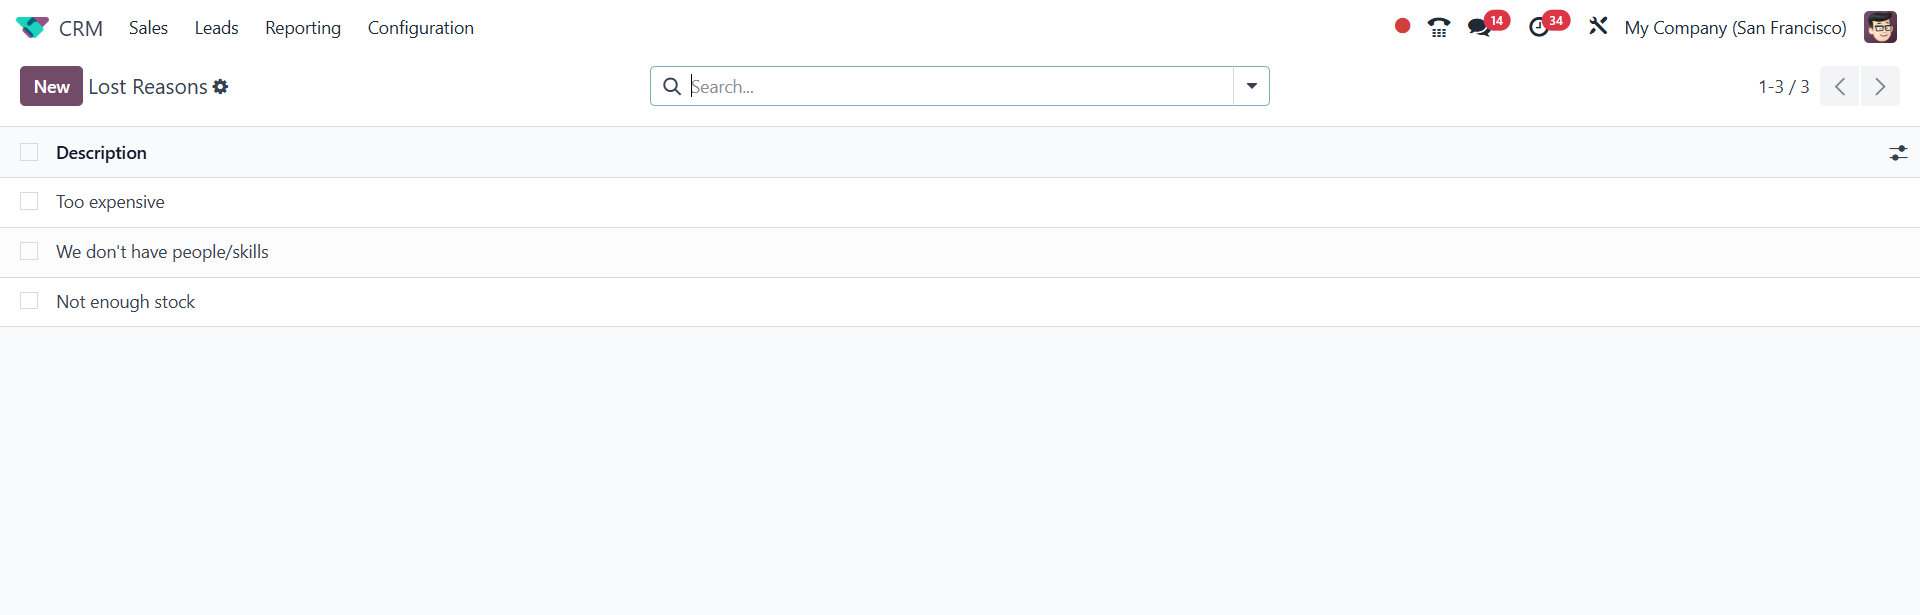
You can find other Lost Reasons
that have previously been set
up on this website. The NEW
button now allows us to
establish a new lost cause.
This can be done with just a
few clicks.
Once you click the New button, a
new line will appear beneath
the old line; simply state
the lost cause in this line.
Once mentioned, the new Lost
Reason will be stored in your
database. Now let's look at
how to use these
justifications for a missed
chance or lead. When handling
a lead or opportunity in the
Odoo CRM module, you will
have the option to designate
it as Won or Lost.
If you lose a chance, click the
Lost button. Clicking this
button will bring up a pop-up
that mentions the missing
cause.

The drop-down menu allows you to
view the list of lost causes
that we previously
established. Select the
appropriate reason from the
presented list, then click
the Mark as Lost button.
After you report the reason
for the loss, your
opportunity will be marked as
a loss, as shown in the
screenshot below.
3.9 Resellers
By using the Odoo 18 ERP system,
you may create resellers and
share some leads and
opportunities with them. This
functionality is linked to
the Resellers module that is
included with Odoo 18. A list
of resellers can be found on
your website under the
Resellers tab.
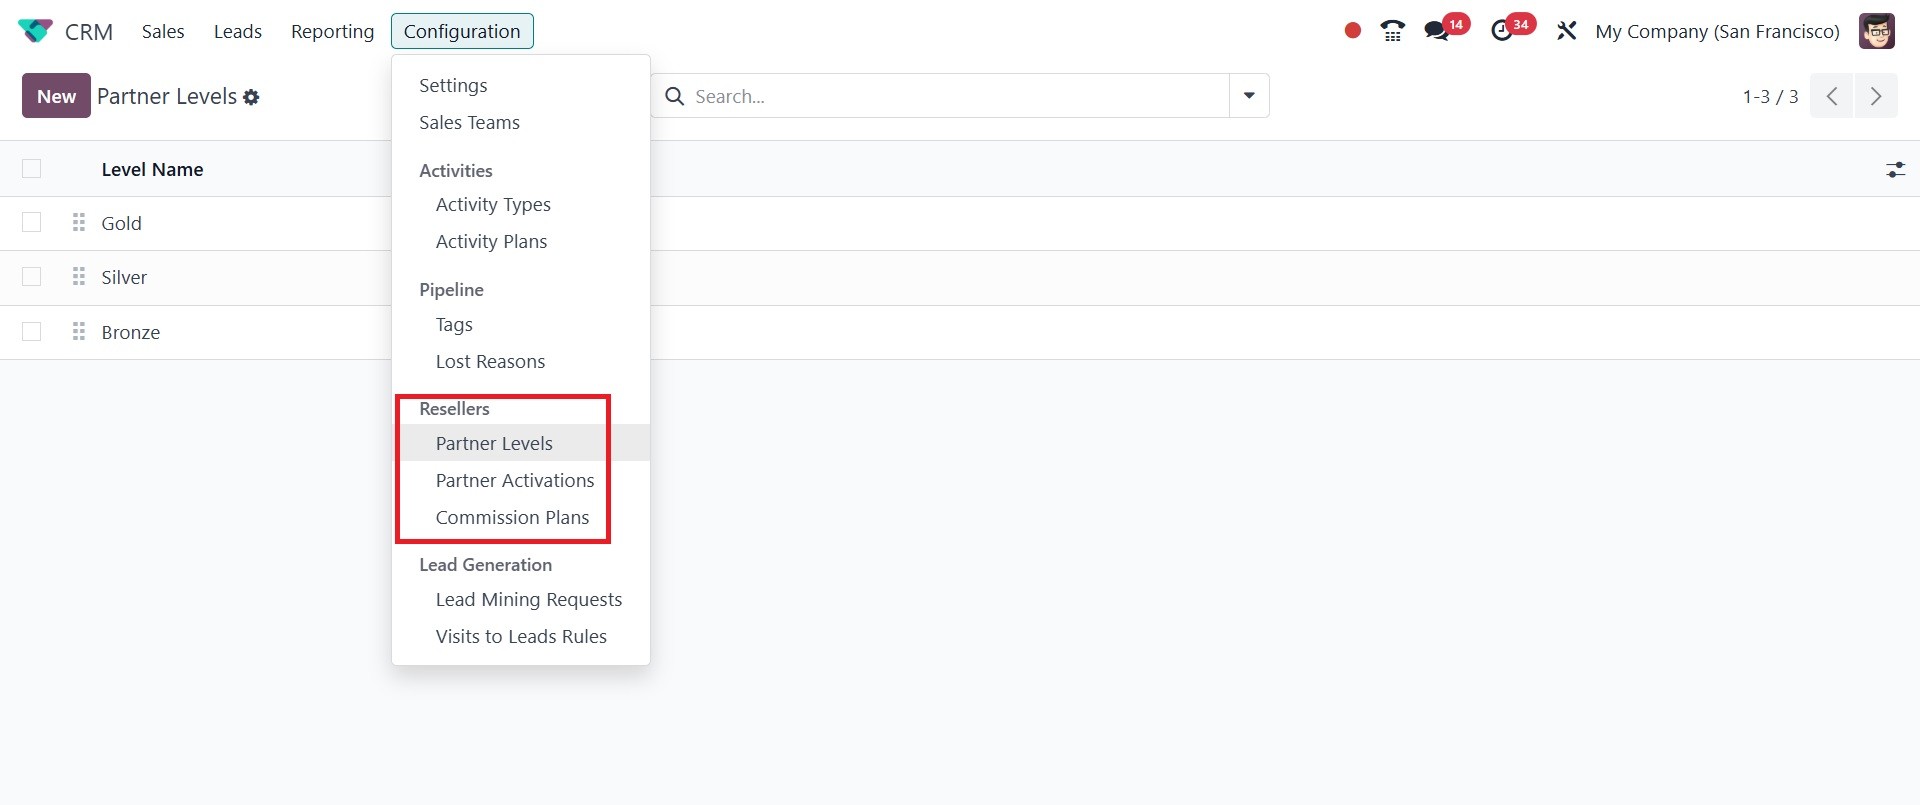
3.10 Partner Level
In the Odoo 18 CRM module, you
may offer the resellers
various Partner Levels.With
the help of the Partner
Levels option in the
Configuration menu, you can
set up multiple levels for
the partners.
You will automatically be
assigned certain partner
tiers on this platform. The
New button allows you to give
the partners a new level.
You can type the Level Name in
the designated space. In the
Level Weight section, you can
specify the probability of
providing a lead to the
partners in this level. The
Sequence number for the level
is shown in this window.
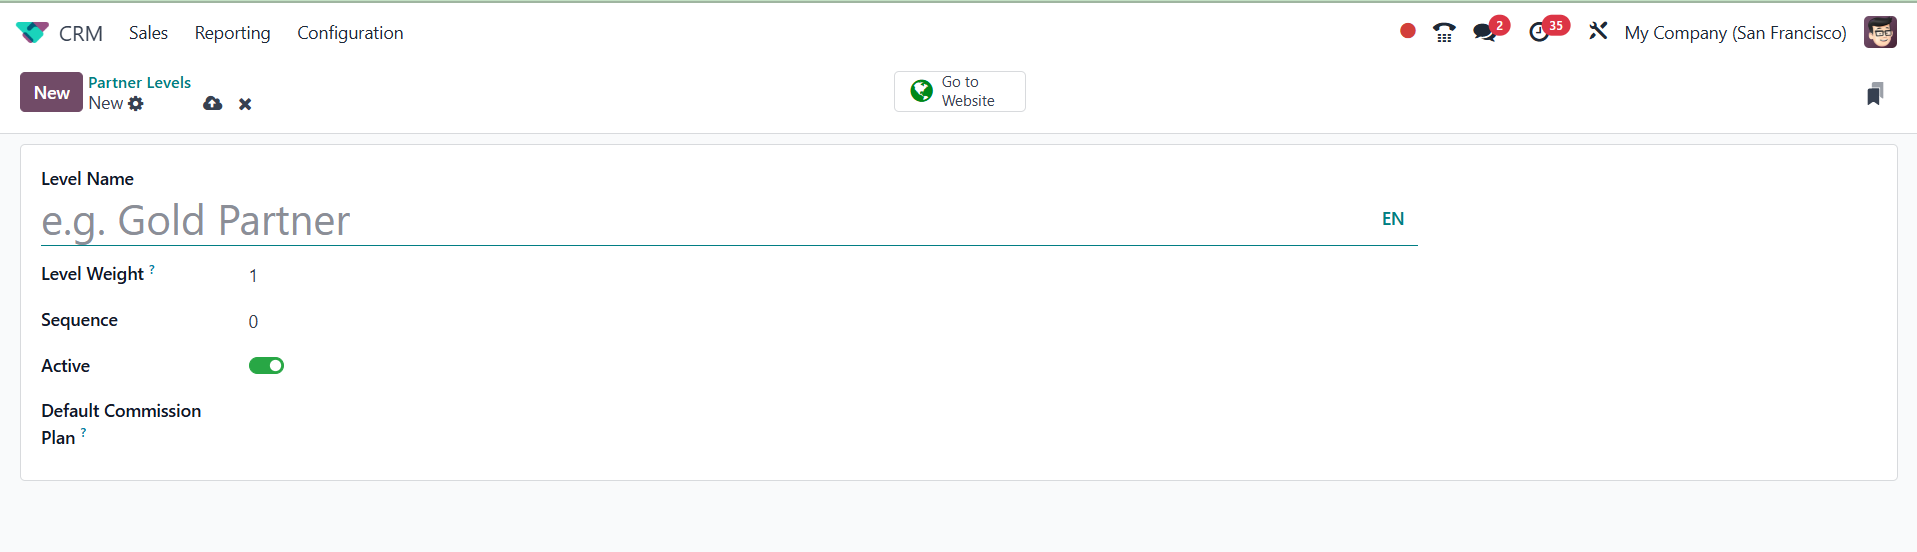
Clicking the Active button will
bring up this level. Add a
commission plan to the
Default Commission Plan for
this partner level. Clicking
the Save button will add the
new partner level to the
existing list.
3.11 Partner
Activation
The Partner Activations option in
the Resellers tab of the
Configuration menu allows you
to create several partner
activation methods. Using the
New button, you can rapidly
type the Partner Activation's
name in the designated field.
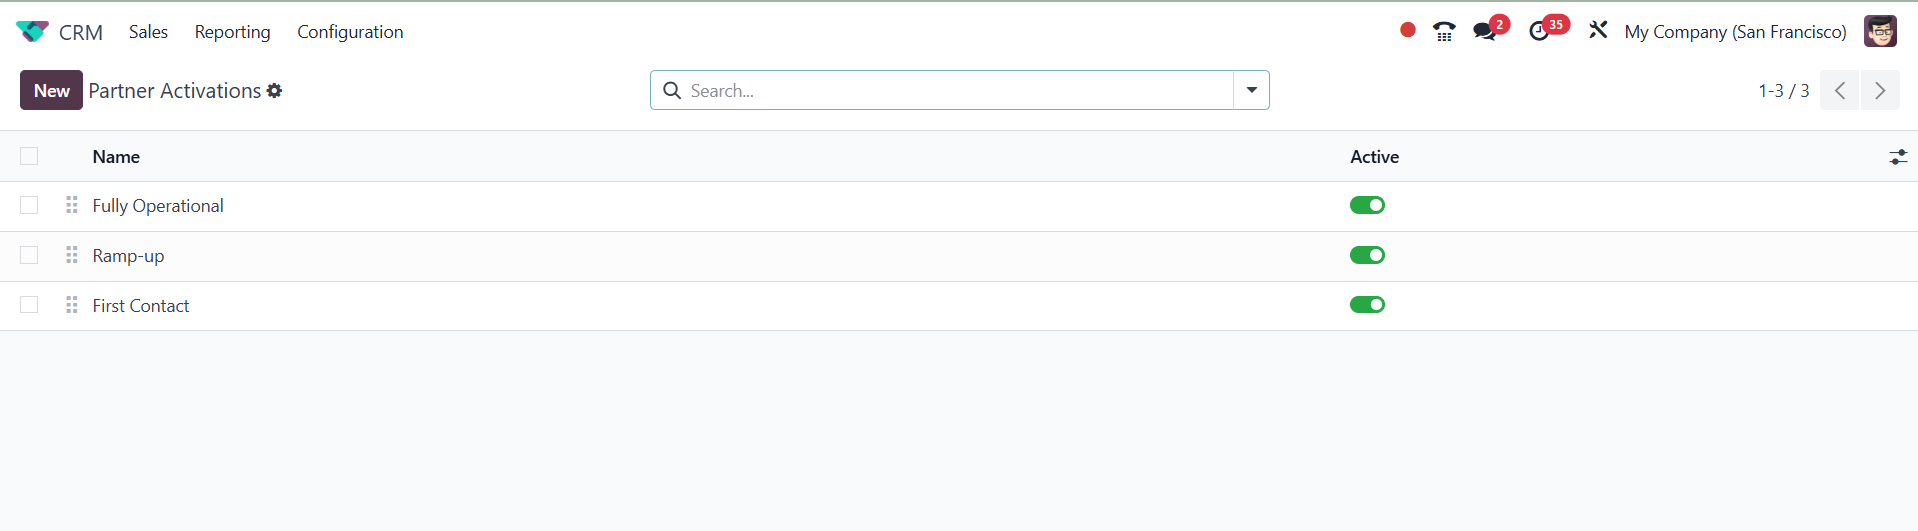
On selecting the New option, you
will have a new line to add
the name, and an active icon.
Later, go for the save icon.
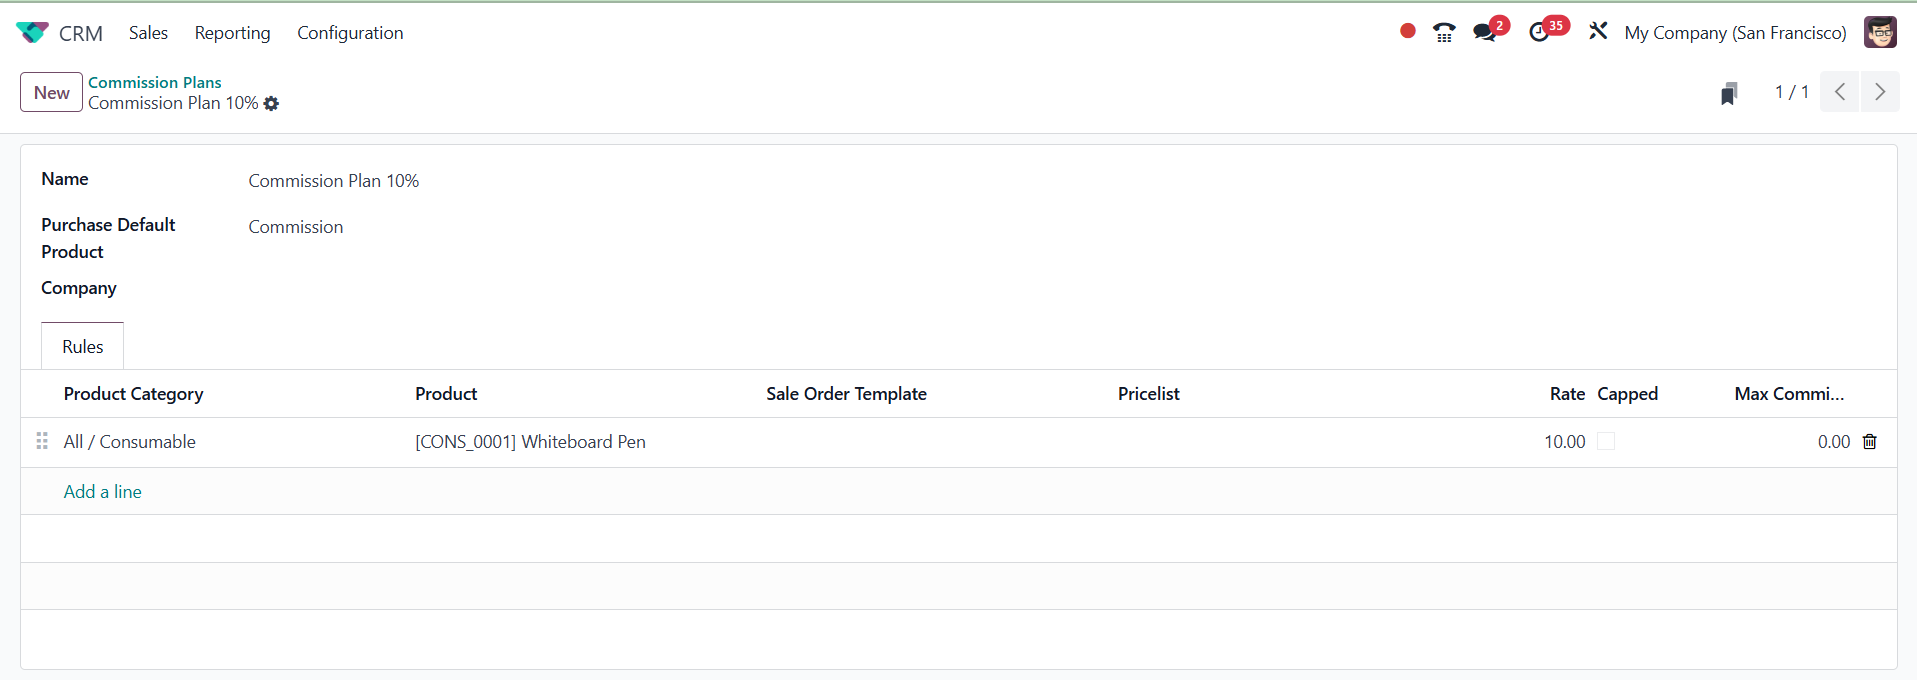
3.12 Commission Plan
The Partner Activations option in
the Configuration menu's
Resellers tab allows you to
define various partner
activation techniques. The
New button allows you to
readily insert the Partner
Activation's name in the
designated field.
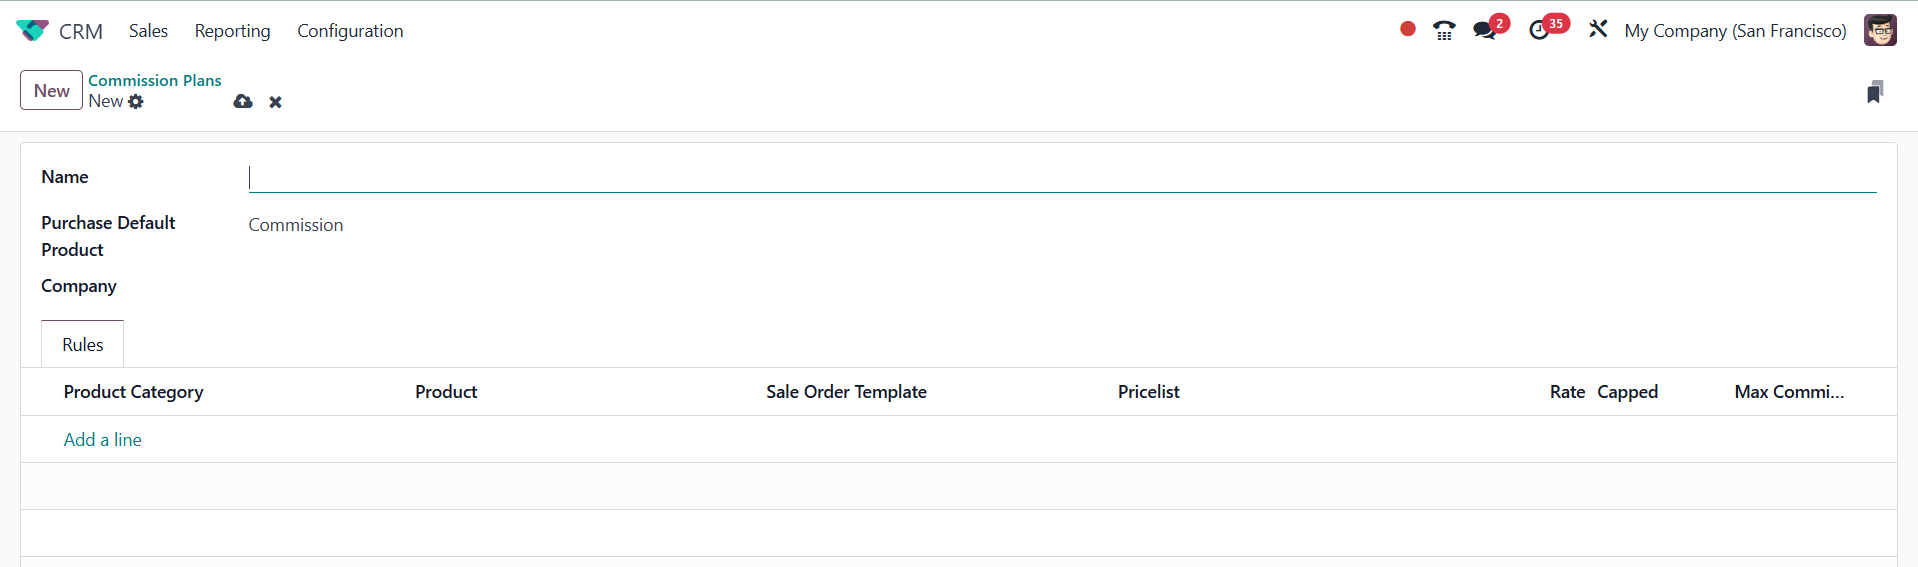
You can provide the name of the
commission plan in the Name
field. If you would like to
pay a partner 10% of the
invoiced amount as a
commission, you may call the
commission plan "Commission
10%." The Purchase Default
Product shows up as
Commission in the
corresponding field. This
service offering will be used
by commission operations to
draft a purchase order. The
Purchase module will
automatically generate a
purchase order when the
purchase default product is
provided. In the Company
section, type the name of the
business. The rules for the
commission plan can be added
under the Rules tab. The Add
a Line button allows you to
include the Product Category,
Product, Sales Order Number,
Pricelist, Rate, Capped, and
Maximum Commission.
Click the Save button once you
have completed the new
commission plan in its
entirety.
Your alliance partner can now
take ownership of this
commission scheme. You can
rapidly do this by selecting
the partner's contact details
from the Customers menu.
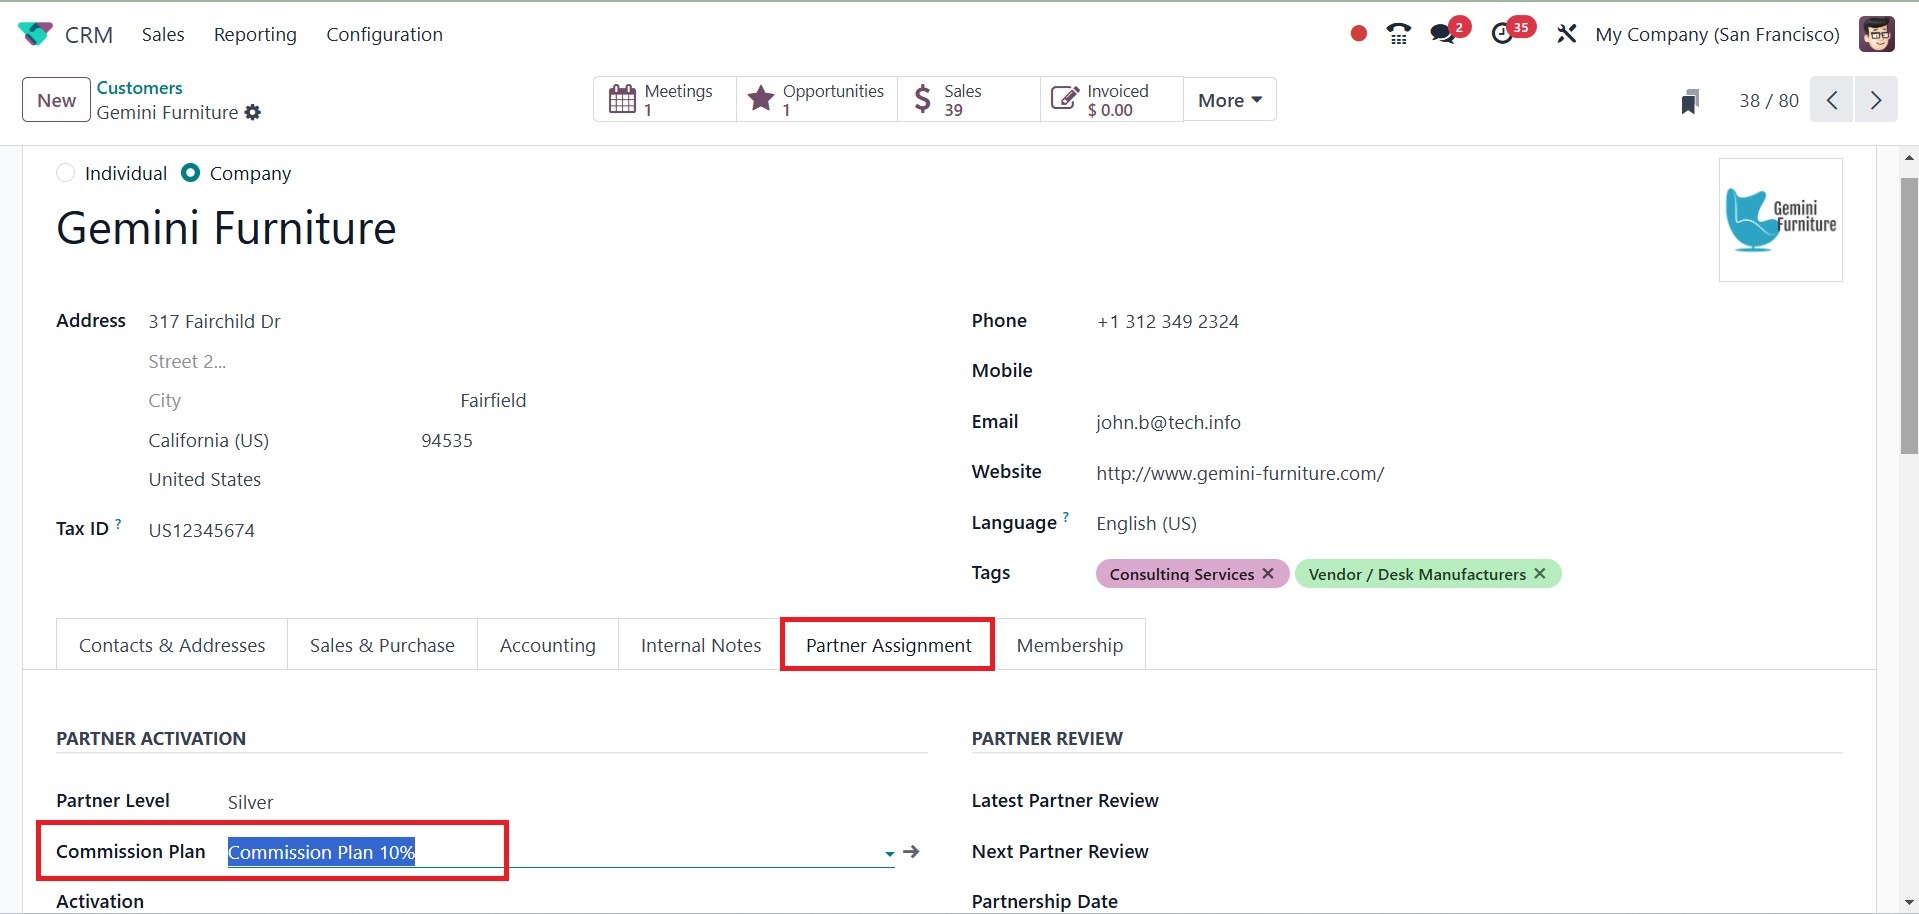
In the Partner Activation
section, which is located
beneath the Partner
Assignment page, you can
specify the Commission Plan.
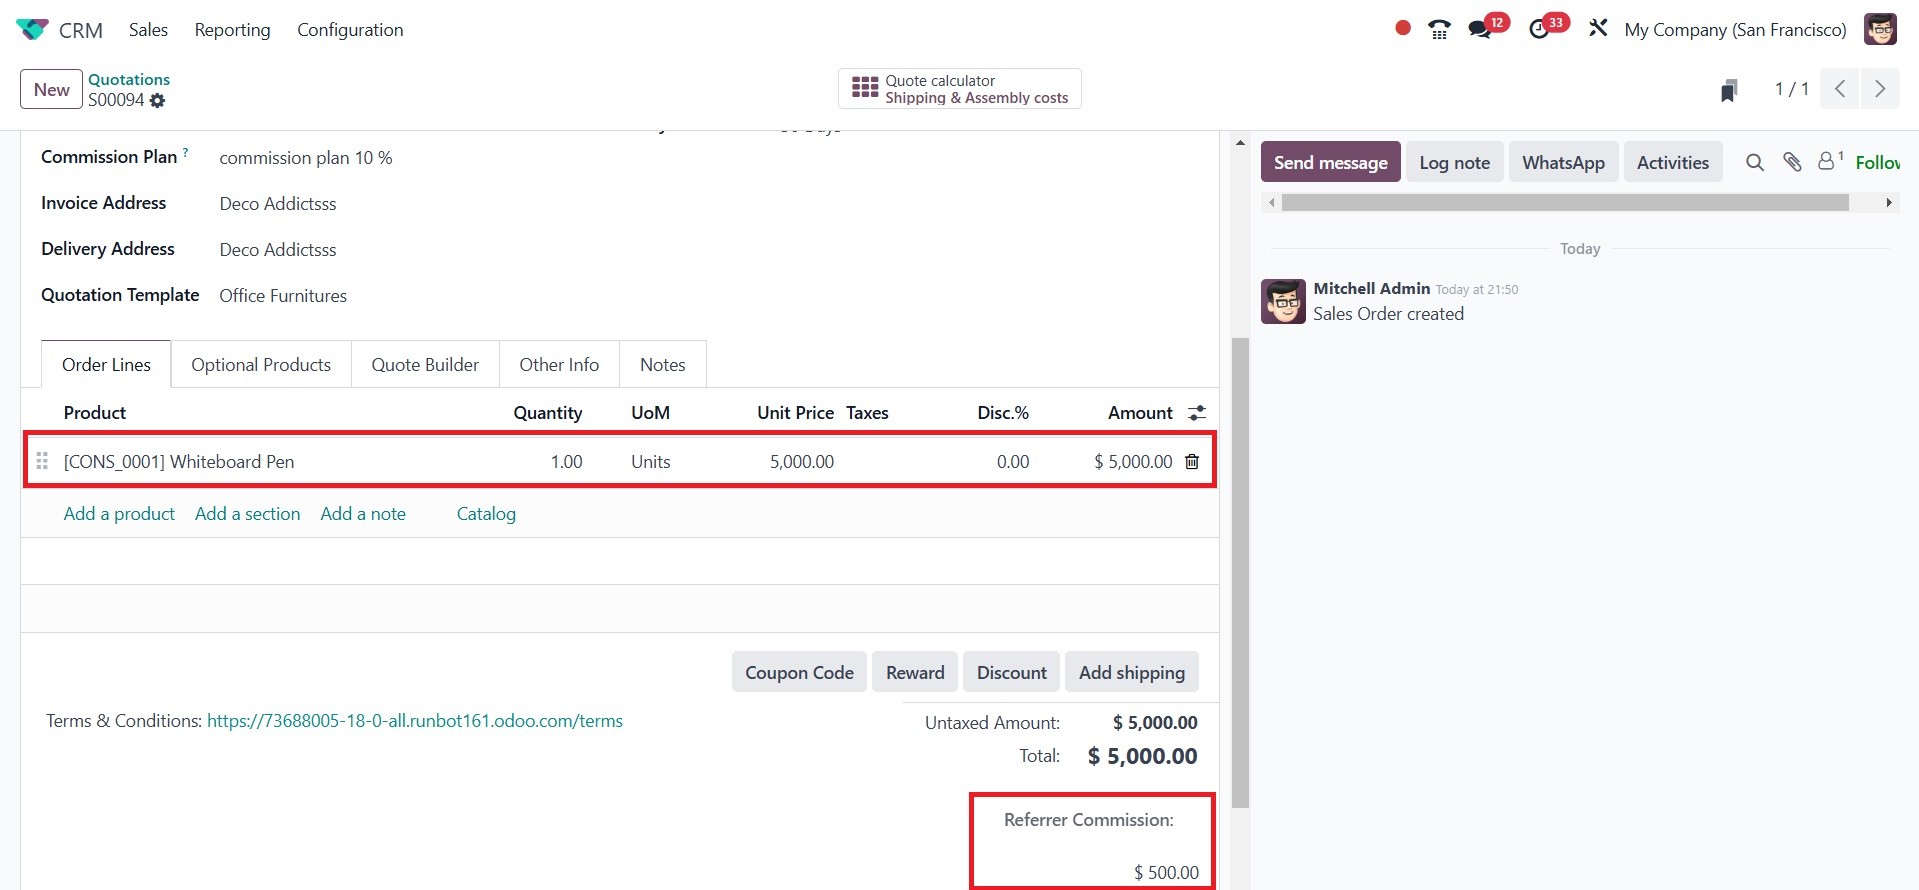
After a customer who was
recommended by your partners
buys a product from the
designated product category,
10% of the invoiced amount
will be paid to the partner
as a commission. When
creating a sales order for a
customer, you will see a
field to add the Referrer
information, where you can
enter the partner's ID.
The Commission Plan will
immediately appear in the
appropriate section because
we have already set up a
customized commission plan
for the partner. At this
point, you can validate the
sales order and generate an
invoice.
After the customer has finished
paying, 10% of the total
amount billed will be sent to
the partner account. Your
partner with the product
commission will receive an
RFQ from the Purchase module.
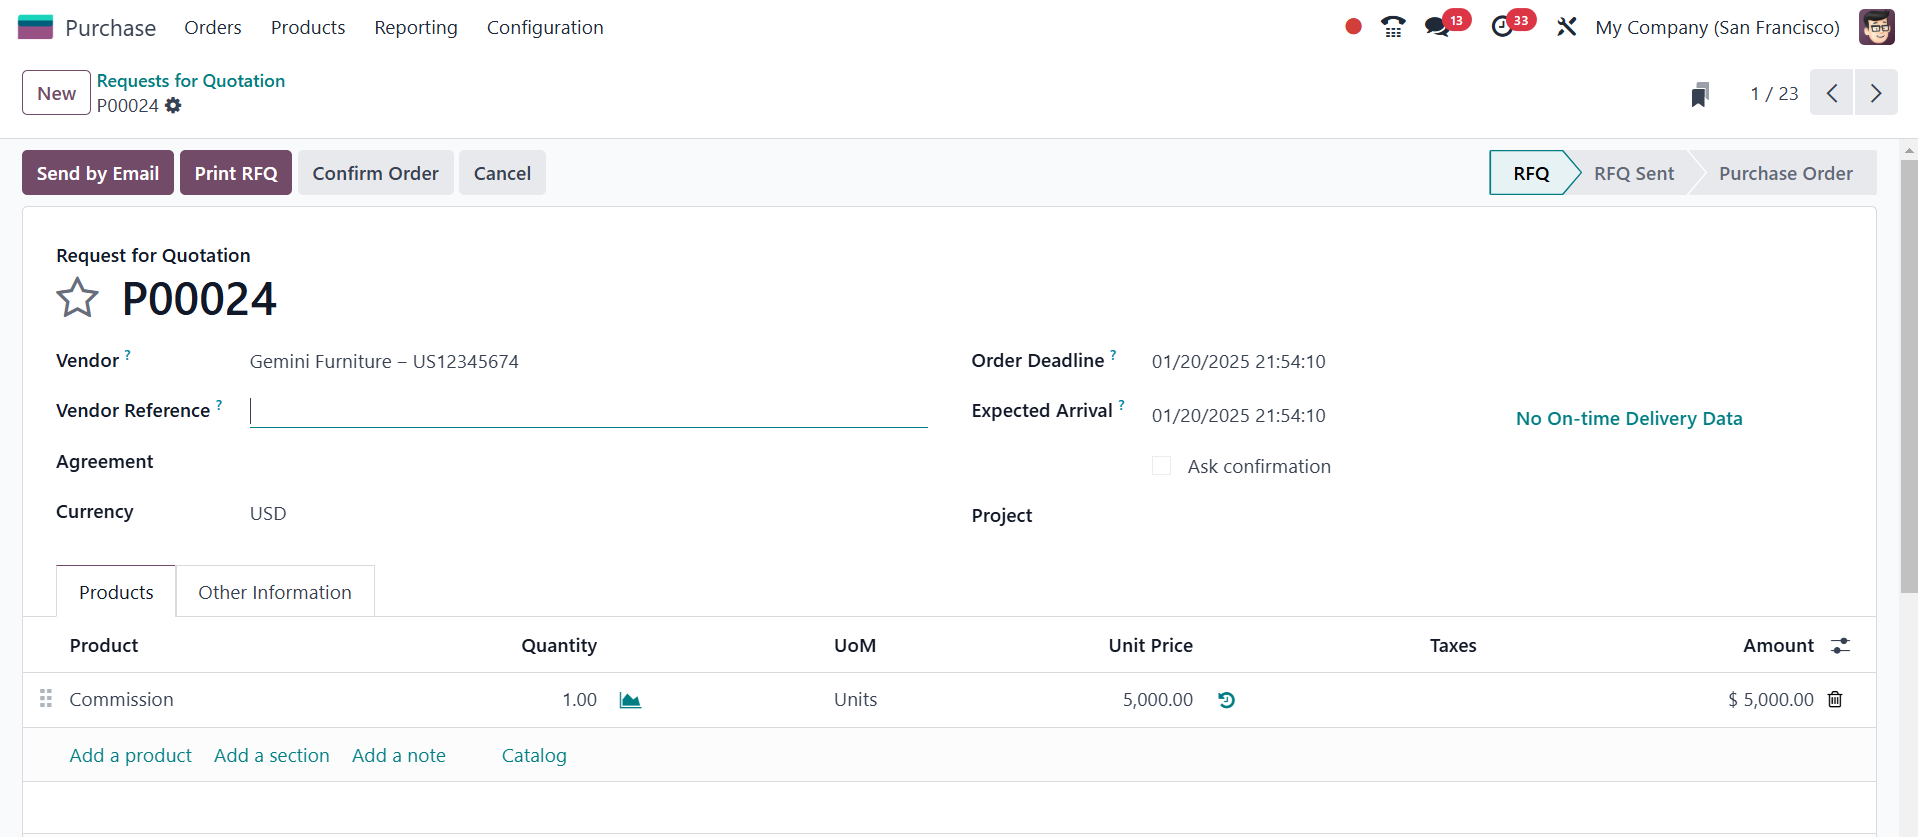
You can verify the order and
create the vendor bill. Your
partner can then receive the
commission amount.
3.13 Settings
The user has a variety of
settings options in the Odoo
18 CRM module. Several
options to activate may be
found under the CRM, Lead
Generation, and Partner
Commissions tab to enhance
the functionality of the CRM
module. Let's go over each of
these choices in greater
depth. The Settings option is
available under the
Configuration.
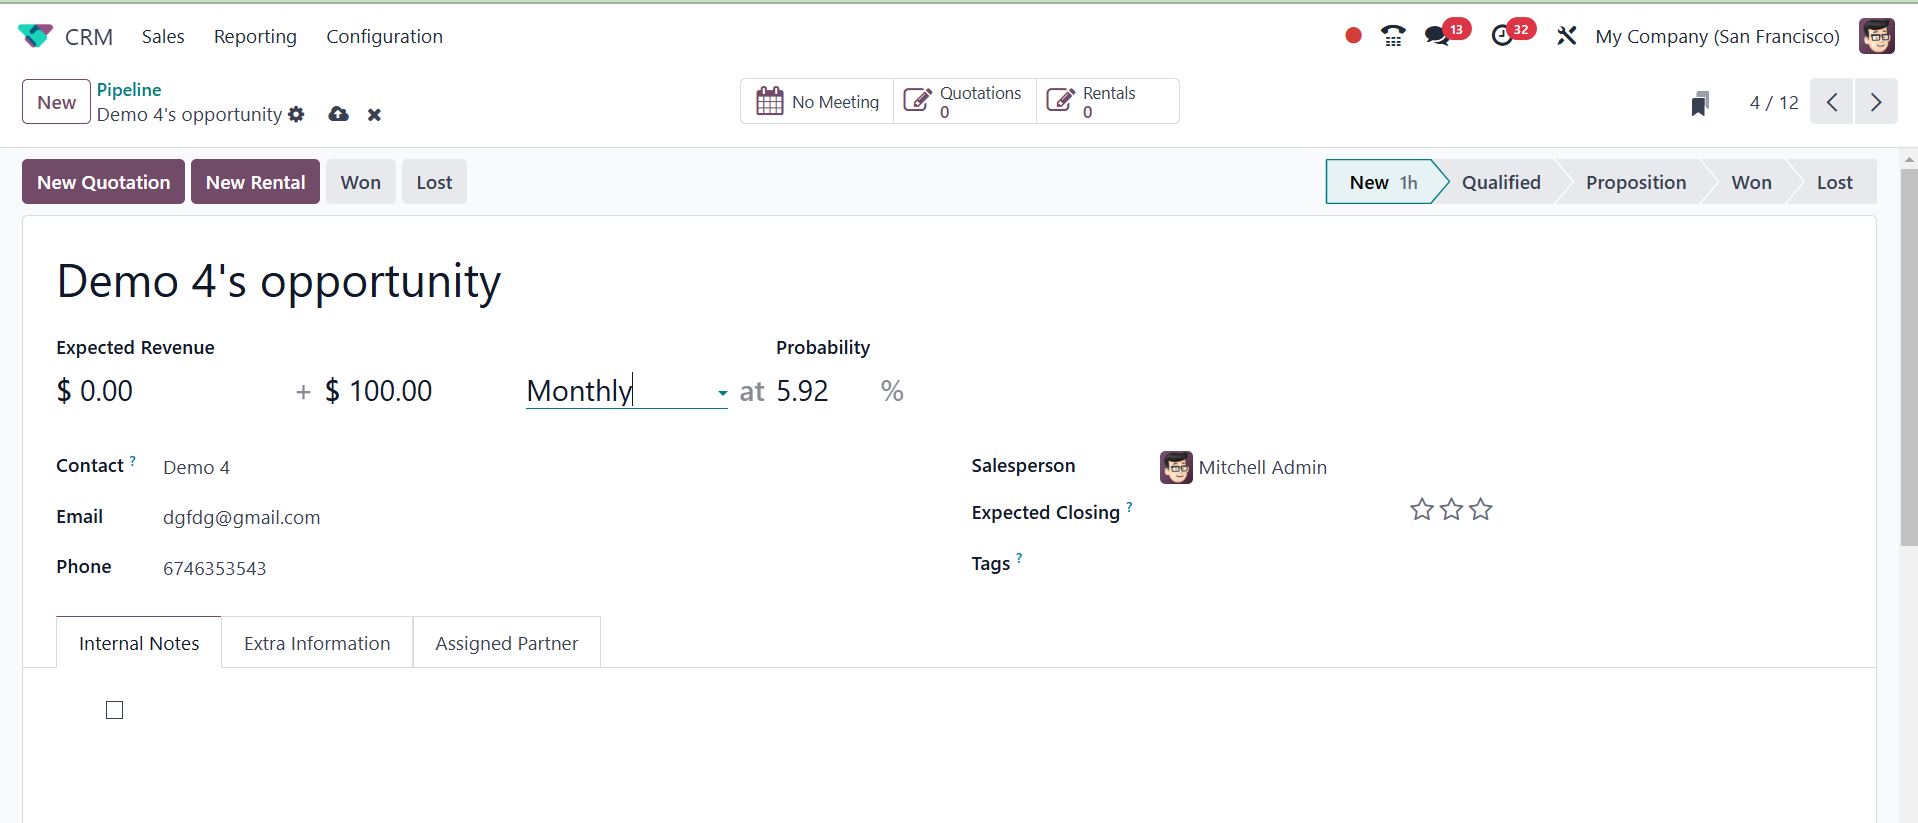
Recurring Revenue
By turning on the Recurring
Revenues box under the CRM
tab, you can specify
recurring plans and revenues
on opportunities.
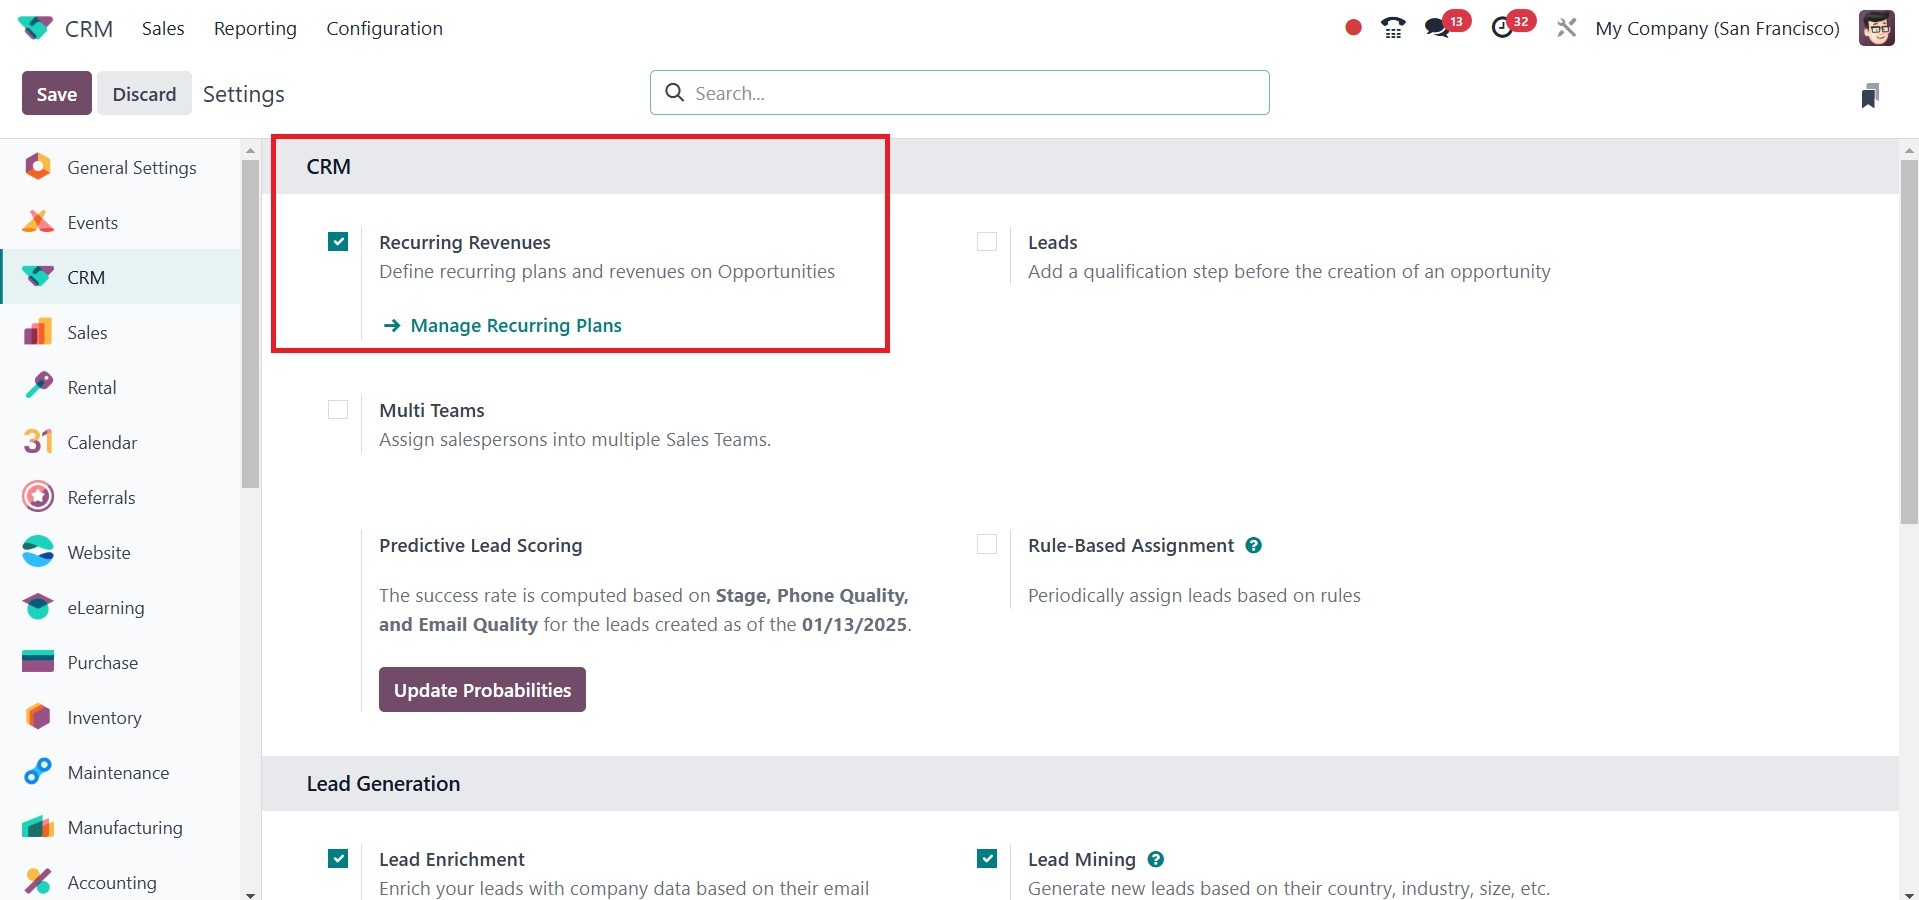
You will receive an external URL
to manage the Recurring Plans
once this option is enabled.
Using the external link
below, you can go to a new
website where you can create
new recurring plans.
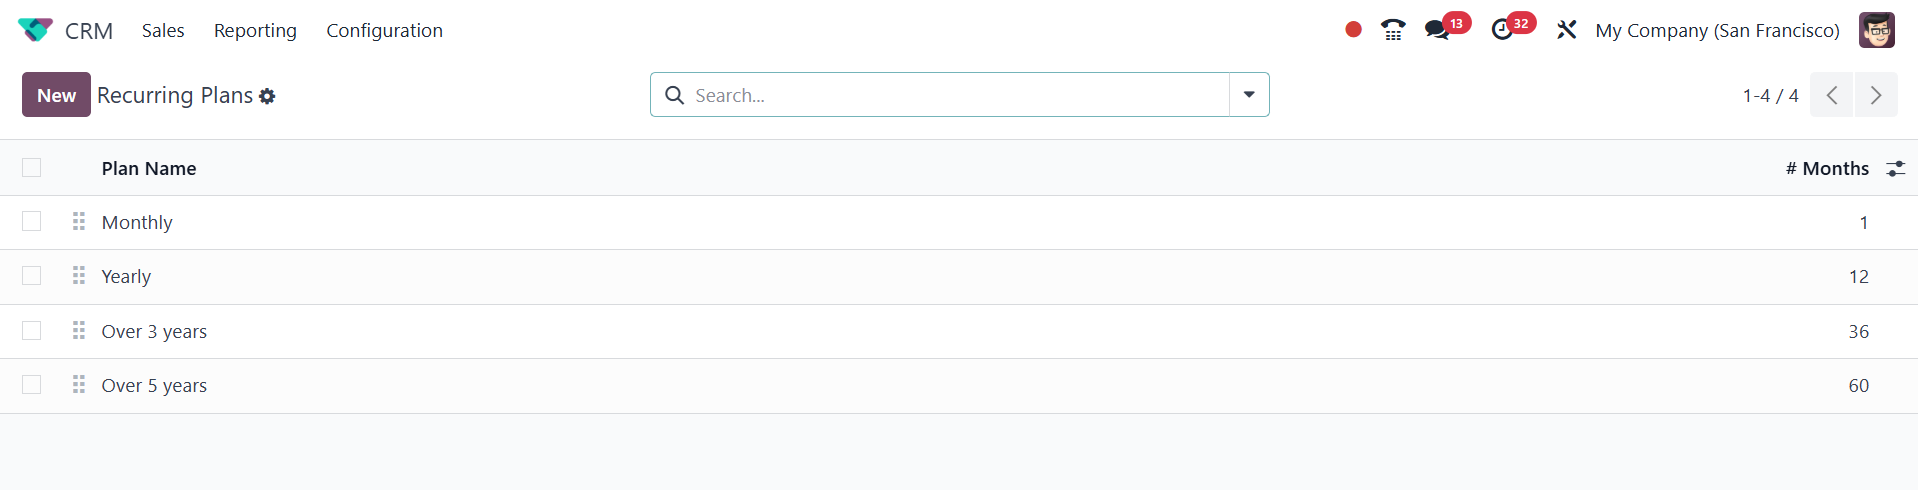
You can simply use the New button
to input the Plan Name in the
designated field. The
recurring revenues on
opportunities are shown
below.
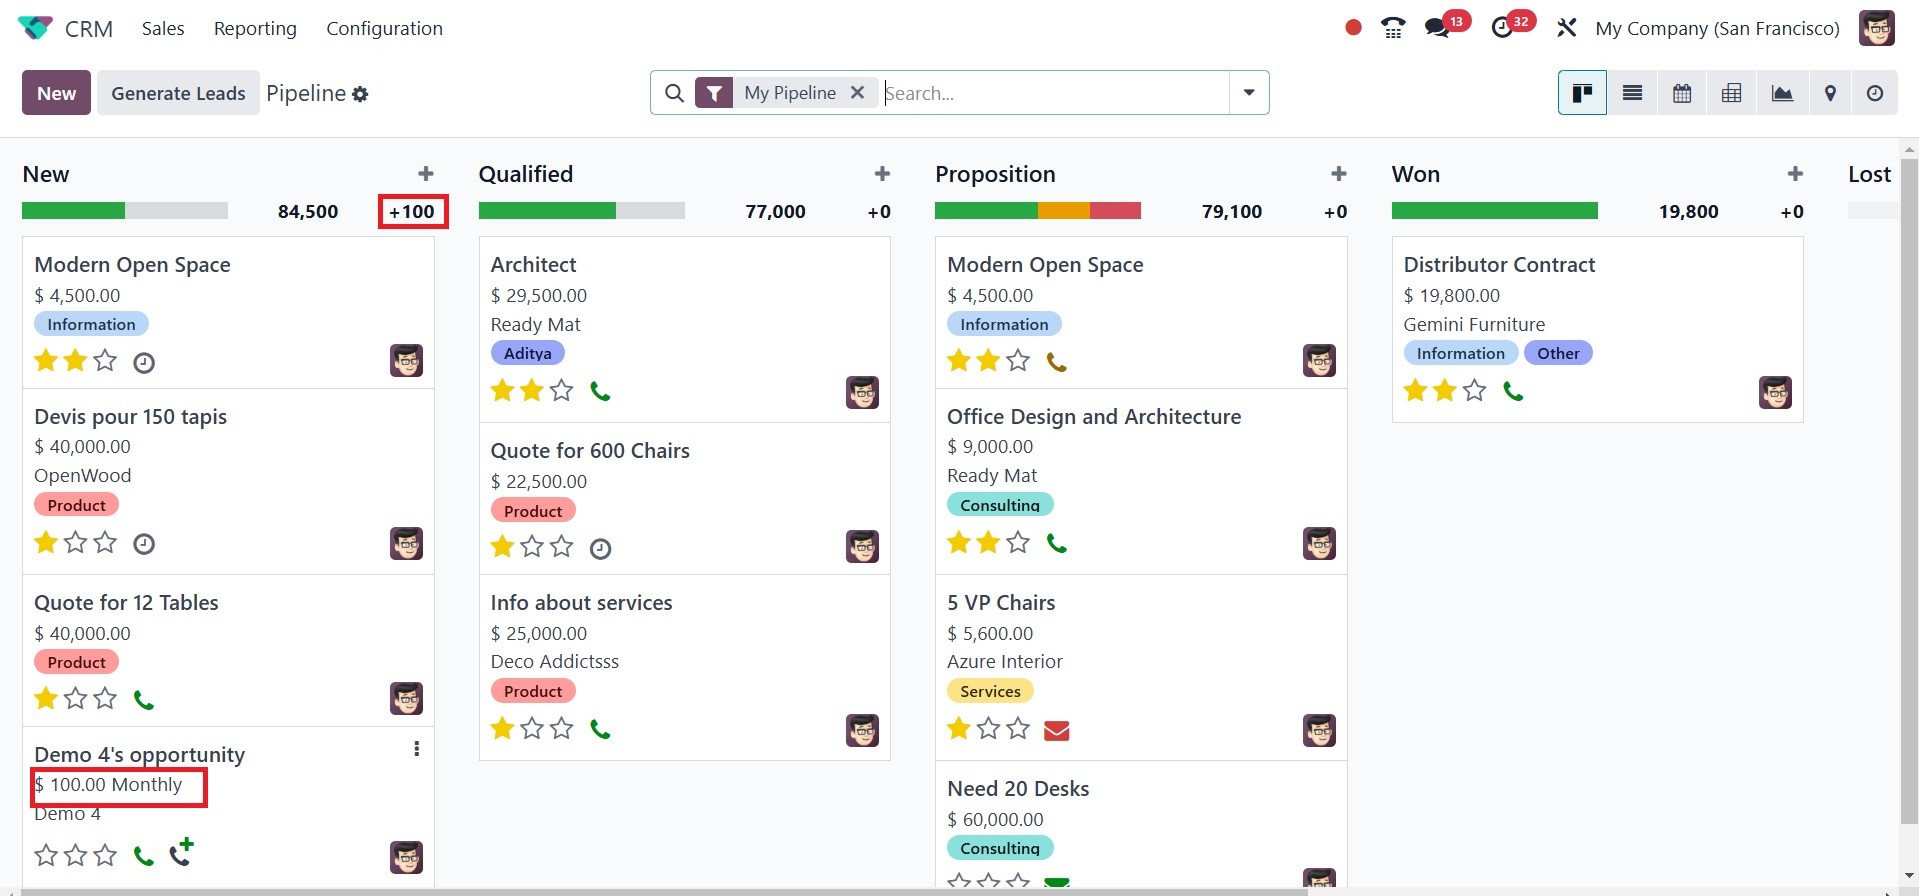
The platform will also display
the recurring sum. The
recurring income amount in
this case is $100. Recurring
Revenue will be displayed
independently while tracking
the stage, as can be seen in
the screenshot below.
From the moment a new opportunity
is created, recurring revenue
and the recurring plan can
also be defined. Hit the +
sign to create a new
opportunity. As seen in the
screenshot below, the field
can be expanded to include
expected revenue, recurring
revenue, and recurring plan.
Multi-Team
By activating the Multi Teams
feature from the Settings
platform, you can rapidly
allocate a salesperson to
many sales teams.
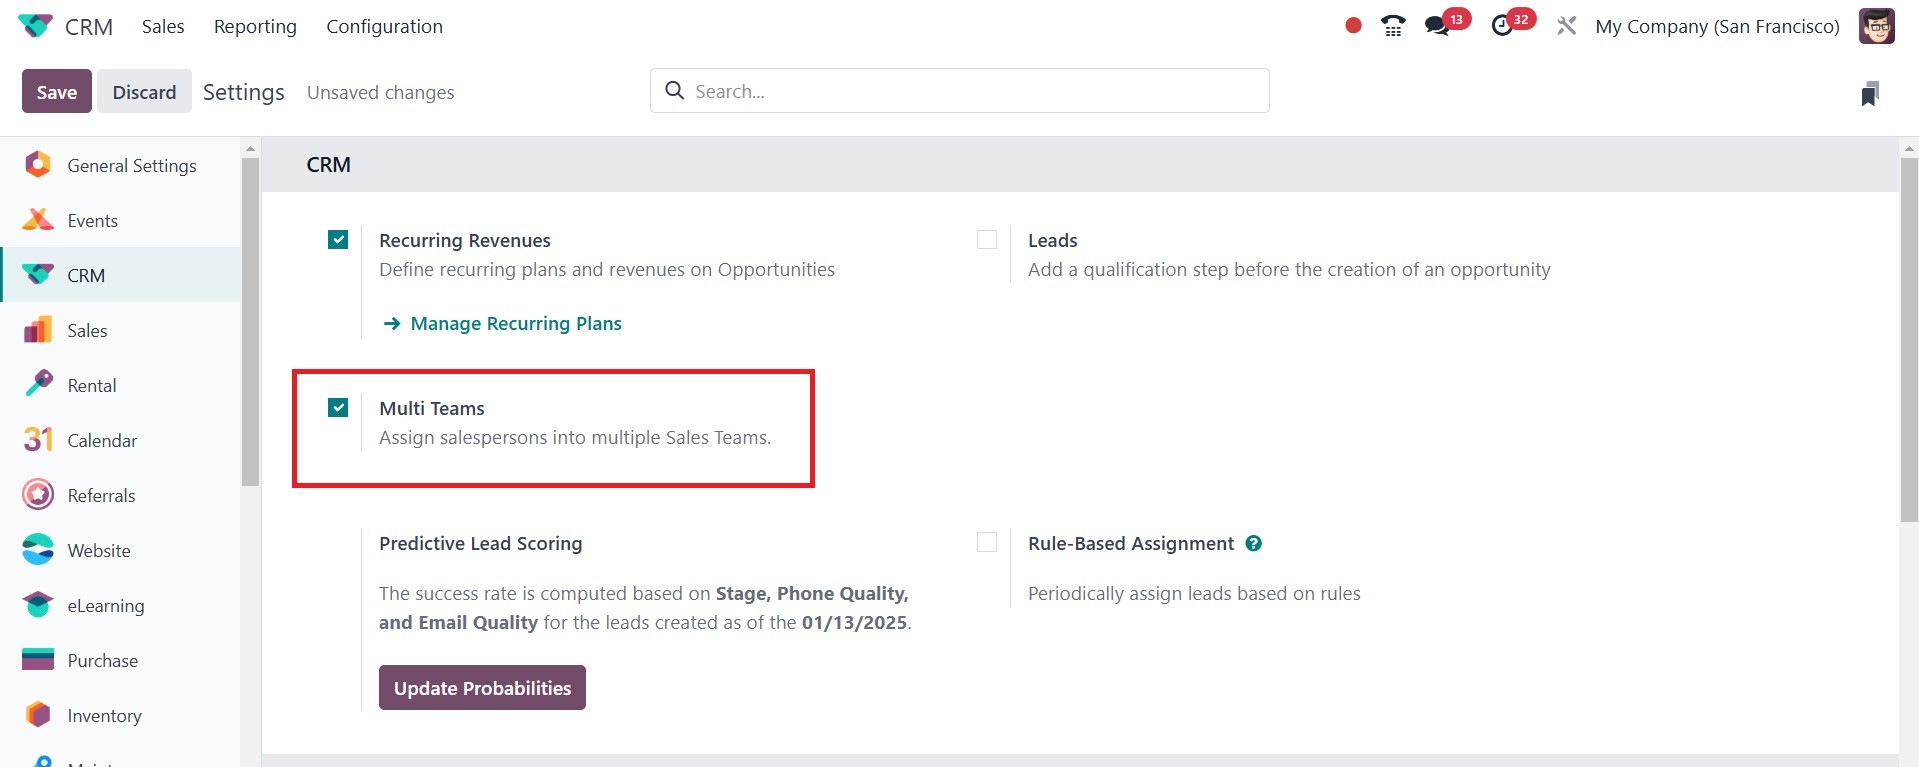
Let's do a demonstration to test
its functionality. As can be
seen below, Mitchell Admin
and Marc Demo joined us to
form a new sales team called
Team 1.
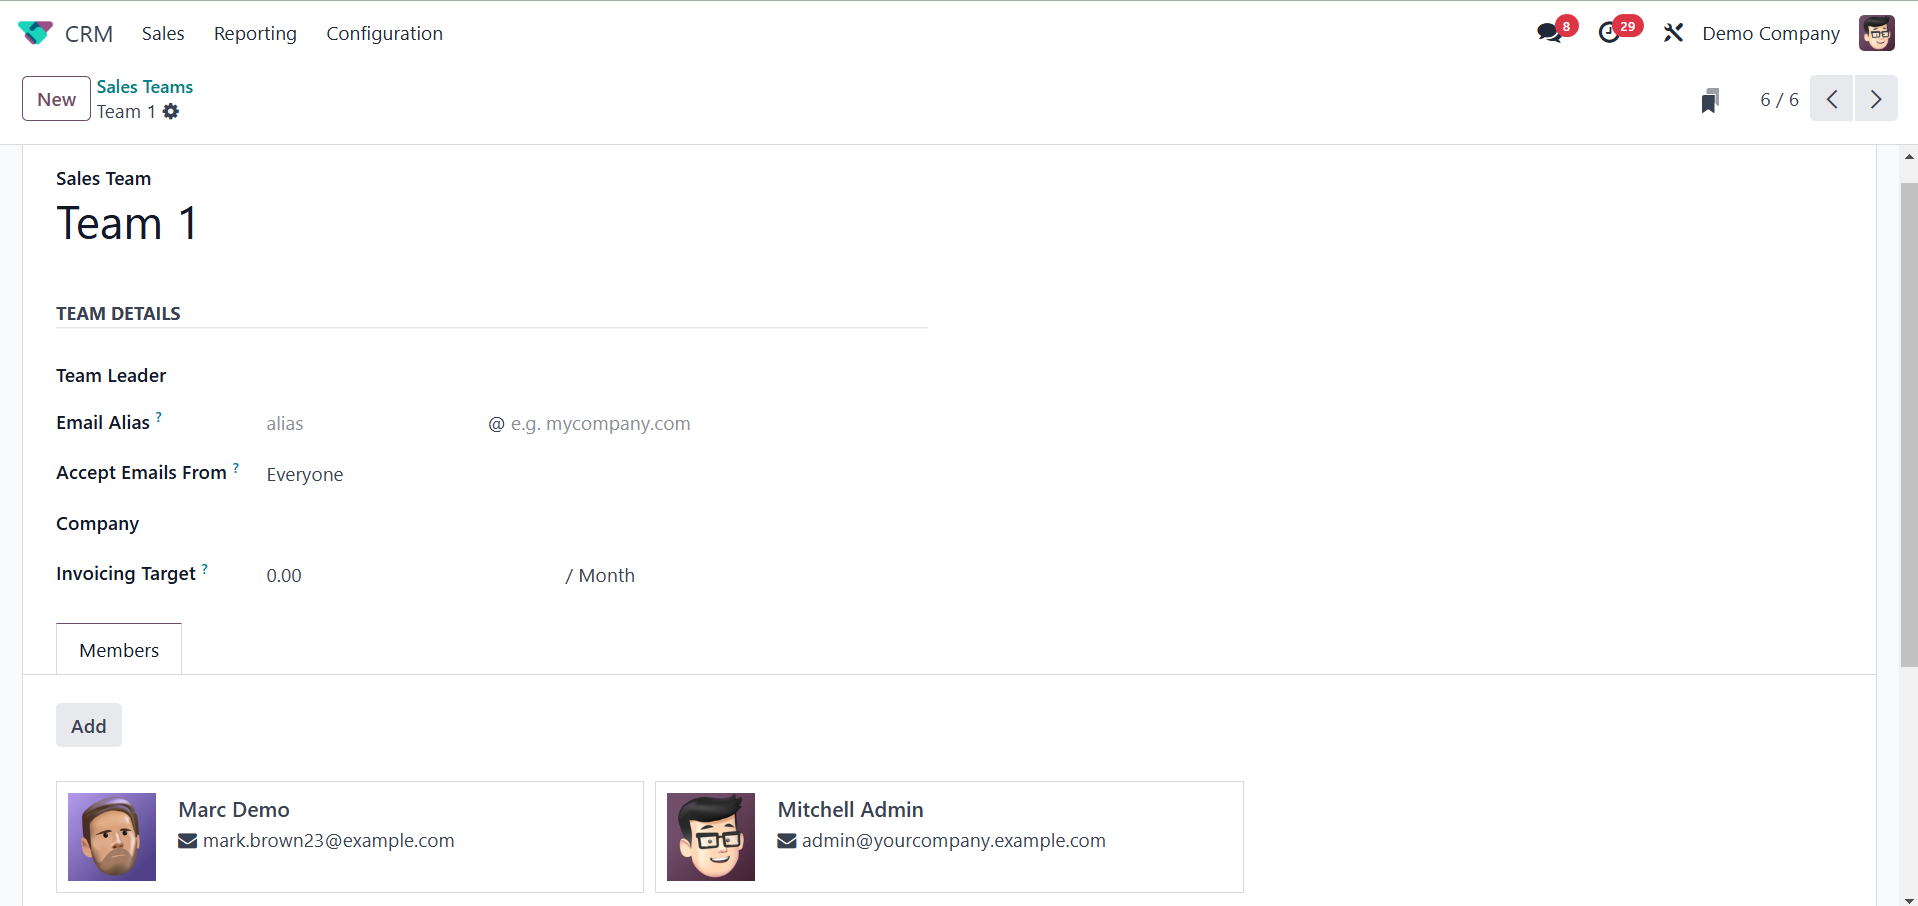
Once the CRM module's Multi Teams
feature is enabled, you can
add a salesperson to multiple
sales teams. Here, we
assembled Team 2, a second
sales team, using the same
members as Team 1.
You can add a salesperson to many
sales teams at once with this
advanced Odoo 18 CRM module
functionality.
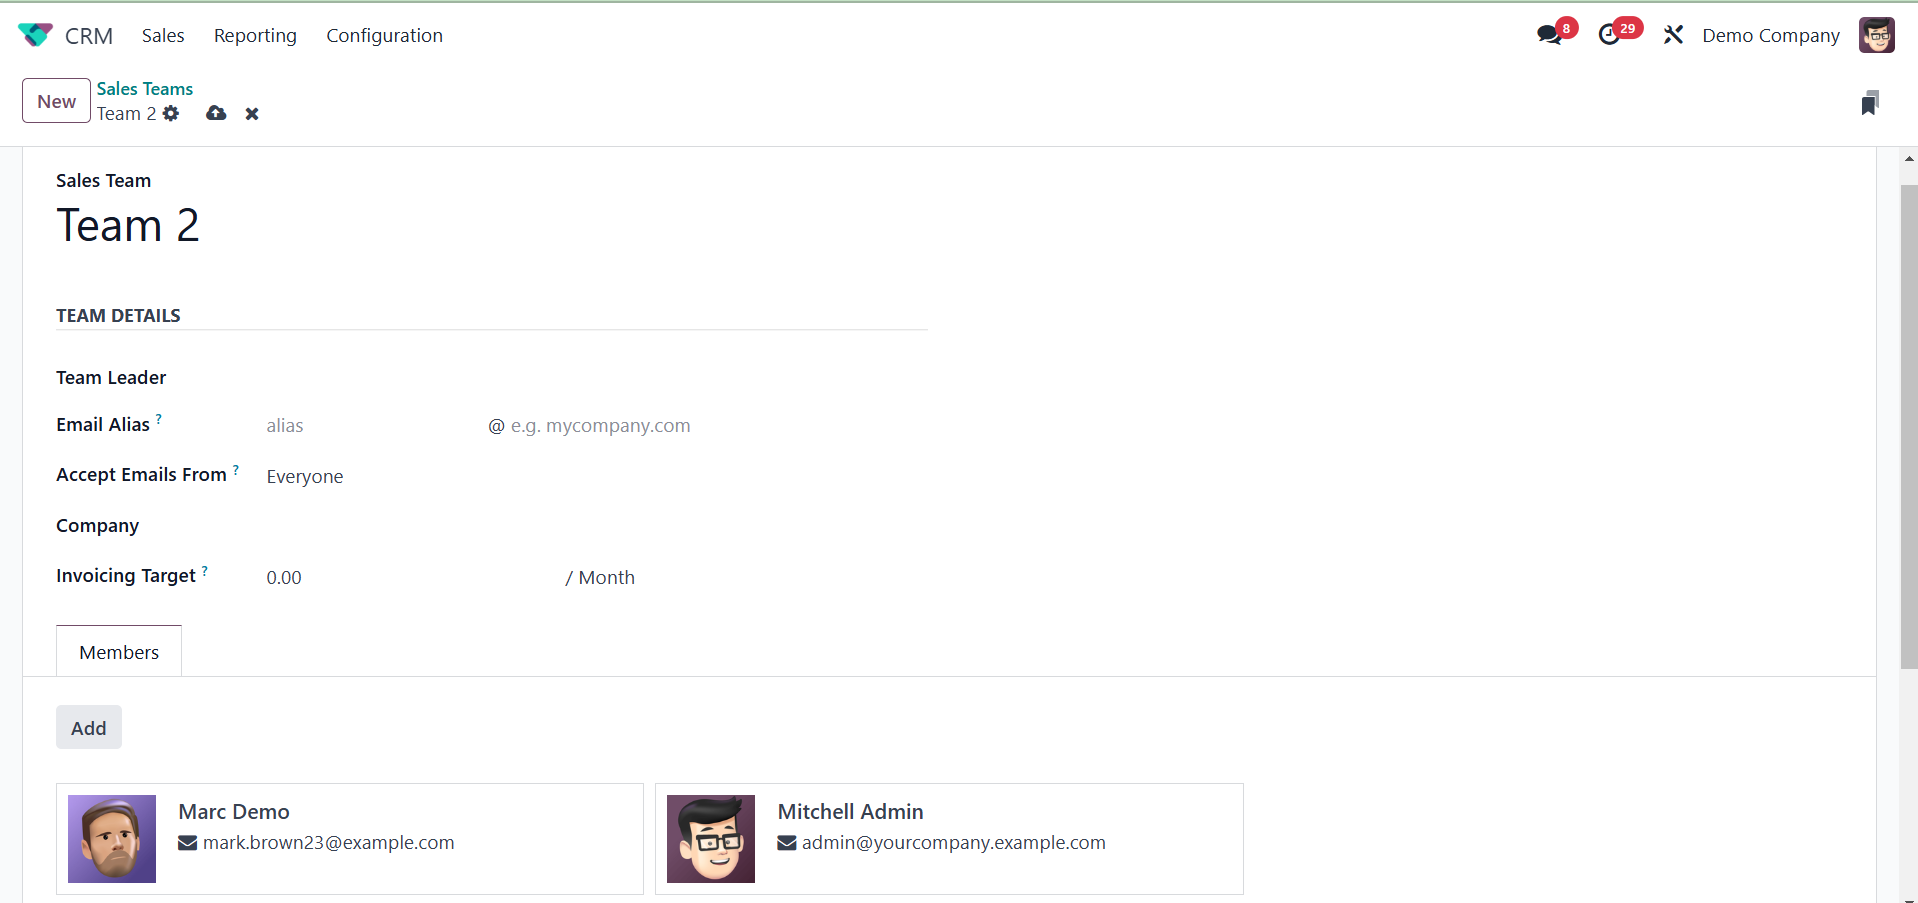
Predictive Lead Scoring
You can ascertain the statistical
probability of closing a lead
by using the Predictive Lead
Scoring tool. The success
percentage for leads created
on a specific date is
determined by a number of
factors, including stage,
phone and email quality, and
many more.
You can change the factors that
are considered when
determining success rates by
using the Update
Probabilities button. A new
wizard will show up to add or
remove the statistical
analysis fields in accordance
with your requirements.
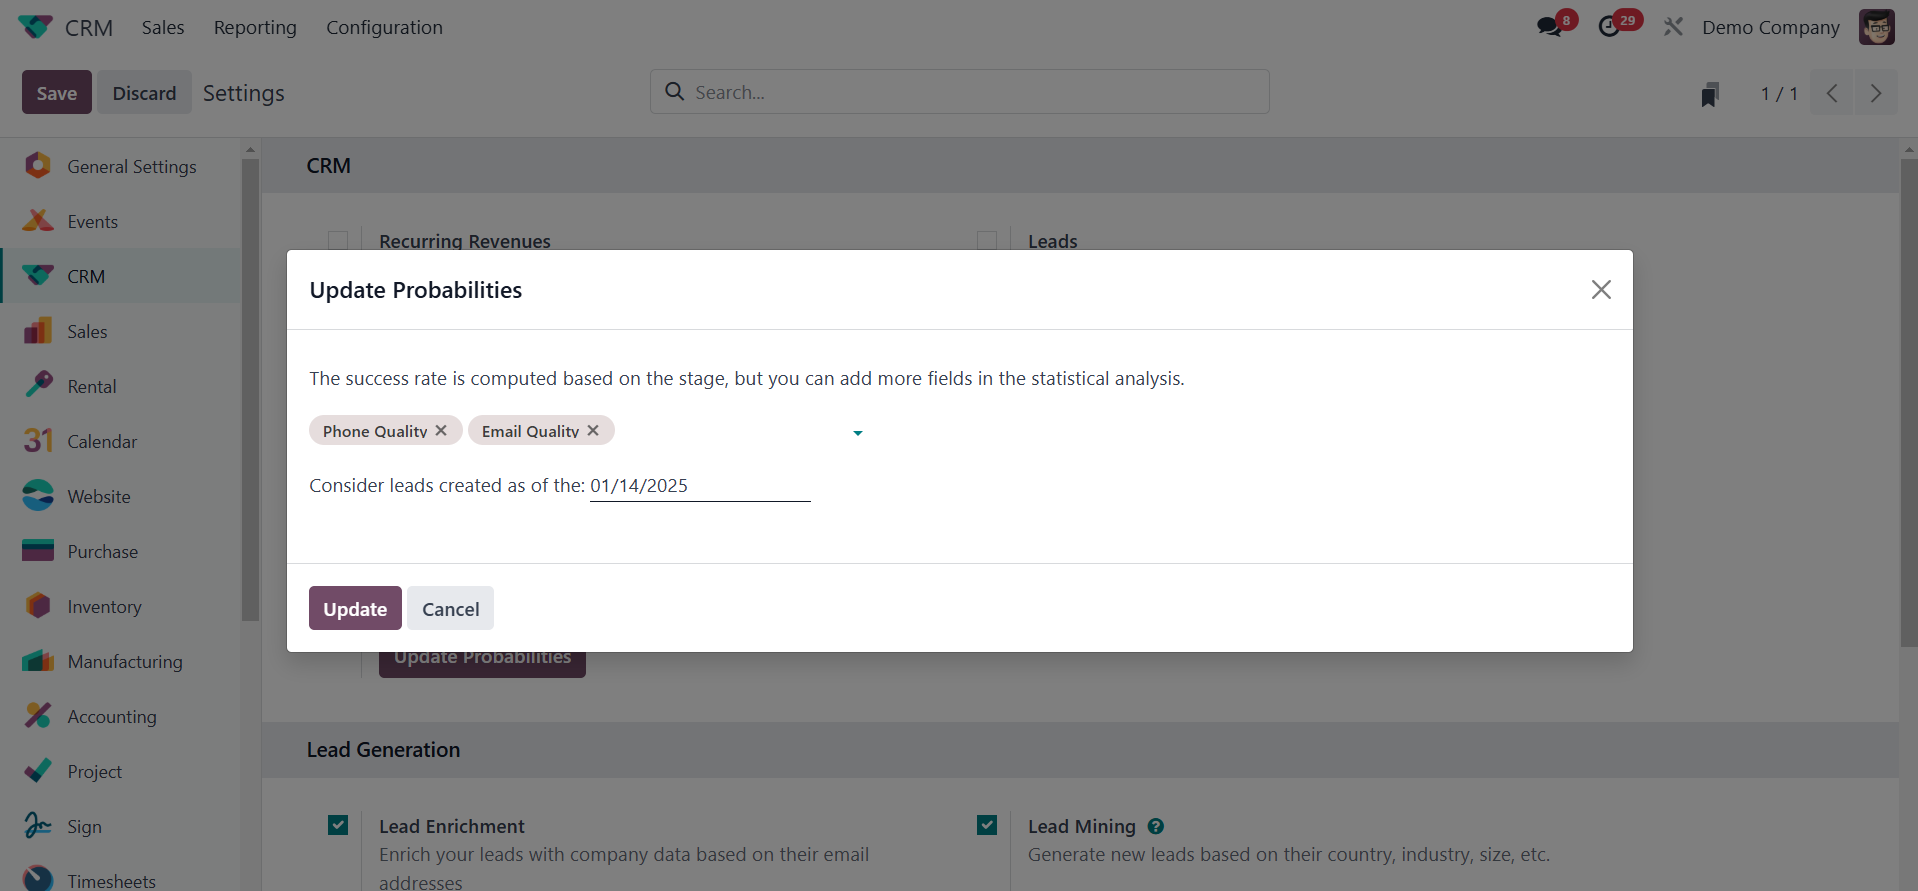
If you enter a specific date in
this field, Odoo will
consider leads generated on
that day. Once the fields and
date have been set, click the
Confirm button to save the
updated changes. This can be
used to calculate
probability.

As mentioned above, you will use
the success rate calculation
parameters to determine your
odds of winning the offer.
Rule Based Assignment
The Rule Based Assignment feature
can be used to automatically
allocate leads to salespeople
based on a set of criteria.
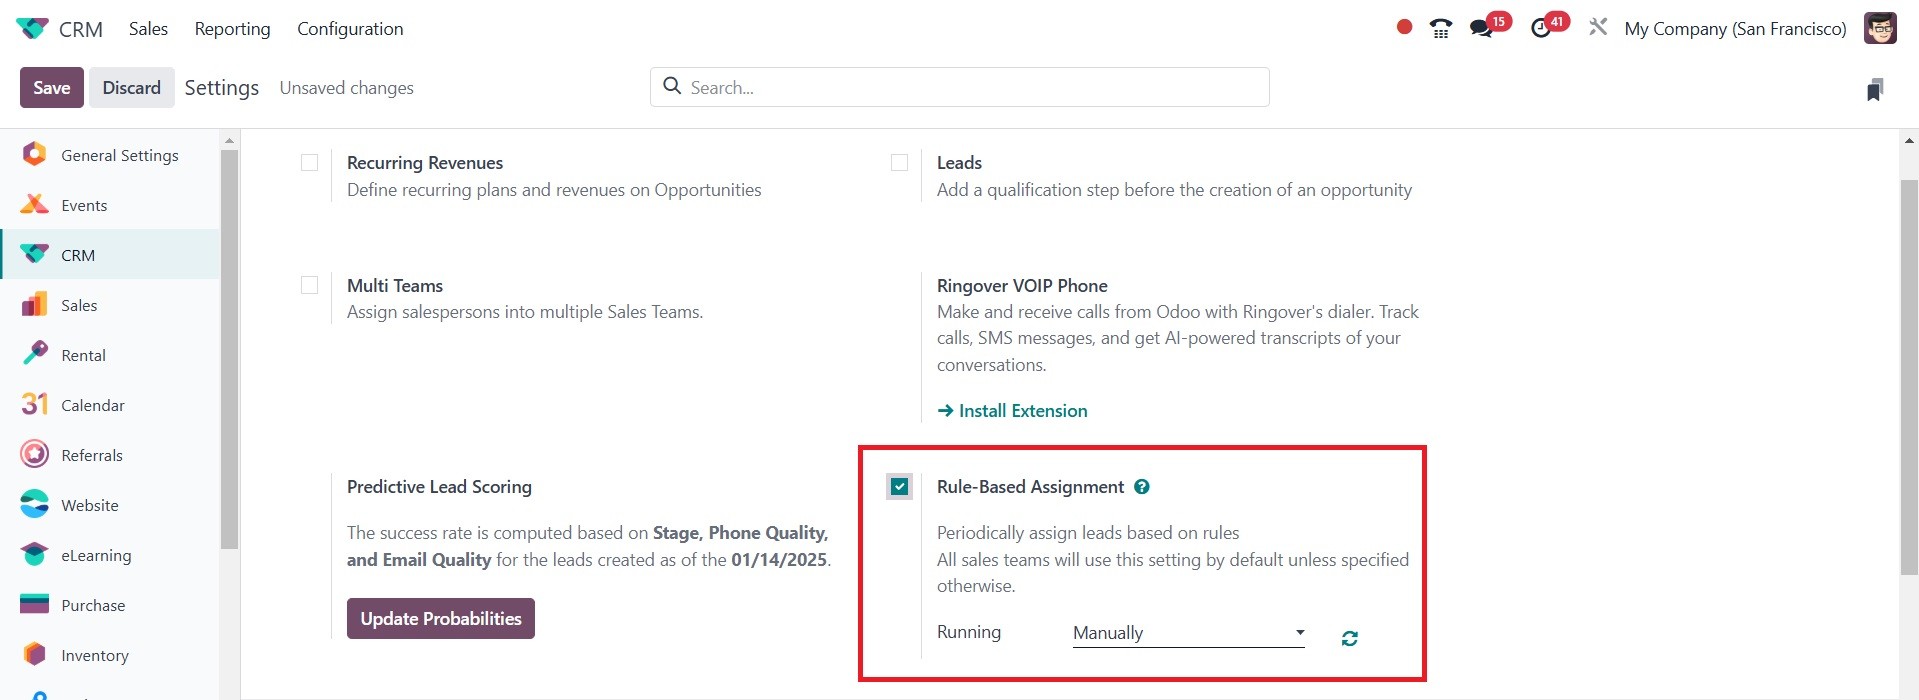
By activating this feature, Odoo
will provide leads on a
regular basis in compliance
with the guidelines. This
setting will be used by
default for all sales teams
unless specified otherwise.
Both manual and repeated
completion of the assignment
are possible. If you wish to
perform this process often,
you can select a repeat
interval. The next run date
will be automatically updated
based on the interval. You
can do it manually by
selecting the relevant
option. Here, we went with
Manual.
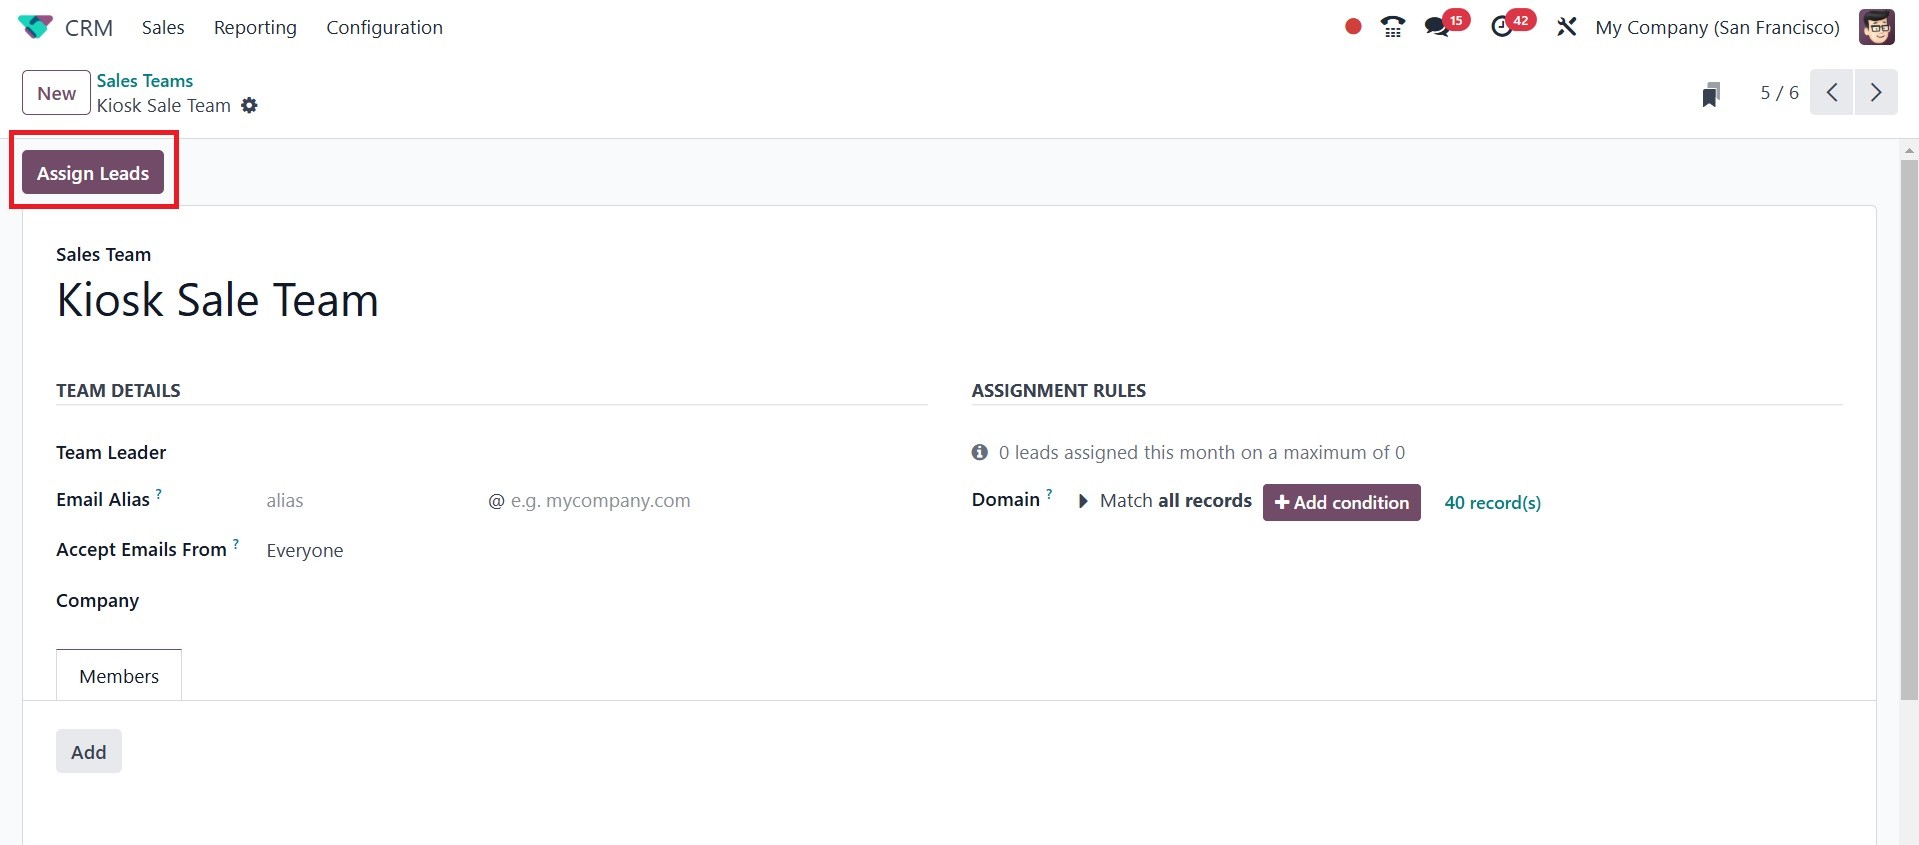
A new sales team can now be
formed. Choose the Sales Team
option from the Configuration
menu to accomplish that.
After providing the required
details for the new sales
team, a new section called
Assignment Rules will appear
on the screen.
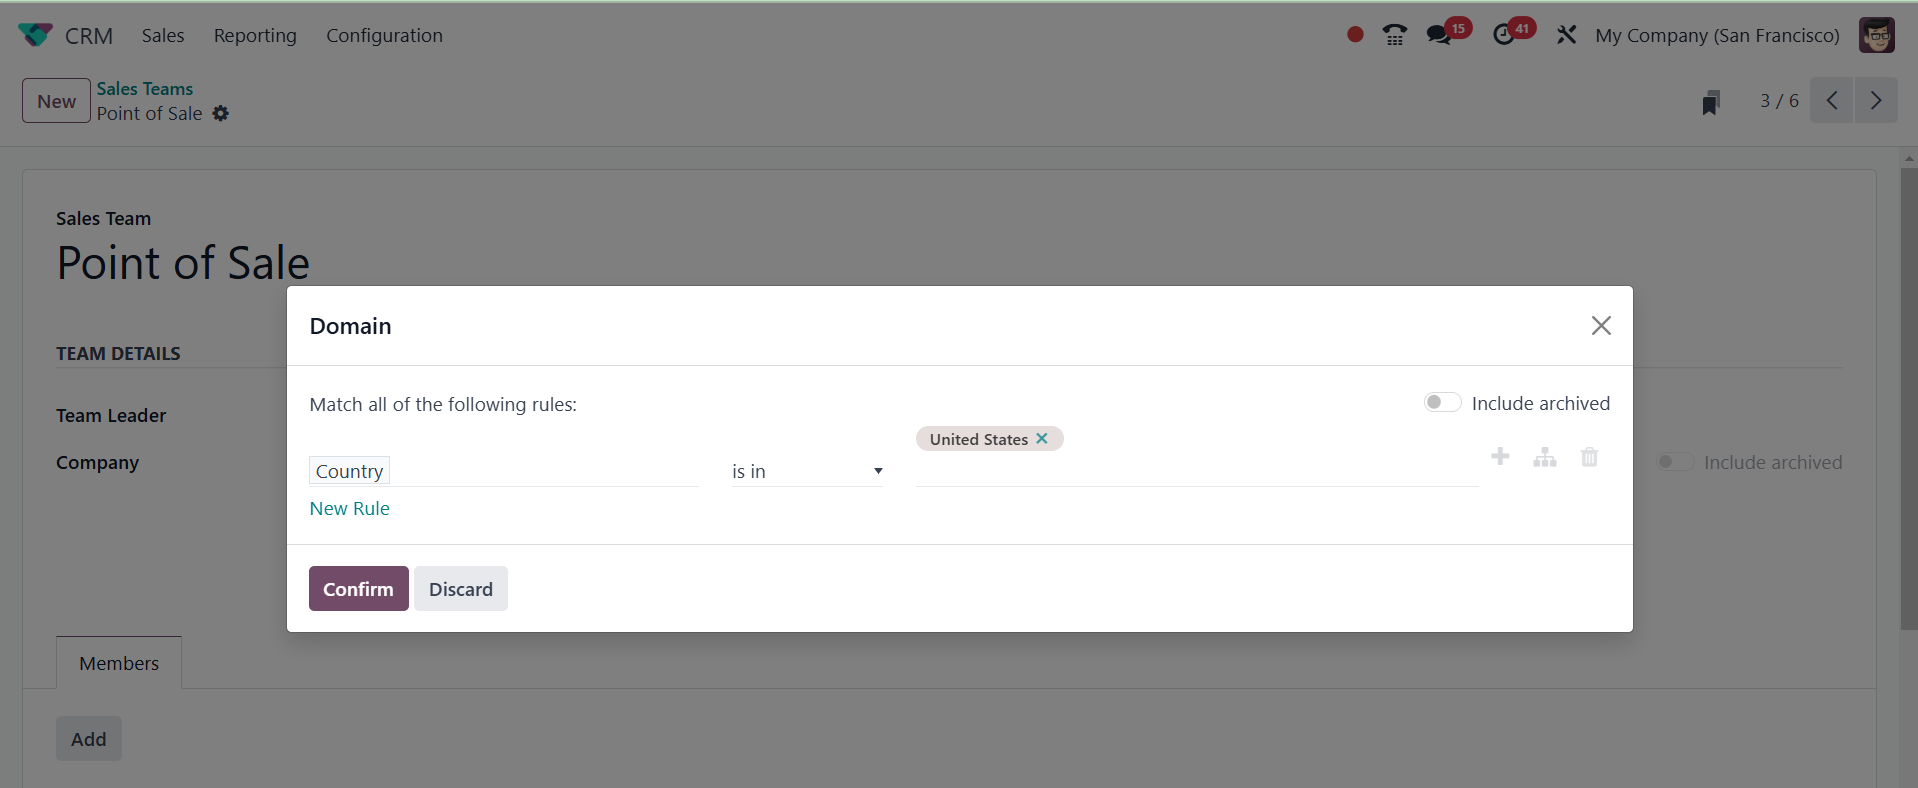
The Edit Domain option allows you
to configure the assignment
rules. A pop-up window
similar to the one below will
appear.
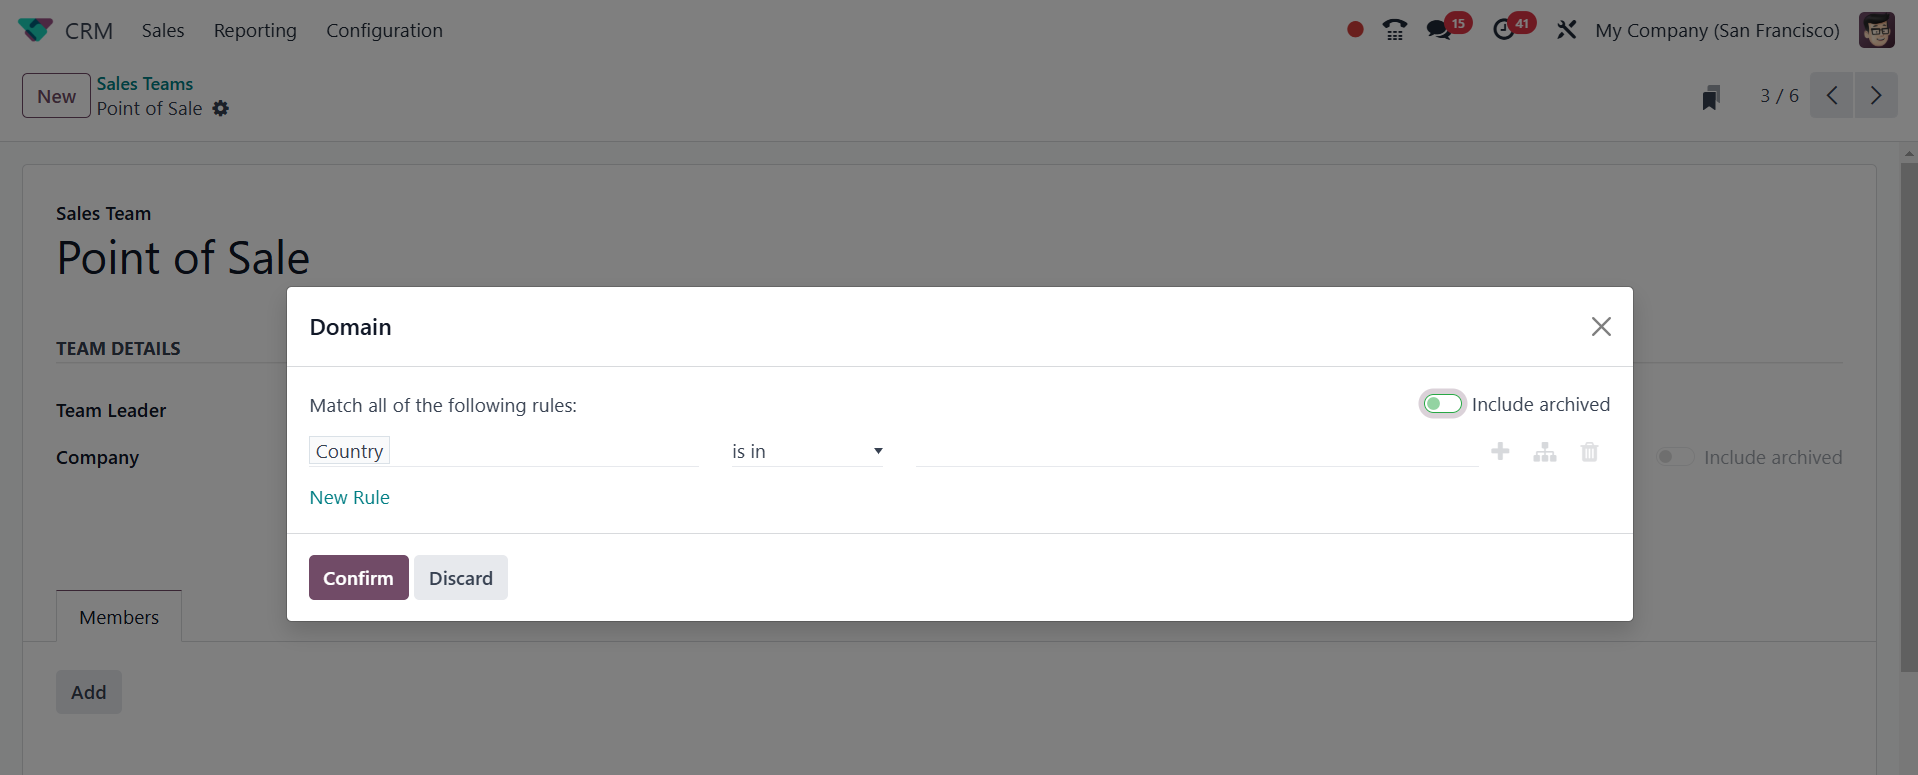
You can add filters with this
wizard. Odoo18 will use the
filters you select to provide
this sales team with the
leads that fit the criteria.
In this case, we used the
filter "Country contains
United States." Therefore,
any leads from the United
States will be assigned to
this sales team right away.
Additionally, you can assign a
domain to each salesman.
While expanding the crew, it
is simple to complete. A
pop-up will display once you
click the Add button on the
Members tab, as seen below.
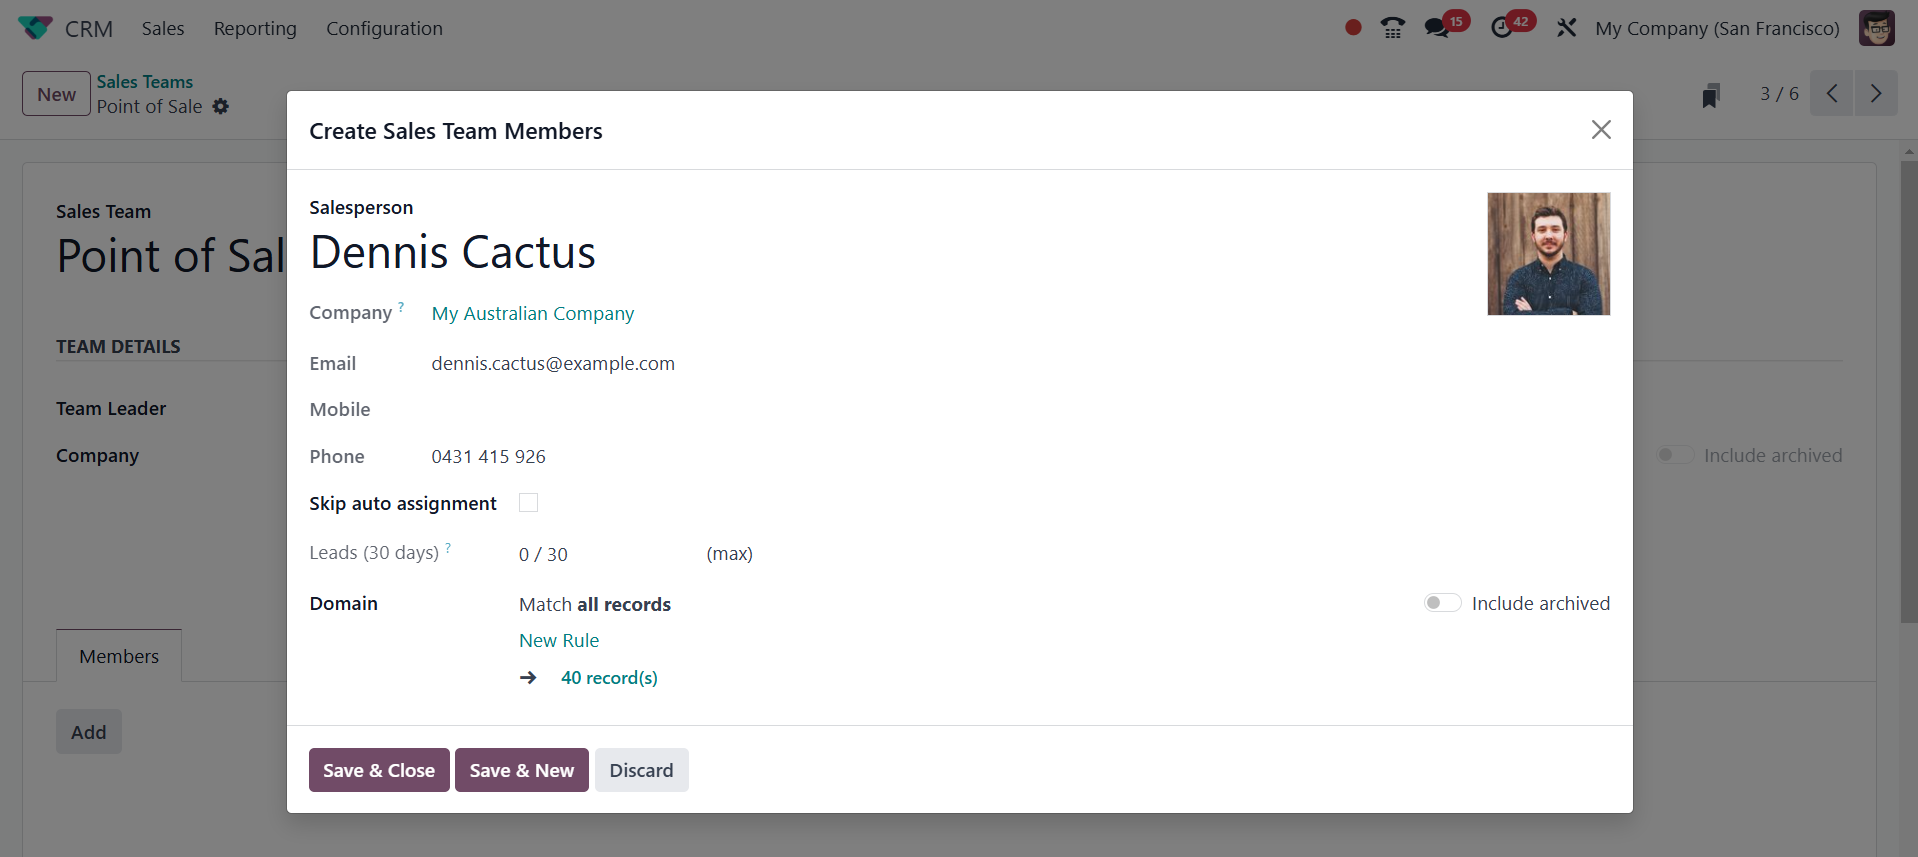
By using the Assign Leads option,
you can allocate the leads to
each member in line with the
specified domain.
Lead Generation
The Lead Generation tab in the
Settings menu offers a number
of advanced options to
improve the lead generation
operations.
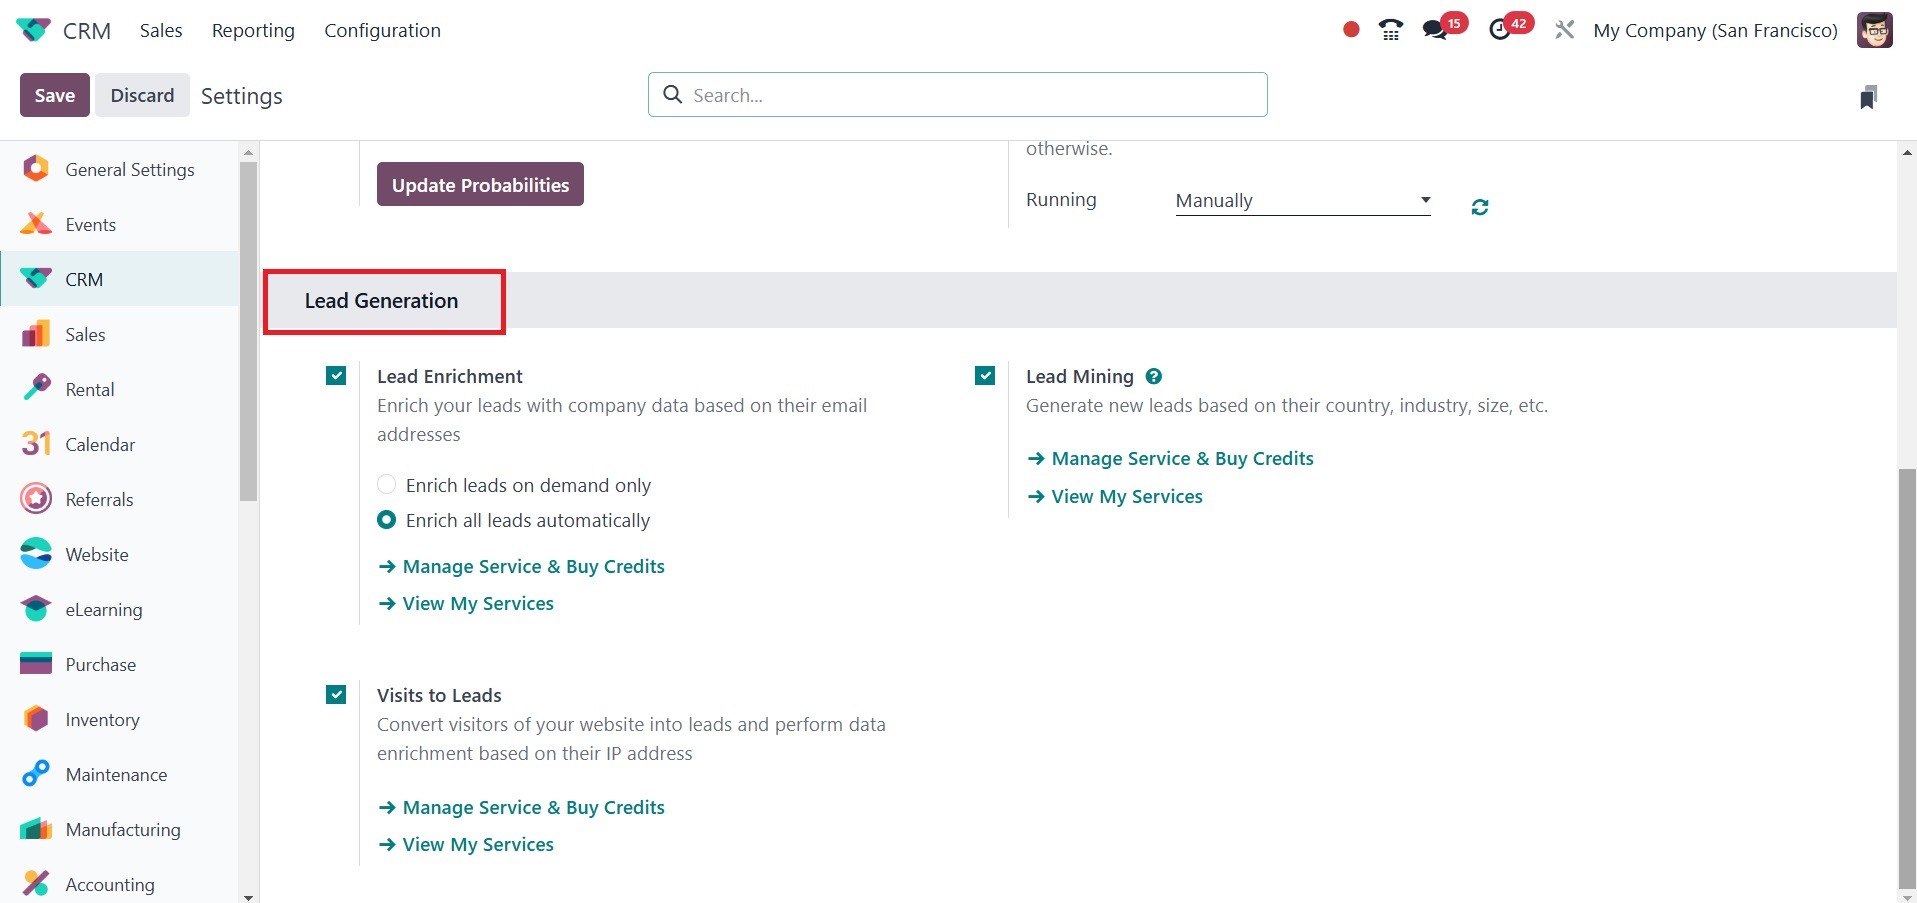
You have the option to activate
the Lead Enrichment, Lead
Mining, and Visits to Leads
features on this platform.
You can easily buy credits,
the foundation of all these
sophisticated options, by
choosing the Buy Credit
option.
Based on their email addresses,
you can add corporate
information to your leads
using the Lead Enrichment
option. You can either
manually or automatically
enhance leads by selecting
the appropriate option from
the lead enrichment tab.
The Lead Mining function allows
you to find new leads based
on criteria like size,
industry, and nation. You can
perform data enrichment based
on website visitor's IP
addresses and convert them
into leads by activating the
Visits to Leads option.
Partners Commission
You can activate Automatic PO
Frequency and Minimum PO
Amount Total under the
Partners Commissions menu.
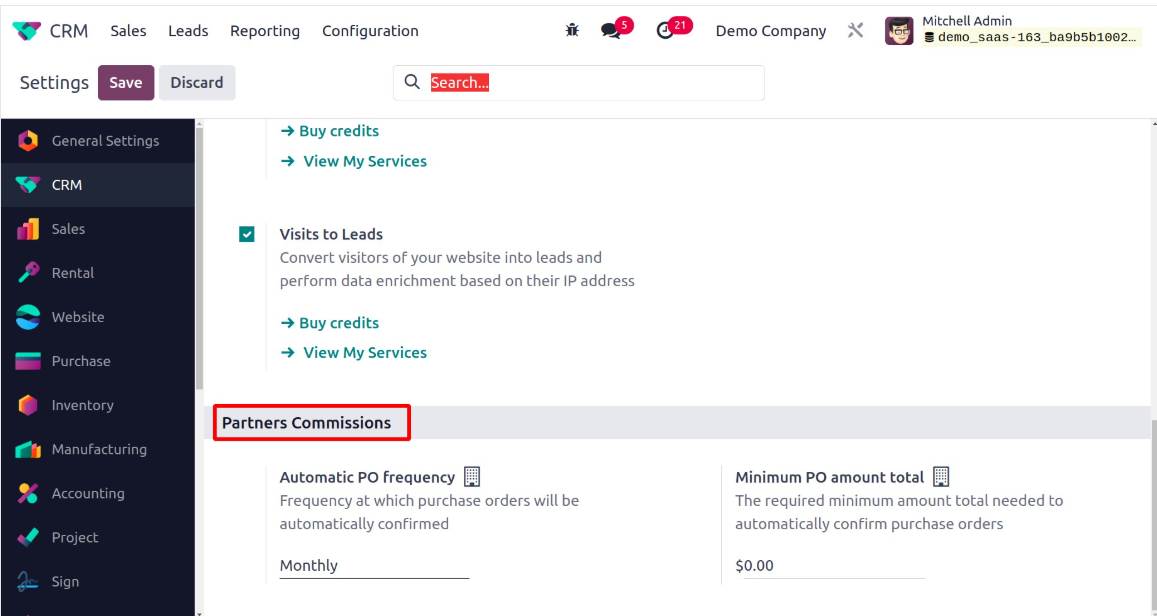
The Automatic PO Frequency option
allows you to specify how
frequently purchase orders
will be automatically
confirmed. You can select the
minimum amount required to
automatically confirm
purchase orders in the
Minimum PO Amount Total
section.