4. Configuration
Under the configuration, you have the options, like settings, event
template, event
stage, event tags categories, lead generation, booth categories,
track location,
and so on.
1. Settings
The Odoo18 Events module allows you to broadcast the event schedule
on your website
and receive talk proposals from different speakers. All of the
tracks from events
that have been uploaded to the internet will be recorded by the
Events module's
Event Tracks menu. In the Settings menu of the module, turn on the
Schedule &
Tracks option.
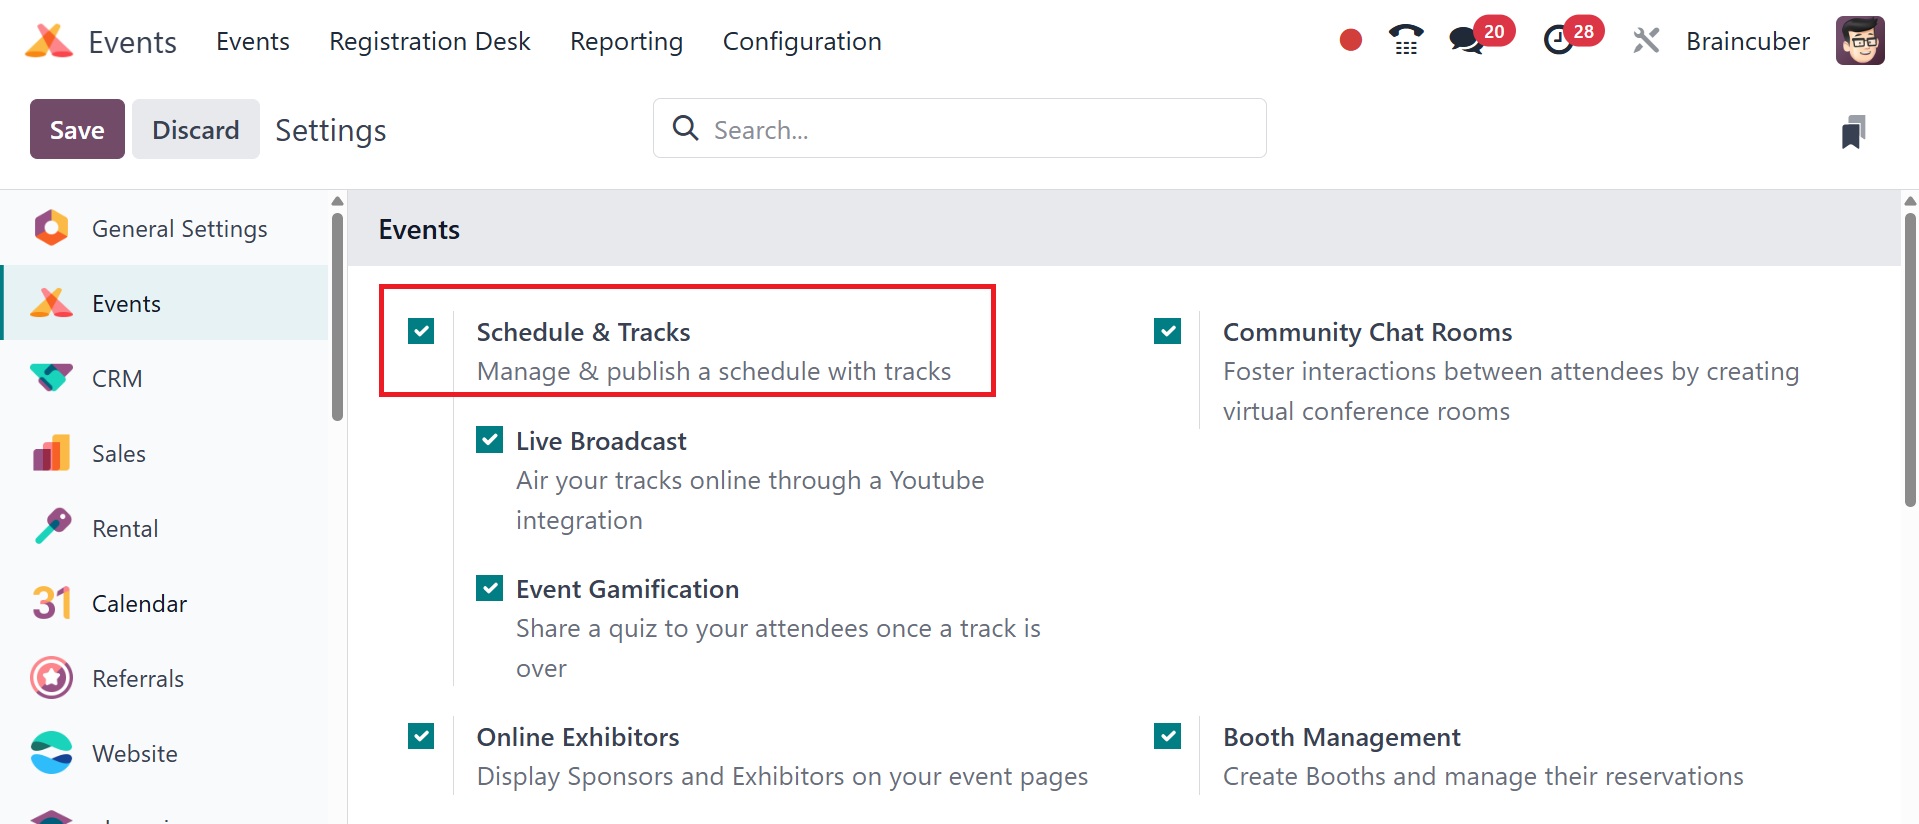
This will provide your event's web pages with a navigation menu that
includes a
schedule, tracks, and a track proposal form.

You can make a track proposal form available to speakers on your
website by enabling
the Allow Track Proposals option, and you can activate the Showcase
Tracks option
in the event creation box to show the event's tracks.
You can access the website for this particular event by clicking the
'Go to Website'
button on Odoo 18.
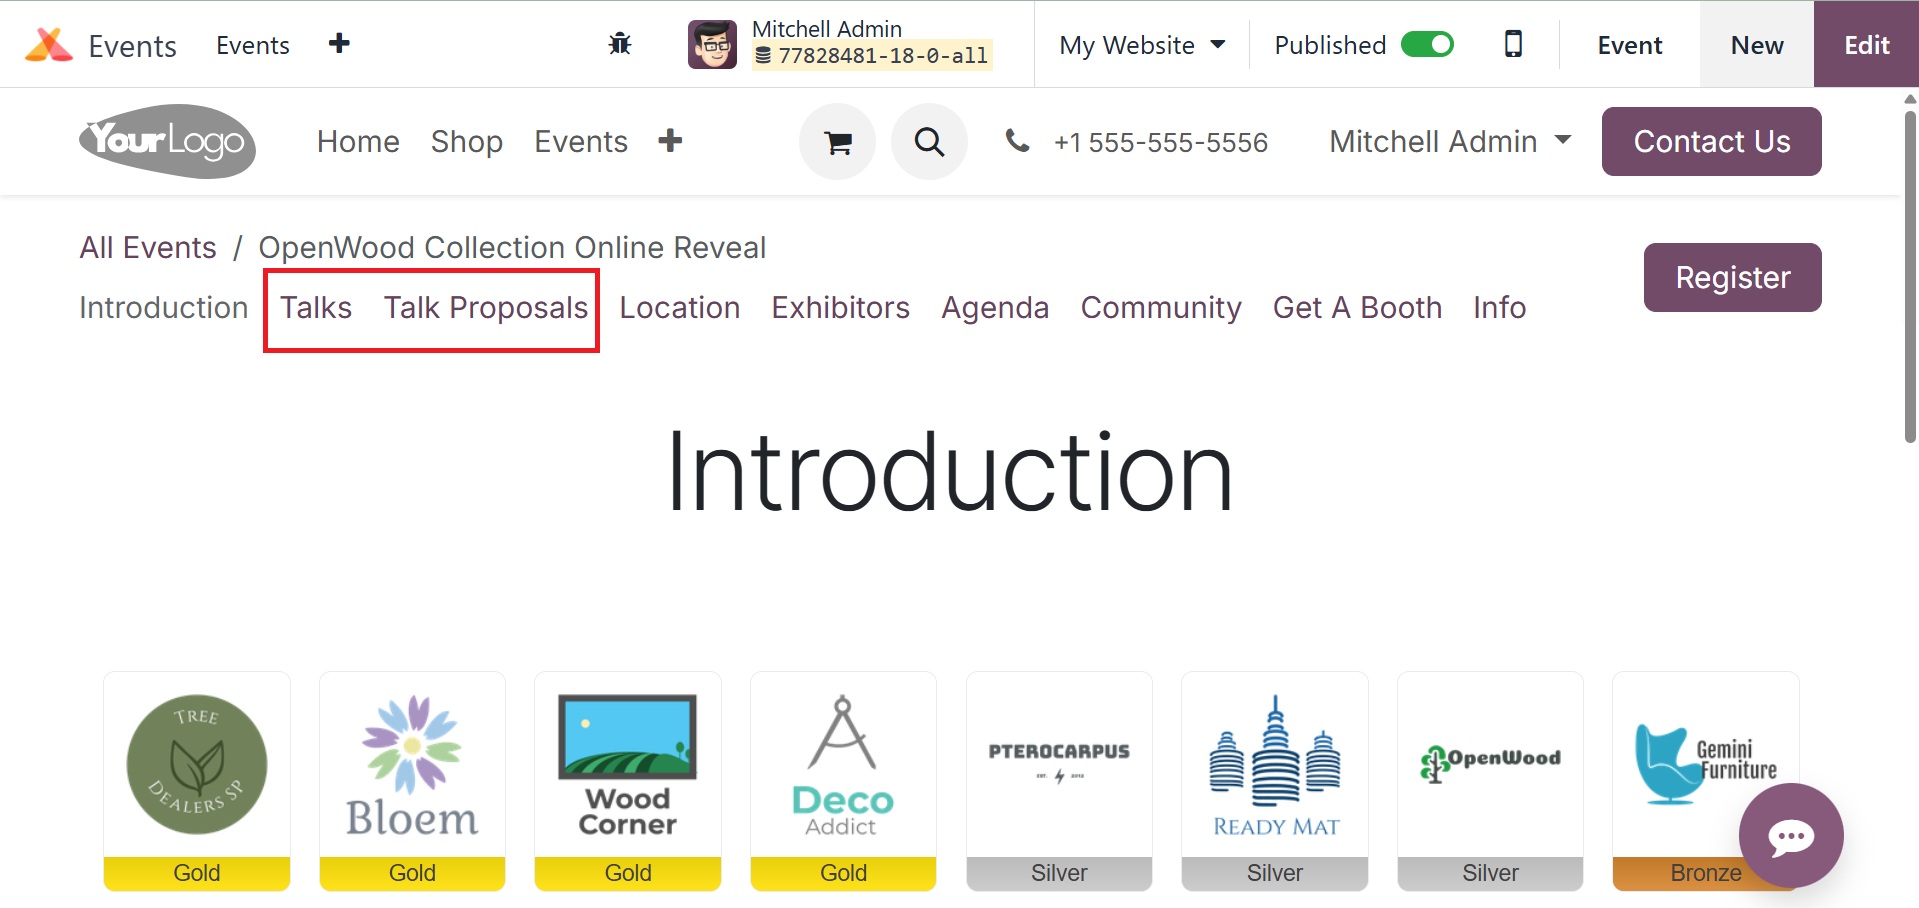
All of the remarks made by different speakers regarding the event
are shown on the
Talks website, which is shown in the image above. Visit the
discussion proposal
link to complete and submit a proposal for a discussion at the
event. The speaker
might include details about the talk in the Talk Into field. This
section contains
the talk's title, introduction, and categories.
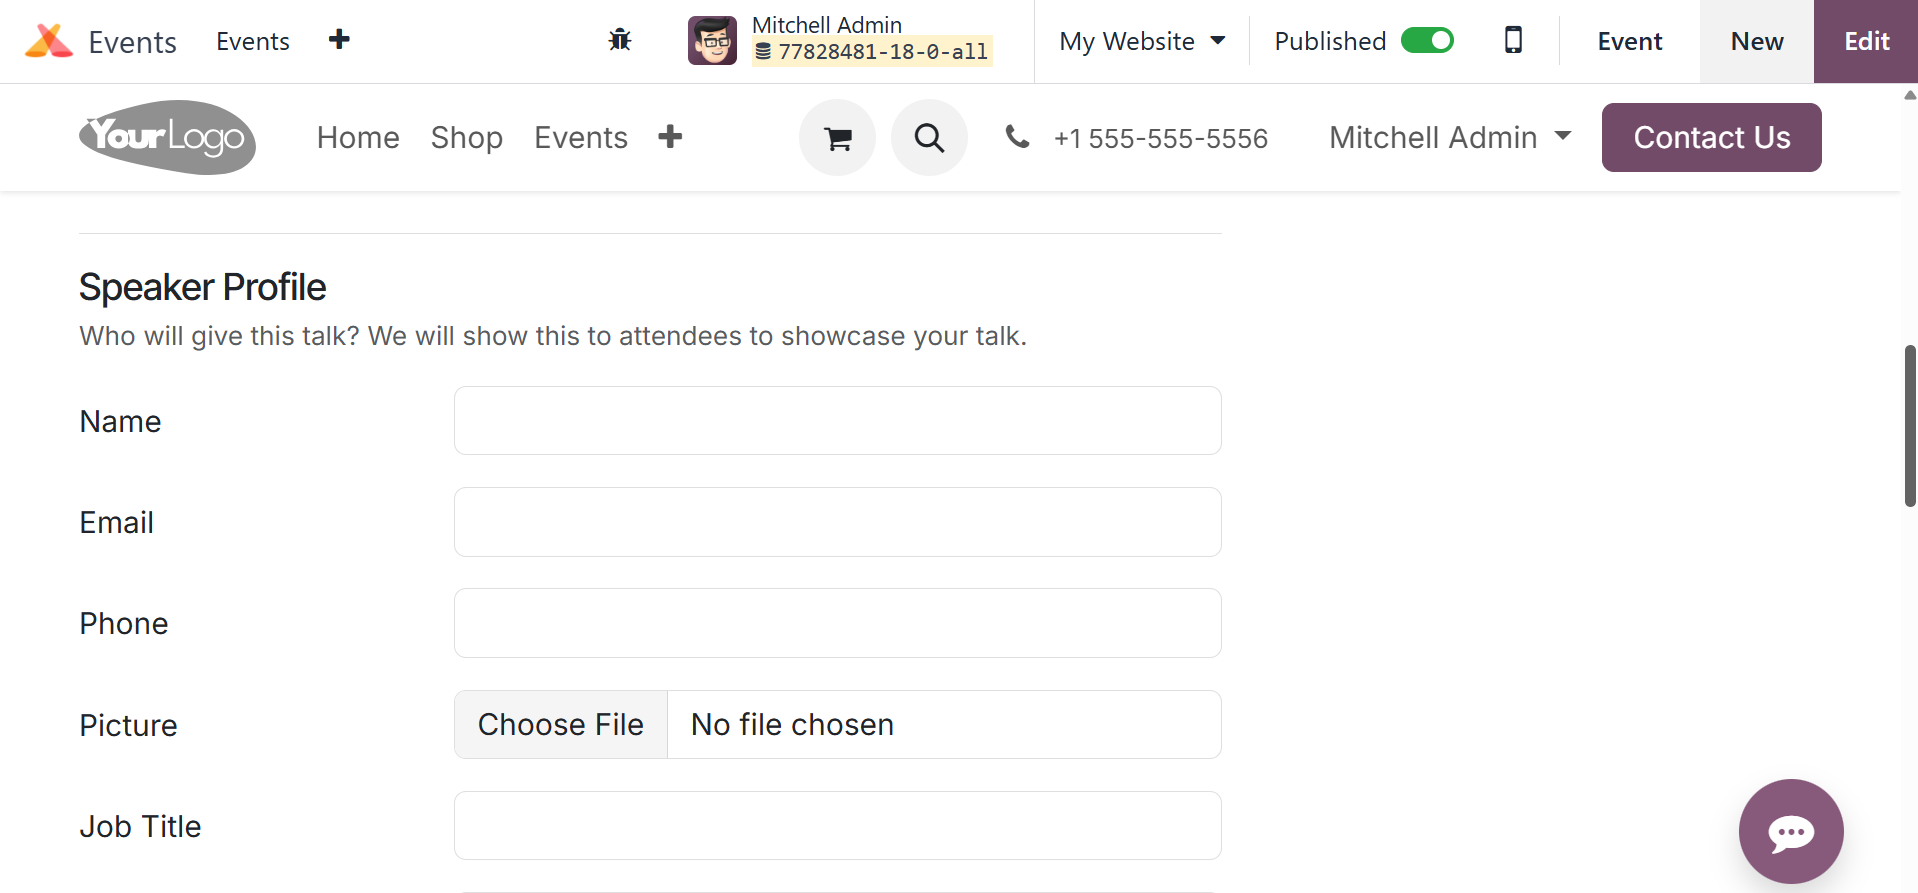
The user can enter the speaker's name, email, phone number, job
title, biography,
and picture in the Picture part of the Speaker Profile. If the user
wishes to activate
the "Contact me through a different email/phone" option, they will
be presented
with additional options to provide additional contact details.
Click the Submit Proposal button to send in the proposal.
You can easily manage all of these provided proposals in the backend
using the Events
module's Tracks menu. This menu won't show up on the Events module
until the Schedule
& Tracks option has been enabled from the Settings menu.
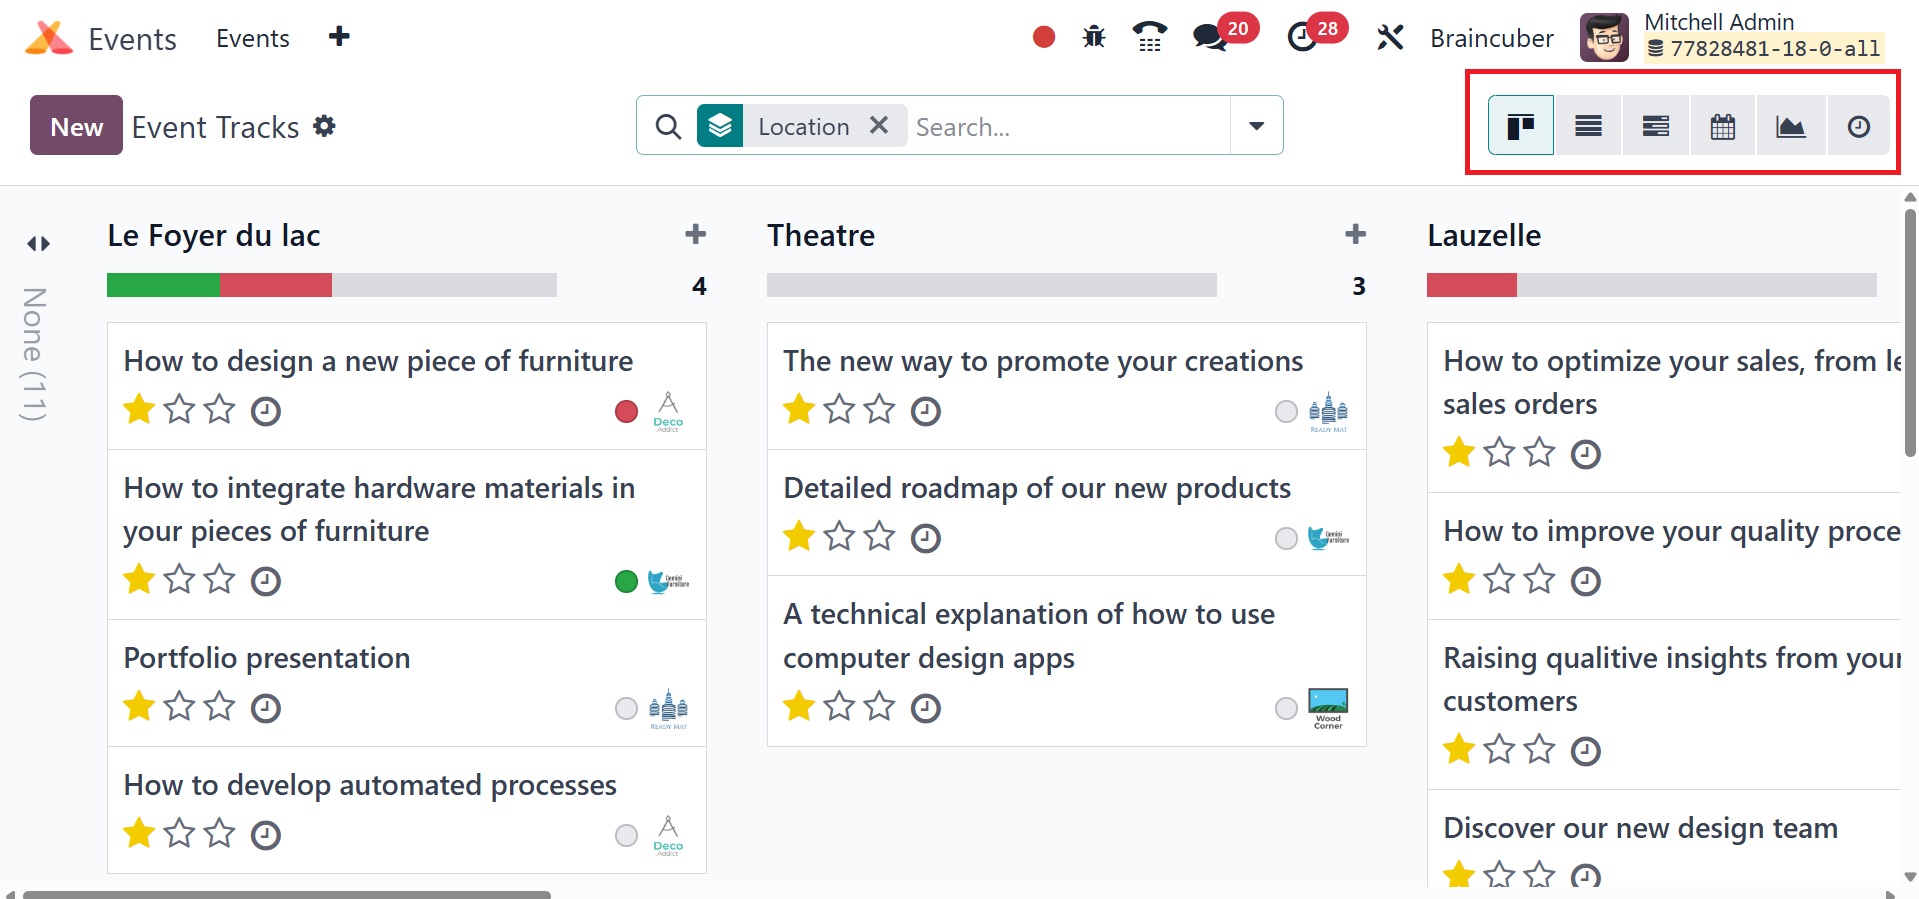
This window displays all event tracks as well as track
recommendations from different
presenters. According to the Kanban view, the event tracks are
arranged into various
phases. To suit your needs, you can use the Filters and Group By
options to categorize
the event tracks. The plus icon next to the Add a Column option
allows you to add
a new stage for the tracks. The Kanban, List, Calendar, Activity,
Gantt, and Graphical
views are all available on this platform.
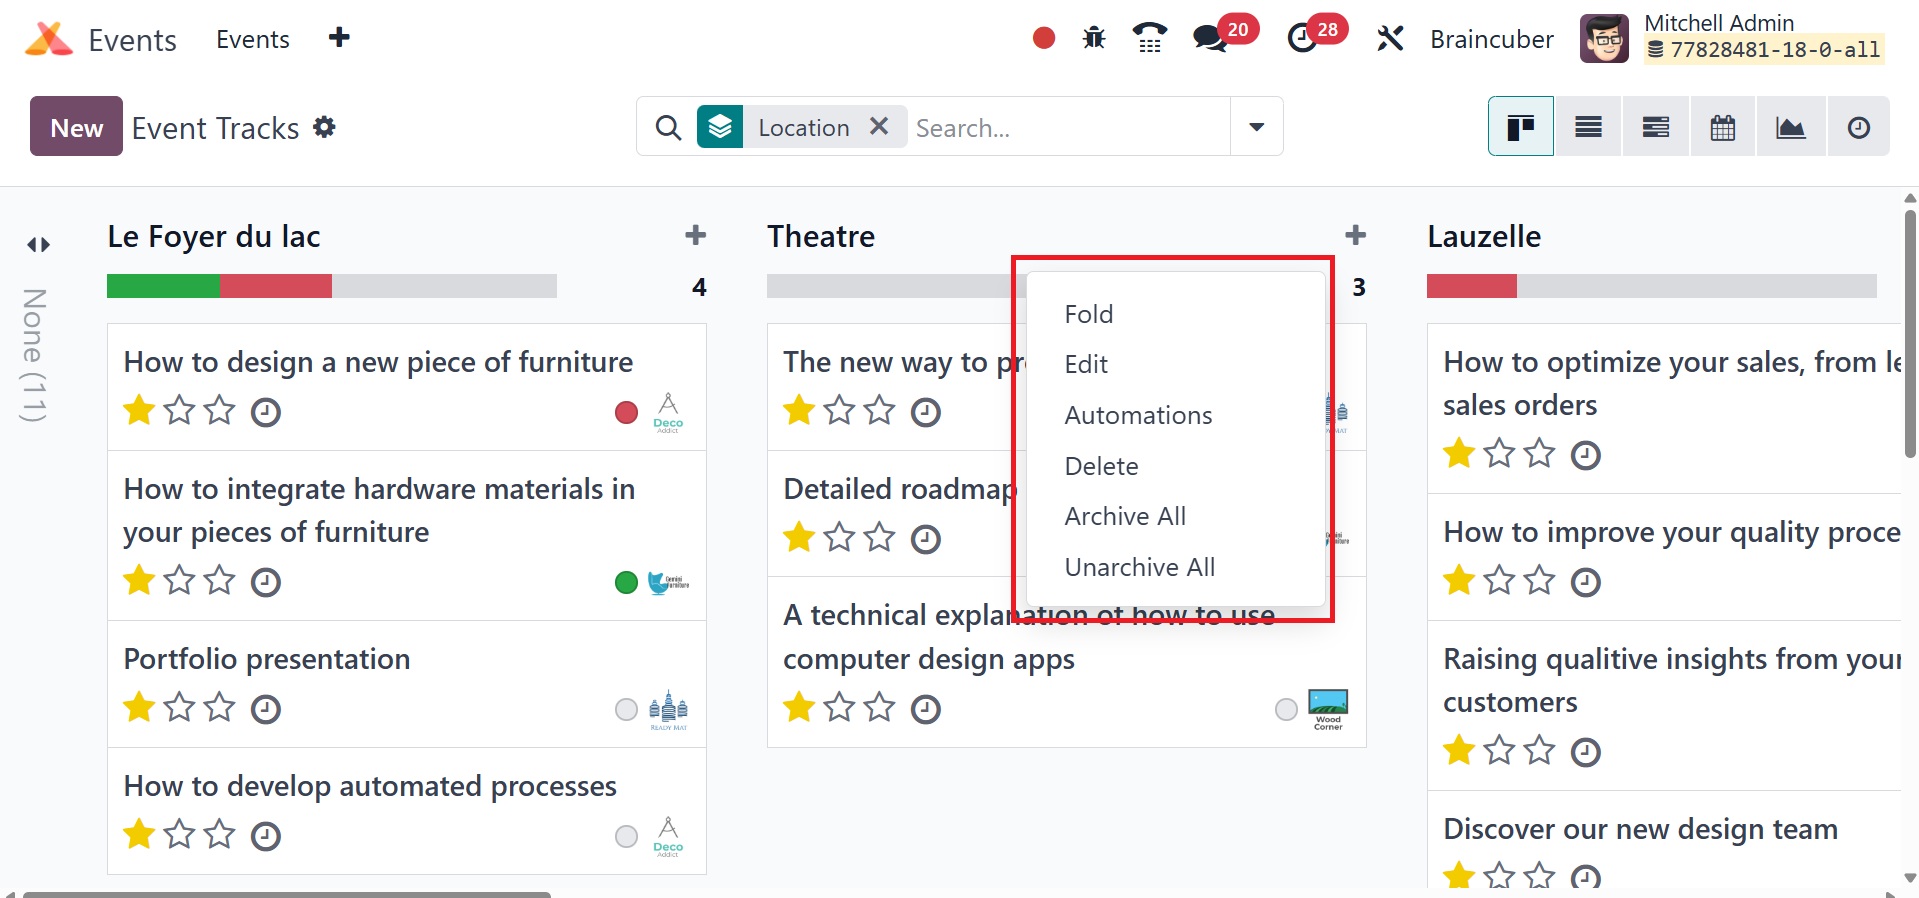
The clock icon can be used to schedule tasks for the selected track.
Three vertical
dots on each event track indicate whether the track should be
viewed, edited, or
deleted. If you want to add a new event track beneath a stage, use
the addition
symbol that appears to the right of the stage title.
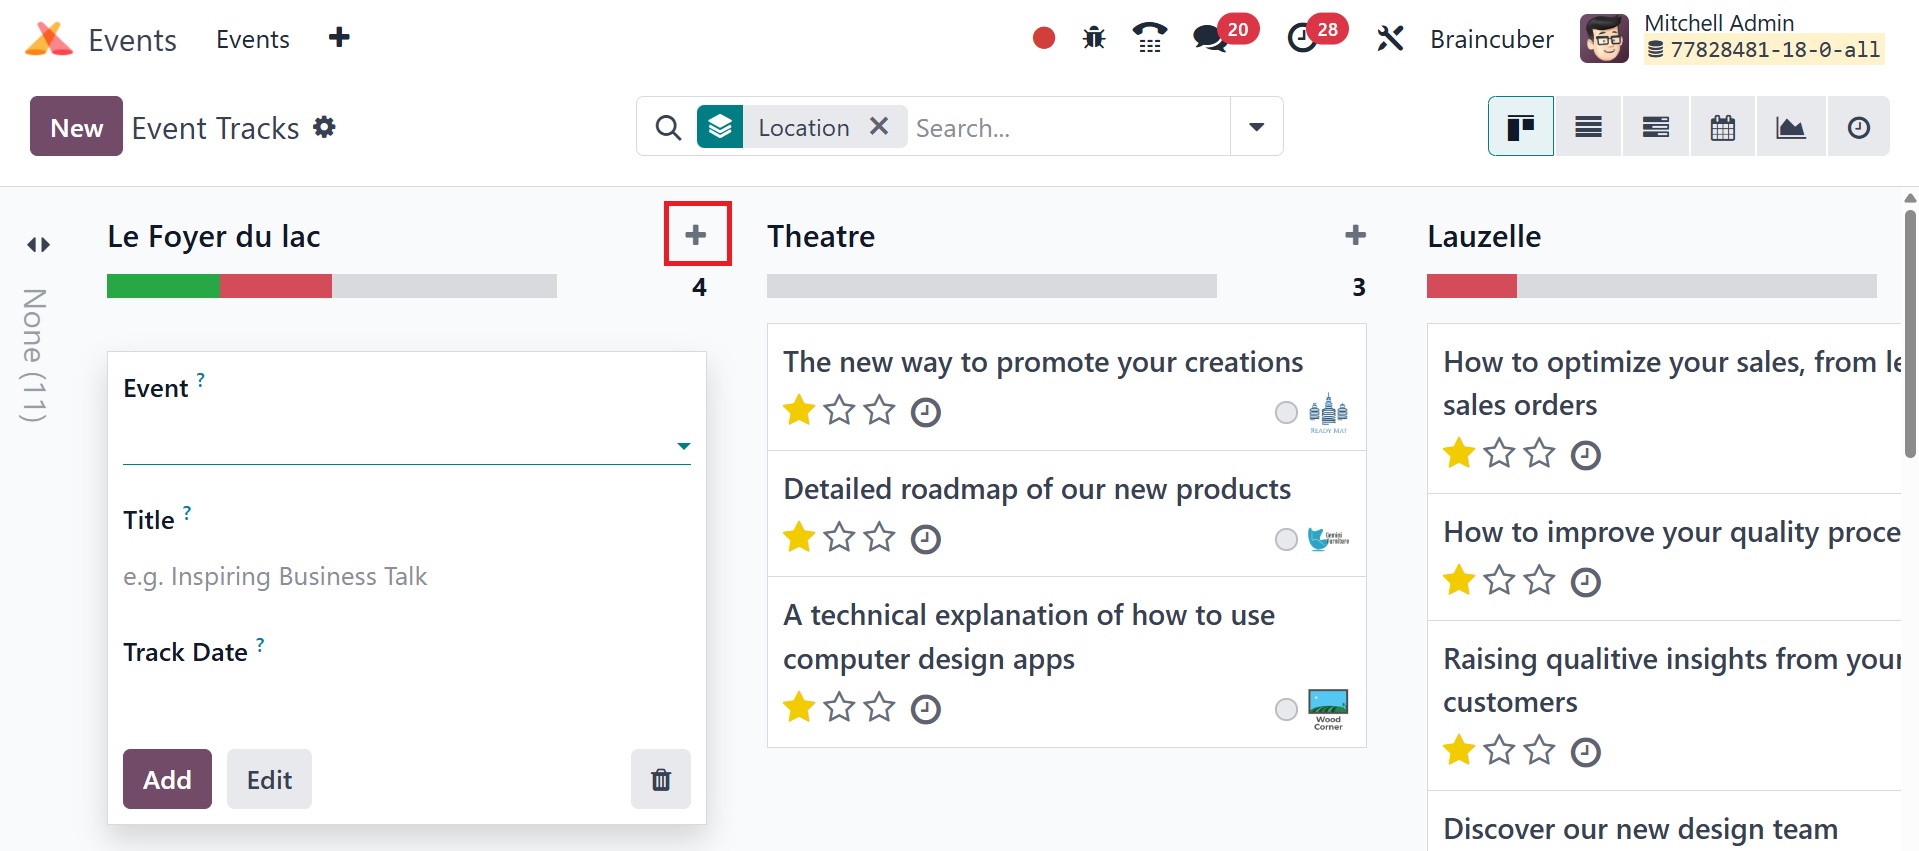
Click the Add button to add the track to the stage of your choice
after entering
the track's title in the corresponding field. By selecting the New
button on this
platform, you may also make a new event track.
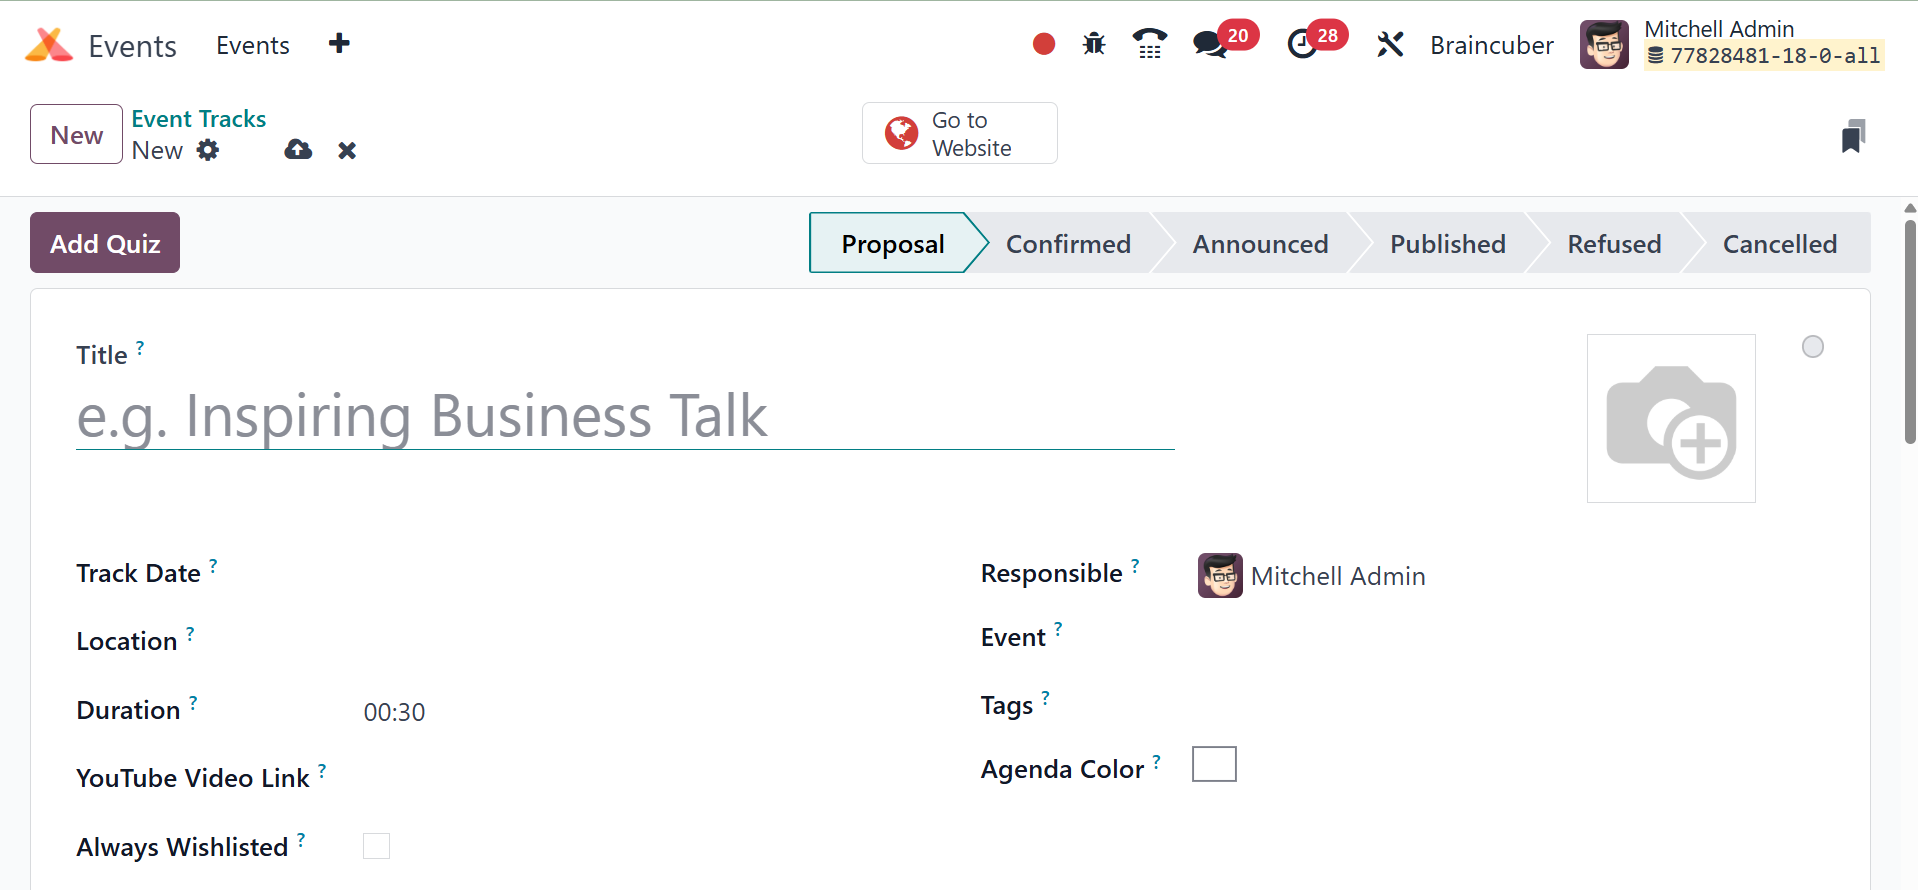
In the Title field, mention the name of the event track. Enter the
Track Date, Location,
and Duration details in the appropriate areas. By mentioning the
track's YouTube
video URL in the appropriate spot, the attendees can see your song
on YouTube. If
the video is already available on YouTube, you can activate the 'Is
Youtube video
link?' option. If the "Always Wishlisted" option is selected, the
talk will be marked
as a favorite for each registered guest. Enter the name of the
responsible employee,
the event, the relevant tags, and the color in the corresponding
fields.
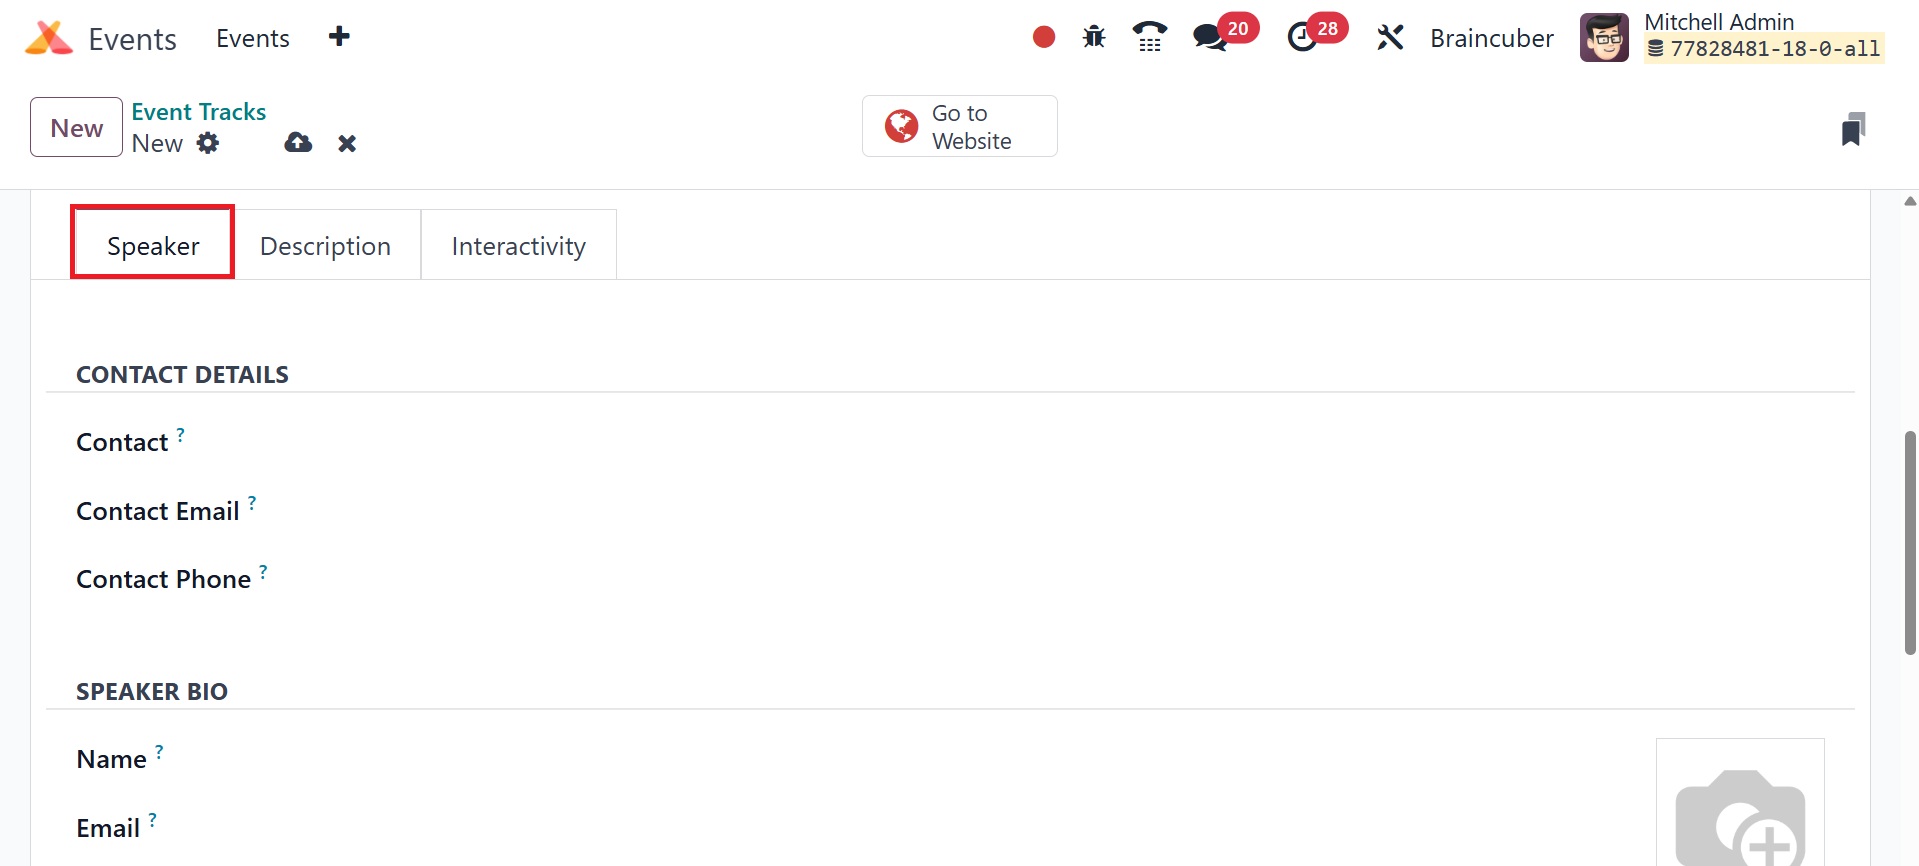
The Speaker tab allows you to add information about the talk's
speaker. Included
are a speaker bio and contact details. You can provide your phone
number, email
address, and contact name in the contact details section. Name,
email, phone number,
job title, company name, and biography are all included in the
speaker's bio. You
can also upload a picture of the speaker in the appropriate space.

The Description tab is where instructions and other important
talk-related information
can be mentioned.
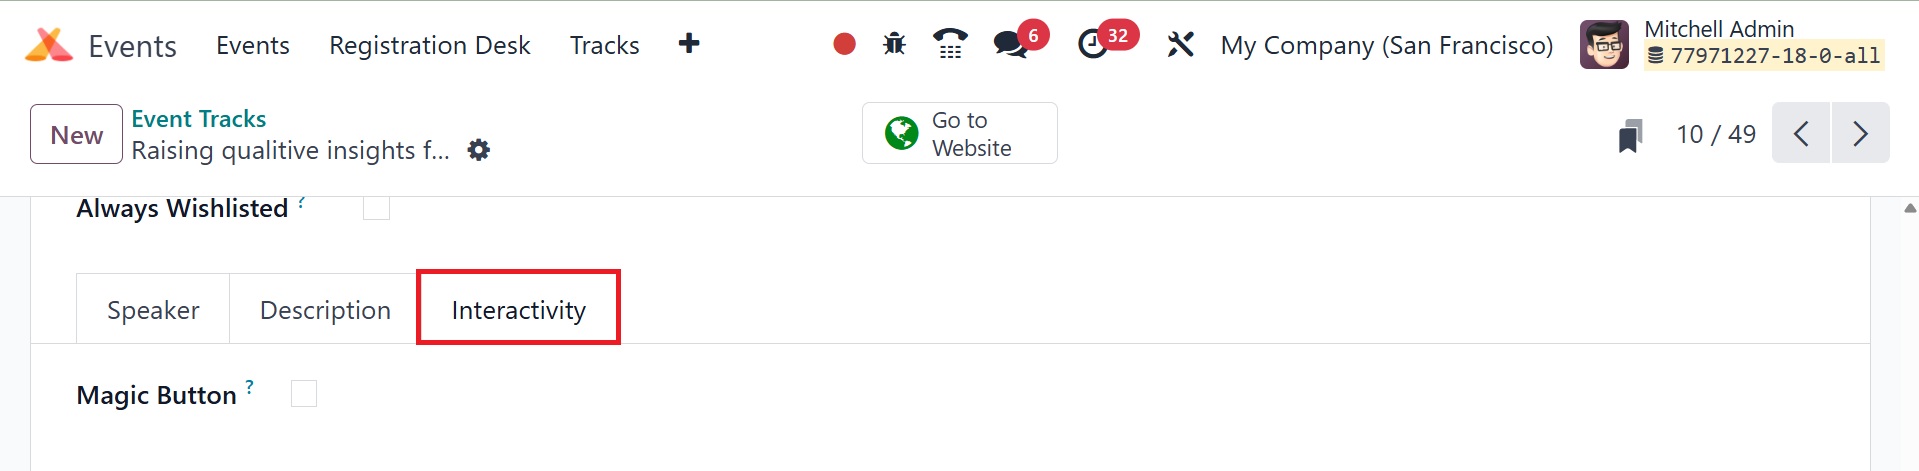
Under the Interactivity menu, you can turn on the Magic Button
option. While your
audience is listening to your lecture, Odoo18 will issue a call to
action if this
option is chosen. This page allows you to change the Button Title,
Button Target
URL, and Button Appearing Time.
You can now click the Save button to save the newly created track.
After the song
is finished, you might ask the audience questions about the
discussion. To add questions
to your track, you can activate Odoo18's Event Gamification feature.
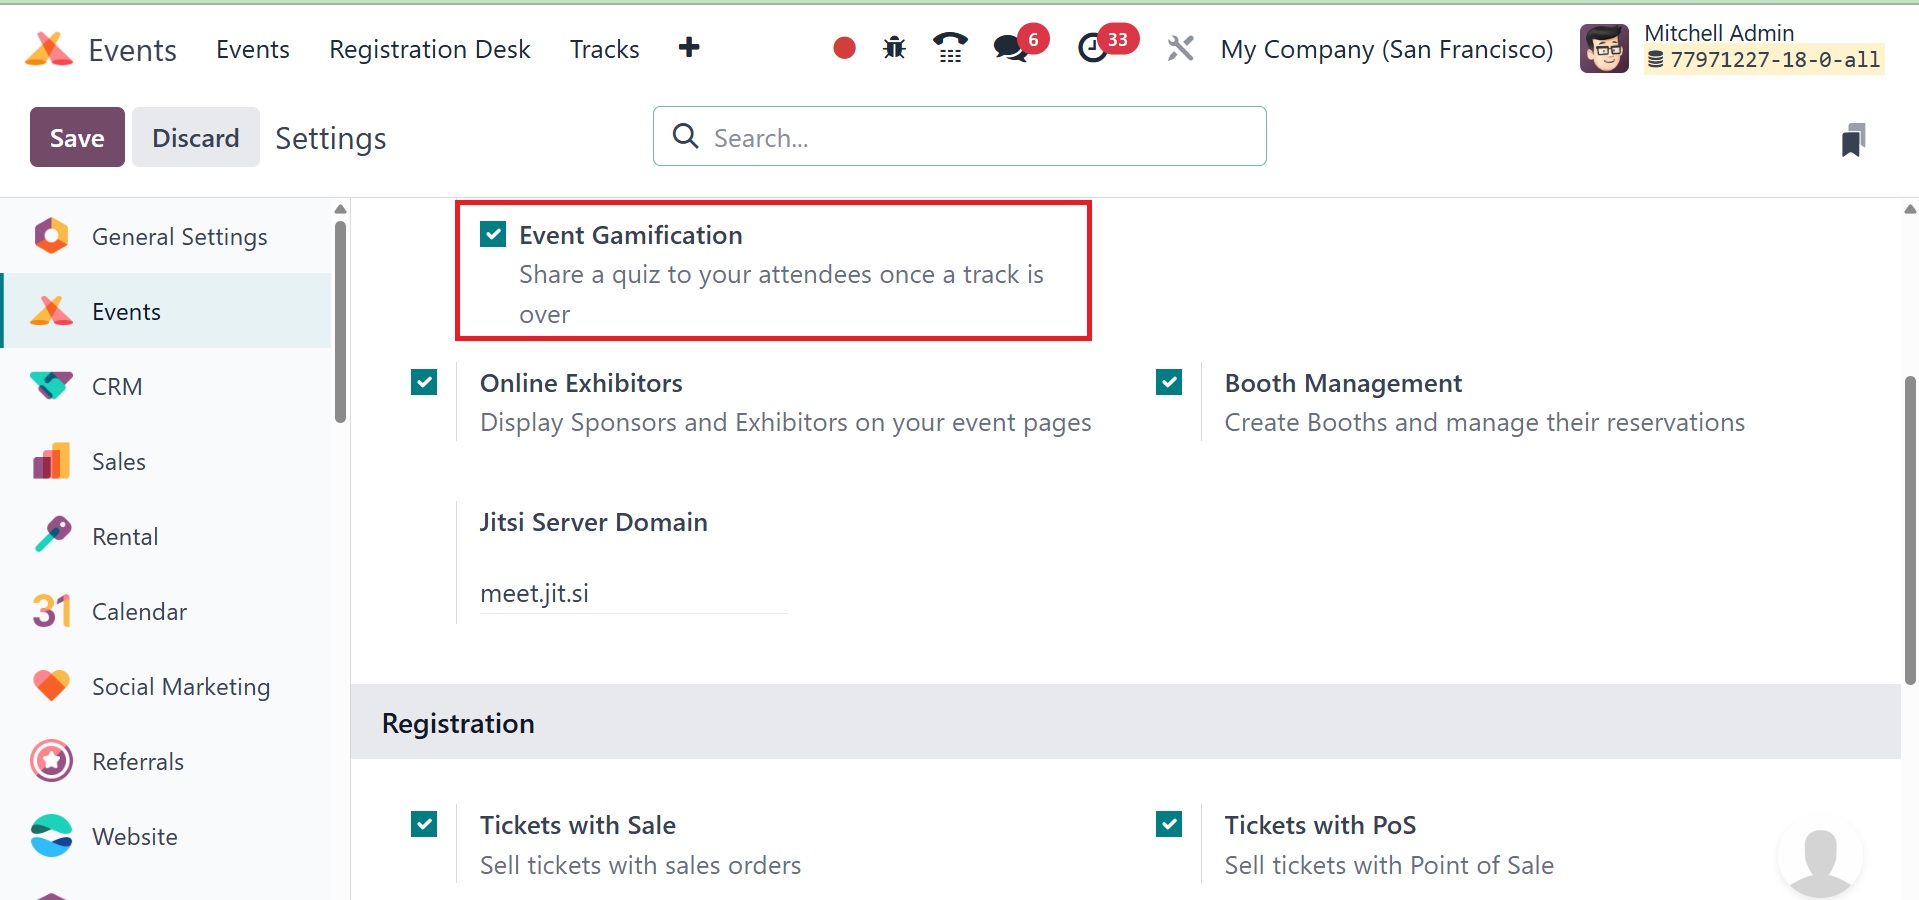
Your event creation window now displays the 'Add Quiz' option.
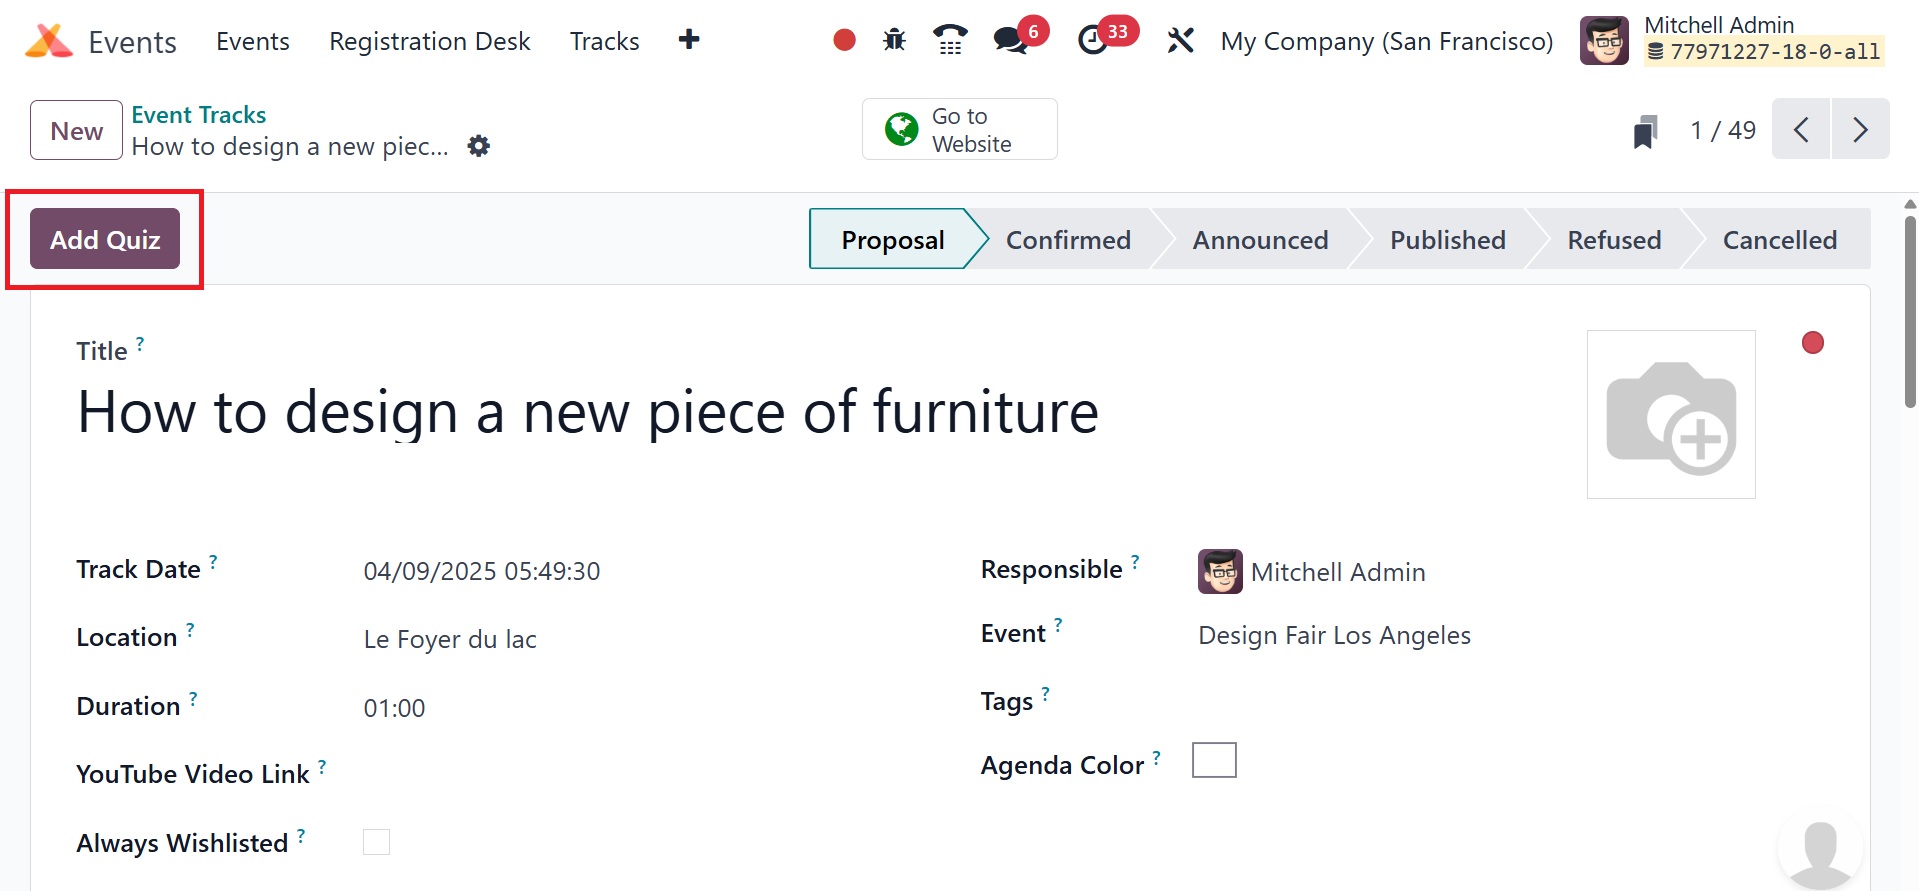
When you select the Add Quiz button to add questions for the event
track, a new
window will open as seen below.
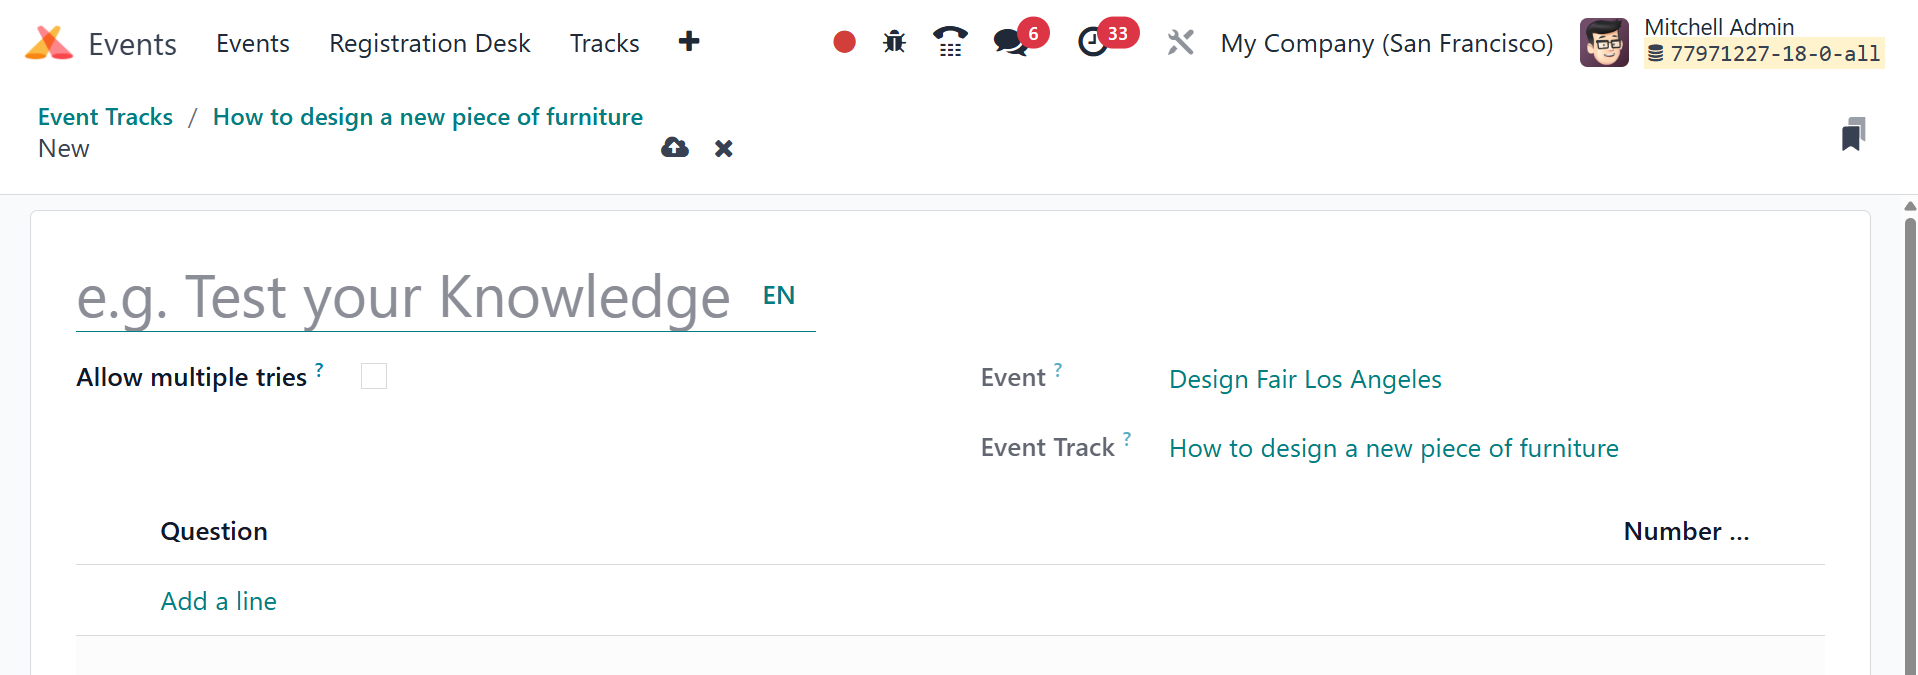
You can enter a title for the quiz in the designated field.
Participants can restart
the quiz by turning on the 'Allow multiple tries' option. The Event
and Event Track
names are shown in this pane. You can create questions by selecting
the Add a Line
option under the Question tab.
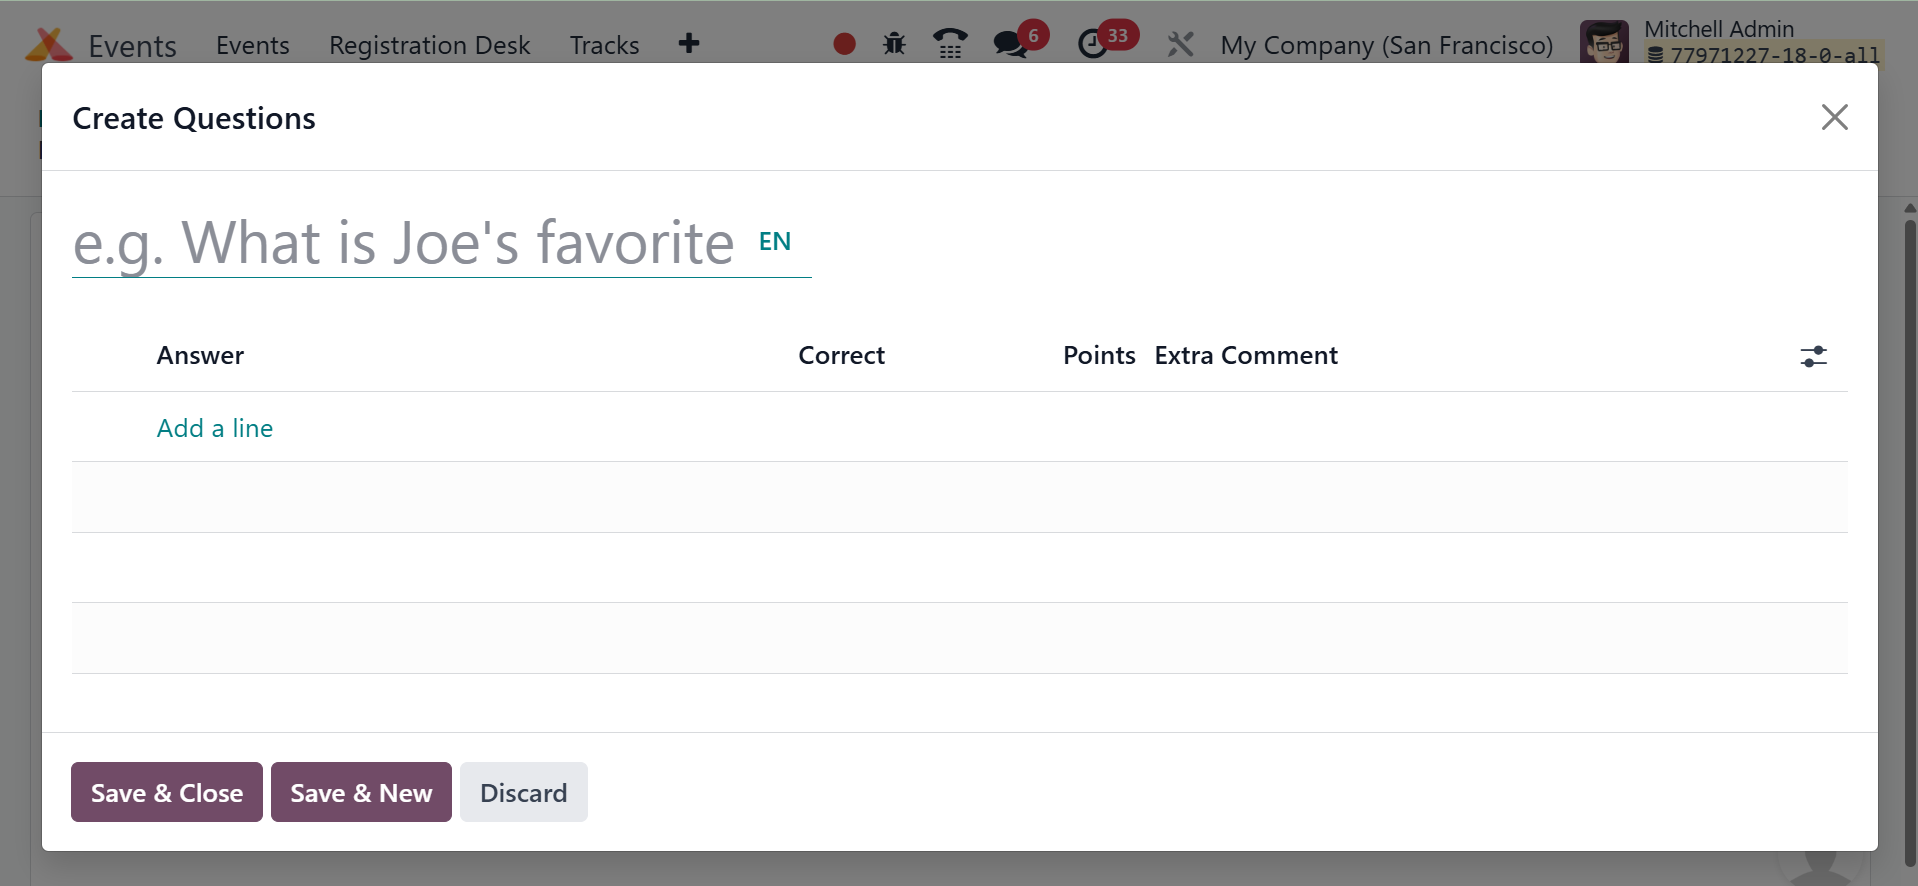
Place the question in the appropriate field of the pop-up window and
the response
options in the Answer line. From the list of options, you can choose
the best answer,
then mark it in the corresponding fields with the necessary number
of points. Participants
will receive the allotted number of points for selecting the correct
answer from
the list of possibilities. This window also allows you to add any
more remarks for
the answer line. Click the Save option at the end to save the quiz.
2. Event Template
You can create suitable templates for Odoo 18 events by using the
Event Template
option in the Configuration menu. When making a new event, these
templates can be
utilized. Depending on the kind of event, you can create a range of
templates on
this platform. You can select one of the pre-made templates or make
a custom one
for your event, as seen in the screenshot below.
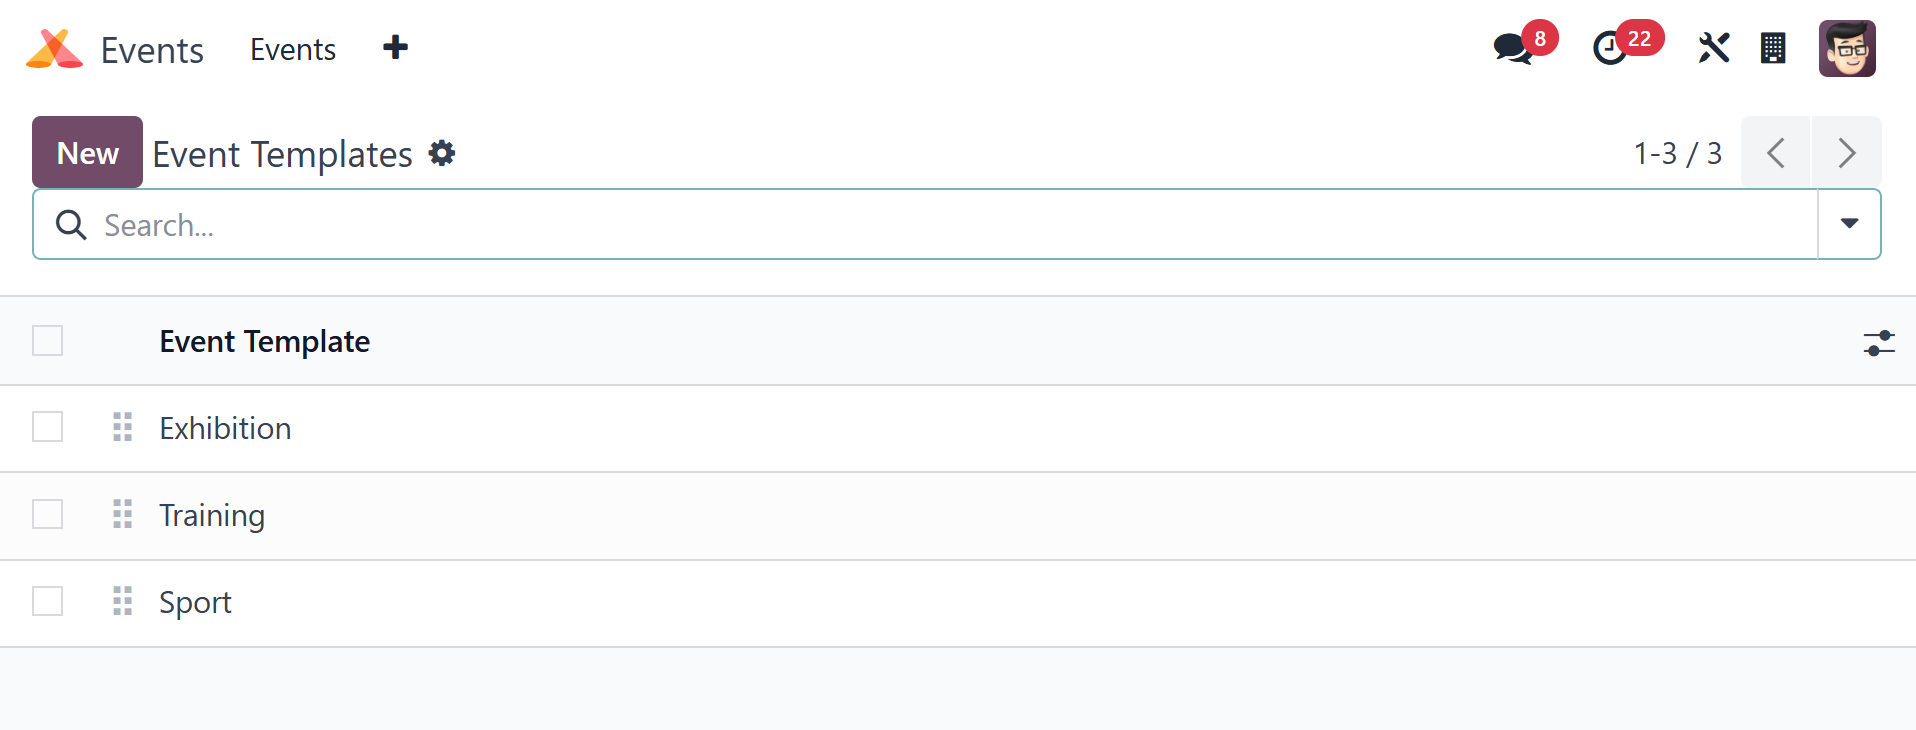
You can create new templates by clicking the New button.
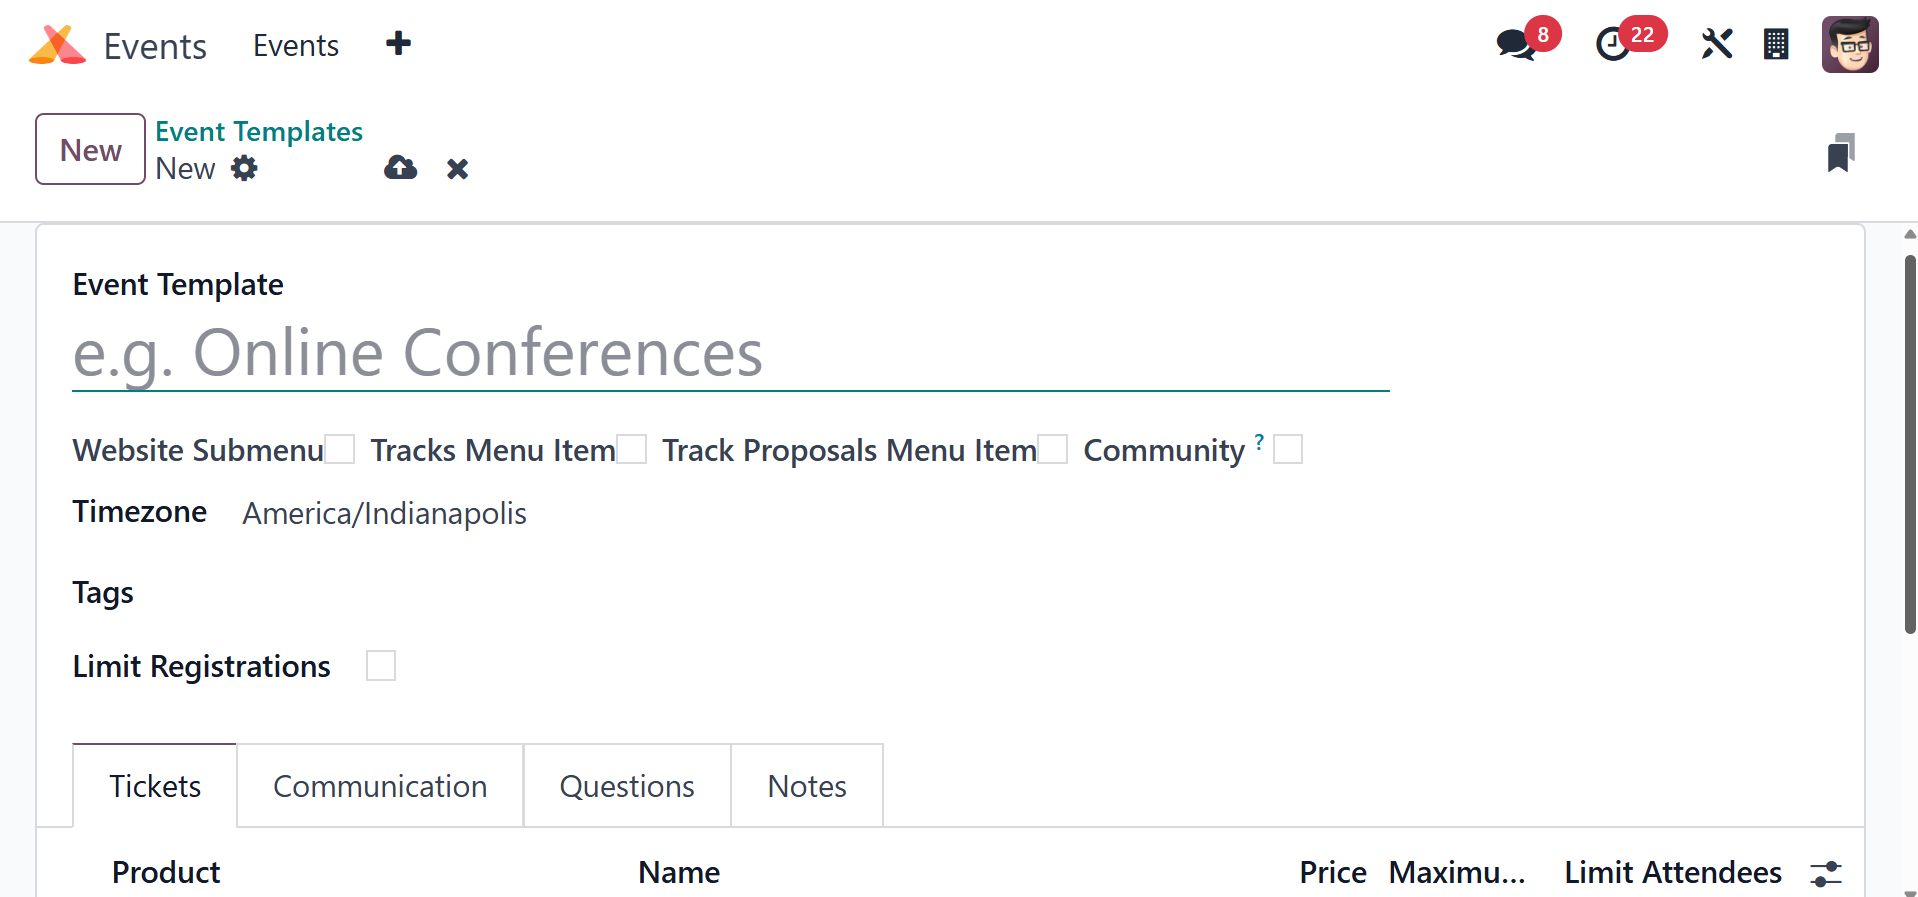
The new template's name can be entered in the Event Template field.
The fields in
the box for establishing new events are the same as the rest of the
fields. You
can fill up the template by adding details regarding Tickets,
Communication, Questions,
Booths, and Notes, as we discussed in the Events session earlier in
this chapter.
These newly created event templates can be used when you create a
new event that
belongs to the same category.
3. Event stages
The occurrences module makes it easy to classify and arrange
occurrences by assigning
them different stages according to the process they are going
through. Use the Event
Stages option from the Configuration menu to add more stages to the
event. All of
the steps in the Events module can be changed, as seen in the
illustration below.
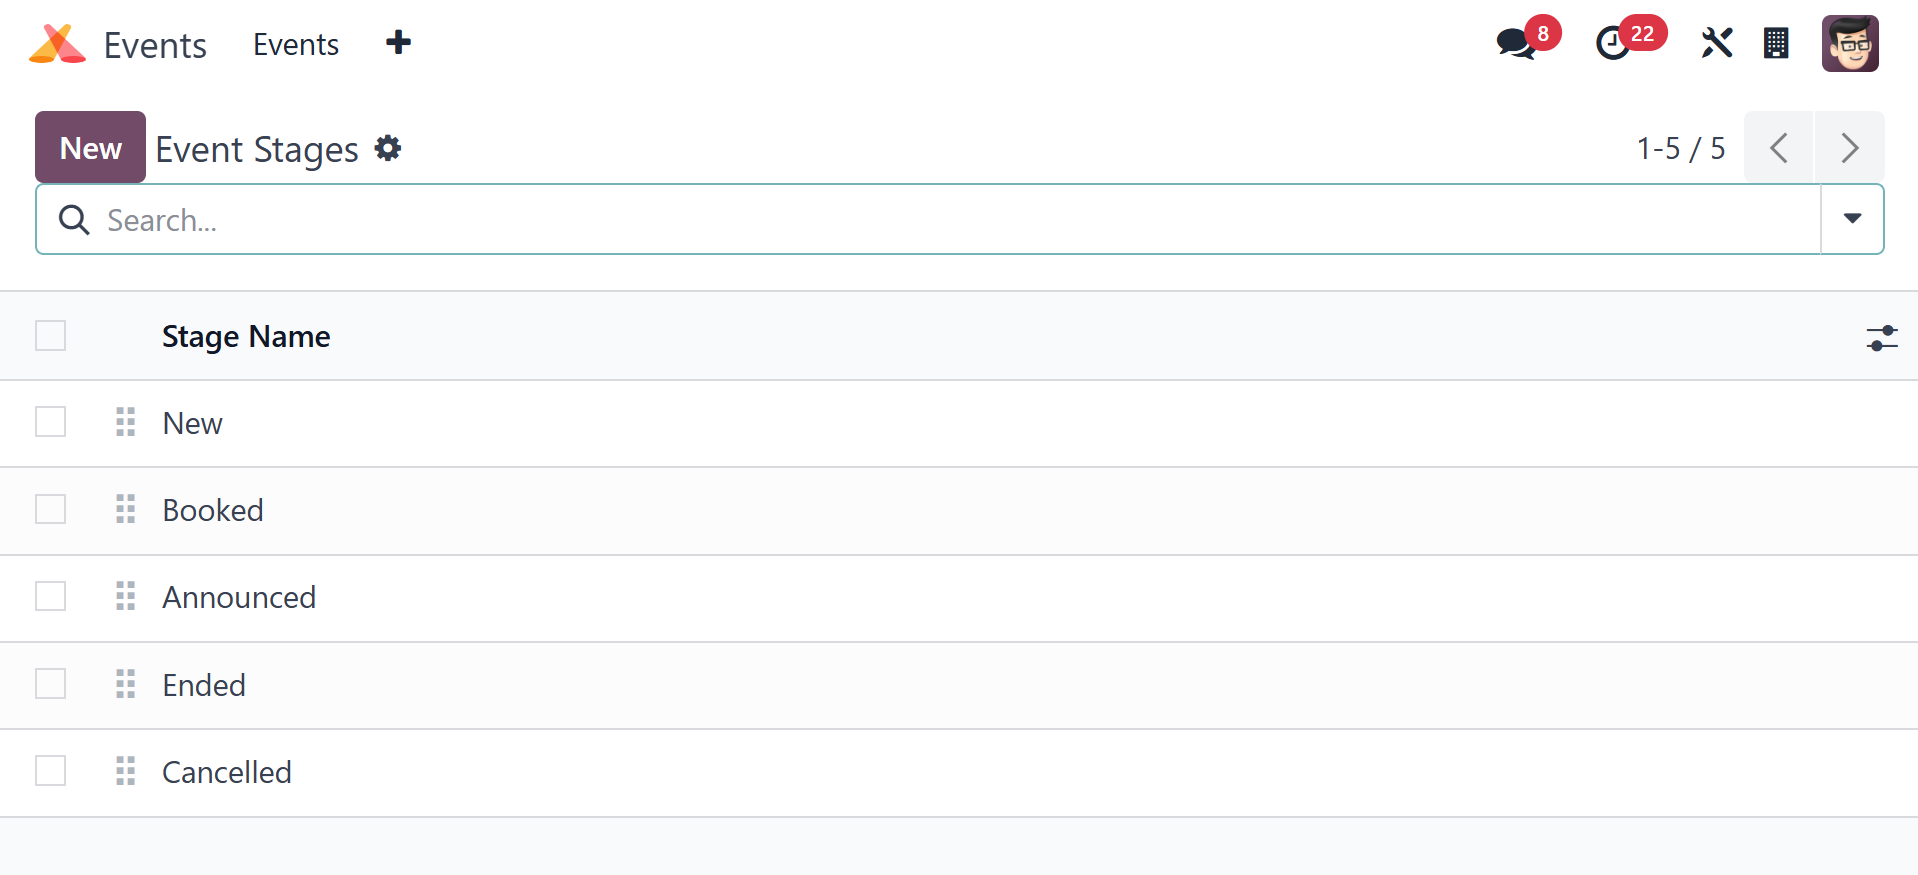
Click the New button to create a new stage.
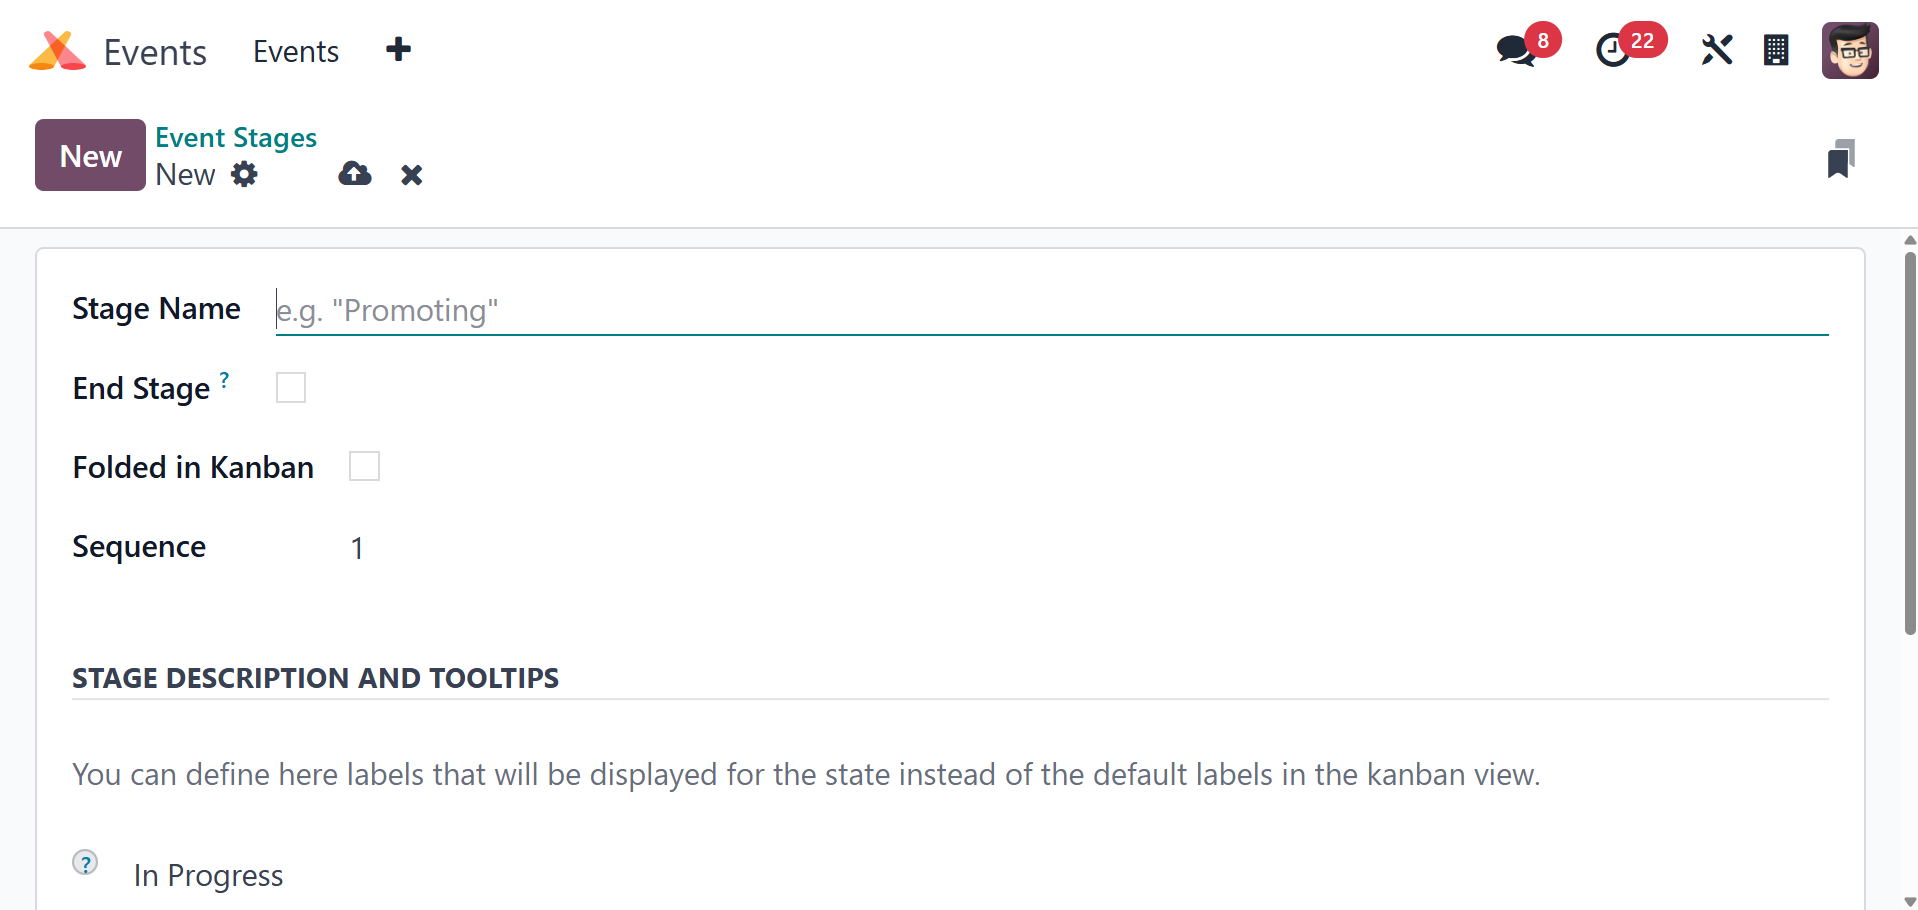
In the Stage Name, include the name of the stage. Odoo18 will
automatically move
the finished events to the End Stage when it is activated. To fold
this stage in
the Kanban view, you can turn on the Folded in Kanban option. Enter
the Sequence
number for the stage in the designated field. You can add a
description and multiple
labels for this stage under the Stage Description and Tooltips tab.
After completing
every field, click the "Save" button.
4. Event Tags Categories
The Events module in Odoo 18 allows you to tag events appropriately.
These tags
make it easy to classify events, and you can use the previously
applied tags to
look for certain occurrences. Event tags can also be applied to
other categories.
You can group tags under a certain category by using the
Configuration menu's Event
Tags Categories option.
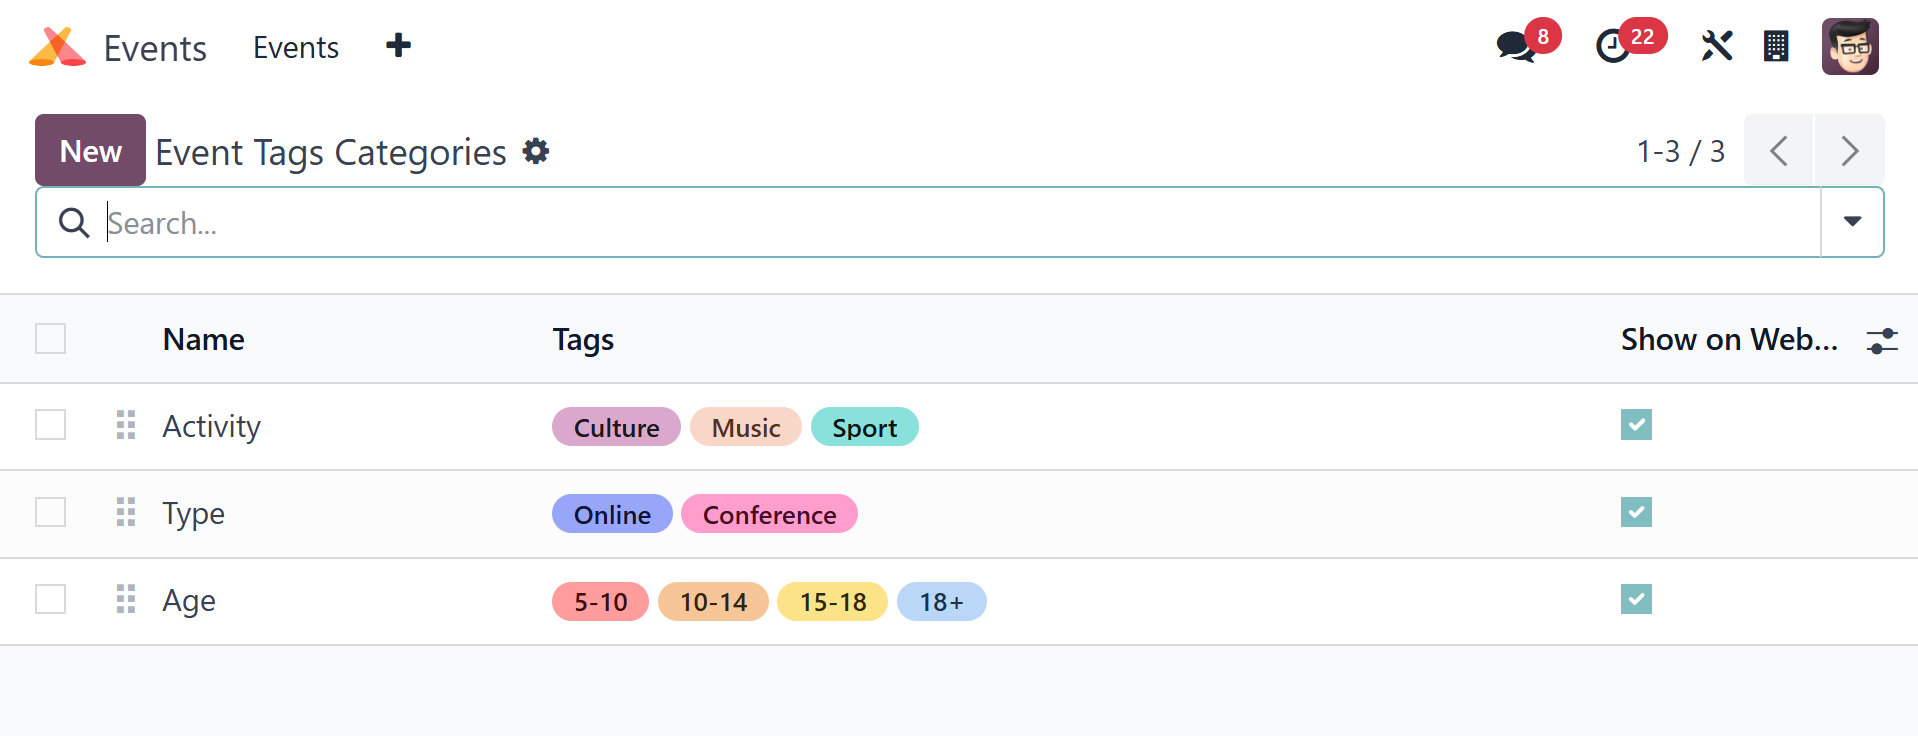
Several tag categories that were created in the Odoo18 Events module
may be found
here. The list includes the name of the category, the tags that go
under each category,
and whether or not the tag category may be viewed online. Now, you
can use the New
button to easily create a new category for the tags in the module.
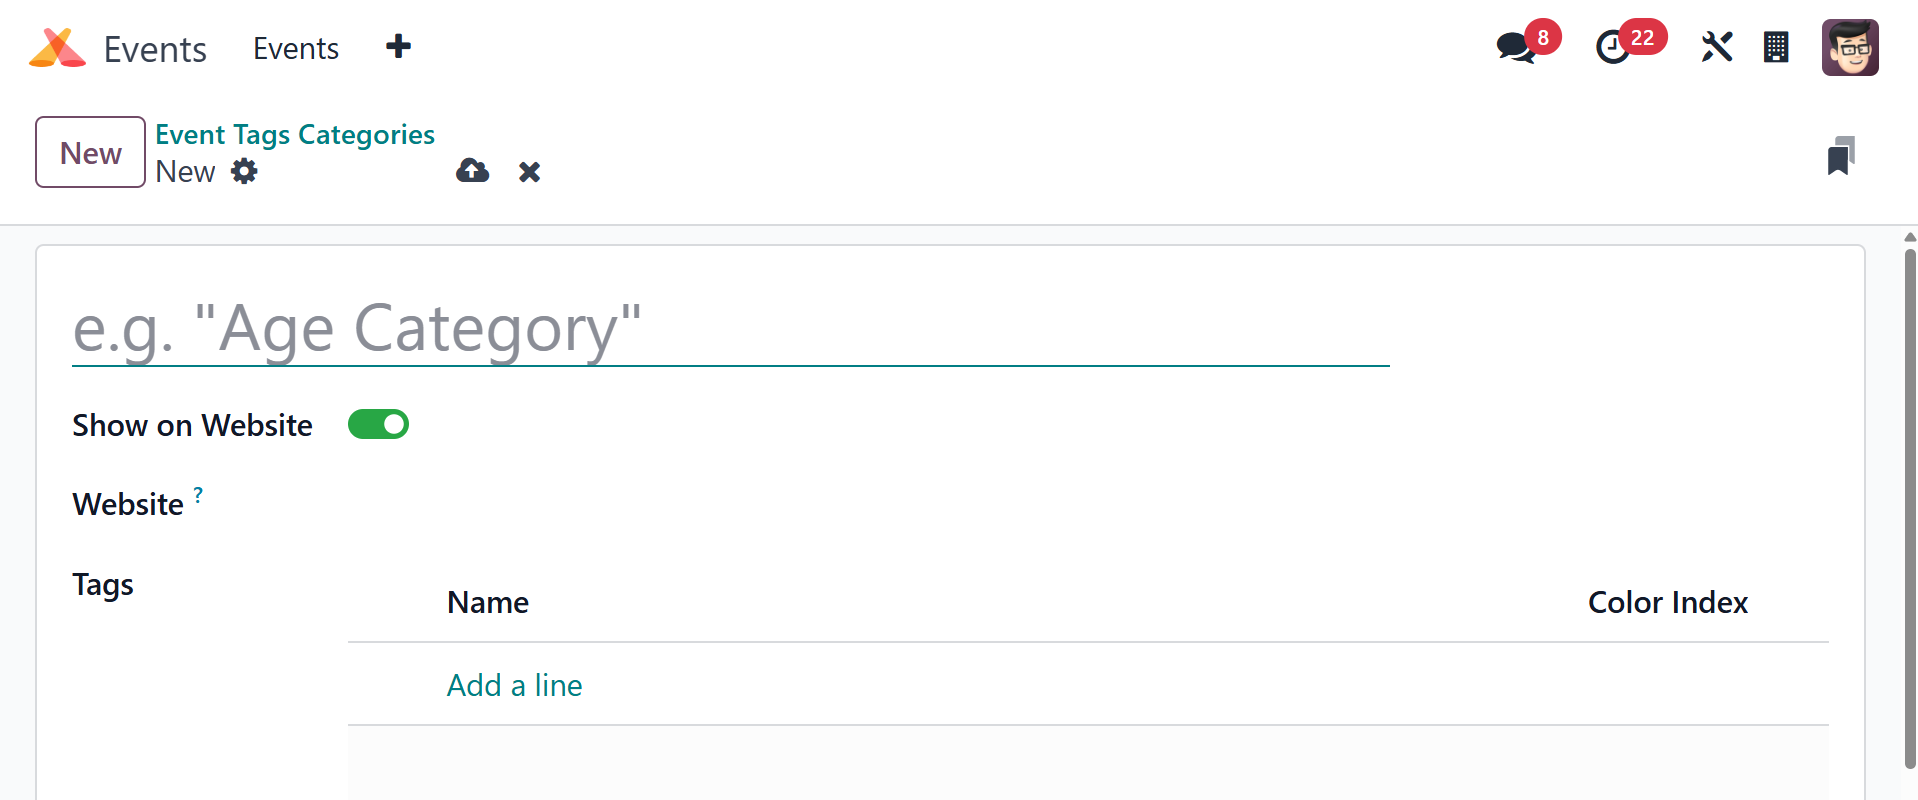
Enter the tag category's name in the corresponding area and select
the Show on Website
option to make the tag category visible on the website. By selecting
Add a Line
from the menu, you can add tags to this category. Select the proper
colors for each
tag that belongs to this category. Use the Save button to add this
new category
to the existing list.
5. Events Mail Scheduler
We set up the Emails/SMS schedulers to remind attendees by email or
SMS whenever
a new event is created in the Odoo18 Events module. A list of all
scheduled emails
and SMS can be seen under the Events Mail Scheduler option.

The list preview shows the event name, Send, Template, Schedule
Date, and the total
number of emails and SMS sent.
6. Lead Generation
Using the data of attendees who have registered for an event, Odoo18
allows you
to instantly generate leads. To establish lead-generating rules, use
the Configuration
menu's Lead Generating option.
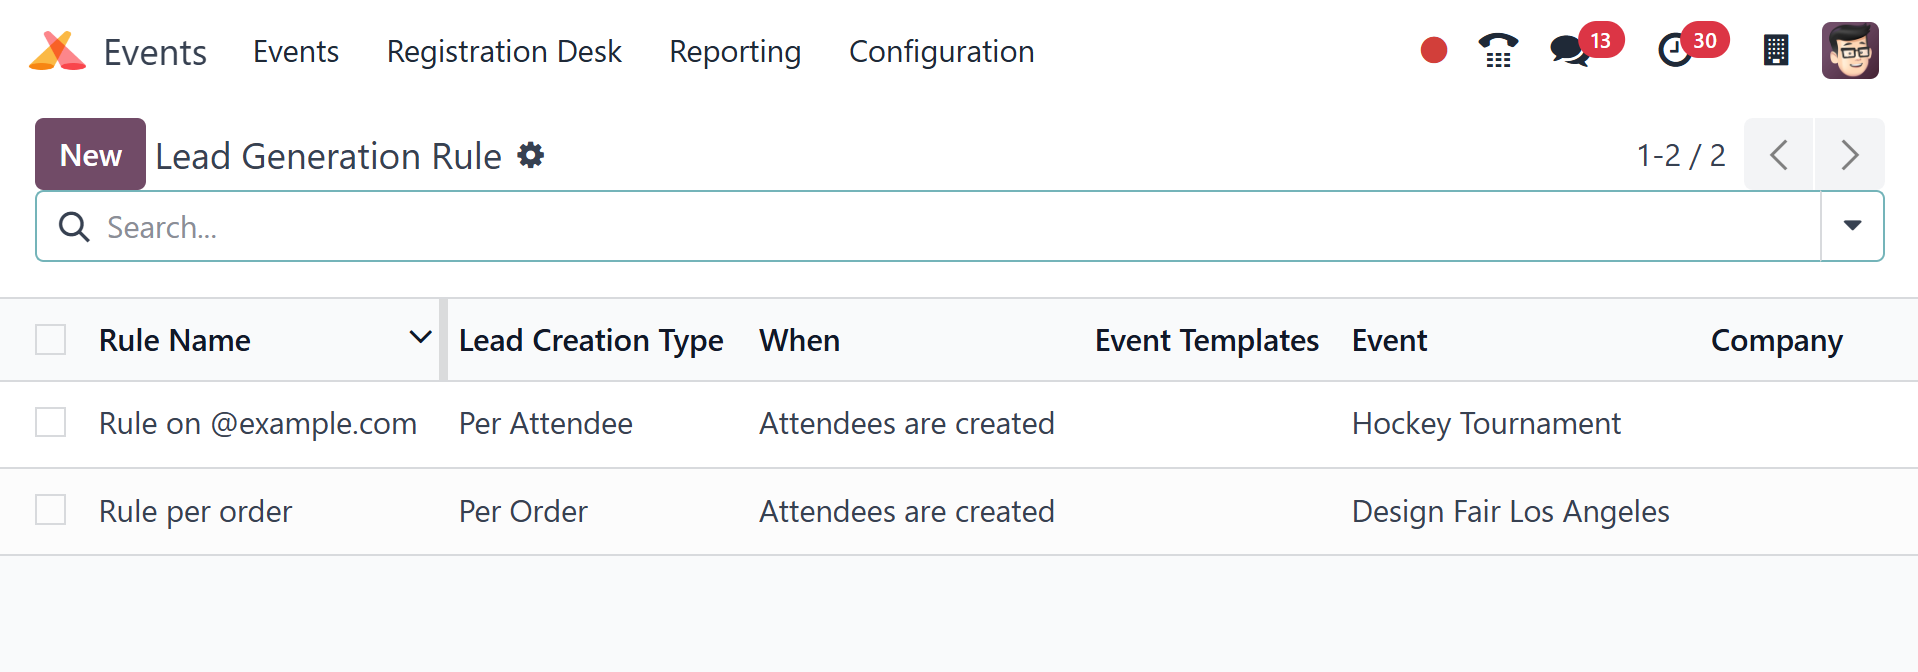
A list of current lead-generating guidelines will be displayed on
this platform.
There will be information about the Rule Name, Lead Creation Date,
Lead Generation
Type, Event Categories, Email, and Company. Click the New button to
establish a
new lead generation rule.
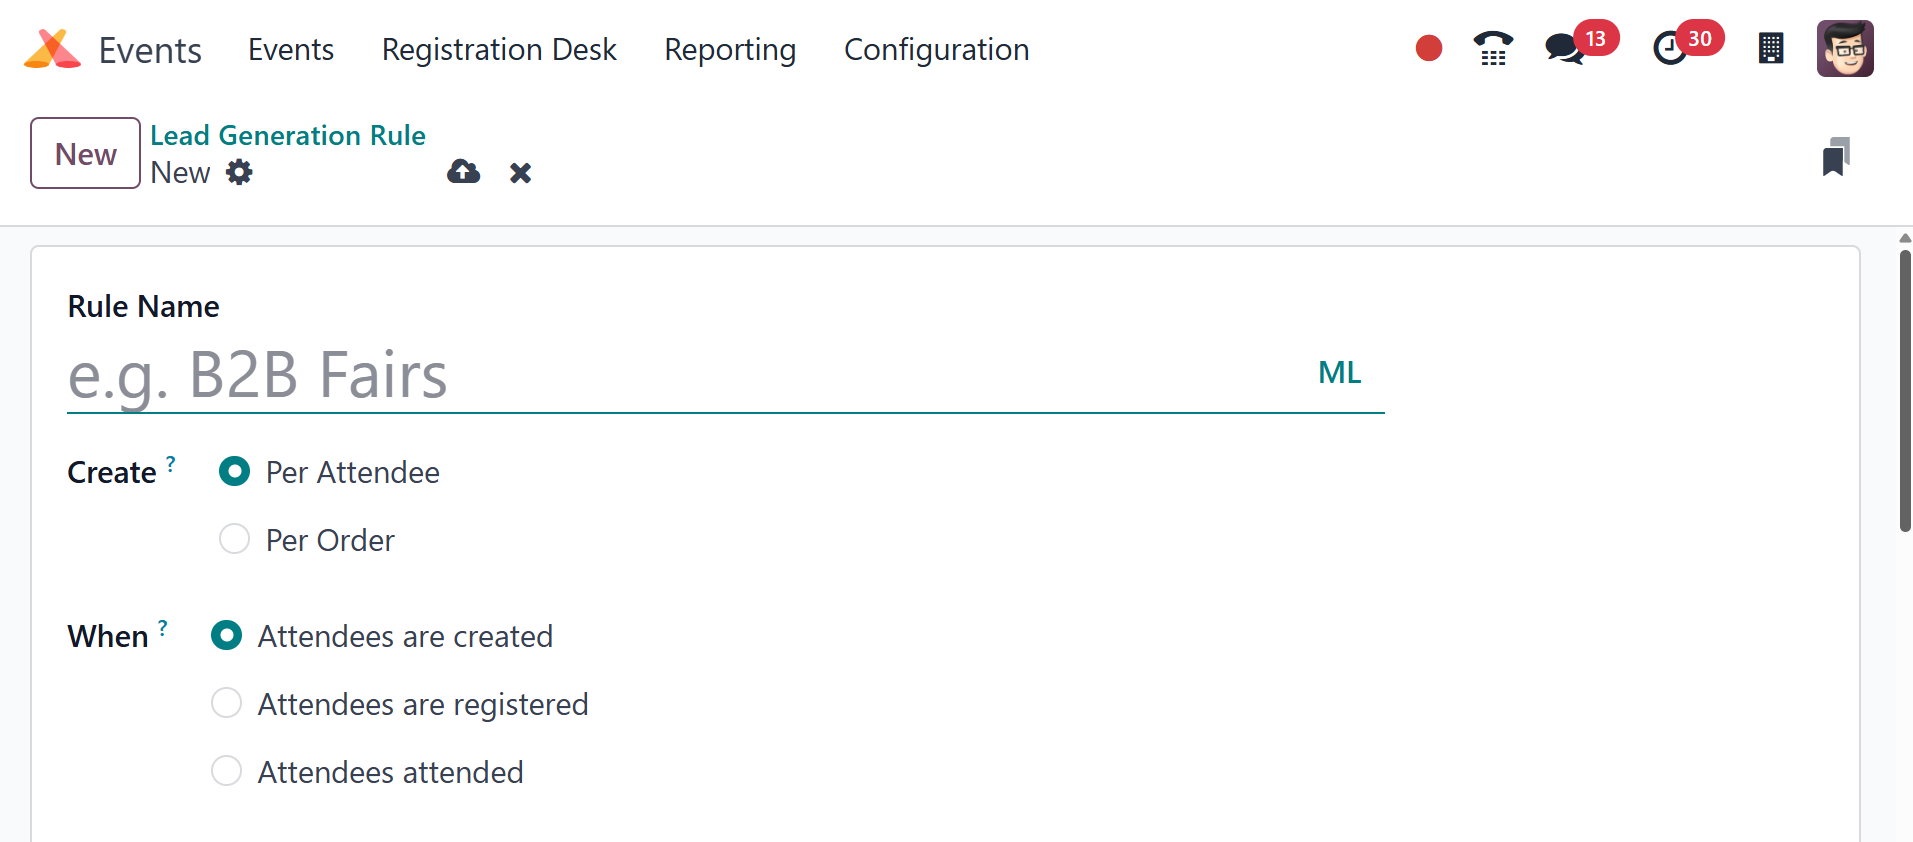
First, fill in the relevant field with the Rule Name. Orders or
attendees can be
used to generate leads. The lead can be created manually or
automatically if the
attendees have been identified, confirmed, or attended. These
parameters can be
set in the relevant fields. You can mention a specific event
category, company,
and event in Odoo 18 to apply this rule to all participants who
belong to that event
category, company, and event. Additionally, you can use the Add
Conditions tool
to define criteria to filter participants. To allocate the produced
leads to a certain
sales team and salesperson, you can record them in the appropriate
fields.
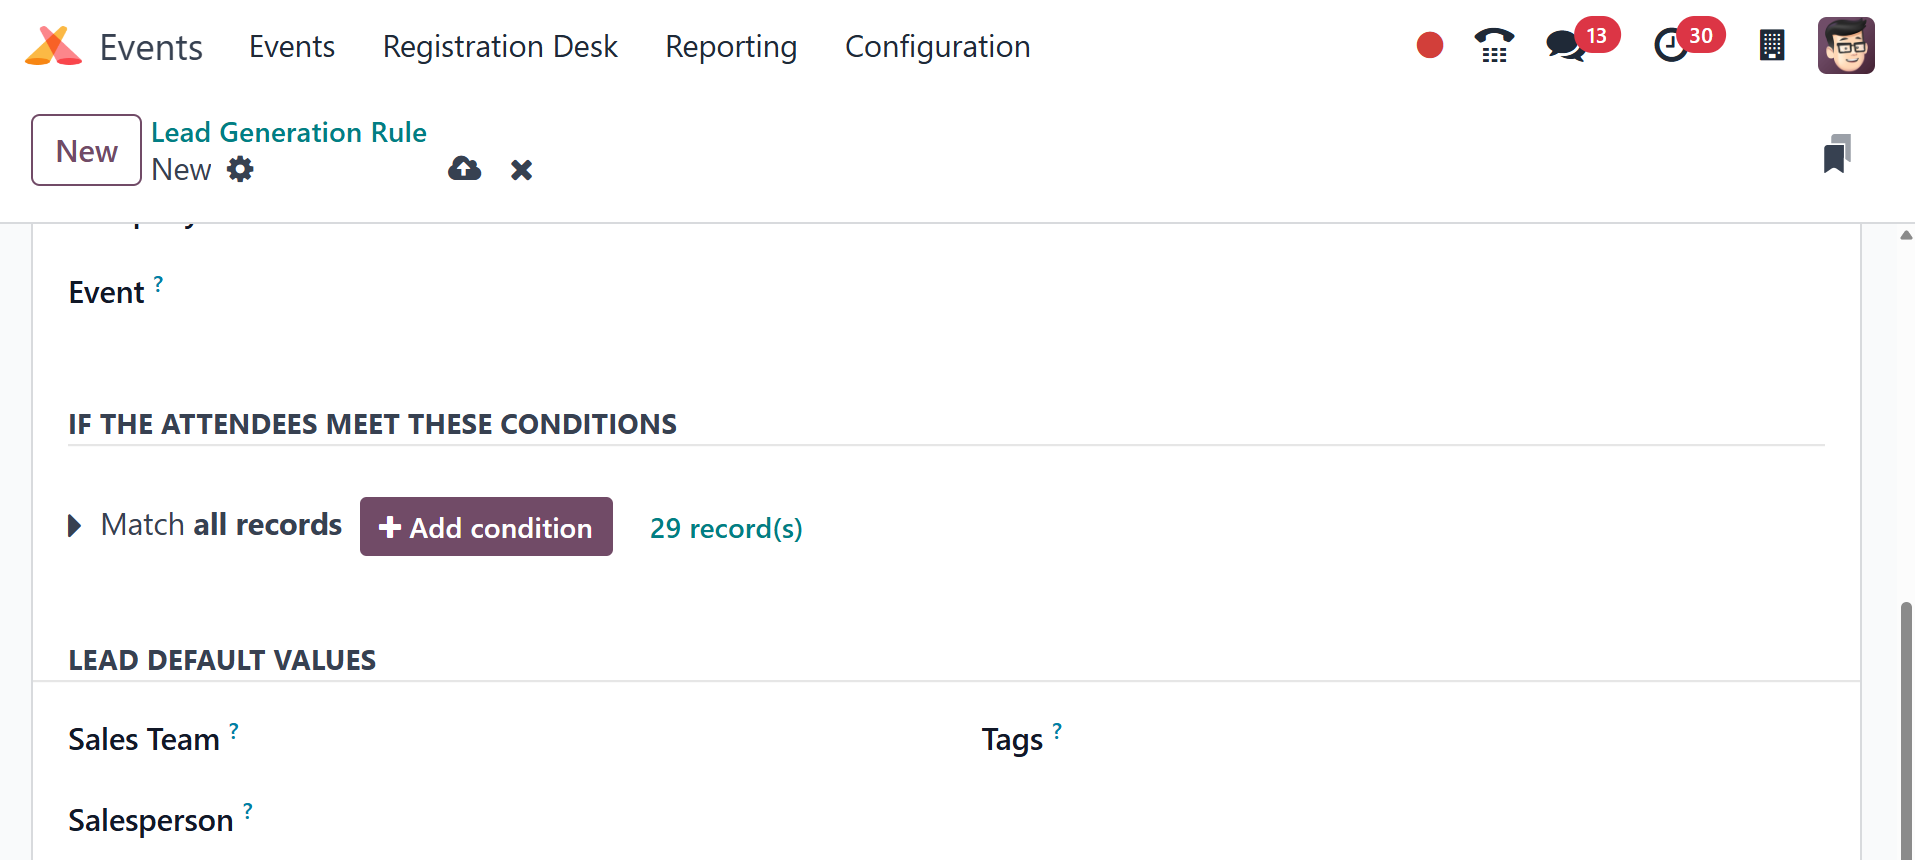
Additionally, a sales team, a salesperson, and tags may be mentioned
for the leads
in this window. Clicking the Save option will allow you to save the
newly created
lead generation rule.
7. Booth
Booths can be put up when a new event is created in the Odoo18
Events module. The
configured booths will be accessible on the event website. If a
business or group
wants to promote or introduce their products or services to the
attendees of a particular
event, they can reserve a booth through the event website. The
Configuration option
in the Events module is where you may set up new booths.

The Booths window's Kanban view separated the configured booths into
Available and
Unavailable groups. You can use this platform's Filters and Group By
options. It's
easier to add a new booth to this window by using the New button.
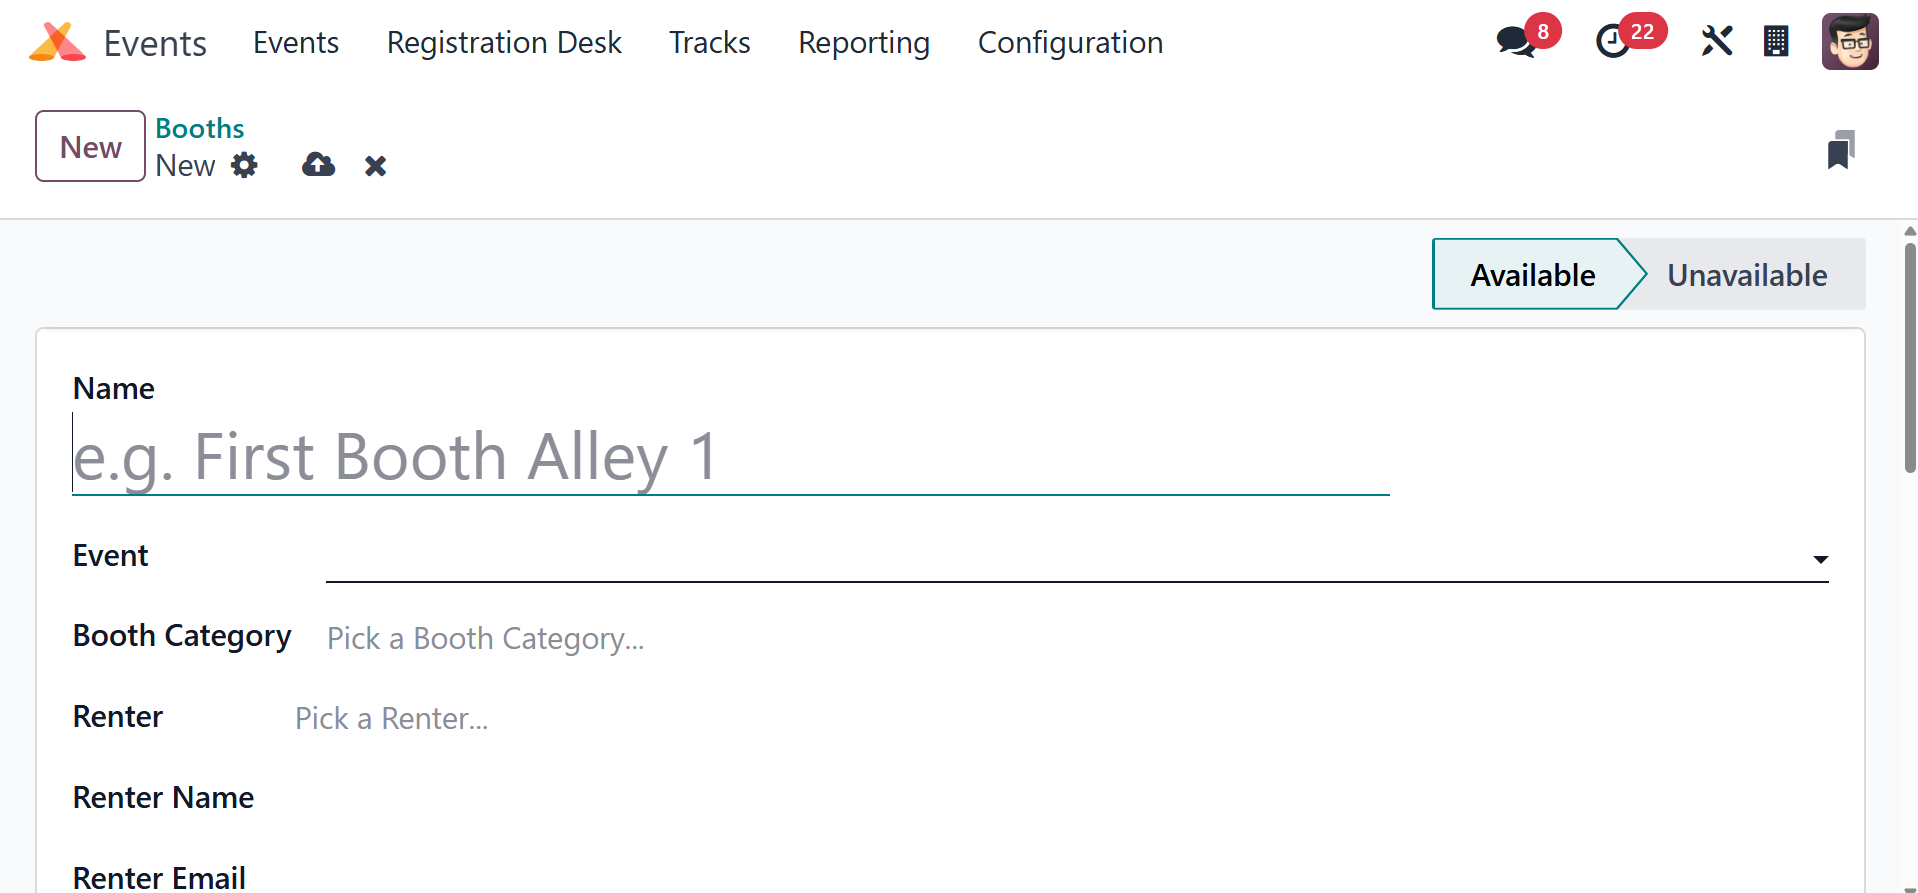
The name of the booth, the event, the booth category, the renter,
the renter's name,
email, phone number, and mobile number can all be entered in the
corresponding sections.
You can see the details of the clients who signed up for this booth
under the Registration
tab. Click the Save button to save the new booth.
8. Booth Categories
The Odoo18 Events module's Configuration menu contains the Booth
Categories option.
This feature allows you to classify booths into multiple groups.
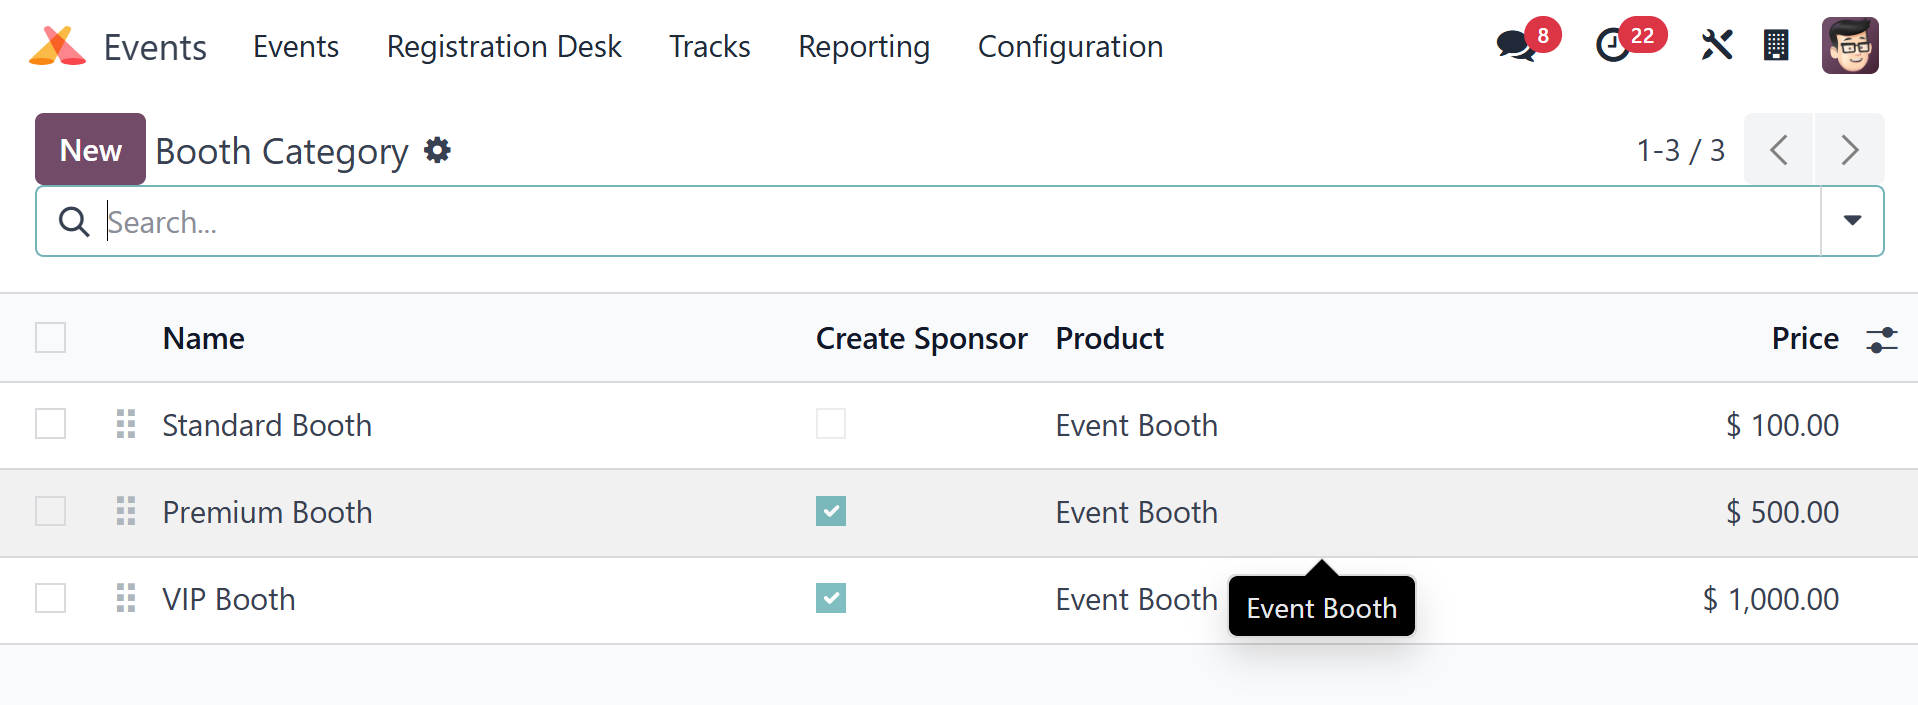
You may get details about Name, Product, Price, and whether or not
you created a
sponsor from this list. Click the New button to create a new booth
category.
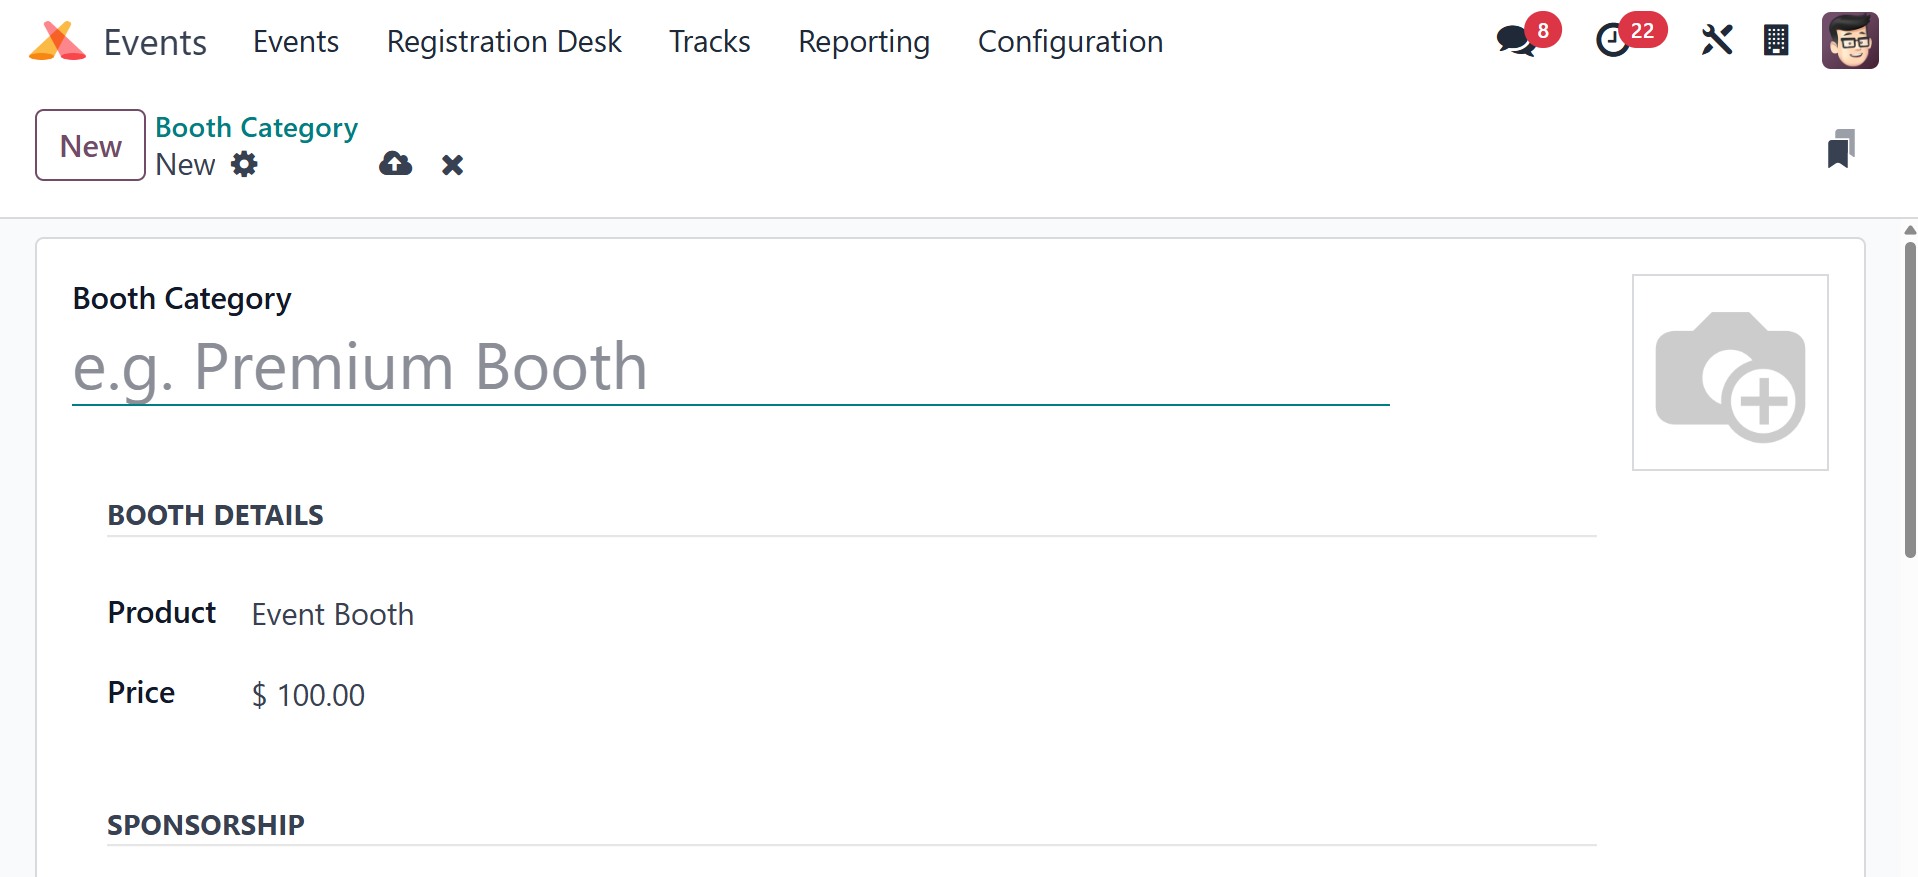
In the designated area of this window, you can enter the Booth
Category. In the
Product column, you can designate the Event Booth as the product.
Enter a price
for this booth category in the relevant field. There is a field to
create a sponsor.
A sponsor will be created when a user reserves a booth. The
Description option allows
you to give more details about the booth category. Clicking the Save
button will
save the new booth category.
9. Track Stages
Participants will have a clear idea of the steps taken and the
progress accomplished
thanks to the many phases allotted to the event tracks. Use the
Track Stages option
from the Configuration menu in the Events module to create and
control various stages
for the tracks.
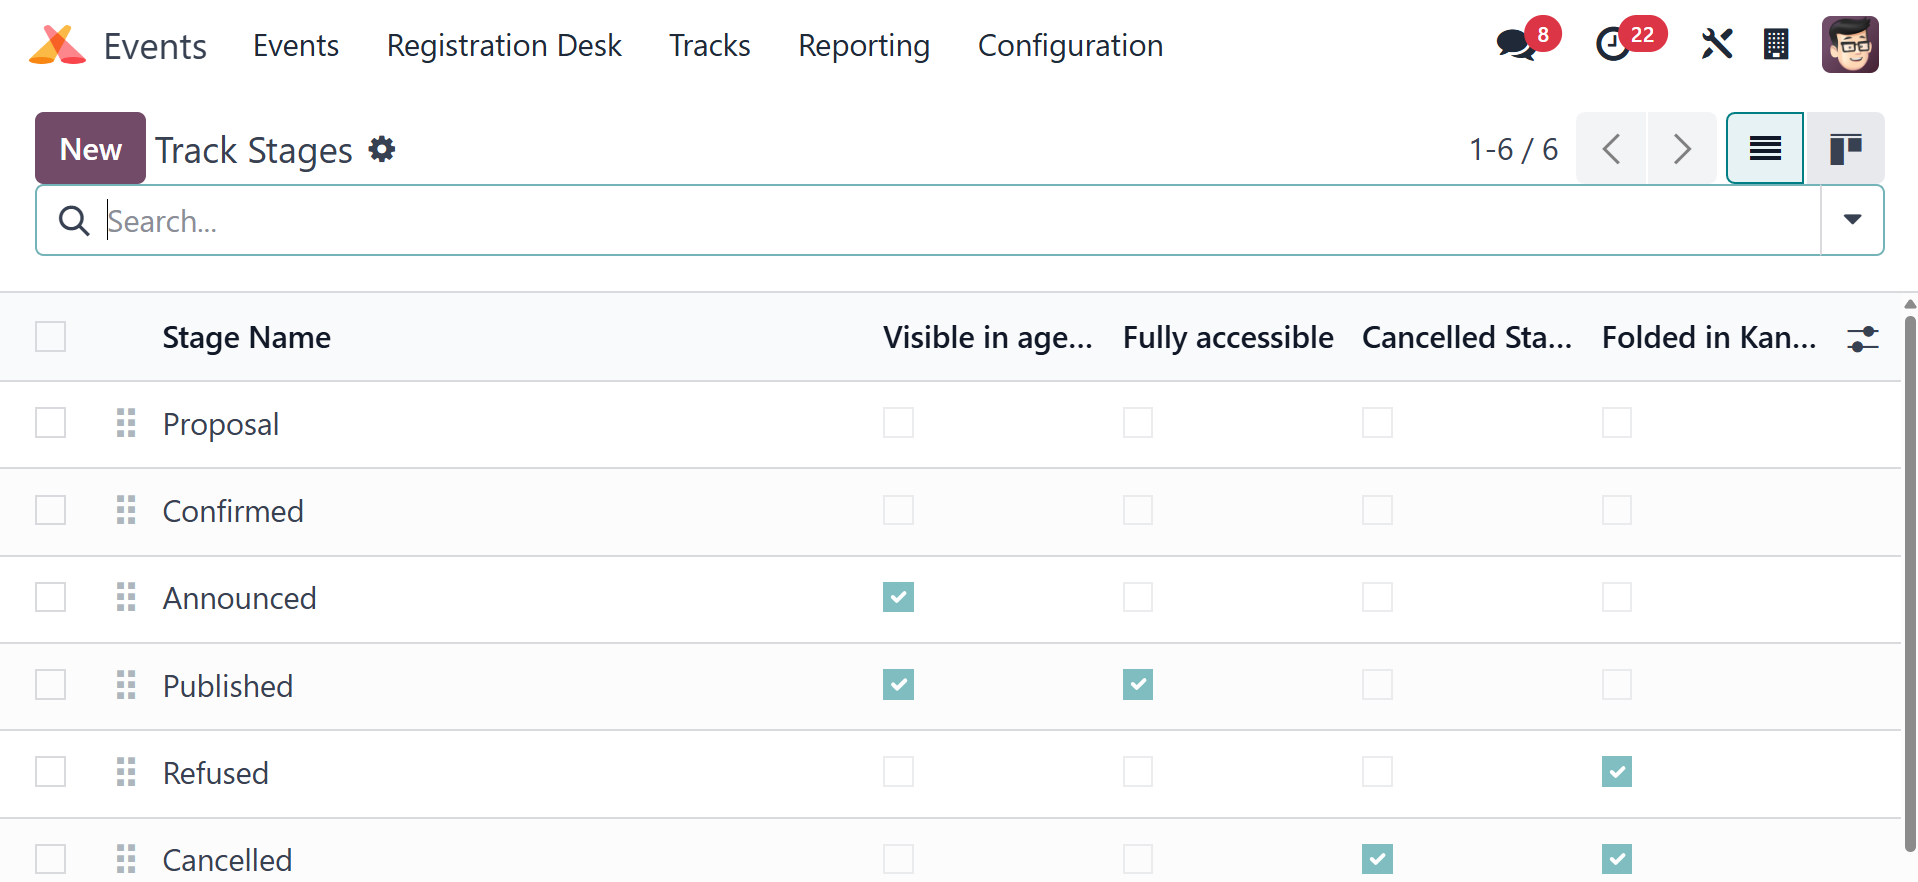
This pane shows stages that have previously been created, as can be
seen in the
screenshot above. Click the New button to create a new stage. Enter
the Stage Name
in the appropriate field. If you upload an email template, Odoo18
will automatically
send the customer an email when an event reaches this point. Enable
the Visible
in Agenda field so that the related track appears on the frontend.
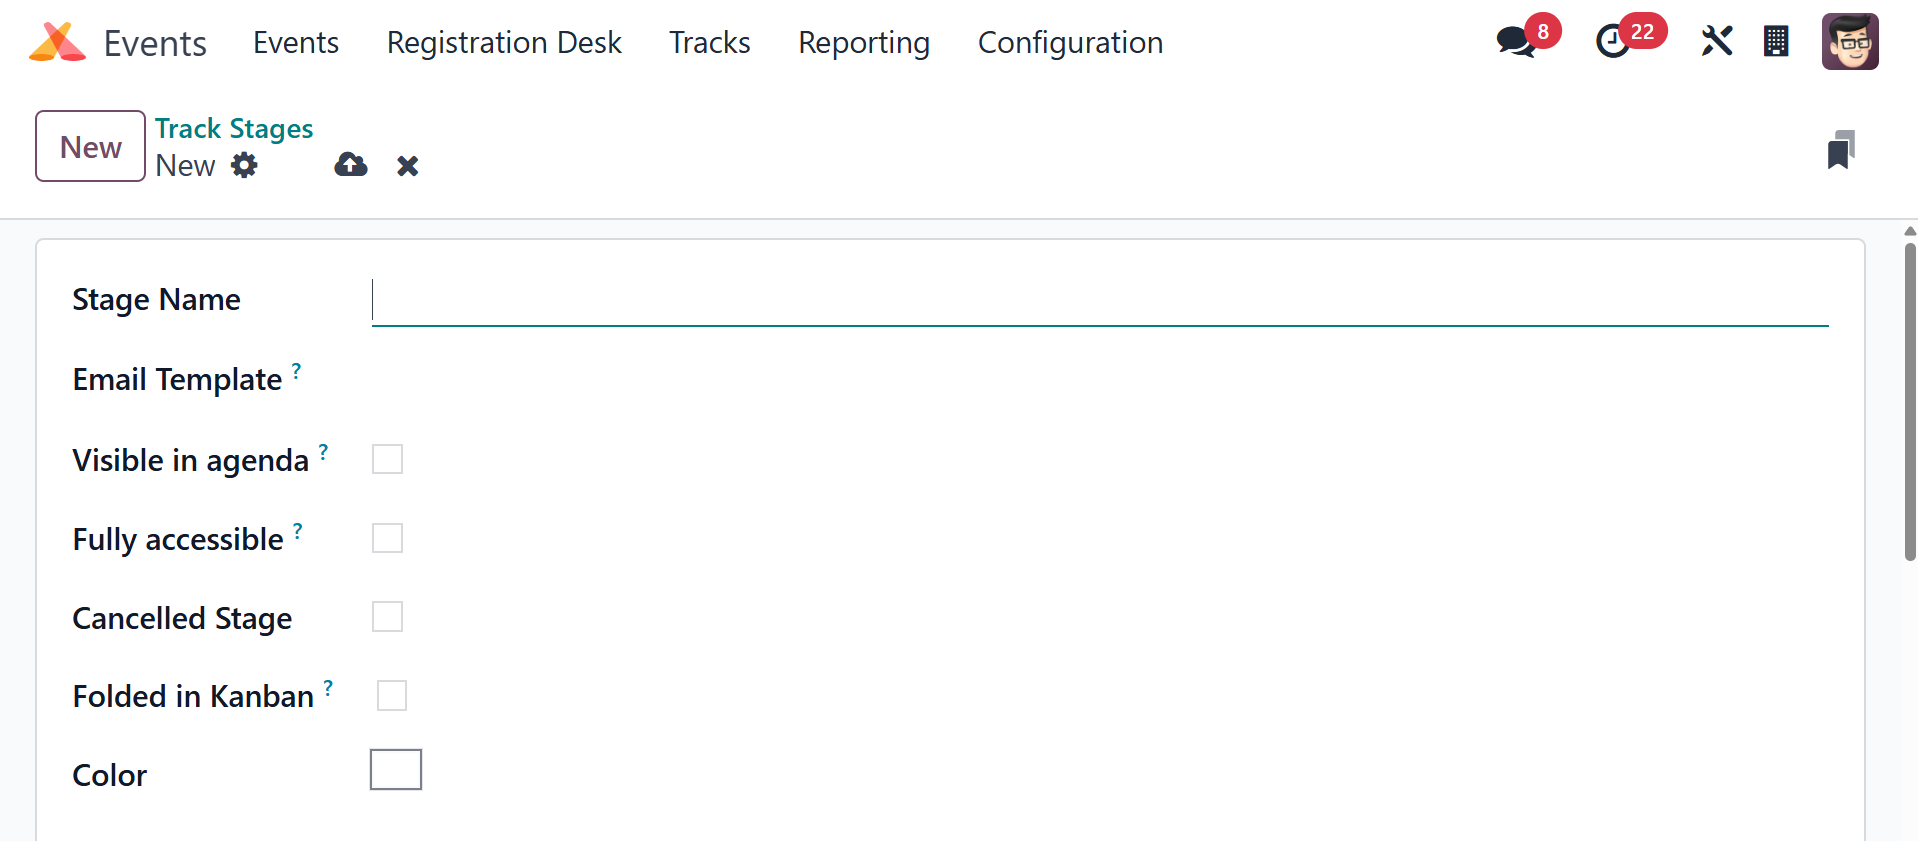
The Fully Accessible field must be activated for customers to obtain
access. When
the Canceled Stage is active, all canceled event tracks will be
added to it. To
fold this stage in Kanban view, enable the Folded in Kanban field.
You can select
the stage's colors using the Color option. You may set the stage's
labels and description
under the Stage Description and Tooltips tab. After filling out all
the fields,
click the Save button.
10. Track Location
When adding a new event or event track, it is essential to mention
the event's location.
Such specified locations are visible under the Track Location
option.
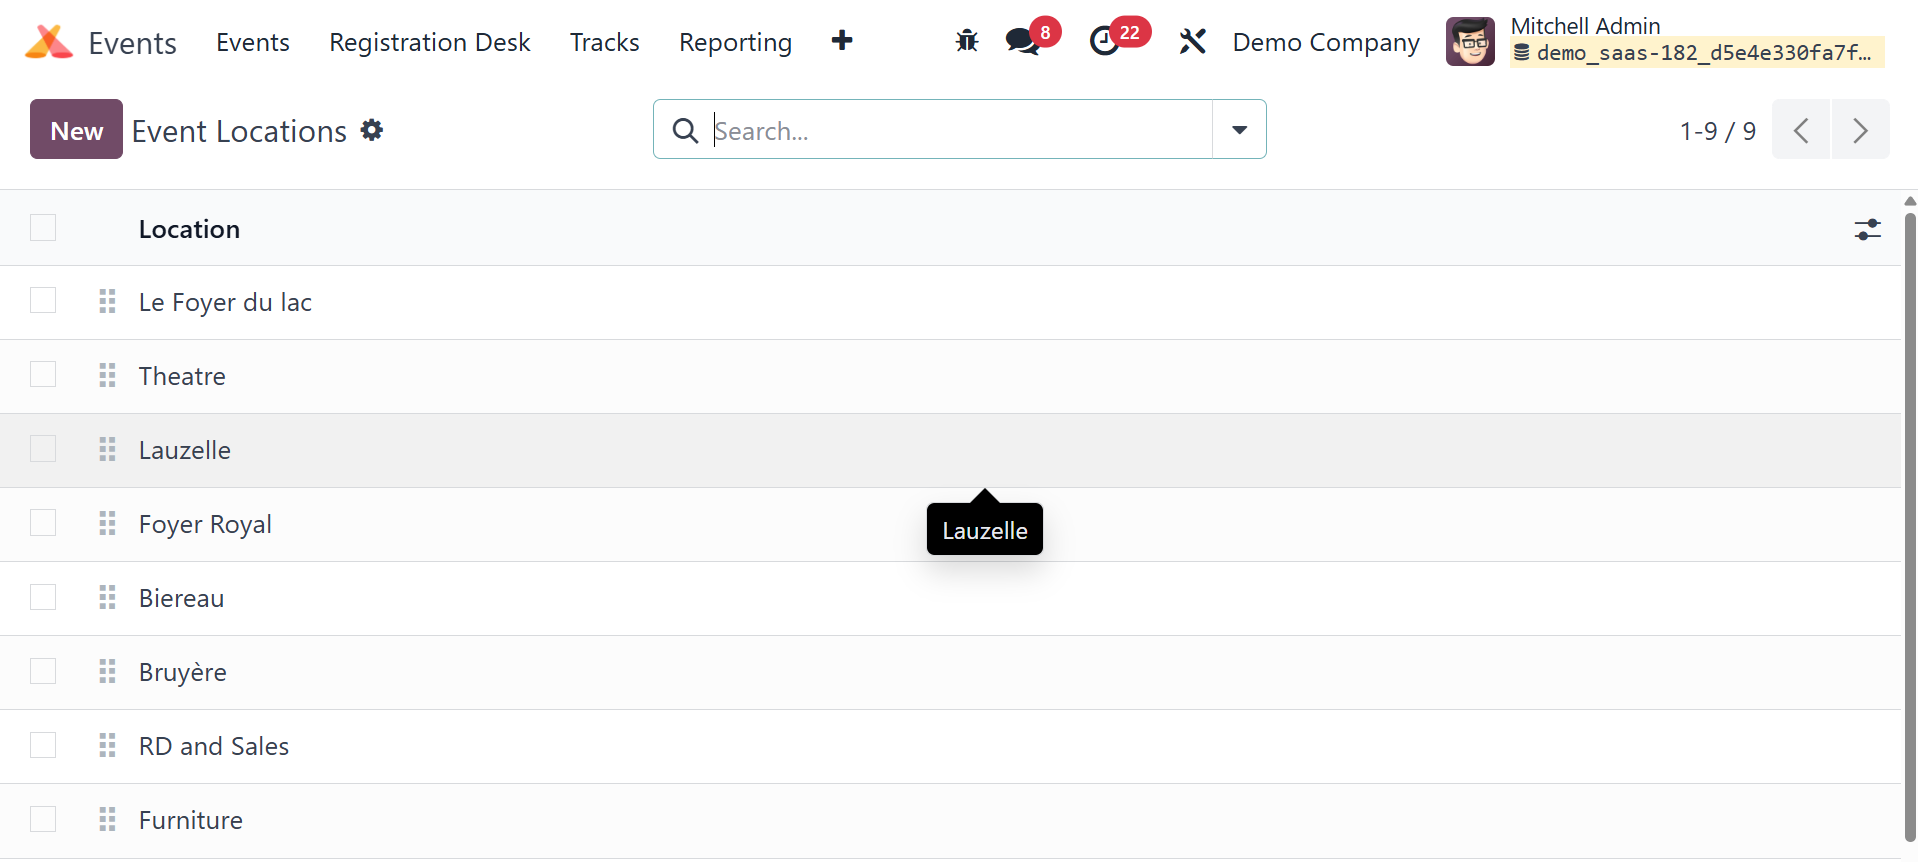
This is a list of all the locations for the events and event tracks
created in the
Events module.
11. Track Tag Categories
Additionally, the evolution of Event Tag Categories was previously
discussed. In
a similar way, you may establish categories for track tags. To do
this, select the
Track Tag Categories option in Configuration.
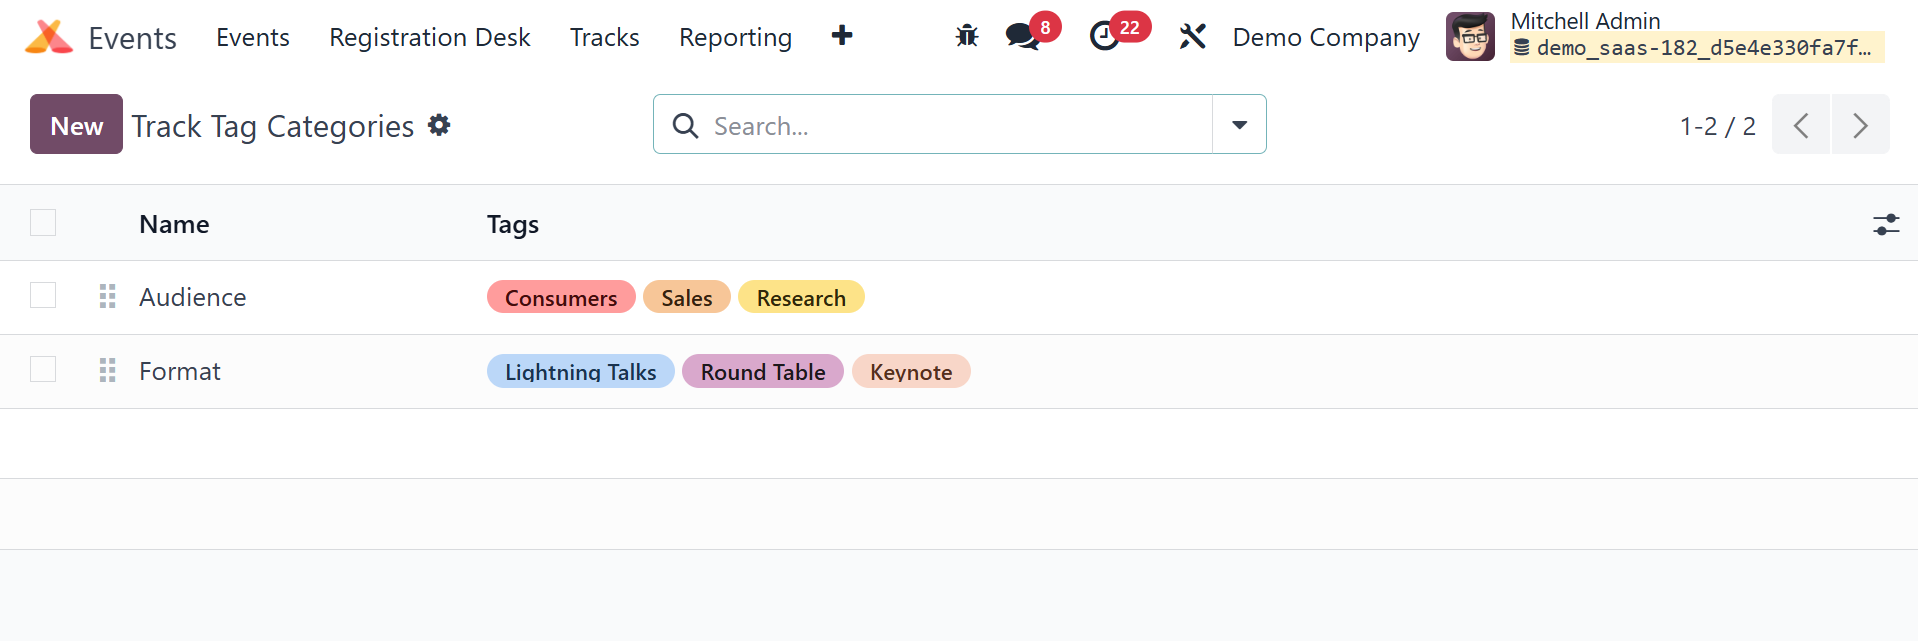
You can see the category name and the tags that are part of each
category on this
platform, as seen in the image above. Click the New button to create
a new track
tag category.
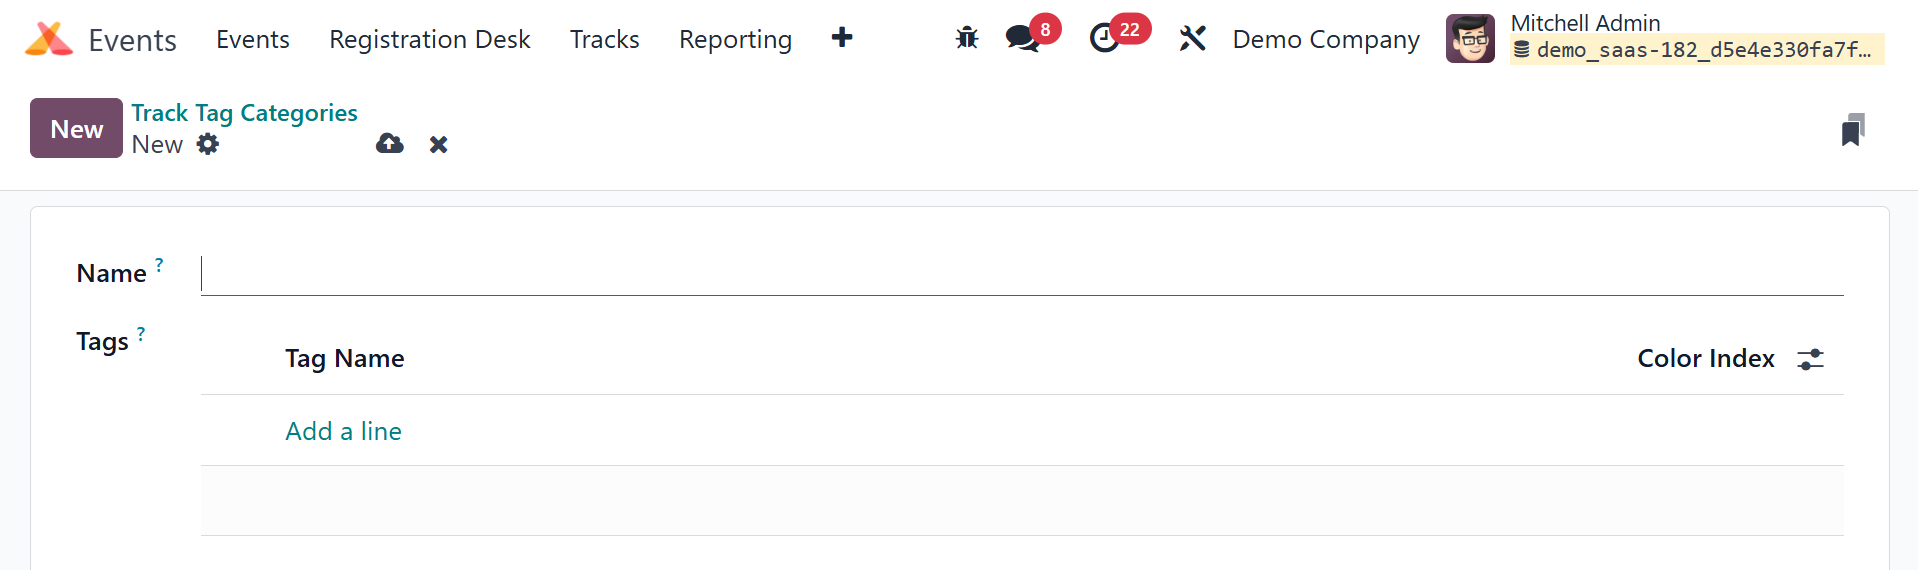
You can input the Category Name in the designated field. Use the Add
a Line button
to add tags for this category. After all the information has been
added, click the
Save button.
12. Track Tags
Now, you can easily create and manage track tags by selecting the
Track Tags option
from the Configuration menu.
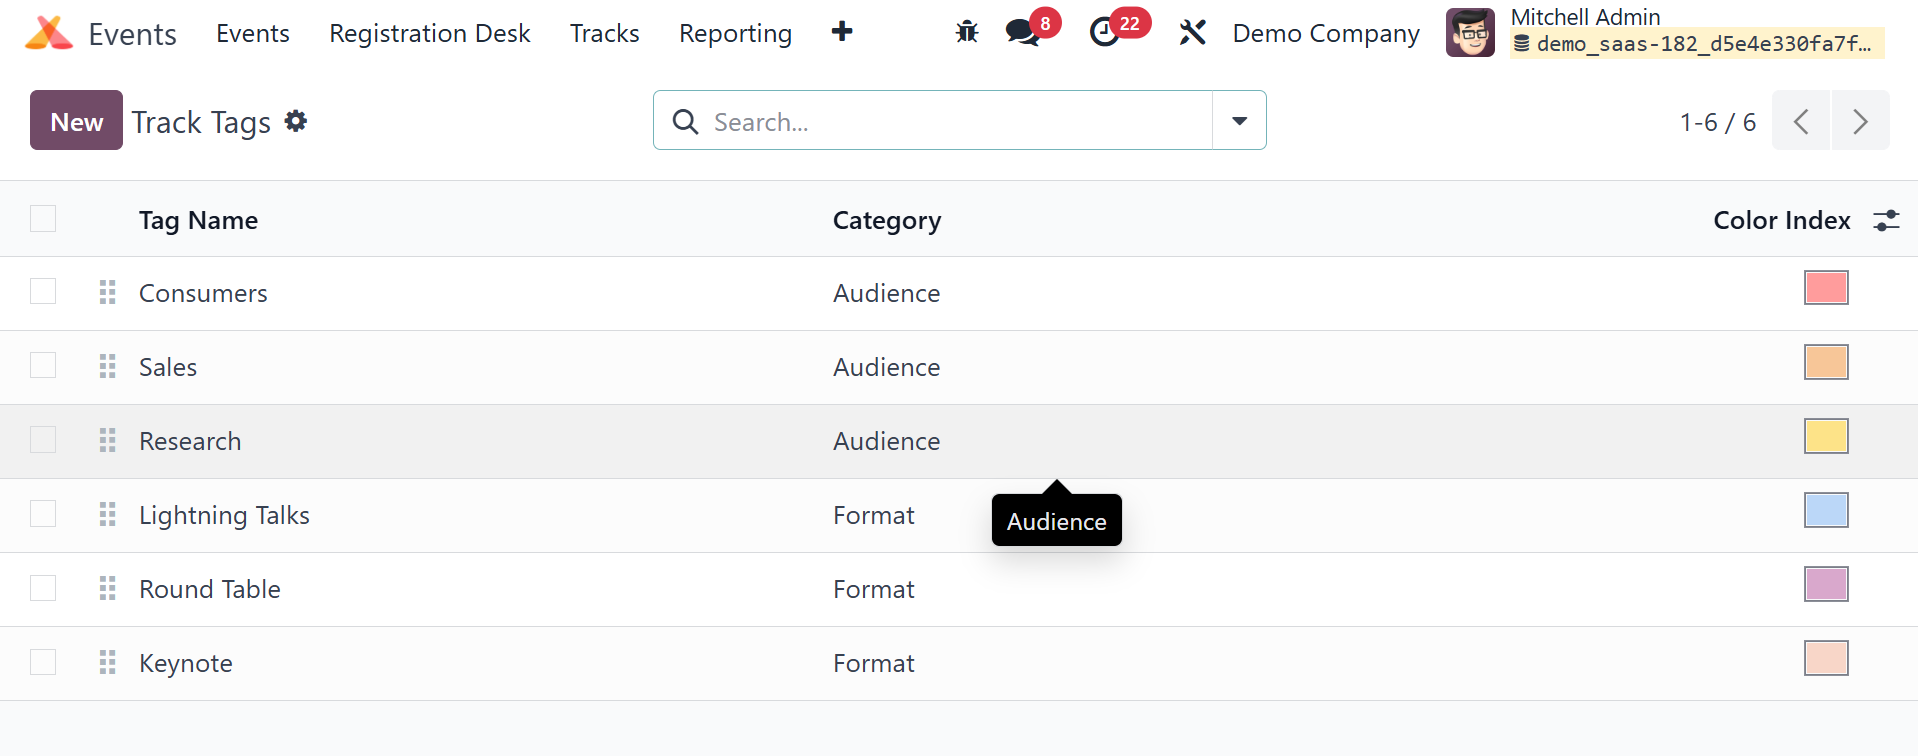
The list will show the Tag Name, Category, and Color Index. By
selecting the Create
button, you may create a new line beneath the existing tag list
where you can enter
the new tag's name. Select the category from the drop-down box and
add a color to
the track tag. By choosing the store option, you can store the
updated tag.
13. Track Visitors
Information about visits to a published track can be tracked using
the Track visits
option in the Configuration menu.
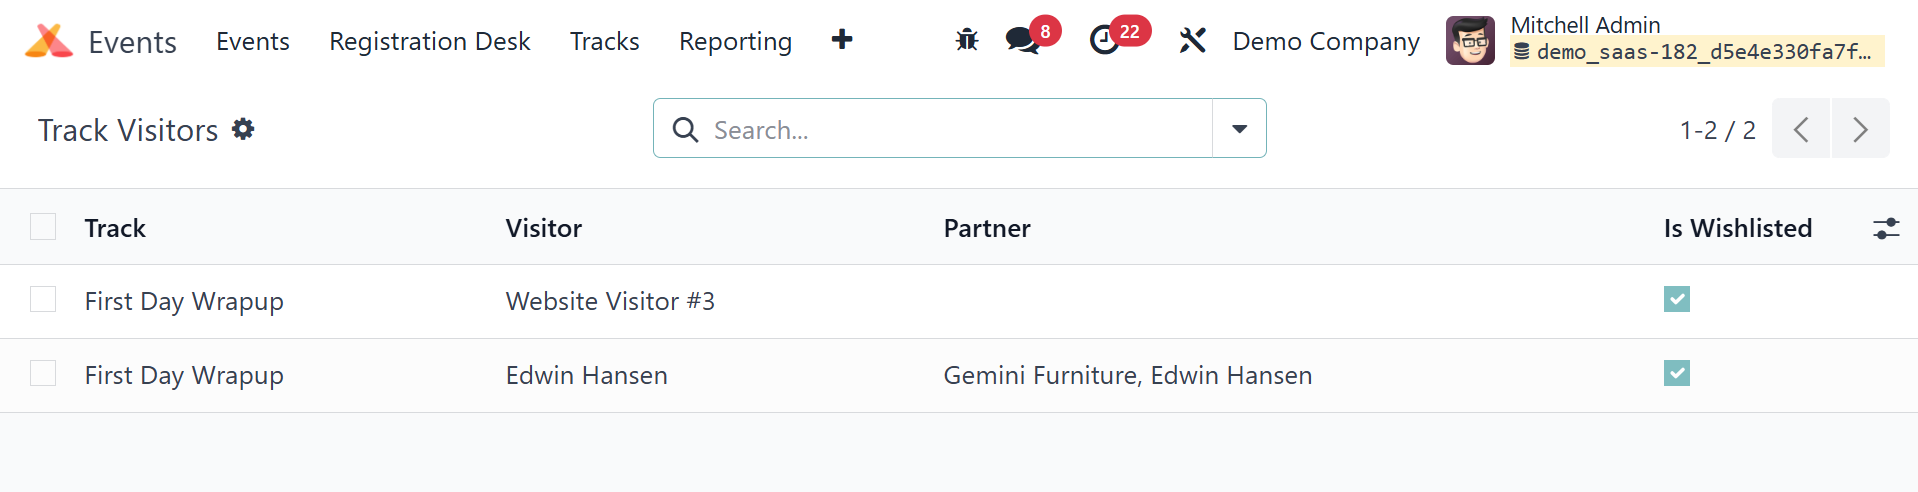
The list includes each visitor's Track Name, Visitor, Partner, and
Quiz Points.
The 'Is Wishlisted' column will show as checked if a visitor added
the music to
their wishlist. The 'Completed' field will be marked as checked if
the visitor finished
the track.
14. Sponsor Levels
The Events module allows you to simply designate the event sponsors
to different
levels. You can accomplish this by selecting the Sponsor Levels
option from the
Configuration menu.
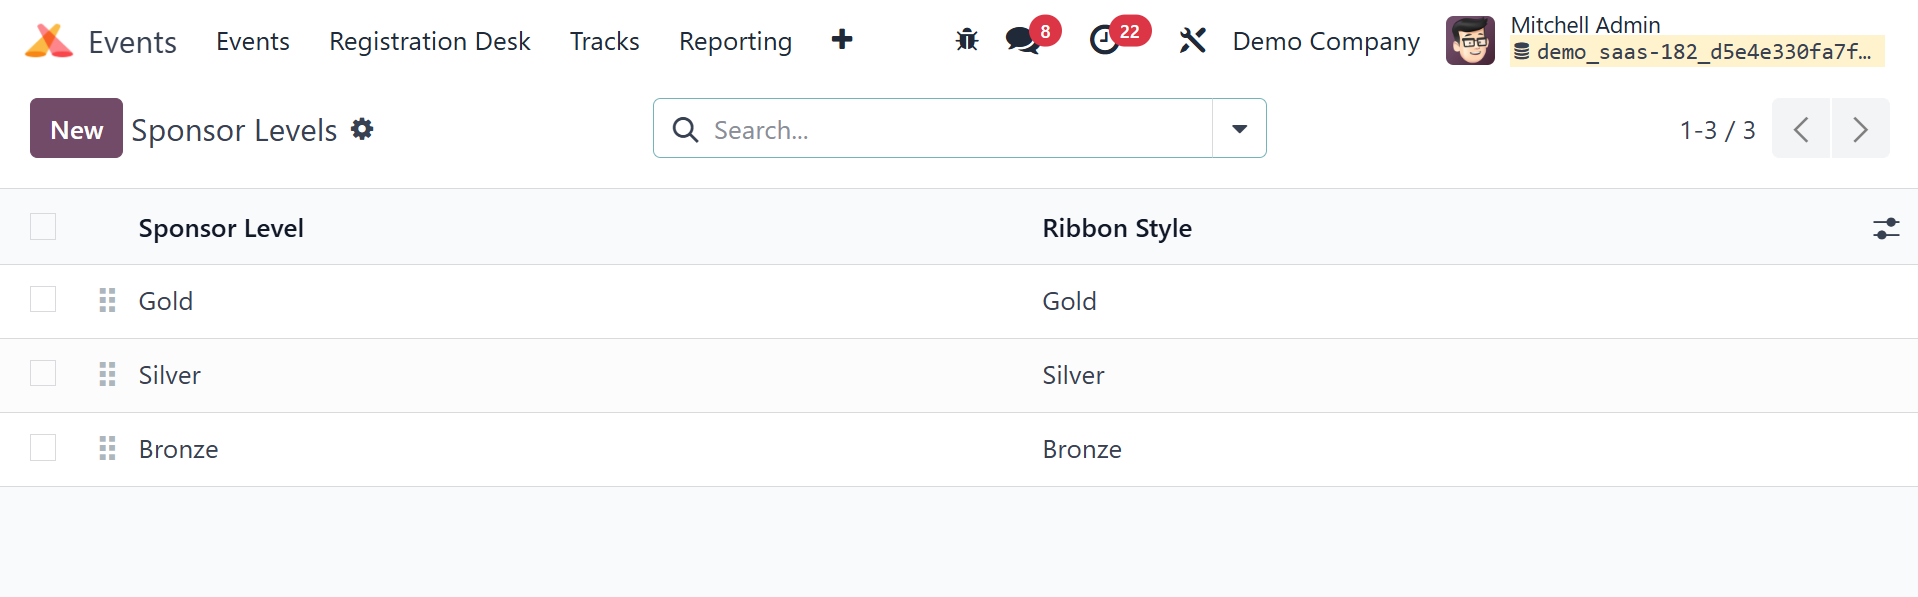
The full list of all the levels created for the sponsors will be
sent to you, along
with an image of the ribbon design for each level. By choosing New,
you may add
a new level for sponsors.
15. Website Menus
The Website Menus option in the Configuration menu will display a
list of all menus
specified on the webpage for the events created in the Events
module.
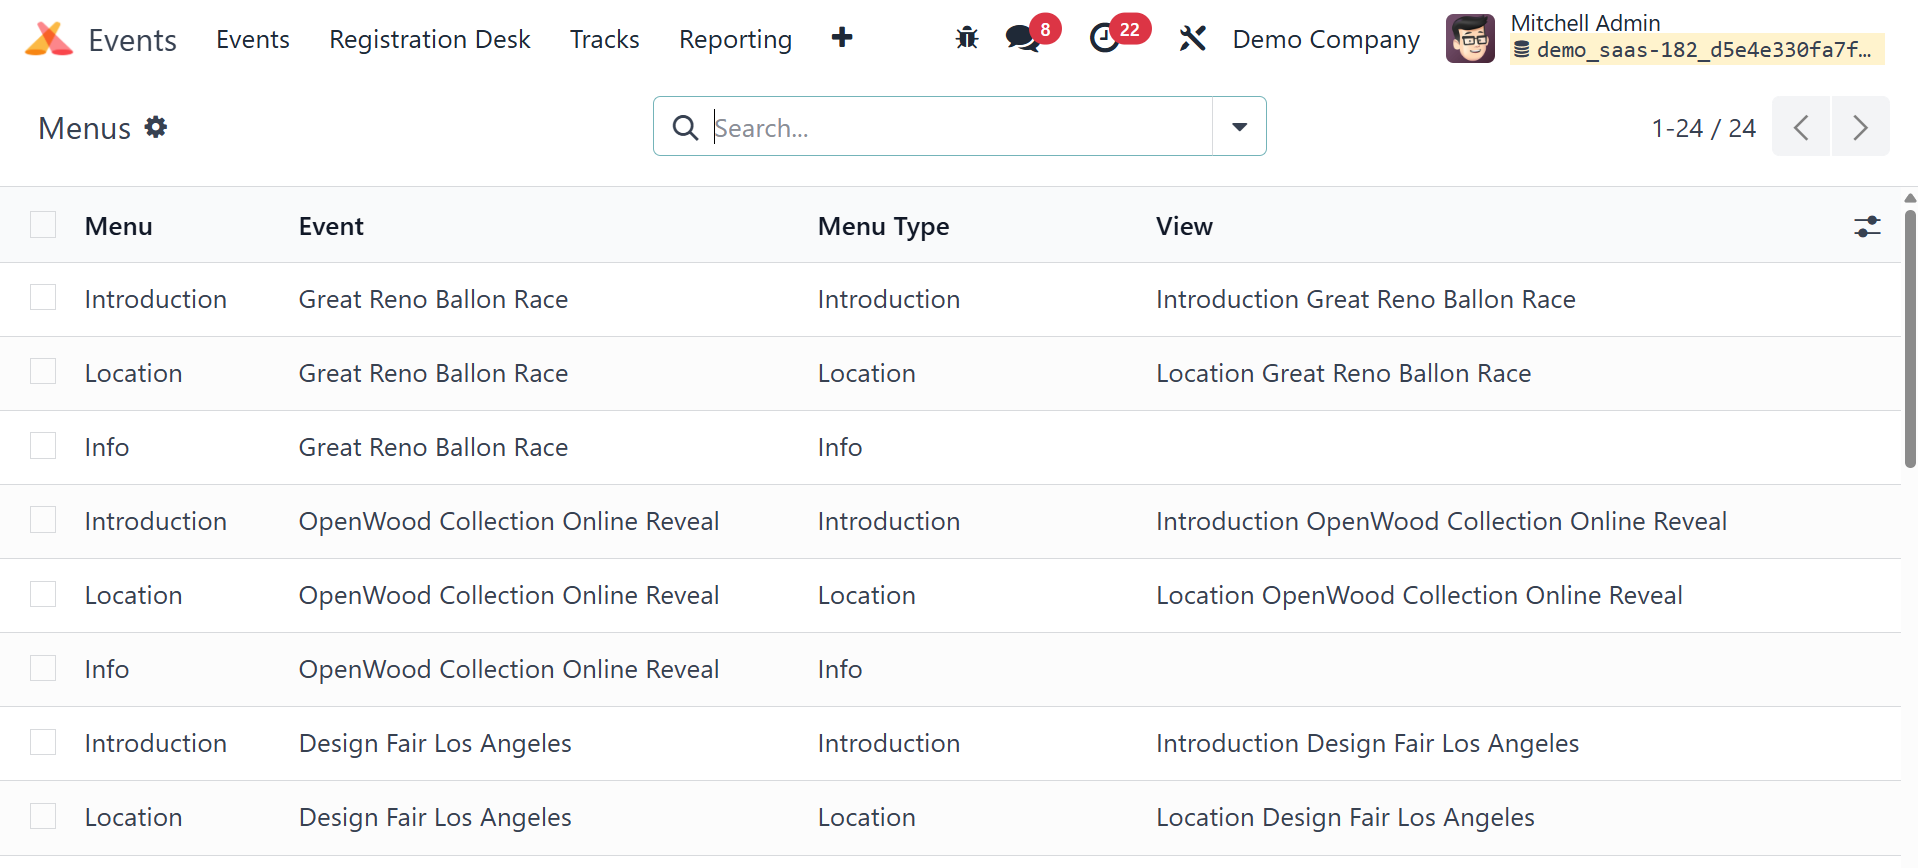
It listed the Menu Type, the Event, the View, and the Menu Name.
The Odoo18 Events module offers the following parameters.