3. Configuration
Warehouse
Management
Warehouse management is one of
the unbiased activities of
the inventory operations of a
firm. For proper running of
the stock operations and
transfers, the warehouses of
a firm must be properly
managed and supervised. Odoo,
as a great inventory
management helper can provide
you with dedicated platforms
for proper management of the
company's warehouses. The
Odoo tools can assist you in
handling multiple warehouses
at a time. The number of
warehouses a company
possesses will vary depending
on the business they conduct.
Regardless of the size and
number of warehouses a
company has, Odoo will always
ensure to simplify the
workflow.
Advanced features like Warehouse,
Locations, Routes, Rules,
Operation Types, Storage
Categories and Putaway Rules
on the Warehouse Management
tab are available in the
Configuration menu of the
Odoo Inventory module.
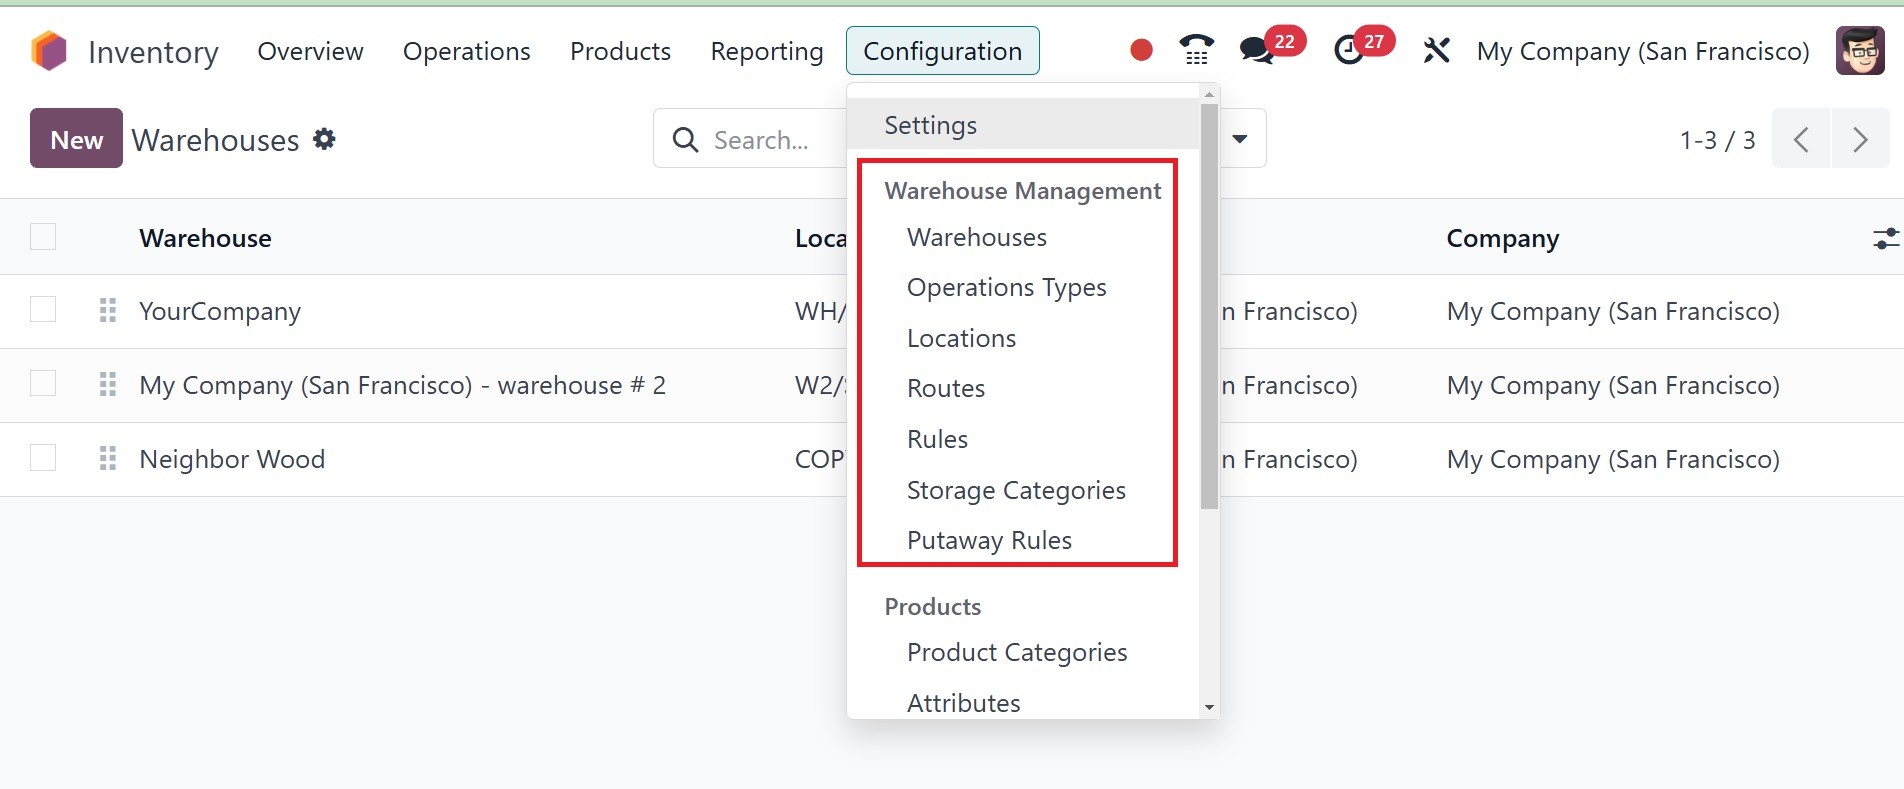
4.1 Warehouse
These are the options that will
help you execute various
warehouse operations. First,
we need to discuss how to
configure warehouses in the
Odoo 18 Inventory module. To
do this, you can choose the
Warehouses option under the
Configuration menu.

The above illustrated screenshot
is the list view of warehouse
platform. You will receive
the Warehouse, Address, and
Company information from this
view. Utilizing the New
button let's set the details
of a new warehouse to the
Odoo Inventory module.
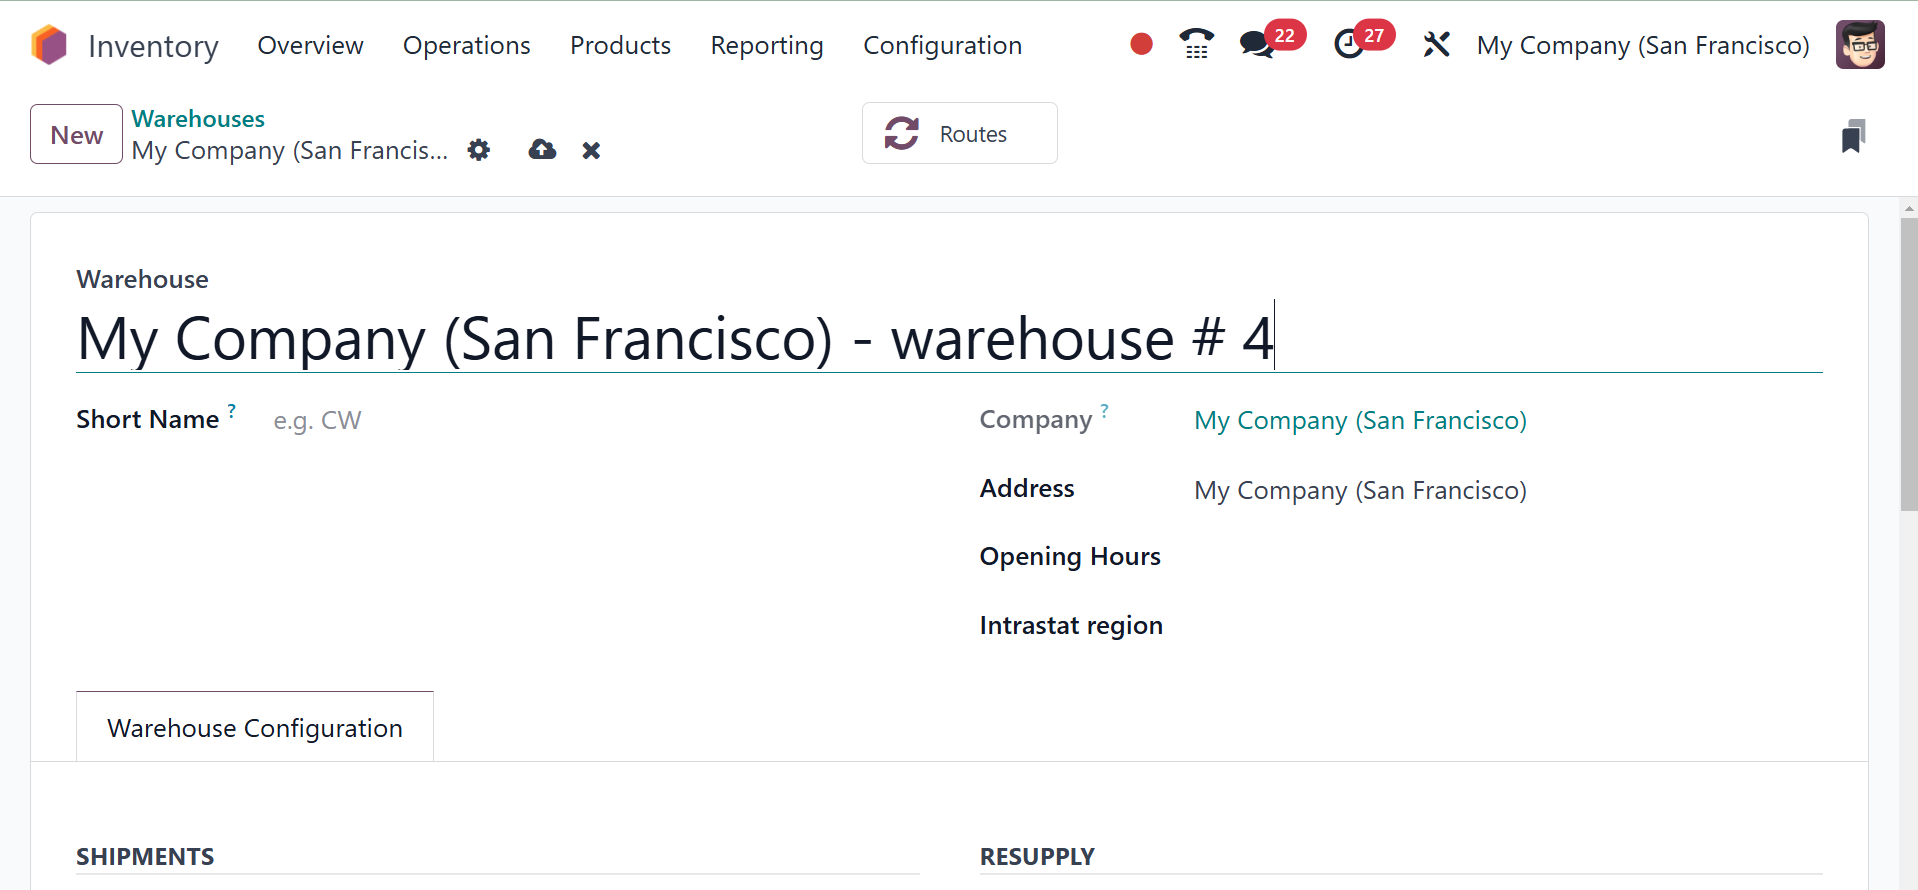
Here, you can enter the
Warehouse, Short Name of the
warehouse, Company, Address,
opening hours, and Intrastat
Region that the warehouse is
part of in the respective
fields. Under the Warehouse
Configuration section, you
are asked to specify the
Shipments and Resupply
information.
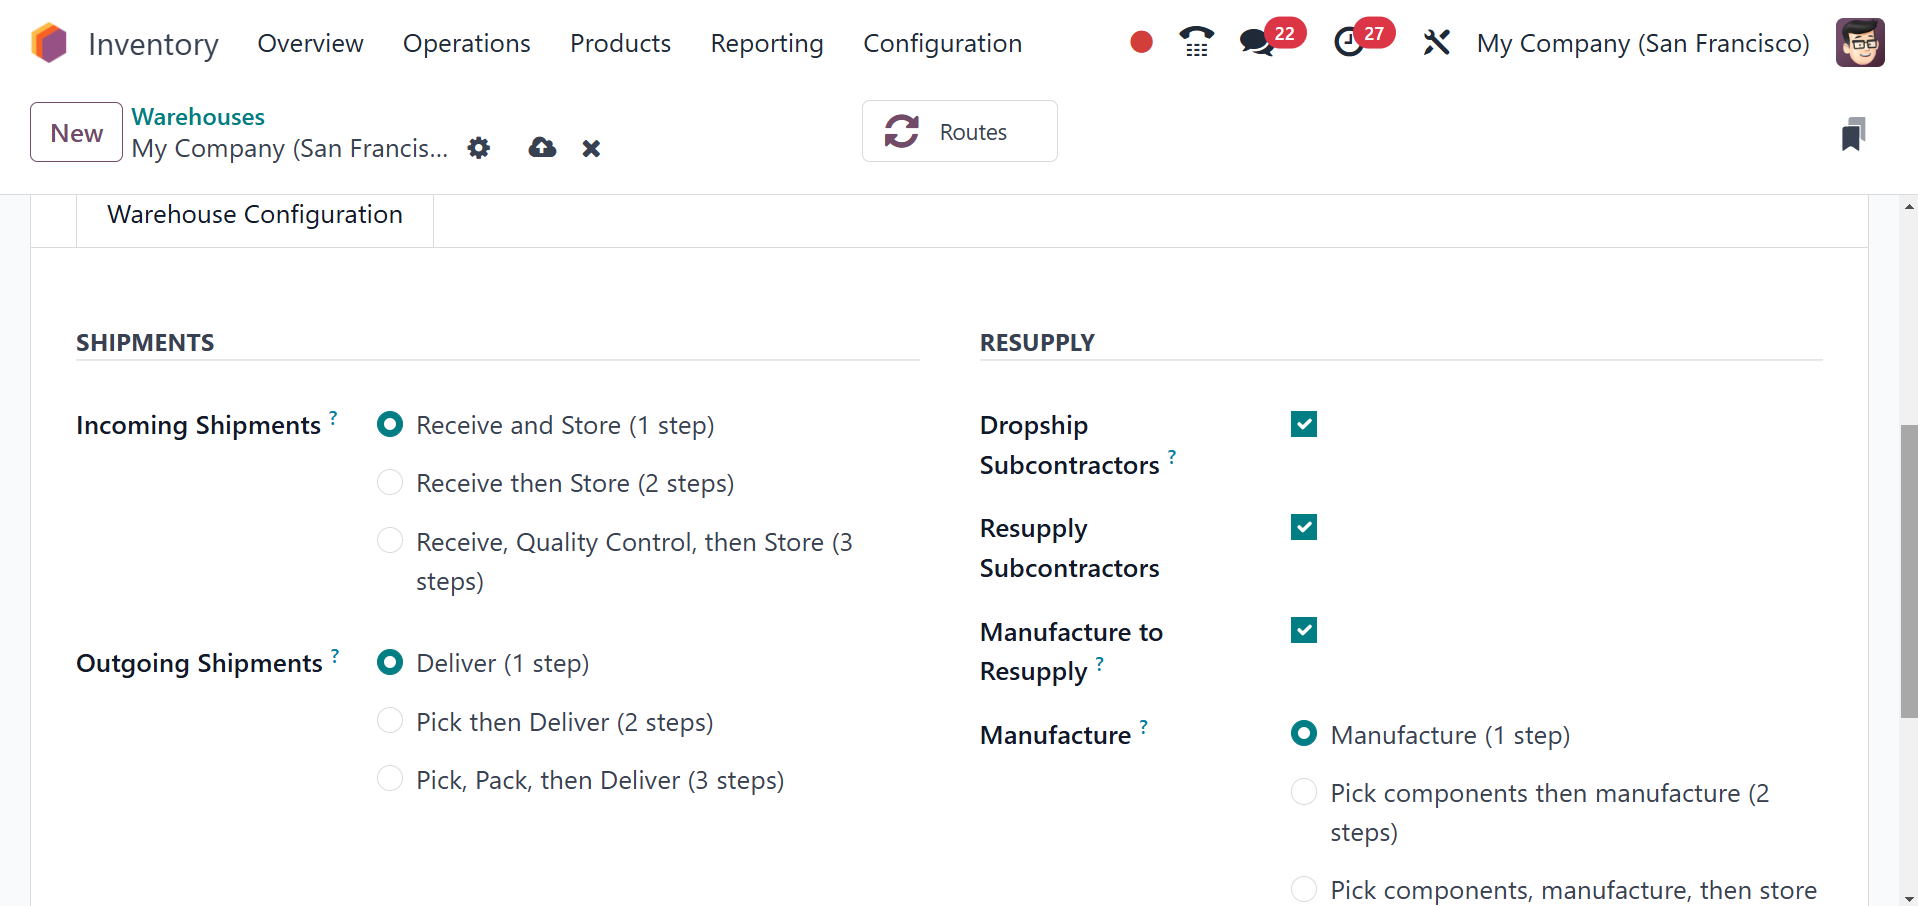
In the Incoming Shipment, you
have the option of how to
handle the incoming shipment
of the products. If you
choose the Receive goods
directly option, you can
receive products directly
into the warehouse. In the
Receive goods in input and
then stock method, the
incoming shipment has
two-step. In this two-step
method, the products will be
received first and then
transferred to the stock.
Once you have taken delivery
of the goods, you can conduct
quality checks on the same
before you stock them via the
Receive goods in input, then
quality, and then stock
method of the incoming
shipment. The same kinds of
options shall be there for
the Outgoing Shipment too and
you shall be able to choose
the appropriate one for this
warehouse's shipment
operations.
With the Resupply tab, you shall
have upgraded features to
switch on.
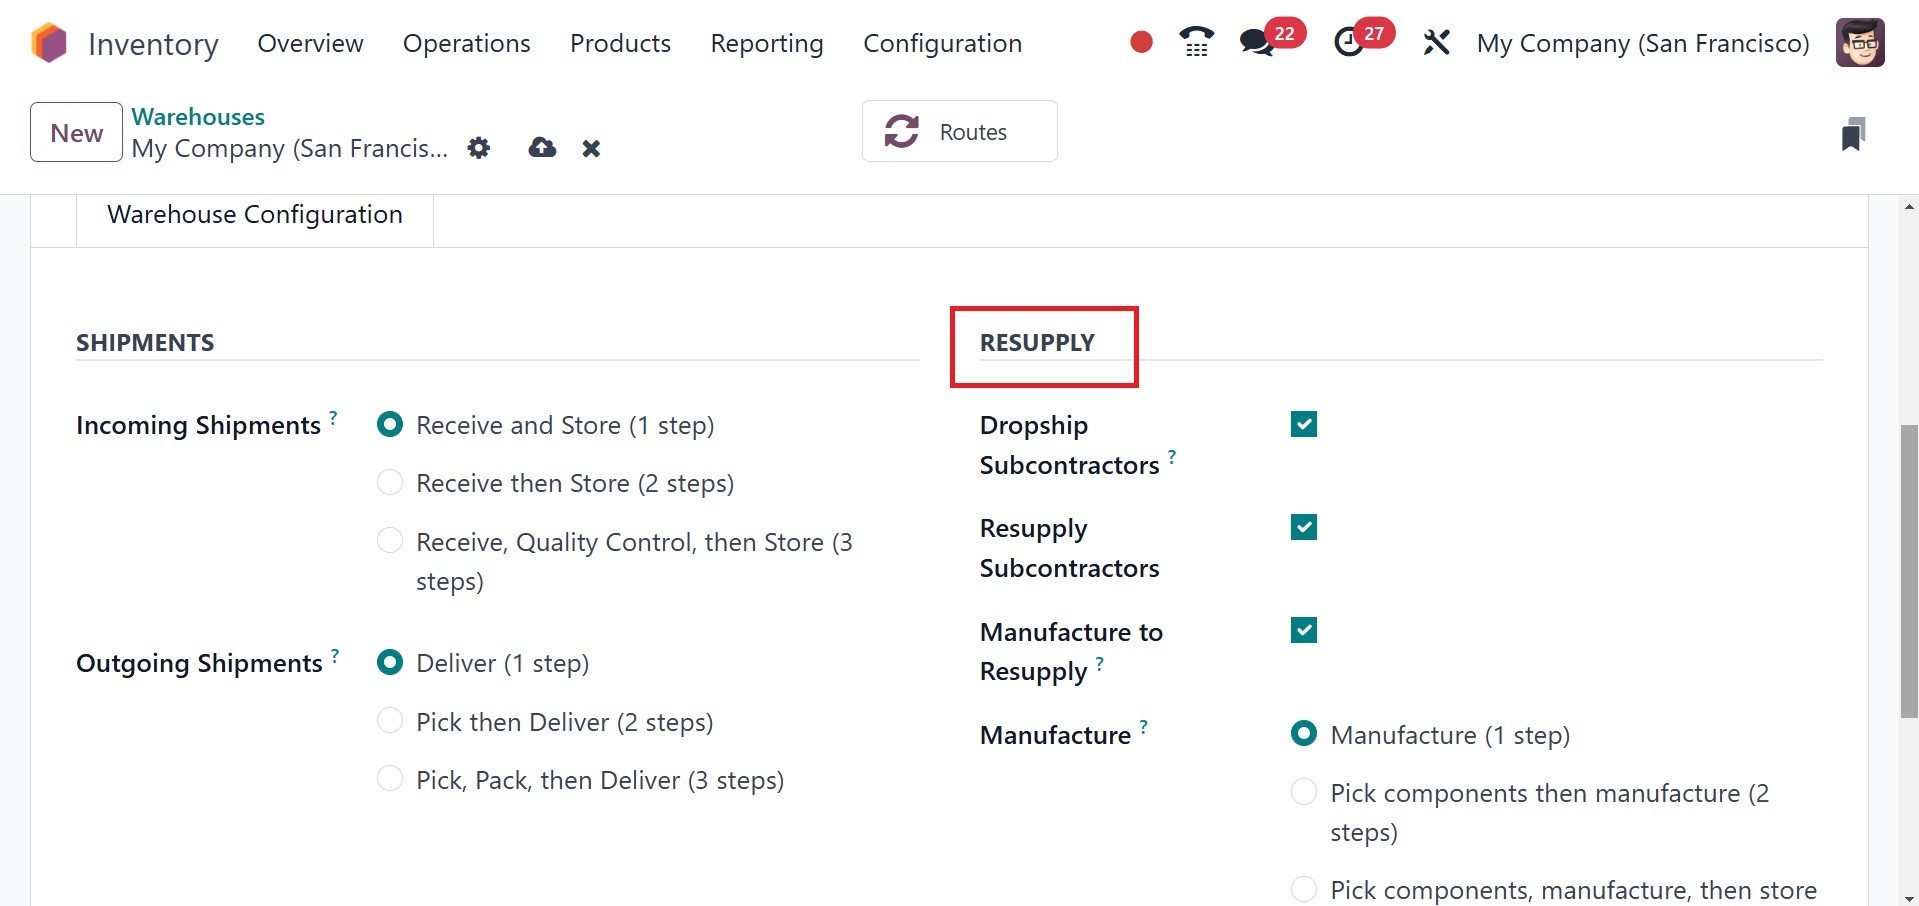
Enabling the Dropship
Subcontractors feature will
enable you to dropship
subcontractors with
components. The Resupply
Subcontractors can be
employed to resupply
subcontractors with the
components. This will assist
the manufacturer to supply
materials to the
subcontractors when needed.
If the company possesses
numerous warehouses, you can
resupply components from one
warehouse to another with
these features.
You can easily resupply raw
materials in warehouses when
they are demanded. When the
products go out of stock, you
can produce them in the
warehouse to resupply by
enabling the Manufacture to
Resupply option. You will
receive three ways to set
manufacturing procedures. By
choosing the Manufacture
option, you can transfer the
components directly to the
production area and initiate
the manufacturing procedures.
Under the Pick components and
then manufacture method, you
have to go through two steps.
First, you need to unload the
components from the stock to
the input location and then
proceed to the production
location for manufacturing.
Once you have picked the
components and manufactured
the products, you can store
them in the warehouse by
using the Pick components,
manufacture, and then store
products option. Activating
the Buy to Resupply feature,
Odoo enables you to purchase
raw materials to resupply and
stock them in this warehouse.
Clicking the Save button will
save the information of the
newly set warehouse.
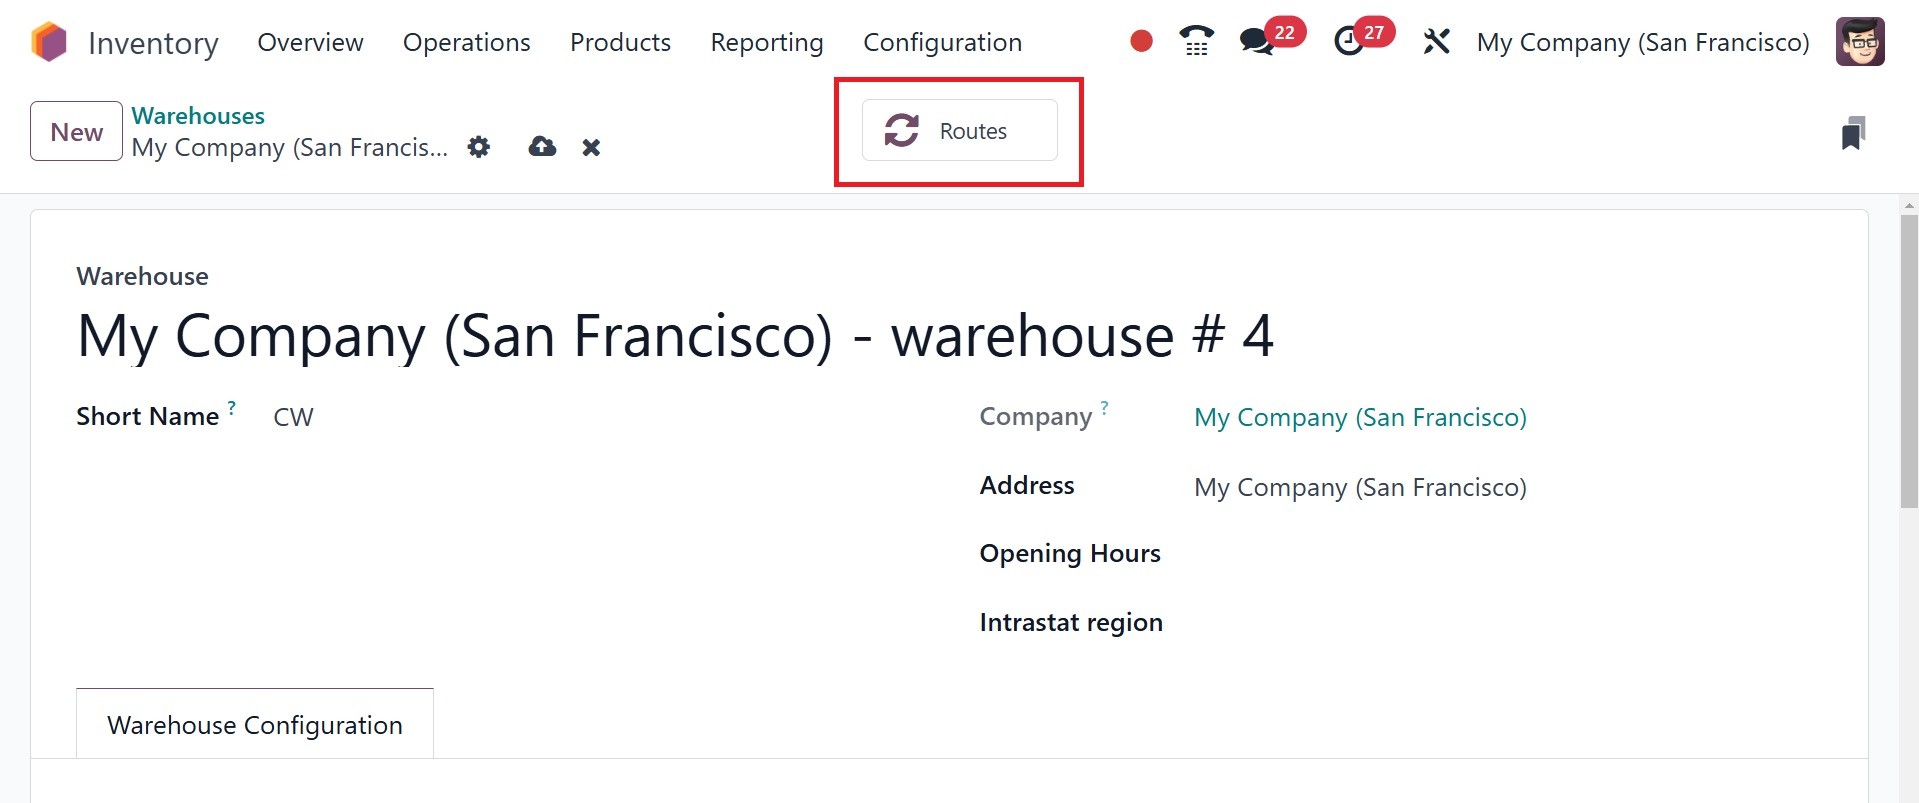
The routes management window for
this warehouse's operations
can be accessed by clicking
the Routes smart button in
the upper right corner of the
display.
4.2 Operation Types
You may quickly create new
operation types in the Odoo
18 Inventory module with the
help of the specific tools
that are offered in the
module. The Operation Types
menu can be accessed from the
Configuration menu, as seen
below.
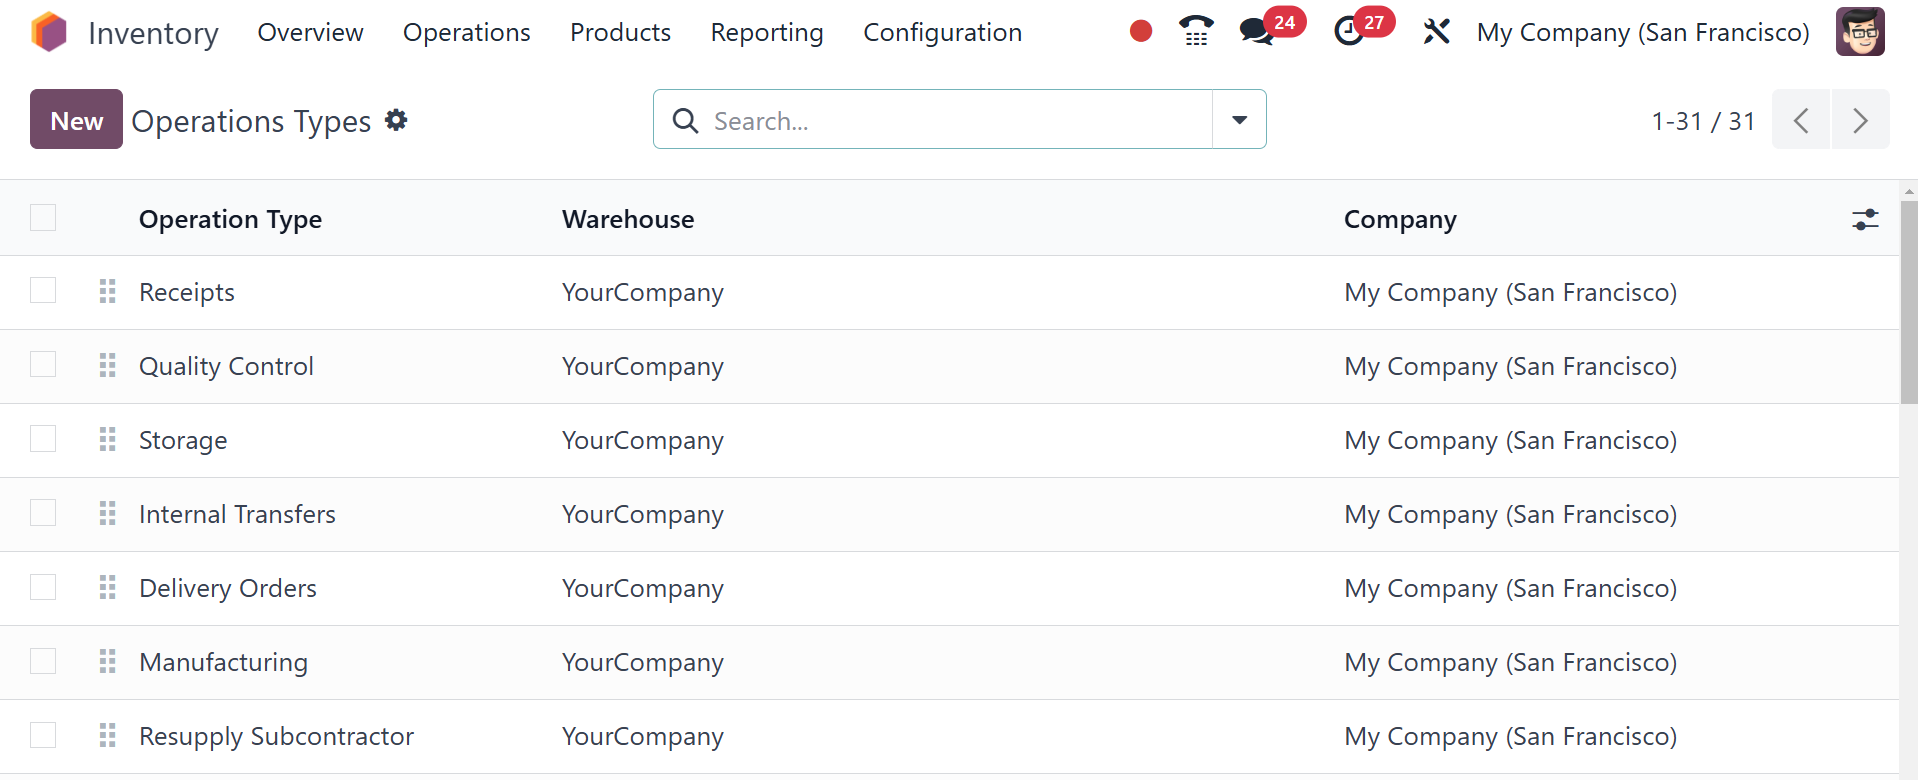
When this choice is made, a new
window with details regarding
the operation currently set
up is opened. You can change
the kinds of operations
available by selecting them
from the given list. In this
case, we are going to create
a brand-new Operation Type.
Hence, click the New button.
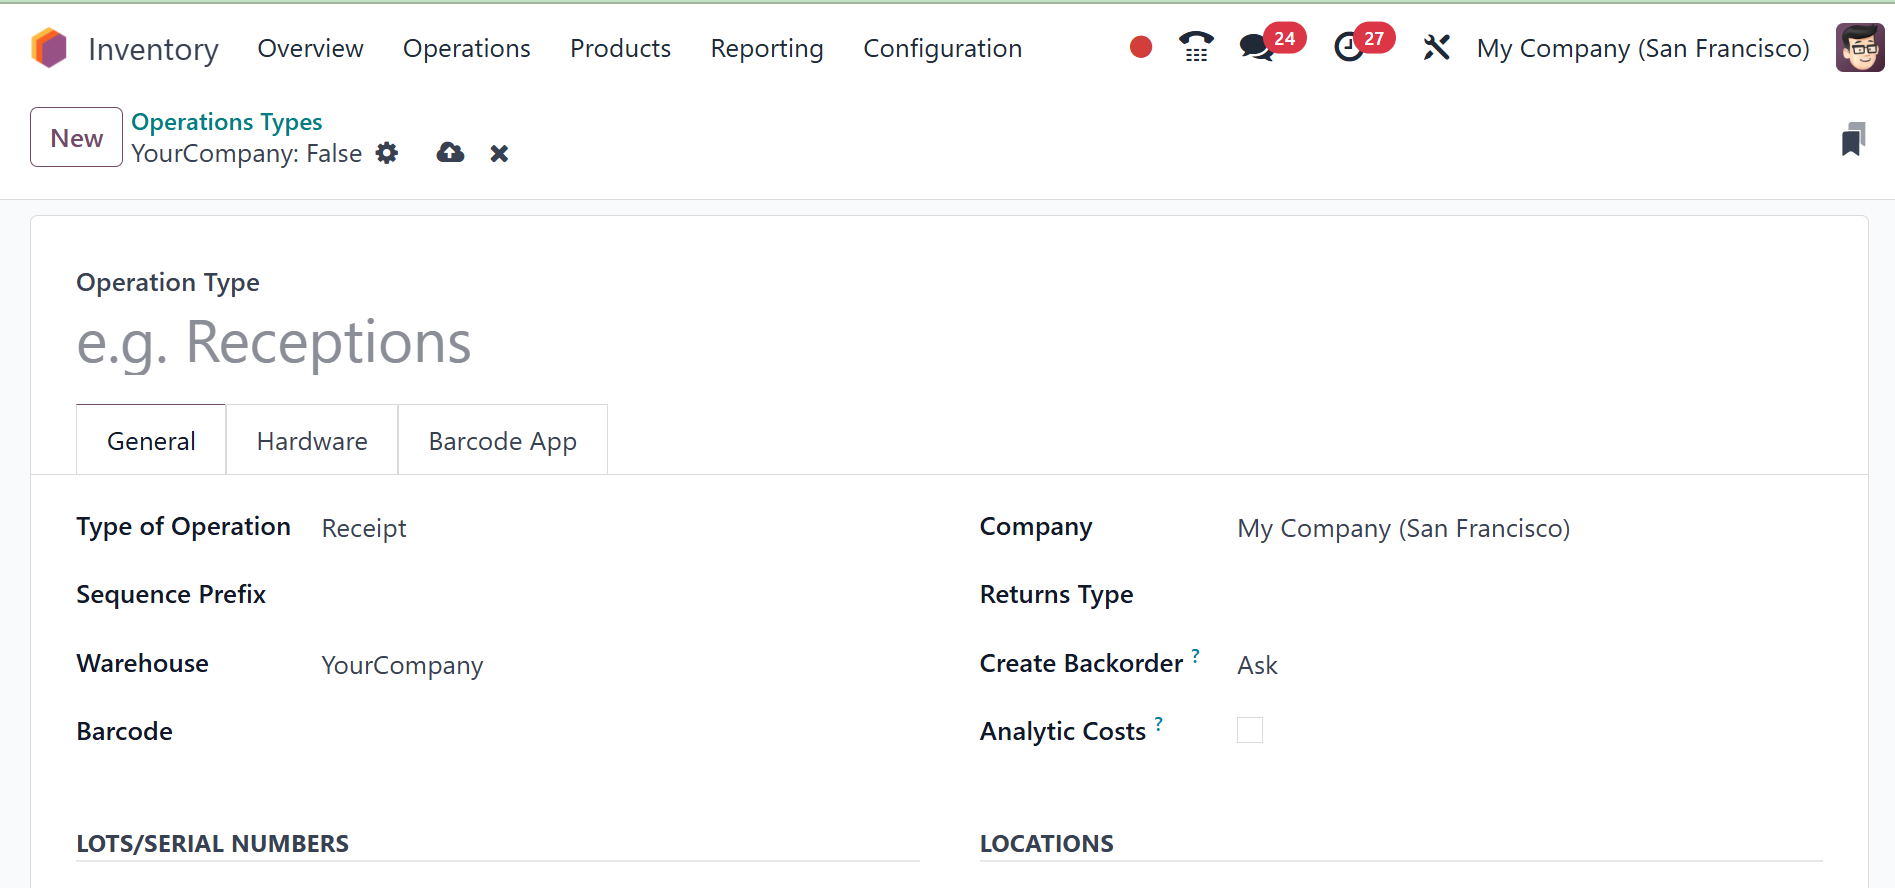
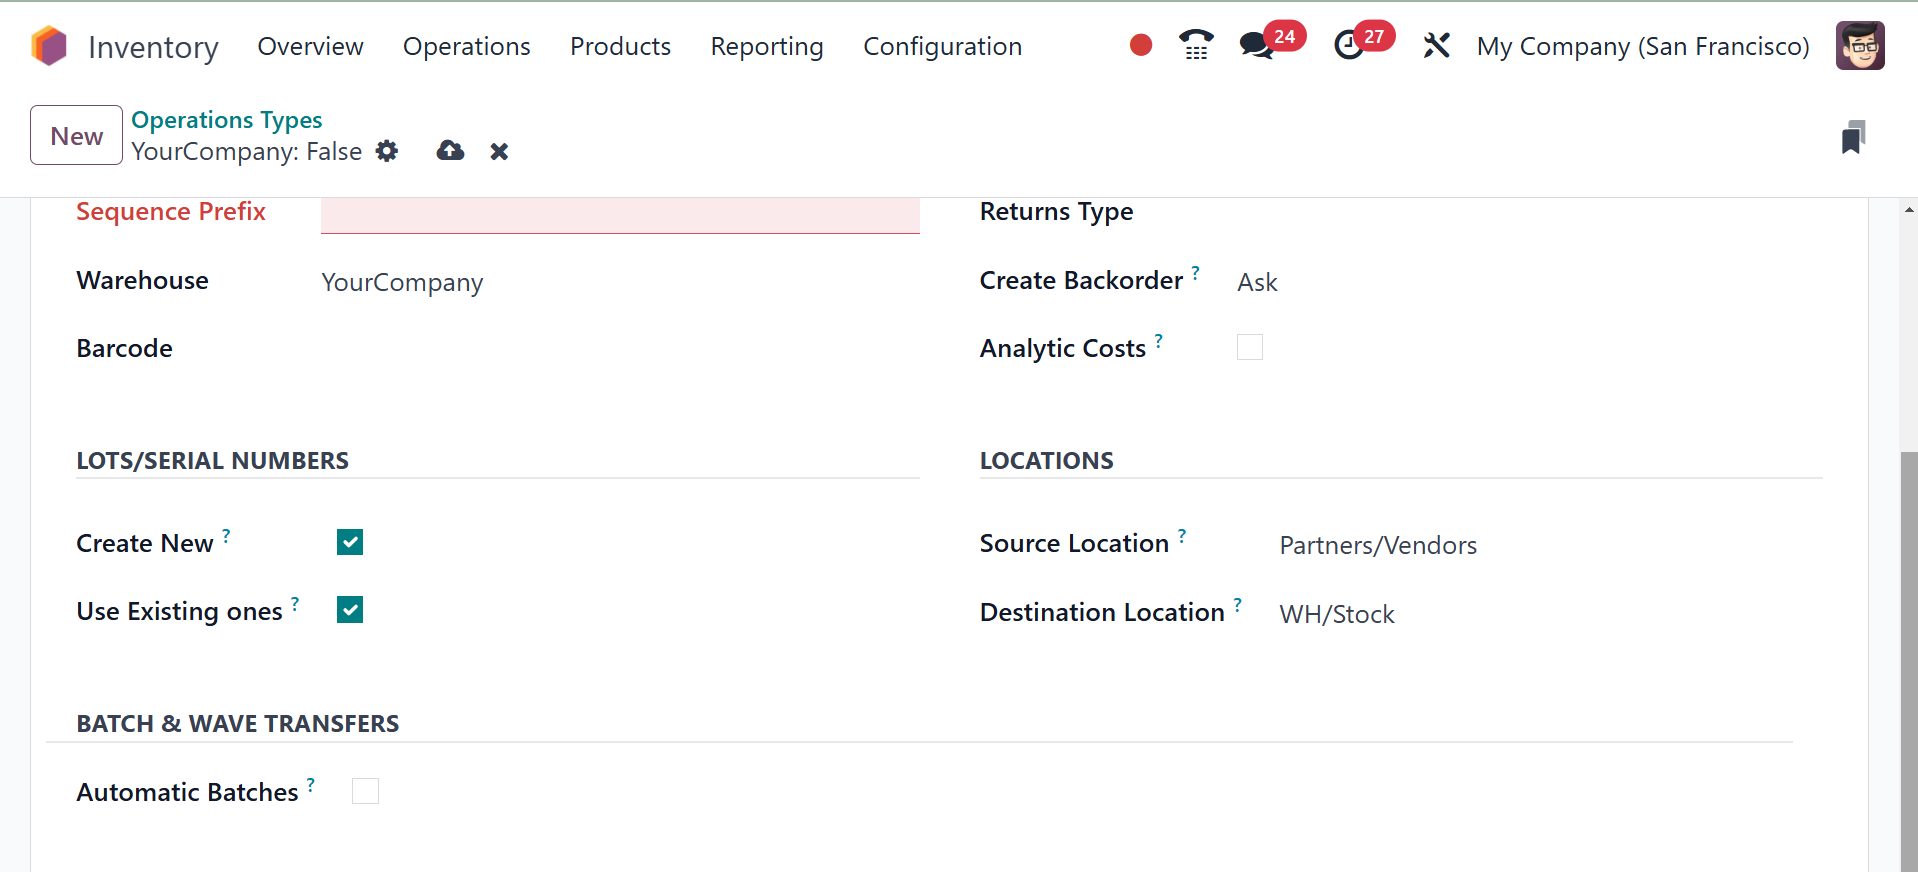
In this window, you can create a
new type of operation. In the
appropriate field, you can
define the operation type. In
the relevant fields, put in
the Sequence prefix,
reservation method, Barcode,
return type, create
backorder, analytic costs,
and Company.
The Reservation Method will
decide the method through
which goods in this kind of
transfers ought to be
preserved.
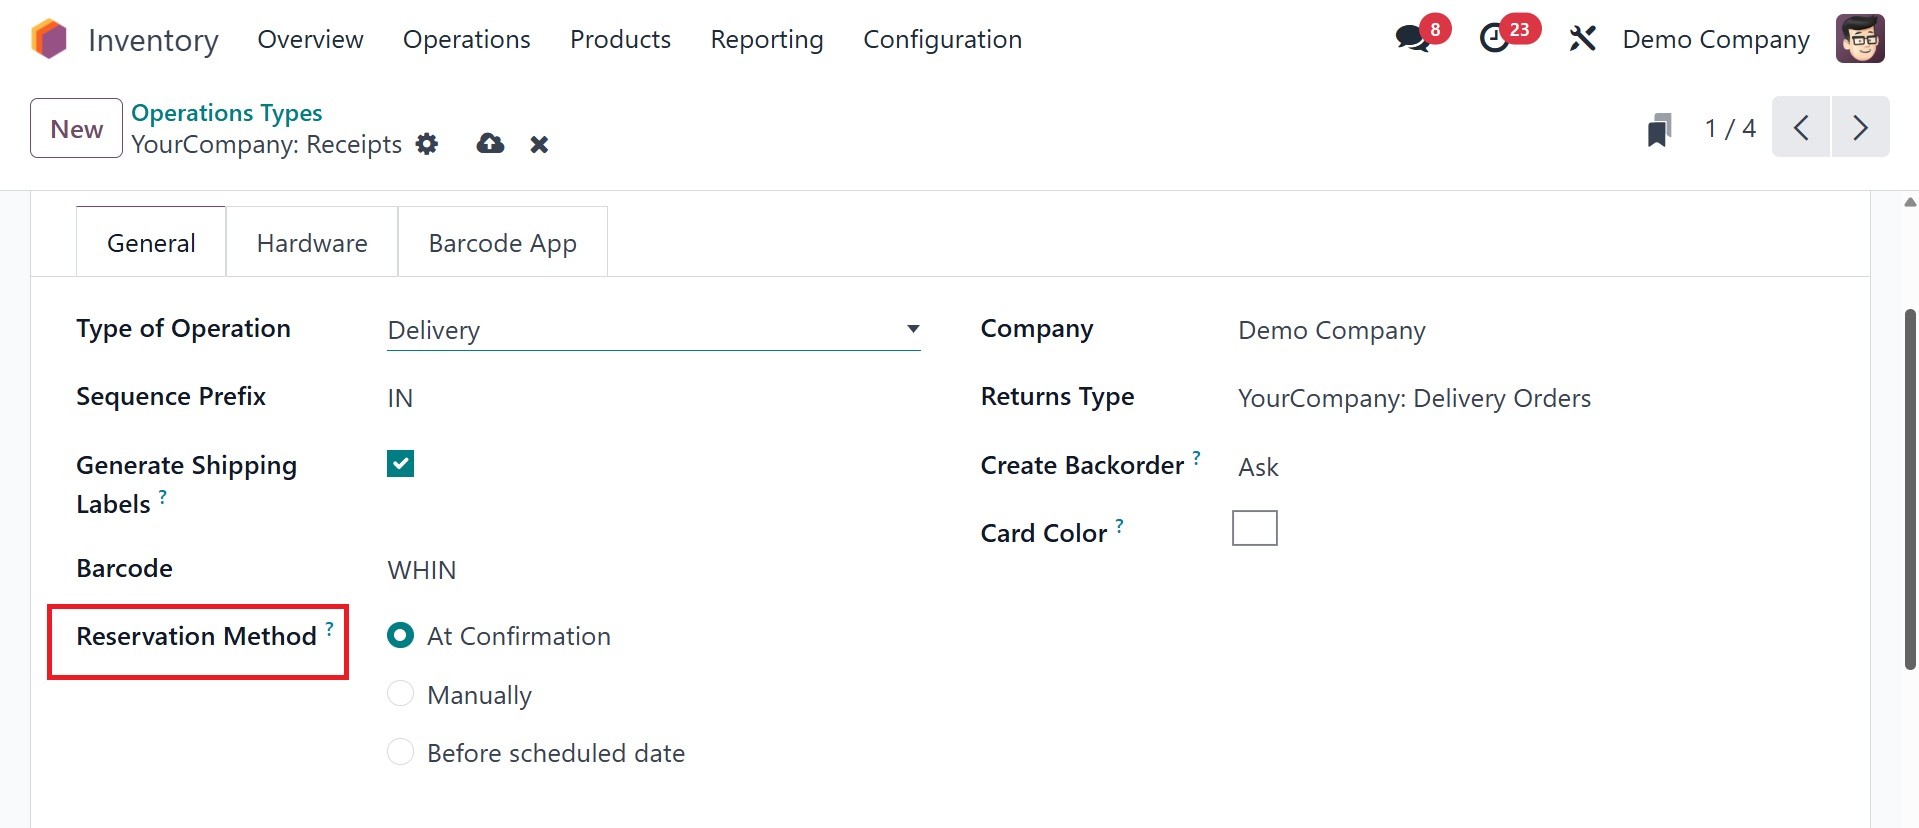
There, you have the sub options,
like at confirmation,
manually, and before
scheduled date, as in the
above image. That is, It is
possible manually, at
confirmation time, or even
before the reserved date. To
select the 'Ask' choice in
the Create Backorder area
while you confirm a transfer
and ask your clients to
choose if they desire a
backorder on the selected
items. Odoo18 will create a
backorder of the remaining
products automatically if the
'Always' option is selected.
The remaining products will
be canceled if the 'Never'
option is selected. Select
the Show Detailed Operation
option if you want to show a
complete stock operation on
the picking lines.
The related fields on the
Locations tab enable you to
define the Default Source
Location and Default
Destination Location of the
transfers of this operation
type.
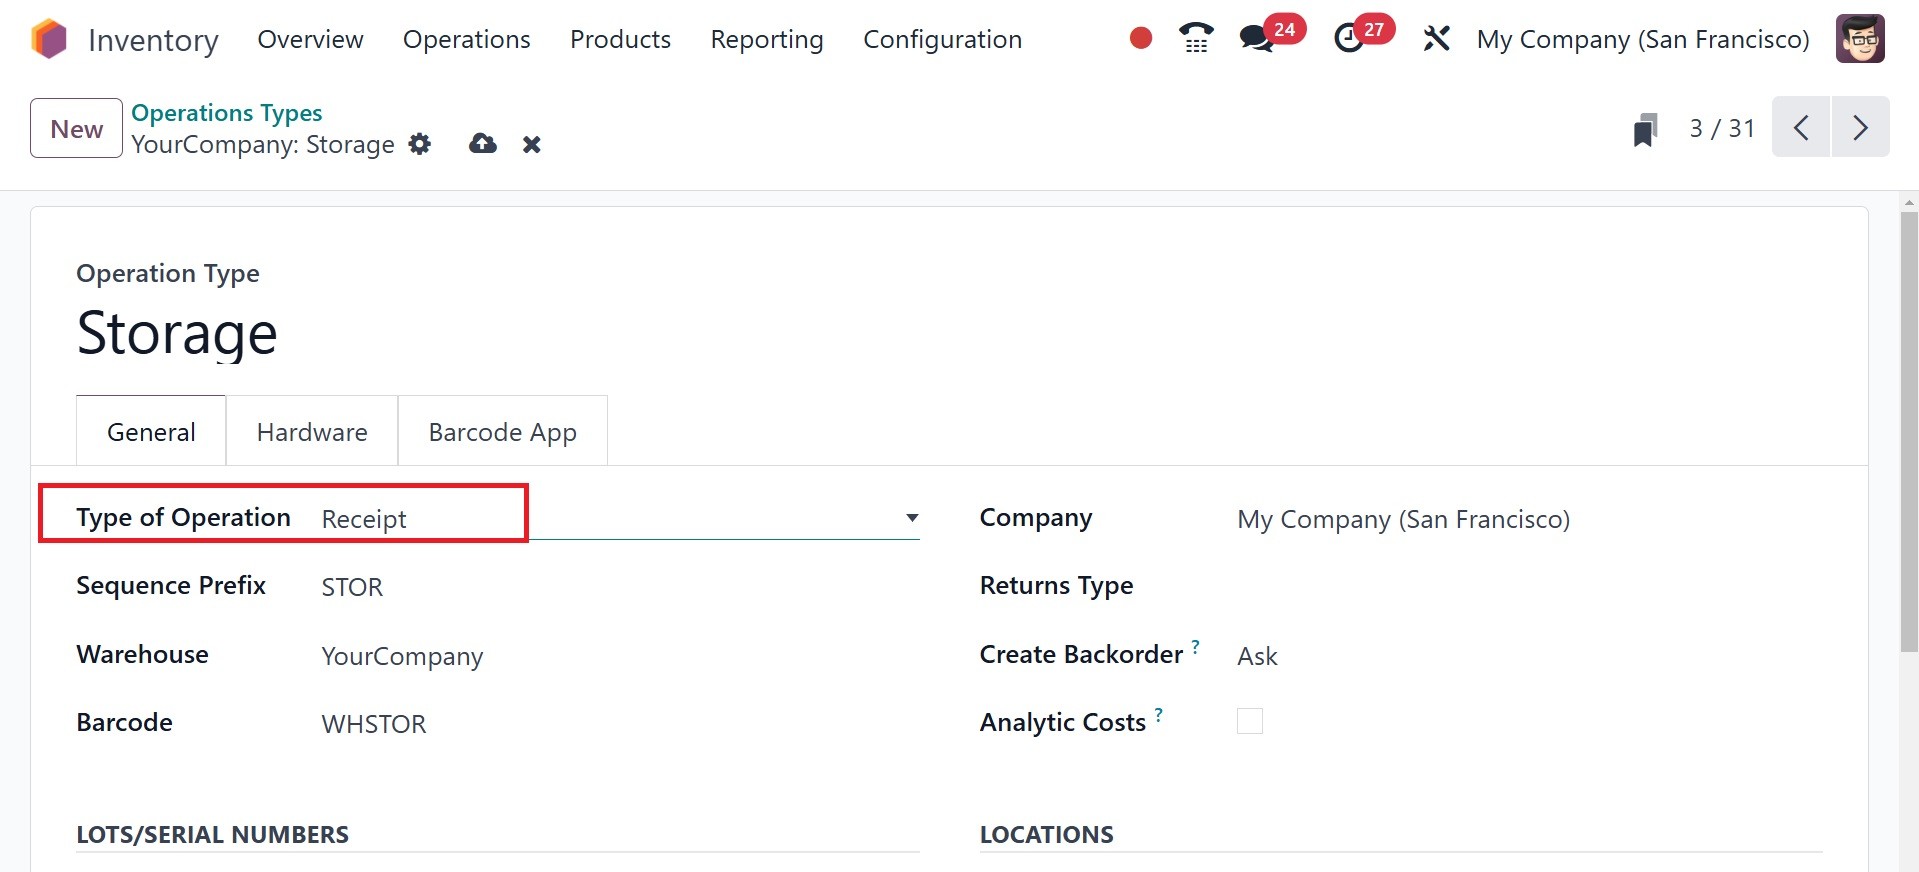
The operation type would be
internal transfer,
manufacturing, delivery, or
receipt. All the other fields
will change by a small
percentage based on which
Type of Operation you select.
There are setup options for
every type of Operation. The
added fields that will appear
on-screen, such as if you
decide to have the type of
operation as receipt, are
mentioned below.
You have the freedom to select
the most appropriate type of
operation in product return
through its insertion into
the Operation Type for
Returns field. The specific
goods, locations, and
lot/serial numbers of
relevance shall automatically
be completed in detailed
operations by Odoo18.
4.3 Locations
There, storage location helps you
to track product location in
your warehouse.You can define
the locations in your
warehouses where the products
are stored using the platform
to set up and control
different locations available
in the Odoo18 Inventory
module. You can control
numerous stock locations
within one warehouse. You
might activate the Storage
Location feature, which will
assist you in monitoring
product location in your
warehouse, from the Inventory
module's Settings menu.
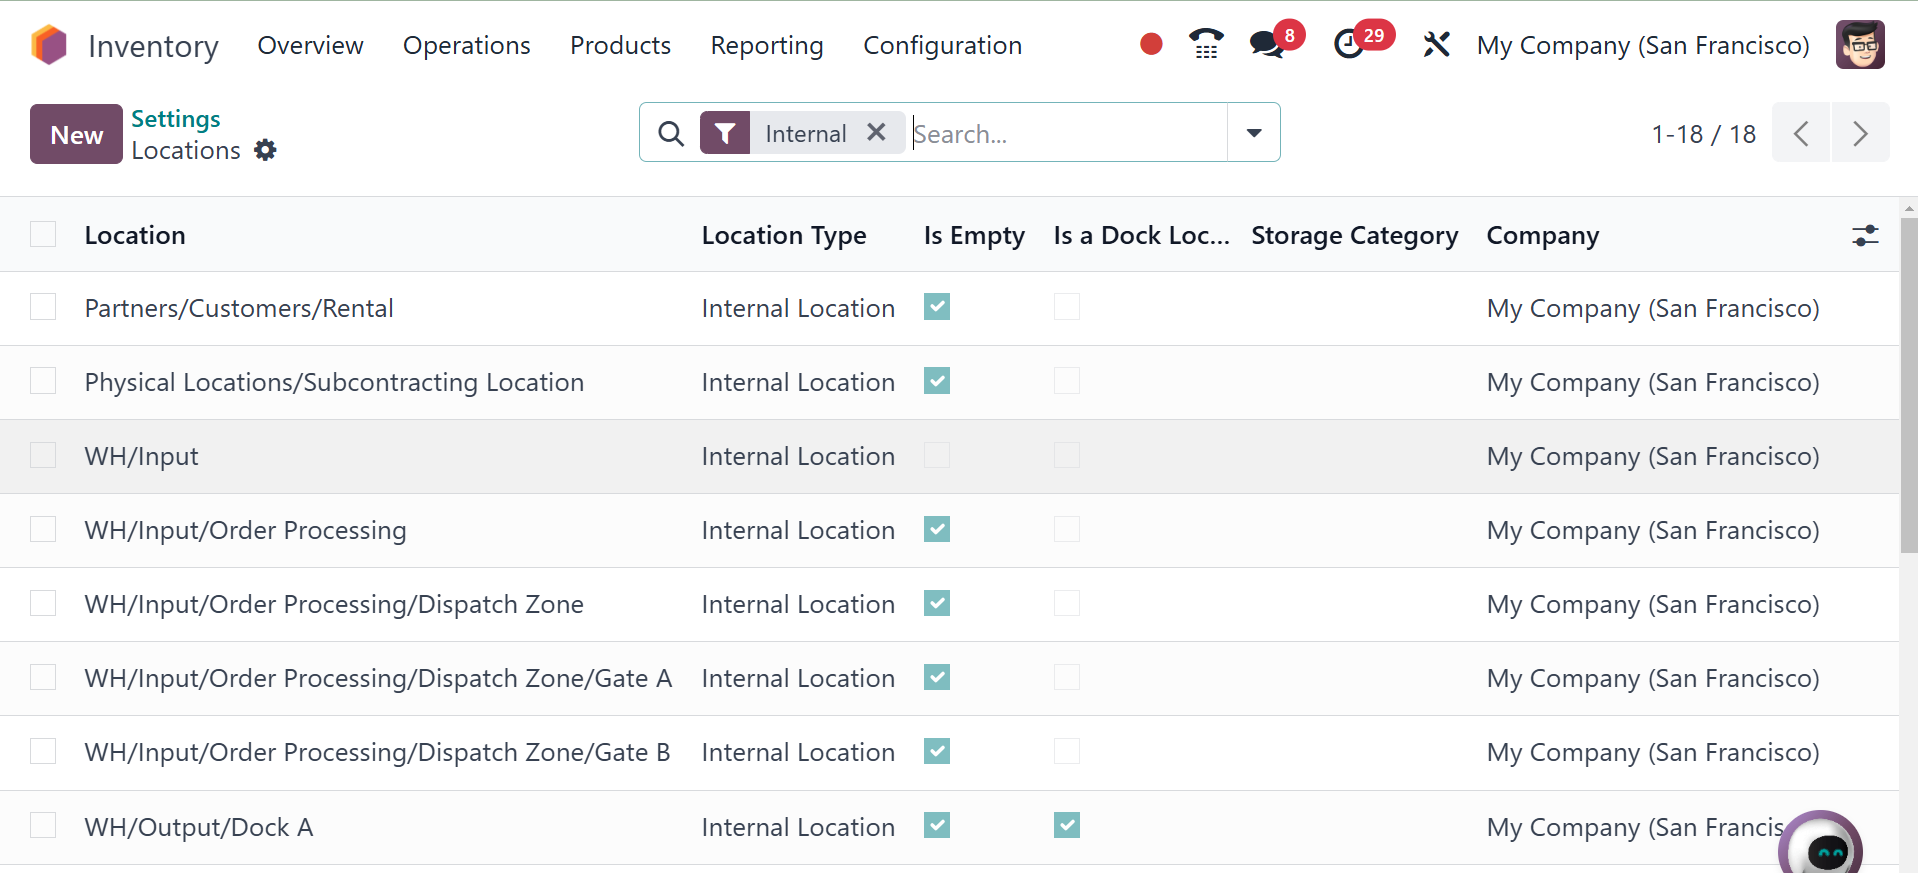
On selecting the location options
there, you will be directed
to the given page.
Information regarding the
Locations, Location Type, Is
empty, Is a dock location,
Storage Category, and Company
is given in this platform's
list view. When discussing
how to create a new location
in Odoo 18, we will consider
each of these options in
further detail. You can
accomplish this by choosing
the New button.
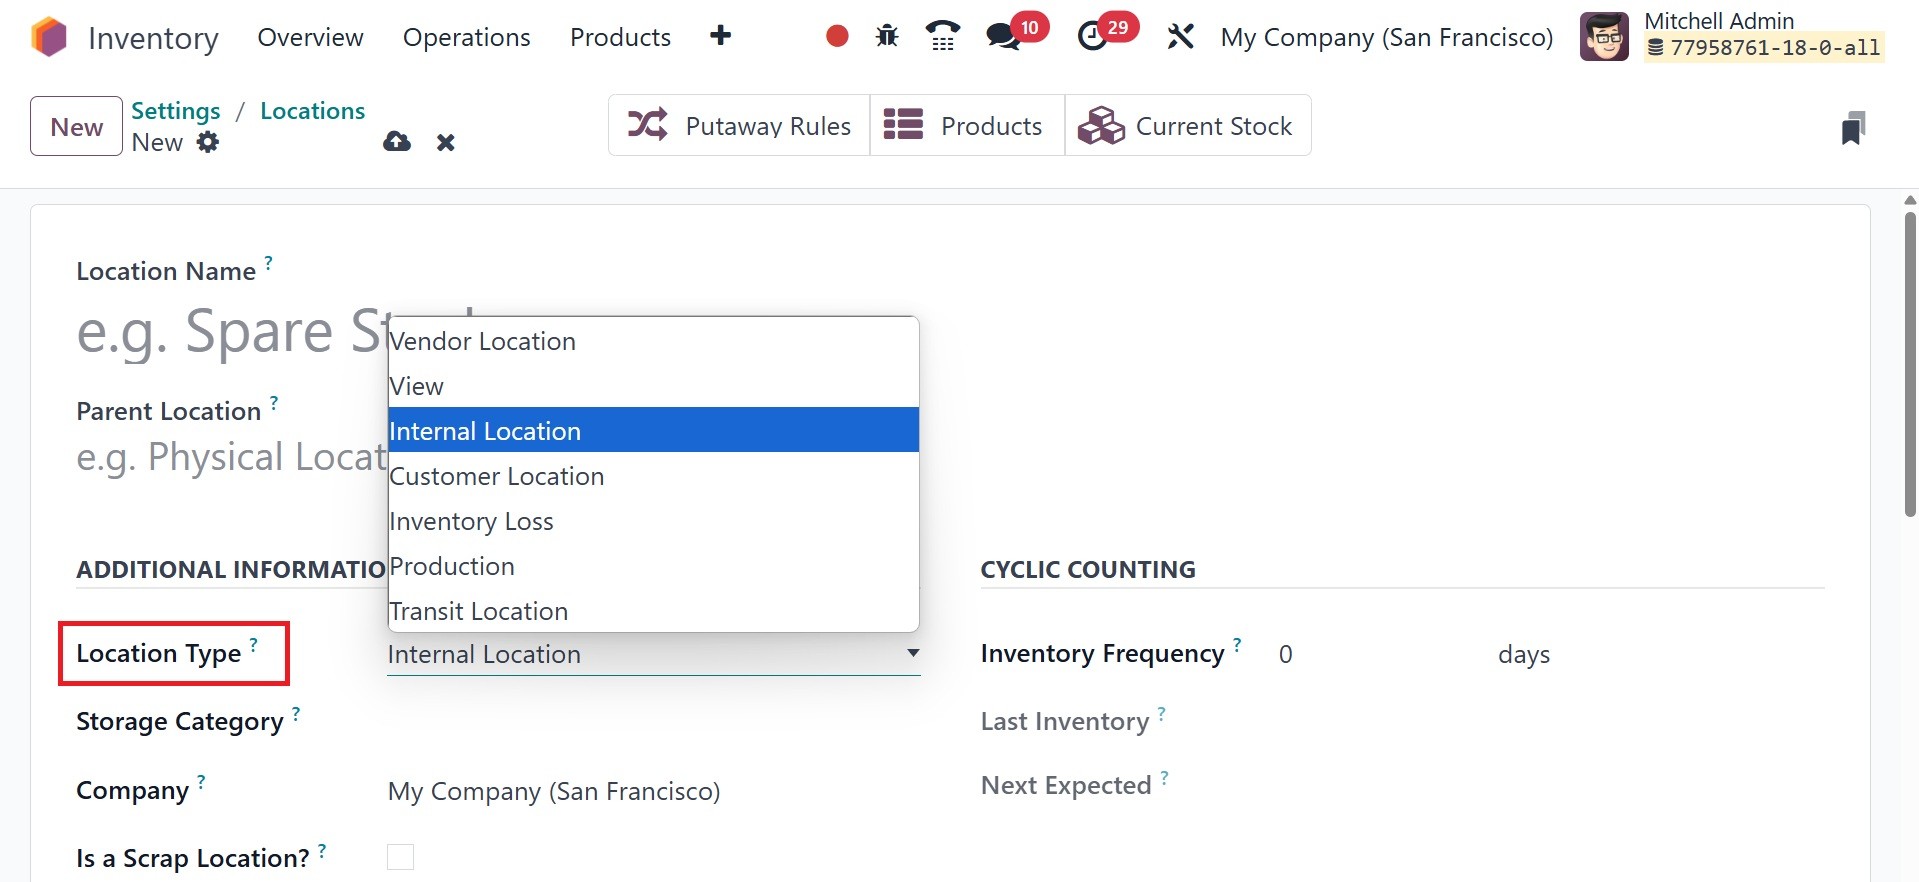
The window to create a new
location is shown above. You
can provide the location name
in the field given here. The
Parent Location option
enables you to enter the
parent location that has this
location. You can select the
parent location from the
drop-down menu. You can
configure the tabs for
Additional information,
Logistics, and Cyclic
Counting. The products stored
at this location will have
the inventory count
automatically set at the
given frequency if it is not
equal to zero. You can select
Location Type for the new one
from the options. The
location types include vendor
location, view, internal
location, customer location,
inventory loss, production,
and transit location.
Vendor location: Represents the
location where goods come
from when you purchase
something.
Internal Location: Represents
your own warehouses or
storage areas.
Customer Location: Represents
where goods go when you
deliver to a customer.
Inventory Loss: Used for stock
adjustments when products are
missing or gained.
Production: Used during
Manufacturing operations.
Transit: Used for dropshipping or
multi-step delivery
View: Not a real location—used as
a parent or container for
other locations.
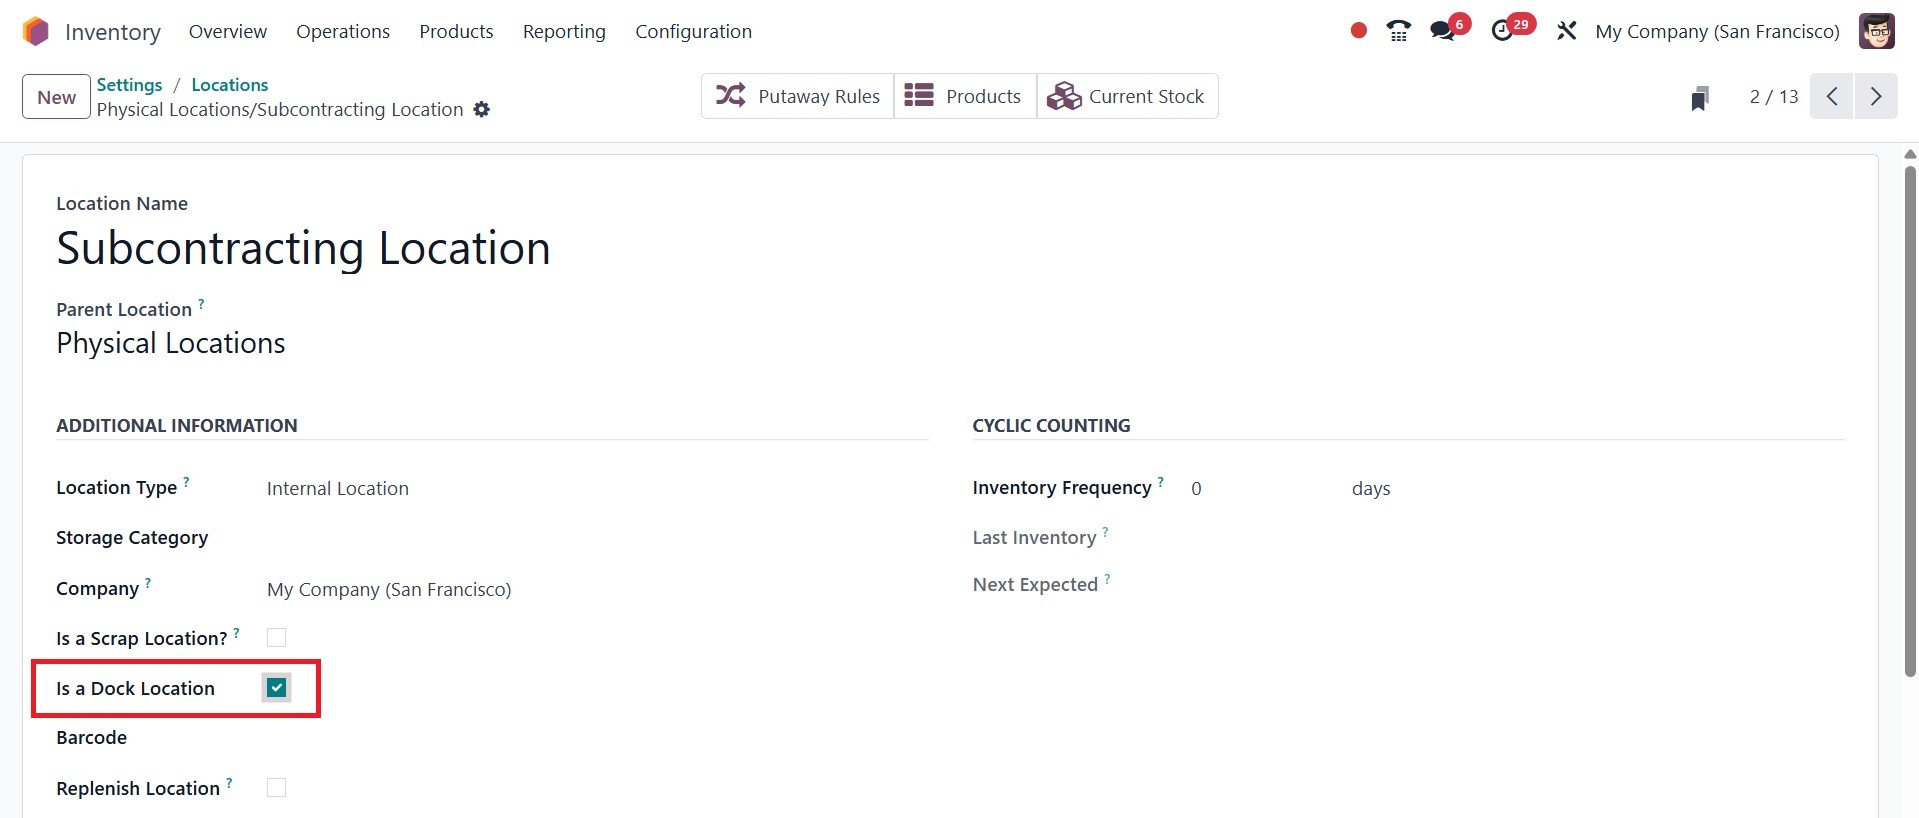
You can indicate the storage
grouping that is being used
in this location by filling
out the Storage Category
section. If multiple
companies share this
location, you can leave the
Company box blank. By turning
on the Is a Scrap Location?
option, you can approve the
placement of scrap and
damaged products here. You
can designate a location as a
dock location by checking a
boolean field in the Location
form. This checkbox, located
in the "Additional
Information" section, allows
you to define specific areas
within your warehouse as
loading/unloading docks.
The Barcode field allows you to
enter the barcode that is
used at this site. To have
all amounts replenished at
this place, use the Replenish
Location function.
Add a line to the Cyclic Counting
tab with the label "Inventory
Frequency" in days. The date
of the inventory count for
the items stored at this
location will be
automatically entered at the
designated frequency if the
difference is more than zero.
The date of the last
inventory at this location
will be shown in the Last
Effective Inventory column.
The Next Expected Inventory
field will then show the date
of the upcoming planned
inventory depending on a
cyclic schedule.
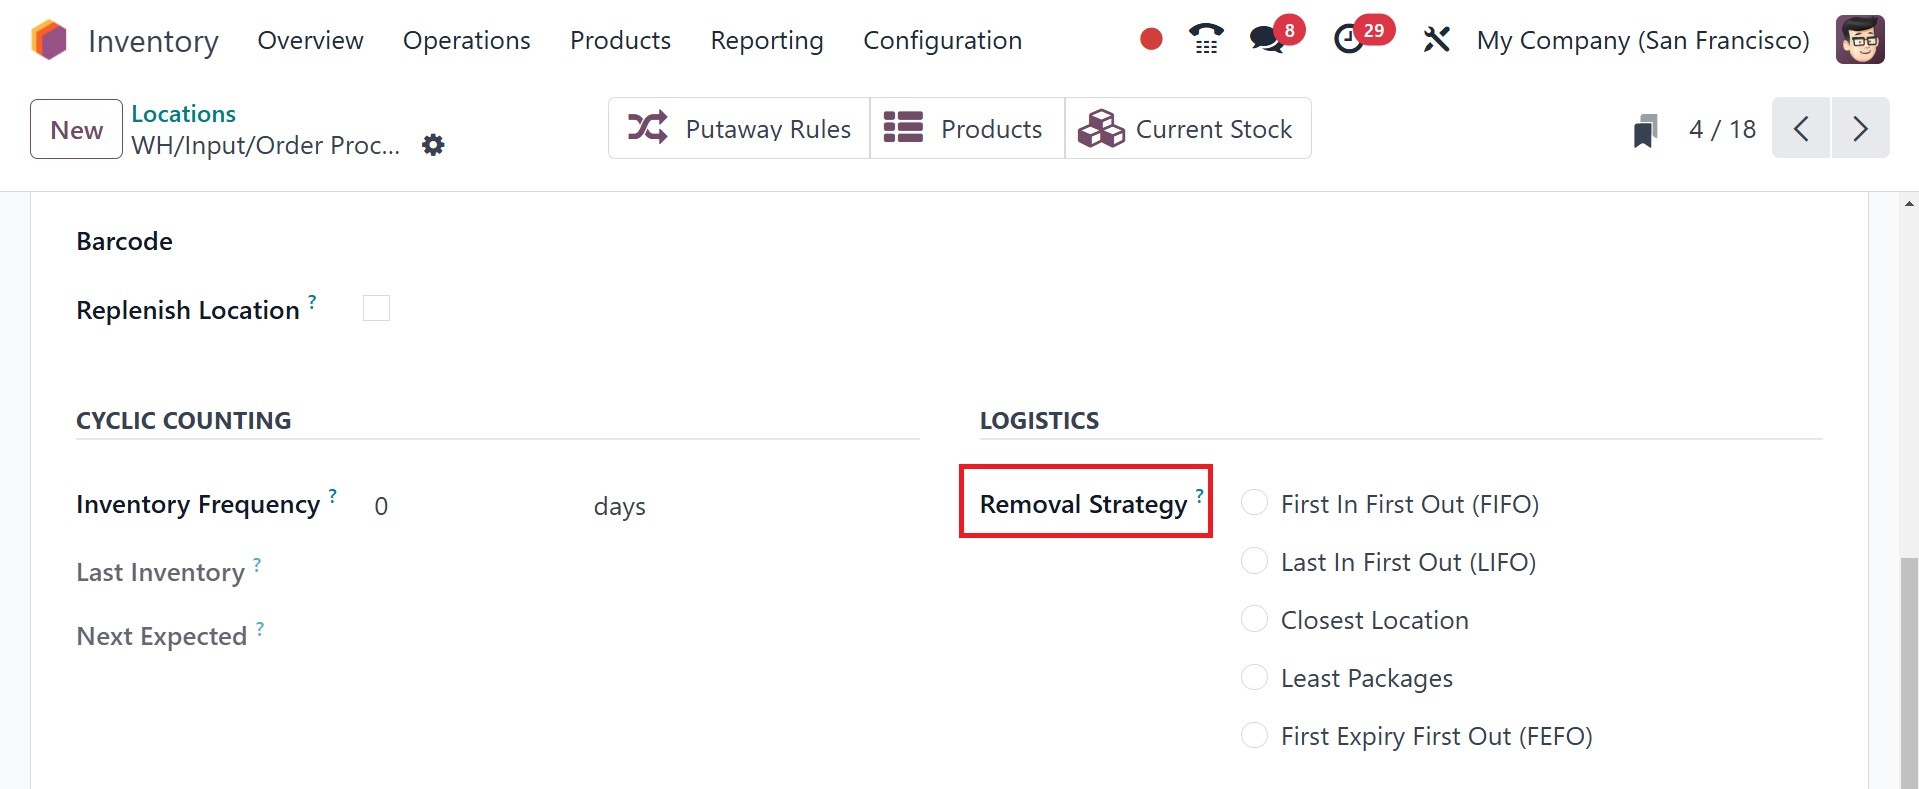
It provides the standard policy
to recommend the exact
location, the lot, etc.,
where the products will be
taken from for this site. In
the event of not being
provided here any parent
locations, there's a fallback
done to the level of the
product category where this
technique may be imposed.
Removal Strategies that can
be utilized here are,
FIFO: Products or lots initially
received will be taken out
first.
LIFO: The last stocked products
or lots will be emptied
first.
Closest Location: The lots or
products closest to the
destination location will be
shipped out first.
FEFO: The products/lots with the
earliest feasible removal
will be emptied first.
Least Packages: Products can be
packed into packages.
Therefore, the smaller
package will be emptied from
the inventory first.

Further, in the window of
location, there are such
special smart buttons for
stocks and putaway rules. The
button of Putaway Rules will
come up with the window of
the instructions to take
products from a place to
another, and Current Stocks
button will give information
of the latest stocks of this
place.
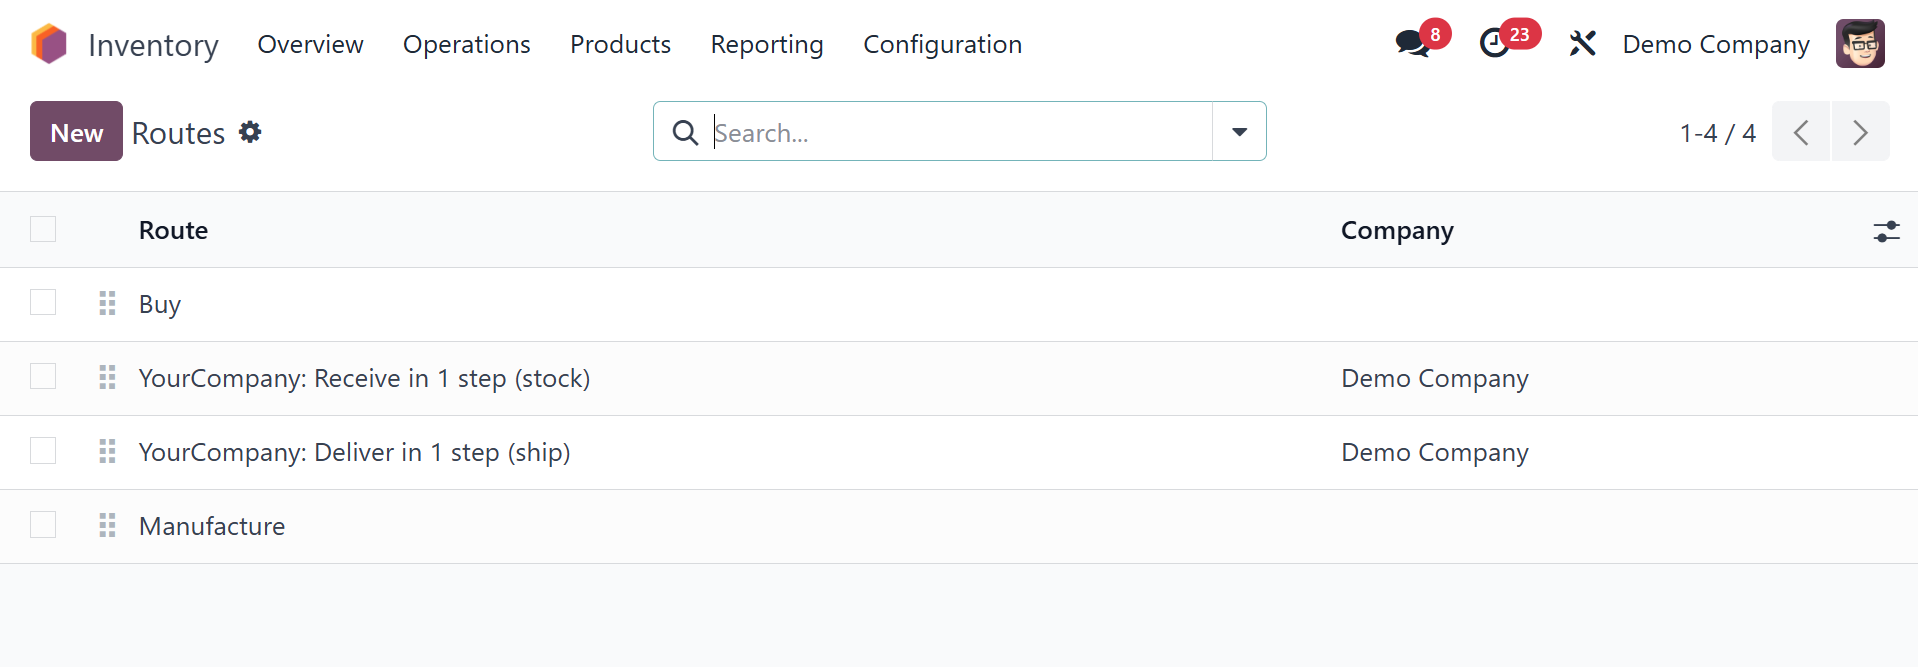
4.4 Routes
The interface for managing and
creating various operating
routes is available via the
Configuration menu of the
Warehouse Management tools in
the Odoo 18 Inventory module.
Besides corporate data and
route names, the user can
navigate a preconfigured list
of routes here.
To create a new inventory move
route, select the New button.
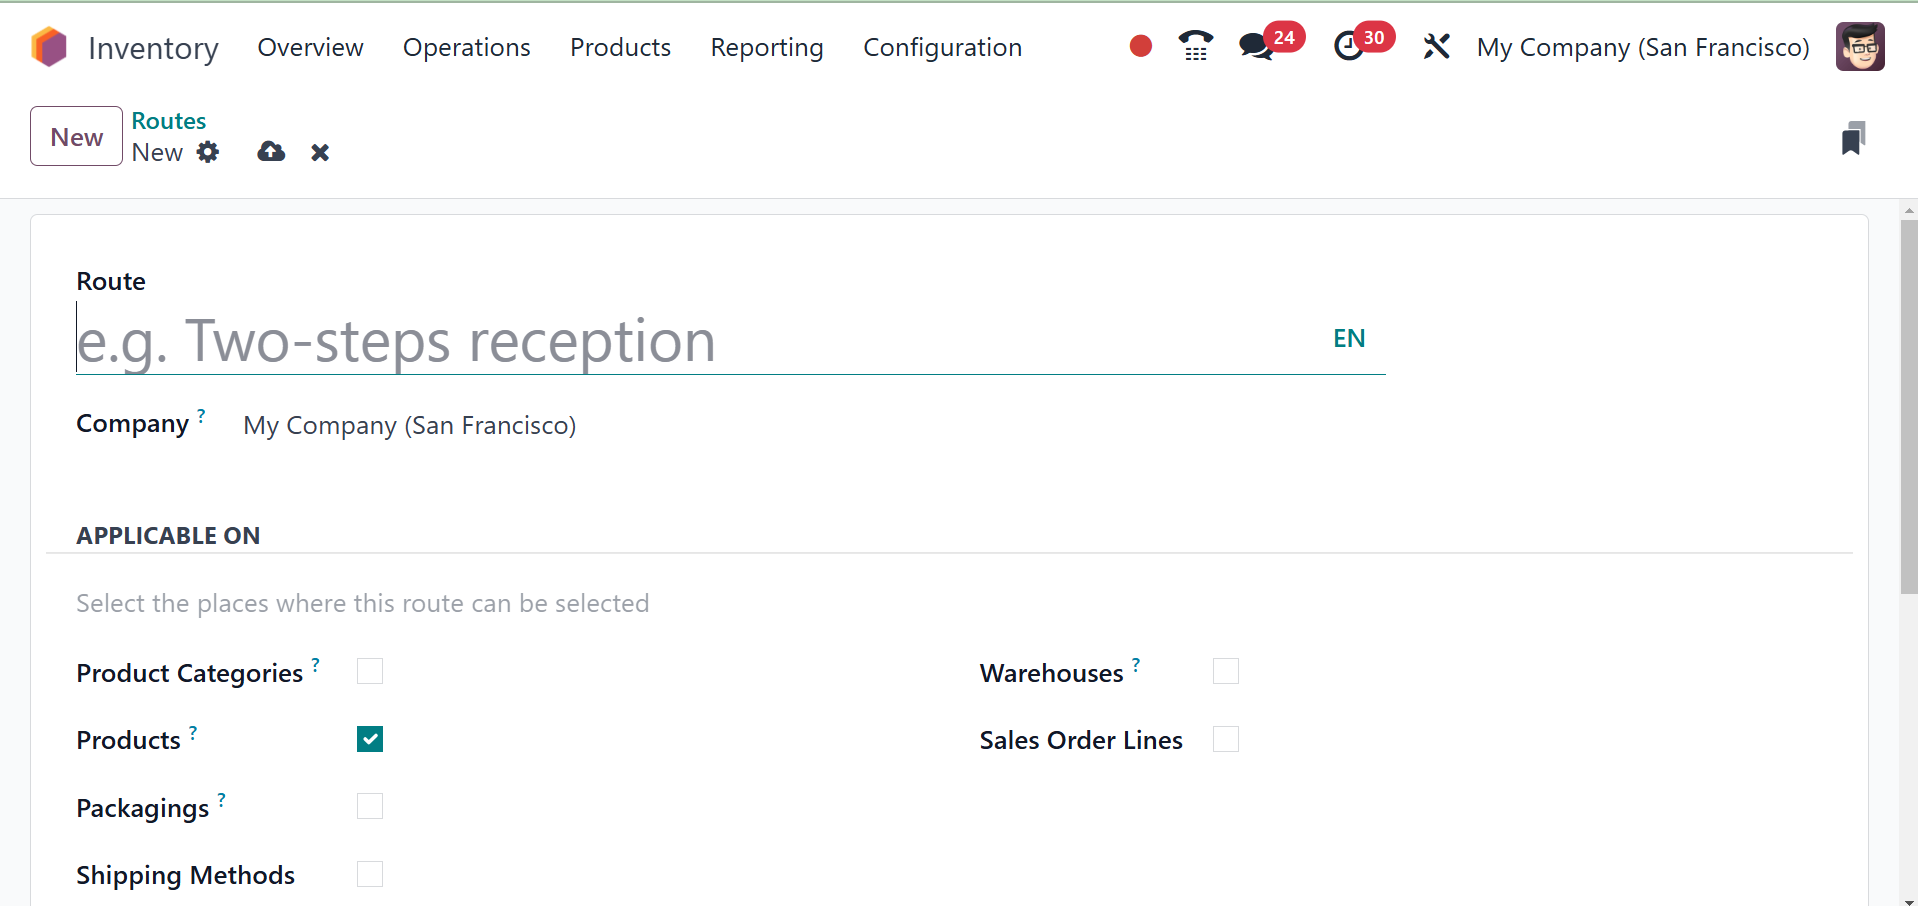
You may input the name of the
route in the Route field. The
same fields can also indicate
the Sequence, Supplied
Warehouse, and Company. You
may not fill the Company
field if all companies in
your database utilize the
same route. In the section
Applicable On, you can choose
which areas this route may be
chosen. You may choose from
the Product Categories,
Products, Packaging, Shipping
methods, Warehouse, and Sales
Order Lines provided here in
line with the policies of
your company.
The Add a Line button on the
Rules tab enables you to add
a description of the rules
applied to this operation
path. The steps outlined
above can be utilized to
create new rules for this
route. Don't forget to save
the changes by clicking the
Save button at the end.
While configuring, you can define
a specific operation path for
every product in the Odoo
database. You can find a
particular field on the
Inventory tab of the products
management window, as
depicted below, and choose
the best path for a product's
inventory movement.
4.5 Rules
The user is able to add new rules
for inventory movements via
the Inventory module's
Configuration menu. By
selecting the Rules option
from the Warehouse Management
menu, as shown below, a new
window with the list view of
the already configured Rules
is opened.
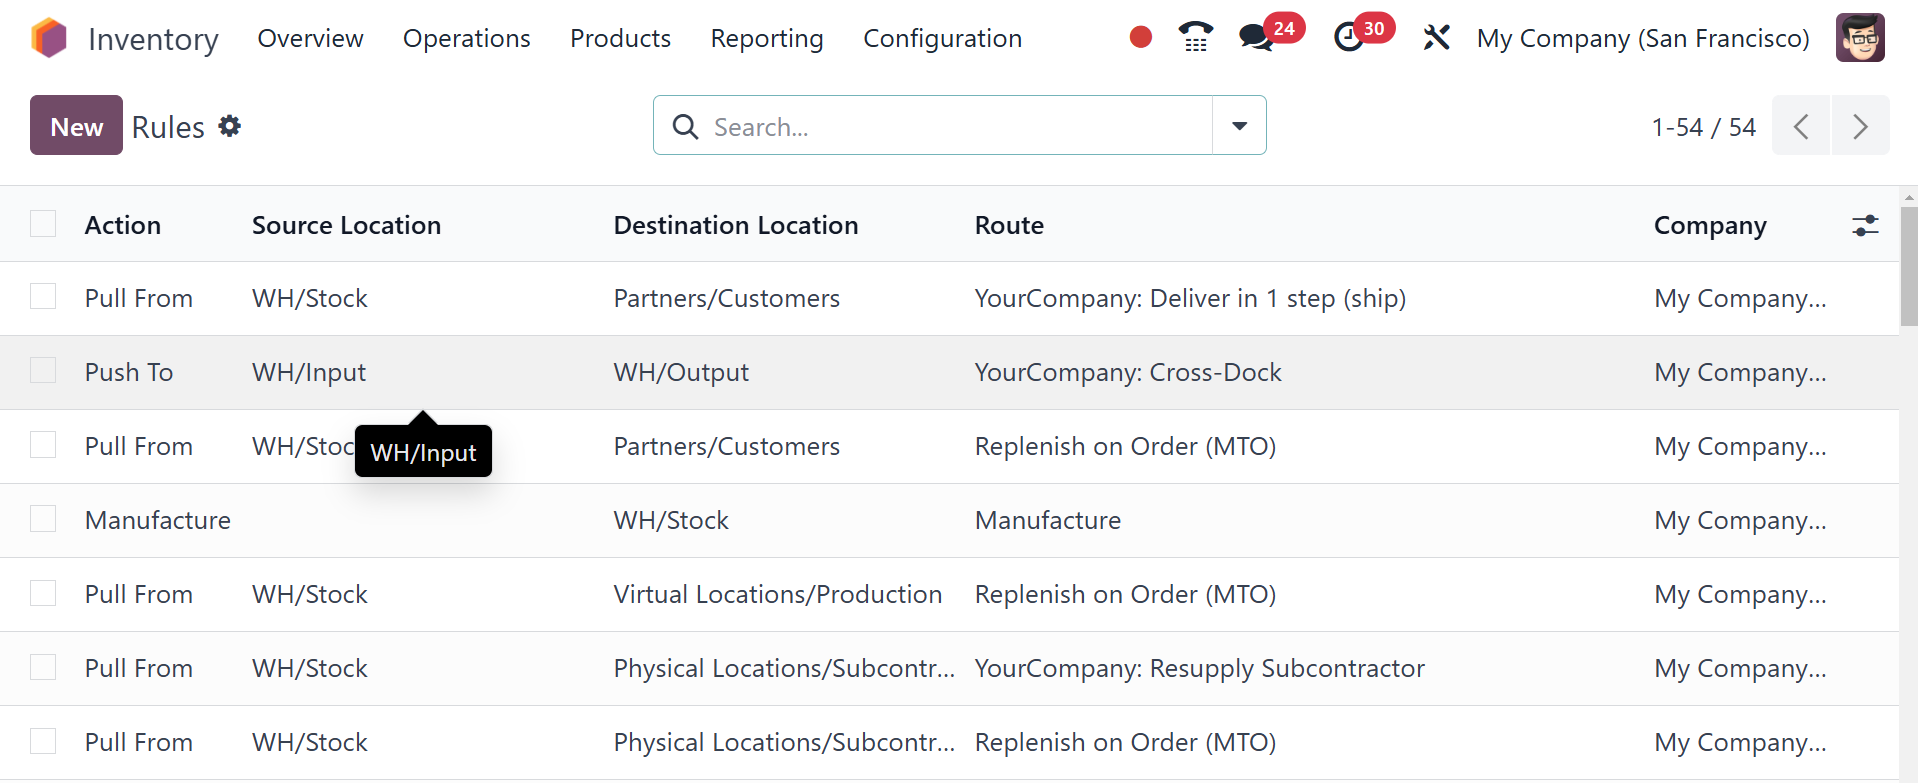
This preview shows the Action,
Source Location, Destination
Location, Route, and Company
information for each Rule.
Similar to other platforms,
Odoo makes sure that the core
and flexible GroupBy and
Filters capabilities are
available to enable
searching. You can go ahead
and click the New button
right away to see how to
create a new rule in Odoo 18.
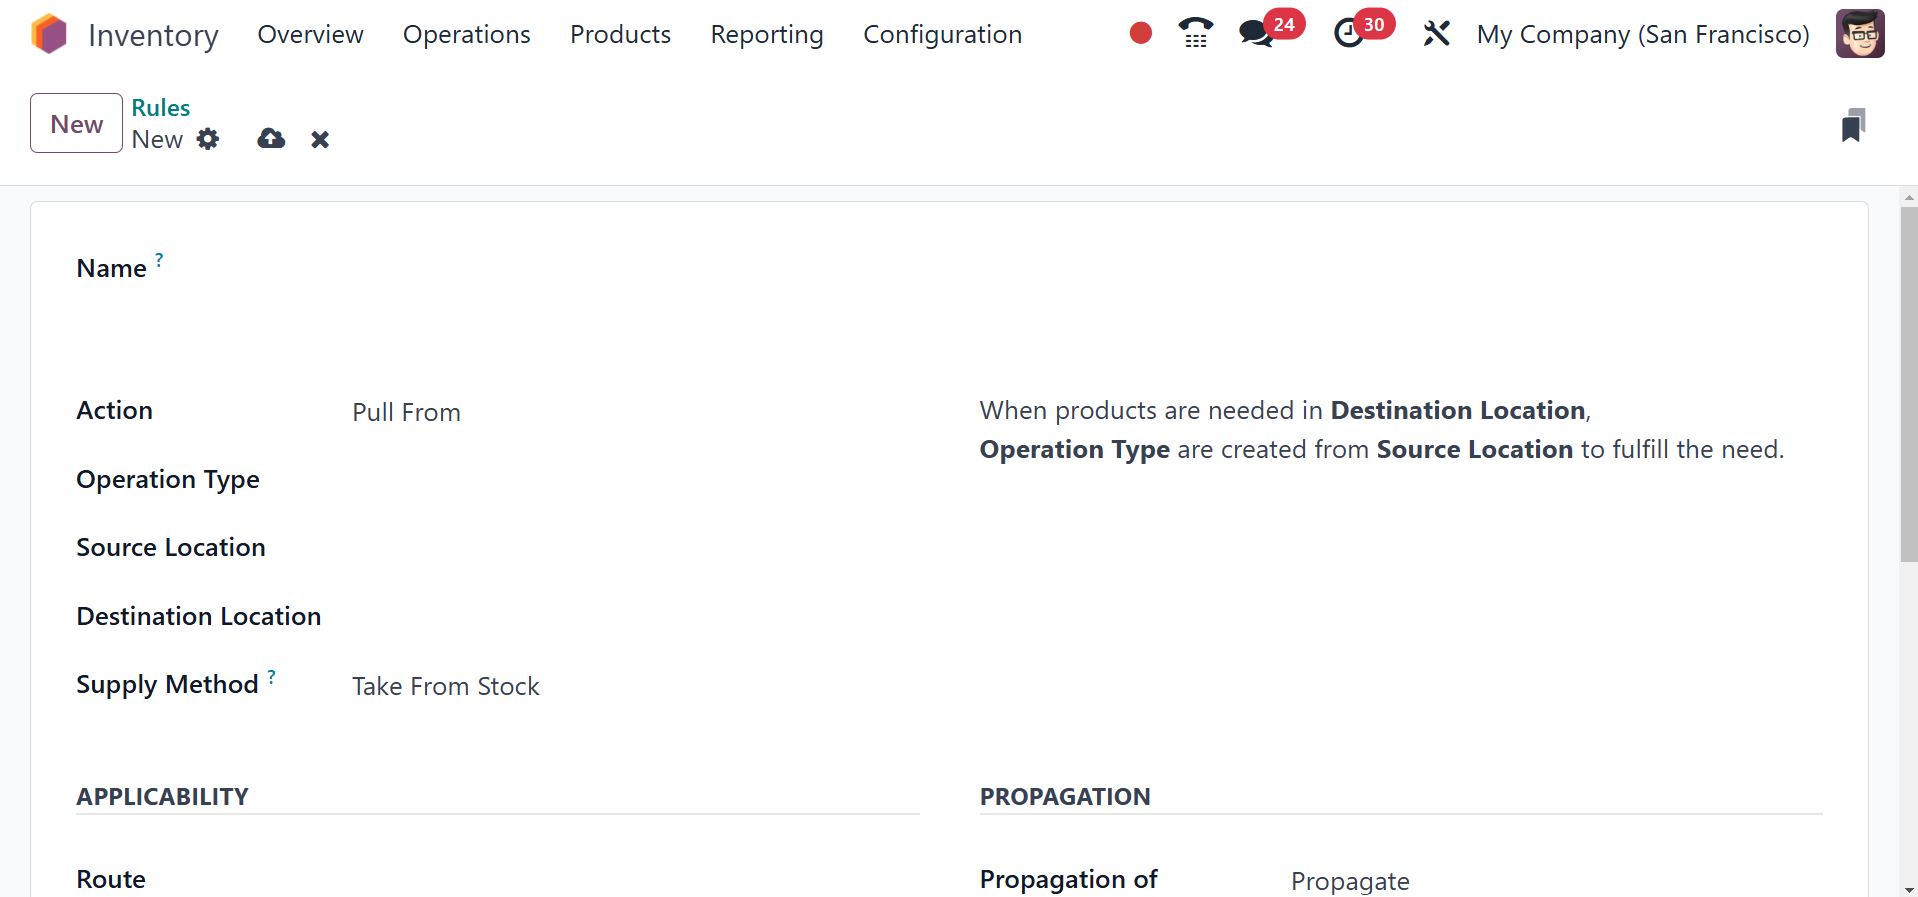
In the Name field, you can enter
an appropriate title for the
new rule. The second step is
to specify the Action for the
new rule. There will be a
drop-down menu where you can
choose the appropriate action
to perform.
Pull From: This action can be set
when goods are required in
the desired location. It may
be from a manufacturing order
or a sales order. In case
there is a requirement for a
product at the destination
point, Odoo will create a
picking operation type from
the source point to fulfill
the need.
Push To: Using this rule, you can
move a product. When the
items have arrived at the
beginning point, you can
transport them to another
location using this action.
Odoo will create a pickup
operation type to ship them
to the destination in this
instance.
Push and Pull: This is an
activity that can be applied
in the above-stated
situations. A pick is taken
from the source location when
products are required at the
destination point.
Specifications of products
are thus needed at the origin
area. After the source point
has met the requirements,
products are pushed to the
destination point to respond
to the needs of the
destination point.
Manufacture: Users can directly
create manufacturing orders
to fulfill the requirements
of the source location with
the assistance of this task.
Buy: When the product is required
at the destination place,
Odoo will utilize this action
to fetch a quote for the
purchase of the product.
The fields below enable you to
select the operation type,
source location, and
destination location. In the
Applicability tab, you can
specify what Route,
Warehouse, Company, and
Sequence this rule is applied
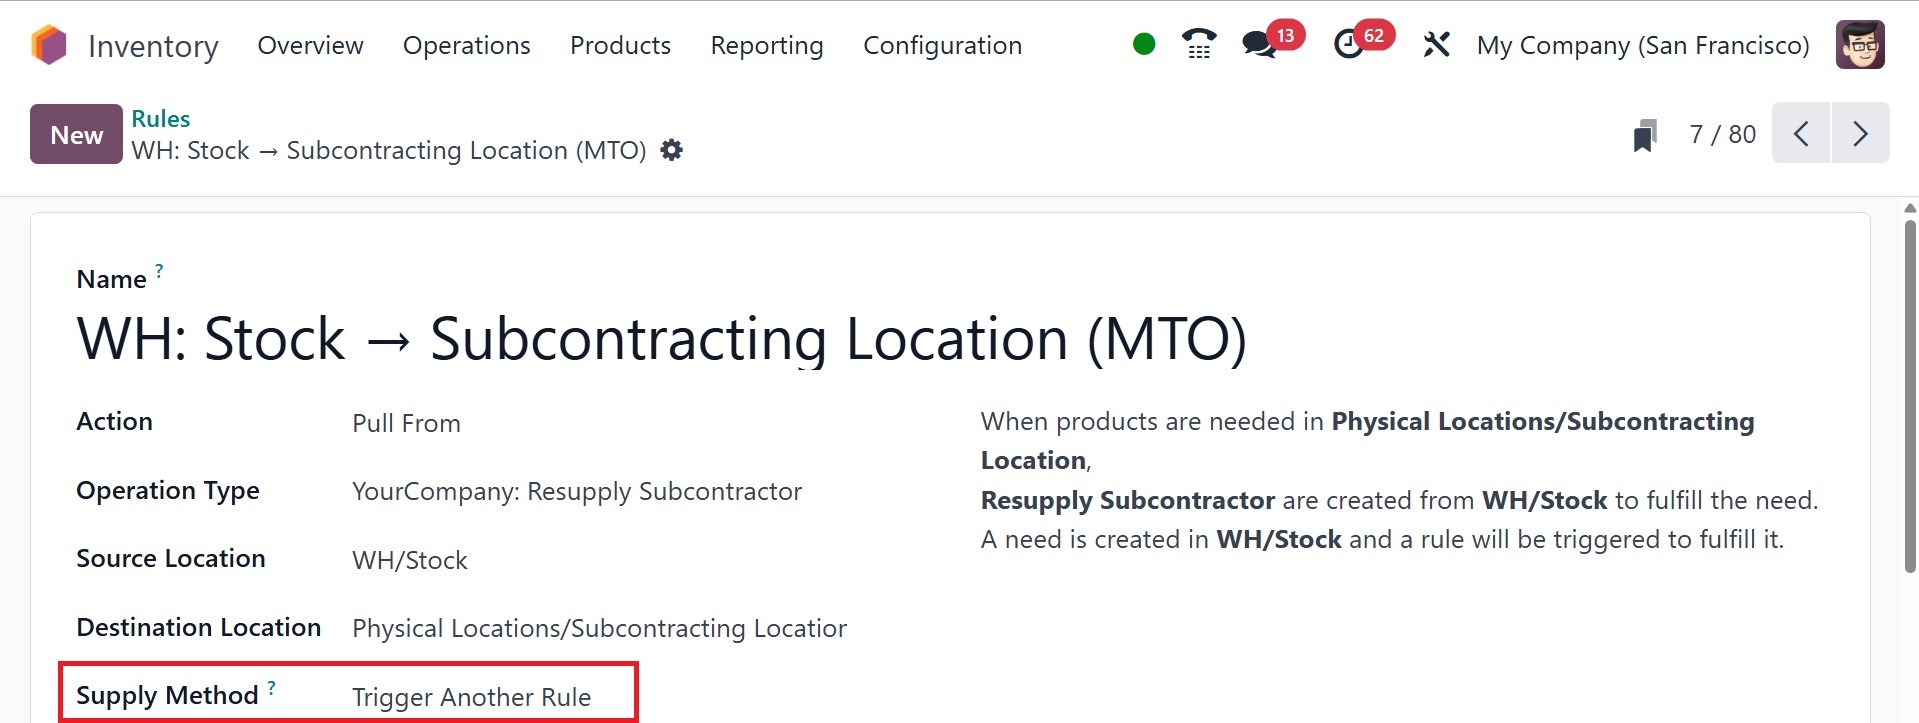
to. The supply method option
determines how a product is
sourced to fulfill a demand,
especially when using
push/pull rules. It dictates
whether the product is taken
from existing stock or if
another rule is triggered to
resupply.
The "Propagation" tab within a
rule defines how the
procurement group associated
with a move or procurement is
handled. It allows you to
choose how related transfers
are linked and determines
whether a specific
procurement group is applied
to all transfers. In the
Propagation tab, you can
select Empty, Fixed, or
Propagate for the propagation
of the Procurement Group.
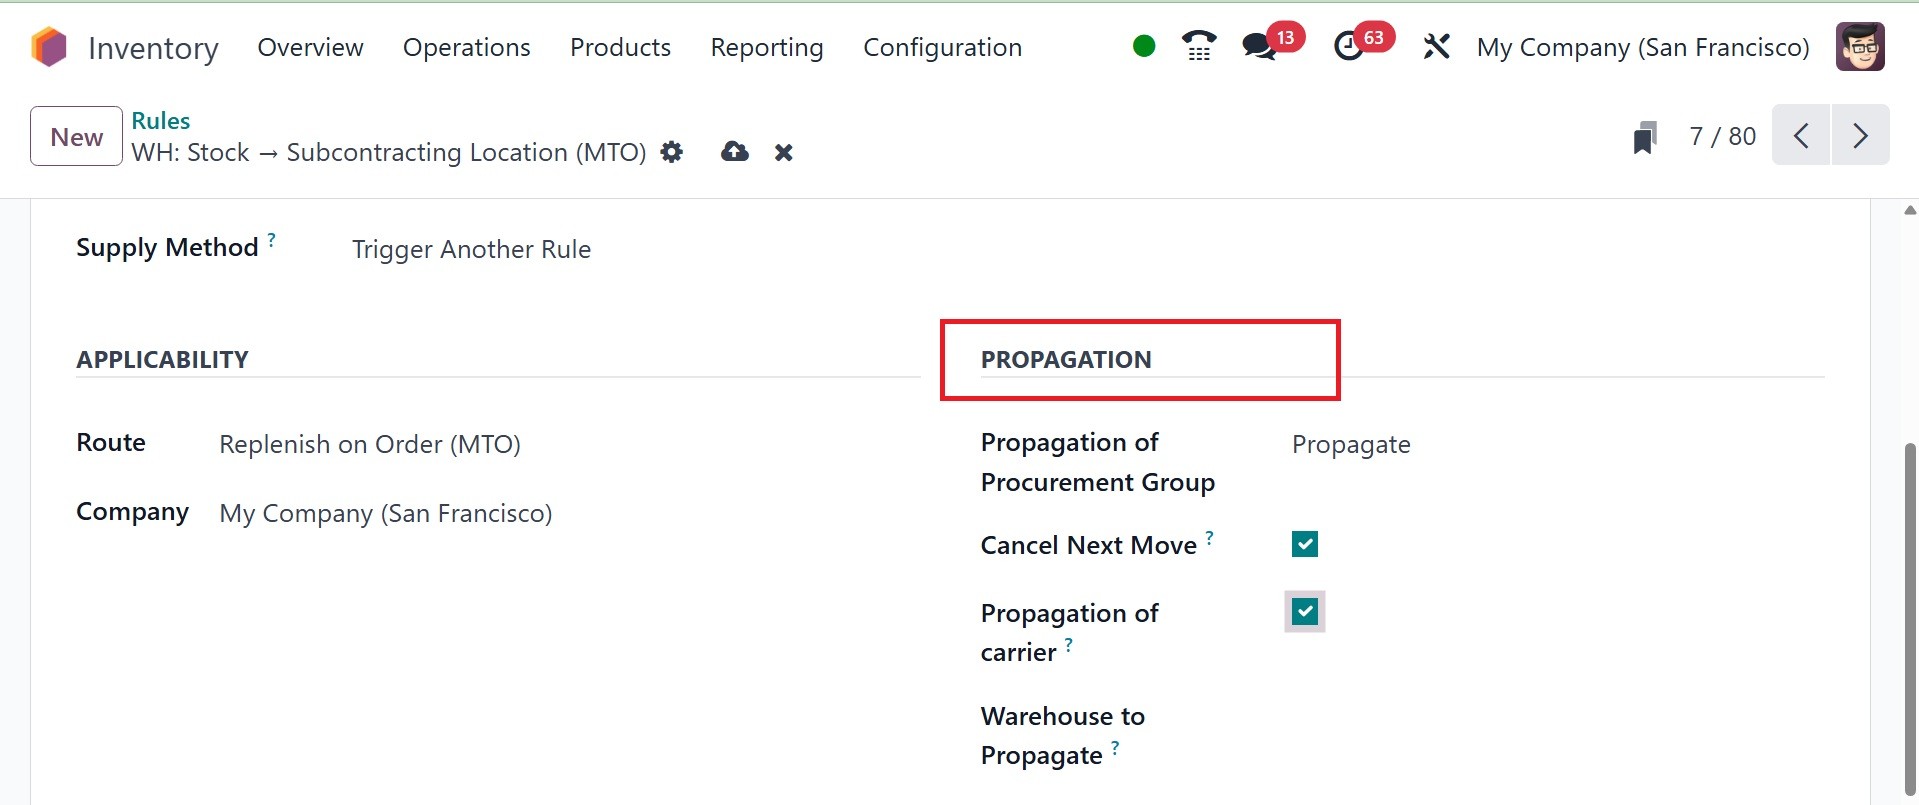
If the Cancel Next Move is set,
the move that this rule
created will be canceled and
so will the next move. When
the carrier propagation is
turned on, the cargo carrier
will propagate. For a new
move or procurement, you can
specify another warehouse in
the Warehouse to Propagate
field than the one for this
rule.
4.6 Storage Categories
The Storage Categories
functionality in Odoo will
enable you to consolidate
numerous storage locations
under one category. You can
define numerous such
categories in the Odoo
Inventory module that will be
useful to execute intelligent
put-away operations.
Prior to configuring the storage
categories, you need to
configure the storage
locations that are present in
your inventory. Then you can
consolidate them under a
particular category. By
enabling the Storage Location
from the Settings module, you
are able to create and manage
all storage locations in your
business. Once you enable
this feature, you will
receive an extra field
referred to as Storage
Categories below to specify
different categories for the
available storage.
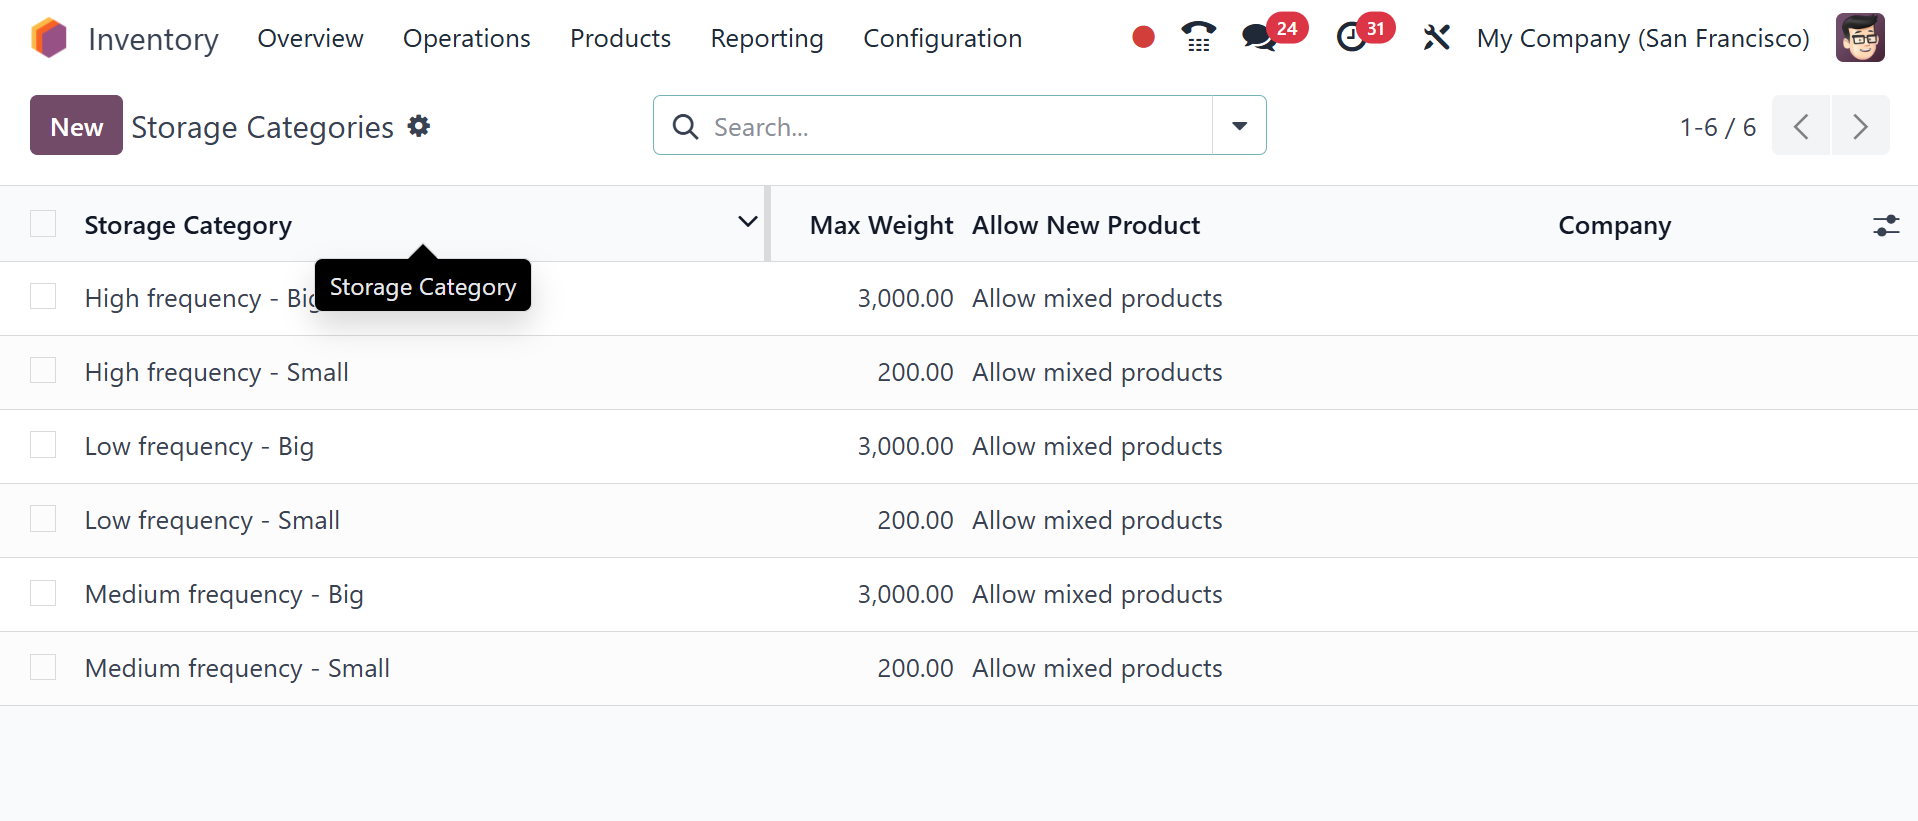
This window's list view will
display the information
concerning the available
Storage Categories, Max
Weight, Allow New Product,
and Company. To add a new
storage category, we can make
use of the New button.
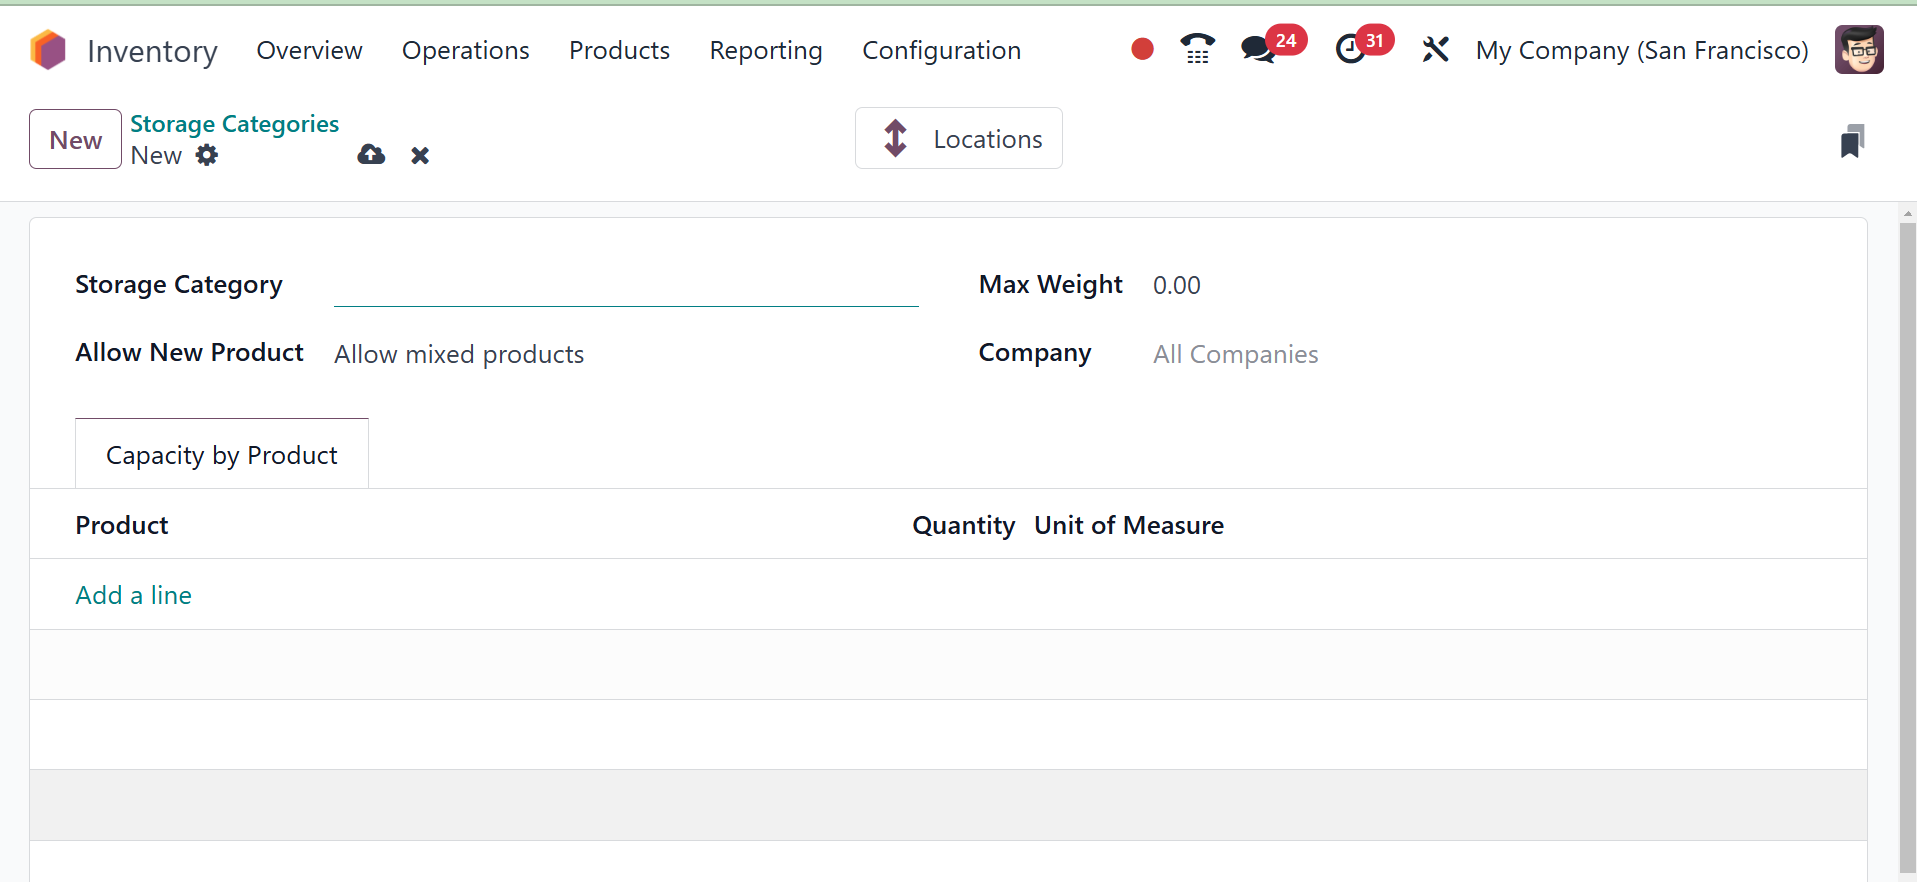
The name of the new storage
category can be entered in
the provided space. In
addition to this, you can
enter the maximum weight that
can be stored under this
category. If you wish to
permit new products to the
locations under this
category, you can provide
conditions for this in the
Allow New Product field. You
can permit new products if
the location is vacant, if
all products are identical,
or permit mixed products.
In the Capacity by Package field,
you can refer to the Package
Type and its Quantity using
the Add a line button that
can be added in this
category. The products that
can be added to this storage
category too, can be
indicated in the Capacity by
Products tab. Saving via the
Save button will add a new
storage category for your
inventory. The intelligent
Location button will provide
the information of the
location that has been
included under this specific
category.
4.7 Putaway Rules
An effective warehouse management
system is responsible for
products being kept at the
right location in the
warehouse. If the warehouse
holds risky and hazardous
items, you ought to take them
under your protection by
providing them with a
separate place where you can
keep them away from contact
with other goods. For
performing these operations
automatically, the Odoo
Inventory module brings
forward the Putaway Rules
that will guide you in
pushing goods to rightful
locations. This aspect will
prevent improper storage of
items in your inventory. With
the putaway rules, you can
move items from the receiving
locations to the most
suitable location in the
warehouse itself.
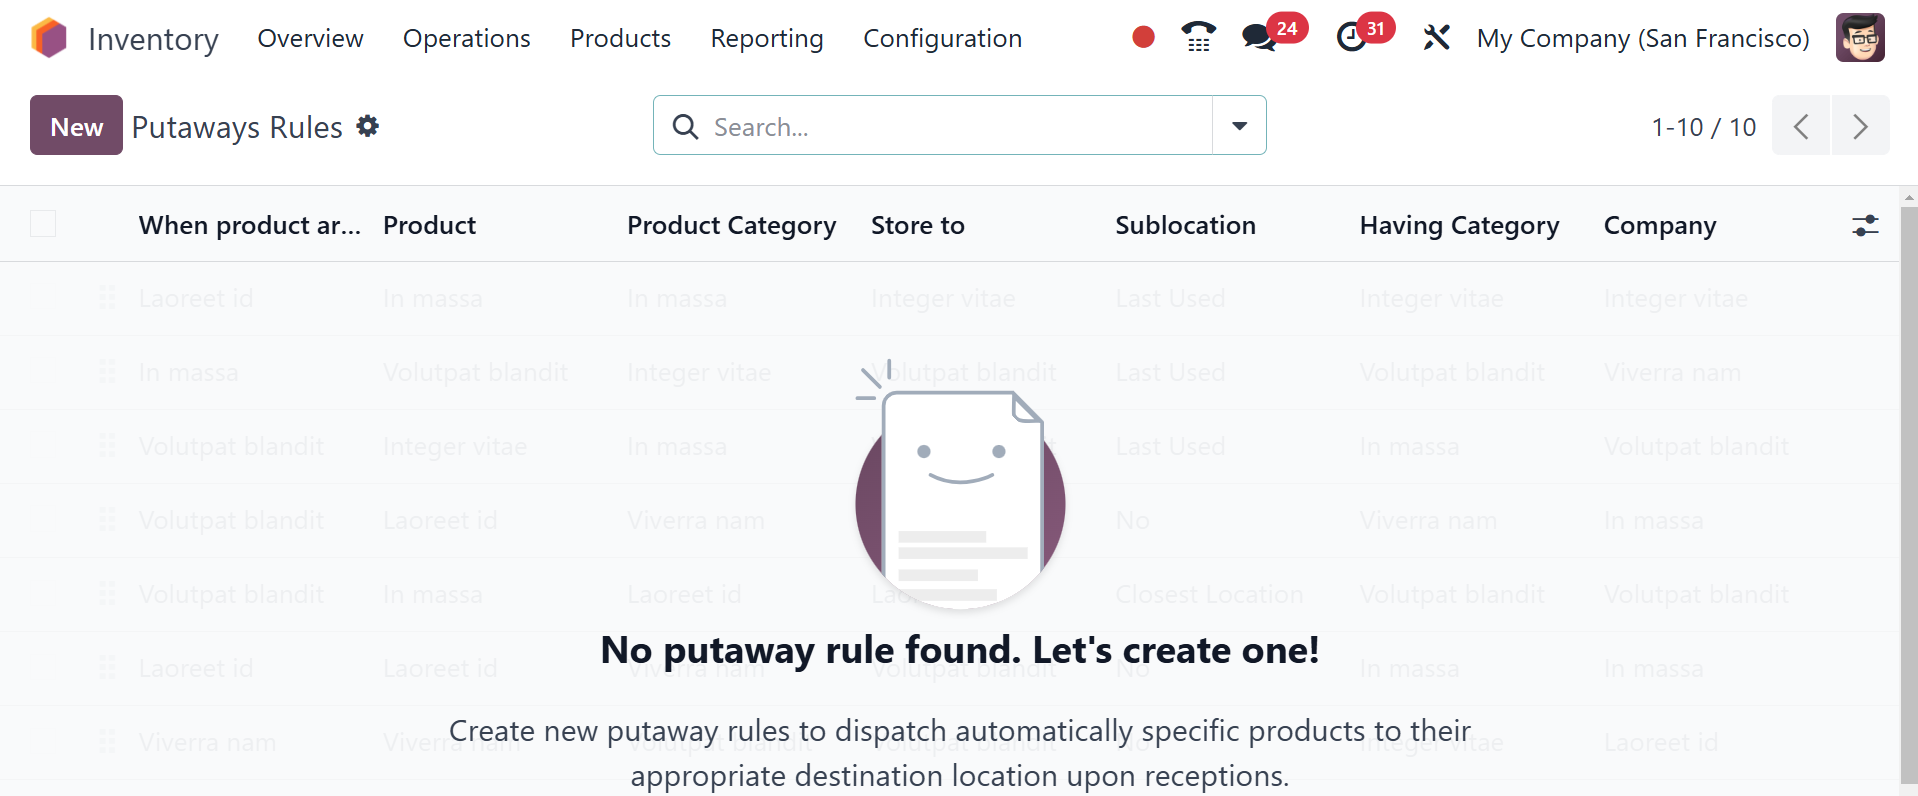
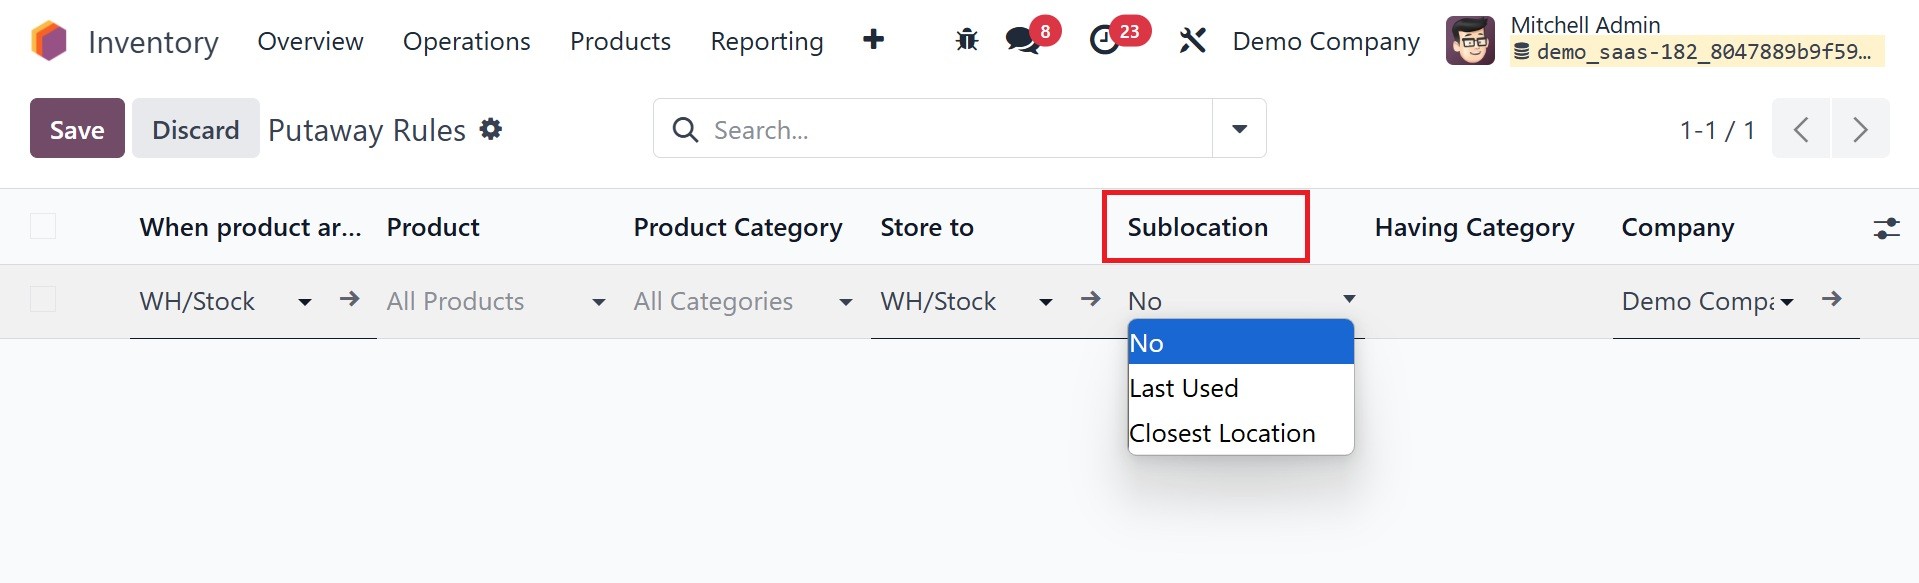
The Putaway Rules window can be
opened through the
Configuration menu of the
module. The following
screenshot presents the list
of previously set putaway
rules. In this, you will be
provided with the information
of When the product arrives
in, Product, Product
Category, Package Type, Store
to sublocation, Having
Category, and Company.
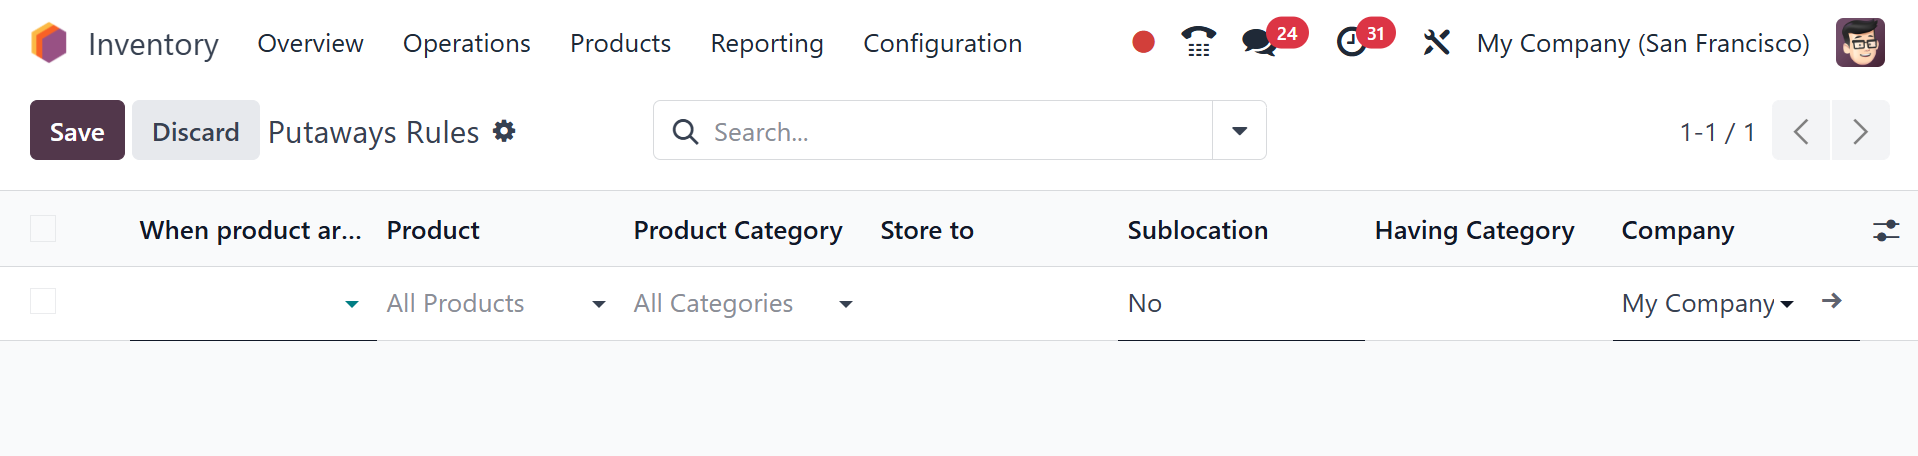
It is simple to create new
putaway rules in Odoo. Click
on the New button and a new
line will be created below
the available list. In this,
you can enter the product
name, product category, and
package type in the
respective fields.
The receiving location of the
product can be defined in the
When product arrives in the
field. In the Store to
Sublocation field, you may
include the location where
you want the product that
comes to the receiving
location moved. The
Sub-location Option in Odoo
Inventory aids in deciding
how products are allocated to
various storage areas inside
a warehouse when setting up
Putaway Rules. Under
Sub-location, the three
primary choices are:
No (Stamped Out Location): The
merchandise is always shipped
to a certain, predetermined
address. It is helpful in
cases where products have
fixed storage locations.
Last Used Location: Incoming
stock is routed by the system
to the product's most recent
usage location. Perfect for
goods that constantly switch
storage locations according
to the availability.
Closest Location: When a product
arrives, Odoo automatically
chooses the closest
sublocation to store it. It
is beneficial for maximizing
warehouse space and cutting
down on employees' commuting
time.
You can specify the category of
the sublocation in the Having
Category field. You may
follow by noting the Company
and then click the Save
button. When a product
belonging to a specific
product category in a
specific package type reaches
the destination location
described here will be
shifted to the said
sublocation of the company by
default. Finally go to the
Save icon.
4.8 Product Categories
It is crucial to put in place a
well-thought-out inventory
management system that
facilitates classification.
Make use of Odoo ERP
software, which makes it
simple to create and modify
product categories and
enables flexibility in
response to shifting business
requirements. Review and
update your categories
frequently to account for new
items or shifts in consumer
preferences. Your inventory
system will stay current and
adapt to changing consumer
demands thanks to this
flexibility. For even more
granularity, think about
using subcategories. Dividing
more general categories into
more focused subcategories
makes it easier to organize
information precisely and
makes searching easier for
both customers and staff.
Start by opening Odoo 18's
Inventory module and going to
the "Configuration" section.
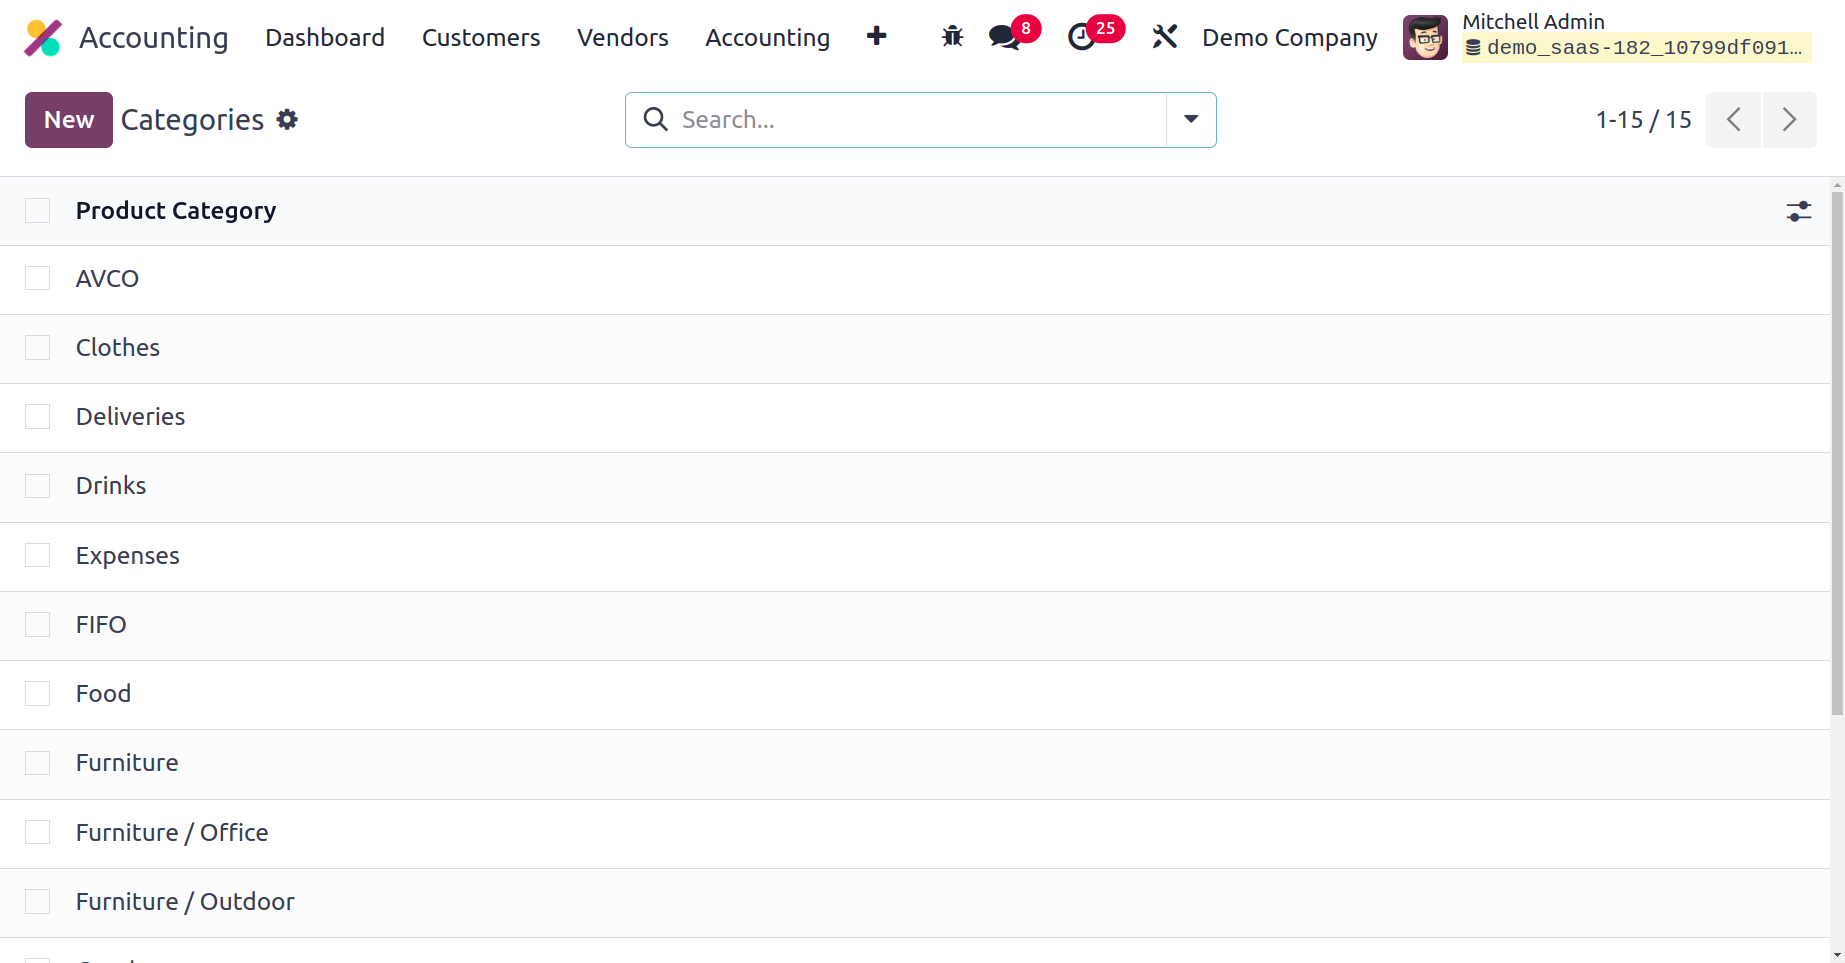
A thorough list of pre-configured
product categories will be
available once you arrive.
These categories give you a
starting point for inventory
organization, making it
simple to classify things
like office supplies,
apparel, and gadgets. Click
the "New" button to create a
new product category and
start customizing your
inventory structure. This
stage is essential for
customizing how your products
are arranged to meet your
unique business requirements.
Use the chance to methodically
supply particular details as
you explore the new product
category's settings window.
This entails entering details
like the category name,
description, and any
pertinent characteristics
that set the category apart.
This methodical technique
guarantees that your product
categories are exactly in
line with your company's
needs, which helps to create
an orderly and effective
inventory management system.
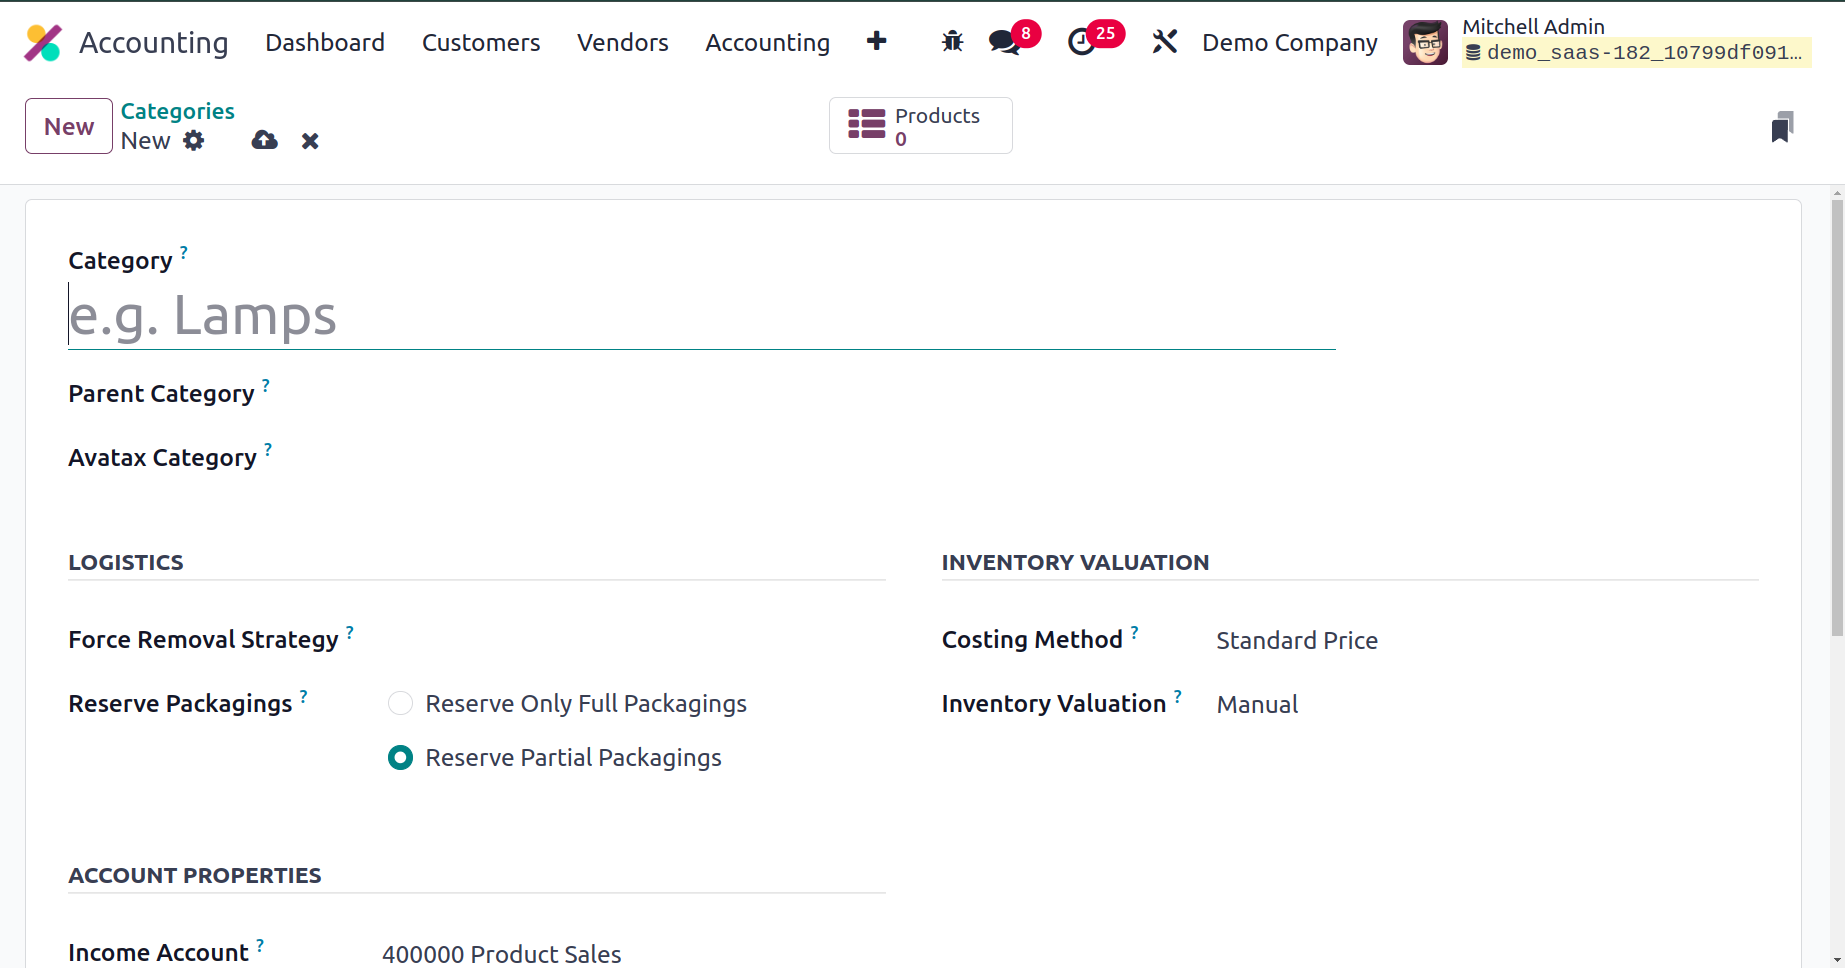
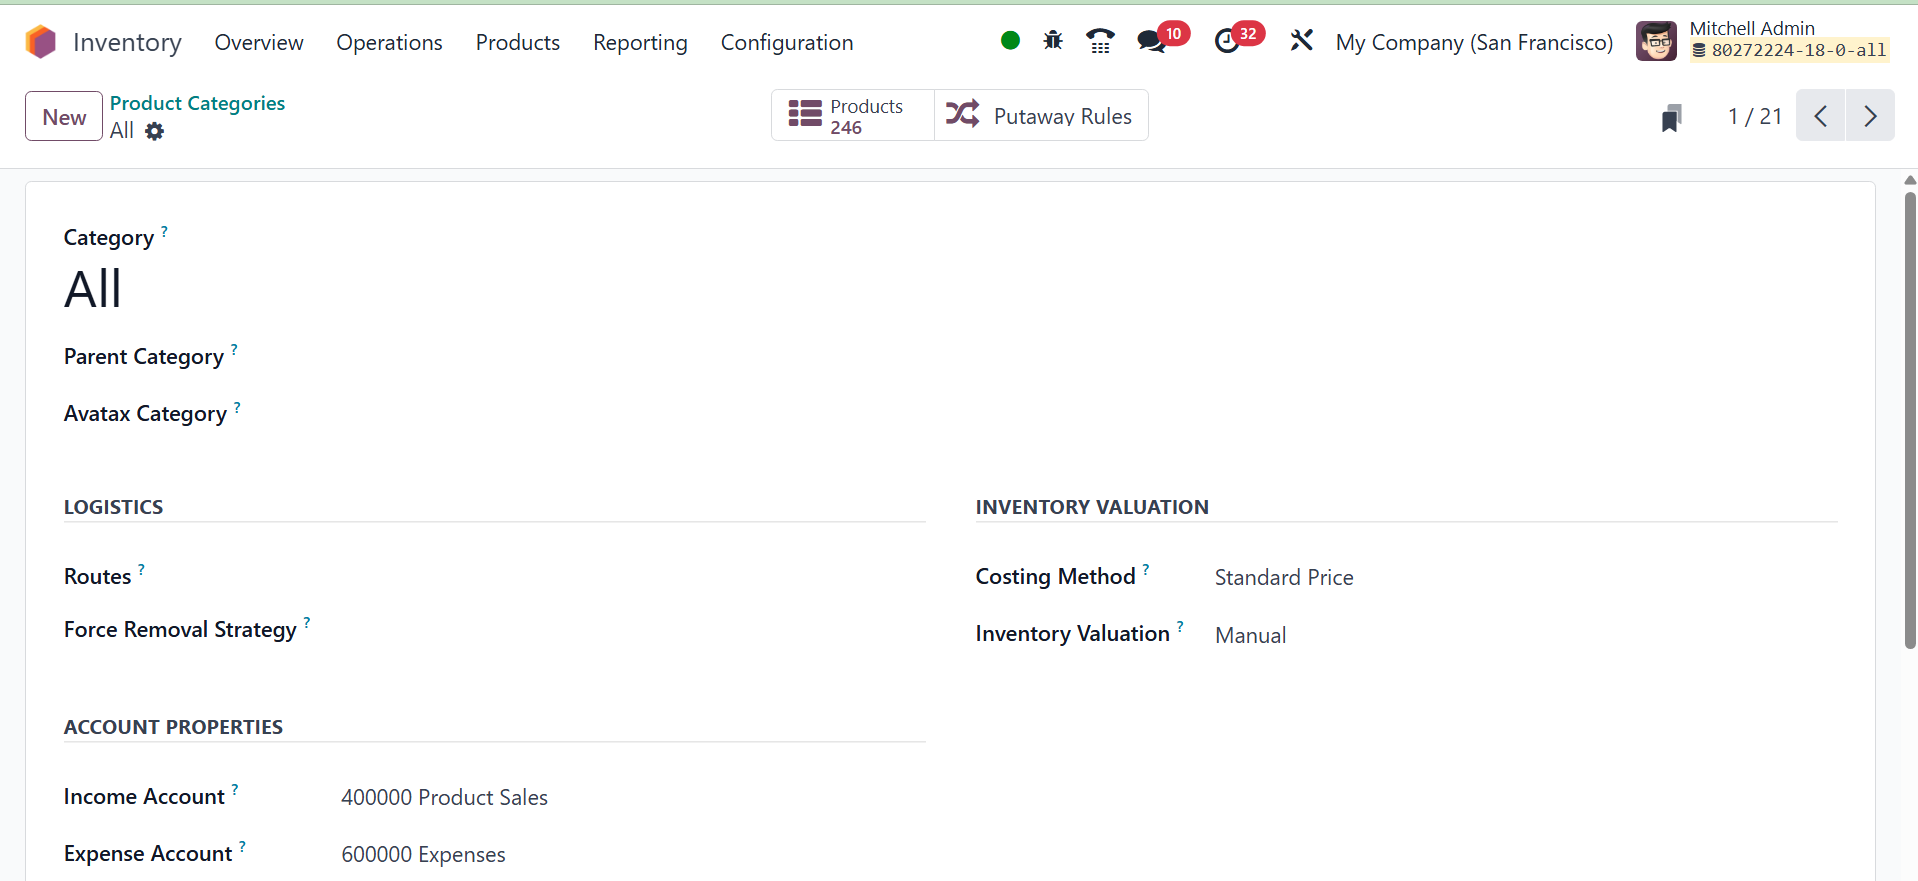
You can give the newly formed
category a relevant name in
the "Category" column, which
will make management and
recognition easier. The
"Parent Category" field
indicates a higher category
that might have lower
subcategories, often known as
kid categories. A systematic
method for classifying and
arranging products is
introduced by this
hierarchical arrangement.
Consider the parent category
"Electronics," for example,
which acts as a large
umbrella beneath which
subcategories such as
"Laptops," "Smartphones," and
"Accessories" are nested. In
addition to improving the
items' organized layout, this
hierarchical structure makes
navigating easier and makes
the system more effective and
user-friendly.
Odoo and AvaTax work together
smoothly to provide precise
sales tax calculations for
all US states and territories
as well as all Canadian
provinces and other
territories. Beyond the
fundamentals, it manages
several Canadian tax
components such as GST, PST,
and HST, giving it a flexible
option for companies doing
business in both Canada and
the US.
With its flexible removal methods
that may be used at different
source sites, the Force
Removal Strategy stands out
in the Logistics tab of the
product category setup
window. These methods are
essential for picking
operations optimization
because they reduce worker
distance, guarantee quality
control, and manage products
according to expiration
dates.
First In First Out (FIFO), Last
In First Out (LIFO), First
Expiry First Out (FEFO),
Least Packages, and Closest
Location are the five main
removal methods that cover a
range of options, as shown in
the accompanying figure.
Every technique has a
specific function in
warehouse management.
FIFO (First In, First
Out):
This method prioritizes picking
products that entered the
warehouse first. It's
suitable for perishable goods
or items with short shelf
lives.
LIFO (Last In, First Out):
This method picks products that
entered the warehouse most
recently. It's commonly used
for products without a shelf
life or where the order of
use doesn't matter.
FEFO (First Expiry, First
Out):
This strategy prioritizes picking
products with the nearest
expiration date. It's crucial
for items with limited shelf
lives, ensuring products are
used before they expire.
Least Packages:
This strategy prioritizes picking
products with the fewest
remaining packages. It can
help optimize inventory and
reduce handling time by
minimizing the number of
packages picked.
Closest Location:
This strategy prioritizes picking
products based on their
physical location within the
warehouse. It minimizes
travel distances for
warehouse staff, especially
when multiple locations hold
the same product.
By concentrating on the actual
locations of things within
the warehouse, the "Closest
Location" approach departs
from chronological order.
This strategy offers a
different approach to
strategic inventory
management and is frequently
used for products that retain
a constant level of quality
throughout time.
Both the Income Account and the
Expense Account for the
product category must be
specified under the Account
Properties tab.

The "Income Account" in Odoo's
product category settings is
usually linked to the money
received from a product's
sale. The goal of this
account is to carefully
monitor the money coming in
from product sales. On the
other hand, the "Expense
Account" is closely related
to the charges or expenses
related to the product. It is
essential for keeping track
of the costs associated with
the product's purchase or
manufacture. You may
effectively manage and
classify your financial
activities by configuring
these accounts inside the
product category settings,
which guarantees a thorough
picture of both sales income
and cost of goods. The
downpayment accounts option A
down payment account is a
particular type of accounting
account that is used to track
payments made in advance to a
vendor or client. These
payments are paid prior to
the completion of the invoice
or the actual delivery.
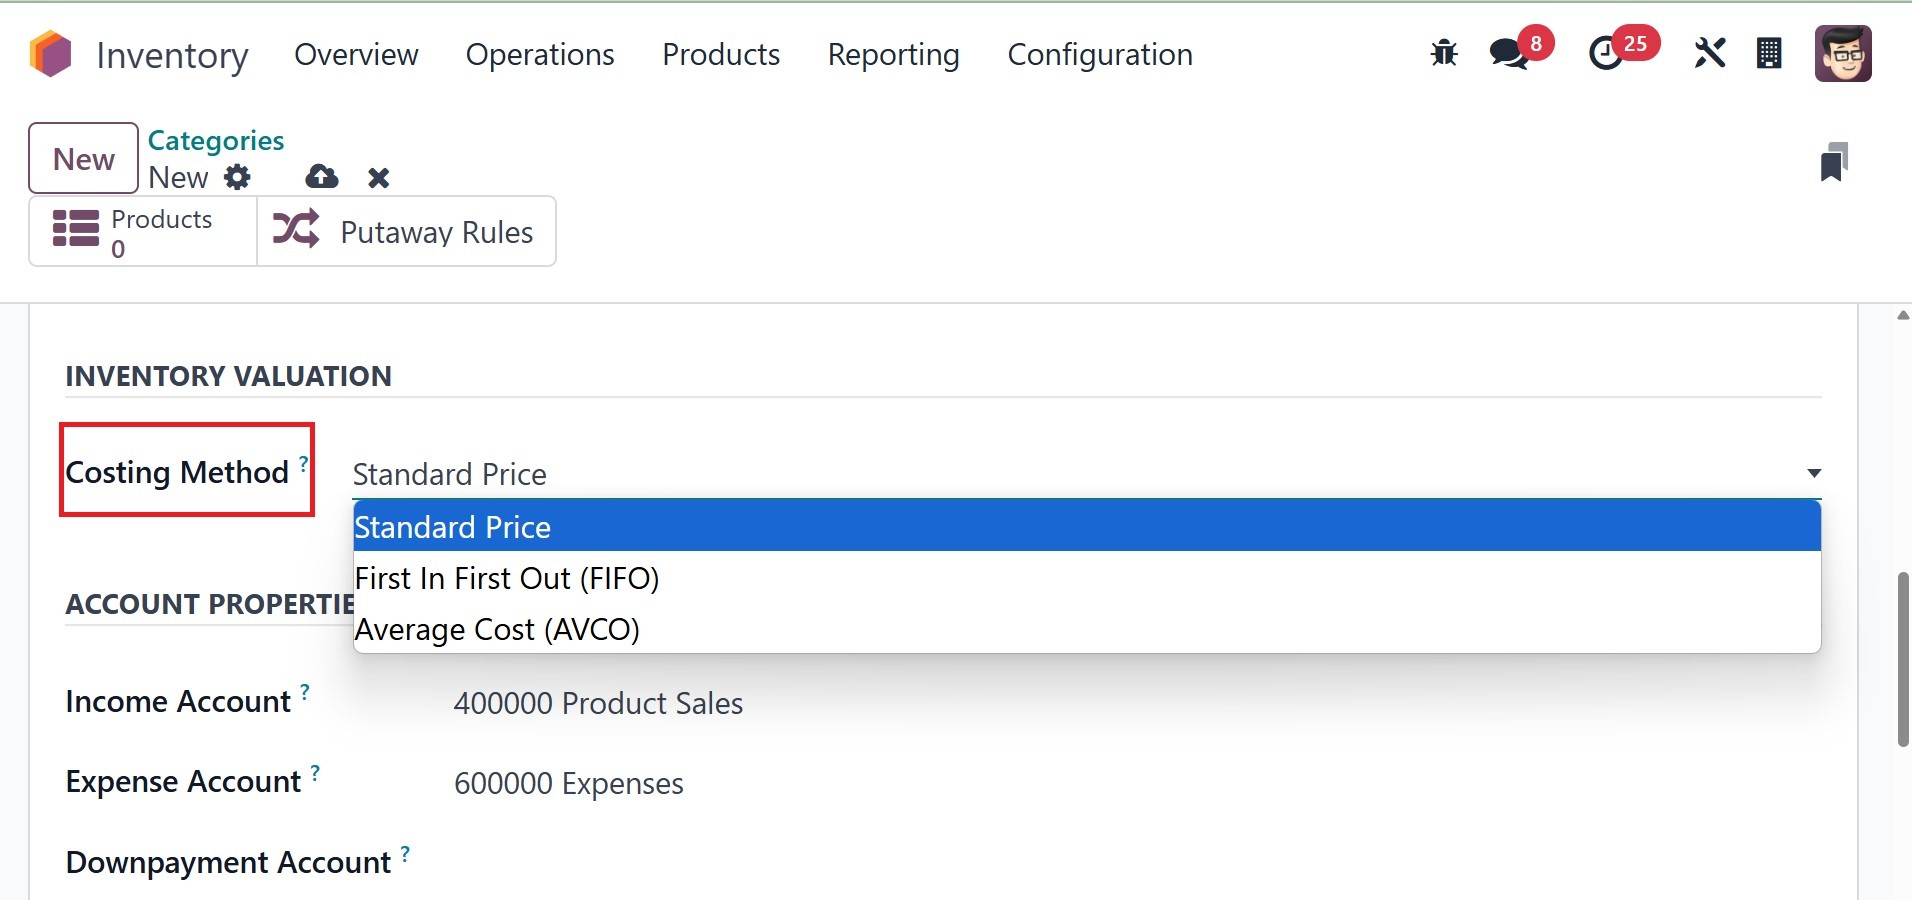
Costing techniques are essential
to Odoo inventory valuation
since they give companies a
variety of choices to suit
their particular
requirements. One such
strategy is the "Standard
Price," which keeps the cost
per unit constant despite
price swings in the market.
Despite the fact that actual
cost changes are dynamic,
this constant number never
wavers.
A more flexible approach to
valuation that takes into
account the continuous
fluctuations in costs is
provided by the "Average
Cost" method, in which the
system dynamically determines
the mean cost of every unit
in stock.
The "First In First Out (FIFO)"
approach ensures a systematic
flow that reflects the
chronological order of
acquisitions for those who
value chronological accuracy
by assuming that the first
products entered to the
inventory are the first to be
sold.
Under the inventory valuation,
you have the costing method
and inventory valuation
options.
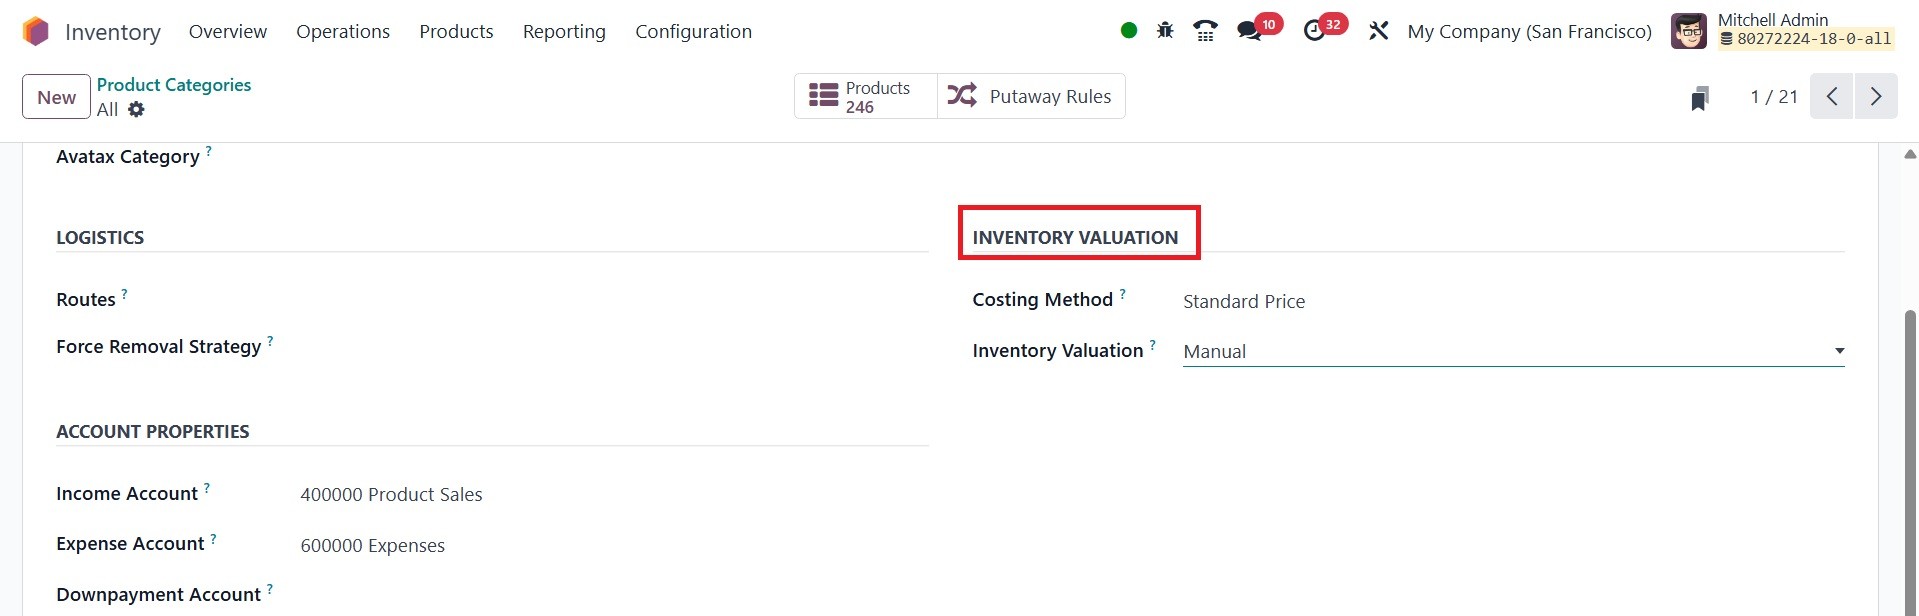
Inventory Valuation Method
defines whether the stock
journal entires need to be
record during a delivery or
receipt.
Manual: Requires you to manually
update inventory values based
on physical stock counts.
Automatic: Automatically updates
inventory values based on
purchase prices and other
relevant data.
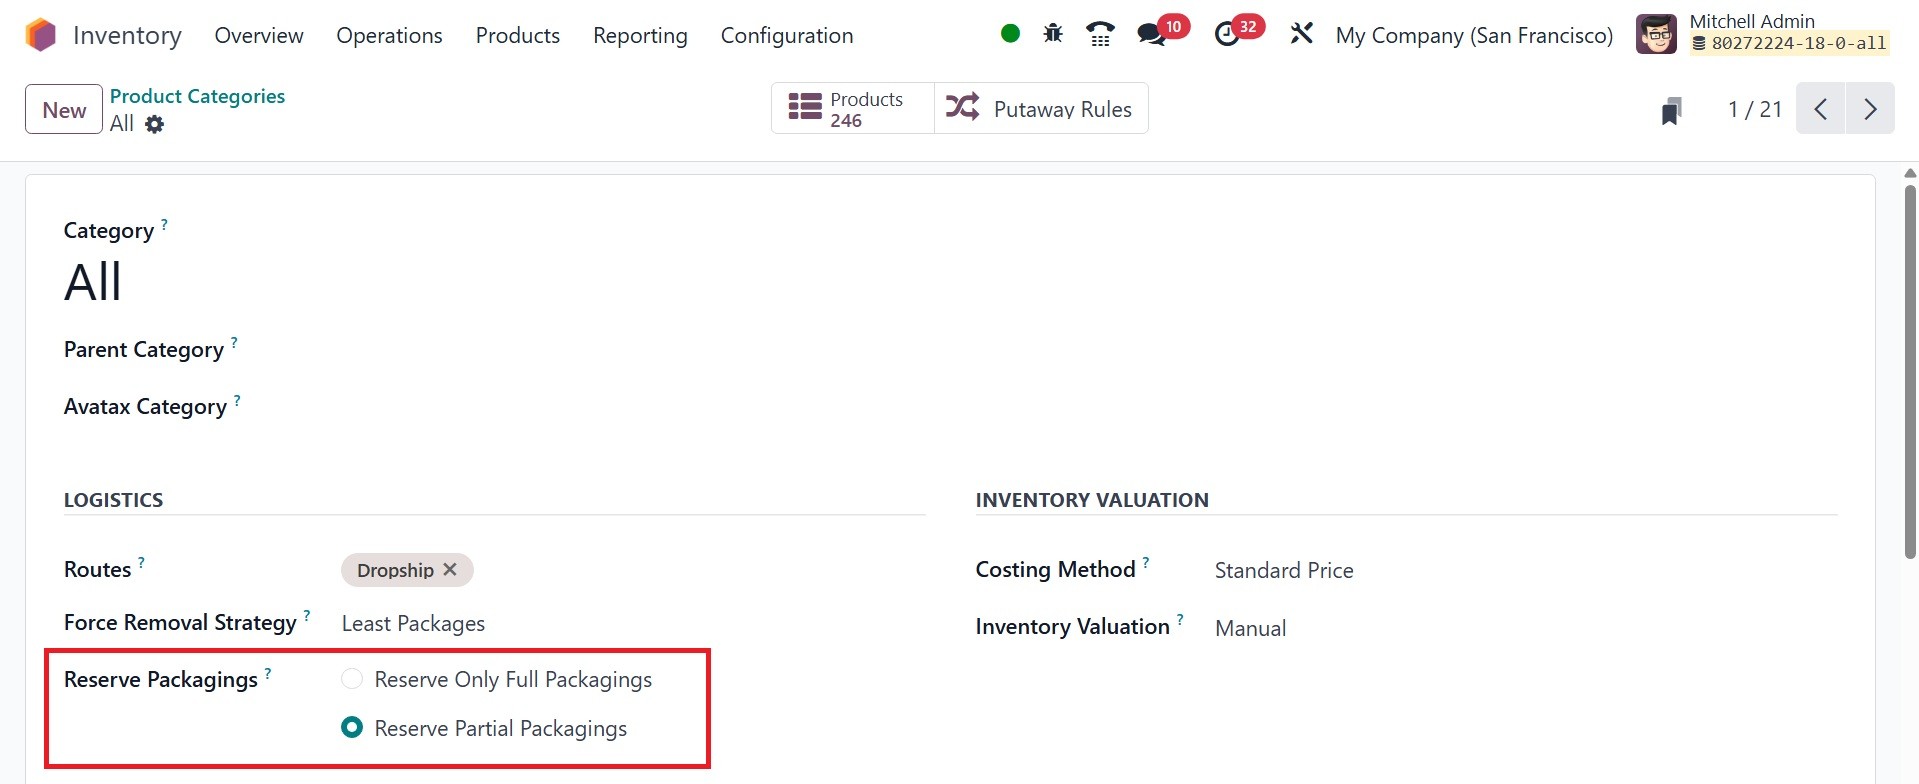
Another section Reserve
Packagings in product
category can be reserved in
full or partial quantities
for outgoing shipments.
Partial packaging flexibility
expedites order fulfillment
by allowing the immediate
shipment of available items,
while awaiting the rest.
To configure packaging
reservation methods, go to
Inventory app ‣ Configuration
‣ Product Categories. Then,
click New, or select the
desired product category.
On the product category’s form,
in the Logistics section,
Reserve Packagings can be set
to Reserve Only Full
Packagings or Reserve Partial
Packagings. To see the
Reserve Packaging field, the
Product Packaging feature
must be enabled. To enable
this feature, go to Inventory
app ‣ Configuration ‣
Settings, scroll to the
Products section, tick the
Product Packagings checkbox,
and click Save.
Take a look at the following
example to better assess the
possibilities according to
business needs:
Each package contains twelve
units of a product. The order
requires two packages. Only
twenty-two units are
available. Only twelve pieces
are set aside for the order
when Reserve Only Full
Packagings is chosen.
In contrast, 22 units are set
aside for the order when
Reserve Partial Packagings is
chosen.
These various methods give
companies the freedom to
modify their inventory value
plans in accordance with
particular requirements and
current market conditions.
Whether choosing the
consistency of Standard
Price, the flexibility of
Average Cost, or the
timeliness of FIFO, Odoo's
strong platform forms the
basis for thorough inventory
control.
4.9 Package Types
In the Odoo Inventory module, you
can define and manage various
package types to better
organize and handle different
product packaging needs,
including delivery
operations. These package
types are configured through
the Configuration menu,
allowing you to define
specifics like size, weight,
and carrier details.
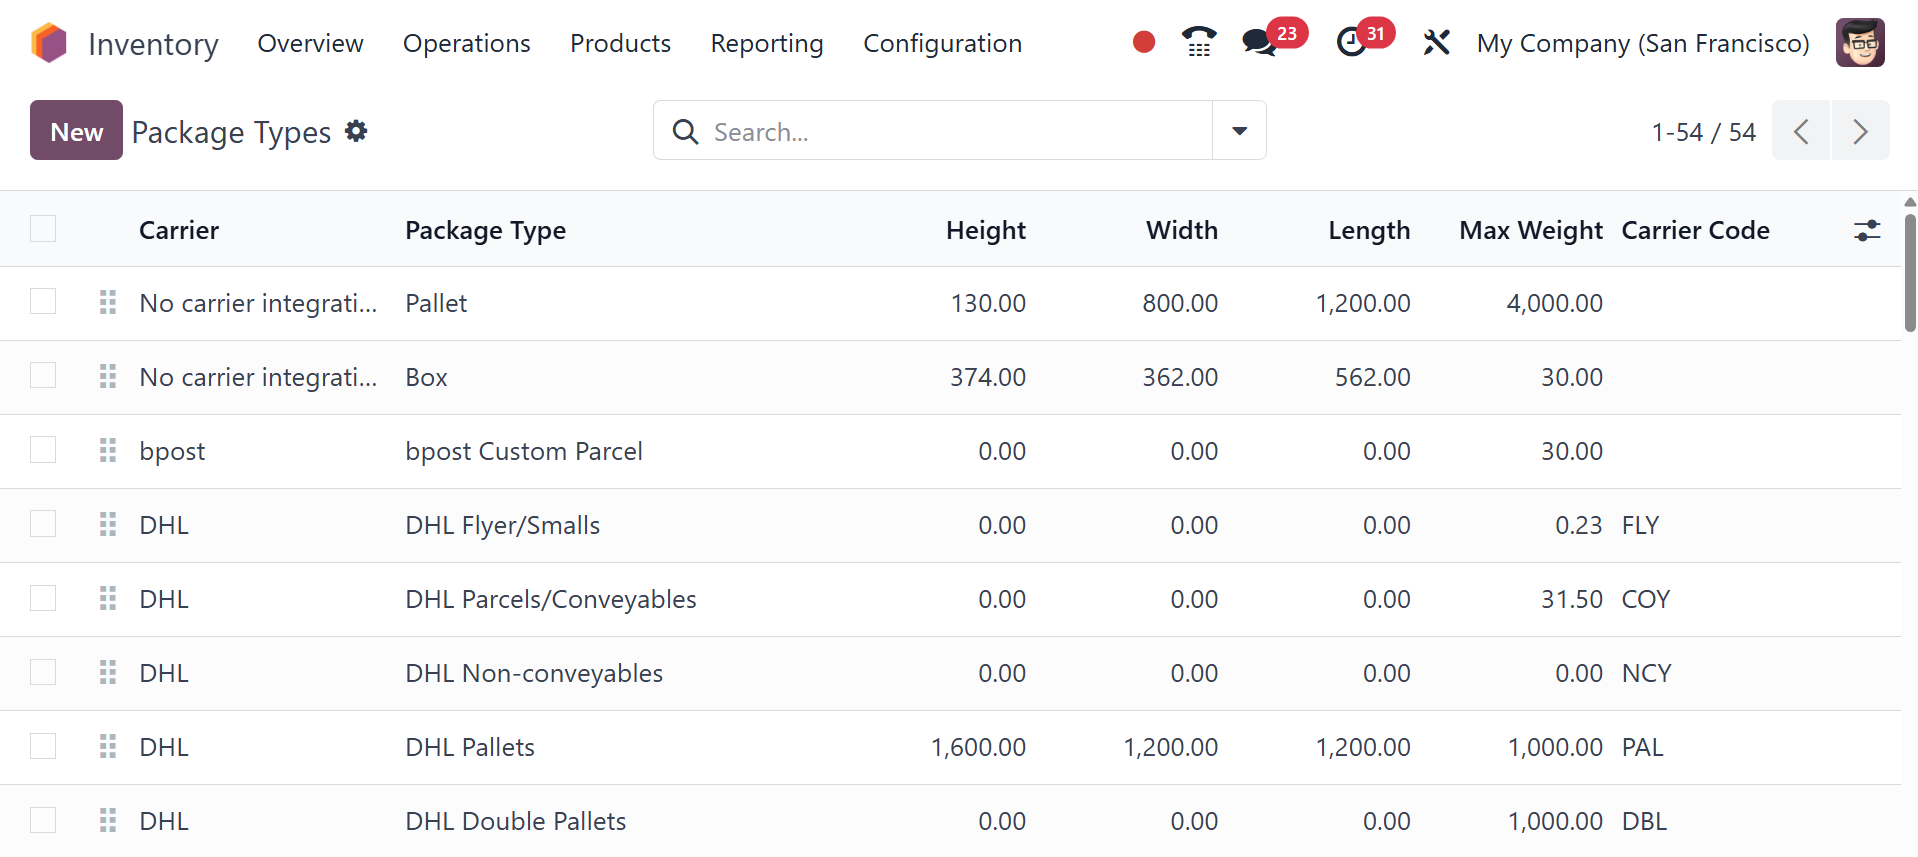
Here, you can see the options
like carrier, package type,
height, width, length, max
weight, and carrier code. To
create a new one, go to the
New icon.
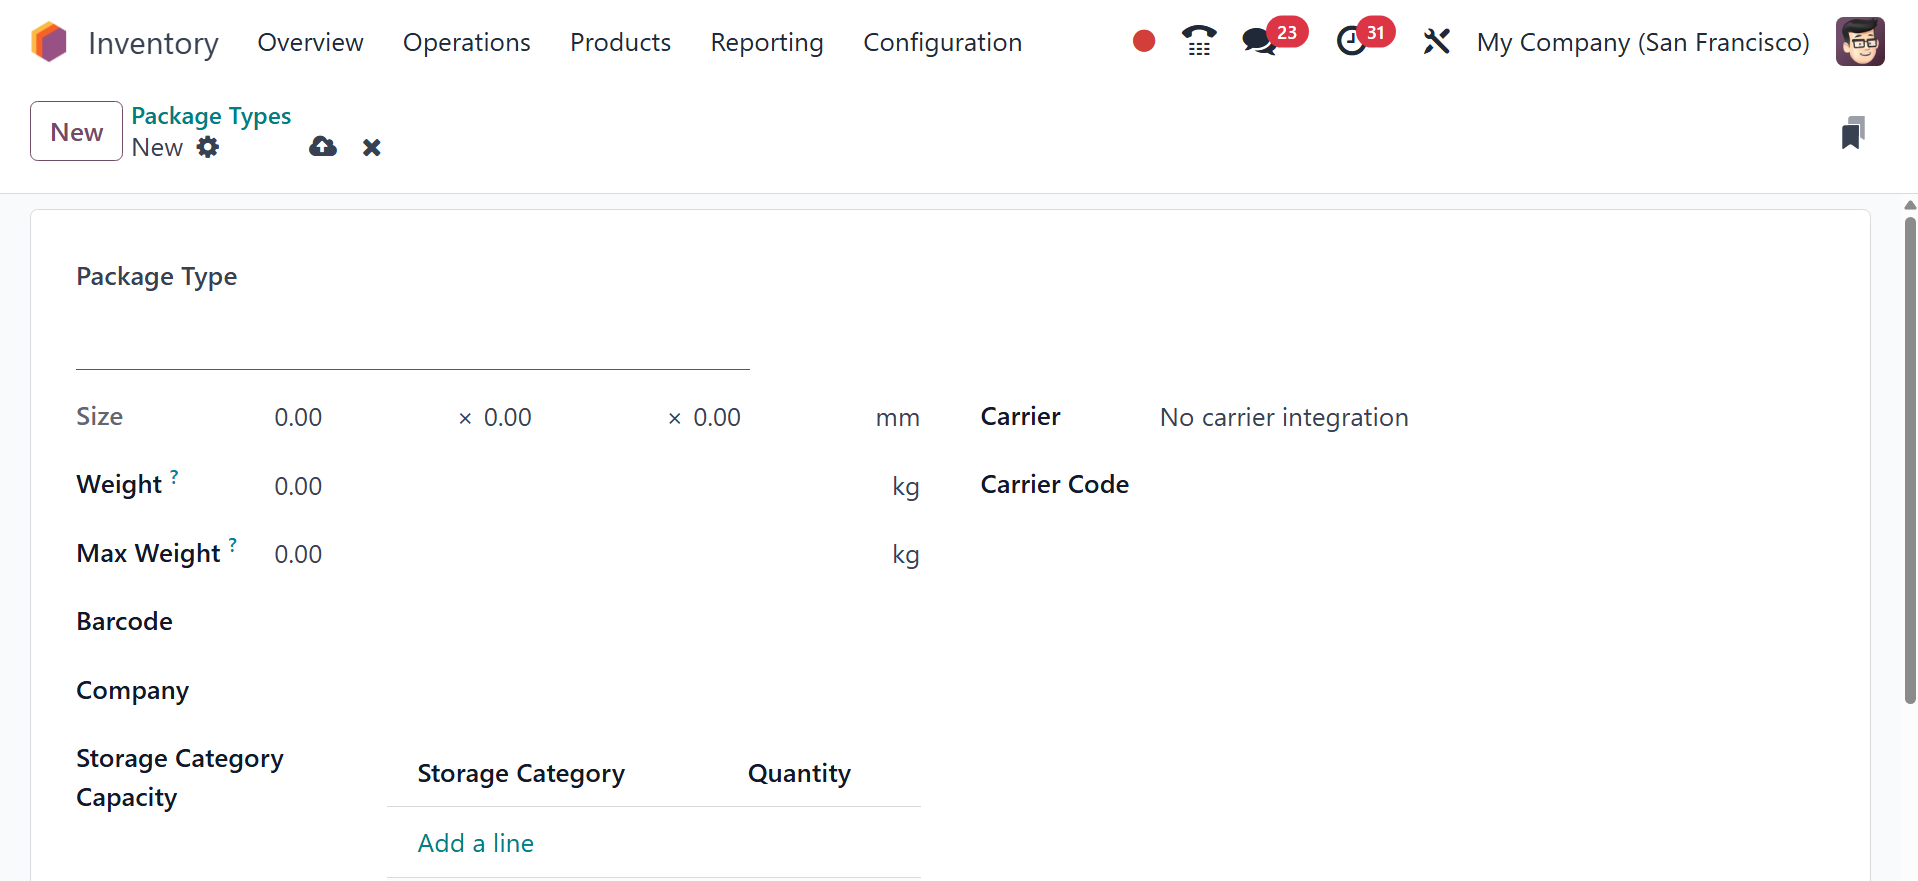
Here, you can add the above
mentioned details as well.