2. Operations
Operations menu in the Odoo
Inventory Module offers vital
utilities for managing stock
movement and warehouse
operations effectively. It
allows businesses to manage
transfers, batch operations,
inventory adjustment, picking
rules, and replenishments to
facilitate seamless logistics
and stock accuracy. This menu
helps optimize warehouse
processes, automate the
replenishment, and track
real-time inventory levels.
Through the use of these
features, businesses can
enhance the efficiency of
their operations and minimize
errors in managing stock.
3.1 Transfers
Companies with multiple
warehouses need to manage the
flow of goods from one
location to another. Under
certain situations, the
companies might possess
different branches in
different cities, and thus it
will be extremely hard to
coordinate product transfers
efficiently. Companies often
manage such situations by
assigning main warehouses and
other warehouses for product
distribution. Product
transfers from one location
to another are simplified
with Odoo18's Transfers
feature.
Inventory transfers involve the
movement of products within
and out of warehouses.
Internal transfers are also
covered for the movement of
products within the
warehouses of the company.
Warehouse management and
setup are facilitated by the
Odoo18 ERP system, which we
will discuss in the next
section. You may control the
product transfer between the
configured warehouses and
locations by using the
Transfers option found under
the Operations menu after
defining the company's
warehouses and locations in
detail.
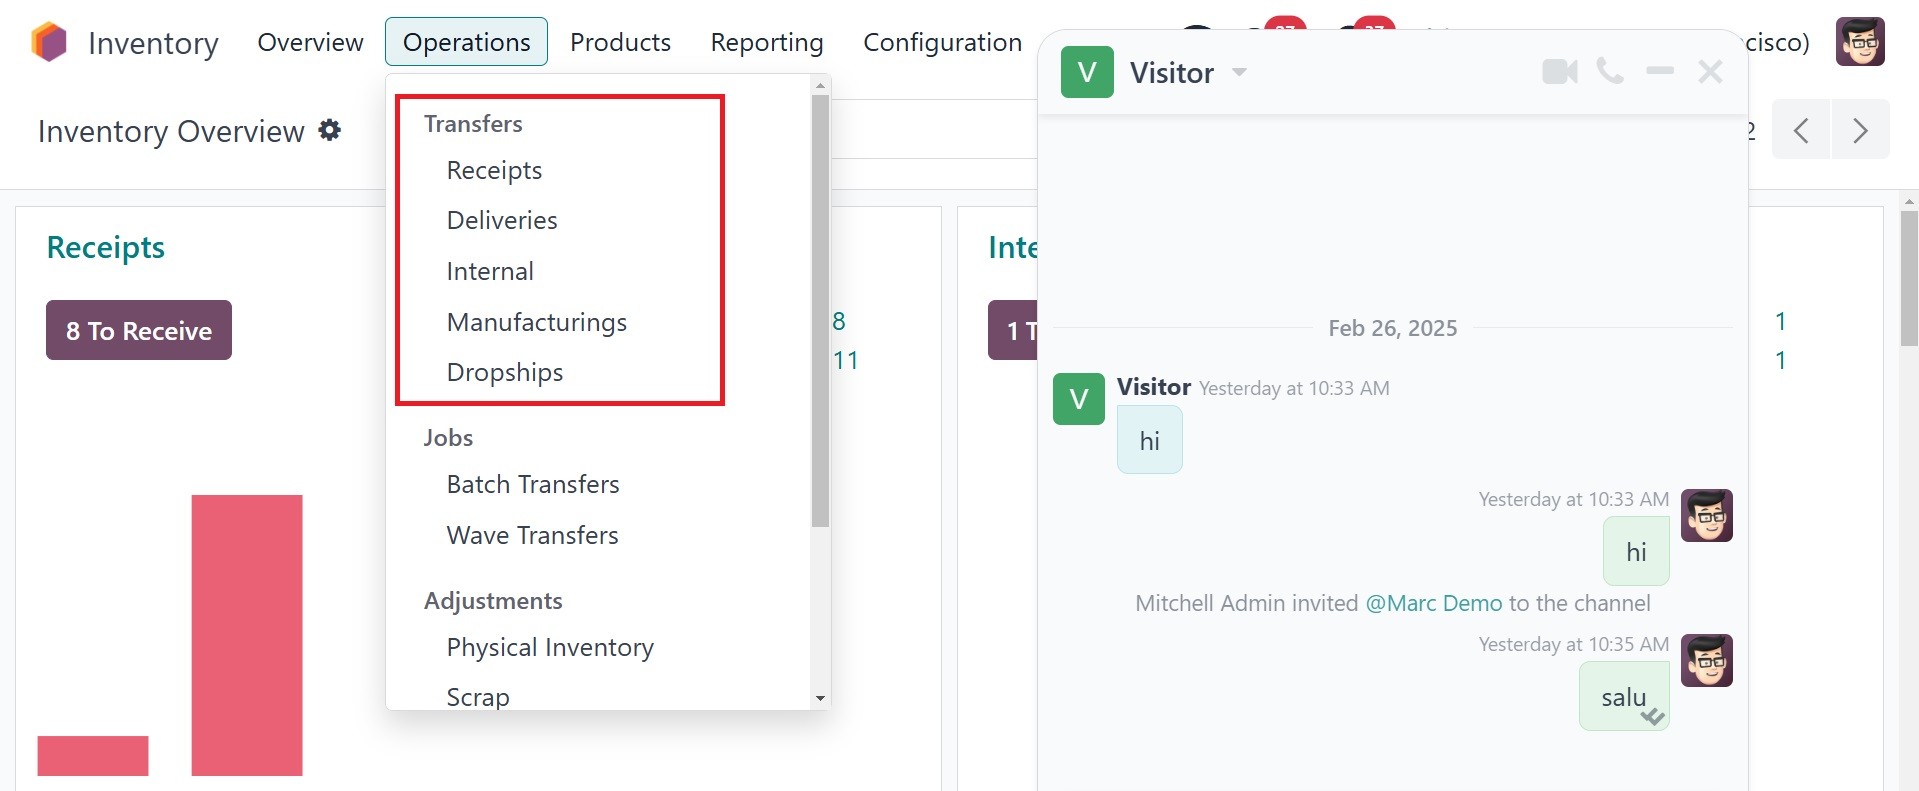
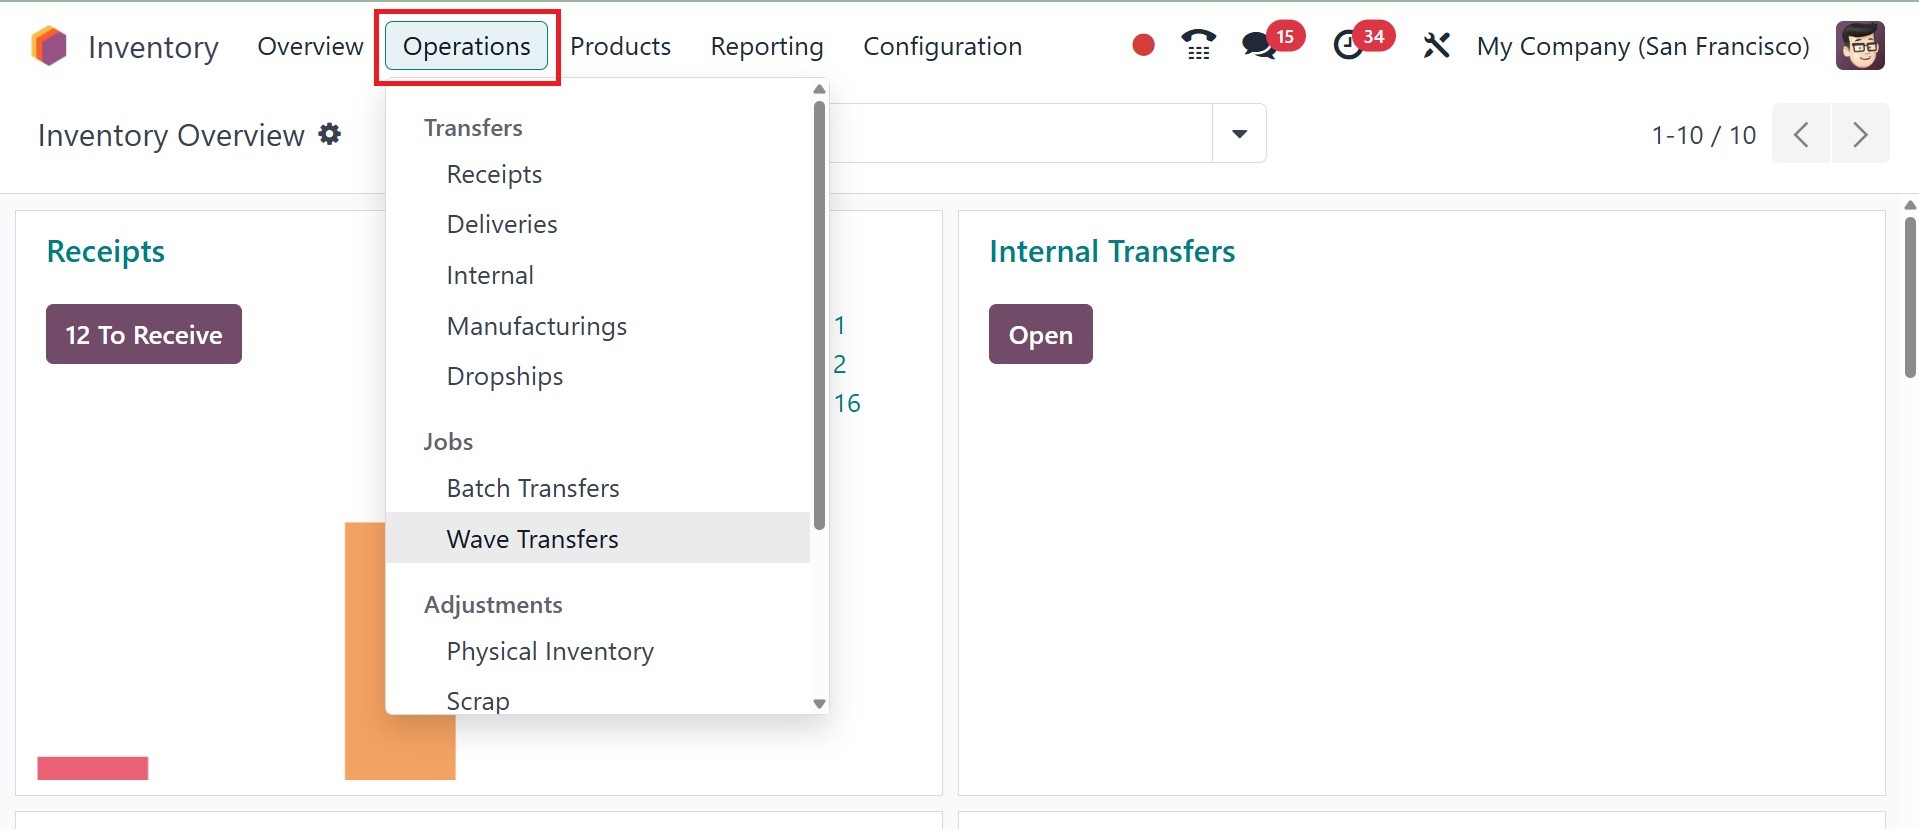
You can see transfers such as
Receipt, Deliveries,
Internal, Manufacturing,
dropship, Batch Transfer, and
Wave Transfer in the
Transfers option, as
indicated in the above image.
3.2 Receipt
You can see details of the
Reference, From, To, Contact,
Scheduled Date, Source
Document, Batch Transfer,
Company, and Status of the
preconfigured transfers here,
as indicated in the following
image.
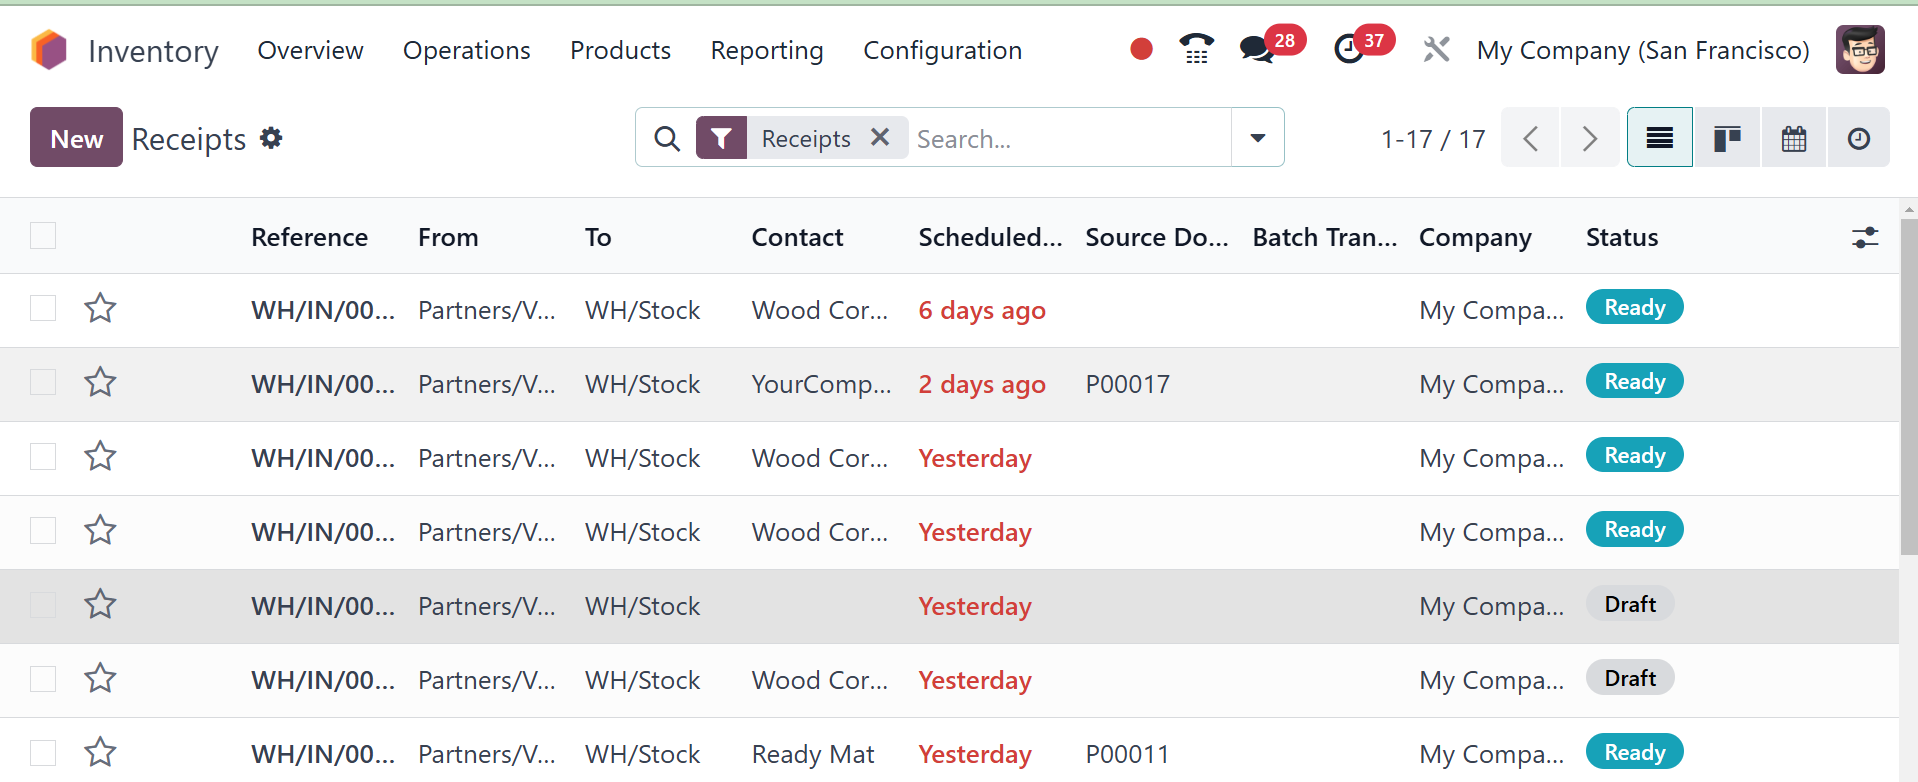
You can simply finish the sorting
activities using the Group By
and Filters features. For
this site, you will also have
Kanban, Calendar, and
Location views. Let us now
see how Odoo18 allows you to
create a new transfer for the
movement of goods between two
places. Click the New button
to accomplish this.
Partner id can be typed in the
Contact field of the new
transfer creation window.
Several transfer types can be
handled by this platform.
Receipt, Internal Transfer,
Delivery Orders, Returns,
Manufacturing, Resupply
Subcontractor, POS Orders,
Dropship, and Manufacturing
are some of them. In the
Operation Type field, you can
select the type of transfer
you desire for your product
movement. You can define the
source location of the
product and destination
location after selecting a
suitable Operation Type. The
Scheduled Date option can be
utilized to denote the
expected date of movement of
stock. You can mention the
reference to the document
related to this transfer of
the product under the Source
Document field. You can use
the Add a Line button on the
Operations tab to list every
item that is included in this
transfer separately. You can
define the names of the
products, their packaging,
demand, and UoM besides their
names. The amount of the
product that is going to be
transferred is called the
demand.
On the Additional Info tab, you
can add the Shipping
Information.
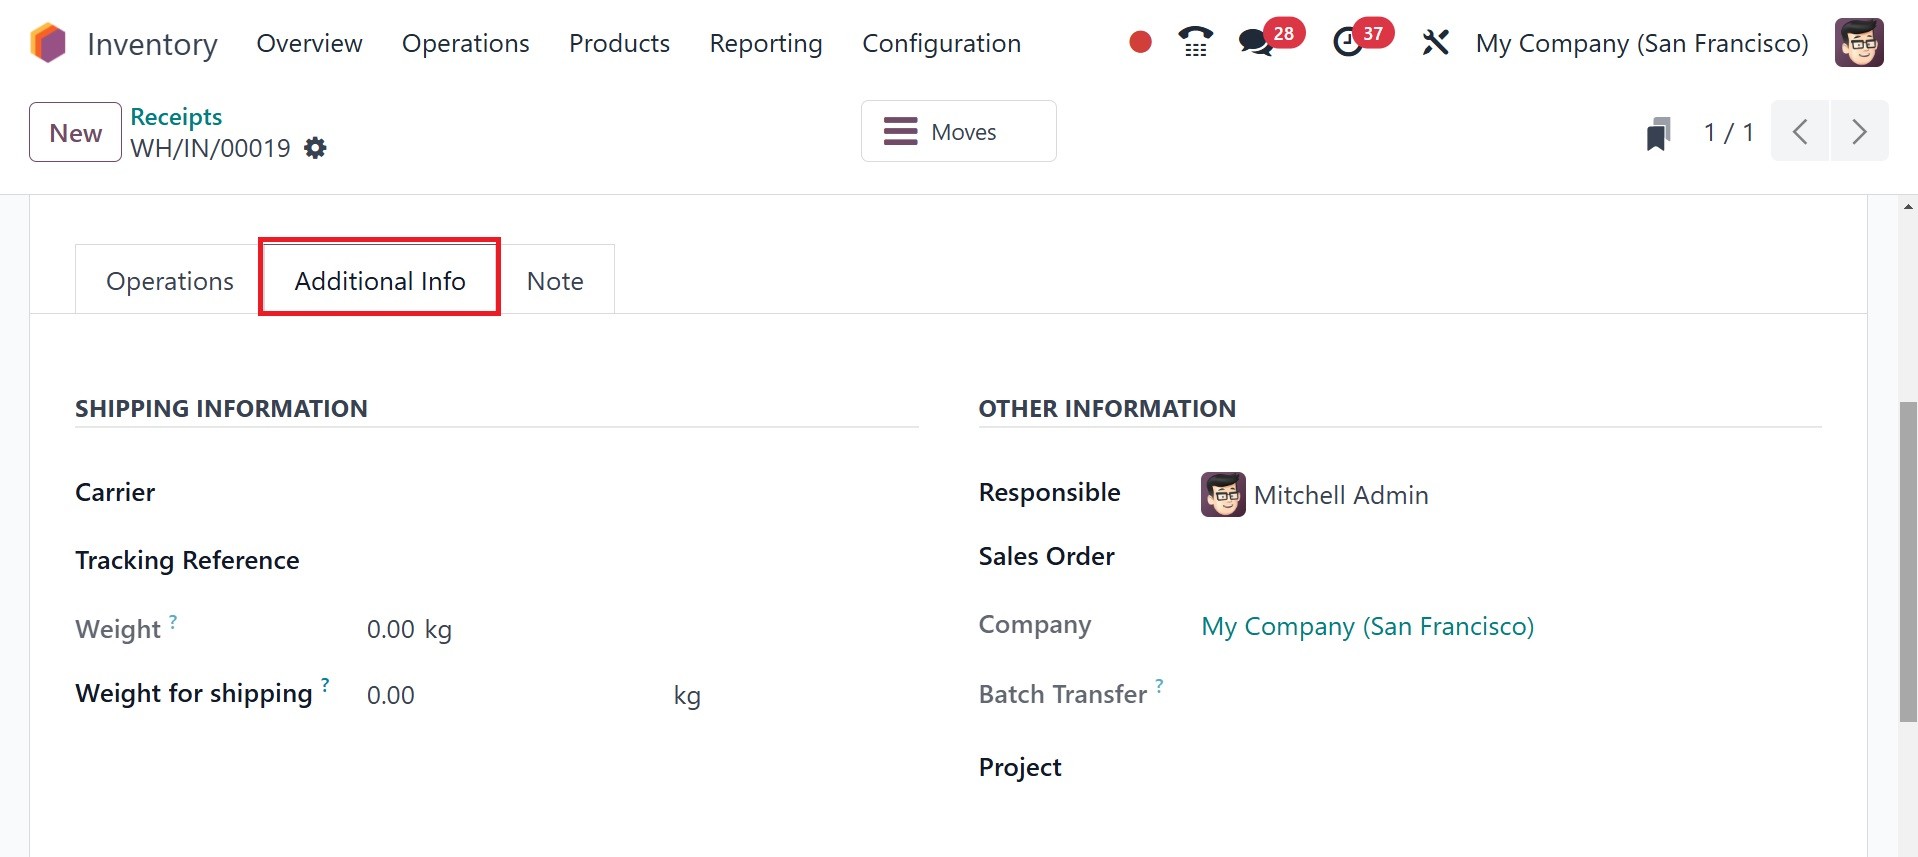
The Carrier Details, Tracking
Reference, Weight, and Weight
for shipping for the goods
under this transfer may all
be added here. The shipping
policy for the transfer may
be set up in the Other
Information section. You can
also define a Responsible
employee to be in charge of
the future activities of the
transfer. Lastly, complete
the respective fields with
the Procurement and Company
information.
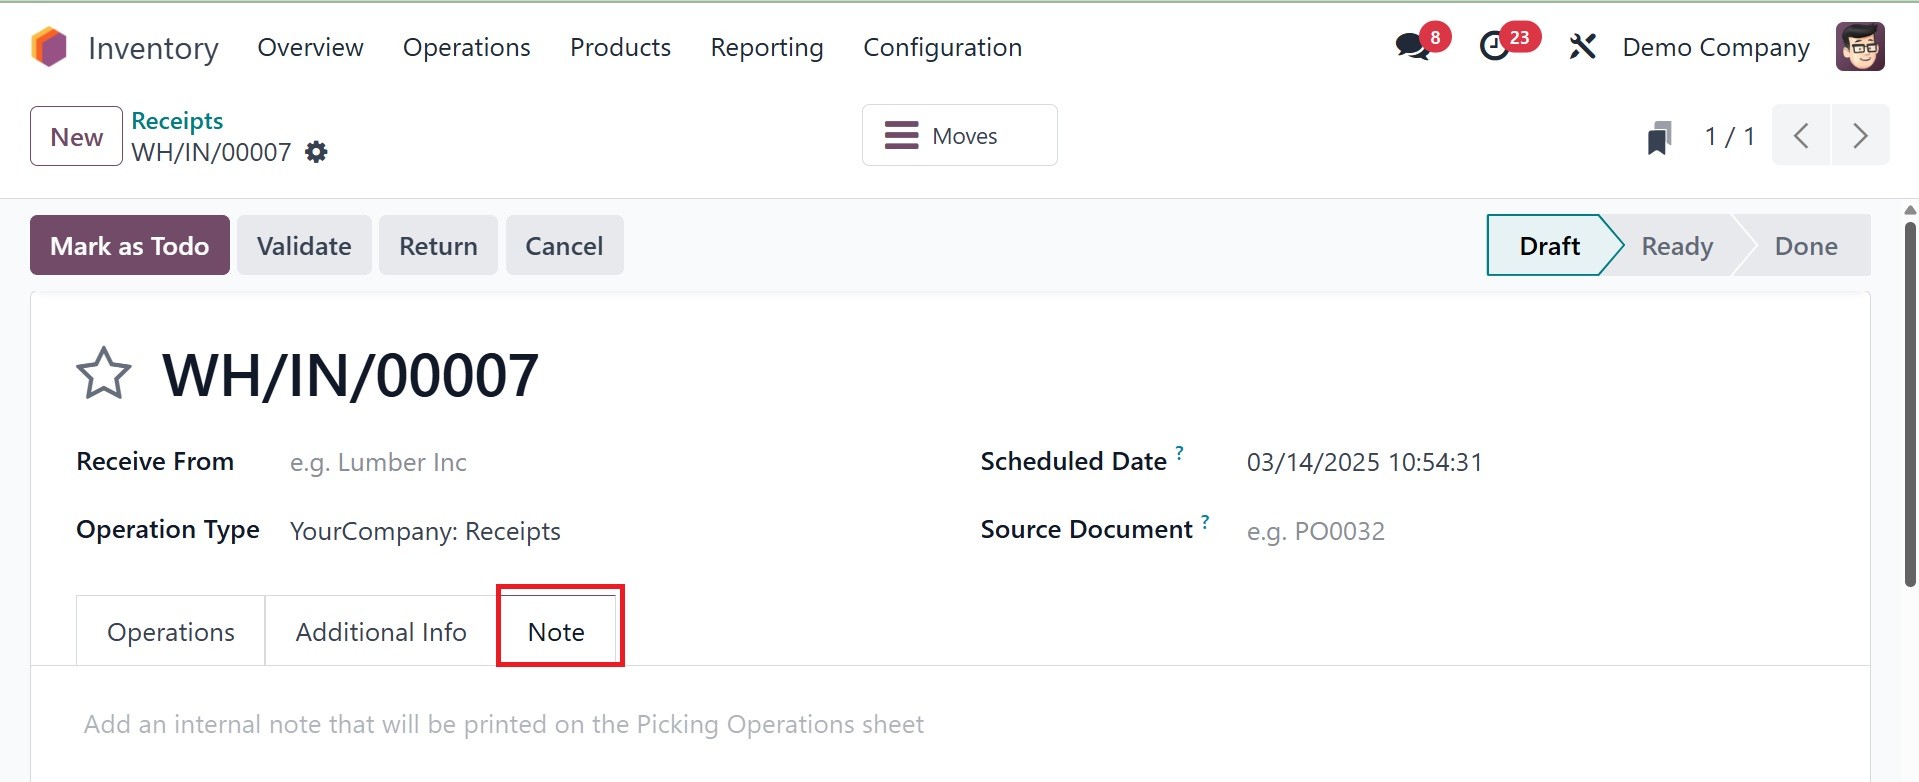
You must include internal notes
regarding this transfer on
the Notes tab. The transfer
will be stored once the Save
button has been clicked.
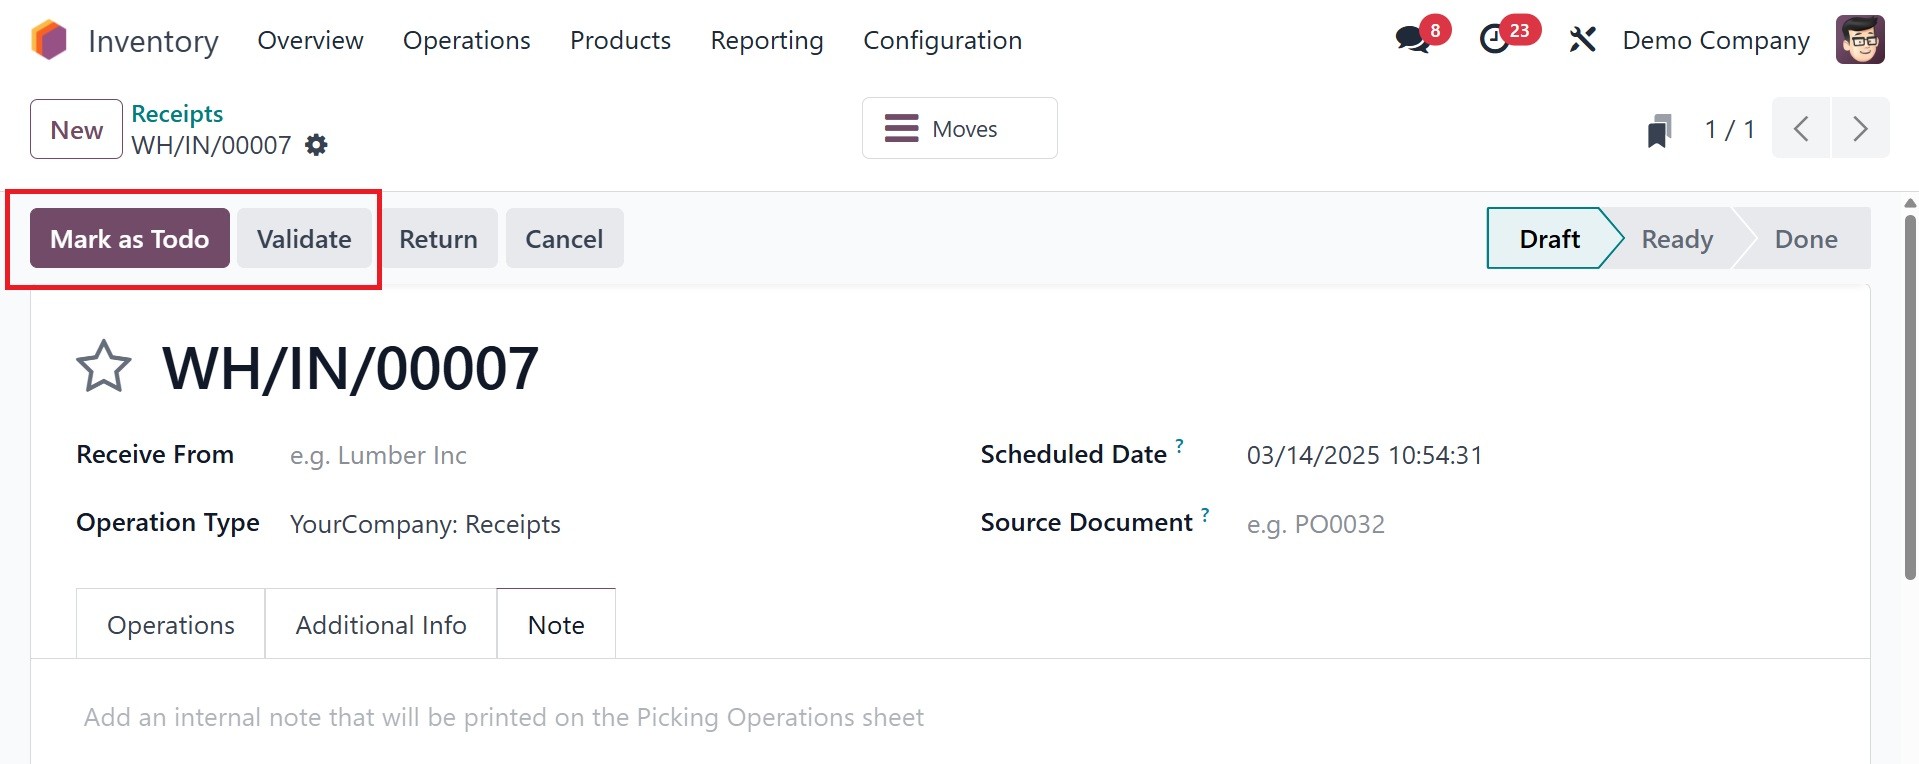
The transfer is first in the
Draft state. The transfer can
be viewed in the Ready state
if it is ready to be
processed. To move the
transfer to the Ready state,
click the ‘Mark as Todo’
button. Click the Validate
button when the transfer
process is complete, as in
the screenshot below.
The transfer process is complete.
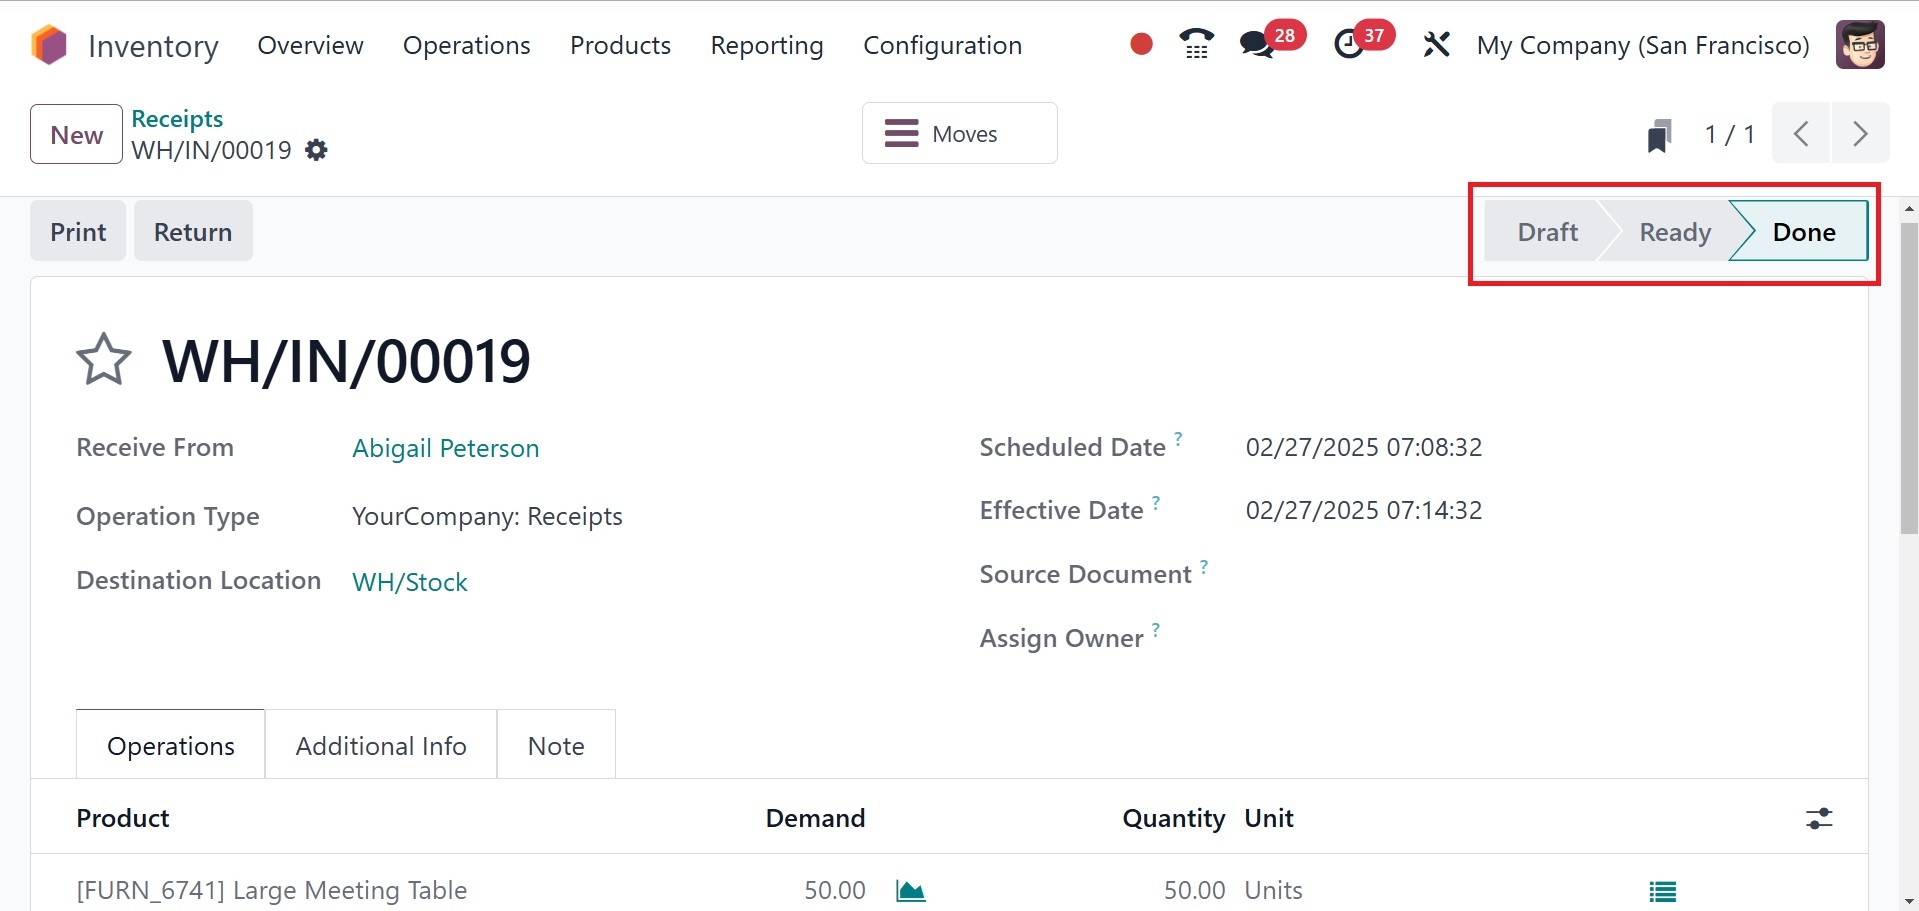
You can print off the transfer's
delivery slip using the Print
button. The Return button
allows you to send the items
back to the previous place.
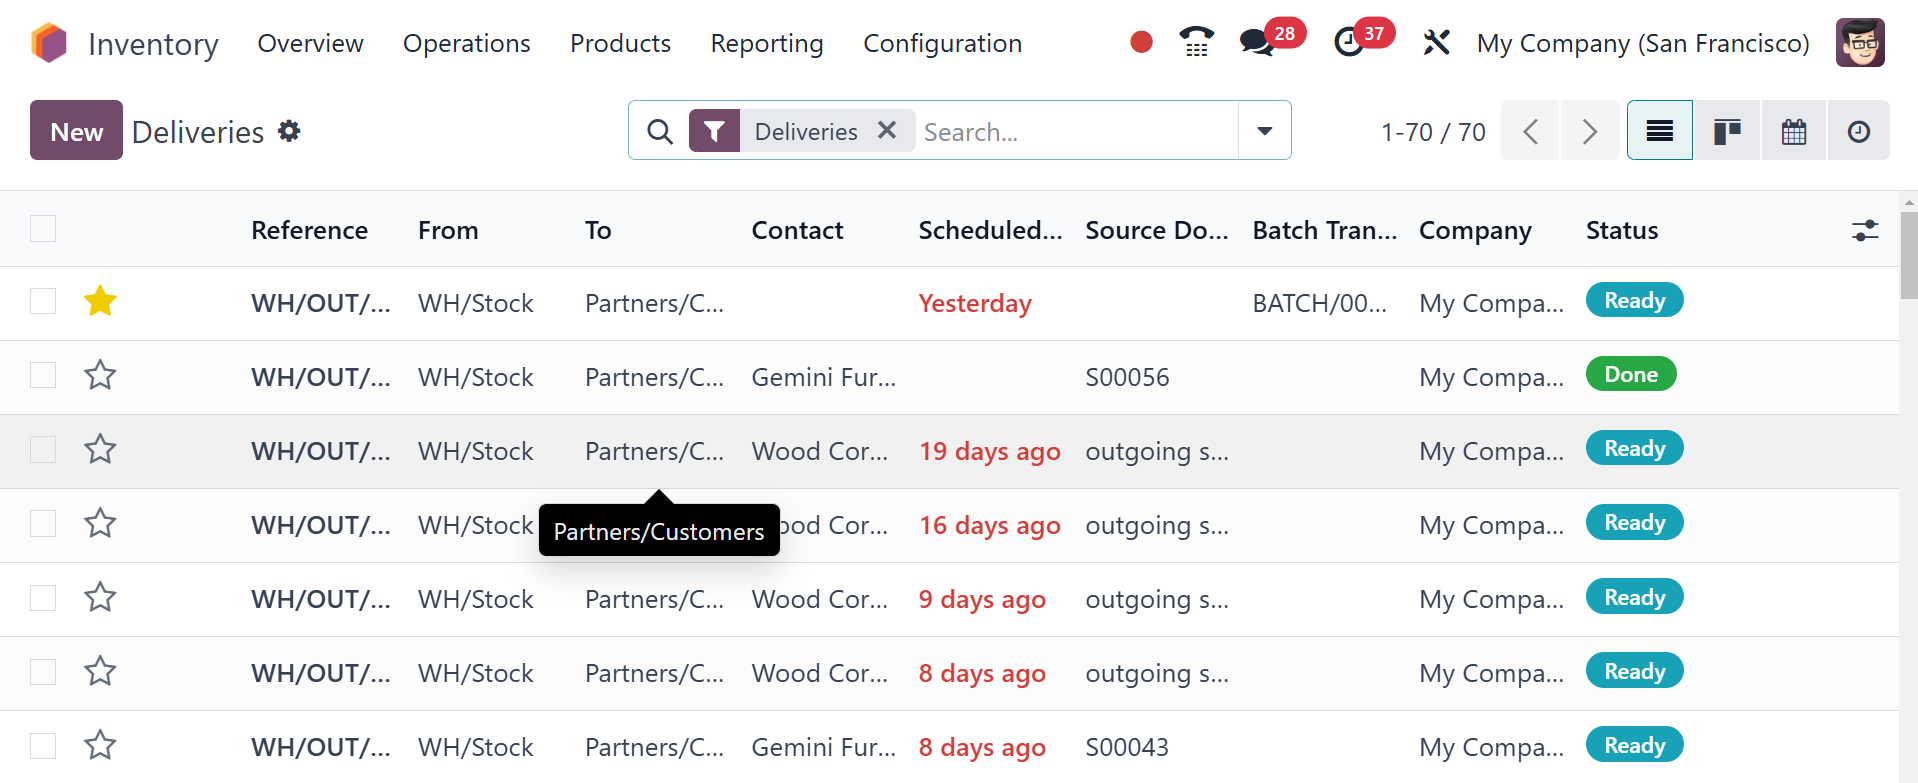
3.3 Deliveries
It moves stock out of the
warehouse to customers or
other locations. Commonly it
is used in sales operations.
The page of deliveries will
be, as in the image below.
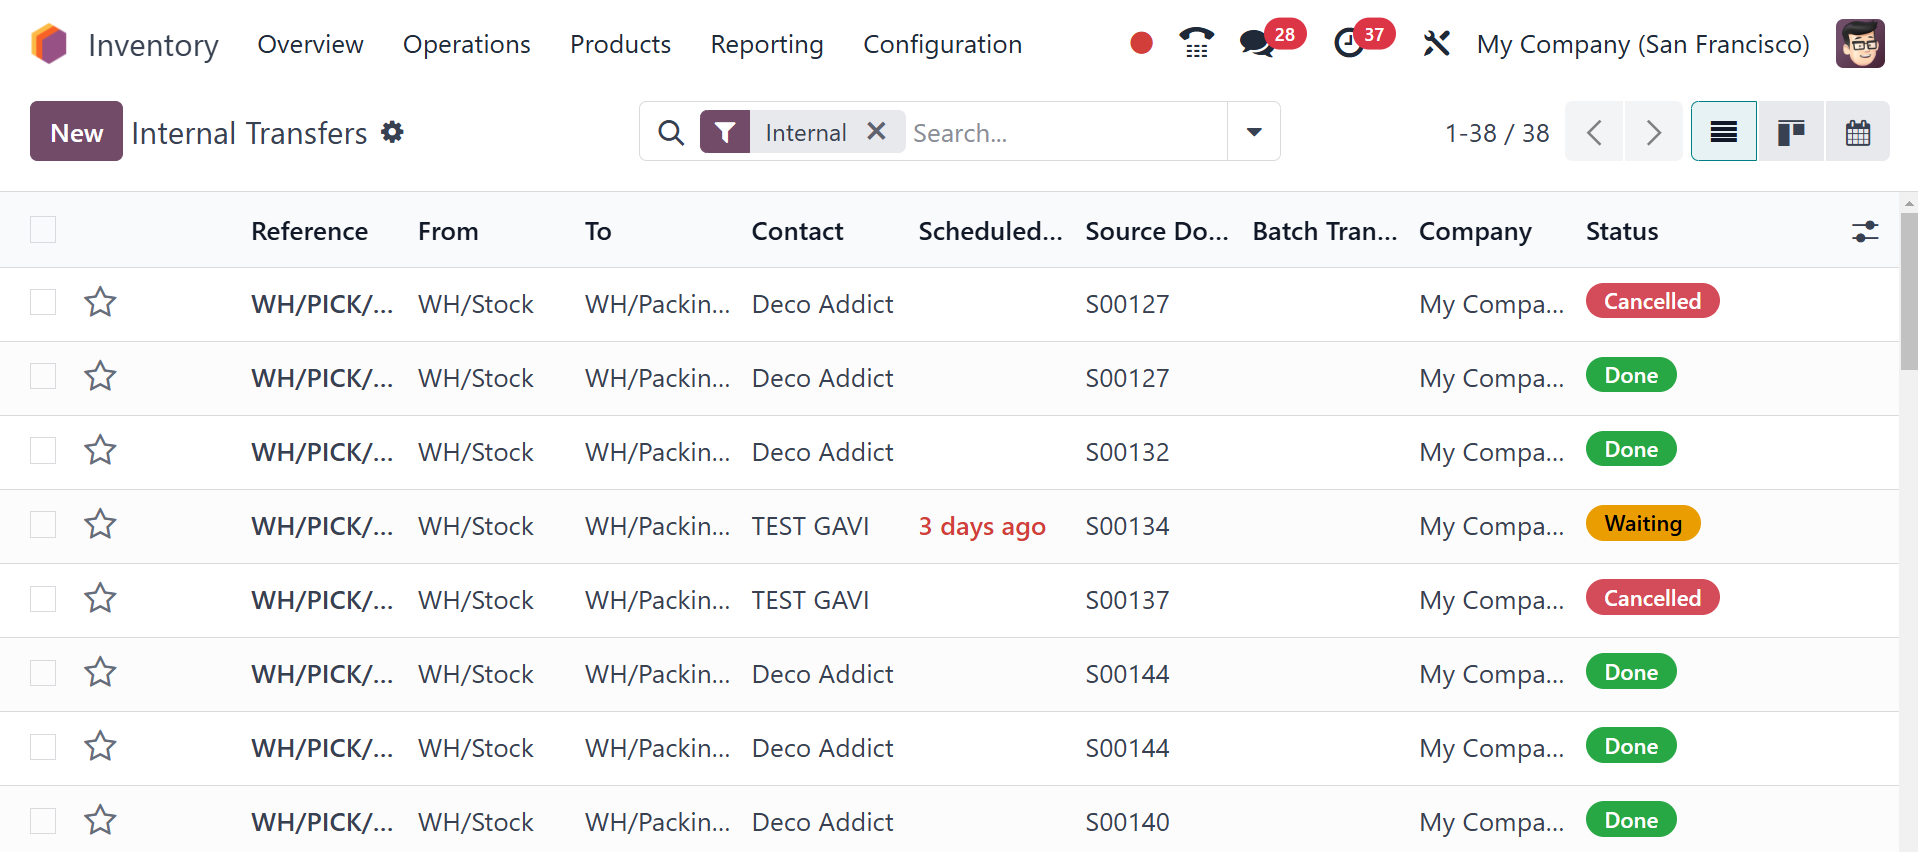
3.4 Internal
Transports inventory from one
place to another within the
same business.
utilized for moving storage
areas or transferring goods
between warehouses.
excludes outside parties.
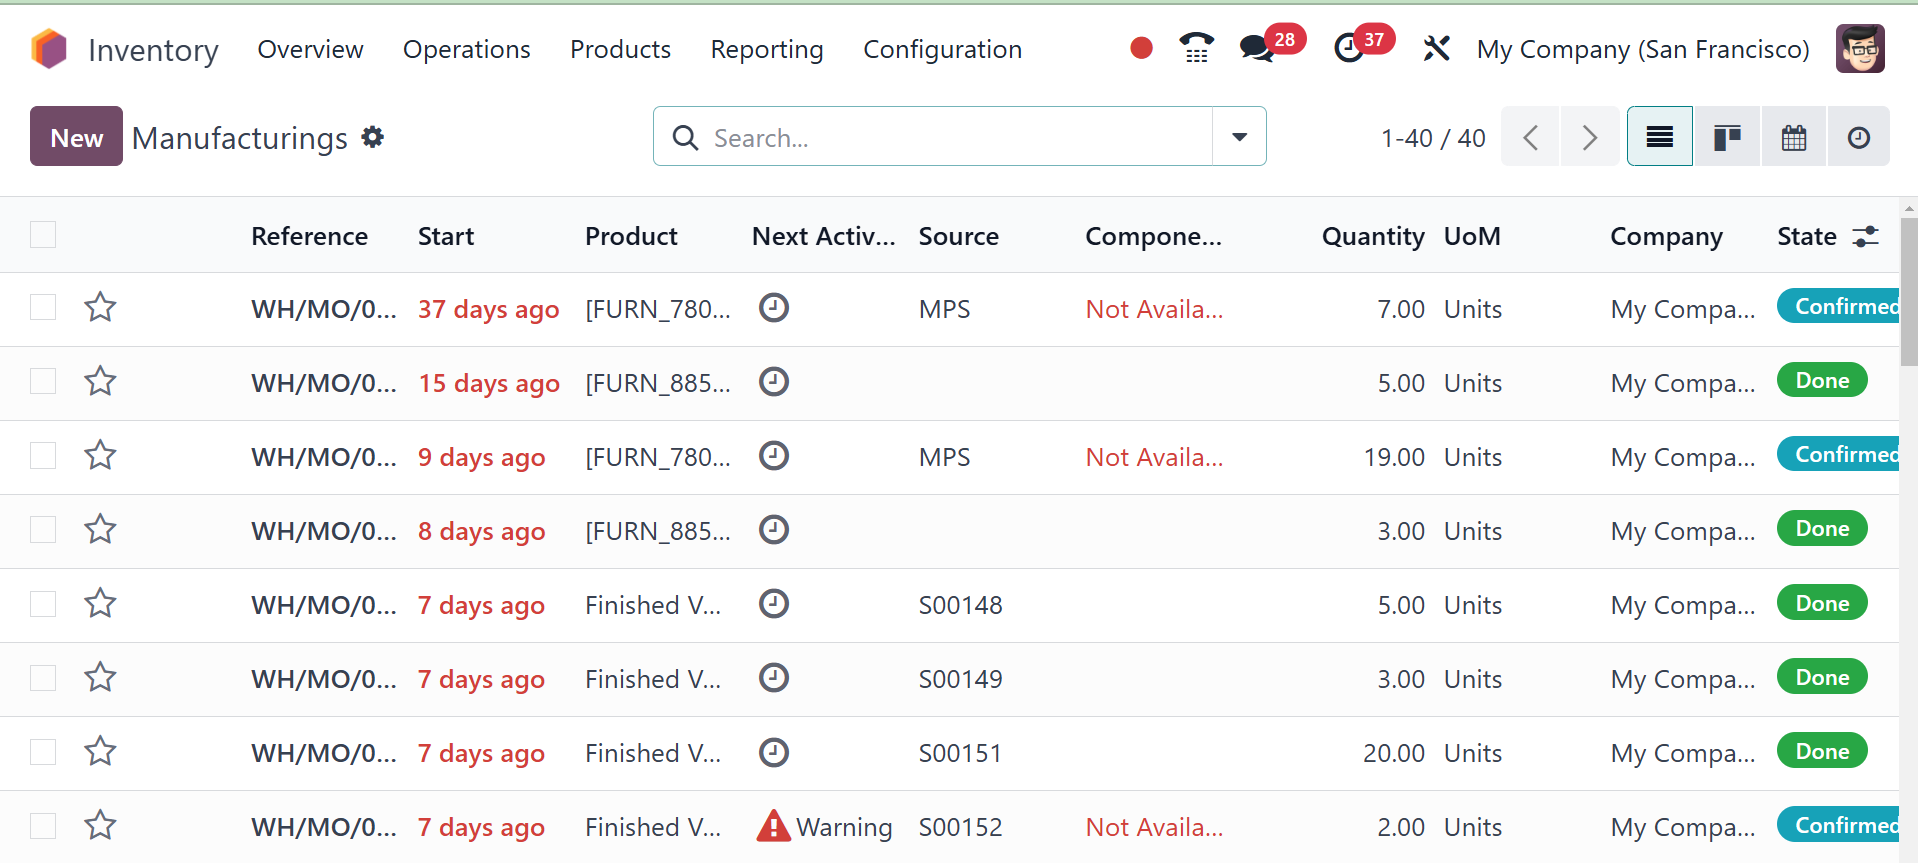
3.5 Manufacturing
It handles the movement of raw
materials to the production
area and the movement of
finished goods back to
inventory.
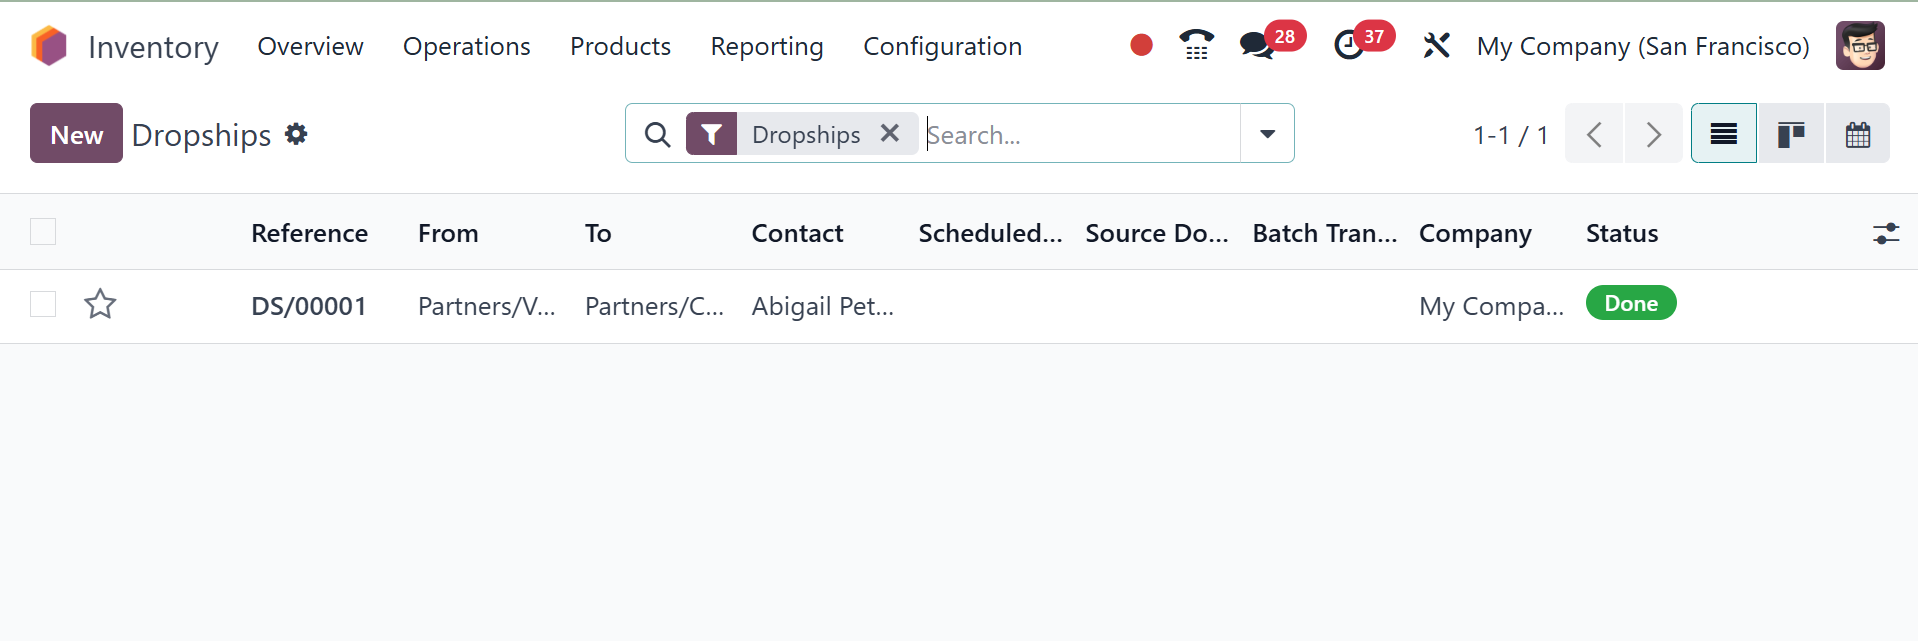
3.6 Dropship
Transports products straight from
a source to a consumer
without keeping them in
storage. No effect on the
business's stock.
On activating the dropshipping
option in the settings, The
tab for an inventory of the
operational routes can be
found in the product
configuration, as in the
image below.
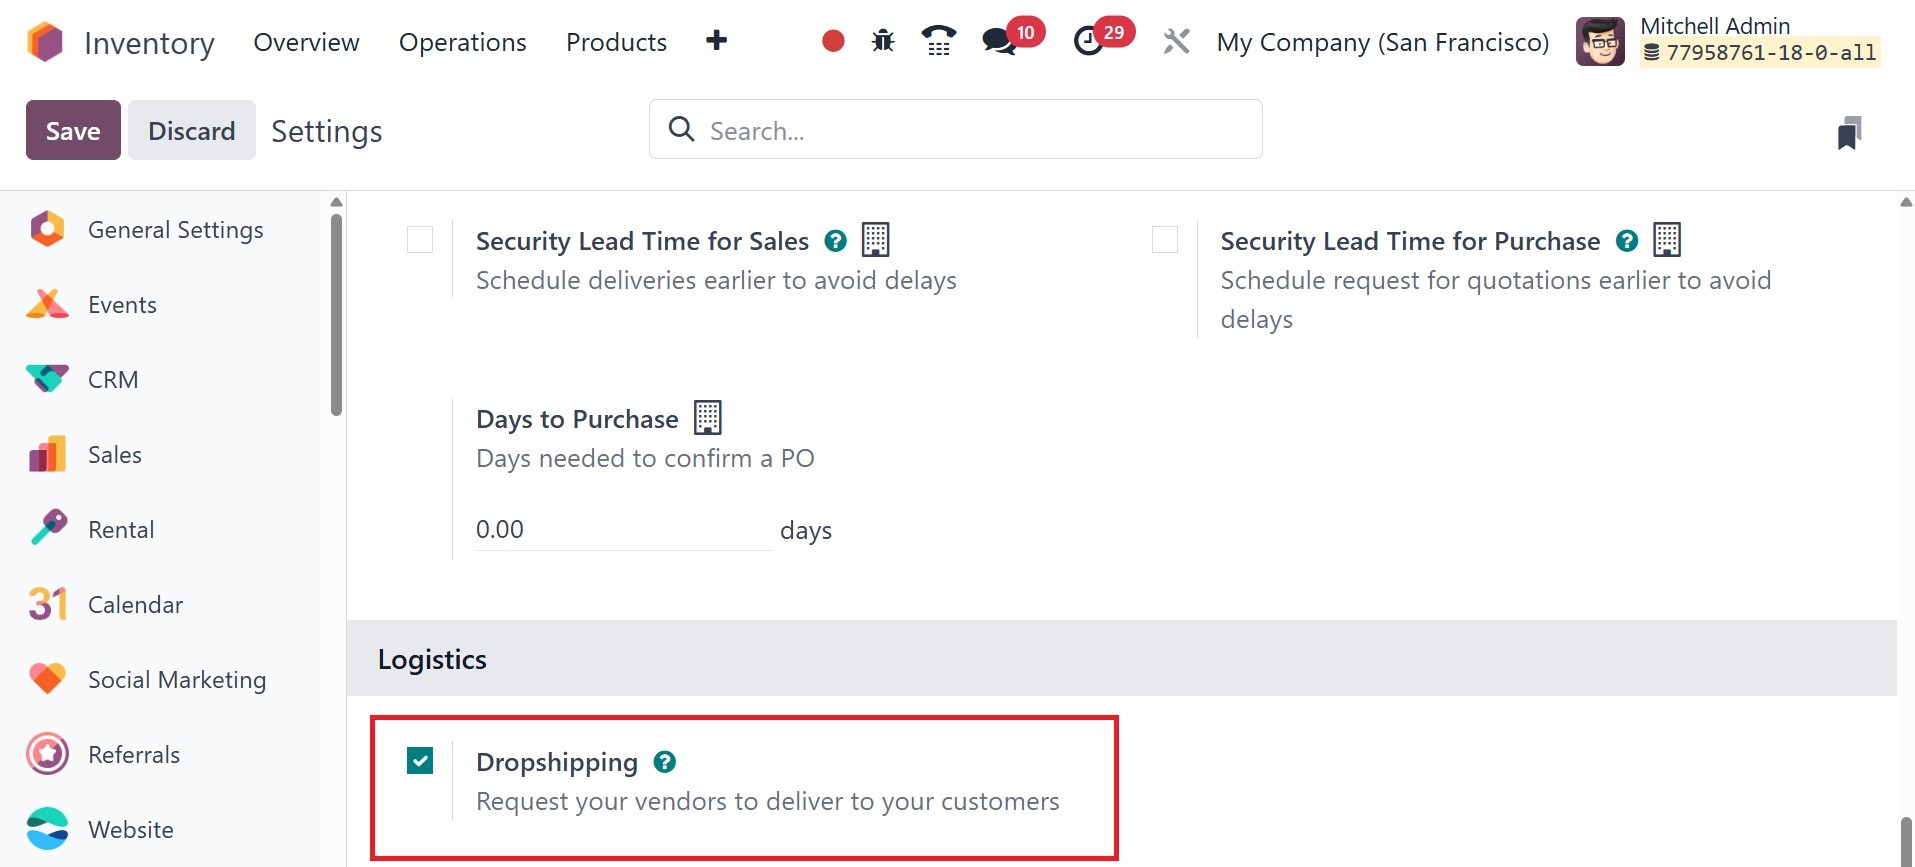
This parameter can be used to
specify a product's routes.
Additionally, remember to add
a vendor from the purchasing
tab of the product form.
When a purchase order is made,
this will be the seller of
the product.
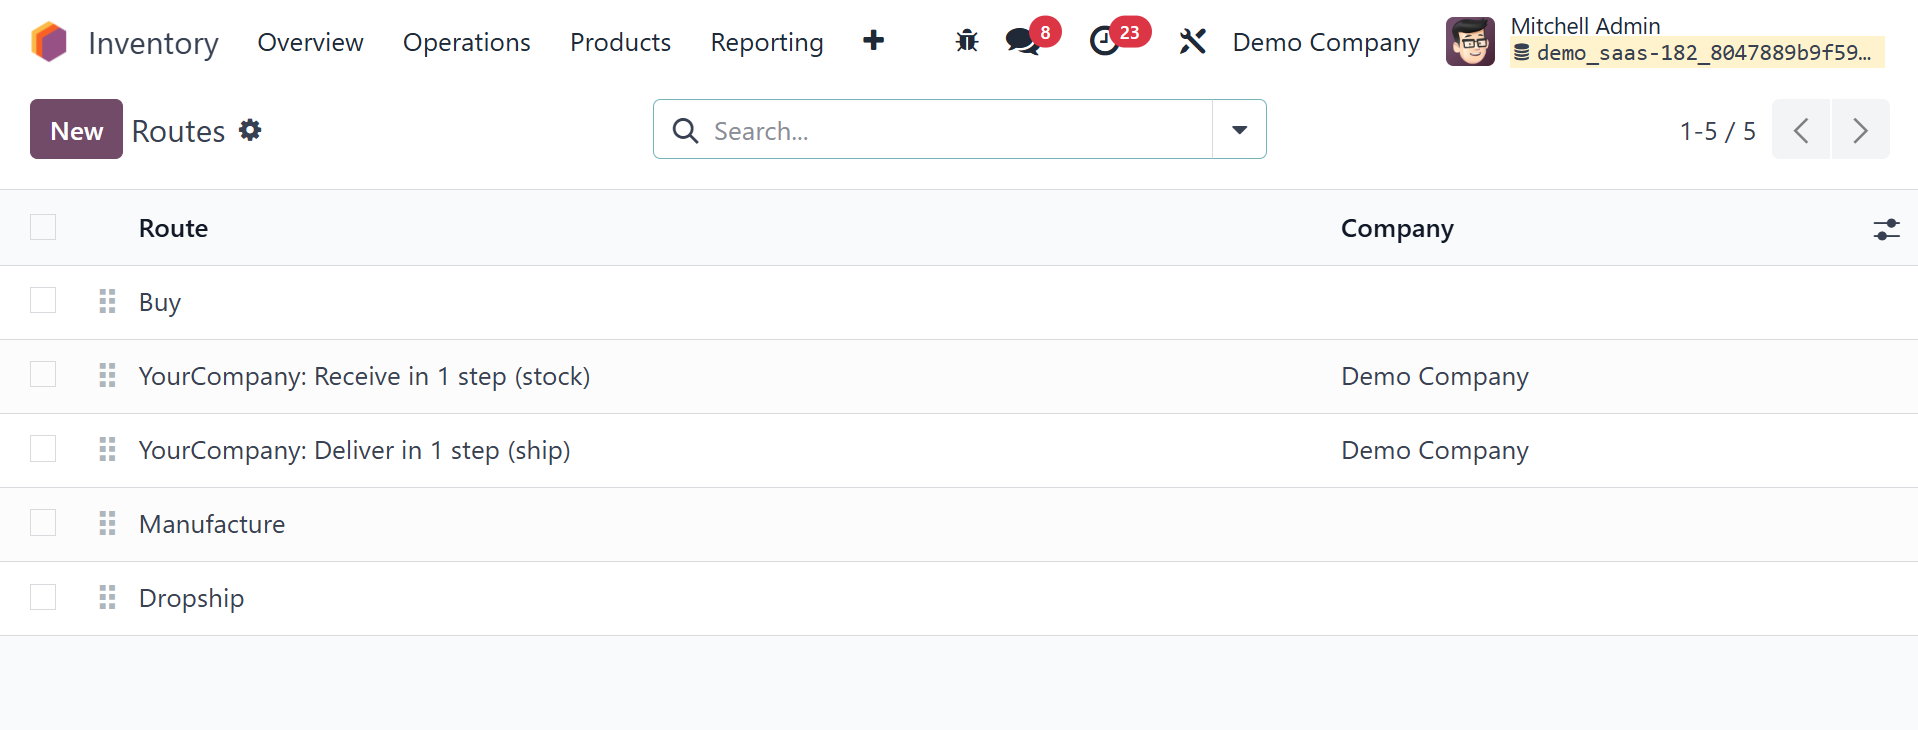
Additionally, you can configure
or create new routes by
heading to the settings tab
of the inventory module,
which will bring up the
Routes menu.
The pathways lead to the
dropship, where you can make
any necessary adjustments.
This part contains the sequence
number and name of the
operational route. You can
select which product
categories and items this
route is accessible for by
filling out the section that
appears. To make this route
the default path for products
that go through the specified
warehouse, you can turn on
the Warehouse option as
needed. Since dropshipping is
a direct delivery method from
the supplier to the buyer, it
typically doesn't require a
warehouse.
Turning on the selling order
lines also allows you to
choose this path from the
line. The details of the
route are described on the
Rules tab.
Now, create a sale order for the
goods that includes
information on the
dropshipping process; when a
customer places an order, the
product will be shipped
directly from the supplier to
the customer.
Additionally, you can use the
sales module to create a sale
order for this product.
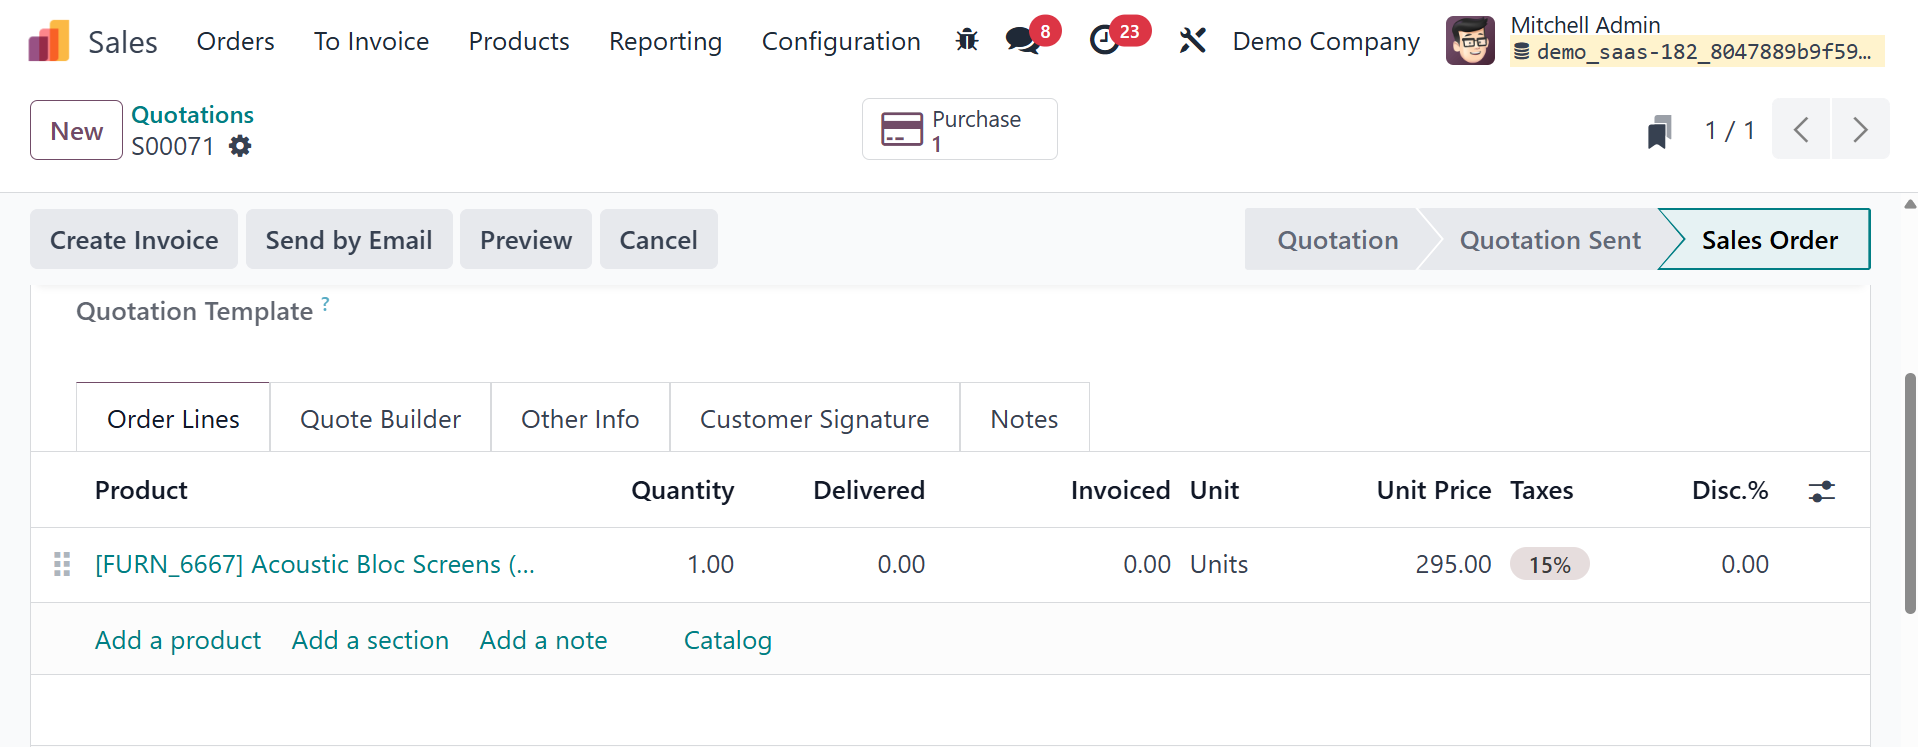
As a result, a purchase order
will be placed to initiate
dropshipping. The RFQ's
status as a purchase order is
confirmed. A purchase order
will appear.
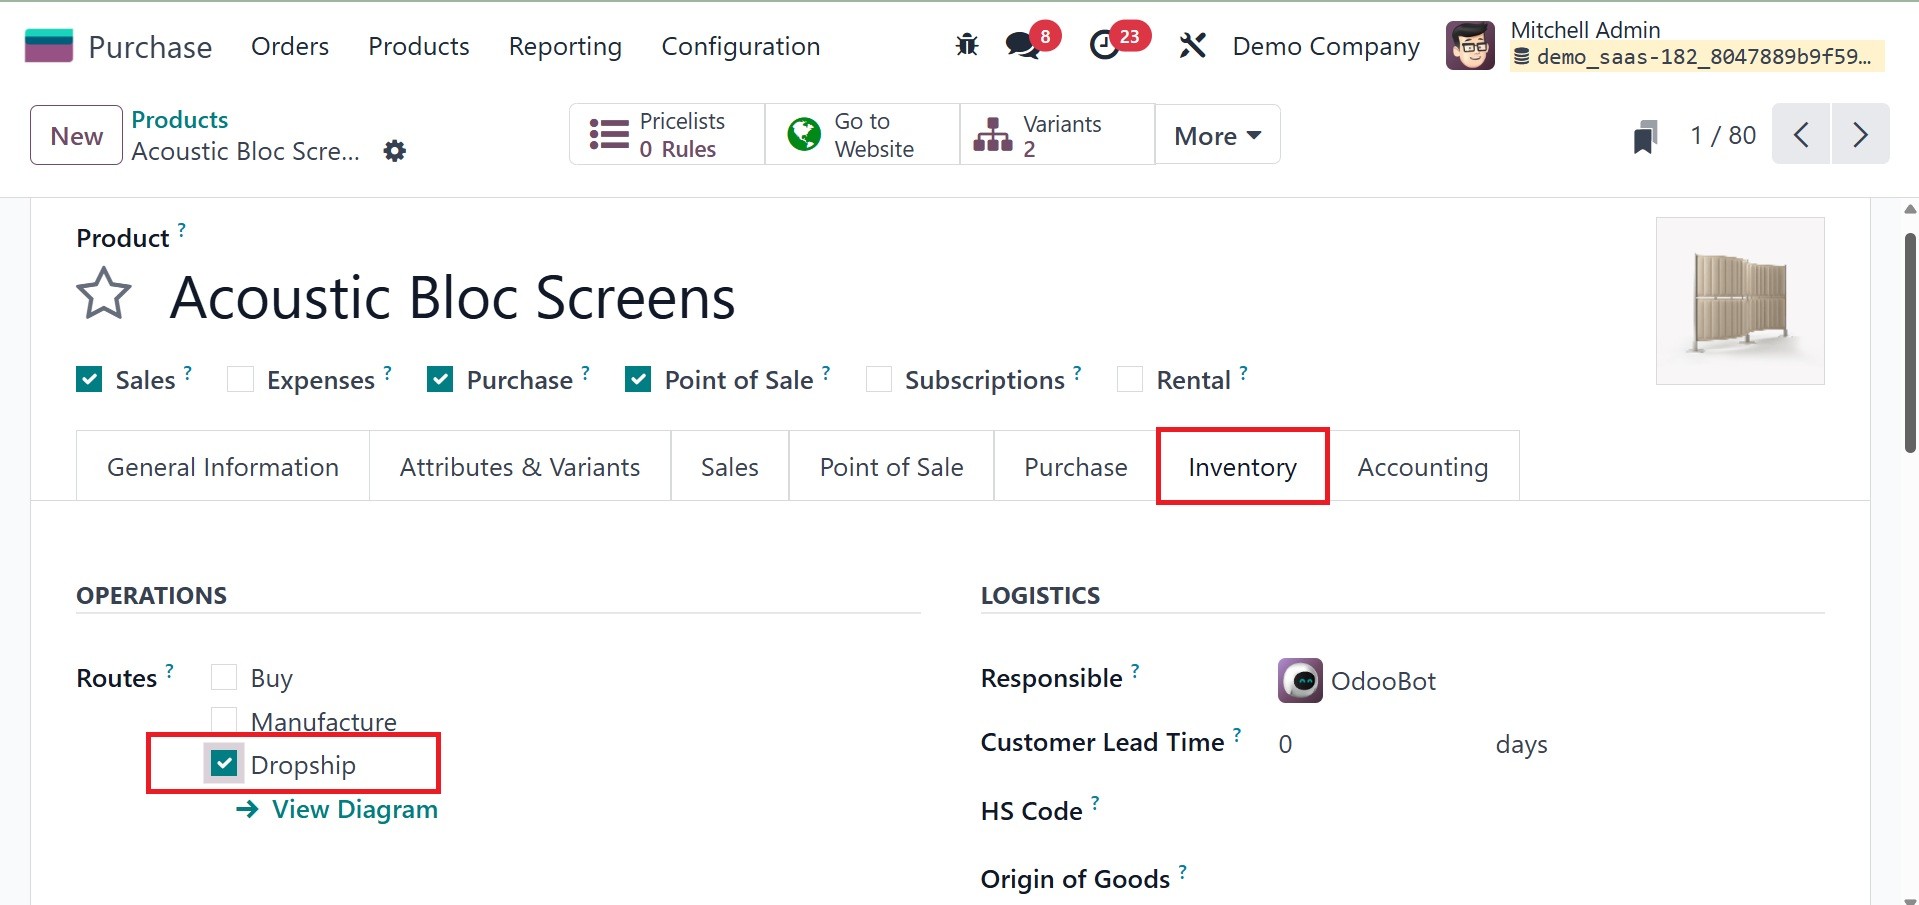
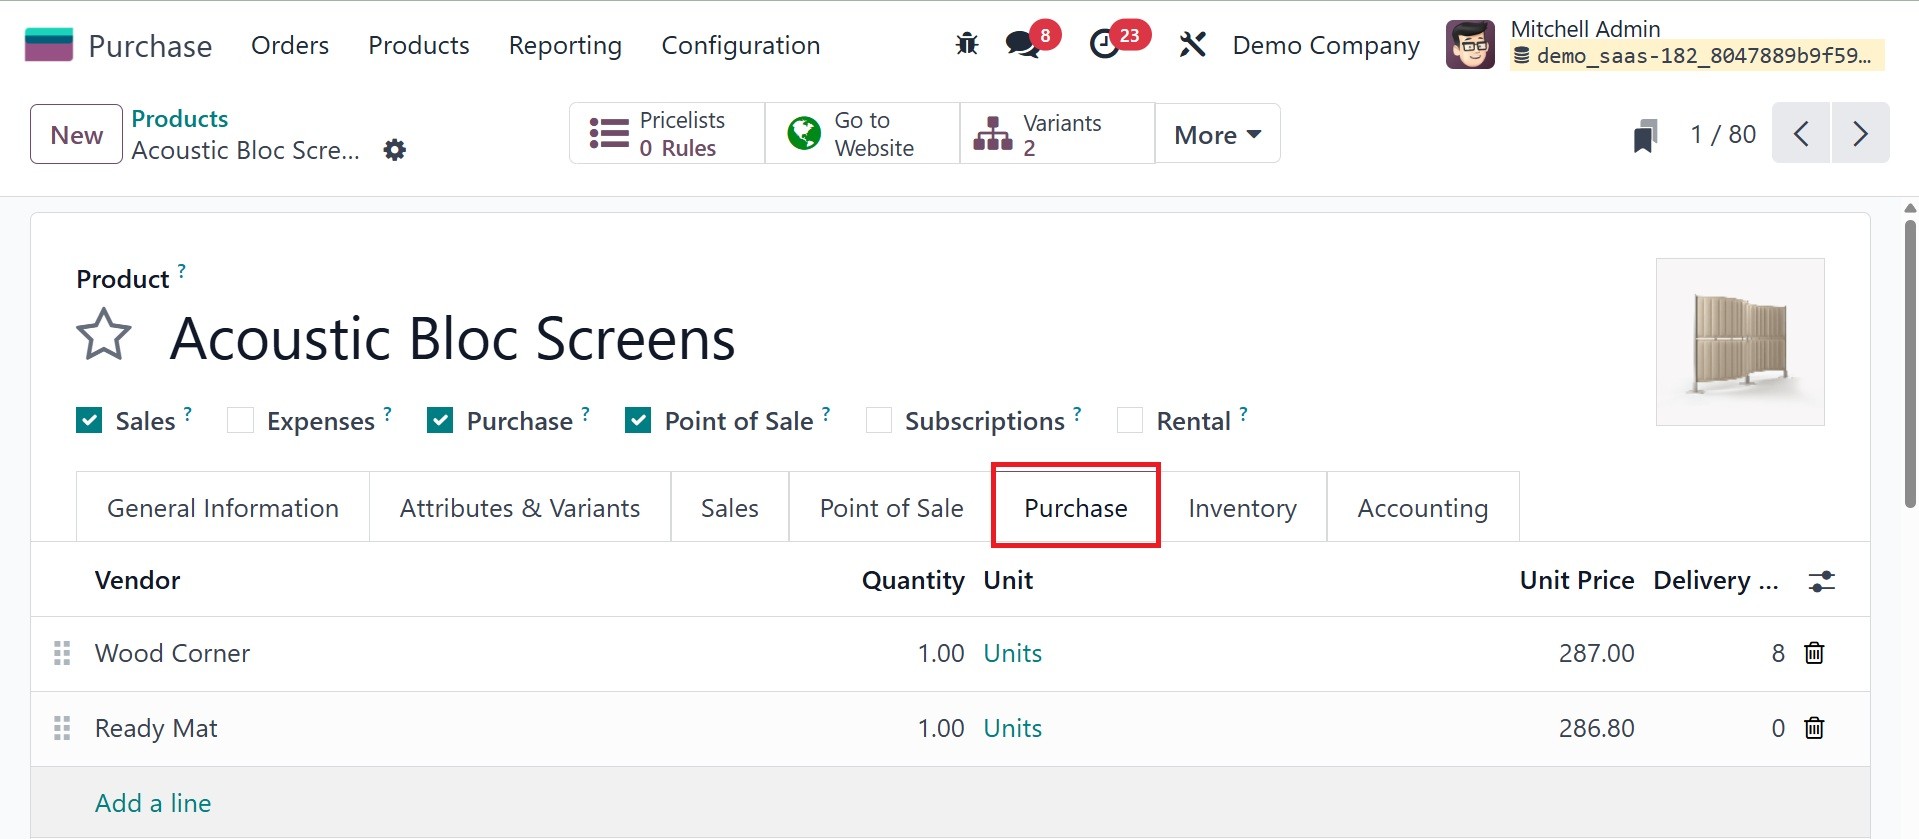
The vendor selected when you open
the purchase order is the one
we mentioned on the product
form's Purchasing tab.
In compliance with the applicable
sale order criteria, the
product and quantity are also
updated. Dropshipping is
used, and the customer
specified on the sale order
serves as the delivery
address.
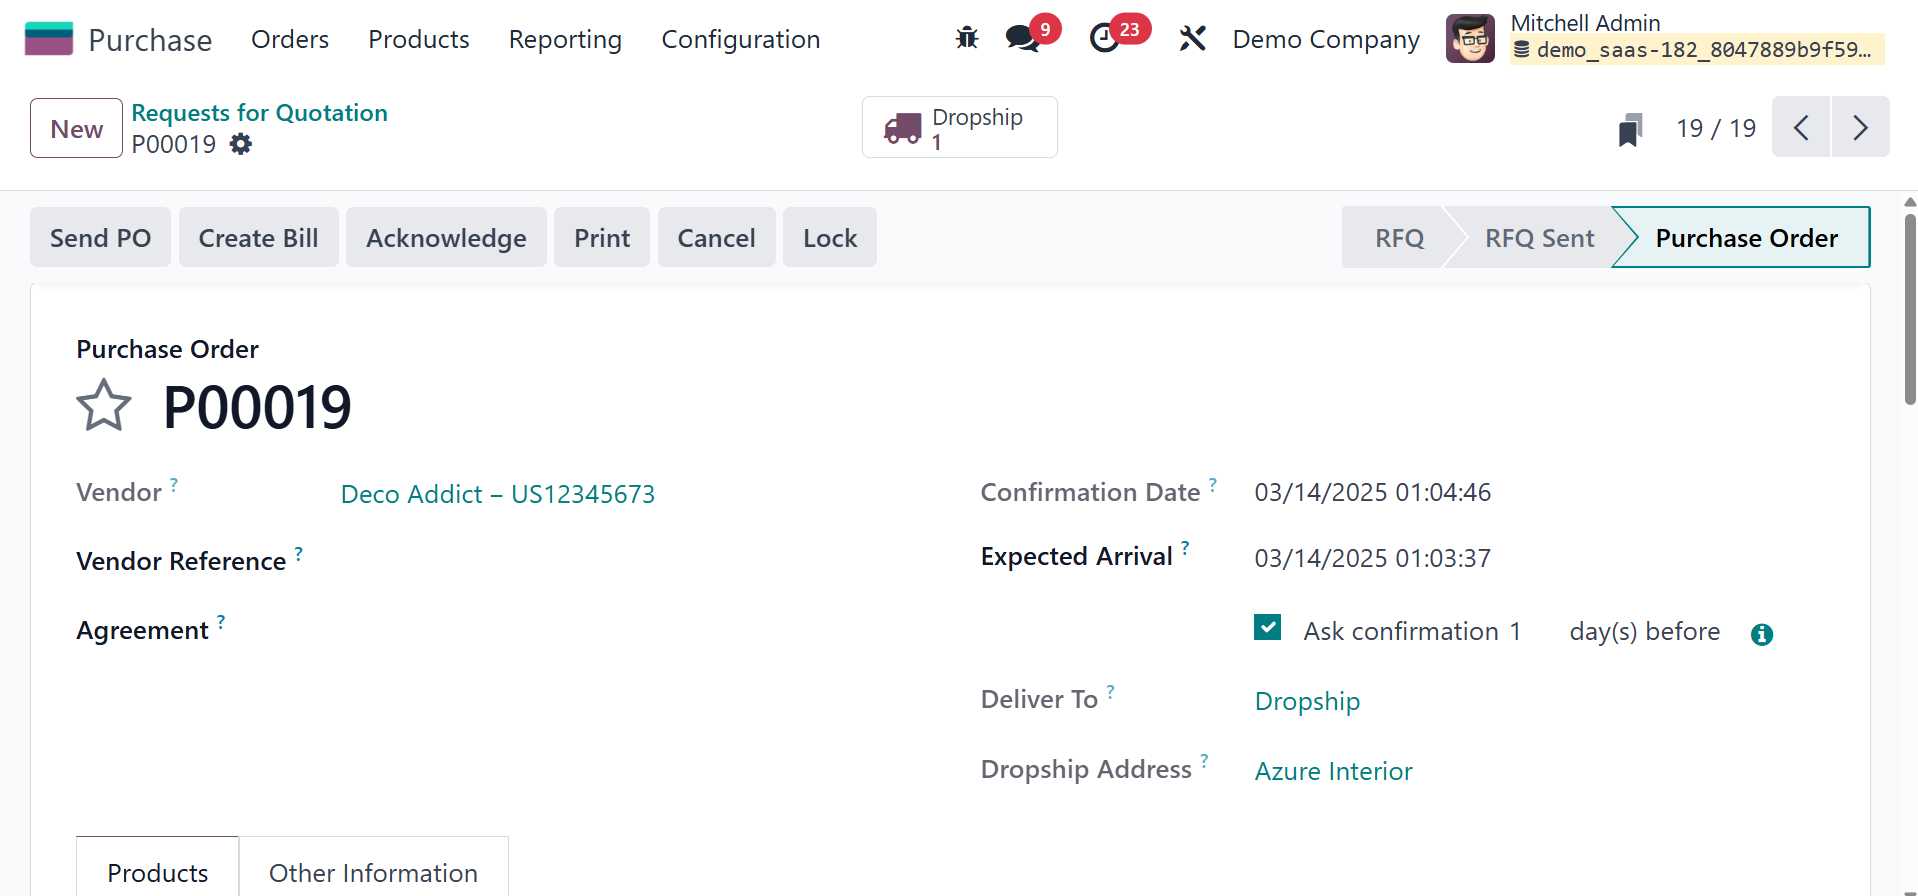
A dropship smart button for
validation will show up when
the purchase order has been
validated.
As you can see, in the form
mentioned above, the delivery
address is the destination
location. The dropship may
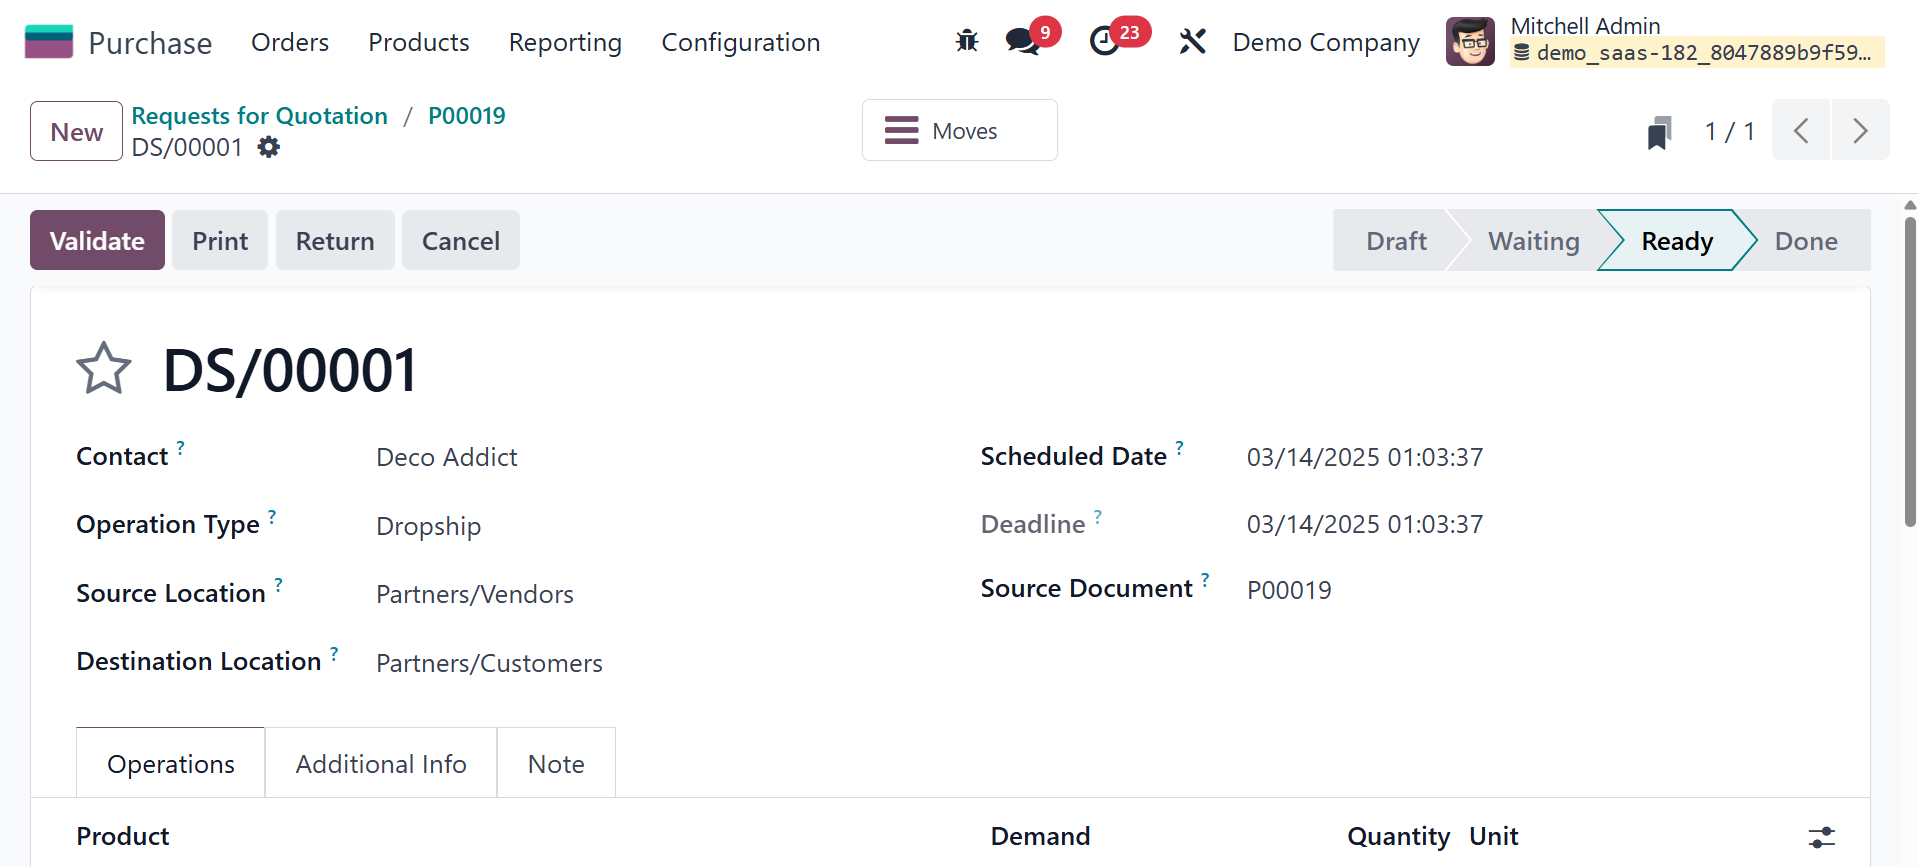
now be confirmed. Create a
bill for the purchase order
and document payment after
the dropship has been
confirmed. I'm going back to
the sale order.

As you can see, the supplied
quantity has been adjusted
here because the seller sent
the merchandise directly to
the client.
Once all of these procedures are
completed, the products will
be purchased from the
supplier in accordance with
the purchase order and
supplied to the customer in
accordance with the sales
order.
3.7 Batch Transfers
Using the Batch Transfer tool in
Odoo18, you can perform
multiple transfers at once.
You can use this tool to
perform batch transfers,
which will save you time and
effort. All transfers
included in the batch are
carried out at the same time
when transferring in batches.
The issues involved in
handling bulk transfers can
be minimized by using this
method.
As can be observed in the picture
below, the Inventory module's
Settings menu enables you to
quickly enable the Batch
Transfer option.
After selecting the Batch
Transfer option, click the
Save button to save the
updated changes. You may now
manage batch transfers from
the platform that is
available under the
Operations menu, as seen.
Here you can observe a list of
previously created batches
and details for Batch
Transfer, Scheduled Date,
Responsible, Operation Type,
Company, and State. You may
also switch the perspective
of the platform to be a
Kanban perspective. From
here, begin a new batch
transfer using the New
button.
You may assign an employee to do
this batch transfer's
upcoming tasks in the
Responsible box. Complete the
blanks for Operation Type and
Company. Odoo18 allows you to
add transfers with this
operation type to this batch
by giving the Operation Type.
You can schedule the
transfer's expected date
manually in the Scheduled
Date column. Unless manually
specified, the date for this
transfer will be set
automatically by Odoo18 to
the first scheduled date of
the transfer that belongs to
the batch. There, you have
the options of dock location,
vehicle, and vehicle category
to add as well, which is
available on activating the
Dispatch Management system
option in the settings.
Now, you may use the Add a Line
option on the Transfer tab to
add transfers to this batch
one at a time.
You will get a new pop-up window
as soon as you click on the
Add a Line button where you
can select the transfers for
this batch. You will be shown
a list of different transfers
for the selected operation
type in different phases. The
transfers can be selected
from the list. Select
transfers of the same stage
either in waiting or ready
status, if feasible. You may
use the Select button to
include them in the batch.
The selected transfers' list will
be added automatically to the
batch, as can be viewed in
the above figure. You can use
the icon ❌ in the following
screenshot to delete any of
the transfers from the batch.
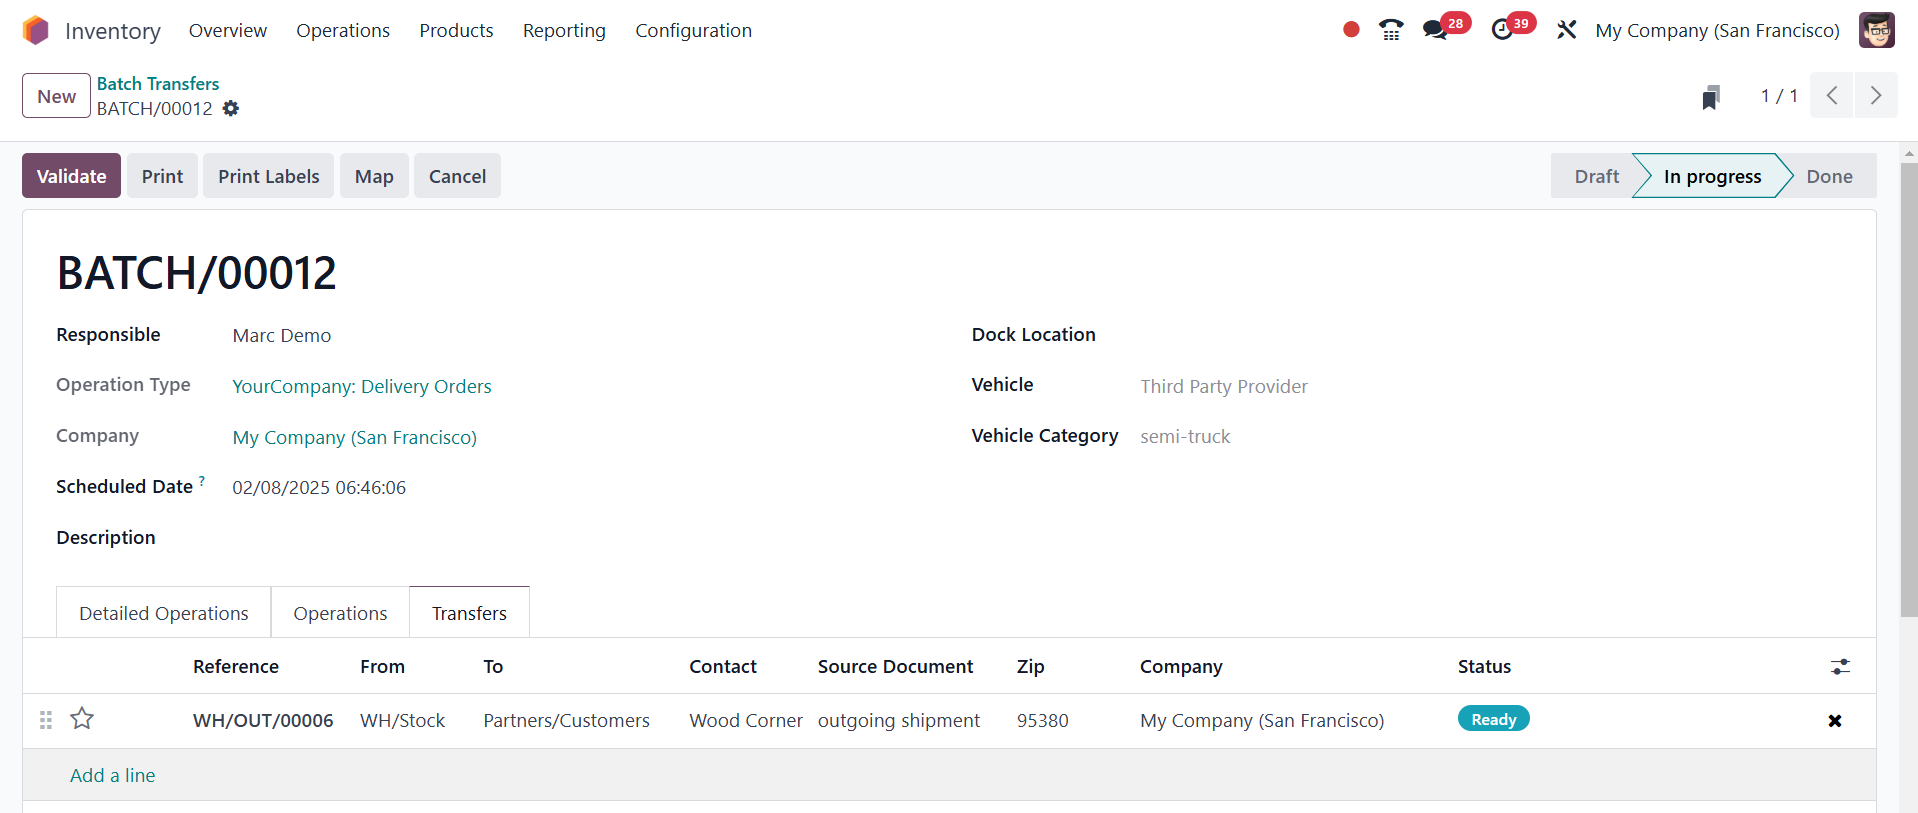
Using the Confirm button once
the availability has been
confirmed, you can complete
the transfer. Then, you can
complete the batch transfer
process by clicking on the
Validate option.
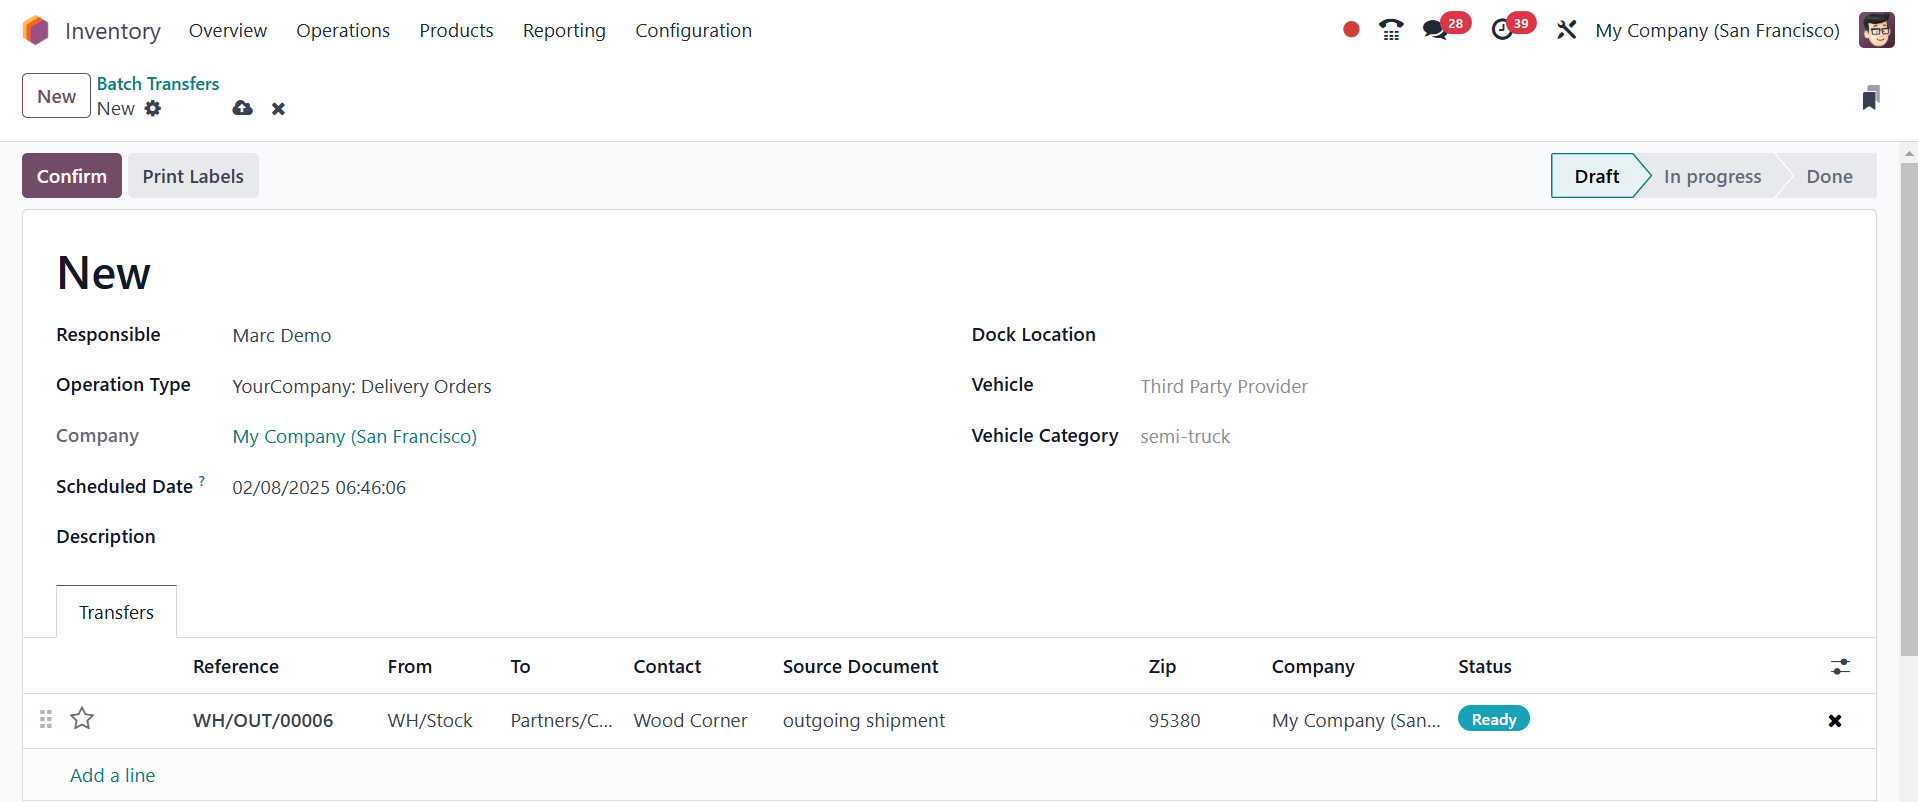
From the Transfers menu, it is
also possible to create new
batches of transfers. This is
possible through access to
the Transfers platform found
under the Operations menu.
The transfers to include in a
batch are selected from the
existing list of available
transfers. Ensure the
selected transfers all have
the same operation type and
status. Following the
selection of the required
transfers, an Action button
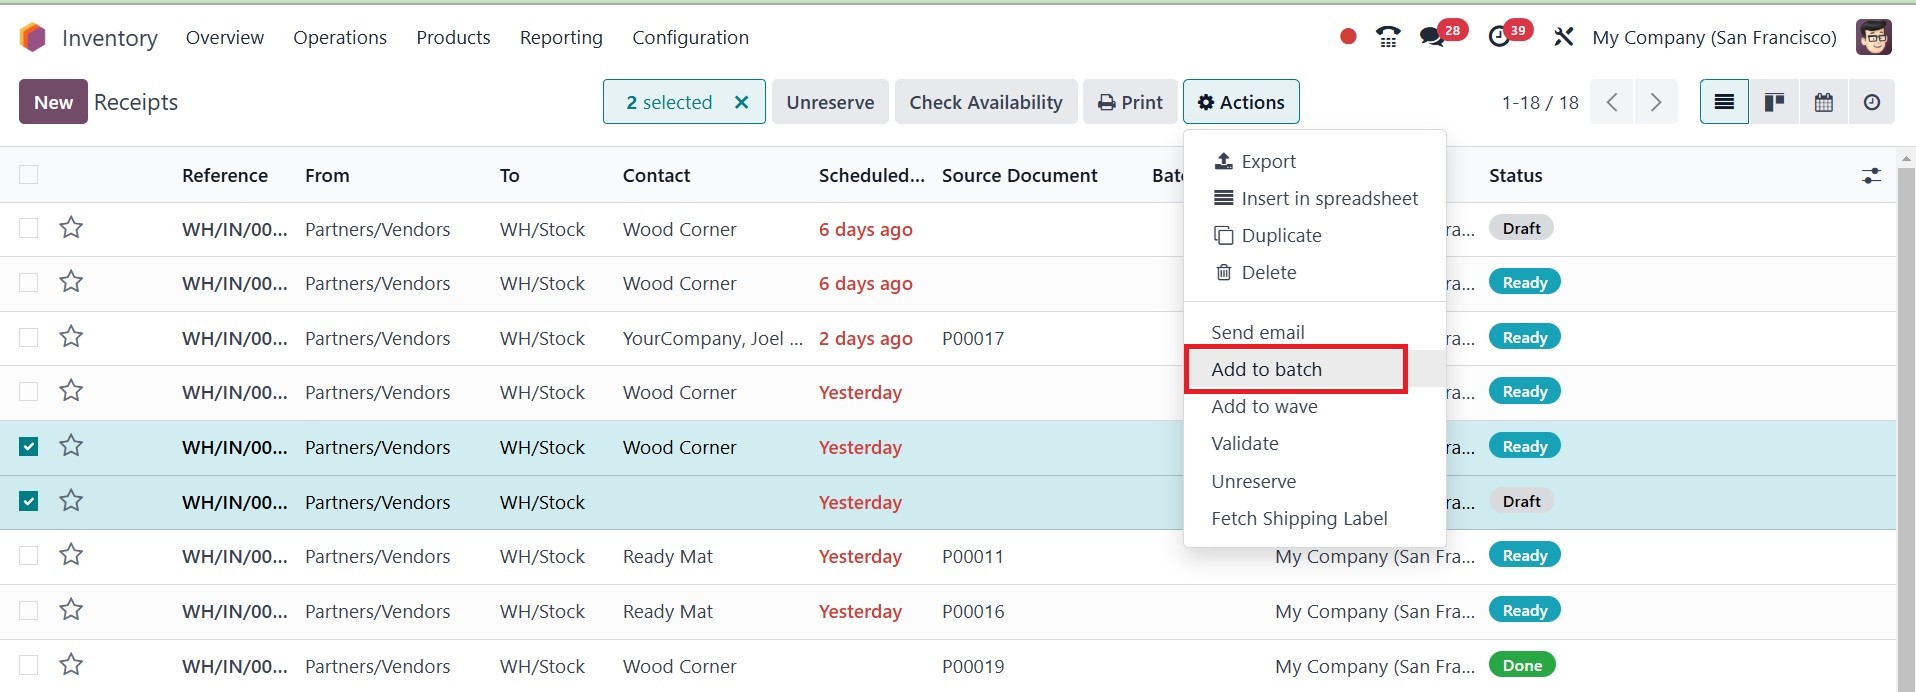
is then visible.
The Action button gives you the
option to incorporate the
selected transfers in a
batch. Select the "Add to
Batch" option.
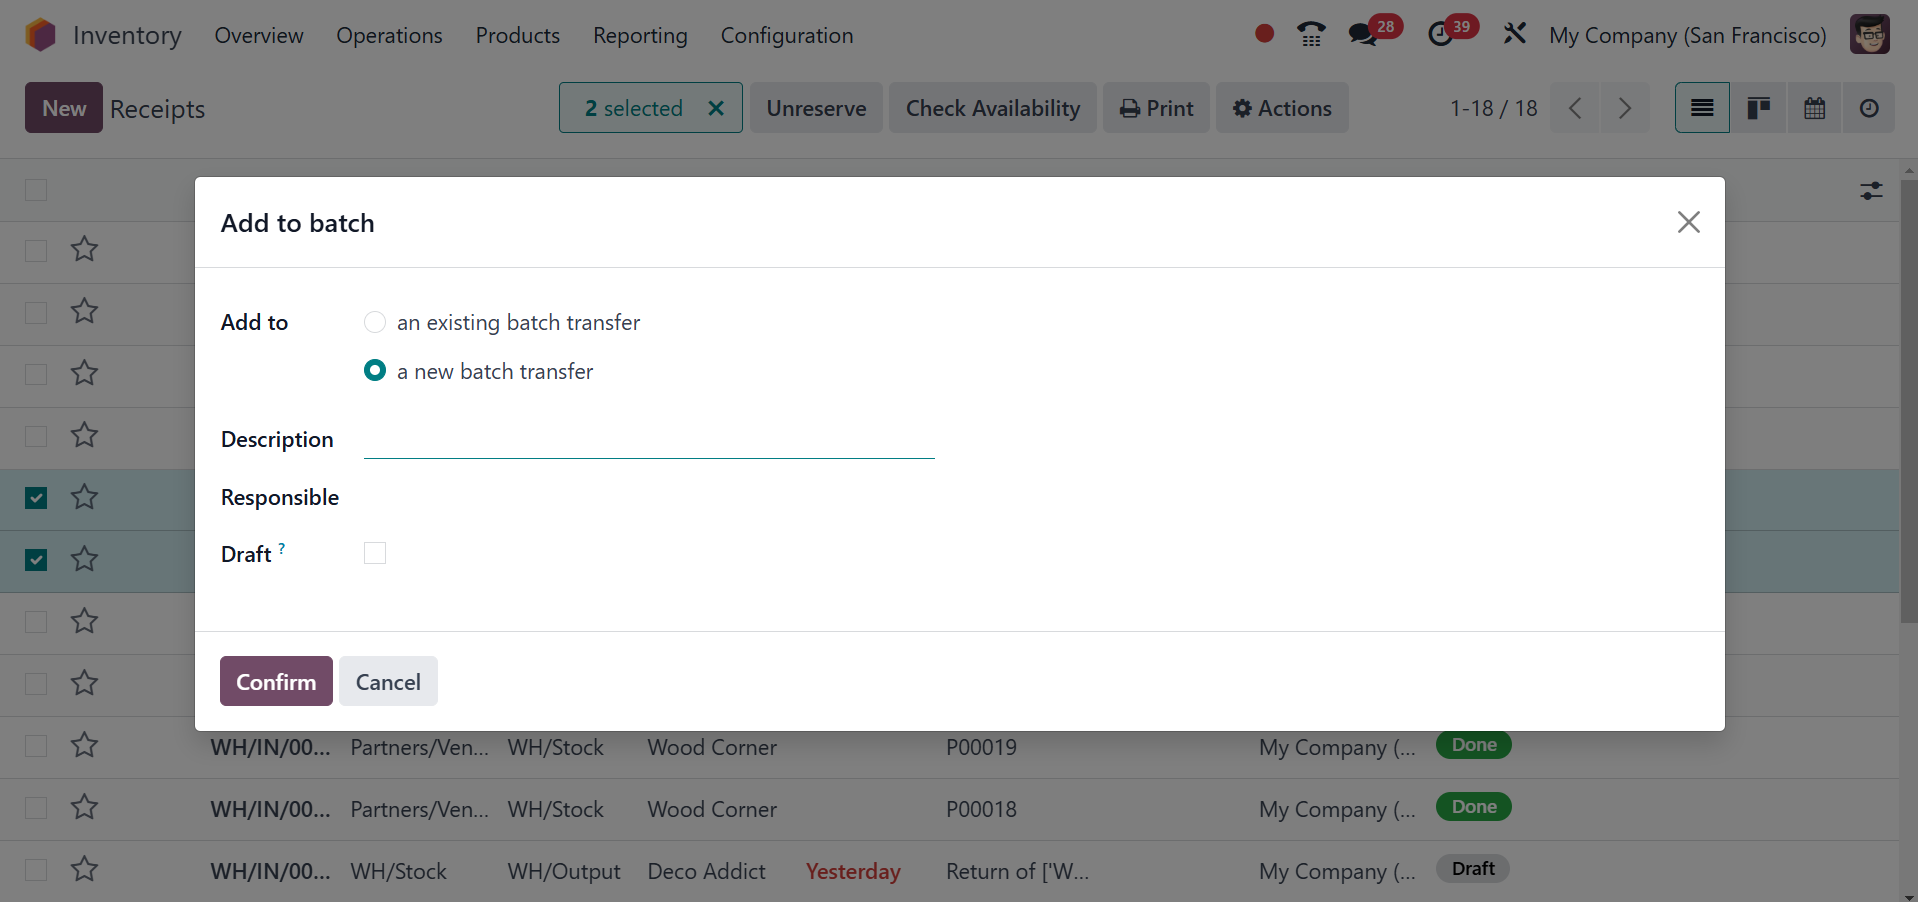
The selected transfers can be
added to an existing or a new
batch transfer. You can
specify the Responsible
employee in the given field
for a new batch transfer.
Enable the Draft option to
generate the new batch in the
draft state. A new batch
transfer will be generated in
the Inventory module after
clicking the Confirm button.
You can track and manage the
new batch transfer from the
Batch Transfer portal.
3.8 Wave transfers
The Wave Transfer method does the
same thing as the Batch
Transfer option. With this
method, you are able to
transfer a significant amount
of merchandise from one
location to another. A
transfer, though, can't be
removed from a wave transfer
once added. The wave transfer
method is more advanced
compared to batch transfers.
Make sure to enable it from
the Settings menu in order to
receive this feature in the
Odoo18 Inventory module.
You are able to access the
Transfers window once the
Wave Transfer feature has
been activated. In order to
add transfers to a wave
transfer, select the
transfers from the Transfers
window with the same status
and operation type.
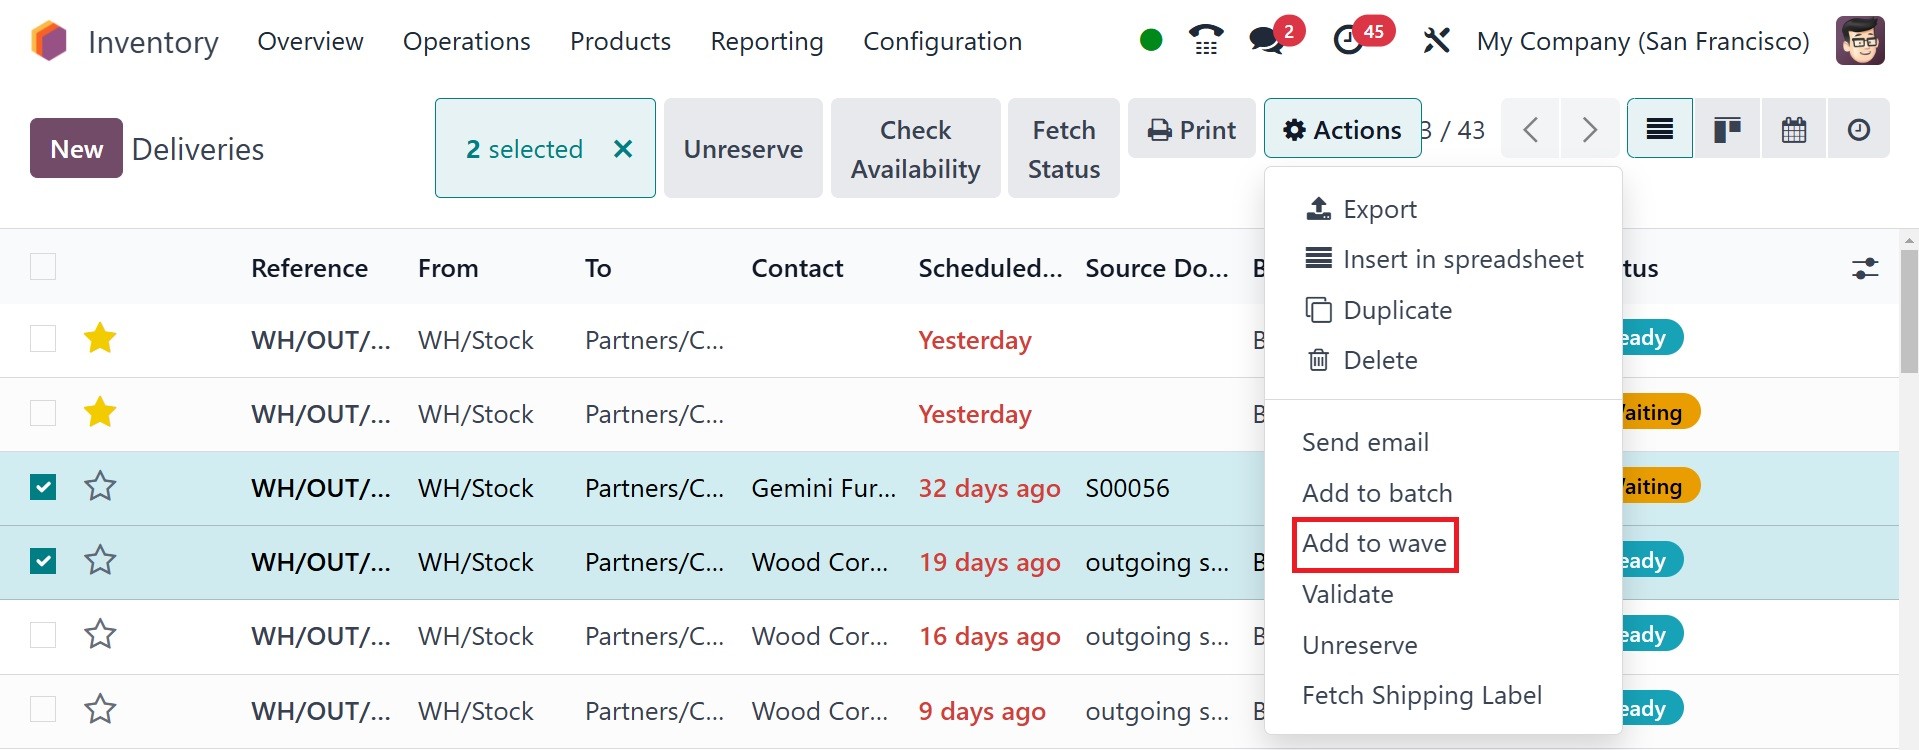
Once you select the required
transfers, the Action button
will be displayed on the
screen, where you can select
the Add to Wave option. A new
pop-up will be displayed on
the screenshot when you click
this button.
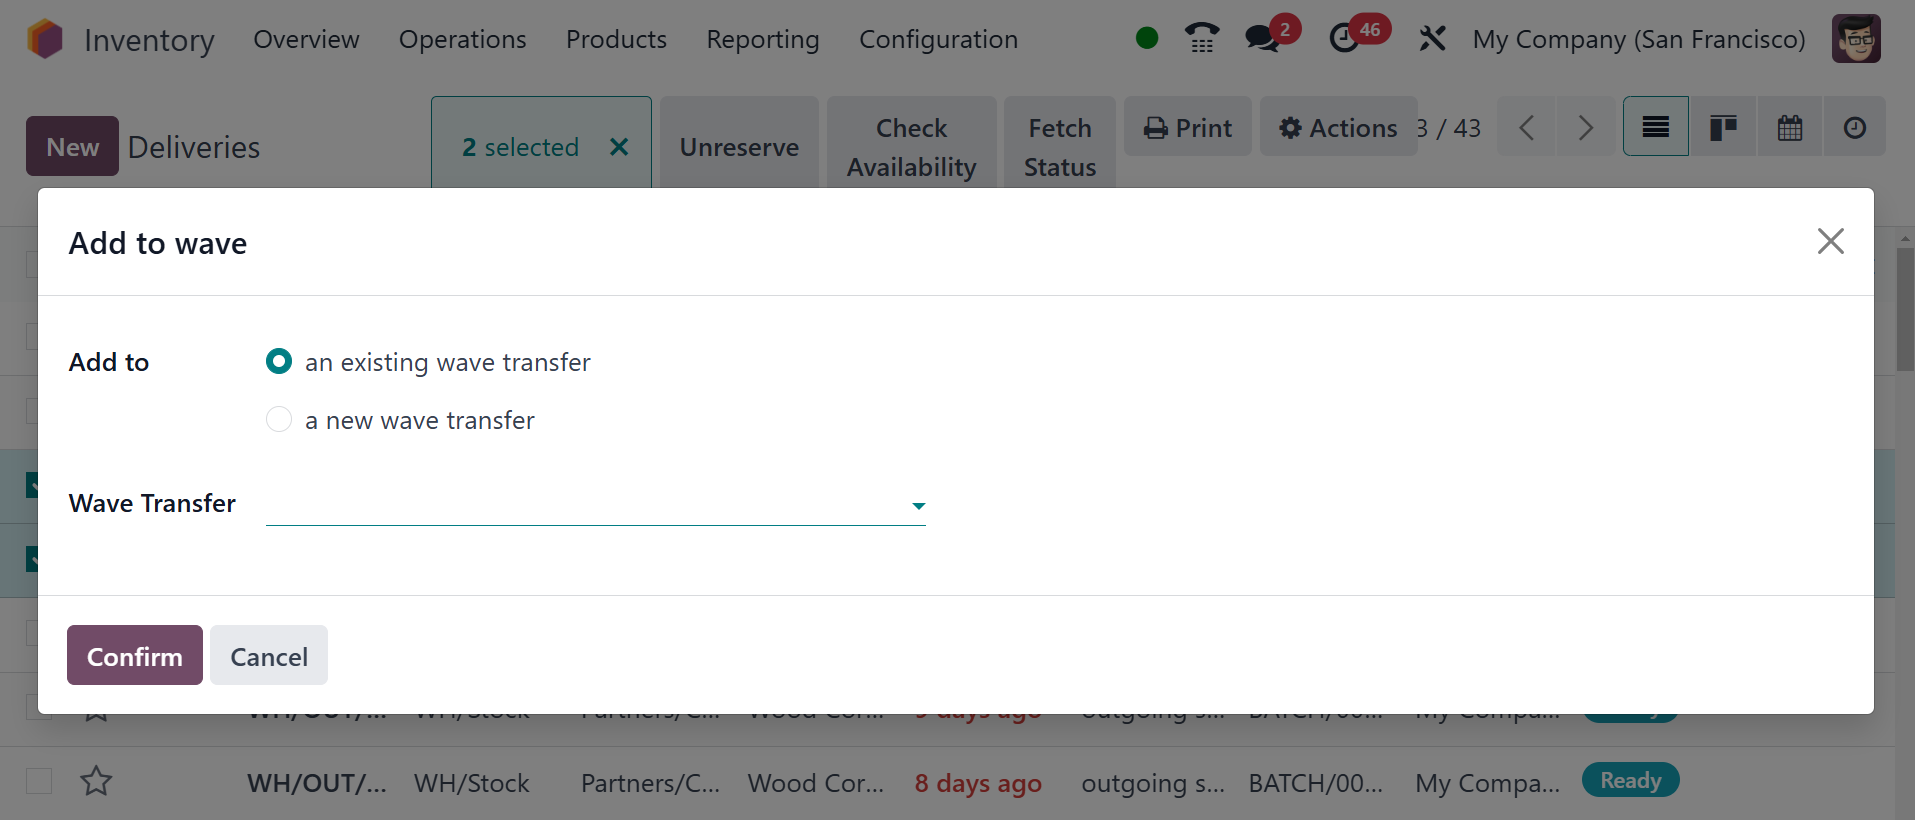
The selected transfers may be
included in a new transfer or
an already-existing wave
transfer. For a fresh wave
transfer, you need to find an
officer in the Responsible
field. To complete, click the
Confirm button.
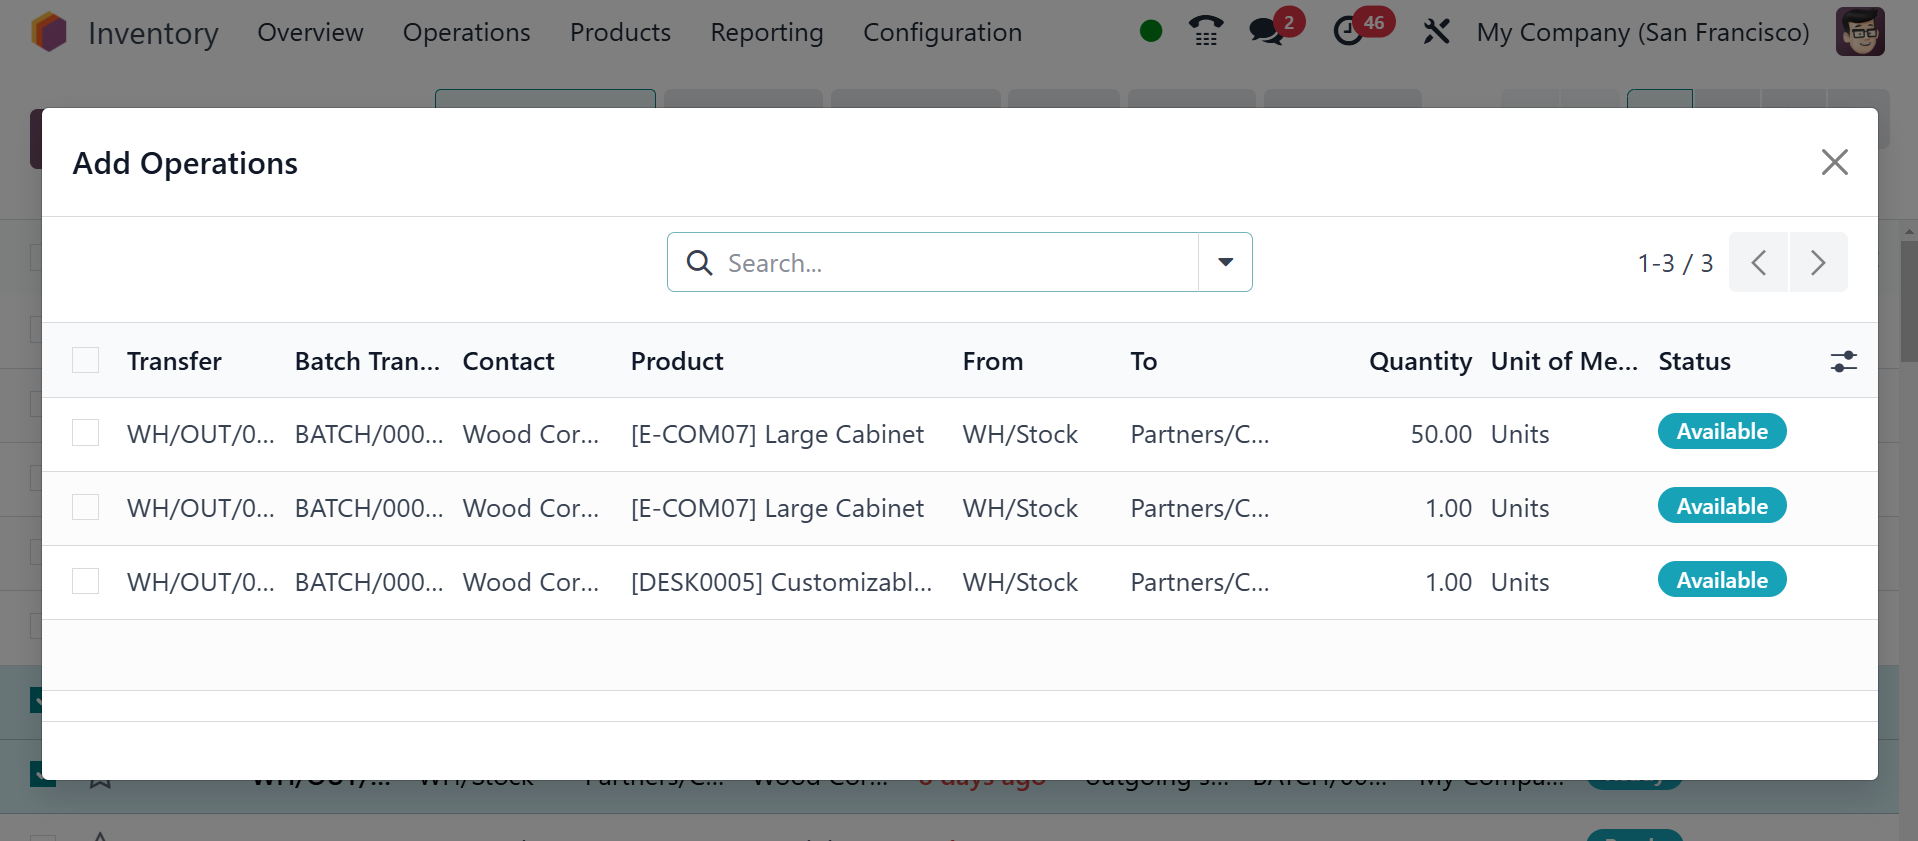
As soon as you approve the
transfer, all orders from the
chosen transfers will appear
on your screen. Select the
required orders from the
list, then select Add to
Wave.
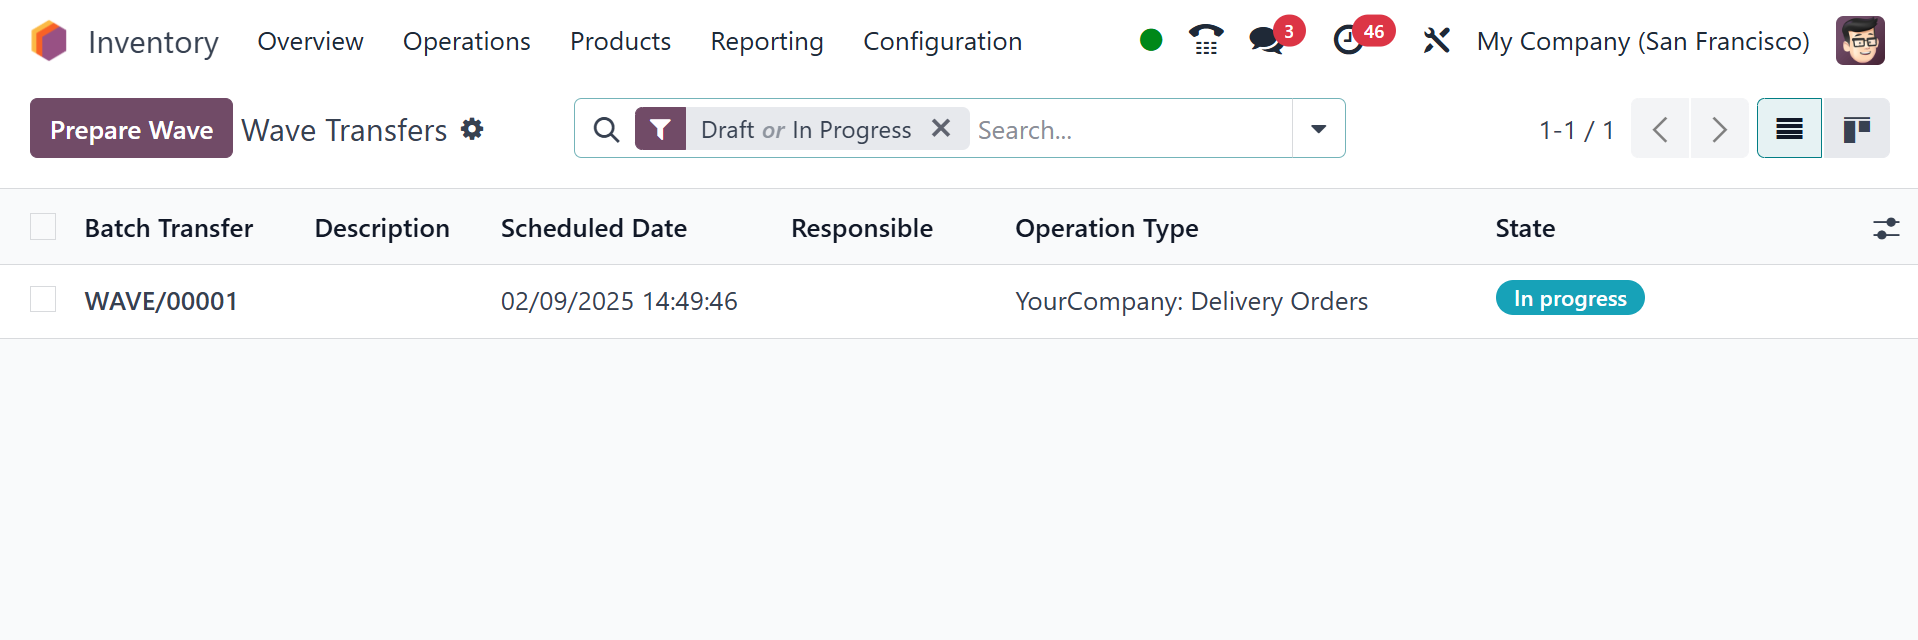
You can see the newly created
wave transfer from the Wave
Transfer platform in the
Operations menu.
The details of the Wave Transfer,
Scheduled Date, Responsible,
Operation Type, Company, and
State will be shown in the
preview of the list. A new
window will open when you
click on the Wave transfer to
confirm the transfer.
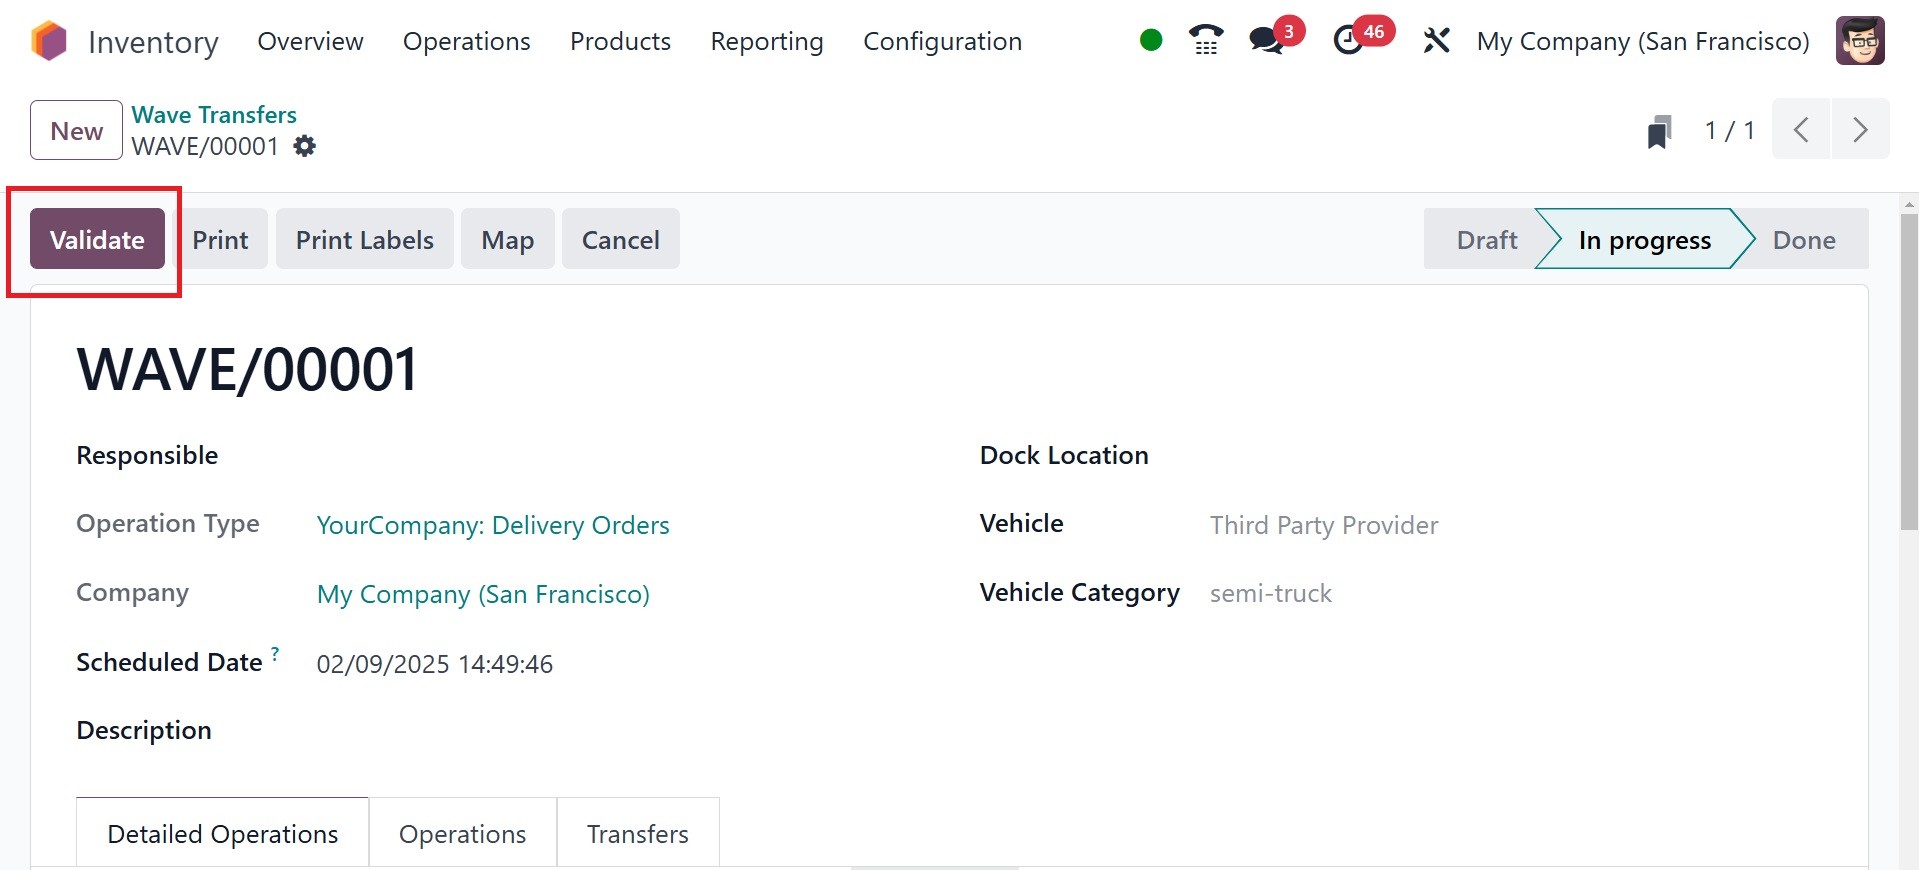
Click the Validate button to
complete the transfer.
You can also have the option of
automatic batch and wave
transfer under the operation
types option, as in the image
below.
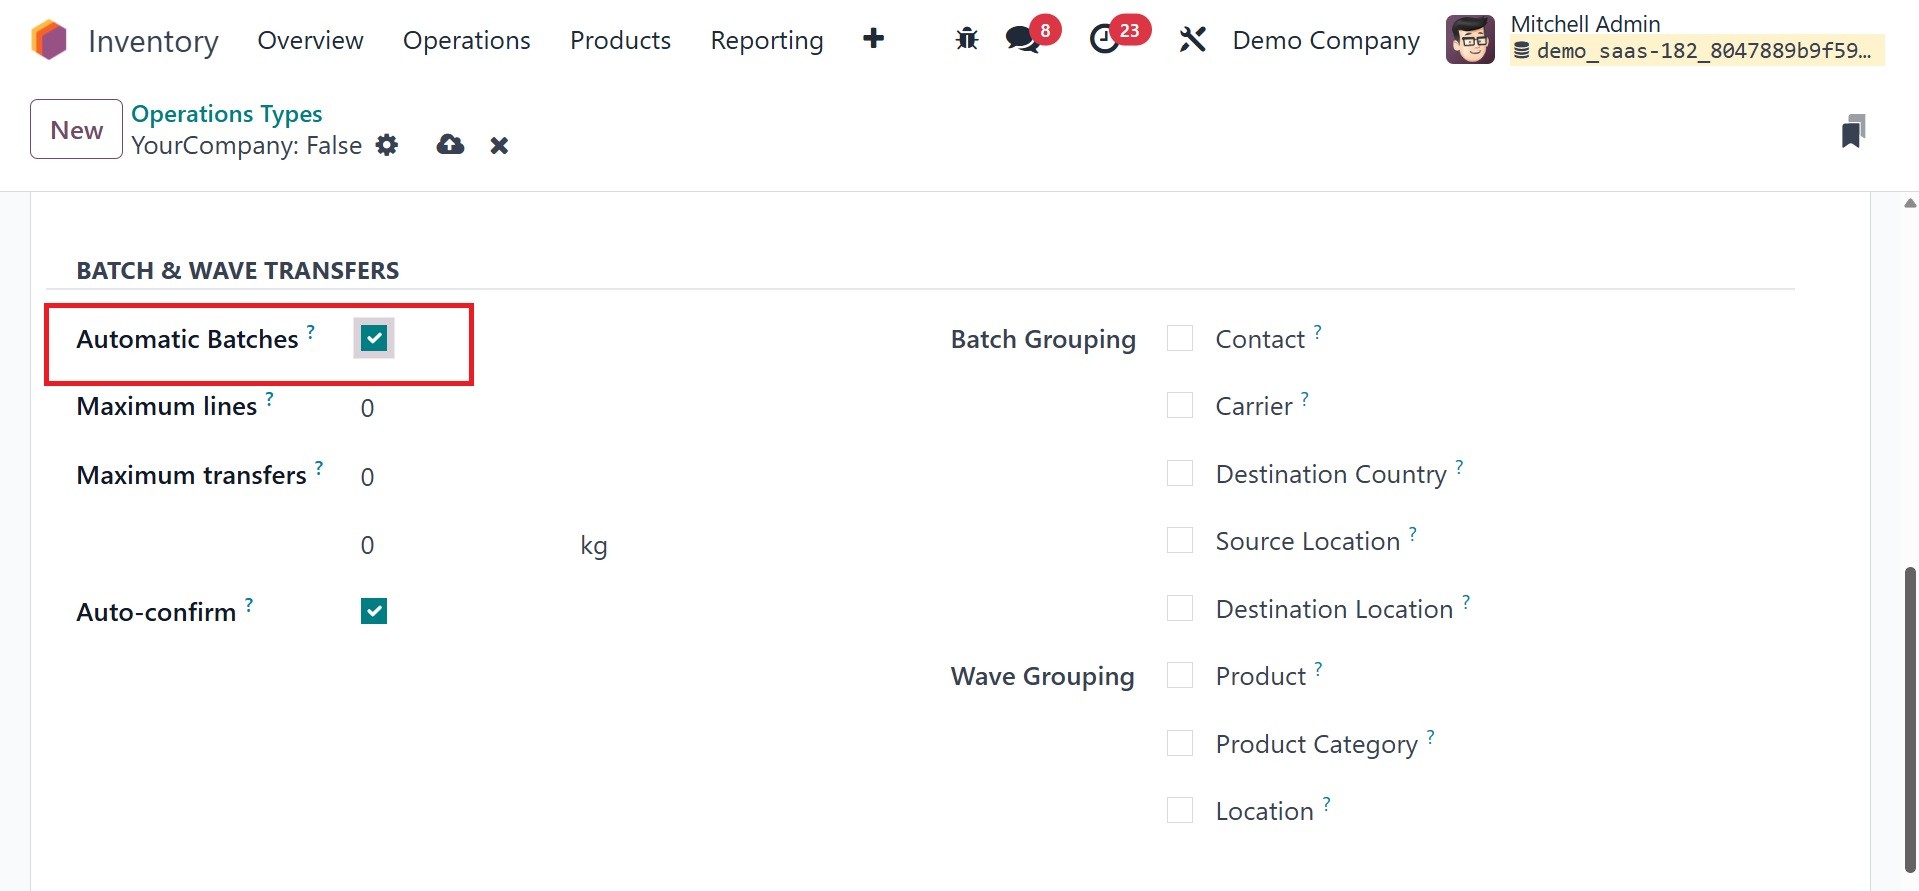
On activating the option, you are
provided with the options,
like maximum lines, maximum
transfers, auto confirm,
batch grouping, and wave
grouping, respectively.
Cluster picking is a warehouse
order fulfillment strategy
where pickers gather items
for multiple orders into a
single cart or container,
reducing travel time and
improving efficiency. It's a
derivative of batch picking,
but instead of sorting
products into separate
containers, pickers sort them
into different order packages
within the same cart.
3.9 Physical Inventory
According to the physical
inventories available in your
company currently, there can
be some situations when
certain changes in the
inventory will be required.
The changes you have done in
the inventory must also be
updated in the inventory
records for ensuring proper
inventory control. You can
make changes to the inventory
records in Odoo18 according
to the availability of
physical stock, with the help
of the Physical Adjustment
platform.
With Odoo18, you are able to
update your inventory
immediately from the window
of product description. On
every product, you will be
able to locate the Update
number button as indicated
below, in an effort to
properly record the number on
hand at your company's
warehouses.
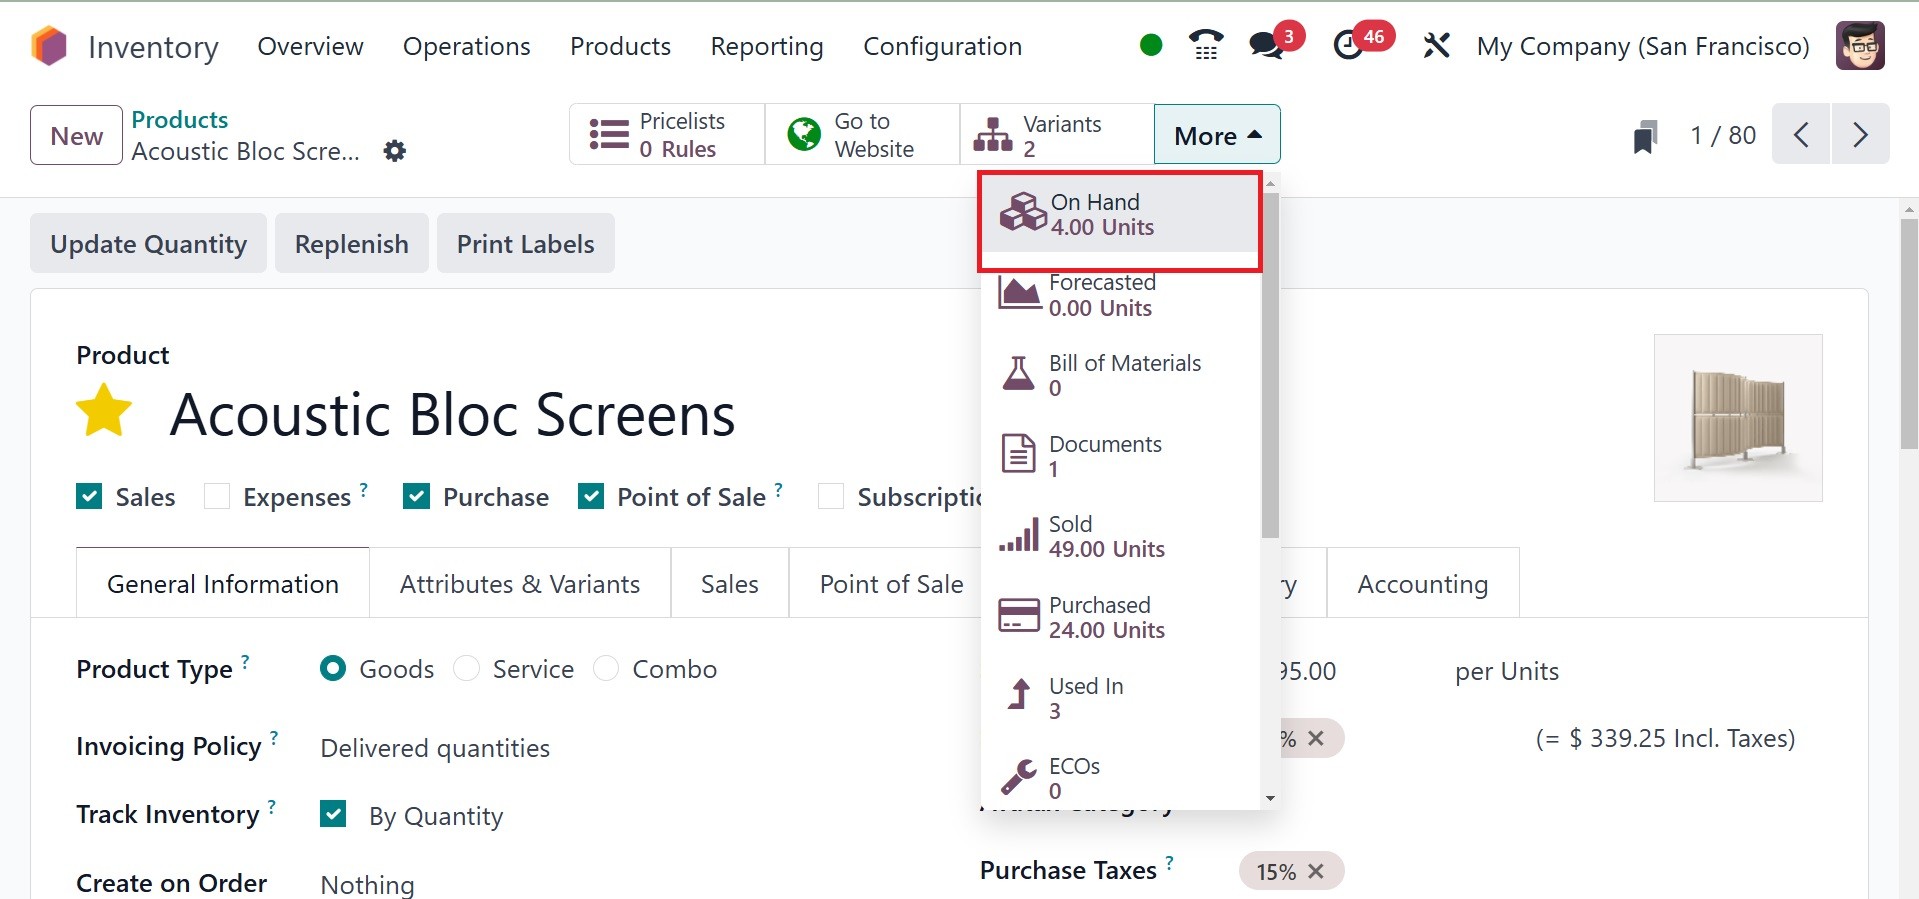
Click the smart button
(highlighted in the image) to
view the information on the
quantities On Hand on this
page. You can alter the
product's amount by clicking
the Update Quantity button.
To manage all of these inventory
revisions, you can find a
special platform called
Physical Inventory in the
Odoo18 Inventory module's
Operations menu.
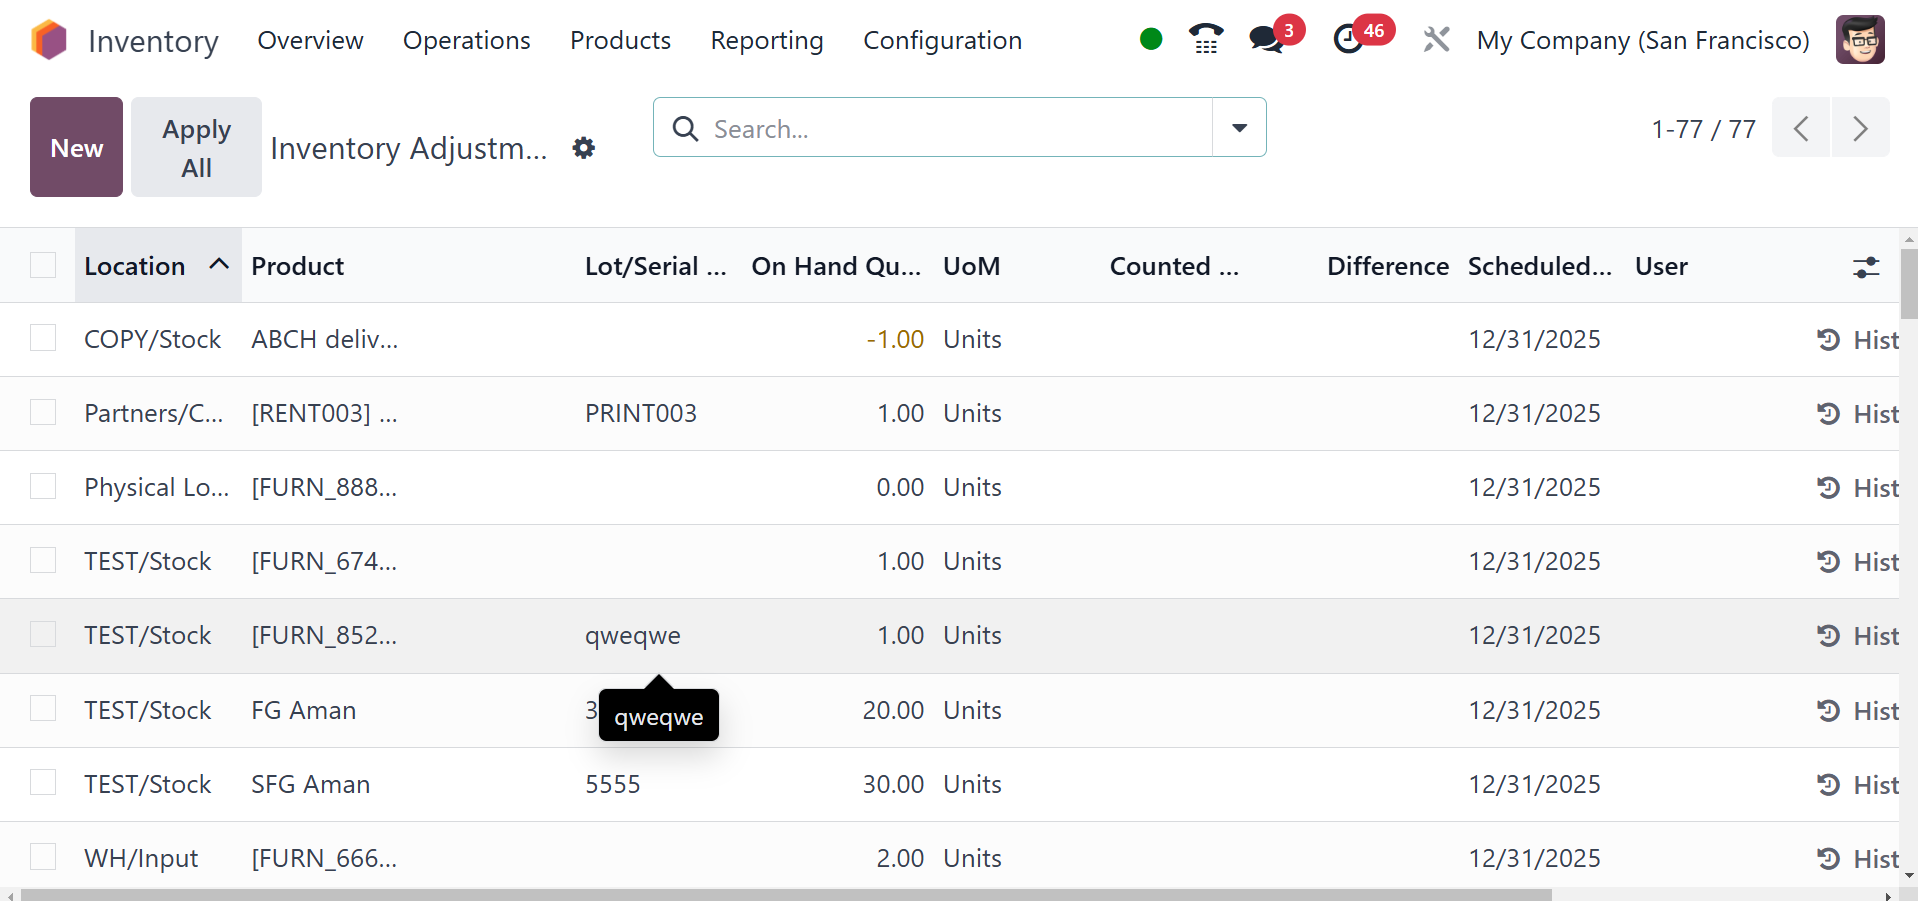
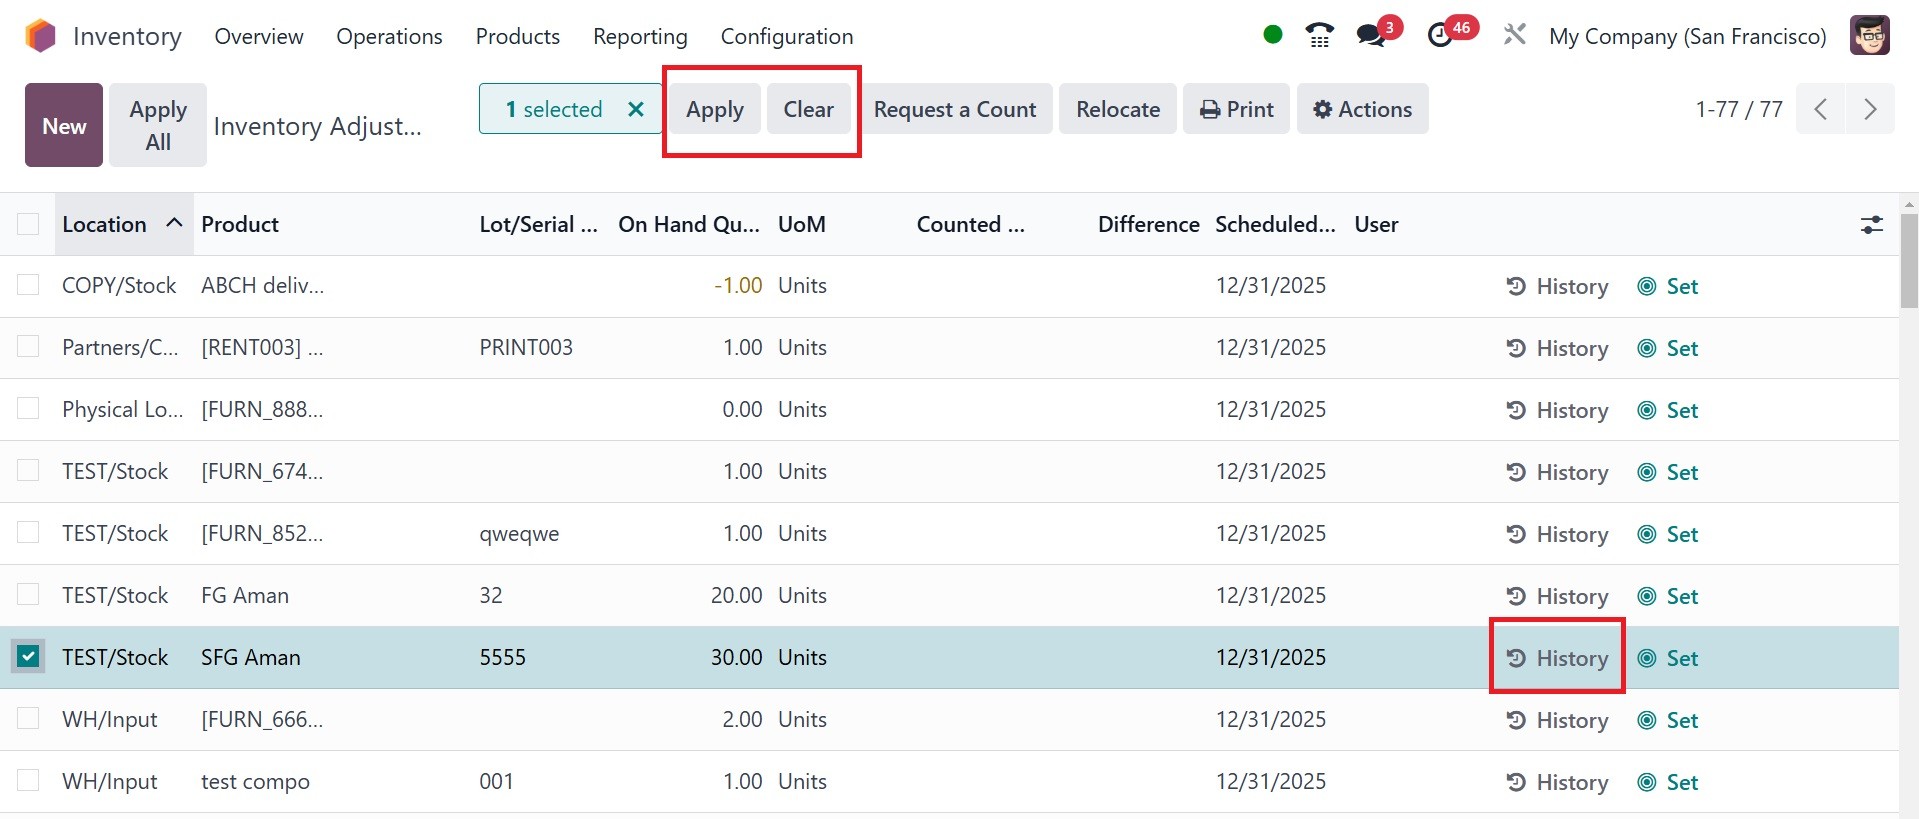
The records of each inventory
modification can be viewed on
this platform. You can update
the quantity of multiple
items at once with this
window.
Through this window, you can
retrieve details of Location,
Product, Lot/Serial Number,
Package, Owner, On Hand
Quantity, UoM, Counted
Quantity, Difference,
Scheduled Date, and User.
You can adjust the amount in
relation to the stock on hand
by clicking on the New
button. In this, you have to
enter the relevant field with
the Counted Quantities for
the given lot/serial number.
Odoo18 will automatically
show the difference between
the On Hand Quantity and the
Counted Quantity as soon as
you refer to the Counted
Quantity.
With the Apply option, you are
now able to update the
records with this inventory
change. You can choose the
Clear option in case no
inventory changes are needed.
The History button enables
users to see the history of
inventory changes done to a
product. You will be given
some additional buttons to
manage the available
inventory adjustments by
selecting them from this
window. To implement the
selected modification along
with the rest, press the
Apply button. You can reverse
all of the selected settings
simultaneously by clicking
the Clear button.
Click on the Apply button, as
shown in the figure, to
implement the updated
inventory changes for the
concerned products.
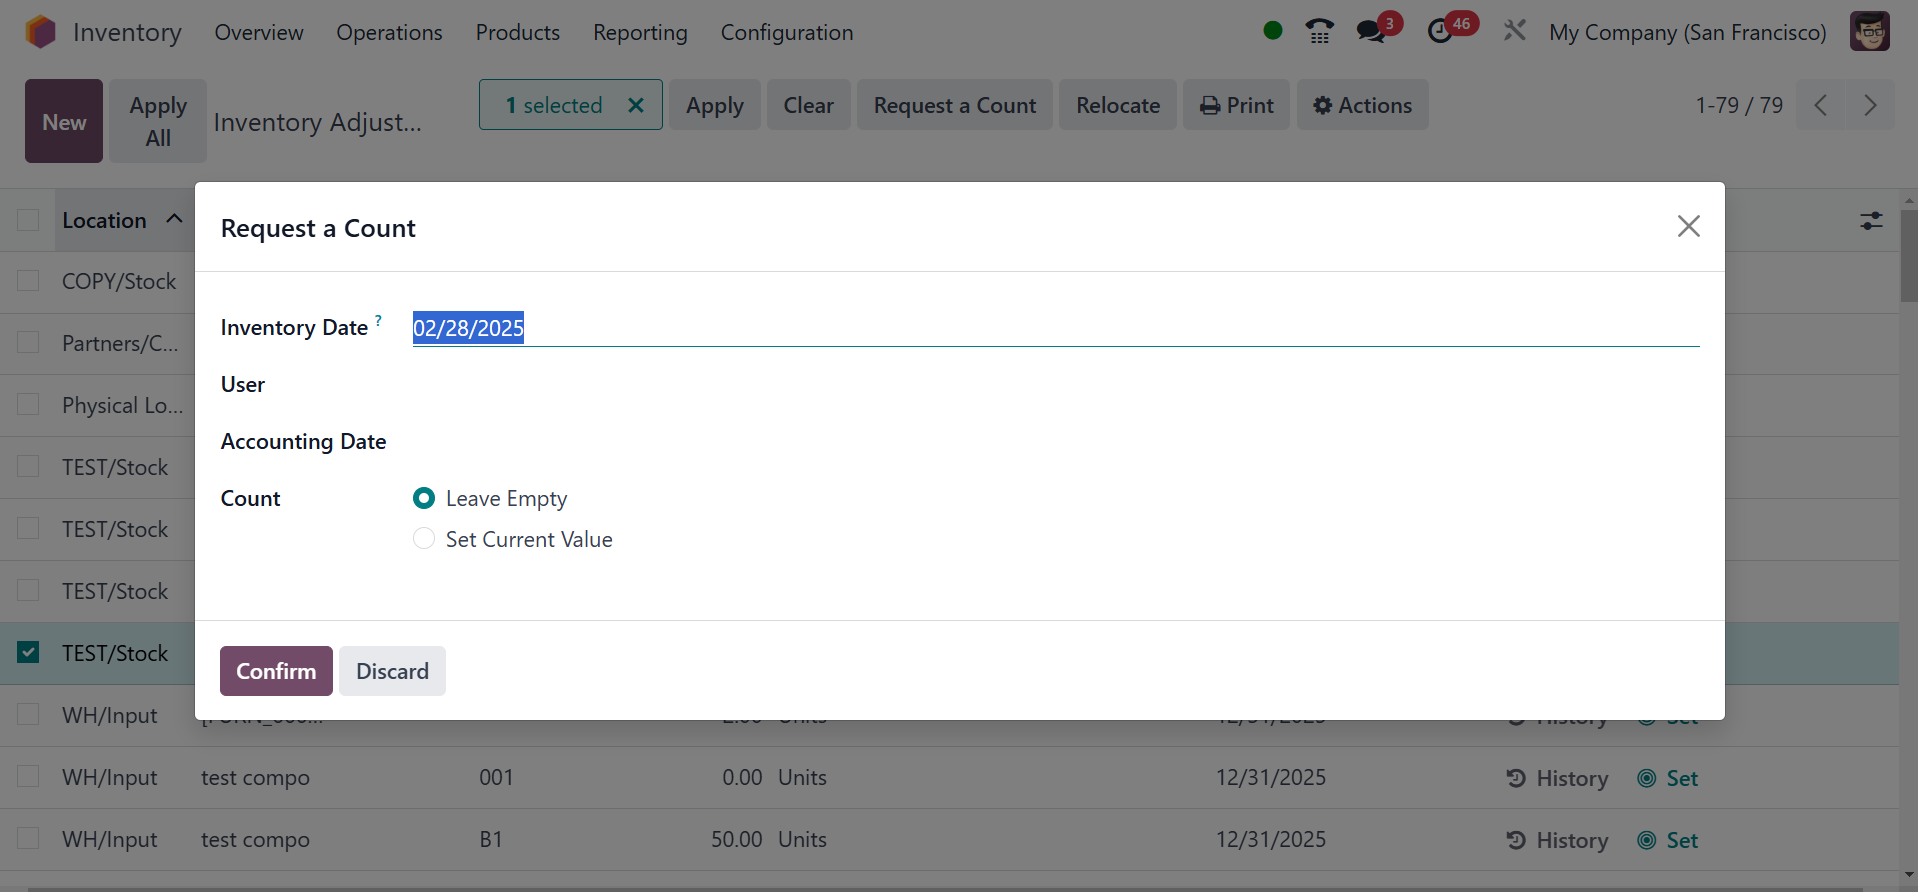
The Request a Count button
enables you to request a
count for the chosen
inventory modifications. You
can specify a date through a
pop-up window to have the
inventory delivered on that
day. You may leave the Count
field empty or modify the
current value according to
your requirements. Choose
"Confirm" from the menu. In
Odoo 18, we treat inventory
modifications in the same
way.
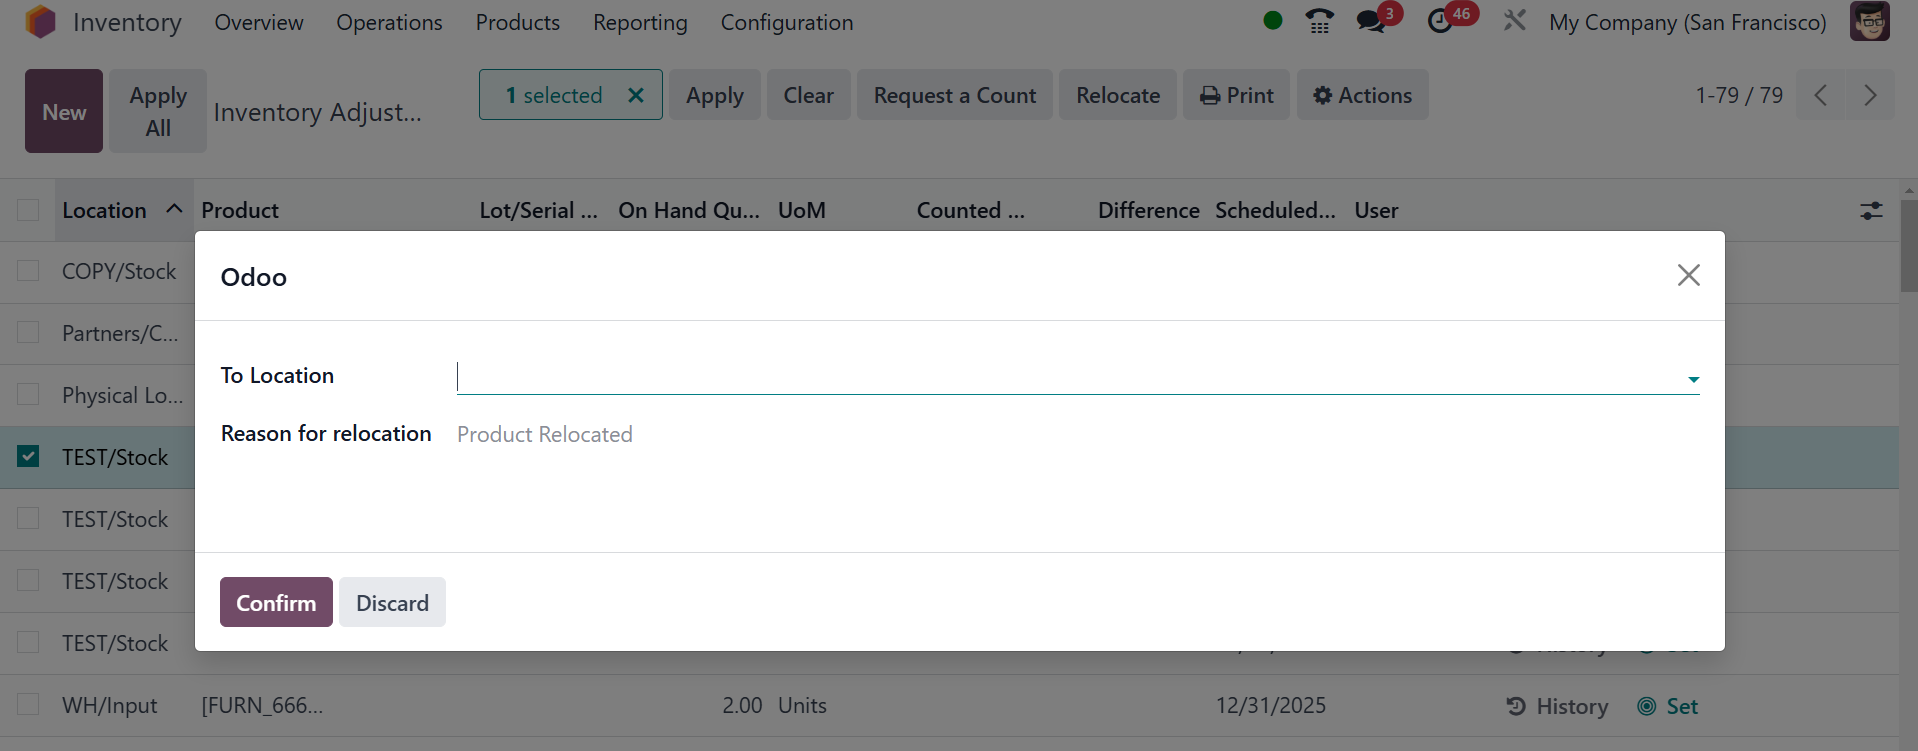
Moving products from one location
to another is made simpler
with Odoo 18's "Relocate"
option. In the popup box, you
can add To Location, To
Package, and explain why
you're moving. Then, confirm.
The module's Settings menu allows
you to choose the day and
month when the yearly
inventory counts will be
conducted.
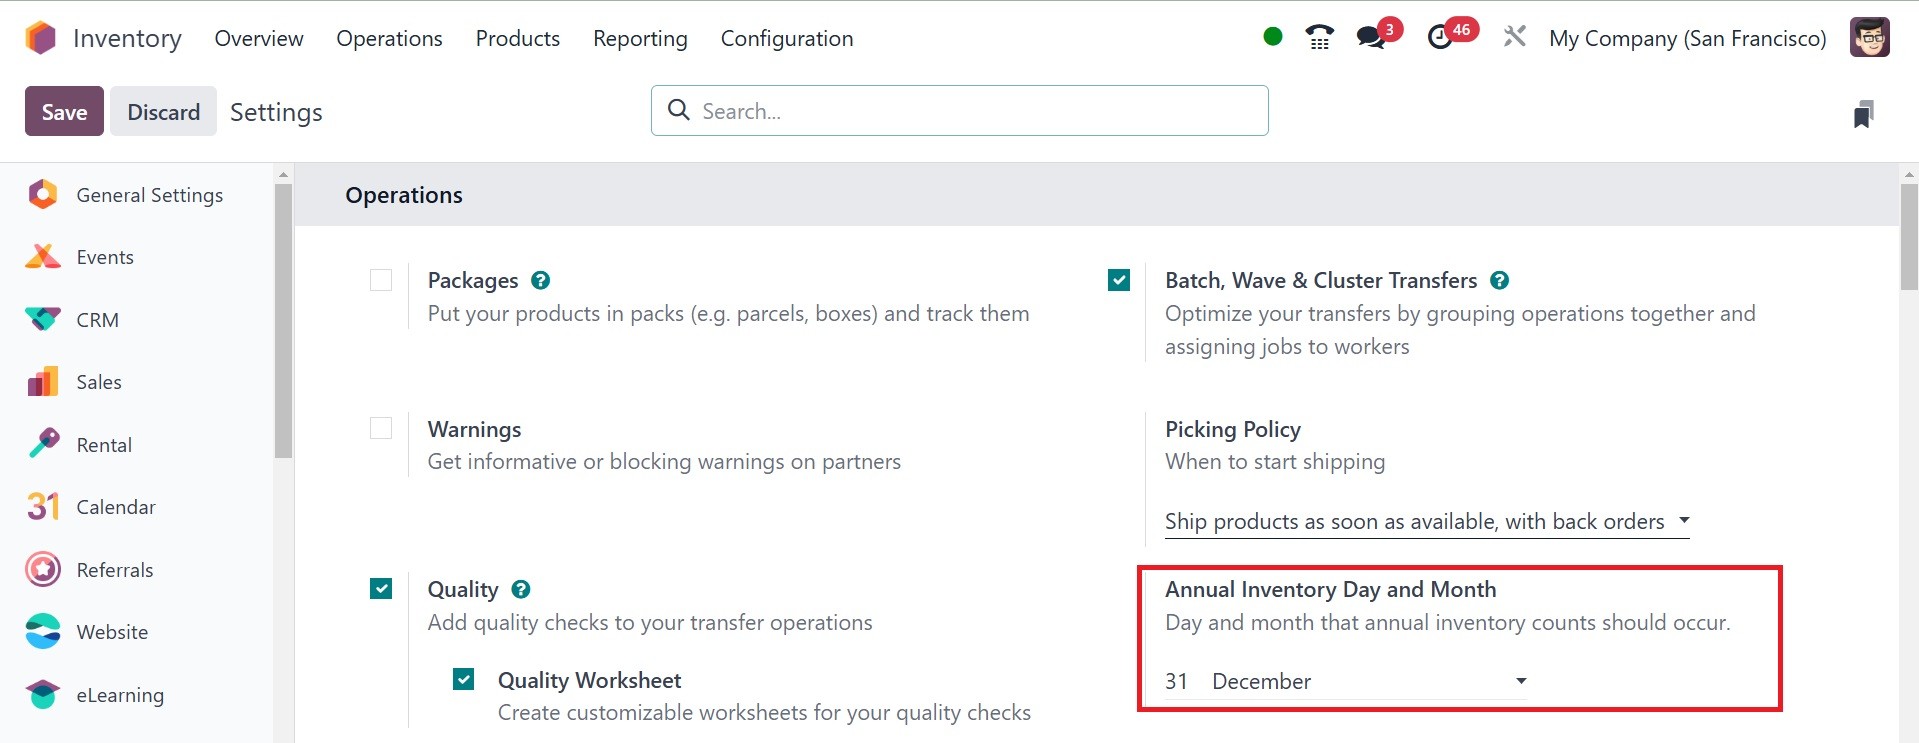
As shown in the example, you can
use the Annual Inventory Day
and Month option to choose
the day and month that yearly
inventory should be counted.
3.10 Scrap
Inventory considered scrap
consists of broken or
non-working products.
Products approaching or past
their expiration dates can
also be considered scraps.
There is a likelihood that
broken or expired products
will be found in checking the
inventory. We must dispose of
these items as soon as
possible since we cannot sell
broken or expired products.
The majority of the time, the
products with minor damage
are used in repair processes.
The reusable parts of the
scraps can be used during the
recycling processes. You can
save money and, above all,
the environment by using a
more intelligent scrap
management system. The
scraper that was removed from
the inventory can be
transported to a location for
scrap.
You can assign a location for
scrap from among the
available storage locations
in the warehouse. Let us find
out how the handling of the
location of scrap in your
storage is simplified by
Odoo18. The handling and
configuration of storage
locations in the Odoo18
Inventory have already been
discussed. You can configure
a location for scrap with the
same process. You can
accomplish this by going to
the Locations menu under the
Configuration menu. The
opening of a new window is
illustrated below.
Click the New button to create a
new scrap location.
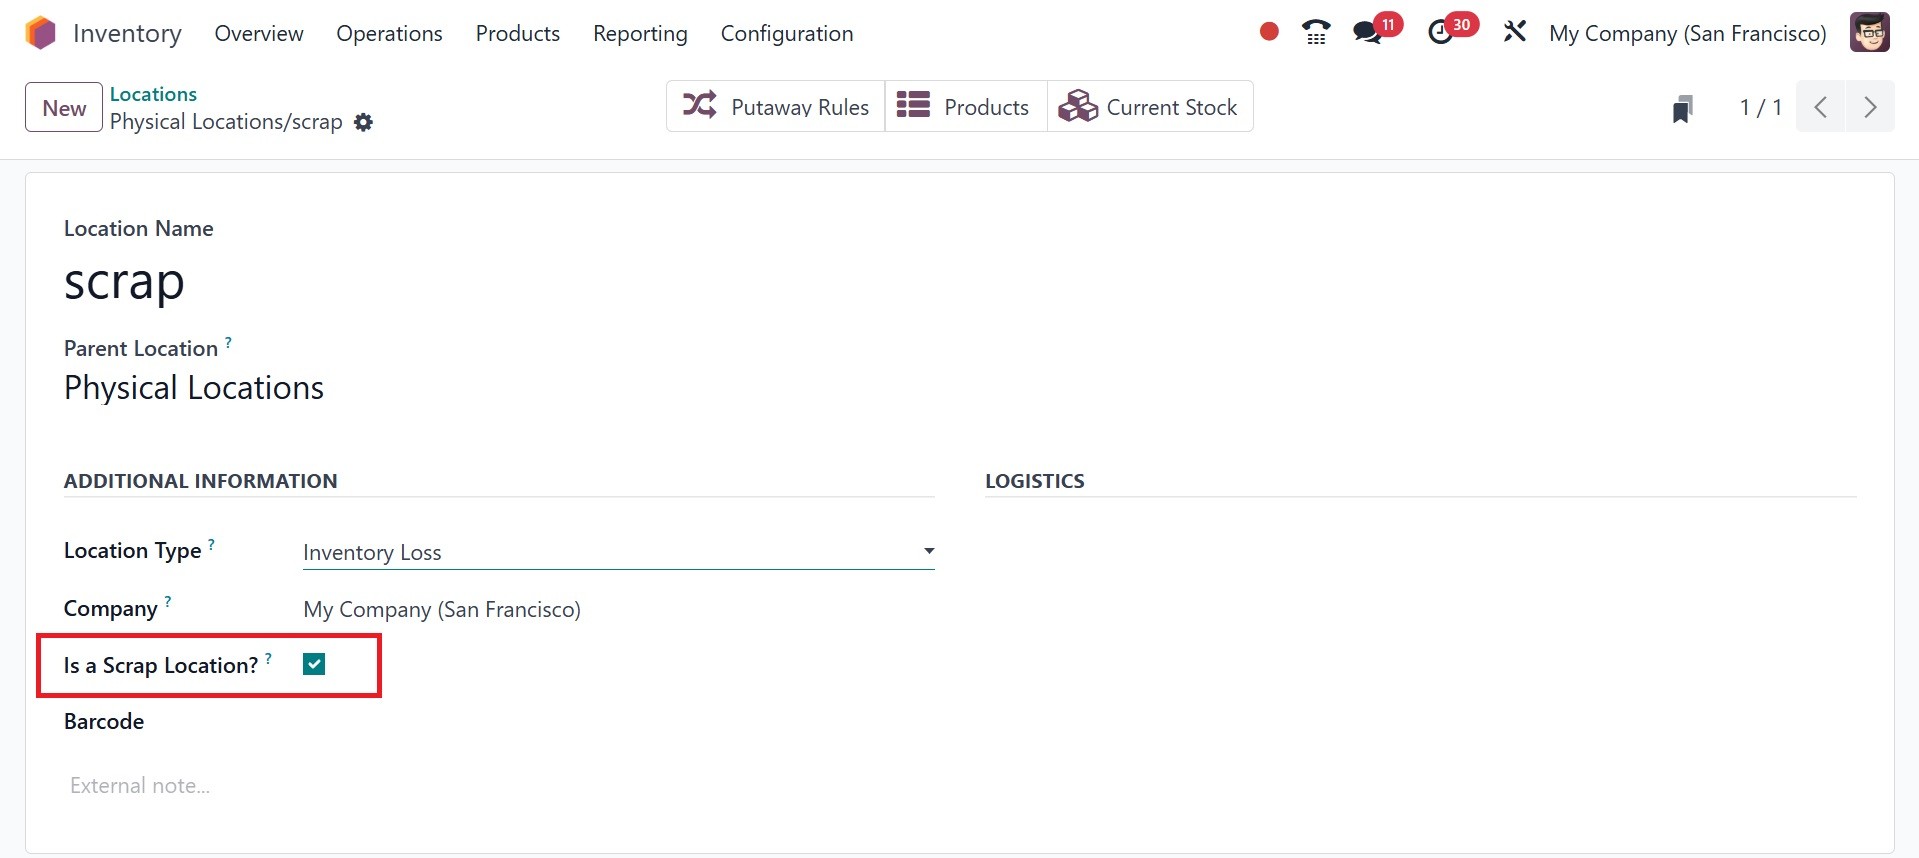
You can type the name of the
location in the field
available in the window for
the new place creation. In
this case, the location is
named Scrap Location. The
rest of the steps are
identical to those we
described in the previous
Location configuration
section. The most important
step is to enable the Is a
Scarp Location field in order
to handle this place as a
scrap location. You may click
the Save button once you have
inserted all applicable
details. In the storeroom,
we've completed assigning a
location for scrap. Through
the use of this method, more
scrap locations may be
established.
On opening the scrap option from
the operation tab, all the
fields for the name of the
scrap product, quantity,
package, and owner are
present here. The Source
Location of the product will
be shown. You can select the
scrap location from the
drop-down list in the Scrap
Location field if you wish to
relocate broken or expired
items there. The product will
be relocated to the specified
scrap location when you press
the Validate button. The
delivery orders will be
decreased by the quantity of
the scrap product. The new
page will be, as in the image
below.
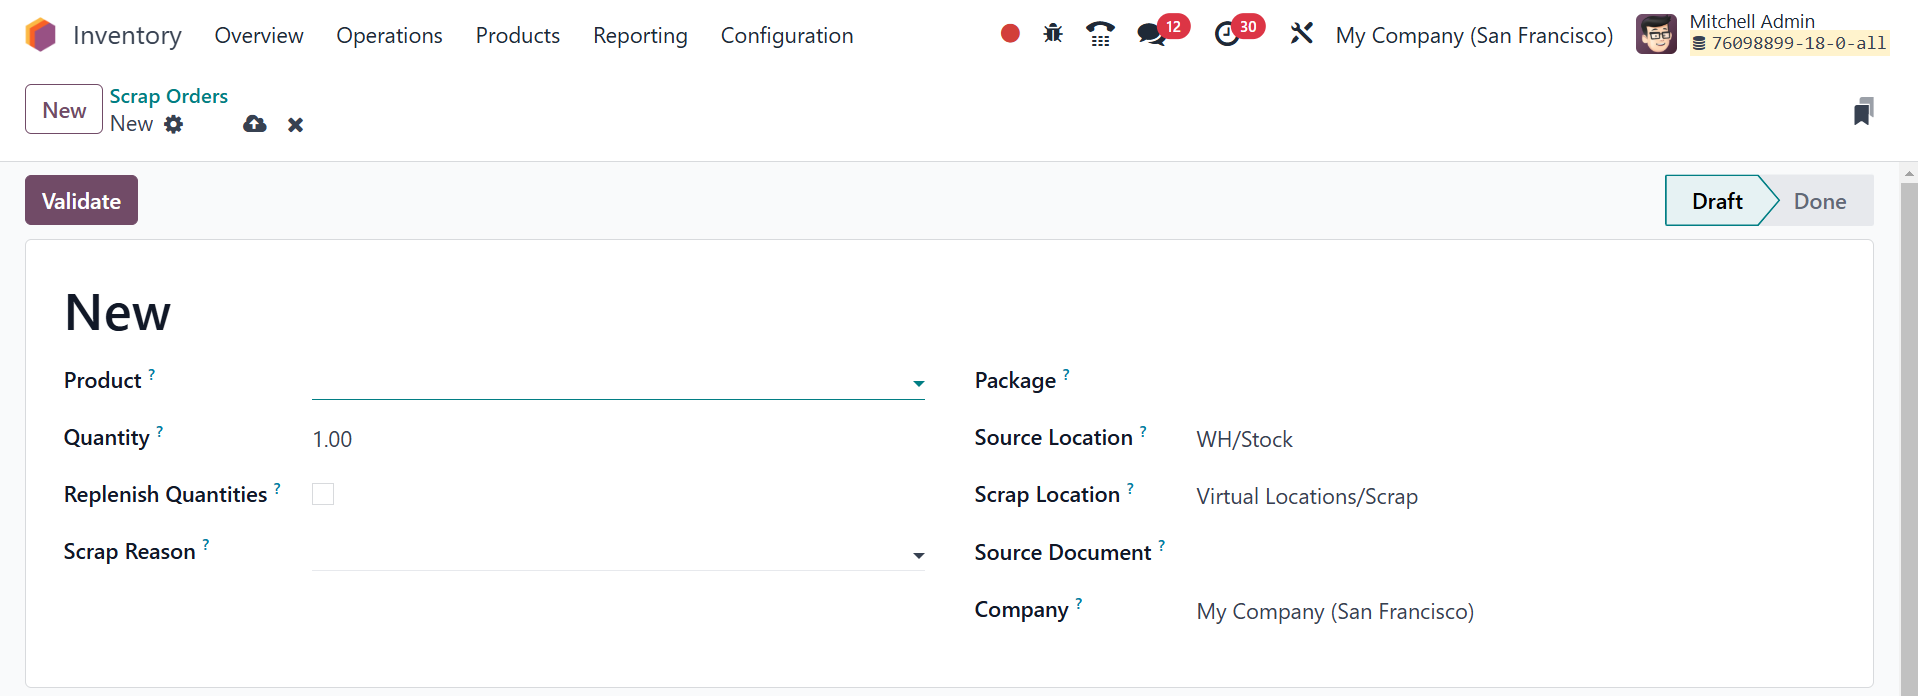
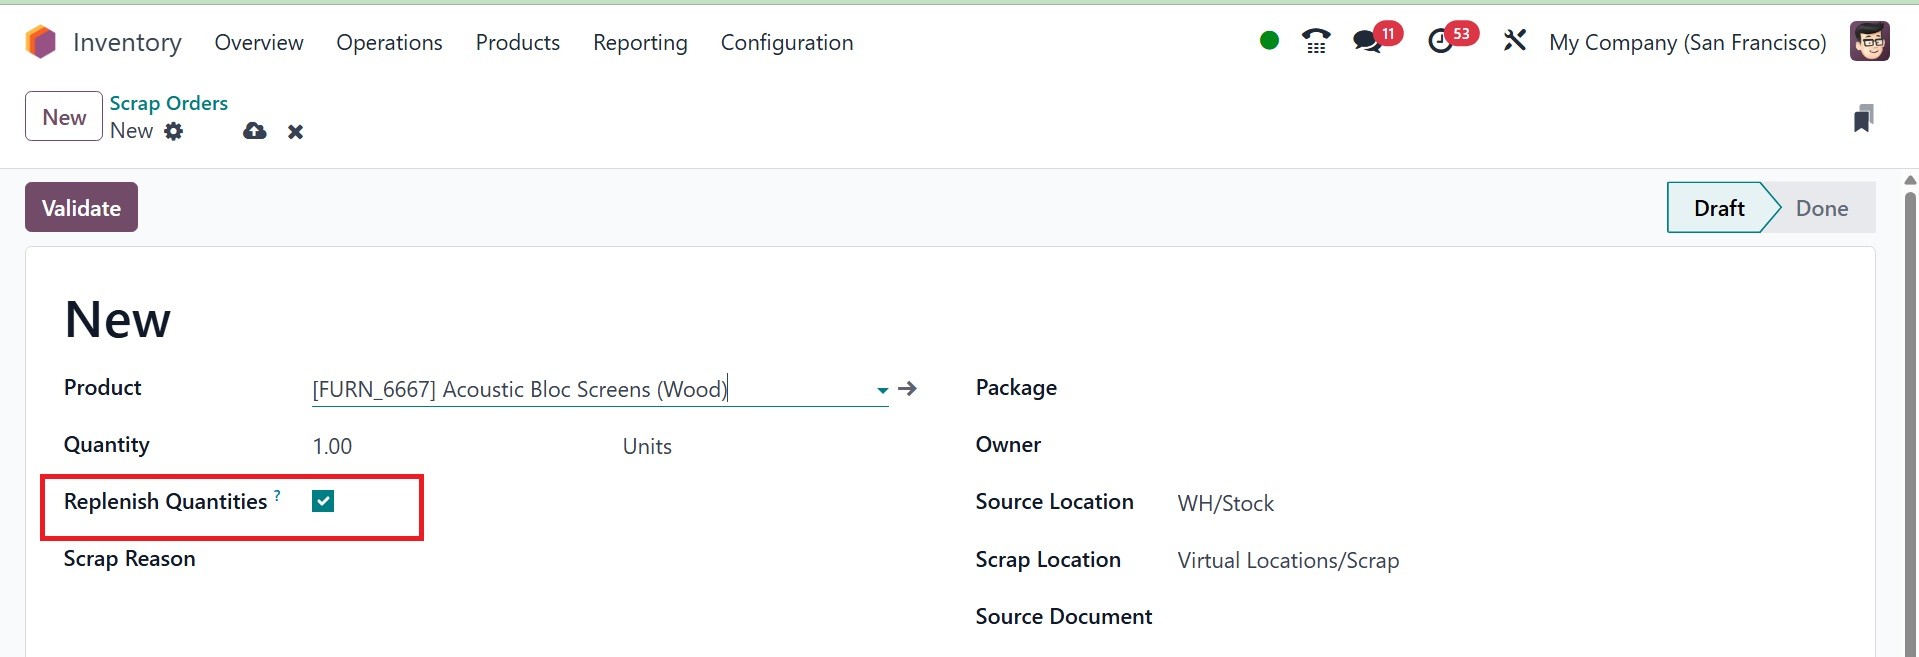
If a replenishment rule is set up
for the product being
scrapped, and if the product
should be replenished, tick
the checkbox for Replenish
Quantities.
The pre-set and programmable
options under the Filters and
Group By features can be used
for sorting.
3.11 Landed Costs
The extra amount the company has
to pay for a product at the
time of purchasing is
referred to as the "Landed
Cost." It involves shipping,
handing charges, import duty,
and various other expenses.
All the extra costs are being
added with the actual cost of
the product to arrive at the
selling cost. Various
companies will adopt a
different approach based on
their organizational policy
to compute the landing cost.
You can calculate the landing
cost and split it over each
of the quantities of the
products in the Odoo18
Inventory module to revise
the selling price.
To enable the Landed Costs
feature as shown in the
picture below, go to the
Settings menu.
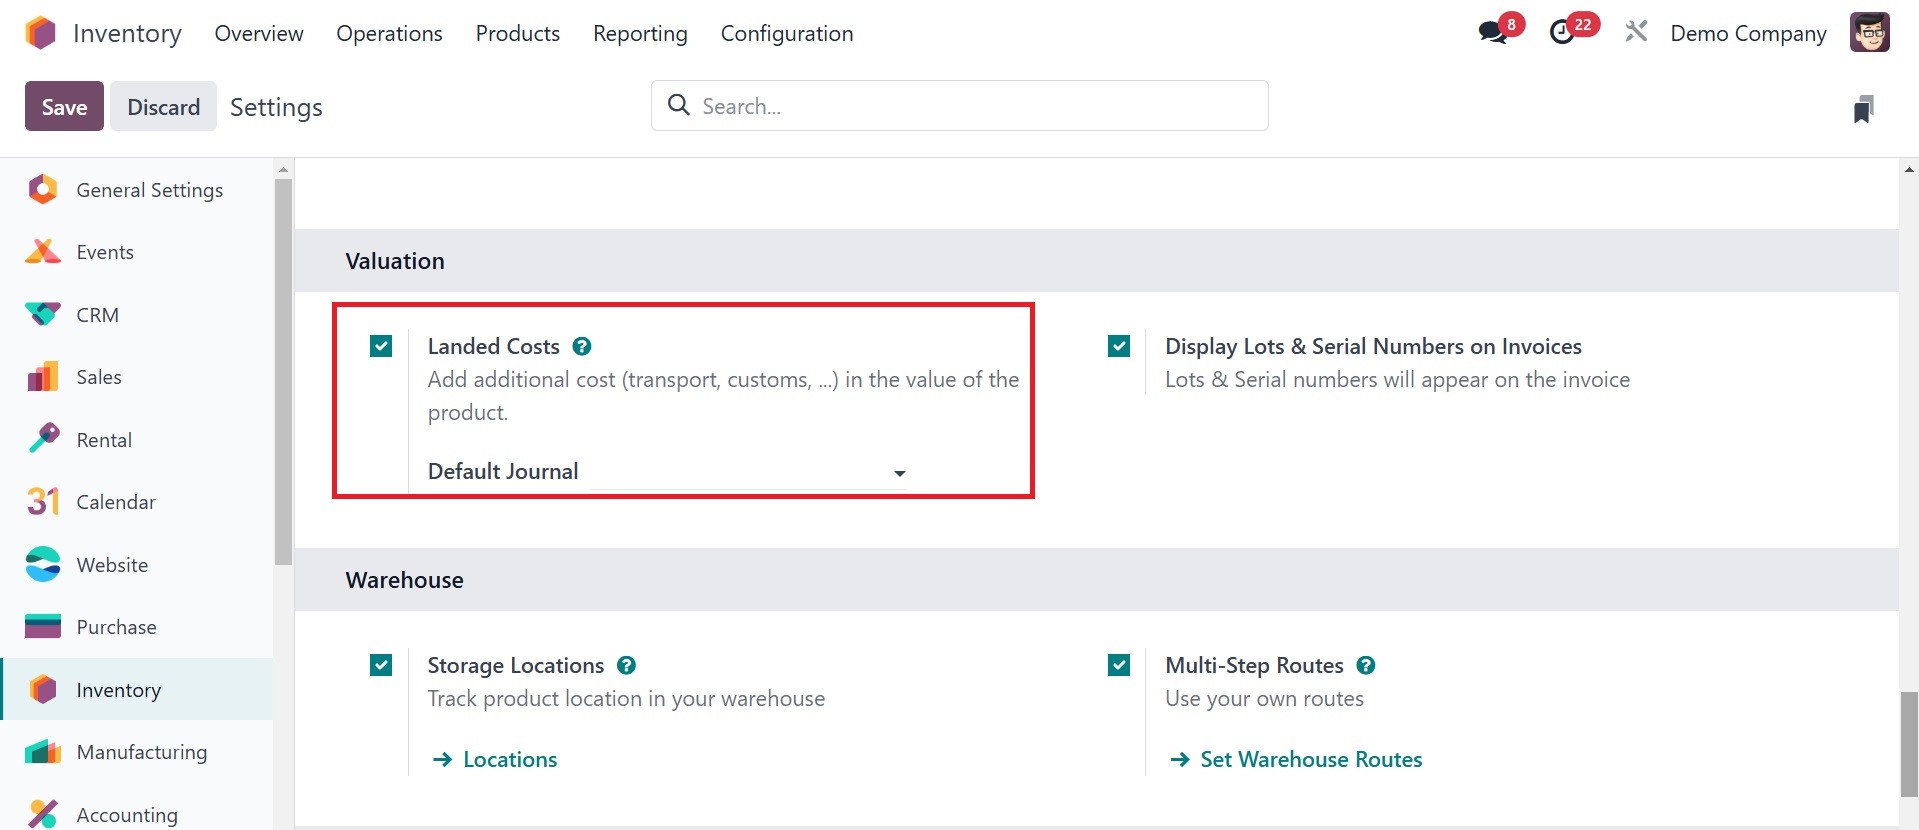
By enabling this feature, you can
include user-defined landing
costs on your items. You can
first build a buy order of
some items under the same
product groups and mark the
order to better understand
the landed cost's
functionality. On products
with an AVCO or FIFO costing
method established, you can
define landing costs.
Inventory valuation of such
products should be Automated.
This is the condition for the
landed cost that you need to
account for when tailoring
it.
Under the Products line, you can
view the unit costs of the
products as you buy them.
Your purchase will be
finalized once you press the
Confirm Order button. When
you press the Receive button,
these items will be posted to
your inventory records.
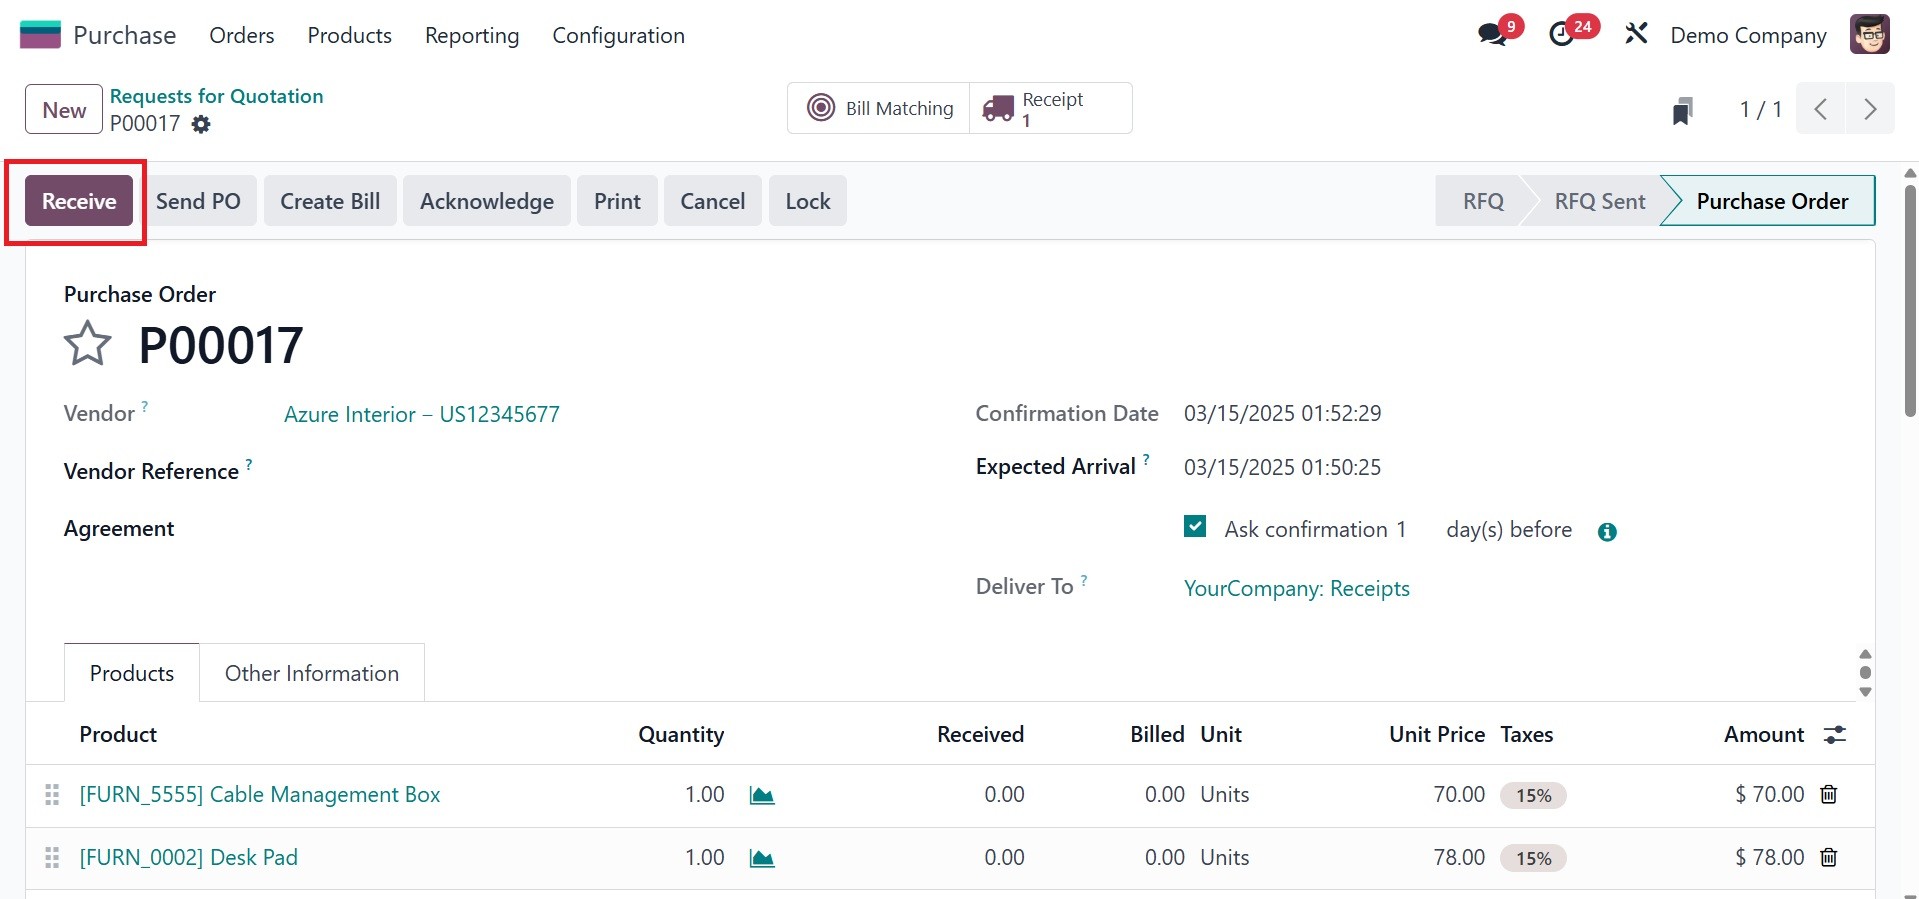
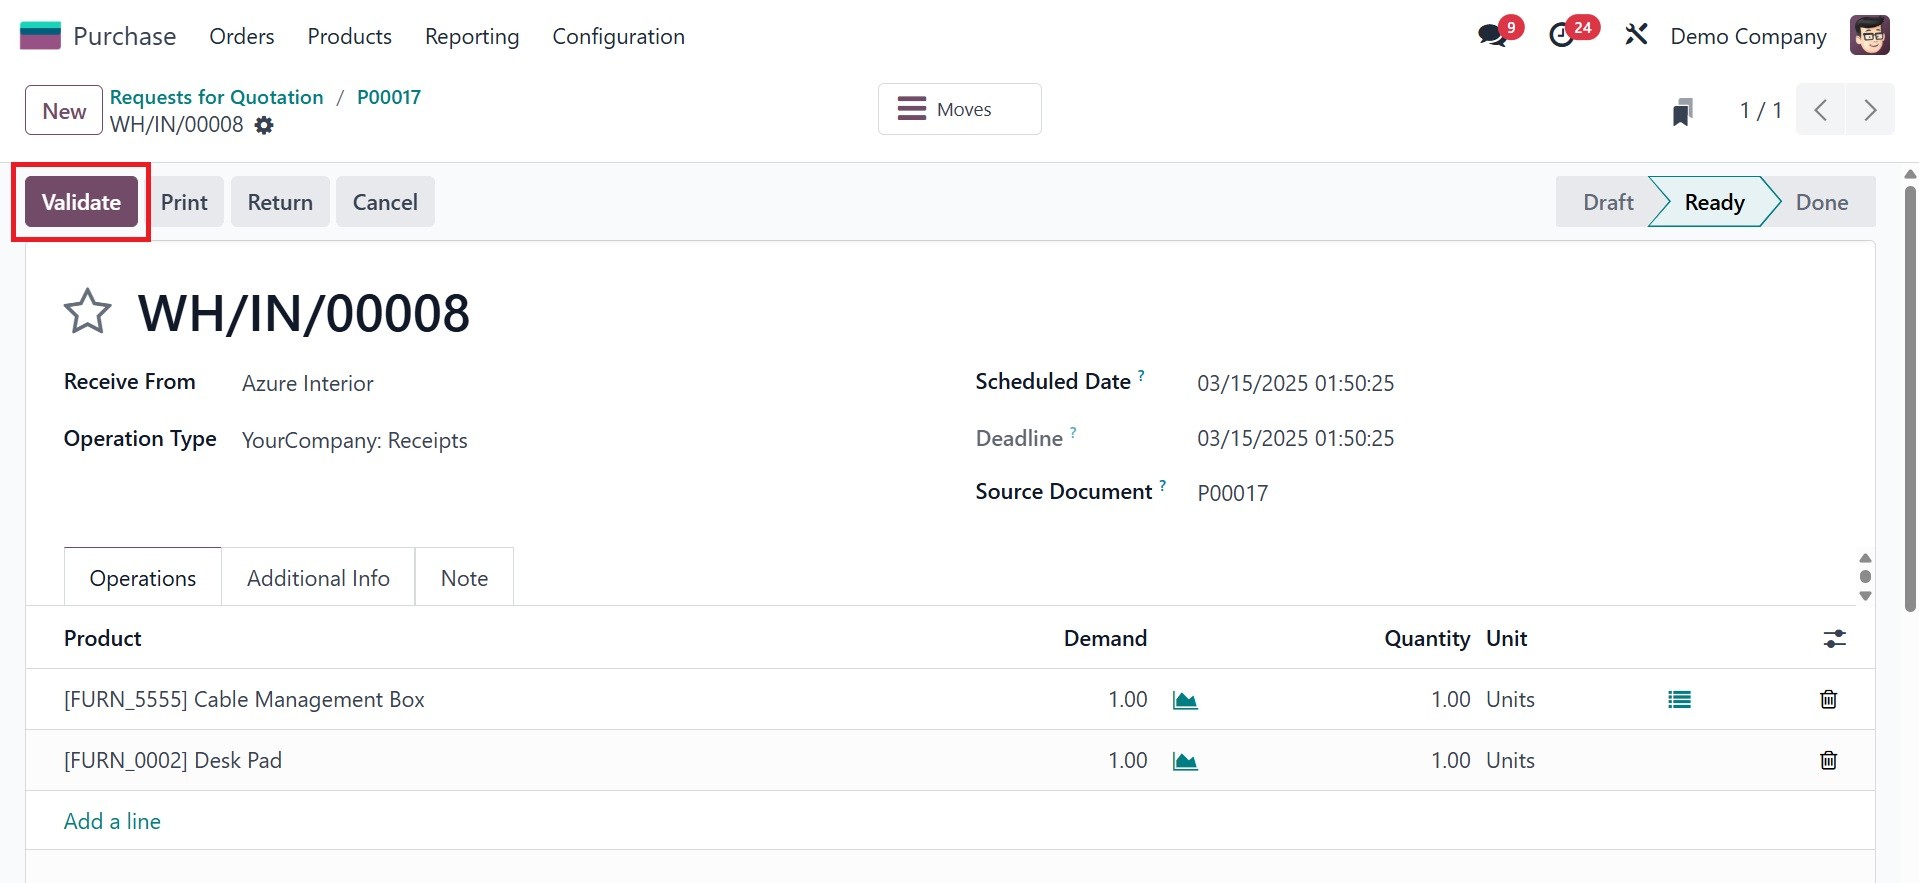
You may now retrieve the items in
inventory. Through clicking
on the Validate button, you
can confirm whether the
products have been
transferred successfully. The
goods that were bought are
now being stored in the space
marked on the receipt. When
you are selling these items,
you may add landed cost to
the price.
Think about shelling out a little
cash for the transfers so you
can send these products to
where you need them. You can
include your lost money in
transfers as an additional
charge on merchandise. You
can make charges on the
products utilizing the landed
cost feature in Odoo 18
Inventory.
Do this by visiting the Inventory
module's Operations menu. As
demonstrated in the
screenshot below, the Landed
Costs platform is accessible.
You are able to retrieve the
details of the previously
added landed charges from
this window. You are able to
create a new landed cost by
clicking the New button.
You can place the date of
creation in the respective
field here. On transfers or
manufacturing orders, you are
able to specify the new
landed cost. As we need to
add landing costs on
transfers, we are able to
select Transfers in the Apply
On field. In the Transfers
section, you can provide the
receipt ID we generated
above. The fields there
enable you to enter the
Journal of the goods,
Company, and Vendor Bill.
With the Add a Line button,
you can specify the extra
costs in the Additional Costs
tab.
In this case, we considered table
top to be an independent
cost. When setting up
transportation as an extra
charge, keep in mind to save
it as a service product, as
shown in the figure below.

After you've indicated the
Product, Description, and
Account details, you may
select the relevant Split
Method.
How the Split Method will split
this landing cost amongst the
products enumerated in the
transfer receipt will be
determined by the Split
Method. As per your company's
policy, it can be set up in
the form of Equal, By
Quantity, By Current Cost, By
Weight, and By Volume. In our
case here, we may use the
Equal split option. Hit the
Compute button to calculate
the landed cost.
With the Validate button, you are
now able to validate the
landing cost. This cost will
be included in the goods'
selling price. This method
might increase your sales
profit by establishing landed
expenses for your products.
3.12 Replenishment
An essential inventory process
that assists you in
maintaining an appropriate
quantity of items in your
inventory is replenishment.
You must stock the inventory
according to demand to ensure
a continuous supply of items.
Here, the Odoo18 ERP System
provides instant support to a
company's replenishment
processes. Replenishment can
be performed in two ways. You
can use both the product
management window as well as
the Replenishment module of
the Inventory module for
stocking products.
The Operations window in Odoo 18
Inventory module provides you
with the access to the
Replenishment management
window. There is a list of
preloaded replenishment
orders on this advanced
platform.
The Search Box is available by
which individual
Replenishment orders can be
searched. Pre-selected and
selectable Filter options
available offer an easy
method to recover required
information. In combination
with the Group By facility,
it can be easy to group
orders on Location, Product,
as well as on Category. On
the left part of the window,
you'll notice a custom sort
panel, by which it's possible
to order information as per
Locations.
You can separate all the
replenishment requests and
manual replenishment with the
Trigger option.
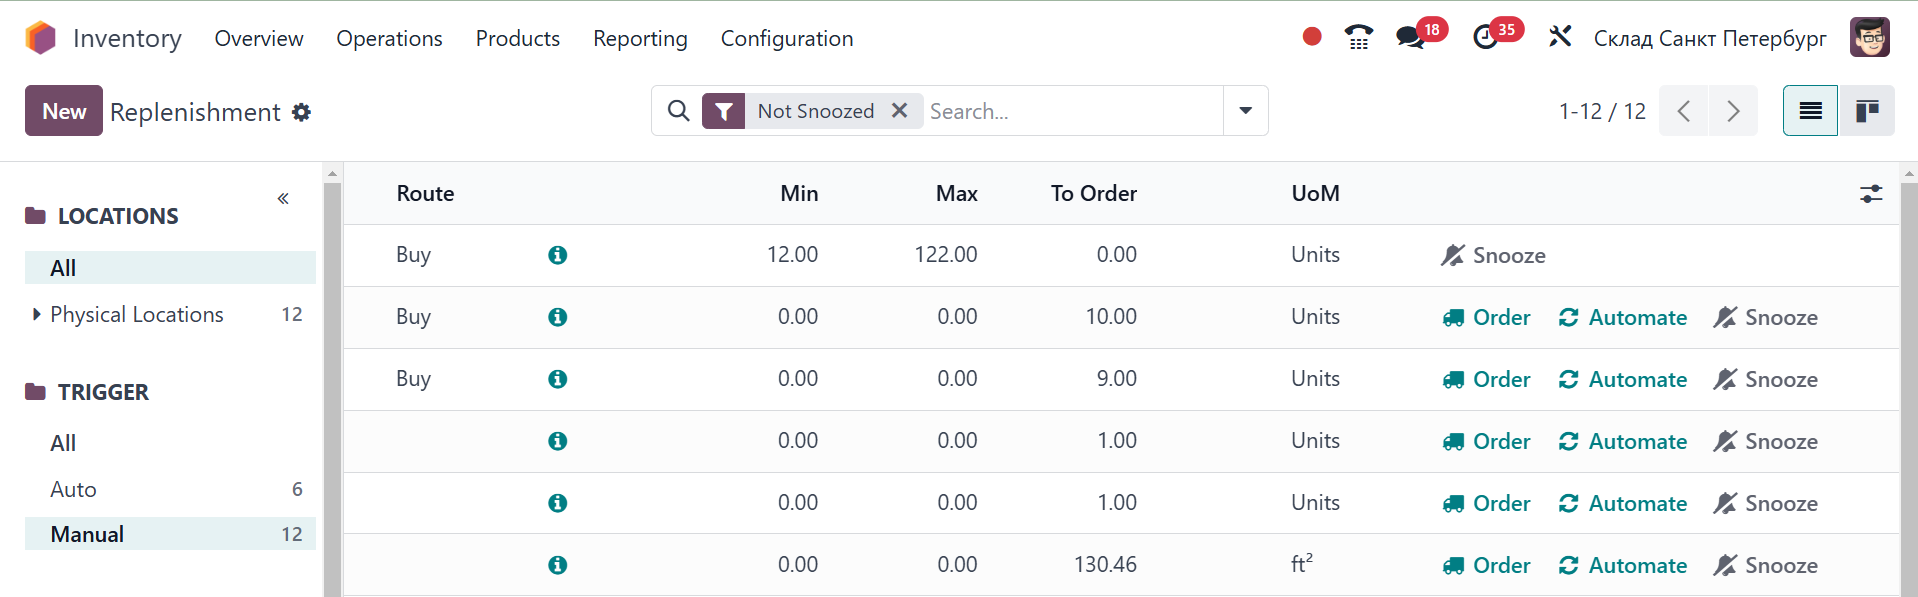
The list preview includes the
following information:
Vendor, Forecast, Preferred
Route, Location, On Hand,
Minimum Quantity, Maximum
Quantity, To Order, and UoM.
You can manually create a
fresh refill by clicking the
fresh button. Details on a
product's refill will be
displayed in a new line.
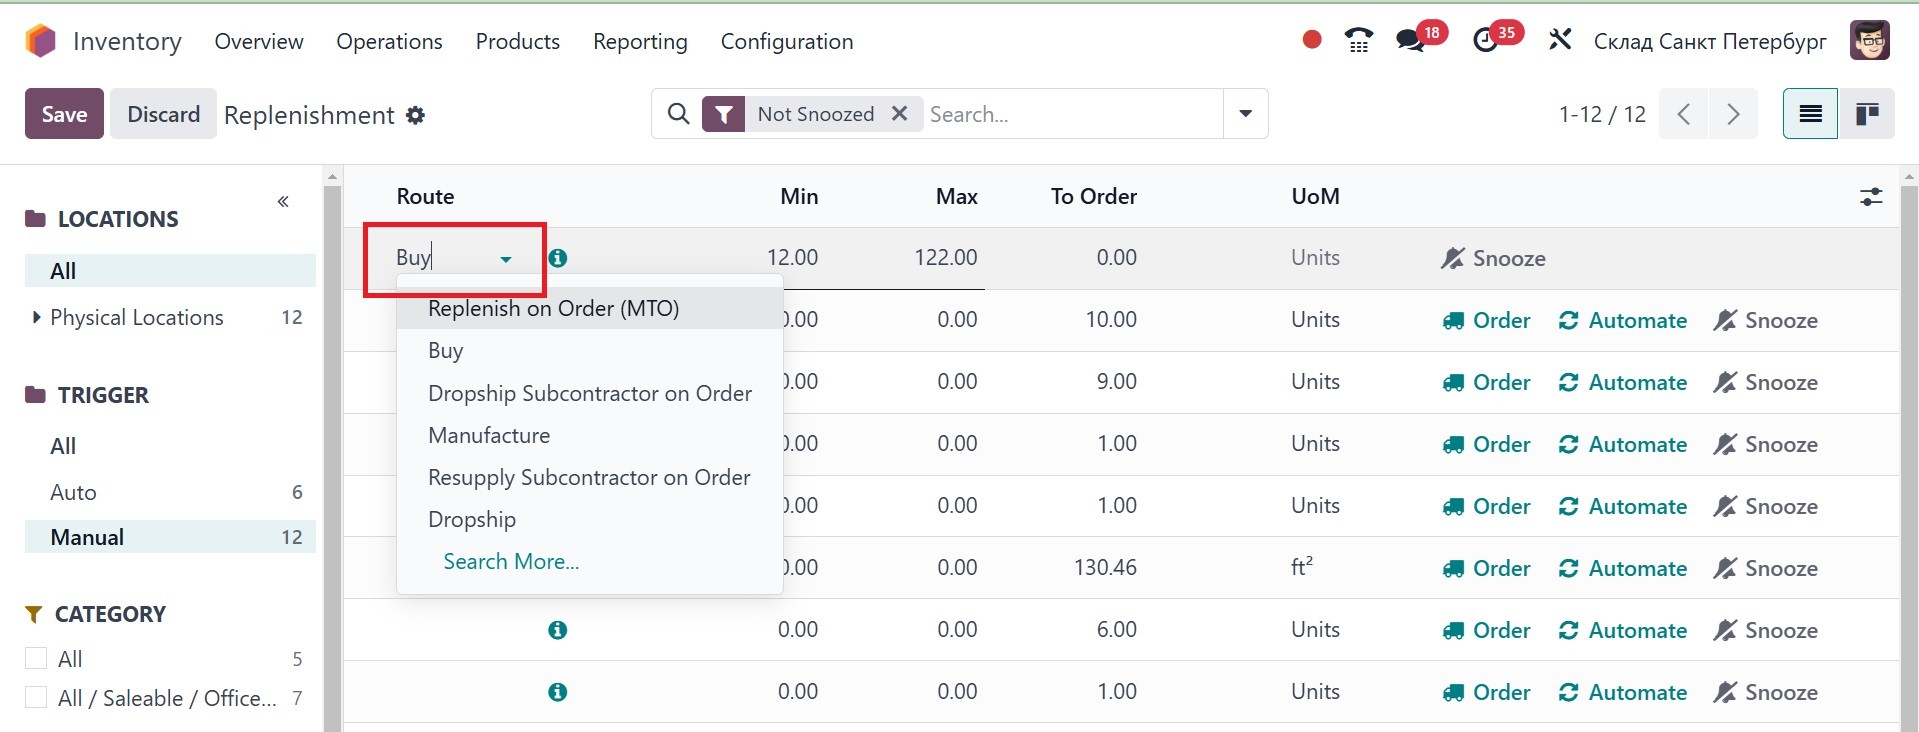
The product's Location, On Hand,
and Forecast will
automatically be filled in
the respective fields when
you enter the product name in
the specified field. The
drop-down option that is
offered enables you to select
the Preferred Route.
The minimum and maximum levels of
the product that need to be
replaced should then be
stated. You will be presented
with two choices to place the
order for the product, like
Order Once and Automatic
Orders, as soon as you enter
the To Order quantity. You
can easily create
replenishment by creating a
request for quotation by
choosing the Order Once
button. The replenishment
orders will be processed
automatically once you click
the Automatic Orders button.
With the use of the Snooze
facility, you can delay the
process for a certain period
of time.
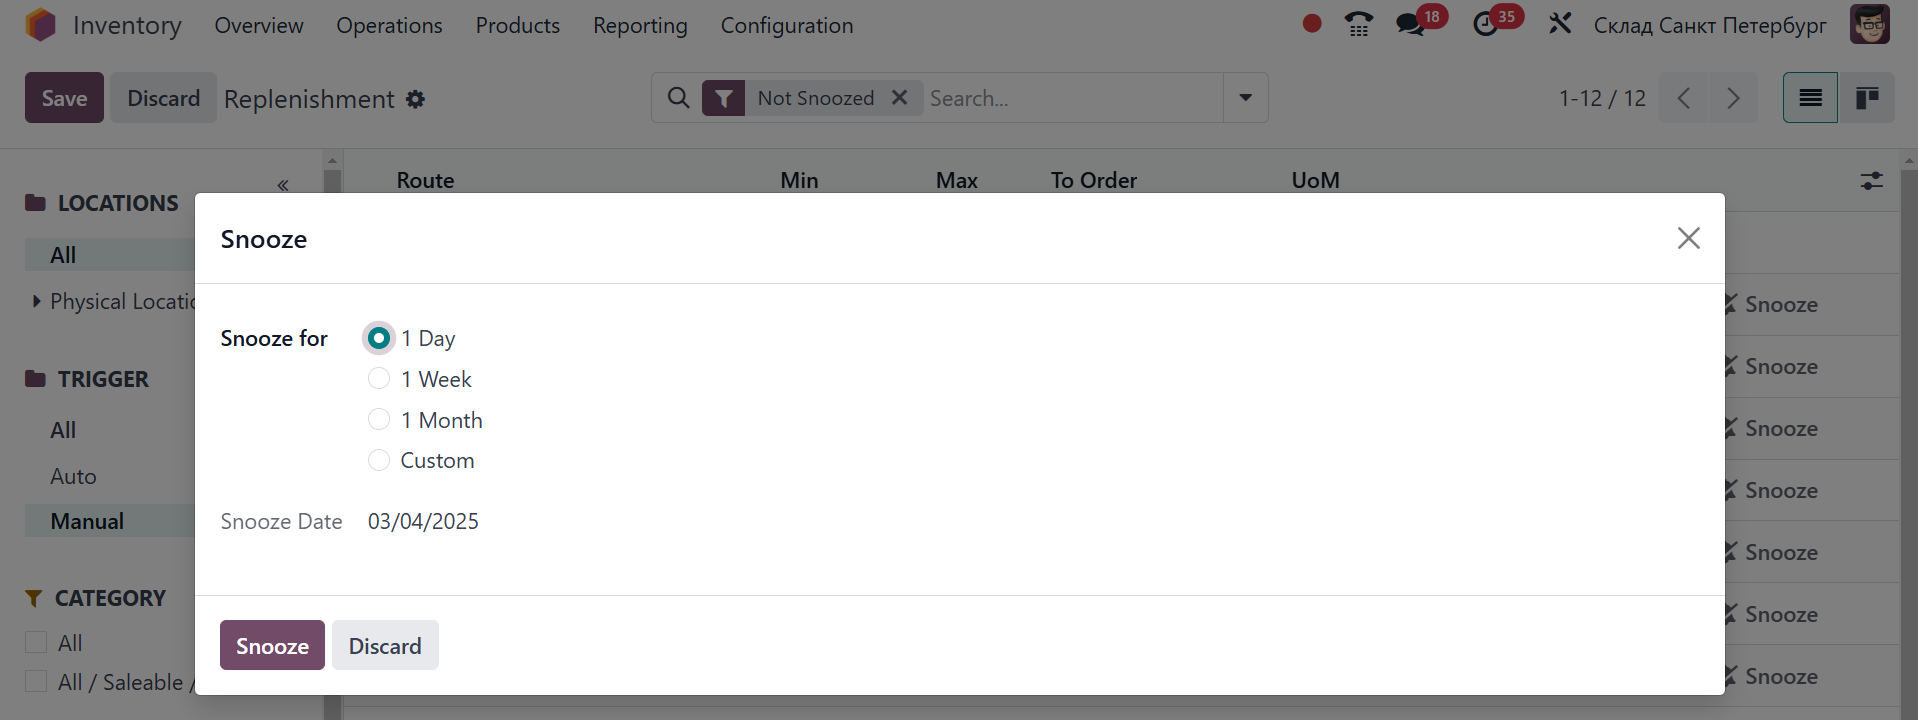
You can choose to delay the
process for a day, a week, a
month, or a custom period of
time with this option. You
can also set a Snooze Date on
this pop-up window.