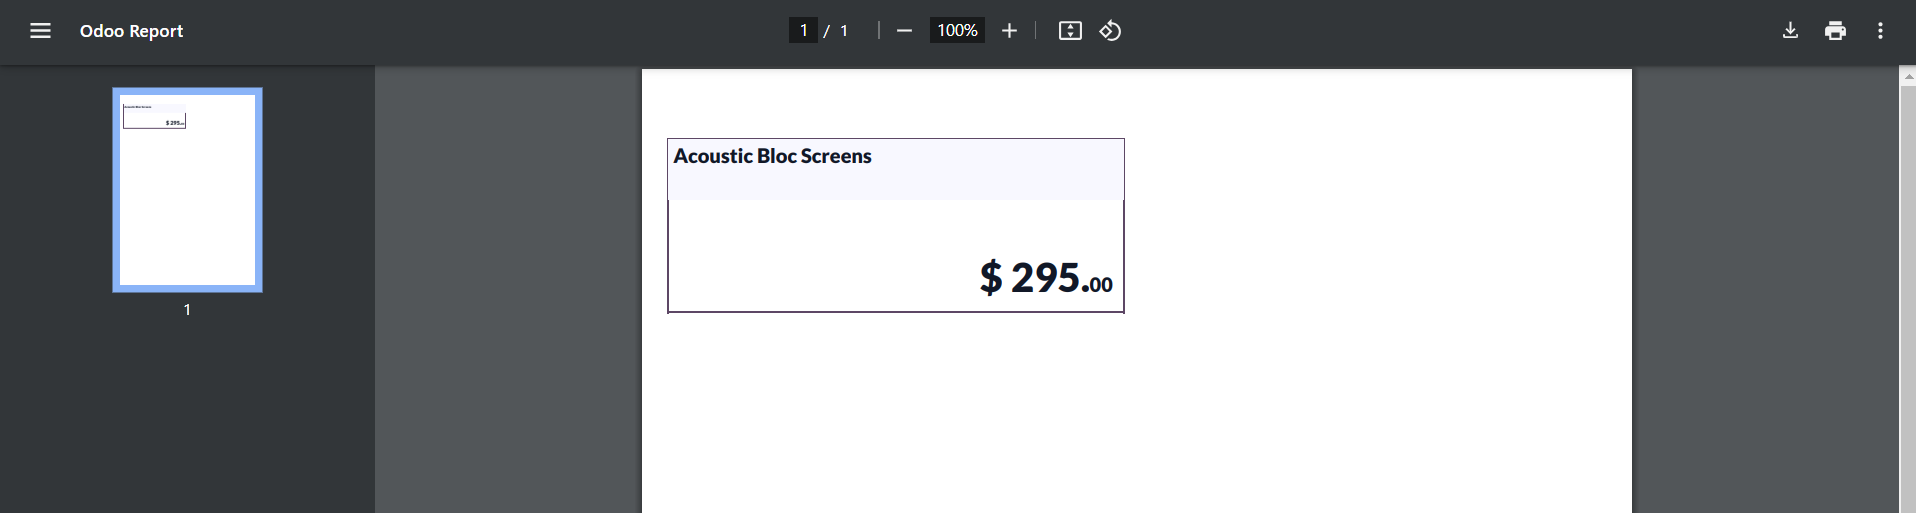
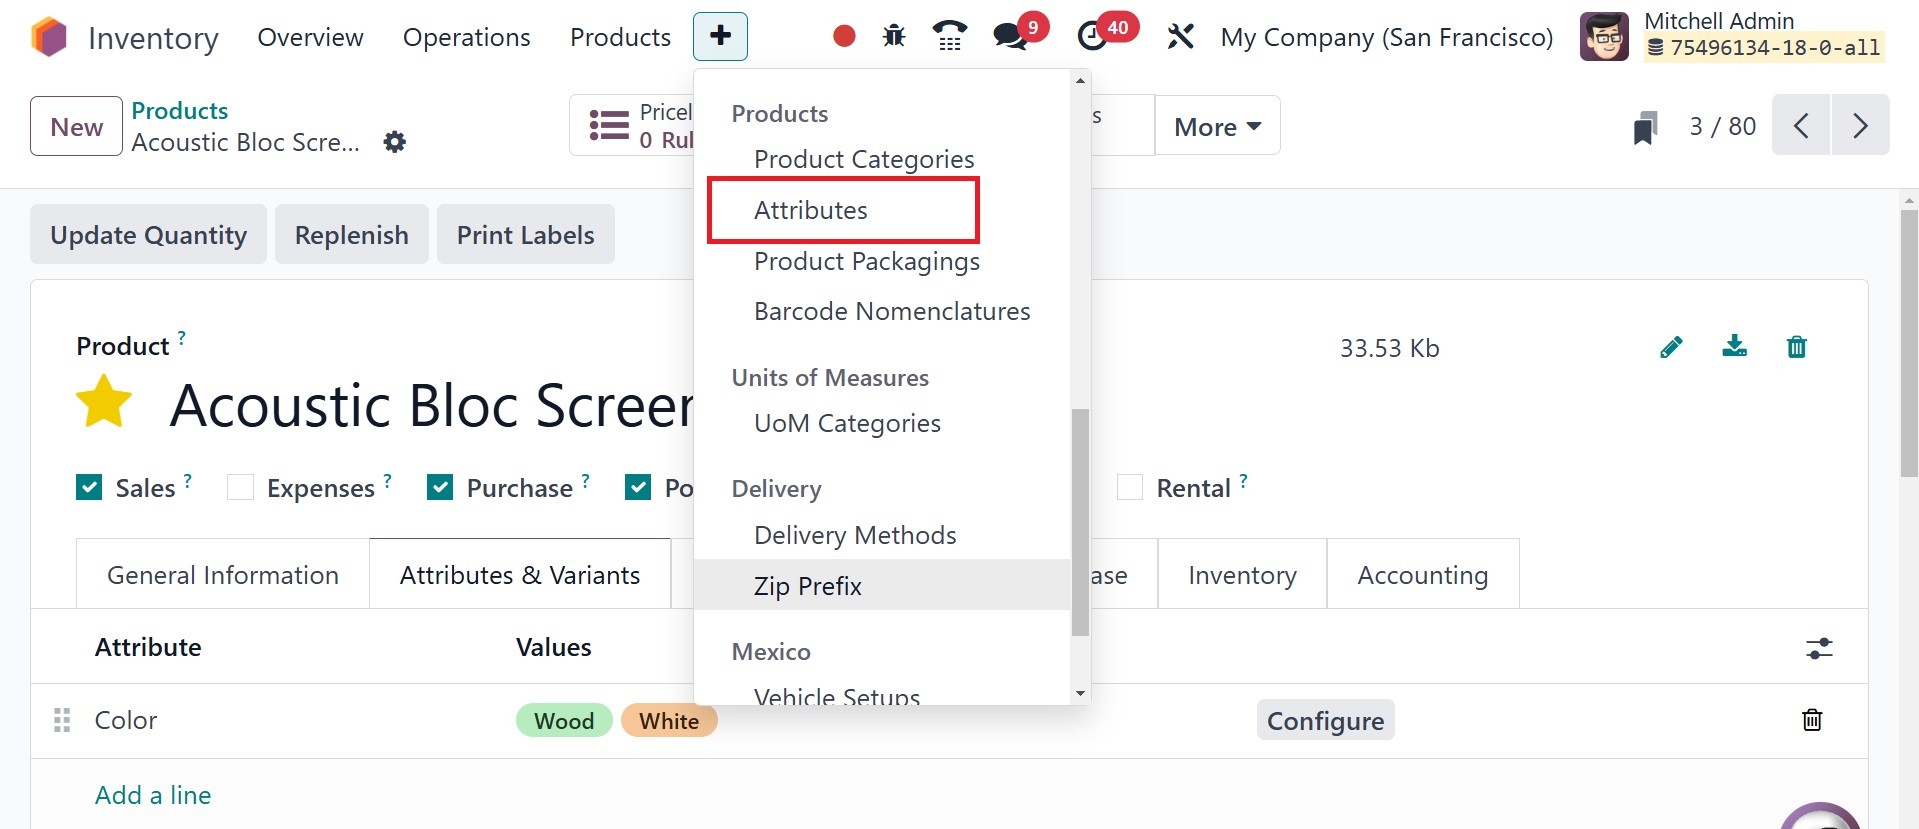
1. Product
Management
Monitoring every aspect of a
product is crucial for
effective inventory
management. Using the Odoo18
Inventory module, you may add
new goods to your database
that will effectively track
and monitor all actions to
enhance the inventory
management of the pertinent
products. The product
configuration procedures used
by the Inventory module and
the Sales and Purchase
modules are nearly the same.
On the Inventory's main menu
bar, you will see a separate
menu named Products for
effective product management
in Odoo18.
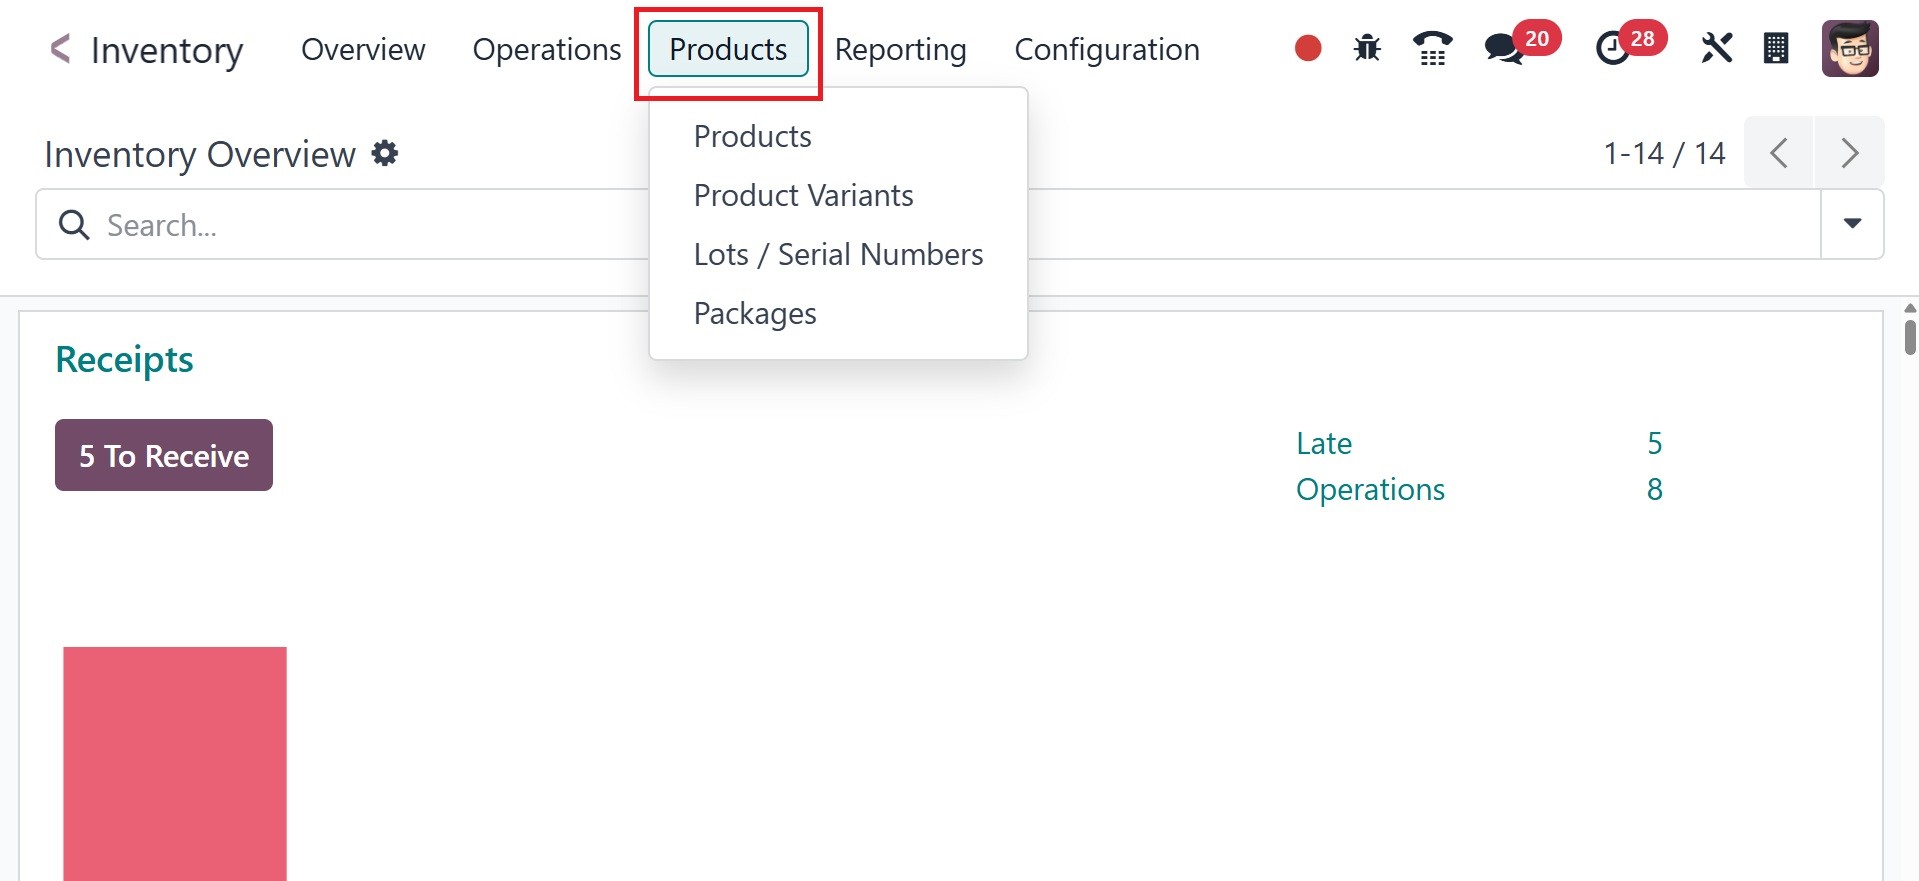
As can be seen in the image
above, the Products menu
offers choices for Products,
Product Variants, Packages,
and Lots/Serial Numbers.
2.1 Product
It is easy to view all setup
items by choosing the items
option. We'll start by going
over how to configure new
products using the Products
menu.
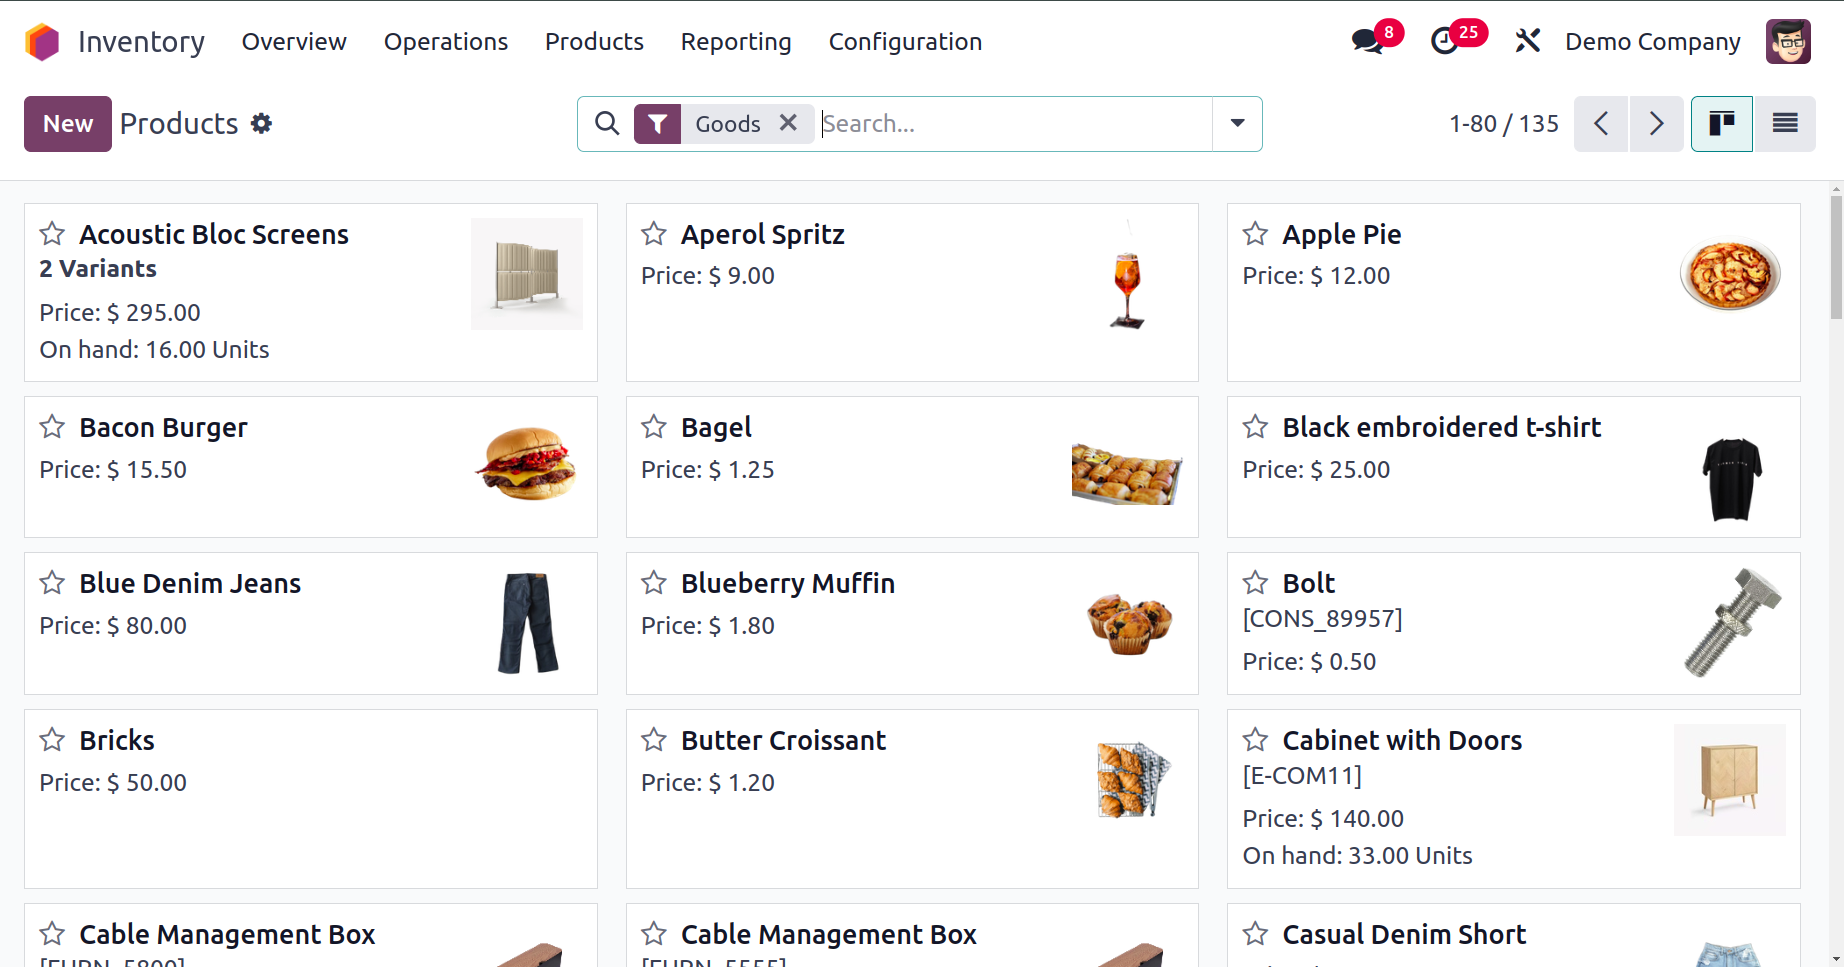
The graphic shows the product's
platform in Kanban view. The
names of the products and
important information such as
the price, picture, number
available, etc., are listed
on each product tab. Using
the star icon, you can add
items to your Favorite list.
You will be able to locate
all of your favorite products
with ease and speed thanks to
this.
Odoo18 has advanced sorting
options on almost all
platforms, as you are aware.
The Filters and Group By
options are also available in
this window, which will help
you find the information you
need about the product that
is displayed in the Inventory
module.
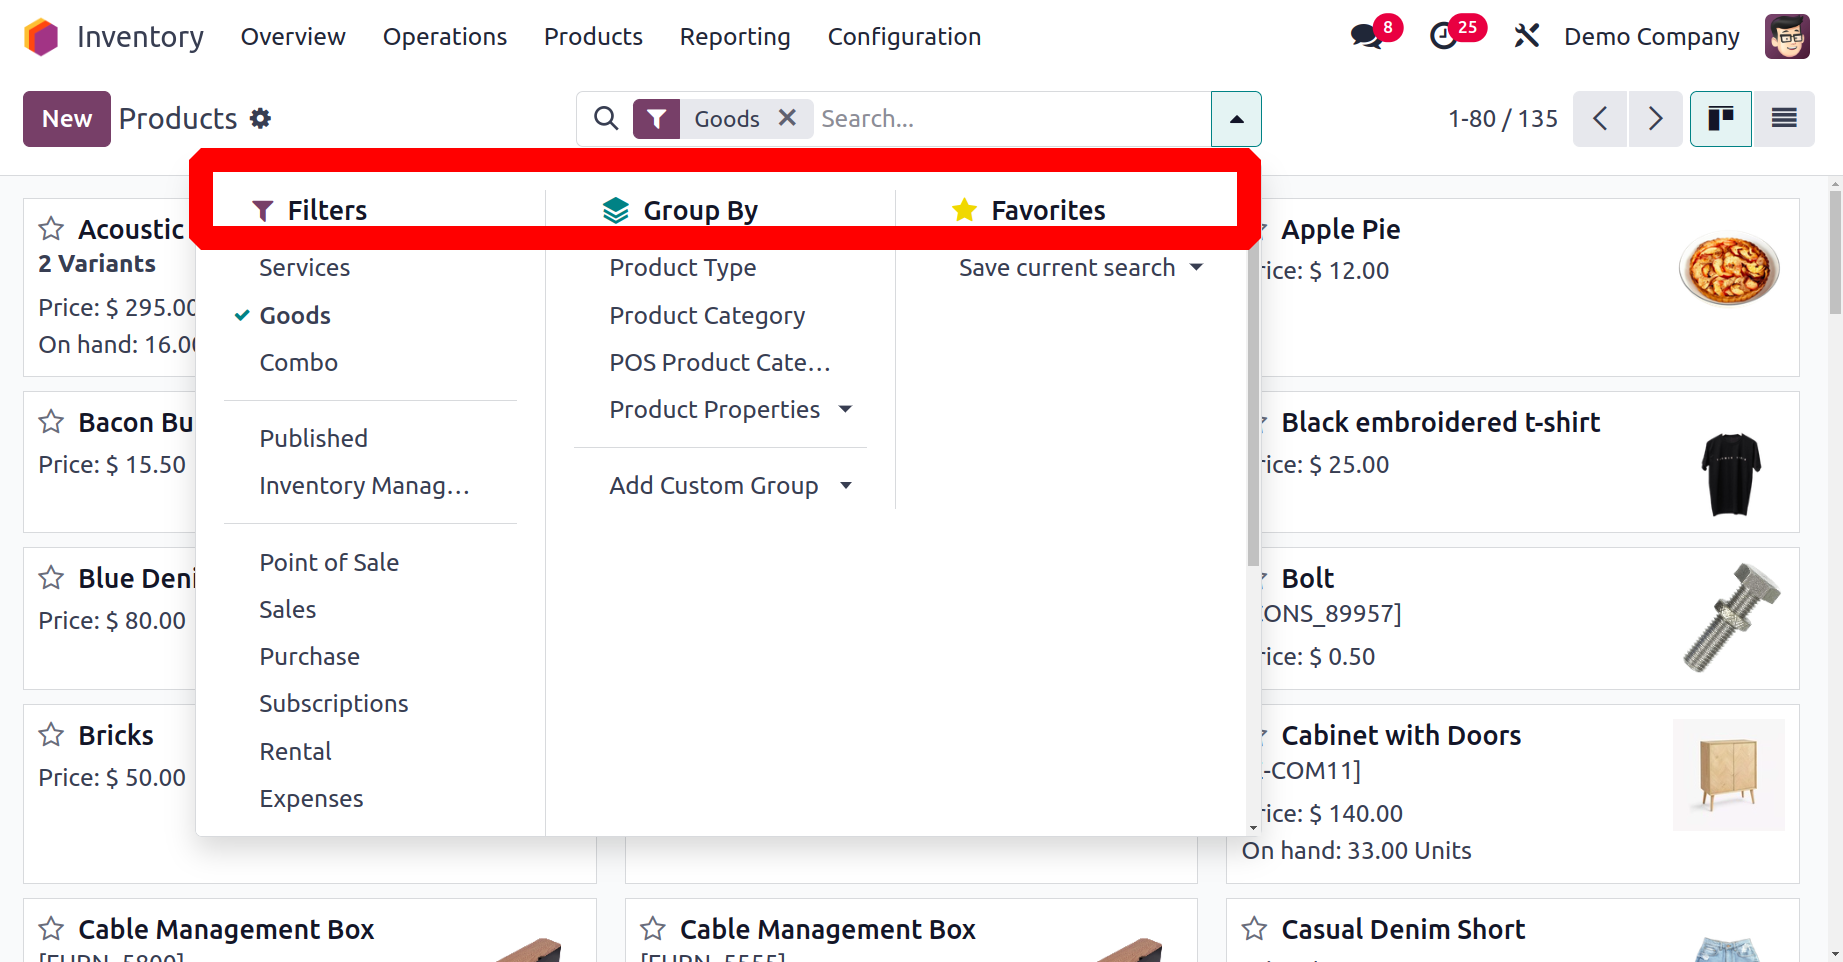
To locate the required data, the
Filter option provides both
conventional and custom
possibilities. Products,
Services, Published,
Available in PoS, Can be
Sold, Can be Purchased, Can
be Rented, Can be
Subcontracted, Can be
Expensed, Available Products,
Negative Forecasted Quantity,
Favorites, Warnings, and
Archived Products are among
the items you can filter
using the default options.
The apply Custom Filter
option allows you to apply
new custom filters to the
products. The Group By
function offers comparable
options for both default and
custom sorting. Using the
default options, you can
arrange products according to
the Product Type, Product
Category, and POS Product
Category. Use the Add Custom
Group tool to create more
grouping possibilities that
suit your needs.
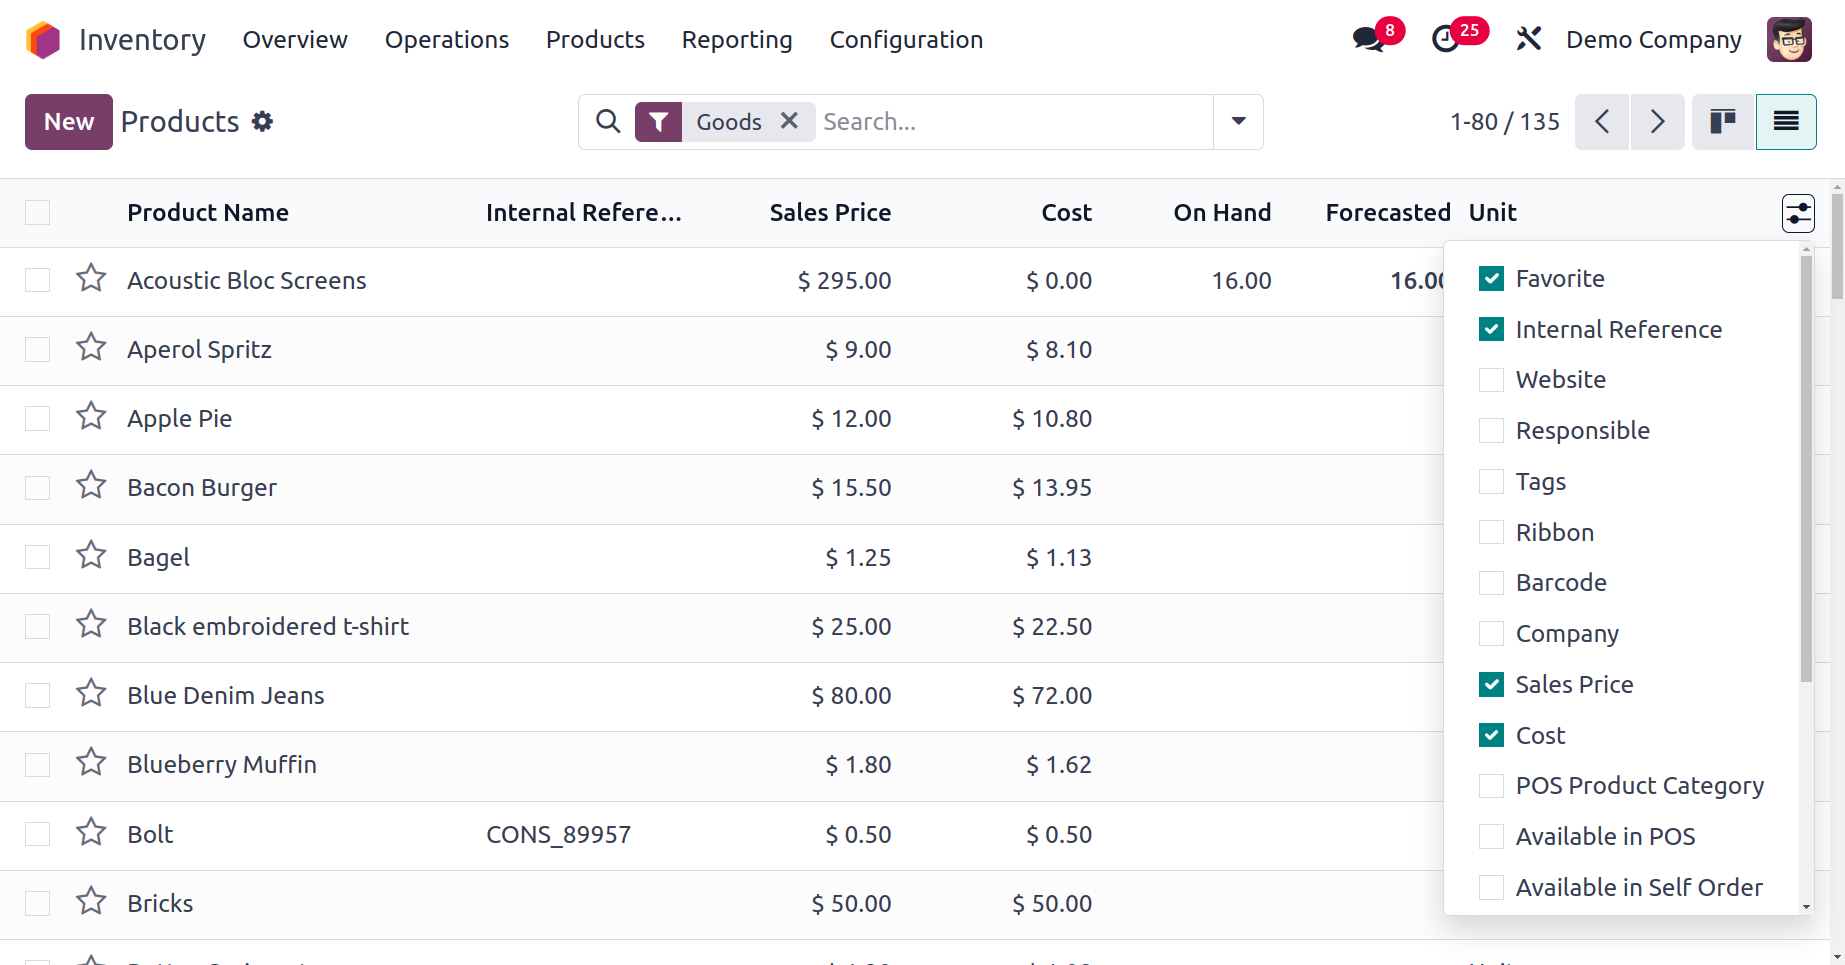
As seen below, a preview of the
products is displayed in the
list view. The preview
contains the following
information: Product name,
Internal Reference,
Responsibility, Product Tags,
sales price, cost, quantity
on hand, anticipated
quantity, and unit of
measurement. Additional
fields, such as the Website
ID, Barcode, Company, POS
Product Category, Product
Category, Product Type, and
eBay Status, can be chosen
from the list view's default
settings to enlarge it. By
choosing the Add Custom Field
option, you can add custom
fields to the list view.
You can control and modify the
details of any product by
choosing the items that are
required from the list. The
product details window
appears as seen in the
example below.
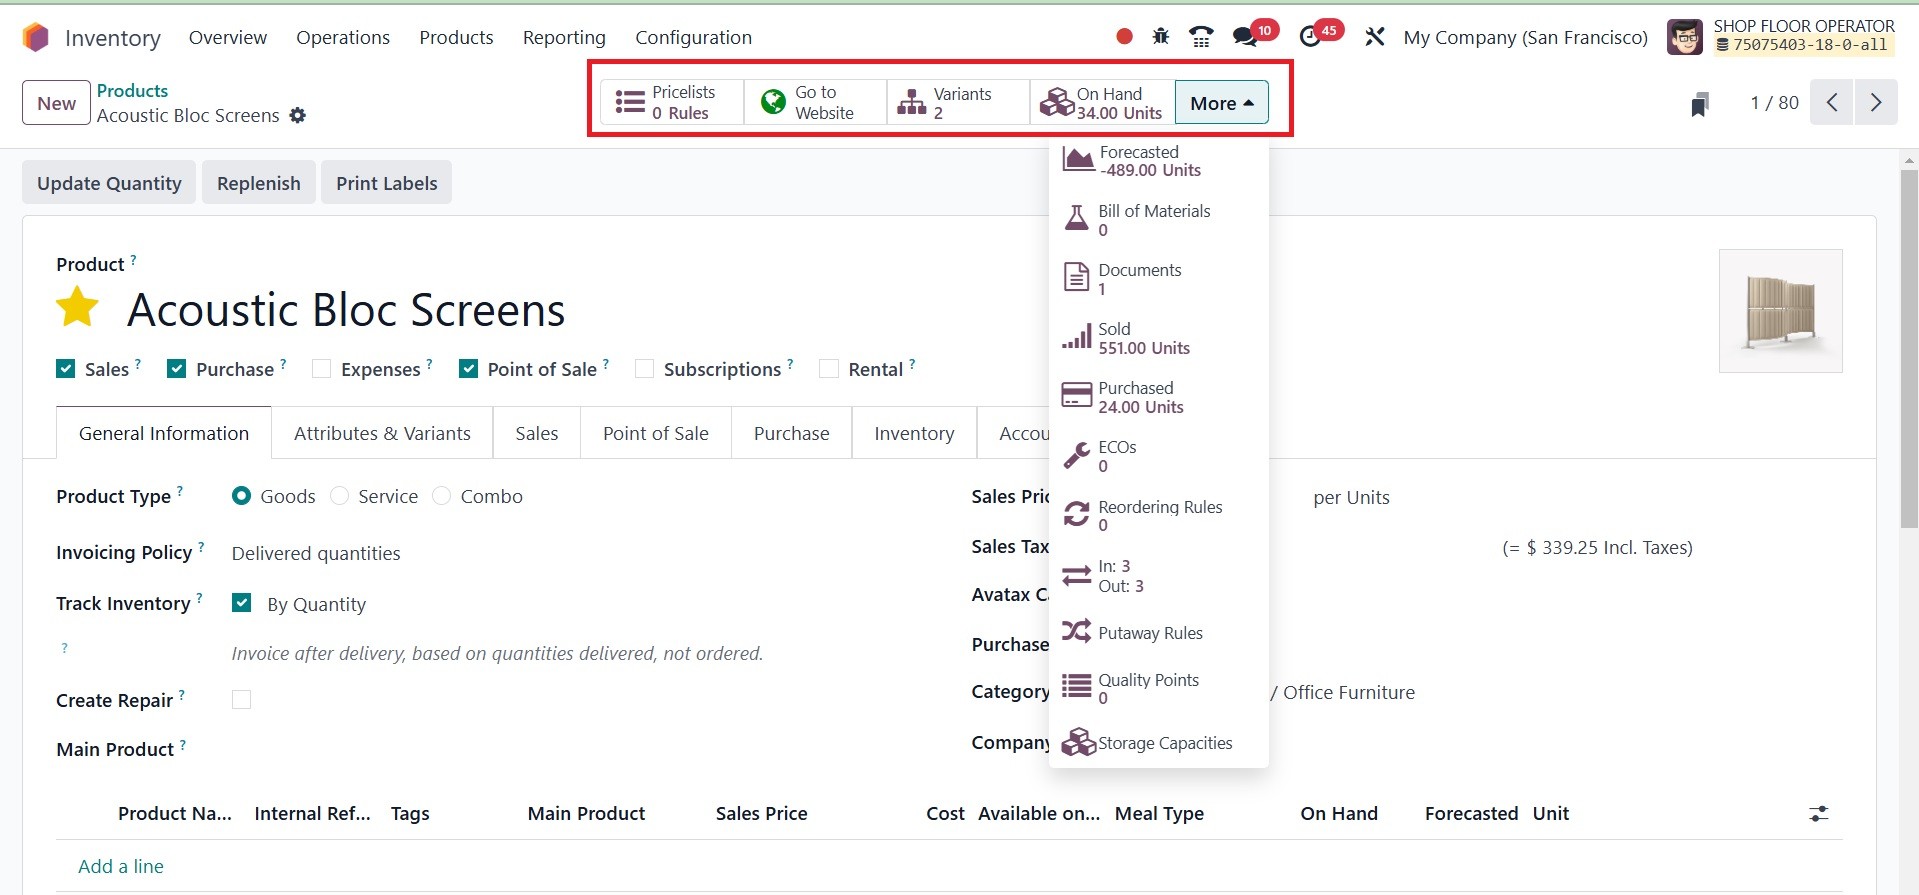
The user will see advanced smart
buttons in the products
window based on the data
configured on the relevant
goods. Click the Extra Prices
tab to handle additional
product price lists. The
product may be easily
published and managed on
eCommerce with the help of
the Go To Website. The
available quantities of the
inventory will be shown by
clicking the On Hand button.
In a similar manner, the
Forecasted button will show
details on the expected
values. The In & Out button
displays the inventory items'
movement history. The
specified Reordering Rules
and Lots/Serial Numbers for
this product can be accessed
using the respective smart
buttons. On selecting the
documents smart tab, you will
be provided with the page, as
in the image below.
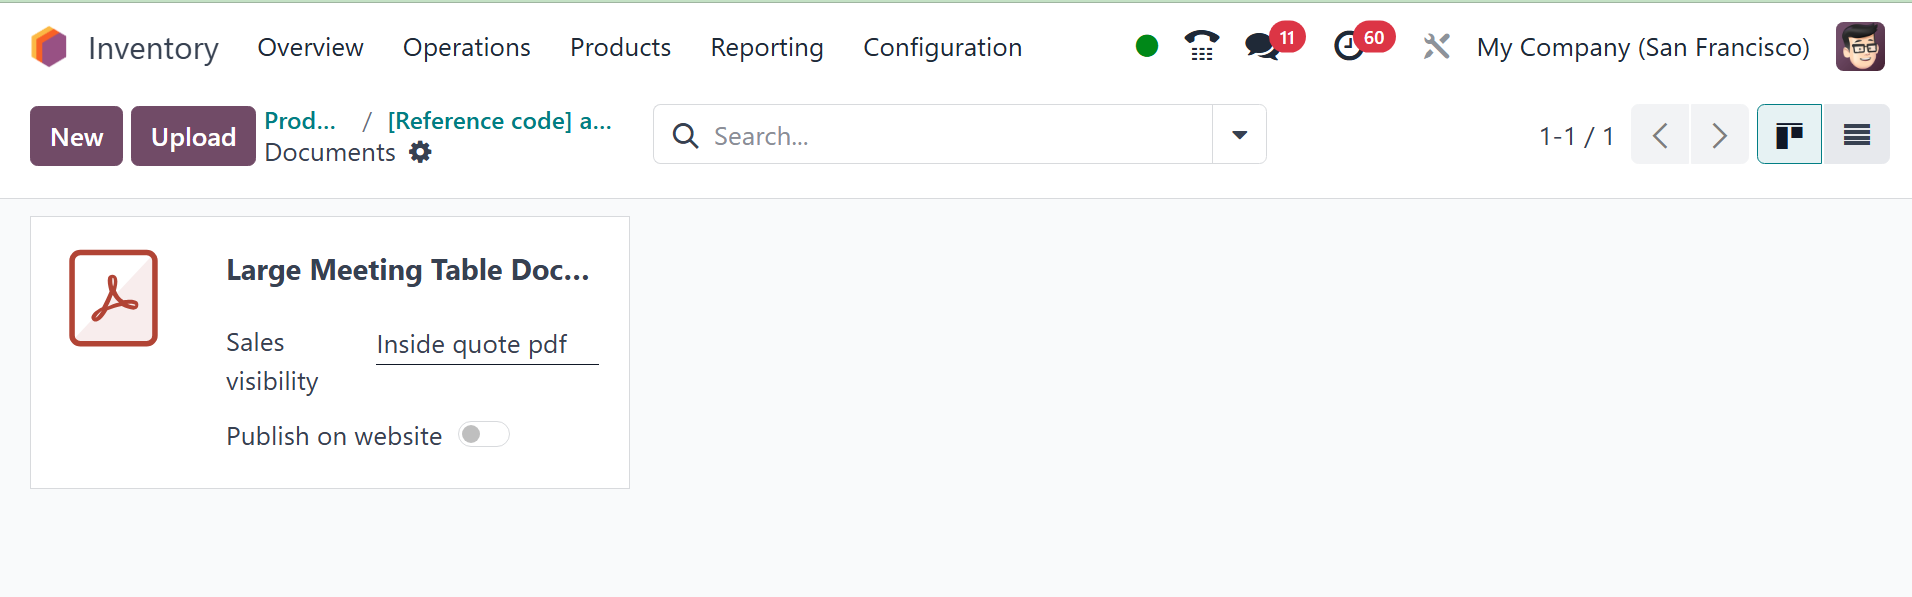
There, you can have the options
of sales visibility and
publish on website option.
The Sales Visibility option
controls whether a document
(such as a product image,
spec sheet, manual, etc.) is
visible to internal sales
teams. When enabled, the
document will be accessible
to salespeople within the
Sales module, especially in
areas where related documents
are shown (e.g., product
details during quoting or
order creation).
This helps sales reps access
relevant documents quickly
while creating quotations or
communicating with customers.
The Publish on Website option
allows you to make the
document publicly available
on your Odoo Website,
typically as a downloadable
file. When checked, the
document becomes visible to
website visitors, usually
attached to the related
product or a designated
download section.
Additional options to locate
details on the product's Bill
of Materials, Engineering
Change Orders, Putaway Rules,
Quality Control Points,
Storage Capabilities,
Purchase Analysis, Sales
Analysis, and Digital
Attachments will appear when
you select the More button.
Now let's create a new product
using the New button and
discuss the options in the
product settings box. When
you click the New button on
the product dashboard, Odoo18
will take you to the product
configuration window, as seen
below.
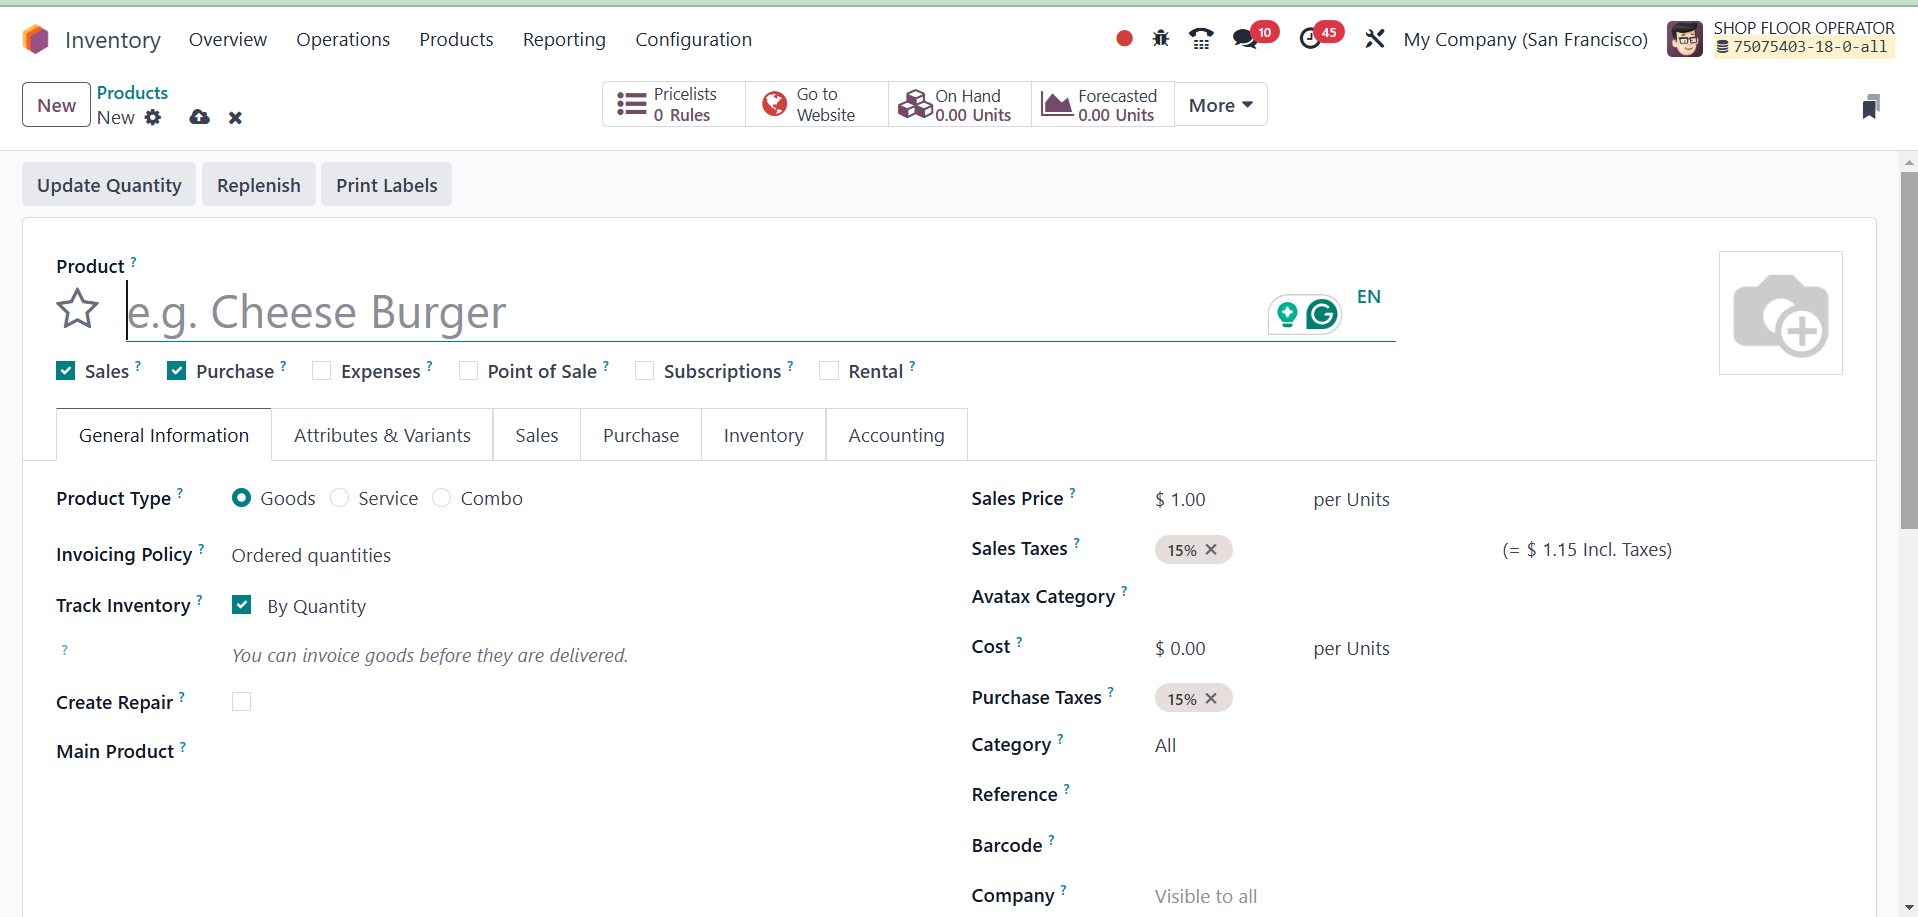
You can begin by entering the
product's name in the Product
Name field. You can add this
new item to your list of
favorites by using the Star
sign. You can add a beautiful
picture of the product using
the available area.
When configuring a new product,
you will be asked to select
the operation types linked to
the product. The options are:
Sales: Select the option
that Sales If your items are
marketable.
Purchase: Select this
option Purchase If the
product is available for
purchase.
Expenses: expense option
is used if you wish to select
this product while incurring
expenses.
Point of Sale: Select the
option Point of Sales To
initiate a subscription while
authorizing purchases of this
item.
Rental: Select the Rental
to permit this product to be
rented.
To add more details about the
product, users provide tabs
for General Information,
Attributes & Variants, Sales,
Purchase, Inventory, and
Accounting. A link to the
general information tab can
be found below.
From the options on this page,
you may choose the Product
Type. Under that, you have
three options, such as :
Goods: You don't need to hold
inventory of these because
suppliers provide them
directly to the right
customers.
Services: Odoo considers all of
an organization's services to
be service items. The user is
unable to keep the inventory
of this type of goods. It is
an intangible service that a
company offers.
Combo: It is possible to make
combinations of different
products. Additionally,
clients are free to select
what they need.
Once the product category has
been indicated, you can
select the Invoicing Policy.
Odoo18 offers two types of
invoicing policies to its
users.
Ordered Quantities: You can
generate invoices for the
quantities that a customer
has ordered by using this
billing policy. You can
invoice for all of the
quantities listed in the
order before it is delivered
if you do this.
Delivered Quantities: Under this
billing method, invoices will
only be generated based on
the supplied quantities. Odoo
will generate an invoice for
the five delivered quantities
when a customer orders twelve
quantities of a product but
only receives five. An
invoice for the remaining
seven sums won't be generated
until after delivery.
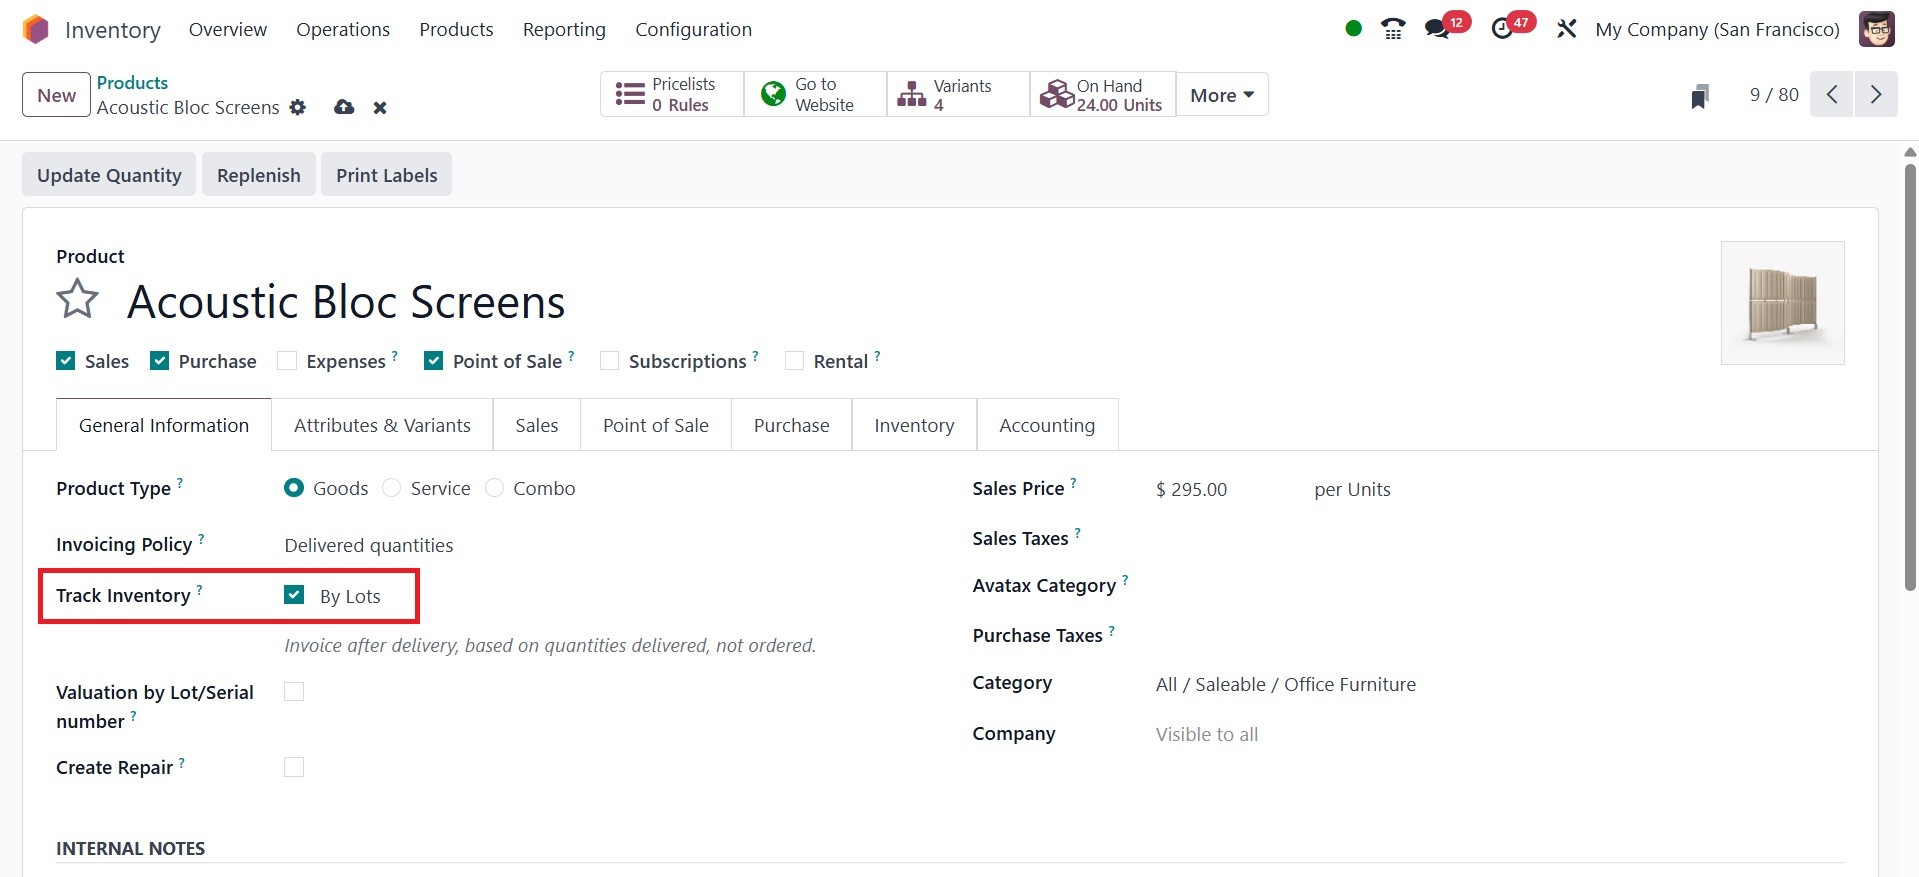
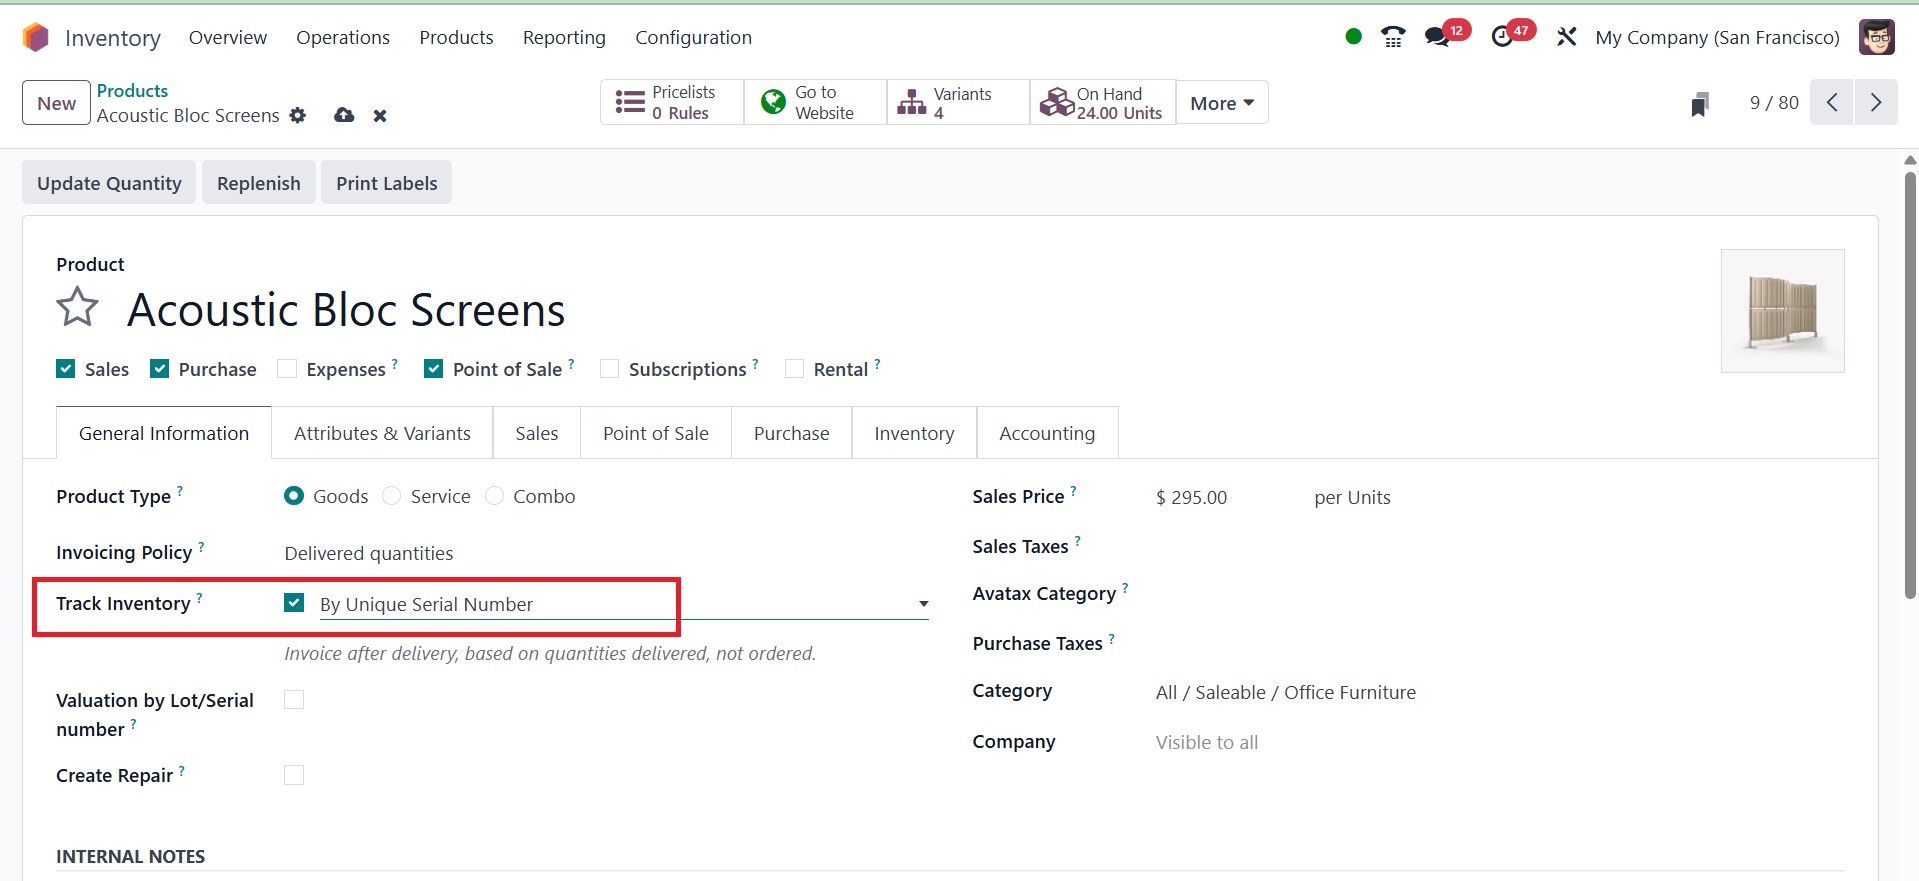
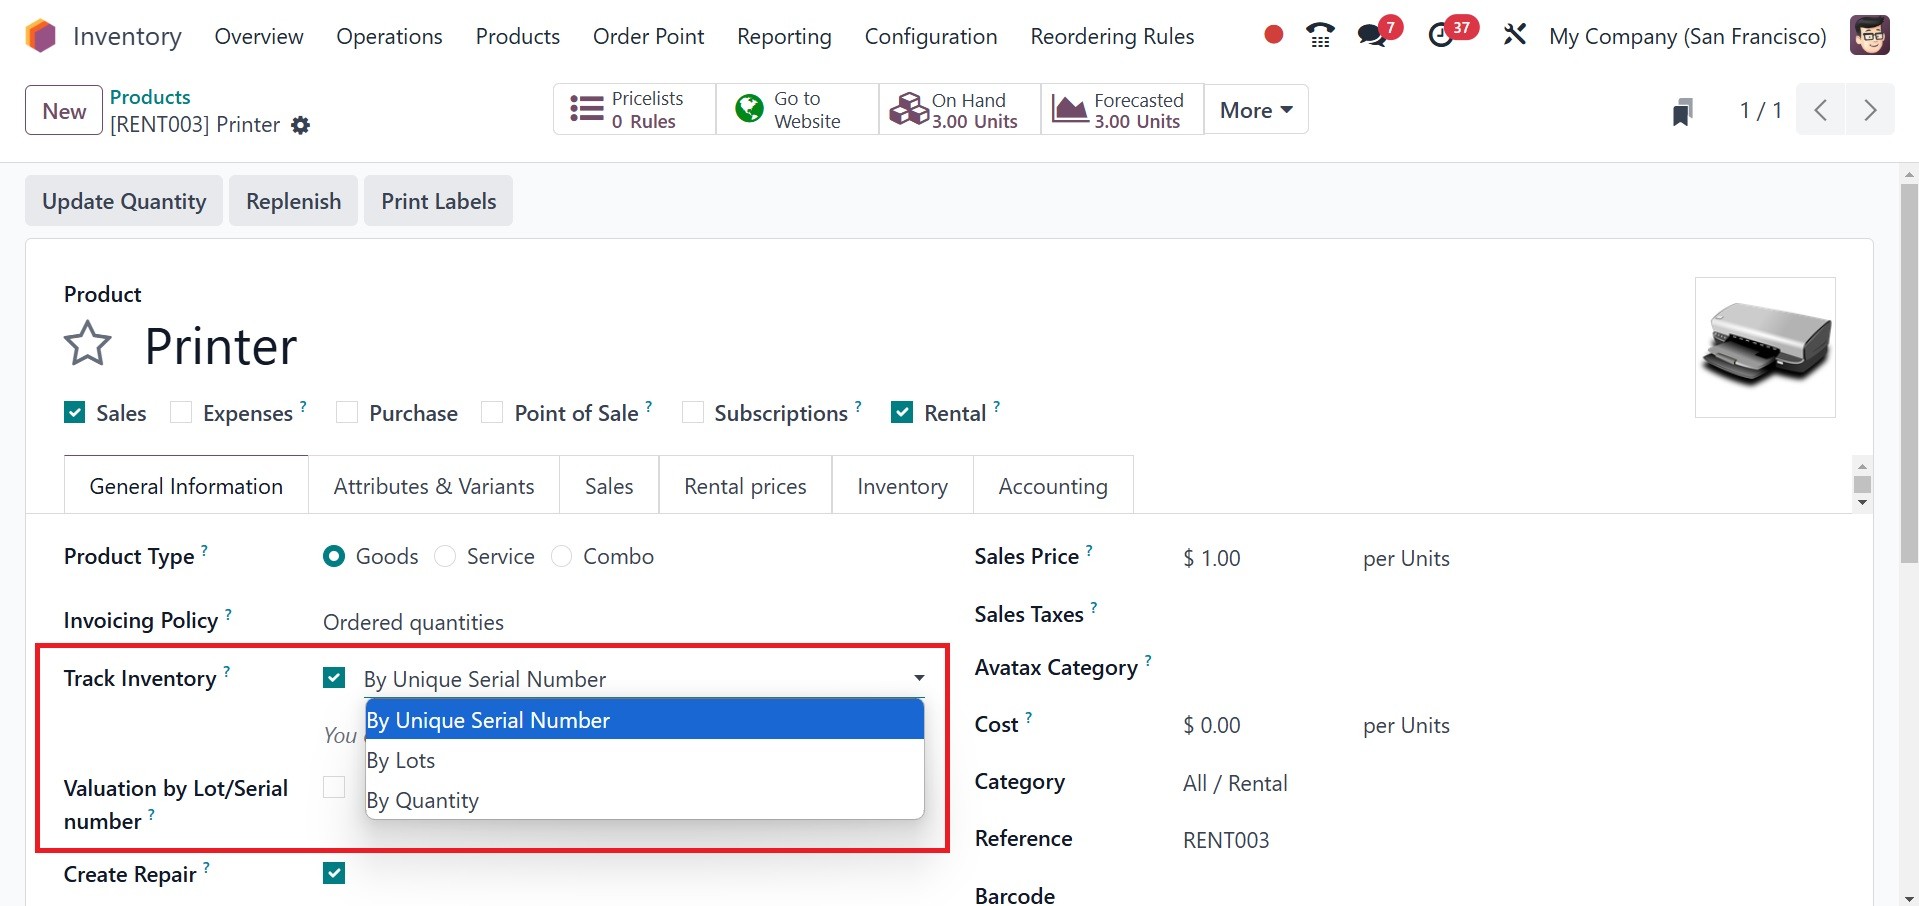
Now, you have the option of Track
Inventory, which provides the
sub options, like by
quantity, by lots, and by
unique serial number.
By quantity: Stock levels are
controlled using this basic
tracking approach in Odoo,
which is based on the overall
quantities in the warehouse.
It works well for goods that
need precise stock control
but don't require individual
identification.
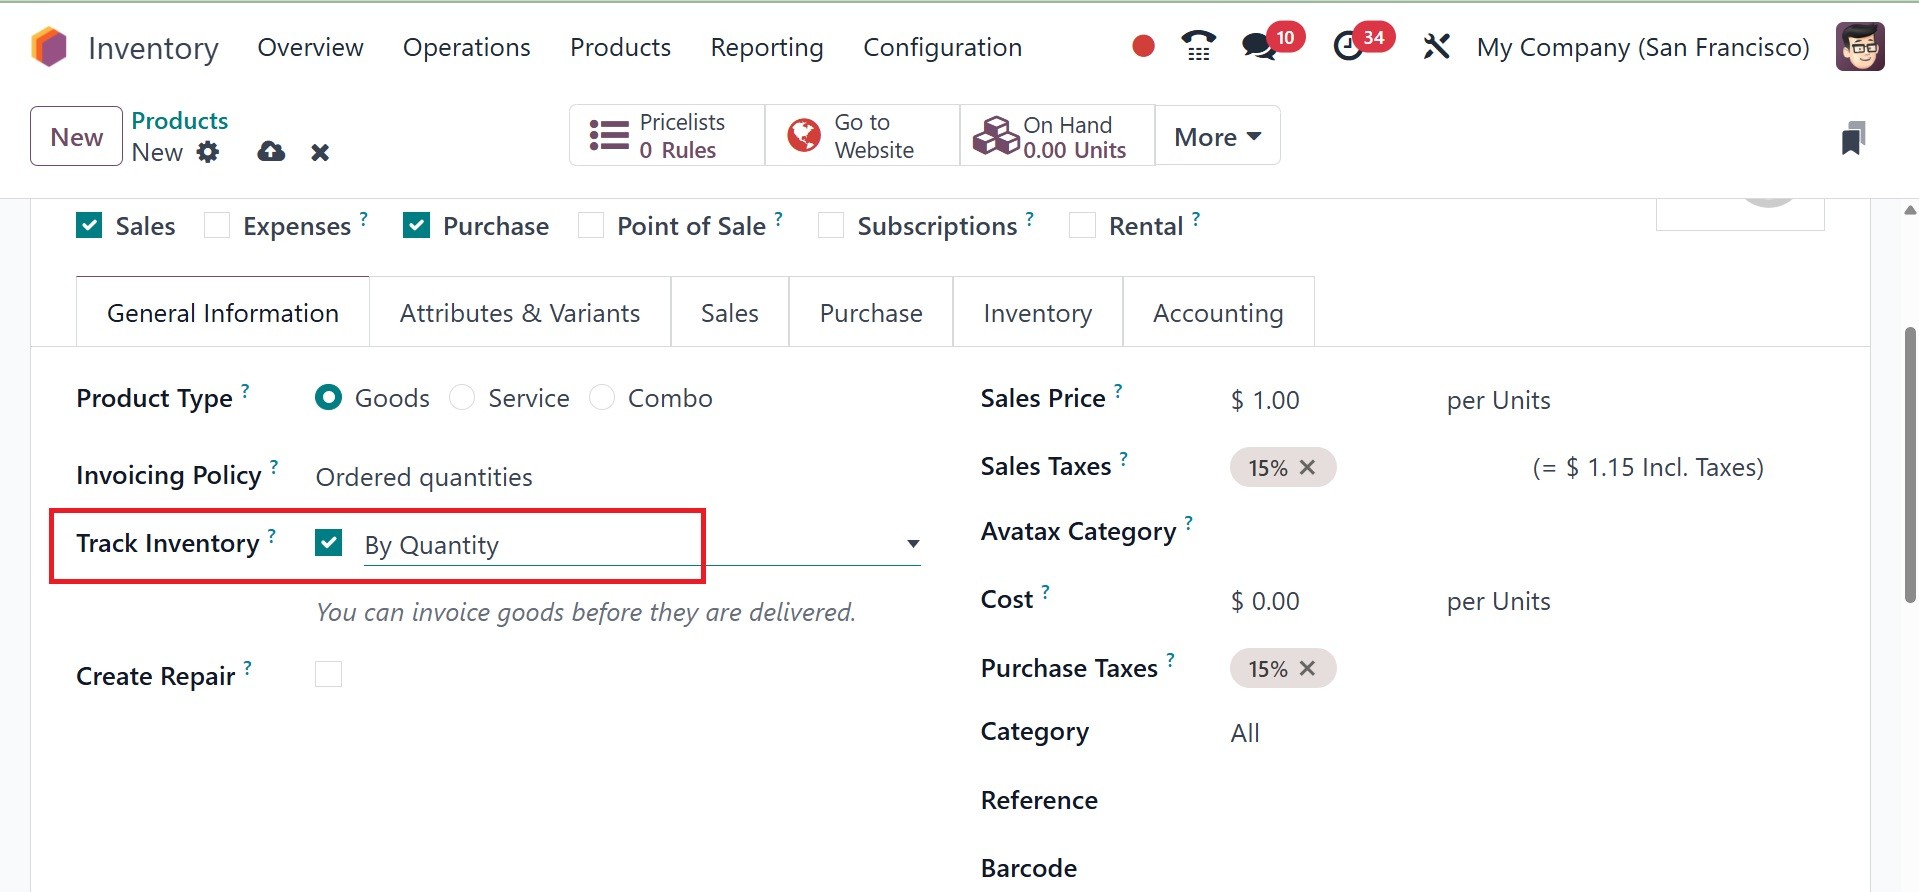
By Lots: Using a distinct
identification for every
batch, this technique enables
tracking of products within
batches or lots.
By unique serial number: By
employing distinct serial
numbers to track separate
objects, this system allows
for comprehensive product
history and information.
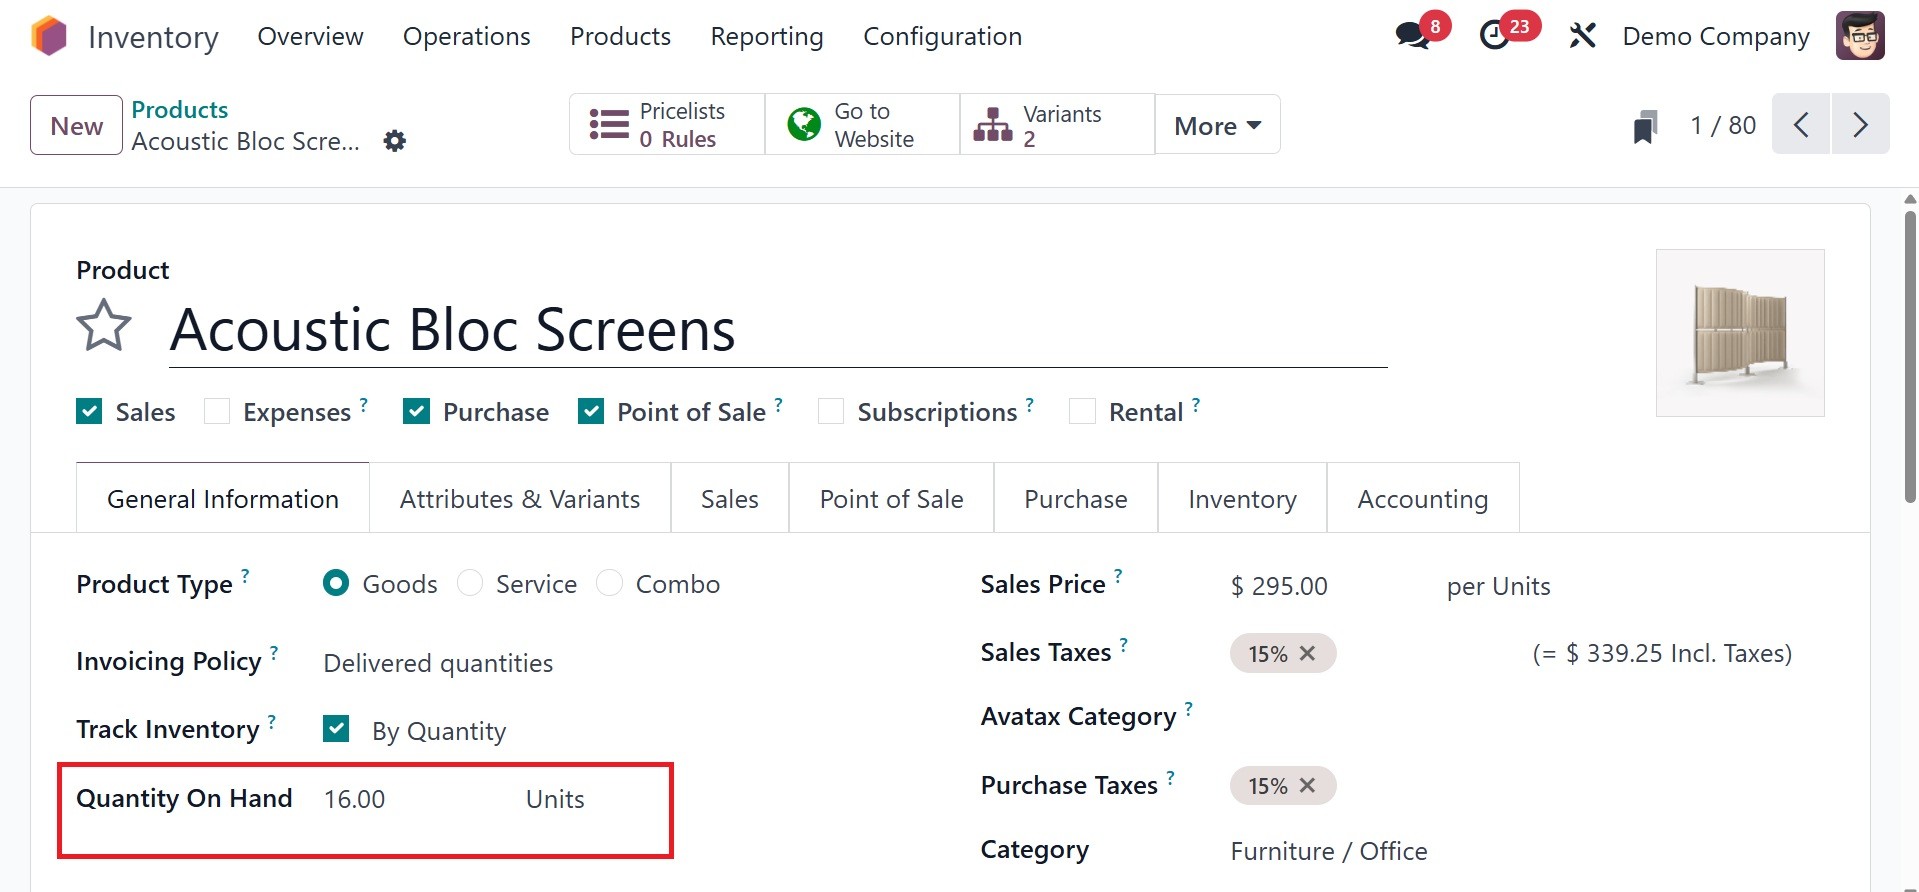
Below that, you have the Quantity
on hand option, which is the
current stock that exists
within a warehouse at any
time. It assists firms in
tracking real-time levels of
stocks to ensure proper
inventory management and
prevent stockouts or excess
stocks.
Odoo18 offers tracking solutions
for the storable items in
your warehouses, which make
it simple and quick to locate
the item in your inventory.
Products can be tracked using
the unique serial numbers or
lots that are assigned to
each one. In the Track
Inventory box, you can set up
the tracking according to
lots of unique serial
numbers.
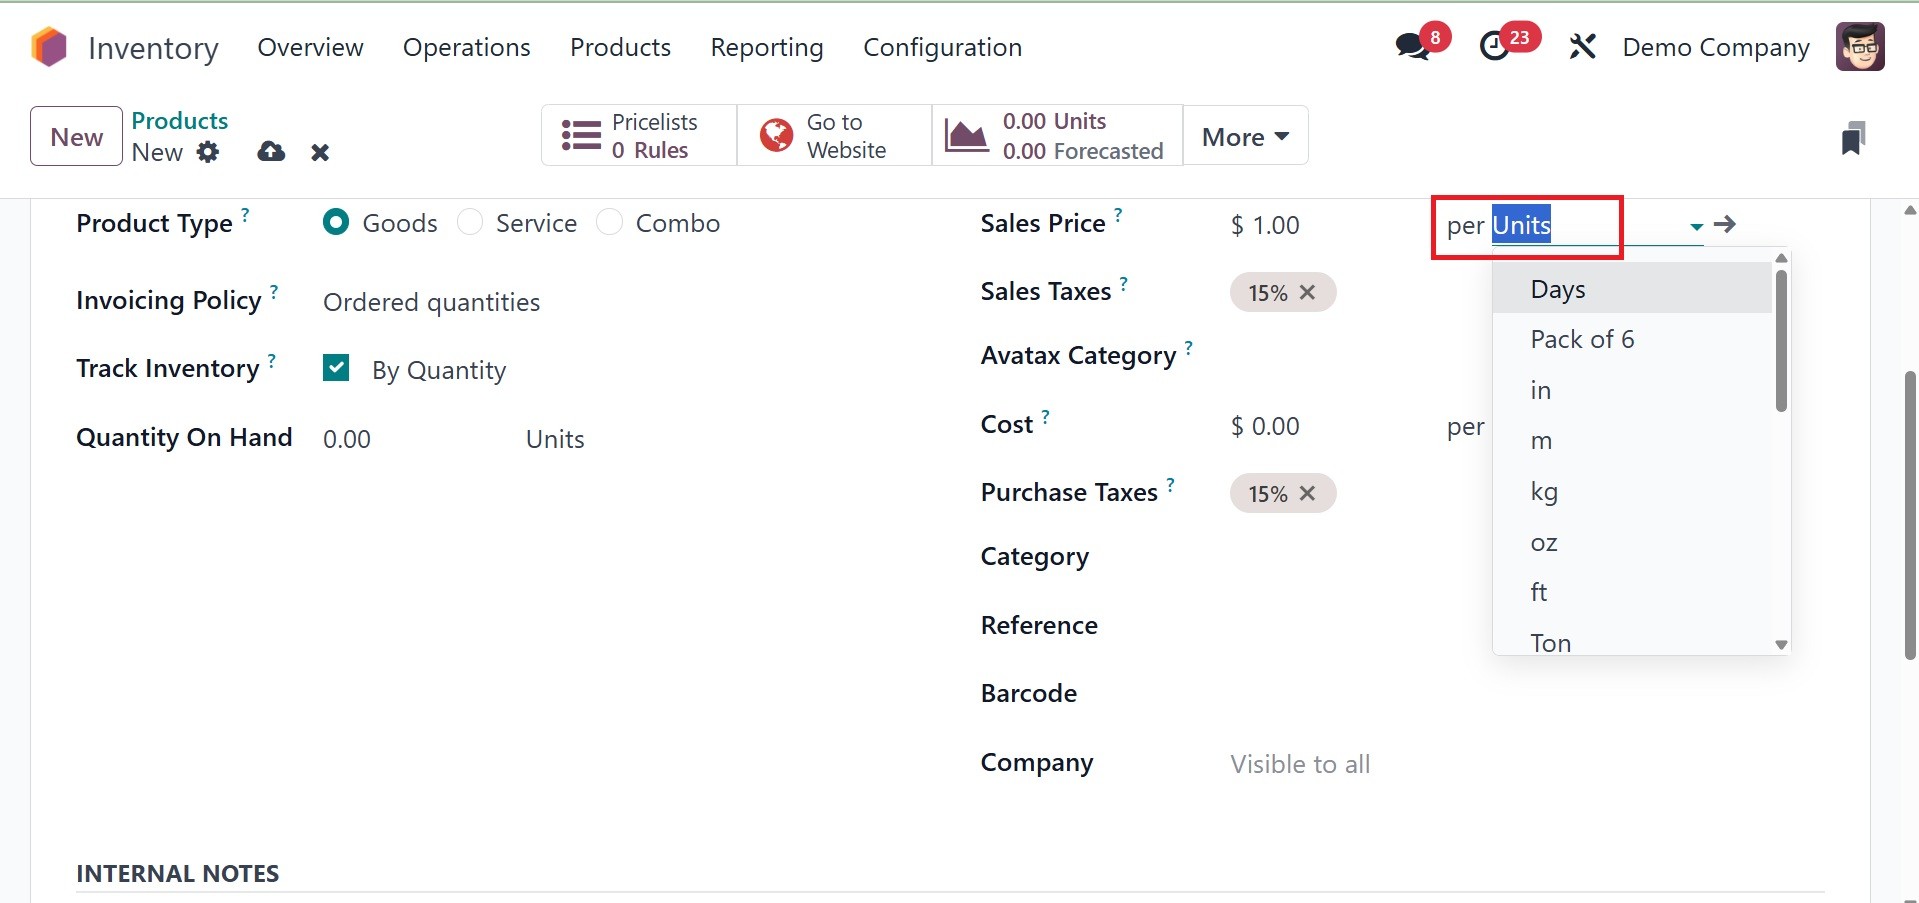
You can list the price you charge
your customers for this
product in the Sales Price
area. There, you can add per
units as well. The Per Units
menu item in the Odoo
Inventory Products Menu
assists in specifying how a
product is packaged and sold.
It aids in maintaining
consistency in sales pricing
and inventory tracking,
especially for companies that
handle bulk sales, unit
conversions, and packaging.
You can designate the default
taxes that are applied to
products at the time of setup
in the Sales Taxes column.
The Avatax Category refers to
the taxability information
codes that are used to
calculate the exact tax rates
for each class of items.
You can provide details about the
Avatax Category, Category,
Barcode, Reference and
Company in the appropriate
areas. The Internal notes box
may contain product-related
remarks that are exclusively
meant for internal use.
For service-type products, such
as event tickets, booths, and
courses, the fields that are
provided can differ in a
number of ways. Below are
four different sorts of
invoicing policies that you
can find here.
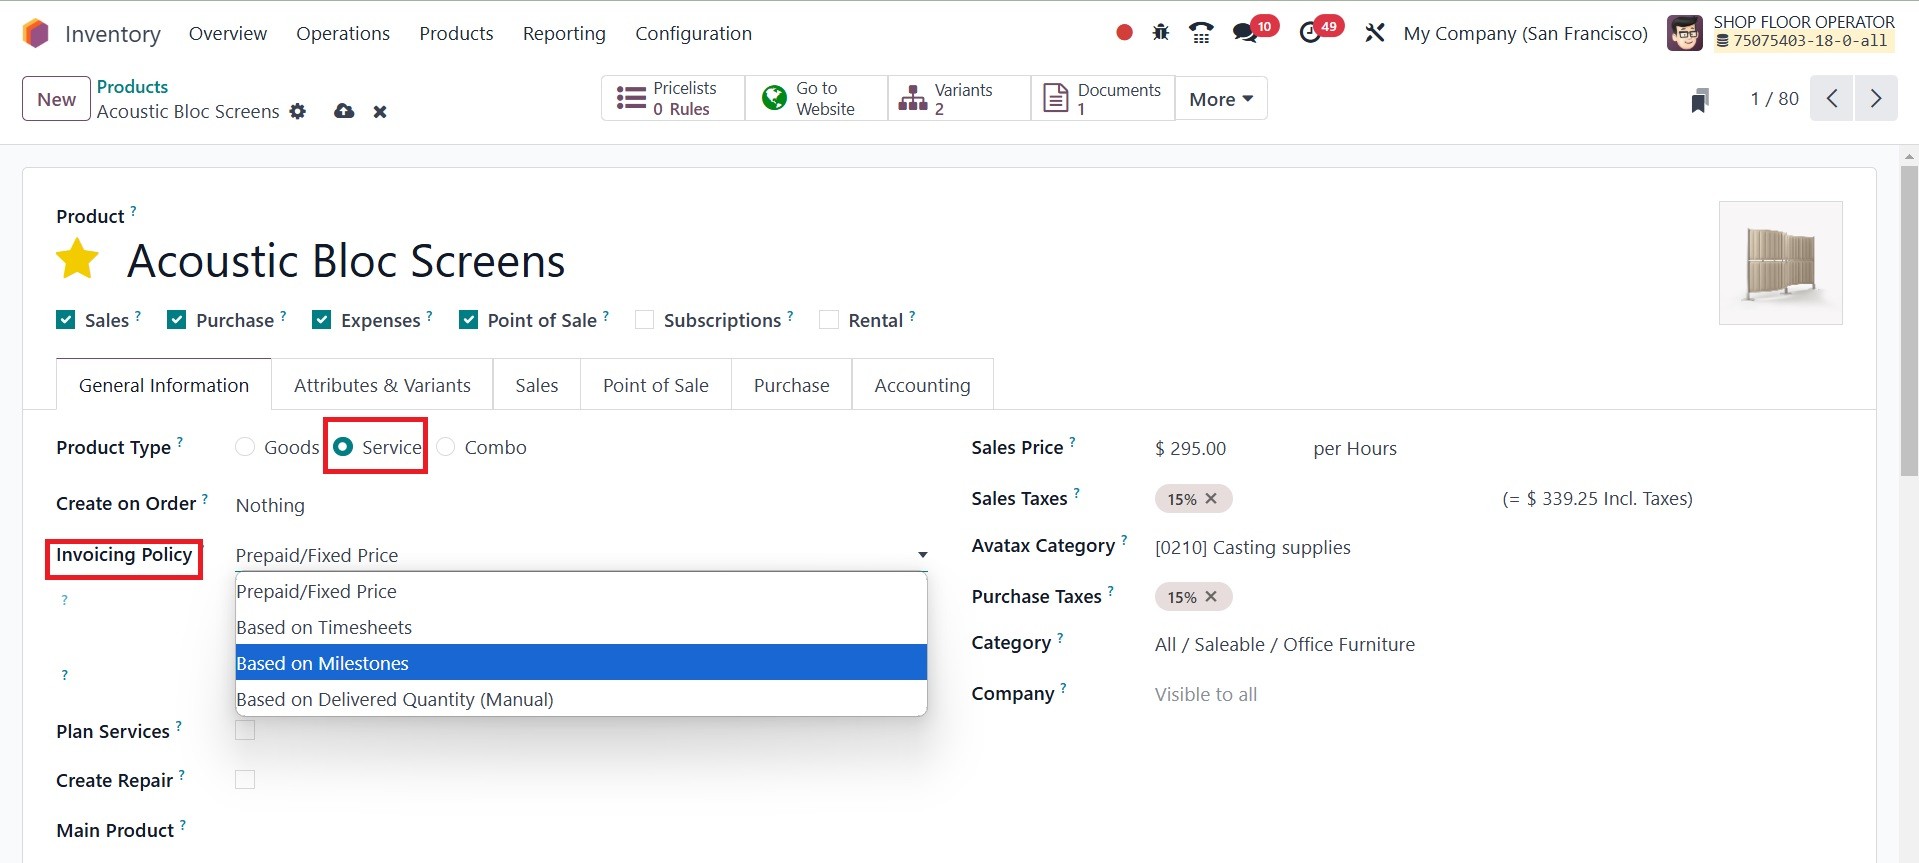
- Prepaid/Fixed: Invoices
may be created as
needed, depending on
the ordered amounts.
- Based on Timesheet: Bill
for projects or tasks
based on timesheets
for the amounts
provided.
- Based on Timesheet: Bill
for projects or tasks
based on timesheets
for the amounts
provided.
- Based on Milestones: Bill
jobs or projects based
on the milestones that
have been reached.
- Based on delivered
Quantity: Determine
service charges by the
actual quantities
supplied.
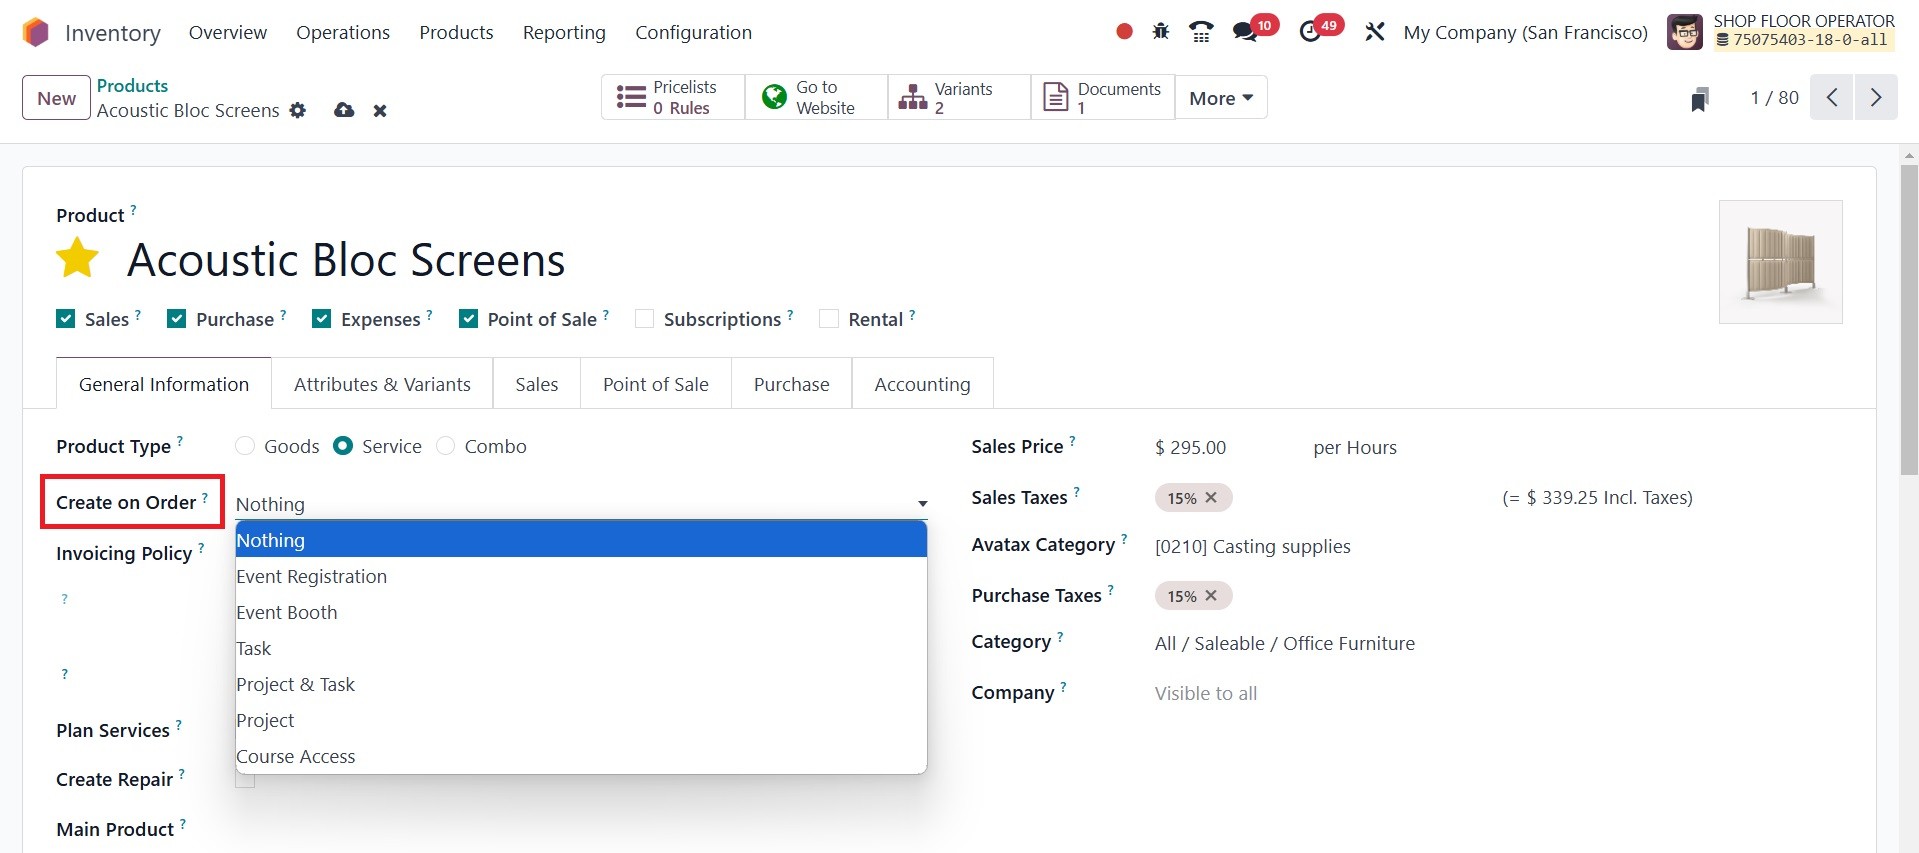
You can select a suitable
substitute under the Create
on Order section. Upon sales
confirmation, this product
can produce a Project, Task,
or a Project + Task
combination, depending on
your selection. With this
project or assignment, you
can keep track of the service
you are offering. If the Plan
Services option is selected,
a shift will be automatically
generated for the selected
position when the sales order
is finalized. A place where
you may describe the job will
appear after you enable the
Plan Services. There is the
create repair booolean which
can be activated for creaing
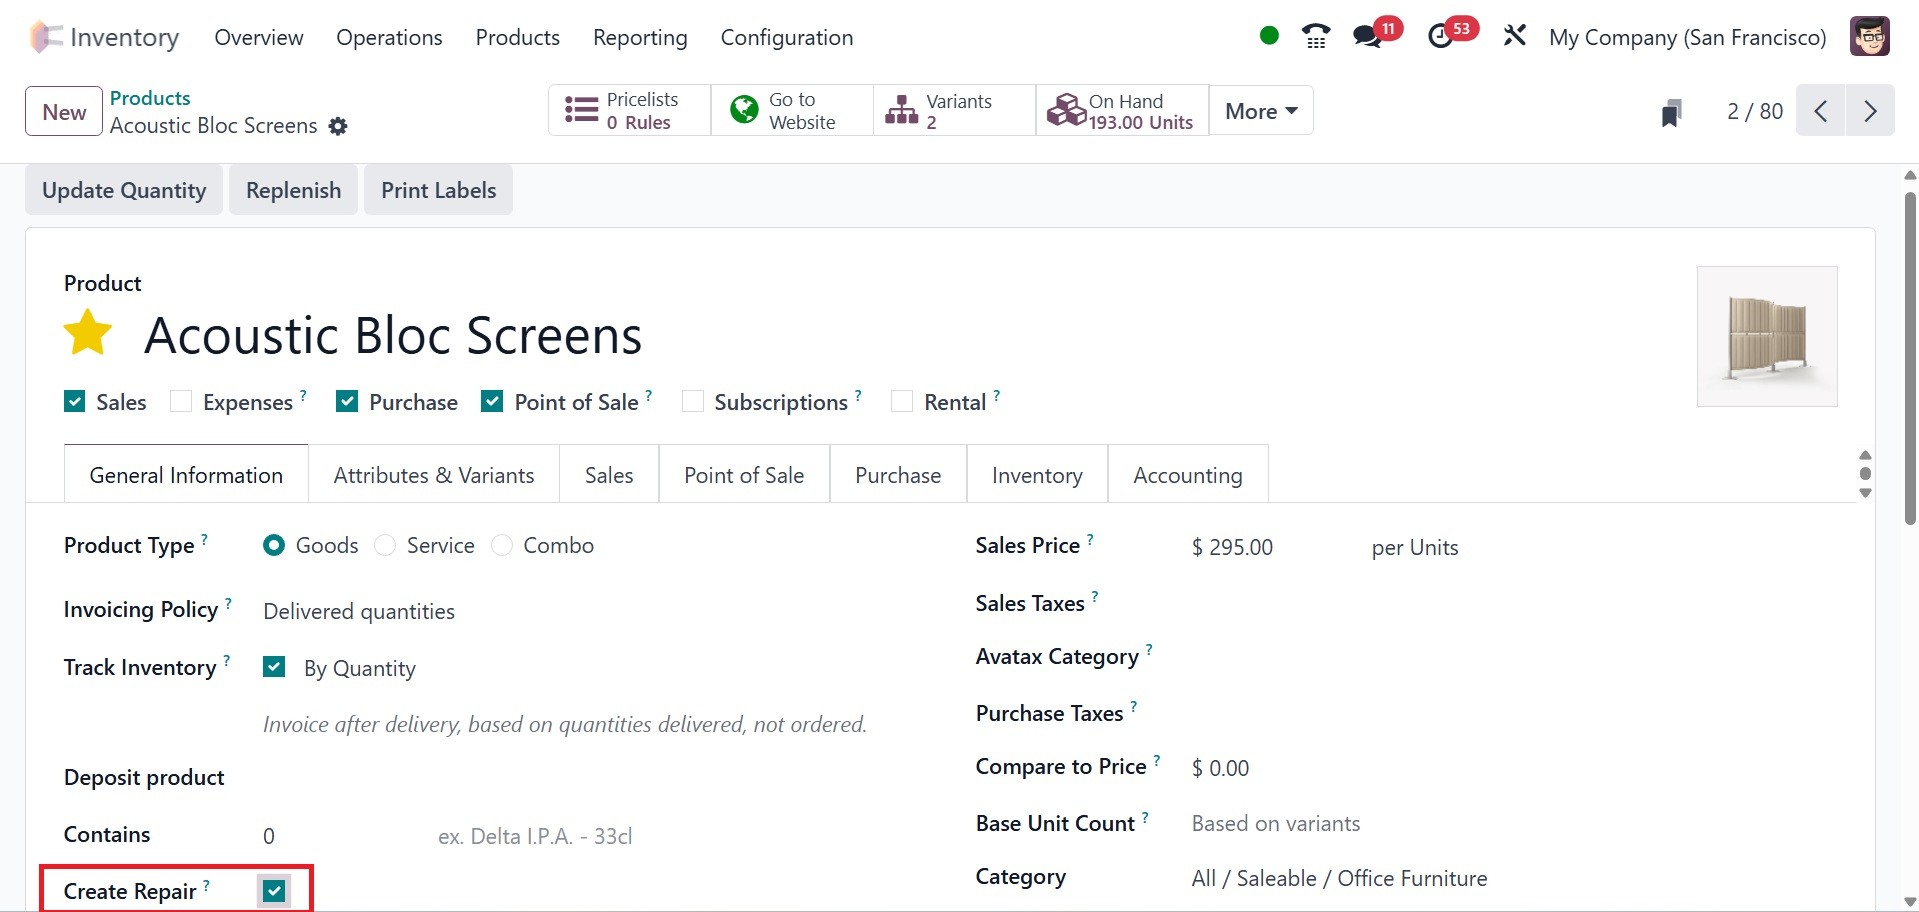
a repair.
To give the customer a wide range
of options, you can monitor
many product versions and
attributes with Odoo18. Using
the Add a Line buttons
located under the Attributes
& Variants tab, you can
specify the product
variations that are already
configured in Odoo18. If you
want to add a new variant or
attribute, use the Configure
option.
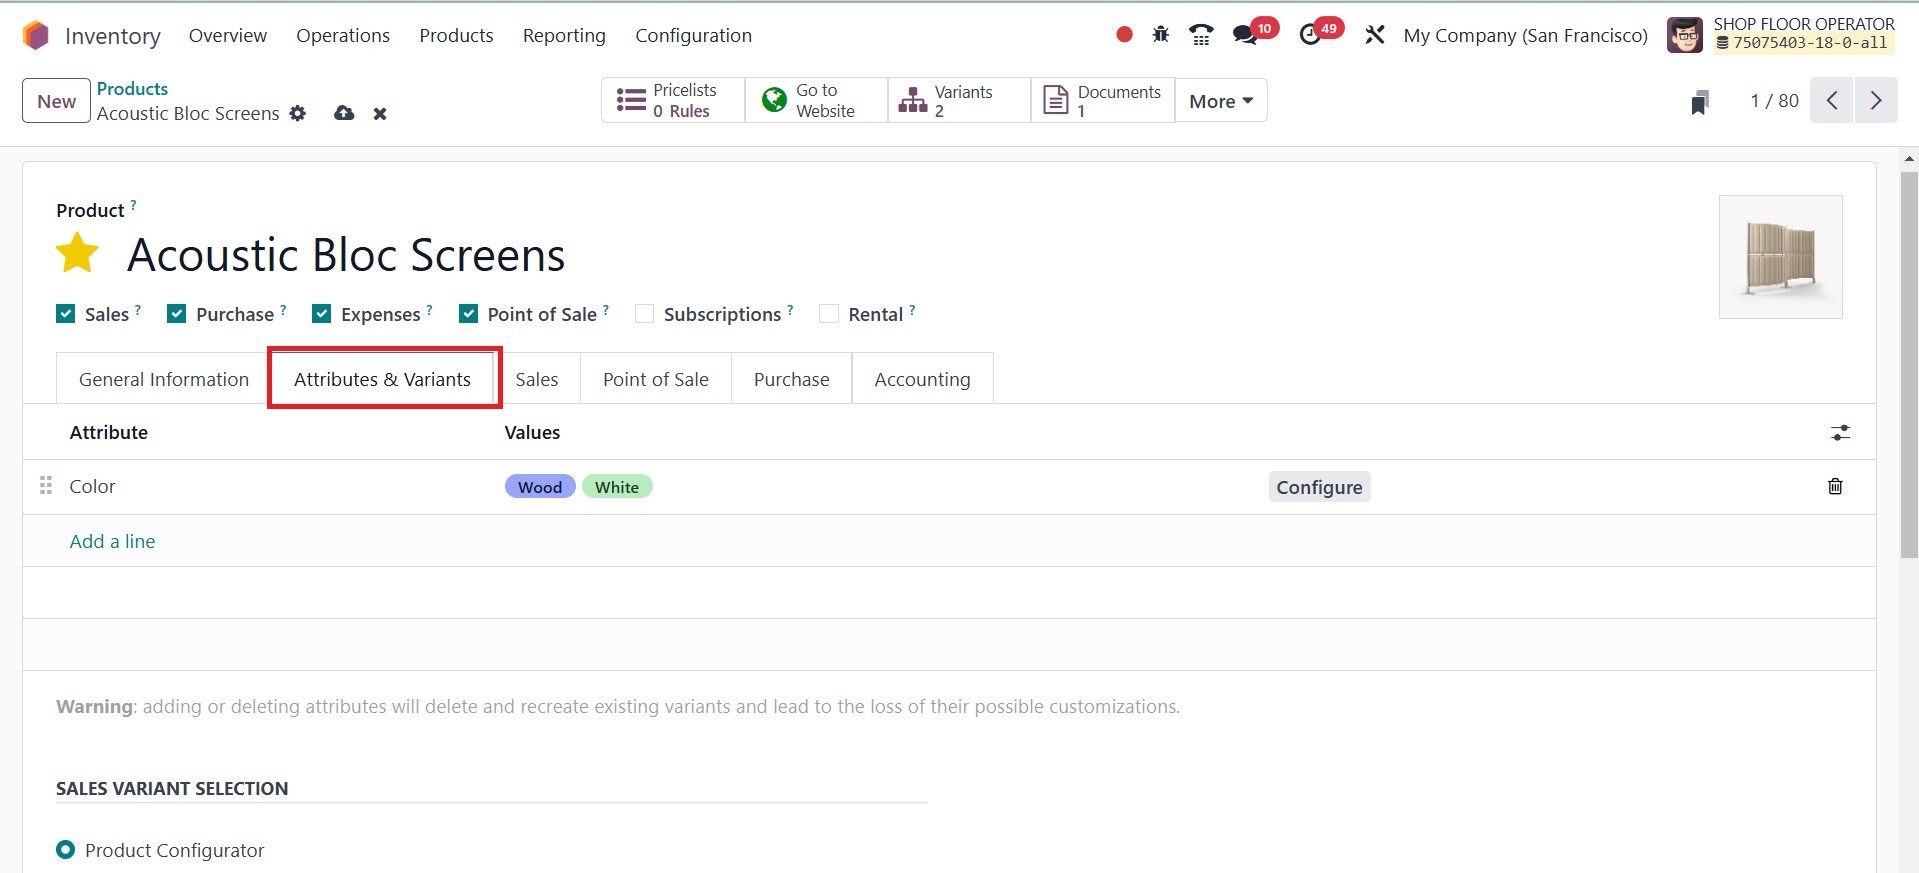
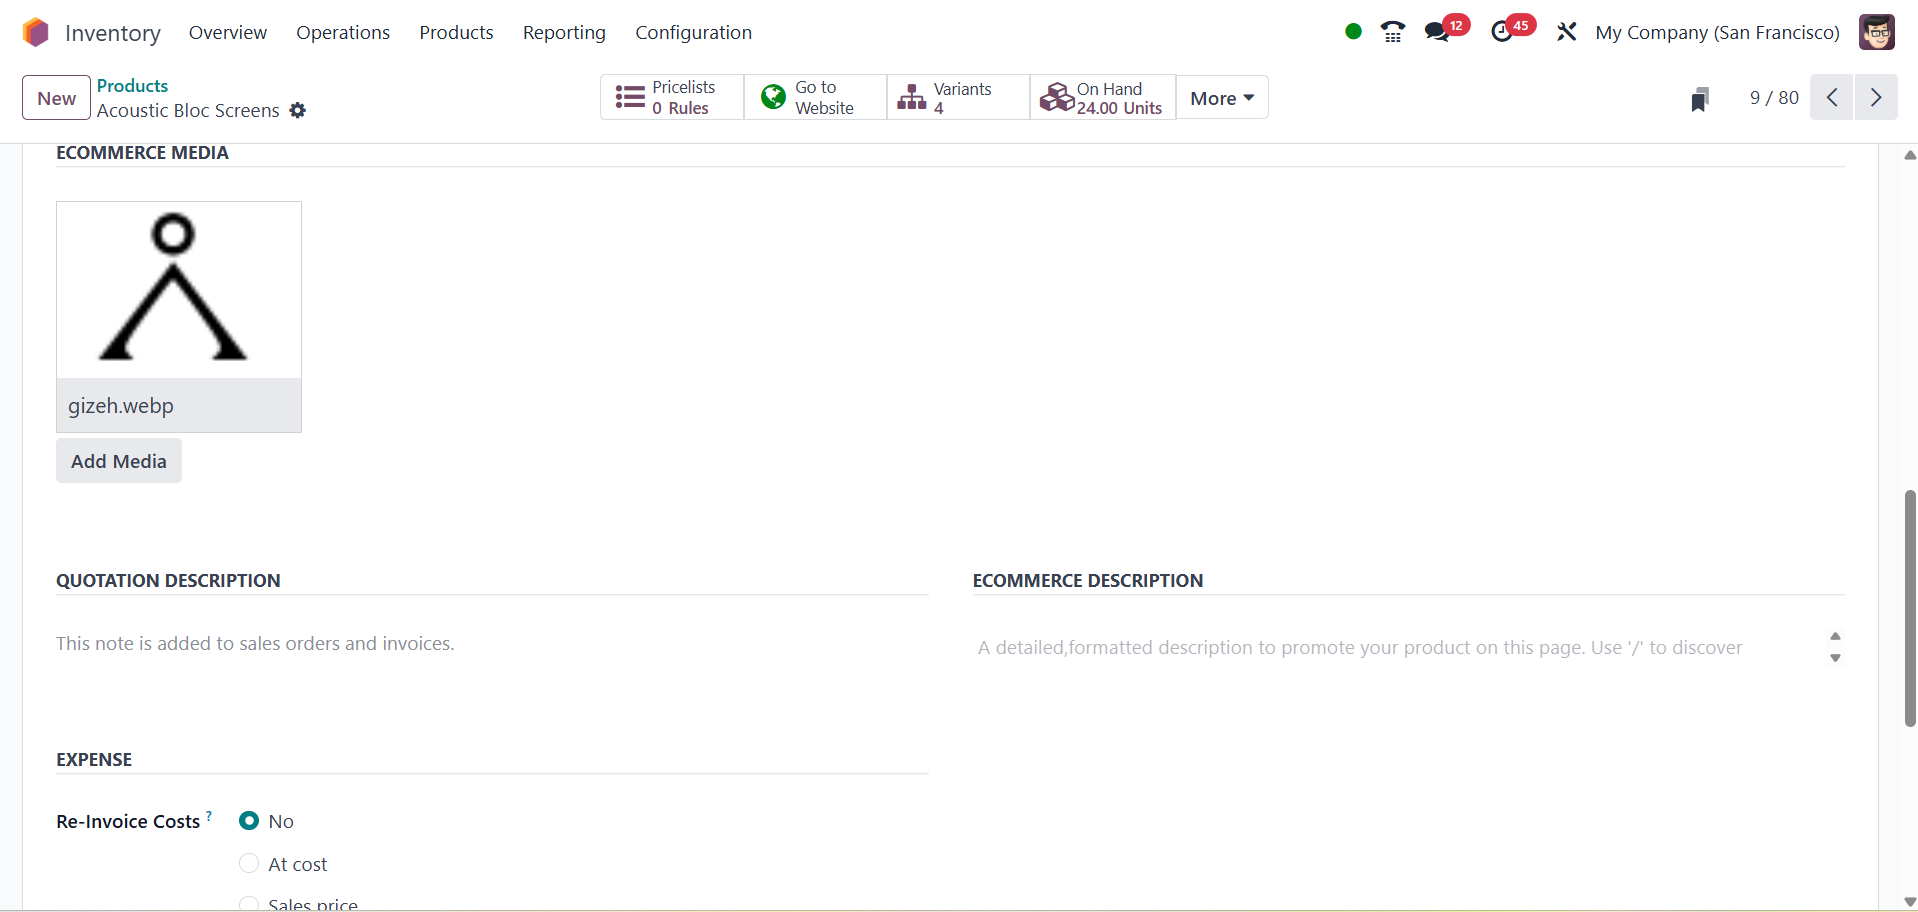
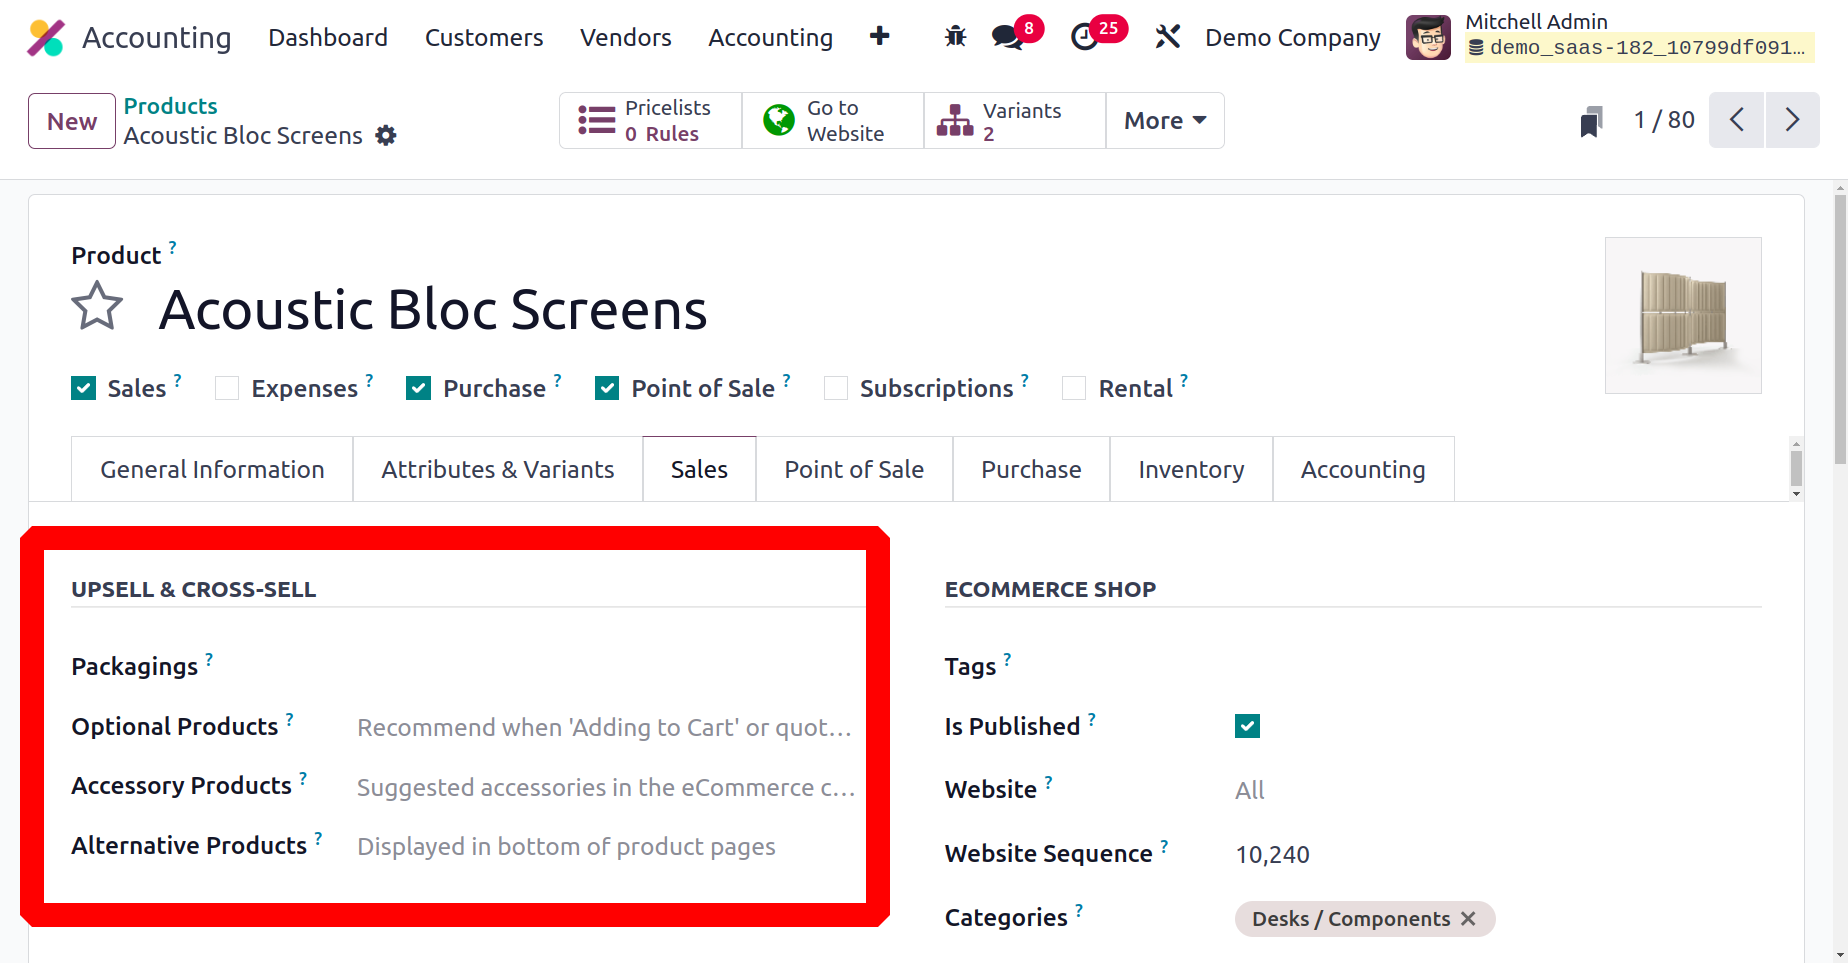
The Sales tab allows you to set
the Upsell & Cross-sell,
Ecommerce Shop, Ecommerce
Media, Quotation Description,
Ecommerce description, and
Expense.
Customers can find
recommendations for
alternative, additional, and
accessory products in the
Upsell and Cross-selling
section. Under the upsell and
cross sell, you have the
packagings, optional
products, accessory products,
and alternative products
options, respectively.
In the ECOMMERCE SHOP area, make
reference to the product's
tags, is published website,
categories, and website
sequence.
A range of eCommerce strategies
are offered by Odoo18 to
boost online sales. On the
Sales tab, you will be able
to choose which upselling and
cross-selling strategies to
use. Users are shown products
that are deemed optional when
they click the Add to Cart
button. This is a component
of the cross-selling
strategy. Odoo18 will use
this feature to recommend
related products that are
available for purchase in
addition to the main item.
When customers check their
shopping carts before
checking out, the
cross-selling strategy
suggests other items to them
using supplementary products.
Alternative Products suggests
alternatives to the product
you selected.
Located near the bottom of the
product page on the eCommerce
website, this is one of the
best upselling strategies to
boost online sales.
You can configure warnings to
appear while this product is
being sold in the Warning
field under the Sales tab, as
seen in the picture below.

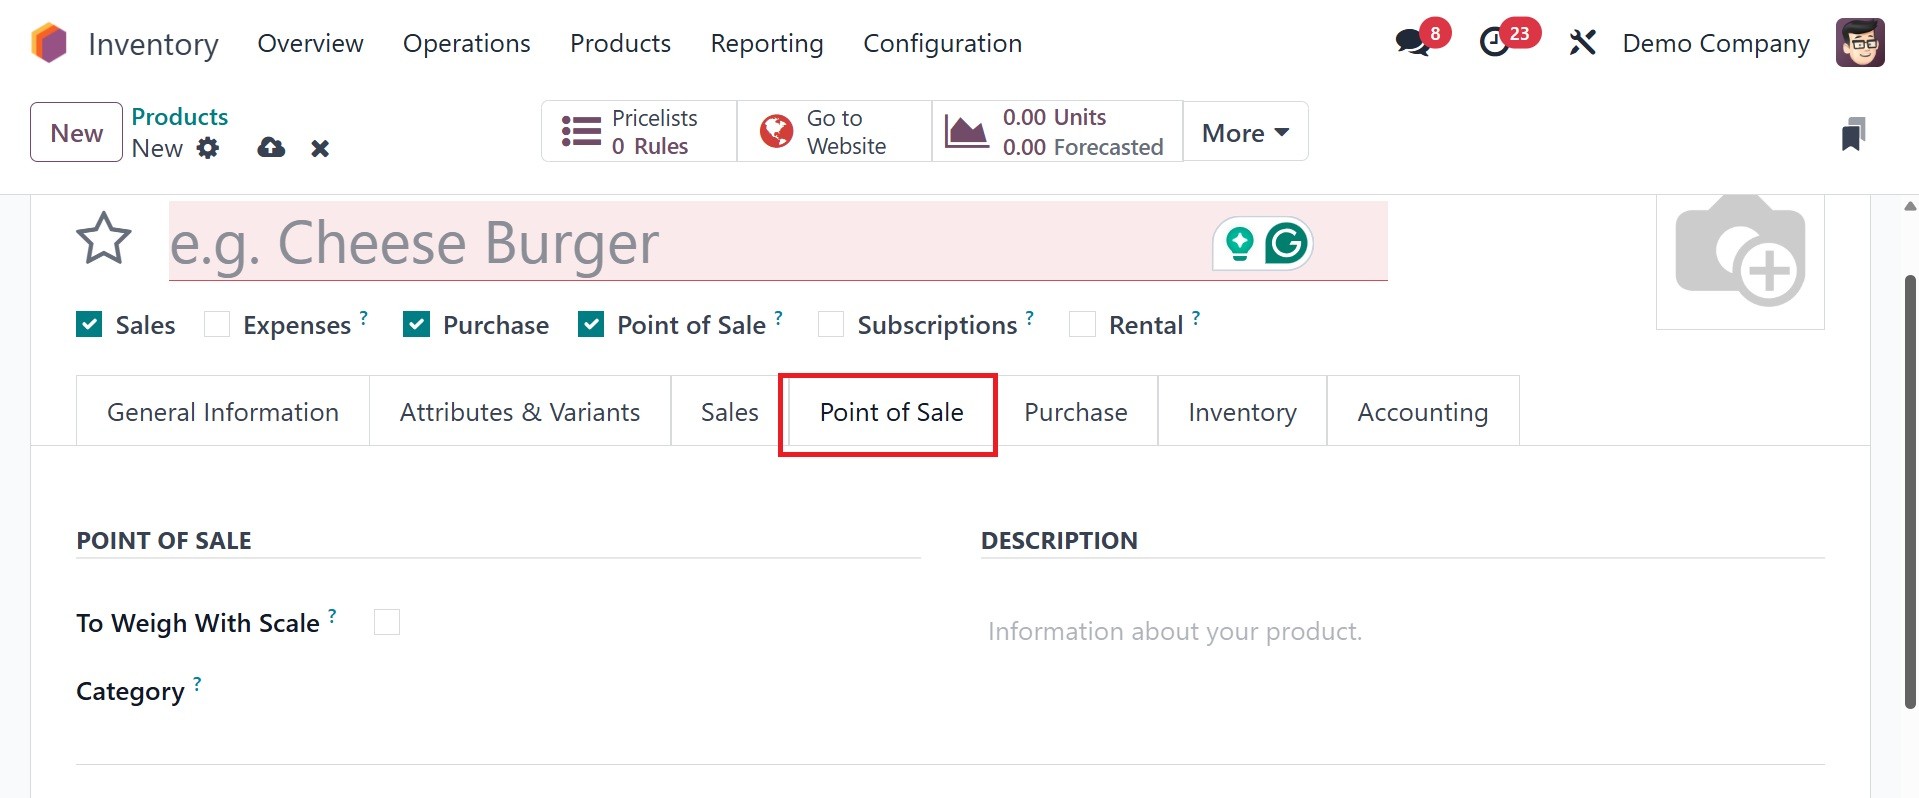
You can enable this product in
POS by selecting the relevant
option in the Point of Sale
field. After choosing this
option, you will be prompted
to activate the To Weight
with Scale feature. You can
activate this feature if the
hardware scale integration is
required for the product's
weight. Enter the product's
category for POS use in the
Category section.
Additional details regarding the
purchase of the goods can be
supplied under the Purchase
tab. The suppliers of this
product can be listed using
the Add a Line button. If you
intend to subcontract this
product with the selected
vendor, you can activate the
Subcontractor field.

To make a purchase transaction
with the merchant, enter the
relevant currency in the
designated field. The Unit of
Measure used for purchase
orders with this vendor, the
price to purchase this
product from the specified
vendor, and the Lead Time for
Delivery can also be included
in the appropriate boxes. The
number of days between the
vendor's confirmation of the
purchase order and the
product's arrival at its
destination is known as the
delivery lead time.
Odoo allows you to link several
vendors to a single product
so you can compare prices and
select the best deal.
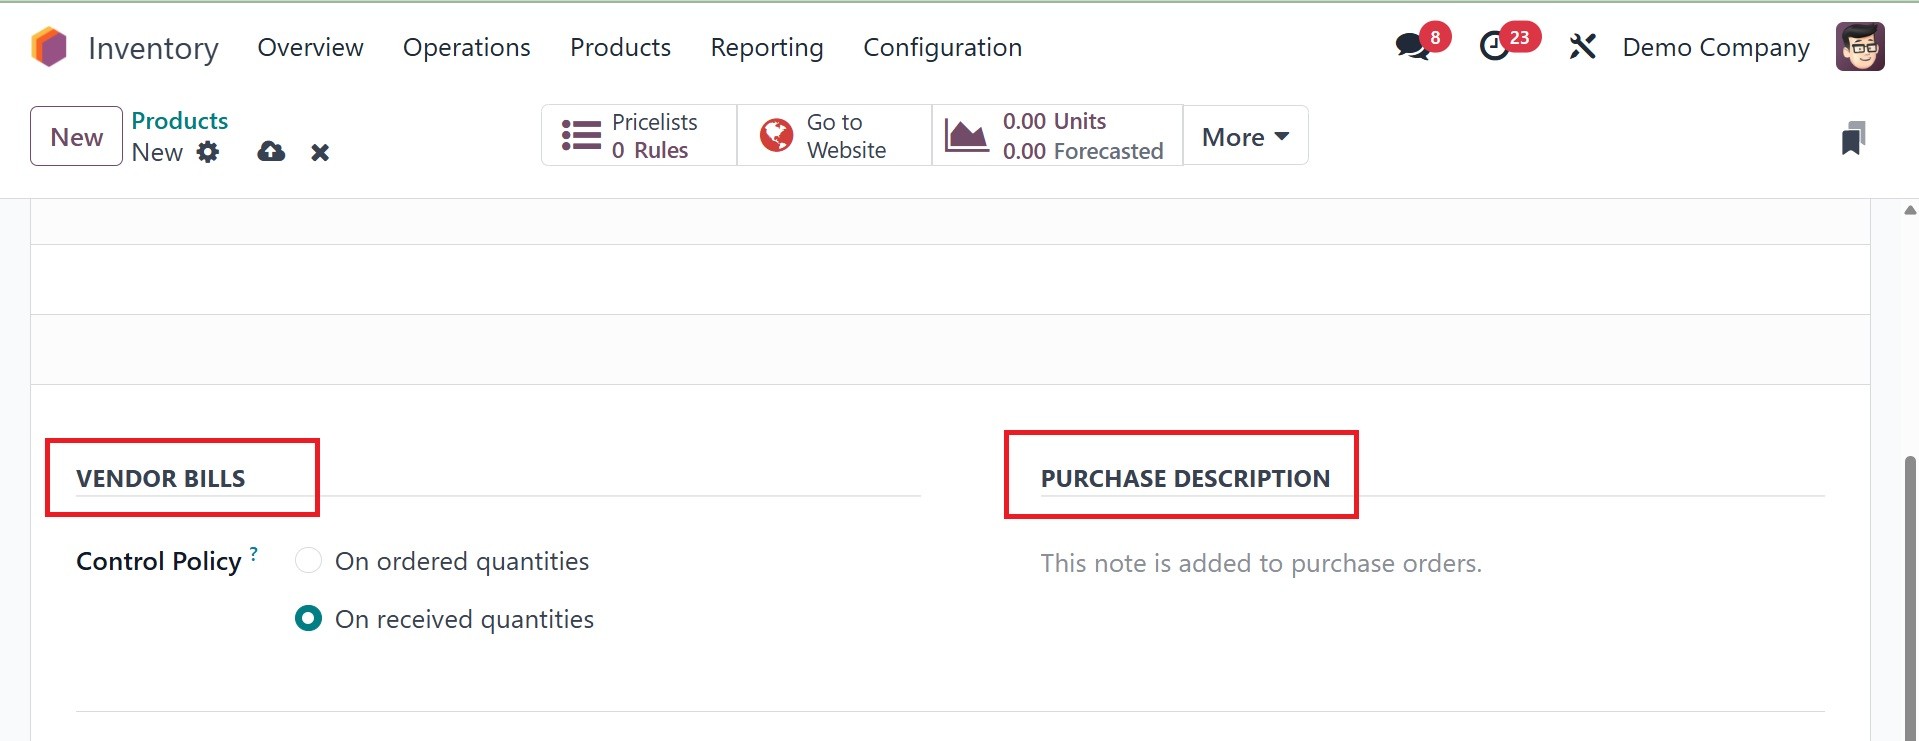
Under the VENDOR BILLS section,
you can set the default
vendor taxes that are applied
to purchases of this product.
The control policy will
specify how to generate
vendor invoices for the
products. Bills can be
generated based on the
quantities that the client
has requested by altering the
bill control policy to
requested amounts. If the
customer wishes to pay the
bill only after receiving the
goods, you can set up a
control policy on received
quantities. Use the PURCHASE
DESCRIPTION tab to include
internal remarks on the
product's purchasing
activities.
Now let's navigate to the
Inventory tab in the Product
Configuration Window. You can
define the operations,
logistics, description for
receipts, description for
delivery orders, and
description for internal
transfers on this page.
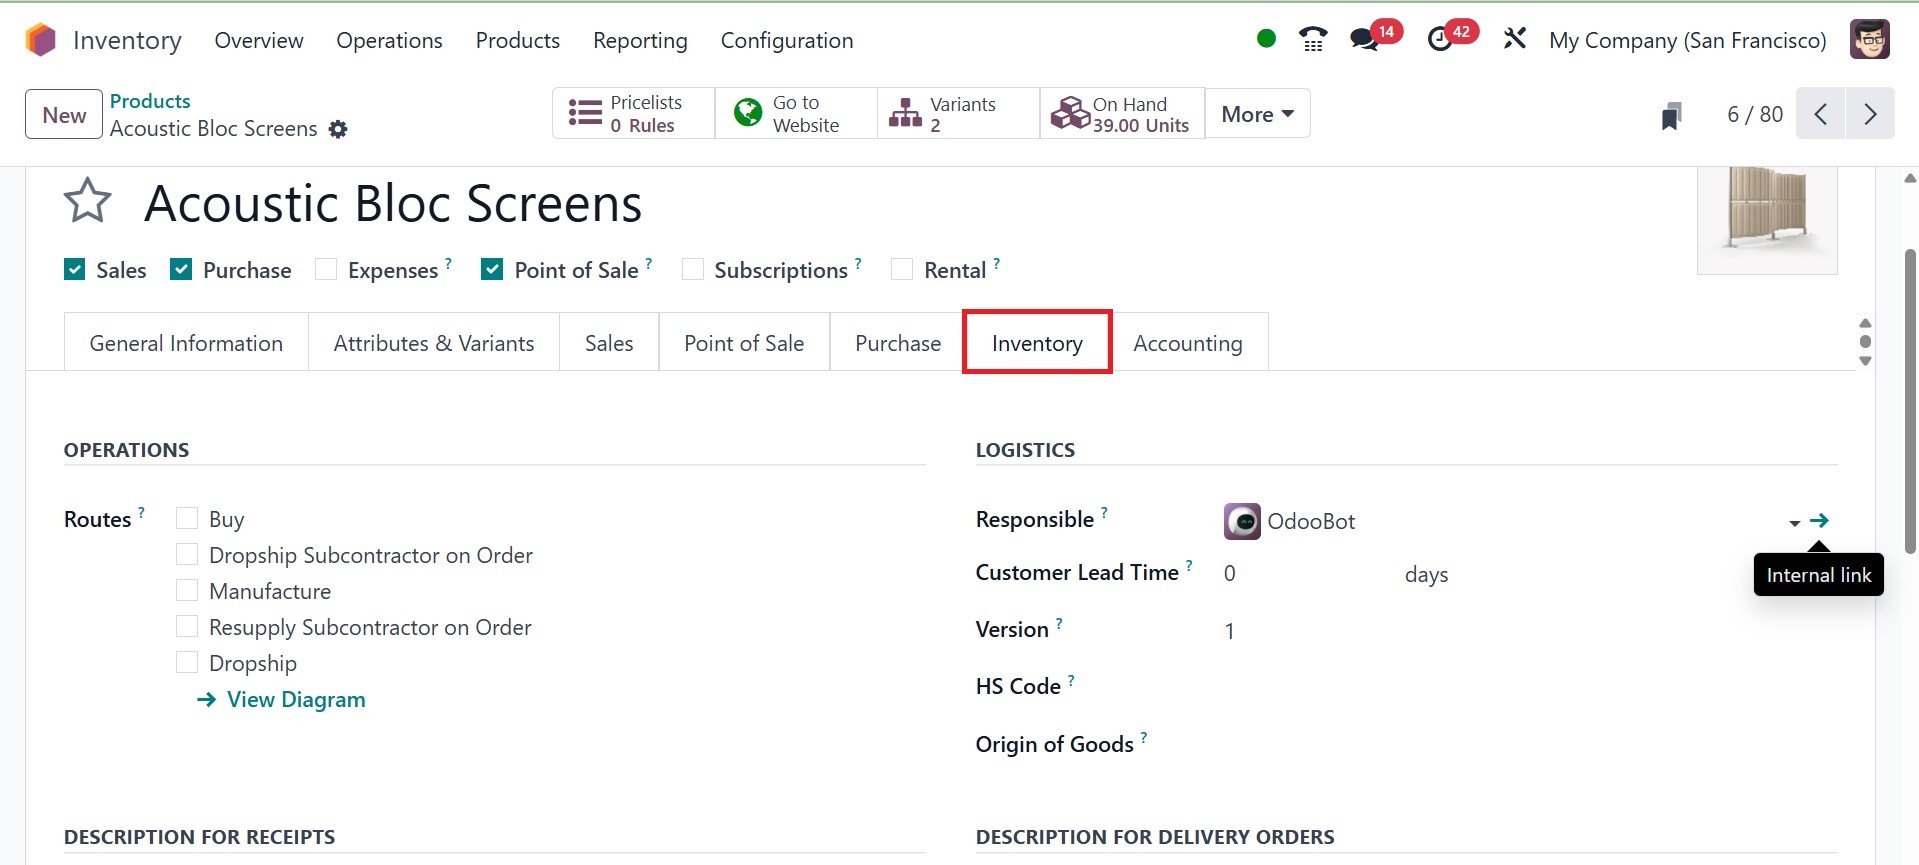
You can define the product's
routes using the OPERATIONS
column, which will help you
match the modules that are
installed in your Odoo18
database. You can configure
this product's route as Buy,
Dropship Subcontractor on
Order, Manufacture, Resupply
Subcontractor on Order, and
Dropship, depending on your
company's restrictions.
In the logistics department,
assign a responsible worker
to oversee the upcoming
logistics-related duties for
this product. You can enter
the customer lead time,
version,origin of goods, and
HS code of this product in
the appropriate areas.
The customer lead time is the
number of days that the
customer is allocated for
delivery after the sales
order has been confirmed.
Enter the HS Code used for
international shipping and
product declaration in the
designated field.
Additionally, you may
determine the goods' nation
of origin, which provides
information about their
manufacturing process and
location.
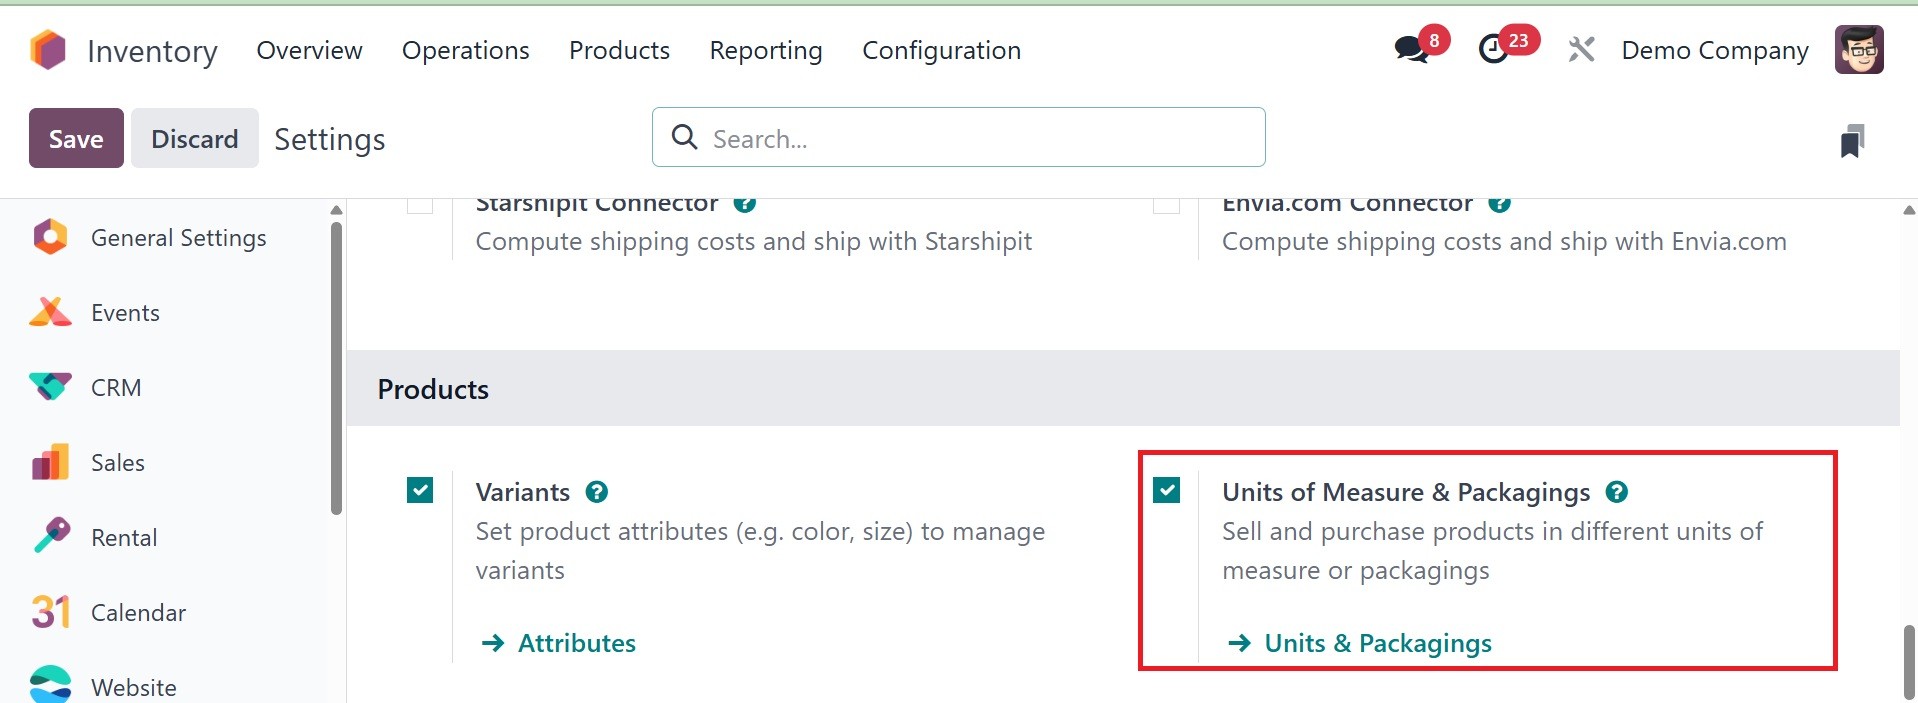
Under the Inventory tab, there is
a new option that allows you
to describe the packaging of
the products you currently
have. To access this option,
you must enable the Units of
Measure and Packagings
feature from the Settings
menu of the module, as seen
below.
Turning on this option under the
Inventory tab of the product
configuration window will
make the product packaging
function available, as
illustrated below.
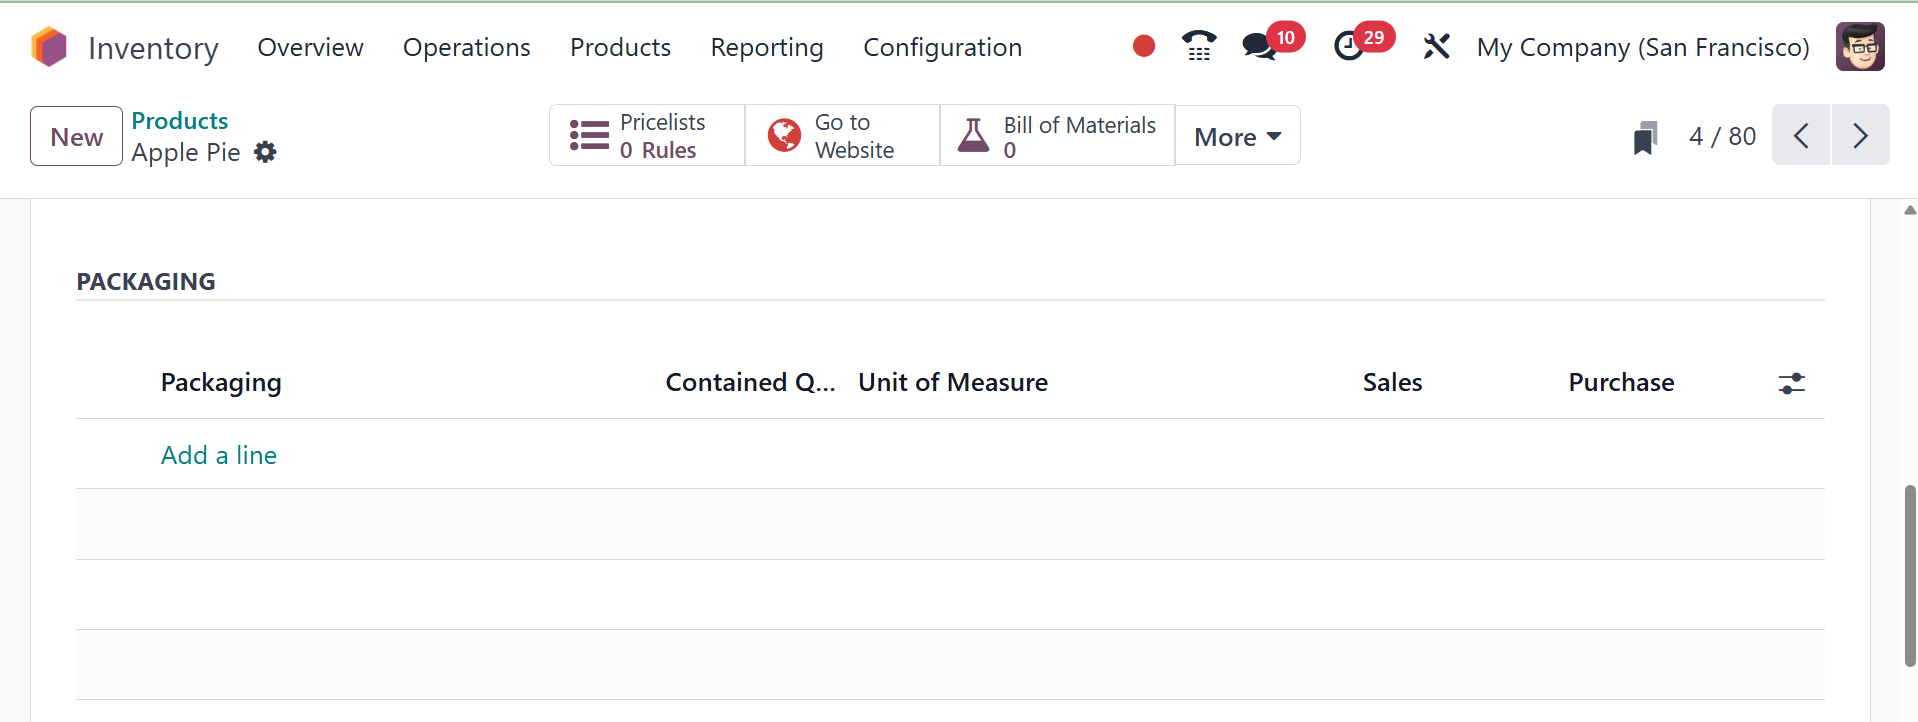
Product packaging makes it
possible to create product
packages in preset amounts.
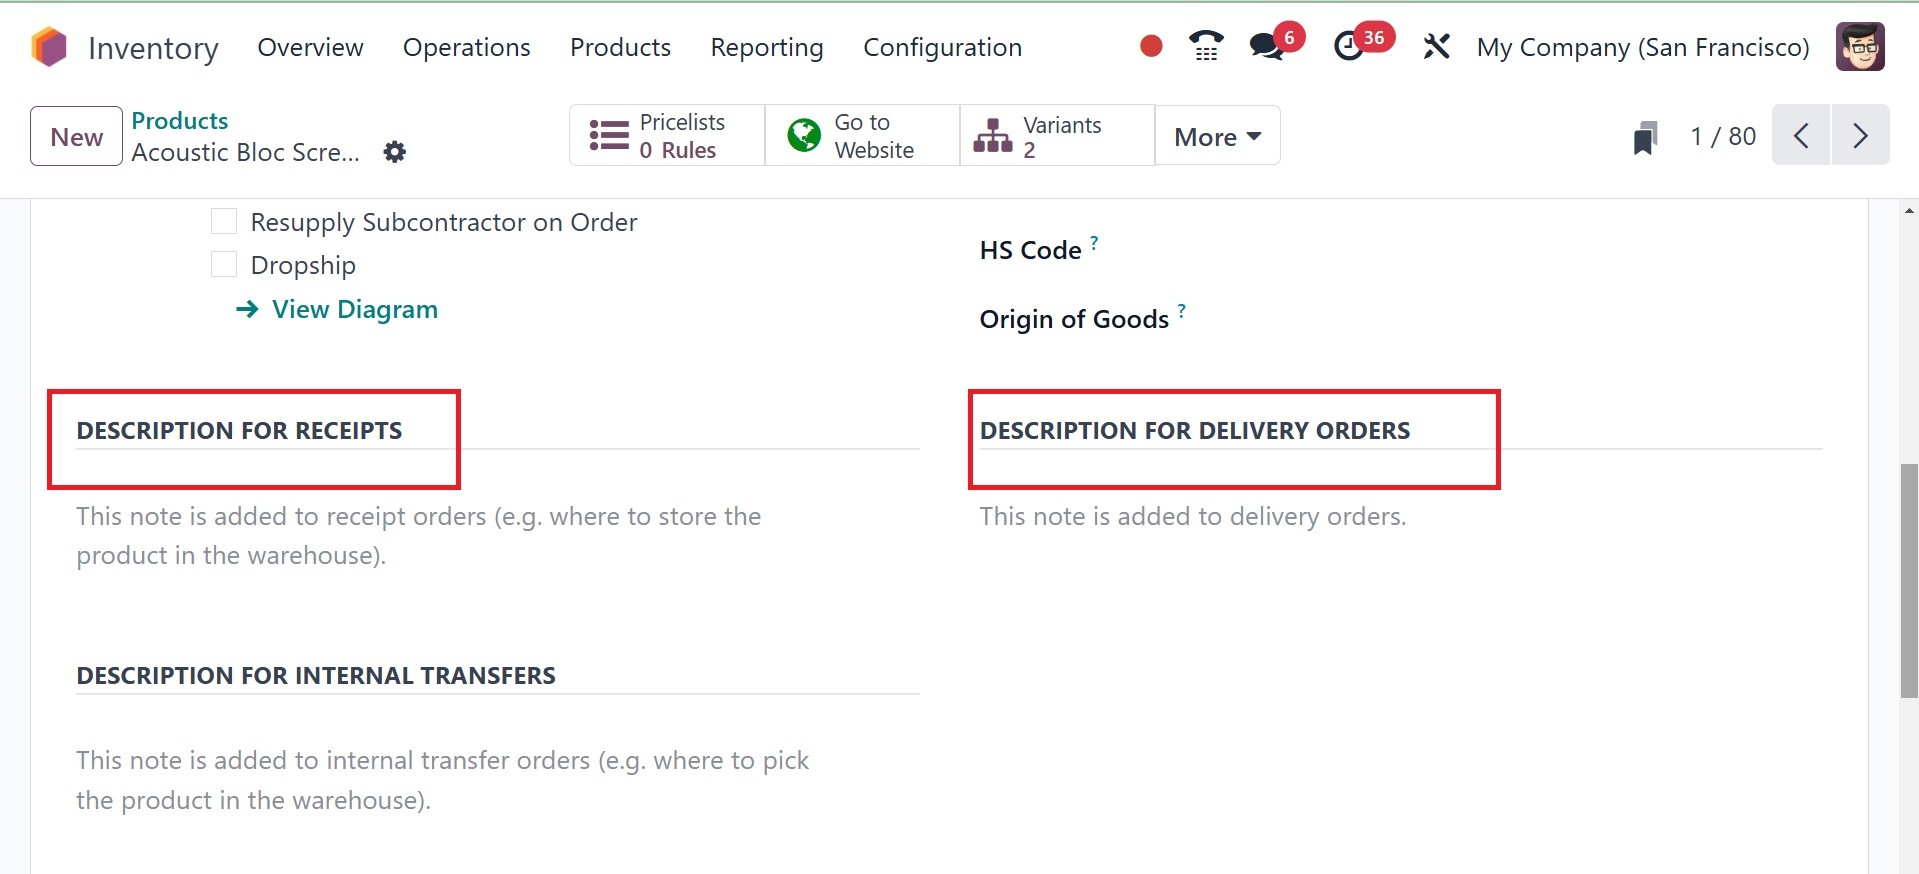
The Description for Delivery
Orders and the Description
for Receipts can be used to
add more remarks for delivery
orders and receipts,
respectively, as in the image
above.
Under the Accounting tab of the
Product Configuration window,
you may define the data
required for the product's
accounting operations.
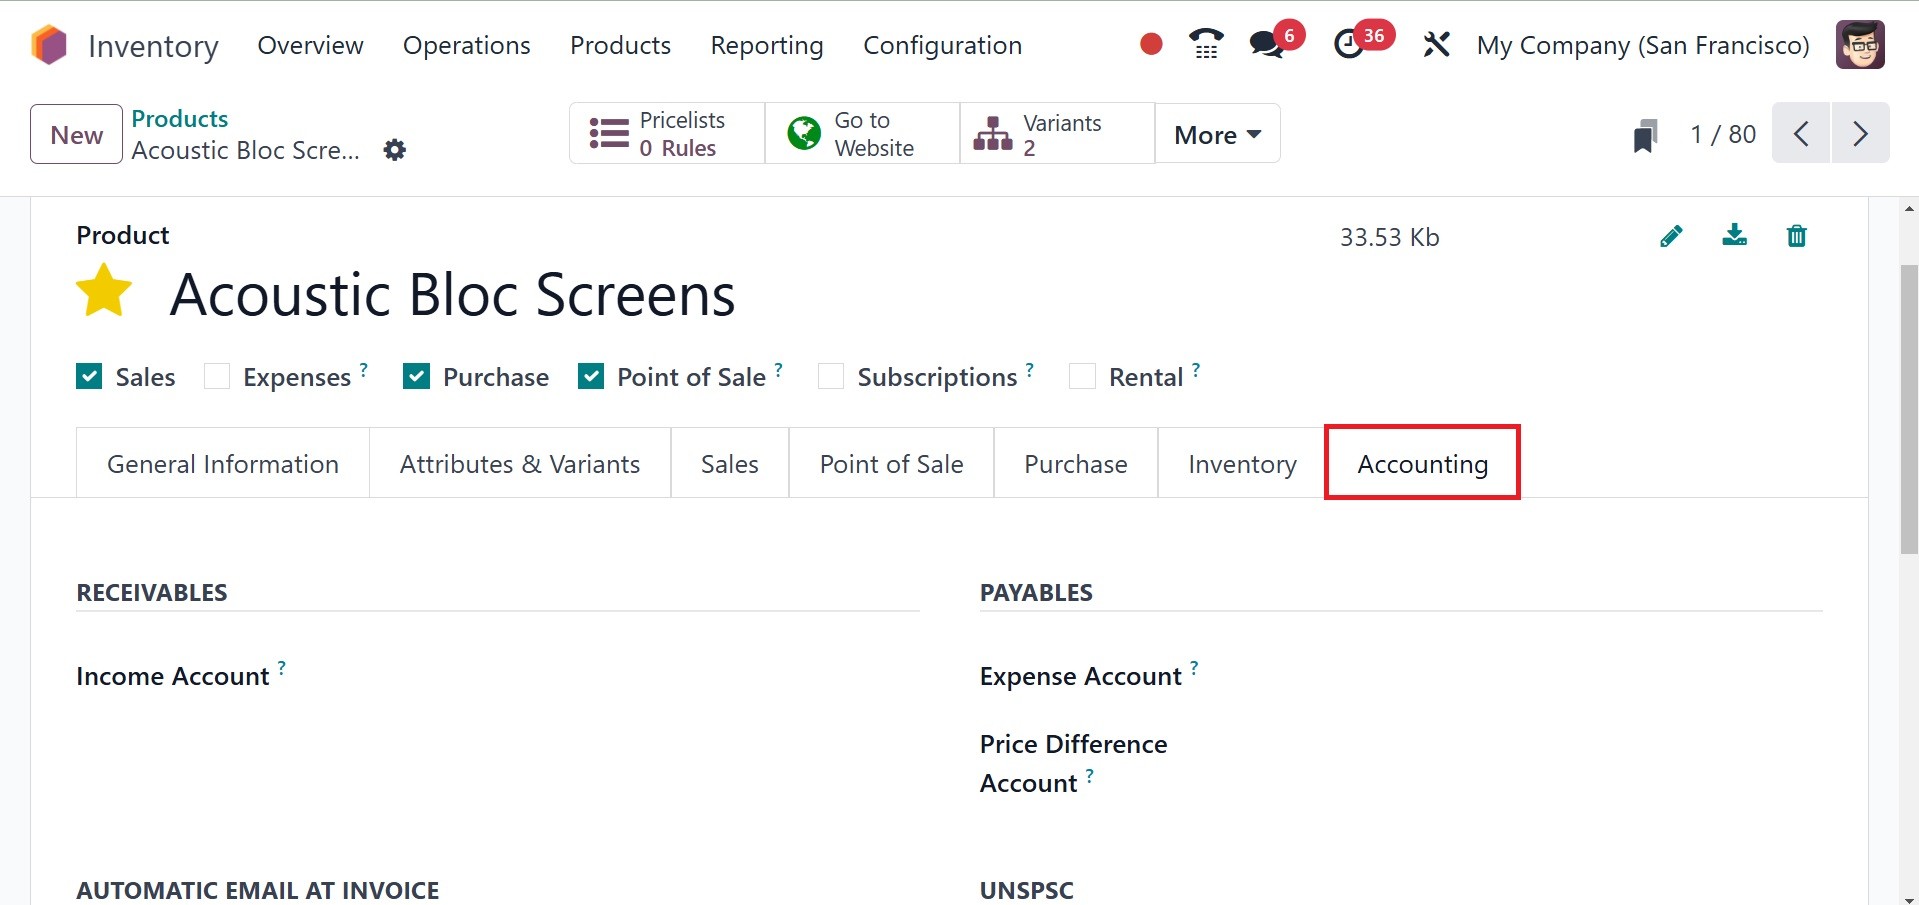
You can enter the Income Account
in the RECEIVABLES section
and the Expense Account and
Price Difference Account in
the PAYABLES field. This
price difference account is
used in automated inventory
valuation to document the
price discrepancy between a
cost and the related vendor
bill when verifying vendor
invoices.
After adding a new product to
your Inventory module, you
can use the operational tools
on the screen, such as
Replenish, Update Quantity,
and Print Labels.
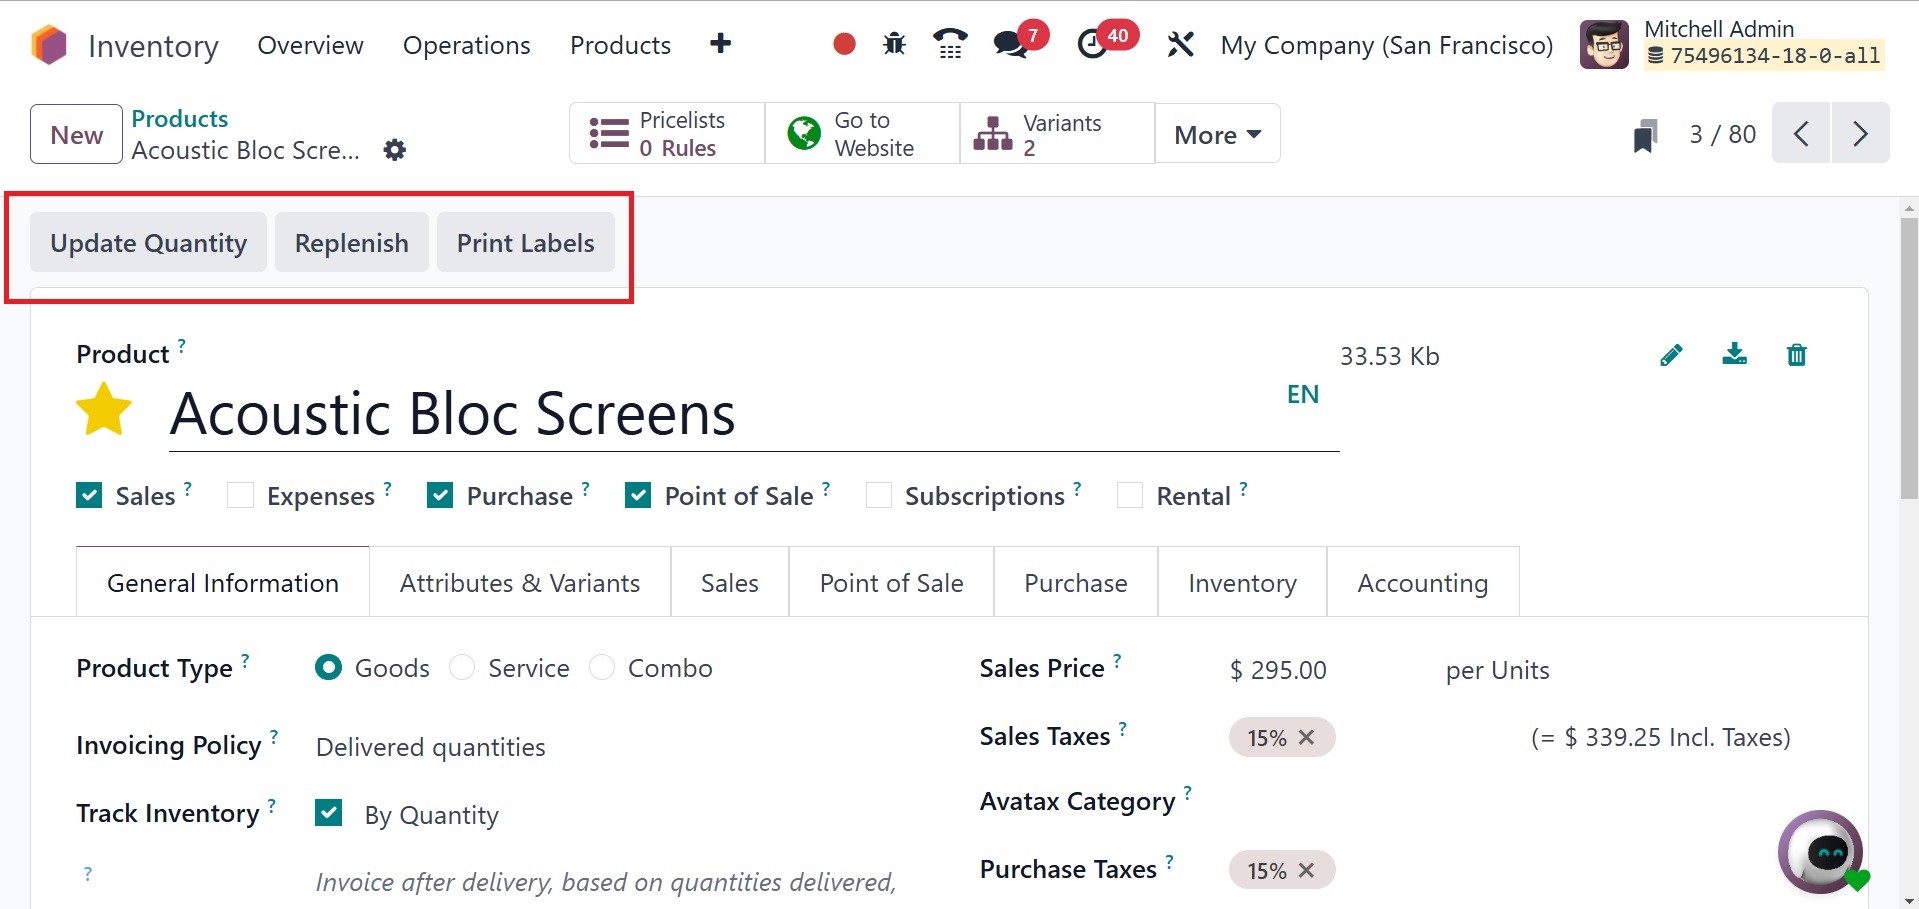
Create labels for this product
using the Print Label option,
which can then be applied to
the packages upon delivery.
This will send you to a new
wizard, as shown below.
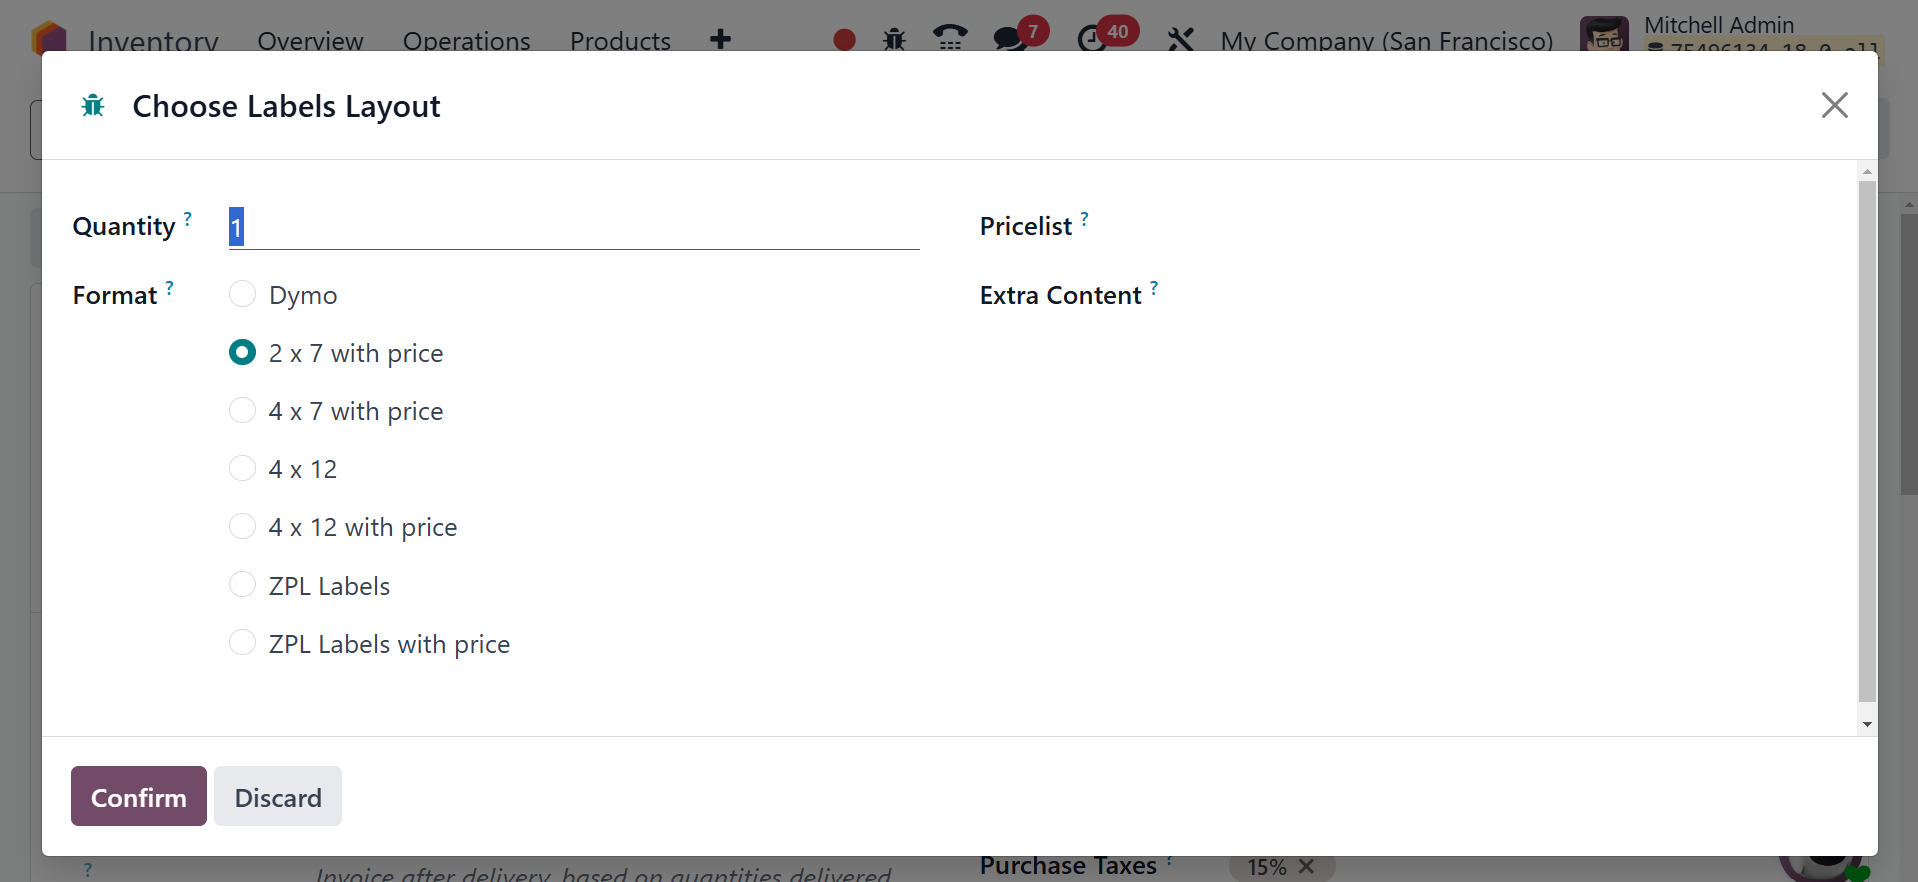
You can specify the product's
quantity, additional content,
and label format in the
fields provided below. After
selecting the Confirm button,
labels for the selected
product will be printed. The
following example.
After discussing the product
configuration capabilities,
let's move on to the
Inventory module and how to
configure product variants.
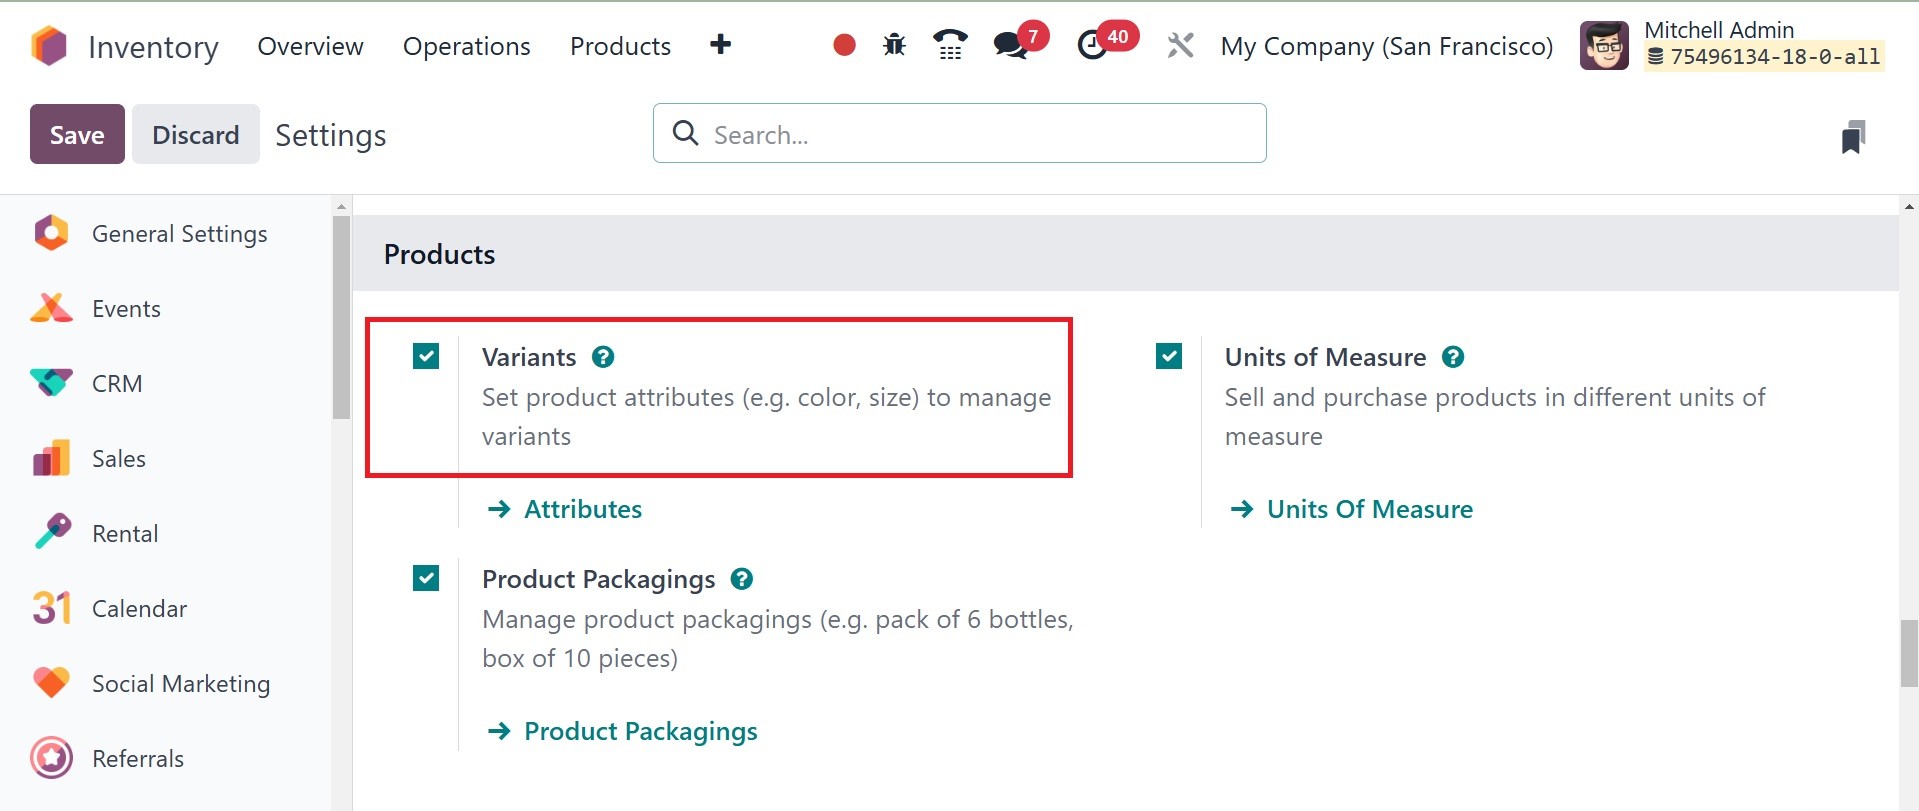
2.2 Product Variants
Offering customers a variety of
product options is a smart
strategy to boost sales.
Odoo18 allows you to
configure several product
versions in the Inventory
module, just like we did in
the Sales and Purchase
module. First, make sure the
Variants option is enabled in
the Inventory module's
Settings menu, as seen below.
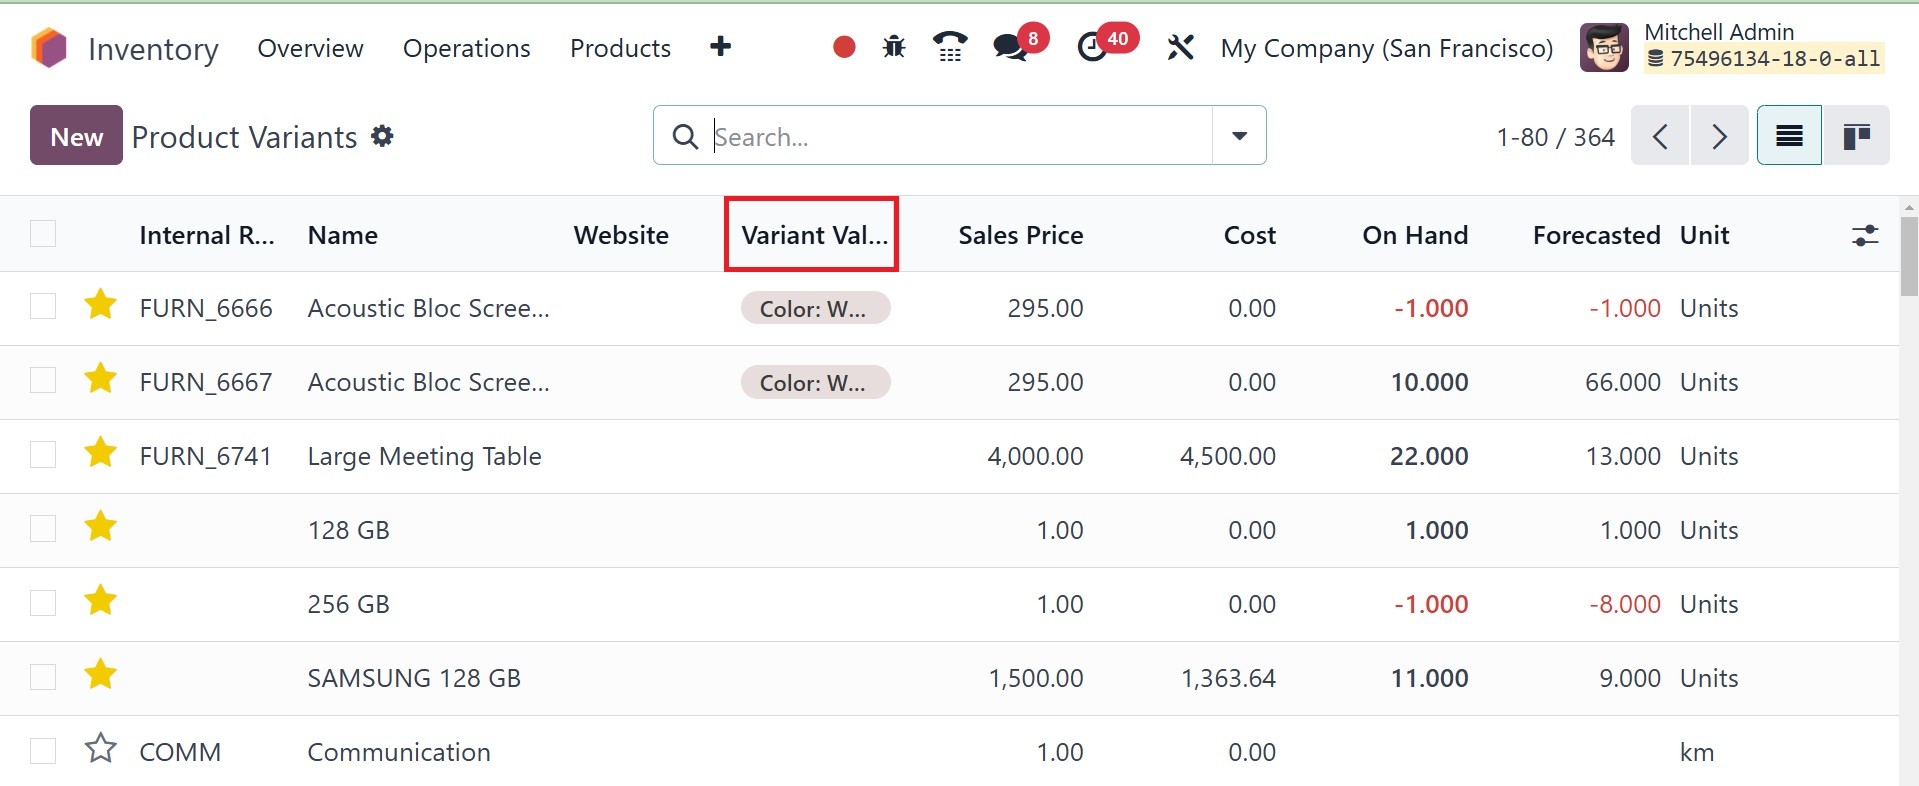
From the Inventory module's
Products menu, you can assess
the Product Variants option.
The configuration of the
product variant is identical
to that discussed in the
preceding section.
The screenshot below shows the
list of variants configured
in the Inventory module. The
product window and this
window are similar. The sole
difference is that the
Variant Values of the related
commodities are now visible.
While configuring a new product,
you can list its versions in
the Attributes & variants
tab. The attributes and
values of the variant must be
mentioned here.
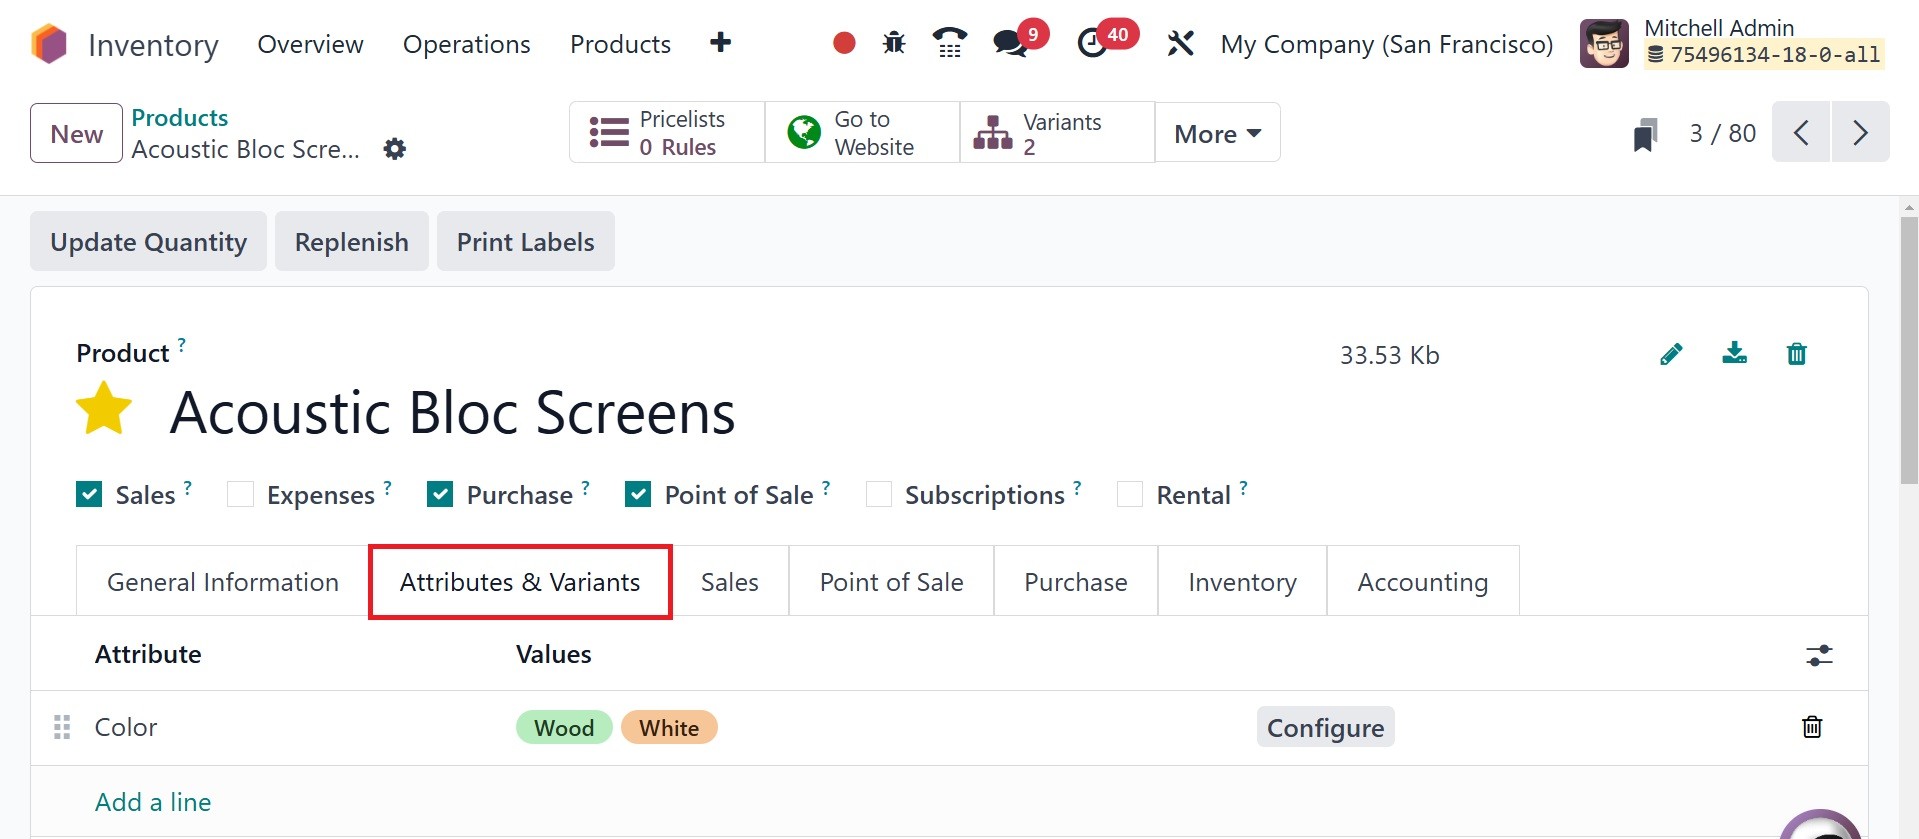
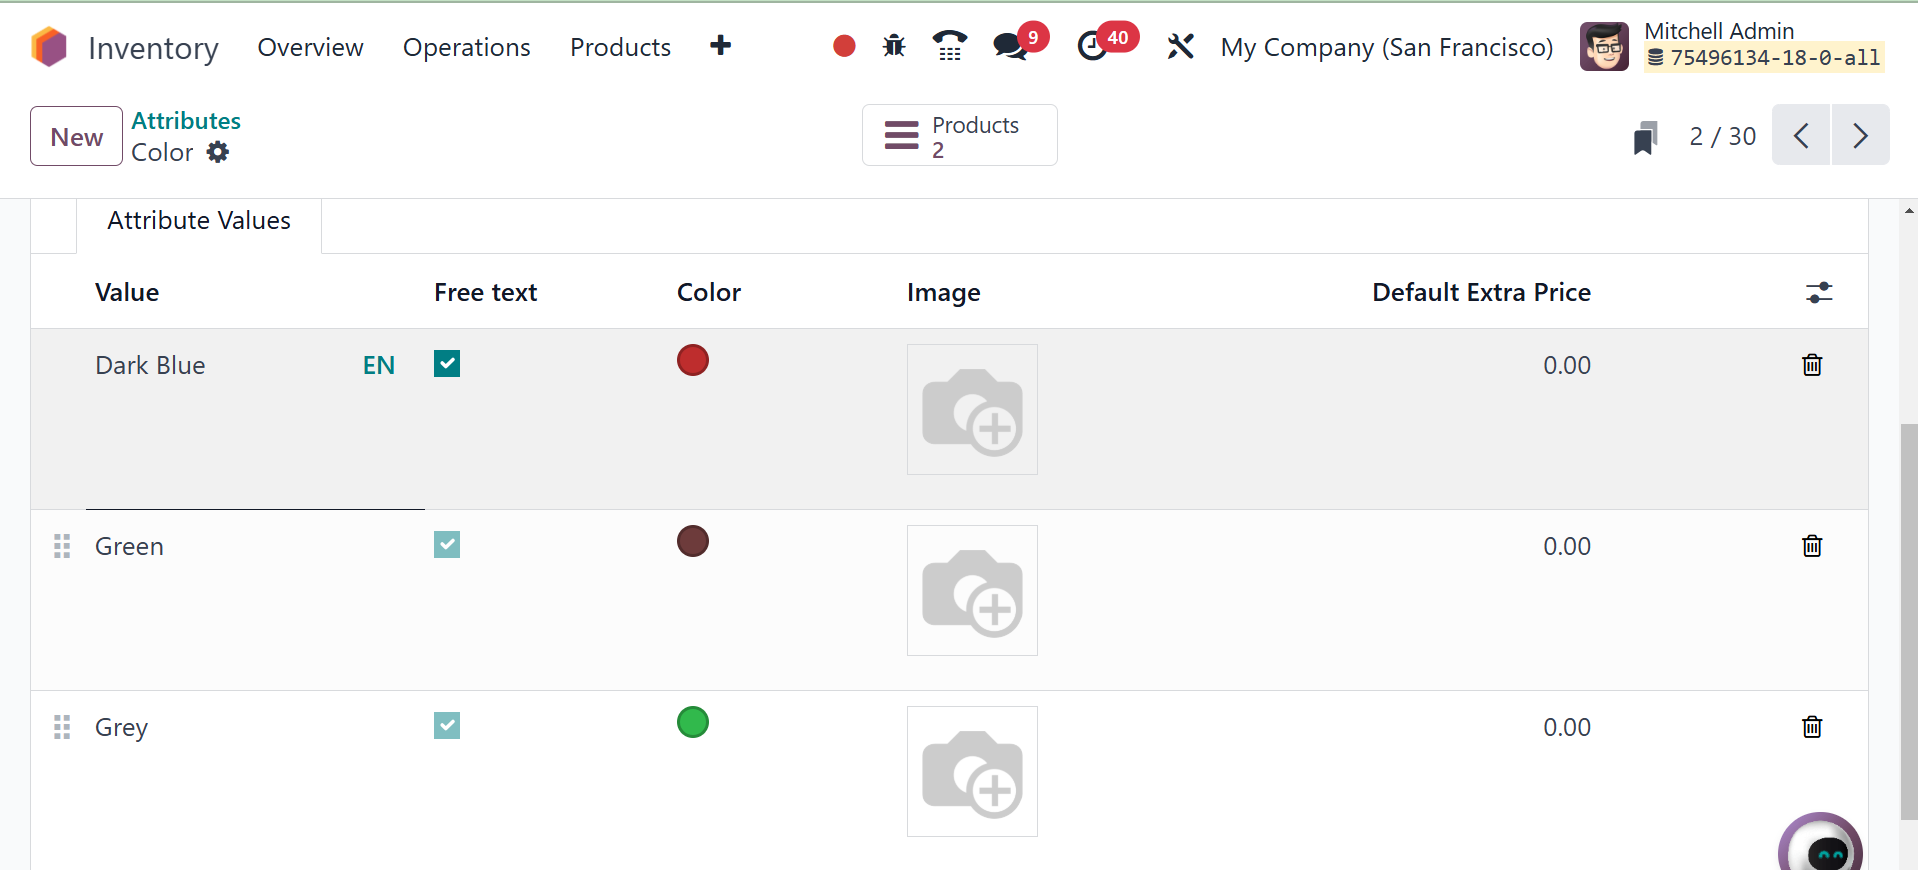
Using the Configure button, you
can create a new variant
value right from this
platform. Furthermore, Odoo18
offers an alternative
platform for setting up new
product values and
attributes. The Configuration
menu provides access to this
platform.
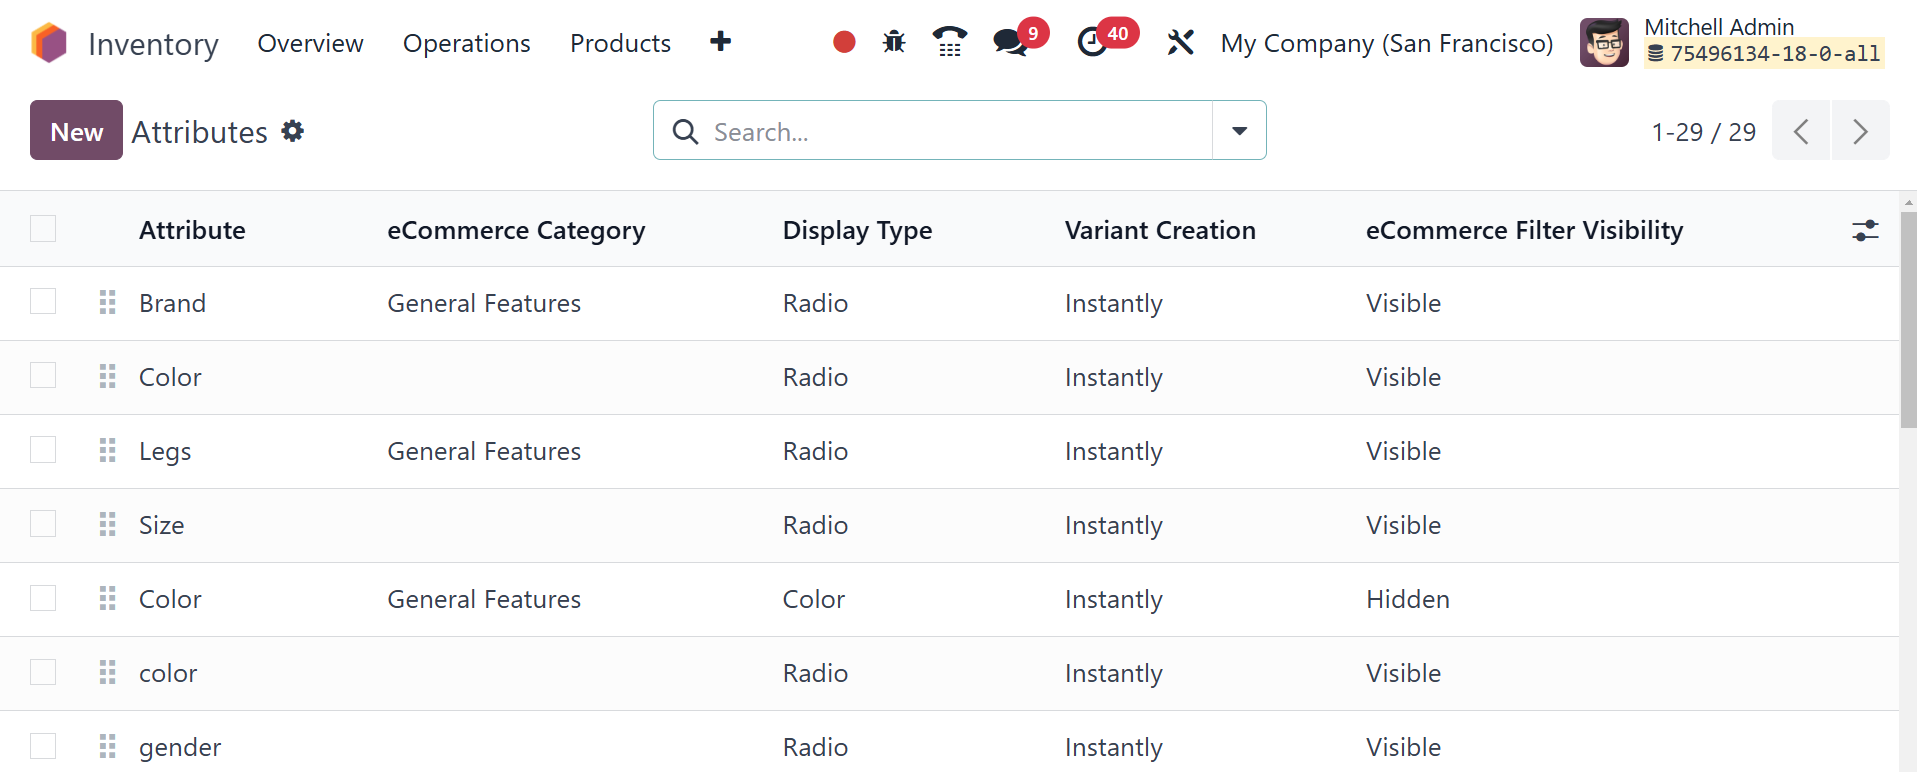
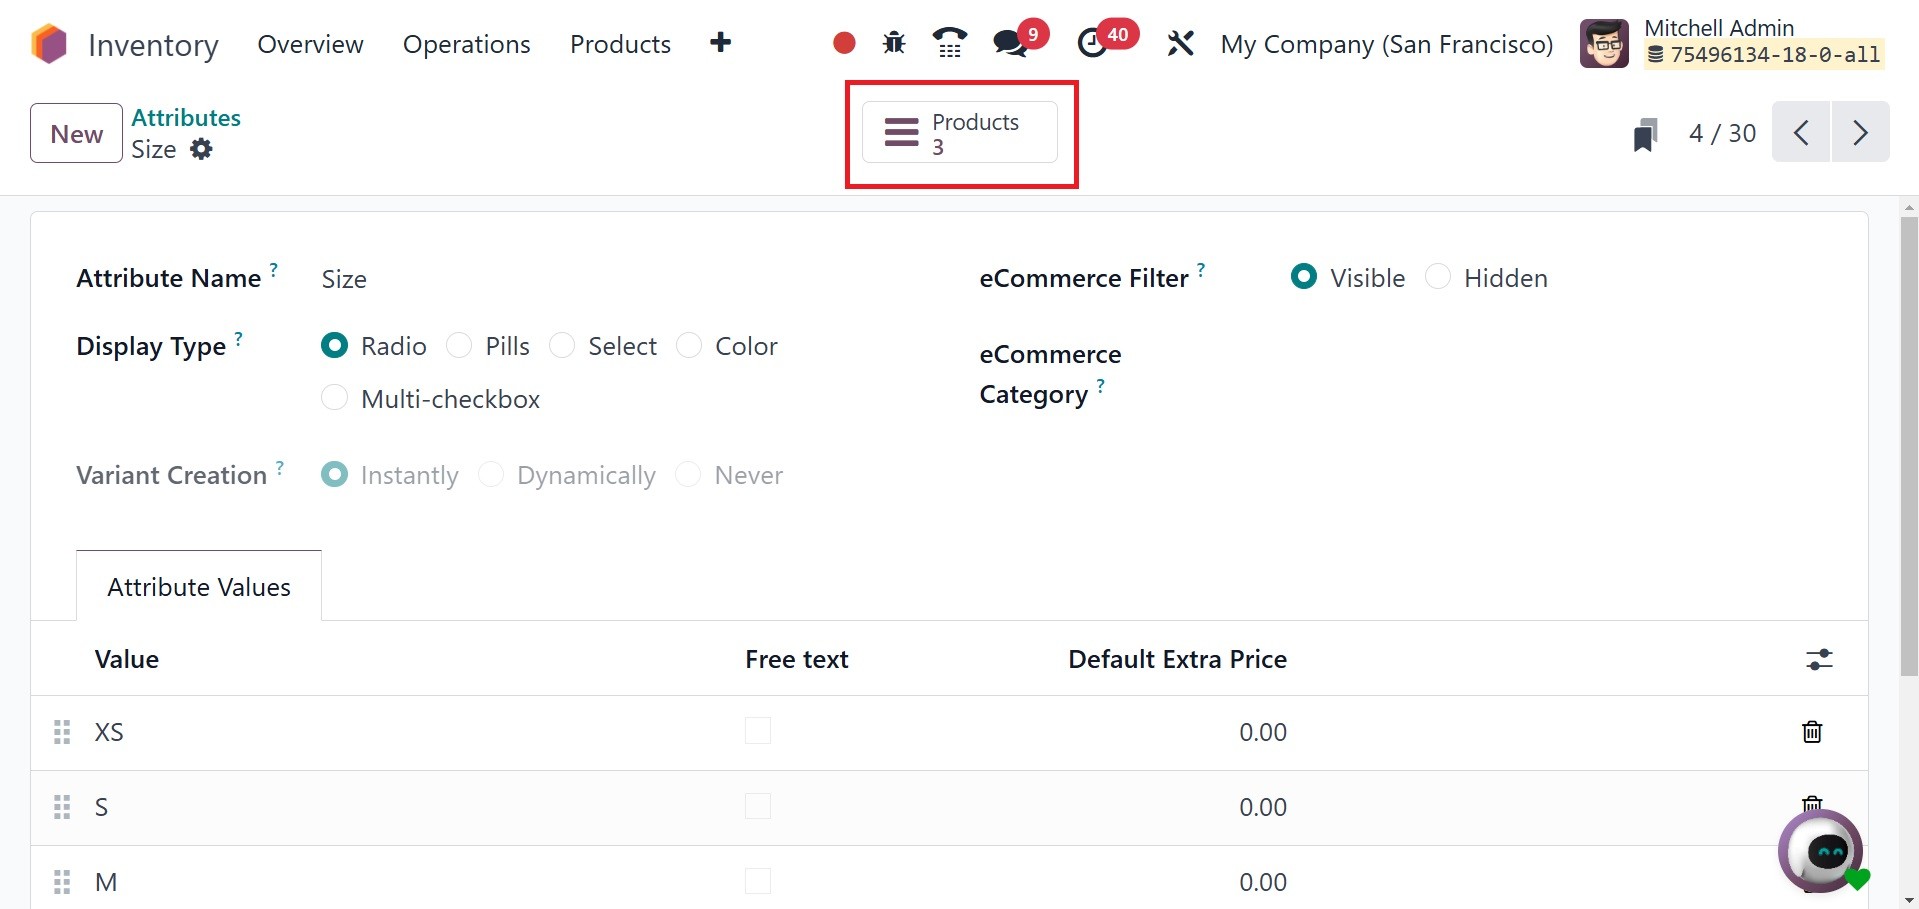
Odoo18 will take you to a
platform with a list of the
attributes that have already
been specified when you click
the Attributes button on the
Configuration page. It shows
the property name, category,
display type, variation
creation mode, and visibility
of the eCommerce filter. You
can search for attributes
using the search box. Sorting
can be done using the custom
Filter and Group By options
in this box. To add new
qualities, click the New
button.
You can enter the proper title
for the attribute in the
Attribute Name field. Put
similar attributes in the
same part of the eCommerce
comparison page by selecting
a category in the Category
box. It is possible to modify
the Display Type of a product
configurator attribute to
Radio, Pills, Select, Color,
or Multi-checkbox (optional).
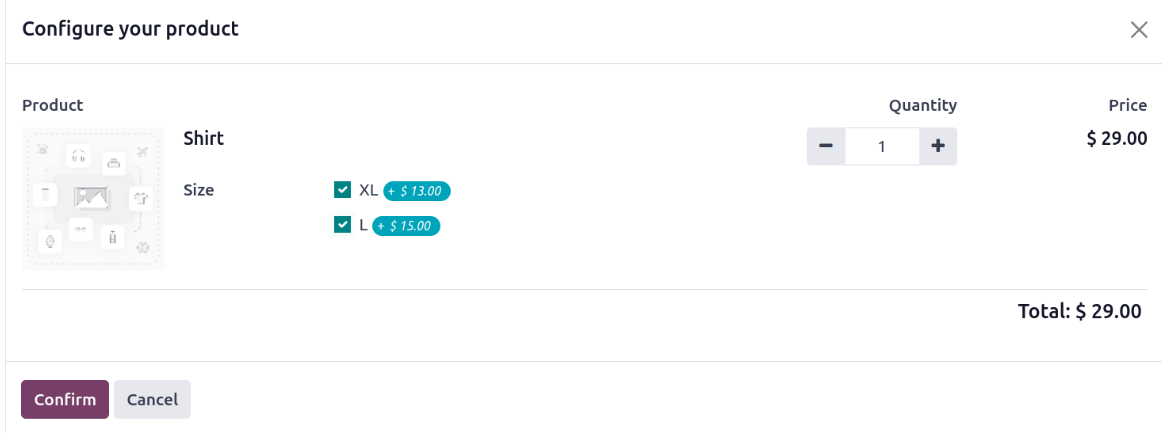
Multi-checkbox is a new feature
in Odoo 18. When the order
line presents a new window
with many product options,
customers can select several
versions if the display type
is Multi-checkbox, as seen in
the picture down below.
Additionally, Odoo 18's second
new feature is the adding of
photos to characteristics.
This is only possible when
the display type is color.
The photos can then be added
to the attribute values tab.
In the Variants Creation mode,
you can select one of the
following methods for
producing variants:
Instantly: Every possible version
of a product is created
instantly with the addition
of an attribute and its
values.
Dynamically: Each variation is
only produced when the
pertinent attributes and
values are added to a sales
order.
Never: Variants of the traits are
never created.
You are unable to alter the
manner of variation creation
once the attribute has been
applied to at least one
product. You can give buyers
the ability to filter
products according to their
attributes by choosing the
Visible option from the
eCommerce Filter Visibility
box. If you select the Hidden
option, the eCommerce page's
attribute filters will be
hidden. You can list the
Attribute Values individually
by using the Add a Line
button. Users can provide
unique values for the
attribute value when the Is
Custom box is enabled.
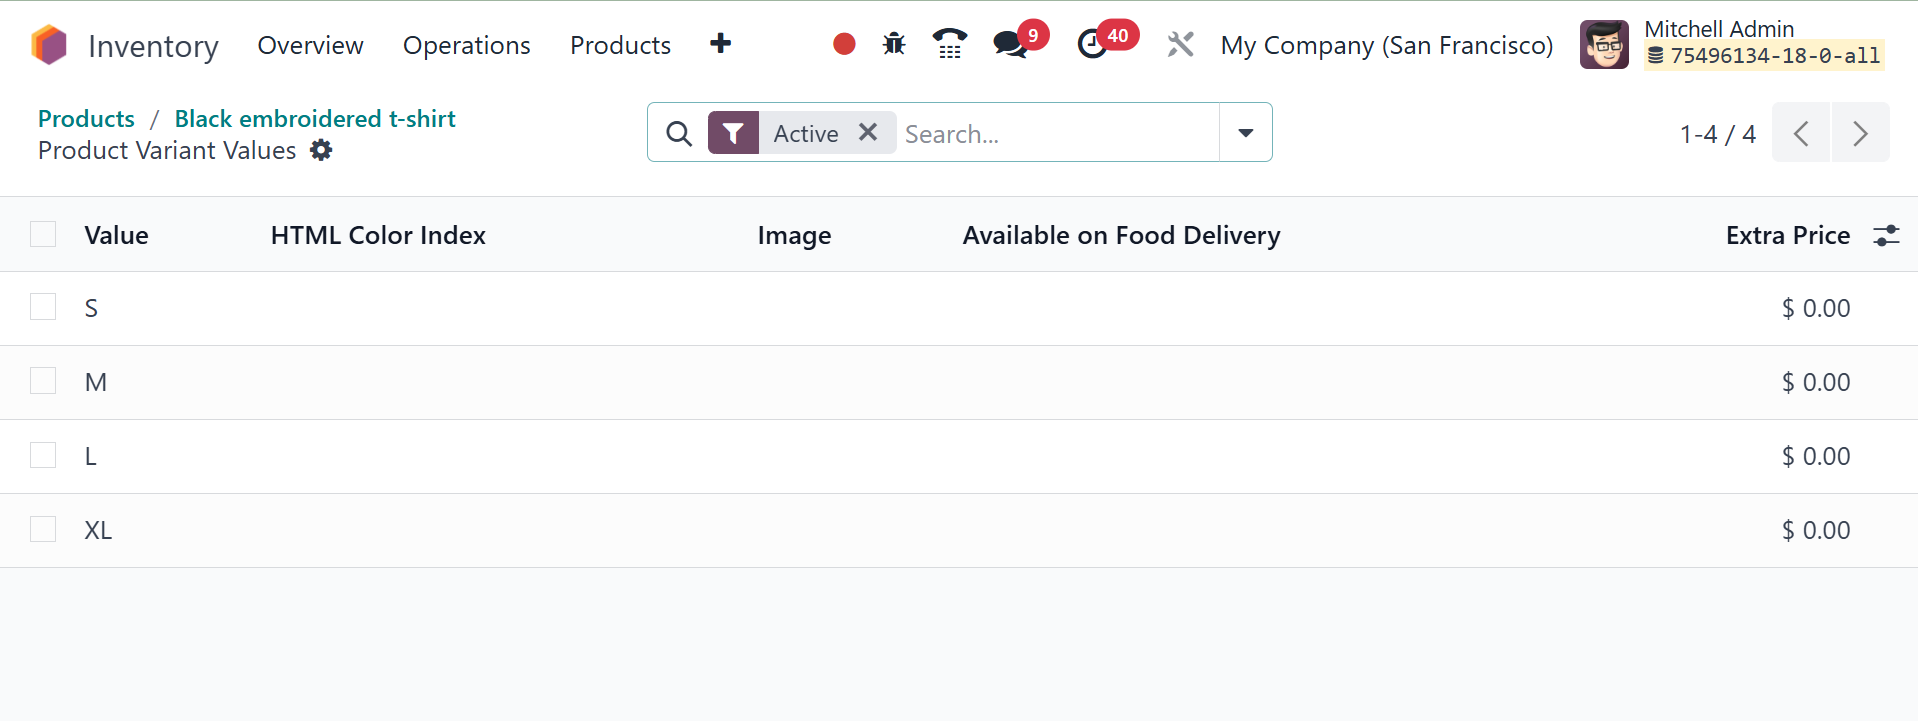
You may view the products that
fit this attribute by using
the Products smart button,
which is highlighted in the
accompanying image.
The created properties can be
applied to the products.
Consequently, the Attributes
& Variant tab allows users to
add the generated attributes
to the items.
The properties can be altered by
choosing the Configure
button, which is located on
the right side as seen in the
above image. When you click
the Configure button, a new
window will open. Value, HTML
color index, image, and extra
cost were provided for each
product variation.
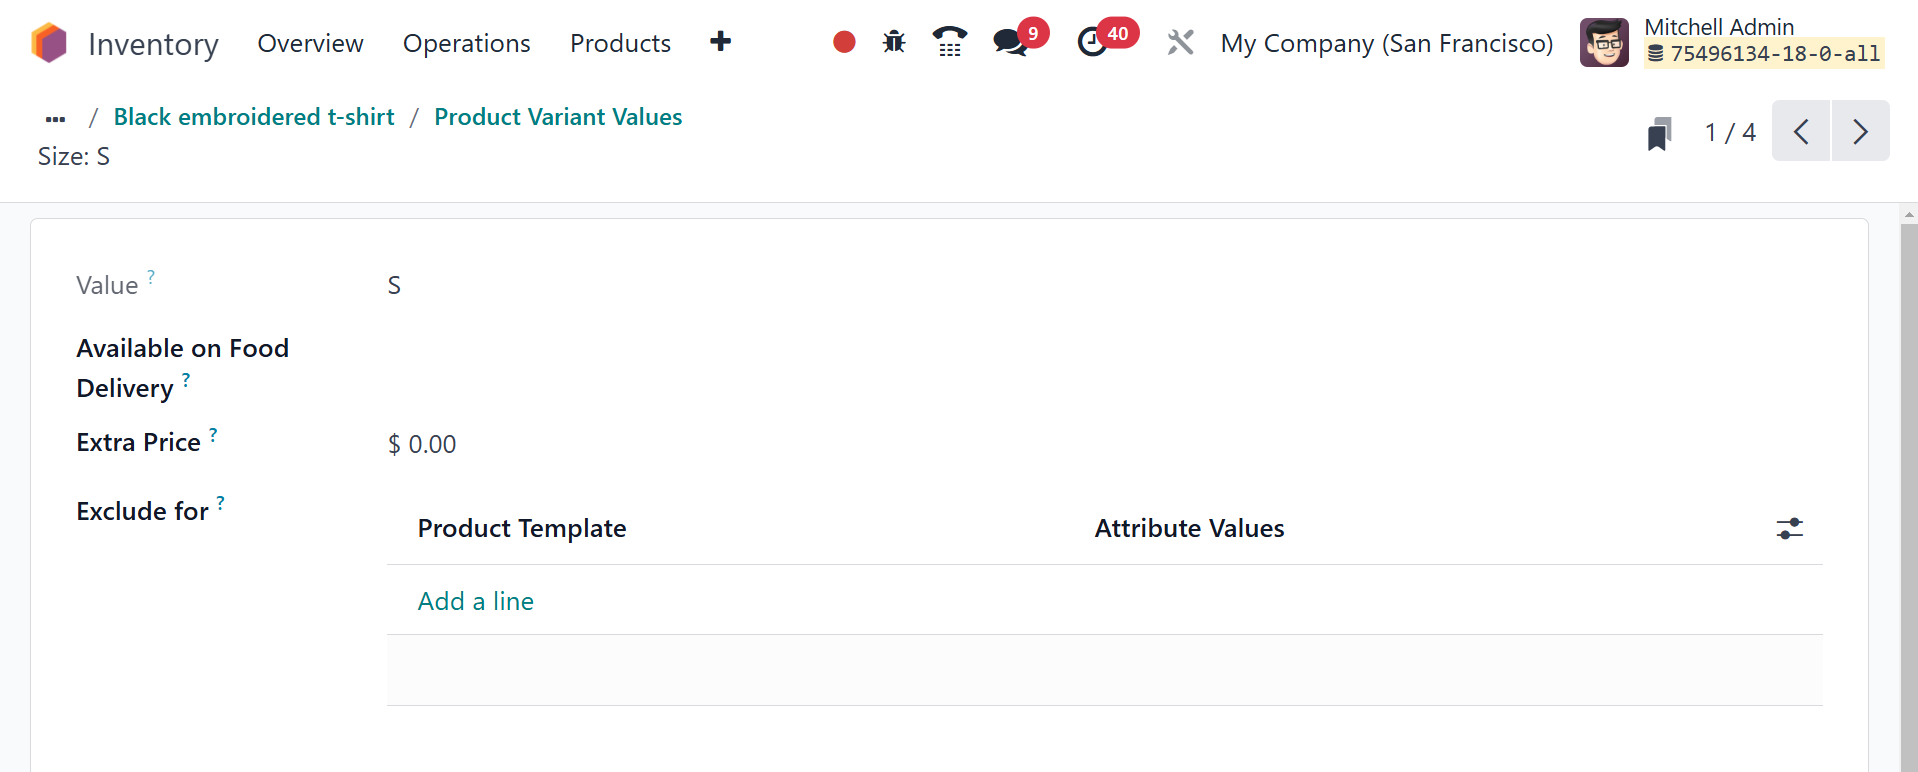
By choosing each product, users
can enter the extra expense
for the version with this
attribute's value on sales
price in the Value Price
Extra field. Because of the
Excluded for field, this
tribute value cannot be used
with other product values or
with certain attribute values
of optional or supplemental
goods.
2.3 Lots/Serial Numbers
After you enable this feature,
the Lots/Serial Numbers
option will appear under the
Products menu.
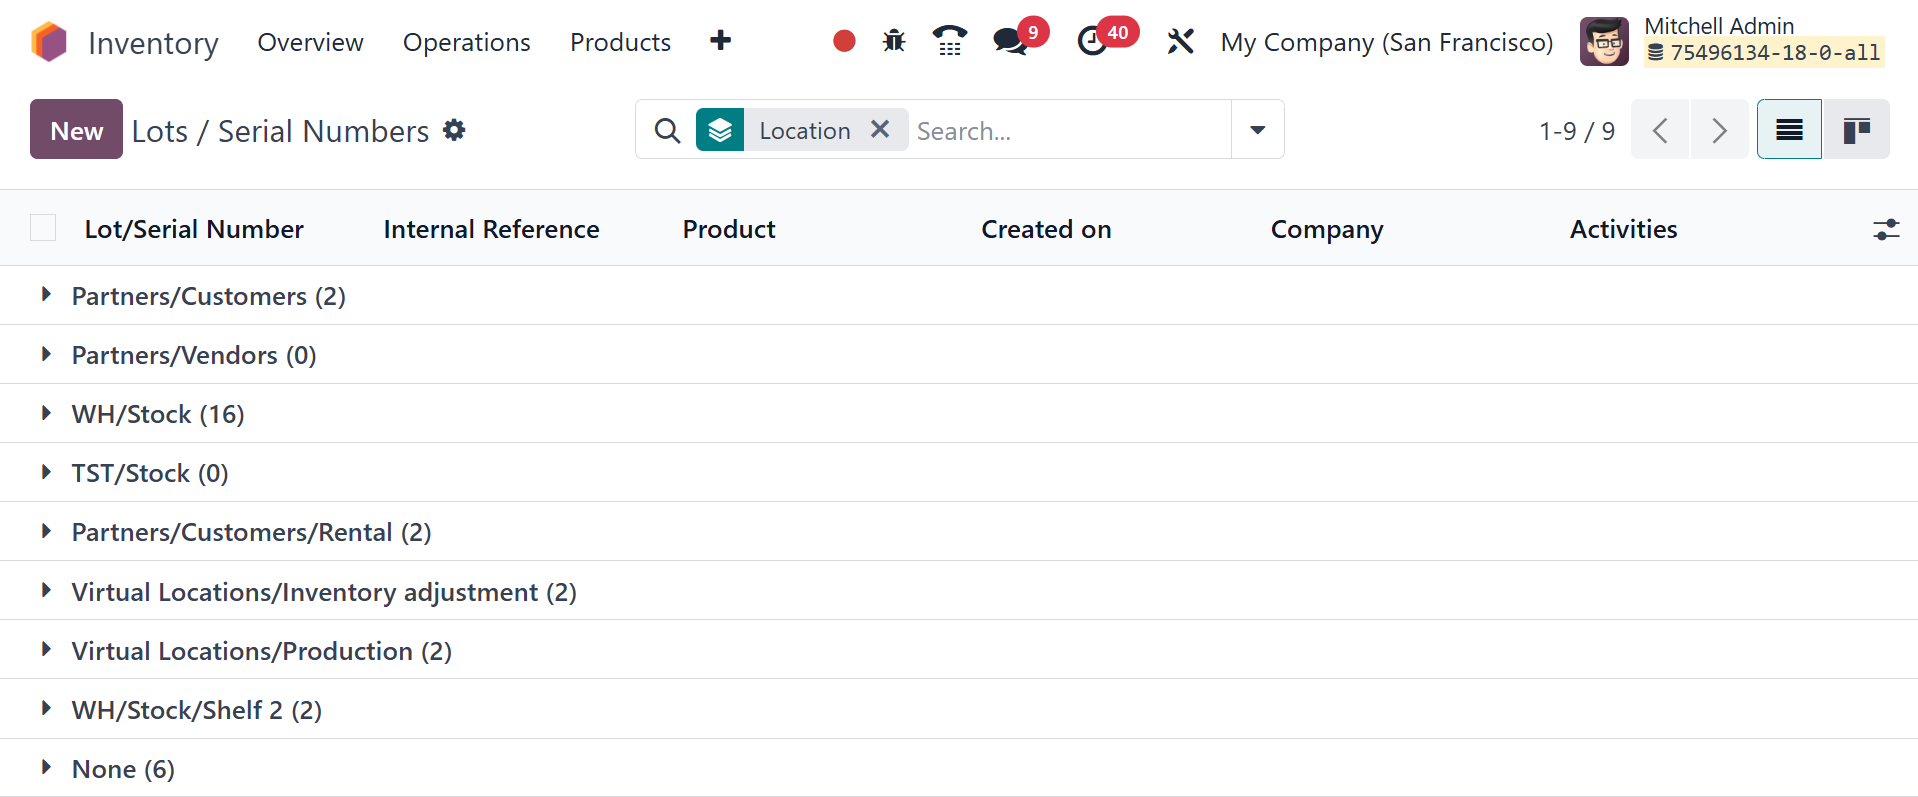
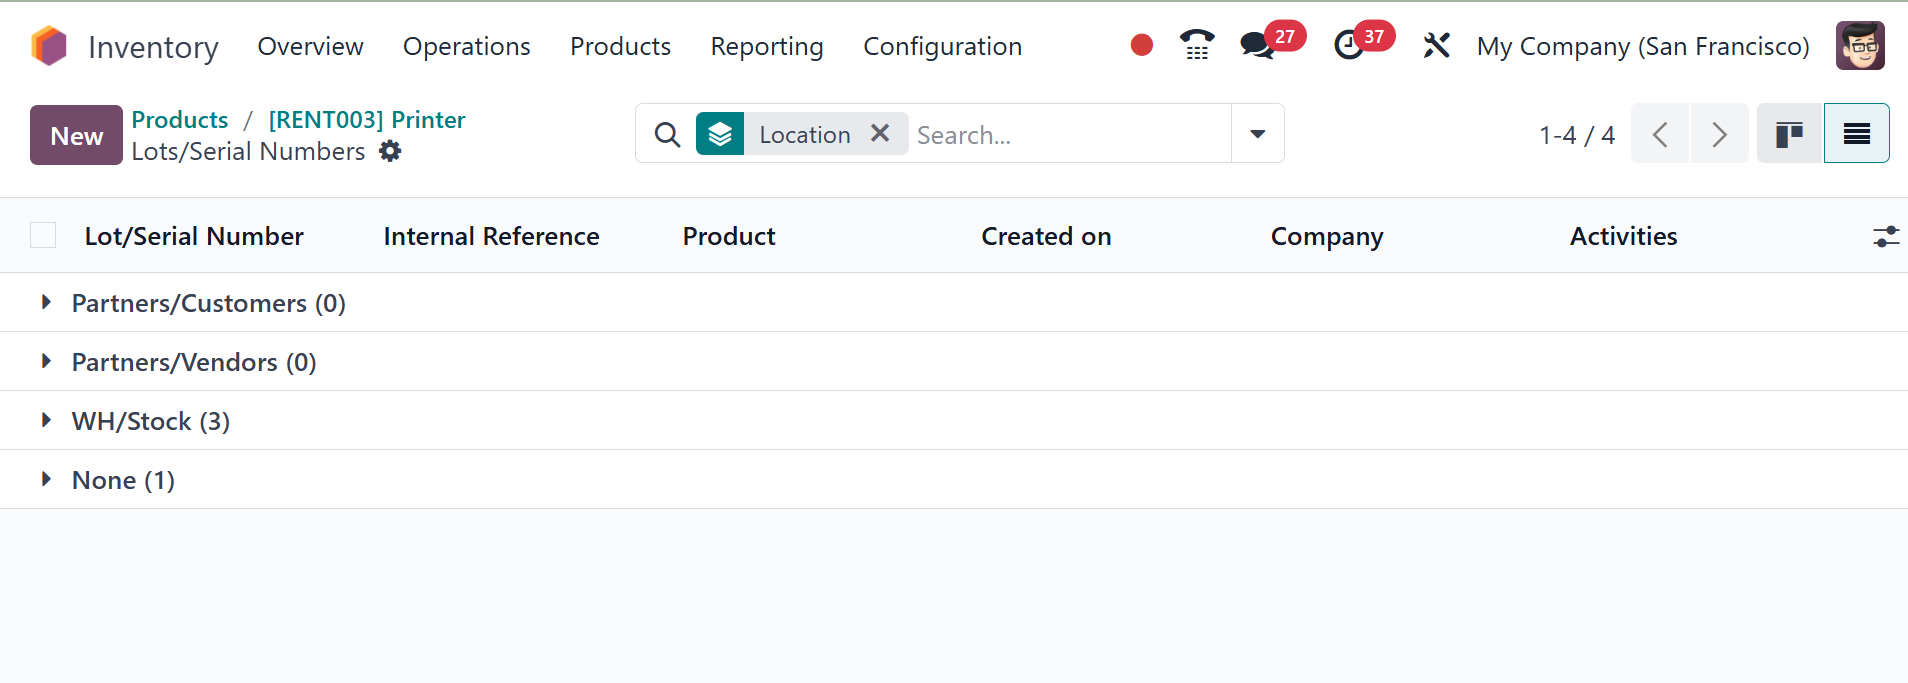
Here you can view serial numbers
and lots that have previously
been configured. It also
contains the Product, the
Creation Date, the Internal
Reference number, and the
Company, in case it deviates
from the manufacturer's lots
or serial numbers. Adding a
new lot number or serial
number to a product is easy
with the NEW button.
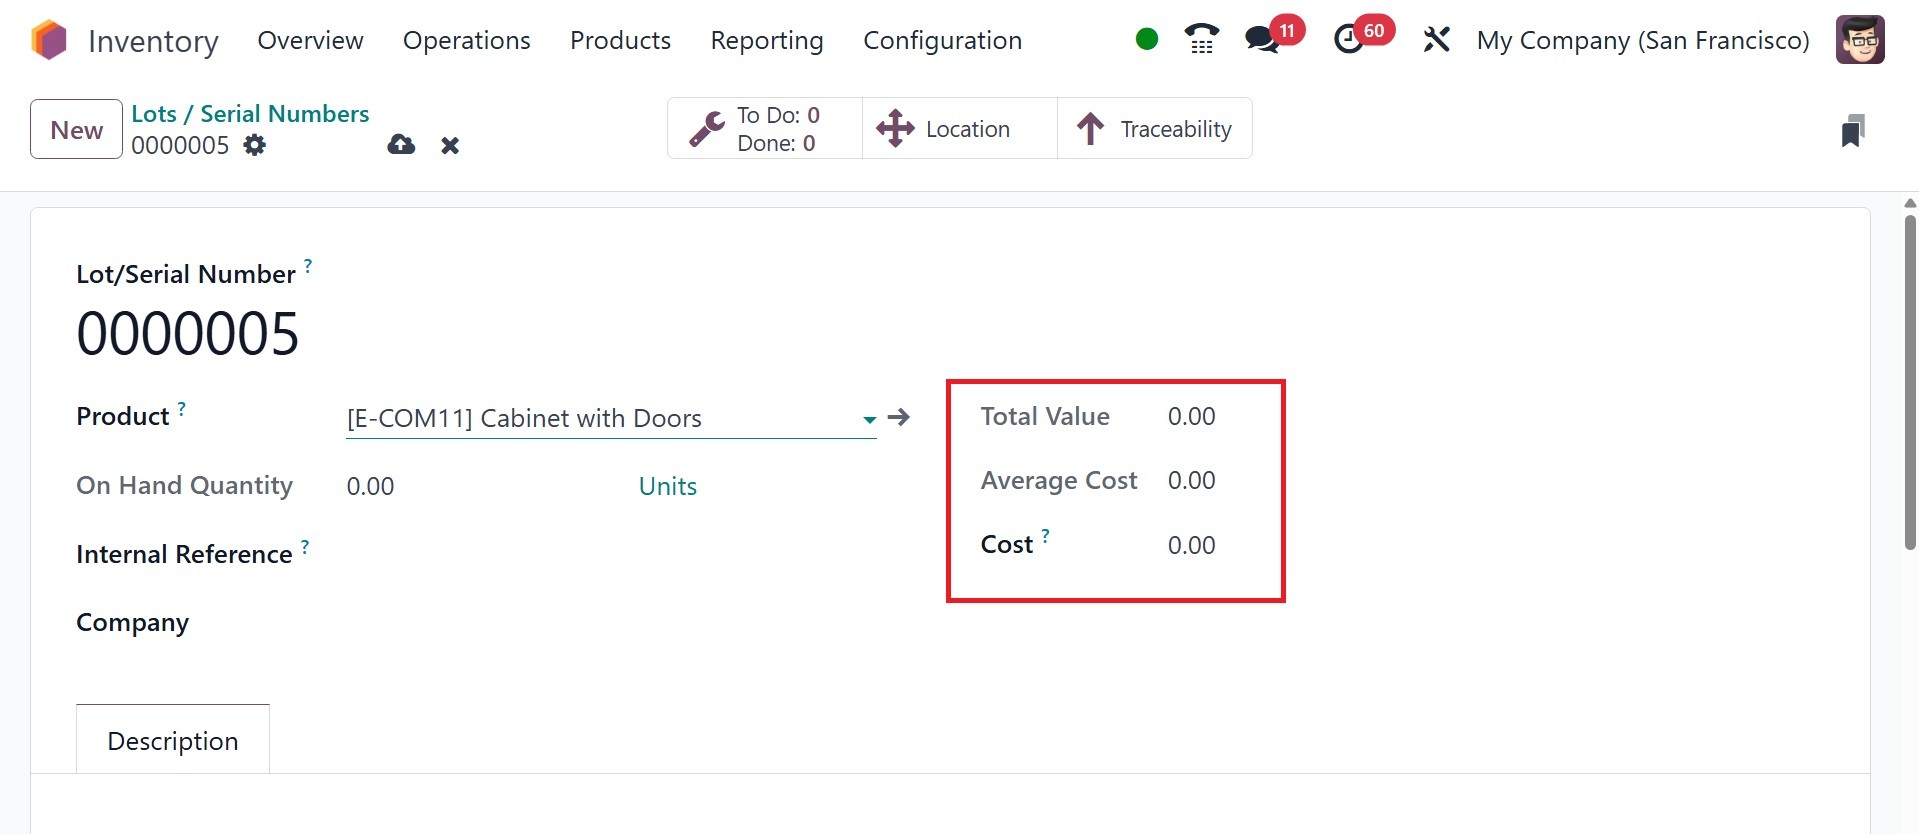
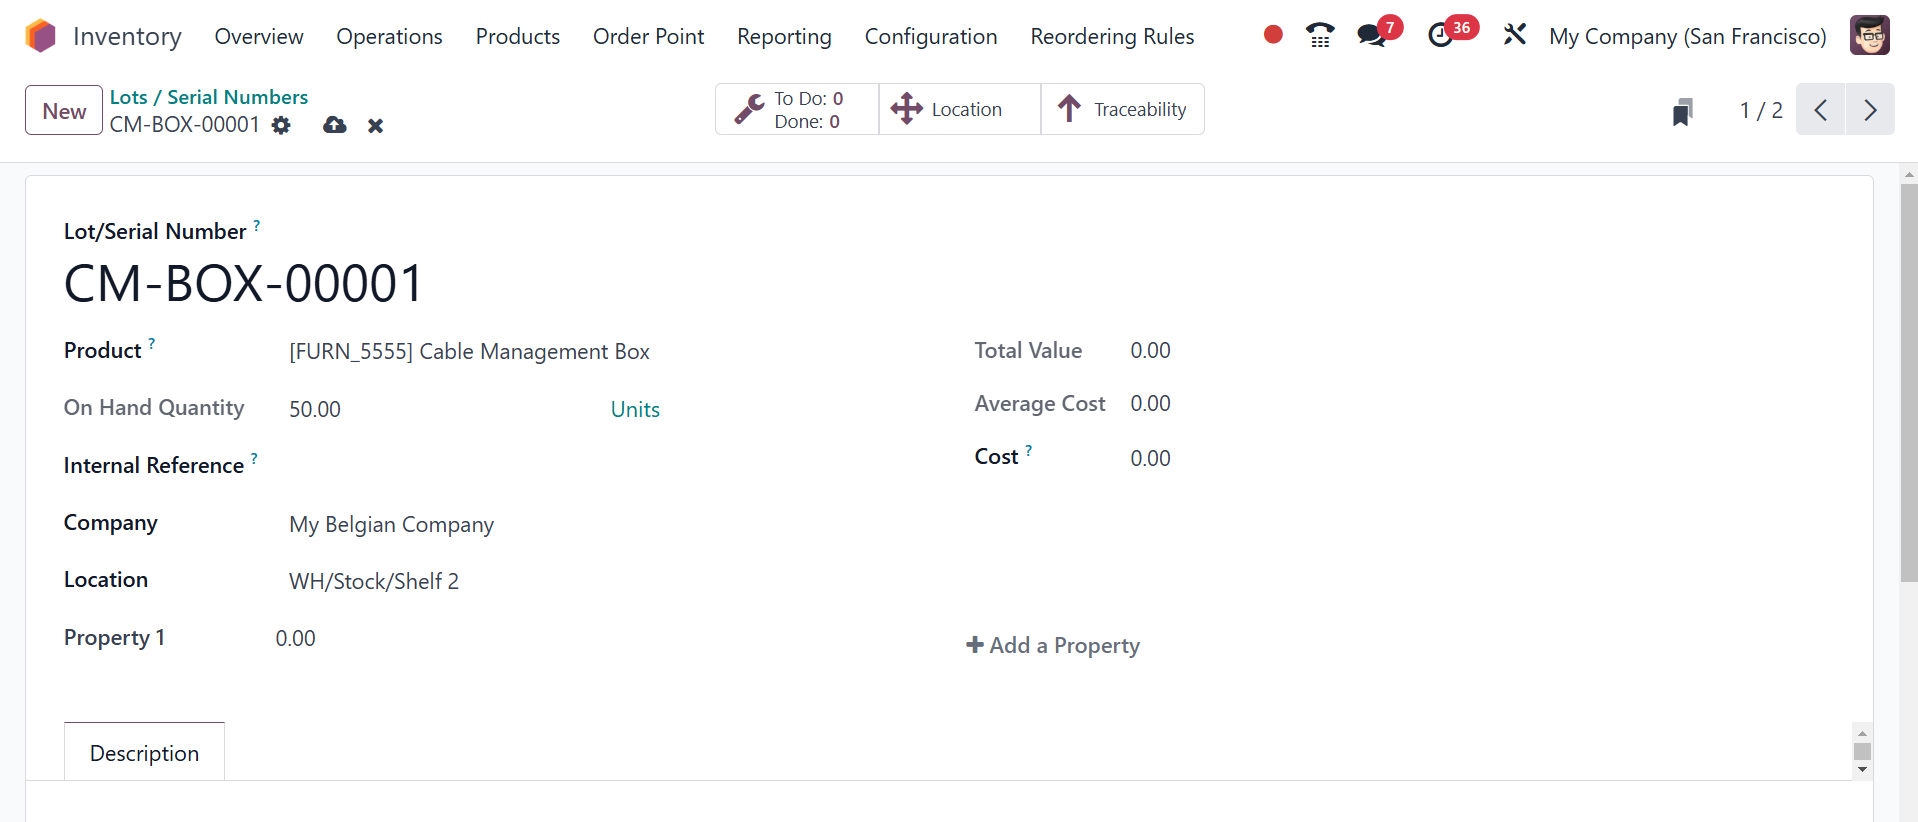
You might begin by stating a
specific lot or serial number
in the designated space. You
can fill in the appropriate
boxes with the Product,
Quantity, Internal Reference,
and Company. The serial
number cannot be altered once
the product has been moved.
Both the Cost and Average
Cost fields show a unit's
average cost. The Total Value
reflects the total on-hand
value for that lot/serial
number, as in the image
below.
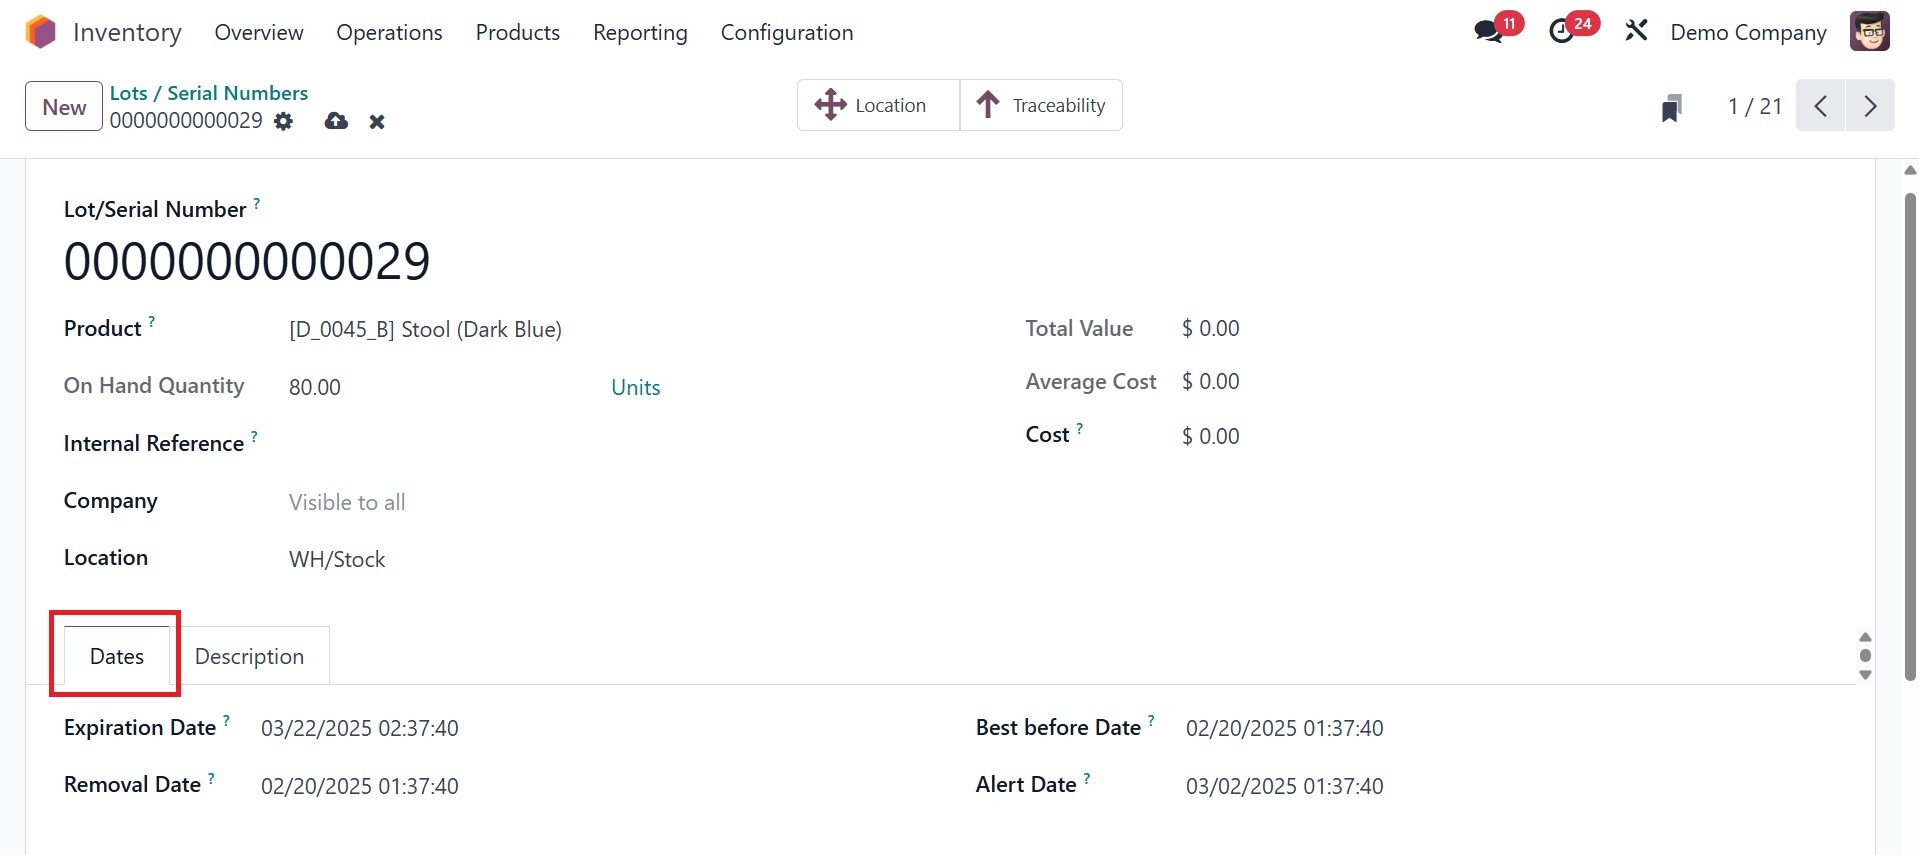
Additional comments about this
lot/serial number can be
included using the
Description tab. And, on
enabling expiration date on
the settings, you will be
provided with a dates tab, as
in the image below, which
will be updated as per the
dates that we provide under
the particular product.
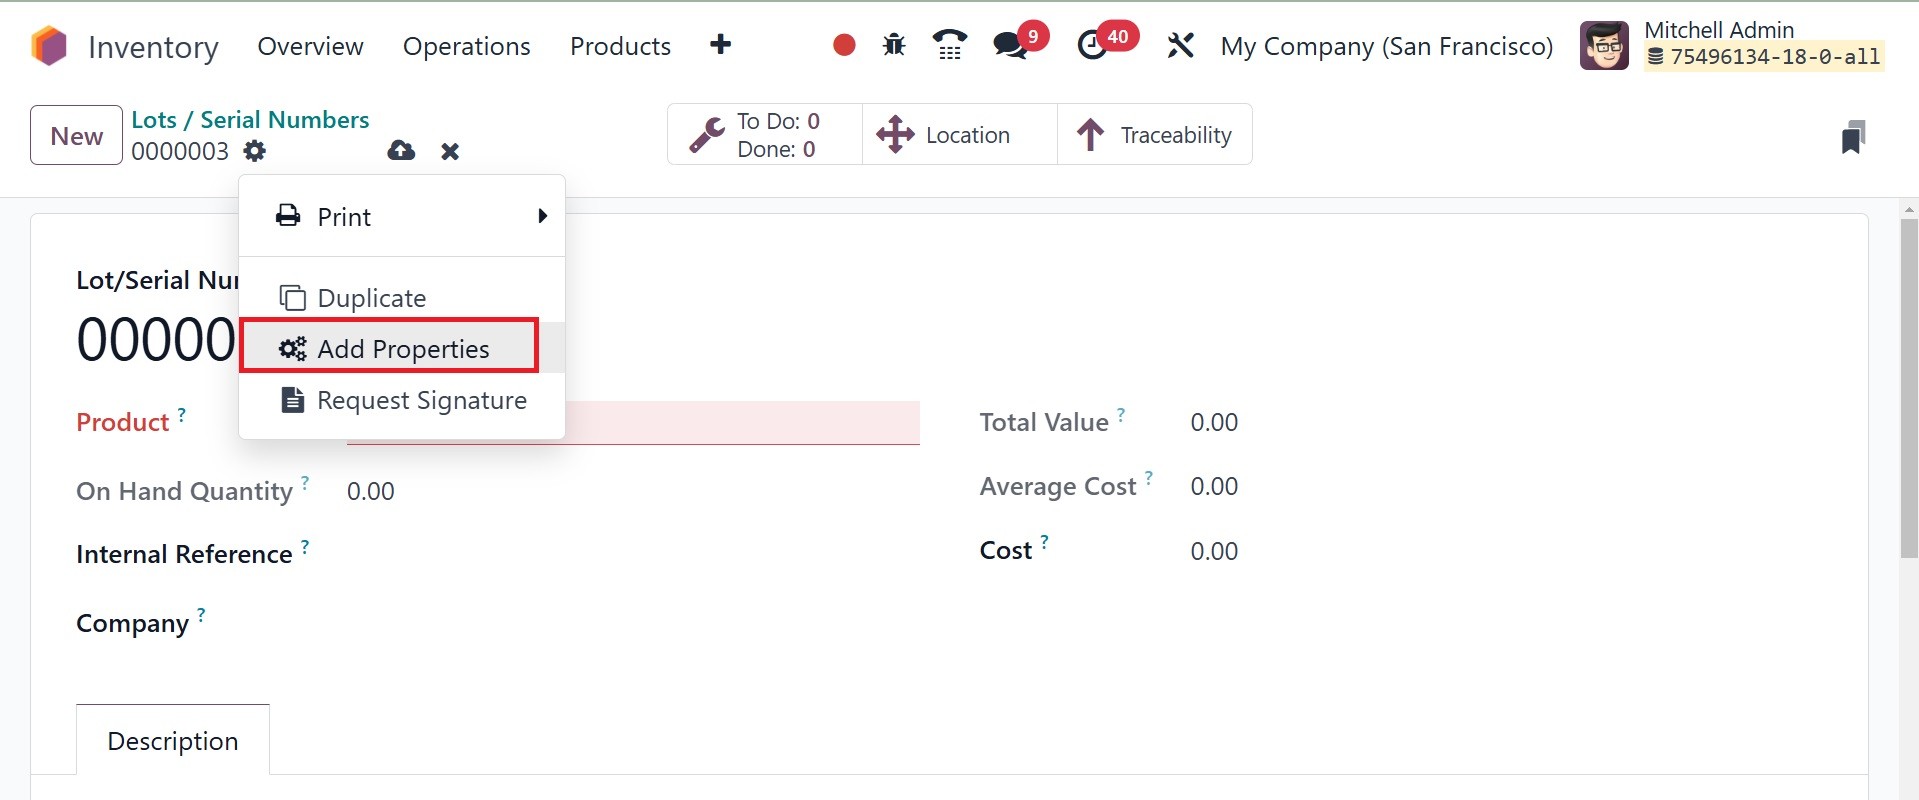
Beginning with Odoo 18, the
Properties option is also
available on the Lot/Serial
number. The Action button has
an Add Property option.
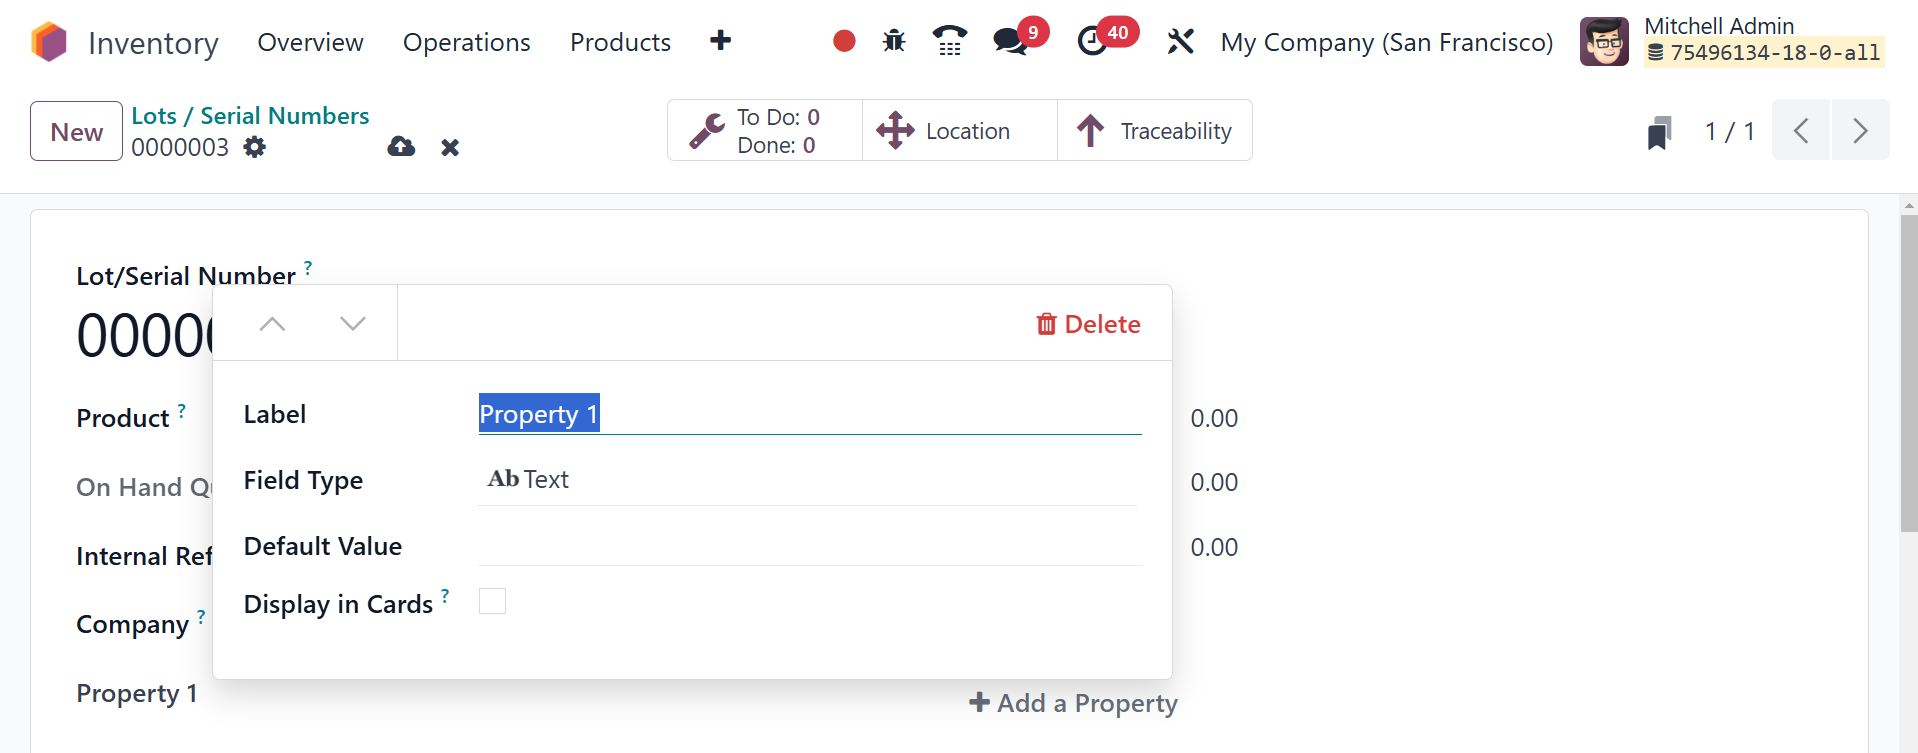
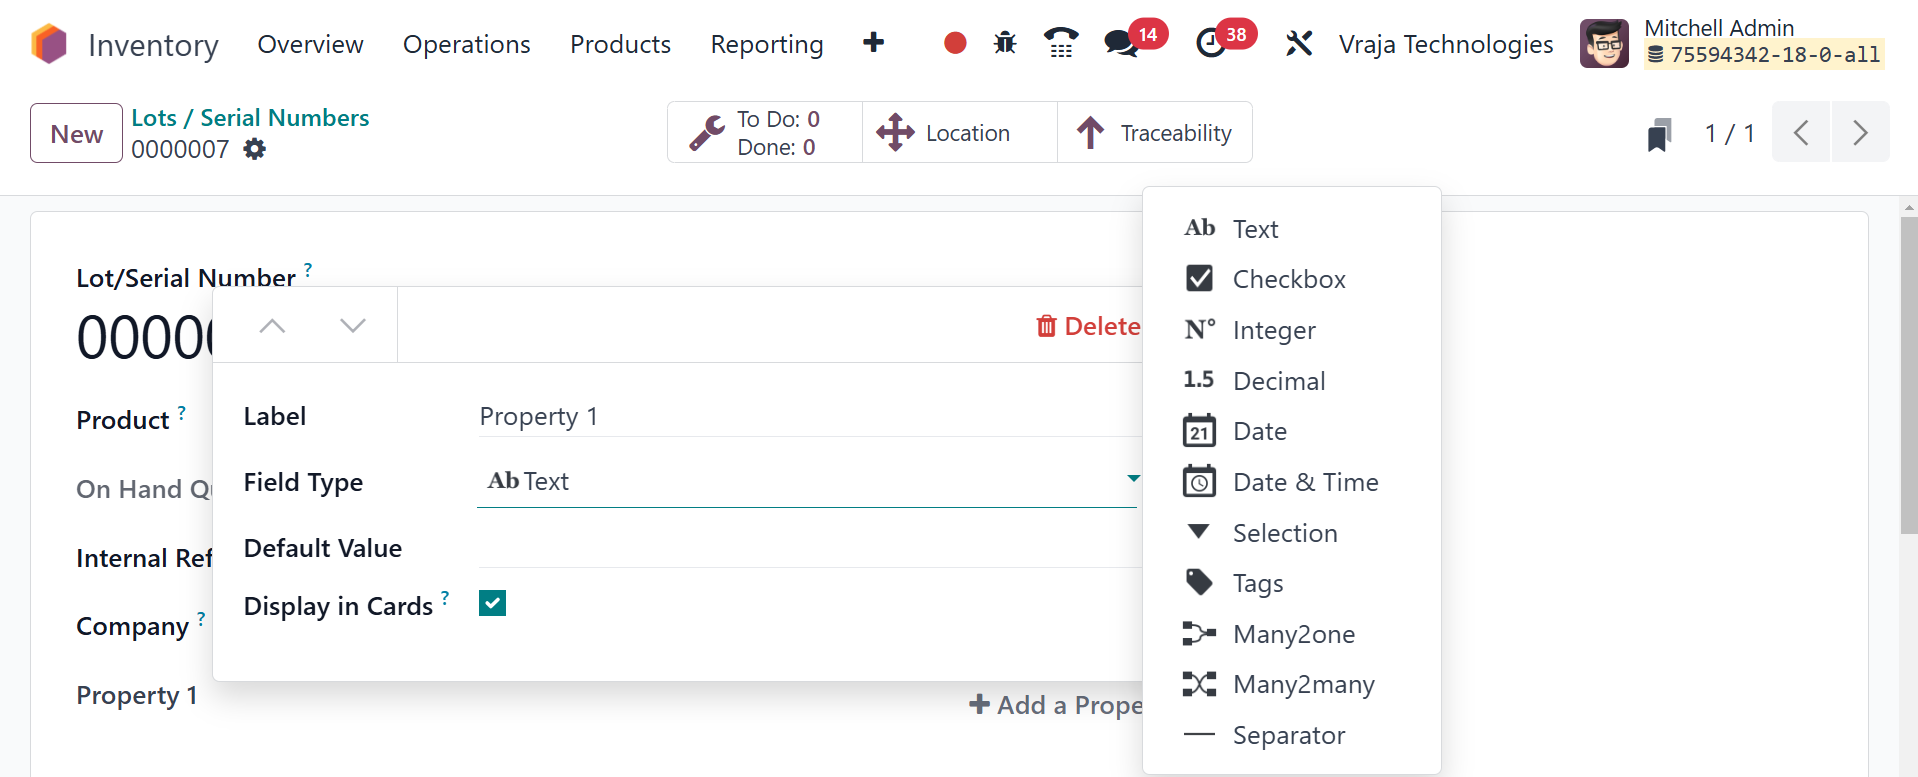
The box that appears then chooses
the field type, adds data,
and makes reference to the
Label.
The box that appears then chooses
the field type, default
value, and makes references
the Label.
Using the Display Cards, you may
select whether the property
field shows up in the
Calendar, Cards, and Calendar
views.
The user will see additional
smart buttons on the
interface depending on what
they do with this lot/serial
number. When you configure a
new lot/serial number, the
Location and Traceability
smart buttons will show up on
the screen, as seen below.
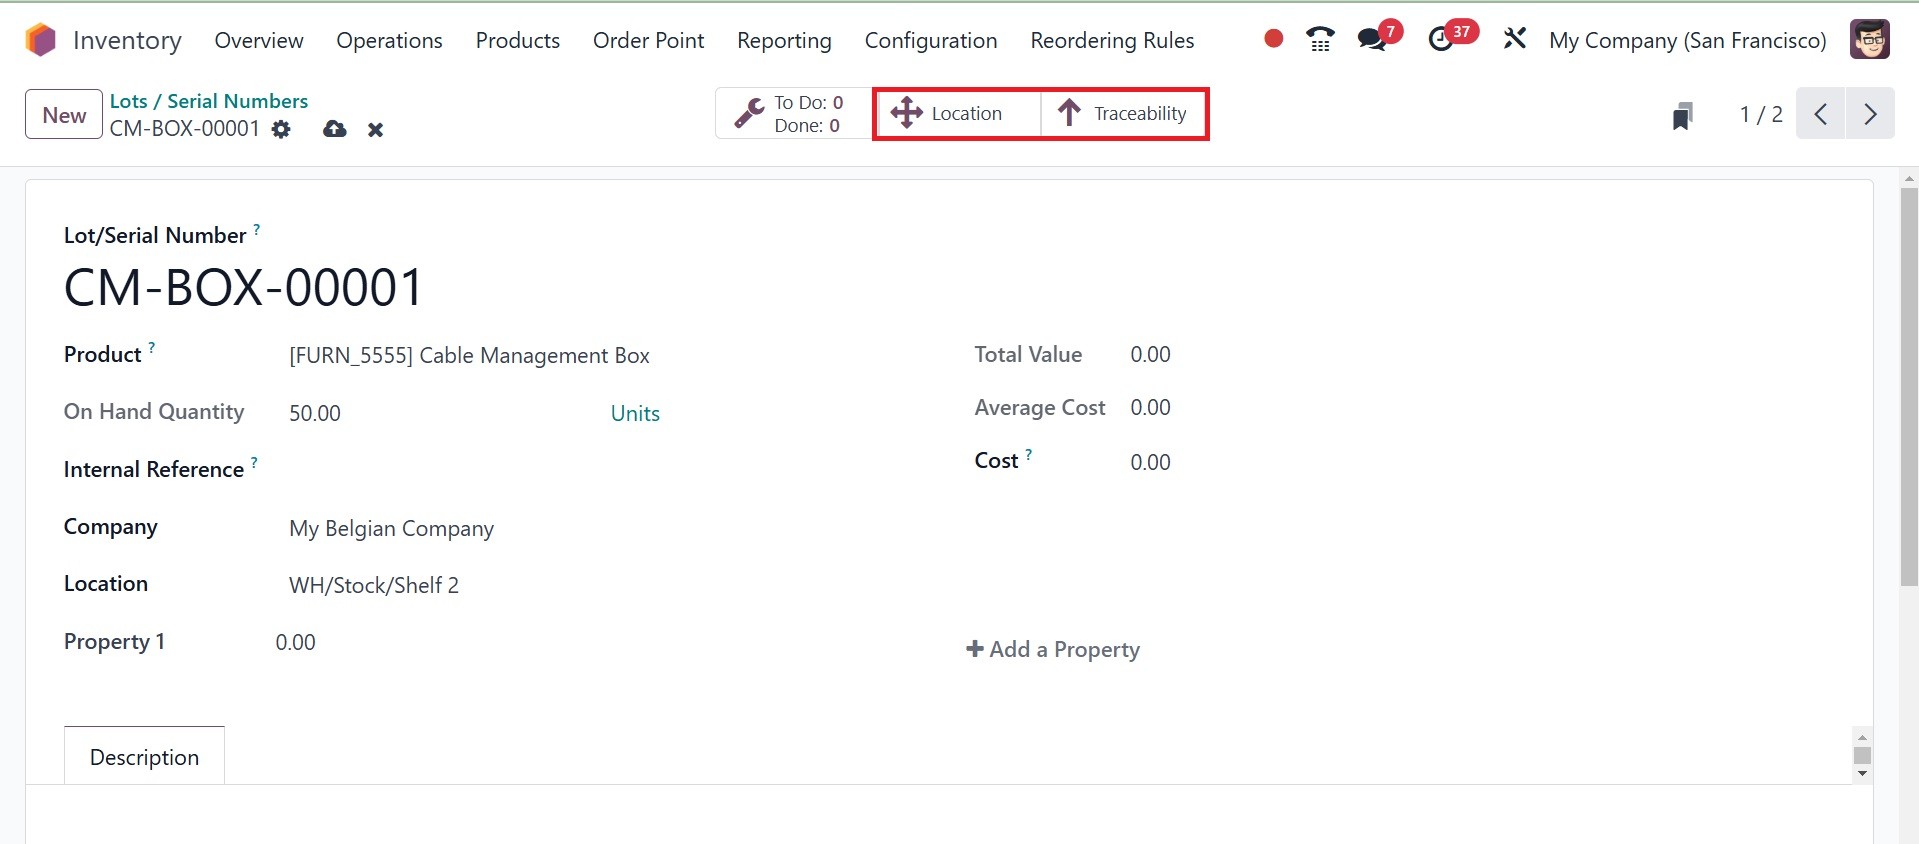
By clicking on the position
symbol, you may see the exact
position of the product.
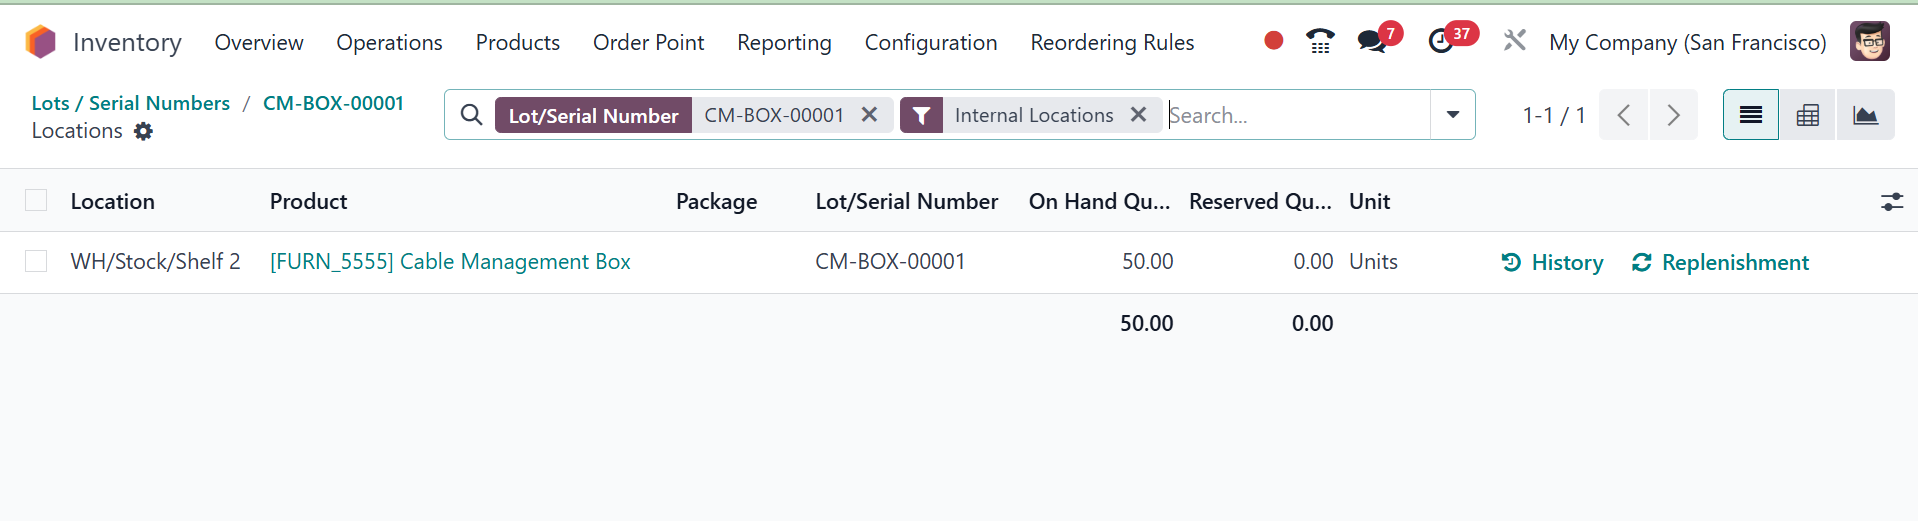
The Location History contains
information about the
Product, Package, Lot/Serial
Number, Owner, On Hand
Quantity, Reserved Quantity,
and Unit. By clicking the
History button here, you can
view the product's movement
history. This window's
Replenishment button allows
you to replenish the product.
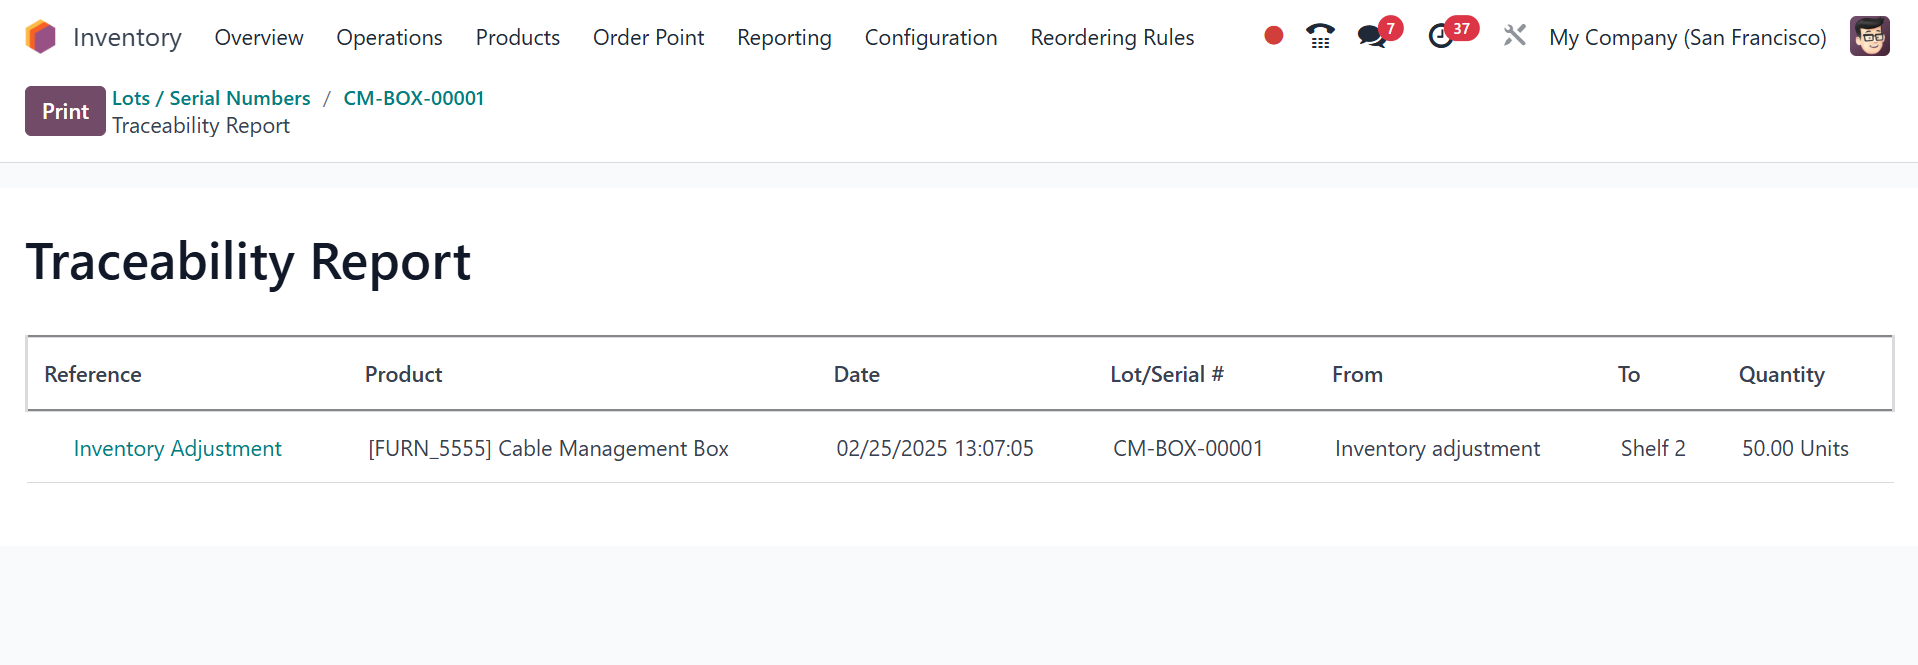
Pressing the Traceability smart
button will reveal the
product's tracking details.
Each product movement's
details, such as the
Reference, Product, Date,
Lot/Serial, From, To, and
Quantity, may be found here.
When defining a new product in
the Odoo18 Inventory module,
you can specify its
traceability. Under the
general information tab, as
seen in the image below, you
can set the product's
tracking.
As soon as a product is received
in the inventory, it may be
issued a lot or serial
number. Once a purchase order
has been confirmed, you can
control the product lots and
serial numbers before you
receive them. To further
understand this, let's create
a fresh receipt order and
verify it.
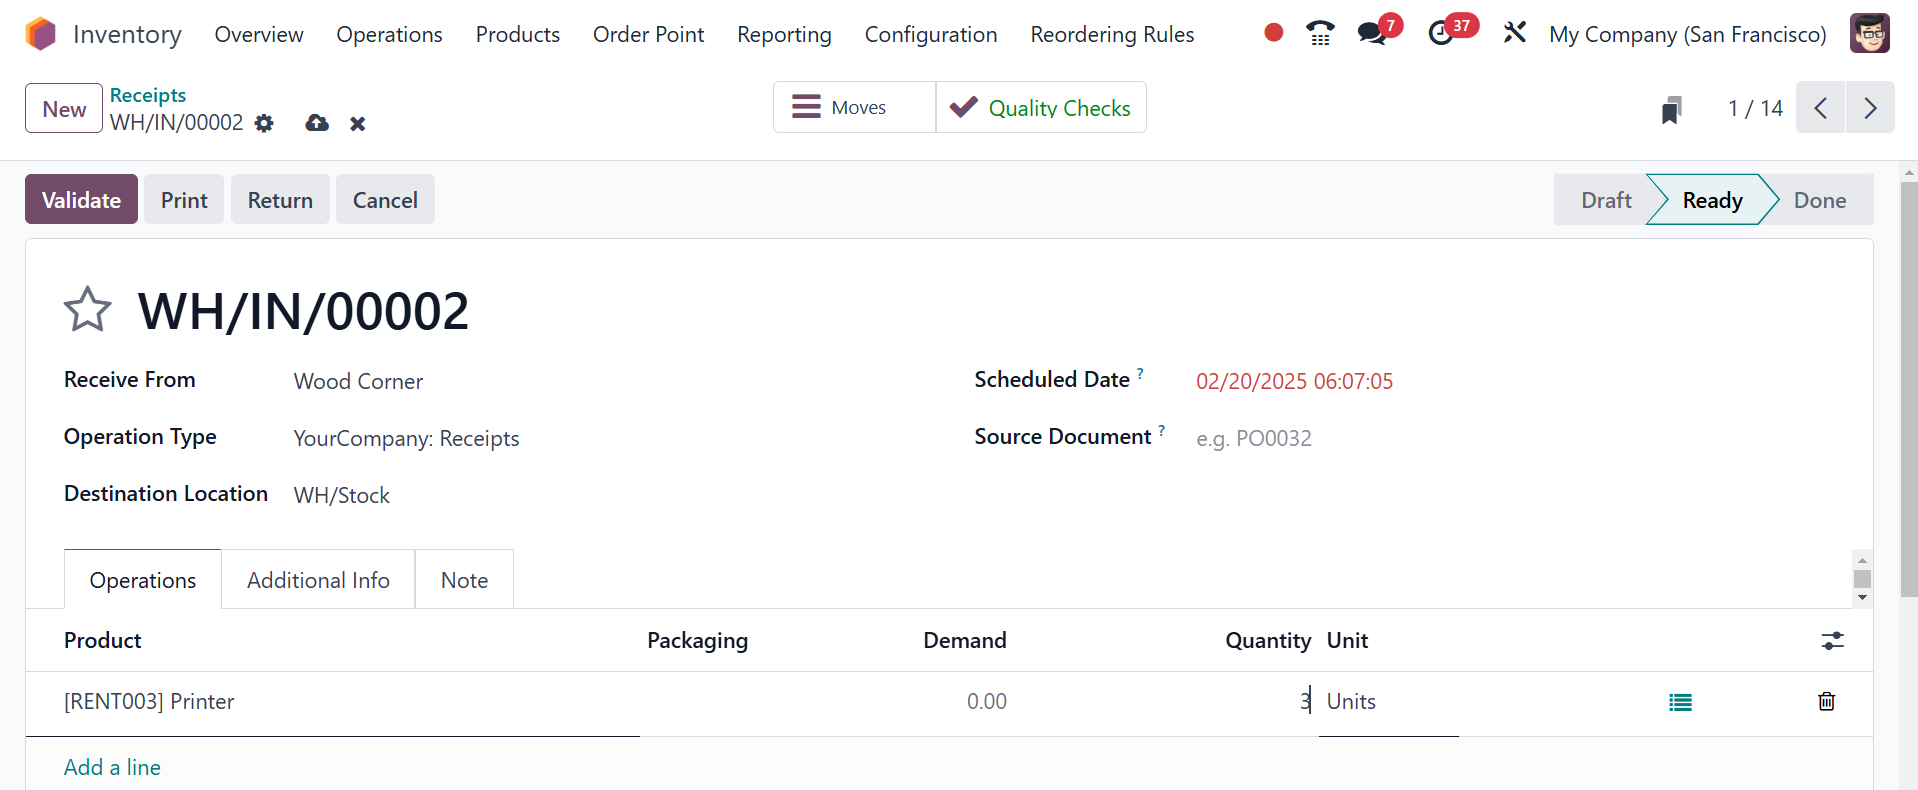
The option that is highlighted in
the preceding image can now
be used in the Receipt
window. A new wizard will
appear as soon as you choose
this option, allowing you to
enter the product's lot or
serial number.
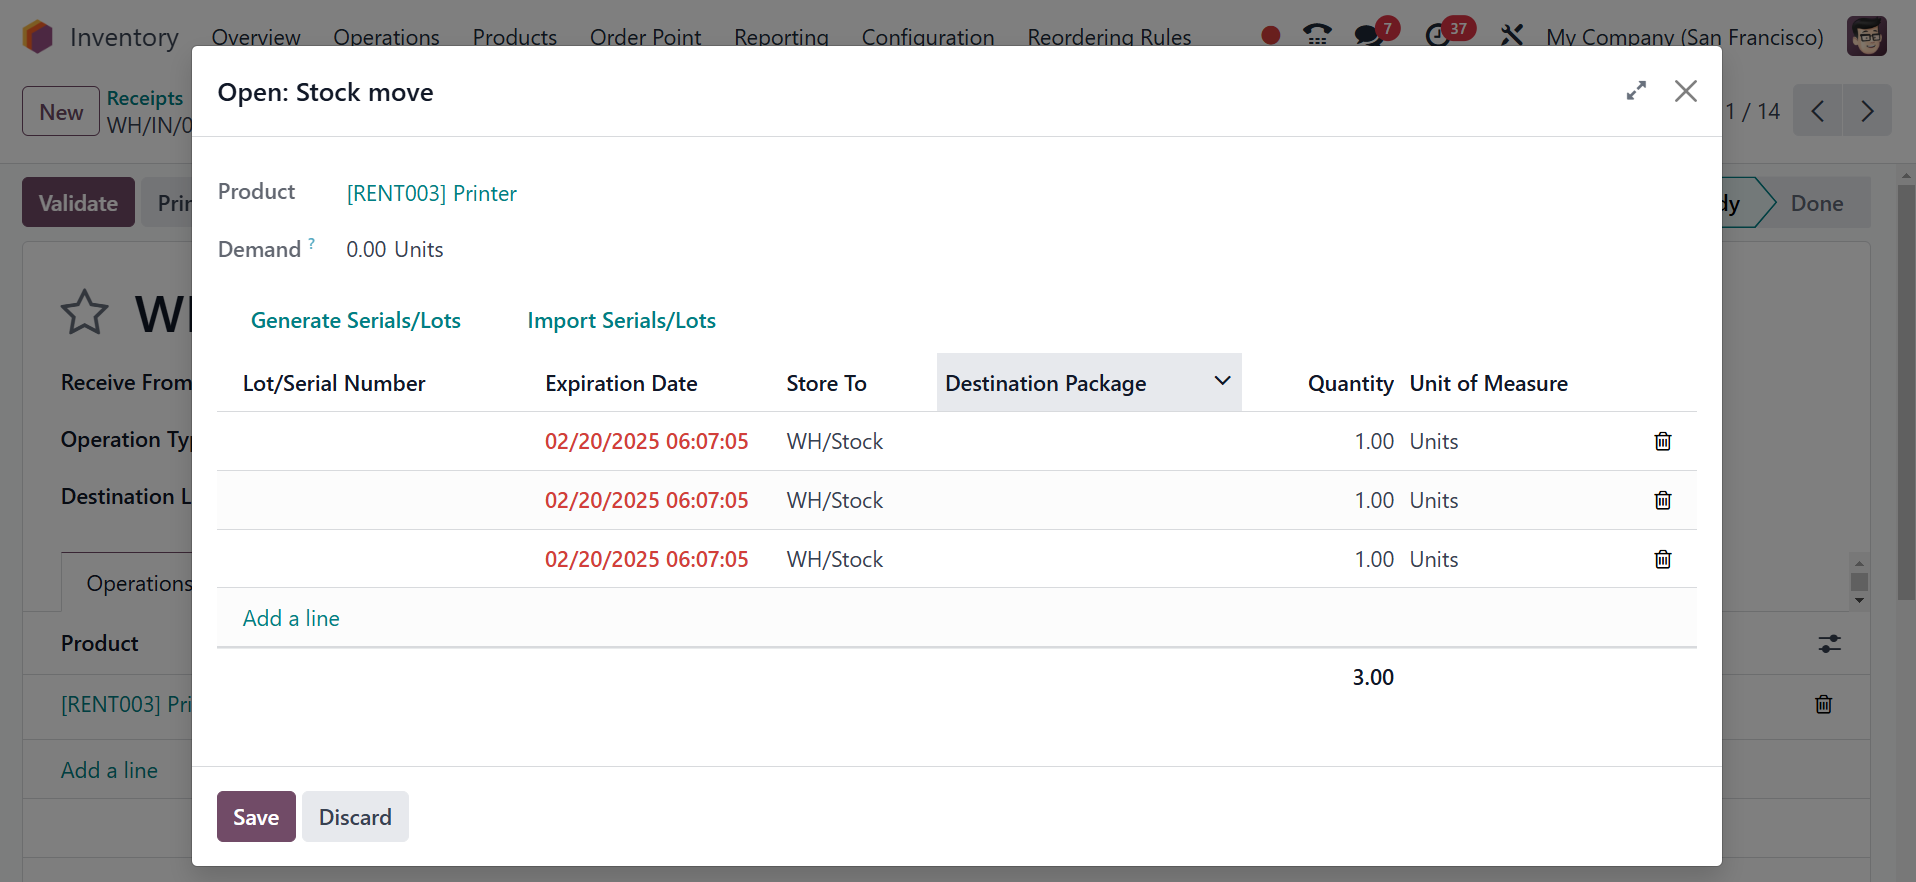
You can insert the Lot/Serial
number and Destination
Package into the appropriate
fields by using the Add a
Line button. In the Odoo
Inventory module, Generate
Serials/Lots allows you to
automatically generate a
sequence of serial numbers or
lot numbers, while Import
Serials/Lots enables you to
manually import a list of
serial or lot numbers from a
file or other source.
Click on "Confirm" in the menu.
At this point, you can add
the item to your inventory
and confirm the receipt.
This lot/serial number will now
be displayed in the product
details window for this newly
purchased item. You may check
this by using the smart
button, which is shown in the
image below, which is on the
product details window.
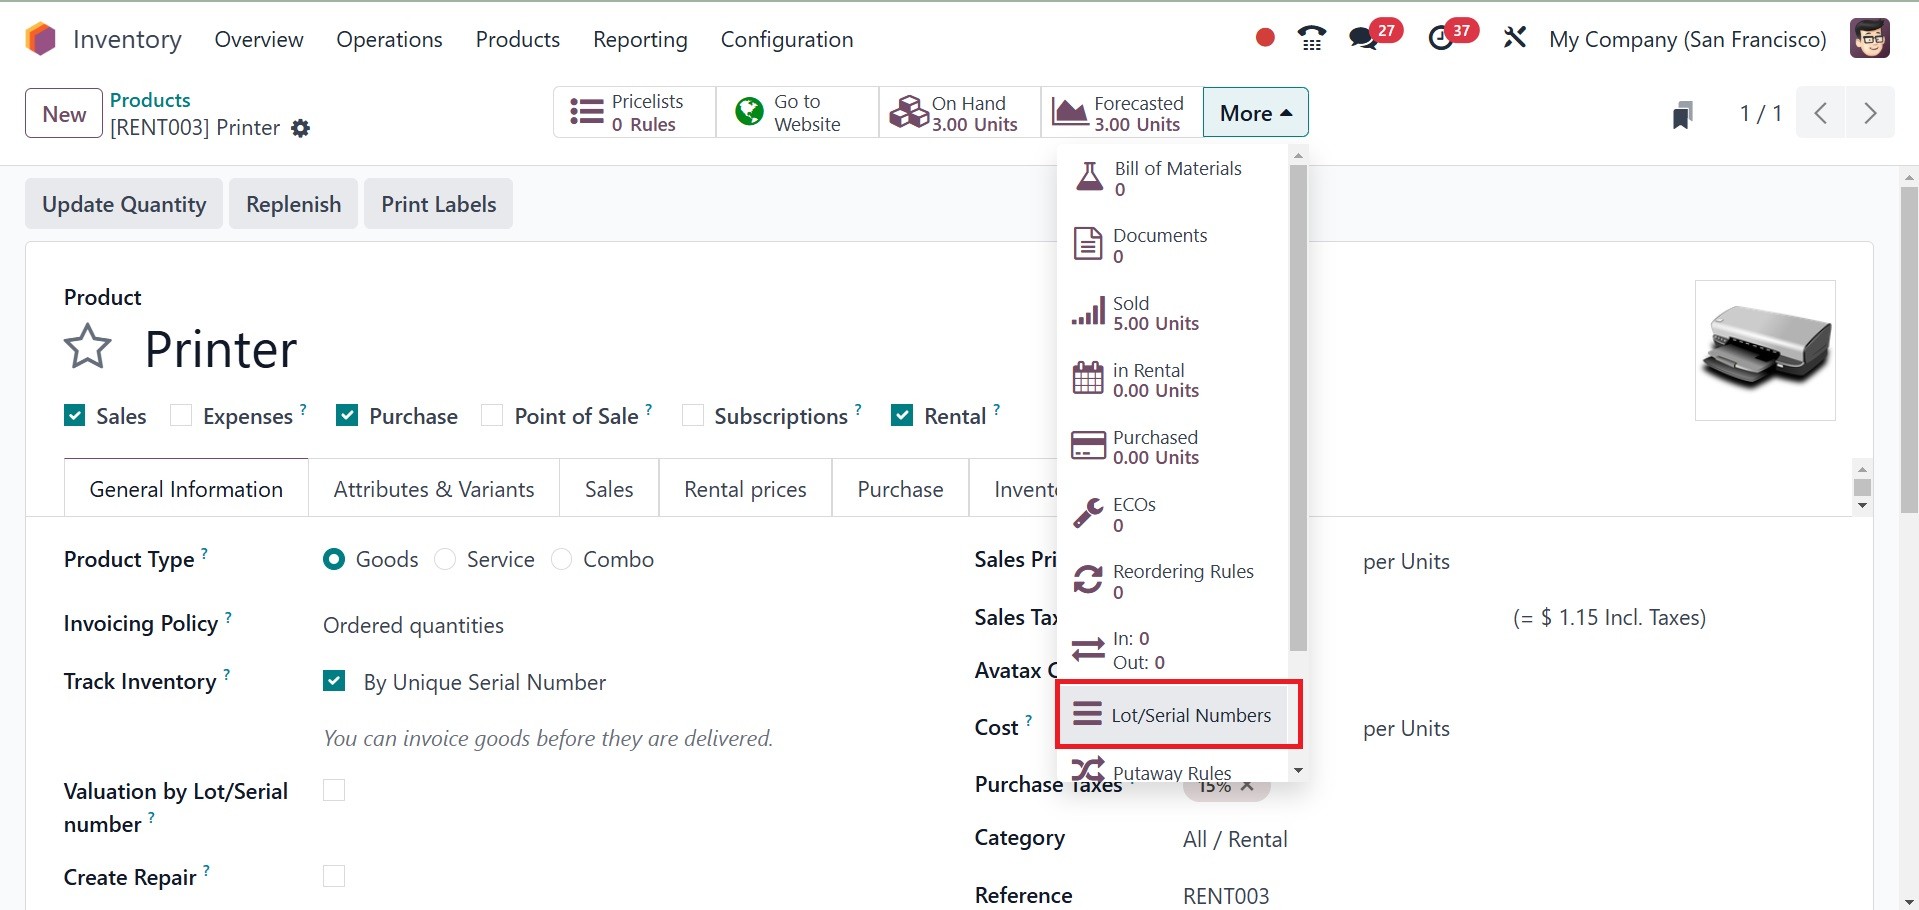
The recently assigned lot or
serial number is displayed
here.
You can display lots and serial
numbers on delivery slips by
activating the Display Lots &
Serial Numbers on Delivery
Slips option under the
Traceability tab of the
Settings menu.
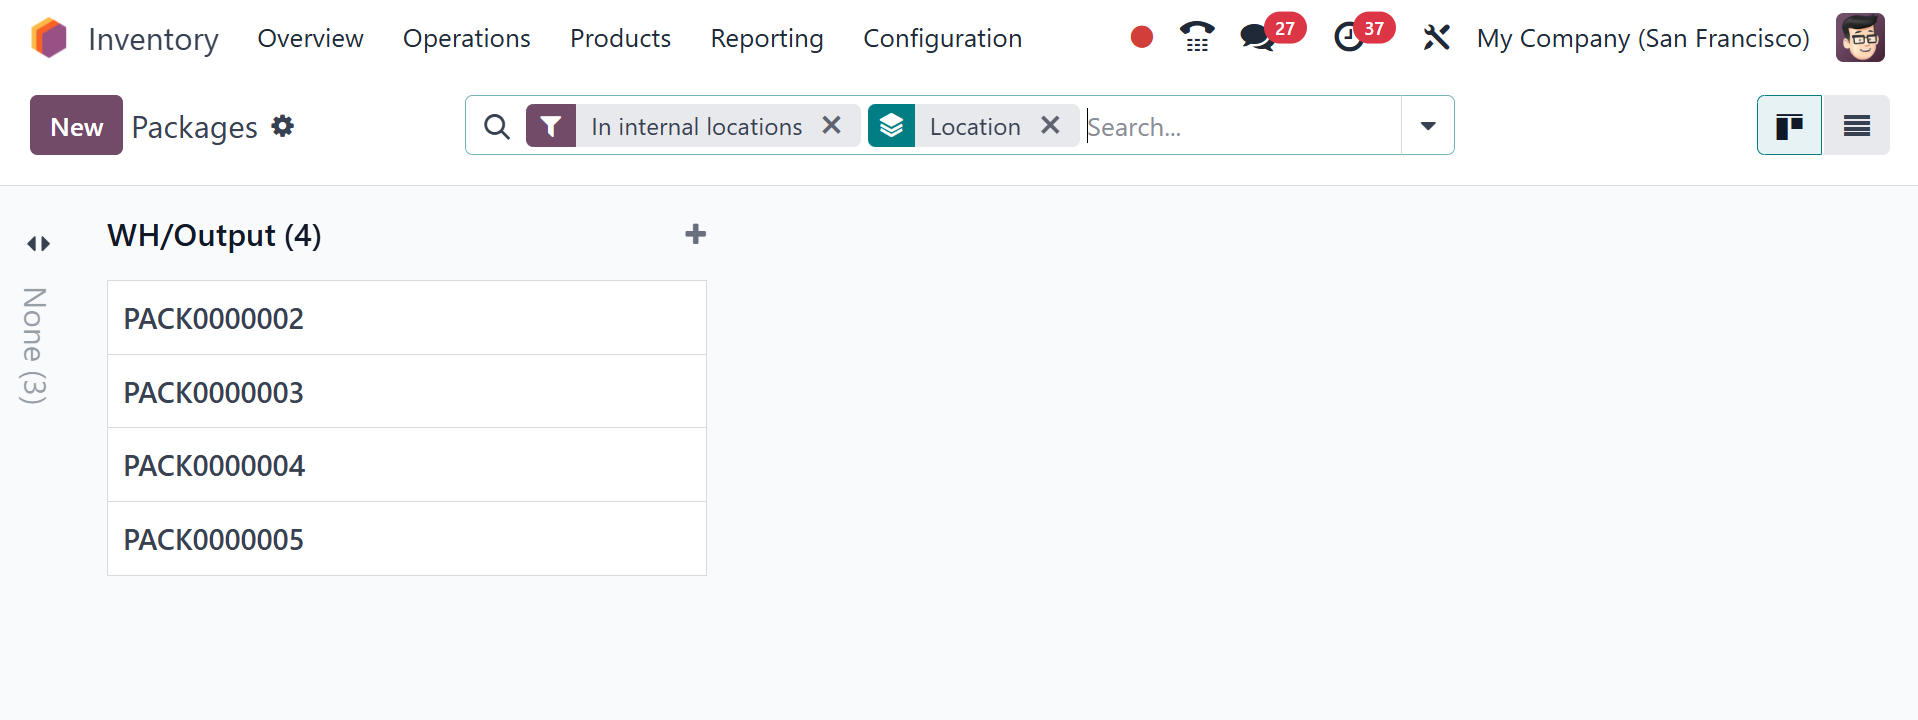
2.4 Packages
After enabling the Packages
feature from the Settings
module, you may find the
option within the Inventory
module's Products menu, as
illustrated below. This is
the Kanban view of the
platform.
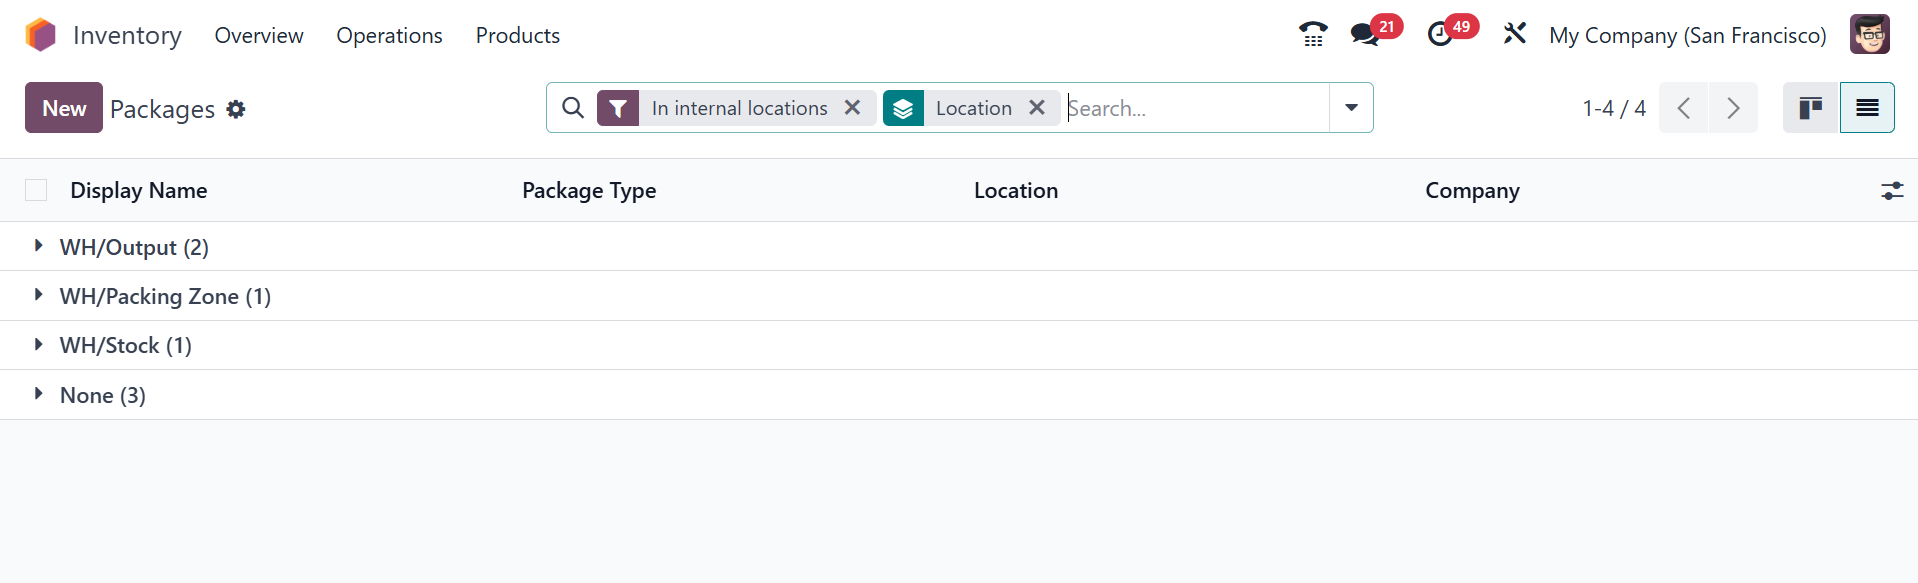
You can view the Display Name,
Package Type, Location, and
Company details of the
previously defined packages
from the list view.
With the New button, a new
package can be created for
multiple products.
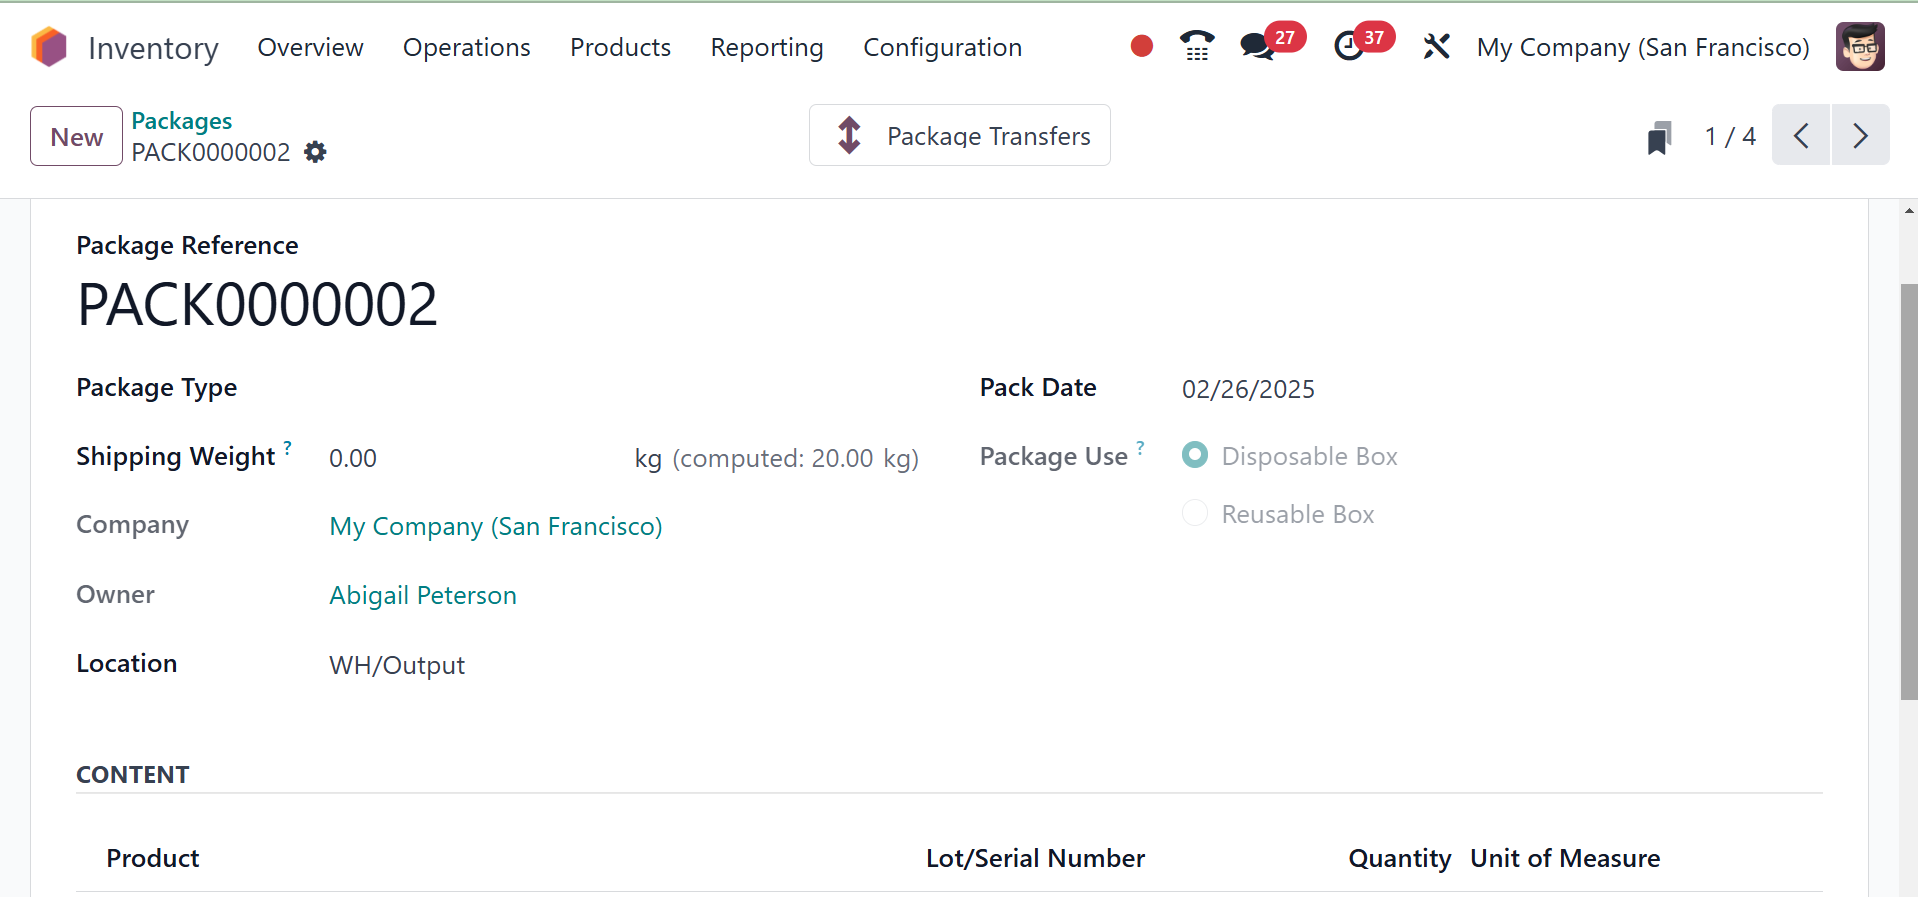
Package Reference is seen in this
window, as it is shown above.
You can select a suitable
type for your packages under
the Package Type section.
We'll discuss the settings of
the package type later. You
can enter the weight of the
package in the Shipping
Weight section. Place the
Company's name and the place
of the product in the
respective fields. The
corresponding field will
indicate the Pack Date.
The Package Use configuration has
two options: Reusable Box and
Disposable Box. Reusable
boxes are used for batch
picking, and they are emptied
and reused. When a reusable
box is scanned, the contents
of the reusable box are
loaded into the barcode
application. The reusable
boxes are not reused. The
contents of a disposable box
are loaded when the barcode
application scans it. You can
see the Products included in
this package by clicking on
the Content tab. The list of
products will be seen only
after you use this package
for stock movements. Product
Name, Lot/Serial Number,
Quantity, and Unit of
Measurement are all there.
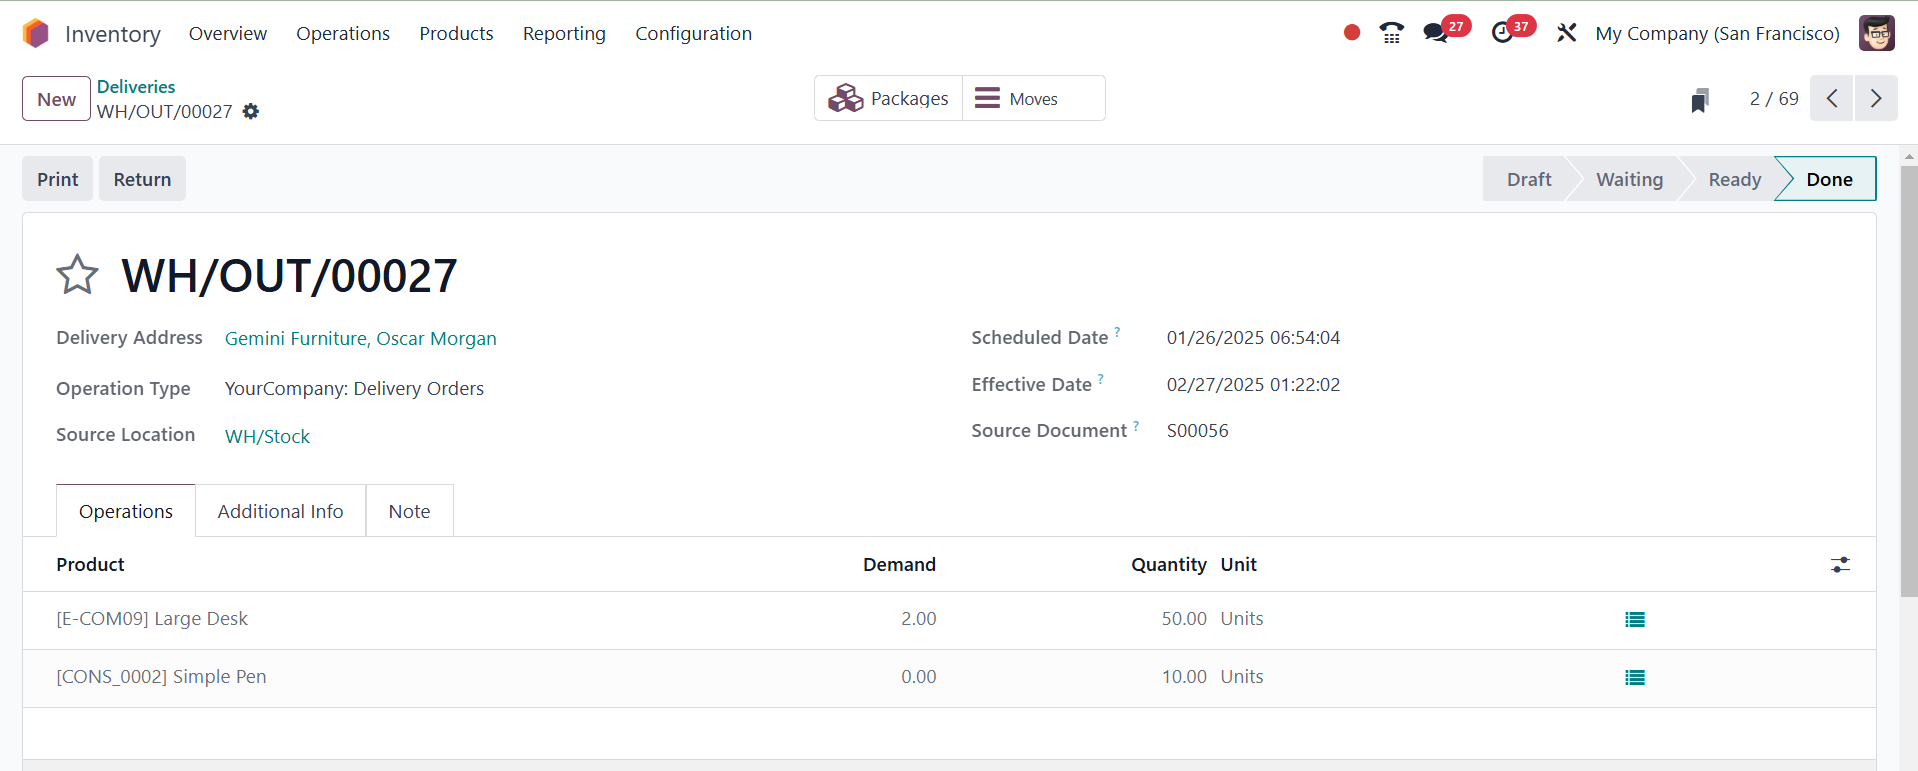
While verifying delivery orders,
you may pack multiple items
together. Using the smart
button on the respective
sales order window, you can
verify the delivery order
after verifying the sales
order. You will get the
delivery order to approve, as
displayed below.
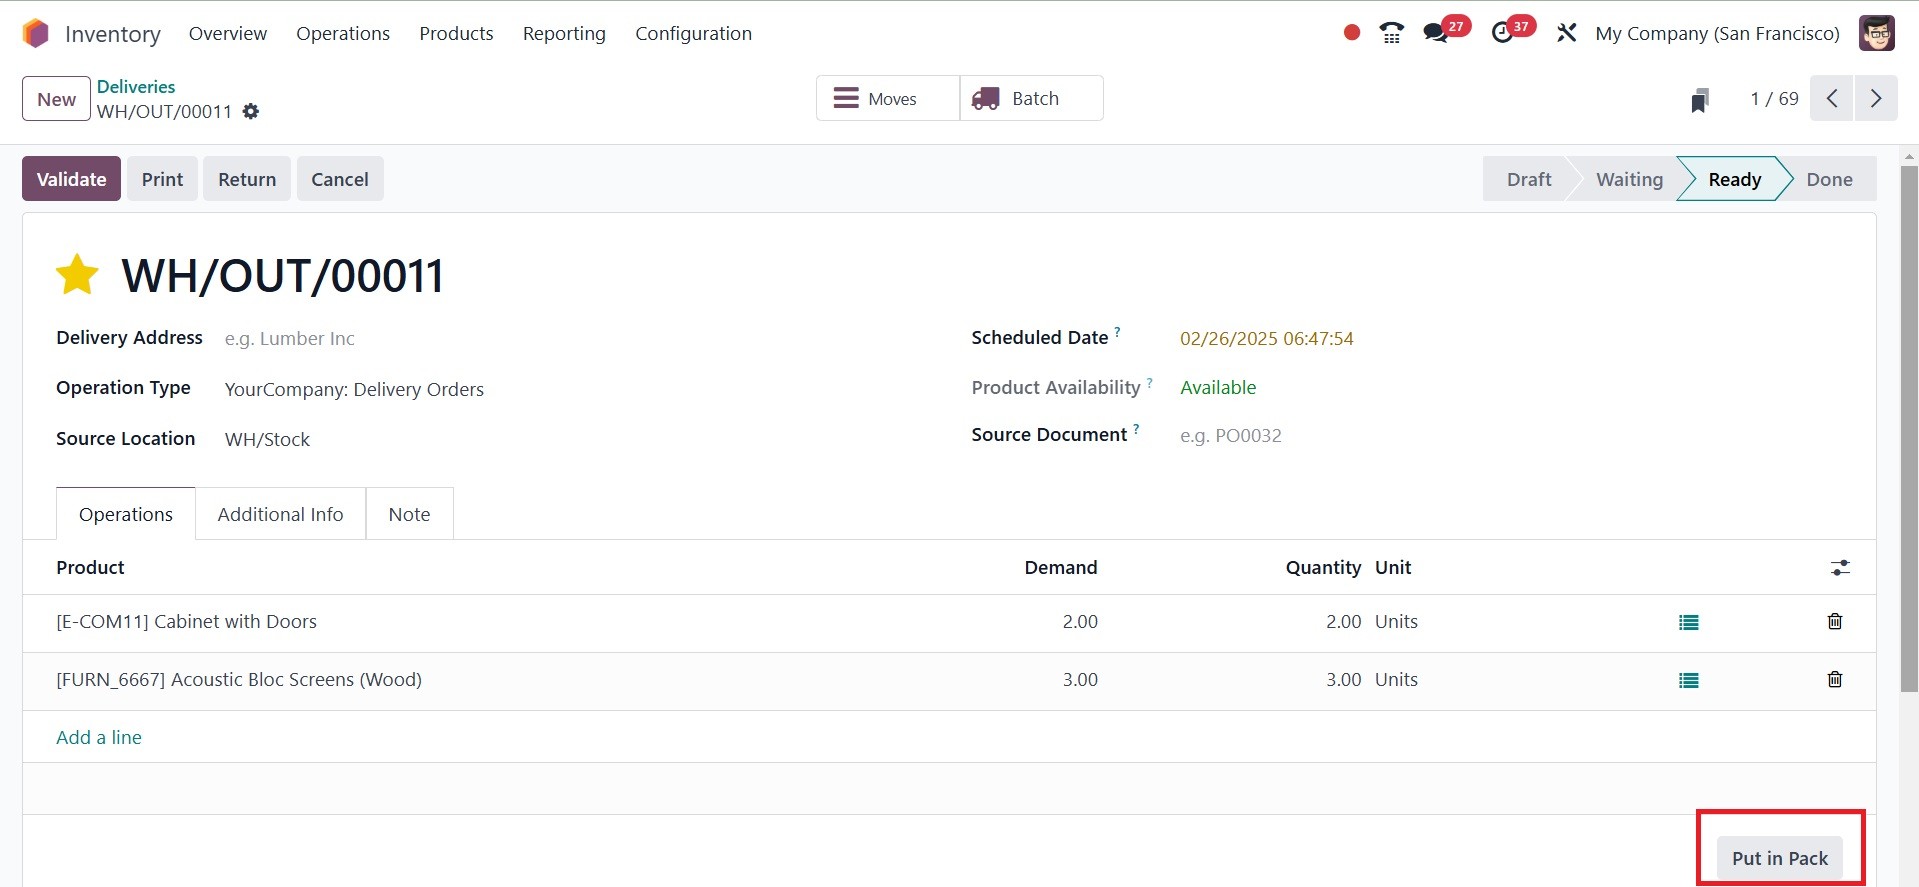
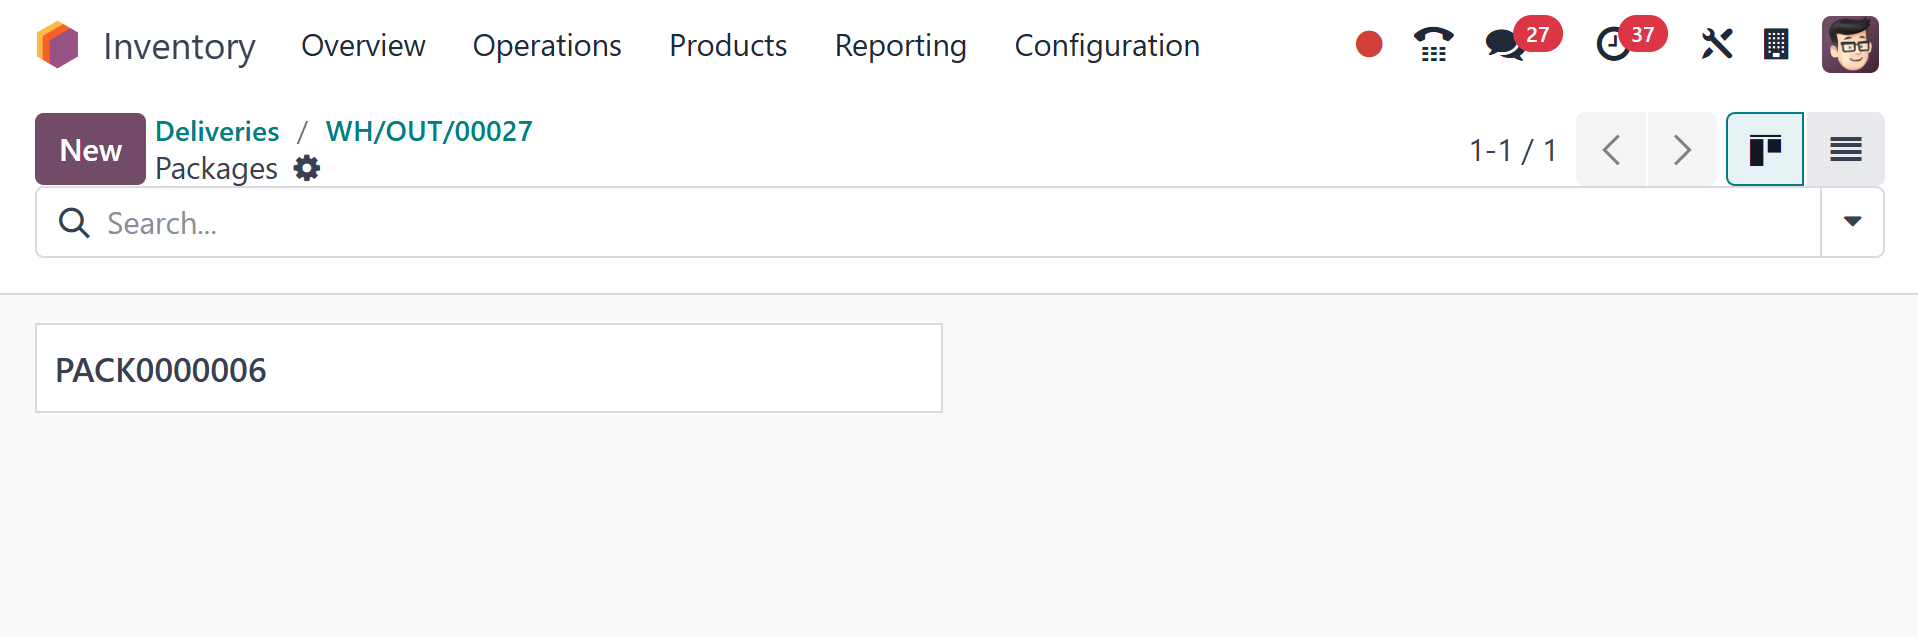
Put in Pack option can be found
here on the Operations tab.
You can use this button to
pack the products the
consumer has ordered. A new
smart button will be
displayed on the screen
immediately you choose this
option, as shown below.
By selecting the Packages option,
you can see the details of
the package that is part of
this delivery order.
As we said earlier, the Inventory
module's Packages option
displays these generated
packages.