4. Settings
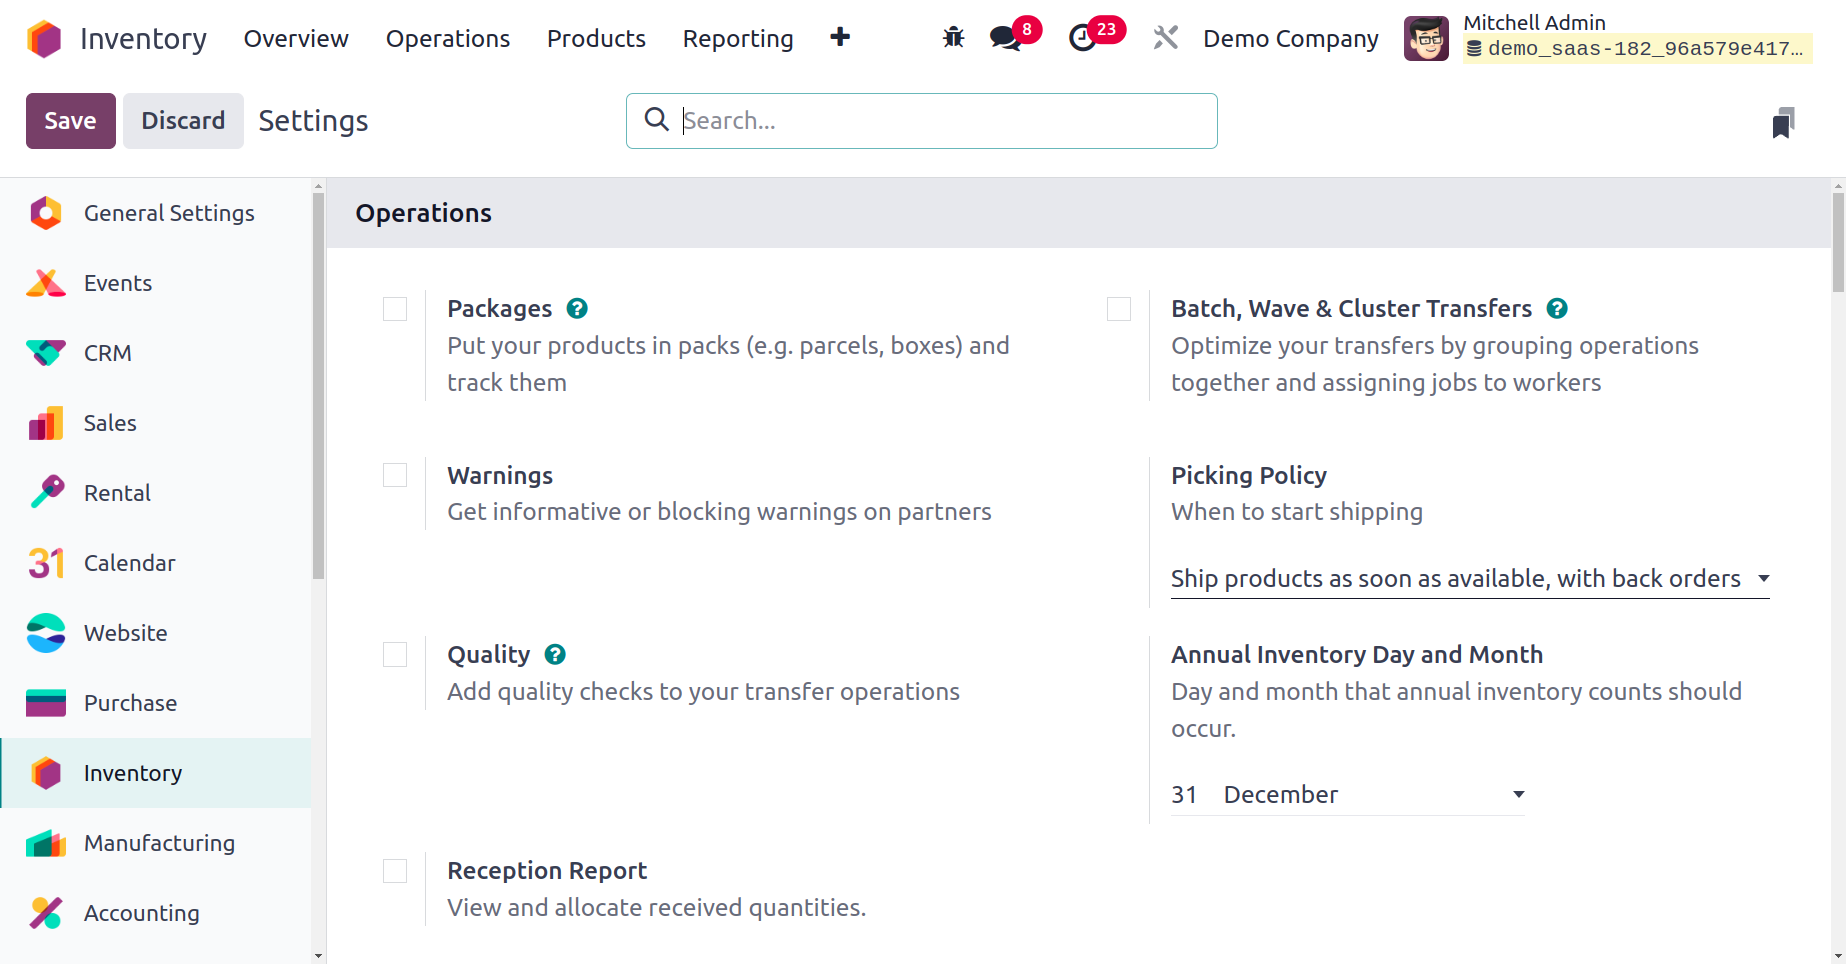
Operations
Under the settings you have the
option of operations, below
which there are options, like
Packages, Warning, Quality,
Reception Report, Batch,
Wave, & Cluster Transfer
respectively.
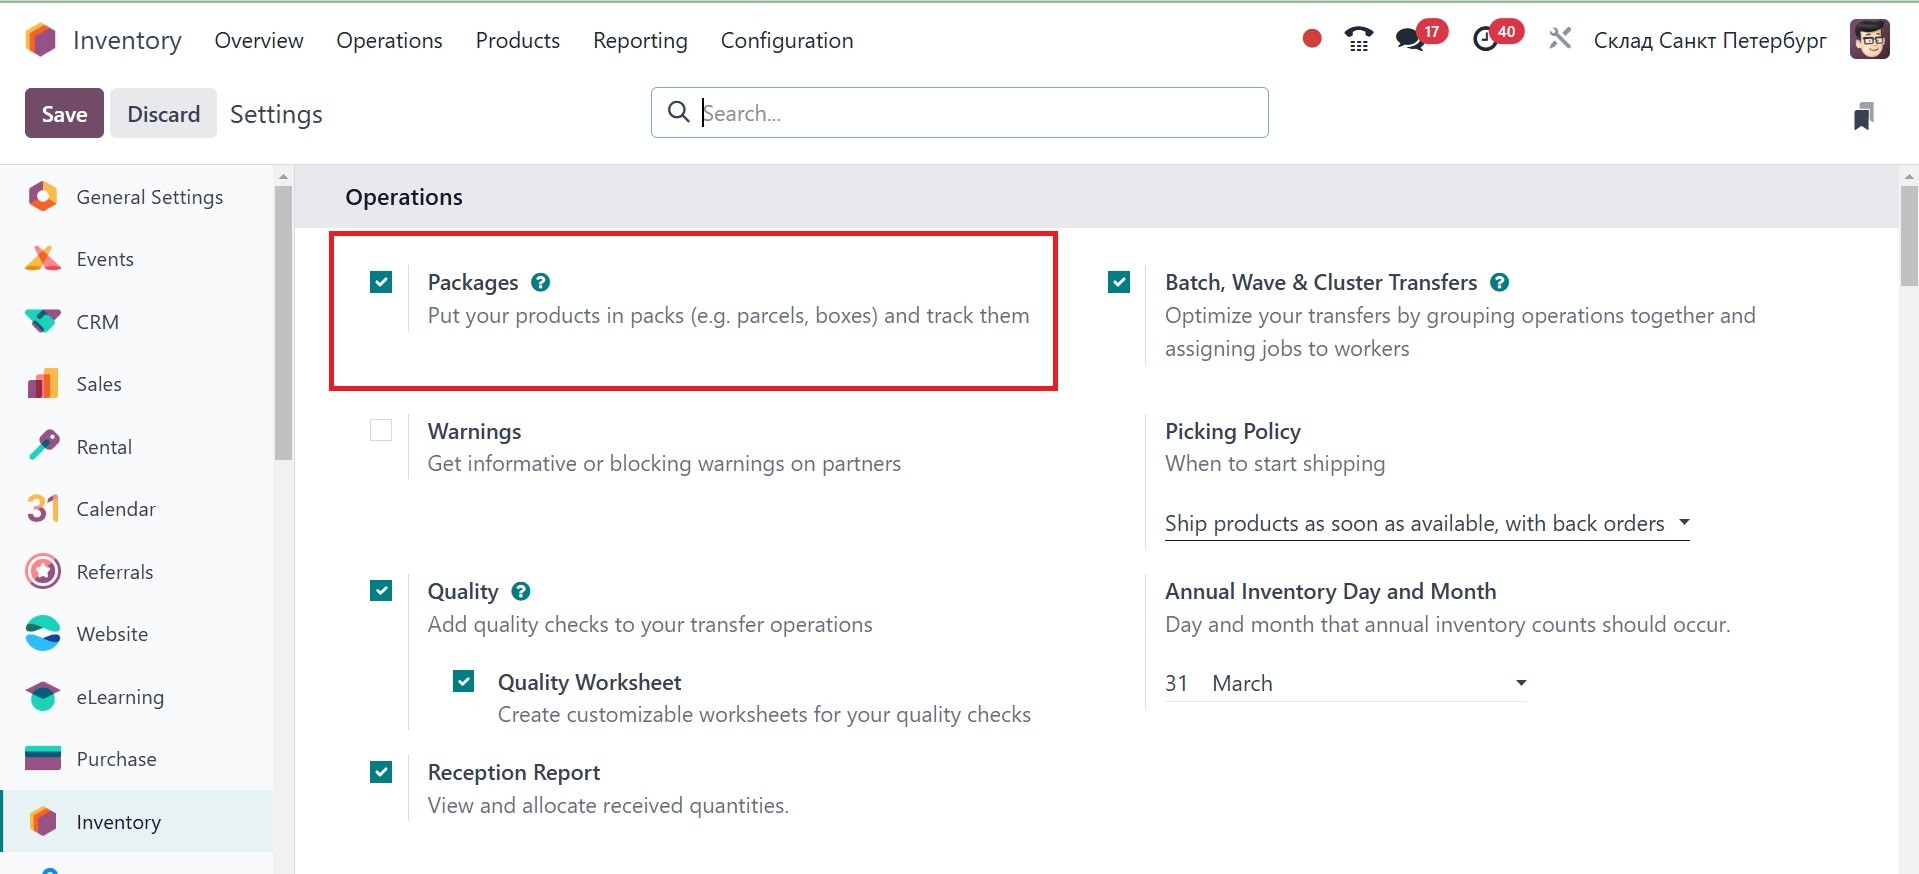
The packages option Products will
be partially saved from
damage by putting them in
packages. It is a basic
responsibility of all
businesses that they move
goods in a damage-free
condition. With Odoo 18, you
can build delivery packages,
multiple packs for one
product, and single packs for
multiple products. Explore
these packaging types in the
Inventory module.
Once you activate the Packaging
options under the Settings
menu, they will be available
in the Inventory module. You
need to activate the Packages
option under the Operations
page.
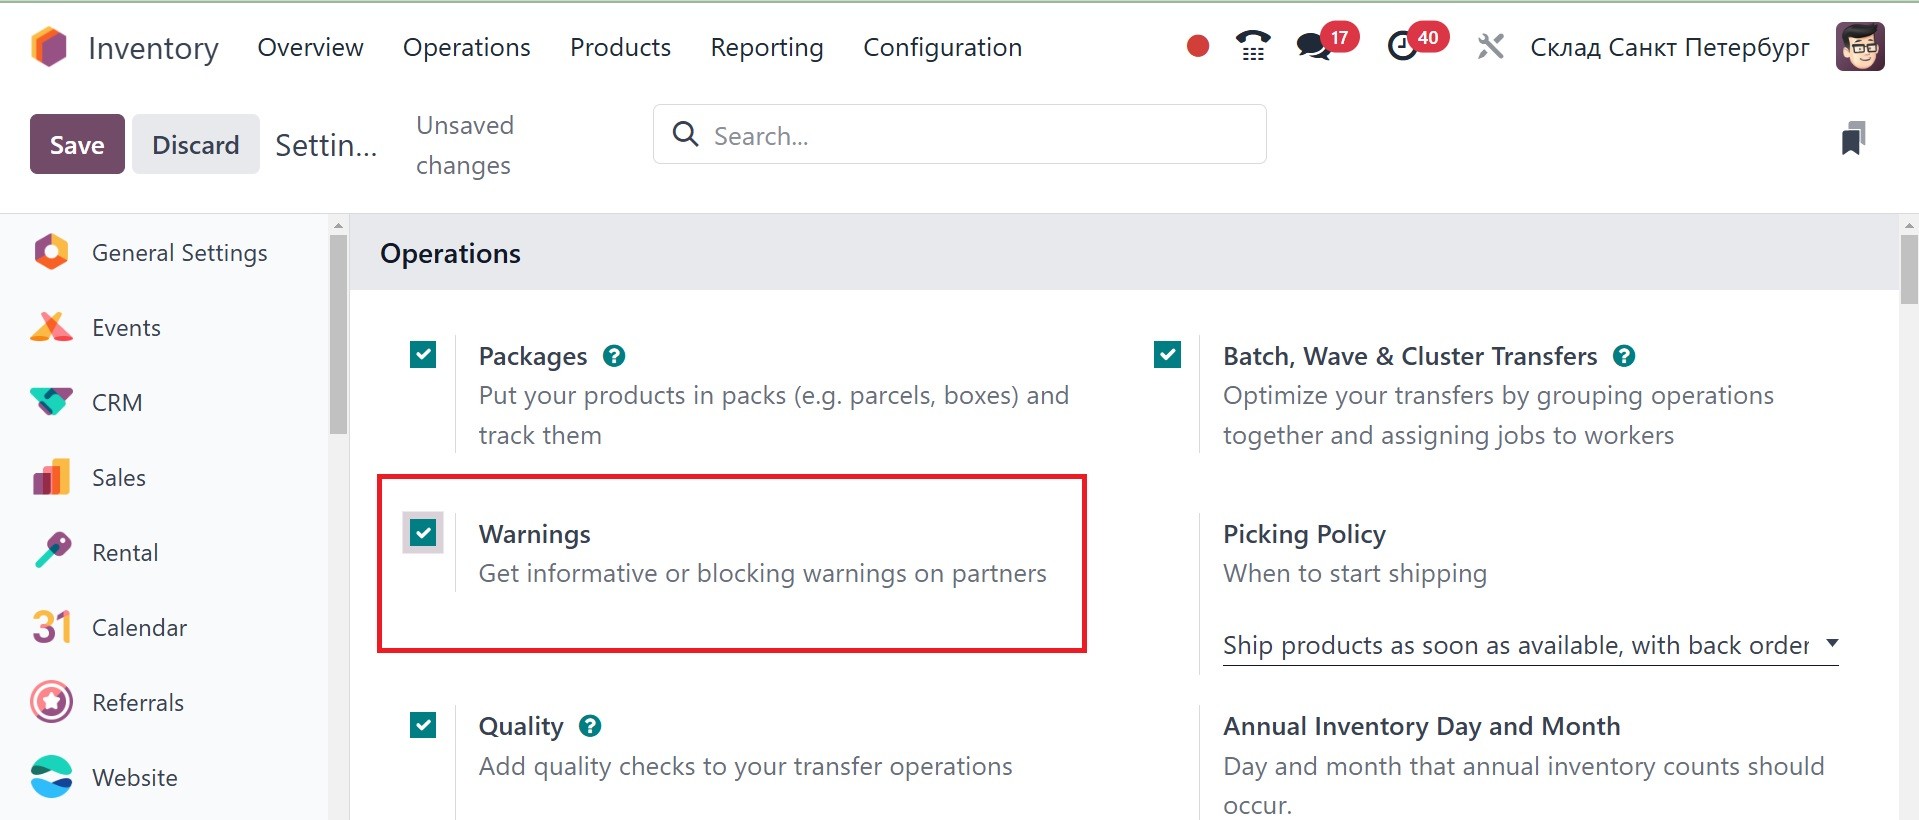
The next option is warning, as in
the image below. The most
advanced Odoo Inventory
module will enable you to
generate automatic warning
messages in different working
scenarios in the Inventory
module. The warning messages
will be activated only when
you turn on the Warnings
option from the Inventory
Settings.
Odoo system also provides you
with the ability to create
informative or blocking
warning messages on each
product, vendor and
customers. You can select any
one of the alert types and
also have the ability to
create individual alerts for
sales, purchase or products.
The following are the types
of warning available. The sub
options on warning are
available under the customers
option of sales module.
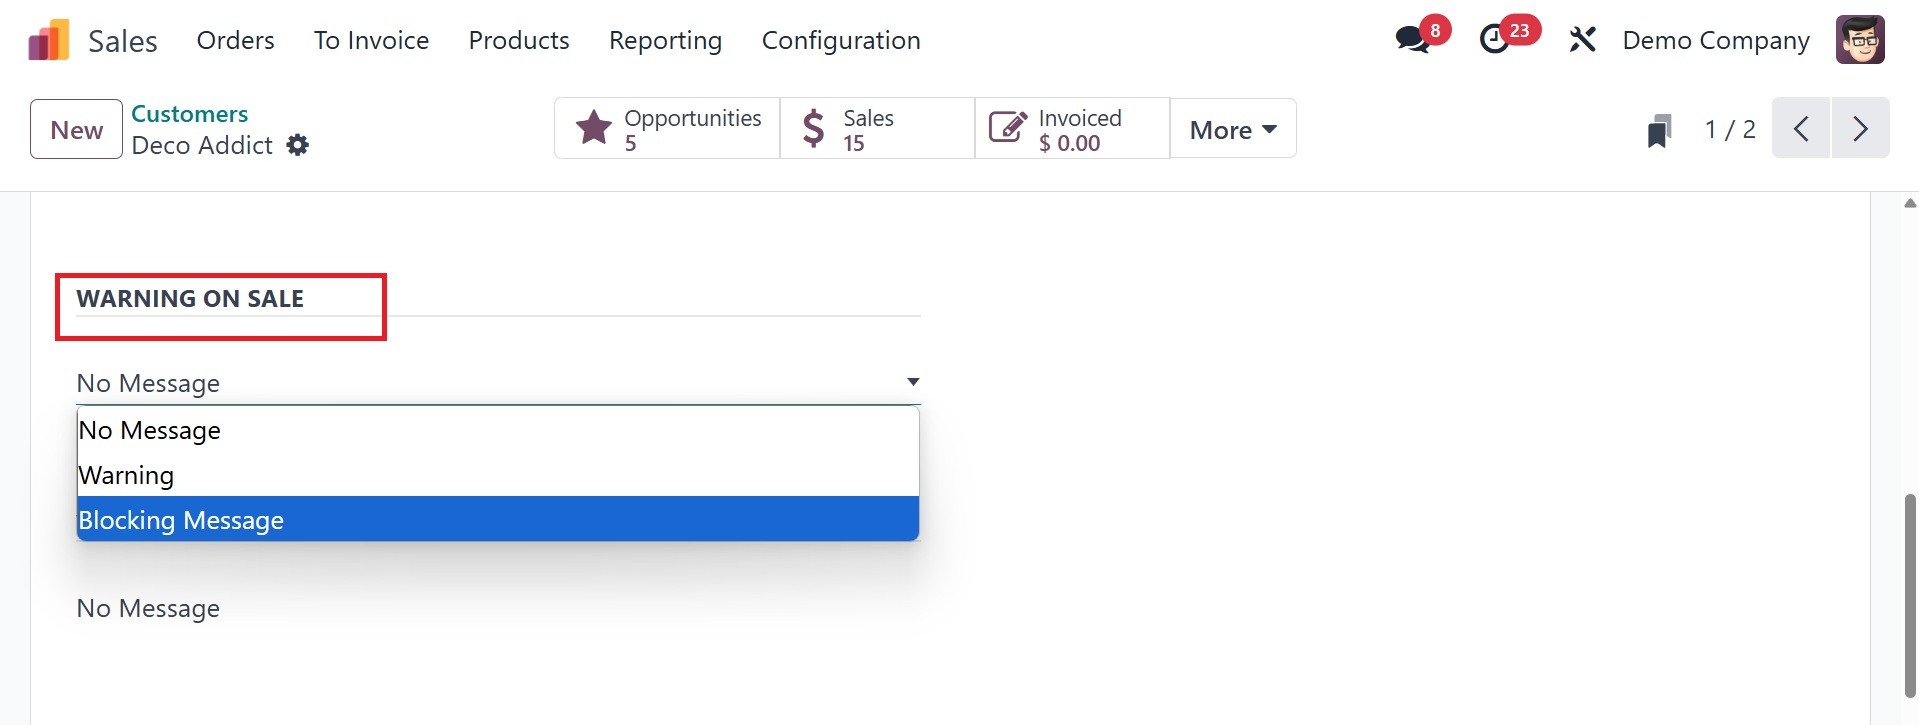
No Message: It will not show any
message, alert or warnings.
Warnings: This will display an
alert message when we are
performing the specific
operation.
Blocking Message: The Blocking
message will raise an
exception with the message
and block the work flaw.
The next option is, quality.
Quality checks are hand
inspections carried out by
workers, and serve to verify
the quality of goods. In
Odoo, a quality check may be
performed for one product, or
several products within the
same inventory operation or
manufacturing order.
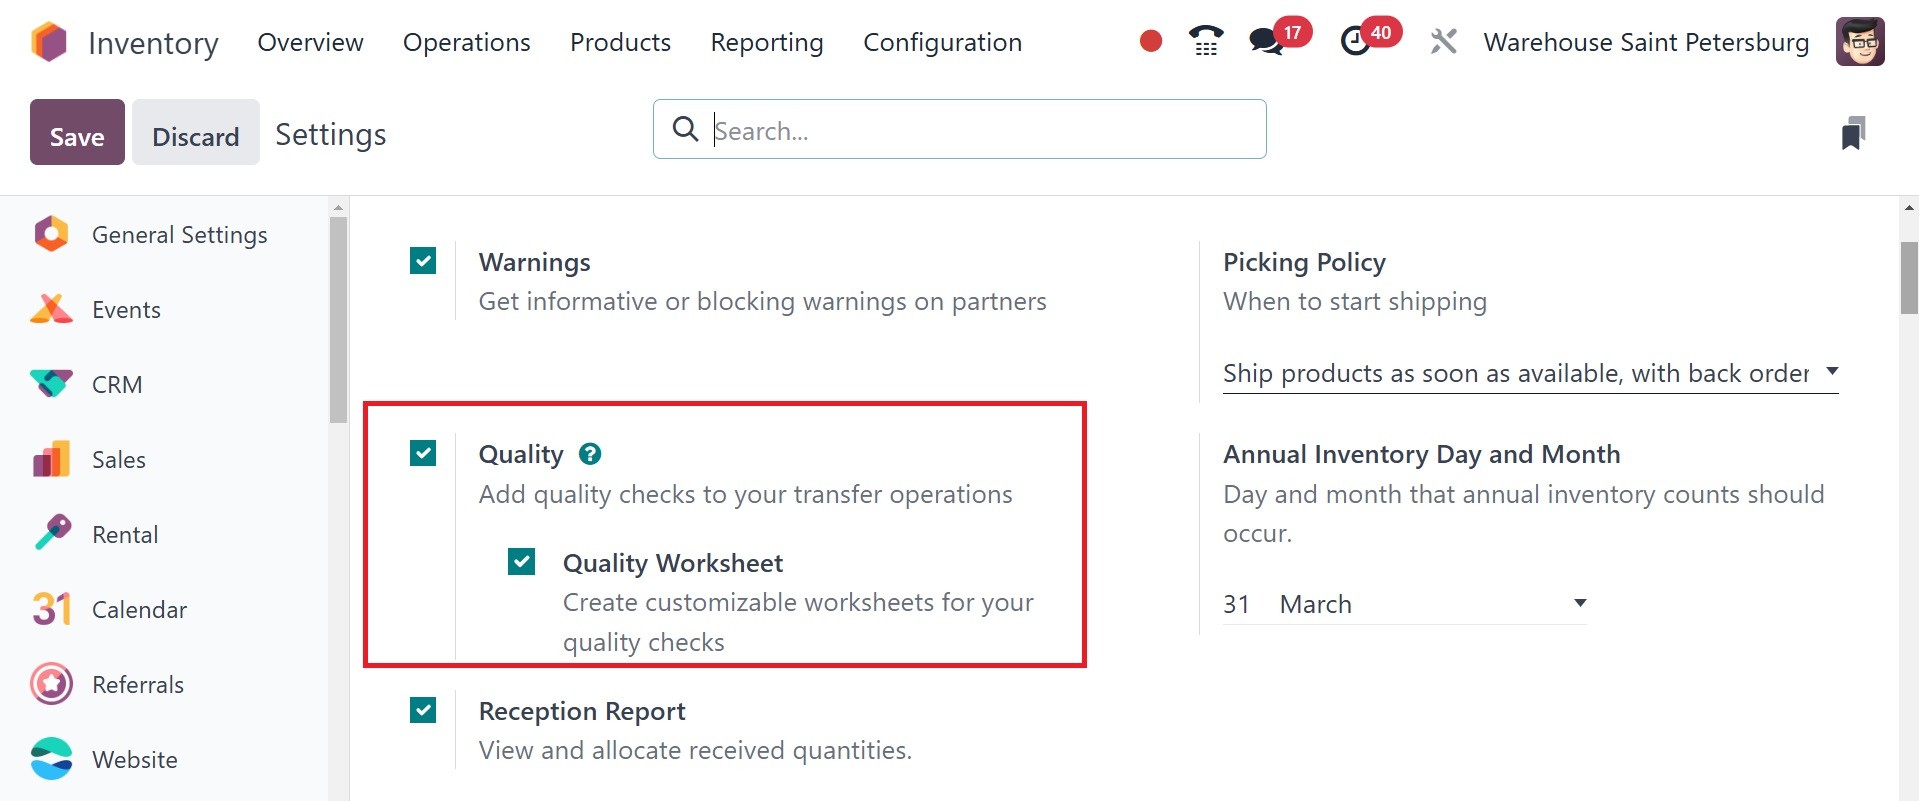
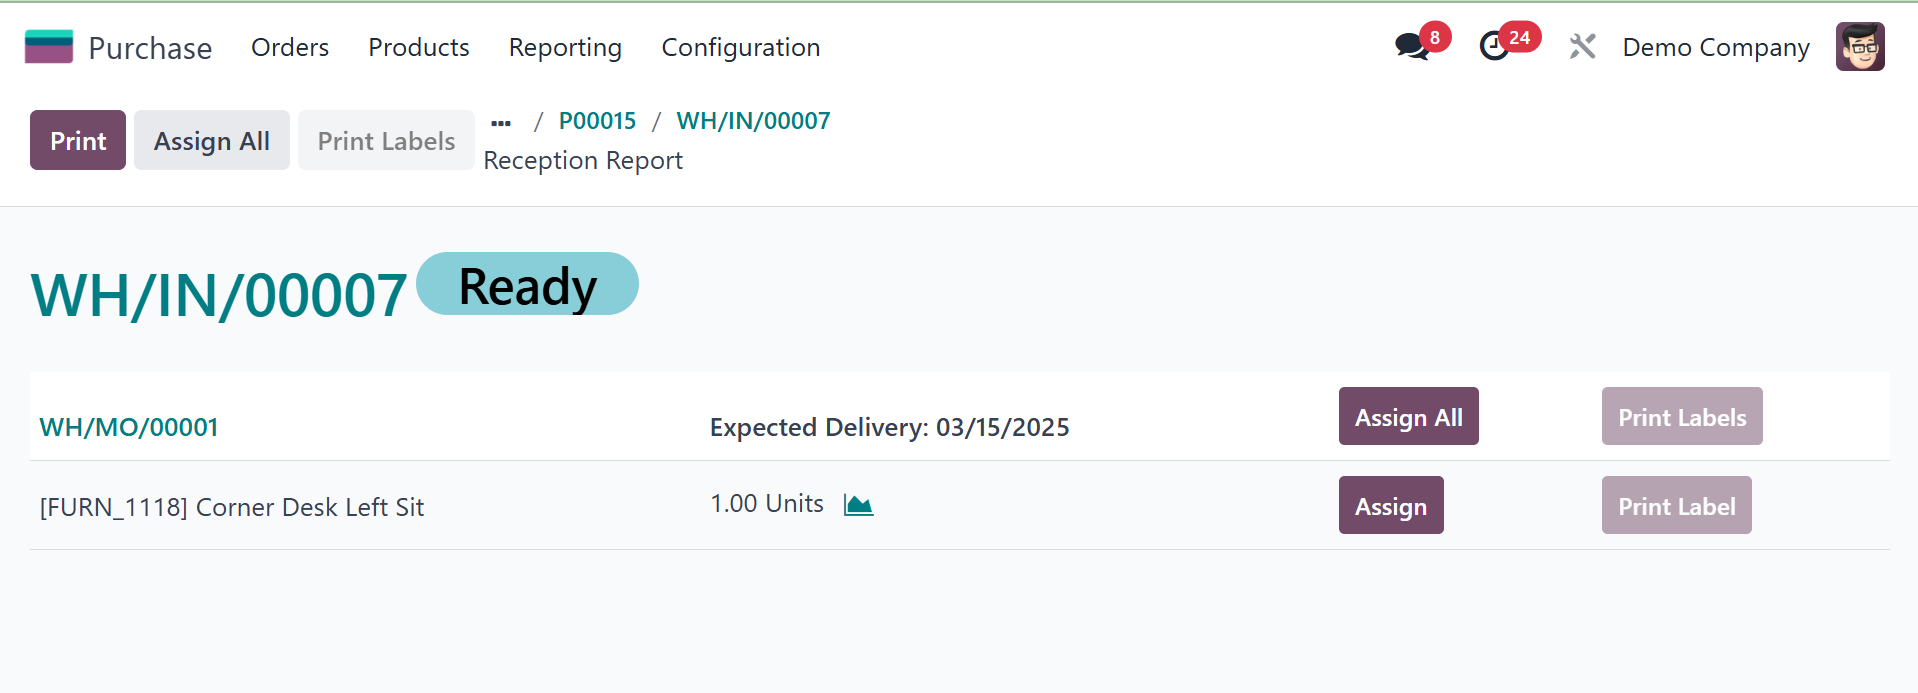
A Reception Report is the next
option. The Reception Report
functionality is a key to
addressing some complexity.
Once a receipt is validated,
the system automatically
creates a concise reception
report, simplifying the
allotment of items to
corresponding orders and
improving organizational
efficacy.
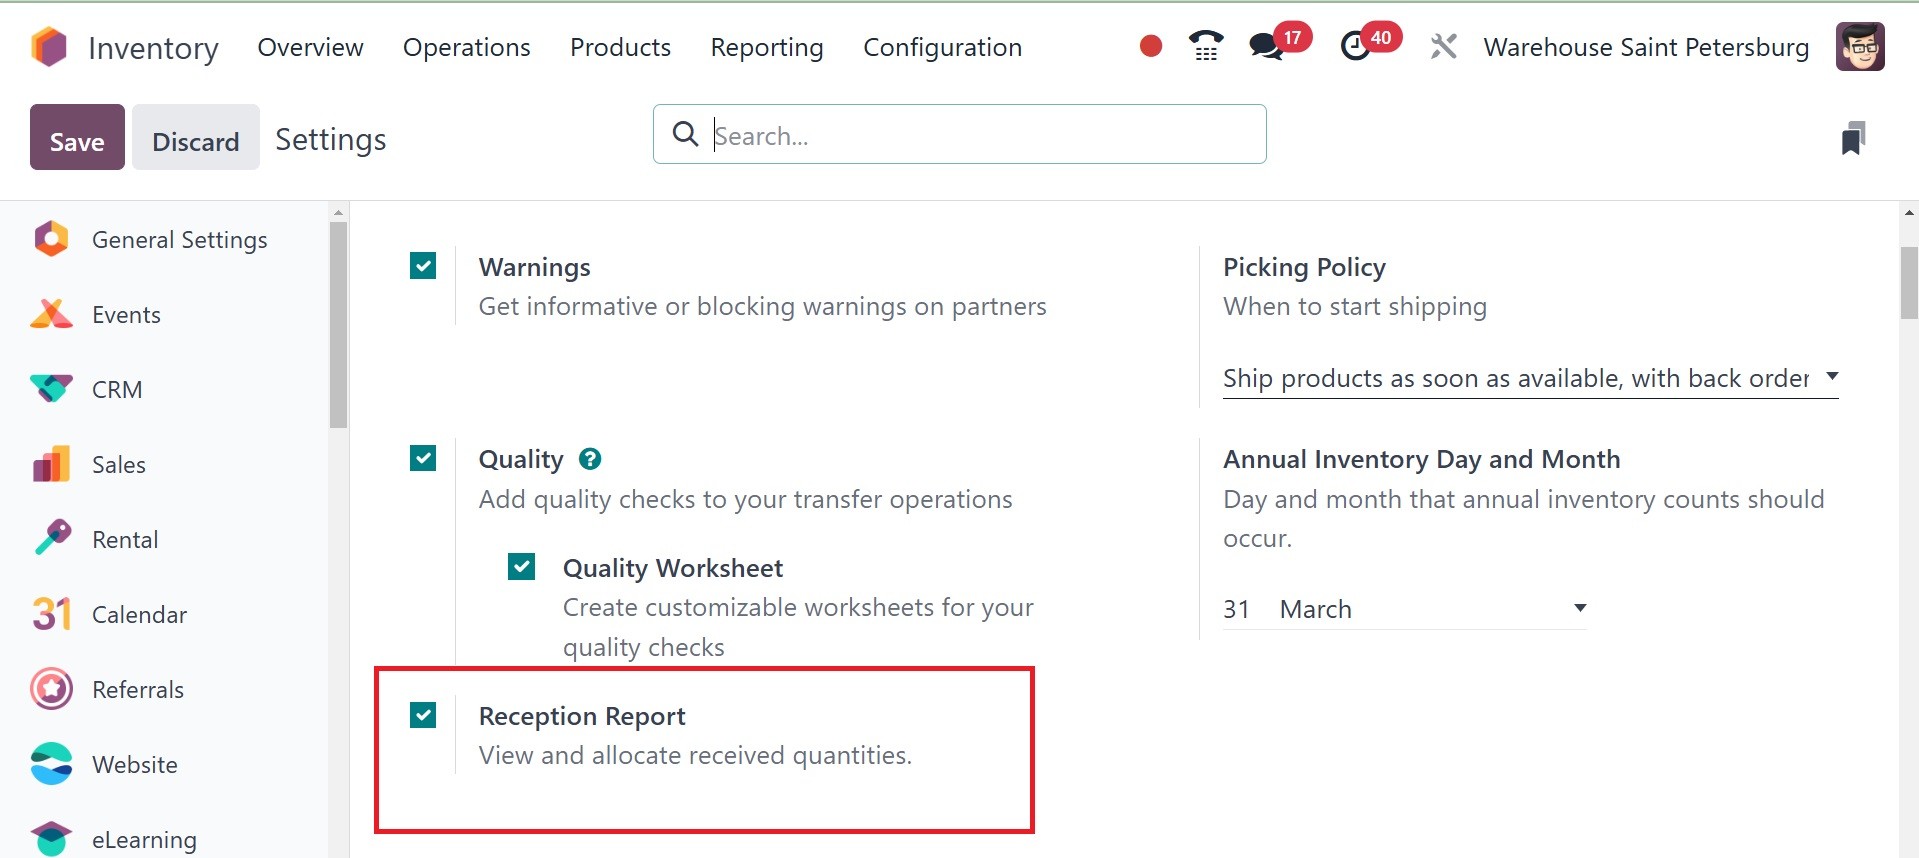
The reception report on the
receipt of purchase module
will be, as in the image
below.
Now, comes the next one, which is
picking policy, as in the
screenshot below.
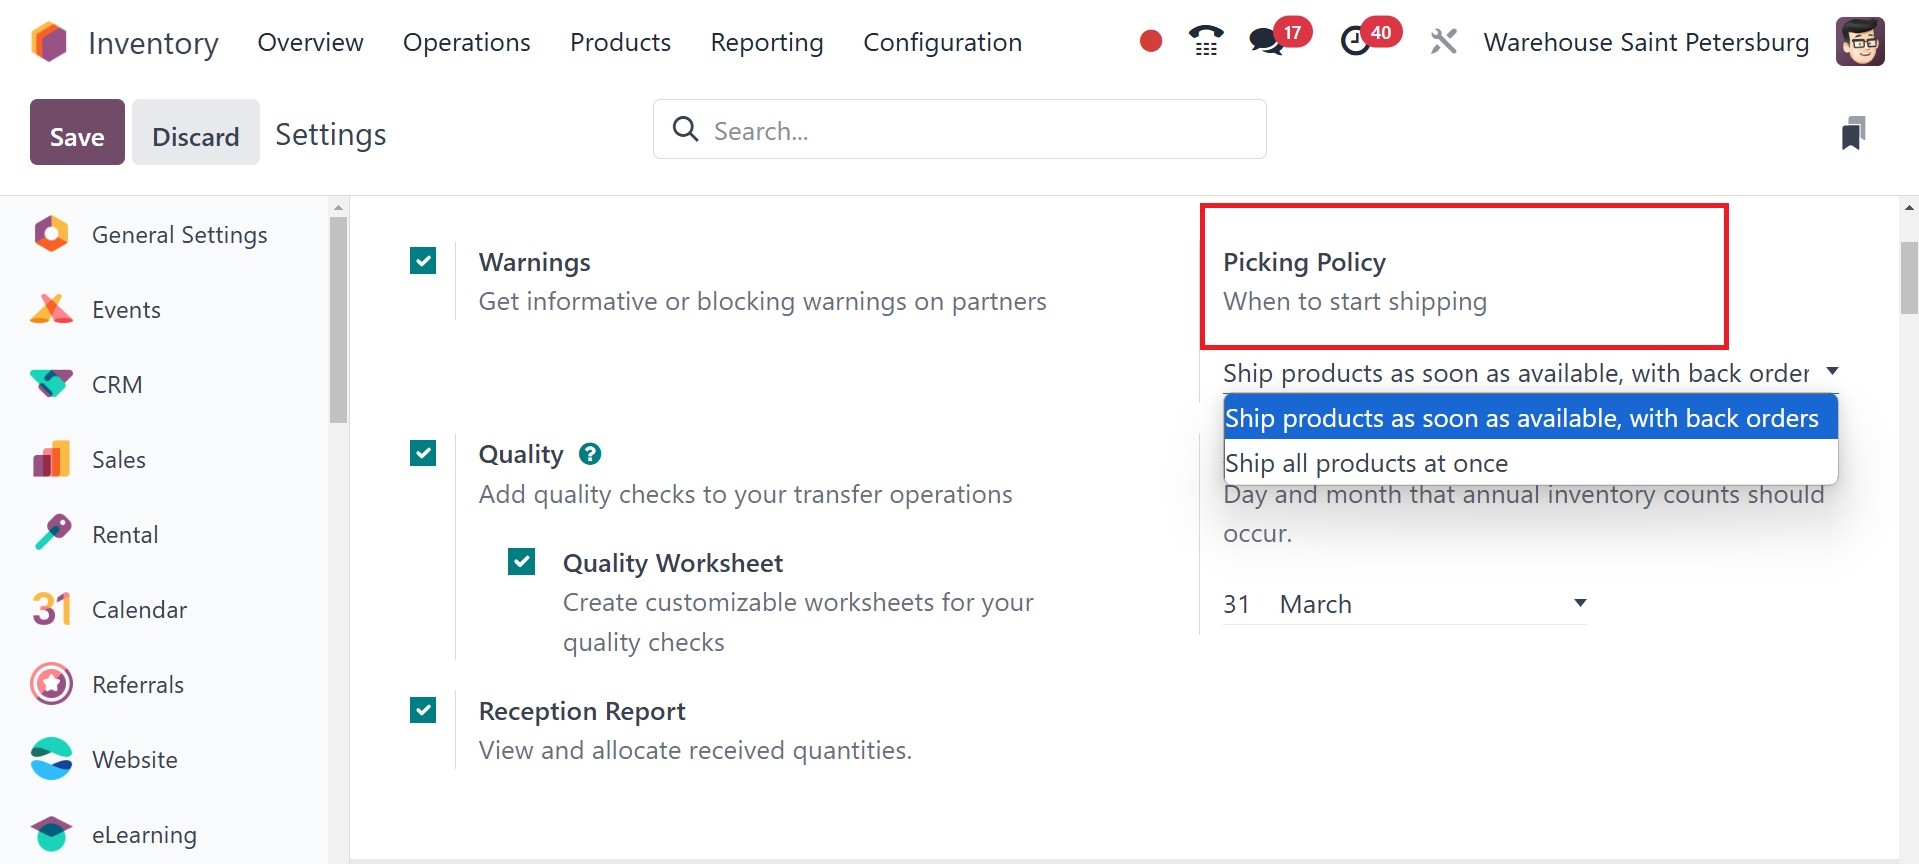
Odoo provides two types of
Picking Policies inside the
Inventory Module platform,
and this feature can be
activated from the “Settings”
submenu in the
“Configuration” menu, as
shown above. The picking
policy can be set inside the
sale order's other info tab,
as in the image below.
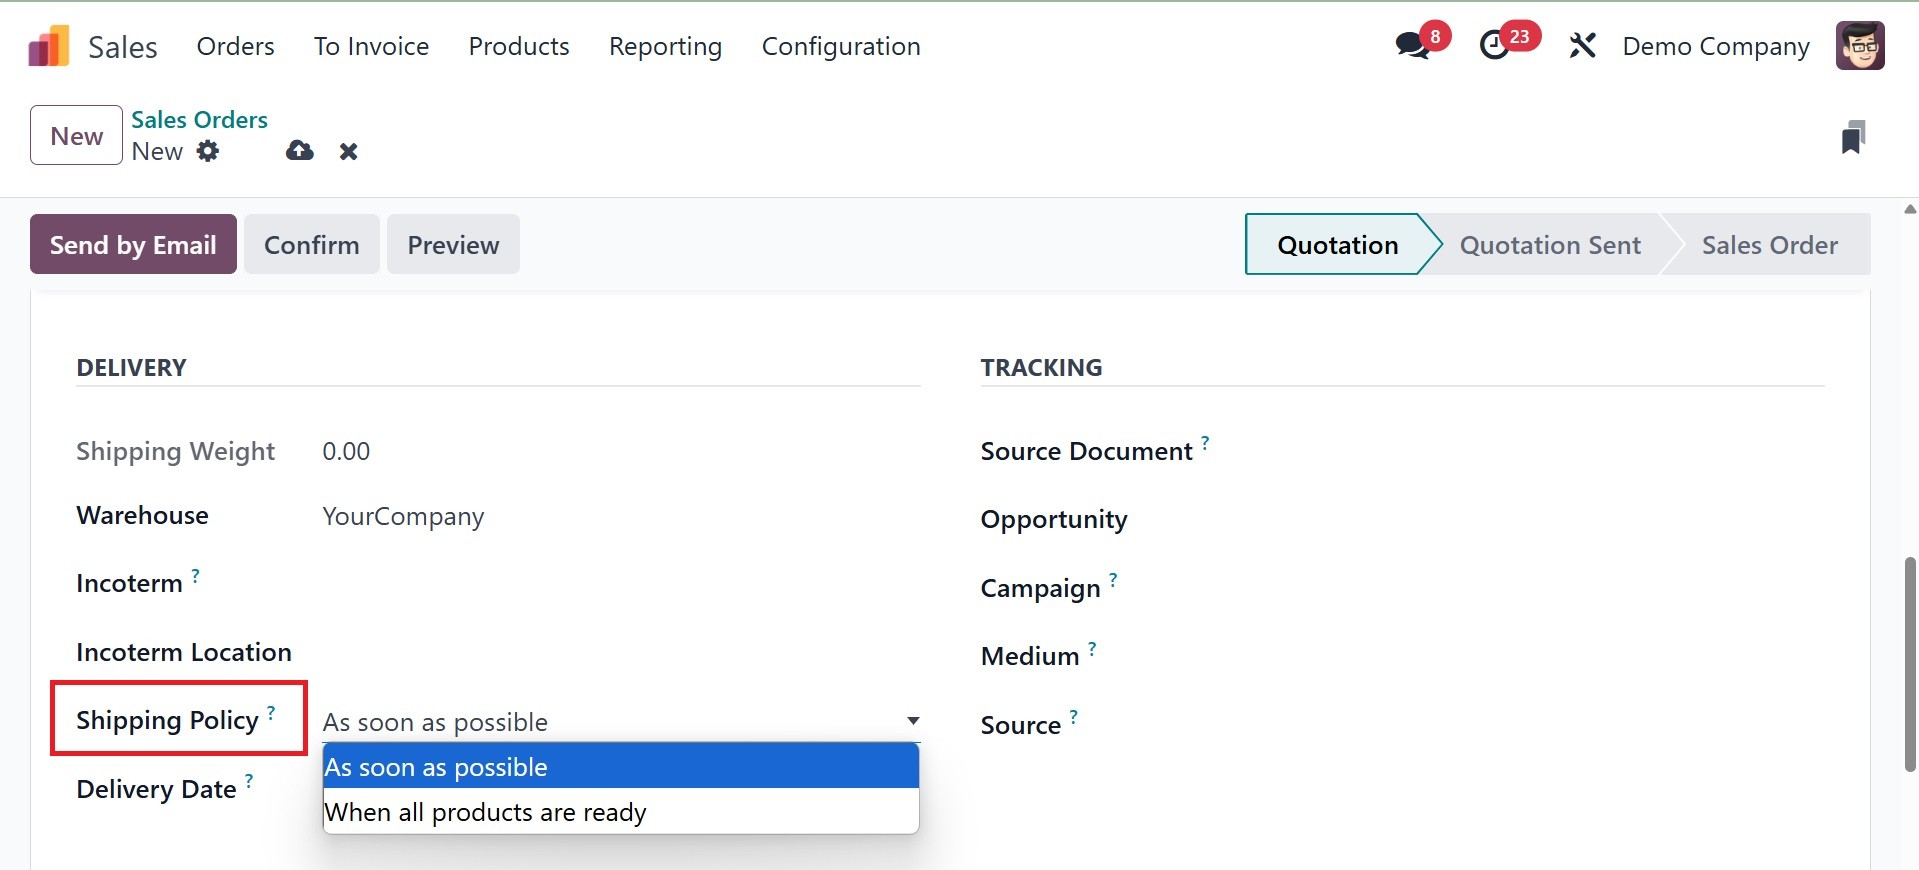
Here, you can find two basic
picking policies that are
"Ship products as soon as
available, with back orders"
and "Ship all products at
once" under the options box.
Now, we can verify the
operation of each picking
policy in detail.
Ship products as soon as
available, with backorders:
Applying the "Ship Products
as Soon as Possible, with
Backorders" setting policy is
useful when a customer orders
a product in greater
quantities than the available
stock. If a customer places
any products after this
option has been activated and
the supply of the inventory
is less than the set amount,
then the buyer can simply go
ahead with the orders.
Ship all products at once: If a
customer places an order for
a product with more quantity
than the stock of the
inventory, then he cannot go
ahead with that specific
order if we have set the
"Ship all products at once"
option as our shipping policy
for the inventory then the
orders will be picked only
after the inventory stock is
replenished.
Barcode is the next. Under the
barcode tab, you have the
options, like barcode
scanner, stock barcode
database, show quantity to
count, and count entire
locations, respectively.
Barcode scanner Odoo offers
barcode scanning to manage
inventory operations of
products in a more convenient
way. You can utilize the
barcode scanning approach to
track and find products in
your inventory. To utilize
the functionality of the
barcode scanner for your
inventory management in Odoo,
ensure you install the
Barcode module from the Odoo
AppStore. After you have
finished the installation,
you can proceed to the
Inventory module's Settings
menu.
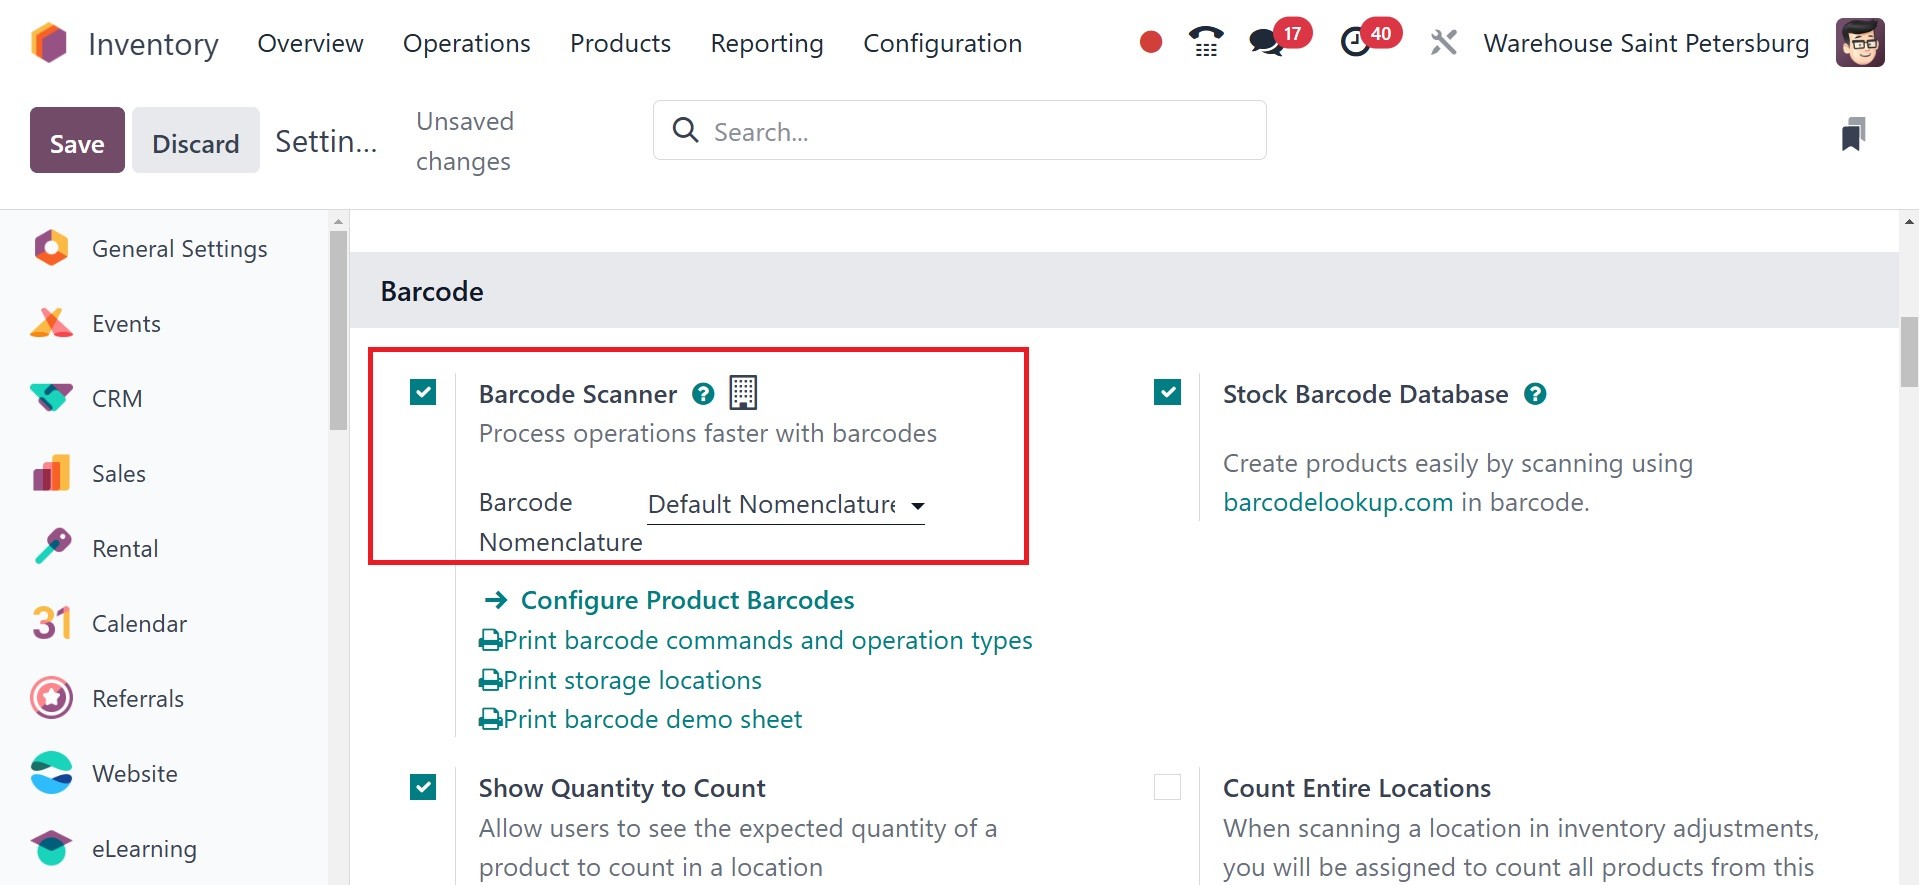
You can enable this feature. In
the Barcode Nomenclature
field, you can choose an
appropriate set of rules for
generating the barcode. Once
this feature is enabled, you
can click the Configure
Product Barcode option to set
barcodes for products.
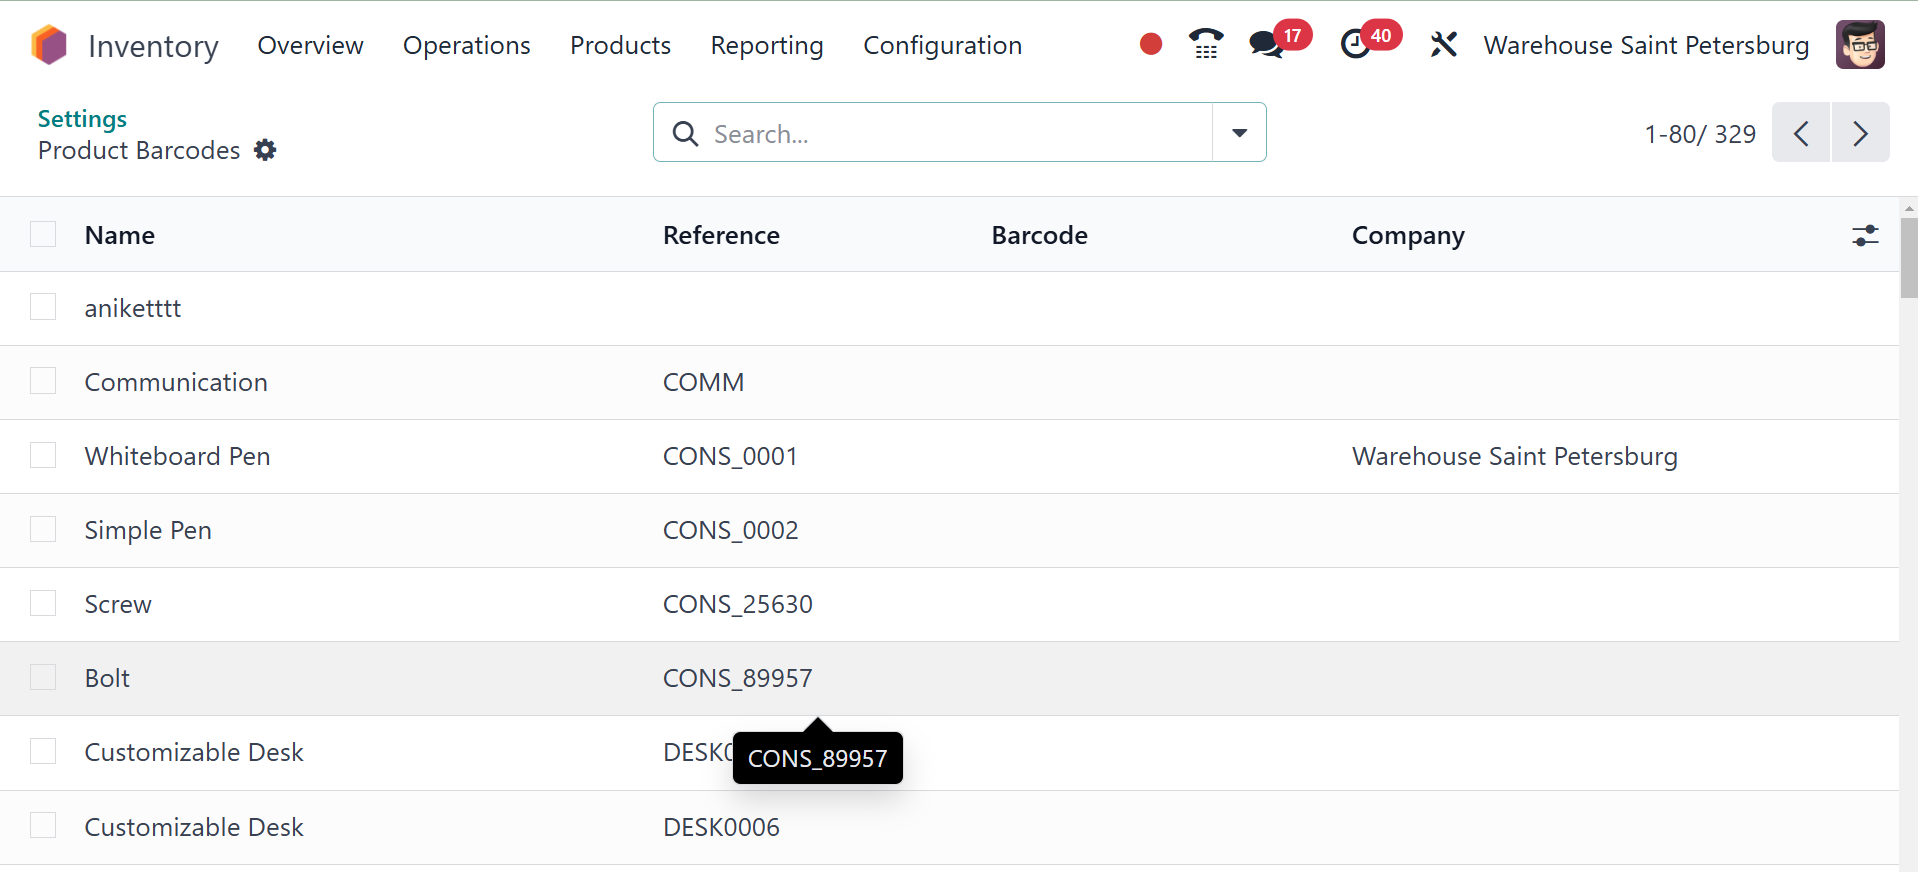
Odoo will take you to a new
platform where you will
receive the list of products
already configured in your
database. You can easily add
Barcode to every product by
clicking on the Barcode field
of the product. Once you add
a barcode to the product, you
can click on the Save button.
You can assign barcodes for
every product by this method.
With this barcode, you can
find products during various
inventory activities with the
assistance of a barcode
scanner.
The Odoo ERP system's Barcode
Nomenclature function allows
you to establish certain
guidelines for barcode
production. Developer mode
must be enabled in order to
configure the barcode
nomenclature in the Odoo
Inventory module.
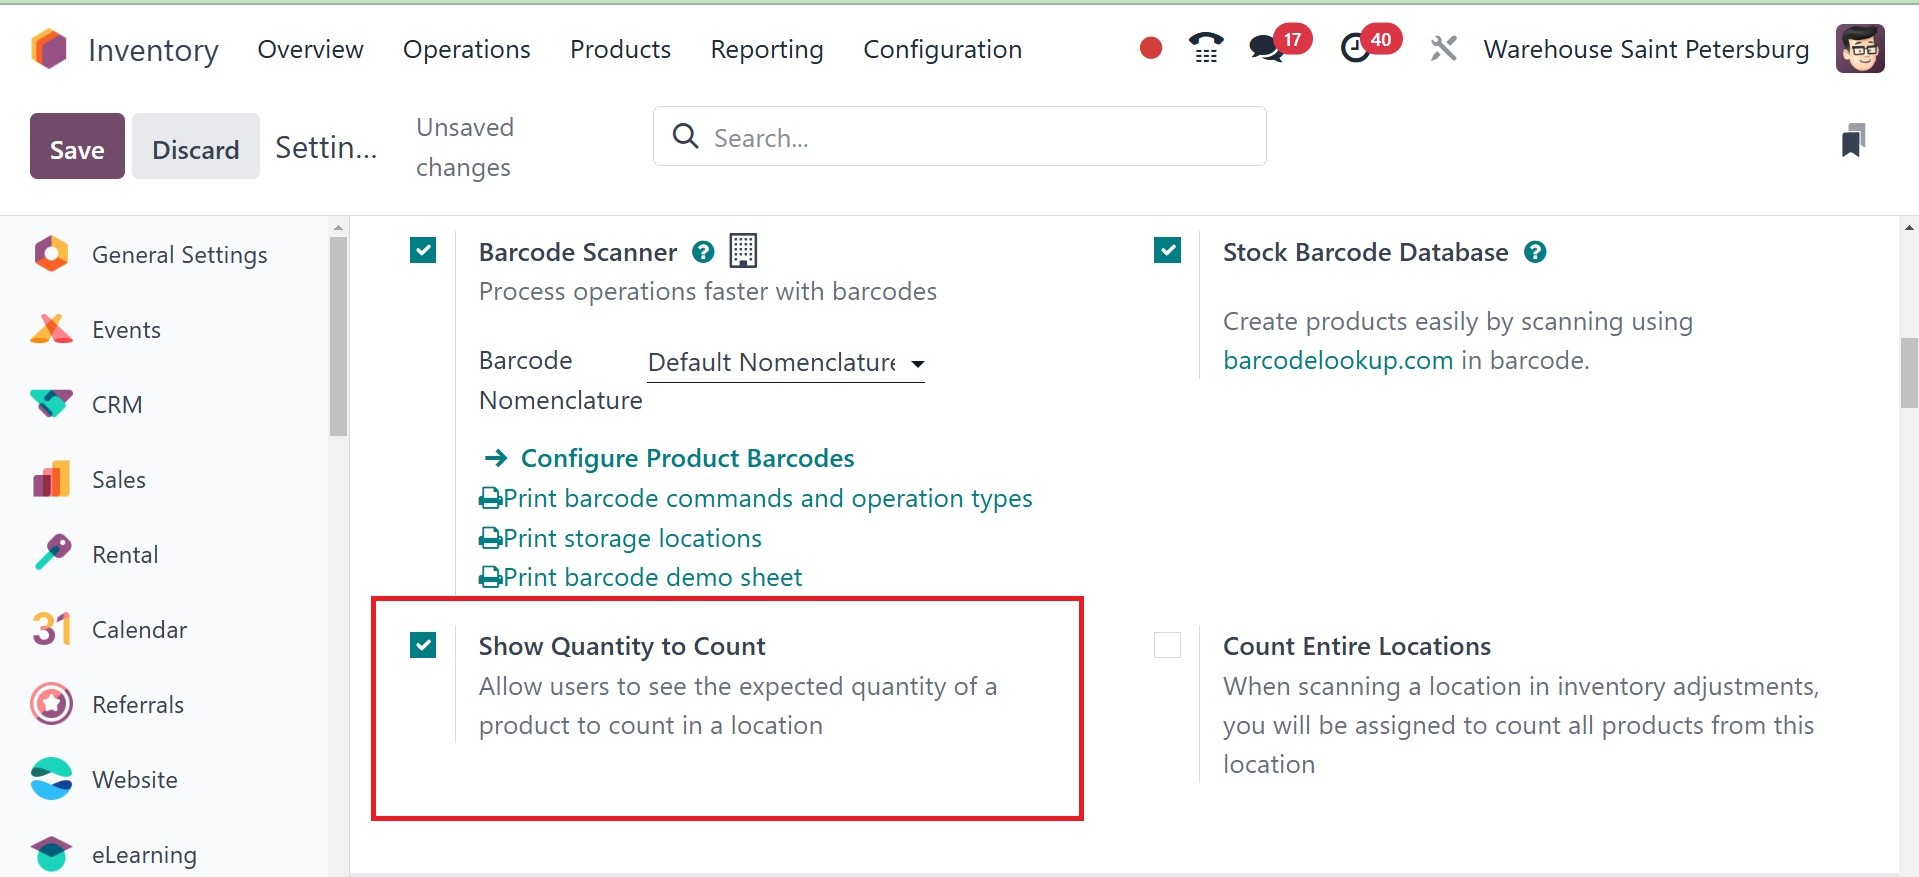
The show quantity to count option
helps you to see the expected
quantity of a product to
count in a location. When
enabled, it displays the
expected quantity (according
to the system) during a
physical count, making it
easier to compare what you
physically count with what's
recorded in Odoo.
The stock barcode database option
easily creates items by
scanning barcodes with
barcodelookup.com.
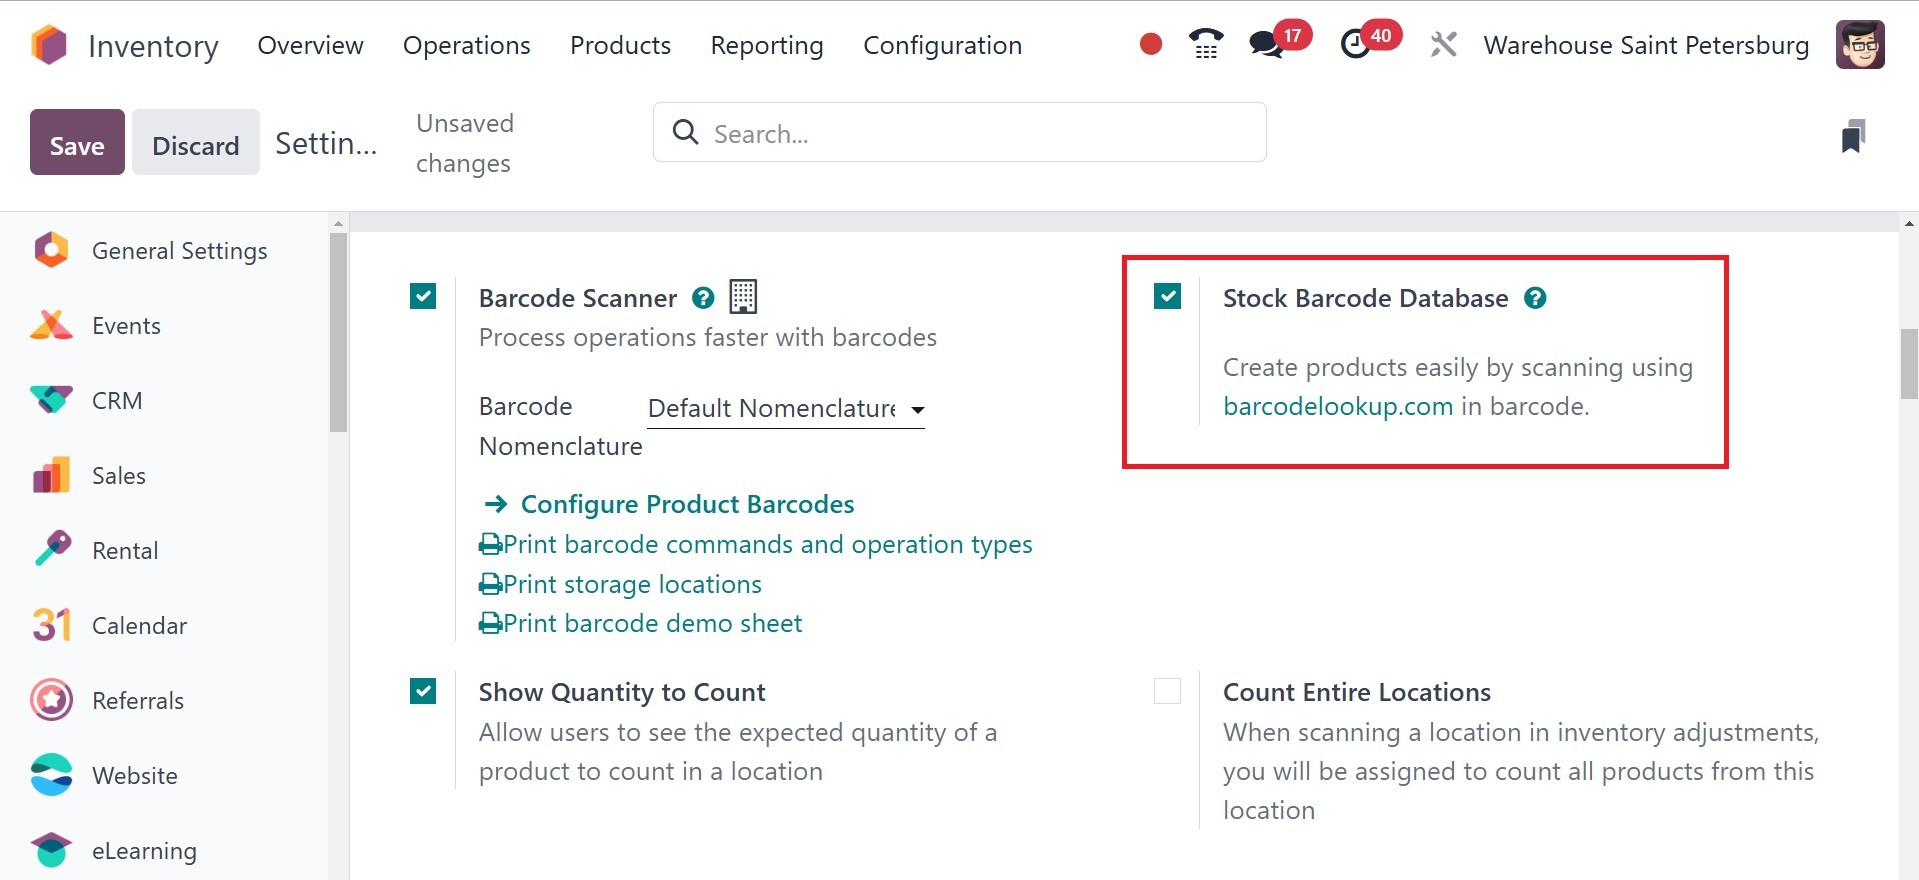
In order to expedite warehouse
procedures, this function
makes barcode scanning
possible for stock operations
such as receipts, deliveries,
internal transfers, and
inventory modifications.
The next option is to count
entire locations, which when
selecting a location in
inventory adjustments, you
will be allotted to count
every product from the
location.
Next tab is Shipping, under which
you have the options, like
delivery method, email
configuration, dispatch
management system signature,
and sms configuration.
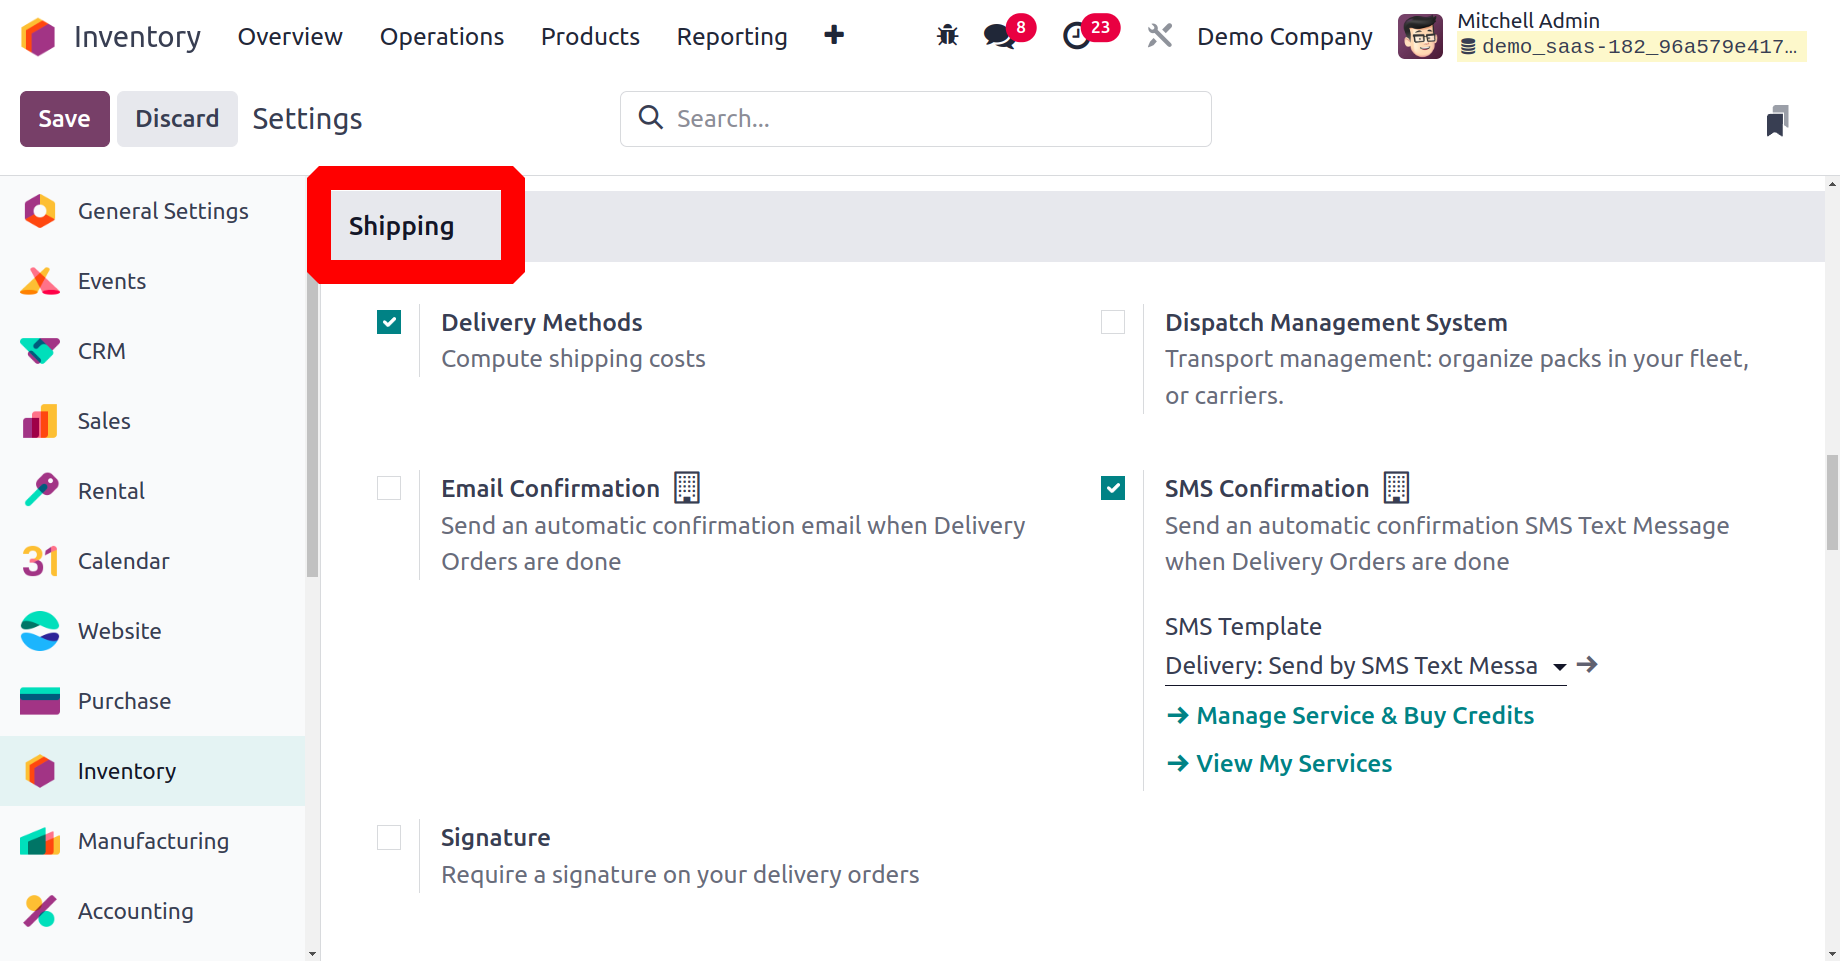
Enabling the Delivery Methods
will assist you in
calculating the shipping
fees. In addition to this,
you can enable available
shipping connectors to
utilize them as third party
shippers for your delivery
processes. You can locate
here UPS Connector, FedEx
Connector, bpost Connector,
Sendcloud Connector, DHL
Express Connector, USPS
Connector, and Easypost
Connector.
You can now set up a new shipping
method for your delivery
business by clicking on the
Shipping Methods choice found
under the Configuration menu.
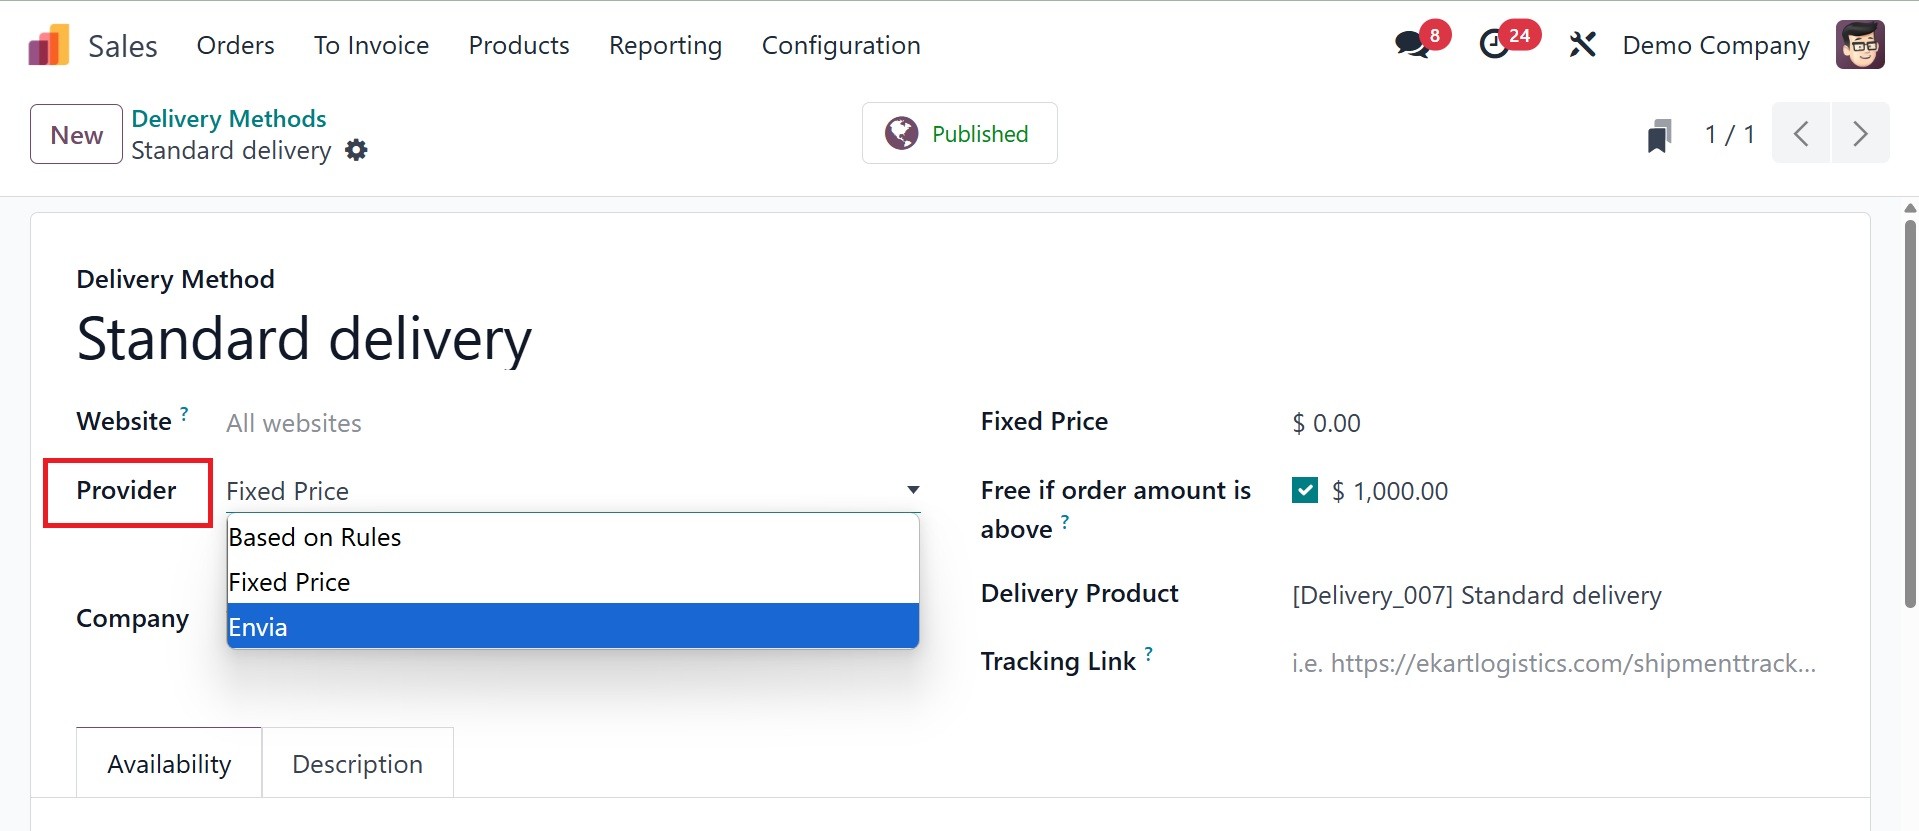
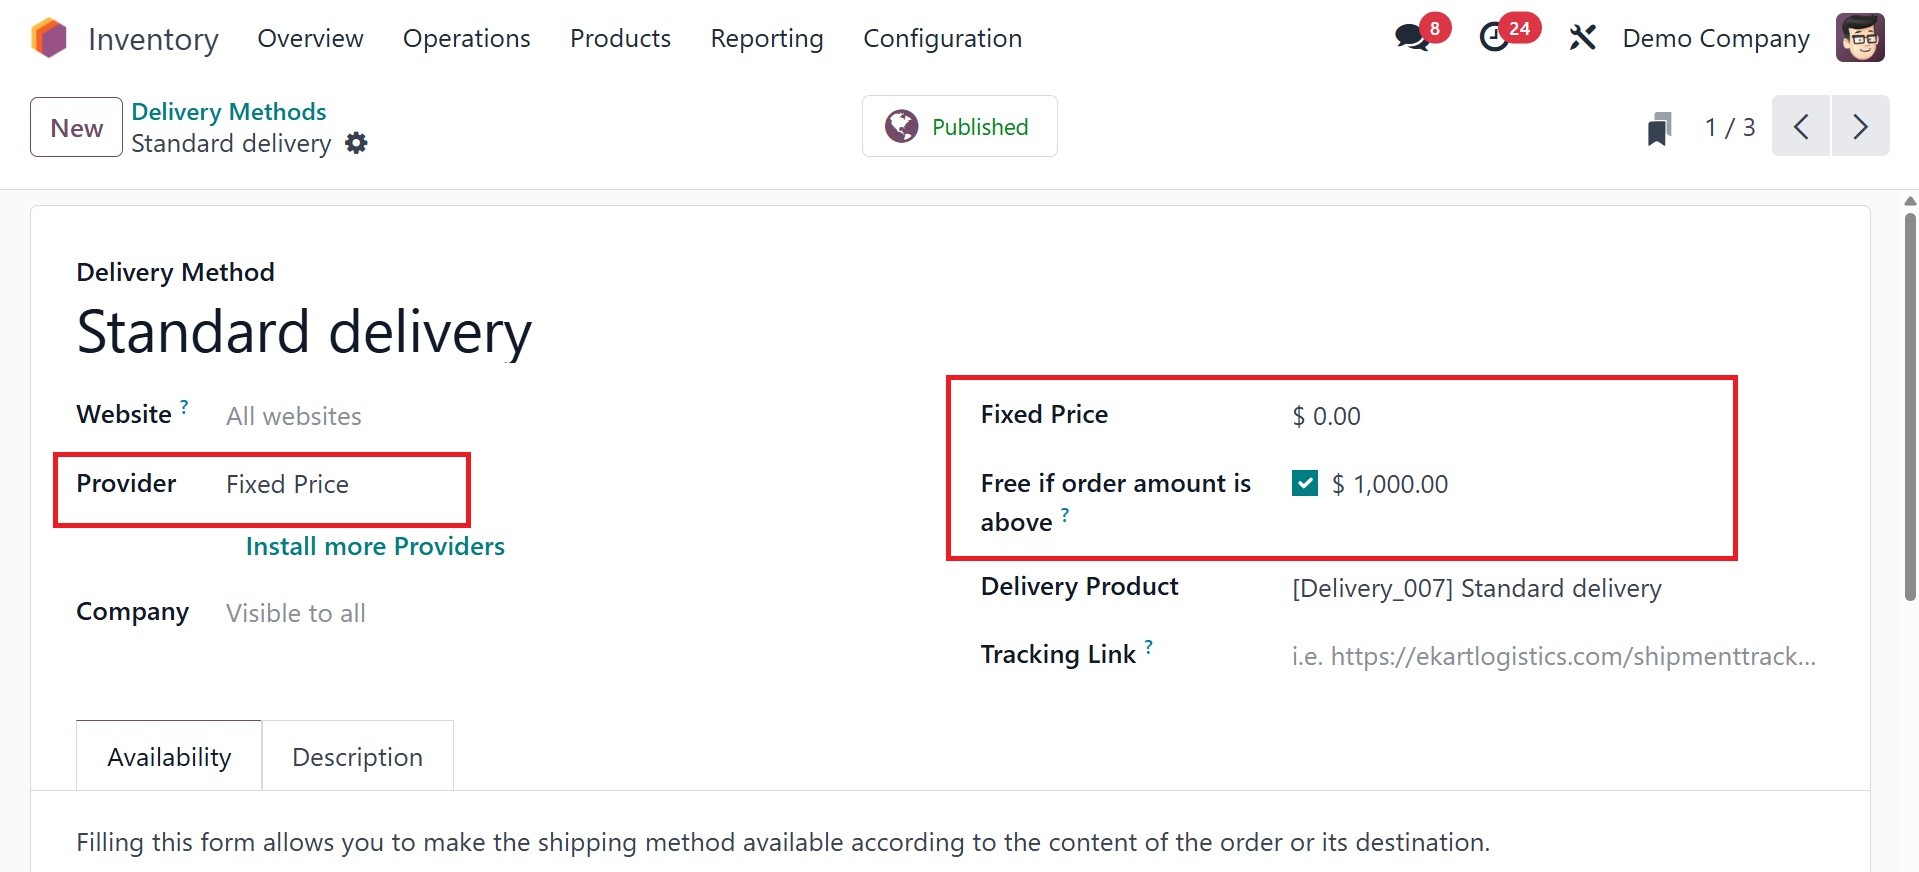
The list of previously set
Shipping Methods will display
details of the Delivery
Method, Provider, Is
Published, Website, and
Company.
Clicking on the New button, you
can configure a new shipping
method.
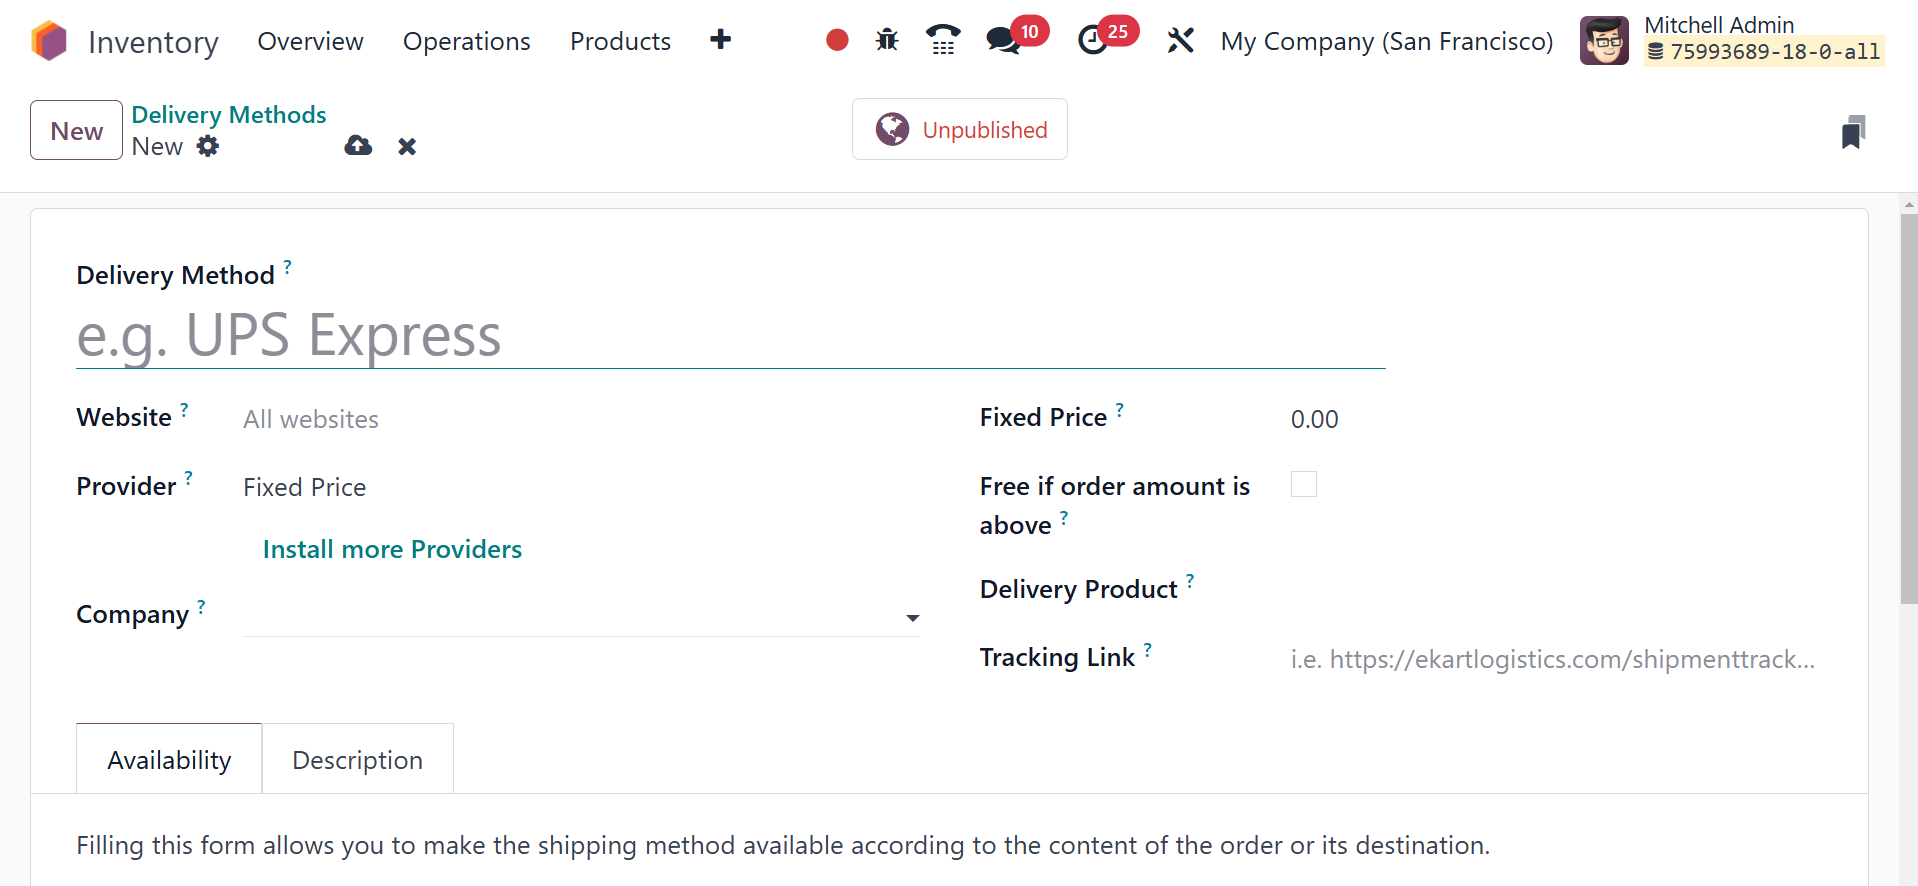
You can enter the name of
Shipping Method in this
field. Refer to the Website
id to allow this shipping in
your eCommerce store. You can
choose an appropriate
shipping provider for your
delivery from the Provider
field. Or you can install
additional providers via the
respective option.
You can enable more providers
using the option ‘Install
more providers’ from the
list.
After choosing Provider, you can
enter Company and Delivery
Product in the respective
fields. Enable the Free if
the order amount is more than
field if you wish to offer
free shipping on orders that
have an amount of value more
than or equal to the value
you enter in the Amount
field. The tab present within
this window will be modified
depending on the Provider
selected. We choose the Fixed
Price here.
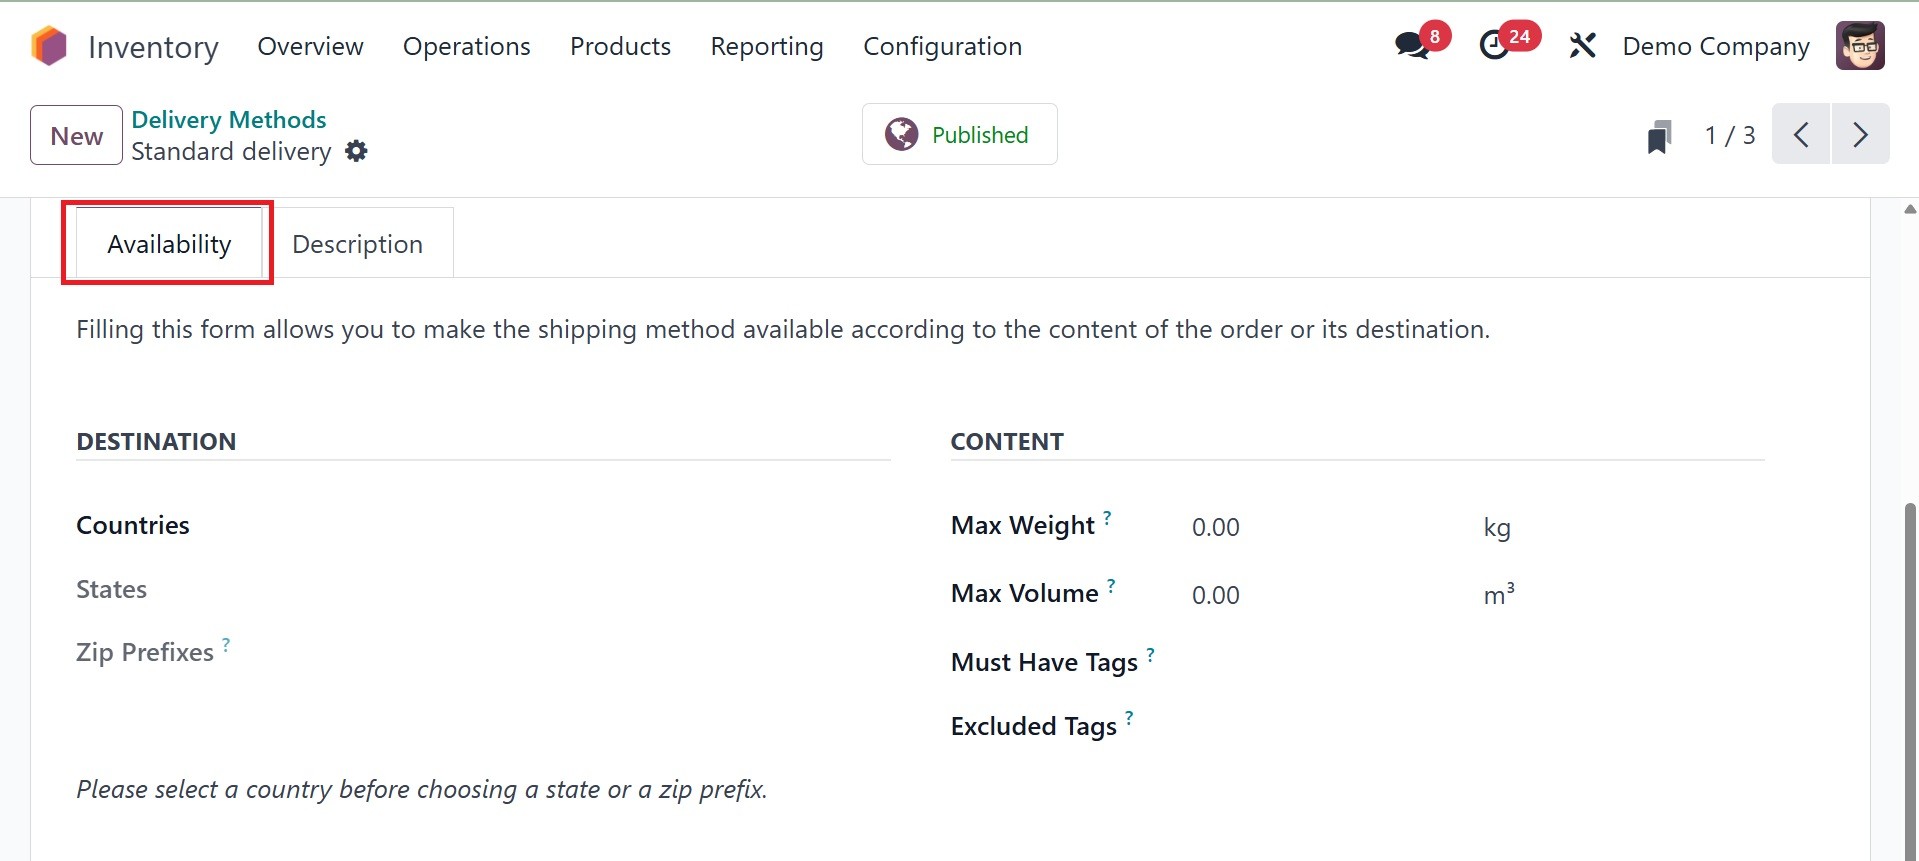
In the Availability tab, you can
define the destinations where
this shipping method is
available. Under destination,
you can add the countries,
states, and zip prefixes. And
in the contents tab, you can
add the max weight, max
volume, must have tags, and
excluded tags, respectively.
An automated confirmation email
and SMS can be sent to the
consumer once the delivery
orders are completed. Under
the Settings menu of the Odoo
18 Inventory module, you can
enable the Email Confirmation
and SMS Confirmation options.
You will have a specific
section where you can define
the SMS Template, which is
the default SMS template.
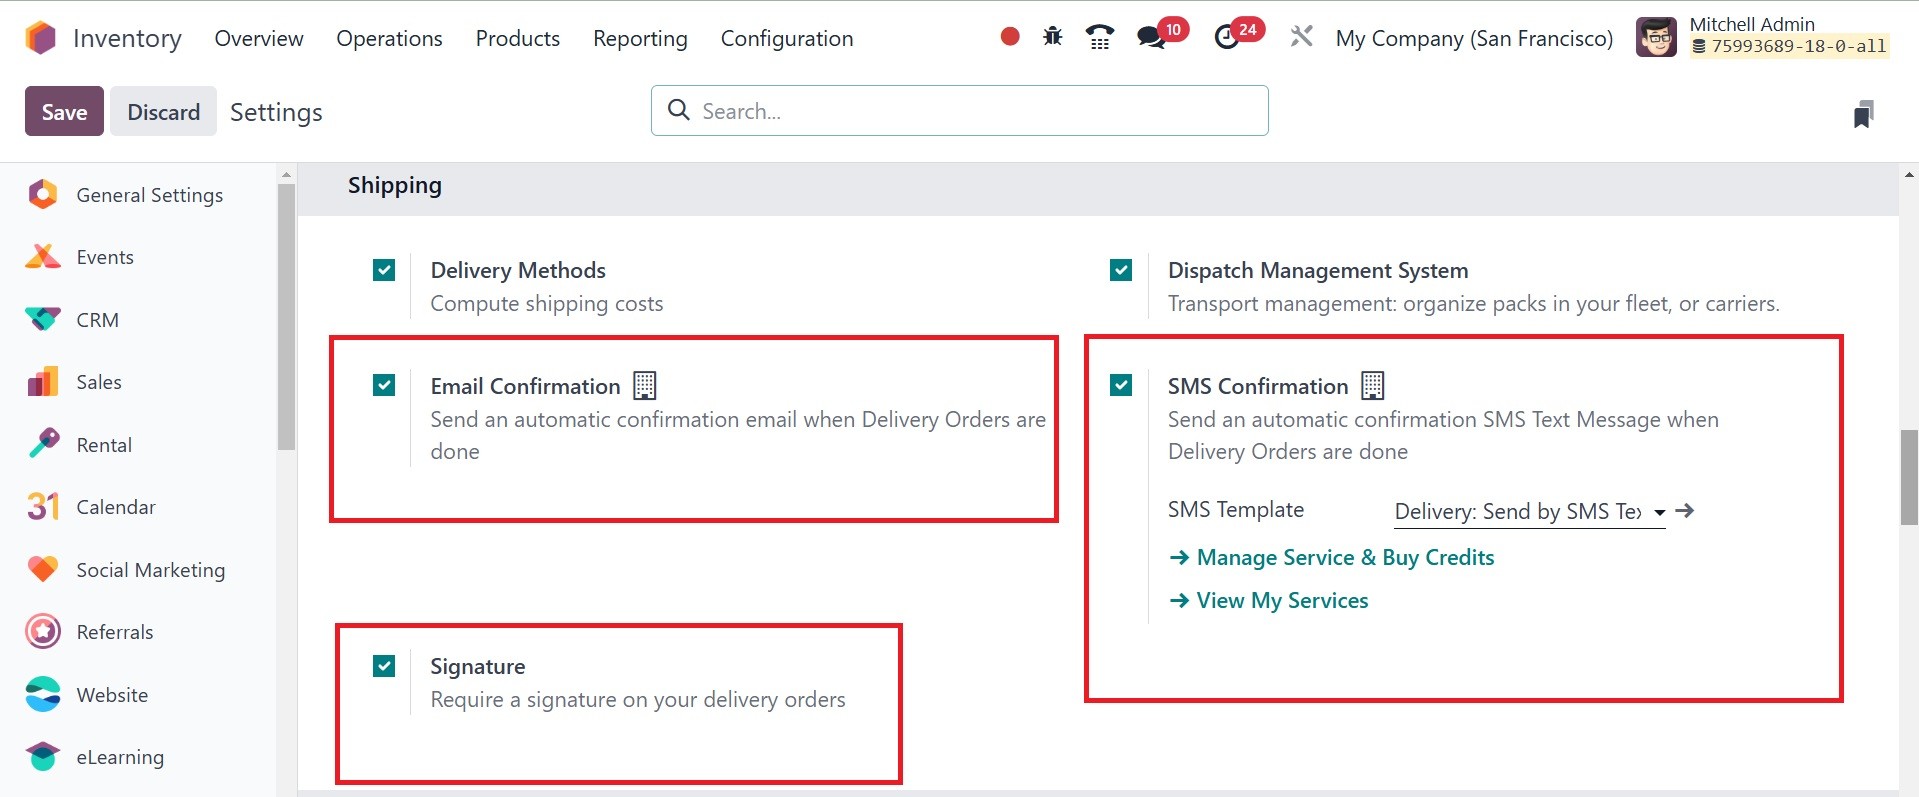
To confirm delivery, you can
request the customer's
signature. To provide the
ability to sign on delivery
confirmation, turn on the
Signature option in the
Shipping tab. There is a Sign
option in the Validated
Delivery Order when this
feature is turned on. The
customer is able to sign and
confirm the delivery using
this button.
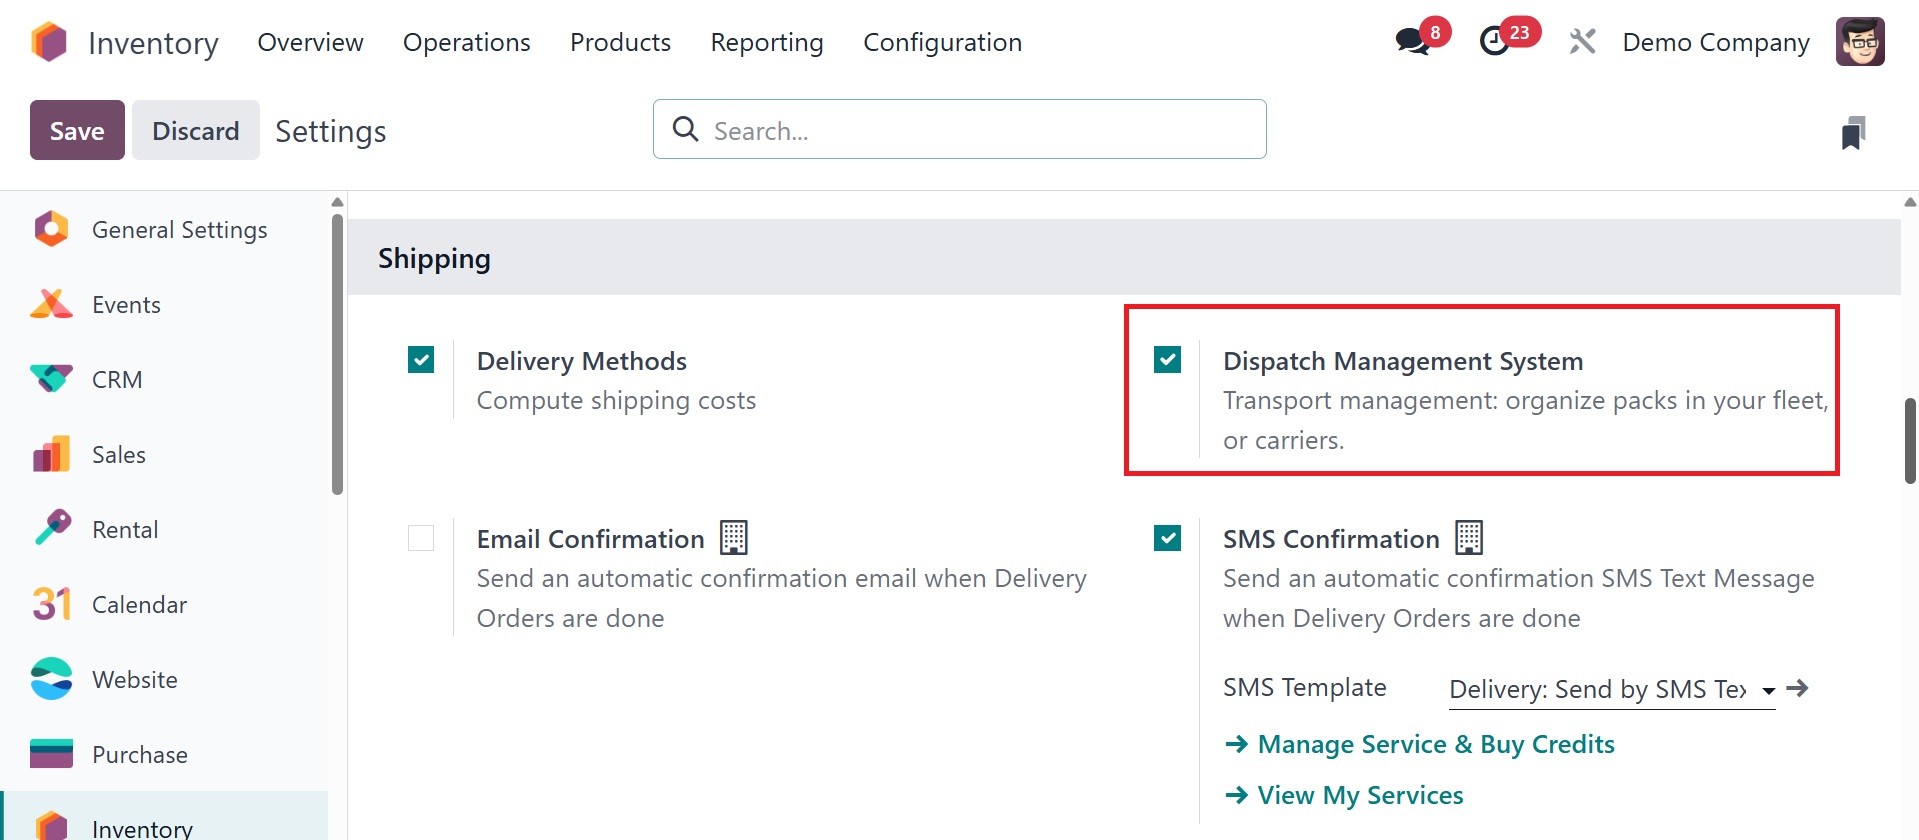
Now, you have the dispatch
management system, which
organizes packs in your
fleet, or carriers, as in the
image below. Odoo Inventory's
Dispatch Management System
assists companies in managing
order fulfillment, shipment
processing, and stock
movements effectively. It
guarantees that products are
dispatched correctly and
within time, minimizing
errors and enhancing customer
satisfaction.
By guaranteeing precise and
on-time delivery, Odoo's
dispatch management system
expedites order fulfillment,
lowers manual labor, and
raises customer happiness.
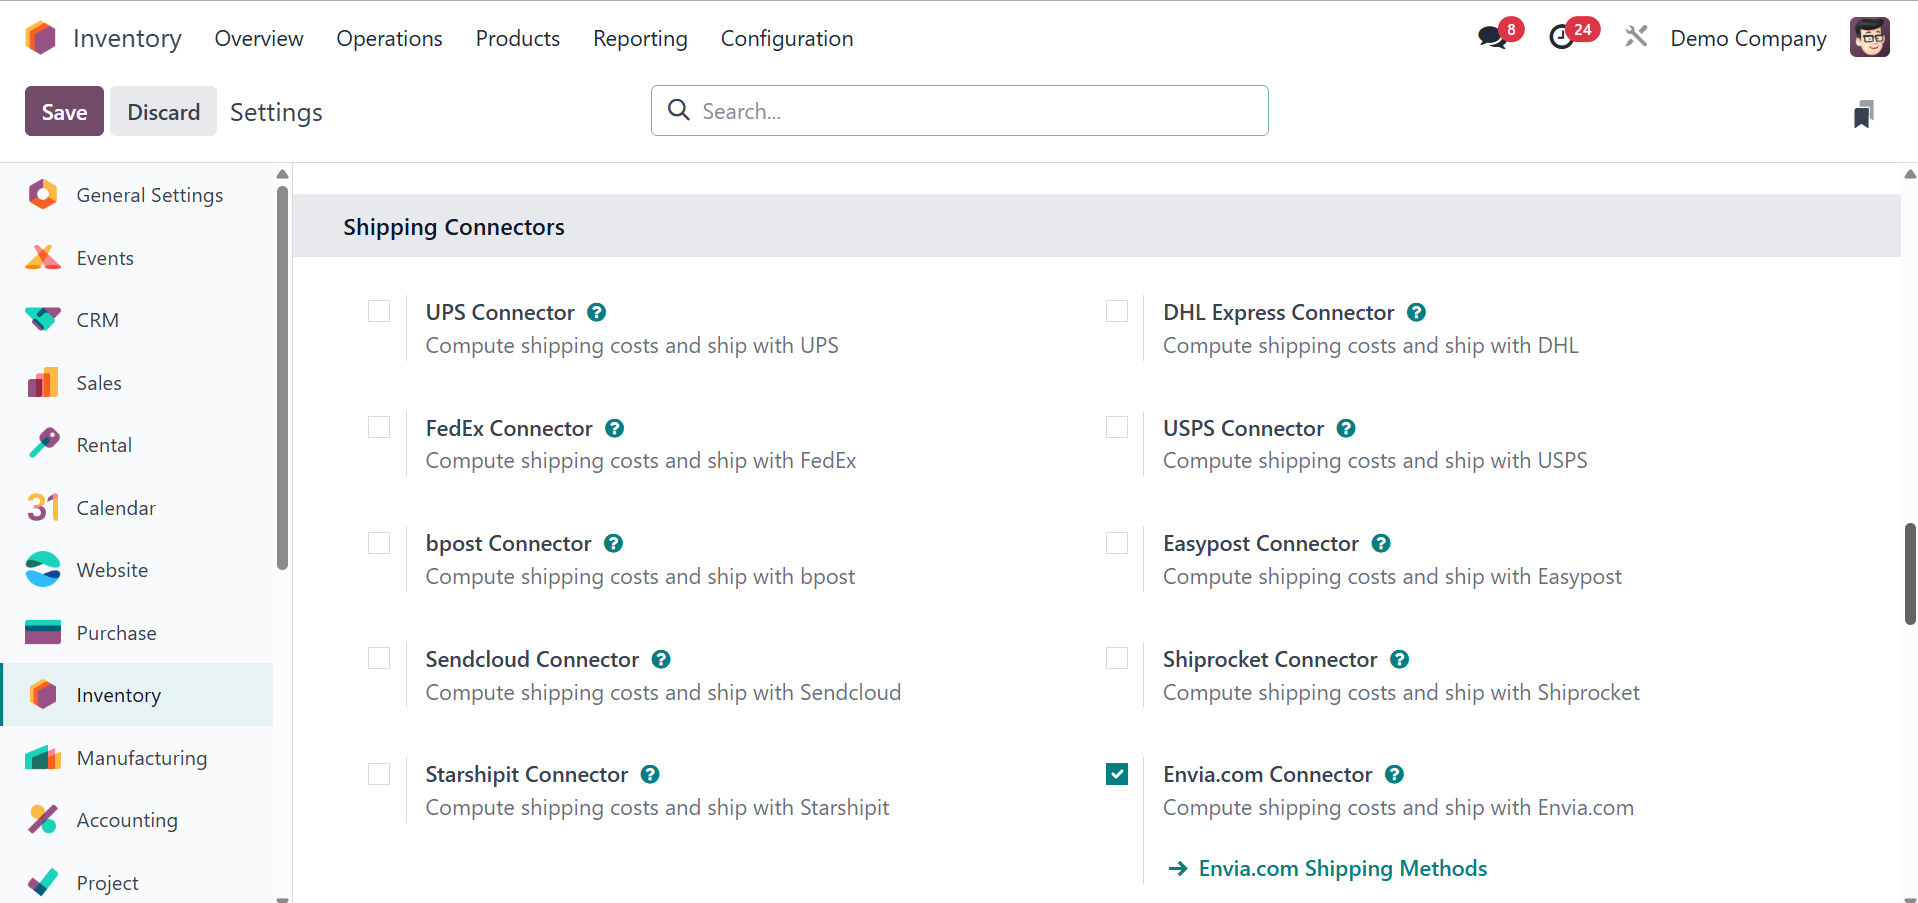
The next option is shipping
connectors, as in the image
below.
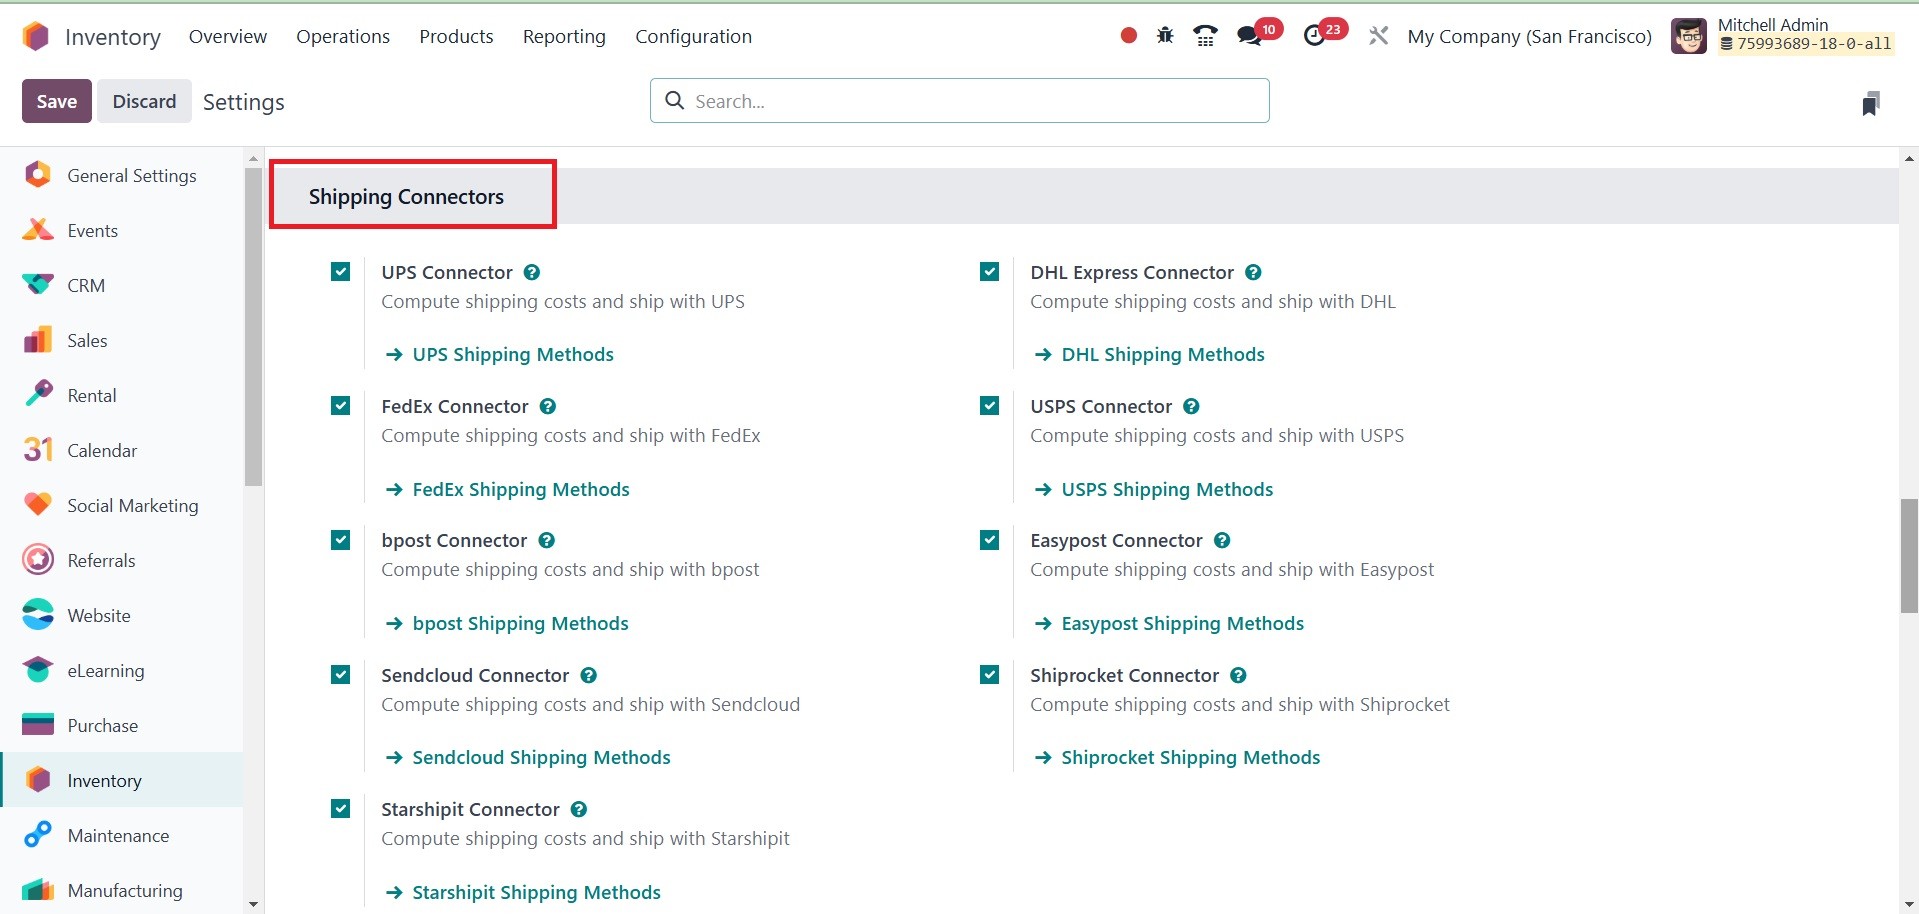
Odoo 18 can handle multiple
delivery modes, such as
external carriers. The
transportation sector's
tracking system can be
connected to Odoo. You'll
have control over the
transportation agency, the
true cost, and the ultimate
destination.
From the settings, the shipping
connectors can be configured
for the system. Then, as
before, choose the
distribution method from the
Configuration menu to
configure it. The routes of
delivery for the chosen
shippers have been
automatically generated
already. The same service
will normally provide two
methods of delivery: one for
home shipping and the other
for overseas shipping.
There are different types of
connectors, such as
UPS : Supports UPS services
including Next Day, 2nd Day
Air, Ground, etc., with
automatic rate fetching.
FedEx : Connects with FedEx to
handle express, ground, and
freight shipping, including
tracking.
Bpost: Integrates with Belgium's
national postal service.
Sendcloud: European-focused
shipping platform connecting
multiple carriers for
eCommerce businesses.
Starshipit: Compute shipping
costs and ship with
Starshipit
DHL: Integrates with DHL for
international and domestic
shipping with real-time rates
and label printing.
USPS: U.S. Postal Service
connector for domestic and
international mail services.
Easypost: Aggregator service that
provides access to multiple
carriers (UPS, FedEx, USPS,
DHL, etc.) via one
integration.
Shiprocket: Compute shipping
costs and ship with
Shiprocket.
The next option in settings is,
product, as in the screenshot
below.
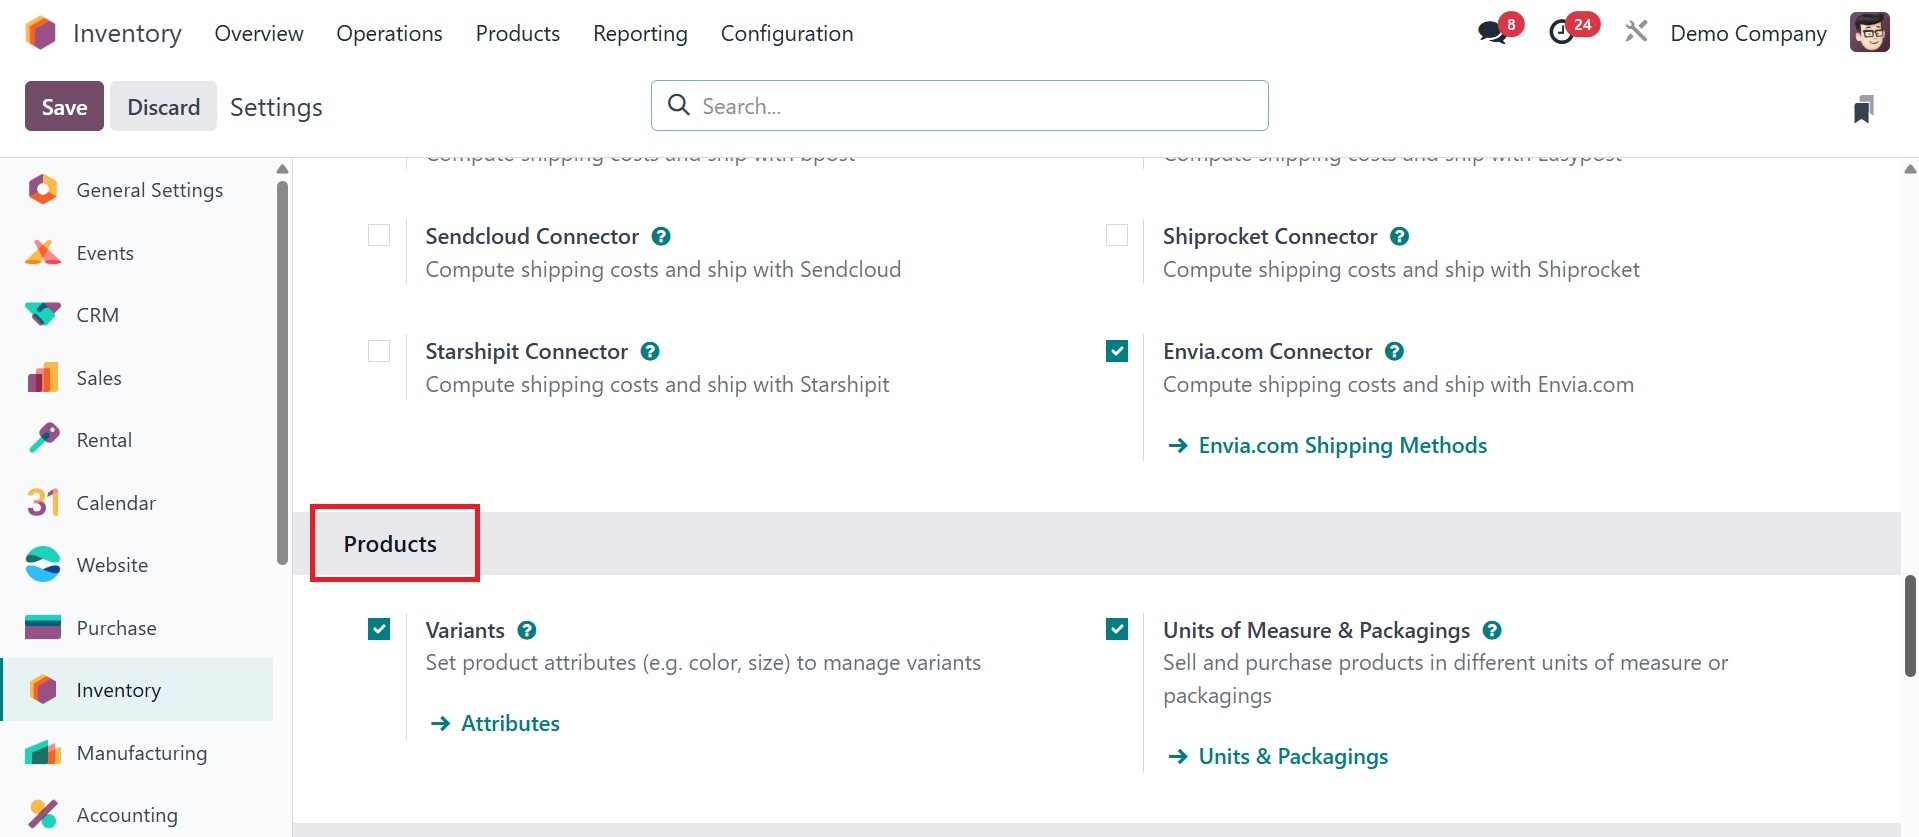
Under the products option, there
are variants, units of
measure, and product
packaging, respectively.
Offering customers a variety
of product options is a smart
strategy to boost sales.
Odoo18 allows you to
configure several product
versions in the Inventory
module, just like we did in
the Sales and Purchase
module. You can test the
Product Variants feature from
the Products menu of the
Inventory module. The product
variation is the same as the
one we've just discussed in
the above section.
The Variants list established in
the Inventory module is
illustrated in the window
below. The window and the
product window are similar.
The only difference is that
you can now see the Variant
Values of the associated
goods.
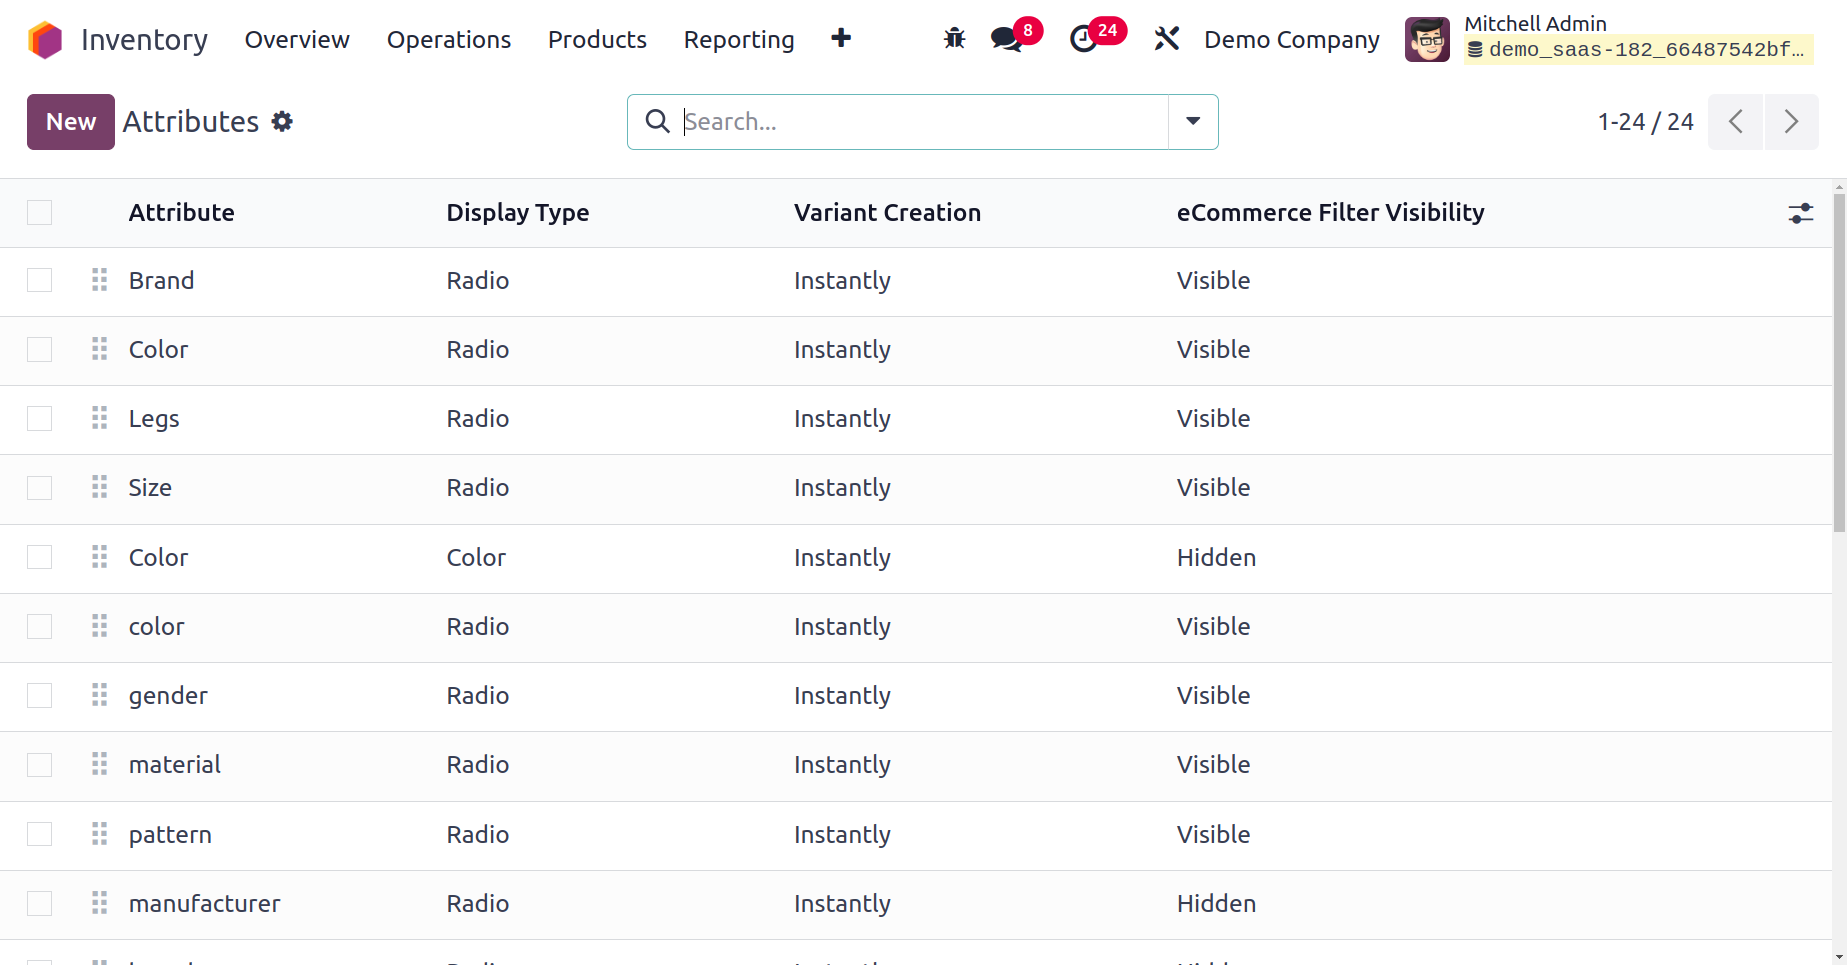
The list of pre configured
attributes will be available
on the settings itself. To
create a new one, go for the
configuration menu, which
provides the option of
attributes, as in the
screenshot below.
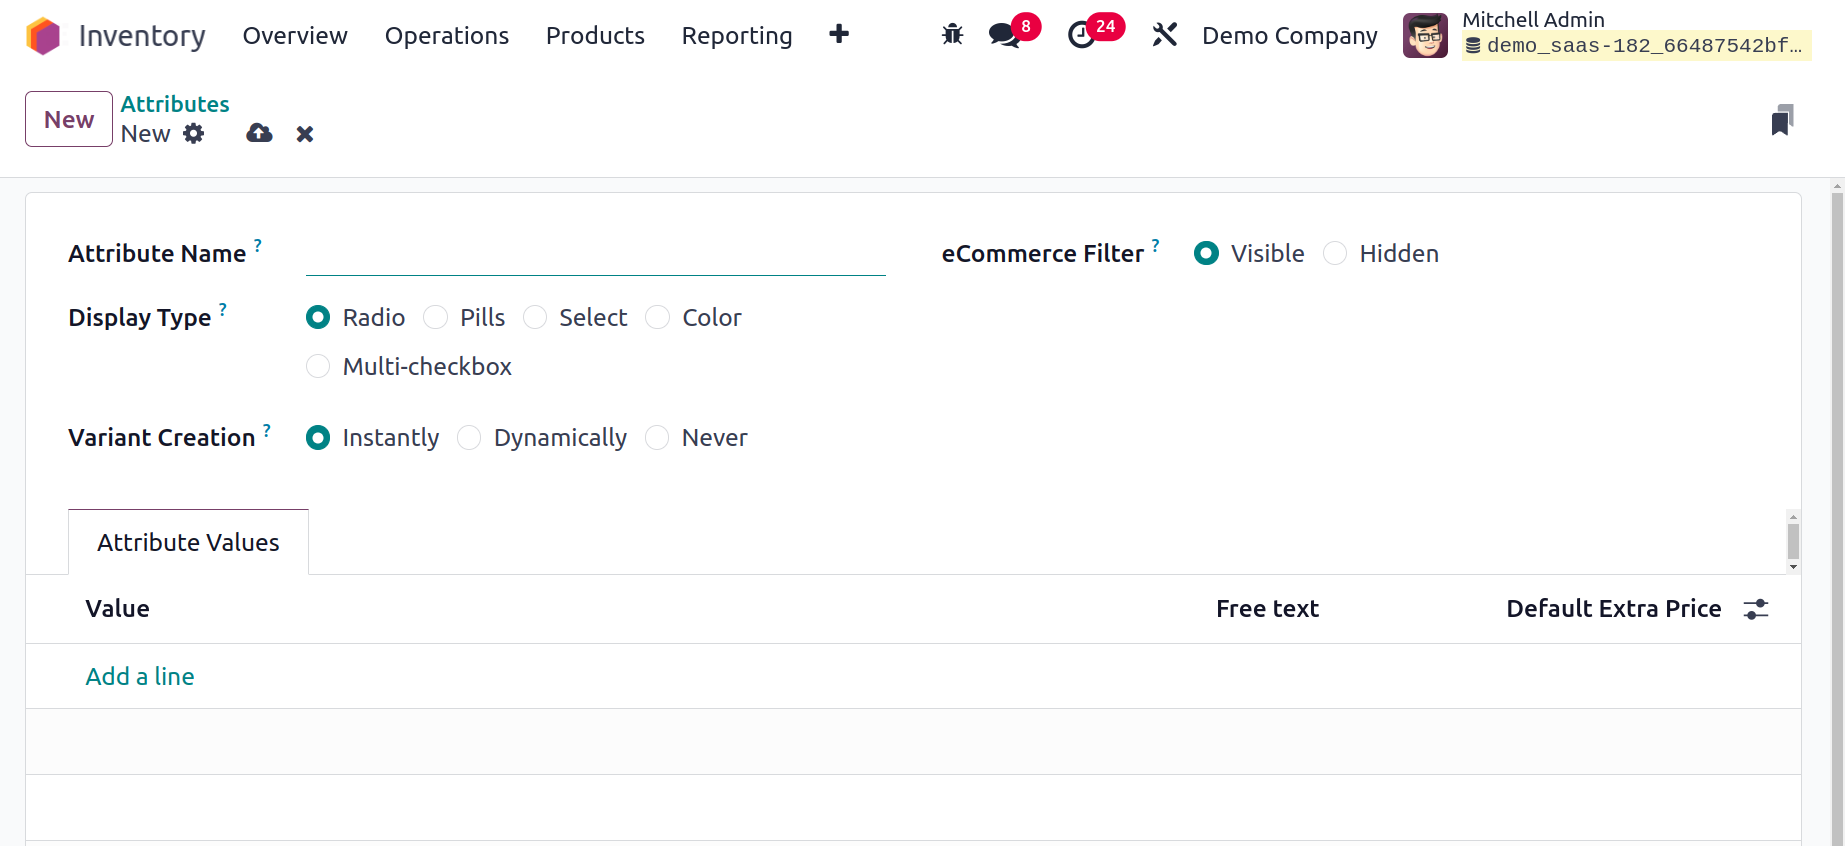
The Attribute Name field lets you
define the proper title of
the attribute. Place similar
attributes within the same
section on the eCommerce
comparison page by assigning
a category in the Category
field. A product configurator
attribute's Display Type can
be modified to Radio, Pills,
Select, Colour, or
Multi-checkbox (option). Odoo
18 introduced a new feature
named multi-checkbox.

The next option is, Units of
measure & Packaging, as in
the above image. We can now
classify units and facilitate
unit conversions thanks to
Odoo's Unit of Measure
Category functionality. It
sells and purchases products
in different units of measure
or packaging.
To obtain this Unit of Measure
Category, select the
Configuration tab. The
configuration tab has a unit
of measure category option.
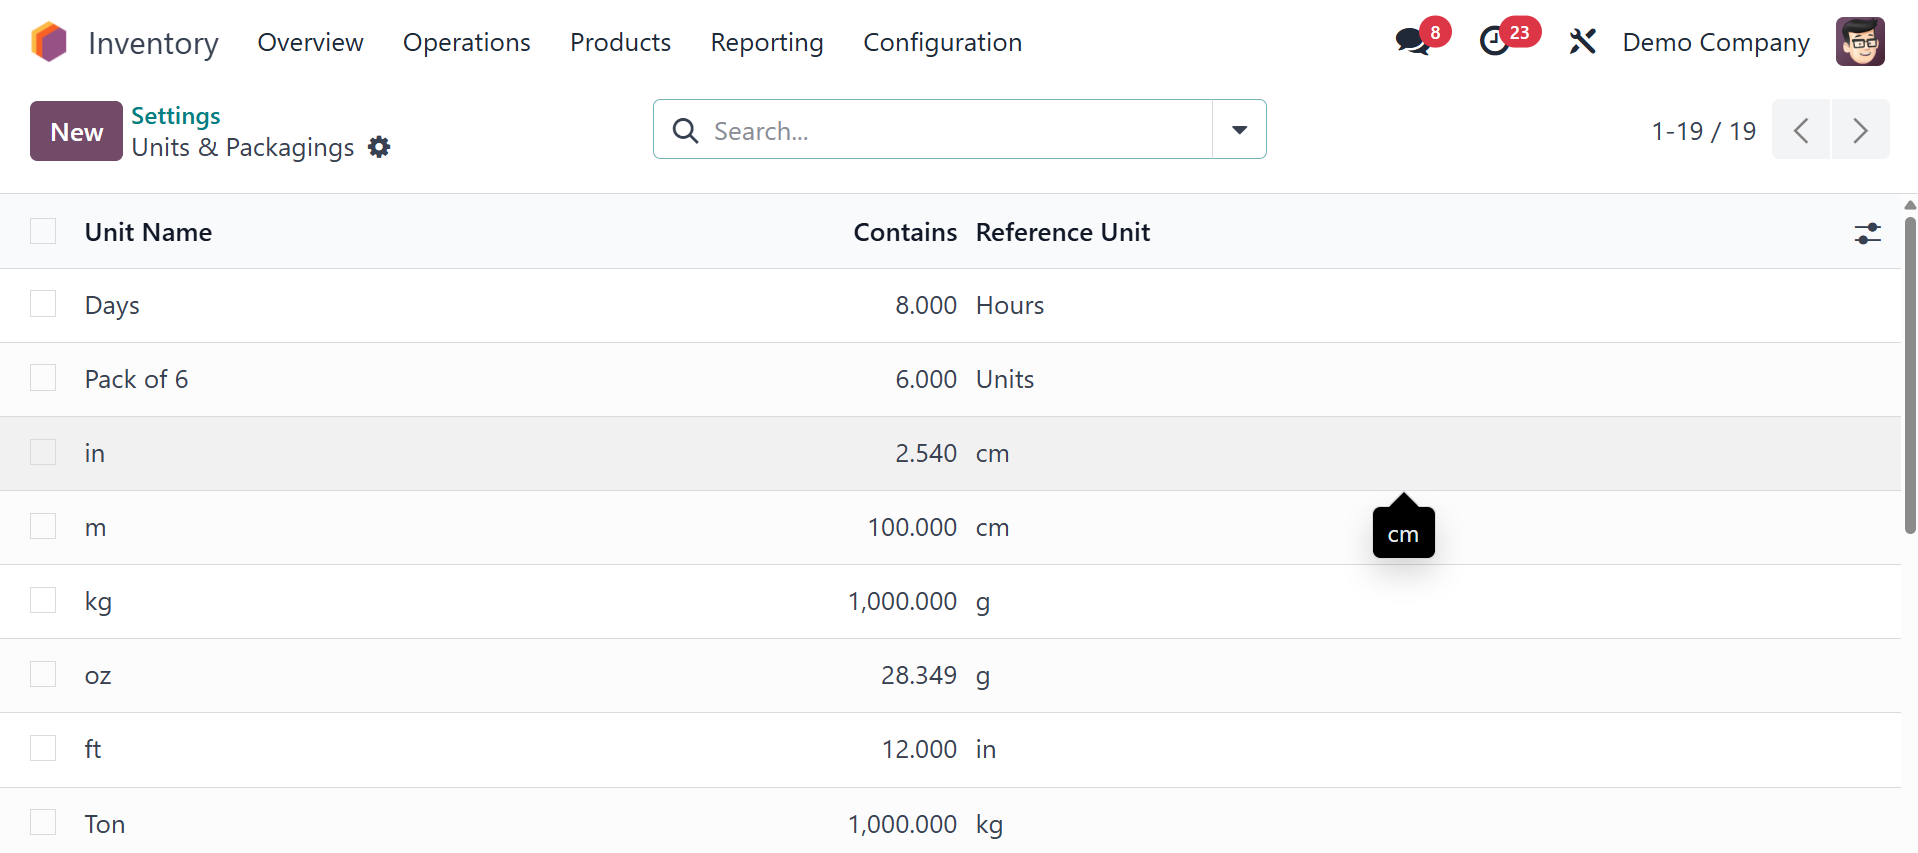
When we select that option, we
can view all the units and
packaging that have been
made. This shows all the
respective units made under
that category. Here, you will
get the list of unit name and
it shows the contains, and
reference units, repectively.
To make a new units, click on
the New button.
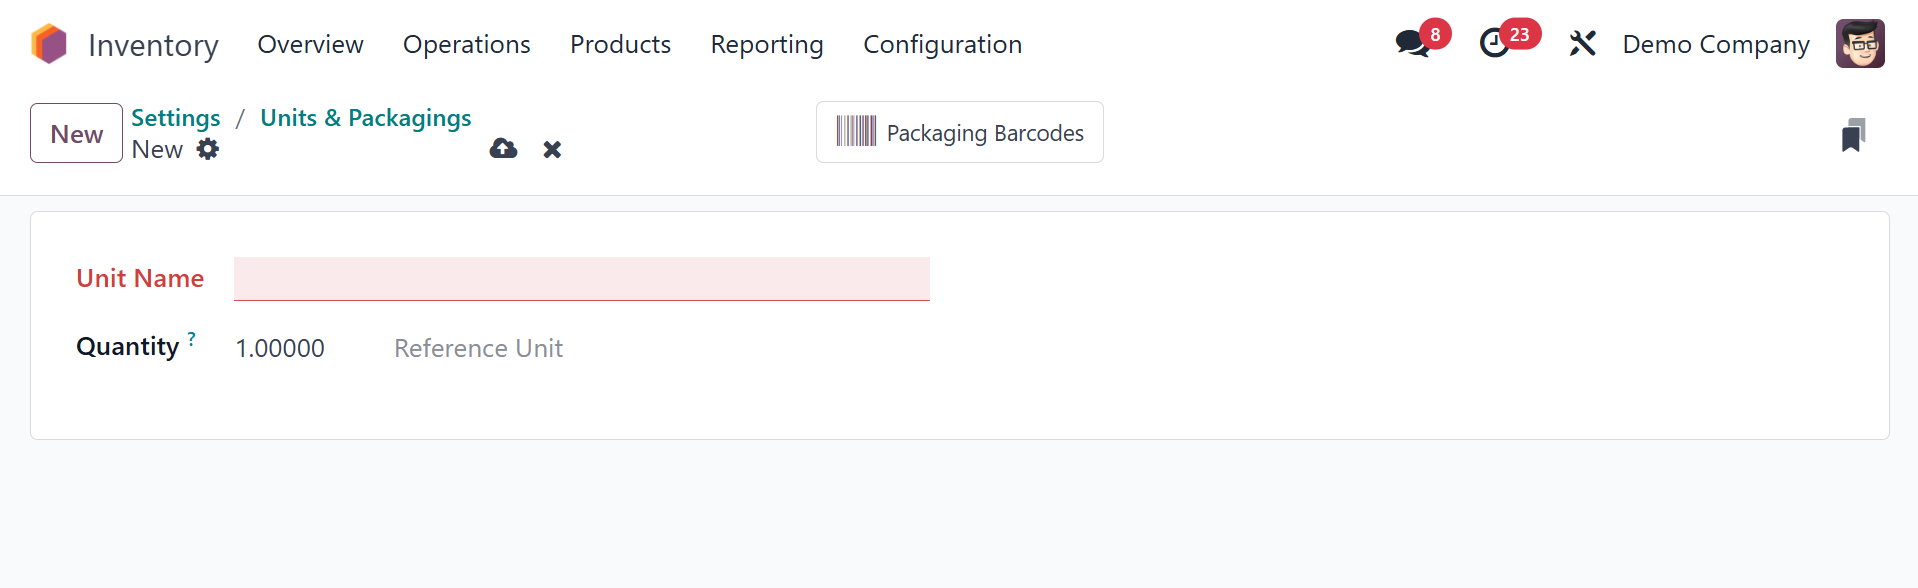
We need to provide the name of
the unit, and quantity while
defining a new one. We can
add all the units of measures
contained in this category
under the unit of measure
tab, as in the image below.
Choose Add a Line to add a
new one. It is necessary to
specify the Unit of Measure,
Type, Ratio, active, and
Rounding Precision when
introducing a new unit of
measurement.
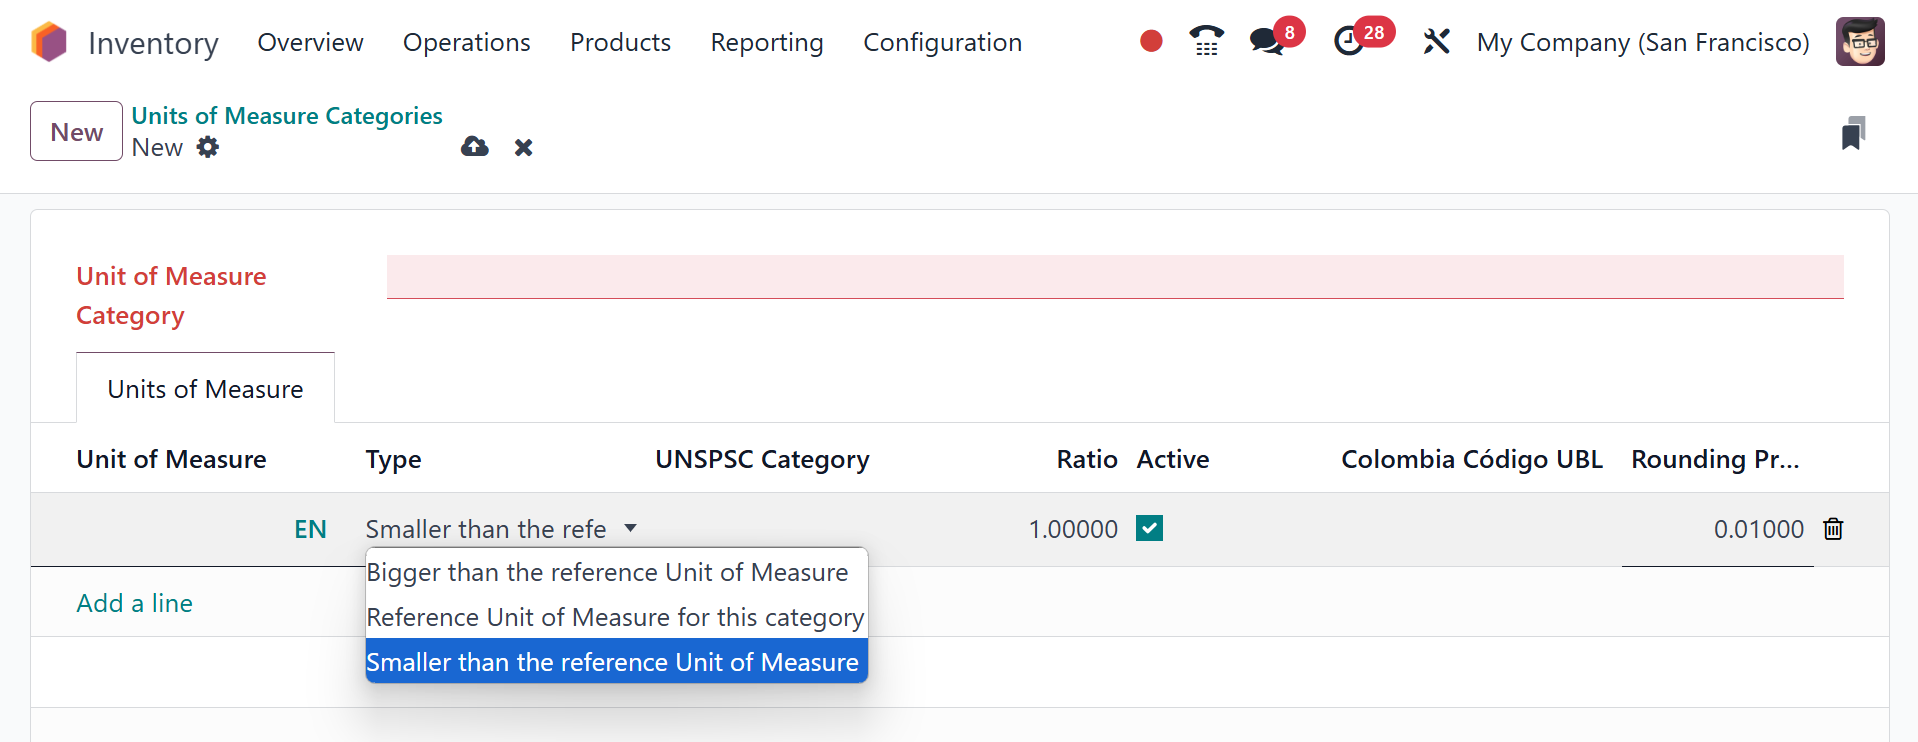
There are three types of
references. One is a
Reference Unit of measure for
the category, another Smaller
than the reference Unit of
measure than the reference
unit, and the third is Larger
than the reference Unit of
measure. Choose the correct
one from the drop-down list.
In the ratio field, we have
to enter the ratio of the
specified unit of measure to
the specified reference unit.
Units have been established as
the reference unit, and we
have placed a bigger Bunch
than the reference unit.
Click the Save button to save
the changes after adding
details.
The list of unit of measure
categories includes the
recently added unit of
measure.
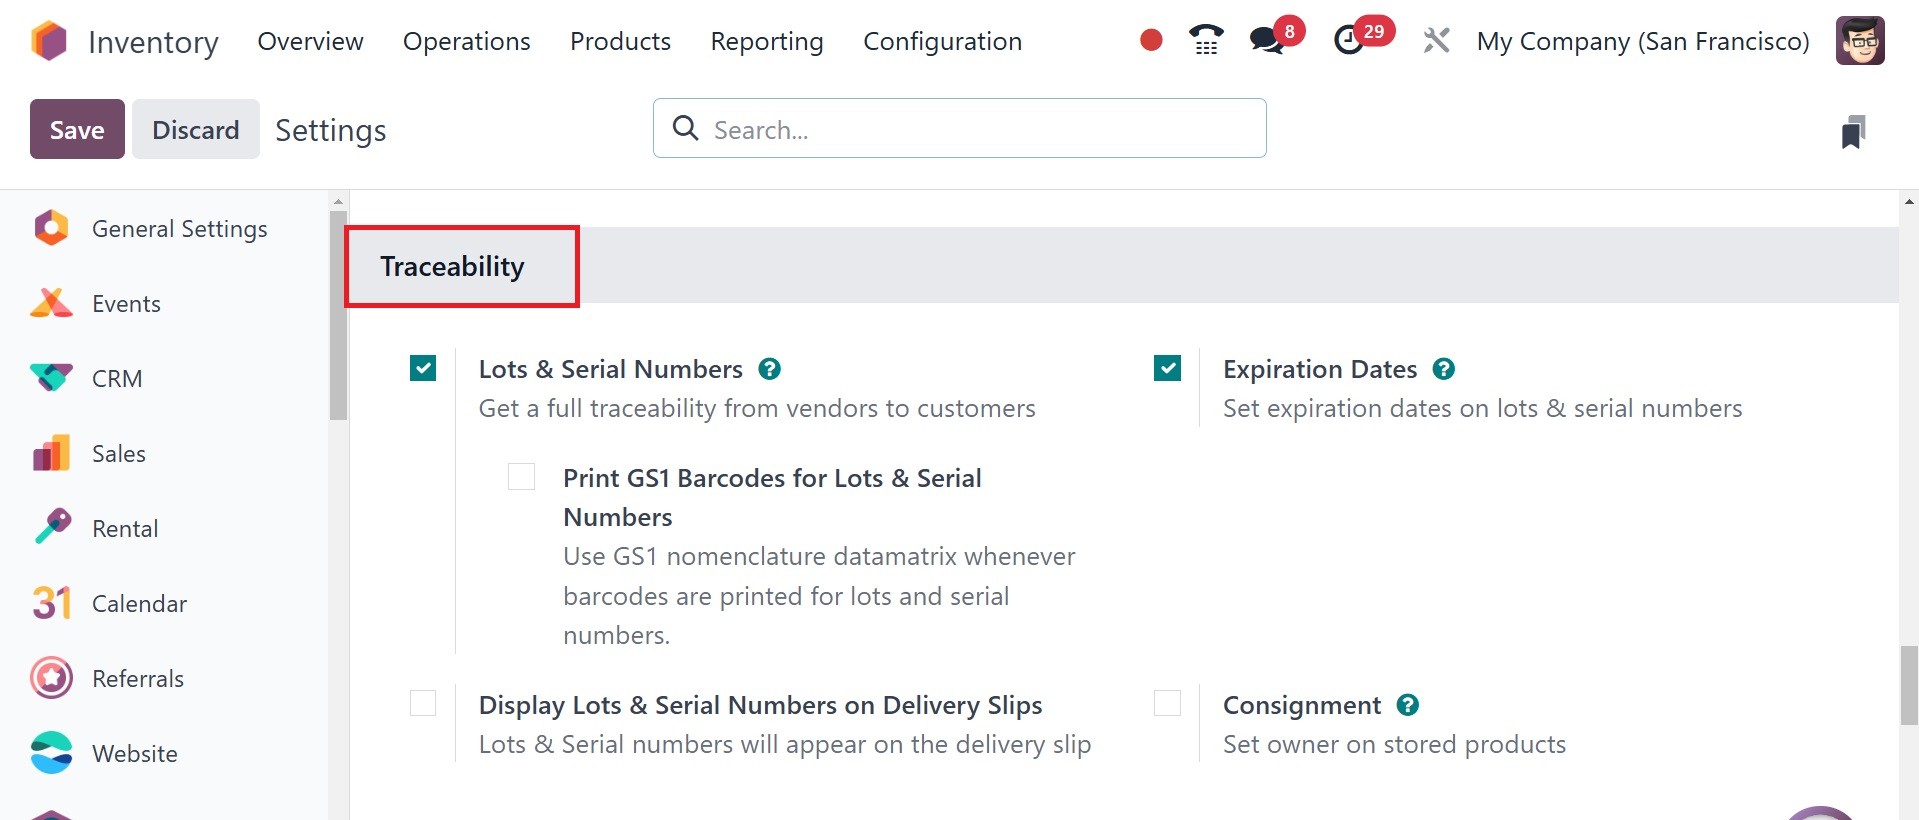
Traceability is the next option
under the settings icon.
While managing their inventory,
we allocate product lots and
serial numbers. While setting
up the products in the
Inventory module, you can
allocate lots and serial
numbers to them so that you
can maintain the traceability
report of the concerned
products later on easily.
This traceability feature is
backed by the inventory
management features offered
by Odoo 18 to facilitate
effective tracking
operations. You need to turn
on the Lots & Serial Numbers
option in the Settings menu
to have full access to all
traceability features in the
Inventory module.
Lots and serial numbers option is
the one in the tab, as shown
in the above image, this
capability will be available
under the Traceability tab.
After you enable this
feature, the Lots/Serial
Numbers option will appear
under the Products menu.
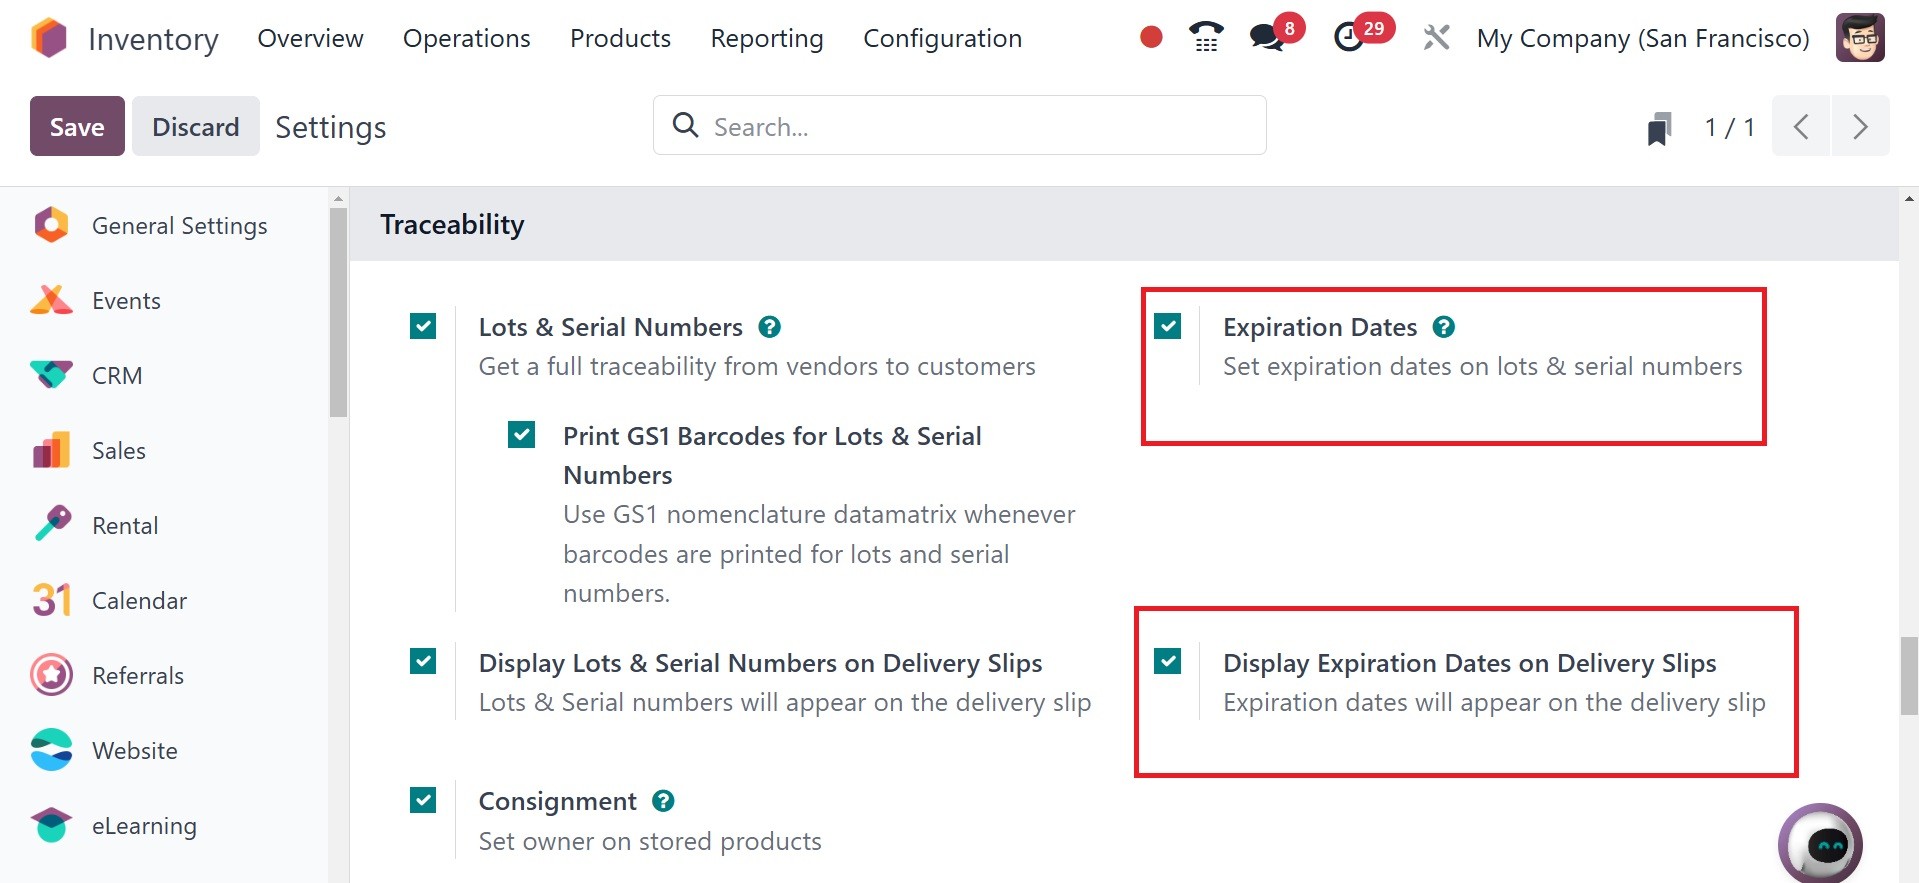
Next one is the Expiration Dates,
as in the image below.
Applying expiration dates on the
consumable or storable
products in your stock is a
critical task. On each
product, you should
definitely mention the
expiration date so that the
consumer knows for how long
the product is safe to use.
Odoo18 manages product
expiration dates through the
features based on lots and
serial numbers. From the
Settings menu of the
Inventory module, you can
enable this functionality.
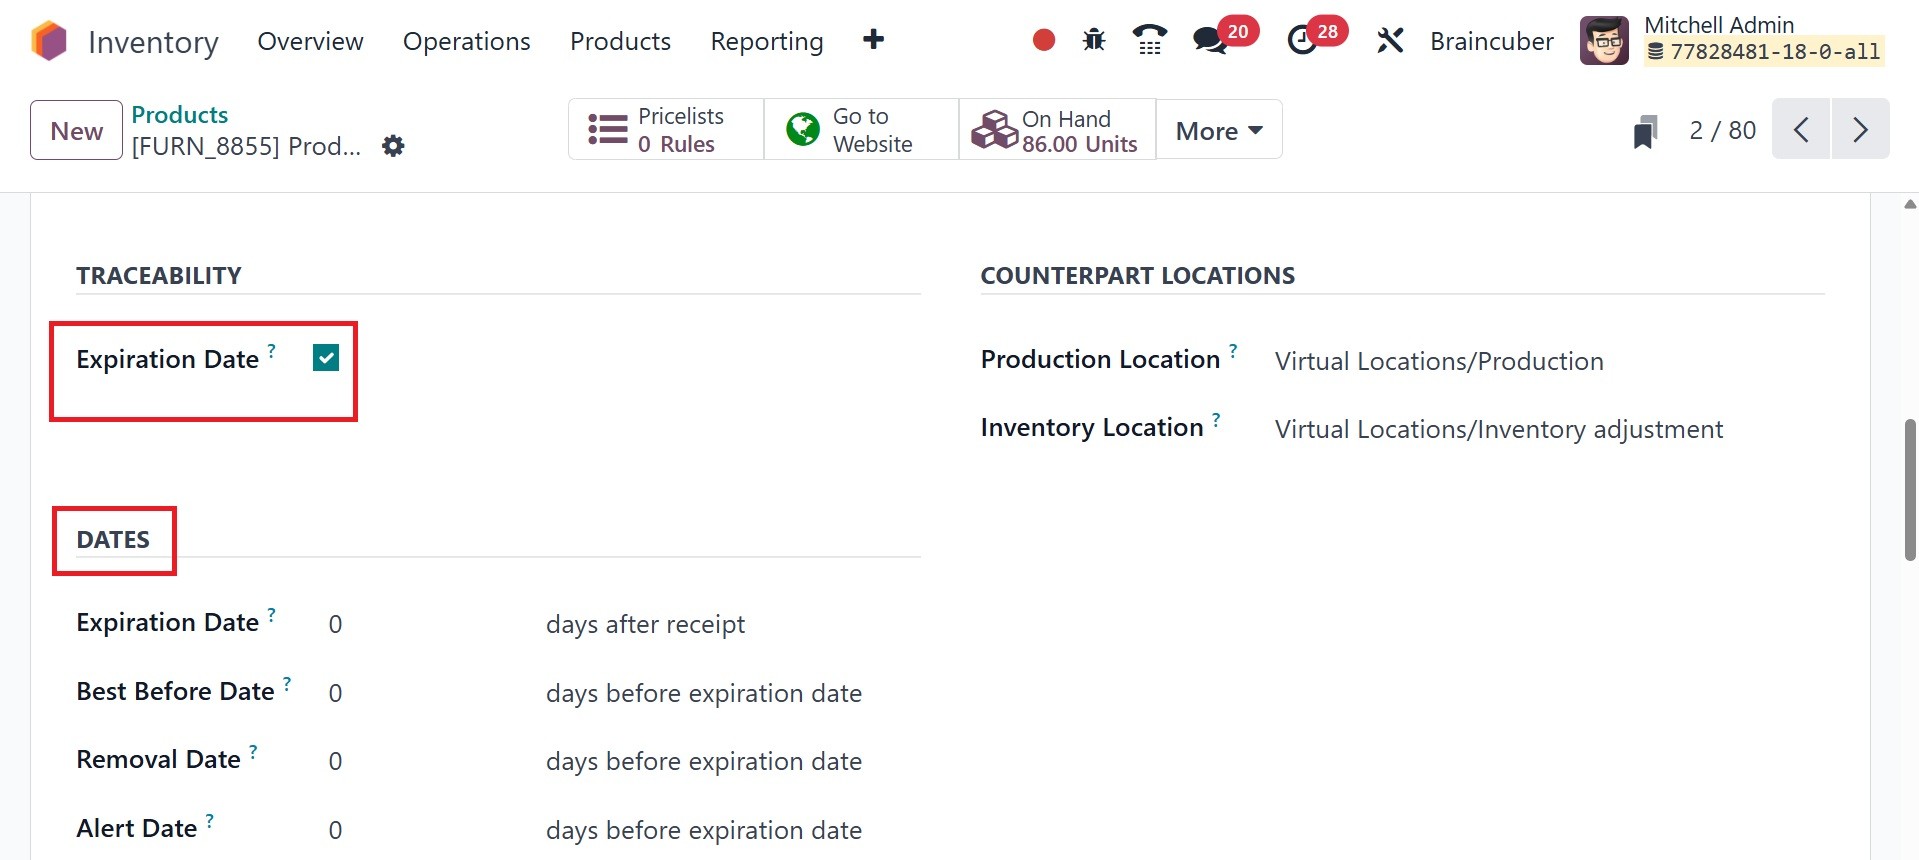
You can enable the Expiration
Dates option in the
Traceability menu.
Furthermore, the expiration
dates may also be displayed
on the delivery slips by
enabling the option to show
them there. In the "DATES"
section, you will see fields
to enter various expiration
dates, such as "Expiration
Date," "Best Before Date,"
"Removal Date," and "Alert
Date."
Expiration dates indicate the
amount of time after an item
is manufactured or purchased
from a seller before it
becomes harmful or unwanted.
Best Before Date: Even in cases
where there isn't a
significant risk, the term
"Best Before Date" describes
the window of time before a
product's expiration date
when it starts to
deteriorate.
Removal Dates: This indicates how
many days it will be before
the products are taken out of
stock.
Alert Date: Products in a given
lot or serial number should
get an alert a certain number
of days prior to the
expiration date.
Now, on activating the display
lots and serial number on
delivery slips, it will
appear on the delivery slip
as well.
The consignment option is the
next one, as in the image
below.
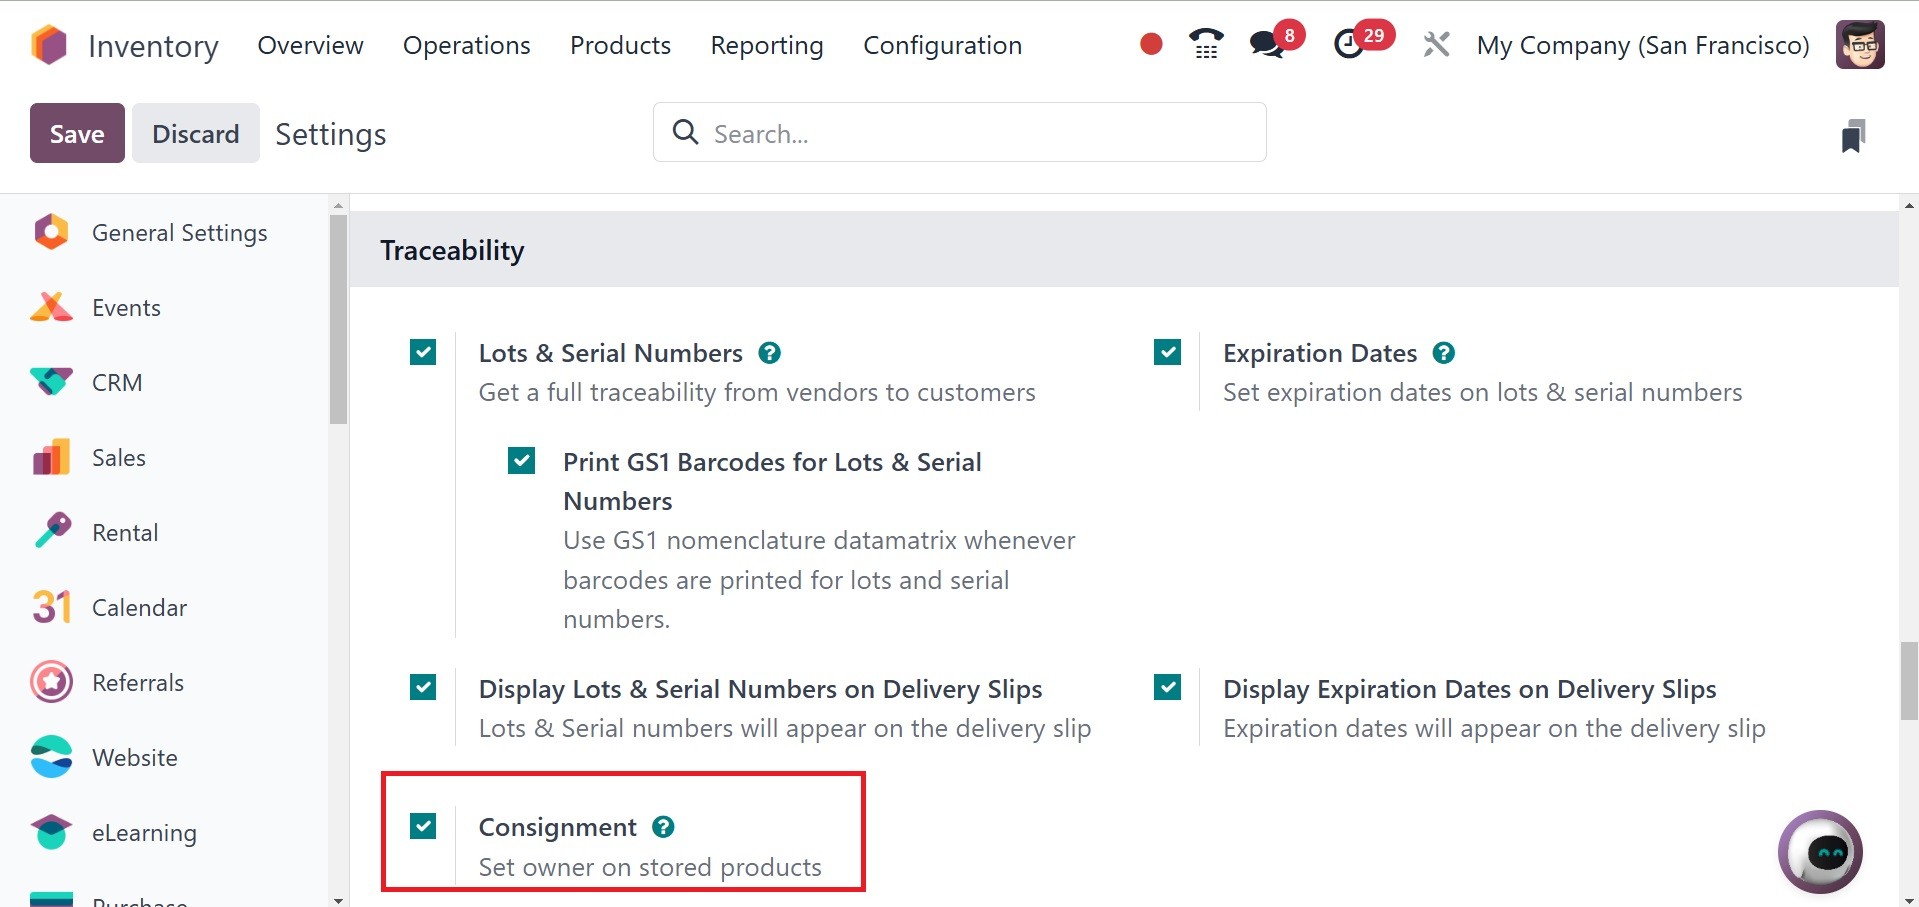
You can specify the owner of
consigned products in your
stock using the Consignment
feature under the Settings
menu. While the shop will be
selling the product, the
supplier will actually own
the product until a customer
buys it. This approach allows
it to be easy to return
unused goods to the
suppliers. For consignment,
the retailers do not have to
keep an ongoing inventory.
You can activate the Consignment
feature in the Traceability
tab of the Settings module.
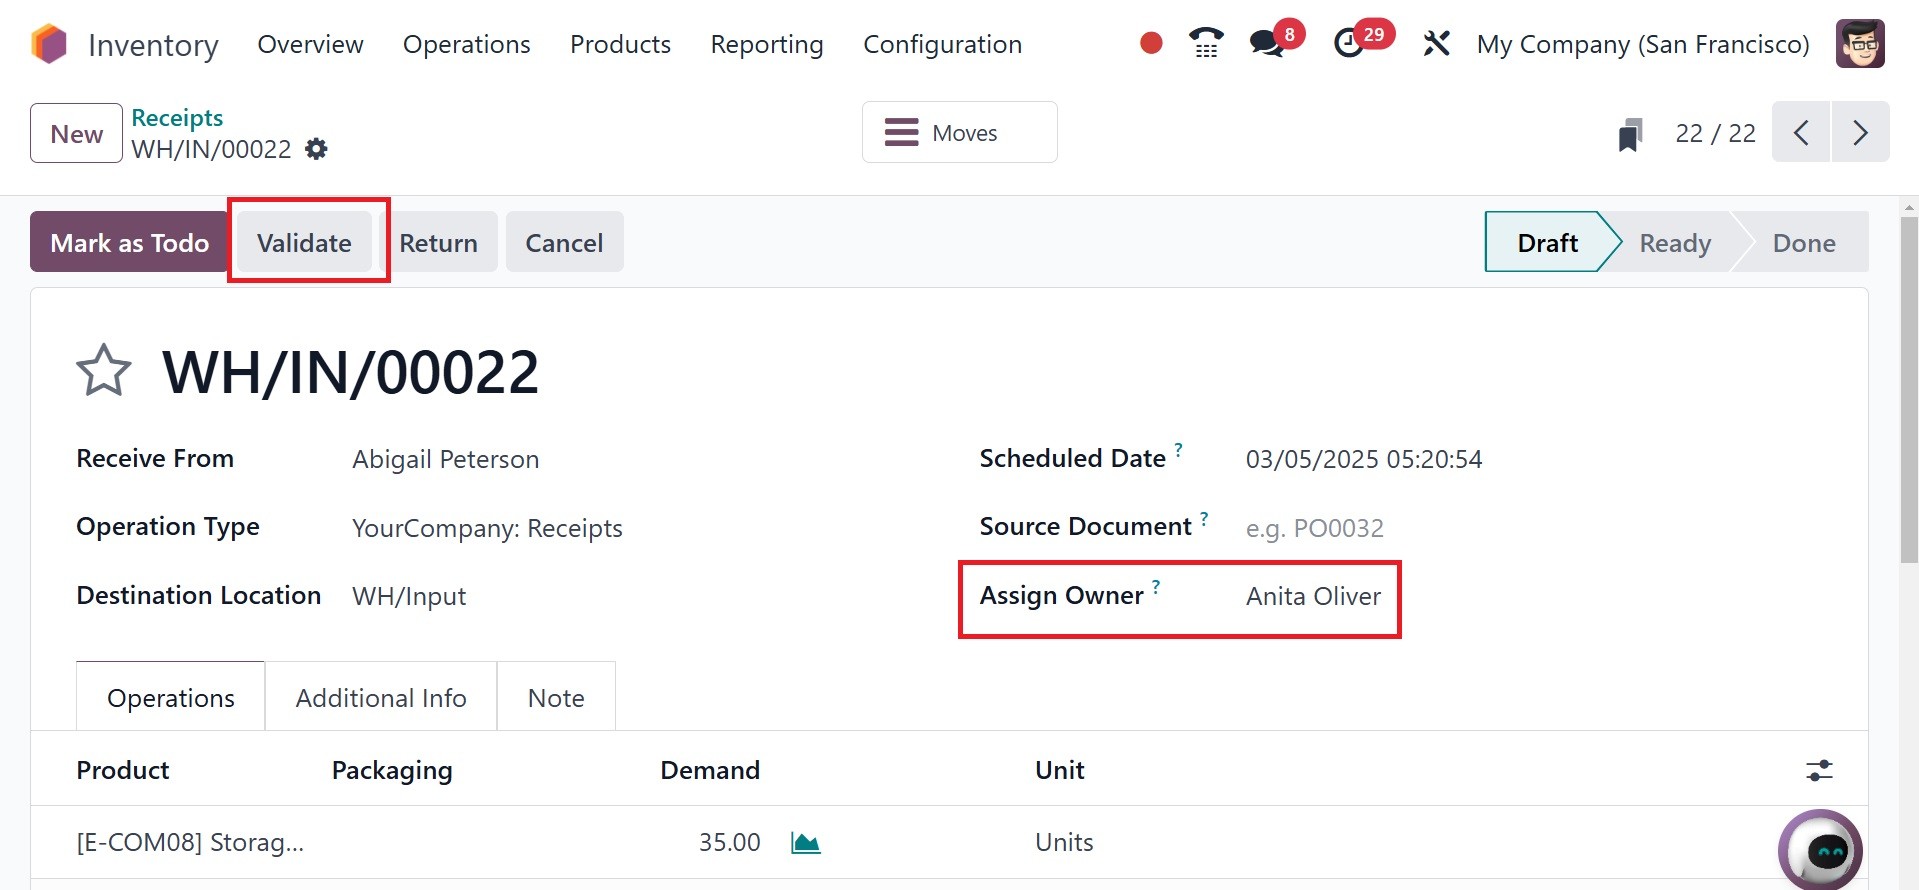
You can utilize this function
to assign an owner to each
item you receive when you put
it into your inventory. Let's
create a receipt for the
consigned stock and assign it
a new owner.
You may put the consignee's name
in the Assign Owner field
during receipt creation. With
the help of the Add a Line
button on the Operations
page, you may add the
consignment stock and its
units. In this case, Anita
Oliver is set as the
product's consignee. We
delivered 35 units of the
product to Anita Oliver.
Pressing the Validate button
is a choice. Customizable
Desk in 35 units has been
sent to Anita Oliver.
The Stock report under the
Reporting option indicates
that there are currently 78
quantities of the product
available.
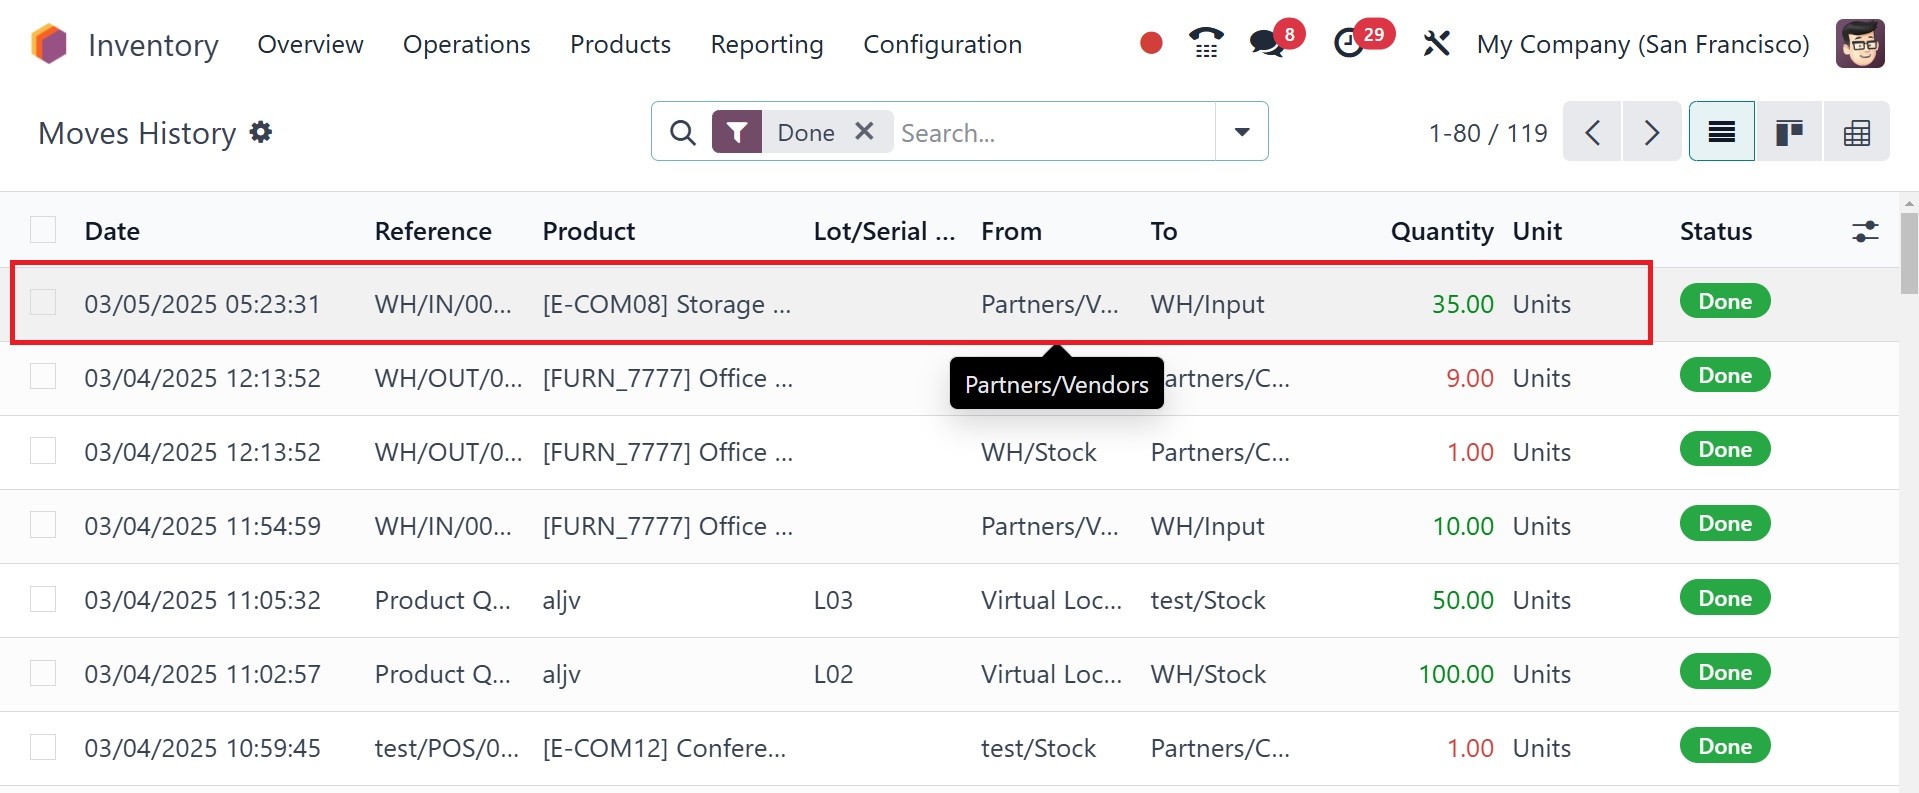
The History of Moves report and
consignment data can be
accessed in detail. We can
conclude from this data that
Anita Oliver is responsible
for the handling of 35 units
of the product. Odoo18
assigns owners to approved
products in this way.
The next option is Valuation, as
in the image below.
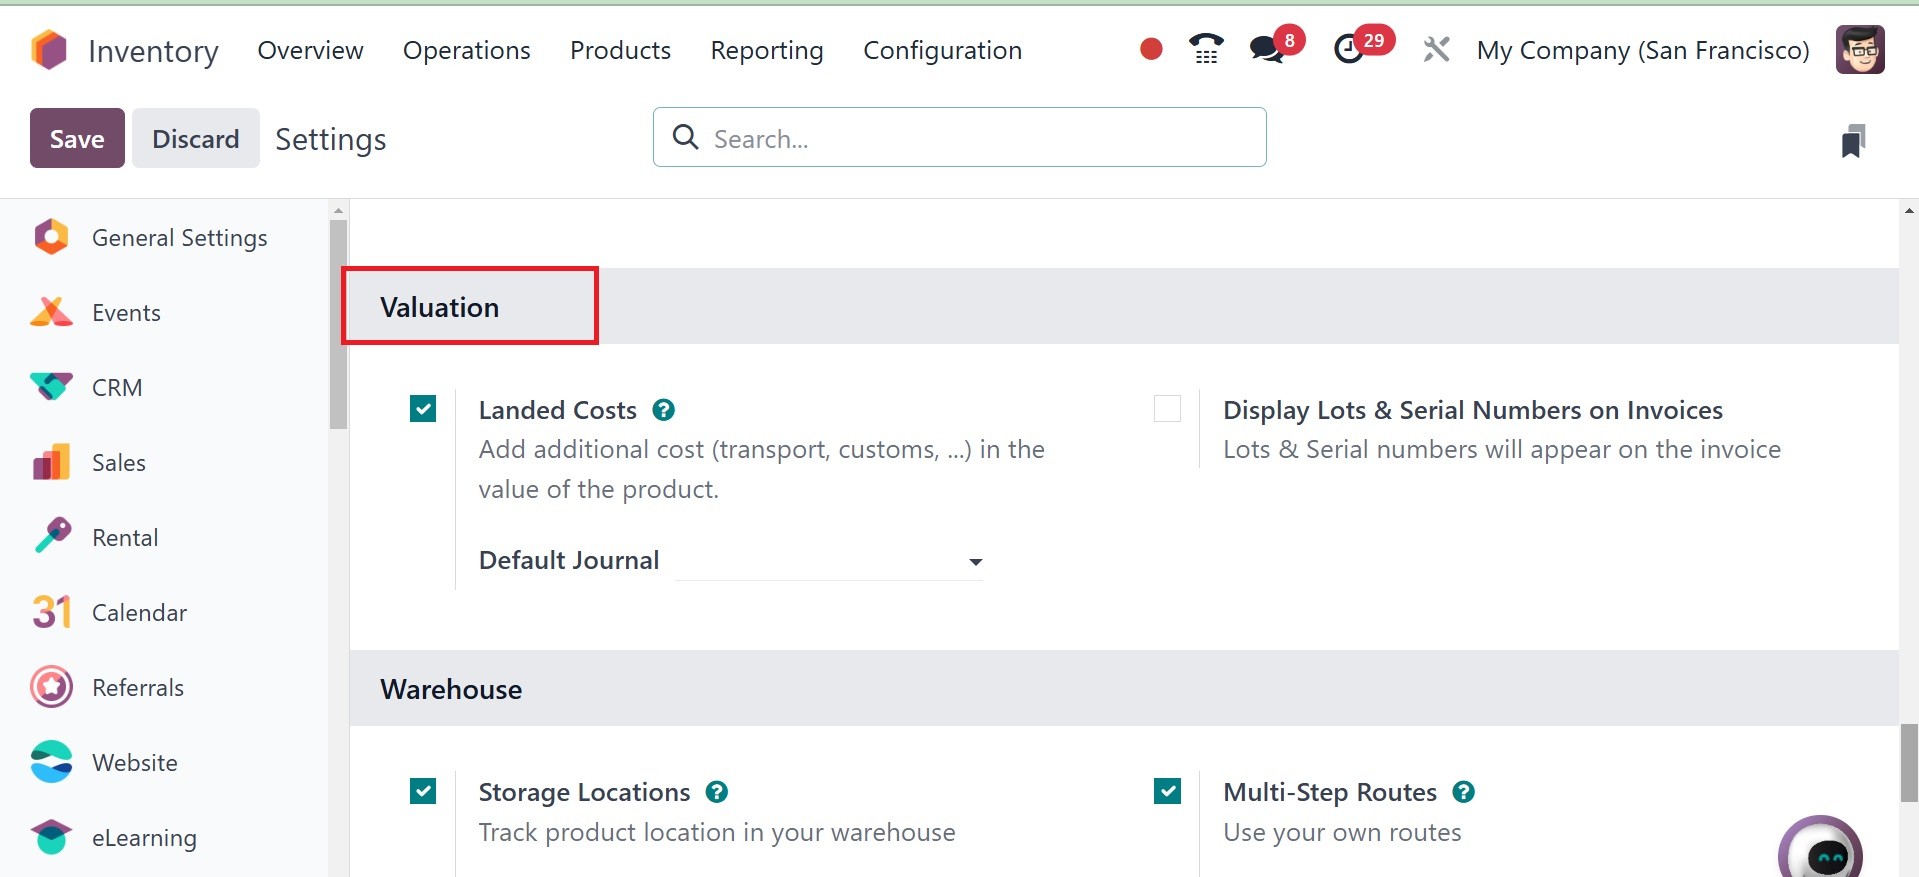
There is an option for landed
cost and display lots and
serial numbers on invoices.
The additional cost of a
product that the company must
pay at the moment of purchase
is known as the "Landed
Costs." This covers shipping,
handling fees, customs
tariffs, and many other
expenses. These extra
expenses are added to the
product's real price to
determine the selling price.
Different firms will use
different methods to
determine the landing cost
depending on their corporate
policy. You may determine the
landing cost and divide it
among each quantity of the
goods in the Odoo18 Inventory
module to update the selling
price.
By enabling this feature, you can
include personalized landing
charges in your products. You
can initially build a buy
order for a couple of
products belonging to the
same product groups and
validate the order so that
you can have a better idea of
how landed cost operates. For
products where an AVCO or
FIFO costing method is
configured, you can configure
landing costs. This is the
mandatory precursor to the
landed cost which you have to
factor in when you are
customizing it.
Display lots and serial numbers
on invoice option helps you
to display lots and serial
numbers on the invoice.
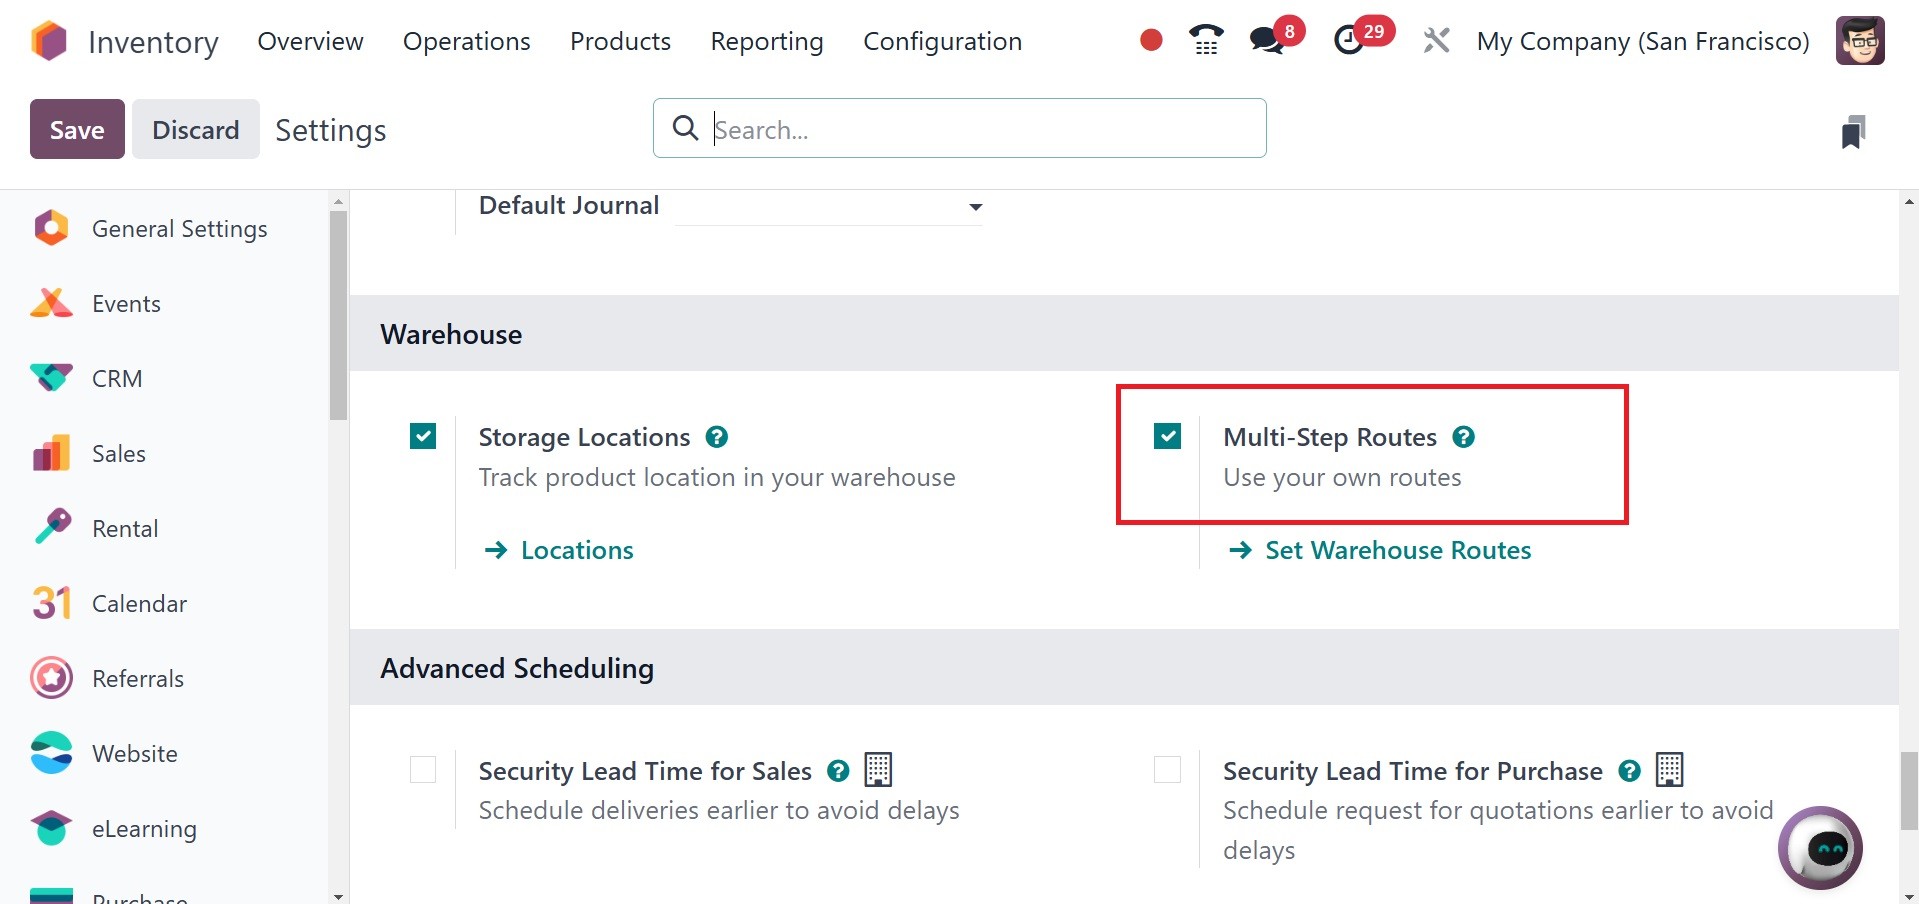
Now the next tab is warehouse, as
in the image below.
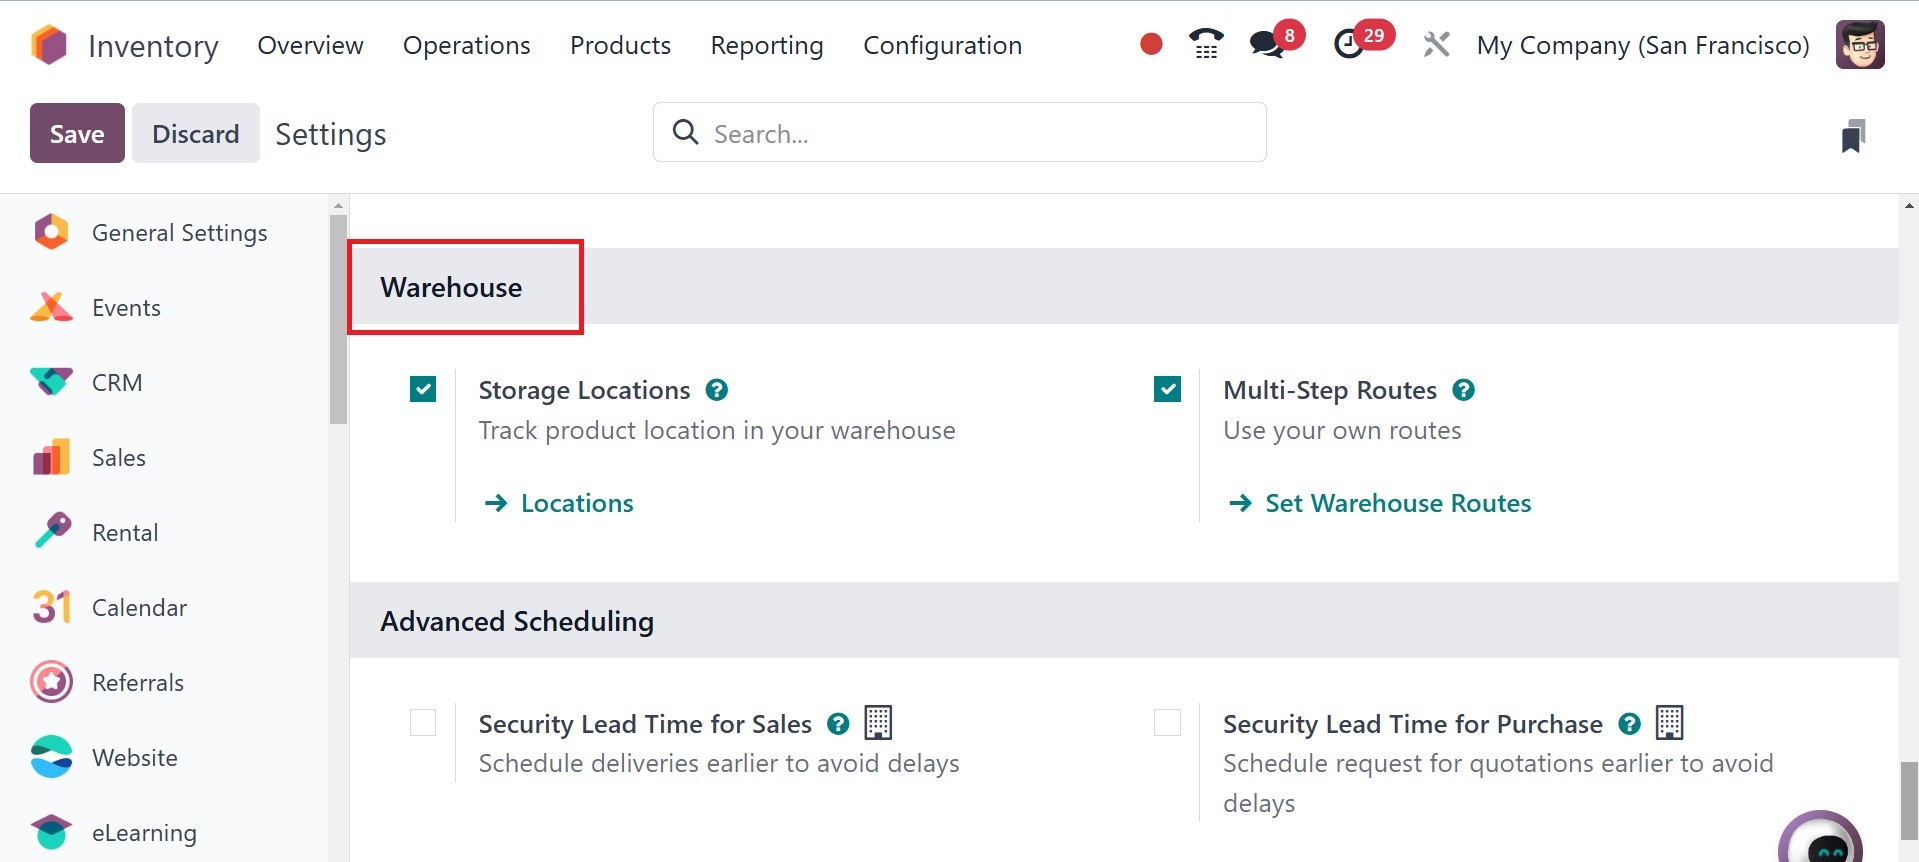
To create specific storage
locations, enable the Storage
Locations feature by going to
Inventory app ‣ Configuration
‣ Settings. In the Warehouses
section, tick the Storage
Locations checkbox. Then,
click Save. Then, you can
have the location option from
the configuration menu.
There, provide : Location
Name: recognizable name of
the location.
Parent Location: the location
within which the new location
exists. After the location is
created, it is listed on the
Locations page using a
location hierarchy, to
describe how a specific
location fits within larger
areas of the warehouse.
You can understand and trace
every movement of a product
using the paths that have
been established for it. It
is the path of operation or
trail used to transport
inventory. It is difficult to
trace and control the
movements of a company's
inventory without having a
good plan. You can define
certain operating rules to
indicate the product
movements in inventory
according to your firm's
policies. With these rules,
you can create numerous
operation routes for the
products with Odoo 18. This
will ensure that your company
is handling its inventory in
the right way.
Users will be able to use
different platforms to create
suitable rules and routes for
stock transfers within the
Odoo 18 Inventory module.
Prior to setting up routes
for stock, ensure to set up
storage locations and
warehouses operations that
routes in Odoo18 are
corresponding to. You have to
allow this option under the
module Settings menu so you
can create new routes in Odoo
18. The Multi-Step Routes can
be set from the Warehouse
tab, found where it's shown
below.
Now, the next option is Advanced
Scheduling, as in the image
below.
Odoo 18's Advanced Scheduling
section arranging function
helps you save time by
efficiently arranging the
processes associated with
sales and purchases. To
utilize this feature, choose
the enable the Settings
option from the Configuration
menu.
To schedule the delivery earlier,
refer to the Security Lead
Time for Sales. You can
specify the number of days
you would like the delivery
date to be moved ahead. To
schedule the purchase order
date prior to the original
date, make use of the
"Security Lead Time for
Purchase" feature. In the
same option, you can specify
the number of days this
action will last. Include the
number of days to allow
confirmation of a purchase
order in "Days to Purchase."
The last tab is logistics, as in
the image below. Dropshipping
is one of the easy shipping
options that can be used by
suppliers who are not looking
to maintain an inventory. The
method will enable you to
ship products from vendor to
customer. It will be more
advantageous to the retailers
since the deliveries are
direct from the suppliers to
the customer, no warehouses
need to be maintained. Rather
than maintaining an
inventory, the dropshipping
process will assist you in
sending the products directly
from the supplier or
manufacturer to the customer.
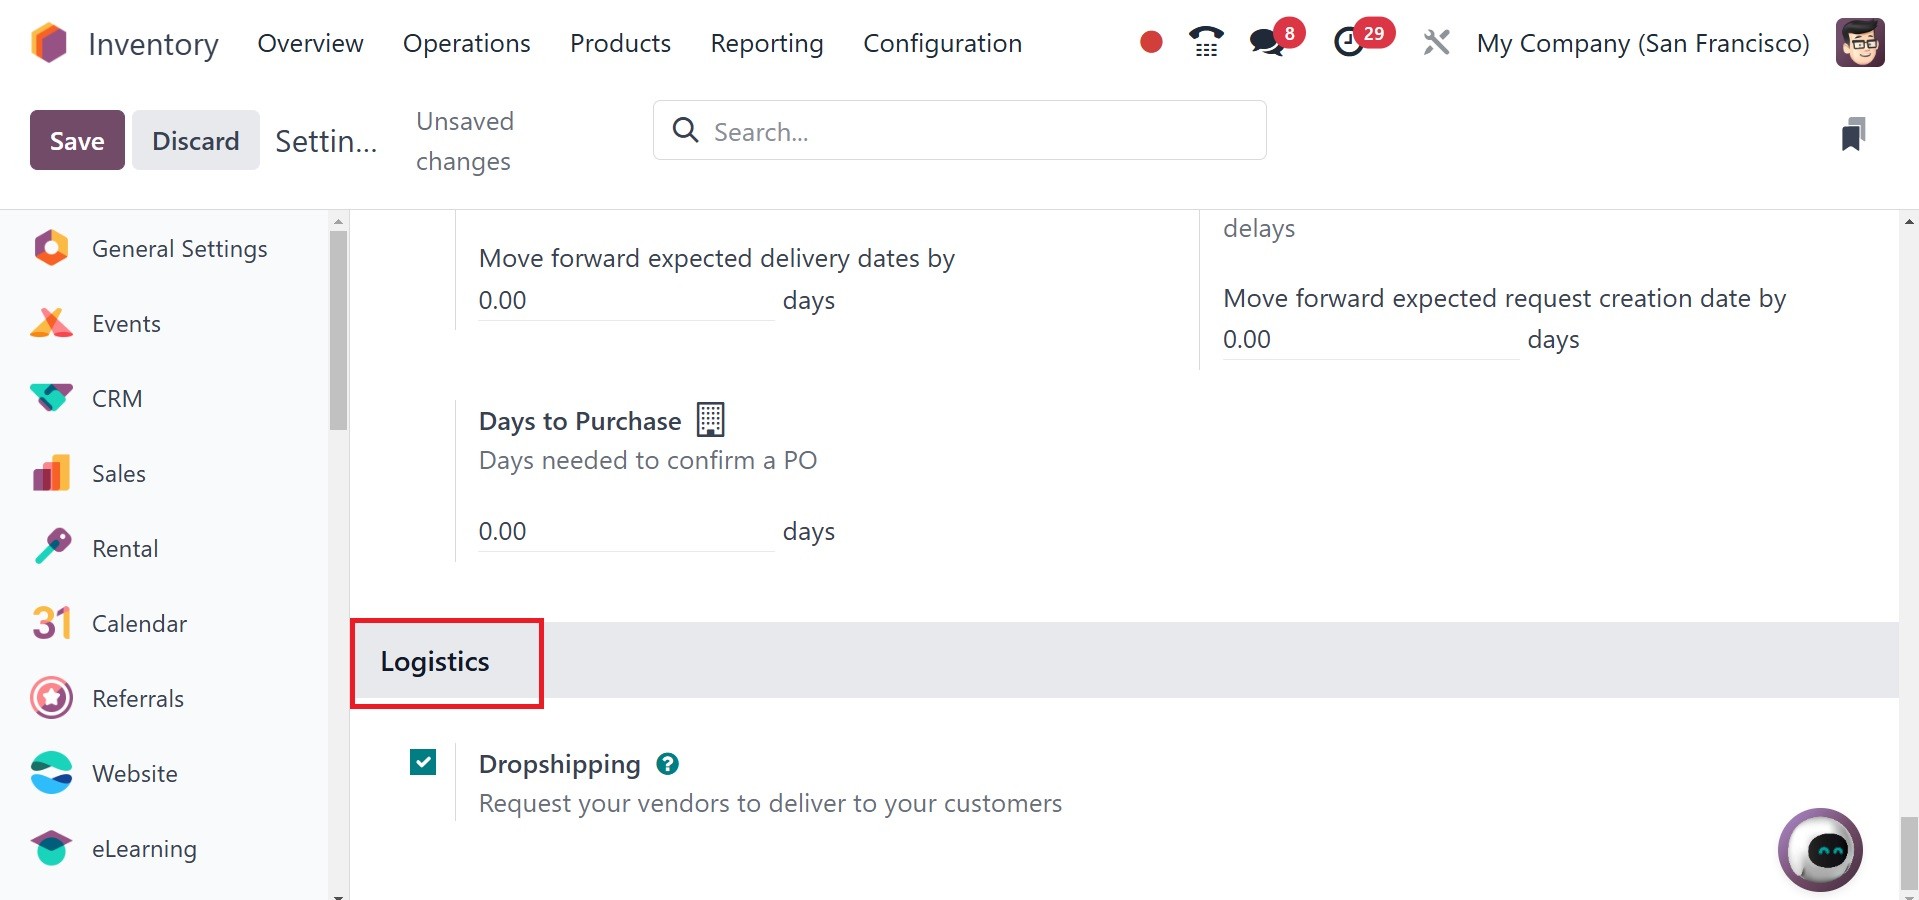
The Dropshipping process in Odoo
can be enabled from the
Purchase module's Settings
menu. As you can see from the
image below, the option will
be present under the
Logistics tab.