3. Equipment Management Menu
The Equipment Menu in the Odoo 18 Maintenance module is designed to
help businesses manage and monitor assets effectively. This menu
includes two sub-menu items, including the ‘Work Centers’ and
‘Machine &Tools’ options.
3.1 Work Centers
A Work Center in Odoo is a designated space or asset, like a machine
or workstation, where manufacturing or maintenance activities occur.
In the Maintenance module, Work Centers are crucial because
equipment and maintenance requests are linked to them, and
preventive maintenance often depends on their performance and usage.
The ‘Work Centre’ dashboard from the Equipment menu provides an
overview of all the available work centers functioning in your
inventory or manufacturing system.

You can also create new work centers within the dashboard window by
opening a new configuration form. In the displayed form view, edit
the Work Center Name, Tag, Code, Alternative Workcentres, Working
Hours, and Company details.
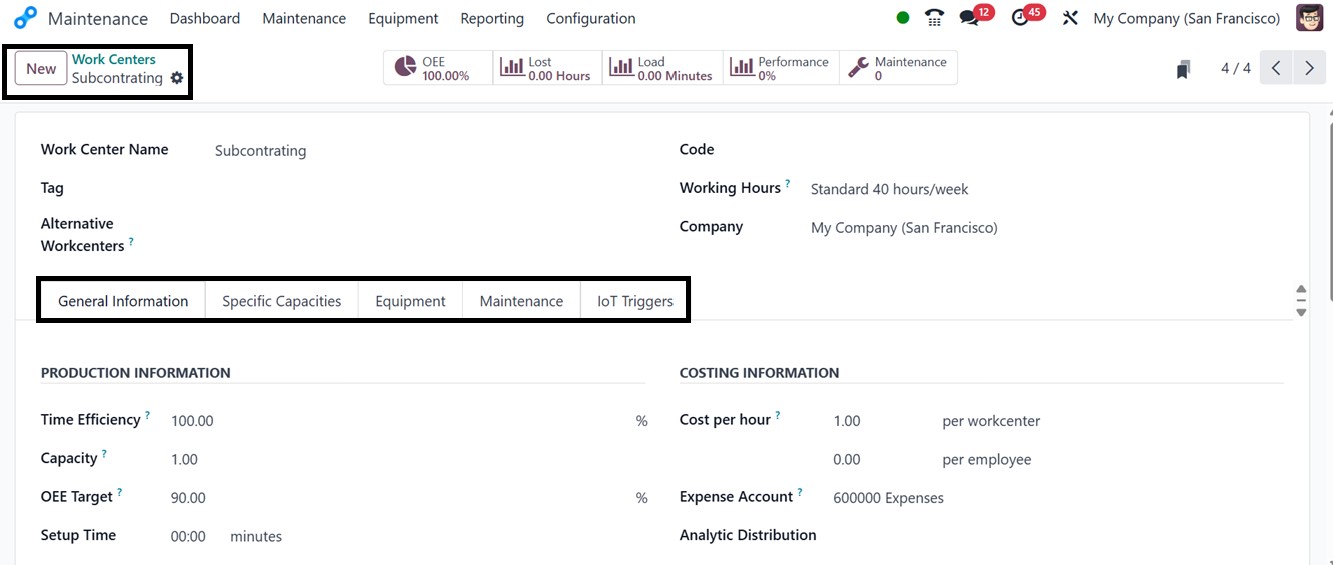
In Odoo 18, the configuration of a work center begins with entering
key production details under the General Information tab. This
includes fields such as Time Efficiency, which defines the estimated
duration for completing tasks in the work center, Capacity, which
represents the number of units that can be processed simultaneously,
and OEE Target, indicating the intended overall equipment efficiency
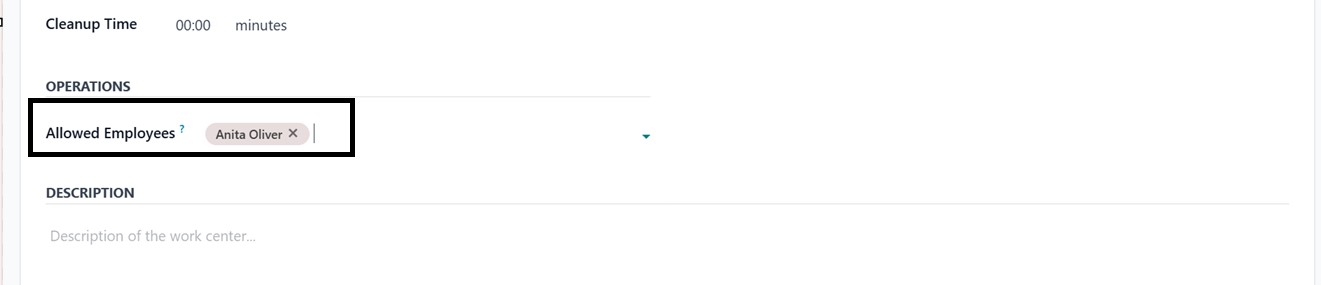
percentage. To enhance security and ensure only authorized staff can
operate within the work center, you can enable the Allowed Employees
option under the OPERATIONS section.
The Costing Information section allows you to define the operational
cost per hour for both the work center and its assigned personnel.
You can also link an Analytical Account to track costs related to
materials and activities. Setup and cleanup times can be configured
here as well, and any additional notes or specifications about the
work center can be entered in the Description field.
For cases where specific products have unique capacity requirements,
the Specific Capacities tab allows you to define those details. By
clicking Add a Line, you can input the product name, its unit of
measure, and the number of units that can be produced concurrently
in that work center.
The Equipment tab is used to list the tools and machinery associated
with the work center. You can specify the equipment name, the
responsible technician, category, and important metrics such as MTBF
(Mean Time Between Failures) and predicted Next Failure dates.
Equipment already configured in Odoo can be selected from a pop-up
list.
Additionally, the IoT Triggers tab supports integration with external
devices. You can use the Add a Line function to define each device’s
ID, associated key, and the action it should trigger. Once all
configurations are complete, the work center is ready for use.
Odoo provides smart buttons on the work center form view that give
insights into ongoing operations. You can monitor scheduled
activities, track Overall Equipment Effectiveness, analyze
Productivity Losses, evaluate Work Center Loads, and review overall
Performance. These reports help you assess efficiency, identify
areas of downtime or slow performance, and measure how actual
performance compares to expected timelines. By leveraging these
features, manufacturers can ensure optimal use of their work centers
and maintain high productivity levels.
3.2 Machines & Tools
The ‘Machines & Tools’ option within the Maintenance module helps
organizations maintain a comprehensive list of all maintenance
equipment. The Kanban dashboard provides a comprehensive overview of
equipment, including model numbers, serial numbers, assigned
statuses, activities, and associated maintenance requests, as
illustrated in the screenshot below.
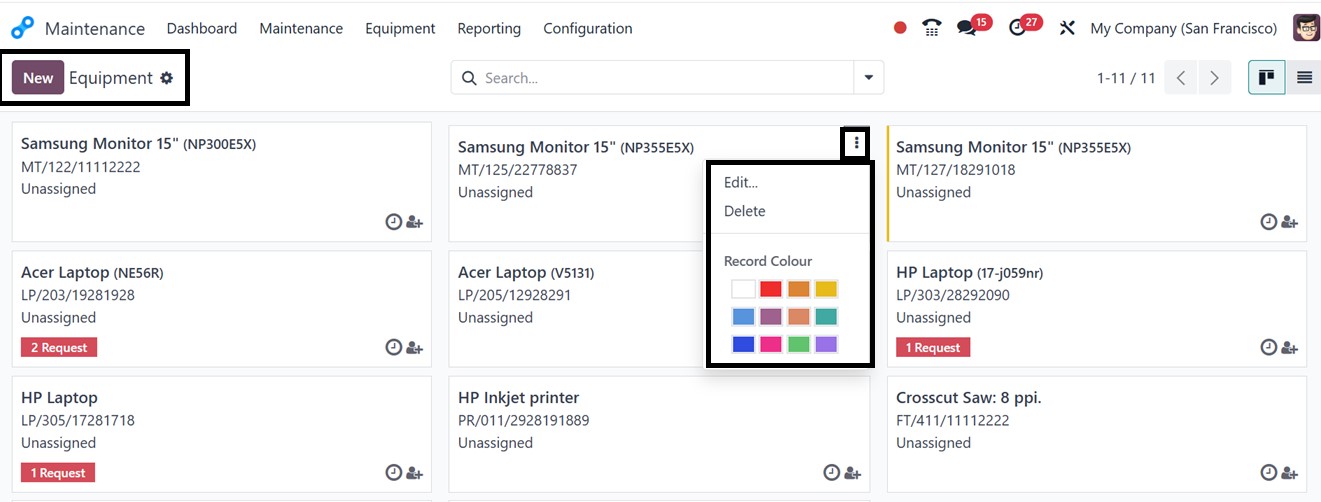
Each equipment card includes Edit and Delete options, accessible via
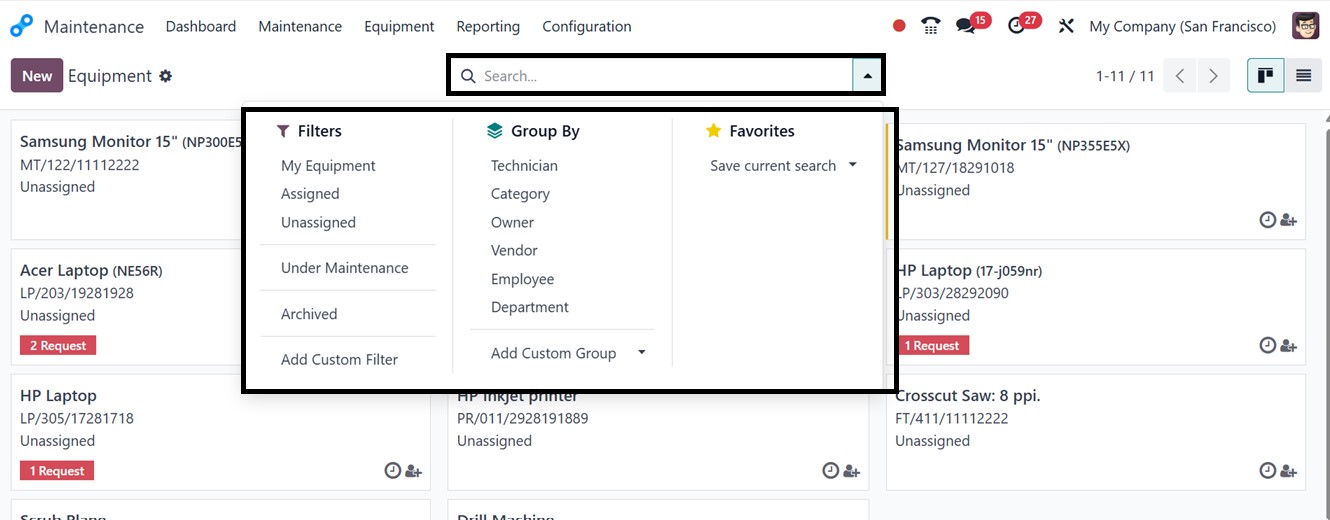
the three-dot icon. The advanced search bar contains Filters such as
My Equipment, Assigned, Unassigned, Under Maintenance, Unread
Messages, and Archived options to sort and filter the equipment. You
can also create customized filter options using the ‘Add Custom
Filter’ button. The Group By tool further categorizes equipment
based on technicians, categories, owners, vendors, employees, and
departments. This also helps to create custom groups as well as
highlight important equipment using the ‘Favorites’ filter option.
You can manage or create any scheduled activities regarding the
equipment through the clock icon provided in each equipment card.
The 'Assign' icon is utilized to assign specific equipment to a
designated responsible individual. To add new equipment, click on
the ‘New’ button. In the displayed settings window, you have to
enter the key details such as the Equipment Name, Equipment
Category, Company, Used By, Department, Maintenance Team,
Technician, Used Location, and Work Center, as shown below.
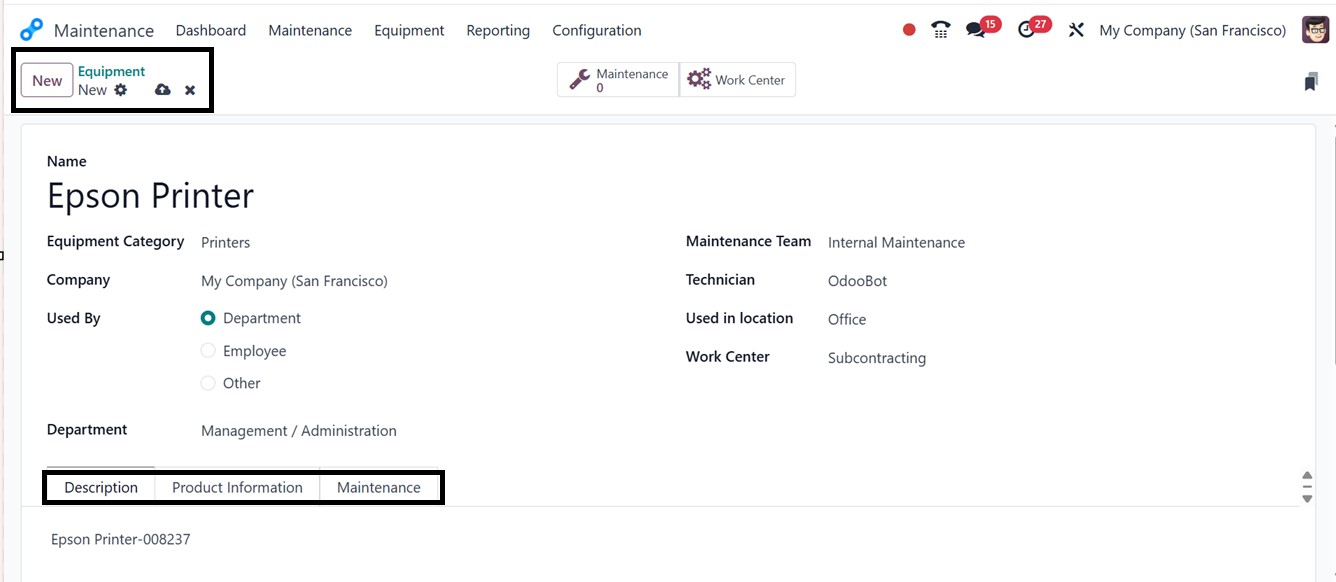
Additional information or any notes regarding the equipment can be
stored under the Description tab.
Important information, including Vendor Data, Model Specifications,
Related Expenses, and the Equipment's Warranty Expiration date
specifics, can be configured in the Product Information tab.
The Maintenance tab, on the other hand, helps guarantee prompt repair
and optimal operation by defining regular maintenance programs and
measuring the Expected Mean Time Between Failures (MTBF) of the
equipment.
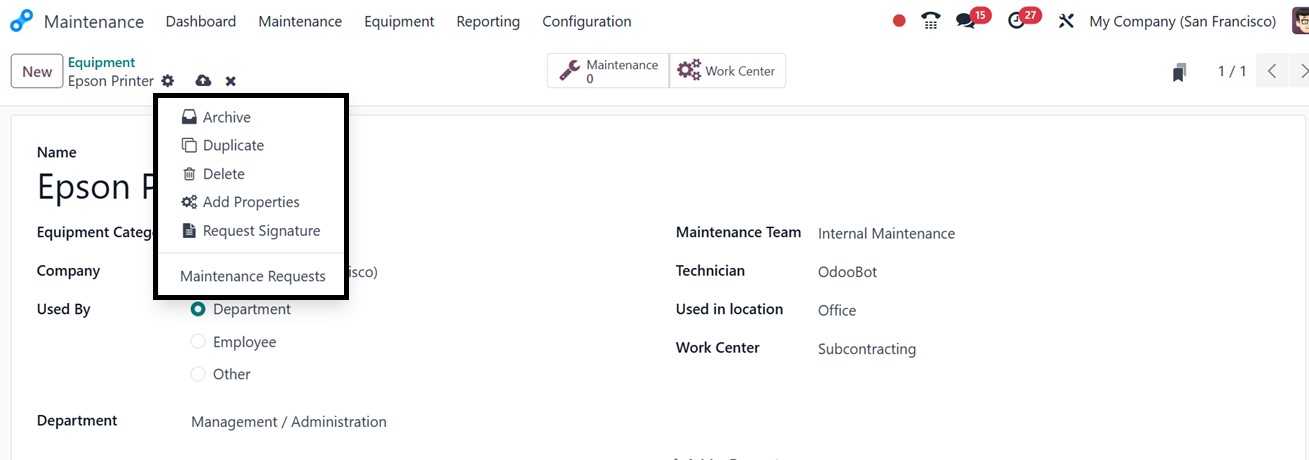
Once all the details are edited and saved, you can utilize the
‘Action’ menu placed on the form to manage the equipment records by
deleting, duplicating entries, archiving old records, adding more
form fields, requesting signatures, or creating new maintenance
requests when necessary. These operations can be done using the
Delete, Duplicate, Archive, Add Properties, Request Signature, and
Maintenance Requests buttons, respectively.
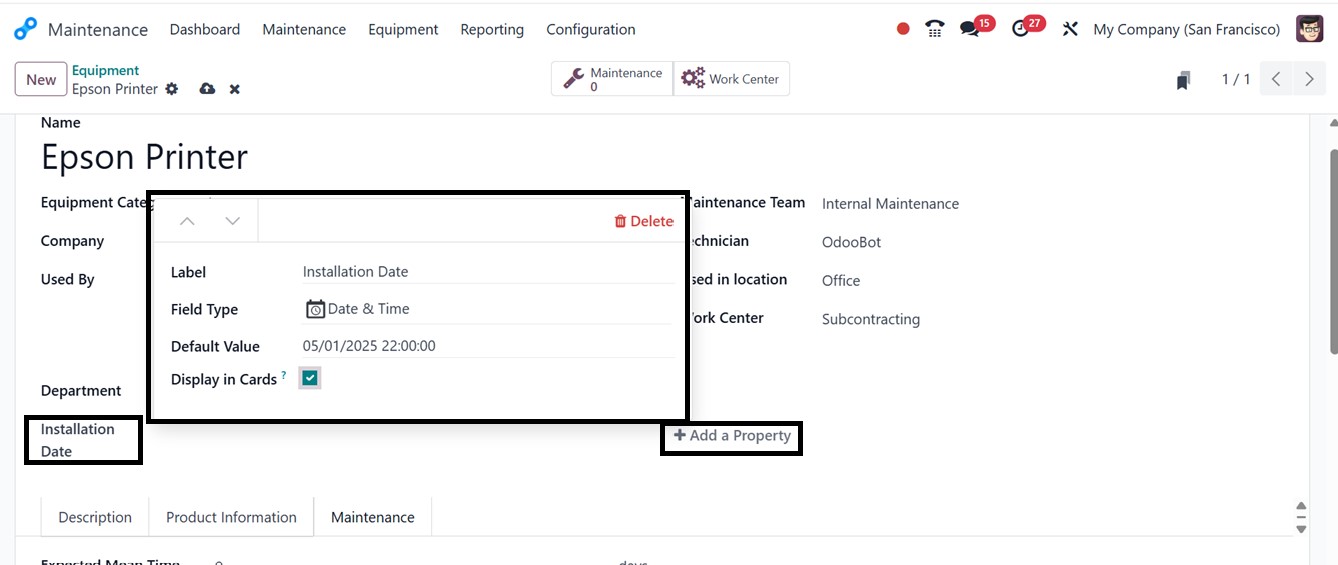
To add more form fields, click on the ‘Add Properties’ button and
edit the Label Name as the field name. The ‘Field Type’ can be set
as a normal Text Box, Date, Date &Time, Decimal, Integer, Check Box,
Selection Menu, etc as per the field specifics or requirements.
Then, the ‘Default Value’ can be provided for default fields that
cannot be edited by the user, and the Display in Cards option to
display whether or not to display this property field in calendar,
card or kanban views, as illustrated below.
If required, you can keep adding more fields once the field data has
been stored. The "Maintenance Request" button allows you to manage
all the maintenance requests for that particular piece of equipment.
By doing this, you will be directed to a dashboard showing all of
the requests made for that specific device.