3. Planning Menu
The Planning menu in the Odoo 18 Manufacturing module offers robust
tools to help you efficiently schedule and manage work orders and
production activities across different work centers. This feature is
essential for coordinating complex manufacturing operations and
ensuring timely production output. Below is an overview of the key
planning options available under this menu.
4.1 Planning by Production
The Planning by Production option allows you to schedule work orders
based on the overall production plan. When creating a manufacturing
order, you can specify the Planned Start Date for the production.
Odoo 18 automatically updates the work orders with this schedule,
which can then be visualized in a calendar-style view under the
Planning by Production interface.
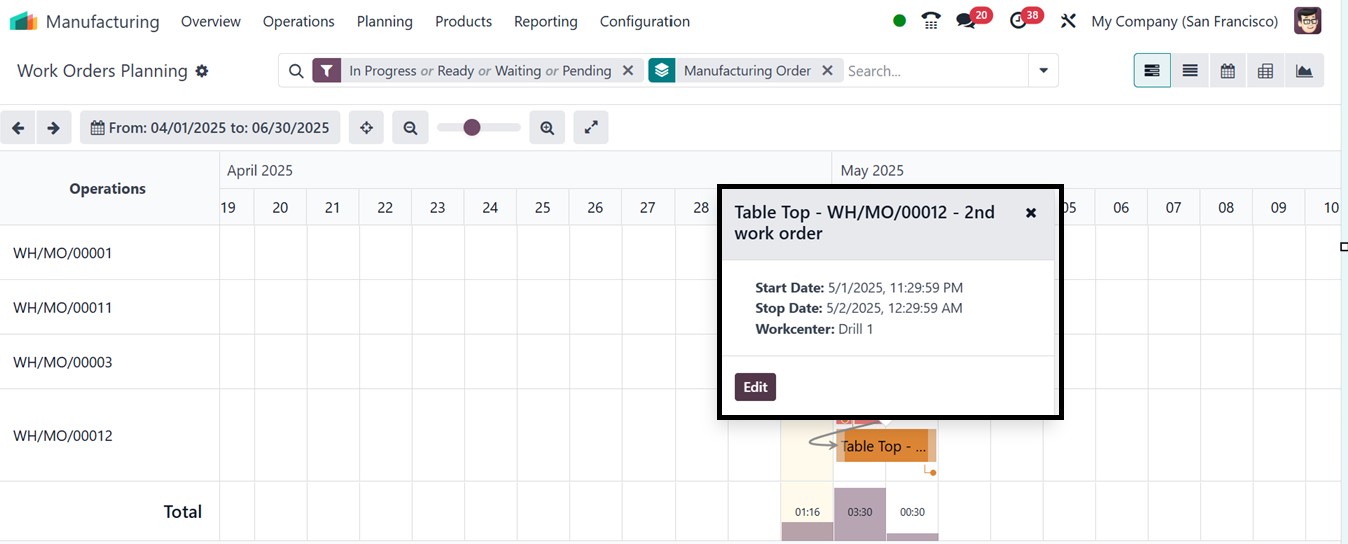
This view displays the scheduled dates for various work orders.
Clicking on a highlighted date provides a summary of the associated
work order, including its Name, Start Date, Stop Date, and Work
Center. You can select the entry to open and manage the full details
of the work order.
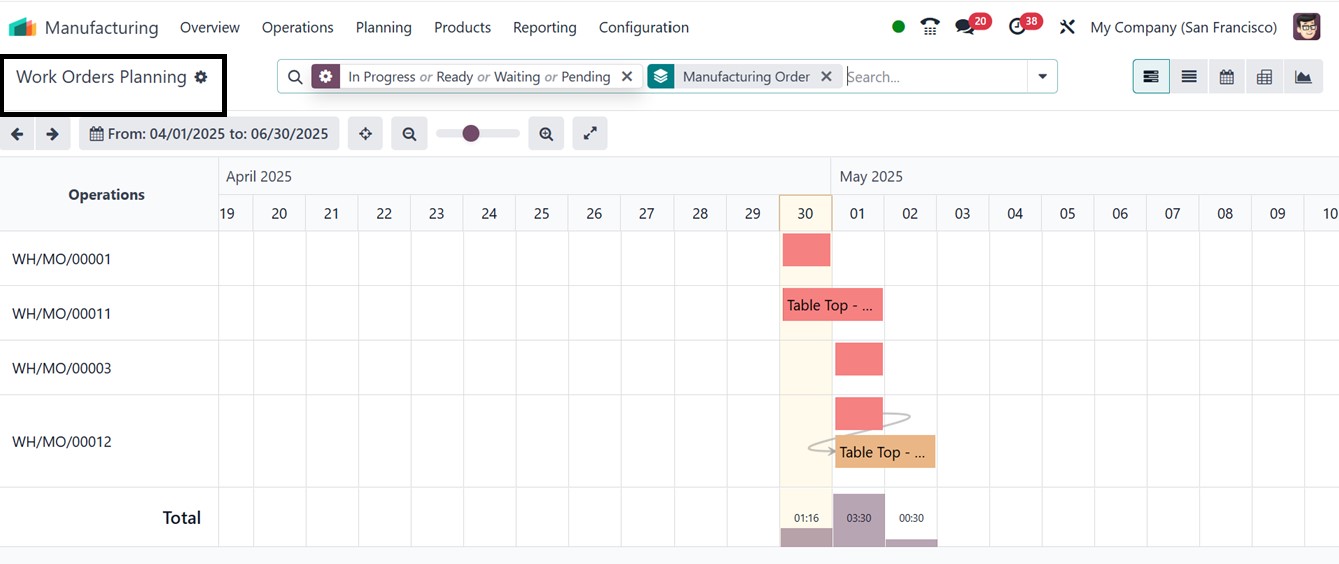
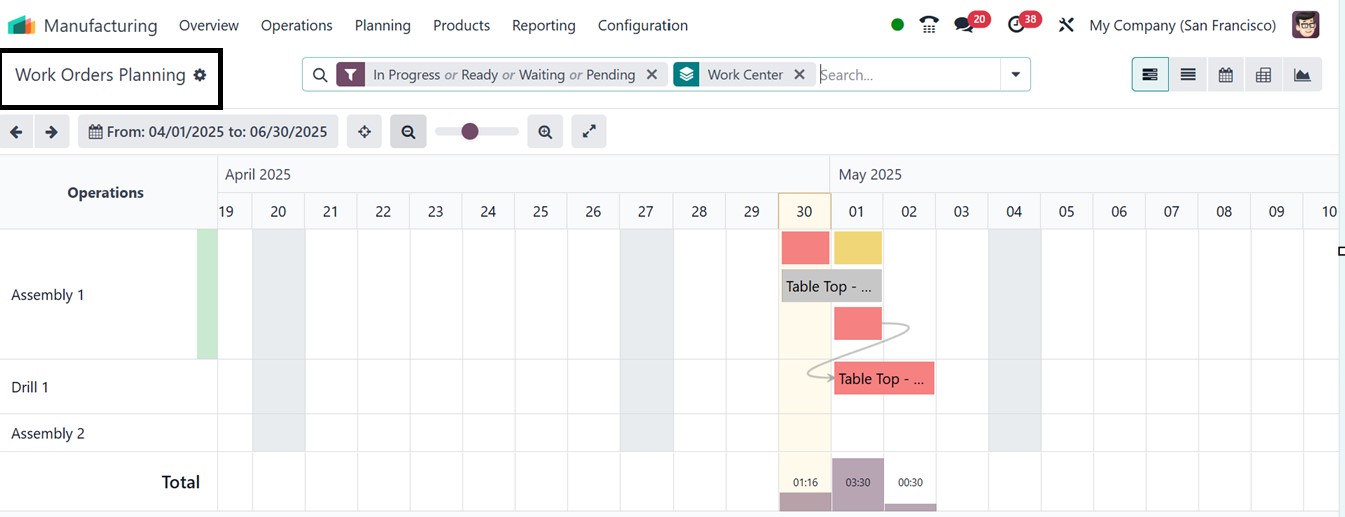
4.2 Planning by Work Center
The Planning by Workcenter view organizes work orders based on the
assigned work centers. This helps managers and production
supervisors monitor the workload across different work centers and
avoid scheduling conflicts. If multiple work orders are assigned to
the same work center on the same day, you can easily adjust and
reschedule them from this interface to balance the workload
efficiently.
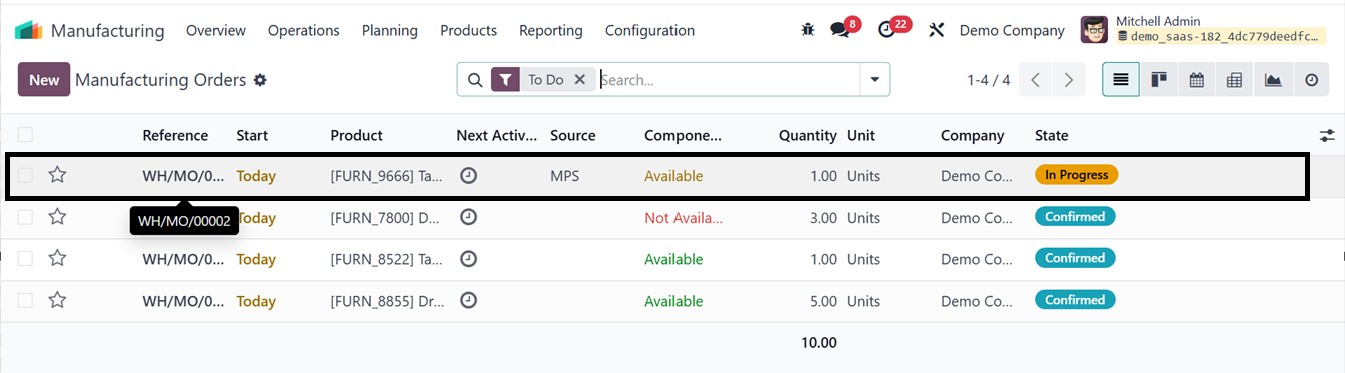
4.3 Master Production Scheduler
The Run Scheduler feature, also accessible from the Planning menu,
plays a vital role in automating material availability and
reordering processes. While this tool is commonly used in the
Inventory module, it is equally powerful in the Manufacturing module
By running the scheduler, Odoo will:
- Allocate available inventory for work orders and operations that
were previously on hold due to missing components.
- Automatically trigger Reordering Rules when stock levels fall
below minimum thresholds, ensuring that production is not
delayed due to shortages.
To begin using the Master Production Schedule (MPS) feature in Odoo
18, it must first be activated from the Settings menu under the
Planning tab, as illustrated in the image below
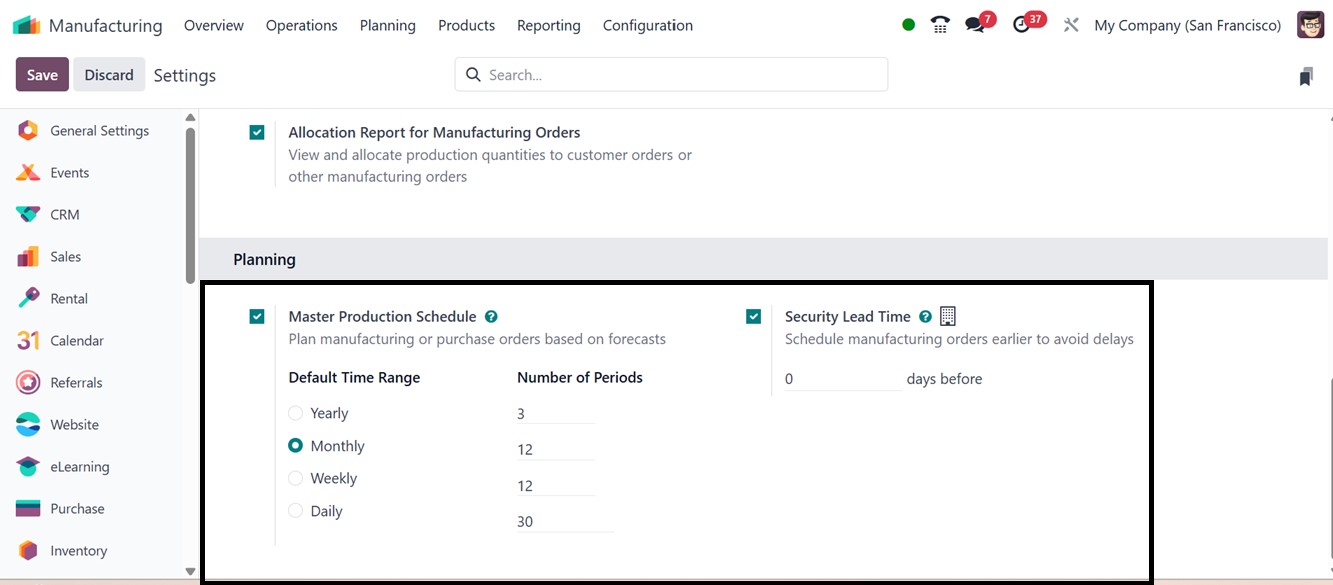
Once the functionality is enabled, you need to define the Time Range
for the schedule, which can be set to daily, weekly, or monthly.
Additionally, you can specify the number of columns that should
appear in the MPS reports, depending on the range selected. After
completing this setup, you can access the Master Production Schedule
from the Planning menu.
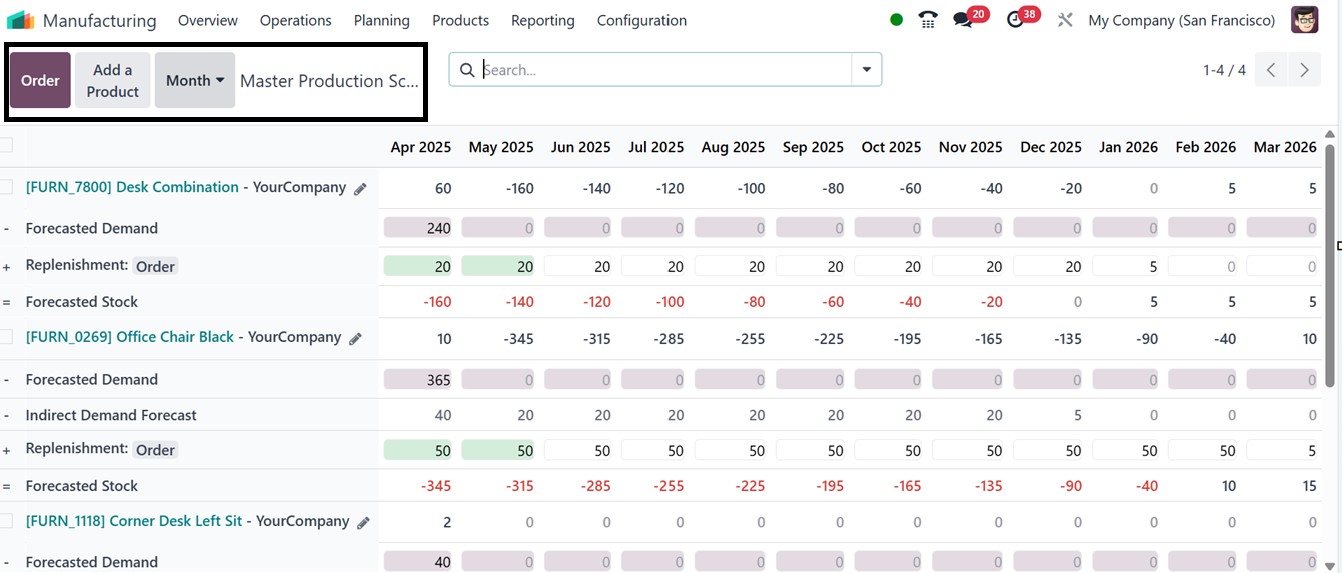
A number of essential inventory and planning parameters that support
effective production management are included in the data presented
in the Master Production Schedule (MPS) window including the
Starting Inventory, which displays the stock on hand at the start of
the period; Actual Demand, which indicates the verified demand for
the product; and the Indirect Demand Forecast, which projects
possible future requirements based on patterns or related requests.
While Actual Replenishment logs the replenishment quantities that
have already been completed, the To Replenish field shows the
quantity that remains to be supplied. Furthermore, Available to
Promise displays the stock that may be assuredly committed to new
orders without compromising current commitments, while Forecast
Stock represents the expected inventory level at the conclusion of
the planning period.
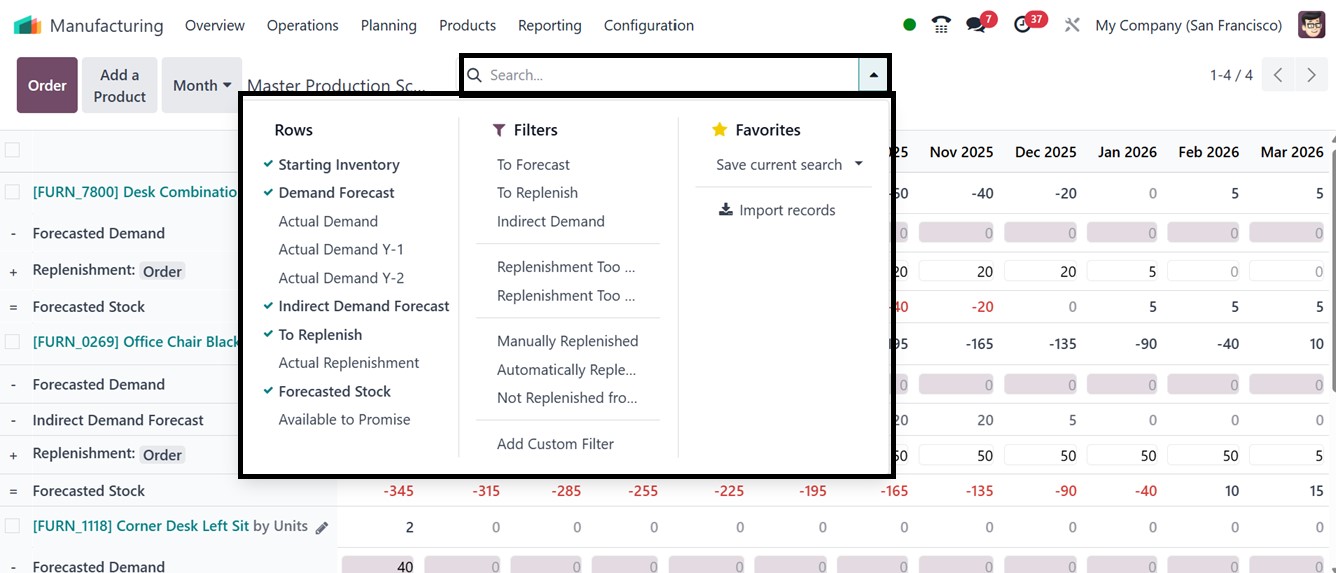
The MPS interface displays columns based on the selected Time Range.
You can further enhance the display by adding additional rows using
the options available in the Rows menu provided in the search bar
area.
It's important to note that Odoo can only generate a manufacturing
order through replenishment if the product’s route of operation is
configured as "Manufacturing". After confirming that the correct
routes are set for the product, you can click on Add a Product to
include it in the MPS. This action will trigger a pop-up window that
will prompt you to input specific details like the Product, Bill of
Materials, Route, Batch Size, and mention whether it is an Indirect
Demand to not display this product in the ‘To Forecast’ filter in an
MPS dashboard.
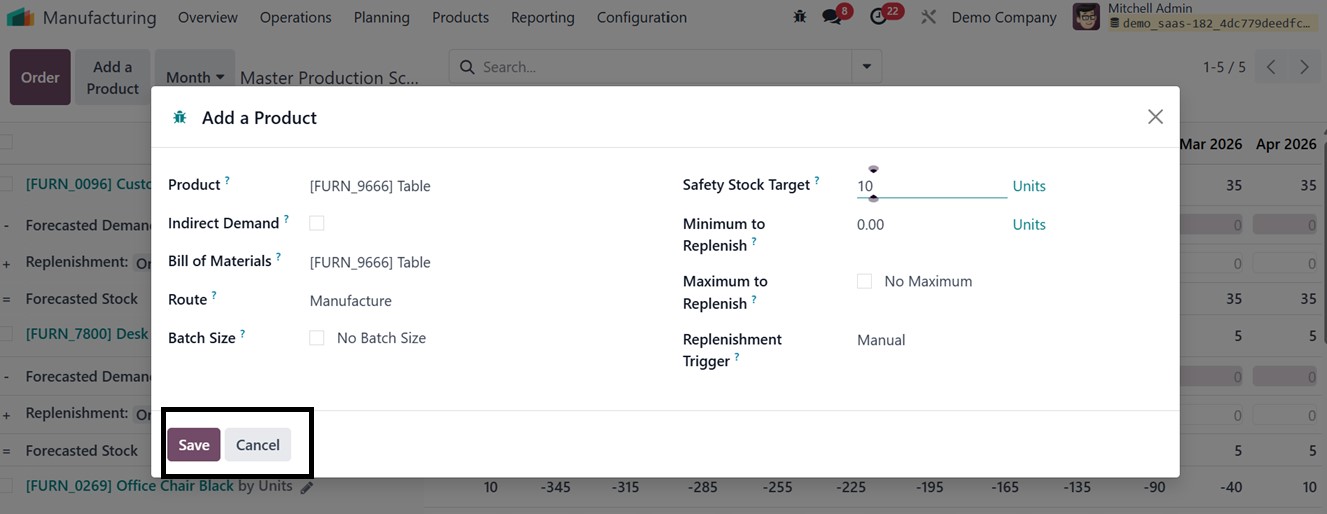
In the Safety Stock Target field, you must specify the minimum
quantity of the product that should always be available in stock.
The Minimum to Replenish value ensures that Odoo 18 will replenish
at least this amount whenever replenishment is required, except when
the demand is zero. The Maximum to Replenish field defines the
highest amount that should be replenished for the product in any
given period. If actual demand exceeds this maximum, the excess will
be automatically rolled over to the next time period. Once all the
fields are filled, click the Save button.
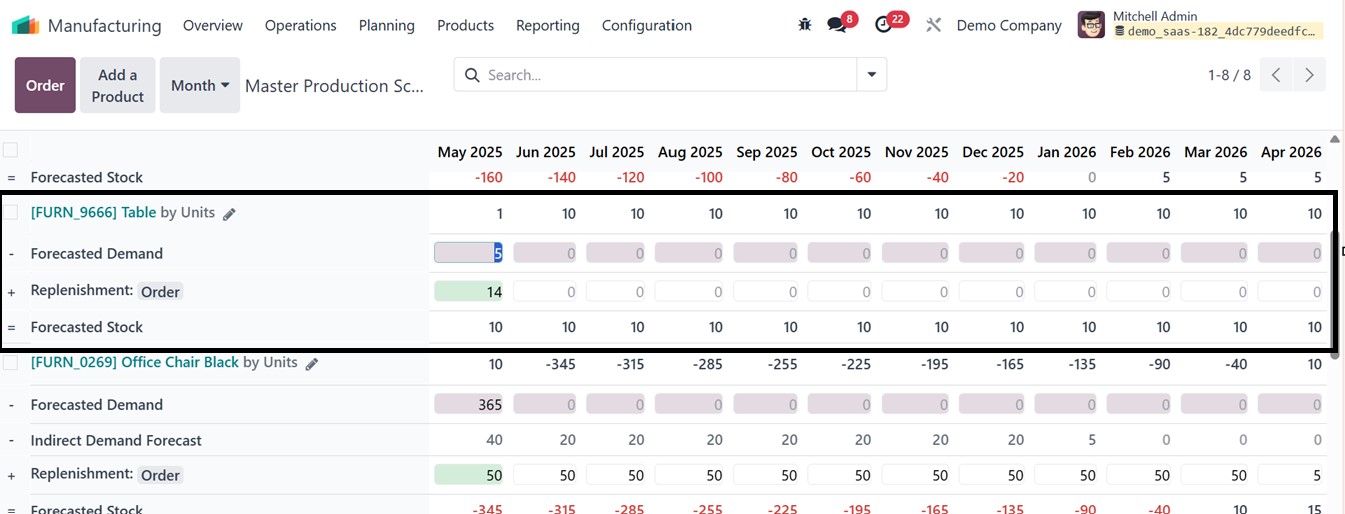
For example, if the product has an on-hand quantity of 20 units, this
will be recorded as the Starting Inventory for the current month.
The MPS screen will show inventory information projected for the
next twelve months. You can manually input estimated demand in the
Forecasted Demand section for the current month. Based on this data,
the system will automatically calculate the Suggested Replenishment
quantity, indicating how much should be ordered through a purchase
or manufacturing order. The Forecasted Stock will reflect the
expected inventory level at the end of the period, as depicted in
the screenshot below.
Depending on how the product’s operational route is configured, Odoo
will generate either a Manufacturing Order or a Purchase Order once
you press the Replenishment button. To view the replenishment orders
generated, navigate to the Manufacturing Orders dashboard. These
records will indicate that the replenishment originated from the
Master Production Schedule, as depicted in the screenshot below.