5. Settings
By going to the Manufacturing
module’s Configuration menu
then choosing the Settings
option, you may modify the
system to match your
manufacturing procedures.
Enabling Work Orders for
thorough task management,
using the Master Production
Schedule (MPS) for planning,
and keeping track of
By-Products in bills of
materials are important
choices. Work Centers may be
set up with efficiency
parameters, Subcontracting
can be configured, and
product variations can be
managed. To improve total
production efficiency,
further capabilities include
Quality Management,
Manufacturing Order
Management, Allocation
Reports as well as Security
Lead Time options can be
configured as per the
requirement.
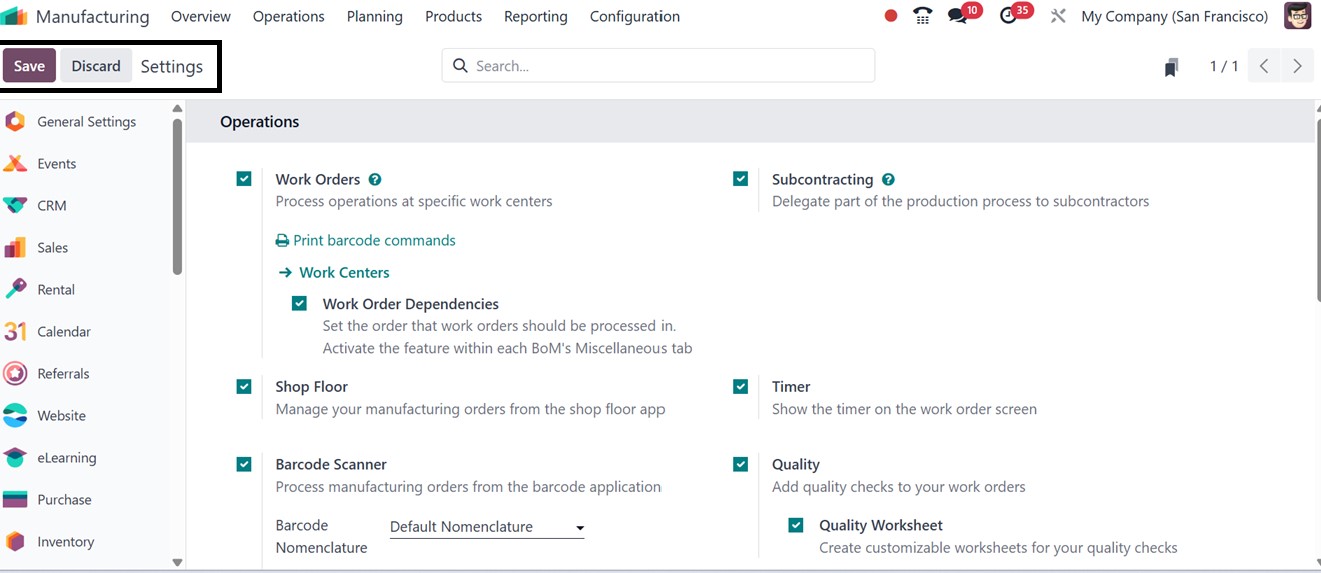
Work Orders: Enabling Work Orders
allows you to break down the
manufacturing process into
detailed, manageable tasks
assigned to specific work
centers. This feature
supports better scheduling,
tracking, and execution of
operations on the shop floor.
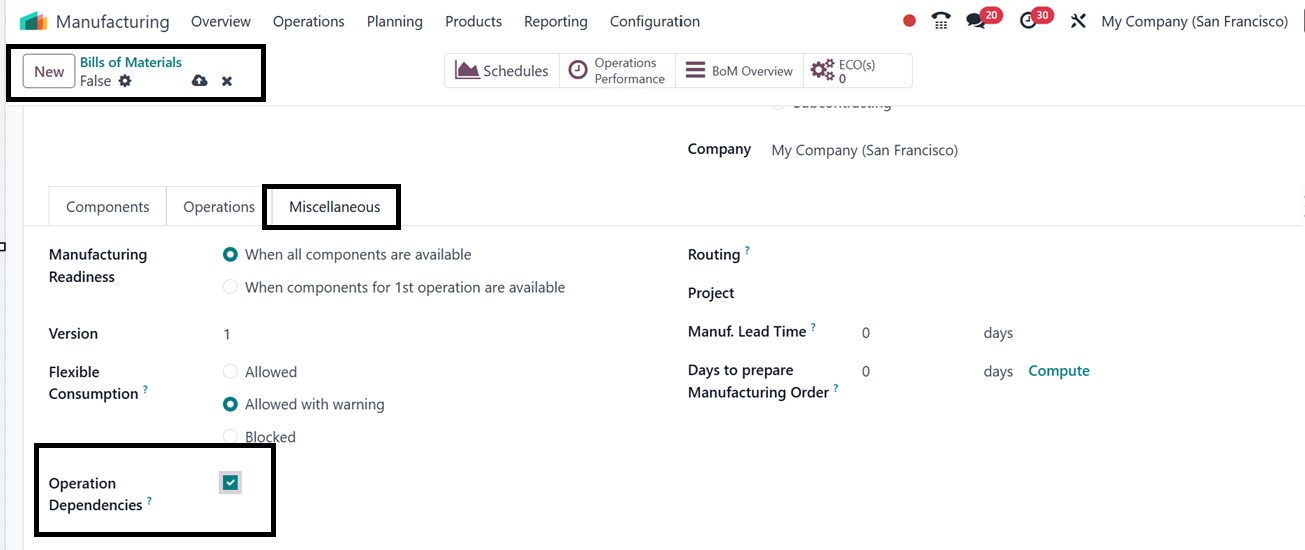
Work Order Dependencies: This
feature allows you to define
the sequence in which work
orders should be executed
within a manufacturing
process. To enable it,
activate the ‘Operation
Dependencies’ option in the
Miscellaneous tab of each
Bill of Materials (BoM), as
illustrated in the screenshot
below.
Shop Floor: The Shop Floor
feature enables you to manage
and execute manufacturing
orders directly from the
dedicated Shop Floor app. It
offers a user-friendly
interface optimized for
tablets and touchscreens,
allowing operators to view
assigned tasks, track
progress, and complete work
orders in real time,
improving on-the-floor
visibility and efficiency.
You can open the shop floor by
clicking on the ‘Open Shop
Floor’ button from a Work
Order configuration form or
using a ‘Shop Floor’ smart
button of a manufacturing
order configuration form.
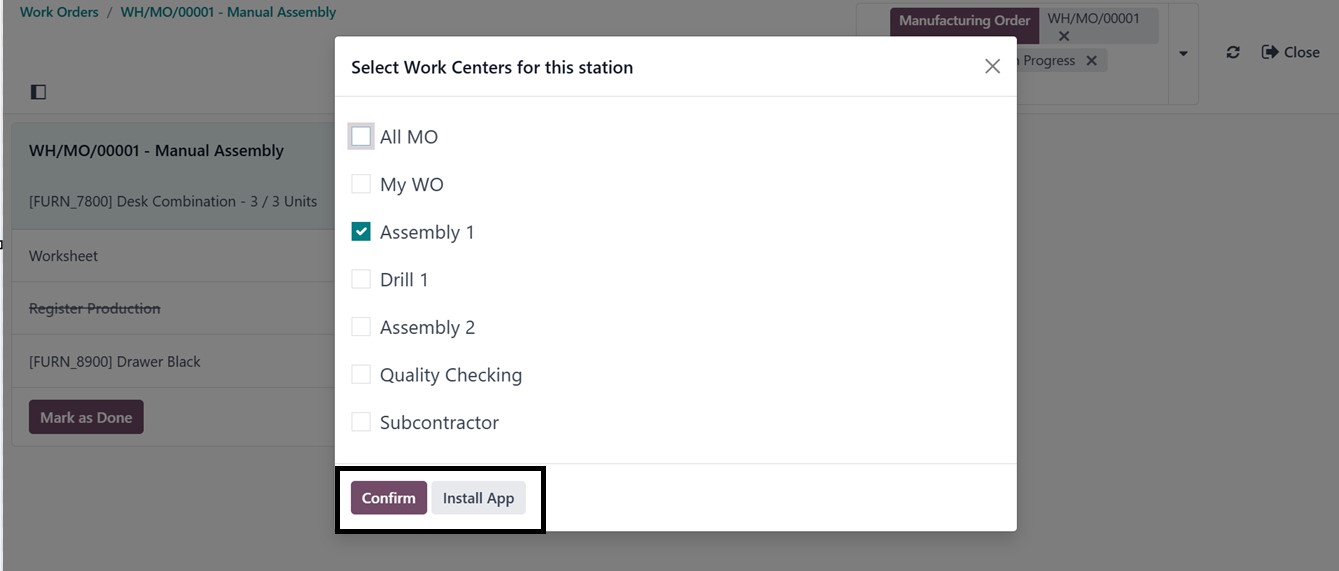
While choosing a work center
for the station, you can
install the shop floor app
using the ‘Install App’
button, as depicted in the
screenshot below.
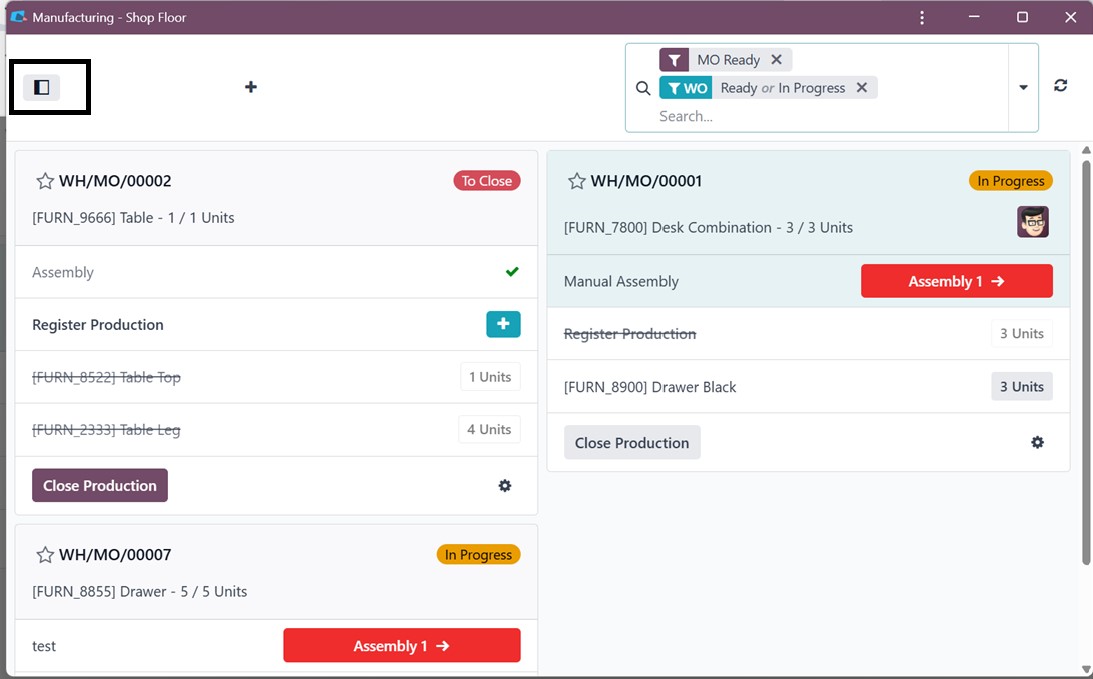
After proceeding with the
installation, choose a work
center, and you can manage
the work orders and other
operations in the Shop Floor
interface, as depicted in the
screenshot below
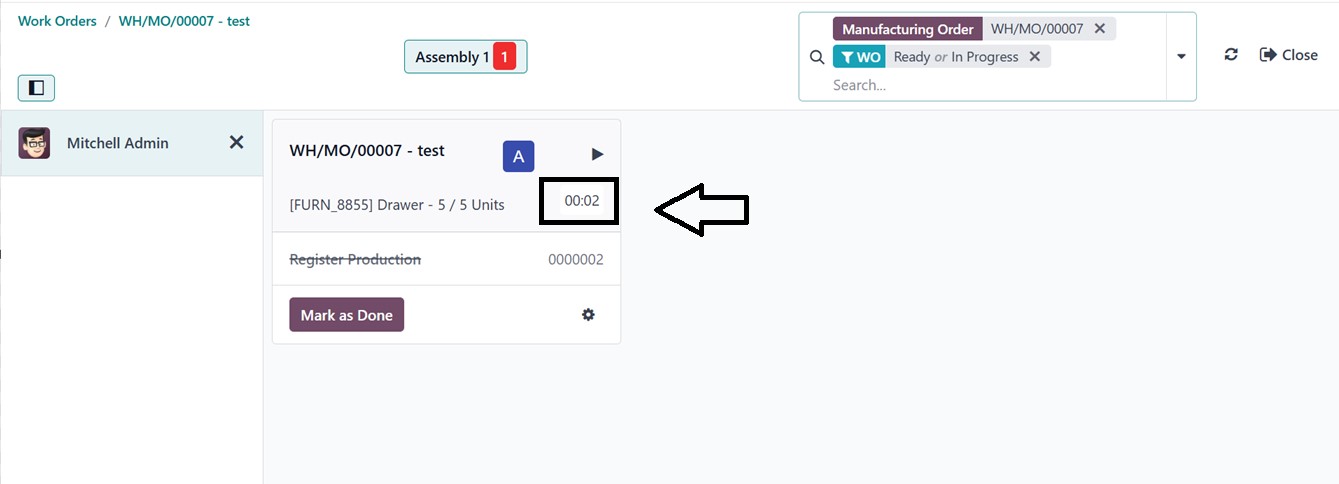
Timer: When enabled, the Timer
displays a stopwatch on the
work order screen. This helps
operators track the time
spent on each task, providing
more accurate production time
logging and supporting
performance monitoring and
time-based analysis.
To check the feature, click on
the ‘Open Shop Floor’ button
from a work order form. You
can see the timer running
under a work order, as
illustrated in the screenshot
below.
Barcode Nomenclature: This
setting defines how barcodes
are interpreted by the
system. It determines the
format (nomenclature) of
scanned barcodes for
different documents like
manufacturing orders,
operations, and products.
Custom barcode rules can be
configured to ensure
compatibility with your
workflows.
The Default Nomenclature offers a
pre-configured set of barcode
rules to identify standard
document types and
operations, which can be
customized as needed. With
the Print Barcode Commands
and Operation Types feature,
you can generate barcodes for
actions like start or pause
and place them on
workstations for quick
scanning. Additionally, the
Print Barcode Demo Sheet
provides sample barcodes for
training, testing, or
configuring barcode scanners
in your manufacturing setup.
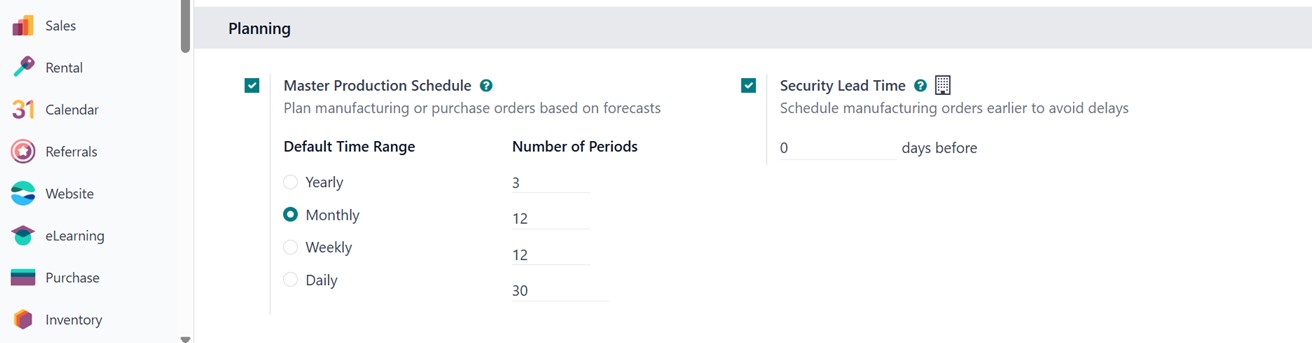
Master Production Schedule (MPS):
The MPS helps with production
planning by allowing you to
forecast demand and plan
manufacturing quantities over
a specific time horizon. This
tool provides a visual,
time-based grid to anticipate
production needs and align
them with resource
availability.
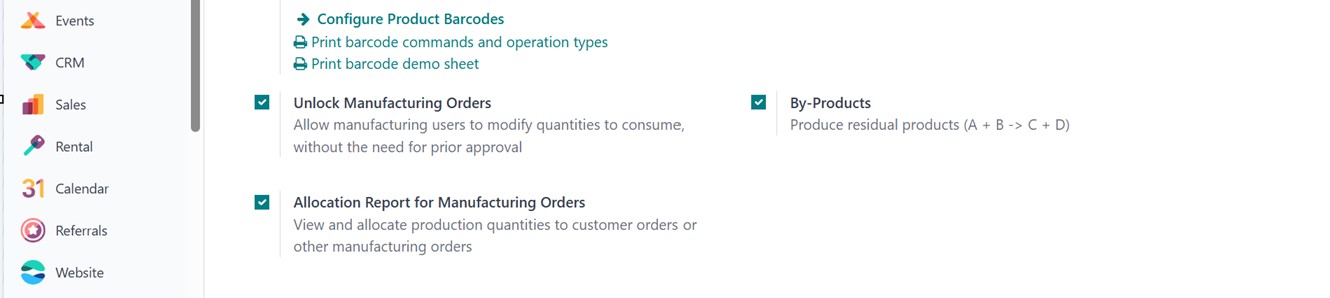
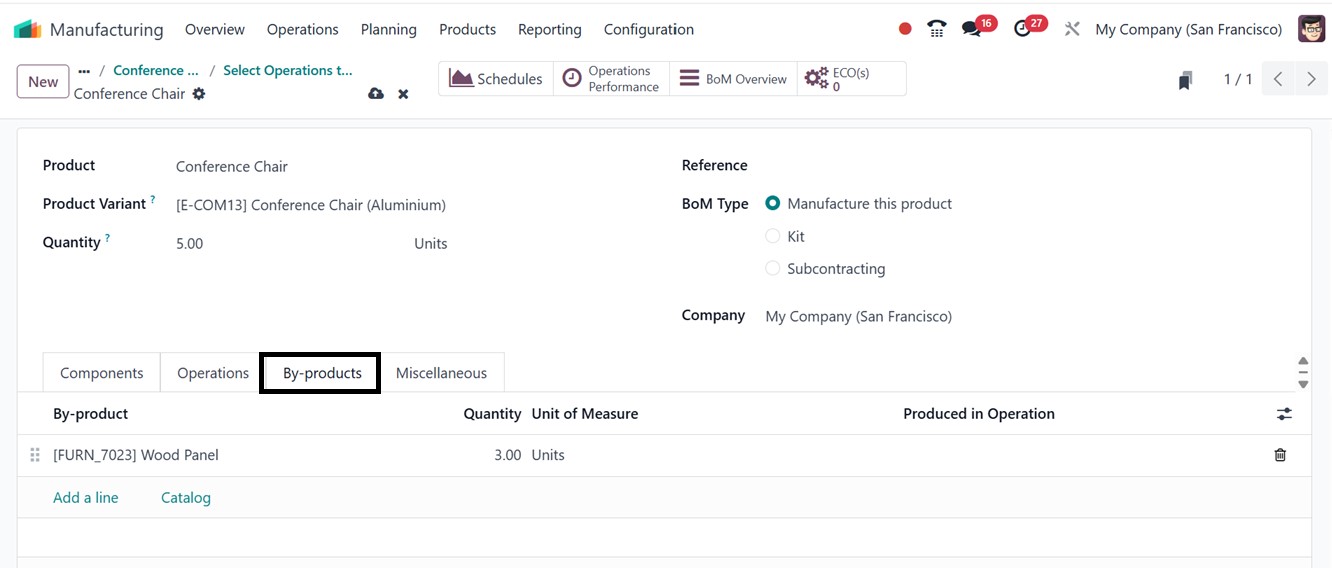
By-Products: Activating
By-Products allows you to
define secondary products
that are generated during a
manufacturing process in the
Bill of Materials (BoM). This
is useful for industries
where waste or reusable
materials are created as part
of the main production, as
depicted in the screenshot
below.
Work Centers With the Work
Centers link, you can
configure the physical or
logical locations where
operations take place. You
can also define parameters
such as capacity, efficiency,
and time tracking to ensure
optimal resource utilization.
From this window, you can
manage and create new Work
Centers.
Subcontracting: The
Subcontracting option enables
you to outsource specific
manufacturing operations to
third-party vendors. You can
track subcontracted work,
manage incoming components,
and monitor delivery of
finished goods.
Quality: Enabling the Quality
option allows integration
with the Quality module,
helping you define quality
control points, inspection
steps, and alert systems.
This ensures compliance and
consistency throughout the
production process.
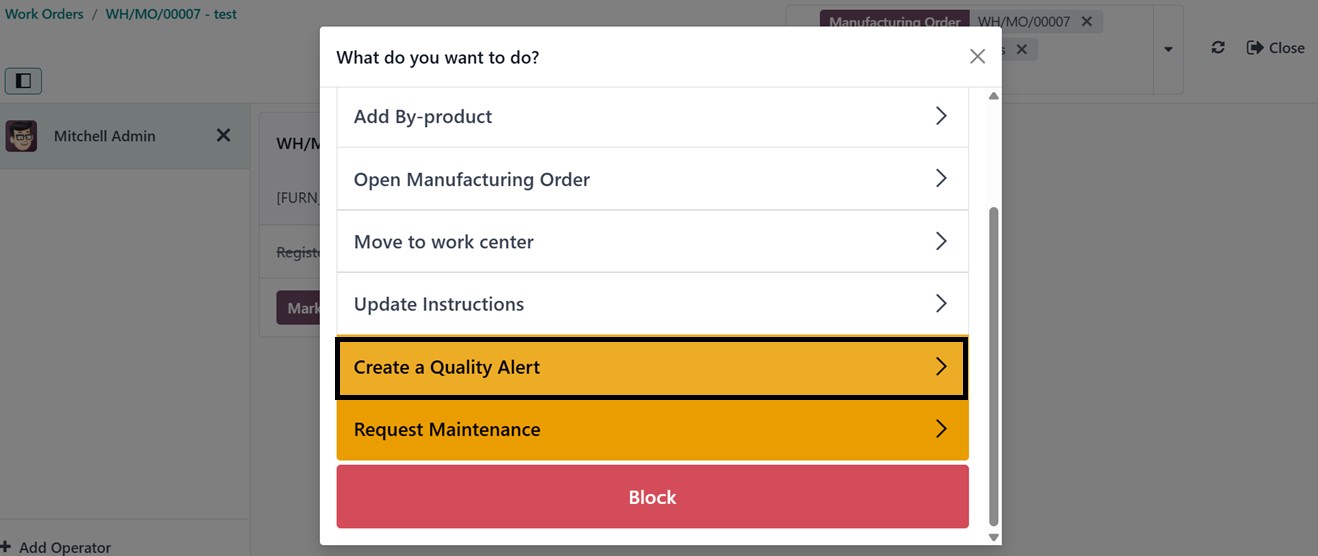
To check the feature, open a Shop
Floor and click on the small
settings icon from the
particular Work Order
station. This will open a
menu list where you can
choose the ‘Create a Quality
Alert’ option to create any
quality alerts when any
product quality issue
arrives.
Then, you can provide the quality
alerts by providing a quality
issue Title, Product, Product
Variant, Lot, Work Center,
Picking, Team, Priority, Root
Cause etc, as illustrated
below.
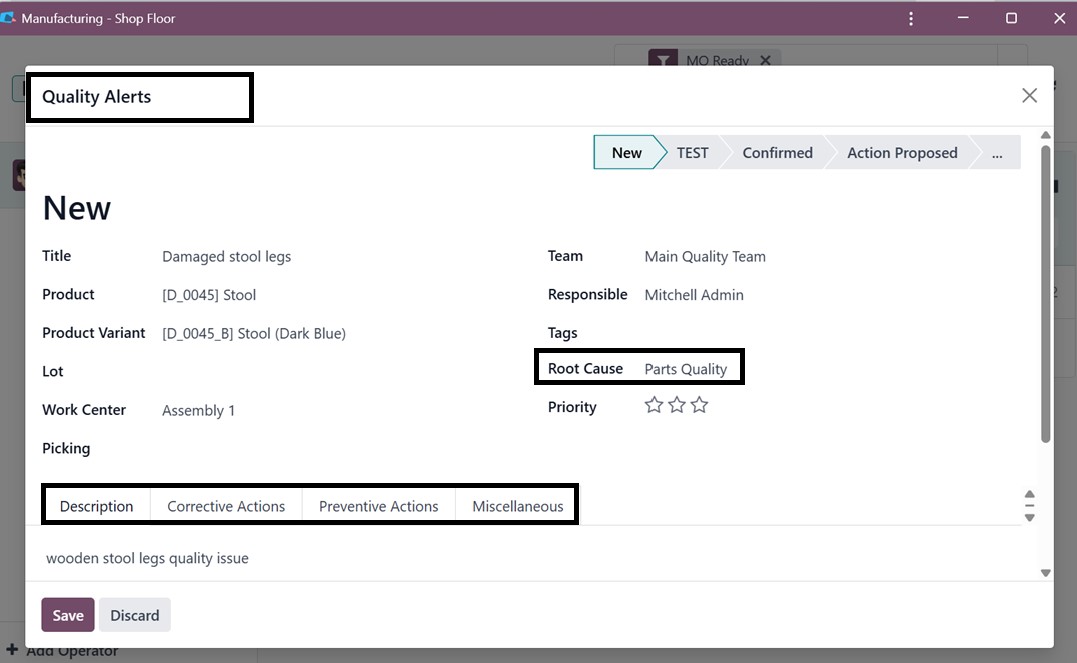
Then, you can provide any
description regarding the
quality issue in the
‘Description’ tab, any
Corrective Actions,
Preventive Actions, and any
other Miscellaneous details
regarding the Vendor, Date
Assigned, etc, in the
relevant tab sections, as you
can see from the above
screenshot.
Manufacturing Order Management:
This function provides
options to automate and
streamline the creation,
tracking, and processing of
Manufacturing Orders (MOs),
ensuring visibility and
control across all stages of
production.
Allocation Reports for
Manufacturing Order provide
visibility into how materials
are allocated to different
manufacturing orders. This
helps in identifying
shortages or surpluses and
improves inventory planning.
Security Lead Time adds buffer
time to manufacturing
operations to account for
unexpected delays. This
ensures that production
deadlines are met even when
disruptions occur.
Each of these settings can be
enabled or configured
according to your specific
operational needs, allowing
Odoo to adapt seamlessly to
your manufacturing workflows.
6.1 Work Centers
Work Centers are the core of
production activities,
serving as dedicated spaces
or units where manufacturing
processes occur. The Odoo 18
Manufacturing module allows
users to create and manage
multiple work centers,
ensuring that every
production activity is
assigned a proper space. This
feature helps ensure quality
at each stage of production.
To set up a new work center,
navigate to the settings
window and activate the Work
Orders option. After
activation, the work center
setup link becomes
accessible, displaying
existing work centers and
their configurations.
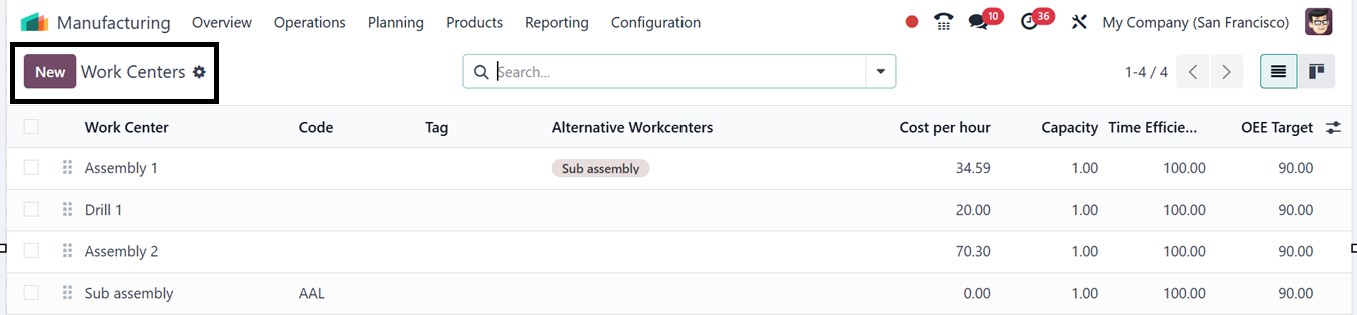
In the ‘Work Centers’ window of
the ‘Configuration’, you can
see the dashboard of all the
available work centers with
their Name, Code, Tag,
Alternative Work Centers,
Cost per hour, Capacity, and
other details, as depicted in
the screenshot below.
To create a new work center for
your company, click on the
‘New’ button and proceed by
filling in the required
fields, including the unique
‘Work Center Name.’ The
‘Tags’ aid in classifying and
arranging work centers for
simpler filtering. You can
choose a backup center in the
‘Alternative Work Center’
field to maintain operations
in the event that the primary
center is unavailable.
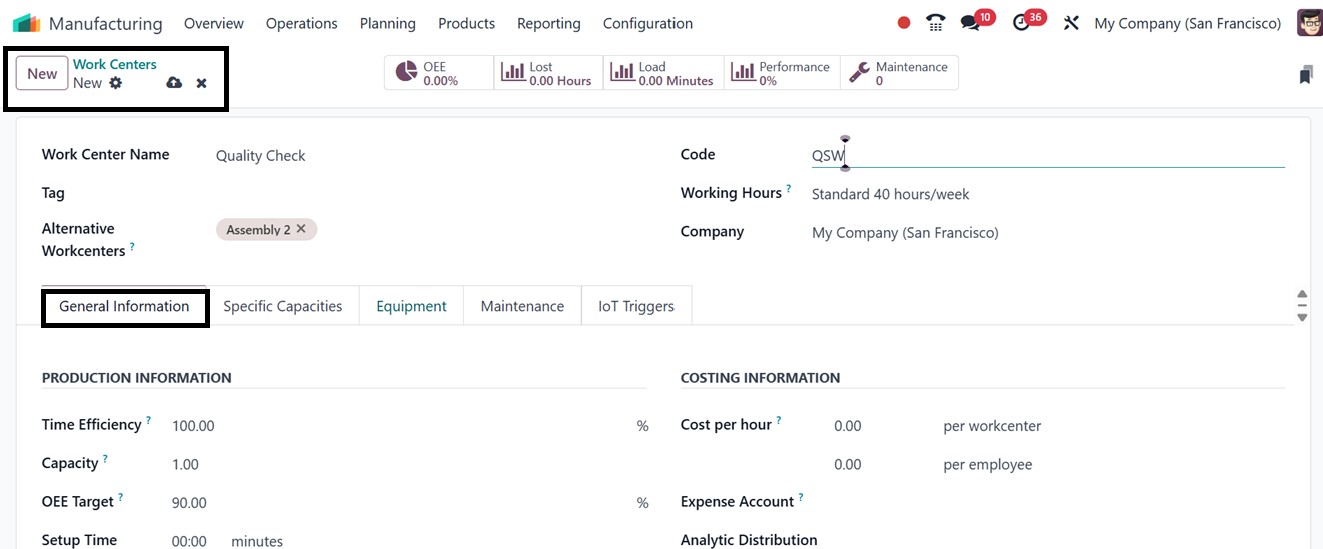
For the purpose of indicating its
availability, every work
center also has a distinct
‘Code’ and set ‘Working
Hours’. You can also input
Cost per Hour, Setup Time,
and Cleanup Time; all crucial
for precisely estimating
production costs as well as
establishing ‘OEE Targets’
(Overall Equipment
Effectiveness targets) to
monitor efficiency and select
the ‘Capacity’ (number of
things it can manufacture
concurrently).
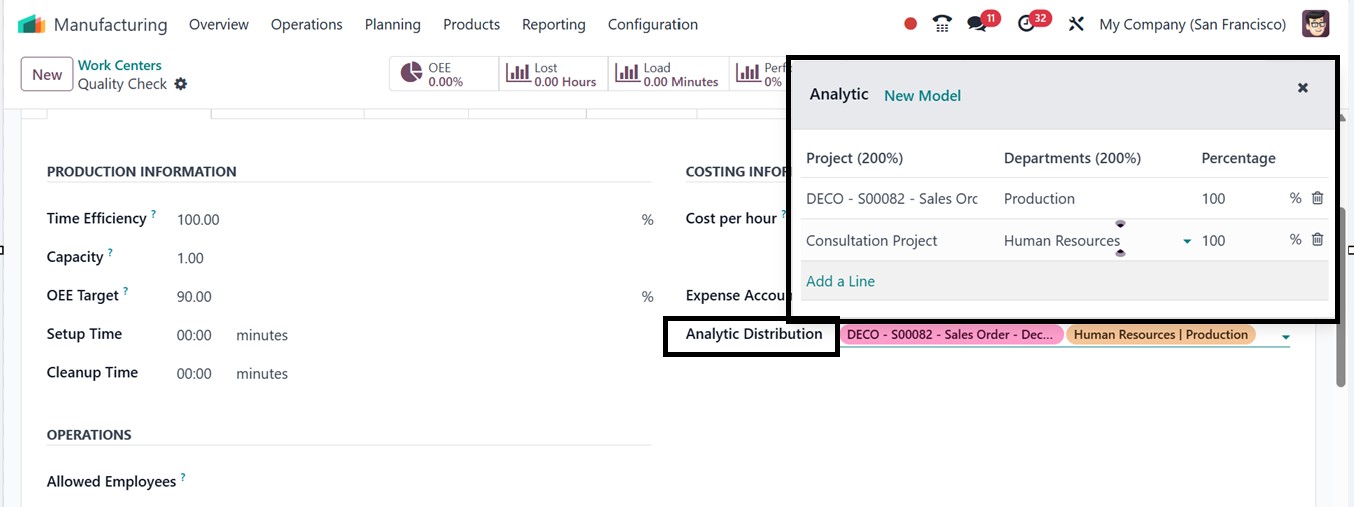
Odoo 18's Manufacturing module
allows for the assignment of
an ‘Expense Account’ to each
work center, ensuring
accurate tracking of costs
like labor, machine usage,
setup, and maintenance. The
'Analytic Distribution'
button allows for precise
allocation of expenses across
departments, projects, or
cost centers, enhancing cost
control and profitability
analysis. Using the ‘Add a
Line’ button from the pop-up
window, you can mention the
Projects, Departments, and
the analytic Distribution
Percentages, as depicted in
the screenshot below.
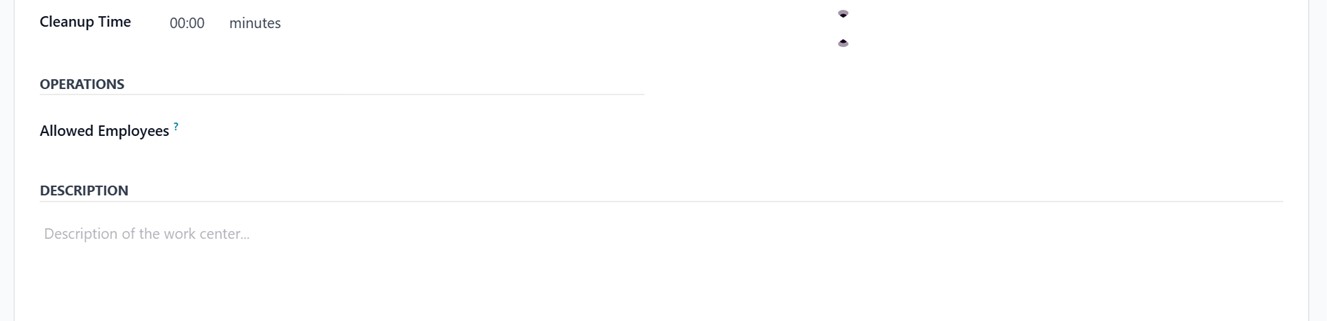
You can specify the employees
responsible for or permitted
to access a particular work
center in the ‘Allowed
Employees’ field.
Additionally, any relevant
information or notes about
the work center can be added
in the ‘Description’ section.
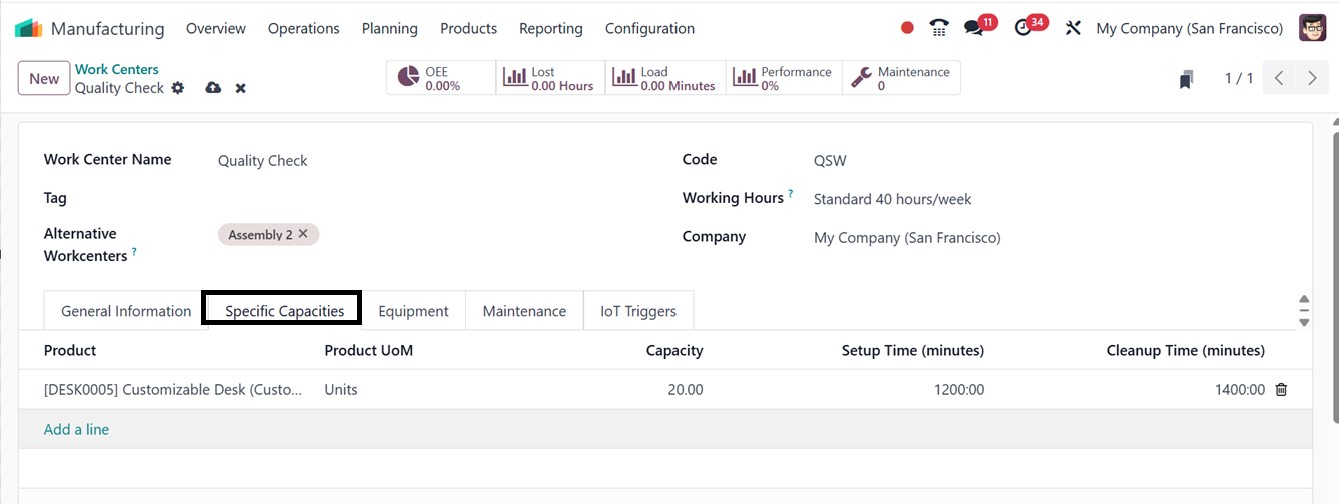
The Specific Capacity setting in
a work center defines the
default number of units that
can be produced
simultaneously during a
single production cycle. This
value serves as a general
benchmark for the work
center’s output capability.
However, if a work center is
capable of handling different
production capacities
depending on the product, you
can configure this by
navigating to the Specific
Capacities tab.
Here, you can set customized
capacity values for
individual products, allowing
for more accurate planning
and resource allocation based
on the unique production
requirements of each item by
clicking on the ‘Add a line’
button, as depicted in the
screenshot below.
The ‘Equipment’ tab allows users
to assign specific equipment
to a work center and track
each item's costs and
productivity individually.
When you click on the ‘Add a
line’ button inside the tab,
you can add any equipment
from the list of all
available equipment.
Within the Equipment tab, you can
view detailed information
about each item, including
the Equipment Name, the
Technician responsible for
its upkeep, its Category, and
key performance indicators
such as MTBF (Mean Time
Between Failures), MTTR (Mean
Time to Recovery), and the
Estimated Next Failure date,
as shown in the screenshot
below.
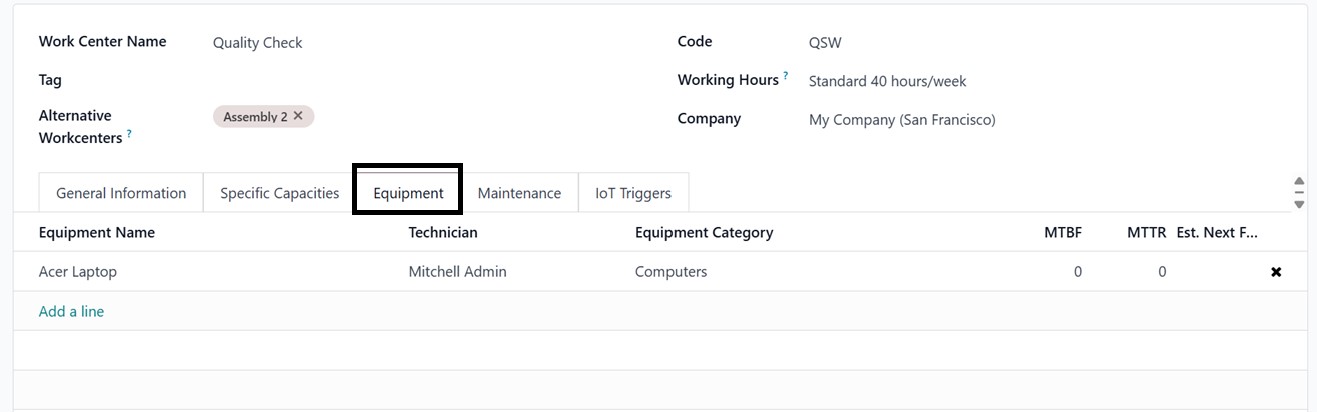
This functionality supports
better maintenance planning,
minimizes downtime, and
improves equipment
reliability.
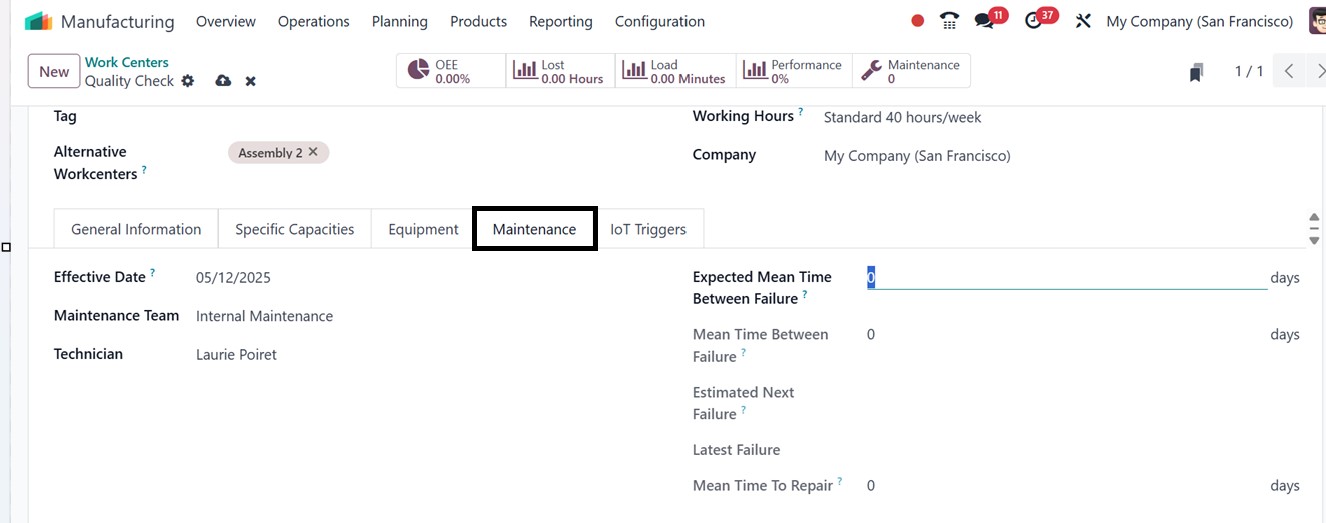
The Maintenance tab allows you to
define key maintenance
details for a work center. In
the Effective Date field, you
can set the start date of the
work center’s operation. You
can then specify the
Maintenance Team and the
responsible Technician
assigned to handle
maintenance tasks.
Additionally, you can enter
the Expected Mean Time
Between Failure (MTBF), a
manually defined metric that
estimates the average time
the equipment is expected to
function before failing. This
helps in planning maintenance
schedules and improving
overall equipment reliability
and performance.
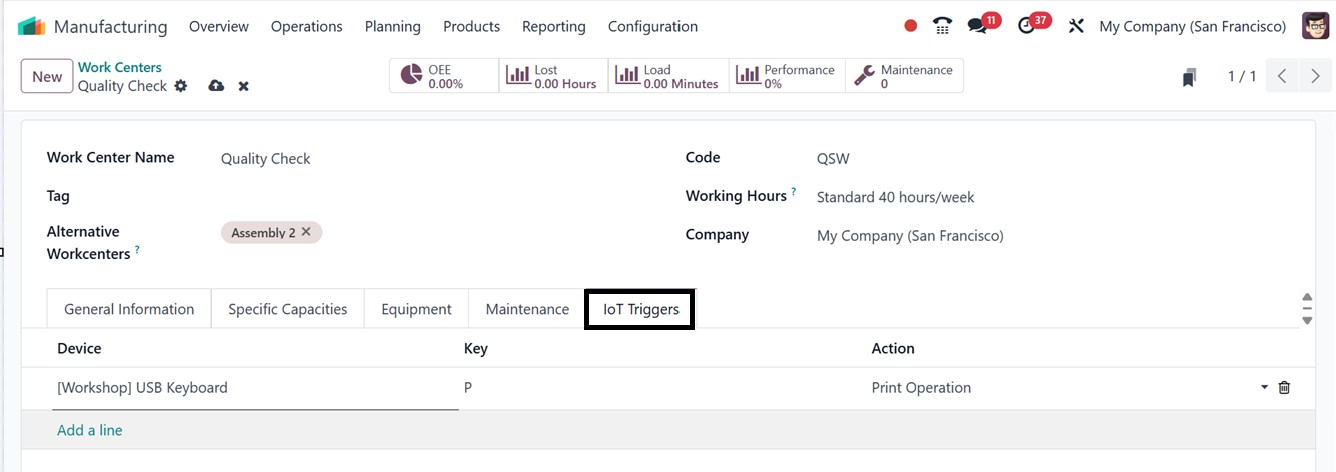
You can automate particular tasks
by integrating IoT devices
with a work center using the
‘IoT Triggers’ tab. This tab
allows you to specify the
action that the device should
do when activated, define the
device to be triggered, and
input the appropriate key for
device authentication. For
increased efficiency, this
permits smooth communication
between linked hardware and
production processes.
After entering all the necessary
information, users can save
the new work center, adding
it to the list of available
centers.
Then the work center form’s smart
buttons provide easy access
to key operational insights,
including scheduled
operations, Overall Equipment
Effectiveness (OEE),
productivity losses, work
center load, and work order
performance. By clicking the
Overall Equipment
Effectiveness button, you can
generate a performance
analysis report that
evaluates employee costs,
task duration, user
performance, and loss
reasons.
The Productivity Loss button
displays reports on
productivity impacts caused
by factors like equipment
failure or reduced speed. The
Loads button compares actual
work order completion times
with planned timelines,
giving insights into work
center capacity. Lastly, the
Performance button lets you
access the performance
analysis report for work
orders assigned to the
specific work center.
Finally, the ‘Maintenance’
smart button will show the
maintenance operations
related to this particular
work center.
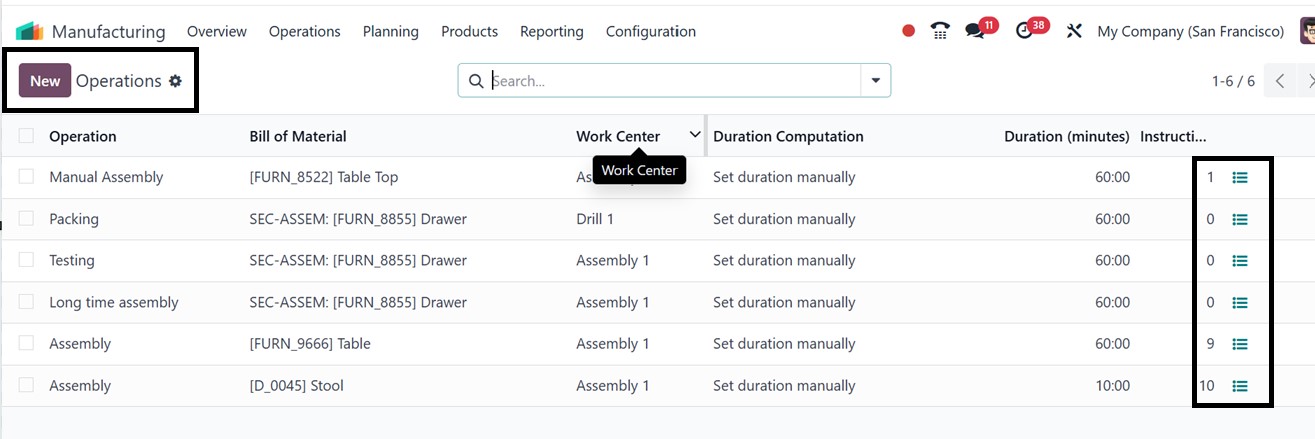
6.2 Operations
The ‘Operations’ are the
production procedures
established by the Odoo
software. Effective
coordination of these
operations across different
work centers ensures that
high-quality products are
efficiently produced for
clients. Setting up and
managing operations in the
manufacturing module can be
done through the
Configuration menu or by
enabling it in the settings
menu.
After opening the ‘Operations’
menu, you can see the
dashboard of all the
available operations with
their respective Name, Bill
of Material, Work Center,
Duration Computation,
Duration in Minutes, and
Instructions.
To quickly check the instructions
of any operation, simply
click on the ‘Show
Instructions’ (three lines)
icon, as depicted in the
screenshot below.
You can open an entry by clicking
on an operation column to get
a detailed view of the
operations in a form view.
Filters, Group By, and
Favorites features are
available to help you
navigate and customize the
display according to your
needs. Let’s now discuss how
to create a similar function
in the Odoo ERP's
manufacturing module,
After opening a new Operation
creation form, you will need
to add key information such
as the Operation Name, Bill
of Materials, and Work
Center. These details are
then linked to different
Duration Computations, which
can either be manually
defined or automatically
calculated based on tracked
time.
Then, you can set the Default
Duration for the operation in
the designated field and
specify any Product Variants
that should automatically
undergo this operation by
entering them in the Apply on
Variants field, as shown in
the screenshot below.
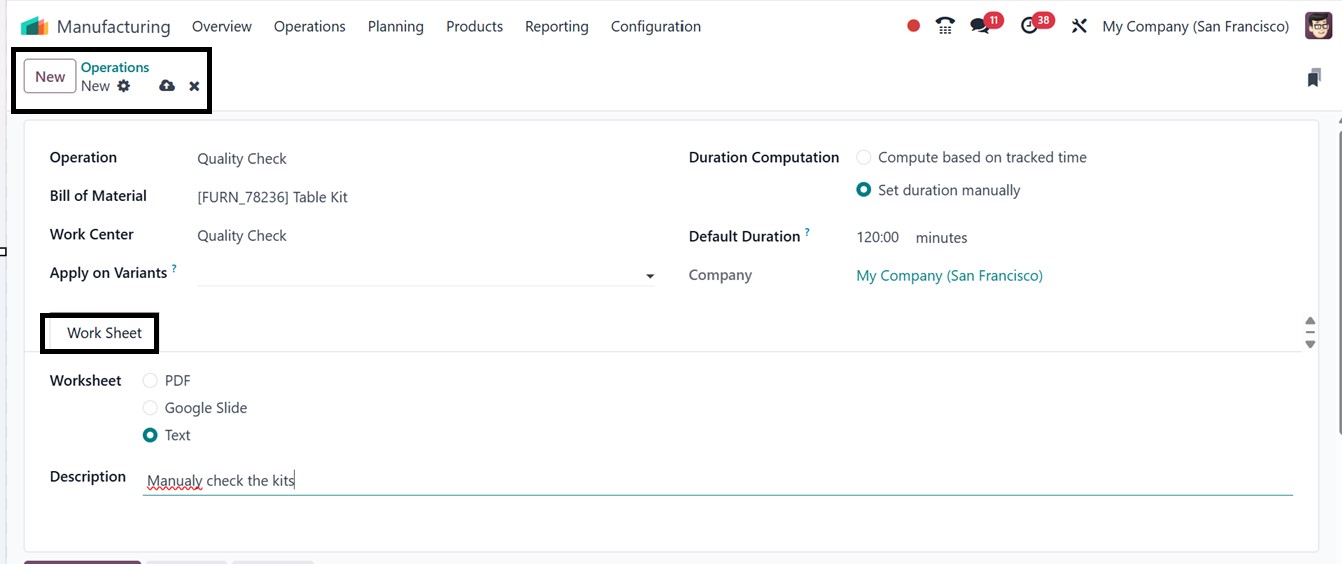
Finally, you can refer to the
worksheet under the Worksheet
tab, which could be a Text
document, Google Slide, or
PDF. This section also allows
for a brief explanation of
the procedure in a
Description field. Once
completed, click the save
button to include the newly
created operation in the list
of existing operations. This
is the standard method of
creating operations in the
manufacturing module.
Then, you can add any
instructions to the
operations as per your
company policies by clicking
on the ‘Show Instructions’
icon provided inside the
operation’s column from the
dashboard.
The Title field is used to enter
clear, detailed instructions
that guide the operator
through the task. Eg: "Check
components of the product."
The Products field specifies
which product(s) the step
relates to, helping identify
involved components or
finished goods. The Operation
Types field links the step to
a particular type of
operation such as
Manufacturing or
Subcontracting. The Work
Order Operation field
connects the step to a
specific operation within a
routing, like Welding or
Assembly. The Company field
indicates which company the
step is configured for,
especially useful in
multi-company environments.
The Responsible field assigns
accountability to a specific
individual who will perform
or oversee the step. The
‘Step Document’ field allows
you to customize or choose a
specific page of the
operation worksheet to
explain the instruction steps
for this particular
operation. For quality
control, the Control per
field sets the basis (Unit,
Batch, or Time), while the
Control Frequency field
determines how often this
control occurs; for example,
checking every 10 units. The
Type field classifies the
step’s nature, such as
Instruction for guidelines,
Check for validations,
Picture for image-based
tasks, or Measure for
recording metrics like
temperature or pressure.
Lastly, the Team field
assigns a responsible work
center or quality team to
handle the step, ensuring
accountability and structured
execution.
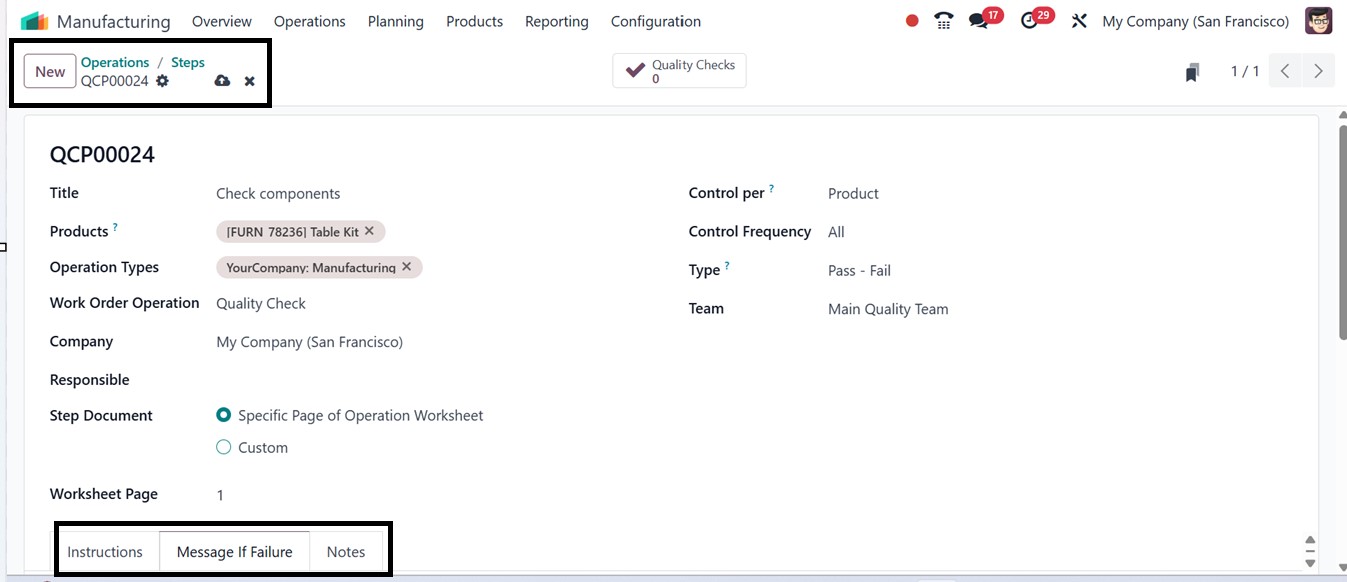
Next, you can add detailed notes
or instructions for complex
operation steps in the
Instructions tab. Use the
Message If Failure tab to
specify contact information,
such as responsible users or
email addresses, to be
notified in case of an
operation failure or a
product-related issue.
Additionally, the Notes tab
can be used to include any
extra information or remarks
related to the steps or the
overall operation.
After saving all the details, you
can access the dashboard of
completed operations or steps
linked to this specific step
through a smart button, based
on the associated work order
operation's name. In this
example, a Quality Checks
smart button is displayed
because the work order
operation is set to Quality
Checking.