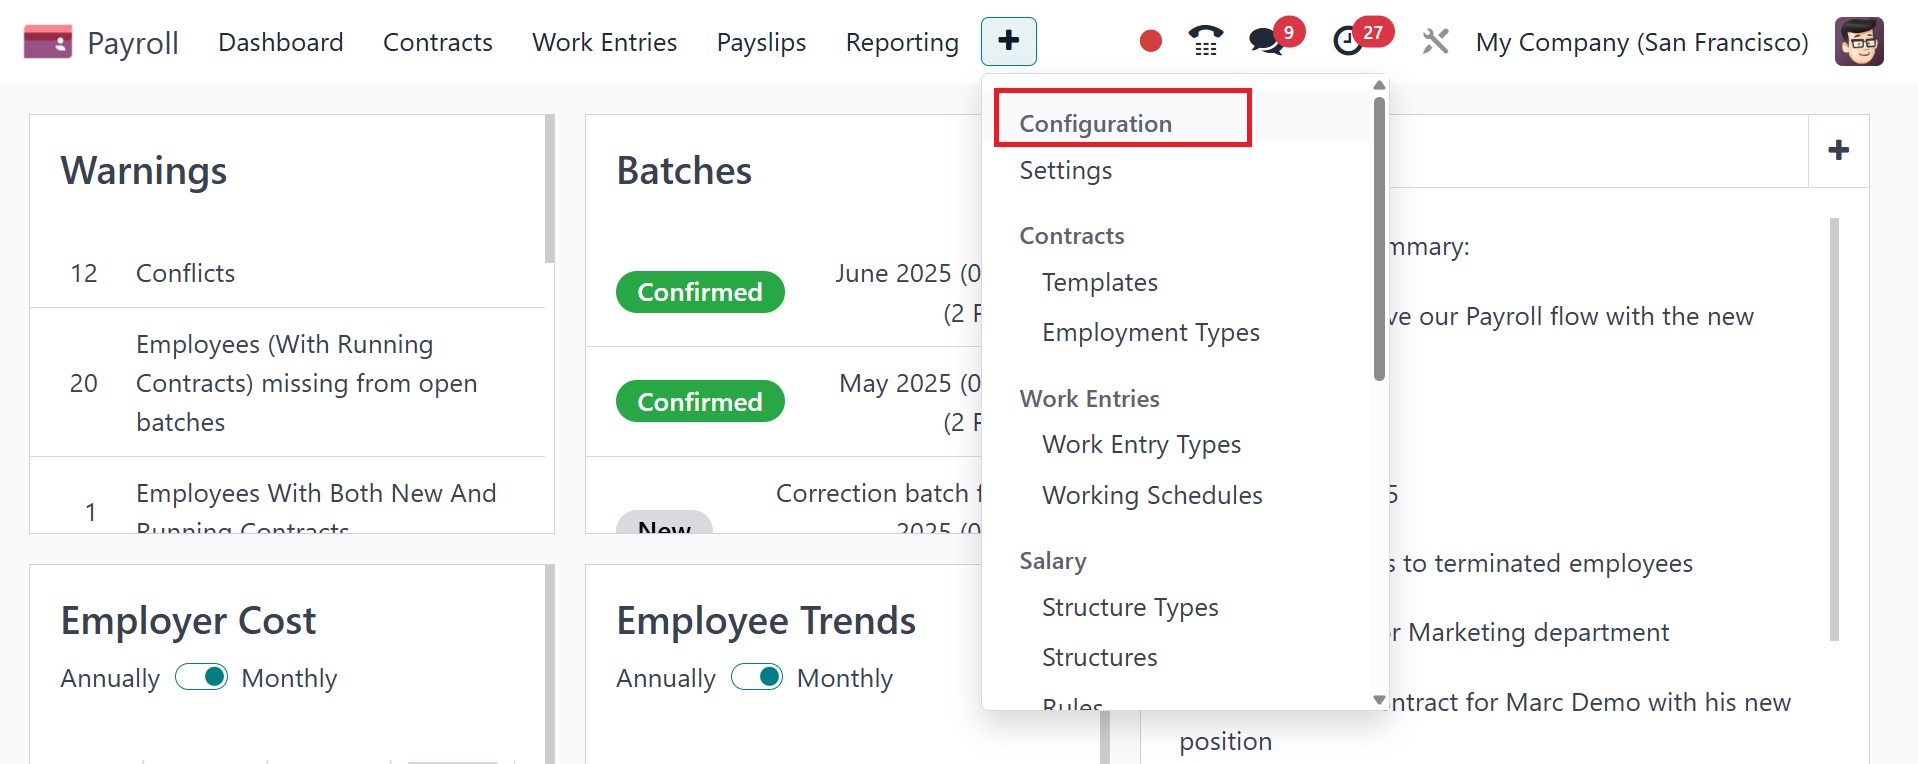
5. Configuration
The Configuration tab in Odoo 18 Payroll allows you to manage the
salary package configurator, job entries, and employee salary data.
Let's now examine the key configuration elements.
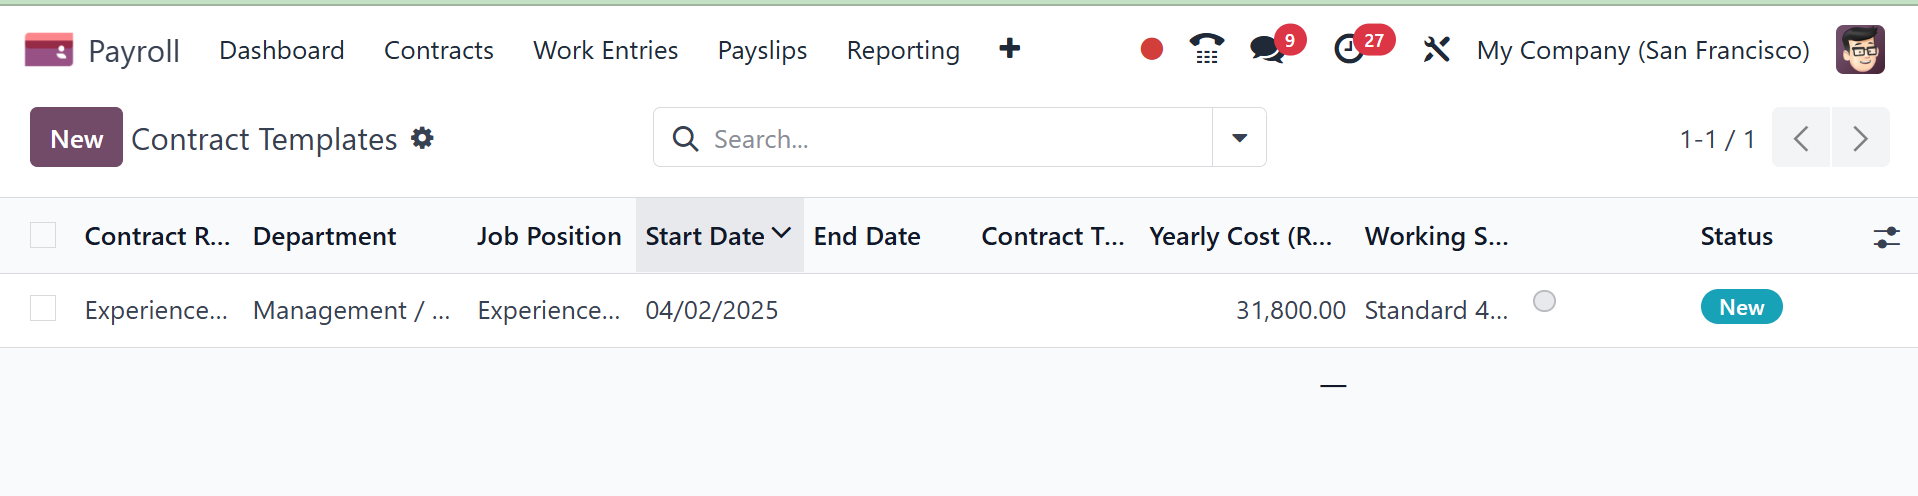
5.1 Template
The contract templates are accessible through the Configuration
menu's Template option. To add a new one, click the New button. The
subjects we discussed in the contract are similar to the form
creation view.
On selecting the NEW option, you can have the creation page, as in
the image below.
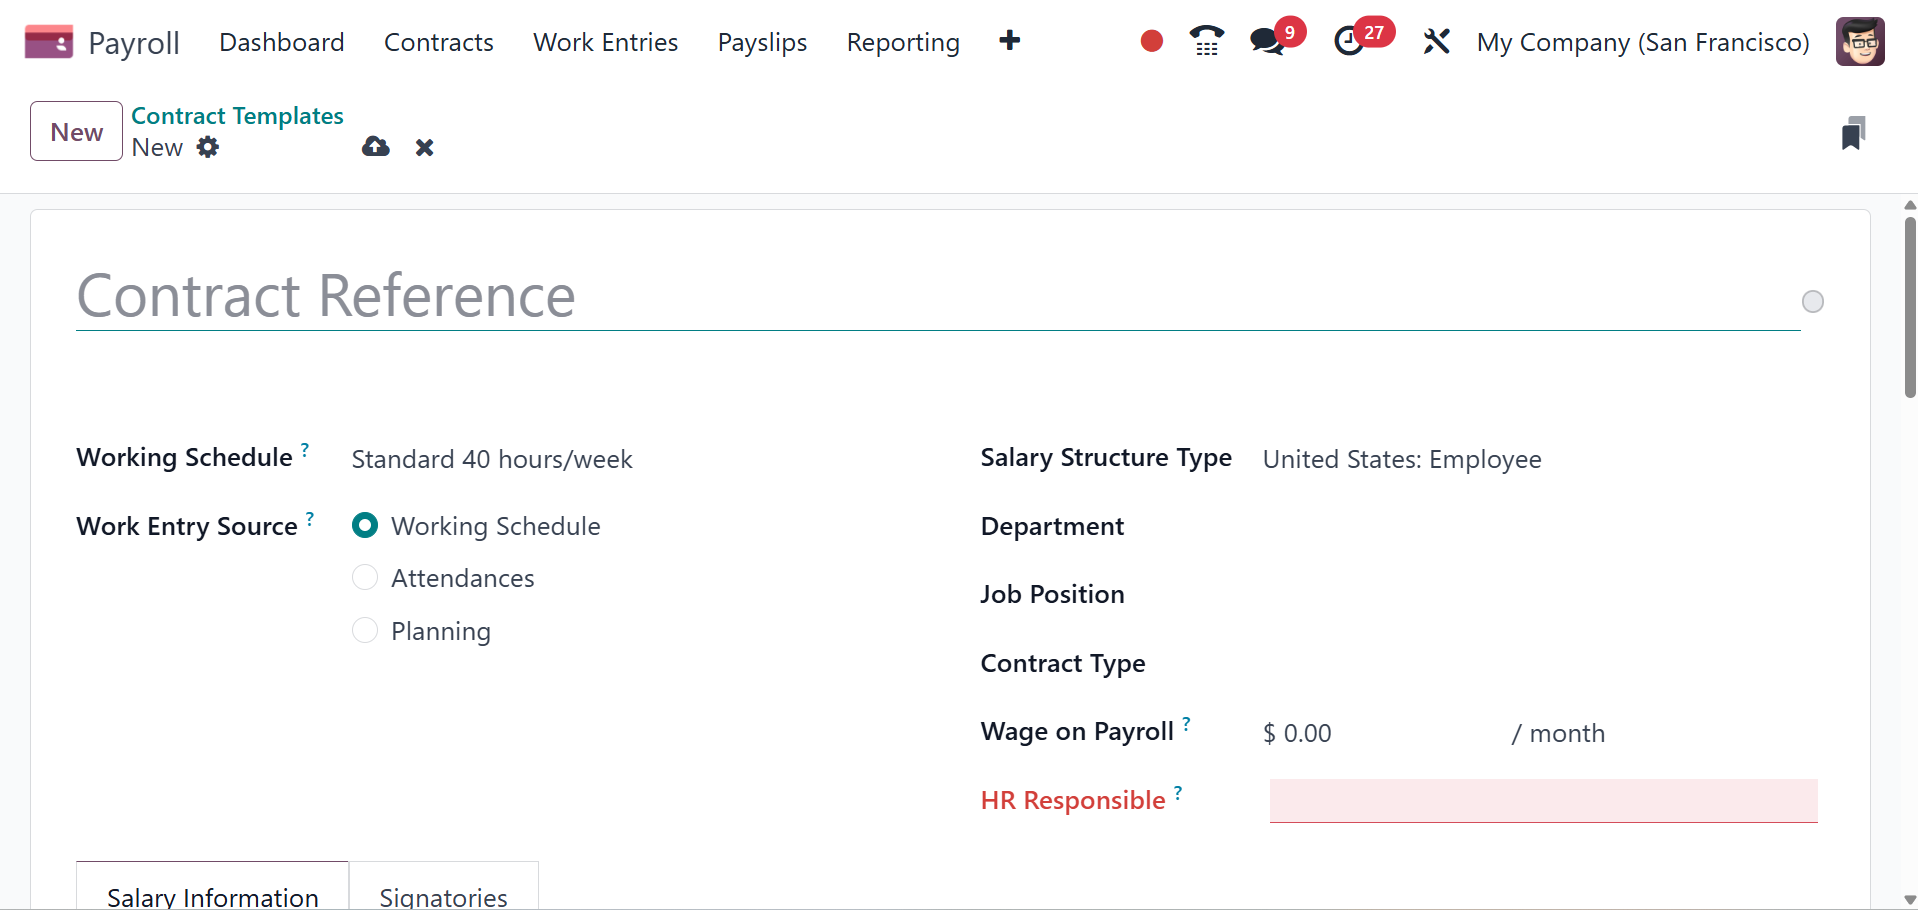
Here, you can add the name of the template, working schedule, working
entry source as working schedule, attendances, or planning.
Work Entry Source: select how the work entries are generated. This
field is required. Click the radio button next to the desired
selection. The options are:
Working Schedule: work entries are generated based on
the selected Working Schedule.
Attendances:work entries are generated based on the
employee’s check-in records in the Attendances application. (This
requires the Attendances application).
Planning: work entries are generated based on the
planned schedule for the employee from the Planning application.
(This requires the Planning application).
Salary Structure Type: select one of the salary
structure types from the drop-down menu. The default salary
structure types are Employee or Worker. A new salary structure type
can be created, if needed. Department: select the department the
contract applies to from the drop-down menu. Job Position: select
the specific job position the contract applies to from the drop-down
menu.then, provide the contract type, wage on payroll, and HR
responsible. Wage on Payroll is to enter the employee’s monthly
wage. Contract Type helps to choose either Permanent, Temporary,
Seasonal, Full-Time, or Part-Time from the drop-down menu.
5.2 Employment Types
Every type of employee in a company, including trainees, permanent
employees, and temporary employees, has a different pay plan to suit
their needs. These employee categories can be configured as
Employment types under the Configuration option.
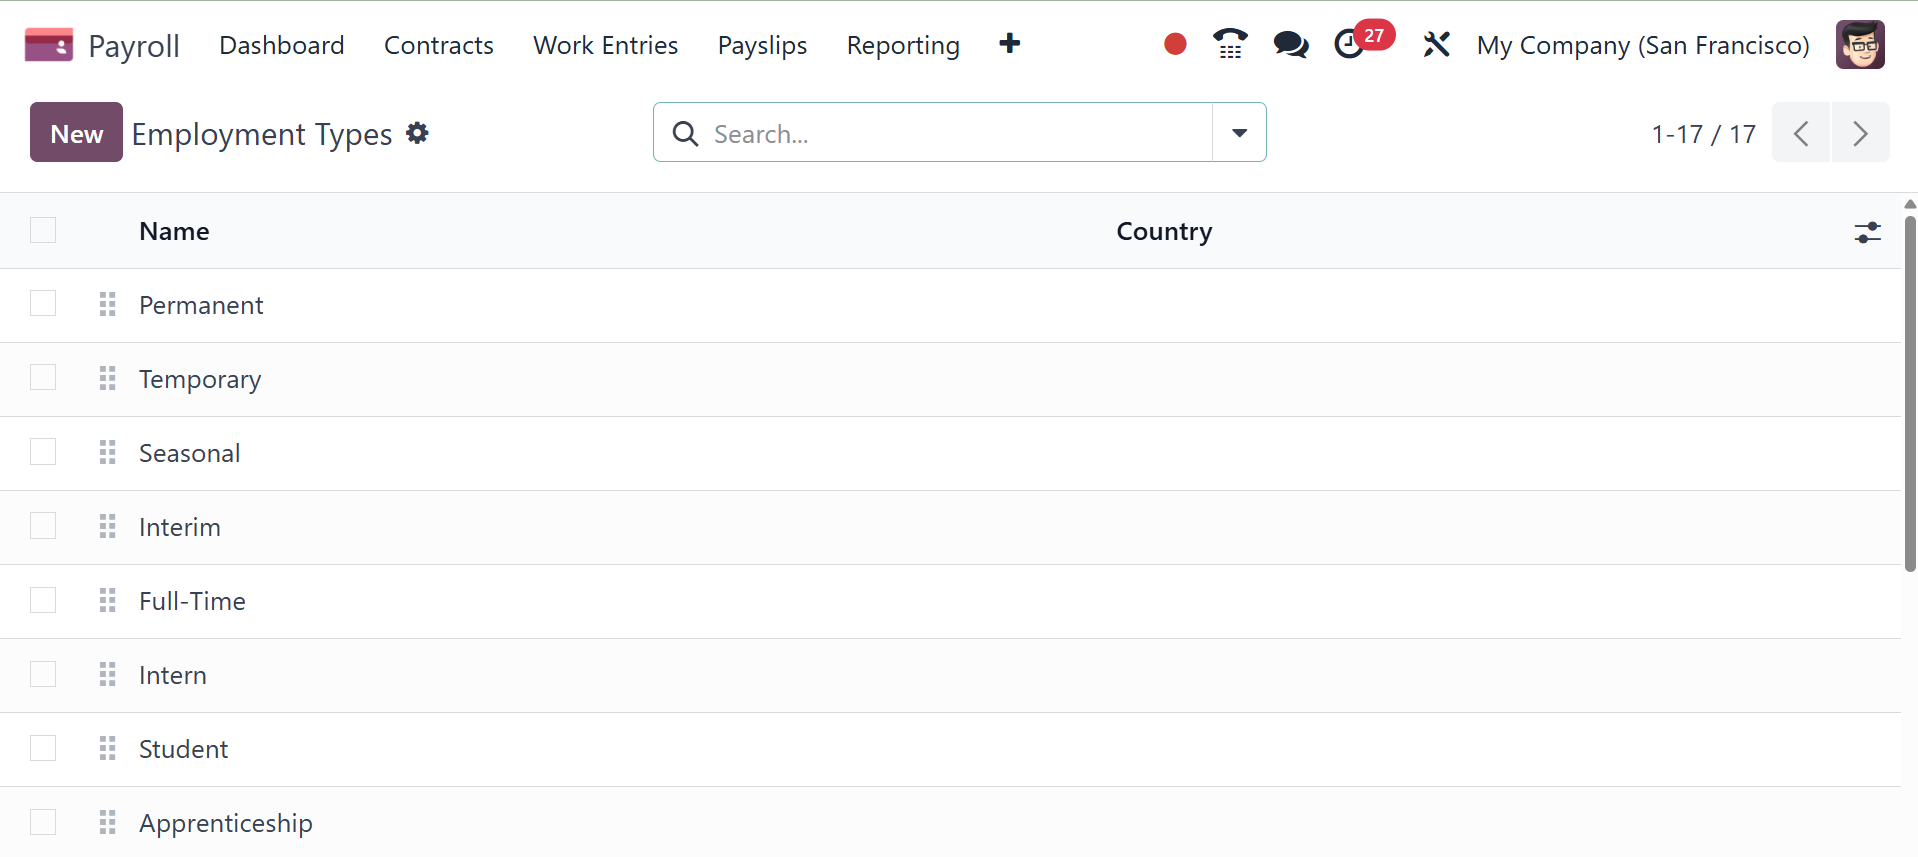
The list includes the name, code, and country. To add a new one,
click the New button. A new line will show up underneath the list.
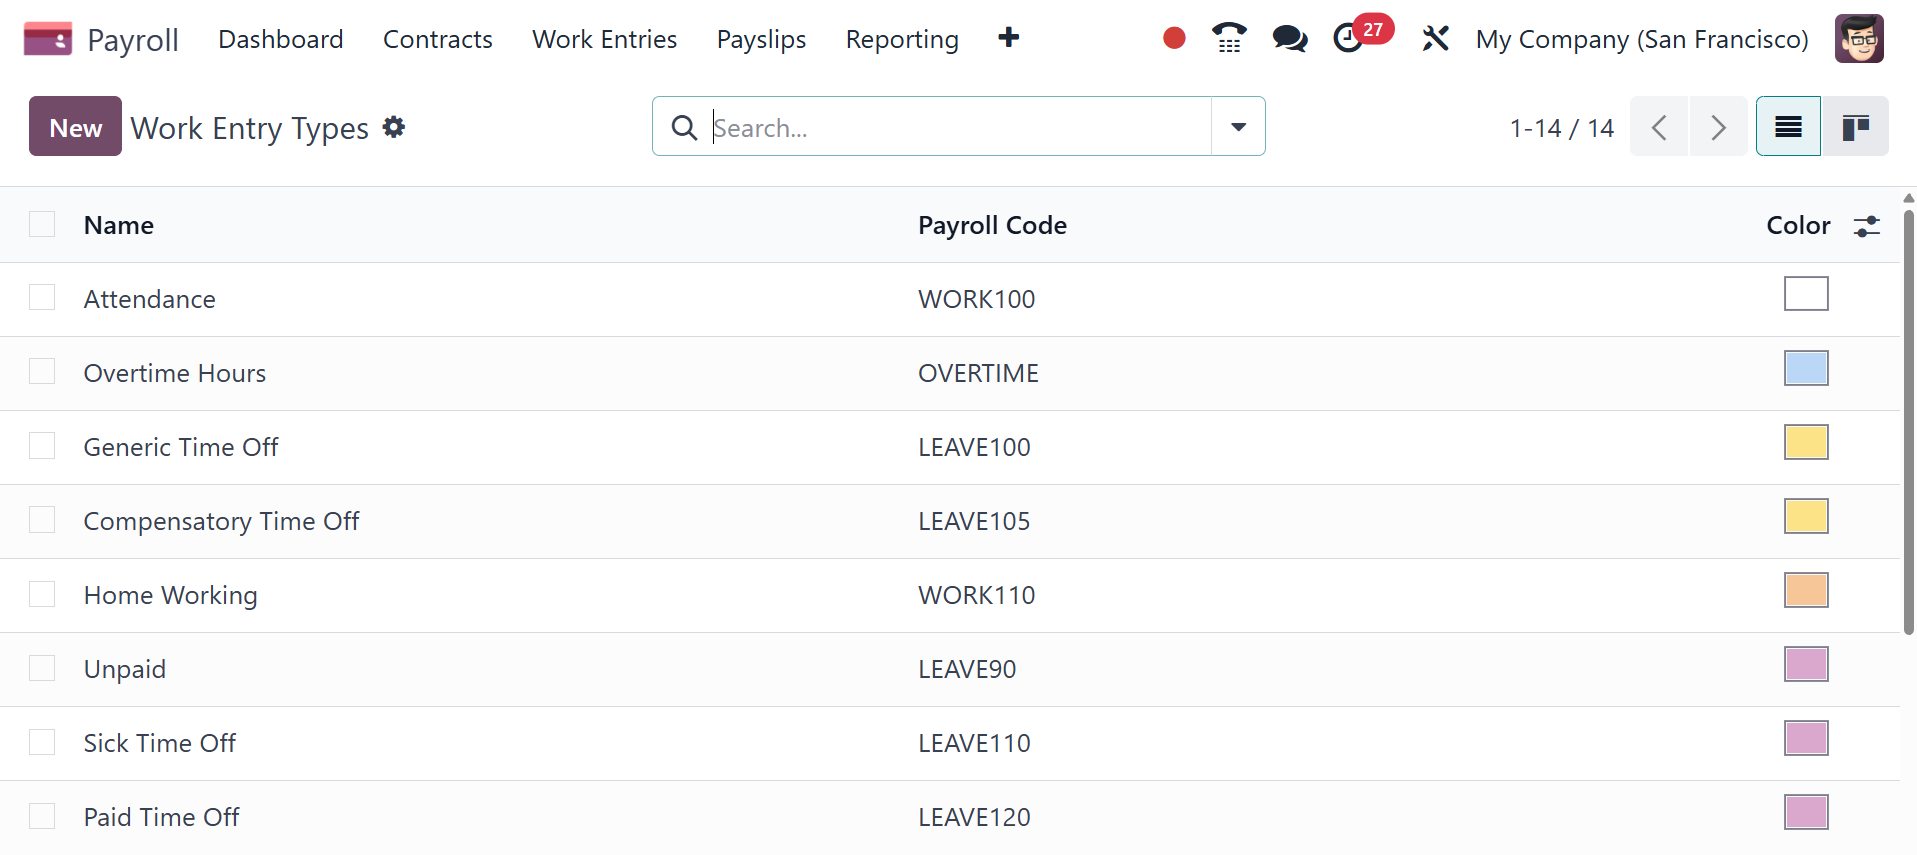
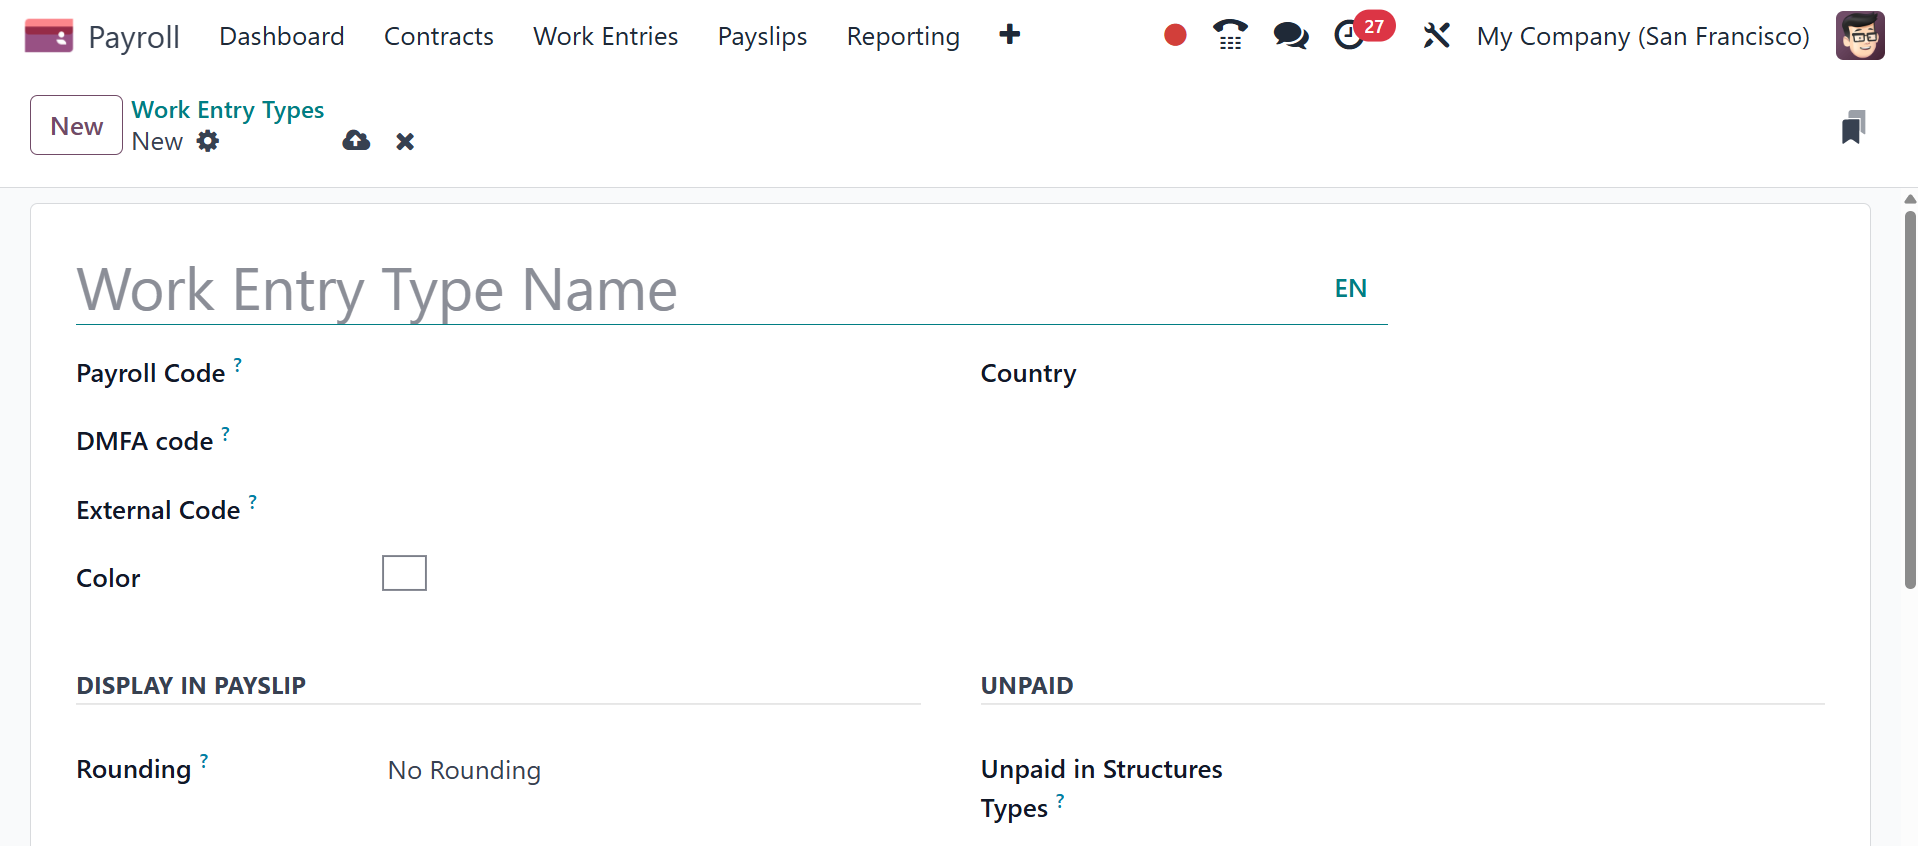
5.3 Work Entry Type
The Configuration menu now displays the list of work entry types. The
Name, Payroll Code, and Color are shown in the list. The New button
can be used to add a new type of work entry.
Enter the Workentry Type Name and Payroll Code. The DMFA Code is used
to identify the work entry in the DMFA report. The information was
exported to an external source by the external code. When the entry
is made on the payslip, the value is rounded using the added
rounding method. The worker benefits from the Unpaid Structure
Types, which do not allow the worker to view their payslip.
Check boxes can then be enabled under the VALID FOR ADVANTAGES
section. Checking each box makes the job entries eligible for
reimbursement of various expenses, including lunch vouchers,
representation fees, and private vehicle charges.
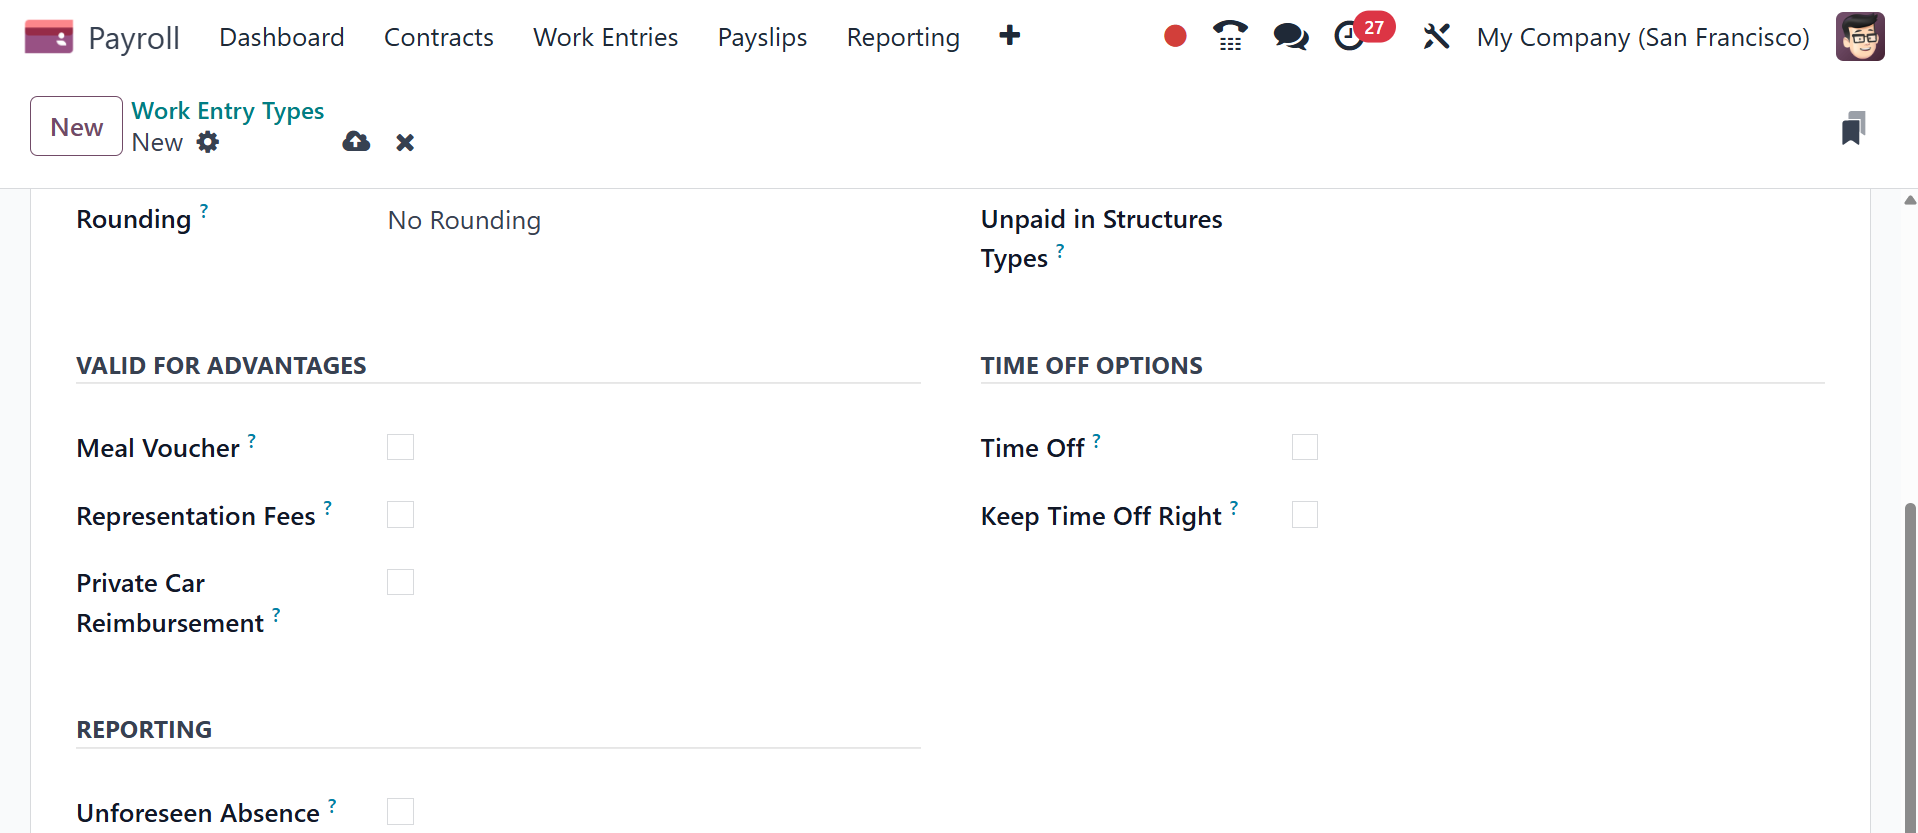
By activating the Time Off, the job entry type can be connected to
time off types. Keep Time Off Right allows job input to be counted
for vacation time in subsequent years. If Unforeseen Absence is
enabled in the job entry, it will be included in the absenteeism at
work report.
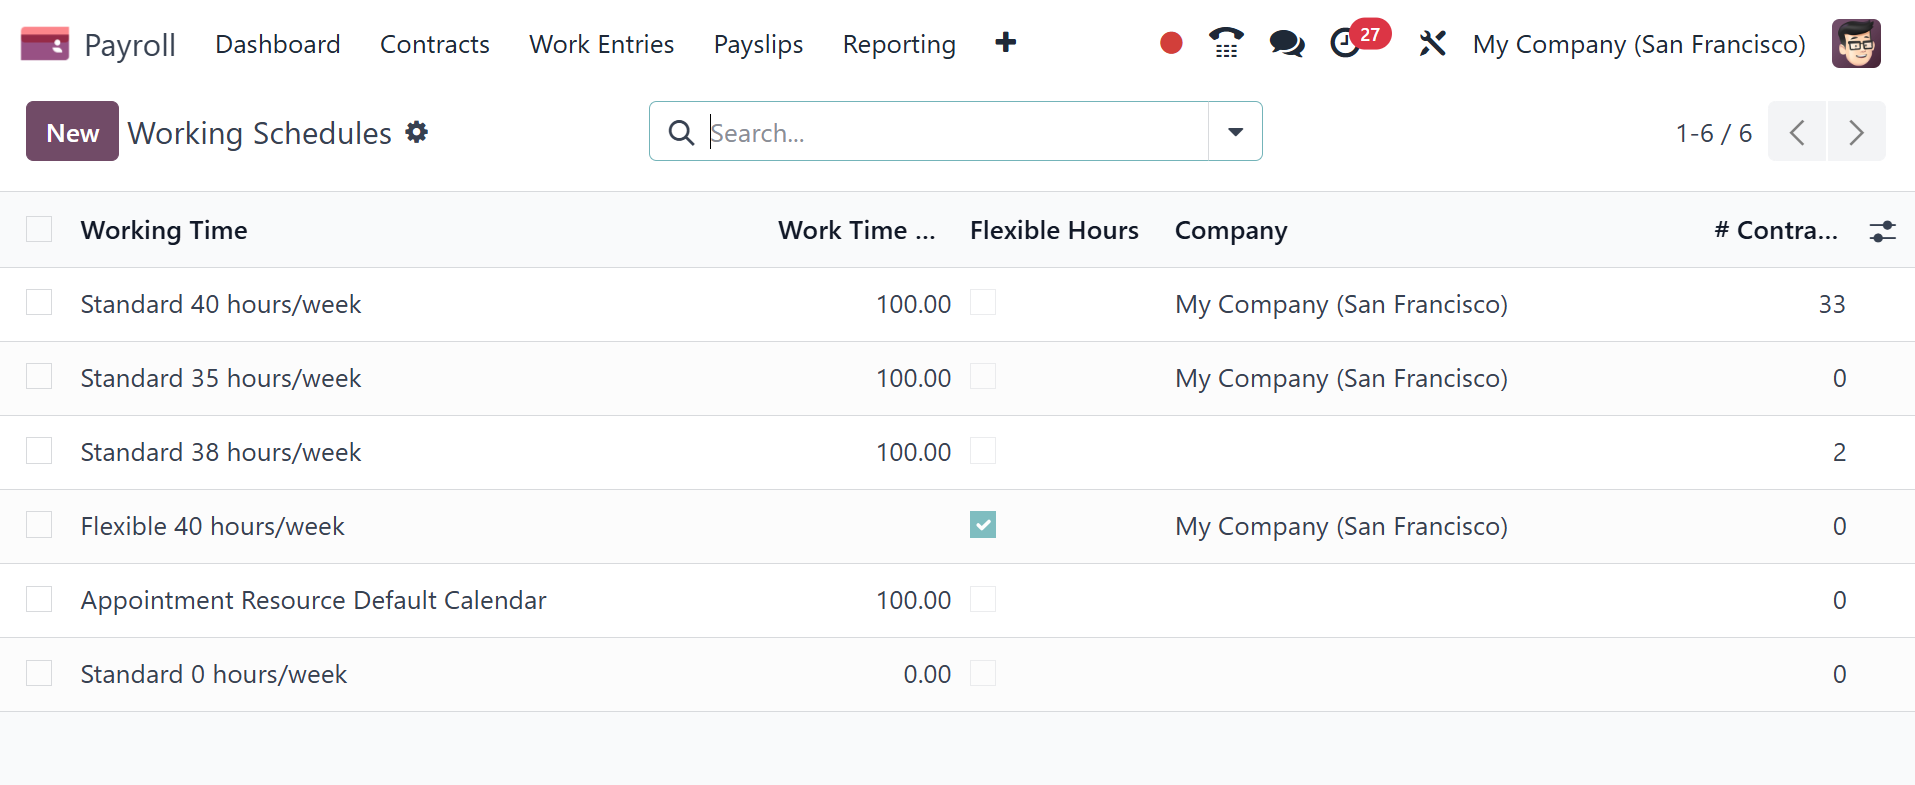
5.4 Working Schedule
The Odoo 18 Payroll module makes it simple for users to monitor their
working hours. With its help, you can boost organizational
productivity. Both companies and employees are given the flexibility
they need to realize their full potential. On the Configuration tab
of Odoo 18 Payroll, select the Working Time menu. In the Working
Times box, we may view data such as Work Time Rate, Contracts using
it, Working Time, and Company. By choosing the New icon, you may
make a new employee work schedule.
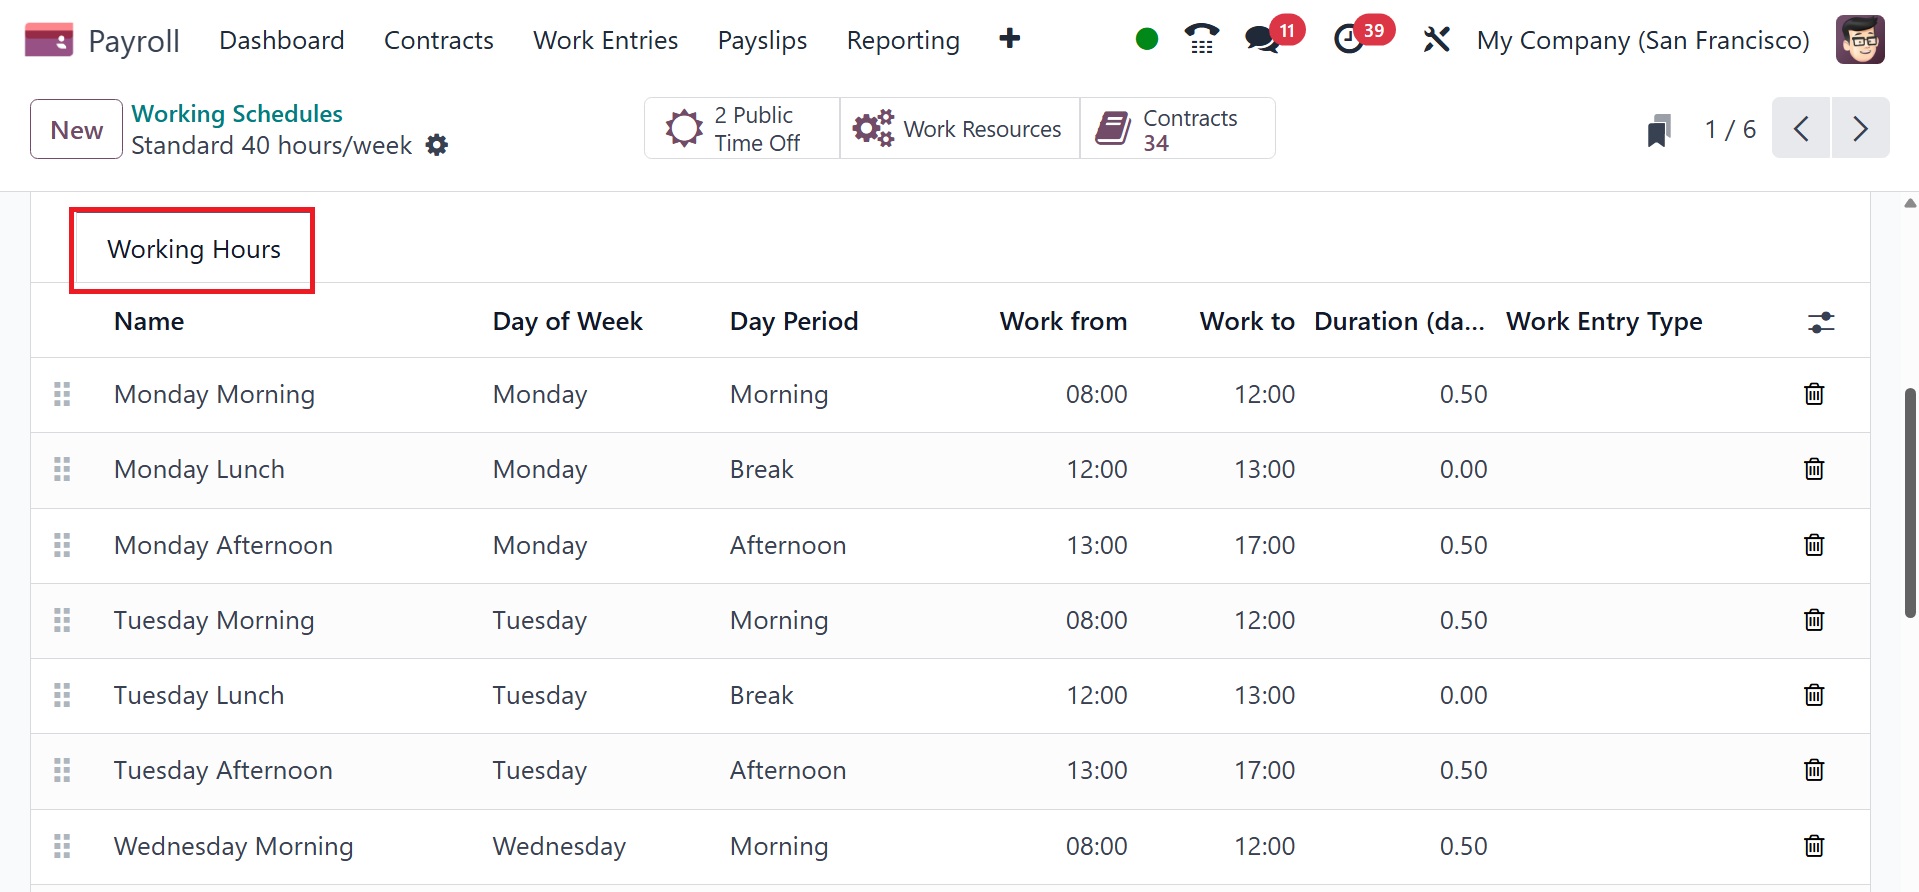
Once the Working schedule window has been launched, the user can
apply the Company, Full Time, Average Hour per Day, and Timezone
data. Among the smart buttons in the Working Times pane are Work
Resources, Contracts, and Public Time Off.

The user can add a new working hour for an employee by choosing Add a
line under the Working Hours tab. The user can enter the name, day
period, type of work entry, day of the week, work from, and other
details under the Working Hours section.
Here, the switch to the 2-week calendar option is available if the
working hours are not consistent each week, and the hours are on a
bi-weekly schedule instead. Click the Switch to 2-week calendar
button at the top of the new default working hours form. This
changes the Working Hours tab to display two weeks of working times
that can be adjusted.
The Salary area of the Configuration tab allows us to define salary
structures and policies. Among the options available in the Salary
area are Rules, Other Input types, Structure kinds, Rule parameters,
Rules, and so on. We can now discuss each of them separately.
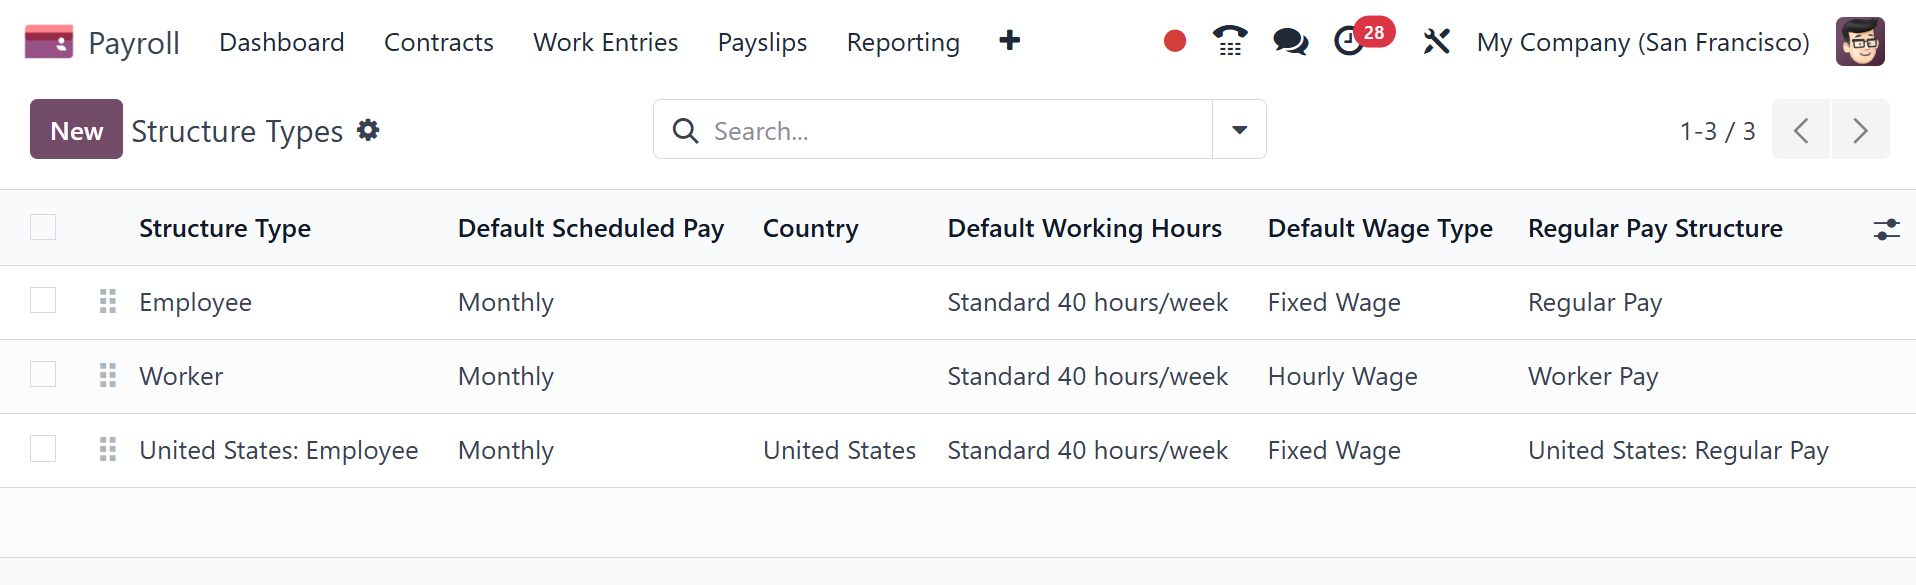
5.5 Structure type
It is possible to configure new types of salary structures in Odoo 18
Payroll. After describing the different wage kinds on a monthly,
hourly, or weekly basis, users can define salary structures for
trainees, employees, and workers within the Odoo18 Payroll system.
Users can designate their employees' pay scales after choosing the
Salary Structures menu on the Configuration tab. The Structure Types
box may contain details on Wage Type, Default Scheduled Pay,
Structure Type, Regular Pay Structure, and other topics. We can
create new structure types in Odoo 18 by clicking the New button.
In the open box, type the name of the structure type and your nation.
It's easy to set the wage type to hourly and fixed monthly.
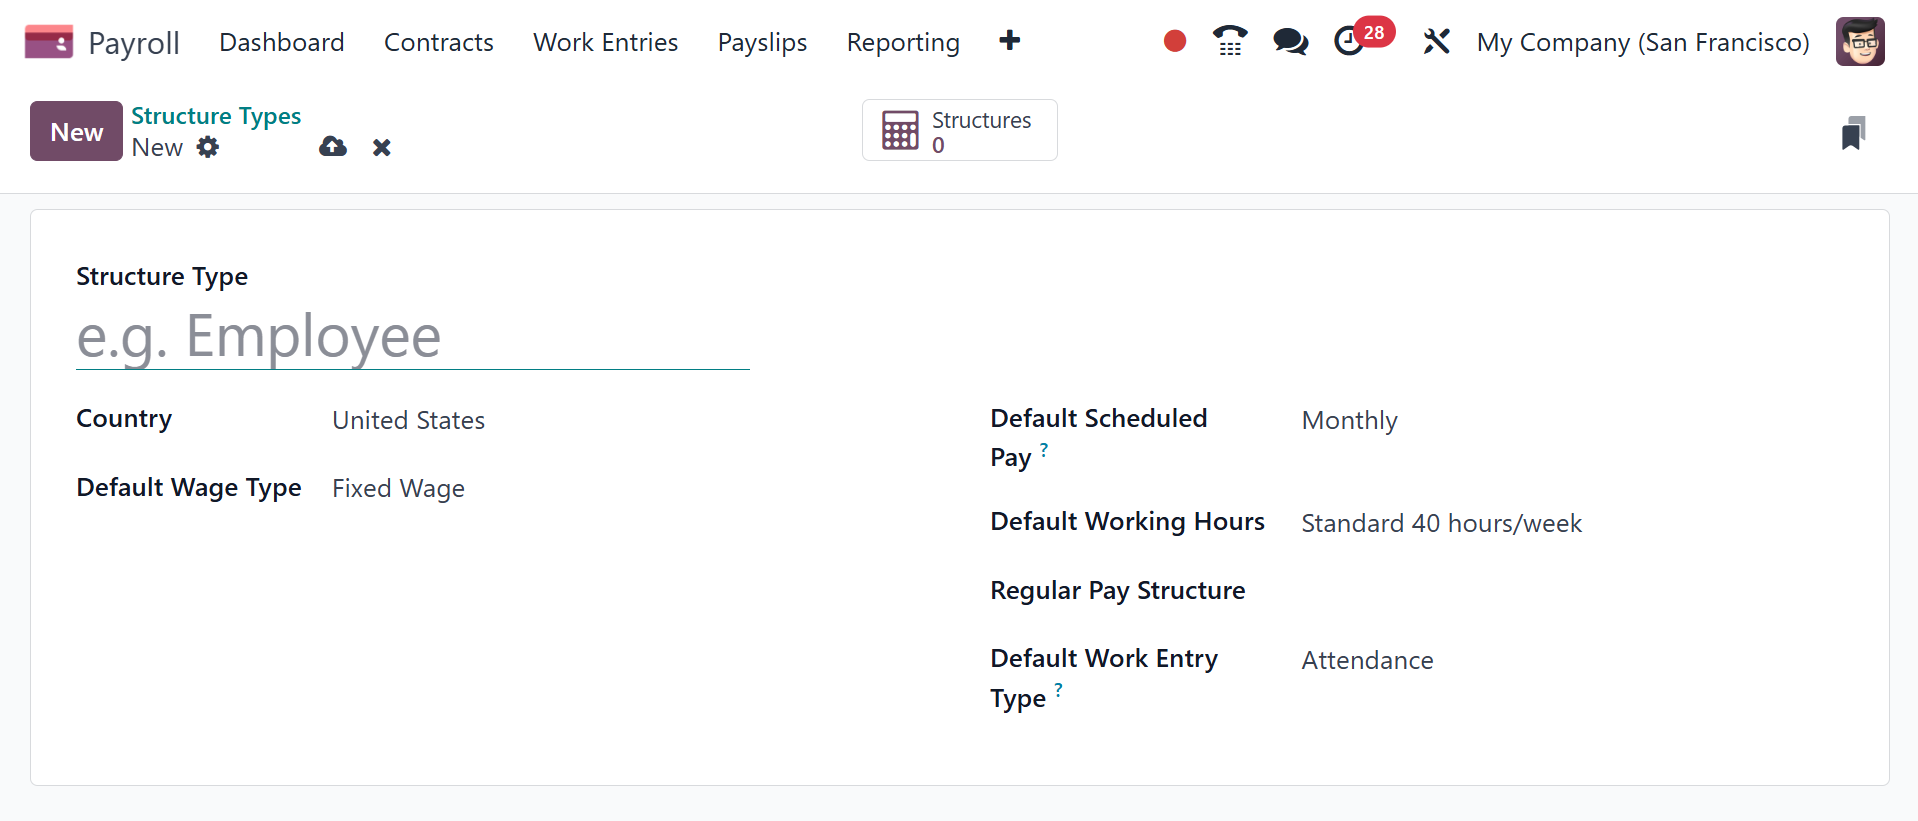
The frequency of wage payments should then be entered in the Default
Scheduled Pay section. The default working hours for the salary
structure type can then be specified by the user. We can explain the
typical employee pay structure in the Structure Type section. You
can also specify the work entry type related to regular attendance
in the Default Work Entry Type section.
The user can view every structure within each of the structure types
after selecting the Structures smart button.
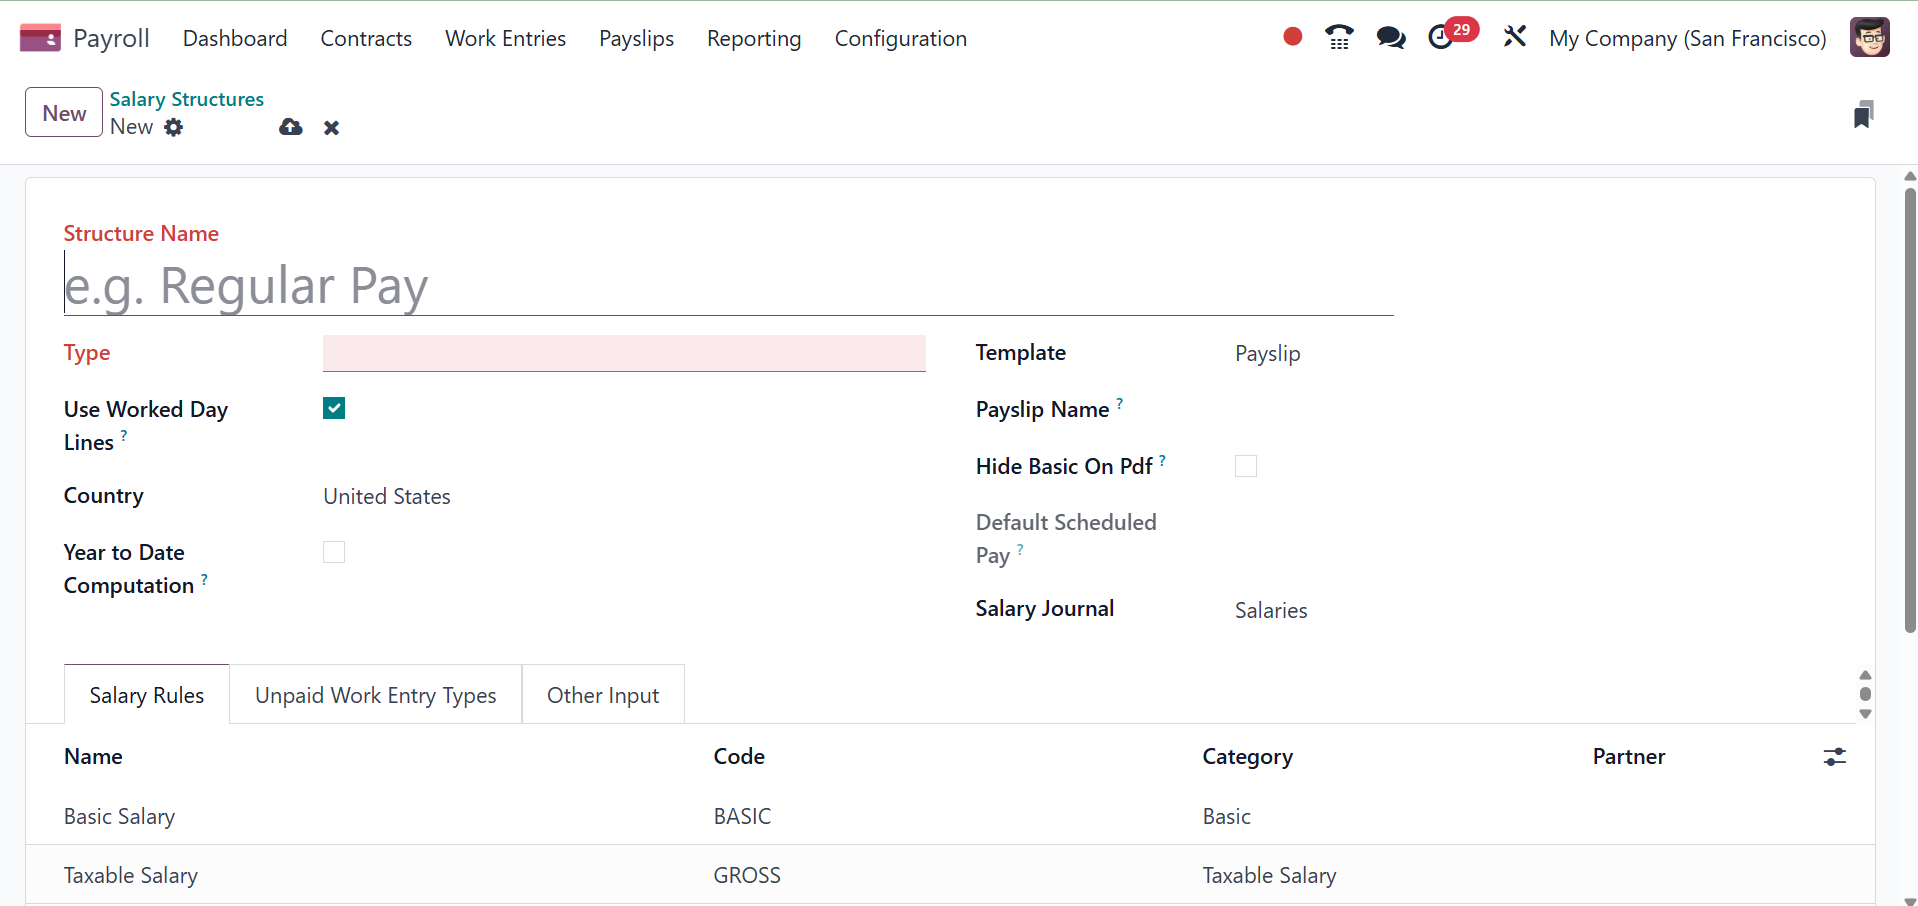
5.6 Salary Structures
We may give payslips for payroll and determine employee wages within
the wage structures based on job advertisements. You can specify
several useful rules for payslip calculations with a wage structure.
The department or group as a whole uses a single salary system.
Users can describe a new compensation structure as soon as they
choose the Structures option in Configuration. Individual salary
schemes for workers and employees are available on the open window.
Along with the employee salary structure, the name, nationality, and
wage regulations of each employee are readily evident. To input the
description of a new salary structure, select the New icon in the
wage Structures box.

For the category of the structure type, you need to enter
Employee/Worker in the Type and Structure Name fields on the new
screen. To show working days on the employee payslip, select the Use
working Day Lines option. When discussing the employee compensation
plan, mention the nation. Then, you have the options to provide the
country name, year to date computation, template, payslip name, hide
basic on PDF, and salary journal, respectively.
Reports on terminations, pay stubs, and other topics are among the
many reports available to users. Weekly, annual, monthly, and other
wage payment options are also available in the Scheduled Pay
section. We can also choose a certain wage journal in relation to
the pay system.
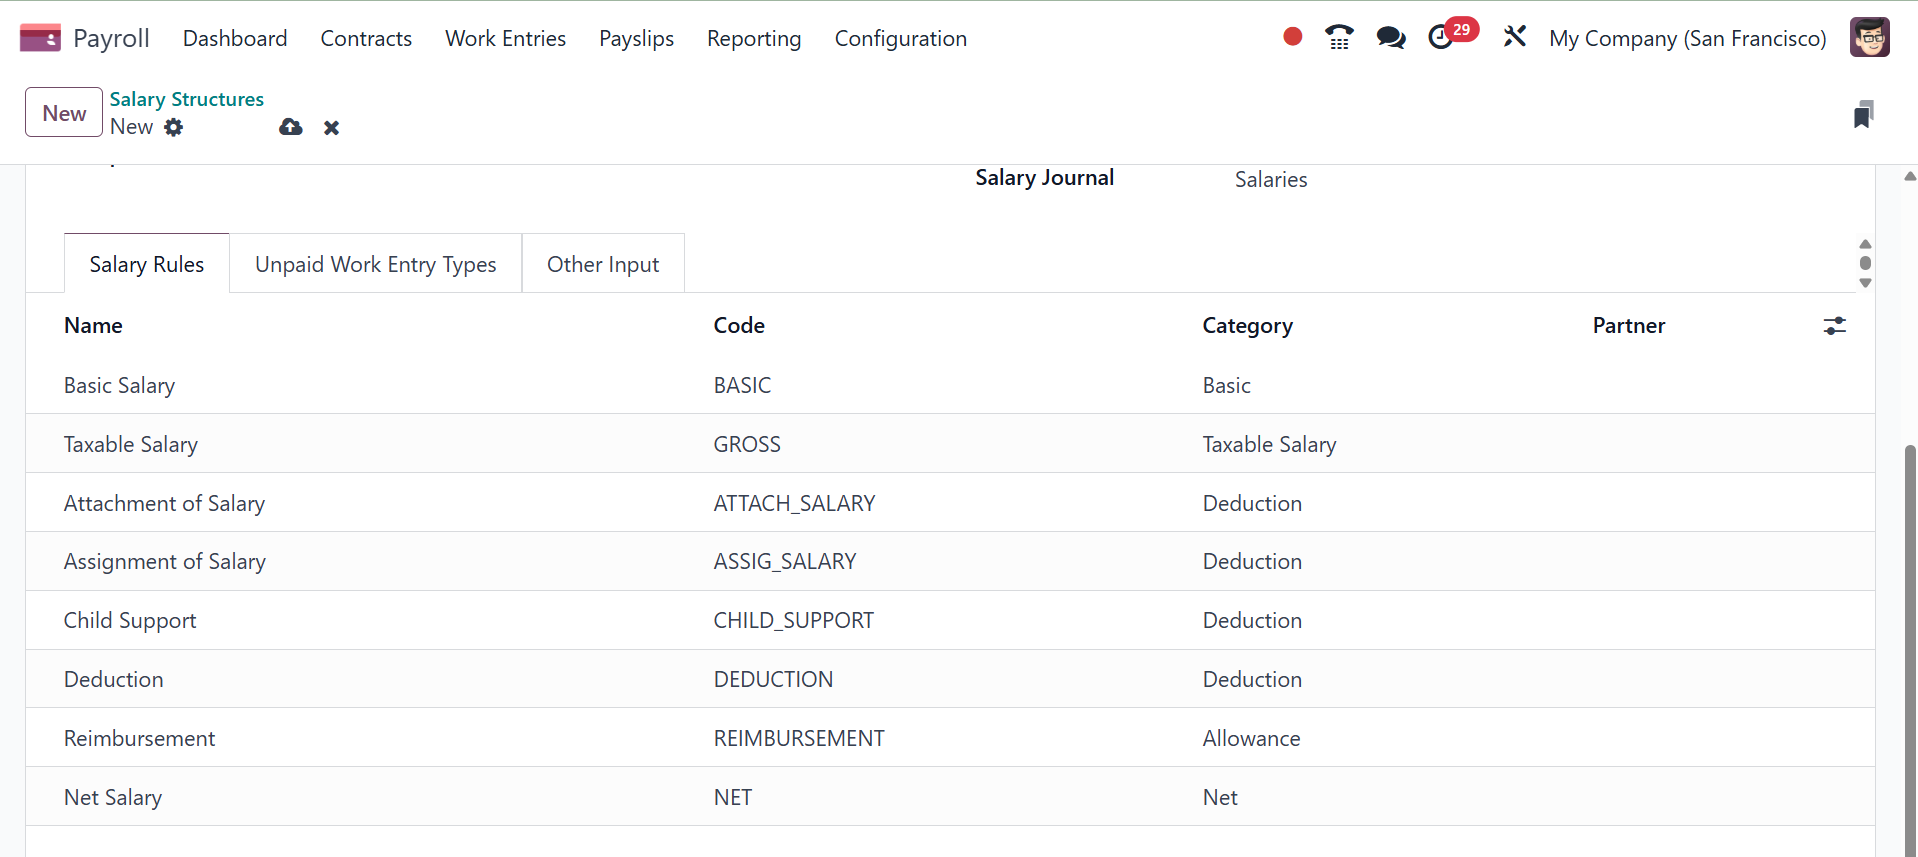
Specific employee salary structure rules can be implemented. Choose
Add a line from the Salary Rules tab and provide the specifications
for your employee's pay scale to do this. You can mention the
Category, Name, Partner, and Code for each salary regulation.
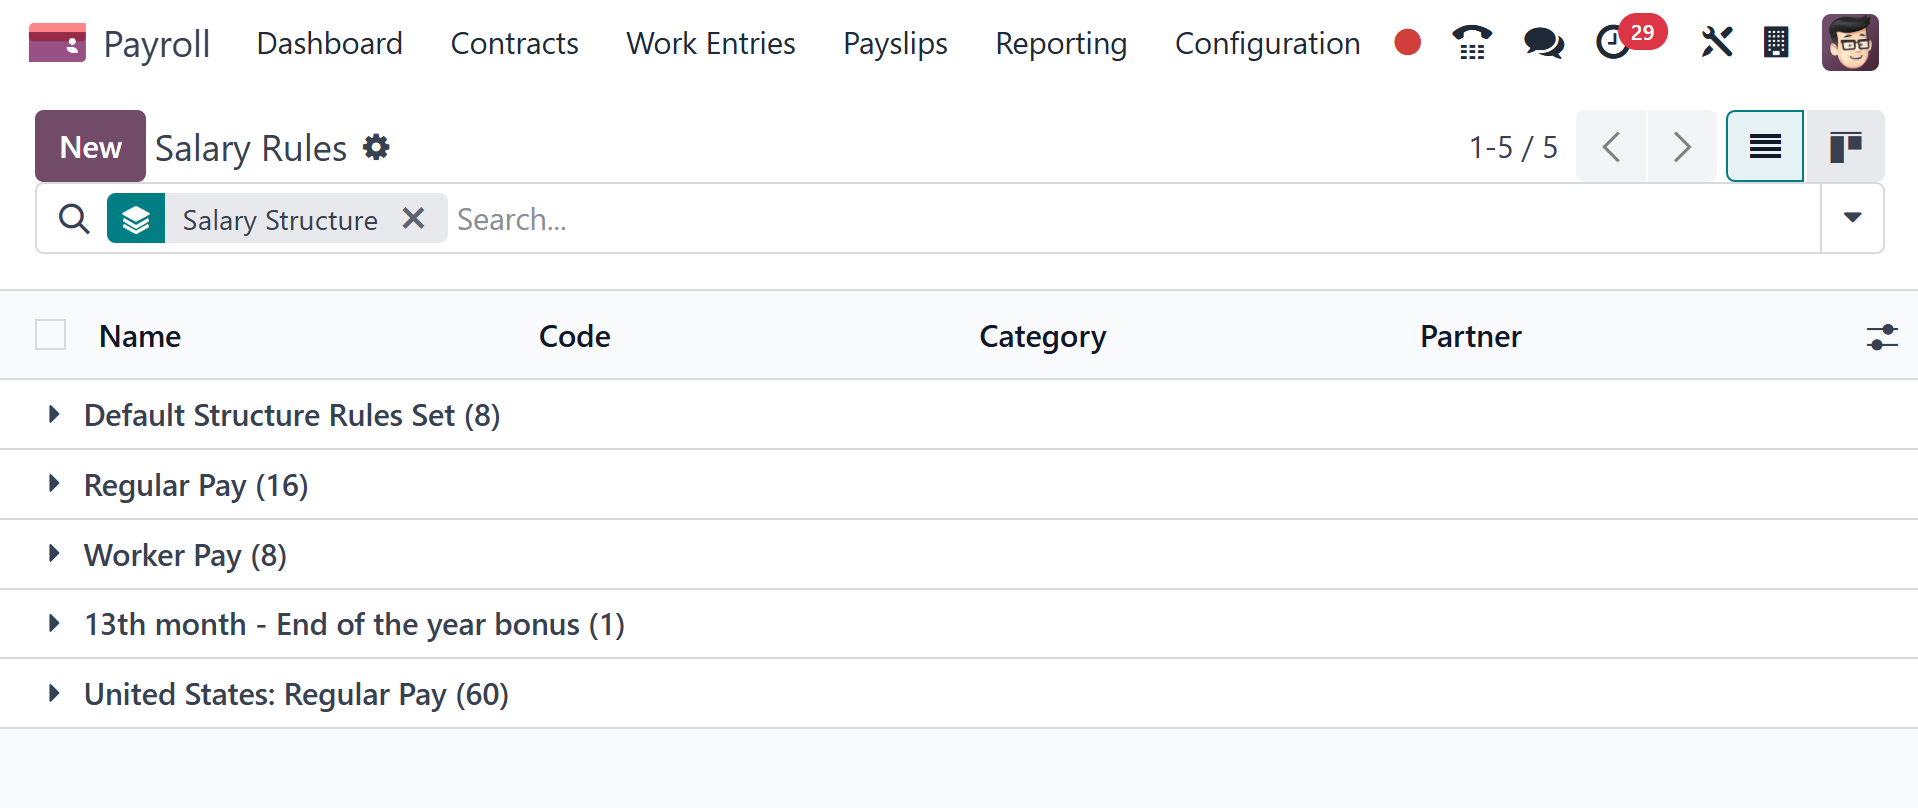
5.7 Salary Rules
One of the most important aspects of every business is the
establishment and maintenance of a fair compensation structure.
Establishing policies, figuring out fair compensation, and planning
ahead are some of the factors that go into effective business
management. These rules ensure that you have the freedom to
determine how much to pay certain organizations. By choosing the
Rules menu item in Configuration, you can access the Salary Rules
pane. All of the wage guidelines set forth in Odoo 18 are accessible
to users. Each compensation rule's salary structures, which include
details like Name, Category, Code, and Partner, are visible to the
user. By choosing the New option in Odoo 18, we can establish a
salary rule.
Under each rule, you can have sub rules, as in the image below.
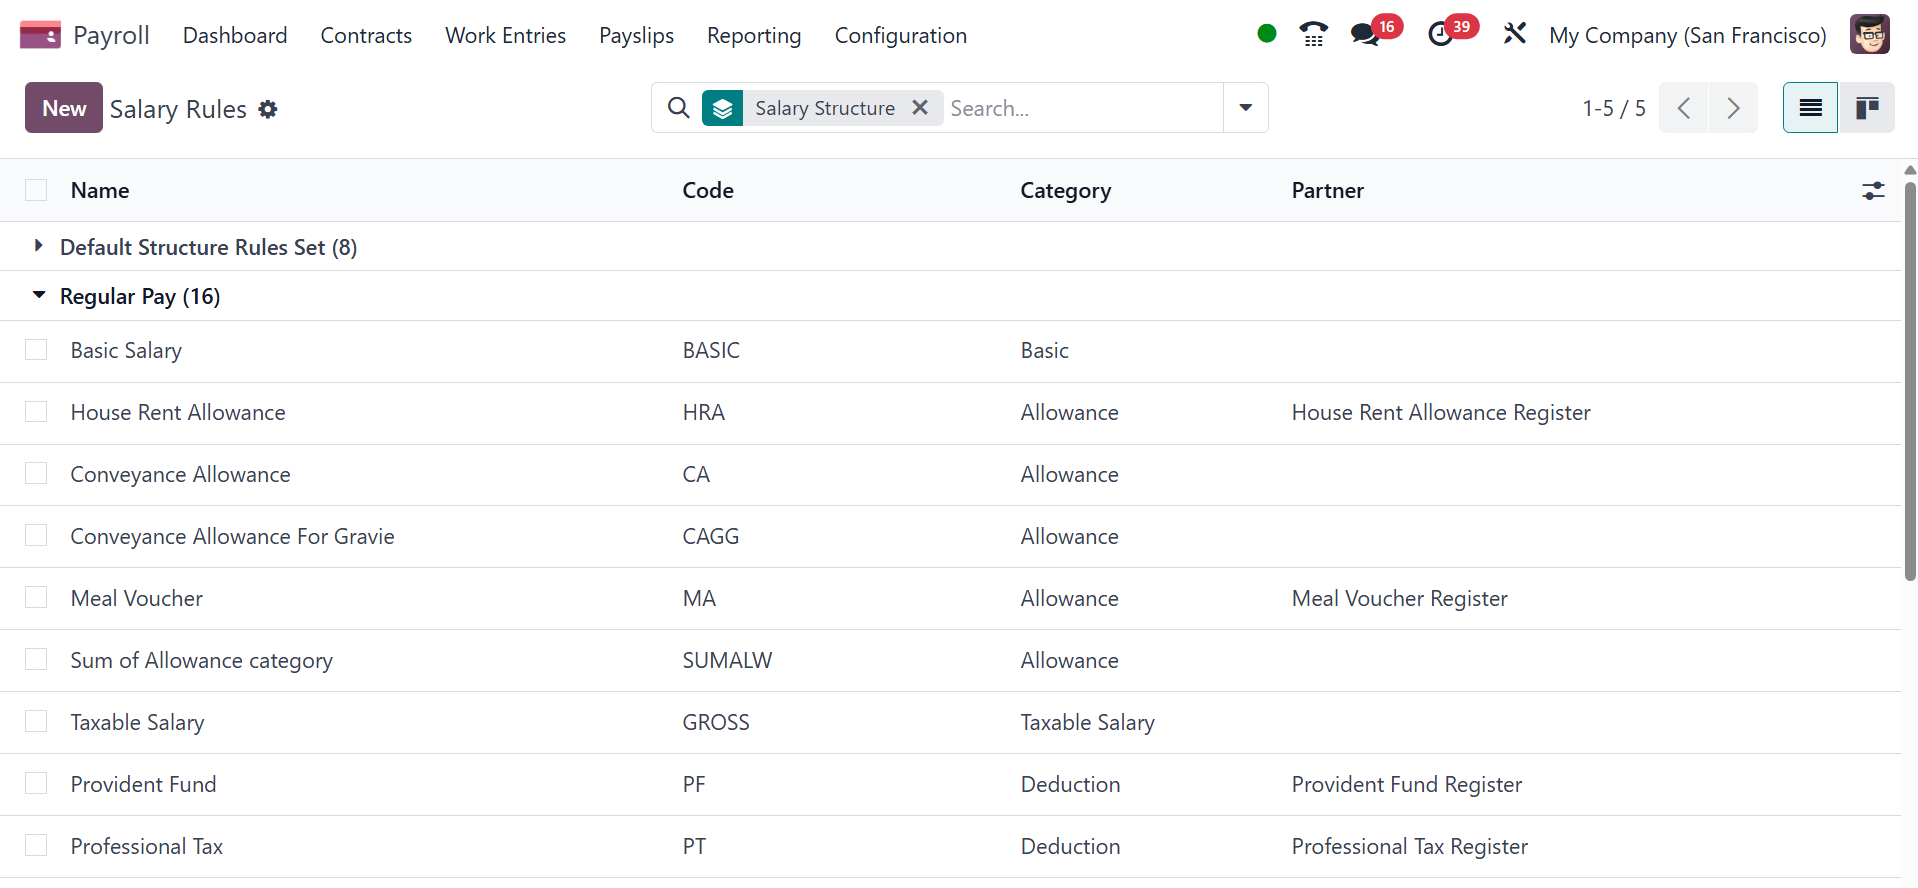
On selecting a particular rule, you will get the details, as in the
image below.
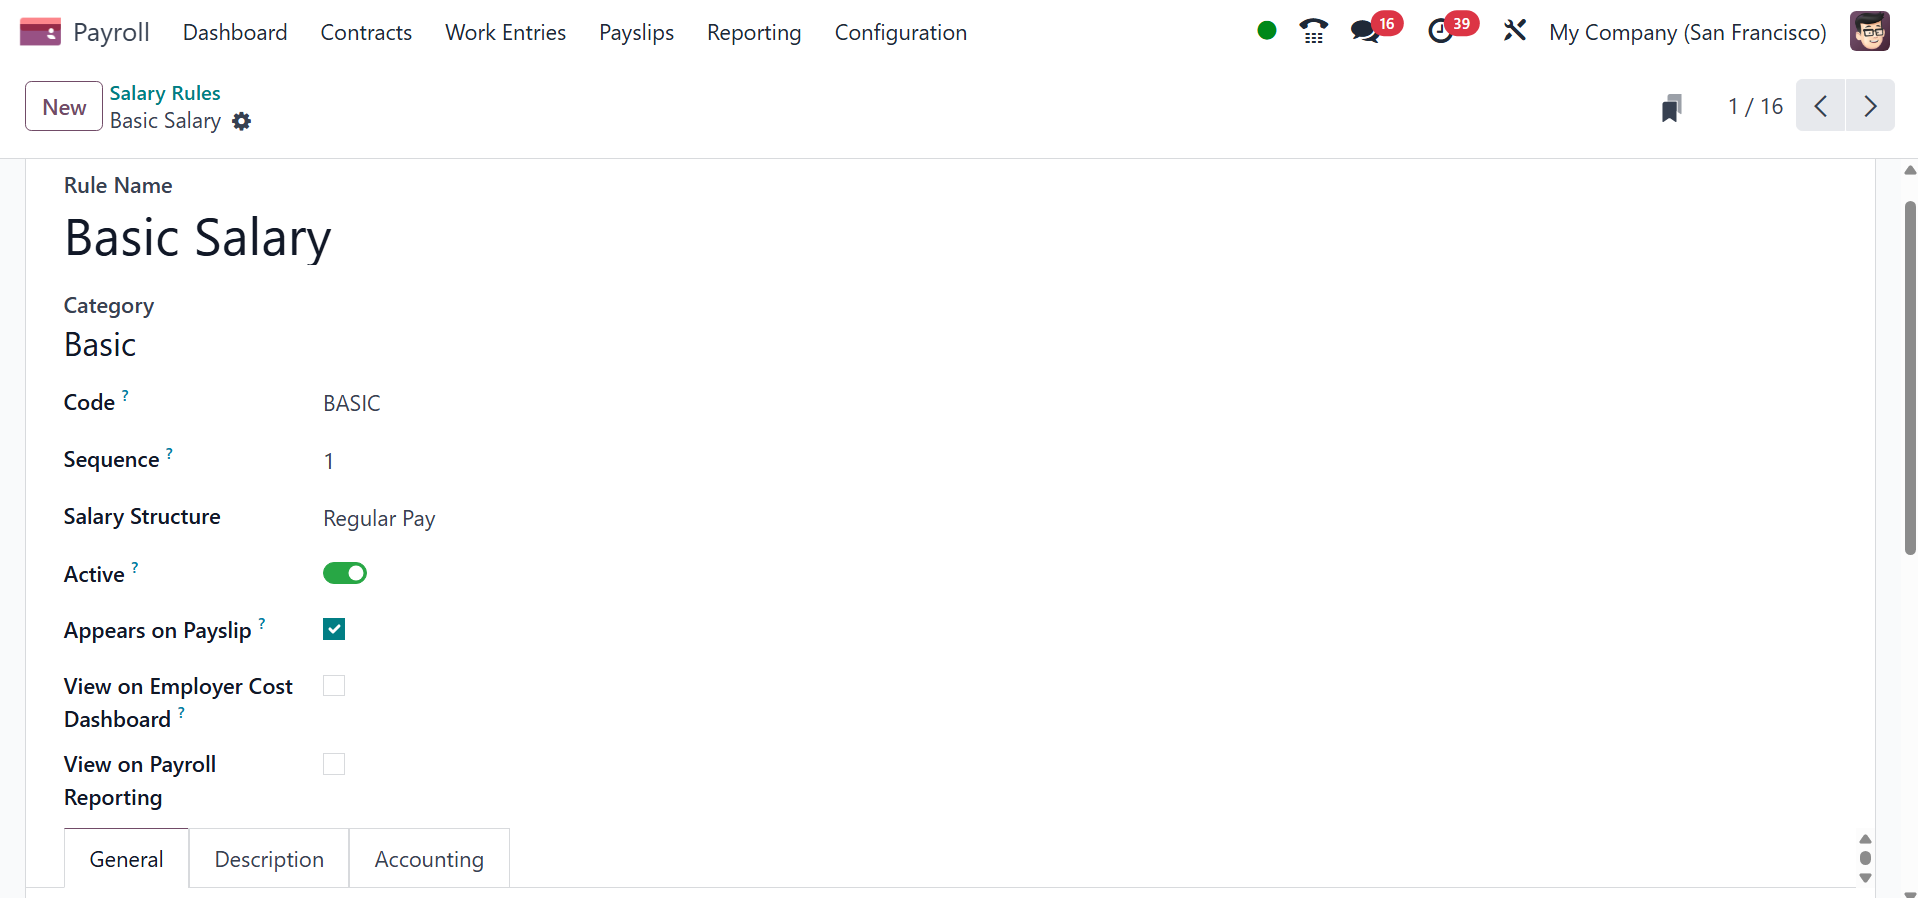
Here, you have the details like
- Rule Name: enter a name for the rule. This field is
required.
- Category: select a category the rule applies to
from the drop-down menu, or enter a new one. This field is
required.
- Code: enter a code to be used for this new rule.
This field is required.
- Sequence: enter a number indicating when this rule
is calculated in the sequence of all other rules.
- Salary Structure: select a salary structure the
rule applies to from the drop-down menu, or enter a new one.
This field is required.
- Active: enable this toggle, so the rule is
available for use. Disable the toggle to continue to show it on
the payslip, but skip the computation.
- Appears on payslip: tick the checkbox to have the
rule appear on employee printed payslip.
- View on Employer Cost Dashboard: tick the checkbox
to have the rule appear on the Employer Cost report, located on
the Payroll app dashboard.
- View on Payroll Reporting: tick the checkbox to
have the rule appear on payroll reports.
To create a new one, use the NEW icon. Choose Category using the Rule
Name you just added after adding it to the resulting screen. Users
can immediately identify the rule by providing a code. Additionally,
to make sequence calculating easier, don't forget to add a serial
number.
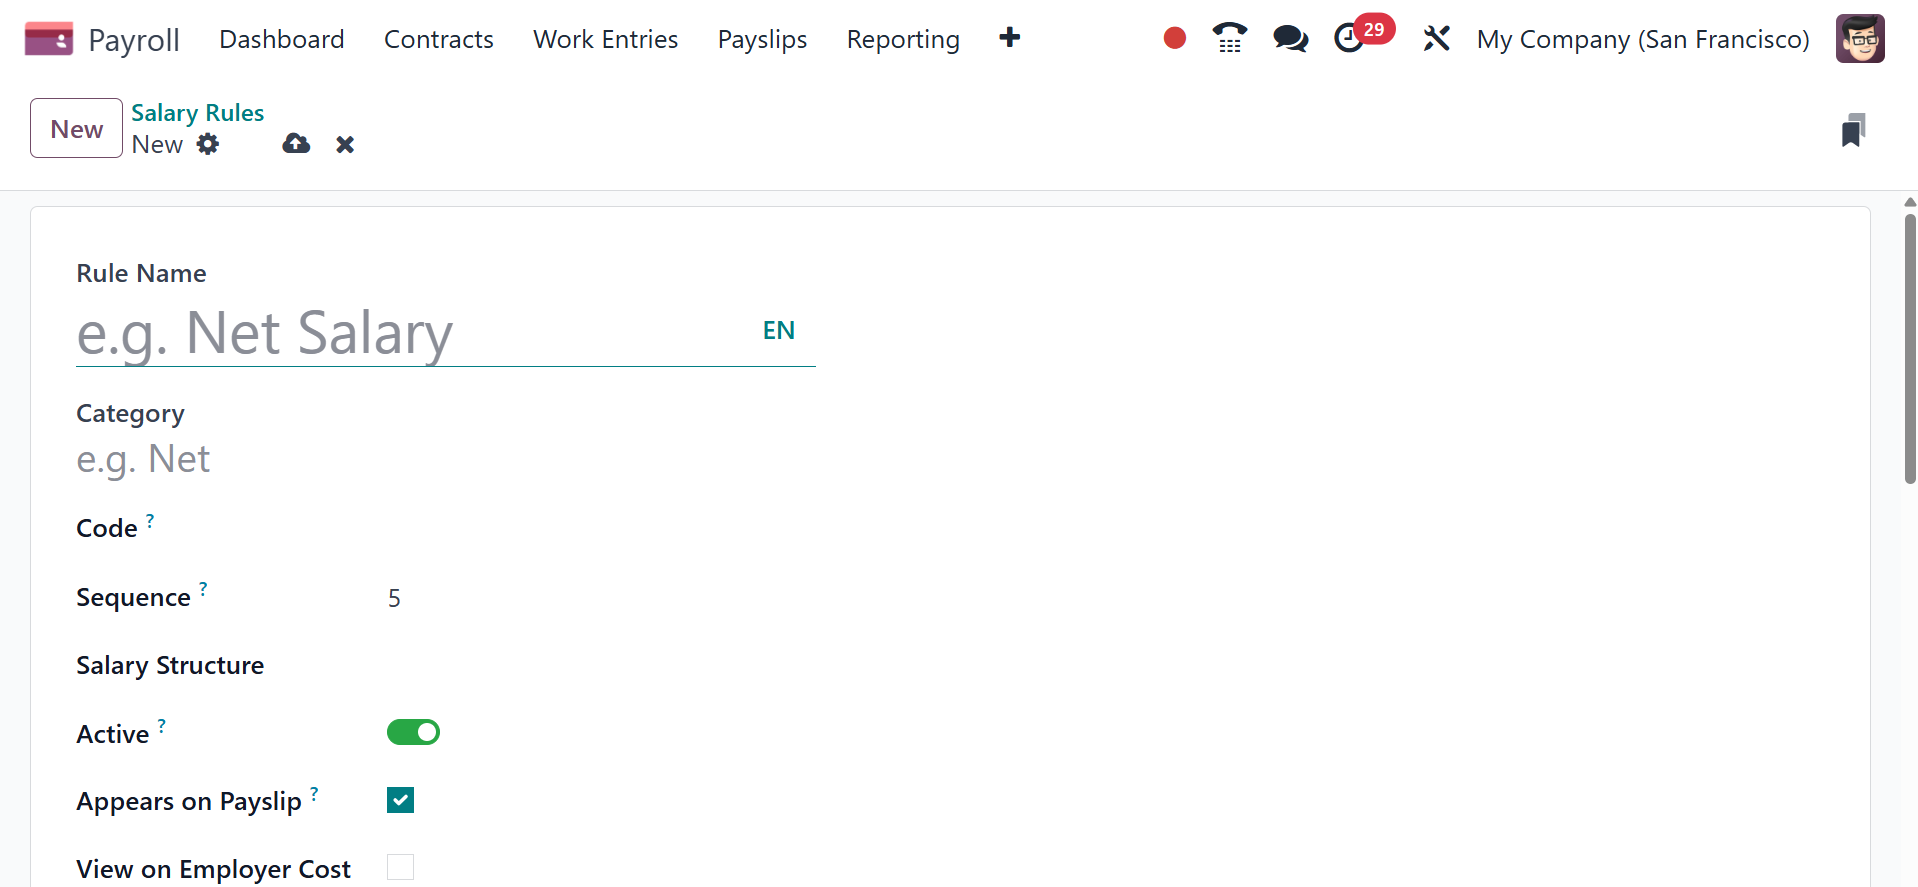
By using the Appears on Payslip option, we may view the salary rule
within a payslip. After turning on the View on Employer Cost
Dashboard, we could see the employer cost value in the dashboard. To
establish the salary rule for payroll reporting, turn on the View on
Payroll Reporting field in the Salary Rules window.
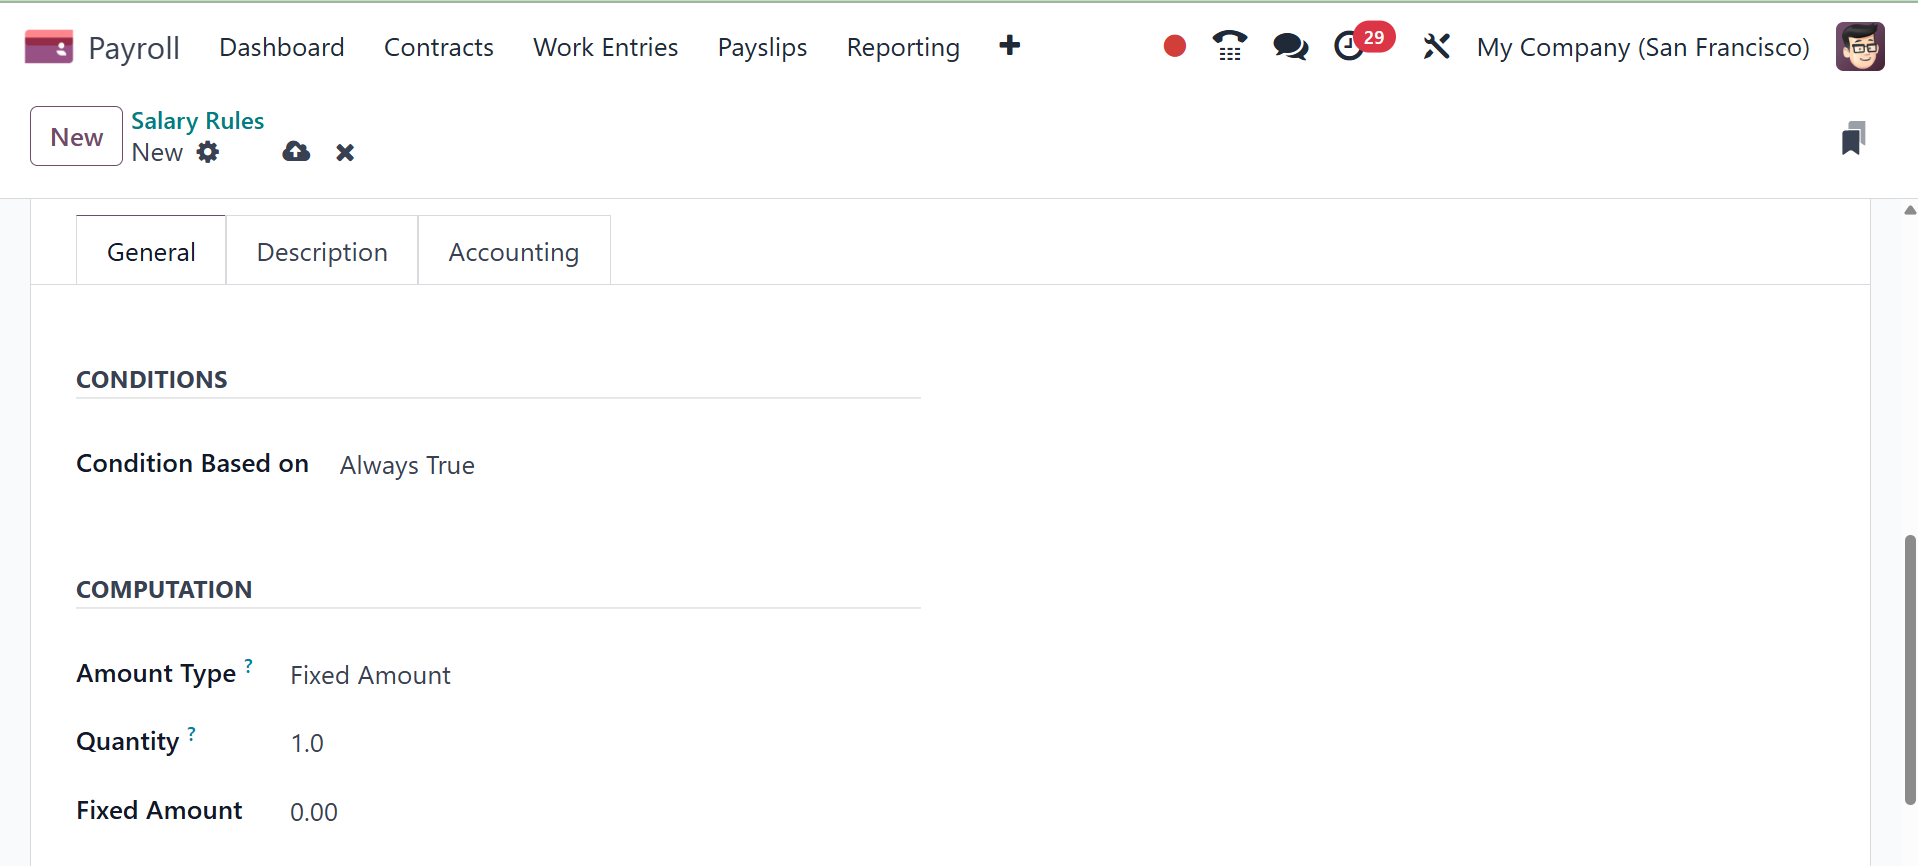
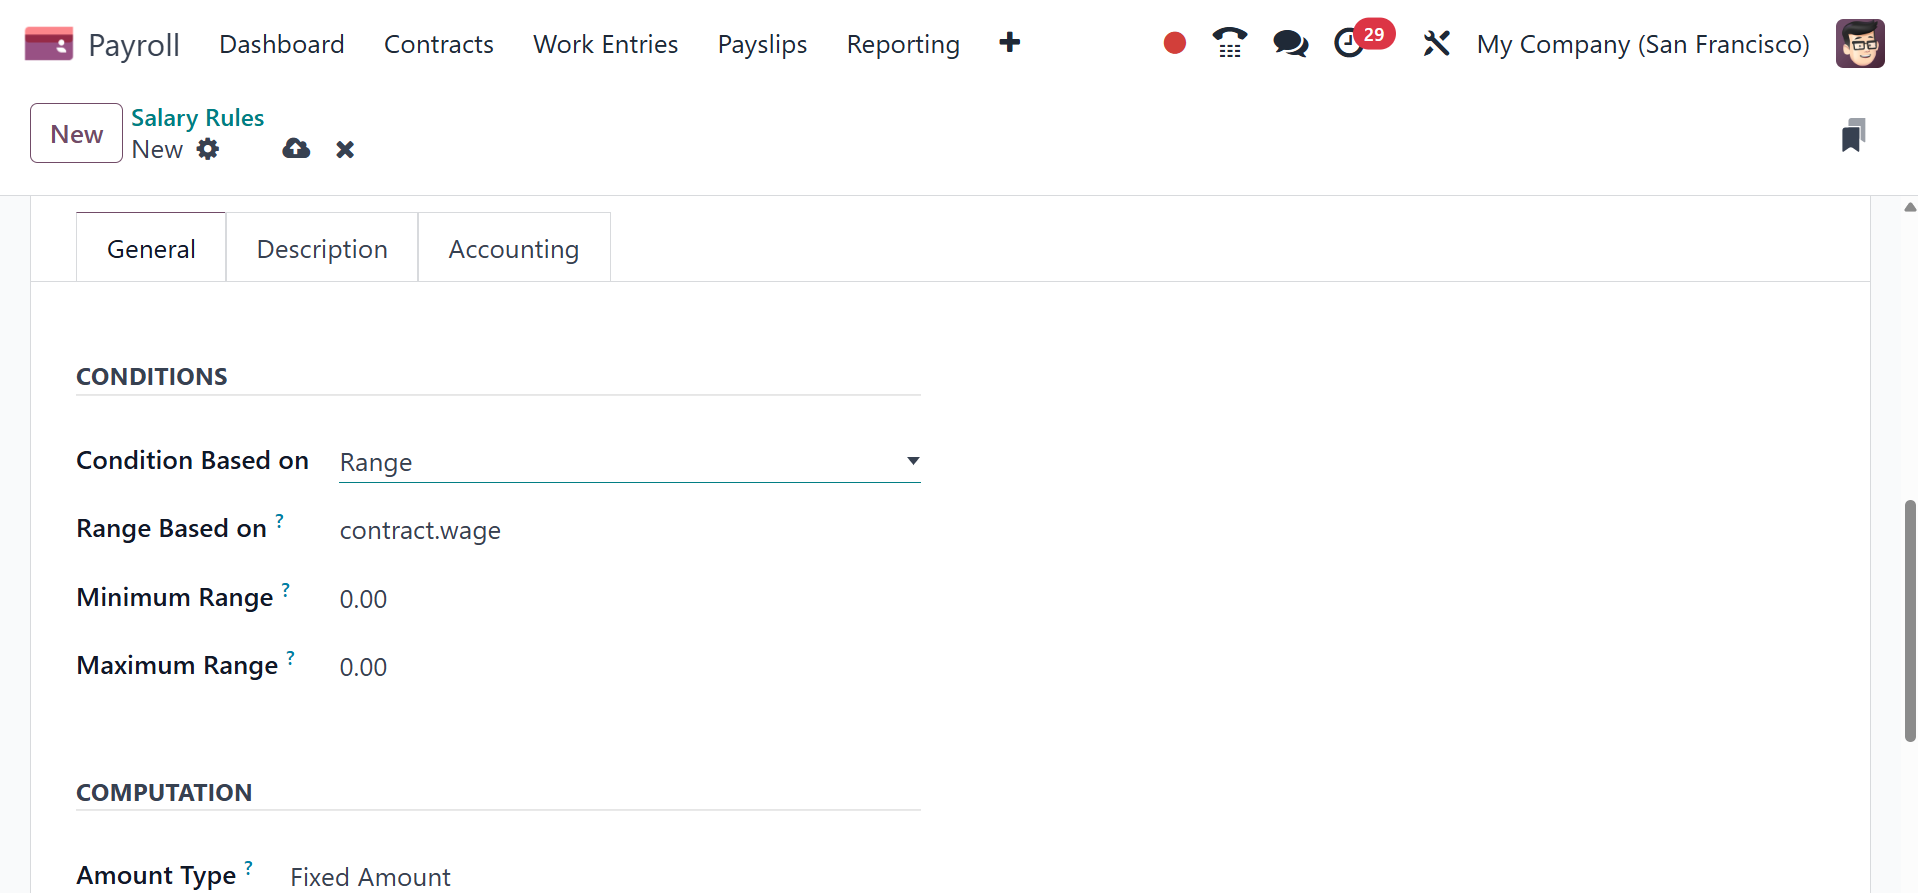
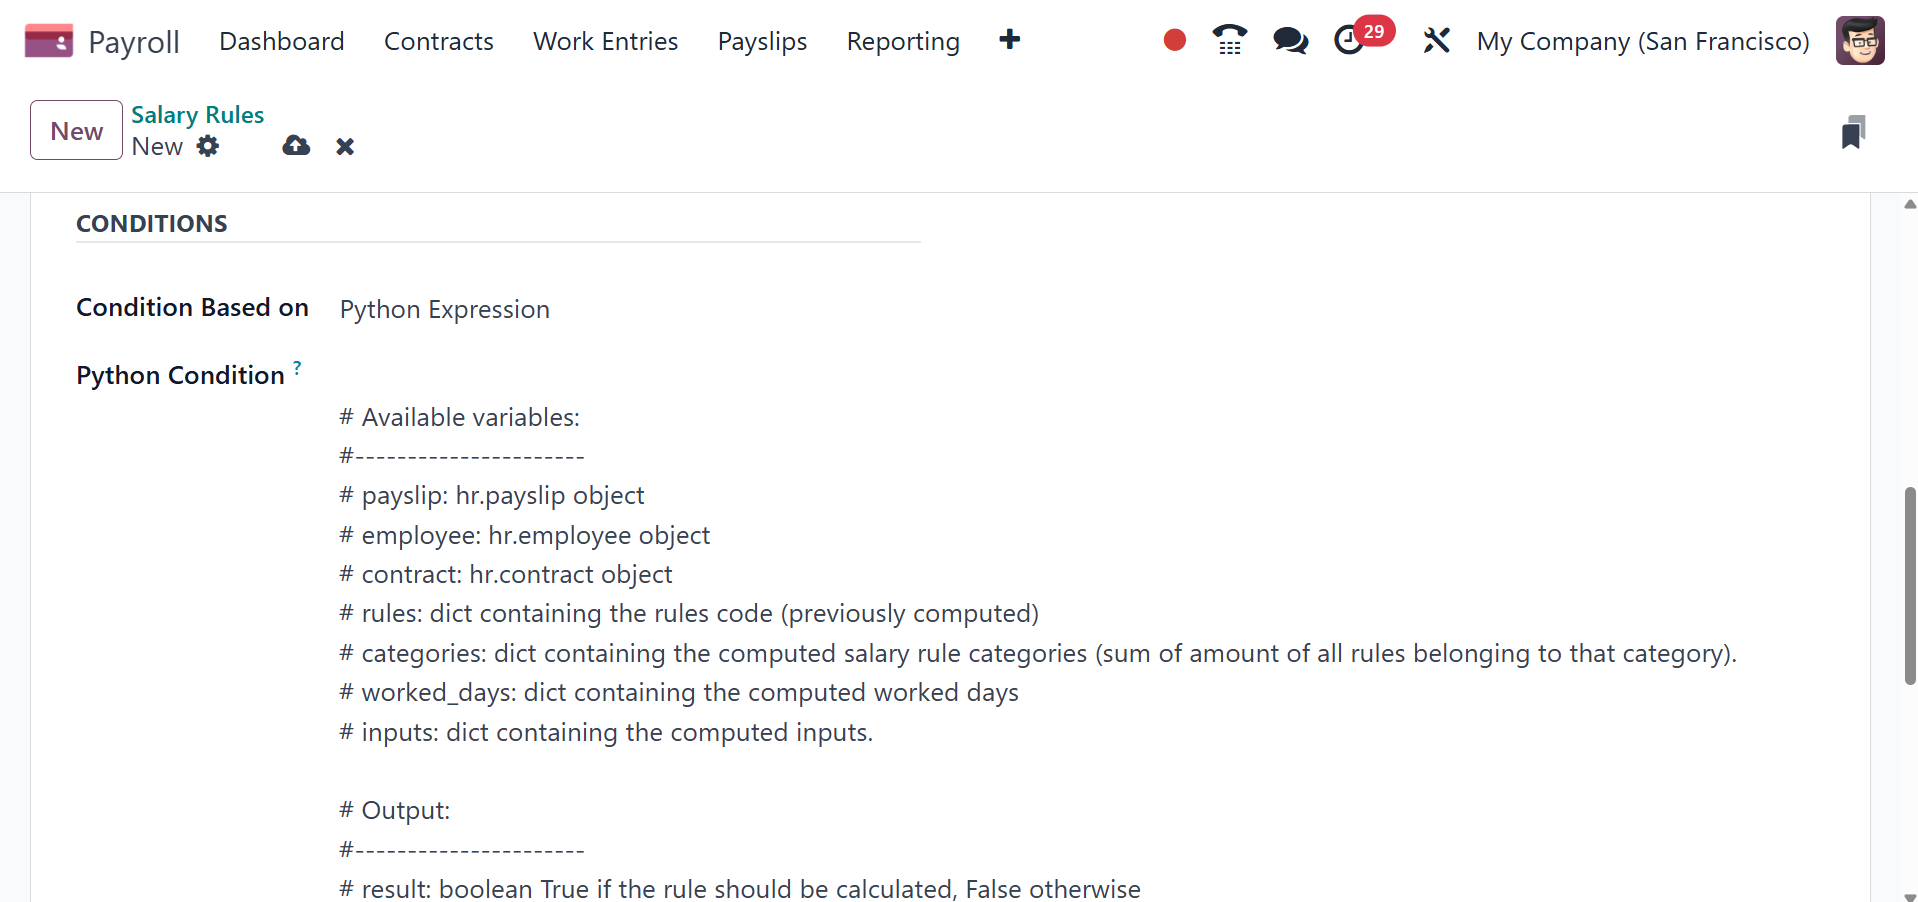
Below the General tab, we are in charge of the calculation, terms,
and corporate contribution. In the "Condition Based on" field, enter
the condition of the salary rule as Range, Always True, and Python
Condition. The required wage rule for salary computation can be
easily configured by choosing the Always True option. You must
provide data for the Maximum Range, Range dependent on, and Minimum
Range after choosing the Range option. The 'Range' Based option is
used to automatically calculate field values.
Odoo18 creates equations using the default method when we choose
Python Expression in the Condition Based on field.
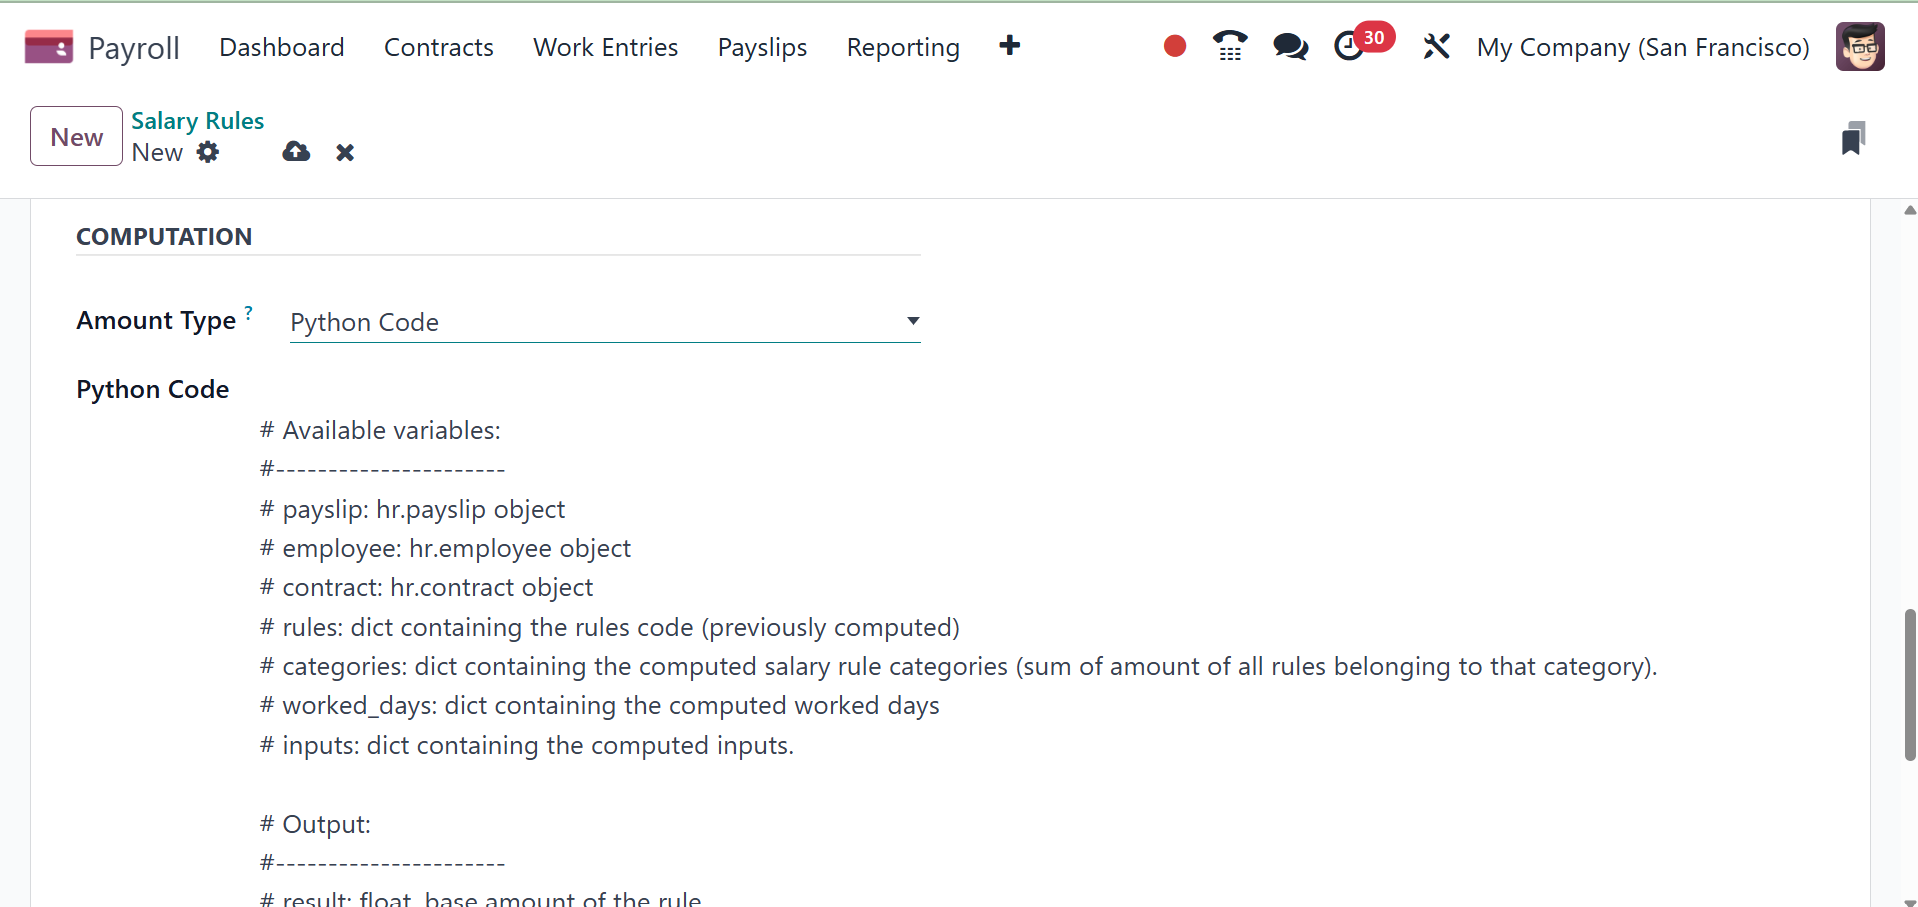
We can determine the salary guidelines under COMPUTATION. To do this,
the user can select the calculating technique in the Amount Type box
from Fixed Amount, Python Code, or percentage (%).
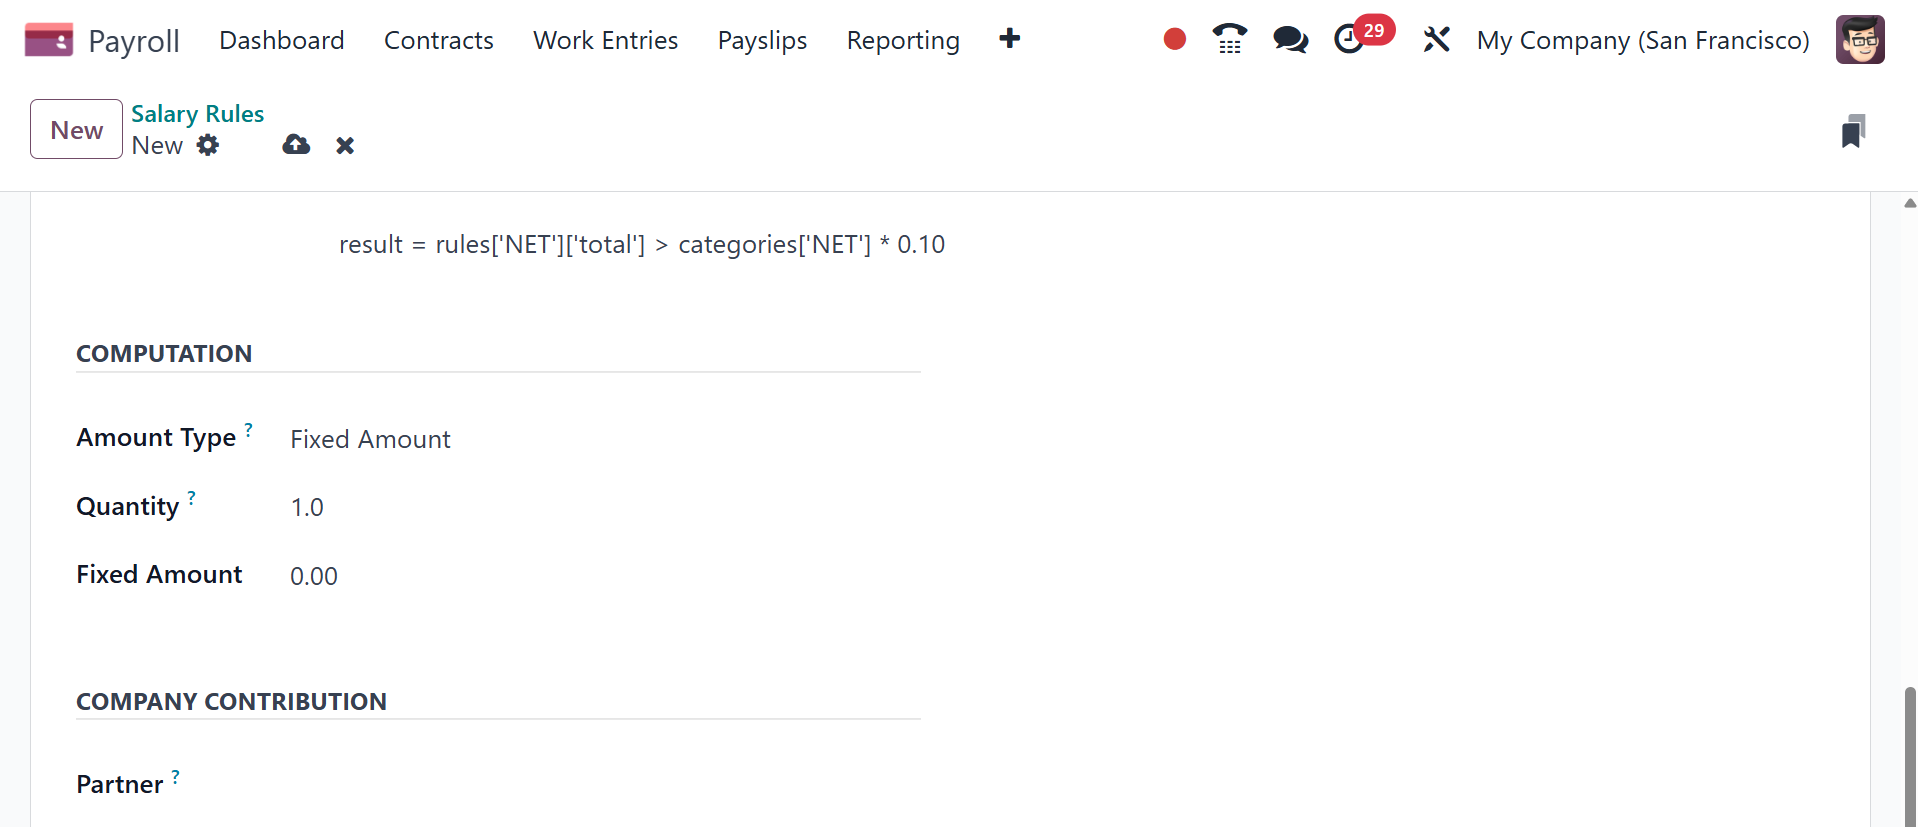
We can compute the amount based on the % once we select it as the
amount type. By choosing the Fixed Amount option in the Amount Type
column, we may generate a fixed amount. After selecting Fixed
Amount, you may select the quantity and fixed amount of the salary
rule.
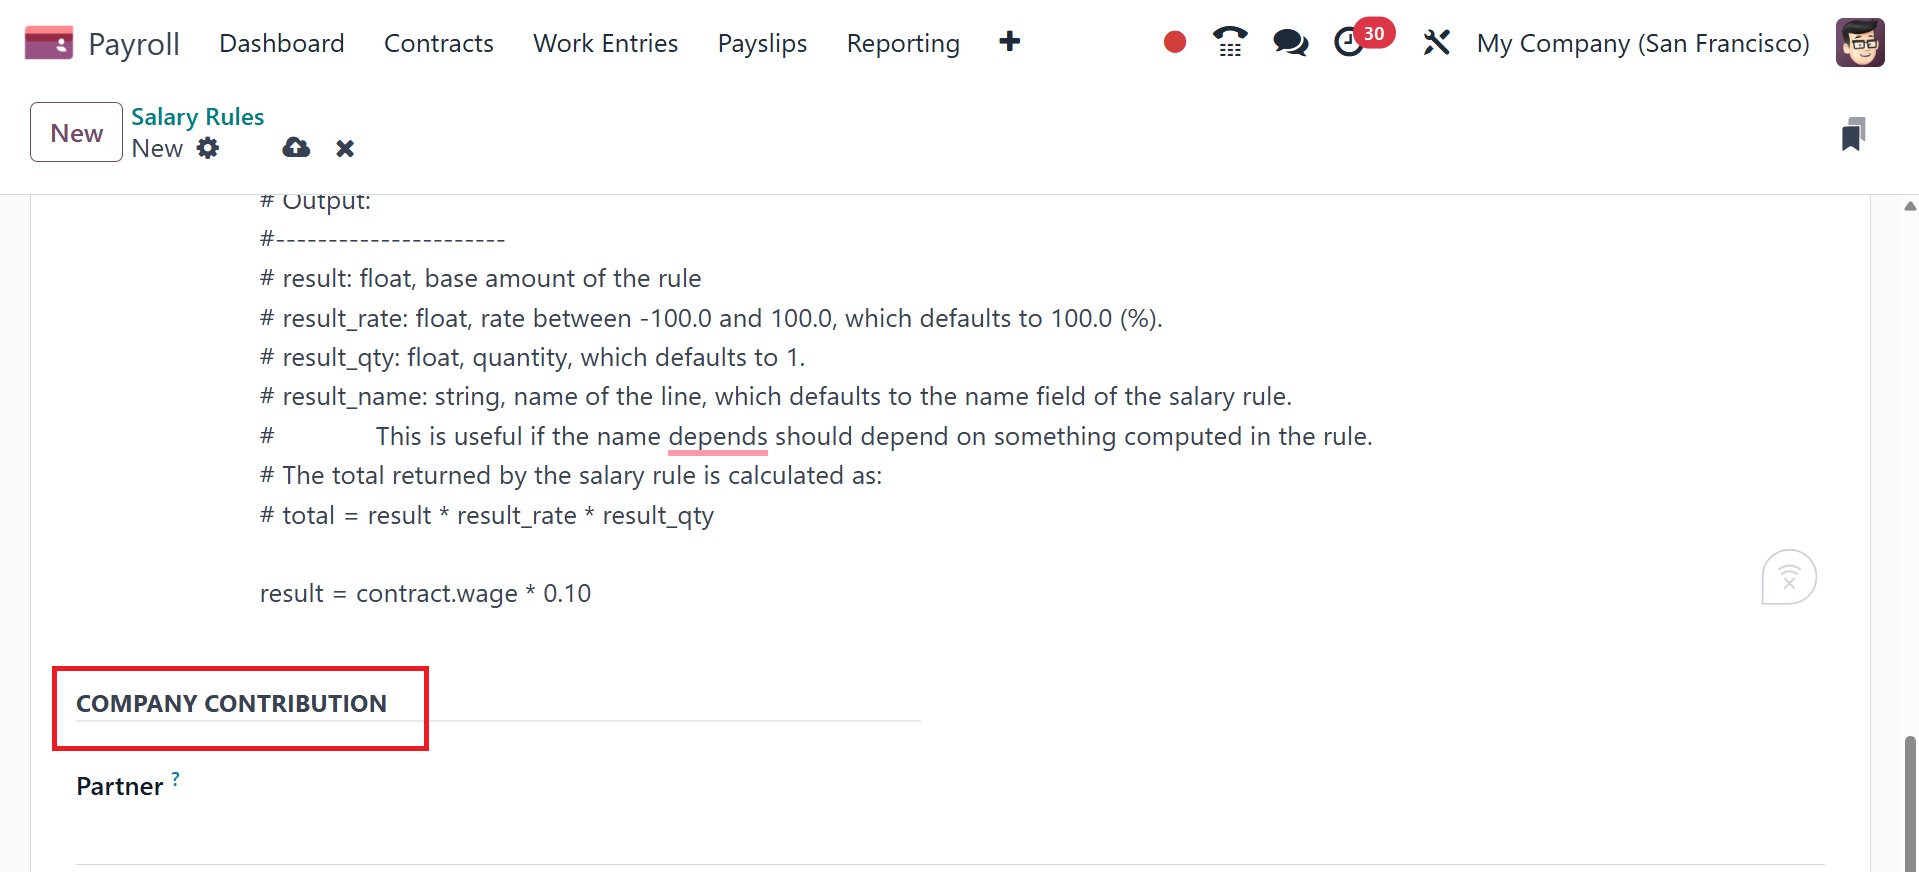
Users can also use Python code to calculate the salary rule. To do
so, enter Python code in the Amount Type column. Later on, you can
define the Python code according to its properties.
In the COMPANY CONTRIBUTION area, we can specify the third party that
is involved in employee salary payments.
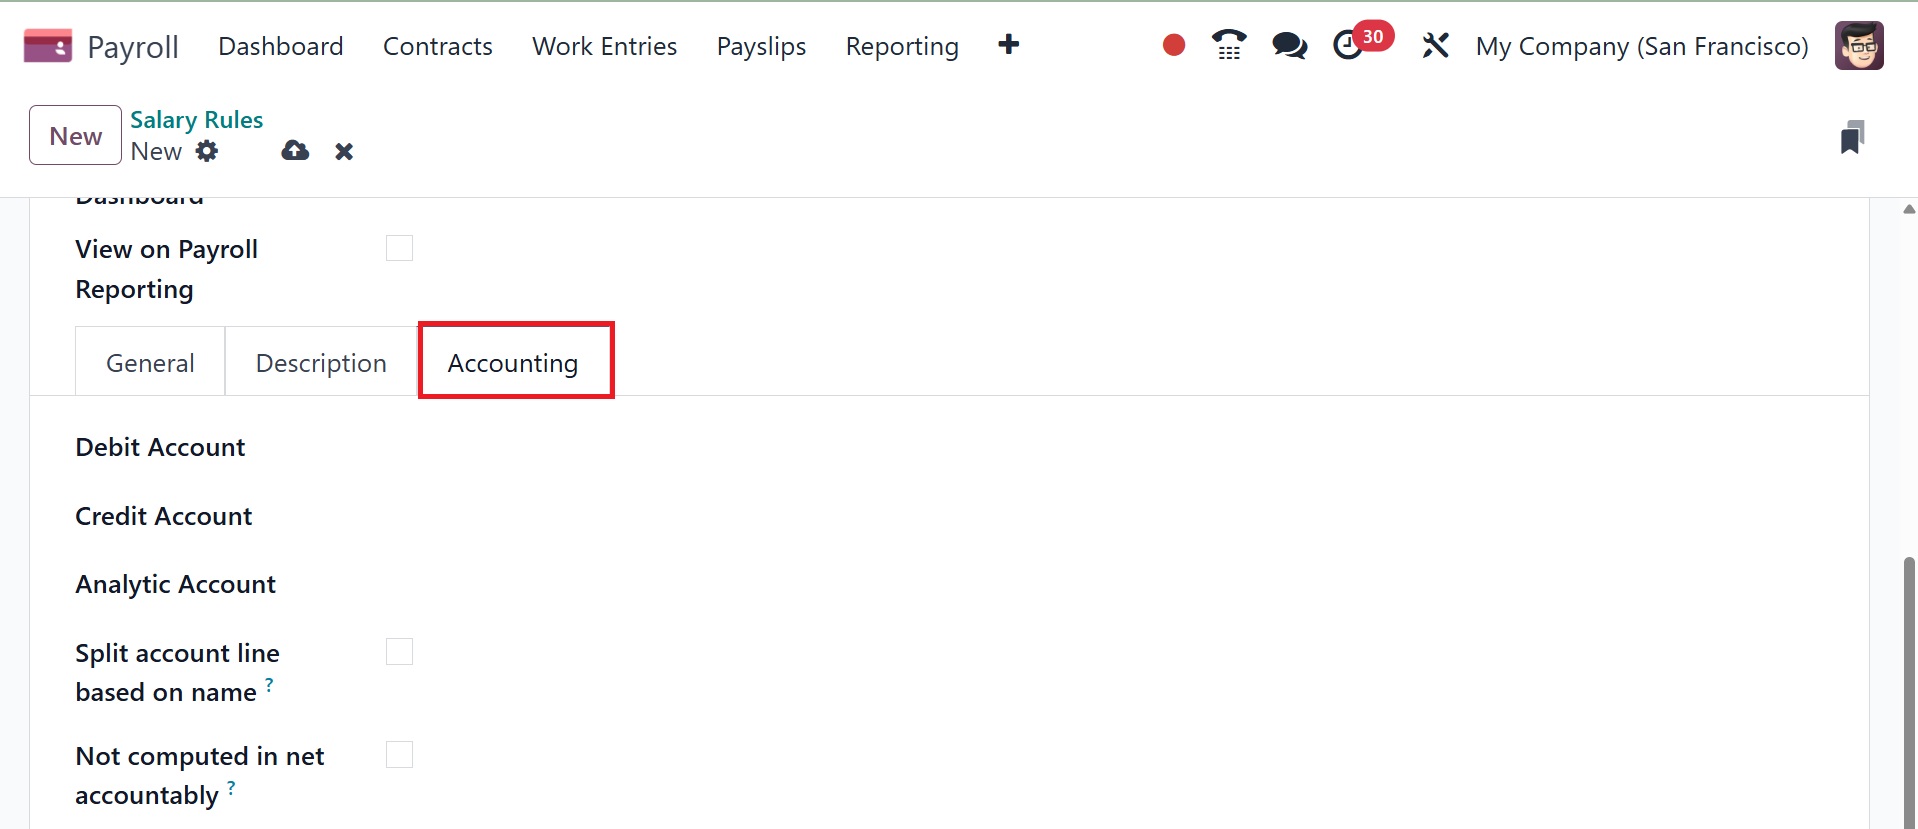
The note regarding the salary rule can be placed beneath the
Description tab. Under the Accounting tab, you can enter details for
the Analytic Account, Debit Account, and Credit Account. You can
eliminate the net salary rule value once you've enabled the Not
Computed in net accountability option in the Accounting section.
The rules are saved in Odoo 18 Payroll.
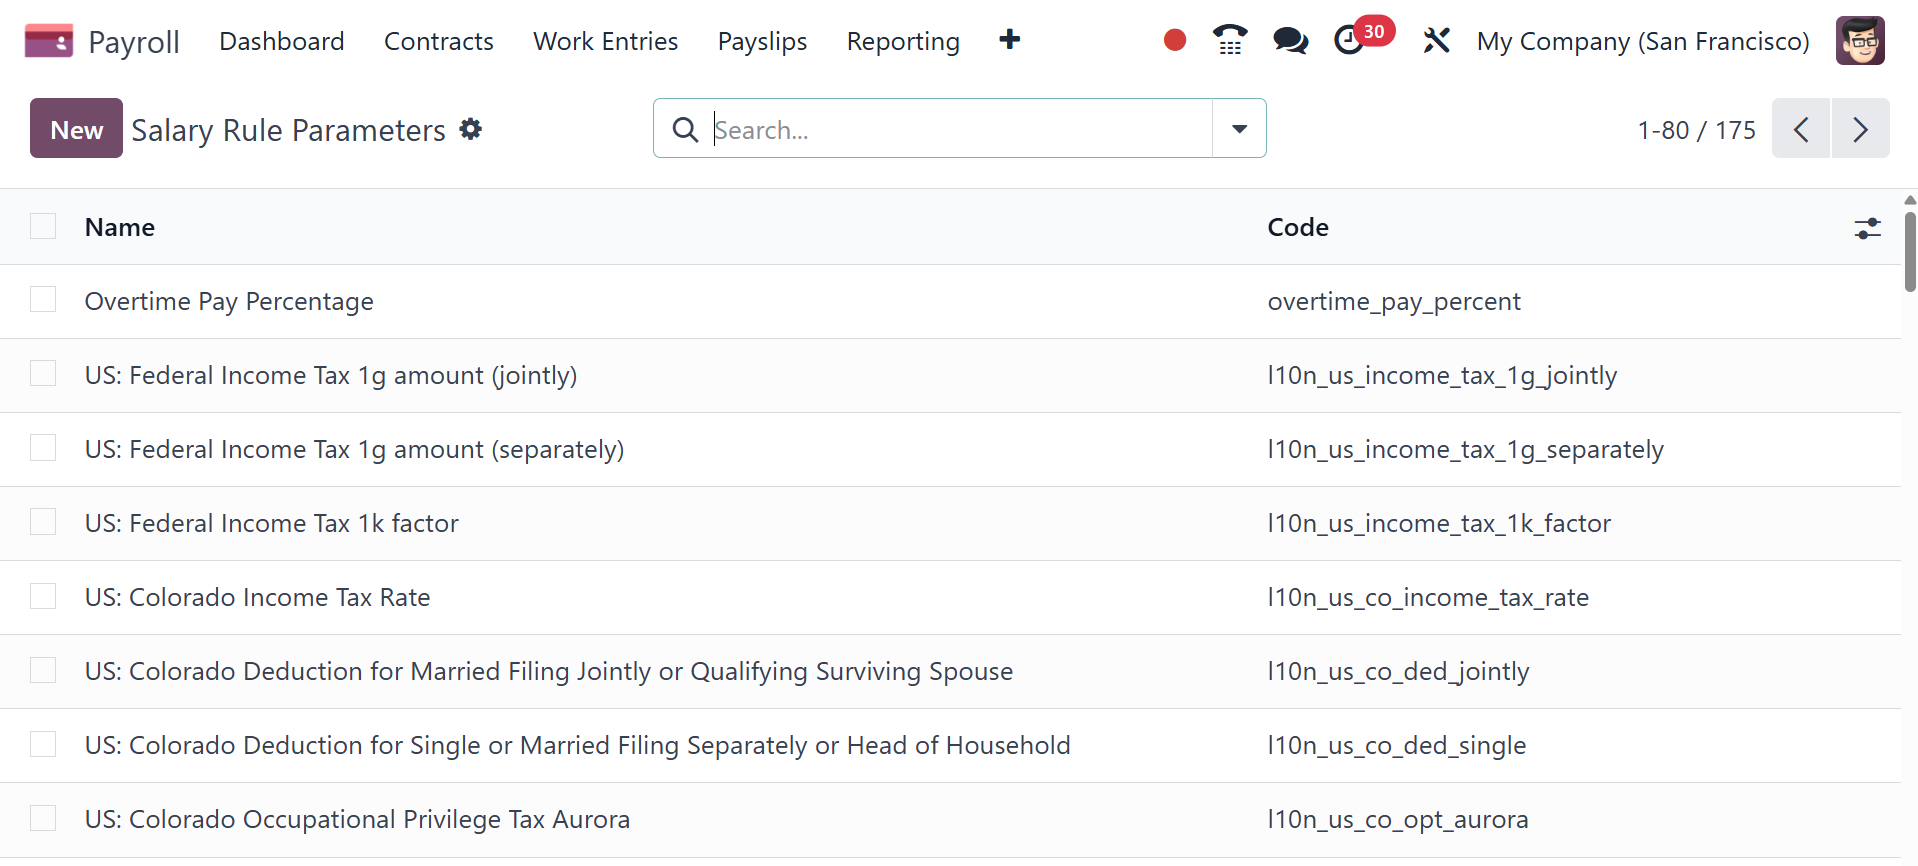
5.8 Rule Parameter
Click the Configuration tab and choose the Rule settings option to
control different rule settings. Each salary rule parameter's code
and name are listed in the Salary Rule Parameters box. To create a
new rule parameter, select the New icon on the Salary Rule
Parameters page.
On the open screen, apply the title of the rule parameter to the Name
option. Add code to the salary rule to include the salary parameter.
You can add extra information about the salary rule parameter in the
Description tab after these specifics have been defined.
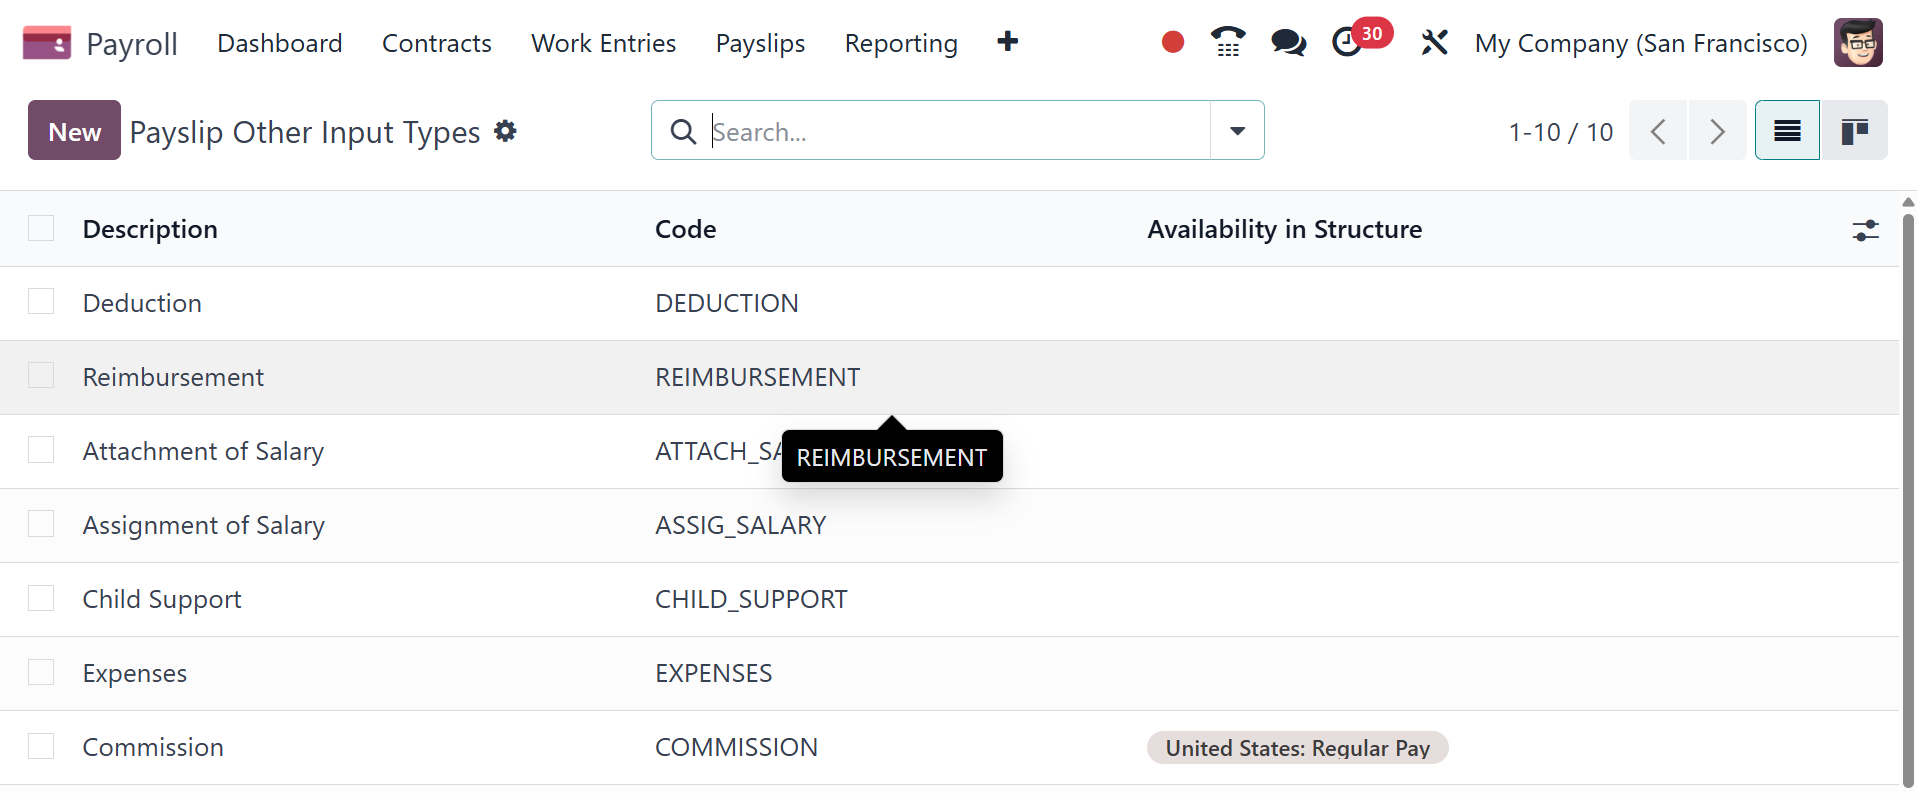
5.9 Other Input Types
The Other Input Types panel, found under Configuration, allows users
to specify a payslip input type. You can see the Code, Description,
and Availability in Structure separately in the List view of the
Payslip Other Input Types box. If you need to export the payslip
input type, select the input types you want and click the Action
icon. You can choose the Export option once you've chosen the
necessary input types in Action.
We can create a new payslip with many input types by clicking the New
button. Refer to the description and code used for the salary rule.
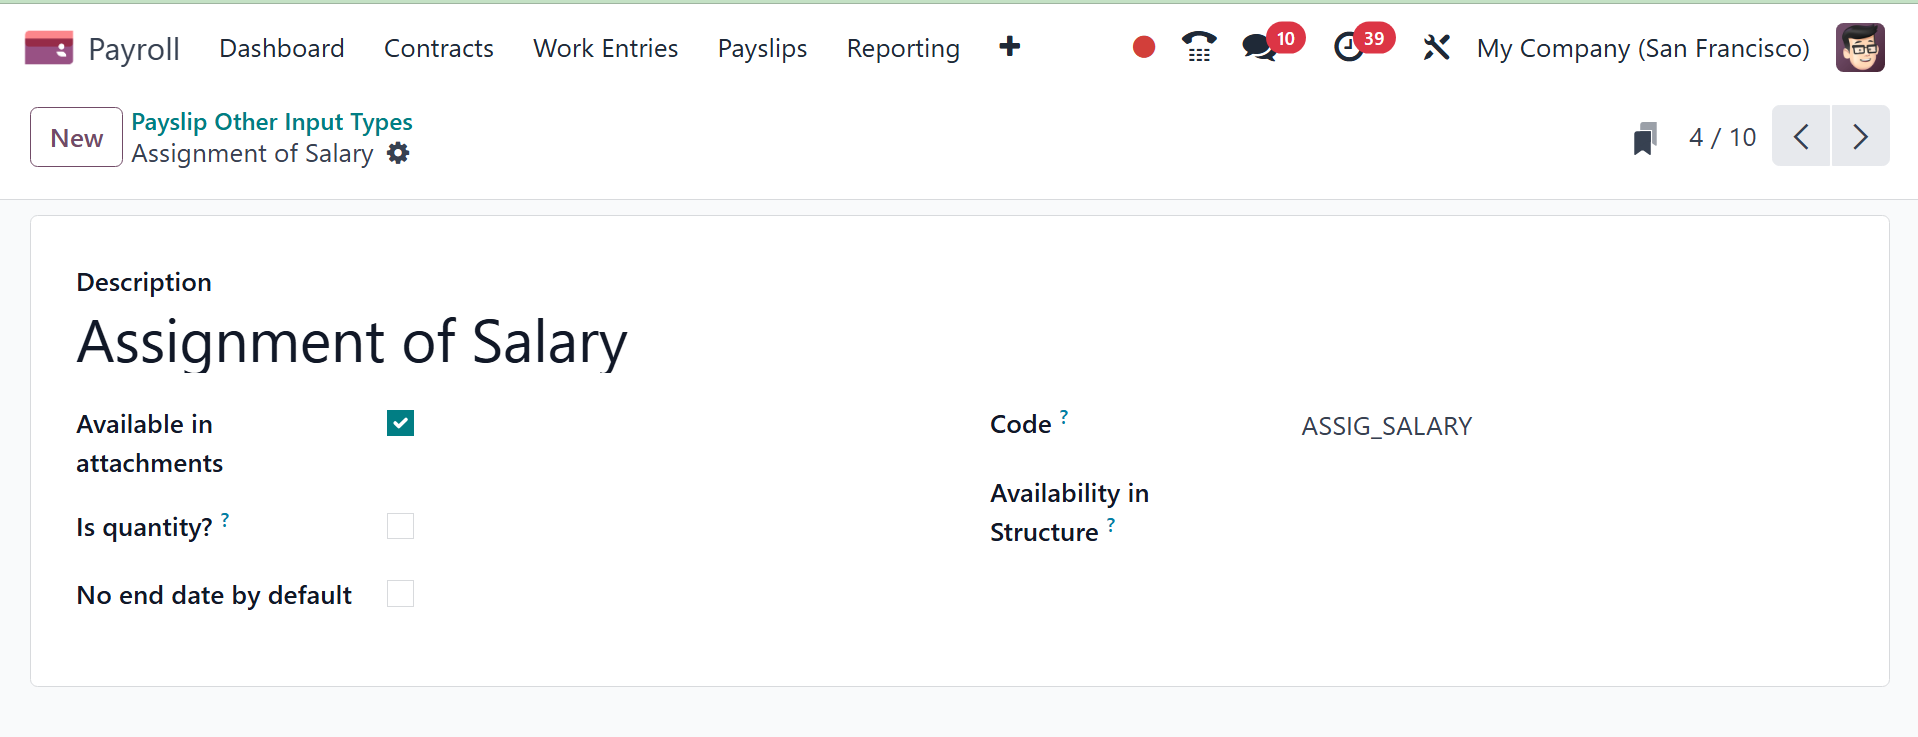
Provide the description, activate the available inattachment option,
is quantity option, and no end date by default option. Then, add the
code, availability in structure as well. If the availability is set
up in the structure, the input is available in all structures. If
you leave the field empty, it will appear on each payslip.
5.10 Salary Package Configurator
We may manage the resume, benefits, and personal data on the
Configuration page, which is located beneath the Salary Package
Configurator. Now let's review each detail separately.
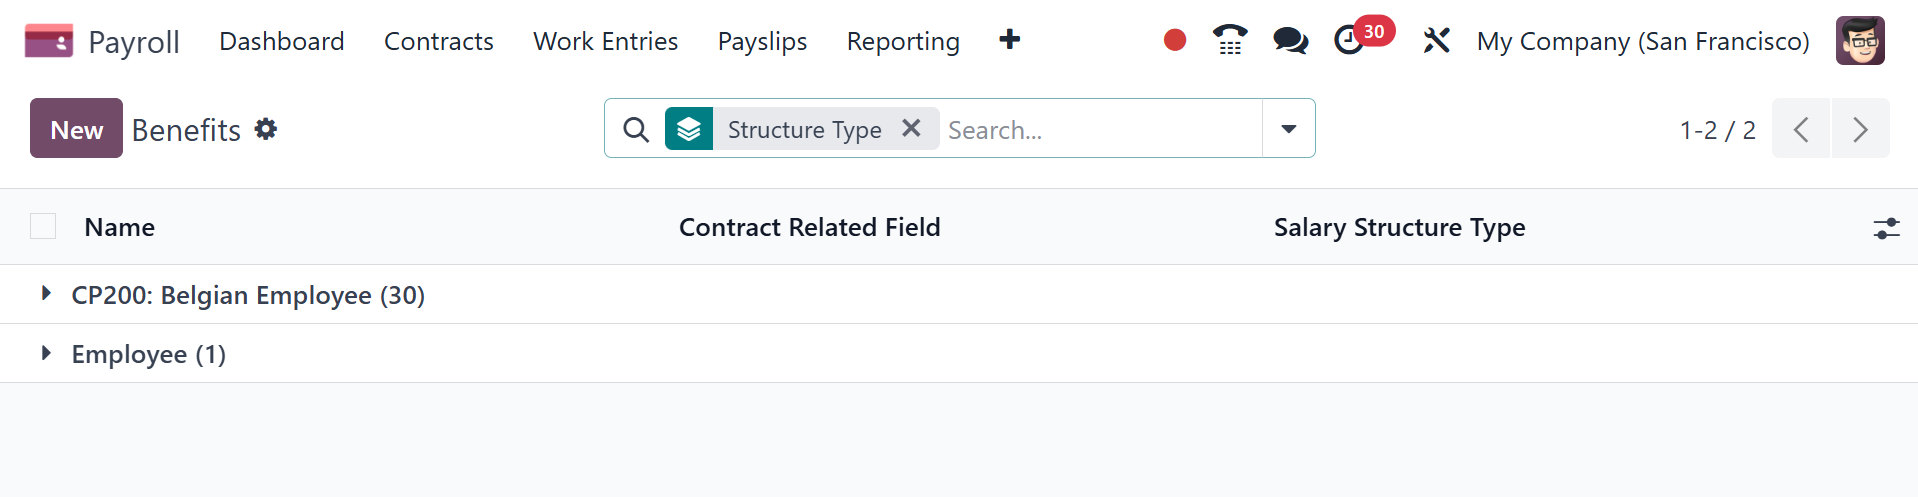
Benefits
The Benefits menu is included in Configuration's Salary Package
Configuration section. You can set up extra compensation benefits
under the Benefits panel. Details of configured advantages include
Name, Benefits field, and Salary Structure Type. By selecting the
New icon, we may specify a new benefit.
The Benefits Name must be entered in the window that is visible. Both
the contract field associated with an advantage's advantage and the
contract field associated with an advantage's cost should be
mentioned in the Cost field. A range of benefit categories are also
available to you, such as monthly cash benefits, non-monetary
benefits, monthly benefits in kind, and more.
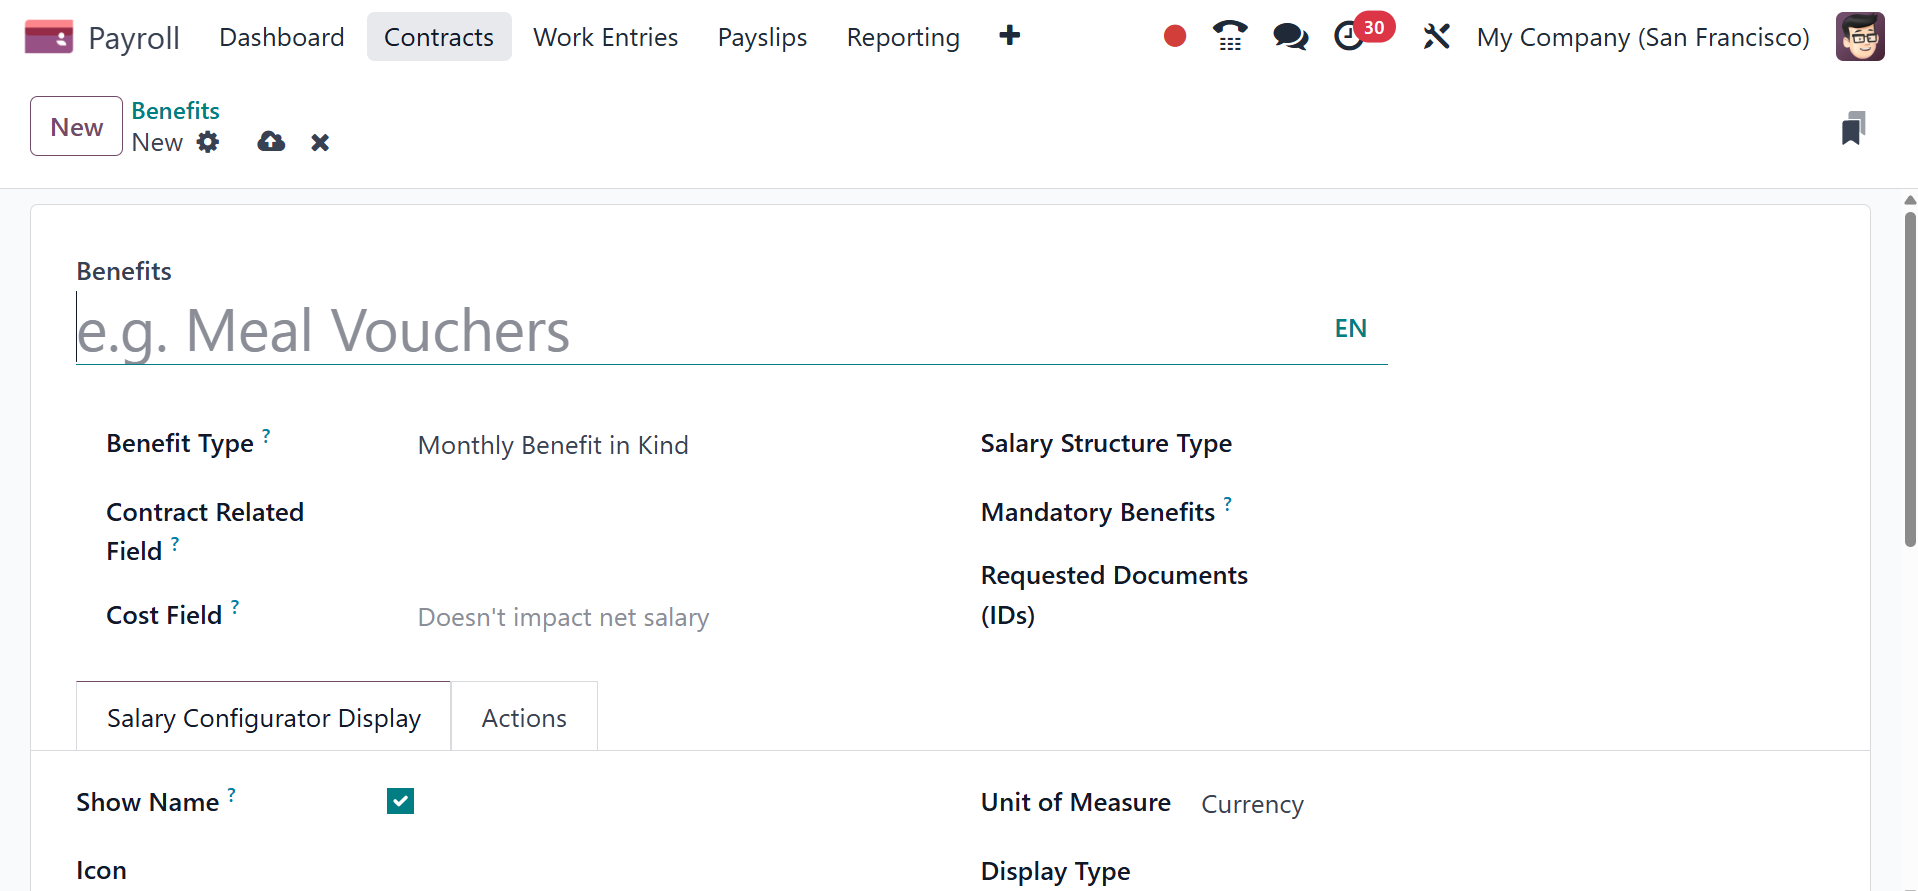
Next, we can choose between the Salary Structure Types of Employee
and Worker. Below that, you have the mandatory benefits option and
requested documents as well. Requested Documents: select any
document that is required to be submitted for this benefit, from the
drop-down menu. Mandatory Benefits: using the drop-down menu, select
the benefit that is required in order for this specific benefit to
be offered to the employee.
Once the type has been applied, you need to add an icon to the
benefit. To get the net salary, you need to activate the Impacts Net
Salary option. For benefit, we can later specify Currency, Days, and
Percentage as the units of measurement. Under the salary
configurator display, you can enable the show name option, icon,
folded, and always show description as well. Show Name: tick the
checkbox to have the benefit name appear in the salary package
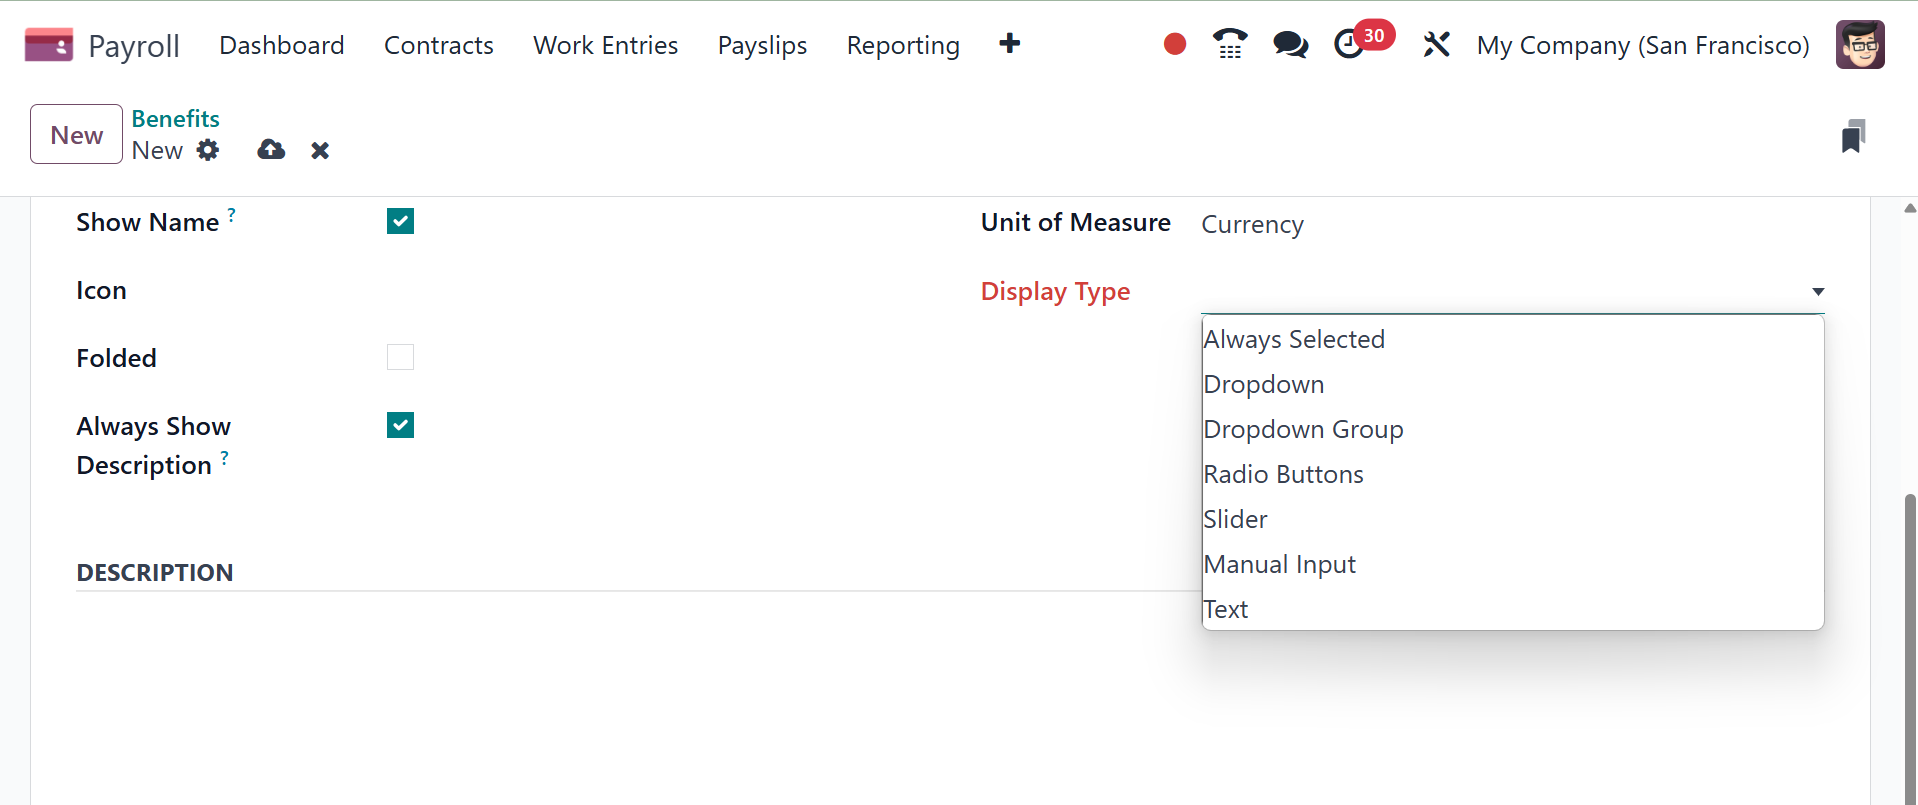
configurator. Display Type: select from the drop-down menu how this
benefit is displayed. The options are Always Selected, Dropdown,
Dropdown Group, Slider, Radio Buttons, Manual Input, or Text. This
field is required.
Folded: if the benefit should be folded, or hidden, because it is
dependant on another benefit selection, tick the checkbox.
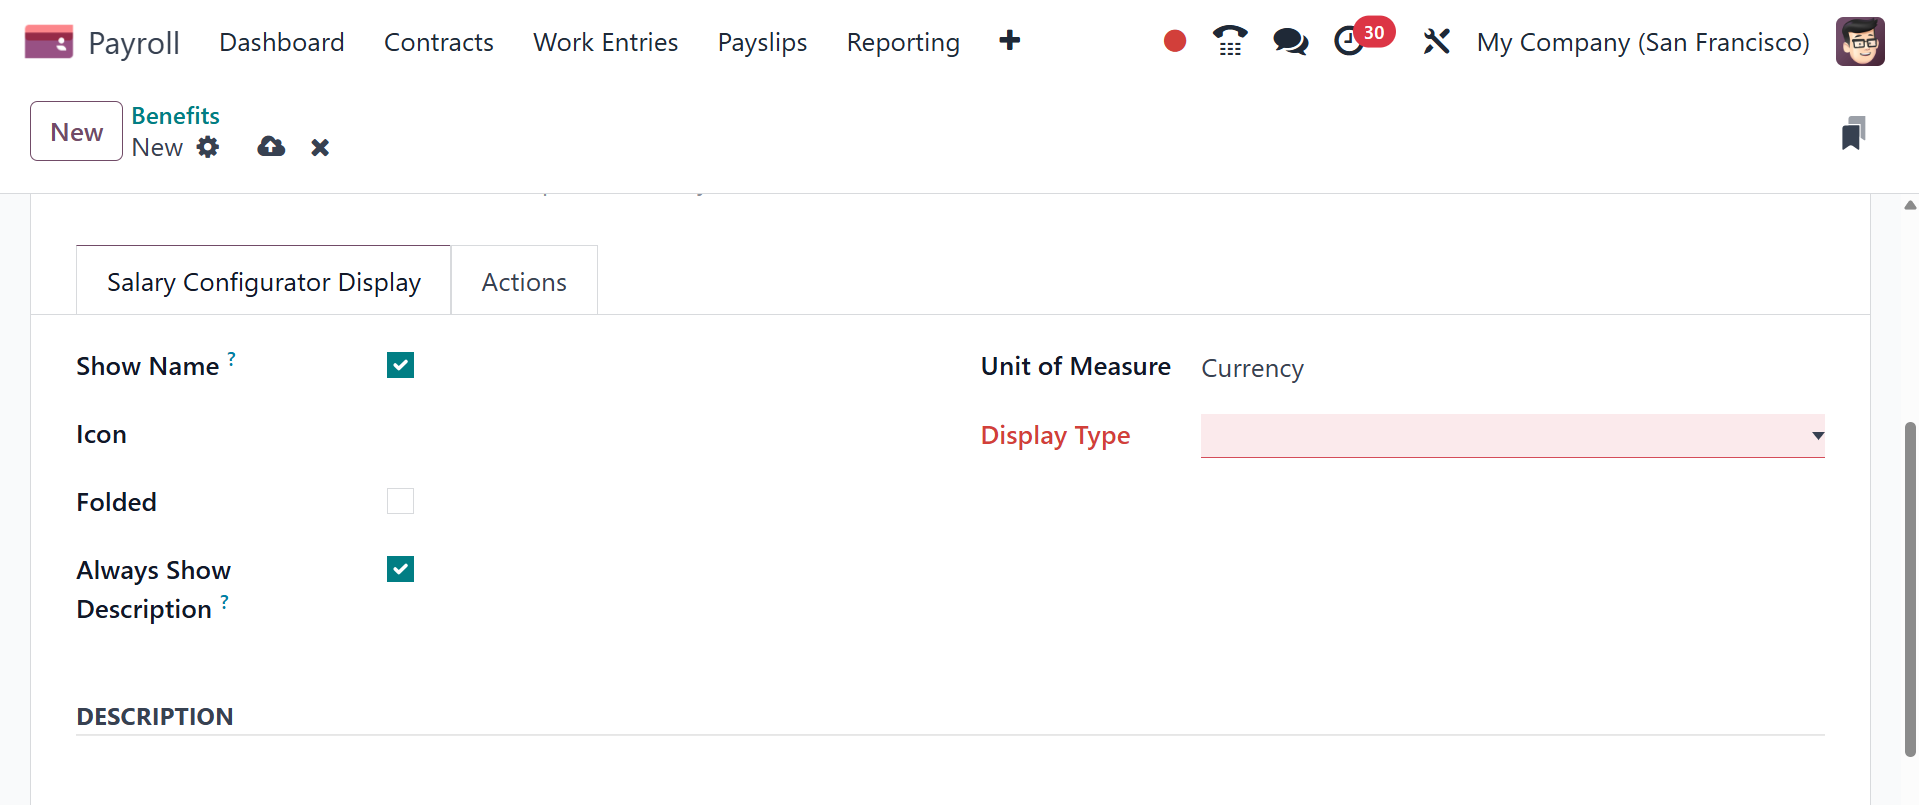
One way to describe an activity's benefit is as an email, meeting,
notification, call, etc. The activity type will be produced
automatically after the employee selects the reward. We might add
more details about the benefits in the Description field. You can
conceal the description after using the conceal Description section
if the benefit is not being used.
Beneficial criterion can be enabled or disabled by users within the
Folded field. Provide choices for display types as well, such as
Text, Slider, Dropdown, and others. You can add required documents
to the section for requested documents for an extra advantage. In
order to sign the employee benefit, users can optionally select a
template.
All of these details are automatically saved by Odoo 18 Payroll.
5.11 Personal Info
It is easy to comprehend the personal data associated with each
employee's paystubs by selecting the Personal Info menu in
Configuration. All of the preset personal information, such as Name,
Salary Structure Type, and Related field, is available to us
individually in the Personal Info box. It's easy to describe a new
record once you've hit the New button.
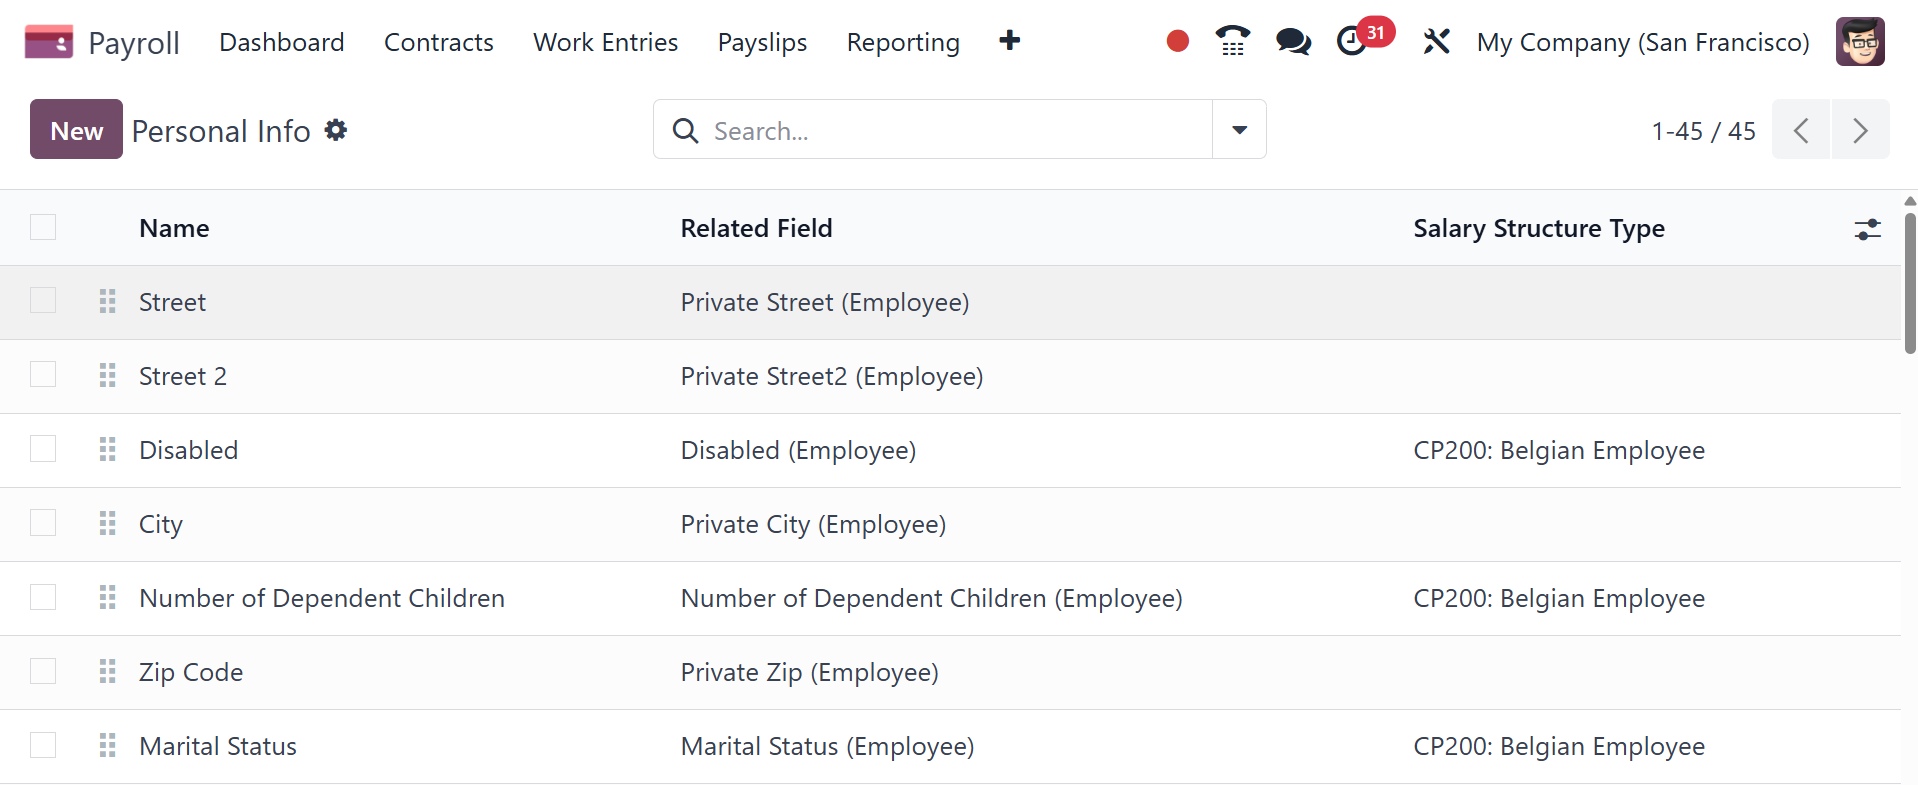
In the open window, enter personal information and the individuals it
applies for. applies on-field, including a bank account, an
employee, and others. Users can also provide the field name for
personal data in the Related field. Additionally, you can input a
variety of personal data, like your address, private documents,
current situation, and more.
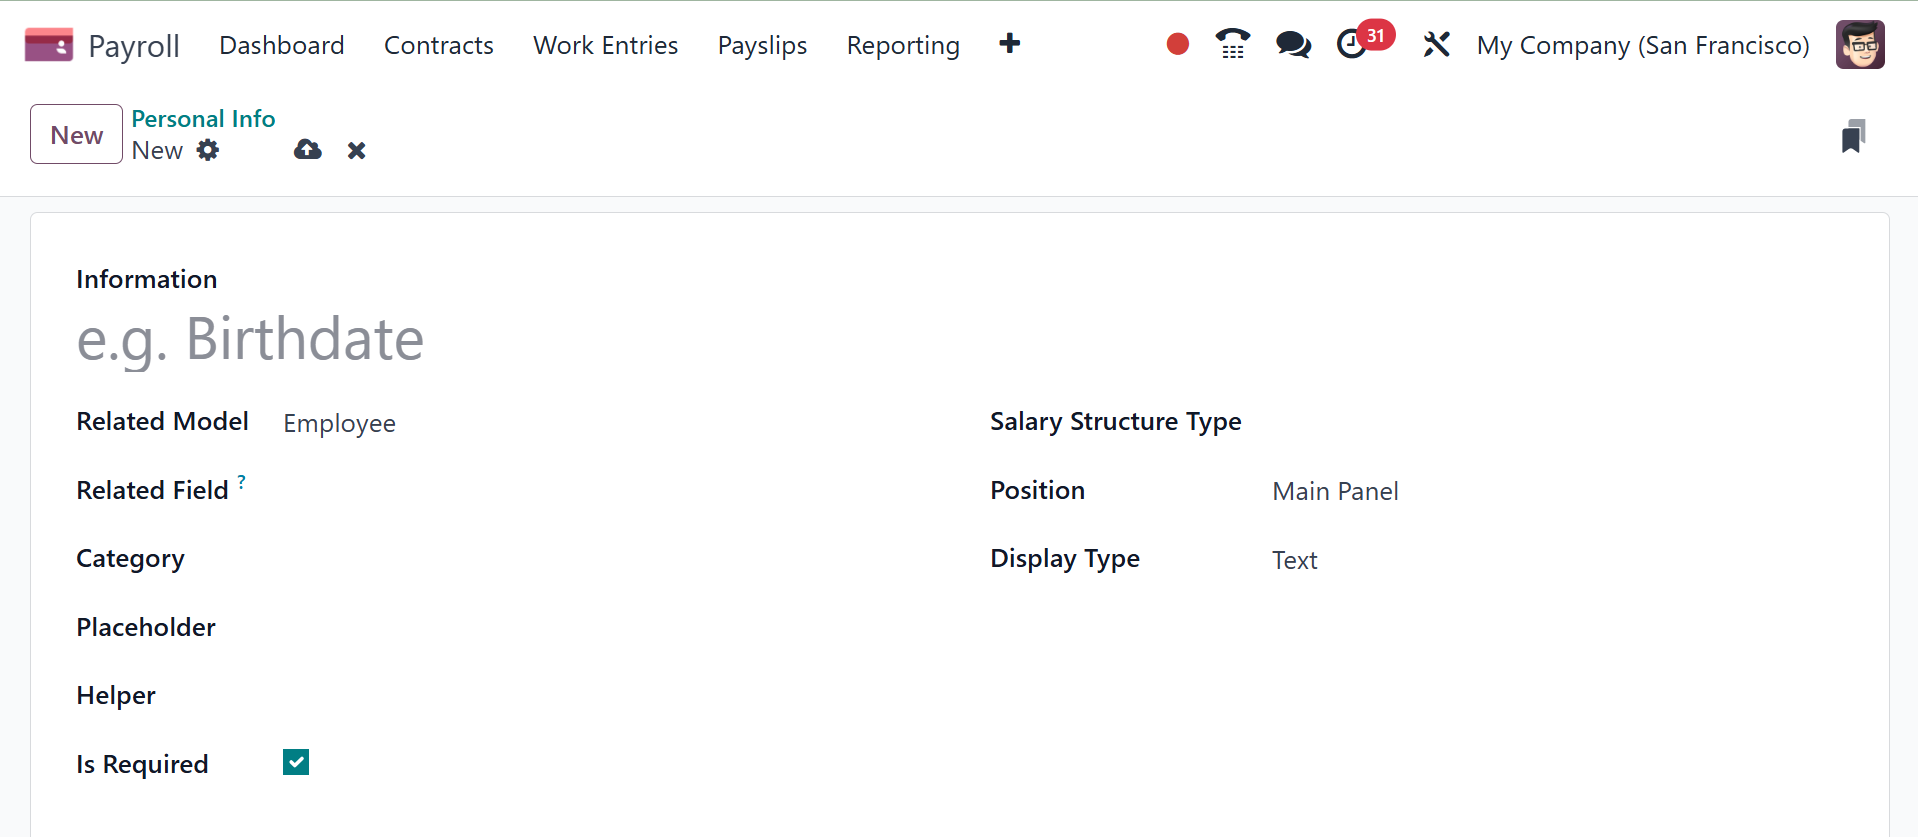
Next, for your personal data, choose Worker and Employee as the
Salary Structure Types. Regarding employee personal information, you
may also bring up the Placeholder and Helper.
The positions of Main Panel and Side Panel for Personal Information
are open to users. After then, the Display Type might be stated as
Radio, Email, Text, etc. Thus, it is easy to utilize personal
information data in Odoo 18.
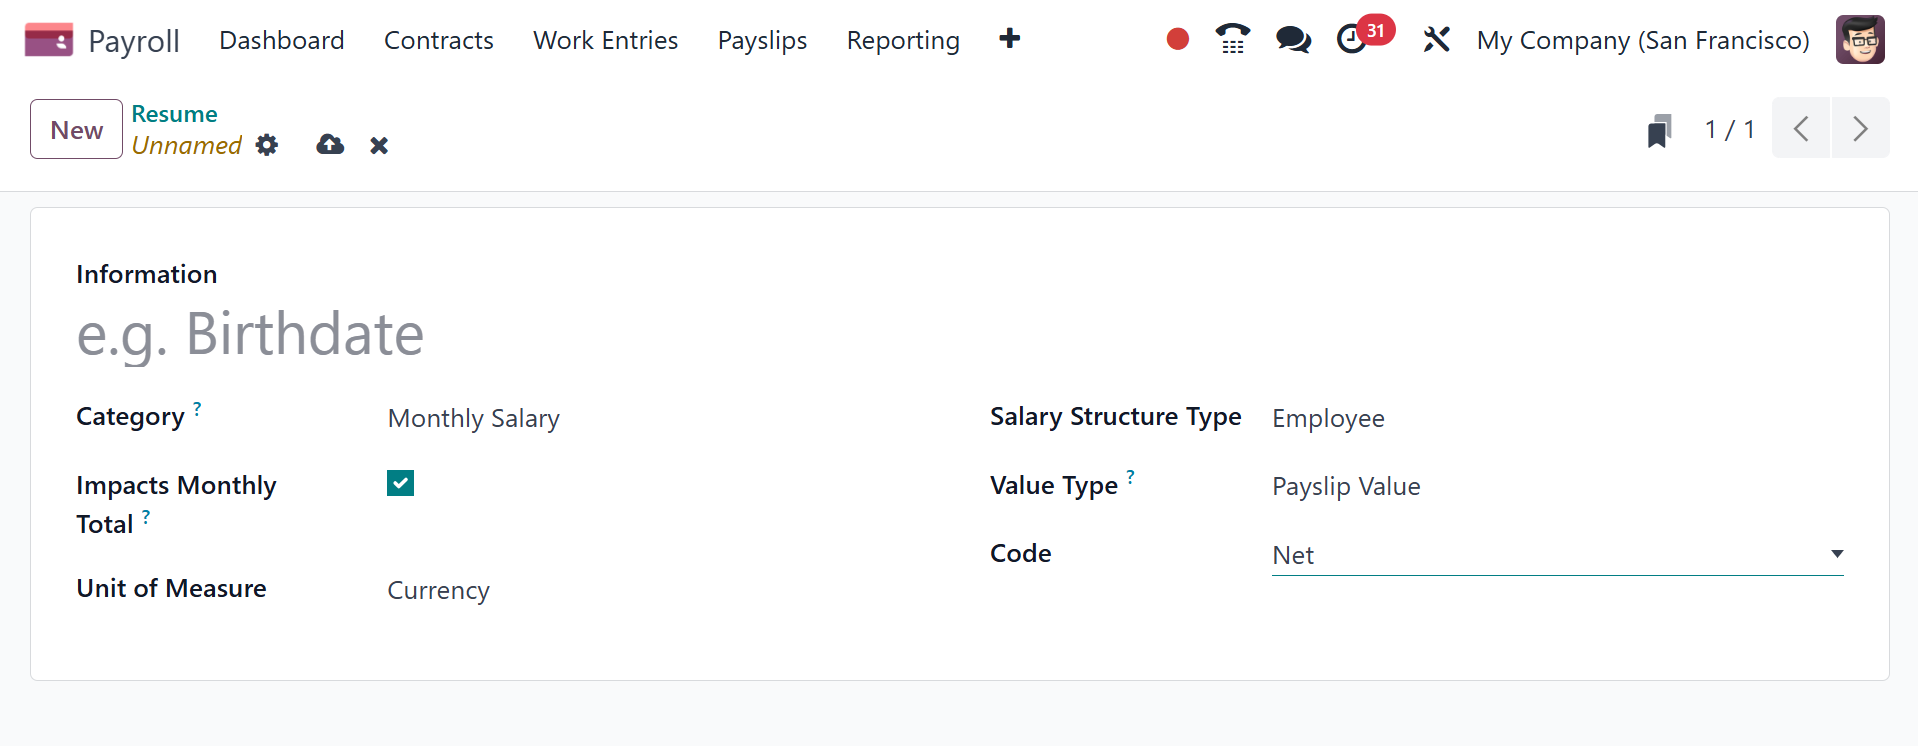
5.12 Resume
We can assign different resume types to a pay structure after
choosing the Resume option on the Configuration tab. The Resume
window defines all freshly created resume data, such as Name, Value
Type, Code, and Salary Structure Type. By choosing the New icon, we
may generate a new resume.

In the open screen's Information box, mention the comprehensive
synopsis. The category that most suits your resume must be chosen,
such as Monthly Salary, Annual Benefits, and so forth. Next, select
your Salary Structure Type on the resume.
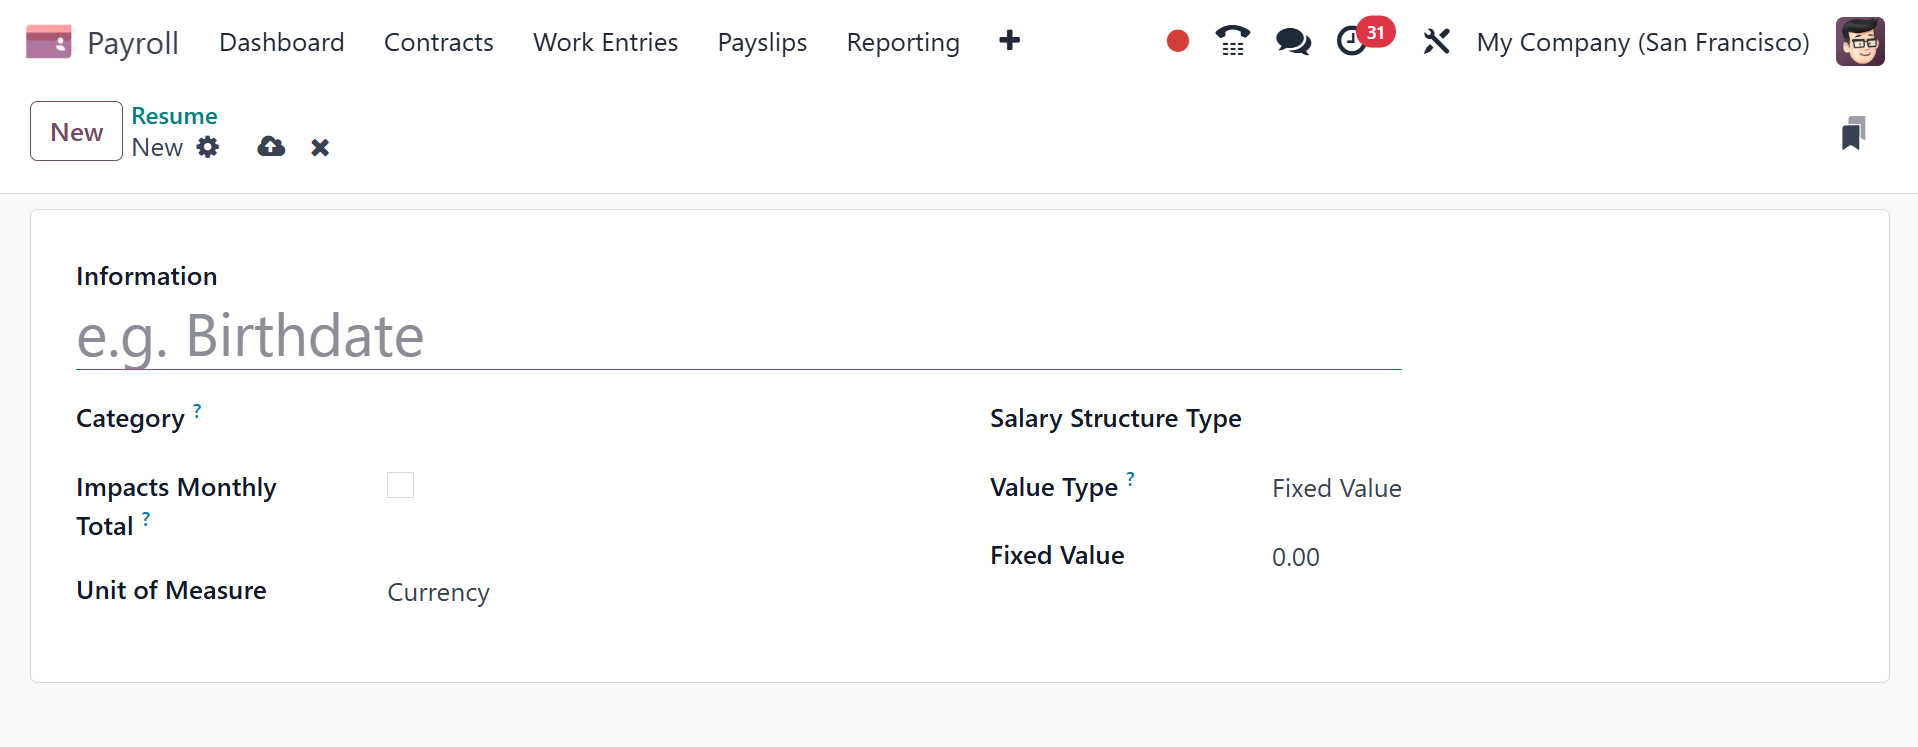
To see monthly expenses on the resume, activate the Impacts Monthly
Total option. In the future, choose the preferred unit of
measurement, such as days, percentages, etc. Furthermore, a value
type can be changed to be Payslip value, Monthly Total, Fixed Value,
and more. After choosing the value type, the user can add a certain
amount depending on the value they have selected.
All of them have to deal with the Odoo 18 Payroll Configuration
function.
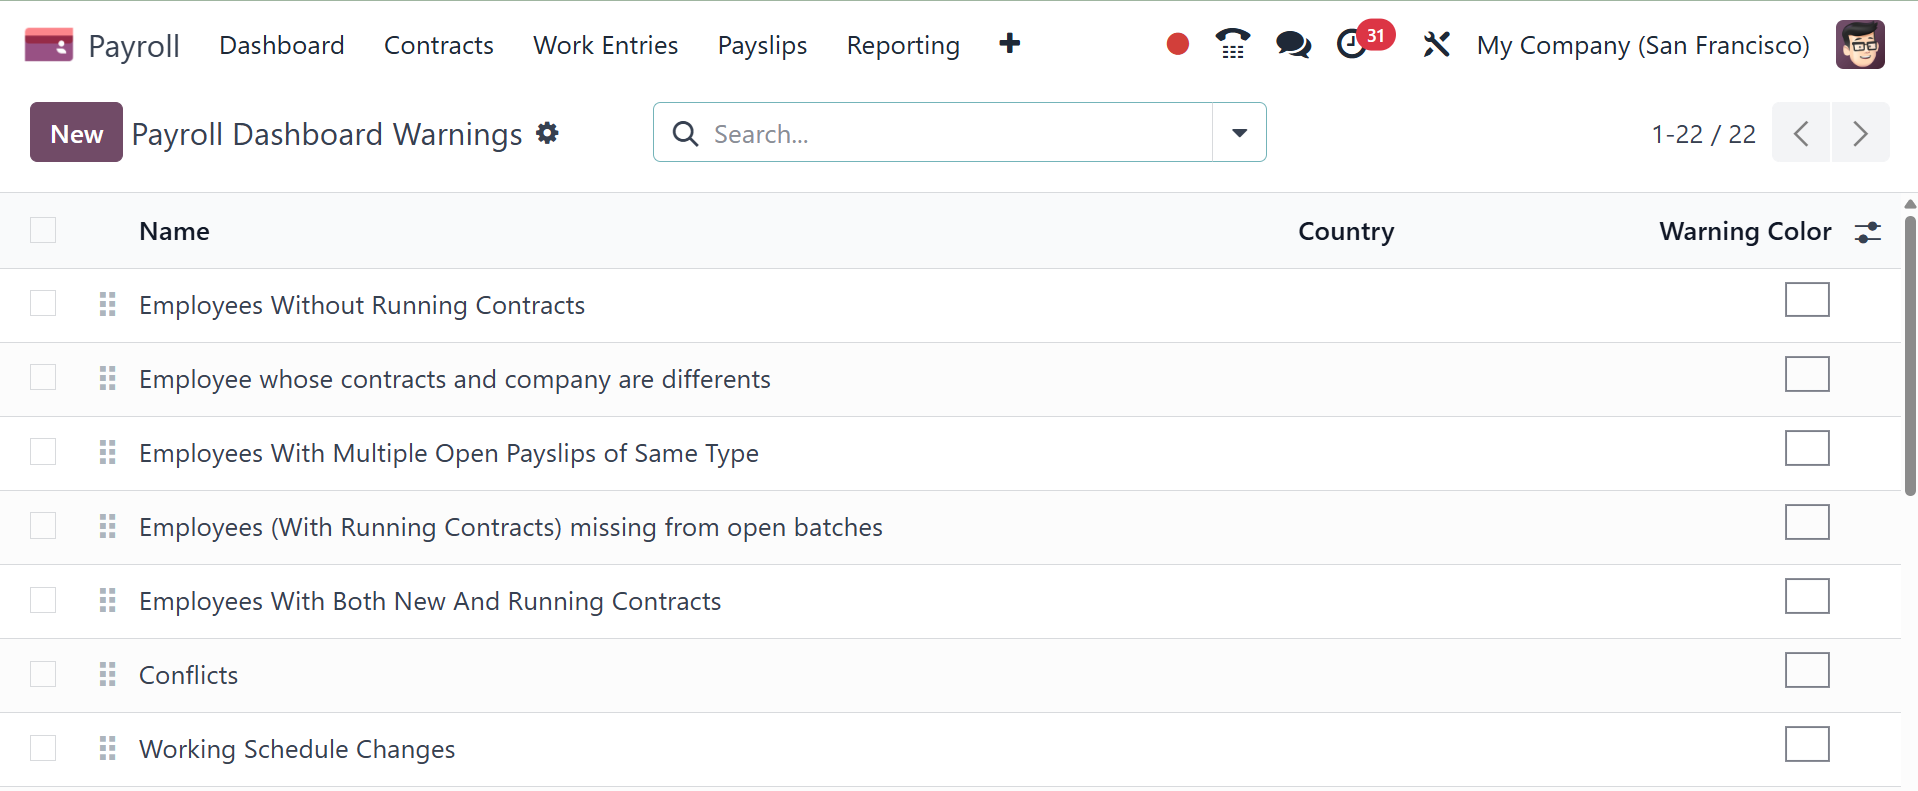
5.13 Dashboard Warnings
Users can locate any significant cautions regarding employment
contracts under the "Warnings" section.
5.14 Job Positions
The Configuration menu contains the Job Position setting. It enables
you to specify several positions inside an organization to which
staff members may be assigned.
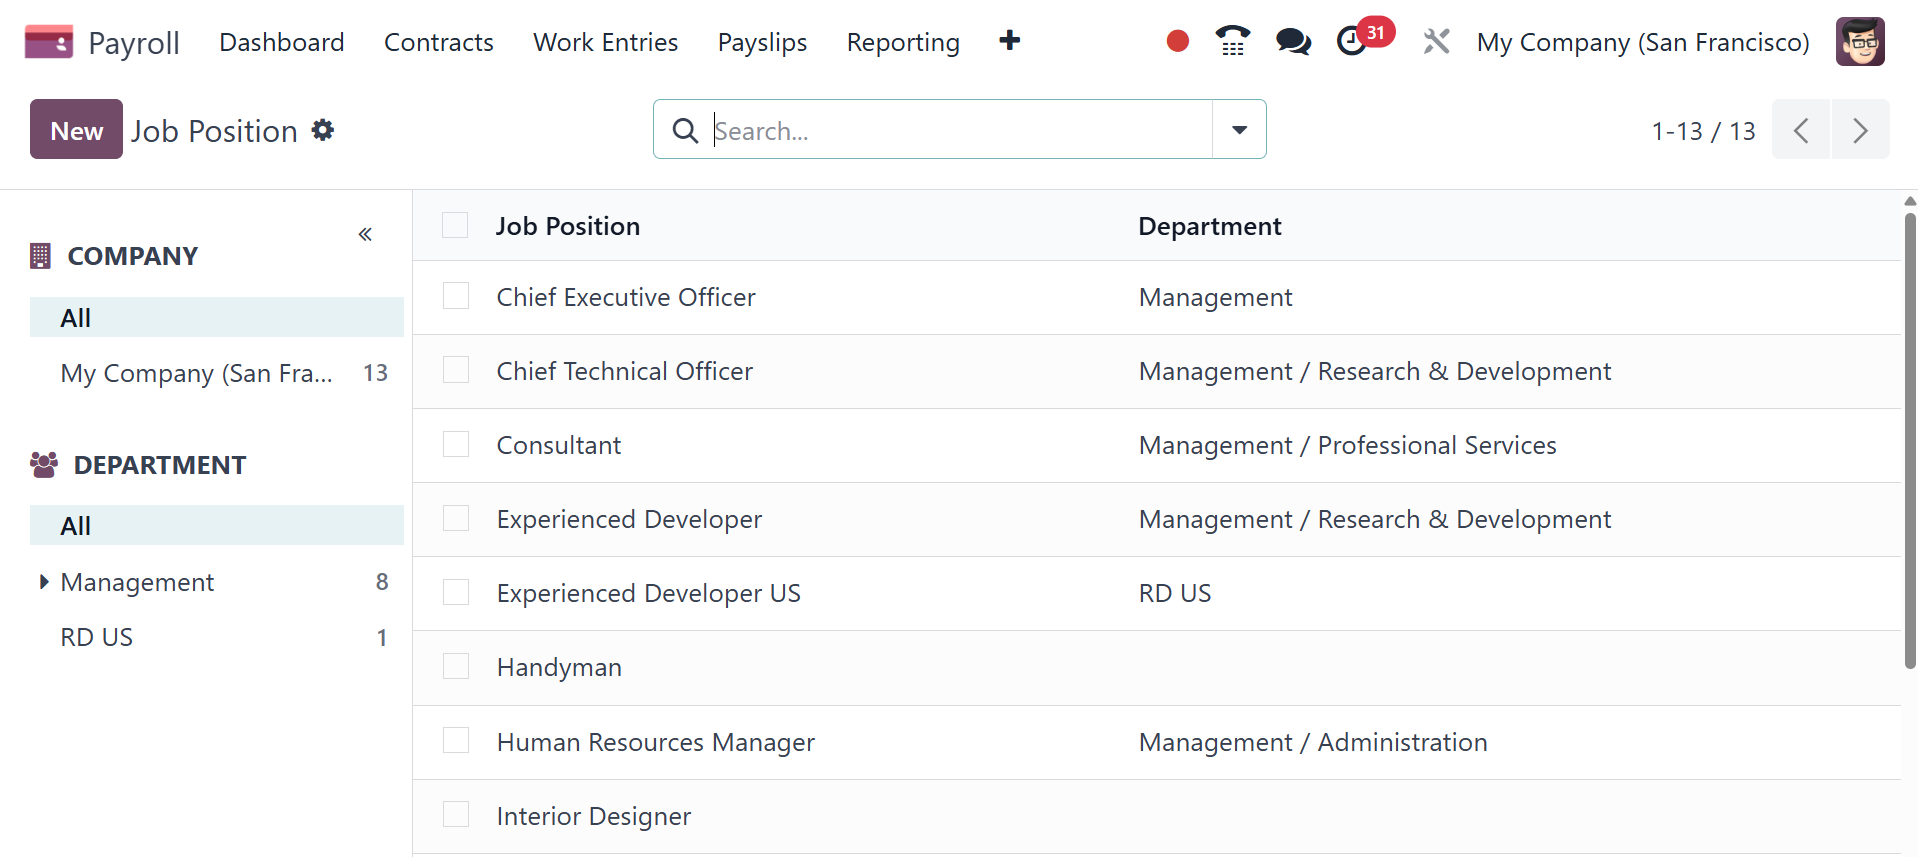
Here, you will get the list of already configured job position and
department.
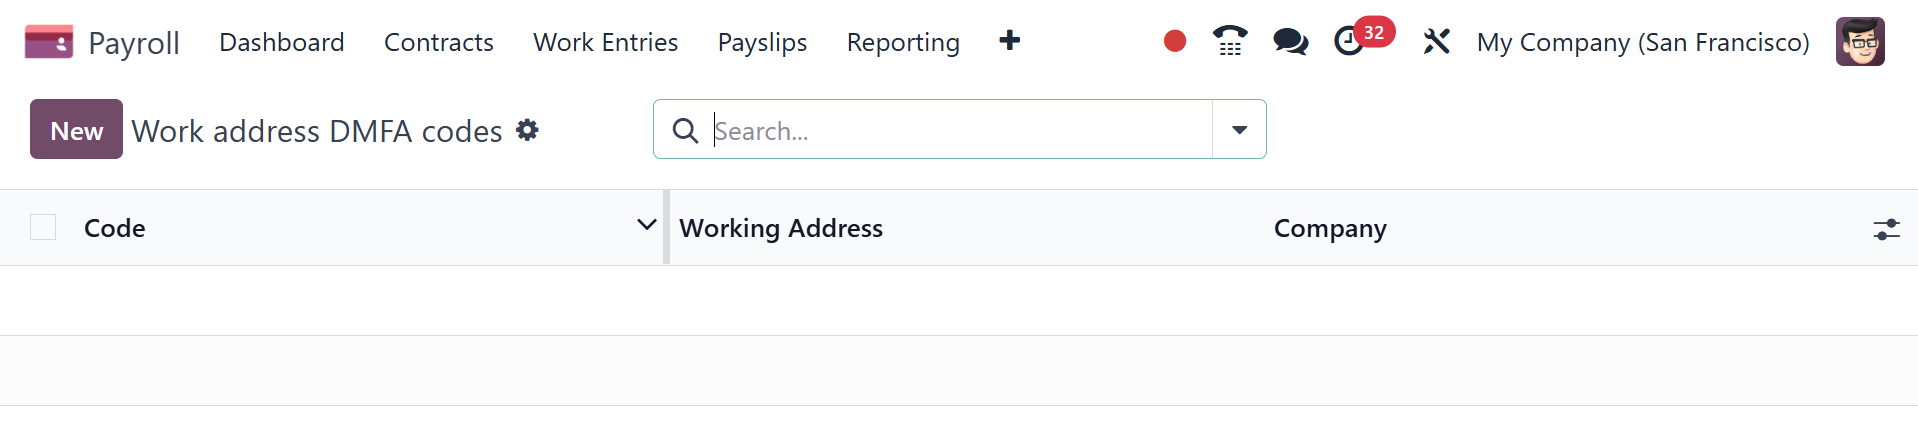
5.15 Work Address DMFA Codes
The Work Address DMFA Codes are included in the Configuration menu of
the Odoo Payroll module. In Belgium, DMFA (Déclaration
Multifonctionnelle) reporting is required for payroll, and these
codes are used for it.
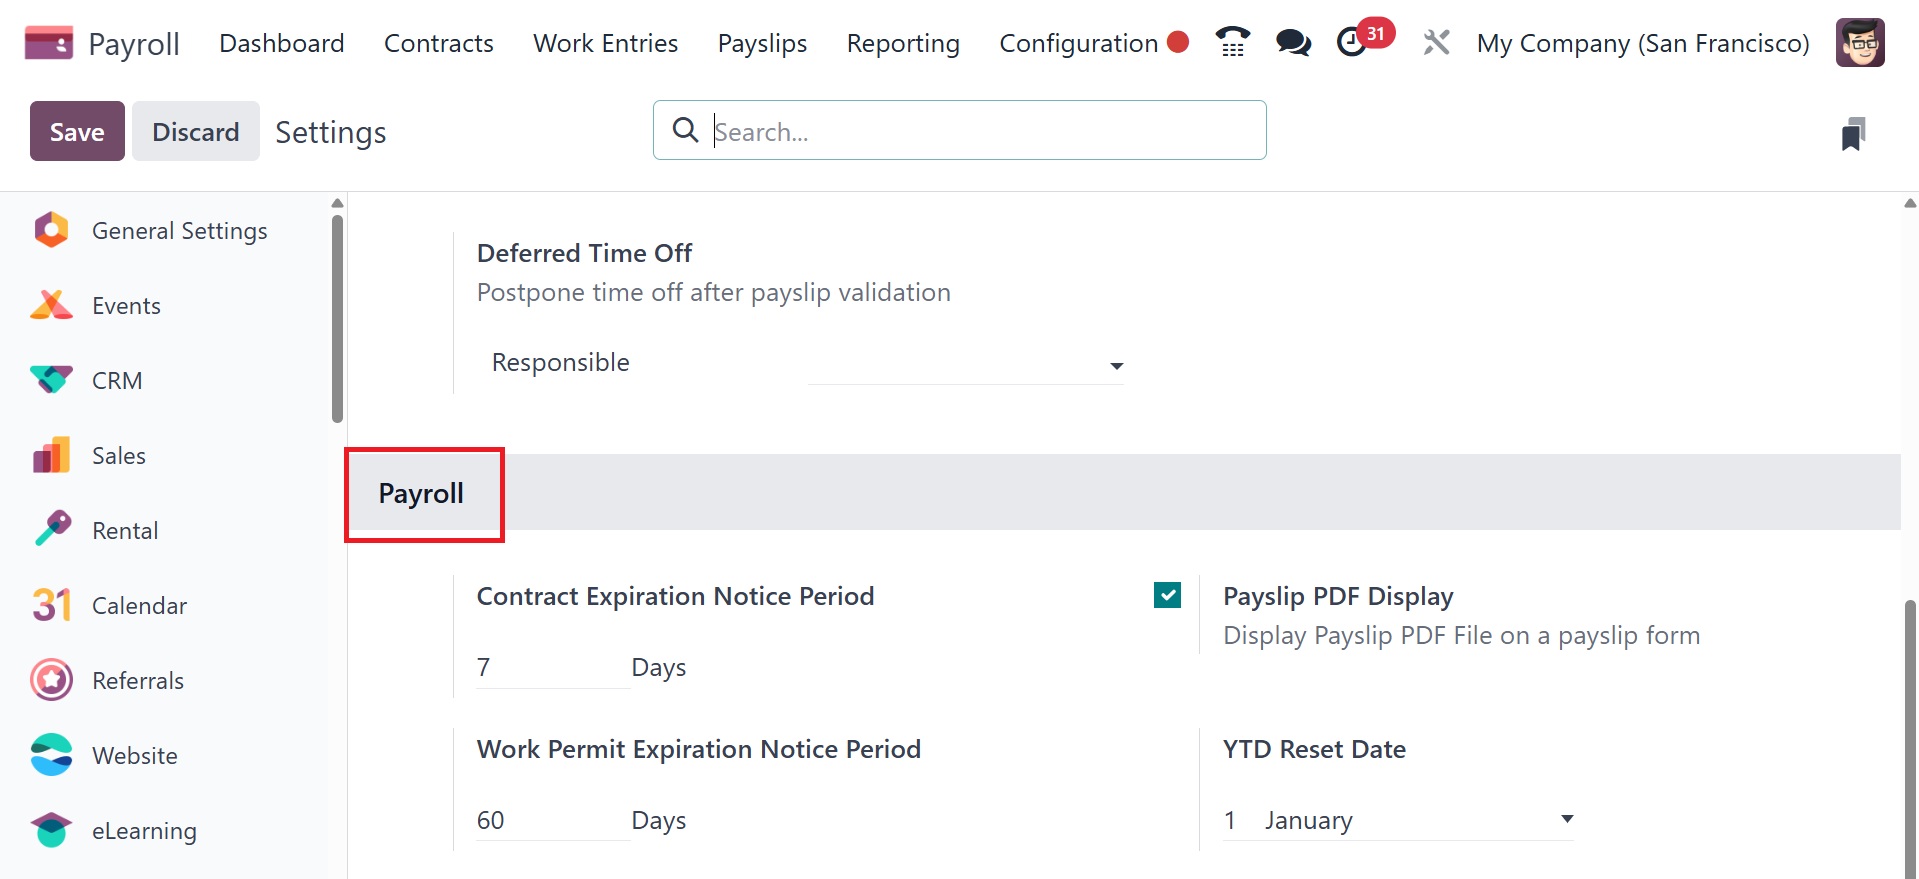
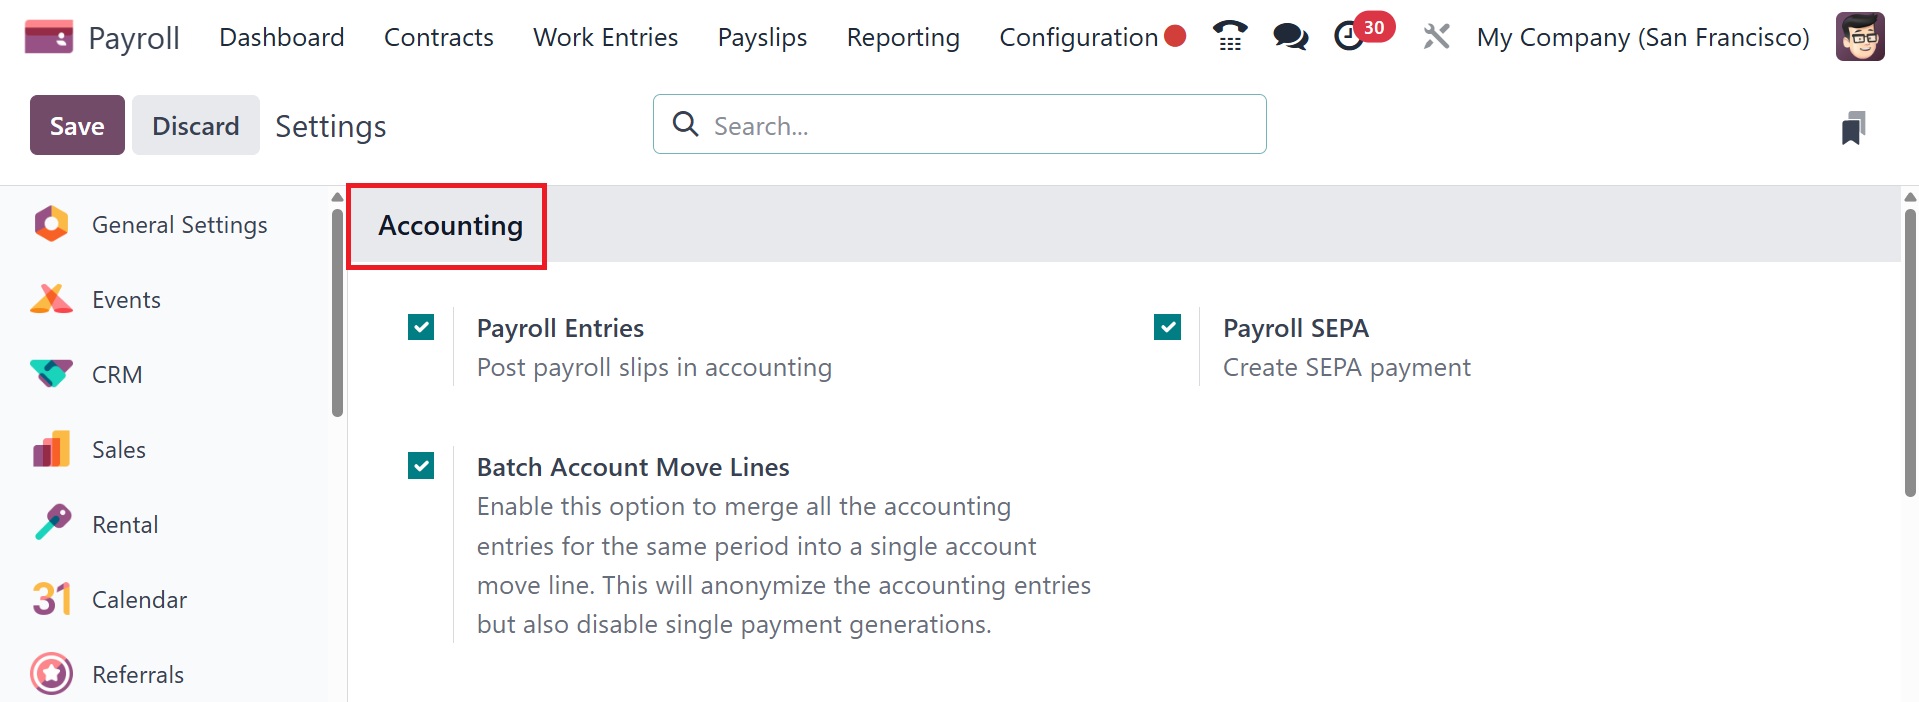
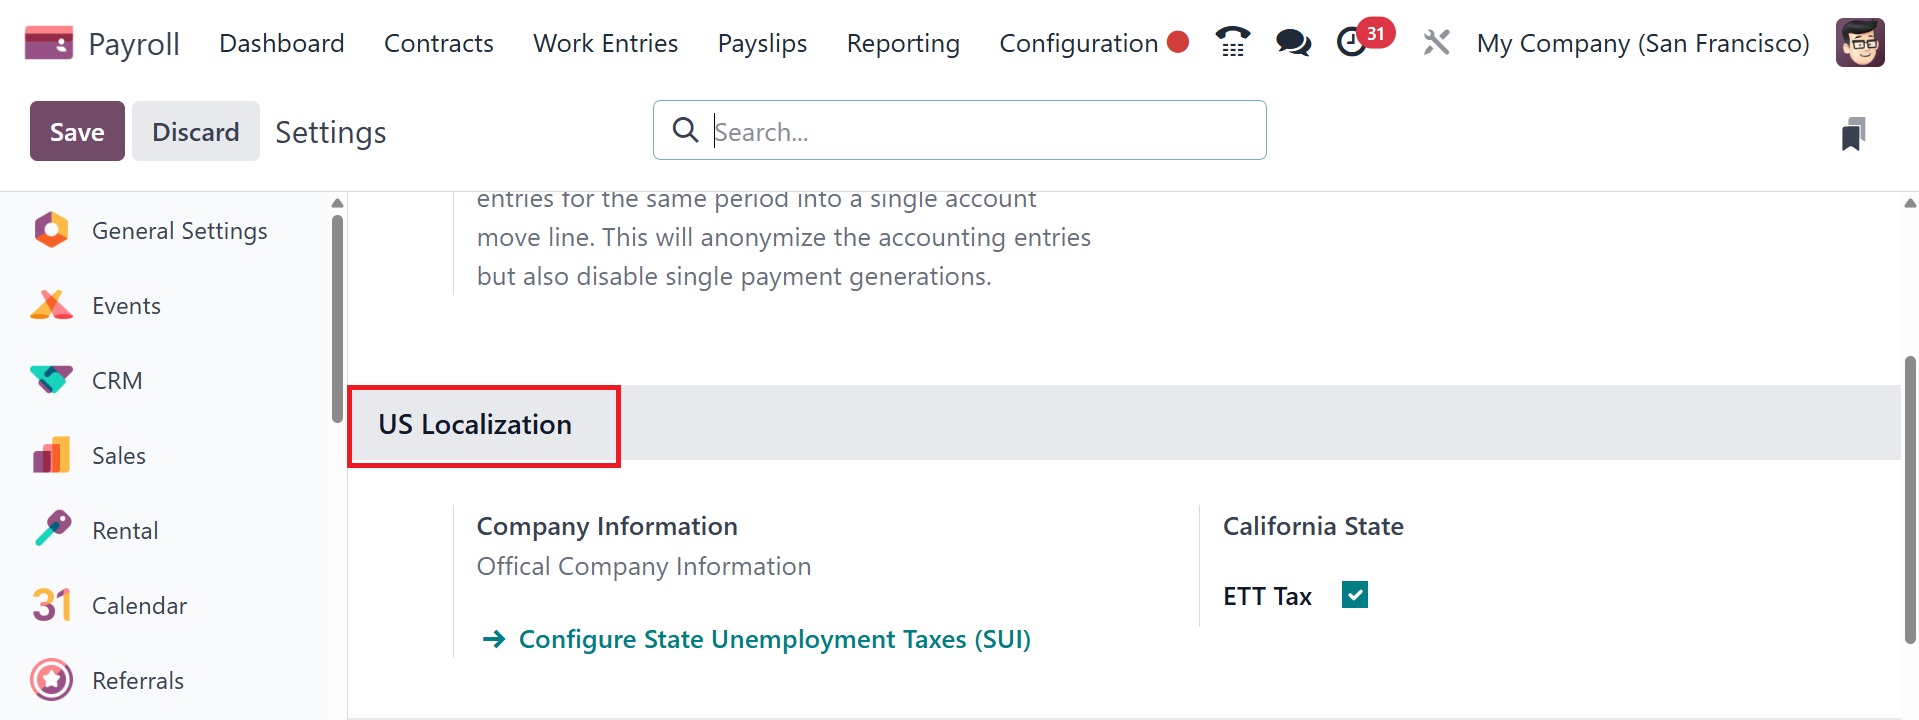
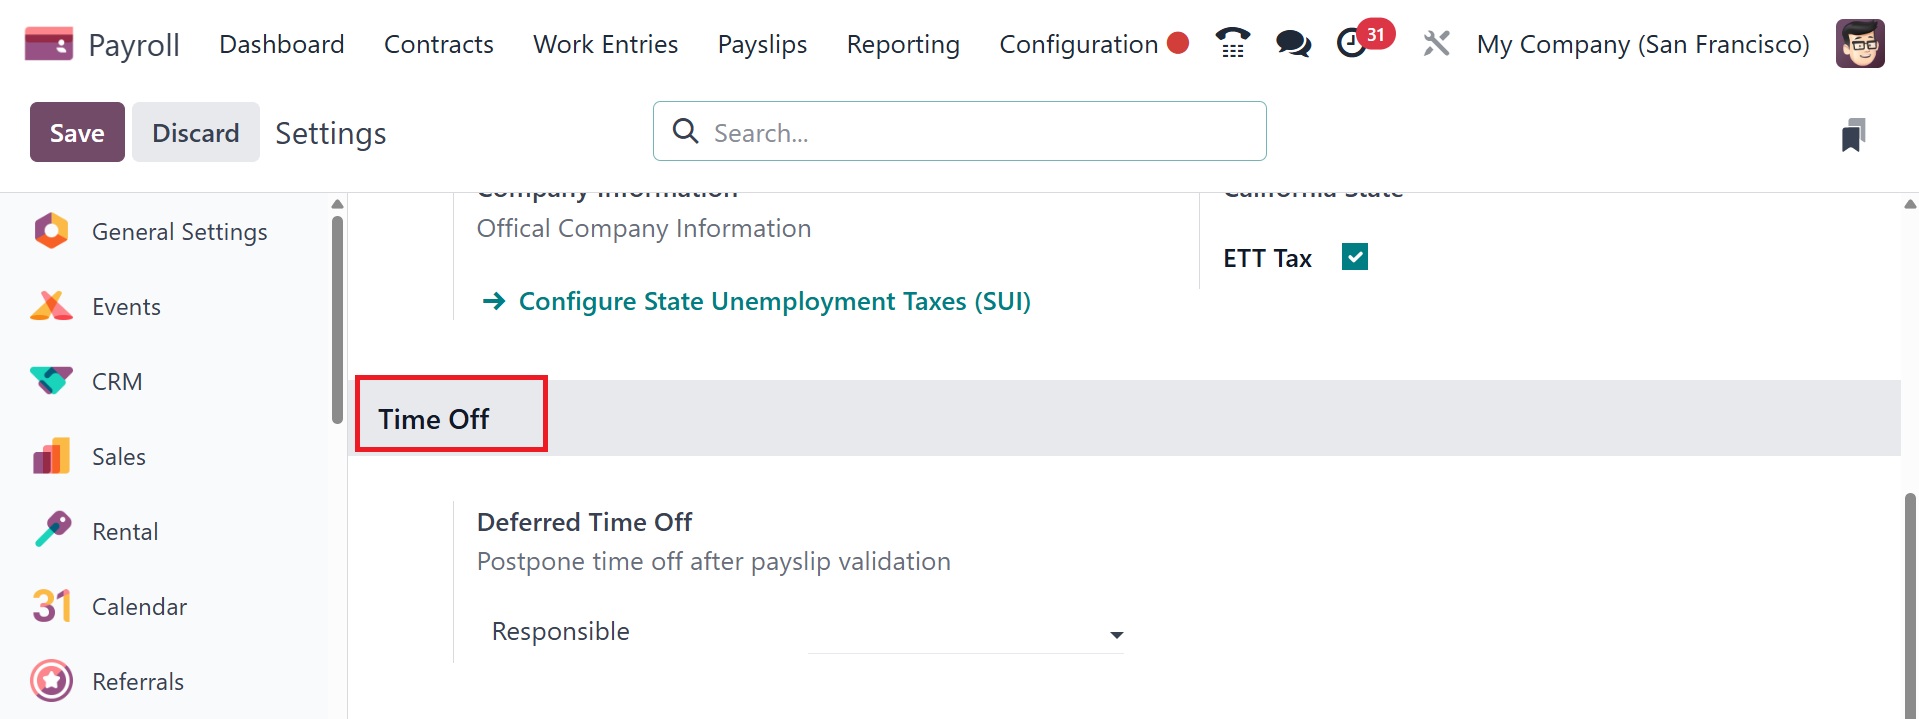
5.16 Settings
The Odoo 18 Payroll Module's "Configuration" menu opens the
"Settings" window. Four options tab parts, including "Accounting,"
"US Localization, Payroll " and "Time Off," are included in this
settings page.
Accounting: under this option, we may configure the "Payroll Entries,
batch account move lines" and "Payroll SEPA" settings. The payroll
entries option posts payroll slips in accounting. Payroll SEPA helps
to create SEPA payments. The batch account move lines option helps
to merge all the accounting entries for the same period into a
single account move line.
US Localization: From this settings page, we may activate the Belgian
localization options, which include company information, and
California state.
Time Off: The "Deferred Time Off" option can be enabled in this area.
Payroll: under the payroll tab, you have the options like contract
expiration notice period, and payslip PDF display option.