5. Configurations
Menu
The Configurations Menu provides
a comprehensive selection of
configuration options for
Point of Sale (PoS) sessions
and their associated
functionalities. These
include General Settings,
Payment Methods, Floor Plans,
Restaurant Mode, Note Models,
PoS categories, and many
more.
6.1 Payment Methods
The PoS module offers a variety
of payment methods to
facilitate business
operations and ensure a
seamless sales process. Odoo
18 simplifies this process by
allowing users to configure
payment methods directly from
the Configuration menu. Users
can select appropriate
payment methods for the
current PoS session from a
predefined list.
Clicking on the 'Payment Methods'
link displays a list of
previously configured payment
methods, along with details
such as Name, Journal,
Company, and PoS session.
Users can view the list in
Kanban format, edit details
via the Edit icon, or select
a payment method for further
information. Filtering and
grouping options enhance
organization, displaying
essential data such as method
type, journal, and company
name.
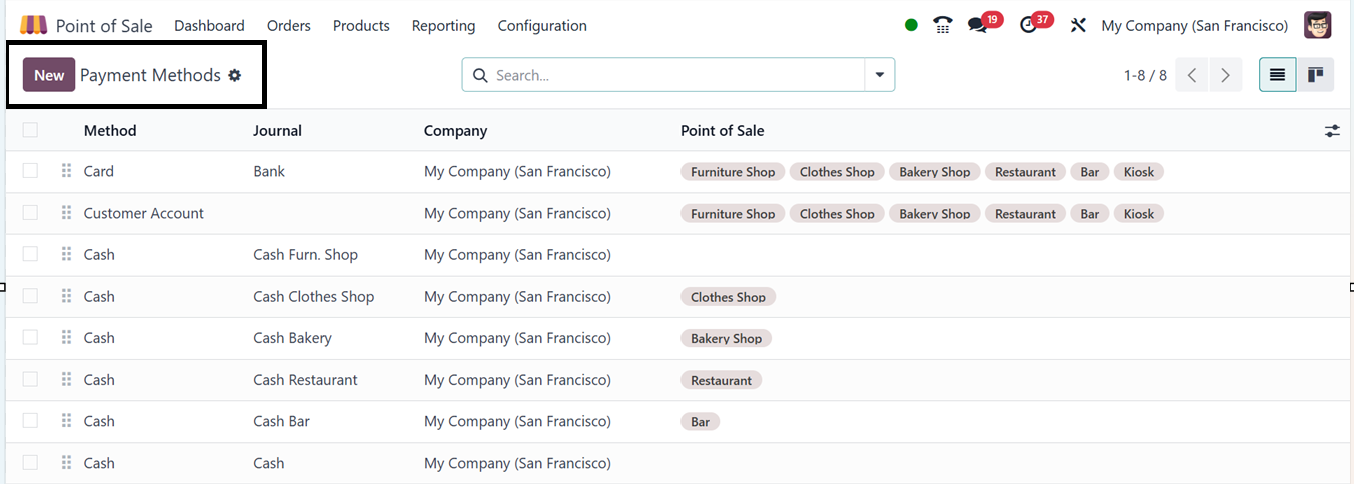
Additional options are available
on the right side of the
customer identification
window. To add a new payment
method, click the 'New'
button.
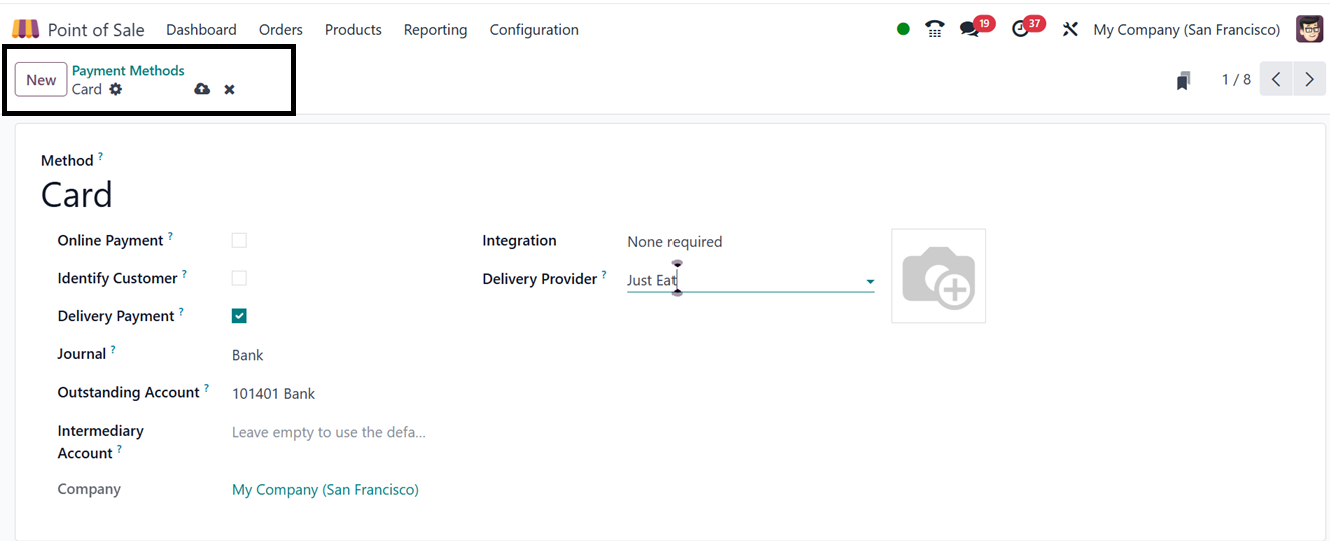
Enter the payment method’s name
in the 'Method' field,
indicate whether it qualifies
as an 'Online Payment,'
select the relevant
'Journal,' and activate the
'Identify Customer' feature
if necessary.then, provide
other details including
Outstanding Account,
Intermediary Account and
Delivery Provider. The form
fields will vary for
different payment method
options. Finally, save the
configuration to integrate
the new payment method into
the system. This payment
method will then be available
for use during PoS
transactions.
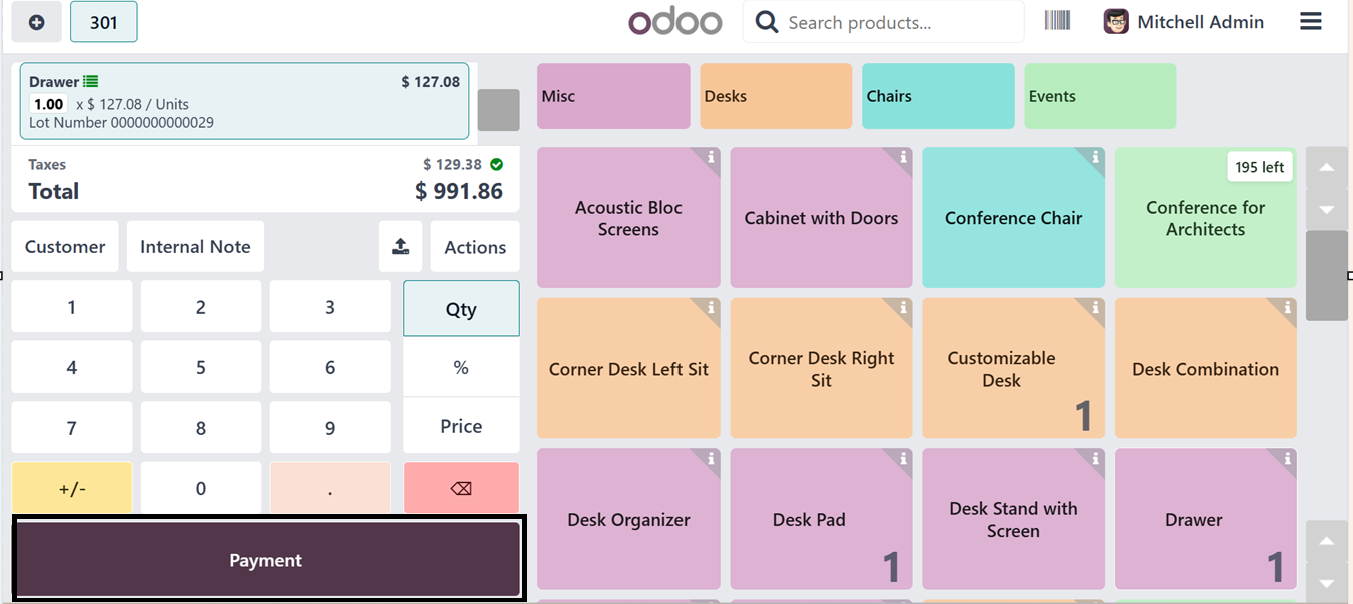
To utilize this feature, navigate
to a PoS session, select
products, and proceed with
payment by clicking the
'Payment' button.
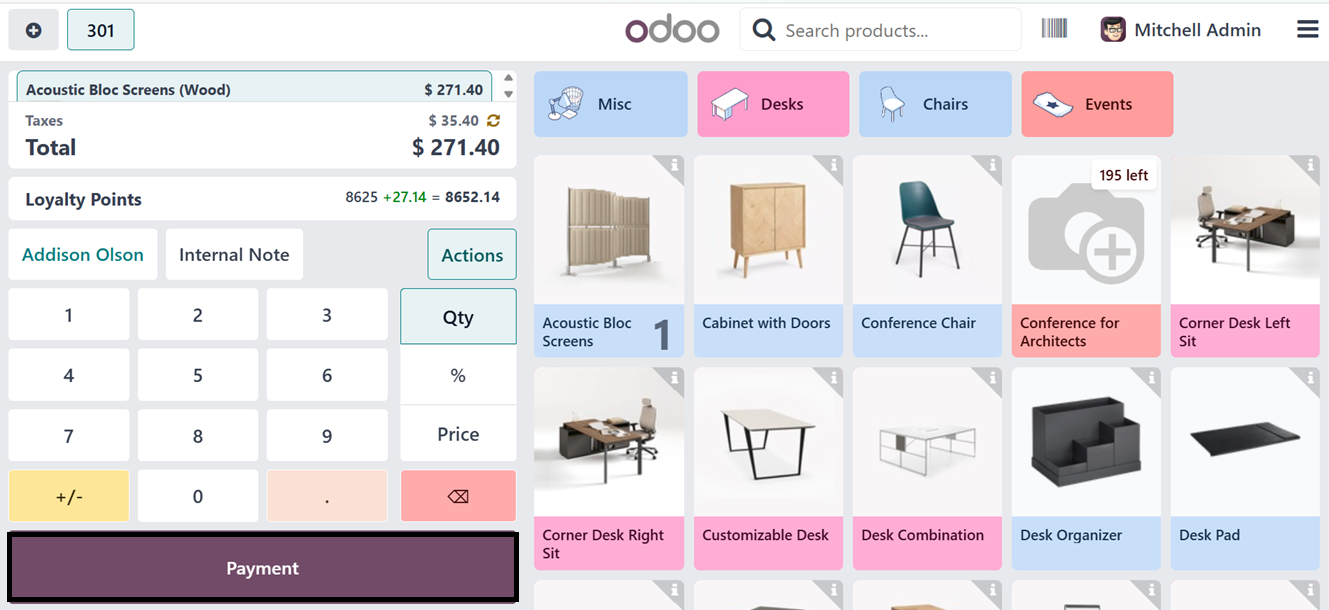
This action directs users to the
payments window, where they
can choose from available
payment methods such as Cash,
Card, and Customer Account.
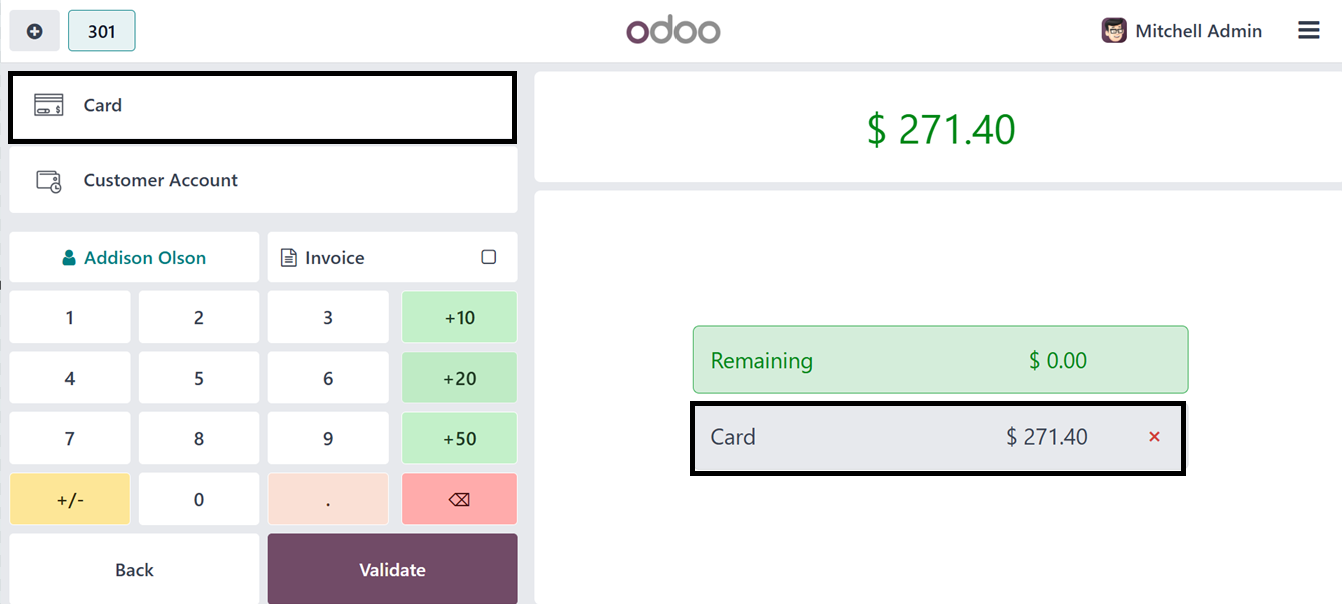
Selecting the 'Customer Account'
option enables businesses to
manage customer credits and
payments within the system,
making it suitable for
credit-based transactions.
6.2 Customer Account and
Credit Purchases
Customers can leverage the
'Customer Account' payment
method for credit
transactions and advance
payments, allowing them to
settle balances later and
apply credit to new orders.
To verify this process,
initiate a new order by
selecting products, placing
the order with the 'Order'
button, and proceeding to
payment.
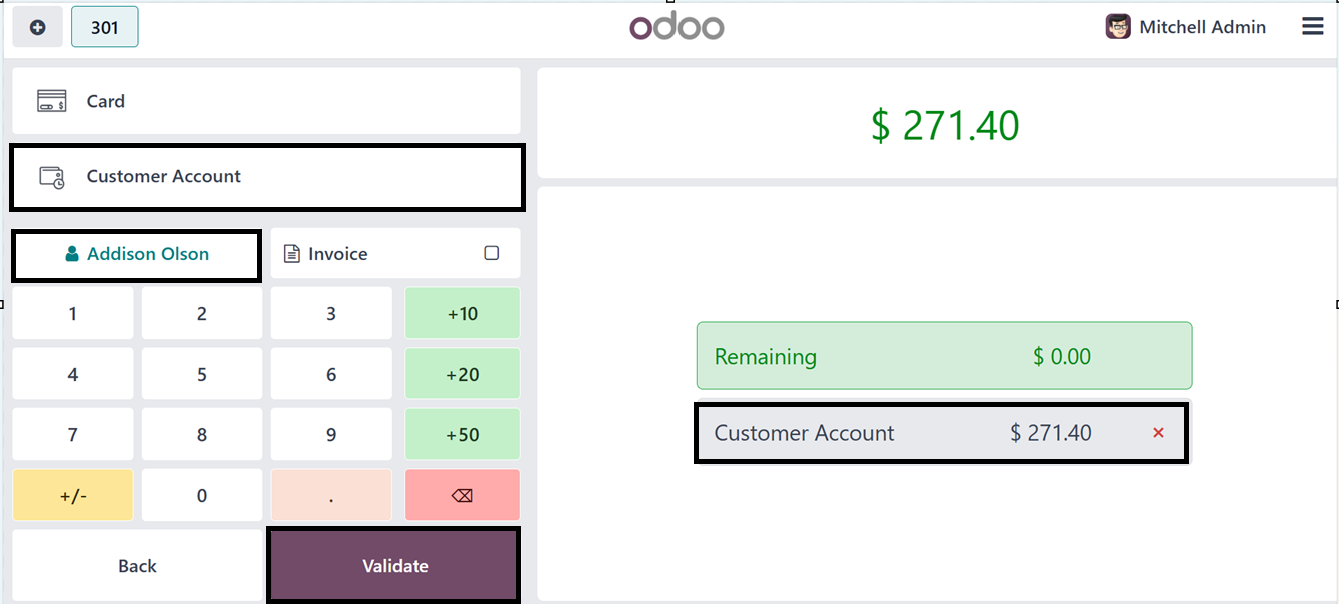
Upon clicking 'Validate,' the
payment method is confirmed,
and a sales invoice is
generated with the total
amount charged to the
Customer Account.
Users can review customer account
details in the Odoo Invoicing
Module by accessing the
‘Customers’ menu. Within the
customer dashboard,
navigating to a specific
customer and selecting the
'Invoicing' tab reveals the
‘CREDIT LIMITS’ section,
where credit limits and
outstanding payments are
displayed. For example, a
receivable amount of $271.40
may appear, representing a
purchase made using the
Customer Account payment
method in a previous PoS
session. Users can also
update the customer’s credit
limit from the 'Partner
Limit' field.
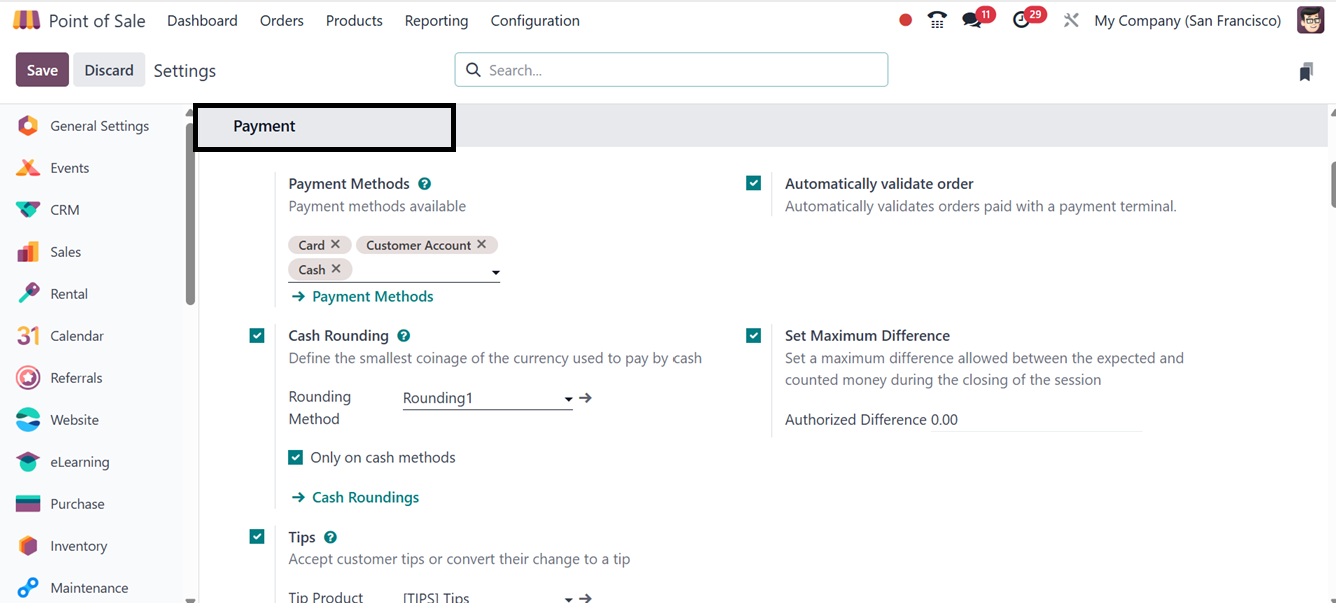
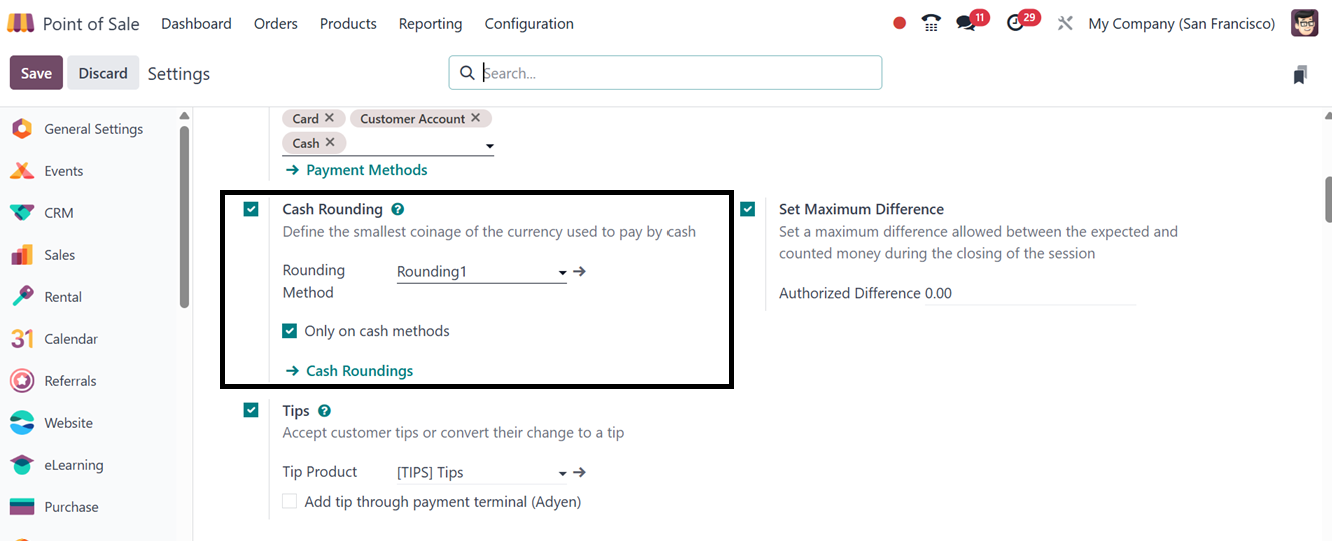
6.3 Payment Settings
The Odoo PoS module allows users
to enable the Cash Rounding
feature, which determines the
lowest currency denomination
for cash payments.
Cash Rounding
Cash rounding ensures that the
smallest physical currency
denomination aligns with a
predefined accounting unit, a
requirement in certain
jurisdictions. Odoo PoS
applies cash rounding to
invoices and receipts.
Activating the 'Cash
Rounding' feature in settings
displays a field for
selecting the preferred
'Rounding Method.'
Users can choose from existing
rounding methods or create
new ones by clicking the
'Cash Rounding' internal
link. The list of available
methods includes details such
as Name, Rounding Precision,
and Rounding Method.

To create a new cash rounding
method, click 'New,' enter a
name, and specify the
smallest currency
denomination in the 'Rounding
Precision' field.
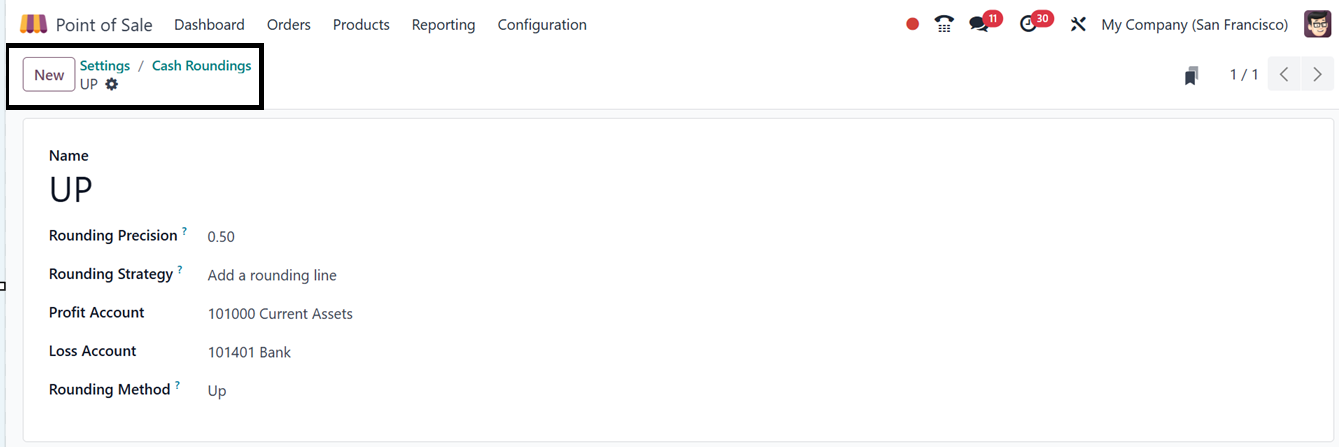
The 'Rounding Strategy' section
defines how invoice amounts
are adjusted to match the
specified precision. Options
include:
- Up: Rounds the
result towards
positive infinity
based on rounding
precision.
- Down: Rounds the
result towards
negative infinity
according to rounding
accuracy.
- Nearest: Rounds
values up or down
based on fractional
components (e.g.,
values less than 0.5
are rounded down).
After saving, users can test the
Cash Rounding method by
initiating a PoS session and
selecting products. After
validating the payment, the
rounding technique applies
automatically to product
pricing.
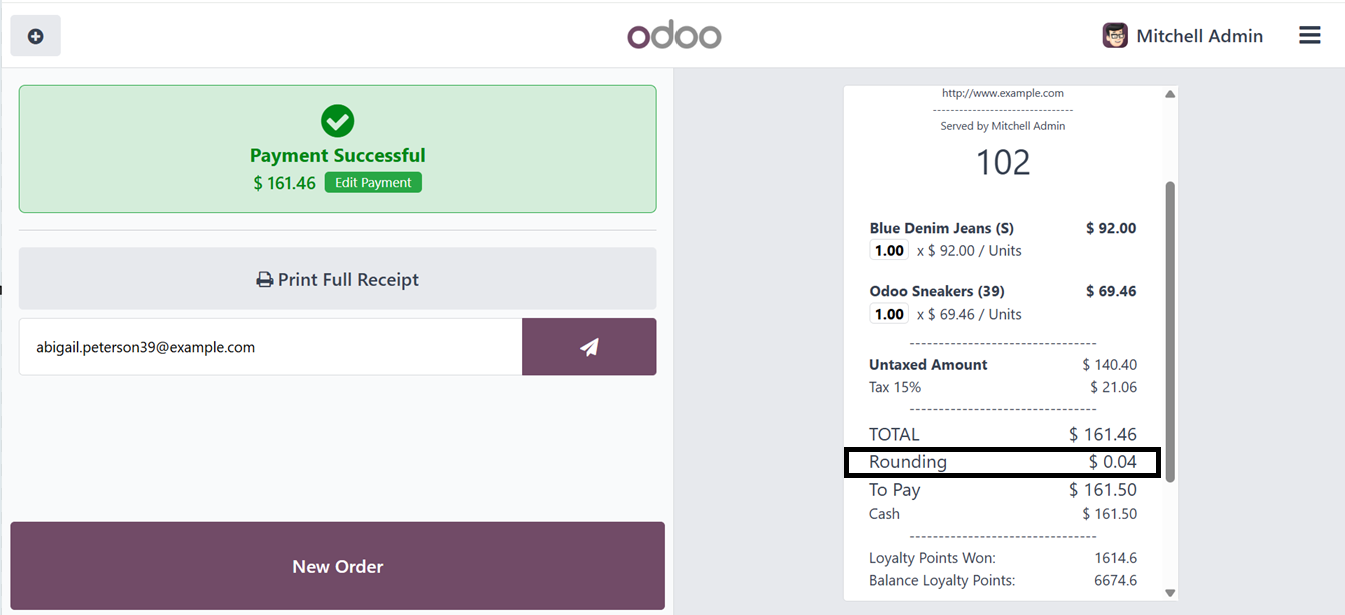
For instance, when using the 'UP'
rounding method with a
precision of .50, the price
rounds to a positive infinity
(e.g., $0.50). Users can
finalize payments by
selecting a payment method
and validating transactions.
The rounded amount is visible
in the sales invoice's
‘TOTAL’ section in the
‘Rounding’ field, as shown in
the screenshot below.
Tips
During checkout, cashiers may ask
customers to tip by selecting
a suggested amount, custom
value, or percentage using
the "Tips" setting in the POS
module of Odoo 18. Before
final payment, tips are
tracked and accounted for
easily by being entered
separately from the order
total.
It is possible to activate
tip-adding functionality only
after payment has been made
by turning on the "Add tip
after payment" button. Then,
by selecting the "Add tip
through payment terminal
(Adyen)" option, consumers
may use the Adyen payment
terminal to add a gratuity
right at checkout. This
prompts them to indicate the
amount of their tip before
they finish paying.
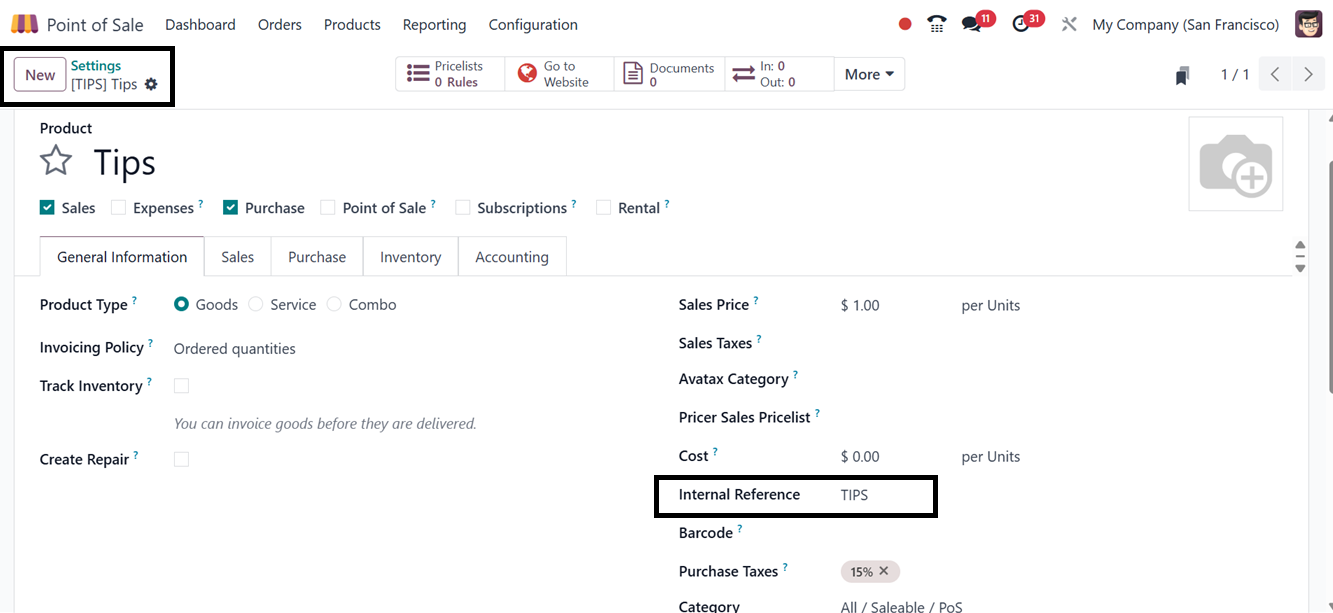
You can choose a tip product by
selecting it from the "Tip
Product" option in the “Tips”
settings after creating it in
your Products catalog. In
this manner, the tip choice
will be shown to clients
during the POS session at
checkout. Here, you can see a
product that I have created
for a demonstration.
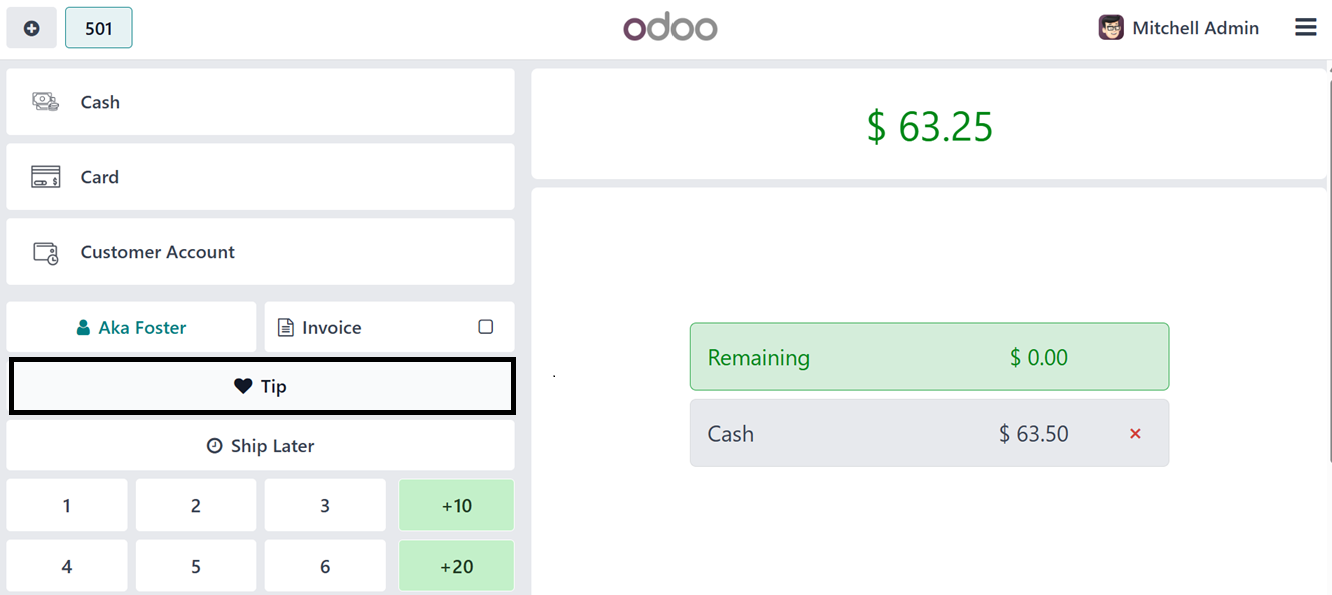
After choosing the Tip Product,
just open a new point of sale
session and choose the
products and initiate the
payment process using the
Payment button. You can see
an “Tip’ button inside the
payment validation window, as
illustrated in the screenshot
below.
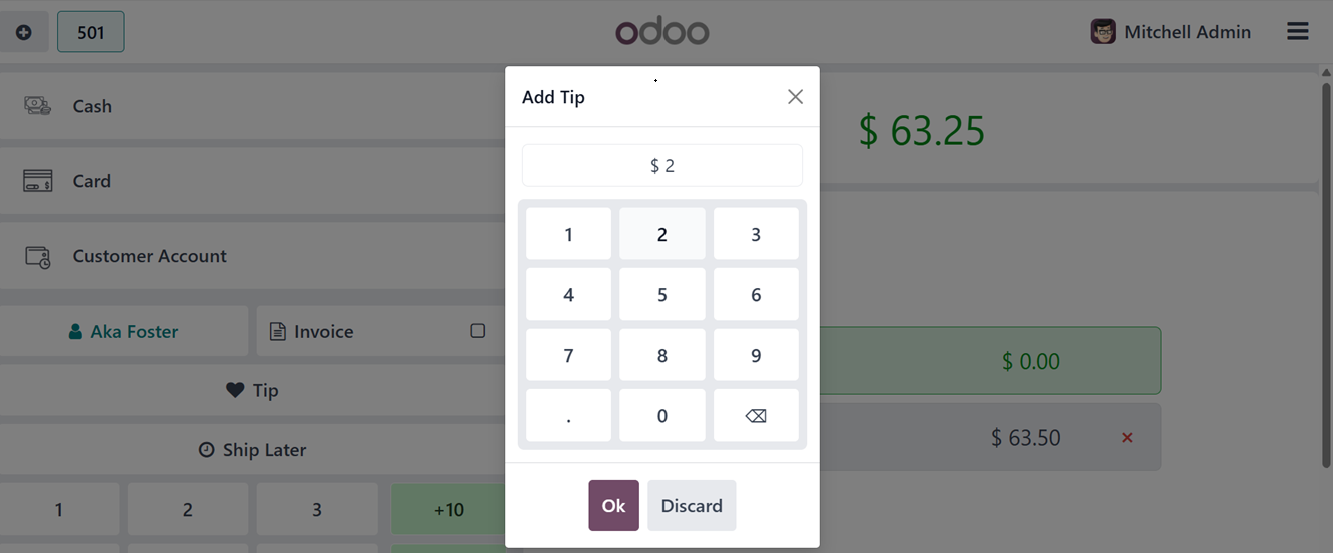
Click on the ‘Tip’button and edit
the tip amount inside the
pop-up window, as shown
below.
The provided tip amount will also
be printed inside the
customer receipt after
completing the payment
process.
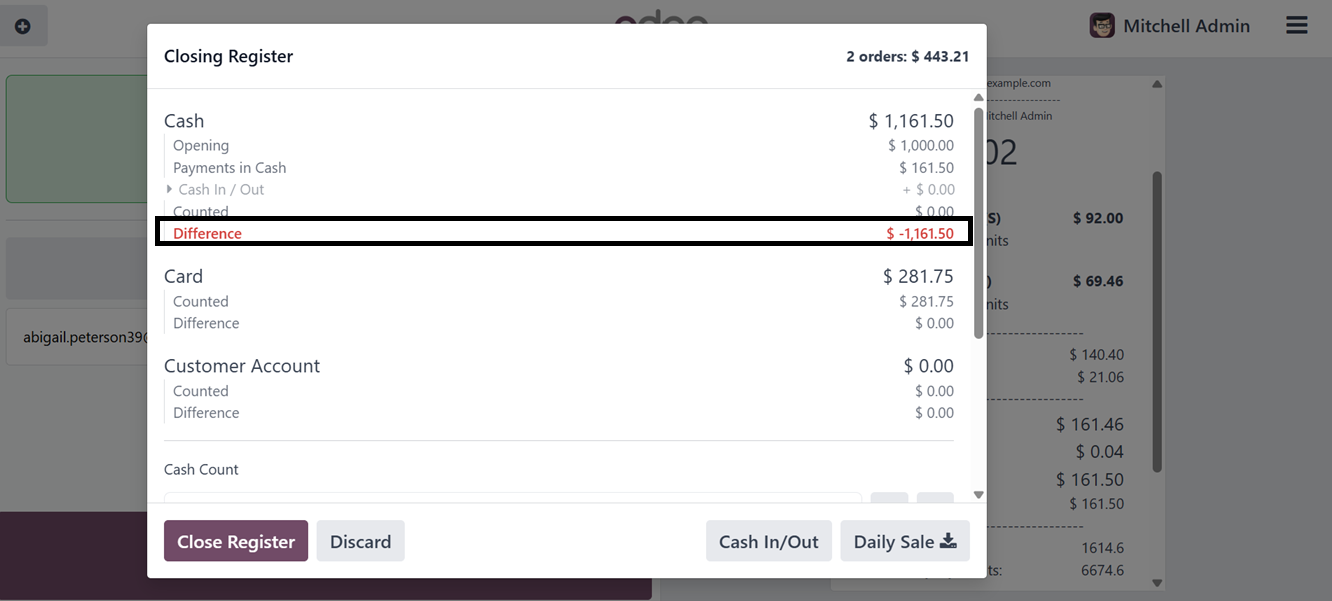
Businesses may also enable
tipping functionalities,
which allow customers to
either provide tips or round
up their change. The 'Set
Maximum Difference' field
defines permissible
discrepancies between
expected and counted cash
amounts.
To utilize this feature, start a
PoS session, complete a
transaction, and validate
payment. The payment summary
window displays the maximum
difference, highlighted in
red if discrepancies occur.
6.4 PoS Interface Settings
Among the customization options
offered by the PoS Interface
settings are the following:
allowing multiple employees
per session with varying
levels of access; enabling
employee login with a PIN or
Badge ID for enhanced
security and accountability;
sharing open orders across
multiple PoS terminals for a
smooth operational flow; and
hiding or displaying product
images during a session.
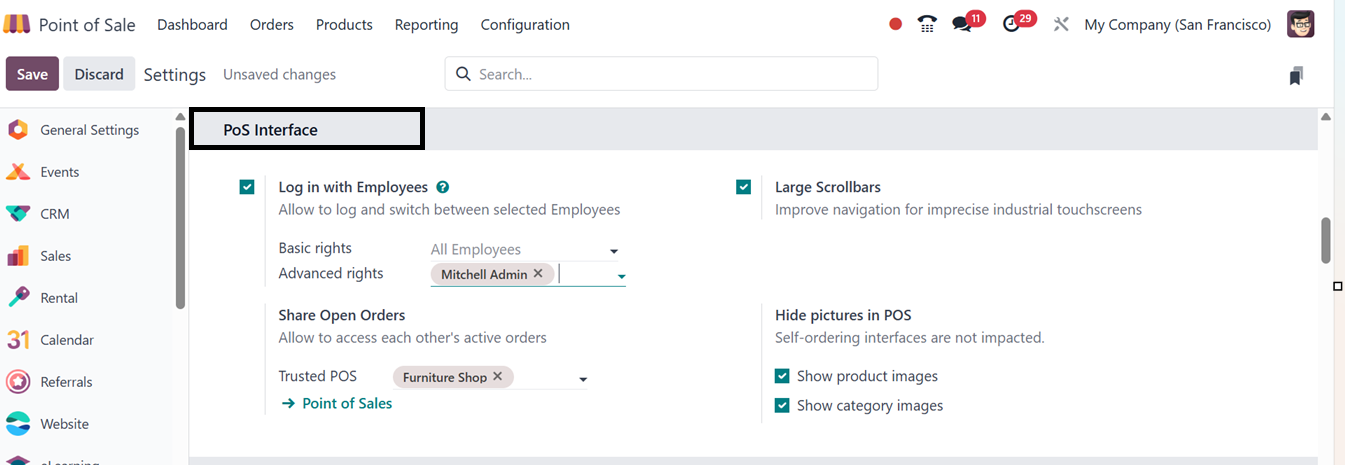
Activating the 'Login with
Employees' feature ensures
controlled access to PoS
sessions. Users can define
employee login rights as
either 'Basic' or 'Advanced.'
Employees can log in via
Badge ID or PIN code,
configured in the HR Settings
tab of the Employees Module.
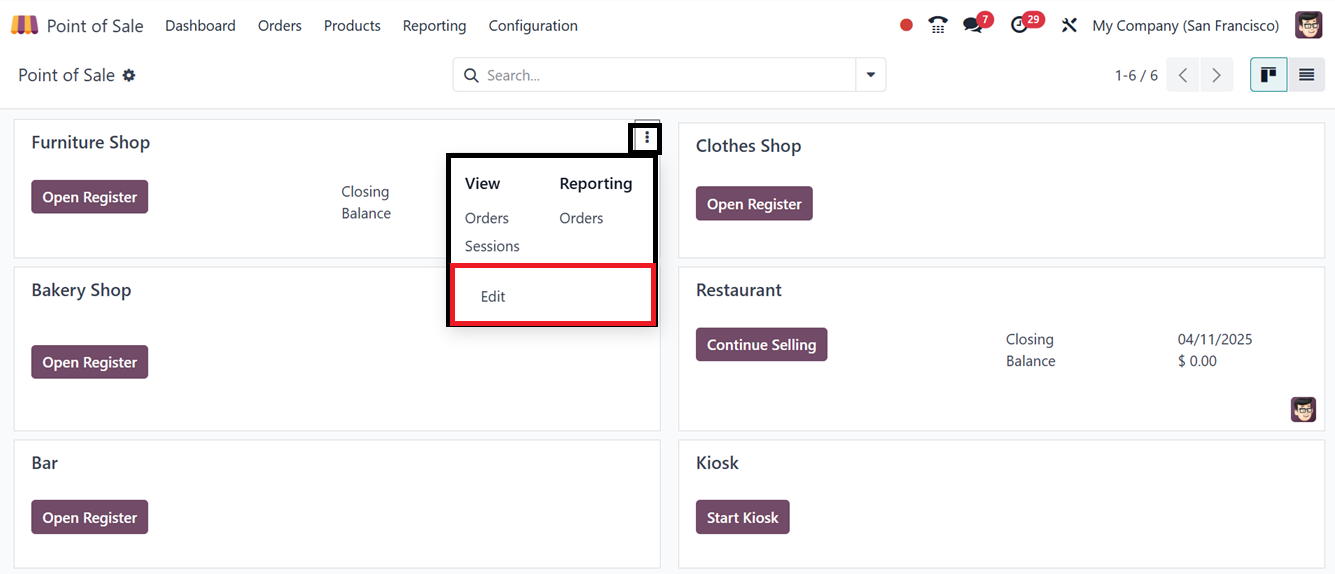
Login with Employees
The 'Login with Employees'
function in Odoo 18's Point
of Sale (POS) module is
intended to improve security
and accountability. Users can
specify which workers are
allowed to log into the
system when they set up a new
store by turning on the
"Multi Employees per Session"
option. Go to the Point of
Sale dashboard, choose the
three-dot menu on the shop's
kanban card, and click 'Edit'
to make the required
adjustments to activate this
function for an
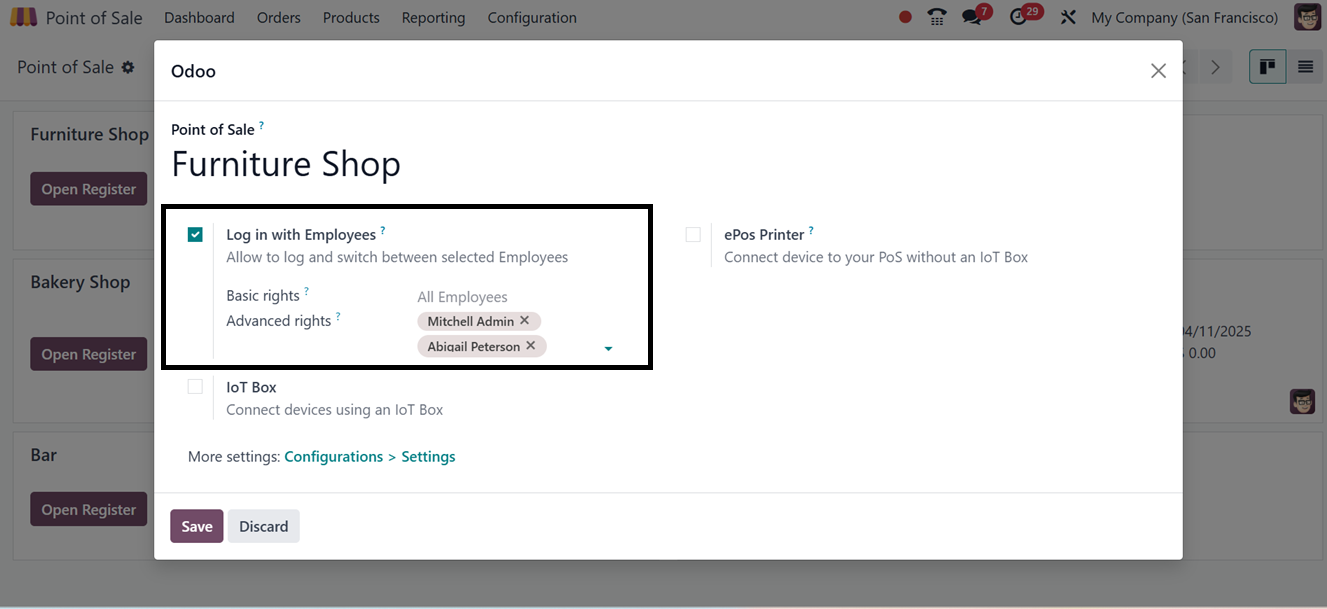
already-existing store.
In the settings window, mention
the employees in the relevant
fields and save the data.
To access a PoS session,
employees enter their PIN or
select their name from a list
of authorized personnel.
Users with advanced rights
can access the system without
additional security
passwords. This stops
unwanted access and enables
precise tracking of sales
activity. The Employees
Module's Settings tab allows
employees to assign their own
PIN number or Badge ID, which
they may use to log in. This
preserves the accuracy of
sales statistics.
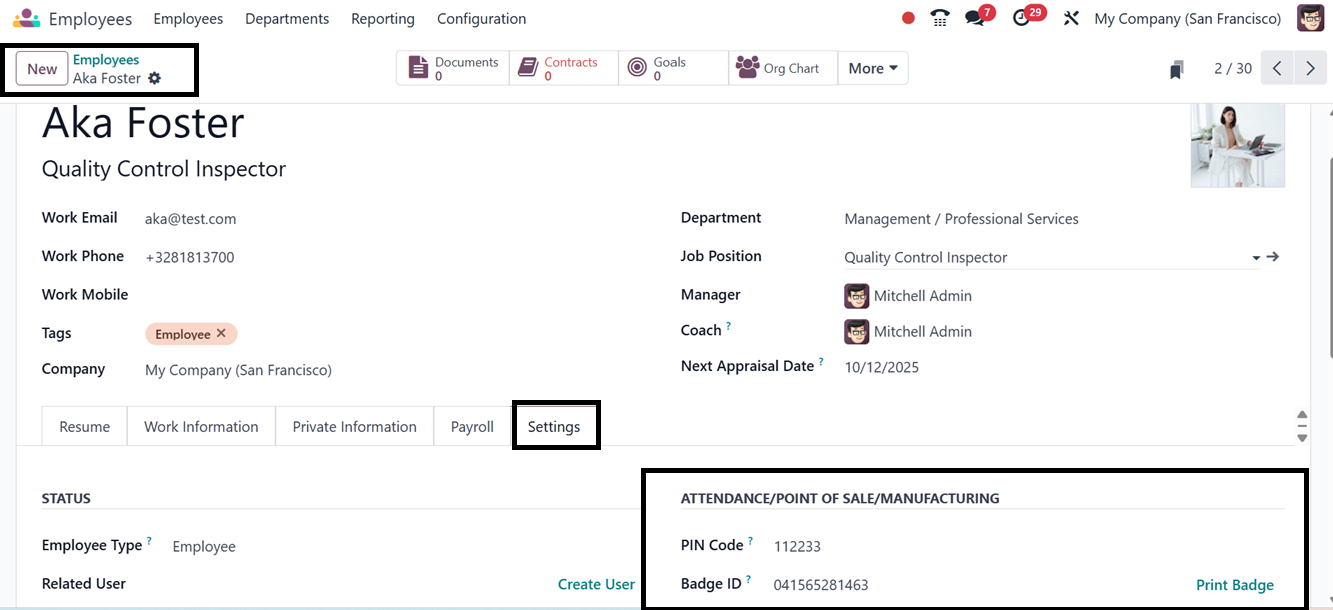
You can also generate and print
Badge ID for that particular
employee. Then, go back to
the Point of sale module to
check the feature. After
opening the particular POS
session, you will be taken to
a window, as depicted in the
screenshot below.
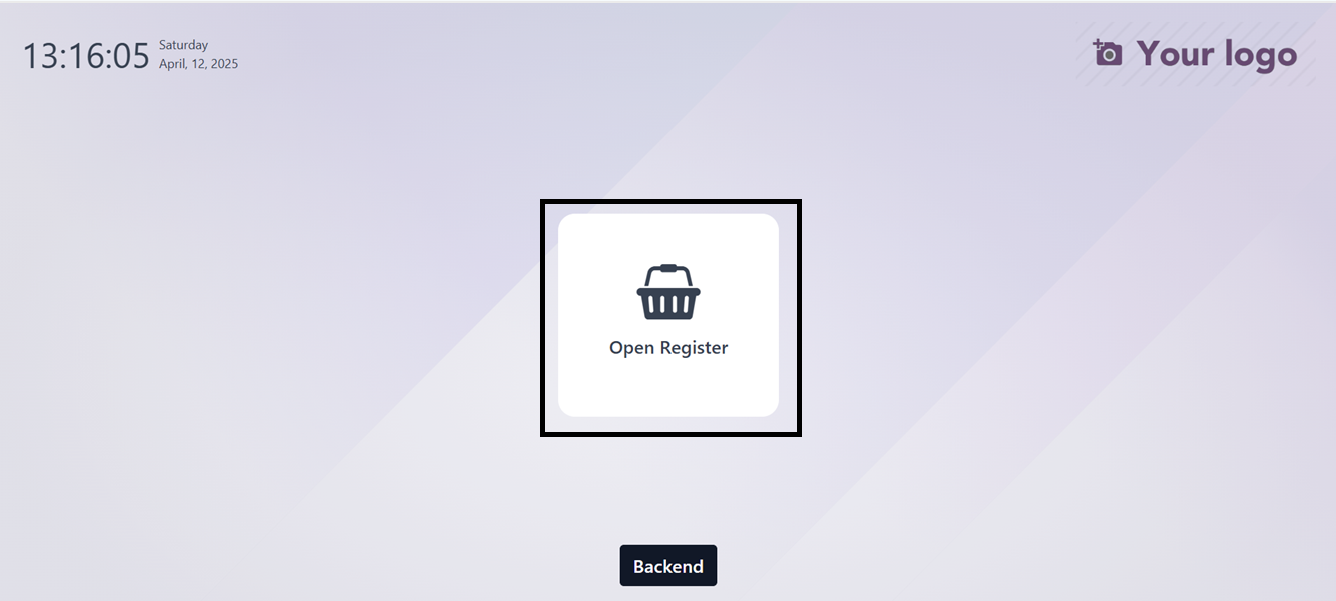
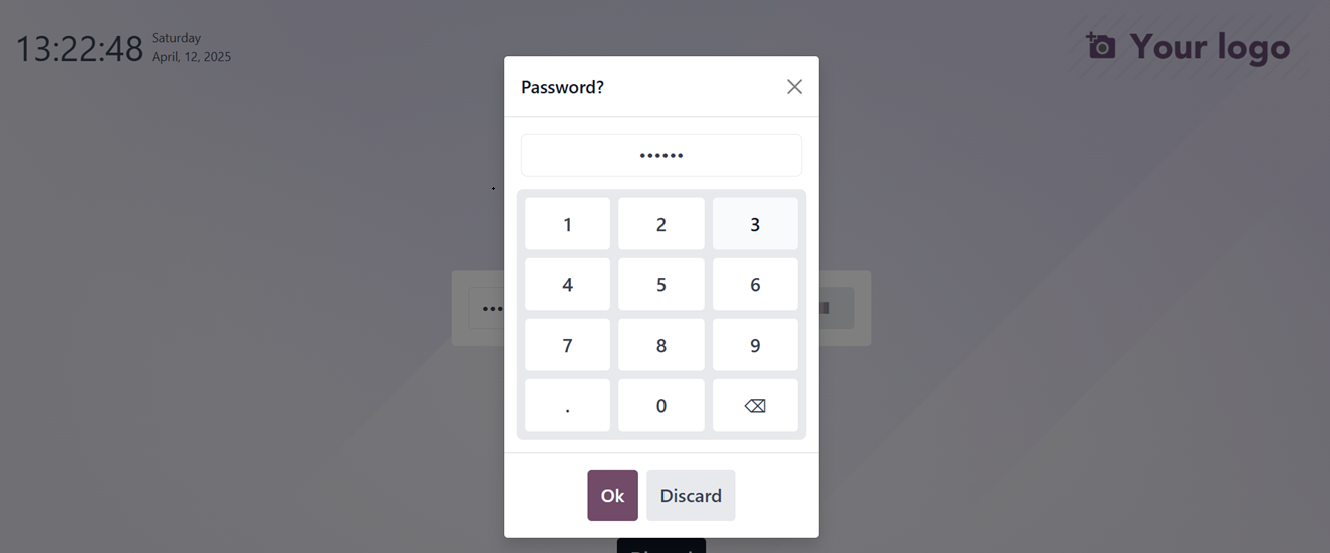
Click on the ‘Open Register’
button to enter into the shop
session, this will open
another window containing a
field to enter the employee
pin code.
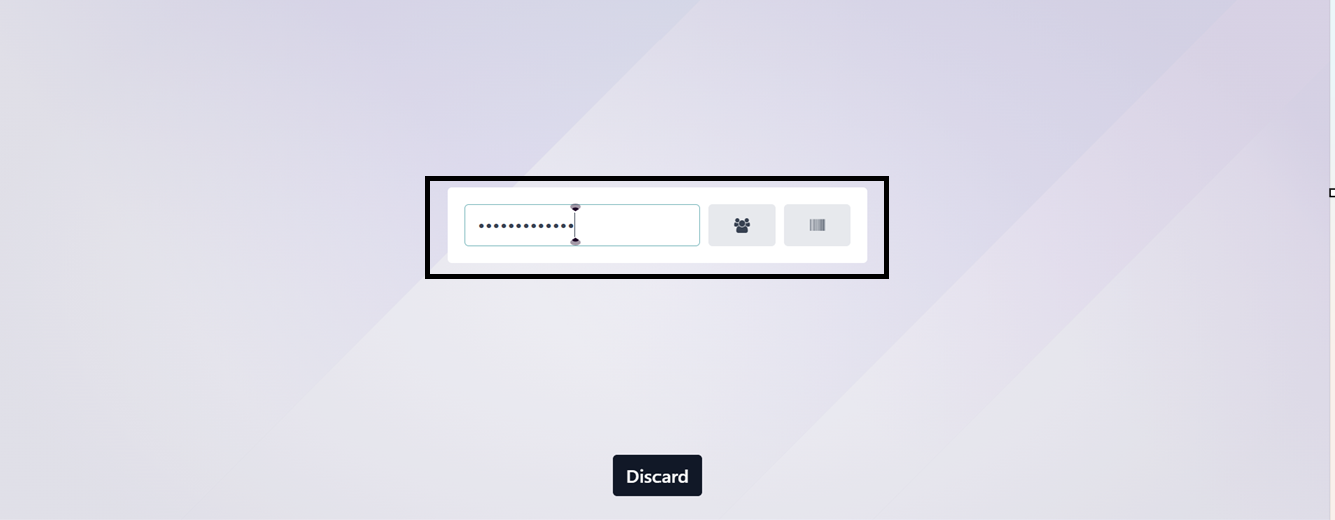
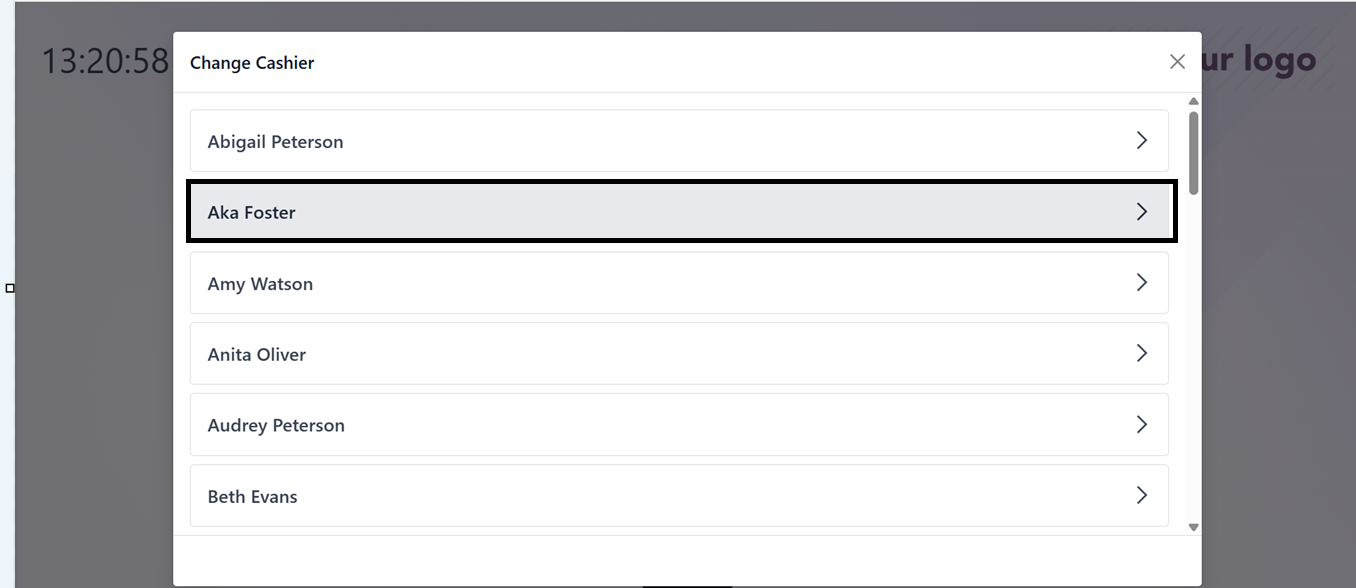
Then, choose the employee name
from the employee icon or
scan their barcode using the
barcode icon.
Then, enter the employee pincode
in the password editing field
and press the “Ok” button.
The employee can log in to the
point of sale session by
clicking the "Ok" button
after providing the PIN. This
will take you to the Opening
Control information panel,
where you can edit the
Opening Balance and Opening
Description. Finally, proceed
with the sales process.
Employees with advanced
permissions can use the Point
of Sale system without
security passwords, and
cashier positions can be
simply switched by signing in
and out using their unique
PIN codes.
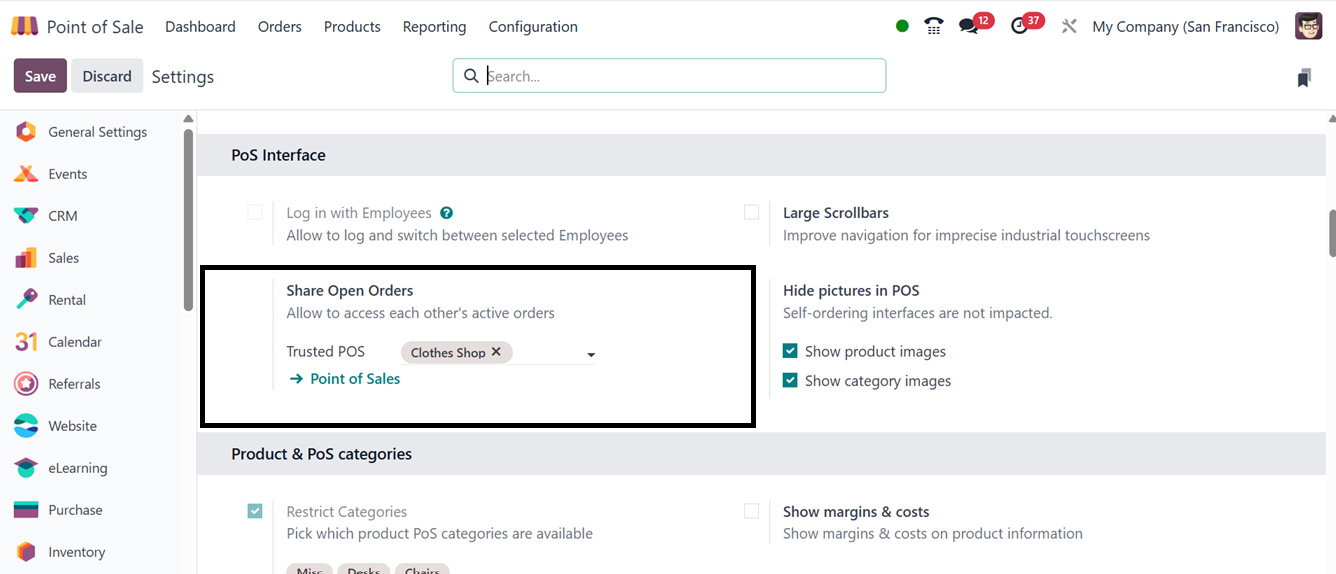
Multiple users or cashiers may
view and control the same
open orders during a single
Point of Sale (POS) session
with the "Share Open Orders"
option in Odoo 18's POS
settings. Orders may be saved
on one POS terminal and moved
to another with ease thanks
to the "Trusted PoS" feature,
which facilitates staff
cooperation. It is especially
helpful in settings where
orders may need to be updated
or completed from many
terminals, such as
restaurants or retail
establishments.
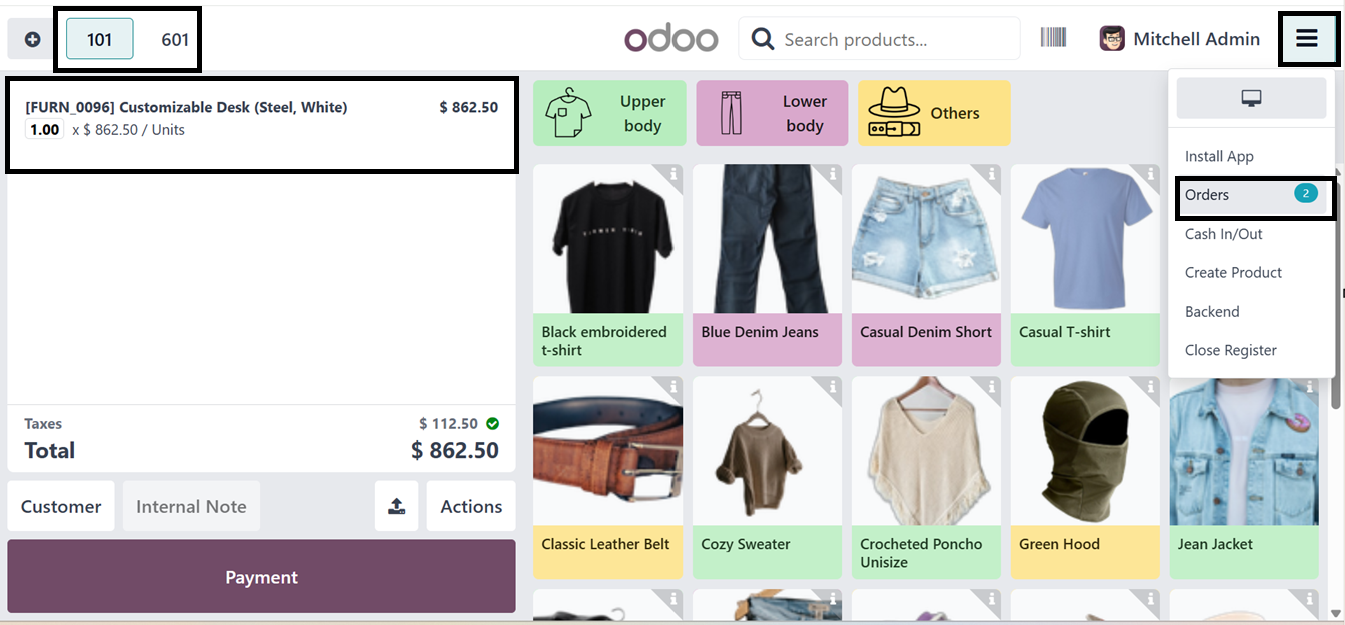
Configuring the Trusted POS shop
section allows for
simultaneous creation of
sales orders in two Point of
Sale sessions. To test this
functionality, I have ordered
a “Customizable Desk” from
the Furniture shop session
and another cloth from the
“Cloth Store” session. So,
these two orders can be saved
within a PoS and monitored
through the 'Orders' section
of the POS terminal menu, as
illustrated in the screenshot
below.
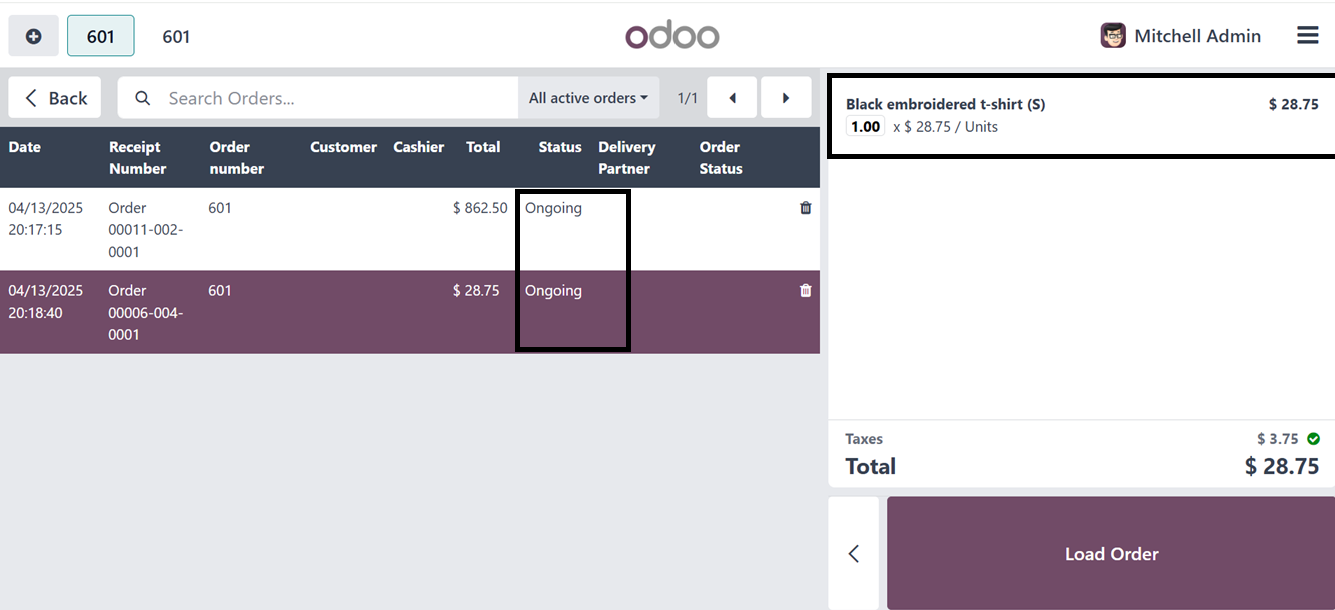
Now, navigate to the Point of
Sale and open a shared
session from the “Orders”
menu to view ongoing order
details from the other sales
session. Here, you can see
the orders of the two
different Point of sale
sessions. So, the cashier can
manage both the orders within
a single platform. Click the
‘Load Order’ button to
proceed with the order.
This feature enhances operational
efficiency and improves
customer service through
real-time access and
flexibility.
In busy restaurant or
point-of-sale store sessions,
the "Large Scrollbars"
settings improve
accessibility and visibility
while improving usability for
mobile touchscreens and
devices with poor accuracy.
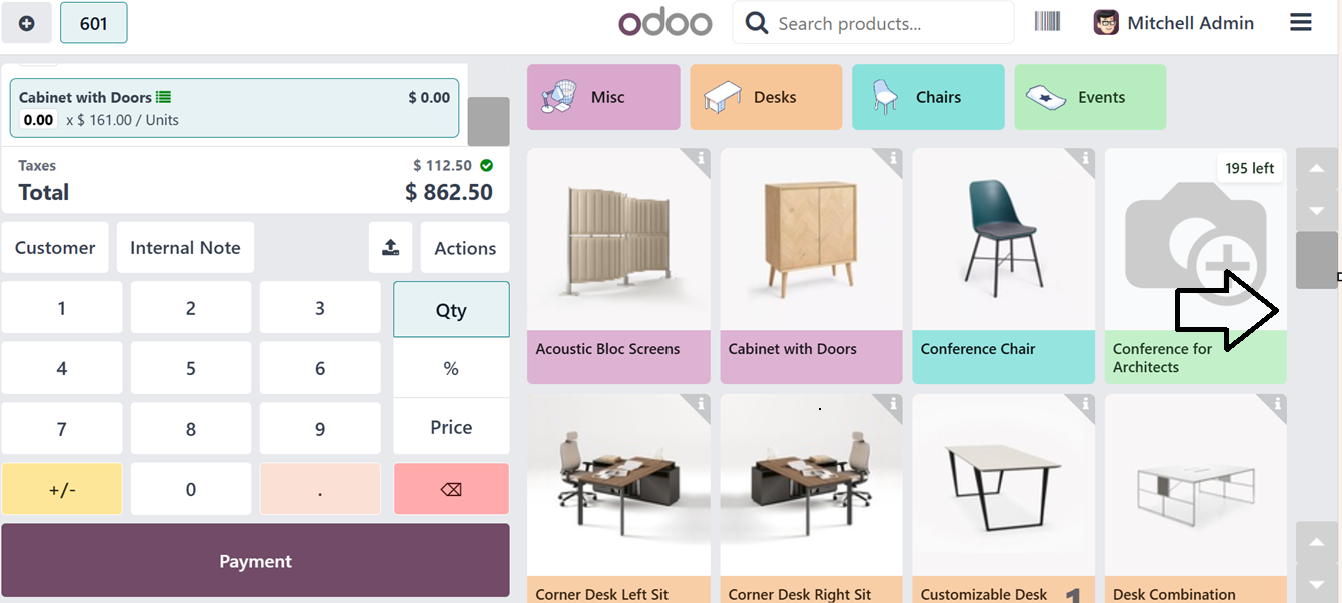
The 'Hide Pictures in POS' option
can be used to hide or show
product and category images
in the point of sale (POS).
Disabling the 'Show product
images' and 'Show category
images' options will prevent
the product catalog window
from showing any images.
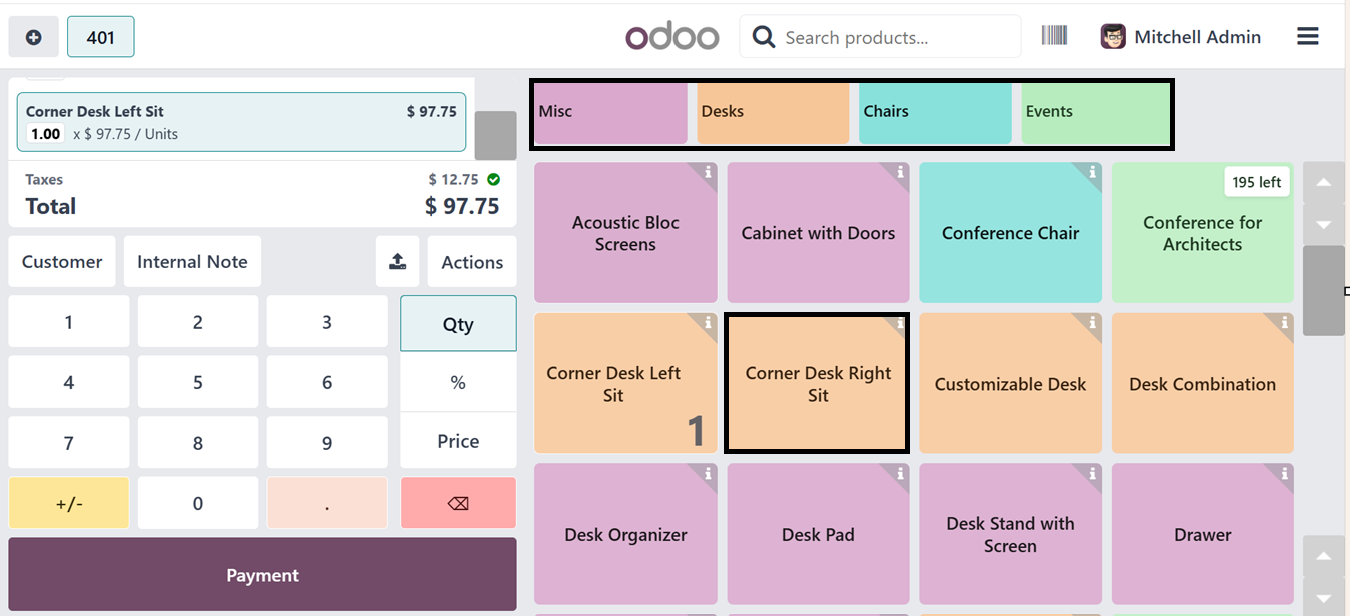
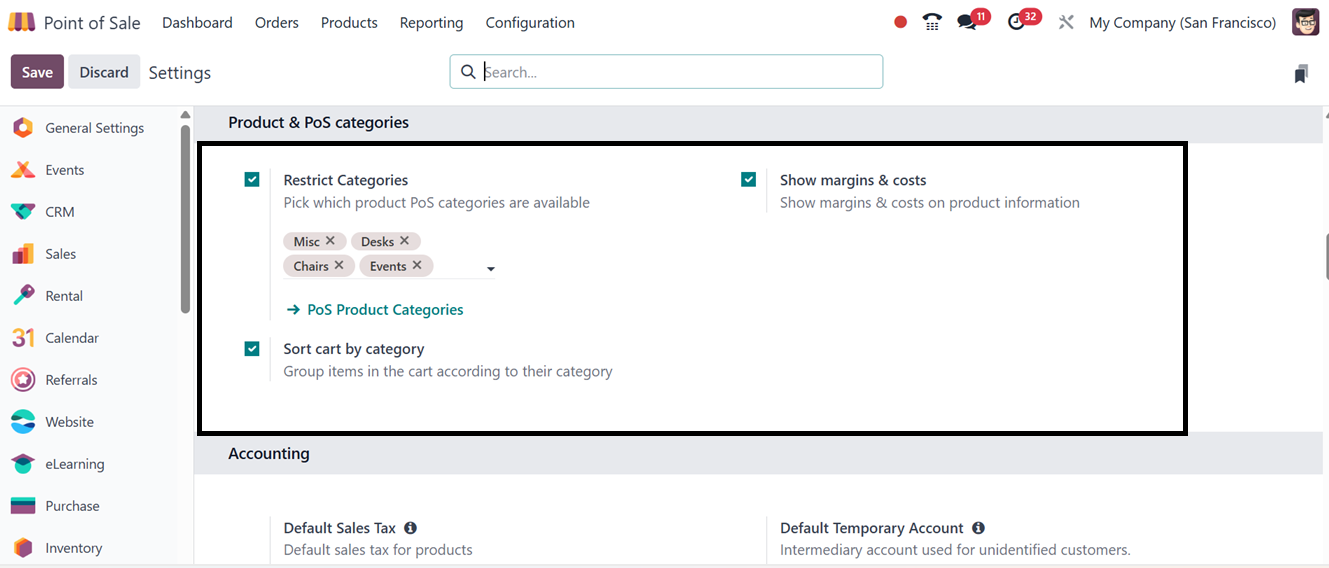
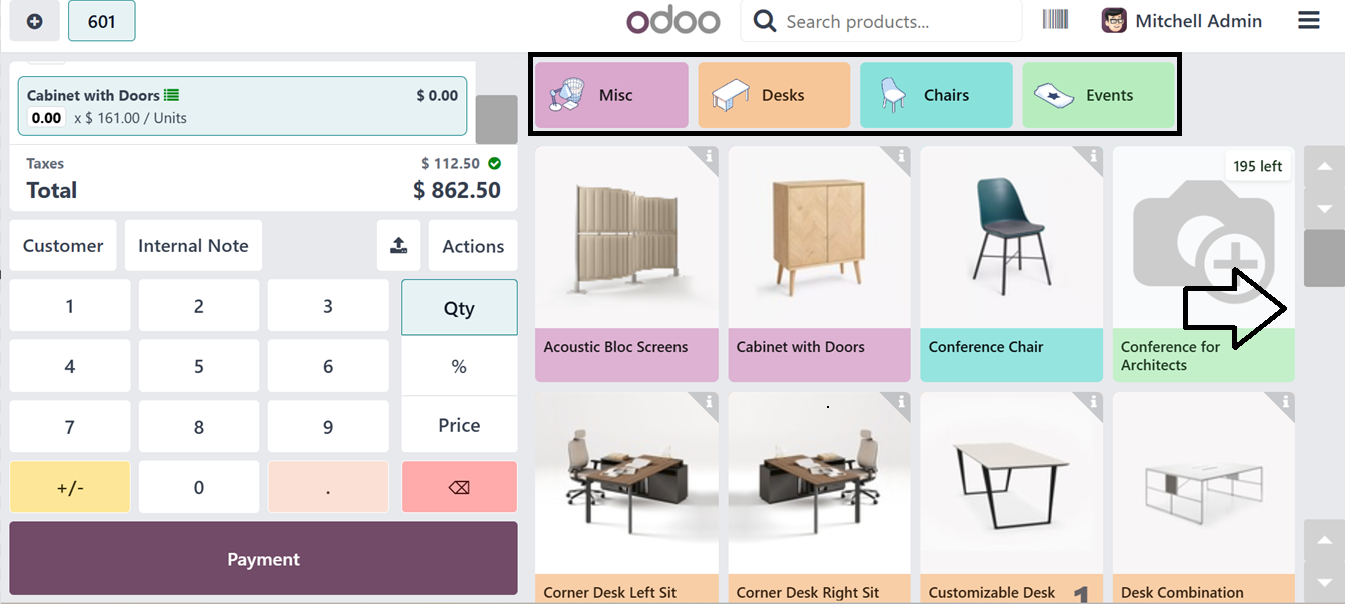
After that, you may use the
"Product & PoS Categories"
area to manage the goods and
categories. The 'Restrict
Categories' option on this
tab will assist you in
controlling which PoS product
categories are available for
this Point of Sale Session.
The categories will be shown
inside the Point of Sale
terminal at the upper part of
the window, as depicted in
the screenshot below.
The ‘Sort by Category’ feature
organizes products into
categories within the
shopping cart, ensuring
streamlined order management.
6.5 Accounting Settings
Users may apply fiscal positions
depending on client regions,
manage tax mappings using the
'Flexible Taxes' feature,
define default journals for
transactions and invoicing,
and set Default Sales Taxes
for new catalog items using
the Accounting tab.
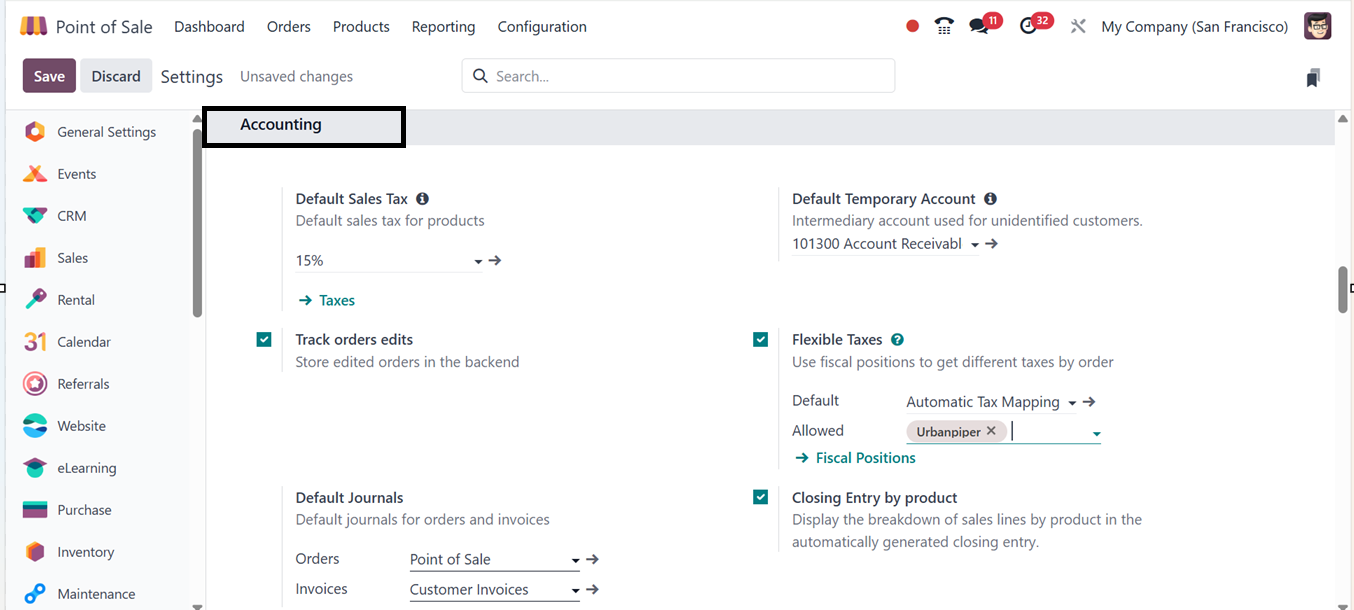
The ‘Default Sales Tax’ is the
basic tax percentage for all
the point of sale
transactions. The ‘Default
Temporary Account’ is the
account used for all the
customers. Enabling the
‘Flexible Taxes’ feature
allows choosing Default and
Allowed tax calculations. The
'Avatax PoS Integration'
automates tax calculations
through Avalara’s AvaTax
service, ensuring compliance
with regional tax laws.
The "Fiscal Position" link is
where you can create a new
Fiscal Position. This will
direct you to the dashboard
below, which shows all of the
current fiscal positions.

For the purpose of creating a new
fiscal position, click the
"New" button. The name of the
fiscal position and the
related company are among the
important elements that you
have to fill in the displayed
window.
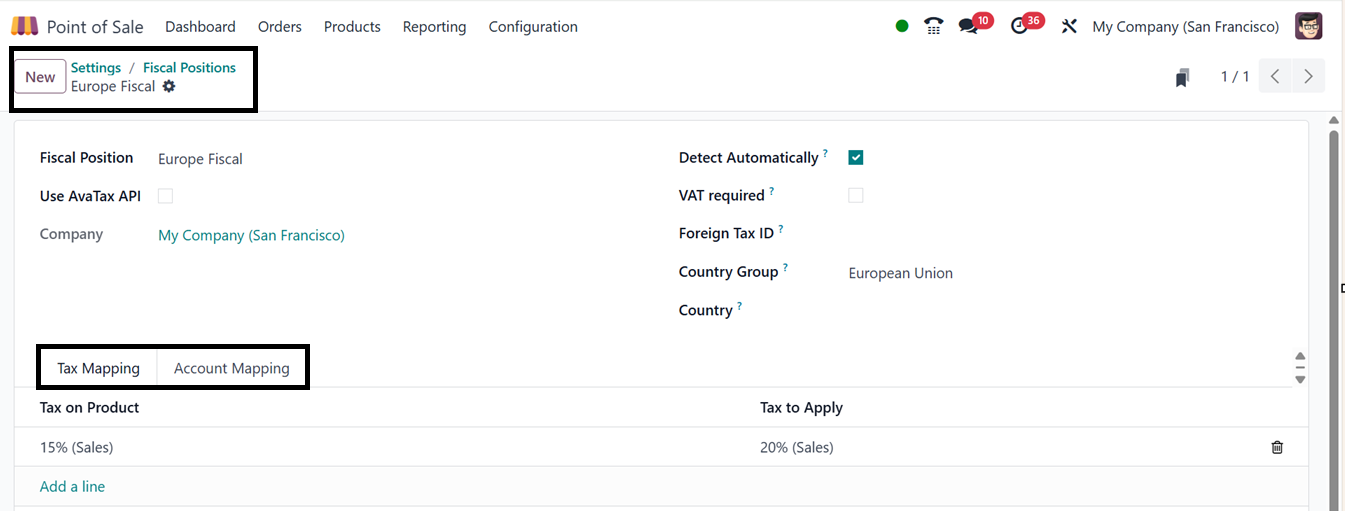
Depending on the location you
choose, Odoo will
automatically apply a fiscal
position if you choose the
"Detect Automatically"
option. When you activate
this functionality, two more
fields will appear: "Country
Group" and "VAT Required."
The tax identification number
of your business that is
pertinent to the fiscal area
can be entered in the
"Foreign Tax ID" section. By
connecting with Avalara's
AvaTax service, the "Use
AvaTax API" option automates
tax computations and helps
guarantee adherence to
regional tax laws.
Odoo offers partners two options
regarding VAT: "Country
Group" and "VAT Required."
Only partners who have a
valid VAT number are taken
into consideration when "VAT
Required" is chosen.
Furthermore, for the fiscal
position to be applicable,
the delivery destination must
correspond to either the
chosen country group or
particular nations indicated
in the "Country Group" and
"Country" boxes.
You may specify the taxes
associated with this fiscal
position under the "Tax
Mapping" tab. You can select
the original tax in the "Tax
on Product" section and the
replacement tax in the "Tax
to Apply" area. You can
further manage all the fiscal
situations from the "Flexible
Taxes" section after all the
information has been saved.
The “Account Mapping” tab in
Odoo allows users to replace
default accounts with
alternative ones, ensuring
accounting entries comply
with different fiscal or
legal requirements.
The ‘Default Journals’ settings
can be used to set the
Default journals for all the
POS Orders and Invoices as
per your company policies. By
enabling users to track and
document order revisions, the
'Track Orders Edit' feature
improves accountability and
transparency while
facilitating audits and
discrepancy resolution from
the Odoo POS backend. When
necessary, it allows users to
change completed orders. For
instance, the cashier can
utilize this function to
switch the payment method to
cash or make other required
adjustments to the
transaction if a customer's
order has been completed and
paid for using a card but
there is a problem with the
card payment. The 'Payment'
button allows users to choose
items, create a new point of
sale order, and complete the
transaction once this
function is activated.
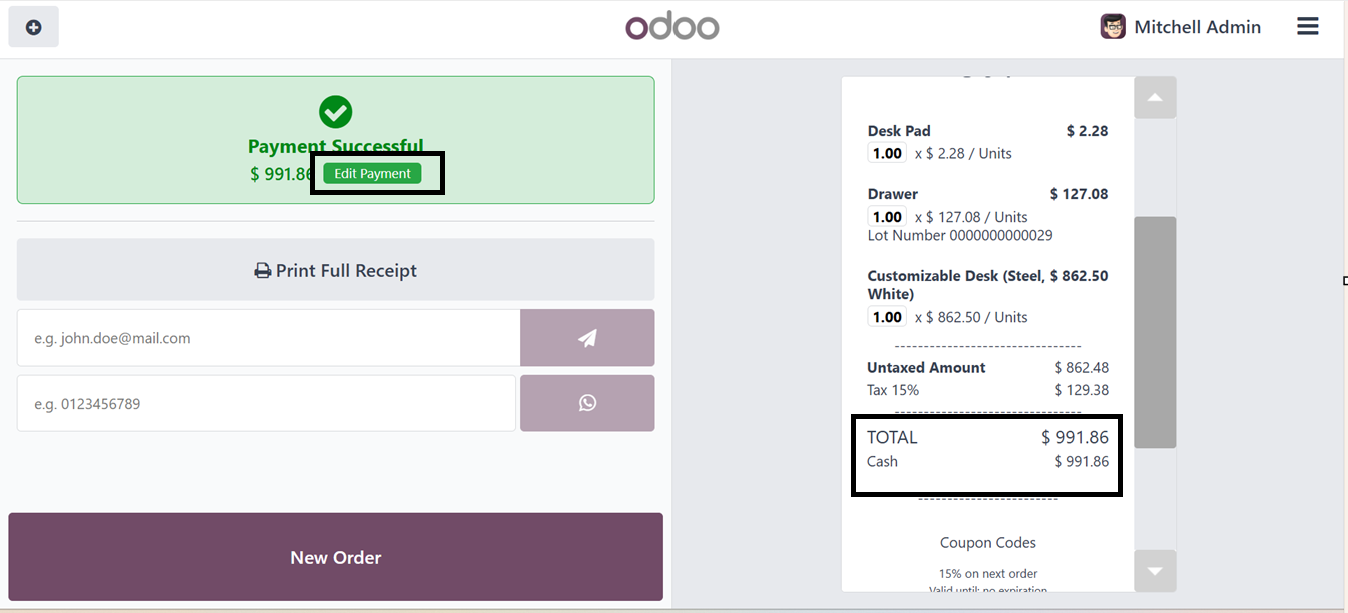
Upon finishing the order, I used
the 'Cash' payment option and
used the 'Validate' button to
confirm the transaction. The
system produced an order
receipt with the bill details
once the payment was
successfully processed, and
it was shown in the Payment
Successful window with the
card payment option selected.
An 'Edit Payment' option
shows up on the payment
success screen when the Track
Orders Edit functionality in
Odoo is enabled.
This feature enables consumers to
change an already-completed
purchase or re-edit a
payment. As seen in the
screenshot below, selecting
the 'Edit Payment' option
brings up the order editing
window in the Odoo backend's
Point of Sale area.
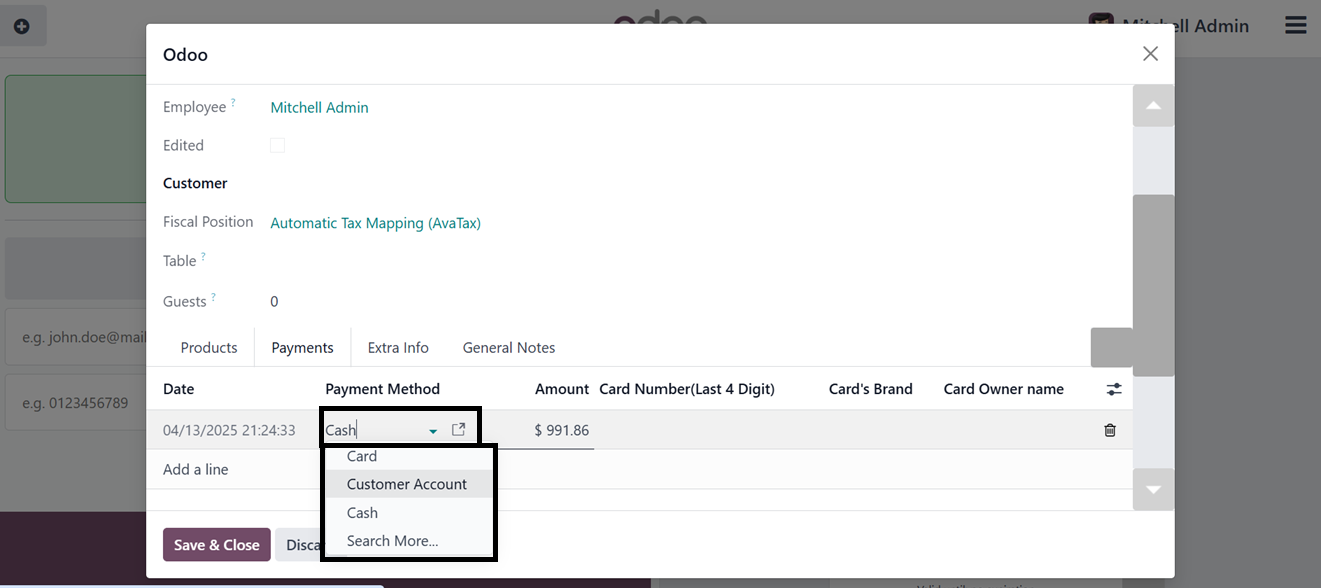
Using the ‘Track Orders Edit’
feature, you can modify and
switch any details regarding
that particular order from
the Odoo backend. Here, I
have changed the Payment
Method from Cash to Customer
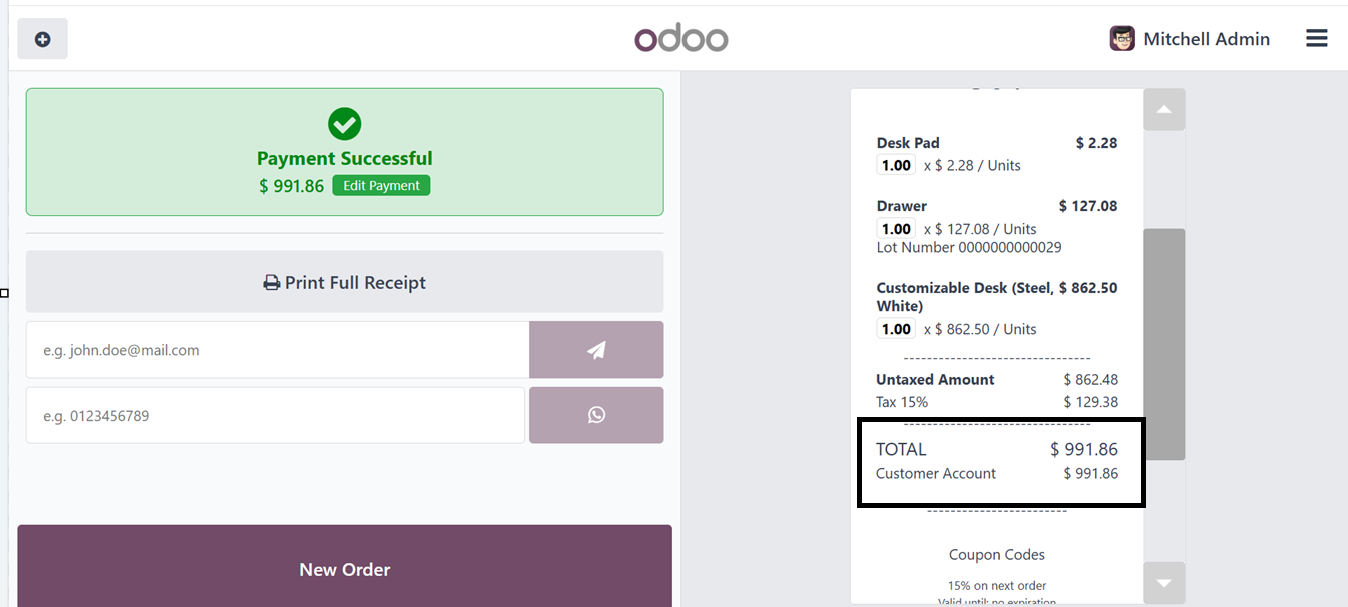
Account. The point of sale
terminal will display the new
information once the
modifications have been
saved, enabling you to see
the amended payment method on
the receipt, as depicted in
the screenshot below.
Errors that may arise during the
order payment validation
process may be fixed with the
help of this functionality.
You may also enter the Orders
menu in the Point of Sale
module to see the revised
information and updated data.
When the "Closing Entry by
product" option is enabled,
the automatically generated
closing record at the end of
the PoS Session will display
the breakdown of each sales
line by product.
The “AvaTax PoS Integration”
feature in Odoo enables
real-time, region-specific
tax calculations by
connecting Avalara's AvaTax
service to the PoS system. It
ensures accurate sales
calculations, full tax
coverage for UN-chartered
countries, cross-border
transactions, and automatic
updates to tax laws and
conditions.
6.6 Sales and Pricing
Settings
Users of Odoo's new PoS system
can choose a Sales Team
straight from the "Sales"
section of the configuration
settings. Click the link in
the "Sales Team" area to get
the list view of teams that
are already in place. This
will allow you to build or
manage Kiosk Sales Teams. The
form view may then be used to
add new members and modify
team information.
Multiple sales teams may be
managed with Odoo's Sales
Module; they are all shown in
a tile view and listed under
the "Sales Team" menu. The
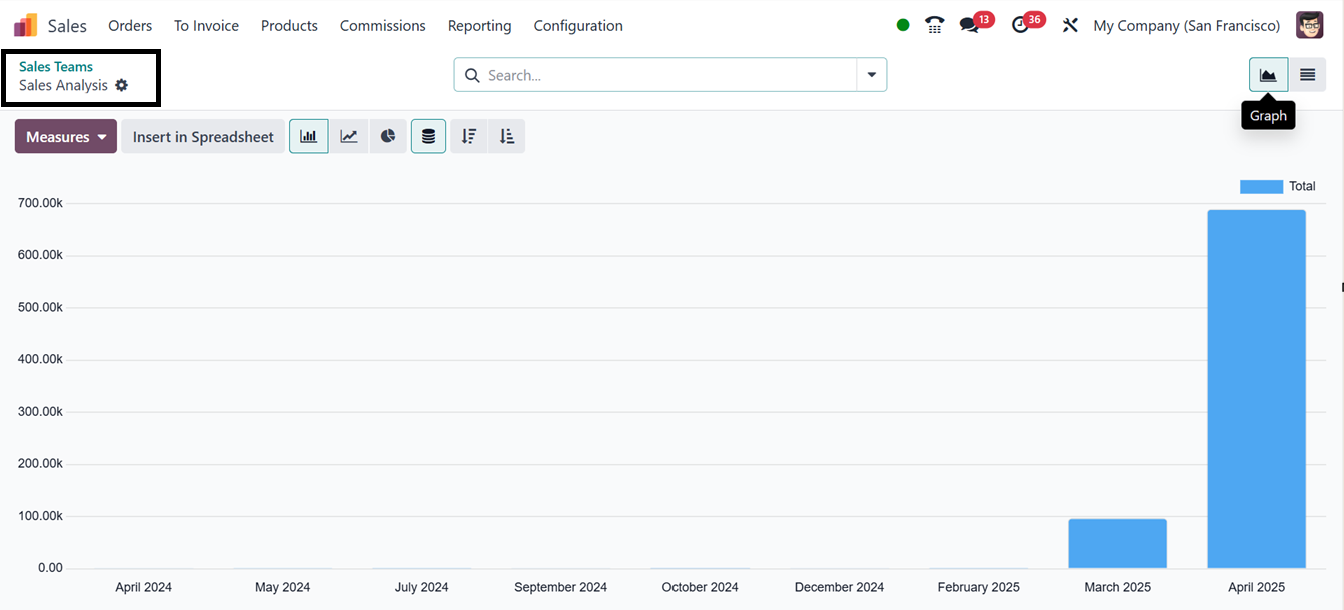
picture below shows how
pressing the "Sales Analysis"
option also yields
comprehensive information on
the sales activity managed by
each team.
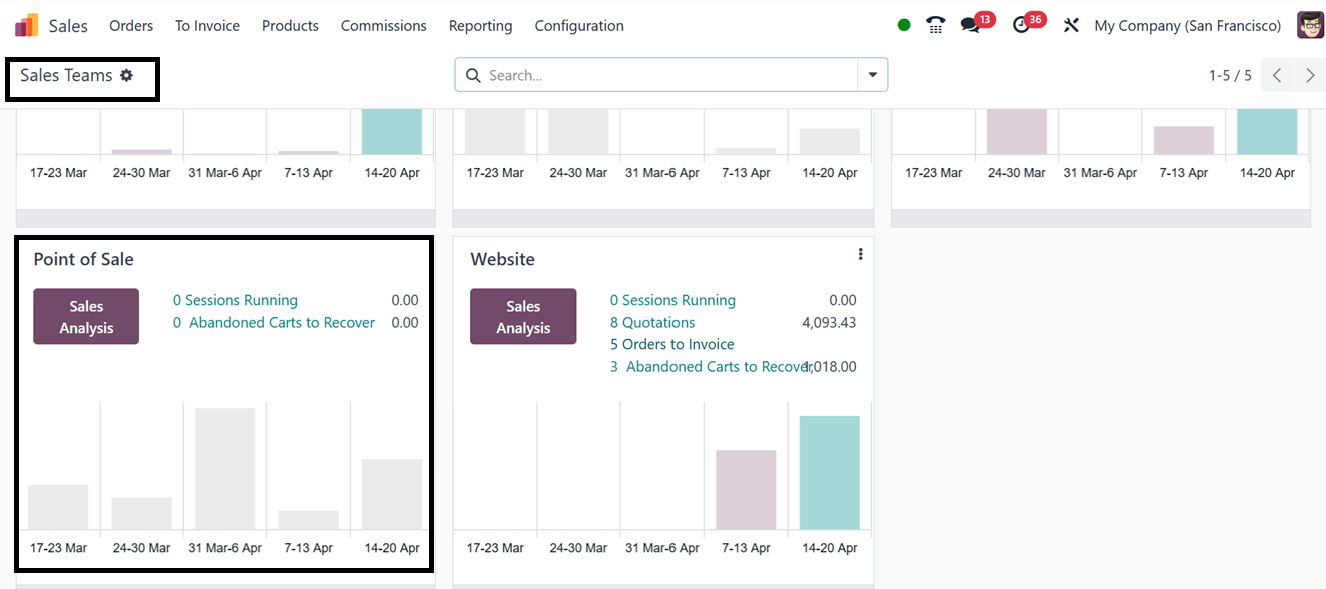
To review sales sessions by a
specific team after Point of
Sale operations, navigate to
the Orders menu in the Sales
Module. Select the 'Sales
Team' option and locate the
team's tile view. Click on
the 'Sales Analysis' button
to access a detailed overview
of all sales conducted by
this team.
You can establish various sales
teams through the Sales
Module and assign them
responsibilities for managing
PoS operations via the 'Sales
Team' settings in the PoS
module.
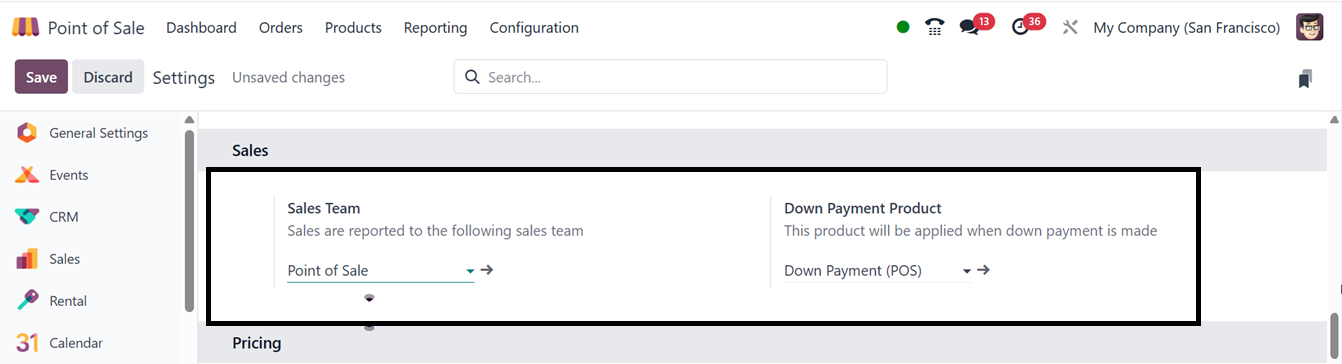
To manage advanced client
payments, the Sales Team
settings section of the point
of sale provides a 'Down
Payment Product' option.
Because of this, companies
may handle partial payments
prior to closing a deal. Upon
making a down payment, a
client can choose a product
from a dropdown list to apply
to a sales order. This down
payment product can be
configured through the
product configuration form.
6.7 Pricing Settings
Odoo 18's Point of Sale (PoS)
module offers ‘Pricing’
settings for businesses to
manage product prices during
sales transactions. These
settings enable businesses to
customize pricing strategies
for different customers,
promotions, and regional tax
requirements. Businesses can
apply different price lists,
offer discounts, set loyalty
programs, and manage
tax-included or tax-excluded
prices.
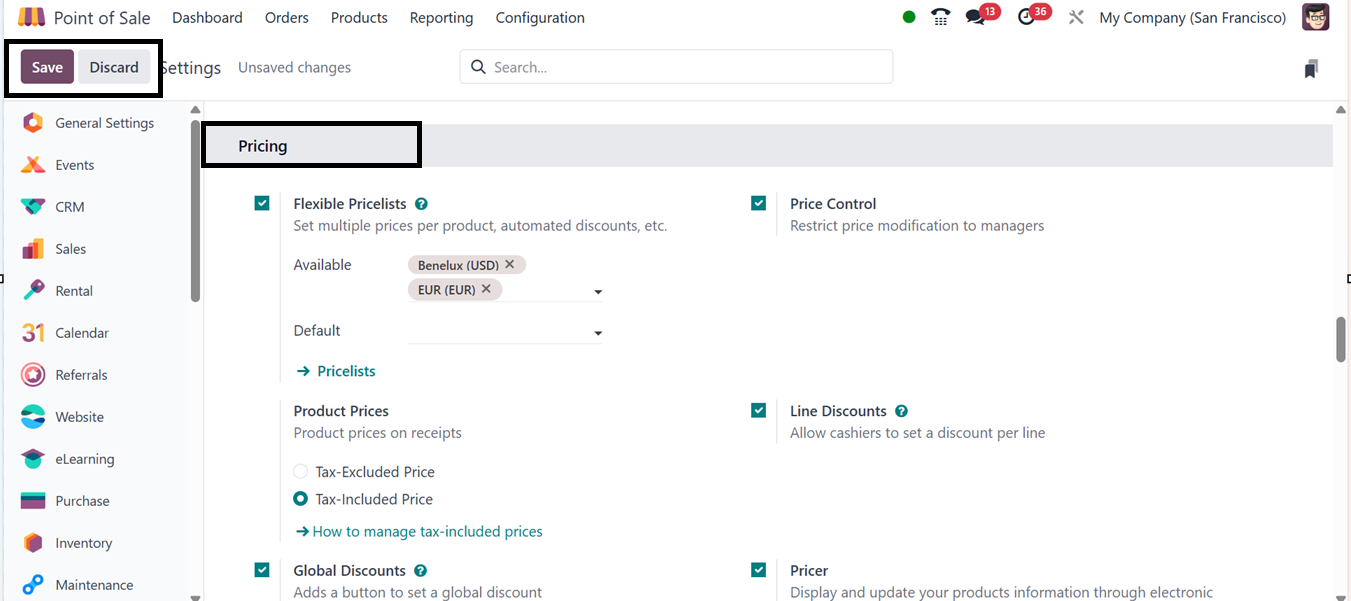
The “Flexible Price Lists” in
Odoo allow users to apply
multiple price lists per
product or configure advanced
pricing rules. The default
and available pricing lists
can be defined in designated
fields.
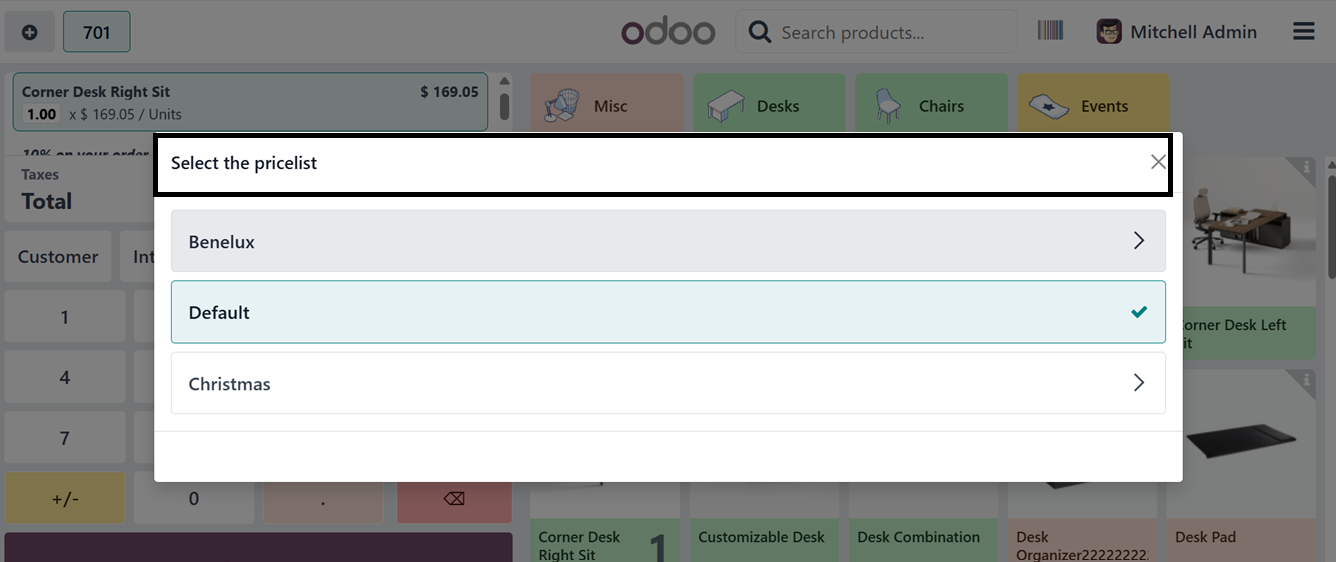
To utilize this feature, users
can initiate a PoS session,
add products to the cart, and
access the price list options
via the ‘Action’ button.
Selecting the 'Pricelist'
button from the displayed
menu allows users to choose
the appropriate price list,
which is then applied to the
ordered products.
6.8 Tax-Inclusive and
Tax-Exclusive Pricing
By adjusting the Product Prices
settings, which provide two
choices: Tax-Included Price
and Tax-Excluded Price,
product prices on receipts
can be controlled after
payments are completed.
Customers can choose how
product prices are shown to
them.
- Tax-Inclusive
Price:
Displays the total
cost of a sales
product, including
tax, suitable for
retail environments.
- Tax-Exclusive
Price:
Shows the base price
of a product before
applying any tax, with
applicable taxes added
at checkout, commonly
used in B2B
transactions.
These options offer flexibility
to meet various business
models and regional tax
regulations, while enhancing
both transparency and
compliance. To demonstrate
this functionality, we can
select a product and access
its configuration form.
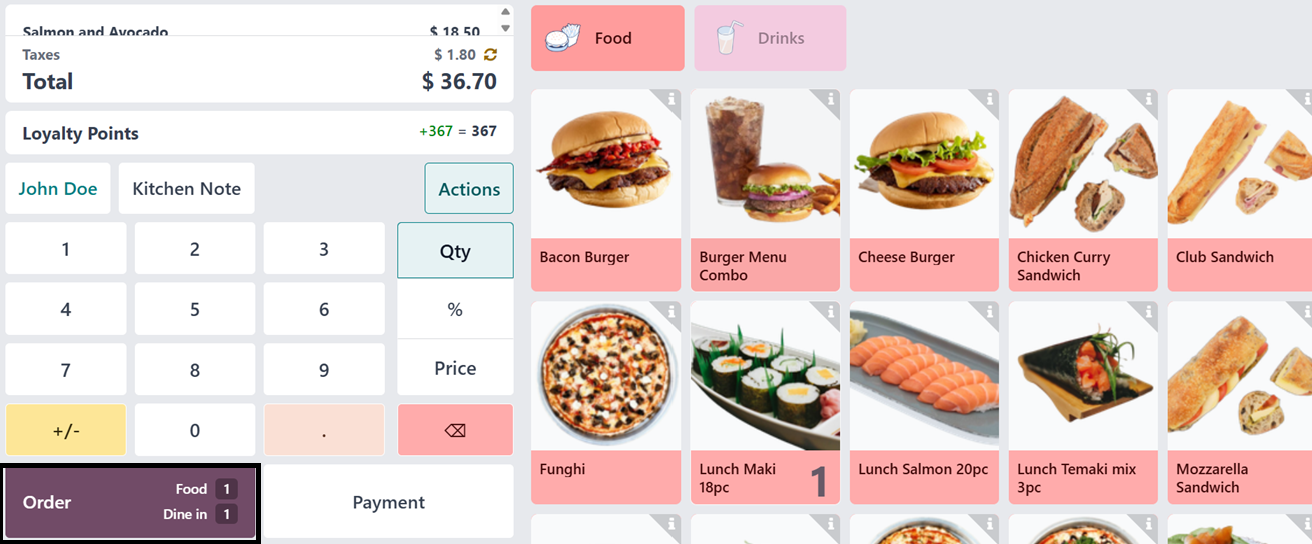
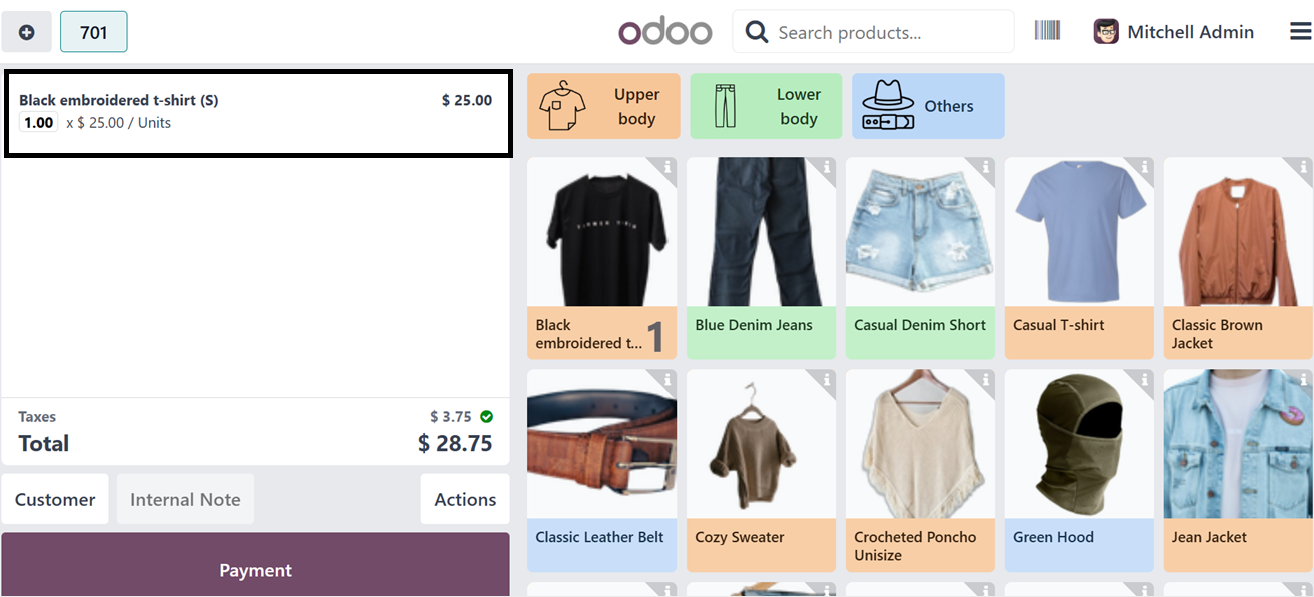
For instance, if the Tax-Excluded
Sales Price of a product is
set at $25, with a tax rate
of 15%, the corresponding
Tax-Included Price will be
$28.75. Next, switch the
setting to Tax-Excluded in a
PoS configuration settings
and start a new order. So,
the product lines will
display prices excluding tax,
while the tax amount will be
added separately to the Total
section in a PoS terminal, as
illustrated in the screenshot
below.
After completing the payment, the
receipt will show the product
prices as tax-exclusive
amounts in the product price
section. However, the total
amount due will include the
applicable tax, clearly added
to reflect the final payable
amount.

The product line in the cart will
show the product price as
well as the included tax
amount if you use the
Tax-Included option from the
Product Prices options, as
seen in the screenshot below.

The receipt will display the
product information and the
tax-inclusive price when the
payment has been completed.
The ‘Price Control’ option
restricts the product prices
modification only to the
authorized managers in a PoS
sales session. Users can
adjust product prices in a
sales session by clicking the
‘Price’ button after enabling
the feature.
The ‘Pricer’ Settings feature
allows users to display and
update product information
through electronic price
tags, enabling seamless
integration with electronic
shelf labels. This feature
synchronizes product details
like prices, names, and stock
levels, ensuring real-time
updates, reducing manual
pricing errors, and
streamlining in-store
operations by keeping shelf
information accurate and
up-to-date.
Then, enabling the ‘Global
Discounts’ allows businesses
to set a default Discount
Percentage and a ‘Discount
Product’ for all customers.
The Products menu allows you to
create and manage discounted
goods and services in the
same way that you would a
regular sales product. In
accordance with business
regulations, the discount
percentage can be entered and
modified in the Discount %
field. The discount rate in
this instance is 10%. Then,to
apply a discount, users can
create a PoS order, select
products, and access the
‘Discount’ action button via
the ‘Actions’ menu.
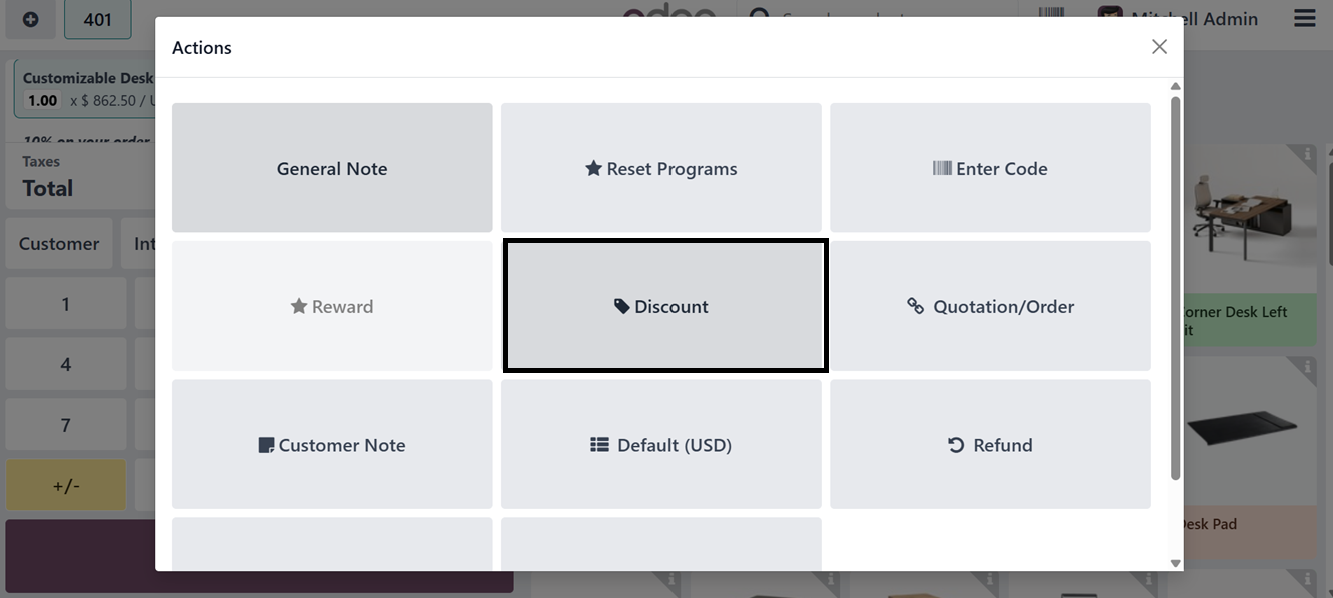
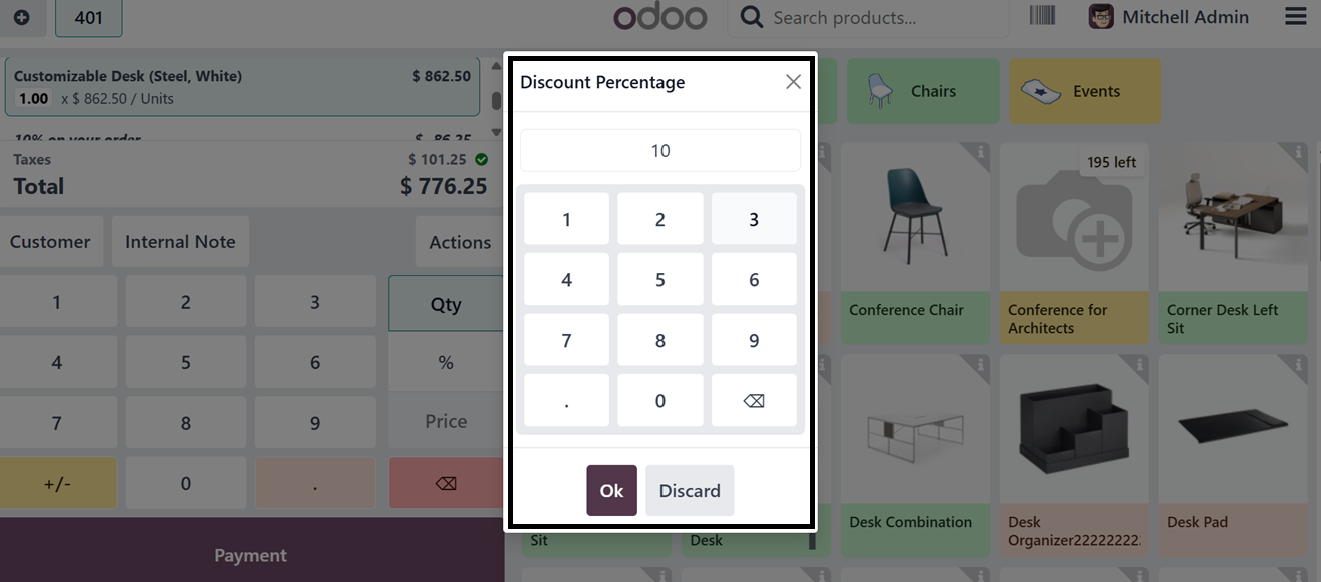
Then, choose the “Discount”
button and you can see the
default global discount
percentage, as illustrated
below.
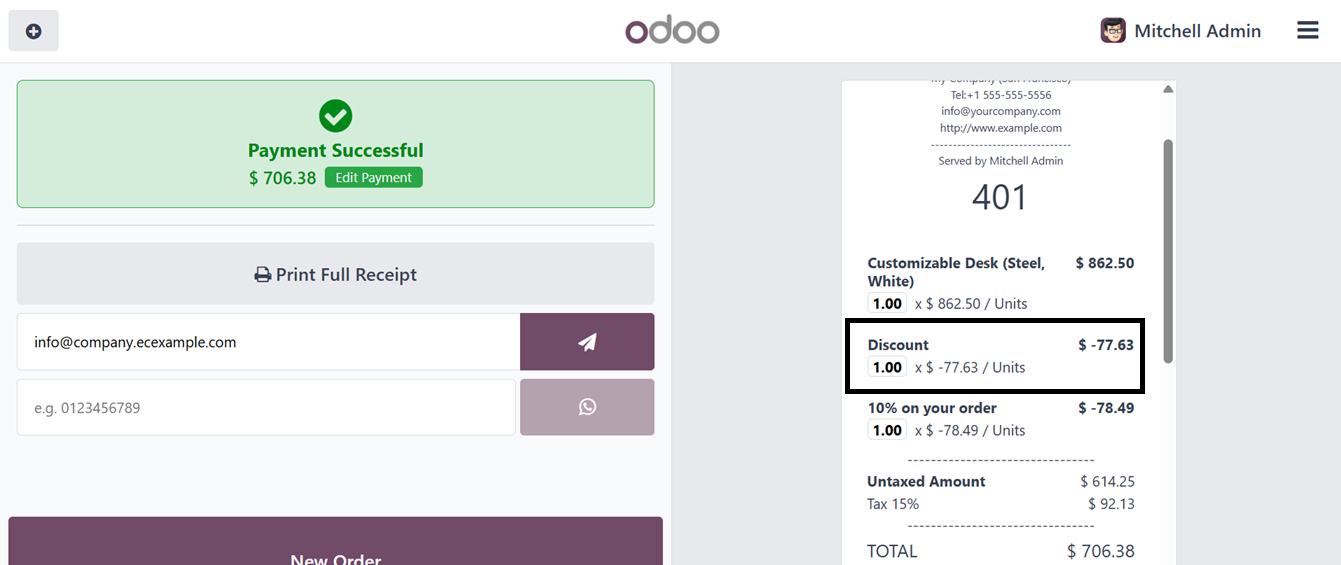
Now, this discount will be
applied to the total price
before finalizing the order
and you can see it from the
sales receipt, as depicted in
the screenshot below.
Additionally, the ‘Line
Discounts’ feature allows
cashiers to set discounts per
product line. Employees can
select a product, click the
Discount icon (%), and enter
a discount percentage (e.g.,
25%) to adjust the item price
accordingly. To check this
feature, open a new PoS
session, add desired
products, select a product
line, click the Discount icon
(%) and edit the discount
percentage number. So, here,
you can see a 25% discount is
applied to a certain product,
as highlighted in the
screenshot below.

The Line Discount feature enables
users to apply discounts to
individual product lines,
providing precise pricing
control. This feature is
useful for promotions,
special offers, and
negotiated deals.
Bills and Receipts
Customization
The “Bills & Receipts” settings
tab can be used to customize
the customer bills and sales
receipts with features like
Custom headers and footers,
Self-service invoicing, Basic
Receipt, automatic receipt
printing etc.
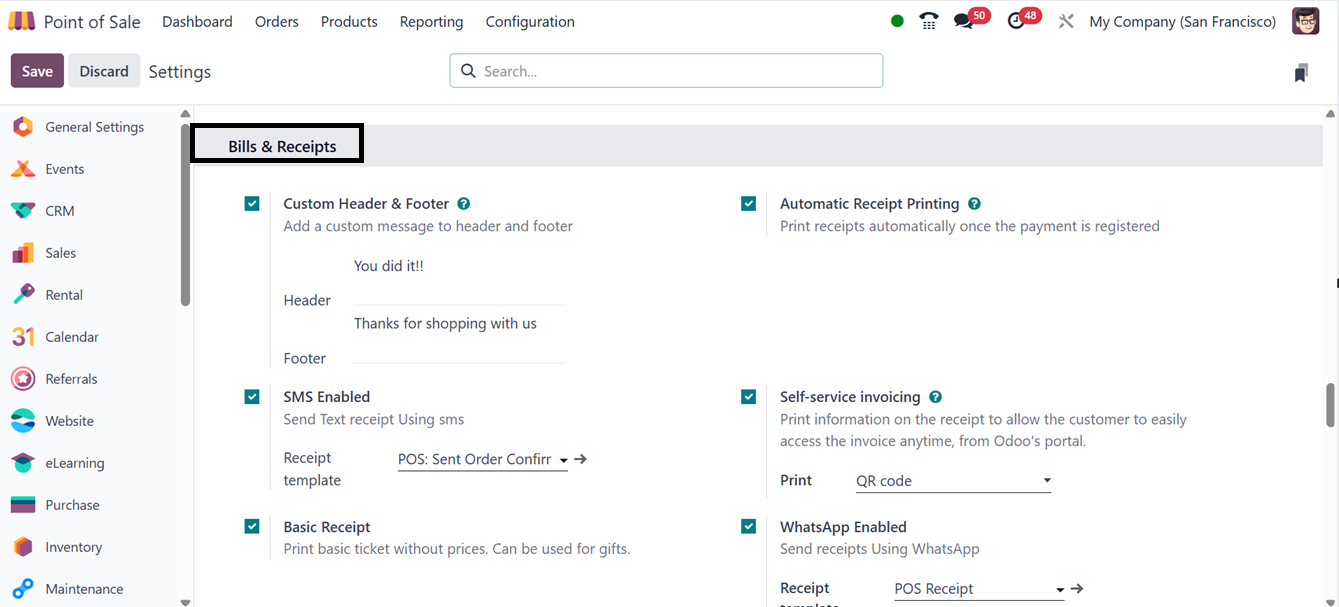
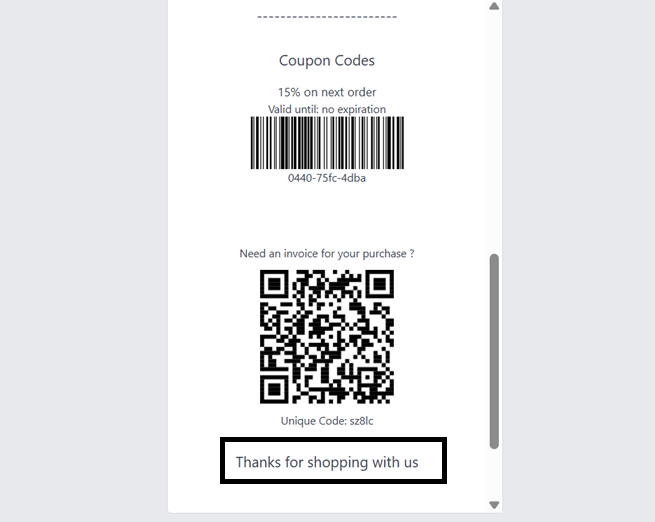
The ‘Custom Header & Footer’
function enables businesses
to personalize invoice and
receipt headers and footers.
Once configured, these custom
messages appear on printed
receipts, as illustrated in
the screenshot below.

Enabling the ‘Automatic Receipt
Printing’ ensures receipts
are printed immediately upon
payment validation. For
simplified receipts, the
‘Basic Receipt’ feature omits
price details. After enabling
the feature, you can print
the basic receipt using the
‘Print basic receipt’ button.
The ‘SMS Enabled’ feature
allows receipts to be sent
via SMS and the ‘Whatsapp
Enbled’ feature can be used
to send receipts via Whatsapp
messenger using the mobile
and whatsapp icons provided
in the payment completion
window, as illustrated in the
screenshot below.

Finally, the customers can easily
request an invoice by
scanning the QR code on their
receipt using the
“Self-Service Invoicing”
feature.
6.9 Food Delivery Connecter
The Food Delivery Connector in
Odoo 18’s Point of Sale
module integrates with
third-party food delivery
services, allowing businesses
to automatically send orders
to delivery platforms. This
ensures seamless order
management, reducing manual
errors and enabling efficient
handling of both in-house and
delivery orders.
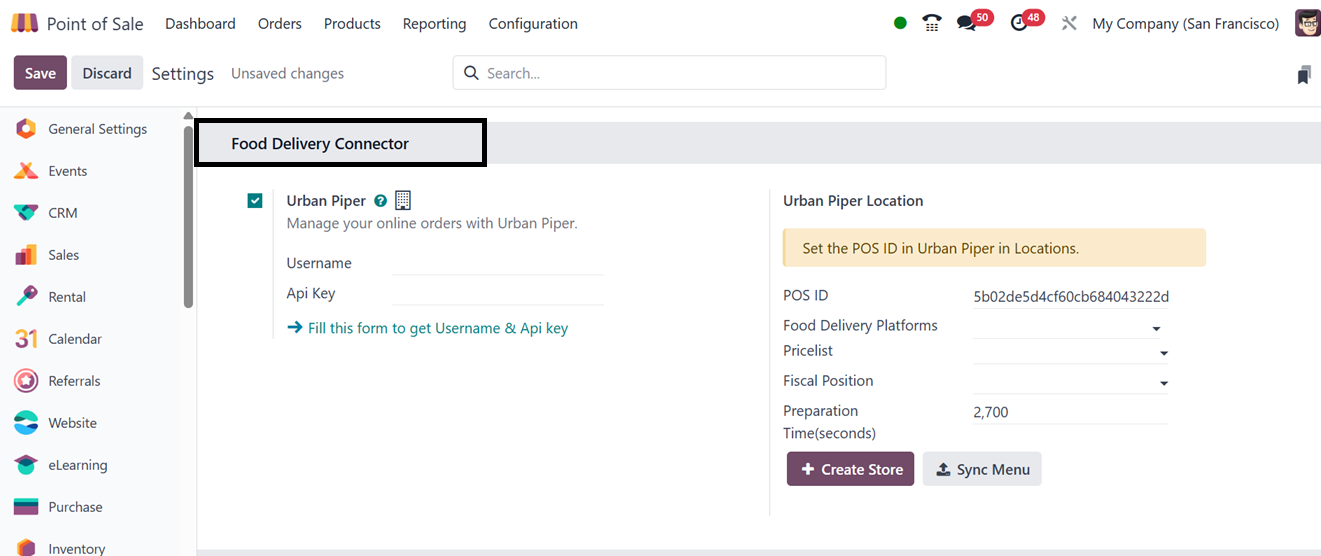
UrbanPiper settings in the Point
of Sale module integrate with
external delivery platforms
like Zomato, Swiggy, and
UberEats, synchronizing
orders, inventory, and
payments in real-time. This
streamlines order flow,
reduces manual entry, and
enhances operational
efficiency and customer
satisfaction.
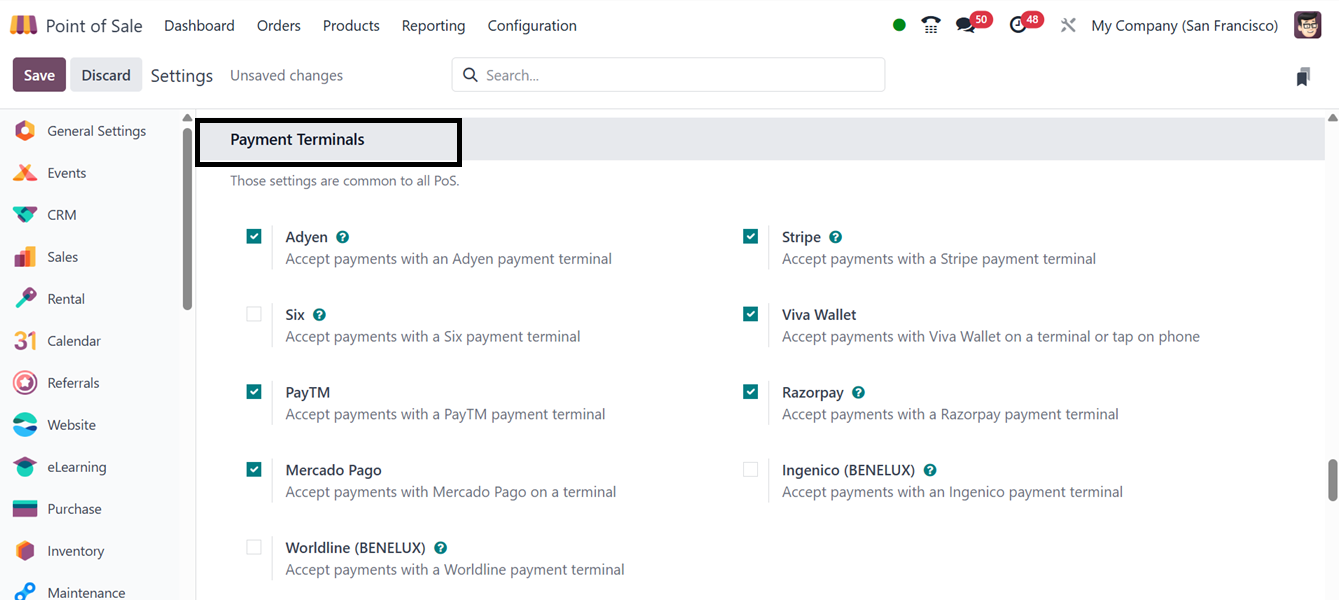
6.10 Payment
Terminal Integration
Odoo’s PoS module integrates with
multiple payment terminals
for simplifying checkout
transactions by allowing
authorization for various
payment terminals including
Adyen, Six, Paytm, Mercado
Pago, Stripe, Viva Wallet,
and Razorpay. These options
can be configured in the
Settings menu based on your
business requirements.
6.11 Connected
Devices Support
Odoo enables direct device
communication without an IoT
Box. Users can enable ePos
Printers for receipt printing
and activate the ‘Customer
Display’ feature to present
the checkout process on a
secondary screen. Barcode
scanners, card readers, and
receipt printers can also be
connected.

You may choose a visually
appealing display picture for
the customer display window
by using the "Background
Image" option.
6.12 Order
Preparation and Inventory
Management
For restaurants and bars, Odoo
provides order preparation
settings, enabling businesses
to streamline kitchen
workflows. These features
include preparation printers
and internal notes for better
coordination.
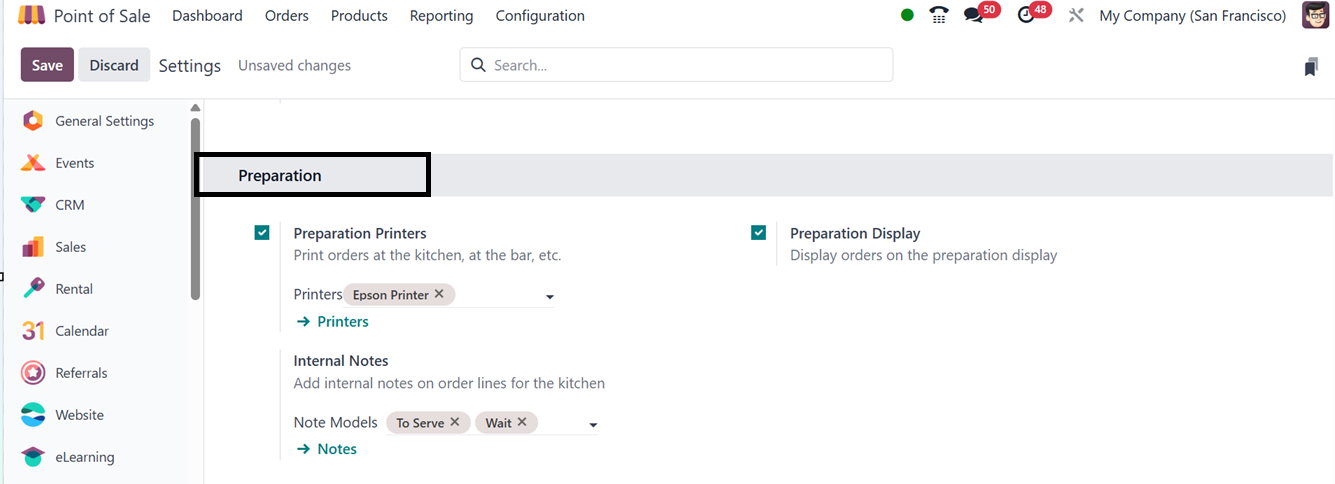
You can mention the printers used
to print orders in your
kitchen and bar shop sessions
in the ‘Preparation Printers’
field. Then, enable the
‘Preparation Display’ feature
to display the orders on the
preparation display. Then,
any notes can be displayed in
the kitchen order lines using
the ‘Internal Notes’ feature.
Inventory
Users can source items during
sales from a specified
location or straight from
stock using the ‘Operation
Type’ feature of the Odoo
Point of Sale module. This
guarantees accurate
transactions and exact
inventory control. In order
to guarantee that items are
derived from this particular
inventory location while
accepting orders during a
Point of Sale session, the
source location for the Point
of Sale is set to
'YourCompany: PoS Order'.
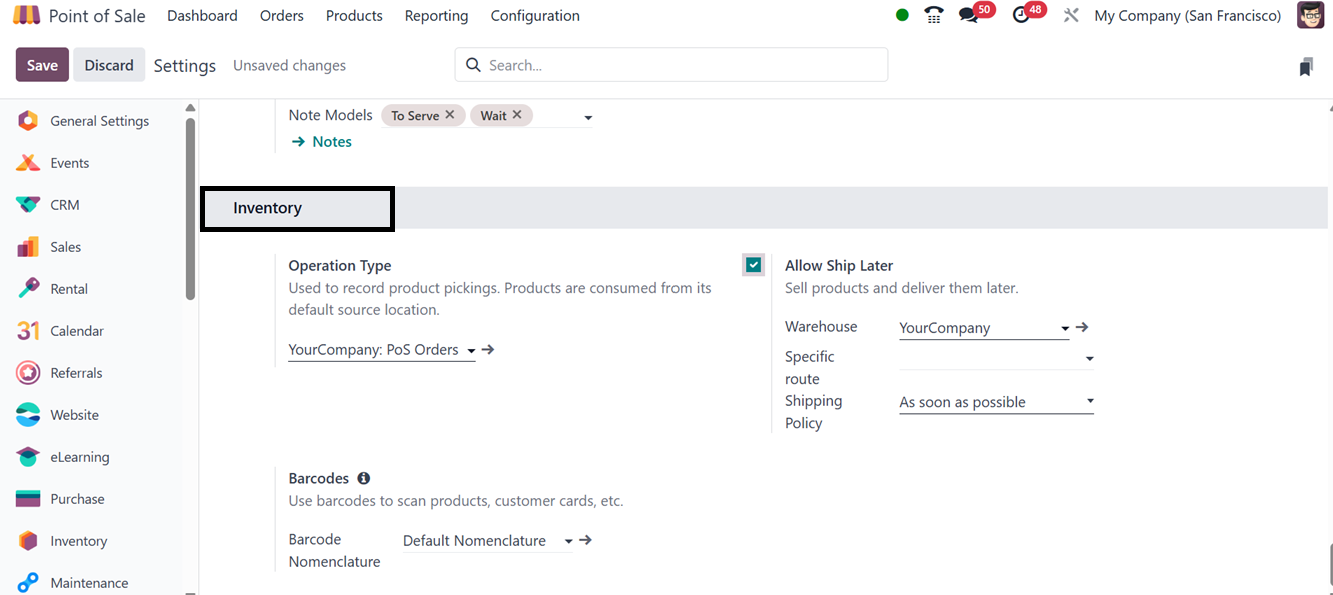
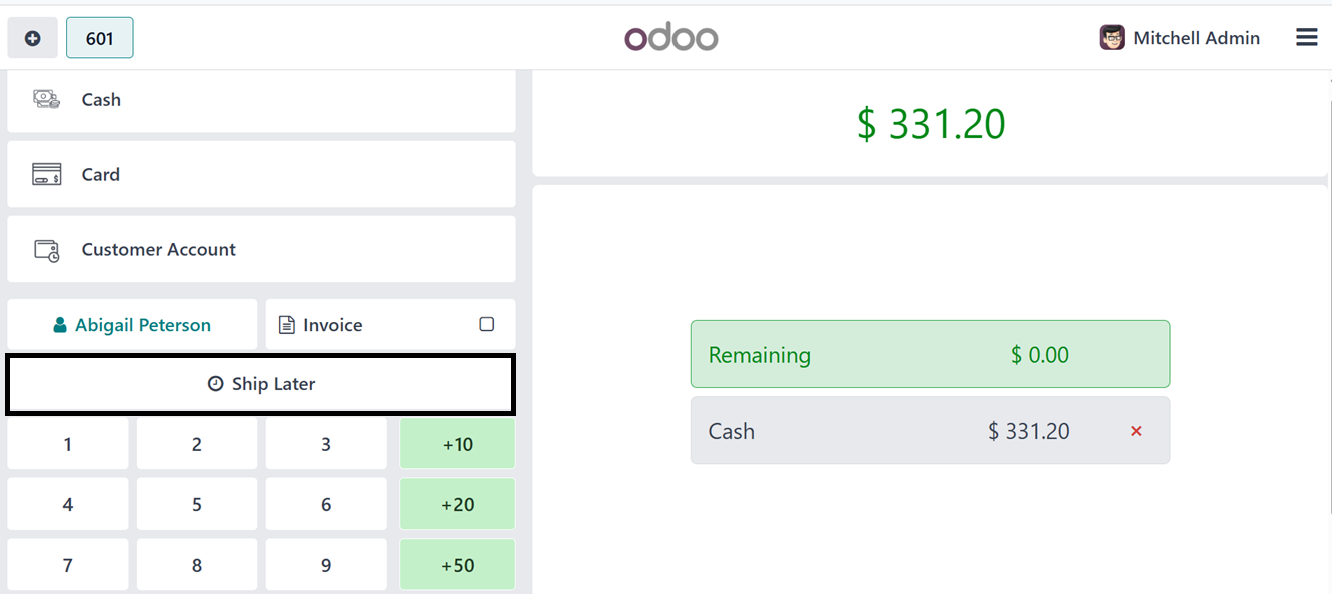
The ‘Allow Ship Later’ feature
lets customers purchase items
for later delivery. Upon
enabling, a ‘Ship Later’
button appears in the PoS
terminal, allowing users to
select a preferred shipping
date, as illustrated in the
screenshot below.
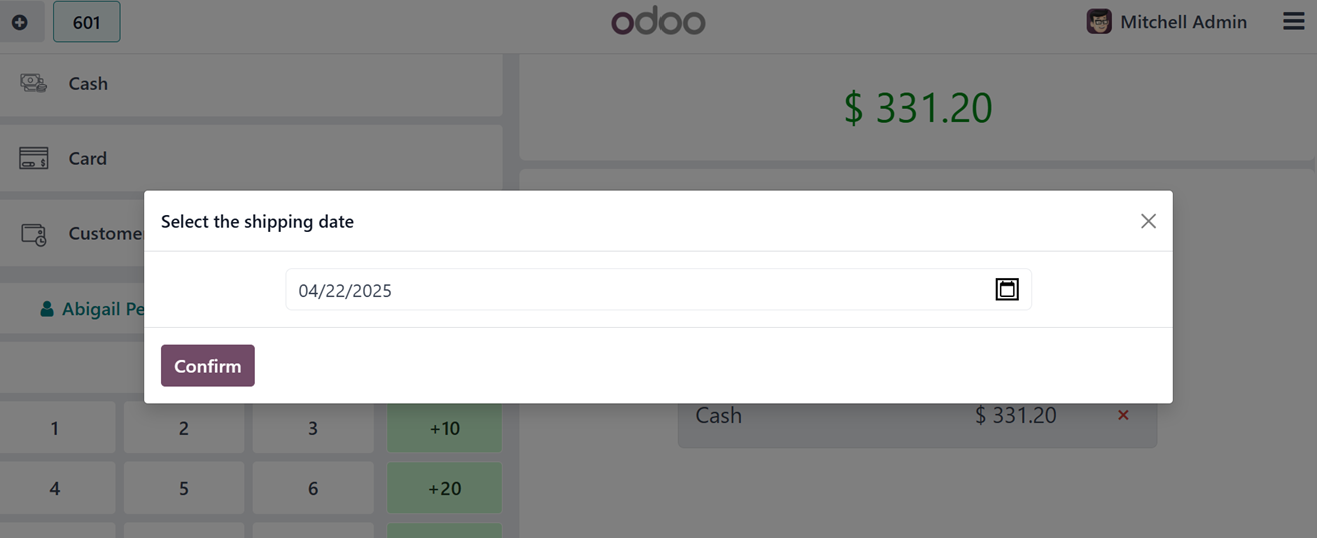
Then, provide the shipping date
and confirm the date, as
highlighted in the screenshot
below.
The barcode scanning
functionalities are supported
through the ‘Barcodes’
feature, which facilitates
scanning of products and
customer cards. Users can
configure barcode rules in
the Inventory module and
assign barcodes to products
for seamless scanning during
transactions.
6.13 Coins/Bills
The ‘Coins/Bills’ option in the
PoS configuration menu
enables businesses to define
accepted currency
denominations. This menu will
take you to the dashboard of
the available Coins/Bills of
your point of sale database,
as illustrated in the
screenshot below.
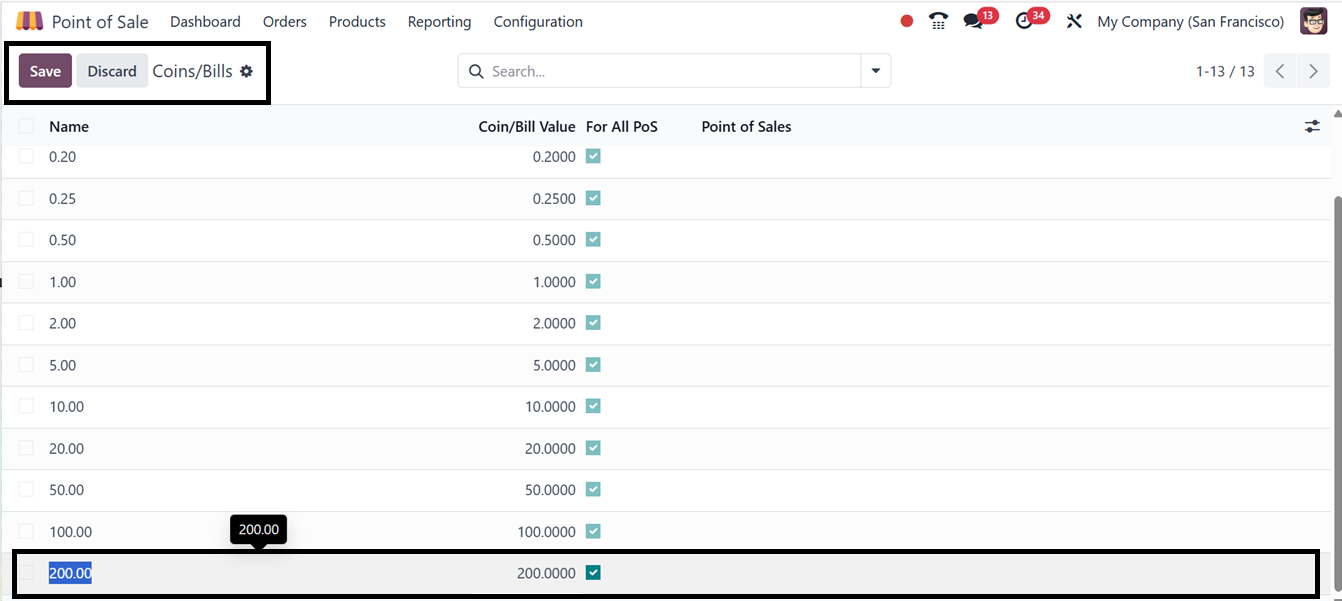
You can easily add new Coin or
bill denominations by
clicking on the ‘New’ button
and editing the values in the
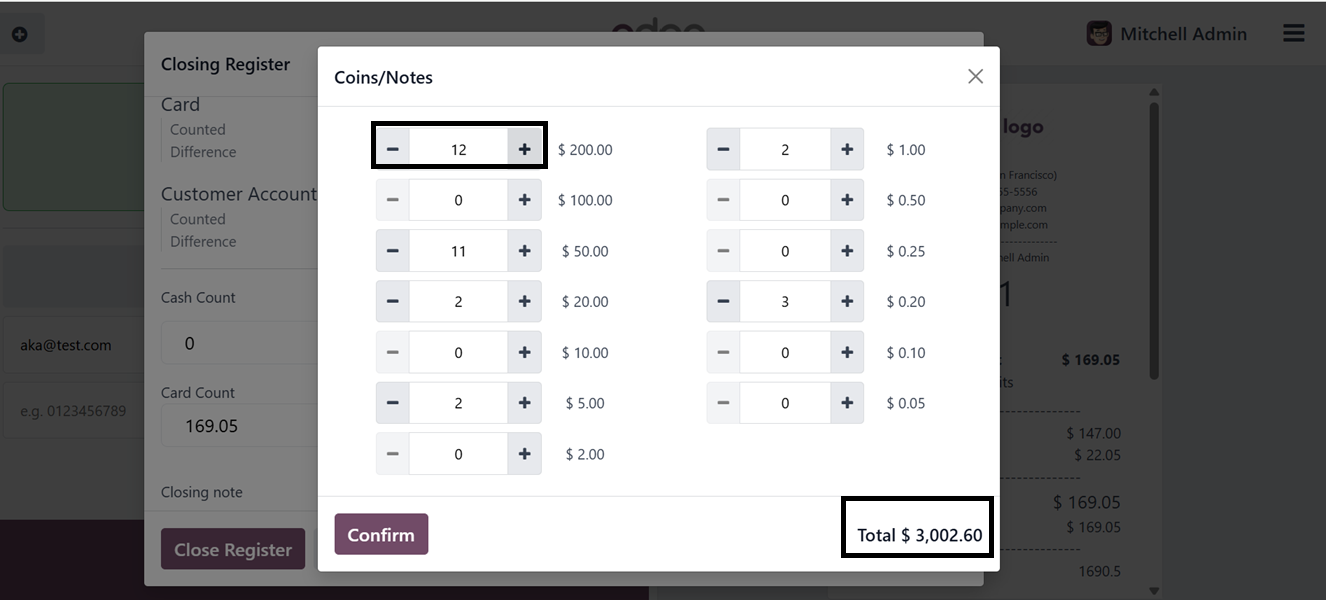
displayed field. During
closing and opening cash
registers, the cashiers can
input specific denominations
to ensure accurate payment
processing using the
Coins/Bills icons, as
depicted in the screenshot
below.

The coins/ icon will open the
available list of all the
Coins/Notes, as shown below.
You can configure the available
coin and note denominations
based on your point of sale
cash transactions. These
entries will later be
recorded in the daily cash
register for accurate
tracking.
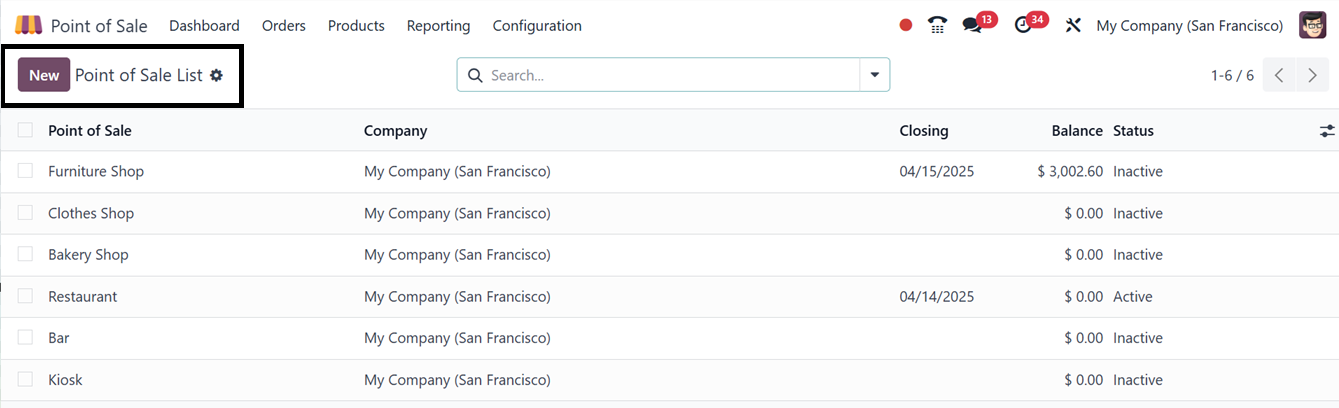
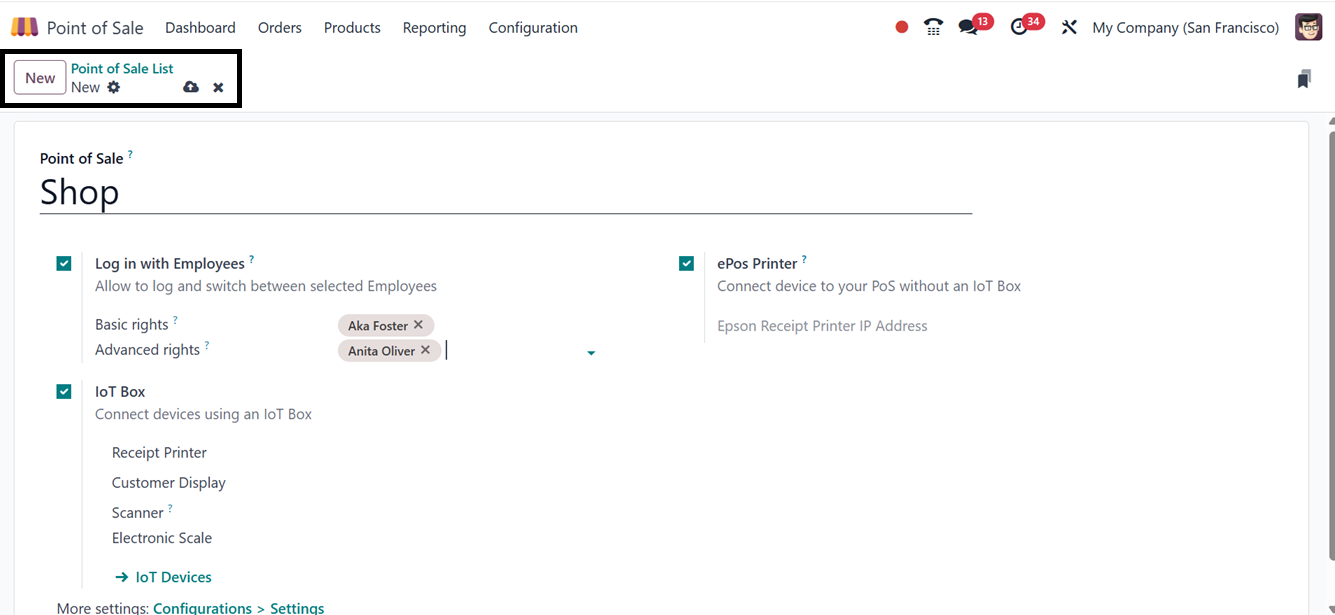
6.14 PoS Management
Businesses can create and manage
PoS sessions from the PoS
dashboard. New shop or
restaurant sessions can be
initiated by clicking ‘New’
and configuring employee
login settings, printer
options, and IoT Box
connectivity.
For employee access control, the
system differentiates between
Basic Rights (limited sales
operations) and Advanced
Rights (management
functions). Employees can log
in using PIN codes, ensuring
secure access. This
functionality is discussed in
the previous section of this
book.
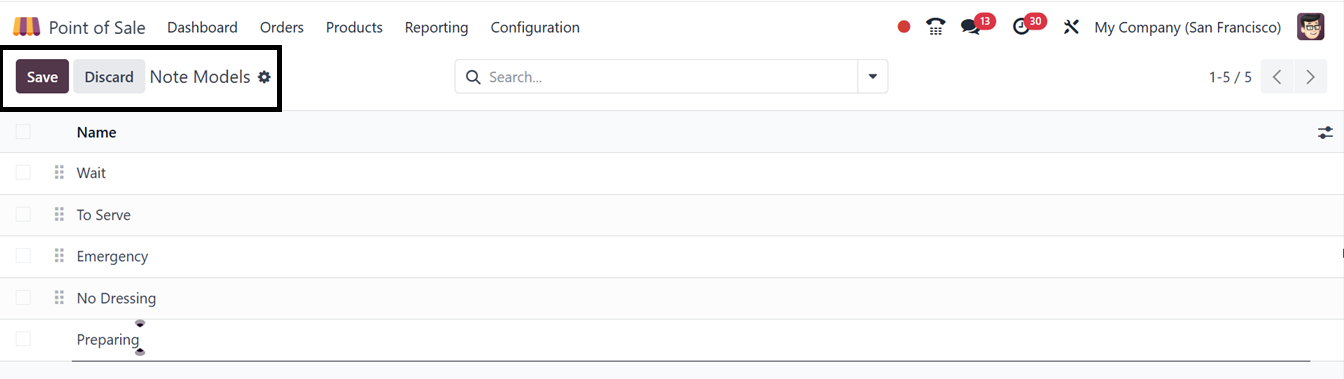
6.15 Note Models
Odoo 18's Point of Sale (POS)
module features Note Models,
allowing businesses to manage
and configure additional
notes or comments on orders
or products. These notes
convey specific instructions,
customer preferences, or
details to be included in the
order or product line. Users
can view available Note
Models from the dashboard,
create new ones by clicking
the 'New' button, and save
them for later use.
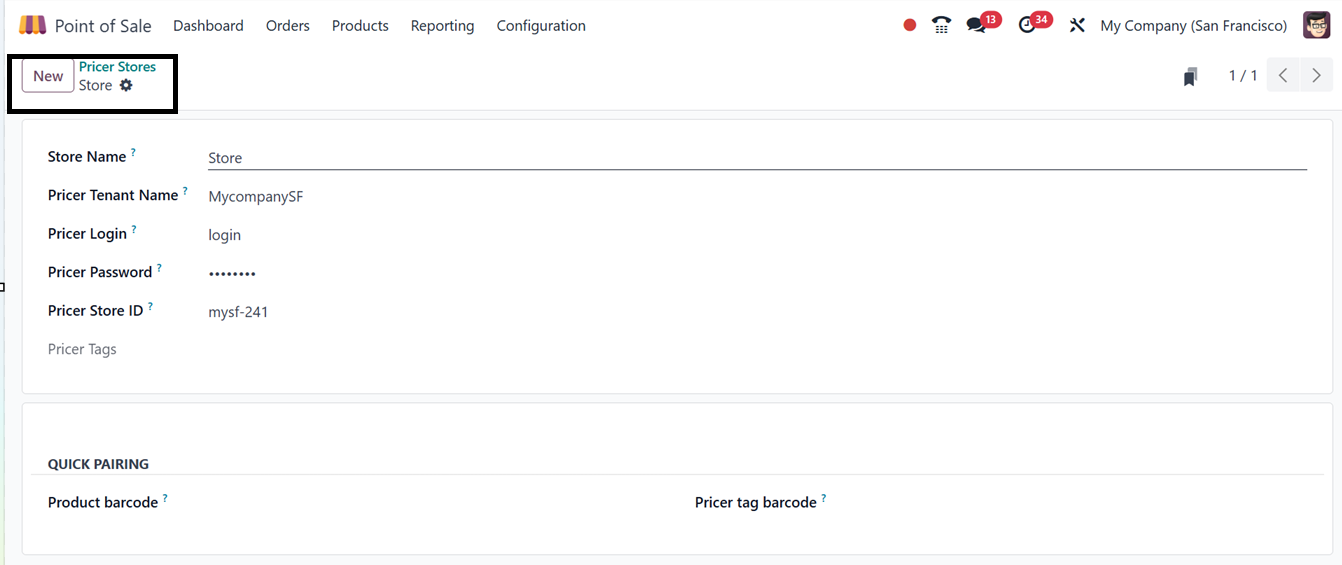
6.16 Pricer store
The Pricer Stores configuration
in Odoo 18's Point of Sale
module allows for real-time
synchronization of product
prices and information across
physical store displays. You
can see the dashboard of all
the available options after
opening the menu, as shown
below.

After opening a new configuration
form, you can create a new
Pricer Store details with the
Store Name, Tenant Name,
Login, Password, Store ID and
other details, as illustrated
in the screenshot below.
By linking the Odoo PoS system
with Pricer's ESL
infrastructure, businesses
can automatically reflect
updates in their stores,
eliminating the need for
manual label updates,
reducing pricing errors, and
enhancing in-store
operational efficiency.
6.17 Pricer Tags
The Pricer Tags configuration in
Odoo's Point of Sale module
is a digital pricing solution
that replaces traditional
paper labels with electronic
shelf labels. These tags can
be linked to specific
products, ensuring real-time
updates on pricing, product
names, or promotional
information.

By clicking on the New button
from the dashboard window,
you can create a new Pricer
Tag for a new product by
mentioning its Pricer Tag
Barcode ID, Associated
Product and Associated Pricer
Store details, as depicted in
the above screenshot.
This not only ensures accuracy
but also saves time on manual
updates, improving the
overall shopping experience
for customers.
6.18 POS Product
Categories
When operating a product sales
company, it is crucial and
effective to classify
products into several groups
or categories. With the Odoo
Point of Sale Module,
classifying various product
categories is simple. The
Configuration menu's PoS
Product category option
allows for this
classification. This
dashboard demonstrates a
variety of sales product
categories.
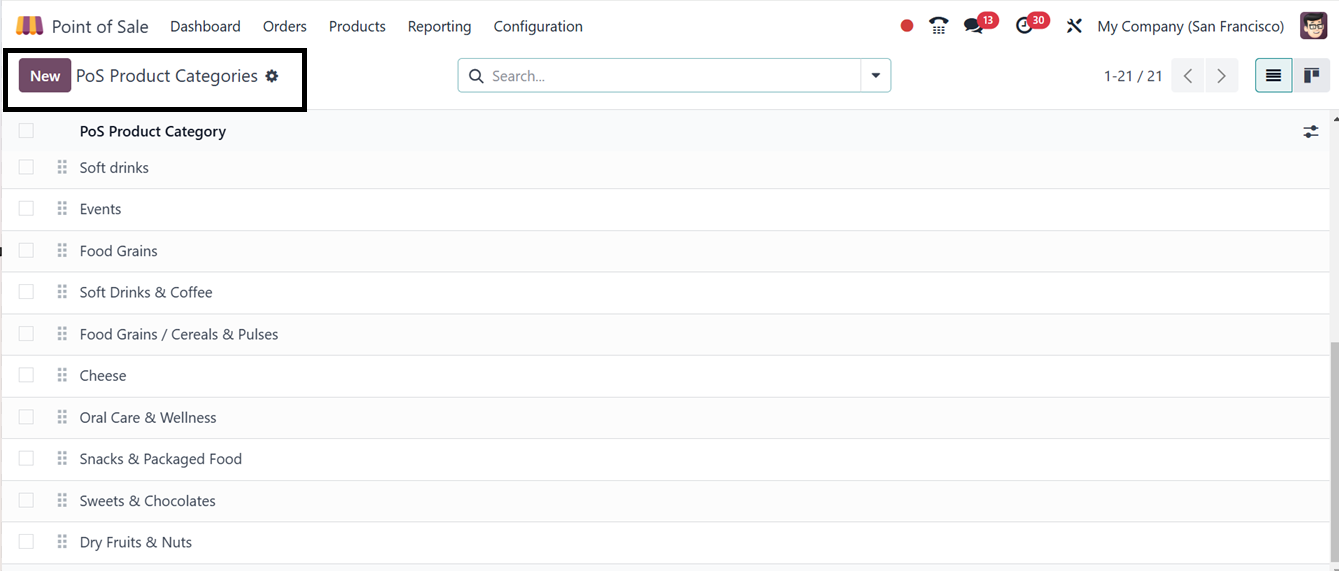
This window can also be viewed in
a Kanban state view for
better understanding.
Filtering, Grouping and
Favorites options are also
available inside the search
bar area. You can create a
new product category using
the ‘New’ button.
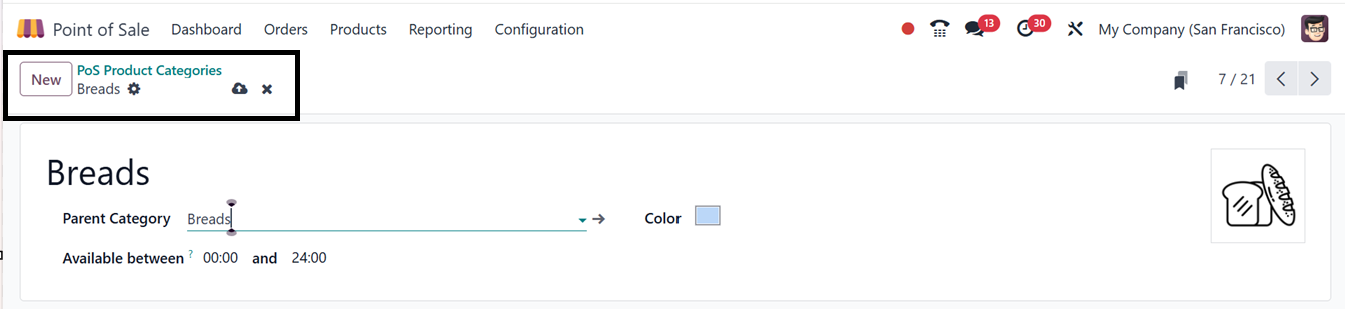
In the new category configuration
form, just enter the Category
Name, Parent Category and
Available between time range
as shown in the above
screenshot. Then highlight
the category with a preferred
color and save the data.
6.19 Attributes
Attributes in Odoo are crucial
for managing product
variations, inventory,
pricing, and sales processes,
representing specific
characteristics like size,
color, or material. The Point
of Sale module can be
customized with various
variants using the Attributes
option in the Configuration
menu.
The attributes list, including
eCommerce Category, Display
Type, Variant Creation mode,
and eCommerce Filter
Visibility, can be easily
accessed from this dashboard
window.
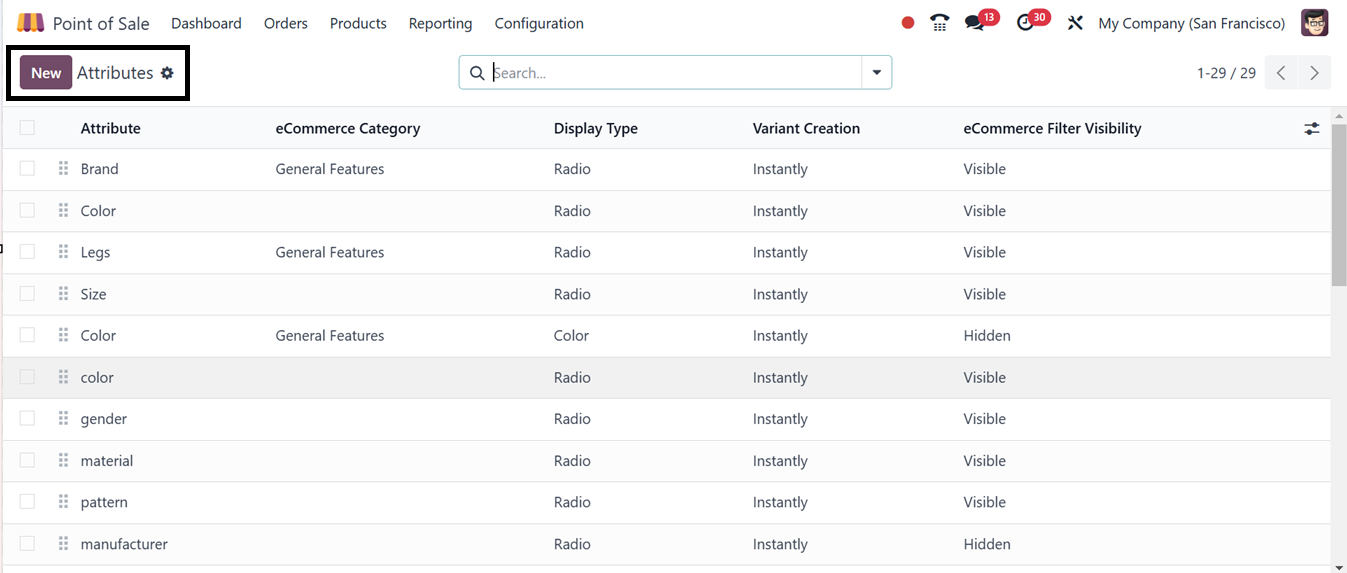
Adding a new attribute to the
product is a simple process
using the ‘New’ icon. In the
displayed form view, edit the
relevant details including
the Attribute Name.
The ‘Display Type’ might be
either radio, pills, select,
or color. Creating variations
can be done rapidly,
dynamically, or never at all
by mentioning it in the
‘Variant Creation’ field.
Potential variances are
allowed for by the
instantaneous production of
alternatives once the traits
and values are provided. Only
by adding values to a sales
order's attributes may
variants be made using
dynamic choices.
Additionally, the never
option never creates the
properties. The visibility of
eCommerce may be changed to
either visible or hidden in
the ‘ eCommerce Filter’ area.
Then, choose the ‘eCommerce
Category,’ as shown in the
screenshot below.
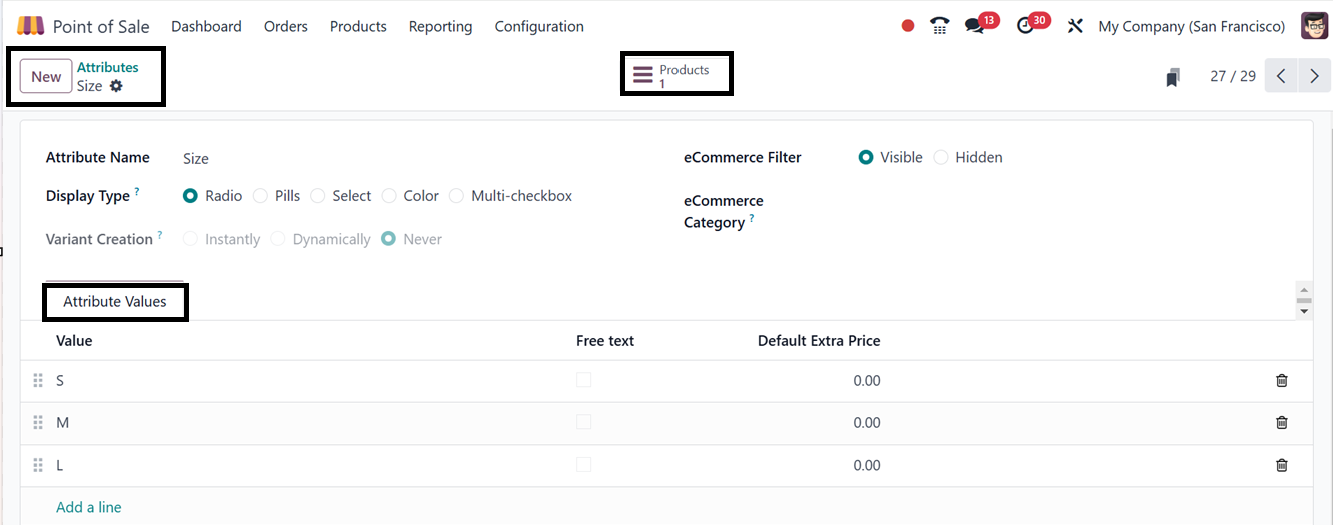
To add the value to the product
attributes, utilize the Add a
line option. Finally, click
on the Save symbol.
6.20 Presets
You can establish and manage
numerous service scenarios,
such as Eat In, Takeaway, or
Prebook, by applying certain
parameters to each one using
Odoo 18's Presets feature
inside the Configuration menu
These presets apply preset
parameters, such as price,
tax rates, guest preferences,
and time-based services,
automatically, which
expedites the purchasing
process, simplify PoS setup
and ensure consistency across
multiple terminals.
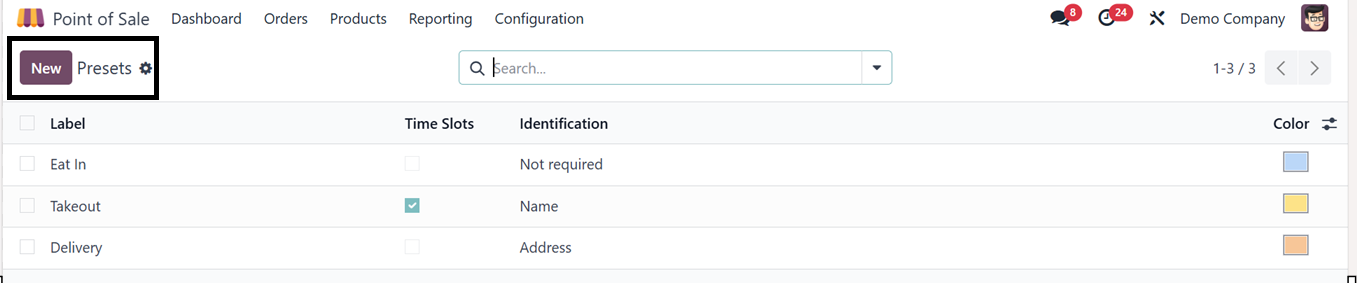
From the ‘Presets’ dashboard, you
can see some presets Label,
Time Slots, Identification
and Color options, as
illustrated in the screenshot
below.
Click on the ‘New’ button to
create a new preset option
and edit the details
including the Label,
Pricelist, Fiscal Position,
Identification requirement,
Color, Guest selection
option, Timeslots, Capacity
etc as illustrated in the
screenshot below.
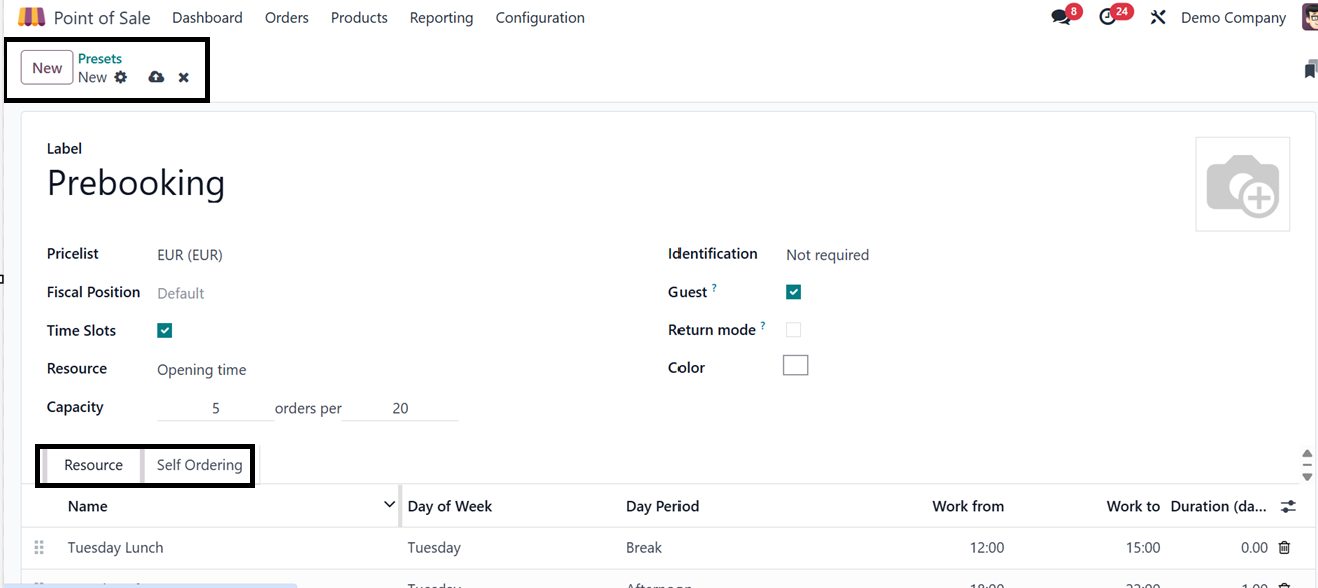
The ‘Resource’ tab allows you to
configure resources based on
the type selected for the
preset. For example, if
you've chosen opening time as
the resource type, you can
add different resource
options within this tab.
After that, you can enable
the Self Ordering feature
from the ‘Self Ordering’ tab.
Additionally, the
‘Takeout/Delivery/Members’
option can be activated from
the Settings window to
include the Default and Other
preset options in your point
of sale shop session, as
shown below.

The applicable taxes and price
for the chosen preset will be
immediately applied to the
products connected with the
selected option once the
functionality is active.
Launch a fresh Point of Sale
session to check the
functionality of this
feature. As seen below, a
dedicated button on the PoS
console allows you to access
the numerous preset choices,
including "Eat In."

You can see the available options
from the drop down list and
choose the required one.
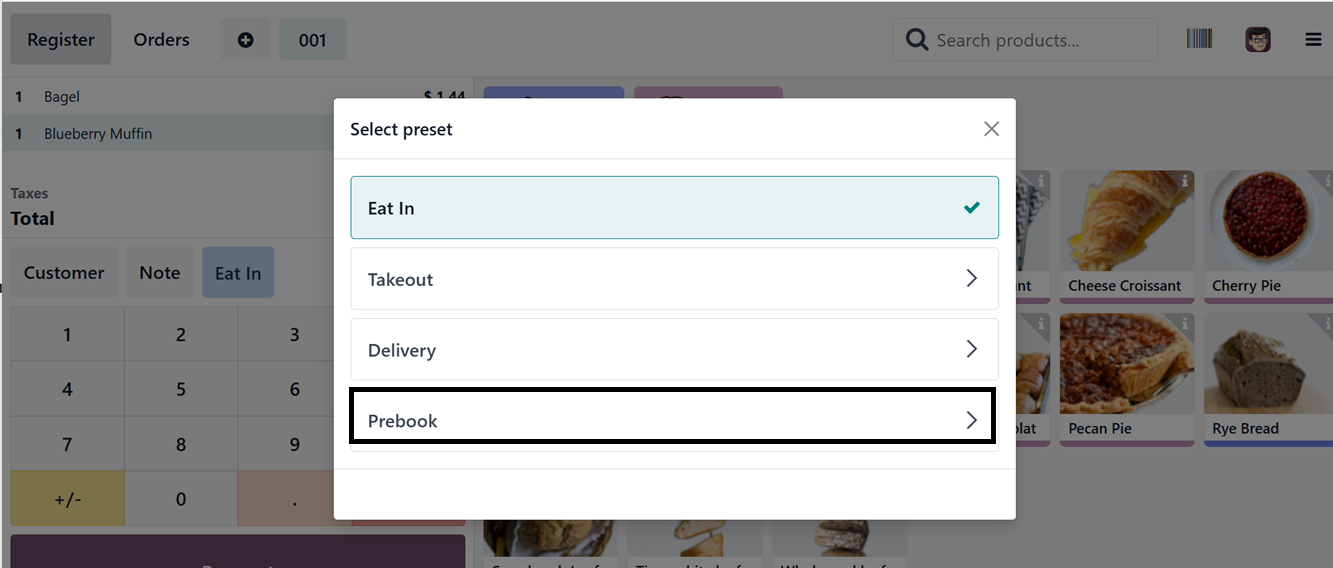
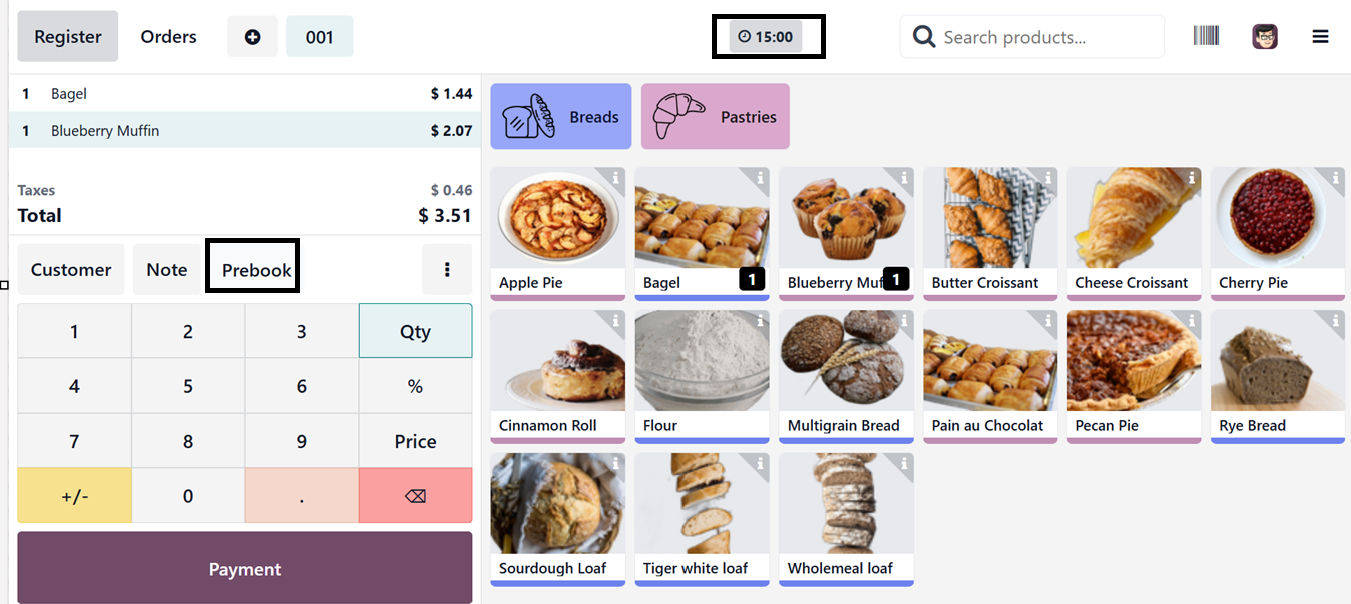
We've chosen the "Prebook" option
in this instance, which
offers time slot
functionality. Consequently,
a Time Slot button appears at
the top of the screen, as
seen in the picture below,
and the preset is applied to
the PoS session.
Using the Time Slot option,
select the desired preset,
along with the preferred
prebooking date and time
based on your requirements.
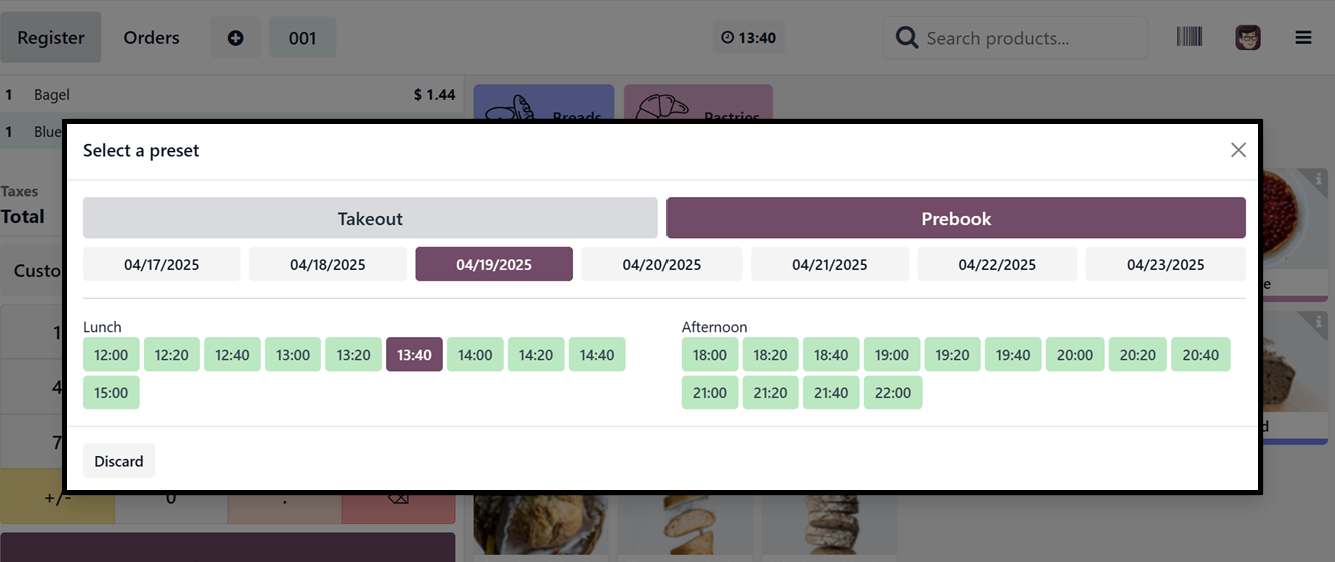
Selecting a time slot and preset
option will automatically
apply any additional prices
and tax rates associated with
that service. Once selected,
you can proceed to place the
order and validate the
payment through the Point of
Sale terminal as usual.
6.21 UrbanPiper
Store Timings
The UrbanPiper Store Timings
configuration in Odoo's Point
of Sale module enables
businesses to manage their
stores' operating hours for
third-party food delivery
platforms like Zomato,
Swiggy, and UberEats.
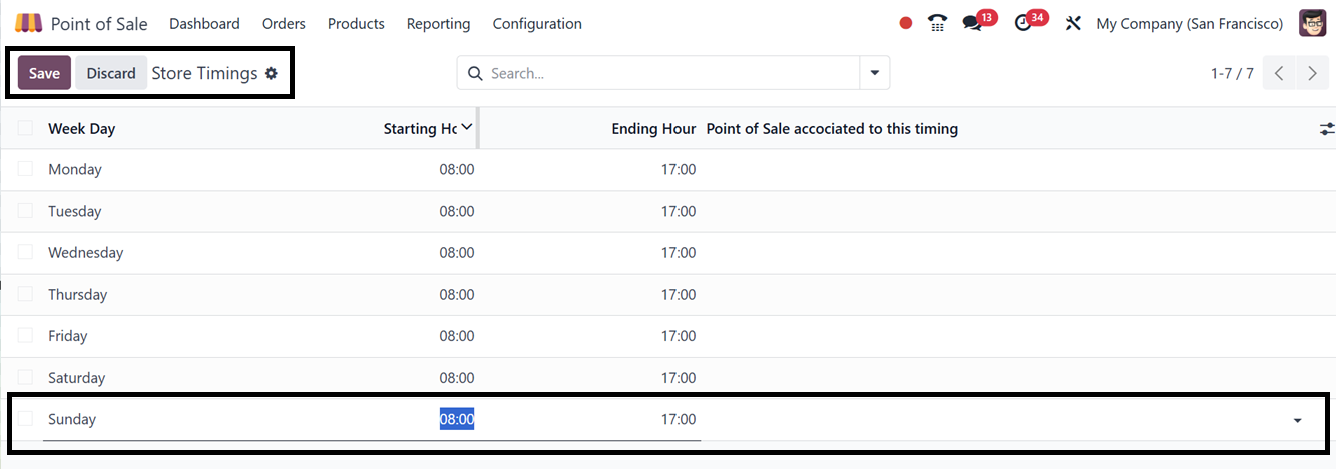
The dashboard will show the
available timings with the
details including Week Day,
Starting Hour, Ending Hour
and Point of sale associated
to this timing. Using the
‘New’ button, you can simply
add a new store timing as per
the requirement, as
highlighted in the screenshot
below.
By setting store timings,
businesses can control when
their stores are marked as
"open" or "closed" on these
platforms, ensuring customers
can only place orders during
active business hours,
automating availability, and
improving coordination
between physical operations
and online delivery services.