3. Configurations
Odoo 18's Purchase module
provides a Configuration menu
that allows users to
customize various aspects of
the purchase process to suit
their company requirements
including basic Settings,
Vendor Pricelists,
Attributes, Product
Categories and Units of
Measure Categories.
3.1 Settings
The ‘Settings’ section offers
general purchasing options
like Purchase Agreements,
Purchase Order Approvals,
Lock Confirmed Orders, Vendor
Pricelists, Warnings, Receipt
Reminders, Purchase
Alternatives, Bill Control,
3-way Matching, Product
Variants, Variant Grid Entry,
Product Packaging, Unit of
Measure and Dropshipping
functions, as illustrated in
the screenshot below.

Now, let’s discuss the
functionality of each
settings option in detail.
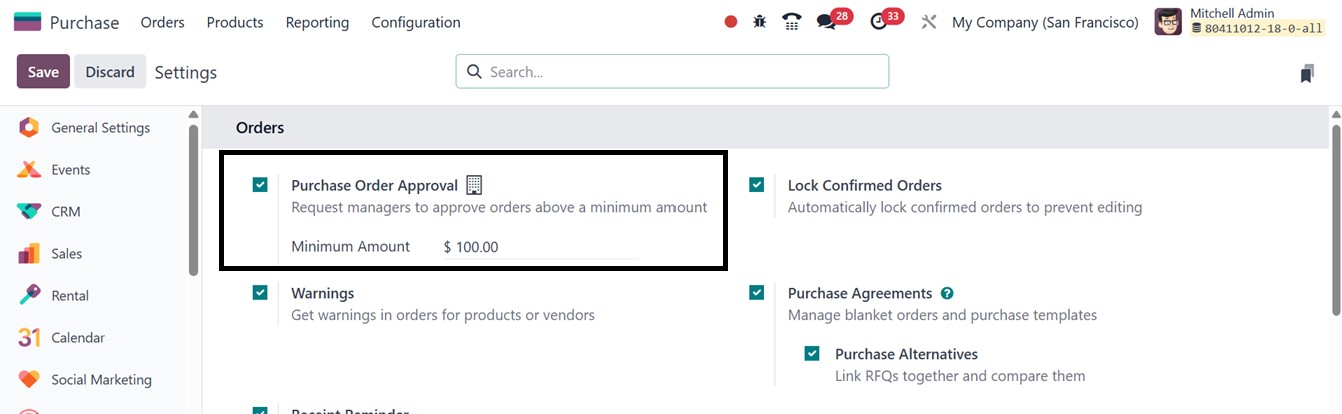
Purchase Order Approval
In the Odoo 18 Purchase module,
you can configure a manager
approval process for purchase
orders that exceed a
specified minimum amount.
This can be enabled by
activating the Purchase Order
Approval option from the
Settings menu. Once this
feature is enabled, an
additional field becomes
available where you can
define the Minimum Amount
threshold. Any purchase order
exceeding this value will
require managerial approval
before it can proceed.
Whenever a purchase
representative, generate a
RFQ greater than minimum
amount mentioned above, when
confirmed ,it will moved to
an approval state instead of
purchase order.
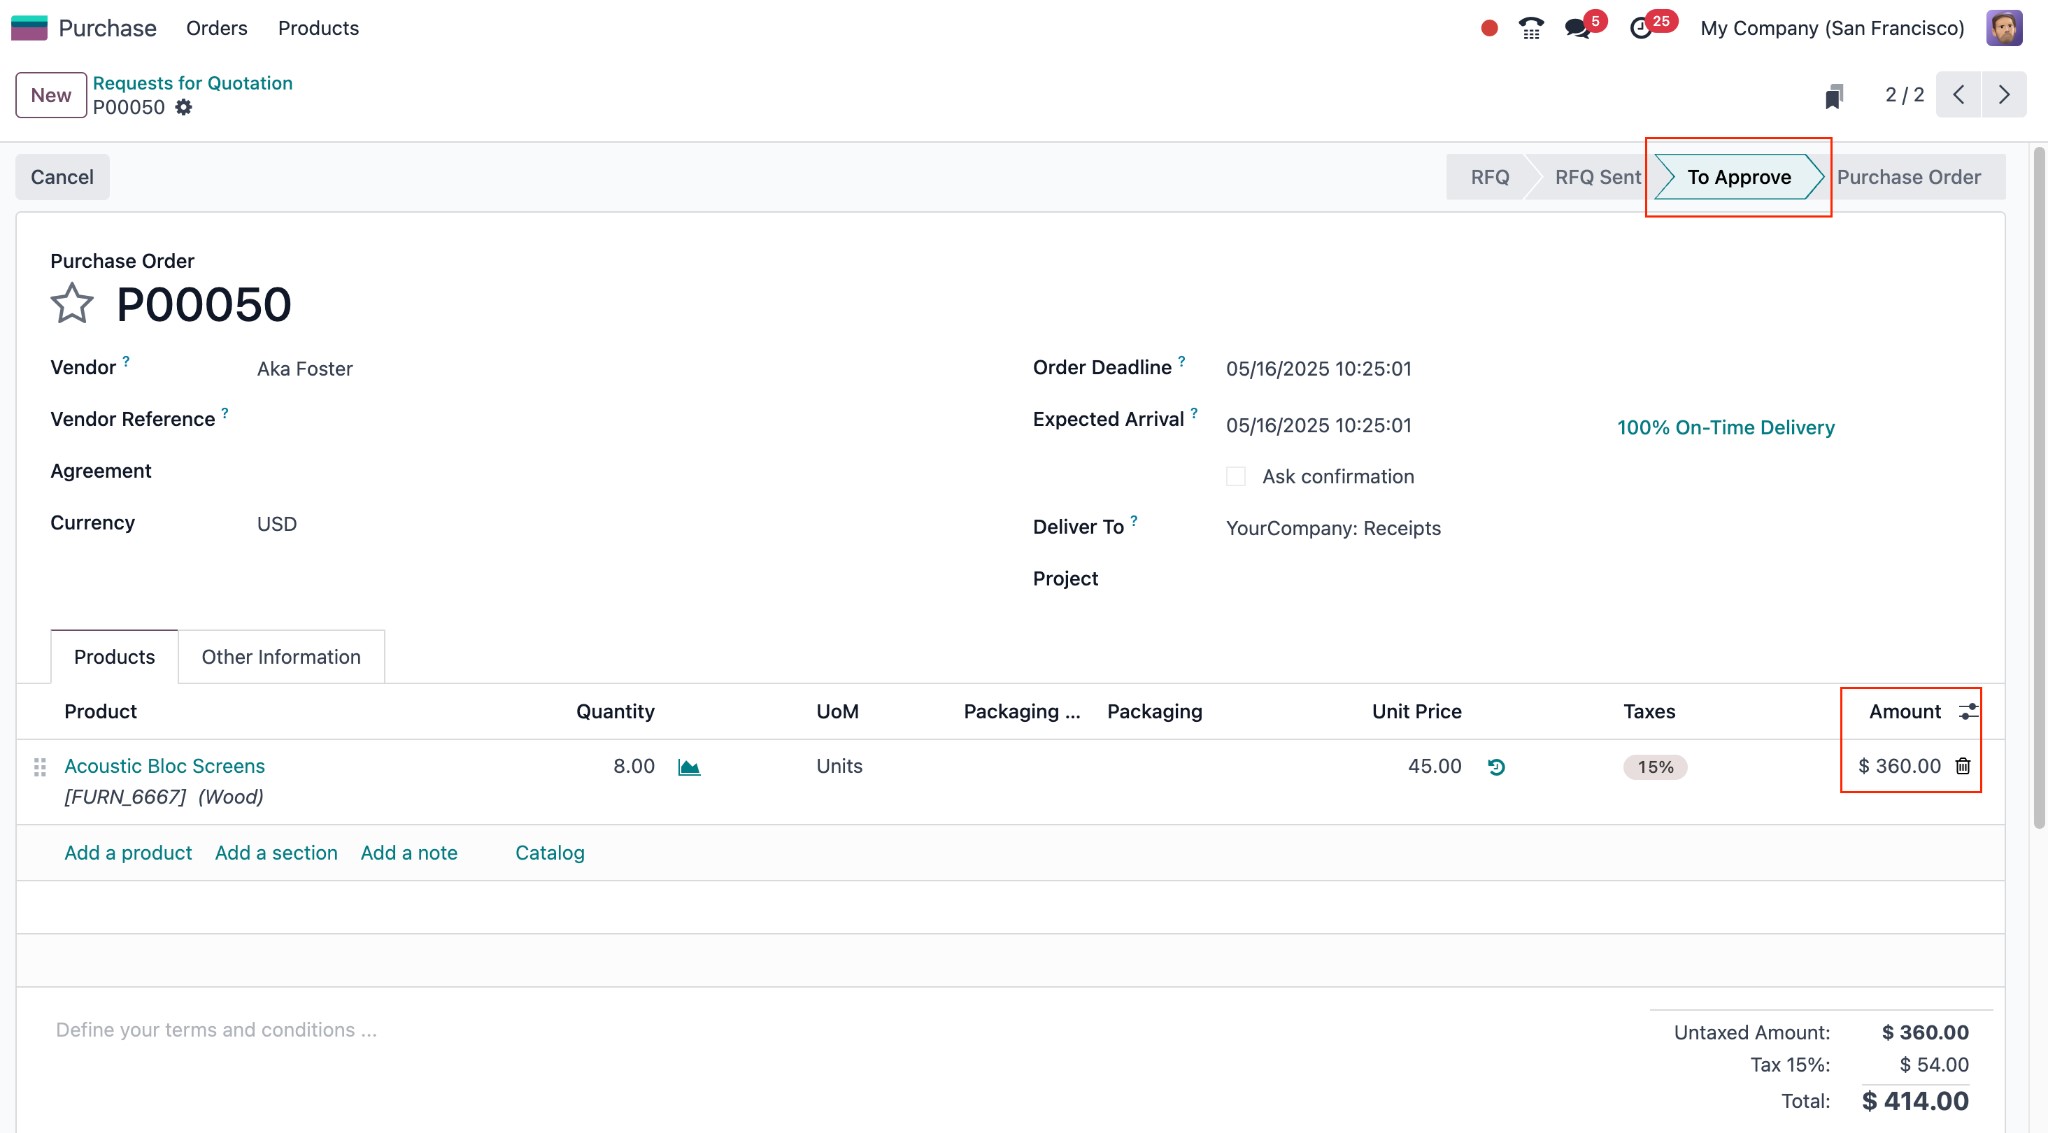
Purchase order can be later
confirmed by purchase
administrator.
Lock Confirmed Orders
Purchase orders become uneditable
once they are verified when
Odoo 18's "Lock Confirmed
Orders" functionality is
activated. This stops
important procurement details
like price, quantity, or
vendor information from being
changed unintentionally or
without authorization, using
the ‘Lock’ and ‘Unlock’
buttons from an order
configuration form, as
illustrated below.
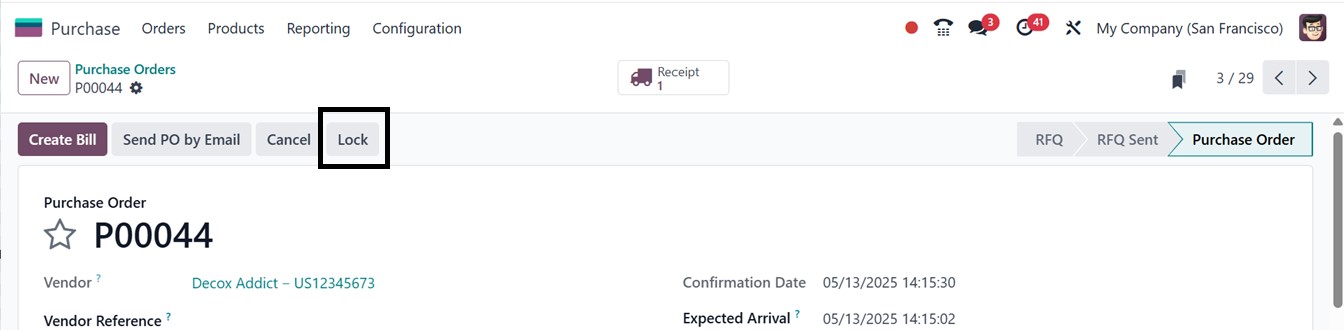
In order to preserve data
integrity and guarantee
consistency in authorized
purchase transactions, the
locked orders can only be
unlocked and modified by
users who possess the
required access privileges
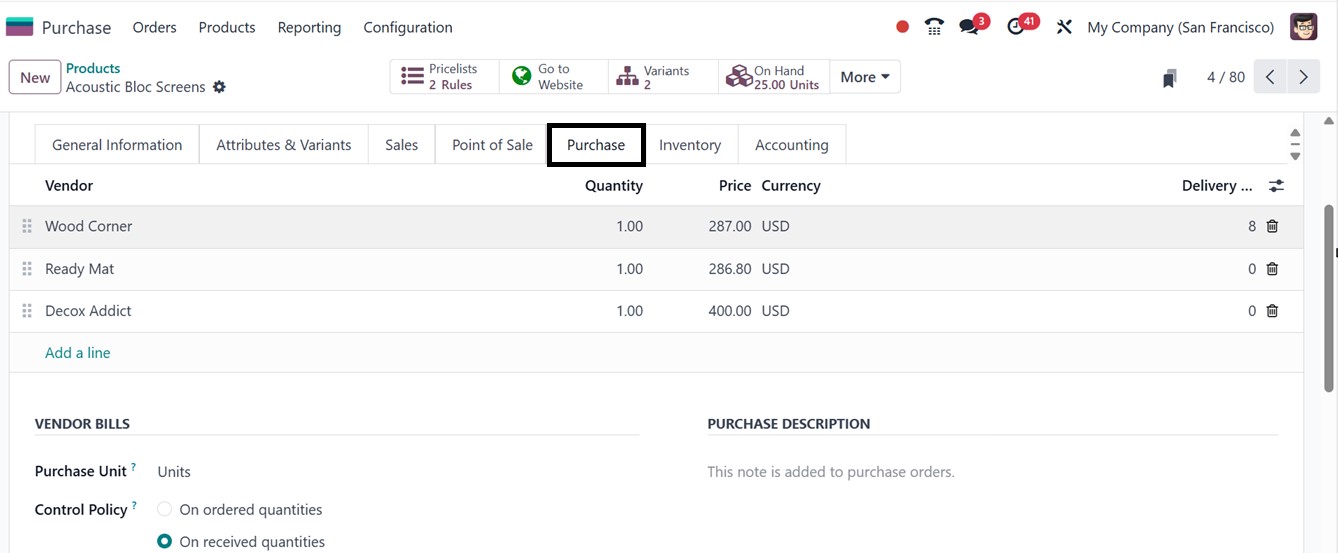
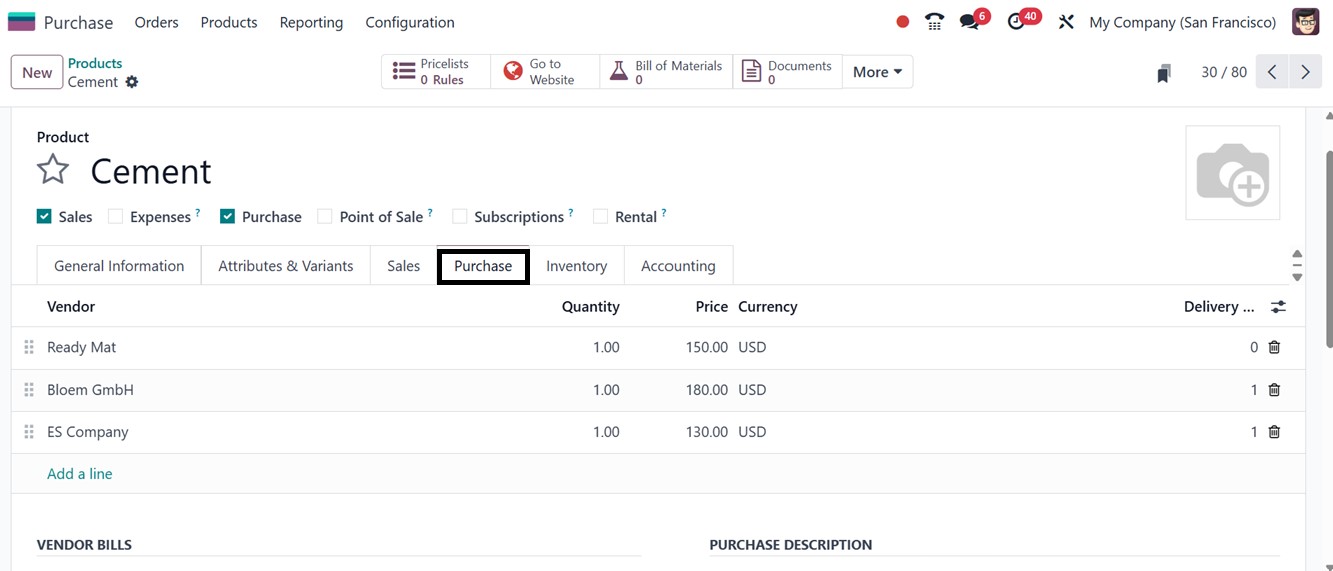
Vendor Pricelists
You can set different pricing
guidelines for items
depending on each supplier by
using the ‘Vendor Price
lists’ feature. After
activating the feature, you
can create customized product
prices for different vendors
from the ‘Purchase’ tab of a
product, as illustrated
below.
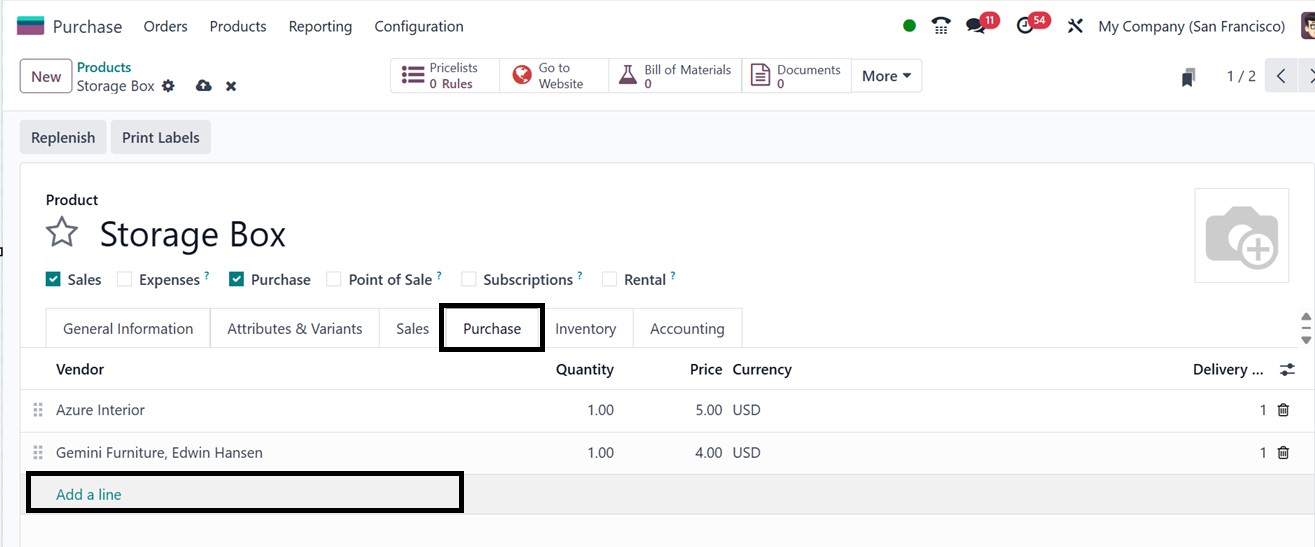
You can include time-based
pricing, quantity discounts,
or fixed rates for different
vendors using this feature.
Once configured, the
pricelists apply
automatically to purchase
orders and RFQs, reducing
errors and ensuring accurate,
vendor-specific pricing
throughout procurement.
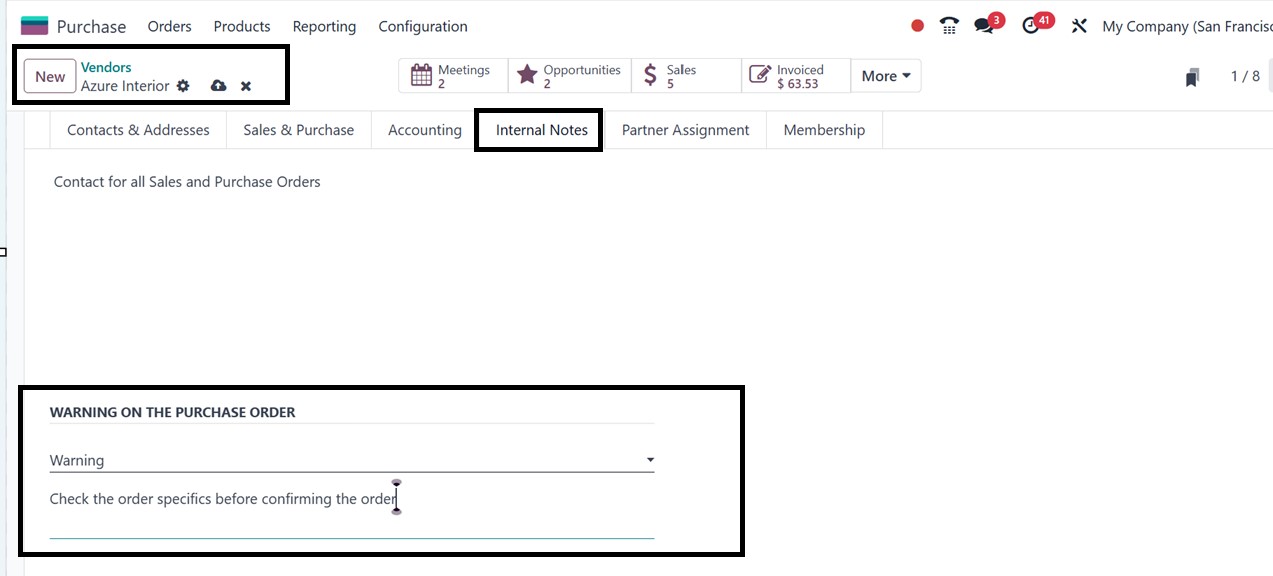
Warning Messages
The ‘Warning Messages’ feature
helps ensure safe and
informed procurement by
allowing users to set alerts
or blocking messages on
purchase orders based on
specific vendors or products.
This is especially useful
when dealing with unreliable
suppliers or restricted
items.
After enabling the ‘Warnings’
option from the Orders tab
feature from the Purchase
module's Settings menu. You
can configure warnings for
both products and vendors
under the Internal Notes tab
of the vendor configuration
form. This warning can be
customized by selecting
options like No Message,
Warning, or Blocking Message
based on the vendor's
reliability or past issues
inside the ‘WARNING ON THE
PURCHASE ORDER’ area, as
illustrated in the screenshot
below.
This functionality is also
available for products. This
Warning feature can also be
found under the ‘WARNING WHEN
PURCHASING THIS PRODUCT’
field within the Purchase tab
of the product details
window, as shown below.

To inform users of possible
problems with this particular
vendor or item, Odoo will
automatically create an alert
when a purchase order is
confirmed for a vendor or
product linked to a warning
message.
Receipt Reminders
Odoo will automatically notify
suppliers about anticipated
delivery dates when ‘Receipt
Reminders’ are enabled. These
reminders enhance supplier
collaboration and guarantee
on-time product receipts.
They work as proactive
reminders to improve
communication and cut down on
delays in the supply chain.
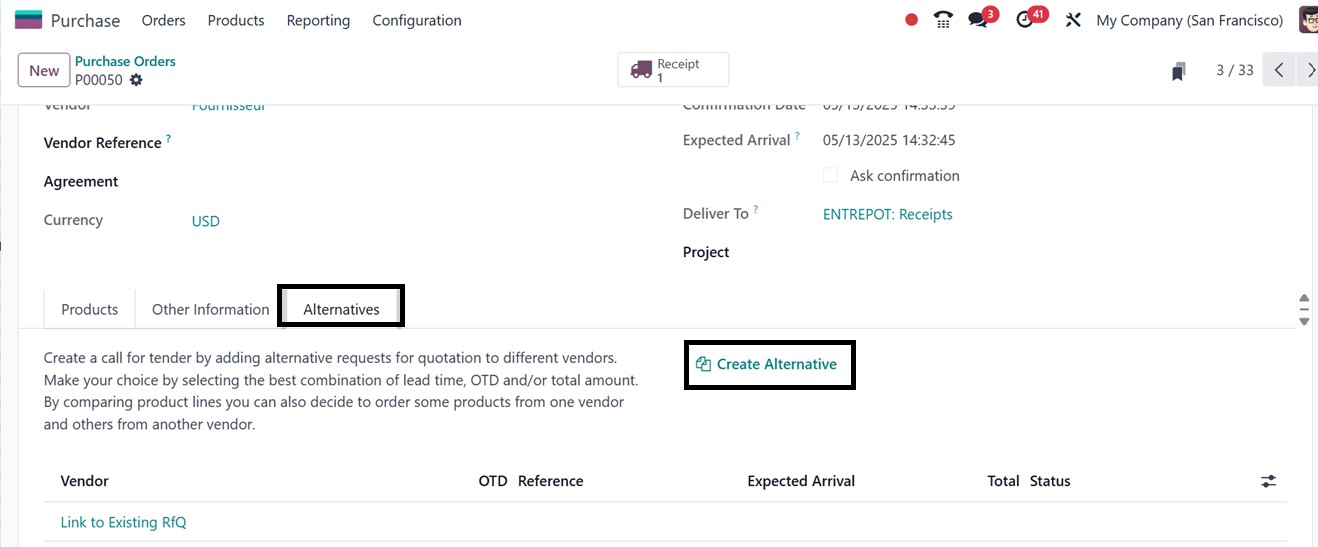
Purchase Alternatives
Users can specify alternative
products for the things they
are buying using the
‘Purchase Alternatives’
functionality. When the
desired product is delayed or
out of stock, this feature
quite helpful.
While creating a purchase order,
the ‘Alternatives’ tab within
a purchase order allows users
to manage and compare
multiple RFQs from different
vendors for the same product.
By using the ‘Create
Alternative’ button, you can
quickly generate additional
RFQs for other suppliers,
making vendor comparison more
efficient.
Bill Control
In Odoo, the ‘Bill Control’
feature regulates the
creation of vendor bills and
their comparison with
purchase orders. Bills can be
generated by users using
either received or ordered
quantity using the ‘Create
Bill’ button from a purchase
order configuration form, as
shown in the screenshot
below.
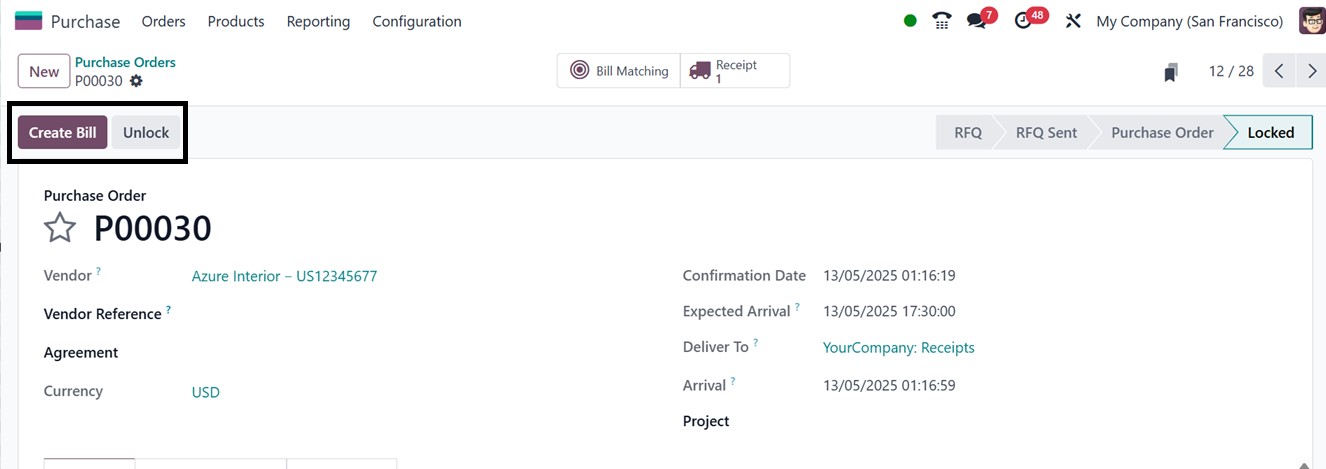
Because of this flexibility,
businesses may minimize
differences between what was
ordered, delivered, and
billed while also aligning
their accounting, inventory,
and procurement systems.
Next, we will discuss
invoices and three-way
matching purchase
verifications.
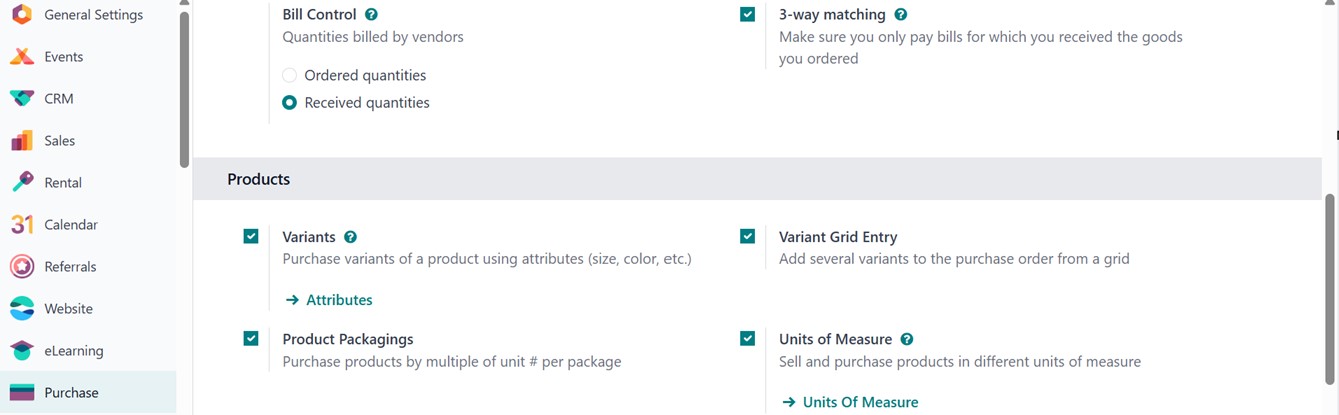
3-Way Matching
The ‘3-Way Matching’ feature in
Odoo Purchase Module ensures
vendor bills are paid only
after the ordered items are
received. It compares the
purchase order, receipt, and
vendor bill to prevent errors
or fraud.
To enable it, go to the Purchase
module's Settings under the
Invoicing tab and set the
bill control policy to
Received Quantities, either
from the settings or the
product detail page.
- Yes: The items have been
delivered, and the
bill is due for
payment.
- No: Payment should not be
made, as the ordered
goods have not yet
been delivered.
- Exception: There is a
discrepancy between
the ordered
quantities, the
received quantities,
and the billed
quantities.
Using the 3-way matching feature,
the system in Odoo will
automatically determine and
allocate the correct value to
the vendor bill. To check
this feature, create a new
purchase order. Then, confirm
the order using the ‘Confirm
Order’ button, consumers can
verify that the products have
been received by clicking the
‘Receive Products’ button.
Once the receipt has been
confirmed, they can create
the relevant vendor invoice.
Then select the Create Bill
button to create a new vendor
bill and this will take you
to the draft bill window.
Under the Other Information
tab of the draft vendor bill,
Odoo will automatically
indicate whether the payment
is required or not in the
‘Should Be Paid’ field, as
illustrated in the screenshot
below.
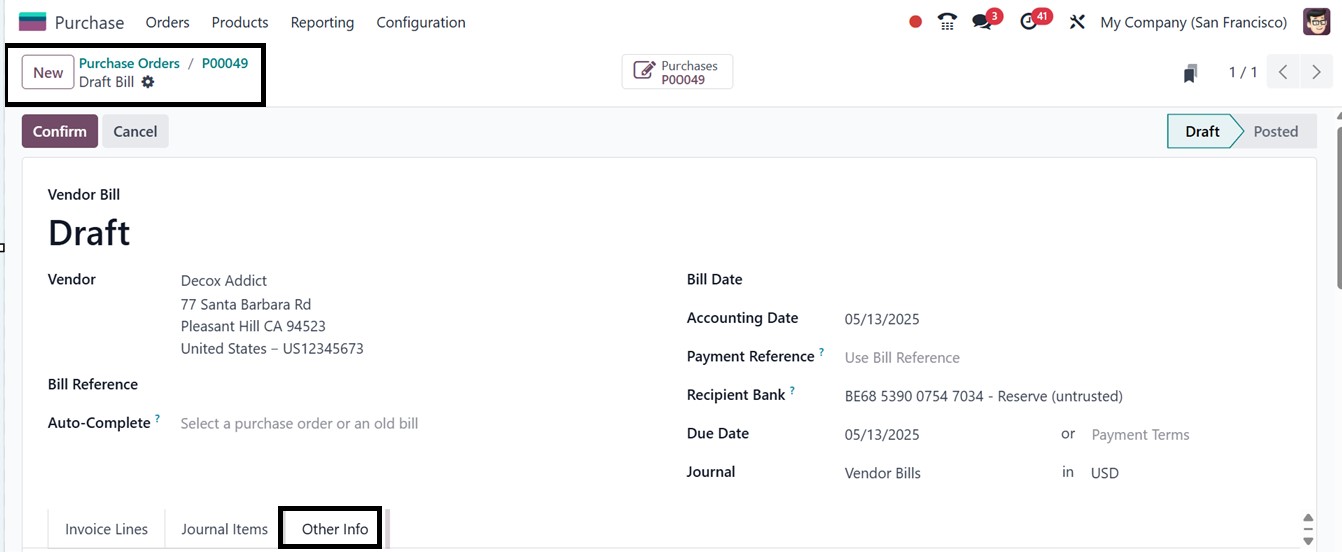
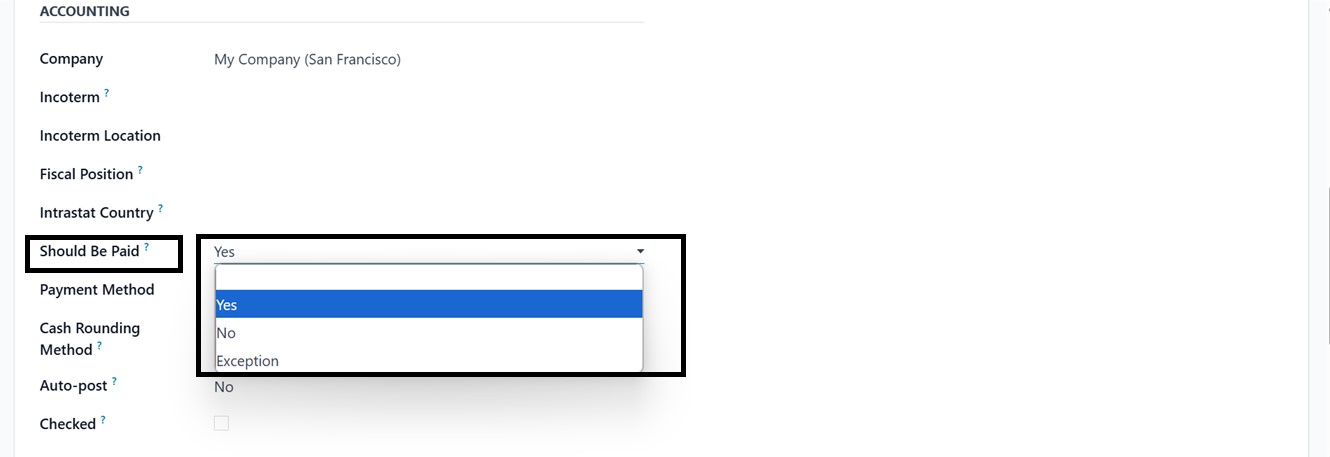
As illustrated in the image
above, the system displays
Yes, signifying that the
purchased items have been
received and the vendor bill
is due for payment.
Product Variants
Product variations are distinct
versions of a product made
according to characteristics
such as material, color, or
size (For instance, a
particular product may be
available in several colors
like "Black in Large size" or
"Red in Medium size"). Every
variation has a unique
pricing, inventory level,
barcode, and SKU.
You can create different product
variants from the ‘Product
Variant’ window of the
‘Products’ menu after
enabling this feature.
Businesses that deal with
configurable or
multi-attribute items need
this capability since it
makes it possible to
precisely monitor and buy
particular varieties.
Variant Grid Entry
The ‘Variant Grid Entry’ enhances
the user interface with a
matrix-style layout that
allows users to select and
order multiple product
variants at once. When adding
products in the ‘Products’
tab of a Purchase Order, a
‘Choose Product Variants’
pop-up appears enabled by
this feature, making it
easier to pick specific
variants, as shown in the
screenshot below.
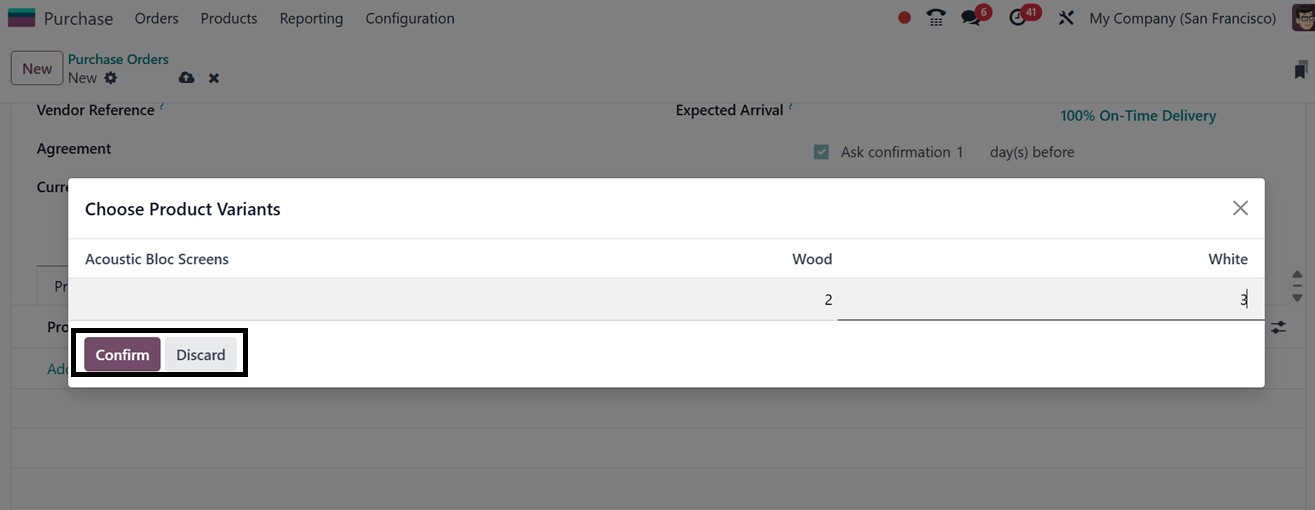
When drafting purchase orders,
this grid view allows you to
choose the preferred product
variation with a variety of
attribute combinations, which
speeds up data entry and
lowers mistakes.
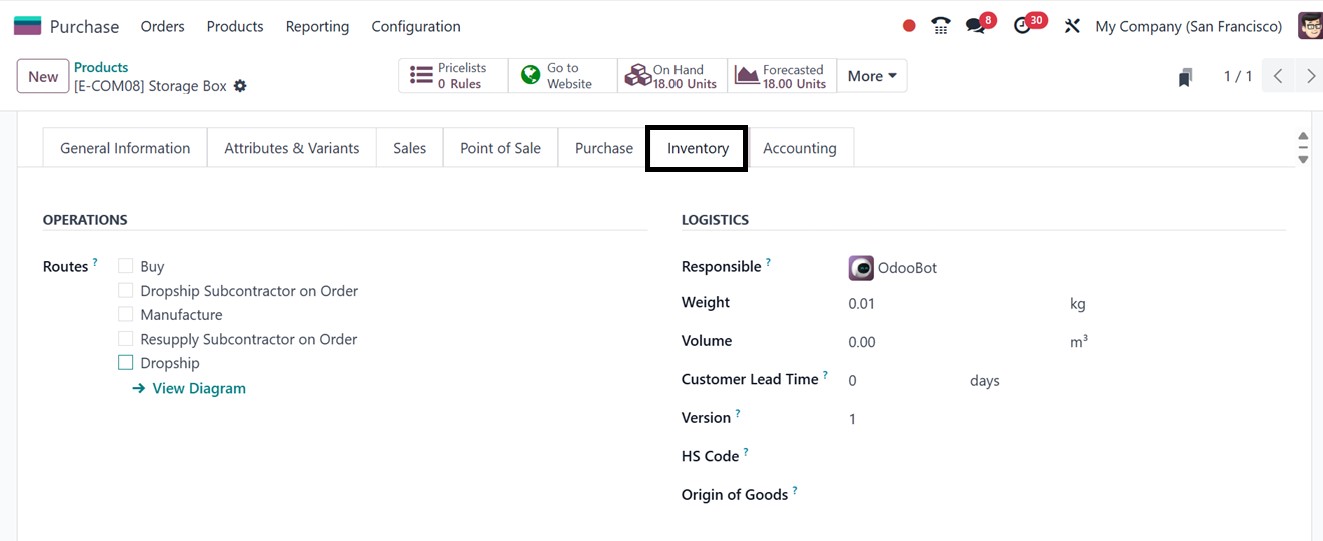
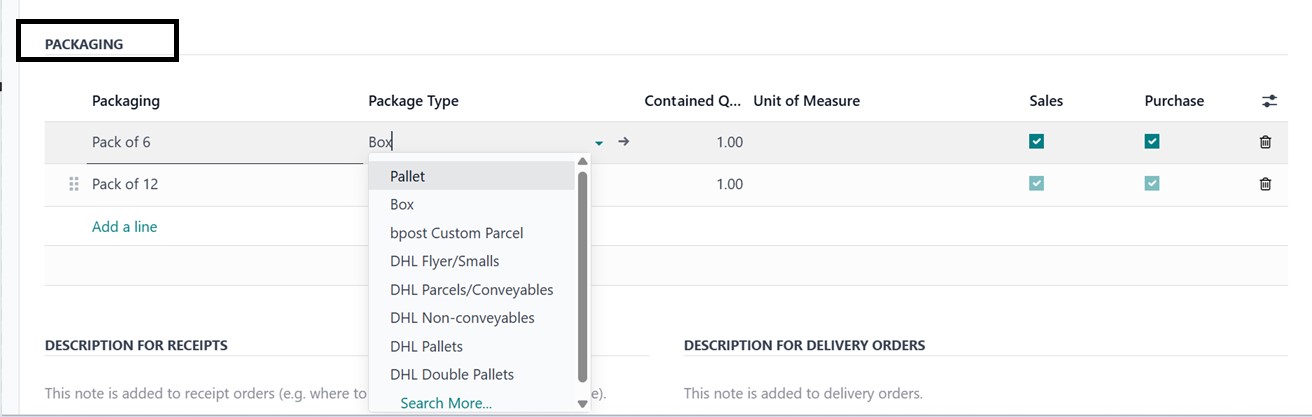
Product Packaging
In Odoo, users can specify how
items are arranged and
distributed using the
‘Product Packaging’ function
(For example, "Pack of 6" or
"12 boxes per pallet"). It
facilitates purchase order
packing specifications,
guarantees precise delivery
instructions, optimizes
warehouse operations, and
enhances logistics planning.
After enabling the feature, you
can configure and manage
product packages from the
‘Inventory’ tab of a product
configuration form, as
illustrated in the screenshot
below.
For more information about the
Product Packaging feature,
refer to the Product
configuration section covered
earlier in this book.
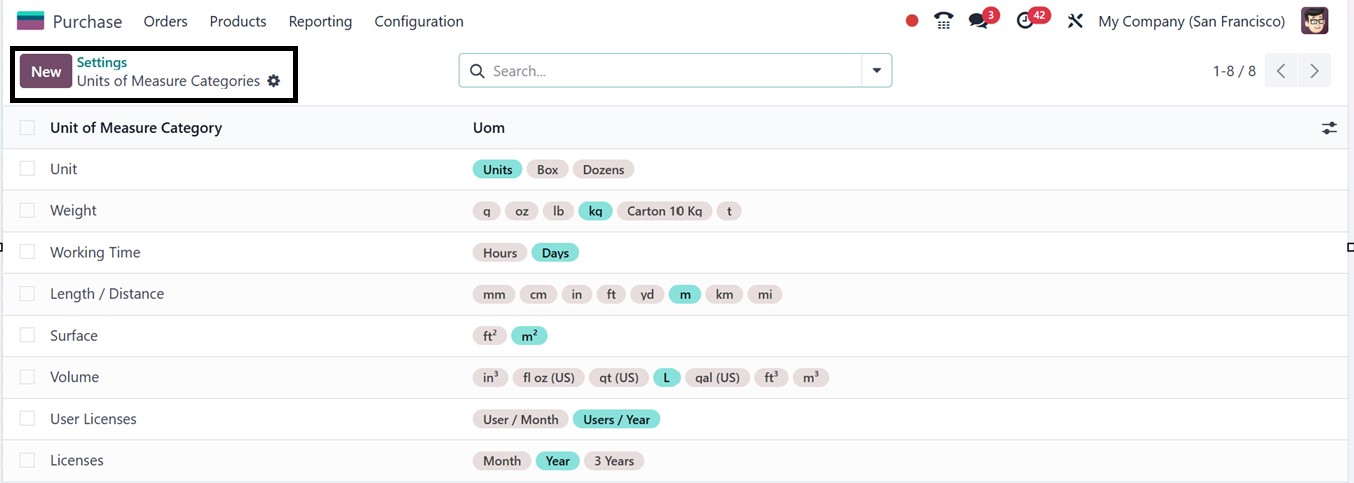
3.2 Units of Measures
Businesses can manage items in
several measurement formats,
such as kilos, pieces, or
boxes using the Odoo's ‘Units
of Measures’ feature for
creating numerous units of
measure. Users can specify
restrictions for unit
conversion, such as buying in
boxes and selling in pieces.
When working with several
vendors or internal divisions
that use a variety of units,
this guarantees adaptability
and consistency.
Click on the ‘Units of Measures’
link from the settings window
or by selecting the ‘Units of
Measures Categories’ option
from the ‘Configuration’
menu. This will lead you to
the dashboard of all the
available unit of measure
according to their category,
as illustrated in the
screenshot below.
Then, click on the ‘New’ button
to create a new unit of
measurement or its category.
This will open a
configuration form. The ‘Unit
of Measure Category’ field
allows us to name a category,
like Weight, Volume, Length,
Units, or Packaging.

The ‘Units of Measure’ tab
section lists all units
associated with the category
and includes fields for Unit
of Measure (e.g., Gram,
Kilogram, Box), Indian GST
UQC (Unique code for indian
GST purposes), Type (which
indicates whether the unit is
larger, smaller, or the
reference unit), UNSPSC
Category (United Nations
Standard Products and
Services Code) is a worldwide
categorization system used in
the Purchase module to
standardize the organization
and analysis of commodities
and services. Then, provide a
‘Ratio’ (which defines the
conversion factor in relation
to the reference unit),
‘Rounding Precision’ (which
determines the decimal
accuracy for calculations).
The "Spanish Facturae EDI
Type" designates the
electronic invoicing type
needed to adhere to Spain's
e-invoicing laws,
guaranteeing accurate tax
reporting and documentation.
Finally, enable or disable
the ‘Active’ checkbox to
activate or deactivate the
unit.
After saving the data, you can
utilize these units while
adding products for a
purchase order.
Next, we will discuss the
Dropshipping functionality
available in the Purchase
module.
3.3 Dropshipping
Dropshipping is a practical
shipping solution for sellers
who prefer not to maintain
inventory. This method
enables direct shipment of
goods from the vendor to the
customer. Since deliveries
are dispatched directly from
suppliers to customers,
merchants benefit from
reduced warehousing costs and
logistical burdens. The
dropshipping approach allows
businesses to fulfill orders
by shipping products directly
from the supplier or
manufacturer without the need
for inventory management.
Dropshipping feature can be
enabled via the ‘Settings’
tab under the ‘Logistics’
section of the Purchase
module. After enabling the
feature, the Inventory tab in
the product form allows users
to set a product's ‘Routes’
to "Dropship", as illustrated
in the screenshot below.
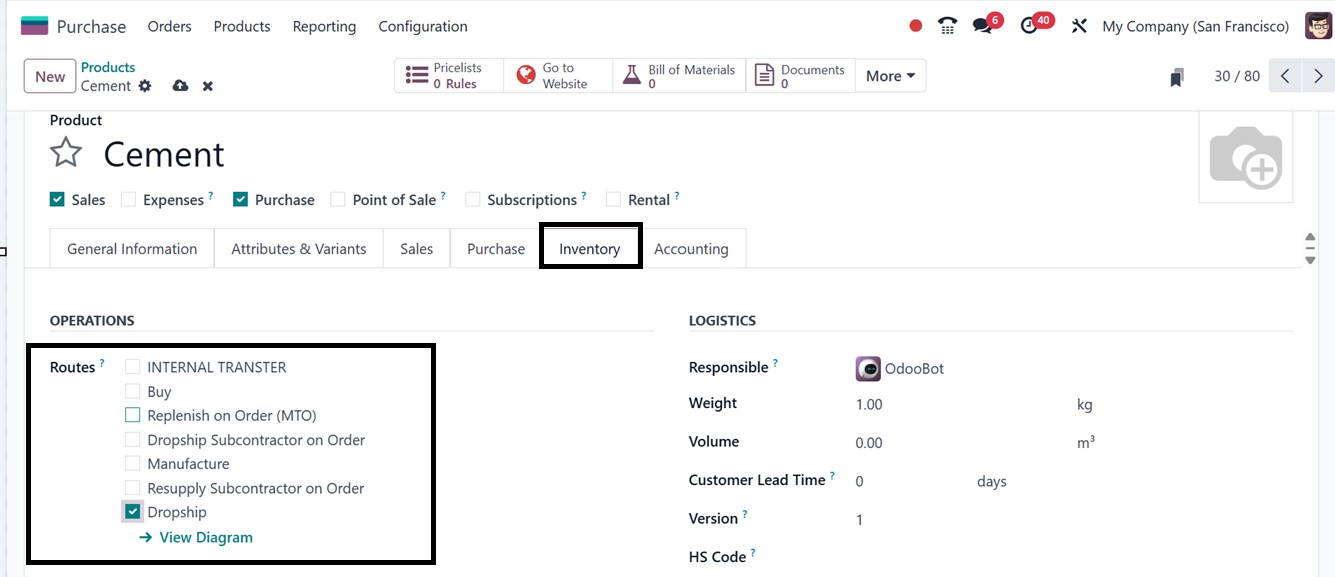
In Odoo 18, you can assign the
dropshipping route to a
product to ensure all its
sales follow the dropshipping
workflow. After choosing the
operational pathways or
routes of the product, it
will be managed more
efficiently using the
Inventory module. To complete
this functionality, it's
important to add a vendor
under the Purchase tab of the
product form to indicate the
vendor who will ship the
product directly to the
customer, as illustrated in
the screenshot below.
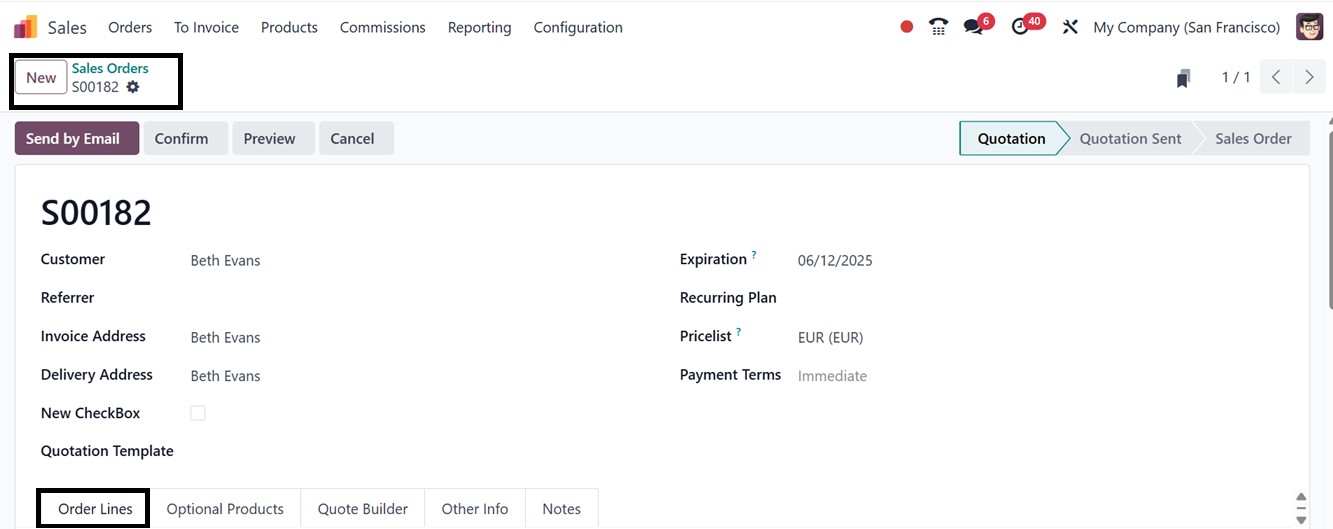
To check the functionality of the
feature, you can then create
a sales order for the
dropshipped product within
the Sales module by editing
all the sales and customer
details in the appropriate
field.

As soon as the sales order is
confirmed by selecting the
Confirm button, a
corresponding purchase order
for the item will be
automatically generated and
linked to the respective
vendor.
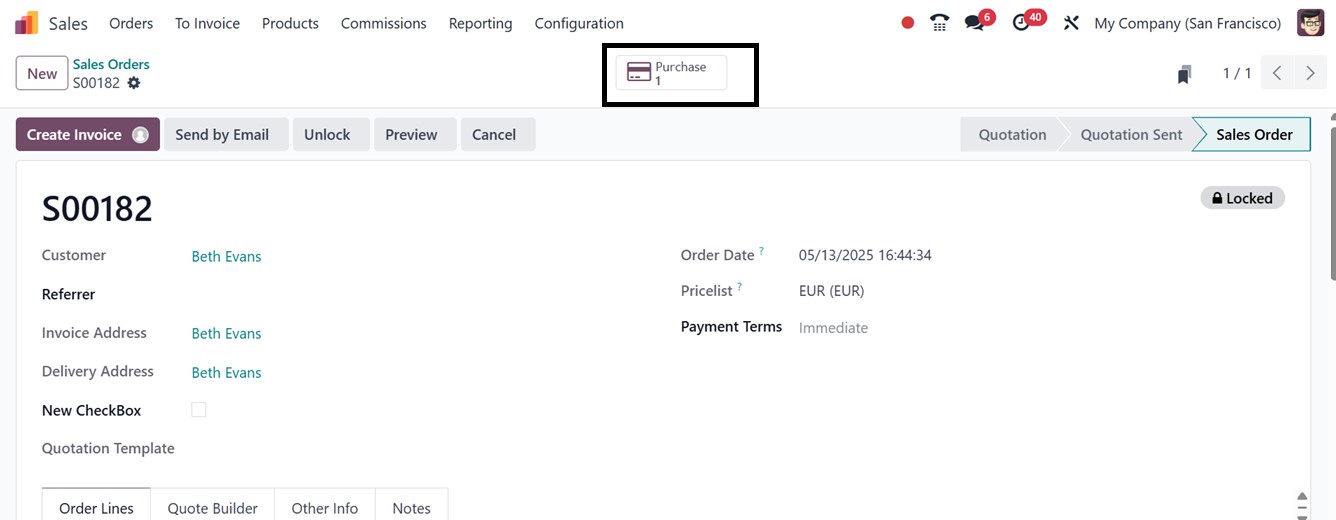
The newly generated purchase
order can be accessed using
the ‘Purchase’ smart button
available within the window.
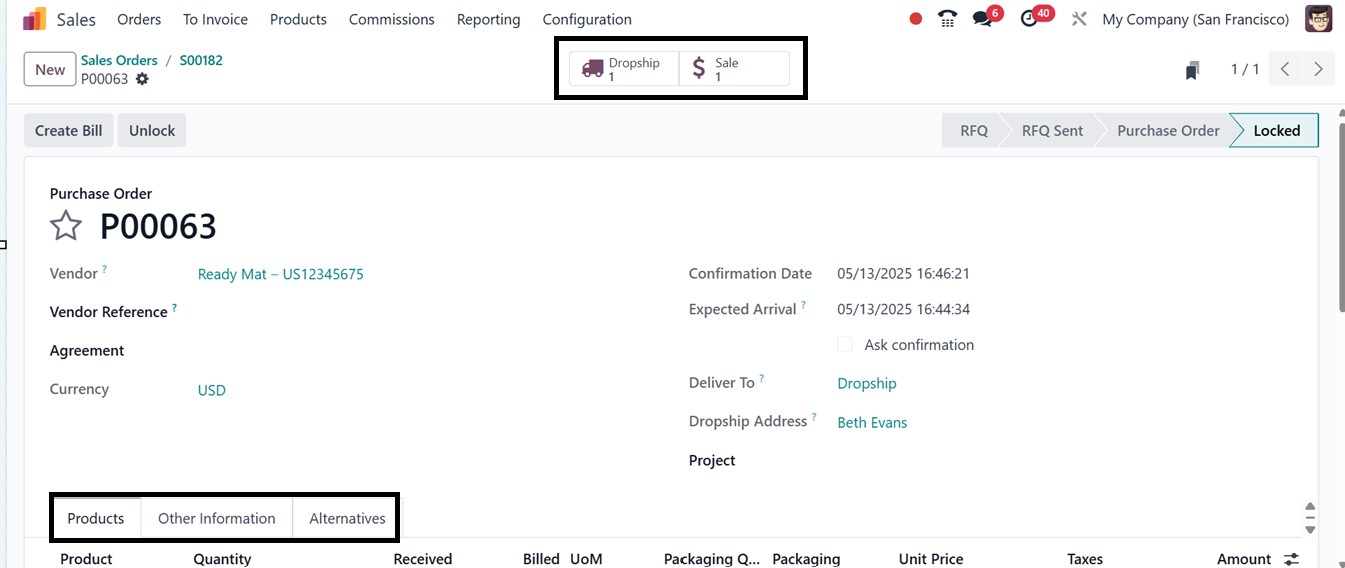
Then, confirm the purchase
order using the ‘Confirm
Order’ button. So, you will
be able to create the
purchase bills and Odoo will
generate the ‘Dropship’ and
‘Sale’ smart buttons, as
shown below.
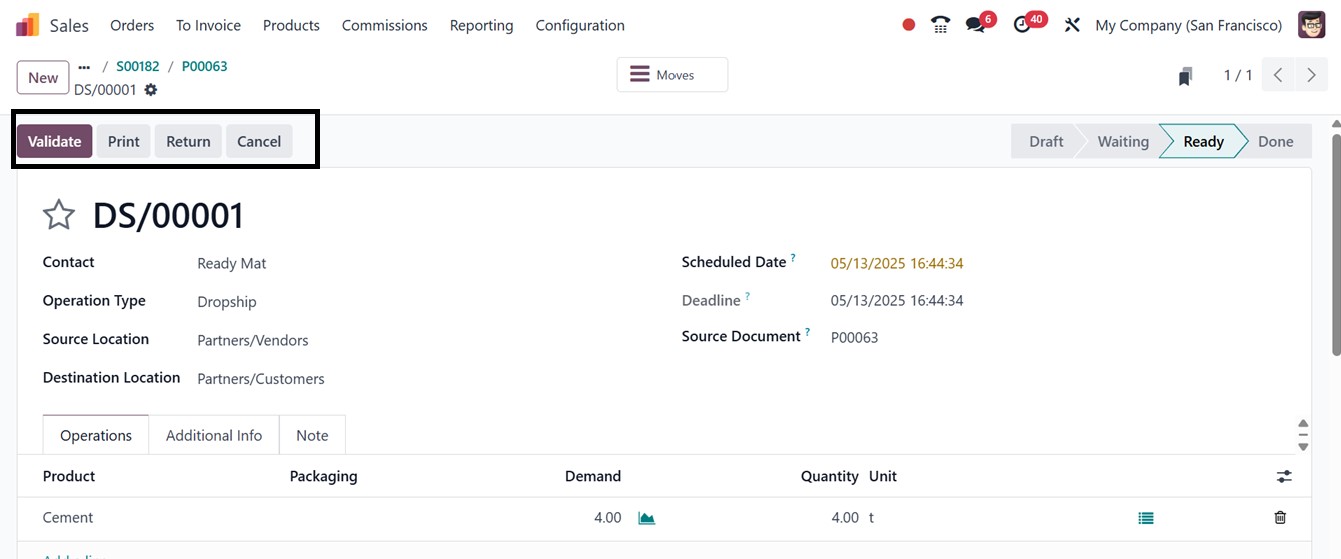
Once the purchase order is
confirmed, the supplier
initiates the shipment, and
Odoo automatically tracks and
records the process to ensure
full visibility. You can open
the ‘Dropship’ smart button
to check and validate the
dropship by clicking the
Validate button to confirm
that the product has been
successfully dispatched to
the customer.
This dropshipping feature reduces
overhead costs and
streamlines operations by
allowing businesses to offer
a wider product range without
storage limitations,
supporting scalable growth
with minimal inventory
investment.
3.4 Vendor Price List
Management
A well-structured vendor price
list is a crucial component
of efficient and profitable
sales operations. It allows
businesses to define specific
pricing agreements with
vendors for selected products
over a specified period. When
procuring goods from a
vendor, the applicable price
list is automatically
applied, ensuring consistency
in purchase costs.
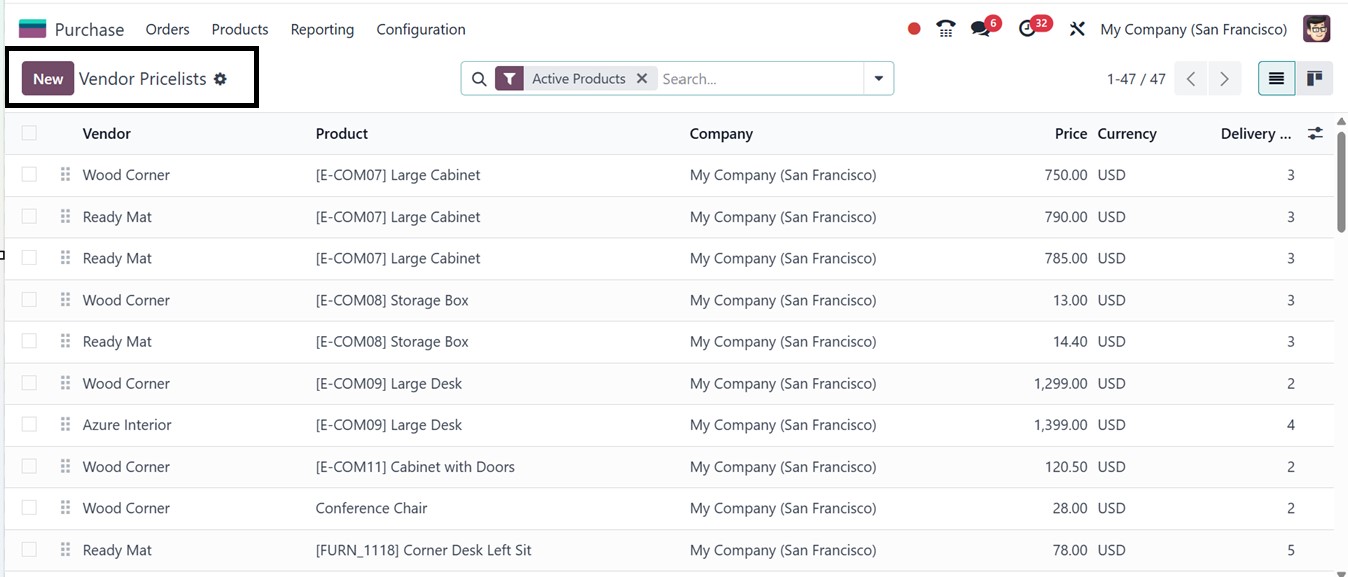
In the Configuration menu you
will find the Vendor Price
Lists option. Selecting this
option will open the Vendor
Price Lists window,
displaying a structured list
view containing key details
such as: Vendor name, Product
name, Company, Currency,
Price and Delivery Lead Time,
as depicted in the screenshot
below.
You can sort the required data
using the Filters, Group By
and Favorites filter options
provided in the search bar
area. Custom filters or
groups can be created
manually if additional
parameters are required,
similar to other features in
Odoo 18.
To create a new vendor price
list, click on the New
button. This will open a new
pricelist configuration
window, where you can enter
the vendor’s name, specify
the Vendor Product Name,
which is the name used by the
vendor on RFQs if left blank.
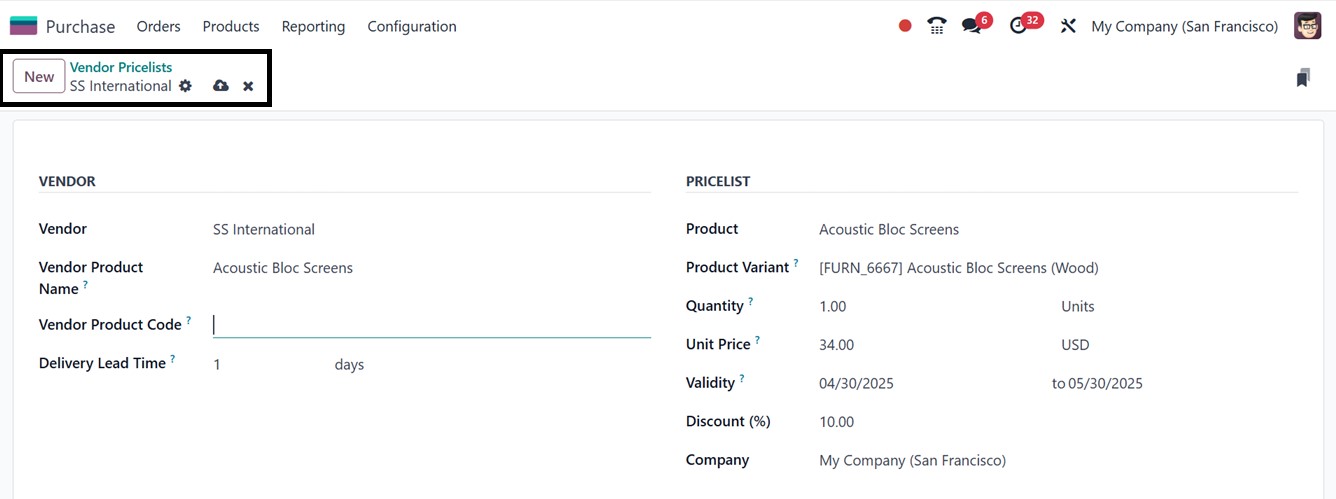
Odoo will use the internal
product name. You can also
add the Vendor Product Code
as a unique identifier and
set the Delivery Lead Time,
indicating the number of days
between order confirmation
and delivery. Under the
PRICELIST section, you can
define the Product and its
Product Variants, along with
details such as the Quantity,
Unit Price, Validity period,
any Discounts, and the
associated Company, as
depicted in the above
screenshot. Once all fields
are filled out, save the data
to store the vendor price
list for later usage.
3.5 Attributes
The ‘Attributes’ feature within
the Purchase module are
primarily used in combination
with products to define their
variants. These attributes
such as size, color, or
material. This feature allows
businesses to manage product
variations more efficiently
throughout the purchasing
workflow. Configuring
attributes is essential when
dealing with products that
come in multiple options or
specifications.
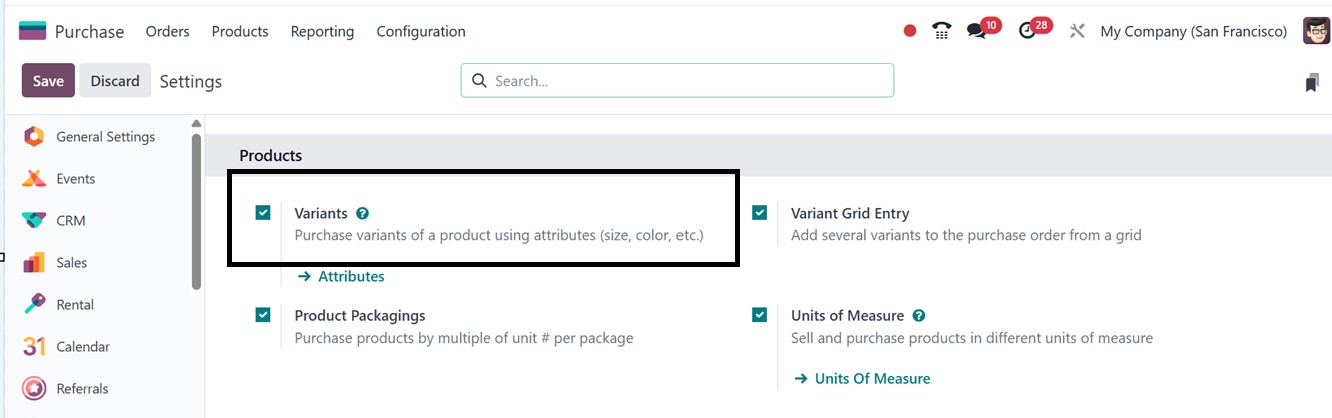
To begin the configuration
process, you must first
enable product variants from
the Settings window of the
Configuration menu. Under the
Products section, activate
the Variants option and save
to apply the changes.
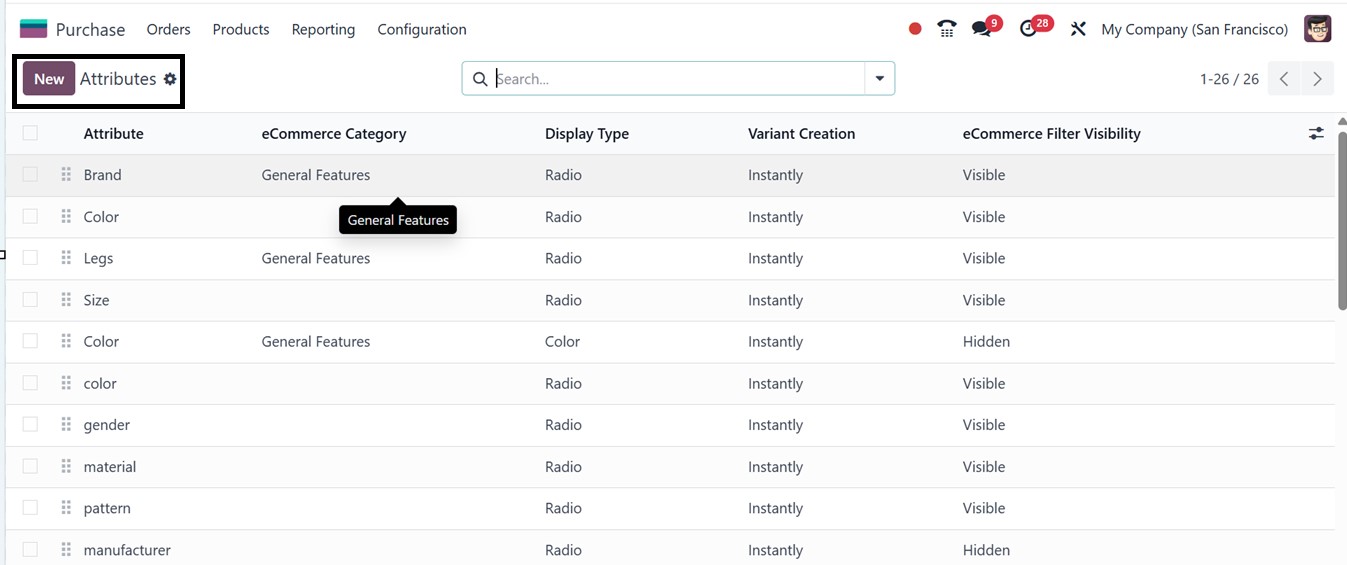
Then, you can create or manage
attributes or the product
variants using the
‘Attributes’ link provided
under the ‘Variants’ settings
option or by selecting the
‘Attributes’ option from the
‘Configuration’ menu. Both
the methods will lead you to
the dashboard of the
available attributes, as
illustrated in the screenshot
below.
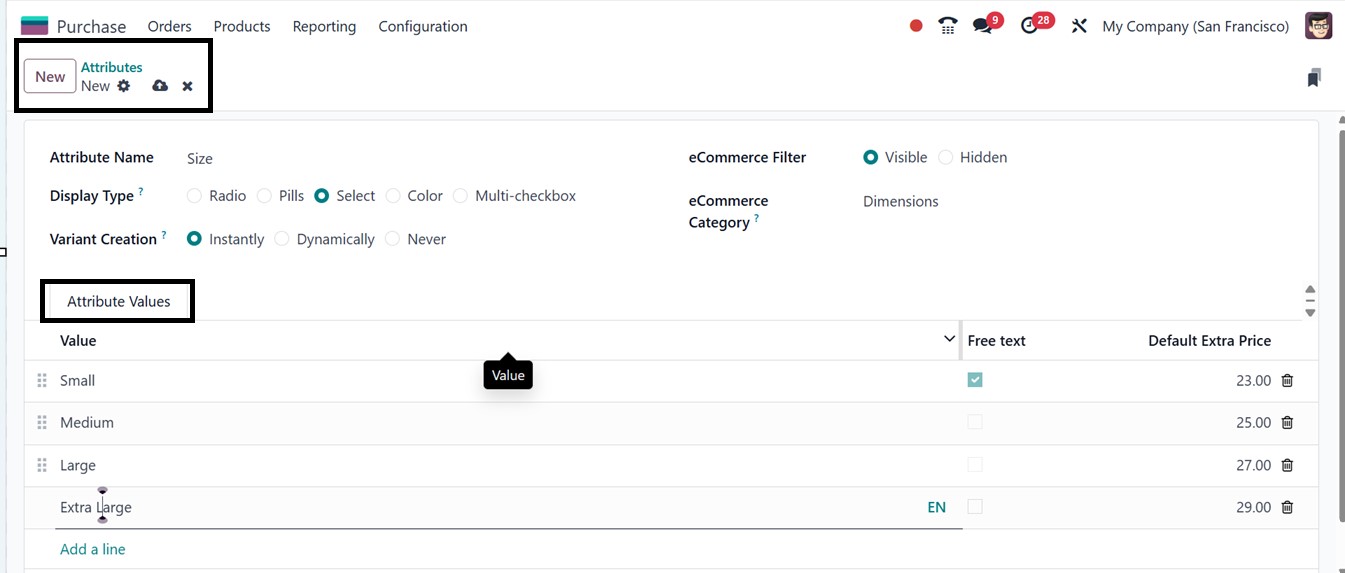
Next, you can create product
attributes using the ‘New’
button. Here, you'll provide
an Attribute Name (e.g.,
Color or Size), select a
Display Type (such as Radio,
Select, or Color), and choose
a Variants Creation mode
(e.g., instantly or
dynamically). The eCommerce
Filter option lets you choose
whether a product variant is
visible or hidden on the
online store. You can also
assign an eCommerce Category
to group similar attributes
for comparison on the
website. Under the Attributes
Values tab, add the various
attribute values (e.g., Red,
Blue, Green for Color). Once
all values are added save
your attribute data.
Then, you can assign these
attributes to a particular
product by opening the
product configuration form
and adding the values in the
‘Attributes & Values’ tab of
the product form using the
‘Add a line’ button, as
depicted in the screenshot
below.
When creating a Request for
Quotation (RFQ) or a Purchase
Order, you can select the
specific product variant
needed inside the ‘Products’
tab by selecting from a
variant grid option, as shown
below.
While billing, each variant is
treated as a separate item in
terms of pricing, inventory
tracking, and vendor
management.
Optionally, you can also define
vendor-specific prices for
each variant. In the product
variant form, go to the
Purchase tab and click on the
Add a line button from the
Vendors section. This allows
you to set different prices,
quantities, and Delivery lead
times for each vendor,
specific to the product
variant being purchased, as
shown in the screenshot
below.
3.6 Product Categories
The ‘Product Categories’ feature
in the Purchase module helps
organize and manage products
by grouping them based on
shared traits like type,
function, or procurement
method. Each category can be
configured with its own
accounting rules, inventory
valuation methods, and
procurement strategies, which
directly influence product
costing, stock movements, and
purchasing operations.
You can configure these
categories by choosing the
‘Product Categories’ option
from the ‘Configuration’
menu. The dashboard will show
the list of all the product
categories, as depicted in
the screenshot below.

To configure new product
categories click on the ‘New’
button. When setting up a
category, you can specify
details such as the Category
Name (e.g., Raw Materials,
Office Supplies), Parent
Category for hierarchical
grouping, and define
strategies like Force Removal
Strategy (FIFO, LIFO, etc),
Reserve Packagings option to
Costing Method (Standard,
Average, or Real Price), and
Inventory Valuation (Manual
or Automated). Additionally,
you can configure relevant
accounting settings,
including Income Account,
Expense Account and
Downpayment Accounts for
purchasing and sales
activities, as illustrated in
the screenshot below.

The ‘Force removal strategies’ in
Odoo connect inventory
operations with the Purchase
module by controlling how
purchased items are tracked,
priced, and the order in
which stock is removed. These
strategies are especially
useful for managing physical
products or inventory
packages. So, let’s discuss a
brief overview of each force
removal strategy in Odoo 18:
- FIFO (First In, First
Out): Uses the oldest
stock first. Ensures
accurate cost tracking
and inventory
valuation.
- LIFO (Last In, First
Out): Uses the newest
stock first. Useful in
specific cases but not
compliant with all
accounting standards.
- Closest Location: Picks
stock from the nearest
storage location.
Optimizes warehouse
efficiency and reduces
picking time.
- Least Packages: Picks
from locations with
the fewest units to
consolidate inventory
and reduce
fragmentation.
- FEFO (First Expiry, First
Out): Uses items with
the earliest
expiration date first.
Critical for
expiry-sensitive
industries.
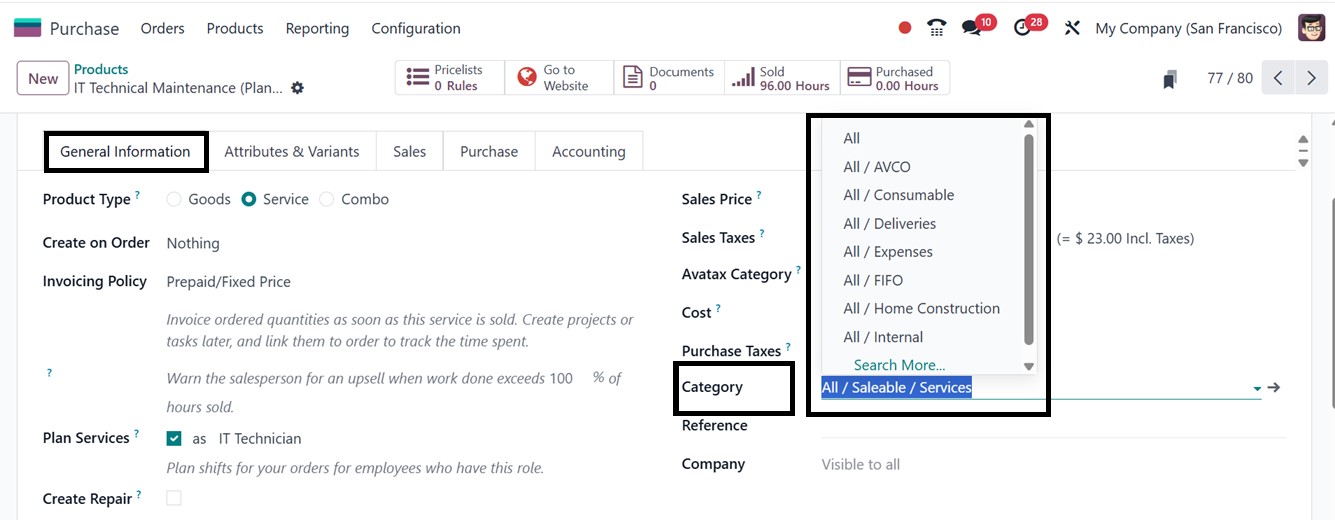
Assigning a category ensures that
the product inherits the
accounting and inventory
rules defined at the category
level. Once the categories
are created, you can assign
them to products by going to
the ‘Products’ dashboard from
the ‘Products’ menu and
opening a product form. Here,
you can select the
appropriate product category
from the ‘Category’ field
provided under the ‘General
Information’ tab. , as shown
in the screenshot below.